

Page 1

9
USING YOUR MICROWAVE OVEN
USE
Ovenproof Glass
• Glass treated for use in high-intensity heat
includes utility dishes, bread dishes, pie plates, cake
plates, liquid measuring cups, casseroles, and bowls
without metallic trim.
China
• Bowls, cups, serving plates, and platters without
metallic trim can be used in your oven.
Plastic
• When using plastic wrap as a cover, make sure that
the dish is deep enough so the plastic wrap does not
touch the food. As the food heats, it may melt the
plastic wrap wherever the wrap touches the food.
• Place plastic wrap loosely over the top of the dish
and secure it by pressing the wrap to the sides of
the dish.
• Vent by turning back one corner of the plastic wrap.
This will allow excess steam to escape.
• Use plastic dishes, cups, semi-rigid freezer
containers, and plastic bags only for short time
cooking. Use these with care because the
plastic may soften from the heat of the food.
Paper
• Microwave-safe paper towels, waxed paper, paper
napkins, and paper plates with no metallic trim or
design can be used in your oven.
• Refer to the manufacturer’s label for use of any
paper product in the microwave oven.
DO NOT USE
Metal Utensil
• Metal shields food from microwave energy and
produces uneven cooking. Avoid metal skewers,
thermometers, or foil trays.
• Metal utensils can cause arcing, which is a
discharge of electric current. Arcing can damage
your microwave oven.
Metal Decoration
• Do not use metal-trimmed or metal-banded
dinnerware, casserole dishes, etc.
Centura™ Tableware
• The Corning Company recommends that you
do not use Centura tableware and some Corelle™
closed-handle cups for microwave
cooking.
Aluminum Foil
• Avoid large sheets of aluminum foil because
they hinder cooking and may cause arcing.
• Use small pieces of foil to shield poultry legs
and wings.
• Keep all aluminum foil at least 1 inch from the walls
and door of the oven.
Wood
• Wooden bowls, boards, and baskets will dry out and
may split or crack when you use them in the
microwave oven.
Tightly Closed Containers
• Tightly closed cookware can explode. Be sure
to leave an opening for steam to escape from
covered cookware.
Brown Paper
• Avoid using brown paper bags. They absorb
heat and could burn.
Metal Twist Ties
• Always remove metal twist ties as they can become
hot and cause a fire.
COOKWARE GUIDE
Most heat-resistant, non-metallic cookware is safe for use in your microwave oven. However, to test cookware
before using, follow these steps:
1. Place the empty cookware in the microwave oven.
2. Measure 1 cup of water in a glass measuring cup and place it in the oven beside the cookware.
3. Microwave on 100% power for 1 minute. If the dish is warm, it should not be used for microwave cooking.
Page 2

1010
USING YOUR MICROWAVE OVEN
TIPS FOR MICROWAVE COOKING
BROWNING
Meat and poultry with high fat content that are cooked
for 10 or 15 minutes or longer will brown lightly. Foods
cooked a shorter time can be brushed with a browning
agent, such as Worcestershire sauce, soy sauce, or
barbecue sauce.
COVERING
A cover traps heat and steam and causes the food to
cook more quickly. Use a lid or microwave-safe plastic
wrap with one corner folded back to vent the excess
steam. Lids on glass casseroles can become hot
during cooking. Handle carefully. Waxed paper will
prevent the food from splattering in the oven and help
retain heat. When warming bread items, use waxed
paper, napkins, or paper towels. To absorb extra
moisture, wrap sandwiches and fatty foods in paper
towels.
SPACING
Arrange individual foods, such as baked potatoes,
cupcakes, and hors d’oeuvres in a circle and at least
1 inch apart. This will help the food cook more evenly.
STIRRING
Stirring blends flavors and redistributes the heat in
foods. Always stir from the outside toward the center
of the dish. Food at the outside of the dish heats first.
TURNING
Large foods, such as roasts and whole poultry, should
be turned so that the top and bottom cook evenly. Also
turn over chicken pieces and chops.
ARRANGEMENT
Do not stack food. Arrange in a single layer in the dish
for more even cooking. Because dense foods cook
more slowly, place thicker portions of meat, poultry, fish,
and vegetables toward the outside of the dish.
TESTING FOR DONENESS
Because foods cook quickly in a microwave oven, you
need to test frequently for doneness.
STANDING TIME
Depending on density, food often needs to stand from 2
to 15 minutes after you remove it from the oven.
Usually, you need to cover food during standing time to
retain heat. Remove most foods when they are slightly
undercooked and they will finish cooking during standing time. The internal temperature of food will rise about
10 °F during standing time.
SHIELDING
To prevent some portions of rectangular or square dishes from overcooking, you may need to shield
them with small strips of aluminum foil to block the
microwaves. You can also cover poultry legs and
wing tips with foil to keep them from overcooking.
Always keep foil at least 1 inch from oven walls
to prevent arcing.
PIERCING
Pierce the shell, skin, or membrane of foods before
cooking to prevent them from bursting. Foods that
require piercing include yolks and whites of eggs, hot
dogs, clams, oysters, and whole vegetables, such as
potatoes and squash.
CLEANING THE MICROWAVE
Wipe the oven inside and outside with a soft cloth and
a mild detergent solution. Then rinse and wipe dry.
This should be done weekly or more often, if needed.
Never use cleaning powders or rough pads.
Excessive oil splatters on the inside top will be difficult
to remove if left for many days. Wipe splatters with a
wet paper towel, especially after cooking chicken or
bacon.
REMOVABLE PARTS
The turntable and turntable roller rest are removable.
They should be hand-washed in warm (not hot) water
with a mild detergent and a soft cloth. Once they are
clean, rinse well and dry with a soft cloth. Never use
cleaning powders, steel wool, or rough pads.
• The turntable may be cleaned at the sink. Be careful
not to chip or scratch the edges as this may cause
the turntable to break during use.
• The turntable roller rest should be cleaned regularly.
SPECIAL CARE
For best performance and safety, the inner door panel
and the oven front frame should be free of food or
grease buildup. Wipe often with a mild detergent; then
rinse and wipe dry. Never use cleaning powders or
rough pads.
After cleaning the control panel, touch STOP/CLEAR
to clear any entries that might have been entered
accidentally while cleaning the panel.
Page 3
1111
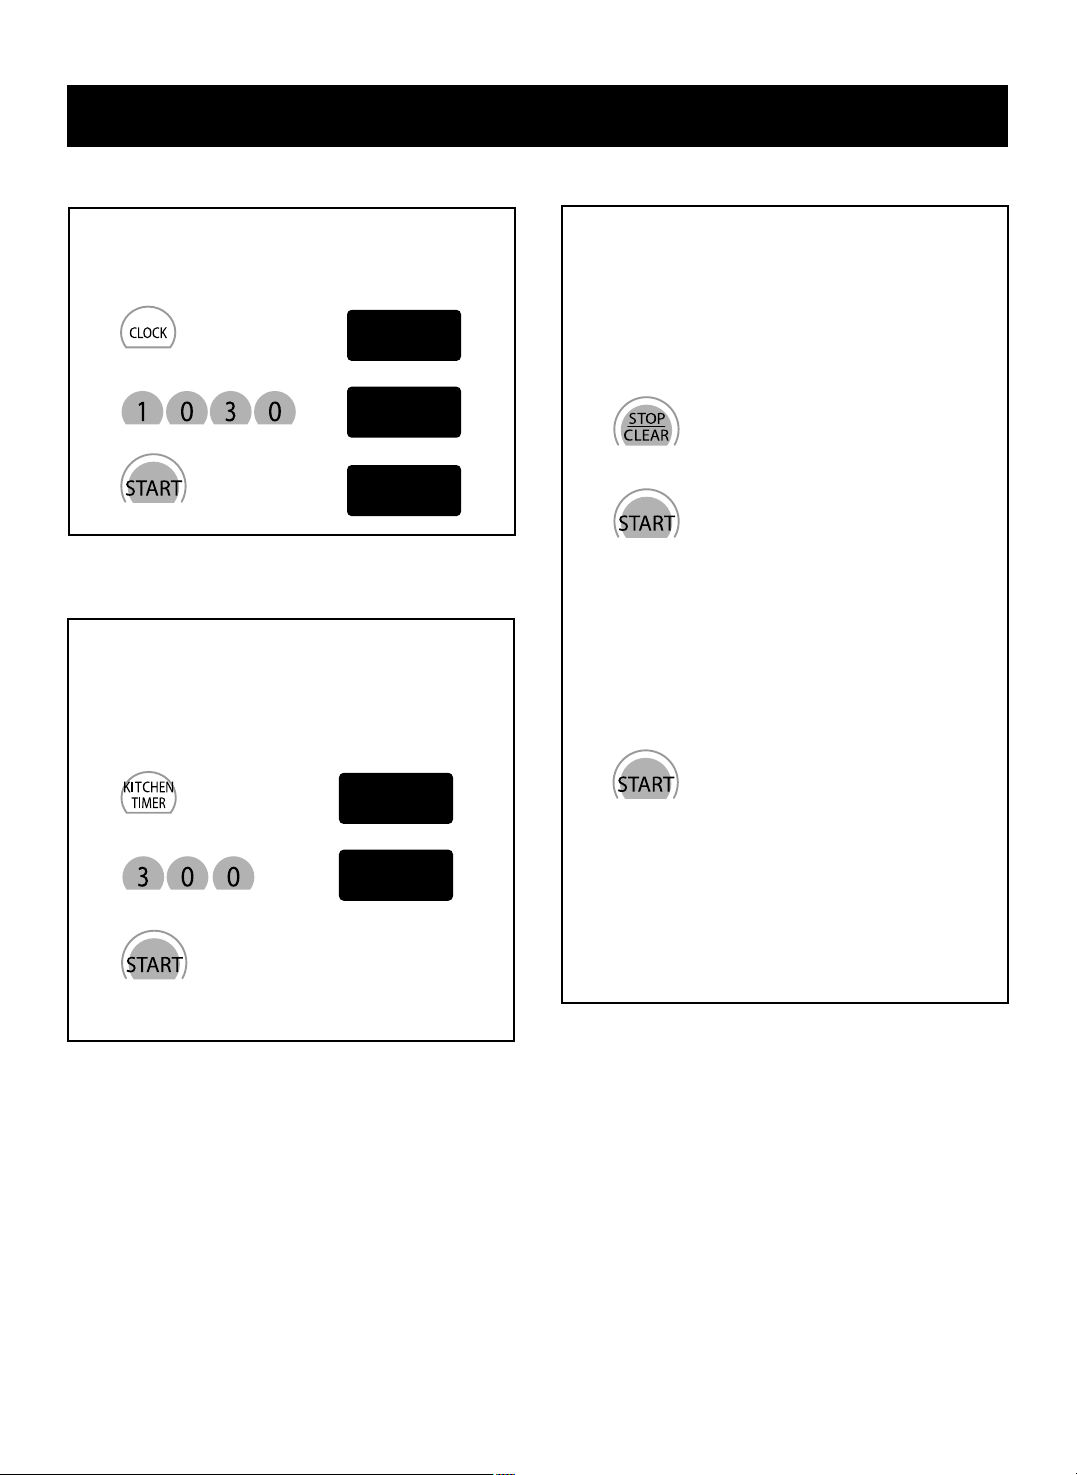
USING YOUR MICROWAVE OVEN
Example: To set the clock for 10:30(AM).
Touch: Display Shows:
CLOCK
1.
2.
3.
Use this safety feature to lock the control panel
when you are cleaning the oven, or so that children
cannot use the oven unsupervised.
To set CHILD LOCK:
Touch: Display Shows:
CHILD LOCK
Touch and hold
until “L” appears
in the display.
(approximately
4 seconds)
To cancel CHILD LOCK:
Touch: Display Shows:
Touch and hold
until “L” disappears
from the display.
(approximately
4 seconds)
Time of day.
1.
1.
2.
Your microwave oven can be used as a kitchen
timer. You can set up to 99 minutes, 99 seconds.
Example: To set 3 minutes.
Touch: Display Shows:
KITCHEN TIMER
Starts timer.
1.
2.
3.
12:00
10:30
10:30
:0
Timer
3:00
Timer
Page 4
12
Time of day.
Twice
USING YOUR MICROWAVE OVEN
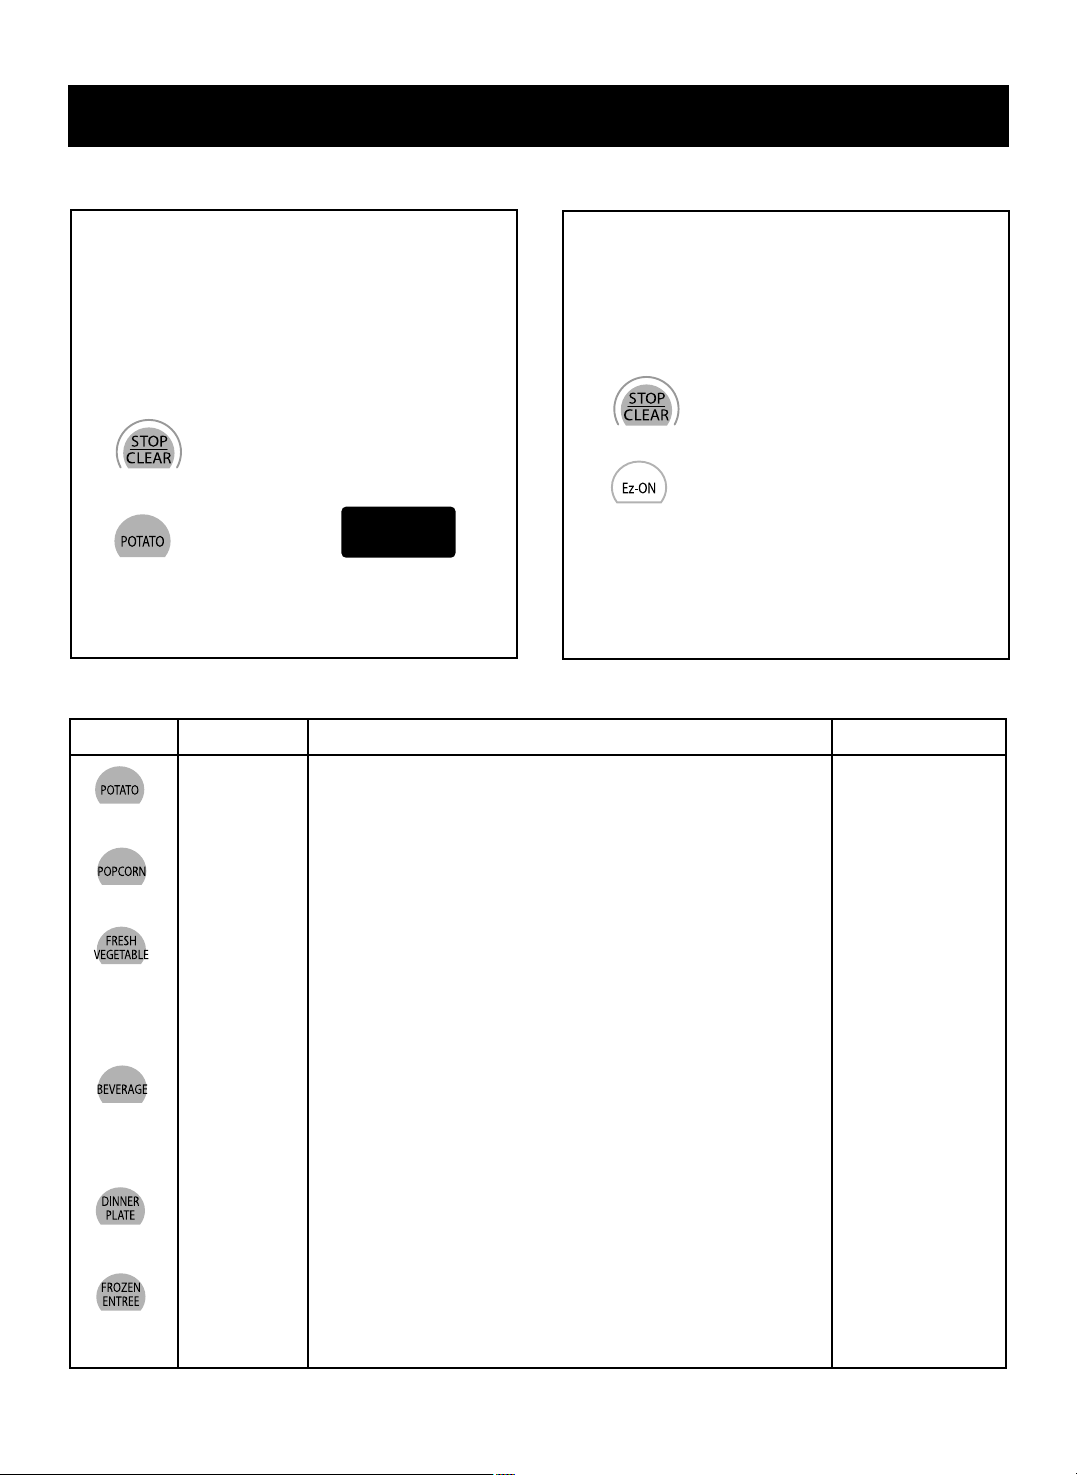
Ez-ON
A time-saving pad, this simplified control lets
you quickly set and start microwave cooking at
100% power without the need to touch START.
Example: To cook for 2 minutes.
Touch: Display Shows:
1.
2.
NOTE: Each time you touch Ez-ON, it will add 1
minute up to 99 min 59 seconds.
Starts cooking.
AUTO COOK
AUTO COOK TABLE
Use this function to cook food without entering a
cook time or power. You don’t need to touch
START. Automatically microwave cooking will start.
Refer to the “Auto Cook Table” below for more
information.
Example: To cook 2 patatoes.
Touch: Display Shows:
1.
2.
3.
Time of day
Starts AUTO COOK after 4 seconds.
DIRECTION
CODE
CATEGORY
Potato
Popcorn
Fresh
Vegetable
Beverage
Dinner
plate
Frozen
Entree
AMOUNT
1 - 4 medium
approx.
10 oz. each
Regular size
(3.0 - 3.5 oz.)
1 - 4 cups
1 - 2 cups
1-2 servings
(Approx. 10 -16 oz.)
10.5 oz.
Pierce each potato with a fork and place on the oven tray
around the edge, at least one inch apart.
After cooking, allow to stand for 5 minutes.
Place only one bag of prepackaged microwave popcorn on the
center of turntable.
Prepare as desired, wash, and leave residual water on the
vegetables. Place in an appropriately-sized microwave container. Add amount of water according to the quantity.
(1-2 cups: 2 tablespoons, 3-4 cups: 4 tablespoons)
Cover with plastic wrap and vent.
After cooking, allow to stand for 3 minutes.
Use a wide-mouth mug. Do not cover.
(Be careful! The beverage will be very hot! Sometimes liquids
heated in cylindrical containers will splash out when the cup is
moved.)
Place foods to be heated on dinner plate or similar dish. Cover
with plastic wrap and vent.
After cooking, allow to stand for 3 minutes.
Remove from outer display package. Slit cover. If not in
microwave safe container, place on plate, cover with plastic
wrap and vent.
After cooking, allow to stand for 3 minutes.
2
MWO
Twice
Page 5

1313
USING YOUR MICROWAVE OVEN
Example: To defrost 1.2 lbs of poultry.
Touch: Display Shows:
AUTO DEFROST
1.
2.
3.
Twice
Starts defrosting.
to enter the weight
Three defrost sequences are preset in the oven.
The auto defrost feature provides you with the best
defrosting method for frozen foods. The cooking guide
will show you which defrost sequence is recommended
for the food you are defrosting.
For added convenience, the Auto Defrost includes a
built-in beep mechanism that reminds you to check,
turn over, separate, or rearrange to get best defrost
results. Three different defrosting levels are provided.
1 MEAT
2 POULTRY
3 FISH
*Available weight is 0.1~6.0 lbs.
NOTE:
When you touch the START pad, the display changes
to defrost time count down. The oven will beep during
the DEFROST cycle. At this time, open the door and
turn, separate, or rearrange the food.
Remove any portions that have thawed.
Return frozen portions to the oven and touch
START to resume the defrost cycle.
OPERATING TIPS
• For best results, remove fish, shellfish, meat, and
poultry from its original closed paper or plastic package (wrapper). Otherwise, the wrap will hold steam
and juice close to the foods, which can cause the
outer surface of the foods to cook.
• For best results, shape your ground meat into the
form of a doughnut before freezing. When defrosting,
scrape off thawed meat when the beep sounds and
continue defrosting.
• Place foods in a shallow container or on a microwave
roasting rack to catch drippings.
• Food should still be somewhat icy in the center when
removed from the oven.
1.2
Defrost
lbs
Defrost
MWO
MWO
Page 6

14
USING YOUR MICROWAVE OVEN
TIMED COOKING
1.
2.
5.
3.
4.
This feature lets you program a specific cook time
and power. For best results, there are 10 power
level settings in addition to HIGH power (100%).
Refer to the “Microwave Power Level Table” on
page 15 for more information.
NOTE: If you do not select a power level, the oven
will automatically cook at HIGH (100%) power.
Example: To cook for 5 minutes, 30 seconds
at 80% power.
Touch: Display Shows:
AUTO DEFROST TABLE
Category
def-1
(MEAT)
def-2
(POULTRY)
def-3
(FISH)
Food to be Defrosted
Beef
Ground beef, Round steak,
Cubes for stew, Tenderloin steak,
Pot roast, Rib roast, Rump roast,
Chuck roast, Hamburger patty
Lamb
Chops (1 inch thick), Rolled roast
Pork
Chops (
1
⁄2
inch thick), Hot dogs,
Spareribs, Country-style ribs.
Rolled roast, Sausage
Veal
Cutlets (1 lb.,
1
⁄2 inch thick)
Poultry
Whole (under 4 lbs.), Cut-up, Breasts
(boneless)
Cornish Hens
Whole
Turkey
Breast
Steaks/Chops
Round beef steak, Tenderloin steak
Lamb chops (1 inch thick)
Pork chops (1/2 inch thick)
Veal cutlets (1 lbs, 1/2 inch thick)
Fish
Fillets, Whole Steaks
Shellfish
Crab meat, Lobster tails, Shrimp,
Scallops
enter cooking time
and
Starts cooking.
:0
MWO
5:30
MWO
p-hi
MWO
p-8o
MWO
Page 7

1515
USING YOUR MICROWAVE OVEN
MICROWAVE POWER LEVELS
Your microwave oven has 10 cook power levels to let
you cook or heat a wide variety of foods. Refer to the
table below for suggestions:
Microwave Power Level Table
• Boiling water.
• Making candy.
• Cooking poultry pieces, fish, & vegetables.
• Cooking tender cuts of meat.
• Whole poultry.
• Reheating rice, pasta, & vegetables.
• Reheating prepared foods quickly.
• Reheating sandwiches.
• Cooking egg, milk, & cheese dishes.
• Cooking cakes, breads.
• Melting chocolate.
• Cooking veal.
• Cooking whole fish.
• Cooking puddings & custard.
• Cooking ham, whole poultry, & lamb.
• Cooking rib roast, sirloin tip.
• Thawing meat, poultry, & seafood.
• Cooking less tender cuts of meat.
• Cooking pork chops, roast.
• Taking chill out of fruit.
• Softening butter.
• Keeping casseroles & main dishes warm.
• Softening butter & cream cheese.
• Standing time.
10
(High)
9
8
7
6
5
4
3
2
1
0
Use
Power
Level
For best results, some recipes call for different cook
powers during different stages of a cook cycle. You
can program your oven to switch from one power
level to another for up to 2 stages.
Example: To set 2-stage cook cycle.
Touch: Display Shows:
MULTI-STAGE COOKING
1.
2.
5.
3.
4.
6.
To set 7 minute cook
time for second stage.
To set 3 minute cook
time for first stage.
7.
9.
8.
To set 50%
cook power for
the second
stage.
To set 80%
cook power for
the first stage.
When the first stage is over, you will hear two
short tones as the oven begins the second
cook stage.
10.
Starts cooking.
:0
MWO
:0
MWO
7:00
MWO
p-hi
MWO
p-50
MWO
3:00
MWO
p-hi
MWO
p-8o
MWO
Page 8

16
Meat
1. No special techniques are required. Meat should be
prepared as with conventional cooking. Season if
desired. Always thoroughly defrost meat before cooking.
2. Place the meat on a microwave roasting rack or
microwave-proof plate and place on the turntable.
3. Cook according to the Meat Cooking Table (below).
Use the longer time for large cuts of meats and the
shorter time for small cuts of meats. For thicker
chops, use the longer time.
4. Turn the meat once halfway through the cooking
time.
5. Let stand for 5-10 minutes wrapped in foil after
cooking. The standing time is very important as it
completes the cooking process.
6. Make sure meat, especially pork, is thoroughly
cooked before eating.
Poultry
1. No special techniques are required. Poultry should
be prepared as with conventional cooking. Season if
desired.
2. Poultry should be thoroughly defrosted. Remove
giblets and any metal clamps.
3. Prick the skin and brush lightly with vegetable oil
unless the poultry is self-basting.
4. All poultry should be placed on a microwave roasting
rack or a microwave-proof plate and placed on the
turntable.
5. Cook according to the instructions in the Poultry
Cooking Table below. Turn over halfway through the
cooking time. Because of its shape, poultry has a
tendency to cook unevenly, especially in very bony
parts.Turning during roasting helps to cook these
areas evenly.
6. Let stand for 5-10 minutes wrapped in foil after
cooking before carving. The standing time is very
important, as it completes the cooking process.
7. Make sure poultry is thoroughly cooked before eating.
Whole poultry is completely cooked when the juices
run clear from the inside thigh when it is pierced with
a sharp knife. Poultry pieces should be pierced with
a sharp knife through the thickest part to ensure that
the juices are clear and the flesh is firm.
USING YOUR MICROWAVE OVEN
WARNING: Do not use aluminum foil during cooking cycle.
BEEF
Standing/Rolled Rib
– Medium
– Well-done
Ground Beef (to
brown for casserole)
Hamburgers,
Fresh or defrosted
(4 oz. each)
– 2 patties
– 4 patties
PORK
Loin, Leg
Bacon
– 4 slices
– 6 slices
Microwave
Power
8
8
HIGH(100%)
HIGH(100%)
HIGH(100%)
8
HIGH(100%)
HIGH(100%)
Cooking Time
Per Pound
9
1
/
2
to11
1
/
2
minutes
11
1
/2
to 14 minutes
61/2 to 91/2 minutes
21/2
to 41/2
minutes
31/
2
to 5
1
/
2
minutes
12
1
/2
to 161/2
minutes
2
1
/2
to 3
1
/2
minutes
3
1
/2
to 4
1
/2
minutes
Meat Cooking Table
CHICKEN
Whole
Breast (boned)
Portions
TURKEY
Whole
Microwave
Power
8
8
8
8
Cooking Time
Per Pound
11 to 15 minutes
10 to 14 minutes
11 to 17 minutes
11 to 15 minutes
Poultry Cooking Table
NOTES:
• The times listed above are only a guide. Allow for
difference in individual tastes and preferences. The
times may also vary due to the shape, cut, and
composition of the food.
• If whole poultry is stuffed, the weight of the stuffed
bird should be used when calculating the cooking
time.
NOTE: The times listed above are only a guide. Allow
for difference in individual tastes and preferences. The
times may also vary due to the shape, cut, and composition of the food.
Poultry
COOKING TIPS
Meat
Page 9

1717
USING YOUR MICROWAVE OVEN
COOKING TIPS
(continued)
Fish
1. Arrange fish in a large shallow non-metallic dish or casserole.
2. Cover with pierced microwave plastic wrap or casserole lid.
3. Place the dish on the turntable.
4. Cook according to the instructions in the Fresh Fish Cooking Table below. Flakes of butter can be added to the
fish if desired.
5. Let stand as directed in the Cooking Table before serving.
6. After standing time, check to see that the fish is thoroughly cooked. The fish should be opaque and flake easily.
Fresh Fish Cooking Table
Fish
Fish Fillets
Whole Mackerel,
Cleaned and Prepared
Whole Trout,
Cleaned and Prepared
Salmon Steaks
Microwave
Power
HIGH
HIGH
HIGH
HIGH
Cooking Time
Per Pound
4
1
/
2
to 8 minutes
4
1
/
2
to 8 minutes
5
1
/
2
to 9 minutes
5
1
/2
to 8 minutes
Standing
Time
2 to 3 minutes
3 to 4 minutes
3 to 4 minutes
3 to 4 minutes
Butter
Add 15 to 30 ml (1 to 2 tbsp lemon juice)
–
–
Add 15 to 30 ml (1 to 2 tbsp lemon juice)
Page 10

18
USING YOUR TOASTER
TIPS FOR TOASTER
CLEANING THE TOASTER
Always unplug the Toast N Wave and allow the toaster
to cool completely before cleaning.
Exterior : Wipe surface with a soft, clean, damp cloth.
Never use abrasive cleaners, as they may
scratch the surface.
Interior : If food jams in the slots, disconnect Toast N
Wave plug from wall outlet and wait until
cooled completely. Remove food with wooden
tongs. Do not use fork or other sharp, metal
object to clean inside of the toaster, or to
remove toast, as it may damage heating elements.
Crumb Tray :After allowing the toaster to cool down
and closing the door, gently slide out the
crumb tray. Brush crumbs off the tray
and, if necessary, wipe it with a clean,
damp cloth. Always dry the tray thoroughly. When sliding the crumb tray into place,
be sure you feel and hear it snap into
position.
IMPORTANT
Before using the toaster for the first time, set the
Darkness Control at medium and operate the toaster
without bread in order to burn off residues on the heating
elements. You will notice an odor that is characteristic of
new heating elements. This is normal and will soon disappear.
MAINTANANCE
This toaster requires little maintenance. It contains no
user-serviceable parts inside the housing. Do not
remove the cover. Contact qualified Sears Service, if
the product requires servicing.
COOKING TIPS
WARNING
Never place any object in the toaster for any reason!
• DO NOT toast pastries with runny fillings or frosting.
• DO NOT toast torn slices of bread or broken pastries.
• DO NOT place buttered bread, wrapped food, or frozen pastries in the toaster.
• DO NOT use this toaster to toast or warm small-size bread slices. These include "melba" size breads, slices
of mini-baguettes, breadsticks, etc.
• DO NOT toast oversized bagel. Because thick bagel’s surface may become closer to the heater, this may
cause overdone of surface and smoke.
NOTE: Different types of bread and their moisture levels may require different darkness settings.
For example, dry bread will brown more rapidly than moist bread and so will be toasted to your
taste at a lighter setting.
Page 11

19
USING YOUR TOASTER
OPERATING INSTRUCTION
• Make sure the crumb tray is pushed all the way in place before plugging toaster into wall outlet.
• Remove all protective wrappings from food before placing into toasting slots. Place bread into slots and Close
the door. Then select one mode (Toast/Bagel) and press the Darkness Control to the desired setting (experiment to suit individual taste). When you press the Start button, the heating element will turn on.
• Centering guides will automatically center the food for even browning. However, uneven browning may occur
if you are only using one toasting slot. If you operate toaster several times
using one slot continuously, the toaster’s internal temperature will be hot and may
cause "Hot" to appear in the display. This will go away after several minutes after
the toaster cools down.
• Do not adjust the Darkness Control while the toaster is in use. To interrupt the
toasting cycle, press the "stop/clear" control button.
• During the toasting cycle, the indicator light wil be illuminated. If you open the door,
toasting will stop and the light will blink. The toasting cycle can be resumed by
closing the toaster door and pressing the start button.
• When the beep sounds, take out food carefully not to touch toaster’s hot surface.
NOTE: After use of toaster, fan will run for 1 minute to cool.
Toast/Bagel Darkness Settings
Degree of darkness
Light
Medium
Dark
Select darkness level
1~3
4~6
7~9
Example : To toast bread at level 3.
Touch: Display Shows: Indicator light
Twice
off
off
on
2.
3.
4.
5
Toast Toaster
3
Toast
Toaster
Time of day
Starts toasting.
1.
Toast
NOTE : For English Muffins, use bagel settings.
This toaster automatically determines required cooking times for toasting
Page 12

2020
USING YOUR TOASTER
Use this function to cook bagel.
Example : To toast bagel at level 7.
Touch: Display Shows: Indicator light
Twice
off
off
on
Bagel
2.
3.
4.
5
Bagel
7
Bagel
Toaster
Toaster
Time of day
Starts toasting.
1.
 Loading...