

Page 1
ENGLISH ESPAÑOL
OWNER’S MANUAL
TOP FREEZER
REFRIGERATOR
Please read this manual carefully before operating
your set and retain it for future reference.
MANUAL DE USUARIO
REFRIGERADOR
CON CONGELADOR SUPERIOR
Lea detenidamente este manual antes
de empezar a utilizar el refrigerador y guárdelo
como referencia para el futuro.
Model Name/Nombre de Modelo**=color number/número de color
LTC22350**
LTC19340**
P/No. MFL62423827
www.lg.com
Page 2
WARRANTY
Visit our web site http://www.lg.com LG Electronics
LIMITED WARRANTY
United States of America
LG Electronics will repair or at its option replace, without charge, your product which proves to be defective
in material or workmanship under normal use during the warranty period listed below from the date of original
purchase.
This warranty is good only to the original purchaser of the product during the warranty period as long as it is in the
U.S. including Alaska, Hawaii, and U.S. Territories.
LG Refrigerator / Freezer Warranty Period
Product Parts Labor
Refrigerator / Freezer 1 year 1 year [In-Home Service (Except Model GR-051)]
Sealed System
(Compressor, Condenser, Evaporator)
No other express warranty is applicable to this product. THE DURATION OF ANY IMPLIED WARRANTIES, INCLUDING
THE IMPLIED WARRANTY OF MERCHANTABILITY, IS LIMITED TO THE DURATION OF THE EXPRESS WARRANTY
HEREIN. LG ELECTRONICS SHALL NOT BE LIABLE FOR THE LOSS OF USE OF THE PRODUCT, INCONVENIENCE,
LOSS OR ANY OTHER DAMAGES, DIRECT OR CONSEQUENTIAL, ARISING OUT OF THE USE OF OR INABILITY TO
USE THIS PRODUCT OR FOR ANY BREACH OF ANY EXPRESS OR IMPLIED WARRANTY, INCLUDING THE IMPLIED
WARRANTY OF MERCHANTABILITY APPLICABLE TO THIS PRODUCT.
Some States do not allow the exclusion or limitation of incidental or consequential damages or limitations on how long an
implied warranty lasts; so these limitations or exclusions may not apply to you. This warranty gives you specic legal rights
and you may also have other rights which vary from state to state.
7 years 1 year [In-Home Service (Except Model GR-051)]
THE ABOVE WARRANTY DOES NOT APPLY TO:
1. Service trips to your home to deliver and pickup, install, instruct, or replace house fuses or correct house wiring or
plumbing, or correction of unauthorized repairs.
2. Damage to the product caused by accident, pests, re, oods, or acts of God.
3. Repairs when your LG product is used in other than normal, single-family household use.
4. Damage resulting from accident, alteration, misuse, abuse, or improper installation.
5. Damages caused during and/or after delivery.
6. Display, discount, or refurbished units purchased with scratches, dents, or defects.
Proof of purchase is required and must be provided to LG in order to validate warranty.
Therefore, these costs are paid by the consumer.
If the product is installed outside the normal service area, any cost of transportation involved in the repair of the product,
or the replacement of defective parts, shall be borne by the owner.
CUSTOMER ASSISTANCE NUMBERS:
To obtain Warranty Coverage: Retain your Bill of Sale to prove date of purchase.
A Copy of your Sales Receipt must be submitted at the time warranty service is
provided.
To obtain Product or Customer: Call 1-800-243-0000 (24 hrs a day, 7 days per week, 365 days per year).
Service Assistance: Press the appropriate menu option, and have your product type (Refrigerator),
model number, serial number, and ZIP/Postal Code ready.
To obtain the nearest Authorized
Service Center:
Call 1-800-243-0000 (24 hrs a day, 7 days per week, 365 days per year)
Press the appropriate option, and have your product type (Refrigerator), model
number, serial number, and ZIP/Postal Code ready.
1
Page 3
TABLE OF CONTENTS
Warranty 1-2
English Version 3
Spanish Version 31
Important Safety Instructions 4-5
Requirements for Ground Connection 5
Parts and Features 6-8
Refrigerator Installation 9-16
Unpacking 9
Installation 9
Installation of Base Grille 9
How to remove and Install the
Refrigerator Doors 10-11
How to reverse and Install the
Refrigerator Doors 12-16
Closing and Aligning the doors 16
Refrigerator Shelves 19-20
Frozen Meat Compartment
(Chef Fresh/Snack Pan) 20
Crisper and Vegetable Drawer 20
Crisper Humidity Control 20
Fixed Refrigerator Rack 20-21
Door Racks 21
Dairy Compartment 21
Can Dispenser 21
Vitabox 21
Ice Tray 21
Refrigerator Care and Cleaning 22-23
Refrigerator Cleaning 22
Outside 22
Inside Walls 22
Door Lining & Gaskets 22
Plastic Parts (Covers and Panel) 22
Back Cover 22
Replacing Refrigerator Lights 22-23
Power Interruptions 23
When Going on Vacation 23
When Moving 23
Using your Refrigerator 17-21
Ensuring Proper Air Circulation 17
Adjusting the Controls 17
Adjusting Control Settings 18
Food Storage Guide 18
Storing Frozen Food 18-19
Refrigerator Section 19-21
About the Automatic Ice Maker 24
Connecting the Water Line 25-27
Troubleshooting Guide 28-30
3
Page 4

IMPORTANT SAFETY INSTRUCTIONS
SAFETY MESSAGES
This manual contains several important safety notices. Always read and obey all of the following safety messages.
This is the safety alert symbol. This symbol is a warning to potential dangers that could cause death, injury
or damage to you, others or the product. All safety messages will follow after this warning symbol and the
word “DANGER”, “CAUTION” or “WARNING”. These words mean:
DANGER
WARNING
CAUTION
All safety messages inform you of potential danger, advise you on how to reduce the risk of injury and tell you what
can occur if the instructions are not followed.
To reduce the risk of fire, electrical shock or personal
injury, the following precaution measures should be
followed:
•NEVER disconnect the refrigerator by pulling the
power cord, always grip the plug firmly and disconnect
it directly from the outlet.
•Immediately repair or replace all faulty or damaged
service cables. Do not use cords that have cracks or
abrasion damage on the length of the cord or on the
plug.
•When moving your refrigerator, take care not to roll
over the electrical cord.
•DO NOT store or use gasoline or other combustible
liquids or vapors in proximity with this or any other
electrical appliance.
•DO NOT permit children to climb, stand or swing from
the doors or shelves of the refrigerator. This can cause
serious injury to them and damage to the product.
•Keep your fingers away from areas in which they
can become caught, such as the doors, hinges and
cabinets. Be careful closing the doors when children
are near.
You may be killed or suffer fatal damage if you do not follow instructions.
You may be killed or seriously injured if you do not follow instructions.
Indicates a potentially hazardous situation which, if not avoided, may result in minor injury
or damage to the product.
WARNING
could explode after freezing and cause damage.
•For your safety, this product should be properly
grounded. Have a qualified professional check the
electrical circuit and outlet to ensure a proper ground
connection.
•Read all instructions before utilizing the product. Utilize
this product only as explicitly expressed in this guide.
•Once the refrigerator is operating, avoid touching cold
surfaces of the freezer with damp or wet hands; the
skin could become adhered to these surfaces.
•In refrigerators with an automatic ice dispenser, avoid
contact with moving parts of the ejector mechanism
or with the heating mechanism that discharges the
cubes. DO NOT place your fingers or hands in the
ice dispenser mechanism while the refrigerator is
connected.
•DO NOT refreeze foods which have already thawed.
The Department of Agriculture of the United States, in
your Bulletin of Home and Gardens No. 69 establishes
that:
“...You can refreeze food that has thawed if they contain
ice crystals or are cold and below 40 °F (4 °C)”.
•Unplug the refrigerator before cleaning or repairing.
NOTE: We strongly recommend that any repair
services be performed by a qualified professional.
•Before replacing a burned-out light bulb, unplug the
refrigerator or shut down the circuit breaker to avoid
contact with a live wire (the bulb could break while
being replaced). NOTE: Setting the control to the OFF
position does not disconnect the power from the light
bulb circuit.
•Do not keep bottles in the freezer compartment, they
KEEP THESE INSTRUCTIONS
“...Ground beef, perishable food or seafood that is
discolored or has an unpleasant odor should not be
frozen or consumed. Consumption of melted ice cream
should also be avoided. If the odor or color of food is
questionable, discard it. The food may be dangerous to
consume”.
“Partial thawing or refreezing reduces the quality of the
food, especially fruit, vegetables and prepared meals.
The quality of red meat is less affected than that of
other foods. Use refrozen products as soon as possible
in order to maintain their quality”.
4
Page 5
CAUTION
This appliance is not intended for use by children, persons with physical or mental disabilities, persons with reduced
sensory or mental capacity, or persons that lack experience or know-how, unless they have supervision or instruction
in relation to the use of the appliance by the person responsible for their safety. Children should be supervised to
assure that they do not play with the appliance.
DANGER: CHILDREN MAY BECOME TRAPPED
Children becoming trapped or suffocated is not
a problem of the past. Discarded and abandoned
refrigerators are a hazard, even if they remain there
“for just a few days”. If you would like to dispose of
your old refrigerator, please follow the instructions
below to prevent any accidents.
BEFORE DISPOSING YOUR REFRIGERATOR
OR FREEZER WHEN NO LONGER IN USE:
• Remove the doors.
• Leave the shelves in place so that children
cannot easily become stuck in them.
CFC DISPOSAL
Your old refrigerator may have a cooling system that
uses CFC’s (chlorofluorocarbons). CFC affects the
stratospheric layer of the ozone.
If you decide to throw out your old refrigerator, ensure
that CFC contaminants are properly disposed of by a
qualified professional. If you intentionally remove the
CFC refrigerant, you could be subject to fines or prison
in accordance with environmental legislation in effect.
REQUIREMENTS FOR GROUND CONNECTION
IMPORTANT: Attentively read the following.
TO CONNECT ELECTRICITY
WARNING
ELECTRICAL SHOCK HAZARD
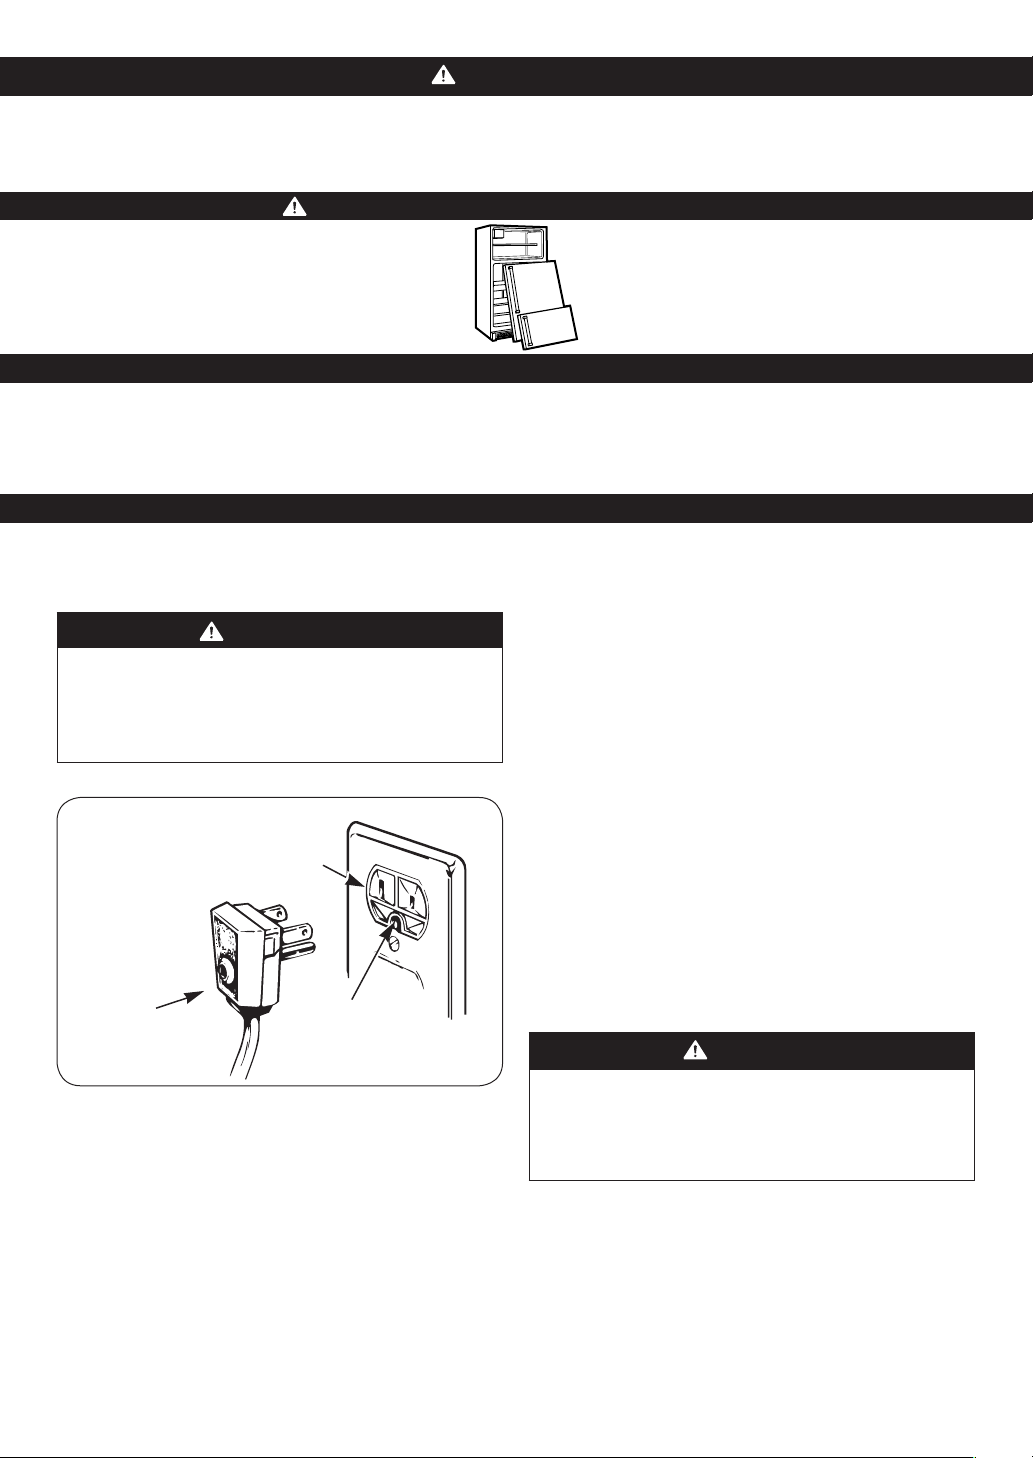
FOR YOUR PERSONAL SAFETY, this appliance must
be properly grounded. Have a qualified electrician
check your wall outlet to ensure that the plug is
grounded properly.
3 prong
grounding type
wall receptacle
3 prong
grounding Ensure proper
plug ground exists
before use
RECOMMENDED GROUNDING METHOD
Your refrigerator must always be plugged to its own
outlet which is adequately grounded. The energy current
should only be 115 V, 60 Hz, A.C. and fused at 15 or 20
A. This provides the best performance and prevents an
overload which could cause a fire from the overheating
of the cables. It is recommended that a separate circuit
be used for this appliance, as well as a receptacle that
cannot be disconnected with a switch.
It is your responsibility and obligation to replace twoprong outlets with that of an adequately grounded threeprong outlet.
Do not, under any circumstance, cut or extract the third
prong from the plug.
NOTE: Before installation, cleaning or replacing light
bulbs, you must disconnect the appliance from the
power source. When finished, plug the appliance back in
and adjust the thermostat to the desired position.
USE OF EXTENSION CABLES
We do not recommend the use of extension cables.
However, if you still choose to utilize an extension cable,
it is absolutely necessary that it is listed in the UL (in
the United States) or CSA (in Canada), that it supports
three-pronged plugs and that the electrical current
support a minimum of 15 A and 120 V.
The use of an extension cable will increase the amount
of space needed behind the refrigerator.
WARNING
REPLACING ELECTRICAL CABLE
If the power cord is damaged, it must be replaced by
our service center or qualified LG technician to avoid
any risk.
Do not use an extension cable.
5
Page 6
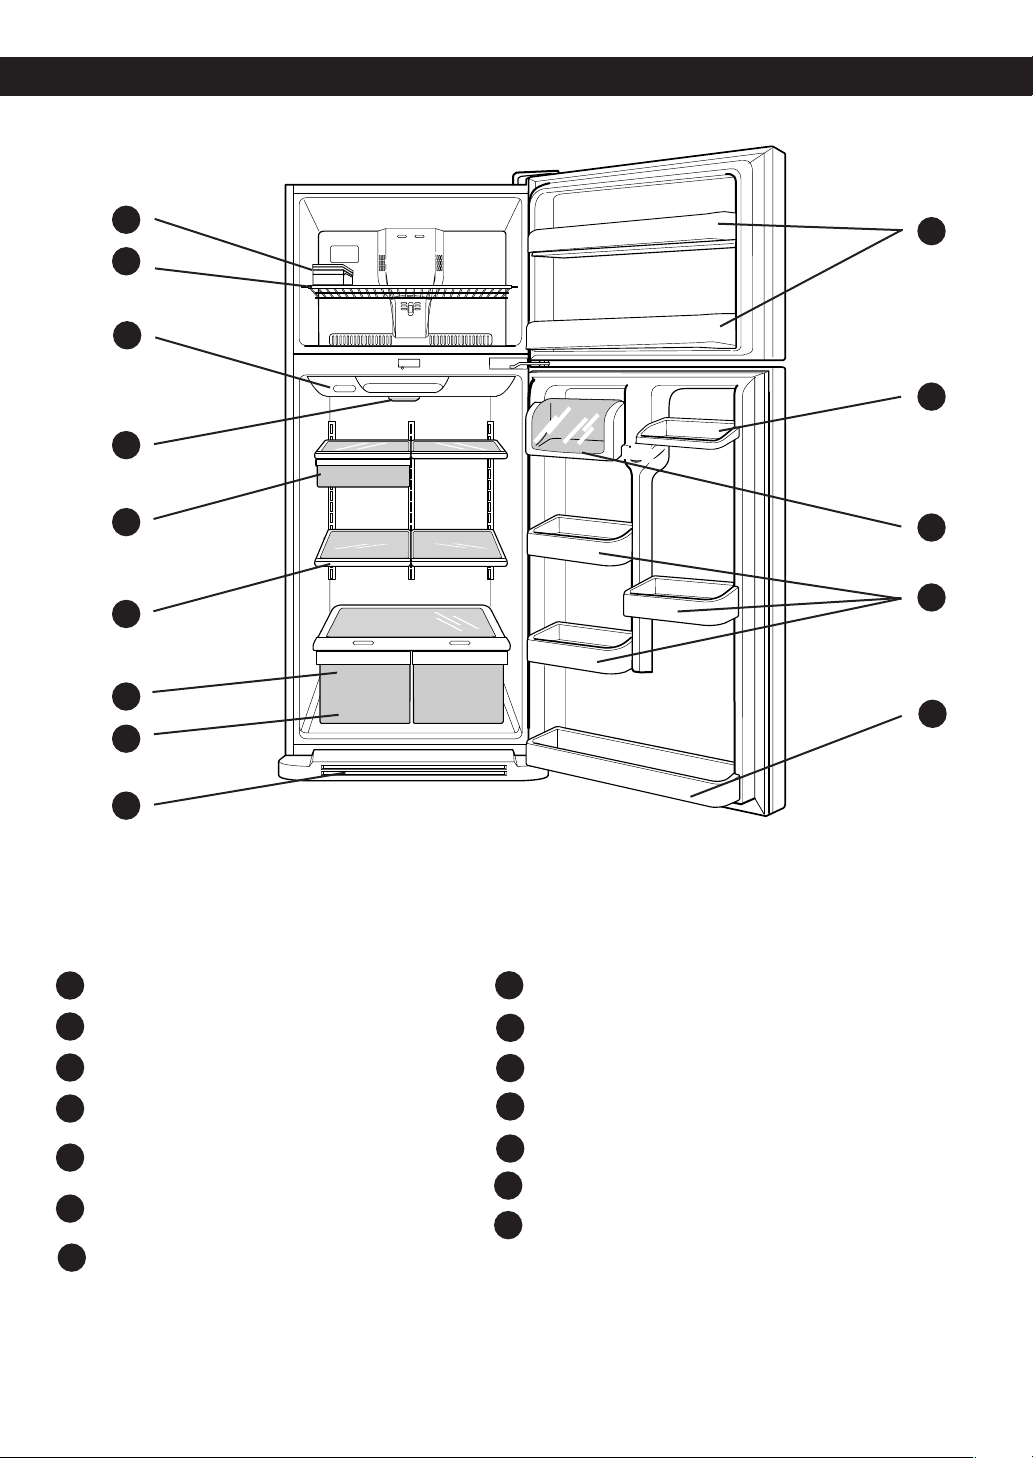
PARTS AND FEATURES
A
J
B
C
K
D
E
L
M
F
G
N
H
I
Read this section to familiarize yourself with the parts and features of your new refrigerator.
NOTE: This guide covers different models. Your refrigerator could have some or all of the features and parts listed
below. The location of some of the parts may not correspond to that of your model.
Ice Bin
A
Freezer Shelf
B
Digital Sensor Control
C
Refrigerator Light
D
Frozen Meat Compartment
E
(Chef Fresh/Snack Pan)
Shelves
F
Crisper
G
Keeps fruits and vegetable fresh and crisp
H
VitaBox (inside) *
Base Grille
I
Freezer Door Racks
J
Can Dispenser
K
Dairy Compartment
L
Door Racks
M
N
Fixed Door Rack
* On some models
6
Page 7
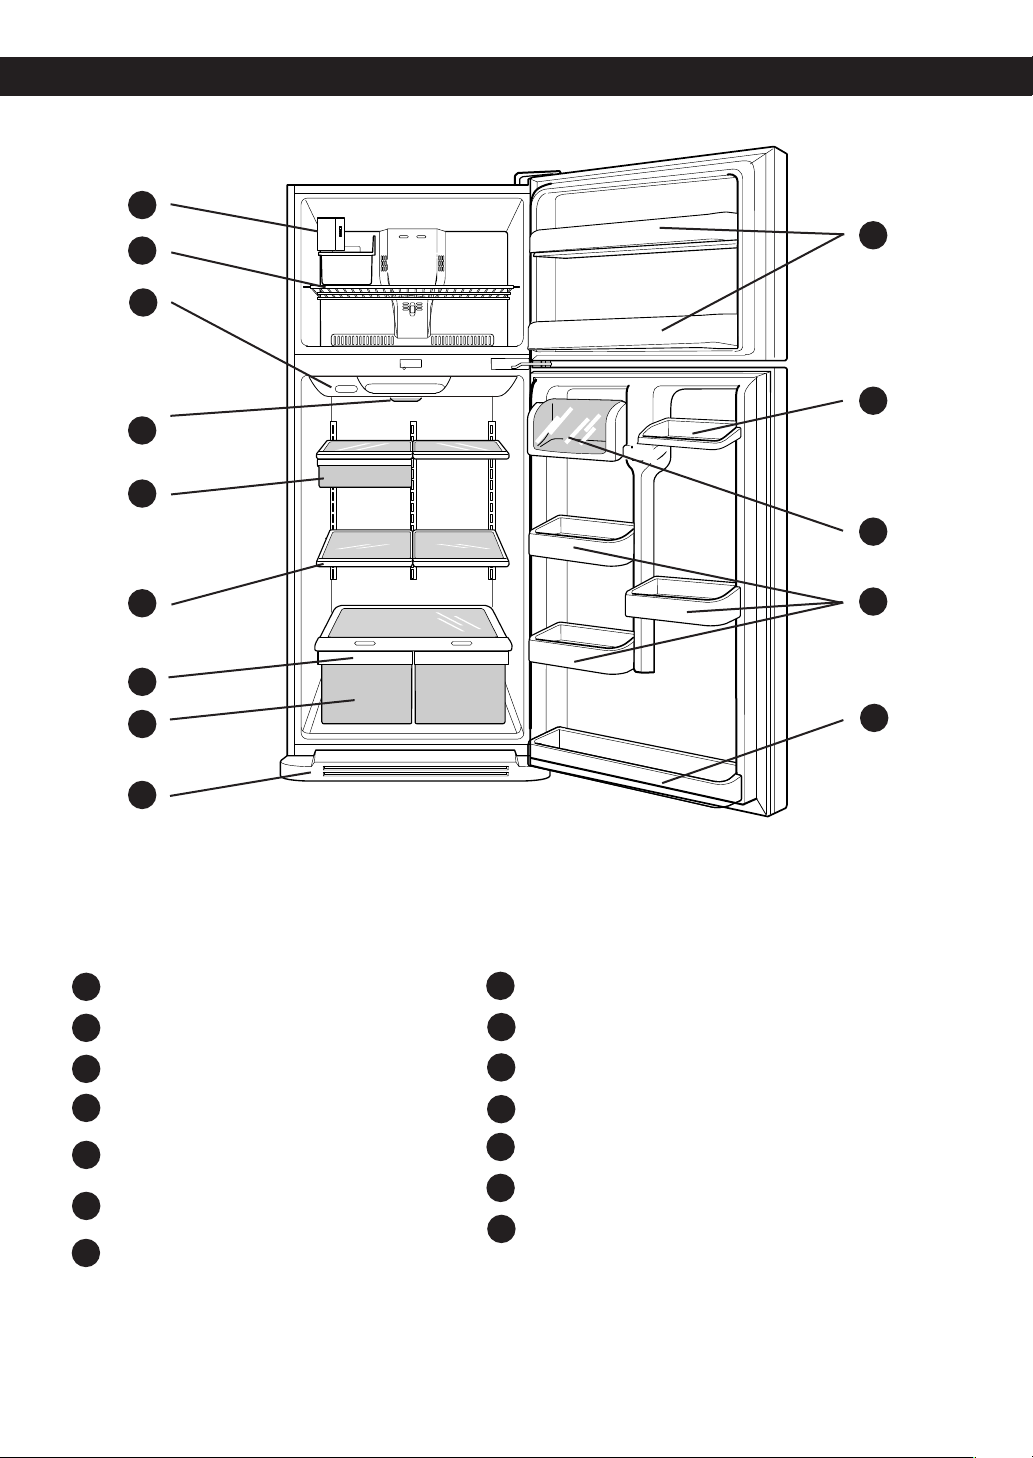
PARTS AND FEATURES
A
B
C
D
E
J
K
L
F
M
G
H
N
I
Read this section to familiarize yourself with the parts and features of your new refrigerator.
NOTE: This guide covers different models. Your refrigerator could have some or all of the features and parts listed
below. The location of some of the parts may not correspond to that of your model.
Ice Maker
A
Freezer Shelf
B
Digital Sensor Control
C
Refrigerator Light
D
Frozen Meat Compartment
E
(Chef Fresh/Snack Pan)
Shelves
F
Crisper
G
Keeps fruits and vegetable fresh and crisp
VitaBox (inside) *
H
Base Grille
I
Freezer Door Racks
J
Can Dispenser
K
Dairy Compartment
L
Door Racks
M
Fixed Door Rack
N
* On some models
7
Page 8

PARTS AND FEATURES
A
B
I
C
D
J
E
F
K
G
L
H
M
Read this section to familiarize yourself with the parts and features of your new refrigerator.
NOTE: This guide covers different models. Your refrigerator could have some or all of the features and parts listed
below. The location of some of the parts may not correspond to that of your model.
A
Ice Maker
Ice Bin
B
Freezer Shelf
C
Digital Sensor Control
D
Refrigerator Light
E
Frozen Meat Compartment
F
(Chef Fresh/Snack Pan)
Shelves
G
Crisper
H
Keeps fruits and vegetable fresh and crisp
I
Freezer Door Racks
Can Dispenser
J
Dairy Compartment
K
Door Racks
L
Fixed Door Rack
M
* On some models
8
Page 9
REFRIGERATOR INSTALLATION
WARNING
EXCESSIVE WEIGHT HAZARD
Use the assistance of two or more persons to move or
install the refrigerator. Not following these instructions
may cause injury to the back and other parts of the
body.
UNPACKING
Before installing your refrigerator, remove any tape
or temporary stickers. Do not remove any stickers
that feature warnings, the model serial number or the
technical label of the product located on the back of the
refrigerator.
To remove adhesive tape residue, rub it well with your
fingers and a little liquid detergent. Clean with warm
water and let dry.
Do not use sharp instruments, rubbing alcohol, flammable
liquids or abrasive cleaning products to remove the
adhesive tape or glue. These products can damage the
surface of your refrigerator. For more information, see
the section on “Important Safety Instructions”.
The shelves come already installed in their factory
position. Remove the shelves and replace them
according to your spacing needs.
Moving Your Refrigerator:
Your refrigerator is extremely heavy. Make sure you
protect the floor when moving your refrigerator for
cleaning or servicing. Always pull your refrigerator
straight out when moving it. Do not shift from side
to side or “walk” the refrigerator when attempting to
move it as this can cause damage to the floor.
3. Install the refrigerator in an area between 55 °F
(13 °C) and 110 °F (43 °C). If the surrounding temperature
is lower or higher than previously mentioned, it can
adversely affect the unit.
CAUTION: Avoid placing the unit near heat
sources, direct sunlight or humidity.
ONCE INSTALLED
1. Carefully clean your refrigerator and remove and dust
accumulated during shipping.
2. Install accessories such as the ice bin, door racks,
shelves, etc., in their proper places. These are already
packed to prevent any possible damage during
shipping.
3. Leave your refrigerator on for 2 to 3 hours before
storing food inside. Verify that there is a flow of cold air
in the freezer compartment to ensure proper cooling.
Your refrigerator is now ready for use.
WARNING:
•Take care when working with the hinges, base cover
and stops, etc. You may injure yourself.
•DO not place your hands or any tools in the air vents,
the base cover or in the bottom of the refrigerator. This
may cause injury or electrical shock.
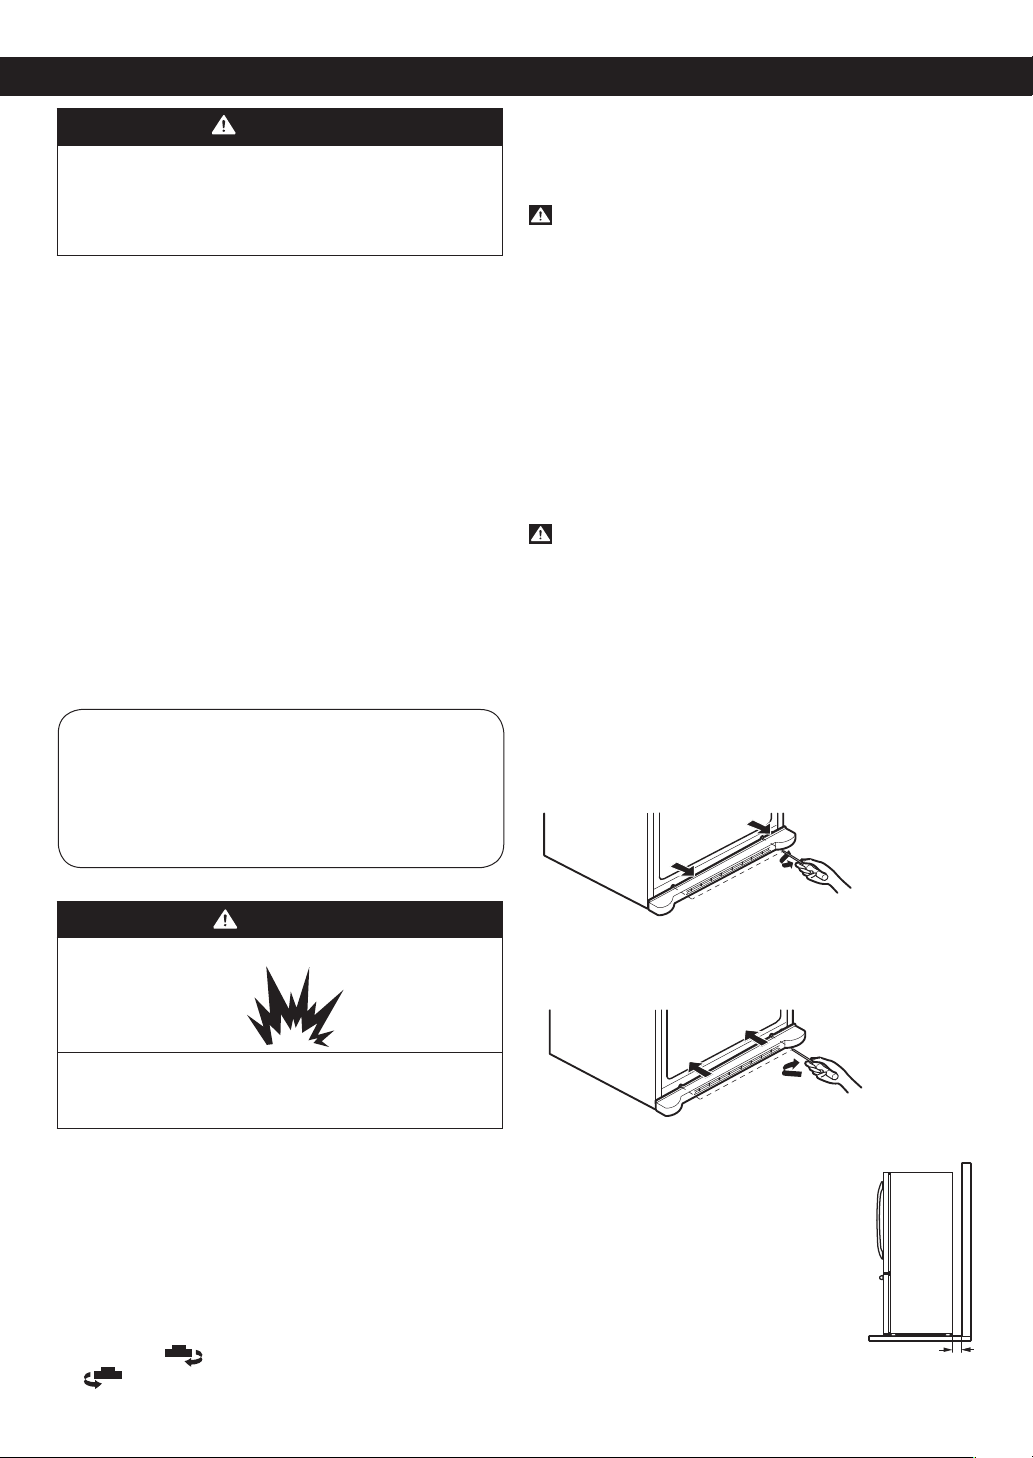
INSTALLATION OF BASE GRILLE
Uninstalling or Replacing the Base Grille
1. Remove the 2 screws from the bottom front part of
your refrigerator (see Figure A).
2. Take off the cover.
Figure A
WARNING
EXPLOSION HAZARD
Keep all flammable materials and vapors (such as
gasoline) away from the refrigerator. Not following
these instructions may cause death, explosion or fire
INSTALLATION
1. Avoid placing the unit near heat sources, direct
sunlight, or humidity.
2. To avoid vibration, the unit should be leveled. If needed,
adjust the leveling screws to compensate for an
unleveled floor. The front should be slightly taller than
the rear to ensure that the doors close properly. The
leveling screws can easily be turned by slightly tilting
the front of the refrigerator, turning the leveling screws
clockwise ( ) to raise it and counter-clockwise
( ) to lower it.
Installing the Base Grille
1. Align the bottom cover and place in position. Insert
the 2 screws and twist in place (see Figure B).
Figure B
Keep a Proper Distance from Adjacent
Objects
Please keep the refrigerator at an
adequate distance from other objects.
Insufficient spacing can reduce the
refrigerator’s freezing efficiency and
increase electricity consumption.
(5.08 cm) 2”
9
Page 10

REFRIGERATOR INSTALLATION
HOW TO REMOVE AND INSTALL THE REFRIGERATOR DOORS
If entrance is lees than 35 inches wide, the refrigerator’s door will need to be removed.
IMPORTANT: Before starting, turn off and unplug the refrigerator. Remove all food and the racks from the doors.
TOOLS YOU MIGHT NEED OR USE
10 mm
13/32 in
3/8 in
Hex Socket Wrench Phillips Screwdriver No. 2 Flat Head Screwdriver
WARNING
ELECTRICAL SHOCK HAZARD
Before you begin, either unplug the refrigerator or
turn off the power at the circuit breaker or fuse box.
Remove food and any door rack from the refrigerator.
Failure to do so could result in death or serious injury.
1. Removing Freezer Door
•Gently pry off the Top Hinge Cover with a flat head
screwdriver and remove it. (See Fig. 1)
Fig. 1
•Using 10 mm or 13/32 inch socket wrench, remove
the three bolts and lift the Top Hinge (See Fig. 2). Set
parts aside.
Fig. 2
Fig. 3
2. Removing Refrigerator Door
• Loose and remove the two bolts and the screw to
remove the middle hinge bracket from refrigerator
housing (See Fig. 4). Set parts aside (See Fig. 5).
Fig. 4
Middle Hinge
Bracket
•Lift freezer door slightly and remove it (See Fig. 3) Set
parts aside.
Fig. 5
•Lift up door slightly and remove it (See Fig. 6).
10
Page 11
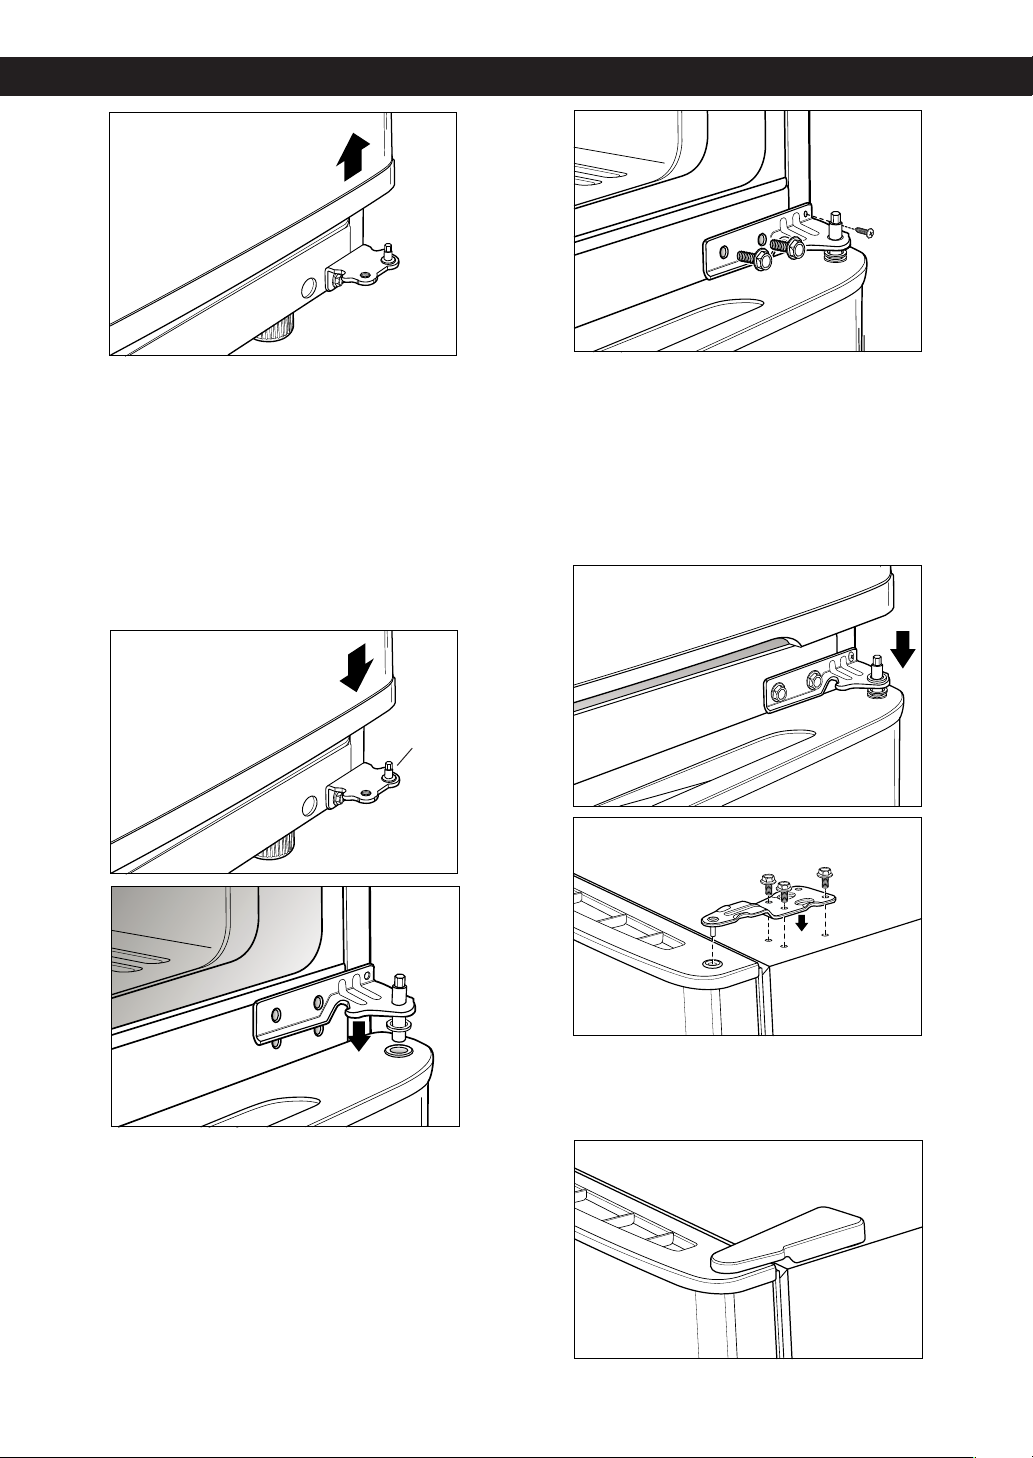
REFRIGERATOR INSTALLATION
Fig. 6
•To replace doors, begin with refrigerator door and then
follow with freezer door.
3. Replacing Refrigerator Door
•Set door on Bottom Hinge Pin (See Fig. 7).
•Place hinge pin of middle bracket inside the hinge pin
insert on the top of the door (See Fig. 8). Hold the
door in place and line up the hinge with the holes in
the refrigerator housing.
Fig. 7
Bottom
Hinge
Pin
Fig. 9
4. Replacing Freezer Door
•Set the freezer door onto the Middle Hinge pin
(See Fig. 10).
•Place upper hinge in the top of the freezer door and
line up the hinge with the holes in top of refrigerator.
Use the three bolts to fasten the hinge (See Fig. 11).
Fig. 10
Fig. 8
•Use the two bolts and the screw to refasten the middle
hinge with the refrigerator housing. (See Fig. 9)
Fig. 11
•Carefully, force the top hinge cover back into place over
hinge (See Fig. 12).
Fig. 12
11
Page 12
REFRIGERATOR INSTALLATION REFRIGERATOR INSTALLATION
HOW TO REVERSE AND INSTALL THE REFRIGERATOR DOORS
You may find it more convenient to have the doors converted from the left opening type (factory installed) to the right
opening type. Directions refer to the right side as the side on your right as you face the unit.
TOOLS YOU MIGHT NEED OR USE
10 mm
13/32 in
3/8 in
Hex Socket Wrench Phillips Screwdriver No. 2 Flat Head Screwdriver
WARNING
ELECTRICAL SHOCK HAZARD
Before you begin, either unplug the refrigerator or
turn off the power at the circuit breaker or fuse box.
Remove food and any door rack from the refrigerator.
Failure to do so could result in death or serious injury.
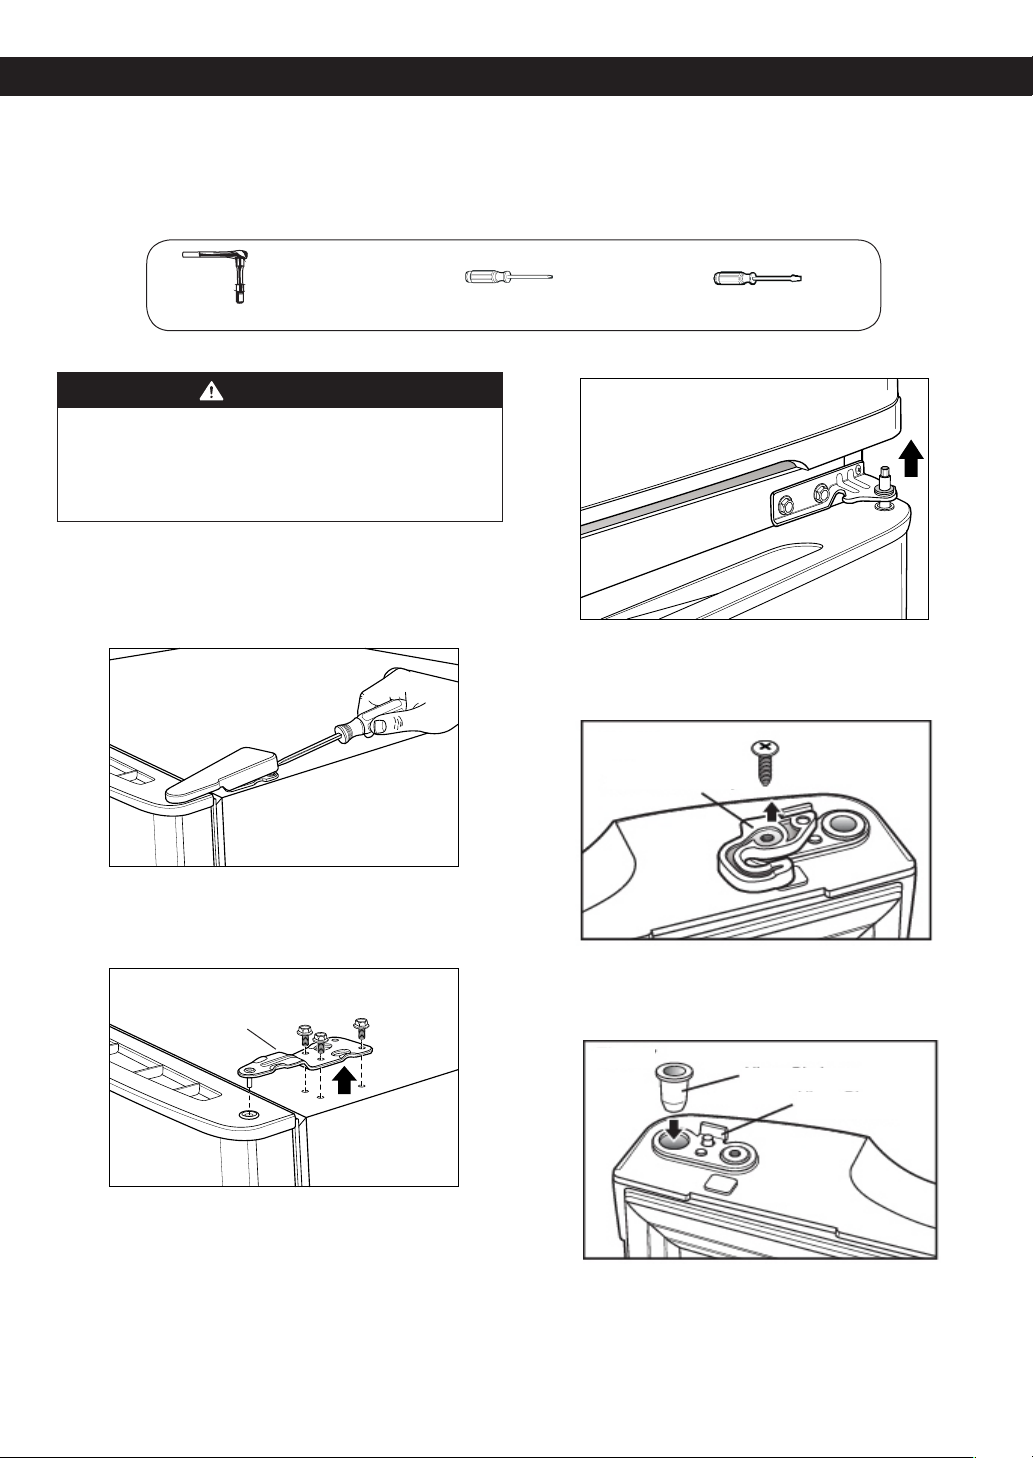
1. Reversing Freezer Door
• Gently pry off the top hinge cover with a flat head
screwdriver and remove it (See Fig. 1).
Fig. 1
• Using 10 mm or 13/32 inch socket wrench,
remove the three bolts and lift off the top hinge
(See Fig. 2). Set parts aside.
Fig. 2
Top Hinge
Fig. 3
•Turn freezer door upside down on a non scratch surface
and loosen the screw to remove door closer (stop) and
hinge pin insert. (See Fig. 4).
Fig. 4
Door Closer (Stop)
• Move the hinge bracket to the other side of the door
(keeping the same orientation) and move the hinge
pin insert into the hole on the left side of the bracket
(See Fig. 5).
•Lift up door slightly and remove it (See Fig. 3).
Fig. 5
Hinge Pin Insert
Hinge Bracket
• Reverse door closer (stop) by flipping over
(See Fig. 6), place on top of hinge bracket and tighten
both down with the screw.
12
Page 13
REFRIGERATOR INSTALLATION
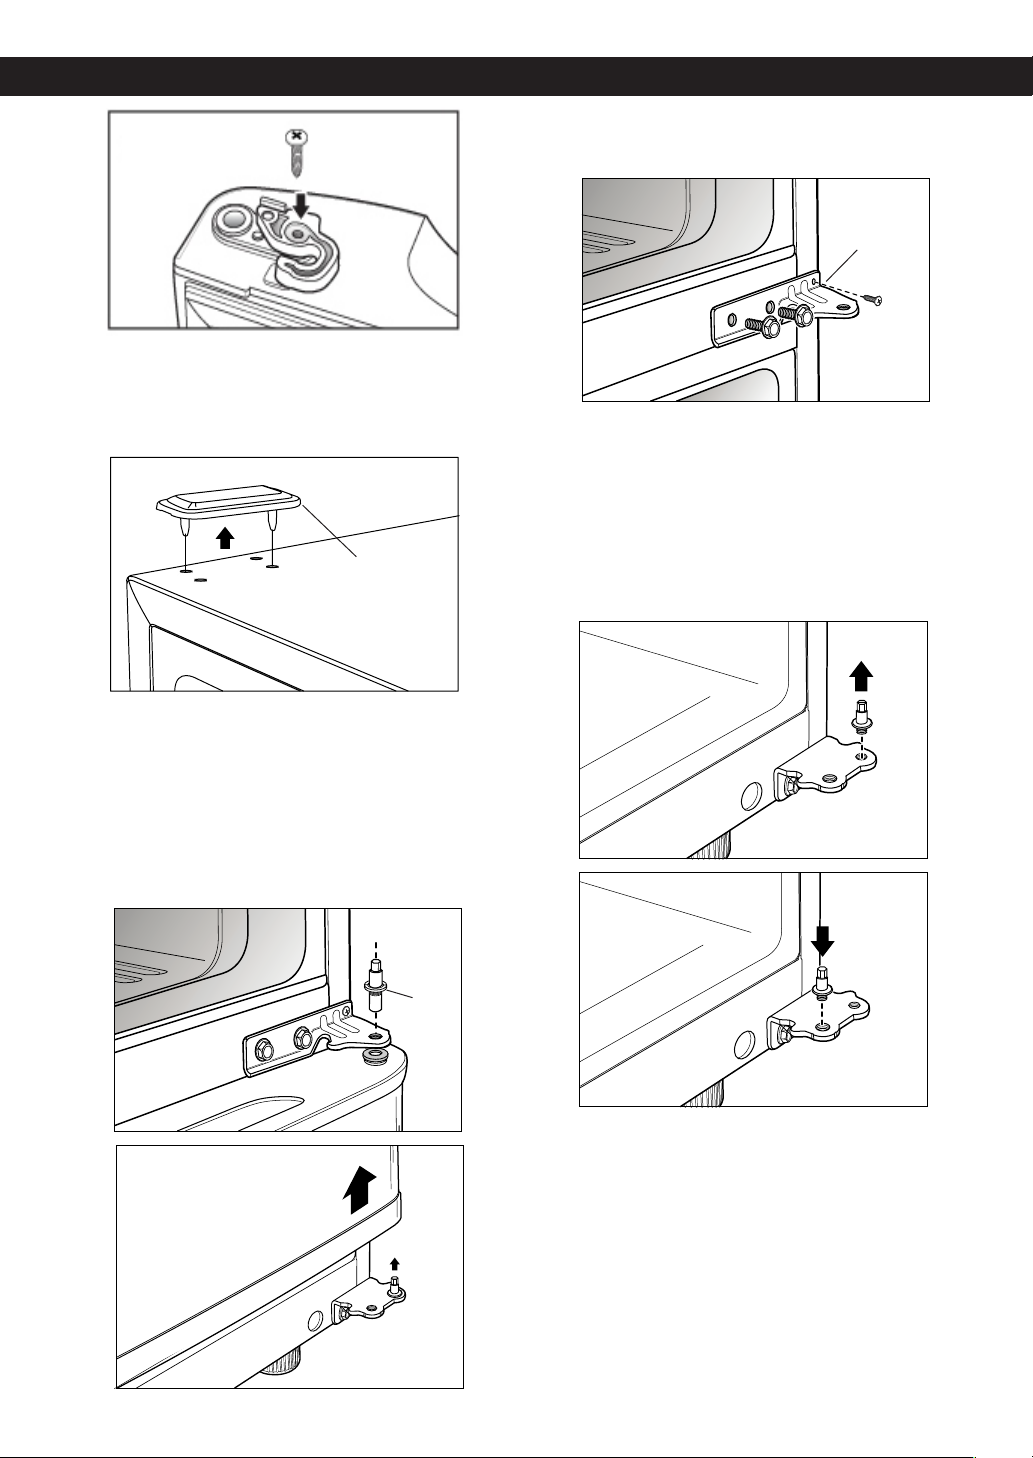
Fig. 6
• Pry off cover on top refrigerator on left side to uncover
screw holes (See Fig. 7).
• Set freezer door and top hinge parts to the side and
remove refrigerator door.
Fig. 7
Cover (on top of
refrigerator)
• Loosen and remove the two bolts and the screw to
remove the middle hinge bracket from refrigerator
housing (See Fig. 10). Set parts aside.
Fig. 10
Middle
Hinge
Bracket
• Remove the Base Grille (See “Installation of Base
Grille”).
• Remove the washer from the bottom hinge pin. Using
a 1/4 inch socket wrench, loosen and remove the
hinge pin from the bottom hinge (See Fig 11).
• Reattach the hinge pin to the opposite side of the
hinge. (See Fig. 12).
NOTE: This is easier to do while the hinge is still attached.
Fig. 11
2. Reversing and Reinstalling Refrigerator Door
• Using a 1/4 inch socket wrench, loosen and remove
hinge pin from the middle hinge bracket. Remove the
washer underneath the hinge and set aside (Fig. 8).
NOTE: At this point, the door will be loose, lift up door
slightly and remove it (See Fig. 9).
Fig. 8
Hinge
Pin
Fig. 9
Fig. 12
• Using 10 mm or 13/32 inch socket wrench with 2
inch extension, loosen the three bolts and remove the
Bottom Hinge from right side of refrigerator housing
(See Fig. 13).
13
Page 14
REFRIGERATOR INSTALLATION REFRIGERATOR INSTALLATION
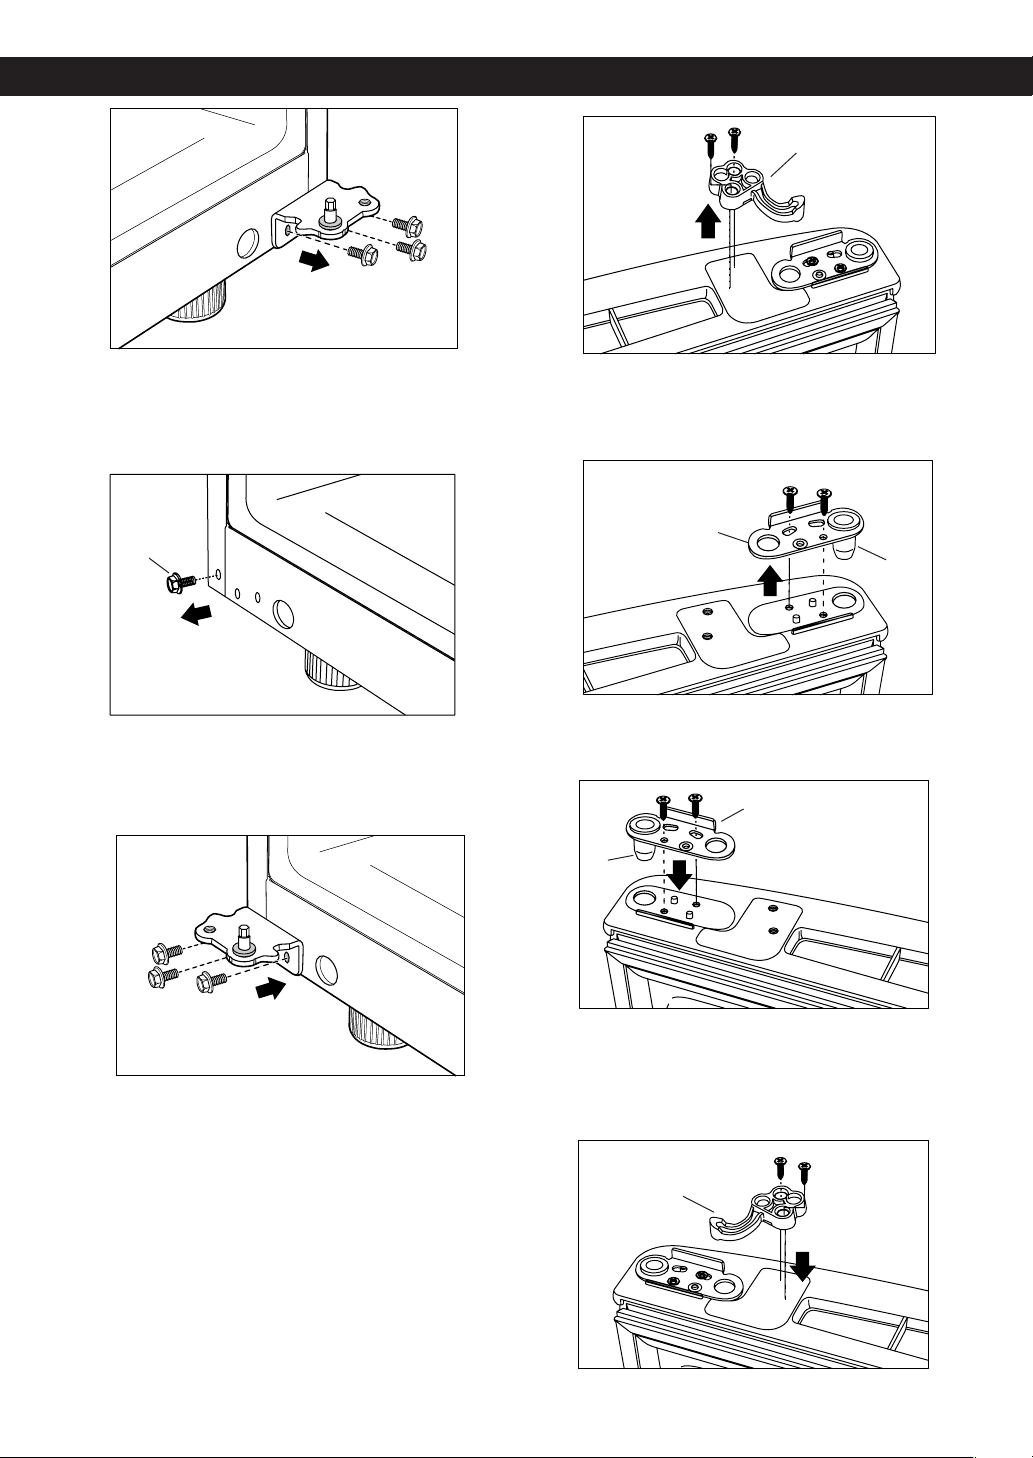
Fig. 13
• At this point, remove the Decorative Bolt on bottom on
refrigerator housing from the left side of refrigerator
(See Fig. 14). You will need this hole for the Bottom
Hinge.
Fig. 14
Decorative
Bolt
Fig. 16
Door Closer (Stop)
• Take out the Hinge Pin Insert and move the Bracket
to the other side of the door, keeping the same
orientation (See Fig. 17).
Fig. 17
Hinge Pin Bracket
Hinge
Pin
Insert
• Move the Bottom Hinge to the left side of housing
keeping the same orientation, and reattach with three
bolts (Fig. 15). Now move decorative bolt to hole on
lower right side of housing.
Fig. 15
• Turn refrigerator door upside down on a nonscratching surface.
• With door upside down, loosen the 2 screws and
remove the door closer (stop) (See Figure 16), then
loosen the other two screws to remove the bottom
Hinge Pin Insert Bracket with Hinge Pin Insert
(Fig. 17).
NOTE: The Refrigerator door closer (stop) is not used on
all models. The model you have may not include this
part.
• Place Hinge Pin Insert into the left side of the bracket,
tighten Hinge Pin Bracket to door (Fig. 18).
Fig. 18
Hinge
Pin
Insert
Hinge Pin
Bracket
• Take Door Closer/stop and flip (See Fig. 19). Line up
screw holes and mount on left side of door bottom
with the two screws. Turn door upright. It is now ready
for reattaching.
Fig. 19
Door Closer (Stop)
14
Page 15
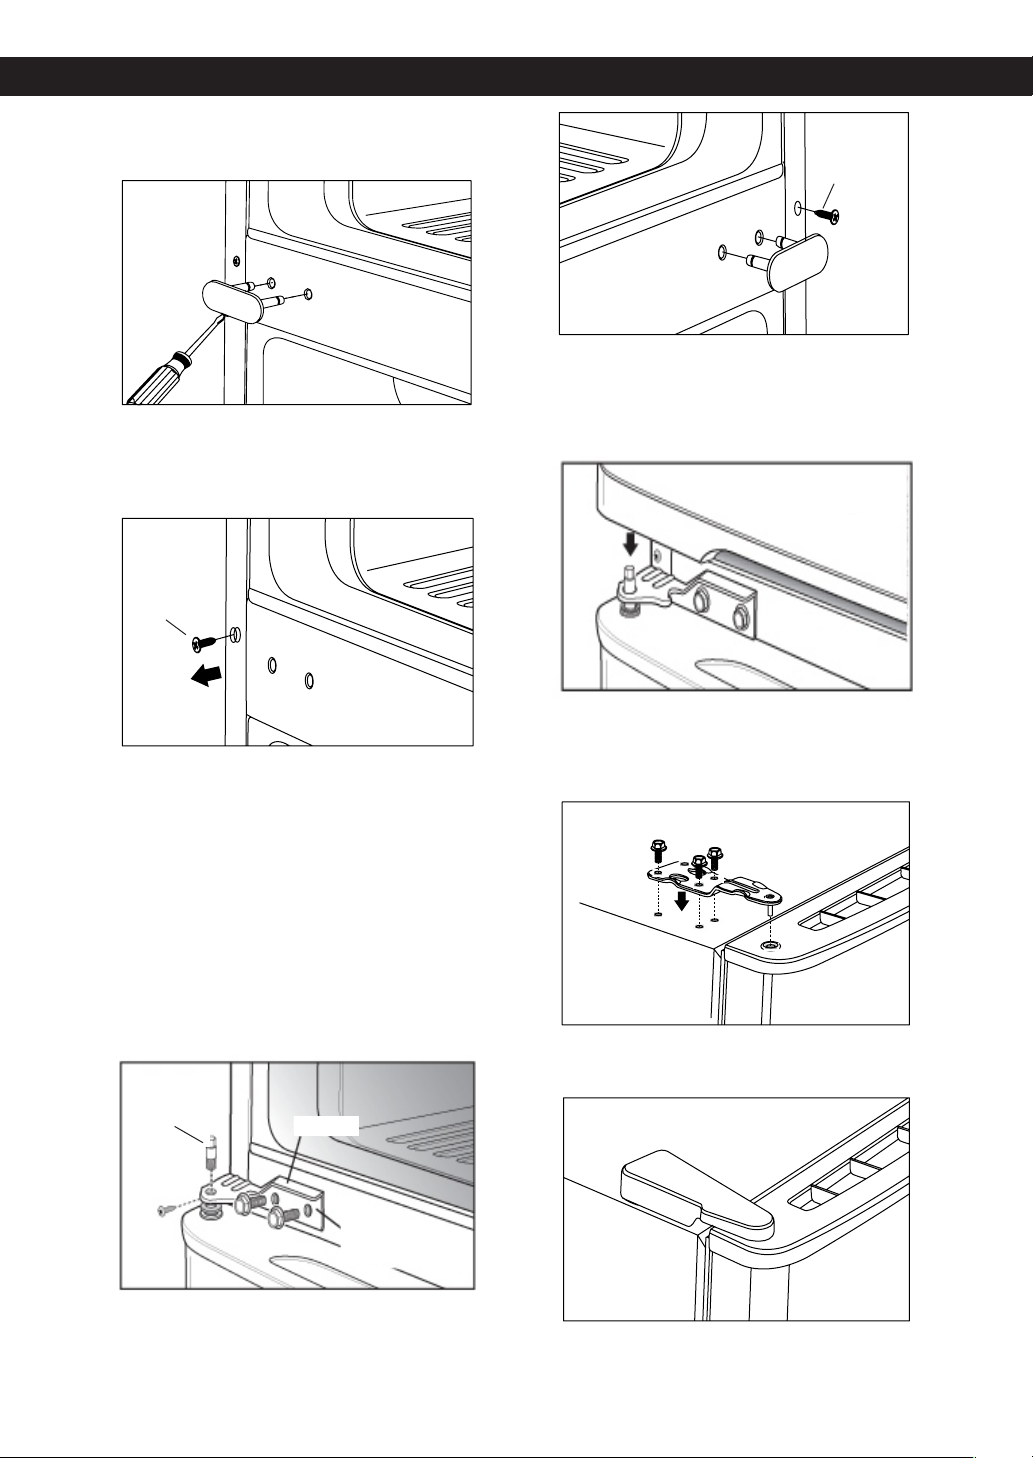
REFRIGERATOR INSTALLATION
• With flat-head screwdriver, carefully pry off and
remove the cover over the screw holes on the left side
of refrigerator housing (Fig. 20).
Fig. 20
• Remove the outer lower Decorative Screw from
housing at area between freezer and refrigerator
doors (See Fig. 21). (You will need this hole for the
Middle Hinge Bracket).
Fig. 21
Decorative
Bolt
Fig. 23
Decorative
Screw
3. Reattaching Freezer Door
• Put freezer door down over the Hinge Pin on the
Middle Hinge Pin Bracket (See Fig. 24).
Fig. 24
• Following illustration, flip the Middle Hinge Bracket
(Flange will now be on top) and position on left side of
refrigerator and re-attach with two bolts and a Phillips
screw (Fig. 22).
• Place refrigerator door down over pin on bottom
hinge.
(See Fig. 22).
• Place washer between refrigerator door and middle
hinge and re-attach Hinge Pin to Hinge Bracket with
1/4 inch socket wrench.
NOTE: Bracket has been flipped, but Hinge Pin stays in
the same orientation with its hexagonal end facing
upward.
Fig. 22
Hinge
Pin
Flange
Middle Hinge
Bracket
• Place Upper Hinge’s Pin in the top of freezer door
and line up the Upper Hinge with holes in top of
refrigerator. Use the three bolts to replace Hinge (Fig.
25).
Fig. 25
• Tighten bolts. Force-fit Top Hinge Cover over Top
Hinge (See Fig. 26).
Fig. 26
• Place Decorative Screw into outer hole on right side
of housing (Fig. 23).
• Attach cover on the right side. Cover is force-fitted
15
Page 16
REFRIGERATOR INSTALLATION USING YOUR REFRIGERATOR
• Replace cover from left side of refrigerator top onto
the right of top to cover the holes. Cover is also forcefitted (Fig. 27).
Fig. 27
Cover (on top of
refrigerator)
After changing doors, make sure that the corners of the
Door Gaskets are not folded over. To ensure a good seal,
apply a small amount of silicon grease on the corners of
gaskets.
Corners
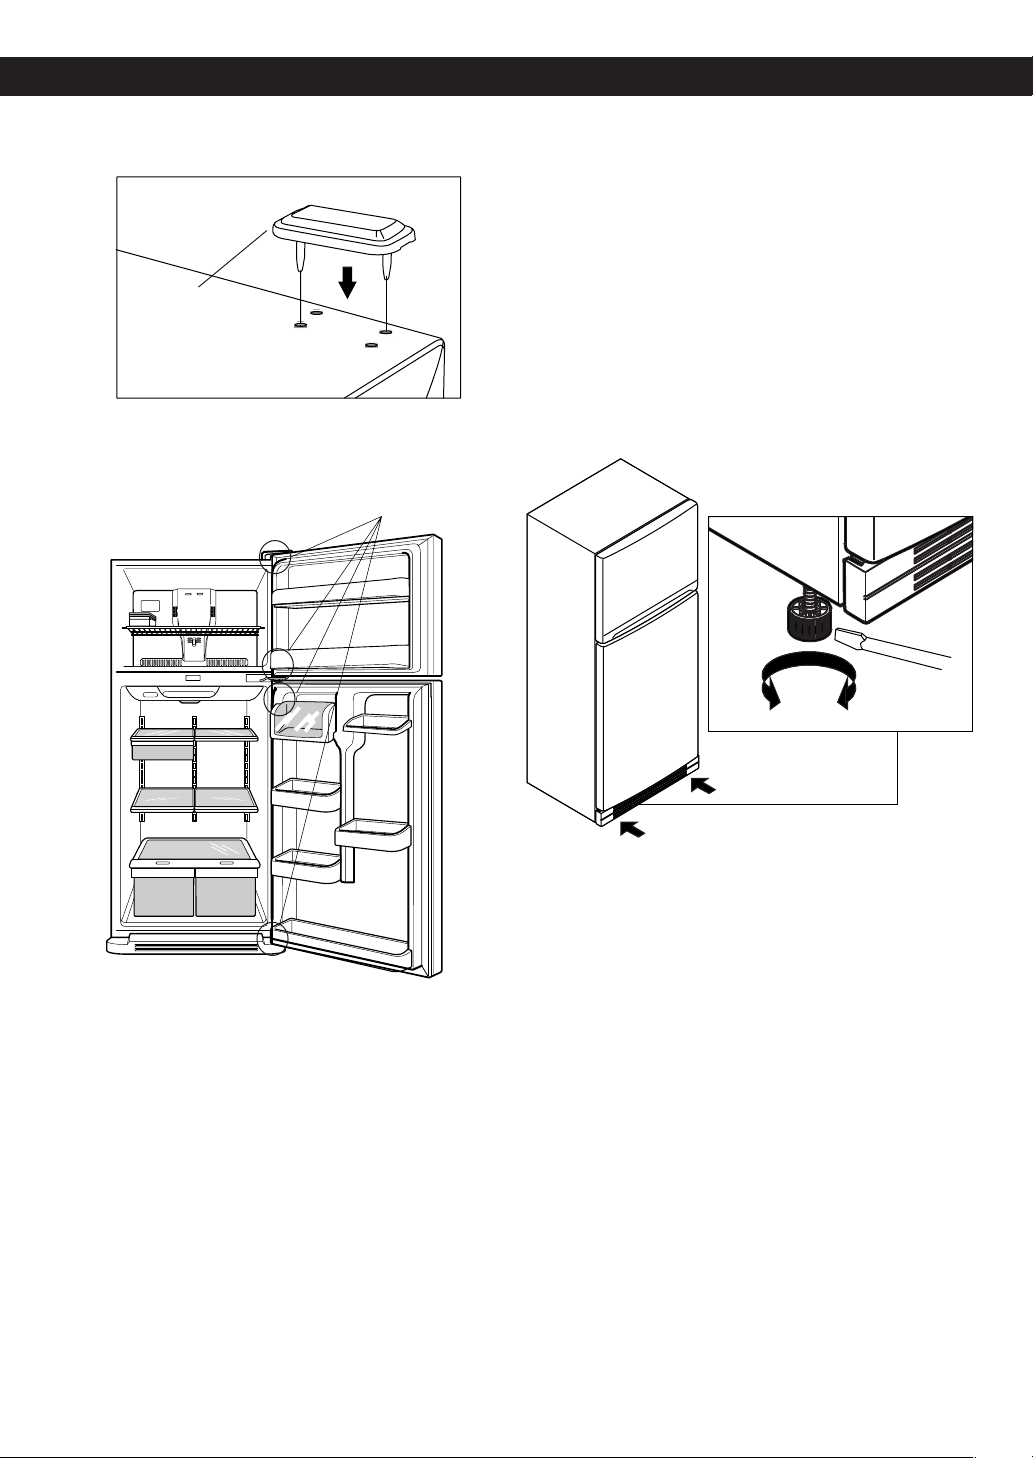
3. Use a flat head screwdriver to adjust the leveling
screws (see Figure A), turning clockwise to raise the
side of the refrigerator and counter-clockwise to lower
it. It may take several turns to adjust it to the inclination
you would like.
NOTE: Having someone push against the top of the
refrigerator takes some weight off the leveling screws.
This will make it easier to adjust the screws.
4. Open both doors again and check to make sure that
they close easily. If not, tilt the refrigerator slightly
more to the rear by turning both Leveling Screws
clockwise. It may take several more turns, and you
should turn both Leveling Screws the same amount.
5. Replace the base grille.
Figure A
CLOSING AND ALIGNING THE DOORS
To avoid vibration, the unit must be leveled. If necessary,
adjust the Leveling Legs to compensate for unevenness
of the floor. The front should be slightly higher than the
rear to aid in door closing.
Your refrigerator has two front leveling screws, one on
the right and one on the left. If your refrigerator seems
unstable or if you would like the doors to close more
easily, simply adjust the inclination of the refrigerator by
following the instructions below:
1. Plug the refrigerator into a 3 prong grounded outlet.
Move the refrigerator into its final position.
2. Remove the base grille (Refer to the section on
“Installation of Base Grille”).
Door Alignment
If the space between your doors is uneven, follow the
instructions below to align the doors:
1. Gently pry off the Top Hinge Cover with a flat head
screwdriver and remove.
2. Loosen the Top Hinge Bolts using a 10 mm or 13/32
inch socket wrench or open-end wrench.
3. Have someone hold the freezer door so the space
between the two doors is even, and retighten the top
hinge bolts.
4. Replace the Top Hinge Cover.
16
Page 17
USING YOUR REFRIGERATOR
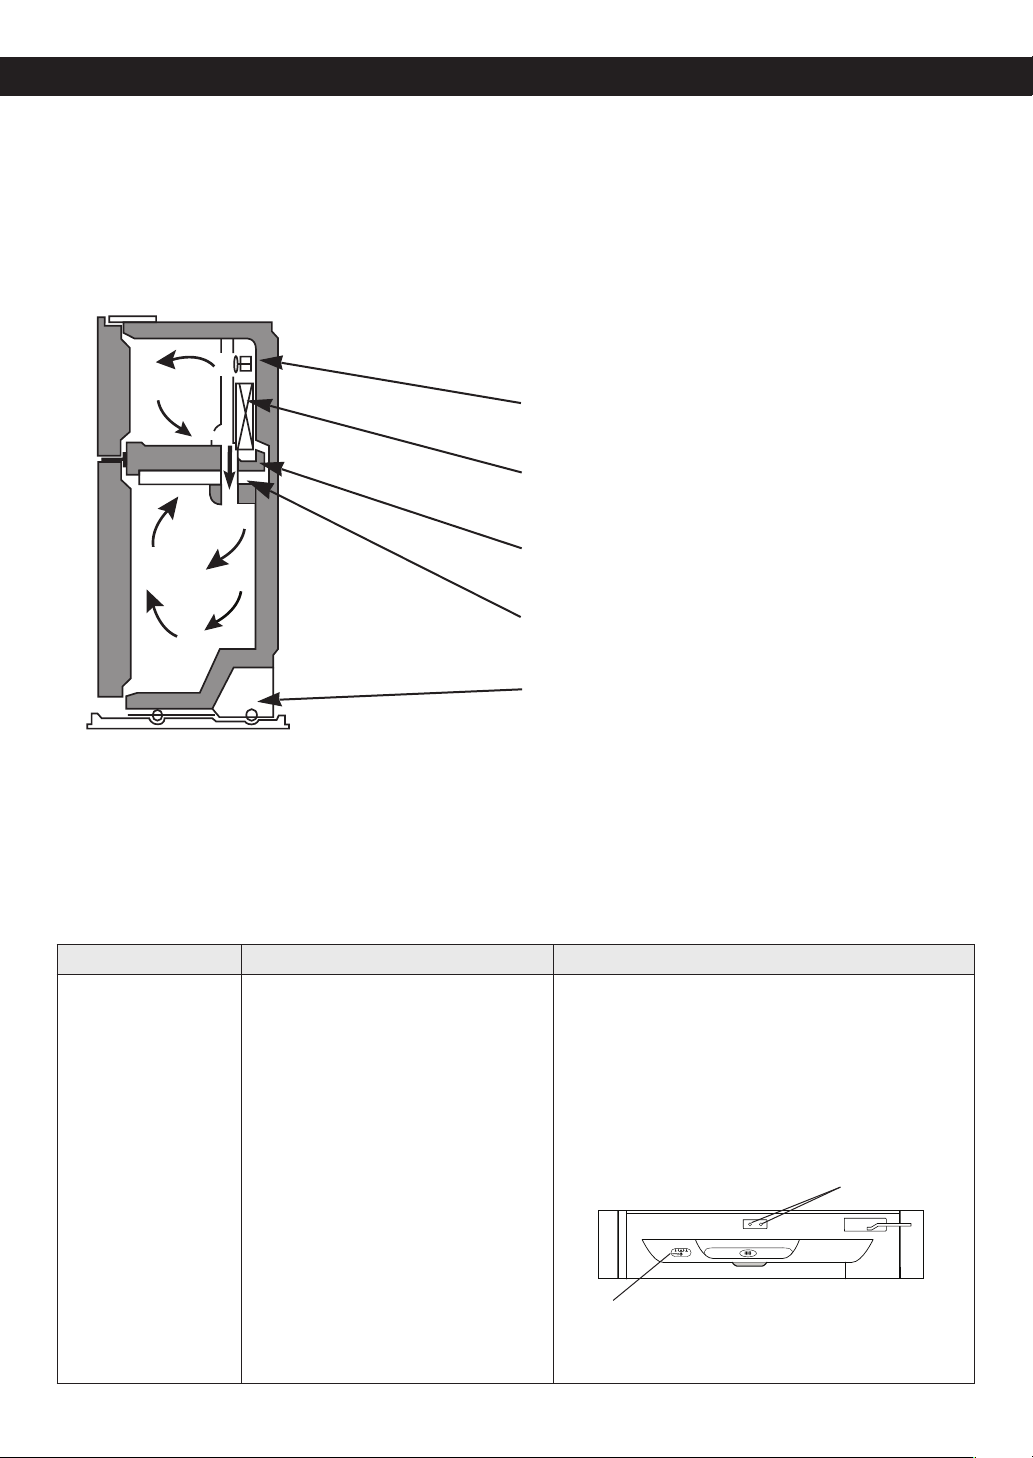
ENSURING PROPER AIR CIRCULATION
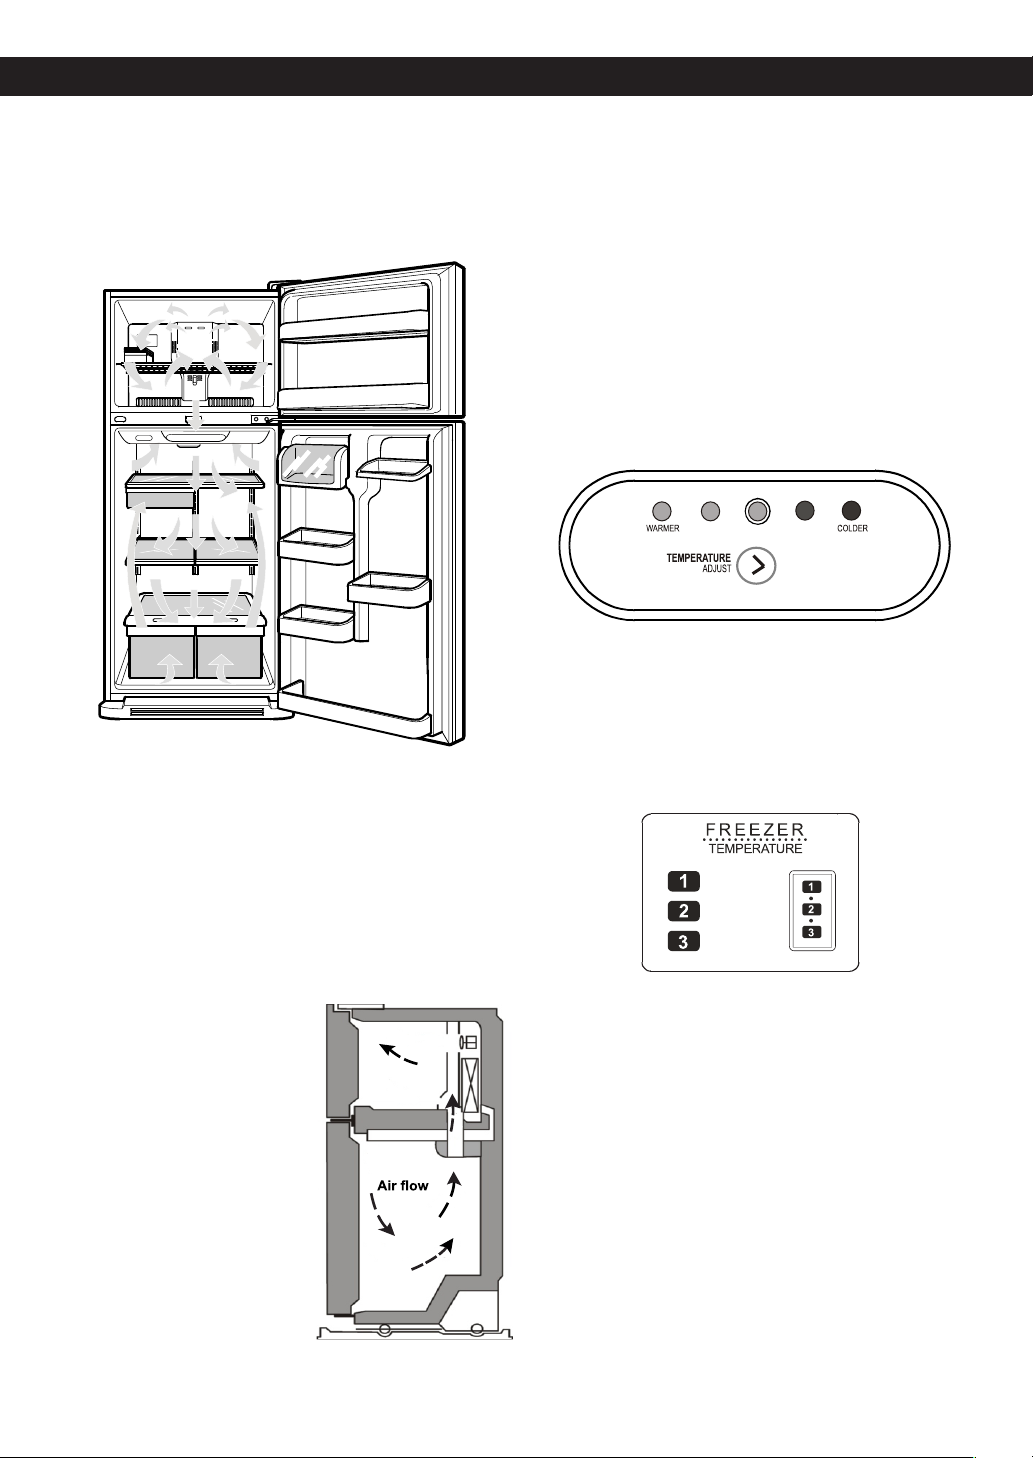
In order to obtain stable temperature, the air must flow
between the freezer and refrigerator sections. As shown
in the illustration below, the cold air enters through
the bottom part and circulates upward. This air returns
below the freezer floor and the rest of the air enters the
refrigerator section through the top vent.
Do not block any of these vents with packages of food.
This can interrupt the flow of air and cause temperature
and moisture problems.
ADJUSTING THE CONTROLS
•Your refrigerator has two controls that allow you to
regulate the temperature the freezer and refrigerator
compartments.
•Refrigerator Control
Initially set the Refrigerator Control on the middle
setting (number 3). To do so, press the TEMPERATURE
ADJUST button until it reaches the middle position
(the third LED turns ON). Leave the refrigerator on this
setting for 24 hours to reach the correct temperature.
After 24 hours, adjust the compartment temperature
as you desire. ALWAYS wait 24 hours before you adjust
the temperature. If you want to set the refrigerator
compartment temperature to a warmer temperature
than the current, continue pressing the TEMPERATURE
ADJUST button until it reaches the desired temperature.
1 2 3 4 5
•Freezer Control
The freezer control should come from factory on the
middle setting (number 2). Wait 24 hours before
adjusting the freezer compartment temperature. Roll
the knob to set the freezer temperature as you desire.
ALWAYS wait 24 hours after any adjustment to reach the
desired temperature.
IMPORTANT: Because air circulates between both
sections, any odors formed in one section will transfer
to the other. You must thoroughly clean both sections to
eliminate odors. To prevent odor transfer and drying out
of food, make sure you wrap or cover foods tightly (See
the “Food Storage Guide” section for details).
NOTE: If you close the fresh food
compartment door applying
more force than necessary,
freezer door may get open and
close again, due internal air flow
of refrigerator.
COLD
NORMAL
COLDER
NOTE: Setting at higher number of the Freezer
compartment, the temperature of freezer compartment
becomes colder.
17
Page 18
USING YOUR REFRIGERATOR USING YOUR REFRIGERATOR
ADJUSTING CONTROL SETTINGS
Give the refrigerator time to cool down completely before
adding food. It is best to wait 24 hours before adding
food to the refrigerator. The mid-settings indicated in the
previous section should be correct for normal household
refrigerator usage. The controls are set correctly when
milk or juice is cold to your liking and ice cream is firm.
The refrigerator control functions as the thermostat for
the entire appliance. The higher the number setting, the
longer the compressor will run to keep the temperature
colder. The freezer control adjusts the cold air flow from
the freezer to the refrigerator. Setting the freezer control
to a lower temperature keeps more cold air in the freezer
compartment to make it colder.
If you need to adjust the temperature in the refrigerator
or freezer, begin by adjusting the refrigerator first. Wait
24 hours after the refrigerator adjustment to check the
freezer temperature. If it is too warm or too cold, then
adjust the freezer control as well.
Use the settings listed in the table below as a guide.
CONDITION/REASON: RECOMMENDED
ADJUSTMENT:
REFRIGERATOR section
is too warm
•Opening the door often
•Adding a large amount
of food
•Room temperature is
very warm
FREEZER section is too
warm/ ice is made too
slowly
•Opening the door often
•Adding a large amount
of food
•Room temperature is
very low (not cycling
often enough)
•Using ice frequently
•Air vents blocked by
objects
REFRIGERATOR section
is too cold
•Controls not set
correctly for your
conditions
FREEZER section is too
cold
•Controls not set
correctly for your
conditions
Adjust the
REFRIGERATOR setting
to the next highest
number and wait 24
hours, then check.
Adjust the FREEZER
setting to the next
highest number and wait
24 hours, then check.
Remove any objects
blocking air flow.
Adjust the
REFRIGERATOR setting
to the next lowest
number and wait 24
hours, then check.
Adjust the FREEZER
setting to the next lowest
number and wait 24
hours, then check.
FOOD STORAGE GUIDE
ITEMS HOW TO STORE
Storing Fresh Food Wrap or store food in the
refrigerator in airtight and
moisture-proof material unless
otherwise noted. This prevents
food odor and taste transfer
throughout the refrigerator. For
dated products, check date code
to ensure freshness.
Butter or
margarine
Cheese Store in original packaging until
Vegetables with
skins (carrots,
peppers)
Fruit Wash and let dry; store in plastic
Leafy Vegetables Remove original packaging and
Fish Consume fish or seafood the
Chef Fresh Store any meat in original airtight,
Leftovers Cover leftovers with plastic
Store opened butter in a covered
dish or in a closed compartment.
When storing a larger quantity,
wrap in freezer packing and
freeze.
you are ready to use it. Once
opened, tightly rewrap with
plastic wrap or aluminum foil.
Place in bags or plastic containers
inside the crisper.
bags in the refrigerator. Do not
wash or pit berries until you
are ready to eat them. Berries
should be selected and kept in
their original packaging (if there
is any) or in a paper bag closed
halfway and set on a shelf.
trim any dirty or discolored parts.
Wash in cold water and drain.
Place in a plastic bag or plastic
container and store in the crisper.
same day purchased.
moisture-proof packaging.
Rewrap if necessary.
wrap or aluminum foil. Plastic
containers with airtight lids can
also be used.
STORING FROZEN FOOD
NOTE: For more information on how to prepare food to
be frozen such in a way to see the period they can be
stored consult a frozen food guide or cook book.
Packaging
A great freezing depends on how great you package the
food. When you seal the package make sure you remove
all excess air and do not allow humidity. A package that
is incorrectly sealed will result in the transmission of bad
odors, contaminants inside your refrigerator and will
cause your foods to dry.
18
Page 19
Packaging Recommendations:
• Use sealed plastic containers.
• Use plastic containers with a smooth surface.
• Package with aluminum foil of high resistance.
• Wrap with paper layered with plastic.
• Use water proof plastic.
• Use recommended plastic bags to store frozen foods.
Follow these packaging or container instructions in order
to reach the best freezing
REFRIGERATOR SECTION
REFRIGERATOR SHELVES
The shelving of your refrigerator can be adjusted to
comply with your storage necessities; Depending on
the model you have in can include glass shelving or
wired shelving. The storing of your foods together and
adjusting the shelving to different heights will ease to
help you locate what you need. This also helps your
refrigerator to stay shut longer which will save you energy.
Do not use:
• Bread Wrapping.
• Plastic container not safe for storing.
• Containers without lids or seals.
• Waxed paper or waxed plastic.
• Thin wrapping paper or not water proof.
Freezing
IMPORTANT: Do not keep bottles in the freezer
compartment, they may explode after freezing and
cause damage.
For the maximum use of your freezer do not store excess
food. Do not introduce a large amount of unfrozen foods
that cannot be frozen within 24 hours (no more than
2 – 3 pounds or ,91 kg - 1,36 kg of food per square
inch of space in the freezer). Sufficient space must be
left in order for the air to circulate properly around the
packages. Leave enough space in order to close your
refrigerator with out difficulty.
Storage times can vary depending on the type and
quality of the food, the way its package, or packaging
container used, (in comparison to air and humidity), and
the temperature it being stored in. Ice crystals formed
inside your package are normal it indicates the air and
humidity inside your package have condensed.
NOTE: Let warm foods cool off at room temperature
for approximately 30 min, then wrap accordingly with
the methods mention above and freeze. By letting your
warm foods cool off before you introduce them to your
freezer it will save you energy.
WARNING
SUFFOCATING DANGER
Adequate ventilation is required when using dry ice.
Dry ice is Carbon Dioxide (CO2). When it evaporates it
produces oxygen, causing dizziness, slight headaches,
unconsciousness or death. Do not inhale these vapors
and properly ventilate the room while in use of dry ice.
IMPORTANT: While your refrigerator glass shelving are
cold do not clean with hot or warm water. The glass
shelving may break if exposed to rapid temperature
changes or hard impacts. For your safety the glass
shelving are made out of tempered glass so when at
breaking they will fracture into tiny fragments.
NOTE: Be careful while moving or relocating the shelves
they are heavy. If moving the shelves is required keep in
mind to locate them in a safe environment to prevent
them from breaking.
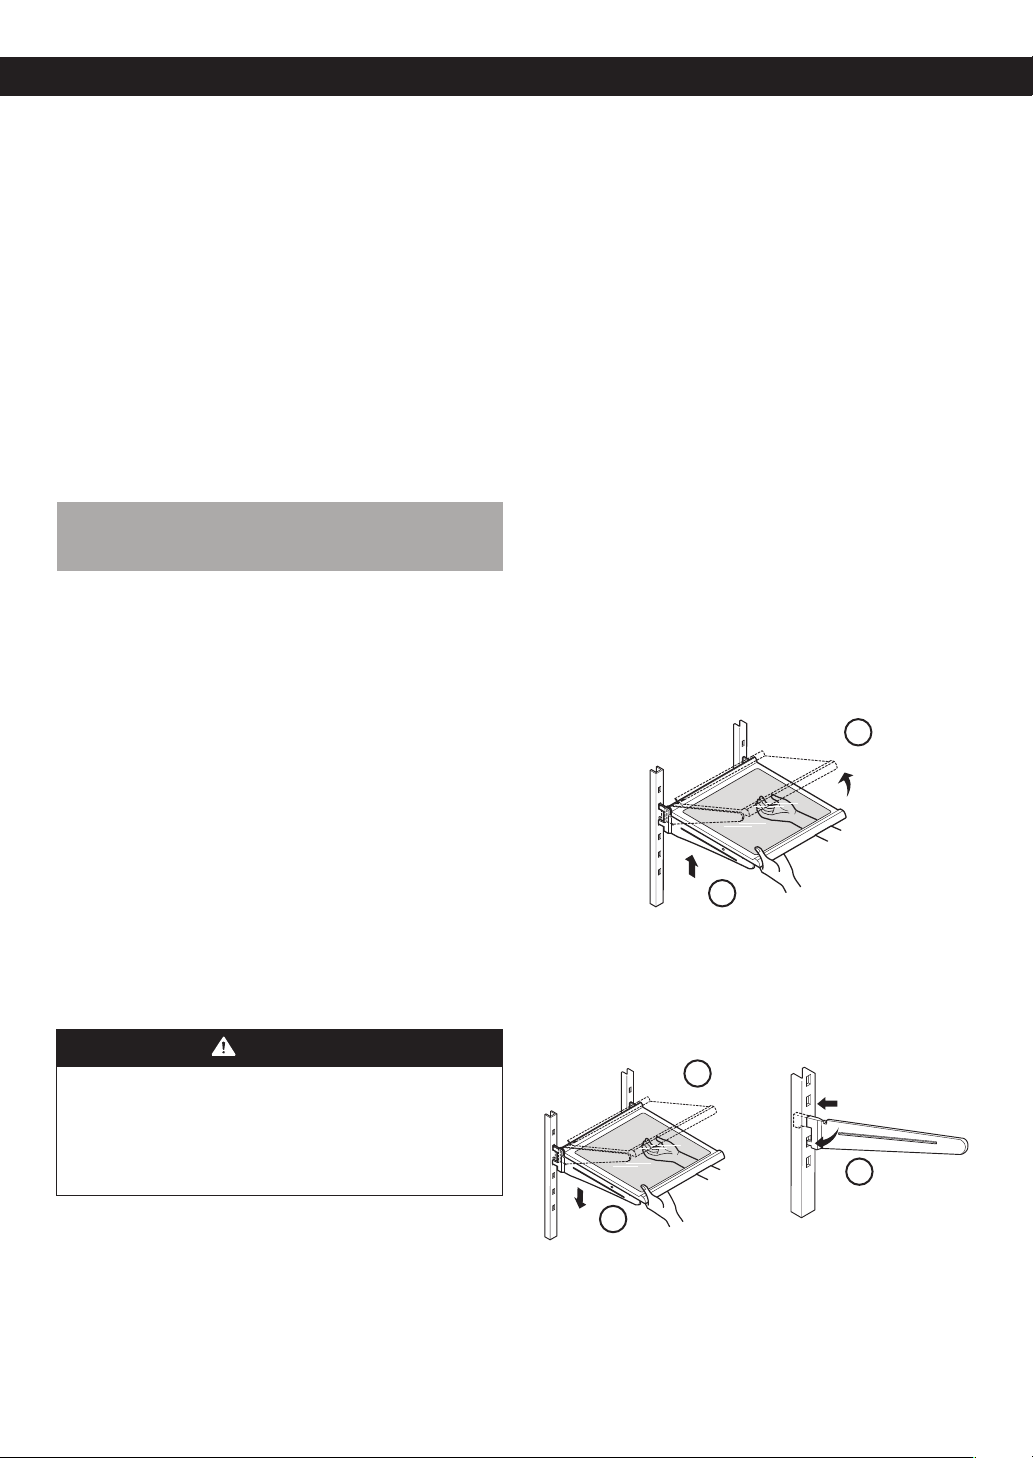
Adjusting Shelves
Remove the shelves and adjust them to your convenience.
•Removing Shelves
Incline the front of the shelf in the direction indicated by
figure 1 and lift in the direction indicated by figure 2. Pull
the shelf towards you.
1
2
• Replacing Shelves
Incline the frontal part of the shelf (1) and guide the
shelf hooks towards the openings at the height desired.
Then lower the front of the shelf (2) so the hooks can be
inserted (3) in the shelf supports.
1
3
2
NOTE: Make sure that the shelf is installed in the
horizontal manner. If not secured it can cause the shelves
to fall, which will cause your stored food to spill.
19
Page 20
USING YOUR REFRIGERATOR USING YOUR REFRIGERATOR
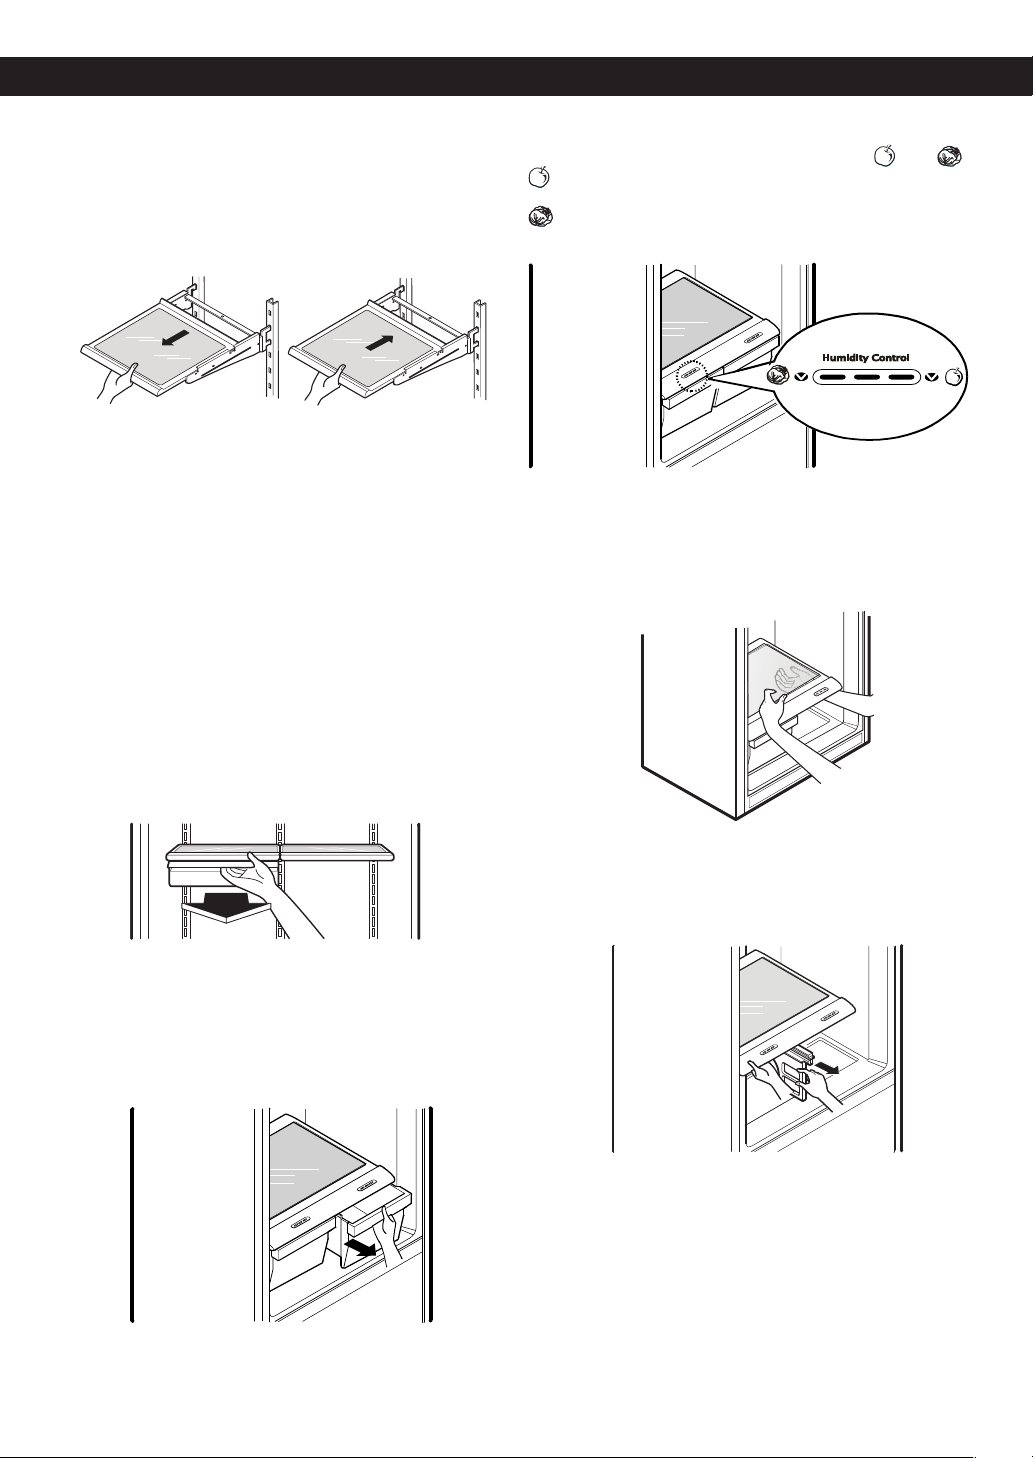
Sliding Shelves (in some models)
You can slide some of the shelves in your refrigerator
towards inside or outside like explained below.
•To slide the shelf towards the outside: Pull towards you,
figure A.
•To slide the shelf towards the inside: Push until it
stops, figure B.
Figure A Figure B
In order to remove a shelf from a metal frame
•Pull the shelf until it stops.
•Incline the front of the shelf towards the top and pull
forward.
•Lift the shelf in the manner it moves across the
support openings.
To put back into place just reverse these steps.
FROZEN MEAT COMPARTMENT/ CHEF FRESH
SNACK PAN (in some models)
To remove the Frozen Meat Compartment
•Pull the frozen meat compartment forward while
holding it with your other hand, slightly lift and pull.
•To replace the frozen meat compartment just follow
the steps in reverse.
CRISPER HUMIDITY CONTROL (in some models)
You can adjust the humidity inside the drawers by
adjusting the control in a position between and .
For better preservation of the fruits allow air to leave
the vegetable drawer.
For a better conservation of vegetables allow the
maximum air in the drawer.
To remove the glass
• Remove Crisper Drawers.
• To remove glass above crispers, reach in under the
glass and lift up.
• Pull glass up and out.
CRISPER AND VEGETABLE DRAWER
• Slide crisper straight out to the stop.
• Lift the front of the crisper, then pull it out to remove.
• Remove the crisper by sliding it back in fully past the
drawer stop.
To remove the crisper cover
• Remove both crispers.
• While holding the crisper cover support, pull the cover
up and out.
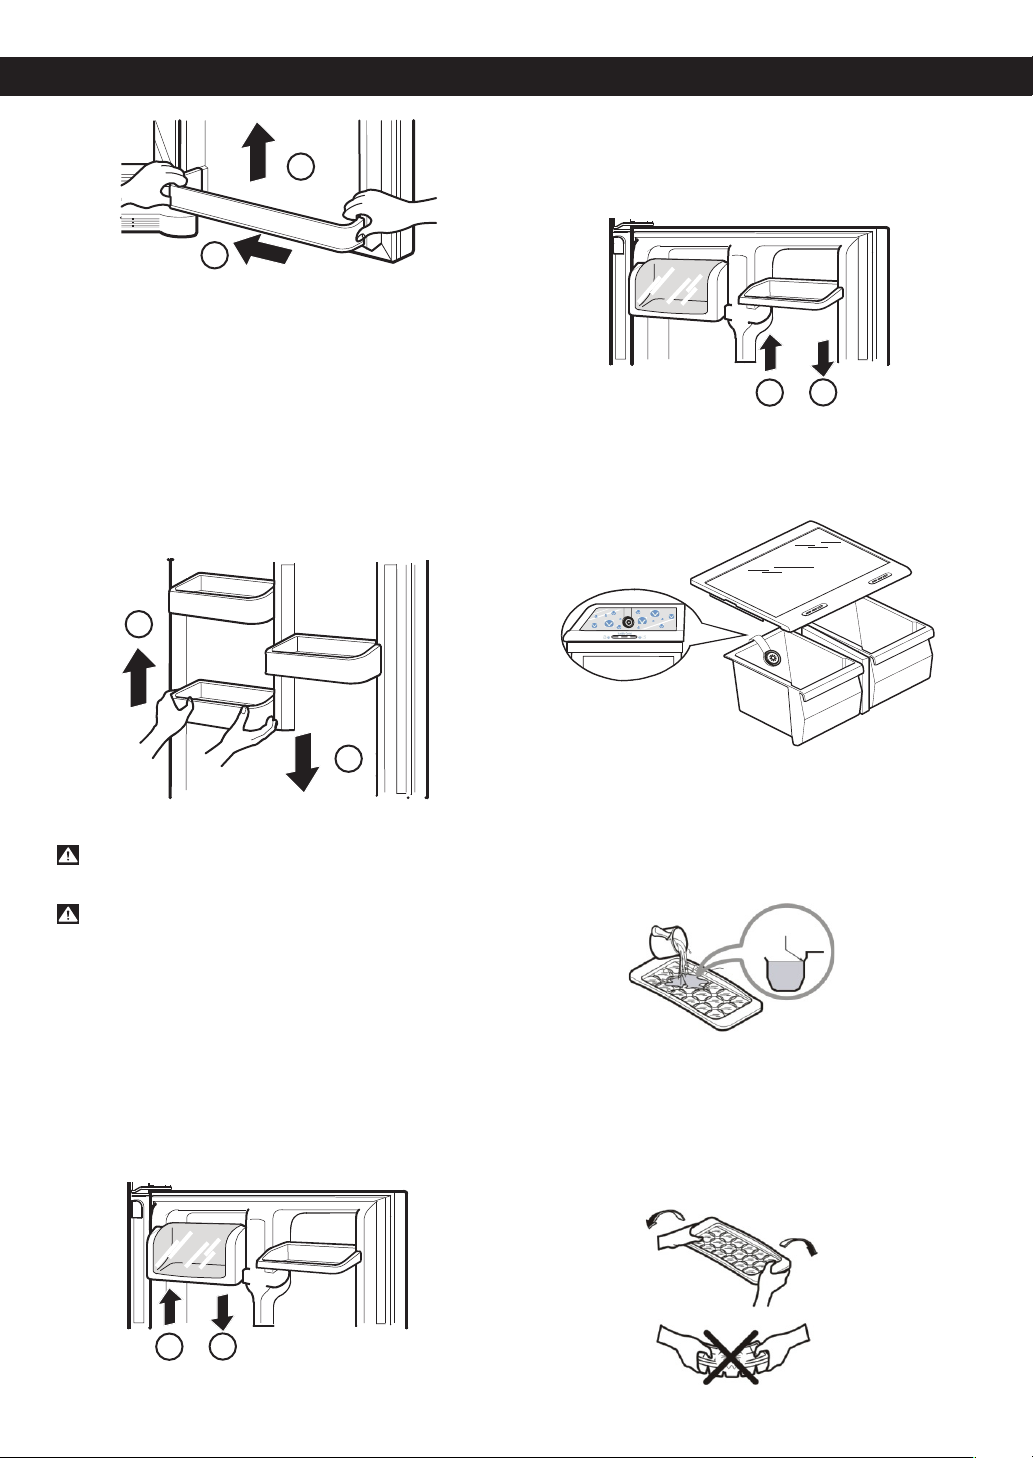
FIXED REFRIGERATOR RACK
The fixed refrigerator racks is removable for easy cleaning
and adjusting.
Removing the Fixed Refrigerator Rack
•Remove the content from the rack.
•Presstherackagainstthedoor’sinnerwall(1)andthen
pull it up (2).
20
Page 21
USING YOUR REFRIGERATOR
2
1
Replacing the Fixed Refrigerator Rack
•Holdtherack’sedgeagainstthedoor’sinnerwall.
•Presstherackuntilitstaysinitsposition.
DOOR RACKS
The door racks are removable for easy cleaning and
adjusting.
• To remove the rack, simply lift the rack up and pull
straight out (1).
• To replace the rack, slide it in above the desired
support button and push down until it stops (2).
1
CAN DISPENSER (in some models)
• To remove the can dispenser, simply lift it and pull
straight out (1).
• To replace the can dispenser, slide it in above the
desired location and push down until it stops (2).
2
1
VITABOX (in some models)
• Provides vitamins to fruits and vegetables, to conserver
fresh for long time.
2
WARNING: Somebody can be hurt if door racks
are not firmly assembled.
CAUTION: DO NOT allow children to play with
baskets. Sharp corners on baskets could cause
injury.
NOTE: DO NOT adjust a rack that is loaded with food.
DAIRY COMPARTMENT (in some models)
• To remove the dairy compartment, simply lift it and
pull straight out (1).
• To replace the dairy compartment, slide it in above the
desired location and push down until it stops (2).
ICE TRAY (in some models)
Ice making
• If the tray is filled with water to the highest level, it will
be difficult to remove ice cubes.
• For quick freeze, adjust the freezer dial to 3.
To remove ice cubes
• Twist the tray. Do not bend the ice tray. Doing so may
result in damage to the tray.
• To remove ice cubes easily, pour water on the tray or
soak it in water before removing ice cubes.
2
1
21
Page 22
REFRIGERATOR CARE AND CLEANING REFRIGERATOR CARE AND CLEANING
WARNING
EXPLOSION HAZARD
Do not use flammable cleaners. Not following these
instructions can cause death, explosion or fire.
The refrigerator, as well as the freezer, do their own
de-freezing. This process does not prevent the build
up of contaminants, therefore it is suggested that you
clean both parts once a month; clean spilled liquids
immediately.
REFRIGERATOR CLEANING
•Unplug your refrigerator.
•Pull out all of the removable parts (such as the
vegetable and dairy doors).
•Use a clean sponge (or a soft rag) and use it with
lukewarm water mixed with detergent. Do not use
abrasive or concentrated cleaners.
•Hand wash it, and dry it thoroughly.
•Plug the refrigerator back in.
OUTSIDE
Wax the outside in order to create better protection. Make
sure you use a product specifically design to be used
for electro-domestic products (car wax is acceptable).
Use a clean, soft rag, and perform this task twice a year.
For metal-made refrigerators, do not wax, simply clean
it with water and detergent. Do not use concentrated or
abrasive products.
NOTE: Avoid the usage of chemical products that
contain phosphates or bleach.
INSIDE (Allow freezer to slightly warm up a small
degree to prevent cloth from sticking)
In order to eliminate bad odors, clean the inside of
the refrigerator with a mixture of baking powder and
lukewarm water (one teaspoon of baking powder per cup
of water). Ensure that the powder dissolves thoroughly, in
order to prevent any sort of damage.
BACK COVER
WARNING
ELECTRICAL SHOCK HAZARD
Before you begin, either unplug the refrigerator or turn
off power at the circuit breaker or fuse box.
NOTE: Back Cover should only be
removed by a qualified technician.
In order to get an efficient
performance of your refrigerator,
clean the back cover of it at least
twice a year.
BACK
COVER
REPLACING REFRIGERATOR LIGHTS
WARNING
ELECTRIC SHOCK HAZARD
Before replacing a burned-out light bulb, either unplug
the refrigerator or turn off power at the circuit breaker
or fuse box.
NOTE: Moving the control to the OFF position does
not remove power to the light circuit.
NOTE: Not all light bulbs for electric-domestic products
will fit your refrigerator. When replacing them, make sure
they are the same size, shape, and of a potency of 40
watts.
NOTE: The light bulbs will turn off, if the door of the
refrigerator is left open for seven minutes. If the door is
closed, the bulbs will turn on again.
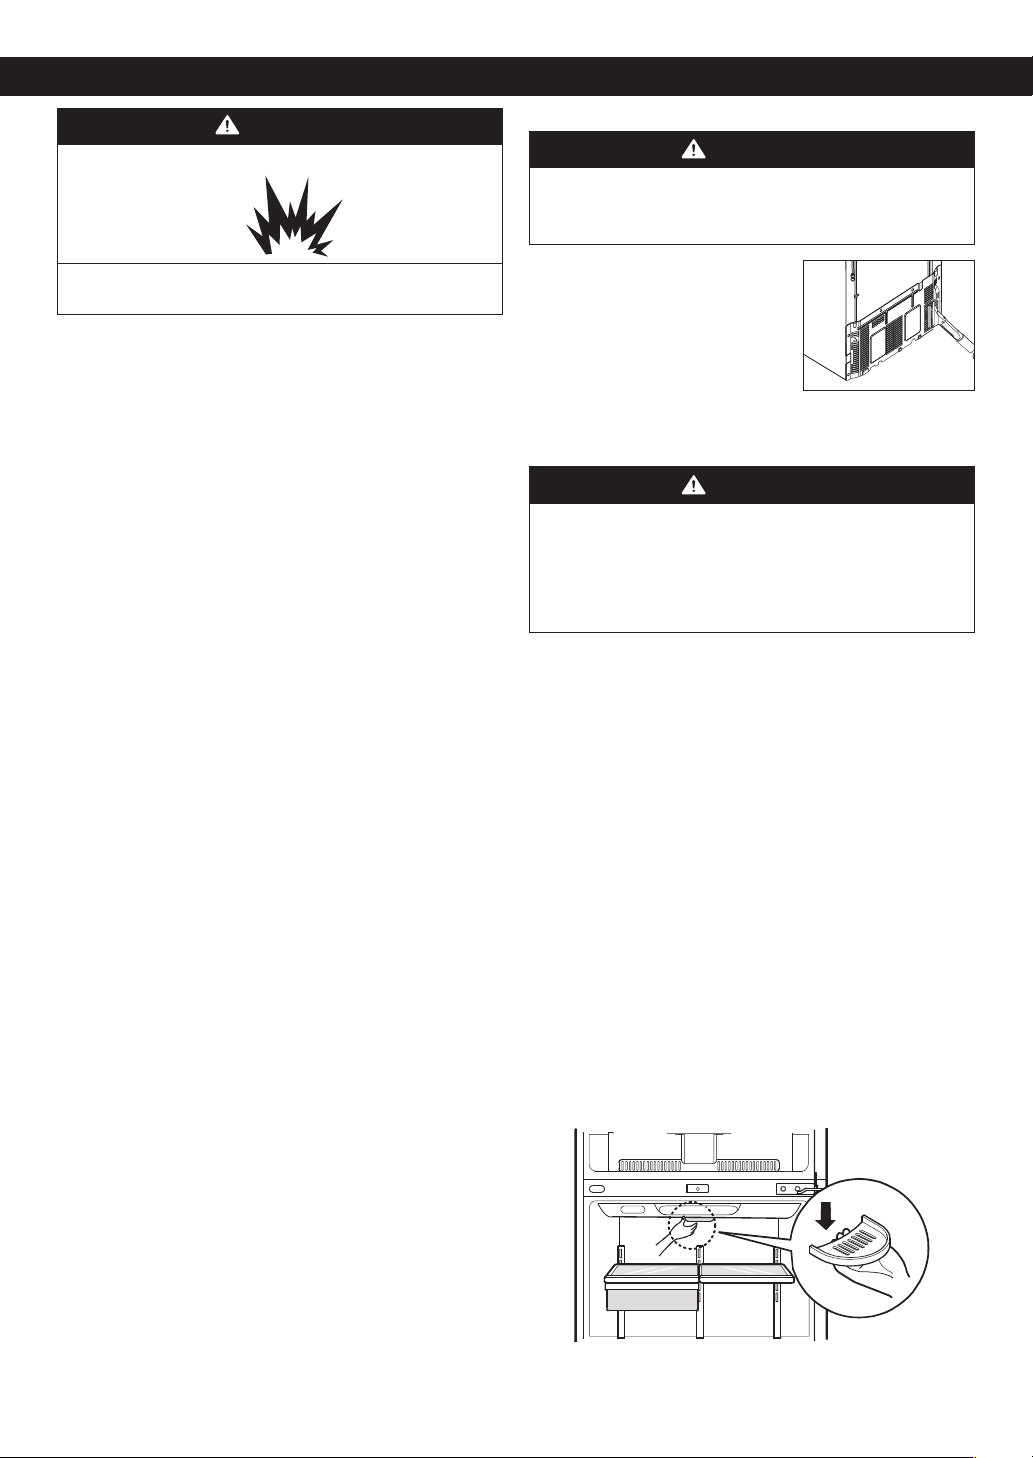
Replacing the Refrigerator Light:
•Unplug your refrigerator.
•Pull out all of the shelves.
•Release the hooks on both ends of the light shield and
pull the shield down to remove it.
•Turn the bulb counterclockwise and remove.
•Replace a burned out light bulb with a new one, turning
it clockwise.
•Replace the light shield pushing it up.
•Replace the refrigerator shelves.
•Plug the power cord to the outlet.
Type A
DOOR LINING AND GASKETS
Use only a mild detergent (such as dish soap).
PLASTIC PARTS (Covers and Panels)
Do not use abrasive, paper or rough products. These
could damage the product.
22
Page 23
REFRIGERATOR CARE AND CLEANING
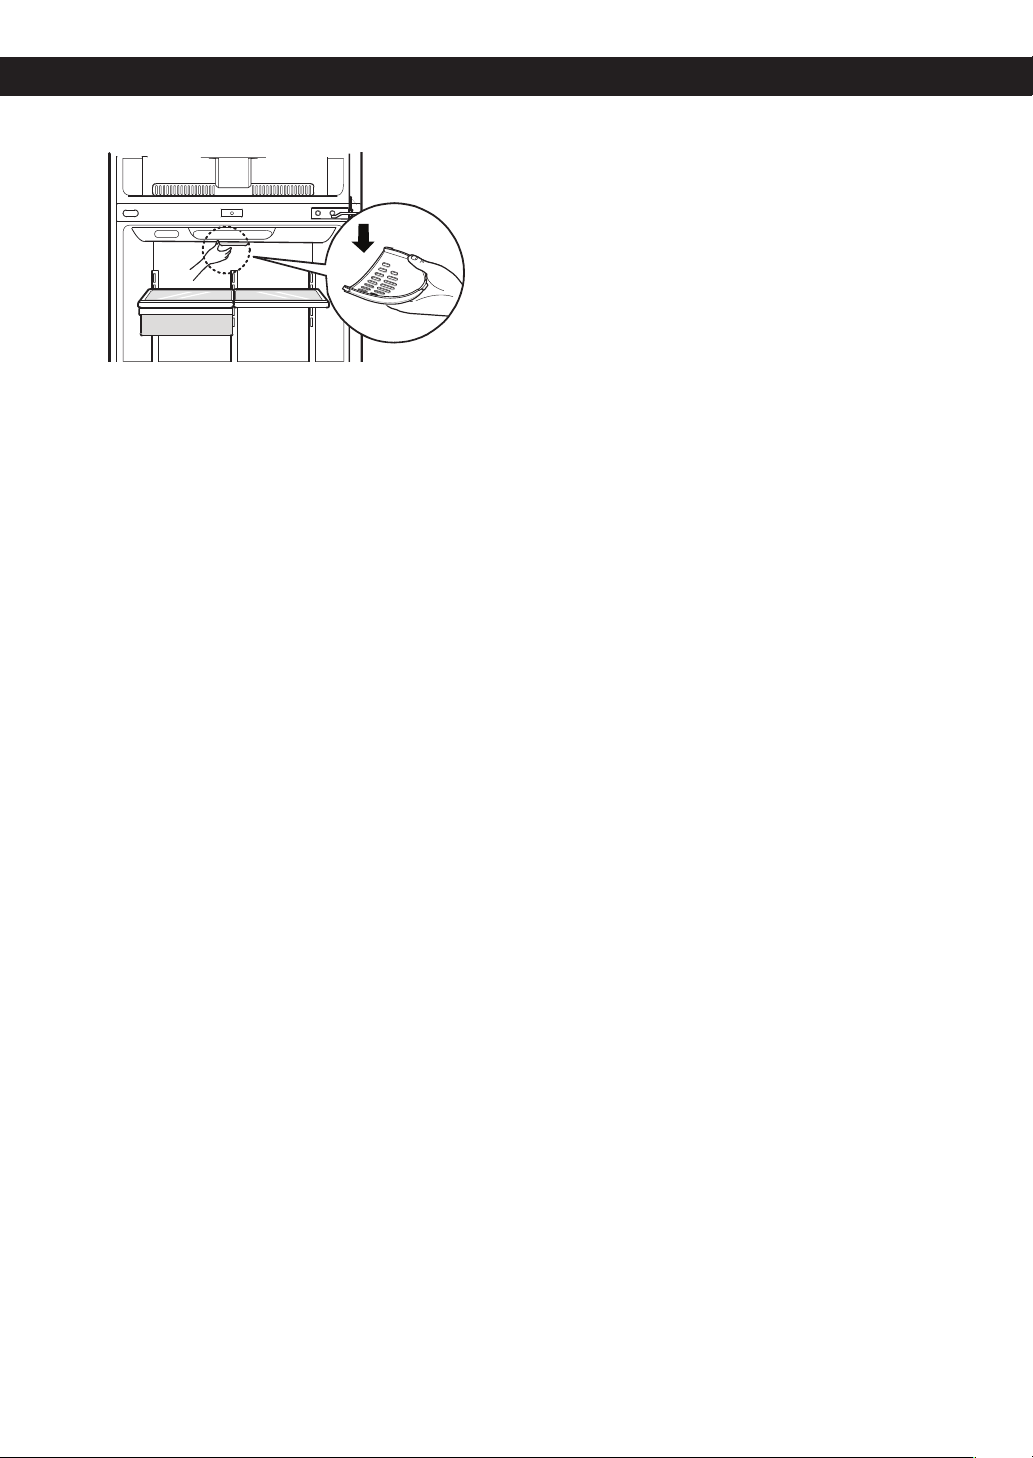
Type B
POWER INTERRUPTIONS
1. In case of a black out, call your electric company and
ask how long it will last.
2. In case of a 24 hour or less black out, do not open the
refrigerator; this will keep the food fresh.
3. In case of a longer black out, do one of the following
options:
• Pull out all of the frozen food and keep them in an ice
chest.
• Put 2 lbs (907 g) of frozen ice (make sure you use
gloves) for each square foot (28 L) inside the freezer.
This task will preserve the food fro 2 to 4 days.
• In case you do not possess neither ice chest or dry ice,
consume your food as soon as possible.
5. Pull out all of the removable parts, and wrap them with
adhesive tape.
6. Depending on the model of the refrigerator, lift the top
part of the refrigerator so it can roll with ease, or screw
the levelers so it won´t scratch the floor. Consult to the
section “Closing and Aligning Doors”.
7. Keep the doors closed with the cable glued to the
refrigerator cabinet with an adhesive tape.
When your refrigerator arrives to your home, put
everything back into place and read the section
“Refrigerator Installation” in order to obtain installation
preparation. In case your refrigerator has a factory ice
maker, remember you have to reconnect the water
supply.
REMEMBER: In a power failure, a full freezer stays cold
longer than a partially filled one. A freezer full of meat
stays cold longer than a freezer full of baked goods. If
you see that food contains ice crystals, it may be safely
refrozen, although the quality and flavor may be affected.
If the condition of the food is poor or if you feel it unsafe,
dispose of it.
WHEN GOING ON VACATION
If you decide to leave your refrigerator on when going
away, consider these steps:
1. Consume all of the perishable items and freeze the
rest.
2. Empty the ice bin.
If you decide to leave your refrigerator off:
1. Remove all of the food.
2. Unplug your refrigerator.
3. Clean and dry it well.
4. Make sure the doors stay open (use blocks or tape) in
order to prevent bad odors and fungi from happening.
WHEN MOVING
If you decide to take your refrigerator with you when
moving, consider the following:
1. Remove all of the food from it, and place the frozen
food in an ice chest with dry ice.
2. Unplug your refrigerator.
3. Empty the water from its tray.
4. Clean and dry it with a rag.
23
Page 24
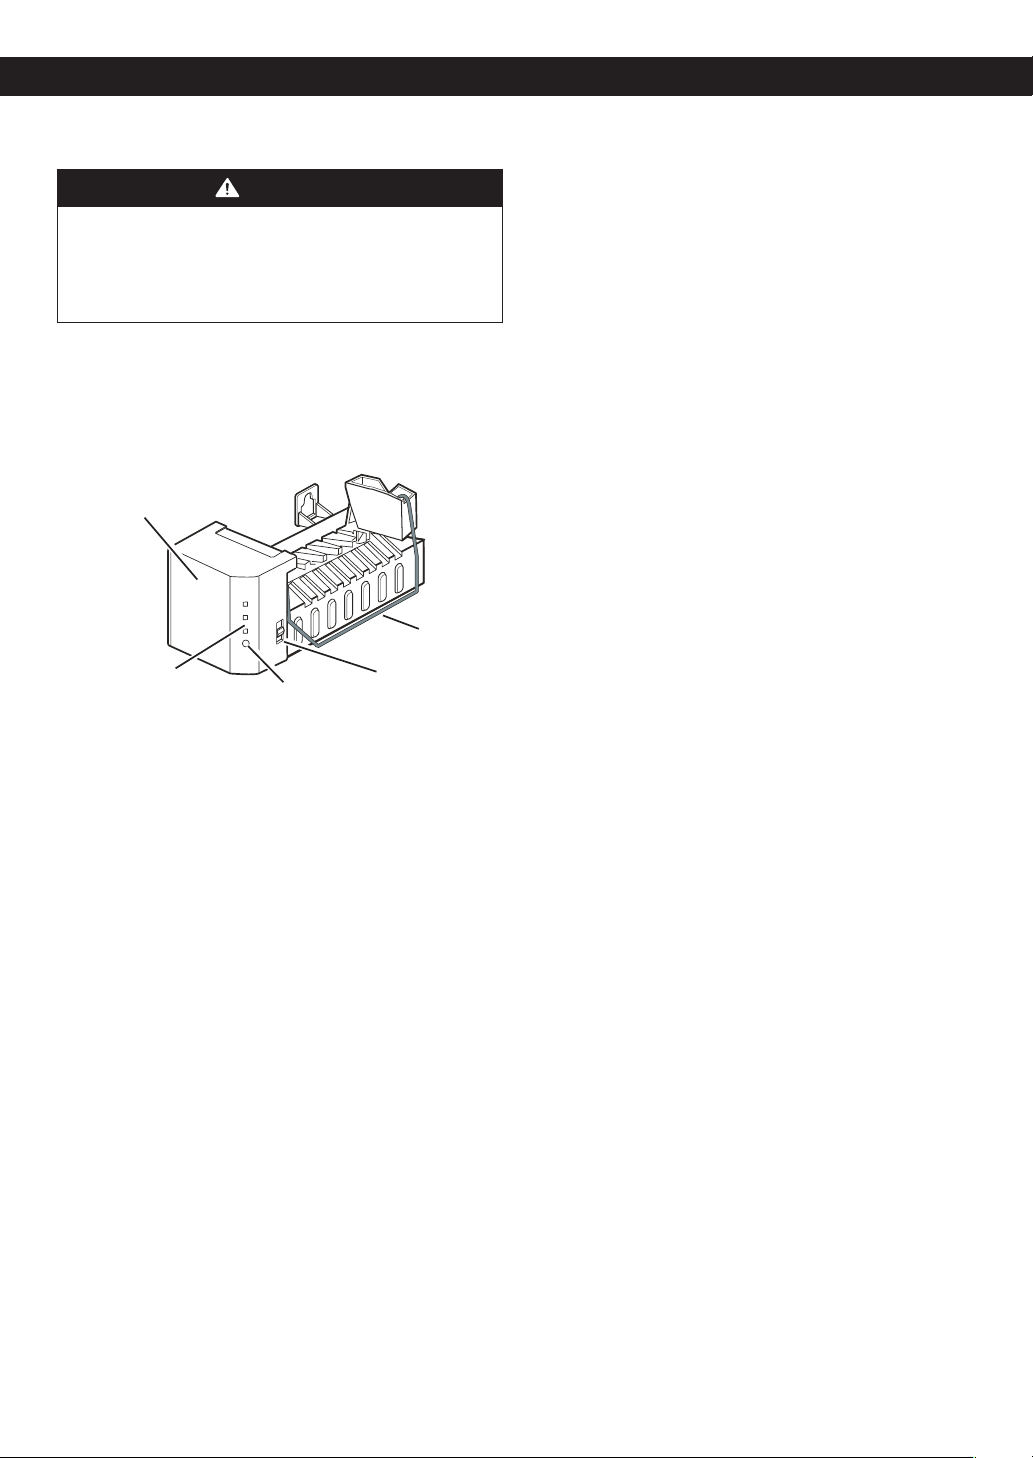
ABOUT THE AUTOMATIC ICE MAKER
NOTE: The automatic Ice maker is only included in some
models. Check your specifications of your refrigerator.
WARNING
PERSONAL INJURY HAZARD
Avoid contact with any moving parts of the ejector
mechanism or with the heater that releases the ice
cubes. DO NOT place your fingers in the automatic ice
maker when the refrigerator is plugged in.
OPERATING INSTRUCTIONS
After turning on your refrigerator, the ice will start to be
made between 12 and 24 hours.
Identify your ice maker type.
Type 1
Ice Maker
Sensor
Cube Size Light Switch
Cube Size Button
The ice maker produces 8 per cycle (in between 100
and 130 cubes in a 24 hour period), depending on the
temperature of the freezer, the times in which the door
opens, and other using conditions (amount of food in
the freezer, etc).
YOU MUST TURN THE SWITCH TO O (OFF)
• When the water supply is interrupted for many hours.
• When the ice container is left out of its place for more
than one or two minutes.
• When the refrigerator will not be in use for various
days.
NORMAL SOUNDS
• The valve will emit a buzzing sound when the ice maker
is full of water. If the switch is placed in the off position
the buzz will still be heard even when the water pipe
has not been connected. To avoid this sound, move
switch to O (off) position.
NOTE: The ice maker can get damaged if the switch is
kept in the ON position before the water pipe has been
connected.
• While the ice maker is filling up with water and
producing ice, you will hear the sound of the ice falling
and water flowing through the pipes.
PREPARING FOR VACATIONS
Move the ice maker switch to the O (off) position and cut
the flow of water going into the refrigerator.
If room temperature is at freezing point, have a
specialized technician drain the flow of water from the
inner pipes (certain models) to avoid broken pipe related
damage.
NOTE: If the size of the ice cube is smaller or bigger
than what you desire, you can adjust its size by pushing
the selective button. This button changes the pressure of
the water, which can give considerable results.
Each time you push the selective button, a light will turn
on. The bigger the amount that turns on, the bigger the
size of the cubes will be.
If the refrigerator is used before the connection of water
to the ice maker was performed, you must turn its dial
to O (off).
When the water connections are performed, turn its dial
to I (on).
The ice maker will fill up (and start making ice) between
12 and 24 hours after the refrigerator is turned on.
Throw away the first batch of ice. Make sure that nothing
interferes with the sensor.
When the ice reaches the sensor, the ice maker will stop
to make ice immediately.
It’s normal that some ice gets stuck. If the ice is not used
frequently, the older cubes of ice will be opaque in color,
smaller, and with a strange flavor.
24
Page 25
CONNECTING THE WATER LINE
NOTE: It is necessary to have a water source when both
water and/or ice dispensers are available in your product.
BEFORE START
The water source is not guaranteed by the refrigerator
manufacturer. Follow instructions carefully in order to
reduce damage.
Air located inside the water pipes can cause hammering
or tapping causing damage to the inner pipes or water
spillage in the inside of the refrigerator. Call a qualified
plumber to fix such hammering on the connections
before installing the water pipe.
To avoid burn damage or such, never connect refrigerator
to hot water pipes.
If you are to use the refrigerator before connecting it
to the water source, make sure the ice maker is the off
position.
Never attempt to install the ice maker pipes in areas
where room temperature is below freezing point.
When using any electrical device (like a drill) during
the installation, make sure device is doubly isolated or
making ground to prevent risk of electrical surge or
discharge.
All installations should be done considering local water
and drainage requirements.
• If an inverted osmosis water filtration system is
connected to the cold water source, the water hose
installation is not assured or guaranteed by the
refrigerator or automated ice maker manufacturer.
Follow the next instructions carefully to minimize costly
water related damages.
• When having an inverted osmosis water filtration
system connected to the cold-water flow, the water
pressure for such system must be at least between
40-60 PSI or 0,27 MPa (2,8 kg · f / cm ² ~ 4,2 kg · f
/ cm ², (2,8 kg · f / cm ² ~ 4,2 kg · f / cm ², less than
2 ~ 3 seconds to fill a 7 oz of capacity cup [0,2 liters]).
• If the inverted osmosis water filtration system pressure
is less than 21 PSI or 0,14 MPa (1,5 kg · f / cm ², more
than four (4) seconds to fill a 7 oz of capacity cup [0,2
liters]):
a) Identify if the sediments filter in the inverted osmosis
system is being blocked. Replace filter if necessary.
b) Allow inverted osmosis system storage tank to refill
after extensive usage.
c) Call a qualified plumber if the inverted osmosis water
pressure problem continues.
REQUIREMENTS
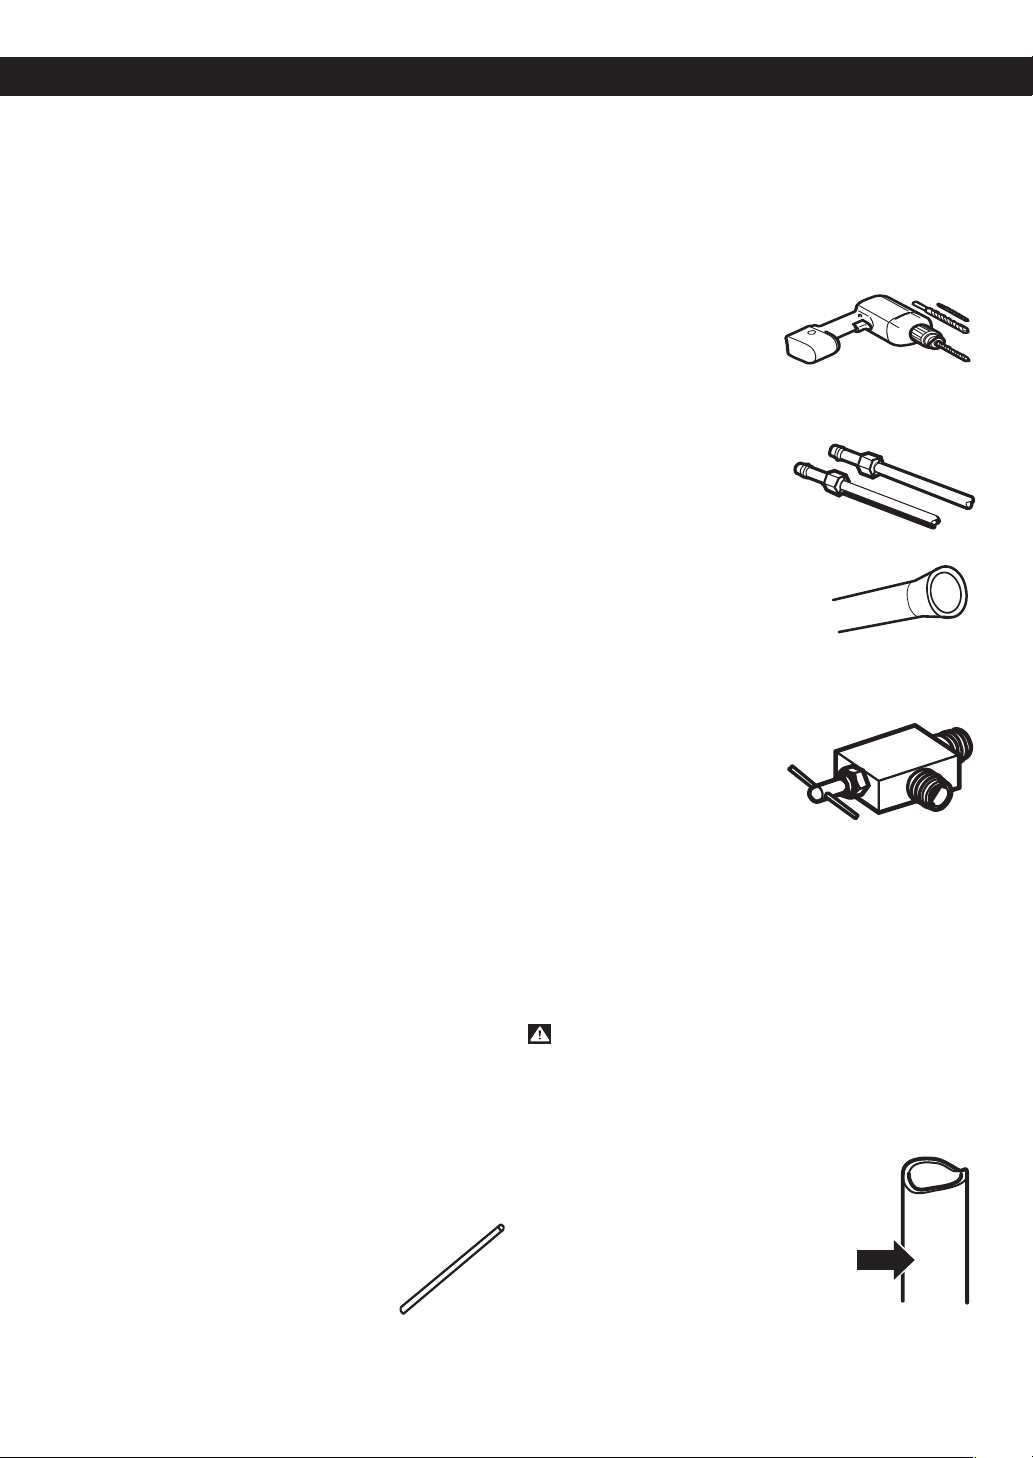
• 1/4” (6,35 mm) in diameter copper pipe
to connect refrigerator to the water
pipe. Make sure both terminals are
cut in a squared manner.
To determine how much pipe material is needed,
measures the distances between the valves located
behind the refrigerator and the source of water and add
to that 8 feet (2,4 m). Make sure there is sufficient pipe
material to allow the free movement of the refrigerator
from the wall
• A cold water source. Water pressure should be between
0,138 and 0,82 MPa or 20 and 120 PSI for models not
containing water filter and between 0,276 and 0,82
MPa or 40 and 120 PSI for models containing water
filter.
• A drill.
• Adjustable 1/2”(12,7 mm) key.
• Flat and Phillips style (star) screwdriver.
• Two 1/4” (6,35 mm) diameter
compression nuts with two
sides to connect the copper
pipe to the refrigerator valve.
If your current copper pipe has some
reduction on the ends, it will be
necessary to get and adaptor (found
in hardware stores) to connect the
water line to the refrigerator. It is also
possible to cut such reductions with a pipe cutter and
use the compression connections mentioned above.
• Bypass valve to connect to
the cold water line. The valve
must have a water opening
with an interior 5/32” (3,46
mm) diameter in the coldwater connection point.
These valves can be located
in any cold-water connection package. Before buying
make sure such valve meets local standards and
requirements.
INSTALLATION INSTRUCTIONS
Install the valve to the pipe that you use to drink water.
(Connect only to a potable water source).
CAUTION: Connect to potable water supply only.
1. CLOSE THE MAIN WATER SOURCE
Open the nearest water faucet to let water flow and
empty pipes.
2. SELECT THE LOCATION OF THE
VALVE
Select the location of the valve that
will provide a better access. It is best
to connect to a vertical pipeline. When
connecting to a horizontal pipeline is
necessary, make the connection in the
lateral or upper area instead of the
lower area to prevent accumulation of
sediment.
25
Page 26
CONNECTING THE WATER LINE
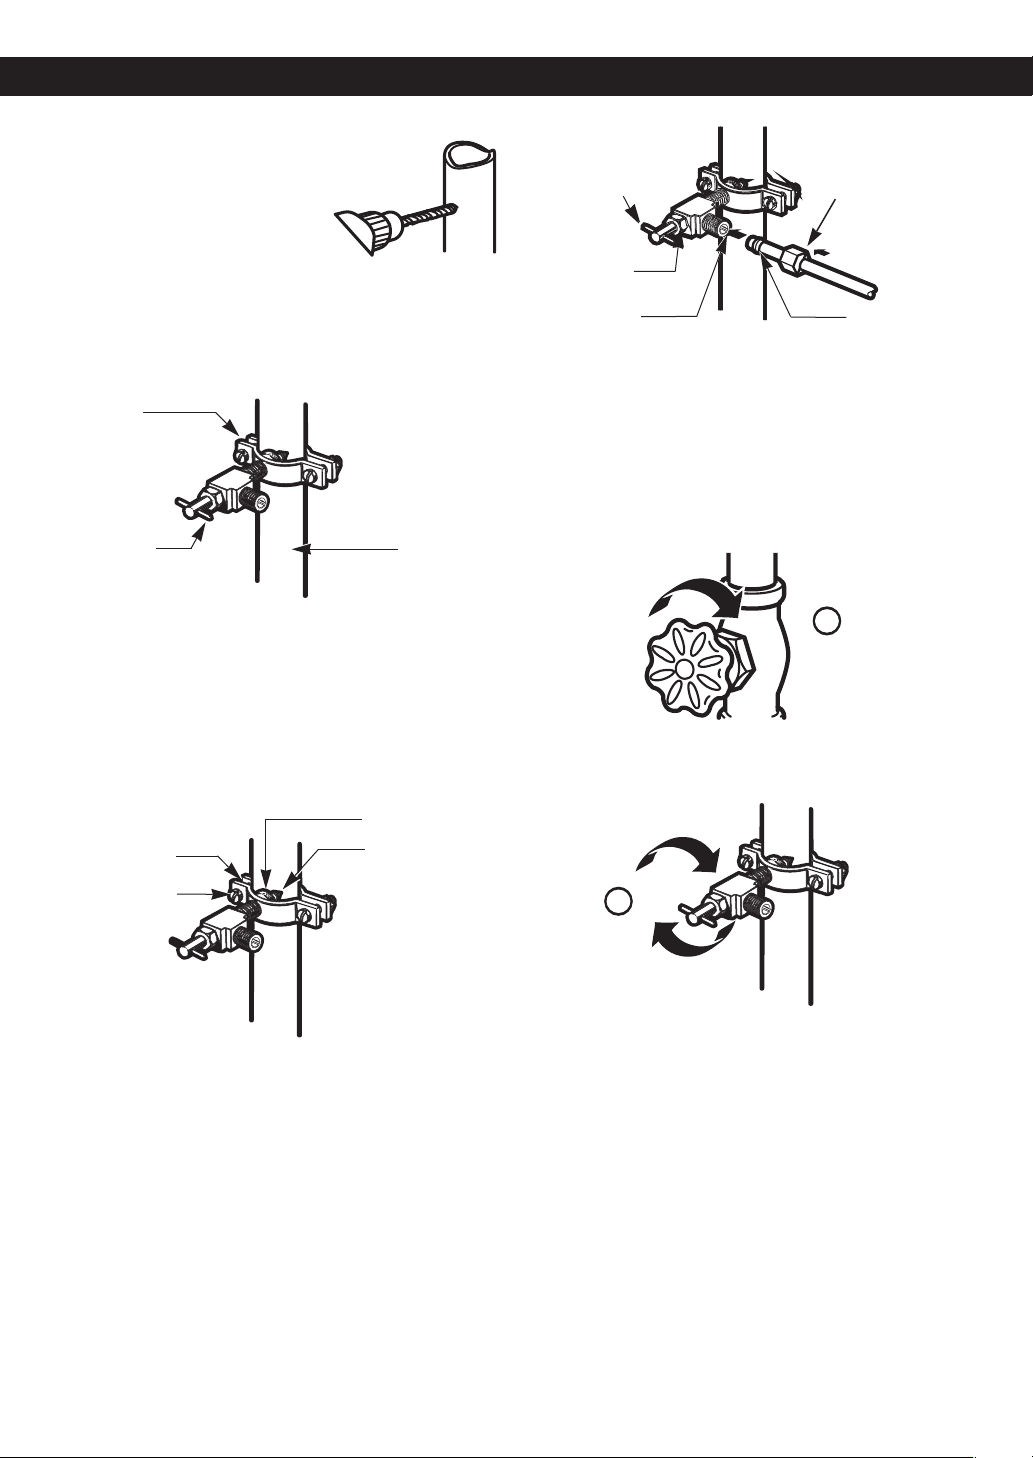
3. DRILL A HOLE FOR THE VALVE
Drill a 1/4” (6,35 mm) diameter
hole in the water pipeline.
Remove jagged edges produces
after perforation. Make sure water
does not reach the drill. Not
performing the 1/4” (6,35 mm)
perforation can lead to a low or
smaller ice production.
4. TIGHTEN THE VALVE
Tight the valve into the cold water pipeline with a tube
trap.
Pipe Clamp
Saddle Type Vertical Cold
Shutoff Valve Water Pipe
Saddle Type
Shutoff Valve Compression Nut
Packing Nut
Outlet Valve Ferule (sleeve)
NOTE: Codes for 248 CMR pipelines of the state of
Massachusetts must be attached to the connection.
Valves of this type are banned in Massachusetts. Call an
authorized plumber.
8. DRAIN THE PIPE
Open the main water source (1) and drain the pipe until
water comes out clear.
NOTE: Codes for 248 CMR pipelines of the state of
Massachusetts must be attached to the connection.
Valves of this type are banned in Massachusetts. Call an
authorized plumber.
5. TIGHTEN THE TRAP
Tighten the trap until the sealing ring begins to grow.
NOTE: Make sure it is not too tight, this can break the
pipe.
Washer
Pipe Clamp Inlet End
Clamp Screw
6. PLACE THE PIPELINE
Place the pipeline between the cold water pipe and the
refrigerator. Place it through a hole in the wall or floor
(behind the refrigerator or next to the cabinet) as close
to the wall as possible.
NOTE: Make sure there is a sufficient amount of extra
pipeline (8 feet [244 mm] coiled up three times with a
10” [25 cm] in diameter) to allow free movement of the
refrigerator from the wall after installation was made.
7. CONNECT PIPELINE TO VALVE
Place the compression nut and the copper pipe ferule at
the end of the pipe and connect to the valve. Make sure
the pipe is completely inserted into the valve. Tighten
nut carefully.
1
Allow water flow from the bypass valve (2) and close after
draining 1/4 of a gallon (1L) of water.
2
9. CONNECT PIPE TO REFRIGERATOR
NOTES:
• Before making connection to refrigerator, make sure
it is not connected to any energy source. If your
refrigerator does not have a water filter, it is advised
to install one.
• If your water source contains sand or related particles
that can travel to the valve, install a water filter near the
refrigerator.
IMPORTANT: Never use old or used hoses. Always use
new ones to have a better use and experience. Connect
always to a potable water source to avoid security and
health issues.
26
Page 27
CONNECTING THE WATER LINE
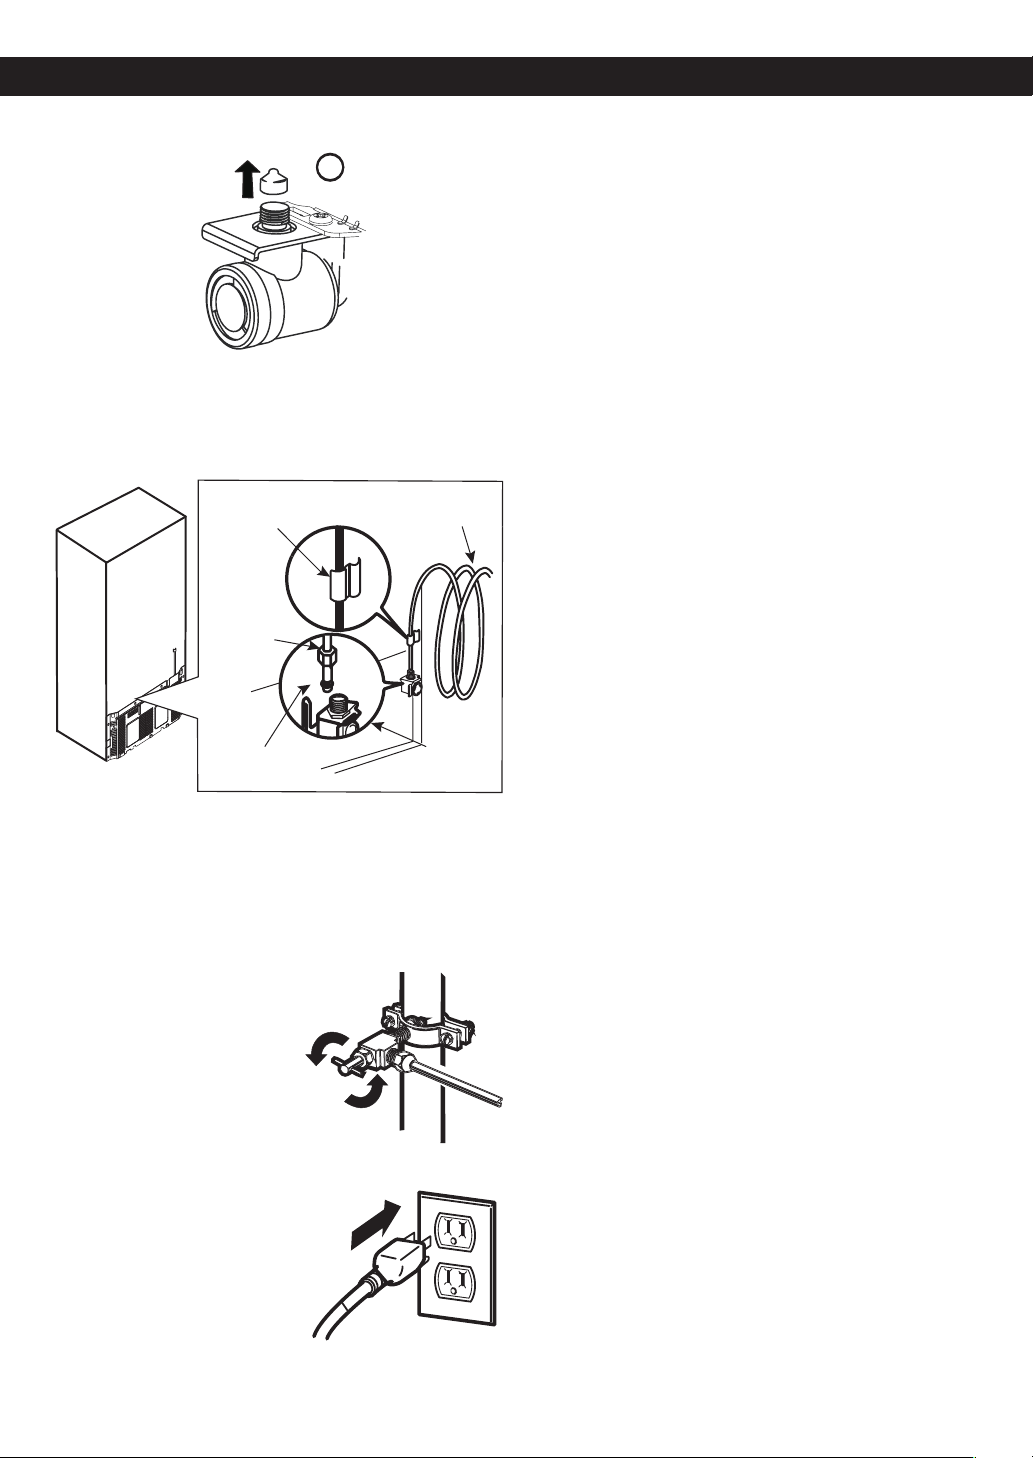
• Remove the ring plug (1) from the valve located at the
top of such device.
1
• Place compression nut and the ferule at the end of the
pipeline. Insert pipeline into the connection valve as far
as possible. Hold tightly while holding pipeline.
Tubing 1/4” (6,35 mm)
Clamp Tubing
Compression
Nut 1/4”
6,35 mm
12. TURN ICE MAKER ON
Turn ice maker switch into the ON position. Ice maker
will start only after reaching its operating temperature
of 15 °F (-9 °C) or less. It will automatically begin the ice
production if switch is located in the ON position.
Ferrule Refrigerator
(sleeve) Connection
Hold on to the pipe from the handles or grabbers located
behind the refrigerator, loosing first the bolt holding the
handle. Afterwards, insert pipe into the hole and tighten
bolt to finalize.
10. OPEN THE BYPASS VALVE
Tighten all connections
containing leaks. Place access
cover back on compressor.
11. CONNECT TO REFRIGERATOR
Fix pipeline in a way that it does
not vibrate on the refrigerator or
wall. Push refrigerator against
wall.
27
Page 28
TROUBLESHOOTING GUIDE
UNDERSTANDING SOUNDS YOU MAY HEAR
Your new refrigerator might produce certain noises that
your previous refrigerator did not. It is normal if you worry.
Most of the new sounds you will be hearing are actually
normal and expected. Hard surfaces like walls or floor
can increase sounds and make them sound louder than
they really are. The following list has a description of such
sounds along with their causes.
•You will hear a bell sound caused by the flow of the
refrigerant, water pipe or objects located on the superior
part of the refrigerator.
•Your refrigerator is designed to work efficiently to
preserve your food at the desired temperature using
the least of energy. You will be able to hear a pulsing
sound coming from the ventilators and the evaporator.
The speed of the ventilator can speed up when you
open the refrigerator door.
•You will hear a dripping sound caused during the
thawing cycle.
•After each cycle you will hear a dripping sound due to
the refrigerant liquid in your refrigerator.
•Contraction and expansion of the inner walls can cause
a slight popping sound..
•During the defrosting cycle the water might cause a
dripping sound.
•You can hear some tight air sound over the capacitor
caused by the fan.
•Running water can be heard during the defrosting
cycle.
•The thawing timer will make a “click” sound when such
timer will start and finish. Temperature controlling
device will also make a “click” sound at the beginning
and ending of the refrigerator cycle.
Problem Possible Causes Solutions
•The plug is correctly positioned.
•A fuse has gone bad or the circuit
presents failures.
•The control panel lights are blinking
sequentially (1-2-3-4-5).
THE
REFRIGERATOR
WON´T TURN ON
•Due to its low energy consumption design of the
refrigerator; the fans will remain of, while the on-off
switch activated the internal light of bin.
•Firmly plug the cord into a live outlet with proper
voltage.
•Replace the fuse or reset the circuit breaker.
•The refrigerator control has been put into the
store demo (demonstration mode). To exit the
demo mode:
1. Open both the refrigerator and freezer doors.
2. Push in both door switches and at the same time
press and hold the Temperature Adjust button for
5 seconds.
Door Switches
Temperature Adjust Button
•The refrigerator is in the defrosting
cycle.
28
•Wait about 30 minutes for defrost cycle to end.
Page 29
Problem Possible Causes Solutions
STRANGE SOUNDS
OR SNOOZING/
VIBRATIONS
THE LIGHT WON’T
TURN ON
IT LOOKS LIKE
THE COMPRESSOR
MOTOR STAYS ON
TOO LONG
DOORS WILL
NOT CLOSE
COMPLETELY
THERE´S ICE ON
THE FOOD
THERE´S WATER IN
THE DRAINING BIN
•The refrigerator is not correctly
positioned.
•The refrigerator is plugged.
•The light bulbs are loose.
•A light bulb has gone bad.
•The replaced refrigerator was an
older model.
•The room temperature is hotter
than usual.
•The door is being opened very often
or there has been a big amount of
food in storage.
•The refrigerator is plugged and the
control has been adjusted correctly.
•Doors won’t close correctly.
•The condenser pipes are dirty.
•The refrigerator is not leveled.
•The food packages are blocking the
doors.
•The ice bin, the vegetable bin, the
panels and the shelves from the
door are out of place or position.
•The gaskets are sticking.
•The refrigerator wobbles or looks
instable.
•The doors were removed during
the installation and they weren’t
properly setup.
•The door hasn’t been closed
completely.
•The door is frequently opened.
•The refrigerator is in defrosting
cycle.
•It’s more humid than usual.
•You need to adjust the leveling screws due the
floor is unleveled or weak. Read the Installation
section.
•Plug the refrigerator in a right voltage plug.
•Unplug the refrigerator. Unscrew the Light bulb
and screw it again (Read the section Refrigerator
Care and Cleaning). Plug again.
•Unplug the refrigerator before changing the light
bulb. Replace the bulb with a same 40 watts bulb
for your local store. (Read the section Replacing
Refrigerator Lights).
•Modern refrigerators with a bigger storage
capacity require longer periods of operation.
•The motor will continue working when the room
temperature is high. The motor might be on
between 40% or 80% of the time. In high
temperature conditions, the capacitor might run
on periods of time.
•When adding or opening the door of the
refrigerator, it warms it up. It’s normal that the
refrigerator to run more that usual in order to cool
the bins. (Read the section Food Storage Guide).
To save energy, take what you need at once, order
your food in order so it can be easily found and
close the door immediately soon after you took
out the food.
•The refrigerator will take 24 hours to cool down
completely.
•Push firmly the Doors. If they don’t close. Read
Doors will not close completely below.
•This will stop the air transfer and marked the
motor to work longer and harder. Clean the pipes
of the condenser.
•Read Refrigerator Installation section to level
refrigerator.
•Adjust the food bins in order to free space
between the doors and the shelves.
•Push the containers and place the vegetable cover
lid, the panels, shelves and any other container or
bin in their right positions. Read the section Using
your Refrigerator.
•Clean the seal rings and the surface they might be
in contact with. Use a piece of cloth with a small
amount of paraffin and apply it over the seal rings.
•Level the refrigerator. Read the section Closing
and Aligning the Doors.
•Remove and place again the door according to
the section Refrigerator Doors: How to remove
and reverse.
•Read Doors Will not Close Completely already
mentioned.
•When the door is opened, warm, humid air is
allowed in the freezer resulting in frost.
•The water will evaporate. It is normal that some
water falls on the bin.
•It might take a while for the water to evaporate.
This is normal when the weather is hot and humid.
29
Page 30
TROUBLESHOOTING GUIDE
Problem Possible Causes Solutions
THERE IS A WEIRD
TASTE AND SMELL
IN THE ICE
THE
REFRIGERATOR
SEEMS TO MAKE
TOO MUCH NOISE
THE ICE MAKER IS
NOT PRODUCING
ICE OR ICE CUBES
ARE FREEZING
TOO SLOWLY
THE ICE CUBES
ARE TOO SMALL
THE DOORS ARE
HARD TO OPEN
THE ICE MAKER
DOES NOT WORK
THE TEMPERATURE
IS TOO HOT
OR THERE´S
HUMIDITY FORMED
INSIDE THE
REFRIGERATOR
•The ice maker has been installed
correctly.
•The ice has been on storage too
long.
•The food hasn’t been packed in the
correct way.
•The water supply contains mineral
and sulfur.
•The inside of the refrigerator need
cleaning.
•The ice bin needs cleaning.
•The sounds may be normal for your
refrigerator.
•The smallest size of ice cubes is
selected.
•Door left open.
•Smaller cube size level is selected.
•The water supply valve is blocked.
•The gaskets are dirty or sticky.
•The door opens itself as soon as
you close it.
•The ice maker is off.
•The water supply is down or not
plugged.
•The freezer temperature is warm.
•The ice cubes turn off the ice maker.
•The air vents are blocked. The
cool air flows from freezer to the
refrigerator and returns thru the
vents that dive this section.
•The doors open very easily.
•The refrigerator control has not been
adjusted for the room conditions.
•A large amount of food is just been
placed inside the refrigerator.
•The food has not been well packed
in each bin.
•The doors haven’t been closed
correctly.
•The weather is humid.
•The auto-defrosting cycle is over.
•Don’t use the first ices made.
•Dispose of that old ice and make new.
•Pack again the food because it can transfer odors
and tastes to the ice.
•You might need to install a filter in order to
eliminate the odors and taste problems.
•Read the section Refrigerator Care and Cleaning.
•Empty the bin and discard the old ice cubes.
•Refer to the Understanding Sounds You May Hear
section
•Wait 24 hours after hook-up for ice production.
See the Adjusting the Controls section.
•Check to see if something is holding the door
open.
•Select a bigger size for the ice cubes.
•Call a plumber to clean the valve.
•Clean the gaskets and surface that they are in
contact with. Use a damp cloth with paraffin also
apply over the seal rings.
•When you open the door, the warm air enters
in refrigerator. When this air is cooled down it
occupies less volume and creates a vacuum effect.
If it is difficult to open wait 5 minutes then check.
•Turn the ice maker to the position on (I).
•Read the section Connecting the Water Line.
•Wait 24 hrs for the freezer to reach its ideal
temperature.
•Hand level the ice cubes.
•With your hand find the vents and move and
package that might be blocking the air flow. See
the Multi Flow Section.
•When the doors are opened the warm and humid
air enters. To keep your refrigerator cool, take what
you need once and keep your food organized to
make it easy to find. Close the door a soon as
you can.
•Wait 24 hours to stabilize the temperature. If the
temperature is cold or hot, move the control until
the desire temperature is reached.
•After adding food to the refrigerator this will warm
up. It might take some hours for the refrigerator to
reach its temperature.
•Wrap the food evenly and before packing anything
dry all the bins to avoid humidity. If it is necessary,
pack the food according to the section Food
Storage Guide.
•Read Doors will not Close Correctly section.
•In humid weathers, the air contains humidity,
which introduces it self if the doors are opened.
•It’s normal that some water props get formed
after the defrosting cycle is completed.
30
Page 31
LG Customer Information Center
USA, Consumer User
1-800-243-0000
USA, Commercial User
1-888-865-3026
CANADA
1-888-542-2623
Register your Product Online!
www.lg.com
 Loading...