

Page 1
AB28
Color Video Network
Camera
User Manual
Model: LSW900
LSW901
Before connecting, operating or adjusting
this product, please read this user manual
carefully and completely.
Page 2
CAUTION
RISK OF ELECTRIC SHOCK
DO NOT OPEN
CAUTION: TO REDUCE THE RISK OF ELECTRIC SHOCK
DO NOT REMOVE COVER (OR BACK)
NO USER-SERVICEABLE PARTS INSIDE
REFER SERVICING TO QUALIFIED SERVICE PERSONNEL.
This lightning flash with arrowhead symbol
within an equilateral triangle is intended to
alert the user to the presence of uninsulated
dangerous voltage within the product’s enclosure that may be of sufficient magnitude to
constitute a risk of electric shock to persons.
The exclamation point within an equilateral
triangle is intended to alert the user to the
presence of important operating and maintenance (servicing) instructions in the literature
accompanying the product.
2
FCC WARNING: This equipment may generate or use radio
frequency energy. Changes or modifications to this equipment may cause harmful interference unless the modifications are expressly approved in the instruction manual. The
user could lose the authority to operate this equipment if
an unauthorized change or modification is made.
REGULATORY INFORMATION: FCC Part 15
This equipment has been tested and found to comply with
the limits for a Class A digital device, pursuant to Part 15
of the FCC Rules. These limits are designed to provide reasonable protection against harmful interference when the
equipment is operated in a commercial environment.
This equipment generates, uses, and can radiate radio frequency energy and, if not installed and used in accordance
with the instruction manual, may cause harmful interference to radio communications.
Operation of this equipment in a residential area is likely to
cause harmful interference in which case the user will be
required to correct the interference at his own expense.
A suitable conduit entries, knock-outs or glands shall •
be provided in the cable entries of this product in the
end user.
Page 3

Caution: Danger of explosion if battery is incorrectly •
replaced. Replaced only with the same or equivalent
type recommended by the manufacturer. Dispose
of used batteries according to the manufacturer’s
instructions.
Holes in metal, through which insulated wires pass, •
shall have smooth well rounded surfaces or shall be
provided with brushings.
Warning: Do not install this equipment in a confined space
such as a bookcase or similar unit.
Warning: Wiring methods shall be in accordance with the
National Electric Code, ANSI/NFPA 70.
Warning: This is a class A product. In a domestic environment this product may cause radio interference in which
case the user may be required to take adequate measures.
Warning: To reduce a risk of fire or electric shock, do not
expose this product to rain or moisture.
Caution: This installation should be made by a qualified
service person and should conform to all local codes.
Caution: To avoid electrical shock, do not open the cabinet. Refer servicing to qualified personnel only.
Caution: The apparatus shall not be exposed to water
(dripping or splashing) and no objects filled with liquids,
such as vases, shall be placed on the apparatus.
To disconnect power from mains, pull out the mains
cord plug. When installing the product, ensure that the
plug is easily accessible.
3
Page 4

Disposal of your old appliance
1. When this crossed-out wheeled bin
symbol is attached to a product it means
the product is covered by the European
Directive 2002/96/EC.
2. All electrical and electronic products
should be disposed of separately from
the municipal waste stream via designated collection facilities appointed by
the government or the local authorities.
3. The correct disposal of your old appliance will help prevent potential negative
consequences for the environment and
human health.
4. For more detailed information about
disposal of your old appliance, please
contact your city office, waste disposal
service or the shop where you purchased the product.
4
This product is manufactured to comply
with EMC Directive 2004/108/EC and Low
Voltage Directive 2006/95/EC.
European representative :
LG Electronics Service Europe B.V.
Veluwezoom 15, 1327 AE Almere,
The Netherlands (Tel : +31-036-547-8940)
Page 5

Important Safety Instructions
1. Read these instructions.
2. Keep these instructions.
3. Heed all warnings.
4. Follow all instructions.
5. Do not use this apparatus near water.
6. Clean only with dry cloth.
7. Do not block any ventilation openings. Install in accordance with the manufacturer's instructions.
8. Do not install near any heat sources such as radiators,
heat registers, stoves, or other apparatus (including
amplifiers) that produce heat.
9. Do not defeat the safety purpose of the polarized or
grounding-type plug. A polarized plug has two blades
with one wider than the other. A grounding type plug
has two blades and a third grounding prong. The wide
blade or the third prong are provided for your safety. If
the provided plug does not fit into your outlet, consult
an electrician for replacement of the obsolete outlet.
10. Protect the power cord from being walked on or
pinched particularly at plugs, convenience receptacles,
and the point where they exit from the apparatus.
11. Only use attachments/accessories specified by the
manufacturer.
12. Use only with the cart, stand, tripod, bracket, or table
specified by the manufacturer, or sold with the apparatus. When a cart is used, use caution when moving
the cart/apparatus combination to avoid injury from
tip-over.
13. Unplug this apparatus during lightning storms or
when unused for long periods of time.
14. Refer all servicing to qualified service personnel.
Servicing is required when the apparatus has been
damaged in any way, such as power-supply cord or
plug is damaged, liquid has been spilled or objects
have fallen into the apparatus, the apparatus has been
exposed to rain or moisture, does not operate normally, or has been dropped.
5
Page 6

Cautions for Safe Operation
Handling of the unit
Be careful not to spill water or other liquids on the unit. Be
cautions not to get combustible or metallic material inside
the body. If used with foreign matter inside, the device is
liable to fail or to get cause of fire or electric shock.
Remove dust or dirt on the surface of the lens with a •
blower.
Use a dry soft cloth to clean the body. If it is very dirty, •
use a cloth dampened with a small quantity of neutral
detergent then wipe dry.
Avoid the use of volatile solvents such as thinners, •
alcohol, benzene and insecticides.
They may damage the surface finish and/or impair the
operation of the device.
6
Operating and storage location
Avoid viewing a very bright object (such as light fittings)
during an extended period. Avoid operating or storing the
unit in the following locations.
Extremely hot or cold places (operating temperature •
-10°C ~ 50°C, however, we recommend that the unit
be used within a temperature range of 0°C ~ 45°C)
Damp or dust place•
Places exposed to rain•
Places subject to strong vibration•
Close to generators of powerful electromagnetic radia-•
tion such as radio or TV transmitters.
Page 7

Contents
Features ................................................................. 8
Part Names and Functions ................................... 9
Connections ........................................................ 12
Precautions .....................................................................12
Connection Overview .................................................12
Connecting Display Device .......................................13
Connecting Network ...................................................13
Connecting Power Source .........................................14
Connecting RS-485 Device ........................................15
Connecting Alarm Device ..........................................15
Connecting Microphone and Speaker Device ...16
Mounting the camera .................................................17
Operation and settings ......................................18
Before using the system .............................................18
Recommended PC Requirements ...........................18
Accessing the LG IP device ........................................19
LG Smart Web Viewer Overview ..............................20
Con guring the LG IP camera ..................................24
OSD Menu Setup...........................................................53
Troubleshooting .................................................65
Open source software notice ............................. 68
Speci cation .......................................................71
7
Page 8

Features
The LG Color Video IP Camera is designed to use on an
Ethernet network and must be assigned an IP address to
make it accessible.
This manual contains instructions on how to install and
manage the LG Color Video IP Camera in your networking
environment.
Some knowledge of networking environments would be
beneficial to the reader.
Should you require any technical assistance, please contact
authorized service center.
Dual H.264 Stream for single Video Input •
Multi-Codec(H.264, MJPEG) Streaming •
Intelligent Video Analysis (Option) •
PoE (Power over Ethernet) Support (802.3af) •
3 Power(AC24,DC12,PoE) Support •
Audio Support (G.711, G.726 Full Duplex) •
Pre/Post Alarm Support •
Remote Pan/Tilt/Zoom Control (RS-485 support)•
Direct NAS Writing•
8
High resolution and high sensitivity with a 1/3 inch •
Vertical Double Interline CCD.
Auto White Balance•
Day & Night function•
WDR (Wide Dynamic Range) is available•
Features Chart
This table shows the differences between the models.
Use LSW901 is used for the description, operations and
details provided in this user manual.
Models LSW900 LSW901
VCA No Yes
PTZ Yes Yes
PRESET Yes Yes
Fan Fail
Notification
Fan & Heater
Temperature
Yes Ye s
No No
Page 9

Part Names and Functions
abcd
e
a Lens mount cap
The lens mount of the camera is covered using a cap
to protect it. Remove the lens cap covering the lens.
b Flange-back adjustment lever
c Lens iris output connector (LENS)
This 4- pin connector is used to send the Iris control
signal and power supply to an auto-iris type lens.
d ALC Lens setting switch
VIDEO: When you attach an Auto Iris lens requir-•
ing the video control signal, please put this
switch in the VIDEO position.
DC: When you attach an Auto Iris lens requiring •
the DC control signal, please put this switch in
the DC position.
e Camera installation bracket
The bracket can be fixed at the top or bottom of the
camera.
9
Page 10
Part Names and Functions
10
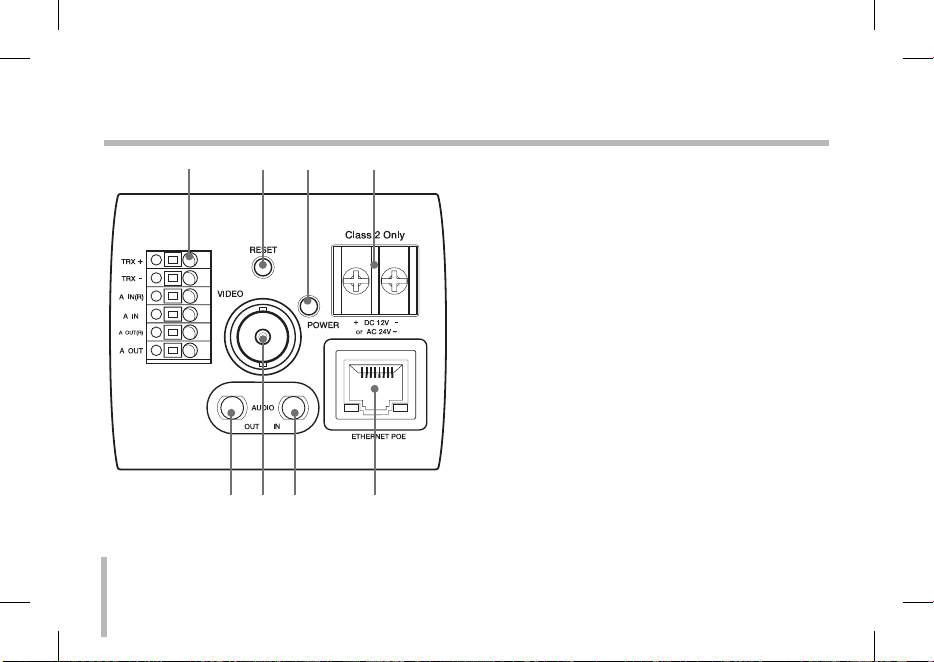
fghi
jkl m
f External device connectors
TRX +/TRX - Terminals: Connect to an external •
controller of RS-485 format.
A IN(R)/A IN (Sensor input) Terminals: •
Provides physical interface for sensor.
A OUT(R)/A OUT (Relay output) Terminals:•
Provides physical interface for Alarm/Relay.
g RESET button
Push the button more than 3 seconds, this would
restore the factory default settings.
h Power indicator
Lights when the camera is powered.
i Power input terminal
Connects to a DC 12V or AC 24V power supply using
proper cables.
j AUDIO OUT (Line Level Output)
Connect to an active speaker with a built-in amplifier.
Page 11

Part Names and Functions
k VIDEO OUT
Supplies analog video signal (composite) to the connected device.
l AUDIO IN (Line Level Input)
Input for a mono microphone, or a line-in mono
signal.
m ETHERNET/POE Port
Connects to a PC or a network via a hub with a
10BASE-T/100BASE-TX cable attached RJ-45 connector.
Note:
Power over Ethernet (PoE) is a technology that integrates power into a standard LAN infrastructure. It
enables power to be provided to the network device,
such as a network camera, using the same cable as
that used for network connection. It eliminates the
need for power outlets at the device locations and
enables easier application of uninterruptible power
supplies (UPS).
11
Page 12

Connections
Precautions
Be sure to switch off the unit before installation and connection.•
The installation should be made by qualified service personnel or system installers. •
Do not expose the power and connection cables to moisture, which may cause damage to the unit.•
Connection Overview
RS-485
RS-485
Unit
Unit
12
PoE Device
PoE Device
(IEEE802.3af)
(IEEE802.3af )
Page 13

Connections
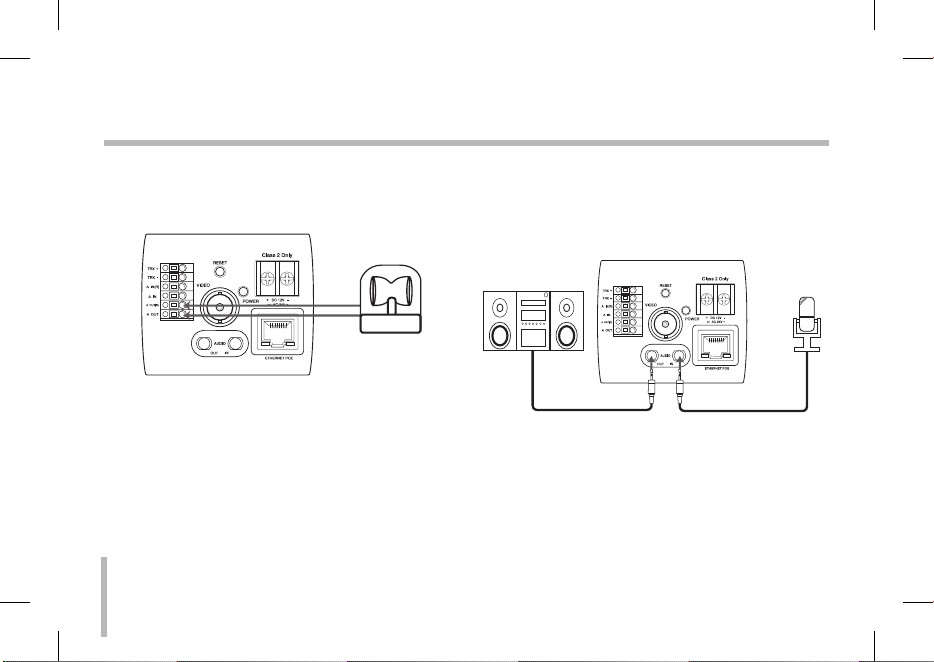
Connecting Display Device
Connect the video signal between the IP camera and the
monitor.
Connecting Network
You can control and monitor the system via network. With
the remote control (monitoring), you can change the system configuration or monitor the image via network. After
the installation, check the network settings for the remote
control and monitoring work.
Connect the IP camera to your network using a standard
RJ-45 network cable as shown below.
Broadband
Broadband
Service
Service
Broadband
Broadband
Service
Service
PoE Device
PoE Device
(IEEE802.3af)
(IEEE802.3af)
Router
Router
13
Page 14
Connections
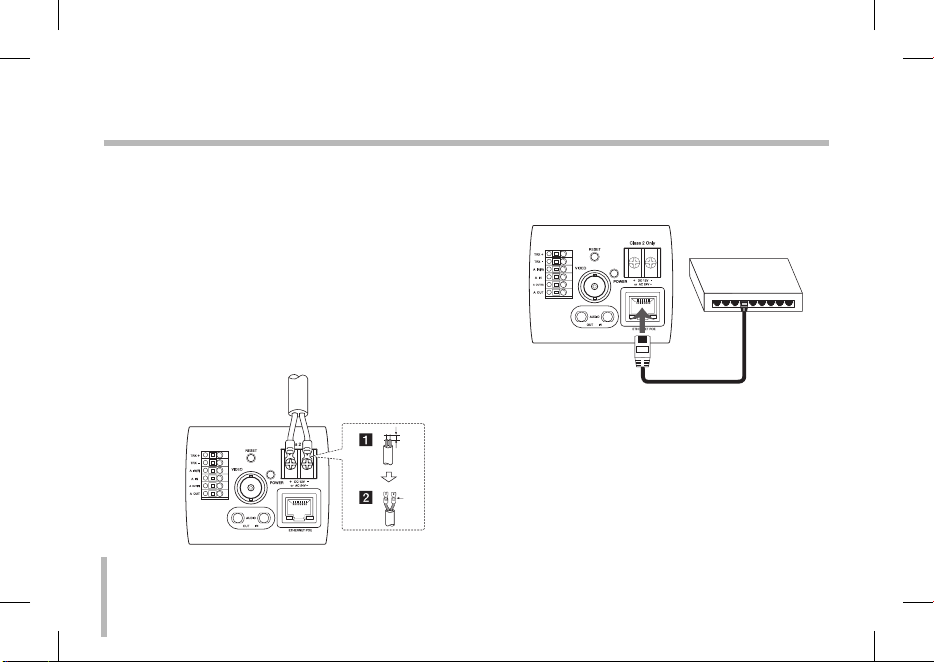
Connecting Power Source
Connect power, using one of the methods listed below:
To use the power adapter
Connect a DC 12 V / AC 24 V power source to the
power input terminal as shown below.
1. Remove the insulation on the power cable as
illustrated.
2. Attach the terminal tips.
3. Connect to the DC 12 V / AC 24 V UL Listed, Class
2 Power Supply only on the unit.
14
To use the PoE (Power over Ethernet) device
Connect the PoE cable to the LAN port on the unit.
You must use the “IEEE802.3af ” standard PoE device.
PoE Device
PoE Device
(IEEE802.3af)
(IEEE802.3af )
Note:
If the camera doesn't work properly after connect PoE
device, please check if the PoE device is supplying enough
power.
Page 15

Connections
Connecting RS-485 Device
Use these ports to connect an external device of RS-485
format.
TRX +
TRX -
RS-485
RS-485
Unit
Unit
Connecting Alarm Device
Alarm terminals are used to connect the alarm (relay)
devices such as sensors, door switches, etc.
A IN(R)/A IN (Sensor Input )
Connect the sensor device to the sensor input
terminal.
Sensor
Device
15
Page 16
Connections
A OUT(R) / A OUT (Relay Output)
Connect the alarm (relay) device to the relay output
terminal. Alarm signal is outputted at an event
occurrence.
Alarm (Relay)
Device
Note:
The Photo MOS Relay is rated for 100mA at 20V DC or
100mA at 28V AC.
16
Connecting Microphone and
Speaker Device
Optionally connect an active speaker and/or external
microphone with a built-in amplifier.
Note:
Keep the microphone away from the speaker to avoid
howling.
Page 17
Connections
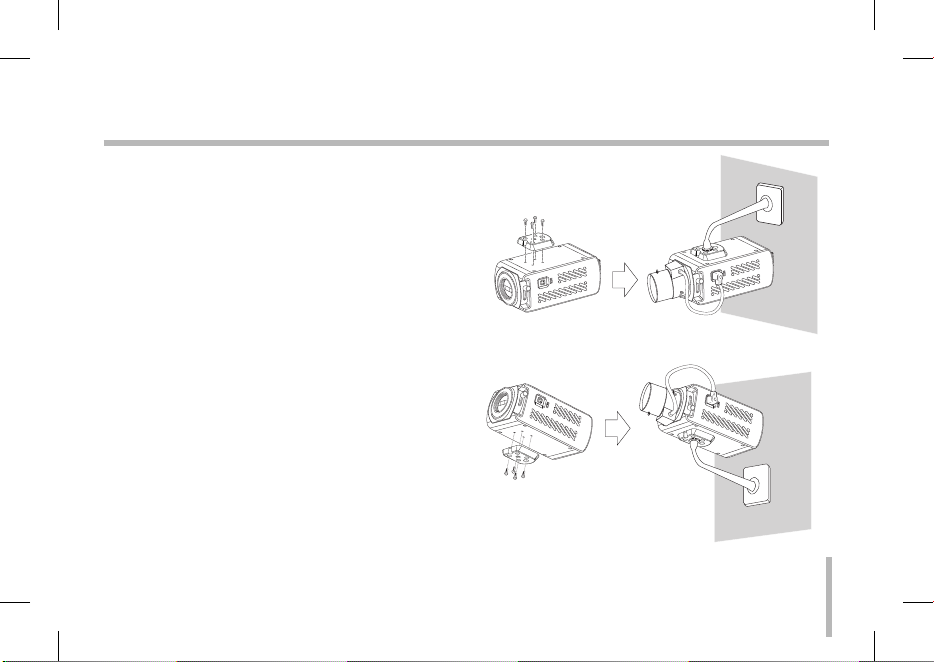
Mounting the camera
The mounting bracket can be secured on either the top or
bottom of the camera. Use the same set of screws to attach
the mounting bracket on the camera.
Note:
If using a camera mounting bracket, select a location that
is strong enough to bear the full weight of the camera and
the mounting bracket for long periods, and install the camera and mounting bracket securely.
17
Page 18

Operation and settings
Before using the system
Before using the LG IP device make sure the connec-•
tions are correct and verify whether proper power
supply is used.
Check the connections of the LG IP device for the cor-•
rect conditions.
Check that the LG IP device is(are) connected to the •
network and that power is supplied.
Once the connections are made you need to install the •
LG client program to the PC from which you want to
access the device. The LG Smart Web Viewer program
is automatically installed when you connect the LG IP
device.
The LG Smart Station and the LG Smart Web Viewer
program are the network program of the LG Video
Server and the LG IP cameras.
JRE (Java Runtime Environment) is a pre requisite for •
LG Smart Web Viewer program. If this is missing in the
PC please install the same manually from "http://java.
sun.com" website. (Version1.6.0.11 or later)
The Layouts and the Live view pages may differ with •
18
different OS (Operating Systems) and Web Browsers.
Care needs to be taken not to run any other applica-•
tions when the Client Program is running as it may
cause memory shortage.
Recommended PC Requirements
The LG IP device can be used with most standard operating
systems and browsers.
Items Requirements
Operating
System
CPU
Web Browser Microsoft Internet Explorer 6.0 or higher
DirectX DirectX 9.0 or above
Memory 2GB or above RAM
Graphics Card 256 MB or above Video RAM
Resolution 1280 x1024 (with 32bit color) or higher
Windows XP Professional or above
Intel Core2 Quard Q6700 (2.66GHz) or
above
Page 19

Operation and settings
Accessing the LG IP device
You can access the LG IP device by following the below
steps.
1. Copy the IP Utility to your PC
1.1 Insert the Client Program CD.
1.2 Find and Copy IP Utility folder to your PC.
2. Discover LG IP device using the IP Utility
The IP Utility can automatically discover and display
LG IP devices on your network. The IP Utility shows the
MAC address, IP address, Model name and so on.
Note:
The computer running the IP Utility must be on the
same network segment (physical subnet) as the LG IP
device.
2.1 Run the IP Utility program.
2.2 Click the [Search] icon or select the [Search]
option in the Device search menu.
After a few seconds the found LG IP devices gets
displayed in the IP Utility window.
3. Logging in to the LG Smart Web Viewer
The LG Smart Web Viewer can be used with most
web browsers. The recommended browser is Internet
Explorer with Windows.
3.1 Run the IP Utility and find the LG IP devices.
3.2 When the LG IP devices appear in the IP Utility
window, double-click IP address or right click on
the same IP address and select "Connect to Web
Page" to start the LG Smart Web Viewer. When
accessing the LG Smart Web Viewer, the authentication dialog appears on the screen.
3.3 Enter the user name and password. (Note that the
default administrator user name and password
are “admin”.)
3.4 Click the [OK] button and then the LG Smart Web
Viewer is displayed in your browser.
Notes:
You can also access the LG Smar t Web Viewer as •
shown below.
3.1 Start your Web browser.
19
Page 20
Operation and settings
3.2 Enter the IP address of the LG IP device in
the address bar of the browse.
3.3 Enter the user name and password set by the
administrator.
3.4 Click the [OK] button and then the LG Smart
Web Viewer is displayed in your browser.
The• LG Smart Web Viewer needs more time to display it according to the network conditions.
If the login window is not displayed, check the •
pop-up blocker. If you set the pop-up blocker, the
login window is not displayed. You must allow
the pop-ups.
If you connect the LG Smart Web Viewer for •
the first time, the Security Warning window is
displayed to install the LG Smart Web Viewer program. You must install the LG Smart Web Viewer
program for using the LG IP device.
If your computer or network is protected by a •
proxy or firewall, the proxy or firewall settings
can prevent the LG Smart Web Viewer program.
Change the proxy or firewall settings to activate
the LG Smart Web Viewer program.
20
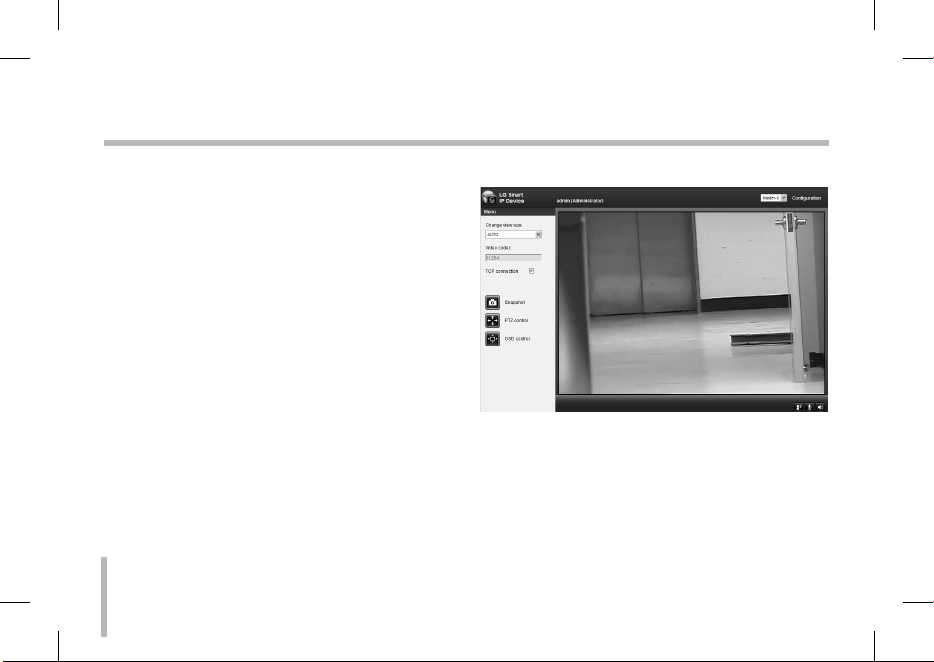
LG Smart Web Viewer Overview
Page 21
Operation and settings
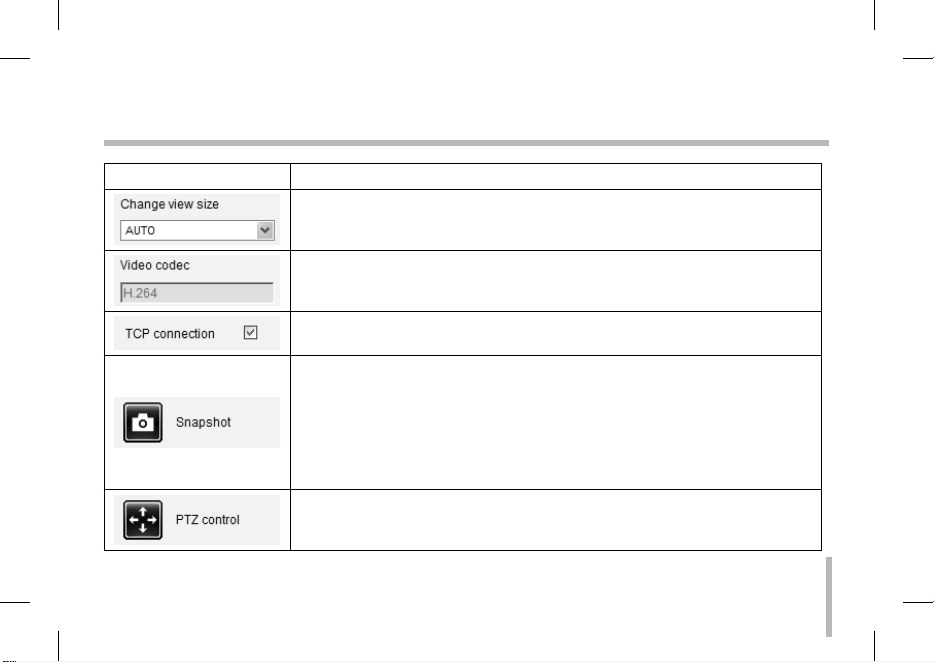
Item Description
Select the video image size from the drop-down list. (AUTO, D1, CIF or QCIF)
The initial view size is set to AUTO. The AUTO option sets the view size according to the
Server’s resolution.
Displays the current video codec of the selected video stream (Master or Slave).
Check this option as the network connection type (TCP or UDP). If you check it, the client
connects to the server using TCP connection.
Click to save the current image in JPEG format on your computer.
1. Click the [Snapshot] button and then the Snapshot window is displayed.
2. Click the [Save] button in the Snapshot window.
3. Enter the file name (JPEG format) and select the folder to save it.
4. Click the [Save] button to confirm it.
5. Click the [Close] button in the Snapshot window to close it.
Displays the PTZ control window. Use these buttons to control the PTZ unit.
This button is not displayed with normal or anonymous user.
21
Page 22

Operation and settings
Displays the Camera OSD control window. Use these buttons to setup the Camera. This
button does not appear on the screen if the login is other than the administrator.
Select the video stream. From the Live view drop-down list, select the desired video
image source between [Master-0] and [Slave-0].
Note:
Master and Slave are output video streams. You can set the stream configurations independently for either Master or Slave stream. This would facilitate the user to set the live
view at his comfort.
Provides all the necessary tools for setting up the device to your requirements. The user
will need administrator level to do this.
Note:
If you want to exit the Configuration menu, select one of the video stream in the Live
view drop-down list.
Displays the current surveillance live screen.
You can monitor the camera image on the live view window of the LG Smart Web Viewer.
22
Page 23
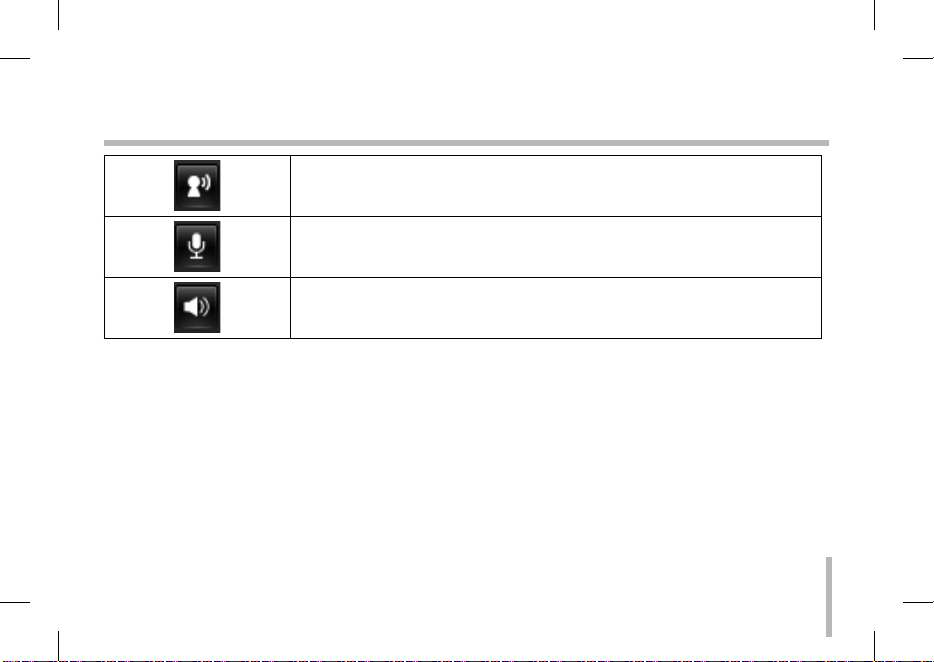
Operation and settings
Click this button to connect or disconnect the audio communication between the LG IP
device and the connected PC.
(Color icon: On, Gray scale icon: Off.)
Click this button to switch the microphone off and on for the computer.
(Color icon: On, Gray scale icon: Off.)
Click this button to switch the sound off and on, for the speaker of the computer.
(Color icon: On, Gray scale icon: Off.)
23
Page 24

Operation and settings
Con guring the LG IP camera
The features and options of the LG IP camera are configured through the Configuration menu.
Only administrator-level users have permission to access
the Configuration menu.
Accessing the Configuration menu
Click the [Configuration] button to display the LG Smart
Web Viewer configuration window.
Warning
The Configuration setup should be made by qualified service personnel or system installers.
24
Con guration menu overview
The following table shows the list of menu items.
Main Menu Sub Menu
Version
Date & Time
System
Audio & Video
Network
Maintenance
Log & Report
Language
Camera
Stream
Audio
PTZ protocol
Preset
Basic
RTP stream
TCP/IP
DDNS
IP filtering
Page 25

Operation and settings
Main Menu Sub Menu
User Basic
Schedule
Event
Recording schedule
Recording server
Event schedule
Event server
Sensor & Relay
Fan
System settings
Version
Displays the current version of Firmware, Hardware,
Software and Web Client.
25
Page 26

Operation and settings
Date & Time
Time zone
Set the time difference from GMT in the area where
the IP device is installed.
Select the time zone in the area where the IP device is
installed from the drop down list.
Time mode
Synchronize with NTP Server: Select if you >
want to synchronize the IP device’s date and
26
time with those of the time server called NTP
(Network Time Protocol) Specify the NTP
server’s name. Click the [Test] button for connection test to the server.
Synchronize with personal computer: Select >
if you want to synchronize the IP device’s
date and time with that of your computer.
Synchronize manually: Select if you want to >
set the IP device’s date and time manually.
Select the year, month and date by clicking
the calendar button. Set hour, minutes and
seconds in the edit boxes.
Server time
Server time: Displays the current date and >
time of the IP device.
Save: Click this button to confirm the settings.•
Page 27

Operation and settings
Maintenance
System reboot
Click the [Reboot] button to restart the IP device. It
takes some minutes for the IP device to start again.
Restore and backup
Backup: To take a backup of all of the set- >
tings. If necessary, it make possible to return
to a backuped configuration. Click this
button and follow the instructions on the
browser to specify the folder and save the
setting data of the IP device. This configuration backup can be restored when ever
needed.
Restore: Click the [Browse] button and select >
the file in which the configuration setting
data is stored and click the [Upload] button.
Click the [Restore] button after successfully uploading the backup configuration.
The System settings will be restored to the
uploaded configuration and reboot the
system.
Notes:
Backup and Restore can happen on IP device •
having the same version of firmware. This
feature is not intended for multi-configurations or for firmware upgrades.
[Backup] function is allowed in HTTP proto-•
col but not in HTTPS protocol.
27
Page 28

Operation and settings
Firmware
Log & Report
28
Upgrade >
1. Click the [Browse] button
2. Find and open the firmware file.
3. Click the [Upload] button.
4. Click the [Upgrade] button to update
the firmware.
Initialize: The [Initialize] button should be >
used with caution. Clicking it will return all of
the IP device’s settings to the factory default
values. (Except for Network settings, PTZ
Protocol and Preset settings.)
Log & Report status
The System log provides a summary of the status of
the IP device. The unit records the data of the software
activity in a file.
View Log: Click this button to display the >
system log information.
View report: Click this button to display the >
report window of the system.
Language
Language list
Select a language for the LG Smart Web Viewer configuration menu and information display.
Save: Click this button to confirm the settings.•
Page 29

Operation and settings
Audio & Video settings
Camera
Preview
You can preview the camera image on the preview
window.
General
Contrast: Edit the contrast value in steps of >
1, from 0 to 100. Selecting 100 provides the
image with the highest contrast.
Brightness: Edit to fine adjust the brightness >
of the camera. It is brighter when a large
value is selected and it is darker when a
small value is selected.
Standard: Displays the video standard of the >
camera.
Hue: Edit the video Hue of the camera from >
0~100.
Save: Click this button to confirm the settings.•
Default: Click this button to restore the IP device •
back to original factory settings.
29
Page 30

Operation and settings
Stream
Master/Slave
30
Enable: Click to activate the stream function. >
Deinterlacing: Click to enable the use of >
deinterlacing function.
Video codec: Select the video mode (Codec) >
from the drop-down list. The viewer can
choose between MPEG and H.264.
Resolution: Select the image size to be sent >
from the camera.
NTSC: D1 (704 x 480), HALF D1 (704 x
240), CIF (352 x 240) and QCIF
(176 x 112)
PAL: D1 (704 x 576), HALF D1 (704 x
288), CIF (352 x 288) and QCIF
(176 x 144)
Maximum frame rate: Set the frame rate of >
the image. Selectable values of the frame
rates are as follows.
NTSC: 1 ~ 30 (fps)
PAL: 1 ~ 25 (fps)
GOP size: It means “Group of Pictures”. The >
higher the GOP, the better is the video quality of the camera. Edit the value of GOP from
1 ~ 30. This setting is valid for H.264 video
format only.
Quality: Select the Quality. >
VBR: The bit rate may vary depending on the complexity of the video to meet
the selected quality.
Page 31

Operation and settings
Audio
CBR: The video quality may vary in order to preserve a constant bit rate.
Stream quality: If the [Quality] option set >
to VBR, this option is displayed. Select the
stream quality from the drop down box, the
camera supports five types (Highest, High,
Medium, Low and Lowest)
Bit rate: If the [Quality] option set to CBR, this >
option is displayed. Edit the bit rate value
from 64 ~ 10240 Kbps.
Save: Click this button to confirm the settings.•
Audio In
Enable: Enables the check box when you >
are going to send the audio from the microphone input connector.
Note:
The Clients connected to the IP device
remains unaffected with additional changes
made in the setting.
Audio type: Select the codec when you send >
the audio from the microphone input connector.
Audio Out
Enable: Enables the check box to output the >
audio from the speaker.
Save: Click this button to confirm the settings.•
31
Page 32

Operation and settings
PTZ protocol
Allows the user to configure to different PTZ controls by
using different PTZ protocols.
32
PTZ protocol list
PTZ protocol: Displays the selected PTZ >
protocol.
Edit: Click to display the PTZ protocol win- >
dow. Select the PTZ protocol and then click
the [Save] button. If you want to delete the
protocol, click the [Remove] button.
Upload PTZ protocol
Follow the instructions below to upload PTZ protocol.
1. Click the [Browse] button, find and open the file
and then click [Upload] button.
2. Click the [Add PTZ protocol] button and then the
PTZ protocol will be added.
PTZ configuration
Enable: Click to use the PTZ protocol. >
Camera ID: Enter the PTZ device ID. Make the >
same ID as the PTZ device.
Pan speed: Enter the panning speed of the >
PTZ device in the edit box. Default value
for the LG Multix Protocol is 60 and ranges
between (0 ~ 127).
Page 33

Operation and settings
Tilt speed: Enter the tilting speed of the PTZ >
device in the edit box. Default value for the
LG Multix protocol is 60 and ranges between
(0 ~ 127).
Zoom speed: Enter the zoom speed of the >
PTZ device to view the object close or at a
distance. Default value for the LG Multix protocol is 1 and ranges between (0 ~ 3).
Focus speed: Enter the focus speed of the >
PTZ device to focus an object clearly near or
far. Default value for the LG Multix protocol
is 1 and ranges between (1 ~ 3).
Preset tour park time: Enter the parking time. >
Port
Baud rate: Select the desired speed of com- >
munication between the IP device and the
PTZ device. Confirm selected parameter to
the baud rate of the IP device.
Data bit: Set the number of the data bits for >
RS-485 communication.
Parity: Select the desired parameter. The par- >
ity bit, added to the data, to perform parity
check.
Stop bit: Enter the desired parameter. The >
stop bit, added to the last of data, in asynchronous communication.
Save: Click this button to confirm the settings.•
Preset
Preview
You can see the settings screen from the preview
window.
33
Page 34

Operation and settings
1. Move the camera to the point you want by using
the arrow buttons.
2. Adjust the zoom, focus or iris options.
3. Set the Pan, Tilt, Zoom or Focus speed options.
4. Click the [Save] button to confirm the settings.
34
Pattern
You can activate the camera in a repeating pattern.
The pattern is programmed by recording your manual
pan, tilt, and zoom operations. The camera stores the
movements you performed in memory.
To record the pattern >
1. Click the [Start recording] button to
start the pattern recording.
2. Move the camera through the desired
movement.
3. Click the [Stop recording] button to
stop the pattern recording.
Note:
The available total time of pattern differs
depending on connected PTZ device and
operation.
Page 35

Operation and settings
To play the pattern >
1. Click the [Play] button to play the programmed pattern.
2. Click the [Stop] button to stop playing.
Preset list
Displays the registered preset position.
Add: Click to add the preset position.•
1. Click the [Add] button.
2. Select the preset index number.
3. Enter the preset alias.
4. Click the [Save] button.
5. Repeat the steps 1-4 to add other positions.
Note:
If you set the HOME position, check the [Set
home position] option.
Remove: Click to delete the preset position.•
1. Select the preset from the list.
2. Click the [Remove] button. The preset will be
deleted.
Go to preset: Move to the preset position.•
1. Select the preset from the list.
2. Click the [Go to preset]. The camera will be
moved to the selected preset.
Preset tour list
A preset tour is composed of a group of preset
positions that the operator can link together in a
sequence.
35
Page 36

Operation and settings
36
To tour the preset positions >
1. Choose the preset in the [Preset list].
2. Click the [Add] button in the [Preset
tour list].
3. Repeat the steps 1-2 to add another
preset.
4. Click the [Save] button to confirm the
preset tour list.
5. Click the [Play] button to start the preset tour.
6. Click the [Stop] button to stop the preset tour.
Note:
If you control the PTZ or OSD, the preset tour
will be stopped.
Remove: Click to delete the selected preset in the •
[Preset tour list].
Network settings
Basic
General
MAC address: Displays the MAC address. >
Port & Encryption
Web port: The default HTTP port number >
(80) can be changed to any port within the
range 1025-65535.
Page 37

Operation and settings
RTSP port: Check RTSP port and the default >
port is 554. Other ports can be selected from
the range 1025 -65535.
Network encryption: Select the HTTP or >
HTTPS option for security.
Note:
The RTSP port number should not be same
with the web port number.
TTL
TTL: This option indicates the Time-To-Live >
of multicast packets. The default setting is 7,
and the allowed TTL range is 1-255.
ARP Ping
Enable ARP Ping to configure IP address: >
Check to enable ARP ping.
Save: Click this button to confirm the settings.•
RTP stream
RTP (Real-time Transport Protocol) is an internet protocol
that allows programs to manage the real-time transmission
of multimedia data, via unicast or multicast.
37
Page 38

Operation and settings
Master / Slave
38
RTP unicast: When enabled the transmis- >
sion of the data to the specified equipment
happens on a network specifying a single
address.
RTP multicast: When enabled it reduces the >
transmission load on the camera by making
the computer of the same segment network
receive the same transmission data. When
multicast option is checked then select
Video Port number, Audio Port number and
Data port number.
Video RTP port: Specify the video transmission port number used for the
multicast streaming. It is initially set to
8888 and you can edit this between
1025 and 65534.
Audio RTP port: Specify the audio port number used for the multicast streaming. It is initially set to 7777 and you can
edit this between 1025 and 65534.
Data RTP port: Specify the VA data port number used for the multicast streaming. It is initially set to 6666 and you can
edit this between 1025 and 65534.
IP address: Set the IP address for RTP multicast.
Note:
Each stream using multicast needs its own
a pair of multicast IP address and port numbers to avoid address conflict.
Save: Click this button to confirm the settings.•
Page 39

Operation and settings
TCP/IP
IP address status
Automatically set with DHCP: Select this >
option when a DHCP server is installed on
the network to allow IP address assignment.
With this setting, the IP address is assigned
automatically.
Notify to SMTP server, if IP address is changed: If you select this option, the
user get a notification mail telling him
that the IP of the IP device has changed.
Note:
You should register the SMTP server
on the Event server setting to set this
function.
Statically set: Select this option when you set >
a fixed IP address, with this setting, specify
the IP address, Subnet mask and default
gateway manually.
IP address: Enter an IP address. Subnet mask: Enter a subnet mask -
address.
Gateway: Enter the gateway address. -
DNS server status
DNS server: Enter the Primary domain name >
server that translates the hostnames into IP
address.
Secondary DNS server: Enter the Secondary >
DNS server address that backups the Primary
DNS.
Save: Click this button to confirm the settings.•
39
Page 40

Operation and settings
DDNS
This free service is very useful when combined with the LG
DDNS Server. It allows the user to connect the IP device
using the URL, rather than an IP Address. This also solves
the problem of having a dynamic IP address.
DDNS status
Don’t use DDNS server: Disable the DDNS >
function.
Use DDNS server: Enable the DDNS function. >
Provider: Displays the DDNS provider. Hostname: Enter the hostname you -
want to use.
Save: Click this button to confirm the settings.•
40
IP filtering
The access of the IP addresses in the list are allowed or
denied according to the choice made in the drop-down list
of the Basic policy option. The administrator can add up to
10 IP address entries to the list (a single entry can contain
multiple IP addresses). The users from these IP addresses
need to be specified in the user list with the appropriate
access rights. The IP list is to control the access permission
of clients by checking the client IP address.
Page 41

Operation and settings
IP list
Basic policy: Select the basic policy type. >
Allow all: Allow all the IP address basi- cally, but the IP addresses in the list are
denied.
Deny all: Deny all the IP address basi- cally, but the IP addresses in the list are
allowed. It needs at least one IP address
to activate this function.
Save: Click this button to confirm the settings.•
Add: Click this button to add the IP address.•
1. Click the [Add] button.
2. Set the IP options.
Alias: Enter the alias. From: Enter the start IP address for the -
IP filtering.
To: Enter the end IP address for the IP -
filtering.
Note:
If you want to deny or to allow a range of
IP addresses, enter the start IP address to
"From" and the end IP address to "To". You
can also add an IP address by entering the IP
address to "From" and "To".
3. Click the [Save] button.
4. Repeat the steps 1-3 to add additional IP
address.
Remove: Click this button to delete the IP •
address.
1. Select the alias from the list.
2. Click the [Remove] button. The IP address
will be deleted.
41
Page 42

Operation and settings
User settings
Basic
The IP device is shipped with the login rights of administrator only. If others need to access the IP device excluding
the configuration a login with viewer rights need to be created. A maximum of 50 viewers can be created.
42
User list
Add the User >
You can register a new user with various
access rights.
1. Click the [Add] button. User setting dia-
log is displayed.
2. Enter the new User ID and Password.
(Should have a minimum of 4 characters and preferably a combination of
alphanumeric).
3. To confirm the password, retype
the password that you typed in the
Password box.
4. Select the authority drop down list to
provide the access rights to each user
and then click the [Save] to confirm
your selection.
Administrator: Allows you to oper- ate setup menus and to view live
images.
Page 43

Operation and settings
Power user: Use of the lim- ited functions of the system (The
Configuration menu is not allowed.
A power user can use the Live
View, PTZ control, OSD control and
audio functions.
Normal user: Provides the lowest level of access. Allows to view live
images only.
Custom user: The user can login and view the live stream image
only when the “Enable anonymous login” option is checked to
enable it.
Note:
Remember the password.
Edit the registered user >
You can change the password or authority.
1. Choose the user ID and then click the
[Edit] button.
2. Change the Password or Authority, then
click the [Save] button to confirm your
selection.
Delete the registered user >
1. Choose the user ID you want to delete.
2. Click the [Remove] button.
Note:
The default administrator user ID ‘admin’ is
permanent and cannot be deleted.
Anonymous
Enable anonymous login >
Check the box to enable anonymous user
login - allows the user access for only viewing the live stream image.
Maximum RTP stream connection
Maximum number of simultaneous stream >
connection:
Set this number to limit the number of
simultaneous stream connections.
43
Page 44

Operation and settings
44
Note:
Preview window of the IP device setting and
preset setting are affected by this setting.
Save: Click this button to confirm the settings.•
Schedule settings
Recording schedule
This IP device provides video monitoring, recording and
event management functions. Users can record video continuously, on schedule, on alarm and/or on Video Contents
Analysis (Optional).
Page 45

Operation and settings
To set the Recording Schedule
1. Click the [Add] button. Recording schedule
setting window is displayed.
2. Set the [Pre alarm] and/or [Post alarm]
option.
Pre alarm: Specifies the maximum recording capacity of the image before
the event detection.
Post alarm: Specifies the maximum recording capacity of the image after
the event detection.
3. Select the Repeat type. It can be configured
in 5 different ways, Repeat None, Daily,
Weekly, Monthly and Yearly.
4. Set the [Custom day] option. This option is
available if the repeat option is None. Here
a calendar is provided to mark the event
detection activity.
5. Set the Activation Time parameters (24h
clock) for the event.
NONE: No scheduled recording CONTINUITY: Recording starts automati- -
cally from the preset time.
VA: Recording starts automatically when -
the object or event is detected within a
designated time.
SENSOR: Recording starts automatically when the sensor input of the IP device
is activated within a designated time.
DUPLICATED (C,V): Recording starts automatically from the preset time.
When the object or event has been
detected within a designated time,
change the continuous recording mode
to VA event recording mode and recording starts automatically.
DUPLICATED (C,S): Recording starts automatically from the preset time.
When the sensor input is activated
within a designated time, change the
continuous recording mode to the sensor event recording mode and recording starts automatically.
DUPLICATED (V,S): Recording starts automatically when the object or event
45
Page 46

Operation and settings
is detected or the sensor input is activated within a designated time.
DUPLICATED (C,V,S): Recording starts automatically from the preset time.
When VA or SENSOR event is detected,
change the continuous recording mode
to the VA event recording mode or the
sensor event recording mode.
6. Click the [Save] button to confirm the settings.
To edit the Recording Schedule
1. Choose the particular schedule in the Total
schedule list that needs to be edited.
2. Click the [Edit] button.
You can check or edit the recording schedule
options.
46
To activate the Recording Schedule
1. Set the [Stream] option. This would give an
option to set either the Master stream or the
Slave stream for recording
2. To allocate a recording schedule choose the
particular one and click the [Allocate] button.
To deactivate the Recording Schedule
1. Choose the schedule in the Schedule list.
2. Click the [DeAllocate] button.
To delete the Recording Schedule
1. Choose the particular schedule from the
Total Schedule list.
2. Click the [Remove] button.
Page 47

Operation and settings
Recording server
Recording server is used to save the recorded data files.
Recording server
These options can be set by using the LG Smart
Station program. (Display only in this LG Smart Web
Viewer program.)
Disk full notification of recording server.
Control relay: Marks up to activate the alarm. >
Alarm is activated when the Recording
Server is full and has no place to record.
SMTP server: Select the SMTP server address. >
Sends an e-mail when the Recording Server
has no further place to record.
Note:
You should register the SMTP server on the
Event server setting to set this function.
Save: Click this button to confirm the settings.•
47
Page 48

Operation and settings
Event settings
Event schedule
When an event (VA/Sensor Event) occurs, this unit records
the live images and routes as configured.
Event schedule list
To edit the Event Schedule >
1. Click the Trigger event in the event
schedule list. Event schedule window is
displayed.
2. Set the options.
48
Trigger: Displays the selected trig-•
ger event.
Time: Sets the weekday, Start, •
Finish, Pre alarm, Post alarm and
Ignore interval time options.
Action: Selects the options. This •
occurs when the event runs.
FTP server/SMTP server: Uploading of images to an
FTP server, or e-mail notification.
Move camera to: Moves the camera to preset position.
Control relay: The relay is acti- vated or deactivated.
Stream: Selects the stream of the •
connected camera.
Default: Sets to default setting •
value.
3. Click the [Save] button to confirm the
settings.
Page 49

Operation and settings
Note:
You should register the SMTP and FTP server
on the Event server setting to set this function.
Event Server
Event Servers are used to receive the recorded video clip
and/or notification messages.
FTP server list
Image files can be transferred to the FTP server within
the scheduled time. Image file that has been recorded
linked to an external event is sent to the FTP server
periodically.
To add the FTP server >
1. Click the [Add] button. FTP server setting window is displayed.
2. Set the FTP server options.
Alias: Type the FTP Server name to upload the image files.
Address: Enter the FTP server’s IP address.
Port: Enter the port number. The default FTP port is 21.
User ID: Type the user name for the Folder shared in the FTP server.
Password: Type the password for the folder shared in the FTP Server.
Folder: Type the path with the fold- er that is shared in the FTP server.
49
Page 50

Operation and settings
3. Click the [Save] button to confirm the
settings.
To edit the FTP server >
1. Choose the FTP server in the FTP server
list.
2. Click the [Edit] button.
You can check or edit the FTP server
options.
To delete the FTP server >
1. Choose the FTP server in the FTP server
list.
2. Click the [Remove] button. This would
remove the FTP server from the list.
SMTP server list
By selecting the e-mail option, a still image of the
event is captured and an e-mail with the image file
attached is sent to the specified mail address.
To add the SMTP server >
1. Click the [Add] button. SMTP server setting window is displayed.
2. Set the SMTP server options.
50
Alias: Enter the SMTP server name. User ID: Enter the user ID of the -
SMTP server. This would be the one
who owns the mail account.
Password: Enter the password. This password of the same account.
Address: Enter the SMTP server address.
Port: Enter the port number. The default port is 25.
Enable SSL: Check when use the SSL (Secure Socket Layer) protocol. SSL protocol is cryptographic
protocols that provide secure communication on a network.
Receiving address: Type the recipients e-mail address. You can
specify only one recipient e-mail
address.
Administrator address: Type the e-mail address of the administrator.
Page 51

Operation and settings
Subject: Enter the subject/title of the e-mail.
Message: This message can describe the information of the
acquired IP address, etc.
3. Click the [Save] button to confirm the
settings.
To edit the SMTP server >
1. Choose the SMTP server in the SMTP
server list.
2. Click the [Edit] button.
You can check or edit the SMTP server
options.
To delete the SMTP server >
1. Choose the SMTP server in the SMTP
server list.
2. Click the [Remove] button.
Sensor & Relay
Sensor
Enable: Marks up when you want to activate >
the sensor.
Alias: Displays the sensor name. >
Type: Select the sensor type. >
Relay
Control duration: Enter the relay time. >
Alias: Displays the relay name. >
Type: Select the relay type. >
Control relay: >
Run: Click to activate the relay. -
51
Page 52

Operation and settings
Stop: Click to stop the relay. -
Save: Click this button to confirm the settings.•
Fan
Fan fail notification
Control relay: Marks up when you want to >
activate the selected relay.
SMTP server: Selects the SMTP server. By >
selecting this option an e-mail notification
is sent to the user indicating a failure in the
fan operation.
Save: Click this button to confirm the settings.•
52
Page 53

Operation and settings
OSD Menu Setup
The following table shows the list of menu items and options. You can adapt the camera to your requirements by
setting up the respective items in these menus.
Main Menu Sub Menu Contents
WDR/BLC
BRIGHTNESS 0~100
EXPOSURE ELC/ALC
SHUTTER
SENS-UP
OFF/WDR/BLC/
HSBLC
OFF/LOW/MIDDLE/
AGC
HIGH
X512, ~, x2, AUTO,
OFF, A.FLK, 1/160,
~, 1/90000
OFF
AUTO
EXIT RET/TOP/END
Main Menu Sub Menu Contents
WHITE BAL
DAY/NIGHT
3D-DNR
ATW -
b PUSH
AWC
COLOR TEMP
MANUAL
MIDDLE -
RED -100 ~ 100
BLUE -100 ~ 100
EXIT RET/TOP/END
LEVEL
AUTO
DWELL TIME
EXIT RET/TOP/END
DAY -
NIGHT -
OFF -
LOW -
HIGH -
INDOOR,
OUTDOOR
LOW/ MIDDLE/
HIGH
5, 10, 15, 30,
60 SEC
53
Page 54

Operation and settings
Main Menu Sub Menu Contents
PRIVACY
OFF -
MASK NUMBER AREA1~AREA8
DISPLAY ON/OFF
COLOR
ON
HEIGHT 4~100
WIDTH 4~100
MOVE Y 2~98
MOVE X 2~98
EXIT RET/TOP/END
54
GRAY, WHITE,
BLACK,
Main Menu Sub Menu Contents
OFF
D-ZOOM
D-EFFECT OFF/ V-FLIP/ MIRROR/ ROTATE
SPECIAL
RESET
EXIT - -
SHARPNESS 0~68
STABILIZER OFF/ ON
COLOR OFF/ ON
USER TITLE OFF/ ON
LANGUAGE
EXIT RET/TOP/END
CAMERA REBOOT -
FACTORY RESET -
EXIT -
ON
English
(The supported language can be
different depending on the model.)
ZOOM
PAN
TILT
EXIT
Page 55

Operation and settings
General Operation
1. Click the [OSD control] button in the LG Smart Web
Viewer.
2. Click
3. Use or button to select an option then click
4. Use
5. Use
6. Select [EXIT ] option then click
button on the OSD control window.
The camera setting menu appears on the live view
window.
button. Submenu appears.
or button to select a submenu option.
or button to select a value.
button to exit the
setup menu. In the submenu, use
select the [EXIT] then use
mode and click
RET: Return to the previous.•
TOP: Return to the CAMERA SETTING menu •
screen.
END: Exit the setup menu.•
Notes:
• button: Used to move upper direction on the
menu screen.
• button: Used to move lower direction on the menu
screen.
• button: Used to increment the value selected in
the menu.
• button: Used to decrement the value selected in
the menu.
• button: Executes selections and displays a submenu for an item with the mark.
button to exit the setup menu.
or button to
or button to select a
55
Page 56

Operation and settings
Exposure settings
WDR/BLC
Use WDR/BLC option to view the object clearly in backlight
conditions.
1. Select [WDR/BLC] option on the [EXPOSURE] menu.
2. Use
56
or button to select a mode then click
button.
WDR: WDR (Wide dynamic range) feature can be •
very helpful to cope with very challenging lighting conditions. It is capable of capturing both of
the dark part and bright part and combining the
differences into a scene to generate a highly realistic image as original scene. Set the WDR limit.
WDR LIMIT: LOW > y MIDDLE y HIGH
BLC: Camera's backlight compensation feature •
helps alleviate issues of visibility in high contrast
areas. Set the BLC limit.
BLC LIMIT: LOW > y MIDDLE y HIGH
HSBLC: Use for masking brightness of the specific •
area to view the subject more clearly. The HSBLC
mode is automatically activated only in low luminance scene.
AREA SETTING: Use >
select a area then use
select a ON or OFF. Click
the area setting menu.
GRAY SCALE: Use >
a gray scale.
(GRAYyD.GRAYyBLACK).
USER SCALE: Use >
bright level. (5 level)
MASK: Use >
or [OFF].
If you set the MASK to ON, the mask function
is activate only when the HSBLC is activated
or button to
or button to
button to exit
or button to select
or button to select a
or button to select [ON]
Page 57

Operation and settings
by auto mode.
OFF: Not used.•
BRIGHTNESS
You can increase the brightness of the darkened video. If
you set the brightness to lower value, the image is darkened. If you set the brightness to higher value, the image
gets bright.
1. Select [BRIGHTNESS] option on the [EXPOSURE] menu.
2. Use
AGC (Automatic Gain Control)
If the images are too dark, change the maximum [AGC]
value to make the images brighter.
1. Select [AGC] option on the [EXPOSURE] menu.
2. Use
or button to set the bright level.
or button to select a mode.
(OFFy LOWyMIDDLEyHIGH)
SHUTTER (Shutter Speed)
Select the desired shutter speed for camera exposure. You
can change the shutter speed to higher speed to capture
fast-moving subjects, though the image becomes darker.
1. Select [SHUTTER] option on the [EXPOSURE] menu.
2. Use
SENS-UP
If pictures are not clear due to darkness, this SENS-UP
operation would increase the sensitivity of picture.
1. Select [SENS-UP] option on the [EXPOSURE] menu.
2. Use
or button to set shutter speed.
(x512~x2 y AUTO y OFF y A.FLK y 1/160 ~
1/90000)
or button to select mode.
AUTO: Adjust the sensitivity of the picture auto-•
matically.
SENS-UP LIMIT: Use >
the SENS-UP limit.
EXIT: Select a mode and click >
exit the menu.
or button to set
button to
57
Page 58

Operation and settings
OFF: Not used.•
Note:
If you set to one of the SHUTTER options except AUTO on
the [SHUTTER] menu or [AGC] to [OFF], the [SENS-UP] setting is not available and [---] mark is displayed.
58
White Balance settings
Select the method by which the camera shifts its output
colors to compensate for the color of a light source.
1. Select [WHITE BALANCE] option.
2. Use
or button to select a mode then click
button.
ATW (Auto-Tracing White Balance): In this mode, •
the color temperature range for the proper white
balance is approximately 1,700 - 11,000°K. Proper
white balance may not be obtained under the following conditions:
When the color temperature is out of the >
1,700 - 11,000°K range.
Page 59

Operation and settings
When the scene contains mostly high color >
temperature objects, such as a blue sky or
sunset.
When the scene is dim. >
AWC • b PUSH: If you select the AWC b PUSH
mode, you will be able to set up the White
Balance automatically using
MANUAL: You can set the white balance options •
manually.
COLOR TEMP: Use >
a function.
INDOOR: The color temperature range for the proper white balance is approximately 3,200°K.
OUTDOOR: The color temperature range for the proper white balance is approxi-
mately 5,100°K.
RED: Set the desired red value. (-100~100) >
BLUE: Set the desired blue value. (-100~100) >
button.
or button to select
Day/Night settings
1. Select [DAY/NIGHT] option.
2. Use
or button to select mode for day/night
function.
AUTO: You will be able to change the Day/Night •
mode automatically.
Note:
If you set the AGC to [OFF] or the SHUTTER is set
to one of the SHUTTER options except AUTO on
the [EXPOSURE] menu, the AUTO mode of the
DAY/NIGHT function is not available and [---]
mark is displayed.
59
Page 60

Operation and settings
60
LEVEL: Use > or button to select a level.
(LOWyMIDDLEyHIGH)
DWELL TIME: Use >
a dwell time. (5, 10, 15, 30 or 60 SEC)
DAY: Color mode enabled.•
NIGHT: Black-and-white mode enabled.•
or button to select
3D-DNR setting
1. Select [3D-DNR] option.
If pictures are not clear due to noise, this option would
reduce the noise of picture.
2. Use
Notes:
or button to select a option.
(OFFyLOWyMIDDLEyHIGH)
If you set the AGC to [OFF] on the [EXPOSURE] menu, •
the [3D-DNR] function is not available.
When you use this function, the afterimage may occur.•
Page 61

Operation and settings
Privacy Mask setting
This function is aiming at the protection of personal privacy, selecting a screen part black not to be displayed in
the screen. Up to 8 zones can be registered.
1. Select [PRIVACY] option.
2. Use
3. Use
4. Use
or button to select a [ON] and click but-
ton. The PRIVACY MASK menu appears.
or button to select a zone number (AREA1
~ AREA8) on the [MASK NUMBER] option.
or button to set up the ON or OFF on the
[DISPLAY] option. If you set to ON, the mask zone box
appears on the live window.
5. Use
6. Use
Note:
The parts with the registered mask numbers from AREA1 to
AREA4 have the same color. (So do the parts with the numbers from AREA5 to AREA8). If you change the mask color,
the registered mask color will be changed automatically
with the same color for each of group (AREA1~4, AREA5~8).
or button to select the color of the mask
zone box on the [COLOR] option.
or button to select an option then use
or button to adjust the option.
HEIGHT: Enlarge or decrease the vertical size of •
the mask zone box.
WIDTH: Enlarge or decrease the horizontal size of •
the mask zone box.
MOVE Y: Moves vertical position of the mask zone •
box.
MOVE X: Moves horizontal position of the mask •
zone box.
61
Page 62

Operation and settings
Special menu settings
D-ZOOM
You can select the digital zoom level.
1. Select [D-ZOOM] option on the [SPECIAL] menu.
2. Use
3. Use
62
or button to select a [ON] then click
button. When you set to ON, the displayed image can
be shaking.
or button to select a option then use or
button to select a level.
ZOOM: Use •
screen.
or button to enlarge the
PAN: Use • or button to move the screen.
(left or right)
TILT: Use •
or down)
D-EFFECT (Digital effect)
You can select the digital effect.
1. Select [D-EFFECT] option on the [SPECIAL] menu.
2. Use
V-FLIP: Flip the picture vertically. •
MIRROR: Turn on the mirror effect.•
ROTATE: Rotate the picture. (180°) •
OFF: Turn off the digital effect.•
SHARPNESS
The degree to which the boundary of the two portions is
clearly distinguished.
1. Select [SHARPNESS] option on the [SPECIAL] menu.
or button to move the screen. (up
or button to select a digital effect.
Page 63

Operation and settings
2. Use or button to adjust the option. If you
set the sharpness value to higher, the image outline
becomes sharp. If you set to lower value, the image
outline becomes dim.
STABILIZER
The image stabilizer function minimizes the appearance of
shaky images caused by low-frequency vibration.
This function is useful for outdoor surveillance.
Select [STABILIZER] option and set to ON or OFF.
Note:
If you set the [STABILIZER] to ON, the Digital zoom is set to
[x1.1] automatically.
COLOR
You can switch the displayed picture to gray scale or color.
1. Select [COLOR] option on the [SPECIAL] menu.
2. Use
or button to change a color effect.
ON: To display the picture with color. •
OFF: To display the picture with grayscale.•
USER TITLE
You can use the camera identification to assign a number
and character to the camera (0 - 9, A-Z, a-z).
To disappear the user title, select [OFF].
1. Select [USER TITLE] option on the [SPECIAL] screen.
2. Use
or button to select a [ON] then click
button. The USER TITLE menu appears.
A
3. Use , , or button to select a character or
number then click
button.
63
Page 64

Operation and settings
CLR: Clear all entered characters and numbers.•
POS: Move the USER TITLE position on the screen •
using the arrow buttons.
END: Confirm your selection or exit the setting.•
A• (Blank): Insert a space at the cursor position.
/ : Moves cursor to left or right.
•
LANGUAGE
Select the viewer language for the camera setup menu and
OSD information display.
64
Reset setting
1. Select [RESET ] option.
2. Click
3. Use
4. Click button to confirm your selection.
button and the RESET menu appears.
or button to select option.
CAMERA REBOOT: Reboot the camera system.•
FACTORY RESET: Clear certain settings and infor-•
mation and return to factory default settings.
Page 65

Troubleshooting
This section provides useful information to help you to
resolve any di culty you might have with your LG IP device.
Fault symptoms, possible causes and remedial actions are
provided here.
IP Setting problems
ARP/Ping: Disconnect and reconnect the power to the •
network camera. The device should get the IP within
2 minutes.
Ping your camera: Open the command prompt on •
your computer, type ping with the IP address of the
network device. The reply obtained by this command
provides explanation for the cause of the problem
1. bytes = 32 time = 2 ms indicates that the IP
address is already used and cannot reuse the
same. A new IP address needs to be obtained
2. Destination host unreachable: indicates that the
network device and your computer do not fall
in the same subnet hence needs to get a new IP
address. Contact the system administrator for the
required help
3. Request timed out: Indicates that the IP is free as
it is not used by anyone and the network device
can obtain this
IP Conflicts: If the LG network device is set with a static •
IP address and if the DHCP option is set then there
may be IP’s same as the network device and other network partner. Hence set the static IP address to 0.0.0.0
to resolve this conflict
Cannot access the camera from browser:
Reconnect the network camera with power and check •
the ping operation to know if the IP is used by others
Disable the proxy setting in the Browser if you are •
using a proxy server
Check for proper cabling and network connections, try •
to ping after verifying the connectivity
Sometimes when HTTPS is enabled, we would be •
checking the URL with http, in this case manually
change the URL to the http/https accordingly
Verify the DNS and Gateway settings if the IP address •
is assigned statically to the network device
65
Page 66

Troubleshooting
Accessing camera external to the local network
Firewall Protection: Check for the internet firewall with •
the system administrator, either he has to do port forwarding or modify the DMZ function on the router.
Default router needed: Check if you need configure •
the router settings.
Sporadic network performance
Network Switches or hubs used may be of the lower •
configuration and the load on this may not meet the
required conditions of our network camera.
Check for the RJ45 cables that are used for the net-•
work connectivity.
If POE is used check if the power is got by the network •
camera when connected to it.
Login Password lost
Reset the camera by pressing the Reset button for •
more than 3 seconds to restore default settings.
After the factory settings login using the default user-•
name and password.
66
Video Streaming problems
If the video streaming does not start on the Web client •
as per the indication install the latest version of JRE
(Java Run Time) on your computer.
When Windows IE browsers are used always take care •
to allow pop ups, check this option before we run the
web client.
Check the quality of image by referring the video set-•
tings as described in the manual.
Sometimes there would be intermittent or very slow •
video streaming, this may be because of the higher
resolution and frame rate that are set for the video.
The video streaming may appear poor at times, this •
may be because of the network traffic ,too many
devices connected to the switch or hub, enabling
motion detection to each of the video streams and
because of other programs running on your computer.
If the images appear to be blurred adjust the focus of •
the network camera to get a clear image.
Video images if appear white and black adjust the set-•
tings in the OSD to get back the colorful image.
Page 67

Troubleshooting
Select the Night mode if the network camera is con-•
nected at a place where surrounding light is less or
dark.
If we obtain lower frame rate than set we need to •
check from the system administrator for sufficient
bandwidth available or reduce the number of applications running on the client computer.
If the client PC’s are unable to access the multicast •
stream, check with the system administrator for the
use of a valid multicast address or check if the router is
supporting multicasting.
If the images appear to have white of gray stripes on •
it, upgrade the Video graphics driver on the client PC
to the latest version.
Video images may be noisy if you are using the cam-•
era in a very low light environment or the bit rate/
quality is set to very low values. Provide higher values
for quality and support the surrounding environment
with enough light.
Audio condition
The client computer that is interacting with the cam-•
era needs to have a sound card that is functional to
support speaker and microphone.
The sound card needs to be checked for its support for •
full duplex communication.
Ensure that the mute button of the client computer is •
not set and all the audio settings are correct.
Speaker button on the web viewer should be enabled •
to listen the audio from the network camera.
Ensure that the bidirectional audio button is enabled •
on the Web viewer and the microphone is set.
Change the input and the output gain for microphone •
and the speaker respectively to set correct audio level.
For all further support please contact the supplier or forums
or websites.
67
Page 68

Open source software notice
The following GPL executables and LGPL libraries used in
this product are subject to the GPL2.0/LGPL2.1 License
Agreements:
GPL EXECUTABLES:
Linux kernel 2.6, bash, busybox, gdbm, libreadline, moduleinit-tools, mount, mtd-utils, net-tools, quftp, tar, util-linux
LGPL LIBRARIES:
Glibc, libelf, libesmtp, live.media
LG Electronics offers to provide source code to you on
CD-ROM for a charge covering the cost of performing such
distribution, such as the cost of media, shipping and handling upon e-mail request to LG Electronics at:
opensource@lge.com
This offer is valid for a period of three (3) years from the
date of the distribution of this product by LG Electronics.
68
You can obtain a copy of the GPL, LGPL licenses from http://
www.gnu.org/licenses/old-licenses/gpl-2.0.html and http://
www.gnu.org/licenses/old-licenses/lgpl-2.1.html .
This product includes mDNSResponder component which
is licensed under the terms of the Apache License, Version
2.0.
You can obtain a copy of the Apache license from http://
www.apache.org/licenses/LICENSE-2.0.html .
Page 69

Open source software notice
This product includes
dhcp client : •
Copyright © 2004-2008 by Internet Systems
Consortium, Inc. (“ISC”)
Copyright © 1995-2003 by Internet Software
Consortium
expat library : Copyright © 2006 expat maintain-•
ers.
libcap•
libjpeg : Independent JPEG Group Copyright © •
1991 1998, Thomas G. Lane.
libmd5 : Copyright © 2002 Aladdin Enterprises.•
libncurses : Copyright © 1998,2002 Free Software •
Foundation, Inc.
libpcre : Copyright © 1997-2009 University of •
Cambridge
UPnP SDK : Copyright © 2000-2003 Intel •
Corporation
libxml2 : Copyright © 1998-2003 Daniel Veillard.•
lighttpd : Copyright © 2004, Jan Kneschke, incre-•
mental
ntpdate : Copyright © David L. Mills 1992-2006•
OpenSSL : •
cryptographic software written by Eric Young >
(eay@cryptsoft.com).
software written by Tim Hudson ( > tjh@cryptsoft.com).
software developed by the OpenSSL Project >
for use in the OpenSSL Toolkit. (http://www.
openssl.org)
PHP software, freely available from • http://www.
php.net/software/ : Copyright © 1999 - 2009 The
PHP Group.
Speex :•
Copyright 2002-2008 Xiph.org Foundation >
Copyright 2002-2008 Jean-Marc Valin >
Copyright 2005-2007 Analog Devices Inc. >
Copyright 2005-2008 Commonwealth >
Scientific and Industrial Research
Organisation (CSIRO)
69
Page 70

Open source software notice
Copyright 1993, 2002, 2006 David Rowe >
Copyright 2003 EpicGames >
Copyright 1992-1994 Jutta Degener, Carsten >
Bormann
Zlib : Copyright © 1995-2002 Jean-loup Gailly and •
Mark Adler.
All rights reserved.
Permission is hereby granted, free of charge, to any person
obtaining a copy of this software and associated documentation files (the “Software”), to deal in the Software without
restriction, including without limitation the rights to use,
copy, modify, merge, publish, distribute, sublicense, and/or
sell copies of the Software, and to permit persons to whom
the Software is furnished to do so, subject to the following
conditions:
THE SOFTWARE IS PROVIDED “AS IS”, WITHOUT WARRANT Y
OF ANY KIND, EXPRESS OR IMPLIED, INCLUDING BUT NOT
LIMITED TO THE WARRANTIES OF MERCHANTABILITY,
FITNESS FOR A PARTICULAR PURPOSE AND
70
NONINFRINGEMENT. IN NO EVENT SHALL THE AUTHORS
OR COPYRIGHT HOLDERS BE LIABLE FOR ANY CLAIM,
DAMAGES OR OTHER LIABILITY, WHETHER IN AN ACTION
OF CONTRACT, TORT OR OTHERWISE, ARISING FROM, OUT
OF OR IN CONNECTION WITH THE SOFTWARE OR THE USE
OR OTHER DEALINGS IN THE SOFTWARE.
Page 71

Speci cation
Item LSW900 LSW901
Image Device 1/3 inch Vertical Double Interline CCD
Lens Type C/CS Mount
Video Out 1.0Vp-p Composite Signal (75ohm)
Auto Gain Control OFF/ LOW/ MIDDLE/ HIGH
Exposure ALC/ELC
Electric Shutter 1/50 ~ 1/90,000(PAL), 1/60~1/90,000(NTSC)
Day/Night True Day and Night ( Auto/ Day / Night )
Sense-Up AUTO/OFF
Min. Illumination Color: 0.1 Lux (Sens-up Off ), B/W: 0.00003 Lux (Sene-up On)
Resolution 540 TV Lines
White Balance ATW / AWC / Manual
Backlight Compensation BLC/ WDR /HSBLC/OFF
3D-DNR OFF/ Low/ Middle/ High
Privacy Masking 8 Zone
Digital Zoom X8
71
Page 72

Speci cation
Item LSW900 LSW901
DIS(Stabilizer) ON/OFF
Digital Effect OFF/ V-Flip / Mirror / Rotate
Resolution (Max) 704 x 480(NTSC), 704 x 576(PAL)
Output RJ-45(Network), CVBS (Monitor)
Frame Rate (Max) 30 fps/25fps(NTSC/PAL)
Compression H.264(Basic Profile)/MJPEG Dual Stream
Audio Full Duplex (Line level input/output )
Audio Compression G.726, G.711(A-law, u-law)
Sensor/Relay 1 digital inputs, 1 relay outputs
Intruder detection (Optional)
Tripwire (Optional)
VCA (Video Contents Analysis)
72
Object Removal (Optional)
Object Counting (Optional)
Tampering (Optional)
Page 73

Speci cation
Item LSW900 LSW901
Event Detection Sensor In Sensor In, VCA
Event Notification Relay, SMTP, FTP
ID/Password Multi level user ID/password (Admin, Power, Normal, Customer)
Encryption HTTPS (SSL,TLS)
Physical Layer 10/100base TX Ethernet
Protocol
IP support Dynamic, Static, Private IP
Users Unicast 10 Streams / 50 user registration
Operation Temp. / Humidity -10 ºC ~ 50 ºC / 0%RH ~ 80%RH
Power Source PoE, AC24 (±20%) (1A or above), DC12V (±10%) (2A or above)
Power Consumption About 9W
etc RS-485 Support
Dimension 69(W) X 54(D) X 128.5(H)
Weight 0.5 Kg
TCP/IP(IPv4), HTTP, HT TPS, RTP, RTSP, UDP, DHCP, FTP, SMTP, NTP, ARP, ICMP,
DDNS(LG)
73
Page 74

P/NO: MFL62591905
 Loading...