

OWNER'S MANUAL
equipments.
P/No. MFL39754867
1
6
Preparing for operation
6
Usage
6
6
Cleaning & Maintenance
6
Service
6
Symbols used in this manual
7
Components
8
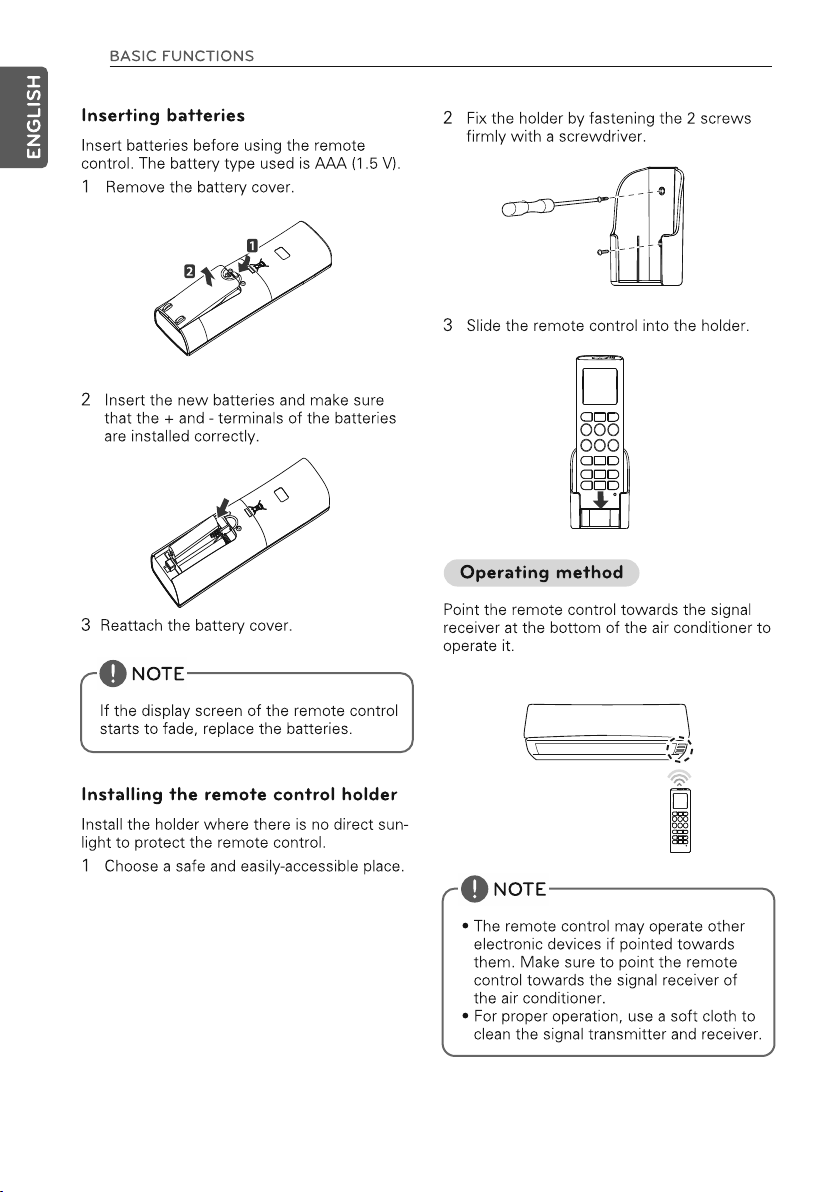
Using the remote control
9
- Inserting battery
9
- Installing the remote control holder
10
BASIC FUNCTIONS
10
10
10
11
11
11
11
11
12
airflow
13
13
13
13
13
14
Dimmer
14
14
15
15
16
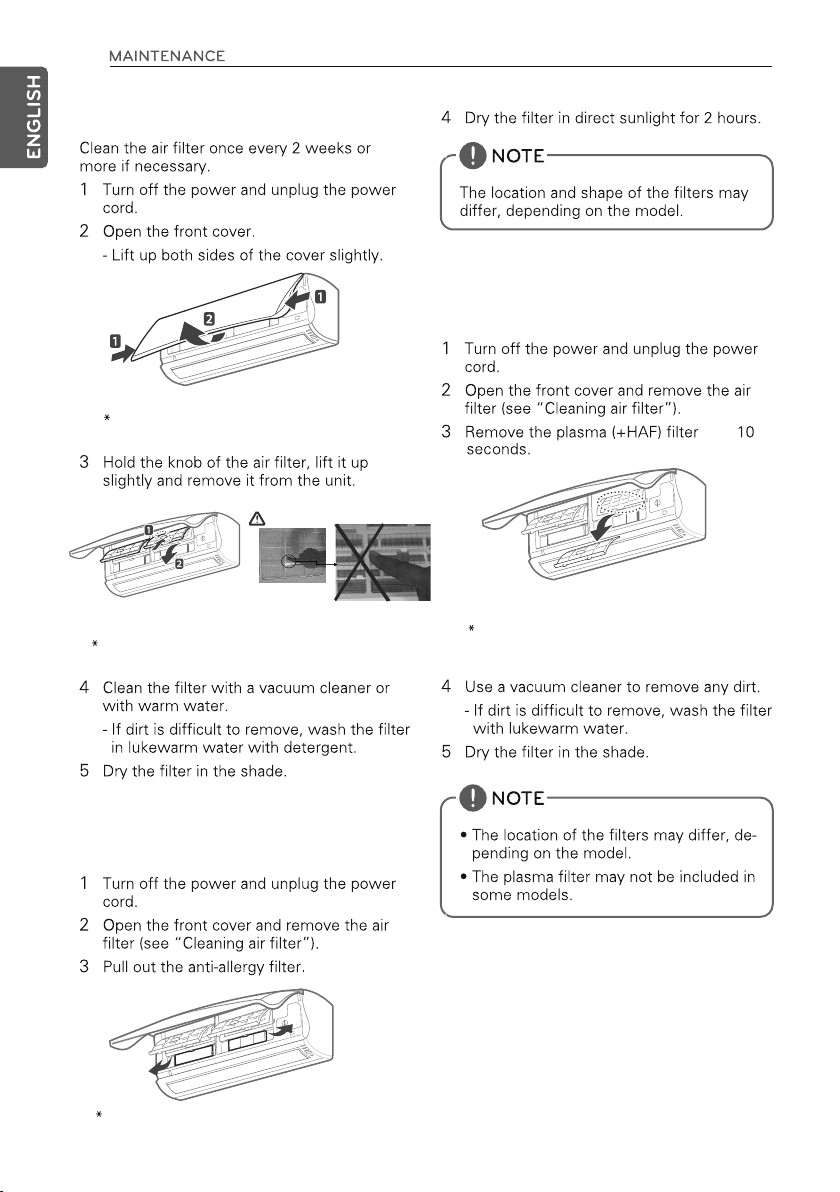
Cleaning the air filter
17
Cleaning the anti-allergy filter and triple
17
filter
Cleaning the plasma (+HAF) filter
17
(Optional)
19
19
19
12
12
12
Avoid excessive cooling
reduce the cooling/ dehumidification functions
result
shall
hazards.
instructions
and
confirming
unit
ON or OFF
water
may effect product performance or
enter
OFF
may effect product performance.
to
not cause
,
in health complications or
solvents for air conditioner cleaning it may effect
product performance or result in product failure
Always insert the filter securely after cleaning. Clean the filter in every two weeks or more often if
necessary.
or
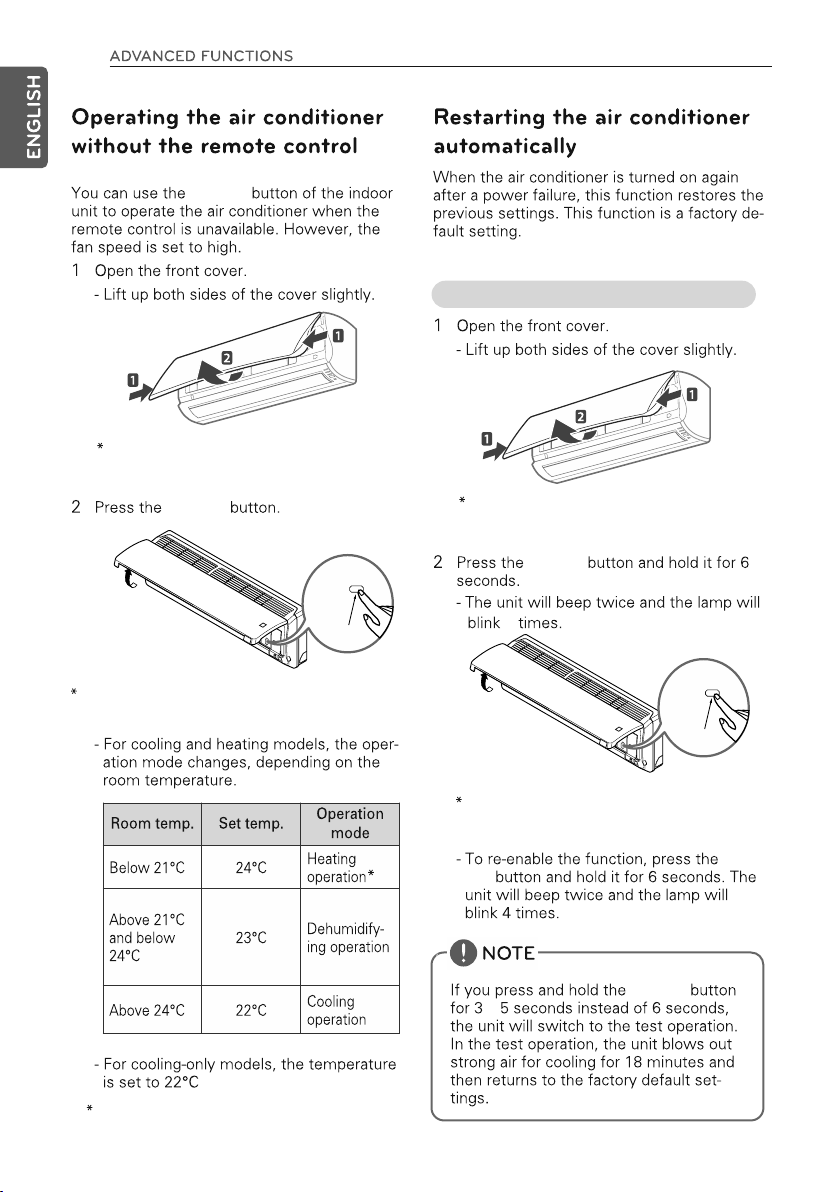
Prior to Operation
6
Preparing for Operation
1.Contact an installation specialist for
installation.
2.Plug in the power plug properly.
3.Use a dedicated circuit breaker.
4.Do not use an extension cord.
5.Do not start/stop operation by plugging/
unplugging the power cord.
6.If the cord/plug is damaged, replace it with
only an authorized replacement part.
Usage
1.Being exposed to direct airflow for a long
time may be hazardous to your health. Do
not expose occupants, pets, or plants to
direct airflow for a long time.
2.Due to the possibility of oxygen deficiency,
ventilate the room when using the
appliance together with stoves or other
heating devices.
3.Do not use this air conditioner for non specified special purpose (e.g. preserving
precision devices, food, pets, plants, or art
objects). Such use may damage your
properties.
Components
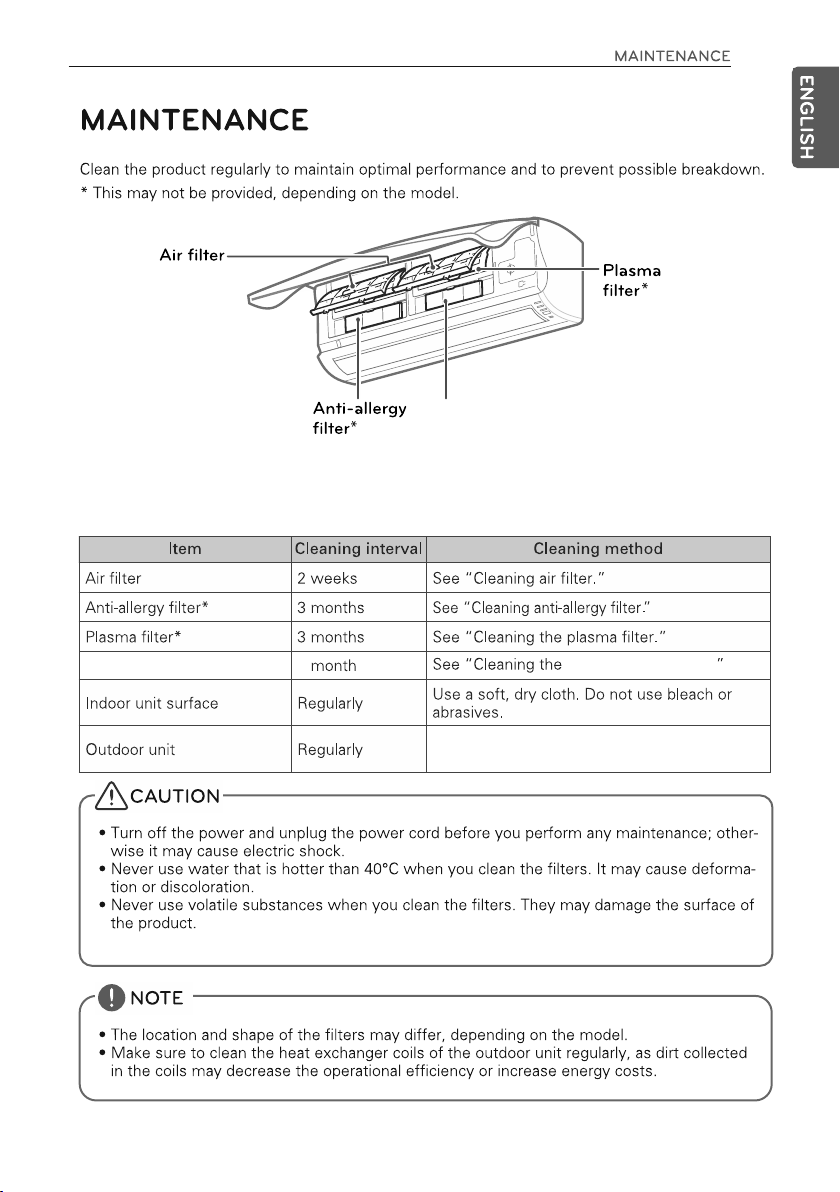
Cleaning and Maintenance
1.Do not touch the metal parts of the unit
when removing the filter injury may occur.
2.Do not use water to clean inside the air
conditioner. Exposure to water can
destroy the insulation, leading to electric
shock.
3.When cleaning the unit, first make sure
that the power and circuit breaker are turned OFF.
The fan rotates at a very high speed during
operation. There is a possibility of injury if
the unit’s power is triggered while cleaning
inner parts of the unit.
Service
For repair and maintenance, contact your
authorized service dealer.
Symbols used in this Manual
This symbol alerts you to the risk of electric shock.
This symbol alerts you to hazards that may cause harm to the
air conditioner.
!
NOTE
This symbol indicates special notes.

7
Air Inlet
Signal Receiver
Air Filter
Front Panel
Product look and picture are for reference only,
actual product may vary depending on model of the air conditioner.
Air Intake Vents
Air Outlet Vents
Base Plate
Connecting
Wires
Piping
Drain Hose
Electrical Safety
WARNING
•
This appliance must be properly grounded.
To minimize the risk of electric shock, you must always plug into a grounded outlet.
•
Do not cut or remove the grounding.
•
Attaching the adapter ground terminal to the wall receptacle cover screw does not ground the
appliance unless the cover screw is metal and not insulated, and the wall receptacle is grounded
through the house wiring.
•
If you have any doubt whether the air conditioner is properly grounded, have the wall receptacle
and circuit checked by a qualified electrician.
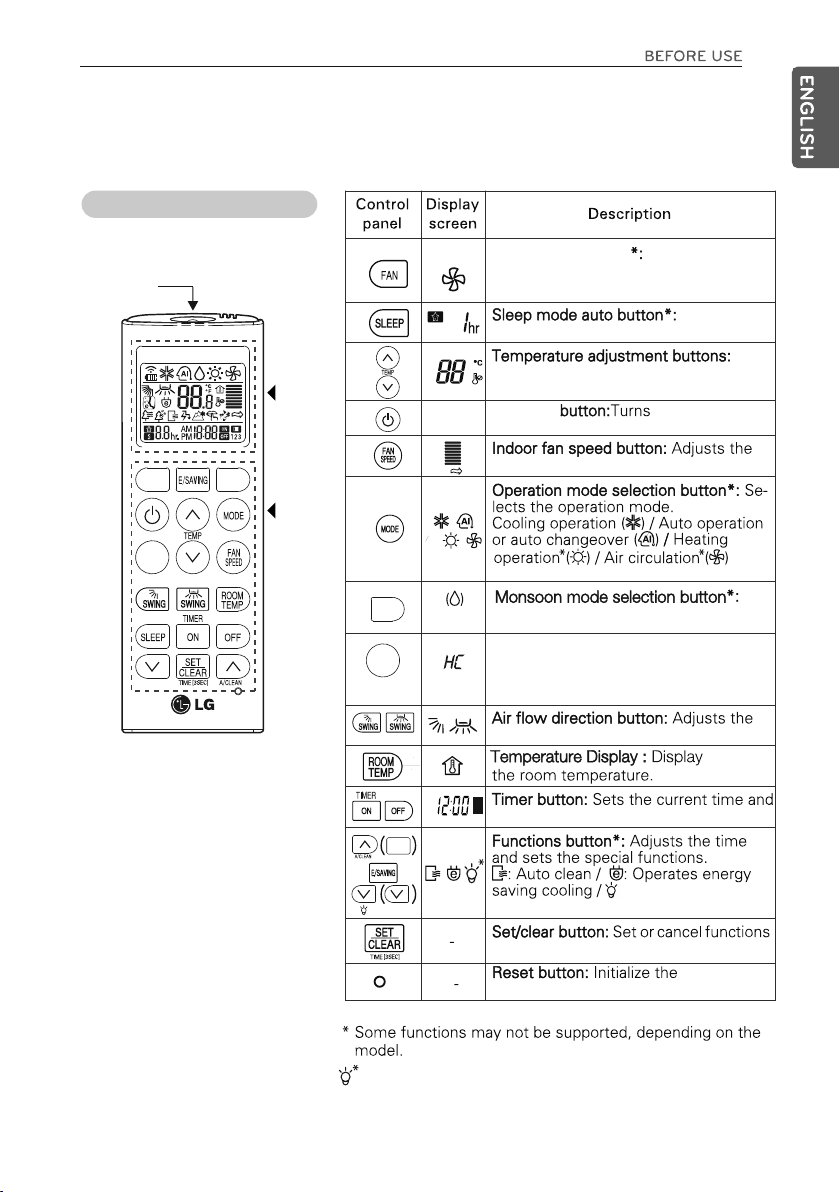
Using the remote control
You can operate the air conditioner more conveniently with the remote control.
Wireless remote control
8
Signal Transmitter
FAN
H’COOL
LIGHT
Air Circulation button
Used to circu-
late the room air without cooling or
heating.
sleep mode auto operation.
M
2
M’SOON
Display
Screen
Control
Panel
justs the desired room temperature
when cooling or heating.
ON/OFF
-
conditioner
ON / OFF
fan speed.
Sets the
Ad-
the air
-
M’SOON
H’COOL
M
Use to remove excess moisture.
H’COOL button* : Cools down the
indoor temperature within a short
period of time
air flow direction.
ON
AM
OFF
the start / end time
A/CLEAN
LIGHT
display ON or OFF.
and set current time.
Turn indoor unit
controller settings.
Symbol is for indoor unit display ON/OFF not for remote
contoller display.
remote
9
BASIC FUNCTIONS
10
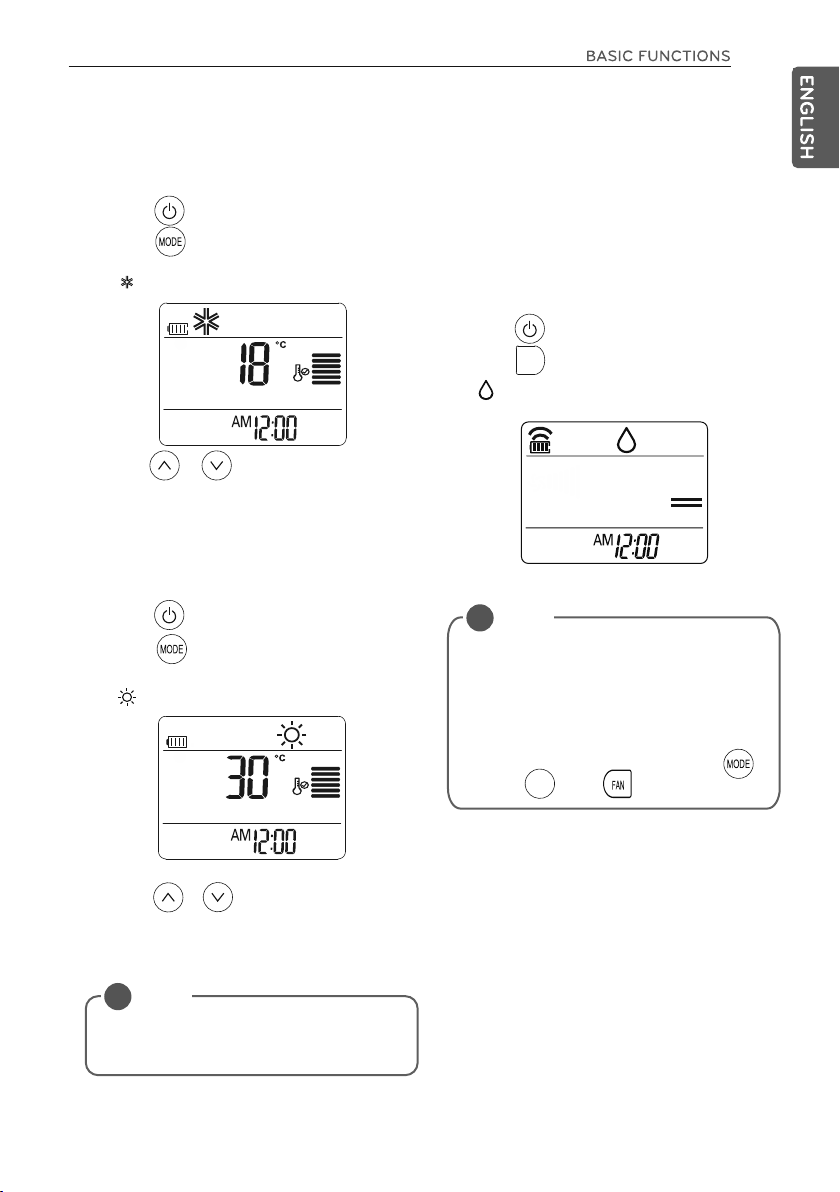
Cooling your room
(Cooling operation)
Press to turn on the
1
2
Press repeatedly to select the cooling
operation.
is displayed on the display screen.
-
Press or to set the desired
3
temperature.
- The temperature range is 18°C 30°C
power.
Heating your room
(Heating operation)
1 Press to turn on the power.
2
Press repeatedly to select the heating
operation.
is displayed on the display screen.
-
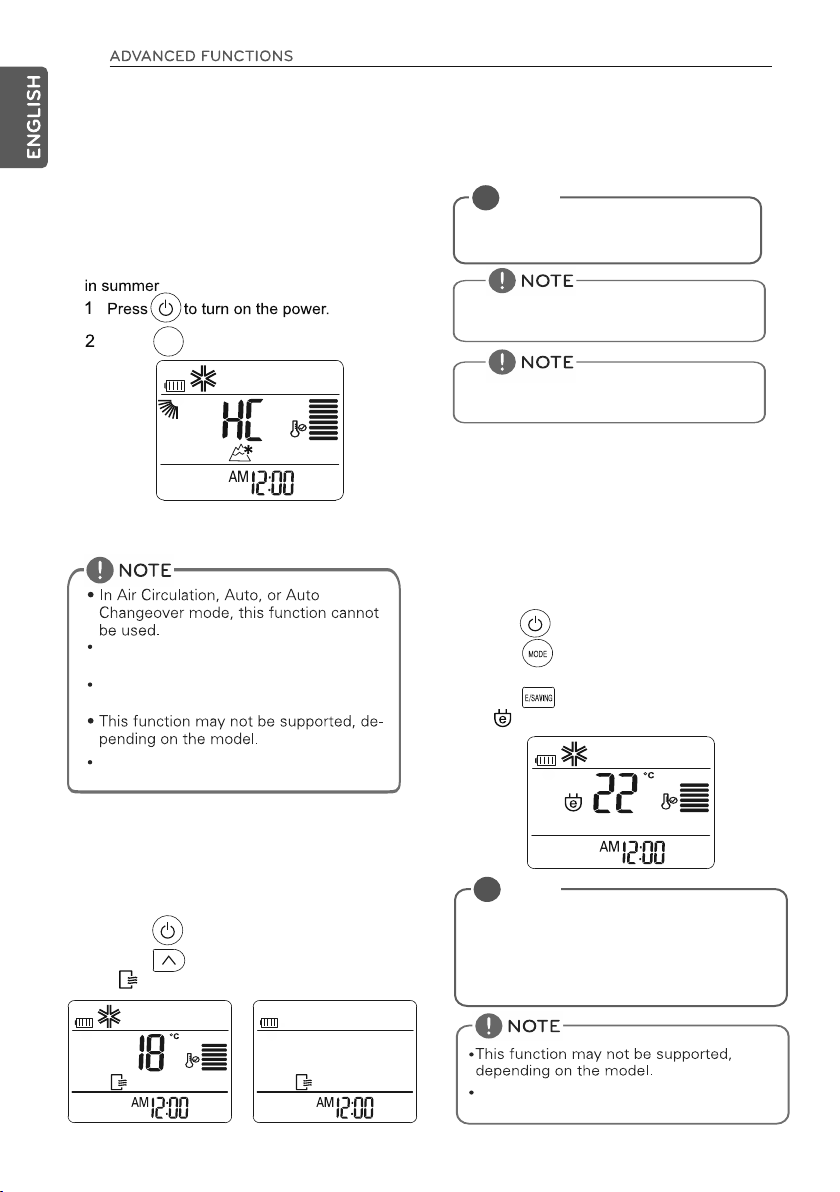
Removing humidity (Cooling Mode Only)
(Monsoon operation)
This mode removes excess moisture from
environment with high humidity or in the rainy
season, in order to prevent mold from setting
in. This mode adjusts the room temperature
and the fan speed automatically to maintain
the optimal level of humidity.
1
Press to turn on the power.
2
Press to select the
M’SOON
M
- is displayed on the display screen.
NOTE
!
• In this mode you cannot adjust the room
temperature, as it is adjusted automatically. Also, the room temperature is not
displayed on the display screen.
• In this mode indoor unit fan and outdoor
unit will be OFF intermittently.
• To Exit from Monsoon mode press
key or key or key
H’COOL
monsoon operation.
M
3
Press or to set the desired temperature.
- The temperature range is 16°C 30°C
NOTE
!
Cooling-only models do not support this
function.
11
Airing your room
(Air Circulation operation)
This mode only circulates the indoor air
without changing the room temperature.
Press to turn on the power.
1
FAN
2
Fan button : Press
circulation operation.
is displayed on the display screen.
-
3
Press to adjust the fan speed.
turn on the air
Adjusting the fan speed
1 Press repeatedly to adjust the fan
speed.
- Select if you want natural air.
The fan speed adjusts automatically.
Natural wind (CHAOS Logic)
For fresher feeling , pr ess the INDOOR FAN
SPEED SELECTION BUTTON and set to
Natural wind mode( ) .
In this mode, the wind bl ows lik e a natural
breeze by automatic all y ch ang ing fan speed.
Adjusting the air flow direction
To adjust the direction of the flow verti-
1
cally, press change the air flow direction automatically.
- This function is apply for only turn air deflector
turn ON/OFF.
2
To adjust the direction of the flow horizon-
tally, press change the air flow direc-
tion automatically.
- This function is apply for only turn air deflector
turn ON/OFF.
NOTE
!
• Adjusting the air flow direction horizontally may not be supported, depending
on the model.
• Adjusting the air deflector arbitrarily may
effect product performance.
• If you restart the air conditioner, it starts
to operate with the previously set direction of air flow, so the air deflector may
not match the icon displayed on the remote control. When this occurs, press
or
the air flow again.
to adjust the direction of
Setting the Timer
You can use the timer function to save energy
and to use the air conditioner more efficiently.
Setting the current time
1 Press and hold it for longer than 3 sec-
onds.
- The AM/PM icon flickers at the bottom of
the display screen.
12
2 Press or to select .
3
Press to finish.
desired time.
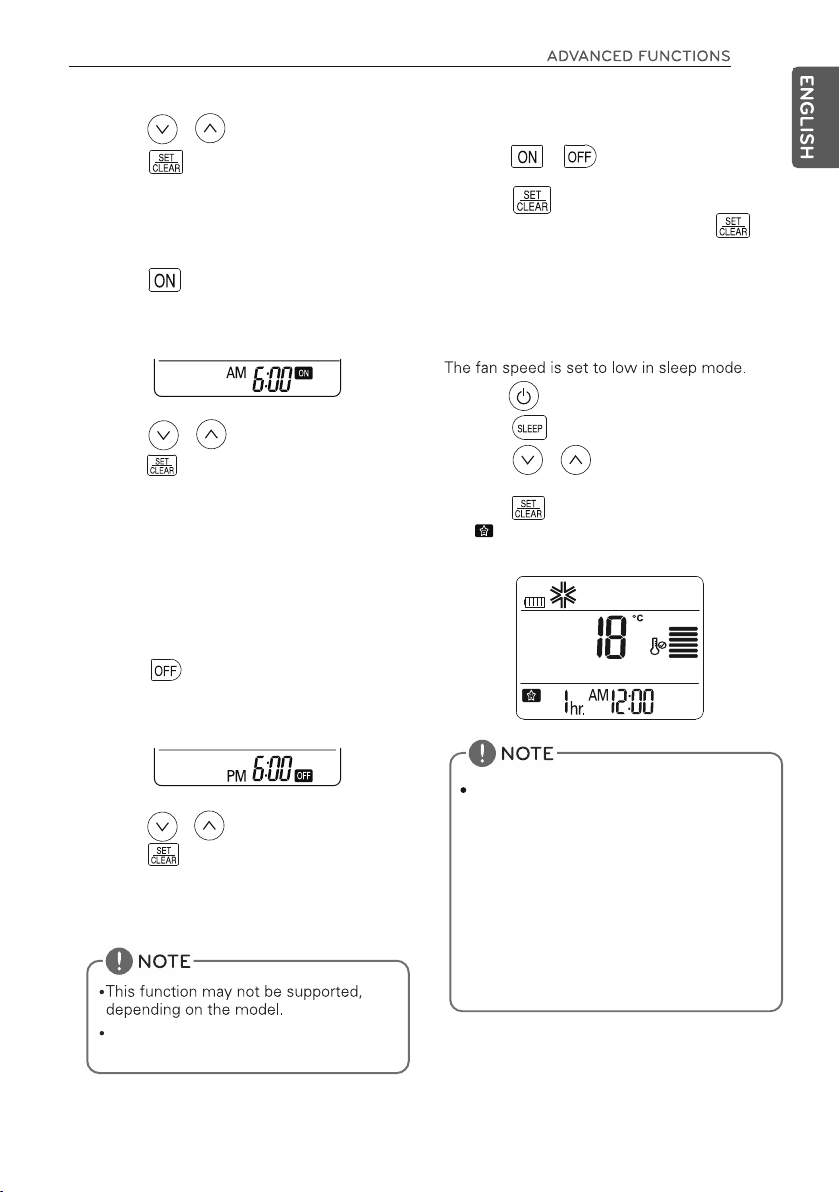
Turning on the air conditioner automatically at a set time
1 Press
- The icon below flickers at the bottom of
the display screen.
2
Press
3
Press to finish.
4
When setting the timer, current time and
ON icon are displayed on the display
screen indicating that the ON TIMER is
set.
or to select
desired time.
times.
Turning off the air conditioner automatically at a set time
1 Press
- The icon below flickers at the bottom of
the display screen.
Canceling the timer setting
1 Press or to select the timer setting
to cancel.
2
Press
- To cancel all timer settings, press
(The timer lamp on the air conditioner and
the remote symbol will go off ).
Setting sleep mode
Use the sleep mode to turn off the air conditioner automatically when you go to sleep.
1
Press to turn on the power.
2
Press
3
Press
(up to 7 hours).
4
Press to finish.
- is displayed on the display screen in
sleep mode.
or to select the hour
2
Press
3
Press to finish.
4
When setting the timer, current time and
OFF icon are displayed on the display
screen indicating that the OFF TIMER is
set.
or to select
the times.
desired time.
This mode does not have auto restart
feature.
The sleep mode will o per ate ind oor fan at
super low speed in co oli ng m ode and at low
speed in heating mod e fo r pl eas ant sleep
In cooling mode or Monso on m ode :
The setting temperatur e wi ll r ise automatically
two times by 1°C over nex t co nse cutive 30
minutes (Maximum 2°C) f or a com fortable
sleep.
This will be the final se tti ng t emperature as
long as sleep mode is fun cti oni ng.
After completion of set tim e un it will switch
OFF automatically.
13
ADVANCED FUNCTIONS
The air conditioner offers some additional advanced functions.
Changing room temperature
quickly
H’COOL Mode
This mode allows you to cool indoor air quickly
H’COOL
Press
-In H’COOL mode,30 minutes strong focused
air blows out for faster cooling.
1
During & after H'COOL mode swing
function will be ON by default.
To OFF swing function Press respective
swing key.
- If you turn off the power, the fan operates for 30 minutes and cleans the inside
of the indoor unit.
NOTE
!
Some buttons cannot be used while the
auto cleaning function is in operation.
During A uto Clean function, “C o” w ill
be disp lay ed o n the unit.
Power s avi ng l amp blink dependin g
on the m ode l.
Energy saving cooling mode
This mode minimizes power consumption during cooling and increases the set temperature
to the optimal level for a more comfortable environment.
The temperature automatically sets at
22°C if ambient temperature is below
The temperature maintains if ambient temperature is above 22°C
Press to turn the power on.
2
Press repeatedly to select the cooling
operation.
3
Press
- is displayed on the display screen.
22°C.
This mode does not have auto restart
feature.
Indoor air purification
Auto Clean operation
In the cooling and monsoon operations,
moisture is generated inside the indoor unit.
Use the auto cleaning function to remove
such moisture.
1
Press to turn on the power.
Press
2
- is displayed on the display screen.
NOTE
!
This function may not be supported,
depending on the model. In Energy Saving
Cooling Mode, temperature on the display
of the remote controller and air conditioner can be different.
This mo de d oes not have auto resta rt
featur e.
14
Auto operation (Optional)
(Artificial inelligence)
Cooling-only models
In this mo de, the fan sp eed and the
temperat ure adjust au tomatically,
based on t he room tempe rature.
1
Press to turn on the power.
2
Press repeatedly to select auto operation.
3
Press
ation code if the temperature is higher or
lower than the desired temperature.
!
• In this mode, you cannot adjust the fan
speed, but you can set the air deflector
to rotate automatically.
• This function may not be supported, depending on the model.
or to select the desired oper-
Code Description
2 Cool
1 Cool slightly
0 Maintain
room
temperature
-1 Heat slightly
-2 Heat
NOTE
Auto Changeover
(Optional)
Heat pump models
This operation is basically heating or cooling
function of the air conditioner. But during this
operation the controller change the operation
mode automatically to keep the temperature
within ±2°C with respect to the setting
temperature.
1
Press to turn ON the power.
2
Press repeatedly to select auto operation.
- is displayed on the display screen.
Press or to set the desired
3
temperature.
- The temperature range is 18°C 30°C
4 Press repeatedly to select the fan speed.
NOTE
!
• This function may not be supported, depending on the model.
Dimmer (Optional)
In Dimmer Mode Unit Display will be turned OFF
completely but system will be in running state.
1.
Make sure that remote & Air conditioner are ON.
2.
Press to activate/deactivate dimmer
function.
Dimmer Mode will be cancelled if any key
except is pressed
(Power Key will turn OFF the Unit).
This function may not be supported by
Auto Restart feature (depending on
selected models.)
LIGHT
15
(Forced Operation)
ON/OFF
The feature can be changed according to the
type of model.
ON/OFF
Open the front
panel upward
ON/OFF
button
Disabling auto restart (Optional)
The feature can be changed according to the
type of model.
ON/OFF
8
The feature can be changed according to the
type of model.
This function may not be supported,
depending on the model.
Open the front
panel upward
ON/OFF
button
The feature can be changed according to the
type of model.
ON/
OFF
ON/OFF
~
Micro Protection filter*
16
Micro Protection filter*
1
Use steam to clean the heat exchanger coils and
the panel vents (consult with technician).
Micro Protection filter.
17
Cleaning the air filter
Cleaning the plasma (+HAF)
filter (Optional)
The feature can be changed according to the
type of model.
Caution :
Do not press
the mesh
The feature can be changed according to the
type of model.
Cleaning the anti-allergy filter
after
The feature can be changed according to the
type of model.
The feature can be changed according to the
type of model.
Cleaning the Micro Protection Filter
(Optional)
Micro Protection Filter.
18
- Do not wash the Micro Protection Filter
with water because the filter can be
damaged.
We suggest changing the Micro Protection
Filter every 6 months.
The location of the filters may differ,
depending on the model.
For more filters, Please contact the
LG service center.
The feature can be changed according to
type of model.
,
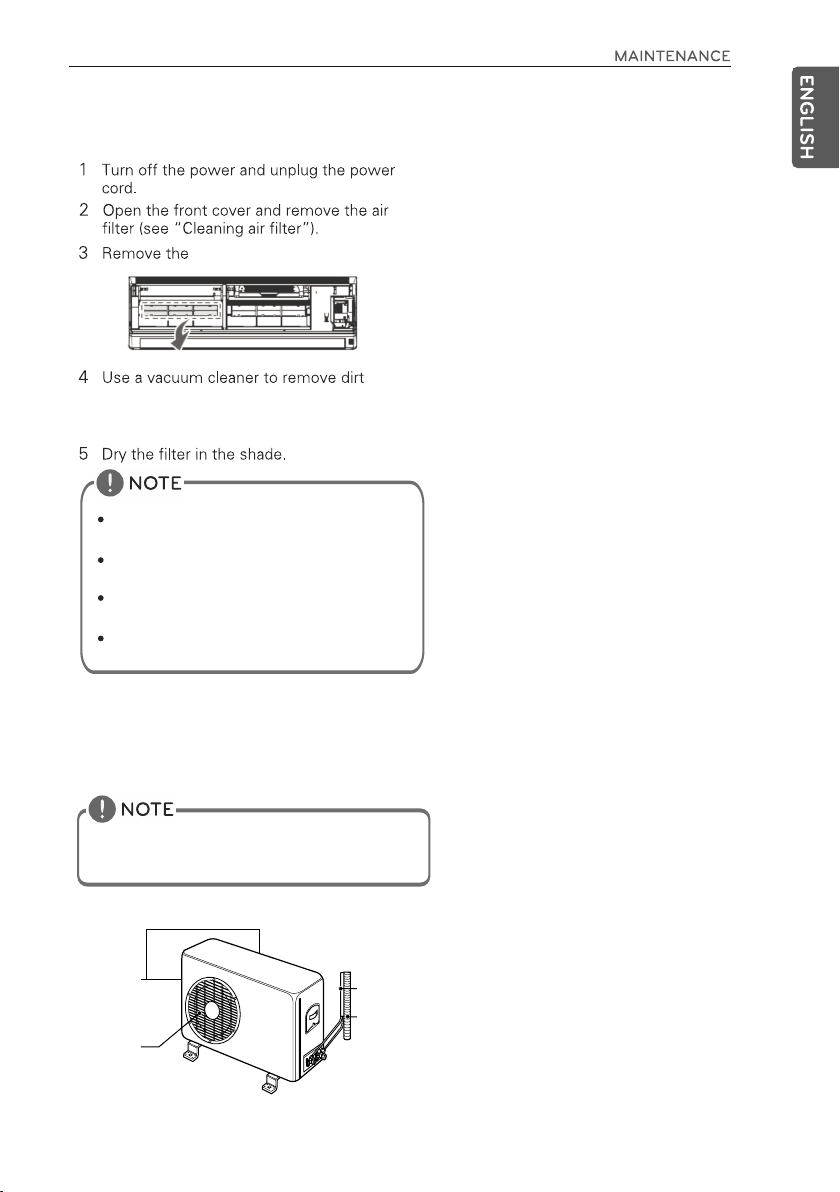
Outdoor Unit
The heat exchanger coils and panel vents of the outdoor unit should
be checked regularly. If clogged with dirt or soot, the heat exchanger
and panel vents may be professionally steam cleaned.
Dirty or clogged coils will reduce the operating
efficiency of the system and cause higher operating
costs.
(Rear)
(Side)
Air intake
vents
Air outlet
vents
Piping
Drain Hose
TROUBLESHOOTING
19
OFF
OFF
OFF

In summer, it may take some time to cool
indoor air. In this case, select the H’COOL
operation to cool indoor air quickly.
20
The auto operation,
H’COOL operation or
dehumidification
operation is selected.
The air circulation
or H’COOL operation is selected.
In some operation modes, such as the H’COOL
or dehumidification operation modes, you cannot
adjust the fan speed. Select an operation mode
in which you can adjust the fan speed.
In some operation modes, such as the air
circulation or H’COOL mode, you cannot
adjust the temperature. Select an operation
mode in which you can adjust the temperature.
When the air conditioner is not going to be used for a long time.
When air conditioner is not going to be
used for a long time.
Operate the air conditioner on Air circulation
mode for 2 to 3 hours.
Turn off the circuit breaker, and disconnect
the plug.
Turn off the circuit breaker when the air conditioner
is not going to be used for a long time.
Dirt may collect and may cause fire.
Remove the batteries from the remote
control.
When the air conditioner is to be used again.
Clean the air filter and install it in the indoor
unit.
Check that the air inlet and outlet of the
indoor/outdoor unit are not blocked.


6
Подготовка к работе
6
использование
6
Чистка и техобслуживание
6
обслуживание
6
Символы, используемые в настоящем руководстве
6
7
8
9
9
10
13
13
13
13
13
14
Диммер
14
Автоматическое переключение
14
15
15
16
1
10
10
10
12
12
12
12
17
17
11
11
11
11
11
17
19
19
19

2


Не устанавливайте кондиционер в местах прямого воздействия солнечных лучей! Это может
привести к повреждению устройства.
Безопасно сложите упаковочные материалы, такие как винты, гвозди или батарейки в упаковочный
мешочек после установки или ремонта. Иначе это может привести к серьезным травмам.
Не устанавливайте кондиционер воздуха там, где он будет подвер-гаться прямому воздействию
морс-кого ветра (солевого тумана). Это может привести к повреждению устройства.
Установите кондиционер воздуха там, где шум от наружного блока или отходящего газа не будет причинять
беспокойство соседям. Если это не сделать, то может возникнуть конфликт между соседями
Соблюдайте осторожность при распаковке или установке кондиционера. Если это не сделать, то можно получить
серьезную трав-му или привести к повреждению устройства.
Не прикасайтесь к местам утечки хладагента во время установки или ремонта. Это может привести к повреждению
устройства.
В перевозке оборудования должны принимать участие 2 или более че-ловек или погрузчик. Иначе можно получить
серьезную травму.

ПЕРЕД ИСПОЛЬЗОВАНИЕМ
6
ПЕРЕД ИСПОЛЬЗОВАНИЕМ
Перед тем, как приступить к работе
Подготовка к работе
1. Для выполнения установки свяжитесь с
специалистом.
2. Надлежащим образом вставьте вилку в
разъём.
3. Пользуйтесь выделенной цепью.
4. Не пользоваться удлинителем.
5.Не начинайте/останавливайте работу,
вставляя/вынимая провод питания.
6.Е с ли про в од / вил к а по вре ж де н ы,
замените их только одоб ренны ми
запчастями.
использование
1. Не подвергайте себя слишком долго
прямому воздействию потока воздуха –
это может быть опасным для здоровья.
Не подвергайте жителей, домашних
животных ил и растения прямо му
воздействию потока воздуха в течение
длительного времени.
2. В связи с вероятностью кислородного
деф ици та, п р ов етр ите к о мнату,
используя устройство одновременно с
печами или другими нагревательными
устройствами.
3. Не используйте кондиционер для
непредназначенных целей (например,
за щита прец изионны х устройс тв,
п род ук т о в пит а н и я , д ом а ш н и х
животных, растений или предметов
искусства.
Чистка и техобслуживание
1. Не прик асайтесь к металлическим
частям устройства при уд алении
фильтра. Можно получить травму.
2. Не используйте воду для очистки
внутренних деталей кондиционера
воздуха. Воздействие воды может
нарушить изоляцию, что приводит к
поражению электрическим током.
3. При очистке устройства, сначала
убедитесь, что питание и выключатель
и выключены. Вентилятор вращается с
очень высокой скоростью во время
ра бот ы. С ущест вует вероя тност ь
тра вма тиз м а в с л уча е з а пус к а
устройства во вр емя выполнения
о ч и ст к и в н ут р е н ни х д е т а л ей
устройства.
обслуживание
Для выполнения ремонта и технического
обслуживания, обратитесь к
авторизованному сервисному дилеру.
Комплектующие
Символы, используемые в настоящем руководстве
Этот символ предупреждает об опа-сности, которая может причинить в
ред кондиционеру воздуха.
ПРИМЕЧАНИЕ
Этот символ указывает на специаль-ные замечания.

ПЕРЕД ИСПОЛЬЗОВАНИЕМ
ПЕРЕД ИСПОЛЬЗОВАНИЕМ
КОМПОНЕНТ
Внутренний блок
* Характеристики могут изменяться в зависимости от модели.
ПРИМЕЧАНИЕ
Количество операций ламп и их расположение может изменяться в зависимости от
модели кондиционера.
Наружный блок
7
* Характеристики могут изменяться в зависимости от модели.
Рабочие условия
В таблице ниже указан температурный диапазон, при котором может работать данный
кондиционер.
Режим Температура в помещении Наружная температура
Охлаждение
Нагрев
ЭЛЕКТРОБЕЗОПСНОСТЬ
ПРЕДУПРЕЖДЕНИЕ
•
Это устройство должен быть должным образом заземлён.
Чтобы свести к минимуму риск по-ражения электрическим током, не-обходимо всегда
подключаться к заземленному розетке.
•
Не отрезать или не удалять заземление.
•
Прикрепите зажим заземления к крышке винта настенной розетки так, чтобы заземлял устройство,
если эта крышка изготовлена из металла и изолирована, а стенка розетки заземлена посредством
домашней проводки.
•
Если имеются сомнения в правильности заземления кондиционера, то розетку и цепь должен
проверить квалифицированный электрик.

8
Кнопка циркуляции воздуха:
Используется для проветривания комнаты
без охлаждения
M
2
FAN
H’COOL
LIGHT
M’SOON
M’SOON
H’COOL
A/CLEAN
LIGHT
-
* *
Кнопка для выбора режима Муссон:
M
Используется для устранения
лишней влаги
Кнопка H'COOL: Для быстрого
охлаждения помещения
Кнопка направления воздушного потока:
Регулирует направление воздуха
ON
AM
OFF
*
Включает
и
выключает дисплей внутреннего блока
Символ для Вкл/Выкл дисплея внешнего блока,
не для пульта ДУ

9

10
(Только охлаждение)
(Опции режима Муссон)
M’SOON
M
M
В этом режиме вентилятор внутреннего
и внешнего блока периодически будет
отключаться.
Для того, что бы покинуть режим
Муссон нажмите кнопки или
H’COOL
или

Кнопка вентиляции: Для перехода в опции
циркуляции воздуха нажмите
11
Что бы направить воздушный поток
вертикально, нажмите
- Эта функция используется только как
включатель.
Что бы направить воздушный поток
горизонтально, нажмите
- Э та функция используется только как
включатель.
Естественный ветер(CHAOS Logic)
Для ощущения свежести нажмите
переключатель скорости вентилятора
и выберете режим Естественного ветра
В этом режиме, потоки такие же как при
естественном ветре благодаря автоматической регулировки скорости вентилятора

12
Если во время настройки таймера на
4
дисплее отображается время и значок
ON - это означает, что таймер включен.
(Лампочка таймера на кондиционере и
дисплей погаснут)
Если во время настройки таймера на
4
дисплее отображается время и значок
OFF – это означает, то таймер отключен.
Эта функция доступна не во всех
моделях.
В этом режиме нет возможности
автоматической перезагрузки.
В спящем режиме вентилятор внутреннего
блока, на охлаждение и на обогрев,
будет работать на супер низкой
скорости для спокойного сна.
В режиме Охлаждения или Муссон :
Для комфортного сна каждые 30 минут
температура автоматически будет
подниматься на один градус
( максимум два градуса)
Это изменение будет последним до конца
работы в спящем режиме.
После завершения работы в установленное
время, прибор выключится автоматически.

HCOOL режим
Этот режим позволяет очень быстро
охладить комнату в жаркое время года
H’COOL
- В режиме HCOOL ц еленаправленно
в течении 30 минут подается сильный
воздушный поток для быстрого охлаждения
Во время само-очистки, на дисплее
будет отображаться ''со''
Лампа энергосбережения мигает в
зависимости от модели
13
Во время и после режима HCOOL
закрылки будут функционировать по
умолчанию.
Для того что бы отключить закрылки,
нажмите соответствующую кнопку
В этом режиме нет возможности
автоматической перезагрузки.
Если окружающая температура ниже 22 С,
температура кондиционера автоматически
°
установиться на 22°С.
регающем режиме охлаждения, температура на дисплее пульта ДУ и на
кондиционере может отличаться.
В этом режиме нет возможности
автоматической перезагрузки
В энергосбе-

14
Автоматическое переключение
( необязательно)
Модели с тепловым насосом
Это функция действует во время охлаждения
или обогрева, но для поддержания
установленной температуры данная функция
может автоматически изменить действующий
режим.
Диммер ( необязательно)
В режиме Диммер дисплей прибора будет
полностью отключен, но система останется
в рабочем состоянии.
1. Убедитесь, что пульт ДУ и кондиционер включены
2. Нажмите для активации/деактивации функций
Диммера.
Режим Диммера будет отключен при
нажатии любой кнопки кроме
В этом режиме может быть не доступна
автоматическая перезагрузка
(в зависимости от модели)
LIGHT

Откройте
переднюю
панель вверх
ON/OFF
button
15
Откройте
переднюю
панель вверх
ON/OFF
button
~

16
Микро Защиты фильтровать*
Микро Защиты фильтровать*
1
Микро Защиты фильтровать"

не нажимайте
сетку
17

18
Микро Защиты фильтровать*
Микро Защиты фильтровать*
Не мойте Фильтр Микро Защиты
фильтровать, так как это может его
повредить
Мы советуем менять Фильтр Микро
Защиты каждые шесть месяцев
Что бы получить еще фильтры, пожалуйста,
свяжитесь с сервис центром LG
Наружный блок
Змеевики и отверстия в панелях теплообменника наружного блока
должны регулярно проверяться. Если они забит грязью или сажей,
то теплообменник и отверстия в панелях следует профессионально
очищать паром.
Загрязнённые или закупоренные змеевики снижают
эффективность работы системы и приводят к
повышенным эксплуатационным расходам.
(Задний)
(Сторона)
Воздухозаборник
Выпускные
вентиляционные
отверс-тия
дренажного
рукава

19

20
H'COOL
H'COOL
H'COOL
H'COOL
H'COOL
Если кондиционер не будет использоваться в течение дли-тельного времени.
Если кондиционер не будет использоваться
в течение дли-тельного времени.
Включите кондиционер на режим
циркуляции воздуха на 2 – 3 часа.
Выключите прерыватель цепи и
извлеките вилку.
ПРЕДОСТЕРЕЖЕНИЕ
Выключите прерыватель цепи, ког-да кондиционер
воздуха не бу-дет использоваться в течение
дли-тельного времени.
Грязь может накапливаться и может привести к пожару.
Извлеките батарейки из пульта дистанционного
управления.
Когда кондиционер воздуха должен
использоваться снова.
Прочистьте воздушный фильтр и
установите его во внутреннем блоке.
Убедитесь, что вход и выход воз-духа
из внутреннего/наружного блока не
заблокированы.


1
6
Ishga tayyorgarlik
6
foydalanish
6
Tozalash va texnik xizmat ko'rsatish
6
xizmat ko'rsatish
6
Mazkur qo'llanmada foydalanilgan simvollar
6
7
8
9
9
13
13
13
13
Elektr tokini tejab sovitish rejimi
13
Avto ishlash rejimi
13
Susaytirilgan
13
Rejimni avtomatik almashtirish
14
15
15
16
17
17
10
10
10
10
11
11
11
11
11
12
12
12
12
17
19
19
19

2


Konditsionerni bevosita quyosh nurlari tushadigan joylarga o'rnatmang! Bu qurilmaning shikastlanishiga olib kelishi mumkin.
O'rnatgandan keyin yoki ta'mirlagandan so'ng vintlar, mixlar yoki batareykalar kabi materiallarni o'rama xaltachaga xavfsiz
qilib joylashtiring. Aks holda bu jiddiy jarohatlarga olib kelishi mumkin.
Havo konditsionerini dengiz shamoli (tuzli tuman) bevosita ta'sir qiladigan joyga o'rnatmang. Bu qurilmaning shikastlanishiga
olib kelishi mumkin.
Kondensatsiyalangan suv to'siqlarsiz drenajlanishi uchun to'kish shlangini tegishli tarzda o'rnating. Agar bu ish qilinmasa,
unda qurilma shikastlanishi mumkin.
Havo konditsionerini tashqi blok yoki chiquvchi gaz shovqini qo'shnilarni bezovta qilmaydigan joyga o'rnating. Agar bu ish
qilinmasa, qo'shnilar orasida nizo chiqishi mumkin.
Konditsionerni o'ramidan ochishda yoki o'rnatishda ehtiyot bo'ling. Aks holda jiddiy jarohatlanish yoki qurilma shikastlanishi
mumkin.
O'rnatish yoki ta'mirlash paytida sovutish agenti sizib chiqadigan joylarga teginmang. Bu qurilmaning shikastlanishiga olib
kelishi mumkin.
Uskunani tashishda 2 yoki undan ortiq kishi yoki yuklagich qatnashishi kerak. Aks holda jiddiy jarohat olish mumkin.

FOYDALANISHDAN OLDIN
Ishni boshlashdan oldin
6
Ishga tayyorgarlik
1. O'rnatish uchun mu ta xa ss is b il an
bog'laning.
2. Vilkani tegishli tarzda teshikka tiqing.
3. Ajratilgan zanjirdan foydalaning.
4. Uzaytiruvchi simdan foydalanmang.
5. Quv vat si min i u l ay o tg a n/ c hiq ari b
olayotgan paytda ishni boshlamang /
to'xtatmang.
6. Agar sim/vilka shikastlangan bo'lsa, ularni
faqat ma'qullangan ehtiyot qismlar bilan
almashtiring.
foydalanish
1. Juda uzoq vaqt davomida bevosita havo
oqimining ta'miri ostida qolmang – bu
salomatlik uchun xavfli bo'lishi mumkin.
Uyda yashovchilarni, uy hayvonlari yoki
o'simliklarni ham uzoq vaqt davomida
bevosita havo oqimining ta'siri ostida
qoldirmang.
2. Qurilma pechlar yoki boshqa isituvchi
qurilmalar bilan bir paytda ishlatilganida
kislorod tanqisligi ehtimoli borligi bois
xonani shamollatib turing.
3. Konditsionerdan boshqa maqsadlarda
foyda lanma ng (masala n, pret sizio n
qurilmalar, oziq-ovqatlar, uy hayvonlari,
o'simliklar yoki san'at predmetlarini
himoya qilish uchun)
Butlovchi qismlar
Tozalash va texnik xizmat ko'rsatish
1. Filtrni yechib olayotganda qurilmaning
m e ta l l q is m l ar i g a t e g i nm a n g.
Jarohatlanishingiz mumkin.
2. Havo konditsionerining ichki detallarini
tozalash uchun suvdan foydalanmang.
Suv ta'sirida izolyatsiya buzilishi mumkin,
bu elektr toki urishiga olib keladi.
3. Qurilmani tozalash paytida oldiniga quvvat
va «viklyuchatel» o'chirib qo'yilganiga
ishonch hosil qiling. Ishlayotgan paytda
ventilyator juda katta tezlikda aylanadi.
Shu bois qurilmaning ichki detallarini
to za lash chog'ida qurilma ni i sh ga
tushirish jarohatlanish ehtimolini oshiradi.
xizmat ko'rsatish
Ta'mirlash va texnik xizmat ko'rsatish ishlarini
bajarish uchun avtorlashgan servis dileriga
murojaat qiling.
Mazkur qo'llanmada foydalanilgan simvollar
Ushbu simvol havo konditsioneriga zarar yetkazishi
mumkin bo'lgan xavf haqida ogohlantiradi.
Ushbu simvol maxsus mulohazalarga ishora qiladi.

7
ELEKTR XAVFSIZLIGI
OGOHLANTIRISH
•
Ushbu qurilma tegishli tarzda yerga tutashtirilishi kerak.
Elektr toki urishi xavfini minimumga yetkazish uchun har doim yerga tutashtirilgan rozetkadan
foydalaning.
•
Yerga tutashtirilgan simni kesmang va olib tashlamang.
•
Agar devor rozetkasi vintining qopqog'i metalldan tayyorlangan va izolyatsiyalangan bo'lib,
rozetka uy simi yordamida yerga tutashtirilgan bo'lsa, yerga tutashtirish qisqichini devor
rozetkasi vintining qopqog'iga shunday mustahkamlangki, u qurilmani yerga tutashtirsin.
•
Agar konditsioner to'g'ri yerga tutashtirilgani borasida shubha bo'lsa, unda rozetka va zanjirni
malakali elektrik tekshirishi lozim.

8
S
M
2
FAN
H’COOL
LIGHT
M’SOON
boshqaradi Havo Konditsioneri.
Joriy vaqtni o'rnatish
Bu belgi tashqi qismning displeyini o'chirish uchun, masofadan
boshqarish pulti uchun emas

9

10

11
( ).

12
:

13

14

15
Old panelni
tepaga oching
ON/OFF
button
Ushbu funksiya hamma modellarda ham
qo'llab-quvvatlanmasligi mumkin.
Old panelni
tepaga oching
ON/OFF
button

Mikro Himoya Filtr*
16
Mikro Himoya Filtr*
1
"Mikro Himoya Filtrini tozalash" ga garang.

17
Iltimos, teshikni
rasmda ko'rsatilgan
holda bosmang

Mikro Himoya Filtrini tozalash
"Mikro Himoya Filtrini"
- Mikro Himoya Filtrini suv bilan yuvmang,
chunki bu uning buzilishiga olib kelishi
mumkin
Biz Mikro Himoya Filtrini har olti oyda
almashtirishni tavsiya qilamiz
Ko'prok filtr olish uchun, iltimos xizmat ko'rsatish
markazi bilan bog'laning
18
Tashqi blok
Tashqi blokning issiqlik almashinuv qurilmasi panellaridagi ilon izisimon
shaklli isitgichlar va teshiklar muntazam ravishda tekshirilishi kerak. Agar
ular ifloslangan yoki qurum bosgan bo'lsa, unda issiqlik almashinuv
qurilmasi va panellardagi teshiklar professional tarzda bug' bilan tozalanishi
zarur.
Ifloslangan yoki tiqilib qolgan ilon izisimon shaklli isitgichlar tizimning ishlash
samaradorligini pasaytiradi va foydalanish xarajatlari oshishiga olib keladi.
(Orqasi)
Trubasi
Drenaj
shlangining
o'tkazuvchi
Havoso'rgich
Chiqaruvchi
ventilyatsiya
tirqishlari
(Cheti)

19
20
H'COOLH'COOL
H'COOL
H'COOL
H'COOL
Agar konditsioner uzoq vaqt davomida foydalanilmasa.
Agar konditsioner uzoq vaqt davomida
foydalanilmasa.
Konditsionerni 2-3 soatga havo sirkulyatsiyasi
rejimiga qo'ying.
Zanjir uzgichni o'chiring va vilkani chiqarib
oling.
OGOHLANTIRISH
Konditsioner uzoq vaqt davomida foydalanilmaydigan
bo'lsa, zanjir uzgichni o'chirib qo'ying.
Iflosliklar to'planishi va yong'inga olib kelishi mumkin.
Masofadan boshqarish pultidagi batareyalarni
chiqarib oling.
Havo konditsioneridan yana foydalanganda.
Havo filtrini tozalang va uni ichki blokka
o'rnating
Ichki/tashqi blokdan havo chiqish va kirish
joylari to'sib qo'yilmaganiga ishonch hosil
qiling.
H'COOL

 Loading...