

LG LSSB2692 series, LSSB2696 series Owner's Manual
Please read this owner's manual thoroughly before operating and keep
it handy for reference at all times.
LSSB2692** / LSSB2696**
www.lg.com
ENGLISH FRANÇAIS ESPAÑOL
OWNER’S MANUAL
SIDE BY SIDE
REFRIGERATOR

ENGLISH
2
4
6
When Connecting the Power
When Using the Refrigerator
Product Overview
Starting
Adjusting the Temperatures and Functions
Control Panel
Shelf
Freezer Door Bin
Dairy Corner
Adjustable Door Bin
Refrigerator Gallon Bin
Refrigerator/Freezer Drawers
Upper/Lower Drawer Covers
Replacing the Water Filter
Food Storage Guide
Smart ThinQ Application
Smart Diagnosis™ Function
General Information
Cleaning
Troubleshooting Guide
Before Calling for Service
12
11
12
13
19
19
20
20
21
22
22
26
29
24
30
31
32
47
21
TABLE OF CONTENTS
SAFETY
INSTRUCTIONS
PRODUCT
OVERVIEW
OPERATION
STORING FOOD
SMART FUNCTIONS
CARE AND
MAINTENANCE

Safety Instructions
3
IMPORTANT SAFETY INSTRUCTIONS
This guide contains many important safety messages.
Always read and obey all safety messages.
This is the safety alert symbol. It alerts you to safety messages that inform you
of hazards that can kill or hurt you or others or cause damage to the product.
All safety messages will be preceded by the safety alert symbol and the hazard
signal word DANGER, WARNING, or CAUTION. These words mean:
All safety messages will identify the hazard, tell you how to reduce the chance of
injury, and tell you what can happen if the instructions are not followed.
DANGER
You may be killed or seriously injured if you don’t follow
instructions immediately.
WARNING
You may be killed or seriously injured if you don’t follow
instructions.
CAUTION
Indicates an imminently hazardous situation which, if
not avoided, may result in minor or moderate injury, or
product damage only.
4
Safety Instructions
ENGLISH
WARNING
To reduce the risk of fire, electric shock, or personal injury when using your
product, basic safety precautions should be followed, including the following.
Read all instructions before using this appliance.
WARNING
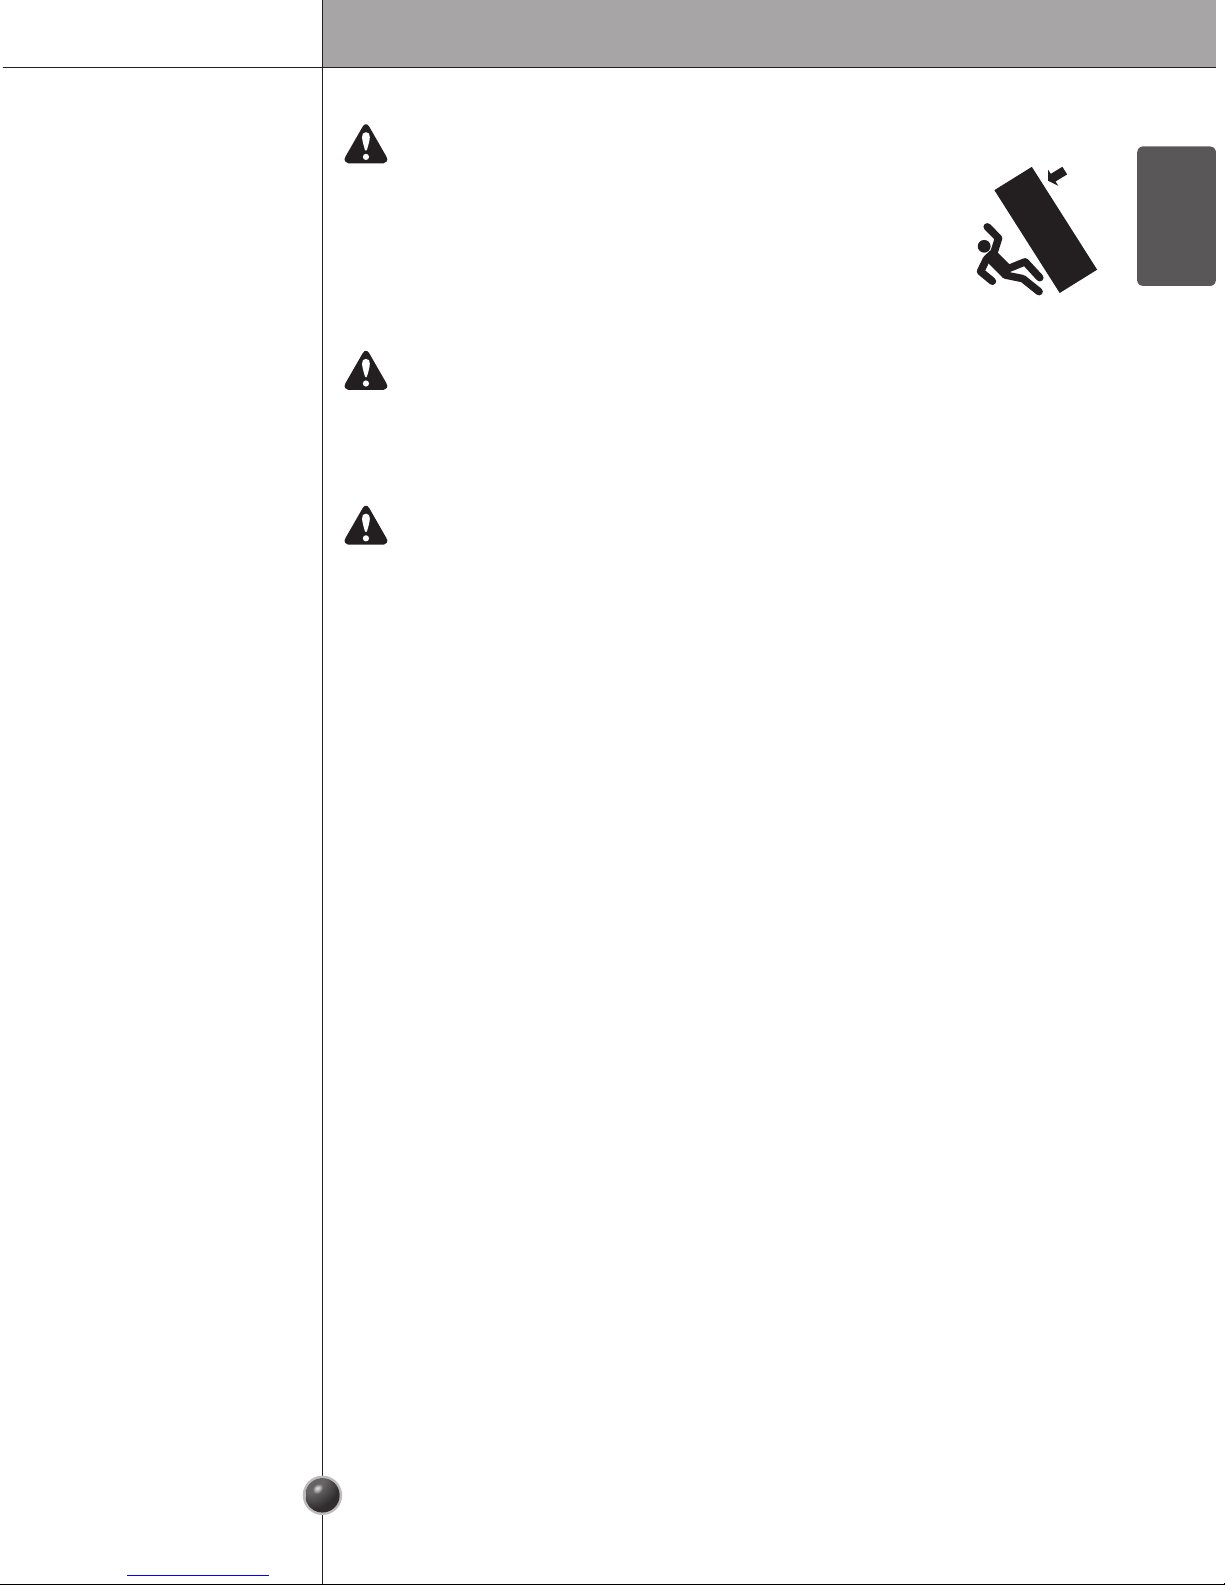
TIP-OVER HAZARD
Use two or more people to move and install the refrigerator.
To prevent the refrigerator from tipping over, install anti-tip brackets
(provided). Failure to follow the refrigerator installation instructions
can result in serious injury or death.
1. When Connecting the Power
Use a dedicated outlet.
• Using several devices at one outlet may cause a fire.
When moving the refrigerator away from the wall, be careful not to roll over or
damage the power cord. Do not squeeze or crush the cord or plug when
pushing the refrigerator back in.
Doing so could result in fire or electric shock.
Do not allow the power cord to be bent, crushed, or damaged. Do not run the
power cord under heavy objects like furniture, other appliances, or through
high-traffic areas.
Doing so may damage the power cord and result in fire or electric shock.
Plug in the power plug with the power cord facing downward.
Failure to do so could damage the plug or cord, resulting in fire or electric shock.
WARNING
This product contains chemicals known to the State of California to cause cancer
and birth defects or other reproductive harm. Wash hands after handling.
Do not extend or modify the length of the power cord.
Use only an exact factory replacement part to avoid electrical issues, fire, or electric
shock.

Safety Instructions
5
Remove water or dust from the power plug and insert it securely into the wall
socket.
Dust, water, or a loose connection may cause a fire or electric shock.
Do not use the power cord or the power plug if it is damaged or if the outlet is
damaged.
Doing so may cause electric shock or short circuit resulting in a fire.
Wait for 5 minutes or longer when reconnecting the plug.
Give the compressor time to cycle before re-starting.
If the supply cord is damaged, it must be replaced by the manufacturer or its
service agent or a similarly qualified person in order to avoid a hazard.
Do not unplug the refrigerator by pulling on the cord.
Doing so may cause electric shock or short circuit resulting in a fire.
Do not pull out the cord or touch the power plug with wet hands.
Doing so may cause electric shock or injury.
Unplug the power cord or turn off the power when cleaning or moving the
refrigerator.
• Failure to do so may cause electric shock or injury.
• Press the POWER button for 3 seconds to turn off the power at display panel.

6
Safety Instructions
ENGLISH
2. When Using the Refrigerator
Do not place heavy or dangerous objects on the refrigerator.
Opening or closing the door may cause objects to fall, resulting in injury, fire, or
electric shock.
Do not install the refrigerator in a damp location or where it will be exposed to
running water.
Deterioration of the insulation on electrical parts may result, causing risk of electric
shock.
Do not allow children to hang on the refrigerator doors, shelves or drawers.
Doing so may cause serious injury.
Do not allow children to climb into the product.
A child's life could be endangered if the child climbs into the refrigerator.
Opening and closing the door of the refrigerator vigorously may cause the
stored food in the door bins to fall.
Do not use or store flammable materials like ether, benzene, alcohol,
medicine, LP gas, sprays, or cosmetics near or in the refrigerator.
Doing so may cause explosion or fire.
Do not use a hair drier to dry the inside, nor light a candle to remove odor.
Doing so may cause explosion or fire.

Safety Instructions
7
If your refrigerator is leaking, have it checked by an authorized service
technician before operating it.
Failure to follow this warning may cause electric shock or fire.
Turn off the refrigerator if you will not be using it for an extended period of
time, or in the event of a severe electrical storm.
Press the POWER button for 3 seconds to turn off the power at the control panel.
Do not install the refrigerator near a gas stove, water heater or other source
of ignition that may possibly leak gas.
Do not use combustible sprays (including cooking sprays,
oils and other aerosol products) on or near the refrigerator.
Doing so may cause a fire.
Do not spray water inside or outside the refrigerator,
do not clean it with benzene or thinner.
If the insulation around electrical parts deteriorates, it can result in electric shock or
fire.
If a strange smell or smoke is detected from the refrigerator, turn off the
refrigerator and contact the service center.
Failure to follow this warning may result in a fire.
This product is not to be used for special purposes such as the storage of
medicine or test materials or for use on ships, vehicles, aircraft, etc.
Doing so may cause an unexpected risk such as fire, electric shock, deterioration of
stored material, chemical reaction.
Do not allow any person except an authorized servicer to disassemble, repair,
or alter the refrigerator.
Doing so may cause injury, electric shock or fire.

8
Safety Instructions
ENGLISH
When disposing of the refrigerator, remove the packing materials from the
door or take off the doors but leave the shelves in place so that children may
not easily climb inside.
Child entrapment generally results in death by suffocation.
This appliance is not intended for use by persons (including children) with
reduced physical, sensory, or mental capabilities, or lack of experience and
knowledge, unless they have been given supervision or instruction
concerning use of the appliance by a person responsible for their safety.
Children should be supervised to ensure that they do not play with the
appliance.
Install the refrigerator on a solid and level floor.
If the refrigerator tips when opening or closing the door, it could fall over, causing
property damage and personal injury.
Do not step on the pipe under the freezer door.
Doing so may cause electric shock or injury.
If connected to a circuit protected by fuses, use time delay fuse.
Do not put hands, feet, or metal objects into the air vents or cover, or below
or behind the refrigerator.
Doing so may result in electric shock or injury.
Supply the automatic icemaker with drinkable water.
Non-potable water can cause health risks.
Safety Instructions
9
Do not touch food or containers in the freezer with wet hands.
Doing so may cause frostbite.
Do not put ice in a thin crystal cup or ceramic ware.
The glass may shatter and present a hazard.
If power goes out, remove ice from ice bin.
Ice will melt and water will leak onto floor. Dump ice if power is out for a long period.
Do not remove the cover of the automatic ice dispenser.
The internal mechanism of the icemaker can cause injury if handled.
Place food items and containers carefully on the shelves in the refrigerator.
Opening and closing the door may cause food to fall, resulting in injury.
Do not put glass bottles or containers in the freezer.
Contents may break the bottle when frozen, causing risk of injury.
Do not stick your hands under the refrigerator.
Sharp edges, fans, and wires may cause an injury.
CAUTION
Do not insert hands into the ice bucket or the ice dispenser.
Doing so may cause injury.

10
Safety Instructions
ENGLISH
Close the door carefully when children are near.
Keep fingers out of pinch point areas; clearances between the doors and cabinets
are necessarily small.
Do not put live animals into the refrigerator.
SAVE THESE INSTRUCTIONS

Product Overview
11
Product Overview
Freezer
Compartment
Refrigerator
Compartment
Dairy Corner
LED Display
Control Panel
LED Lamp
Automatic
Icemaker
Top Cover
Shelf
Shelf
Door Bin
Drawer (3)
Lower Cover
Shelf
Shelf
LED Lamp
Filter
Gallon bin
Adjustable door bin
Adjustable door bin
Drawer(3)

12
Operation
ENGLISH
Starting
When the refrigerator is first installed, allow it to stabilize at normal operating
temperatures for 2-3 hours prior to filling it with fresh or frozen foods.
If operation is interrupted, wait 5 minutes before restarting.
Adjusting the Temperatures and Functions
Dispenser Push Switch
Dispenser Lamp (hidden)
Water/Ice Output
Dispenser Control Panel
LED Display Control Panel
Operation
13
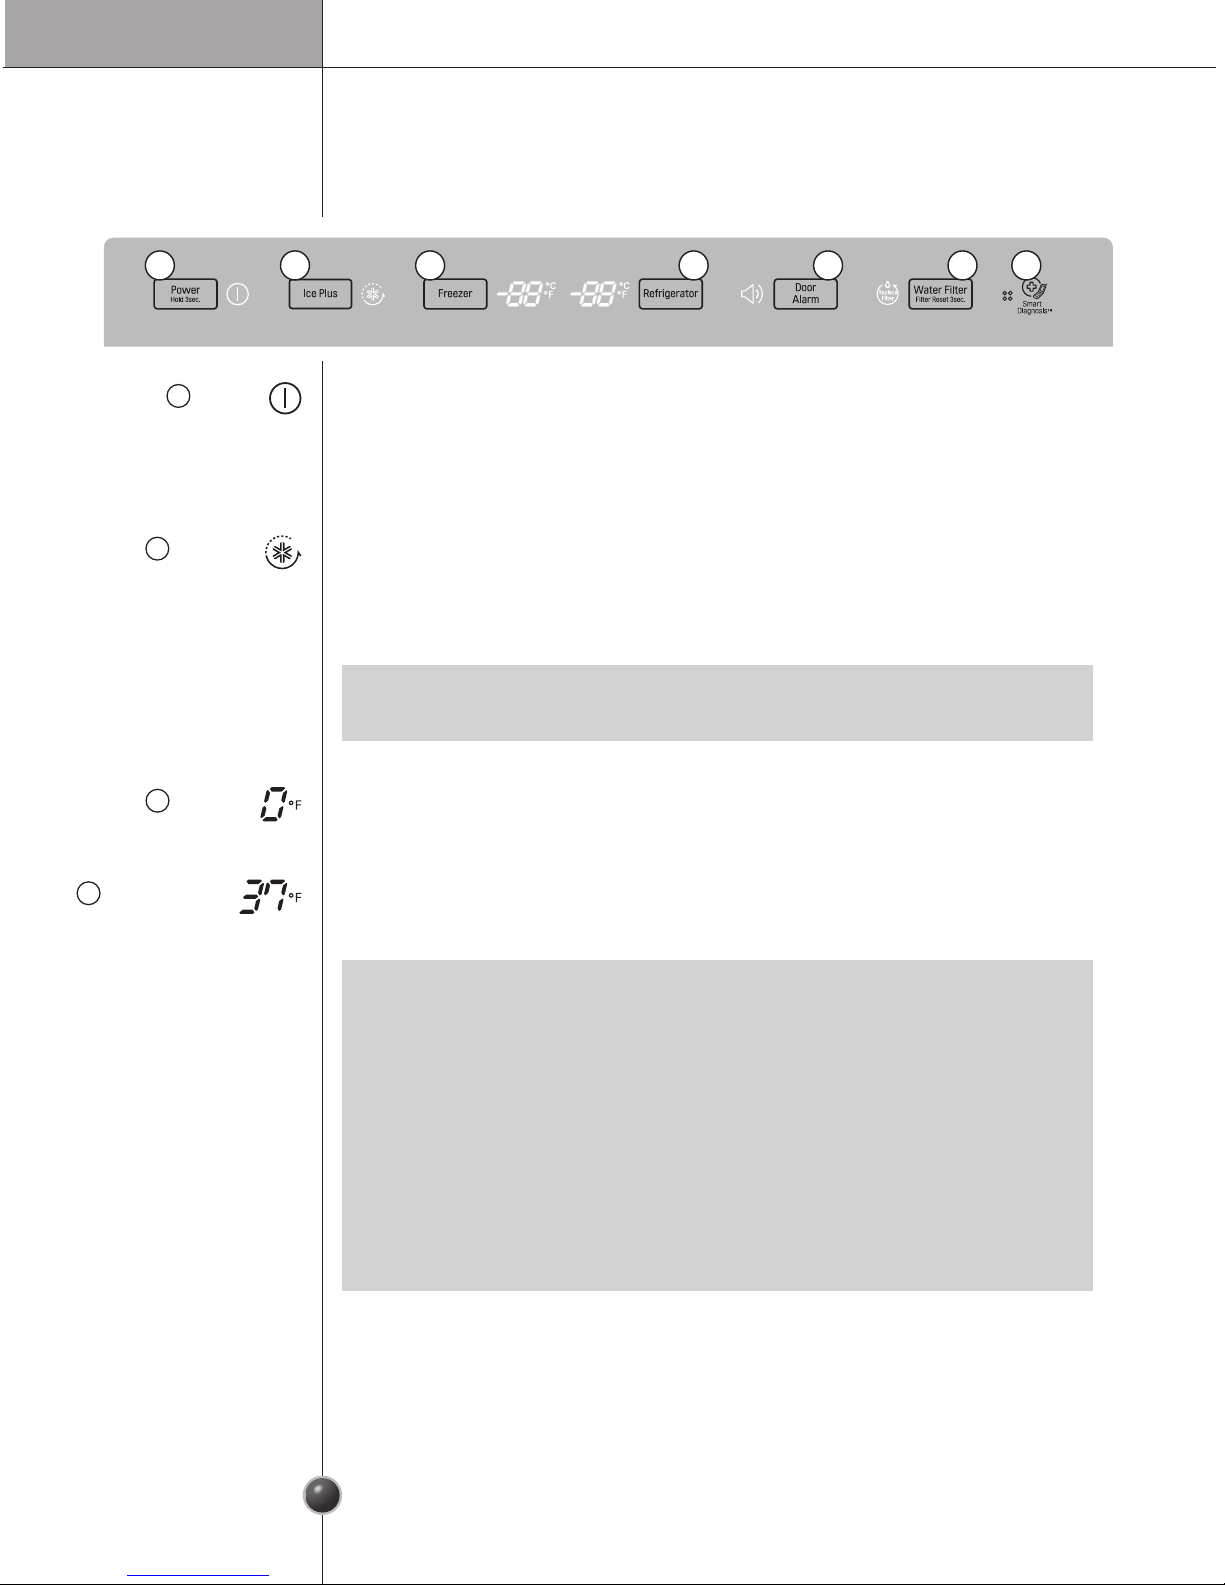
Control Panel
1
2 3 4 5 6 7
LED Display Control Panel
1
Power
2
Ice Plus
3
Freezer
4
Refrigerator
The Power button turns off all electrical power to the unit.
Press and hold the Power button for 3 seconds to turn off the power. When the
power is off, the indicator light is off. There is no need to turn off power at the circuit
breaker or wall receptacle. Use this function for service or extended vacations.
Press the Ice Plus button once to activate the Ice Plus function.
The Ice Plus icon on the display panel illuminates when activated.
The Ice Plus function runs the freezer compartment at the coldest setting for a
24-hour period to increase icemaking by up to 20%, and then turns off automatically.
To adjust the temperature in the freezer compartment, press the Freezer button to
cycle through the range of available settings.
To adjust the temperature in the refrigerator compartment, press the Refrigerator
button to cycle through the range of available settings.
•
Press the button again to cancel the Ice Plus function.
NOTE
• The actual inner temperature varies depending on the food status, since the
indicated temperature setting is the target temperature and not the actual
temperature within the refrigerator.
Initially set the REFRIGERATOR CONTROL at 37 ˚F and the FREEZER
CONTROL at 0 ˚F. Leave them at these settings for 24 hours (one day) to
stabilize.
Then adjust the compartment temperature as illustrated above.
• To change temperature display from Fahrenheit to Celsius press and hold the
Freezer and Refrigerator buttons simultaneously for approximately 5 seconds.
Do the same to convert back to Fahrenheit.
NOTE
14
Operation
ENGLISH
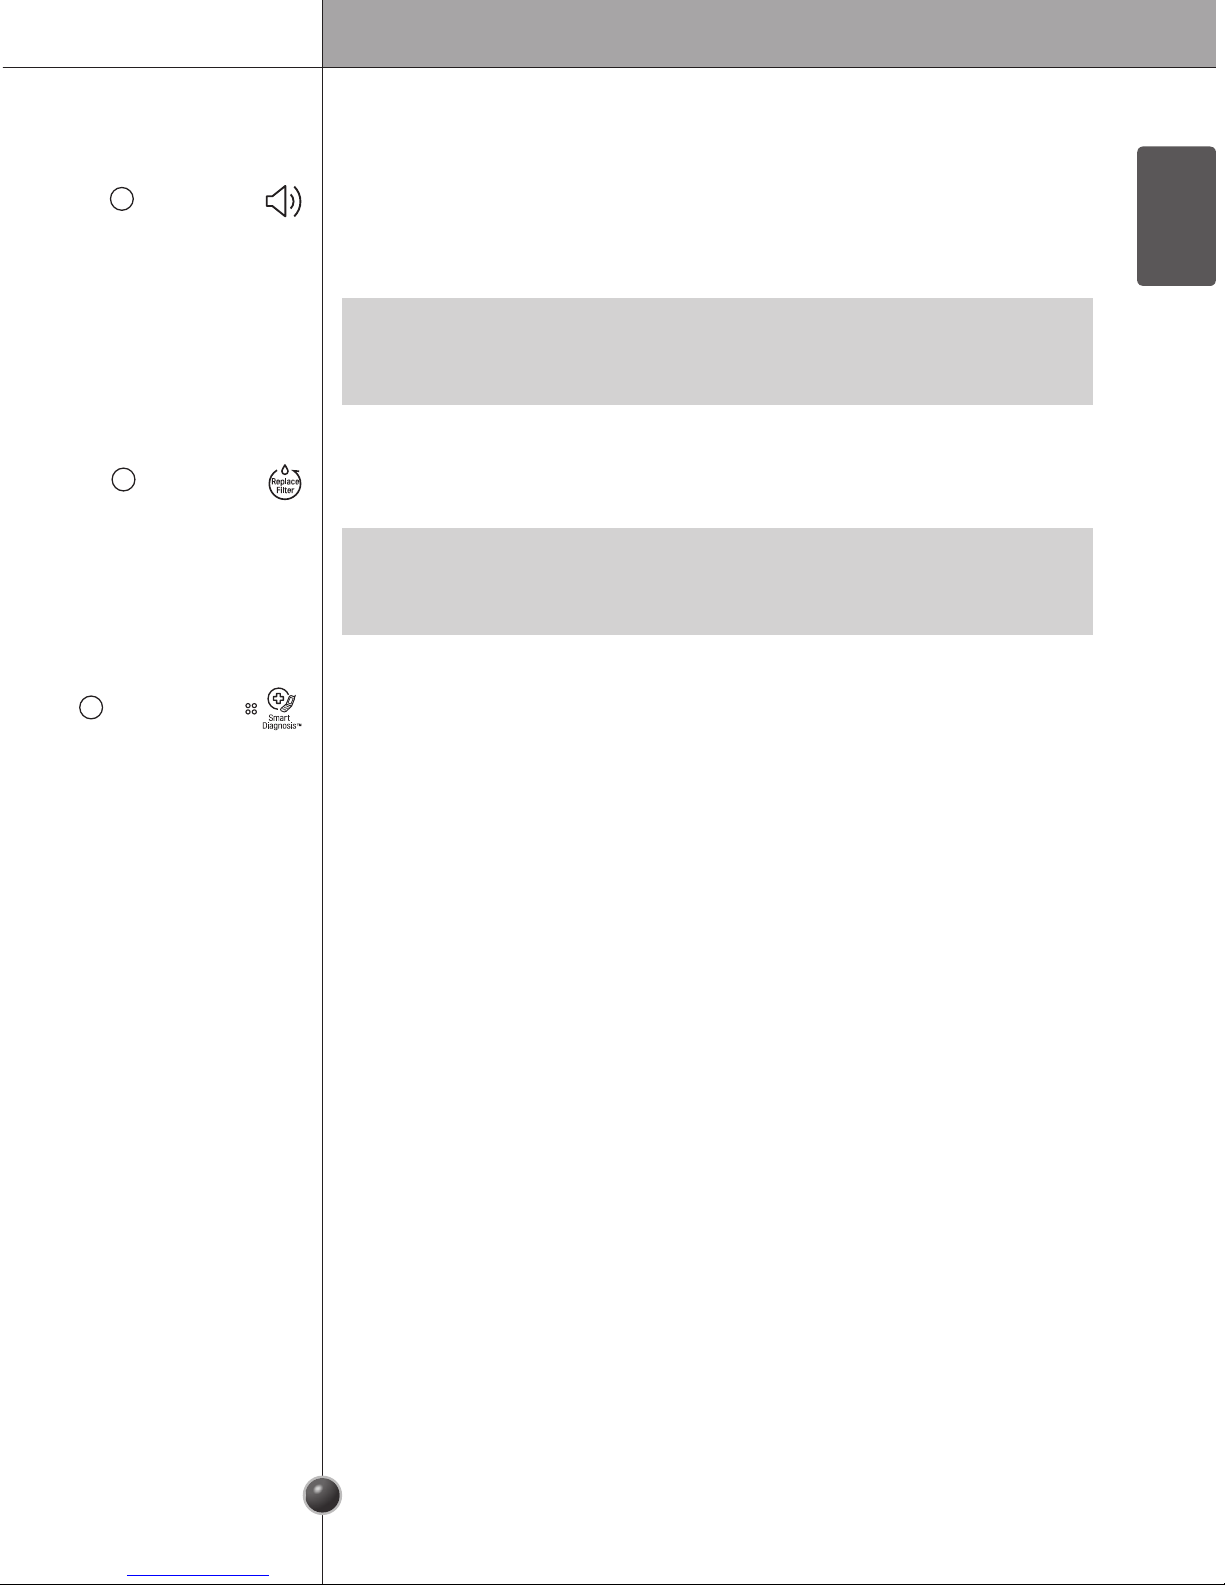
6
Water Filter
7
Smart Diagnosis
Press and hold the Water Filter button for approximately 3 seconds to reset the filter
indicator after the water filter has been replaced.
Use during the Smart Diagnosis™ feature.
•
Replace
the water filter approximately every 6 months, when the water filter
indicator light reaches 0 or if the ice or water starts to taste bad.
NOTE
5
Door Alarm
The Door Alarm sounds three times at 30-second intervals when a compartment
door is left open for more than 60 seconds. The alarm stops sounding when the
door is closed. Press the Door Alarm button once to activate or deactivate the door
alarm function.
• Contact your local service center if the alarm continues to sound after the
doors are closed.
NOTE
Operation
15
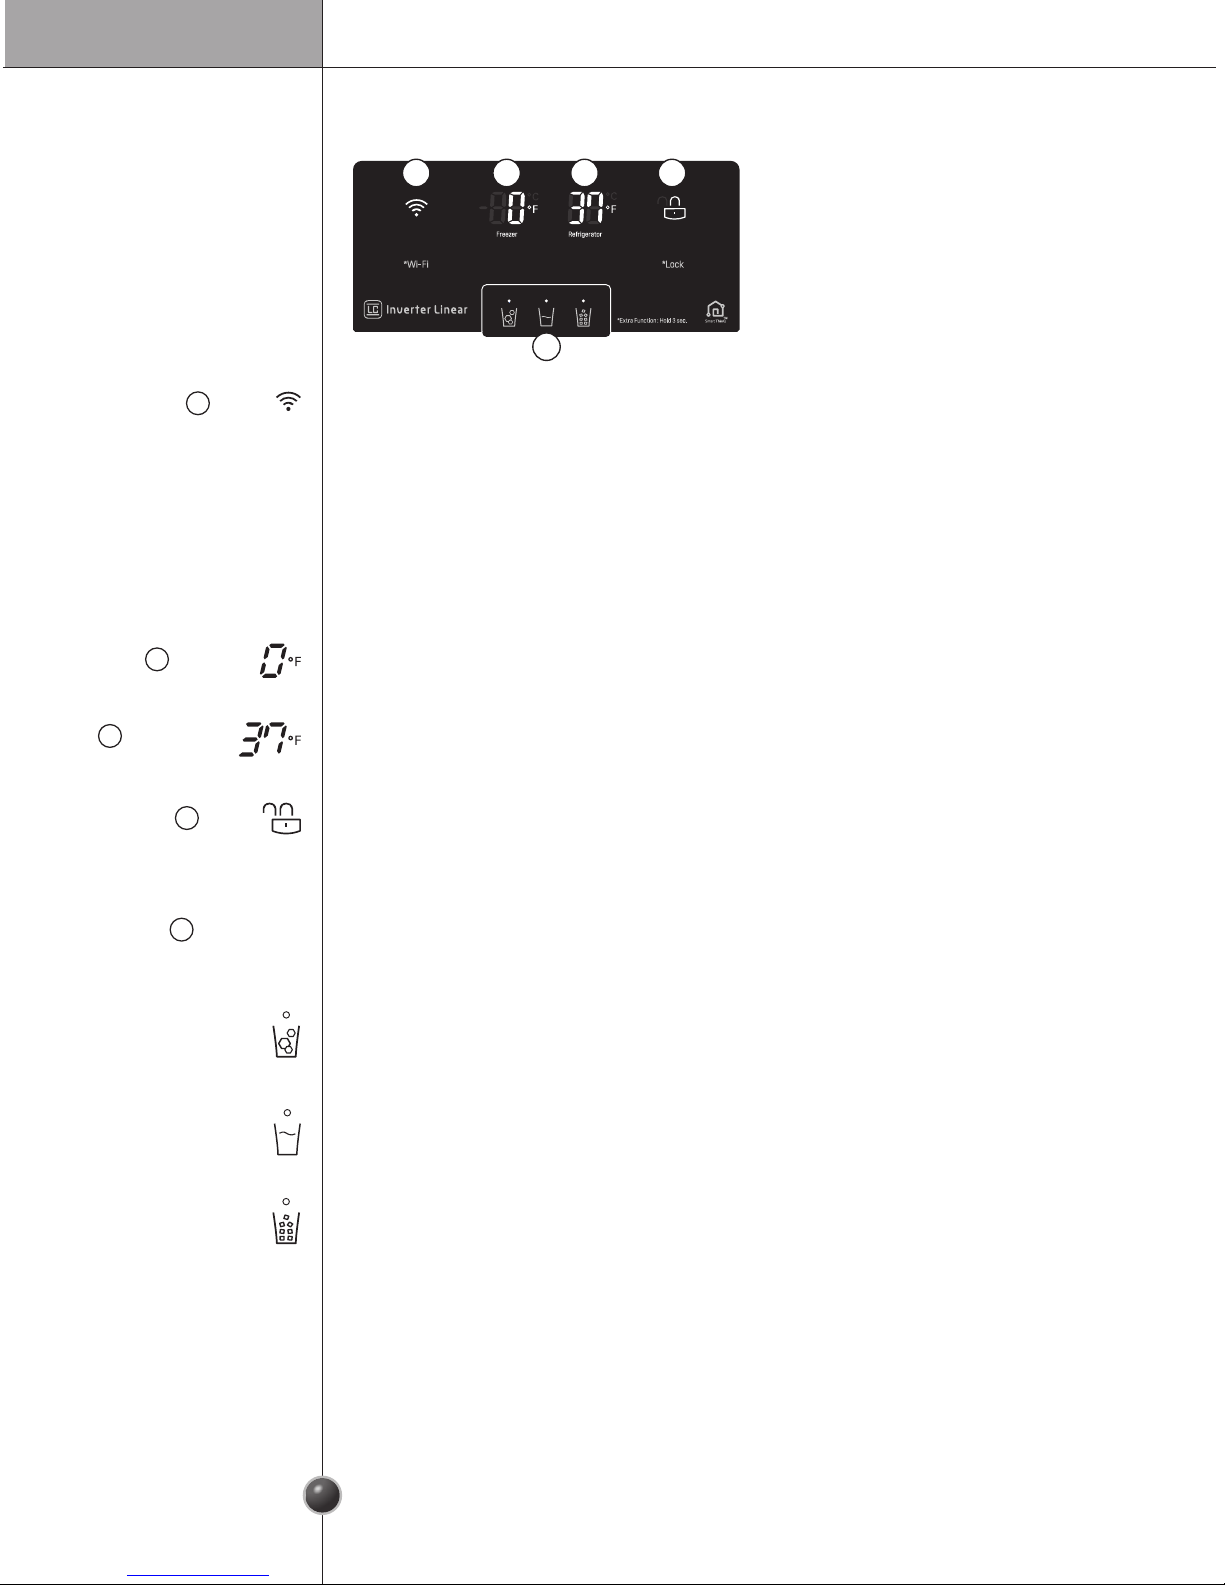
8
Wi-Fi
9
Freezer
10
Refrigerator
11
Lock
Dispensing Water
12
Dispenser
Selection Indicator
Use the Wi-Fi button with the LG Smart Refrigerator smart phone app to connect
the refrigerator to a home Wi-Fi network. Refer to the Smart Features section of the
manual for information on the initial setup of the application.
The Wi-Fi icon displays the status of the refrigerator’s network connection. When
the refrigerator is connected to the network, the Wi-Fi icon is illuminated.
Press and hold the Wi-Fi button for 3 seconds to connect to the network.
The icon blinks while the connection is being made, then turns on once the
connection is successfully made. To disconnect, press and hold the button again.
Freezer temperature indicator.
Refrigerator temperature indicator.
Press and hold the Lock button for three seconds to lock the dispenser and all of
the other control panel functions.
Press and hold again for 3 seconds to unlock.
Press the dispenser selection button repeatedly until the cubed ice icon illuminates.
Press the dispenser switch with a glass or other container to dispense cubed ice.
Press the dispenser selection button repeatedly until the water icon illuminates.
Press the dispenser switch with a glass or other container to dispense water.
Press the dispenser selection button repeatedly until the crushed ice icon
illuminates.
Press the dispenser switch with a glass or other container to dispense crushed ice.
Displays whether the dispenser is set to dispense water, cubed or crushed ice.
111098
12
Dispensing
Crushed Ice
Dispensing
Cubed Ice
Dispenser Control Panel
16
Operation
ENGLISH
CAUTION
• The automatic icemaker can automatically
make 6 cubes at a time, 70~120 pieces per day.
This quantity may vary by circumstance,
including ambient temperature, door opening,
freezer load. etc.
• Icemaking stops when the ice storage bin is full.
• To turn the icemaker off, turn the icemaker
switch to OFF. To turn the icemaker back on,
turn the switch to ON.
Automatic
Icemaker
• It is normal to hear noise when ice drops into the ice storage bin.
• Occasionally shake the ice storage bin so that the ice does not pile higher on one
side. If the ice piles up high next to the ice maker, ice production will stop.
NOTE
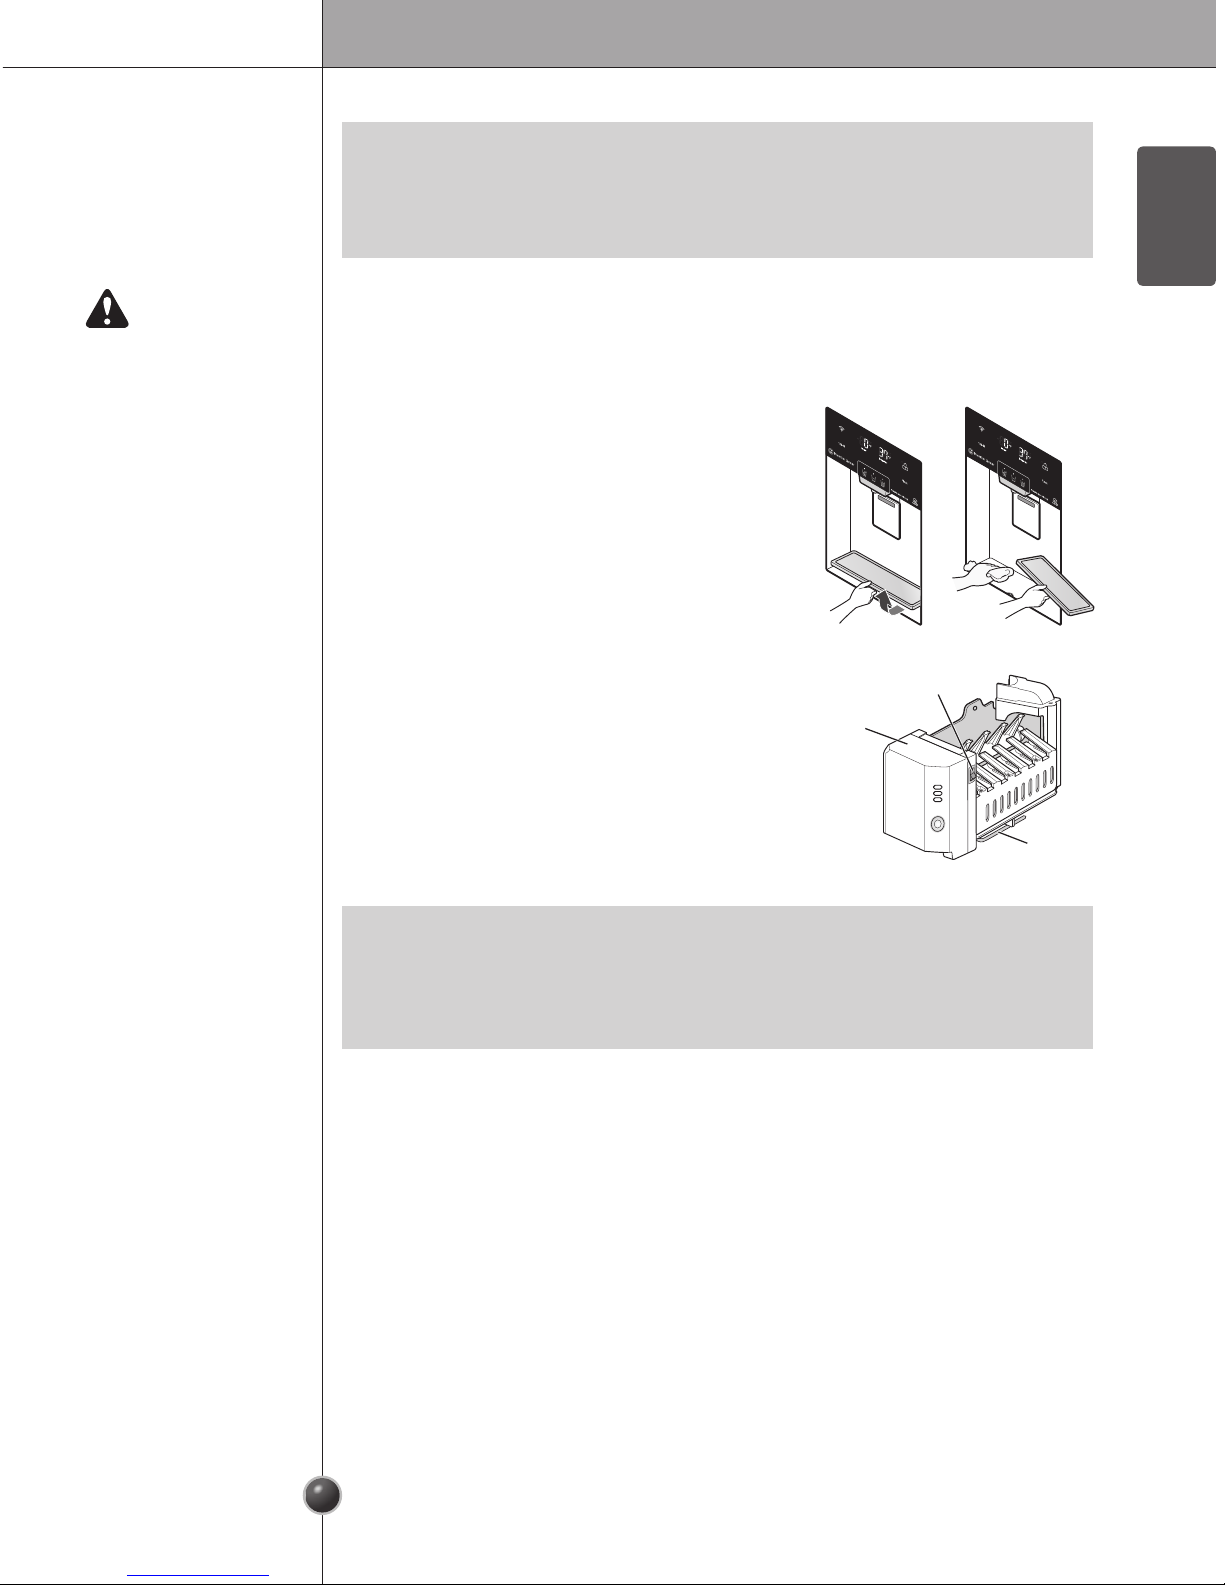
Cleaning
The water collector has no self-drainage function,
so it should be cleaned regularly. Remove the
cover by pulling the front of the water collector
cover and dry it with a cloth.
lcemaker
ON/OFF Switch
Automatic
Shutoff
Arm
• Hold the container as close to the ice or water chute as possible to avoid
spilling and splashing.
• Do not dispense ice into fine china or crystal glasses. China or crystal can be
broken.
• Hold the glass or other container in place for a couple of seconds after
dispensing ice or water to catch the last few cubes or drops. The dispenser is
designed to not operate while either refrigerator door is open.
NOTE
Ice is Lumped Together
• When ice is lumped together, take the ice lumps out of the ice storage bin,
break them into small pieces, and return the pieces to the ice storage bin.
• When the ice produced by the icemaker is too small or is lumped together, the
amount of water supplied to the icemaker may need to be adjusted. Contact
the service center.
❈ If ice is not used frequently, it may lump together.
Power Failure
•
Ice may drop into the freezer compartment. Take the ice storage bin out and
discard all the ice. Dry the ice bin and place it back in the freezer.
The Refrigerator is Newly Installed
•
It takes about 12 hours for a newly installed refrigerator to make ice.
Icemaker Not
Working Properly

Operation
17
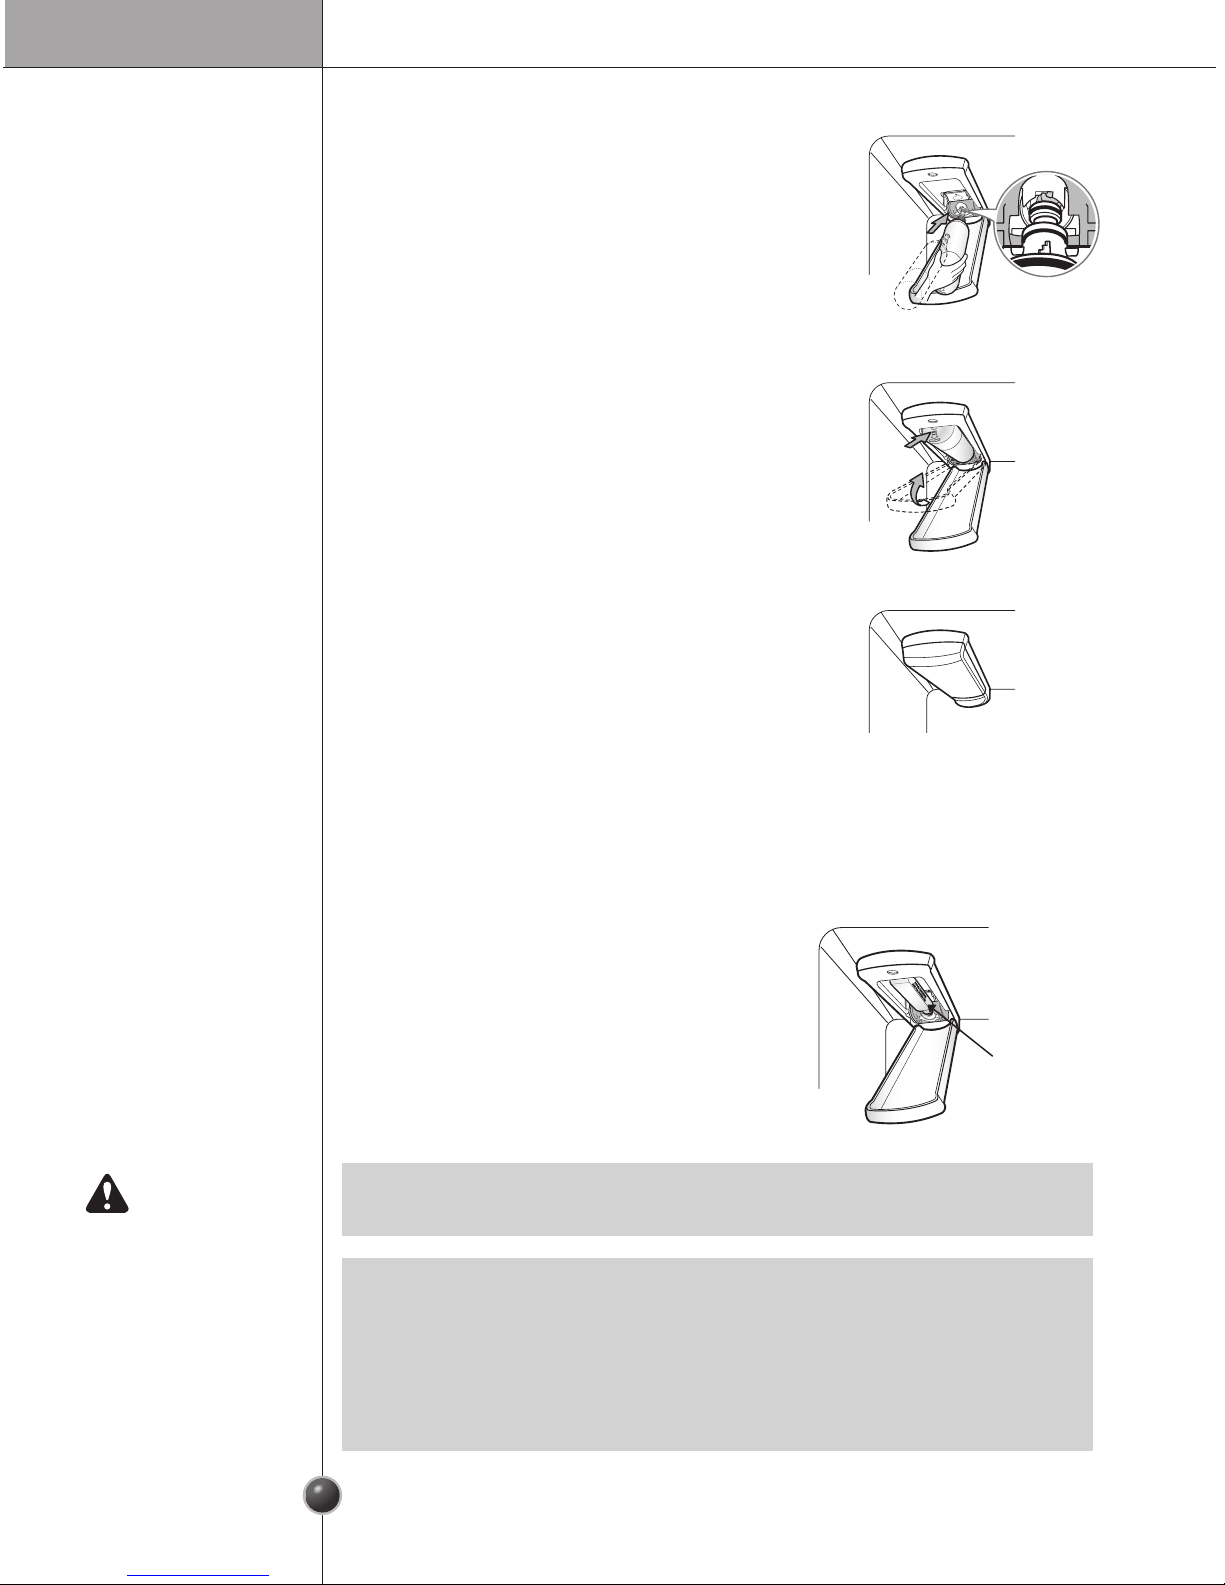
• Do not dismantle the ice storage bin unless it is necessary.
• Use both hands to remove the ice bin to avoid dropping it.
• Do not touch the ejector mechanism with hands or tools.
It may damage the icemaker or hurt your hands (figure 2).
WARNING
Remove
• Grip the handle as shown in the figure 1.
BIN
• Lift the lower part slightly
• Take the Ice Storage bin out slowly
Cover
• Lift up the cover
❈ Watch the hooks inside of cover.
Reinstall (Bin&Cover)
•
Assembly is the reverse order of disassemby.
• You will hear the bin snap into place when it is in the correct position.
How to remove
and reinstall the
ice storage bin
Other Functions
Open Door Alert
• A warning tone will sound 3 times at thirty-second intervals if the refrigerator or
freezer door is left open for more than sixty seconds.
• Please contact a local service center if the warning continues to sound after the
door is closed.
Auto-Closing Door
System
• This function is performed by a spring-damper
mechanism. Closing speed and strength depends
on the ambient temperature, frequency of door
opening/closing and contents of the door bins.
NOTE
The doors automatically close when in the 60 degree position.
figure 1
figure 2
18
Operation
ENGLISH
Throw away the first few batches of ice (about 24 cubes) and water
(about 7 glasses) first made after refrigerator installation.
The first ice and water may include particles or odor from the feed water pipe or
feed water box. This is also necessary if the refrigerator has not been used for
a long time.
Children should be supervised when using the dispenser.
Be careful that frost does not block the ice passage.
The ice passage may become blocked with frost if only crushed ice is used.
Remove the frost that accumulates by removing the ice bin and clearing the
passage with a rubber spatula. Dispensing cubed ice can also help prevent
frost buildup.
Never store beverage cans or other items in the ice bin for the purpose of
rapid cooling.
Doing so may damage the icemaker or the containers may burst.
Never use thin crystal glass or crockery to collect ice.
Such containers may chip or break resulting in glass fragments in the ice.
Dispense ice into a glass before filling it with water or other beverages.
Splashing may occur if ice is dispensed into a glass that already contains liquid.
To avoid personal injury, keep hands out of the ice door and passage.
Part breakage or injury may occur.
Never remove the icemaker cover.
If discolored ice is dispensed, check the water filter and water supply. If
the problem continues, contact service center. Do not use the ice or water
until the problem is corrected.
Never use a glass that is exceptionally narrow or deep.
Ice may jam in the ice passage and refrigerator performance may be affected.
Keep the glass at a proper distance from the ice outlet.
A glass held too close to the outlet may prevent ice from dispensing.
CAUTION
Operation
19
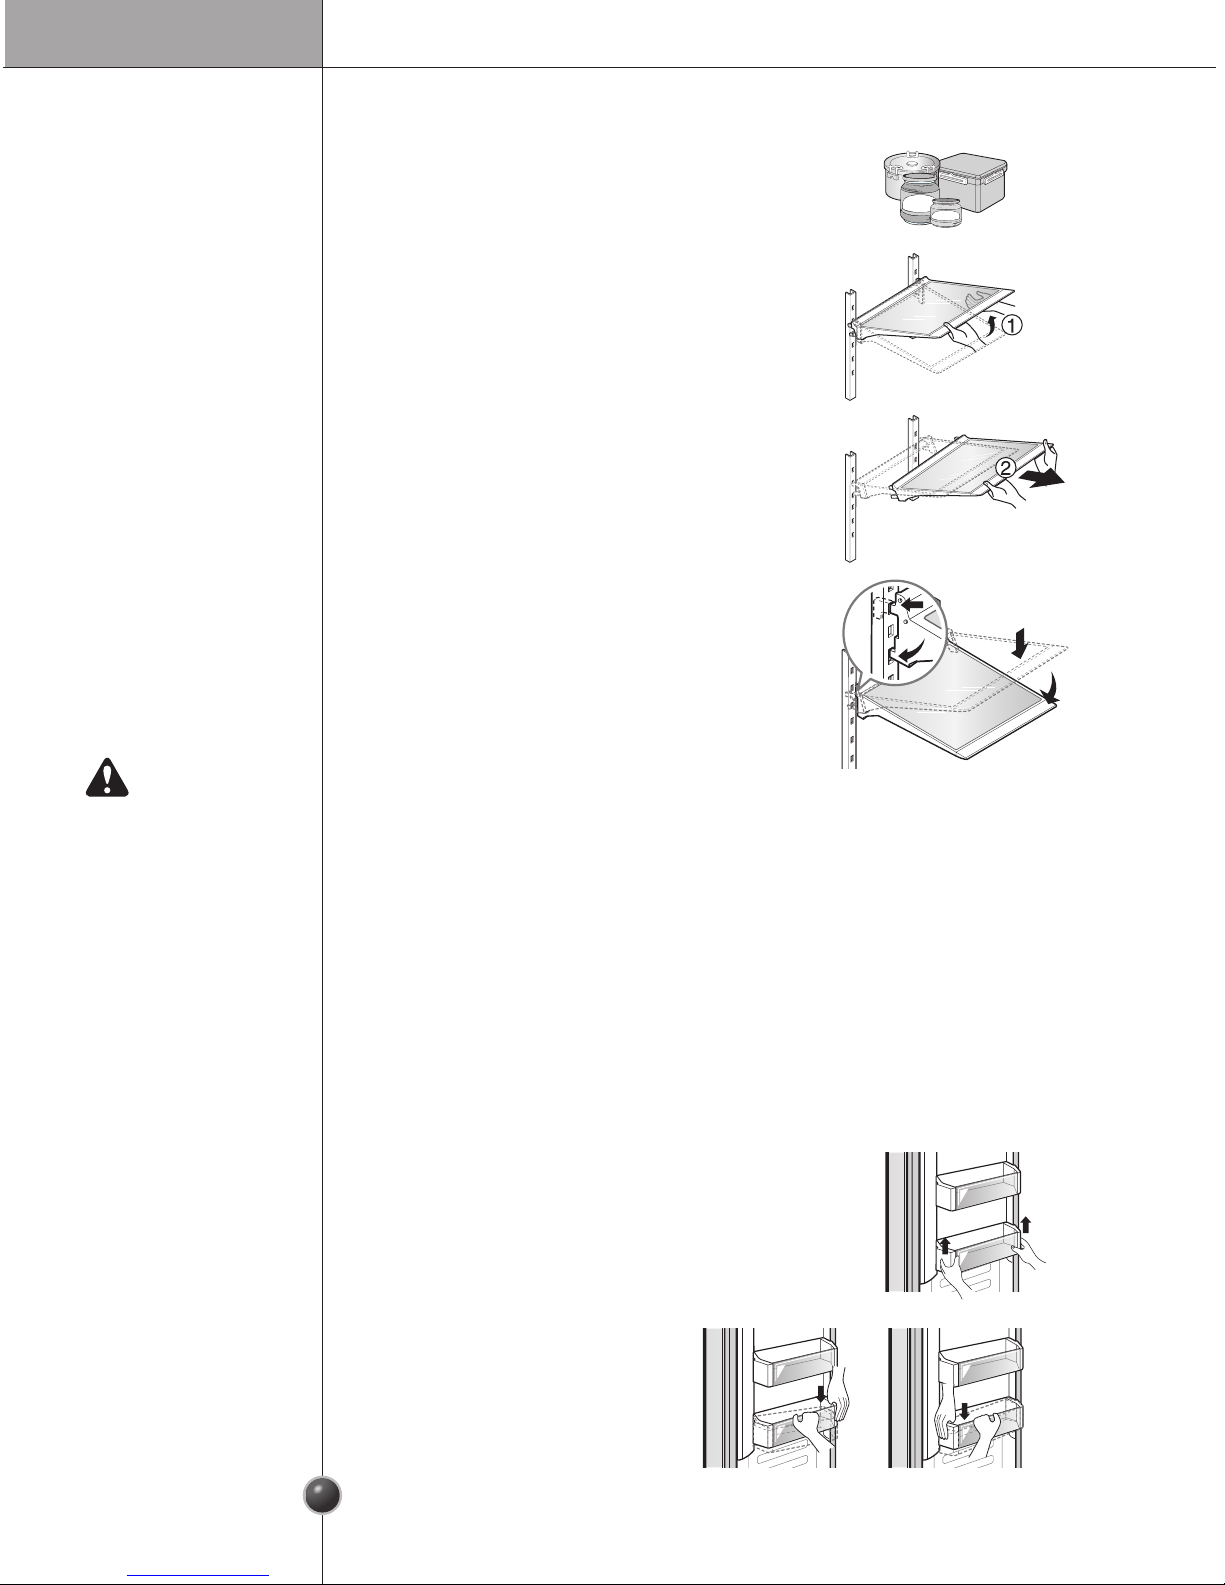
Shelf
The shelves in the refrigerator are adjustable to meet
individual storage needs.
1. Lift the front of the shelf slightly.
2. While supporting the shelf, tilt it and pull it out.
Make sure that shelves are level from one side to the
other.
Failure to do so may result in the shelf falling or food
spilling.
Tilt the front of the shelf up and guide the shelf
hooks into the slots at a desired height. Then, lower
the front of the shelf so that the hooks drop into the
slots.
Disassembling
Reassembling
Freezer Door Bin
Use to store small packaged frozen food.
Do not use door bins to store ice cream or for long-term food storage.
Hold the bin with both hands and slightly lift up the
front part to pull the bin out.
Disassembling
Hold the bin with both hands and
reassemble one side at a time by
pushing it in.
Reassembling
CAUTION
20
Operation
ENGLISH
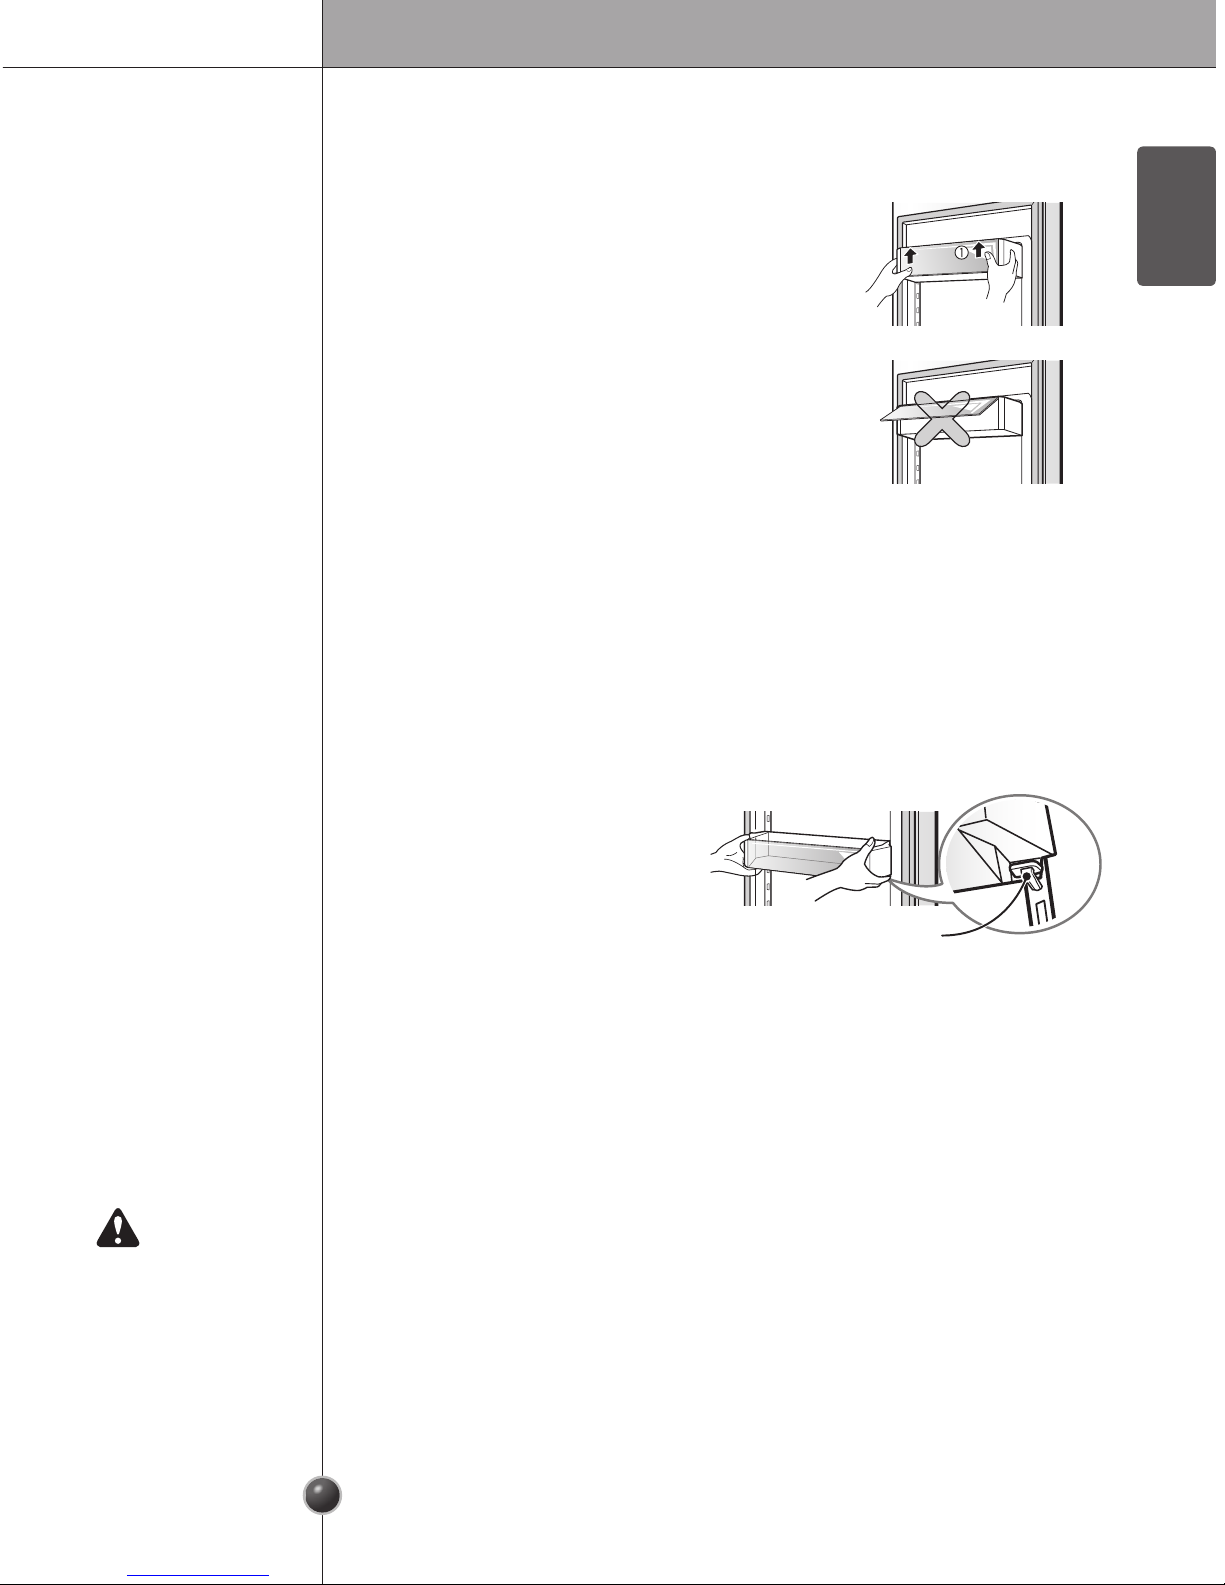
Adjustable Door Bins
Use to store small, packaged refrigerated food or beverages such as milk, canned
drinks, etc. The adjustable door bins are removable for easy cleaning and
adjustment.
You must remove the dairy corner before
disassembling the adjustable door bin.
To remove the door bin, pull the levers
on each side and pull the bin up off of
the rail.
Disassembling
Before reassembling the adjustable door bin, remove the dairy corner.
Hold the door bin with both hands and place it on top of the rail. Push the basket
down while holding the lever under the bin. The bin clicks when it is in the correct
position.
Reassembling
Dairy Corner
Use to store dairy goods like butter and cheese.
To remove the dairy corner, simply lift it up and pull
straight out.
Close the dairy corner completely after use.
The refrigerator door may not close properly if the
dairy corner is left open.
Disassembling
- Always disassemble/assemble the adjustable door bin using two hands.
Make sure that the adjustable door bins are empty before disassembling/
assembling them.
CAUTION
Lever

Operation
21
Refrigerator Gallon Bin
For storing larger containers, such as gallons of milk.
Hold the bin with both hands, lift up and pull out.
Disassembling
Hold the bin with both hands and click it
into place, one side at a time.
Reassembling
Refrigerator/Freezer Drawers
For convenient storage of items like fruits, vegetables and packaged frozen food.
1. Hold the front handle of the drawer and pull it out until it stops.
2. When you cannot pull out the drawer any more, lift it up slightly to pull it out.
3. The lower compartment under the drawer is also removable.
The drawer is reassembled in the reverse order.
1. Slide both rails in simultaneously.
2. Hook the support into the rail tabs
on both sides.
3. Lower the front of the compartment.
The compartment clicks when it is in the
correct position.
Disassembling
Reassembling the
Lower
Compartment
- Always disassemble the drawers using two hands.
Make sure that the drawers are empty before removing them.
CAUTION
22
Operation
ENGLISH
Disassembling
Replacing the Water Filter
Replace the water filter:
- Approximately every six months.
- When the water filter indicator turns on.
- When the water dispenser output decreases.
- When the ice cubes are smaller than normal.
1. Remove the old water filter.
- Lower or remove the top left shelf to allow the
water filter to rotate all the way down.
- Press the push button to open the water filter
cover.
- Pull the water filter downward and pull out.
Make sure to rotate the filter down completely
before pulling it out of the manifold hole.
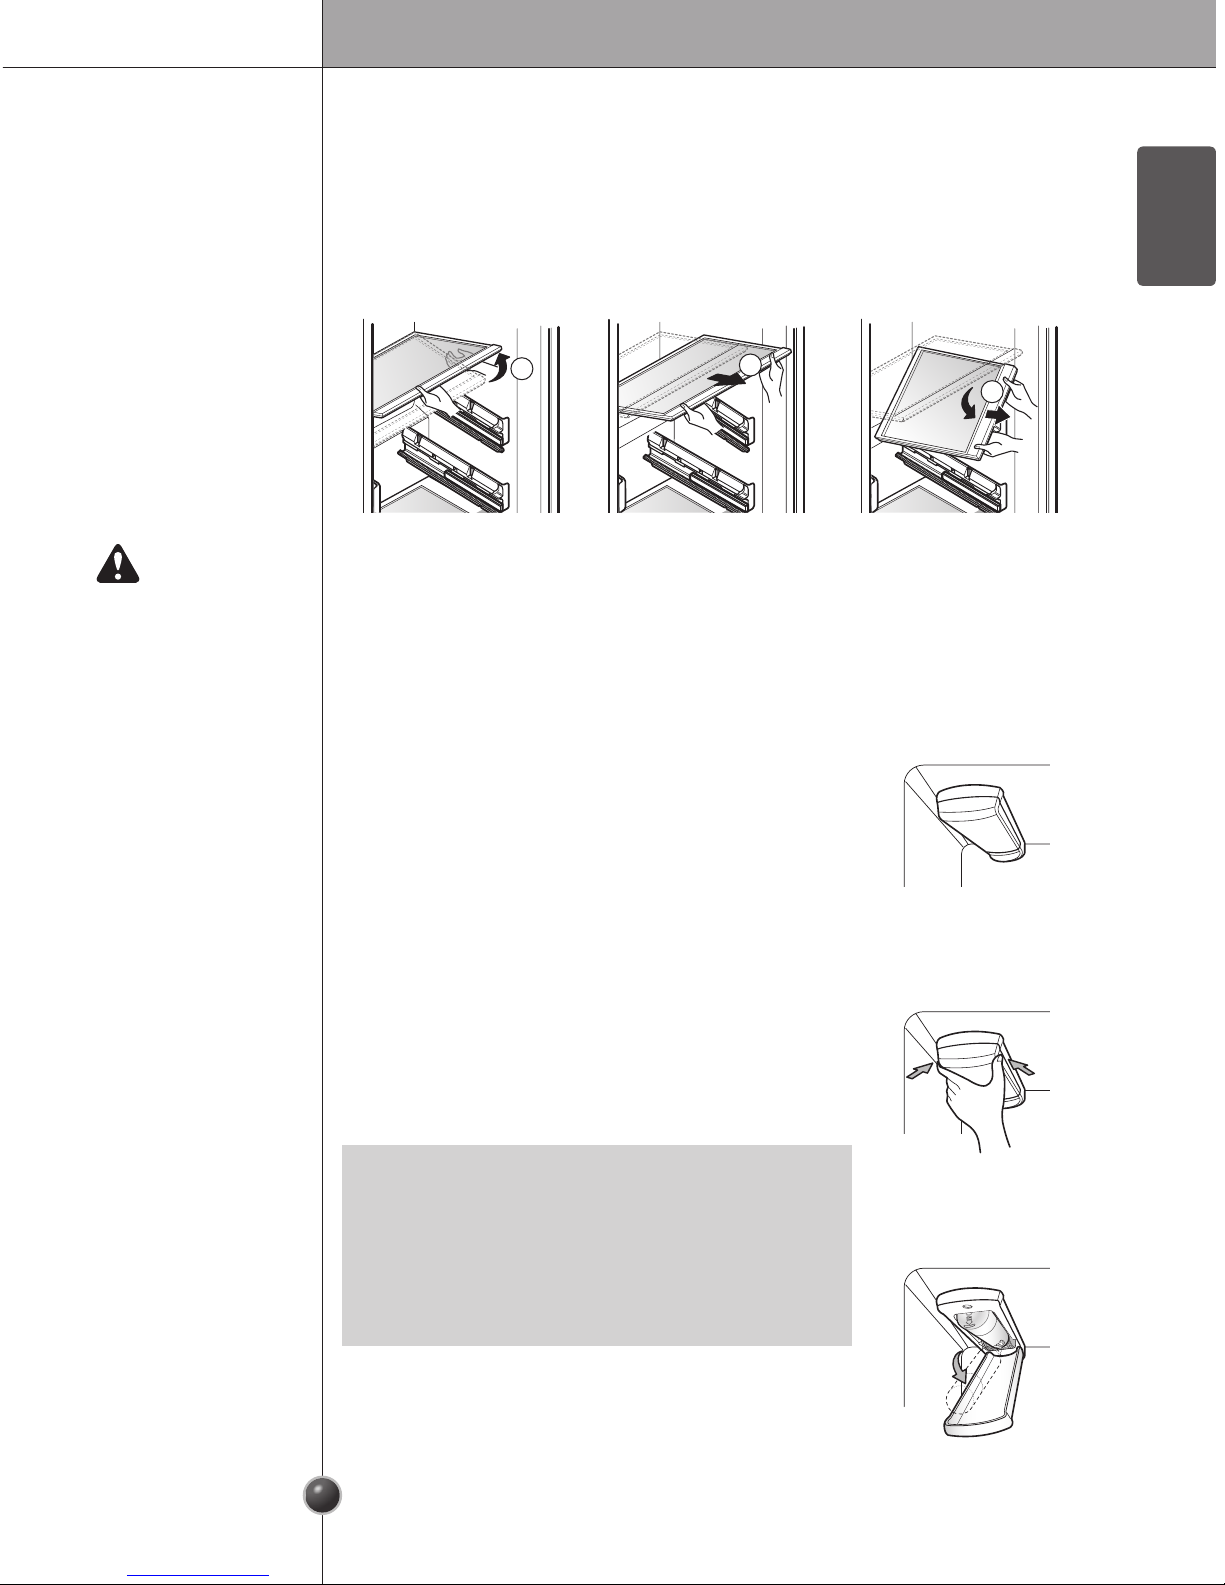
Upper/Lower Drawer Covers
1. Lift the front of the cover slightly, then lift the back of the cover from below.
2. Pull the cover forward firmly.
3. Tilt the cover up 45° and remove it.
The cover is reassembled in the reverse order.
1
2
3
• Replacing the water filter causes a small amount of
water (around 1 oz. or 25 cc) to drain. Place a cup
under the front end of the water filter cover to collect
any leaking water. Hold the water filter upright, once it
is removed, to prevent any remaining water from
spilling out of the water filter.
NOTE
Never wash the inside accessories of the appliance in the dishwasher.
They must be cleaned by hand.
CAUTION
Operation
23
2. Replace with a new water filter.
- Take the new water filter out of its packing and
remove the protective cover from the o-rings. With
water filter tabs in the horizontal position, push the
new water filter into the manifold hole until it stops.
- Rotate the water filter up into position and close the
cover. The cover clicks when closed correctly.
3. After the water filter is replaced, dispense 2.5 gallons of water (flush for
approximately 5 minutes) to remove trapped air and contaminants from the
system. Do not dispense the entire 2.5 gallon amount continuously. Depress and
release the dispenser pad for cycles of 30 seconds ON and 60 seconds OFF.
4. Water Filter Bypass Plug
- Keep the water filter bypass plug. You MUST
use the water filter bypass plug when a
replacement water filter cartridge is not
available.
Water Filter
Bypass Plug
DO NOT operate refrigerator without water filter or water filter bypass plug
installed.
CAUTION
• To purchase a replacement water filter:
- Visit your local dealer or distributor
- Web: Find Parts & Accessories from Support section of lg.com
- Call : 1-800-243-0000 (USA), 1-888-542-2623 (Canada)
• Part number of the replacement water filter: ADQ36006101
NOTE
24
Storing Food
ENGLISH
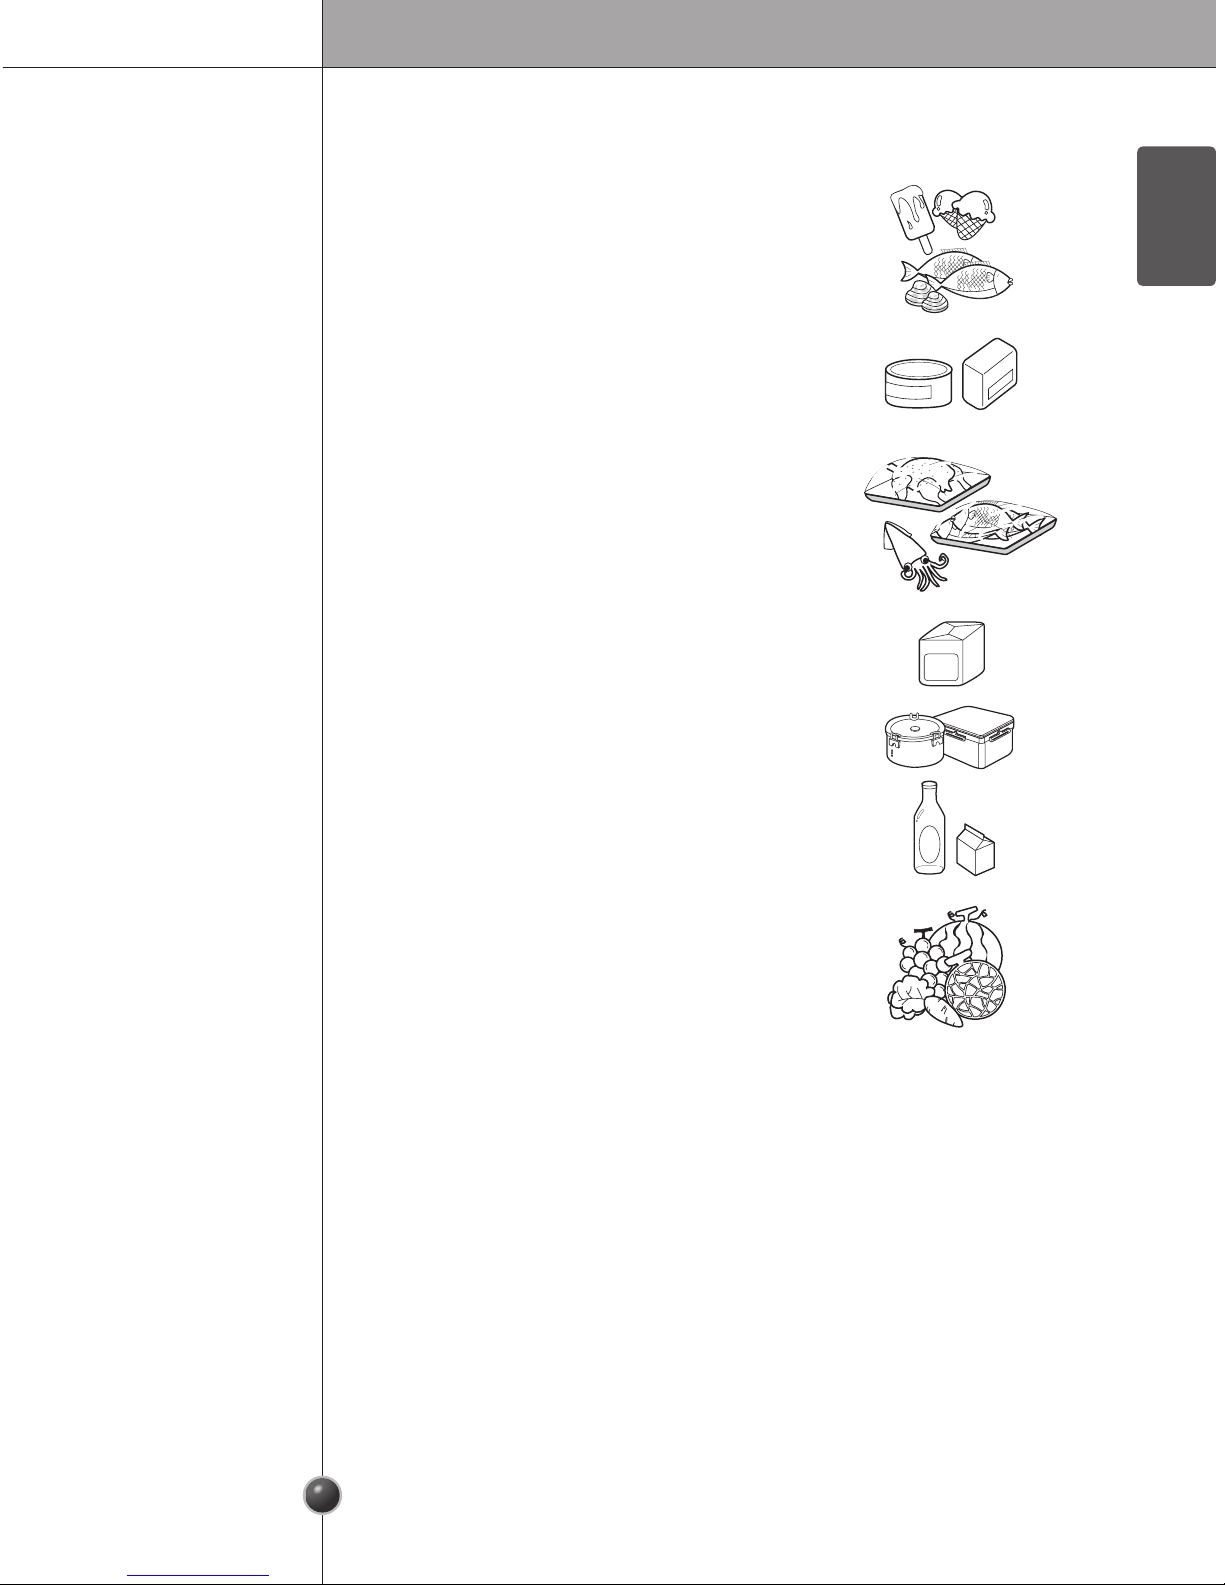
Food Storage Guide
(Refer to the Product Overview for identification of parts.)
Store various frozen foods such as meat, fish, ice
cream, frozen snacks, etc.
• Store small packed frozen food.
• The temperature in the door bins is likely to increase as
the door opens; therefore, do not store long-term foods
such as ice cream in the door bins.
Freezer
Compartment
Shelf
Freezer
Compartment
Door Bin
Freezer
Compartment
Drawer
Dairy Corner
Refrigerator
Compartment
Shelf
Refrigerator
Compartment
Door Bin
Vegetable Drawer
• Store meat, fish, chicken, etc. after wrapping them
with thin foil.
• Store dry.
Store dairy products such as cheese and butter.
Store side dishes or other foods at a proper distance.
Store small packed food or beverages such as milk,
juice, etc.
Store vegetables or fruits.
Storing Food
25
Food storage guide
• Store fresh food in the refrigerator compartment. How food is frozen and thawed is
an important factor in maintaining its freshness and flavor.
• Do not store food that spoils quickly, such as bananas and melons, at low
temperatures.
• Allow hot food to cool prior to storing it in the refrigerator. Placing hot food in the
refrigerator could spoil other food and lead to a higher energy consumption.
• Tightly wrap food or store it in a container with a lid.
• Do not block air vents with food. Smooth circulation of chilled air keeps refrigerator
temperatures even.
• Do not open the door frequently. Opening the door lets warm air enter the
refrigerator and causes temperatures to rise.
•
Do not overfill the door bins.
• Do not store bottles or glass in the freezer compartment. They may break or
shatter.
• Do not refreeze food that has been thawed. This causes loss of taste and
nutrients.
•
When storing frozen food for an extended period of time, such as ice cream, keep
it on a shelf, not in a door bin.
• Do not touch frozen containers made of metal with wet hands.
• Always clean food prior to refrigerating. Vegetables and fruits should be washed
and dried. Packed food should be wiped to prevent adjacent food from spoiling.
• When storing eggs in their storage rack or box, ensure that they are fresh, and
always store them in an upright position.
Freezer
compartment
Refrigerator
compartment
• If you keep the refrigerator in a hot and humid place, frequent opening of the
door or storing a lot of vegetables in it may cause condensation to form which
has no effect on its performance. Remove the condensation with a paper or
kitchen towel.
NOTE
26
Smart Functions
ENGLISH
Smart ThinQ Application
The Smart ThinQ application allows you to communicate with the appliance using a
smartphone.
Search for the LG Smart ThinQ application from the Google Play Store or Apple
App Store on a smart phone. Follow instructions to download and install the
application.
• For appliances with the
or logo
Firmware Update
Keep the appliance performance updated.
Manage Food
This feature helps track items in the refrigerator and freezer, sends alerts when
items are near their use by dates, generates grocery lists, and links to related
recipes.
Energy Monitoring
This feature keeps track of the refrigerator's power consumption and the number of
door openings.
Remote Control
Control the Refrigerator Temperature, Fresh Air Filter and Ice Plus from the smart
phone app.
Push Messages
If the door remains open for more than ten minutes, you will receive a push
message. When Ice Plus is finished, you will receive a push message.
Smart Diagnosis™
This function provides useful information for diagnosing and solving issues with the
appliance based on the pattern of use.
Settings
Allows you to set various options on the refrigerator and in the application.
Installing Smart
ThinQ Application
Smart ThinQ
Application
Features
To verify the Wi-Fi connection, check that Wi-Fi • icon on the control panel is lit.
LG Smart ThinQ is not responsible for any network connection problems or any •
faults, malfunctions, or errors caused by network connection.
The machine supports 2.4 GHz Wi-Fi networks only.•
If the appliance is having trouble connecting to the Wi-Fi network, it may be too far •
from the router. Purchase a Wi-Fi repeater (range extender) to improve the Wi-Fi
signal strength.
The Wi-Fi connection may not connect or may be interrupted because of the home •
network environment.
The network connection may not work properly depending on the internet service •
provider.
The surrounding wireless environment can make the wireless network service run •
slowly.
This information is current at the time of publication. The application is subject to •
change for product improvement purposes without notice to users.
NOTE
Smart Functions
27
FCC Notice
Wireless LAN
module
Specifications
FCC RF Radiation
Exposure
Statement
For transmitter module contained in this product•
This equipment has been tested and found to comply with the limits for a Class B
digital device, pursuant to Part 15 of the FCC Rules. These limits are designed to
provide reasonable protection against harmful interference in a residential
installation. This equipment generates, uses, and can radiate radio frequency
energy and, if not installed and used in accordance with the instructions, may cause
harmful interference to radio communications. However, there is no guarantee that
interference will not occur in a particular installation. If this equipment does cause
harmful interference to radio or television reception, which can be determined by
turning the equipment off and on, the user is encouraged to try to correct the
interference by one or more of the following measures:
Reorient or relocate the receiving antenna.•
Increase the separation between the equipment and the receiver.•
Connect the equipment to an outlet on a circuit different from that to which the •
receiver is connected.
Consult the dealer or an experienced radio/TV technician for help.•
This device complies with part 15 of the FCC Rules. Operation is subject to the
following two conditions:
1) this device may not cause harmful interference and
2) this device must accept any interference received, including interference that
may cause undesired operation of the device.
Any changes or modifications in construction of this device which are not expressly
approved by the party responsible for compliance could void the user's authority to
operate the equipment.
This equipment complies with FCC radiation exposure limits set forth for an
uncontrolled environment. This transmitter must not be co-located or operating in
conjunction with any other antenna or transmitter.
This equipment should be installed and operated with a minimum distance of 20 cm
(7.8 inches) between the antenna and your body. Users must follow the specific
operating instructions for satisfying RF exposure compliance.
Model LCW-003
Frequency Range 2412 to 2462 MHz
Output Power (Max)
IEEE 802.11b: 17.56 dBm
IEEE 802.11b: 25.53 dBm
IEEE 802.11b: 25.29 dBm
28
Smart Functions
ENGLISH
For transmitter module contained in this product•
This device complies with Industry Canada's licence- exempt RSSs. Operation is
subject to the following two conditions:
1) This device may not cause interference; and
2) This device must accept any interference, including interference that may cause
undesired operation of the device.
This equipment complies with IC radiation exposure limits set forth for an
uncontrolled environment.
This equipment should be installed and operated with a minimum distance of 20 cm
(7.8 inches) between the antenna and your body.
To obtain the source code under GPL, LGPL, MPL, and other open source licenses,
that is contained in this product, please visit http://opensource.lge.com. In addition
to the source code, all referred license terms, warranty disclaimers and copyright
notices are available for download.
LG Electronics will also provide open source code to you on CD-ROM for a charge
covering the cost of performing such distribution (such as the cost of media,
shipping, and handling) upon email request to opensource@lge.com. This offer is
valid for three (3) years from the date on which you purchased the product.
Industry Canada
Statement
IC Radiation
Exposure
Statement
Open Source
Software Notice
Information
The manufacturer is not responsible for any radio or TV interference caused by •
unauthorized modifications to this equipment. Such modifications could void the
user's authority to operate the equipment.
NOTE
Smart Functions
29
Smart Diagnosis™ Function
Should you experience any problems with the appliance, it has the capability of
transmitting data via your telephone to the LG Customer Information Center. NFC
or Wi-Fi equipped models can also transmit data to a smartphone using the LG
Smart ThinQ application.
For appliances with the •
or logo.
Use the Smart Diagnosis feature in the Smart ThinQ application for help diagnosing
issues with the appliance without the assistance of the LG Customer Information
Center.
Follow the instructions in the Smart ThinQ application to perform a Smart Diagnosis
using your smartphone.
Smart ThinQ
Smart Diagnosis™
For best results, do not move the phone while the tones are being transmitted.•
If the call center agent is not able to get an accurate recording of the data, you •
may be asked to try again.
The Smart Diagnosis™ function depends on the local call quality.•
Bad call quality may result in poor data transmission from your phone to the •
call center, which could cause Smart Diagnosis™ to malfunction.
NOTE
For appliances with the • or logo.
This gives you the capability of speaking directly to our trained specialists. The
specialist records the data transmitted from the appliance and uses it to analyze the
issue, providing a fast and effective diagnosis.
1. Call the LG Electronics Customer Information Center at:
(LG U.S.A.) 1-800-243-0000
(LG Canada) 1-888-542-2623
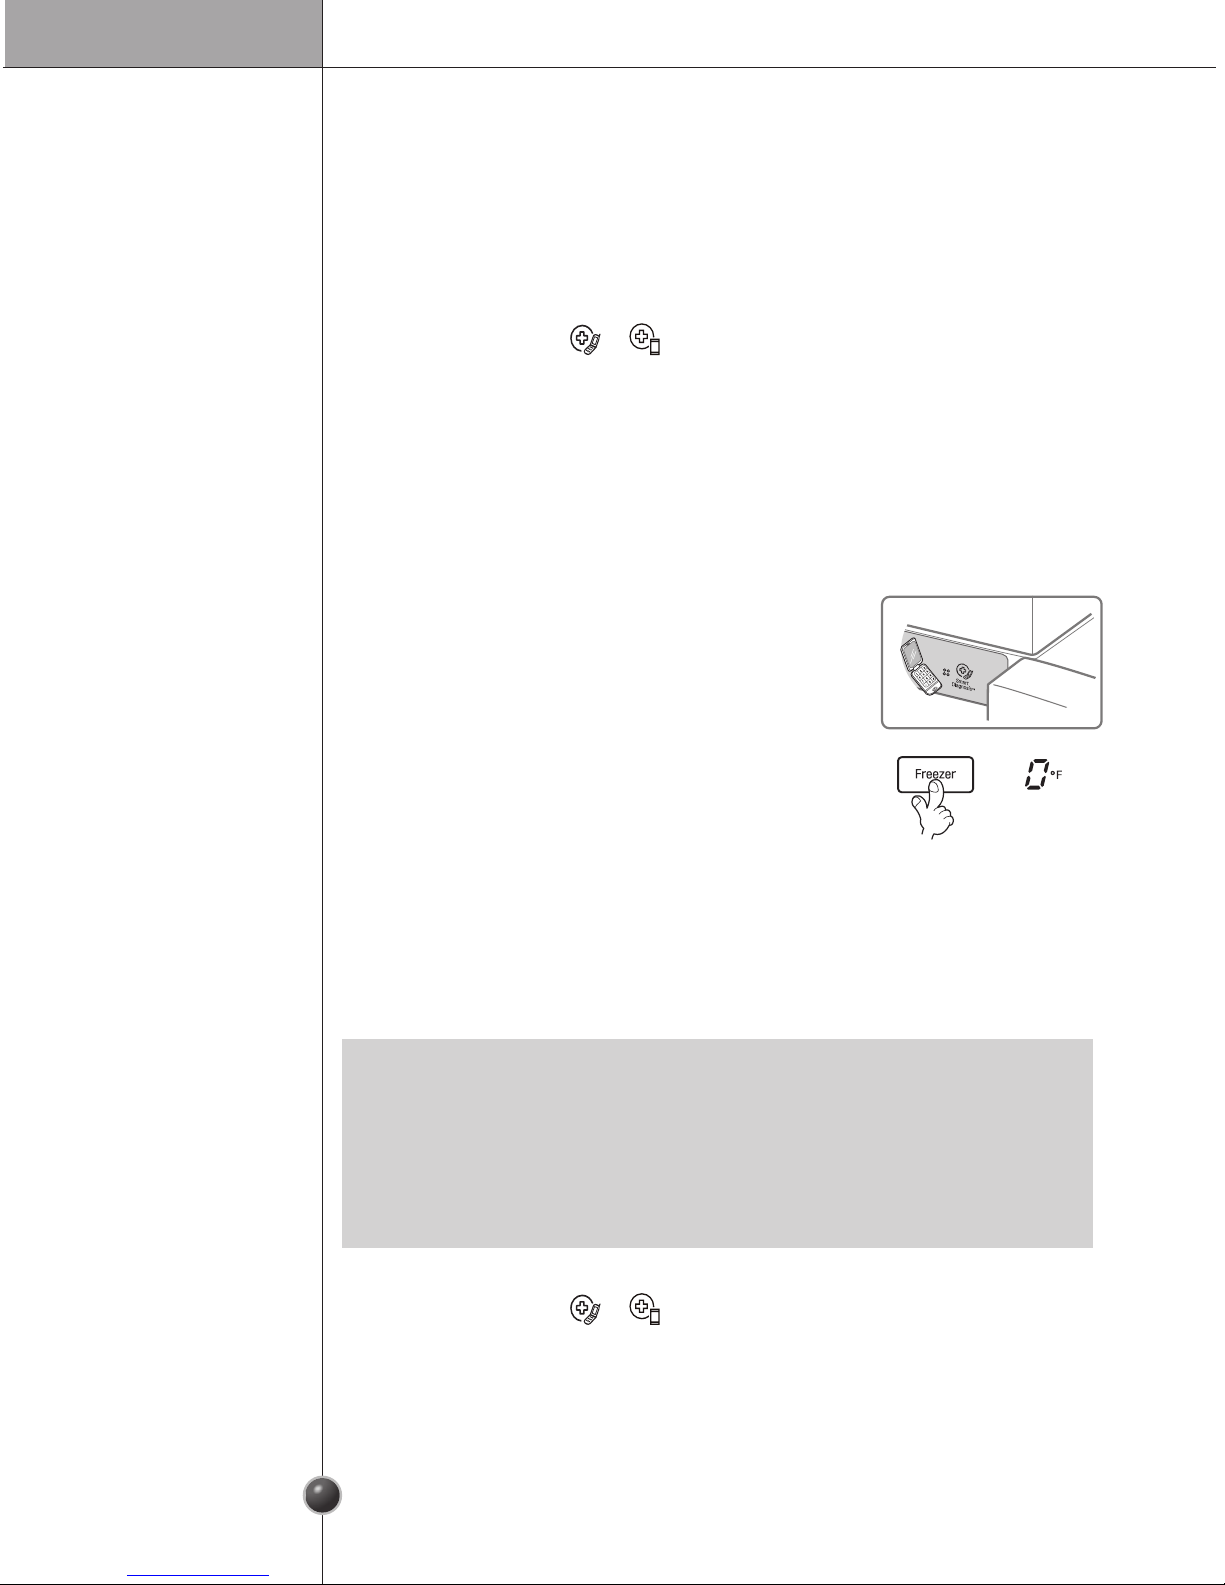
2. Open the right refrigerator door.
3. Hold the mouthpiece of your phone in front of the
speaker that is located on the right hinge of the
refrigerator door, when instructed to do so by the
call center.
4. Press and hold the Freezer button for three
seconds while continuing to hold your phone to the
speaker.
5. After you hear three beeps, release the Freezer
button.
6. Keep the phone in place until the tone transmission has finished.
The display will count down the time. Once the countdown is over and the
tones have stopped, resume your conversation with the specialist, who will
then be able to assist you in using the information transmitted for analysis.
Smart Diagnosis™
through the Customer
Information Center
 Loading...