

LG LSRE307ST User Manual

OWNER’S MANUAL
ELECTRIC RANGE
Please read this guide thoroughly before operating and keep it handy
for reference at all times.
LSRE307ST
P/No.: MFL57206005
www.lge.com
ENGLISH ESPAÑOL

- 2 -
TABLE OF CONTENTS
SAFETY.......................................................................3-7
- Important safety instructions .................................3-7
SURFACE CONTROLS COOKING.............................8-12
- PF or HS message .................................................8
- Locations of the radiant surface elements
and controls .............................................................8
- Setting surface controls .........................................9
- Operating the warming zone..................................10
- About glass cooktop surface..................................11
- About cookware.....................................................12
SETTING WARMING DRAWER CONTROLS............13-14
INFORMATION...........................................................15-16
-
Parts and features
...............................................15
-
Control panel features
.............................................16
OPERATION ...............................................................17-28
- Setting the clock ....................................................17
- Setting the timer on/off..........................................17
- Options...................................................................18-19
• Setting convection auto conversion feature
• Thermostat adjustment
• Setting language selection (English or Spanish)
• Setting preheating alarm light on/off
• Setting beeper volume
• Setting temperature unit (F or C)
Please record the model number and serial number of
this unit for future reference. We also suggest that you
record the details of any contact with LG (LG
Electronics USA, Inc.) concerning this unit.
Staple your receipt here to verify your retail purchase.
Model No.:
Serial No.:
Dealer:
Dealer Phone No.:
Customer Relations
LG Electronics U.S.A., Inc.
Service Division Bldg. #3
201 James Record Rd.
Huntsville, AL 35824-0126
Thank you for purchasing an LG electric oven.
- Setting bake ...........................................................20-21
- Setting timed bake.................................................22
- Setting delayed timed bake....................................23
- Setting broil............................................................23
- Recommended broiling guide ..............................24
- Setting convection bake.........................................25
- Setting convection roast ........................................
26
- Using the favorites feature ................................27
- Setting the cook & warm feature...........................27
- Setting oven lockout feature..................................28
-
Changing hour mode on clock (12hr., 24hr.)
..............28
- Setting the proof feature........................................28
- To turn the oven light on/off...................................28
SELF-CLEAN...............................................................29-30
MAINTENANCE .........................................................31-35
- Removing and replacing the warming drawer .......31
- Oven vent ..............................................................31
- Care & cleaning......................................................32-34
- Removing & replacing the lift-off oven door ..........35
- Door care instructions............................................35
TROUBLESHOOTING ................................................36-39
- Before calling for service........................................36-39
WARRANTY ...............................................................40
- 3 -
ENGLISH
SAFETY
IIIIMMMMPPPPOOOORRRRTTTTAAAANNNNTTTT SSSSAAAAFFFFEEEETTTTYYYY IIIINNNNSSSSTTTTRRRRUUUUCCCCTTTTIIIIOOOONNNNSS
SS
Read and follow all instructions before using your oven to prevent the risk of fire, electric shock, personal injury, or damage
when using the range. This guide do not cover all possible conditions that may occur. Always contact your service agent or
manufacturer about problems that you do not understand.
This symbol will alert you to hazards or unsafe practices which could cause serious bodily
harm or death.
This is the safety alert symbol. This symbol alerts you to potential hazards that can kill or hurt you and others.
All safety messages will follow the safety alert symbol and either the word “WARNING” or “CAUTION”.
These word means :
This symbol will alert you to hazards or unsafe practices which could cause bodily injury or
property damage.
WARNING
CAUTION
• Be certain your appliance is properly installed and
grounded by a qualified technician.
• Do not repair or replace any part of the appliance unless
specifically recommended in the manual.
• All other servicing should be referred to a qualified
technician.
• Always disconnect power to appliance before servicing by
unplugged, removing the fuse or switching off the circuit breaker
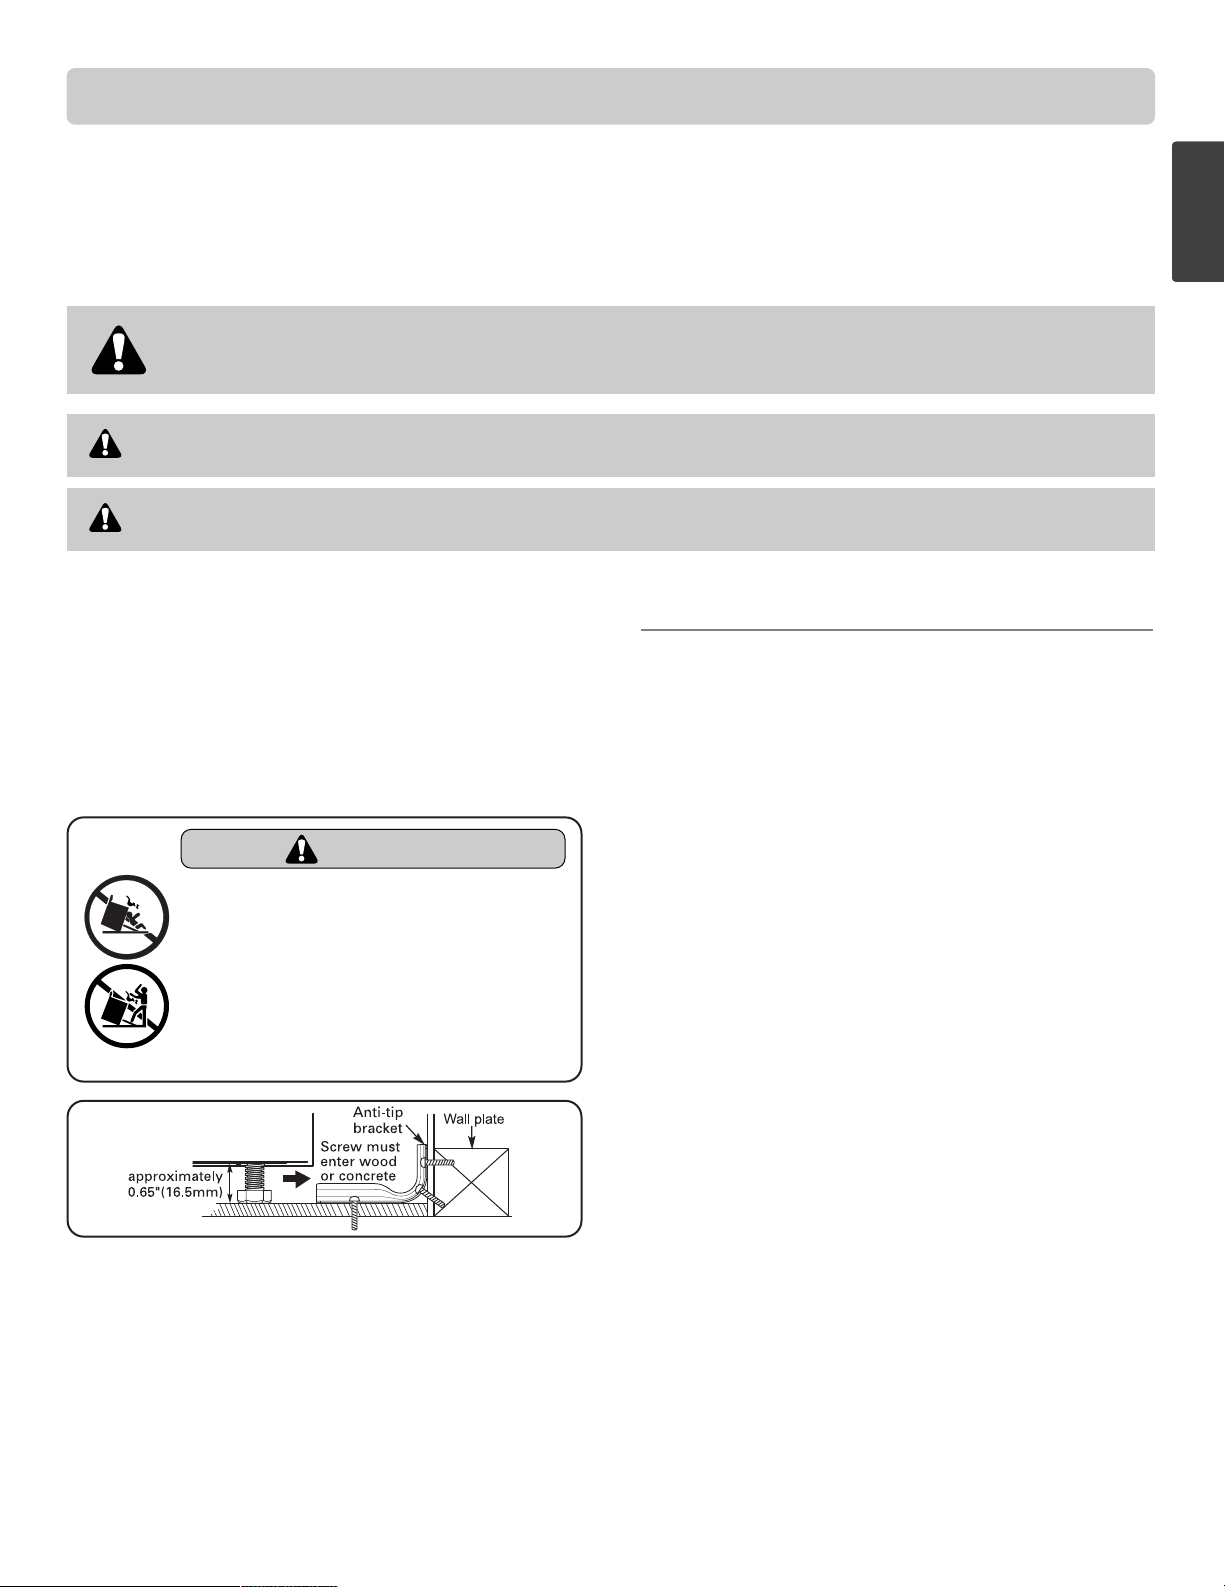
• To reduce the risk of tipping of the range, the range must
be secured by properly installing anti-tip devices.
• To check that the anti-tip bracket is properly installed:
Grasp the top rear edge of the range back guard and
carefully attempt to tilt it forward. Verify that the anti-tip
devices are engaged.
• Warming drawer or Storage drawer : Remove drawer and
visually inspect that the rear leveling leg is fully inserted
into the anti-tip bracket.
• Refer to the installation manual for proper anti-tip bracket
installation.
SURFACE COOKING UNITS
• Use Proper Pan Sizes. This appliance is equipped with
one or more surface units of different size. Select utensils
having flat bottoms large enough to cover the surface unit
heating element.
The use of undersized utensils will expose a portion of the
heating element to direct contact and may result in ignition
of clothing. Proper relationship of utensil to burner will
also improve efficiency.
• Never Leave Surface Units Unattended at High
Heat Settings. Boilovers cause smoking and greasy
spillovers that may ignite.
• Glazed Cooking Utensils. Only certain types of glass,
glass/ceramic, ceramic, earthenware, or other glazed
utensils are suitable for range-top service without breaking
due to the sudden change in temperature.
• Utensil Handles Should Be Turned Inward and Not
Extend Over Adjacent Surface Units. To reduce the
risk of burns, ignition of flammable materials, and spillage
due to unintentional contact with the utensil, the handle of
a utensil should be positioned so that it is turned inward,
and does not extend over adjacent surface units.
• Be sure you know which control pads operate each surface
unit.
Make sure you turned on the correct surface unit.
WARNING
• DO NOT step or sit on the door. Install the
Anti-Tip Bracket packed with range.
- The range could be tipped and injury might result
from spilled hot liquid, food, or the range itself.
- If the range is pulled away from the wall for
cleaning, service, or any other reason, ensure that
the Anti-Tip Device is properly reengaged when
the range is pushed back against the wall.
ENGLISH
- 4 -
SAFETY
IIIIMMMMPPPPOOOORRRRTTTTAAAANNNNTTTT SSSSAAAAFFFFEEEETTTTYYYY IIIINNNNSSSSTTTTRRRRUUUUCCCCTTTTIIIIOOOONNNNSS
SS
OVEN
• DO NOT TOUCH HEATING ELEMENTS OR
INTERIOR SURFACES OF OVEN. Heating elements
may be hot even though they are dark in color. Interior
surfaces of an oven become hot enough to cause burns.
During and after use, do not touch or let clothing or other
flammable materials contact heating elements or interior
surfaces of oven until they have had sufficient time to cool.
Other surfaces of the appliance may become hot enough to
cause burns. Among these surfaces are the cooktop and
areas facing the cooktop, oven vent openings, surfaces near
these openings, oven doors, and windows of oven doors.
• Use Care When Opening Door. Let hot air or steam
escape before you remove or replace food in the oven
• Do Not Heat Unopened Food Containers. Build-up of
pressure may cause container to burst and result in injury.
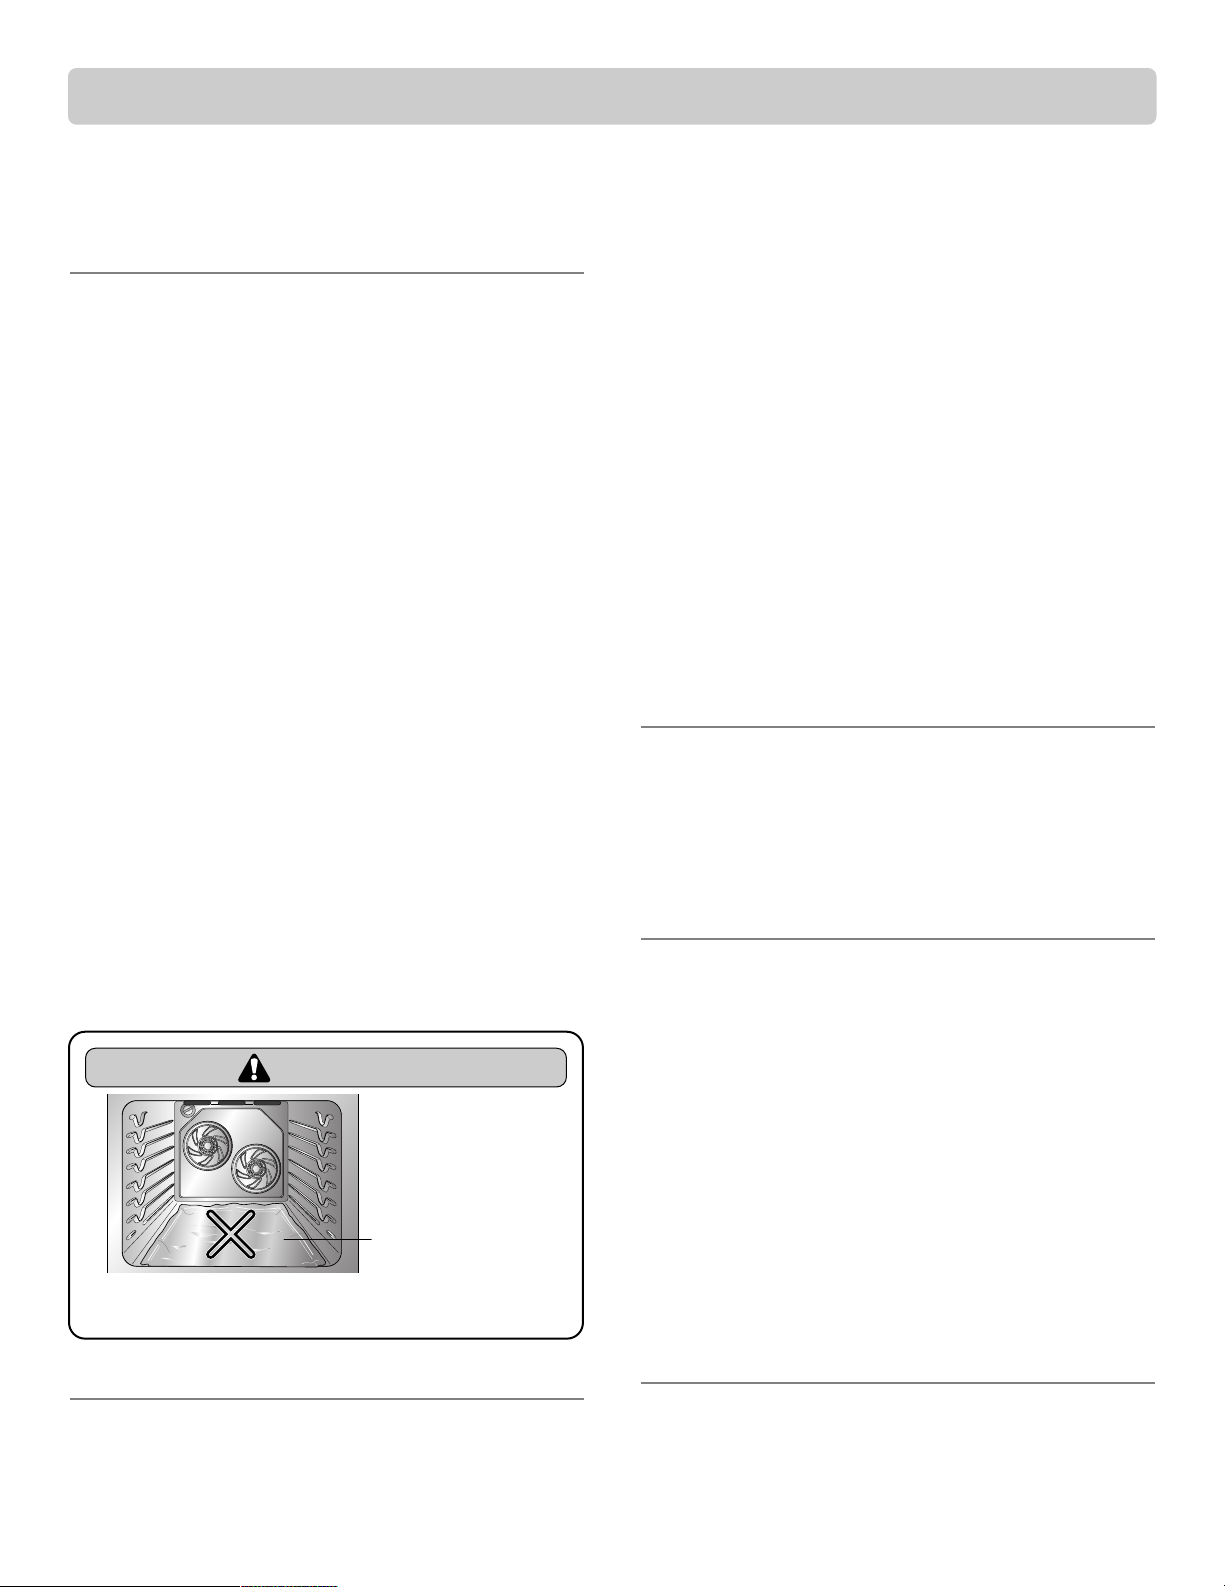
• Protective Liners. Do not use aluminum foil or any other
material to line the oven bottoms. Improper installation of
these liners may result in a risk of electric shock or fire.
• Keep Oven Vent Ducts Unobstructed. The oven vent
is located above the left rear surface unit. This area could
become hot during oven use. Never block this vent and
never place plastic or heat-sensitive items on vent.
• Placement of Oven Racks. Always place oven racks in
desired location while oven is cool. If rack must be moved
while oven is hot, do not, let a potholder come in contact
with the hot heating element in the oven.
• Do Not allow aluminum foil or meat probe to contact
heating elements.
SELF-CLEANING OVENS
• Do Not Clean Door Gasket. The door gasket is essential
for a good seal. Care should be taken not to rub, damage, or
move the gasket.
• Do Not Use Oven Cleaners. No commercial oven
cleaner or oven liner protective coating of any kind should
be used in or around any part of the oven.
• Clean in the self-clean cycle only parts listed in this
manual. Before self-clean the oven, remove the broiler
pan and any utensils of foods from the oven.
• Before Self-Cleaning the Oven. Remove broiler pan
and other utensils.
• Never keep pet birds in the kitchen. The health of
birds is extremely sensitive to the fumes released during an
oven self-clean cycle. Fumes may be harmful or fatal to
birds. Move birds to well-ventilated room.
• Important Instruction. In the event the self clean error
code F is displayed, or three long beeps sound, the oven is
malfunctioning in the self clean mode. Turn off or
disconnect appliance from power supply and have serviced
by a qualified technician.
VENTILATING HOODS:
• Clean Ventilating Hoods Frequently. Grease should
not be allowed to accumulate on hood or filter.
• When flaming foods under the hood, turn the fan
on.
GLASS/CERAMIC COOKING
SURFACES
• DO NOT TOUCH SURFACE UNITS OR AREAS
NEAR UNITS. Surface units may be hot even though they
are dark in color.
Areas near surface units may become hot enough to cause
burns. During and after use, do not touch, or let clothing or
other flammable materials contact surface units or areas
near units until they have had sufficient time to cool.
The areas include – Cooktop, area above the oven door.
• Do Not Cook on Broken CookTop. If cooktop should
break, cleaning solutions and spillovers may penetrate the
broken cook-top and create a risk of electric shock. Contact
a qualified technician immediately.
• Clean CookTop With Caution. Do not use sponges or
cloth to wipe spills on a hot cooking area. Use a proper
metal scraper.
DEEP FAT FRYERS:
• Use extreme caution when moving the grease kettle or
disposing of hot grease.
WARNING
• DO NOT place aluminum foil directly on
the oven bottom.
aluminium foil
ENGLISH
- 5 -
SAFETY
IIIIMMMMPPPPOOOORRRRTTTTAAAANNNNTTTT SSSSAAAAFFFFEEEETTTTYYYY IIIINNNNSSSSTTTTRRRRUUUUCCCCTTTTIIIIOOOONNNNSS
SS
WARNING
• DO NOT step or sit on the door. Install the Anti-Tip Bracket packed with range.
- The range could be tipped and injury might result from spilled hot liquid, food, or the range itself.
- If the range is pulled away from the wall for cleaning, service, or any other reason, ensure that the Anti-Tip Device is
properly reengaged when the range is pushed back against the wall.
• Always turn off all power to the warming drawer before attempting to remove it.
- Failure to do so can result in severe personal injury, death or electrical shock.
• Before replacing your oven light bulb, DISCONNECT the electrical power to the range at the
main fuse or circuit breaker panel.
- Failure to do so can result in severe personal injury, death or electrical shock.
• Make sure oven and bulb are cool.
• Children should be kept away from the range.
- Accessible parts may become hot when the grill is in use.
CAUTION
• DO NOT store items of interest to children in cabinets above a range or on the back guard of a
range.
- Children climbing on the range to reach items could be seriously injured.
• DO NOT use the glass cooktop surface as a cutting board.
• DO NOT place or store items that can melt or catch fire on the glass cooktop, even when it is
not being used.
• Always turn the surface units on after placing cookware.
• DO NOT store heavy items above the cooktop surface that could fall and damage it.
• DO NOT place aluminum foil or plastic items such as salt and pepper shakers, spoon holders,
or plastic wrappings or any other material on the range when it is in use.
- The hot air from the vent could melt plastics or ignite flammable items.
• Make sure you turned on the correct surface unit.
• NEVER cook directly on the glass. Always use cookware.
• Always place the pan in the center of the surface unit you are cooking on.
• DO NOT leave children alone.
- Children should not be left alone or unattended in area where appliance is in use. Children should never be allowed to sit
or stand on any part of the appliance.
• NEVER use your appliance for warming or heating the room.
• DO NOT use water on grease fires.
- Turn off the oven to avoid spreading the flames. Smother the fire by closing the oven door or use dry chemical, baking
soda, or foam-type extinguishers.
• Use only dry potholders.
- Moist or damp pot holders on hot surfaces may result in burns from steam. Do not let the pot holder touch hot heating
elements. Do not use a towel or other bulky cloth.
- 6 -
SAFETY
CAUTION
• Storage in or on appliance.
- Flammable materials should not be stored in an oven or near surface elements.
• Be certain all packing materials are removed from the appliance before operating.
- Keep plastics, clothes, and paper away from parts of the appliance that may become hot.
• Wear proper apparel.
- Loose-fitting or hanging garments should never be worn while using the appliance.
• NEVER leave surface units unattended at high heat setting.
- Boilovers cause smoking and greasy spillovers that may catch on fire.
• Always turn the surface units off before removing cookware.
• DO NOT use plastic wrap to cover food.
- Plastic may melt onto the surface and be very difficult to remove.
• DO NOT touch surface units until it has cooled down.
• The surface elements may still be hot and burns may occur if the glass surface is touched
before it has cooled down sufficiently.
• Immediately clean the spills on cooking area to prevent a tough cleaning chore later.
• If cabinet storage is provided directly above cooking surface, limit it to items that are
infrequently used and can be safely stored in an area subjected to heat. Temperatures may be
unsafe for items such as volatile liquids, cleaners or aerosol sprays.
• DO NOT touch surface elements until it has cooled down sufficiently.
- The surface elements may still be hot and burns may occur.
• NEVER leave food unattended at high or medium-high setting.
- Boilovers can cause smoking and greasy spillovers may catch on fire.
• Use only cookware and dishes recommended as safe for oven and cooktop use.
• When warming foods do not use containers that seal. Allow venting for heated air to escape.
• DO NOT warm food on the warming zone for more than 2 hours
- Placing uncooked or cold food on the warming zone could result in foodborne illness.
• Always use pot holders or oven mitts when removing food from the Warming Drawer or
Warming Center as cookware and plates will be hot.
- You can be burned as cookware and plates will be hot.
• Always arrange oven racks when the oven is cool.
IIIIMMMMPPPPOOOORRRRTTTTAAAANNNNTTTT SSSSAAAAFFFFEEEETTTTYYYY IIIINNNNSSSSTTTTRRRRUUUUCCCCTTTTIIIIOOOONNNNSS
SS
- 7 -
SAFETY
ENGLISH
CAUTION
• Use caution with the TIMED BAKE or DELAYED TIMED BAKE features. Use the automatic timer
when cooking cured or frozen meats and most fruits and vegetables. Foods that can easily
spoil, such as milk, eggs, fish, meat or poultry, should be chilled in the refrigerator first. Even
when chilled, they should not stand in the oven for more than 1 hour before cooking begins,
and should be removed promptly when cooking is completed.
- Eating spoiled food can result in sickness from food poisoning.
• Should an oven fire occur, leave the oven door closed and turn the oven off. If the fire
continues, throw baking soda on the fire or use a fire extinguisher.
• DO NOT put water or flour on the fire.
- Flour may be explosive and water can cause a grease fire to spread and cause personal injury.
• DO NOT use the roasting rack when boiling.
- To do so can prevent contacting the broil element and grease splattering.
• DO NOT leave small children unattended near the appliance.
- During the Self-cleaning cycle, the outside of the range can become very hot to touch.
• DO NOT line the oven walls, racks, bottom or any other part of the range with aluminum foil or
any other material.
- Doing so will destroy heat distribution, produce poor baking results and cause permanent damage to the oven interior
(aluminum foil will melt to the interior surface of the oven).
• DO NOT force the door open.
- This can damage the automatic door locking system. Use care when opening the oven door after the Self-Cleaning cycle.
Stand to the side of the oven when opening the door to allow hot air or steam to escape. The oven may still be VERY
HOT.
• DO NOT use a steel-wool pad.
- It will SCRATCH the surface.
• DO NOT use harsh abrasive cleaners or sharp metal scrapers to clean the oven door glass since
they can scratch the surface.
- It may result in shattering of the glass.
• DO NOT use scrub pads or abrasive cleaning pads.
- They may damage your glass cooktop surface.
• Cookware with rough or bottoms can mark or scratch the cooktop surface.
• Do not slide anything metal or glass across the cooktop.
• Do not use cookware with dirt or dirt build up on bottom.
• Be careful when removing and lifting the door.
• DO NOT lift the door by the handle.
- The door is very heavy.
• The Oven must be switched off before removing the fan guard for cleaning, the guard must be
replaced in accordance with the instructions after cleaning.
IIIIMMMMPPPPOOOORRRRTTTTAAAANNNNTTTT SSSSAAAAFFFFEEEETTTTYYYY IIIINNNNSSSSTTTTRRRRUUUUCCCCTTTTIIIIOOOONNNNSS
SS

- 8 -
SURFACE CONTROLS COOKING
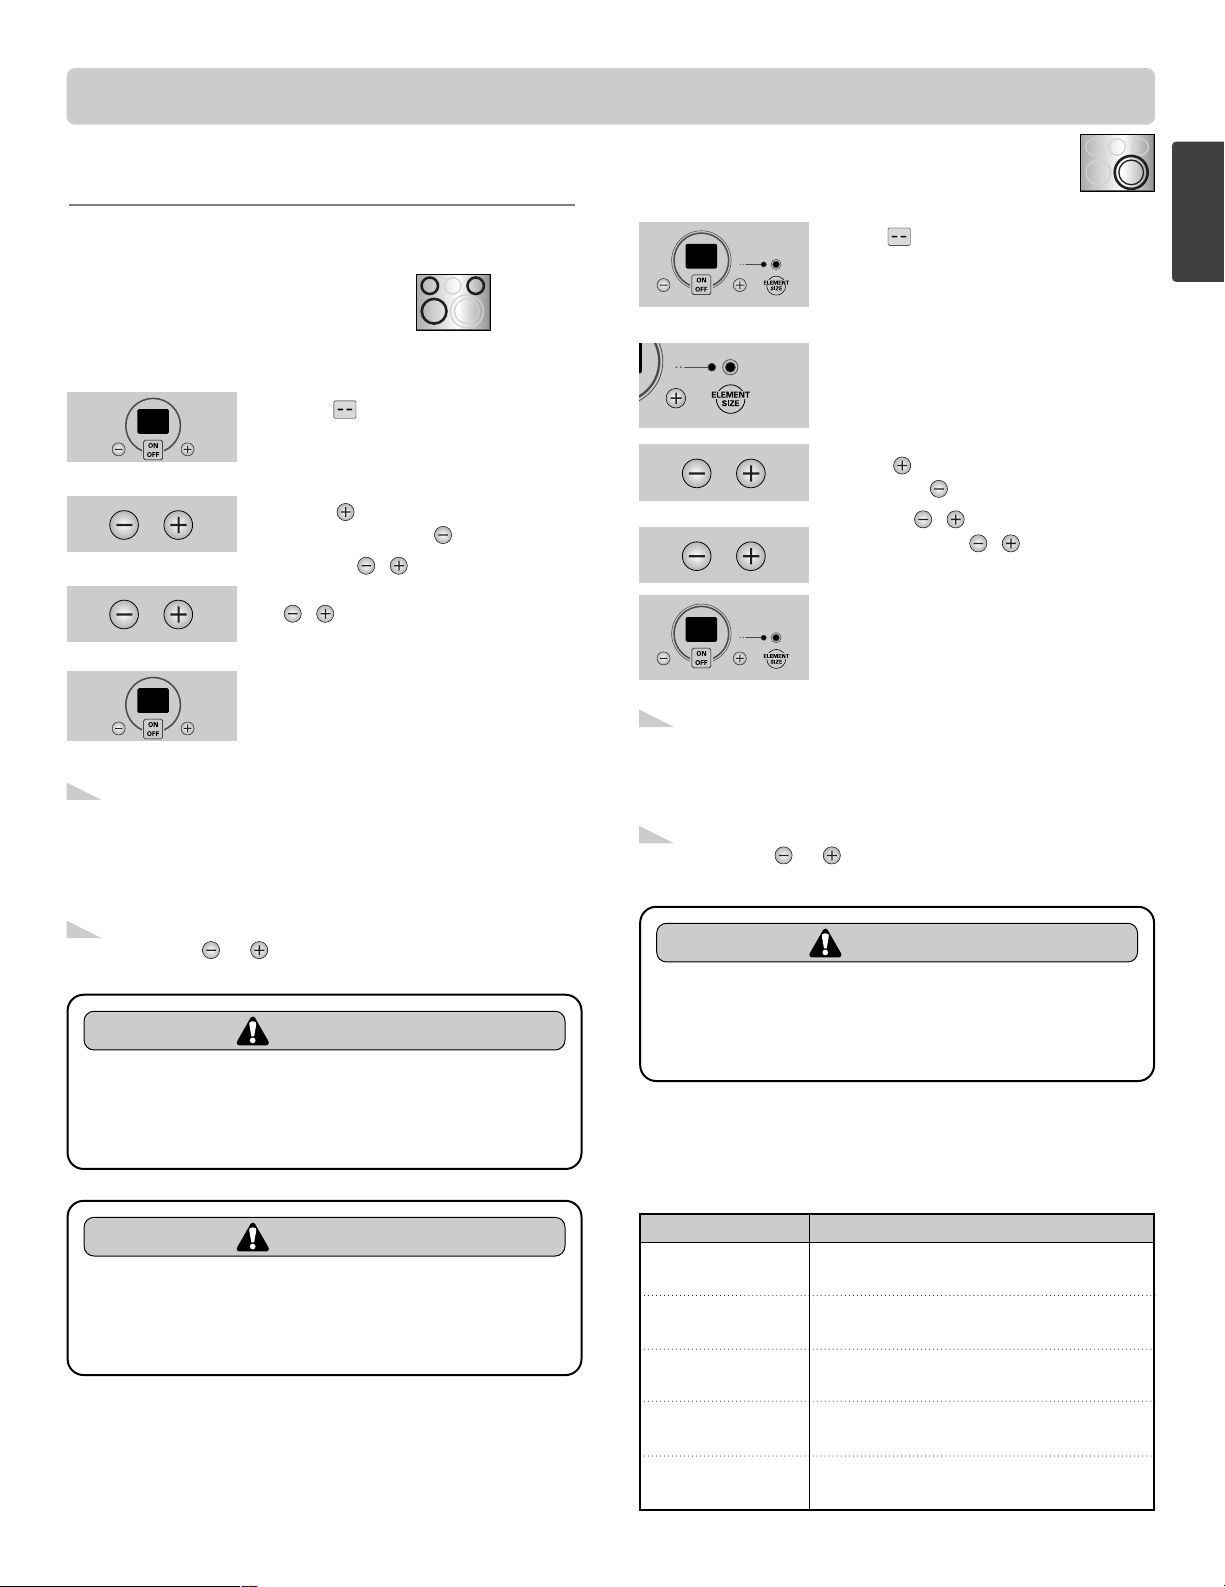
LOCATIONS OF THE RADIANT
SURFACE ELEMENTS AND
CONTROLS
The radiant surface elements are located on the cooktop as
below.
The radiant control key locations are correlative to radiant
surface elements on the cooktop as shown below.
PF(Power Failure) MESSAGE
The PF message will appear whenever there has been a
power interruption to the appliance. To clear the PF message
press ON/OFF control pad to reset and be sure to reset the
clock with the correct time of day.
HS(Hot Surface) MESSAGE
LIGHT WILL:
• Come on when the unit is hot to touch after it is turned off.
• Come on during Self Cleaning Cycle.
• Stay on even after the unit is turned off.
• Glow until the unit has cooled down to approximately 150°F.
Single
Left Rear Element
Single
Left Front Element
Dual
Right Front
Dual Element
Warming Zone
Single
Right Rear Element
- 9 -
ENGLISH
SURFACE CONTROLS COOKING
SETTING SURFACE CONTROLS
When changing from a high heat setting to a lower heat
setting, the surface unit may stop glowing. This is normal.
1. Press ON/OFF for the desired
element position. The display will
flash .
(If no further pads are pressed
within 10 seconds, the display will
disappear.)
2. Press once to turn on the
power level Hi or once for Lo.
3. Use the / to choose the
desired power setting.
/ is continuously accessible.
(Adjustable at any time while the
element is ON.)
4. To turn off the unit after cooking,
press ON/OFF once.
To turn on a single surface unit
(Right Rear, Left Rear, Left Front)
1. Press ON/OFF. The display will
flash .
(If no further pads are pressed within
10 seconds, the display will
disappear.)
2. Press ELEMENT SIZE as needed to
select the desired burner size. When
first selected, 12” size is ON. The
light above ELEMENT SIZE indicates
which size surface unit is on.
3. Press once to turn on the power
level Hi or once for Lo.
4. Use the / to choose the desired
power setting. / is continuously
accessible. (Adjustable at any time
while the element is ON.)
5. To turn off the unit after cooking,
press ON/OFF once.
To turn on a dual surface unit (Right Front)
Recommended Surface Cooking
Settings
Recommended setting for the single & dual elements.
• Each time a pad is pressed a beep will sound.
• The power level decreases or increases by 0.5
from 9.0 through 3.0. (by 0.2 from 3.0 through
1.0)
• Lo is the lowest power level available.
Note:
• Each time a pad is pressed a beep will sound.
• The power level decreases or increases by 0.5 from
9.0 through 3.0. (by 0.2 from 3.0 through 1.0)
• Lo is the lowest power level available.
Note:
Setting
Type of cooking
HIGH
(8.5 – Hi)
MEDIUM HIGH
(5.5 – 8.0)
MEDIUM
(3.5 – 5.0)
MEDIUM LOW
(2.2 – 3.0)
LOW/SIMMER
(Lo – 2.0)
Start most foods, bring water to a
boil or pan broiling.
Continue a rapid boil, fry, or deep
fat fry.
Maintain a slow boil, thicken sauces
and gravies, or steam vegetables.
Keep foods cooking, poach, or stew
(2.8 or lower is a simmer setting).
Keep warm, melt, or simmer.
To scroll through the power levels quickly press and
hold the or key pads until the power level
desired is reached.
Note:
To scroll through the power levels quickly press and
hold the or key pads until the power level
desired is reached.
Note:
CAUTION
• DO NOT touch surface elements until it
has cooled down sufficiently.
- The surface elements may still be hot and burns may
occur.
CAUTION
• DO NOT touch surface elements until it
has cooled down sufficiently.
- The surface elements may still be hot and burns may
occur.
CAUTION
• NEVER leave food unattended at high or
medium-high setting.
- Boilovers can cause smoking and greasy spillovers
may catch on fire.
- 10 -
SURFACE CONTROLS COOKING
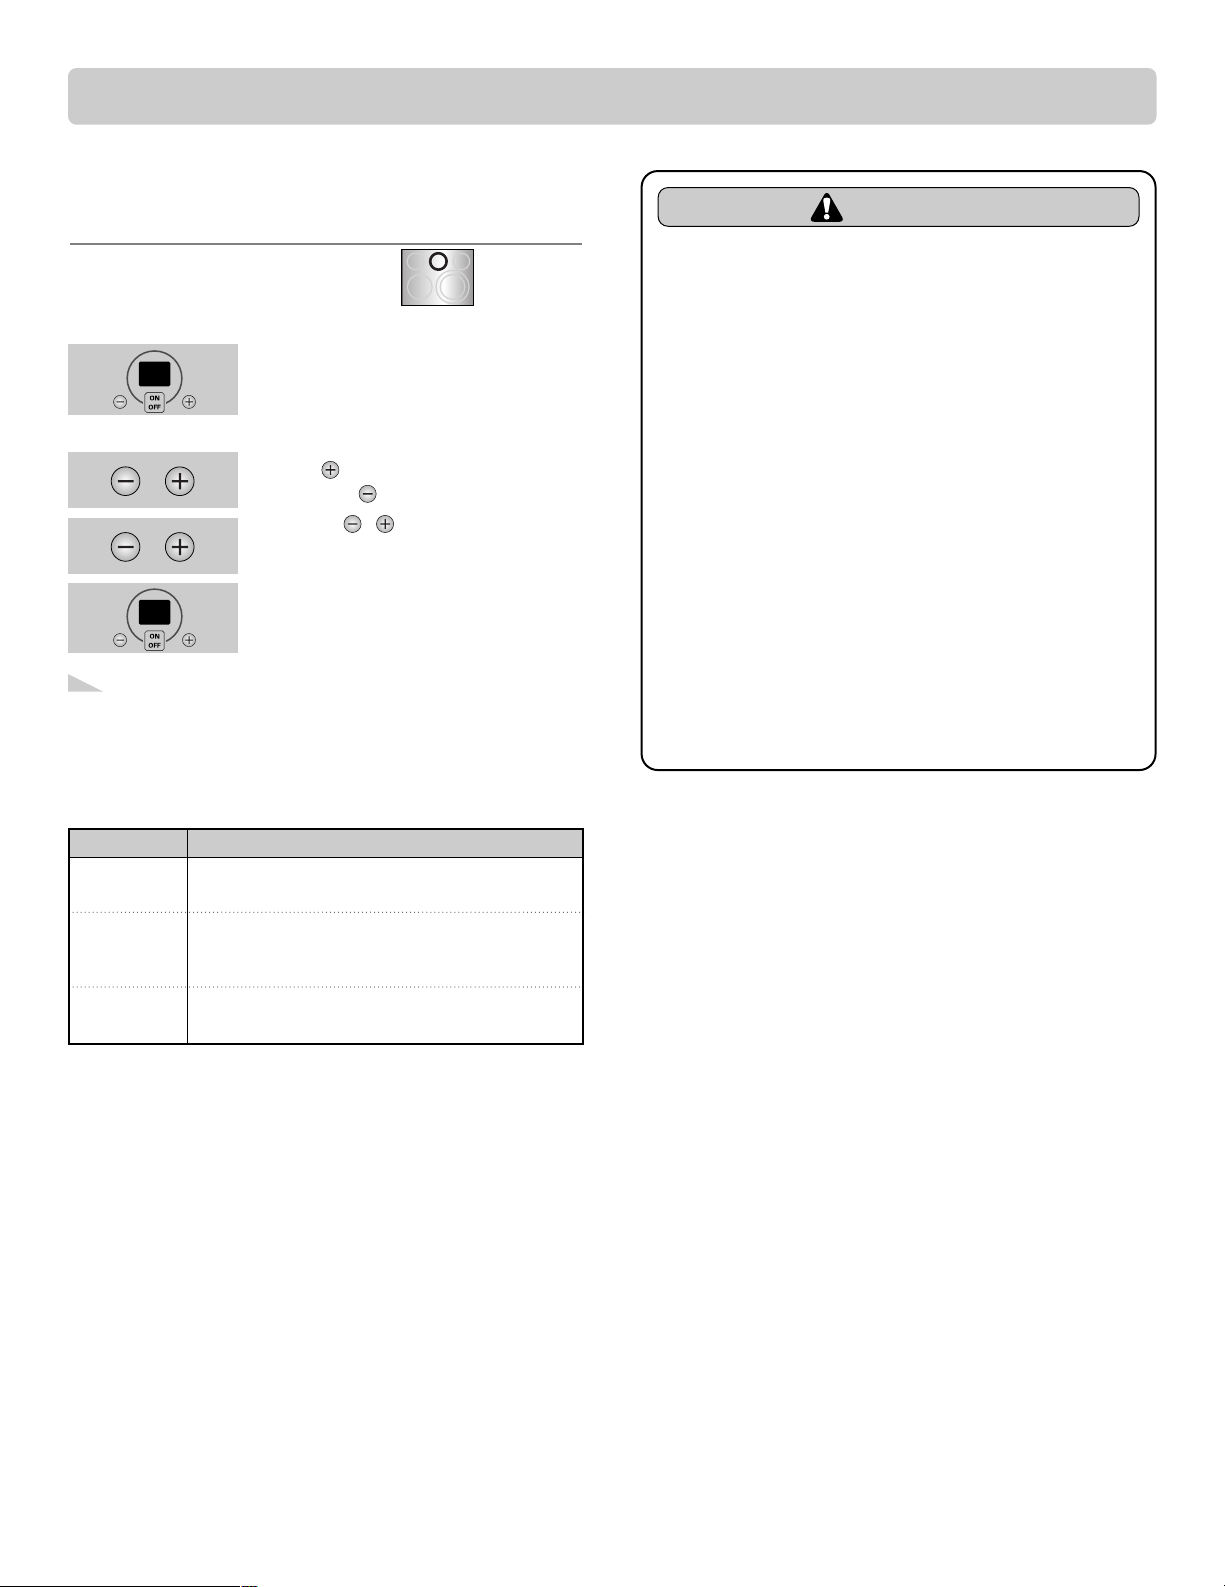
OPERATING THE WARMING
ZONE
1. Press ON/OFF at the warming zone
control position. The warming zone
indicator light will flash.
(If no further pads are pressed within
10 seconds the display will
disappear.)
2. Press once to turn on the power
level Hi or to turn on for Lo.
3. Use the / to choose the desired
power setting. (Adjustable at any time
while the element is ON.)
4. To turn off the unit when the food is
ready to serve, press ON/OFF once.
To set the warming zone control
Suggested Settings
• Each time a pad is pressed a beep will sound.
• The controls for the warming zone allow for 5
different heat settings : Lo~Hi
• “HS” will appear when the unit is hot to touch.
Note:
Setting
Type of cooking
Lo
2 – 4
Hi
Breads/Pastries
Casseroles
Dinner Plate with Food
Soups (Cream)
Vegetables
Fried Foods
Soups (Liquid)
Gravies
Eggs
Sauces
Stews
Meats
Hot Beverages
CAUTION
• Use only cookware and dishes
recommended as safe for oven and
cooktop use.
• Always use oven mitts when removing
food from the warming center as
cookware and plates will be hot.
• When warming foods do not use
containers that seal. Allow venting for
heated air to escape.
• DO NOT use plastic wrap to cover foods.
- Plastic may melt onto the surface and be very difficult
to clean.
• Food should be kept in its container and
covered with a lid or aluminum foil to
maintain food quality.
• DO NOT warm food on the warming
zone for more than 2 hours
- Placing uncooked or cold food on the warming
zone could result in foodborne illness.
- 11 -
ENGLISH
SURFACE CONTROLS COOKING
TIPS TO PROTECT THE GLASS
COOKTOP SURFACE
Cleaning
(see pages 32~33 for more information)
Before first use, clean the cooktop.
Clean your cooktop daily or after each use. This will keep
your cooktop looking good and can prevent damage.
If a spillover occurs while cooking, immediately clean the
spill from the cooking area while it is hot to prevent a tough
cleaning chore later. Using extreme care, remove spill with a
proper metal scraper.
Do not allow spills to remain on the cooking area or the
cooktop trim for a long period of time.
Do not use abrasive cleansing powders or scouring pads
which will scratch the cooktop.
Do not use chlorine bleach, ammonia, or other cleansers
not specifically recommended for use on glass-ceramic.
To Prevent Marks and Scratches
Do not use glass pans. They may scratch the surface.
Do not place a trivet or wok ring between the surface and
pan. These items can mark or scratch the top.
Do not slide aluminum pans across a hot surface. The pans
may leave marks which need to be removed promptly.”
(See Cleaning pages 32~33.)
Make sure the surface and the pan bottom are clean and dry
before turning on to prevent scratches.
To prevent scratching or damaging to the glass-ceramic top,
do not leave sugar, salt, or fats on the cooking area. Wipe the
cooktop surface with a clean cloth or paper towel before
using.
Do not slide heavy metal pans across the surface since these
may scratch.
To Prevent Stains
Do not use a soiled dish cloth or sponge to clean the
cooktop surface. A film will remain which may cause stains
on the cooking surface after the area is heated.
Continuously cooking on a soiled surface may/will result in a
permanent stain.
To Prevent Other Damages
Do not allow plastic, sugar, or foods with high sugar content
to melt onto the hot cooktop. Should this happen, clean
immediately. (See Cleaning pages 32~33.)
Do not let a pan boil dry as this will damage the surface and
pan.
Do not use cooktop as a work surface or cutting board.
Do not cook food directly on the surface.
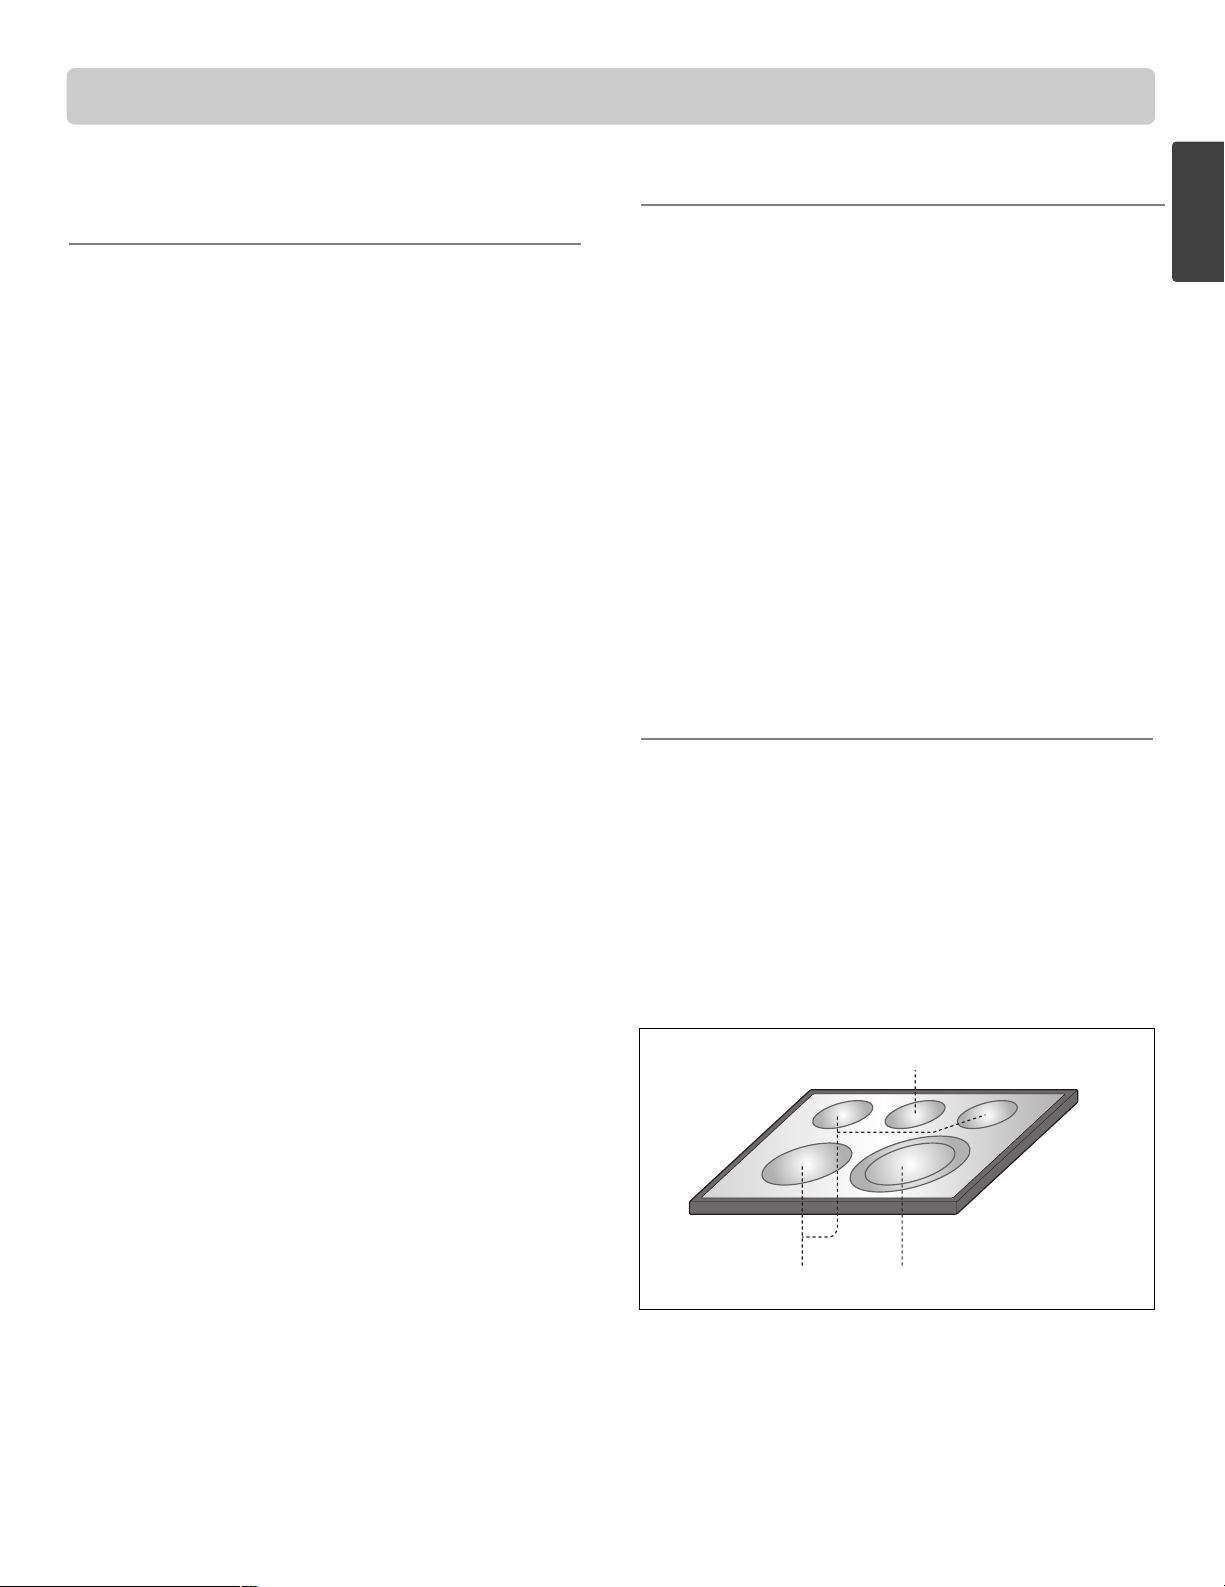
COOKING AREAS
The cooking areas on your range are identified by permanent
circles on the glass cooktop surface. For the most efficient
cooking, fit the pan size to the element size.
Pans should not extend more than 1/2 to 1-inch
beyond the cooking area.
When a control is turned on, a glow can be seen through the
glass cooktop surface. The element will cycle on and off
to maintain the preset heat setting, even on Hi.
For more information on cookware, refer to Cookware
Recommendations.
Glass Cooktop Surface Notes:
• Cooktop may emit light smoke and odor the first few
times the cooktop is used. This is normal.
• Glass cooktops retain heat for a period of time
after the elements are turned off. Turn the elements
off a few minutes before food is completely cooked and use
the retained heat to complete cooking. When the hot
surface light turns off, the cooking area will cool down
enough to touch. Because of the way they retain heat, the
cooktop elements will not respond to changes in settings as
quickly as coil elements.
• In the event of a potential boilover, remove the pan from
the cooking surface.
• Do not attempt to lift the cooktop.
• The smoothtop surface may appear discolored when it is
hot. This is normal and will disappear when the surface
cools.
GLASS COOKTOP SURFACE
Single element Dual element
Warming zone
- 12 -
SURFACE CONTROLS COOKING
HOME CANNING TIPS
Be sure the canner is centered over the surface unit.
Make sure the canner is flat on the bottom.
The base must not be more than 1 inch larger than the
element. Use of water bath canners with rippled bottoms
may extend the time required to bring the water to a boil and
cooktops may be damaged.
Some canners are designed with smaller bases for use on
smooth top surfaces.
Use the high heat setting only until the water comes to a boil
or pressure is reached in the canner.
Reduce to the lowest heat setting that maintains the boil,
or pressure. If the heat is not turned down,the cooktop may
be damaged.
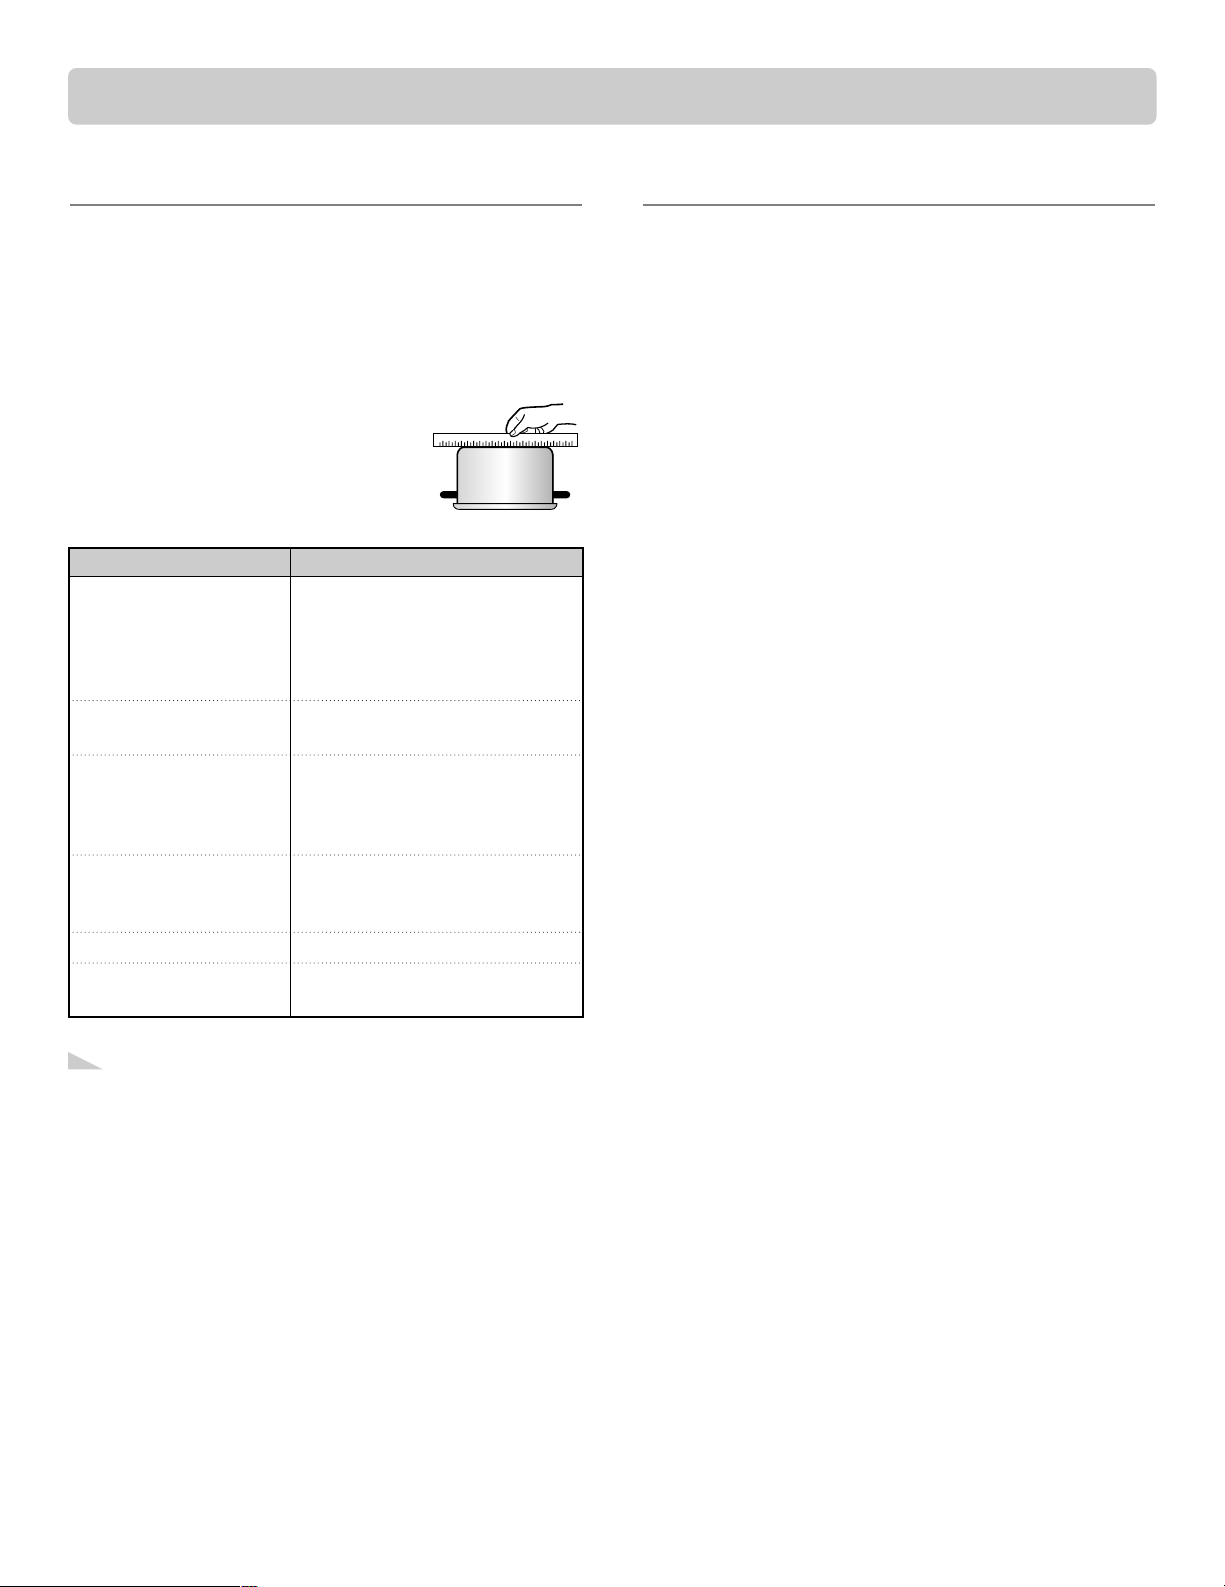
USING THE PROPER COOKWARE
Using the right cookware can prevent many problems, such
as food taking longer to cook or achieving inconsistent
results. Proper pans will reduce cooking times and cook food
more evenly. Stainless steel is recommended.
Check pans for flat bottoms by
using a straight edge or ruler
1. Place a ruler across the bottom of the
pan.
2. Hold it up to the light.
3. No light should be visible under the
ruler.
• Do not use a small pan on a large element. Not only
does this waste energy, but it can also result in
spillovers burning onto the cooking area which
requires extra cleaning.
• Do not use non-flat specialty items that are oversized
or uneven such as round bottom woks, rippled
bottom, and/or oversized canners and griddles.
• Do not use foil or foil-type containers. Foil may melt
onto the glass. If metal melts on the cooktop, do not
use. Call an authorized Service agent.
Note:
Recommended
Incorrect
Flat bottom and
straight sides.
Heavy-gauge pans.
Pan sizes match the
amount of food to be
prepared and the size
of the surface element.
Weight of handle does
not tilt pan. Pan is well
balanced.
Tight-fitting lids.
Flat bottom woks.
Curved, grooved, or warped
pan bottoms. Pans with
uneven bottoms do not cook
efficiently and sometimes may
not boil liquid.
Very thin-gauge metal or glass
pans.
Pans are smaller or larger than
the element.
Cookware with loose or broken
handles. Heavy handles that tilt
the pan.
Loose-fitting lids.
Woks with a ring-stand
bottom.
- 13 -
ENGLISH
SETTING WARMING DRAWER CONTROLS
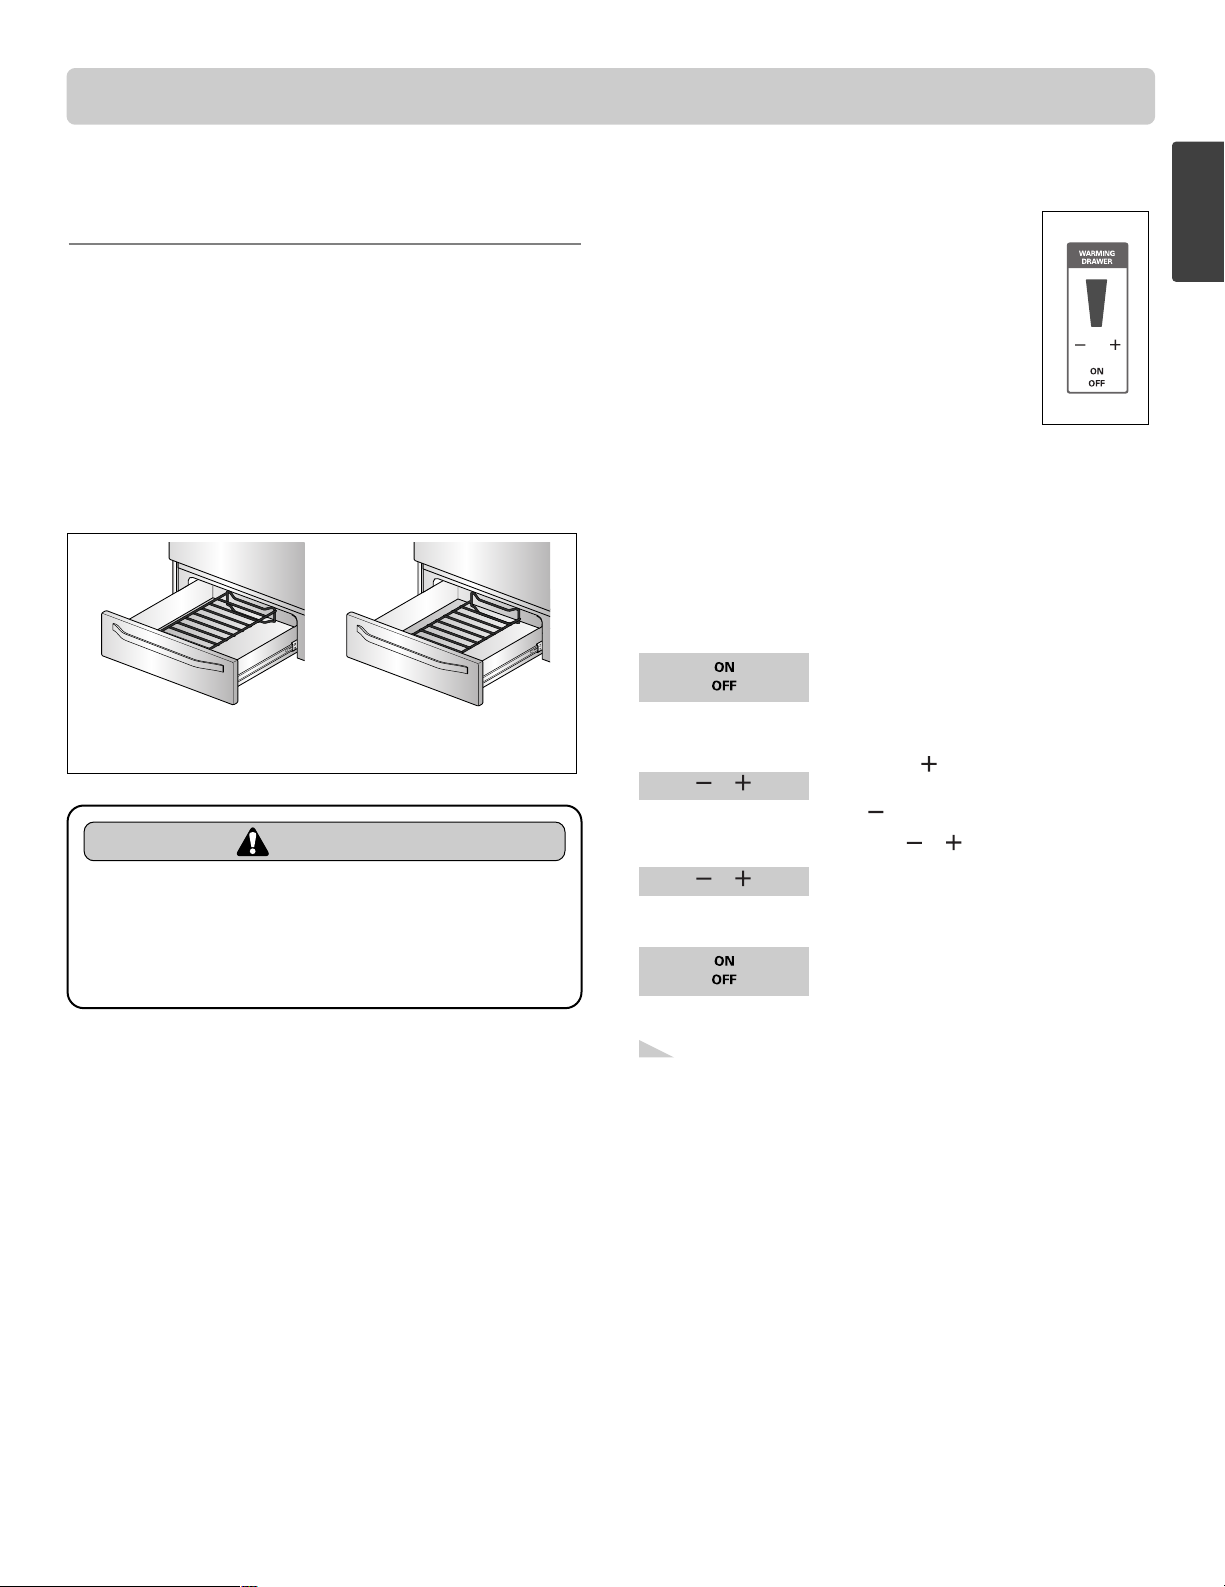
ARRANGING WARMING
DRAWER RACK POSITIONS
The rack can be used in 2 ways:
• In the upright position to allow low profile food items to
be placed both under and on top of the rack (for example,
rolls or biscuits on top of the rack and a casserole dish
underneath).
• In the downward position to allow you to place light
weight food items and empty cookware (for example, rolls
or pastries and dinner plates) on the rack.
Set the Warming Drawer rack in either position as shown
below (Fig. 1).
1. Press ON/OFF at the WARMING
DRAWER
position. The indicator
light will flash.
(If no further pads are pressed
within 25 seconds, the display will
clear.)
2. Press ( ) once to turn on the
power level for high(5 level) or
( ) for Low(1 level).
3. Use ( )/( ) to choose the
desired power setting. (Adjustable
at any time while the Drawer is
ON.)
4. When the food is ready for
removal, press ON/OFF once to
turn off.
To set the warming drawer control
Warming Drawer Rack
in upward position
Warming Drawer Rack
in downward position
To Operate the Warming Drawer
The purpose of the Warming Drawer is to keep
hot cooked foods at serving temperature.
Always start with hot food. It is not
recommended to heat cold food in the
Warming Drawer.
All food placed in the Warming Drawer should
be covered with a lid or aluminum foil to
maintain quality. Do not use plastic wrap to
cover food. Plastic may melt onto the drawer
and be very difficult to clean. Use only utensils
and cookware recommended for oven use in
the Warming Drawer.
Warming
Drawer
Control
• The Warming Drawer will shut off automatically
after 3 hours.
Note:
CAUTION
• Always use pot holders or oven mitts
when removing food from the Warming
Drawer.
- You can be burned as cookware and plates will be
hot.
 Loading...