

LG LRSC26925SW, LSRC26923SW, LRSC26925TT, LSRC26923TT User Manual

24 HOURS A DAY, 7 DAYS A WEEK FOR LG CUSTOMER SERVICE
ServicioLG(AtencinalCliente)24horasalda,7dasalasemana
LRSC26925SW
LRSC26923SW
LRSC26925TT
LRSC26923TT
2
Entry
Important Safety Instruction
Identification of Parts
Where to Locate
Door Removal
Door Replacement
Water Pipe Installation
Water Connection Instruction Guide
Operation Instruction Guide
Height Adjustment
Starting
Adjusting the Temperatures and functions
(Dispenser/Automatic Icemaker)
Shelf
Wine Holder (Applicable to some models only)
Egg Bin (Applicable to some models only)
Humidity Control in the Vegetable Compartment
Optichill Temperature Transition Corner
Temperature Change at Optichill
Optichill
Location of Foods
Storing Foods
How to Dismantle Parts
General Information
Cleaning
Troubleshooting
Table of Contents
Introduction
Installation
Operation
Suggestion on
Food Storage
Care and
Maintenance
3
3
6
7
8
9
9
10
12
14
15
15
21
21
22
22
23
23
23
24
25
26
28
28
29
Introduction
Entry
The model and serial numbers are found on the inner case or back of refrigerator
compartment of this unit. These numbers are unique to this unit and not
available to others. You should record requested information here and retain
this guide as a permanent record of your purchase. Staple your receipt here.
Date of purchase
Dealer
:
Dealer address
Dealer phone no.
Model no.
Serial no.
:
:
:
:
:
Important safety
Instructions
WARNING
SAFETY MESSAGES
This guide contains many important safety messages. Always read and obey
DANGER
WARNING
CAUTION
All safety messages will identify the hazard, tell you how to reduce the chance of injury
and tell you what can happed if the instructions are not followed.
To reduce the risk of fire, electric shock or injury to persons when using your
product, basic safety precautions should be followed, including the
following. Read all instructions before using this appliance:
NEVER unplug your refrigerator by pulling on the power cord. Always grip the
plug firmly and pull it straight out from the outlet.
Repair or replace inmediately all electric service cords that have become frayed
or otherwise damaged. Do not use a cord that shows cracks or abrasion damage
along its length or at either the plug or connector end.
When moving your refrigerator away from the wall, be careful not to roll over or
damage it in any way.
Do not crush or damage the water line.
Do not store or use gasoline or other flammable vapors and liquids in the vicinity
of this or any other appliance.
Do not allow children to climb, stand, or hang on the refrigerator doors or or
shelves in refrigerator. They could damage the refrigerator and seriously injure
themshelves.
Keep fingers out of “pinch point” areas; clearances between the doors and
cabinet are necessarily small. Be careful when you open the doors when children
are in he area.
Unplug your refrigerator before cleaning or making any repairs.
3
NOTE: We strongly recommend that any servicing be performed by a qualified
individual.
You will be killed or seriously injured if you don’t follow instructions.
You can
Indicates an imminently hazardous situation which, if not avoided,
may
be killed or seriously injured if you don’t follow instructions.
result in minor or moderate injury, or product damage only.
Introduction
Before replacing a burned-out light bulb, unplug the refrigerator or turn off power
at the circuit breaker or fuse box in order to avoid contact with a live wire filament.
(A burned-out light bulb may break when being replaced). NOTE: Setting either or
both controls to the OFF position does not remove power to the light circuit.
Do not store bottles in the freezer compartment they may break when frozen,
causing damage.
The refrigerator-freezer should be so positioned that the supply plug is accessible
for quick disconnection when accident happens.
For personal safety, this appliance must be properly grounded. Have the wall
outlet and the circuit checked by a qualified electrician to make sure the outlet is
properly grounded.
This refrigerator must be properly installed in accordance with the Attention
Installer Instructions that were taped to the front of the refrigerator.
After your refrigerator is in operation, do not touch the cold surfaces in the freezer
compartment when hands are damp or wet. Skin may adhere to the extremely cold
surfaces.
In refrigerators with automatic icemakers, avoid contact with the moving parts of
the ejector mechanism, or with the heating element that releases the cubes. DO
NOT place fingers or hands on the automatic icemaking mechanism while the
refrigerator is plugged in.
DO NOT refreeze frozen foods which have thawed completely. The United States
Department of Agriculture in Home and Garden Bulletin No. 69 says:
“...You may safely refreeze frozen foods that have thawed if they still contain ice
crystals or if they are still cold below 40° (4°C).”
“...Thawed ground meats, poultry, or fish that have any off-odor or off-color should
not be frozen and should not be eaten. Thawed ice cream should be discarded. If
the odor or color of any food is poor or questionable, get rid of it. The food may be
dangerous to eat.”
“Even partial thawing and refreezing reduces the eating quality of foods,
particularly fruits, vegetables and prepared foods.
The eating quality of red meats is affected less than that of many other foods. Use
refrozen foods as soon as possible to save as much of their quality as you can.”
DANGER
Risk of child
entrapment
CFC DISPOSAL
Child entrapment and suffocation are not problems of
the past. Junked or abandoned refrigerators are still
dangerous... even if they will sit for “just a few days”.
BEFORE YOU THROW AWAY YOUR OLD REFRIGERATOR OR FREEZER
Take off the doors.
Leave the shelves in place so that
children may not easily climb inside.
Your old refrigerator may have a cooling system that used CFCs
(chlorofuorocarbons). CFCs are believed to harm stratospheric ozone.
If you are throwing away your old refrigerator, make sure the CFC refrigerant is
removed for proper disposal by a qualified servicer. If you intentionally release
this CFC refrigerant, you can be subject to fines and imprisonment under
provisions of environmental legislation.
This appliance contains fluid (refrigerant, lubricant), is made of parts and
materials which are reusable and / or recyclable. All the important materials
should be sent to the collecton center of waste material and can be reused
after rework (recycling). For take back, please contact with the local agency.
4
Introduction
GROUNDING
REQUIREMENTS
WARNING
Electrical
Shock Hazard
IMPORTANT: Please read carefully
TO CONNECT ELECTRICITY
FOR PERSONAL SAFETY, this appliance must be
properly grounded. Have the wall outlet and the
circuit checked by a qualified electrician to make sure
the outlet is properly grounded.
3-prong
grounding
plug
3-prong
grounding type
wall receptacle
Ensure proper
ground exists
before use.
RECOMMENDED GROUNDING METHOD
The refrigerator should always be plugged into its own individual properly
grounded electrical outlet rated for 115 Volts, 60 Hz, AC only and fused at 15 or 20
amperes. This provides the best performance and also prevents overloading house
wiring circuits which could cause a fire hazard from overheated wires. It is
recommended that a separate circuit serving only this appliance be provided.
Use a receptacle which cannot be turned off with a switch or pull chain. Do not use
an extension cord.
Where a standard two-prong wall outlet is encountered, it is your personal
responsibility and obligation to have it replaced with a properly grounded threeprong wall outlet.
Do not, under any circumstances, cut or remove the third (ground) prong from the
power cord.
NOTE: Before performing any type of installation, cleaning, or removing a light
bulb, turn the control (Thermostat, Refrigerator Control or Freezer Control,
depending on the model) to OFF and then disconnect the refrigerator from the
electrical source. When you are finished, reconnect the refrigerator to the electrical
source and reset the control (Thermostat, Refrigerator Control or Freezer Control,
depending on the model) to the desired setting.
USE OF EXTENSION CORDS
Because of potential safety hazards under certain conditions, we strongly
recommend against the use of an extension cord. However, if you still elect to use
an extension cord, it is absolutely necessary that it be a UL-listed (in the United
States), 3-wire grounding type appliance extension cord having a groundind type
plug and outlet, and that the electrical rating of the cord be 15 amperes (minimum)
and 120 volts.
Use of an extension cord will increase the clearance needed for the back of the
refrigerator.
If the supply cord is damaged, it must be replaced by the manufacturer or its
service agent or a similarly qualified person in order to avoid any hazard.
5
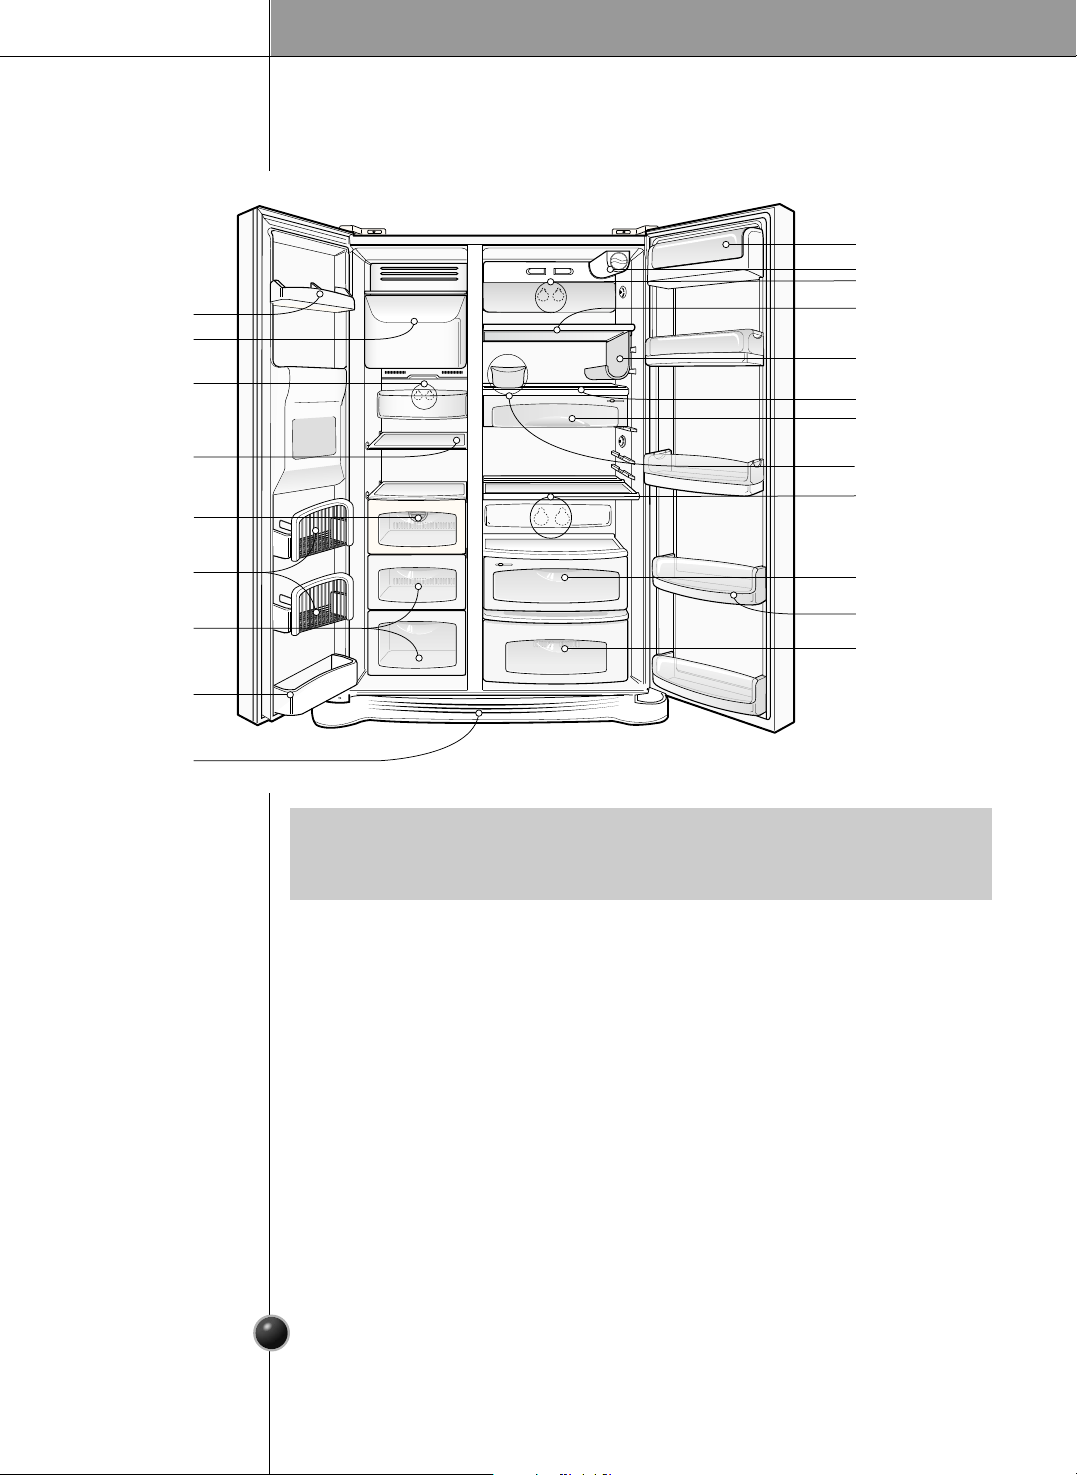
Identification of Parts
Introduction
•
If you find some parts missing from your unit, they may be parts only used in other
models. (i.c. the Optichill is not included in all models)
NOTE
Freezer
Compartment
Refrigerator
Compartment
Dairy Corner
Water Filter
Lamp
Door Rack
Lamp
Automatic
Icemaker
Shelf
(steel or glass)
Door Rack
Jet Freezing
Drawer
Door Rack
Lower Cover
Shelf
Shelf
Snack Drawer
Wine holder
Egg Box
Lamp
Vegetable Drawer
Door Rack
Optichill
6
6
Introduction
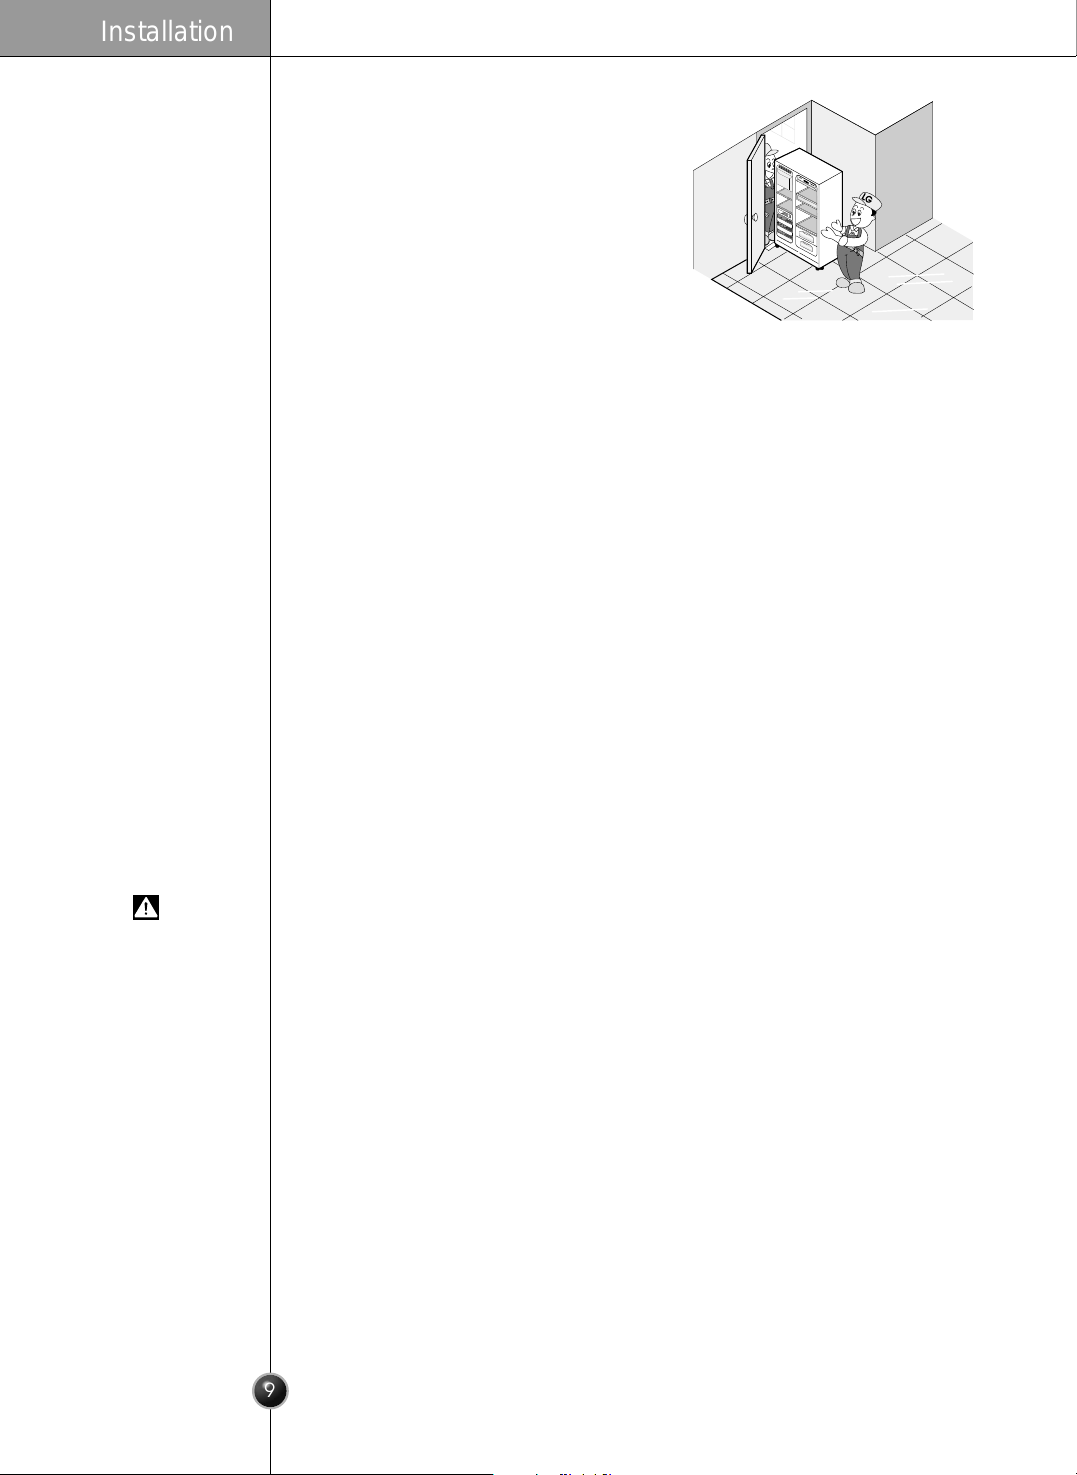
Select a Good
Location
Where to Locate
1. Place your appliance where it is easy to use.
2. Avoid placing the unit near heat sources, direct sunlight, or moisture.
3. To avoid vibrations, the appliance must be leveled.
4. Do not install this refrigerator in areas where the ambient temperature is below 41°F.
It will have an adverse effect on performance.
5. Allow the clearance of at least 2 inch from the ceiling and 1 inch from the side walls
for better cooling efficiency, ease of installation, proper air circulation and electrical
connections.
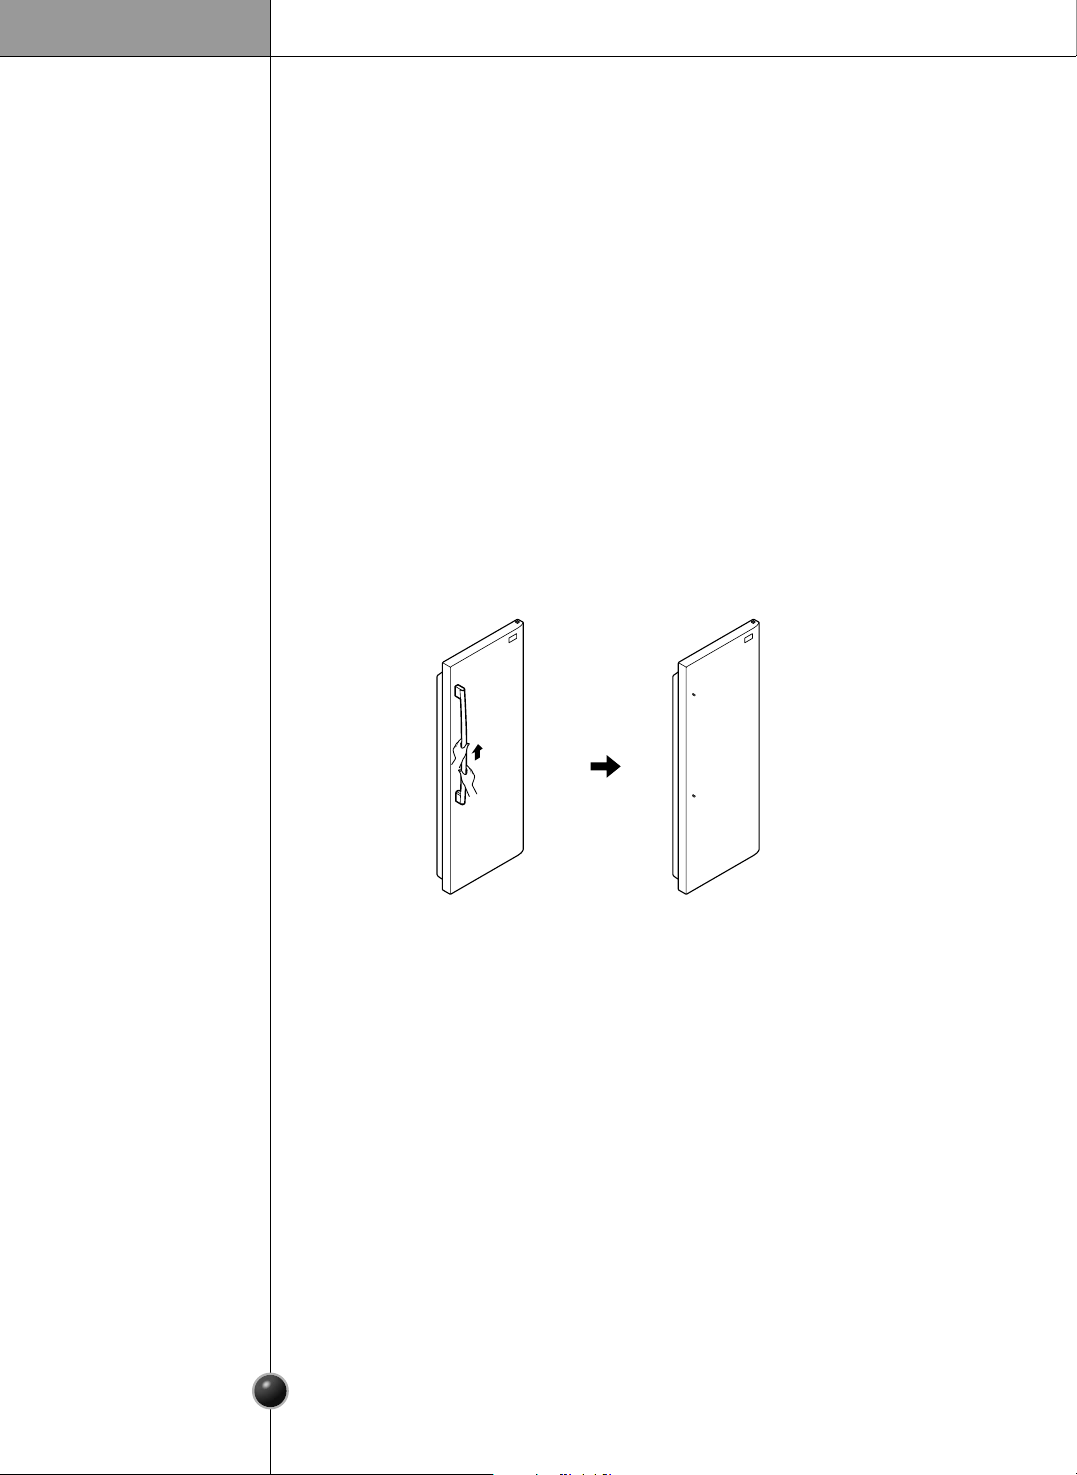
Method to remove protection film (Some Model)
1. Grasp the handles with both hands and hold them upward to remove.
2. Entirely remove the protection film adhered to the external surface of the door.
3. Assemble the fixing bracket on the both ends of the handle to the fixing bolt of the
door and lower the handle downward until it is entirely fixed.
7
Door removal
Failure to do so could result in death or serious injury.
If your entrance door is too narrow for the
refrigerator to pass through, remove the
refrigerator door and pass the refrigerator laterally.
Electric Shock Hazard
Disconnect electrical supply to refrigerator before installing.
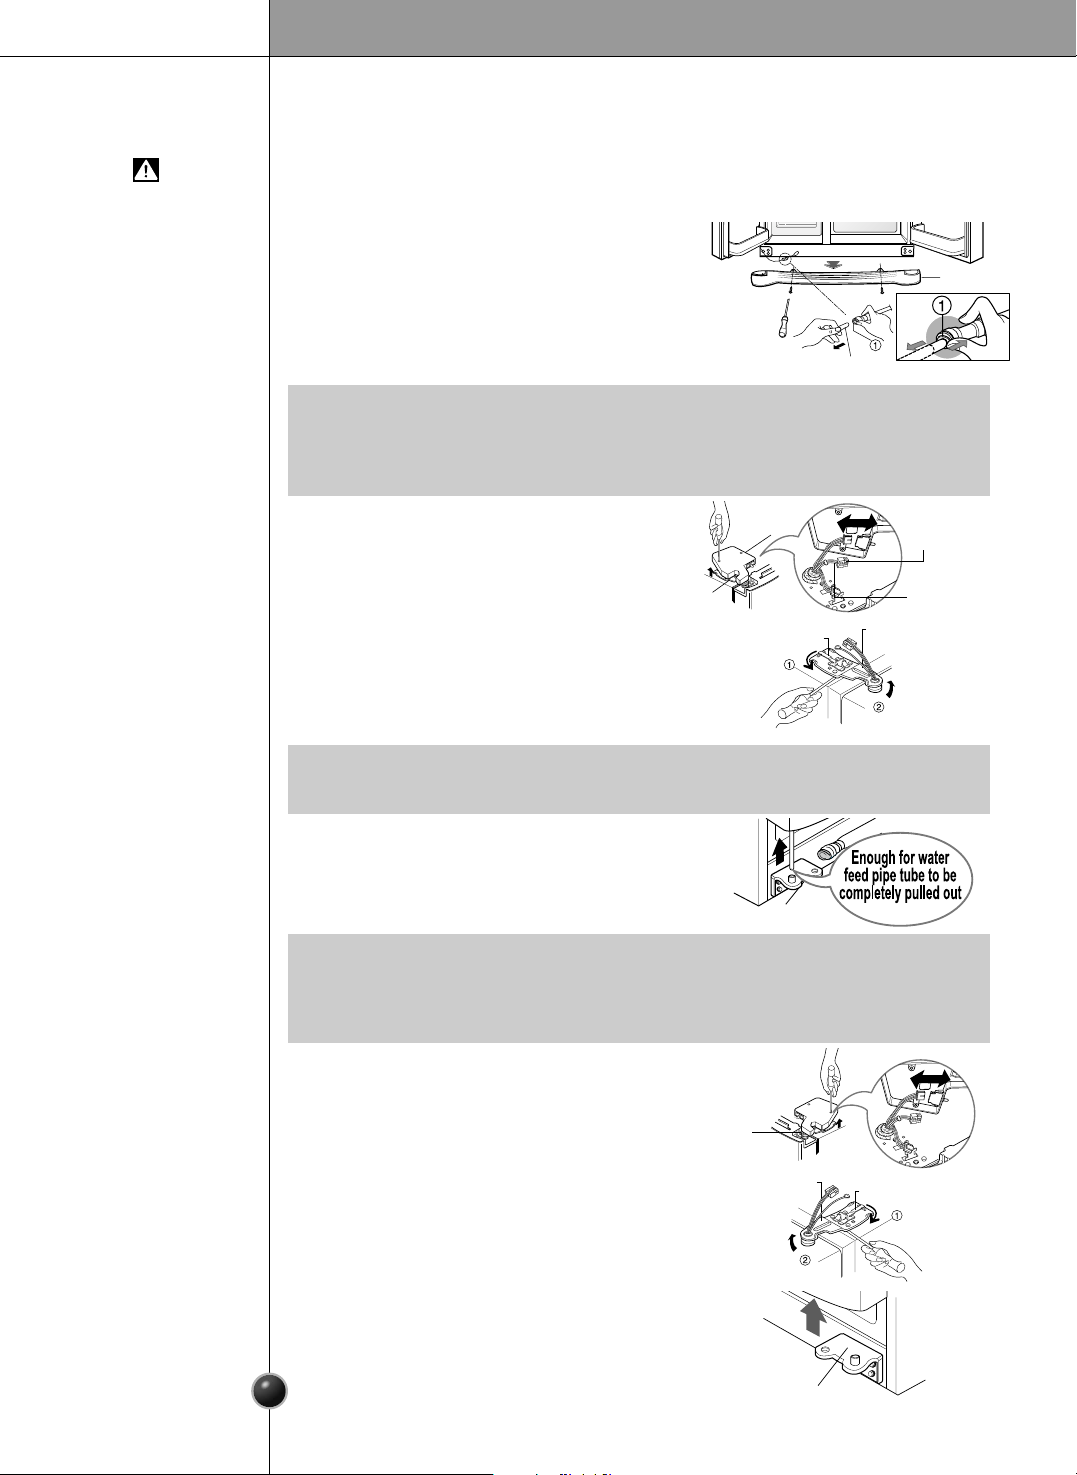
Remove the lower cover by lifting upward, and
then pull up the water feed tube while pressing
area shown in the figure to the right.
Remove Lower
Cover and
Water Feed Tube
Warning
Remove the
Freezer
Compartment
Door
Remove the
Refrigerator
Door
Installation
1) Remove the hinge cover by loosening the
screws. Disconnect all connections except
the ground line.
2) Remove the keeper by rotating it counter
clockwise and then lifting the upper
hinge up
.
3) Remove the freezer compartment door by
lifting it upward. This time, the door should
be lifted enough for the water feed tube to
be completely pulled out.
1) Loosen the hinge cover screws and remove
the cover. Remove connection wire, if any,
except for the ground line.
2) Remove keeper by rotating it clockwise
and then remove the upper hinge by lifting
it up .
3) Remove the refrigerator compartment door
by lifting it up.
•
If a tube end is deformed or abraded, trim the part away.
Disconnecting the tube under the door causes about 1.5 litters water to flow out.
Please put up a big container to prevent it.
NOTE
•
When removing the upper hinge, be careful that the door does not fall forward .
NOTE
•
After removing the door, take it into the kitchen where you are installing the
refrigerator. Lay it down on a blanket and be careful to avoid damaging the water
feed tube.
NOTE
Lower Cover
Lower hinge
Lower Hinge
Keeper
Water Feed Tube
Connection
Wires
Connection
Wires
Hinge
Cover
Upper Hinge
Upper Hinge
Keeper
Upper Hinge
Earth Line
8
Door replacement
Feed water tube installation
Push the refrigerator sideways through the
entrance door as shown in the right picture.
Automatic icemaker operation needs water pressure of 21.3~121psi(lb/inch2) (That
is, a 7oz. paper cup will be filled within 3 sec.).
If water pressure does not reach the rated 21.3psi(lb/inch2) or below, it is necessary
to purchase a separate pressure pump for normal automatic icemaking and cool
water feed.
Keep the total length of the water feed tube within 40 feet and be careful not to
bend or kink the tube. If the tube is longer than 40 feet, the icemaker and water
dispenser will not operate properly.
Install the water feed tube at a place free from heat.
Connect to potable water supply only.
Refer to instructions with water filter kit for installation.
Mount the doors in the reverse order of removal after the refrigerator is brought to
the installation area.
Move the
Refrigerator
Before
Installation
Warning
1
2
3
45
Max
FR
Z
T
E
M
P
R
EF
T
E
M
P
M
i
n
5
4
3
2
1
Max
Installation
9

Water Connection Instruction Guide
Read all directions carefully before you begin.
Connecting
the Refrigerator
to a Water Source
Connect to potable water supply only.
Warning
•
If operating the refrigerator before installing the water connection, turn icemaker
to the OFF position to prevent operation without water.
•
All installations must be in accordance with local plumbing code requirements.
•
Use copper tubing and check for leaks.
•
Install copper tubing only in areas where temperatures will remain above freezing.
•
It may take up to 24 hours for your icemaker to begin producing ice.
IMPORTANT
Standard screwdriver
7/16-inch and 1/2-inch open-end wrenches or two adjustable wrenches
1/4-inch nut driver
1/4-inch drill bit
Hand drill or electric drill (properly grounded)
Tools Required
•
Your refrigerator dealer has a kit available with a 1/4-inch saddle-type shut-off valve,
a union, and copper tubing. Before purchasing, make sure a saddle-type valve
complies with your local plumbing codes. Do not use a piercing-type or 3/16-inch
saddle valve which reduces water flow and clogs more easily.
NOTE
Installation
1010
1. Unplug refrigerator or disconnect power.
2. Turn OFF main water supply. Turn on the nearest faucet to relieve the pressure
on the line. It may help to open an outside faucet to allow the water to drain from
the line in the house.
3. Find a 1/2-inch to 1-1/4-inch vertical COLD water pipe near the refrigerator.
Connect
the Tubing to
Water Line
•
Horizontal pipe will work, but the following precaution must be taken: Drill on the top of
the pipe, not the bottom. This will help keep water away from the drill. This also keeps
normal sediment from collecting in the valve.
NOTE
4. To determine the length of copper tubing you will need, measure from the
connection on the lower left rear of the refrigerator to the water pipe. Add 7
feet (2.1m) to allow for moving refrigerator for cleaning. Use 1/4-inch O.D.
(outside diameter) copper tubing. Be sure both ends of copper tubing are cut
square.
5. Using a drill, drill a 1/4-inch hole in the cold water pipe you have selected.
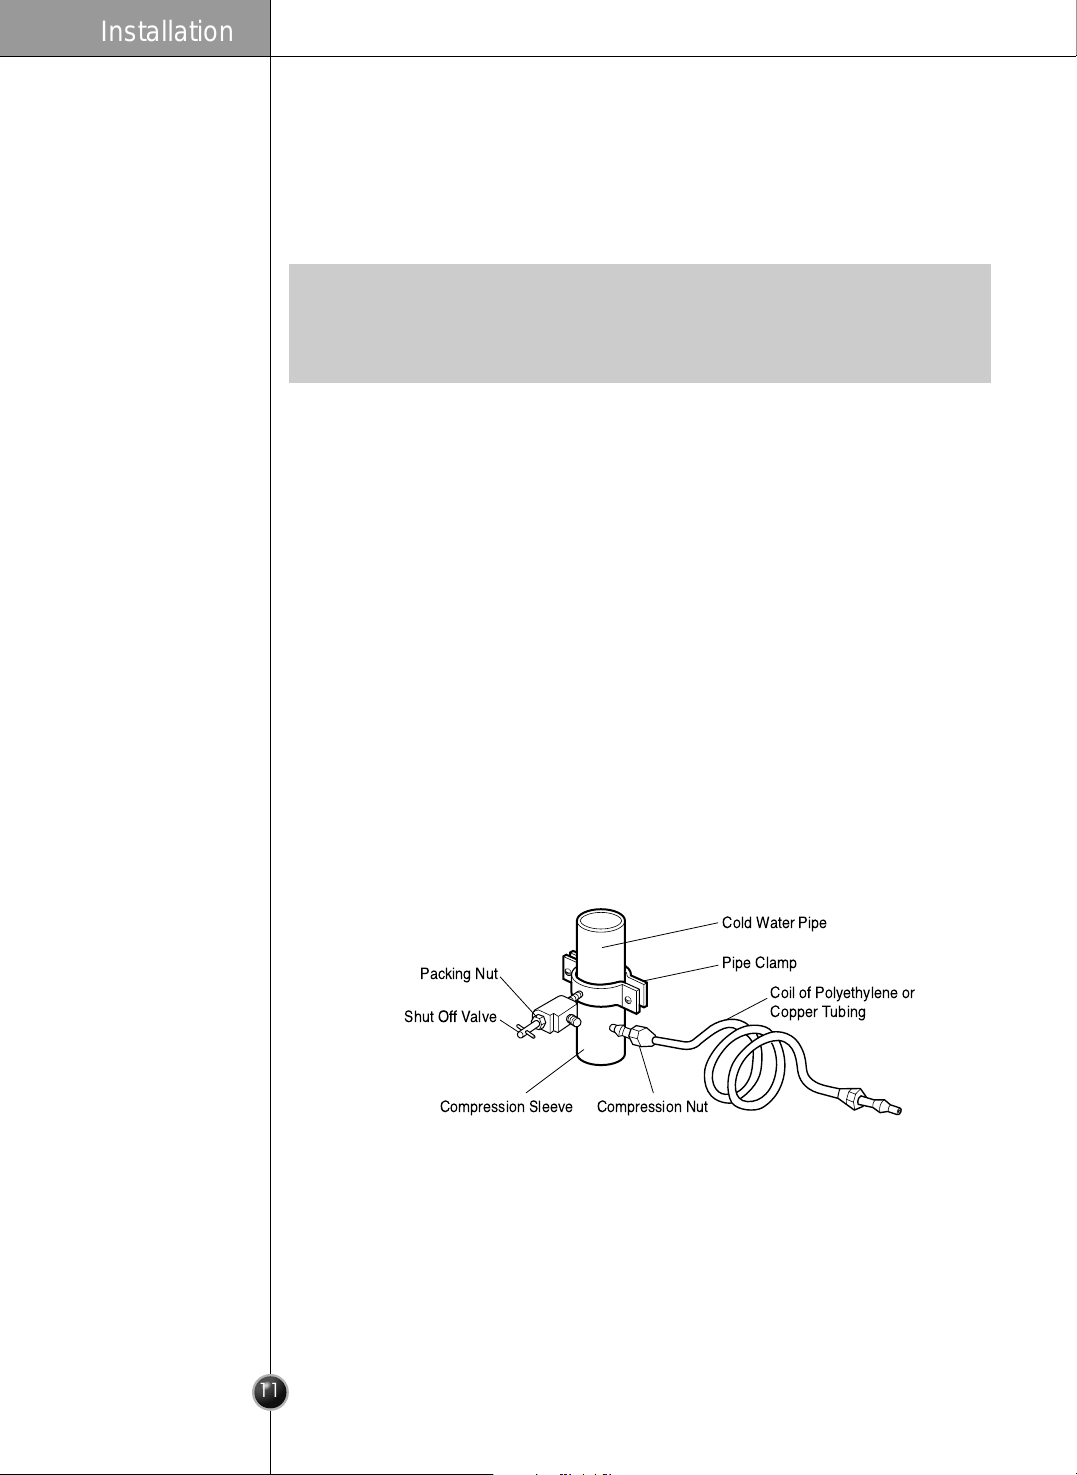
6. Fasten shut-off valve to cold water pipe with pipe clamp. Be sure outlet end is
solidly in the 1/4-inch drilled hole in the water pipe and that the washer is
under the pipe clamp. Tighten packing nut. Tighten the pipe clamp screws
carefully and evenly so washer makes a watertight seal. Do not overtighten or
you may crush the copper tubing, especially if soft (coiled) copper tubing is
used. Now you are ready to connect the copper tubing.
7. Slip compression sleeve and compression nut on copper tubing as shown.
Insert end of tubing into outlet end squarely as far as it will go. Screw
compression nut onto outlet end with adjustable wrench. Do not over tighten.
8. Place the free end of the tubing into a container or sink, and turn ON main
water supply and flush out tubing until water is clear. Turn OFF shutoff valve
on the water pipe. Coil the copper tubing as shown below.
Cold Water Pipe
Pipe Clamp
Coil of Polyethylene or
Copper Tubing
Compression NutCompression Sleeve
Shut Off Valve
Packing Nut
Installation
111
 Loading...