

Page 1

OWNER'S MANUAL
FRIDGE & FREEZER
Read this owner’s manual thoroughly before operating the appliance and keep it handy for reference at
all times.
EN ENGLISH FR FRANÇAIS
DE DEUTSCH IT ITALIANO
ES ESPAÑOL PL POLSKI
www.LGSIGNATURE.com
MFL68302797
Rev.01_112519
Copyright © 2019 LG Electronics Inc. All Rights Reserved
Page 2

TABLE OF CONTENTS
SAFETY INSTRUCTIONS ..............................................................3
IMPORTANT SAFETY INSTRUCTIONS ..........................................................3
CARING FOR THE ENVIRONMENT ..............................................................10
INSTALLATION ............................................................................. 11
Dimensions and Clearances ........................................................................... 11
Ambient Temperature ...................................................................................... 11
Levelling ..........................................................................................................12
Turning on the Power ......................................................................................12
Moving the Appliance For Relocation .............................................................12
OPERATION .................................................................................13
Before Use ......................................................................................................13
Product Features.............................................................................................15
Exterior ............................................................................................................15
Interior .............................................................................................................16
Control Panel ..................................................................................................18
InstaView Door in Door ...................................................................................21
Door in Door ....................................................................................................21
Fridge Shelf .....................................................................................................22
Fridge Drawer .................................................................................................22
Custom Chill Pantry .......................................................................................23
Auto-lift Device ................................................................................................24
This manual may contain images or content
different from the model you purchased.
This manual is subject to revision by the
manufacturer.
SMART FUNCTIONS .................................................................... 26
Using LG ThinQ Application ............................................................................26
Using the Voice Assistant ...............................................................................27
Smart Diagnosis ..............................................................................................29
MAINTENANCE ............................................................................ 30
Cleaning ..........................................................................................................30
Replacing the Fresh Filter ...............................................................................30
TROUBLESHOOTING .................................................................. 31
Before Calling for Service ...............................................................................31
Page 3
SAFETY INSTRUCTIONS
EN
The following safety guidelines are intended to prevent unforeseen
risks or damage from unsafe or incorrect operation of the
appliance.
The guidelines are separated into ‘WARNING’ and ‘CAUTION’ as
described below.
This symbol is displayed to indicate matters and
operations that can cause risk. Read the part with this
symbol carefully and follow the instructions in order to
avoid risk.
WARNING
This indicates that the failure to follow the instructions can
cause serious injury or death.
CAUTION
This indicates that the failure to follow the instructions can
cause the minor injury or damage to the product.
IMPORTANT SAFETY INSTRUCTIONS
WARNING
To reduce the risk of explosion, fire, death, electric shock,
injury or scalding to persons when using this product, follow
basic precautions, including the following:
Children in the Household
• This appliance can be used by children aged from 8 years and above
and persons with reduced physical, sensory or mental capabilities
or lack of experience and knowledge if they have been given
supervision or instruction concerning use of the appliance in a safe
way and understand the hazards involved. Children shall not play
with the appliance. Cleaning and user maintenance shall not be made
by children without supervision.
3
Page 4

EN
• Children aged from 3 to 8 years are allowed to load and unload
refrigerating appliances.
Installation
• This appliance should only be transported by two or more people
holding the appliance securely.
• Ensure that the socket outlet is properly grounded, and that the earth
pin on the power cord is not damaged or removed from the power
plug. For more details on grounding, inquire at an LG Electronics
customer information centre.
• This appliance is equipped with a power cord having an equipment-
grounding conductor and a grounding power plug. The power plug
must be plugged into an appropriate socket outlet that is installed and
grounded in accordance with all local codes and ordinances.
• If the power cord is damaged or the hole of the socket outlet is loose,
do not use the power cord and contact an authorized service centre.
• Do not plug the appliance into a multi socket adapter which does not
have a power cable (mounted).
• Do not modify or extend the power cable.
• The appliance should be connected to a dedicated power line which
is separately fused.
• Do not use a multi socket outlet which is not properly grounded
(portable). In case of using a properly-grounded multi socket outlet
(portable), use the multi socket outlet with the current capacity of the
power code rating or higher and use the multi socket outlet only for
the appliance.
• Install the appliance in a place where is easy to unplug the power
plug of the appliance.
• Be careful not to point the power plug up or let the appliance lean
against the power plug.
• Install the appliance on a firm and level floor.
• Do not install the appliance in a damp and dusty place. Do not
install or store the appliance in any outdoor area, or any area that is
subject to weathering conditions such as direct sunlight, wind, rain, or
temperatures below freezing.
4
Page 5

EN
• Do not place the appliance in direct sunlight or expose it to the heat
from heating appliances such as stoves or heaters.
• Be careful not to expose the rear of the appliance when installing.
• Be careful not to let the appliance door fall during assembly or
disassembly.
• Be careful not to pinch, crush, or damage the power cable during
assembly or disassembly of the appliance door.
• Do not connect a plug adapter or other accessories to the power
plug.
Operation
• Do not use the appliance for any purpose (storage of medical
or experimental materials or shipping) other than any domestic
household food storage use.
• Unplug the power plug during a severe thunderstorm or lightening or
when not in use for a long period of time.
• Do not touch the power plug or the appliance controls with wet hands.
• Do not bend the power cable excessively or place a heavy object on
it.
• If water penetrates electrical parts of the appliance, disconnect power
plug and contact an LG Electronics customer information centre.
• Do not place hands or metallic objects inside the area emitting the
cold air, cover or heat releasing grille on the back.
• Do not apply excessive force or impact to the back cover of the
appliance.
• Do not put animals, such as pets into the appliance.
• Be careful of nearby children when you open or close the appliance
door. The door may bump the child and cause injury.
• Avoid the danger of children getting trapped inside the appliance. A
child trapped inside the appliance can cause suffocation.
• Do not place heavy or fragile objects, containers filled with liquid,
combustible substances, flammable objects (such candles, lamps,
etc.), or heating devices (such as stoves, heaters, etc.) on the
appliance.
5
Page 6

EN
• If there is a gas leakage (isobutane, propane, natural gas, etc.),
do not touch the appliance or power plug and ventilate the area
immediately. This appliance uses a refrigerant gas (isobutane,
R600a). Although it uses a small amount of the gas, it is still
combustible gas. Gas leakage during appliance transport, installation
or operation can cause fire, explosion or injury if sparks are caused.
• Do not use or store flammable or combustible substances (ether,
benzene, alcohol, chemical, LPG, combustible spray, insecticide, air
freshener, cosmetics, etc.) near the appliance.
• Immediately unplug the power plug and contact an LG Electronics
customer information centre if you detect a strange sound, odour, or
smoke coming from the appliance.
• Fill with potable water only into icemaker or dispenser water tank.
• Do not damage the refrigerant circuit.
• Do not place any electronic appliance (such as heater and mobile
phone) inside the appliance.
Maintenance
• Disconnect the power cord before cleaning the appliance or replacing
the inside lamp (where fitted).
• Securely plug the power plug in the socket outlet after completely
removing any moisture and dust.
• Never unplug the appliance by pulling on the power cable. Always
grip the power plug firmly and pull straight out from the socket outlet.
• Do not spray water or inflammable substances (toothpaste, alcohol,
thinner, benzene, flammable liquid, abrasive, etc.) over the interior or
exterior of the appliance to clean it.
• Do not clean the appliance with brushes, cloths or sponges with
rough surfaces or which are made of metallic material.
• Only qualified service personnel from LG Electronics service centre
should disassemble, repair, or modify the appliance. Contact an LG
Electronics customer information centre if you move and install the
appliance in a different location.
6
Page 7

EN
• Do not use a hair drier to dry the inside of the appliance or place a
candle inside to remove the odours.
• Do not use mechanical devices or other means to accelerate the
defrosting process.
Disposal
• When discarding the appliance, remove the door gasket while leaving
the shelves and baskets in place and keep children away from the
appliance.
• Dispose of all packaging materials (such as plastic bags and
styrofoam) away from children. The packaging materials can cause
suffocation.
Technical Safety
• Keep ventilation openings, in the appliance enclosure or in the built-in
structure, clear of obstruction.
• Do not use electrical appliances inside the refrigerator.
• The refrigerant and insulation blowing gas used in the appliance
require special disposal procedures. Consult with service agent or a
similarly qualified person before disposing of them.
• Refrigerant leaking out of the pipes could ignite or cause an
explosion.
• The amount of refrigerant in your particular appliance is shown on the
identification plate inside the appliance.
• Never start up an appliance showing any signs of damage. If in
doubt, consult your dealer.
• This appliance is intended to be used in household and similar
applications only. It should not be used for commercial, or catering
purposes, or in any mobile application such as a caravan or boat.
• Do not store explosive substances such as aerosol cans with a
flammable propellant in this appliance.
7
Page 8

EN
Risk of Fire and Flammable Materials
This symbol alerts you to flammable materials that can
ignite and cause a fire if you do not take care.
• This appliance contains a small amount of isobutane refrigerant
(R600a), but it is also combustible. When transporting and installing
the appliance, care should be taken to ensure that no parts of the
refrigerating circuit are damaged.
• If a leak is detected, avoid any naked flames or potential sources
of ignition and air the room in which the appliance is standing for
several minutes. In order to avoid the creation of a flammable gas
air mixture if a leak in the refrigerating circuit occurs, the size of the
room in which the appliance is used should correspond to the amount
of refrigerant used. The room must be 1 m² in size for every 8 g of
R600a refrigerant inside the appliance.
• When positioning the appliance, ensure the supply cord is not
trapped or damaged.
• Do not locate multiple portable socket-outlets or portable power
supplies at the rear of the appliance.
Auto-lift Feature
• The auto-lift drawer function can be used by children aged 8 years
and above and persons with reduced physical, sensory or mental
capabilities or lack of experience and knowledge if they have been
given supervision or instruction concerning its use in a safe way and
understand the hazards involved. The function can be turned off in
the control panel, if desired.
• Do not allow children to play with or climb inside the drawer’s inner
compartment.
• Do not use the auto-lift function while folding the rear drawer back
cover.
• Do not put your hand in the open areas at the sides or back of the
drawer when open.
8
Page 9
EN
• Keep feet away from the bottom drawer when using the auto-open
feature.
• Turn off the appliance before cleaning the bottom drawer
compartment.
• The auto-lift device is heavy, so remove it with both hands.
• Do not unlock the locking knob of auto-lift device. The device could
be activated, unfold, and be damaged.
CAUTION
To reduce the risk of minor injury to persons, malfunction, or
damage to the product or property when using this product,
follow basic precautions, including the following:
Installation
• Do not tilt the appliance to pull or push it when transporting.
• Make sure not to get a body part such as a hand or foot stuck while
moving the appliance.
Operation
• Do not touch frozen food or the metal parts in the freezer
compartment with wet or damp hands. It may cause frostbite.
• Do not place glass containers, bottles or cans (especially those
containing carbonated drinks) in the freezer compartment, shelves or
ice bin that will be exposed to temperatures below freezing.
• The tempered glass on the front side of the appliance door or the
shelves can be damaged by an impact. If it is broken, do not touch it
with hands, as this may result in injury.
• Do not hang from the appliance door, storage room, shelf or fridge
door in door or climb up into it.
• Do not store an excessive amount of water bottles or containers for
side dishes on the door baskets.
• Prevent animals from nibbling on the power cable or water hose.
9
Page 10
EN
• Do not open or close the appliance door with excessive force.
• If the hinge of the appliance door is damaged or operates improperly,
stop using the appliance and contact an authorized service centre.
• Do not clean glass shelves or covers with warm water when they are
cold. They may break if exposed to sudden temperature changes.
• Never eat frozen foods immediately after they have been taken out in
the freezer compartment.
• Make sure not to get a hand or foot stuck upon opening or closing the
appliance door or door in door.
• Do not open the door of the appliance with the door in door open, or
do not open the door in door while the door of the appliance is open.
The door in door may be struck by the edge of the appliance and
damaged.
Maintenance
• Do not insert the shelves upside down. The shelves may fall.
• To remove frost from the appliance, contact an LG Electronics
customer information centre.
• Dispose of the ice inside the ice bin in the freezer compartment
during an extended power outage.
CARING FOR THE ENVIRONMENT
Disposal of Your Old Appliance
• This crossed-out wheeled bin symbol indicates that waste electrical and electronic
products (WEEE) should be disposed of separately from the municipal waste stream.
• Old electrical products can contain hazardous substances so correct disposal of your
old appliance will help prevent potential negative consequences for the environment
and human health. Your old appliance may contain reusable parts that could be
used to repair other products, and other valuable materials that can be recycled to
conserve limited resources.
• You can take your appliance either to the shop where you purchased the product,
or contact your local government waste office for details of your nearest authorised
WEEE collection point. For the most up to date information for your country please
see www.lg.com/global/recycling.
10
Page 11
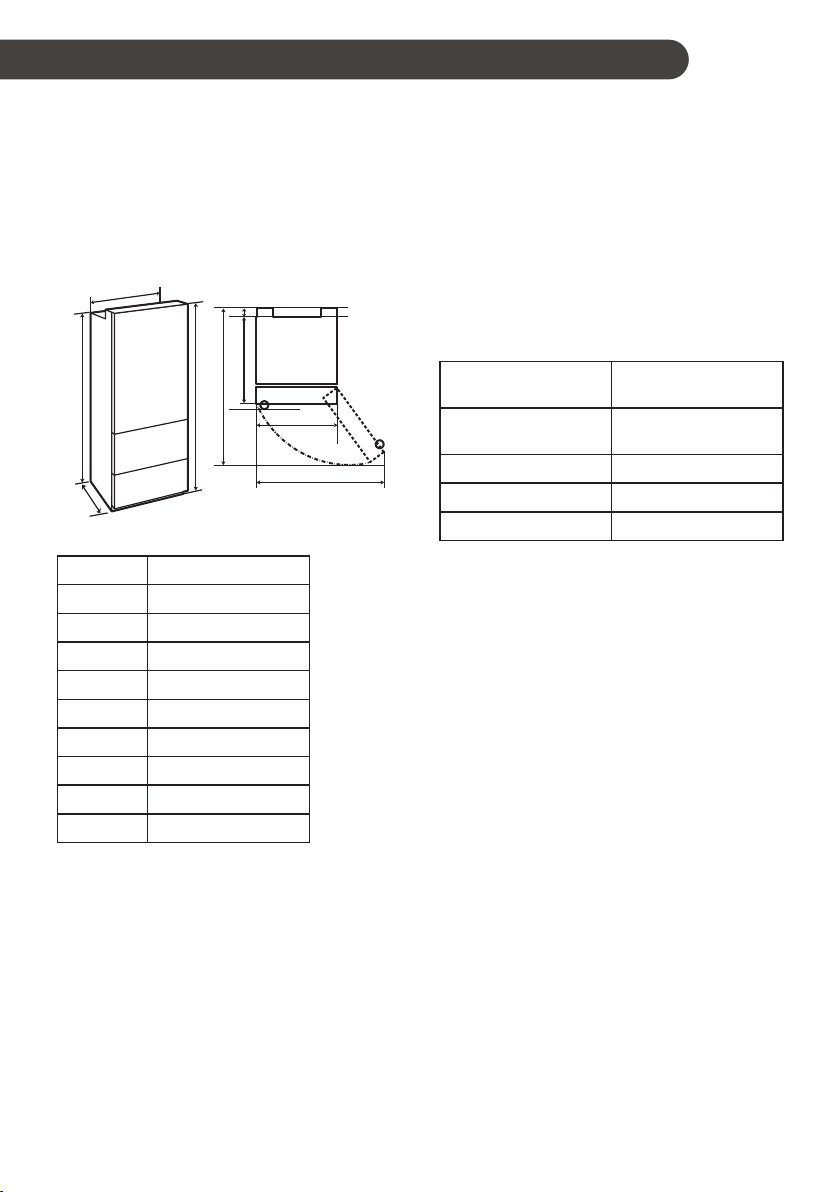
INSTALLATION
EN
Dimensions and Clearances
• Too small of a distance from adjacent items
may result in the degradation of freezing
capability and increased electricity costs. Allow
over 50 mm of clearance from each adjacent
wall when installing the appliance.
A
B
D
Type Dimensions
A 695 mm
B 1 753 mm
C 1 793 mm
D 735 mm
E 23 mm
F 711 mm
G 1 300 mm
H 1 020 mm
I 700 mm
E
G F
C
I
H
Ambient Temperature
• The appliance is designed to operate within
a limited range of ambient temperatures,
depending on the climate zone. Do not use the
appliance at a temperature exceeding the limit.
• The internal temperature could be affected
by the location of the appliance, the ambient
temperature, the frequency of door opening
and so on.
• The climate class can be found on the rating
label.
Climate Class
SN (Extended
Temperate)
N (Temperate) +16 - +32
ST (Subtropical) +16 - +38
T (Tropical) +16 - +43 / +10 - +43*
*Australia, India, Kenya
NOTE
The appliances rated from SN to T are intended to
be used at an ambient temperature between 10 ºC
and 43 ºC.
Ambient Temperature
Range ºC
+10 - +32
NOTE
• You can determine what type of appliance
it is by looking at the label inside the fridge
compartment.
11
Page 12
EN
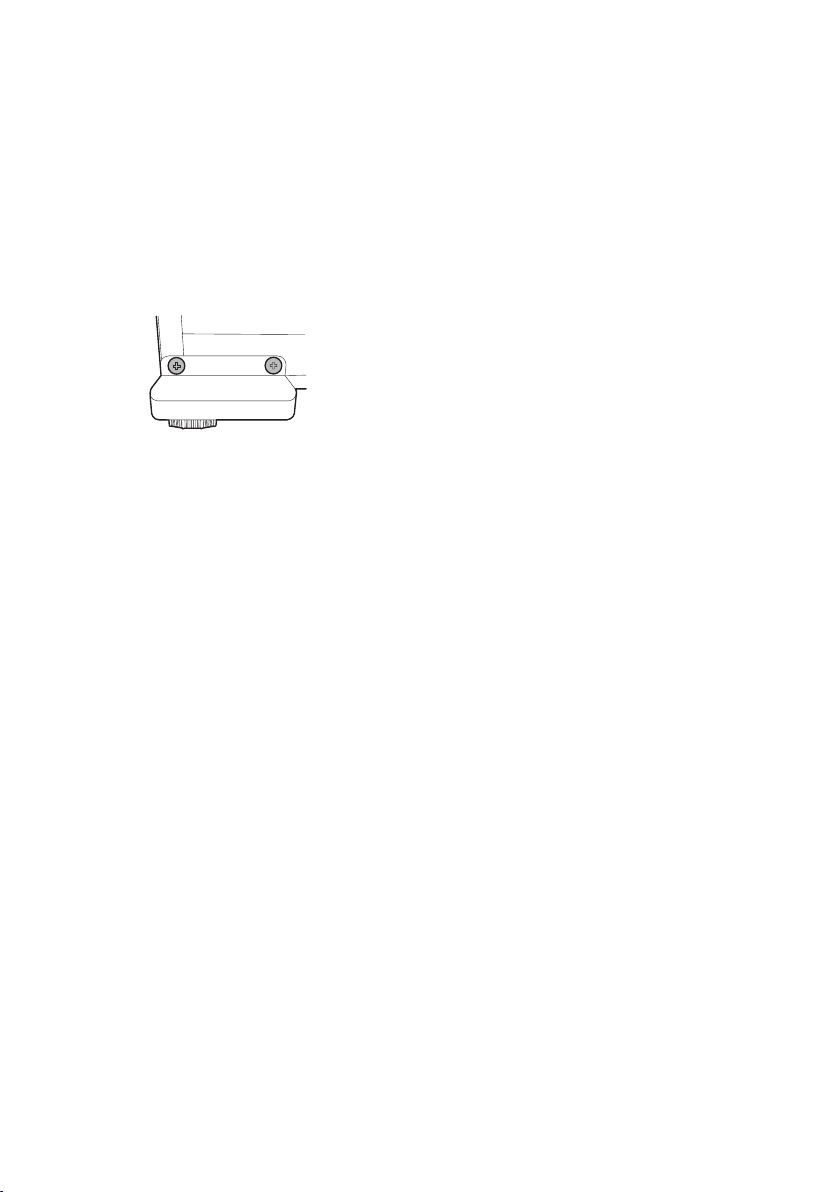
Levelling
The appliance has two front levelling legs. Adjust
the legs to alter the tilt from front-to back or side-to
side. If the appliance seems unsteady, or the door
does not close easily, adjust the appliance’s tilt
using the instructions below:
Open the bottom drawer and remove the
1
cover from the appliance.
Turn the levelling leg to the left to raise that
2
side of the appliance or to the right to lower it.
It may take several turns of the levelling leg to
adjust the tilt of the appliance.
Open the door and the drawers and check to
3
make sure that they close easily. If they do
not close easily, tilt the appliance slightly more
to the rear by turning both levelling legs to
the left. It may take several more turns, and
be sure to turn both levelling legs the same
amount.
Turning on the Power
Connecting the Appliance
After installing the appliance, connect the power
plug into the outlet socket.
NOTE
• After connecting the power supply cord (or
plug) to the outlet, wait 3 or 4 hours before you
put food into the appliance. If you add food
before the appliance has cooled completely,
your food may spoil.
Moving the Appliance For Relocation
Preparing for Relocation
Remove all food from inside the appliance.
1
Pull the power plug out, insert and fix it into
2
the power plug hook at the rear or on top of
the appliance.
Tape parts such as shelves and the door
3
handle to prevent from falling off while moving
the appliance.
When the appliance is level, open the bottom
4
drawer and reassemble the cover.
12
Move the appliance with more than two people
4
carefully. When transporting the appliance
over a long distance, keep the appliance
upright.
After installing the appliance, connect the
5
power plug into a mains outlet socket and
switch it on.
Page 13

OPERATION
EN
Before Use
Notes for Operation
• Users should keep in mind that frost can form
if the door is not closed completely or if the
humidity is high during the summer.
• Ensure there is sufficient space between food
stored on the shelf or door basket to allow the
door to close completely.
• Opening the door lets warm air enter the
appliance, and may cause the internal
temperature to rise.
• If you are leaving the appliance turned off for
an extended period of time, remove all food
and unplug the power cord. Clean the interior,
and leave the doors slightly ajar to prevent
mold from growing in the appliance.
Door Open Alarm
The alarm sounds 3 times in 30 second intervals
if the door is left open or not completely closed for
1 minute.
NOTE
• Contact the LG Electronics customer
information centre if the alarm sound continues
after 30 seconds even after closing all doors.
Failure Detection
The appliance can automatically detect problems
during the operation.
NOTE
• If a problem is detected, the appliance may not
operate and an error code is displayed even
when any button is pressed.
• If an error code is indicated on the display, do
not turn off the power. Immediately contact the
LG Electronics customer information centre
and report the error code. If you turn off the
power, the repair technician from the our
information centre may have difficulty finding
the problem.
Suggestion for Energy Saving
• Ensure there is sufficient space between
storedfoods. This allows cold air to be
circulated evenly and lowers electricity bills.
• Store hot food only after it has cooled in order
to prevent dew or frost.
• When storing food in the freezer compartment,
set the freezer temperature lower than the
temperature indicated on the food.
• Do not set the temperature of the appliance
lower than needed.
• Do not put food near the temperature sensor of
the fridge compartment. Keep a distance of at
least 3 cm from the sensor.
• Note that a temperature rise after defrosting
has a permissible range in the appliance
specifications. If you wish to minimise
the impact on the food storage due to a
temperature rise, seal or wrap the stored food
in several layers.
• The automatic defrosting system in the
appliance ensures that the compartment
remains free of ice buildup under normal
operating conditions.
Storing Foods Effectively
• Store frozen food or refrigerated food inside
sealed containers.
• Check the expiration date and label (storage
instructions) before storing food in the
appliance.
• Do not store food for a long period of time
(more than 4 weeks) if it spoils easily at a low
temperature.
• Place the refrigerated food or frozen food
in each fridge or freezer compartment
immediately after purchasing.
13
Page 14

EN
• Store raw meat and fish in suitable containers
in the appliance, so that it is not in contact with
or drip onto other food.
• Refrigerated foods and other food items can be
stored on top of the vegetable box.
• Avoid refreezing any food which has been
completely thawed. Freezing any food which
has been completely thawed again will lower its
taste and nutrition.
• Do not overfill the appliance. Cold air can not
circulate properly if the appliance is overfilled.
• Cool hot food before storing. If too much hot
food is placed inside, the internal temperature
of the appliance can increase and negatively
affect other foods stored in the appliance.
• If you set an excessively low temperature
for food, it may become frozen. Do not
set a temperature lower than the required
temperature for the food to be stored correctly.
• If there are chill compartments in the appliance,
do not store vegetables and fruits with higher
moisture content in the chill compartments as
they may freeze due to the lower temperature.
• In the event of a blackout, call the electricity
company and ask how long it is going to last.
− You should avoid door openings while the
power is off.
− When the power supply gets back to normal,
check the condition of the food.
Freezing the Maximum Amount of
Food
If large quantities of food are to be stored, the
inner container and auto-lift device should be
taken out of the bottom drawer.
CAUTION
• To remove the drawers, first remove the food
from drawers and then pull out the drawers
carefully. Not doing so could cause injury or
damage to the drawers.
Max Freezing Capacity
• Express Freeze function will allow the freezer
to reach its maximum freezing capacity.
This generally takes up to 24 hours and
automatically switches off.
• Express Freeze must be switched on for 2
hours before fresh products are placed in the
freezer compartment.
• To get better air circulation, insert all inner
parts like baskets, drawers, and shelves.
14
Page 15
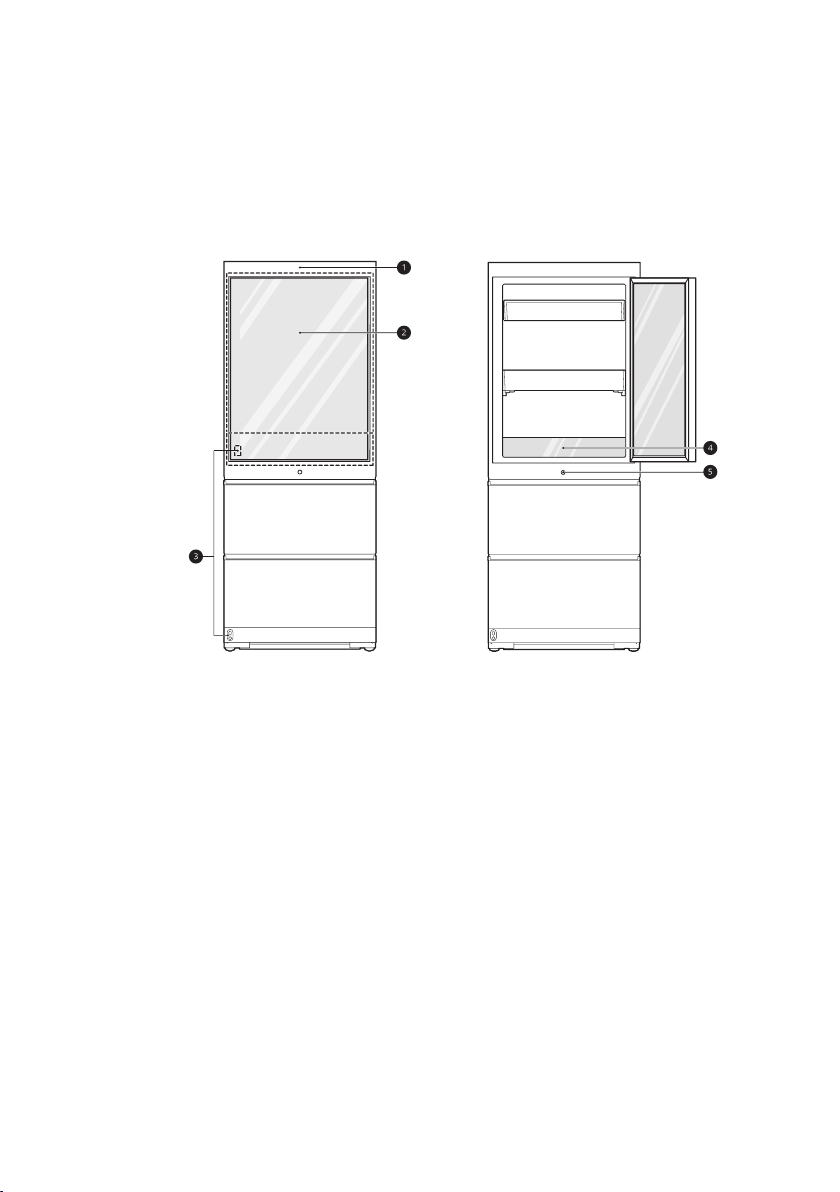
Product Features
The appearance or components of the appliance may differ from model to model.
Exterior
EN
Voice Assistant Device
a
A voice assistant device is built into the door.
InstaView Door in Door
b
The sleek tinted glass panel illuminates with two quick knocks, allowing you to see inside the easy
access compartment without ever opening the door.
Automatic Door Opening Sensors
c
Stand close enough to the front of the appliance and DOOR OPEN appears on the floor. Pass your
foot over the words on the floor to open the door automatically.
Control Panel
d
Displays the fridge, and freezer temperature controls.
Bottom Pullout Drawer Button
e
When the button is pressed, the bottom drawer opens automatically and the inner compartment rises
up for convenient access.
15
Page 16

Interior
Fresh Filter
a
This reduces odours inside the fridge compartment.
EN
Fridge Shelf
b
This is where refrigerated foods and other items are stored. Store the foods with higher moisture
content at the front of the shelf. The shelf height can be adjusted by inserting the shelf in another
groove of different height.
Vegetable Drawer
c
This is where fruits and vegetables are stored to remain fresh for as long as possible.
Custom Chill Pantry
d
As a chill compartment, this is where meat, fish and vegetables are stored.
Durabase Divider
e
Provides storage for large food items.
16
Page 17

Quick Freezing Zone
f
When you set the middle and bottom drawer to the freezer mode, the quick freezing zone will reach
the set temperature most quickly.
Door in Door Compartment
g
This is where foods which are taken out frequently such as beverages and snacks are stored.
Middle / Bottom Drawer
h
The 2 drawers can be set to either Fridge or Freezer mode. Both drawers must use the same mode.
• To store fresh food, press the Fridge Drawer button for at least 1 second.
• To store frozen food, press the Freezer Drawer button for at least 1 second.
CAUTION
• Empty out both drawers before changing the mode from freezer to fridge or vice versa.
• If the mode is changed while food is in the drawer, the food could spoil.
Inner Container
i
Rises during the auto-lift operation.
EN
17
Page 18
Control Panel
The actual control panel may differ from model to model.
Control Panel Features
EN
Voice Assistant
a
Changes voice assistant settings. This
button allows you to activate/deactivate the
Voice Assistant. To use the voice assistant
feature, the appliance must be connected
to the LG ThinQ application. For more
information on connecting the appliance,
refer to the SMART FUNCTIONS.
Wi-Fi
b
This button allows the appliance to
connect to a home Wi-Fi network. Refer to
SMART FUNCTIONS for information on the
initial setup of the LG ThinQ application.
Auto Door
c
The door opens automatically if you place
a foot near the motion sensor at the bottom
of the door. This is convenient when you
have both hands full and need to open the
door. To set the automatic opening door
function, press the button repeatedly to
toggle between the ON, Sound Off, and
OFF settings.
Using the Auto Door Function
When the automatic door opening
1
function is enabled, text is displayed on
the floor near the motion sensor.
Pass one foot in front of the motion
2
sensor and step on the displayed
text. The door opens. If the door
opens less than about 20 degrees
and is not opened further, it will close
automatically after 3 seconds.
NOTE
• Place your foot close enough to the
sensor that the text appears on top of
the foot, not just on the toes.
18
Page 19

CAUTION
You may want to disable the automatic
door opening function if you have young
children or persons with reduced physical,
sensory, or mental capabilities in the home.
They could be injured if the door opens
unexpectedly while they are nearby.
NOTE
• The displayed text may not be readable
on some flooring materials, but this
will not affect the performance of the
automatic door opening function.
• If flooring material is highly reflective
(metal, glass tile), the motion sensor
may malfunction and the automatic door
opening function may not work properly.
• Reflective objects placed in front of
the motion sensor may cause the text
to display, but the text disappears if no
movement is detected.
• If a pet passes by below when a person
stands in front of the product, the
automatic door opening function may be
triggered.
Fridge
d
Press this button repeatedly to select a
desired temperature between 1 °C and 7
°C.
• The initial fridge temperature is 3 °C.
Custom Chill
e
Select a temperature setting for the Custom
Chill pantry by pressing the Custom Chill
button repeatedly to toggle between Meat,
Deli, or Produce.
The temperature setting becomes
progressively colder from Produce → Deli
→ Meat.
• Meat (Coldest): Meat or beverages
• Deli (Colder): Cooked or prepared food
ready for serving
• Produce (Cold): Vegetable or fruit
Lock
f
The lock function disables every other
button on the display.
• When power is initially connected to the
appliance, the lock function is off.
• To lock the control panel buttons, press
and hold the Lock button until the icon
appears in the display and the function
is activated.
• To disable the function, press and hold
the Lock button for approximately three
seconds.
Express Freeze
g
This function can quickly freeze a large
amount of ice or frozen foods.
• This function is enabled and disabled in
turn each time you press the button.
• This function automatically terminates
after a specific period has passed.
Auto Lift
h
When Auto Lift is enabled, pressing the
bottom pullout drawer button automatically
opens the drawer and raises the inner
container for convenient access.
Press the bottom pullout drawer button
again to automatically lower the inner
container and close the drawer.
Setting Auto Lift
Press Auto Lift repeatedly to toggle
between Off ~ Sound On ~ Sound Off
~ Auto Drawer Opening Only.
The setting is indicated by the icon in the
display.
− Off: The drawer must be opened
manually and the auto-lift function is
disabled.
− Sound On: Sound is heard, the drawer
is automatically opened and the inner
container is raised
− Sound Off: The drawer automatically
opens without sound and the inner
container is raised
EN
19
Page 20
EN
− Auto Drawer Opening Only: The
drawer opens automatically without
sound, but the inner container is not
raised.
Using Auto Lift
Press the Auto Lift button to turn Auto
1
Lift on.
Press the bottom pullout drawer button
2
b. The bottom drawer automatically
opens and the inner container is raised.
• When the auto open sensor a
detects motion in front of the
appliance, the bottom pullout drawer
button b lights up. If the button
does not light up, move closer to the
appliance to trip the sensor.
Press the bottom pullout drawer button
3
b to automatically lower the inner
container and close the drawer.
NOTE
• When the auto-lift function is turned off
in the control panel:
− Standing in front of the appliance
will not activate the light around the
bottom pullout drawer button.
− When the bottom pullout drawer
button is pressed, the light blinks 3
times.
• When the auto-lift function is turned on
in the control panel:
− If pressing the bottom pullout drawer
button does not close the bottom
drawer, open the middle drawer or
manually close the bottom drawer.
− If pressing the bottom pullout drawer
button does not open the bottom
drawer, manually opening the drawer
will cause the inner compartment to
lift up.
− The auto-lift function does not work
when the middle drawer is open.
Freezer Drawer
i
Press this button repeatedly to select a
desired temperature between - 23 °C and
- 15 °C.
• The initial freezer temperature is -18 °C.
Setting Drawers to Freezer Mode
To set the drawers to the freezer mode,
press and hold the Freezer Drawer button
for approximately 1 second.
Fridge Drawer
j
Press this button repeatedly to select a
desired temperature between 1 °C and 7
°C.
• The initial fridge temperature is 3 °C.
Setting Drawers to Fridge Mode
To set the drawers to the fridge mode, press
and hold the Fridge Drawer button for
approximately 1 second.
NOTE
• The displayed temperature is the
target temperature, and not the actual
temperature of the appliance. The actual
temperature depends on the food inside
the appliance.
Air Filter
k
Replace the air filter when the icon turns on.
After replacing the air filter, press and hold
the Air Filter button for three seconds to
turn the icon light off. Replace the air filter
approximately every six months.
20
Page 21

EN
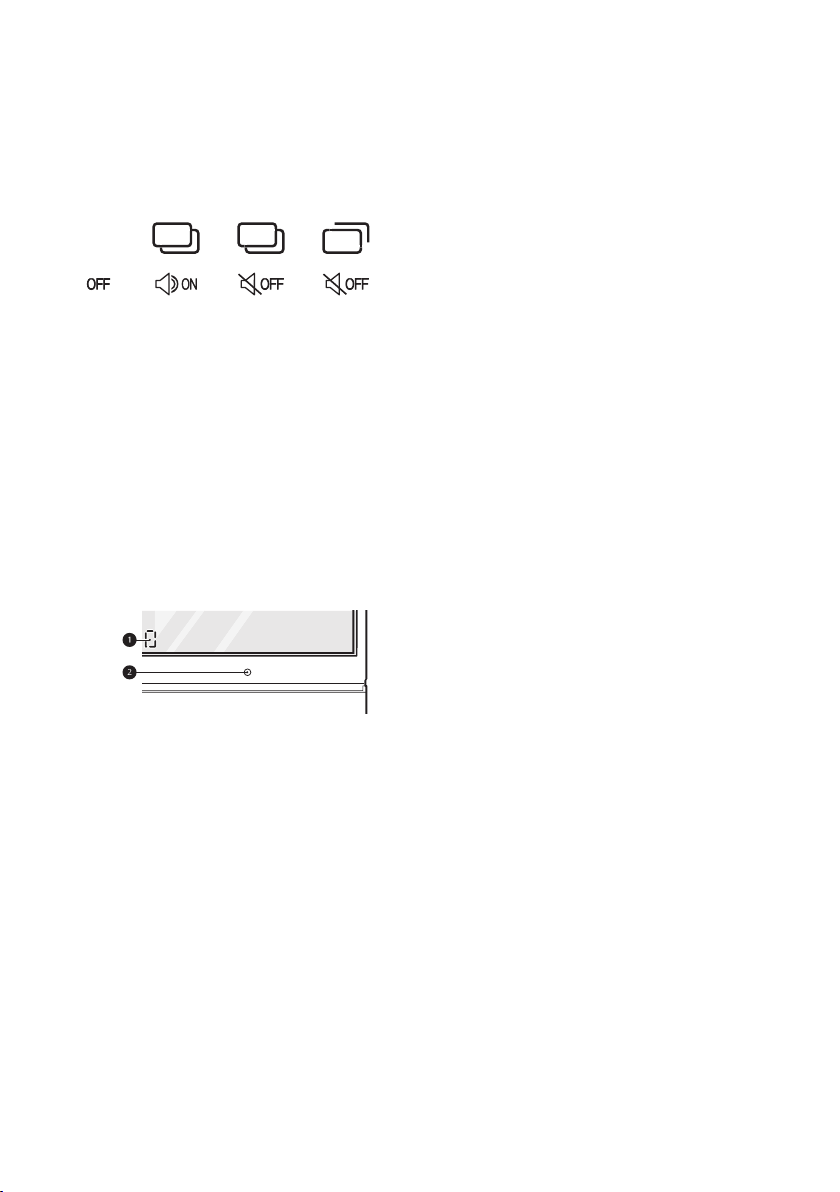
InstaView Door in Door
The sleek tinted glass panel illuminates with two
quick knocks, allowing you to see inside the fridge
storage compartment without ever opening the
door.
Knock twice on the glass to turn the LED light
1
inside the door on or off.
Door in Door
Using the Moving Basket
Adjusting the moving basket allows taller food
items to be stored more conveniently.
To raise the moving basket, hold both ends of
1
the basket in the center and push the basket
up until it clicks into place.
To lower the moving basket, press up to
2
release the levers at the side of the basket
and lower the basket until it clicks into place.
The LED light turns off automatically after ten
2
seconds.
NOTE
• The InstaView Door in Door function is disabled
for 2 seconds after closing the door.
• Knock near the center of the glass. Knocking
near the edges of the glass may not activate
the InstaView Door in Door function.
• Knock hard enough so that the knocking sound
is audible.
• The InstaView Door in Door function may
activate if a loud noise occurs near the
appliance.
• Clean the glass door with a dry cloth. To
remove stubborn stains, slightly moisten a
clean cloth with lukewarm water or a glass
cleaner. Do not spray glass cleaner directly at
the glass door.
CAUTION
• To avoid personal injury or damage to the
basket or its contents, empty the moving basket
before moving it up or down.
Removing/Refitting the Upper
Basket
Open the fridge door.
1
21
Page 22
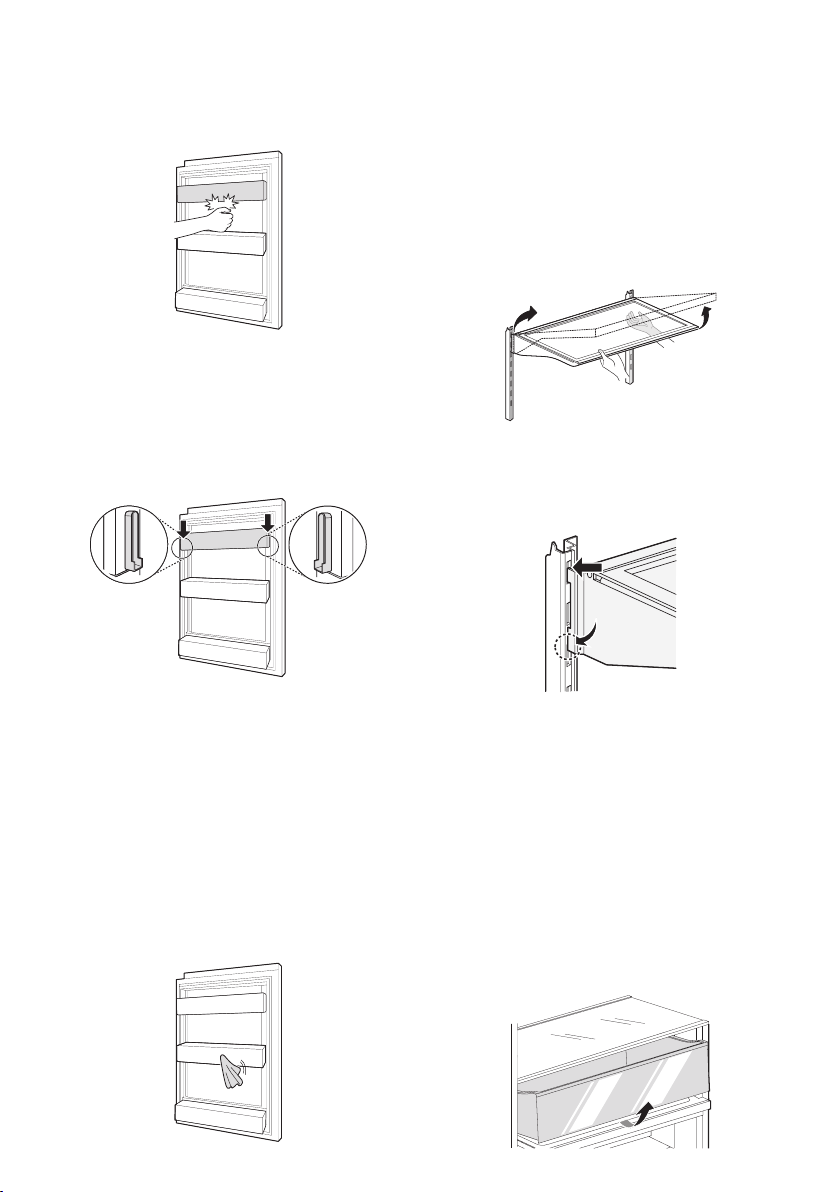
Gently hit the bottom of the basket by hand.
2
Slightly lift both ends of the basket and pull
3
forward to separate.
To refit, align the basket with the left and right
4
grooves and lower it.
EN
Fridge Shelf
Removing/Refitting the Fridge Shelf
To remove, raise the front of the shelf to
1
disengage the shelf hooks, then lift the shelf
from the back.
To refit, tilt the front of the shelf up and guide
2
the shelf hooks into the slots at a desired
height.
Gently hit the top of both sides of the basket.
5
• If you hear a click, the refitting is correct.
Cleaning the Moving and Lower
Basket
Open the fridge door.
1
Clean the baskets with a soft cloth.
2
22
Note
• Foreign objects and dirt between the shelf and
the inner cabinet wall could prevent the shelf
light from turning on.
Fridge Drawer
Removing/Refitting the Drawer
Remove the contents of the drawer. Hold the
1
handle of the vegetable drawer and gently pull
it out.
Page 23
EN
Keeping both levers pressed, lift the drawer
2
support slightly and remove it from the rail
system.
Align the drawer support on the rail and press
3
it down until you hear snap sound.
The temperature setting becomes progressively
colder from Produce → Deli → Meat.
• Meat (Coldest): Meat or beverages
• Deli (Colder): Cooked or prepared food ready
for serving
• Produce (Cold): Vegetable or fruit
Removing/Refitting the Pantry
Remove the contents of the pantry. Hold the
1
handle of the pantry and gently pull it out.
Keeping both levers pressed, lift the drawer
2
support slightly and remove it from the rail
system.
To refit, slightly tilt up the front, insert the
4
vegetable drawer into the frame and push it
back into place.
Custom Chill Pantry
Using the Custom Chill Pantry
Select a temperature setting for the Custom
Chill pantry by pressing the Custom Chill button
repeatedly to toggle between Meat, Deli, or
Produce.
Align the drawer support on the rail and press
3
it down until you hear snap sound.
23
Page 24
To refit, slightly tilt up the front, insert the pantry
4
into the frame and push it back into place.
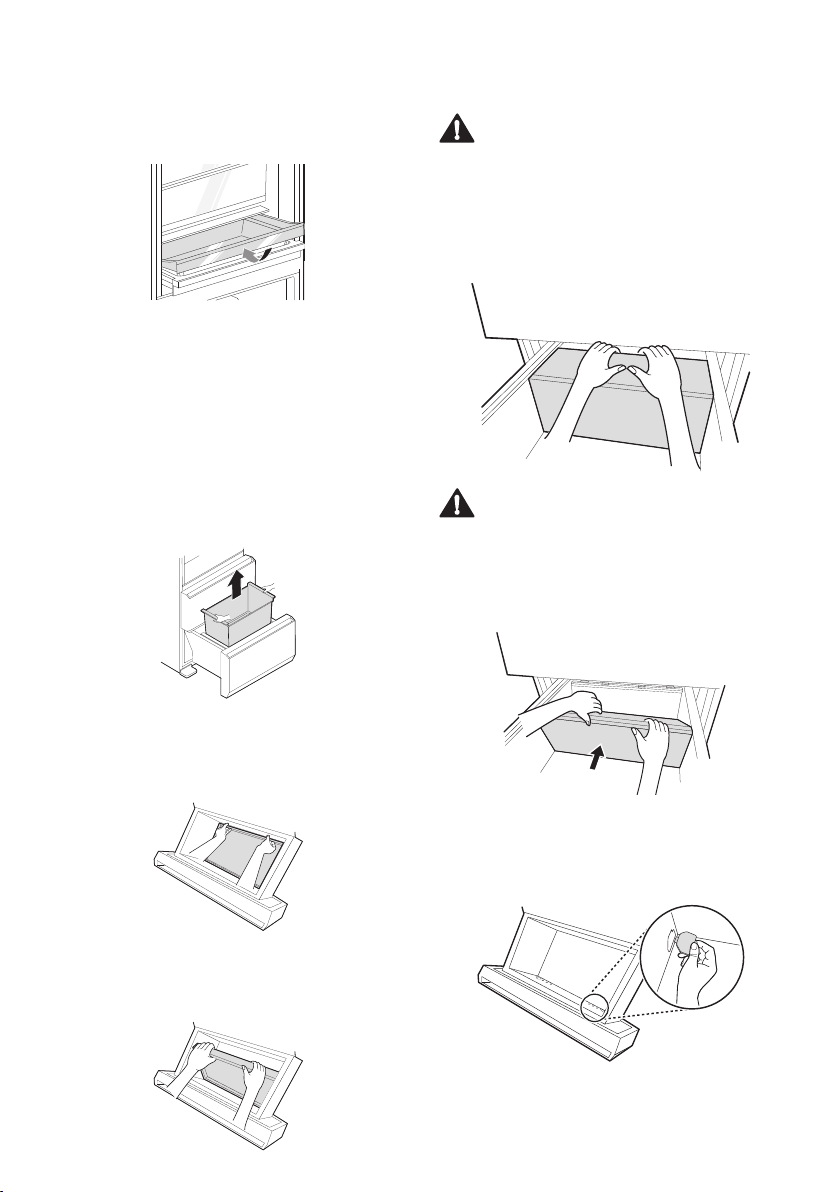
Auto-lift Device
Removing the Auto-lift Device
Remove the auto-lift device in the bottom drawer
to increase the storage space or for cleaning.
Unplug the appliance or disconnect power.
1
Open the bottom drawer, hold the inner
2
compartment with both hands and pull it out.
WARNING
• The auto-lift device is heavy, so remove it with
both hands.
Insert the fingertips of both hands under the
5
cover at the center and pull the cover forward
gently.
CAUTION
• Pull the cover gently to avoid damaging it.
Fold the back of the cover down and push the
6
folded cover back slightly.
EN
The auto-lift device is at the bottom of the
3
drawer. Hold the inner edge of the device with
both hands and pull it up.
Hold the top of the auto-lift device with both
4
hands and remove it from the bottom drawer.
24
Insert the supplied hole cover into the groove
7
at the bottom of the drawer.
Page 25

Refitting the Auto-lift Device
Remove the hole cover from the bottom of the
1
drawer.
Raise the back section of the folded cover and
2
rest it on the guide a at the rear of the drawer.
Lift the auto-lift device with both hands.
5
Insert the hinges on the auto-lift device into
6
the slots at the front of the drawer.
EN
Hold the middle of the cover and lift it slightly
3
into the groove.
Make sure the hinges on the auto-lift device
4
are aligned with the slots in the drawer.
Lower the device into place and move it back
7
and forth to make sure it is engaged.
Use both hands to refit the inner compartment
8
in the drawer.
Plug in the appliance or connect power.
9
25
Page 26

SMART FUNCTIONS
Using LG ThinQ Application
The LG ThinQ application allows you to
communicate with the appliance using a
smartphone.
LG ThinQ Application Features
Communicate with the appliance from a smart
phone using the convenient smart features.
Smart Diagnosis™
If you experience a problem while using the
appliance, this smart diagnosis feature will help
you diagnose the problem.
Settings
Allows you to set various options on the appliance
and in the application.
NOTE
• If you change your wireless router, Internet
service provider, or password, delete the
registered appliance from the LG ThinQ
application and register it again.
• The application is subject to change for
appliance improvement purposes without
notice to users.
• Functions may vary by model.
Before Using LG ThinQ
Check the distance between the appliance
1
and the wireless router (Wi-Fi network).
• If the distance between the appliance and
the wireless router is too far, the signal
strength becomes weak. It may take a long
time to register or installation may fail.
Turn off the Mobile data or Cellular Data on
2
your smartphone.
Connect your smartphone to the wireless
3
router.
NOTE
• To verify the Wi-Fi connection, check that
Wi-Fi f icon on the control panel is lit.
• The appliance supports 2.4 GHz Wi-Fi
networks only. To check your network
frequency, contact your Internet service
provider or refer to your wireless router manual.
• LG ThinQ is not responsible for any
network connection problems or any faults,
malfunctions, or errors caused by network
connection.
• If the appliance is having trouble connecting
to the Wi-Fi network, it may be too far from
the router. Purchase a Wi-Fi repeater (range
extender) to improve the Wi-Fi signal strength.
• The Wi-Fi connection may not connect or may
be interrupted because of the home network
environment.
• The network connection may not work properly
depending on the Internet service provider.
• The surrounding wireless environment can
make the wireless network service run slowly.
• The appliance cannot be registered due to
problems with the wireless signal transmission.
Unplug the appliance and wait about a minute
before trying again.
• If the firewall on your wireless router is enabled,
disable the firewall or add an exception to it.
• The wireless network name (SSID) should be
a combination of English letters and numbers.
(Do not use special characters.)
• Smartphone user interface (UI) may vary
depending on the mobile operating system
(OS) and the manufacturer.
• If the security protocol of the router is set
to WEP, you may fail to set up the network.
Please change it to other security protocols
(WPA2 is recommended) and register the
product again.
EN
26
Page 27
EN
Installing LG ThinQ
Search for the LG ThinQ application from the
Google Play Store or Apple App Store on a smart
phone. Follow instructions to download and install
the application.
Connecting to Wi-Fi
The Wi-Fi button, when used with the LG ThinQ
application, allows the appliance to connect to a
home Wi-Fi network. The Wi-Fi icon shows the
status of the appliance’s network connection. The
icon illuminates when the appliance is connected
to the Wi-Fi network.
Initial Appliance Registration
Run the LG ThinQ application and follow the
instructions in the application to register the
appliance.
Re-registering the Appliance or
Registering Another User
Press and hold the Wi-Fi button for 3 seconds
to temporarily turn it off. Run the LG ThinQ
application and follow the instructions in the
application to register the appliance.
NOTE
• To disable the Wi-Fi function, press and hold
the Wi-Fi button for 3 seconds. Wi-Fi icon will
be turned off.
Wireless LAN Module Specifications
Declaration of Conformity
Hereby, LG Electronics declares that the radio
equipment type Refrigerator is in compliance
with Directive 2014/53/EU. The full text of the
EU declaration of conformity is available at the
following internet address:
http://www.lg.com/global/support/cedoc/cedoc#
LG Electronics European Shared Service Center
B.V.
Krijgsman 1
1186 DM Amstelveen
The Netherlands
Open Source Software Notice
Information
To obtain the source code under GPL, LGPL, MPL,
and other open source licenses, that is contained
in this product, please visit http://opensource.lge.
com.
In addition to the source code, all referred license
terms, warranty disclaimers and copyright notices
are available for download.
LG Electronics will also provide open source code
to you on CD-ROM for a charge covering the cost
of performing such distribution (such as the cost of
media, shipping, and handling) upon email request
to opensource@lge.com. This offer is valid for a
period of three years after our last shipment of this
product. This offer is valid to anyone in receipt of
this information.
Model PWFSA2
Frequency Range 2412 to 2472 MHz
Output
Power(Max)
Wireless function S/W version : V 1.0
For consideration of the user, this device should be
installed and operated with a minimum distance of
20 cm between the device and the body.
IEEE 802.11b: 17.55 dBm
IEEE 802.11g: 16.07 dBm
IEEE 802.11n: 15.85 dBm
Using the Voice Assistant
Use your voice to automatically open the door and
get information such as the weather or time of day.
Before Using
The product must be connected to the LG ThinQ
app in order to use the voice assistant feature.
For more information on connecting the product,
refer to the SMART FUNCTIONS section.
Note
• Voice assistant supports English commands
only, so it will not be responded to other than
English language.
27
Page 28

EN
Voice Assistant Features
Function Command (example)
Open the refrigerator door.
Open Door
Information
Could you open the refrigerator
door?
Please open the refrigerator
door.
What day is it today?
What time is it now?
NOTE
• Voice assistant results may vary based on the
volume of the user’s voice, their intonation, and
the ambient noise.
• For best results, keep background noise to a
minimum and stand within 3 m of the appliance.
• On some models, the motion sensor works
with the voice assistant to answer certain voice
commands.
Setting up the Voice Assistant
You must wake the voice assistant up before it
can assist you. You can select 2 different ways to
do this.
Mode Details
This mode allows you to use
either motion sensor activation or
voice activation.
Wake Zone
+ Wake
Word
Wake Word
OFF
28
• Wake Zone: Stand close
enough to the front of the
product and the voice assistant
will wake automatically without
the wake word.
• Wake Word: Stand within 3
m of the appliance and clearly
say, “Hi, LG”.
This mode allows you to use
voice activation.
• Wake Word: Stand within 3
m of the appliance and clearly
say, “Hi, LG”.
This mode turns off the voice
assistant
Voice Assistant
Wake Zone
Wake Word
Voice Assistant
Wake Word
Voice Assistant
OFF
CAUTION
• When the voice assistant function is in standby
mode, the built-in microphone is activated
whether the display is on or off. Voice is then
sent over the network to the server.
NOTE
• When the voice assistant is set to the
Wake Zone + Wake Word mode:
− Every time you pass in front of the appliance,
the voice assistant is activated by the
Wake Zone and enters the standby mode to
recognize voice commands. Saying “Hi, LG”
will not activate the Wake Word function in
this case.
Using Wake Word
To use the Wake Word, stand within 3 m of the
appliance.
To wake the voice assistant, say, “Hi, LG”.
1
• The voice assistant control
window automatically displays
“Go ahead, I’m listening.” and enters the
ready mode.
Clearly issue your command.
2
• Example: Open the refrigerator door.
• If the voice assistant does not recognize
the command, repeat it or try a different
command.
Using Wake Zone
To use the Wake Zone, stand near the front of the
appliance and the voice assistant will automatically
wake and enter standby mode to receive voice
commands.
Stand in front of the product and wait a
1
moment.
• The voice assistant control
window automatically displays
“Go ahead, I’m listening.” and enters the
ready mode.
Page 29

EN
Clearly issue your command.
2
• Example: Open the refrigerator door.
NOTE
• Voice assistant supports English commands
only, so it will not be responded to other than
English language.
• To issue a new voice command, say, “Hi, LG”
or move away from the appliance and then
move close again (within 1 m).
• If the voice command is not recognized, the
voice assistant function exits the standby
mode.
Smart Diagnosis
This feature is only available on models with the
c or d logo.
Use this feature to help you diagnose and solve
problems with your appliance.
NOTE
• For reasons not attributable to LGE’s
negligence, the service may not operate due to
external factors such as, but not limited to, WiFi unavailability, Wi-Fi disconnection, local app
store policy, or app unavailability.
• The feature may be subject to change without
prior notice and may have a different form
depending on where you are located.
Using LG ThinQ to Diagnose
Issues
If you experience a problem with your Wi-Fi
equipped appliance, it can transmit troubleshooting
data to a smartphone using the LG ThinQ
application.
• Launch the LG ThinQ application and select
the Smart Diagnosis feature in the menu.
Follow the instructions provided in the
LG ThinQ application.
• Launch the LG ThinQ application and select
the Smart Diagnosis feature in the menu.
Follow the instructions for audible diagnosis
provided in the LG ThinQ application.
Press the Lock button to activate the lock
1
function.
• If the display has been locked for over 5
minutes, you must deactivate the lock and
then reactivate it.
Open the fridge door and then hold the phone
2
on the upper right speaker hole.
• Position the phone so that its microphone is
aligned with the speaker hole.
Press and hold the Freezer Drawer button
3
for three seconds or longer while holding your
phone to the speaker until the data transfer is
complete.
• The diagnosis sound is generated after
around 3 seconds.
After the data transfer is complete, the
4
diagnosis will be displayed in the application.
NOTE
• For best results, do not move the phone while
the tones are being transmitted.
Using Audible Diagnosis to
Diagnose Issues
Follow the instructions below to use the audible
diagnosis method.
29
Page 30

MAINTENANCE
EN
Cleaning
General Cleaning Tips
• When cleaning the inside or outside of the
appliance, do not wipe it with a rough brush,
toothpaste, or flammable materials. Do not
use cleaning agents containing flammable
substances. This may cause discoloration or
damage to the appliance.
− Flammable substances: alcohol (ethanol,
methanol, isopropyl alcohol, isobutyl alcohol,
etc.), thinner, bleach, benzene, flammable
liquid, abrasive, etc.
• After cleaning, check if the power cable is
damaged.
Cleaning the Exterior
• When cleaning the outside air vents of the
appliance by means of vacuuming, then the
power cord should be unplugged from the
outlet to avoid any static discharge that can
damage the electronics or cause an electric
shock. Regular cleaning of the rear and side
ventilation covers is recommended to maintain
reliable and economical operation of the unit.
• Keep the air vents on the exterior of the
appliance clean. Blocked air vents can cause
fire or appliance damage.
• Waxing external painted metal surfaces helps
provide rust protection. Do not wax plastic
parts. Wax painted metal surfaces at least
twice a year using appliance wax (or auto paste
wax). Apply wax with a clean, soft cloth.
• For the appliance exterior, use a clean sponge
or soft cloth and a mild detergent in warm
water. Do not use abrasive or harsh cleaners.
Dry thoroughly with a soft cloth. Do not use
contaminated cloths when cleaning the
stainless steel doors. Always use a dedicated
cloth and wipe in the same direction as the
grain. This helps reduce surface staining and
tarnishing.
• Detach the shelves and drawers and clean
them with water, and then dry them sufficiently,
before replacing them.
• Regularly wipe the door gaskets with a wet soft
towel.
• Door basket spills and stains should be cleaned
as they can compromise storage ability of the
basket and could even be damaged.
• Never clean the shelves or containers in the
dishwasher. The parts may become deformed
due to the heat.
Replacing the Fresh Filter
Replace the Fresh Filter according to the below
replacement period.
• Approximately every six months.
• When the Fresh Filter LED blinks or the
Replace Filter icon is displayed.
Removing the Fresh Filter
Remove the cover of the Fresh Filter
1
compartment. The cover can be easily
separated by inserting the plastic rod into the
groove on either side of the bottom of the
compartment.
Remove the filter inside the Fresh filter cover
2
and replace it with a new filter.
• Make sure to insert the new filter with the
“Back” label facing out.
Cleaning the Interior
• When removing a shelf or drawer from inside
the appliance, remove all stored foods from the
shelf or drawer to prevent injury or damage to
the appliance. Otherwise, injury may occur due
to the weight of stored foods.
30
To reset the filter replacement period, press
3
the Air Filter button on the control panel until
the icon on the control panel turns off.
Page 31

TROUBLESHOOTING
Before Calling for Service
Cooling
Symptoms Possible Cause & Solution
Is there a power interruption?
There is no refrigeration or
freezing.
There is poor refrigeration
or freezing.
The appliance contains a
bad smell.
• Check the power of other appliances.
Check the power of other appliances.
• Plug the power plug in the outlet properly.
Is the fridge or freezer temperature set to its warmest setting?
• Set the fridge or freezer temperature to a colder setting.
Is the appliance in direct sunlight, or is it near a heat generating
object such as cooking oven or heater?
• Check the installation area and reinstall it away from heat generating
objects.
Did you store hot food without cooling it first?
• Cool the hot food first before putting it in the fridge or freezer
compartment.
Did you put in too much food?
• Maintain an appropriate space between food.
Are the appliance doors completely closed?
• Completely close the door and make sure that stored food is not
obstructing in the door.
Is there enough space around the appliance?
• Adjust the installation position to make enough space around the
appliance.
Is the fridge or freezer temperature set to ‘Warm’?
• Set the fridge or freezer temperature to a colder setting.
Did you put in food with a strong smell?
• Store foods with strong smells in a sealed containers.
Vegetables or fruit may have spoiled in the drawer?
• Throw away rotten vegetables and clean the vegetable drawer. Do not
store vegetables too long in the vegetable drawer.
EN
31
Page 32

Condensation & Frost
Symptoms Possible Cause & Solution
There is condensation
inside the appliance or on
the bottom of the vegetable
drawer cover.
Frost has formed in the
freezer compartment.
Frost or condensation has
formed inside or outside
the appliance.
The side or front of the
appliance is warm.
EN
Did you store hot food without cooling it first?
• Cool the hot food first before putting it inside the fridge or freezer.
Did you leave the appliance door open?
• Although the condensation will disappear soon after you close the
appliance door, you can wipe it with a dry cloth.
Do you open and close the appliance door too frequently?
• Condensation can form due to the temperature difference from the
outside. Wipe out the dampness with a dry cloth.
Did you put warm or moist food inside without sealing it in a
container?
• Store food in a covered or sealed container.
Doors may not be closed properly?
• Check if the food item inside the appliance is blocking the door and
make sure that the door is tightly closed.
Did you store hot food without cooling it first?
• Cool the hot food first before putting it in the fridge or freezer
compartment.
Is the air entry or exit of the freezer compartment blocked?
• Make sure that air entry or exit is not blocked so that the air can
circulate inside.
Is the freezer compartment overfilled?
• Maintain an appropriate space between items.
Did you open and close the appliance door frequently or is the
appliance door improperly closed?
• Frosts or condensation can form if the outside air penetrates inside
the appliance.
Is the installation environment humid?
• Condensation can appear on the exterior of the appliance if the
installation area is too humid or on a humid day such as a rainy day.
Wipe off any moisture with a dry cloth.
There are anti condensation pipes fitted to these areas of the
appliance to reduce condensation forming from around the door
area.
• The heat releasing pipe to prevent condensation is installed on the
front and side of the appliance. You may feel it particularly hot right
after the appliance is installed or during the summer. You can be
assured that this is not a problem and is quite normal.
32
Page 33

Parts & Features
Symptoms Possible Cause & Solution
The appliance door is not
closed tightly.
It is difficult to open the
appliance door.
The inside lamp in the
appliance does not turn on.
Voice Assistant function
turns on automatically.
EN
Is the appliance leaning forward?
• Adjust the front feet to raise the front side slightly.
Were the shelves properly assembled?
• Refit the shelves if needed.
Did you close the door with excessive force?
• If you apply too much force or speed when closing the door, it may
remain briefly open before closing. Make sure that you do not slam the
door closed. Close without force.
Did you open the door right after you closed it?
• If you try to open the appliance door within one minute after you
closed it, you may have difficulties because of the pressure inside the
appliance. Try to open the appliance door again in a few minutes so
that the internal pressure stabilizes.
Lamp failure
• Close the door and re-open. If the lamp does not turn on, please
contact the LG Electronics customer information centre. Do not
attempt removal of the lamp.
The voice assistant is set to the Wake Zone + Wake Word mode.
Every time you pass in front of the appliance, the voice assistant
wakes and enters the standby mode to recognize voice commands.
• Change Voice Assistant from Wake Zone + Wake Word to
Wake Word.
33
Page 34

Noises
Symptoms Possible Cause & Solution
The appliance is noisy
and generates abnormal
sounds.
Clicking noises
Rattling noises
Whooshing noises
Gurgling noises
Popping noises
Vibrating
EN
Is the appliance installed on a weak floor or improperly levelled?
• Install the appliance on a solid and flat area.
Does the rear of the appliance touch the wall?
• Adjust the installation position to allow enough clearance around the
appliance.
Are objects scattered behind the appliance?
• Remove the scattered objects from behind the appliance.
Is there an object on top of the appliance?
• Remove the object on top of the appliance.
The defrost control will click when the automatic defrost cycle
begins and ends. The thermostat control (or appliance control on
some models) will also click when cycling on and off.
• Normal Operation
Rattling noises may come from the flow of appliance, the water line
on the back of the unit (for plumbed models only), or items stored on
top of or around the appliance.
• Normal Operation
Appliance is not resting evenly on the floor.
• Floor is weak or uneven or levelling legs need to be adjusted. See the
Door Alignment section.
Appliance with linear compressor was moved while operating.
• Normal operation. If the compressor does not stop rattling after three
minutes, turn the power to the appliance off and then on again.
Evaporator fan motor is circulating air through the fridge and freezer
compartments.
• Normal Operation
Air is being forced over the condenser by the condenser fan.
• Normal Operation
Appliance flowing through the cooling system.
• Normal Operation
Contraction and expansion of the inside walls due to changes in
temperature.
• Normal Operation
If the side or back of the appliance is touching a cabinet or wall,
some of the normal vibrations may make an audible sound.
• To eliminate the noise, make sure that the sides and back do not make
any contact with any wall or cabinet.
34
Page 35

Wi-Fi
Symptoms Possible Cause & Solution
Your home appliance
and smartphone are not
connected to the Wi-Fi
network.
EN
The password for the Wi-Fi that you are trying to connect to is
incorrect.
• Find the Wi-Fi network connected to your smartphone and remove it,
then register your appliance on LG ThinQ.
Mobile data for your smartphone is turned on.
• Turn off the Mobile data of your smartphone and register the appliance
using the Wi-Fi network.
The wireless network name (SSID) is set incorrectly.
• The wireless network name (SSID) should be a combination of English
letters and numbers. (Do not use special characters.)
The router frequency is not 2.4 GHz.
• Only a 2.4 GHz router frequency is supported. Set the wireless router
to 2.4 GHz and connect the appliance to the wireless router. To check
the router frequency, check with your Internet service provider or the
router manufacturer.
The distance between the appliance and the router is too far.
• If the distance between the appliance and the router is too far, the
signal may be weak and the connection may not be configured
correctly. Move the location of the router so that it is closer to the
appliance.
35
Page 36

Memo
Page 37

BEDIENUNGSANLEITUNG
KÜHLSCHRANK UND
GEFRIERSCHRANK
Lesen Sie diese Bedienungsanleitung vor der Inbetriebnahme des Haushaltsgeräts sorgfältig durch und
halten Sie sie griffbereit, damit Sie jederzeit darin nachschlagen können.
www.LGSIGNATURE.com
Copyright © 2019 LG Electronics Inc. Alle Rechte vorbehalten
Page 38

INHALTSVERZEICHNIS
SICHERHEITSANWEISUNGEN ..................................................... 3
WICHTIGE SICHERHEITSANWEISUNGEN ....................................................3
SCHONUNG DER UMWELT ..........................................................................12
AUFSTELLEN ............................................................................... 13
Abmessungen und Abstände .......................................................................... 13
Umgebungstemperatur ...................................................................................13
Nivellierung .....................................................................................................14
Einschalten der Stromversorgung ...................................................................14
Verstellen des Geräts an einen anderen Ort ..................................................14
BETRIEB ....................................................................................... 15
Vor der Verwendung........................................................................................15
Produkteigenschaften .....................................................................................17
Außenseite ......................................................................................................17
Innenseite........................................................................................................18
Bedienfeld .......................................................................................................20
InstaView Door in Door ...................................................................................24
Door in Door ....................................................................................................24
Abstellfläche ....................................................................................................25
Fridge Drawer (Kühlschublade) ......................................................................25
CustomChill-Fach ...........................................................................................26
Automatische Hebeeinheit ..............................................................................27
Diese Bedienungsanleitung kann Abbildungen
oder Inhalte enthalten, die sich von Ihrem
Modell unterscheiden.
Änderungen an dieser Bedienungsanleitung
durch den Hersteller bleiben vorbehalten.
INTELLIGENTE FUNKTIONEN .................................................... 29
Verwendung der LG ThinQ-App ......................................................................29
Verwendung des Sprachassistenten ..............................................................31
Smart Diagnosis ..............................................................................................33
WARTUNG ....................................................................................34
Reinigung ........................................................................................................34
Ersetzen des Frischefilters ..............................................................................34
FEHLERBEHEBUNG ....................................................................36
Bevor Sie das Servicezentrum anrufen...........................................................36
Page 39

SICHERHEITSANWEISUNGEN
DE
Die folgenden Sicherheitsrichtlinien dienen dazu,
unvorhergesehene Risiken oder Beschädigungen durch
unsicheren oder nicht ordnungsgemäßen Betrieb des Geräts zu
vermeiden.
Die Richtlinien sind unterteilt in die Hinweise 'WARNUNG' und
'ACHTUNG', wie nachfolgend beschrieben.
Dieses Symbol wird angezeigt, um auf Punkte
und Bedienvorgänge hinzuweisen, die ein Risiko
bergen können. Lesen Sie den mit diesem Symbol
gekennzeichneten Teil sorgfältig und befolgen Sie die
Anweisungen, um Risiken zu vermeiden.
WARNUNG
Damit wird angezeigt, dass die Nichtbeachtung der Anweisung
zu ernsthaften Verletzungen oder zum Tod führen kann.
ACHTUNG
Damit wird angezeigt, dass die Nichtbeachtung der
Anweisungen zu leichten Verletzungen oder einer
Beschädigung des Geräts führen kann.
WICHTIGE SICHERHEITSANWEISUNGEN
WARNUNG
Befolgen Sie grundlegende Vorsichtsmaßnahmen, um
Explosionen, Brandgefahren, Stromschläge, Verbrühungen
oder sonstige Personenschäden zu vermeiden. Dazu gehört
Folgendes:
3
Page 40

DE
Kinder im Haushalt
• Dieses Haushaltsgerät kann von Kindern ab 8 Jahren benutzt werden
sowie von Personen mit eingeschränkten körperlichen, sensorischen
oder geistigen Fähigkeiten oder mit mangelnder Erfahrung und
Kenntnis, wenn sie bei der Nutzung des Geräts beaufsichtigt werden
oder eine Einweisung zur sicheren Nutzung des Geräts und den
damit verbundenen Gefahren erhalten haben. Kinder dürfen mit
dem Haushaltsgerät nicht spielen. Die Reinigung und Wartung
seitens des Benutzers darf von Kindern nicht ohne Beaufsichtigung
vorgenommen werden.
• Kinder im Alter von 3 bis 8 Jahren dürfen Kühlgeräte befüllen und
Produkte daraus entnehmen.
Installation
• Das Gerät darf nur von zwei oder mehr Personen transportiert
werden, die das Gerät sicher halten.
• Stellen Sie bitte erstmal sicher, dass der Stecker einwandfrei geerdet
ist und dass der Erdungsstift an dem Stromkabel nicht beschädigt
oder entfernt wurde. Um weitere Details über Erdung in Erfahrung
zu bringen, nehmen Sie bitte Kontakt mit dem Kundendienst von LG
Electronics auf.
• Dieses Gerät ist mit einem Netzkabel ausgerüstet, das über einen
Geräte-Erdungsleiter und einen Erdungs-Netzstecker verfügt. Der
Netzstecker muss in eine geeignete Steckdose gesteckt werden,
die mit allen gemäß der lokalen Vorschriften und Anordnungen
vorgeschriebenen Ausrüstungen versehen ist.
• Wenn das Einspeisekabel für Strom beschädigt oder die Steckdose
locker ist, verwenden Sie das Stromkabel nicht und nehmen Sie bitte
Kontakt mit dem Kundendienst auf.
• Schließen Sie das Gerät nicht an eine Verteilersteckdose, die über
kein Stromkabel (montiert) verfügt.
• Das Stromkabel darf nicht modifiziert oder verlängert werden.
• Das Gerät sollte an eine dedizierte Stromleitung angeschlossen
werden, die über eine separate Sicherung verfügt.
4
Page 41

DE
• Verwenden Sie keine Steckdosenleiste, die nicht ordnungsgemäß
geerdet ist (tragbar). Wenn Sie eine ordnungsgemäß geerdete
(tragbare) Steckdosenleiste verwenden, verwenden Sie die
Steckdosenleiste mit der Stromleistung der Code-Nennleistung oder
höher und verwenden Sie die Steckdosenleiste nur für das Gerät.
• Stellen Sie das Gerät an einem Aufstellplatz auf, der ein einfaches
Herausziehen des Stromsteckers ermöglicht.
• Achten Sie darauf, dass der Stromstecker nicht nach oben gerichtet
ist und/oder das Gerät sich gegen diesen lehnt.
• Stellen Sie das Gerät bitte auf einem festen und ebenen Fußboden
auf.
• Bitte installieren Sie das Gerät nicht an einer Stelle, an der Dampf
oder Staub entsteht. Bitte installieren Sie das Gerät nicht in einem
Bereich unter freiem Himmel oder einem Bereich, an dem es
Witterungseinflüssen, wie direkter Sonneneinstrahlung, Wind, Regen
oder Temperaturen unterhalb des Gefrierpunktes, ausgesetzt ist.
• Bitte stellen Sie das Gerät nicht in direktem Sonnenlicht auf und
setzen Sie es nicht der Hitze von Heizgeräten wie Öfen oder
Heizkörpern aus.
• Bitte gehen Sie vorsichtig, um die Rückseite des Gerätes beim
Einbau keinen Gefahren auszusetzen.
• Seien Sie bitte vorsichtig und lassen Sie die Gerätetür während des
Ausbaus oder Einbaus nicht fallen.
• Seien Sie bitte vorsichtig, um das Stromkabel während des
Zusammenbaus oder Ausbaus der Gerätetür weder zu kneifen, zu
quetschen oder zu beschädigen.
• Schließen Sie keine Zwischensteckdose oder andere Geräte an den
Netzstecker an.
Betrieb
• Verwenden Sie das Gerät bitte nicht für andere Zwecke (Lagerung
von medizinischen oder experimentellen Materialien, oder für den
Transport), sondern nur für die für den Haushalt vorgesehene
Lagerung von Lebensmitteln.
5
Page 42

DE
• Bitte trennen Sie den Stromstecker bei schweren Gewittern oder
Blitzen oder wenn das Gerät über einen längeren ´Zeitraum nicht
benutzt wird von der Steckdose.
• Berühren Sie nie den Stecker oder die Gerätesteuerung mit feuchten
Händen.
• Biegen Sie das Stromkabel nicht übermäßig und stellen Sie bitte
keine schweren Gegenstände auf den Stromkabel.
• Sollte Wasser in die Elektro-Teile des Gerätes eindringen, trennen
Sie bitte sofort die Stromzufuhr und nehmen Sie Kontakt mit dem
Kundendienst von LG Electronics auf.
• Platzieren Sie keinesfalls Ihre Hände oder metallische Gegenstände
in dem Bereich, der die kalte Luft ausstrahlt, auf Abdeckungen oder
die Wärmeableitung auf der Rückseite.
• Wenden Sie keine übermäßige Kraft oder Stöße auf die Rückseite
des Gerätes an.
• Keine lebenden Tiere, wie etwa Haustiere, in das Gerät legen.
• Seien Sie vorsichtig beim Öffnen und Schließen der Gerätetür, wenn
Kinder in der Nähe sind. Ein Kind kann sich an der Tür stoßen, was
Verletzungen verursachen kann. Erlauben Sie niemandem von den
Türen zu schwingen, da das Gerät kippen und schwere Verletzungen
verursachen könnte.
• Vermeiden Sie die Gefahr, dass Kinder im Inneren des Gerätes
eingeschlossen werden können. Ein Kind, eingeschlossen im Inneren
des Gerätes, kann Erstickungsgefahren ausgesetzt sein.
• Legen oder stellen Sie keine schweren oder zerbrechlichen
Gegenstände, Behälter mit Flüssigkeiten, brennbare Gegenstände
(wie Kerzen, Lampen etc.) oder Heizapparate (wie Kochplatten,
Heizer, etc.) auf das Gerät.
• Sollte ein Gasleck (Isobutan, Propan, Erdgas etc.) vorhanden sein,
berühren Sie weder das Gerät noch den Stromstecker und lüften
Sie den Bereich sofort. Dieses Gerät verwendet ein Kältemittelgas
(Isobutan, R600a). Obwohl nur eine geringe Menge dieses Gases
verwendet wird, kann es sich dennoch entzünden. Gasleckagen
während des Transports, des Einbaus oder des Betriebs des Gerätes
können Brand, Explosion oder Verletzungen verursachen, wenn
Funken entstehen.
6
Page 43

DE
• Es dürfen keine entzündbaren oder brennbaren Stoffe (Ether, Benzin,
Alkohol, Chemikalien, LPG (Abkürzung LPG für engl. Liquefied
Petroleum Gas), brennbare Sprühmittel, Insektenvertilgungsmittel,
Lufterfrischer und Raumdeodorants, Kosmetika etc.) in der Nähe des
Gerätes verwendet oder aufbewahrt werden.
• Ziehen Sie sofort den Stromstecker und nehmen Sie Kontakt mit dem
Kundendienst von LG Electronics auf, wenn Sie anomale Geräusche,
Gerüche oder Rauch an dem Gerät feststellen.
• Bitte füllen Sie die Eismaschine oder den Wassertank nur mit
Trinkwasser.
• Bitte beschädigen Sie nicht den Kühlmittelkreislauf.
• Legen Sie keine elektronischen Geräte (wie zum Beispiel Heizkörper
oder Handys) in das Gerät.
Wartung
• Trennen Sie das Einspeisungskabel vor dem Reinigen des Gerätes
oder dem Austausch der Innenleuchten (wo angebracht).
• Stecken Sie den Stromstecker sicher in die Steckdose, nachdem Sie
die gesamte Feuchtigkeit und den Staub beseitigt haben.
• Schalten Sie das Gerät niemals aus, indem Sie am Stromkabel
ziehen. Bitte nehmen Sie den Stromstecker immer fest in die Hand
und ziehen Sie ihn gerade aus der Steckdose.
• Verwenden Sie zur Reinigung kein Wasser und keine entzündlichen
Substanzen (Zahnpasta, Alkohol, Lösemittel, Benzol, brennbare
Flüssigkeiten, Scheuermittel etc.) im Innenraum oder an der
Außenseite des Geräts.
• Bitte reinigen Sie das Gerät nicht mit Bürsten, Tüchern oder
Schwämmen mit rauer Oberfläche oder aus Metall gefertigten
Gegenstände.
7
Page 44

DE
• Nur qualifizierte Mitarbeiter der Instandsetzungsabteilung des LG
Electronics Kundendienstes dürfen den Ausbau, die Reparatur oder
die Modifizierung des Gerätes vornehmen. Nehmen Sie Kontakt
mit dem Kundendienst von LG Electronics auf, wenn Sie das Gerät
verschieben oder an einem anderen Aufstellungsort aufstellen.
• Verwenden Sie keinen Haartrockner, um die Innenseiten des Gerätes
zu trocknen und stellen Sie keine Kerze in das Gerät, um Gerüche zu
beseitigen.
• Verwenden Sie keine mechanischen Vorrichtungen oder andere
Mittel, um den Abtauvorgang zu beschleunigen.
Entsorgung
• Sollten Sie ein Gerät ausrangieren, entfernen Sie die Türdichtungen,
während Sie die Regale und Behälter an Ort und Stelle lassen und
halten Sie Kinder vom Geräte fern.
• Bitte entsorgen Sie die gesamten Verpackungsmaterialien (wie
zum Beispiel Plastiktüten und Styropor) außerhalb der Reichweite
von Kindern. Die Verpackungsmaterialien können Erstickungen
verursachen.
Technische Sicherheit
• Belüftungsöffnungen im Gehäuse des Haushaltsgeräts oder in der
Einbaukonstruktion frei halten.
• Verwenden Sie keine elektrischen Geräte im Kühlschrank.
• Die im Haushaltsgerät verwendeten Kühlmittel und
Isolationsmaterialien müssen fachgerecht entsorgt werden. Bitte
wenden Sie sich vor deren Entsorgung an einen Servicemitarbeiter
oder einen entsprechend qualifizierten Fachmann.
• Kühlmittelleckage aus den Rohren könnte sich entzünden oder eine
Explosion verursachen.
• Die Kühlmittelmenge, die in Ihrem konkreten Haushaltsgerät
enthalten ist, finden Sie auf dem Typenschild im Inneren des
Haushaltsgeräts.
8
Page 45

• Ein Haushaltsgerät niemals in Betrieb nehmen, wenn Anzeichen von
Beschädigung sichtbar sind. Falls Sie sich nicht sicher sind, setzen
Sie sich mit Ihrem Händler in Verbindung.
• Dieses Gerät ist nur für den Gebrauch im Haushalt oder ähnliche
Anwendungen vorgesehen. Es sollte nicht für kommerzielle oder
Catering Zwecke oder auf einem Boot und im Caravan verwendet
werden.
• Keine explosiven Stoffe, wie etwa Aerosol-Behälter mit einem
brennbaren Treibmittel, in diesem Haushaltsgerät lagern.
Brandgefahr und brennbare Materialien
Dieses Symbol weist auf brennbare Materialien hin, die sich
entzünden und einen Brand verursachen können, wenn
nicht vorsichtig damit umgegangen wird.
• Dieses Gerät enthält einen kleinen Anteil (R600a) Isubutan-
Kältemittel, welches brennbar ist. Beim Transport und Aufstellen des
Haushaltsgeräts muss darauf geachtet werden, dass keine Bauteile
des Kühlkreislaufs beschädigt werden.
DE
• Falls ein Leck festgestellt wird, offene Flammen oder mögliche
Zündquellen vermeiden und den Raum, in dem das Haushaltsgerät
steht, mehrere Minuten lüften. Um die Bildung eines entzündlichen
Gas/Luftgemischs zu vermeiden, falls es zu einem Leck im
Kühlkreislauf des Geräts kommt, sollte die Größe des Raums,
in dem das Haushaltsgerät betrieben wird, der verwendeten
Kühlmittelmenge entsprechen. Der Raum muss für jeweils 8 g
R600a, die in dem Haushaltsgerät enthalten sind, eine Fläche von
1 m² aufweisen.
• Beim Aufstellen des Geräts muss sichergestellt werden, dass das
Netzkabel nicht eingeklemmt oder beschädigt wird.
• Es dürfen keine Verlängerungsleitungen mit Mehrfachsteckdosen
oder Netzgeräte hinter dem Gerät platziert werden.
9
Page 46

DE
Funktion Automatisches Heben
• Diese Funktion Automatisches Heben kann von Kindern ab 8
Jahren benutzt werden sowie von Personen mit eingeschränkten
körperlichen, sensorischen oder geistigen Fähigkeiten oder mit
mangelnder Erfahrung und Kenntnis, wenn sie bei der Verwendung
der Funktion beaufsichtigt werden oder eine Einweisung zur sicheren
Verwendung der Funktion und den damit verbundenen Gefahren
erhalten haben. Die Funktion kann bei Bedarf am Bedienfeld
ausgeschaltet werden.
• Lassen Sie Kinder nicht mit der Schublade spielen oder in den
Innenbehälter der Schublade klettern.
• Verwenden Sie die Funktion Automatisches Heben nicht, während
Sie die hintere Abdeckung der Schublade zusammenklappen.
• Wenn die Schublade geöffnet ist, fassen Sie nicht mit der Hand
in die offenen Bereiche an den Seiten oder an der Rückseite der
Schublade.
• Halten Sie Ihre Füße von der unteren Schublade fern, wenn Sie die
automatische Öffnungsfunktion verwenden.
• Schalten Sie das Gerät aus, bevor Sie das untere Schubladenfach
reinigen.
• Die Hebeeinheit ist schwer, nehmen Sie sie daher mit beiden Händen
heraus.
• Entriegeln Sie nicht den Verriegelungsknopf der Hebeeinheit. Das
Gerät könnte aktiviert, entfaltet und beschädigt werden.
ACHTUNG
Um die Gefahr von leichten Verletzungen an Personen,
Fehlfunktion oder Beschädigung am Produkt oder Eigentum zu
reduzieren, befolgen Sie bei der Verwendung dieses Produkts
grundlegende Vorsichtsmaßnahmen, einschließlich der
folgenden:
10
Page 47

DE
Installation
• Kippen Sie das Gerät nicht, um es während des Transports zu ziehen
oder zu schieben.
• Bitte achten Sie darauf, dass Sie sich beim Bewegen des Geräts
keine Körperteile wie Hände oder Füße einklemmen.
Betrieb
• Sie dürfen die eingefrorenen Lebensmittel oder die metallischen
Teile in dem Gerät nicht mit feuchten Händen berühren. Dies könnte
Frostbeulen verursachen.
• Stellen Sie keine Glasbehälter, Flaschen oder Dosen (insbesondere
solche, die kohlensäurehaltige Getränke enthalten) in Regale, Fächer
oder Eisbehälter des Gefrierschranks, sodass sie Temperaturen
unterhalb des Gefrierpunktes ausgesetzt wären.
• Das Hartglas auf der Vorderseite der Tür oder auf den Regalen kann
durch Aufprall beschädigt werden. Sollte es zerbrechen, berühren Sie
es nicht mit den Händen, da dies zu Verletzungen führen kann.
• Bitte nicht mit dem Körpergewicht an die Tür hängen und nicht auf
die Tür oder Ablage steigen.
• Lagern Sie keine übermäßige Anzahl von Wasserflaschen oder
Behältern für Beilagen in den Türbehältern.
• Vermeiden Sie, dass Tiere an dem Stromkabel oder den
Wasserschläuchen knabbern.
• Bitte wenden Sie keine übermäßige Kraft beim Öffnen und Schließen
der Gerätetür an.
• Falls das Scharnier der Gerätetür beschädigt ist oder nicht
ordnungsgemäß funktioniert, benutzen Sie das Gerät nicht mehr
und setzen Sie sich mit dem Servicecenter von LG Electronics in
Verbindung.
• Reinigen Sie keine Glasregale oder Abdeckungen mit warmem
Wasser, wenn diese kalt sind. Sie können zerbrechen, wenn sie
plötzlichen Temperaturveränderungen ausgesetzt werden.
• Essen Sie bitte niemals eingefrorene Lebensmittel unmittelbar
nachdem diese aus dem Gefrierfach genommen wurden.
11
Page 48

DE
• Achten Sie bitte darauf, dass Sie sich nicht die Hände oder Füße
beim Öffnen oder Schließen der Tür oder der Door in Door des
Geräts einklemmen.
• Öffnen Sie die Tür des Geräts nicht, während die Door-in-Door offen
ist und umgekehrt. Die Door-in-Door kann von der Ecke der Tür
getroffen und beschädigt werden.
Wartung
• Bitte setzen Sie die Regale nicht umgedreht ein. Die Regale können
fallen.
• Um Eis aus dem Gerät zu entfernen, nehmen Sie bitte Kontakt mit
dem Kundendienst von LG Electronics auf.
• Entfernen Sie das Eis aus dem Eisbehälter im Gefrierfach während
eines längeren Stromausfalls.
SCHONUNG DER UMWELT
Entsorgung Ihrer Altgeräte
12
• Das durchgestrichene Symbol eines fahrbaren Abfallbehälters weist darauf hin, dass
Elektro- und Elektronik-Produkte (WEEE) getrennt vom Hausmüll entsorgt werden
müssen.
• Alte elektrische Produkte können gefährliche Substanzen enthalten, die eine korrekte
Entsorgung dieser Altgeräte erforderlich machen, um schädliche Auswirkungen
auf die Umwelt und die menschliche Gesundheit zu vermeiden. Ihre ausgedienten
Geräte können wiederverwendbare Teile enthalten, mit denen möglicherweise andere
Produkte repariert werden können, aber auch sonstige wertvolle Materialien enthalten,
die zur Schonung knapper Ressourcen recycelt werden können.
• Sie können Ihr Gerät entweder in den Laden zurückbringen, in dem Sie das Produkt
ursprünglich erworben haben oder Sie kontaktieren Ihre Gemeindeabfallstelle
für Informationen über die nächstgelegene autorisierte WEEE Sammelstelle. Die
aktuellsten Informationen für Ihr Land finden Sie unter www.lg.com/global/recycling.
Page 49

AUFSTELLEN
DE
Abmessungen und Abstände
• Steht das Gerät zu nah an benachbarten
Objekten, kann das die Gefrierleistung
herabsetzen und die Kosten für den
Stromverbrauch erhöhen. Achten Sie beim
Aufstellen darauf, dass der Abstand zu
benachbarten Wänden über 50 mm beträgt.
A
B
D
Typ Abmessungen
A 695 mm
B 1 753 mm
C 1 793 mm
D 735 mm
E 23 mm
F 711 mm
G 1 300 mm
H 1 020 mm
I 700 mm
E
G F
C
I
H
Umgebungstemperatur
• Abhängig von der Klimazone ist das Gerät
so konzipiert, dass es in einem begrenzten
Umgebungstemperaturbereich betrieben wird.
• Die interne Temperatur wird beeinflusst
durch den Aufstellort des Geräts, die
Umgebungstemperatur, die Häufigkeit, in der die
Tür geöffnet wird, usw.
• Auf dem Typenschild ist die Klimaklasse
angegeben.
Klimazone
SN (Erweitert
Gemäßigt)
N (Gemäßigt) +16 - +32
ST
(Subtropisch)
T (Tropisch) +16 - +43 / +10 - +43*
*Australien, Indien, Kenia
HINWEIS
Die Geräteeinstufungen von SN bis T gelten für
Umgebungstemperaturen im Bereich von 10 ° bis
43 °C.
Umgebungstemperaturbereich
°C
+10 - +32
+16 - +38
HINWEIS
• Sie können feststellen, welche Art von Gerät
es ist, indem Sie auf das Etikett im Inneren des
Kühlschranks schauen.
13
Page 50

DE
Nivellierung
Das Gerät hat zwei vordere Nivellierungsfüße.
Stellen Sie diese Füße ein, um die Neigung von
vorne nach hinten oder von Seite zu Seite zu
ändern. Wenn das Gerät instabil erscheint oder
sich die Tür nicht leicht schließen lässt, stellen Sie
die Neigung des Geräts anhand der folgenden
Anweisungen ein:
Öffnen Sie die untere Schublade und
1
entfernen Sie die Abdeckung.
Drehen Sie den Nivellierungsfuß nach links,
2
um diese Seite des Geräts anzuheben,
oder nach rechts zum Absenken. Es kann
einige Umdrehungen des Nivellierungsfußes
in Anspruch nehmen, bis die Neigung des
Geräts eingestellt ist.
Öffnen Sie die Tür und die Schubladen und
3
überzeugen Sie sich, dass sie sich leicht
schließen lassen. Wenn sie sich nicht leicht
schließen lassen, neigen Sie das Gerät
etwas weiter nach hinten, indem Sie beide
Nivellierungsfüße nach links drehen. Es
können noch einige Umdrehungen nötig
sein. Achten Sie dabei darauf, dass Sie
beide Nivellierungsfüße auf die gleiche Höhe
einstellen.
Wenn das Gerät waagerecht steht, öffnen
4
Sie die untere Schublade und bringen Sie die
Abdeckung wieder an.
Einschalten der Stromversorgung
Anschluss des Geräts
Stecken Sie nach der Installation des Geräts den
Netzstecker in die Steckdose.
HINWEIS
• Warten Sie nach dem Anschließen des
Netzkabels (bzw. des Steckers) an der
Steckdose 3 bis 4 Stunden, bevor Sie
Lebensmittel in das Gerät geben. Wenn Sie
Lebensmittel hineinlegen, bevor das Gerät
vollständig auf die richtige Temperatur herunter
gekühlt ist, können diese verderben.
Verstellen des Geräts an einen anderen Ort
Vorbereitung des Transports
Nehmen Sie alle Lebensmittel aus dem Gerät.
1
Ziehen Sie den Netzstecker und befestigen
2
Sie ihn an der Halterung an der Rück- oder
Oberseite des Geräts.
Befestigen Sie bitte alle Teile wie Fächer
3
und den Türgriff mit Klebeband, damit sie
beim Transport des Geräts nicht beschädigt
werden.
Bewegen Sie das Gerät beim Transport
4
vorsichtig und mindestens durch zwei
Personen. Bitte halten Sie das Gerät beim
Transport über längere Strecken aufrecht.
Stecken Sie nach der Installation des Geräts
5
den Netzstecker in eine Steckdose und
schalten Sie es ein.
14
Page 51

BETRIEB
DE
Vor der Verwendung
Bedienungshinweise
• Die Anwender sollten bedenken, dass sich
Frost bilden kann, wenn die Tür nicht komplett
geschlossen ist oder wenn während des
Sommers hohe Feuchtigkeit herrscht.
• Stellen Sie sicher, dass ausreichend Platz
zwischen den auf den Regalen gelagerten
Lebensmitteln oder den Türbehältern vorhanden
ist, sodass die Tür geschlossen werden kann.
• Das Öffnen der Tür lässt warme Luft in das
Gerät eindringen und kann einen internen
Temperaturanstieg verursachen.
• Wenn Sie das Gerät für längere Zeit
ausgeschaltet lassen, nehmen Sie bitte alle
Lebensmittel heraus und ziehen Sie den
Netzstecker. Reinigen Sie das Innere und
lassen Sie die Tür angelehnt, damit sich kein
Schimmel im Gerät bilden kann.
Tür-Offen-Alarm
Der Alarm ertönt 3-mal in 30-Sekunden-Intervallen,
wenn die Tür für 1 Minute offen gelassen oder
nicht komplett geschlossen wurde.
HINWEIS
• Setzen sie sich bitte mit dem
Kundeninformationszentrum von LG Electronics
in Verbindung, wenn der Alarmton nach 30
Sekunden immer noch ertönt, obwohl alle Türen
geschlossen wurden.
Fehlererkennung
Das Gerät kann Probleme während des Betriebs
automatisch erkennen.
HINWEIS
• Wenn ein Problem erkannt wird, funktioniert
das Gerät möglicherweise nicht und es wird ein
Fehlercode angezeigt, auch wenn eine beliebige
Taste gedrückt wird.
• Sollte ein Fehler angezeigt werden, stellen
Sie den Strom nicht ab und nehmen Sie
sofort Kontakt mit dem Kundendienst von
LG Electronics auf, um den Fehlercode zu
melden. Wenn Sie den Strom abschalten,
könnten die Techniker unseres Kundendienstes
Schwierigkeiten haben, den Fehler ausfindig zu
machen.
Vorschläge zum Energiesparen
• Stellen Sie sicher, dass ausreichend Platz
zwischen den Lebensmitteln vorhanden ist. Dies
ermöglicht es der kalten Luft gleichmäßig zu
zirkulieren und verringert die Stromrechnungen.
• Lagern Sie heiße Lebensmittel nur nachdem
diese abgekühlt sind, um Tau oder Frost zu
vermeiden.
• Wenn Sie Lebensmittel im Gefrierbereich
lagern, stellen Sie die Temperatur des
Gefrierbereichs niedriger als die Temperatur ein,
welche auf dem Lebensmittel angegeben ist.
• Stellen Sie die Temperatur des Geräts nicht
kälter ein als notwendig.
• Bitte stellen Sie keine Lebensmittel in der Nähe
des Temperatursensors des Kühlfachs ab.
Halten Sie einen Abstand von mindestens 3 cm
von dem Sensor ein.
• Bitte beachten Sie, dass ein Temperaturanstieg
nach der Entfrostung in einem zulässigen
Bereich gemäß der Gerätespezifikationen
erlaubt ist. Sollten Sie einen verringerten
Einfluss auf die eingelagerten Lebensmittel
wünschen, versiegeln oder verpacken Sie die
eingelagerten Lebensmittel in mehreren Lagen.
• Die Abtauautomatik des Geräts sorgt dafür,
dass sich unter normalen Betriebsbedingungen
im Ablagefach kein Eis bildet.
Effektive Lagerung von
Lebensmitteln
• Lagern Sie gefrorene oder gekühlte
Lebensmittel in geschlossenen Behältern.
• Überprüfen Sie die Haltbarkeitsdaten und
das Etikett (Lageranleitungen), bevor Sie die
Lebensmittel in dem Gerät lagern.
• Lagern Sie keine Lebensmittel über einen
langen Zeitraum (mehr als 4 Wochen), wenn
diese bei niedrigen Temperaturen leicht
verderben.
15
Page 52

DE
• Bitte legen Sie die gekühlten oder gefrorenen
Lebensmittel unmittelbar nach dem Einkauf in
den Kühlschrank oder Gefrierschrank.
• Lagern Sie Frischfleisch und frischen Fisch in
geeigneten Behältern im Gerät, so dass es nicht
mit anderen Lebensmitteln in Kontakt kommt
oder darauf tropfen kann.
• Gekühlte Lebensmittel und andere
Nahrungsmittel können auf der Gemüsebox
gelagert werden.
• Vermeiden Sie das erneute Einfrieren von
Lebensmitteln, die schon gänzlich aufgetaut
waren. Das Einfrieren von Lebensmitteln,
die gänzlich aufgetaut waren, beeinträchtigt
Geschmack und Nährwert.
• Überfüllen Sie das Gerät nicht. Die kalte Luft
kann nicht einwandfrei zirkulieren, wenn das
Gerät überfüllt ist.
• Lassen Sie heiße Lebensmittel vor dem
Einlagern abkühlen. Wenn zu viel heiße
Lebensmittel eingelagert werden, kann die
Temperatur des Gerätes ansteigen und sich
negativ auf andere eingelagerte Lebensmittel
auswirken.
• Eine übertrieben niedrige Temperatur könnte
zum Gefrieren der Lebensmittel führen. Stellen
Sie die Temperatur nicht niedriger ein, als es
für die korrekte Lagerung der Lebensmittel
erforderlich ist.
• Verfügt Ihr Gerät über ein Kaltlagerfach, dann
bewahren Sie dort bitte kein Gemüse und keine
Früchte mit höherem Feuchtigkeitsgehalt auf,
da sie aufgrund der niedrigeren Temperatur
einfrieren könnten.
• Fragen Sie bei einem Stromausfall Ihren
Stromlieferanten, wie lange es dauert, bis die
Stromversorgung wiederhergestellt ist.
− Vermeiden Sie, die Tür zu öffnen, so lange
kein Strom anliegt.
− Überprüfen Sie den Zustand der
Lebensmittel, wenn die Stromversorgung
wiederhergestellt ist.
• Express Freeze muss für 2 Stunden
eingeschaltet sein, bevor frische Lebensmittel
im Gefrierbereich gelagert werden.
• Um eine bessere Luftzirkulation zu erreichen,
installieren Sie alle inneren Teile wie Behälter,
Fächer und Regale.
Einfrieren der maximalen Menge
an Lebensmitteln
Wenn große Mengen an Lebensmitteln gelagert
werden sollen, sollten der Innenbehälter und
die automatische Hebeeinheit aus der unteren
Schublade entnommen werden.
ACHTUNG
• Um die Schubladen zu entnehmen, nehmen Sie
zuerst die Lebensmittel aus den Schubladen
und ziehen Sie dann die Schubladen vorsichtig
heraus. Andernfalls können Verletzungen oder
Beschädigungen auftreten.
Maximale Gefrierkapazität
• Express Freeze– Diese Funktion lässt
den Gefrierbereich auf seine maximale
Gefrierkapazität abkühlen. Dies dauert
normalerweise bis zu 24 Stunden und wird
automatisch abgeschaltet.
16
Page 53

Produkteigenschaften
Das Aussehen der Komponenten kann sich von Modell zu Modell unterscheiden.
Außenseite
DE
Sprachassistent-Gerät
a
In der Tür ist ein Sprachassistent-Gerät eingebaut.
InstaView Door in Door
b
Die elegante, getönte Glasscheibe wird durch zweimaliges Klopfen transparent, sodass Sie in das
Schnellzugriff-Fach sehen können, ohne die Tür öffnen zu müssen.
Automatische Türöffnungssensoren
c
Stellen Sie sich nah genug an die Vorderseite des Geräts, und es wird auf dem Boden der Schriftzug
DOOR OPEN angezeigt. Gehen Sie mit Ihren Fuß über die Wörter auf dem Boden, um die Tür
automatisch zu öffnen.
Bedienfeld
d
Anzeige der Temperaturregler für Kühl- und Gefrierschrank.
Unterer Schubladenknopf
e
Wenn der Knopf gedrückt wird, öffnet sich die untere Schublade automatisch und der Innenbehälter
wird für leichten Zugriff angehoben.
17
Page 54

Innenseite
Frischefilter
a
Der Frischefilter reduziert Geruchsbildung im Kühlschrankbereich.
DE
Abstellfläche
b
Hier werden die gekühlten Lebensmittel oder andere Artikel gelagert. Lagern Sie Lebensmittel mit
einem höheren Feuchtigkeitsgehalt vorne auf der Abstellfläche. Die Höhe der Abstellfläche kann
angepasst werden, indem Sie sie in eine andere Einkerbung mit einer unterschiedlichen Höhe
einsetzen.
Gemüseschublade
c
Hier wird Obst und Gemüse gelagert, um es so lange wie möglich frisch zu halten.
CustomChill-Fach
d
Dieses Kühlfach dient zur Lagerung von Fleisch, Fisch und Gemüse.
Durabase-Teiler
e
Bietet Platz für große Lebensmittel.
18
Page 55

Schnellgefrierzone
f
Wenn Sie die mittlere und untere Schublade auf den Gefriermodus einstellen, wird in der
Schnellgefrierzone die eingestellte Temperatur am schnellsten erreicht.
Door in Door-Bereich
g
Hier werden Lebensmittel aufbewahrt, die häufig entnommen werden wie z. B. Getränke und
Snacks.
Mittlere / Untere Schublade
h
Die beiden Schubladen können entweder auf Kühl- oder Gefriermodus eingestellt werden. Beide
Schubladen müssen den gleichen Modus verwenden.
• Um frische Lebensmittel aufzubewahren, drücken Sie mindestens 1 Sekunde lang auf die Taste
Fridge Drawer.
• Um Tiefkühlprodukte aufzubewahren, drücken Sie mindestens 1 Sekunde lang auf die Taste
Freezer Drawer.
ACHTUNG
• Leeren Sie beide Schubladen, bevor Sie den Modus von Gefrier- auf Kühlmodus oder umgekehrt
ändern.
• Wenn der Modus geändert wird, während sich Lebensmittel in der Schublade befinden, können
die Lebensmittel verderben.
Innenbehälter
i
Hebt sich während des Automatischen Hebens.
DE
19
Page 56

Bedienfeld
Das Bedienfeld kann sich von Gerät zu Gerät unterscheiden.
Bedienfeldfunktionen
DE
Voice Assistant
a
Zur Änderung der Einstellungen des
Sprachassistenten. Mit dieser Taste können
Sie den Sprachassistenten aktivieren/
deaktivieren. Um die SprachassistentFunktion verwenden zu können, muss das
Gerät mit der LG ThinQ-App verbunden
sein. Weitere Informationen zur Verbindung
mit der App finden Sie unter den
INTELLIGENTE FUNKTIONEN.
Wi-Fi
b
Diese Taste ermöglicht es dem
Gerät, eine Verbindung mit dem
Wi-Fi-Heimnetzwerk herzustellen. Für
Informationen zur Erstkonfiguration der
LG ThinQ-Anwendung beachten Sie bitte
die INTELLIGENTE FUNKTIONEN.
Auto Door
c
Die Tür öffnet sich automatisch,
wenn Sie Ihren Fuß in die Nähe des
Bewegungssensors an der Unterseite der
Tür bringen. Das ist vor allem praktisch,
wenn Sie beide Hände voll haben und
die Tür öffnen müssen. Sie können
die automatische Türöffnungsfunktion
einstellen, indem Sie die Taste wiederholt
drücken, um zwischen EIN, Ton aus und
AUS hin- und herschalten.
Verwenden der automatischen
Türfunktion
Wenn die automatische
1
Türöffnungsfunktion aktiviert ist, dann
wird auf dem Boden in der Nähe des
Bewegungssensors ein Schriftzug
angezeigt.
Bewegen Sie einen Fuß an dem
2
Bewegungssensor vorbei und treten
Sie auf die angezeigte Schrift. Die Tür
öffnet sich. Wenn sich die Tür weniger
als ca. 20 Grad öffnet und nicht weiter,
dann wird sie automatisch nach 3
Sekunden wieder geschlossen.
20
HINWEIS
• Bringen Sie Ihren Fuß nah genug an den
Sensor, so dass die Schrift auf dem Fuß
erscheint und nicht nur auf den Zehen.
Page 57

ACHTUNG
Sie können die automatische
Türöffnungsfunktion deaktivieren, wenn
Sie kleine Kinder oder Personen mit
eingeschränkten körperlichen, sensorischen
oder geistigen Fähigkeiten im Haushalt
haben. Sie könnten verletzt werden, wenn
sich die Tür unerwartet öffnet, während sie
sich in der Nähe befinden.
HINWEIS
• Der angezeigte Text ist möglicherweise
auf einigen Bodenbelägen nicht lesbar.
Dies beeinträchtigt jedoch nicht die
Funktionalität der automatischen
Türöffnungsfunktion.
• Sollte der Fußbodenbelag stark
reflektierend sein (Metall, Glasfliesen),
kann es zu einer Fehlfunktion des
Bewegungssensors kommen und die
automatische Türöffnungsfunktion
funktioniert eventuell nicht
ordnungsgemäß.
• Reflektierende Gegenstände, die vor
den Bewegungsmelder gesetzt werden,
können dazu führen, dass die Schrift
angezeigt wird. Doch wenn keine
Bewegung erkannt wird, verschwindet
die Schrift wieder.
• Wenn ein Haustier an dem Sensor
vorbeiläuft, während eine Person vor
dem Gerät steht, kann die automatische
Türöffnungsfunktion aktiviert werden.
Fridge
d
Drücken Sie diese Taste wiederholt, um
eine gewünschte Temperatur zwischen 1 °C
und 7 °C auszuwählen.
• Die ursprüngliche Kühltemperatur beträgt
3 °C.
Custom Chill
e
Wählen Sie eine Temperatureinstellung für
das CustomChill-Fach, indem Sie die Taste
Custom Chill mehrfach betätigen, um
zwischen Fleisch, Aufschnitt oder Obst und
Gemüse zu wählen.
Die Temperatureinstellungen werden in
folgender Reihenfolge kühler: Obst und
Gemüse → Aufschnitt → Fleisch.
• Fleisch (am kältesten): Fleisch oder
Getränke
• Aufschnitt (kälter): Tischfertige Speisen
• Obst und Gemüse (kalt): Obst oder
Gemüse
Lock
f
Die Sperrfunktion deaktiviert alle anderen
Tasten auf dem Bedienfeld.
• Wenn das Gerät zum ersten Mal mit
Strom versorgt wird, ist die Sperrfunktion
deaktiviert.
• Um die Bedienfeldtasten zu sperren,
halten Sie die Taste Lock gedrückt,
bis das Symbol angezeigt wird und die
Funktion aktiviert ist.
• Halten Sie zum Ausschalten der Funktion
die Taste Lock etwa drei Sekunden lang
gedrückt.
Express Freeze
g
Mit dieser Funktion kann eine große Menge
an Eis oder Tiefkühlkost schnell eingefroren
werden.
• Die Funktion wird mit jedem Tastendruck
aktiviert bzw. deaktiviert.
• Diese Funktion wird nach Ablauf einer
bestimmten Zeit automatisch beendet.
DE
21
Page 58

DE
Auto Lift
h
Wenn Auto Lift aktiviert ist, wird durch
Drücken des unteren Schubladenknopfs
die Schublade automatisch geöffnet und
der Innenbehälter für leichten Zugriff
angehoben.
Drücken Sie den unteren Schubladenknopf
erneut, um den Innenbehälter automatisch
abzusenken und die Schublade zu
schließen.
Auto Lift einstellen
Drücken Sie wiederholt auf Auto Lift, um
zwischen Off (AUS) ~ Sound On (Ton
Ein) ~ Sound Off (Ton Aus) ~ Auto
Drawer Opening Only (Nur automatische
Schubladenöffnung) zu wechseln.
Die Einstellung wird durch das Symbol auf
dem Bedienfeld angezeigt.
− Aus: Die Schublade muss manuell
geöffnet werden und die Funktion
Automatisches Heben ist deaktiviert.
− Ton Ein: Es ist ein Ton zu vernehmen,
die Schublade wird automatisch
geöffnet und der Innenbehälter wird
angehoben
− Ton aus: Die Schublade öffnet sich
automatisch ohne Ton und der
Innenbehälter wird angehoben
− Nur automatische Schubladenöffnung:
Die Schublade öffnet sich automatisch
ohne Ton, aber der Innenbehälter wird
nicht angehoben.
Verwendung von Automatisches Heben
Drücken Sie die Taste Auto Lift, um
1
die Funktion Automatisches Heben
einzuschalten.
Drücken Sie den unteren
2
Schubladenknopf b. Die untere
Schublade öffnet sich automatisch und
der Innenbehälter wird angehoben.
• Wenn der automatische
Öffnungssensor a eine Bewegung
vor dem Gerät erkennt, leuchtet
der untere Schubladenknopf b auf.
Wenn die Taste nicht aufleuchtet,
gehen Sie näher an das Gerät heran,
um den Sensor auszulösen.
Drücken Sie den unteren
3
Schubladenknopf b, um den
Innenbehälter automatisch abzusenken
und die Schublade zu schließen.
HINWEIS
• Wenn die Funktion Automatisches Heben
im Bedienfeld ausgeschaltet ist:
− Wenn eine Person vor dem Gerät
steht, wird das Licht rund um den
unteren Schubladenknopf nicht
eingeschaltet.
− Wenn der untere Schubladenknopf
gedrückt wird, blinkt das Licht dreimal.
22
Page 59

DE
• Wenn die Funktion Automatisches Heben
im Bedienfeld eingeschaltet ist:
− Wenn durch Drücken des unteren
Schubladenknopfs die untere
Schublade nicht geschlossen wird,
öffnen Sie die mittlere Schublade oder
schließen Sie die untere Schublade
per Hand.
− Wenn durch Drücken des unteren
Schubladenknopfs die untere
Schublade nicht geöffnet wird, wird
durch Öffnen der Schublade per Hand
der Innenbehälter angehoben.
− Die Funktion Automatisches Heben
funktioniert nicht, wenn die mittlere
Schublade geöffnet ist.
Freezer Drawer
i
Drücken Sie diese Taste wiederholt, um
eine gewünschte Temperatur zwischen -23
°C und -15 °C auszuwählen.
• Die ursprüngliche Gefriertemperatur
beträgt -18 °C.
Einstellen der Schubladen auf den
Gefriermodus
Um die Schubladen auf den Gefriermodus
einzustellen, halten Sie die Taste
Freezer Drawer ca. eine Sekunde lang
gedrückt.
Air Filter
k
Ersetzen Sie den Luftfilter, wenn das
Symbol aufleuchtet. Halten Sie nach dem
Ersetzen des Luftfilters die Taste Air Filter
drei Sekunden lang gedrückt, um die
Symbolleuchte auszuschalten. Ersetzen Sie
den Luftfilter etwa alle sechs Monate.
Fridge Drawer
j
Drücken Sie diese Taste wiederholt, um
eine gewünschte Temperatur zwischen 1 °C
und 7 °C auszuwählen.
• Die ursprüngliche Kühltemperatur beträgt
3 °C.
Einstellen der Schubladen auf den
Kühlmodus
Um die Schubladen auf den Kühlmodus
einzustellen, halten Sie die Taste
Fridge Drawer ca. eine Sekunde lang
gedrückt.
HINWEIS
• Die angezeigte Temperatur ist die
Zieltemperatur und nicht die tatsächliche
Temperatur des Geräts. Die tatsächliche
Temperatur hängt von den im Gerät
befindlichen Lebensmitteln ab.
23
Page 60

DE
InstaView Door in Door
Die elegante, getönte Glasscheibe wird durch
zweimaliges Klopfen transparent, sodass Sie in
den Kühlschrank sehen können, ohne die Tür
öffnen zu müssen.
Klopfen Sie zweimal auf das Glas, um das
1
LED-Licht in der Tür zu aktivieren oder zu
deaktivieren.
Door in Door
Die Verwendung des beweglichen
Korbs
Durch das Anpassen des beweglichen Korbes
können größere Lebensmittel bequem verstaut
werden.
Um den beweglichen Korb anzuheben, halten
1
Sie beide Enden den Korbs in der Mitte und
schieben den Korb nach oben, bis er einrastet.
Um den beweglichen Korb zu senken, drücken
2
Sie nach oben, um die Hebel an der Seite des
Korbes zu lösen, und senken Sie den Korb ab,
bis er einrastet.
Das LED-Licht schaltet sich automatisch nach
2
10 Sekunden ab.
HINWEIS
• Nach dem Schließen der Tür ist die Funktion
InstaView Door-in-Door 2 Sekunden lang
deaktiviert.
• Klopfen Sie in die Glasmitte. Klopfen am Rand
des Glases aktiviert die InstaView Door in DoorFunktion nicht ordnungsgemäß.
• Klopfen Sie hart genug, sodass ein Klopfen zu
hören ist.
• Die InstaView Door-in-Door Funktion kann sich
selbst aktivieren, wenn in der Nähe des Geräts
ein lautes Geräusch auftritt.
• Reinigen Sie die Glastür mit einem trockenen
Tuch. Um hartnäckige Flecken zu entfernen,
befeuchten Sie ein sauberes Tuch leicht mit
lauwarmem Wasser oder einem Glasreiniger.
Sprühen Sie keinen Glasreiniger direkt auf die
Glastür.
24
ACHTUNG
• Um Verletzungen zu vermeiden und den Korb
oder seinen Inhalt nicht zu beschädigen, leeren
Sie den Korb, bevor Sie ihn nach oben oder
unten bewegen.
Herausnehmen/Wiedereinsetzen
des oberen Korbs
Öffnen Sie die Kühlschranktür.
1
Page 61

Klopfen Sie vorsichtig mit der Hand auf den
2
Boden des Korbs.
Heben Sie beide Enden des Korbs leicht an
3
und ziehen Sie ihn zum Abnehmen nach vorn.
Richten Sie den Korb zum Wiedereinsetzen
4
auf die linken und rechten Einkerbungen aus
und senken Sie ihn ab.
Abstellfläche
Herausnehmen/Wiedereinsetzen
der Abstellfläche
Heben Sie zum Herausnehmen zuerst die
1
Vorderseite des Regals an, um die Haken
des Regals zu lösen und heben Sie dann das
Regal hinten an.
Zum Einsetzen kippen Sie die Vorderseite
2
des Regals nach oben und führen Sie die
Regalhaken in der gewünschten Höhe in die
Löcher ein.
DE
Klopfen Sie vorsichtig oben auf beide Seiten
5
des Korbs.
• Wenn Sie ein Klicken hören, ist er korrekt
eingesetzt.
Reinigung des beweglichen und
des unteren Korbs
Öffnen Sie die Kühlschranktür.
1
Reinigen Sie die Körbe mit einem weichen
2
Tuch.
HINWEIS
• Fremdkörper und Schmutz zwischen der Ablage
und der Innenwand können das Einschalten der
Ablagenbeleuchtung verhindern.
Fridge Drawer (Kühlschublade)
Herausnehmen/Wiedereinsetzen
der Schublade
Nehmen Sie den Inhalt aus der Schublade
1
heraus. Halten Sie den Griff der
Gemüseschublade fest und ziehen Sie sie
vorsichtig heraus.
25
Page 62

DE
Halten Sie beide Hebel gedrückt, heben Sie
2
die Schubladenauflage leicht an und nehmen
Sie sie von den Schienen.
Setzen Sie die Schubladenstütze richtig auf
3
die Führungsschiene und drücken Sie sie
herunter, bis Sie das Einrasten hören.
Die Temperatureinstellungen werden in folgender
Reihenfolge kühler: Obst und Gemüse →
Aufschnitt → Fleisch.
• Fleisch (am kältesten): Fleisch oder Getränke
• Aufschnitt (kälter): Tischfertige Speisen
• Obst und Gemüse (kalt): Obst oder Gemüse
Herausnehmen/Wiedereinsetzen
des Fachs
Nehmen Sie den Inhalt aus dem Fach heraus.
1
Halten Sie den Griff des Fachs fest und ziehen
Sie es vorsichtig heraus.
Halten Sie beide Hebel gedrückt, heben Sie
2
die Schubladenauflage leicht an und nehmen
Sie sie von den Schienen.
Zum Wiedereinsetzen kippen Sie die
4
Vorderseite leicht nach oben, setzen die
Gemüseschublade in den Rahmen ein und
schieben sie nach hinten.
CustomChill-Fach
Nutzung des CustomChill-Fachs
Wählen Sie eine Temperatureinstellung für
das CustomChill-Fach, indem Sie die Taste
Custom Chill mehrfach betätigen, um zwischen
Fleisch, Aufschnitt oder Obst und Gemüse zu
wählen.
26
Setzen Sie die Schubladenstütze richtig auf
3
die Führungsschiene und drücken Sie sie
herunter, bis Sie das Einrasten hören.
Page 63

Zum Wiedereinsetzen kippen Sie die Vorderseite
4
leicht nach oben, setzen das Fach in den
Rahmen ein und schieben es nach hinten.
Automatische Hebeeinheit
Ausbau der Automatischen Hebeeinheit
Sie können die Hebeeinheit aus der unteren
Schublade ausbauen, um den Stauraum zu
vergrößern oder um sie zu reinigen.
Ziehen Sie den Netzstecker des Geräts oder
1
trennen Sie das Gerät anderweitig von der
Stromversorgung.
Öffnen Sie die untere Schublade, greifen Sie
2
den Innenbehälter mit beiden Händen und
ziehen Sie ihn heraus.
WARNUNG
• Die Hebeeinheit ist schwer, nehmen Sie sie
daher mit beiden Händen heraus.
Führen Sie die Fingerspitzen beider Hände in
5
der Mitte unter die Abdeckung und ziehen Sie
die Abdeckung vorsichtig nach vorn.
ACHTUNG
• Ziehen Sie die Abdeckung vorsichtig, um sie
nicht zu beschädigen.
Falten Sie die Rückseite der Abdeckung
6
nach unten und drücken Sie die gefaltete
Abdeckung leicht nach hinten.
DE
Die Hebeeinheit befindet sich am Boden der
3
Schublade. Greifen Sie die Innenkante der
Einheit mit beiden Händen und ziehen Sie sie
nach oben.
Greifen Sie die Hebeeinheit mit beiden
4
Händen an der Oberseite und ziehen Sie sie
aus der Schublade.
Setzen Sie die mitgelieferte Abdeckung der
7
Öffnung in die Nut am Boden der Schublade
ein.
27
Page 64

Wiedereinbau der Automatischen
Hebeeinheit
Entfernen Sie die Abdeckung der Öffnung vom
1
Boden der Schublade.
Heben Sie den hinteren Teil der gefalteten
2
Abdeckung an und legen Sie ihn auf die
Führung a an der Rückseite der Schublade.
Heben Sie die Hebeeinheit mit beiden Händen
5
an.
Setzen Sie die Scharniere der Hebeeinheit in
6
die Schlitze an der Vorderseite der Schublade
ein.
DE
Halten Sie die Mitte der Abdeckung und heben
3
Sie sie leicht in die Nut.
Vergewissern Sie sich, dass die Scharniere
4
der Hebeeinheit mit den Schlitzen in der
Schublade ausgerichtet sind.
28
Senken Sie die Einheit ab und bewegen Sie
7
sie vor und zurück, um sicherzustellen, dass
sie eingerastet ist.
Setzen Sie den Innenbehälter mit beiden
8
Händen wieder in die Schublade ein.
Stecken Sie den Netzstecker in die Steckdose
9
oder schließen Sie das Gerät anderweitig
wieder an die Stromversorgung an.
Page 65

INTELLIGENTE FUNKTIONEN
Verwendung der LG ThinQApp
Mithilfe der LG ThinQ -App können Sie über ein
Smartphone mit dem Gerät kommunizieren.
Die Funktionen der LG ThinQAnwendung
Kommunizieren Sie mit dem Gerät von einem
Smartphone aus, über das Sie die komfortablen
intelligenten Funktionen verwenden können.
Smart Diagnosis™
Wenn bei der Verwendung des Geräts ein
Problem auftritt, kann Ihnen diese intelligente
Diagnosefunktion helfen, das Problem zu
diagnostizieren.
2
3
DE
Schalten Sie das Mobile Netz oder die
Mobilen Daten auf Ihrem Smartphone aus.
Verbinden Sie Ihr Smartphone mit dem Router.
Einstellungen
Hier können verschiedene Optionen auf dem
Gerät oder in der App eingestellt werden.
HINWEIS
• Wenn Sie Ihren drahtlosen Router,
Internetanbieter oder Ihr Passwort ändern,
löschen Sie das registrierte Gerät aus der
LG ThinQ-Anwendung und registrieren Sie es
erneut.
• Um die Geräte Funktionalität zu verbessern,
kann die Anwendung geändert werden ohne
den Nutzer zu benachrichtigen.
• Funktionen können sich je nach Modell
unterscheiden.
Vor der Verwendung von LG
ThinQ
Überprüfen Sie den Abstand vom Gerät zum
1
kabellosen Router (WLAN-Netzwerk).
• Wenn der Abstand zwischen dem Gerät und
dem WLAN-Router zu groß ist, kann die
Signalstärke schwach sein. In diesem Fall
dauert die Registrierung sehr lange oder die
Installation kann fehlschlagen.
HINWEIS
• Um die WLAN-Verbindung zu überprüfen,
überprüfen Sie, ob das Wi-Fi-Symbol f auf
dem Bedienfeld leuchtet.
• Das Gerät unterstützt nur 2,4 GHz
WLAN-Netzwerke. Kontaktieren Sie Ihren
Internetanbieter oder sehen Sie im Handbuch
Ihres kabellosen Routers nach, um Ihre
Netzwerkfrequenz in Erfahrung zu bringen.
• LG ThinQ ist für keine Netzwerkbedingungen,
Fehler oder Störungen/ Fehler, die durch
Netzwerkverbindung verursacht wurde,
verantwortlich.
• Wenn das Gerät Schwierigkeiten hat, sich
mit dem WLAN-Netzwerk zu verbinden,
kann es sein, dass es zu weit vom Router
entfernt ist. Kaufen Sie einen WLAN-Repeater
(Reichweitenerweiterung), um die WLANSignalstärke zu verbessern.
• Die WLAN-Verbindung könnte wegen der
Heimnetzwerkumgebung nicht aufgenommen
oder könnte unterbrochen werden.
• Die Netzwerkverbindung arbeitet
möglicherweise aufgrund Ihres Internet-ServiceProviders nicht störungsfrei.
• Die Umgebung des drahtlosen Netzwerkes kann
das drahtlose Netzwerk verlangsamen.
29
Page 66

DE
• Das Gerät kann aufgrund von Problemen
mit der drahtlosen Signalübertragung nicht
registriert werden. Ziehen Sie den Stecker des
Geräts aus und warten Sie ca. eine Minute,
bevor Sie es erneut versuchen.
• Wenn die Firewall Ihres WLAN-Routers aktiviert
ist, müssen Sie sie deaktivieren oder eine
Ausnahme hinzufügen.
• Der Name des WLAN-Netzwerks (SSID)
sollte aus einer Kombination aus lateinischen
Buchstaben und Zahlen bestehen. (Verwenden
Sie keine Sonderzeichen)
• Die Smartphone-Benutzeroberfläche kann
je nach Betriebssystem und Hersteller
unterschiedlich ausfallen.
• Wenn das Sicherheitsprotokoll des Routers
auf WEP eingestellt ist, ist es möglich, dass
Sie kein Netzwerk einrichten können. Bitte
ändern Sie die Einstellung auf ein anderes
Sicherheitsprotokoll (wir empfehlen WPA2) und
registrieren Sie das Produkt erneut.
Installation von LG ThinQ
Suchen Sie auf einem Smartphone nach der
LG ThinQ App im Google Play Store & Apple
App Store. Befolgen Sie die Anweisungen, um die
Anwendung herunter zu laden und zu installieren.
Führen Sie die Anwendung LG ThinQ aus
und befolgen Sie bitte die in der Anwendung
angezeigten Instruktionen, um das Gerät zu
registrieren.
HINWEIS
• Um die WLAN-Funktion zu deaktivieren, halten
Sie die Taste Wi-Fi Taste für 3 Sekunden
gedrückt. Das Wi-Fi-Symbol erlischt.
Wireless-LAN-Modul Technische Daten:
Modell PWFSA2
Frequenzbereich 2412 bis 2472 MHz
Ausgangsleistung
(Max)
Drahtlosfunktion Software-Version: V 1.0
Zur Rücksichtnahme auf den Nutzer, sollte dieses
Gerät mit einem Abstand von mindestens 20 cm
zwischen dem Gerät und dem Körper installiert
und betrieben werden.
IEEE 802.11b: 17.55 dBm
IEEE 802.11g: 16.07 dBm
IEEE 802.11n: 15.85 dBm
Verbindung zum WLAN herstellen
Mit der Taste Wi-Fi wird, wenn die LG ThinQ-App
genutzt wird, dem Gerät ermöglicht, eine
Verbindung mit dem Wi-Fi-Netzwerk
herzustellen. Das Wi-Fi-Symbol zeigt den
Netzwerkverbindungsstatus des Geräts an. Das
Symbol leuchtet auf, wenn das Gerät mit dem
Wi-Fi-Netzwerk verbunden ist.
Erstmalige Geräteregistrierung
Führen Sie die Anwendung LG ThinQ aus
und befolgen Sie bitte die in der Anwendung
angezeigten Instruktionen, um das Gerät zu
registrieren.
Das Gerät neu registrieren oder einen
anderen Benutzer registrieren
Für 3 Sekunden die Taste Wi-Fi gedrückt halten,
um die Funktion vorübergehend auszuschalten.
30
Page 67

DE
Konformitätserklärung
Hiermit erklärt LG Electronics, dass der FunkKühlschrank die Richtlinie 2014/53/EU erfüllt. Den
vollständigen Text der EU-Konformitätserklärung
finden Sie unter der folgenden Internetadresse:
http://www.lg.com/global/support/cedoc/cedoc#
LG Electronics European Shared Service Center
B.V.
Krijgsman 1
1186 DM Amstelveen
Niederlande
Information: Hinweis bezüglich OpenSource-Software
Den Quellcode unter GPL, LGPL, MPL sowie
weitere Open-Source-Lizenzen, die in diesem
Produkt enthalten sind, können Sie unter http://
opensource.lge.com herunterladen.
Neben dem Quellcode stehen dort
alle verwiesenen Lizenzbedingungen,
Garantieausschlüsse sowie
Urheberrechtshinweise zum Download bereit.
LG Electronics bietet gegen eine kostendeckende
Gebühr (Medium, Versand und Bearbeitung) den
Quellcode auf CD-ROM an. Senden Sie dazu eine
Anfrage per E-Mail an: opensource@lge.com.
Dieses Angebot gilt bis drei Jahre nach der letzten
Auslieferung des Produkts. Dieses Angebot gilt für
jeden Empfänger dieser Information.
HINWEIS
• Der Sprachassistent unterstützt nur englische
Befehle, daher wird nur auf Befehle in
englischer Sprache reagiert.
Sprachassistent-Funktionen
Funktion Befehl (Beispiel)
Open the refrigerator door.
Could you open the
Tür öffnen
Informationen
HINWEIS
• Die Ergebnisse des Sprachassistenten können
je nach Lautstärke der Stimme des Benutzers,
deren Intonation und Umgebungsgeräuschen
variieren.
• Halten Sie für optimale Ergebnisse die
Hintergrundgeräusche auf einem Minimum und
halten Sie sich innerhalb von 3 m zum Gerät
auf.
• Bei einigen Modellen arbeitet der
Bewegungssensor mit dem Sprachassistenten
zusammen, um auf bestimmte Sprachbefehle
zu reagieren.
refrigerator door?
Please open the refrigerator
door.
What day is it today?
What time is it now?
Verwendung des Sprachassistenten
Verwenden Sie Ihre Stimme, um die Tür
automatisch zu öffnen und Informationen wie das
Wetter oder die Tageszeit abzurufen.
Vor der Verwendung
Das Produkt muss mit der LG ThinQ-App
verbunden sein, um die Sprachassistent-Funktion
verwenden zu können.
Weitere Informationen zur Verbindung
des Produkts finden Sie im Abschnitt
INTELLIGENTE FUNKTIONEN.
Einrichtung des
Sprachassistenten
Sie müssen den Sprachassistenten aktivieren,
bevor er Sie unterstützen kann. Sie können dazu
zwischen zwei verschiedenen Möglichkeiten
auswählen.
31
Page 68

DE
Modus Details
In diesem Modus
können Sie entweder die
Bewegungssensoraktivierung
oder die Sprachaktivierung
verwenden.
Wake Zone
+ Wake
Word
Wake Word
OFF
Voice Assistant
Wake Zone
Wake Word
• Wake Zone: Stellen Sie
sich nah genug an die
Vorderseite des Geräts
und der Sprachassistent
wird automatisch ohne das
Aktivierungswort aktiviert.
• Wake Word: Stellen Sie sich
innerhalb von 3 m vor das
Gerät und sagen Sie deutlich
„Hi, LG“.
In diesem Modus können Sie die
Sprachaktivierung verwenden.
• Wake Word: Stellen Sie sich
innerhalb von 3 m vor das
Gerät und sagen Sie deutlich
„Hi, LG“.
In diesem Modus wird der
Sprachassistent ausgeschaltet.
Voice Assistant
Wake Word
Voice Assistant
OFF
Verwendung des
Aktivierungsworts
Um das Wake Word zu verwenden, halten Sie
sich in einem Abstand von 3 m zum Gerät auf.
Um den Sprachassistenten zu aktivieren,
1
sagen Sie „Hi, LG“.
• Die Anzeige des Sprachassistenten zeigt
automatisch „Go ahead, I’m listening.“ an
und geht in den Bereitschaftsmodus.
Sprechen Sie Ihren Befehl deutlich.
2
• Beispiel: Open the refrigerator door.
• Wenn der Sprachassistent den Befehl
nicht erkennt, wiederholen Sie ihn oder
versuchen Sie es mit einem anderen
Befehl.
Verwendung der
Aktivierungszone
Wenn Sie die Wake Zone verwenden möchten,
stellen Sie sich in die Nähe der Vorderseite des
Geräts. Der Sprachassistent wird automatisch
aktiviert und wechselt in den Standby-Modus, um
Sprachbefehle zu empfangen.
Stellen Sie sich vor das Gerät und warten Sie
1
einen Moment.
• Die Anzeige des Sprachassistenten zeigt
automatisch „Go ahead, I’m listening.“ an
und geht in den Bereitschaftsmodus.
ACHTUNG
• Wenn sich der Sprachassistent im Standby-
Modus befindet, wird das eingebaute Mikrofon
aktiviert – unabhängig davon, ob die Anzeige
ein- oder ausgeschaltet ist. Der Sprachbefehl
wird dann über das Netzwerk an den Server
gesendet.
HINWEIS
• Wenn der Sprachassistent auf den Modus
Wake Zone + Wake Word eingestellt ist:
− Jedes Mal, wenn Sie vor dem Gerät
vorbeigehen, wird der Sprachassistent von
der Wake Zone aktiviert und wechselt in
den Standby-Modus, um Sprachbefehle
zu erkennen. „Hi, LG“ zu sagen, wird die
Wake Word-Funktion in diesem Fall nicht
aktivieren.
32
Sprechen Sie Ihren Befehl deutlich.
2
• Beispiel: Open the refrigerator door.
HINWEIS
• Der Sprachassistent unterstützt nur englische
Befehle, daher wird nur auf Befehle in
englischer Sprache reagiert.
• Um einen neuen Sprachbefehl zu erteilen,
sagen Sie „Hi, LG“ oder entfernen Sie sich vom
Gerät und bewegen Sie sich wieder in seine
Nähe (innerhalb von 1 m).
• Wird der Sprachbefehl nicht erkannt, verlässt
der Sprachassistent den Standby-Modus.
Page 69

Smart Diagnosis
Diese Funktion steht nur bei Modellen mit dem
Logo c oder d zur Verfügung.
Verwenden Sie diese Funktion, um Probleme mit
Ihrem Gerät zu diagnostizieren und zu lösen.
HINWEIS
• Aus Gründen, die nicht auf die Fahrlässigkeit
von LGE zurückzuführen sind, ist es möglich,
dass der Dienst aufgrund externer Faktoren
wie beispielsweise Nichtverfügbarkeit oder
Trennung der WLAN-Verbindung, lokalen App
Store-Richtlinien oder Nichtverfügbarkeit der
App nicht verfügbar ist.
• Die Funktion kann ohne vorherige Ankündigung
geändert werden und je nach Standort eine
andere Form haben.
Die Verwendung von LG ThinQ
zum Diagnostizieren von
Problemen
Wenn bei Ihrem mit WLAN ausgestatteten
Gerät ein Problem auftritt, kann es mithilfe der
LG ThinQ-App Fehlerdaten auf ein Smartphone
übertragen.
• Starten Sie die LG ThinQ-App und wählen
Sie im Menü die Smart Diagnosis-Funktion.
Befolgen Sie die Anweisungen in der
LG ThinQ-App.
Die Tür des Kühlschranks öffnen
2
und das Telefon oben rechts an die
Lautsprecheröffnung halten.
• Halten Sie das Telefon so, dass sein
Mikrofon über der Lautsprecheröffnung
liegt.
Halten Sie die Taste Freezer Drawer
3
mindestens drei Sekunden lang gedrückt,
während Sie das Telefon an den Lautsprecher
halten, bis die Datenübertragung
abgeschlossen ist.
• Der Diagnoseton wird nach ca. 3 Sekunden
erzeugt.
Nach Abschluss der Datenübertragung wird
4
die Diagnose in der App angezeigt.
HINWEIS
• Um die besten Ergebnisse zu erzielen, das
Telefon nicht bewegen, während die Töne
übertragen werden.
DE
Die Verwendung der akustischen
Diagnose zum Diagnostizieren
von Problemen
Gehen Sie nach den folgenden Anweisungen
vor, um die akustische Diagnosemethode zu
verwenden.
• Starten Sie die LG ThinQ-App und wählen
Sie im Menü die Smart Diagnosis-Funktion.
Befolgen Sie die Anweisungen für die
akustische Diagnose in der LG ThinQ-App.
Drücken Sie die Taste Lock, um die
1
Sperrfunktion zu aktivieren.
• Wenn die Anzeige für mehr als 5 Sekunden
verriegelt ist, müssen Sie die Verriegelung
deaktivieren und es dann erneut aktivieren.
33
Page 70

WARTUNG
DE
Reinigung
Allgemeine Reinigungstipps
• Reinigen Sie das Inneren oder Äußere des
Geräts nicht mit einer groben Bürste, Zahnpasta
oder brennbaren Materialien. Verwenden
Sie keine Reinigungsmittel, die entzündliche
Inhaltsstoffe enthalten. Dies kann zu
Verfärbungen oder Schäden am Gerät führen.
− Entzündliche Substanzen: Alkohol (Ethanol,
Methanol, Isopropylalkohol, Isobutylalkohol
etc.), Verdünnungsmittel, Bleiche, Benzol,
entzündliche Flüssigkeiten, Scheuermittel,
etc.
• Kontrollieren Sie nach der Reinigung, ob das
Netzkabel beschädigt ist.
Reinigung der Außenseite
• Während der Reinigung der Lüftungsöffnungen
an der Außenseite des Geräts mittels
Staubsauger, sollte das Stromkabel nicht
angesteckt sein, um eine statische Entladung
zu verhindern, die zur Beschädigung des Geräts
oder zu einem elektrischen Schlag führen kann.
Es ist empfehlenswert, die Abdeckungen der
rückseitigen und seitlichen Lüftungsöffnungen
regelmäßig zu reinigen, um einen verlässlichen
und sparsamen Betrieb aufrechtzuerhalten.
• Halten Sie die Lüftungsöffnungen an der
Außenseite des Geräts sauber. Verstopfte
Lüftungsöffnungen können zu Bränden oder
Schäden am Gerät führen.
• Das Einwachsen lackierter Metalloberflächen
bietet Rostschutz. Wachsen Sie keine
Kunststoffteile ein. Wachsen Sie lackierte
Metalloberflächen mindestens zweimal jährlich
mit Gerätewachs (oder Autowachspaste) ein.
Tragen Sie das Wachs mit einem sauberen,
weichen Tuch auf.
• Reinigen Sie die Außenseite des Geräts
mit einem sauberen Schwamm oder einem
weichen Lappen und warmem Wasser mit
einem milden Reinigungsmittel. Verwenden
Sie keine rauen oder scheuernden Reiniger.
Trocknen Sie das Gerät sorgfältig mit einem
weichen Tuch ab. Verwenden Sie zur Reinigung
der Edelstahltüren keine schmutzigen Tücher.
Verwenden Sie immer ein speziell dafür
bestimmtes Tuch und wischen Sie in dieselbe
Richtung wie die Maserung. Dies verhindert,
dass die Oberfläche fleckig wird und ihren Glanz
verliert.
Reinigung der Innenseite
• Beim Ausbau von Regalen und Schubfächern
aus dem Gerät, entfernen Sie bitte alle
Lebensmittel von diesen, um Verletzungen
und Beschädigungen zu vermeiden. Sonst
könnten Verletzungen durch die eingelagerten
Lebensmittel verursacht werden.
• Bitte nehmen Sie die Regale und Schubfächer
heraus, reinigen sie mit Wasser und trocknen
sie anschließend gründlich, bevor Sie sie wieder
einbauen.
• Wischen Sie regelmäßig die Dichtungen der
Türen mit einem feuchten weichen Tuch ab.
• Spritzer und Flecken auf den Türbehältern
sollten gereinigt werden, da diese die
Lagerfähigkeit der Behälter beeinträchtigen und
sie sogar beschädigen könnten.
• Die Schubfächer oder Behälter niemals im
Geschirrspüler reinigen. Die Teile können durch
Hitzeeinwirkung verformt werden.
Ersetzen des Frischefilters
Ersetzen Sie den Frischefilter gemäß dem unten
angegebenen Austauschzeitraum.
• Etwa alle sechs Monate.
• Wenn die Frischefilter-LED blinkt oder das
Symbol „Filter ersetzen“ angezeigt wird.
34
Page 71

Ausbau des Frischefilters
Entfernen Sie die Abdeckung des
1
Frischefilterfachs. Die Abdeckung kann
einfach durch Einführen des Kunststoffstabs
in die Nut auf beiden Seiten des Bodens des
Fachs abgebaut werden.
Bauen Sie den Filter aus der Filterabdeckung
2
aus und tauschen Sie diesen gegen einen
neuen Filter aus.
• Stellen Sie sicher, dass der neue Filter mit
der Beschriftung „Back“ nach außen zeigt.
DE
Um den Austauschzeitraum zurückzusetzen,
3
drücken Sie die Taste Air Filter auf dem
Bedienfeld, bis das Symbol erlischt.
35
Page 72

FEHLERBEHEBUNG
Bevor Sie das Servicezentrum anrufen
Kühlen
Symptome Mögliche Ursache und Lösung
Ist die Stromversorgung unterbrochen?
Keine Kühlung oder
Tiefkühlung.
Schlechte Kühlung oder
Tiefkühlung.
In dem Gerät riecht es
schlecht.
• Bitte überprüfen Sie den Strom und andere Betriebsmittel.
Bitte überprüfen Sie den Strom und andere Betriebsmittel.
• Stecken Sie den Netzstecker ordnungsgemäß in die Steckdose.
Ist die Temperatur des Gefriergerätes oder Tiefkühlschranks auf
"wärmstes" eingestellt?
• Stellen Sie die Temperatur des Kühlschranks oder Gefrierschranks auf
eine kältere Temperatur ein.
Befindet sich das Gerät unter direkter Sonneneinstrahlung oder in
der Nähe von Hitzequellen, wie Küchenherde oder Mikrowellen?
• Kontrollieren Sie den Aufstellbereich und stellen Sie das Gerät ggf. in
entsprechender Entfernung von wärmeerzeugenden Geräten auf.
Haben Sie warme Speisen eingelagert, ohne diese vorher abkühlen
zu lassen?
• Bitte lassen Sie warme Speisen zuerst abkühlen, bevor Sie diese in
den Gefrierschrank oder den Kühlschrank stellen.
Haben Sie zu viele Lebensmittel eingelagert?
• Lassen Sie genügend Platz zwischen den einzelnen Lebensmitteln.
Sind die Gerätetüren fest verschlossen?
• Schließen Sie die Tür fest zu und stellen Sie sicher, dass die
eingelagerten Lebensmittel das Schließen der Tür nicht behindern.
Steht ausreichender Raum rund um das Gerät zur Verfügung?
• Passen Sie die Aufstellungsposition des Gerätes so an, dass
ausreichender Raum rund um das Gerät vorhanden ist.
Ist die Temperatur des Gefriergerätes oder Tiefkühlschranks auf
"warm" eingestellt?
• Stellen Sie die Temperatur des Kühlschranks oder Gefrierschranks auf
eine kältere Temperatur ein.
Haben Sie intensiv riechende Speisen in das Gerät gestellt?
• Lagern Sie Lebensmittel mit starken Gerüchen in versiegelten
Behältern.
Gemüse oder Obst könnten in einem Schubfach verdorben sein?
• Werfen Sie verfaultes Gemüse in den Müll und reinigen Sie die
Gemüseschublade. Lagern Sie Gemüse nicht zu lange in der
Gemüseschublade.
DE
36
Page 73

Kondensation und Eisbildung
Symptome Mögliche Ursache und Lösung
Haben Sie warme Speisen eingelagert, ohne diese vorher abkühlen
zu lassen?
• Lassen Sie das heiße Essen erst auskühlen bevor Sie es in den
Kühlschrank oder Gefrierer stellen.
Haben Sie die Gerätetür offen gelassen?
Es befindet sich
Kondensation im Inneren
des Gerätes oder auf dem
Boden der Abdeckung für
die Gemüseschiebefächer.
Im Gefrierschrank hat sich
Eis gebildet.
Es hat sich Kondensierung
an der Innen- und
Außenseite des Gerätes
gebildet.
• Obwohl die Kondensierung kurz nach dem Schließen der Gerätetür
weicht, können Sie diese mit einem trockenen Tuch abwischen.
Nehmen Sie ein übermäßiges Öffnen und Schließen der Gerätetür
vor?
• Aufgrund des Temperaturunterschieds zwischen innen und außen kann
sich Kondensation bilden. Wischen Sie die Feuchtigkeit mit einem
trockenen Tuch ab.
Haben Sie warme oder feuchte Lebensmittel in das Gerät gestellt,
ohne sie in einem Behälter versiegelt zu haben?
• Bitte lagern Sie Speisen in einem abgedeckten oder verschlossenen
Behälter.
Türen können nicht einwandfrei schließen?
• Überprüfen Sie, ob die Abteile für Lebensmittel die Tür blockieren und
stellen Sie sicher, dass die Tür dicht geschlossen ist.
Haben Sie warme Speisen eingelagert, ohne diese vorher abkühlen
zu lassen?
• Bitte lassen Sie warme Speisen zuerst abkühlen, bevor Sie diese in
den Gefrierschrank oder den Kühlschrank stellen.
Ist der Lufteinlass oder -auslass des Gefrierschranks blockiert?
• Stellen Sie sicher, dass der Lufteinlass oder -auslass nicht blockiert ist,
damit die Luft im Inneren zirkulieren kann.
Ist der Gefrierschrank überfüllt?
• Bitte lassen Sie genügend Platz zwischen den einzelnen Artikeln.
Öffnen oder schließen Sie die Gerätetür häufig oder ist die Gerätetür
nicht einwandfrei geschlossen?
• Es können sich Frost und Eis bilden, wenn die Außenluft in das Innere
des Gerätes dringt.
Ist das Umfeld des Aufstellortes feucht?
• Kondensation kann an der Außenseite des Gerätes auftreten, wenn der
Aufstellungsort zu feucht ist, oder an einem feuchten Tag, zum Beispiel
bei Regen. Wischen Sie die Feuchtigkeit mit einem trockenen Tuch ab.
DE
37
Page 74

Symptome Mögliche Ursache und Lösung
Die Seite oder Vorderseite
des Gerätes ist warm.
Teile und Funktionen
Symptome Mögliche Ursache und Lösung
Die Gerätetür ist nicht
einwandfrei geschlossen.
Es ist schwer, die Gerätetür
zu öffnen.
Die Innenleuchte des
Gerätes schaltet sich nicht
ein.
Die SprachassistentFunktion wird automatisch
eingeschaltet.
DE
Diese Bereiche wurden mit Antikondensations-Röhren ausgerüstet,
um die Bildung von Kondensation im Bereich der Tür zu verringern.
• Das Wärmeablassrohr, um die Kondensation zu vermeiden, ist an der
Vorderseite und Seite des Gerätes installiert. Es könnte sich besonders
heiß anfühlen, kurz nachdem das Gerät installiert wurde oder während
des Sommers. Sie können versichert sein, dass dies kein Problem
darstellt und vollkommen normal ist.
Weist das Gerät eine Neigung nach vorwärts auf?
• Stellen Sie die vorderen Füße so ein, dass die Vorderseite leicht
angehoben wird.
Wurden die Schubfächer richtig eingelegt?
• Bauen Sie die Regale erneut ein, falls erforderlich.
Haben Sie die Tür mit zu viel Schwung geschlossen?
• Wenn Sie die Tür mit zu viel Kraft oder Schwung schließen, schließt
sie möglicherweise nicht ordentlich. Stellen Sie sicher, dass Sie die Tür
nicht zuschlagen. Schließen Sie die Tür ohne Kraftanwendung.
Haben Sie versucht, die Tür unmittelbar nach dem Schließen zu
öffnen?
• Wenn Sie versuchen, die Gerätetür innerhalb von einer Minute,
nachdem Sie geschlossen wurde, wieder zu öffnen, könnten Sie
Schwierigkeiten aufgrund des Drucks im Inneren des Geräts haben.
Versuchen Sie die Gerätetür nach ein paar Minuten erneut zu öffnen,
sodass der Druck im Inneren sich stabilisieren kann.
Lampenausfall
• Schließen Sie die Tür und öffnen Sie sie wieder. Wenn die Lampe nicht
einschaltet, wenden Sie sich an das Kundeninformationszentrum von
LG Electronics. Versuchen Sie nicht, die Lampe auszubauen.
Der Sprachassistent ist auf den Wake Zone + Wake Word eingestellt.
Jedes Mal, wenn Sie vor dem Gerät vorbeigehen, wird der
Sprachassistent aktiviert und wechselt in den Standby-Modus, um
Sprachbefehle zu erkennen.
• Ändern Voice Assistant von Wake Zone + Wake Word zu
Wake Word.
38
Page 75

Geräusche
Symptome Mögliche Ursache und Lösung
Das Gerät ist geräuschvoll
und verursacht anomale
Geräusche.
Klickgeräusche
Rasselnde Geräusche
Zischende Geräusche
Glucksende Geräusche
Knallende Geräusche
DE
Wurde das Gerät auf einem schwachen oder einem nicht einwandfrei
nivellierten Boden aufgestellt?
• Nehmen Sie die Aufstellung des Gerätes auf einem festen und ebenen
Fußboden vor.
Befindet sich die Rückseite des Gerätes in Kontakt mit der Wand?
• Passen Sie die Aufstellungsposition des Gerätes so an, dass
ausreichender Raum rund um das Gerät vorhanden ist.
Wurden Gegenstände hinter dem Gerät gestapelt?
• Beseitigen Sie die verstreuten Gegenstände hinter dem Gerät.
Befindet sich ein Gegenstand auf der Oberseite des Gerätes?
• Beseitigen Sie Gegenstände von der Oberseite des Gerätes.
Die Abtausteuerung klickt, wenn der automatische Abtauzyklus
beginnt und endet. Die Thermostatsteuerung (oder Gerätesteuerung
einiger Modelle) gibt ebenfalls Klick-Laute ab, wenn ein Zyklus
umgeschaltet wird.
• Normalbetrieb
Rasselnde Geräusche können vom Kühlmitteldurchfluss stammen,
von der Wasserleitung an der Rückseite der Einheit (nur Modelle mit
Reinigungsapparat) oder von Gegenständen, die auf der Oberseite
oder in der Nähe des Gerätes abgestellt wurden.
• Normalbetrieb
Das Gerät ist nicht auf ebenem Boden aufgestellt worden.
• Der Boden gibt nach, ist ungleich oder die Nivellierungsfüße müssen
ausgerichtet werden. Weitere Informationen finden Sie im Abschnitt
„Ausrichtung der Türen“.
Das Gerät mit Linearkompressor wurde während des Betriebs
verschoben.
• Normalbetrieb. Wenn der Kompressor die Geräusche nicht innerhalb
von drei Minuten einstellt, schalten Sie den Strom ab und dann wieder
ein.
Verdampferventilatoren blasen Luft durch die Abteile des
Gefriergerätes oder des Tiefkühlschranks.
• Normalbetrieb
Luft wird vom Verflüssigergebläse über den Verflüssiger geleitet.
• Normalbetrieb
Kühlmitteldurchfluss durch das Kühlsystem.
• Normalbetrieb
Zusammenziehen und Ausdehnen der Innenwände aufgrund von
Temperaturänderungen.
• Normalbetrieb
39
Page 76

Symptome Mögliche Ursache und Lösung
Vibrieren
Wi-Fi
Symptome Mögliche Ursache und Lösung
Es kann sein, dass Ihr
Heimgerät und das
Smartphone nicht mit dem
WLAN-Netzwerk verbunden
sind.
DE
Wenn die Seite oder die Rückseite des Gerätes mit einem Schrank
oder der Wand in Berührung kommt, kann es sein, dass die normalen
Schwingungen des Gerätes ein hörbares Geräusch verursachen.
• Um das Geräusch zu beseitigen, stellen Sie bitte sicher, dass die
Seiten und die Rückseite keinen Kontakt mit einer Wand oder einem
Schrank haben.
Das Passwort für das WLAN, mit dem Sie sich verbinden wollen, ist
falsch.
• Suchen Sie das WLAN-Netzwerk, das mit Ihrem Smartphone
verbunden ist, und entfernen Sie es. Registrieren Sie dann Ihr Gerät
unter LG ThinQ.
Mobile Daten sind für Ihr Smartphone aktiviert.
• Bitte schalten Sie die Mobilen Daten Ihres Smartphones aus und
registrieren Sie das Gerät über das WLAN-Netzwerk.
Der Name des kabellosen Netzwerks (SSID) ist falsch eingerichtet.
• Der Name des WLAN-Netzwerks (SSID) sollte aus einer Kombination
aus lateinischen Buchstaben und Zahlen bestehen. (Verwenden Sie
keine Sonderzeichen)
Die Frequenz des Routers ist nicht 2,4 GHz.
• Nur Router mit 2,4 GHz-Frequenz werden unterstützt. Bitte richten Sie
den kabellosen Router auf 2,4 GHz ein und verbinden Sie das Gerät
mit dem kabellosen Router. Sie können Ihren Internetanbieter oder
den Hersteller des Routers um Informationen über die Routerfrequenz
bitten.
Der Abstand zwischen dem Gerät und dem Router ist zu groß.
• Wenn der Abstand zwischen dem Gerät und dem Router zu groß ist,
kann es sein, dass das Signal zu schwach ist und die Verbindung nicht
richtig konfiguriert ist. Stellen Sie den Router an einem anderen Ort auf,
damit er näher am Gerät ist.
40
Page 77

MANUAL DEL PROPIETARIO
FRIGORÍFICO Y
CONGELADOR
Lea con detenimiento este manual del propietario antes de hacer funcionar el electrodoméstico y
téngalo a mano para poder consultarlo en cualquier momento.
www.LGSIGNATURE.com
Copyright © 2019 LG Electronics Inc. Todos los derechos reservados
Page 78

ÍNDICE
Este manual puede contener imágenes o
contenido diferente del modelo que haya
adquirido.
Este manual está sujeto a revisión por parte
del fabricante.
INSTRUCCIONES DE SEGURIDAD ..............................................3
Instrucciones de seguridad importantes ...........................................................3
CUIDADO DEL MEDIOAMBIENTE ................................................................11
INSTALACIÓN .............................................................................. 12
Dimensiones y separaciones ..........................................................................12
Temperatura ambiente ....................................................................................12
Nivelado ..........................................................................................................13
Conexión de la alimentación ...........................................................................13
Movimiento del aparato para su reubicación .................................................13
FUNCIONAMIENTO ...................................................................... 14
Antes de usar ..................................................................................................14
Características del producto ...........................................................................16
Exterior ............................................................................................................16
Interior .............................................................................................................17
Panel de control ..............................................................................................19
InstaView Door in Door ...................................................................................22
Door in Door ....................................................................................................23
Estante del frigorífico ......................................................................................24
Cajón del frigorífico .........................................................................................24
Despensa Custom Chill ..................................................................................25
Dispositivo de elevación automática ...............................................................26
FUNCIONES SMART ....................................................................28
Uso de la aplicación LG ThinQ .......................................................................28
Usar el asistente de voz .................................................................................30
Smart Diagnosis ..............................................................................................31
MANTENIMIENTO ........................................................................33
Limpieza ..........................................................................................................33
Sustitución del filtro de frescura ......................................................................33
SOLUCIÓN DE PROBLEMAS ......................................................35
Antes de solicitar asistencia técnica ...............................................................35
Page 79

INSTRUCCIONES DE SEGURIDAD
Las siguientes instrucciones de seguridad tienen por
objetivo evitar riesgos imprevistos o daños derivados de un
funcionamiento poco seguro o incorrecto del aparato.
Las instrucciones se dividen en "ADVERTENCIAS" y
"PRECAUCIONES", como se describe a continuación.
Este símbolo se muestra para indicar cuestiones y
acciones que pueden suponer un riesgo. Lea con
atención la parte señalada con este símbolo y siga las
instrucciones a fin de evitar riesgos.
ADVERTENCIA
Indica que, de no seguirse las instrucciones, pueden
producirse lesiones graves o la muerte.
PRECAUCIÓN
Indica que, de no seguirse las instrucciones, pueden
producirse lesiones menos graves o daños en el aparato.
ES
Instrucciones de seguridad importantes
ADVERTENCIA
Para reducir el riesgo de explosión, incendio, muerte, descarga
eléctrica, lesiones o quemaduras a personas al utilizar este
producto, siga instrucciones básicas de seguridad, entre las
que se encuentran las siguientes:
Niños
• Este electrodoméstico solo puede ser utilizado por niños a partir de
8 años de edad y personas con capacidades físicas, sensoriales o
mentales disminuidas o sin experiencia o conocimientos si están
sometidos a supervisión o si reciben instrucciones sobre el uso
del electrodoméstico de forma segura y entienden los peligros
que entraña. Los niños no deben jugar con el electrodoméstico.
Los niños no pueden llevar a cabo operaciones de limpieza ni de
mantenimiento sin supervisión.
3
Page 80

ES
• Los niños entre 3 y 8 años pueden cargar y descargar
electrodoméstico de refrigeración.
Instalación
• Este aparato sólo debe ser transportado por dos o más personas que
sostengan el aparato de forma segura.
• Asegúrese de que la toma de corriente esté correctamente
conectada a tierra, y de que la toma de tierra del cable de
alimentación no esté dañada o quitada de la clavija de alimentación.
Para más detalles sobre conexiones a tierra, pregunte en un centro
de información al cliente de LG Electronics.
• Este aparato está equipado con un cable que tiene un conductor
de conexión a tierra y un enchufe de corriente a tierra. El cable
de alimentación debe estar conectado a una toma de corriente
apropiado que esté instalado y conectado a tierra de acuerdo con
todos los códigos y ordenanzas locales.
• Si el cable de alimentación está dañado o el hueco de la toma de
corriente está suelto, no utilice el cable de alimentación y póngase en
contacto con un centro de servicio autorizado.
• No enchufe el electrodoméstico a un adaptador de varios zócalos
que no tenga un cable de alimentación (instalado).
• No modifique o prolongue el cable de alimentación.
• El aparato debe conectarse a una línea de alimentación específica
con fusible independiente.
• No utilice un adaptador de varios zócalos que no esté correctamente
conectado a tierra (portátil). Si usa un adaptador de varios zócalos
correctamente conectado a tierra (portátil), utilice uno que tenga la
capacidad de corriente del valor de alimentación nominal o superior y
utilícelo solo para el electrodoméstico.
• Instale el aparato en un lugar donde sea fácil desconectar el cable de
alimentación del aparato.
• Tenga cuidado de no dejar el enchufe de alimentación mirando hacia
arriba ni dejar que el aparato se apoye sobre el enchufe.
• Instale el aparato sobre un suelo firme y nivelado.
4
Page 81

ES
• No instale el aparato en un lugar húmedo y polvoriento. No instale ni
guarde el aparato en cualquier área al aire libre, o cualquier área que
esté sujeta a condiciones climatológicas tales como la luz directa del
sol, el viento o la lluvia o temperaturas bajo cero.
• No coloque el aparato bajo la luz solar directa ni lo exponga al calor
de fuentes de calor como estufas o calentadores.
• Tenga cuidado de no exponer la parte posterior del aparato durante
la instalación.
• Tenga cuidado de no dejar caer la puerta del aparato durante el
montaje o desmontaje.
• Tenga cuidado de no perforar, aplastar ni dañar el cable de
alimentación durante el montaje o desmontaje de la puerta del
aparato.
• No conecte un adaptador de enchufe ni otro accesorio a la clavija
eléctrica.
Funcionamiento
• No utilice el aparato para cualquier propósito (almacenamiento de
materiales médicos o experimentales o envío) distinto a un uso de
almacenamiento interno de alimentos en el hogar.
• Desconecte el cable de alimentación durante una tormenta severa o
cuando no esté en uso durante un largo período de tiempo.
• No toque el enchufe de alimentación o los controles del aparato con
las manos mojadas.
• No doble excesivamente el cable de alimentación ni coloque un
objeto pesado sobre él.
• Si el agua penetra en las piezas eléctricas del aparato, desconecte
el enchufe y póngase en contacto con un centro de información al
cliente de LG Electronics.
• No ponga las manos ni objetos metálicos dentro de la zona que
emite el aire frío, la tapa ni la rejilla de liberación de calor de la parte
posterior.
• No aplique una fuerza o impacto excesivos sobre la tapa posterior
del aparato.
5
Page 82

ES
• No introduzca animales vivos, como mascotas, en el
electrodoméstico.
• Tenga cuidado por si hay niños cerca cuando abra o cierre la puerta
del aparato. La puerta podría golpear al niño y provocarle lesiones.
• Evite el peligro de que los niños queden atrapados en el interior
del aparato. Un niño atrapado en el interior del aparato puede sufrir
asfixia.
• No coloque objetos pesados o frágiles, recipientes llenos de líquido,
sustancias inflamables, objetos inflamables (como velas, lámparas,
etc.) o dispositivos de calefacción (como estufas, calentadores, etc.)
sobre el aparato.
• Si hay una fuga de gas (isobutano, propano, gas natural, etc.), no
toque el aparato ni el enchufe y ventile el área inmediatamente. Este
aparato usa un gas refrigerante (isobutano, R600a). Aunque usa una
pequeña cantidad de gas, sigue siendo gas combustible. Las fugas
de gas durante el transporte, la instalación o el funcionamiento del
aparato pueden provocar incendios, explosiones o lesiones si se
producen chispas.
• No utilice ni almacene sustancias inflamables o combustibles (éter,
benceno, alcohol, productos químicos, gas licuado de petróleo,
aerosol combustible, insecticida, ambientador, cosméticos, etc.)
cerca del aparato.
• Desenchufe inmediatamente el cable de alimentación y póngase en
contacto con un centro de información al cliente de LG Electronics si
detecta un sonido extraño, olor o humo procedentes del aparato.
• Llene la máquina de hielo o el depósito del dispensador de agua solo
con agua potable.
• No dañe el circuito del refrigerante.
• No coloque ningún aparato electrónico (como calentador y teléfono
móvil) en el interior del aparato.
Mantenimiento
• Desconecte el cable de alimentación antes de limpiar el aparato o
reemplazar la lámpara del interior (si existe).
6
Page 83

ES
• Enchufe de manera segura el cable de alimentación en la toma de
corriente después de eliminar por completo cualquier humedad y
polvo.
• Nunca desenchufe el aparato tirando del cable de alimentación.
Agarre siempre el enchufe firmemente y tire en línea recta desde la
toma de corriente.
• No rocíe agua o sustancias inflamables (pasta de dientes, alcohol,
diluyente, benceno, líquido inflamable, abrasivo, etc.) sobre el interior
o el exterior del aparato para limpiarlo.
• No limpie el aparato con cepillos, trapos ni esponjas de superficie
rugosa o hechos de material metálico.
• Solo el personal de servicio cualificado del centro de servicio de LG
Electronics debe desmontar, reparar o modificar el aparato. Póngase
en contacto con un centro de información al cliente de LG Electronics
si se muda e instala el aparato en un lugar diferente.
• No utilice un secador de pelo para secar el interior del aparato ni
coloque una vela en su interior para eliminar los olores.
• No utilice dispositivos mecánicos ni otros medios para acelerar el
proceso de descongelación.
Eliminación
• Cuando no funcione el aparato, retire la junta de la puerta, dejando
los estantes y cestas en su lugar y mantenga a los niños alejados del
aparato.
• Elimine el material de embalaje (como vinilo y poliestireno extruido)
de forma que los niños no tengan acceso a él. Los materiales de
embalaje pueden causar asfixia.
Seguridad técnica
• Mantenga las aberturas de ventilación, en el recinto del dispositivo o
la estructura incorporada, libres de obstrucciones.
• No utilice aparatos eléctricos en el interior del frigorífico.
• El refrigerante y el gas de expansión utilizados en el
electrodoméstico precisan de procedimientos de eliminación
adecuados. Consulte con el agente de mantenimiento o con una
persona igualmente cualificada antes de eliminarlos.
7
Page 84

ES
• El derrame de refrigerante desde las tuberías puede provocar un
incendio o causar una explosión.
• La cantidad de refrigerante que contiene cada electrodoméstico se
indica en la placa de identificación que hay dentro de este.
• No conecte jamás un electrodoméstico que presente indicios de
daño. Si tiene dudas, consulte con el distribuidor.
• Este electrodoméstico está destinado solo para su uso doméstico
y en aplicaciones similares. No debe ser utilizado con fines
comerciales, o de restauración, o en cualquier aplicación móvil, como
una caravana o un barco.
• No almacene sustancias explosivas, como latas con pulverizador
que contengan un propelente inflamable, dentro de este
electrodoméstico.
Riesgo de incendio y materiales inflamables
Este símbolo le indica los materiales inflamables que
pueden prenderse y provocar un incendio si no tiene
cuidado.
• Este aparato contiene una pequeña cantidad de gas refrigerante
isobutano (R600a), pero no deja de ser combustible. Al transportar e
instalar el aparato, debe tenerse precaución para asegurarse de que
no resulte dañada ninguna parte del circuito de refrigeración.
• Si se detecta una fuga, evite acercar llamas o posibles fuentes de
ignición y ventile la habitación en la que se encuentra el aparato
durante varios minutos. Con el fin de evitar la creación de una
mezcla de gas y aire inflamable si se produce una fuga en el
circuito de refrigeración, el tamaño de la habitación en la que se
utiliza el aparato debe corresponderse a la cantidad de refrigerante
utilizado. La habitación debe tener 1 m² de superficie por cada 8 g de
refrigerante R600a contenido en el aparato.
• Al colocar el aparato, asegúrese de que el cable de alimentación no
se enganche o se dañe.
• No coloque múltiples bases de enchufes portátiles o fuentes de
alimentación portátiles detrás del aparato.
8
Page 85

ES
Función de Elevación-automática
• Esta función de elevación-automática del cajón solo puede ser
utilizada por niños a partir de 8 años de edad y personas con
capacidades físicas, sensoriales o mentales disminuidas o sin
experiencia o conocimientos si están sometidos a supervisión o si
reciben instrucciones sobre su uso de forma segura y entienden
los peligros que entraña. La función puede apagarse en el panel de
control, si lo desea.
• No permita que los niños jueguen con el compartimento interior del
cajón ni se metan dentro.
• No utilice la función de elevación-automática mientras pliega la
cubierta posterior del cajón trasero.
• No ponga la mano en las áreas abiertas a los lados o en la parte
posterior del cajón cuando esté abierto.
• Mantenga los pies alejados del cajón inferior cuando use la función
de apertura automática.
• Apague el aparato antes de limpiar el compartimento inferior del
cajón.
• El dispositivo de elevación automática es pesado, así que retírelo
con ambas manos.
• No desbloquee el tirador de bloqueo del dispositivo de elevación-
automática. El dispositivo podría activarse, desplegarse y dañarse.
PRECAUCIÓN
Para reducir el riesgo de lesiones leves a personas,
funcionamiento erróneo o daños al producto o a la propiedad
cuando use este producto, siga las siguientes instrucciones
básicas de seguridad:
9
Page 86

ES
Instalación
• No incline el aparato para tirar de él o empujarlo durante el
transporte.
• Asegúrese de no pillarse una parte del cuerpo, como la mano o el
pie, cuando mueva el dispositivo.
Funcionamiento
• No toque los alimentos congelados o las piezas de metal del
compartimiento del congelador con las manos mojadas o húmedas.
Podrían producirse lesiones por congelación.
• No coloque recipientes de vidrio, botellas o latas (especialmente
las que contienen bebidas carbonatadas) en el congelador, en los
estantes o en el contenedor de hielo, ya que se verán expuestos a
temperaturas de congelación.
• El cristal templado del frontal de la puerta del electrodoméstico o los
estantes puede sufrir daños por impactos. Si se rompe, no lo toque
con las manos, ya que podría provocarle lesiones físicas.
• No se cuelgue de la puerta del electrodoméstico, de la sala de
almacenamiento, del estante o del door in door del frigorífico ni se
suba sobre él.
• No almacene una cantidad excesiva de botellas de agua o
contenedores para guarniciones en las cestas de la puerta.
• Evite que los animales mordisqueen el cable de alimentación o el
conducto del agua.
• No ejerza una fuerza excesiva para abrir o cerrar el aparato.
• Si la bisagra de la puerta del aparato está dañada o no funciona
correctamente, deje de usarlo y póngase en contacto con un centro
de servicio de LG Electronics.
• No limpie estantes de vidrio o cubiertas con agua tibia cuando
estén fríos. Podrían romperse si se exponen a cambios bruscos de
temperatura.
• Nunca coma alimentos congelados inmediatamente después de que
hayan sido sacados del compartimiento del congelador.
10
Page 87

ES
• Asegúrese de no pillarse la mano o el pie al abrir o cerrar la puerta
del aparato o la puerta Door in Door.
• No abra la puerta del dispositivo con el door in door abierto, ni abra
el door in door mientras la puerta del frigorífico está abierta. El door
in door puede recibir un impacto del borde del dispositivo y sufrir
desperfectos.
Mantenimiento
• No inserte los estantes del revés, dado que podrían caerse.
• Para eliminar la escarcha del aparato, póngase en contacto con un
centro de información al cliente de LG Electronics.
• Deseche el hielo del interior del depósito de hielo en el
compartimiento del congelador durante un apagón prolongado.
CUIDADO DEL MEDIOAMBIENTE
Símbolo para marcar AEE
• El símbolo del contenedor de basura tachado con un aspa indica que la recogida
separada de aparatos eléctricos y electrónicos (AEE) debe realizarse de manera
separada.
• Los productos eléctricos antiguos pueden contener sustancias peligrosas de modo que
la correcta eliminación del antiguo aparato ayudará a evitar posibles consecuencias
negativas para el medio ambiente y para la salud humana. El antiguo aparato puede
contener piezas reutilizables que podrían utilizarse para reparar otros productos y
otros materiales valiosos que pueden reciclarse para conservar los recursos limitados.
Este producto contiene pilas y/o acumuladores. Siempre que no sea necesaria la
intervención de un profesional cualificado para ello, y antes del depósito final del
producto en las instalaciones de recogida selectiva, usted debe extraer las pilas y
acumuladores de forma segura y separadamente para su adecuada gestión.
• Puede llevar el aparato a cualquiera de los centros autorizados para su recogida.
Para obtener la información más actualizada para su país por favor visite www.lg.com/
global/recycling
11
Page 88

INSTALACIÓN
ES
Dimensiones y separaciones
• Colocar objetos a una distancia demasiado
reducida puede provocar una disminución de la
capacidad de congelación y aumentar el coste
de la electricidad. Cuando instale el aparato,
deje una separación de más de 50 mm con
respecto a cada pared adyacente.
A
B
D
Tipo Dimensiones
A 695 mm
B 1 753 mm
C 1 793 mm
D 735 mm
E 23 mm
F 711 mm
G 1 300 mm
H 1 020 mm
I 700 mm
E
G F
C
I
H
Temperatura ambiente
• El aparato está diseñado para funcionar dentro
de un intervalo de temperaturas ambiente
limitado, en función de la zona climática. No
utilice el aparato a una temperatura que supere
el límite.
• Las temperaturas internas pueden verse
afectadas por la ubicación del aparato, la
temperatura ambiente, la frecuencia de apertura
de la puerta y otros factores.
• La clase climática se puede consultar en la
etiqueta de características.
Clase climática
SN (Templado
Ampliado)
N (Templado) +16 - +32
ST (Subtropical) +16 - +38
T (Tropical) +16 - +43 / +10 - +43*
*Australia, India y Kenia
NOTA
Los aparatos con calificación de SN a T están
diseñados para ser utilizados a una temperatura
ambiente que oscile entre los 10 ºC y los 43 ºC.
Intervalo de
temperatura ambiente
en ºC
+10 - +32
NOTA
• Puede averiguar de qué tipo de aparato
se trata mirando la etiqueta del interior del
compartimiento de frigorífico.
12
Page 89

ES
Nivelado
El aparato tiene dos patas niveladoras delanteras.
Ajuste las patas para alterar la inclinación de
adelante hacia atrás o de lado a lado. Si el
aparato parece inestable, o la puerta no se cierra
fácilmente, ajuste la inclinación del aparato
siguiendo las instrucciones a continuación:
Abra el cajón inferior y retire la cubierta del
1
aparato.
Gire la pata niveladora hacia la izquierda
2
para levantar ese lado del aparato o hacia
la derecha para bajarlo. Podría tener que
realizar varias vueltas de la pata niveladora
para ajustar la inclinación del aparato.
Abra la puerta y los cajones y verifique que se
3
cierren fácilmente. Si no se cierran fácilmente,
incline el aparato un poco más hacia atrás
girando ambas patas niveladoras hacia la
izquierda. Podría tener que realizar varias
vueltas más, y asegúrese de girar ambas
patas niveladoras las mismas veces.
Cuando el aparato esté nivelado, abra el cajón
4
inferior y vuelva a armar la cubierta.
Conexión de la alimentación
Puesta en funcionamiento del
aparato
Después de instalar el aparato, conecte el enchufe
la toma de corriente.
NOTA
• Después de conectar el cable de alimentación
(o enchufe) a la toma, espere 3-4 horas antes
de colocar alimentos en el aparato. Si añade
alimentos antes de que el aparato se haya
enfriado por completo, sus alimentos podrían
echarse a perder.
Movimiento del aparato para su reubicación
Preparación para la reubicación
Retire todos los alimentos del interior del
1
aparato.
Desconecte el enchufe de alimentación,
2
insértelo y fíjelo en el enganche situado en la
parte trasera o superior del aparato.
Coloque cinta adhesiva en las piezas, como
3
los estantes y el asa de la puerta, para evitar
que se caigan mientras mueve el aparato.
Mueva el aparato con ayuda de más de
4
una persona con cuidado. Mantenga en
posición vertical el aparato al transportarlo en
distancias largas.
Después de instalar el aparato, conecte el
5
enchufe a la toma de corriente y enciéndalo.
13
Page 90

FUNCIONAMIENTO
ES
Antes de usar
Notas sobre el funcionamiento
• Los usuarios deben tener en cuenta que puede
formarse escarcha si la puerta no se cierra
completamente o si la humedad es alta durante
el verano.
• Asegúrese de que haya suficiente espacio entre
los alimentos almacenados del estante o de la
puerta para permitir que la puerta se cierre por
completo.
• Al abrir la puerta entra aire caliente en el
electrodoméstico, y puede hacer que la
temperatura interna aumente.
• Si va a dejar el electrodoméstico apagado
durante un periodo de tiempo prolongado,
saque todos los alimentos y desenchufe el
cable de alimentación. Limpie el interior y
deje las puertas ligeramente entreabiertas
para evitar la proliferación de moho en el
electrodoméstico.
Alarma de puerta abierta
La alarma suena 3 veces en intervalos de 30
segundos si la puerta se deja abierta o no se
cierra por completo durante 1 minuto.
NOTA
• Póngase en contacto con el centro de
información al cliente de LG Electronics si el
sonido de la alarma continúa después de 30
segundos, incluso después de cerrar todas las
puertas.
Detección de fallos
El electrodoméstico puede detectar
automáticamente los problemas durante el
funcionamiento.
NOTA
• Si se detecta un problema, el electrodoméstico
podría no funcionar y un código de error se
muestra incluso cuando se pulsa cualquier
botón.
• Si se indica un error en la pantalla, no
desconecte la alimentación. Contacte
inmediatamente con un centro de información
al cliente de LG Electronics y reporte el código
de error. Si se desconecta la alimentación, el
técnico de reparación del centro de información
podría tener dificultades para encontrar el
problema.
Sugerencia para ahorrar energía
• Asegúrese de que haya suficiente espacio entre
los alimentos almacenados. Esto permite que el
aire frío circule de manera uniforme y reduce las
facturas de electricidad.
• Almacene comida caliente solo después de
que se haya enfriado con el fin de evitar rocío o
escarcha.
• Al almacenar comida en el compartimento
del congelador, ajuste la temperatura del
congelador por debajo de la temperatura
indicada en la comida.
• No ajuste la temperatura del electrodoméstico
por debajo de lo necesario.
• No introduzca alimentos cerca del sensor de
temperatura del compartimento del frigorífico.
Mantenga una distancia de al menos 3 cm
desde el sensor.
• Tenga en cuenta que un aumento de la
temperatura después de la descongelación
tiene un rango permisible en las
especificaciones del electrodoméstico. Si desea
minimizar el impacto en el almacenamiento de
alimentos debido a un aumento de temperatura,
selle o envuelva los alimentos almacenados en
varias capas.
• El sistema de descongelación automática
del electrodoméstico garantiza que el
compartimento se mantiene libre de escarcha
en condiciones de funcionamiento normales.
Almacenamiento eficaz de
alimentos
• Guarde los alimentos congelados o refrigerados
dentro de recipientes sellados.
• Compruebe la fecha de caducidad y la etiqueta
(instrucciones de almacenamiento) antes de
almacenar alimentos en el electrodoméstico.
14
Page 91

ES
• No guarde alimentos durante un largo período
de tiempo (más de 4 semanas) si se estropean
fácilmente a una temperatura baja.
• Guarde la comida refrigerada o congelada
dentro del frigorífico o congelador, según
corresponda, inmediatamente después de
comprarla.
• Almacene la carne y el pescado crudo
en contenedores adecuados en el
electrodoméstico, para que no estén en
contacto con otros alimentos ni goteen sobre
ellos.
• Los alimentos refrigerados y otros artículos de
alimentación pueden ser almacenados sobre el
cajón para verduras.
• Evite recongelar cualquier alimento que ya
haya sido completamente descongelado. La
congelación de cualquier alimento que haya
sido completamente descongelado de nuevo
disminuirá su sabor y nutrición.
• No llene en exceso el electrodoméstico, de lo
contrario el aire frío no podrá circular de forma
apropiada.
• Deje enfriar los alimentos calientes antes de
guardarlos. Si coloca en el interior alimentos
demasiado calientes, la temperatura interior del
electrodoméstico puede aumentar y perjudicar
al resto de alimentos almacenados.
• Si configura una temperatura demasiado baja
para la comida, podría llegar a congelarla. No
configure una temperatura más baja que la
temperatura requerida para que la comida se
almacene correctamente.
• Si el electrodoméstico incluye compartimentos
de refrigeración elevada, no guarde verduras
y frutas con un alto contenido de humedad en
ellos, ya que podrían congelarse debido a las
bajas temperaturas.
• En caso de producirse un corte del suministro
eléctrico, llame a la compañía eléctrica y
pregunte cuánto va a durar.
− Debe evitar abrir las puertas mientras se
mantenga la interrupción del suministro
eléctrico.
− Cuando se recupere el suministro eléctrico
normal, compruebe el estado de los
alimentos.
Capacidad máxima de
congelación
• La función Express Freeze establecerá
el congelador en su capacidad máxima de
congelación. Esto generalmente toma hasta 24
horas y se apaga automáticamente.
• Express Freeze debe estar encendida durante
2 horas antes de que los productos frescos se
coloquen en el compartimento del congelador.
• Para conseguir una mejor circulación de aire,
inserte todas las partes internas como cestas,
cajones y bandejas.
Congelar la cantidad máxima de
alimentos
Si se van a almacenar grandes cantidades de
alimentos, el contenedor interno y el dispositivo
de elevación automática deben sacarse del cajón
inferior.
PRECAUCIÓN
• Para quitar los cajones, primero retire la comida
de los cajones y luego tire de los cajones con
cuidado. No hacerlo podría causar lesiones o
daños a los cajones.
15
Page 92

Características del producto
La apariencia o componentes del electrodoméstico pueden diferir de un modelo a otro.
Exterior
ES
Dispositivo de asistente de voz
a
Un dispositivo de asistente de voz está integrado en la puerta.
InstaView Door in Door
b
El elegante panel de vidrio tintado se ilumina con dos golpes rápidos, lo que le permite ver dentro
del compartimento de fácil acceso sin tener que abrir la puerta.
Sensores automáticos de apertura de puerta
c
Sitúese cerca de la parte delantera del electrodoméstico y aparecerá DOOR OPEN en el suelo.
Pase el pie sobre las palabras en el suelo para abrir la puerta automáticamente.
Panel de control
d
Muestra los controles de temperatura del frigorífico y del congelador.
Botón cajón extraíble inferior
e
Cuando se presiona el botón, el cajón inferior se abre automáticamente y el compartimento interior
se eleva para un cómodo acceso.
16
Page 93

Interior
Filtro de frescura
a
Esto reduce los malos olores dentro del compartimento del frigorífico.
ES
Estante del frigorífico
b
Aquí es donde se almacenan los alimentos refrigerados y otros artículos. Almacene los alimentos
con un mayor contenido de humedad en la parte frontal del estante. La altura del estante puede
ajustarse insertando el estando en otra ranura con una altura diferente.
Cajón de las verduras
c
Aquí es donde se almacenan frutas y verduras para mantenerse frescas durante el mayor tiempo
posible.
Despensa Custom Chill
d
Como compartimento de refrigeración, aquí es donde se almacenan la carne, el pescado y las
verduras.
17
Page 94

Divisor Durabase
e
Proporciona almacenamiento para alimentos grandes.
Zona de congelación rápida
f
Cuando configura el cajón medio e inferior en el modo de congelador, la zona de congelación rápida
alcanzará la temperatura establecida más rápidamente.
Compartimento del Door in Door
g
Aquí es donde se almacenan los alimentos que se toman con frecuencia, tales como bebidas y
aperitivos.
Cajón medio / inferior
h
Los 2 cajones se pueden configurar en modo Frigorífico o Congelador. Ambos cajones deben usar el
mismo modo.
• Para almacenar alimentos frescos, presione el botón Fridge Drawer durante al menos 1 segundo.
• Para almacenar alimentos congelados, presione el botón Freezer Drawer durante al menos 1
segundo.
PRECAUCIÓN
• Vacíe ambos cajones antes de cambiar el modo de congelador a frigorífico o viceversa.
• Si se cambia el modo mientras hay comida en el cajón, la comida podría echarse a perder.
Contenedor interior
i
Se eleva durante la operación de elevación automática.
ES
18
Page 95

Panel de control
El panel de control puede variar de un modelo a otro.
Características del panel de control
ES
Voice Assistant
a
Cambia la configuración del asistente
de voz. Este botón le permite activar/
desactivar el Asistente de voz. Para
usar la función de asistente de voz, el
electrodoméstico debe estar conectado
a la aplicación LG ThinQ. Para obtener
más información sobre cómo conectar
el electrodoméstico, consulte las
FUNCIONES SMART.
Wi-Fi
b
Este botón permite al electrodoméstico
conectarse a un red Wi-Fi doméstica.
Consulte la sección FUNCIONES SMART
para obtener más información sobre
la configuración inicial de la aplicación
LG ThinQ.
Auto Door
c
La puerta se abre automáticamente
si coloca un pie cerca del sensor de
movimiento en la parte inferior de la puerta.
Esto es conveniente cuando tiene las dos
manos llenas y necesita abrir la puerta.
Para configurar la función de apertura
automática de la puerta, presione el botón
repetidamente para alternar entre los
ajustes de ENCENDIDO, Apagar sonido y
APAGADO.
Uso de la función de puerta automática
Cuando la función de apertura
1
automática de la puerta está habilitada,
el texto se muestra en el piso cerca del
sensor de movimiento.
Pase un pie delante del sensor de
2
movimiento y pise el texto que se
muestra. Se abre la puerta. Si la
puerta se abre menos de unos 20
grados y no se abre más, se cerrará
automáticamente después de 3
segundos.
NOTA
• Coloque el pie lo suficientemente cerca
del sensor para que el texto aparezca
encima del pie, no solo de los dedos.
19
Page 96

PRECAUCIÓN
Es posible que desee desactivar la función
de apertura automática de la puerta si
tiene niños pequeños o personas con
capacidades físicas, sensoriales o mentales
reducidas en el hogar. Podrían lesionarse
si la puerta se abre inesperadamente
mientras están cerca.
NOTA
• El texto que se muestra puede no
ser legible en algunos materiales
para suelos, pero esto no afectará el
rendimiento de la función de apertura
automática de la puerta.
• Si el material del suelo es altamente
reflectante (metal, vidrio), el sensor
de movimiento puede funcionar mal
y la función de apertura automática
de la puerta puede no funcionar
correctamente.
• Los objetos reflectantes situados delante
del sensor de movimiento podrían
provocar la aparición del texto, aunque
este desaparecerá si no se detecta
ningún movimiento.
• Si una mascota pasa por debajo cuando
una persona se para frente al producto,
se puede activar la función de apertura
automática de la puerta.
Fridge
d
Presione este botón repetidamente para
seleccionar la temperatura deseada entre
1 °C y 7 °C.
• La temperatura del frigorífico inicial es
de 3 °C.
Custom Chill
e
Seleccione un ajuste de temperatura para
la despensa Custom Chill pulsando el botón
Custom Chill varias veces para alternar
entre Carne, Charcutería o Productos
elaborados.
El ajuste de temperatura es cada vez más
frío en el orden Productos elaborados →
Charcutería → Carne.
• Carne (El más frío): carne o bebidas
• Charcutería (Más frío): alimentos
cocinados o preparados para servir
• Productos elaborados (Frío): verduras
o frutas
Lock
f
La función de bloqueo deshabilita cualquier
otro botón en la pantalla.
• Cuando la alimentación se conecta
inicialmente al electrodoméstico, la
función de bloqueo está desactivada.
• Para bloquear los botones del panel de
control, mantenga presionado el botón
Lock hasta que aparezca el icono en la
pantalla y se active la función.
• Para desactivar la función, mantenga
presionado el botón Lock durante
aproximadamente tres segundos.
Express Freeze
g
Con esta función, el electrodoméstico
puede elaborar rápidamente una gran
cantidad de hielo o congelar una gran
cantidad de alimentos.
• Esta función se activa o desactiva cada
vez que se pulsa el botón.
• Esta función finaliza automáticamente
después de un período específico.
ES
20
Page 97

ES
Auto Lift
h
Cuando Auto Lift está habilitado, al
presionar el botón cajón extraíble inferior se
abre automáticamente el cajón y se levanta
el contenedor interno para un acceso
cómodo.
Presione el botón cajón extraíble inferior
nuevamente para bajar automáticamente el
contenedor interno y cerrar el cajón.
Configuración Auto Lift
Pulse Auto Lift repetidamente para alternar
entre Apagado ~ Encender sonido ~
Apagar sonido ~ Solo apertura cajón
automática.
El ajuste se indica mediante el icono en la
pantalla.
− Apagado: el cajón debe abrirse
manualmente y la función de
elevación automática está
desactivada.
− Encender sonido: se escucha sonido,
el cajón se abre automáticamente y el
contenedor interno se levanta
− Apagar sonido: el cajón se abre
automáticamente sin sonido y el
contenedor interno se levanta
− Solo apertura cajón automática: el
cajón se abre automáticamente sin
sonido, pero el contenedor interno no
está levantado.
Usando Elevación automática
Presione el botón Auto Lift para activar
1
Elevación automática.
Presione el botón cajón extraíble
2
inferior b. El cajón inferior se abre
automáticamente y el contenedor
interno se levanta.
• Cuando el sensor de apertura
automática a detecta movimiento
delante del electrodoméstico, se
ilumina el botón cajón extraíble
inferior b. Si el botón no se ilumina,
acérquese al electrodoméstico para
activar el sensor.
Presione el botón cajón extraíble
3
inferior b para bajar automáticamente
el contenedor interno y cerrar el cajón.
NOTA
• Cuando la función de elevación
automática está desactivada en el panel
de control:
− Situarse frente al electrodoméstico
no activará la luz alrededor del botón
cajón extraíble inferior.
− Cuando se presiona el botón cajón
extraíble inferior, la luz parpadea 3
veces.
21
Page 98

ES
• Cuando la función de elevación
automática está activada en el panel de
control:
− Si al presionar el botón cajón
extraíble inferior no se cierra el cajón
inferior, abra el cajón central o cierre
manualmente el cajón inferior.
− Si al presionar el botón cajón extraíble
inferior no se abre el cajón inferior,
abrirlo manualmente hará que el
compartimento interior se levante.
− La función de elevación automática no
funciona cuando el cajón central está
abierto.
Freezer Drawer
i
Presione este botón repetidamente para
seleccionar la temperatura deseada entre 23 °C y - 15 °C.
• La temperatura del congelador inicial es
de -18 °C.
Configuración de cajones en modo
congelador
Para configurar los cajones en el modo
congelador, presione y mantenga
presionado el botón Freezer Drawer
durante aproximadamente 1 segundo.
Fridge Drawer
j
Presione este botón repetidamente para
seleccionar la temperatura deseada entre
1 °C y 7 °C.
• La temperatura del frigorífico inicial es
de 3 °C.
Establecer cajones en modo frigorífico
Para configurar los cajones en el
modo frigorífico, presione y mantenga
presionado el botón Fridge Drawer durante
aproximadamente 1 segundo.
NOTA
• La temperatura que se muestra
es la temperatura objetivo y no la
temperatura real del electrodoméstico.
La temperatura real depende de los
alimentos dentro del electrodoméstico.
22
Air Filter
k
Sustituya el filtro de aire cuando se
encienda el icono. Después de sustituir el
filtro de aire, mantenga pulsado el botón
Air Filter durante tres segundos hasta que
se apague la luz del icono. Sustituya el filtro
de aire aproximadamente cada seis meses.
InstaView Door in Door
El elegante panel de vidrio tintado se ilumina
con dos golpes rápidos, lo que le permite ver
dentro del compartimento de almacenamiento del
frigorífico sin tener que abrir la puerta.
Toque dos veces el cristal para encender o
1
apagar la luz LED dentro de la puerta.
La luz LED se apagará automáticamente
2
después de diez segundos.
NOTA
• La función InstaView Door in Door se desactiva
durante 2 segeundos con posterioridad al cierre
de la puerta.
• Toque la parte central del cristal. Si toca los
bordes del cristal, es posible que la función
InstaView Door in Door no se active.
• Toque el cristal con suficiente fuerza para que
se escuche el sonido correspondiente.
Page 99

ES
• La función InstaView Door in Door podría
activarse si se producen ruidos fuertes cerca del
electrodoméstico.
• Limpie la puerta de vidrio con un trapo
seco. Para eliminar las manchas rebeldes,
humedezca ligeramente un trapo limpio con
agua templada o limpiacristales. No rocíe
limpiacristales directamente sobre la puerta de
vidrio.
Door in Door
Uso del anaquel móvil
Ajustar el anaquel móvil permite guardar los
alimentos más grandes con mayor facilidad.
Para subir el anaquel móvil, sujete ambos
1
extremos del anaquel por la parte central y
presione el anaquel hacia arriba hasta que
encaje en su sitio.
PRECAUCIÓN
• Para evitar lesiones personales o daños en el
anaquel o su contenido, vacíe el anaquel móvil
antes de moverlo hacia arriba o hacia abajo.
Retirada/recolocación del anaquel
superior
Abra la puerta del frigorífico.
1
De un toque suave en la parte inferior del
2
anaquel con su mano.
Levante ligeramente ambos extremos del
3
anaquel y tire hacia delante para separarlos.
Para reajustar, realinee el anaquel con las
4
ranuras izquierda y derecha y bájela.
Para bajar el anaquel móvil, empújelo hacia
2
arriba para liberar las palancas situadas en el
lateral del anaquel y bájelo hasta que encaje
en su sitio.
Toque suavemente ambos extremos del
5
anaquel.
• Si escucha un clic, el reajuste se habrá
realizado correctamente.
23
Page 100

ES
Limpieza del anaquel móvil e
inferior
Abra la puerta del frigorífico.
1
Limpie los anaqueles con un paño suave.
2
Estante del frigorífico
Retirada/recolocación del estante
del frigorífico
Para extraer, levante la parte delantera del
1
estante para desenganchar los ganchos del
estante, luego levante el estante desde la
parte posterior.
Nota
• Los objetos extraños y la suciedad entre el
estante y la pared interior del armario podrían
evitar que la luz del estante se encienda.
Cajón del frigorífico
Retirada/recolocación del cajón
Elimine el contenido del cajón. Agarre el
1
mango del cajón de las verduras y tire de él
hacia afuera por completo suavemente.
Manteniendo ambas palancas presionadas,
2
levante el soporte del cajón ligeramente y
sáquelo del sistema de travesaños.
Para volver a colocarlo, incline el frente del
2
estante hacia arriba y guíe los ganchos del
estante hacia las ranuras a la altura deseada.
24
Alinee el soporte del cajón en el riel y presione
3
hasta que oiga cómo encaja.
 Loading...