

Page 1

www.LGSIGNATURE.com
OWNER'S MANUAL
FRIDGE&FREEZER
Read this owner's manual thoroughly before operating the appliance and keep it handy for
reference at all times.
MFL68302729
Copyright © 2017 LG Electronics. All Rights Reserved
Page 2

T ABLE OF CONTENTS
SAFETY INSTRUCTIONS .................................................................4
IMPORTANT SAFETY INSTRUCTIONS .................................................................4
INSTALLATION ................................................................................14
Compartments .......................................................................................................14
Notes for Movement and Transport .......................................................................15
Notes for Installation ..............................................................................................15
Removing the Door ................................................................................................16
Refitting the Door ...................................................................................................18
Adjusting the Height of the Door ............................................................................18
OPERATION .....................................................................................20
Parts and Functions ...............................................................................................20
Notes for Operation ...............................................................................................24
Using Control Panel ...............................................................................................25
InstaView Function ................................................................................................27
Auto Open Door Function ......................................................................................28
Auto Open Drawer Function ..................................................................................29
Suggestion for More Usable Space .......................................................................29
CustomChill Pantry ................................................................................................30
Other Functions .....................................................................................................32
This manual may contain images or content
different from the model you purchased.
This manual is subject to revision by the
manufacturer.
SMART FUNCTIONS .......................................................................33
Using Smart ThinQ Application ..............................................................................33
Using Smart Diagnosis™ ......................................................................................34
Page 3

MAINTENANCE ................................................................................35
Notes for Cleaning .................................................................................................35
Cleaning the Door Basket ......................................................................................36
Cleaning the Shelf .................................................................................................37
Cleaning the Vegetable Drawer .............................................................................37
Cleaning the Freezer Drawer ................................................................................39
Cleaning the Drawer Support ................................................................................40
TROUBLESHOOTING .....................................................................41
Rev.02_042717
Page 4

SAFETY INSTRUCTIONS
EN
The following safety guidelines are intended to prevent
unforeseen risks or damage from unsafe or incorrect operation
of the appliance.
The guidelines are separated into ‘WARNING’ and ‘CAUTION’
as described below.
This symbol is displayed to indicate matters and
operations that can cause risk. Read the part with this
symbol carefully and follow the instructions in order to
avoid risk.
WARNING
This indicates that the failure to follow the instructions can
cause serious injury or death.
CAUTION
This indicates that the failure to follow the instructions can
cause the minor injury or damage to the product.
IMPORTANT SAFETY INSTRUCTIONS
WARNING
To reduce the risk of explosion, fire, death, electric shock,
injury or scalding to persons when using this product, follow
basic precautions, including the following:
Children in the Household
This appliance is not intended for use by persons (including children)
with reduced physical, sensory or mental capabilities, or lack of
experience and knowledge, unless they have been given supervision
or instruction concerning use of the appliance by a person
responsible for their safety. Children should be supervised to ensure
that they do not play with the appliance.
4
Page 5

EN
For use in Europe:
This appliance can be used by children aged from 8 years and
above and persons with reduced physical, sensory or mental
capabilities or lack of experience and knowledge if they have been
given supervision or instruction concerning use of the appliance in
a safe way and understand the hazards involved. Children shall not
play with the appliance. Cleaning and user maintenance shall not be
made by children without supervision.
Installation
•This appliance should only be transported by two or more people
holding the appliance securely.
•Ensure that the socket outlet is properly grounded, and that the
earth pin on the power cord is not damaged or removed from
the power plug. For more details on grounding, inquire at an LG
Electronics customer information centre.
•This appliance is equipped with a power cord having an equipment-
grounding conductor and a grounding power plug. The power plug
must be plugged into an appropriate socket outlet that is installed
and grounded in accordance with all local codes and ordinances.
•If the power cord is damaged or the hole of the socket outlet is
loose, do not use the power cord and contact an authorized service
centre.
•Do not plug the appliance into a multi socket adapter which does
not have a power cable(mounted). Failure to do so may result in
fire.
•Do not modify or extend the power cable.
5
Page 6

EN
•Avoid using any extension cords or double adaptor. The appliance
should be connected to a dedicated power line which is separately
fused.
•Do not use a multi socket outlet which is not properly
grounded(portable). Upon using a properly-grounded multi socket
outlet (portable), use a product with the current capacity of the
power code rating or higher. Failure to do so may result in electric
shock or fire due to the heat of multi socket outlet. The power may
be shut off when the circuit breaker is operated.
•Install the appliance in a place where is easy to unplug the power
plug of the appliance.
•Be careful not to point the power plug up or let the appliance lean
against the power plug.
•Install the appliance on a firm and level floor.
•Do not install the appliance in a damp and dusty place. Do not
install or store the appliance in any outdoor area, or any area that
is subject to weathering conditions such as direct sunlight, wind, or
rain or temperatures below freezing.
•Do not place the appliance in direct sunlight or expose it to the heat
from heating appliances such as stoves or heaters.
•Be careful not to expose the rear of the appliance when installing.
•Be careful not to let the appliance door fall during assembly or
disassembly.
•Be careful not to pinch, crush, or damage the power cable during
assembly or disassembly of the appliance door.
•Do not connect a plug adapter or other accessories to the power
plug.
6
Page 7
EN
Operation
•Do not use the appliance for any purpose (storage of medical
or experimental materials or shipping) other than any domestic
household food storage use.
•In case of flood, disconnect the power plug and contact the LG
Electronics customer information centre.
•Unplug the power plug during a severe thunderstorm or lightening
or when not in use for a long period of time.
•Do not touch the power plug or the appliance controls with wet
hands.
•Do not bend the power cable excessively or place a heavy object
on it.
•If water penetrates electrical parts of the appliance, disconnect
power plug and contact an LG Electronics customer information
centre.
•Do not place hands or metallic objects inside the area emitting the
cold air, cover or heat releasing grille on the back.
•Do not apply excessive force or impact to the back cover of the
appliance.
•Do not put animals, such as pets into the appliance.
•Be careful of nearby children when you open or close the appliance
door. The door may bump the child and cause injury.
•Avoid the danger of children getting trapped inside the appliance. A
child trapped inside the appliance can cause suffocation.
•Do not place heavy or fragile objects, containers filled with liquid,
combustible substances, flammable objects(such candles, lamps,
etc.), or heating devices(such as stoves, heaters, etc.) on the
appliance.
7
Page 8

•If there is a gas leakage (isobutane, propane, natural gas, etc.),
do not touch the appliance or power plug and ventilate the
area immediately. This appliance uses a very eco-friendly gas
(isobutane, R600a) as the refrigerant. Although it uses a small
amount of the gas, it is still combustible gas. Gas leakage during
appliance transport, installation or operation can cause fire,
explosion or injury if sparks are caused.
•Do not use or store flammable or combustible substances (ether,
benzene, alcohol, chemical, LPG, combustible spray, insecticide,
air freshener, cosmetics, etc.) near the appliance.
•Immediately unplug the power plug and contact an LG Electronics
customer information centre if you detect a strange sound, odour,
or smoke coming from the appliance.
•Fill with potable water only into icemaker or dispenser water tank.
Maintenance
•Disconnect the power cord before cleaning the appliance or
replacing the inside lamp (where fitted).
•Securely plug the power plug in the socket outlet after completely
removing any moisture and dust.
•Never unplug the appliance by pulling on the power cable. Always
grip the power plug firmly and pull straight out from the socket
outlet.
•Do not spray water or inflammable substances(toothpaste, alcohol,
thinner, benzene, flammable liquid, abrasive, etc.) over the interior
or exterior of the appliance to clean it.
•Do not clean the appliance with brushes, cloths or sponges with
rough surfaces or which are made of metallic material.
EN
8
Page 9

EN
•Only qualified service personnel from LG Electronics service centre
should disassemble, repair, or modify the appliance. Contact an LG
Electronics customer information centre if you move and install the
appliance in a different location.
•Do not use a hair drier to dry the inside of the appliance or place a
candle inside to remove the odours.
•Do not use mechanical devices or other means to accelerate the
defrosting process.
Disposal
•When discarding the appliance, remove the door gasket while
leaving the shelves and baskets in place and keep children away
from the appliance.
•Dispose of all packaging materials (such as plastic bags and
styrofoam) away from children. The packaging materials can cause
suffocation.
Technical Safety
•Keep ventilation openings, in the appliance enclosure or in the built-
in structure, clear of obstruction.
•Do not use electrical appliances inside the food storage
compartments of the appliance, unless they are of the type
recommended by the manufacturer.
•The refrigerant and insulation blowing gas used in the appliance
require special disposal procedures. Consult with service agent or a
similarly qualified person before disposing of them.
9
Page 10

EN
•This appliance contains a small amount of isobutane refrigerant
(R600a), natural gas with high environmental compatibility, but it is
also combustible. When transporting and installing the appliance,
care should be taken to ensure that no parts of the refrigerating
circuit are damaged.
•Refrigerant leaking out of the pipes could ignite or cause an
explosion.
•If a leak is detected, avoid any naked flames or potential sources
of ignition and air the room in which the appliance is standing for
several minutes. In order to avoid the creation of a flammable gas
air mixture if a leak in the refrigerating circuit occurs, the size of
the room in which the appliance is used should correspond to the
amount of refrigerant used. The room must be 1 m² in size for every
8 g of R600a refrigerant inside the appliance.
•The amount of refrigerant in your particular appliance is shown on
the identification plate inside the appliance.
•Never start up an appliance showing any signs of damage. If in
doubt, consult your dealer.
•This appliance is intended to be used in household and similar
applications only. It should not be used for commercial, or catering
purposes, or in any mobile application such as a caravan or boat.
•Do not store explosive substances such as aerosol cans with a
flammable propellant in this appliance.
10
Page 11

EN
CAUTION
To reduce the risk of minor injury to persons, malfunction, or
damage to the product or property when using this product,
follow basic precautions, including the following:
Installation
•Do not tilt the appliance to pull or push it when transporting.
•Make sure not to get a body part such as a hand or foot stuck while
moving the appliance.
Operation
•Do not touch frozen food or the metal parts in the freezer
compartment with wet or damp hands. It may cause frostbite.
•Do not place glass containers or bottles in the freezer compartment,
shelves or ice bin that will be exposed to temperatures below
freezing.
•The tempered glass on the front side of the appliance door or the
shelves can be damaged by an impact. If it is broken, do not touch
it with wet hands, as this may result in injury.
•Do not place heavy objects on top of the door in door.
•Do not use the door in door as a chopping board and ensure it
is not scratched by a sharp tool, as this may cause appliance
damage.
•Do not hang from the appliance door, storage room, shelf or fridge
door in door or climb up into it.
•Do not store an excessive amount of water bottles or containers
for side dishes on the door baskets. The basket may break or your
hand may bump into the surrounding structure, causing injury.
11
Page 12
EN
•Keep food organized inside the appliance.
•Prevent animals from nibbling on the power cable or water hose.
•Do not open or close the appliance door with excessive force.
•If the hinge of the product door is damaged or operates improperly,
stop using the appliance and contact an authorized service centre.
•Do not damage the refrigerant circuit.
•Do not place any electronic appliance (such as heater and mobile
phone) inside the appliance.
•Do not clean glass shelves or covers with warm water when
they are cold. They may break if exposed to sudden temperature
changes.
•Never eat frozen foods immediately after they have been taken out
in the freezer compartment.
•Do not open the door of the appliance with the door in door open,
or do not open the door in door while the door of the appliance is
open. The door in door may be struck by the edge of the appliance
and damaged.
•Do not grab the side of the refrigerator door when closing it. When
closing the door, please use the door handle.
12
Page 13
Maintenance
•Do not insert the shelves upside down. The shelves may fall,
causing injury.
•To remove frost from the appliance, contact an LG Electronics
customer information centre.
•Dispose of the ice inside the ice bin in the freezer compartment
during an extended power outage.
EN
13
Page 14
INSTALLATION
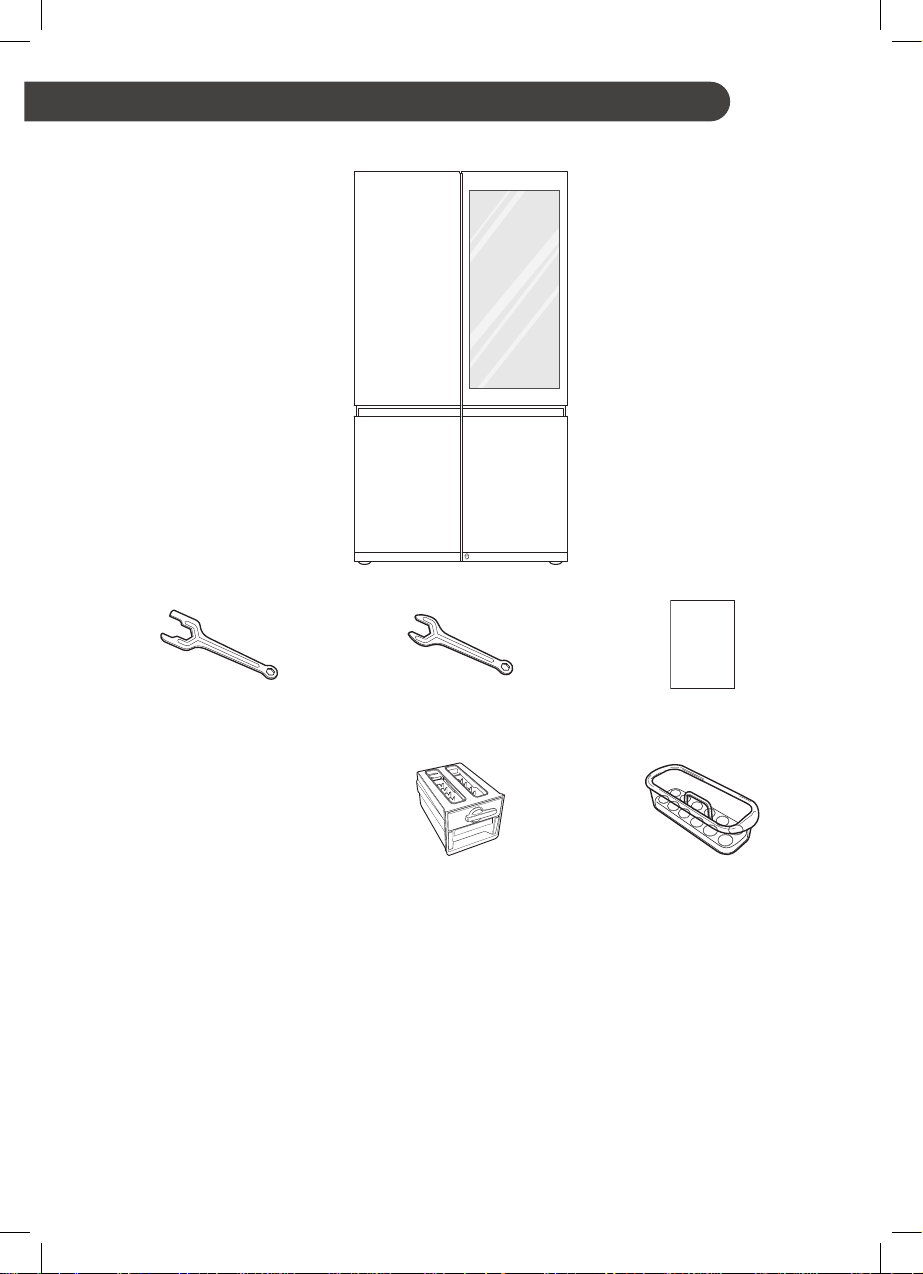
Compartments
EN
Spanner Type1 Spanner Type2 Owner's Manual
Ice Maker Egg Box
• The appearance or components of the appliance may differ from model to model.
14
Page 15

EN
Notes for Movement and Transport
• Remove all food from inside the appliance.
Then, transport the appliance only after fixing
fragile parts such as shelves and the door
handle with tape. Failure to do so may cause
appliance damage.
• Pull the power plug out, insert and fix it into the
power plug hook at the rear or on top of the
appliance. Failure to do so may cause damage
to the power plug or floor scratch.
• When transporting the appliance, more than
two people should transport the appliance
carefully. Dropping the appliance, which is
extremely heavy, may cause personal injury or
appliance failure.
• When transporting the appliance over a long
distance, keep the appliance upright. The
appliance may fall over, causing malfunctions.
Never transport the appliance laying down as it
can cause a refrigerant circulation malfunction
when it is turned back on again.
Notes for Installation
• Install the appliance on a solid and flat area.
− If the appliance is installed on an uneven
floor, it can cause vibration and noise causing
the appliance to fall resulting in injury. It could
also cause the doors not to close correctly
and introduce moisture inside the unit during
operation.
− If the appliance front or rear is not level,
adjust the front feet so that it can be
corrected. Severe cases may need the floor
to be packed out with strips of thin timber.
• Avoid placing the unit near heat sources, direct
sunlight or moisture.
• Connect the power supply cord (or plug) to the
outlet. Don't double up with other appliances
on the same outlet.
• After connecting the power supply cord (or
plug) to the outlet, Wait two or three hours
before you put food into the appliance. If you
add food before the appliance has cooled
completely, your food may spoil.
• Models with handles should be located at least
55 mm from the wall on the hinge side to open
door by 90°.
• Allow over 55 mm clearance to the right, left,
back and top when installing.
15
Page 16
EN
(1
(2)
Removing the Door
When it is necessary to move the appliance
through a narrow opening, removing the doors is
the recommended procedure.
WARNING
• Disconnect the power cord, house fuse or
circuit breaker before installing or service the
appliance. Failure to follow these instructions
may result in death, fire or electric shock.
If your entrance door is too narrow for the
appliance to pass through, remove the appliance
doors and pass the appliance laterally.
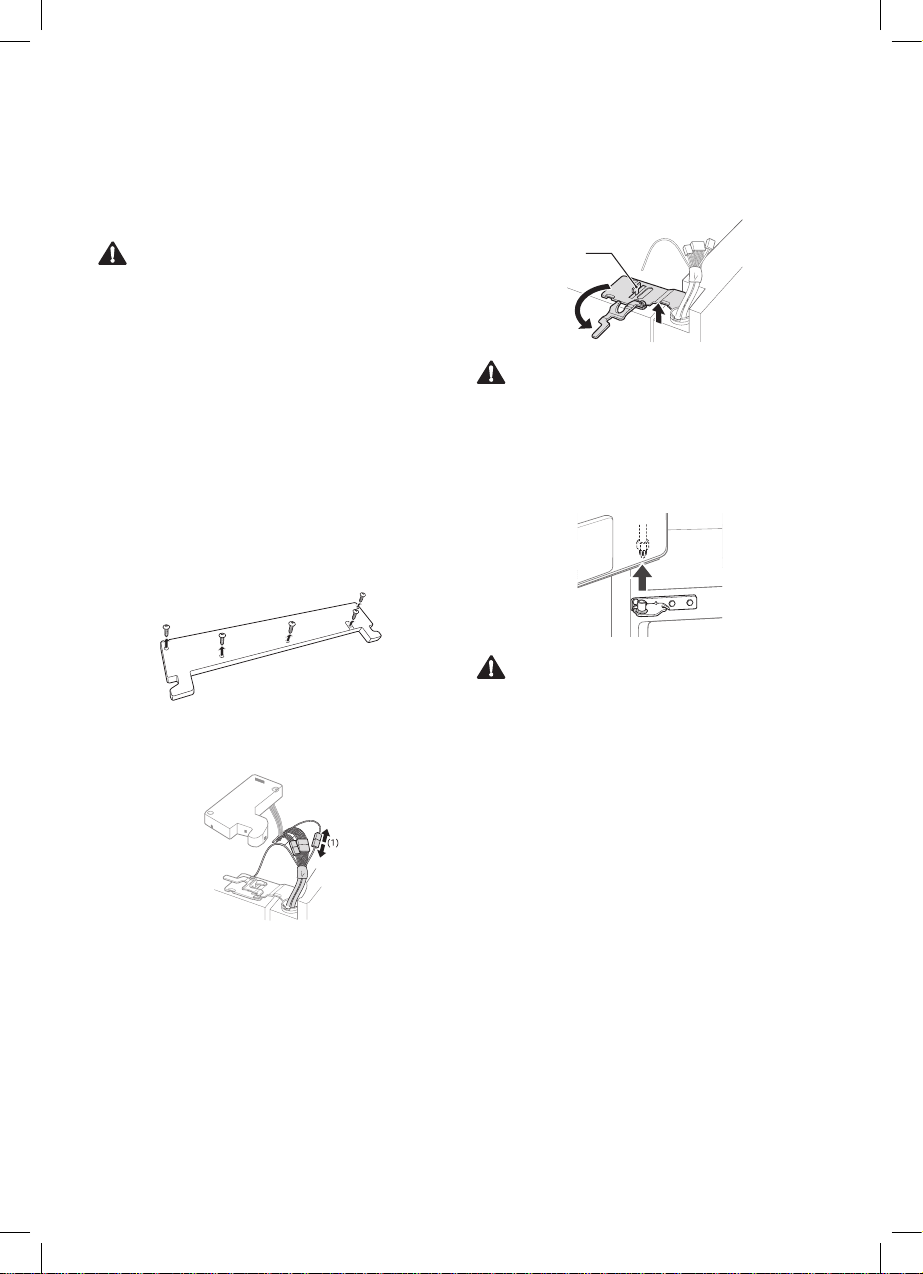
[The Left Fridge Door]
Remove the screws from the hinge cover
1
at the top of the refrigerator. Lift the hook
(not visible), located on the side of the
cover at the bottom edge, with a flat-head
screwdriver.
Remove the cover. Disconnect all wire
2
harnesses (1).
Rotate the hinge lever counterclockwise (1).
3
Lift the top hinge (2) free of the hinge lever
latch.
Hinge Lever Latch
)
CAUTION
• When lifting the hinge free of the latch, be
careful that the door does not fall forward.
Remove the hinge lever by tapping the end
4
of it toward the outside edge of the cabinet.
CAUTION
• When lifting the hinge free of the latch, be
careful that the door does not fall forward.
16
Page 17
EN
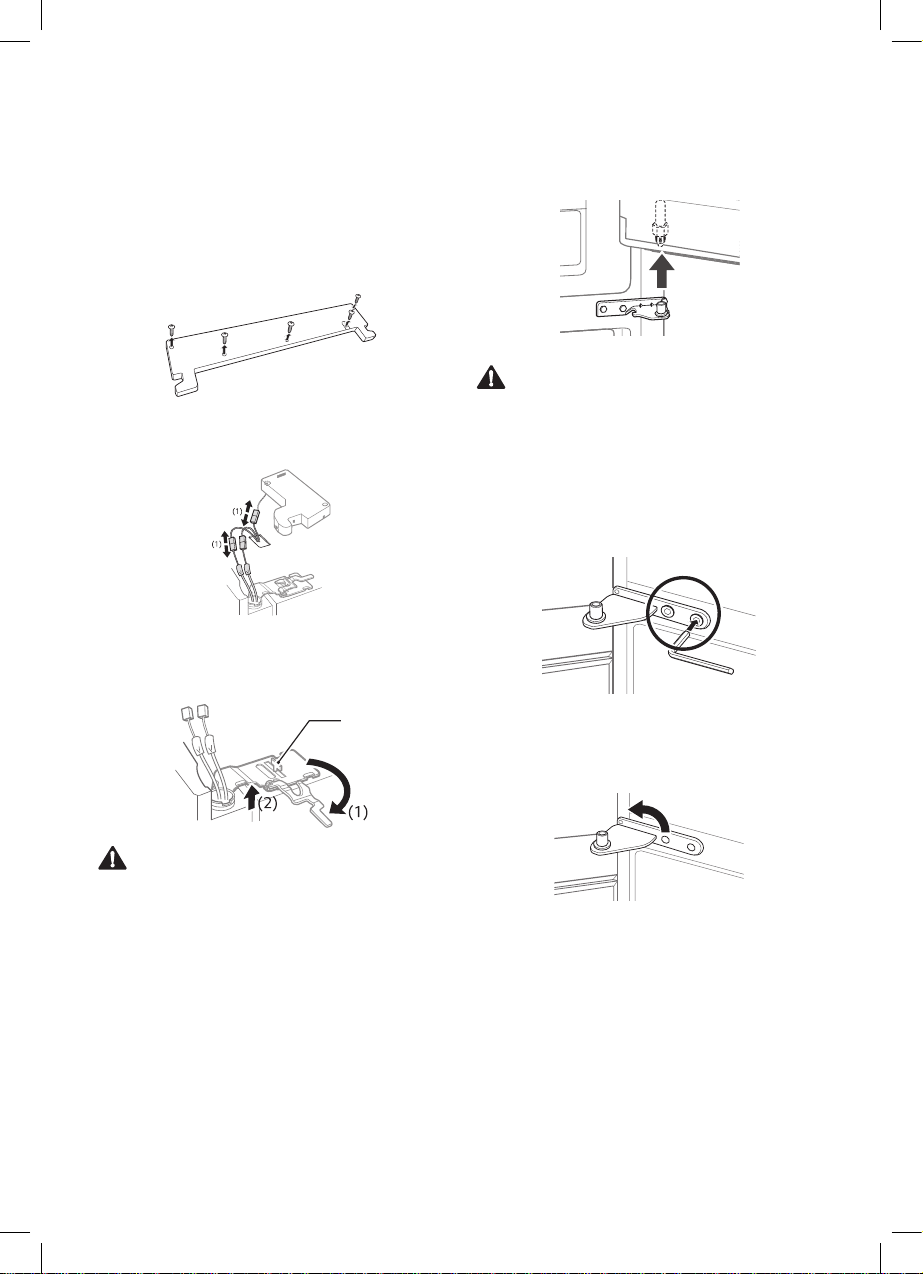
[The Right Fridge Door]
Remove the screws from the hinge cover
1
at the top of the refrigerator. Lift the hook
(not visible), located on the side of the
cover at the bottom edge, with a flat-head
screwdriver.
Detach the wire harness (1).
2
Rotate the hinge lever (1) clockwise. Lift the
3
top hinge (2) free of the hinge lever latch.
Hinge Lever Latch
Lift the door from the middle hinge pin and
4
remove the door.
CAUTION
• Place the door on a non-scratching surface
with the inner side facing up.
[The Freezer Doors]
Remove the two hinge bolts.
1
Twist the hinge to raise the pivoting end so
2
that the door can be lifted off. Lift the door off
the lower hinge pin and remove it.
CAUTION
• When lifting the hinge free of the hinge lever
latch, be careful that the door does not fall
forward.
17
Page 18

Unscrew the screw that attaches the lower
3
hinge cover and remove the cover.
EN
Refitting the Door
Mount them in the reverse sequence of removal
after the appliance is passed through the access
door.
(2)
Disconnect all wire harnesses.
4
Remove the door by lifting it off the lower
5
hinge pin.
Lower Hinge
(1)
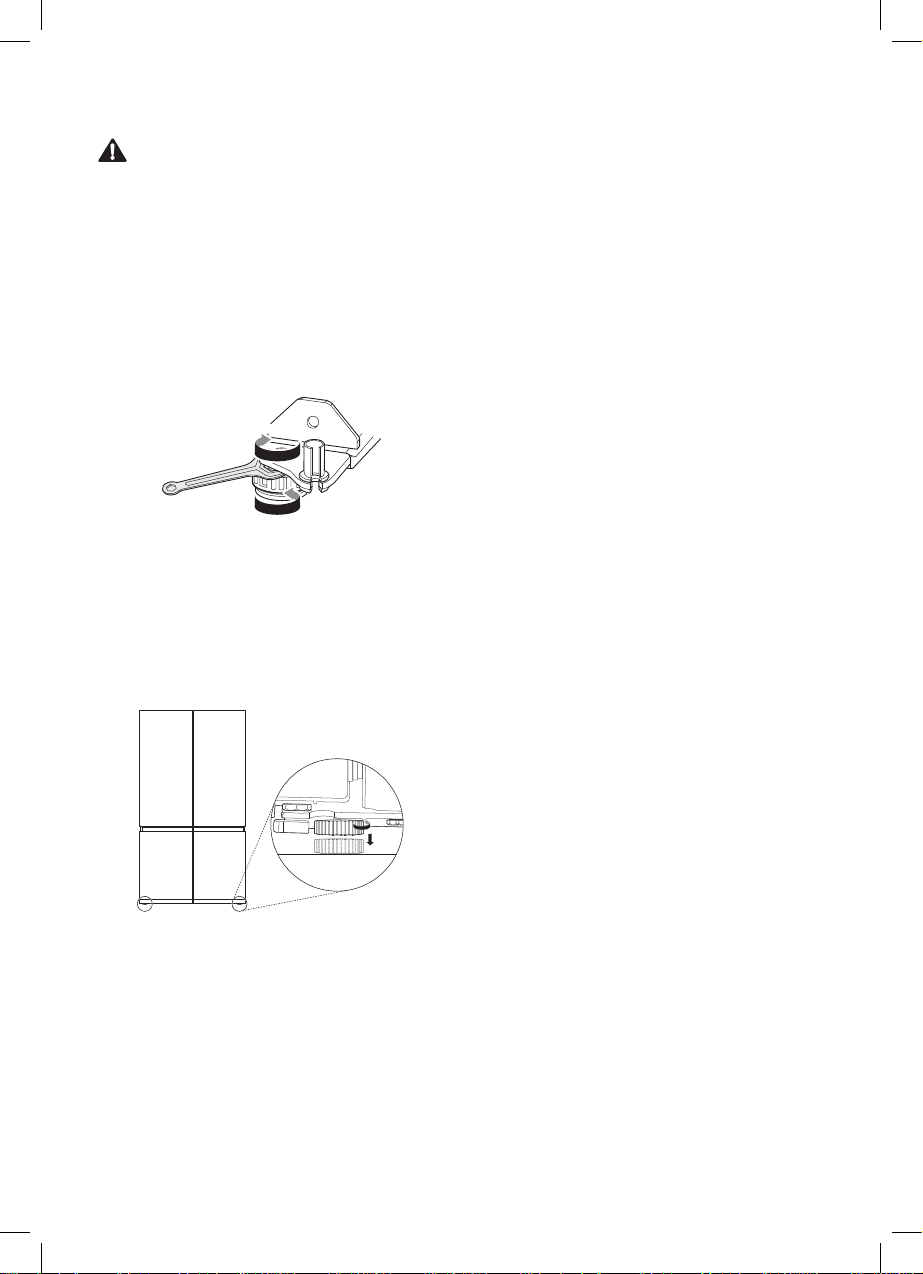
Adjusting the Height of the Door
[Fridge Door Height]
Open the fridge door and use the spanner type1
to rotate the door hinge bolt as shown.
Height difference
Fridge door
Freezer door
[Freezer Door Height]
[Method1]
Open the freezer door and use the spanner
type1 to rotate the door hinge bolt as shown.
Freezer door
18
Height difference
Page 19
EN
CAUTION
• When tilting the appliance backward to loosen
the screen at the bottom of the appliance, two
or more people should hold the handles at the
bottom and rear top side of the appliance.
[Method2]
With the refrigerator door open, fit the spanner
type2 in the nut of the height adjustment screw,
and turn until it is level.
Raise the door
Lower the door
NOTE
• Support the bottom of the appliance once the
height adjustment screws on both sides of the
bottom have been completely loosened. This
way you can prevent the door from slanting
downward due to the weight of stored food
items.
Door Mullion and Auto Open Door
Once the door baskets are filled, the doors may
become misaligned, preventing the door mullion
or the Auto Open Door function from working
properly.
If the mullion on the left refrigerator door does
not open and close properly or the right door
stays ajar after the Auto Open Door function,
follow the directions below.
Make sure both front leveling legs are
1
extended fully and in firm contact with the
floor.
Follow the instructions in the Door Alignment
2
section to raise the left refrigerator door
until the door mullion is once again working
properly.
Adjust the right refrigerator door so it aligns
3
with the left refrigerator door.
19
Page 20

OPERATION
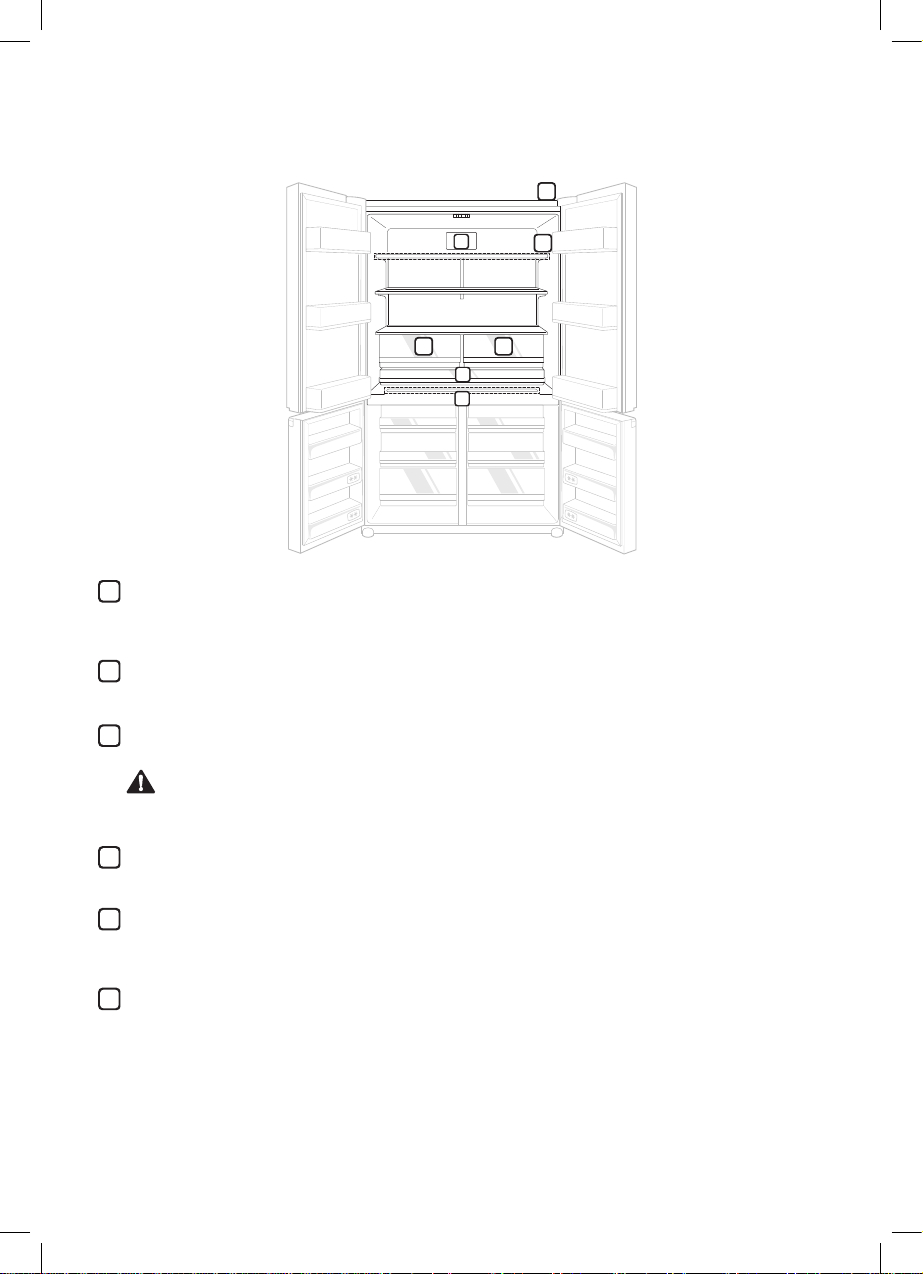
1
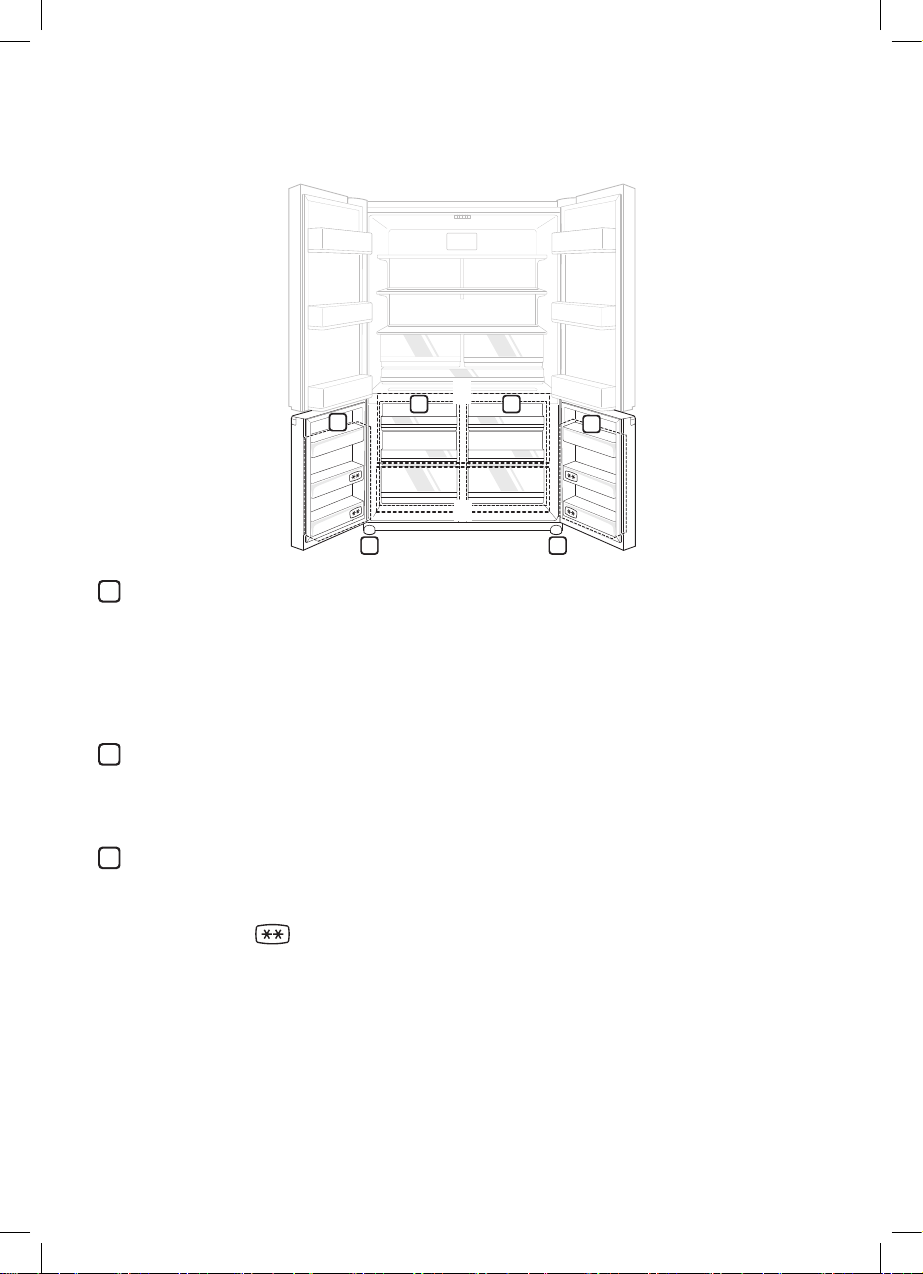
Parts and Functions
EN
1
2
3
InstaView Door in Door
The InstaView Door in DoorTM compartment allows for easy access to commonly used food items.
2
Control Panel
To set the freezer and fridge temperatures.
3
Auto Open Door Sensor
The right fridge door opens automatically if you place your foot near the motion sensor at the
bottom of the door.
• The appearance or components of the appliance may differ from model to model.
TM
20
Page 21
EN
3
1
1
Smart Diagnosis Unit
2
4 4
5
6
3
Use this function when contacting LG Electronics customer information centre to help make an
accurate diagnosis when the appliance operates abnormally or a failure occurs.
2
Hygiene Fresh+ Filter
• This function minimizes bacteria and odor inside the appliance.
Adjustable Fridge Shelf(Optional)
Shelves are adjustable to meet individual storage needs.
CAUTION
• If you close the fridge door without pushing back the Adjustable Fridge Shelf, the appliance
may be damaged.
4
Vegetable Drawer
This is where fruits and vegetables are stored to remain fresh for as long as possible.
5
Custom Chill Pantry
This space is used to store meat, fish, dairy products, beverages, and other items that need to
be kept chilled.
6
Hidden Bar Tray
Store small item fresher than shelf area or defrost frozen items.
21
Page 22

EN
7
Fridge Door Basket
7
7
10
7
8
9
8
This is where small packages of refrigerated foods, drinks and sauce containers are stored.
8
InstaView Door in Door
TM
Basket
This is where foods which are taken out frequently such as beverages and snacks are stored.
9
Adjustable Moving Basket
Easily move Adjustable Moving Basket up and down as necessary.
10
Door Mullion
This blocks the cold air of the refrigerator from leaking.
CAUTION
• To reduce the risk of scratching the door or breaking the center door mullion, make sure that
the refrigerator door mullion is always folded in.
22
Page 23
1)
3
1
Auto Open Drawer
2
1
(1)
3 3
1
2
2)
This is for long-term storage of frozen items.
Drawer 1)
• Preserve small packaged frozen food or frequently-taken out foods. To use larger space,
remove drawers.
Drawer 2)
• Preserve frozen food to keep longer.
EN
2
Freezer Door Basket
This is where small packages of frozen food can be stored.
• Do not store ice cream or food which will be stored for a long period of time within these
baskets.
Auto Open Drawer Sensor
The freezer drawers automatically open when the freezer door is opened by at least 85 degrees.
NOTE
• The 2-star section ( ) basket or drawer can be used to store ice and food from -12 °C to -18
°C for short periods.
• The top shelf of the freezer(1) will reach the set temperature the most quickly.
23
Page 24

EN
Notes for Operation
• Users should keep in mind that frost can form
If the door is not closed completely, if the
humidity is high during the summer, or if the
freezer door is opened frequently.
• Ensure there is sufficient space between food
stored on the shelf or door basket to allow the
door to close completely.
• Opening the door lets warm air enter the
appliance, and may cause the internal
temperature to rise.
• Do not open or close the appliance door
excessively.
• The LED lamp is only intended for use in
domestic appliances and is not suitable for
household room illumination.
Suggestion for Energy Saving
• Ensure there is sufficient space between stored
foods. This allows cold air to be circulated
evenly and lowers electricity bills.
• Store hot food only after it has cooled in order
to prevent dew or frost.
• When storing food in the freezer compartment,
set the freezer temperature lower than the
temperature indicated on the appliance.
• Do not set the temperature of the appliance
lower than needed. For ice making in normal
climates, the freezer temperatures should be
set to -18 or colder.
• Do not put food near the temperature sensor of
the fridge compartment. Keep a distance of at
least 3 cm from the sensor.
• Please note that a temperature rise after
defrosting has a permissible range in the
appliance specifications. If you wish to
minimise the impact this may have on the food
storage due to a temperature rise, seal or wrap
the stored food in several layers.
Storing Foods Effectively
• Store frozen food or refrigerated food inside
sealed containers.
• Check the expiration date and label (storage
instructions) before storing food in the
appliance.
• Do not store food for a long period of time
(more than four weeks) if it spoils easily at a
low temperature.
• Place the refrigerated food or frozen food
in each fridge or freezer compartment
immediately after purchasing.
• Avoid refreezing any food which has been
completely thawed. Freezing any food which
has been completely thawed again will lower
its taste and nutrition.
• Do not wrap and store vegetables with
newspaper. Printing material of newspaper
or other foreign substances may smear and
contaminate food.
• Do not overfill the appliance. Fill less than
70 % of the space. Cold air can not circulate
properly if the appliance is overfilled.
• Cool hot food before storing. If too much hot
food is placed inside, the internal temperature
of the appliance can increase and negatively
affect other foods stored in the appliance.
• If you set an excessively low temperature
for food, it may become frozen. Do not
set a temperature lower than the required
temperature for the food to be stored correctly.
• Always keep the appliance clean.
Max Freezing Capacity
• The Express Freeze function will allow the
freezer to its maximum freezing capacity. This
generally takes up to seven hours, however, it
will automatically turn off after a given time and
can also be turned off manually at any given
time.
• To get better air circulation, insert all inner
parts like baskets, drawers, and shelves.
24
Page 25

Using Control Panel
3
9
Units and Functions
5.532 mm
EN
1
* Wi-Fi
6
• This sets the refrigerator to connect to
your home’s Wi-Fi network.
2
* Lock
7
• This locks the buttons on the control
panel.
Auto Door
• This sets the Auto Door function.
4
Auto Drawer
8
• This sets the Auto Drawer function.
5
Fridge Temperature
• This sets the target temperature of the
fridge.
• Hold the Fridge Temperature button for
3 seconds or more to configure the Fresh
Keeper option.
• The actual control panel may differ from model to model.
Freezer Temperature
• This sets the freezer target temperature.
Hygiene Fresh
• This sets the Hygiene Fresh function.
• This function minimizes bacteria and odor
inside the appliance.
Express Freeze
• This sets Express Freeze functions.
Display Unit
You can check the appliance's settings.
• This image is the start-up screen.
• Press buttons
1
~ 8 to display the setting
for each function.
25
Page 26

EN
Notes for Use the Control Panel
• The control panel will turn on in any of the
following cases.
− When the power is turned on
− When a button is pressed
− When the appliance door (fridge
compartment, freezer compartment, door in
door) is opened
• The control panel will turn off automatically for
energy saving in any of the following cases.
− When one minute has passed after turning on
the power
− When no button operation is carried out for
20 seconds after a desired button is pressed
− When 20 seconds has passed after the
appliance door (fridge compartment, freezer
compartment, door in door) is opened and
closed
• If there is any finger or skin contact to the
control panel while cleaning it, the button
function may operate.
Setting the Temperature
This sets the fridge temperature or freezer
temperature.
• Press the Fridge button or Freezer button to
adjust the temperature.
• The initial temperature is set.
− Fridge : 3 °C
− Freezer : -18 °C
• The temperature can be adjusted.
− Fridge : from 0 °C to 7 °C
− Freezer : from -24 °C to -16 °C
• The actual inner temperature varies depending
on the food status, as the indicated setting
temperature is a target temperature, not actual
temperature within the appliance.
NOTE
• The default temperature setting may vary
depending on the appliance.
• Wait until two or three hours have passed after
connecting the appliance to the outlet before
storing food in the appliance.
• The appliance can automatically detect
problems during the operation.
• If a problem is detected, the appliance does
not operate and an error code is displayed
even when any button is pressed.
• When this occurs, do not turn off the power
and immediately contact an LG Electronics
customer information centre. If you turn off
the power, the repair technician from the LG
Electronics customer information centre. It may
have difficulty finding the problem.
Setting the Fresh Keeper
You can minimize the spoiling of food from
temperature changes by maintaining the
refrigerator’s temperature at 2 °C.
Press the Fridge Temperature button for 3
seconds and the Fresh Keeper will icon appear
in the control panel. Then the Fresh Keeper can
be configured.
• To turn off the Fresh Keeper, press the Fridge
Temperature button once while the fridge
temperature is displayed on the control panel
or hold the Fridge Temperature button for 3
seconds when the fridge temperature is not
displayed.
26
Page 27

EN
Setting Express Freeze
The function can quickly freeze a large amount
of ice or frozen foods.
• When you press the Express Freeze button,
the Express Freeze icon lights on the control
panel.
• The function is enabled and disabled in turn
each time you press the button.
• The Express Freeze function automatically
terminates after a specific period has passed.
Setting and Resetting Lock
This locks the buttons on the control panel.
• When you press the Lock button for 3
seconds, the Lock/Unlock icon on the
control panel lights. The function is enabled
and disabled in turn each time you press the
button.
• If you press a button other than lock when the
lock is set, the button will not function.
• When you press a button other than lock when
the lock is set, the Lock/Unlock icon on the
control panel will flash 3 times.
• To change a setting, first press the Lock button
for three seconds to disable the function.
Setting Wi-Fi
The Wi-Fi button, when used with the LG Smart
ThinQ application, allows the refrigerator to
connect to a home Wi-Fi network.
• The Wi-Fi icon shows the status of the
refrigerator’s network connection. The icon
illuminates when the refrigerator is connected
to the Wi-Fi network.
• Press and hold the Wi-Fi button for 3 seconds
to connect to the network. The icon blinks while
the connection is being made, then turns on
once the connection is successfully made.
InstaView Function
The InstaView function on the Door-in-Door
lets you see if you’re running low on frequently
used items like beverages and snacks, without
opening the refrigerator door.
Knock twice on the glass to turn the LED
1
light inside the Door-in-Door on or off.
The LED light turns off automatically after
2
ten seconds.
• The InstaView Door-in-Door function is
disabled when the right or left freezer door are
open, for two seconds after closing the door,
and when the ice dispenser is in use.
• Knock near the center of the glass. Knocking
near the edges of the glass may not activate
the InstaView Door-in-Door function.
• Knock hard enough so that the knocking sound
is audible.
• The InstaView Door-in-Door function may
activate if a loud noise occurs near the
refrigerator.
27
Page 28

EN
Auto Open Door Function
The right refrigerator door opens automatically
if you place a foot near the motion sensor at the
bottom of the door. This is convenient when you
have both hands full of groceries and need to
open the refrigerator door. To set the Auto Open
Door function, press the button repeatedly to
toggle between the ON, Sound Off, and OFF
settings.
Using the Auto Open Door
Function
When the Auto Open Door Function is
1
enabled, text is displayed on the floor near
the motion sensor.
Pass one foot in front of the motion sensor
2
and step on the displayed text. The right
door opens. If the door opens less than 20
degrees and is not opened further, it will
close automatically after 3 seconds.
NOTE
• Place your foot close enough to the sensor that
the text appears on top of the foot, not just on
the toes.
CAUTION
• Disable the Auto Open Door function if you
have young children or individuals lacking in
cognitive ability in the home. They could be
injured if the door opens unexpectedly while
they are nearby.
NOTE
• The displayed text may not be readable on
some flooring materials, but this will not affect
the performance of the Auto Open Door
function.
• If flooring material is highly reflective (metal,
glass tile), the motion sensor may malfunction
and the Auto Open Door function may not work
properly.
• Reflective objects placed in front of the motion
sensor may cause the text to display, but the
text disappears if no movement is detected.
• If a pet passes by when a person is standing in
front of the product, the automatic door open
function may be activated.
28
Page 29
EN
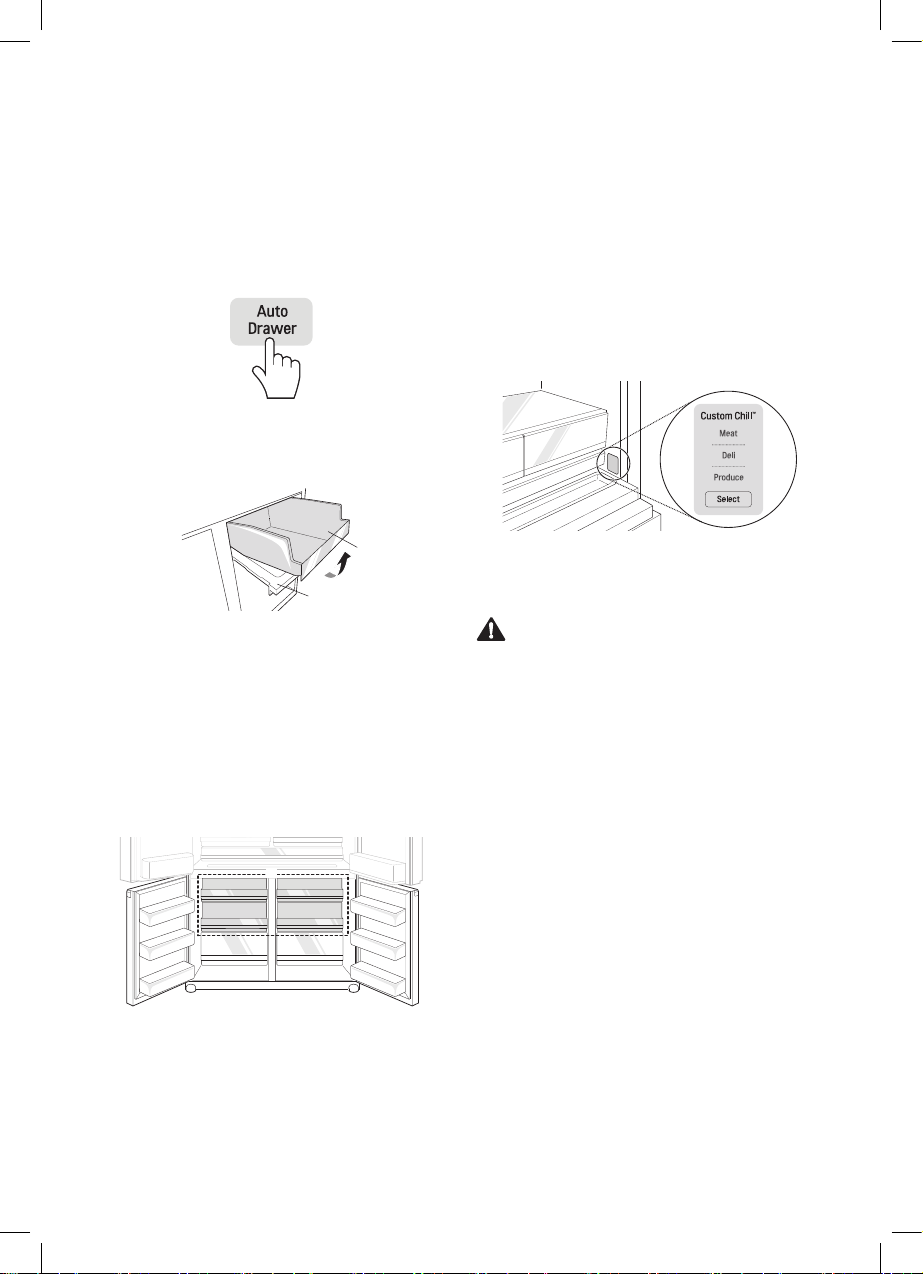
Auto Open Drawer Function
When Auto Open Drawer is enabled, the freezer
drawers automatically open when the freezer
door is opened. The drawers automatically close
when the freezer door is closed.
Setting Auto Open Drawer
Function
Press Auto Drawer to activate or deactivate the
function. When the function is activated, an icon
appears on the display.
Using Auto Open Drawer Function
Open the freezer door at least 85 degrees to
automatically open the drawers. Slowly close the
door to automatically close the drawers.
More than 85°
CAUTION
• Do not use excessive force to push or pull the
freezer drawers.
• Do not slam the freezer door shut while the
drawers are open. Failure to follow these
warnings may result in personal injury or
damage to the product.
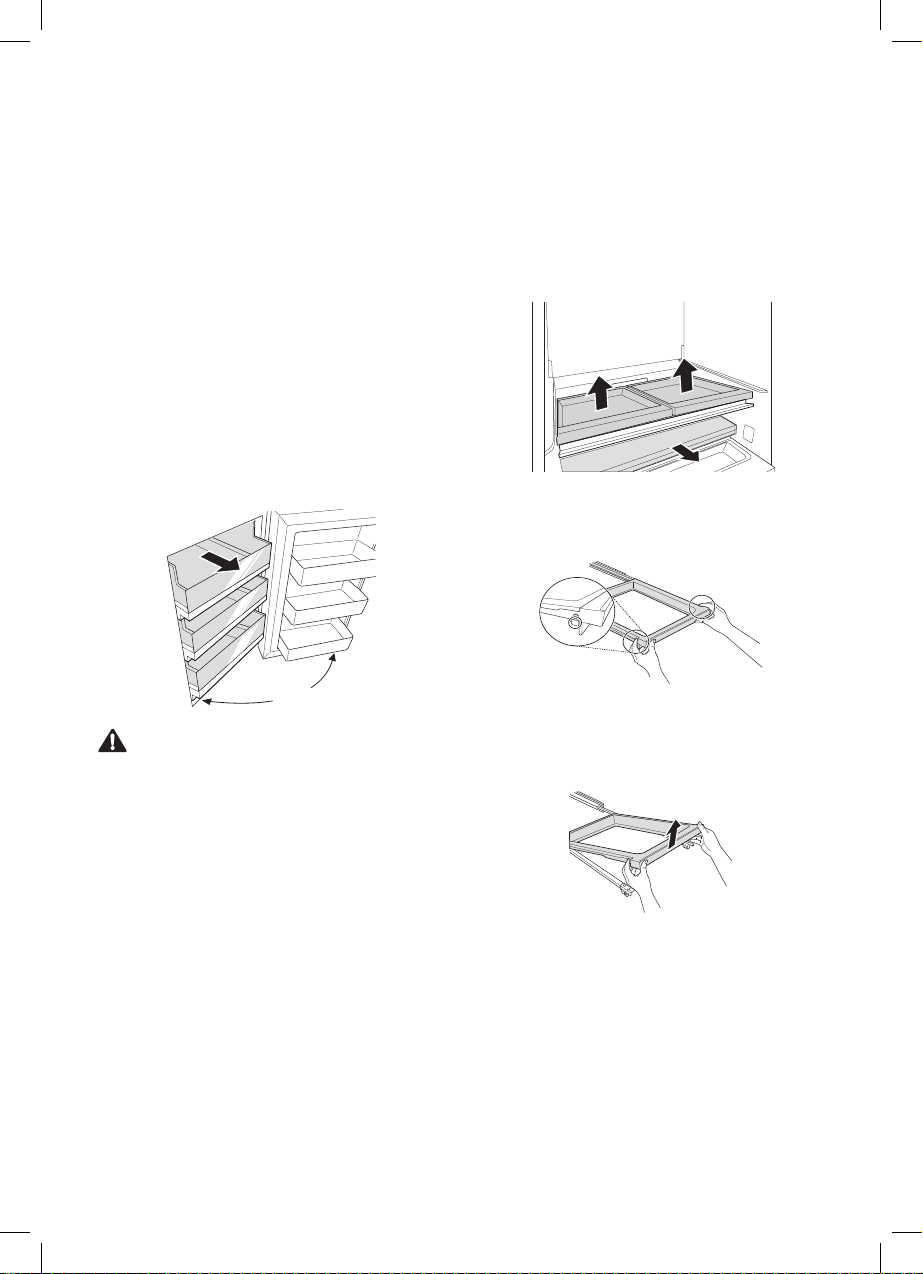
Suggestion for More Usable
Space
Using Without Drawer Support
To make more spacious refrigerator
compartment, remove drawer supports and
shelves.
Press the levers on either side of the drawer
1
support.
Keeping both levers pressed, lift the drawer
2
support slightly and remove it from the rail
system.
29
Page 30
EN
Using Without Freezer Drawer
To make more spacious freezer compartment,
remove freezer drawers.
Press the Auto Drawer button on the control
1
panel to deactivate the Auto Open Drawer
function.
Lift the empty freezer drawer slightly to
2
remove it from the shelf.
Freezer Drawer
Shelf
NOTE
• Deactivate the Auto Open Drawer function
before using. Be careful that food does not fall
from the shelf.
• Slightly pull and push the shelf. Be careful that
food does not fall from the shelf.
• Freezer drawer may not be clossed it food get
stuck behind the drawer.
• `Using Without Freezer Drawer’ section
demonstrates Drawer 1).
CustomChill Pantry
This space is used to store meat, fish, dairy
products, beverages, and other items that need
to be kept chilled.
Setting the CustomChill Pantry
Choose a temperature setting for the
CustomChill pantry by pressing the Select button
repeatedly to toggle between Meat, Deli, or
Produce.
The temperature setting becomes progressively
colder from Produce → Deli → Meat.
CAUTION
• Vegetables or fruit may freeze if placed in the
CustomChill™ pantry when it is set to Meat or
Deli.
30
1)
Page 31
EN
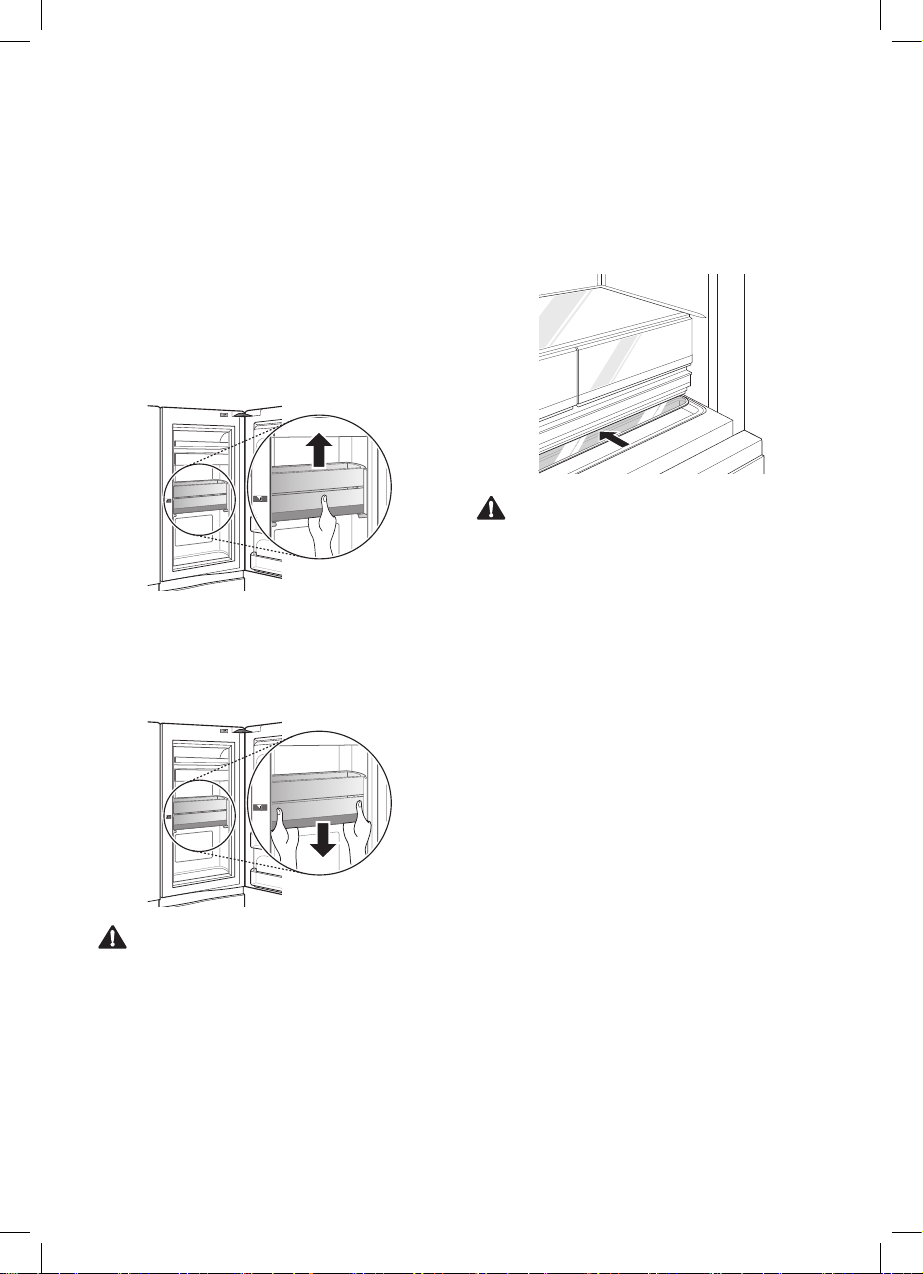
Adjustable Moving Basket
Easily Adjustable Moving Basket up and down
as necessary.
• Remove all items from the Adjustable Moving
Basket before moving it up or down.
• Adjusting the Adjusting Moving Basket
allows taller food items to be stored more
conveniently.
To raise the Adjustable Moving Basket, hold
1
the bottom of the basket in the center and
push the basket up until it clicks into place.
To lower the Adjustable Moving Basket,
2
press up to release the levers at the bottom
of the basket and lower the basket until it
clicks into place.
Hidden Bar Tray
The Hidden Bar Tray compartment is slightly
cooler than the shelf or door bin areas, so it is a
convenient place to store dairy snacks or other
small items you want to keep especially cold. It
is also a handy place to defrost meat.
CAUTION
• To reduce the risk of scratching the door and
breaking the center door mullion, make sure
that the refrigerator door mullion is always
folded in.
• The door alarm sounds every 30 seconds if
the door remains open longer than one minute.
Ensure that the folding mullion is folded in
before closing the left-hand door.
NOTE
• To open the cover, push the handle toward the
rear of the bin to release the catch.
• To close the cover, slide the cover over the bin
until the catch clicks into place.
CAUTION
• To avoid personal injury or damage to the
basket or its contents, empty the Adjustable
Moving Basket bin before moving it up or
down.
31
Page 32

Other Functions
Door Open Alarm
The alarm sounds 3 times in a 30 seconds
interval if the door (fridge compartment, freezer
compartment, door in door) is left open or not
completely closed for one minute.
• Contact an LG Electronics customer
information centre if the alarm sound continues
even after closing the door.
Failure Detection
The appliance can automatically detect problems
during the operation.
• If a problem is detected, the appliance does
not operate and an error code is displayed
even when any button is pressed.
• When this occurs, do not turn off the power
and immediately contact an LG Electronics
customer information centre. If you turn off
the power, the repair technician from the LG
Electronics customer information centre. It may
have difficulty finding the problem.
EN
32
Page 33

SMART FUNCTIONS
EN
Using Smart ThinQ Application
Installing Smart ThinQ
Search for the LG Smart ThinQ application from
the Google Play Store or Apple App Store on a
smart phone. Follow instructions to download
and install the application.
Wi-Fi Function
• For appliances with the or logo
Communicate with the appliance from a smart
phone using the convenient smart features.
Firmware Update
Keep the appliance performance updated.
Smart Diagnosis™
If you use the Smart Diagnosis function, you will
be provided with the useful information such as
a correct way of using the appliance based on
the pattern of use.
Settings
Allows you to set various options on the
refrigerator and in the application.
NOTE
• To verify the Wi-Fi connection, check that Wi-Fi
icon on the control panel is lit.
• LG Smart ThinQ is not responsible for any
network connection problems or any faults,
malfunctions, or errors caused by network
connection.
• The machine supports 2.4 GHz Wi-Fi networks
only.
• If the appliance is having trouble connecting
to the Wi-Fi network, it may be too far from
the router. Purchase a Wi-Fi repeater (range
extender) to improve the Wi-Fi signal strength.
• The Wi-Fi connection may not connect or may
be interrupted because of the home network
environment.
• The network connection may not work properly
depending on the internet service provider.
• The surrounding wireless environment can
make the wireless network service run slowly.
• The application is subject to change for
appliance improvement purposes without
notice to users.
• Functions may vary by model.
Open Source Software Notice
Information
To obtain the source code under GPL, LGPL,
MPL, and other open source licenses, that is
contained in this product, please visit http://
opensource.lge.com.
In addition to the source code, all referred
license terms, warranty disclaimers and
copyright notices are available for download.
LG Electronics will also provide open source
code to you on CD-ROM for a charge covering
the cost of performing such distribution (such as
the cost of media, shipping, and handling) upon
email request to opensource@lge.com. This
offer is valid for three (3) years from the date on
which you purchased the product.
Smart Diagnosis™ Using a Smart
Phone
• For appliances with the or logo
Use this function if you need an accurate
diagnosis by an LG Electronics customer
information centre when the appliance
malfunctions or fails.
Smart Diagnosis™ can not be activated
unless the appliance is connected to power.
If the appliance is unable to turn on, then
troubleshooting must be done without using
Smart Diagnosis™.
33
Page 34

EN
Using Smart Diagnosis™
Smart Diagnosis™ Through the
Customer Information Centre
Use this function if you need an accurate
diagnosis by an LG Electronics customer
information center when the appliance
malfunctions or fails. Use this function only to
contact the service representative, not during
normal operation.
Press the Lock button to activate the lock
1
function.
• If the lock function has been activated
already, press the Lock button to
deactivate the lock function, and then
press the Lock button again to activate the
lock function.
• Please note that the Smart Diagnosis
function will not operate until five minutes
has passed since the lock function was
activated.
Press and hold the Freezer button for three
2
seconds or longer while continuing to hold
your phone to the speaker.
After the data transfer is complete, the
4
service agent will explain the result of the
Smart Diagnosis™.
NOTE
• Position the phone so that its microphone is
aligned with the speaker hole.
• The Smart Diagnosis™ sound is generated
after around three seconds.
• Do not take the phone off the speaker hole
while the data is transmitted.
• Hold the phone to the upper right speaker hole
and wait while the data is transmitted.
• The data transfer sound may be harsh to the
ear while the Smart Diagnosis™ data is being
transmitted, but do not take the phone off the
speaker hole for accurate diagnosis until the
data transfer sound has stopped.
• When the data transfer is complete, the
transfer completion message is displayed and
the control panel is automatically turned off
and then on again after a few seconds. After
the customer information centre explains the
diagnosis result.
• The Smart Diagnosis™ function depends on
the local call quality.
• The communication performance will improve
and you can transmit a better signal if you use
a land line home phone.
• If the Smart Diagnosis™ data transfer is poor
due to poor call quality, you may not receive
the best Smart Diagnosis™ service.
Open the fridge door and then hold the
3
phone on the upper right speaker hole.
• Position the phone so that its microphone
is aligned with the speaker hole.
34
Page 35

MAINTENANCE
EN
Notes for Cleaning
• When removing a shelf or drawer from inside
the appliance, remove all stored foods from the
shelf or drawer to prevent injury or damage to
the appliance.
− Otherwise, injury may occur due to the weight
of stored foods.
• If cleaning the outside air vents of the
appliance by means of vacuuming, then the
power cord should be unplugged from the
outlet to avoid any static discharge that can
damage the electronics or cause an electric
shock.
• Detach the shelves and drawers and clean
them with water, and then dry them sufficiently,
before replacing them.
• Regularly wipe the door gaskets with a wet soft
towel.
• Door basket spills and stains should be
cleaned as they can compromise storage
ability of the basket and could even be
damaged.
• After cleaning, check if the power cable is
damaged, warm or improperly plugged.
• Keep the air vents on the exterior of the
appliance clean.
− Blocked air vents can cause fire or appliance
damage.
• Waxing external painted metal surfaces helps
provide rust protection. Do not wax plastic
parts. Wax painted metal surfaces at least
twice a year using appliance wax (or auto
paste wax). Apply wax with a clean, soft cloth.
• For the appliance exterior, use a clean sponge
or soft cloth and a mild detergent in warm
water. Do not use abrasive or harsh cleaners.
Dry thoroughly with a soft cloth.
• Never clean the shelves or containers in the
dishwasher.
− The parts may become deformed due to the
heat.
• If the appliance is equipped with an LED
lamp, do not remove lamp cover and LED
lamp in any attempt to repair or service it.
Please, contact an LG Electronics customer
information centre.
35
Page 36

EN
Cleaning the Door Basket
Removing the Left Fridge Door
Basket
Hold both edges of the basket and remove it by
lifting it upward.
Removing the Freezer Door
Basket and Lower InstaView
Basket
To remove the door baskets, slightly lift both
ends of the basket and pull forward to separate.
Refitting the Freezer Door Basket
and Lower InstaView Basket
To replace, match both ends of the basket to the
hole, and push with force until it clicks into place.
Removing the Upper InstaView
Basket
Open the latches underneath the basket by
1
rotating them inwards. Tilt the front of the
basket up until the tabs on the top sides
clear the rails, then push the basket slightly
backward.
Hold both edges of the basket and remove it
2
by lifting it upward.
36
Page 37

EN
Cleaning the Shelf
Removing the Fridge Shelf
Tilt up the front of the shelf and lift it straight up.
Pull the shelf out.
Refitting the Fridge Shelf
Tilt the front of the shelf up and guide the rear
shelf hooks into the slots at the desired height.
Then, lower the front of the shelf so that the
hooks drop into the slots.
CAUTION
• Make sure that shelves are level from one side
to the other. Failure to do so may result in the
shelf falling or food spilling.
Cleaning the Vegetable Drawer
Removing the Vegetable Drawer
Pull the crisper drawer out until it stops.
1
Slightly lift the crisper drawer to remove it
2
from the support.
CAUTION
• Please note that injuries can be caused by the
weight of stored food items when removing the
vegetable drawer.
NOTE
• The left side shelf is marked “LEFT”.
• If left and right side shelves are switched, they
are not properly assembled.
37
Page 38

EN
Removing the Vegetable Drawer
Box
Fully open the fridge door and pull out all the
1
shelves.
CAUTION
• To avoid injury, always empty the shelves and
vegetable drawers before removing them.
Lift the front of the vegetable drawer cover
2
until you hear a loud click.
Tilt the cover slightly and support it with one
3
hand while pulling it out.
Open the convertible pantry and lift the front
4
side of the vegetable drawer box with both
hands.
Slide one hand under the vegetable drawer
5
box and tilt the box up slightly to remove it.
38
Page 39

EN
Refitting the Vegetable Drawer
Box
Use one hand to support the bottom of the
1
vegetable drawer box while aligning the
inner edge of the box with the groove inside
the refrigerator. Lower the box into place.
Angle the vegetable drawer cover into the
2
refrigerator and then lower it into place.
Slide the vegetable drawer cover back until
3
it stops.
Cleaning the Freezer Drawer
Removing the Freezer Drawer
Pull the freezer drawer out until it stops.
1
Empty all contents out of the drawer before
removing it.
Lift the empty freezer drawer slightly to
2
remove it from the support.
CAUTION
• The drawers are heavy. Always use two hands
when removing or assembling the drawers
to avoid product damage or personal injury.
Always empty drawers before removing them.
• Always open the freezer doors completely
before removing or assembling the drawers.
39
Page 40

Cleaning the Drawer Support
Removing the Drawer Support
Press the levers on either side of the drawer
1
support.
Keeping both levers pressed, lift the drawer
2
support slightly and remove it from the rail
system.
Refitting the Drawer Support
EN
Pull out and remove the rail of the drawer
1
support.
Align the drawer support on the rail and
2
press it down until you hear snap sound.
40
Page 41

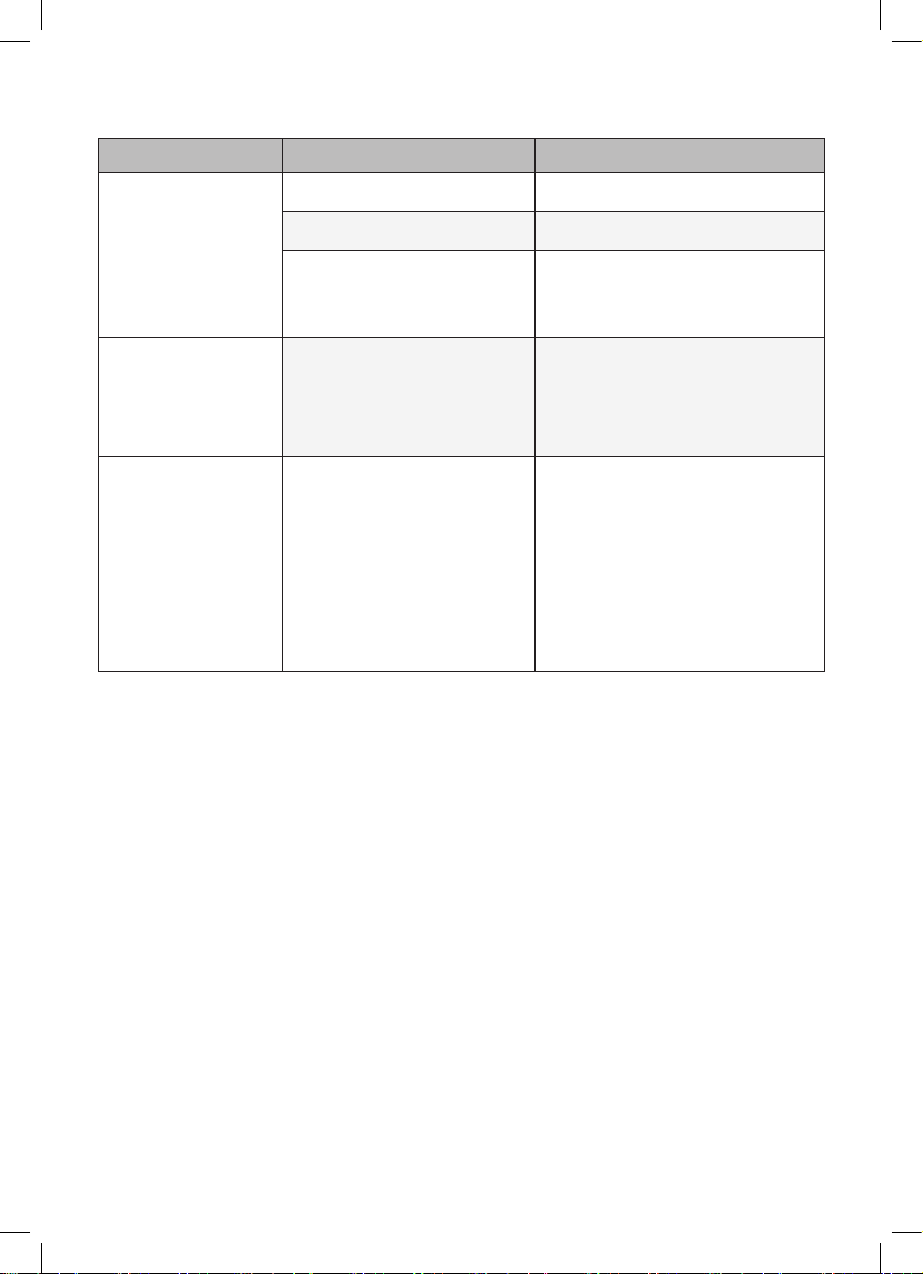
TROUBLESHOOTING
Symptoms Reason Solution
There is no
refrigeration or
freezing.
There is poor
refrigeration or
freezing.
The appliance
contains a bad smell.
The inside lamp in the
appliance does not
turn on.
Is there a power interruption? • Check the power of other appliances.
If the power plug unplugged
from the outlet?
Is the fridge or freezer
temperature set to its warmest
setting?
Is the appliance in direct
sunlight, or is it near a heat
generating object such as
cooking oven or heater?
Did you store hot food without
cooling it first?
Did you put in too much food?
Are the appliance doors
completely closed?
Is there enough space around
the appliance?
Is the fridge or freezer
temperature set to 'Warm'?
Did you put in food with a
strong smell?
Vegetables or fruit may have
spoiled in the drawer?
Does the inside lamp in the
appliance turn off?
• Plug the power plug in the outlet
properly.
• Set the fridge or freezer temperature
to 'Medium'.
• Check the installation area and
reinstall it away from heat generating
objects.
• Cool the hot food first before putting it
in the fridge or freezer compartment.
• Maintain an appropriate space
between food.
• Completely close the door and
make sure that stored food is not
obstructing in the door.
• Adjust the installation position to
make enough space around the
appliance.
• Set the fridge or freezer temperature
to 'Medium'.
• Store foods with strong smells in a
sealed containers.
• Throw away rotten vegetables and
clean the vegetable drawer. Do not
store vegetables too long in the
vegetable drawer.
• It is hard for customers to replace the
inside lamp in the appliance as they
are not serviceable. If the inside lamp
does not turn on, please contact the
LG Electronics customer information
centre.
EN
41
Page 42
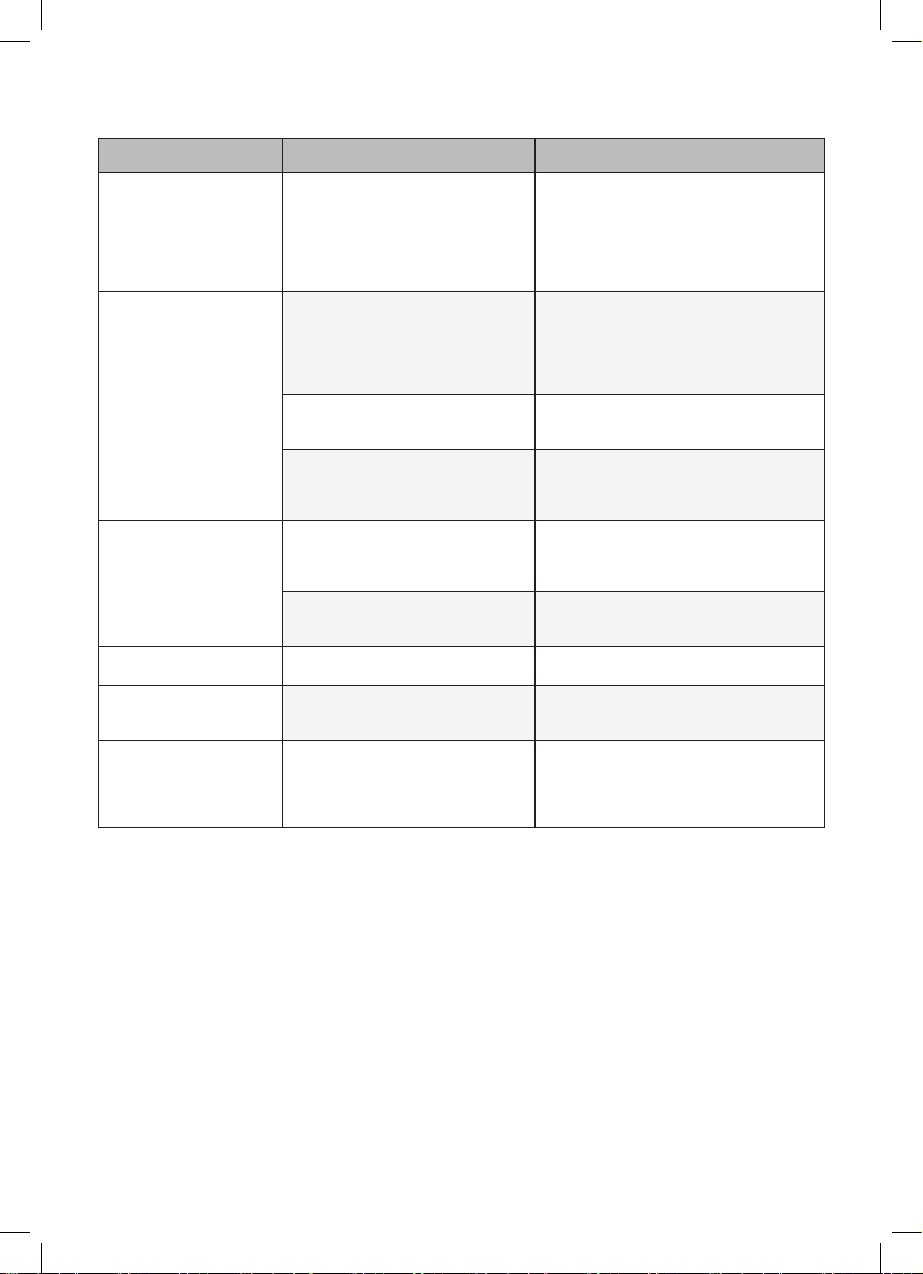
Symptoms Reason Solution
The appliance door is
not closed tightly.
It is difficult to open
the appliance door.
Door mullion does
not fold in and out
properly.
Is the appliance leaning
forward?
Were the shelves properly
assembled?
Did you close the door with
excessive force?
Did you open the door right
after you closed it?
Are front leveling legs
extended, refrigerator level,
and doors aligned?
• Adjust the front feet to raise the front
side slightly.
• Refit the shelves if needed.
• If you apply too much force or speed
when closing the door, it may remain
briefly open before closing. Make
sure that you do not slam the door
closed. Close without force.
• If you try to open the appliance door
within one minute after you closed
it, you may have difficulties because
of the pressure inside the appliance.
Try to open the appliance door again
in a few minutes so that the internal
pressure stabilizes.
• Once the door baskets are filled,
the doors may become misaligned,
preventing the door mullion or the
Auto Open Door function from
working properly. Extend both front
leveling legs fully so they are in firm
contact with the floor. Follow the
instruction in the Door Alignment
section to raise the left refrigerator
door until the door mullion is once
again working properly. Adjust the
right refrigerator door so it aligns with
the left refrigerator door.
EN
42
Page 43

Symptoms Reason Solution
There is condensation
inside the appliance
or on the bottom of
the vegetable drawer
cover.
Frosts has formed
in the freezer
compartment.
Did you store hot food without
cooling it first?
Did you leave the appliance
door open?
Do you open and close the
appliance door too frequently?
Did you put warm or moist food
inside without sealing it in a
container?
Doors may not be closed
properly?
Did you store hot food without
cooling it first?
Is the air entry or exit of the
freezer compartment blocked?
Is the freezer compartment
overfilled?
• Cool the hot food first before putting
it inside the fridge or freezer.
• Although the condensation will
disappear soon after you close the
appliance door, you can wipe it with
a dry cloth.
• Condensation can form due to the
temperature difference from the
outside. Wipe out the dampness with
a dry cloth.
• Store food in a covered or sealed
container.
• Check if the food item inside the
appliance is blocking the door and
make sure that the door is tightly
closed.
• Cool the hot food first before putting it
in the fridge or freezer compartment.
• Make sure that air entry or exit is not
blocked so that the air can circulate
inside.
• Maintain an appropriate space
between items.
EN
43
Page 44

Symptoms Reason Solution
Frost or condensation
has formed inside or
outside the appliance.
The appliance is
noisy and generates
abnormal sounds.
The side or front of
the appliance is warm.
There is water inside
or outside of the
appliance.
Did you open and close the
appliance door frequently or is
the appliance door improperly
closed?
Is the installation environment
humid?
Is the appliance installed on
a weak floor or improperly
leveled?
Does the rear of the appliance
touch the wall?
Are objects scattered behind
the appliance?
Is there an object on top of the
appliance?
There are anti condensation
pipes fitted to these areas
of the appliance to reduce
condensation forming from
around the door area.
Is there water leakage around
the appliance?
Is there water on the bottom of
the appliance?
• Frosts or condensation can form if
the outside air penetrates inside the
appliance.
• Condensation can appear on the
exterior of the appliance if the
installation area is too humid or on a
humid day such as a rainy day. Wipe
off any moisture with a dry cloth.
• Install the appliance on a solid and
flat area.
• Adjust the installation position to
allow enough clearance around the
appliance.
• Remove the scattered objects from
behind the appliance.
• Remove the object on top of the
appliance.
• The heat releasing pipe to prevent
condensation is installed on the front
and side of the appliance. You may
feel it particularly hot right after the
appliance is installed or during the
summer. You can be assured that this
is not a problem and is quite normal.
• Check if the water has leaked from a
sink or another place.
• Check if the water is from the thawed
frozen food or a broken or dropped
container.
EN
44
Page 45
Symptoms Reason Solution
The defrost control will click
when the automatic defrost
Clicking noises
Rattling nosies
Whooshing nosies
Gurgling nosies
Popping nosies
Vibrating
cycle begins and ends.
The thermostat control (or
appliance control on some
models) will also click when
cycling on and off.
Rattling noises may come from
the flow of appliance, the water
line on the back of the unit (for
plumbed models only), or items
stored on top of or around the
appliance.
Appliance is not resting evenly
on the floor.
Appliance with linear
compressor was moved while
operating.
Evaporator fan motor is
circulating air through
the fridge and freezer
compartments.
Air is being forced over the
condenser by the condenser
fan.
Appliance flowing through the
cooling system
Contraction and expansion of
the inside walls due to changes
in temperature.
If the side or back of the
appliance is touching a cabinet
or wall, some of the normal
vibrations may make an
audible sound.
• Normal Operation
• Normal Operation
• Floor is weak or uneven or leveling
legs need to be adjusted. See the
Door Alignment section.
• Normal operation. If the compressor
does not stop rattling after three
minutes, turn the power to the
appliance off and then on again.
• Normal Operation
• Normal Operation
• Normal Operation
• Normal Operation
• To eliminate the noise, make sure
that the sides and back do not make
any contact with any wall or cabinet.
EN
45
Page 46

PRODUCT INFORMATION
Model GR-Q23FGNGL
Producer LG Electronics
Category Refrigerator-Freezer
Total
ISO Gross
Capacity (l)
ISO Storage
Net / Packing
Weight (kg)
Free standing / Built-in
Defrost system
Sound Power (dB)
Energy Class
Energy Consumption (kWh/year)
Temperature rise time (hr)
Freezing Capacity (kg/24hr)
Refrigerant
Star Rating
Climate Class
* Climate Class : N - T (This appliance is intended to be used at an ambient temperature between 16°C
Width x Height x
Depth
and 43°C.)
Freezer
Refrigerator
Total
Freezer
Two stars section 29
Refrigerator
Product
Packing
735
272
463
623
158
436
195 / 209
912 X 1784 X 754
954 X 1850 X 805
Free standing
Frost Free
39
A++
344
16
7.5
R600a
N - T
Page 47

ХОЛОДИЛЬНИК И МОРОЗИЛЬНАЯ КАМЕРА
**non tradotto**
Перед началом работы с прибором внимательно прочитайте данное руководство и держите
его постоянно под рукой.
www.LGSIGNATURE.com
Copyright © 2017 LG Electronics. Все права защищены.
Page 48

СОДЕРЖАНИЕ
ТЕХНИКА БЕЗОПАСНОСТИ ...........................................................4
Важные указания по технике безопасности .........................................................4
РУКОВОДСТВО ...............................................................................14
Отсеки ...................................................................................................................14
Замечания по перемещению и транспортировке ..............................................15
Замечания по установке ......................................................................................15
Снятие двери .......................................................................................................16
Установка двери ...................................................................................................18
Регулировка высоты двери .................................................................................18
ЭКСПЛУАТАЦИЯ .............................................................................20
Детали и функции ................................................................................................20
Примечания по эксплуатации .............................................................................24
Использование панели управления ...................................................................25
Функция InstaView ................................................................................................27
Функция автоматического открывания двери ....................................................28
Функция автоматического открывания ящика ...................................................29
Совет для организации большего полезного пространства .............................29
Стандартное охлаждение для хранения продуктов ..........................................30
Другие функции ....................................................................................................32
В данном руководстве могут встречаться
изображения или материалы, не
относящиеся к
Произво
в
содержание руководства.
купленной вами модели.
дитель может вносить изменения
ИНТЕЛЛЕКТУАЛЬНЫЕ ФУНКЦИИ ..............................................33
Использование приложения Smart ThinQ ..........................................................33
Использование функции Smart Diagnosis™.......................................................34
Page 49

ТЕХНИЧЕСКОЕ ОБСЛУЖИВАНИЕ..............................................35
Примечания по очистке устройства ...................................................................35
Очистка лотка в дверце .......................................................................................36
Очистка полок ......................................................................................................37
Очистка овощного контейнера ............................................................................37
Очистка контейнера морозильной камеры ........................................................39
Очистка опоры ящика .......................................................................................... 40
ПОИСК И УСТРАНЕНИЕ НЕИСПРАВНОСТЕЙ ..........................41
Page 50

ТЕХНИКА БЕЗОПАСНОСТИ
Следующие рекомендации по технике безопасности призваны
предотвратить непредвиденные риски и ущерб, вызванный
небезопасной либо неверной эксплуатацией изделия.
Рекомендации делятся на две категории: ОСТОРОЖНО
и ВНИМАНИЕ (см. ниже).
Этим символом помечены действия, связанные
с повышенной опасностью. Внимательно прочтите
соответствующий текст и следуйте инструкциям,
чтобы избежать риска.
ОСТОРОЖНО!
Означает, что несоблюдение инструкций может привести
серьезной травме или смерти.
к
ВНИМАНИЕ!
RU
Означает
легкой травме или к поломке изделия.
к
Важные указания по технике безопасности
, что несоблюдение инструкций может привести
ОСТОРОЖНО!
Чтобы снизить опасность пожара, удара током
или получения травм при использовании изделия,
необходимо принять следующие основные меры
предосторожности.
Дети в доме
Изделие не предназначено для использования лицами
(включая детей) со сниженными физическими или умственными
способностями, болезнями органов чувств, недостаточным
опытом и знаниями. Указанные категории должны использовать
изделие после обучения и под присмотром лица, ответственного
за их безопасность. Не позволяйте детям играть с изделием.
4
Page 51
Информация для потребителей, проживающих
странах Европы
в
Изделие разрешается использовать детям в возрасте от
8 лет и лицам со сниженными физическими или умственными
способностями, болезнями органов чувств, недостаточным
опытом и знаниями под присмотром или при условии их
обучения безопасному использованию изделия и при условии,
что они осознают имеющиеся опасности. Дети не должны играть
с изделием. Без присмотра взрослых дети не должны проводить
очистку и обслуживание изделия.
Установка
•Для безопасной транспортировки данного устройства
требуются два человека или более.
•Убедитесь в том, что розетка была должным образом
заземлена, а контакт заземления на кабеле питания был не
поврежден и имелся в наличии. Более подробные сведения
можно получить в центре поддержки клиентов компании LG
Electronics.
•Изделие снабжено шнуром электропитания с жилой
заземления оборудования и вилкой с заземляющим контактом.
Вилку следует подключать к правильно установленной
и заземленной согласно местным нормам и правилам розетке.
•В случае повреждения кабеля питания или ослабления
гнезда розетки не используйте кабель питания и свяжитесь
с авторизованным сервисным центром.
•**non tradotto**
•Не вносите изменения и не удлиняйте кабель питания.
RU
5
Page 52

•Не допускайте использования удлинителей или двойных
переходников. Устройство должно быть подсоединено
к отдельной линии питания с отдельным предохранителем.
•Не использовать многоконтактную розетку, которая
неправильно заземлена (переносная). После использования
правильно заземленной многоконтактной розетки (переносной)
используйте изделие с допустимой нагрузкой норм мощности
или выше. Несоблюдение может привести к поражению
электрическим током или пожару в связи с нагреванием
многоконтактной розетки. Мощность может отключиться при
срабатывании автоматического выключателя.
•Установите устройство в месте со свободным доступом
к розетке электропитания.
•Соблюдайте осторожность и не допускайте, чтобы вилка
электропитания была направлена вертикально или чтобы
холодильник касался вилки питания.
•Установите устройство на ровный прочный пол.
•Не устанавливайте устройство в местах с высокой влажностью
или большим количеством пыли. Не устанавливайте
и не храните устройство вне помещений или в местах,
подверженных прямому воздействию погодных условий
(прямой солнечный свет, ветер, дождь или температура ниже
нуля градусов).
•Не устанавливайте устройство в местах с прямым
воздействием на него солнечных лучей или теплого воздуха от
нагревательных приборов (газовых плит, обогревателей).
•Не подвергайте заднюю часть устройства воздействиям такого
типа во время установки.
•Соблюдайте осторожность, чтобы не уронить дверцу
устройства при сборке или разборке.
•Соблюдайте осторожность, чтобы не пережать, передавить
или повредить кабель питания во время установки или снятия
дверцы устройства.
•Не подключать адаптер-штекер или другие принадлежности к
разъему электропитания.
RU
6
Page 53

Эксплуатация
•Не используйте устройство в каких-либо целях (хранение или
перевозка медикаментов, экспериментальных материалов),
отличающихся от хранения продуктов в домашних условиях.
•Если устройство залило водой, отсоедините вилку
электропитания и свяжитесь с центром поддержки клиентов
компании LG Electronics.
•Отсоединяйте вилку питания от розетки во время сильной
грозы, а также в том случае, если планируете прекратить
эксплуатацию холодильника на длительное время.
•Не прикасайтесь к вилке электропитания или кнопкам
управления устройством мокрыми руками.
•Не перегибайте шнур питания слишком сильно и не помещайте
на него тяжелые предметы.
•Если вода попадает на электрические компоненты устройства,
вытащите вилку питания из розетки и свяжитесь с центром
поддержки клиентов компании LG Electronics.
•Не суйте руки или металлические предметы в зону, откуда идет
холодный воздух, под крышку или к решетке сзади, откуда
выходит тепло.
•Не допускайте чрезмерных усилий или ударов по задней
крышке устройства.
•Не помещайте животных внутрь изделия.
•Если поблизости находятся дети, будьте осторожны при
открытии или закрытии дверцы устройства. Случайный удар
дверцей может привести к травме ребенка.
•Следите за тем, чтобы дети не оказались запертыми
внутри устройства. Ребенок, оказавшийся запертым внутри
устройства, может задохнуться.
•Не размещать тяжелые или хрупкие предметы, контейнеры,
заполненные жидкостью, горючими веществами,
воспламеняемые предметы (такие как свечи, лампы и т.д) или
нагревательные приборы (такие как печи, обогреватели и т.д.)
на прибор.
RU
7
Page 54

•В случае утечки газа (изобутана, пропана, природного
газа и т. п.) не прикасайтесь к устройству или к вилке
электропитания и немедленно проветрите помещение. В
качестве хладагента в данном устройстве используется
максимально экологичный газ (изобутан R600a). Несмотря на
то, что объем используемого газа незначительный, этот газ
является горючим. Искрообразование при утечке газа во время
транспортировки, установки или эксплуатации устройства
может вызвать возгорание, взрыв или стать причиной травм.
•Не используйте и не храните воспламеняющиеся или горючие
вещества (эфир, бензол, спирт, химические реагенты,
сжиженную пропан-бутановую смесь, горючие спреи, средства
от насекомых, освежитель воздуха, косметические средства
и т. д.) вблизи устройства.
•Немедленно отключите питание и свяжитесь с центром
поддержки клиентов компании LG Electronics в случае
обнаружения необычных звуков, неприятного запаха или дыма
в устройстве.
•Питьевая вода заливается только в льдогенератор или водяной
бачок диспенсера.
RU
Обслуживание
•Отсоедините кабель питания перед очисткой устройства или
заменой лампы внутреннего освещения (при ее наличии).
•После полного удаления влаги и пыли аккуратно вставьте вилку
электропитания в розетку.
•Никогда не отключайте вилку электропитания из розетки,
потянув за кабель питания. Обязательно надежно удерживайте
вилку в руках и извлекайте ее из розетки, не допуская
перекосов.
•Не распылять воду или воспламеняемые вещества (зубная
паста, спирт, растворитель, бензол, воспламеняемые жидкости,
абразивы и т.д.) внутри или снаружи прибора для его чистки.
•Не проводите очистку устройства с использованием щеток,
ткани или губок с грубой или металлической поверхностью.
8
Page 55

•К разборке, ремонту и модификации изделия допускаются
только уполномоченные специалисты центра поддержки
клиентов компании LG Electronics. Свяжитесь с центром
поддержки клиентов компании LG Electronics, если вы
переместили или установили устройство в новое место.
•Не используйте фен для сушки волос для испарения влаги
внутри устройства, а также не используйте ароматические
свечи для избавления от неприятного запаха внутри
устройства.
•Не используйте механические устройства и другие средства,
кроме рекомендованных производителем.
Утилизация
•При утилизации устройства снимите уплотнитель двери,
оставьте полки и лотки на своих местах и не допускайте детей
к устройству.
•Утилизируйте упаковочные материалы (например, пластиковые
пакеты и пенопласт) в местах, недоступных для детей.
Упаковочные материалы могут стать причиной удушения.
RU
Техническая безопасность
•Не допускайте наличия препятствий у вентиляционных
отверстий в корпусе устройства или во встроенных системах.
•Не используйте электрические приборы внутри отсеков для
хранения продуктов устройства, если они не рекомендованы
производителем.
•Хладагент и изолирующий газ, используемые в устройстве,
должны утилизироваться в соответствии со специальными
процедурами. Перед их утилизацией проконсультируйтесь
со специалистом по техническому обслуживанию или другим
специалистом с достаточной квалификацией.
9
Page 56

•Данное устройство содержит небольшое количество
изобутанового хладагента (R600a) — природного газа,
соответствующего требованиям по охране окружающей среды,
но горючего. При транспортировке и установке устройства
соблюдайте осторожность, чтобы не повредить элементы
охлаждающего контура устройства.
•Утечки хладагента из патрубков могут привести к возгоранию
или взрыву.
•При обнаружении утечки не допускайте использования
открытого пламени или потенциальных источников
воспламенения, в течение нескольких минут проветрите
комнату, в которой установлено устройство. В целях
предотвращения образования огнеопасной смеси газа
и воздуха при утечке в охлаждающем контуре, размер комнаты,
в которой установлено устройство, должен соответствовать
количеству используемого хладагента. Площадь комнаты
должна составлять 1 кв. м на каждые 8 грамм хладагента
R600а внутри устройства.
•Количество хладагента в вашем конкретном устройстве
указано на табличке с паспортными данными внутри
устройства.
•Никогда не включайте устройство с признаками повреждений.
При наличии сомнений в исправности устройства обратитесь
к местному дилеру.
•Данное устройство предназначено только для домашнего
использования или аналогичных областей применения.
Устройство не должно использоваться в коммерческих целях,
на предприятиях общественного питания или на средствах
передвижения, таких как трейлеры или яхты.
•Не храните взрывоопасные вещества, например баллоны
с аэрозолем, содержащим воспламеняющиеся компоненты,
внутри устройства.
RU
10
Page 57

RU
ВНИМАНИЕ!
Чтобы уменьшить риск незначительной травмы,
неисправности или повреждения продукта или имущества
при использовании этого продукта, соблюдайте основные
меры предосторожности, включая следующие.
Установка
•Не наклоняйте и не кантуйте устройство при транспортировке.
•Следите за тем, чтобы никакие части тела, например руки или
ноги, не застряли при перемещении прибора.
Эксплуатация
•Не касайтесь замороженных продуктов или металлических
деталей в морозильной камере мокрыми или влажными
руками. Это может вызвать обморожение.
•Не ставьте стеклянные контейнеры или бутылки в морозильный
отсек, на полки или в корзину для льда, где температура ниже
точки замерзания.
•Закаленное стекло на передней стенке дверцы устройства
или на полках может быть повреждено в результате ударного
воздействия. Если стекло повреждено, не прикасайтесь к нему
руками, так как существует угроза получения травмы.
•Не кладите тяжелые предметы на дверцу в двери.
•Не используйте дверцу в качестве разделочной доски,
старайтесь не поцарапать ее острым инструментом, поскольку
это приведет к поломке устройства.
•Запрещается висеть на двери устройства, камере хранения,
полках и дверце в основной двери, а также забираться на них.
•Не храните излишнее количество бутылок с водой или
контейнеров для салатов в лотках в дверце. Лоток может
поломаться, а вы можете удариться рукой о расположенные
рядом предметы и получить травму.
11
Page 58

•Не допускайте беспорядка при хранении продуктов
в устройстве.
•Следите за тем, чтобы животные не грызли кабель питания или
шланг подачи воды.
•Не прилагайте чрезмерных усилий при открывании/закрывании
дверцы устройства.
•Если петля дверцы устройства повреждена или работает
не должным образом, прекратите эксплуатацию устройства
и свяжитесь с авторизованным сервисным центром.
•Соблюдайте осторожность, чтобы не повредить трубки контура
циркуляции хладагента.
•Не помещайте электронные приборы (нагреватели или
мобильные телефоны) внутрь устройства.
•Не выполняйте мойку холодных стеклянных полок или крышек
с использованием теплой воды. Они могут треснуть от резкого
перепада температур.
•Никогда не употребляйте в пищу замороженные продукты сразу
после того, как они были извлечены из морозильной камеры.
•Не открывать двери прибора при открытой дверце в дверце,
а также не открывать дверцу в дверце, когда открыта дверь
прибора. Дверца в дверце может удариться о край прибора и
повредиться.
•Не хватать сторону двери холодильника при закрывании. При
закрывании двери используйте ручку двери.
RU
12
Page 59
Обслуживание
•Не устанавливайте полки в перевернутом положении. Полки
могут упасть и стать причиной травм.
•Для удаления наледи из устройства свяжитесь с центром
поддержки клиентов компании LG Electronics.
•На время продолжительного отключения питания удалите весь
лед изнутри контейнера для хранения льда в морозильной
камере.
RU
13
Page 60

РУКОВОДСТВО
Отсеки
RU
Гаечный ключ тип 1 Гаечный ключ тип 2 Руководство пользователя
Ледогенератор Лоток для яиц
• Внешний вид или состав компонентов у
14
стройства могут отличаться на разных моделях.
Page 61

RU
Замечания по перемещению и
транспортировке
• Извлеките из устройства все продукты. Перед
перевозкой устройства закрепите с помощью
скотча все хрупкие части, такие как полки и
ручка двери. В противном случае возможна
поломка устройства.
• Извлеките вилку из роз
крючок в задней или верхней части устройства.
В противном случае можно повредить вилку
или поцарапать пол.
• При транспортировке устройство должны
осторожно переносить три и более человека.
При падении устройства, вес которого очень
велик, возможны травмы или поломка.
• При перевозке на большие расст
устройство должно находиться в вертикальном
положении. Оно может опрокинуться, что
приведет к поломкам. Ни в коем случае не
перевозите устройство в горизонтальном
положении, поскольку при обратном подъеме
нарушится циркуляция хладагента.
етки и повесьте на
ояния
Замечания по установке
• Установите устройство на прочной и ровной
поверхности.
− В случае установки устройства на неровном
полу может возникнуть вибрация и шум;
возможно падение и травмы. Кроме того
возможно, что дверцы не будут плотно
закрываться и при использовании внутрь
попадет влага.
− Если устройство наклонено впере
отрегулируйте передние ножки так, чтобы
выровнять его. В особо сложных случаях
придется положить на пол тонкие дощечки.
• Не допускайте уст
источниками тепла, под прямыми солнечными
лучами или во влажном месте.
• Подключите шнур пит
розетке. Не подключайте к этой же розетке
другие устройства.
• После подключения шнура п
к розетке подождите два-три часа, затем
загружайте продукты. Если положить их до
того, как устройство полностью охладится,
продукты могут испортиться.
• Сторона петель мо
находиться на расстоянии не менее 55
стены, чтобы дв
• При установке оставьт
справа, слева, сзади и св
ановку холодильника рядом с
ания (или вилку) к
делей с ручками должна
ерь открывалась на 90°.
е зазор более 55
ерху.
д или назад,
итания (или вилки)
мм от
мм
15
Page 62
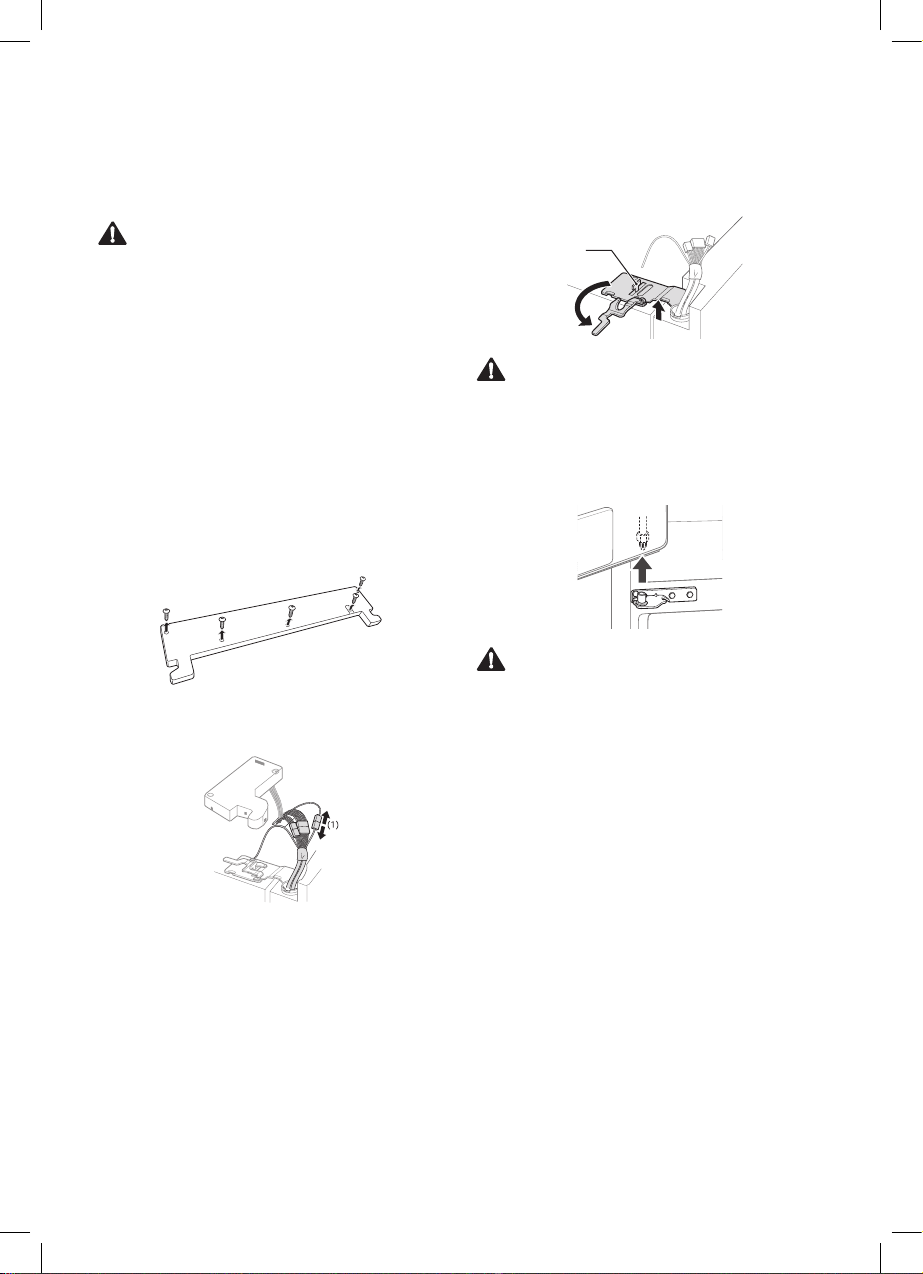
RU
(1
(2)
Снятие двери
Если потребуется переместить устройство через
узкий проем, рекомендуется снять дверь.
ОСТОРОЖНО!
• Перед установкой или обслуживанием
устройства отсоедините кабель питания,
предохранитель или размыкатель.
Несоблюдение данных указаний может
привести к
Если входная дверь слишком узкая, и устройство
в нее не проходит, снимите двери и пронесите
боком.
[Левая дверь холодильника]
1
2
смерти, пожар
Извлеките винты из крышки петель наверху
холодильника. Поднимите отверткой с
плоским шлицем крючок (не виден), который
находится на стороне крышки у нижней
кромки.
Снимите крышку. Отсоедините все жгуты
проводов (1).
у или удару током.
Вращайте рычаг петли против часовой
3
стрелки (1). Поднимите верхнюю петлю (2)
без защелки петли.
Защелка петли
)
ВНИМАНИЕ!
• При подъеме петли без защелки будьте
осторожны, чтобы дверца не упала вперед.
Снимите рычаг петли, постучав по его концу
4
в направлении наружного края корпуса.
ВНИМАНИЕ!
• При подъеме петли без защелки будьте
осторожны, чтобы дверца не упала вперед.
16
Page 63

RU
[Правая дверь холодильника]
Извлеките винты из крышки петель наверху
1
холодильника. Поднимите отверткой с
плоским шлицем крючок (не виден), который
находится на стороне крышки у нижней
кромки.
Отсоединить жгут проводов (1).
2
Вращайте рычаг петли по часовой стрелке
3
(1). Поднимите верхнюю петлю (2) без
защелки петли.
Защелка петли
Поднимите дверь со среднего стержня петли
4
и снимите дверь.
ВНИМАНИЕ!
• Поместите дверь на нецарапающуюся
поверхность, развернув внутренней стороной
вверх.
[Дверь морозильной камеры]
Снимите два болта петли.
1
Поверните петлю, чтобы поднять поворотный
2
конец так, чтобы можно было поднять и
убрать дверь. Поднимите дверь с нижнего
стержня петли и снимите ее.
ВНИМАНИЕ!
• При подъеме петли без защелки будьте
осторожны, чтобы дверца не упала вперед.
17
Page 64

Открутите винт, соединяющий нижнюю
3
крышку петли и уберите крышку.
RU
Установка двери
После перемещения устройства через дверной
проем установите дверь на место, выполнив
процедуру в обратном порядке.
(2)
Отсоедините все жгуты проводов.
4
Снимите двери, подняв их с нижнего стержня
5
петли.
Нижняя петля
(1)
Регулировка высоты двери
[Высота двери холодильника]
Откройте дверь холодильника и воспользуйтесь
гаечным ключом типа 1, чтобы вращать болт
дверной петли, как показано на рисунке.
Разница высоты
Дверь
холодильника
Дверь морозильной
камеры
[Высота двери морозильной
камеры]
[Метод 1]
Откройте дверь морозильной камеры и
воспользуйтесь гаечным ключом типа 1, чтобы
вращать болт дверной петли, показано на
рисунке.
Дверь морозильной камеры
18
Разница высоты
Page 65

RU
ВНИМАНИЕ!
• При наклоне оборудования назад, чтобы
отсоединить сетку внизу прибора, двое или
несколько людей должны держать за ручки
внизу и на задней верхней стороне прибора.
[Метод 2]
При открытых дверях холодильника
вставьте гаечный ключ типа 2 на гайку болта
регулирования высоты и вращайте, пока он не
будет ровным.
Поднять дверь
Опустить дверь
ПРИМЕЧАНИЕ
• Поддерживайте нижнюю часть прибора, когда
винты регулирования высоты полностью
выкручены с обеих сторон снизу. Таким
образом можно предотвратить наклон двери
вниз под весом хранящихся продуктов питания.
Центральная планка и
автоматическое открывание двери
Когда лотки на двери заполнены, двери могут
перекоситься, в результате чего центральная
планка или функция автоматического открывания
двери не будут работать правильно.
Если центральная планка на левой двери
холодильника не открывается и не закрывается
должным образом или правая дверь остается
приоткрытой после функции автоматического
открывания двери, соблюдайте описание ниже.
Убедитесь в том, что обе передние
1
выравнивающие ножки полностью
выдвинуты и плотно контактируют с полом.
Соблюдайте инструкции в разделе
2
«Выравнивание двери», чтобы поднять
левую дверь холодильника, пока
центральная планка снова не начнет
правильно функционировать.
Выровняйте правую дверь холодильника
3
так, чтобы она была расположена на одной
линии с левой дверью холодильника.
19
Page 66

ЭКСПЛУАТАЦИЯ
1
Детали и функции
RU
1
2
3
InstaView Дверь-в-двери
Отсек InstaView Двери-в-двериTM обеспечивает легкий доступ к часто используемым продуктам
питания.
Панель управления
2
Настройка температуры в холодильнике и морозильнике.
Датчик автоматического открывания двери
3
Правая дверь холодильника открывается автоматически, если поставить ногу возле датчика
движения внизу двери.
• Внешний вид или состав компонентов устройства могут отличаться на разных моделях.
TM
20
Page 67

RU
3
1
2
4 4
5
6
Блок системы диагностики Smart Diagnosis
1
Функция используется при обращении в пользовательский информационный центр LG Electronics.
Она помогает точно диагностировать отклонения в работе устройства или поломки.
Hygiene Fresh+ Filter (Гигиена и свежесть+Фильтр)
2
• Данная функ
который они вызывают.
Регулируемая полка холодильника (дополнительно)
Полки можно регулировать для соответствия индивидуальным потребностям в хранении.
ция сводит к
уму количество бактерий внутри устройства и
миним
3
тный запах,
неприя
ВНИМАНИЕ!
• Если закрыть дверь холодильника, не задвинув на место регулируемую полку холодильника,
оборудование может повредиться.
Овощной контейнер
4
Этот отдел предназначен для длительного хранения свежих фруктов и
Стандартное охлаждение для хранения продуктов
5
Это пространство используется для хранения мяса, рыбы, молочных продуктов, напитков и
прочих продуктов, которые должны быть охлажденными.
Скрытый лоток
6
Для хранения мелких элементов свежее, чем на полках, или для размораживания замороженных
продуктов.
овощ
ей.
21
Page 68

RU
9
10
7
7
10
7
Лоток в дверце холодильника
7
В этом отделе необходимо хранить охлажденные продукты в
контейнеры с соусами.
Корзина InstaView Двери-в-двери
8
Здесь хранятся продукты, к которым требуется быстрый доступ, например напитки и закуски.
Регулируемая подвижная корзина
Легко перемещать регулируемую подвижную корзину вверх и вниз по необходимости.
Центральная планка
Она блокирует утечку холодного воздуха из холодильника.
TM
8
9
8
небо
льших пакетах, напитки или
ВНИМАНИЕ!
• Чтобы сократить риск царапанья двери или поломки центральной планки, убедитесь, что
центральная планка всегда сложена.
22
Page 69

1)
3
2
1
(1)
3 3
Ящик автоматического открывания
1
Данный контейнер предназначен для длительного хранения замороженных продуктов.
Ящик 1)
• Сохранение м
Для использования большего пространства снимите ящики.
Ящик 2)
• Сохранение замороженных продуктов более длительное время.
елких упакованных замороженных продуктов или часто извлекаемых продуктов.
1
2
2)
RU
Дверной отсек для замороженных продуктов
2
Здесь можно хранить небольшие пакеты с замороженными продуктами.
• Не храните
Датчик автоматического открывания ящика
Ящики морозильной камеры автоматически открываются, если дверь морозильной камеры
открыта как минимум на 85 градусов.
в этих отсеках мороженое или продукты длительного хранения.
ПРИМЕЧАНИЕ
• 2-звездная секция ( ): в отсеке или ящике можно непродолжительное время хранить мороженое
и продукты при температуре от –12 до –18
• Верхняя полка морозильной камеры (1) достигает заданной температуры быстрее всего.
°C.
23
Page 70

RU
Примечания по эксплуатации
• Пользователи должны помнить о том, что
наледь может образовываться в
неполного закрытия дв
влажности в
частого открытия дв
• Следите за тем, чтобы ме
полке и внутри лотка в
до
статочное пространство, чтобы обеспечить
полное закрытие дверцы.
• Открытая дверца способствует поступлению
теплого воздуха в
ричиной повышения внутренней температуры.
п
• Не открывайте и не закрывайте дверцу
устройств
• Светодиодная лам
для использования в
не подходит для освещ
и
помещений.
летние месяцы или в случае
а слишком часто.
ерцы, при избыточной
ерцы морозильной камеры.
дверце оставалось
устройство и может стать
па предназначена только
бытовых электроприборах
Рекомендации по
энергосбережению
• Следите за тем, чтобы между хранящимися
продуктами оставалось достаточно свободного
места. Это позволит холодному воздуху
циркулировать равномерно и
энерг
опотребления.
• Помещайте горячие продук
только после их предварительного
охлаждения для предотвращения отпотевания
и
образования наледи.
• При хранении бытового прибора в морозильном
отсеке установите температуру ниже указанной
на приборе.
• Не настраивайте температ
ниже необходимой. Для приготовления льда в
обычных климатических условиях температуру
морозильной камеры необходимо настроить на
-18 или ниже.
• Не кладите продукты ря
морозильном отсеке датчиком температуры.
• Обратите внимание на то, что допу
диапазон повышения температуры после
разморозки приведен в
еристиках устройства. Если вы хотите
характ
уменьшить влияние повышения температуры
на процесс хранения продуктов, упакуйте их
герметично или оберните в несколько слоев
упаковочного материала.
технических
случае
жду продуктами на
ения жилых
сократит уровень
ты на хранение
уру оборудования
дом с установленным в
стимый
Эффективное хранение продуктов
• Храните замороженные или охлажденные
продукты в
• Проверьте срок годности и этикетку (инструкции
по хранению) перед помещением продуктов
в
устройство.
• Не следует долго (бол
хранить продукты, если они легко портятся при
низкой температуре.
• Сразу же после покупк
или замороженные продукты в холодильный
или морозильный отсек.
• Не допускайте заморажив
которые были полностью разморожены.
Повторная заморозка любых ранее полностью
размороженных продуктов негативно
скажется на вкусовых качествах и
пита
• Не оборачивайте овощи газ
Типографская краска и
исп
испортить продукты.
• Не допускайте переп
продуктами. Для хранения продуктов должно
использоваться не более 70
Если устройство п
это препятствует нормальной циркуляции
охлажденного воздуха.
• Охлаждайте горячие продук
хранением. При излишнем заполнении
устройства продуктами его внутренняя
температура может вырасти, что негативно
скажется на качестве хранимых продуктов.
• Установка очень низкой тем
хранения продуктов может привести к
заморозке. Не устанавлив
ниже необходимой для правильного хранения
продукта.
• Всегда содержите устройство в чистоте.
герметичных контейнерах.
ее четырех недель)
и кладите охлажденные
ания продуктов,
количестве
тельных веществ.
етой для хранения.
другие материалы,
ользуемые при выпуске газет, могут
олнения устройства
% пространства.
ереполнено продуктами,
ты перед
пературы для
их
айте температуру
Максимальная мощность
замораживания
• Режим быстрой заморозки (Express Freeze)
обычно работает до семи часов, но он
автоматически отключится по прошествии
заданного времени и может быть в любое
время отключен вручную.
• Для обеспечения лучшей цирку
установите все внутренние элементы, такие как
лотки в дверце, контейнеры и полки.
ляции воздуха
24
Page 71

Использование панели управления
1
7
9
Типы панелей и функции
5.532 mm
RU
* Wi-Fi
1
• Позволяет по
домашней сети Wi-Fi.
*
Lock (Блокировка)
2
• Блокировка кнопок
Автоматическая дверь
3
• Настраивает функцию автом
двери.
Автоматический ящик
4
• Настраивает функцию автом
ящика.
Fridge Temperature (Температура
5
холодильника)
• Настраивает целевую тем
холодильника.
• Удерживайте кнопку
(Температура холодильника) 3 секунды
или больше, чтобы настроить опцию
Поддержание свежим.
• Фактически панель управления у разных моделей может отличаться.
дключить холодильник к
на панели управления.
атической
атического
пературу
Fridge Temperature
Freezer Temperature (Температура
6
морозильной камеры)
• С помощью данной кнопки задается
нужный уровень температуры
в
морозильной камере.
Hygiene Fresh (Функция Hygiene Fresh)
• Данная кнопка задает функцию Hygiene
Fresh.
• Данная функция сводит к минимуму
личество бактерий внутри устройства
ко
неприятный запах, который они
и
вызыв
ают.
Express Freeze (Режим быстрой
8
заморозки)
• Данная кнопка задает параме
«Режим быстрой заморозки».
Блок дисплея
Можно проверить настройки устройства.
• Это изображение являет
экраном.
• Нажимайте кнопки
настройки для каждой функции.
тры функции
ся стартовым
~ 8 для отображения
25
Page 72

RU
Замечания по использованию
панели управления
• Панель управления включается в любом из
следующих случаев.
− При включении питания
− При нажатии кнопки
− При открытии двери устройства (о
холодильника, морозильника, двери-в-двери).
• Для экономии энергии панель уп
автоматически выключается в любом из
следующих случаев.
− Через одну минуту после вк
− Если после нажатия нужной кноп
нажимать в течение 20
− Через 20 с. после открытия и закрытия
двери устройства (отсек холодильника,
морозильника, двери-в-двери).
• Если при очистке панели уп
кнопки пальцем, нажатая кнопка может
сработать.
с.
тсек
равления
лючения питания.
ки ничего не
равления коснуться
Установка параметров
температуры
С помощью данной кнопки задается нужный
уровень температуры в
в
морозильной камере.
• Нажмите на кнопку Fridge или
регулировки температуры.
• Температура п
− Холодильная камера: 3 °C
− Морозильная камера: -18 °C
• Температур
− Холодильник: от 0 °C до 7 °C
− Морозильная камера: от -24 °C до -16 °C
• Фактическая температура внутри устройства
может отличаться в
продуктов, поскольку отображаемая заданная
температура является целевой, а
фактической темпера
у можно регулировать.
холодильнике и
о умолчанию.
зависимости от состоя
турой внутри устройства.
ли
Freezer для
не
ния
ПРИМЕЧАНИЕ
• Температура по умолчанию зависит от модели
устройства.
• После включения устройства в розетку
подождите два-три часа, затем закладывайте
ед у.
• Устройство может авт
неисправности во время работы.
• Если выявлена неисправность, устройство не
тает, и
рабо
нажатии любой из кнопок.
• При возникновении так
отключайте устройство от электросети
немедленно обратитесь в центр поддержки
и
клиент
отключите устройство, то у
поддержк
могут возникнуть сложности с
неисправности.
отображается к
ов компании LG Electronics. Если вы
и клиентов компании LG Electronics
оматически выявлять
од ошибки даже при
ой ситуации не
специалиста центра
определением
Настройка режима Поддержание
свежим
Порчу продуктов из-за изменений температуры
можно свести к минимуму, поддерживая
температуру в холодильнике 2 °C.
Нажимайте кнопку Fridge Temperature
(Температура холодильника) 3 секунды, тогда
появится пиктограмма Поддержание свежим
на панели управления. Тогда можно настроить
функцию Поддержание свежим.
• Чтобы выключить функцию По
свежим, нажмите однократно кнопку Fridge
Temperature (Температура холодильника),
когда температура холодильника отображается
на панели управления, или удерживайте кнопку
Fridge Temperature нажатой 3 секунды, когда
температура холодильника не отображается.
ддержание
26
Page 73

RU
Установка параметров режима
быстрой заморозки
Данная функция обеспечивает быструю
заморозку большого количества льда или
продуктов.
• При нажатии к
быстрой заморозки) на панели управления
включится подсветка значка Express Freeze.
• Данная функция
после каждого нажатия кнопки.
• Функция «Р
автоматически отключается по истечении
определенного количества времени.
нопки Express Freeze (Режим
включается и
ежим быстрой заморозки»
лючается
отк
Установка и сброс блокировки
Блокировка кнопок на панели управления.
• При нажатии к
в течение 3 секунд на панели управления
появится пиктограмма Lock/Unlock
(Блокировать/Разблокировать). Функция
включается и выключается каждый раз при
нажатии кнопки.
• При вклю
блокировки) не работают.
• Если на забл
любую кнопку, кроме блокировки, значок Lock/
Unlock на панели управления мигнет 3 раза.
• Чтобы изм
кнопку Lock на три секунды, чтобы отключить
функцию.
нопки Lock (Блокировать)
ченной блокировке кнопки (кроме
окированном устройстве нажать
енить настройку, сначала зажмите
Настройка Wi-Fi
При использовании приложения LG Smart ThinQ
кнопка Wi-Fi позволяет подключить холодильник
к домашней сети Wi-Fi.
Wi-Fi показывает состояние
• Значок
подключения холодильника к сети. Значок
светится, когда холодильник подключен к сети
Wi-Fi.
• Нажмите и у
3 секунд, чтобы подключиться к сети. Значок
будет мигать во время выполнения соединения,
а затем будет светиться постоянно, когда
соединение будет успешно установлено.
держивайте кнопку Wi-Fi в течение
Функция InstaView
Функция InstaView на двери-в-двери позволяет
увидеть, что заканчиваются часто используемые
продукты питания, например напитки и закуски,
не открывая при этом дверцу холодильника.
Постучите по стеклу два раза, чтобы
1
включить или выключить светодиодную
подсветку в дверце.
Светодиодная подсветка автоматически
2
выключается через 10 секунд.
• Функция InstaV
когда правая или левая дверца холодильной
камеры открыты, а также в течение двух
секунд после закрытия дверцы и во время
использования дозатора льда.
• Постучите рядом с центральной частью
стекла. Стук рядом с краями стекла может не
активировать функцию InstaView.
• Стучите дост
был слышен.
• Функция InstaV
громкого шума рядом с холодильником.
iew двери-в-двери недоступна,
аточно сильно, чтобы звук стука
iew также активируется от
27
Page 74
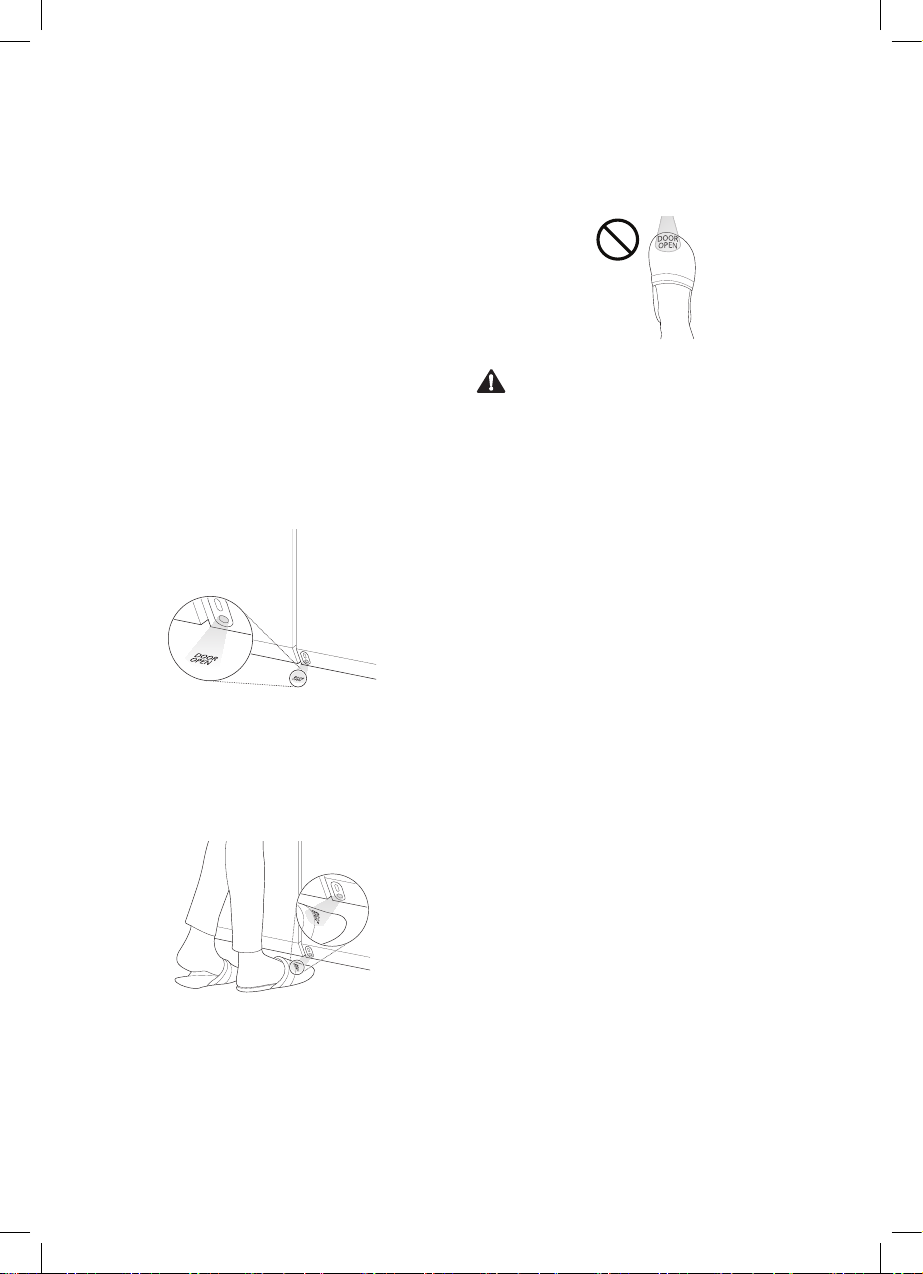
RU
Функция автоматического
открывания двери
Правая дверь холодильника открывается
автоматически, если поставить ногу возле
датчика движения внизу двери. Это удобно,
если у вас в обеих руках продукты и необходимо
открыть дверь холодильника. Чтобы настроить
функцию автоматического открывания двери,
нажмите кнопку несколько раз для переключения
между настройками ВКЛ., ВЫКЛ. ЗВУК и ВЫКЛ.
Использование функции
автоматического открывания
двери
Когда включена функция автоматического
1
открывания двери, отображается текст на
полу рядом с датчиком движения.
Проведите ногой напротив датчика движения
2
и встаньте на отображаемый текст. Правая
дверь откроется. Если дверь откроется
меньше, чем на 20 градусов и дальше не
будет открыта, она автоматически закроется
через 3 секунды.
ПРИМЕЧАНИЕ
• Поставьте ногу рядом с датчиком, так чтобы
текст отображался на ноге, а не просто на
пальцах.
ВНИМАНИЕ!
• Отключите функцию автоматического
открывания двери, если в доме есть маленькие
дети или люди с ограниченными умственными
способностями. Они могут получить травму,
если дверь откроется неожиданно, когда они
будут рядом.
ПРИМЕЧАНИЕ
• Отображаемый текст может не читаться
на некоторых материалах покрытия пола,
но это не влияет на выполнение функции
автоматического открывания двери.
• Если материал пола им
отражения (металл, стеклянная плитка), датчик
движения может срабатывать неправильно и
функция автоматического открывания двери не
будет функционировать должным образом.
• Отражающие объекты напротив датчика
движения могут отображать текст, но текст
исчезает, если не обнаружено движение.
• Если животное пройдет в то врем
напротив изделия стоит человек, функция
автоматического открывания двери может
активироваться.
еет высокую степень
я, когда
28
Page 75
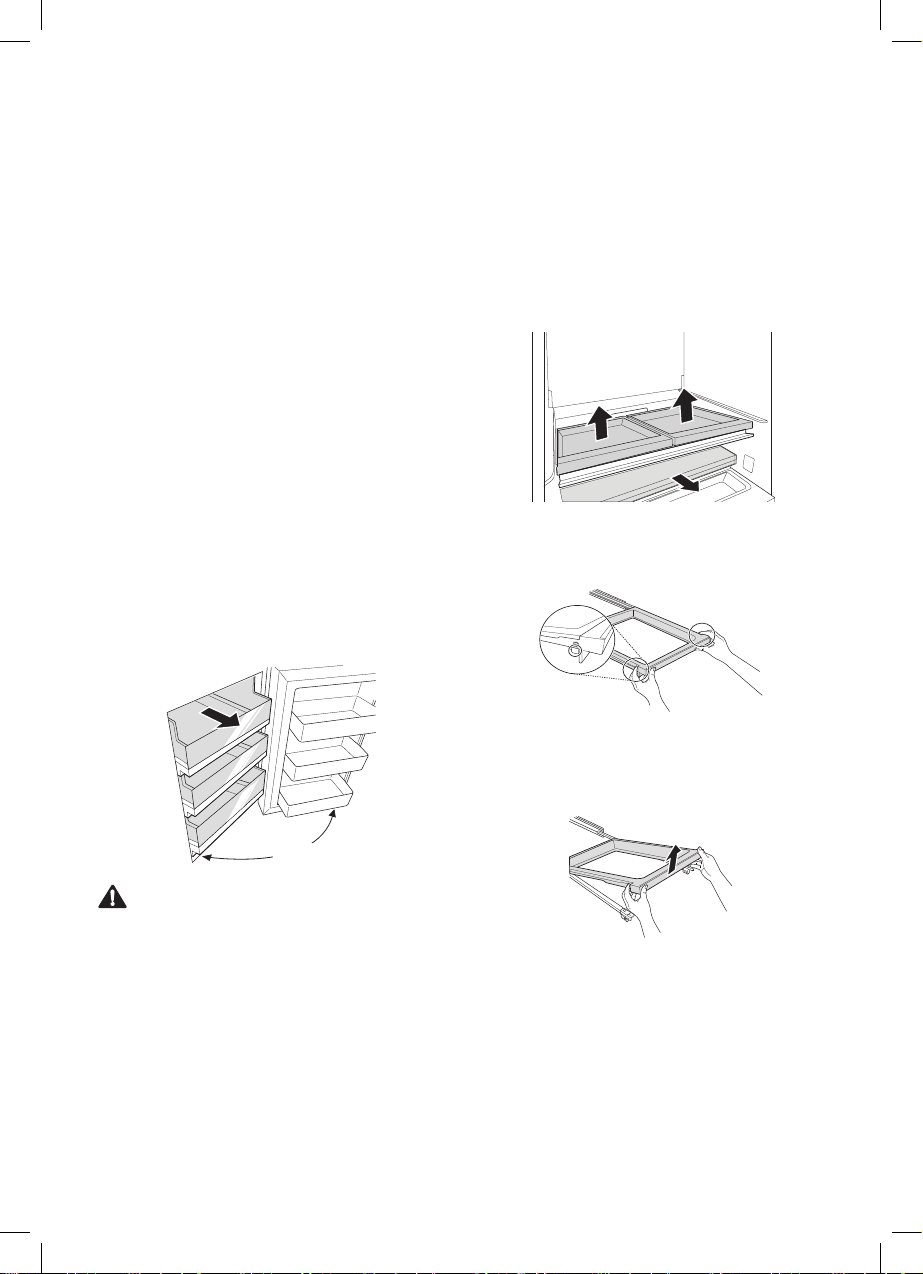
RU
Функция автоматического
открывания ящика
Если включено автоматическое открывание
ящика, ящики морозильной камеры открываются
автоматически, когда открывается дверь
морозильной камеры. Ящики автоматически
закрываются, когда закрывается дверь
морозильной камеры.
Настройка функции
автоматического открывания
ящика
Нажмите Auto Drawer (Автоматический ящик),
чтобы активировать или деактивировать
функцию. Когда функция активирована, на
дисплее отображается иконка.
Использование функции
автоматического открывания
ящика
Откройте дверь морозильной камеры хотя бы
на 85 градусов, чтобы автоматически открыть
ящики. Медленно закройте дверь, чтобы
автоматически закрыть ящики.
Совет для организации
большего полезного
пространства
Использование без поддержки
ящика
Чтобы увеличить пространство в холодильнике,
уберите опоры для ящиков и полки.
Нажмите на рычаги с обеих сторон опор
1
ящика.
Более 85°
ВНИМАНИЕ!
• Не прилагайте чрезмерные усилия, не толкайте
и не тяните ящики морозильной камеры.
• Не захлопывайте дверь морозильной камеры,
когда открыты ящики. Несоблюдение этих
предупреждений может привести к травмам
людей или повреждению продукта.
Придерживая оба рычага нажатыми,
2
поднимите слегка опору ящика и уберите ее
с направляющих.
29
Page 76

RU
Использование без ящика
морозильной камеры
Чтобы сделать морозильную камеру более
просторной, уберите ящики из нее.
Нажмите кнопку Auto Drawer (Автоматически
1
ящик) на панели управления, чтобы
отключить функцию автоматического
открывания ящика.
Поднимите пустой ящик морозильной
2
камеры и уберите его с полки.
Ящик
морозильной
камеры
Полка
ПРИМЕЧАНИЕ
• Отключите функцию автоматического
открывания ящика перед использованием.
Будьте осторожны, чтобы продукты не падали
с полки.
• Слегка потяните и то
осторожны, чтобы продукты не падали с полки.
• Ящик морозильной камеры м
закрываться, если продукты застряли за
ящиком.
• В разделе "Использов
морозильной камеры" показан ящик 1).
лкните полку. Будьте
ожет не
ание без ящика
Стандартное охлаждение для
хранения продуктов
Это пространство используется для хранения
мяса, рыбы, молочных продуктов, напитков
и прочих продуктов, которые должны быть
охлажденными.
Настройка стандартного
охлаждения для хранения
продуктов
Выберите настройку температуры для
стандартного охлаждения для хранения
продуктов, нажимая несколько раз кнопку Select
(Выбрать) для переключения между режимами
Мясо, Полуфабрикаты или Продукт.
Настройка температуры постепенно становится
холоднее в последовательности Продукт →
Полуфабрикаты → Мясо.
ВНИМАНИЕ!
• Овощи и фрукты могут замерзнуть, если
поместить их в хранилище CustomChill™ с
настройкой на Мясо или Полуфабрикаты.
30
1)
Page 77

RU
Регулируемая подвижная корзина
Легко перемещать регулируемую подвижную
корзину вверх и вниз по необходимости.
• Уберите все из регулируемой подвижной
корзины перед перемещением вверх или вниз.
• При регулировании регулируемой подвижной
корзины можно более удобно хранить высокие
продукты.
Чтобы поднять регулируемую
1
перемещаемую корзину, удерживайте кнопку
корзины в центре и толкайте корзину вверх,
пока она со щелчком не зафиксируется на
месте.
Чтобы опустить регулируемую
2
перемещаемую корзину, прижмите, чтобы
отпуститвниз,аги внизу корзины, и опустите
корзину вниз, пока она со щелчком не
зафиксируется на месте.
Скрытый лоток
Отделение скрытого лотка немного прохладнее,
чем область полки или дверей, поэтому там
удобно хранить молочные закуски или другие
мелкие элементы, которые необходимо
поддерживать особенно холодными. Там также
удобно размораживать мясо.
ВНИМАНИЕ!
• Чтобы сократить риск царапанья двери или
поломки центральной планки, убедитесь, что
планка всегда сложена.
• Сигнал тревоги двери звучит каждые 30 секунд,
дверь остается открытой дольше одной
если
минуты. Убедитесь в том, что складная планка
сложена перед закрыванием левой двери.
ПРИМЕЧАНИЕ
• Чтобы открыть крышку, толкните ручку назад,
чтобы отпустить защелку.
• Чтобы закрыть крышку, сдвиньте крышку на
емкость, пока защелка не зафиксируется на
месте.
ВНИМАНИЕ!
• Чтобы избежать личных травм и повреждений
корзины или ее содержимого, опустошите
емкость регулируемой перемещаемой корзины
перед перемещением ее вверх или вниз.
31
Page 78

Другие функции
Система оповещения об открытой
дверце
Если дверь (холодильника, морозильного отсека,
дверь-в-двери) открыта или неплотно закрыта в
течение одной минуты, звуковой сигнал подается
3 раза с интервалом 30 секунд.
• Обратитесь в клиентский информ
центр LG, если звук не прекращается даже
после закрытия двери.
Обнаружение неполадки
Устройство может автоматически выявлять
неисправности во время работы.
• Если выявлена неисправность, устройство не
работает, и
нажатии любой из кнопок.
• При возникновении так
отключайте устройство от электросети
немедленно обратитесь в центр поддержки
и
клиент
отключите устройство, то у специалиста центра
поддержки клиентов компании LG Electronics
могут возникнуть сложности с
неисправности.
отображается к
ой ситуации не
ов компании LG Electronics. Если вы
ационный
од ошибки даже при
определением
RU
32
Page 79

ИНТЕЛЛЕКТУАЛЬНЫЕ ФУНКЦИИ
RU
Использование приложения
Smart ThinQ
Установка приложения Smart ThinQ
Найдите приложение LG Smart ThinQ в Google
Play Store & Apple App Store с помощью
смартфона. Следуйте инструкциям по загрузке и
установке приложения.
Функция Wi-Fi
• Для приборов с логотипом или
Подключайтесь к устройству со смартфона при
помощи удобных интеллектуальных функций.
Обновление микропрограммы
Обновляйте микропрограммное обеспечение для
поддержания производительности устройства.
Smart Diagnosis™
Интеллектуальная функция диагностики Smart
Diagnosis позволяет получать такую полезную
информацию, как способы правильного
использования устройства на основании
шаблонов.
Настройки
Позволяет задавать различные параметры на
самом холодильнике и с помощью приложения.
ПРИМЕЧАНИЕ
• Чтобы проверить Wi-Fi соединение, убедитесь,
что значок Wi-Fi
светится.
• Приложение LG Smart ThinQ не предназначено
для решения проблем с подключением к сети,
а также неполадками и ошибками, вызванными
сетевым подключением.
• Устройство поддерживает т
частотой 2,4 ГГц.
• Если возникли какие-либо п
подключению устройства к сети Wi-Fi, это
может быть вызвано тем, что устройство
находится слишком далеко от маршрутизатора.
Приобретите ретранслятор (усилитель сигнала)
Wi-Fi, чтобы улучшить сигнал Wi-Fi.
• Подключение Wi-Fi може
или прервано из-за особенностей домашней
сети.
на панели управления
олько Wi-Fi сети с
роблемы при
т быть не установлено
• В зависимости от Интернет-провайдера с
сетевым соединением могут возникать те или
иные проблемы.
• Окружающая беспров
замедлить работу беспроводной сети.
• В целях улучшения про
могут вноситься изменения без
предварительного уведомления пользователя.
• Характеристики могут меняться
от модели.
одная среда может
дукта в приложение
в зависимости
Информация о программном
обеспечении с открытым исходным
кодом
Для получения исходного кода по условиям
лицензий GPL, LGPL, MPL и других лицензий
с открытым исходным кодом, которые
используются в этом продукте, посетите сайт
http://opensource.lge.com.
В дополнение к исходному коду для загрузки
также доступны все применимые условия
лицензионного соглашения, отказ от гарантийных
обязательств и заявления об авторских правах.
Компания LG Electronics также предоставляет
исходный код на компакт-дисках за плату,
которая покрывает стоимость выполнения
этой услуги (в частности, стоимость носителя,
доставку и обработку). Запрос можно оставить по
адресу: opensource@lge.com. Это предложение
действует в течение 3 (трех) лет с даты
приобретения продукта.
Использование функции Smart
Diagnosis™ на смартфоне
• Для приборов с логотипом или
Воспользуйтесь этой функцией, чтобы получать
результаты точной диагностики из центра
поддержки клиентов компании LG Electronics при
возникновении неисправности или выходе из
строя вашего устройства.
Smart Diagnosis™ не активируется, если
устройство не включено в розетку. Если включить
прибор не удалось, то неисправности придется
устранять без функции Smart Diagnosis™.
33
Page 80

RU
Использование функции Smart
Diagnosis™
Система диагностики Smart
Diagnosis™ через центр поддержки
клиентов компании LG Electronics
С помощью этой функции в случае
возникновения неполадок или сбоев в
устройства сервисный центр к
Electronics способен провести дистанционную
диагностику. Используйте данную функцию
только для обращения к мастеру сервисного
центра, а
1
2
3
не во время нормальной работы.
Нажмите кнопку Lock, чтобы включить
блокировку.
• Если устройство уже заблокировано,
нажатие кнопки Lock отключит ее, а
повторное нажатие включит.
• Обратите внимание, что функция
интеллектуальной диагностики не
будет работать в течение 5 минут после
включения блокировки.
Держа телефон у динамика, нажмите и
удерживайте кнопку Freezer в течение трех
секунд.
Откройте дверцу холодильника и поднесите
телефон к динамику в верхнем правом углу.
• Расположите телефон таким образом,
чтобы микрофон располагался напротив
отверстия динамика.
работе
омпании LG
После завершения передачи данных
4
специалист по техническому обслуживанию
сообщит вам результаты диагностики
системе Smart Diagnosis™.
в
ПРИМЕЧАНИЕ
• Расположите телефон таким образом, чтобы
микрофон располагался напротив отверстия
динамика.
• Система Smart Diagnosis™ издает звук
примерно через три секунды.
• Не отводите телефон о
передаче данных.
• Удерживайте телефон напротив в
правого отверстия динамика и
завершения пере
• Звук передачи данных при исп
функции Smart Diagnosis™ может быть резким
для уха, но в
диагностики не отводите телефон от отверстия
динамика до прекращения звука передачи
данных.
• По завершении передачи данных на дисплей
удет выведено соответствующее сообщение, а
б
панель управления автоматически выключится
и затем включится через несколько секунд.
Затем сотрудник центра клиентской поддержки
объясняет результаты диагностики.
• Работоспособность функции Smart Diagnosis™
зависит от качества местной телефонной связи.
• Домашний проводной телефон обеспечивает
более высокое качество связи и сигнала.
• Если передача данных с помощью функции
Smart Diagnosis™ затруднена вследствие
низкого качества телефонной связи, вы не
сможете получить максимальный эффект от ее
применения.
целях обеспе
т отверстия при
дождитесь
дачи данных.
чения точности
ерхнего
ользовании
34
Page 81

ТЕХНИЧЕСКОЕ ОБСЛУЖИВАНИЕ
RU
Примечания по очистке
устройства
• Перед снятием полки или контейнера из
внутренней части устройства извлеките все
хранившиеся там продукты во избежание
получения травм или повреждения устройства.
− В противном случае вес хранящихся
продуктов может стать причиной травм.
• При очистке наружных вентиля
отверстий устройства при помощи
пылесоса необходимо отсоединить кабель
электропитания от розетки во избежание
статического разряда, который может вывести
из строя электронное оборудование или стать
причиной поражения электрическим током.
• Снимите полки и контейнеры, промойт
• Регулярно очищайте упл
• Необходимо удалять п
• После проведения очистки п
• Вентиляционные отверстия на внешней стенке
затем дайте им п
водой, а
перед обратной установкой.
влажной мягкой тканью.
пятна с лотков в дверце, поскольк
и
наличие может негативно сказаться на качестве
хранения продуктов или даже привести
к
повреждению лотков.
поврежден ли кабель питания, не происходит
ли его нагрева и
в
розетку.
у
стройства должны поддерживаться в
− Засорение вентиляционных каналов мо
стать причиной пожара или повреждения
устройства.
правильно ли он вставлен
олностью высохнуть
отнитель дверцы
ролитые продукты
роверьте, не
ционных
е их
у их
чистоте.
жет
• Покрытие внешних металлических
повер
хностей воском помогает защитить
их от ржавчины. Нельзя покрывать воском
пластиковые детали. Как минимум два раза в
год покрывайте окрашенные металлические
поверхности воском. Используйте восковые
составы для бытовой техники (или восковую
пасту для автомобилей). Для нанесения воска
используйте чистую мягкую ткань.
• Для мойки наружной части исп
губку или мягкую тряпку со слабым моющим
средством и теплой водой. Не используйте
абразивы или сильные очистители. Тщательно
протрите поверхность мягкой тканью.
• Запрещается мыть полк
в посудомоечной машине.
− Эти детали могут деформиров
воздействием высокой температуры.
• Если устройство оснащено свет
индикаторами, не снимайте крышку индикатора
и
сам индикатор для ремонта или т
обслуживания. Обратитесь в
ов компании LG Electronics.
клиент
ользуйте чистую
и или контейнеры
аться под
одиодными
ехнического
центр поддержки
35
Page 82

RU
Очистка лотка в дверце
Снятие корзины левой двери
холодильника
Удерживая лоток за обе кромки, поднимите его и
снимите.
Снятие корзины двери
морозильной камеры и нижней
корзины InstaView
Чтобы снять дверную корзину, немного
поднимите оба конца корзины и потяните вперед,
чтобы отделить.
Снятие верхней корзины InstaView
Откройте защелки под корзиной, вращая
1
их вовнутрь. Наклоните переднюю часть
корзины вверх, так чтобы петли наверху
освободили направляющие, потом легко
протолкните корзину назад.
Удерживая лоток за обе кромки, поднимите
2
его и снимите.
Установка на место корзины двери
морозильной камеры и нижней
корзины InstaView
Чтобы установить на место, совместите оба
конца корзины с отверстием, с усилием толкайте,
пока она не зафиксируется на месте со щелчком.
36
Page 83
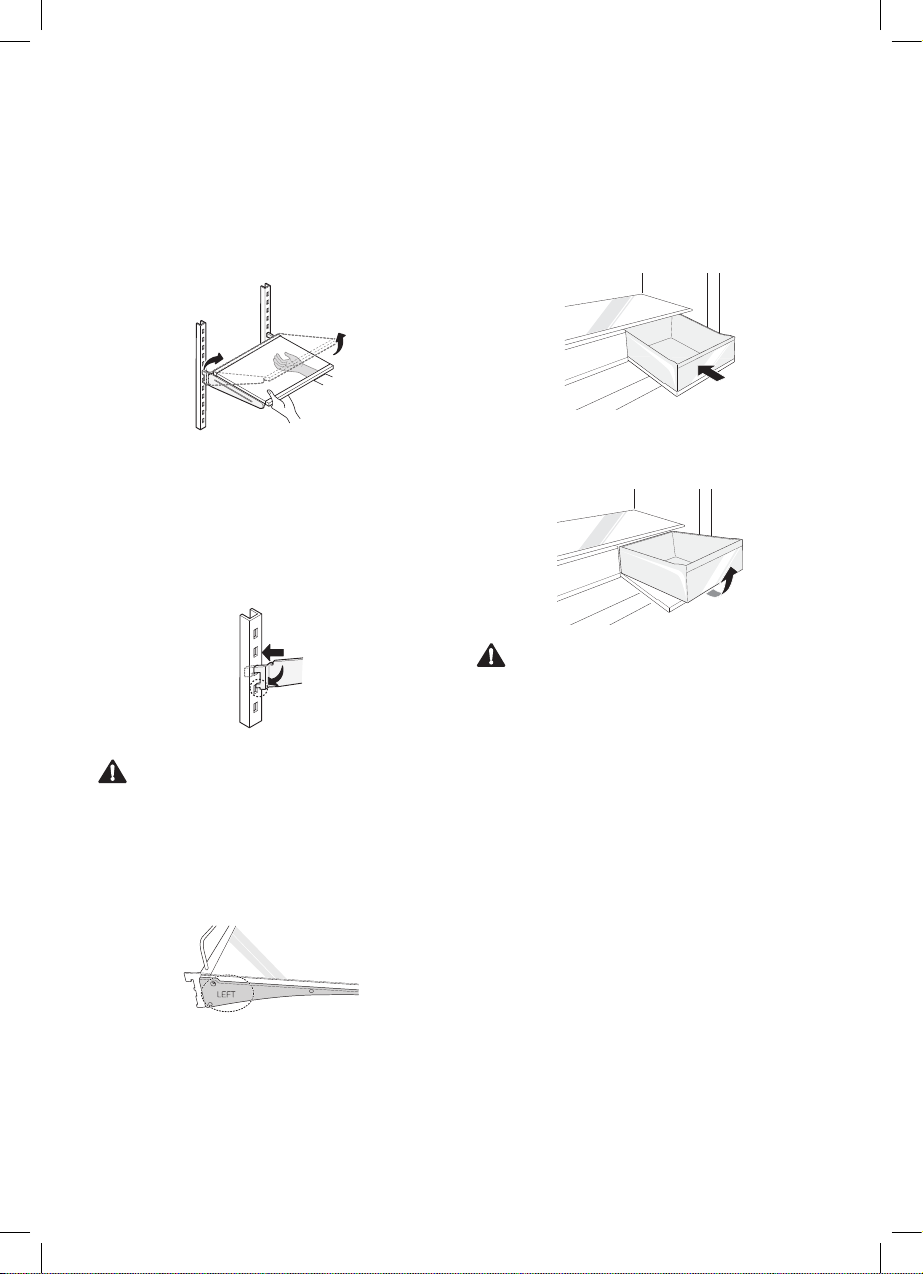
RU
Очистка полок
Извлечение полки из холодильной
камеры
Наклоните переднюю часть полки и поднимите
ее прямо вверх. Вытяните полку.
Установка полки в холодильную
камеру
Наклоните переднюю часть полки и направляйте
задние крюки полки в пазы на необходимой
высоте. Затем опустите переднюю часть полки
так, чтобы крюки опустились в отверстия.
Очистка овощного контейнера
Снятие овощного контейнера
Вытягивайте контейнер для фруктов и
1
овощей, пока он не остановится.
Немного приподнимите контейнер для
2
фруктов и овощей, чтобы снять его с опоры.
ВНИМАНИЕ!
• Обратите внимание, что травмы могут быть
вызваны весом хранящихся продуктов при
извлечении ящика для овощей.
ВНИМАНИЕ!
• Убедитесь в том, что полки ровные по обеим
сторонам. Если этого не сделать, полка может
упасть, а еда рассыпаться.
ПРИМЕЧАНИЕ
• Левая сторона полки имеет пометку "Левая".
• Если поменять местами левую и правую
стороны полки, они не соберутся правильно.
37
Page 84

RU
Извлечение емкости ящика для
овощей
Полностью откройте дверь холодильника и
1
вытяните все полки.
ВНИМАНИЕ!
• Чтобы избежать травм, всегда опустошайте
полки и ящики для овощей перед их
извлечением.
Поднимайте переднюю часть крышки ящика
2
для овощей, пока не услышите громкий
щелчок.
Немного наклоните крышку и поддерживайте
3
ее рукой, вытягивая.
Откройте откидной отсек для хранения и
4
поднимите переднюю сторону емкости ящика
для овощей обеими руками.
Проведите рукой под емкостью ящика для
5
овощей и наклоните емкость немного вверх
для извлечения.
38
Page 85

RU
Установка на место емкости ящика
для овощей
Одной рукой поддерживайте нижнюю часть
1
емкости ящика для овощей, выравнивая
внутренний край коробки с пазом внутри
холодильника. Опустите емкость на место.
Под углом поместите крышку ящика для
2
овощей в холодильник, а потом опустите ее
на место.
Сдвигайте крышку ящика для овощей на
3
место, пока она не остановится.
Очистка контейнера
морозильной камеры
Извлечение контейнера
морозильной камеры
Вытягивайте ящик морозильной камеры,
1
пока он не остановится. Опустошите все
содержимое ящика перед извлечением.
Поднимите пустой ящик морозильной
2
камеры и уберите его с опоры.
ВНИМАНИЕ!
• Ящики тяжелые. Всегда вытягивайте и
устанавливайте ящики двумя руками, чтобы
избежать повреждения изделия и нанесения
травм людям. Всегда опустошайте ящики перед
извлечением.
• Всегда полностью открывайте двери
моро
зильной камеры перед извлечением или
сборкой ящиков.
39
Page 86

Очистка опоры ящика
Извлечение опоры ящика
Нажмите на рычаги с обеих сторон опор
1
ящика.
Придерживая оба рычага нажатыми,
2
поднимите слегка опору ящика и уберите ее
с направляющих.
Установка на место опоры ящика
RU
Вытяните и уберите направляющую опоры
1
ящика.
Выровняйте опору ящика на направляющей
2
и прижмите ее вниз до слышного щелчка.
40
Page 87

ПОИСК И УСТРАНЕНИЕ НЕИСПРАВНОСТЕЙ
Признаки Возможная причина Способ устранения
Охлаждения или
заморозки продуктов
не происходит.
Плохой уровень
охлаждения или
заморозки продуктов.
Внутри устройства
присутствует
неприятный запах.
Лампа внутреннего
освещения устройства
не работает.
Имели ли место перебои
электропитания?
Вилка вынута из розетки?
Установлена ли температура
холодильника или морозильной
камеры в режим минимального
охлаждения?
Подвергается ли устройство
воздействию прямых
солнечных лучей или
находится ли оно вблизи
объектов, излучающих тепло,
таких как, например, плита
для приготовления пищи или
обогреватель?
Помещали ли вы горячие
продукты питания
холодильник без
в
предв
арительного охлаждения?
Не перегружен ли холодильник
продуктам?
Полностью ли закрыты дверцы
устройства?
Достаточно ли свободного
пространства вокруг
устройства?
Установлен ли режим
Warm (Слабое охлаждение)
холодильника или морозильной
камеры?
Хранили ли вы продукты
резким запахом?
с
Испортились ли фр
овощи в контейнере?
и
Лампа внутреннего освещения
устройства выключена?
укты
• Проверьте, подает
электропитание на другие устройства.
• Правильно вставьте вилку в роз
• Установите режим тем
холодильника или морозильной
камеры Medium (Средний уровень
охлаждения).
• Проверьте место уст
устройства и
в другое место вдали о
тепло объектов.
• Охлаждайте горячую пищу перед тем,
как поместить в холодильный или
морозильный отсек.
• Обеспечьте наличие доста
свободного пространства между
продуктами.
• Полностью закройте дверцу
и убедитесь в том, что хранящиеся
про
дукты питания не мешают
закрытию двери.
• Измените место установки таким
образом, чтобы обеспечить
достаточное пространство вокруг
устройства.
• Установите режим тем
холодильника или морозильной
камеры Medium (Средний уровень
охлаждения).
• Храните продукты с резким запахом
герметичных контейнерах.
в
• Избавьтесь от испор
и
очистите овощной контейнер.
Не храните ов
контейнере слишком
• Клиентам очень сложно заменить
ла
мпу внутри устройства, поскольку
она не предназначены для
технического обслуживания. Если
лампа внутри устройства не горит,
свяжитесь с
к
лиентов компании LG Electronics.
ся ли
установите устройство
ощи в
центром поддержки
етку.
пературы
ановки
т излучающих
точного
пературы
ченных овощей
овощном
долго.
RU
41
Page 88

Признаки Возможная причина Способ устранения
• Отрегулируйте переднюю ножку,
чтобы слегка поднять лицевую
сторону устройства.
• Измените положение полок при
необходимости.
• Если закрывать дверцу слишком
быстро или прикладывать для ее
закрытия слишком большое усилие,
дверца может оставаться открытой
в течение короткого промежутка
времени перед закрытием.
Старайтесь не хлопать дверцей при
закрытии. Закрывайте дверцу, не
прикладывая большого усилия.
• Охлаждайте горячую пищ
тем, как класть в холодильный или
морозильный отсек. Попробуйте
открыть дверцу устройства через
несколько минут, после стабилизации
уровня давления внутри устройства.
• Когда корзина двери заполнена,
дв
ери могут перекоситься, в
результате чего планка или функция
автоматического открывания двери не
будут работать правильно. Выдвините
обе передние выравнивающие ножки
полностью, так чтобы они плотно
прилегали к полу. Соблюдайте
инструкции в разделе «Выравнивание
двери», чтобы поднять левую дверь
холодильника, пока планка снова не
будет правильно функционировать.
Выровняйте правую дверь
холодильника так, чтобы она была
расположена на одной линии с левой
дверью холодильника.
Дверца холодильника
неплотно закрыта.
Дверца устройства
открывается со
значительным
усилием.
Планки дверей не
сгибаются и не
разгибаются должным
образом.
Наклонено ли устройство
вперед?
Были ли полки установлены
должным образом?
Закрывали ли вы дверцу
приложением излишнег
с
усилия?
Вы открывали дверь сразу же
после ее закрытия?
Вытянуты ли передние
выравнивающие ножки,
холодильник ровный и двери
выровнены?
о
RU
у перед
42
Page 89
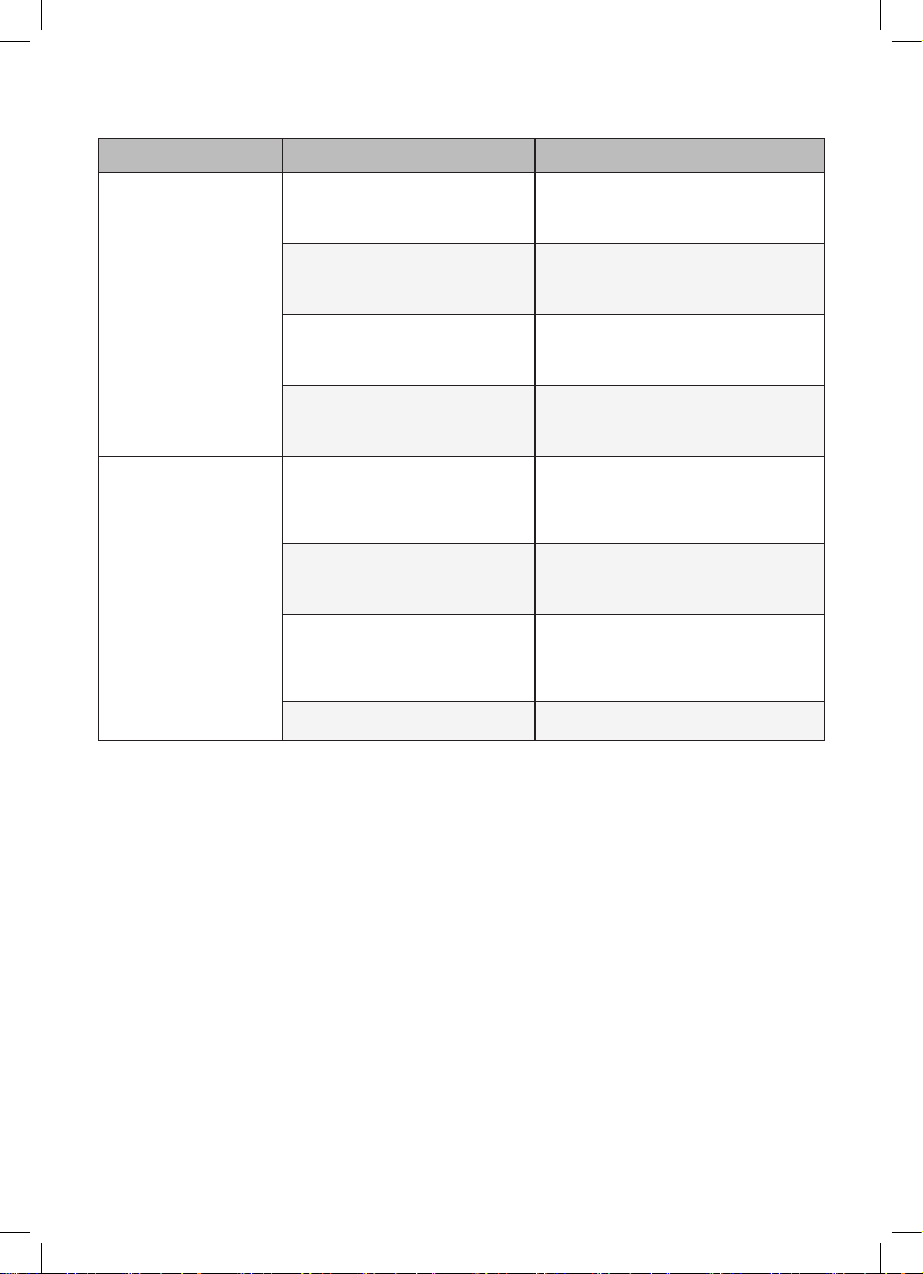
Признаки Возможная причина Способ устранения
Конденсат внутри
устройства или на
дне крышки овощного
контейнера.
В морозильном отсеке
образовался иней.
Помещали ли вы горячие
продукты питания
в холодильник без
предварительного охлаждения?
Дверца устройства была
оставлена открытой?
Открывали ли вы дверцу
устройства слишком часто?
Клали ли вы теплые или
влажные продукты внутрь
устройства без упаковки их
герметичные контейнеры?
в
Возможно, дверца неплотно
закрыта?
Помещали ли вы горячие
продукты питания
холодильник без
в
предв
арительного охлаждения?
Подача или выпуск воздуха
из морозильного отсека
затруднена?
Морозильный отсек
переполнен?
• Охладите горячую еду пере
как класть в холодильник или
морозильник.
• Несмотря на то, что к
испарится вскоре после закрытия
дверцы устройства, можно удалить
его куском сухой ткани.
• Конденсат может образовыв
вследствие разницы температуры
внутри устройства и
Удалите в
• Храните продукты в закрытых или
герметичных к
• Следите за тем, чтобы п
питания внутри холодильника не
препятствовали закрытию дверцы,
обязательно проверяйте, плотно ли
закрыта дверца.
• Охлаждайте горячую пищ
как поместить в холодильный или
морозильный отсек.
• Следите за тем, чтобы отверстия
для забора и выпуска воздуха не
были засорены, чтобы обеспечивать
циркуляцию воздуха внутри
устройства.
• Обеспечьте наличие свободного
пространства между продуктами.
лагу куском сухой ткани.
RU
д тем,
онденсат
аться
снаружи.
онтейнерах.
родукты
у перед тем,
43
Page 90

Признаки Возможная причина Способ устранения
Образование инея или
конденсата внутри или
снаружи устройства.
Устройство работает
шумно и
странные звуки.
Боковая или передняя
стенки устройства
теплые.
Вода внутри или
снаружи устройства.
издает
Часто ли вы открывали
и закрывали дверцу
устройства? Дверца устройства
закрыта не полностью?
Высокая ли влажность в месте
установки?
Устройство установ
непрочной поверхности или
не было выровнено должным
образом?
ается ли задняя стенка
Кас
устройства стены?
Находятся ли за устройством
какие-либо предметы?
Расположен ли какой-либо
предмет на устройстве?
Эти участки
устройства оснащены
противоконденсатными
трубками для уменьшения
количества конденсата вокруг
дверцы.
Не происходит ли утечка воды
вблизи устройства?
Имеется ли на дне устройства
вода?
лено на
• Иней или конденсат могут
формироваться
в
устройство наружного в
• Конденсат может появ
наружных деталях устройства,
если в
месте установки слишк
высокая влажность или при большом
количестве осадков. Удалите влагу
куском сухой ткани.
• Установите устройство на про
и
ровной поверхности.
• Выберите место установк
обеспечить достаточное свободное
пространство вокруг устройства.
• Удалите предме
устройством.
• Снимите все предме
расположенные на устройстве.
• Трубка отво
предотвращения возникновения
конденсата установлена в
и боковой частях устройства. Сраз
после установки или в
летних месяц
сильно нагреваться. Можете быть
уверены, это не является признаком
неисправности.
• Проверьте, не происходит ли утечки
воды из-под раковины или из другого
места.
• Проверьте, появля
оттаивания продуктов, повреждения
или поломки контейнера в
падения.
да тепла для
при проникновении
ты, лежащие за
ев она может довольно
оздуха.
ляться на
ом
чной
и так, чтобы
ты,
передней
течение
ется ли вода из-за
у
результа
RU
те
44
Page 91

Признаки Возможная причина Способ устранения
Процесс управления
оттаиванием может
сопровождаться щелчками
Щелкающие звуки
Дребезжание
Свист
Бульканье
Щелчки
Вибрация
при автоматическом
запуске и
процесса оттаив
Работа терморегулятора
(или устройства управления
холодильником на некоторых
моделях) также сопровождается
щелчками при включении
отключении.
и
Ист
звуков может быть поток
хладагента, трубопровод воды
задней части холоди
в
(только для моделей
устройством очистки) или
с
предметы, хранящие
холодильнике или рядом с
Устройство не установ
полу ровно.
Устройство с
компрессором было
пере
эксплуатации.
Электродвигатель вентилятора
испарителя обеспечивает
циркуляцию воздуха
в холодильнике и морозильной
камере.
Воздух о
конденсатора при помощи
вентилятора конденсатора.
По
охлаждения
Сжатие и
внутренних стенок вследствие
изменения те
Если боковые или задняя
стенка у
стены помещения или стенок
шкафа, это может стать
причиной шумов даже при
нормальном уровне вибрации.
завершении
ания.
очником дребезжащих
льника
ся на
ним.
лено на
линейным
мещено во время
тводится из
ток хладагента через систему
расширение
мпературы.
стройства касается
• Устройство исправно.
• Устройство исправно.
• Пол слабый или неровный или
необходимо выровня
ножки. См. раздел Выравнивание
двери.
• Нормальная работа. Если компрессор
не перестанет дребезжать через три
минуты, отключите и снова включите
питание устройства.
• Устройство исправно.
• Устройство исправно.
• Устройство исправно.
• Устройство исправно.
• Для предотвращения шума убедитесь
в том, что боковые стороны и задняя
стенка устройства не соприкасаются
со стеной помещения или стенками
шкафа.
RU
ть регулируемые
45
Page 92

ИНФОРМАЦИЯ О ПРОДУКТЕ
Модель GR-Q23FGNGL
Производитель LG Electronics
Категория Refrigerator-Freezer
Общая
Общая по
ISO
Вместимость
(л)
Вес (кг)
Напольный / Встраиваемый Напольный
Система размораживания Система Frost Free
Мощность звука (дБ)
Класс по напряжению
Потребление энергии (кВт/год)
Время повышения температуры (ч.)
Производительность морозильного аппарата (кг/24 ч.)
Хладагент
Класс энергопотребления
Климатический класс
* Климатический класс : N - T (данный холодильник предназначен для использования при
Холодильная
камера по
ISO
Без упаковки / в упаковке
Ширина x
высота x
глубина
температуре от 16°C до 43°C)
Морозильная камера
Холодильник
Общая
Морозильная камера
Отделение Две звездочки
Холодильник
Изделие
Упаковка
735
272
463
623
158
29
436
195 / 209
912 X 1784 X 754
954 X 1850 X 805
39
A++
344
16
7.5
R600a
N - T
Page 93

Для заметок
Page 94

Символ «не для пищевой продукции» применяется в соответствии с техническим
регламентом Таможенного союза «О безопасности упаковки» 005/2011 и указывает на
то, что упаковка данного продукта не предназначена для повторного использования
и подлежит утилизации. Упаковку данного продукта запрещается использовать для
хранения пищевой продукции.
Символ «петля Мебиуса» указывает на возможность утилизации упаковки. Символ может
быть дополнен обозначением материала упаковки в виде цифрового и/или буквенного
обозначения.
Информация
Вы можете увидеть месяц и год изготовления на этикетке внутри холодильника.
Page 95

ТОҢАЗЫТҚЫШ ЖӘНЕ МҰЗДАТҚЫШ
**non tradotto**
Құрылғыны пайдаланбас бұрын пайдаланушы нұсқаулығын мұқият оқып шығыңыз және
анықтама үшін оны әрқашан ыңғайлы жерде сақтаңыз.
Copyright © 2017 LG Electronics. All Rights Reserved
Page 96
МАЗМҰНЫ
ҚАУІПСІЗДІК НҰСҚАУЛАРЫ............................................................4
Маңызды қауіпсіздік нұсқаулары ..........................................................................4
ОРНАТУ ............................................................................................14
Бөлімдері ..............................................................................................................14
Жылжыту және тасымалдауға арналған ескертпелер ......................................15
Орнатуға арналған ескертпелер .........................................................................15
Есікті алу ...............................................................................................................16
Есікті қайта орнату ...............................................................................................18
Есіктің биіктігін реттеу ..........................................................................................18
ПАЙДАЛАНУ....................................................................................20
Бөлшектер мен функциялар ...............................................................................20
Пайдалануға қатысты ескертпелер ....................................................................24
Басқару панелін пайдалану ................................................................................25
InstaView функциясы ...........................................................................................27
Автоматты түрде ашылатын есік функциясы ....................................................28
Автоматты түрде ашылатын тартпа функциясы ...............................................29
Пайдалы орынды тиімді пайдалануға арналған ұсыныстар ............................29
Арнайы салқындату шкафы ................................................................................30
Басқа функциялар ...............................................................................................32
Бұл нұсқаулықта сатып алған үлгіден өзгеше
кескіндер немесе мазмұн болуы мүмкін.
Бұл нұсқаулықты өндіруші түзете алады.
СМАРТ ФУНКЦИЯЛАРЫ ...............................................................33
Smart ThinQ қолданбасын пайдалану ................................................................33
Smart Diagnosis™ функциясын пайдалану ........................................................34
Page 97

ҚЫЗМЕТ КӨРСЕТУ .........................................................................35
Тазалау бойынша ескертпелер ...........................................................................35
Есіктегі жәшікті тазалау .......................................................................................36
Сөрені тазалау .....................................................................................................37
Көкөністер тартпасын тазалау ............................................................................37
Мұздатқыш тартпасын тазалау ...........................................................................39
Тартпа тіреуішін тазалау .....................................................................................40
АҚАУЛАРДЫ ЖОЮ .........................................................................41
Page 98

ҚАУІПСІЗДІК НҰСҚАУЛАРЫ
Қауіпсіздік нұсқаулары өнімді қауіпті тудыра отырып пайдалану
және дұрыс пайдаланбау салдарынан болатын қауіптер мен
зақымдардың алдын алуға арналған.
Нұсқаулар төменде сипатталғандай «АБАЙЛАҢЫЗ» және
«ЕСКЕРТУ» болып бөлінеді.
KK
Бұл таңба қауіп тудыратын жағдайлар мен жұмысты
анықтау үшін көрсетіледі. Осындай таңбасы бар
бөлімді мұқият оқып шығыңыз және қауіптің алдын
алу үшін нұсқауларды орындаңыз.
АБАЙЛАҢЫЗ
Бұл нұсқаулар орындалмаған жағдайда ауыр жарақатқа
немесе өлімге әкелуі мүмкін екенін білдіреді.
ЕСКЕРТУ
Бұл нұсқаулар орындалмаған жағдайда өнімнің аз
деңгейде зақымдалуы мен бұзылуын білдіреді.
Маңызды қауіпсіздік нұсқаулары
АБАЙЛАҢЫЗ
Құрылғыны пайдаланған кезде жарылу, өрт, өлім, ток
соғу, зақымдау немесе адамды күйдіру қаупінің алдын
алу үшін мыналарды қоса негізгі қауіпсіздік шараларын
қолданыңыз:
Үйдегі балалар
Бұл құрылғы физикалық мүмкіндігі мен ақыл-есі шектеулі
немесе құрылғыға қатысты тәжірибесі мен білімі аз адамдарды
(балаларды қоса) олардың қауіпсіздігіне жауапты адам
қадағаламаған кезде немесе құрылғыны пайдалануға қатысты
нұсқаулар берілмеген кезде пайдалануға арналмаған.
Балалардың құрылғымен ойнамауы қадағалануы қажет.
4
Page 99

Еуропада пайдалану:
Құрылғыны 8 жастан жоғары жастағы балалар мен физикалық
мүмкіндігі мен ақыл-есі шектеулі және құрылғыға қатысты
тәжірибесі мен білімі аз адамдар құрылғыны қауіпсіз
қолдануға қатысты қадағалау мен нұсқаулар берілген кезде
пайдаланады. Балалар құрылғымен ойнамауы керек. Тазалау
мен пайдаланушы көрсететін қызметті балалар қадағалаусыз
жасамауы керек.
Орнату
•Бұл құрылғыны екі немесе одан көп адам абайлап көтеріп
тасымалдауы қажет.
•Розетканың жерге дұрыс тұйықталғанын және қуат сымындағы
жерге тұйықтау ашасының зақымдалмағанын немесе қуат
ашасынан алынбағанын тексеріңіз. Жерге тұйықтау туралы
қосымша мәліметтерді LG Electronics тұтынушыларды қолдау
орталығынан сұраңыз.
•Бұл құрылғы жабдықты жерге тұйықтау өткізгішіне ие қуат
сымымен және жерге тұйықтау ашасымен жабдықталған. Қуат
ашасы барлық жергілікті кодтар мен реттеулерге сәйкес және
жерге тұйықталған тиісті розеткаға жалғануы керек.
•Қуат сымы зақымдалған немесе розетканың тесігі босап
қалған болса, қуат сымын пайдаланбаңыз және өкілетті қызмет
көрсету орталығымен байланысыңыз.
•Құрылғыны (орнатылған) қуат кабелі жоқ көп розеткалы
адаптерге қоспаңыз. Бұл әрекет өрт шығуына себеп болуы
мүмкін.
•Қуат сымын өзгертпеңіз немесе ұзартпаңыз.
KK
5
Page 100

•Ұзартқыштарды немесе қос адаптерді қолданбаңыз. Құралды
бөлек сақтандырғышы бар арнайы қуат сымына жалғау керек.
•Жерге дұрыс емес тұйықталған (шағын) бірнеше розетка
саңылауын пайдаланбаңыз. Жерге дұрыс тұйықталған
бірнеше розетка саңылауын (шағын) пайдаланғанда, ток қуаты
кодтық деңгей бойынша немесе одан жоғары қуатты өнімді
пайдаланыңыз. Бұл әрекет бірнеше розетка саңылауының
қызуына байланысты электр тогының соғуына немесе өртке
себеп болуы мүмкін. Автоматты ажыратқышты пайдаланғанда
қуат өшірілуі мүмкін.
•Құрылғы тоқтан оңай ажыратуға болатын орынға орнатыңыз.
•Қуат сымының жоғары қаратылып тұруына және құрылғының
қуат ашасына қисайып тұруына жол бермеңіз.
•Құрылғыны мықты және тегіс еденге орнатыңыз.
•Құрылғыны ылғал және шаң жерге орнатпаңыз. Құрылғыны
кез келген сыртқы аймаққа, тікелей күн көзі, жел немесе жауын
сияқты ауа райы жағдайларына ұшырайтын немесе нөлден
төмен температуралы аймаққа орнатпаңыз және сақтамаңыз.
•Құрылғыны тікелей күн сәулесіне немесе оны пештер мен
жылыту құрылғылары сияқты жылу көздеріне жақындатпаңыз.
•Орнатқан кезде құрылғының артқы жағына тиіп кетпеуді
қамтамасыз етіңіз.
•Құрастыру немесе бөлшектеу кезінде құрылғы есігінің құлап
кетпеуін қамтамасыз етіңіз.
•Құрылғы есігін құрастыру немесе бөлшектеу кезінде қуат
сымын қыспаңыз, баспаңыз немесе зақымдамаңыз.
•Ашалы адаптер немесе басқа да керек-жарақтарды тоқ көзіне
жалғамаңыз.
KK
6
 Loading...