

Page 1
www.LGSIGNATURE.com
OWNER'S MANUAL
FRIDGE&FREEZER
Read this owner's manual thoroughly before operating the appliance and keep it handy for
reference at all times.
EN ENGLISH DE DEUTSCH ES ESPAÑOL FR FRANÇAIS IT ITALIANO
MFL68302745
Copyright © 2017 LG Electronics Inc. All Rights Reserved
Page 2

TABLE OF CONTENTS
SAFETY INSTRUCTIONS .................................................................4
IMPORTANT SAFETY INSTRUCTIONS ................................................................. 4
Disposal of Your Old Appliance .............................................................................13
INSTALLATION ................................................................................14
Compartments .......................................................................................................14
Notes for Movement and Transport .......................................................................15
Notes for Installation ..............................................................................................15
Removing the Door ................................................................................................16
Refitting the Door ...................................................................................................18
Adjusting the Height of the Door ............................................................................18
Connecting the Water Line (For Plumbed models Only) .......................................20
OPERATION .....................................................................................21
Parts and Functions ...............................................................................................21
Notes for Operation ...............................................................................................25
Using Control Panel ...............................................................................................26
Using Water Dispenser ..........................................................................................27
InstaView Function ................................................................................................29
Auto Open Door Function ......................................................................................30
Auto Open Drawer Function ..................................................................................31
Suggestion for More Usable Space .......................................................................31
CustomChill Pantry ................................................................................................32
Water and Ice Dispenser .......................................................................................33
Automatic Icemaker ...............................................................................................34
Detaching the In-Door Ice Bin ...............................................................................34
Other Functions .....................................................................................................36
This manual may contain images or content
different from the model you purchased.
This manual is subject to revision by the
manufacturer.
SMART FUNCTIONS .......................................................................37
Using Smart ThinQ Application ..............................................................................37
Using Smart Diagnosis™ ......................................................................................38
Page 3

MAINTENANCE ................................................................................40
Notes for Cleaning .................................................................................................40
Replacing the Fresh Filter .....................................................................................41
Cleaning the Door Basket ......................................................................................41
Cleaning the Shelf .................................................................................................42
Cleaning the Vegetable Drawer .............................................................................43
Cleaning the Freezer Drawer ................................................................................45
Cleaning the Drawer Support ................................................................................45
Cleaning the Water Dispenser ...............................................................................46
Replacing the Water Filter (For Plumbed models Only) ........................................46
TROUBLESHOOTING .....................................................................50
Rev.02_051817
Page 4
SAFETY INSTRUCTIONS
EN
The following safety guidelines are intended to prevent
unforeseen risks or damage from unsafe or incorrect operation
of the appliance.
The guidelines are separated into ‘WARNING’ and ‘CAUTION’
as described below.
This symbol is displayed to indicate matters and
operations that can cause risk. Read the part with this
symbol carefully and follow the instructions in order to
avoid risk.
WARNING
This indicates that the failure to follow the instructions can
cause serious injury or death.
CAUTION
This indicates that the failure to follow the instructions can
cause the minor injury or damage to the product.
IMPORTANT SAFETY INSTRUCTIONS
WARNING
To reduce the risk of explosion, fire, death, electric shock,
injury or scalding to persons when using this product, follow
basic precautions, including the following:
Children in the Household
This appliance is not intended for use by persons (including children)
with reduced physical, sensory or mental capabilities, or lack of
experience and knowledge, unless they have been given supervision
or instruction concerning use of the appliance by a person
responsible for their safety. Children should be supervised to ensure
that they do not play with the appliance.
4
Page 5

EN
For use in Europe:
This appliance can be used by children aged from 8 years and
above and persons with reduced physical, sensory or mental
capabilities or lack of experience and knowledge if they have been
given supervision or instruction concerning use of the appliance in
a safe way and understand the hazards involved. Children shall not
play with the appliance. Cleaning and user maintenance shall not be
made by children without supervision.
Installation
•This appliance should only be transported by two or more people
holding the appliance securely.
•Ensure that the socket outlet is properly grounded, and that the
earth pin on the power cord is not damaged or removed from
the power plug. For more details on grounding, inquire at an LG
Electronics customer information centre.
•This appliance is equipped with a power cord having an equipment-
grounding conductor and a grounding power plug. The power plug
must be plugged into an appropriate socket outlet that is installed
and grounded in accordance with all local codes and ordinances.
•If the power cord is damaged or the hole of the socket outlet is
loose, do not use the power cord and contact an authorized service
centre.
•Do not plug the appliance into a multi socket adapter which does
not have a power cable(mounted). Failure to do so may result in
fire.
•Do not modify or extend the power cable.
5
Page 6

EN
•Avoid using any extension cords or double adaptor. The appliance
should be connected to a dedicated power line which is separately
fused.
•Do not use a multi socket outlet which is not properly
grounded(portable). Upon using a properly-grounded multi socket
outlet (portable), use a product with the current capacity of the
power code rating or higher. Failure to do so may result in electric
shock or fire due to the heat of multi socket outlet. The power may
be shut off when the circuit breaker is operated.
•Install the appliance in a place where is easy to unplug the power
plug of the appliance.
•Be careful not to point the power plug up or let the appliance lean
against the power plug.
•Install the appliance on a firm and level floor.
•Do not install the appliance in a damp and dusty place. Do not
install or store the appliance in any outdoor area, or any area that
is subject to weathering conditions such as direct sunlight, wind, or
rain or temperatures below freezing.
•Do not place the appliance in direct sunlight or expose it to the heat
from heating appliances such as stoves or heaters.
•Be careful not to expose the rear of the appliance when installing.
•Be careful not to let the appliance door fall during assembly or
disassembly.
•Be careful not to pinch, crush, or damage the power cable during
assembly or disassembly of the appliance door.
•Do not connect a plug adapter or other accessories to the power
plug.
6
Page 7
EN
Operation
•Do not use the appliance for any purpose (storage of medical
or experimental materials or shipping) other than any domestic
household food storage use.
•In case of flood, disconnect the power plug and contact the LG
Electronics customer information centre.
•Unplug the power plug during a severe thunderstorm or lightening
or when not in use for a long period of time.
•Do not touch the power plug or the appliance controls with wet
hands.
•Do not bend the power cable excessively or place a heavy object
on it.
•If water penetrates electrical parts of the appliance, disconnect
power plug and contact an LG Electronics customer information
centre.
•Do not place hands or metallic objects inside the area emitting the
cold air, cover or heat releasing grille on the back.
•Do not apply excessive force or impact to the back cover of the
appliance.
•Do not put animals, such as pets into the appliance.
•Be careful of nearby children when you open or close the appliance
door. The door may bump the child and cause injury.
•Avoid the danger of children getting trapped inside the appliance. A
child trapped inside the appliance can cause suffocation.
•Do not place heavy or fragile objects, containers filled with liquid,
combustible substances, flammable objects(such candles, lamps,
etc.), or heating devices(such as stoves, heaters, etc.) on the
appliance.
7
Page 8

•If there is a gas leakage (isobutane, propane, natural gas, etc.),
do not touch the appliance or power plug and ventilate the
area immediately. This appliance uses a very eco-friendly gas
(isobutane, R600a) as the refrigerant. Although it uses a small
amount of the gas, it is still combustible gas. Gas leakage during
appliance transport, installation or operation can cause fire,
explosion or injury if sparks are caused.
•Do not use or store flammable or combustible substances (ether,
benzene, alcohol, chemical, LPG, combustible spray, insecticide,
air freshener, cosmetics, etc.) near the appliance.
•Immediately unplug the power plug and contact an LG Electronics
customer information centre if you detect a strange sound, odour,
or smoke coming from the appliance.
•Fill with potable water only into icemaker or dispenser water tank.
Maintenance
•Disconnect the power cord before cleaning the appliance or
replacing the inside lamp (where fitted).
•Securely plug the power plug in the socket outlet after completely
removing any moisture and dust.
•Never unplug the appliance by pulling on the power cable. Always
grip the power plug firmly and pull straight out from the socket
outlet.
•Do not spray water or inflammable substances(toothpaste, alcohol,
thinner, benzene, flammable liquid, abrasive, etc.) over the interior
or exterior of the appliance to clean it.
•Do not clean the appliance with brushes, cloths or sponges with
rough surfaces or which are made of metallic material.
EN
8
Page 9

EN
•Only qualified service personnel from LG Electronics service centre
should disassemble, repair, or modify the appliance. Contact an LG
Electronics customer information centre if you move and install the
appliance in a different location.
•Do not use a hair drier to dry the inside of the appliance or place a
candle inside to remove the odours.
•Do not use mechanical devices or other means to accelerate the
defrosting process.
Disposal
•When discarding the appliance, remove the door gasket while
leaving the shelves and baskets in place and keep children away
from the appliance.
•Dispose of all packaging materials (such as plastic bags and
styrofoam) away from children. The packaging materials can cause
suffocation.
Technical Safety
•Keep ventilation openings, in the appliance enclosure or in the built-
in structure, clear of obstruction.
•Do not use electrical appliances inside the food storage
compartments of the appliance, unless they are of the type
recommended by the manufacturer.
•The refrigerant and insulation blowing gas used in the appliance
require special disposal procedures. Consult with service agent or a
similarly qualified person before disposing of them.
9
Page 10
EN
•This appliance contains a small amount of isobutane refrigerant
(R600a), natural gas with high environmental compatibility, but it is
also combustible. When transporting and installing the appliance,
care should be taken to ensure that no parts of the refrigerating
circuit are damaged.
•Refrigerant leaking out of the pipes could ignite or cause an
explosion.
•If a leak is detected, avoid any naked flames or potential sources
of ignition and air the room in which the appliance is standing for
several minutes. In order to avoid the creation of a flammable gas
air mixture if a leak in the refrigerating circuit occurs, the size of
the room in which the appliance is used should correspond to the
amount of refrigerant used. The room must be 1 m² in size for every
8 g of R600a refrigerant inside the appliance.
•The amount of refrigerant in your particular appliance is shown on
the identification plate inside the appliance.
•Never start up an appliance showing any signs of damage. If in
doubt, consult your dealer.
•This appliance is intended to be used in household and similar
applications only. It should not be used for commercial, or catering
purposes, or in any mobile application such as a caravan or boat.
•Do not store explosive substances such as aerosol cans with a
flammable propellant in this appliance.
10
Page 11
EN
CAUTION
To reduce the risk of minor injury to persons, malfunction, or
damage to the product or property when using this product,
follow basic precautions, including the following:
Installation
•Do not tilt the appliance to pull or push it when transporting.
•Make sure not to get a body part such as a hand or foot stuck while
moving the appliance.
Operation
•Do not touch frozen food or the metal parts in the freezer
compartment with wet or damp hands. It may cause frostbite.
•Do not place glass containers or bottles in the freezer compartment,
shelves or ice bin that will be exposed to temperatures below
freezing.
•The tempered glass on the front side of the appliance door or the
shelves can be damaged by an impact. If it is broken, do not touch
it with wet hands, as this may result in injury.
•Do not place heavy objects on top of the door in door.
•Do not use the door in door as a chopping board and ensure it
is not scratched by a sharp tool, as this may cause appliance
damage.
•Do not hang from the appliance door, storage room, shelf or fridge
door in door or climb up into it.
•Do not store an excessive amount of water bottles or containers
for side dishes on the door baskets. The basket may break or your
hand may bump into the surrounding structure, causing injury.
11
Page 12

EN
•Keep food organized inside the appliance.
•Prevent animals from nibbling on the power cable or water hose.
•Do not open or close the appliance door with excessive force.
•If the hinge of the product door is damaged or operates improperly,
stop using the appliance and contact an authorized service centre.
•Do not damage the refrigerant circuit.
•Do not place any electronic appliance (such as heater and mobile
phone) inside the appliance.
•Do not clean glass shelves or covers with warm water when
they are cold. They may break if exposed to sudden temperature
changes.
•Never eat frozen foods immediately after they have been taken out
in the freezer compartment.
•Do not insert your hands into the mechanical part of the automatic
icemaker such as the ice bin or the ice dispenser.
•Do not use a thin crystal cup or chinaware when dispensing.
•Do not remove the cover of the automatic icemaker. Touching any
mechanical part of the automatic icemaker. It may result in injury.
•Make sure not to get a hand or foot stuck upon opening or closing
the appliance door.
•Do not open the door of the appliance with the door in door open,
or do not open the door in door while the door of the appliance is
open. The door in door may be struck by the edge of the appliance
and damaged.
12
Page 13
Maintenance
•Do not insert the shelves upside down. The shelves may fall,
causing injury.
•To remove frost from the appliance, contact an LG Electronics
customer information centre.
•Dispose of the ice inside the ice bin in the freezer compartment
during an extended power outage.
•Connect the water supply line (for plumbed models only) to a
potable water source only. Otherwise, impurities in the water may
cause illness.
Disposal of Your Old Appliance
• This crossed-out wheeled bin symbol indicates that waste electrical and electronic
products (WEEE) should be disposed of separately from the municipal waste stream.
• Old electrical products can contain hazardous substances so correct disposal of your
old appliance will help prevent potential negative consequences for the environment
and human health. Your old appliance may contain reusable parts that could be
used to repair other products, and other valuable materials that can be recycled to
conserve limited resources.
• You can take your appliance either to the shop where you purchased the product,
or contact your local government waste office for details of your nearest authorised
WEEE collection point. For the most up to date information for your country please
see www.lg.com/global/recycling.
EN
13
Page 14

INSTALLATION
Compartments
EN
Spanner Type1 Spanner Type2 Owner's Manual
Water Filter
• The appearance or components of the appliance may differ from model to model.
14
Page 15

EN
Notes for Movement and
Transport
• Remove all food from inside the appliance.
Then, transport the appliance only after fixing
fragile parts such as shelves and the door
handle with tape. Failure to do so may cause
appliance damage.
• Pull the power plug out, insert and fix it into the
power plug hook at the rear or on top of the
appliance. Failure to do so may cause damage
to the power plug or floor scratch.
• When transporting the appliance, more than
two people should transport the appliance
carefully. Dropping the appliance, which is
extremely heavy, may cause personal injury or
appliance failure.
• When transporting the appliance over a long
distance, keep the appliance upright. The
appliance may fall over, causing malfunctions.
Never transport the appliance laying down as it
can cause a refrigerant circulation malfunction
when it is turned back on again.
Notes for Installation
• Install the appliance on a solid and flat area.
− If the appliance is installed on an uneven
floor, it can cause vibration and noise causing
the appliance to fall resulting in injury. It could
also cause the doors not to close correctly
and introduce moisture inside the unit during
operation.
− If the appliance front or rear is not level,
adjust the front feet so that it can be
corrected. Severe cases may need the floor
to be packed out with strips of thin timber.
• Avoid placing the unit near heat sources, direct
sunlight or moisture.
• Connect the power supply cord (or plug) to the
outlet. Don't double up with other appliances
on the same outlet.
• After connecting the power supply cord (or
plug) to the outlet, Wait two or three hours
before you put food into the appliance. If you
add food before the appliance has cooled
completely, your food may spoil.
• Models with handles should be located at least
55 mm from the wall on the hinge side to open
door by 90°.
• Allow over 55 mm clearance to the right, left,
back and top when installing.
15
Page 16
EN
(1
(2)
Removing the Door
When it is necessary to move the appliance
through a narrow opening, removing the doors is
the recommended procedure.
WARNING
• Disconnect the power cord, house fuse or
circuit breaker before installing or service the
appliance. Failure to follow these instructions
may result in death, fire or electric shock.
If your entrance door is too narrow for the
appliance to pass through, remove the appliance
doors and pass the appliance laterally.
[The Left Fridge Door]
The water supply is connected to the
1
upper right part of the rear surface of the
refrigerator. Remove the ring in the joint
area. Hold the water supply connection and
gently push the collet to detach the water
supply line as shown in (1).
(1)
collet
Remove the cover and pull out the tube (1).
3
Disconnect all wire harnesses (2).
Rotate the hinge lever counterclockwise (1).
4
Lift the top hinge (2) free of the hinge lever
latch.
Hinge Lever
Latch
)
CAUTION
• When lifting the hinge free of the latch, be
careful that the door does not fall forward.
Remove the hinge lever by tapping the end
5
of it toward the outside edge of the cabinet.
NOTE
• Detaching the water supply is only necessary
when detaching the left refrigerator door.
Remove the screws from the hinge cover
2
at the top of the refrigerator. Lift the hook
(not visible), located on the side of the
cover at the bottom edge, with a flat-head
screwdriver.
16
CAUTION
• When lifting the hinge free of the latch, be
careful that the door does not fall forward.
Page 17

EN
NOTE
Collet
Tube
Insert Line
• Gently insert the tube until only one of the
tube’s lines is visible.
(Correct)
(Incorrect)
• Pull on the tube to make sure that it is tightly
fastened.
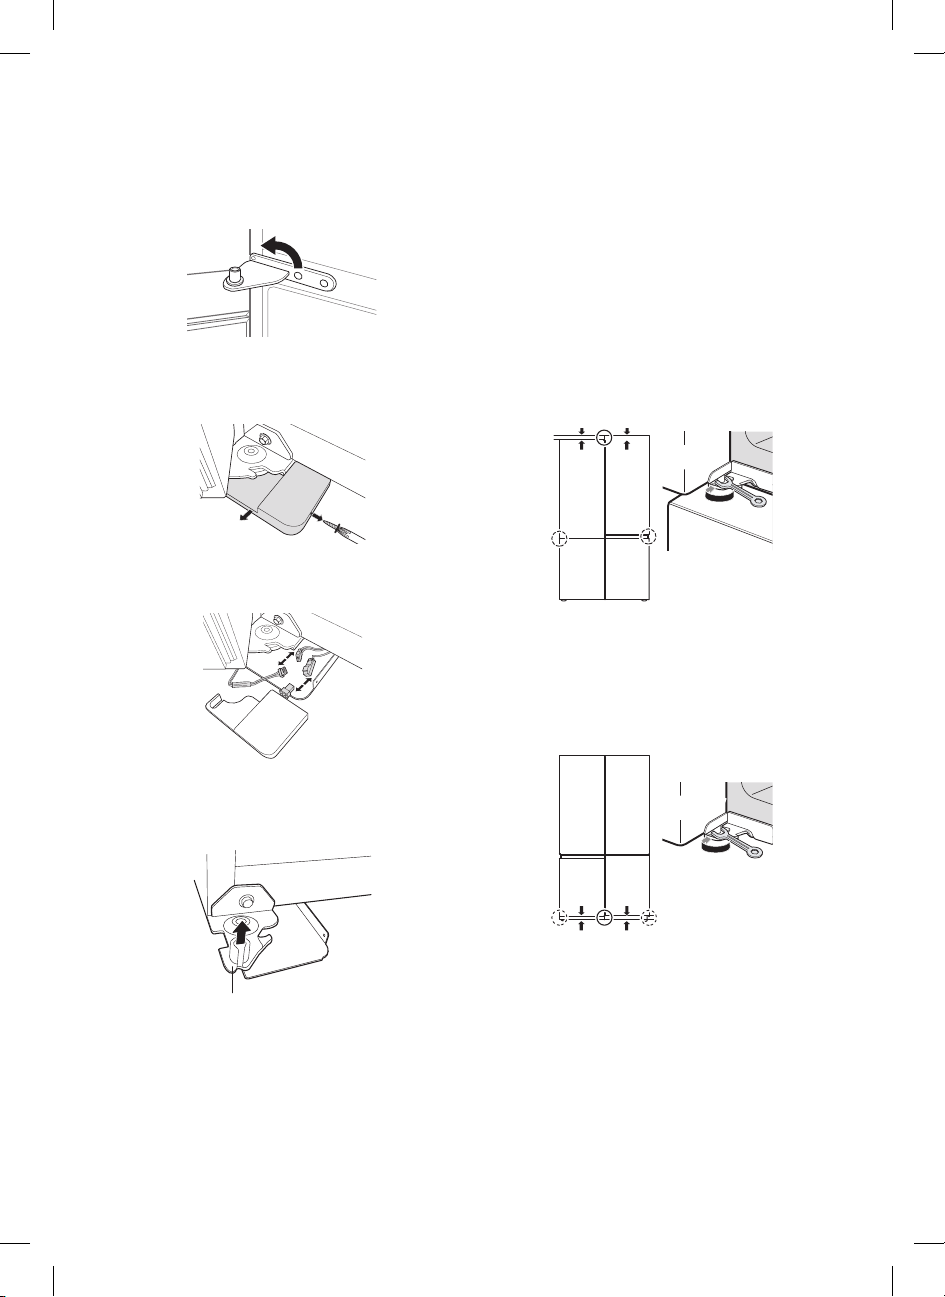
[The Right Fridge Door]
Remove the screws from the hinge cover
1
at the top of the refrigerator. Lift the hook
(not visible), located on the side of the
cover at the bottom edge, with a flat-head
screwdriver.
Rotate the hinge lever (1) clockwise. Lift the
3
top hinge (2) free of the hinge lever latch.
Hinge Lever
Latch
CAUTION
• When lifting the hinge free of the hinge lever
latch, be careful that the door does not fall
forward.
Lift the door from the middle hinge pin and
4
remove the door.
CAUTION
• Place the door on a non-scratching surface
with the inner side facing up.
Detach the wire harness (1).
2
[The Freezer Doors]
Remove the two hinge bolts.
1
17
Page 18
Twist the hinge to raise the pivoting end so
2
that the door can be lifted off. Lift the door off
the lower hinge pin and remove it.
Unscrew the screw that attaches the lower
3
hinge cover and remove the cover.
EN
Refitting the Door
Mount them in the reverse sequence of removal
after the appliance is passed through the access
door.
Adjusting the Height of the
Door
[Fridge Door Height]
Open the fridge door and use the spanner type1
to rotate the door hinge bolt as shown.
Height difference
Fridge door
(2)
Disconnect all wire harnesses.
4
Remove the door by lifting it off the lower
5
hinge pin.
Lower Hinge
(1)
Freezer door
[Freezer Door Height]
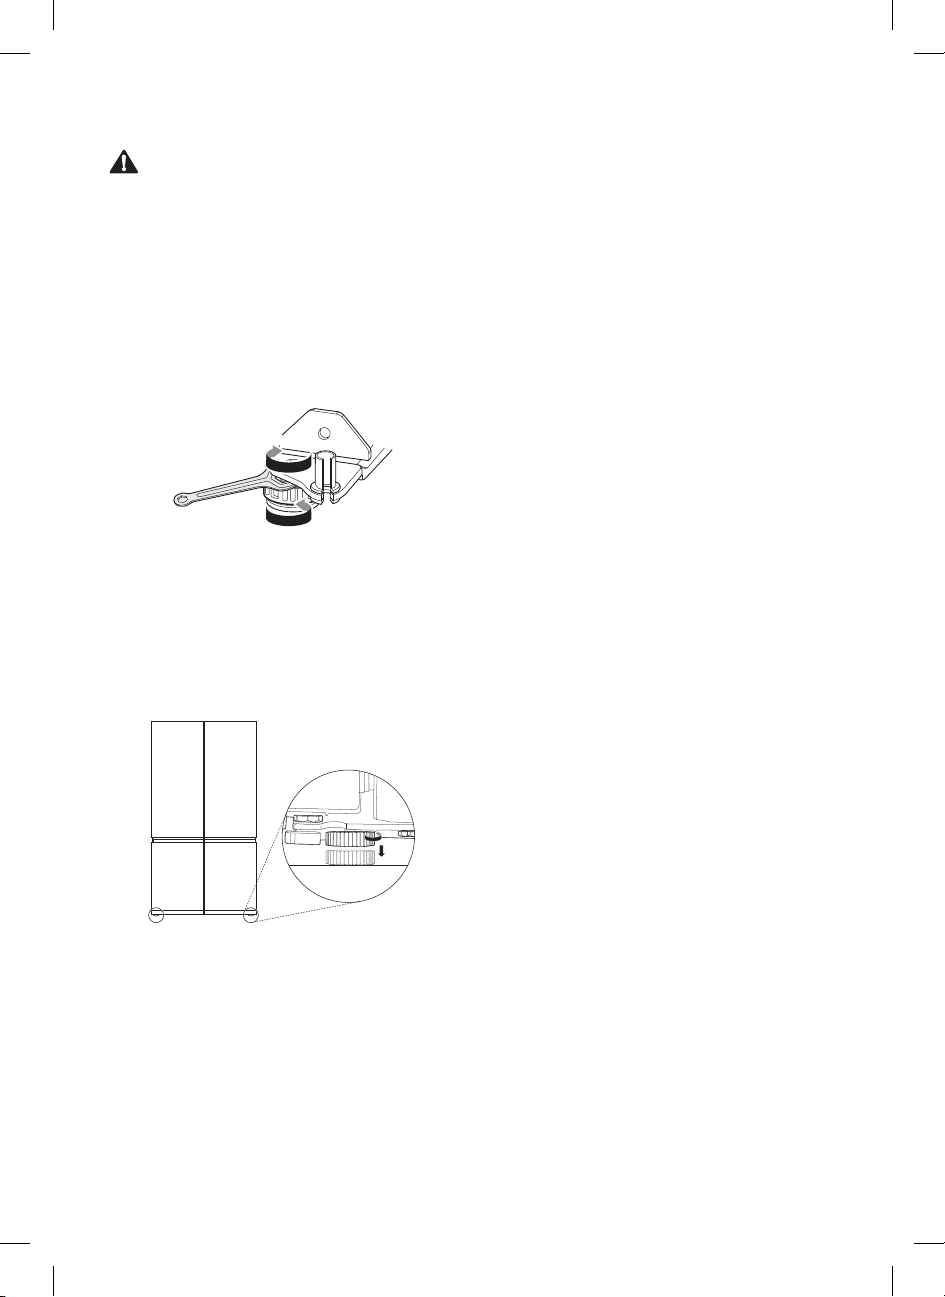
[Method1]
Open the freezer door and use the spanner
type1 to rotate the door hinge bolt as shown.
Freezer door
Height difference
18
Page 19
EN
CAUTION
• When tilting the appliance backward to loosen
the screen at the bottom of the appliance, two
or more people should hold the handles at the
bottom and rear top side of the appliance.
[Method2]
With the refrigerator door open, fit the spanner
type2 in the nut of the height adjustment screw,
and turn until it is level.
Raise the door
Lower the door
NOTE
• Support the bottom of the appliance once the
height adjustment screws on both sides of the
bottom have been completely loosened. This
way you can prevent the door from slanting
downward due to the weight of stored food
items.
Door Mullion and Auto Open Door
Once the door baskets are filled, the doors may
become misaligned, preventing the door mullion
or the Auto Open Door function from working
properly.
If the mullion on the left refrigerator door does
not open and close properly or the right door
stays ajar after the Auto Open Door function,
follow the directions below.
Make sure both front leveling legs are
1
extended fully and in firm contact with the
floor.
Follow the instructions in the Door Alignment
2
section to raise the left refrigerator door
until the door mullion is once again working
properly.
Adjust the right refrigerator door so it aligns
3
with the left refrigerator door.
19
Page 20

EN
Connecting the Water Line
(For Plumbed models Only)
Accessories
Water Filter Water Tube
Water Supply Requirements
A cold water supply with water pressure
between 147 kPa and 834 kPa (1.5-8.5 kgf/
cm²) is requried to operate the water dispenser.
If the refrigerator is installed in an area with
low water pressure (below 147 kPa), you can
install a booster pump to compensate for the low
pressure.
If a reverse osmosis water filtration system is
connected to your cold water supply, the water
pressure to the reverse osmosis system needs
to be a minimum of 147 kPa to 834 kPa (1.5-8.5
kgf/cm²)
WARNING
• Unplug the appliance before carrying out any
work on connecting the water line. Failure to do
so may cause electric shock.
• Only connect the water line to a cold water
supply. Failure to do so may cause the water
filter to malfuction. Water hammer (water
banging in the pipes) in house plumbing can
cause damage to appliance parts and can lead
to water leakage or flooding.
• Connecting the water line must only be
installed by a qualified plumber and in
accordance with local legislation and
regulations governing water quality.
NOTE
• This water line installation is not covered by the
appliance warranty.
Connecting to the Appliance
Remove the cap from the tube connector on
1
the back side of the refrigerator.
Connect the installation tube to the
2
connector.
Checking the Water Connection
Turn on the water supply and switch on the
1
appliance. Carefully check all fittings for
possible leaks due to poorly fitted hoses.
Press and hold the Water Filter button for
2
three seconds. That resets the Replacement
Filter icon. The new water filter has been
activated.
Place a cup under the water dispenser
3
to verify that water is flowing throughthe
appliance.
Check the connecting tube and joints for
4
leaks once again.
20
Page 21
OPERATION
3
4
Parts and Functions
1
EN
2
1
Dispenser Control Panel
3
4
4
Displays the ice maker and dispenser modes the water filter status.
2
InstaView Door in Door
TM
The InstaView Door in DoorTM compartment allows for easy access to commonly used food items.
Control Panel
To set the freezer and fridge temperatures.
Auto Open Door Sensor
The right fridge door opens automatically if you place your foot near the motion sensor at the
bottom of the door.
• The appearance or components of the appliance may differ from model to model.
21
Page 22

EN
1
2
5
6
1
2
4 4
5
6
3
Smart Diagnosis Unit
Use this function when contacting LG Electronics customer information centre to help make an
accurate diagnosis when the appliance operates abnormally or a failure occurs.
Fresh Filter
• This function reduces and removes odors inside the fridge compartment.
3
Adjustable Fridge Shelf
Shelves are adjustable to meet individual storage needs.
4
Vegetable Drawer
This is where fruits and vegetables are stored to remain fresh for as long as possible.
Custom Chill Pantry
This space is used to store meat, fish, dairy products, beverages, and other items that need to be
kept chilled.
Hidden Bar Tray
Store small item fresher than shelf area or defrost frozen items.
22
Page 23
EN
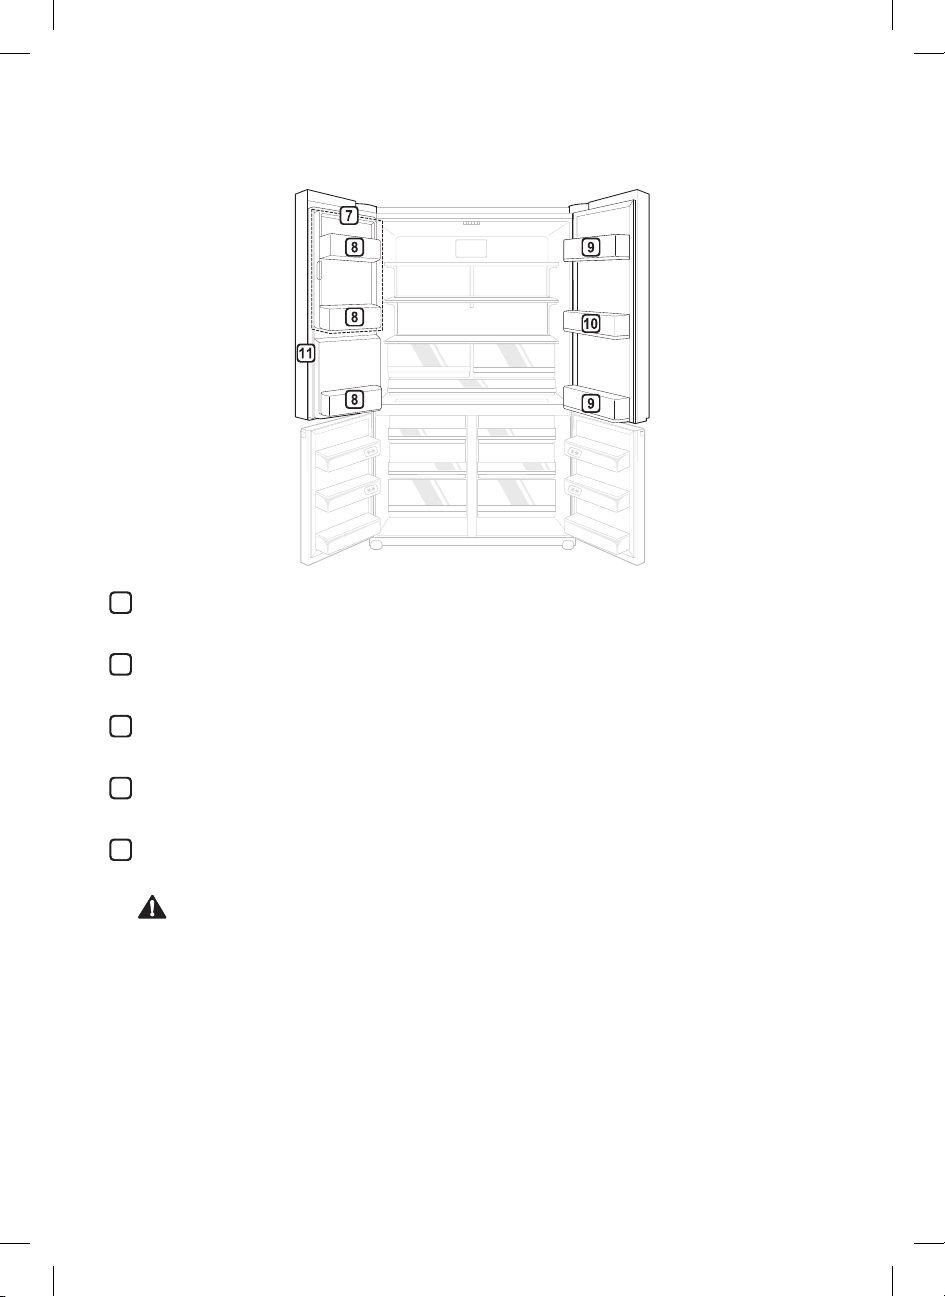
789
7
8
9
8
11
8
10
9
Automatic Icemaker
This is where ice is automatically produced and stored.
Fridge Door Basket
This is where small packages of refrigerated foods, drinks and sauce containers are stored.
InstaView Door in Door
TM
Basket
This is where foods which are taken out frequently such as beverages and snacks are stored.
10
Adjustable Moving Basket
Easily move Adjustable Moving Basket up and down as necessary.
11
Door Mullion
This blocks the cold air of the refrigerator from leaking.
CAUTION
• To reduce the risk of scratching the door or breaking the center door mullion, make sure that the
refrigerator door mullion is always folded in.
23
Page 24

1)
1
1
2
(1)
3 3
1
2
2)
Auto Open Drawer
This is for long-term storage of frozen items.
Drawer 1)
• Preserve small packaged frozen food or frequently-taken out foods. To use larger space, remove
drawers.
Drawer 2)
• Preserve frozen food to keep longer.
EN
2
Freezer Door Basket
This is where small packages of frozen food can be stored.
• Do not store ice cream or food which will be stored for a long period of time within these baskets.
3
Auto Open Drawer Sensor
The freezer drawers automatically open when the freezer door is opened by at least 85 degrees.
NOTE
• The 2-star section ( ) basket or drawer can be used to store ice and food from -12 °C to -18 °C
for short periods.
• The top shelf of the freezer(1) will reach the set temperature the most quickly.
24
Page 25

EN
Notes for Operation
• Do not use the ice water dispenser tank for
beverages other than drinking water.
• Users should keep in mind that frost can form
If the door is not closed completely, if the
humidity is high during the summer, or if the
freezer door is opened frequently.
• Ensure there is sufficient space between food
stored on the shelf or door basket to allow the
door to close completely.
• Opening the door lets warm air enter the
appliance, and may cause the internal
temperature to rise.
• Do not open or close the appliance door
excessively.
• The LED lamp is only intended for use in
domestic appliances and is not suitable for
household room illumination.
Suggestion for Energy Saving
• Ensure there is sufficient space between stored
foods. This allows cold air to be circulated
evenly and lowers electricity bills.
• Store hot food only after it has cooled in order
to prevent dew or frost.
• When storing food in the freezer compartment,
set the freezer temperature lower than the
temperature indicated on the appliance.
• Do not set the temperature of the appliance
lower than needed. For ice making in normal
climates, the freezer temperatures should be
set to -18 or colder.
• Do not put food near the temperature sensor of
the fridge compartment. Keep a distance of at
least 3 cm from the sensor.
• Please note that a temperature rise after
defrosting has a permissible range in the
appliance specifications. If you wish to
minimise the impact this may have on the food
storage due to a temperature rise, seal or wrap
the stored food in several layers.
Storing Foods Effectively
• Store frozen food or refrigerated food inside
sealed containers.
• Check the expiration date and label (storage
instructions) before storing food in the
appliance.
• Do not store food for a long period of time
(more than four weeks) if it spoils easily at a
low temperature.
• Place the refrigerated food or frozen food
in each fridge or freezer compartment
immediately after purchasing.
• Avoid refreezing any food which has been
completely thawed. Freezing any food which
has been completely thawed again will lower
its taste and nutrition.
• Do not wrap and store vegetables with
newspaper. Printing material of newspaper
or other foreign substances may smear and
contaminate food.
• Do not overfill the appliance. Fill less than
70 % of the space. Cold air can not circulate
properly if the appliance is overfilled.
• Cool hot food before storing. If too much hot
food is placed inside, the internal temperature
of the appliance can increase and negatively
affect other foods stored in the appliance.
• If you set an excessively low temperature
for food, it may become frozen. Do not
set a temperature lower than the required
temperature for the food to be stored correctly.
• Always keep the appliance clean.
Max Freezing Capacity
• The Express Freeze function will allow the
freezer to its maximum freezing capacity. This
generally takes up to seven hours, however, it
will automatically turn off after a given time and
can also be turned off manually at any given
time.
• To get better air circulation, insert all inner
parts like baskets, drawers, and shelves.
25
Page 26
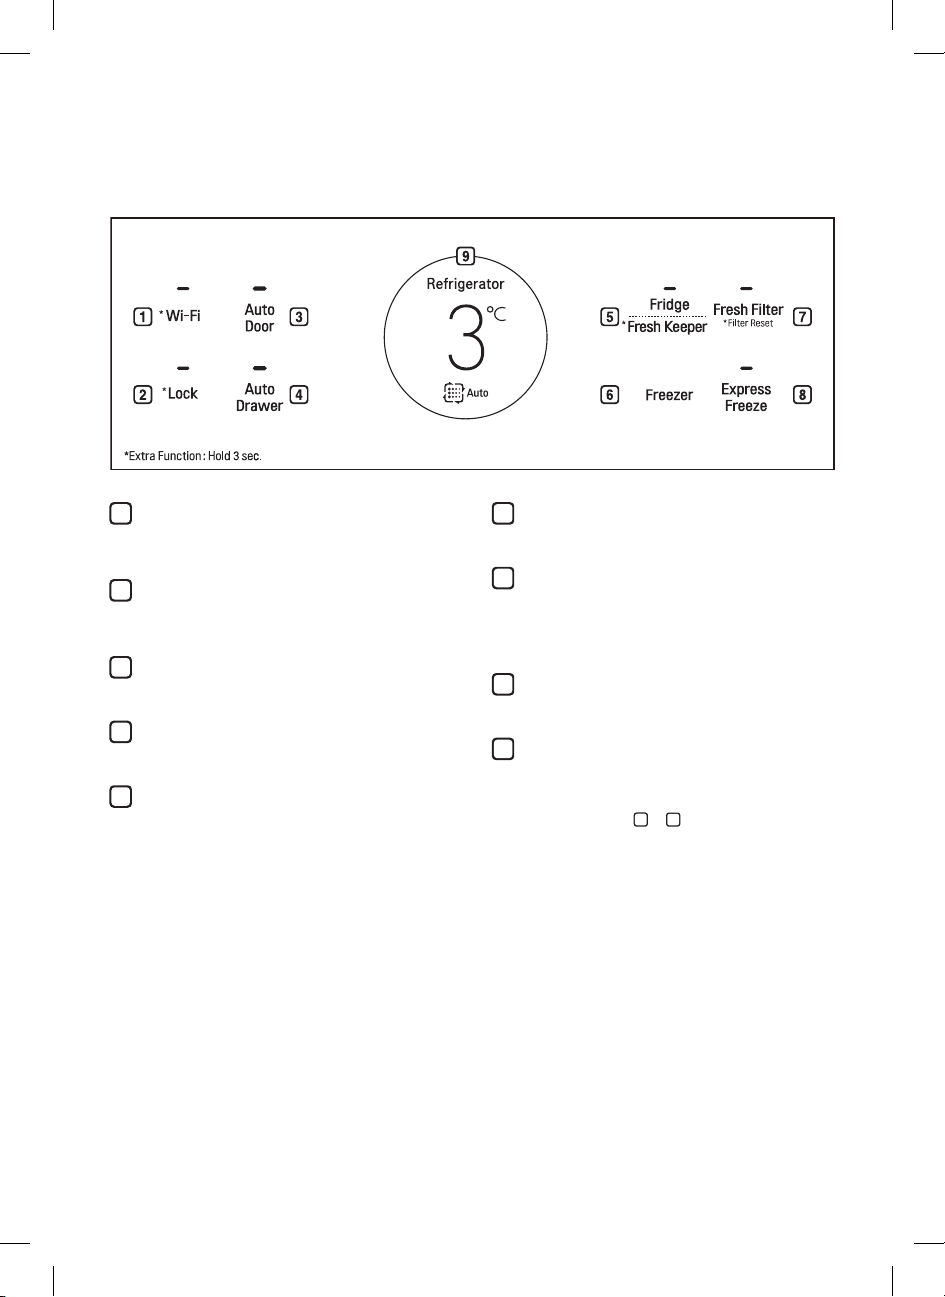
Using Control Panel
5.532 mm
2
5
8
Units and Functions
EN
1
* Wi-Fi
6
• This sets the refrigerator to connect to
your home’s Wi-Fi network.
* Lock
7
• This locks the buttons on the control
panel.
3
Auto Door
• This sets the Auto Door function.
4
Auto Drawer
• This sets the Auto Drawer function.
9
Fridge Temperature
• This sets the target temperature of the
fridge.
• Hold the Fridge Temperature button for
3 seconds or more to configure the Fresh
Keeper option.
• The actual control panel may differ from model to model.
Freezer Temperature
• This sets the freezer target temperature.
Fresh Filter
• This sets the Fresh Filter function.
• This function reduce and remove odors
inside the fridge compartment.
Express Freeze
• This sets Express Freeze functions.
Display Unit
You can check the appliance's settings.
• This image is the start-up screen.
• Press buttons
1
~ 8 to display the setting
for each function.
26
Page 27

Using Water Dispenser
5.532
3
6
Units and Functions
mm
EN
1
Ice On/Off
• Turn ON/OFF the automatic icemaker
function.
2
Cubed
• Press this button for cubed ice.
Water
• Press this button for water.
4
Crushed
• Press this button for crushed ice.
5
Water Filter
• After changing the filter, push and hold the
Water Filter button for three seconds to
reset the filter.
Measured Fill
• The measured fill function dispenses a
predetermined amount of water.
27
Page 28

EN
Notes for Use the Control Panel
• The control panel will turn on in any of the
following cases.
− When the power is turned on
− When a button is pressed
− When the appliance door (fridge
compartment, freezer compartment, door in
door) is opened
• The control panel will turn off automatically for
energy saving in any of the following cases.
− When one minute has passed after turning on
the power
− When no button operation is carried out for
20 seconds after a desired button is pressed
− When 20 seconds has passed after the
appliance door (fridge compartment, freezer
compartment, door in door) is opened and
closed
• If there is any finger or skin contact to the
control panel while cleaning it, the button
function may operate.
Setting the Temperature
This sets the fridge temperature or freezer
temperature.
• Press the Fridge button or Freezer button to
adjust the temperature.
• The initial temperature is set.
− Fridge : 3 °C
− Freezer : -18 °C
• The temperature can be adjusted.
− Fridge : from 0 °C to 7 °C
− Freezer : from -24 °C to -16 °C
• The actual inner temperature varies depending
on the food status, as the indicated setting
temperature is a target temperature, not actual
temperature within the appliance.
NOTE
• The default temperature setting may vary
depending on the appliance.
• Wait until two or three hours have passed after
connecting the appliance to the outlet before
storing food in the appliance.
• The appliance can automatically detect
problems during the operation.
• If a problem is detected, the appliance does
not operate and an error code is displayed
even when any button is pressed.
• When this occurs, do not turn off the power
and immediately contact an LG Electronics
customer information centre. If you turn off
the power, the repair technician from the LG
Electronics customer information centre. It may
have difficulty finding the problem.
Setting the Fresh Keeper
You can minimize the spoiling of food from
temperature changes by maintaining the
refrigerator’s temperature at 2 °C.
Press the Fridge Temperature button for 3
seconds and the Fresh Keeper will icon appear
in the control panel. Then the Fresh Keeper can
be configured.
• To turn off the Fresh Keeper, press the Fridge
Temperature button once while the fridge
temperature is displayed on the control panel
or hold the Fridge Temperature button for 3
seconds when the fridge temperature is not
displayed.
28
Page 29
EN
Setting Express Freeze
The function can quickly freeze a large amount
of ice or frozen foods.
• When you press the Express Freeze button,
the Express Freeze icon lights on the control
panel.
• The function is enabled and disabled in turn
each time you press the button.
• The Express Freeze function automatically
terminates after a specific period has passed.
Setting and Resetting Lock
This locks the buttons on the control panel.
• When you press the Lock button for 3
seconds, the Lock/Unlock icon on the
control panel lights. The function is enabled
and disabled in turn each time you press the
button.
• If you press a button other than lock when the
lock is set, the button will not function.
• When you press a button other than lock when
the lock is set, the Lock/Unlock icon on the
control panel will flash 3 times.
• To change a setting, first press the Lock button
for three seconds to disable the function.
Setting Wi-Fi
The Wi-Fi button, when used with the LG Smart
ThinQ application, allows the refrigerator to
connect to a home Wi-Fi network.
• The Wi-Fi icon shows the status of the
refrigerator’s network connection. The icon
illuminates when the refrigerator is connected
to the Wi-Fi network.
• Press and hold the Wi-Fi button for 3 seconds
to connect to the network. The icon blinks while
the connection is being made, then turns on
once the connection is successfully made.
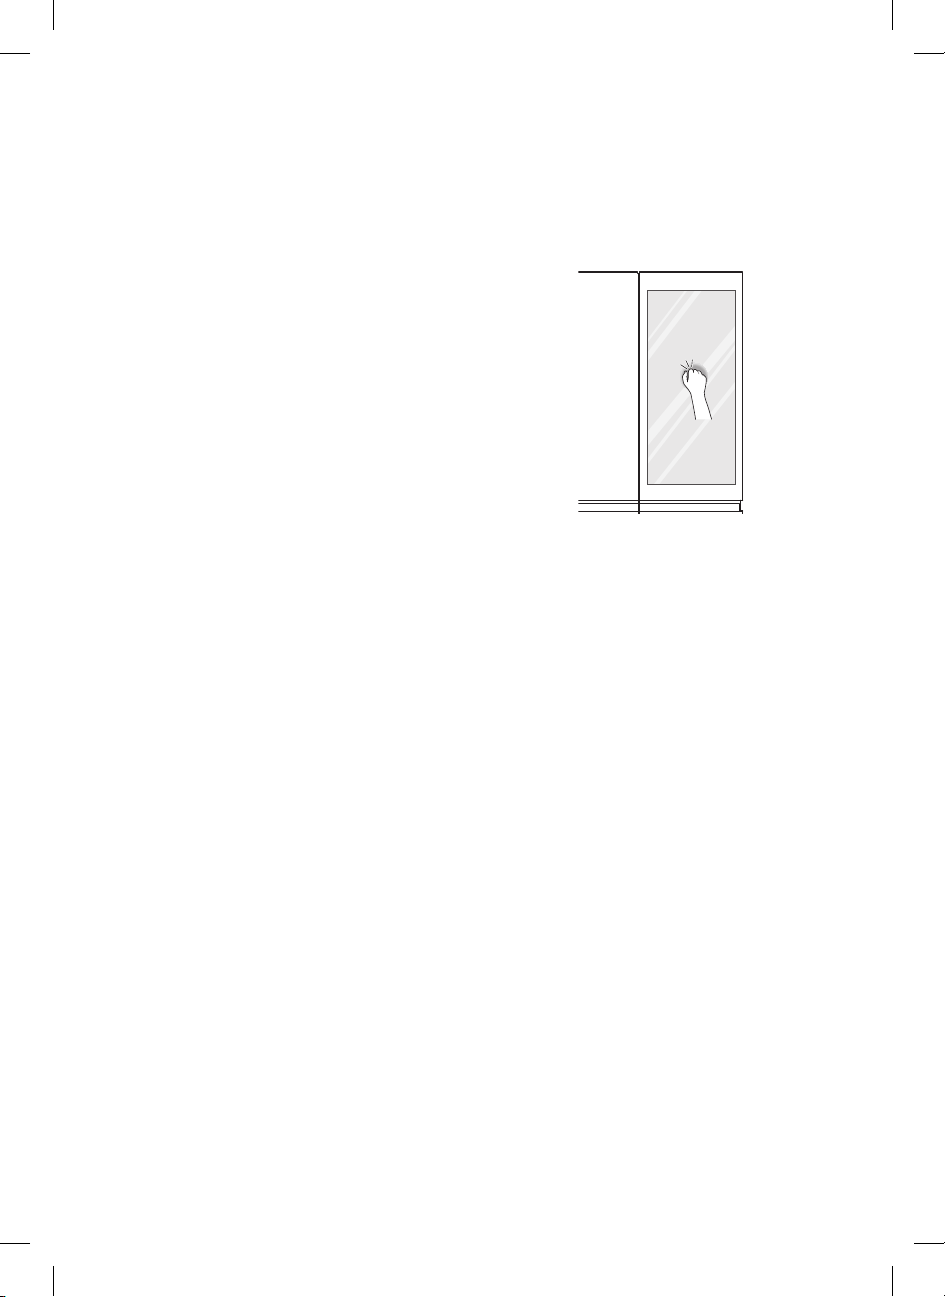
InstaView Function
The InstaView function on the Door-in-Door
lets you see if you’re running low on frequently
used items like beverages and snacks, without
opening the refrigerator door.
Knock twice on the glass to turn the LED
1
light inside the Door-in-Door on or off.
The LED light turns off automatically after
2
ten seconds.
• The InstaView Door-in-Door function is
disabled when the right or left freezer door are
open, for two seconds after closing the door,
and when the ice dispenser is in use.
• Knock near the center of the glass. Knocking
near the edges of the glass may not activate
the InstaView Door-in-Door function.
• Knock hard enough so that the knocking sound
is audible.
• The InstaView Door-in-Door function may
activate if a loud noise occurs near the
refrigerator.
29
Page 30

EN
Auto Open Door Function
The right refrigerator door opens automatically
if you place a foot near the motion sensor at the
bottom of the door. This is convenient when you
have both hands full of groceries and need to
open the refrigerator door. To set the Auto Open
Door function, press the button repeatedly to
toggle between the ON, Sound Off, and OFF
settings.
Using the Auto Open Door
Function
When the Auto Open Door Function is
1
enabled, text is displayed on the floor near
the motion sensor.
Pass one foot in front of the motion sensor
2
and step on the displayed text. The right
door opens. If the door opens less than 20
degrees and is not opened further, it will
close automatically after 3 seconds.
NOTE
• Place your foot close enough to the sensor that
the text appears on top of the foot, not just on
the toes.
CAUTION
• Disable the Auto Open Door function if you
have young children or individuals lacking in
cognitive ability in the home. They could be
injured if the door opens unexpectedly while
they are nearby.
NOTE
• The displayed text may not be readable on
some flooring materials, but this will not affect
the performance of the Auto Open Door
function.
• If flooring material is highly reflective (metal,
glass tile), the motion sensor may malfunction
and the Auto Open Door function may not work
properly.
• Reflective objects placed in front of the motion
sensor may cause the text to display, but the
text disappears if no movement is detected.
• If a pet passes by when a person is standing in
front of the product, the automatic door open
function may be activated.
30
Page 31

EN
Auto Open Drawer Function
When Auto Open Drawer is enabled, the freezer
drawers automatically open when the freezer
door is opened. The drawers automatically close
when the freezer door is closed.
Setting Auto Open Drawer
Function
Press Auto Drawer to activate or deactivate the
function. When the function is activated, an icon
appears on the display.
Using Auto Open Drawer Function
Open the freezer door at least 85 degrees to
automatically open the drawers. Slowly close the
door to automatically close the drawers.
More than 85°
CAUTION
• Do not use excessive force to push or pull the
freezer drawers.
• Do not slam the freezer door shut while the
drawers are open. Failure to follow these
warnings may result in personal injury or
damage to the product.
Suggestion for More Usable
Space
Using Without Drawer Support
To make more spacious refrigerator
compartment, remove drawer supports and
shelves.
Press the levers on either side of the drawer
1
support.
Keeping both levers pressed, lift the drawer
2
support slightly and remove it from the rail
system.
31
Page 32

EN
Using Without Freezer Drawer
To make more spacious freezer compartment,
remove freezer drawers.
Press the Auto Drawer button on the control
1
panel to deactivate the Auto Open Drawer
function.
Lift the empty freezer drawer slightly to
2
remove it from the shelf.
Freezer Drawer
Shelf
NOTE
• Deactivate the Auto Open Drawer function
before using. Be careful that food does not fall
from the shelf.
• Slightly pull and push the shelf. Be careful that
food does not fall from the shelf.
• Freezer drawer may not be clossed it food get
stuck behind the drawer.
• `Using Without Freezer Drawer’ section
demonstrates Drawer 1).
CustomChill Pantry
This space is used to store meat, fish, dairy
products, beverages, and other items that need
to be kept chilled.
Setting the CustomChill Pantry
Choose a temperature setting for the
CustomChill pantry by pressing the Select button
repeatedly to toggle between Meat, Deli, or
Produce.
The temperature setting becomes progressively
colder from Produce → Deli → Meat.
CAUTION
• Vegetables or fruit may freeze if placed in the
CustomChill™ pantry when it is set to Meat or
Deli.
32
1)
Page 33

EN
Water and Ice Dispenser
You can dispense cubed ice, water and crushed
ice by pressing the respective button for the
desired mode.
• When you press the Cubed, Water or Crushed
button on the control panel, the lamp on the
control panel will turn on and the desired mode
will be set. At this time, when you press the
dispenser lever, the selected appliance (cubed
ice, water and crushed ice) will be dispensed.
• The function is enabled and disabled in turn
each time you press the button on the control
panel.
CAUTION
• Keep children away from the dispenser to
prevent children playing with or damaging the
controls.
• Throw away the first few batches of ice (about
20 cubes and 7 cups of water). This is also
necessary if the appliance has not been used
for a long time.
NOTE
• If you open the freezer door while water is
being dispensed, the water supply will stop and
the control panel will return to the initial screen.
• If you open the fridge door while water,
cubed ice or crushed ice is being dispensed,
dispensing will be paused. When you close the
door, the selected item for the previously set
mode will continue to be dispensed.
• If the cup rim is small, water may splash out of
the glass or miss it completely.
• Use a cup with a rim of over 68 mm in diameter
when dispensing water, cubed ice or crushed
ice.
• When the ice maker produces smaller ice
cubes, or the cubes become lumped together,
the amount of water supplied to the ice maker
may be low due to insufficient water in the
water tank. If ice is not used frequently, it may
also lump together.
33
Page 34

EN
Automatic Icemaker
The automatic icemaker can automatically make
7 cubes at a time, 50-60 pieces within a 24hr
period if conditions are favorable. This amount
may vary according to the environment (ambient
temperature around the appliance, frequency of
the door being opened, amount of food stored in
the appliance, etc.).
• If the ice bin is completely filled with ice, ice
production will stop.
• Sound of ice dropping into the ice bin is
normal.
• The icemaker produces ice normally when
approximately 48 hours have passed after the
appliance is initially installed.
• Discard ice produced for the first time without
using it.
• While the automatic icemaker is operating, do
not touch it with your hands directly.
• If ice cubes are stored in the ice bin for a long
period of time, they may clump together and
may not be separated easily. In such a case,
clean the ice bin before using it.
Turning the Automatic Icemaker
On or Off
To turn the automatic icemaker On/Off, press
and hold the Ice On/Off button on the control
panel for 3 seconds.
Detaching the In-Door Ice Bin
Gently pull the handle to open the ice
1
compartment.
To remove the in-door ice bin, grip the front
2
handle, slightly lift the lower part, and slowly
pull out the bin as shown.
34
WARNING
• Do not touch the automatic icemaker’s
mechanical parts with your hand or a tool.
Otherwise, appliance damage or injury may
occur.
• Caution should be taken, as the automatic
icemaker operates continuously after the
freezer door is opened when the automatic
icemaker switch is set to the on position.
• Do not disassemble, repair or alter the
automatic icemaker. These tasks should only
be done by a service technician.
Page 35

EN
CAUTION
• Throw away the first few batches of ice (about
20 cubes and 7 cups of water). This is also
necessary if the appliance has not been used
for a long time.
• The first ice and water dispensed may include
particles or odor from the water supply line or
the water tank.
• Keep children away from the dispenser.
Children may play with or damage the controls.
• The ice passage may become blocked with
frost if only crushed ice is used. Remove the
frost that accumulates by removing the ice
bin and clearing the passage with a rubber
spatula. Dispensing cubed ice periodically can
also help prevent frost buildup.
• If discolored ice is dispensed, check the water
tank and the water supply for a possible
source. If the problem continues, contact the
LG Electronics customer information centre.
Do not use the ice or water until the problem is
corrected.
• Dispense ice into a glass before filling it with
water or other beverages. Splashing may occur
if ice is dispensed into a glass that already
contains liquid.
• Do not touch the ice outlet or the automatic
icemaker with your hand or a tool. Otherwise,
appliance damage or injury may occur.
• When refitting the ice bin, ensure that it is
placed correctly. If it is tilted or unlevel, it
may not continue to make ice due to sensor
disruption.
• Never use a glass that is exceptionally narrow
or deep. Ice may jam in the ice passage,
affecting the performance of the appliance.
• Keep the glass at a proper distance from the
ice outlet. A glass held too close to the outlet
may prevent ice from dispensing.
• Dispose of the ice inside the ice bin in the
freezer compartment if you go on vacation or if
an extended power outage occurs. Water from
melting ice may drop from the dispenser onto
the floor.
Adjustable Moving Basket
Easily Adjustable Moving Basket up and down
as necessary.
• Remove all items from the Adjustable Moving
Basket before moving it up or down.
• Adjusting the Adjusting Moving Basket
allows taller food items to be stored more
conveniently.
To raise the Adjustable Moving Basket, hold
1
the bottom of the basket in the center and
push the basket up until it clicks into place.
To lower the Adjustable Moving Basket,
2
press up to release the levers at the bottom
of the basket and lower the basket until it
clicks into place.
CAUTION
• To avoid personal injury or damage to the
basket or its contents, empty the Adjustable
Moving Basket bin before moving it up or
down.
35
Page 36

EN
Hidden Bar Tray
The Hidden Bar Tray compartment is slightly
cooler than the shelf or door bin areas, so it is a
convenient place to store dairy snacks or other
small items you want to keep especially cold. It
is also a handy place to defrost meat.
CAUTION
• To reduce the risk of scratching the door and
breaking the center door mullion, make sure
that the refrigerator door mullion is always
folded in.
• The door alarm sounds every 30 seconds if
the door remains open longer than one minute.
Ensure that the folding mullion is folded in
before closing the left-hand door.
NOTE
• To open the cover, push the handle toward the
rear of the bin to release the catch.
• To close the cover, slide the cover over the bin
until the catch clicks into place.
Other Functions
Door Open Alarm
The alarm sounds 3 times in a 30 seconds
interval if the door (fridge compartment, freezer
compartment, door in door) is left open or not
completely closed for one minute.
• Contact an LG Electronics customer
information centre if the alarm sound continues
even after closing the door.
Failure Detection
The appliance can automatically detect problems
during the operation.
• If a problem is detected, the appliance does
not operate and an error code is displayed
even when any button is pressed.
• When this occurs, do not turn off the power
and immediately contact an LG Electronics
customer information centre. If you turn off
the power, the repair technician from the LG
Electronics customer information centre. It may
have difficulty finding the problem.
36
Page 37

SMART FUNCTIONS
EN
Using Smart ThinQ
Application
Installing Smart ThinQ
Search for the LG Smart ThinQ application from
the Google Play Store or Apple App Store on a
smart phone. Follow instructions to download
and install the application.
Wi-Fi Function
• For appliances with the or logo
Communicate with the appliance from a smart
phone using the convenient smart features.
Firmware Update
Keep the appliance performance updated.
Smart Diagnosis™
If you use the Smart Diagnosis function, you will
be provided with the useful information such as
a correct way of using the appliance based on
the pattern of use.
Settings
Allows you to set various options on the
refrigerator and in the application.
NOTE
• To verify the Wi-Fi connection, check that Wi-Fi
icon on the control panel is lit.
• LG Smart ThinQ is not responsible for any
network connection problems or any faults,
malfunctions, or errors caused by network
connection.
• The machine supports 2.4 GHz Wi-Fi networks
only.
• If the appliance is having trouble connecting
to the Wi-Fi network, it may be too far from
the router. Purchase a Wi-Fi repeater (range
extender) to improve the Wi-Fi signal strength.
• The Wi-Fi connection may not connect or may
be interrupted because of the home network
environment.
• The network connection may not work properly
depending on the internet service provider.
• The surrounding wireless environment can
make the wireless network service run slowly.
• The application is subject to change for
appliance improvement purposes without
notice to users.
• Functions may vary by model.
Wireless LAN Module Specifications
Model LCW-003
Frequency
Range
Output
Power(Max)
2412 to 2472 MHz
IEEE 802.11b:18.37 dBm
IEEE 802.11g:17.67 dBm
IEEE 802.11n:17.67 dBm
Wireless function S/W version : V 1.0
For consideration of the user, this device should
be installed and operated with a minimum
distance of 20 cm between the device and the
body.
Declaration of Conformity
Hereby, LG Electronics declares that the radio
equipment type Refrigerator is in compliance
with Directive 2014/53/EU. The full text of the
EU declaration of conformity is available at the
following internet address:
http://www.lg.com/global/support/cedoc/cedoc#
LG Electronics European Shared Service Center
B.V.
Krijgsman 1
1186 DM Amstelveen
The Netherlands
37
Page 38

EN
Open Source Software Notice
Information
To obtain the source code under GPL, LGPL,
MPL, and other open source licenses, that is
contained in this product, please visit http://
opensource.lge.com.
In addition to the source code, all referred
license terms, warranty disclaimers and
copyright notices are available for download.
LG Electronics will also provide open source
code to you on CD-ROM for a charge covering
the cost of performing such distribution (such as
the cost of media, shipping, and handling) upon
email request to opensource@lge.com. This
offer is valid for three (3) years from the date on
which you purchased the product.
Smart Diagnosis™ Using a Smart
Phone
• For appliances with the or logo
Use this function if you need an accurate
diagnosis by an LG Electronics customer
information centre when the appliance
malfunctions or fails.
Smart Diagnosis™ can not be activated
unless the appliance is connected to power.
If the appliance is unable to turn on, then
troubleshooting must be done without using
Smart Diagnosis™.
Using Smart Diagnosis™
Smart Diagnosis™ Through the
Customer Information Centre
Use this function if you need an accurate
diagnosis by an LG Electronics customer
information center when the appliance
malfunctions or fails. Use this function only to
contact the service representative, not during
normal operation.
Press the Lock button to activate the lock
1
function.
• If the lock function has been activated
already, press the Lock button to
deactivate the lock function, and then
press the Lock button again to activate the
lock function.
• Please note that the Smart Diagnosis
function will not operate until five minutes
has passed since the lock function was
activated.
Press and hold the Freezer button for three
2
seconds or longer while continuing to hold
your phone to the speaker.
38
Open the fridge door and then hold the
3
phone on the upper right speaker hole.
• Position the phone so that its microphone
is aligned with the speaker hole.
Page 39

After the data transfer is complete, the
4
service agent will explain the result of the
Smart Diagnosis™.
NOTE
• Position the phone so that its microphone is
aligned with the speaker hole.
• The Smart Diagnosis™ sound is generated
after around three seconds.
• Do not take the phone off the speaker hole
while the data is transmitted.
• Hold the phone to the upper right speaker hole
and wait while the data is transmitted.
• The data transfer sound may be harsh to the
ear while the Smart Diagnosis™ data is being
transmitted, but do not take the phone off the
speaker hole for accurate diagnosis until the
data transfer sound has stopped.
• When the data transfer is complete, the
transfer completion message is displayed and
the control panel is automatically turned off
and then on again after a few seconds. After
the customer information centre explains the
diagnosis result.
• The Smart Diagnosis™ function depends on
the local call quality.
• The communication performance will improve
and you can transmit a better signal if you use
a land line home phone.
• If the Smart Diagnosis™ data transfer is poor
due to poor call quality, you may not receive
the best Smart Diagnosis™ service.
EN
39
Page 40

MAINTENANCE
EN
Notes for Cleaning
• When removing a shelf or drawer from inside
the appliance, remove all stored foods from the
shelf or drawer to prevent injury or damage to
the appliance.
− Otherwise, injury may occur due to the weight
of stored foods.
• If cleaning the outside air vents of the
appliance by means of vacuuming, then the
power cord should be unplugged from the
outlet to avoid any static discharge that can
damage the electronics or cause an electric
shock.
• Detach the shelves and drawers and clean
them with water, and then dry them sufficiently,
before replacing them.
• Regularly wipe the door gaskets with a wet soft
towel.
• Door basket spills and stains should be
cleaned as they can compromise storage
ability of the basket and could even be
damaged.
• After cleaning, check if the power cable is
damaged, warm or improperly plugged.
• Keep the air vents on the exterior of the
appliance clean.
− Blocked air vents can cause fire or appliance
damage.
• Waxing external painted metal surfaces helps
provide rust protection. Do not wax plastic
parts. Wax painted metal surfaces at least
twice a year using appliance wax (or auto
paste wax). Apply wax with a clean, soft cloth.
• For the appliance exterior, use a clean sponge
or soft cloth and a mild detergent in warm
water. Do not use abrasive or harsh cleaners.
Dry thoroughly with a soft cloth.
• Never clean the shelves or containers in the
dishwasher.
− The parts may become deformed due to the
heat.
• If the appliance is equipped with an LED
lamp, do not remove lamp cover and LED
lamp in any attempt to repair or service it.
Please, contact an LG Electronics customer
information centre.
40
Page 41

EN
Replacing the Fresh Filter
When to replace the Fresh Filter.
• Approximately every six months.
• When the Fresh Filter LED blinks or the
Replace Filter icon is displayed.
Removing the Fresh Filter
Remove the cover to the Fresh Filter
1
compartment. The cover can be easily
separated by inserting the plastic rod into the
groove on either side of the bottom of the
compartment.
The Fresh Filter is on the inside of the cover.
2
Remove the filter inside the Fresh filter cover
3
and replace it with a new filter.
Cleaning the Door Basket
Removing the Left Fridge Door
Basket
Hold both edges of the basket and remove it by
lifting it upward.
Removing the Freezer Door
Basket and Lower InstaView
Basket
To remove the door baskets, slightly lift both
ends of the basket and pull forward to separate.
Refitting the Freezer Door Basket
and Lower InstaView Basket
To replace, match both ends of the basket to the
hole, and push with force until it clicks into place.
41
Page 42

EN
Removing the Upper InstaView
Basket
Open the latches underneath the basket by
1
rotating them inwards. Tilt the front of the
basket up until the tabs on the top sides
clear the rails, then push the basket slightly
backward.
Hold both edges of the basket and remove it
2
by lifting it upward.
Cleaning the Shelf
Removing the Fridge Shelf
Tilt up the front of the shelf and lift it straight up.
Pull the shelf out.
Refitting the Fridge Shelf
Tilt the front of the shelf up and guide the rear
shelf hooks into the slots at the desired height.
Then, lower the front of the shelf so that the
hooks drop into the slots.
CAUTION
• Make sure that shelves are level from one side
to the other. Failure to do so may result in the
shelf falling or food spilling.
42
NOTE
• The left side shelf is marked “LEFT”.
• If left and right side shelves are switched, they
are not properly assembled.
Page 43

EN
Cleaning the Vegetable
Drawer
Removing the Vegetable Drawer
Pull the crisper drawer out until it stops.
1
Slightly lift the crisper drawer to remove it
2
from the support.
CAUTION
• Please note that injuries can be caused by the
weight of stored food items when removing the
vegetable drawer.
Removing the Vegetable Drawer
Box
Fully open the fridge door and pull out all the
1
shelves.
CAUTION
• To avoid injury, always empty the shelves and
vegetable drawers before removing them.
Lift the front of the vegetable drawer cover
2
until you hear a loud click.
43
Page 44

EN
Tilt the cover slightly and support it with one
3
hand while pulling it out.
Open the convertible pantry and lift the front
4
side of the vegetable drawer box with both
hands.
Slide one hand under the vegetable drawer
5
box and tilt the box up slightly to remove it.
Refitting the Vegetable Drawer
Box
Use one hand to support the bottom of the
1
vegetable drawer box while aligning the
inner edge of the box with the groove inside
the refrigerator. Lower the box into place.
Angle the vegetable drawer cover into the
2
refrigerator and then lower it into place.
Slide the vegetable drawer cover back until
3
it stops.
44
Page 45

EN
Cleaning the Freezer Drawer
Removing the Freezer Drawer
Pull the freezer drawer out until it stops.
1
Empty all contents out of the drawer before
removing it.
Lift the empty freezer drawer slightly to
2
remove it from the support.
CAUTION
• The drawers are heavy. Always use two hands
when removing or assembling the drawers
to avoid product damage or personal injury.
Always empty drawers before removing them.
• Always open the freezer doors completely
before removing or assembling the drawers.
Cleaning the Drawer Support
Removing the Drawer Support
Press the levers on either side of the drawer
1
support.
Keeping both levers pressed, lift the drawer
2
support slightly and remove it from the rail
system.
Refitting the Drawer Support
Pull out and remove the rail of the drawer
1
support.
Align the drawer support on the rail and
2
press it down until you hear snap sound.
45
Page 46

EN
Cleaning the Water Dispenser
Cleaning the Dispenser Tray
The dispenser tray may become wet easily due
to spilled ice or water. Wipe the entire area with
a damp cloth.
Cleaning the Water and Ice Outlet
Wipe the water or ice outlet frequently with a
clean cloth as it may get dirty easily. Please note
that lint from a cloth may adhere to the outlet.
Water Outlet
Ice Outlet
Replacing the Water Filter
(For Plumbed models Only)
Replace the disposable water filter when
indicated on the Replacement Filter icon or at
least every 6 months.
To give you preparation time to get a new filter,
the light will come on just before the capacity of
the current filter runs out. Changing the filter on
time provides you with the fresh and clean water
from the appliance.
Unplug the appliance.
1
Turn off the water supply to the appliance.
2
Remove the disposalbe water filter.
3
Replace with a new water filter. Insert the
4
new filter into the filter head and rotate it
clockwise until the arrow on the new filter
lines up with the arrow on the filter head.
Swing the filter back into the compartment.
46
Turn on the water supply and switch on the
5
appliance.
Press and hold the Water Filter button for
6
three seconds. That resets the Replacement
Filter icon. The new water filter has been
activated.
Page 47

Performance Data Sheet
Use Replacement Cartridge: MDJ64844601(LT1000P)
The concentration of the indicated substances in water entering the system was reduced to a
concentration less than or equal to the permissible limit for water leaving the system as specified in
NSF/ANSI Standard 42 and Standard 53 and Standard 401.
System tested and certified by NSF International against NSF/ANSI Standard 42
and Standard 53 and Standard 401. For the reduction of substances listed below.
EN
Max
Permissible
Product Water
Concentration
equirements
Contaminant
Reduction
Chlorine Taste
and Odor
Average
Influent
NSF specified
Challenge
Concentration
Avg %
Reduction
Average
Product Water
Concentration
2.0 μg/L 2.0 μg/L± 10% >97.5% 0.050 μg/L N/A ≥ 50.00%
Nominal
Particulate
Class I, , ≥ 0.5
12,000,000
pts/Ml
At least 10,000
particles/mL
0.998 24,000 pts/ml N/A ≥ 85.00%
to < 1.0 μm
7
to 108 MFL;
10
Asbestos 180 MFL
fibers greater
than 10 μm in
>99.00% < 1MLF N/A ≥ 99.00%
length
Atrazine 8.5 μg/L 9.0 μg/L ± 10% >94.10% 0.500 μg/L 3.0 μg/L N/A
Benzene 15.0 μg/L
Carbofuran 74.0 μg/L
15.0 μg/L±
10%
80.0 μg/L±
10%
>96.60% 0.510 μg/L 5.0 μg/L N/A
0.983 1.258 μg/L 40 μg/L N/A
Lindane 1.9 μg/L 2.0 μg/L± 10% >99.00% 0.019 μg/L 0.2 μg/L N/A
P-Dichlorobenzene
230.0 μg/L
2,4-D 210.0 μg/L
Lead pH @6.5 140.0 μg/L
Lead pH @8.5 150.0 μg/L
Mercury @ pH
6.5
Mercury @ pH
8.5
5.9 μg/L 6.0 μg/L± 10% 0.91 0.531 μg/L 2.0 μg/L N/A
5.6 μg/L 6.0 μg/L± 10% 0.925 <0.420 μg/L 2.0 μg/L N/A
225.0 μg/L±
10%
210.0 μg/L±
10%
150.0 μg/L±
10%
150.0 μg/L±
10%
>99.80% 0.460 μg/L 75.0 μg/L N/A
>99.90% 0.210 μg/L 70.0 μg/L N/A
0.996 0.560 μg/L 10.0 μg/L N/A
>90% <0.500 μg/L 10.0 μg/L N/A
NSF
Reduction
47
Page 48

EN
Contaminant
Reduction
Cyst*
Atenolol 240 ng/L
Carbamazepine
DEET 1600 ng/L
Trimethoprim 170 ng/L
Linuron 160 ng/L
Phenytoin 200 ng/L
Ibuprofen 400 ng/L
Naproxen 140 ng/L
Estrone 120 ng/L
Bisphenol A 2000 ng/L
Nonyl Phenol 1600 ng/L
• Based on the use of Cryptosporidium parvum oocysts.
Average
Influent
100,000
cysts/L
1600 ng/L
NSF specified
Challenge
Concentration
Minimum
50,000 cysts/L
200 ± 40%
ng/L
1400 ± 40%
ng/L
1400 ± 40%
ng/L
140 ± 40%
ng/L
140 ± 40%
ng/L
200 ± 40%
ng/L
400 ± 40%
ng/L
140 ± 40%
ng/L
140 ± 40%
ng/L
2000 ± 40%
ng/L
1400 ± 40%
ng/L
Avg %
Reduction
>99.99% 10 N/A ≥ 99.95%
> 95.50% 10.80 ng/L 30 ng/L NA
0.984 25.60 ng/L 200 ng/L NA
0.971 46.40 ng/L 200 ng/L NA
>96.80% 5.44 ng/L 20 ng/L NA
>96.60% 5.44 ng/L 20 ng/L NA
>94.80% 10.40 ng/L 30 ng/L NA
>94.50% 22.00 ng/L 60 ng/L NA
>96.10% 5.46 ng/L 20 ng/L NA
>96.10% 4.68 ng/L 20 ng/L NA
>98.90% 22.00 ng/L 300 ng/L NA
>97.10% 46.40 ng/L 200 ng/L NA
Average
Product Water
Concentration
Max
Permissible
Product Water
Concentration
NSF
Reduction
equirements
48
Page 49

EN
Application Guidelines/Water Supply
Parameters
Service Flow 1.9 lpm
Water Supply
Water Pressure 138 - 827 kPa
Water Temperature 0.6 -37.8°C
Capacity 757 liters
It is essential that the manufacturer’s
recommended installation, maintenance and
filter replacement requirements be carried out for
the product to perform as advertised.
Community or Private
Well - Potable Water
NOTE
• While the testing was performed under
standard laboratory conditions, actual
performance may vary.
Replacement Cartridge:
MDJ64844601(LT1000P)
For replacement filters, visit your local dealer or
distributor or search under "water filters" on the
lg.com website.
For further assistance, the LG Electronics
Customer Information Center is open 24 hours a
day/7 days a week.
WARNING
To reduce the risk associated with choking:
• Do not allow children under 3 years of age
to have access to small parts during the
installation of this product.
To reduce the risk associated with the
ingestion of contaminants:
• Do not use with water that is microbiologically
unsafe or of unknown quality without adequate
disinfection before or after the system.
Systems certified for cyst reduction may be
used on disinfected water that may contain
filterable cysts. EPA Establishment # 070595MEX-001
CAUTION
To reduce the risk associated with property
damage due to water leakage:
• Read and follow Use Instructions before
installation and use of this system.
• Installation and use MUST comply with all state
and local plumbing codes.
• Do not install if water pressure exceeds 827
kPa. If your water pressure exceeds 80 psi,
you must install a pressure limiting valve.
Contact a plumbing uncertain how to check
your water pressure.
• Do not install where water hammer conditions
may occur. If water hammer conditions exist
you must install a water hammer arrester.
Contact a plumbing professional if you are
uncertain how to check for this condition.
• Do not install on hot water supply lines. The
maximum operating water temperature of this
filter system is 37.8 °C.
• Protect filter from freezing. Drain filter when
temperatures drop below 4.4 °C.
• The disposable filter cartridge MUST be
replaced every 6 months, at the rated capacity
or if a noticeable reduction in flow rate occurs.
• Where a backflow prevention device is
installed on a water system, a device for
controlling pressure due to thermal expansion
must be installed.
• Ensure all tubing and fittings are secure and
free of leaks.
49
Page 50

TROUBLESHOOTING
Symptoms Reason Solution
There is no
refrigeration or
freezing.
There is poor
refrigeration or
freezing.
The appliance
contains a bad smell.
The inside lamp in the
appliance does not
turn on.
Is there a power interruption? • Check the power of other appliances.
If the power plug unplugged
from the outlet?
Is the fridge or freezer
temperature set to its warmest
setting?
Is the appliance in direct
sunlight, or is it near a heat
generating object such as
cooking oven or heater?
Did you store hot food without
cooling it first?
Did you put in too much food?
Are the appliance doors
completely closed?
Is there enough space around
the appliance?
Is the fridge or freezer
temperature set to 'Warm'?
Did you put in food with a
strong smell?
Vegetables or fruit may have
spoiled in the drawer?
Does the inside lamp in the
appliance turn off?
• Plug the power plug in the outlet
properly.
• Set the fridge or freezer temperature
to 'Medium'.
• Check the installation area and
reinstall it away from heat generating
objects.
• Cool the hot food first before putting it
in the fridge or freezer compartment.
• Maintain an appropriate space
between food.
• Completely close the door and
make sure that stored food is not
obstructing in the door.
• Adjust the installation position to
make enough space around the
appliance.
• Set the fridge or freezer temperature
to 'Medium'.
• Store foods with strong smells in a
sealed containers.
• Throw away rotten vegetables and
clean the vegetable drawer. Do not
store vegetables too long in the
vegetable drawer.
• It is hard for customers to replace the
inside lamp in the appliance as they
are not serviceable. If the inside lamp
does not turn on, please contact the
LG Electronics customer information
centre.
EN
50
Page 51

Symptoms Reason Solution
The appliance door is
not closed tightly.
It is difficult to open
the appliance door.
Door mullion does
not fold in and out
properly.
Is the appliance leaning
forward?
Were the shelves properly
assembled?
Did you close the door with
excessive force?
Did you open the door right
after you closed it?
Are front leveling legs
extended, refrigerator level,
and doors aligned?
• Adjust the front feet to raise the front
side slightly.
• Refit the shelves if needed.
• If you apply too much force or speed
when closing the door, it may remain
briefly open before closing. Make
sure that you do not slam the door
closed. Close without force.
• If you try to open the appliance door
within one minute after you closed
it, you may have difficulties because
of the pressure inside the appliance.
Try to open the appliance door again
in a few minutes so that the internal
pressure stabilizes.
• Once the door baskets are filled,
the doors may become misaligned,
preventing the door mullion or the
Auto Open Door function from
working properly. Extend both front
leveling legs fully so they are in firm
contact with the floor. Follow the
instruction in the Door Alignment
section to raise the left refrigerator
door until the door mullion is once
again working properly. Adjust the
right refrigerator door so it aligns with
the left refrigerator door.
EN
51
Page 52

Symptoms Reason Solution
There is condensation
inside the appliance
or on the bottom of
the vegetable drawer
cover.
Frosts has formed
in the freezer
compartment.
Did you store hot food without
cooling it first?
Did you leave the appliance
door open?
Do you open and close the
appliance door too frequently?
Did you put warm or moist food
inside without sealing it in a
container?
Doors may not be closed
properly?
Did you store hot food without
cooling it first?
Is the air entry or exit of the
freezer compartment blocked?
Is the freezer compartment
overfilled?
• Cool the hot food first before putting
it inside the fridge or freezer.
• Although the condensation will
disappear soon after you close the
appliance door, you can wipe it with
a dry cloth.
• Condensation can form due to the
temperature difference from the
outside. Wipe out the dampness with
a dry cloth.
• Store food in a covered or sealed
container.
• Check if the food item inside the
appliance is blocking the door and
make sure that the door is tightly
closed.
• Cool the hot food first before putting it
in the fridge or freezer compartment.
• Make sure that air entry or exit is not
blocked so that the air can circulate
inside.
• Maintain an appropriate space
between items.
EN
52
Page 53

Symptoms Reason Solution
Frost or condensation
has formed inside or
outside the appliance.
The appliance is
noisy and generates
abnormal sounds.
The side or front of
the appliance is warm.
There is water inside
or outside of the
appliance.
Did you open and close the
appliance door frequently or is
the appliance door improperly
closed?
Is the installation environment
humid?
Is the appliance installed on
a weak floor or improperly
leveled?
Does the rear of the appliance
touch the wall?
Are objects scattered behind
the appliance?
Is there an object on top of the
appliance?
There are anti condensation
pipes fitted to these areas
of the appliance to reduce
condensation forming from
around the door area.
Is there water leakage around
the appliance?
Is there water on the bottom of
the appliance?
• Frosts or condensation can form if
the outside air penetrates inside the
appliance.
• Condensation can appear on the
exterior of the appliance if the
installation area is too humid or on a
humid day such as a rainy day. Wipe
off any moisture with a dry cloth.
• Install the appliance on a solid and
flat area.
• Adjust the installation position to
allow enough clearance around the
appliance.
• Remove the scattered objects from
behind the appliance.
• Remove the object on top of the
appliance.
• The heat releasing pipe to prevent
condensation is installed on the front
and side of the appliance. You may
feel it particularly hot right after the
appliance is installed or during the
summer. You can be assured that this
is not a problem and is quite normal.
• Check if the water has leaked from a
sink or another place.
• Check if the water is from the thawed
frozen food or a broken or dropped
container.
EN
53
Page 54

Symptoms Reason Solution
• The ice maker produces ice normally
when approximately 48 hours
have passed after the appliance is
installed.
• Connect the water supply pipe to the
appliance and open the supply valve
completely.
• If the water supply hose is bent, the
water flow could be compromised.
• It takes approximately 24 hours to
produce more ice in the automatic
icemaker. Please wait.
• Press I on the automatic icemaker
switch or set ON for the automatic
icemaker button on the control panel.
(For more details on how to use, visit
LG electronics website or use your
smart device.)
• If the set temperature is too warm,
ice will be produced slowly or not at
all. Set the Freezer temperature to
-18 °C for normal operation of the
automatic icemaker.
• If you open the appliance door
frequently, cold air will escape,
lowering the speed of ice production.
Do not open and close the appliance
door frequently.
• If the appliance door is not
completely closed, the temperature
of the freezer compartment will
increase, slowing down the ice
production speed. Close the
appliance door completely.
• In the control panel, select the
modes for cubed ice and crushed ice
alternately to dispense the ice.
• Ice may not be dispensed properly
if the ice passage is blocked. Check
the ice and clean the ice path
regularly.
The automatic
icemaker does
not produce ice or
produces a small
amount of ice.
Ice is not dispensed.
Did you install the appliance
recently?
Did you connect the water
supply pipe to the appliance
and open the supply valve?
Is the water supply hose bent?
Have you dispensed a large
amount of ice recently?
Did you set the ice maker
switch or the automatic
icemaker button on the control
panel to ON?
Is the temperature of the
freezer compartment set too
high?
Have you been opening the
appliance door frequently?
Is the appliance door
completely closed?
Unable to hear the sound of ice
coming out?
Is the ice path blocked? (You
can check the ice passage by
separating the ice bin.)
EN
54
Page 55

Symptoms Reason Solution
• In the control panel, select the
modes for cubed ice and crushed ice
alternately to dispense the ice.
• Ice may not be dispensed properly
if the ice passage is blocked. Check
the ice and clean the ice path
regularly.
• Open the water supply valve.
• Fill the water dispenser tank.
• Open the water supply valve.
• Unfiltered water can contain a large
amount of various heavy metals
or foreign substances, so the filter
may be clogged in the early stage
regardless of the life of the filter.
• Has the purified water or cold water
not been used for an extended period
of time?
• If an expired filter is used, the
purification performance may decline.
It is recommended to replace
the filter according to the filter
replacement period.
• When you install or replace the filter
for the first time, you need to remove
air and activated carbon residue from
inside the filter. Use the appliance
after dispensing and discharging
approximately 5 litres of purified
water from the dispenser by pressing
the water dispensing lever. (Activated
carbon is harmless to humans.)
• The taste of old water may change
due to bacterial growth. Use the
product after dispensing and
discharging approximately 5 litres
(approximately three minutes) from
the water dispenser.
Ice is not dispensed.
Water does not come
out.
Water tastes strange.
Unable to hear the sound of ice
coming out?
Is the ice path blocked? (You
can check the ice passage by
separating the ice bin.)
The supply valve may be
turned off? (For Plumbed
models Only)
The water dispenser tank
may be empty? (Non plumbed
models only)
Is the water supply valve
closed? (For Plumbed models
Only)
Are you using unfiltered water?
Is the taste of water different
when comparing it with
the taste of water from the
previous water purifier?
Has it been a long time since
you installed and replaced the
filter?
Have you flushed out the filter
properly in the initial stage
after installing it?
Has the purified water or cold
water not been used for an
extended period of time?
EN
55
Page 56

Symptoms Reason Solution
The defrost control will click
when the automatic defrost
Clicking noises
Rattling nosies
Whooshing nosies
Gurgling nosies
Popping nosies
Vibrating
cycle begins and ends.
The thermostat control (or
appliance control on some
models) will also click when
cycling on and off.
Rattling noises may come from
the flow of appliance, the water
line on the back of the unit (for
plumbed models only), or items
stored on top of or around the
appliance.
Appliance is not resting evenly
on the floor.
Appliance with linear
compressor was moved while
operating.
Evaporator fan motor is
circulating air through
the fridge and freezer
compartments.
Air is being forced over the
condenser by the condenser
fan.
Appliance flowing through the
cooling system
Contraction and expansion of
the inside walls due to changes
in temperature.
If the side or back of the
appliance is touching a cabinet
or wall, some of the normal
vibrations may make an
audible sound.
• Normal Operation
• Normal Operation
• Floor is weak or uneven or leveling
legs need to be adjusted. See the
Door Alignment section.
• Normal operation. If the compressor
does not stop rattling after three
minutes, turn the power to the
appliance off and then on again.
• Normal Operation
• Normal Operation
• Normal Operation
• Normal Operation
• To eliminate the noise, make sure
that the sides and back do not make
any contact with any wall or cabinet.
EN
56
Page 57

www.LGSIGNATURE.com
BEDIENUNGSANLEITUNG
KÜHLSCHRANK UND
Lesen Sie diese Bedienungsanleitung vor der Inbetriebnahme des Haushaltsgeräts sorgfältig
durch und halten Sie sie griffbereit, damit Sie jederzeit darin nachschlagen können.
Copyright © 2017 LG Electronics Inc. Alle Rechte vorbehalten
Page 58

INHALT
SICHERHEITSANWEISUNGEN .......................................................4
AUFSTELLEN ...................................................................................14
BETRIEB ...........................................................................................21
Diese Bedienungsanleitung kann Abbildungen
oder Inhalte enthalten, die sich von Ihrem
Modell unterscheiden.
Änderungen an dieser Bedienungsanleitung
durch den Hersteller bleiben vorbehalten.
WICHTIGE SICHERHEITSANWEISUNGEN ..........................................................4
Entsorgung Ihrer Altgeräte .....................................................................................13
Fächer ...................................................................................................................14
Hinweise für Bewegung und Transport ..................................................................15
Hinweise zum Aufstellen ........................................................................................15
Abbauen der Tür ....................................................................................................16
Anbau der Tür ........................................................................................................18
Die Höhe der Tür einstellen ...................................................................................18
Anschließen der Wasserleitung (nur Modelle mit Wasseranschluss) 20
Bauteile und Funktionen ........................................................................................21
Bedienungshinweise ..............................................................................................25
Nutzung des Bedienfelds .......................................................................................26
Verwendung des Wasserspenders ........................................................................ 27
InstaView Funktion ................................................................................................29
Automatische Türöffnungsfunktion ........................................................................30
Automatische Schubladenöffnungsfunktion ..........................................................31
Möglichkeiten für mehr Nutzraum ..........................................................................31
CustomChill-Fach ..................................................................................................32
Wasser- und Eisspender .......................................................................................33
Eismaschine ..........................................................................................................34
Abnehmen des Eisfachs in der Tür .......................................................................34
Andere Funktionen ................................................................................................36
INTELLIGENTE FUNKTIONEN ......................................................37
Verwendung der Smart ThinQ-App .......................................................................37
Die Verwendung von Smart Diagnosis™ ..............................................................38
Page 59

WARTUNG ........................................................................................40
Hinweise zur Reinigung .........................................................................................40
Ersetzen des Frischefilters ....................................................................................41
Reinigung der Türbehälter ..................................................................................... 41
Reinigung der Regaböden .....................................................................................42
Reinigung des Gemüse-Schubfaches ...................................................................43
Reinigung der Gefrierschubladen ..........................................................................45
Reinigung der Schubladenstütze ...........................................................................45
Die Reinigung des Wasserspenders .....................................................................46
Austausch des Wasserfilters (nur Modelle mit Wasseranschluss) ........................46
FEHLERBEHEBUNG .......................................................................50
Page 60

SICHERHEITSANWEISUNGEN
Die folgenden Sicherheitsrichtlinien dienen dazu,
unvorhergesehene Risiken oder Beschädigungen durch unsicheren
oder nicht ordnungsgemäßen Betrieb des Geräts zu vermeiden.
Die Richtlinien sind unterteilt in die Hinweise 'WARNUNG' und
'ACHTUNG', wie nachfolgend beschrieben.
DE
Dieses Symbol wird angezeigt, um auf Punkte
und Bedienvorgänge hinzuweisen, die ein Risiko
bergen können. Lesen Sie den mit diesem Symbol
gekennzeichneten Teil sorgfältig und befolgen Sie die
Anweisungen, um Risiken zu vermeiden.
WARNUNG
Damit wird angezeigt, dass die Nichtbeachtung der
Anweisung zu ernsthaften Verletzungen oder zum Tod
führen kann.
ACHTUNG
Damit wird angezeigt, dass die Nichtbeachtung der
Anweisungen zu leichten Verletzungen oder einer
Beschädigung des Geräts führen kann.
WICHTIGE SICHERHEITSANWEISUNGEN
WARNUNG
Befolgen Sie grundlegende Vorsichtsmaßnahmen, um
Explosionen, Brandgefahren, Stromschläge, Verbrühungen
oder sonstige Personenschäden zu vermeiden. Dazu gehört
Folgendes:
Kinder im Haushalt
Dieses Haushaltsgerät ist nicht für die Verwendung durch Personen
(einschließlich Kindern) mit eingeschränkten körperlichen,
sensorischen oder geistigen Fähigkeiten oder mangelnder Erfahrung
oder Kenntnis geeignet, es sei denn, sie werden bei der Nutzung
des Geräts beaufsichtigt oder haben dafür eine Einweisung von
jemandem erhalten, der für ihre Sicherheit verantwortlich ist. Kinder
sollten beaufsichtigt werden, um sicherzustellen, dass sie mit dem
Haushaltsgerät nicht spielen.
4
Page 61

DE
Für die Verwendung in Europa:
Dieses Haushaltsgerät kann von Kindern ab 8 Jahren benutzt
werden sowie von Personen mit eingeschränkten körperlichen,
sensorischen oder geistigen Fähigkeiten oder mit mangelnder
Erfahrung und Kenntnis, wenn sie bei der Nutzung des Geräts
beaufsichtigt werden oder eine Einweisung zur sicheren Nutzung
des Geräts und den damit verbundenen Gefahren erhalten haben.
Kinder dürfen mit dem Haushaltsgerät nicht spielen. Die Reinigung
und Wartung seitens des Benutzers darf von Kindern nicht ohne
Beaufsichtigung vorgenommen werden.
Installation
•Das Gerät darf nur von zwei oder mehr Personen transportiert
werden, die das Gerät sicher halten.
•Stellen Sie sicher, dass der Stecker einwandfrei geerdet ist und
dass der Erdungsstift an dem Stromkabel nicht beschädigt oder
entfernt wurde. Um weitere Details über Erdung in Erfahrung zu
bringen, nehmen Sie bitte Kontakt mit dem Kundendienst von LG
Electronics auf.
•Dieses Gerät ist mit einem Stromeinspeisungskabel ausgerüstet,
das über einen Geräte-Erdungsleiter und einen ErdungsNetzstecker verfügt. Der Netzstecker muss in eine geeignete
Steckdose gesteckt werden, die mit allen gemäß der lokalen
Vorschriften und Anordnungen vorgeschriebenen Ausrüstungen
versehen ist.
•Wenn das Einspeisekabel für Strom beschädigt oder die Steckdose
locker ist, verwenden Sie das Stromkabel nicht und nehmen
Kontakt mit dem Kundendienst auf.
•Stecken Sie das Gerät nicht in eine Mehrfachsteckdose ohne
angeschlossenes Netzwerkkabel, da es sonst Feuer fangen kann.
•Das Stromkabel darf nicht modifiziert oder verlängert werden.
5
Page 62

DE
•Vermeiden Sie Verlängerungskabel oder Doppelnetzteile. Das
Gerät sollte an eine dedizierte Stromleitung angeschlossen werden,
die über eine separate Sicherung verfügt.
•Verwenden Sie keine Mehrfachsteckdose, die nicht
ordnungsgemäß geerdet ist (tragbar). Wenn Sie eine
ordnungsgemäß geerdete Mehrfachsteckdose (tragbar)
einsetzen, verwenden Sie ein Produkt mit der Momentanleistung
der Anschlussleistung oder höher. Sollten Sie dies nicht tun,
besteht durch die Hitze der Mehrfachsteckdose die Gefahr eines
Stromschlags oder Feuers. Der Strom kann unterbrochen werden,
wenn Schutzschalter betätigt wird.
•Stellen Sie das Gerät an einem Aufstellplatz auf, der ein einfaches
Herausziehen des Stromsteckers ermöglicht.
•Seien Sie vorsichtig, dass der Stromstecker nicht auf einen
Tiefpunkt gerät oder das Gerät sich gegen diesen lehnt.
•Nehmen Sie die Aufstellung des Gerätes auf einem festen und
ebenen Fußboden vor.
•Installieren Sie das Gerät nicht an einer Stelle, an der Dampf
oder Staub entsteht. Installieren Sie das Gerät nicht in einem
Bereich unter freiem Himmel oder einem Bereich, an dem es
Witterungseinflüssen, wie direkter Sonneneinstrahlung, Wind,
Regen oder Temperaturen unterhalb des Gefrierpunktes,
ausgesetzt ist.
•Stellen Sie das Gerät nicht in direktem Sonnenlicht auf und setzen
Sie es nicht der Hitze von Heizgeräten wie Öfen oder Heizkörpern
aus.
•Gehen Sie vorsichtig vor, um die Rückseite des Gerätes beim
Einbau keinen Gefahren auszusetzen.
•Seien Sie vorsichtig und lassen Sie die Gerätetür während des
Ausbaus oder Einbaus nicht fallen.
•Seien Sie vorsichtig, um das Stromkabel während des
Zusammenbaus oder Ausbaus der Gerätetür weder zu kneifen, zu
quetschen oder zu beschädigen.
•Schließen Sie keine Zwischensteckdose oder andere Geräte an
den Netzstecker an.
6
Page 63

DE
Betrieb
•Verwenden Sie das Gerät nicht für andere Zwecke (Lagerung
von medizinischen oder experimentellen Materialien, oder für den
Transport), sondern nur für die für den Haushalt vorgesehene
Lagerung von Lebensmitteln.
•Im Falle von Überschwemmungen, ziehen Sie den Stromstecker
heraus und nehmen Sie Kontakt mit dem Kundendienst der LG
Electronics auf.
•Trennen Sie den Stromstecker bei schweren Gewittern oder Blitzen
oder wenn das Gerät über einen längeren ´Zeitraum nicht benutzt
wird von der Steckdose.
•Berühren Sie nie den Stecker oder die Gerätesteuerung mit
feuchten Händen.
•Biegen Sie das Stromkabel nicht übermäßig und stellen Sie keine
schweren Gegenstände auf dasselbe.
•Sollte Wasser in die Elektro-Teile des Gerätes eindringen, trennen
Sie sofort die Stromzufuhr und nehmen Sie Kontakt mit dem
Kundendienst von LG Electronics auf.
•Platzieren Sie keinesfalls Ihre Hände oder metallische
Gegenstände in dem Bereich, der die kalte Luft ausstrahlt, auf
Abdeckungen oder die Wärmeableitung auf der Rückseite.
•Wenden Sie keine übermäßige Kraft oder Stöße auf die Rückseite
des Gerätes an.
•Keine lebenden Tiere, wie etwa Haustiere, in das Gerät legen.
•Seien Sie vorsichtig beim Öffnen und Schließen der Gerätetür,
wenn Kinder in der Nähe sind. Ein Kind kann sich an der Tür
stoßen, was Verletzungen verursachen kann. Erlauben Sie
niemandem von den Türen zu schwingen, da das Gerät kippen und
schwere Verletzungen verursachen könnte.
•Vermeiden Sie die Gefahr, dass Kinder im Inneren des Gerätes
eingeschlossen werden können. Ein Kind, eingeschlossen im
Inneren des Gerätes, kann Erstickungsgefahren ausgesetzt sein.
•Legen oder stellen Sie keine schweren oder zerbrechlichen
Gegenstände, Behälter mit Flüssigkeiten, brennbare Gegenstände
(wie Kerzen, Lampen etc.) oder Heizapparate (wie Kochplatten,
Heizer, etc.) auf das Gerät.
7
Page 64

DE
•Sollte eine Gasleckstelle (Isobutan, Propan, Erdgas etc.)
vorhanden sein, berühren Sie weder das Gerät noch den
Stromstecker und entlüften Sie den Bereich sofort. Geräte dieser
Art verwenden äußerst umweltfreundliches Gas (Isobutan, R600a)
als Kühlmittel. Obwohl nur eine geringe Menge dieses Gases
verwendet wird, kann es sich dennoch entzünden. Gasleckagen
während des Transports, des Einbaus oder des Betriebs des
Gerätes können Brand, Explosion oder Verletzungen verursachen,
wenn Funken entstehen.
•Es dürfen keine entzündbaren oder brennbaren Stoffe
(Ether, Benzin, Alkohol, Chemikalien, LPG (Abkürzung LPG
für engl. Liquefied Petroleum Gas), brennbare Sprühmittel,
Insektenvertilgungsmittel, Lufterfrischer und Raumdeodorants,
Kosmetika etc.) in der Nähe des Gerätes verwendet oder
aufbewahrt werden.
•Ziehen Sie sofort den Stromstecker und nehmen Sie Kontakt mit
dem Kundendienst von LG Electronics auf, wenn Sie anomale
Geräusche, Gerüche oder Rauch an dem Gerät feststellen.
•Füllen Sie die Eismaschine oder den Wasserspendertank nur mit
Trinkwasser.
Wartung
•Trennen Sie das Einspeisungskabel vor dem Reinigen des Gerätes
oder dem Austausch der Innenleuchten (wo angebracht).
•Stecken Sie den Stromstecker sicher in die Steckdose, nachdem
Sie die gesamte Feuchtigkeit und den Staub beseitigt haben.
•Schalten Sie das Gerät niemals aus, indem Sie am Stromkabel
ziehen. Nehmen Sie immer den Stromstecker fest in die Hand und
ziehen Sie ihn gerade aus der Steckdose.
•Geben Sie zur Reinigung kein Wasser oder entzündliche
Substanzen (Zahnpasta, Alkohol, Scheuermittel etc.) in den
Innenraum oder außen auf das Gerät.
•Reinigen Sie das Gerät nicht mit Bürsten, Tüchern oder
Schwämmen mit rauer Oberfläche oder aus Metall gefertigt.
8
Page 65

DE
•Nur qualifizierte Mitarbeiter der Instandsetzungsabteilung des LG
Electronics Kundendienstes dürfen den Ausbau, die Reparatur oder
die Modifizierung des Gerätes vornehmen. Nehmen Sie Kontakt
mit dem Kundendienst von LG Electronics auf, wenn Sie das Gerät
verschieben oder an einem anderen Aufstellungsort aufstellen.
•Verwenden Sie keinen Haartrockner, um die Innenseiten des
Gerätes zu trocknen und stellen Sie keine Kerze in das Gerät, um
Gerüche zu beseitigen.
•Den Abtauvorgang nicht mit anderen mechanischen Vorrichtungen
oder Hilfsmitteln beschleunigen.
Entsorgung
•Sollten Sie ein Gerät ausrangieren, entfernen Sie die
Türdichtungen, während Sie die Regale und Behälter an Ort und
Stelle lassen und halten Sie Kinder vom Geräte fern.
•Entsorgen Sie die gesamten Verpackungsmaterialien (wie zum
Beispiel Plastiktüten und Styropor) außerhalb der Reichweite
von Kindern. Die Verpackungsmaterialien können Erstickungen
verursachen.
Technische Sicherheit
•Belüftungsöffnungen im Gehäuse des Haushaltsgeräts oder in der
Einbaukonstruktion frei halten.
•Keine Elektrogeräte innerhalb des Bereichs des Haushaltsgeräts
verwenden, der zur Aufbewahrung von Lebensmitteln dient, es sei
denn, diese entsprechen den vom Hersteller empfohlenen Typen.
•Die im Haushaltsgerät verwendeten Kühlmittel und
Isolationsmaterialien müssen fachgerecht entsorgt werden.
Wenden Sie sich vor deren Entsorgung an einen Servicemitarbeiter
oder einen entsprechend qualifizierten Fachmann.
9
Page 66

DE
•Dieses Haushaltsgerät enthält eine geringe Menge Isobutan-
Kühlmittel (R600a), ein Erdgas mit hoher Umweltverträglichkeit,
das sich aber dennoch entzünden kann. Beim Transport und
Aufstellen des Haushaltsgeräts muss darauf geachtet werden, dass
keine Bauteile des Kühlkreislaufs beschädigt werden.
•Kühlmittelleckage aus den Rohren könnte sich entzünden oder eine
Explosion verursachen.
•Falls ein Leck festgestellt wird, offene Flammen oder mögliche
Zündquellen vermeiden und den Raum, in dem das Haushaltsgerät
steht, mehrere Minuten lüften. Um die Bildung eines entzündlichen
Gas/Luftgemischs zu vermeiden, falls es zu einem Leck im
Kühlkreislauf des Geräts kommt, sollte die Größe des Raums,
in dem das Haushaltsgerät betrieben wird, der verwendeten
Kühlmittelmenge entsprechen. Der Raum muss für jeweils 8 g
R600a, die in dem Haushaltsgerät enthalten sind, eine Fläche von
1 m² aufweisen.
•Die Kühlmittelmenge, die in Ihrem konkreten Haushaltsgerät
enthalten ist, finden Sie auf dem Typenschild im Inneren des
Haushaltsgeräts.
•Ein Haushaltsgerät niemals in Betrieb nehmen, wenn Anzeichen
von Beschädigung sichtbar sind. Falls Sie sich nicht sicher sind,
setzen Sie sich mit Ihrem Händler in Verbindung.
•Dieses Gerät ist nur für den Gebrauch im Haushalt oder ähnliche
Anwendungen vorgesehen. Es sollte nicht für kommerzielle oder
Catering Zwecke oder auf einem Boot und im Caravan verwendet
werden.
•Keine explosiven Stoffe, wie etwa Aerosol-Behälter mit einem
brennbaren Treibmittel, in diesem Haushaltsgerät lagern.
10
Page 67

ACHTUNG
Um die Gefahr von leichten Verletzungen an Personen,
Fehlfunktion oder Beschädigung am Produkt oder Eigentum
zu reduzieren, befolgen Sie bei der Verwendung dieses
Produkts grundlegende Vorsichtsmaßnahmen, einschließlich
der folgenden:
Installation
•Kippen Sie das Gerät nicht, um es während des Transports zu
ziehen oder zu schieben.
•Achten Sie darauf, dass Sie sich beim Bewegen des Geräts keine
Körperteile wie Hände oder Füße klemmen.
Betrieb
•Sie dürfen die eingefrorenen Lebensmittel oder die metallischen
Teile in dem Gerät nicht mit feuchten Händen berühren. Dies
könnte Frostbeulen verursachen.
•Stellen Sie keine Glasbehälter oder Flaschen in das Gefrierfach,
auf die Böden oder den Eisbehälter, da diese dort Temperaturen
unter dem Gefrierpunkt ausgesetzt werden.
•Das gehärtete Glas an der Vorderseite der Gerätetür oder der
Regale kann durch einen Stoß beschädigt werden. Wenn es
zerbrochen ist, nicht mit den Händen berühren, da dies zu
Verletzungen führen kann.
•Stellen Sie keine schweren Gegenstände auf die Tür-in-Tür.
•Verwenden Sie die Tür-in-Tür nicht als Schneidbrett und achten Sie
stets darauf, dass sie nicht durch ein scharfes Werkzeug zerkratzt
wird, da dies das Gerät beschädigen kann.
•Nicht mit dem Korpergewicht an die Tuer haengen, auch nicht auf
die Tuer oder auf die Ablage steigen.
•Lagern Sie keine übermäßige Anzahl von Wasserflaschen oder
Behälter für Beilagen in den Türbehältern. Der Behälter könnte
zerbrechen oder Ihre Hand könnte gegen die umliegende Struktur
stoßen und verletzt werden.
DE
11
Page 68

DE
•Sorgen Sie immer dafür, dass die Lebensmittel in dem Gerät einer
bestimmten Organisation folgen.
•Vermeiden Sie, dass Tiere an dem Stromkabel oder den
Wasserschläuchen knabbern.
•Wenden Sie keine übermäßige Kraft beim Öffnen und Schließen
der Gerätetür an.
•Wenn die Scharniere der Gerätetür beschädigt sind oder sich
schwer bedienen lassen, stellen Sie den Betrieb des Gerätes ein
und nehmen Sie Kontakt mit einem zugelassenen Kundendienst
auf.
•Den Kühlmittelkreislauf nicht beschädigen.
•Legen Sie keine elektronischen Geräte (wie zum Beispiel
Heizkörper oder Handys) in das Gerät.
•Reinigen Sie keine Glasregale oder Abdeckungen mit warmem
Wasser, wenn diese kalt sind. Sie können zerbrechen, wenn sie
plötzlichen Temperaturveränderungen ausgesetzt werden.
•Essen Sie niemals eingefrorene Lebensmittel unmittelbar nachdem
diese aus dem Gefrierfach genommen wurden.
•Greifen Sie nicht mit Ihren Händen in den mechanischen Teil
der automatischen Eismaschine wie den Eisbehälter oder den
Eisspender.
•Verwenden Sie keine Behälter aus dünnem Kristallglas oder
Porzellan zum Abfüllen.
•Nehmen Sie nicht die Abdeckung der Eismaschine ab. Berühren
Sie keinen mechanischen Teil der Eismaschine. Dies kann zu
Verletzungen führen.
•Achten Sie darauf, dass Sie sich nicht Hände oder Füße beim
Öffnen oder Schließen der Tür des Geräts klemmen.
•Öffnen Sie die Tür des Geräts nicht, während die Door-in-Door
offen ist und umgekehrt. Die Door-in-Door kann von der Ecke der
Tür getroffen und beschädigt werden.
12
Page 69

Wartung
•Setzen Sie die Tabletts nicht umgekehrt ein. Die Tabletts könnten
fallen und Verletzungen verursachen.
•Um Eis aus dem Gerät zu entfernen, nehmen Sie bitte Kontakt mit
dem Kundendienst von LG Electronics auf.
•Entfernen Sie das Eis aus dem Eisbehälter im Gefrierfach während
eines längeren Stromausfalls.
•Schließen Sie die Wasserversorgungsleitung (nur Modelle mit
Wasseranschluss) nur an eine Trinkwasserquelle an. Ansonsten
können Verunreinigungen im Wasser Krankheiten verursachen.
Entsorgung Ihrer Altgeräte
• Das durchgestrichene Symbol eines fahrbaren Abfallbehälters weist darauf hin, dass
Elektro- und Elektronik-Produkte (WEEE) getrennt vom Hausmüll entsorgt werden müssen.
• Alte elektrische Produkte können gefährliche Substanzen enthalten, die eine korrekte
Entsorgung dieser Altgeräte erforderlich machen, um schädliche Auswirkungen auf die
Umwelt und die menschliche Gesundheit zu vermeiden. Ihre ausgedienten Geräte können
wiederverwendbare Teile enthalten, mit denen möglicherweise andere Produkte repariert
werden können, aber auch sonstige wertvolle Materialien enthalten, die zur Schonung
knapper Ressourcen recycelt werden können.
• Sie können Ihr Gerät entweder in den Laden zurückbringen, in dem Sie das Produkt
ursprünglich erworben haben oder Sie kontaktieren Ihre Gemeindeabfallstelle für
Informationen über die nächstgelegene autorisierte WEEE Sammelstelle. Die aktuellsten
Informationen für Ihr Land finden Sie unter www.lg.com/global/recycling
DE
13
Page 70

AUFSTELLEN
Fächer
DE
Schraubenschlüssel 1 Schraubenschlüssel 2 Bedienungsanleitung
Wasserfilter
• Das Aussehen der Komponenten kann sich von Modell zu Modell verändern.
14
Page 71

DE
Hinweise für Bewegung und
Transport
• Nehmen Sie alle Lebensmittel aus dem Gerät.
Transportieren Sie das Gerät erst nachdem Sie
zerbrechliche Teile wie Einlegeböden und den
Türgriff mit Klebeband befestigt haben. Eine
Nichtbeachtung kann zu Schäden am Gerät
führen.
• Ziehen Sie den Netzstecker und befestigen Sie
ihn an der Halterung an der Rück- oder Oberseite
des Geräts. Eine Nichtbeachtung kann den
Netzstecker beschädigen oder zu Kratzern auf
dem Boden führen.
• Das Gerät sollte von mehr als zwei Personen
vorsichtig transportiert werden. Wenn das extrem
schwere Gerät fallengelassen wird, kann dies
zu schweren Verletzungen von Personen oder
Beschädigungen des Geräts führen.
• Halten Sie das Gerät beim Transport über längere
Strecken aufrecht. Das Gerät kann umkippen,
was zu Defekten führen kann. Transportieren
Sie das Gerät niemals liegend, da dies zu einer
Fehlfunktion des Kältemittelkreislaufs führen kann,
wenn das Gerät wieder eingeschaltet wird.
Hinweise zum Aufstellen
• Stellen Sie das Gerät auf einem festen und
ebenen Untergrund auf.
− Falls das Gerät auf einem unebenen Boden
aufgestellt wird, kann es Vibrationen und
Geräusche verursachen. Dies kann zum
Umkippen des Geräts führen, wodurch
Verletzungen verursacht werden können. Es
kann auch dazu führen, dass die Türen nicht
richtig schließen und während des Betriebs
Feuchtigkeit in das Innere des Geräts gelangt.
− Wenn das Gerät in Längsrichtung von vorn
nach hinten nicht in Waage steht, können
Sie dies mithilfe der verstellbaren, vorderen
Füße korrigieren. In schweren Fällen müssen
möglicherweise zum Ausgleich des Bodens
dünne Holzstreifen untergelegt werden.
• Vermeiden Sie ein Aufstellen des Geräts in der
Nähe von Wärmequellen, in Bereichen mit direkter
Sonneneinstrahlung oder in einer feuchten
Umgebung.
• Stecken Sie das Netzkabel (oder den Stecker)
in die Steckdose. Schließen Sie kein zweites
Haushaltsgerät an der gleichen Steckdose an.
• Warten Sie nach dem Anschließen des Netzkabels
(oder Steckers) an die Steckdose 2-3 Stunden,
bevor Sie Lebensmittel in das Gerät stellen. Wenn
Sie Lebensmittel hineinstellen, bevor das Gerät
vollständig abgekühlt ist, können diese verderben.
• Modelle mit Griffen müssen auf der Seite mit den
Türscharnieren mindestens 55 mm Abstand zur
Wand haben, damit sich die
öffnen lässt.
• Lassen Sie bei der Installation rechts, links, hinten
und oben über 55 mm Abstand.
Tür vollständig um 90°
15
Page 72

DE
(1
(2)
Abbauen der Tür
Wenn das Gerät durch eine schmale Öffnung
transportiert werden muss, wird empfohlen, die
Türen abzubauen.
WARNUNG
• Vor Installation oder Wartung des Geräts trennen
Sie die Stromversorgung des Geräts an Netzkabel,
Sicherung oder Leitungsschutzschalter. Eine
Nichtbeachtung dieser Anweisungen kann zu Tod,
Brand- bzw. Stromschlaggefahr führen.
Wenn Ihre Eingangstür zu schmal für das Gerät ist,
bauen Sie die Türen des Geräts ab und tragen Sie
es seitlich hindurch.
[Linke Kühlschranktür]
Der Wasseranschluss ist oben rechts an der
1
Hinterseite des Kühlschranks angebracht.
Entfernen Sie den Verbindungsring. Halten
Sie den Wasseramschluss fest und drücken
die Klemmhülse vorsichtig nach unten, um
den Wasserschlauch wie unter (1) gezeigt,
abzunehmen.
(1)
Klemmhülse
Entfernen Sie die Abdeckung und ziehen Sie
3
das Rohr heraus (1). Entfernen Sie die gesamte
Verkabelung (2).
Drehen Sie den Scharnierhebel gegen den
4
Uhrzeigersinn (1). Heben Sie das obere
Scharnier (2) an, so dass es nicht mehr in der
Scharnierhebelverriegelung steckt.
Scharnierhebelverriegelung
)
ACHTUNG
• Achten Sie darauf, dass die Tür nicht nach
vorne kippt, wenn Sie das Scharnier aus der
Verriegelung nehmen.
Entfernen Sie den Scharnierhebel, indem Sie
5
ihn in Richtung der Außenkante des Schrankes
HINWEIS
• Sie müssen den Wasseranschluss nur abnehmen,
wenn Sie die linke Kühlschranktür entfernen.
Entfernen Sie die Schrauben von der
2
Schanierabdeckung oben auf dem Kühlschrank.
Heben Sie den Haken (nicht sichtbar), der sich
an der unteren Ecke der Seite der Abdeckung
befindet, mit einem Flachschraubenzieher an.
schlagen.
ACHTUNG
• Achten Sie darauf, dass die Tür nicht nach
vorne kippt, wenn Sie das Scharnier aus der
Verriegelung nehmen.
16
Page 73

DE
HINWEIS
Klemmhülse
Rohr
Linie
• Führen Sie das Rohr vorsichtig ein, bis nur eine
der Linien am Rohr sichtbar ist.
(Richtig)
(Falsch)
• Ziehen Sie am Rohr um Sicherzustellen, dass es
fest sitzt.
[Rechte Kühlschranktür]
Entfernen Sie die Schrauben von der
1
Schanierabdeckung oben auf dem Kühlschrank.
Heben Sie den Haken (nicht sichtbar), der sich
an der unteren Ecke der Seite der Abdeckung
befindet, mit einem Flachschraubenzieher an.
Drehen Sie den Scharnierhebel gegen im
3
Uhrzeigersinn (1). Heben Sie das obere
Scharnier (2) an, so dass es nicht mehr in der
Scharnierhebelverriegelung steckt.
Scharnierhebelverriegelung
ACHTUNG
• Achten Sie darauf, dass die Tür nicht nach
vorne kippt, wenn Sie das Scharnier aus der
Verriegelung nehmen.
Heben Sie die Tür vom mittleren
4
Scharnierbolzen und entfernen Sie die Tür.
ACHTUNG
• Legen Sie die Tür auf eine glatte Fläche mit der
Innenseite nach oben.
Nehmen Sie die Verkabelung ab (1).
2
[Gefrierschranktüren]
Entfernen Sie die beiden Scharnierbolzen.
1
17
Page 74

Drehen Sie das Scharnier, damit das
2
schwenkbare Ende angehoben wird und die Tür
heruntergehoben werden kann. Heben Sie die
Tür vom unteren Scharnierbolzen und entfernen
Sie sie.
Lösen Sie die Schraube, mit der die untere
3
Scharnierabdeckung befestigt ist, und entfernen
Sie die Abdeckung.
(2)
Lösen Sie die gesamte Verkabelung.
4
(1)
DE
Anbau der Tür
Bauen Sie die Tür in umgekehrter Reihenfolge des
Ausbaus wieder an, nachdem das Gerät durch die
Eingangstür transportiert wurde.
Die Höhe der Tür einstellen
[Höhe der Kühlschranktür]
Öffnen Sie die Kühlschranktür und verwenden
Sie einen Schraubenschlüssel des Typ 1, um den
Scharnierbolzen der Tür wie gezeigt zu drehen.
Höhenunterschied
Kühlschranktür
Gefrierschranktür
[Höhe der Gefrierschranktür]
[Methode 1]
Entfernen Sie die Tür, indem Sie sie vom
5
unteren Scharnierbolzen heben.
Unteres
Scharnier
18
Öffnen Sie die Gefrierschranktür und verwenden
Sie einen Schraubenschlüssel 1, um den
Scharnierbolzen der Tür wie gezeigt zu drehen.
Gefrierschranktür
Höhenunterschied
Page 75

DE
ACHTUNG
• Wenn Sie das Gerät nach hinten kippen, um
den Schutz unter dem Gerät zu entfernen, dann
sollten zwei oder mehr Personen die Griffe an
der Unterseite und hinteren Oberseite des Geräts
halten.
[Methode 2]
Wenn nun die Kühlschranktür offen ist, setzen Sie
jetzt den Schraubenschlüssel 2 auf die Mutter der
Höhenanpassungsschraube und drehen Sie sie, bis
sie gerade steht.
Heben Sie die Tür an
Lassen Sie die Tür
herunter
HINWEIS
• Stützen Sie die Unterseite des Geräts ab,
sobald die Höhenanpassungsschrauben auf
beiden Seiten der Unterseite vollständig gelöst
wurden. So können Sie verhindern, dass sich
die Tür aufgrund des Gewichts der gelagerten
Nahrungsmittel verzieht.
Türldichtung und automatische
Türöffnung
Sobald die Türfächer befüllt sind, kann es sein,
dass die Türen sich verziehen und die Türdichtung
oder die automatische Türöffnerfunktion nicht mehr
ordnungsgemäß funktionieren.
Wenn sich die Türdichtung der linken Kühlschranktür
nicht mehr richtig öffnen oder schließen lässt, oder
die rechte Tür trotz automatischer Türöffnerfunktion
offen bleibt, folgen Sie bitte den untengenannten
Schritten.
Achten Sie darauf, dass beide vorderen
1
Nivellierungsfüße vollständig ausgefahren sind
und fest auf dem Boden stehen.
Folgen Sie den Anweisungen im Abschnitt
2
„Ausrichtung der Türen“, um die vordere,
linke Kühlschranktür so zu erhöhen, dass
die Türdichtung wieder ordnungsgemäß
funktioniert.
Richten Sie die rechte Kühlschranktür so aus,
3
dass sie der linken Tür entspricht.
19
Page 76

DE
Anschließen der
Wasserleitung (nur Modelle mit
Wasseranschluss)
Zubehör
Wasserfilter Wasserschlauch
Anforderungen an die
Wasserversorgung
Für den Betrieb des Wasserspenders ist ein
Kaltwasserzulauf mit einem Wasserdruck zwischen
147 kPa und 834 kPa (1,5~8,5 kgf/cm²) erforderlich.
Wenn der Kühlschrank in einer Region mit niedrigem
Wasserdruck (unterhalb 147 kPa) installiert wird,
können Sie eine Druckerhöhungspumpe zum
Ausgleich des niedrigen Drucks installieren.
Wenn eine Umkehrosmosefilteranlage an den
Kaltwasserzlauf angeschlossen ist, muss der
Wasserdruck der Umkehrosmoseanlage mindestens
147 kPa bis 834 kPa (1,5~8,5 kgf/cm²) betragen.
WARNUNG
• Trennen Sie das Gerät von der Stromversorgung,
bevor Sie jegliche Arbeiten zum Anschließen der
Wasserleitung durchführen. Eine Nichtbeachtung
kann zu Stromschlägen führen.
• Schließen Sie den Wasserzulauf nur an eine
Kaltwasserleitung an. Eine Nichtbeachtung
kann zu Defekten des Wasserfilters führen.
Wasserschlag (Druckstoß in den Wasserleitungen)
in den Hausleitungen kann zu Schäden am Gerät
und Wasseraustritt oder Überflutungen führen.
• Der Anschluss der Wasserleitung muss
durch einen qualifizierten Klempner und in
Übereinstimmung mit den örtlichen Gesetzen und
Vorschriften über die Wasserqualität durchgeführt
werden.
HINWEIS
• Der Wasserleitungsanschluss ist nicht von der
Garantie des Geräts abgedeckt.
Anschluss an das Gerät
Entfernen Sie die Abdeckung des
1
Rohranschlusses auf der Rückseite des
Kühlschranks.
Verbinden Sie das Installationsrohr mit dem
2
Anschluss.
Kontrolle des Wasseranschlusses
Drehen Sie den Wasserhahn auf und schalten
1
Sie das Gerät ein. Überprüfen Sie alle
Anschlüsse sorgfältig auf Undichtigkeit aufgrund
schlecht sitzender Schläuche.
Drücken Sie die Taste Water Filter und halten
2
Sie sie 3 Sekunden lang gedrückt. Damit wird
das Filter Austauschen-Symbol zurückgesetzt.
Der neue Wasserfilter wurde aktiviert.
Stellen Sie eine Tasse unter den
3
Wasserspender, um zu überprüfen, ob Wasser
durch das Gerät fließt.
Überprüfen Sie den Verbindungsschlauch und
4
die Anschlüsse erneut auf Lecks.
20
Page 77

BETRIEB
3
4
Bauteile und Funktionen
1
DE
2
1
Bedienfeld des Spenders
3
4
4
Zeigt den Wasserfilterstatus für die Eismaschine und den Spendermodus an.
2
InstaView Door-in-Door
TM
Das InstaView Door-in-DoorTMTürfach ermöglicht den einfachen Zugriff auf häufig verwendete
Lebensmittel.
Bedienfeld
Zum Einstellen der Temperaturen in Gefrier- und Kühlbereich.
Automatischer Türöffnungssensor
Die rechte Kühlschranktür öffnet sich automatisch, wenn Sie Ihren Fuß in die Nähe des
Bewegungssensors an der Unterseite der Tür halten.
• Das Aussehen der Komponenten kann sich von Modell zu Modell verändern.
21
Page 78

DE
1
2
5
6
1
2
4 4
5
6
3
Smart Diagnosis-Einheit
Verwenden Sie diese Funktion, wenn Sie eine genaue Diagnose durch das Kundeninformationszentrum
von LG Electronics benötigen, weil das Gerät nicht normal funktioniert oder eine Störung aufgetreten ist.
Frischefilter
• Diese Funktion verringert und entfernt Gerüche im Inneren des Kühlfachs.
3
Verstellbares Kühlschrankregal
Die Regale können verstellt werden, um individuellen Lagerplatz zu schaffen.
4
Gemüseschublade
Hier wird Obst und Gemüse gelagert, um es so lange wie möglich frisch zu halten.
CustomChill-Fach
Hier können Sie Fleisch, Fisch, Milchprodukte, Getränke und andere Dinge lagern, die kühlgehalten
werden sollen.
Verborgenes Tablett
Lagern Sie kleinere Dinge, damit sie frischer als in den Regalen bleiben, oder lassen Sie sie hier
auftauen.
22
Page 79

DE
789
7
8
9
8
11
8
10
9
Eismaschine
Hier werden Eiswürfel zubereitet und aufbewahrt.
Behälter in den Türen des Gefriergerätes
Hier werden kleine Packungen an gekühlten Lebensmitteln, Getränken und Saucenbehältern aufbewahrt.
InstaView Door-in-Door
TM
-Korb
Hier werden Lebensmittel aufbewahrt, die häufig entnommen werden wie z. B. Getränke und Snacks.
10
Verstellbarer Korb
Der verstellbare Korb kann leicht hoch oder runter gesetzt werden.
11
Türdichtung
Verhindert, dass die kalte Luft des Kühlschranks austritt.
ACHTUNG
• Um das Risiko zu mindern, dass die Tür zerkratzt oder die mittlere Türdichtung beschädigt wird, sollten
Sie darauf achten, dass die Türdichtung stets eingeklappt ist.
23
Page 80

1)
1
1
2
(1)
3 3
1
2
2)
Automatische Schubladenöffnung
Dienen zur langfristigen Aufbewahrung von Gefriergut.
Schublade 1)
• Bewahren Sie hier kleine Packungen Tiefkühlkost auf oder Nahrungsmittel, die Sie oft herausnehmen.
Entfernen Sie die Schubladen, um mehr Platz zur Verfügung zu haben.
Schublade 2)
• Bewahren Sie gefrorene Lebensmittel auf, damit sie länger halten.
DE
2
Tielfkühl-Türkorb
Hier können kleine Packungen Tiefkühlkost aufbewahrt werden.
• Bewahren Sie hier keine Eiscreme oder Lebensmittel auf, die für längere Zeit gelagert werden sollen.
3
Automatischer Schubladenöffnungssensor
Die Gefrierschubladen öffnen sich automatisch, wenn die Gefrierschranktür mindestens zu 85 Grad
geöffnet ist.
HINWEIS
• Der Korb oder die Schublade des Zwei-Sterne-Bereichs ( ) kann zur Aufbewahrung von Eis oder
Lebensmitteln für kurze Zeiträume bei -12 °C bis -18 °C genutzt werden.
• Die obere Schublade des Gefrierbereichs (1) erreicht die vorgegebene Temperatur am schnellsten.
24
Page 81

DE
Bedienungshinweise
• Verwenden Sie den Wasserspendertank nicht für
andere Getränke als Trinkwasser.
• Die Anwender sollten bedenken, dass sich
Frost bilden kann, wenn die Tür nicht komplett
geschlossen ist, wenn die Feuchtigkeit während
des Sommers hoch ist oder wenn die Tür oft
geöffnet wird.
• Stellen Sie sicher, dass ausreichender Platz
zwischen den auf den Regalen gelagerten
Lebensmitteln oder den Türbehältern vorhanden
ist, sodass die Tür geschlossen werden kann.
• Das Öffnen der Tür lässt warme Luft in das
Gerät eindringen und kann einen internen
Temperaturanstieg verursachen.
• Nehmen Sie kein übermäßiges Öffnen und
Schließen der Gerätetür vor.
• Die LED-Leuchte ist nur als Haushaltsgerät
vorgesehen und nicht dazu geeignet, für die
Beleuchtung eines Raums verwenden zu werden.
Vorschläge zum Energiesparen
• Stellen Sie sicher, dass ausreichender Raum
zwischen den eingelagerten Lebensmitteln
vorhanden ist. Dies ermöglicht es der kalten Luft
gleichmäßig zu zirkulieren und verringert die
Stromrechnungen.
• Lagern Sie heiße Lebensmittel nur nachdem diese
abgekühlt sind, um Tau oder Frost zu vermeiden.
• Wenn Sie Lebensmittel im Gerät lagern, stellen
Sie die Temperatur des Gefrierbereichs niedriger
ein als die Temperatur die auf dieser V
angegeben ist.
• Stellen Sie die Temperatur des Geräts nicht
niedriger, als es sein muss. Um unter normalen
Temperaturen Eis herzustellen, muss die
Temperatur des Gefrierschranks auf -18 °C oder
kälter eingestellt sein.
• Stellen Sie keine Lebensmittel in der Nähe des
Temperatursensors des Kühlfachs ab. Halten Sie
einen Abstand von mindestens 3 cm von dem
Sensor ein.
• Bitte beachten, dass ein Temperaturanstieg nach
der Entfrostung in einem zulässigen Bereich
gemäß der Gerätespezifikationen erlaubt ist.
Sollten Sie einen verringerten Einfluss dieses
Temperaturanstiegs auf die eingelagerten
Lebensmittel wünschen, versiegeln oder
verpacken Sie die eingelagerten Lebensmittel in
mehreren Lagen.
orrichtung
Effektive Lagerung von
Lebensmitteln
• Lagern Sie gefrorene oder gekühlte Lebensmittel
in geschlossenen Behältern.
• Überprüfen Sie die Haltbarkeitsdaten und
das Etikett (Lageranleitungen), bevor Sie die
Lebensmittel in dem Gerät lagern.
• Lagern Sie keine Lebensmittel über einen langen
Zeitraum (mehr als vier Wochen), wenn diese bei
niedrigen Temperaturen leicht verderben.
• Legen Sie die gekühlten oder gefrorenen
Lebensmittel unmittelbar nach dem Einkauf in den
Kühlschrank oder Gefrierschrank.
• Vermeiden Sie das erneute Einfrieren von
Lebensmitteln, die schon gänzlich aufgetaut
waren. Das Einfrieren von Lebensmitteln,
die gänzlich aufgetaut waren, beeinträchtigt
Geschmack und Nährwert.
• Packen und lagern Sie Gemüse nicht in
Zeitungspapier ein. Der Bedruckstoff der Zeitung
oder andere Fremdsubstanzen könnten abfärben
und die Lebensmittel verunreinigen.
• Überlasten Sie das Gerät nicht. Befüllen Sie es
höchstens zu 70 %. Die kalte Luft kann nicht
einwandfrei zirkulieren, wenn das Gerät überlastet
ist.
• Lassen Sie heiße Lebensmittel vor dem Einlagern
abkühlen. Wenn zu viel heiße Lebensmittel
eingelagert werden, kann die Temperatur des
Gerätes ansteigen und sich negativ auf andere
eingelagerte Lebensmittel auswirken.
• Eine übertrieben niedrige Temperatur könnte zum
Gefrieren der Lebensmittel führen. Stellen Sie
die Temperatur nicht niedriger ein, als es für die
korrekte Lagerung der Lebensmittel erforderlich
ist.
• Halten Sie das Gerät immer sauber.
Maximale Gefrierkapazität
• Die Expressgefrier-Funktion ermöglicht
es dem Gefriergerät das Einfrieren bis zur
maximalen Kapazität vorzunehmen. Dies dauert
normalerweise bis zu sieben Stunden. Die
Funktion wird jedoch automatisch nach einer
vorgegebenen Zeit abgeschaltet und kann auch
von Hand abgeschaltet werden.
• Um eine bessere Luftzirkulation zu erreichen,
installieren Sie alle inneren Teile wie Behälter,
Fächer und Regale.
25
Page 82

Nutzung des Bedienfelds
5.532 mm
2
5
8
Einheiten und Funktionen
DE
1
* Wi-Fi
• Dies verbindet Ihren Kühlschrank mit Ihren
WiFi-Heimnetzwerk.
*
Lock (Sperre)
• Damit werden die Tasten des Bedienfelds
gesperrt.
3
Automatische Tür
• Damit stellen Sie die automatische
Türfunktion ein.
4
Automatische Schublade
• Damit stellen Sie die automatische
Schubladenfunktion ein.
Fridge Temperature
(Kühlschranktemperatur)
• Dies stellt die Innentemperatur des
Kühlschranks ein.
• Halten Sie die Taste Fridge Temperature 3
Sekunden
Option einzurichten.
• Das Bedienfeld kann sich von Gerät zu Gerät unterscheiden.
oder länger, um die Fresh-Keeper-
6
7
9
Freezer Temperature
(Gefrierschranktemperatur)
• Dadurch wird die Temperatur des
Tiefkühlschranks eingestellt.
Frischefilter
• Damit stellen Sie die Fresh-Filter-Funktion
ein.
• Diese Funktion verringert und entfernt
Gerüche im Inneren des Kühlfachs.
Express Freeze (Express Einfrieren)
• Damit wird die Funktion zum Schnellgefrieren
aktiviert.
Bedienungsfeld
Hier können Sie die Einstellungen des Geräts
überprüfen.
• Diese Abbildung stellt den Startbildschirm dar.
1
• Drücken Sie die Tasten
Einstellungen für jede Funktion anzuzeigen.
~ 8, um die
26
Page 83

Verwendung des Wasserspenders
5.532
3
6
Einheiten und Funktionen
mm
DE
1
Eis ein/aus
• Schaltet die automatische Eisfunktion EIN/
AUS.
2
Würfel
• Drücken Sie diese Taste, um Eiswürfel zu
erhalten.
Wasser
• Drücken Sie diese Taste, um Wasser zu
erhalten.
4
Zerstoßen
• Drücken Sie diese Taste, um zerstoßenes Eis
zu erhalten.
5
Wasserfilter
• Wenn Sie den Filter gewechselt haben, halten
Sie die Taste Water Filter 3 Sekunden lang
gedrückt, um den Filter zurückzusetzen.
Abgemessene Befüllung
• Die abgemessene Befüllungsfunktion gibt
eine bestimmte Menge Wasser ab.
27
Page 84

DE
Hinweise für die Verwendung des
Bedienfelds
• Das Bedienfeld wird in jedem der folgenden Fälle
automatisch eingeschaltet.
− Wenn die Stromversorgung eingeschaltet ist
− Wenn eine Taste berührt wird
− Wenn eine Tür des Geräts (Kühlbereich,
Gefrierbereich, Tür-in-Tür) geöffnet wird
• Das Bedienfeld wird in jedem der folgenden Fälle
automatisch ausgeschaltet, um Energie zu sparen.
− Eine Minute nach dem Einschalten der
Stromversorgung
− Wenn nach 20 Sekunden, nachdem eine Taste
gedrückt wurde, keine weitere T
wird
− 20 Sekunden nachdem eine Tür des Geräts
(Kühlbereich, Gefrierbereich, magisches Fach)
geöffnet und geschlossen wurde
• Wenn es bei der Reinigung zu Finger- oder
Hautkontakt auf dem Bedienfeld kommt, kann die
ausgelöste Funktion in Betrieb gehen.
aste gedrückt
Einstellung der Temperatur
Dadurch wird die Temperatur des Gefriergerätes
oder Tiefkühlschranks eingestellt.
• Betätigen Sie den Fridge Druckknopf oder
den Freezer Druckknopf , um die T
anzupassen.
• Die Anfangstemperatur ist eingestellt.
− Kühlschrank: 3 °C
− Gefrierschrank: -18 °C
• Die Temperatur kann angepasst werden.
− Kühlschrank: zwischen 0 °C bis 7°C
− Gefrierschrank: zwischen -24 °C bis -16 °C
• Die Innentemperatur verändert sich abhängig
vom Status der Lebensmittel, die eingestellte
Temperatur ist also nur ein Zielwert, nicht die
tatsächliche Temperatur im Inneren des Geräts.
emperatur
HINWEIS
• Je nach Gerät kann die Standardtemperatur
variieren.
• Warten Sie zwei bis drei Stunden, nachdem Sie
das Gerät an die Stromversorgung angeschlossen
haben, bevor Sie Lebensmittel in dem Gerät
aufbewahren.
• Das Gerät kann automatisch Fehler während des
Betriebs erkennen.
• Wenn ein Problem erkannt wird, geht das Gerät
nicht in Betrieb und ein Fehlercode wird angezeigt,
auch wenn mehrere Druckknöpfe betätigt werden.
• Sollte dies eintreten, nehmen Sie keine
Stromabschaltung vor und nehmen Sie sofort
Kontakt mit dem Kundendienst von LG Electronics
auf. Wenn Sie den Strom abschalten, könnten die
Techniker für die Reparatur des Kundendienstes
von LG Electronics Schwierigkeiten haben, den
Fehler ausfindig zu machen.
Einstellung des Fresh-Keepers
Sie können das Verderben von Nahrungsmittel
durch Temperaturwechsel reduzieren, indem Sie die
Temperatur des Kühlschranks auf 2 °C setzen.
Drücken Sie die Taste Fridge Temperature 3
Sekunden lang und das Symbol des Fresh-Keepers
erscheint auf dem Bedienfeld. Dann können Sie den
Fresh-Keeper konfigurieren.
• Um den Fresh-Keeper anzuschalten, drücken Sie
die Taste Fridge Temperature einmal, während
die Kühlschranktemperatur auf dem Bedienfeld
angezeigt wird. Oder Sie können die T
Temperature 3 Sekunden lang gedrückt halten,
wenn die Kühlschranktemperatur nicht angezeigt
wird.
aste Fridge
28
Page 85

DE
Schnellgefrieren einstellen
Mit dieser Funktion kann eine große Menge Eis oder
gefrorene Lebensmittel schnell eingefroren werden.
• Wenn Sie den Express Einfrieren Druckknopf
betätigen, leuchtet das Express Einfrieren
Symbol an der Steuertafel auf.
• Die Funktion wird mit jedem Drücken der Taste
entweder aktiviert oder deaktiviert.
• Die Expressgefrier-Funktion wird automatisch
beendet, nachdem ein spezifischer Zeitraum
vergangen ist.
Setzen und Zurücksetzen der Sperre
Damit werden die Tasten des Bedienfelds gesperrt.
• Wenn Sie die Taste Lock 3 Sekunden lang
gedrü
ckt halten, dann wird das Symbol Lock/
Unlock auf dem Bedienfeld erleuchtet. Die
Funktion wird nacheinander aktiviert und
deaktivert, wenn Sie die Taste betätigen.
• Wenn Sie eine andere Taste als Sperre drücken,
während die Sperre aktiviert ist, reagiert diese
Taste nicht.
• Wenn Sie eine andere Taste als Sperre drücken,
während die Sperre aktiviert ist, blinkt das Symbol
Lock/Unlock auf dem Bedienfeld 3 Mal.
• Um eine Einstellung zu ändern, drücken Sie die
Taste Lock 3 Sekunden, um die Funktion zu
deaktivieren.
Einstellung des WLANs
Der Wi-Fi Taster, wenn die LG Smart ThinQ
Anwendung genutzt wird, erlaubt dem Kühlschrank
eine Verbindung mit dem WiFi-Heimnetzwerk
herzustellen.
• Das Wi-Fi Symbol zeigt den
Netzwerkverbindungsstatus des Kühlschranks an.
Das Symbol leuchtet auf, wenn der Kühlschrank
mit dem WiFi-Netzkwerk verbunden ist.
• Drücken und halten Sie den Wi-Fi Taster drei
Sekunden
zu verbinden. Das Symbol blinkt, wenn die
Verbindung hergestellt wird, dann wechselt es,
sobald die Verbindung erfolgreich hergestellt
wurde.
lang, um sich mit dem Netzwerk
InstaView Funktion
Über die InstaView Funktion der Door-in-Door
können Sie sehen, wann Sie häufig verwendete
Dinge wie Getränke oder Snacks nachkaufen
müssen, ohne dabei die Kühlschranktür zu öffnen.
Klopfen Sie zweimal auf das Glas, um das LED-
1
Licht in der Door-in-Door zu aktivieren oder zu
deaktivieren.
Das LED-Licht schaltet sich automatisch nach
2
10 Sekunden ab.
• Die InstaView Door-in-Door Funktion ist
deaktiviert, wenn die rechte oder die linke
Gefrierschranktür offen sind, bis zu 2 Sekunden
nachdem eine Tür geschlossen wurde, und wenn
der Eisspender verwendet wird.
• Klopfen Sie in die Glasmitte. Klopfen am Rand
des Glases aktiviert die InstaView Door-in-DoorFunktion nicht ordnungsgemäß.
• Klopfen Sie hart genug, sodass ein Klopfen zu
hören ist.
• Die InstaView Door-in-Door Funktion kann
sich selbst aktivieren, wenn in der Nähe des
Kühlschranks ein lautes Geräusch auftritt.
29
Page 86

DE
Automatische
Türöffnungsfunktion
Die rechte Kühlschranktür öffnet sich
automatisch, wenn Sie Ihren Fuß in die Nähe des
Bewegungssensors an der Unterseite der Tür
halten. Das ist vor allem praktisch, wenn Sie beide
Arme voller Einkäufe haben und die Kühlschranktür
öffnen müssen. Sie können die automatische
Türöffnungsfunktion einstellen, indem Sie die Taste
wiederholt drücken, um zwischen EIN, Ton aus und
AUS hin- und herschalten.
Verwenden der automatischen
Türöffnungsfunktion
Wenn die automatische Türöffnungsfunktion
1
aktiviert ist, dann wird auf dem Boden in der
Nähe des Bewegungssensors Schrift angezeigt.
Bewegen Sie einen Fuß an dem
2
Bewegungssensor vorbei und treten Sie auf die
angezeigte Schrift. Die rechte Tür öffnet sich.
Wenn sich die Tür weniger als 20 Grad öffnet
und nicht weiter, dann wird sie automatisch
nach 3 Sekunden wieder geschlossen.
HINWEIS
• Bringen Sie Ihren Fuß nah genug an den Sensor,
so dass die Schrift auf dem Fuß erscheint und
nicht nur auf den Zehen.
ACHTUNG
• Deaktivieren Sie die automatische
Türöffnungsfunktion, wenn Sie kleine Kinder oder
Menschen mit kognitiven Störungen im Haus
haben. Sie könnten sich verletzten, wenn sich die
Tür unerwartet öffnet, während sie in der Nähe
sind.
HINWEIS
• Auf einigen Bodenbelägen kann es sein, dass
die Schrift nicht lesbar ist. Dies beeinträchtigt
jedoch nicht die Leistung der automatischen
Türöffnungsfunktion.
• Sollte der Fußbodenbelag stark reflektierend
sein (Metall, Glasfliesen), kann es zu einer
Fehlfunktion des Bewegungssensors kommen und
die automatische Türöffnungsfunktion funktioniert
eventuell nicht ordnungsgemäß.
• Reflektierende Gegenstände, die vor den
Bewegungsmelder gesetzt werden, können dazu
führen, dass die Schrift angezeigt wird. Doch wenn
keine Bewegung erkannt wird, verschwindet die
Schrift wieder.
• Wenn ein Haustier an dem Sensor vorbeiläuft,
während eine Person vor dem Gerät steht, kann
die automatische Türöffnungsfunktion aktiviert
werden.
30
Page 87

DE
Automatische
Schubladenöffnungsfunktion
Wenn die automatische Schubladenöffnungsfunktion
aktiviert ist, öffnen sich die Gefrierschubladen
automatisch, wenn die Gefrierschranktür
geöffnet wird. Die Schubladen schließen sich
wieder automatisch, wenn die Gefrierschranktür
geschlossen wird.
Einstellung der automatischen
Schubladenöffnungsfunktion
Drücken Sie auf Automatische Schubladen, um die
Funktion zu aktivieren oder zu deaktivieren. Sobald
die Funktion aktiviert ist, erscheint ein Symbol auf
dem Bedienfeld.
Verwenden der automatischen
Schubladenöffnungsfunktion
Öffnen Sie die Gefrierschranktür mindestens 85
Grad, um die Schubladen automatisch zu öffnen.
Schließen Sie die Tür langsam wieder, um die
Schubladen automatisch zu schließen.
Möglichkeiten für mehr
Nutzraum
Nutzung ohne Schubladenstütze
Sie können ein Kühlschrankfach größer machen,
indem Sie die Schubladenstützen und Regale
herausnehmen.
Drücken Sie auf die Hebel zu beiden Seiten der
1
Schubladenauflage.
Halten Sie beide Hebel gedrückt, heben Sie die
2
Schubladenauflage leicht an und nehmen Sie
sie von den Schienen.
Mehr als 85°
ACHTUNG
• Verwenden Sie keine übermäßige Kraft, um die
Gefrierschubladen zu ziehen oder zu drücken.
• Schlagen Sie die Gefrierschranktür nicht zu,
während die Schubladen offen sind. Wenn Sie
diesen Warnhinweisen nicht folgen, kann dies zu
Verletzungen oder Schäden am Produkt führen.
31
Page 88

DE
Verwendung ohne Gefrierschublade
Entfernen Sie die Gefrierschubladen, um mehr
Gefrierraum zu schaffen.
Betätigen Sie die Schaltfläche Auto Drawer
1
auf dem Bedienfeld, um die automatische
Schubladenöffnungsfunktion zu deaktivieren.
Heben Sie die leere Gefrierschublade leicht an,
2
um sie aus dem Regal zu nehmen.
Schubfächer des
Gefriergerätes
Regal
HINWEIS
• Deaktivieren Sie die automatische
Schubladenöffnungsfunktion vor der Verwendung.
Achten Sie darauf, dass das Essen nicht vom
Regal fällt.
• Ziehen Sie vorsichtig an dem Regal und drücken
Sie es dann. Achten Sie darauf, dass das Essen
nicht vom Regal fällt.
• Sollte Essen hinter der Schublade eingeklemmt
sein, kann es sein, dass sich die Gefrierschublade
nicht schließen lässt.
• Abschnitt 'Nutzung ohne Gefrierschublade' zeigt
Schublade 1).
CustomChill-Fach
Hier können Sie Fleisch, Fisch, Milchprodukte,
Getränke und andere Dinge lagern, die kühlgehalten
werden sollen.
Einstellung des anpassbaren
Kühlfachs
Wählen Sie eine Temperatureinstellung für das
Custom Chill-Fach, indem Sie die Taste Auswahl
mehrfach betätigen, um zwischen Fleisch, Aufschnitt
oder Obst und Gemüse zu wählen.
Die Temperatureinstellungen werden in folgender
Reihenfolge kühler: Obst und Gemüse → Aufschnitt
→ Fleisch.
ACHTUNG
• Obst und Gemüse können frieren, wenn sie in das
CustomChill™ Fach mit der Einstellung Fleisch
oder Aufschnitt gelegt werden.
32
1)
Page 89

DE
Wasser- und Eisspender
Sie können am Spender Eiswürfel, Wasser und
zerstoßenes Eis durch Drücken der entsprechenden
Taste für den gewünschten Modus ausgeben.
• Wenn Sie die Taste für Eiswürfel, Wasser oder
zerstoßenes Eis auf dem Bedienfeld drücken,
leuchtet die Leuchte auf dem Bedienfeld auf, und
der gewünschte Modus ist eingestellt. Wenn Sie
nun den Spenderhebelarm drücken, wird das
ausgewählte Produkt (Eiswürfel, W
zerstoßenes Eis) ausgegeben.
• Die Funktion wird mit jedem Drücken der Taste auf
dem Bedienfeld entweder aktiviert oder deaktiviert.
ACHTUNG
• Halten Sie Kinder vom Spender fern, um zu
verhindern, dass Kinder mit den Bedienelementen
spielen oder sie beschädigen.
• Schütten Sie die ersten Chargen von Eis und
Wasser nach der ersten Inbetriebnahme weg (ca.
20 Eiswürfel und 7 Gläser Wasser). Dies ist auch
notwendig, wenn das Gerät längere Zeit nicht
benutzt wurde.
asser oder
HINWEIS
• Wenn Sie die Tür des Gefrierbereichs öffnen,
während Wasser ausgegeben wird, wird die
Ausgabe gestoppt, und das Bedienfeld schaltet
zum ursprünglichen Bildschirm zurück.
• Wenn Sie die Tür des Kühlbereiches öffnen,
während Wasser
ausgeben wird, wird die Ausgabe unterbrochen.
Wenn Sie die Türe schließen, wird die Ausgabe
des vorher gewählten Artikels fortgesetzt.
• Wenn der Durchmesser der Glasöffnung zu klein
ist, kann Wasser aus dem Glas spritzen oder an
der Seite vorbeilaufen.
• Verwenden Sie ein Glas mit mindestens 68 mm
Durchmesser an der Oberseite zum Abfüllen von
Wasser, Eiswürfeln oder zerstoßenem Eis.
• Wenn die Eismaschine kleinere Eiswürfel
produziert oder die Eiswürfel beginnen,
zusammenzukleben, gelangt womöglich nicht
genügend Wasser in die Eismaschine aufgrund
von zu wenig Wasser im W
selten Eis ausgegeben wird, kann es ebenfalls
zusammenkleben.
, Eiswürfel oder zerstoßenes Eis
assertank. Wenn nur
33
Page 90

DE
Eismaschine
Die automatische Eismaschine kann automatisch
bis zu 7 Eiswürfel gleichzeitig herstellen oder
50-60 Stück innerhalb von 24 Stunden, wenn die
Gegebenheiten günstig sind. Die Menge kann sich
je nach Umgebung verändern (Raumtemperatur
um das Gerät herum, wie oft die Tür geöffnet wird,
Menge des Essens, das im Gerät gelagert wird
usw.).
• Wenn der Eisbehälter vollständig mit Eis gefüllt ist,
stoppt die Herstellung.
• Geräusche von Eis, das in den Behälter fällt, sind
normal.
• Die Eismaschine beginnt normalerweise mit der
Herstellung von Eis etwa 48 Stunden nach der
Erstinbetriebnahme des Geräts.
• Verwenden Sie die erste Charge von Eis nicht und
werfen Sie es weg.
• Wenn die Eismaschine in Betrieb ist, berühren Sie
sie nicht direkt mit den Händen.
• Wenn Eiswürfel für einen längeren Zeitraum
im Eisbehälter aufbewahrt werden, können Sie
zusammenkleben, und lassen sich nicht leicht
voneinander trennen. Reinigen Sie in diesem Fall
den Eisbehälter vor der Verwendung.
Ein- oder Ausschalten der
automatischen Eismaschine
Um die automatische Eismaschine ein- oder
auszuschalten, halten Sie die Taste Ice On/Offbb|
auf dem Bedienfeld 3 Sekunden lang gedrückt.
Abnehmen des Eisfachs in der
Tür
Ziehen Sie vorsichtig an dem Griff, um das
1
Eisfach zu öffnen.
Greifen Sie zum Entfernen des Eisfachs in der
2
Tür den vorderen Griff, heben Sie den oberen
Teil leicht an und ziehen Sie das Fach wie
gezeigt langsam heraus.
34
WARNUNG
• Berühren Sie die mechanischen Teile der
automatischen Eismaschine weder mit den
Händen, noch mit Werkzeugen. Ansonsten kann
es zu Schäden am Gerät oder Verletzungen
kommen.
• Beachten Sie, dass die automatische Eismaschine
bei geöffneter Türe des Tiefkühlers ständig
weiterarbeitet, falls der Schalter der automatischen
Eismaschine auf der Ein-Position steht.
• Nehmen Sie die automatische Eismaschine
nicht auseinander, reparieren Sie sie nicht und
versuchen Sie nicht, sie zu verändern. Diese
Aufgaben sollten nur von einem Fachmann
durchgeführt werden.
Page 91

DE
ACHTUNG
• Schütten Sie die ersten Chargen von Eis und
Wasser nach der ersten Inbetriebnahme weg (ca.
20 Eiswürfel und 7 Gläser Wasser). Dies ist auch
notwendig, wenn das Gerät längere Zeit nicht
benutzt wurde.
• Das erste Eis und Wasser, das ausgegeben wird,
kann Partikel oder Geruch aus der Wasserleitung
oder dem Wassertank enthalten.
• Halten Sie Kinder vom Spender fern. Kinder
können mit den Bedienelementen spielen oder sie
beschädigen.
• Wenn nur zerstoßenes Eis verwendet wird, kann
die Eisleitung durch Eisablagerungen blockiert
werden. Entfernen Sie Eisablagerungen in der
Leitung nach Ausbau des Eisbehälters mit einem
Gummispatel. Ein regelmäßiges Ausgeben von
Eiswürfeln kann ebenfalls Eisablagerungen
verhindern.
• Sollte verfärbtes Eis ausgegeben werden,
überprüfen Sie den Wassertank und die
Wasserleitung als mögliche Quelle. Wenn das
Problem weiter besteht, nehmen Sie Kontakt
mit dem Kundeninformationszentrum von LG
Electronics auf. Verwenden Sie das Eis oder
asser nicht, bis das Problem behoben ist.
W
• Geben Sie zuerst das Eis in ein Glas, bevor Sie
es mit Wasser oder anderen Getränken füllen.
Wenn Eis in ein Glas gegeben wird, das bereits
Flüssigkeit enthält, können Spritzer auftreten.
• Berühren Sie die Eisausgabe oder die
Eismaschine nicht mit der Hand oder mit einem
Werkzeug. Andernfalls können Beschädigungen
oder Verletzungen auftreten.
• Wenn Sie das Eisfach wieder einsetzen, achten
Sie darauf, dass es richtig sitzt. Wenn es schräg
oder uneben eingefügt ist, kann es sein, dass es
aufgrund von fehlendem Sensorkontakt kein Eis
mehr produziert.
• Verwenden Sie niemals ein Glas, das sehr schmal
oder tief ist. Eis kann im Zulauf stecken bleiben
und die Leistung des Geräts mindern.
• Halten Sie das Glas in einem geeigneten Abstand
vor der Eisausgabe. Wenn das Glas zu nahe
an die Ausgabe gehalten wird, kann dies die
Eisausgabe verhindern.
• Wenn Sie in den Urlaub fahren oder über längere
Zeit von einem Stromausfall betroffen sind, sollten
Sie das Eis im Eisfach des Gefrierfachs entsorgen.
Schmilzt das Eis, kann Wasser aus dem Spender
auf den Boden tropfen.
Verstellbarer Korb
Der verstellbare Korb kann leicht hoch oder runter
gesetzt werden.
• Entfernen Sie alle Gegenstände aus dem
verstellbaren Korb, bevor Sie ihn hoch- oder
runtersetzen.
• Die Anpassung des verstellbaren Korbs ermöglicht
es Ihnen, größere Nahrungsmittel bequemer
aufzubewahren.
Um den verstellbaren Korb zu erhöhen, halten
1
Sie die Unterseite des Korbs mittig und heben
Sie den Korb an, bis er einrastet.
Um den verstellbaren Korb abzusenken,
2
drücken Sie nach oben, um die Hebel an der
Unterseite des Korbs zu lösen und senken Sie
dann den Korb, bis er einrastet.
ACHTUNG
• Leeren Sie den verstellbaren Korb zuerst aus,
bevor Sie ihn hoch oder runter bewegen, um so
Verletzungen oder Schäden am Korb oder seinem
Inhalt zu vermeiden.
35
Page 92

DE
Verborgenes Tablett
Das verborgene Tablettfach ist etwas kühler als
die Regale oder die Türfächer, deswegen bietet es
sich an, dort Milchsnacks oder andere kleine Dinge
aufzubewahren, die besonders kalt sein sollen.
Außerdem kann dort Fleisch aufgetaut werden.
ACHTUNG
• Um das Risiko zu mindern, dass die Tür zerkratzt
wird oder die mittlere Türdichtung beschädigt wird,
sollten Sie darauf achten, dass die Türdichtung
stets eingeklappt ist.
• Der Türalarm erklingt alle 30 Sekunden, wenn die
Tür länger als eine Minute offen ist. Stellen Sie
sicher, dass die Faltdichtung zusammengefaltet
ist, bevor Sie die linke Tür schließen.
HINWEIS
• Zum Öffnen der Abdeckung drücken Sie den Griff
in Richtung Rückseite des Faches, um den Riegel
zu lösen.
• Sie können die Abdeckung schließen, indem
Sie sie über das Fach schieben, bis der Riegel
einrastet.
Andere Funktionen
Alarm bei geöffneter Tür
Der Alarm ertönt 3 Mal mit einem Intervall von 30
Sekunden, wenn die Tür (Kühlschrank, Gefrierfach,
Tür-in-Tür) eine Minute offen gelassen oder nicht
komplett geschlossen wird.
• Setzen Sie sich mit dem
Kundeninformationszentrum von LG Electronics
in Verbindung, wenn der Alarmton weiter ertönt,
obwohl die Tür geschlossen wurde.
Fehlersuche
Das Gerät kann automatisch Fehler während des
Betriebs erkennen.
• Wenn ein Problem erkannt wird, geht das Gerät
nicht in Betrieb und ein Fehlercode wird angezeigt,
auch wenn mehrere Druckknöpfe betätigt werden.
• Sollte dies eintreten, nehmen Sie keine
Stromabschaltung vor und nehmen Sie sofort
Kontakt mit dem Kundendienst von LG Electronics
auf. Wenn Sie den Strom abschalten, könnten die
Techniker für die Reparatur des Kundendienstes
von LG Electronics Schwierigkeiten haben, den
Fehler ausfindig zu machen.
36
Page 93

INTELLIGENTE FUNKTIONEN
DE
Verwendung der Smart ThinQApp
Installation von Smart ThingQ
Suchen Sie auf einem Smartphone nach der LG
Smart ThinQ App im Google Play Store & Apple
App Store. Befolgen Sie die Anweisungen, um die
Anwendung herunter zu laden und zu installieren.
WLAN-Funktion
• Für Geräte mit dem oder -Logo
Kommunizieren Sie mit dem Gerät von einem
Smartphone aus, über das Sie die komfortablen
intelligenten Funktionen verwenden können.
Firmware-Aktualisierung
Hält die Geräteleistung aktuell.
Smart Diagnosis™
Wenn Sie die Smart Diagnosis-Funktion nutzen,
erhalten Sie nützliche Informationen wie die richtige
Verwendung des Geräts auf der Grundlage der
Nutzungsstruktur.
Einstellungen
Hier können verschiedene Optionen auf dem
Kühlschrank oder in der Anwendung eingestellt
werden.
HINWEIS
• Um die WiFi-Verbindung zu überprüfen,
überprüfen Sie, dass das Wi-Fi
dem Bedienfeld leuchtet.
• LG Smart ThinQ ist für keine
Netzwerkverbindungs-Probleme, Fehler,
Störungen
Netzwerkverbindung verantwortlich.
• Die Maschine unterstützt nur 2,4-GHz-WLAN-
Netzwerke.
• Wenn das Gerät Schwierigkeiten hat, sich mit dem
WLAN-Netzwerk zu verbinden, kann es sein, dass
es zu weit vom Router entfernt ist. Kaufen Sie
einen WLAN-Repeater (Reichweitenerweiterung),
um die WLAN-Signalstärke zu verbessern.
• Die WLAN-Verbindung könnte wegen der
Heimnetzwerkumgebung nicht aufgenommen oder
könnte unterbrochen werden.
oder Fehler verursacht durch die
Symbol auf
• Die Netzwerkverbindung arbeitet möglicherweise
aufgrund Ihres Internet-Service-Providers nicht
störungsfrei.
• Die Umgebung des drahtlosen Netzwerkes kann
das drahtlose Netzwerk verlangsamen.
• Die Anwendung ist Gegenstand um den Geräte-
Zweck zu verbessern, ohne den Benutzer zu
benachrichtigen.
• Funktionen können sich je nach Modell
unterscheiden.
Wireless-LAN-Modul Technische Daten:
Modell LCW-003
Frequency Range 2412 bis 2472 MHz
Ausgangsleistung
(Max)
Drahtlosfunktion
Software-V
Zur Rücksichtnahme auf den Nutzer, sollte dieses
Gerät mit einem
zwischen dem Gerät und dem Körper installiert und
betrieben werden.
ersion: V 1.0
IEEE 802.11b:18.37 dBm
IEEE 802.11g:17.67 dBm
IEEE 802.11n:17.67 dBm
Abstand von mindestens 20 cm
Konformitätserklärung
Hiermit erklärt LG Electronics, dass der FunkKühlschrank die Richtlinie 2014/53/EU erfüllt. Den
vollständigen Text der EU-Konformitätserklärung
finden Sie unter der folgenden Internetadresse:
http://www.lg.com/global/support/cedoc/cedoc#
LG Electronics European Shared Service Center
B.V.
Krijgsman 1
1186 DM Amstelveen
Niederlande
37
Page 94

DE
Information: Hinweis bezüglich OpenSource-Software
Den Quellcode unter GPL, LGPL, MPL sowie
weitere Open-Source-Lizenzen, die in diesem
Produkt enthalten sind, können Sie unter http://
opensource.lge.com herunterladen.
Neben dem Quellcode stehen dort noch alle
Lizenzbedingungen, auf die verwiesen wird,
Garantieausschlüsse sowie Urheberrechtshinweise
zum Download bereit.
LG Electronics stellt Ihnen gegen eine Gebühr (für
Distribution, Medien, Versand und Verwaltung) auch
den Quellcode auf CD-ROM bereit. Wenden Sie sich
per E-Mail an LG Electronics: opensource@lge.com.
Dieses Angebot ist drei (3) Jahre ab Kaufdatum des
Produkts gültig.
Die Verwendung von Smart
Diagnosis™ mit einem Smartphone
• Für Geräte mit dem oder -Logo
Verwenden Sie diese Funktion, wenn Sie im Falle
eines Gerätefehlers eine genaue Diagnose vom LG
Electronics Kundendienst benötigen.
Smart Diagnosis™ kann nur aktiviert werden, wenn
das Gerät eingeschaltet ist. Wenn das Gerät sich
nicht einschalten lässt, muss die Fehlersuche ohne
Smart Diagnosis™ erfolgen.
Die Verwendung von Smart
Diagnosis™
Smart Diagnosis™ über den
Kundendienst
Verwenden Sie diese Funktion, wenn
Sie eine genaue Diagnose durch das
Kundeninformationszentrum von LG Electronics
benötigen, weil das Gerät eine Störung hat oder
ausgefallen ist. Verwenden Sie diese Funktion erst,
nachdem Sie sich mit einem Servicemitarbeiter
in Verbindung gesetzt haben, nicht während des
normalen Betriebs.
Drücken Sie die Taste Lock, um die
1
Sperrfunktion zu aktivieren.
• Sollte die Sperrfunktion bereits aktiviert
sein, drücken Sie die Lock Taste, um die
Sperrfunktion zu deaktivieren, drücken Sie die
Lock
Taste erneut um die Sperrfunktion zu
aktivieren.
• Bitte beachten Sie, dass die Smart Diagnosis-
Funktion erst funktioniert, wenn fünf Minuten
verstrichen sind, nachdem die Sperrfunktion
aktiviert wurde.
38
Drücken Sie die Taste Freezer und halten Sie
2
sie für drei Sekunden oder länger gedrückt,
während Sie weiterhin Ihr Handy an den
Lautsprecher halten.
Die Tür des Kühlschranks öffnen und das
3
Telefon oben rechts an die Lautsprecheröffnung
halten.
• Halten Sie das Telefon so, dass sein Mikrofon
über der Lautsprecheröffnung liegt.
Page 95

Nachdem die Datenübertragung abgeschlossen
4
ist, wird Ihnen der Servicemitarbeiter das
Ergebnis der Smart Diagnosis™ erklären.
HINWEIS
• Halten Sie das Telefon so, dass sein Mikrofon über
der Lautsprecheröffnung liegt.
• Nach ca. 3 Sekunden wird der Ton der Smart
Diagnosis™ erzeugt.
• Entfernen Sie das Telefon nicht von der
Lautsprecheröffnung, während die Daten
übertragen werden.
• Halten Sie das Telefon an die obere rechte
Sprecheröffnung und warten Sie während die
Daten übermittelt werden.
• Der Ton der Datenübertragung für die Smart
Diagnosis™ ist möglicherweise schrill für das
Ohr. Um eine genaue Diagnose zu ermöglichen,
nehmen Sie das Telefon jedoch nicht von
der Lautsprecheröf
Datenübertragung beendet ist.
• Nachdem die Datenübertragung abgeschlossen
ist, wird die Meldung "Übertragung abgeschlossen"
angezeigt und das Bedienfeld wird automatisch
abgeschaltet. Nach wenigen Sekunden wird es
wieder eingeschaltet. Anschließend erklärt der
Servicemitarbeiter das Diagnoseergebnis.
• Die Smart Diagnosis™ ist abhängig von der
Gesprächsqualität vor Ort.
• Die Kommunikationsleistung wird verbessert und
Sie können ein besseres Signal übermitteln, wenn
Sie ein Festnetztelefon verwenden.
• Wenn die Übertragung der Daten für die
Smart Diagnosis™ aufgrund der schlechten
Gesprächsqualität unzureichend ist, kann Ihnen
unter Umständen nicht der bestmögliche Service
für eine Smart Diagnosis™ zur Verfügung gestellt
werden.
fnung ab, bis der Ton der
DE
39
Page 96

WARTUNG
DE
Hinweise zur Reinigung
• Beim Ausbau von Regalen und Schubfächern aus
dem Gerät, entfernen Sie alle Lebensmittel von
diesen, um Verletzungen und Beschädigungen zu
vermeiden.
− Sonst könnten Verletzungen durch die
eingelagerten Lebensmittel verursacht werden.
• Während der Reinigung der Entlüfter an der
Außenseite des Geräts mittels Staubsauger
sollte das Stromkabel nicht angesteckt sein, um
eine statische Entladung zu verhindern, die zur
Beschädigung des Geräts oder einem elektrischen
Schlag führen kann.
• Nehmen Sie die Regale und Schubfächer
heraus, reinigen sie mit Wasser und trocknen
sie anschließend gründlich, bevor Sie sie wieder
einbauen.
• Wischen Sie regelmäßig die Dichtungen der Türen
mit einem feuchten weichen Tuch ab.
• Spritzer und Flecken auf den Türbehältern sollten
gereinigt werden, da diese die Lagerfähigkeit
der Behälter beeinträchtigen und sie sogar
beschädigen könnten.
• Kontrollieren Sie nach dem Reinigen, ob das
Netzkabel beschädigt, heiß oder falsch
ist.
• Halten Sie die Entlüftungen an der Außenseite des
Gerätes sauber.
− Verstopfte Lüftungsöffnungen können Brand
oder Beschädigungen des Gerätes verursachen.
eingesteckt
• Das Einwachsen lackierter Metalloberflächen
bietet Rostschutz. Wachsen Sie keine
Kunststoffteile ein. Wachsen Sie lackierte
Metalloberflächen mindestens zweimal jährlich mit
Gerätewachs (oder Autowachspaste) ein. T
Sie das Wachs mit einem sauberen, weichen Tuch
auf.
• Reinigen Sie die Außenseite des Geräts mit
einem sauberen Schwamm oder einem weichen
Lappen und warmem Wasser mit einem milden
Reinigungsmittel. Verwenden Sie keine rauen oder
scheuernden Reiniger
sorgfältig mit einem weichen Tuch ab.
• Die Schubfächer oder Behälter niemals im
Geschirrspüler reinigen.
− Die Teile können durch Hitzeeinwirkung verformt
werden.
• Wenn das Gerät mit einer LED-Leuchte
ausgerüstet ist, darf die Abdeckung der Leuchte
und die LED-Leuchte auf keinen Fall für
Reparaturen oder Instandhaltung ausgebaut
werden. Bitte, nehmen Sie Kontakt mit dem
Kundendienst von LG Electronics auf.
. Trocknen Sie das Gerät
ragen
40
Page 97

DE
Ersetzen des Frischefilters
Wann sollte der Frischefilter ersetzt werden?
• Ungefähr alle 6 Monate.
• Wenn die LED des Frischefilters blinkt oder das
Symbol „Filter ersetzen“ angezeigt wird.
Entfernen des Frischefilters
Entfernen Sie die Abdeckung des
1
Frischefilterfachs. Die Abdeckung kann leicht
entfernt werden, indem Sie den Plastikstab in
die Einkerbung an beiden Seiten des unteren
Fachs stecken.
Der Frischefilter befindet sich Innen an der
2
Abdeckung.
Entfernen Sie den Filter in der
3
Frischefilterabdeckung und ersetzen Sie ihn mit
einem neuen Filter.
Reinigung der Türbehälter
Entfernung des Korbs an der linken
Tür
Halten Sie beide Ränder der Behälter fest und
nehmen Sie diese heraus, indem Sie sie anheben.
Entfernen des Kühlschranktürkorbs
und senken des InstaView-Korbs
Um die Türkörbe zu entfernen, müssen Sie
beide Enden des Korbs leicht anheben und zum
Abnehmen leicht nach vorne ziehen.
Austauschen des
Kühlschranktürkorbs und senken
des InstaView-Korbs
Zum Ersetzen des Korbs müssen Sie beide Enden
des Korbs in das Loch einfügen und dann kräftig
drücken, bis es klickt.
41
Page 98

DE
Entfernen des oberen InstaViewKorbs
Öffnen Sie die Riegel unter dem Korb, indem
1
Sie sie nach innen drehen. Neigen Sie die
Vorderseite des Korbs, bis die Haken auf der
Oberseite über die Schienen hinweg sind, und
drücken Sie dann den Korb leicht nach hinten.
Halten Sie beide Ränder der Behälter fest
2
und nehmen Sie diese heraus, indem Sie sie
anheben.
Reinigung der Regaböden
Herausnehmen der Abstellfläche
Neigen Sie die Vorderseite des Regals und heben
Sie es dann nach oben. Ziehen Sie das Regal
heraus.
Auswechseln des Kühlschrankregals
Neigen Sie die Vorderseite des Regals hoch und
schieben Sie die hinteren Haken des Regals in der
gewünschten Höhe in die Öffnungen. Senken Sie
dann die Vorderseite des Regals wieder, so dass die
Haken in die Öffnungen fallen.
42
ACHTUNG
• Achten Sie darauf, dass die Regale gerade sind.
Ist dem nicht so, können die Regale fallen oder
Nahrungsmittel können herunterfallen.
HINWEIS
• Die linke Seite des Regals ist mit „LINKS“ markiert.
• Wenn die Regale der rechten und der linken Seite
vertauscht werden, sind sie nicht ordnungsgemäß
zusammengebaut.
Page 99

DE
Reinigung des GemüseSchubfaches
Herausnehmen der
Gemüseschublade
Ziehen Sie das Gemüsefach soweit heraus, wie
1
Sie können.
Heben Sie das Gemüsefach vorsichtig an, um
2
es aus seiner Halterung zu entfernen.
ACHTUNG
• Bitte nehmen Sie zur Kenntnis, dass das Gewicht
von Nahrungsmitteln, die darin gelagert weden,
beim Entfernen des Gemüsefachs zu Verletzungen
führen können.
Entfernen der Gemüseschublade
Öffnen Sie die Kühlschranktür vollständig und
1
ziehen Sie alle Regale heraus.
ACHTUNG
• Leeren Sie die Regale und Gemüseschubladen,
bevor Sie sie entfernen, um so Verletzungen zu
vermeiden.
Heben Sie die Vorderseite der
2
Gemüseschubladenabdeckung an, bis Sie ein
lautes Klicken hören.
43
Page 100

DE
Neugen Sie die Abdeckung leicht und stützen
3
Sie sie mit einer Hand ab, während Sie sie
herausziehen.
Öffnen Sie das verstellbare Fach und heben
4
Sie die Vorderseite der Gemüseschublade mit
beiden Händen an.
Schieben Sie eine hand unter die
5
Gemüseschublade und neigen Sie die sie leicht
nach oben, um sie zu entfernen.
Auswechseln der Gemüseschublade
Verwenden Sie eine Hand, um die Unterseite
1
der Gemüseschublade zu stützen, während
Sie die innere Kante der Schublade auf gleiche
Höhe mit den Einkerbungen im Kühlschrank
bringen. Senken Sie die Schublade, so dass sie
an ihrem Platz sitzt.
Richten Sie die Abdeckung der
2
Gemüseschublade im Kühlschrank aus und
senken Sie sie dann ab.
Schieben Sie die Abdeckung der
3
Gemüseschublade so weit es geht nach hinten.
44
 Loading...