

LG LSP-400T User Manual
For any queries or information Call 121 toll free from your phone. Visit us at www.tataindicom.com
Please read this manual carefully before operating your set. Retain it for future reference.
USER GUIDE
Model: LSP-400T
Model: LSP-400T

LGE CDMA Fixed Wireless Phone
3
DATE VERSION CONTENTS OF CHANGES REMARK
2005/07 1.0 Initial Release
REVISED HISTORY

5
Highlights
Congratulations on your subscription to the LSP-400T Fixed Wireless Phone.
This phone has been designed to operate on the latest digital mobile communi-
cations technology CDMA 2000 1x. It has greatly enhanced voice clarity and
provides various advanced features.
Key phone features:
●
Advanced SMS features
●
3-line LCD Display
●
12 Polyphonic sound and Ring tones to choose from 15 melodies
●
Large Phone Book with 300 entries
●
Speed Dialling for upto 300 numbers
●
3 Way call conferencing
●
50 numbers call history
●
Last number redial
●
Hands free Speaker Phone
●
Receiver Off-Hook tone
●
Adjustable Ring volume, Key volume, Earpiece volume
●
Fast charging Lithium Ion battery with Standby time of upto 120 hours
and talk time of upto 4 hours.

7
CONTENTS
1 Introduction 9
1.1 Front View of the Phone 9
1.2 LCD Display 10
1.3 Installation 11
1.4 Installation Steps 14
2 Basic Operations 15
2.1 Making a Call 15
2.2 Messaging 15
2.3 3 way call conferencing 15
2.4 Call Wait 16
2.5 Volume Control 16
2.6 Receiving a Call 17
2.7 In Call Memo 17
2.8 Lock Mode 17
3 Menu Tree 19
3.1 MENU 22
3.2 MESSAGE 33
3.3 FIND 38
4 Speaker Phone 43
5 Troubleshooting 44
6 Important Information 45
6.1 Safety Instruction 45
6.2 Optimal Phone Performance 45
6.3 Care and Service 46
6.4 Safety Information 47

Introduction
9
1.1 Front View of the Phone
ڹ Soft key 1 : Activates MAIN MENU state
ں Message : Activates SMS MENU state
ڻ END/PWR : Escape from the any MENU state, Power ON / OFF
ڼ Soft key 2 : Activates FIND MENU state
ڽ Down Key (ƌ) : Moves down in the MENU or Volume DOWN
ھ Up Key (ᵋ) : Moves up in the MENU or Volume UP
ڿ Clear : Deletes the last digit / Moves previous MENU
ۀ Dial/Flash : Activates Dial or Flash state, View Call History
ہ Activates hands free speaker phone function
ۂ MIC : Microphone for hands free speaker phone function
ۃ Attached Antenna
ڹ
ں
ڻ
ڼ
ۃ
ۂ
ڽ
ھ
ڿ
ۀ
ہ
8
CONTENTS
7 General Information 50
7.1 Main Unit 50
7.2 AC/DC Adapter 50
7.3 Battery. 50
LIMITED WARRANTY STATEMENT 51
Appendix FCC RF Exposure Information 54
TATA Service Center List 55
Introduction
10
Introduction
11
1.3 Installation
You should follow each step carefully as shown below in order to guarantee the
proper operation of CDMA Fixed Wireless Phone.
M
e
s
s
a
g
e
END/PWR
M
i
c
V
o
l
u
m
e
C
le
a
r
D
i
a
l
/
F
l
a
s
h
S
p
e
a
k
e
r
p
h
o
n
e
M
e
s
s
a
g
e
END/PWR
M
i
c
V
o
l
u
m
e
C
le
a
r
D
i
a
l
/
F
l
a
s
h
S
p
e
a
k
e
r
p
h
o
n
e
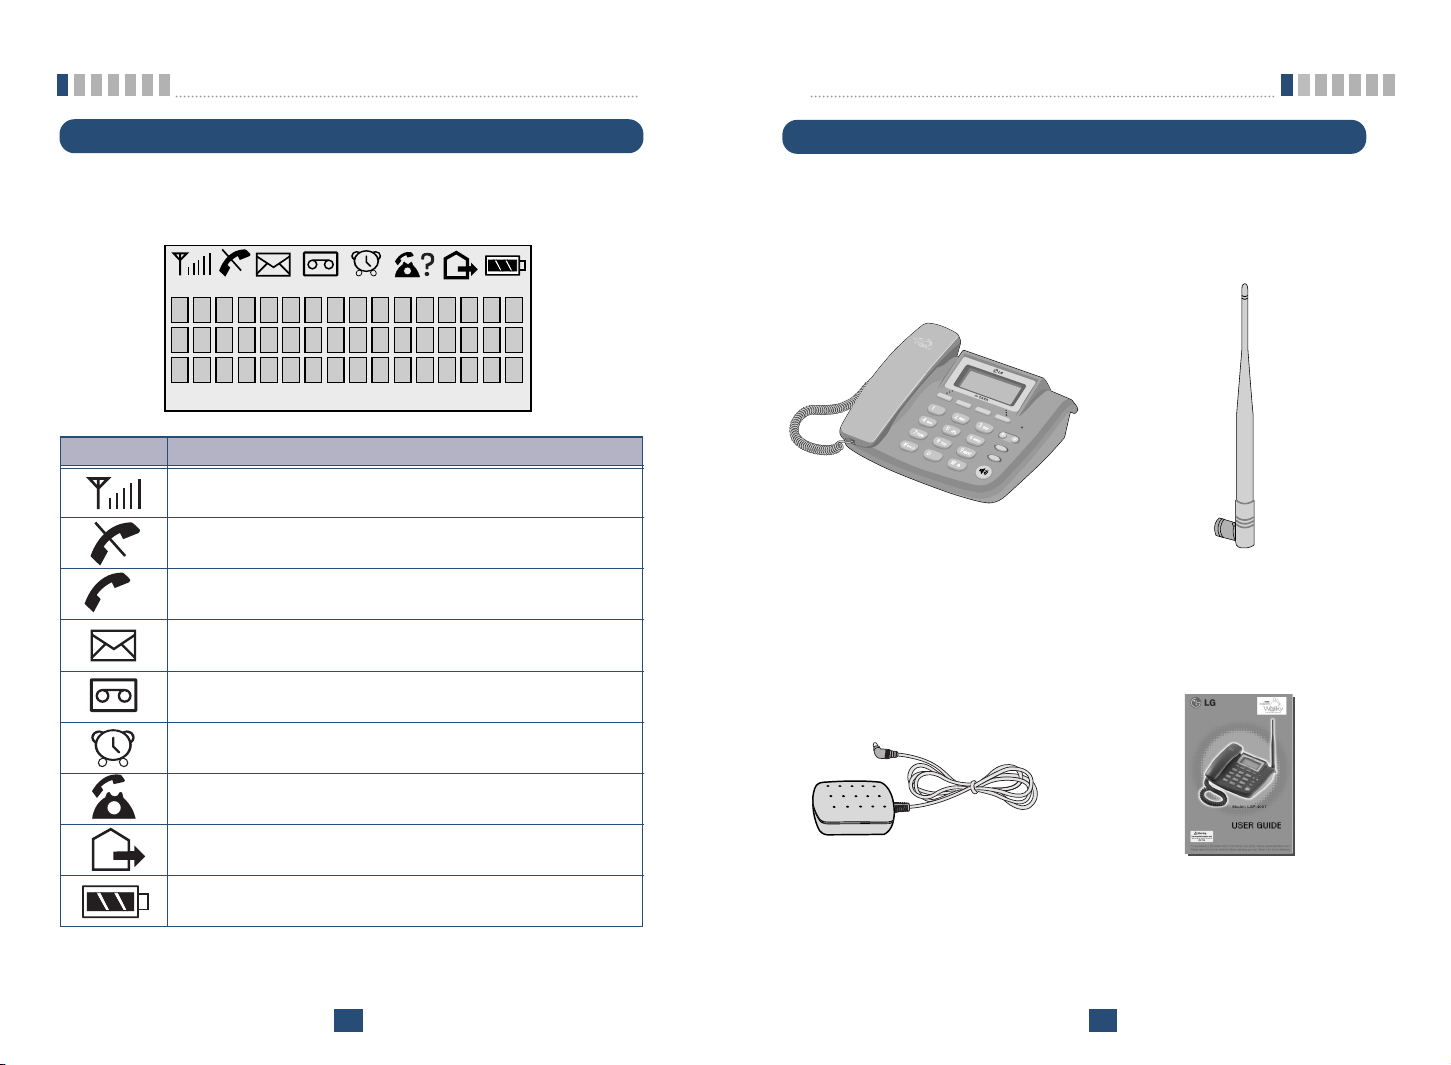
Main Unit Dipole Antenna
AC/DC Power Adapter User Guide
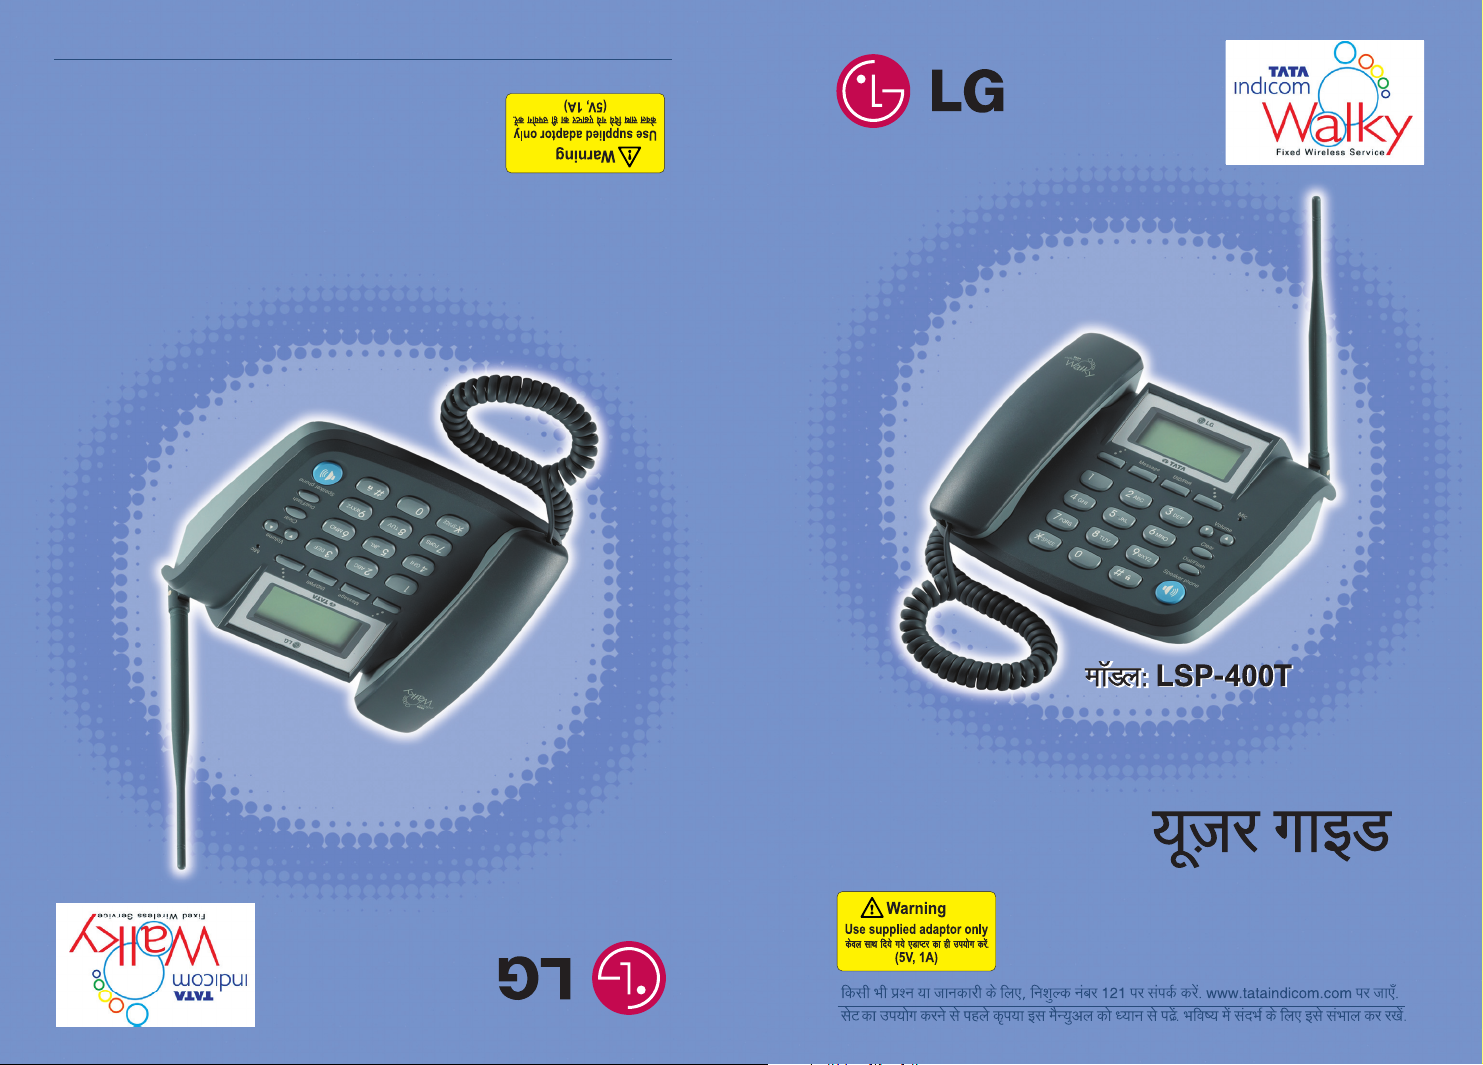
The LCD shows icons on the top of the LCD screen.
Different indicators appear based on the phone's operating mode.
1.2 LCD Display
LED Operating Condition
RSSI indicator: Indicates the signal strength in the service
area.
No service: The phone is not receiving any system signal.
In use: Displayed when a call is in progress or the phone is in
offhook and dial tone is heard.
Text message: Displayed when a text message is received.
Voice message: Displayed when a voice message is received.
Alarm: Displayed when alarm time is set.
Caller ID: Displayed when caller ID is received.
Not used
Battery charge level: Indicates charged battery level.
Introduction
13
Introduction
12
■
Please observe the following to get better voice quality
1. Keep away from electrical appliances such as TV, computer, radio etc.
2. Keep the unit in a high and central location without any obstructions.
3. Raise the integral antenna of the unit to get maximum strength as shown
in the figure.
STEP IV. Check the LCD Display
■ After you follow the installation instruction step I to step III, please check
the LCD for normal operation.
■ If you do not see the status of service, please repeat the 4th instruction of
step III.
Then confirm the status of phone to get the proper signal strength from the
service operator system.
STEP I. Check Components
■ The following components are supplied Fixed Wireless Phone.
1.
LSP-400T Main Unit with Handset (Including inner backup battery) -1EA-
2. Dipole Antenna -1EA-
3. AC/DC Power Adapter -1EA-
4. User Guide -1EA-
■ Please make sure that these components are present before you begin to
nstall the unit. If any of the components are missing or damaged, contact
your service provider immediately.
STEP II. Place the Terminal
■ Place the unit on the stable flat surface area (desk, table, etc.). Serious
damage may result if the unit is dropped. Do not place the unit within 1
meter of heaters or radiators.
This unit is designed for desktop usage. Avoid the direct exposure to sun-
light and dampness.
■ Read the SAFETY INFORMATION located in the first part of this docu-
ment before you place the unit.
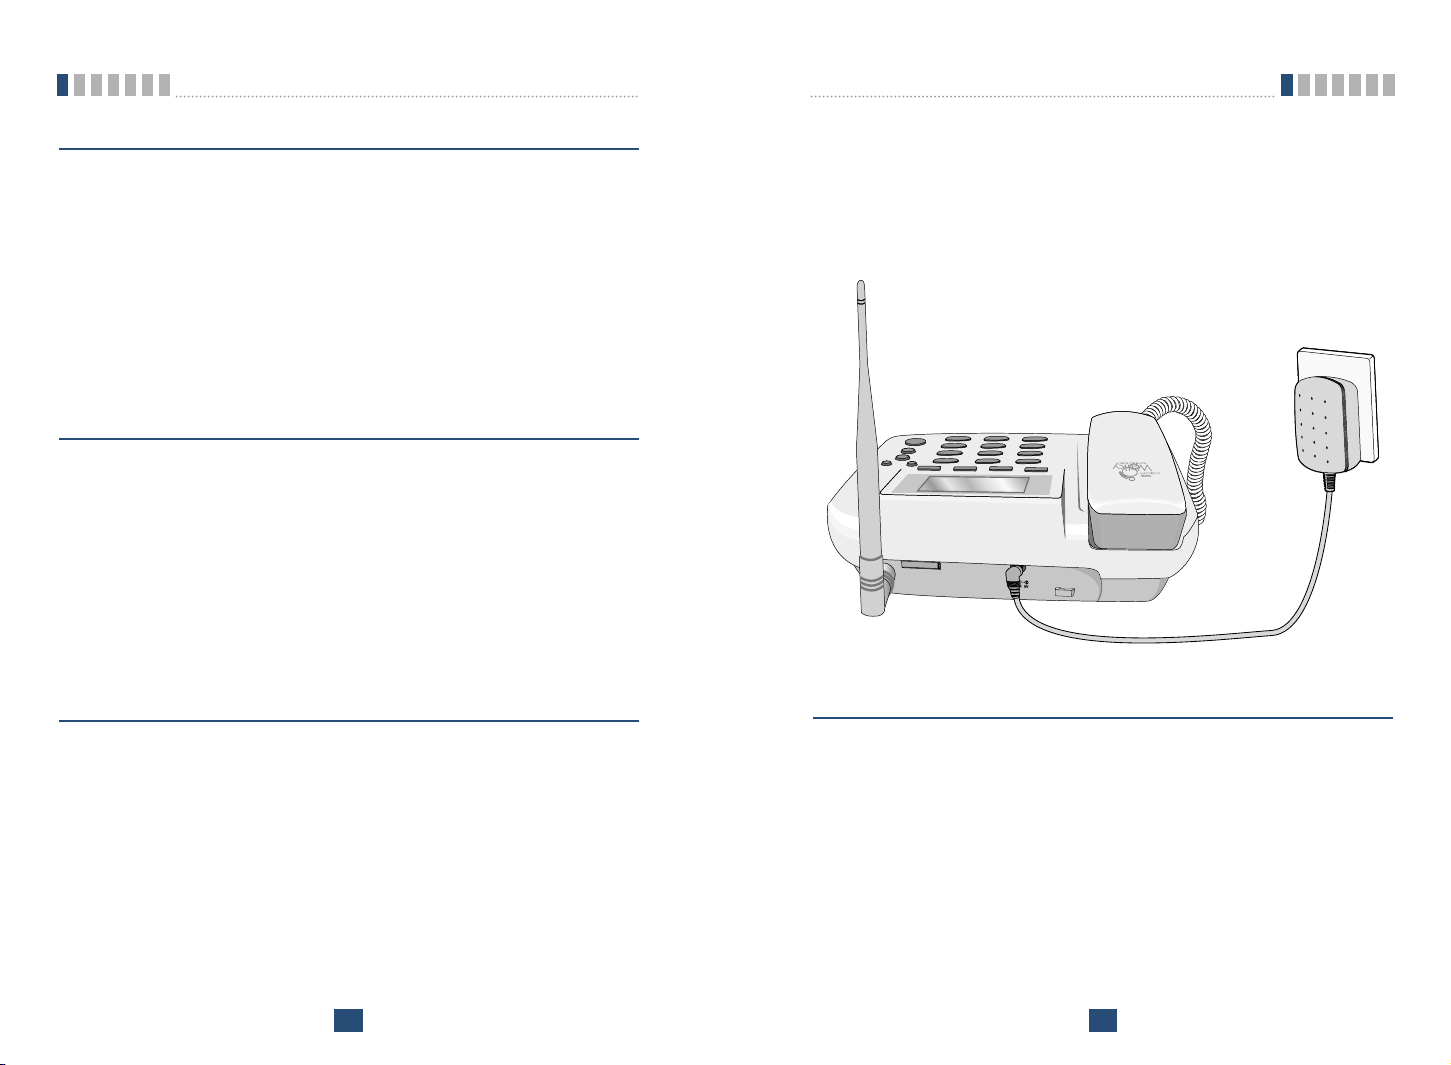
STEP III. Connect Components
(Please refer to “Installation Steps” in 1.4)
■ Connect the antenna to the TNC antenna connector located at the top of
the unit. If you have placed the unit on a flat surface, position the antenna
upright.
■ Connect the curl cord of the handset to the RJ-11 port located on the left
side of the unit.
■ Connect the AC/DC Adapter cable to the DC input port located at the top
of the unit.
➢ If it is correct, a beep tone will be heard.
➢ If it is not correct (Booting fails or beep tone is not heard), you will
have to reconnect the adapter or reset the battery switch to “on”.
Basic Operation
15
Introduction
14
2.1 Making a Call
You can make a call as follows.
1. Pick up the handset or press button.
2. Listen for dial tone.
3. Enter the phone number with area code if needed.
4. Wait for the Auto Time-out.
5. The call is connected and you may start conversation.
6. To disconnect the call, replace the handset or press button.
When the user presses the Dial/Flash button after dialing any desired num-
ber, if the user picks up the handset or presses the Speaker Phone button, the
phone makes a call immediately.
2.2 Messaging
You can send or receive a short message. If you want to send SMS, press
button + 1 () + 1 () in on-hook
state and write message that you want and send your message. When the
message received in idle state or during a call, you can confirm your message
as follows.
1. Press button + 2 () + 1 ().
2. Press Soft Key 1 to confirm desired message.
2.3 3 way call conferencing
You can start tripartite conversation.
1. Enter the phone number of the 2ndparty phone while you are in tele-
phonic conversation with 1stparty.
2. Press Dial/Flash button.
This service should be provided by your service provider.
VIEW
TEXT MSGINBOXMessage
NEW MESSAGEWRITEMessage
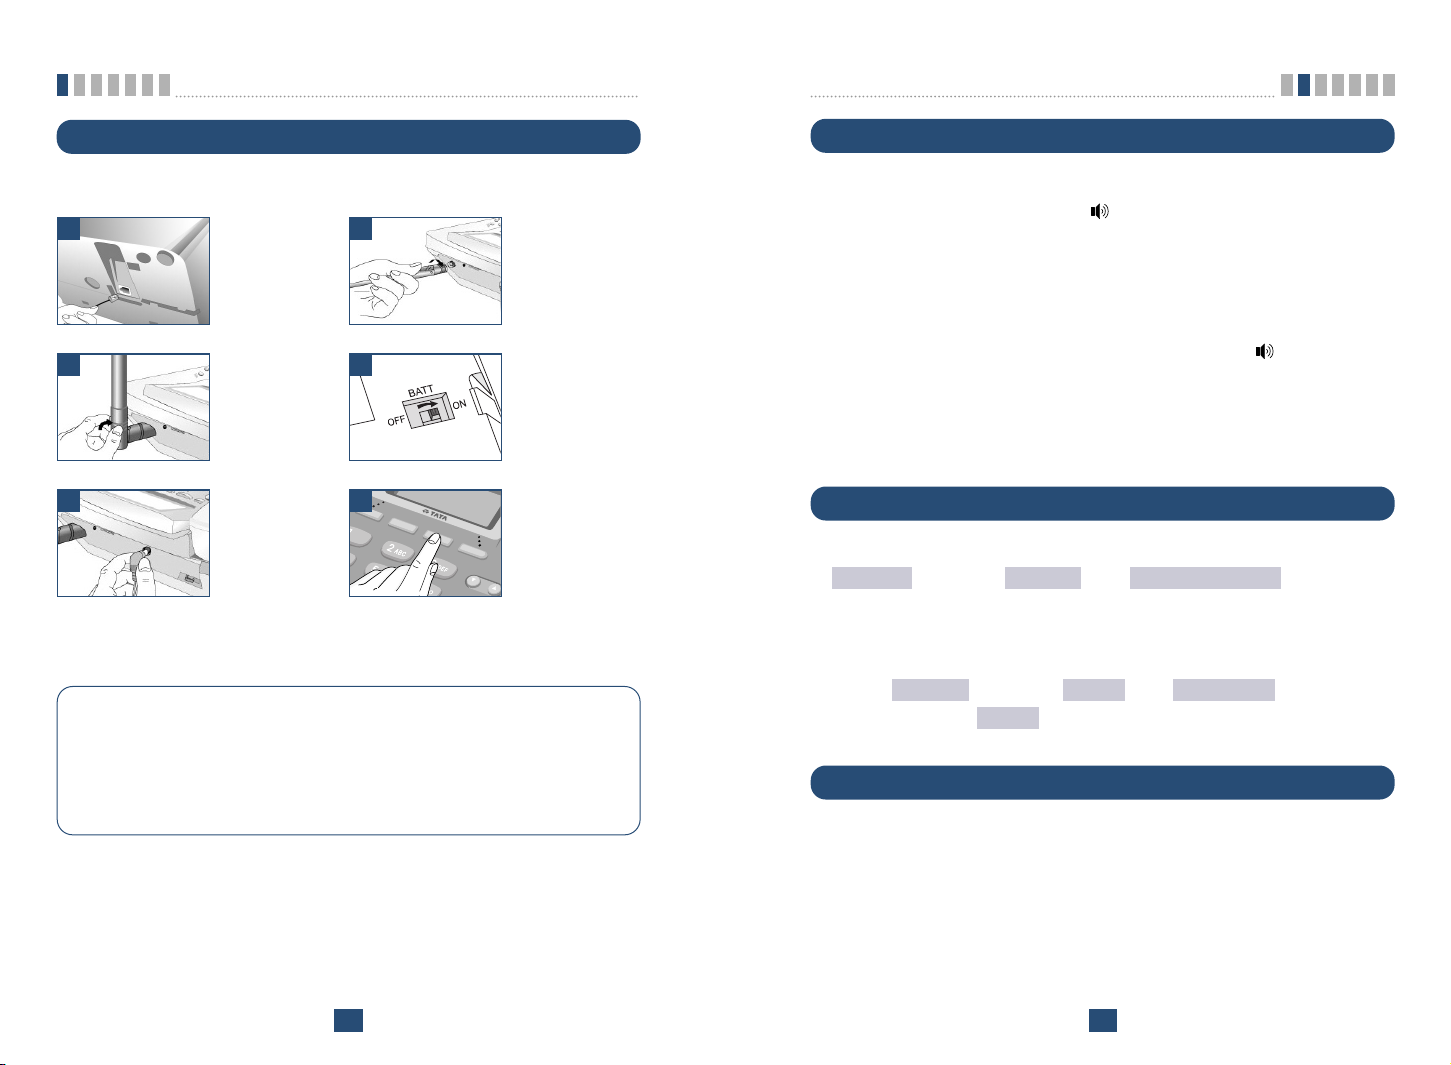
1.4 Installation Steps
Please follow the procedure below to install the unit properly.
Connect
basehandset
to the handset
connector.
Turn the antenna
upright.
Connect the AC
power supply.
Connect the
antenna to the
TNC connector
(Turn right).
When you first
use the unit,
please Turn “on”
the battery
switch.
1 2
3
Press END/PWR
button to operate
initially.
M
e
s
s
a
g
e
END/PWR
V
o
l
u
m
e
M
e
s
s
a
g
e
END/PWR
V
o
l
u
m
e
5 6
4
■ Before using the unit, please check that the battery switch is “on”.
■ After switching it on, use the phone.
■ When charging the battery, check that the battery switch is “on”.
■ The battery will be charged only when the battery switch is “on”.
Notice:

Basic Operation
17
Basic Operation
16
2.6 Receiving a Call
When the bell rings in idle state, you can receive a call as follows
1. Pick up the handset or press the Speaker Phone button.
2. Start a conversation.
3. To disconnect the call, replace the handset or press the Speaker Phone
button.
2.7 In Call Memo
Allow you to store number during the call.
To store number:
1. Press Soft Key 1 + 1().
2. Enter upto 32 numbers using the keypad.
3. Press Soft Key 1 to save.
To retrieve an In Call Memo:
1. Press Dial/Flash button to see saved number.
Note: You can store the number by pressing Soft Key 1 .
2.8 Lock Mode
Protects your phone from unauthorized use. Once the phone is locked, it is in
restricted mode, until the in lock code is entered. This will allow you to
receive phone calls and still make emergency calls. The lock code/password
on your phone is “0000” by default.
ADD
ADD
MEMOMENU
2.4 Call Wait
While a call is in progress, you may hear two beeps indicating another
incoming call.
When call wait is enabled, you may put the active call on hold while you
answer the other incoming call.
1. Press Clear or END/PWR button, Call Wait window then disappears.
2. Press Dial/Flash button, you may start conversation with called num-
ber.
3. Re-press Dial/Flash button, you may start conversation with previous
number.
2.5 Volume Control
1. Press UP/DOWN button of navigation while in a call, to adjust ear-
piece volume.
2. Press Soft Key 2 to Prevent sound from your end during the
call. To cancel Mute, Press again Soft Key 2 .
Soft Key 1 Soft Key 2
To scroll in MENU, press ᵋor ᵍ button.
3. Press Soft Key 1 + 3 during a call and select
Low or High by pressing Soft Key 2 or Press UP/DOWN
button, to adjust MIC volume.
NEXT
MIC LEVELMENU
●●●●●●
END/PWRMessage
●●●●●●
UNMUTE
MUTE

19
Basic Operation
18
Also you can modify your lock code as explained [See 3.1.4.6 page no. 32].
You can lock your phone using the ‘#’( :Lock) key, also you can lock your
phone manually as
explained [See 3.1.4.1 page no. 29].
Under Lock Mode
1. Press ‘#’ button for some time.
The phone is now locked.
2. To unlock, press Soft Key 1 .
Soft Key 1 Soft Key 2
3. Enter 4 digits lock code/password. (Default “0000”).
●●●●●●
END/PWRMessage
●●●●●●
UNLOCK
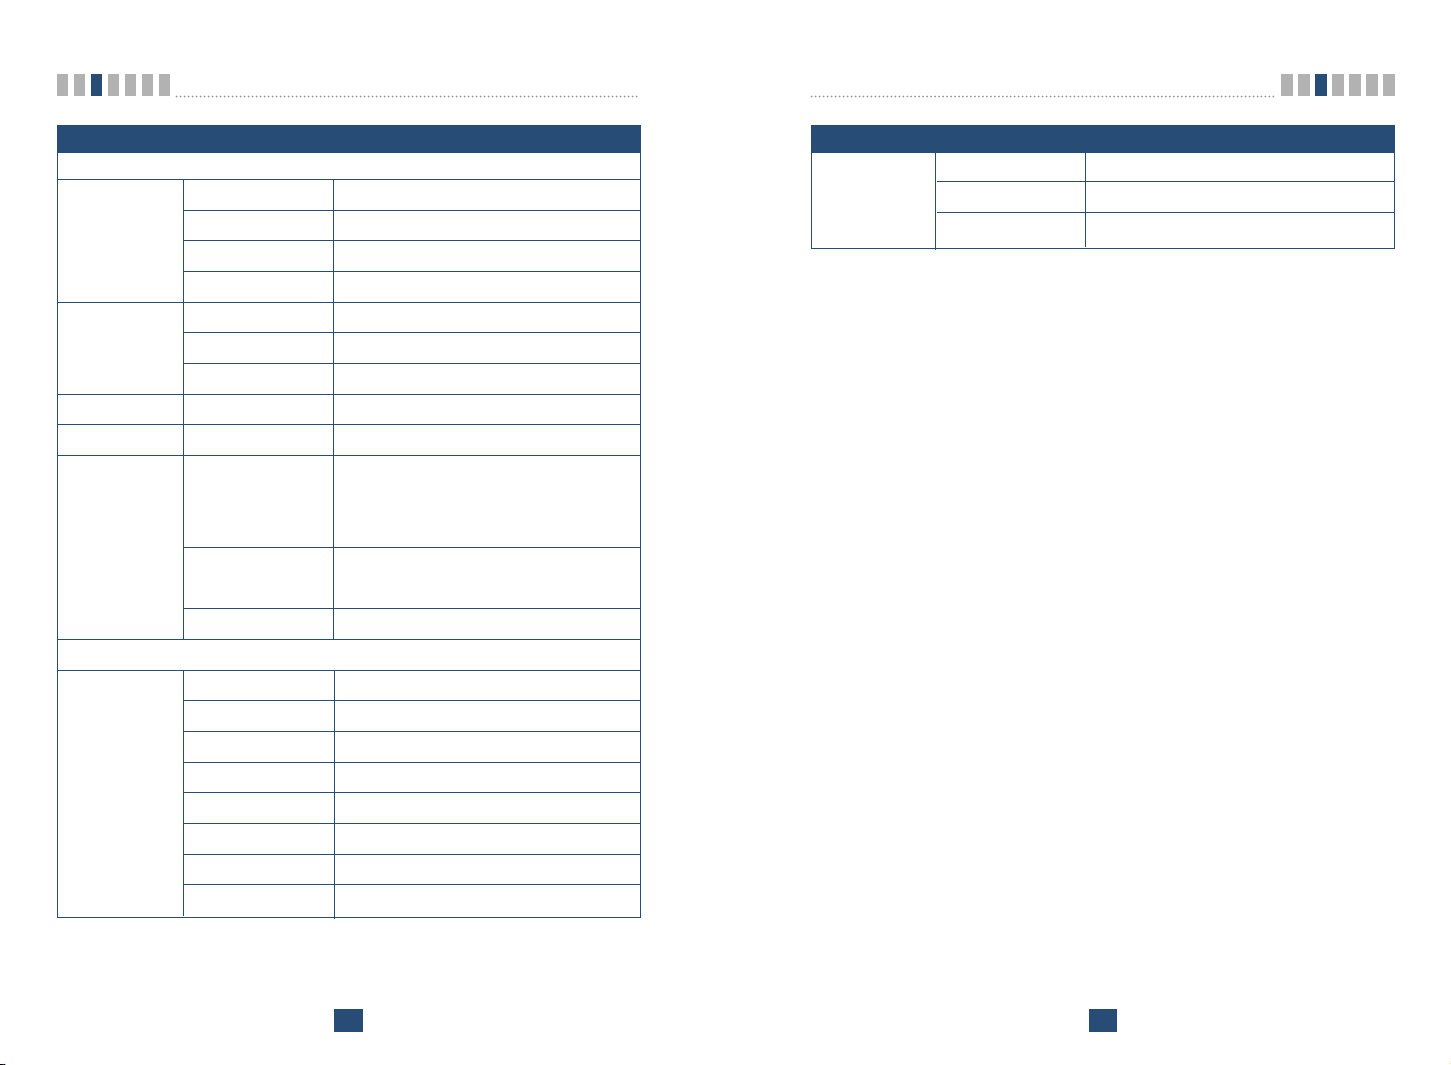
Menu Tree
1. MENU
1. RING TYPE DoMoreLiveMore / Bengali / Disco / Filmi /
Goan / Gujrati Folk /Happybday / Malyalam /
Marathi pohada /OmJaiJagdish / Pahadi /
Punjabi / SareJahanSe / Shiridivaasa /
1. SOUND VandeMataram
2. RING VOLUME 4 steps
3. KEY VOLUME 5 steps (including silent step)
4. EAR VOLUME 4 steps
1. ALARM SET TIME / SET RINGER
2. CALL CALL FORWARD / CALL WAIT
2. SETTINGS
3. CONNECT ALERT Enable / Disable
4. MY NUMBER OK / EDIT
5. VIEW VERSION OK / MORE
1. HOT LINE Enable / Disable
2. HOT LINE TIME 2-9 sec.
3. DIAL FEATURES
3. AUTO TIME-OUT
2-9 sec.
4. SPEED DIALING Enable / Disable
5. DTMF LENGTH Short / Long
1. SET LOCK MODE Enable / Disable
2. CLEAR CALLS No / Yes
3. CLEAR MEMORY No / Yes
4. SECURITY 4.
EMERGENCY CALL
3 Options
5. RESTRICT CALL
SET RESTRICT / WHITE LIST/
BLACK LIST
6. NEW CODE
Main MENU
Sub-MENU Setting Value
2120
Menu Tree
1. BY NAME FIND / ABC
2. PHONE BOOK
2. BY ADDRESS FIND
3. BY NUMBER FIND
Main Menu
Sub-Menu Setting Value
Menu Tree
2. MESSAGE
1. NEW MESSAGE OK / FIND
1. WRITE
2. EDIT OUTBOX EDIT / ERASE
3. EDIT INBOX EDIT
4.
CLEAR OUTBOX
No / Yes
1. TEXT MSG VIEW / ERASE
2. INBOX 2. VOICE MSG REPLY / ERASE
3. CLEAR ALL No / Yes
3.
MSG ALERT
Off / Once / Every 2 Min
4.
MSG RINGER
Sms alarm 1 ~ 5
Immediate / After 30 Min. / After 1 Hour /
1.
DEFER DELIVERY
After 2 Hours / After 12 Hours / After 1 Day /
After 2 Days
5. SETTINGS
2. VALID PERIOD
Default / 30 Minutes / 1 Hour / 2 Hours /
12 Hours / 1 Day / 2 Days
3.
AUTO DEL.INBOX
Disable / Enable
3. FIND
1. ALL CALL VIEW / ERASE
2. MISSED VIEW / ERASE
3. RECEIVED VIEW / ERASE
4. DIALLED VIEW / ERASE
1. CALL HISTORY
5. MEMO VIEW / ERASE
6. ERASE HISTORY ERASE ALL CALL / ERASE MISSED /
ERASE RECEIVED / ERASE DIALLED /
ERASE MEMO
Main Menu
Sub-Menu Setting Value
 Loading...