


OWNER’S MANUAL
Mouse Scanner
LSM300
(Windows version)
Please read this manual carefully before operating
your set and retain it for future reference.
The S/W included with the product may be updated or changed to
improve performance without notice.

Getting Started 3
Safety Information
There are two types of precautions: “Warning” and “Caution”.
Warning
>
Caution
>
Note
,
: This symbol indicates a prohibited use of the product.
7
-After reading this manual, make sure to keep it in a place where you can easily access while using the
product.
-The following safety information is intended to guide you to the safe and correct use of the product and
prevent unwanted accident or damage.
: Failure to observe these instructions may result in serious injury or death.
: Failure to observe these instructions may result in minor injury or damage to the product.
: Following the tips can prevent malfunction or damage to the product.
Warning
>
1
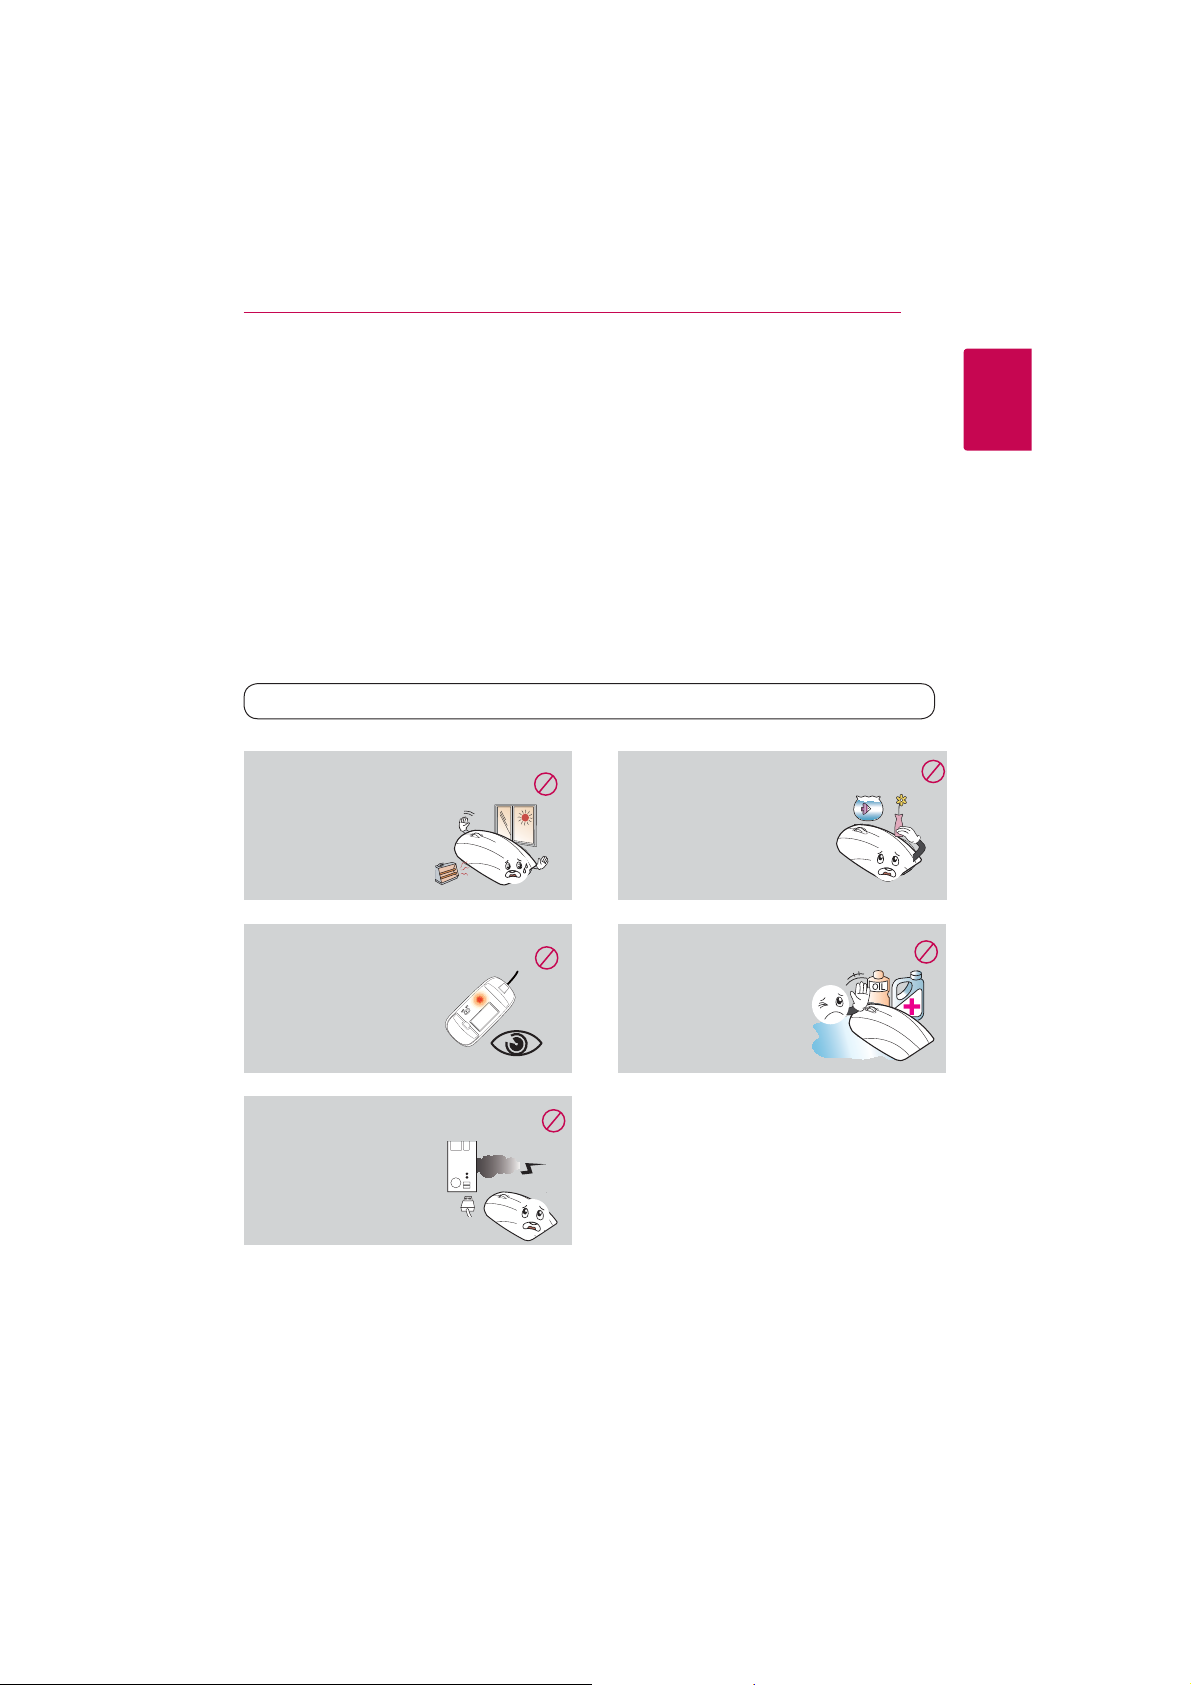
Getting Started
Do not use or store the product in direct
sunlight or near a hot object (e.g., a heater
or replace).
yOtherwise, this may result
in re due to excessive heat.
Do not direct the laser beam towards your
eyes.
yOtherwise, this may cause
damage to your eyesight or
a loss of vision.
If the product is emitting smoke, unusual
odors or sounds, stop using the product
immediately and disconnect it
from the computer.
yOtherwise, this may cause
re or electric shock.
Do not place a container lled with liquid
such as vase, owerpot, cup, cosmetics/
toiletry or chemicals/medicine near
the product.
yOtherwise, this may result in
personal injury or death due to
re or electric shock.
Do not use the product if liquid such as
water, chemicals or oil is spilled on the
product.
yOtherwise, this may cause
re or electric shock.
Getting Started4
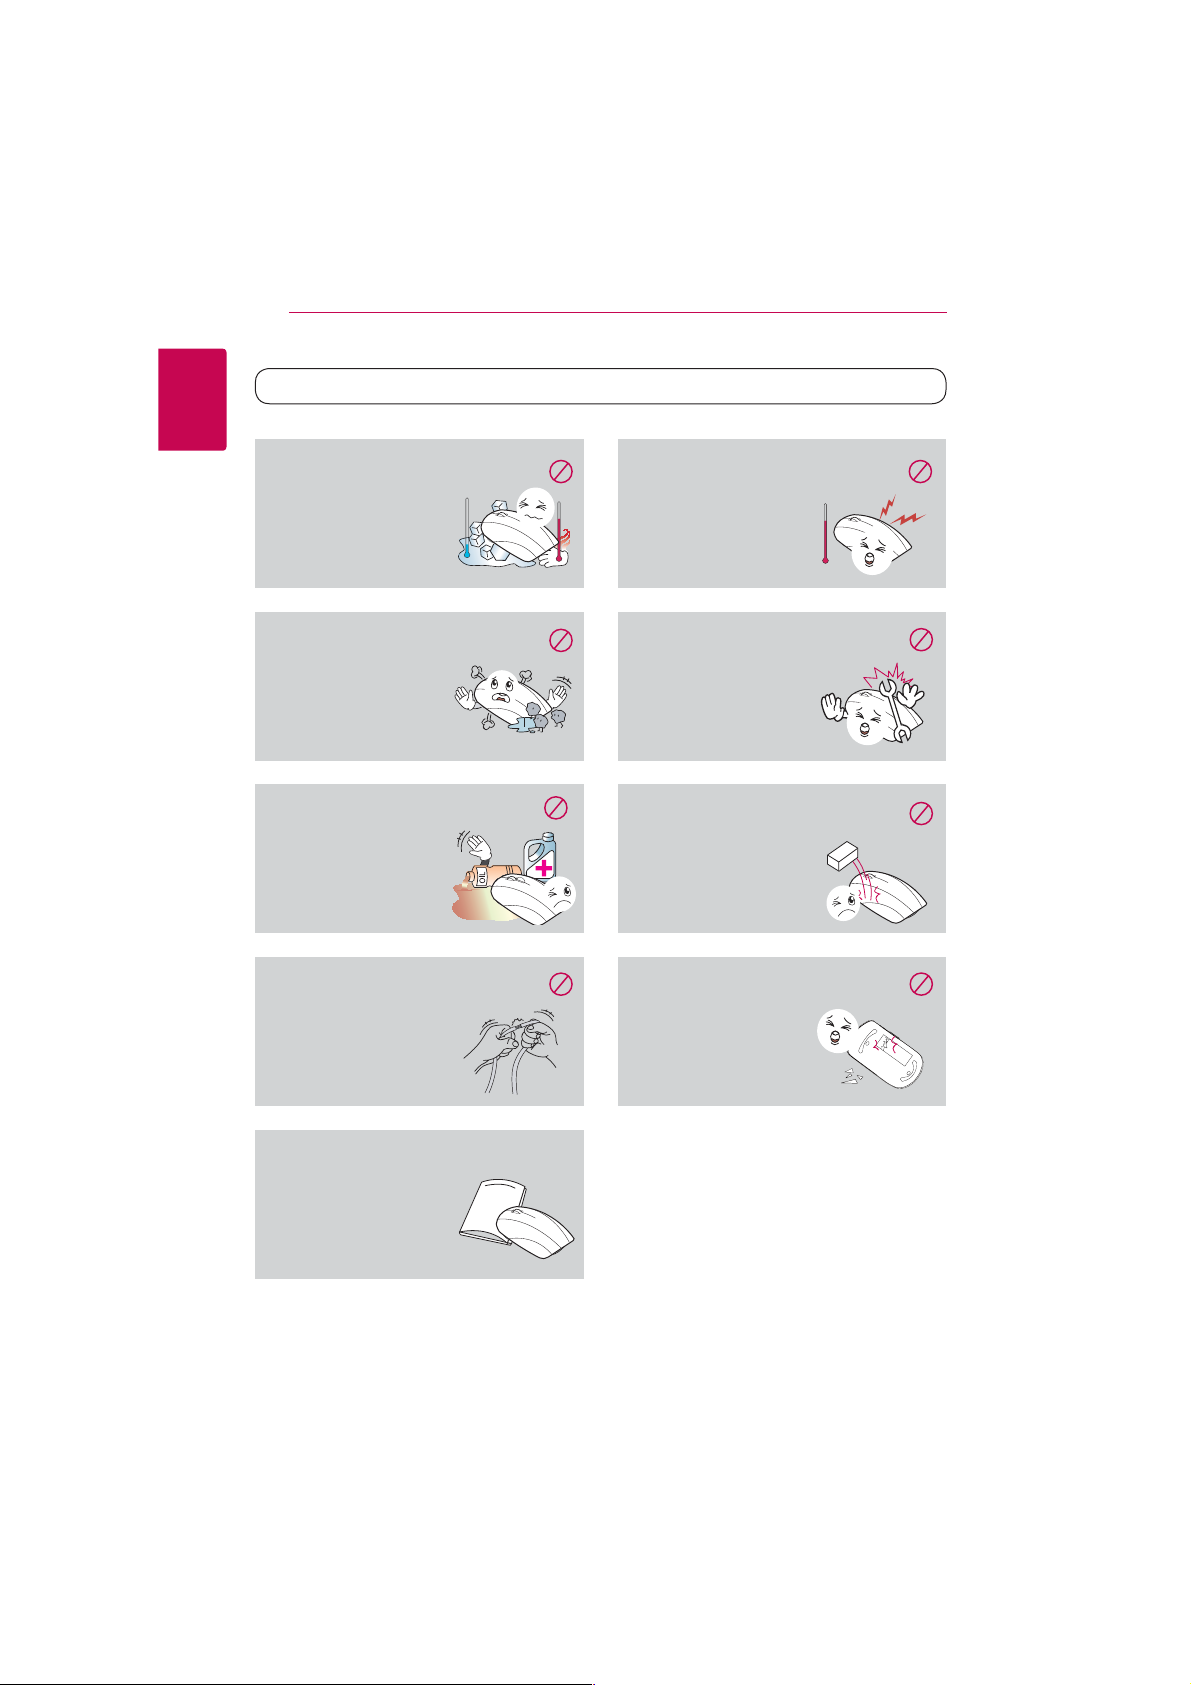
1
Do not install the product in an extremely
Getting Started
hot (over 35 °C) or cold (under 5 °C) area, or
with high temperature variation.
yOtherwise, this may cause
malfunction or damage to
the product.
Caution
>
Do not install the device in an area prone
to static electricity or excessive heat.
yOtherwise, this may cause
malfunction or damage to
the product.
Do not install the product in a humid or
dusty area.
yOtherwise, this may cause
malfunction or damage to
the product.
Be careful not to spill liquid such as water,
chemicals or oil on the product.
yOtherwise, this may cause
malfunction or damage to
the product.
Do not apply excessive bending or shock
to the cable.
yOtherwise, this may cause
malfunction or damage to
the product.
Always read and follow the user manual
when using or removing the product.
yImproper use may cause
malfunction or damage
to the product.
Do not disassemble, modify or repair the
product.
yOtherwise, this may cause the
product to break down,
increase the safety risk, and
voids the warranty of the
product.
Do not apply excessive shock to the
product.
yOtherwise, this may cause
malfunction or damage to
the product.
Be careful not to drop the product or apply
excessive shock to the scan window on the
bottom of the product.
yOtherwise, this may cause
malfunction or damage to
the product.

Getting Started 5
FCC ID : SSNLSM300R, SSNLSM3001306
FCC Compliance Statement
This device complies with part 15 of the FCC
rules. Operation is subject to the following two
conditions:
(1) This device may not cause harmful interference,
and
(2) This device must accept any interference
received, including interference that may cause
undesired operation.
NOTE: This equipment has been tested and found
to comply with the limits for a Class B digital device,
pursuant to Part 15 of the FCC Rules. These limits are
designed to provide reasonable protection against
harmful interference in a residential installation. This
equipment generates, uses, and can radiate radio
frequency energy and, if not installed and used
in accordance with the instructions, may cause
harmful interference to radio communications.
However, there is no guarantee that interference
will not occur in a particular installation.
If this equipment does cause harmful interference
to radio or television reception, which can be
determined by turning the equipment off and
on, the user is encouraged to try to correct the
interference by one or more of the following
measures:
yReorient or relocate the receiving antenna.
yIncrease the separation between the equipment
and receiver.
yConnect the equipment into an outlet on a
circuit dierent from that to which the receiver is
connected.
yConsult the dealer or an experienced radio/TV
technician for help.
CAUTION: Any changes or modications not
expressly approved by the party responsible for
compliance could void the user’s authority to
operate this equipment.
FCC RF Radiation Exposure Statement : This
equipment complies with FCC radiation exposure
limits set forth for an uncontrolled environment.
This equipment should be installed and operated
with minimum distance 20 cm between the
radiator and your body. End users must follow the
specic operating instructions for satisfying RF
exposure compliance. This transmitter must not be
co-located or operating in conjunction with any
other antenna or transmitter.
FCC Radio Frequency Interference
Requirements
This device is restricted to indoor use due to its
operation in the 5.15 to 5.25 GHz frequency range.
FCC requires this product to be used indoors for
the frequency range 5.15 to 5.25 GHz to reduce the
potential for harmful interference to co-channel
Mobile Satellite systems. High power radars are
allocated as primary users of the 5.25 to 5.35 GHz
and 5.65 to 5.85 GHz bands. These radar stations
can cause interference with and/or damage this
device. This device cannot be co-located with any
other transmitter.
CAUTION: Regulations of the FCC and FAA prohibit
airborne operation of radio-frequency wireless
devices because their signals could interfere with
critical aircraft instruments.
Responsible Party :
LG Electronics USA, Inc.1000 Sylvan Avenue
Englewood Clis, NJ 07632
TEL. : +1-800-243-0000
WARNING: This product contains chemicals known
to the State of California to cause cancer and birth
defects or other reproductive harm. Wash hands
after handling.
1
Getting Started

Getting Started6
CAUTION
yUsing the mouse scanner for a prolonged time
can cause serious injuries or disorders, and
1
Getting Started
excessive computer work can cause fatigue to
your body, including hands, feet, shoulder and
neck. If such pains continue, this can lead to
muscles and musculoskeletal disorders such as
Carpal Tunnel Syndrome (CTS). If you experience
fatigue or discomfort, please consult your local
doctor.
The following measures are recommended to
reduce the risk of injury.
- Take a rest at regular intervals.
- Stretch your arm and shoulder muscles
regularly.
- Place the mouse scanner in a convenient
position.
yDisassembling the mouse scanner may
cause malfunction of the product. Do not
disassemble the mouse scanner. LG Electronics
is not responsible for problems caused by
disassembling the product by users or nonauthorized personnel.
Handling the Unit
yWhile on the move, always put the mouse
scanner in the pouch to protect the scan
window from scratch and shock.
yThe scan window may be broken if mouse
scanner is dropped especially on a hard surface.
It can cause harm to a persons body.
yTouch the scan window with sharp objects or
using the scanner on a rough surface may cause
damage to the scan window. If the scan window
is scratched, the quality of the scanned image
may deteriorate.
yWhen removing ngerprints or dusts o the scan
window, always use the soft composite ber
cloth.

Table of Contents 7
Table of Contents
1 Getting Started
3 Safety Information
8 Main Features
8 – About the mouse scanner
8 In the Box
9 Product Overview
2 Mouse Operation
10 Using an Wireless Mouse
10 – Battery installation
11 – Connecting the mouse scanner
12 Using an Wired Mouse
12 – Connecting the mouse scanner
3 Scanner Operation
13 Installing the LG Smart Scan Software
13 – About LG Smart Scan Software
13 – System requirements
14 – How to install
14 – How to quit
15 Using the LG Smart Scan Software
15 – Main menu display
16 Scanning
20 Editing
20 – Edit menu display
20 – Control panel
20 – Editing the scanned image
21 Pasting
22 Exporting
22 – Drag & Drop feature
22 – Double Click feature
23 Sharing
23 – Using [Share] menu
24 – Using [Apps] menu
25 – Managing [Share] and [Apps] menu
26 Settings
26 – General
26 – Save
26 – Updates
27 – Text Recognition
27 – Proxy Settings
27 – Advanced
1
2
3
4
5
4 Troubleshooting
28 Troubleshooting
29 Customer Support
5 Appendix
30 Specifications
Getting Started8
+
+
-
-
Main Features
1
About the mouse scanner
Getting Started
This product combines the features of a scanner
and a mouse to enhance the mobility and
convenience. It can be used either as a scanner or a
mouse.
Real-time sharing
You can share the scanned image with others
through the various SNS (Facebook, Twitter, Flickr)
and e-mail.
OCR editing
Supports OCR, scanning content into editable
oce documents eciently and easily without
typing.
High Resolution
Up to 400 dpi scanning resolution for optimal
scanning quality.
Excellent Mouse
1200 dpi mouse works on Windows XP, Vista,
Windows 7 or Windows 8.
Free size scan
Scan dierent size, and select the dierent parts to
be scanned, maximum scanning size is up to A3
paper size.
Easy to use
Drag & Drop and Double Click feature make
scanning so simple and convenient that anyone
can use it easily.
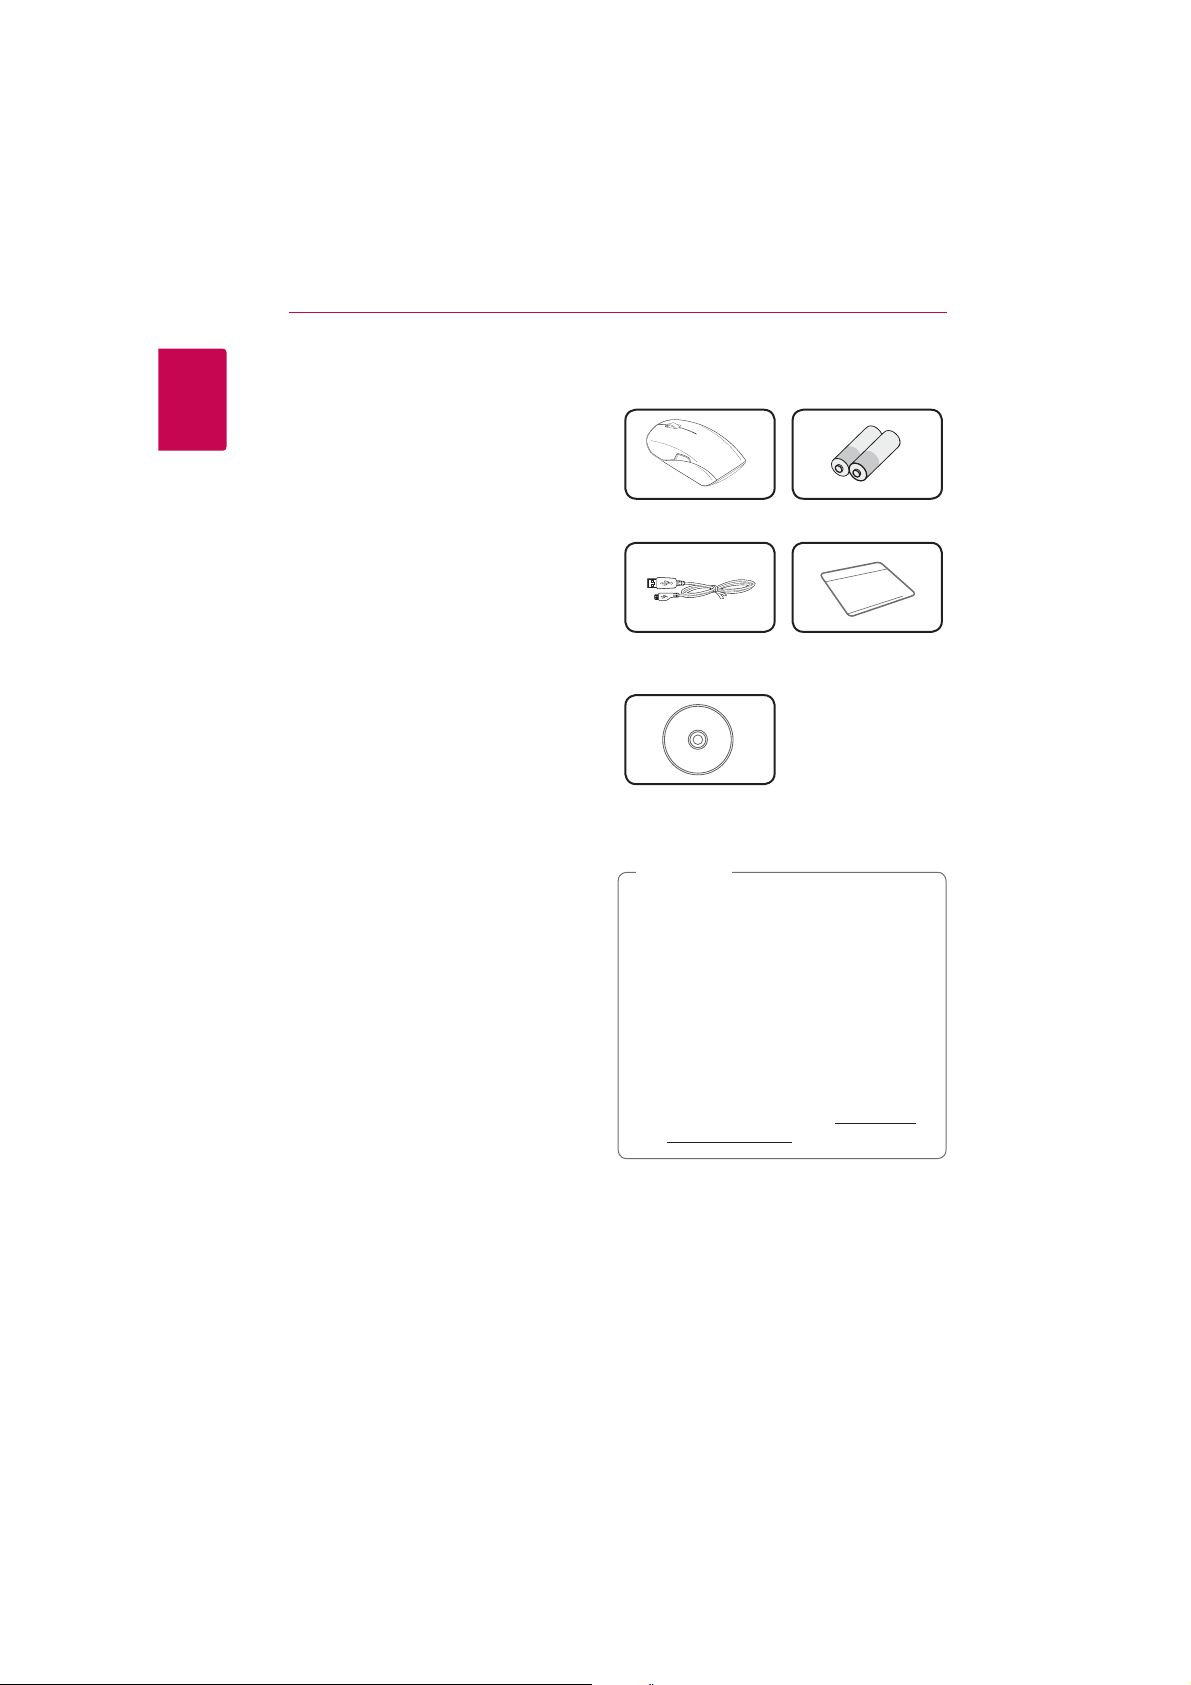
In the Box
Mouse Scanner (1) batteries (2)
Micro USB Cable (1) Mini Business Card
DVD including User
Manual & LG Smart
Scan Software (1)
Note
,
yThe components may look dierent from
the images shown here. Some components
are subjuct to change to improve the
performance of the product.
yAfter purchasing the product, make sure
that all of the above components are
included in the package. If any components
are missing or damaged, contact the
retail store you purchased the product
immediately.
yIf your computer is unable to read the CD,
you can download the le at www.lg.com
or www.lgservice.com.
Holder (1)
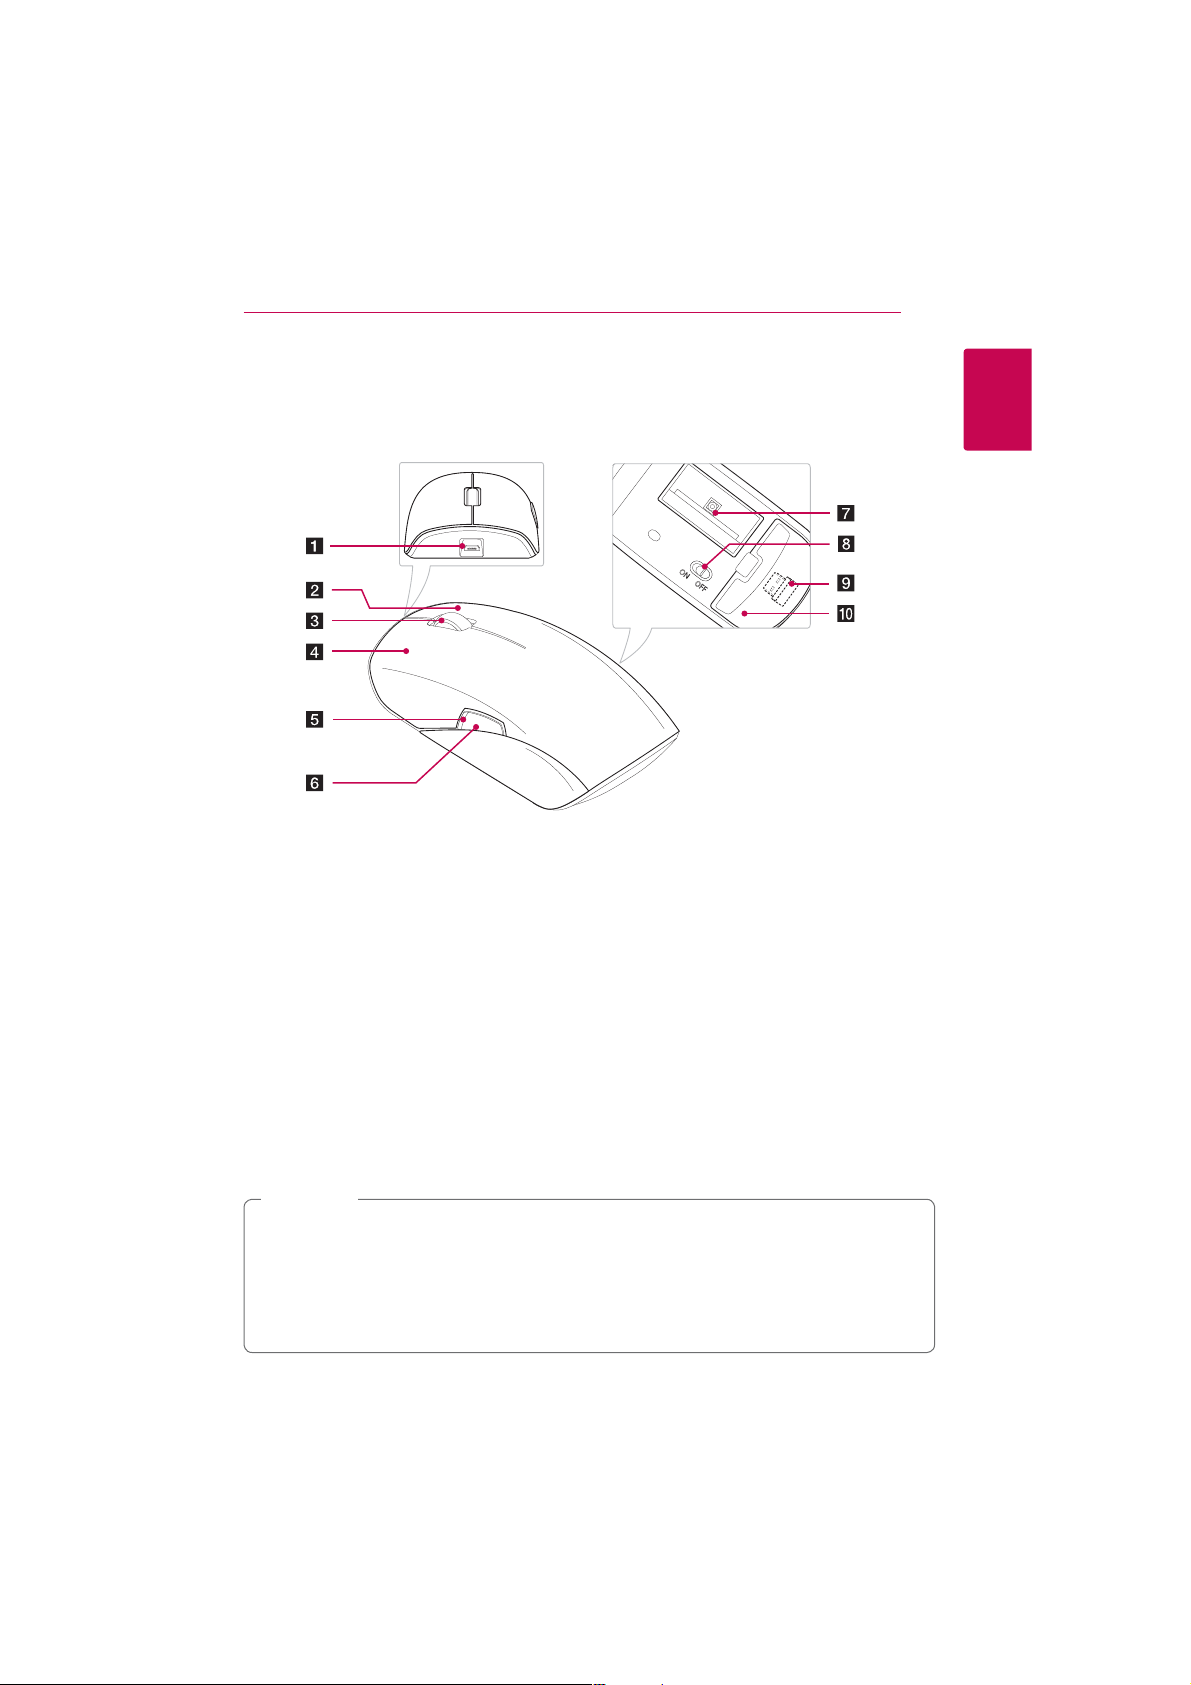
Product Overview
Getting Started 9
1
Getting Started
Micro USB port
a
Left button
b
Wheel
c
Right button
d
LED indicator
e
Scanning : Red LED blinks.
Low battery : LED turns on Red.
Scan start/stop button
f
Note
,
yTouching the scan window with sharp objects or using the mouse scanner on a rough surface may
cause damage to the scan window. If the scan window is scratched, the quality of the scanned image
may deteriorate.
yWhen removing ngerprints or dusts o the scan window, always use the soft composite ber cloth.
yDo not direct the LED indicator your eyes. Otherwise, this may cause damage to your eyesight or a
loss of vision.
Scan window
g
Before using it, remove the film attached to the
scan window.
On /O switch
h
Nano receiver
i
Before using it, make sure that there is nano
receiver on nano receiver’s holder.
Battery cover
j
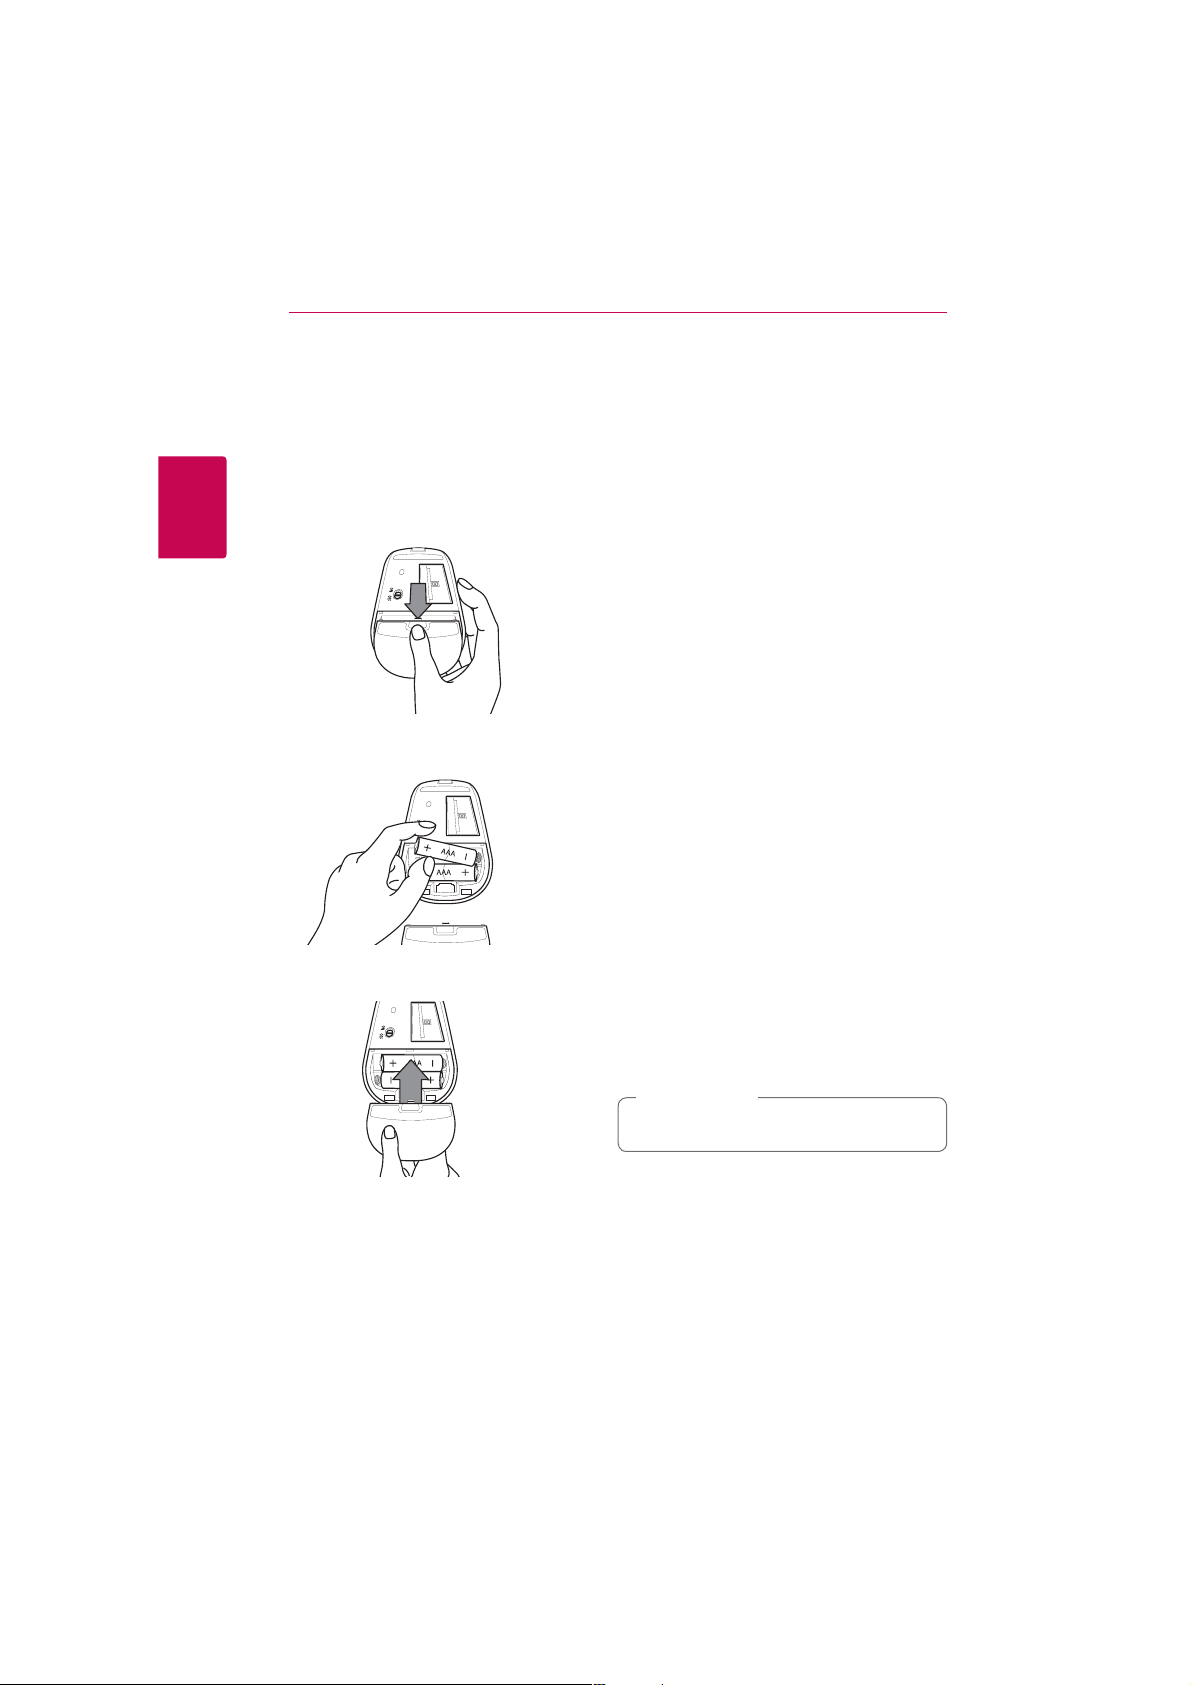
Mouse Operation10
Using an Wireless
Mouse
Battery installation
Insert the batteries to use the mouse scanner as an
wireless mouse.
2
Mouse Operation
1. Remove the battery cover on the bottom of the
mouse scanner.
2. Insert two R03 (size AAA) batteries with 4 and
matched correctly.
5
Notes on battery
yThe provided battery will start slow discharge
from the date of ex-factory. Besides, the service
life of the battery is also aected by the use time
and environment.
yThe service life of the battery may also be
shortened if it is stored at the place with
extremely low temperature.
yFor long time no use of the product, pleaes
remove the battery for proper storage; otherwise,
product fault may be caused by battery leakage.
yTo extend the service life of the battery, please
turn o the power on the bottom of the mouse
scanner for product movement or for long time
no use of the product.
yNew and high quality battery is recommended.
Besides, try to use two batteries taken from the
same package as far as possible.
yThe mixed use of batteries with dierent
trademarks, types or validity periods may shorten
the service life of batteries.
yThe use of old or cheap battery or storage
battery may also shorten the service life.
(Battery with more than 3 years of service life is
recommended.)
yThe battery service life may also vary from the
mouse pad surface. Avoid using dim or rough
pad surface.
yThe battery service life may vary largely from the
number of hours using the mouse at home or in
the company.
yFor direct and frequent mouse use, the battery
service life may be shortened. (e.g. on-line search
or playing games.)
3. Close the mouse scanner with the battery
cover.
Caution
>
Keep batteries out of the reach of children.

Mouse Operation 11
Connecting the mouse scanner
1. To use the mouse scanner as an wireless mouse,
plug the supplied nano receiver into USB port
on your computer.
How to store the reciever
When the mouse scanner is not used or moved,
please remove the receiver from the PC and then
store it in the receiver’s holder on the bottom of
the mouse scanner as shown in fugure below to
prevent it from being lost.
2
Mouse Operation
Notes on Receiver
yThe nano receiver attached to the product
(receiving equipment) can only be used with
this mouse. It will not run in other company’s
products of other models and products with
other S/N under the same model.
yThe small size nano receiver (receiving
equipment) is likely to be lost. When move
the mouse, please load the receiver in the
receiver’s holder on the bottom of the mouse.
If the receiver is lost, A/S services can hardly be
provided.
2. Turn on the power on the bottom of mouse
scanner.
3. You can pair the mouse scanner with the
plugged nano receiver.
Note
,
To operate the mouse well, please be sure that
your mouse is placed near the receiver. (within
10 m)

Mouse Operation12
Using an Wired Mouse
Connecting the mouse scanner
To use the mouse scanner as an wired mouse,
connect the mouse scanner to the computer with
supplied USB cable.
2
Mouse Operation
Note
,
yThe mouse pointer will not work on a glass.
It is recommended to use a mouse pad.
yIf you lose supplied Micro USB cable, use
the Micro USB cable (Charging / Data
transfering) for other products.
Before using another Micro USB cable, make
sure that the Micro USB cable is for Charging
and Data transfering by contacting the
Micro USB cable provider.
Caution
>
The scan window may be broken if mouse
scanner is dropped especially on a hard
surface. It can cause harm to a persons body.

Mouse Operation 13
Installing the LG Smart Scan Software
About LG Smart Scan Software
LG Smart Scan Software, provided with Mouse Scanner, lets you scan an image or text with mouse scanner.
You can edit the scanned image or text and then share it with your friend through SNS (Social Networking
Services) such as Facebook and Twitter.
System requirements
Item
System
CPU
RAM 4 GB 1GB Free of RAM
External graphics card
Built-in graphics card -
OpenGL version 2.0 or later 1.5 or later
Free space 4 GB 1 GB
Operating system Window 7 Window XP, Service pack 2 later
USB USB 2.0 USB 2.0
yThe minimum system requirements are subject to change.
y*1 GB Free of RAM for Mouse Scanner. This is subject to change according to PC service environment.
Supported Operating Systems
yWindows XP (SP2) – 32 Bit
yWindows XP (SP3) – 32 Bit
yWindows Vista – 32 Bit and 64 Bit
yWindows 7 – 32 Bit and 64 Bit
yWindows 8 – 32 Bit and 64 Bit
Recommended System Minimum System
Intel® Core™ 2 Duo or
AMD Athlon™ II processor
512 MB AMD Radeon™ HD
4850 or 512 MB ATI FirePro™
V5700 or better
yConnect the mouse scanner to your
computer using USB cable, then install the
LG Smart Scan software.
yLog in with the administrator account to
install the LG Smart Scan software. Do not
change the user while installing it.
yBefore upgrading your Windows, please
uninstall the LG Smart Scan software.
Reinstall the Scanner software after
Windows upgrade is complete.
(e.g. XP ® Vista ®7 ®8)
yWhile installing the LG Smart Scan software
for the Mouse scanner, do not remove it
from the USB port.
Intel® Core™ Duo 1.2 GHz or
AMD Athlon™ 64 X2, 1.7 GHz
128 MB NVIDIA® GeForce® 8400
GS or 128 MB ATI Radeon™ X1300
384 MB (shared) Intel® GMA
X3000 or better
Caution
>
*
2
Mouse Operation

Mouse Operation14
How to install
To use mouse scanner’s scan function, you should
install LG Scan Software CD first.
Please read the user manual before installing the
LG Smart Scan software. When you insert the CD
you will see 3 icons which are installation of the LG
Smart Scan software, User Manual and Movie Clip.
1. Insert Scan Software CD.
2. Find and double-click “Setup.exe” file and
2
Mouse Operation
installation screen appears.
-Install : Installs the LG Smart Scan software.
-User Manual : Goes to the folder to see user
manual.
-Movie Clip : Shows the introduction movie.
3. Select your language.
4. Click [Install] to display the initial installation
screen.
The end user license agreement screen will
appear. Read the end user license agreement
carefully.
5. If you accept all conditions, click check box and
click [Install].
Once the installation is complete, the wizard’ s
finish screen appears.
6. Click [Finish] to finish the installation.
How to quit
If you want to quit the software please go to tray
which is bottom and right side of Windows O/S.
1. Move the cursor on the icon and click the right
button of the mouse. You will find out the quit
buton on it.
2. Press quit button to quit the software.

Using the LG Smart Scan Software
Main menu display
Mouse Operation 15
Menu bar
Scanned
image
Type of le
Makes the scanned image into an image le icon (jpg,
png) and a text le icon (doc, pdf, txt, xls).
Because of OCR process, saving as a text le may take
time.
Note
,
The [Share] service and [Apps] function may be updated or changed to improve performance without
notice.
Quick Menu
[Save]
Saves the scanned image as an image
le (png, jpg, tif, bmp) or a text le (pdf,
xls, doc) to the desired location.
Because of OCR process, saving as a text
le may take time.
[Copy]
Copies the scanned image. (page 21)
[Edit]
Goes to the edit window. (page 19)
[Share]
Uploads the scanned image to Flickr,
Twitter, Facebook, or attaches the image
to an e-mail message. (page 23)
[Apps]
Seaches the relevant contents through
search engine. (page 24)
2
Mouse Operation

Scanner Operation16
Scanning
To use the scanning function, mouse scanner must
be connected to computer using the USB cable.
3
Scanner Operation
1. Connect the Micro USB jack on the mouse
scanner to the USB port on your computer
using supplied USB cable.
2. Fix a document or photo on the flat surface.
3. Place the mouse scanner on the document or
photo, then press the scan button on the side.
4. Once the scan starts, the screen turns black
and the image where the mouse scanner is
positioned is displayed.
Function
Scan image
Remaining
available memory
display
5. Move the mouse scanner to scan the desired
area of the document.
Scan window
description
Note
,
If the scan window turns yellow or red during
scanning, you may be moving your mouse
scanner too fast. Try to slow it down.
6. When scanning is complete, press the scan
button to stop scanning and the edit window
will be opened automatically.
For more information on editing, refer to page
19.

Scanner Operation 17
How to make high quality image
yWhile scanning, do not take o the mouse
scanner from the object to scan.
yWhile scanning, keep the scan window green
color, controlling the scan speed.
How to use the business card holder
If you scan the small object, use the supplied
business card holder.
How to scan the book
1. Lift-off left side to make right sides as flat as
possible.
2. Scan the inner part first as below.
3
Scanner Operation
3. Scan the middle area in zigzag.
Note
,
yThe pointer may jump due to the
transparent material on the business card
holder. When scanning content in the
holder, please move the mouse slowly.
yIf you place a colored or coated paper in
the holder, this may produce vertical lines
on the scanned image due to reection of
light.
4. Rotate the mouse scanner to scan the corner of
the book.
Note
,
If the mouse sensor of the bottom
move out of the book, the scan will
be paused or stopped.

Scanner Operation18
Optical Character Recognition
(OCR)
You can convert the scanned image to the editable
text using OCR function.
Supported application : Microsoft Oce (e.g.,
Word, Excel and Outlook), Internet browser, e-mail
applications such as Outlook.
Note
,
yTo use the OCR function, scan a document
or photo in high-resolution. Go to [Settings]
[General] to check the resolution. The
[
OCR function supports minimum font size
of 10 point.
3
Scanner Operation
yIf it fails to recognize the text, check
whether the language you selected is valid.
Go to [Settings] [ [Text Recognition] and
check the language set in the right panel.
The OCR function restarts whenever the
language is changed or the text recognition
range is modied in edit mode.
When using the OCR, make sure that the
resolution is set to high in [Settings] [
[General].
Notes on Scanning
yMake sure to x a document or photo so that it
does not move while scanning. If the document
or photo moves with the mouse scanner, the
scanner may be unable to calibrate the image.
yPlease do not click or typing of other Input
device while scanning.
yIf you move the mouse scanner too fast, some
areas may not be scanned and result in empty
spots. Go back to the empty spots and move the
mouse scanner slowly to re-scan the areas.
yIf the scanned image appears distorted or
broken, stop moving the mouse scanner
briey and then the image will be calibrated
automatically. If the image still appears distorted
or broken, re-scan the corresponding area to
calibrate the image manually.
yIf you scan a large image, the image will be
automatically reduced. If you need to check
whether it is scanned properly, roll the mouse
scanner wheel up/down to zoom in/out the
image.
yIf the mouse scanner is placed away from a
document or photo, the scanning will pause.
To resume scanning, place the mouse scanner
where the scanning is paused and move it left/
right/up/down.
yIf you pause scanning in a blank area with no
text or image, the scanner is not able to resume
the operation and stops scanning. The edit menu
appears.

Cautions on Scanning
yAvoid pausing the scan for a prolonged time
as it may cause damage to the LED. It is not
recommended to stay paused for more than 5
seconds.
yIt is not recommended to use the scan function
with the software which brings burden on the
graphic card such as game in high-resolution. It
may not work at the same time.
yPlease quit the LG Smart Scan software before
running games, etc.
yWhile scanning, do not write or read data in the
storage devices such as USB, External HDD etc.
yScanning the following documents may damage
the documents or produce unwanted results.
Wrinkled or creased documents, curled
documents, torn documents, documents with
paper clips or staples, carbon paper, coated
paper, extremely thin and translucent paper,
paper with adhesive notes or ags attached,
coated photos, overhead tranparencies,
papers that are stuck together, paper with wet
substances such as glue or correction uid, table
of contents of the books, which consist of lines
only, corner or edge of the books, thick books
and same pattern of the images.
yIf your computer system is closer to the
minimum system requirements, the scanner can
scan up to an A4 size document.
yIf it is closer to the recommended system
requirements, the scanner can scan up to an A3
size document.
yIf you lower the resolution, the scanning area will
be increased in the same system.
Scanner Operation 19
3
Scanner Operation

Scanner Operation20
Editing
You can adjust size, angle, color, brightness, etc. of
the scanned image, using edit menu.
Edit menu display
Rotate arrow
3
Scanner Operation
Background
Control panel
Scanned image
Adjusts the color, saturation,
brightness and contrast of
the image.
Adjusts the Background
color.
Control Panel
Editing the scanned image
1. When scanning is complete, the scanned image
is automatically cut into a rectangular shape
and aligned perpendicular to the background.
2. Using rectangular box and rotate arrow, adjust
the size and angle of the image.
3. Using the control panel, adjust the color,
brightness, etc. of the scanned image.
4. Click [OK] to complete editing scanned image
and then the OCR function starts automatically.
Note
,
yIf the scanned image is not perpendicular to
the background, rotate it manually with the
rotate arrow.
yWhen scanning a partial area, the
image may not be perpendicular to the
background. In this case, the OCR function
may not work properly. Make sure to align
the image vertically prior to proceeding.
Rotates the image.
Erases the image.

Scanner Operation 21
Pasting
When editing is complete, you can easily paste
the scanned image on the compatible application.
There are several ways to paste the scanned image
or text.
Copy
Copy Image
Choose [Edit] [ [Copy Image] in the menu bar or
choose [Copy] in the quick menu bar.
Copy Text
Choose [Edit] [ [Copy Text] in the menu bar.
Paste
1. Open the compatible application.
2. Paste the scanned image or text using the
[Paste] feature on each compatible application.
<Pasted image>
3
Scanner Operation
<Pasted text>
3. Confirm the pasted image or text on the
compatible application.

Scanner Operation22
Exporting
When editing is complete, the le icons appear at
the bottom of the LG Smart Scan Software. You can
easily export le variously by using Drag & Drop or
Double Click feature.
Drag & Drop feature
You can export a scanned image to desired le
format easily using Drag & Drop feature.
Click and drag the desired le format at the
bottom of the LG Smart Scan Software to desired
application or folder.
3
Scanner Operation
Double Click feature
You can open a scanned image on designated
application. Double click desired le format at the
bottom of the LG Smart Scan Software.
Note
,
ySelecting multiple OCR languages
will increase the time required for the
OCR process. Select only the necessary
languages prior to scanning. (OCR can
support up to 3 languages simultaneously.)
yIf scanned image contains a table, it is
recommended to use Excel.

Sharing
Using [Share] menu
You can share the scanned image with others
through the various SNS and e-mail.
Using SNS service
You can use various SNS via internet on the [Share]
menu.
1. Click [Share] and select an SNS option.
(e.g. Facebook)
2. Fill in [ID] and [Password], and then click [Login].
Scanner Operation 23
3
Scanner Operation
3. Check the image which will be posted, enter
the words you want to wirte in the message
box. Then click [Post] to upload them on the
SNS service.
If you use this function for the first time, you
need to sign in with your account.
If you do not have an account, register.
Once the sign in is complete, you can use these
services with your account.
Note
,
If you are using a shared computer, do not
select the [Keep me logged in] check box for
blocking personal information leakage.
4. The image was successfully posted on SNS
service. If you want to check the image on SNS,
Please click [Show post on Facebook].
Note
,
yDepending on the version of software and
SNS service, some of the steps written in
this user manual may dier.
yThe [Share] service and [Apps] function
may be updated or changed to improve
performance without notice.
yIf you want to change the account of the
SNS service, goes to [Option] [ [Manage
Apps] and then click the [Sign Out] on SNS
service [Setting].

Scanner Operation24
Using e-mail service
You can send the scanned image using an e-mail
service via internet on [Share] menu.
1. Click [Share] and select [Mail].
2. E-mail application appears on the screen with
3
Scanner Operation
attached file you’ve scanned.
Note
,
You can select one of the e-mail applications
available in your system. Outlook is selected by
default.
Using [Apps] menu
Using the scanned image, you can search for
relevant information or translate to other language
with [Apps] menu. If you click [Apps], four options
are displayed.
a Evernote - Posts scans directly on Evernote.
The Evernote program must be installed on
your PC to use the Evernote service.
b Google Search By Image - Searches for
relevant information directly by google
search engine.
Because of searching by image, the result
may be inaccurate and differ.
c Google Translate - Translates scanned text
(OCRed) directly by google translator.
If scanned text exceeds 1000 characters,
paste scanned text to google translate
webpage using copy text on [Edit] [ [Copy
text].
d QR Code Reader - Scans QR Code directly
and goes to linked web page.
Before using QR Code Reader, make sure that
scanned QR code is aligned perpendicular.
Note
,
The [Share] service and [Apps] function may be
updated or changed to improve performance
without notice.

Managing [Share] and [Apps]
menu
You can change the account information of the
SNS service and choose whether to activate apps
or not.
1. Click [Options] and select [Manage Apps].
2. Select the service you want to change. Click
[Disable], [Enable] or [Settings].
Scanner Operation 25
3
Scanner Operation
Note
,
In [Settings] on each SNS service, you can
deselect the [Keep me logged in] check box
for blocking personal information leakage.

Scanner Operation26
Settings
You can adjust the settings of the software in the
[Settings] menu. Choose [Options] [ [Settings] in
the menu bar.
General
3
Scanner Operation
General options
a [User interface language]
Selects proper user interface language.
b [Scan resolution]
Low : 100 dpi
Middle : 200 dpi
High : 320 dpi
Full : 400 dpi
Note
,
yIf you higher the resolution, the scanning
area will be reduced in the same system.
yThe resolution may be lower than the
maximum available options due to your
computer specications and/or user
settings.
yIf you higher the resolution, the OCR
function will be improved. (At least [High])
Window behavior
c [Always on top]
Yes : Always shows the application in the
foreground.
No : Not always shows the application in
the foreground.
d [Window position]
Right (default)
Left
Remember last position
Save
Save options
a [Default le name prex]
The default file name is inserted at the
beginning of the file’s name (configurable).
b [JPEG Quality]
JPEG compression ratio in three levels:
high, medium and low. The compression
ratio depends on the resolution.
Updates
Software updates check
a [Silent]
Installs updates automatically.
[Automatically]
Checks for updates but you can choose
whether to download updates or not.
You can set the update check interval to Daily,
Weekly or Monthly.
b [Manually]
Does not check the updates.
Note
,
Once the update is complete, remove the
mouse scanner from the USB port, then
reconnect it in 5 seconds. The mouse scanner
may function properly.

Scanner Operation 27
Text Recognition
Languages for OCR can be selected in the options
menu.
Text recognition options
a [Filter]
Languages can be filtered by “selected”
languages and “available” languages.
b [Search]
Languages can be found quickly using the
search tab underneath the filter option.
Proxy Settings
Advanced
Advanced
a [Maximum scan memory]
Adjusts the size of the maximum scan
memory.
b [Drag & Drop and paste image size]
Adjusts the size of the image.
Note
,
Modifying the advanced options is generally
not suggested as it may aect the system’s
performance.
3
Scanner Operation
Proxy Settings
[No Proxy]
a
[Use system settings]
b
[Manual settings]
c
[Proxy-Server requires password]
d
Note
,
If your network is blocked or behind a rewall,
use the proxy feature. For more detail, please
contact with the network manager.

Troubleshooting28
Troubleshooting
Common / Mouse
Symptom Cause & Solution
Mouse scanner is not
recognized by the PC.
Mouse scanner intermittently
stops responding
4
Troubleshooting
Mouse scanner doesn’t work as
wired mouse.
Mouse scanner doesn’t scroll
up or down.
Mouse scanner’s buttons do
not work as expected.
yThe USB connection may be loose. Try unplugging the mouse
scanner and plugging it back in.
yPlug the mouse scanner into a dierent USB port.
yIf your mouse scanner is plugged into a USB hub or USB switch box,
try removing it and plugging it directly into the PC.
yUnplug other USB devices that are not in use.
yTry the mouse scanner on another PC to verify it is not defective.
yClick mouse scanner once to reconnect it with your PC. It may take a
moment for the mouse scanner to respond.
yPress a key on the keyboard to reconnect it with your PC. It may take
a moment for the keyboard to respond.
yCheck for signal interference.
yCheck the batteries. (If battery is low, LED indicator turns on Red.)
yPlug the mouse scanner into a dierent USB port.
yCheck the Micro USB cable.
If you lose the Micro USB cable, purchase from the online stores or
nearest electronic stores. (Micro USB cable only for charging is not
available.)
yCheck the control panel in your operating system.
yAvoid pressing down on the wheel while scrolling.

Troubleshooting 29
Scanner
Symptom Cause & Solution
Scanning does not work. yConnect the mouse scanner to your PC with the USB cable.
yWhile scanning, keep the scanning speed with green color on scan
window.
yIf you scan the small object, use the supplied business card holder.
OCR function does not work. yCheck the language on [Options] [ [Settings] [ [Text Recognition].
OCRed character is low quality.
or distorted.
How to make PDF, WORD and
other le formats?
yCutting part of character images
yMake sure to align the image vertically prior to scanning.
(If tilt, rotate the picture.)
yCheck the save option on [Options] [ [Settings] [ [Save] menu.
Because of JPEG format with high quality picture and smaller storage
capacity, please use JPEG format to scan before conversion. Click
[Save] on quick menu, select conversion format and conversion page,
click [Save] to complete the operation.
Customer Support
To obtain the user manual, etc. for this mouse scanner, please visit http://www.lg.com or contact LG
Electronics customer care center.
4
Troubleshooting

Appendix30
Specifications
Mouse
Sensor Laser Sensor / 1200 dpi
Button 4 buttons with scan button
Dimension (L x W x H) 139 mm x 60 mm x 38 mm (5.5” x 2.4” x 1.5”)
Scanner
Resolution (Maximum)
Scan Size
Pixel Size 640 x 300 pixels @ 30 Hz
Function
Edit
5
Appendix
Save Format JPEG / TIFF/ PNG / PDF / BMP / Word / Excel available
Share Facebook / Flickr / Twitter / Connectable to E-mail service and so on
Compatible Application Microsoft Oce, Adobe Photoshop and so on
Text recognition OCR Function Supported
Full : 400 dpi, High : 320 dpi, Middle : 200 dpi, Low : 100 dpi
(Can be modied in the [Settings])
yThe resolution may be lower than the maximum available options
due to your computer specications and/or user settings.
A3 Support on recommended computer system
(It may be dierent regarding with user’s computer system.)
Contrast Control / Brightness Control / Zoom in and out /
Resizable / Auto rotation

System Requirement
Interface 2.4 GHz, μ-USB Port (5pin)
Operating System Window XP / Vista / 7 / 8
CPU : Intel® Core™ Duo 1.2 GHz or AMD Athlon™ 64X2, 1.7 GHz
RAM : 1 GB of free RAM
Depending on Operating system, the RAM which is for scanning
may be dier. (When the LG Smart Scan Software is being intalled, it
Minimum System
Recommended System
Compatible Application Microsoft Oce, Adobe Photoshop and so on
OCR Supported
yDesign and specications are subject to change without notice.
checks your PC’s RAM whether software is usable or not using Auto
spec checking tool.)
Video Card : 128 MB NVIDIA® GeForce® 8400 GS, 128 MB ATI Radeon™
X1300, 384 MB (shared) Intel® GMA X3000 or better
Free Disk Space : 1 GB
CPU : Intel® Core™ 2 Duo or AMD Athlon™ II processor
RAM : 4 GB
Video Card : 512 MB AMD Radeon™ HD 4850, 512 MB ATI FirePro™
V5700 or better
Free Disk Space : 4 GB
Appendix 31
5
Appendix

 Loading...