

Page 1

ENGLISH
ESPAÑOL
USER’S GUIDE & INSTALLATION INSTRUCTIONS
CERAMIC-GLASS
INDUCTION COOKTOP
Please read this guide thoroughly before operating
and keep it handy for reference at all times.
LSCI307ST
www.lg.com
Page 2

INTRODUCTION
IMPORTANT SAFETY INFORMATION
Important Notice: Radio Interference............................3
Important Safety Precautions ...................................4–8
INTRODUCTION TO INDUCTION COOKING
Induction Cooking ........................................................9
Selecting Cookware................................................ 9–11
PARTS AND FEATURES
Parts and Features of Your Cooktop ..........................12
Touch Control Features .............................................13
OPERATING INSTRUCTIONS
Before Using the Cooktop ..........................................14
Setting the Controls ..............................................14–16
Using the Bridge Cooking Zones ................................17
Using the Timer .......................................................... 17
Using Child Lock.........................................................18
Other Functions ..........................................................18
CARE AND CLEANING
Cleaning the Cooktop .................................................19
INSTALLATION INSTRUCTIONS
Before You Begin ........................................................20
Unpacking the Cooktop .............................................. 20
Technical Specifications .............................................20
Preparing the Installation Location ............................. 21
Dimensions and Clearances.......................................22
Electrical Connections ..........................................23–25
Cooktop Installaton ...............................................25, 26
Final Check.................................................................26
THANK YOU!
Congratulations on your purchase
and welcome to the LG family.
Your new LG INDUCTION Cooktop
combines precision cooking
features with simple operation
and stylish design. By following
the operating and care instructions
in this manual, your cooktop will
provide you with many years of
reliable service.
TROUBLESHOOTING
Before Calling for Service .....................................27,28
WARRANTY
Warranty for customers in the U.S.A. ........................29
Warranty for customers in Canada ............................30
Product Registration Information
Model:
Serial Number:
Date of Purchase:
2
Page 3

IMPORTANT SAFETY INFORMATION
READ ALL INSTRUCTIONS BEFORE USE
You can download an owner's & installation manual at http://www.lg.com.
ENGLISH
WARNING
For your safety, the information in this manual must be
followed to minimize the risk of fire, electric shock, or to prevent property damage,
personal injury, or death.
IMPORTANT NOTICE: RADIO INTERFERENCE
This unit has been tested and found to comply
with the limits for a class B digital device,
pursuant to Part 18 of the FCC rules. These limits
are designed to provide reasonable protection
against harmful interference in a residential
installation. This unit generates, uses and can
radiate radio frequency energy and, if not
installed and used in accordance with the
instructions, may cause harmful interference to
radio communications. However there is no
guarantee that interference will not occur in a
particular installation. If this unit does cause
harmful interference to radio or
television reception, which can be determined by
turning the unit off and on, the user is
encouraged to try to correct the interference by
one or more of the following measures:
• Reorient or relocate the radio and/or television
receiving antennae.
• Increase the distance between the cooktop unit
and radio or television receiver.
• Connect the cooktop unit into an outlet or a
circuit different from that to which the radio or
television receiver is connected.
3
Page 4
IMPORTANT SAFETY INFORMATION
READ ALL INSTRUCTIONS BEFORE USE
SAFETY PRECAUTIONS
• Proper Installation: Be sure your appliance is
properly installed and grounded by a qualified
technician in accordance with the National Electrical
Code ANSI/NFPA No. 70, latest edition in the United
States, and all local code requirements. Install only
per installation instructions.
• Do not attempt to repair or replace any part of your
cooktop unless it is specifically recommended in this
manual. All other service should be referred to a
qualified technician.
• Remove all tape and packaging wrap before using
the appliance. Destroy the carton and plastic bags
after unpacking the appliance.
Never allow children to play with packaging material.
• The safety aspects of this appliance comply with
accepted technical standards.
•
Know how to disconnect the electrical power to
the appliance at the circuit breaker or fuse box in
case of an emergency.
ease of identification and swift action if necessary.
• Do not repair or replace any part of the
appliance. All servicing should be done only by a
qualified technician to avoid the risk of personal
injury and damage to the appliance.
• Never modify or alter the construction of an
appliance such as removal of panels, wire
covers or any other permanent part of the
product.
• Storage on appliance: Flammable materials
should not be stored near or on the cooking
surface. This includes paper, plastic and cloth
items, such as cookbooks, plasticware and towels,
as well as flammable liquids. Do not store
explosives, such as aerosol cans, on or near the
appliance. Flammable materials may explode and
result in fire or property damage.
• Do not leave children alone. Children should not
be left alone or unattended in the area where an
appliance is in use. They should never be allowed
to sit or stand on any part of the appliance.
Mark the breaker or fuse for
• Do not store or use gasoline or other flammable
vapors and liquids in the vicinity of this or any
other appliance.
CAUTION
Items of interest to children should not be
stored in cabinets above a cooktop or on the
backsplash of a cooktop—children climbing on
the cooktop to reach items could be seriously
injured.
WARNING
Never use your appliance for warming or
heating a room.
WARNING
Persons with a pacemaker or similar
medical device should exercise caution
using or standing near an induction
unit while it is in operation, as the
electromagnetic field may affect the working
of the pacemaker or similar medical device.
It would be advisable to consult your doctor
or the pacemaker or similar medical device
manufacturer about your particular situation.
CAUTION
DO NOT touch Cooking Zones or areas near
these surfaces. Cooking Zones may be hot from
residual heat even though they are dark in color.
Areas near the Cooking Zones may become hot
enough to cause burns. During and after use, do
not touch or let clothing or other flammable
materials touch these areas until they have had
sufficient time to cool.
4
Page 5
IMPORTANT SAFETY INFORMATION
READ ALL INSTRUCTIONS BEFORE USE
ENGLISH
SAFETY PRECAUTIONS
• Wear proper apparel. Loose-fitting or hanging
garments should never be worn while using
the appliance. Do not let clothing or other
flammable materials contact hot surfaces.
• Do not use water or flour on grease fires.
Smother the fire with a pan lid, or use baking
soda, a dry chemical or foam-type extinguisher.
• When heating fat or grease, watch it closely.
Fat or grease may catch fire if allowed to become
too hot.
(cont.)
ELECTRICAL SAFETY
WARNING
• If the surface is cracked, switch off the
appliance to avoid the possibility of electric
shock. Do not reuse your COOKTOP until
the glass surface has been changed.
• When using the COOKTOP, never use
aluminum foil, products wrapped in
aluminum foil, or deep-frozen food in
aluminum cookware.
• If the supply cord is damaged, it must be
replaced by the manufacturer, its service
agent or similarly qualified persons in order
to avoid a hazard.
• Use only dry pot holders. Moist or damp pot
holders on hot surfaces may result in burns from
steam. Do not let the pot holders touch hot
surface units. Do not use a towel or other
bulkycloth instead of a pot holder.
• Do not heat unopened food containers.
Buildup of pressure may cause the container to
burst and result in injury.
• The installation and connection of the new
appliance must only be carried out by qualified
personnel.
• Flush-mounted appliances may only be operated
following installation in suitable cabinets and
workplaces which conform to the relevant
standards. This ensures sufficient protection
against electric shock as required by certification
agencies.
• If your appliance malfunctions or fractures, switch
off all cooking zones, and contact Service Center.
CHILD SAFETY
WARNING
• This appliance is not intended for use by
young children or infirm persons unless they
have been adequately supervised by a
responsible person to ensure that they can
use the appliance safely.
• Young children should be supervised to
ensure that they do not play with the
appliance.
• Accessible parts may become hot during
use. Young children should be kept away.
5
Page 6

IMPORTANT SAFETY INFORMATION
READ ALL INSTRUCTIONS BEFORE USE
SAFETY DURING USE
• This appliance may only be used for normal
cooking and frying in the home. It is not
designed for commercial or industrial purposes.
• Do not use the cooktop to heat the room.
• Take care when plugging in electric
appliances near the cooktop. Cords must not
come into contact with the hot surface. This could
cause damage to the cooktop and cable
insulation.
• Overheated fats and oils catch fire quickly.
You should supervise cooking when preparing
foods in fat or oil.
• After use, switch off the hob element by its
control and do not rely on the pan detector.
• Always keep the control panels clean and dry.
Do not let liquids or grease remain on the cooktop
controls area. Spilled or burnt-on foods can
activate or deactivate the appliance. Clean the
controls area thoroughly to resume normal
operation of the appliance.
• Never place combustible items on the
cooktop.
• Never keep any combustible items or aerosol
cans in a drawer located under the cooktop.
• Avoid placing metal cooking utensils on the
cooking surface areas. Metal objects can
become hot and cause burns.
• Know which touch keypad controls each
surface of the cooking zones.
• Clean the appliance regularly to keep all parts
free of grease that could catch fire.
Exhaust fan ventilation hoods and grease filters
should be kept clean. Do not allow grease to
accumulate on hood or filter. Greasy deposits in
the fan could catch fire. Refer to hood
manufacturer's instructions for cleaning.
• Use proper pan size. This appliance is equipped
with one or more Cooking Zones of different
sizes.
• Select utensils having flat bottoms large
enough to cover the Cooking Zones. The pan
detection sensors will not allow the affected
cooking zones to operate without a pan present.
• Do not place any object on or near the control
keypad area in order to prevent accidental
activation of the cooktop controls.
• Utensil handles should be turned inward and
should not extend over adjacent cooking
zones to reduce the risk of burns, ignition of
flammable materials, and spillage due to
unintentional contact with the utensil.
• Never leave prepared food on the Cooking
Zones. Boilovers cause smoking and greasy
spillovers that may ignite, or a pan that has boiled
dry may melt or become damaged.
• Protective liners: Do not use aluminum foil to
line any part of the cooktop. Only use aluminum
foil as recommended after the cooking process, if
used as a cover to be placed over the food. Any
other use of aluminum foil may result in the risk of
electric shock, fire or short circuit.
• Glazed cooking utensils: Only certain types of
glass, glass/ceramic, ceramic, earthenware, or
other glazed utensils are suitable for rangetop
service without breaking due to the sudden
change in temperature. Check the
manufacturer’s recommendations for cooktop
use.
• Ventilating hood: The ventilating hood above
your cooking surface should be cleaned
frequently, so the grease from cooking vapors
does not accumulate on the hood or filter.
• Do not clean or operate a broken cooktop.
If cooktop should break, cleaning solutions and
spillovers may penetrate the broken cooktop and
create a risk of electric shock. Contact a qualified
technician immediately.
• Clean cooktop with caution. If a wet sponge or
cloth is used to wipe spills on a hot cooking area,
be careful to avoid a steam burn. Some cleaners
can produce harmful fumes if applied to a hot
surface.
6
Page 7
IMPORTANT SAFETY INFORMATION
READ ALL INSTRUCTIONS BEFORE USE
ENGLISH
SAFETY DURING USE
• Do not place hot cookware on cold cooktop
glass. This could cause glass to break.
• Do not slide pans across the cooktop surface.
They may scratch the cooktop surface.
• Do not let pans boil dry. This may cause
permanent damage in the form of breakage,
fusion, or marking that can affect the
ceramicglass cooktop. (This type of damage is
not covered by your warranty.)
• Never leave surface units unattended at high
heat settings. Boilover causes smoking and
greasy spillovers that may ignite.
(cont.)
SAFETY WHEN CLEANING
• Always switch off the appliance before
cleaning.
• For safety reasons, do not clean the appliance
with a steam jet or high-pressure cleaner.
• Clean the cooktop in accordance with the
maintenance and cleaning instructions in this
manual.
• Steam cleaner is not to be used for cleaning
of the cooktop.
CAUTION
DO NOT pick up the supplied bridge pan
handles after cooking. They might be hot and
there is a risk of burning yourself.
• Do not use harsh abrasive cleaners or rough
metal scrapers to clean the cooktop glass
since they can scratch the surface, which may
result in shattering of the glass.
COOK MEAT AND POULTRY THOROUGHLY
Cook meat and poultry thoroughly—meat to at
least an INTERNAL temperature of 160°F and
poultry to at least an INTERNAL temperature of
180°F. Cooking to these temperatures usually
protects against foodborne illness.
7
Page 8
IMPORTANT SAFETY INFORMATION
READ ALL INSTRUCTIONS BEFORE USE
HOW TO AVOID DAMAGE TO THE APPLIANCE
• Prior to using your cooktop for the first time, apply
the recommended cooktop cleaning creme to the
ceramic surface. Buff with a non-abrasive cloth or
pad. This will make cleaning easier when soiled
from cooking. The special cooktop cleaning
cream leaves a protective finish on the glass to
help prevent scratches and abrasions.
• Do not use the cooktop as a worksurface or
storage space.
• Please be careful at the edges when moving pots
and pans around.
• Do not have the cooking zones on with empty
pans, or with no pots or pans on them.
• Ceramic glass is very tough, and impervious to
sharp temperature changes but is not
unbreakable. It can be damaged if particularly
hard or sharp objects fall onto it.
• Be very cautious if using pots made of cast iron,
or other pots with rough edges or burrs. Moving
these can cause scratches on glass.
• If sugar or a mixture containing sugar falls onto a
hot cooking zone and melts, remove immediately,
while still hot. If left to cool down, it may damage
the surface when removed.
NOTE: There is a risk of burning yourself
when the glass scraper is used on a hot
cooking zone!
• Keep meltable objects or materials away from the
ceramic glass surface, for example, plastic
utensils, aluminum foil, or cooking wraps. If any
materials or foodstuffs melt on the ceramic-glass
surface, these should be cleaned up immediately.
DISPOSAL OF OLD APPLIANCES
To protect the environment, it is important that
worn-out appliances are disposed of in the correct
manner.
• The appliance must not be disposed of with
household rubbish.
• You can obtain information about collection dates
or public refuse disposal sites from your local
health council or environmental health office.
Before disposing of old appliances please
make them inoperable so they cannot be a
source of danger. To do this, have a qualified
person disconnect the appliance from the
house circuitry.
CAUTION
CALIFORNIA SAFE DRINKING WATER AND TOXIC
ENFORCEMENT ACT
WARNING:
cancer. Wash hands after handling.
READ AND FOLLOW THIS SAFETY INFORMATION CAREFULLY.
This product contains chemicals known to the State of California to cause
SAVE THESE INSTRUCTIONS
8
Page 9
INTRODUCTION TO INDUCTION COOKING
INDUCTION COOKING
ENGLISH
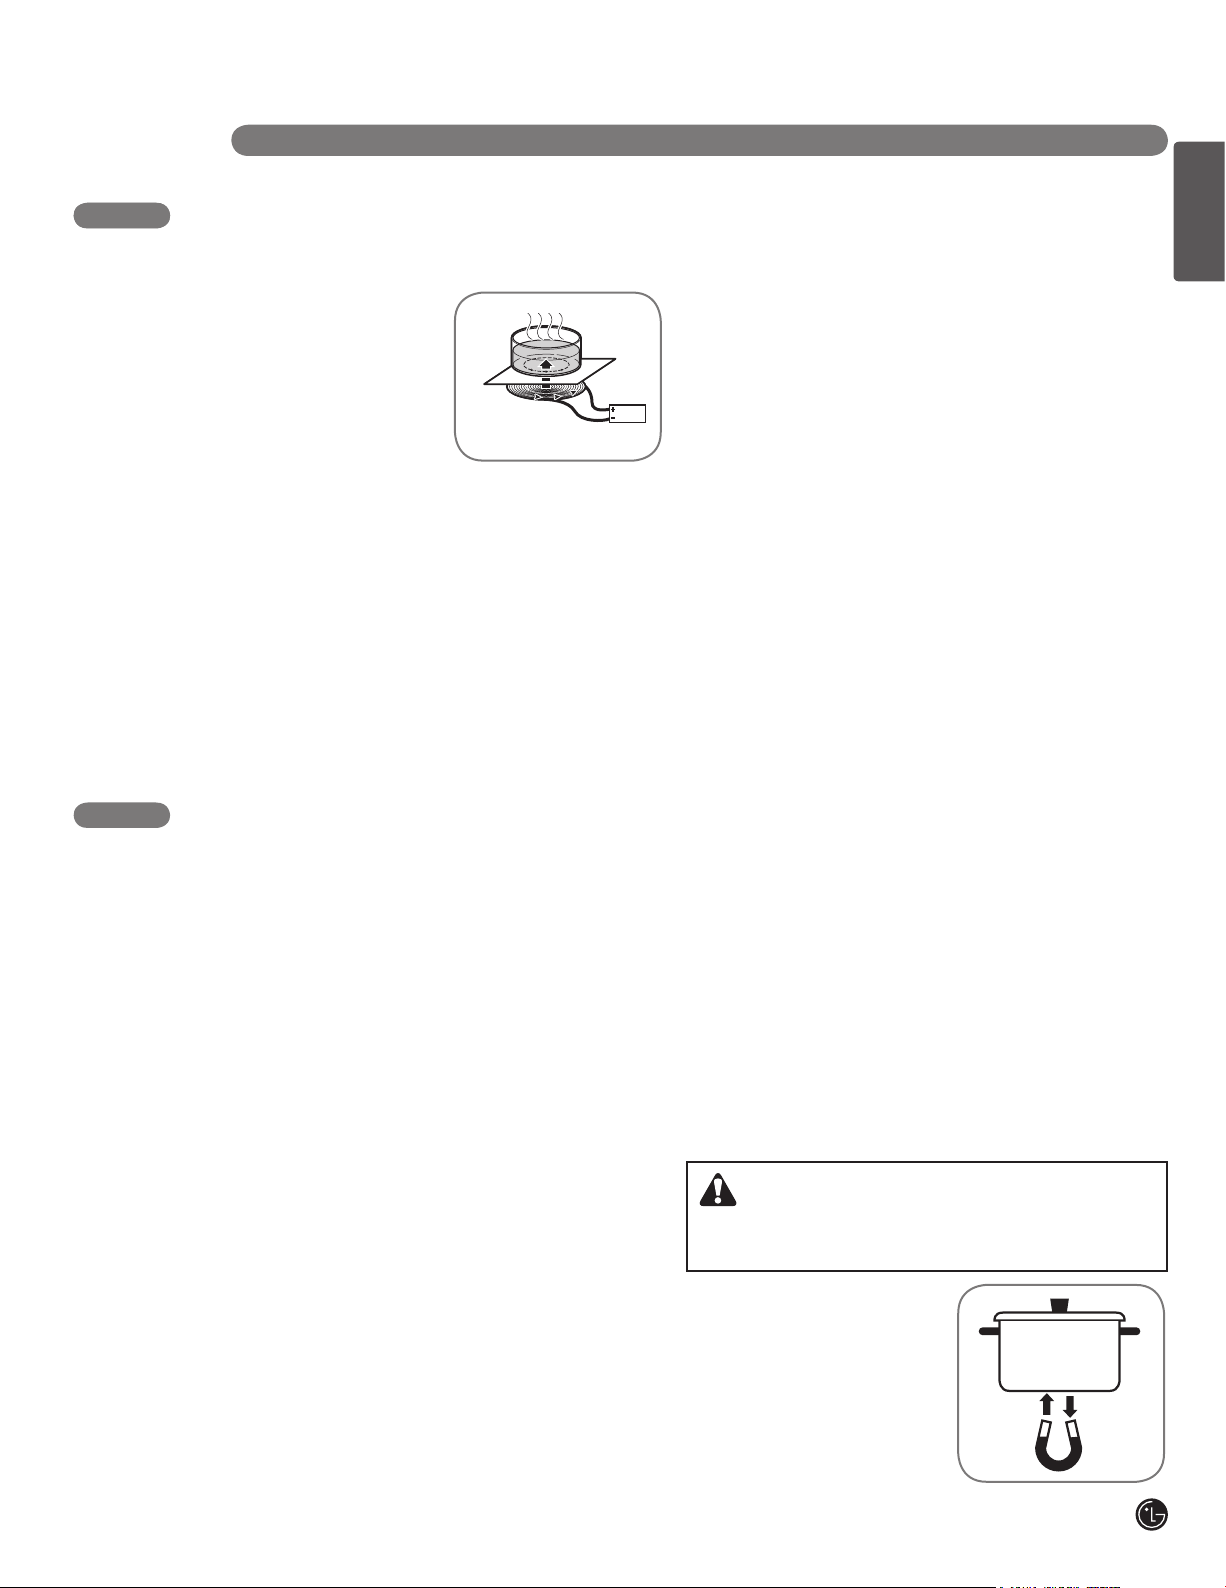
HOW INDUCTION COOKING WORKS
An induction coil is beneath
the ceramic glass cooking
surface. This generates
magnetic fields, which act
directly on the base of the
pots and pans as compared
to methods that first heat
the ceramic glass. This
means that the base of the pan is immediately
heated up, saving time and energy. Since the heat
required for cooking is generated directly in the
base of the pan, the Cooking Zone itself warms up
only slightly. The cooktop becomes hot from the
heat from the base of the pan.
NOTE: If there is no pot or pan on the cooking
zone, there is no energy transfer (heating up). This
prevents the Cooking Zones being switched on and
becoming hot accidentally.
SELECTING COOKWARE
IMPORTANT:
• Remove all tape and packaging wrap before
using the appliance. Destroy the carton and
plastic bags after unpacking the appliance. Never
allow children to play with packaging materials.
• Electromagnetic fields can affect electronic
circuits and interfere with portable radios and
phones.
• Do not put magnetically active objects (e.g., credit
cards, computer diskettes, cassettes) on or near
the ceramic glass surface while one or more
induction cooking zones are in use!
• Do not put any metallic objects (e.g., spoons, pan
lids) on the Cooking Zones as they can become
hot when the Cooking Zones are in use.
The magnetic Cooking Zone sensors located below the cooktop surface require the use of cookware
made with magnetic material in order to start the heating process on any of the Cooking Zones. When
purchasing pans, look for cookware specifically labeled by the manufacturer for use with induction
cooktops.
POTS AND PANS
• In principle, all pots and pans with magnetic
bases are suitable. These include steel,
steelenamel, as well as cast-iron pots and pans.
• High grade steel pans with a mixed metal base
(sandwich base, e.g. Tefal® with an aluminum/
copper base) are suitable for induction only if the
manufacturer has expressly marked them as
such. In that case they have a magnetic material
in the base.
• If you wish to use a special type of pan (e.g., a
pressure cooker, simmering pan, wok), please
follow the manufacturer’s instructions and do not
use a very thin pan.
NOTE: Some cookware can produce noises when
used on induction cooking zones. This is not a fault
in the cooktop, and its function will not be impaired
in any way as a result.
SUITABILITY TEST:
If you are not sure if a pot or pan is suitable for use
with your induction cooktop, you can find out with a
few simple tests:
• Place a pot filled with a little water (1/8ʺ–1/4ʺ) on
the Cooking Zone. Set the Cooking Zone to full
power (power level 9).
CAUTION
The pan base of suitable kitchenware heats up
within a few seconds! Water should boil rapidly.
• You can also check
cookware suitability with a
magnet. If the magnet
remains fixed to the base
of the pan, the pan is
suitable for induction
cooking.
9
Page 10
INTRODUCTION TO INDUCTION COOKING
SELECTING COOKWARE
(continued)
AVOIDING SCRATCHES
It is recommended to always use heavier gauge
stainless steel cookware on your induction cooktop
surface. This will help reduce the possibility of
developing scratches on the ceramic surface. Lowquality cookware can scratch the cooktop surface.
Cookware should always be lifted over the ceramic
cooktop surface to prevent scratching. Sliding any
type of cookware over the ceramic cooktop can
affect the overall appearance of the cooktop. Over
time, sliding ANY type of cookware over the
ceramic cooktop may alter the overall appearance
of the cooktop. Eventually, the buildup of scratches
can make cleaning the surface difficult and
degrade the overall appearance of the cooktop.
Scratches can also result from grains of sand (e.g.,
after washing vegetables) which are dragged with
the pot across the cooking surface.
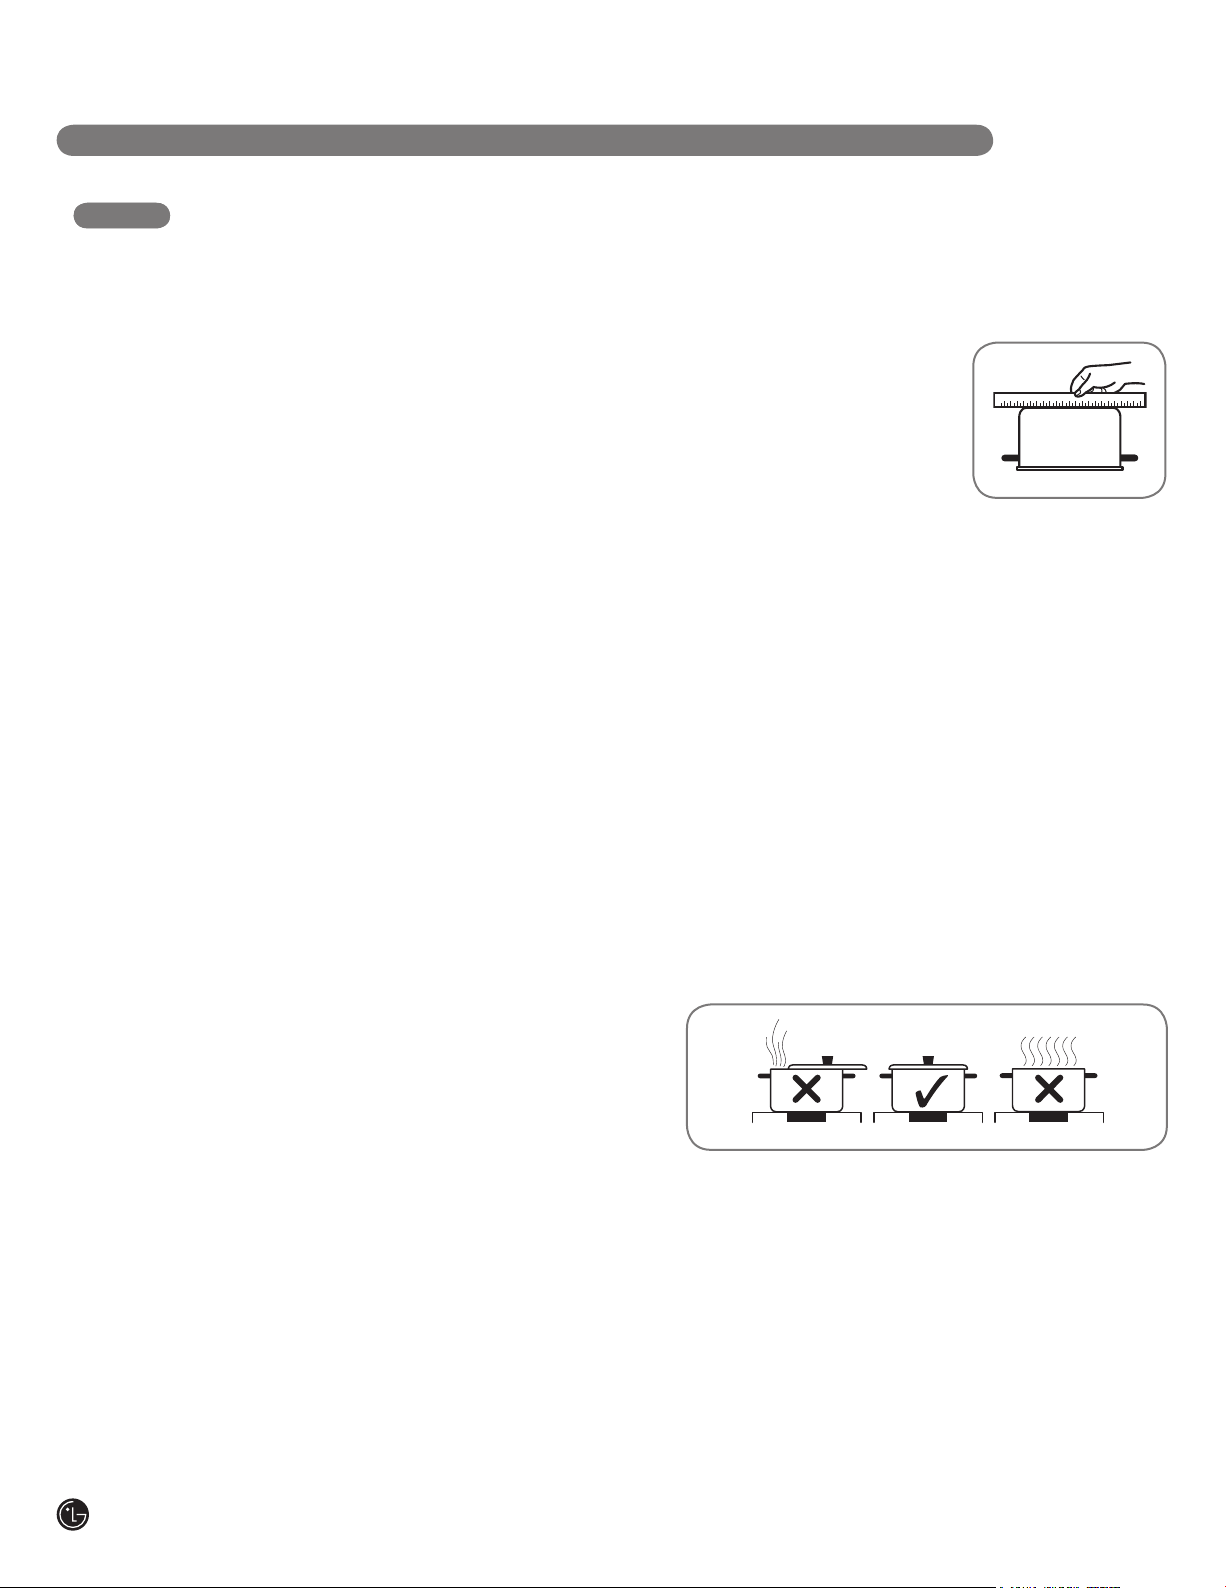
FOR BEST RESULTS:
USE FLAT-BOTTOMED COOKWARE
Cookware must fully contact the surface of the
cooking element. Use flatbottomed pans sized to fit
the cooking element and
amount of food being
prepared. Check for flatness
by rotating a ruler across the
bottom of the cookware.
TIPS FOR SAVING ENERGY:
Always follow the recommendations for proper
cookware type and size. In addition:
• Do not use dirty pans with grease buildup. Always
use pans that are easy to clean after cooking, and
make sure that the bottoms of the pans are clean
and dry.
• When cooking with large amounts of liquid, use
large pots so that nothing can boil over.
• Do not let pans boil dry. This may cause
permanent damage in the form of breakage,
fusion, or marring that can affect the ceramic
cooktop. (This type of damage is not covered by
your warranty.)
• Match the pan size and Cooking Zone to the
amount of food being prepared.
• Always position pots and pans before you switch
on the Cooking Zone.
• Dirty cooking zones and cookware use more
electricity.
• Whenever possible, always have the lid firmly
placed on the pots and pans so that they are
completely covered.
10
Page 11
INTRODUCTION TO INDUCTION COOKING
SELECTING COOKWARE
ENGLISH
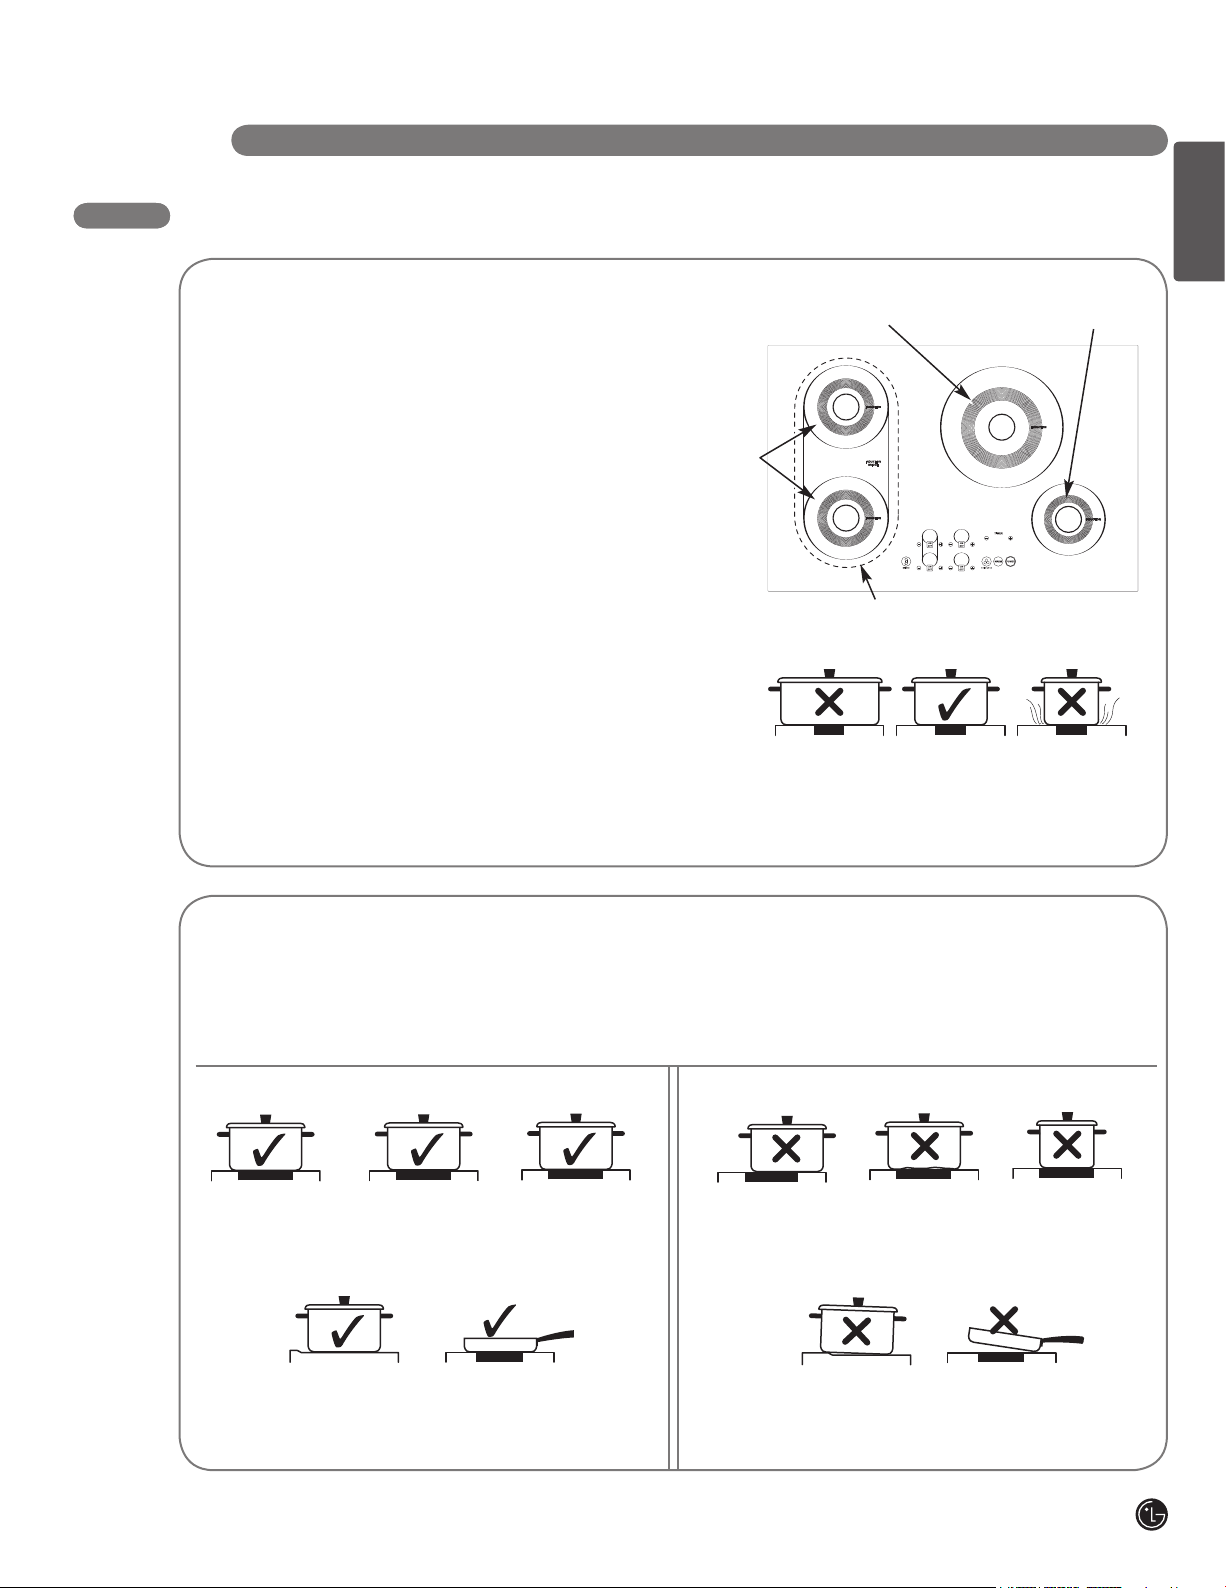
SELECTING THE PROPER PAN SIZE
• There are 4 Cooking Zones on the induction
cooktop. Each element requires a minimum
pan size to be used effectively. The inner ring
of each cooking zone is a guide to correctly
match the minimum pan size. The bottom of
the pan must fully cover the inner ring for
proper cooking to occur.
• The thicker outer ring at each Cooking Zone
is helpful to determine the pan MAXIMUM
size. After centering the cookware on the
Cooking Zone, make sure the cookware
does not extend more than 1/2ʺ beyond the
thicker line on the Cooking Zone. The pan
must make FULL contact on the glass
surface without the bottom of the pan
touching the metal cooktop trim.
Minimum
pan size =
53⁄4ʺ (145 mm)
Minimum pan size =
71⁄4ʺ (180 mm)
Only use the supplied pan on the
bridge element.
If a pan made of the correct material is centered
properly on any of the active Cooking Zones but is
TOO SMALL, the affected Cooking Zone LED will
blink and the pan will not heat.
Minimum pan size =
5ʺ (125 mm)
COOKWARE SELECTION AND PLACEMENT
It is important that the proper cookware be used and placed correctly on the cooktop. ANY one of the
incorrect conditions shown below may be detected by the sensors located below the ceramic cooktop
surface. If this happens, one or more of the Cooking Zones will not heat, and an F will appear in the
affected Cooking Zone display. Correct the problem before attempting to use the cooktop.
CORRECT INCORRECT
Cookware centered
correctly on Cooking
Zone surface.
Pan rests completely
on the cooktop
surface.
Flat pan bottom &
straight sides.
Pan is properly
balanced.
Pan size meets or
exceeds the
recommended
minimum size for
the Cooking Zone.
Cookware not
centered on
Cooking Zone
surface.
Pan bottom rests on
cooktop trim or does
not rest completely
on the cooktop
surface.
Cookware not
centered on
Cooking Zone
surface.
Heavy handle
tilts pan.
Pan does not meet
the minimum size
required for the
Cooking Zone
used.
11
Page 12
PARTS AND FEATURES
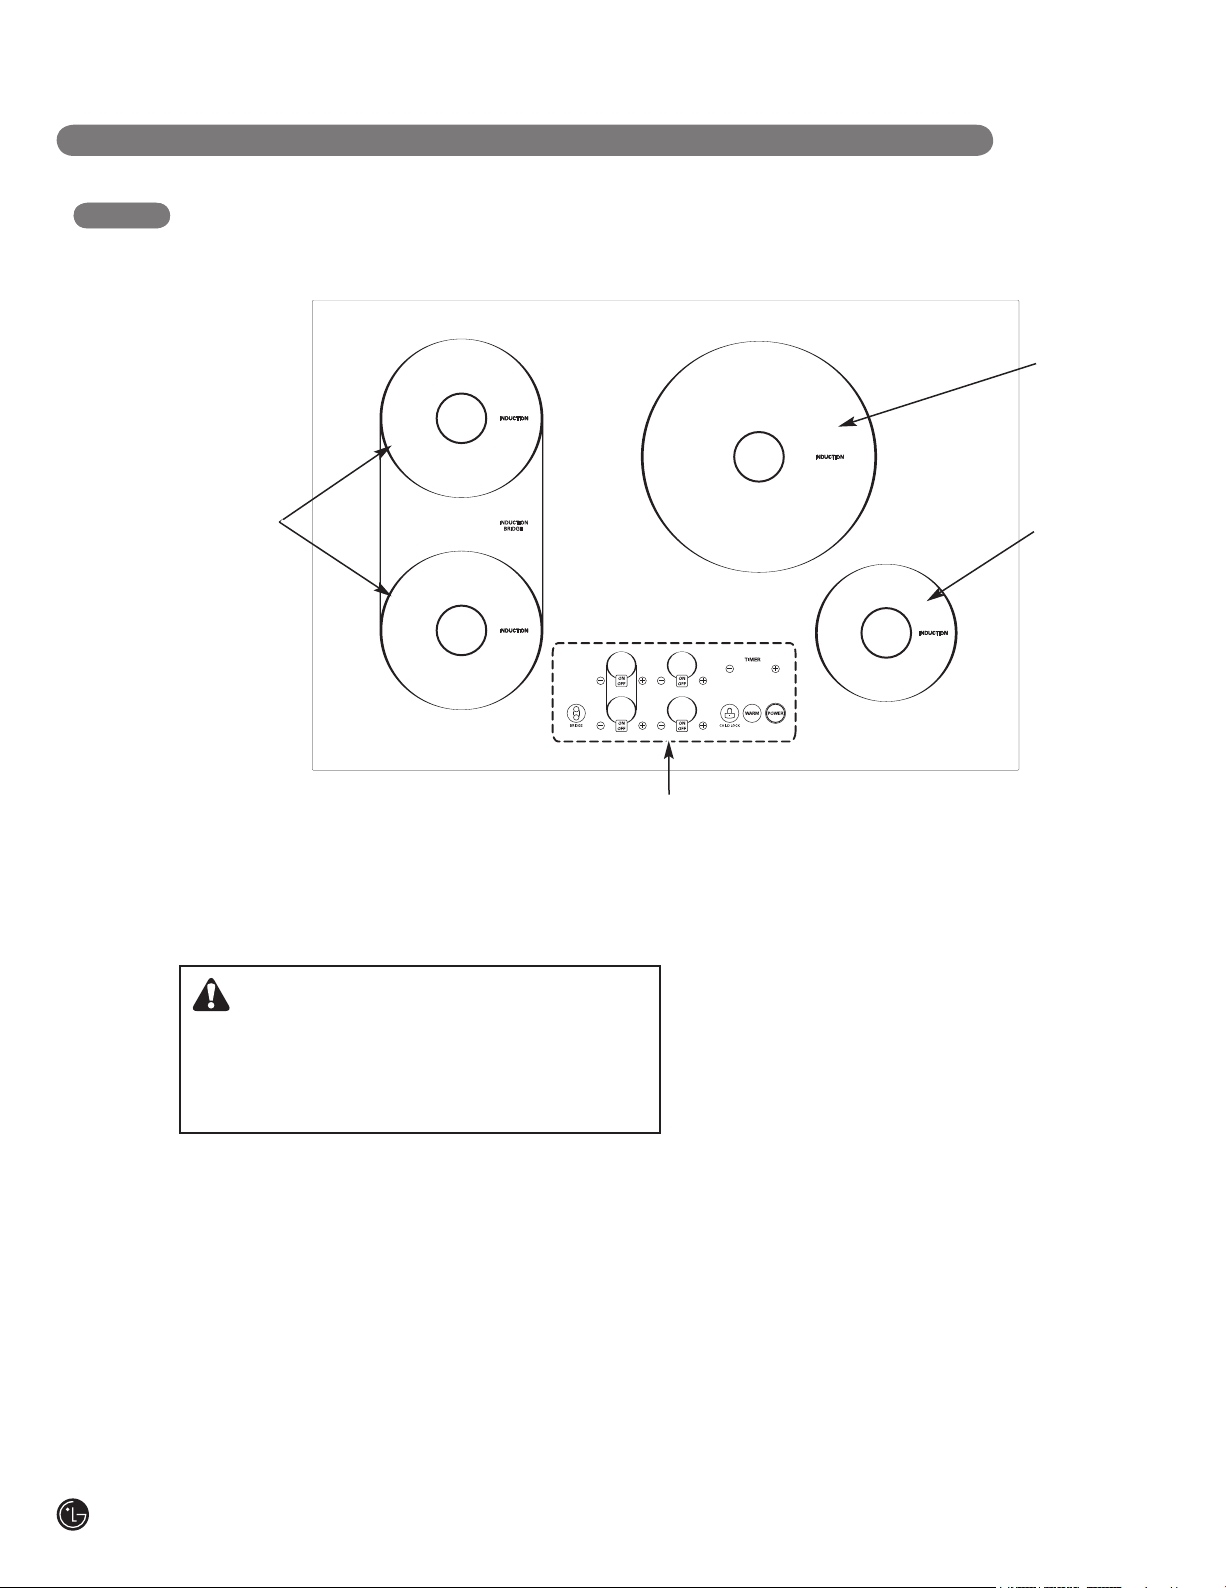
PARTS AND FEATURES OF YOUR COOKTOP
Throughout this manual, features and appearance may vary from your model.
2400W (Normal)
3300W (Boost)
1800W (Normal)
2400W (Boost)
Electronic touch controls
Ceramic Cooktop: LG’s new induction cooktop
features a ceramic cooktop surface that remains
cooler than conventional ceramic cooktops,
regardless of whether it is ON or OFF.
CAUTION
Burn Hazard: The Cooking Zones may appear
cool when turned ON and after they have been
turned OFF. The ceramic surface may be HOT
from residual heat transferred from cookware.
Magnetic Detector: The coil sensor automatically
detects suitable cookware and prevents accidental
activation.
Pan Size Detection: The pan recognition sensor
automatically detects and adapts the Cooking
Zones to the pan size being used.
Improved Efficiency: Induction cooking heats
faster while using less energy. Induction cooking
brings liquids to a boil quickly yet allows even,
steady simmering.
1400W (Normal)
1800W (Boost)
Induction Cooking Zones: Induction Cooking Zones
under the ceramic cooktop heat the base of the pan
immediately without heating the ceramic-glass
cooktop first. The two mediumsized zones can be
used together for larger oblong pans.
Touch Controls: Easy-to-use touch controls provide
precise operation.
Easy Cleaning: The ceramic-glass cooking surface
and touch control make for easy cleanup and
eliminate crevices and gaps where grease can
accumulate.
Control and Function Displays: Digital displays
show current settings and warn you of hot surfaces
from any residual heat of the corresponding cooking
zone.
Safety Shutoff: All Cooking Zones feature a safety
shut off that turns off the Cooking Zone if ON/OFF is
pressed but no power level is selected within 10
seconds.
12
Page 13
TOUCH CONTROL FEATURES
PARTS AND FEATURES
ENGLISH
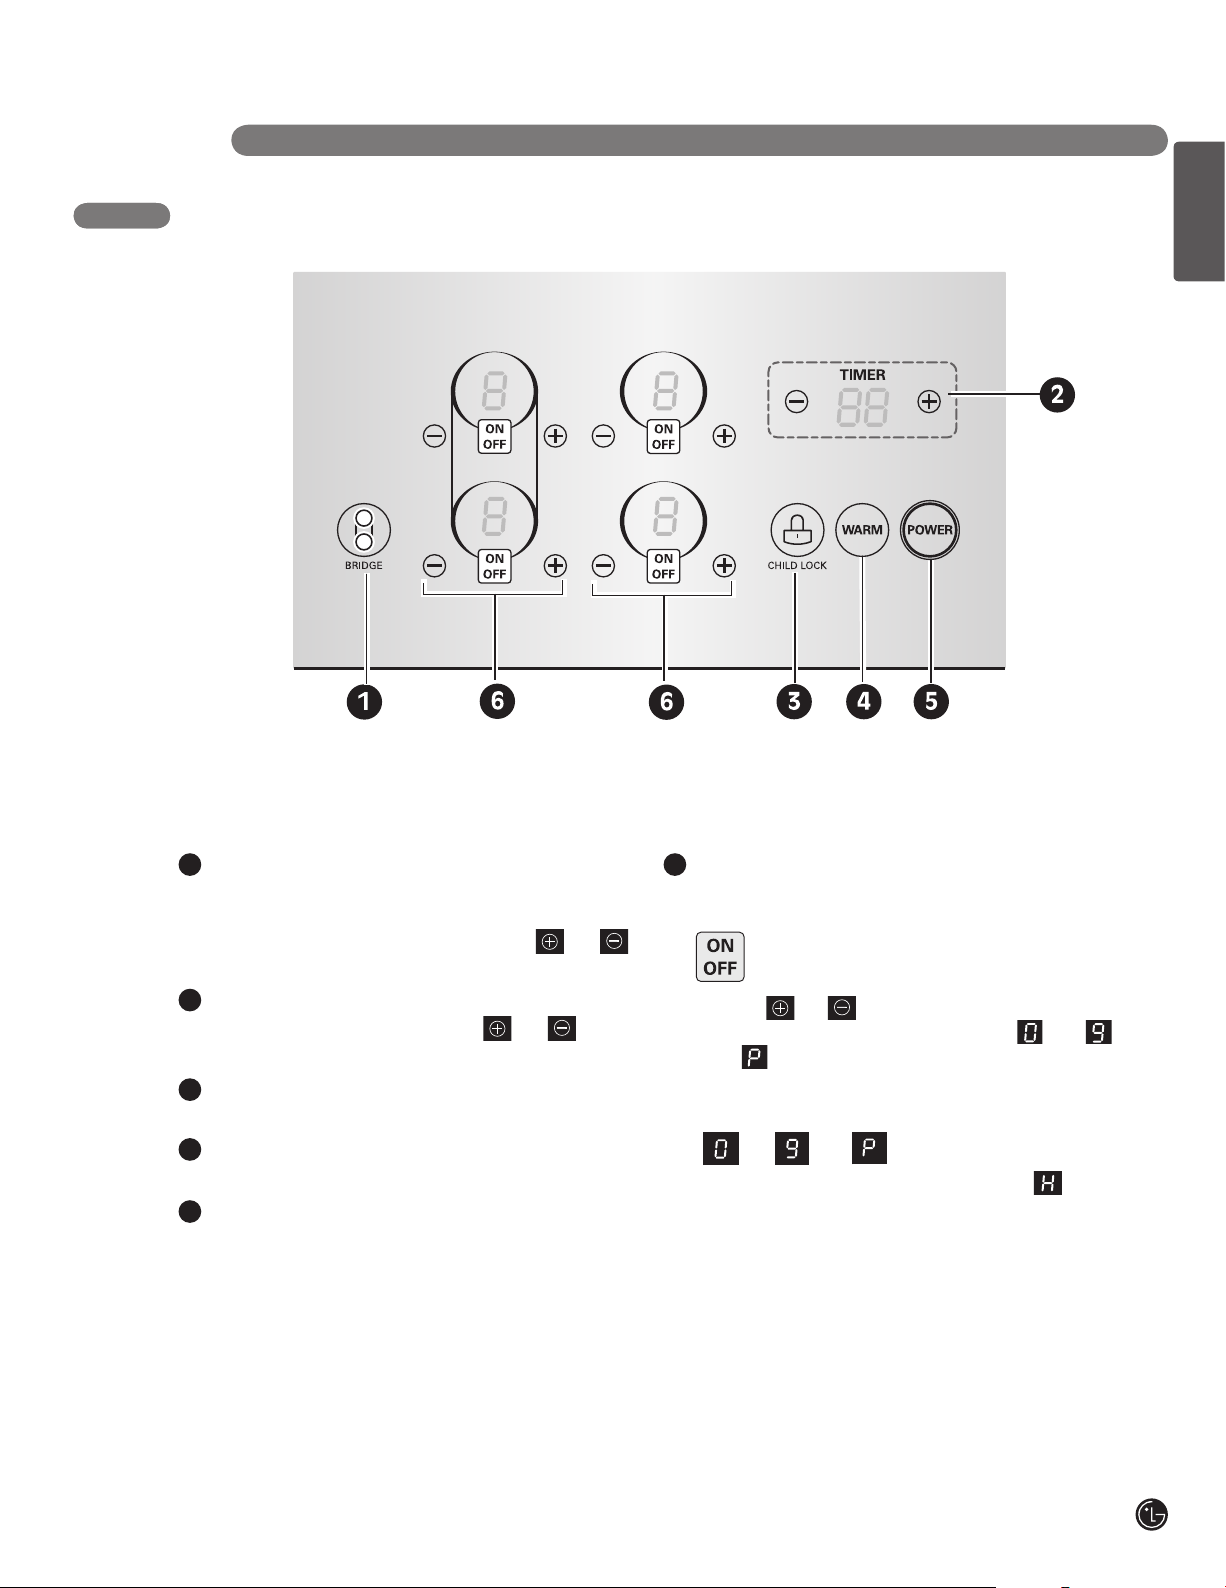
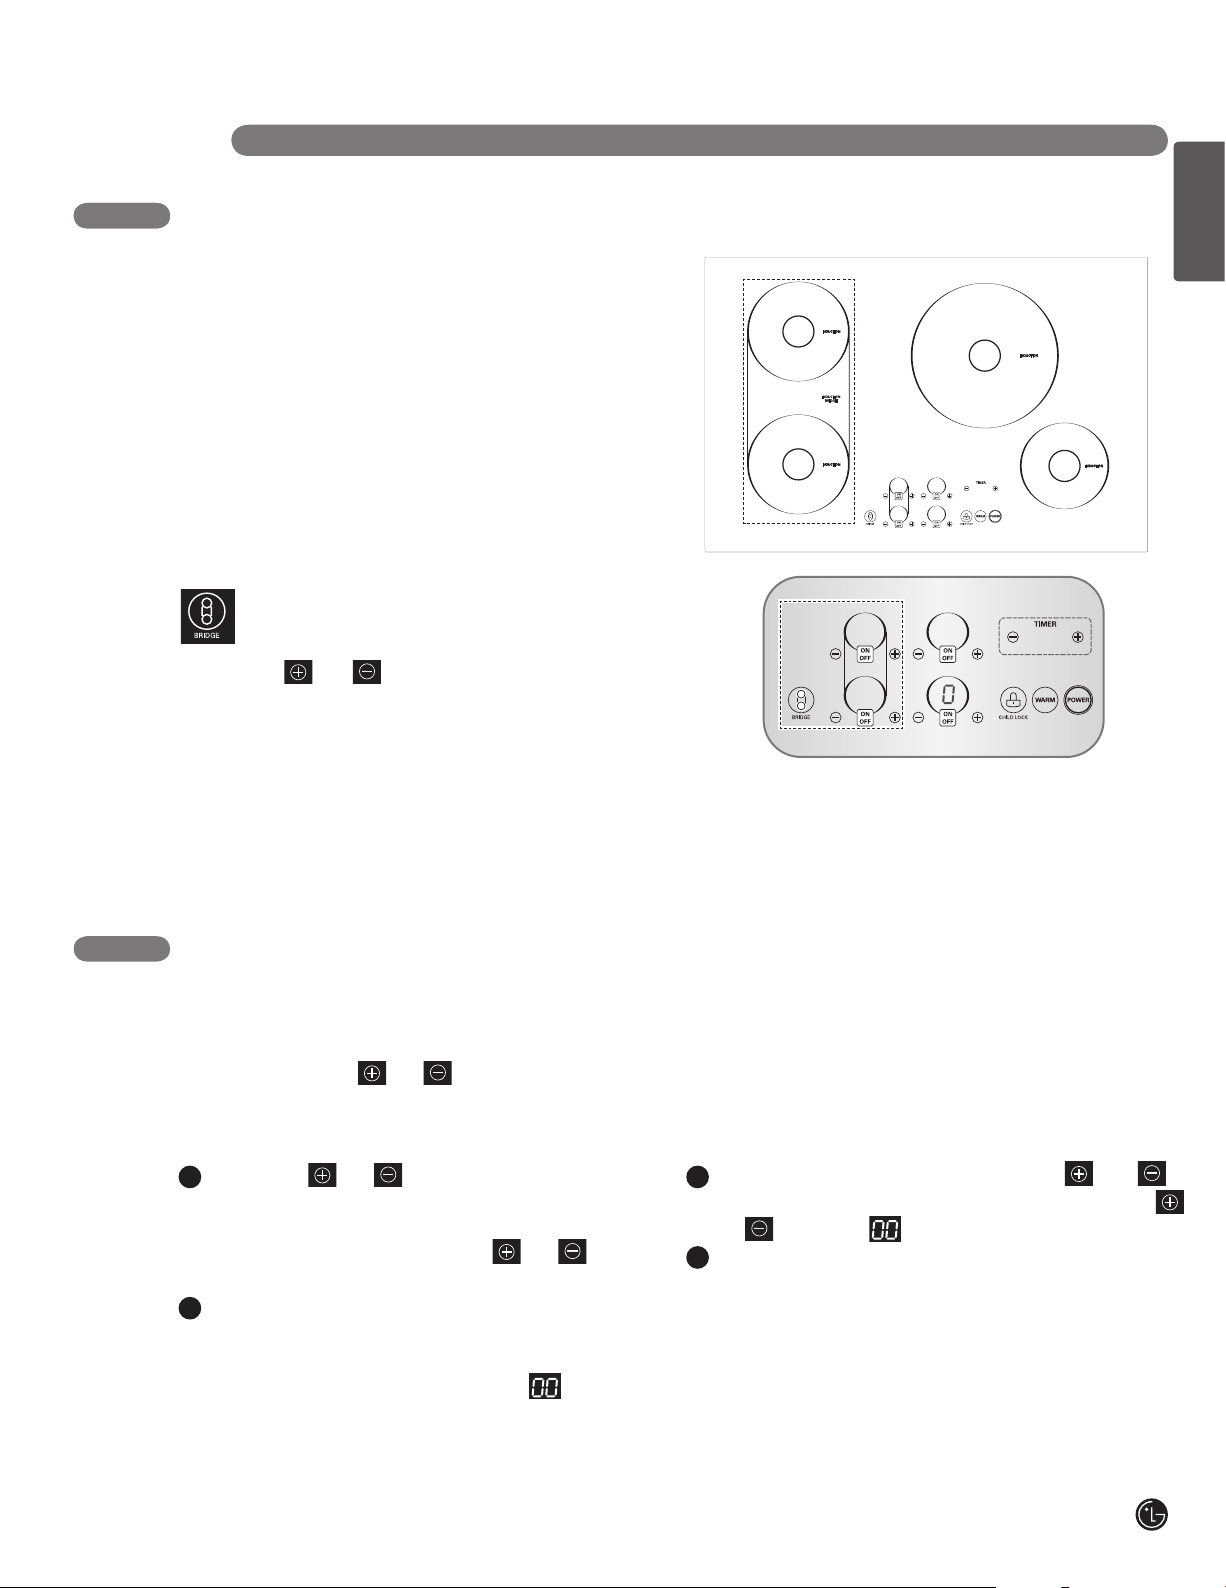
1 6
BRIDGE: Activates the two left Cooking Zones
together as a single large Cooking Zone.
For bridge operation, touch this pad to activate
and adjust the power level with the or
pads for either left Cooking Zone.
2
TIMER: When activated, the time remaining is
shown in the display. Use the or pads to
adjust the timer.
3
CHILD LOCK: Press and hold for 3 seconds to
activate and deactivate the child lockout function.
4
WARM: This pad automatically lowers the last
selected active element to the lowest setting.
5
POWER: Press the POWER pad to turn the
entire cooktop ON and OFF. When it is ON, the
cooktop is in standby mode until a Cooking Zone
is activated.
COOKING ZONE CONTROLS: Each Cooking
Zone features its own control, and can be activated
individually.
The ON/OFF pad activates the desired
Cooking Zone.
Use the or pads for the active Cooking
Zone to adjust the power level from to
and (Boost).
The display in the Cooking Zone control will show
the power level:
to or
Hot Surface Indicator: After use, an will
appear in the Cooking Zone power level display
until the cooking surface has cooled down.
13
Page 14
OPERATING INSTRUCTIONS
BEFORE USING THE COOKTOP
Before using the cooktop for the first time, clean it
thoroughly with the included cleaner or ceramic
cooktop cleaner according to the Care and
Cleaning instructions in this guide. This will remove
any help protect the ceramic surface and make
future cleanup easier.
SETTING THE CONTROLS
To operate the touch control pads, touch the pad
firmly with the flat part of your fingertip.
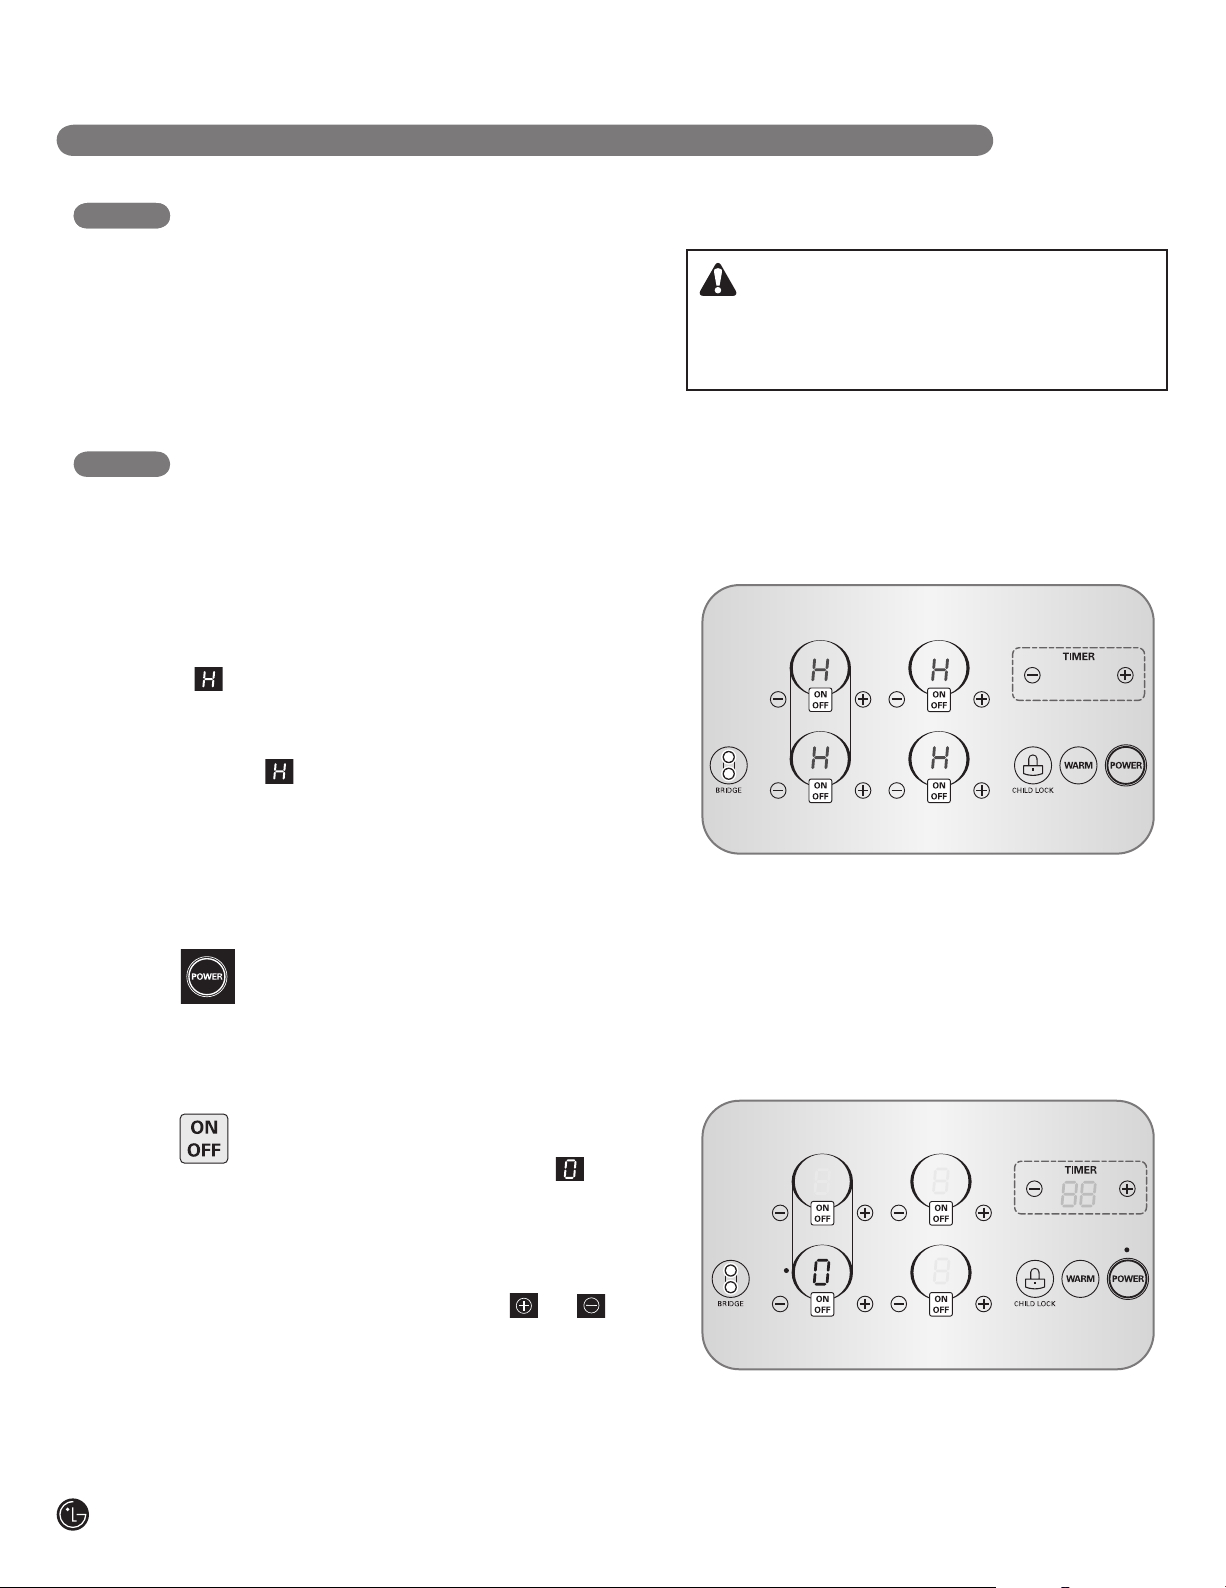
FIRST OPERATION
The first time that power is supplied to the cooktop,
will flash in the display for each cooking zone
for 60 seconds or until the POWER pad is touched
for approximately 2 seconds.
NOTE: will also flash when power is restored
after a power outage.
CAUTION
Never use scrub pads or abrasive cleaners. They
can cause permanent damage to the cooktop
surface.
ACTIVATING THE COOKTOP
To turn on the cooktop, touch the POWER
pad for approximately 2 seconds. The
indicator above the pad will light.
SELECTING THE COOKING ZONE
To select the desired Cooking Zone, press
the ON/OFF pad. The display for the
selected Cooking Zone will show and
and an indicator will light to indicate that the
Cooking Zone is on but no power level is set.
NOTE: Once the Cooking Zone has been selected
with the ON/OFF pad, the power level must be
selected within 5 seconds with the or pad.
Otherwise, the Cooking Zone will turn off for safety
reasons.
NOTE: After turning on the cooktop with the
POWER pad, you must select one of the Cooking
Zones within 20 seconds using the Cooking Zone
ON/OFF pad(s). If no selection is made, the
cooktop will turn off for safety reasons.
14
Page 15
OPERATING INSTRUCTIONS
ENGLISH
SETTING THE CONTROLS
SETTING THE POWER LEVEL
The power level for the selected Cooking Zone can
be set from to and (Boost).
To adjust the power level:
1
Touch the or pad for the selected
Cooking Zone.
Touching will set the power level to .
Touching will set the power level to .
Touch the or pad of the selected
Cooking Zone to increase or decrease the
power level.
If power level is selected, the Cooking Zone
will turn off after 5 seconds.
2
For faster power level adjustments, touch and
hold the or pads until the desired setting
is reached.
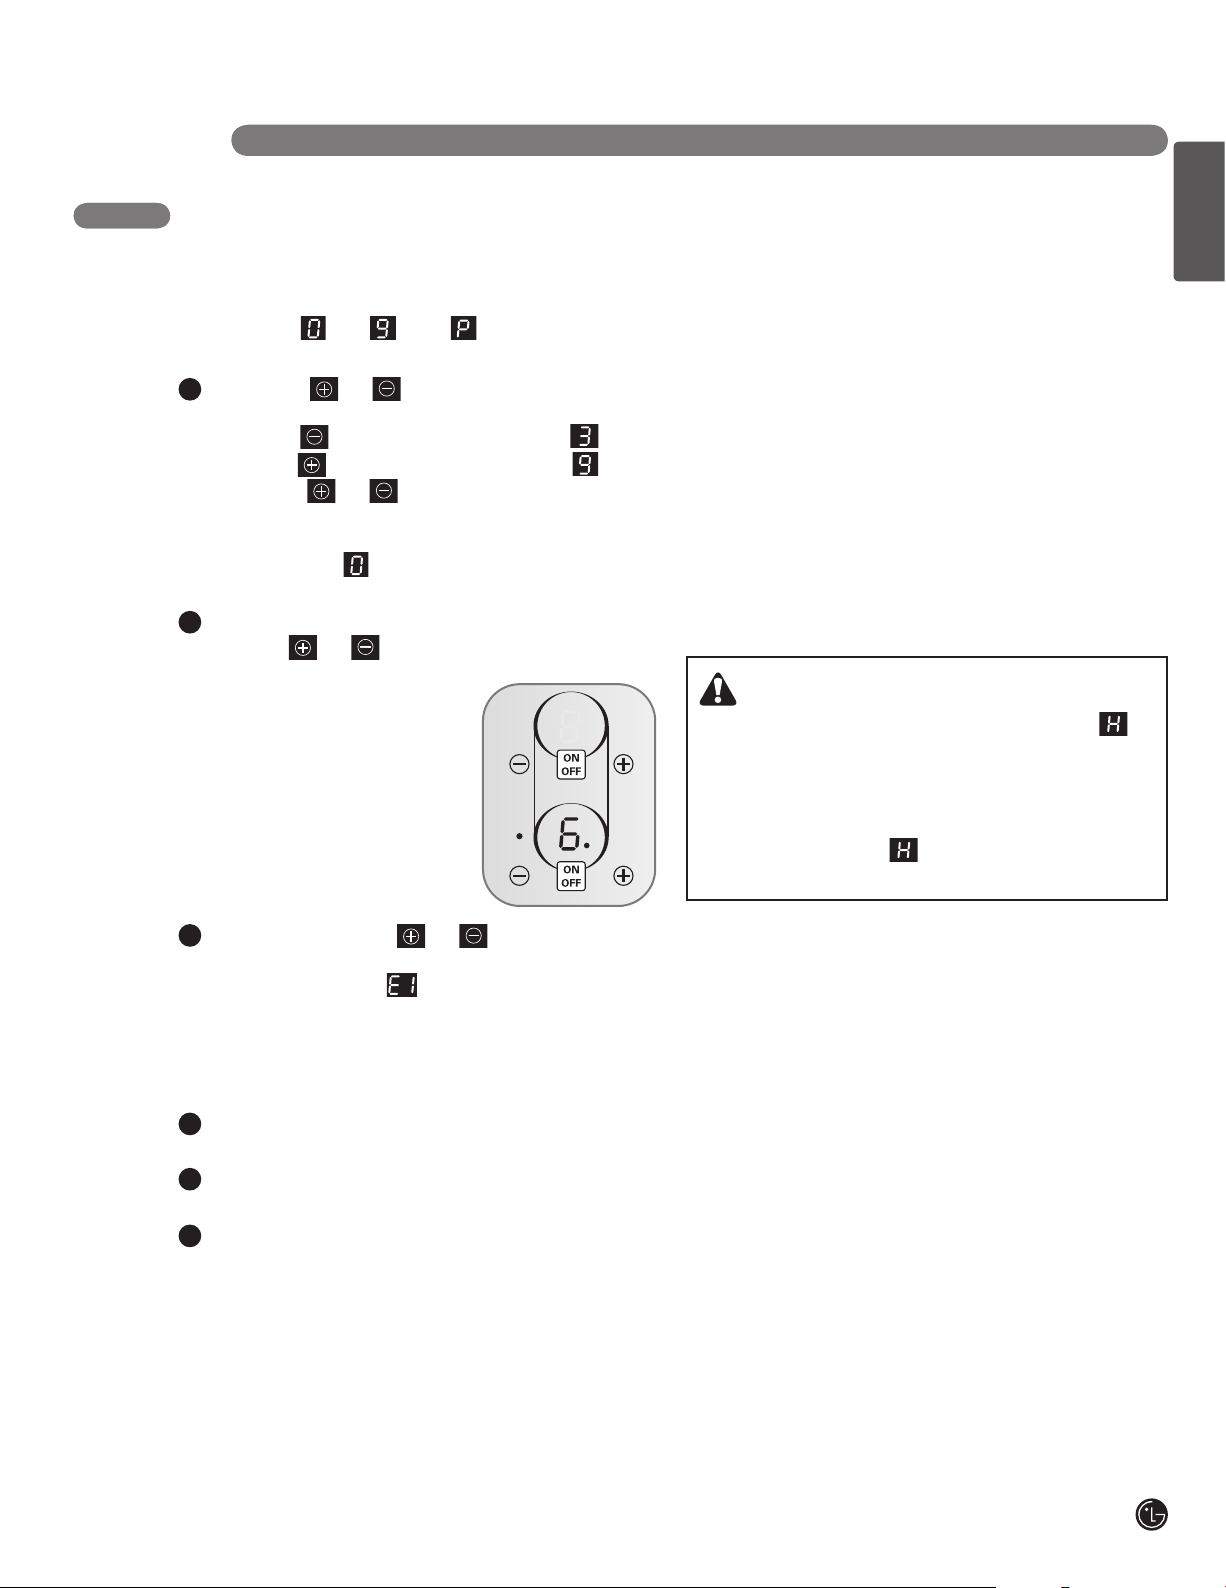
NOTE: Normal power
settings range in 1/2 step
increments for power levels
from 2 to 6 to allow
precision cooking. A dot will
appear next to the number
to indicate a 1/2 power level
step.
NOTE:
• If the cookware or pan is moved from the center
of any active Cooking Zone for any reason, a
sensor will detect this and the Cooking Zone will
no longer heat. The display for that Cooking Zone
will flash the last power level setting for the
Cooking Zone.
• The Cooking Zone will remember the power level
setting for up to 90 seconds before the Cooking
Zone will automatically shut off.
WARNING
Your cooktop has a residual heat indicator
for each Cooking Zone. This indicator will warn
that this area has been used and is still giving off
enough heat to cause burns. Avoid touching the
burner when this indicator is shown. Although the
cooktop is OFF, the will stay lit until the
cooktop has cooled down.
3
If the Cooking Zone or pads are held for
more 10 seconds, the timer display will show
the error message . To clear this error
message, press the ON/OFF pad for the
Cooking Zone you were setting. This message
does NOT relate to the timer pad.
To turn off the cooking zone:
1
Once cooking is complete, touch the ON/OFF
pad to turn the cooking zone OFF.
2
The corresponding cooking zone display witll
turn off.
3
If the POWER pad is touched instead of ON/
OFF, the entire cooktop will turn off.
15
Page 16
OPERATING INSTRUCTIONS
SETTING THE CONTROLS
(cont.)
POWER BOOST
Boost is the highest power level, designed for
quickly heating or boiling larger quantities. Boost
will operate for a maximum of 12 minutes. After 12
minutes, it will automatically revert to power level 9.
ACTIVATING POWER BOOST
1
Turn on the desired Cooking Zone with the ON/
OFF pad for that Cooking Zone.
2
Touch the pad and will be displayed.
3
Touch the pad again and will be
displayed.
NOTE: The power boost function will be
activated for a maximum of 12 minutes. At the
end of the power boost cycle, the Cooking Zone
will automatically default to the back to the
power level . The power boost function
CANNOT be used with the front and rear
Cooking Zones on the same side at the same
time.
4
To deactivate the power boost function and
revert to normal power levels, touch the pad.
NOTE: To protect the internal electronic
components of the cooktop, the cooktop may
automatically deactivate the power boost
function and return to a normal power level
before 12 minutes have passed. This is normal.
NOTE: The electronic processes involved with
induction cooking create some unusual
background noises. These noises are normal
and part of the induction cooking process.
Please note that these noises are more
noticeable while cooking with power boost.
WARM
The cooktop features a WARM setting that
operates the last Cooking Zone used at the LOW
power level.
To activate:
Touch the WARM pad and the last Cooking Zone
used will be set to the LOW setting. will appear
in the display.
To deactivate:
To turn off the WARM function and return to normal
power levels, touch the pad and will be
displayed.
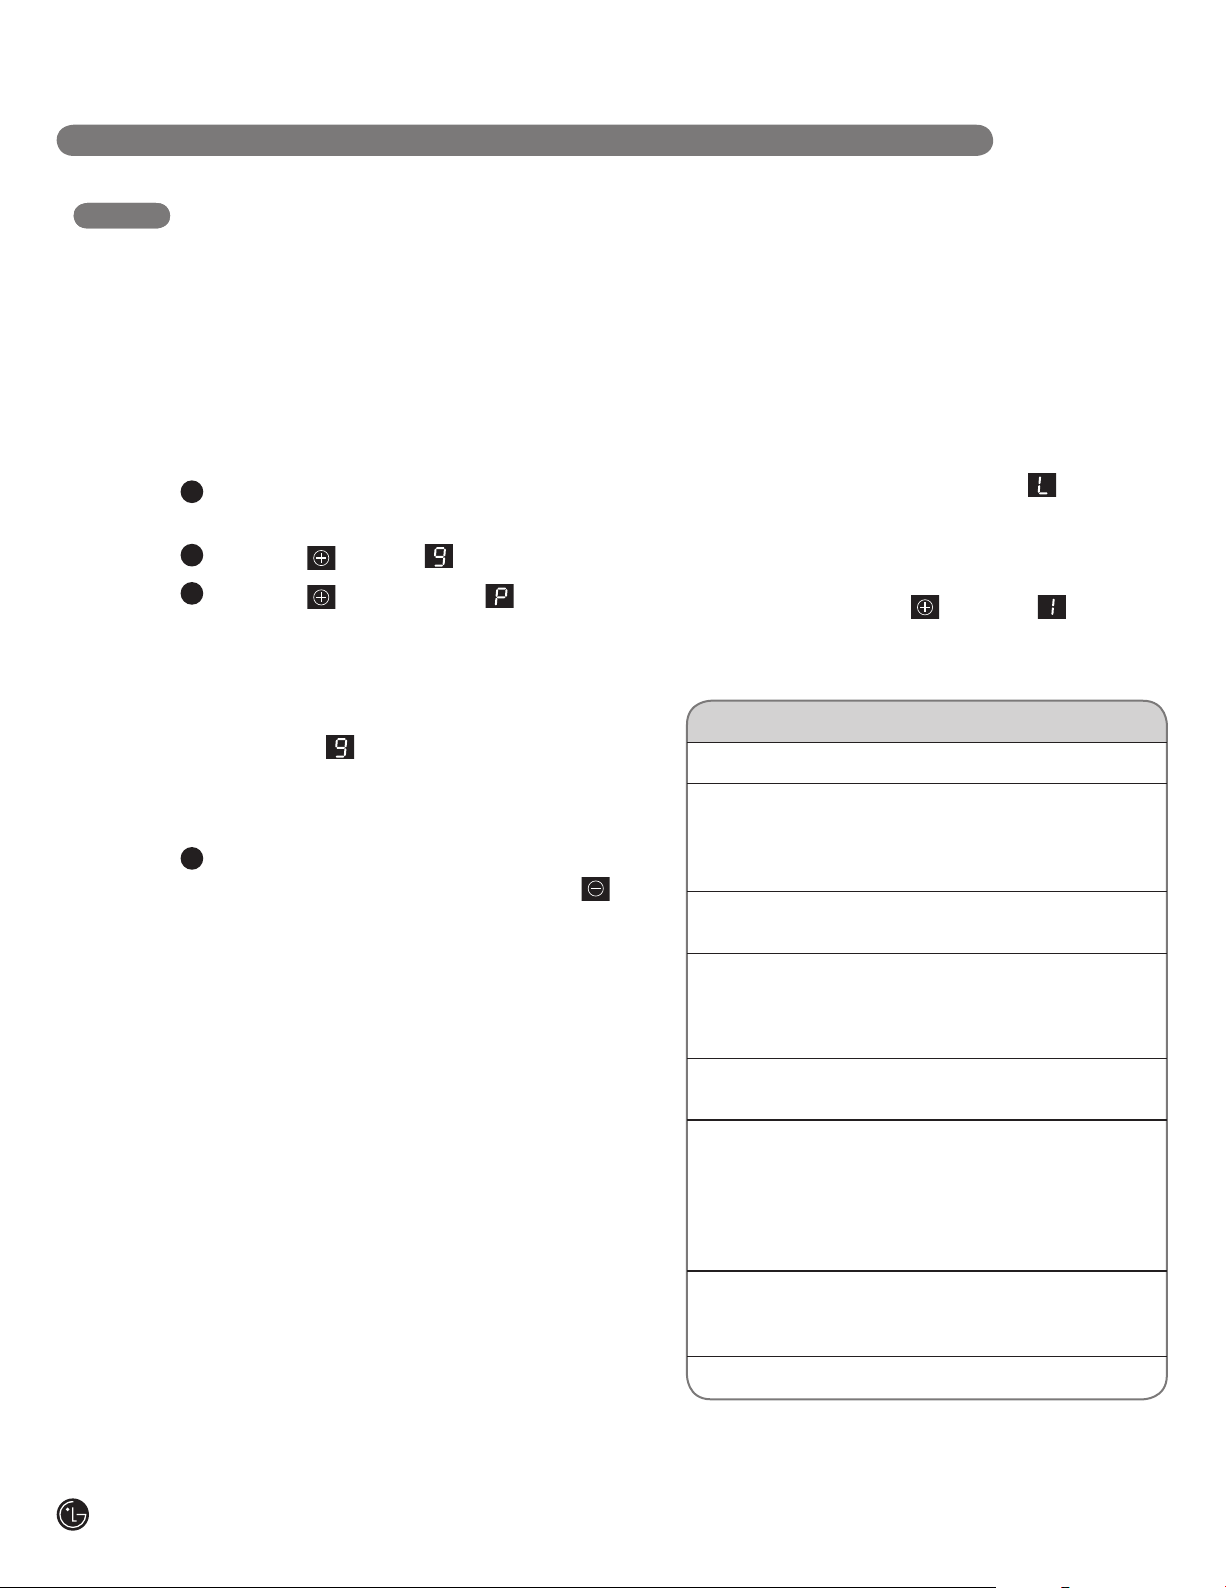
POWER LEVEL GUIDE
Setting Used forFunction
9 or Boost
7-9
6-7
4-5
3-4
2-3
Fast heating
Heaving browning,
deep fat frying
Roasting, frying
Boiling, general
cooking
Steaming
Simmering
Bringing liquids to a boil.
Browning meats, heating oil
for deep-fat frying, sautéing,
maintaining a fast boil for
large amounts of liquids.
Frying meats, chops,
pancakes, sausages, eggs.
Cooking larger quantities,
soups and stews, steaming
potatoes, cooking meat
stock or bouillon.
Steaming vegetables,
braising meats.
Simmering rice or milkbased dishes, steaming
smaller quantities of
potatoes and vegetables,
heating ready-to-serve
meals.
16
1–2, L
0
Melting
OFF
Fluffy omelettes, keeping
dishes warm, melting butter
or chocolate.
Off setting.
NOTE: These settings are recommended
guidelines for cooking. You may need to adjust the
power level for the type of food and pan.
Page 17
OPERATING INSTRUCTIONS
USING THE BRIDGE COOKING ZONES
BRIDGE COOKING ZONES
The two left Cooking Zones can be used together
as a single Cooking Zone using the Bridge
function. This allows you to cook with larger, oblong
pans.
NOTE: When using the supplied bridge pan, it is
important to rub it with oil to prevent burning and
sticking.
ACTIVATING THE BRIDGE
COOKING ZONE
Touch the BRIDGE pad. The indicator
above the pad will light.
Touch the or pad for either left Cooking
Zone to adjust the power level for both Cooking
Zones.
ENGLISH
NOTE:
• Use the supplied bridge pan ONLY on the bridge cooking zone.
• To purchase a replacement or additional bridge pan, call 1-800-243-0000 (U.S.A) or 1-800-542-2623
(Canada) and choose the appropriate prompt from the menu. Or, visit our Web site at us.lgservice.com
(U.S.A) or ca.lgservice.com (Canada).
USING THE TIMER
The timer feature may be helpful if a recipe calls for
cooking for a set time. The timer can be set from 1
to 99 minutes. Once set, the digital display
between the timer or pads will begin to
count down the remaining time in minutes.
SETTING THE TIMER
1 1
Touch the or pads under the word
TIMER. Each touch will increase or decrease
the time by one minute, from 1 to 99 minutes.
You may also touch and hold or to
scroll up or down. The timer display will flash.
2
Once the desired time is set, the display will
stop flashing and the timer will start counting
down after no pad has been touched for 5
seconds. Once the timer reaches , a long
beep will sound to indicate the time is up.
NOTE: The timer function is a minute timer only. It
does NOT turn the cooktop ON or OFF.
CANCELING THE TIMER
To cancel the timer, touch the TIMER and
pads at the same time, OR Touch and hold the
or pad until appears in the display.
2
The timer display will turn off.
17
Page 18
OPERATING INSTRUCTIONS
USING CHILD LOCK
You can lock the entire cooktop at any time when it
is not in use. Locking the cooktop will prevent
Cooking Zones from being turned on accidentally.
SETTING CHILD LOCK
The cooktop must be OFF to set the CHILD
LOCK function. If it is not OFF, touch and
hold the POWER pad for approximately 2
seconds. The indicator above the POWER
pad will turn OFF.
Touch and hold the CHILD LOCK pad for 3
seconds. The indicator light above the
CHILD LOCK pad will turn on to indicate
that the cooktop is locked.
OTHER FUNCTIONS
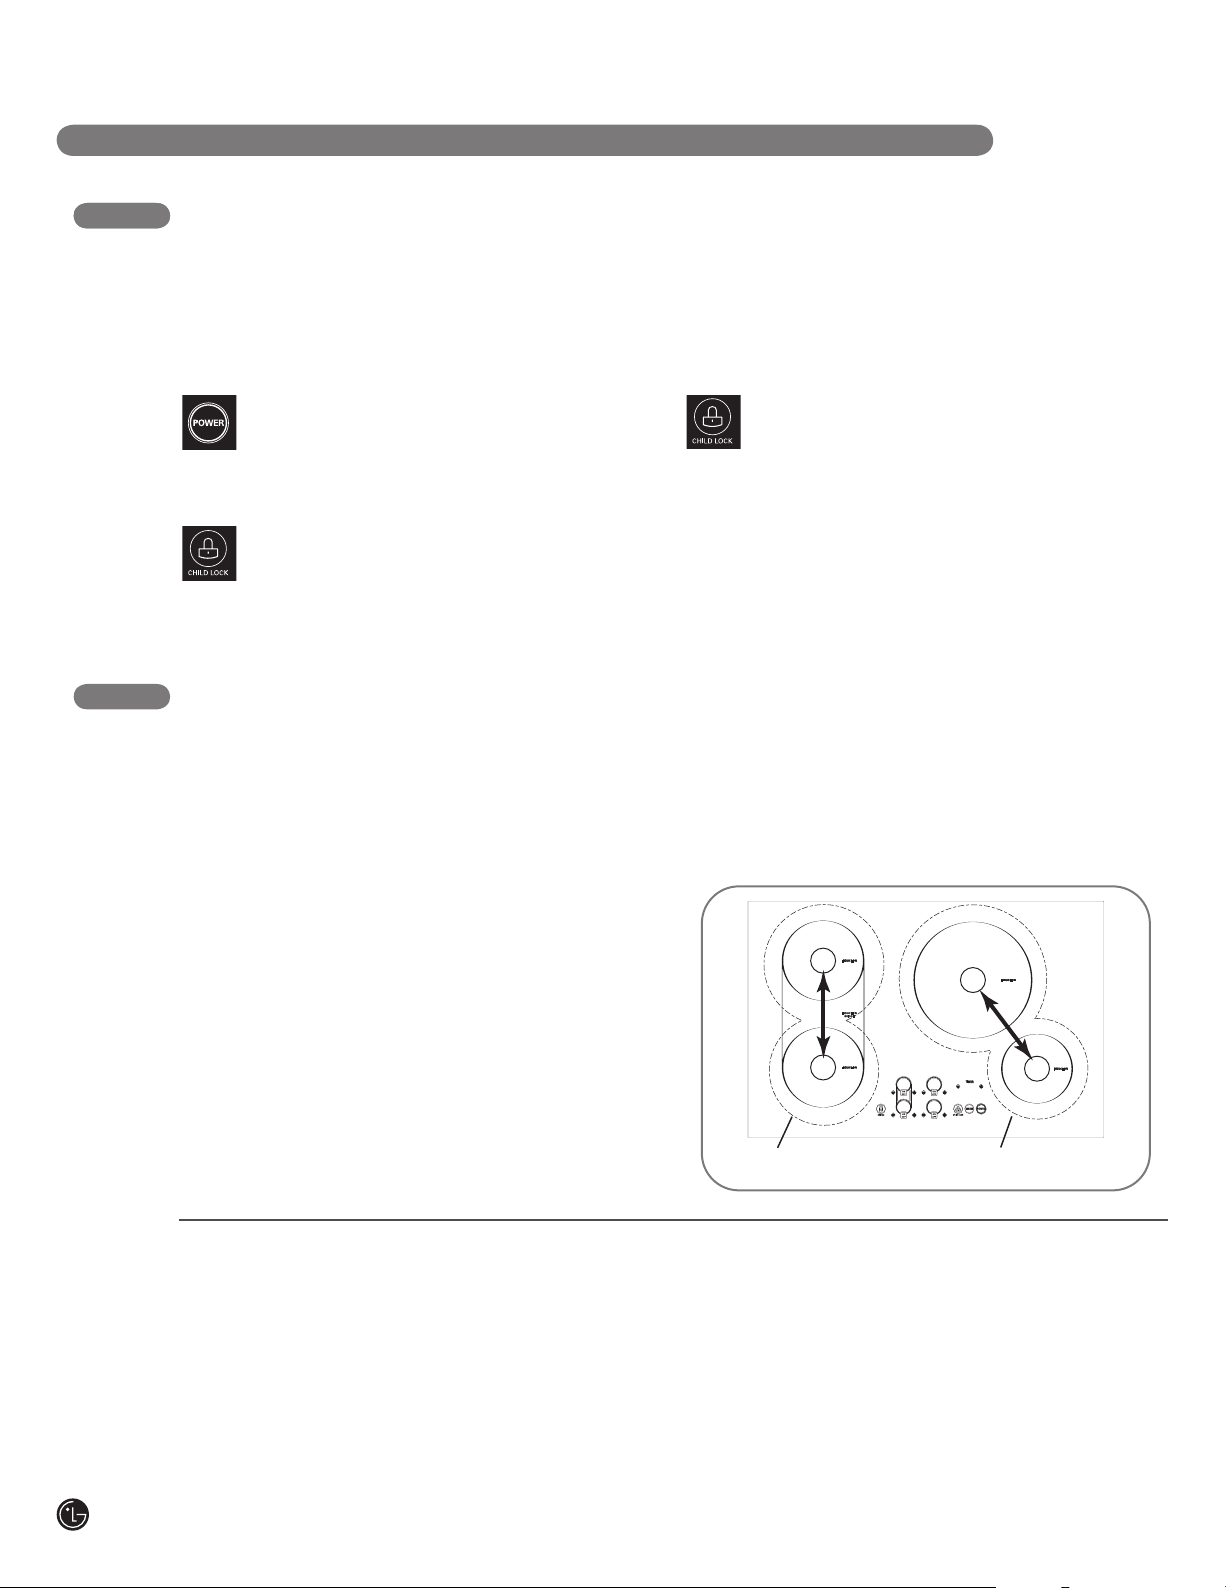
POWER SHARING
Your cooktop is equipped with four induction Cooking
Zones within two heating sections. The right and left
Cooking Zones are powered by two independent
induction inverters—one inverter for each of the two
heating sections. Two Cooking Zones in a heating
section share the power of one inverter. This is called
power sharing. For example, if you are cooking on
both right Cooking Zones, the last power level set will
be maintained, while the first Cooking Zone may
experience a slight reduction in the power level.
POWER SHARING TIPS:
Remember to set the power level for the food item
you wish to keep constant last. When using two
Cooking Zones, you can maintain a constant power
CANCELING CHILD LOCK
To turn off CHILD LOCK, touch and hold
the CHILD LOCK pad for 3 seconds. The
indicator light above the pad will go off and
the cooktop can now be used normally.
level for two pans on separate heating sections. Place
one pan on one of the Cooking Zones of the left
heating section and the other pan on one of the
Cooking Zones of the right heating section.
18
AUTOMATIC SHUTOFF
If a Cooking Zone is in constant use for more than 17
hours and the control setting is not changed, the
Cooking Zone will shut off automatically.
Left heating
section
Right heating
section
AUTOMATIC POWER LEVEL CONTROL
The power level displayed may be different from the
actual power level at the high temperature range. To
prevent the cooktop from overheating, the power level
is controlled automatically.
Page 19
BEFORE YOU BEGIN
CARE AND CLEANING
ENGLISH
General cleaning for induction ceramic glass
cooking surfaces is considerably easier than for
cooking surfaces with radiant heating.
NOTE:
To prevent accidental activation of the controls, it is
recommended that you set the CHILD LOCK
feature before cleaning.
IMPORTANT:
• Cleaning agents must not come in contact with
the hot ceramic-glass surface. All cleaning agents
must be rinsed off thoroughly with clean water.
• Do not use any aggressive cleaners such as grill
or oven sprays, coarse scouring cleansers, or
abrasive pan cleaners.
• Clean the ceramic-glass surface after each use
when it is warm to the touch or cold. This will
prevent spills from becoming burnt on. Remove
water marks, grease and discoloration with a
glass scraper and ceramic-glass cleaner.
NOTE:
You can obtain glass scrapers and ceramicglass
cleaners from your local hardware store.
GENERAL CLEANING
1
When it is cool, wipe the ceramic-glass surface
with a damp cloth and a small amount of ceramic
glass cleaner.
2
Wipe dry with a clean cloth.
3
Once a week, thoroughly clean the entire ceramicglass cooking surface with a commercially
available ceramic-glass cleaner.
4
Then, wipe the ceramic-glass surface using a
clean, soft cloth dampened with clean water, and
polish dry with a clean lint-free cloth.
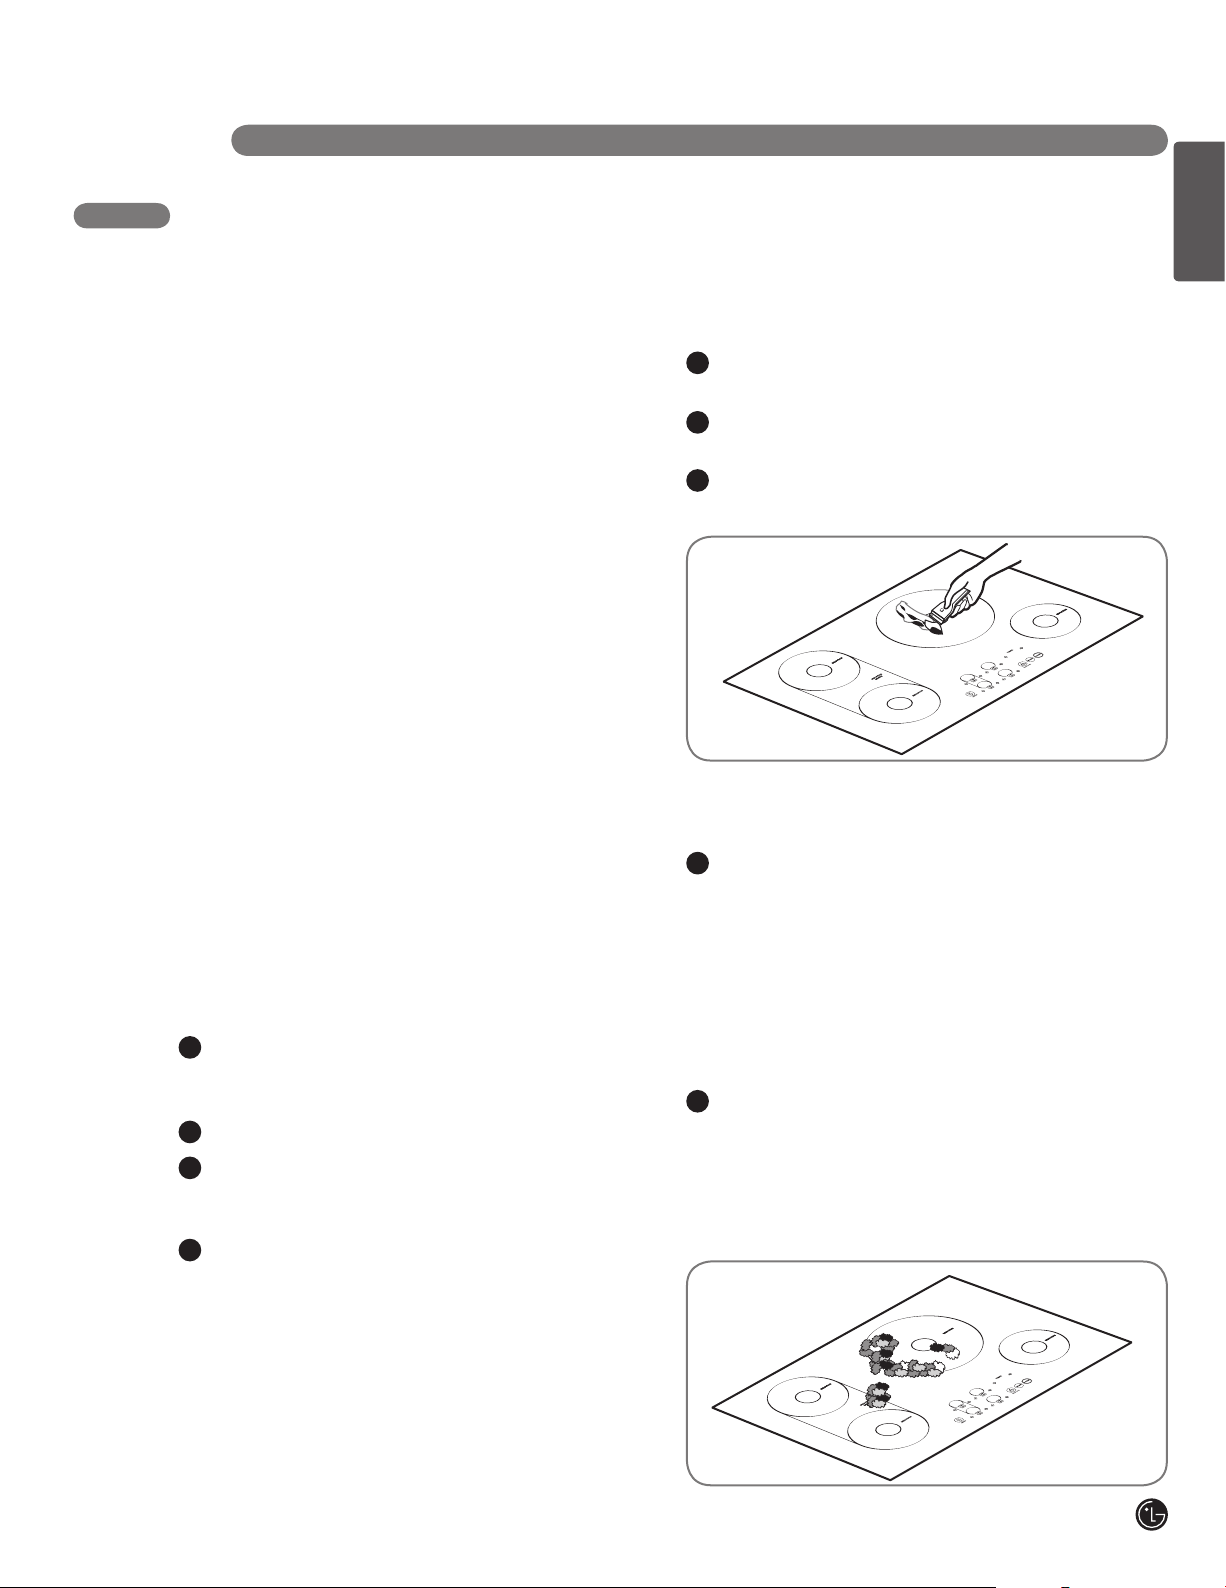
REMOVING HEAVY SOIL
To remove food that has boiled over or stubborn
spills, use a glass scraper.
1
Hold the glass scraper at an angle of about 45° to
the ceramic-glass surface.
2
Remove soiling by sliding the blade across the
area.
3
Use a ceramic glass cleaner as described in
GENERAL CLEANING.
PROBLEM SOILS
1
Remove sugar, melted plastic, aluminum foil, or
other meltable materials with a glass scraper
immediately and while still hot. Failure to do so
can cause permanent damage to the cooktop
surface. If the Cooking Zone has already cooled
down, warm it up again.
IMPORTANT: There is a risk of burning yourself when
the glass scraper is used on a hot Cooking Zone. Use
care and wear an oven mitt.
2
Then clean the cooktop normally when it has
cooled down.
NOTE: Scratches or dark marks on the ceramicglass
surface caused by a pan base with sharp edges
cannot be removed. However, they do not impair the
function of the cooktop.
19
Page 20

INSTALLATION INSTRUCTIONS
INSTALLATION AND SERVICE MUST BE PERFORMED BY A QUALIFIED INSTALLER.
IMPORTANT: SAVE THESE INSTRUCTIONS FOR LOCAL ELECTRICAL INSPECTOR’S
USE. READ AND SAVE THESE INSTRUCTIONS FOR FUTURE REFERENCE.
BEFORE YOU BEGIN
Read these instructions completely and
carefully.
NOTES TO INSTALLER:
• Read all instructions contained in these
installation instructions before installing the
cooktop.
• Remove all packing material before connecting
the electrical supply to the cooktop.
• Observe all governing codes and ordinances.
• Only certain cooktop models may be installed
over certain built-in electric oven models.
• Be sure to leave these instructions with the
consumer.
UNPACKING THE COOKTOP
1
Unpack and visually inspect the cooktop for any
damage or missing components.
NOTE TO CONSUMER:
Keep this User’s Guide and Installation Instructions
for future reference.
NOTE: This appliance must be properly grounded.
Damage caused by failure to follow these
instructions is not covered by the cooktop warranty.
2
Be sure the bottle of cleaner and conditioner
packed in the literature bag is left where the
user can find it easily. It is important that the
ceramic-glass cooktop be pretreated before
use. See CARE AND CLEANING.
20
TECHNICAL SPECIFICATIONS
COOKTOP DIMENSIONS
Width 307/8ʺ (783 mm)
Depth 21
Height 2
3
/4ʺ (552 mm)
3
/16ʺ (56 mm)
COOKING ZONES
Position
Front Left
Rear Left
Front Right
Rear Right
* The rated power consumption may vary according to pan size and type.
Diameter
7ʺ (180 mm)
7ʺ (180 mm)
6ʺ (150 mm)
1
/4ʺ (260 mm)
10
Power
1800W (2400W Boost)
1800W (2400W Boost)
1400W (1800W Boost)
2400W (3300W Boost)
COUNTERTOP CUTOUT DIMENSIONS
Width 293/8ʺ (746 mm)
Depth 20
ELECTRICAL SPECIFICATIONS
Connection voltage:
240/208 VAC 60 Hz.
Maximum connected power load:
7.4 kW/6.7 kW
1
/4ʺ (515 mm)
Page 21

INSTALLATION INSTRUCTIONS
A
B
I
J
C
D
H
E
F
G
L
M
K
PREPARING THE INSTALLATION LOCATION
IMPORTANT INSTALLATION INFORMATION
ENGLISH
• All electric cooktops run off a single phase, three-
wire or four-wire cable, 240/208 volt, 60 hertz,
AC-only electrical supply with ground.
30” Min.
Air exhaust**
(76.2 cm)
Fresh a ir intake**
Air exhaust**
• Minimum distance between cooktop and overhead
cabinetry is 30ʺ (76.2 cm).
** Do not obstruct these areas!
4" X 8" (10.2 cm x 20.3 cm)
opening to route armored
cable if panel is present.
Unit
Inch
mm
All dimensions are stated in inches and millimeters (mm).
Allow 2ʺ (5 cm) space below the armored cable opening to clear the electric cable and allow
space for installation of the junction box on the wall at the back of the cooktop.
A B D E H I L M
3013/
783
21
16
552
C
3
2
/
4
56
13
3
28
/
16
732.2
19
/
16
498
Min
5
3
29
/
/
8
8
746
F G J
Min Min MinMax MaxMax
13
20
5
24
1
/
/
16
16
33
610
29
749
1
1
20
/
2
515
3
20
/
/
4
8
518
30
762
K
3
4
106
/
16
1
1
/
2
3824610
21
Page 22
INSTALLATION INSTRUCTIONS
J
F
G
I
L
M
H
K
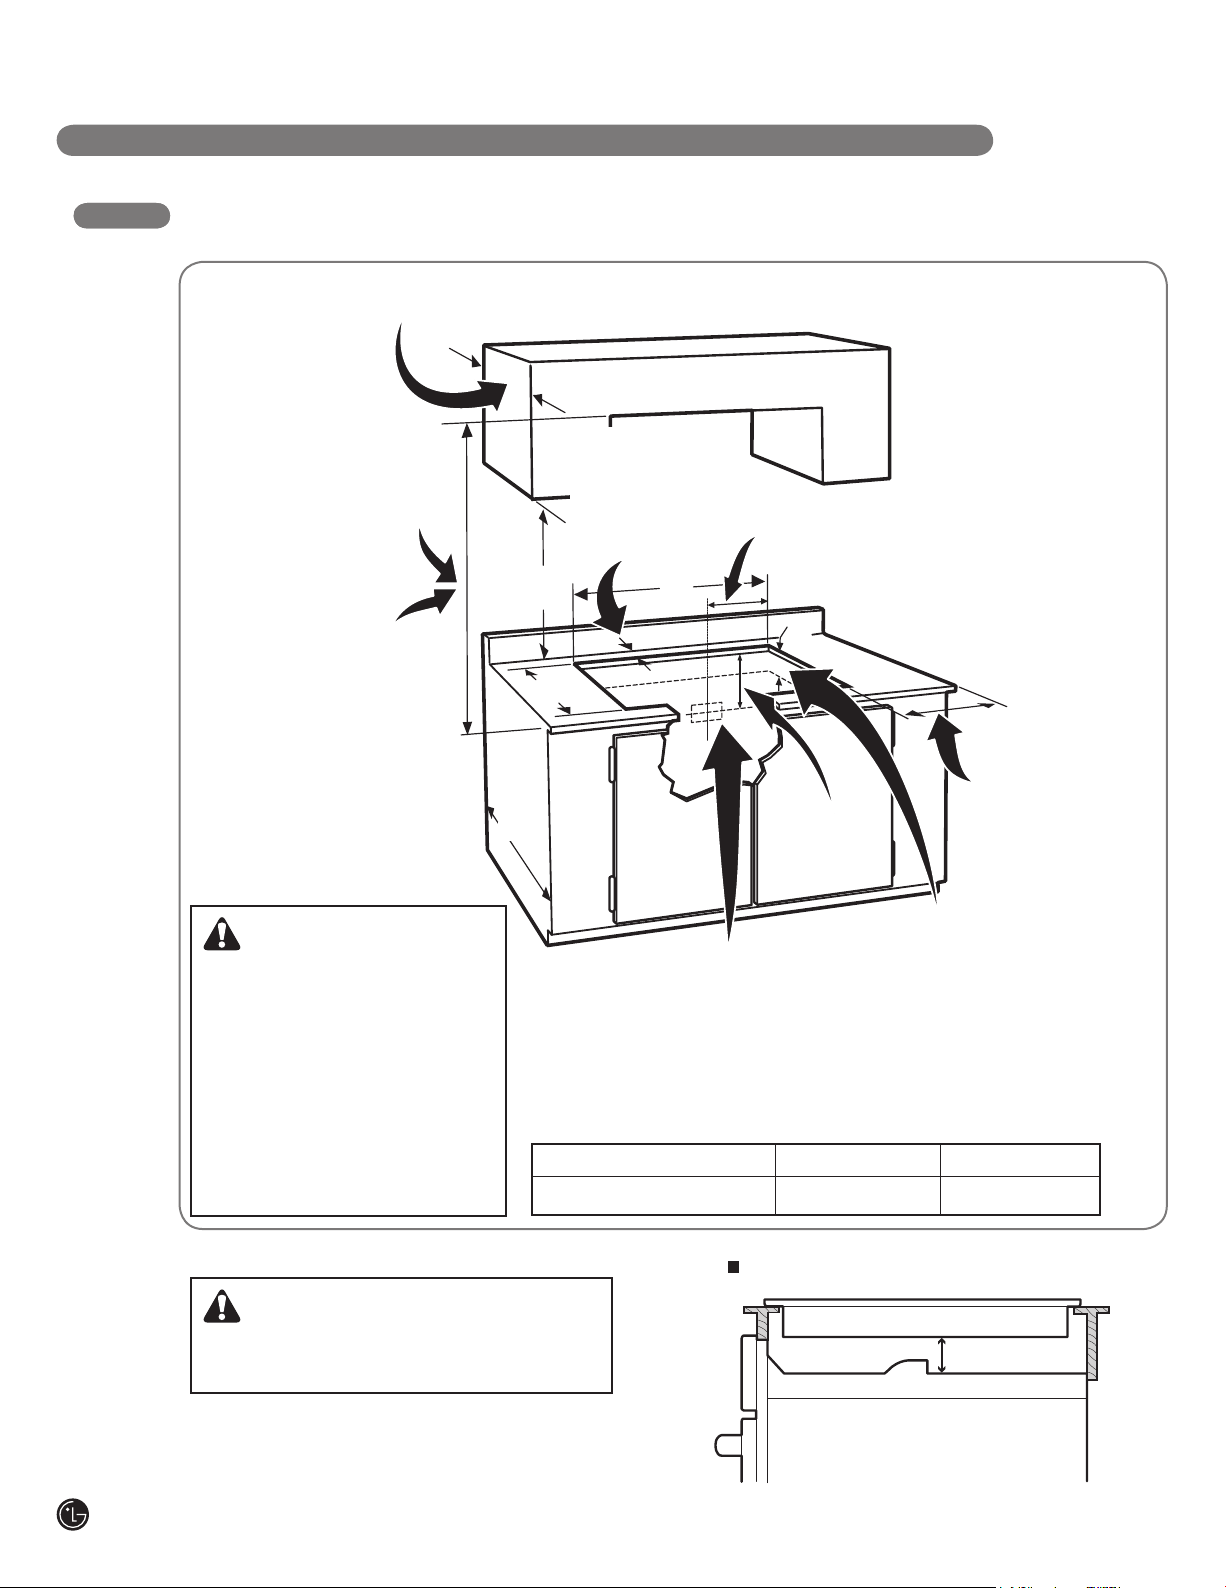
DIMENSIONS AND CLEARANCES
Overhead cabinet should not exceed a maximum
depth of 13” (33 cm).
Min. recommended
30” (76.2 cm) min. clearance
between the top of the
cooktop and the bottom of
an unprotected wood or
metal cabinet.
24” (61 cm) min. when bottom
of wood or metal cabinet is
protected by not less than 1/8”
flame-retardant millboard
covered with no less than No.
28 MGS sheet steel, 0.015”
(0.4 mm) stainless steel,
0.024” (0.6 mm) aluminum, or
0.020” (0.5 mm) copper.
( 45.7 cm)
24"
(61 cm)
distance between
rear edge of cutout
and nearest
combustible
surface.
18"
10"
( 25.4 cm)
12"
(30.5 cm)
Min. from edge of
cooktop to nearest
combustible wall
(either side of unit).
CAUTION
To eliminate the risk of burns or
fire by reaching over heated
Approximate location of junction box.
surfaces, cabinet storage space
located above the cooktop
should be avoided. If cabinet
storage is provided, risk can be
reduced by installing a range
hood that projects horizontally a
minimum of 5ʺ (12.7 cm) beyond
the face of the cabinets.
Model H K
30ʺ 71/2ʺ(191mm) 11/2ʺ(38mm)
CAUTION
It is very important to keep 2
distance between the cooktop and the oven.
3
/4” (70 mm)
Empty space is needed underneath
the cooktop for installation purposes.
Recommend space cooktop and oven
23/4” (70 mm)
22
Page 23

INSTALLATION INSTRUCTIONS
ELECTRICAL CONNECTIONS
ENGLISH
IMPORTANT SAFETY INSTRUCTIONS
• Be sure your cooktop is installed and grounded
properly by a qualified installer or service technician.
• This cooktop must be electrically grounded in
accordance with local codes or, in their absence,
with the National Electrical Code ANSI/NFPA No. 70,
latest edition in the United States.
WARNING
The electrical power to the cooktop must be shut
off while line connections are being made. Failure
to do so could result in serious injury or death.
ELECTRICAL REQUIREMENTS
Observe all governing codes and local
ordinances.
1
A 3-wire or 4-wire single-phase 120/240 or
120/208 volt, 60 Hz AC-only electrical supply is
required on a separate circuit fused on both sides
of the line (time-delay fuse or circuit breaker is
recommended). DO NOT fuse neutral. The fuse
size must not exceed the circuit rating of the
appliance specified on the nameplate.
2
This unit can consume up to 7,400W at 240 VAC.
A 40 Amp circuit breaker with wire gauge #8 AWG
must be used.
NOTE: Wire sizes and connections must conform
with the fuse size and rating of the appliance in
accordance with the National Electrical Code
ANSI/NFPA No. 70, latest edition, and local codes
and ordinances.
PROVIDING THE ELECTRICAL
CONNECTION
Install the junction box under the cabinet and run
120/240 or 120/208 volt, AC wire from the main
circuit panel.
NOTE: DO NOT connect the wire to the circuit
panel at this time.
3
The appliance should be connected to the fused
disconnect (or circuit breaker) box through flexible
armored or nonmetallic sheathed cable. The
flexible armored cable extending from this
appliance should be connected directly to the
grounded junction box. The junction box should be
located as shown on page 22 with as much slack
as possible remaining in the cable between the
box and the appliance, so it can be moved if
servicing is ever necessary.
4
A suitable strain relief must be provided to attach
the flexible armored cable to the junction box.
WARNING
An extension cord must not be used with this
appliance. Such use may result in a fire, electrical
shock, or other personal injury.
23
Page 24

INSTALLATION INSTRUCTIONS
ELECTRICAL CONNECTIONS
(cont.)
ELECTRICAL CONNECTION
Connect the flexible armored cable that extends
from the surface unit to the junction box using a
suitable strain relief at the point the armored cable
enters the junction box. Then make the electrical
connection as follows.
Electrical ground is required on this appliance.
This appliance is manufactured with a supply wire
and a frame connected green or bare copper
grounding wire.
NOTE TO ELECTRICIAN:
The armored cable leads supplied with the
appliance are UL-listed for connection to larger
gauge household wiring. The insulation of the leads
is rated at temperatures much higher than the
temperature rating of household wiring. The
current-carrying capacity of the conductor wire is
governed by the temperature rating of the
insulation around the wire, rather than the wire
gauge alone.
WARNING
DO NOT ground to a gas supply pipe. DO NOT
connect to electrical power supply until
appliance is permanently grounded. Connect
the ground wire before turning on the power.
WARNING
This appliance is equipped with a copper
conductor flexible cable. If connection is made
to aluminum house wiring, use only special
connectors which are approved for joining
copper and aluminum wires in accordance with
the National Electrical Code and local codes
and ordinances. Improper connection of
aluminum house wiring to copper leads can
result in a short circuit or fire. Follow the
connector manufacturer’s recommended
procedure closely.
WHERE LOCAL CODES PERMIT CONNECTING THE APPLIANCE-GROUNDING
CONDUCTOR TO THE NEUTRAL (WHITE) WIRE
Observe all governing codes and local ordinances.
1
Disconnect the power supply.
2
At the circuit breaker box, fuse box or junction
box, connect appliance and power supply cable
wires as shown.
3-WIRE GROUNDED JUNCTION BOX
Cable from power supply
White wire
(neutral)
Red
wires
WARNING
You may not ground the cooktop through
the neutral (white) wire if cooktop is used
in a new branch circuit installation (1996
NEC), mobile home, recreational vehicle, or
where local codes do not permit grounding
to the neutral (white) wire. When grounding
to the neutral (white) wire is prohibited, you
must use a 4-wire power supply cable.
Failure to heed this warning may result
in electrocution or other serious
personal injury.
Green wire (ground)
Cable from cooktop
UL-listed conduit
connector
Black
wires
Junction box
24
Page 25

INSTALLATION INSTRUCTIONS
ENGLISH
ELECTRICAL CONNECTIONS
(cont.)
IF COOKTOP IS USED IN A NEW BRANCH CIRCUIT INSTALLATION (1996 NEC), MOBILE
HOME, RECREATIONAL VEHICLE, OR WHERE LOCAL CODES DO NOT PERMIT
GROUNDING TO THE NEUTRAL (WHITE) WIRE
Observe all governing codes and local ordinances
1
Disconnect the power supply.
2
At the circuit breaker box, fuse box or junction
box, connect appliance and power supply cable
wires as shown.
WARNING
If connecting to a 4-wire power supply cable
electrical system, the appliance frame
connected ground wire MUST NOT be
connected to the neutral wire of the 4-wire
electrical system.
.
Green wire (ground)
4-WIRE GROUNDED JUNCTION BOX
Cable from power supply
Ground
wire
Red
wires
Cable from cooktop
White wire
(no connection)
Black
wires
Junction box
UL-listed conduit
connector
COOKTOP INSTALLATION
1
Visually inspect the cooktop for damage. Make
sure all cooktop screws are tight (see below for
locations).
Screws
WARNING
Do not remove the nylon spacers on the
edges of the cooktop. These spacers center
the cooktop in the space provided. The
cooktop must be centered to allow proper
venting and to prevent excess heat buildup
that may result in heat damage or fire.
2
Carefully lower the cooktop into the countertop
cutout, making sure not to trap any wires.
NOTE: Do not use caulking compound. The
cooktop must be removable, should service be
required.
Nylon spacers
25
Page 26

INSTALLATION INSTRUCTIONS
COOKTOP INSTALLATION
3
Install the retainer brackets to the bottom of the
cooktop; then snug the bolts against the bottom
of the countertop as shown.
Preferred
installation
Retainer
brackets
(cont.)
NOTE: The retainer brackets MUST be installed to
meet local codes or, in their absence, with the
National Electrical Code ANSI/NFPA No. 70, latest
edition.
Alternative
installation
Retainer
brackets
Cooktop Countertop
Bolt
Retainer
brackets
FINAL CHECK
Perform a final operational check of the cooktop,
making sure the cooktop powers on properly and
that each Cooking Zone operates correctly. Refer
to the Operating Instructions in this guide for
details.
MODEL AND SERIAL NUMBER LOCATION
The model and serial numbers are located on a
plate on the bottom of the cooktop. Please record
them in this guide; you will need them for warranty
registration.
CAUTION
Do not touch cooktop glass or Cooking
Zones. They may be hot enough to
cause burns.
26
Page 27

TROUBLESHOOTING
BEFORE CALLING FOR SERVICE
Before you call for service, review this list. It may save you time and expense. This list includes common
occurrences that are not the result of a defect in workmanship or materials.
Problem Possible Causes Solutions
ENGLISH
Cooktop does not work
Cooktop does not heat
• Cooktop controls are locked.
• Circuit breaker has tripped or
fuse is blown.
• Power outage.
• Installation wiring not complete.
• No cookware or improper
cookware on Cooking Zone.
• Cookware incorrect size for
selected Cooking Zone.
• Cookware not resting completely
on Cooking Zone.
• Incorrect Cooking Zone selected.
• No power to cooktop.
• See USING CHILD LOCK to turn off the
CHILD LOCK feature.
• Reset the circuit breaker.
• Check house lights to confirm power
outage.
• Contact the installer or dealer.
•
Make sure that cookware is centered on the cooking
zone, and that cookware is of the proper type for
induction cooking. See SELECTING COOKWARE.
•
Cookware bottom must be large enough to cover Cooking
Zone completely. See SELECTING COOKWARE.
•
Cookware bottoms must be flat and centered on
the Cooking Zone, and must not rest on the
cooktop triim. See SELECTING COOKWARE.
• Make sure the correct control is ON for the
Cooking Zone being used.
• See “Cooktop does not work” above.
Cooktop turns off
while cooking.
The power level for a
Cooking Zone is
flashing
Power Boost does
not work
• Cooktop internal heat sensor has
detected high temperature inside
the cooktop.
• Automatic shutoff has activated.
• Liquid or object on controls area.
• Cookware has been removed
from the Cooking Zone.
• Cookware not centered on
Cooking Zone.
• Power Boost being used with two
Cooking Zones on the same side
of the cooktop.
• Make sure the cooktop vents are not
blocked. See page 21 for Air Exhaust and
Fresh Air Intake locations.
•
The cooktop features an automatic shutoff feature
that turns the entire cooktop off if any Cooking Zone
has been on continuously for 17 hours.
•
The cooktop control may read liquids or objects in the controls
area as a touch, which could cause the cooktop to shut off.
Clean up spills or remove objects and restart cooktop.
•
Place the cookware back on the Cooking Zone within
90 seconds to maintain the power level settings.
•
Make sure cookware is centered and resting flat on
the Cooking Zone. See SELECTING COOKWARE.
•
Each side of the cooktop shares an inverter for both
Cooking Zone. Power Boost cannot be used with two
Cooking Zones on the same inverter at the same time
See POWER BOOST and POWER SHARING.
27
Page 28

TROUBLESHOOTING
BEFORE CALLING FOR SERVICE
Problem Possible Causes Solutions
appears in the
timer display
appears in the
timer display
appears in the
display and a number
appears in the timer
display
• Control pad was touched too
long.
• Supplied voltage to cooktop is
too low.
• Electronics fault error message.
• This message will appear if any pad except
the Timer or pads is touched for
more than 10 seconds It will also appear if
liquids or objects are spilled or left on the
controls area. To clear the error code,
remove any liquid or objects from the
controls area and press the POWER pad
to reset the cooktop.
• If the voltage of the power supplied to the
cooktop is too low, it cannot operate
properly and will show this error code. This
may be caused by reduced voltage being
supplied to the house circuit. If connections
are correct and the supplied voltage
returns to normal, the code will disappear.
• Turn the cooktop OFF; then shut off power
at the fuse or circuit breaker for about 30
seconds. Turn power back on to the
cooktop and turn the cooktop on using the
POWER pad. If the error message is still
displayed, call for service.
flashes in the display
• Power outage or initial startup.
• When the cooktop is first turned on or after
a power outage, will blink in the
display for 90 minutes or until the POWER
pad is touched for 2 seconds.
28
Page 29

LG ELECTRONICS, INC.
INTRODUCTION
LG INDUCTION COOKTOP LIMITED WARRANTY - USA
LG Electronics Inc. will repair or replace your product, at LG’s option, if it proves to be defective in material or workmanship
under normal use, during the warranty period set forth below, effective from the date of original consumer purchase of the
product. This limited warranty is good only to the original purchaser of the product and effective only when used in U.S.A.
ENGLISH
WARRANTY PERIOD:
Two years
from date of original
purchase
Please retain dealerÕs dated bill of sale as evidence of the Date of Purchase for proof of warranty, and submit a copy of
the bill of sale to the service person at the time warranty service is provided.
Please call 1-800-243-0000 and choose the appropriate option to locate your nearest LG Authorized Service Center. Or
visit our Web site at http://us.lgservice.com.
THIS WARRANTY IS IN LIEU OF ANY OTHER WARRANTIES, EXPRESS OR IMPLIED, INCLUDING WITHOUT
LIMITATION, ANY WARRANTY OF MERCHANTABILITY OR FITNESS FOR A PARTICULAR PURPOSE. TO THE
EXTENT ANY IMPLIED WARRANTY IS REQUIRED BY LAW, IT IS LIMITED IN DURATION TO THE EXPRESS
WARRANTY PERIOD ABOVE. LG WILL NOT BE LIABLE FOR ANY CONSEQUENTIAL, INDIRECT, OR INCIDENTAL
DAMAGES OF ANY KIND, INCLUDING LOST REVENUES OR PROFITS, IN CONNECTION WITH THE PRODUCT.
SOME STATES DO NOT ALLOW LIMITATION ON HOW LONG AN IMPLIED WARRANTY LASTS OR THE EXCLUSION
OF INCIDENTAL OR CONSEQUENTIAL DAMAGES, SO THE ABOVE LIMITATIONS OR EXCLUSIONS MAY NOT
APPLY TO YOU.
THIS LIMITED WARRANTY DOES NOT APPLY TO:
Service calls to correct the installation of your appliance, to instruct you how to use your appliance, to replace house fuses
1.
or correct house wiring, or to replace owner-accessible light bulbs.
2. Repairs when your appliance is used in other than normal, single-family household use.
3. Pickup and delivery. Your appliance is designed to be repairable in the home.
Damage resulting from accident, alteration, misuse, abuse, fire, flood, improper installation, acts of God, or use of products
4.
not approved by LG Corporation.
5. Repairs to parts or systems resulting from unauthorized modifications made to the appliance.
6. Replacement parts or repair labor costs for units operated outside the United States.
7. Any labor costs during the limited warranty period.
This warranty is extended to the original purchaser for products purchased for home use within the USA. In Alaska, the
warranty excludes the cost of shipping or service calls to your home. Some states do not allow the exclusion or limitation of
incidental or consequential damages, so this exclusion or limitation may not apply to you. This warranty gives you specific
legal rights, and you may also have other rights which vary from state to state. To know what your legal rights are, consult
your local or state consumer affairs or your state’s Attorney General.
WHAT IS COVERED:
Any part of the cooktop which fails due to a defect in materials or workmanship. During this full
two-years warranty, LG will also provide, free of charge, all labor and in-home service to
replace the defective part.
TO CONTACT LG ELECTRONICS BY MAIL:
LG Customer Interactive Center
P. O. Box 240007
201 James Record Road
Huntsville, Alabama 35824
ATTN: CIC
29
Page 30

MEMO
30
Page 31

ESPAÑOL
GUÍA PARA EL USO & INSTRUCCIONES DE INSTALACIÓN
COCINA A INDUCCIÓN DE
VIDRIO CERÁMICO
Lea detenidamente estas instrucciones antes utilizar y
guárdelas como referencia para el futuro.
LSCI307ST
P/No.: MFL41494802
www.lg.com
Page 32

INTRODUCCIÓN
INFORMACIÓN IMPORTANTE DE SEGURIDAD
Aviso Importante: Interferencia Radio .......................... 3
Precauciones Importantes de Seguridad
.................4–8
INTRODUCCIÓN A LA COCCIÓN POR
INDUCCIÓN
Cocción por Inducción .................................................9
Selección de Utensilio
............................................ 9–11
PARTES Y CARACTERÍSTICAS
Partes y Características de su Cocina .......................12
Funciones del Control Táctil
......................................13
INSTRUCCIONES DE USO
Antes de Usar la Cocina .............................................14
Configuración de Controles
Uso de las zonas de Cocción del Puente
Uso del Temporizador
Uso del Bloqueo para Niños
Otras Funciones
......................................................... 18
..................................14–16
...................17
.................................................17
.......................................18
CUIDADO Y LIMPIEZA
Limpieza de la Cocina ................................................ 19
INSTRUCCIONES DE INSTALACIÓN
Antes de Comenzar ....................................................20
Desempaque de la Cocina
Especificaciones Técnicas.
Preparación del Lugar de Instalación
Dimensiones y Despeje.
Conexiones Eléctricas
Instalación de la Cocina
Control Final
...............................................................26
.........................................20
........................................20
.........................21
.............................................22
..........................................23–25
.......................................25, 26
¡GRACIAS!
Felicitaciones por su compra y
bienvenido a la familia de LG.
Su nueva Cocina de Inducción
combina características precisas
para la cocción con un uso simple
y diseño elegante. Siguiendo las
instrucciones de funcionamiento y
cuidado de este manual, su cocina
le brindará muchos años de
uso confiable.
SOLUCIÓN DE PROBLEMAS
Antes de Solicitar Reparaciones ..........................27,28
GARANTÍA
Información de Registro del Producto. ...................... 29
Información sobre registro de producto
Modelo:
Número de serie:
Fecha de compra:
2
Page 33

INFORMACIÓN IMPORTANTE DE SEGURIDAD
LEA TODAS LAS INSTRUCCIONES
ANTES DE USAR
Puede descargar un manual del usuario y de instalación en http://www.lg.com.
ADVERTENCIA
manual a fin de minimizar riesgos de incendio, descargas eléctricas, daños en su
propiedad, heridas personales o la muerte.
AVISO IMPORTANTE: INTERFERENCIA RADIO
Este equipo ha sido probado y cumple con los límites
establecidos para un dispositivo digital de clase B,
según la parte 18 de la Normativa de la FCC. Estos
límites han sido establecidos para ofrecer una
protección razonable contra interferencias
perjudiciales en la instalación residencial. Este equipo
genera, usa y puede emitir energía de
radiofrecuencia y, si no se instala y utiliza de acuerdo
con las instrucciones, puede ocasionar interferencias
perjudiciales para las comunicaciones de radio. Sin
embargo, no se garantiza que no se presenten
interferencias en una instalación en particular. Si el
equipo provoca interferencias perjudiciales para la
recepción de radio o televisión, lo que puede
Para su seguridad, siga las instrucciones de este
comprobar encendiendo y apagando el equipo, se
aconseja alusuario que intente corregir la
interferencia con una o más de las siguientes
medidas:
• Reoriente o reubique la antena receptora de la radio
y/o televisión.
• Aumente la distancia entre la cocina y el receptor de
radio o televisión.
• Conectar la cocina a un tomacorriente de un circuito
diferente del tomacorriente al que se encuentra
conectado el receptor de radio o televisión.
ESPAÑOL
3
Page 34

INFORMACIÓN IMPORTANTE DE SEGURIDAD
LEA TODAS LAS INSTRUCCIONES ANTES
DE USAR
PRECAUCIONES DE SEGURIDAD
• Instalación Adecuada: Asegúrese que el dispositivo
sea instalado y conectado en forma adecuada por
un técnico calificado, de acuerdocon el Código de
Electricidad Nacional ANSI/NFPA Nº 70 – la última
edición en los Estados Unidos y todos los requisitos
del código local. Realice la instalación sólo de
acuerdo con las instrucciones.
• No intente reparar o reemplazar ninguna parte de la
cocina, a menos que se lo recomiende
específicamente en este manual. Cualquier otra
reparación deberá ser realizada por un técnico
calificado.
• Quite todas las cintas y envoltorios antes de usar el
electrodoméstico. Destruya las bolsas de plástico y
cartón luego de desempacar el electrodoméstico.
Nunca permita que los niños jueguen con el material
de empaque.
• Los aspectos de seguridad de este
electrodoméstico cumplen con las normas técnicas
aceptadas.
• Sepa cómo desconectar el encendido eléctrico del
electrodoméstico en el disyuntor o la caja del fusible
en caso de emergencia. Marque el disyuntor o
fusible para poder identificarlo de manera fácil y
poder actuar rápidamente si fuera necesario.
• No repare o reemplace ninguna parte del
electrodoméstico. Todas las reparaciones deberán
ser realizadas únicamente por un técnico calificado
a fin de evitar riesgos de heridas personales y
daños sobre el electrodoméstico.
• Nunca modifique ni altere la construcción del
electrodoméstico ya sea quitando paneles,
cobertores de cables o cualquier otra parte
permanente del producto.
• Ubicación de objetos sobre el electrodoméstico: No
se deberán colocar materiales inflamables cerca o
sobre la superficie de cocción. Esto incluye ítems de
papel, plástico y tela, tales como libros de cocina,
elementos plásticos y toallas y líquidos inflamables.
No coloque materiales explosivos, tales como
aerosoles en lata sobre ni cerca del
electrodoméstico. Los materiales inflamables
pueden explotar y ocasionar incendios o daños en
la propiedad.
• No deje solos a los niños. No se deberá dejar a los
niños solos o fuera de su radio de atención en la
zona donde el electrodoméstico se encuentre en
uso. Nunca se les deberá permitir sentarse o
pararse sobre ninguna parte del electrodoméstico.
• No guarde ni use materiales combustibles, gasolina
u otros vapores o líquidos cerca de este o cualquier
otro aparato.
PRECAUCIÓN
Los ítems de uso de los niños no se deben
guardar en armarios sobre una cocina o en el
tablero posterior de dicha cocina – al trepar los
niños en la cocina para alcanzar un ítem podrían
sufrir heridas graves.
ADVERTENCIA
Nunca use el electrodoméstico para calentar o
calefaccionar una habitación.
ADVERTENCIA
Aquellas personas que utilicen un marcapasos o un
dispositivo médico similar deberán ser cuidadosas
al usar o colocarse cerca de una unidad de
inducción mientras ésta se encuentre en uso, ya
que el campo electromagnético podrá afectar el
funcionamiento del marcapasos o dispositivo
médico similar. Se recomienda consultar a su
médico o al fabricante el marcapasos o dispositivo
médico similar sobre su situación particular.
PRECAUCIÓN
NO toque las zonas de cocción o zonas cercanas a estas
superficies. Es posible que las zonas de cocción se encuentren
calientes debido al calor residual, aunque su color sea oscuro.
Es posible que las zonas cercanas a las zonas de cocción se
calienten lo suficiente como para provocar quemaduras.
Durante y después del uso, no toque ni permita que telas u
otros materiales inflamables toquen estas zonas hasta que
haya pasado un tiempo suficiente para que se enfríen.
4
Page 35

INFORMACIÓN IMPORTANTE DE SEGURIDAD
LEA TODAS LAS INSTRUCCIONES ANTES
DE USAR
PRECAUCIONES DE SEGURIDAD
• Use ropa adecuada. Nunca se deben usar
prendas sueltas o que cuelguen mientras se usa
el electrodoméstico. Evite que la ropa u otros
materiales inflamables tomen contacto con las
superficies calientes.
• No use agua ni harina sobre fuego con grasa.
Apague el fuego con la tapa de una cacerola o
use bicarbonato de sodio, un químico seco o un
extintor contra incendios.
• Al calentar grasa, controle dicha cocción de
cerca. Es posible que la grasa se prenda fuego si
se deja calentar demasiado.
SEGURIDAD ELÉCTRICA
ADVERTENCIA
• Si la superficie se encuentra resquebrajada,
apague el electrodoméstico a fin de evitar
una posible descarga eléctrica. No vuelva a
usar la COCINA hasta que la superficie de
vidrio se haya cambiado.
• Al usar la COCINA, nunca use papel de
aluminio, productos envueltos en papel de
aluminio o comida congelada en cacerolas
de aluminio.
• Si el cable suministrado está dañado,
deberá ser reemplazado por el fabricante, su
agente de servicios o personas con
calificación similar a fin de evitar riesgos.
(continua)
• Use sólo ollas con sostenedores secos. Los
sostenedores húmedos o mojados sobre
superficies calientes pueden ocasionar
quemaduras debido al vapor. Evite que los
sostenedores tomen contacto con unidades con
superficies calientes. No use una toalla u otra tela
voluminosa en lugar de un sostenedor.
• No caliente envases de comida que no fueron
abiertos. La acumulación de presión pueden
ocasionar que el contenedor explote y ocasione
heridas.
• La instalación y conexión del nuevo
electrodoméstico sólo deberá ser realizada por
personal calificado.
• Los electrodomésticos montados al ras sólo se
podrán usar realizando la instalación en
gabinetes adecuados y lugares de
funcionamiento que estén en conformidad con las
normas relevantes. Esto asegura un nivel de
protección suficiente contra descargas eléctricas,
según lo establecido por las agencias de
certificación.
• Si el electrodoméstico funciona mal o sufre
fracturas: apague todas las zonas de cocción y
comuníquese con el Centro de Servicios.
ESPAÑOL
SEGURIDAD PARA LOS NIÑOS
ADVERTENCIA
• Este dispositivo no debe ser usado por niños
pequeños o personas que sufren cierta
debilidad, a menos que una persona
responsable las supervise de modo
adecuado a fin de asegurar que puedan usar
el electrodoméstico de manera segura.
• Los niños pequeños deberán ser
supervisados a fin de asegurar que no se
juegue con el electrodoméstico.
• Es posible que las partes accesibles se
vuelvan calientes durante el uso. Se deberá
mantener alejados a niños pequeños.
5
Page 36

INFORMACIÓN IMPORTANTE DE SEGURIDAD
LEA TODAS LAS INSTRUCCIONES ANTES
DE USAR
SEGURIDAD DURANTE EL USO
• Este electrodoméstico sólo se podrá usar para una cocción o
fritura normal. No fue diseñado para uso comercial o industrial.
• No use la cocina para calefaccionar el ambiente.
• Sea cuidadoso al enchufar aparatos eléctricos cerca de la
cocina. Los cables no deben entrar en contacto con la
superficie caliente. Esto podría dañar la cocina y el cable
aislante.
• Las grasas y aceites sobrecalentados se prenden fuego
rápidamente. Se deberá supervisar la cocción al preparar
comidas con grasa o aceite.
• Cuando termine de usarlo, apague el elemento el control y
confíe en el detector de sartén.
• Mantenga siempre los paneles de control limpios y secos. No
permita que queden líquidos o grasa en la zona superior de
los controles de la cocina. Las comidas derramadas o
quemadas pueden activar o desactivar el electrodoméstico.
Limpie las zonas de los controles con cuidado a fin de
reestablecer el funcionamiento normal del electrodoméstico.
• Nunca coloque elementos combustibles sobre la cocina.
• Nunca deje ningún elemento combustible o latas de aerosol
en un cajón ubicado debajo de la cocina.
• Evite colocar utensilios metálicos sobre la superficie de la
cocina. Los objetos metálicos pueden generar calor y
ocasionar quemaduras.
• Sepa qué perilla controla cada superficie de las zonas de
cocción.
• Limpie el electrodoméstico en forma regular a fin de mantener
todas las partes sin grasa, evitando que se provoquen
incendios. Las campañas de escape de la ventilación y los
filtros de grasa se deben mantener limpios. No permita la
acumulación de grasa en la campana ni en el filtro. Los
depósitos de grasa sobre el ventilador pueden provocar
incendios. Lea las instrucciones de limpieza del fabricante de
la campana.
• Use cacerolas del tamaño adecuado. Este electrodoméstico
está equipado con una o más zonas de cocción de diferentes
tamaños.
• Seleccione los utensilios con fondos planos que sean lo
suficientemente largos como para cubrir las zonas de cocción.
Los sensores de detección de cacerolas no permitirán que las
zonas de cocción afectadas funcionen sin que haya una
cacerola presente.
• No coloque ningún objeto sobre o cerca dla zona de la perilla
de control, a fin de evitar la activación accidental de los
controles de la cocina.
• Las manijas de los utensilios se deberán colocar hacia dentro
y no extenderse sobre zonas de cocción adyacentes. La
finalidad de esto es disminuir el riesgo de quemaduras, el
encendido de materiales inflamables y derrames debido a un
contacto no intencional con el utensilio.
• Nunca deje comidas preparadas en las zonas de cocción. Los
excesos de hervor causan vapores y derrames de grasa que
se pueden encender, o una cacerola que se secó debido al
hervor puede sufrir derretimiento o daños.
• Cobertores de protección: No use papel de aluminio para
cubrir ninguna parte de la cocina. Use sólo papel de aluminio
como se recomienda luego del proceso de cocción, si se usa
como cobertor de la comida. Cualquier otro uso de papel de
aluminio podrá provocar riesgos de descargas eléctricas,
incendios o cortocircuitos.
• Utensilios de cocción de vidrio: Sólo ciertos tipos de vidrio,
vidrio/cerámico, cerámico, objetos de barro u otros utensilios
de vidrio son aptos para la superficie de la cocina sin que se
produzcan roturas debido a un cambio brusco de temperatura.
Lea las recomendaciones del fabricante sobre el uso de la
cocina.
• Campana de ventilación: La campana de ventilación sobre la
superficie de cocción se debe limpiar de forma frecuente, de
modo que la grasa de los vapores de cocción no se acumulen
sobre la campana o el filtro.
• No limpie ni use una cocina rota. Si la cocina sufriera roturas,
los productos de limpieza y los derrames podrán penetrar
sobre dichas roturas, creando riesgos de descargas eléctricas.
Comuníquese con un técnico calificado de inmediato.
• Limpie la cocina con cuidado. Si se usa una esponja o trapo
para limpiar derrames sobre una superficie de cocción
caliente, evite quemaduras de vapor. Algunos productos de
limpieza pueden producir gases nocivos si se aplican sobre
una superficie caliente.
6
Page 37

INFORMACIÓN IMPORTANTE DE SEGURIDAD
LEA TODAS LAS INSTRUCCIONES ANTES
DE USAR
SEGURIDAD DURANTE EL USO
• No coloque cacerolas calientes sobre el vidrio frío
de la cocina. Esto podría hacer que el vidrio se
rompa.
• No deslice cacerolas sobre la superficie de la
cocina. Las mismas pueden rayar la superficie de
la cocina.
• No deje que las cacerolas hiervan
excesivamente. Esto podría ocasionar daños
permanentes tales como roturas, fusiones o
marcas que pueden afectar la cocina. (Este tipo
de daños no están cubiertos por la garantía).
• Nunca descuide las unidades cuando se
encuentren a altas temperaturas. Los hervores
excesivos causan vapores y derrames de grasa
que se pueden encender.
SEGURIDAD DURANTE LA LIMPIEZA
(continua)
PRECAUCIÓN
NO tome las manijas de las cacerolasluego de la
cocción. Podrían estar calientes y existe riesgo
de que sufra quemaduras.
ESPAÑOL
• Siempre apague el electrodoméstico antes de
realizar la limpieza.
• Por razones de seguridad, no limpie el
electrodoméstico con limpiadores de vapor de
presión o alta presión.
• Limpie la cooktop de acuerdo con las
instrucciones de mantenimiento y limpieza que
figuran en este manual.
• El limpiador por vapor no debe usarse para
limpiar los quemadores de una cocina.
• No use limpiezadores abrasivos ásperos ni
raspadores metálicos ásperos para limpiar el
vidrio de la cocina, ya que pueden rayar la
superficie, ocasionando la rutura del vidrio.
COCINE CARNES Y CARNES DE AVE EN FORMA
COMPLETA
Cocine carnes y carnes de ave en forma completa
– la carne por lo menos a una temperatura
INTERIOR de 160° F (71° C) y la carne de ave por
lo menos a una temperatura INTERIOR de 180° F
(82° C). Normalmente la cocción a estas
temperaturas brindan una protección contra
enfermedades transmitidas por la comida.
7
Page 38

INFORMACIÓN IMPORTANTE DE SEGURIDAD
LEA TODAS LAS INSTRUCCIONES
ANTES DE USAR
CÓMO EVITAR DAÑOS SOBRE EL ELECTRODOMÉSTICO
• Antes de usar la cocina por primera vez, aplique la
crema de limpieza recomendada sobre la superficie
cerámica de la cocina. Pula con una tela o estropajo
no abrasivo. Esto facilitará la limpieza al quitar la
suciedad de la cocción. La crema especial de la
cocina deja una capa protectora sobre el vidrio que
evita rayas y abrasiones.
• No use la superficie de cocción para trabajar o
guardar cosas.
• Evite que se produzcan daños sobre los bordes al
trasladar ollas y cacerolas alrededor de la cocina.
• No use las zonas de cocción con cacerolas vacías o
sin ollas ni cacerolas sobre dichas zonas.
• El vidrio cerámico es muy duro y resistente a
cambios extremos de temperatura, pero no es
irrompible. Puede sufrir daños si caen sobre el
mismo objetos particularmente duros o=
puntiagudos.
• Sea muy cuidadoso si usará ollas de hierro fundido
u otras ollas con extremos duros o ásperos. Al
mover las mismas se podrán producir marcas sobre
el vidrio.
• Si cae azúcar o una mezcla que contenga azúcar
sobre la zona caliente de cocción y se derrite, quite
la misma de inmediato, mientras aún se encuentra
caliente. Si se la deja enfriar, es posible que la
superficie sufra daños al quitar la misma. NOTA:
¡Corre el riesgo de sufrir quemaduras al utilizar el
raspador para vidrio sobre un área de cocción que
se encuentre caliente!
• Mantenga los objetos con riesgos de sufrir
derretimiento alejados de la superficie de vidrio
cerámico; por ejemplo, utensilios de plástico, papel
de aluminio o envoltorios de cocción. Si cualquier
otro material o comidas se derritieron en la
superficie de vidrio cerámico, se deberán limpiar en
forma inmediata.
ELIMINACIÓN DE ELECTRODOMÉSTICOS VIEJOS
A fin de proteger el medioambiente, es importante
que se eliminen los electrodomésticos viejos de la
forma correcta.
No se deberá deshacer del electrodoméstico del
•
mismo modo en que se deshace la basura del hogar.
• Puede obtener información sobre fechas de
recolección o lugares públicos para arrojar
deshechos a través del consejo u oficina de salud
medioambiental.
PRECAUCIÓN
Antes de deshacerse de electrodomésticos
viejos, asegúrese de hacer que ya no
funcionen a fin de que no se conviertan en un
elemento peligroso. Para hacer esto, solicite
a una persona calificada que desconecte el
electrodoméstico del circuito eléctrico de su
hogar.
ACTO DE REFORZAMIENTO DE LA INGESTA SEGURA DE
AGUA LIBRE DE TOXICOS
ADVERTENCIA:
California de causar cáncer. Lávese las manos después de manipular.
LEA Y SIGA ESTA INFORMACIÓN DE SEGURIDAD CUIDADOSAMENTE.
8
CONSERVE ESTAS INSTRUCCIONES
Este producto contiene quimicos conocidos por el Estado de
Page 39
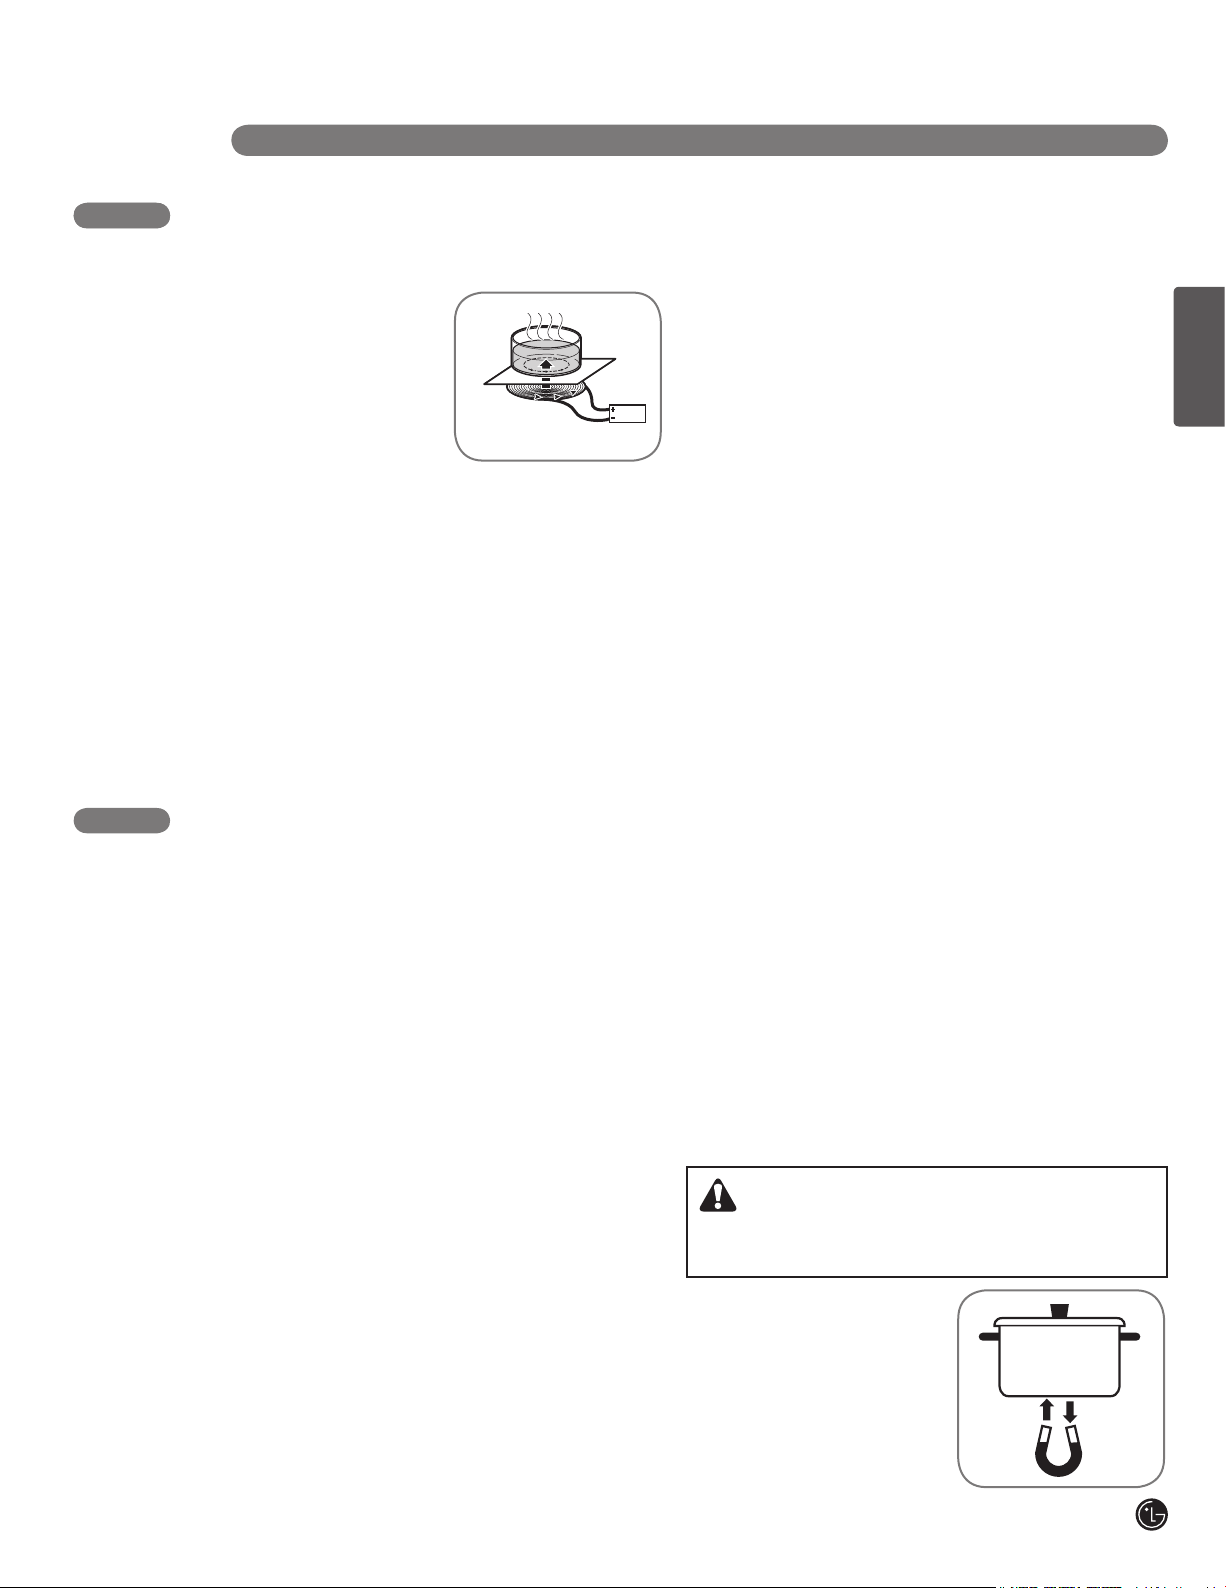
INTRODUCCIÓN A LA COCCIÓN POR INDUCCIÓN
COCCIÓN POR INDUCCIÓN
FUNCIONAMIENTO DE LA COCCIÓN
POR INDUCCIÓN
Debajo de la superficie de
cocción de vidrio cerámico se
encuentra una bobina de
inducción. La misma genera
campos magnéticos, los
cuales actúan sobre la base de
las ollas y cacerolas, cuando
otros métodos calentando primero el vidrio cerámico.
Esto significa que la base de la cacerola se calienta de
inmediato, ahorrando tiempo y dinero. Debido a que el
calor necesario para la cocción se genera directamente
sobre la base de la cacerola, la zona de cocción apenas
se calienta. Sólo recibe el calor que rebota desde la
base de la cacerola.
NOTA: Si no hay una olla o cacerola en la zona de
cocción, no se produce transferencia de energía
(calentamiento). Esto evita que las zonas de cocción se
puedan encender y calentar de forma accidental.
IMPORTANTE:
• Quite todas las cintas y envoltorios antes de usar
• Los campos electromagnéticos pueden afectar
• ¡No coloque objetos magnéticamente activos (por
• No coloque ningún objeto metálico (por ejemplo:
SELECCIÓN DE UTENSILIOS
ESPAÑOL
el electrodoméstico. Destruya las bolsas de
plástico y cartón luego de desempacar el
electrodoméstico. Nunca permita que los niños
jueguen con el material de empaque.
los circuitos electrónicos e interferir con radios y
teléfonos portátiles.
ejemplo: tarjetas de crédito, discos de
computadora, cassettes) sobre o cerca de la
superficie del vidrio cerámico mientras una o más
zonas de cocción se encuentren en uso!
cucharas, tapas de ollas) sobre las zonas de
cocción, ya que las mismas se pueden calentar
cuando las zonas de cocción se encuentren en
uso.
Los sensores magnéticos de la Zona de Cocción ubicados debajo de la superficie de la cocina requieren el
uso de utensilios fabricados con material magnético, a fin de iniciar el proceso de calentamiento sobre
cualquiera de las Zonas de Cocción. Al adquirir las cacerolas, busque aquellas que posean etiquetas donde el
fabricante indique que son aptas para uso con cocinas de inducción.
OLLAS Y CACEROLAS
• En principio, todas las ollas y cacerolas con base
magnética son aptas. Las mismas son de acero o
de hierro fundido.
• Las ollas de acero de un alto grado con una base
metálica mixta (tipo sándwich, es decir, de Tefal®
con una base de aluminio/cobre) son aptas sólo
para inducción si el fabricante lo indicó
expresamente de ese modo. En tal caso cuentan
con un material magnético en la base.
• Si desea usar un tipo de cacerola especial (por
ejemplo: a presión, para cocción lenta), siga las
instrucciones del fabricante y no use una olla
demasiado fina.
NOTA: Algunos utensilios pueden producir ruidos al
ser usados en zonas de cocción por inducción. No se
trata de un defecto de la cocina y su funcionamiento
no se verá afectado como resultado de esto.
PRUEBA DE IDONEIDAD:
Si no está seguro si una olla o cacerola es apta para el
uso con la cocina de inducción, podrá averiguarlo con
unas simples pruebas:
• Coloque una cacerola que contenga un poco de agua
(1/8ʺ–1/4ʺ [3–6mm) sobre la zona de cocción. Coloque
la zona de cocción en su máximo nivel (ajústela en 9).
PRECAUCIÓN
¡La base de las cacerolas aptas se calientan en pocos
segundos! El agua hervirá de forma rápida.
• También puede realizar el
control con un imán. Si el
mismo se mantiene
adherido a la base de la
cacerola, significa que es
apto para las zonas de
cocción por inducción.
9
Page 40

INTRODUCCIÓN A LA COCCIÓN POR INDUCCIÓN
SELECCIÓN DE UTENSILIOS
(continúa)
EVITE QUE SE PRODUZCAN RAYAS
Se recomienda usar siempre utensilios de acero
inoxidable de calibre grueso sobre la superficie de
la cocina de inducción. Esto ayudará a reducir la
posibilidad que se produzcan rayas sobre la
superficie cerámica. Los utensilios de baja calidad
pueden ocasionar rayas sobre la superficie de la
cocina. Los utensilios siempre se deben levantar
de la superficie de cocción de cerámica a fin de
evitar que se produzcan rayas. El deslizamiento de
cualquier tipo de utensilio sobre la cocina de
cerámica puede afectar la apariencia completa de
la misma. Con el paso del tiempo, el deslizamiento
de CUALQUIER tipo de utensilio sobre la cocina
de cerámica puede alterar la apariencia completa
de la misma. Finalmente, la acumulación de rayas
puede hacer que la limpieza de la superficie sea
dificultosa y que degrade la apariencia completa
de la cocina. También se pueden producir rayas a
partir de granos de arena (por ejemplo: luego de
lavar vegetales), los cuales son arrastrados con la
cacerola sobre la superficie de cocción.
USE UTENSILIOS CON FONDO PLANO
El utensilio debe tomar contacto completo con la
superficie del elemento de
cocción. Use cacerolas con
fondo plano cuyos tamaños
sean adecuados al elemento
de cocción y a la cantidad de
comida que se preparará.
Controle que sea plano
rotando una regla sobre el
fondo del utensilio.
PARA UN MEJOR RESULTADO:
Siempre siga las recomendaciones para un tipo y
tamaño de utensilio adecuado. Además:
• No use cacerolas sucias con grasa acumulada.
Siempre use cacerolas de fácil limpieza luego de
la cocción, y asegúrese que los fondos de las
mismas estén limpios y secos.
• Al cocinar con gran cantidad de líquido, use
cacerolas grandes de modo que no se produzca
hervor excesivo.
• No deje que las cacerolas hiervan
excesivamente. Esto podría ocasionar daños
permanentes tales como roturas, fusiones o
marcas que pueden afectar los utensilios de
cerámica. (Este tipo de daños no están cubiertos
por la garantía).
• Haga que el tamaño de la cacerola y la zona de
cocción coincidan con la cantidad de comida
preparada.
CONSEJOS PARA AHORRAR ENERGÍA:
• Siempre ubique las ollas y cacerolas antes de
encender la zona de cocción.
• Las zonas de cocción y utensilios sucios
consumen más electricidad.
• Siempre que sea posible, coloque la tapa con
firmeza sobre las ollas y cacerolas de modo que
queden completamente cubiertas.
10
Page 41
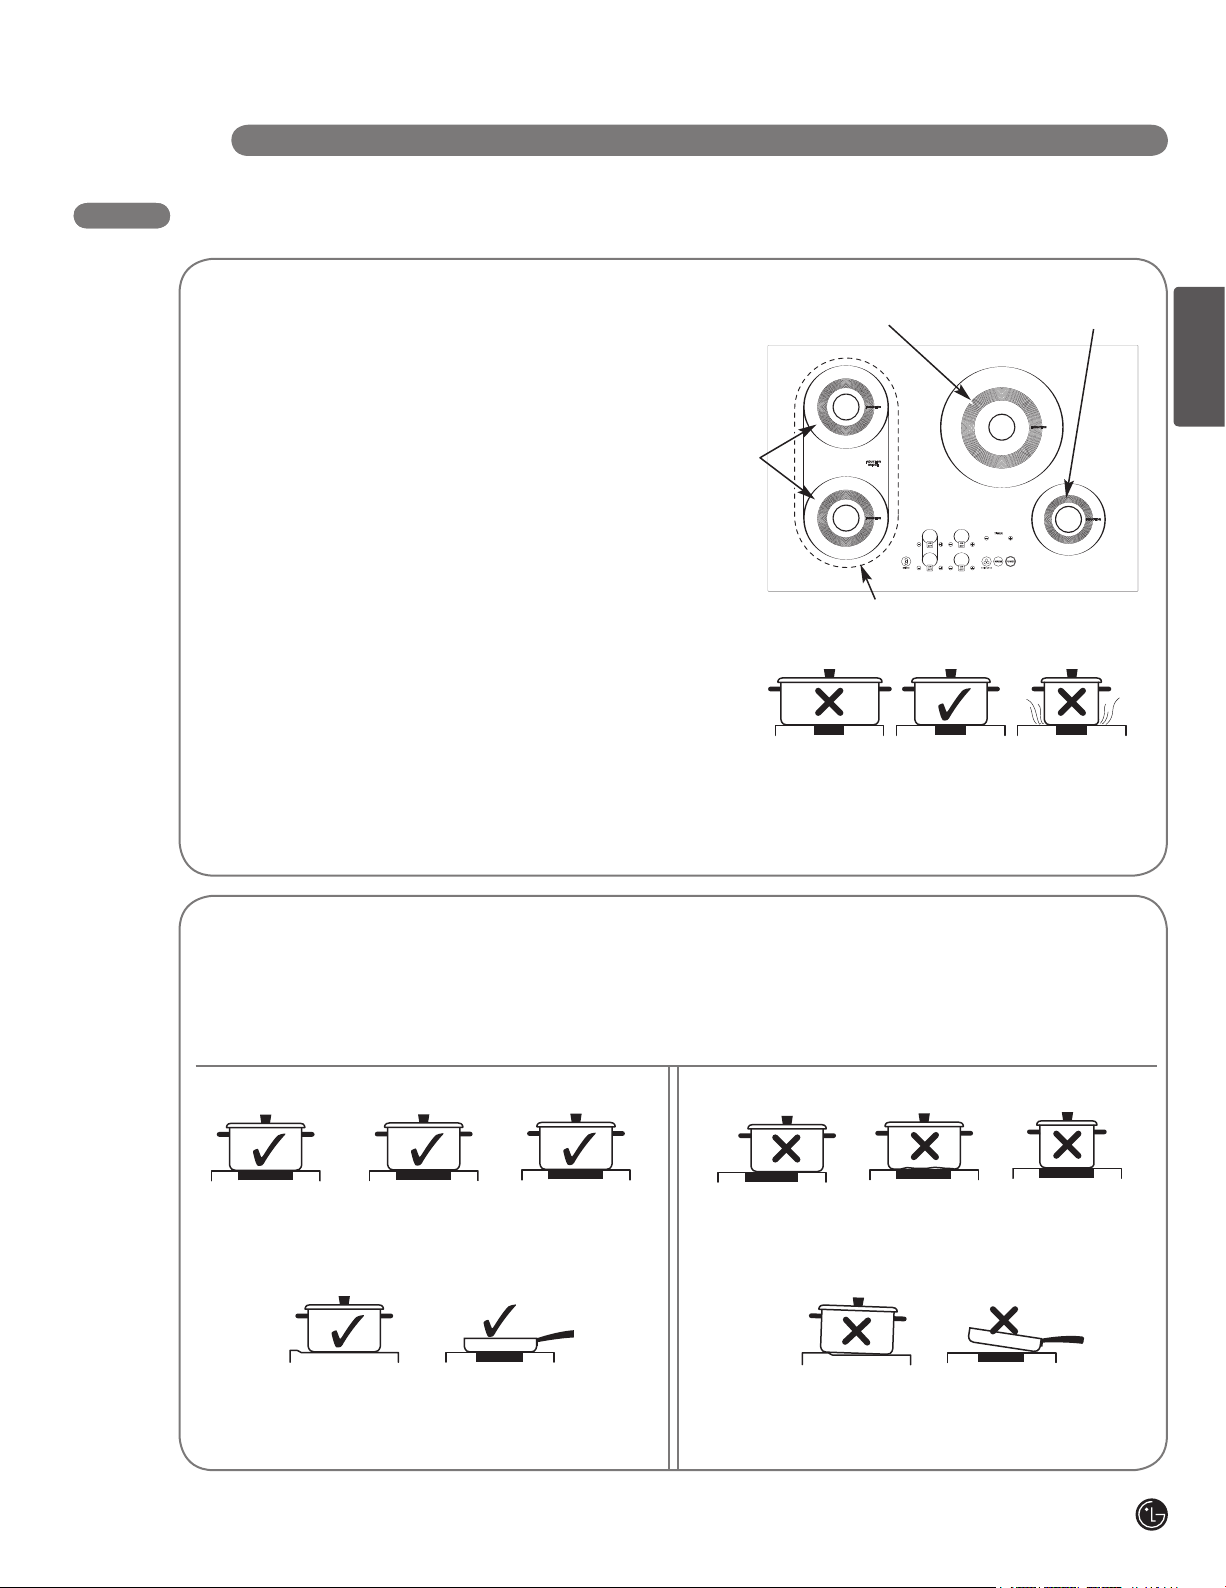
INTRODUCCIÓN A LA COCCIÓN POR INDUCCIÓN
SELECCIÓN DE UTENSILIOS
(continúa)
SELECCION DEL TAMAÑO
CORRECTO DE LA CACEROLA
• La cocina de inducción cuenta con 4 zonas
de cocción. Cada elemento requiere que el
tamaño de la cacerola sea mínimo para que
pueda ser usado en forma efectiva. El anillo
interior de cada zona de cocción es una guía
para enlazar de modo correcto el tamaño
mínimo de la cacerola. El fondo de la
cacerola deberá cubrir completamente el
anillo interior para lograr una cocción
adecuada.
• El anillo exterior más grueso en cada zona
de cocción ayuda a determinar el tamaño
MÁXIMO de la cacerola. Luego de ubicar el
utensilio en la cocina, asegúrese que el
utensilio no supere en más de 1/2ʺ (12,7mm)
la línea más gruesa de la zona de cocción.
La cacerola deberá tener un contacto TOTAL
con la superficie de vidrio, evitando que el
fondo de la cacerola tome contacto con el
borde metálico de la cocina.
cacerola min. =
53⁄4ʺ (145 mm)
Tamaño de cacerola min.
= 71⁄4ʺ (180mm)
Tamaño de
Sólo use la cacerola provista sobre la
parte del puente.
Si una cacerola fabricada del material correcto se
ubica de forma adecuada sobre cualquier de las
zonas de cocción pero es DEMASIADO
PEQUEÑA, la LUZ dla zona de cocción afectada
titilará y la cacerola no se calentará.
Tamaño de cacerola min.
= 5ʺ (125mm)
ESPAÑOL
SELECCIÓN Y UBICACIÓN DEL UTENSILIO
Es importante que se usen utensilios adecuados y que se los ubique de modo correcto sobre la cocina. Cualquiera
de las condiciones incorrectas que figuran a continuación podrá ser detectada por los sensores ubicados debajo de
la superficie cerámica de la cocina. Si esto sucede, una o más de las zonas de cocción no se calentarán y aparecerá
una F en la pantalla de la zona de cocción afectada. Corrija el problema antes de intentar usar la cocina.
CORRECTO INCORRECTO
El utensilio está
ubicado en forma
correcta sobre la
superficie de la zona
de cocción.
La cacerola reposa
completamente
sobre la superficie de
la cocina.
El fondo de la
cacerola es plano
y los costados
rectos.
La cacerola está
adecuadamente
equilibrada.
El tamaño de la
cacerola alcanza o
supera el tamaño
mínimo
recomendado para
la zona de cocción.
El utensilio no
está centrado
sobre la
superficie de la
zona de cocción.
El fondo de la cacerola
reposa sobre el borde de
la cocina o no reposa
completamente sobre la
superficie de la cocina.
El fondo o
laterales de la
cacerola son
curvos o
combados.
Las manijas
pesadas
producen la
inclinación de
la cacerola.
La cacerola no
alcanza el tamaño
mínimo requerido
para ser usado en
la zona de cocción.
11
Page 42

PARTES Y CARACTERÍSTICAS
PARTES Y CARACTERÍSTICAS DE SU COCINA
Es posible que las funciones y apariencias varíen con relación a su modelo a lo largo del manual.
2400W (Normal)
3300W (Aumentado)
1800W (Normal)
2400W (Aumentado)
Cocina de Cerámica: La nueva cocina de inducción
de LG cuenta con una superficie cerámica que
permanece más fría que las superficies cerámicas de
las cocinas convencionales, independientemente de
si se encuentra ENCENDIDA o APAGADA.
Riesgo de quemaduras:
Las zonas de cocción aparecen friás al estar
ENCENDIDAS y luego de haber sido APAGADAS.
La superficie de cerámica podrá permanecer
CALIENTE debido al calor residual
desde el utensilio.
Detector Magnético: El sensor de bobina detecta de
forma automática el utensilio y evita activaciones
accidentales.
Detección del Tamaño de la Cacerola: El sensor de
reconocimiento de la cacerola detecta y adapta de forma
automática las zonas de cocción al tamaño de la
cacerola que se está usando.
Mayor Eficiencia: La cocción por inducción se calienta
más rápido y al mismo tiempo consume menos energía.
La cocción por inducción lleva los líquidos a su punto de
hervor de manera rápida, permitiendo al mismo tiempo
un hervor lento y parejo.
12
PRECAUCIÓN
Controles electrónicos táctiles
transferido
1400W (Normal)
1800W (Aumentado)
zonas de Cocción por Inducción: Las zonas de
cocción por inducción debajo de la cocina cerámica
calientan la base de la cacerola de forma inmediata
sin calentar la cocina de vidrio cerámica primero. Las
dos zonas de tamaño mediano se pueden usar juntas
para cacerolas más grandes y apaisadas.
Controles Táctiles: Los botones táctiles de fácil uso
brindan un funcionamiento preciso.
Fácil Limpieza: La superficie de cocción de vidrio
cerámico y el control táctil facilitan la limpieza, ya que
no incluyen aberturas ni espacios donde se puede
producir la acumulación de grasa.
Pantallas de Control y Función: Las pantallas
digitales muestran las configuraciones actuales y le
advierten sobre superficies calientes de cualquier
calor residual dla zona de cocción correspondiente.
Apagado Automático de Seguridad: Todas las
zonas de cocción cuentan con la función de apagado
de seguridad, la cual apaga la zona de cocción si se
presiona el botón ENCENDIDO/ AGAGADO (ON/
OFF) pero no se selecciona ningún nivel dentro de
los 10 segundos.
Page 43

PARTES Y CARACTERÍSTICAS
CARACTERÍSTICAS DEL CONTROL TÁCTIL
ESPAÑOL
1 6
PUENTE: Active las dos zonas de cocción
izquierdas al mismo tiempo como una gran zona
de cocción.
Para activar la función de puente, toque esta
tecla a fin de activar y ajustar el nivel de energía
con las teclas o de cualquiera de las
zonas de cocción izquierdas.
TEMPORIZADOR: Al activarlo, el tiempo
2
restante se visualizará en la pantalla. Use las
teclas o para ajustar el temporizador.
3
BLOQUEO PARA NIÑOS: Mantenga la tecla
presionada durante 3 segundos para activar y
desactivar la función de bloqueo para niños.
4
CALIENTE: Esta tecla reduce de forma
automática el último elemento seleccionado que
se encuentre activo al nivel de configuración
más bajo.
5
ENCENDIDO: Presione la tecla ENCENDIDO
para ENCENDER o APAGAR la cocina. Cuando
esté ENCENDIDA, la cocina quedará en el modo
de espera hasta que se active un área de
cocción.
CONTROLES DE LAS ZONAS DE COCCIÓN:
Cada área de cocción cuenta con su propio
control, el cual se puede activar de forma
individual.
La tecla ENCENDIDO/APAGADO (ON/OFF)
activa la zona de cocción deseada.
Use las teclas or para configurar el nivel
de la zona de cocción activa de a y
(nivel más alto de intensidad). La pantalla del
control de la zona de cocción mostrará el nivel
seleccionado: a o
Indicador de Superficie Caliente: Luego de
usarlo, una aparecerá en la pantalla
indicadora del nivel de la zona de cocción, hasta
que la superficie de cocción se haya enfriado.
13
Page 44
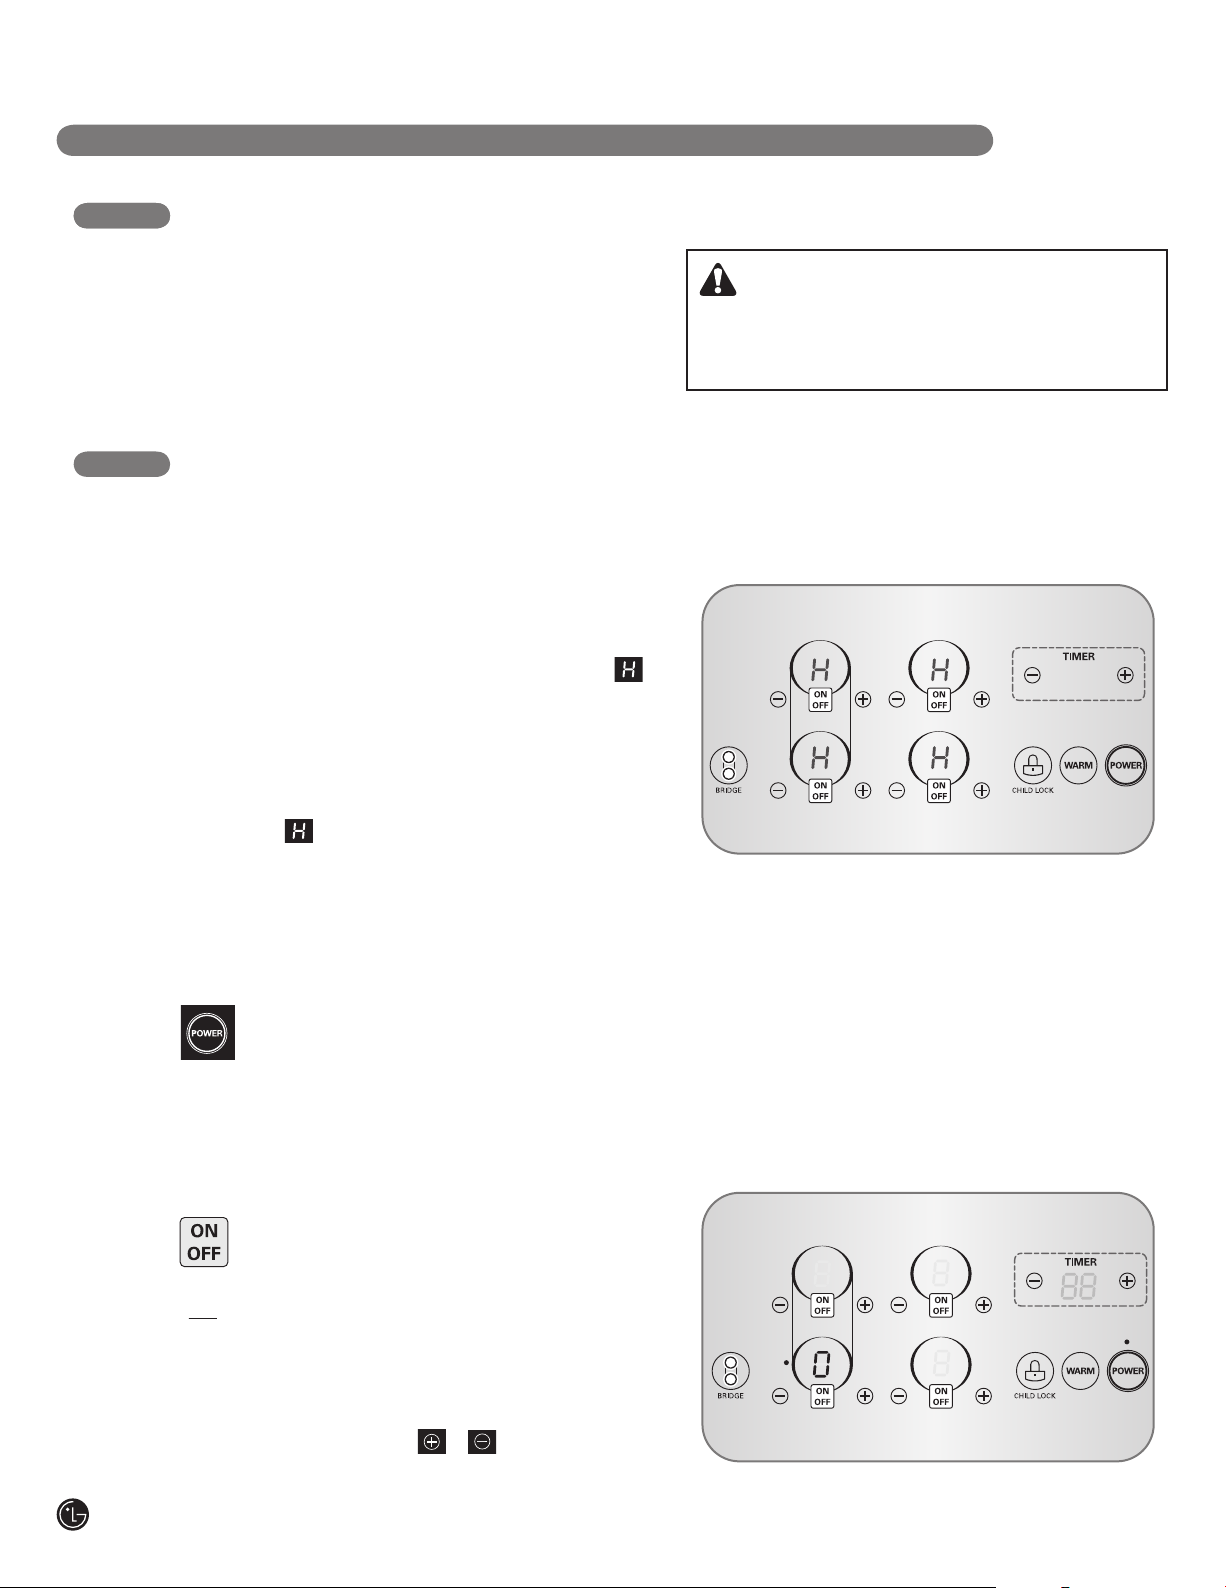
INSTRUCCIONES DE USO
ANTES DE USAR LA COCINA
Antes de usar la cocina por primera vez, limpie la
misma completamente con el limpiador incluido o
con un limpiador para cocinas de cerámica, de
acuerdo con las instrucciones de Cuidado y
Limpieza de esta guía. Esto ayudará a proteger la
superficie de cerámica y facilitará la limpieza en el
futuro.
CONFIGURACIÓN DE CONTROLES
Para usar las teclas de control táctil, toque la tecla
firmemente con la parte plana de la punta de su
dedo.
USO POR PRIMERA VEZ
La primera vez que se enchufe la cocina, una
aparecerá en la pantalla de cada área de cocción
durante 60 segundo o hasta que la tecla
ENCENDIDO (POWER) se toque durante
aproximadamente 2 segundos.
PRECAUCIÓN
Nunca use estropajos para fregar ni limpiadores
abrasivos. Los mismos pueden ocasionar daños
permanentes sobre la superficie de la cocina.
NOTA: La también aparecerá cuando vuelva
la corriente luego de un corte de luz.
ACTIVACIÓN DE LA COCINA
Encienda la cocina, toque la tecla
ENCENDIDO (POWER) durante
aproximadamente 2 segundos. El indicador
sobre la tecla se iluminará.
SELECTING THE COOKING ZONE
Para seleccionar la zona de cocción deseada, presione
la tecla ENCENDIDO/APAGADO (ON/OFF). La pantalla
para la zona de cocción seleccionada mostrará 0 y un
indicador se iluminará para indicar que la zona de
cocción está encendida pero que no se estableció el
nivel de intensidad.
NOTA: Una vez que se haya seleccionado la zona de
cocción con la tecla ENCENDIDO/APAGADO (ON/OFF)
el nivel de intensidad se deberá seleccionar dentro de
los 5 segundos con la tecla o . De otra forma, la
zona de cocción se apagará por razones de seguridad.
NOTA: Luego de encender la cocina presionando
la tecla de ENCENDIDO (POWER), deberá
seleccionar una de las zonas de cocción dentro de
los 20 segundos utilizando la tecla(s)
ENCENDIDO/APAGADO (ON/OFF). Si no se
realiza ninguna selección, la cocina se apagará por
razones de seguridad.
14
Page 45
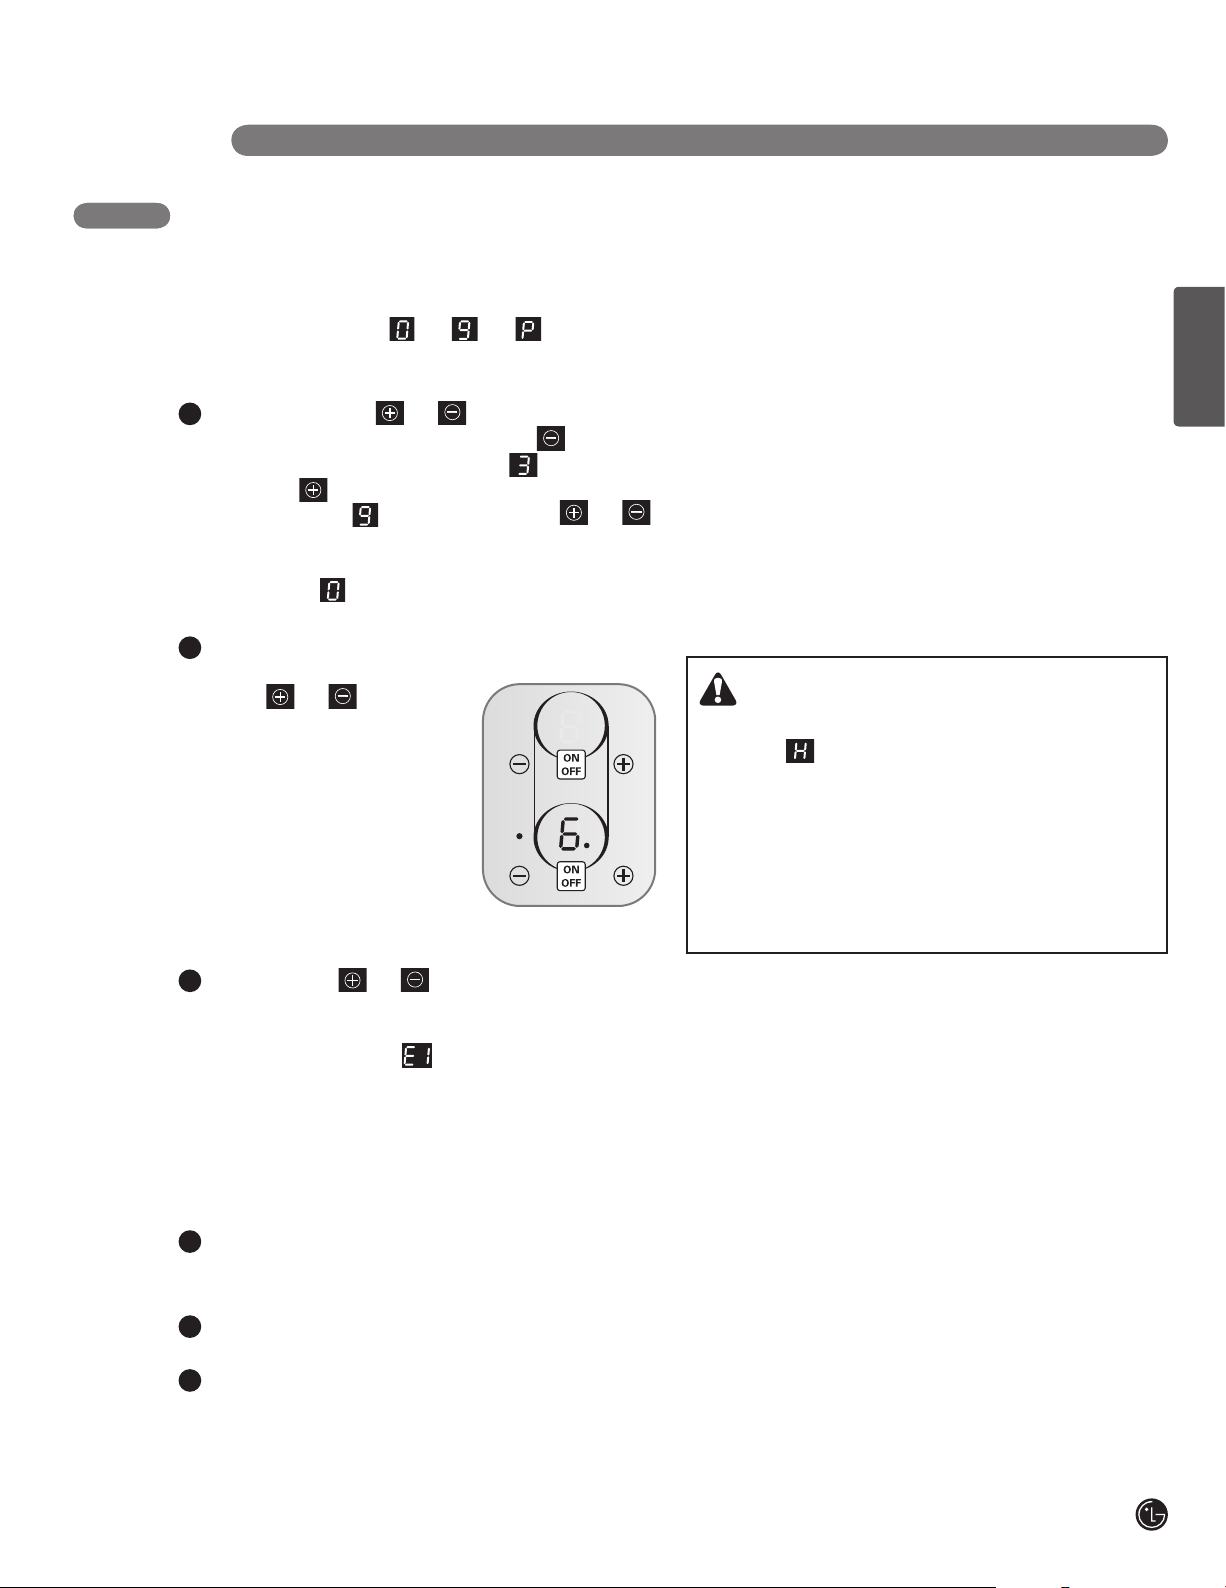
INSTRUCCIONES DE USO
CONFIGURACIÓN DE CONTROLES
(continúa)
AJUSTE EL NIVEL DE INTENSIDAD
Puede ajustar el nivel de intensidad de la zona de
cocción seleccionada a y (nivel más
alto de intensidad).
Para ajustar el nivel de intensidad:
1
Presione la tecla o de la zona de
cocción seleccionada. Si presiona el nivel
de intensidad se configurará en . Si
presiona el nivel de intensidad se
configurará en . Presione la tecla o
de la zona de cocción seleccionada para
aumentar o reducir el nicel de intensidad. Si
selecciona , la zona de cocción se apague
despues de 5 segundos.
2
Para realizar ajustes de nivel más rápido,
mantenga presionada la
tecla o hasta llegar
al ajuste deseado.
NOTA: Las configuraciones
normales de intensidad son
de 1/2 paso entre los
niveles de intensidad de 2 a
6 a fin de permitir una
cocción precisa. Un punto
aparecerá junto al número
para indicar un cambio de
1/2 paso en el nivel de intensidad.
3
Si las teclas or de la zona de cocción
se mantienen presionadas durante más de 10
segundos, la pantalla del temporizador mostrará
el mensaje de error . Para borrar este
mensaje de error, presione la tecla
ENCENDIDO/APAGADO (ON/OFF) de la zona
de cocción que estaba configurando. Este
mensaje NO se relaciona con la tecla del
temporizador.
Apague el área de cocción:
1
Una vez completada la cocción, presione la
tecla ENCENDIDO/APAGADO (ON/OFF) para
apagar el área de cocción.
La pantalla correspondiente al área de cocción
2
se apagará.
3
Si se presiona la tecla de ENCENDIDO
(POWER) en lugar de ENCENDIDO/ APAGADO
(ON/OFF), se apagará toda la cocina.
NOTA:
• Si se mueve el utensilio o cacerola del centro de
cualquier zona de cocción activa por cualquier
razón, un sensor detectará dicha acción y la zona
de cocción ya no emitirá calor. La pantalla de
dicha zona de cocción mostrará el último nivel de
intensidad en esa área de cocción.
• La zona de cocción recordará el nivel de
intensidad configurado hasta 90 segundos antes
de que la zona de cocción se apague de forma
automática.
ADVERTENCIA
La cocina cuenta con un indicador de calor
residual para cada zona de cocción. Este
indicador advertirá que esta zona fue usada y
que aún está emitiendo calor suficiente como
para producir quemaduras. Evite tocar el
mechero cuando aparece este indicador. Aunque
la cocina esté en posición de APAGADO (OFF),
la Hpermanecerá hasta que la cocina se haya
enfriado.
ESPAÑOL
15
Page 46

INSTRUCCIONES DE USO
CONFIGURACIÓN DE CONTROLES
NIVEL SUPERIOR DE INTENSIDAD
El nivel más alto de intensidad (power boost), fue
diseñado para calentar o hervir grandes cantidades
de forma rápida. El nivel más alto funcionará
durante un tiempo máximo de 12 minutos. Luego
de 12 minutos, revertirá la intensidad
automáticamente a 9.
(cont.)
CALIENTE
La cocina cuenta la una función de configuración
CALIENTE (WARM), la cual funciona en la última
zona de cocción usada en el nivel de intensidad
más BAJO (LOW).
Para activarla:
Presione la tecla CALIENTE (WARM) y la última
zona de cocción usada se configurará en BAJO
ACTIVACIÓN DEL NIVEL MÁS ALTO
1
Encienda la zona de cocción deseada con la
tecla ENCENDIDO/APAGADO (ON/OFF) de
dicha zona.
2
Al presionar la tecla aparecerá el .
3
Al presionar la tecla nuevamente aparecerá
(LOW). Aparecerá la en la pantalla.
Para desactivarla:
Para desactivar la función CALIENTE (WARM) y
recomenzar la cocción normal, presione la tecla
y aparecerá la .
GUÍA DE NIVEL DE INTENSIDAD
la .
NOTA: La función de nivel más alto se activara
durante un máximo de 12 minutos. Al finalizar el
ciclo de intensidad más alto, la zona de cocción
Configuración
9 o el Nivel
más Alto
regresará por omisión al nivel de intensidad de
. La función del nivel más alto NO se puede
usar en las zonas de cocción del frente y de la
parte trasera del mismo lado en forma
7-9
simultánea.
4
Para desactivar la función de nivel más alto y
6-7
regresar la intensidad al nivel normal, toque la
tecla .
NOTA: A fin de proteger los componentes
4-5
electrónicos interiores de la cocina, esta última
podrá desactivar de forma automática la función
3-4
del nivel más alto de intensidad y regresar al
nivel normal antes de haber transcurrido los 12
minutos. Esto es normal.
NOTA: Los procesos electrónicos involucrados
con la cocción por inducción producen algunos
ruidos de fondo atípicos. Estos ruidos son
2-3
normales y son parte del proceso de cocción
por inducción. Se debe tener en cuenta que
1–2, L
estos ruidos son aún más notorios al cocinar
con EL NIVEL MÁS ALTO DE INTENSIDAD.
Calentar de
forma rápida
Dorado intenso,
fritura de grasas
Asar, freír
Hervir, cocción
general
Vapor
Hervor a
fuego lento
Derretimiento
Usada paraFunción
Que los líquidos lleguen
lleguen al punto de hervor.
Dorar carnes, calentar
aceite para freír grasas, rehogar,
mantener un hervor rápido para
grandes cantidades de líquido.
Freír carnes, costillas,
panqueques, salsas, huevos.
Cocinar cantidades grandes,
sopas y estofados, tomates al
vapor, cocinar carne o caldo.
Cocinar vegetales al vapor
dorar carnes a fuego lento.
Hervir a fuego lento arroz
o platos a base de leche,
cocinar al vapor cantidades
más pequeñas de papas
y vegetales, calentar carnes
listas para servir.
Omelettes esponjosos,
mantener platos calientes,
derretir manteca o chocolate.
16
0
APAGADO (OFF)
Configuración de Apagado (Off)
.
NOTA: Estas configuraciones son pautas recomendadas
para la cocción. Es posible que deba configurar el nivel
de intensidad de acuerdo
al tipo de comida y
cacerola.
Page 47

INSTRUCCIONES DE USO
USO DE LAS zonas DE COCCIÓN DEL PUENTE
ÁREA DE COCCIÓN DEL PUENTE
Las dos zonas de cocción restantes se pueden usar
juntas como una sola área de cocción utilizando la
función Puente (Bridge). Esto le permitirá cocinar con
cacerolas más grandes y apaisadas.
NOTA: Al usar la cacerola provista para el área del
puente, es importante frotar la misma con aceite a fin
de evitar quemaduras o adherencias no deseadas.
ACTIVACIÓN DEL PUENTE ÁREA DE
COCCIÓN
Presione la tecla PUENT (BRIDGE). El
indicador sobre la tecla se iluminará.
Presione la tecla o para que cualquiera
de las zonas de cocción izquierdas ajusten el nivel
de intensidad para ambas zonas de cocción.
ESPAÑOL
NOTA:
• Use la cacerola provista para el área del puente SÓLO sobre el área de cocción del puente.
• Para adquirir cacerolas para el puente adicionales o de reemplazo, llame al 1-800-243-0000 y elija la
opción adecuada del menú. O visite nuestro sitio web en http://us.lgservice.com.
AJUSTE DEL TEMPORIZADOR
La función de temporizador puede ser de ayuda si
es necesario realizar la cocción de una receta
durante un tiempo específico. El temporizador se
puede configurar entre 1 y 99 minutos. Una vez
configurado, la pantalla digital entre las teclas
o comenzará la cuenta regresiva de los
minutos restantes.
USO DEL TEMPORIZADOR
Presione las teclas o debajo de la palabra
1
TEMPORIZADOR (TIMER). Cada vez que presione aumentará
o disminuirá el tiempo en un minuto, de 1 a 99 minutos.
También puede mantener presionado o para
aumentar o disminuir la intensidad. La pantalla del temporizador
se iluminará.
2
Una vez que haya configurado el tiempo deseado, la pantalla
dejará de estar iluminada y el temporizador comenzará la
cuenta regresiva, una vez que no se haya tocado ninguna tecla
durante 5 segundos. Cuando el temporizador llegue a , se
escuchará un pitido largo que indicará que finalizó el conteo.
NOTE: La función de temporizador sólo cuenta por
minutos. NO cumple la función de ENCENDIDO
(ON) o APAGADO (OFF) de la cocina.
CÓMO CANCELAR EL TEMPORIZADOR
1
Para cancelar el temporizador, toque las teclas
y del TEMPORIZADOR (TIMER) al mismo
tiempo, O Mantenga presionada la tecla o
hasta que aparezca en la pantalla.
2
La pantalla del temporizador se apagará.
17
Page 48

INSTRUCCIONES DE USO
USO DEL BLOQUEO PARA NIÑOS
Puede bloquear la cocina totalmente en cualquier
momento cuando no esté en uso.
CONFIGURACIÓN DEL BLOQUEO PARA
NIÑOS
Para configurar la función de BLOQUEO PARA
NIÑOS (CHILD LOCK) la cocina deberá estar
apagada. Si no se encuentra apagada, mantenga
presionada a tecla de ENCENDIDO (POWER) durante
aproximadamente 2 segundos. El indicador sobre la
tecla de ENCENDIDO (POWER) se apagará.
Mantenga presionada la tecla BLOQUEO
PARA NIÑOS (CHILD LOCK) durante 3
segundos. La luz indicadora sobre la tecla
BLOQUEO PARA NIÑOS (CHILD LOCK)
se encenderá a fin de indicar que la cocina
está bloqueada.
OTRAS FUNCIONES
INTERCAMBIO DE ENERGÍA
La cocina está equipada con cuatro zonas de cocción
por inducción dentro de dos secciones para calentar.
Las zonas de cocción derechas e izquierdas cuentan
con dos inversores de inducción independientes – un
inversor para cada una de las dos secciones para
calentar. Dos zonas de cocción de una sección para
calentar comparten la energía de un inversor. Esto se
llama intercambio de energía (power sharing). Por
ejemplo, si está cocinando sobre ambas zonas de
cocción derechas, se mantendrá el último nivel de
intensidad (power level), mientras que la primera área
de cocción podrá experimentar una mínima reducción
del nivel de intensidad.
Bloquear la cocina evitará que las zonas de
cocción se enciendan en forma accidental.
CÓMO CANCELAR EL BLOQUEO PARA
NIÑOS
Para apagar la función de BLOQUEO
PARA NIÑOS (CHILD LOCK), mantenga
presionada la tecla BLOQUEO PARA
NIÑOS (CHILD LOCK) durante 3
segundos. La luz indicadora sobre la tecla
se apagará y la cocina podrá ahora ser
usada normalmente.
para dos cacerolas en utilisando dos sección para
calentar. Ubicando una cacerola en una de las zonas
de cocción de la sección izquierda y la otra cacerola
en una de las zonas de cocción de la sección
derecha.
18
CONSEJOS SOBRE INTERCAMBIO DE ENERGÍA
Recuerde configurar el nivel de energía para el ítem
de comida que desee mantener para el final en una
cocción constante. Al usar dos zonas de cocción,
puede permanecer un nivel de energía constante
APAGADO AUTOMÁTICO
Si la zona de cocción se usa de forma constante
durante más de 17 horas y la configuración de control
no varía, la zona de cocción se apagará de forma
automática.
Sección de
cocción izquierda
Sección de
cocción derecha
CONTROL AUTOMÁTICO DEL NIVEL DE
INTENSIDAD
Es posible que el nivel de intensidad que aparece sea
diferente del nivel real en el rango de temperatura
alta. A fin de evitar el sobrecalentamiento de la
cocina, el nivel de intensidad se controla de forma
automática.
Page 49

LIMPIEZA DE LA COCINA
CUIDADO Y LIMPIEZA
La limpieza general sobre superficies de cocción
de vidrio cerámico de inducción es
considerablemente más fácil que sobre superficies
de calor radiante.
NOTA:
A fin de evitar la activación accidental de los
controles, se recomienda que configure la función
de BLOQUEO PARA NIÑOS (CHILD LOCK) antes
de efectuar la limpieza
IMPORTANTE:
• Los agentes de limpieza no deben tomar contacto
con la superficie de vidrio cerámico caliente.
Todos los agentes de limpieza se deben eliminar
completamente con agua potable.
• No utilice limpiadores agresivos tales como
rociadores para horno o parrilla, limpiadores
ásperos que producen desgaste ni limpiadores
para ollas que sean abrasivos.
• Limpie la superficie de vidrio cerámico luego de
cada uso cuando esté caliente al tacto o fría. Esto
evitará que los derrames se quemen. Quite
marcas de agua, grasa o decoloración con un
raspador para vidrio y un limpiador para vidrio
cerámico.
NOTA:
Puede usar raspadores de vidrio o limpiadores de
vidrio cerámico que encontrera en su tienda local
de productos de este tipo.
CÓMO ELIMINAR MUCHA SUCIEDAD
Para eliminar comida que hirvió o manchas difíciles, use un
raspador para vidrio.
1
Sostenga el raspador para vidrio en un ángulo de
aproximadamente 45° sobre la superficie de vidrio
cerámico.
Elimine la suciedad deslizando la hoja sobre la zona.
2
Use un limpiador de vidrio cerámico del tipo descrito en
3
LIMPIEZA GENERAL.
ESPAÑOL
SUCIEDAD PROBLEMÁTICA
1
Elimine azúcar, plástico derretido, papel de aluminio u
otros materiales que se derriten con un raspador para
vidrio de forma inmediata y mientras se encuentren
calientes. Si no realiza esta acción, se podrá ocasionar
daños permanentes sobre la superficie de la cocina. Si
la zona de cocción ya se enfrió, caliente la misma
nuevamente.
IMPORTANTE: Corre el riesgo de sufrir quemaduras al
utilizar el raspador para vidrio sobre un área de cocción
que se encuentre caliente. Use un protector y un guante
para horno.
LIMPIEZA GENERAL
1
Una vez fría, limpie la superficie de vidrio
cerámico con un trapo húmedo y una cantidad
pequeña de limpiador de vidrio cerámico.
2
Seque con un trapo seco.
3
Una vez por semana, limpie totalmente toda la
superficie de vidrio cerámico con un limpiador de
vidrio cerámico comercialmente disponible.
Luego limpie la superficie de vidrio cerámico con
4
un trapo limpio y suave, humedecido con agua
potable y pula y seque con un trapo limpio sin
hilachas.
2
Luego limpie la cocina normalmente una vez que esté
fría.
NOTA: Las rayas o marcas oscuras sobre la superficie del
vidrio cerámico ocasionadas por la base de una cacerola
con puntas filosas no se podrán eliminar. Sin embargo, las
mismas no impiden el buen funcionamiento de la cocina.
19
Page 50

INSTRUCCIONES DE INSTALACIÓN
LA INSTALACIÓN Y REPARACIÓN DEBERÁ SER REALIZADA POR UN INSTALADOR
CALIFICADO.
IMPORTANTE: GUARDE ESTAS INSTRUCCIONES PARA USO DEL INSPECTOR DE
ELECTRICIDAD LOCAL.
LEA Y GUARDE ESTAS INSTRUCCIONES PARA REFERENCIA FUTURA.
ANTES DE COMENZAR
Lea estas instrucciones en su totalidad y
atentamente.
NOTAS PARA EL INSTALADOR:
• Lea todas las instrucciones que aparecen en estas
instrucciones de instalación antes e instalar la cocina.
• Retire el material de empaque antes de conectar la
cocina al enchufe.
• Cumpla con todos los códigos y ordenanzas
gubernamentales.
• Sólo ciertos modelos de cocinas se pueden instalar
sobre ciertos modelos de hornos eléctricos
incorporados.
• Asegúrese de que estas instrucciones queden en
manos del comprador.
DESEMPAQUE DE LA COCINA
Desempaque e inspeccione visualmente
1
cualquier daño o componentes faltantes de la
cocina.
NOTA PARA EL CONSUMIDOR:
Guarde esta Guía del Usuario e Instrucciones de
Instalación para referencia futura.
NOTA: Este electrodoméstico deberá estar conectado a
tierra de forma adecuada. Aquellos daños ocasionados
por no cumplir con estas instrucciones no estarán
cubiertos por la garantía de la cocina.
Asegúrese de guardar la botella del limpiador y acondicionador
2
que se encuentran dentro de la bolsa con documentación, en un
lugar donde el usuario pueda encontrarla con facilidad. Es
importante que la cocina de vidrio cerámico se precaliente antes
de usar. Lea la sección de CUIDADO Y LIMPIEZA.
20
ESPECIFICACIONES TÉCNICAS
DIMENSIONES DE LA COCINA
Ancho 307/8ʺ (783 mm)
Profundidad 21
Altura 2
3
/4ʺ (552 mm)
3
/16ʺ (56 mm)
DIMENSIONES DE LA BASE DE APOYO
Ancho 293/8ʺ (746 mm)
Profundidad 20
1
/4ʺ (515 mm)
ESPECIFICACIONES ELÉCTRICAS
Voltaje de conexión:
240/208 VAC, 60 Hz.
Carga de corriente máxima:
7.4 kW/6.7 kW
ZONAS DE COCCIÓN
Posición
Frente Izquierdo
Parte Trasera
Izquierda
Frente Derecho
Parte Trasera
Derecha
Diámetro
7ʺ (180 mm)
7ʺ (180 mm)
6ʺ (150 mm)
1
/4ʺ (260 mm)
10
Potenciá *
1800W
(2400W Nivel Máximo)
1800W
(2400W Nivel Máximo)
1400W
(1800W Nivel Máximo)
2400W
(3300W Nivel Máximo)
Page 51

INSTRUCCIONES DE INSTALACIÓN
A
B
I
J
C
D
H
E
F
G
L
M
K
PREPARACIÓN DEL LUGAR DE INSTALACIÓN
INFORMACIÓN IMPORTANTE DE INSTALACIÓN
• Todas las cocinas eléctricas usan un cable de tres o
cuatro polos, de una sola fase, 240/208 voltios, 60
hertz, con suministro eléctrico a tierra de AC
(corriente alterna).
30” Min.
(76.2 cm)
Entrada de aire fresco**
Escape de aire**
• Se debe mantener una distancia mínima de 30ʺ
(76.2 cm.) entre la cocina y los muebles sobre ésta.
** No obstruya estas áreas.
ESPAÑOL
Unidad
Pulg.
mm
Escape de aire**
4" X 8" (10.2 cm x 20.3 cm)
abertura para cable blindado
si hay un panel presente.
A B D E H I L M
3013/
783
21
16
552
C
3
2
/
4
56
13
3
28
/
16
732.2
5
19
/
/
16
8
498
F G J
Min
29
746
3
29
/
8
749
Min Min MinMax MaxMax
518
13
3
/
/
16
8
20
1
1
20
/
2
515
20
/
4
5
24
1
/
16
33
610
30
762
K
3
4
106
/
16
1
1
/
2
3824610
Todas las dimensiones están expresadas en pulgadas y milímetros (mm.).
Deje un espacio de 2ʺ (5 cm.) debajo de la abertura del cable blindado a fin dejar espacio para el
cable eléctrico y para la instalación de la caja de empalmes sobre la pared en la parte trasera de la
cocina.
21
Page 52

INSTRUCCIONES DE INSTALACIÓN
J
F
G
I
L
M
H
K
DIMENSIONES Y DESPEJE
El gabinete de la parte Superior no deberá
superar una profundidad máxima de 13Ó (33 cm.)
Min. distancia
30" (76.2 cm.) min. de
despeje entre la parte
superior de la plataforma de
la cocina y la parte inferior
del gabinete de madera o
metal sin protección
( 45.7 cm)
24" (61 cm.) min. cuando la
parte inferior de madera o
metal del gabinete está
protegida por no menos\ de
cartón de retardo de Incendios
de\ 1/8” cubierto con no menos
que una hoja de acero
Inoxidable Nº 28 MGS, 0.015Ó
(0.4 mm.), de aluminio de
0.024 (0.6 mm.) o de cobre de
0.020 (0.5 mm.).
24"
(61 cm)
PRECAUCIÓN
A fin de eliminar el riesgo de
quemaduras o incendios al
alcanzar superficies calientes, no
se deberá usar el espacio de
almacenamiento del gabinete
ubicado sobre la cocina. De haber
un gabinete de almacenamiento,
el riesgo se puede reducir
instalando una campana de salida
de aire con proyección horizontal
a 5“ (12.7 cm.) como mínimo del
frente de los gabinetes.
recomendada entre el
extremo trasero del
apoyo y de la superficie
combustible más
cercana sobre la base
18"
Ubicación aproximada de la caja de
empalmes
10"
( 25.4 cm)
Modelo H L
30ʺ 71/2ʺ(191mm) 11/2ʺ(38mm)
(30.5 cm)
12"
Min. desde el extremo de la
cocina hasta la pared
combustible más cercana
(sobre cualquier lado de la
unidad
Se debe dejar un espacio vacío debajo
de la cocina por cuestiones de instalación
22
PRECAUCIÓN
Es muy importante mantener una
distancia de 2
encimera y el horno.
3
/4” (70 mm) entre la
Espacio recomendado entre la encimera y el horno
23/4” (70 mm)
Page 53

INSTRUCCIONES DE INSTALACIÓN
CONEXIONES ELÉCTRICAS
INSTRUCCIONES IMPORTANTESDE
SEGURIDAD
• Asegúrese que su cocina sea instalada y conectada
a tierra de forma adecuada por un instalador o
técnico calificado.
• La cocina deberá estar conectada a tierra de
acuerdo con los códigos locales o, en su ausencia,
con el Código Nacional de Electricidad ANSI/NFPA
Nº 70 – última edición en los Estados Unidos.
ADVERTENCIA
El encendido eléctrico de la cocina deberá estar
apagado mientras se realizan las conexiones de
línea. Si esto no se cumple, se pueden sufrir
heridas personales graves o la muerte.
REQUISITOS ELÉCTRICOS
Cumpla con todos los códigos y ordenanzas
gubernamentales.
1
Se requiere un cable eléctrico de una fase de tres
o cuatro polos de 120/240 o 120/208 voltios, 60
Hz, AC (corriente alterna) en un circuito separado
con fusible en ambos lados de la línea (se
recomienda un fusible de retardo de tiempo o un
disyuntor). NO use un fusible neutro. El tamaño
del fusible no deberá exceder el promedio del
circuito del electrodoméstico especificado en la
placa.
2
Esta unidad puede consumir hasta 7,400 W en
240 VAC. Se debe usar un disyuntor de 40 Amp
con un cable de calibre nº 8 AWG.
NOTA: Los tamaños de los cables y las
conexiones deben ser acordes al tamaño del
fusible y al promedio que figura en la placa del
electrodoméstico, de acuerdo con el Código
Nacional de Electricidad ANSI/NFPA Nº 70 –
última edición y códigos y ordenanzas locales.
CÓMO BRINDAR LA CONEXIÓN
ELÉCTRICA
Instale la caja de empalmes debajo del gabinete y
extienda un cable de 120/240 o 120/208 voltios, de
AC (corriente alterna) desde el panel del circuito
principal.
NOTA: NO conecte el cable al panel del circuito en
esta oportunidad.
3
El electrodoméstico se debe conectar a la caja del
fusible de desconexión (o disyuntor), a través de
un cable enfundado no metálico y blindado que
sea flexible. El cable blindado y flexible que se
extiende del electrodoméstico se debe conectar
directamente a la caja de empalmes conectada a
tierra. La caja de empalmes se deberá ubicar
como se muestra en la página 22, con la mayor
soltura posible del cable que queda entre la caja y
el electrodoméstico, de modo que se pueda mover
en caso de necesitar reparaciones.
Se deberá brindar un amortiguador con refuerzos
4
adecuado a fin de ajustar el cable blindado y
flexible a la caja de empalmes.
ESPAÑOL
ADVERTENCIA
No se deberá usar un prolongador con este
electrodoméstico. El uso del mismo podrá
ocasionar un incendio, descarga eléctrica u otras
heridas personales.
23
Page 54

INSTRUCCIONES DE INSTALACIÓN
CONEXIONES ELÉCTRICAS
(cont.)
CONEXIÓN ELÉCTRICA
Conecte el cable blindado y flexible que se extiende
desde la unidad de la superficie hasta la caja de
empalmes, utilizando un amortiguador de refuerzo
adecuado sobre el lugar por donde ingresa el cable
blindado a la caja de empalmes. Luego realice la
conexión eléctrica de la siguiente manera.
Este equipo requiere que se realice una conexión a
tierra.
Este electrodoméstico se fabricó con un cable de
corriente y un cable a tierra conectado de color verde o
cobre.
NOTA PARA EL ELECTRICISTA:
Las puntas del cable blindado suministradas con el
electrodoméstico son de clasificación UL para conexión
a un cableado hogareño de calibre más grande. El
aislante de las puntas resiste a temperaturas mucho
más altas que las estimadas para el cableado hogareño.
La capacidad de transmisión de corriente del cable
conductor depende del nivel de temperatura del aislante
alrededor del cable, y no del calibre del cable
únicamente.
WARNING
DO NOT ground to a gas supply pipe. DO NOT
connect to electrical power supply until
appliance is permanently grounded. Connect
the ground wire before turning on the power.
WARNING
This appliance is equipped with a copper
conductor flexible cable. If connection is made
to aluminum house wiring, use only special
connectors which are approved for joining
copper and aluminum wires in accordance with
the National Electrical Code and local codes
and ordinances. Improper connection of
aluminum house wiring to copper leads can
result in a short circuit or fire. Follow the
connector manufacturer’s recommended
procedure closely.
DONDE LOS CÓDIGOS LOCALES PERMITEN LA CONEXIÓN DEL CONDUCTOR A TIERRA
DEL ELECTRODOMÉSTICO AL CABLE NEUTRO (BLANCO)
Cumpla con todos los códigos y ordenanzas
gubernamentales.
1
Desconecte el suministro de corriente.
2
En la caja del disyuntor, la caja del fusible o la
caja de empalmes, conecte los cables del
electrodoméstico y al suministro de energía
como se muestra.
ADVERTENCIA
No podrá conectar a tierra la cocina a través del
cable neutro (blanco) si la misma se usa en una
instalación de circuito derivado nueva (1996 NEC),
casa móvil, vehículo de recreación o donde los
códigos locales no permitan la conexión a tierra a
través del cable neutro (blanco). Cuando la
conexión a tierra a través del cable neutro (blanco)
esté prohibida, se deberá usar un cable de conexión
de cuatro polos. No cumplir con esta advertencia
podrá ocasionar como resultado electrocutamiento
u otras heridas personales graves.
3-CAJA DE EMPALME CON CABLE
A TIERRA
Cable del suministro de
corriente
Cable blanco
(neutro)
Cables
rojos
Cable verde (a tierra)
Cable del electrodoméstico
Cables
negros
Caja de
empalmes
Conexión con
clasificación UL
24
Page 55
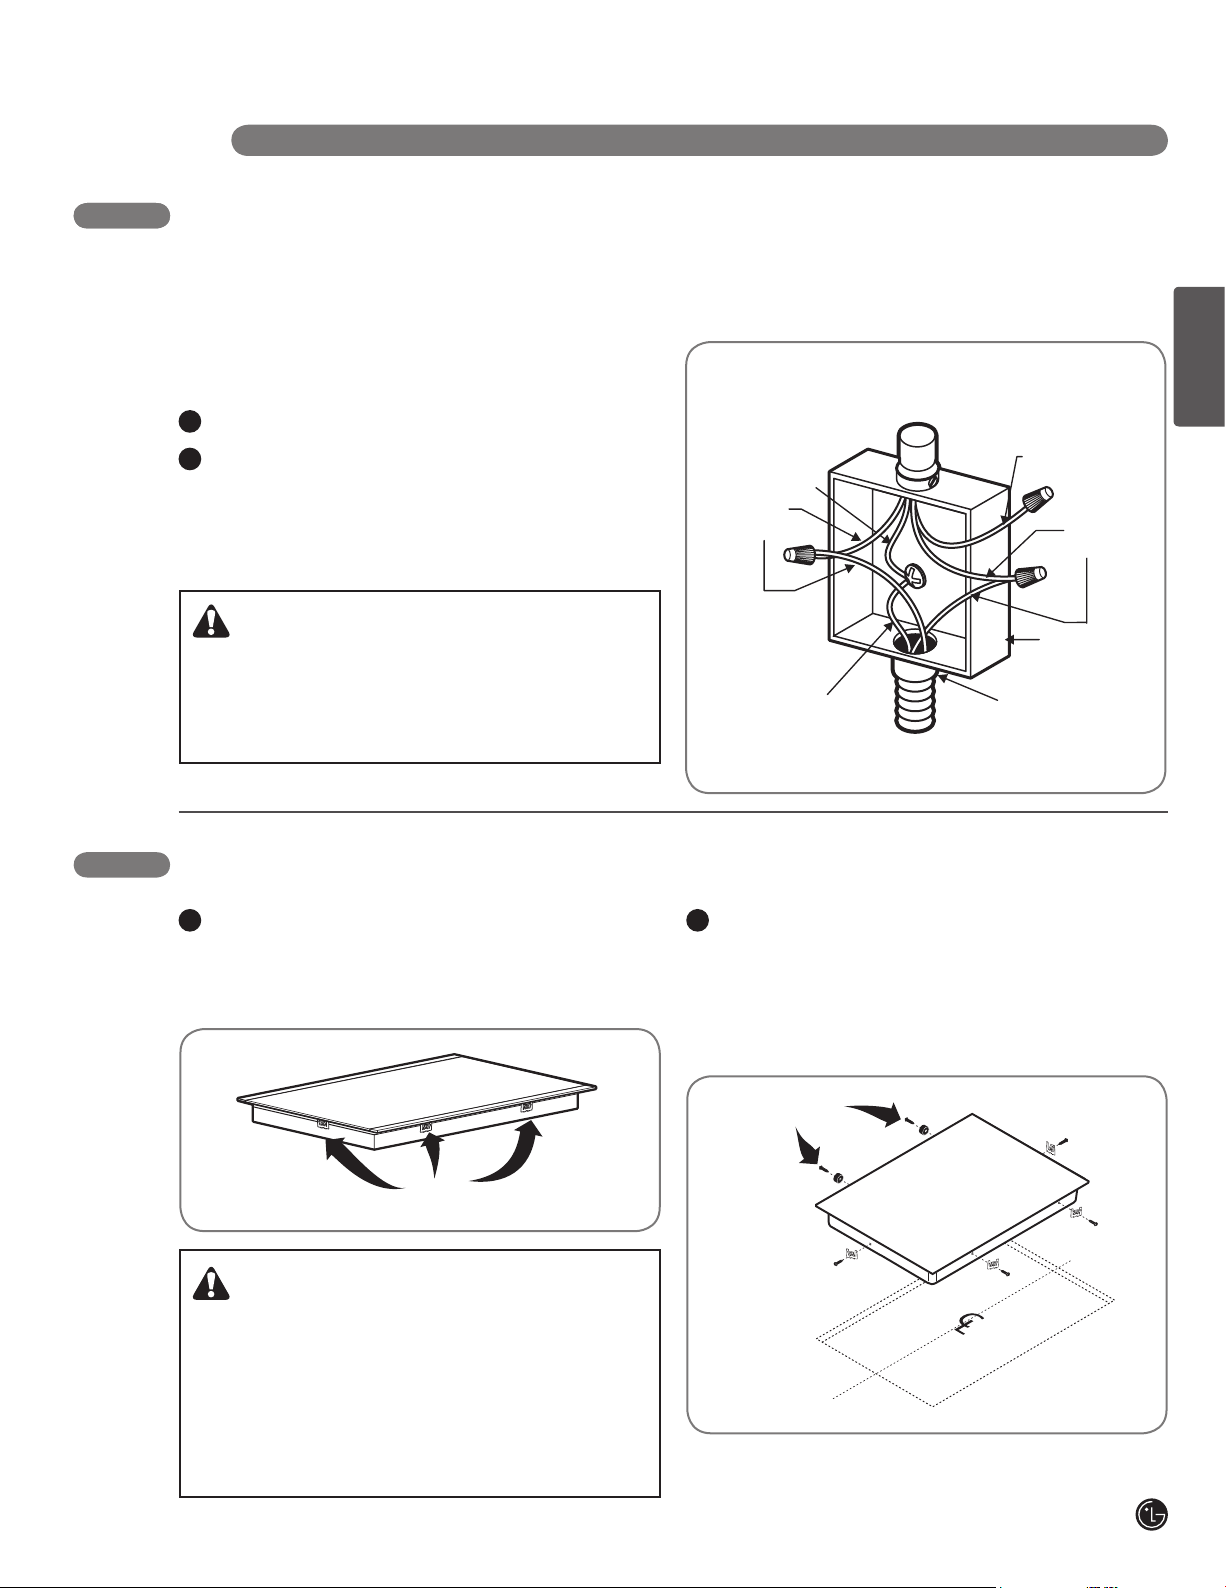
INSTRUCCIONES DE INSTALACIÓN
CONEXIONES ELÉCTRICAS
(cont.)
SI LA COCINA SE USA EN UNA INSTALACIÓN DE CIRCUITO DERIVADO NUEVA (1996
NEC), CASA MÓVIL, VEHÍCULO DE RECREACIÓN O DONDE LOS CÓDIGOS LOCALES NO
ESPAÑOL
PERMITAN LA CONEXIÓN A TIERRA A TRAVÉS DEL CABLE NEUTRO (BLANCO)
Cumpla con todos los códigos y ordenanzas
gubernamentales.
1
Desconecte el suministro de corriente.
2
En la caja del disyuntor, la caja del fusible o la
caja de empalmes, conecte los cables del
electrodoméstico y al suministro de energía
como se muestra.
.
Cables
rojos
CAJA DE EMPALME CON 4
CABLES A TIERRA
Cable del suministro de corriente
A tierra
Cable blanco
Cables
negros
ADVERTENCIA
Si conectará un sistema de cableado eléctrico
de conexión de 4 polos, el cable de conexión a
tierra NO DEBE ser conectado al cable neutro
del sistema eléctrico de 4 polos.
Cable verde (e tierra)
Cable del electrodomestico
Caja de
empalmes
Conector con
clasificación UL
INSTALACIÓN DE LA COCINA
1 2
Inspeccione visualmente que la cocina no esté
dañada. Asegúrese que todos los tornillos de la
cocina estén ajustados (vea ubicaciones más
abajo).
Screw
ADVERTENCIA
No quite los espaciadores de nylon sobre los
bordes de la cocina. Estos espaciadores
centran la cocina en el espacio provisto. La
cocina se debe centrar a fin de permitir una
salida de aire adecuada y para evitar la
acumulación excesiva de calor que podría
producir daños por calor o incendios.
Mueva con cuidado hacia abajo la cocina sobre
la base de apoyo, asegurándose que no se
enrede con ningún cable.
NOTA: No use compuestos de masilla. La
cocina se debe poder retirar en caso de que
sea necesaria una reparación.
Espaciadores
de nylon
25
Page 56

INSTRUCCIONES DE INSTALACIÓN
INSTALACIÓN DE LA COCINA
3
Instale los soportes de retención en la parte
inferior de la cocina; luego ajuste los tornillos
contra la parte inferior de la base como se
muestra.
Instalación
preferida
Soportes de
retención
(cont.)
Cocina
NOTA: Los soportes de retención DEBEN ser
instalados de acuerdo con los códigos locales o,
en ausencia de los mismos, con el Código
Nacional de Electricidad ANSI/NFPA Nº 70 – última
edición.
Instalación
Alternativa
Soportes de
retención
Base
Tornillo
Soportes de
retención
CONTROL FINAL
Realice un control final del funcionamiento de la
cocina, asegurando que la misma se encienda de
modo correcto y que cada zona de cocción
funcione adecuadamente. Para más detalles, lea
las Instrucciones de Uso de esta guía.
UBICACIÓN DEL NÚMERO DE MODELO Y DE
SERIE
Los números de modelo y de serie está ubicados
en una placa que se encuentra en la parte inferior
de la cocina. Escriba los mismos en esta guía; los
necesitará para registrar la garantía.
PRECAUCIÓN
No toque el vidrio de la cocina ni las zonas de
cocción. Es posible que estén lo
suficientemente calientes como para
provocar quemaduras.
26
Page 57
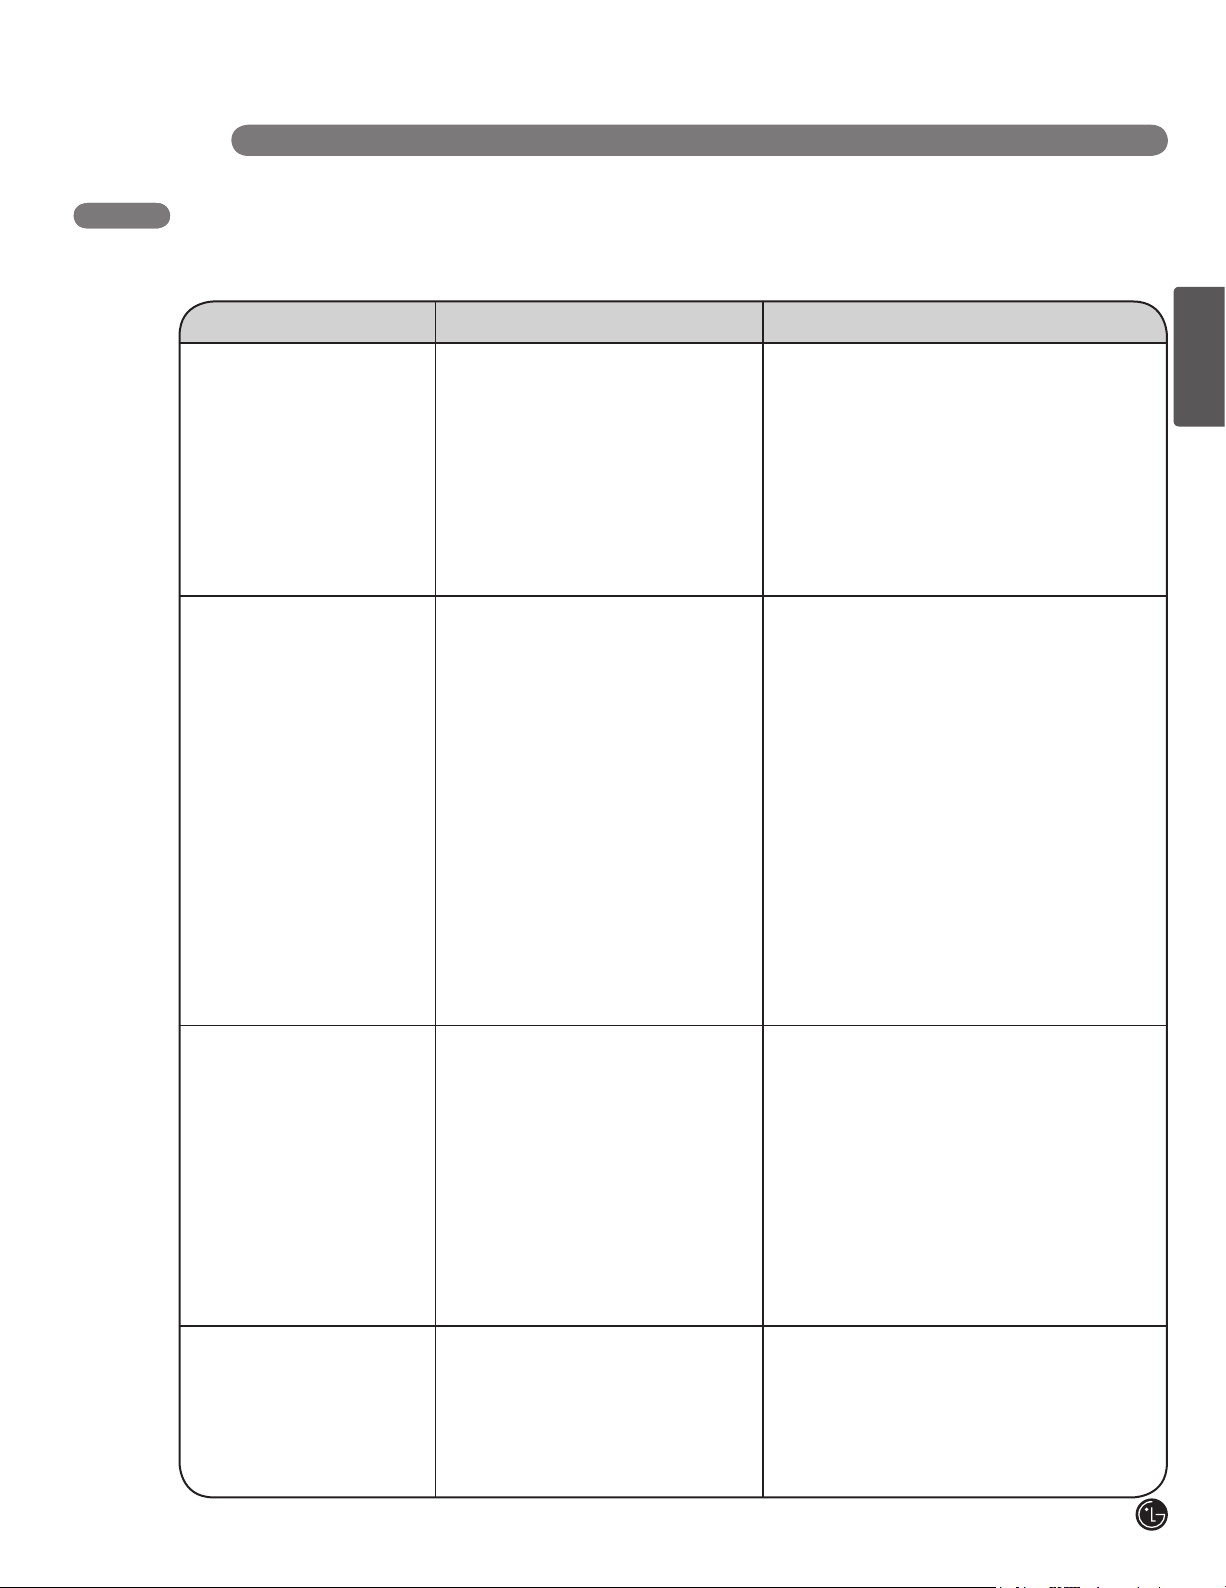
SOLUCIÓN DE PROBLEMAS
ANTES DE SOLICITAR REPARACIONES
Antes de solicitar reparaciones, revise esta lista. Es posible que le ahorre tiempo y gastos. Esta lista
incluye hechos comunes que no son el resultado de un defecto de fabricación o materiales.
Problema Causas Posibles Soluciones
ESPAÑOL
La cocina no funciona
La cocina no calienta
• Los controles de la cocina están
bloqueados.
• Se activó el disyuntor o saltó el
fusible.
• Corte de corriente.
• Instalación de cableado
incompleta.
• No se colocó ningún utensilio o
se colocó un utensilio
inadecuado en la zona de
cocción.
• El tamaño del utensilio es
incorrecto para la zona de
cocción seleccionada.
• El utensilio no se apoya de forma
completa sobre la zona de
cocción.
• Área de cocción seleccionada
incorrecta.
• La cocina no recibe corriente.
•
Lea sobre el USO DEL BLOQUEO PARA NIÑOS para
apagar dicha función.
• Vuelva a activar el disyuntor o reemplace
el fusible.
• Controle las luces del hogar para confirmar
que se trata de un corte de corriente.
• Comuníquese con el instalador o el
vendedor.
•
Asegúrese que el utensilio esté centrado en la zona
de cocción y que sea del tipo adecuado para la
cocción por inducción. Lea SELECCIîN DE UTENSILIO.
•
La parte inferior
suficientemente grande como para cubrir
la zona de cocción en su totalidad.
SELECCIîN DE UTENSILIO.
•
Las partes inferiores del utensilio deben ser
planas y estar centradas en la zona de cocina.
Lea SELECCIîN DE UTENSILIO.
• Asegúrese que el control correcto de la
zona de cocción usada esté en la posición
ENCENDIDO (ON).
• Lea "La cocina no funciona” más arriba.
del utensilio debe ser lo
Lea
La cocina se apaga
mientras se cocina
El nivel de intensidad
de una zona de cocción
se iluminó
• El sensor de calor interior de la
cocina detectó temperatura alta
dentro de la cocina.
• Se activó el apagado automático.
• Líquido u objeto en la zona de
controles.
• Se retiró el utensilio de la zona
de cocción.
• El utensilio no está centrado en
la zona de cocción.
• Asegúrese que las salidas de aire de la
cocina no estén bloqueadas. Lea página
21 en las Instrucciones de Installación.
•
La cocina cuenta con la función de apagado
automático, la cual apaga la misma en su totalidad si
un área de cocción estuvo encendida en forma
ininterrumpida durante 17 horas.
•
El control de la cocina puede interpretar los líquidos u objetos
en la zona de controles como un contacto, el cual puede
hacer que la cocina se apague. Limpie derrames o quite
objetos y vuelva a encender la cocina.
•
Vuelva a colocar el utensilio en la zona de cocción
dentro de los 90 segundos a fin de mantener la
configuración del nivel de intensidad
•
Asegúrese que el utensilio esté centrado y que
descanse de forma plana sobre la zona de cocción.
Lea SELECCIîN DE UTENSILIO.
27
Page 58

SOLUCIÓN DE PROBLEMAS
ANTES DE SOLICITAR REPARACIONES
Problema
El NIVEL DE
INTENSIDAD MÁS
ALTO (POWER
BOOST) no funciona
aparece en la
pantalla del temporizador
aparece en la
pantalla del temporizador
Causas Posibles Soluciones
• El NIVEL DE INTENSIDAD
MÁS ALTO se está usando
en dos zonas de cocción del
mismo lado de la cocina.
• Se presionó una tecla del
control durante demasiado
tiempo.
• El nivel de voltaje que recibe la
cocina es demasiado bajo.
• Cada lado de la cocina comparte un
inversor para ambas zonas de cocción. El
Nivel de Intensidad Más Alto no se puede
usar con dos zonas de cocción en el mismo
inversor al mismo tiempo. Lea sobre NIVEL
DE INTENSIDAD MÁS ALTO (POWER
BOOST) e INTERCAMBIO DE ENERGÍA
(POWER SHARING).
• Este mensaje aparecerá en cualguier tecla
excepto que se presionen las teclas o
del Temporizador durante más de 10
segundos. También aparecerá si se
derraman líquidos o se dejan objetos en la
zona de controles. Para borrar el código de
error, retire cualquier líquido u objetos del
área de controles y presione la tecla de
ENCENDIDO (POWER) para reiniciar la
cocina.
• Si el voltaje suministrado a la cocina es
demasiado bajo, no funcionará
correctamente y aparecerá este mensaje de
error. Esto se puede deber a un nivel de
voltaje reducido en el suministro del circuito
del hogar. Si las conexiones son correctas y
el voltaje suministrado vuelve al nivel normal,
el código desaparecerá.
28
aparece en la
pantalla y un número
aparece en la pantalla del
temporizador
se ilumina en la
pantalla
• Mensaje de error por falla
electrónica.
• Corte de luz o arranque inicial.
• APAGUE la cocina; luego apague el
encendido del fusible o disyuntor durante
aproximadamente 30 segundos. aparece en
la pantalla Vuelva a encender el suministro
de corriente y encienda del temporizador la
cocinapresionando la tecla ENCENDIDO
(POWER). Si el mensaje de error permanece,
comuníquese con el servicio de reparaciones.
• Cuando la cocina se enciende por primera
vez o luego de un corte de corriente, la
se iluminará en la pantalla durante 90
segundos, o hasta que la tecla de
ENCENDIDO (POWER) se toque durante 2
segundos.
Page 59
ESPAÑOL
29
Page 60

NOTES
30
Page 61

NOTES
31
Page 62

NOTES
32
Page 63

NOTES
33
Page 64

LG Customer Information Center
1-800-243-0000
1-888-865-3026
Register your product Online!
www.lg.com
USA, Consumer User
USA, Commercial User
Printed In Korea
 Loading...