


LGLS996
User Guide

Table of Contents
Your Phone at a Glance ........................................................................................................................ 1
Set Up Your Phone ............................................................................................................................... 1
Activate Your Phone ............................................................................................................................. 2
Complete the Setup Screens ................................................................................................................ 3
Make Your First Call.............................................................................................................................. 4
Set Up Your Voicemail .......................................................................................................................... 4
Sprint Account Information and Help .................................................................................................... 5
Sprint Account Passwords ............................................................................................................ 5
Manage Your Account .................................................................................................................. 5
Sprint Support Services ................................................................................................................ 6
Your Phone's Layout ............................................................................................................................. 7
Turn Your Phone On and Off ................................................................................................................ 8
Screen On/Off ............................................................................................................................... 9
Lock and Unlock Your Phone ..................................................................................................... 10
Unlock Your Screen Using the Knock Code Feature .......................................................................... 11
Guest Mode ......................................................................................................................................... 11
Set Up Guest Mode .................................................................................................................... 11
Use Guest Mode ......................................................................................................................... 12
Hardware Key Control Mode ............................................................................................................... 12
Battery and Charger ............................................................................................................................ 12
Extend Your Battery Life ............................................................................................................. 14
Phone Function Keys .......................................................................................................................... 14
Recent Apps Key ........................................................................................................................ 14
Work with Menus ........................................................................................................................ 15
Notifications Panel ...................................................................................................................... 16
Home Key ................................................................................................................................... 17
Back Key ..................................................................................................................................... 17
Touchscreen Navigation ..................................................................................................................... 17
Your Home Screen.............................................................................................................................. 18
Home Screen .............................................................................................................................. 18
Extended Home Screen .............................................................................................................. 19
Use the Applications Key ............................................................................................................ 20
TOC i

Applications: How to View, Open and Switch ............................................................................. 20
Applications ................................................................................................................................. 22
Customize Your Home Screen ................................................................................................... 24
Add and Remove Widgets on the Home Screen ........................................................................ 25
Change the Phone's Wallpaper .................................................................................................. 26
Customize Applications Icons on the Home Screen ................................................................... 26
Access Recently-Used Applications ........................................................................................... 27
Home Screen Clean View ........................................................................................................... 28
Quick Access .............................................................................................................................. 28
Change the Screen Orientation .................................................................................................. 28
Status Bar ........................................................................................................................................... 29
Enter Text With the On-screen Keyboard ........................................................................................... 32
Tips for Editing Text .................................................................................................................... 34
Search Your Phone and the Web ....................................................................................................... 38
Phone and Web Search Using Text Entry .................................................................................. 38
Phone and Web Search Using Voice Command ........................................................................ 40
Using Clip Tray .................................................................................................................................... 40
Text Link .............................................................................................................................................. 40
HD™ Voice ......................................................................................................................................... 42
Make Phone Calls ............................................................................................................................... 42
Call Using the Phone Dialer ........................................................................................................ 42
Dialing Options ............................................................................................................................ 43
Missed Call Notification ............................................................................................................... 43
Wi-Fi Calling ................................................................................................................................ 44
Call Emergency Numbers ........................................................................................................... 44
In-Call Options ............................................................................................................................ 45
Dial and Save Phone Numbers With Pauses ............................................................................. 45
Dial From the Contacts List ......................................................................................................... 46
Use Direct Dialing ....................................................................................................................... 46
Plus (+) Code Dialing .................................................................................................................. 46
Receive Phone Calls ........................................................................................................................... 46
Visual Voicemail .................................................................................................................................. 47
Set Up Visual Voicemail .............................................................................................................. 48
Review Visual Voicemail ............................................................................................................. 48
Listen to Multiple Voicemail Messages ....................................................................................... 49
TOC ii

Visual Voicemail Options ............................................................................................................ 49
Configure Visual Voicemail Settings ........................................................................................... 49
Change Your Main Greeting via the Voicemail Menu ................................................................. 50
Edit the Display Name via the Voicemail Menu .......................................................................... 50
Voicemail (Traditional) ........................................................................................................................ 51
Set Up Voicemail ........................................................................................................................ 51
Voicemail Notification .................................................................................................................. 51
Retrieve Your Voicemail Messages ............................................................................................ 52
Phone Call Options ............................................................................................................................. 52
Caller ID ...................................................................................................................................... 52
Call Waiting ................................................................................................................................. 53
3-way Calling............................................................................................................................... 53
Call Forwarding ........................................................................................................................... 54
In-call Options ............................................................................................................................. 54
Set Up Speed Dialing .......................................................................................................................... 55
Call Logs ............................................................................................................................................. 56
Save a Phone Number ........................................................................................................................ 58
Find a Phone Number ......................................................................................................................... 58
Text-to-Speech .................................................................................................................................... 59
Get Started With Contacts .................................................................................................................. 60
Add a Contact ..................................................................................................................................... 61
Add a Contact to Your Favorites ......................................................................................................... 62
Edit a Contact ...................................................................................................................................... 62
Communicate with Your Contacts ....................................................................................................... 65
Import, Export, and Share Contacts .................................................................................................... 67
Import Contacts From Your Internal Storage .............................................................................. 67
Export Contacts to Your Internal Storage ................................................................................... 67
Share a Contact .......................................................................................................................... 67
Join and Separate Contacts........................................................................................................ 68
Gmail ................................................................................................................................................... 69
Create a Google Account ............................................................................................................ 69
Sign into Your Google Account ................................................................................................... 69
Access Gmail .............................................................................................................................. 70
Send a Gmail Message ............................................................................................................... 72
Read and Reply to Gmail Messages .......................................................................................... 72
TOC iii

Change Gmail Settings ............................................................................................................... 74
Email ................................................................................................................................................... 76
Add an Email Account (POP3 or IMAP) ..................................................................................... 77
Corporate Email (Outlook) .......................................................................................................... 77
Open Email ................................................................................................................................. 78
Create and Send Email ............................................................................................................... 78
Reply to or Delete an Email Message ........................................................................................ 79
Configure and Sync Corporate Email Settings ........................................................................... 79
Text and Multimedia Messaging ......................................................................................................... 81
Compose Text Messages ................................................................................................................... 82
Read and Reply to Text Messages ............................................................................................. 82
Send a Multimedia Message (MMS) ........................................................................................... 83
Save and Resume a Draft Message ........................................................................................... 84
Managing Message Conversations ............................................................................................ 84
Delete Messages ........................................................................................................................ 85
Text and Multimedia Message Options ...................................................................................... 86
Social Networking Accounts ............................................................................................................... 88
Facebook .................................................................................................................................... 88
Google Hangouts ........................................................................................................................ 88
Synchronize Accounts ........................................................................................................................ 89
Synchronize Your Google Account ............................................................................................. 89
Synchronize Your Corporate Account................................................................................................. 90
Google Play Store ............................................................................................................................... 91
Sprint ID .............................................................................................................................................. 92
Sprint Applications .............................................................................................................................. 93
Music ................................................................................................................................................... 94
Google Play Music ...................................................................................................................... 94
Music Player................................................................................................................................ 94
Back Up Your Downloaded Music Files ...................................................................................... 95
YouTubeTM .......................................................................................................................................... 95
GPS Navigation ................................................................................................................................... 96
Google Maps™ ........................................................................................................................... 96
Scout by Telenav ........................................................................................................................ 98
Connect Wi-Fi ..................................................................................................................................... 99
Turn Wi-Fi On and Connect to a Network ................................................................................... 99
TOC iv

Add a Wi-Fi Network ................................................................................................................. 100
Wi-Fi Direct ............................................................................................................................... 100
Virtual Private Networks (VPN) ......................................................................................................... 101
Prepare Your Phone for VPN Connection ................................................................................ 101
Set Up Secure Credential Storage ........................................................................................... 101
Add a VPN Connection ............................................................................................................. 101
Connect to or Disconnect From a VPN ..................................................................................... 102
Browser ............................................................................................................................................. 102
Learn to Navigate the Browser ................................................................................................. 102
Go to a Specific Website ........................................................................................................... 103
Browser Menu ........................................................................................................................... 104
Adjust Browser Settings ............................................................................................................ 105
Create Website Settings ........................................................................................................... 105
Create Bookmarks .................................................................................................................... 105
Connections Optimizer ...................................................................................................................... 107
Data Services General Information (3G and 4G Networks) ............................................................. 107
4G Spark LTE ........................................................................................................................... 108
Your User Name ....................................................................................................................... 108
Launch a Web Connection ........................................................................................................ 108
Data Connection Status and Indicators .................................................................................... 109
Take Pictures .................................................................................................................................... 110
Record Videos ................................................................................................................................... 110
Camera and Video Settings ...................................................................................................... 111
Multi-point Auto-focus ............................................................................................................... 111
Gesture shot.............................................................................................................................. 112
Super Zooming ......................................................................................................................... 112
View Your Pictures .................................................................................................................... 112
Gallery Options ......................................................................................................................... 112
Assign Pictures ......................................................................................................................... 113
Dual Feature ............................................................................................................................. 114
Video Options ........................................................................................................................... 114
Live Zoom ................................................................................................................................. 115
Dual Play ........................................................................................................................................... 116
LG Health .......................................................................................................................................... 117
QSlide ............................................................................................................................................... 118
TOC v

QuickRemote .................................................................................................................................... 118
QuickMemo+ ..................................................................................................................................... 120
Dual Window ..................................................................................................................................... 121
Calendar ............................................................................................................................................ 122
Change Calendar View ............................................................................................................. 122
View Event Details .................................................................................................................... 125
Create an Event ........................................................................................................................ 125
Edit or Delete an Event ............................................................................................................. 126
Set an Event Reminder ............................................................................................................. 126
Respond to an Event Reminder ................................................................................................ 127
Display and Synchronize Calendars ......................................................................................... 127
Change Calendar Settings ........................................................................................................ 127
Folders .............................................................................................................................................. 128
Clock ................................................................................................................................................. 128
Tasks ................................................................................................................................................. 131
Calculator .......................................................................................................................................... 133
Bluetooth ........................................................................................................................................... 133
Turn Bluetooth On and Off ........................................................................................................ 134
Bluetooth Settings Menu ........................................................................................................... 134
Pairing Bluetooth Devices ......................................................................................................... 135
Send Items via Bluetooth .......................................................................................................... 136
Disconnect Bluetooth Connection During an Active Call .......................................................... 136
SmartShare ....................................................................................................................................... 137
Enjoy Content Via a Variety of Devices .................................................................................... 137
Enjoy Content from Nearby Devices ......................................................................................... 138
Using Content from the Cloud................................................................................................... 138
microSD Card .................................................................................................................................... 139
Insert a microSD Card .............................................................................................................. 139
Remove a microSD Card .......................................................................................................... 139
View microSD Card Memory..................................................................................................... 139
Format the microSD Card ......................................................................................................... 140
Unmount the microSD Card ...................................................................................................... 140
Transfer User Contents From an Android Phone to Your LG LS996 ............................................... 140
Transfer Via PC or Laptop ........................................................................................................ 140
Transfer Via Bluetooth Connection ........................................................................................... 141
TOC vi

Transfer Via Cloud Storage ...................................................................................................... 142
Wireless Networks ............................................................................................................................ 144
Airplane Mode ........................................................................................................................... 144
Wi-Fi Settings ............................................................................................................................ 144
Wi-Fi Calling Settings ................................................................................................................ 145
Bluetooth Settings ..................................................................................................................... 145
Mobile Data ............................................................................................................................... 145
Call Settings ...................................................................................................................................... 145
Voicemail Settings .................................................................................................................... 145
Smart Dialing............................................................................................................................. 145
North American Dialing ............................................................................................................. 145
International Dialing .................................................................................................................. 146
Incoming Voice Call Pop-up ...................................................................................................... 146
Call Reject ................................................................................................................................. 146
Decline with Message ............................................................................................................... 146
Privacy Keeper .......................................................................................................................... 146
Auto Answer .............................................................................................................................. 147
TTY Mode ................................................................................................................................. 147
Hearing Aids.............................................................................................................................. 147
Proximity Sensor ....................................................................................................................... 147
Voice Enhancement .................................................................................................................. 148
Save Unknown Numbers .......................................................................................................... 148
Power Key Ends Call ................................................................................................................ 148
Roaming Settings .............................................................................................................................. 148
Roaming Mode .......................................................................................................................... 149
Roaming Guard ......................................................................................................................... 150
Data Roam Guard ..................................................................................................................... 150
Share & Connect ............................................................................................................................... 150
NFC Settings ............................................................................................................................. 151
Android Beam ........................................................................................................................... 151
SmartShare Beam .................................................................................................................... 151
Media Server ............................................................................................................................. 151
Miracast ..................................................................................................................................... 152
More Settings .................................................................................................................................... 152
USB Tethering .......................................................................................................................... 152
TOC vii

Wi-Fi Hotspot ............................................................................................................................ 152
Bluetooth Tethering ................................................................................................................... 153
Mobile Networks Settings ......................................................................................................... 153
VPN Settings ............................................................................................................................. 154
Device Settings ................................................................................................................................. 154
Sound Settings .......................................................................................................................... 154
Ringtone and Vibration Settings ............................................................................................... 156
Display Settings ........................................................................................................................ 157
Home Screen ............................................................................................................................ 161
Lock Screen .............................................................................................................................. 162
Gestures .................................................................................................................................... 165
One-handed Operation ............................................................................................................. 167
Storage ...................................................................................................................................... 168
Battery ....................................................................................................................................... 168
Smart Cleaning ......................................................................................................................... 168
Apps .......................................................................................................................................... 168
Default Message App ................................................................................................................ 169
Dual Window ............................................................................................................................. 169
Personal Settings .............................................................................................................................. 169
Accounts & Sync ....................................................................................................................... 169
Cloud ......................................................................................................................................... 170
Guest Mode............................................................................................................................... 170
Location ..................................................................................................................................... 170
Security ..................................................................................................................................... 171
Language & Input Settings ........................................................................................................ 172
Backup & Reset ........................................................................................................................ 173
System Settings ................................................................................................................................ 174
Shortcut Key.............................................................................................................................. 174
Date & Time .............................................................................................................................. 174
Accessibility............................................................................................................................... 174
QuickCircle Case ...................................................................................................................... 177
Activate This Device ................................................................................................................. 177
System Updates ........................................................................................................................ 177
Printing ...................................................................................................................................... 178
About Phone ............................................................................................................................. 178
TOC viii

Important Safety Information ............................................................................................................. 180
General Precautions ................................................................................................................. 180
Maintaining Safe Use of and Access to Your Phone ................................................................ 180
Using Your Phone With a Hearing Aid Device .......................................................................... 182
Caring for the Battery ................................................................................................................ 184
Radio Frequency (RF) Energy .................................................................................................. 185
Manufacturer‘s Warranty ................................................................................................................... 188
Manufacturer‘s Warranty ........................................................................................................... 188
General Terms and Conditions of Service ........................................................................................ 190
Basic Definitions ....................................................................................................................... 190
The Service Agreement ............................................................................................................ 191
Additional Terms ....................................................................................................................... 191
Our Policies ............................................................................................................................... 191
When You Accept The Agreement ........................................................................................... 191
Term Commitments & Early Termination Fees ......................................................................... 192
When You Don‘t Have To Pay An Early Termination Fee ........................................................ 192
Our Right To Change The Agreement & Your Related Rights ................................................. 192
Our Right To Suspend Or Terminate Services ......................................................................... 192
Your Right To Change Services & When Changes Are Effective ............................................ 193
Your Right To Terminate Services ............................................................................................ 193
Credit Checks & Credit Information .......................................................................................... 193
Account Spending Limits (―ASL‖) .............................................................................................. 193
Deposits & Returning Deposits ................................................................................................. 194
Restrictions On Using Services ................................................................................................ 194
Your Device, Number & Email Address .................................................................................... 194
Porting/Transferring Phone Numbers ....................................................................................... 194
Coverage; Where Your Device Will Work; Service Speeds ..................................................... 195
Roaming .................................................................................................................................... 195
About Data Services & Content ................................................................................................ 195
Specific Terms & Restrictions On Using Data Services ........................................................... 196
Software License ...................................................................................................................... 196
Fees, Activation & Miscellaneous Charges .............................................................................. 196
Account & Service Charges ...................................................................................................... 196
How We Calculate Your Charges For Billing Purposes ............................................................ 197
Your Bill ..................................................................................................................................... 198
TOC ix

Your Payments; Late Fees ....................................................................................................... 198
Taxes & Government Fees ....................................................................................................... 198
Surcharges ................................................................................................................................ 198
Disputing Charges - You Must Still Pay Undisputed Charges .................................................. 199
Protecting Our Network & Services .......................................................................................... 199
Your Privacy .............................................................................................................................. 199
Location-Enabled Services ....................................................................................................... 200
911 Or Other Emergency Calls ................................................................................................. 200
If Your Device Is Lost or Stolen ................................................................................................ 200
Disclaimer of Warranties ........................................................................................................... 201
You Agree That We Are Not Responsible For Certain Problems ............................................. 201
You Agree That Our Liability Is Limited - No Consequential Damages .................................... 201
DISPUTE RESOLUTION AND ARBITRATION ........................................................................ 201
No Trial By Jury and No Class Action ....................................................................................... 203
Indemnification .......................................................................................................................... 203
Providing Notice To Each Other Under The Agreement .......................................................... 204
Contacting You Regarding Billing and Collections ................................................................... 204
Other Important Terms .............................................................................................................. 204
Important Message from Sprint ......................................................................................................... 204
Index .......................................................................................................................................................... 206
TOC x
Get Started
This section gives you all the information you need to set up your phone and Sprint service for the first
time.
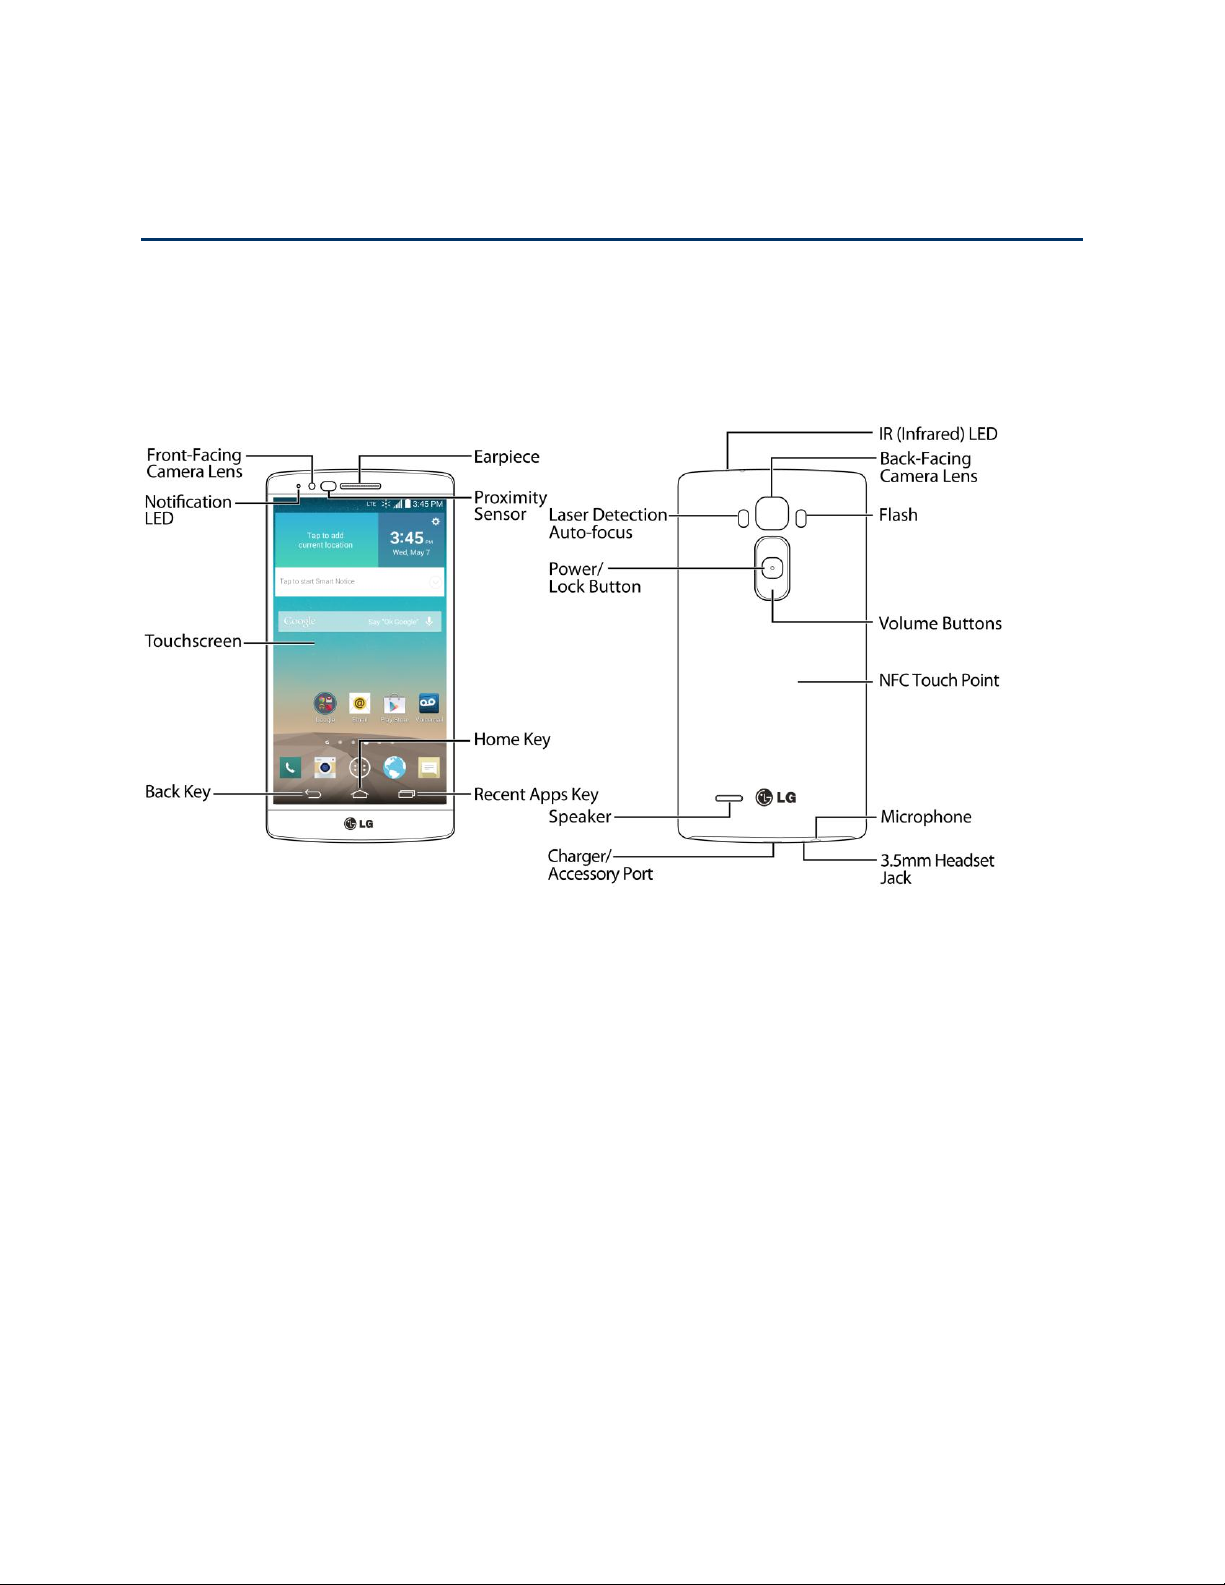
Your Phone at a Glance
The following illustration outlines your phone‗s primary external features and buttons.
Set Up Your Phone
You must first install and charge the battery to begin setting up your phone.
1. Install the battery.
Insert your fingernail into the slot located on the lower left of the back cover and lift the cover
up gently.
Insert the battery, contacts end first, and gently press the battery into place.
Replace the back cover, making sure all the tabs are secure and there are no gaps around
the cover.
Note: When you insert the battery, your phone may power on automatically.
2. Charge your battery.
Plug the USB connector into the charger/accessory port at the bottom of your phone.
Get Started 1

Plug the AC adapter into an electrical outlet. Fully charging a battery may take up to three
hours.
Note: Your phone‘s battery should have enough charge for the phone to turn on and find a signal, run the
setup application, set up voicemail, and make a call. You should fully charge the battery as soon as
possible.
3. Press and hold the Power/Lock Button to turn the phone on.
If your phone is activated, it will turn on, search for Sprint service, and begin the setup
process.
If your phone is not yet activated, see Activate Your Phone for more information.
Activate Your Phone
Follow the instructions below to activate your phone if it has not already been activated. Depending on
your account or how and where you purchased your phone, it may be ready to use or you may need to
activate it on your Sprint account.
● If you purchased your phone at a Sprint Store, it is probably activated and ready to use.
● If you received your phone in the mail and it is for a new Sprint account or a new line of service, it
is designed to activate automatically.
When you turn the phone on for the first time, you should see a Hands Free Activation
screen, which may be followed by a PRL Update screen and a Firmware Update screen.
Follow the onscreen instructions to continue.
● If you received your phone in the mail and you are activating a new phone for an existing number
on your account (you're swapping phones), you can activate on your computer online or directly
on your phone.
Activate on your computer:
• Go to sprint.com/activate and complete the online instructions to activate your phone.
Activate on your phone:
Get Started 2

• Turn on your new phone. (Make sure the old one is turned off.) Your phone will
automatically attempt Hands-Free Activation.
• Touch Activate to override auto-activation and start the manual activation wizard.
• Follow the on-screen prompts to complete the activation process.
To confirm activation, make a phone call. If your phone is still not activated, visit sprint.com/support for
assistance. If you do not have access to the Internet, call Sprint Customer Service at 1-888-211-4727
from another phone.
Tip: Do not press the Power/Lock Button while the phone is being activated. Pressing the
Power/Lock Button cancels the activation process.
Note: If you are having any difficulty with activation, visit sprint.com/support.
Complete the Setup Screens
The setup screens help you set up certain features and preferences on your phone. Once your phone has
been turned on, you will see a Accessibility message. You can then complete the setup process.
Note: You may be able to complete the setup screens before your phone has been activated on your
Sprint account.
Note: During or after setup, you may see a Connections Optimizer notice. Read the notice and touch I
Agree to allow your phone to connect automatically to the best available data network, including Wi-Fi.
To turn Connections Optimizer off at any time, from home, tap > > Settings > More… >
Mobile networks > Connections Optimizer and uncheck the box. See Connections Optimizer for details.
1. On the configuration screen, touch Next to get started.
2. Follow the onscreen instructions to complete each section. For each topic, you will have the
option to skip it and continue to the next screen.
Got Google? – Touch Yes and complete the steps to sign in to your current Google Account,
or touch No and then touch Get an account (to set up a new Google Account) or Not now to
skip Google setup. The following options may apply depending on your selection:
• Sign in – Enter your Gmail address and password and touch Sign in to sign in to your
current Google Account.
• Get an account – Follow the instructions to sign up for a new Google Account. There will
be screens to enter your first and last names, create an email address (Gmail), create a
password, enter recovery information (including a backup email address and recovery
question), an option to join Google+, and an option to enable purchases from the Google
Play Store app. Touch Next between each screen.
• Use Google location – Select your Google location options and then touch Next.
This phone belongs to… - If applicable, enter your first and last name and touch Next. This
information is used by the phone to personalize certain apps.
Get Started 3
Useful settings - Set your phone information for your convenience.
Knock Code - Set Knock Code for your security.
Home touch button combination - Select the desired home touch button combination.
3. Tap Done. Your setup is now complete. Follow the onscreen instructions to learn about basic
touch menu navigation, view tutorials, or just get started.
Note: You do not need to sign up for a Google Account to use your phone. However, to download apps
from the Google Play Store app, you must link your phone to a Google Account.
Make Your First Call
Once your phone is activated, you can make phone calls.
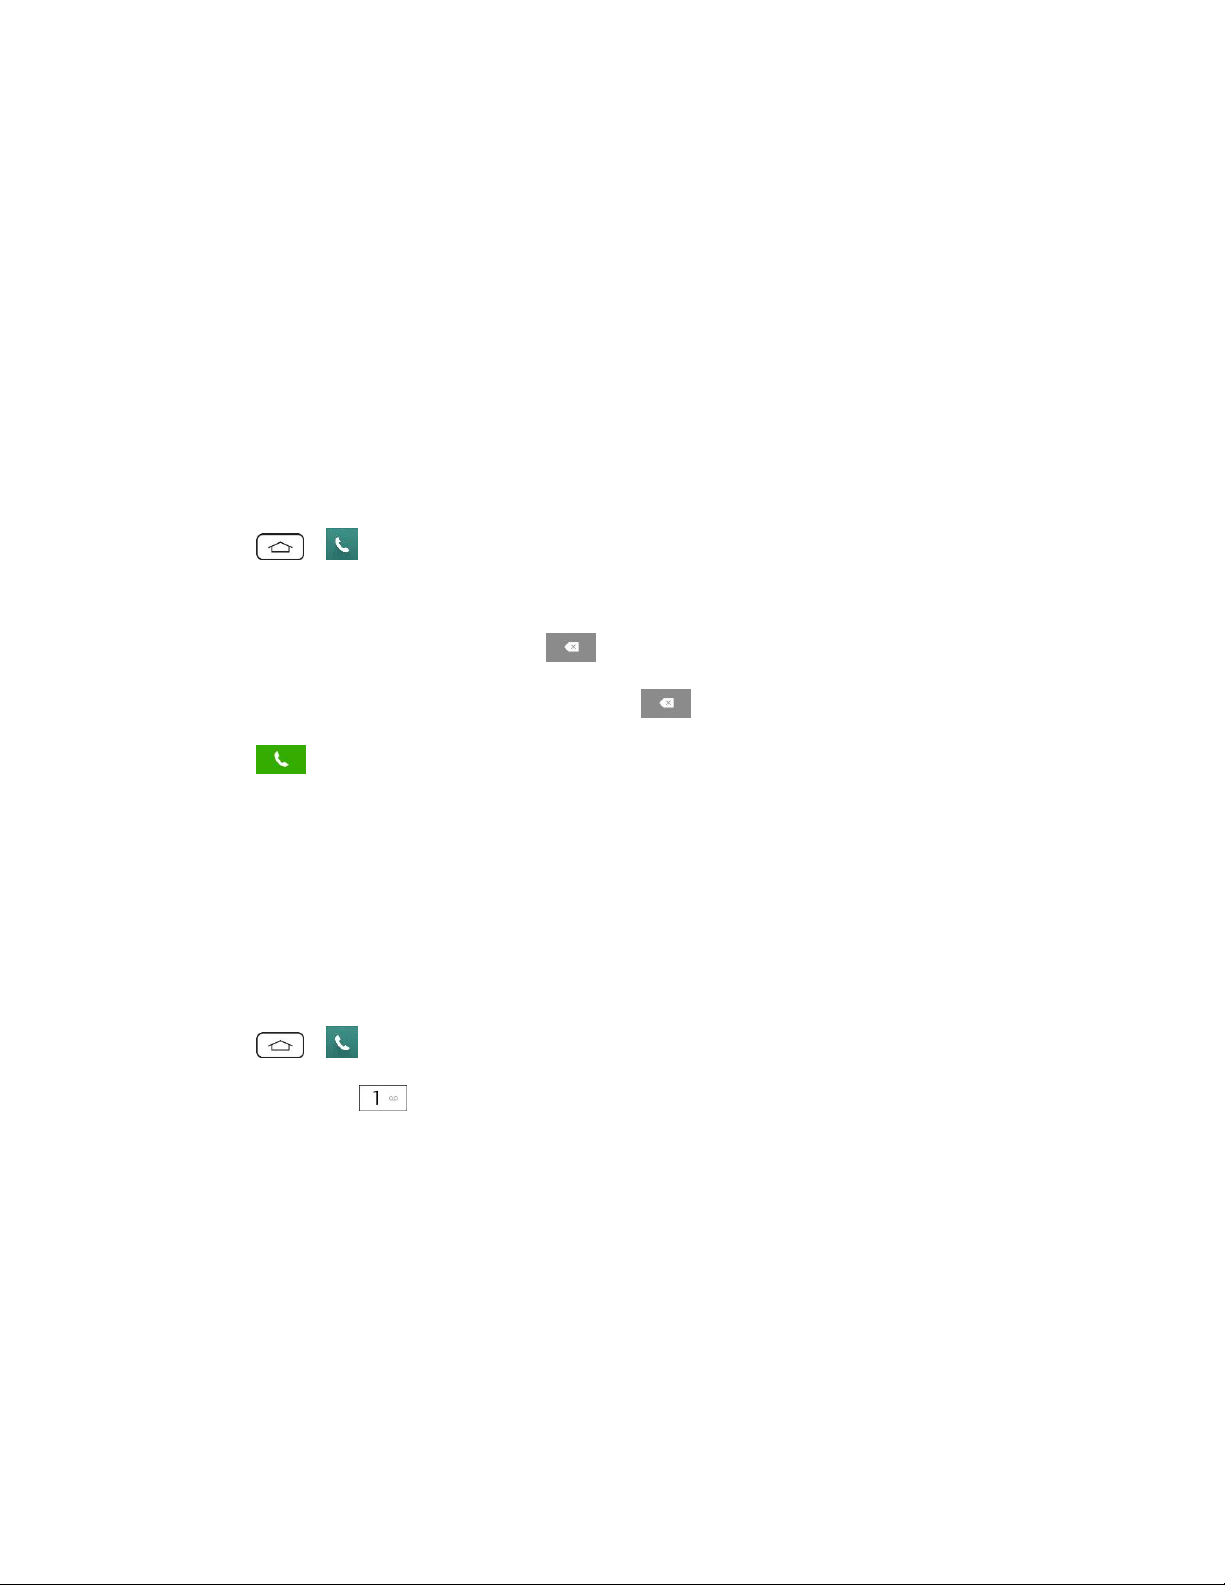
1. Tap > .
2. Use the dialpad to enter a phone number.
If you enter a wrong number, tap to erase digits one by one.
To erase the entire number, touch and hold .
3. Tap to dial the number.
Note: Your phone's battery should have enough charge for your phone to turn on and find a signal, set up
your voicemail, and make a call. You should fully charge your battery as soon as possible.
Set Up Your Voicemail
Your phone automatically transfers all unanswered calls to your voicemail, even if your phone is in use or
turned off. You should set up your Sprint voicemail and personal greeting as soon as your phone is
activated. Always use a password to protect against unauthorized access.
1. Tap > .
2. Touch and hold .
3. Follow the system prompts to:
Create your password.
Record your name announcement.
Record your greeting.
Note: Sprint strongly recommends that you create a password when setting up your voicemail to protect
against unauthorized access. Without a password, anyone who has access to your phone is able to
access your voicemail messages.
Get Started 4

For more information about voicemail, see Voicemail or Visual Voicemail.
Sprint Account Information and Help
Find out about account passwords and information about managing your account and finding help.
Sprint Account Passwords
As a Sprint customer, you enjoy unlimited access to your personal account information, your voicemail
account, and your data services account. To ensure that no one else has access to your information, you
will need to create passwords to protect your privacy.
Account User Name and Password
If you are the account owner, you will create an account username and password when you sign on to
sprint.com/mysprint. (Click Sign in/Register > Sign up now! to get started.) If you are not the account
owner (if someone else receives the bill for your Sprint service), you can get a sub-account password at
sprint.com/mysprint.
Voicemail Password
You‘ll create your voicemail password (or passcode) when you set up your voicemail. See Set Up Your
Voicemail for more information on your voicemail password.
Data Services Password
With your Sprint phone, you may elect to set up an optional data services password to control access and
authorize Premium Service purchases.
For more information, or to change your passwords, sign on to sprint.com/mysprint.
Manage Your Account
Manage your Sprint account from your computer, your Sprint phone, or any other phone.
Online: sprint.com/mysprint
● Access your account information.
● Check your minutes used (depending on your Sprint service plan).
● View and pay your bill.
● Enroll in Sprint online billing and automatic payment.
● Purchase accessories.
● Shop for the latest Sprint phones.
● View available Sprint service plans and options.
● Learn more about data services and other products like games, ringers, screensavers, and more.
From Your Sprint Phone
Get Started 5
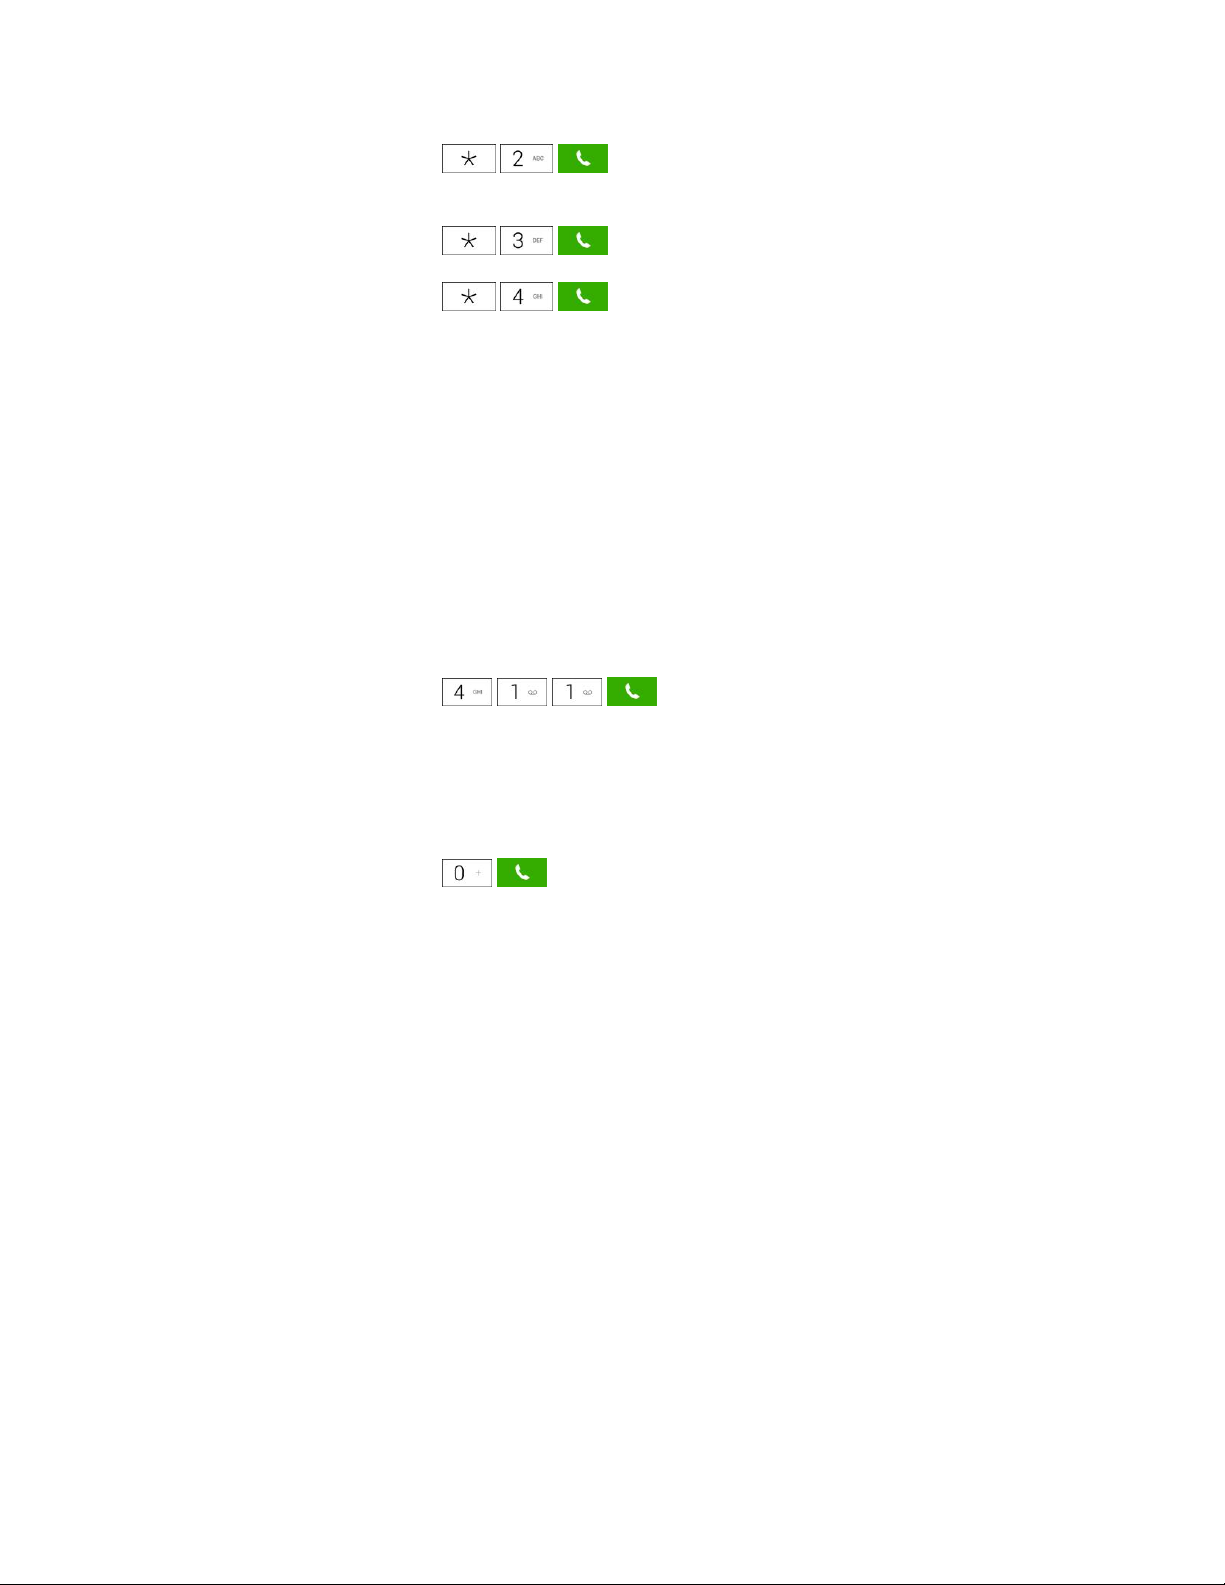
● From the dial screen, tap to access a summary of your Sprint service plan or
get answers to other questions.
● From the dial screen, tap to make a payment.
● From the dial screen, tap to check minute usage and account balance.
Sprint Support Services
Sprint 411 and Sprint Operator Services let you easily access information and calling assistance from
your Sprint phone.
Sprint 411
Sprint 411 gives you access to a variety of services and information, including residential, business, and
government listings; movie listings or showtimes; driving directions, restaurant reservations, and major
local event information. You can get up to three pieces of information per call, and the operator can
automatically connect your call at no additional charge.
There is a per-call charge to use Sprint 411, and you will be billed for airtime.
■ From the dial screen, tap .
Sprint Operator Services
Sprint Operator Services provides assistance when you place collect calls or when you place calls billed
to a local telephone calling card or third party.
■ From the dial screen, tap .
For more information or to see the latest in products and services, visit us online at sprint.com/mysprint.
Get Started 6
Phone Basics
Your phone is packed with features that simplify your life and expand your ability to stay connected to the
people and information that are important to you. The topics in this section will introduce the basic
functions and features of your phone.
Tip: Phone Software Upgrades – Updates to your phone‘s software may become available from time to
time. Sprint will automatically upload critical updates to your phone. You can also use the menu to check
for and download updates. Tap > > Settings > System updates.
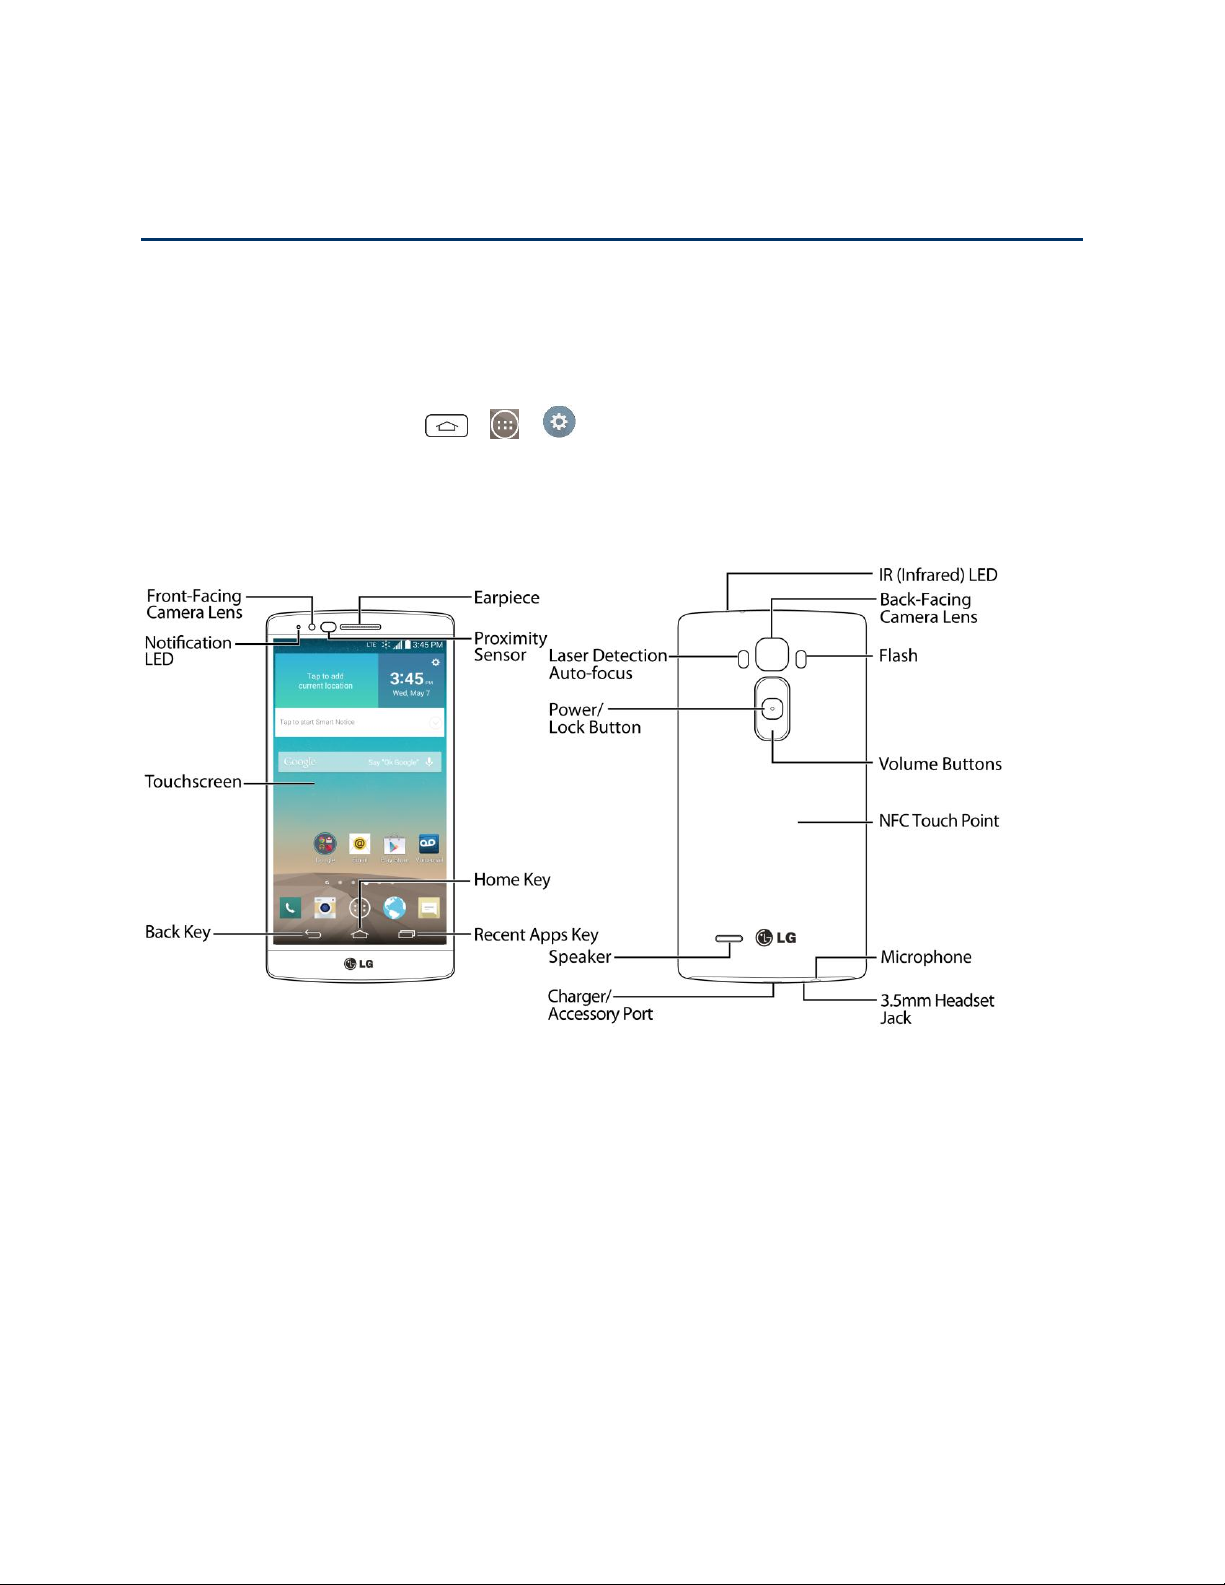
Your Phone's Layout
The illustrations and descriptions below outline your phone‗s basic layout.
Key Functions
● Front-Facing Camera Lens allows you to take pictures and video of yourself. Also lets you
participate in video chats.
● Notification LED flashes front notification LED when you receive notifications, such as an
incoming call, if you enable this feature.
● Touchscreen displays all the information needed to operate your phone, such as the applications,
call status, the Contacts list, the date and time, and the signal and battery strength.
● Back Key returns to the previous screen. It also closes pop-up display items such as menus and
dialog boxes. Touch and hold to access the Dual window feature.
● 3.5mm Headset Jack allows you to plug in a headset for convenient, hands-free conversations.
Phone Basics 7

CAUTION! Inserting an accessory into the incorrect jack may damage the phone.
● Microphone transmits your voice for phone calls or records your voice or ambient sounds for
voice recordings and videos.
● Recent Apps Key allows you to access recently-used apps. Touch and hold to access the
available options.
● Home Key returns to the Home screen. If you're already viewing one of extension canvases, it
opens the central Home screen. Touch and hold to access Google Now.
● Proximity Sensor senses proximity towards other objects (such as your head) so that touch
commands are not accidentally activated during a call.
Note: Please be careful not to cover the sensors with a protective film, pouch, or a protective case not
authorized by LG.
● Earpiece lets you hear the caller and automated prompts.
● Laser Detection Auto-focus - Long and short distance focus are quickly and accurately aligned
when shooting with the back-facing camera.
● Power/Lock Button locks the screen. Press and hold to open the phone options menu for the
following options: Power off, Power off and restart, and Turn on/off Airplane mode. You can also
quickly switch to Silent mode , Vibration mode or Sound mode .
● Speaker lets you hear the different ringers and sounds. The speaker also lets you hear the
caller‘s voice in speakerphone mode.
● Charger/Accessory Port allows you to connect the phone charger or an optional USB cable.
CAUTION! Inserting an accessory into the incorrect jack may damage the phone.
● NFC Touch Point tap the back of your phone to an NFC tag or another NFC compatible device
in this location.
● Volume Buttons allow you to adjust the ringer and media volumes, or to adjust the in-call volume
during a call.
● Flash helps you take pictures and video in dim lighting.
● Back-Facing Camera Lens lets you take pictures and record videos.
● IR (Infrared) LED uses infrared to communicate with devices using the QuickRemote app.
Turn Your Phone On and Off
Turn your phone on and off and wake-up the screen by using the Power/Lock Button .
Turn Your Phone On
■ Press and hold the Power/Lock Button .
Phone Basics 8

Once your phone is on, it may display ―Searching for Service.‖ When your phone finds a signal, it enters
standby mode – the phone‘s idle state. At this point, you are ready to begin making and receiving calls.
If your phone is unable to find a signal after 15 minutes of searching, a Power Save feature is
automatically activated. When a signal is found, your phone automatically returns to standby mode.
In Power Save mode, your phone searches for a signal periodically without your intervention. You can
also initiate a search for Sprint service by pressing any key (when your phone is turned on).
Tip: The Power Save feature conserves your battery power when you are in an area where there is no
signal.
Turn Your Phone Off
1. Press and hold the Power/Lock Button for two seconds until you see the Phone options on
the display screen.
2. Tap Power off and then tap OK to power off the phone.
Your screen remains blank while your phone is off (unless the battery is charging).
Wake Up the Screen
If you don‘t use the phone for a while, the screen and backlight will shut off to conserve battery power.
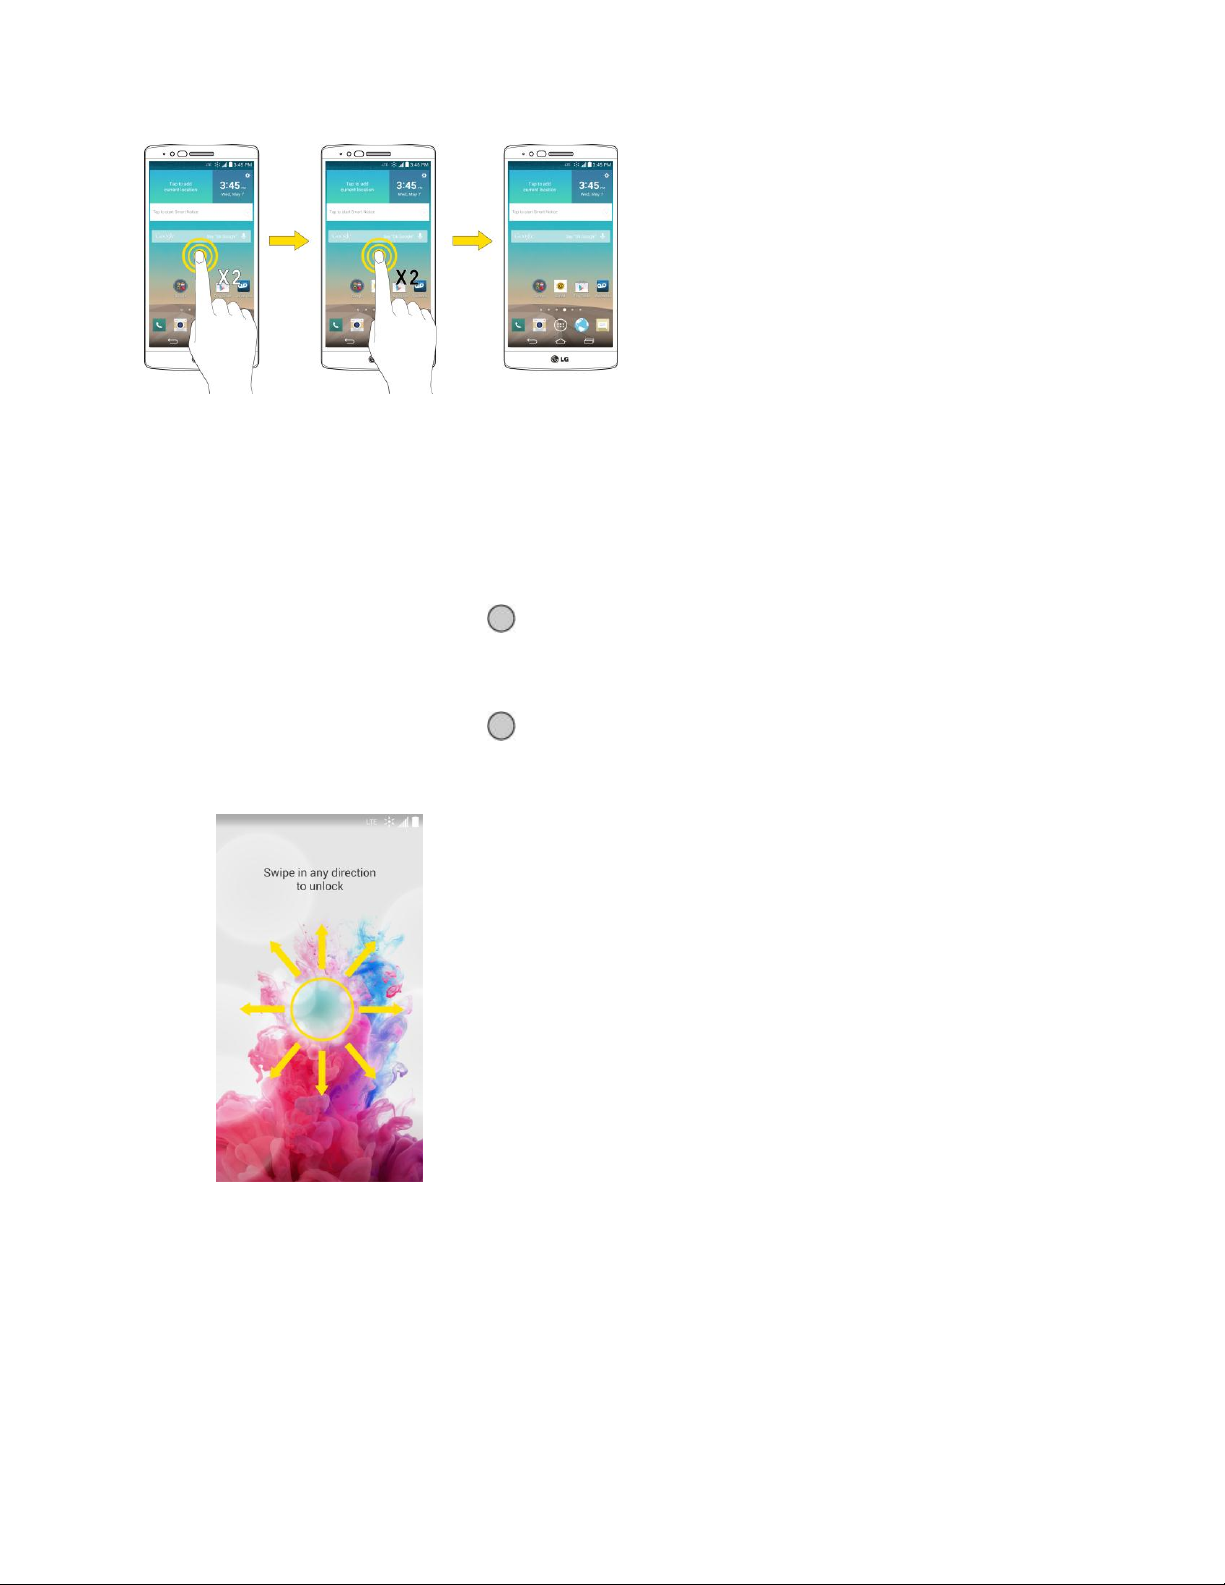
1. Press the Power/Lock Button . Your lock screen will appear. See Lock Screen.
2. Swipe the screen to any direction to unlock it. The last screen you were working on opens. (This
is the default lock screen.)
Note: When turning the screen on, make sure you do not cover the proximity sensor. Doing so will not
allow you to turn the screen on.
Screen On/Off
The KnockON feature allows you to double-tap the screen to easily turn it on or off.
To Turn the Screen On
1. Double-tap the center of the Lock screen to turn the screen on.
2. Unlock the screen or access any of the available shortcuts or widgets.
To Turn the Screen Off
1. Double-tap an empty area of the Home screen or the Status Bar.
2. The screen will turn off.
Phone Basics 9
Lock and Unlock Your Phone
You can prevent accidental screen touches from activating phone functions by locking your phone.
Lock Your Phone
When your phone is locked, you can only receive incoming calls or make calls to 9-1-1.
■ Press the Power/Lock Button .
Unlock Your Phone
1. Press the Power/Lock Button to wake up the phone.
2. Swipe the screen to any direction to unlock it.
Note: The default Lock screen simply locks the screen to prevent unintentional actions. For more security
to guard against unauthorized use, you can set an unlock requirement (such as a pattern, PIN, or
password) that will need to be entered to unlock it.
Phone Basics 10
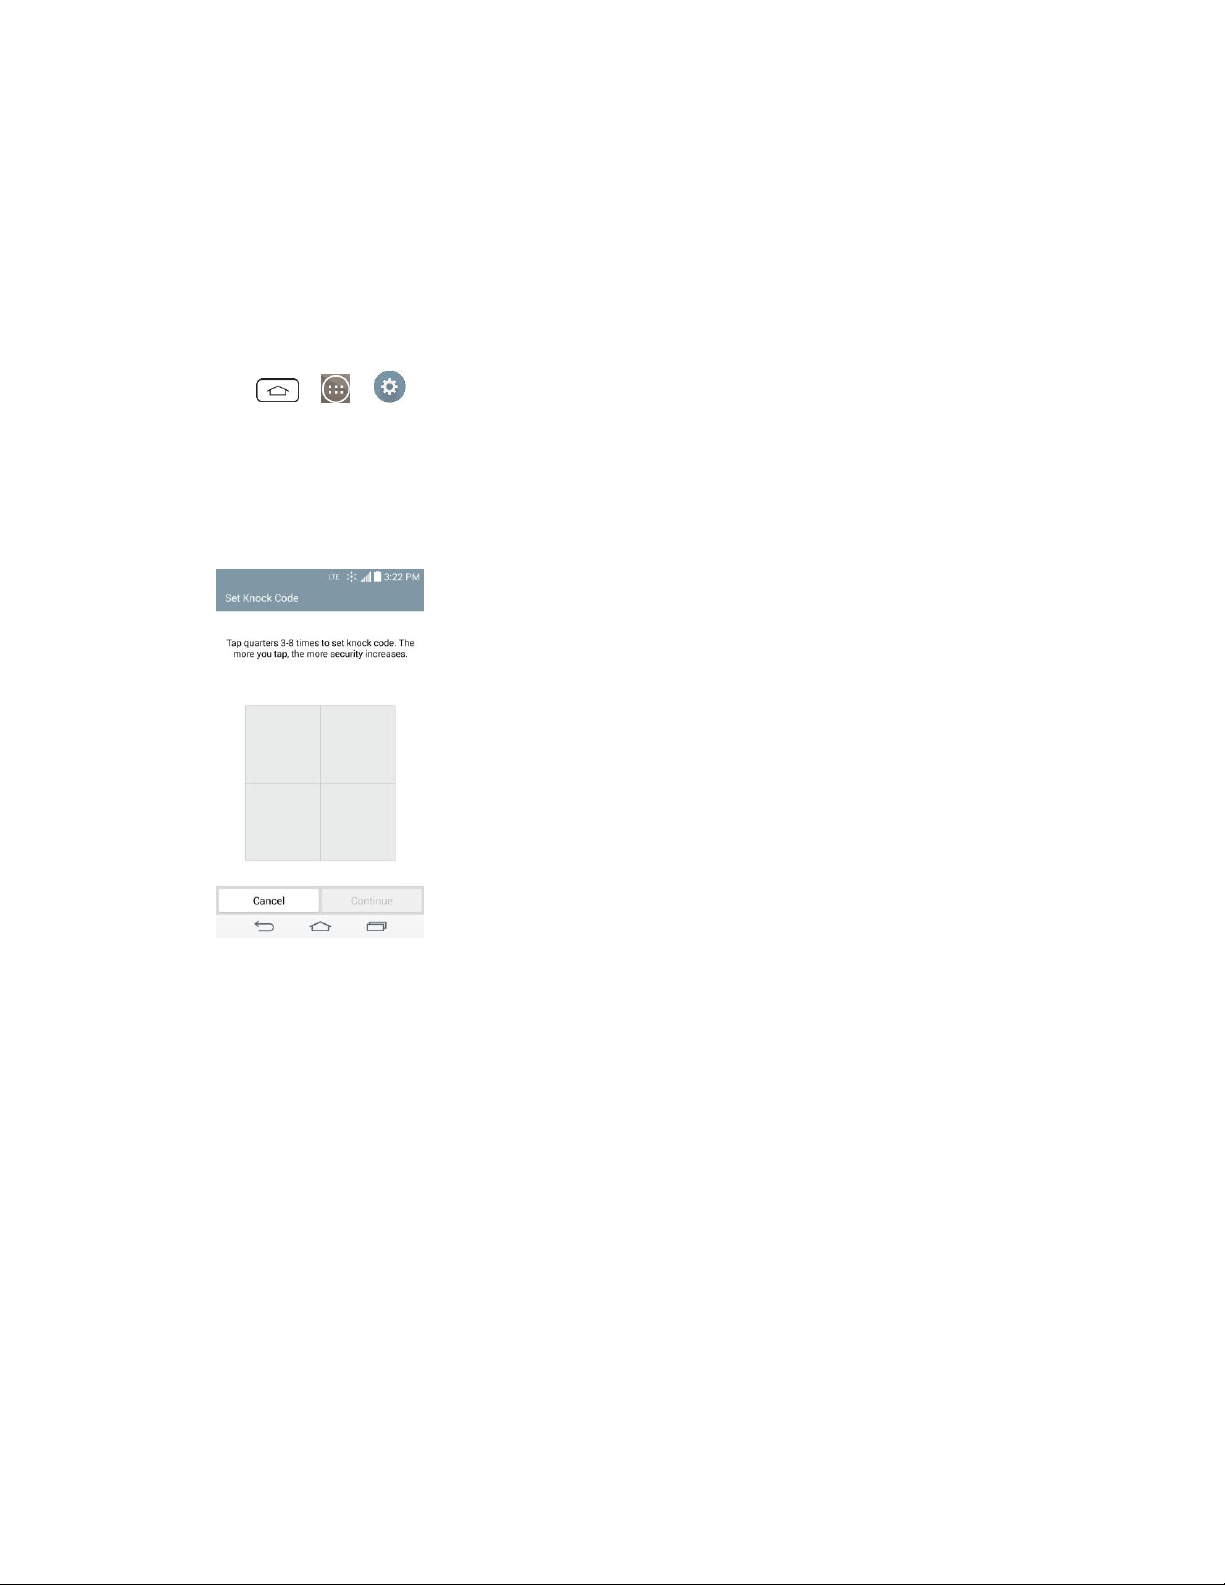
Unlock Your Screen Using the Knock Code Feature
The Knock Code feature allows you to create your own unlock code using a combination of knocks (or
taps) on the screen.
To activate the Knock Code feature:
1. Tap > > Settings.
2. From the DEVICE section, tap Lock screen.
3. Tap Select screen lock and tap Knock Code.
4. Use the 2x2 grid to create a sequence of knocks (or taps) to set your knock code.
Note: You have to create a Backup PIN as a safety measure in case you forget your unlock sequence.
To unlock the phone using Knock Code:
■ While the screen is off, tap the same sequence you established anywhere on the screen. The
Home screen will be accessed directly.
Guest Mode
Use Guest mode when you let someone else use your phone. They will only be able to use the
applications that you‘ve selected. Once you set it up, you can easily put your phone in Guest mode by
drawing the guest pattern on the Lock screen that you set, which is different from your normal unlock
pattern.
Note: Guests can also use applications that your selected applications link to.
Set Up Guest Mode
Follow the steps below to set up Guest mode and begin using it.
Phone Basics 11

1. Tap > > Settings > Guest mode.
2. Tap Lock screen type, then set the screen lock you want to use to put your device in Guest
mode.
Set the screen lock for the Lock screen, then set the Guest mode screen lock.
3. Tap Allowed app to view which apps can be accessed in Guest mode.
Checkmark the apps that can be accessed.
Remove checkmarks from the apps that you don't want to be accessed.
4. Tap the switch to ON next to Guest mode.
Note: If your unlock sequence is already set to one of Knock Code, Pattern, PIN or password, you will
need to enter it to be able set the guest mode unlock method.
Use Guest Mode
After you‘ve set up and enabled Guest mode, lock the screen so that you can enter your Guest mode
pattern. The Guest mode Home screen is displayed with only the apps you‘ve selected for guest access.
To exit Guest mode, enter your normal unlock pattern on the Lock screen.
Note: The Guest mode switch will be automatically turned off if your lock sequence is changed.
Otherwise, manually disable it if you no longer want to allow guest access.
Hardware Key Control Mode
If your phone display is damaged or broken, you can answer an incoming call, end a call, or turn off an
alarm using the hardware keys.
1. Turn your phone off.
2. Press and hold the Power/Lock Button and the Volume Buttons at the same time
for more than 6 seconds to enter the Hardware key control mode.
3. Press the Volume Buttons to scroll to the desired option, then press the Power/Lock
Button to confirm.
Answer call: Press both Volume Buttons at the same time.
Stop alarm: When an alarm rings, press and hold the Volume Up Button to stop the alarm.
Note: If you use your phone with a broken display glass, your phone can break even more or you can be
injured. Make sure to visit the LG authorized service center to get your phone repaired.
Battery and Charger
Sprint-approved or LG-approved batteries and accessories can be found at Sprint Stores or through LG,
or call 1-866-866-7509 to order. They‘re also available at www.sprint.com.
Phone Basics 12
Battery Capacity
Your phone is equipped with a Li-Ion battery. It allows you to recharge your battery before it is fully
drained. The battery provides up to 24 hours of continuous digital talk time.
When the battery reaches 2% of its capacity, the battery icon blinks. When there are approximately two
minutes of talk time left, the phone can sound an audible alert and then turn off.
Note: Long backlight settings, searching for service, using vibrate mode, browser use, and other variable
may reduce the battery‘s talk and standby times.
Tip: Watch your phone's battery level indicator and charge the battery before it runs out of power.
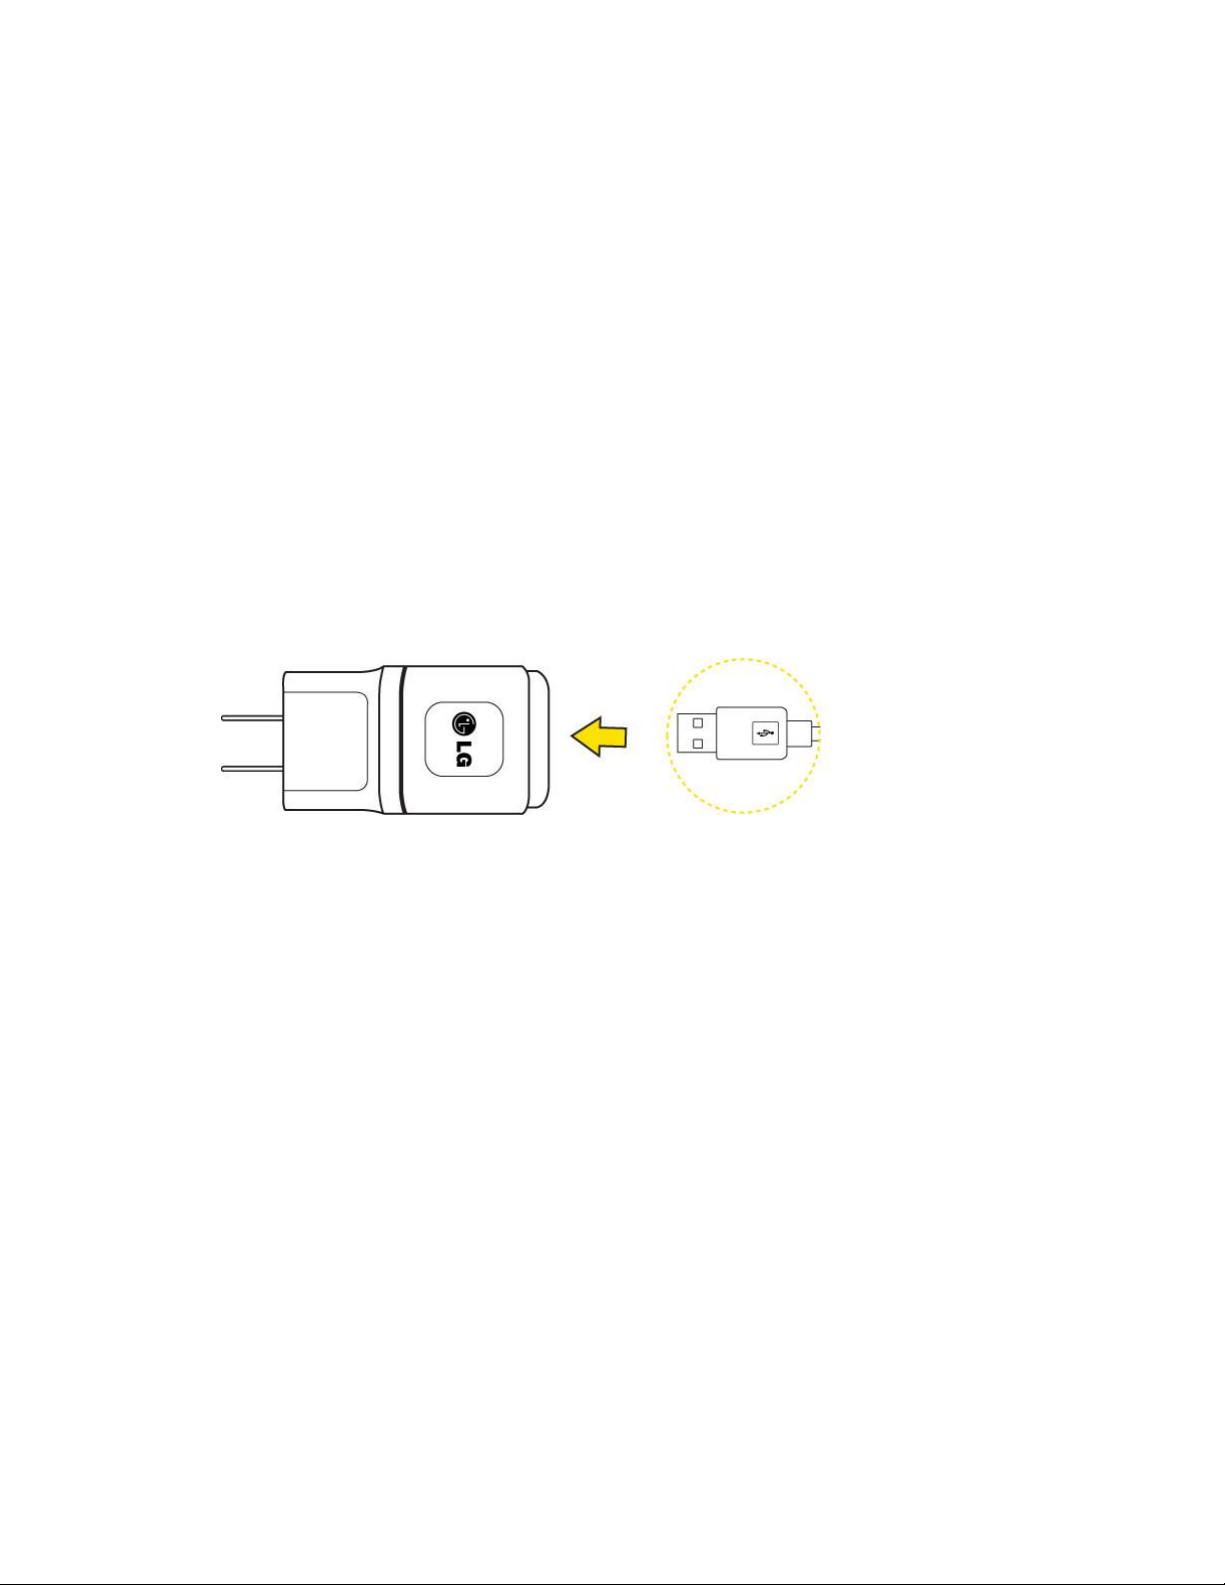
Charge the Battery
Keeping track of your battery's charge is important. If your battery level becomes too low, your phone
automatically turns off and you will lose any information you were just working on.
1. Connect the charging adapter and USB cable as shown; the LG logo on the charging adapter
should face toward you.
2. Plug one end of the USB cable into the phone's Charger/Accessory Port and the other end into
an electrical outlet. The charge time varies depending upon the battery level.
Battery Temperature Protection
Though extremely rare, if the battery becomes overheated, the phone will automatically turn off.
Charge with USB
You can use your computer to charge your phone. To be able to charge with the USB cable, you need to
install the necessary USB drivers on your computer first. Connect one end of the USB cable to the
Charger/Accessory Port on your phone and connect the other end to a USB port on your computer. It is
best to use the rear USB port when connecting to a desktop computer. The USB hub should be powered
by an external power source.
Note: Low-power USB ports are not supported, such as the USB port on your keyboard or bus-powered
USB hub.
The LG USB Driver is downloadable from the following site: http://www.lg.com/us/ > Select SUPPORT. In
the Search box next to SEARCH PRODUCT SUPPORT, enter the model name or name and click
SEARCH. Click the model. On the PRODUCT SUPPORT page, click on Software Update & Drivers.
Always unplug the charger from the wall socket after the phone is fully charged to save unnecessary
power consumption of the charger.
Phone Basics 13

Extend Your Battery Life
You can extend your battery's life between charges by turning off features that run in the background.
You can also monitor how applications and system resources consume battery power.
● Reduce the amount of time your backlight is on.
● Turn Bluetooth off when not in use.
● Turn Wi-Fi off when not in use.
● Deactivate the GPS when not needed. Most applications using this function will periodically query
the GPS satellites for your current location; each query drains your battery.
● Do not wait until your battery is completely depleted before charging your phone. Repeating this
process of a complete discharge and recharge can over time reduce the storage capacity of any
battery.
● Turn off Automatic application sync.
● Check the Running Services and close any unnecessary applications.
Note: If you accidently press the Power/Lock Button while the device is in your pocket, the screen will turn
off automatically in order to save battery power.
Battery Charge Level
■ Tap > > Settings > About phone > Battery.
The battery status (charging or discharging) and level (as a percentage of fully charged) are displayed.
Monitor and Control Battery Use
The Battery use screen shows which applications consume the most battery power. You can also use it to
turn off applications that you‘ve downloaded, if they are consuming too much power.
■ Tap > > Settings > About phone > Battery > Battery use.
Tap any of the listed items for more options.
Phone Function Keys
Your phone comes equipped with three main function buttons that can be used on any screen to access
added functions.
Recent Apps Key
The Recent Apps Key allows you to view your most recently-used apps and also displays an available
menu function for the current screen or application. When on the Home screen, touch and hold to
view the following options:
● Add apps & widgets allow you to add apps and widgets to the Home screen.
Phone Basics 14
● Home screen settings provides direct access to the phone's Home screen settings menu. (See
Home Screen.)
● Lock screen settings provides direct access to the phone's lock screen settings menu. (See
Lock Screen.)
● System settings provides quick access to the phone's Settings menu. (See Settings.)
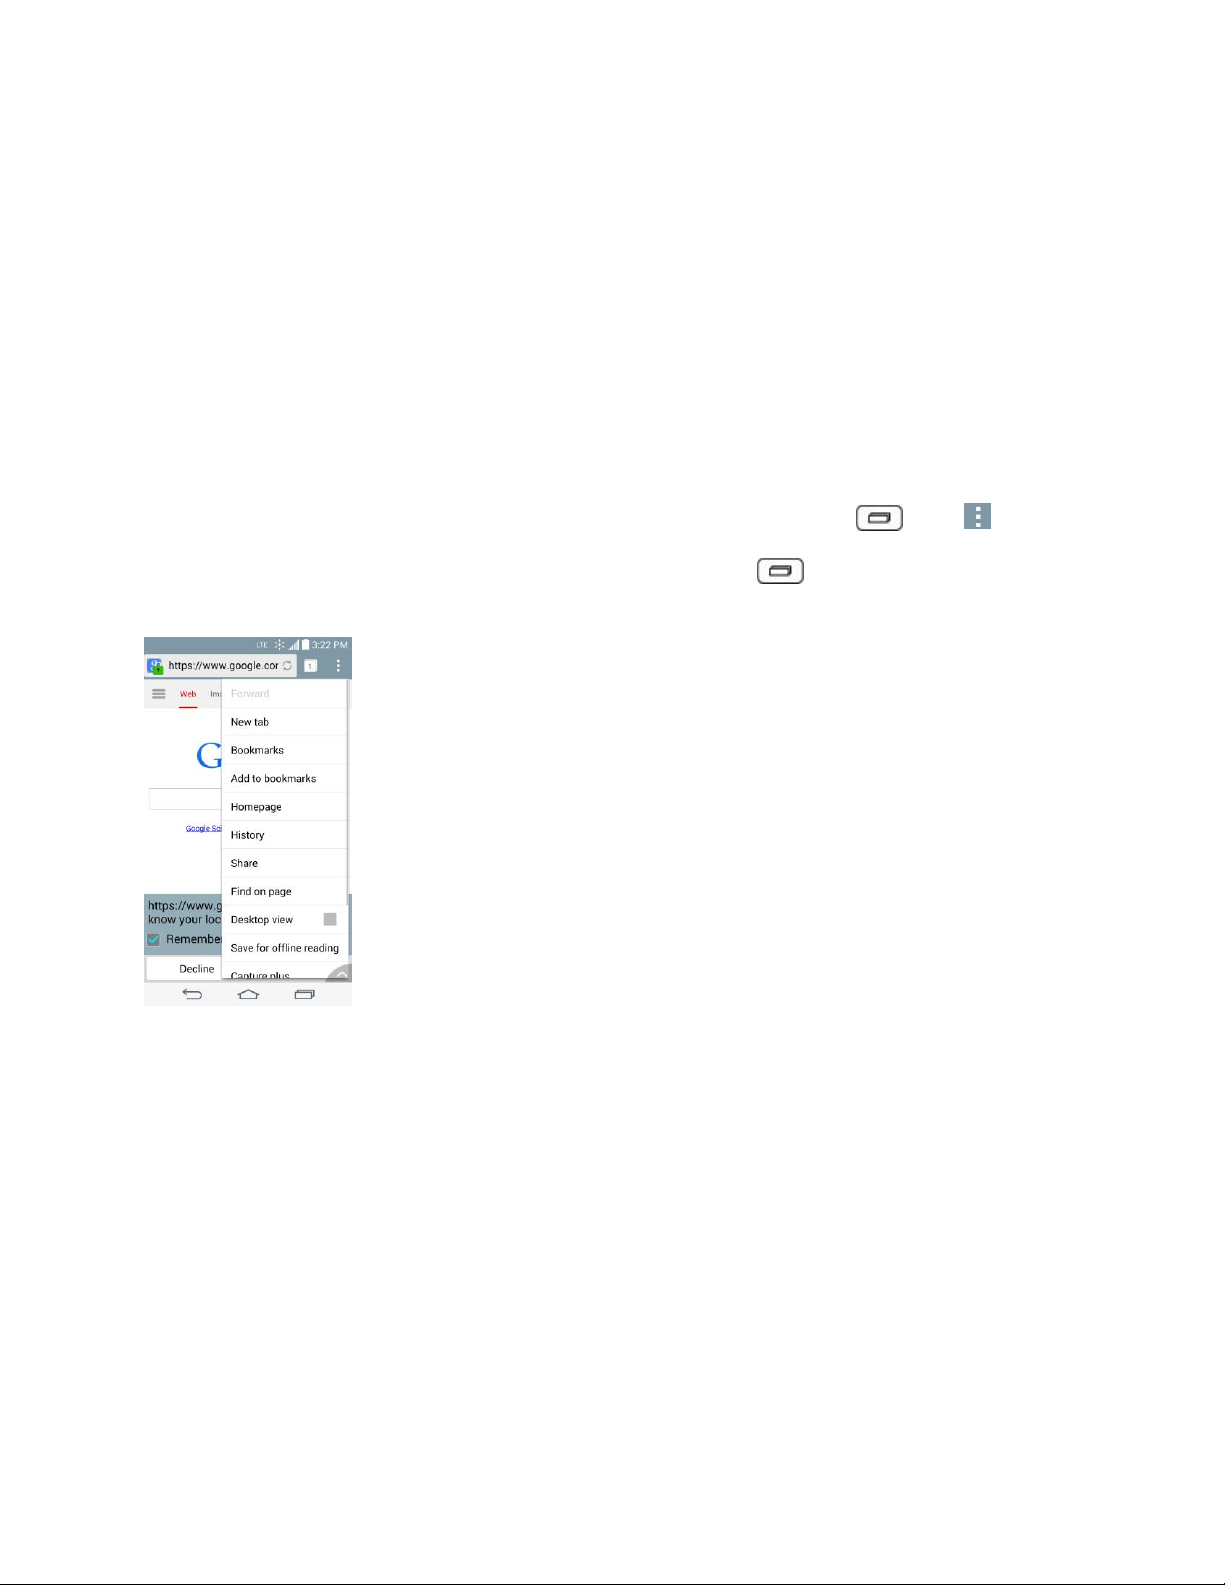
Work with Menus
There are two Android menu types, Options menus and Context menus.
Options Menus
Options menus contain tools that apply to the activities of the current screen or application, not to any
specific item on the screen. To open the available options menu, touch and hold or tap .
Note: Not all applications have Options menus; if you touch and hold on a screen that has no
Options menu, nothing will happen.
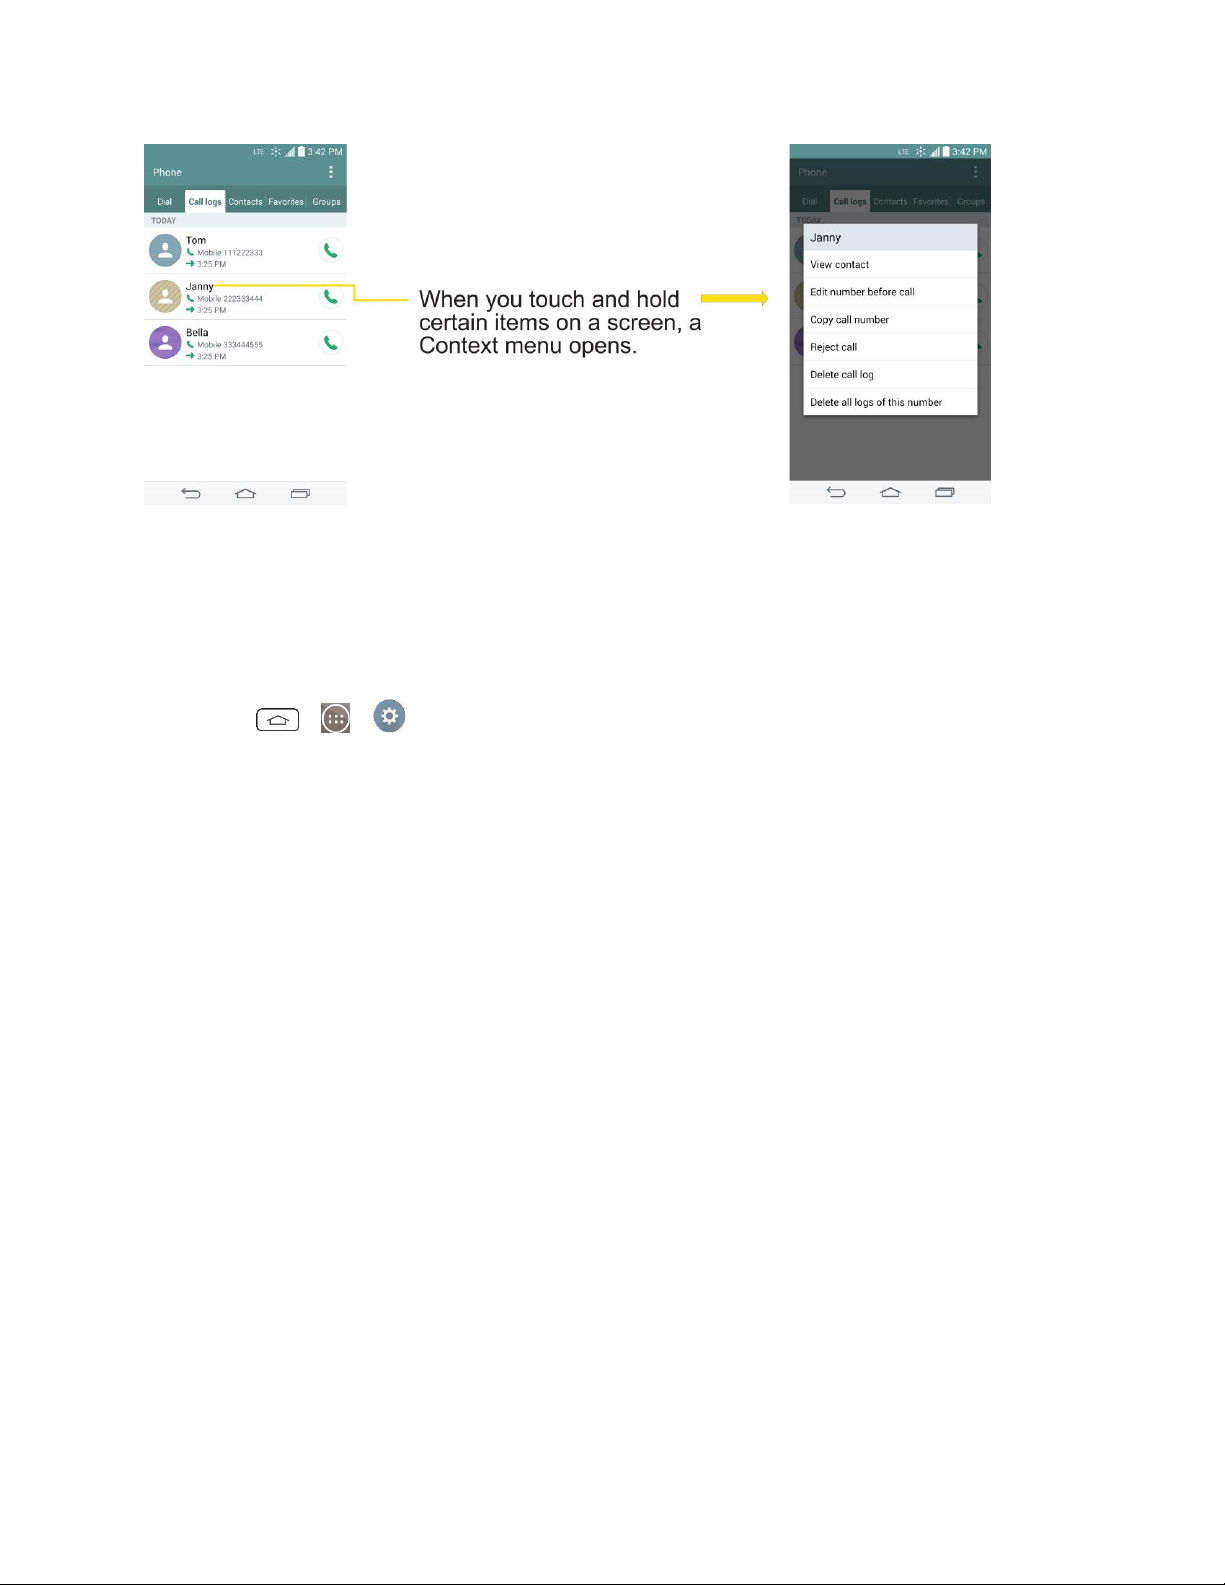
Context Menus
Context menus contain options that apply to a specific item on the screen. To open a Context menu,
touch and hold an item on the screen. Not all items have Context menus. If you touch and hold an item
that has no Context menu, nothing will happen.
Phone Basics 15
Select Menu Items
To select a menu or option, simply tap it. If there are more menus/options than can fit in a screen, slide
the screen up to display more menus/options.
For example, to set the phone to play tones when dialing numbers on the dial pad:
1. Tap > > Settings.
2. Tap Sound.
3. Slide the screen up to display more menus.
4. Tap Sound effects.
Notifications Panel
Notification icons report the arrival of new messages, calendar events, alarms, as well as ongoing events,
such as when you are on a call.
When you receive a notification, text appears briefly and the notification icon will be displayed in the
Status Bar. For descriptions of the various notification icons, see Status Bar.
You can open the Notifications Panel to view a list of all recent notifications. Depending on your settings,
you may hear a notification sound and the phone may vibrate.
Note: Adjusting sound volume and other general notifications settings is described in Sound Settings.
Applications whose activities produce notifications, such as Gmail and Google HangoutsTM, have their
own settings, which you can use to configure whether, and how, they send notifications. See the sections
on those applications for details.
Open Notifications
■ Touch and drag the Status Bar to the bottom of the screen.
Phone Basics 16

The Notifications Panel displays the Quick Settings and a list of your current notifications, organized into
ongoing and event-based notifications.
Respond to Notifications
1. Open the Notifications Panel. Your current notifications are listed in the panel, each with a brief
description.
2. Tap a notification to view it. The Notifications Panel will close and the application that
corresponds to your response will open.
For example, new voicemail notifications dial your voicemail box, and network disconnect notifications
open the list of configured networks so you can reconnect.
Clear Notifications
1. Open the Notifications Panel.
2. Tap at the top right of the panel.
All event-based notifications will be cleared; ongoing notifications will remain in the list.
Close Notifications
■ Touch and drag the tab at the bottom of the Notifications Panel to the top of the screen.
– or –
■ Tap . (The panel will also close when you tap a notification.)
Home Key
The Home Key takes you back to your default Home screen canvas (of the 7 total available canvases).
Tap to access your main Home screen.
Note: Touch and hold to access Google Now.
Back Key
The Back Key returns you to the previously active screen. If the on-screen keyboard is currently open, the
Back Key closes the keyboard.
Note: Touch and hold to access Dual window.
Touchscreen Navigation
Your device is a touch-sensitive phone which allows you to select an on-screen option with a single touch
and to easily scroll through long lists. Simply slide up and down through the display with your fingertip.
Your touchscreen provides an excellent way to interact with and use your Android phone. With the touch
of your finger, you can access available applications, make menu selections, and access data saved to
Phone Basics 17
your phone. The following terms are used for describing the different available actions using the
touchscreen:
● Tap: A single finger tap selects items, links, shortcuts and letters on the on-screen keyboard.
● Touch and hold: Touch and hold an item on the screen by touching it and not lifting your finger
until an action occurs. For example, to open a contact‗s available options, touch and hold the
contact in the Contacts list until the context menu opens.
● Drag: Touch and hold an item for a moment and then, without lifting your finger, move your finger
on the screen until you reach the target position. You can drag items on the Home screen to
reposition them, as described in Add and Remove Widgets on the Home Screen, or drag the
Notifications Panel open, as described in Notifications Panel.
● Swipe or slide: To swipe or slide, quickly move your finger across the surface of the screen,
without pausing when you first touch it (so you don‗t drag an item instead). For example, you can
slide the screen up or down to scroll through a list, or browse through the different Home screens
by swiping from left to right (and vice versa).
● Double-tap: Double-tap to zoom on a web page or a map. For example, quickly double-tap a
section of a web page to adjust that section to fit the width of the screen. You can also double-tap
to zoom in and out when taking a picture (using the Camera), and when using Maps.
● Pinch-to-Zoom: Use your index finger and thumb in a pinch or spread motion to zoom in or out
when using the Browser, Maps, or browsing pictures.
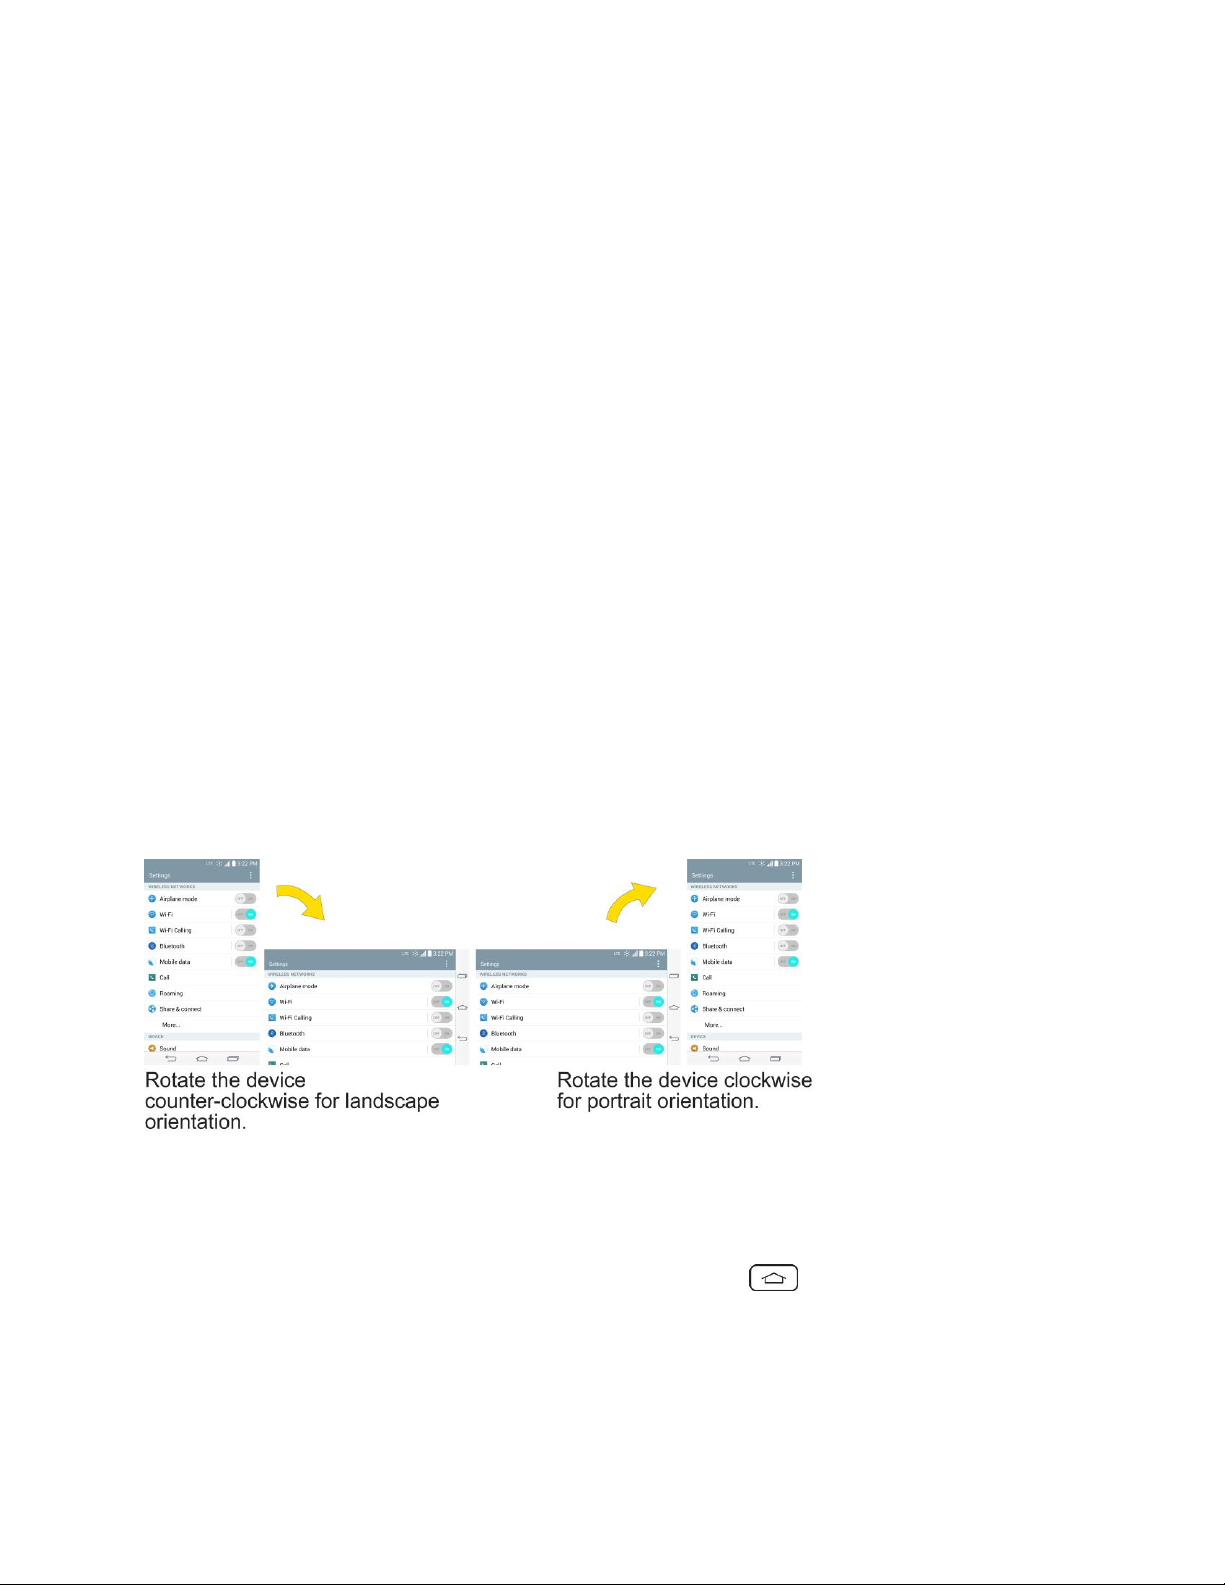
● Rotate the screen: From many applications and menus, the orientation of the screen adjusts to
the phone‗s physical orientation. (See Change the Screen Orientation.)
Your Home Screen
The Home screen is the starting point for many applications and functions, and it allows you to add items
like application shortcuts, or Google widgets to give you instant access to information and applications.
This is the default canvas and accessible from any menu by tapping .
Home Screen
On the Home screen, you can view Quick Keys at the bottom of the screen. The Quick Keys and
application icons provide easy, one-tap access to the functions you use the most.
Phone Basics 18
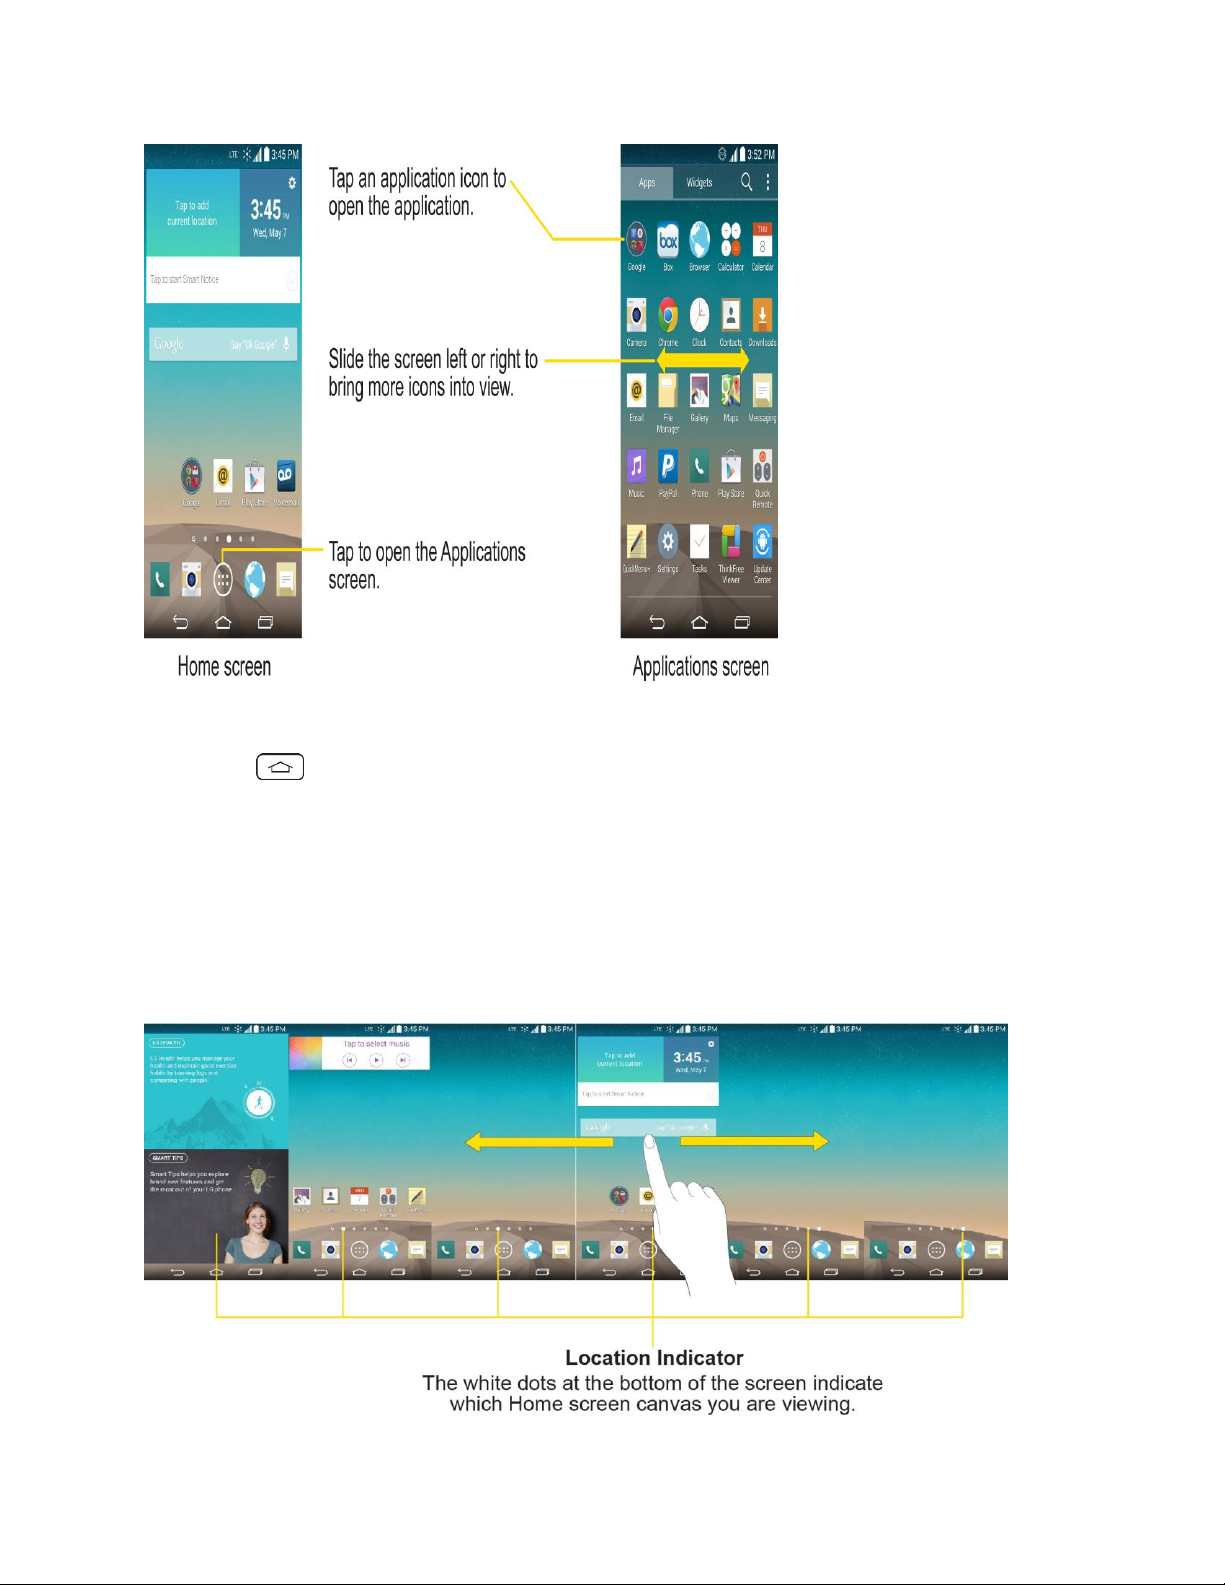
To return to the Home screen:
■ Tap at any time, from any application
Extended Home Screen
The operating system provides multiple Home screen canvases to provide more space for adding icons,
widgets, and more.
■ Slide your finger left or right across the Home screen. The default canvas is in the center with 2
extension canvases on either side of it. (For more information on sliding, see Touchscreen
Navigation.)
Phone Basics 19
 Loading...