

Page 1
Get
Started
All you need to know to get going.
Page 2

Welcome!
Thanks for choosing Sprint. This booklet introduces you to the
basics of getting started with Sprint Spark™ and HD™ Voice
capable*
ReadyNow – For more help in getting up and running with
your new phone, take advantage of exclusive Ready Now
resources at sprint.com/readynow. You can even schedule a
one-on-one appointment at a Sprint Store near you.
For ongoing support and resources, visit sprint.com/support.
There, you’ll ind guides, tutorials, and more to help you get
the most out of your phone.
Note: Available applications and services are subject to change at any time.
* The Sprint Spark enhanced LTE network and HD Voice capability are available in select markets.
Visit sprint.com/coverage for more information.
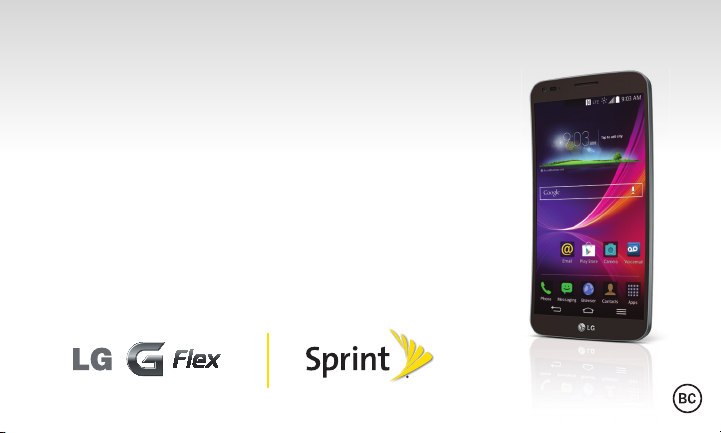
LG G Flex.
Page 3
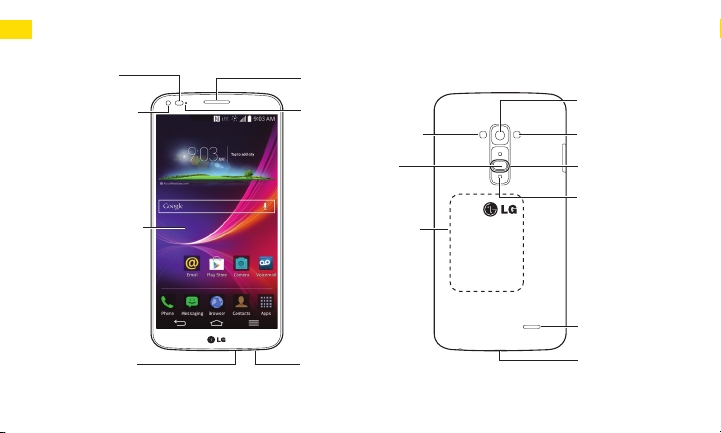
Accessory Port
Microphone
Earpiece
Proximity
Sensor
Front-Facing
Camera Lens
T
Your LG G Flex
ouchscreen
Notification LED
3.5mm Headset Jack
IR (infrared)
LED
Power/
Lock Button
NFC Touch
Point
Back-Facing
Camera Lens
Flash
LED
Volume
Buttons
Speaker
Charger/
Page 4

Using This Guide
This Get Started guide is designed to help you set up and use your new LG
G Flex. It’s divided into four sections to help you nd the information you
need quickly and easily.
Get Ready − page 5 − Find out what
you need to do before you use your
phone the rst time, including inserting
a battery and activating Sprint service on
your phone.
Android Basics − page 9 − Learn some
basics about how to move around on
your phone, use the Home screen, and
enter text. If you’re familiar with Android
phones, you can probably skip these
pages (although a refresher course never
hurt anyone).
Use Your Phone − page 13 − Take
advantage of your phone’s features
and Sprint services, from the basics
(Making Calls) to the more advanced
(using Google Play™, Wi-Fi™, and more).
Tools & Resources − page 29 − Find
useful tips for your phone and discover
resources and other helpful Sprint
information. For additional information
including the full User Guide, videos,
tutorials, and community forums, visit
sprint.com/support.
Page 5

Get Your Phone Ready
Before you start: Visit sprint.com/readynow
to learn about transferring contacts,
calendars, and more from your old phone.
Note: Your LG G Flex is a solid-state device.
The battery cannot be removed so there is
no battery installation required.
Charge the Battery
1. Connect the charging adapter and
USB cable.
2. Plug one end of the USB cable into the
phone’s Charger/Accessory Port and the
other end into an electrical outlet.
Turn the Phone On
► Press and hold the Power/Lock Button
to turn your phone on.
visit sprint.com/readynow for more information to get your phone up and running 54
Turn the Screen On and O
•To quickly turn the display screen o, press
the Power/Lock Button
of the phone.
•To turn the screen on and display
the unlock screen, press the
Power/Lock Button
on the back
.
Unlock the Screen
► Swipe any part of the screen to unlock it.
Turn the Phone O
► Press and hold the Power/Lock Button
on the
back of the phone and then tap
Power o >
OK to turn the phone o.
Get Ready
Page 6

Get Your Phone Ready
TalkBack
Before the activation process can begin, the
device will prompt the TalkBack voice
navigation feature. TalkBack is an
Accessibility Service that helps blind and
vision-impaired users interact
with their devices more easily. To bypass
this feature, tap Next.
To disable TalkBack, follow these steps:
1. Tap > > System settings.
2. Place two ingers on the screen to activate
scrolling and move your ingers in an
upward direction to scroll.
3. Tap Accessibility > TalkBack.
4. Tap the OFF/ON toggle switch.
Note: When Talkback is turned on, the
touchscreen settings require the user to irst
tap an item they wish to select, and then
double tap the item again in order to access
the feature.
Page 7
Activate Your Phone
Activate Your Phone
If you purchased your phone at a
Sprint Store, it is probably
activated and ready to use.
If you received your phone in the
mail, and it is a new Sprint account
or a new phone number, your
phone is designed to activate
automatically when you irst turn it
on. When you turn the phone on
for the irst time, you should see a
Hands Free Activation screen,
which may be followed by a PRL
Update screen and a Firmware
Update screen. Follow the
onscreen instructions to continue.
To conirm your activation, make a
phone call.
visit sprint.com/readynow for more information to get your phone up and running 76
If you received your phone in the
mail and it is going to be activated
on an existing number (you’re
swapping phones), go to
sprint.com/activate and follow the
instructions. When you have
inished, make a phone call to
conirm your activation.
If your phone is still not activated, visit
sprint.com/support for assistance. If you
do not have access to the Internet, call
Sprint Customer Service at 1-888-211-4727
from another phone.
Get Ready
Page 8
Phone Basics
These instructions help you set up various
options and applications, including setting
up your Google™ Account.*
Sprint Connections Optimizer
Following phone activation, you may see a
Sprint Connections Optimizer notice. Read
the notice and tap I Agree to allow your
phone to connect automatically to the best
available data network, including Wi-Fi.
Note: You can turn o Sprint Connections
Optimizer at any time. Tap
settings >
Connections Optimizer.
More... > Mobile networks >
> > System
Set Up a Google Account
Setting up a Google Account lets you
access many features of your Android
phone. It also allows you to sync Google
contacts and apps you may previously have
used.
1. Tap > > System settings >
Accounts & sync.
2. Tap Add account > Google.
3. Follow the prompts to set up a new
Google
Account or sign in to an existing
Google Account.
* You do not need to sign up for a Google
Account to use your phone; however, to
download content from the Google Play™
Store app, you must link your phone to a
Google Account.
Page 9

Android® Basics: Getting Around Your Phone
Move Around Your Phone’s Menus
and Screens Using Gestures
Your phone’s touchscreen lets you control
everything through various types of
touches, or gestures.
Tap: When you want to press onscreen
buttons, select items such as application
and settings icons, or type, simply tap the
screen with your inger. A light tap
works best.
Touch and hold: To open the available
options for an item (for example, options for
a contact), simply touch and hold the item.
Drag: To scroll through a list or move slowly,
drag across the touchscreen horizontally or
vertically. For example, tap Contacts and
then drag the list up or down.
visit sprint.com/support for guides, tutorials and more 9
Swipe or slide: To swipe or slide, quickly
move your inger across the surface of the
screen, without pausing when you irst
touch it (so you don’t drag an item instead).
For example, you can slide the screen up or
down to scroll through a list, or browse
through the dierent Home screens by
swiping from left to right (and vice versa).
Pinch-to-Zoom: “Pinch” the screen using
your thumb and foreinger to zoom out or
zoom in when viewing a picture or a Web
page. (Move ingers inward to zoom out and
outward to zoom in.) You can also doubletouch the screen to zoom in and then
double-touch again to zoom out.
Android Basics
Page 10

Your Home Screen
Viewing Extended Screens
Your phone’s Home screen extends
horizontally to six additional screens. This
gives you room to customize your phone
and put the things you need front and
center, just a swipe away.
•To display the Home screen, tap
any screen.
•To view extended screens, swipe the screen
left or right. There are three additional
screens on each side of the Home screen.
from
Notiications Panel
When you see a notiication icon on the left
side of the status bar, drag the Status Bar
down to display the Notiications Panel. Tap a
notiication to open the related application,
such as messaging, call list, or event.
To close the panel, drag the bottom bar up.
Add Items to Your Screens
1. Choose a screen and touch and hold an
empty area of the screen.
2. Tap either Apps, Widgets, or Wallpapers.
3. Touch and hold the desired shortcut and
drag to your screen.
4. Release your inger.
Page 11
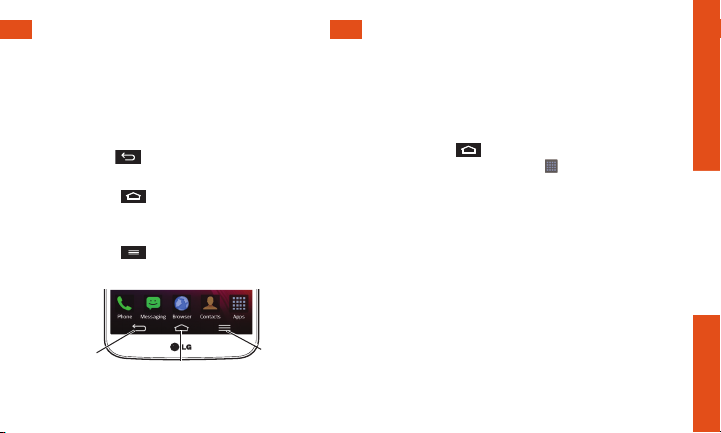
Keys
Open Apps
Function Keys
Just below the touchscreen, you’ll ind a row
of three static keys that let you perform
speciic functions.
•Back Key ( ) – Tap to return to the
previous screen view.
• Home Key ( ) – Tap to return to the Home
screen. Touch and hold to view a list of
recently-used apps.
•Menu Key ( ) – Tap to open context-
speciic menus.
Back
Key
visit sprint.com/support for guides, tutorials and more 1110
Home Key
Menu
Key
Open Apps
•If an app is on one of your Home screens,
just tap it to open it.
•If an app is not available from your Home
screen, tap
Home screen), tap Apps
apps list, and then tap the app from the
alphabetical list. You may have to scroll to
the side to ind the app you’re looking for.
(if you’re not already on the
to display the
Android Basics
Page 12

Typing Use Your Phone: Calls
Language and Keyboard Settings
You can change your text entry options
through the Language & input settings
menu. These may include selecting
touchscreen keyboard options (LG Keyboard
and Swype
correction, personal dictionary, and language.
► Tap > > System settings >
•To change the language for your
•To select a keyboard type, tap Default
•To change the language and keyboard
), or Google voice typing,
Language & input and then tap an option.
keyboard, tap Language.
and select an input method.
settings, tap
typing, LG Keyboard, or Swype.
next to Google voice
spelling
LG Keyboard
Use the LG Keyboard to enter text one letter
at a time.
Using Swype to Enter Text
Swype lets you enter words by tracing over
the letters in a single motion.
• Touch an onscreen character, and then, while
maintaining your inger onscreen, drag to the
next character in the desired word.
Google Voice Typing
Use your voice to enter text instead of typing.
1. From any screen where you can enter text,
touch the input ield to reveal the keyboard.
2. Touch and speak clearly.
Page 13

Use Your Phone: Calls
Make a Phone Call
1. Tap > Phone > Dial tab to display the
phone dialpad.
2. Tap the digits of the number you want to
call on the dialpad. Tap
more digits.
3. Tap to place the call.
to delete one or
Note: While on a call and holding the phone
near your face to speak, the touchscreen
automatically deactivates to avoid accidental
screen presses. When you move the phone
away from your face, the touchscreen
automatically reactivates.
Respond to an Incoming Call
•On the incoming call screen, lick the
Answer icon in any direction.
•Flick the Decline icon in any direction to
send the call to your voicemail inbox.
•Flick the Decline with message icon in any
direction
message to the caller.
visit sprint.com/support for guides, tutorials and more 13
to ignore the call and send a
Use Your Phone
Page 14
Voicemail
Set Up Your Voicemail
All unanswered calls are automatically
transferred to your voicemail, even if your
phone is in use or turned
up your voicemail and personal greeting as
soon as your phone is activated:
1. Tap > Phone (Tap the Dial tab,
if the screen is not already on the
dial screen.)
2. Touch and hold .
3. Follow the voice prompts to create
your password and record your name
and greeting.
Sprint strongly recommends setting a
voicemail password.
o . You should set
Retrieve Your Voicemail
► Tap > Phone and then touch
and hold
From any other phone:
1. Dial your wireless phone number.
2. When your voicemail answers, tap
Visual Voicemail
This gives you a quick and easy way to
access your voicemail. Now you can ind the
exact message you are looking for without
having to listen to every voicemail irst.
1. Tap > > Voicemail .
2. Tap Personalize now and follow the system
prompts to set up your Visual Voicemail.
.
.
*
Page 15
Contacts
Your phone’s Contacts application lets you access and manage contacts from a variety of
sources, including Gmail, Exchange, Facebook, Twitter, contacts synced from your
computer, and old-fashioned contacts entered by hand.
View Contacts
1. Tap > Apps > Contacts .
2. Scroll through the list to view your contacts.
Add a New Contact
1. Tap > Apps > Contacts > .
Note: You may be prompted to select an
account to sync your new contact with.
2. Add as much or as little information as
you want.
•To add information in a ield, tap the ield
to display the touchscreen keyboard.
•To assign a number or address type (such
as HOME, MOBILE, WORK, etc.), tap the
label next to the number or address ield.
visit sprint.com/support for guides, tutorials and more 1514
•To assign a picture, tap the icon next to
the name, select a location, and tap a
picture. You can also take a new picture.
3. Tap Save when you’re inished.
Note:
If you have contacts associated with
your Gmail account, they are automatically
synced with your phone.
Edit Contacts
1. Tap > Apps > Contacts .
2. Tap a contact to open it, and then tap .
•Tap a ield to add or edit information.
3. Tap Save when you’re inished.
Note: To delete a contact, tap
Delete
> Yes .
Use Your Phone
>
Page 16
Messaging
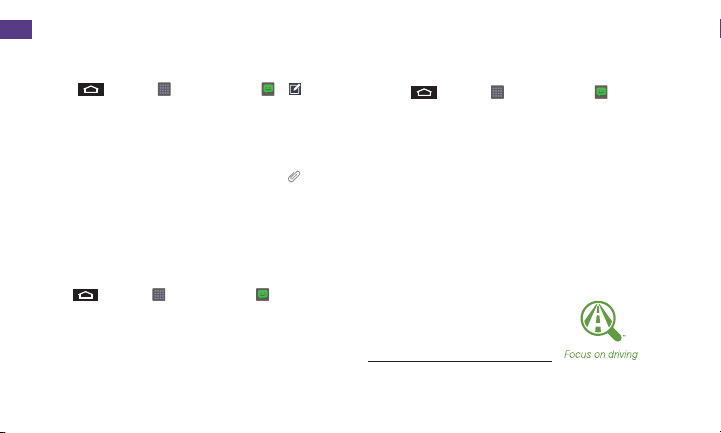
Send a Message
1. Tap > Apps
2. Enter a phone number or email address in
the “To” ield.
3. Tap the “Enter message” ield and type your
message.
• To insert pictures or other iles, tap .
4. When you are inished, tap Send.
Note: For information on taking pictures and
recording videos with your phone, see
“Camera & Camcorder” on page 20.
> Messaging
>
.
Access Messages
•Tap > Apps >
Tap a message to open and read it.
–or–
•If you have a new message notiication, drag
the Status Bar down to open the Notiications
Panel. Tap a message to open and read it.
Messaging
.
Read and Reply to Messages
► Tap > Apps
•To open a message, tap it. Tapping a text
message or a social networking message
opens the message and all its replies.
•To reply to a text or social networking
message, open it and enter your reply in
the text box at the bottom.
•To forward a text message, touch and
hold the message to bring up an options
menu, tap Forward, and select or enter
a recipient.
> Messaging .
Be a hero. Don’t
drive distracted.
sprint.com/focusondriving
Page 17

Email
You can link multiple email accounts to your
LG G Flex, including Exchange server
accounts. You can set up email accounts
directly through the settings menu or email
application.
Set Up a Gmail™ Account
1. Tap > Apps > Gmail .
2. Follow the instructions to set up or sign in
to a Gmail account.
Note: Although you need a Gmail account to
use certain features such as Google Play™,
you do not have to use Gmail as the default
account for your phone.
visit sprint.com/support for guides, tutorials and more 1716
Note: When setting up a new Google
Account, you will be prompted to add a
secondary email address. Enter a second
Gmail address or any other email address
from which you currently send and receive
email. This address is used to authenticate
your account should you ever encounter
problems or forget your password. It is
strongly encouraged for Android users so
you can regain access to Google services
and purchases on your phone.
Use Your Phone
Page 18
Email Email
Set Up an Email Account
1. Tap > Apps > Email .
2. Follow the instructions to sign in to your
email account.
•Tap Manual setup to conigure your
connection settings manually (POP3 ,
IMAP, or Exchange). Follow the on-screen
prompts and enter the information
speciic to your carrier.
Note: If you‘re not sure about your account,
tap Next after entering your email address and
password. If your phone can’t autoconigure
your account, you’ll then be asked to
conigure it manually.
Set Up a Microsoft® Exchange® Account
Use the Microsoft Exchange option to set
up Exchange server work email accounts.
Contact your IT administrator for account
sign-in requirements.
1. Tap > > System settings >
Accounts & sync.
2. Tap Add account > Microsoft Exchange.
3. Enter the Exchange server account details
and then tap Next.
• Contact your Exchange Server administrator
for required sign-in information.
4. Select the type of information you want to
synchronize and tap Done.
Page 19
Email
Access Email Messages
1. Tap > Apps
•If necessary, tap the email account you
want to use.
2. From the inbox, tap the message you want
to view.
> Email
or
Send an Email Message
1. Tap
2. Tap
3. Enter an email address in the To: ield.
4. Enter a subject and a message.
visit sprint.com/support for guides, tutorials and more 1918
>
Apps
• If necessary, tap Inbox and tap the email
account you want to use.
or
.
•To add a Gmail attachment, tap >
Attach ile and select an attachment.
> Email or Gmail .
Gmail .
•To add an Email attachment, tap
select an attachment.
5. Tap
or
.
and
Access Gmail Messages
1. Tap > Apps > Gmail .
2. Select the inbox you want to view.
3. Touch a message to view it.
Send a Gmail Message
1. Tap > Apps > Gmail .
2. Tap .
3. Enter an email address or contact name.
4. Enter a subject and a message.
•To add attachments, tap
5. Touch to send the message.
> Attach ile.
Use Your Phone
Page 20
Take a Picture
1. Tap > Apps
2. Tap
to take the picture.
> Camera .
Record a Video
1. Tap
> Apps
2. Tap to switch to Camcorder mode.
3. Select MMS (for max 30 second videos to
attach to email or messages) or Long video
(for longer videos).
4. Tap
to begin recording. Tap to stop.
> Camera .
Camera & Camcorder Settings
•From the camera or camcorder screen, tap
to open the capture settings menu.
These settings include Brightness, Focus,
Image size, Color e ect and much more.
Page 21
Camera & Camcorder
View Pictures and Videos
1. Tap > Apps
2. Select a folder to display pictures or videos.
•Tap a picture or video to display it full size.
•For video playback, tap the play
pause
visit sprint.com/support for guides, tutorials and more 2120
> Gallery .
icons.
and
Share Pictures and Videos by Email,
Gmail, or Messaging
1. Tap > Apps
2. Tap an album to display the thumbnails.
3. Touch and hold a thumbnail and then tap Share.
–or–
Tap the thumbnail to open it and then tap .
4. Choose Messaging, Bluetooth, Email,
Gmail, Google+, Picasa, YouTube and
others as a share method.
5. Compose your message and then tap
,
or Upload.
> Gallery .
Send,
Use Your Phone
Page 22

Web
Wi-Fi Google Play and Google Mobile Services
Find sports scores, news, and weather.
Shop online. Tabbed browsing lets you
browse the Web just the way you want to.
Go Online
► Tap > Apps > Browser .
•To go to a speciic website, tap the
address bar and enter the Web address.
•To access and manage bookmarks, tap
> Bookmarks or Add to Bookmarks.
Connect to a Wi-Fi Network
When you’re in range of an available Wi-Fi
network, you can use your phone’s Wi-Fi
feature to access the Internet and other
data services.
1. Tap > > System settings.
2. Tap the Wi-Fi OFF/ON icon to turn
Wi-Fi on.
3. Tap Wi-Fi to display a list of
available networks.
4. Tap a Wi-Fi network to connect. If
necessary, enter the security key and
tap Connect.
•When you’re connected to a Wi-Fi
network, you’ll see the Wi-Fi icon (
in the Status Bar.
)
Page 23

Google Play and Google Mobile Services
Google Play is the place to go to ind
new apps, games, movies, and more for
your phone.
Download Apps and Games
1. Tap > Apps > Play Store .
2. The irst time you visit the Google Play
Store app, tap Accept to accept the Terms
of Service.
3. Browse through featured apps and games, or
tap
at the top of the app to start a search.
4. Tap an item to read a description and reviews.
5. Tap INSTALL (for free apps) or the price (for
paid apps) and follow the onscreen prompts.
Note: You must have a Google Account set up
on your phone to purchase and download
apps from Google Play.
visit sprint.com/support for guides, tutorials and more 2322
Google Mobile Services
• Gmail – The Google mail service. Your Gmail
account lets you access many Google-related
services as well as Google Play.
•Google+ Hangouts – Google’s instant
messaging service. Tap
Hangouts to begin using the service.
•Google Maps – The Google location
program. Tap
begin using this service.
•YouTube – View and share videos. Tap
Apps
> YouTube to browse through
and view available videos. Sign in with your
Google Account to upload your own videos.
> Apps > Maps to
> Apps >
Use Your Phone
>
Page 24

Bluetooth
Pair and Connect With a
Bluetooth
1. Tap >
Bluetooth
•If Bluetooth is not turned on, tap the
2. Select an available device and follow the
prompts to pair the devices. You may be
required to enter a passcode (often 0000)
to complete pairing.
3. Once you’re paired, your connection
should launch.
®
Device
>
System settings >
.
Bluetooth OFF/ON icon to ON.
Share Contacts, Files, or Pictures
Using Bluetooth
1. Open the application containing the ile
you want to share. (For example, tap
Apps
>
2. Locate the ile you want to share.
3. You can send pictures and videos directly
from the camera or from Gallery, Calendar
events, or Contacts. Not all devices will be
able to receive all ile types.
4. Tap > Bluetooth .
5. Touch the name of the device to which
you’re sending the ile. (If prompted, tap
Yes to turn Bluetooth on.)
Gallery .)
>
Page 25

Portable Wi-Fi Hotspot
Portable Wi-Fi Hotspot allows you to turn
your LG G Flex into a Wi-Fi hotspot.
Set Up and Activate Your Mobile Hotspot
Note: Risks can be associated with
connecting to the public Internet. Your
phone allows you to create a mobile hotspot.
It is recommended that you use a password
or other possible steps to protect against
unauthorized access.
1. Tap
>
Wi-Fi hotspot and tap the switch next to
Wi-Fi hotspot to turn on this feature.
2. Tap Set up Wi-Fi hotspot and enter your settings.
•Wi-Fi name (SSID) — Enter a unique name
for your hotspot.
•Security — Select the type of security
you want. Other users can access your
mobile hotspot only if they enter the
correct password.
visit sprint.com/support for guides, tutorials and more 2524
> System settings > More... >
•Password — Add a password depending
on your Security settings.
•SSID Visibility — Choose whether to
show or hide your SSID on the network.
•Max users — Specify the number of users
who can access your hotspot at any
given time.
Connect a Device to the Mobile Hotspot
1. Enable Wi-Fi on your device (for example,
a laptop computer).
2. Select the Wi-Fi name (SSID) for your
mobile hotspot and enter the password
if prompted.
3. When “Connected” appears on your
device, launch your Web browser to
conirm you have an Internet connection.
Use Your Phone
Page 26

Sprint Applications Sprint Applications
Sprint ID
Sprint ID lets you instantly personalize your
phone with mobile ID packs featuring apps,
ringtones, wallpapers, widgets, and more,
customized to suit your lifestyle.
1. Tap > Apps > Sprint ID .
2. From the Choose your ID screen, tap an ID
pack to apply it, or tap Get New ID Packs
to search for new ID packs.
•To download a new ID pack, browse
through the selection and tap an ID pack
to see its details. Tap Install and follow
the prompts to download the pack.
Once it has been downloaded, drag the
Notiications bar down and tap OK. Access
additional exclusive Sprint features right
from your phone.
Download Sprint Applications
1. Tap > Apps > Sprint Zone .
2. From the Sprint Zone Web page, scroll up
or down and tap an item to check your
account, read the latest news about your
phone, load an application, and more.
Page 27

GPS Navigation Sprint Applications
Sprint TV & Movies
Note: The Sprint TV & Movies application does
not come preinstalled on your phone, unless
you have downloaded the Sprint ID pack. You
will need to download it from Google Play.
Live TV and video on demand. Complete
episodes and clips of your favorite
primetime shows and movies. Over 50
channels of news, entertainment, weather,
sports, and streaming music.
1. Tap
> Apps
2. In the top bar, tap Home, Live TV, On
Demand, Movies, or Shop to ind what you
want to watch.
•For quick access, touch a featured item in
the center of the screen or select a live
option in the bottom bar.
Visit sprintchannels.mobitv.com for more
information on channels and pricing.
visit sprint.com/support for guides, tutorials and more 2726
> Sprint TV & Movies .
Get turn-by-turn directions to a known
address, and ind nearby restaurants, stores,
and other points of interest.
Google Maps™
► Tap > Apps
>
Maps .
Use Your Phone
Page 28

Open Your Music Player
► Tap > Apps
library screen appears.
•Music is stored in categories Songs,
Albums, Artists, Genres, Playlists,
Folders, Nearby devices, and Cloud.
Touch a category, and then touch the
song or playlist you want to play. Tap to
randomly play all songs.
Note: You will need to load music onto your
before you can listen to music. See
phone
“Getting Music.”
>
Music . The Music
Getting Music
Before you can listen to your music, you
need to load songs into your phone.
Here’s one way to do it:
1. Use the supplied USB cable to connect
your phone to an available USB port on
your computer.
2. Copy music iles from your computer to
the music folder, follow the procedures to
safely remove the drive, and then
disconnect the phone from the USB cable.
Page 29

Tools & Resources: Settings
Explore ways to customize your phone, set permissions, update your phone, and more in the
Settings menu.
Accessing Settings
1. Tap > > System
settings.
–or–
Tap
> Apps >
Settings
2. Select the settings category
you want to change.
Categories include:
•Airplane mode
•Wi-Fi
•Bluetooth
•Mobile data
•Call
•Roaming
visit sprint.com/support for guides, tutorials and more 2928
.
•Share & Connect
•More...
•Sound
•Display
•Home screen
•Lock screen
•Gestures
•One-handed operation
•Storage
•Battery
•Apps
•Multitasking
•Tap & pay
•Accounts & sync
•Cloud
•Guest mode
•Location
•Security
•Language & input
•Backup & reset
•Date & time
•Accessibility
•PC connection
•Accessory
•Activate this device
•System updates
•Printing
•About phone
For detailed information
about settings, please
see the User Guide at
sprint.com/support.
Tools & Resources
Page 30

Battery-Saving Tips
Manage the Display Brightness and
Screen Timeout
► Tap
>
Display > Brightness or Screen timeout to
> System settings
modify your settings.
>
Manage Your Phone’s Wireless Functions
Disable the Wi-Fi hotspot, Bluetooth, and GPS
functions of the phone when you’re not
using them.
► Tap
For more useful tips about battery care and
safety, see the User Guide at sprint.com/support.
>
disable any of these functions that are not
in use under WIRELESS NETWORKS or
Location.
> System settings and
Page 31

Manage Your Account
Online: www.sprint.com
•Make a payment, see your bills, enroll in
online billing.
•Check minute usage and account balance.
•See or modify the details of your Sprint
service plan.
• Get detailed instructions and download content.
From Your Sprint Phone
•Tap > to check minute
usage and account balance.
• Tap
>
•Ta p
>
Zone, where you can check your account,
update your phone, watch video tutorials, or
contact Sprint Customer Service.
visit sprint.com/support for guides, tutorials and more 3130
to make a payment.
to access the Sprint
From Any Other Phone
• Sprint Customer Service:
Dial 1-888-211-4727
•Business Customer Service:
Dial 1-888-788-4727
Tools & Resources
Page 32

Resources
Resources For Your Phone
•This Get Started Guide to get you up
and running.
•Ready Now – Visit sprint.com/readynow for
additional help to get started on your new
phone. You’ll ind more information on
basic setup, activation, maximizing your
phone’s performance, and personalization.
Plus, you can even schedule a personalized
one-on-one Ready Now appointment at a
Sprint Store near you.
•Online Support – For ongoing help over the
life of your phone, visit sprint.com/support
to ind videos, tutorials, troubleshooting
tips, and the complete User Guide for
your LG G Flex.
•Community – Visit community.sprint.com
to join the discussion about all things
Sprint. Here people help each other make
the most of their wireless services with tips,
forums, blogs, and the latest news.
• On Your Phone – Tap
Sprint Zone
Sprint news, phone information, suggested
applications, troubleshooting, and more.
to access account services,
> Apps >
Page 33

Sustainability
Feedback
At Sprint, environmental responsibility is
more than talk. To ind out just what we’ve
been up to, use your phone to scan the QR
®
Code
below or visit sprint.com/green for
more information.
To scan the code, download
and install a QR Code
from the Google Play Store app,
launch the reader, and aim your
phone’s camera at the image.
This guide is printed with soy inks and
contains 100% post consumer paper.
visit sprint.com/support for guides, tutorials and more 3332
®
reader
We are interested in your initial
impressions of this new Sprint phone.
Within two weeks of your purchase, please go
to http://labs.sprint.com/sprintphonesurvey to
complete a brief survey. Your feedback will
help us provide the wireless features and
services you want most.
Thank you for choosing Sprint.
Tools & Resources
Page 34

The services described in this guide may require a subscription to a service plan and/or may incur
Los servicios descritos en esta guía pueden requerir una suscripción a un plan de servicio y/o pueden
incurrir cargos adicionales. No todos los servicios trabajarán en todos los teléfonos. La cobertura Sprint no
está disponible en todos los mercados. Visita sprint.com/cobertura para más detalles.
Porciones de esta guía son reproducciones de trabajo creado por y compartido por Google y se utilizan
según los términos descritos en la Licencia de Atribución Creative Commons 3.0.
Mensaje importante de conidencialidad. Este teléfono es capaz de determinar su propia/su localización
geográica. Para conigurar los controles de acceso y uso de la información suya de localización por otros,
toca >
> Ajustes del sistema > Ubicación y toca OFF/ON icono para encenderlo. Siga cualesquiera
instrucciones aplicables. Estas coniguraciones para el uso de la información de localización pueden
encenderse y apagarse. Para algunas aplicaciones y algunos servicios que usted seleccione, un teléfono
deberá estar encendido y conigurado para permitir la colección de información de localización para poder
funcionar.
Por favor, dése por enterado de que si usted usa una aplicación de terceros, la aplicación puede que
coleccione su información personal o requerir que Sprint divulgue su información de cliente, incluyendo la
información de localización (cuando aplique), al proveedor de la aplicación o a algún otro tercero. Las
políticas Sprint no aplican a estas aplicaciones de terceros. Por favor, revise cuidadosamente los términos
de uso de la aplicación y/o las políticas del proveedor de la aplicación para más información sobre cómo la
aplicación coleccionará, tendrá acceso a, usará o divulgará su información antes de usar una aplicación de
terceros. Los términos de uso y otras políticas normalmente se encuentran disponibles en el sitio de
Internet del proveedor de la aplicación.
©2014 Sprint. Sprint, Sprint Spark y los logotipos son marcas comerciales de Sprint. El logotipo de HD
Voice es una marca comercial de la GSM Association. LG y el logotipo LG son marcas comerciales
registradas de LG Electronics, Inc. Gmail, Hangouts, Google Maps, YouTube, Android, Google, Picasa,
Google Maps Navigation, Google Mobile Services y Google Play son marcas comerciales de Google, Inc.
Otras marcas son propiedad de sus respectivos proprietarios.
additional charges. Not all services will work on all phones. Sprint coverage is not available in all markets.
See sprint.com/coverage for more details.
Portions of this guide are reproductions of work created and shared by Google and used according to
terms described in the Creative Commons 3.0 Attribution License.
Important Privacy Message. This phone is capable of determining its/your geographical location. To set
controls for access and use of your location information by others, tap
Location and tap the Location OFF/ON icon to ON. Follow any applicable prompts. These settings for the
use of location information can be turned on and o. For some applications and services you select, a
phone must be turned on and set to allow collection of location information in order to function.
Please be advised that if you use a third-party application, the application may collect your personal
information or require Sprint to disclose your customer information, including location information (when
applicable), to the application provider or some other third party. Sprint’s policies do not apply to these
third-party applications. Please carefully review the application’s terms of use and/or the application
provider’s policies for more information about how the application will collect, access, use or disclose your
information before using a third-party application. Terms of use and other policies usually are available on
the application provider’s website.
©2014 Sprint. Sprint, Sprint Spark and the logos are trademarks of Sprint. HD Voice logo is a trademark of the
GSM Association. LG and the LG logo are registered trademarks of LG Electronics, Inc. Gmail, Hangouts,
Google Maps, YouTube, Android, Google, Picasa, Google Maps Navigation, Google Books, Google Mobile
Services, and Google Play are trademarks of Google, Inc. Other marks are property of their respective owners.
Screen images simulated. Appearance of device may vary.
> > System settings >
Page 35

Otras marcas son propiedad de sus respectivos proprietarios.
Google Maps Navigation, Google Mobile Services y Google Play son marcas comerciales de Google, Inc.
registradas de LG Electronics, Inc. Gmail, Hangouts, Google Maps, YouTube, Android, Google, Picasa,
Voice es una marca comercial de la GSM Association. LG y el logotipo LG son marcas comerciales
©2014 Sprint. Sprint, Sprint Spark y los logotipos son marcas comerciales de Sprint. El logotipo de HD
Internet del proveedor de la aplicación.
terceros. Los términos de uso y otras políticas normalmente se encuentran disponibles en el sitio de
aplicación coleccionará, tendrá acceso a, usará o divulgará su información antes de usar una aplicación de
de uso de la aplicación y/o las políticas del proveedor de la aplicación para más información sobre cómo la
políticas Sprint no aplican a estas aplicaciones de terceros. Por favor, revise cuidadosamente los términos
información de localización (cuando aplique), al proveedor de la aplicación o a algún otro tercero. Las
coleccione su información personal o requerir que Sprint divulgue su información de cliente, incluyendo la
Por favor, dése por enterado de que si usted usa una aplicación de terceros, la aplicación puede que
funcionar.
deberá estar encendido y conigurado para permitir la colección de información de localización para poder
encenderse y apagarse. Para algunas aplicaciones y algunos servicios que usted seleccione, un teléfono
instrucciones aplicables. Estas coniguraciones para el uso de la información de localización pueden
> > Ajustes del sistema > Ubicación y toca OFF/ON icono para encenderlo. Siga cualesquiera
toca
geográica. Para conigurar los controles de acceso y uso de la información suya de localización por otros,
Mensaje importante de conidencialidad. Este teléfono es capaz de determinar su propia/su localización
según los términos descritos en la Licencia de Atribución Creative Commons 3.0.
Porciones de esta guía son reproducciones de trabajo creado por y compartido por Google y se utilizan
está disponible en todos los mercados. Visita sprint.com/cobertura para más detalles.
incurrir cargos adicionales. No todos los servicios trabajarán en todos los teléfonos. La cobertura Sprint no
Los servicios descritos en esta guía pueden requerir una suscripción a un plan de servicio y/o pueden
Page 36

visita sprint.com/support para obtener guías, tutoriales y más 3332
Recursos para tu teléfono
•Ésta guía de introducción para activar y
comenzar a usar tu nuevo móvil.
•Ready Now – Visita sprint.com/readynow1
para obtener ayuda adicional y así
comenzar a usar tu nuevo móvil.
Encontrarás más información sobre la
coniguración básica y activación,
maximizando el rendimiento y
personalización de tu móvil. Además,
podrás incluso programar citas de atención
personalizada Ready Now en tu Tienda
Sprint más cercana.
•Apoyo en línea – Para ayuda acerca de la vida
útil de tu móvil, visita sprint.com/support
1
. Allí
encontrarás videos, tutoriales, sugerencias
para resolver problemas y la Guía completa
del usuario para tu LG G Flex.
•Comunidad – Visita community.sprint.com
1
para unirte a las discusiones acerca de todo
lo relacionado con Sprint. Allí la gente
colabora mutuamente para sacar el máximo
provecho de nuestros servicios móviles,
con consejos, foros, blogs y las últimas
noticias.
• En tu móvil –Toca >
>
Sprint Zone
para acceder a los servicios de la cuenta,
noticias Sprint, información telefónica,
aplicaciones sugeridas, solución de
problemas y más.
1
Disponible sólo en inglés.
Recursos Sostenibilidad
Herramientas y recursos
Disponible sólo en inglés.
1
Gracias por elegir Sprint.
para
1
móviles que más quieras.
nos ayudará a proveer las funciones y servicios
completar una breve encuesta. Tu respuesta
http://labs.sprint.com/sprintphonesurvey
de tu equipo, por favor ve al sitio de Internet
Dentro de las dos semanas a partir de la compra
equipo Sprint.
impresiones iniciales de este nuevo
Estamos interesados en tus
para más información.
1
cámara del móvil hacia la imagen.
Play, ejecuta el lector, y apunta la
desde la App Store de Google
instala un lector de código QR
Para leer el código, descarga e
Encuesta
contiene hasta un 100% de papel de postconsumo.
Esta guía está impresa con tintas de verduras y
sprint.com/green
código QR (ver bajo estas líneas) o visita
haciendo, usa tu móvil para escanear el
saber exactamente lo que estamos
ambiente es más que habladurías. Para
En Sprint, la responsabilidad con el medio
Sostenibilidad
Page 37

visita sprint.com/support para obtener guías, tutoriales y más 3332
visita sprint.com/support para obtener guías, tutoriales y más 3332
del usuario para tu LG G Flex.
para resolver problemas y la Guía completa
encontrarás videos, tutoriales, sugerencias
. Allí
1
Disponible sólo en inglés.
1
problemas y más.
aplicaciones sugeridas, solución de
noticias Sprint, información telefónica,
para acceder a los servicios de la cuenta,
> > Sprint Zone
• En tu móvil –Toca
noticias.
con consejos, foros, blogs y las últimas
provecho de nuestros servicios móviles,
colabora mutuamente para sacar el máximo
lo relacionado con Sprint. Allí la gente
útil de tu móvil, visita sprint.com/support
Sprint más cercana.
personalizada Ready Now en tu Tienda
podrás incluso programar citas de atención
personalización de tu móvil. Además,
maximizando el rendimiento y
coniguración básica y activación,
Encontrarás más información sobre la
comenzar a usar tu nuevo móvil.
para obtener ayuda adicional y así
comenzar a usar tu nuevo móvil.
para unirte a las discusiones acerca de todo
1
•Comunidad – Visita community.sprint.com
•Apoyo en línea – Para ayuda acerca de la vida
•Ready Now – Visita sprint.com/readynow1
•Ésta guía de introducción para activar y
Recursos para tu teléfono
Recursos Sostenibilidad
Page 38

visita sprint.com/support para obtener guías, tutoriales y más 3130
Maneja la luminosidad de la pantalla
y el tiempo de pantalla activa
► Toca
>
> Ajustes del sistema >
Pantalla > Brillo o Límite de tiempo de
pantalla para modiicar tus coniguraciones.
Maneja las funciones móviles de tu
teléfono
Inhabilita el punto de acceso Wi-Fi,
Bluetooth y la funciones GPS del teléfono
cuando no las estés usando.
► Toca
>
> Ajustes del sistema
e inhabilita cualquiera de estas funciones
que no están en uso en REDES
INALÁMBRICAS o Ubicación.
Para más consejos útiles sobre el cuidado y
seguridad de baterías, cons ulta la
Guía del Usuario en sprint.com/support1.
1
Disponible sólo en inglés.
Consejos de la batería
Herramientas y recursos
> para realizar
Marca 1-888-788-4727
•Atención al Cliente para Negocios:
Marca 1-888-211-4727
•Atención al Cliente Sprint:
>
para acceder a la
Desde cualquier otro teléfono
Atención al Cliente Sprint.
o ponerte en contacto con el Servicio de
actualizar tu teléfono, ver videos de tutorías
zona Sprint donde puedes revisar tu cuenta,
•Toca
un pago.
•Toca
de minutos y el saldo de la cuenta.
•Toca > para revisar tu uso
Desde tu teléfono Sprint
contenido.
•Obtén instrucciones detalladas y descarga
servicio Sprint.
•Revisa o modiica los detalles de tu plan de
cuenta.
•Revisa los minutos de uso y el saldo de tu
suscríbete a facturación por Internet.
•Realiza un pago, revisa tus facturas,
En Internet: www.sprint.com
Maneja tu cuenta
Page 39

visita sprint.com/support para obtener guías, tutoriales y más 3130
visita sprint.com/support para obtener guías, tutoriales y más 3130
Disponible sólo en inglés.
1
Guía del Usuario en sprint.com/support1.
seguridad de baterías, cons ulta la
Para más consejos útiles sobre el cuidado y
INALÁMBRICAS o Ubicación.
que no están en uso en REDES
e inhabilita cualquiera de estas funciones
>
> Ajustes del sistema
► Toca
cuando no las estés usando.
Bluetooth y la funciones GPS del teléfono
Inhabilita el punto de acceso Wi-Fi,
>
> Ajustes del sistema >
teléfono
Maneja las funciones móviles de tu
pantalla para modiicar tus coniguraciones.
Pantalla > Brillo o Límite de tiempo de
► Toca
y el tiempo de pantalla activa
Maneja la luminosidad de la pantalla
Consejos de la batería
Page 40

visita sprint.com/support para obtener guías, tutoriales y más 2928
Música
Abre tu reproductor de música
► Toca > > Música . La pantalla de la
biblioteca de música aparece.
•La música se almacena en categorías
Canciones, Álbumes, Artistas, Géneros,
Listas de reproducción, Carpetas,
Dispositivos cercano y Nube. Toca una
categoría y después toca la canción o
lista de canciones que quieras escuchar.
Toca para escuchar todas las
canciones al azar.
Nota: Deberás cargar canciones a tu teléfono
antes de poder escuchar música. Consulta
“Obtener música”.
Obtener música
Antes de poder escuchar tu música, deberás
cargar canciones a tu teléfono.
Aquí hay una manera de hacerlo:
1. Utiliza el cable USB suministrado para
conectar tu teléfono a un puerto USB
disponible en tu computadora.
2. Copia archivos de música desde tu
computadora al nuevo archivo de música,
sigue los procedimientos para remover la
unidad de disco con seguridad y después
desconecta el teléfono del cable USB.
Herramientas y recursos
Disponible sólo en inglés.
1
1
en sprint.com/support
consulta la Guía del Usuario
coniguraciones, por favor
Para información detallada de
•Acerca del teléfono
•Impresión
sistema
•Actualizaciones del
•Activar dispositivo
•Accesorio
•Conexión de PC
•Accesibilidad
•Fecha y hora
restauración
•Copia de respaldo y
•Idioma y teclado
•Seguridad
•Ubicación
•Modo invitado
•Nube
•Cuentas y sincronización
•Tocar y pagar
•Multitarea
•Aplicaciones
•Batería
•Almacenamiento
•Operación de una mano
•Gestos
•Bloqueo de pantalla
•Pantalla principal
•Pantalla
•Sonido
•Más...
Con�iguraciones
•Compartir y conectar
•Roaming
•Llamadas
•Datos móviles
•Bluetooth
•Wi-Fi
•Modo avión
Las categorías incluyen:
quieras cambiar.
coniguraciones que
2. Selecciona la categoría de
> > Ajustes .
Toca
–o–
Ajustes del sistema.
1. Toca > >
coniguraciones
Accediendo a
en el menú Coniguración.
Explora maneras de personalizar tu teléfono, conigurar permisos, actualizar tu teléfono y más
Herramientas y recursos:
Page 41

visita sprint.com/support para obtener guías, tutoriales y más 2928
visita sprint.com/support para obtener guías, tutoriales y más 2928
desconecta el teléfono del cable USB.
unidad de disco con seguridad y después
sigue los procedimientos para remover la
computadora al nuevo archivo de música,
2. Copia archivos de música desde tu
disponible en tu computadora.
conectar tu teléfono a un puerto USB
1. Utiliza el cable USB suministrado para
Aquí hay una manera de hacerlo:
cargar canciones a tu teléfono.
Antes de poder escuchar tu música, deberás
Obtener música
“Obtener música”.
antes de poder escuchar música. Consulta
Nota: Deberás cargar canciones a tu teléfono
canciones al azar.
para escuchar todas las
Toca
lista de canciones que quieras escuchar.
categoría y después toca la canción o
Dispositivos cercano y Nube. Toca una
Listas de reproducción, Carpetas,
Canciones, Álbumes, Artistas, Géneros,
•La música se almacena en categorías
biblioteca de música aparece.
► Toca > > Música . La pantalla de la
Abre tu reproductor de música
Música
Page 42

visita sprint.com/support para obtener guías, tutoriales y más 2726
Sprint ID
Sprint ID te permite personalizar tu teléfono
al instante con paquetes ID móviles con
funciones de aplicaciones, timbres, fondos
de pantalla, controles y más, personalizados
para adaptarse a tu estilo de vida.
1. Toca > > Sprint ID .
2. Desde la pantalla, toca un paquete ID para
aplicarlo, o toca Obtener nuevos IDs para
buscar nuevos paquetes ID.
•Para descargar un nuevo paquete ID,
navega por medio de la selección y toca
un paquete ID para ver sus detalles. Toca
Instalar y sigue las instrucciones para
descargar el paquete.
Una vez se haya descargado, arrastra la
barra de notiicaciones hacia abajo y
toca Aceptar.
Descarga aplicaciones de Sprint
1. Toca > > Sprint Zone .
2. Desde la página Web de Sprint Zone,
desliza hacia arriba o hacia abajo y toca
un de los elementos para revisar tu
cuenta, leer las últimas noticias sobre tu
teléfono, cargar una aplicación y más.
Aplicaciones Sprint Aplicaciones Sprint
información sobre canales y precios.
Visita sprintchannels.mobitv.com
barra de abajo.
selecciona una opción en vivo en la
principal en el centro de la pantalla o
•Para acceso rápido, toca un objeto
encontrar lo que quieras ver.
On Demand, Movies, o Shop para
2. En la barra de arriba, toca Home, Live TV,
1. Toca > > Sprint TV & Movies .
audiencia y películas favoritas.
programas favoritos de horario de máxima
Episodios completos y fragmentos de tus
Televisión y video en vivo on demand.
debes descargar de Google Play.
hayas instalado el paquete Sprint ID. Primero
preinstalado en tu teléfono, a menos que
Nota: Sprint TV y películas no no está
Sprint TV & Movies
Usa tu teléfono
para más
1
Disponible sólo en inglés.
1
► Toca > > Maps .
Google Maps™
interés.
restaurantes, tiendas y otros puntos de
dirección conocida, o encuentra
Obtén indicaciones “paso a paso” hacia una
Aplicaciones Sprint Navegación por GPS
Page 43

visita sprint.com/support para obtener guías, tutoriales y más 2726
visita sprint.com/support para obtener guías, tutoriales y más 2726
descargar el paquete.
Instalar y sigue las instrucciones para
un paquete ID para ver sus detalles. Toca
navega por medio de la selección y toca
•Para descargar un nuevo paquete ID,
buscar nuevos paquetes ID.
aplicarlo, o toca Obtener nuevos IDs para
teléfono, cargar una aplicación y más.
cuenta, leer las últimas noticias sobre tu
un de los elementos para revisar tu
desliza hacia arriba o hacia abajo y toca
2. Desde la página Web de Sprint Zone,
1. Toca > > Sprint Zone .
Descarga aplicaciones de Sprint
toca Aceptar.
barra de notiicaciones hacia abajo y
Una vez se haya descargado, arrastra la
2. Desde la pantalla, toca un paquete ID para
1. Toca > > Sprint ID .
para adaptarse a tu estilo de vida.
de pantalla, controles y más, personalizados
funciones de aplicaciones, timbres, fondos
al instante con paquetes ID móviles con
Sprint ID te permite personalizar tu teléfono
Sprint ID
Aplicaciones Sprint Aplicaciones Sprint
Page 44

visita sprint.com/support para obtener guías, tutoriales y más 2524
Bluetooth
Empareja y haz una conexión con un
equipo capacitado para Bluetooth
®
1. Toca > > Ajustes del sistema >
Bluetooth .
•Si Bluetooth no está encendido, toca
OFF/ON icono Bluetooth para encenderlo.
2. Selecciona un equipo disponible y sigue
las instrucciones para emparejar los
equipos. Puede que tengas que ingresar
una contraseña (frecuentemente 0000)
para completar el emparejamiento.
3. Una vez hayas emparejado, tu conexión
debe lanzarse.
Comparte contactos, archivos o fotos
usando Bluetooth
1. Abre la aplicación que contiene el archivo
que quieras compartir. (Por ejemplo, toca
> > Galería .)
2. Localiza el archivo que quieras compartir.
•Puedes enviar fotos y videos
directamente desde la cámara o desde
Galería, Agenda o Contactos. No todos
los equipos podrán recibir todos los tipos
de archivos.
3. Toca > Bluetooth .
4. Toca el nombre del equipo al cual le estás
enviando el archivo. (Si se te pide, toca OK
para encender Bluetooth).
una contraseña para acceder el hotspot.
seguridad. Otros usuarios deben ingresar
•Seguridad – Selecciona el tipo de
único para tu punto de conexión.
•Nombre Wi-Fi (SSID) – Ingresa un nombre
ingresa tus coniguraciones.
2. Toca Conigure el Punto de acceso Wi-Fi e
esta función.
junto a Punto de acceso Wi-Fi para activar
Punto de acceso Wi-Fi y toca el interruptor
1. Toca > Ajustes del sistema > Más... >
proteger contra el acceso sin autorización.
contraseña u otros pasos posibles para
conexión móvil. Es recomendable que uses una
Tu teléfono permite que crees un punto de
realización de una conexión pública en Internet.
Nota: Puede haber riesgos asociados a la
Conigura y activa tu hotspot móvil
El hotspot Wi-Fi portátil permite que conviertas tu LG G Flex en un hotspot Wi-FI.
Usa tu teléfono
conirmar que tienes una conexión a Internet.
equipo, lanza tu navegador de Internet para
3. Cuando aparezca “Conectado” en tu
ingresa la contraseña si se te pide.
(SSID) para tu punto de conexión móvil e
2. Selecciona el nombre de Nombre Wi-Fi
una computadora portátil).
1. Habilita Wi-Fi en tu equipo (por ejemplo,
Conecta un equipo al Sprint Hotspot
de conexión en cualquier momento dado.
usuarios que pueden acceder a tu punto
•Max usuarios – Especiica el número de
o esconder tu SSID en la red.
•Visibilidad SSID — Escoge entre mostrar
“Security” (seguridad).
dependiendo de tus coniguraciones de
•Contraseña – Agrega una contraseña
Hotspot Wi-Fi portátil
Page 45

visita sprint.com/support para obtener guías, tutoriales y más 2524
visita sprint.com/support para obtener guías, tutoriales y más 2524
para encender Bluetooth).
enviando el archivo. (Si se te pide, toca OK
4. Toca el nombre del equipo al cual le estás
3. Toca > Bluetooth .
de archivos.
los equipos podrán recibir todos los tipos
Galería, Agenda o Contactos. No todos
directamente desde la cámara o desde
•Puedes enviar fotos y videos
2. Localiza el archivo que quieras compartir.
> > Galería .)
que quieras compartir. (Por ejemplo, toca
1. Abre la aplicación que contiene el archivo
usando Bluetooth
Comparte contactos, archivos o fotos
.
®
debe lanzarse.
para completar el emparejamiento.
una contraseña (frecuentemente 0000)
equipos. Puede que tengas que ingresar
las instrucciones para emparejar los
OFF/ON icono Bluetooth para encenderlo.
•Si Bluetooth no está encendido, toca
Bluetooth
3. Una vez hayas emparejado, tu conexión
2. Selecciona un equipo disponible y sigue
1. Toca > > Ajustes del sistema >
equipo capacitado para Bluetooth
Empareja y haz una conexión con un
Bluetooth
Page 46
visita sprint.com/support para obtener guías, tutoriales y más 2322
Internet Wi-Fi
Encuentra resultados deportivos, noticias y
pronósticos del tiempo. Compra en Internet.
Haz compras por Internet. Navegación con
pestañas te permite navegar por Internet
justo como quieras hacerlo.
Ve a Internet
► Toca >
>
Internet .
•Para ir a un sitio especíico de Internet,
toca la barra de dirección e ingresa la
dirección de Internet.
• Para acceder y administrar marcadores,
toca
>
Favoritos o Agregar a Favoritos.
Conecta de una red Wi-Fi
Cuando estés al alcance de una red Wi-Fi
disponible puedes usar la función Wi-Fi de
tu teléfono para acceder a Internet y otros
servicios de datos.
1. Toca > > Ajustes del sistema.
2. Toca el ícono Wi-Fi OFF/ON para activar
el Wi-Fi.
3. Toca Wi-Fi para visualizar una lista de
redes disponibles.
4. Toca una red Wi-Fi para hacer una
conexión. Si es necesario, ingresa la
clave de seguridad y toca Conectar.
•Cuando estés conectado a una red
Wi-Fi, verás el icono Wi-Fi (
) en la
barra de estado.
Google Play.
comprar y descargar aplicaciones de
(Gmail) conigurada en tu teléfono para
Nota: Deberás tener una cuenta Google
o el precio (para aplicaciones pagadas).
5. Toca INSTALAR (para aplicaciones gratuitas)
descripción y reseñas por usuarios.
4. Toca una aplicación o juego para leer una
la aplicación para iniciar una búsqueda.
destacados o toca
3. Navega por las aplicaciones y juegos
de Servicio.
toca Aceptar para aceptar los Términos
2. La primera vez que visitas Play Store,
1. Toca > > Play Store .
Descarga aplicaciones y juegos
apps, juegos, películas y más para tu teléfono.
Google Play es el lugar para encontrar nuevo
Usa tu teléfono
propios videos.
con tu cuenta Gmail para cargar tus
medio de y ver videos disponibles. Ingresa
> > YouTube para navegar por
•YouTube – Ver y compartir vídeos. Toca
comenzar a usar el servicio.
ubicación. Toca > > Maps para
•Google Maps – El programa Google para
Hangouts para comenzar a usar el servicio.
de mensajería instantánea. Toca > >
•Google+ Hangouts – El servicio Google
al Google Play.
servicios relacionados a Google al igual que
cuenta Gmail te permite acceso a muchos
•Gmail – El servicio de correos Google. Tu
Servicios móviles Google
en la parte superior de
Google Play y servicios móviles Google
Page 47

visita sprint.com/support para obtener guías, tutoriales y más 2322
visita sprint.com/support para obtener guías, tutoriales y más 2322
) en la
barra de estado.
Wi-Fi, verás el icono Wi-Fi (
•Cuando estés conectado a una red
clave de seguridad y toca Conectar.
conexión. Si es necesario, ingresa la
4. Toca una red Wi-Fi para hacer una
redes disponibles.
3. Toca Wi-Fi para visualizar una lista de
el Wi-Fi.
2. Toca el ícono Wi-Fi OFF/ON para activar
1. Toca > > Ajustes del sistema.
servicios de datos.
tu teléfono para acceder a Internet y otros
disponible puedes usar la función Wi-Fi de
Cuando estés al alcance de una red Wi-Fi
Conecta de una red Wi-Fi
>
Favoritos o Agregar a Favoritos.
>
Internet .
toca
• Para acceder y administrar marcadores,
dirección de Internet.
toca la barra de dirección e ingresa la
•Para ir a un sitio especíico de Internet,
► Toca >
Ve a Internet
justo como quieras hacerlo.
pestañas te permite navegar por Internet
Haz compras por Internet. Navegación con
pronósticos del tiempo. Compra en Internet.
Encuentra resultados deportivos, noticias y
Internet Wi-Fi
Page 48

visita sprint.com/support para obtener guías, tutoriales y más 2120
Cámara y videocámara Cámara y videocámara
Toma una foto
1. Toca > > Cámara .
2. Toca para tomar la foto.
Graba un video
1. Toca > > Cámara .
2. Toca para cambiar al modo de vídeo.
3. Selecciona Vídeo MMS (para vídeos de 30
segundos máximo que adjuntar a emails
o mensajes) o Vídeo largo (para videos
más largos).
4. Toca para empezar a grabar. Toca
para parar.
Coniguraciones de la cámara y
videocámara
•Desde la pantalla de la cámara o
videocámara, toca
para abrir el menú de
coniguraciones de captación. Estas
coniguraciones incluyen Brillo, Enfoque,
Tam. imagen, Efectos de color y mas.
Ve fotos y vídeos
1. Toca > > Galería .
2. Toca un archivo para visualizar fotos
o vídeos.
•Toca una foto o vídeo para visualizarlo
en tamaño completo.
•Para reproducción de vídeo, toca los
iconos de reproducir
y pausar .
Usa tu teléfono
o Enviar.
5. Compón tu mensaje y después toca ,
como un método para compartir.
Gmail, Google+, Picasa, YouTube y otros
4. Selecciona Mensajes, Bluetooth, E-mail,
.
después toca
Toca la imagen en miniatura para abrirla y
–o–
después toca Compartir.
3. Toca y sujeta una imagen en miniatura y
imágenes en miniatura.
2. Toca un álbum para visualizar las
1. Toca > > Galería .
Gmail o mensajería
Comparte fotos y vídeos para email,
Cámara y videocámara
Page 49

visita sprint.com/support para obtener guías, tutoriales y más 2120
visita sprint.com/support para obtener guías, tutoriales y más 2120
y pausar .
para abrir el menú de
iconos de reproducir
•Para reproducción de vídeo, toca los
en tamaño completo.
•Toca una foto o vídeo para visualizarlo
o vídeos.
2. Toca un archivo para visualizar fotos
1. Toca > > Galería .
Ve fotos y vídeos
Tam. imagen, Efectos de color y mas.
coniguraciones incluyen Brillo, Enfoque,
coniguraciones de captación. Estas
videocámara, toca
•Desde la pantalla de la cámara o
videocámara
Coniguraciones de la cámara y
para parar.
4. Toca para empezar a grabar. Toca
más largos).
o mensajes) o Vídeo largo (para videos
segundos máximo que adjuntar a emails
3. Selecciona Vídeo MMS (para vídeos de 30
2. Toca para cambiar al modo de vídeo.
1. Toca > > Cámara .
Graba un video
2. Toca para tomar la foto.
1. Toca > > Cámara .
Toma una foto
Cámara y videocámara Cámara y videocámara
Page 50

visita sprint.com/support para obtener guías, tutoriales y más 1918
Conigura una cuenta de email
1. Toca > >
E-mail
.
2. Sigue las instrucciones para ingresar a tu
cuenta de email.
•Toca Coniguración manual para
conigurar tus composiciones de
conexión manualmente (POP3, IMAP, o
Exchange). Sigue las sugerencias en la
pantalla para ingresar la información
especíica de tu proveedor.
Nota: Si no estás seguro(a) sobre tu cuenta,
toca Siguiente después de ingresar tu
dirección de email y contraseña. Si tu
teléfono no puede conigurar tu cuenta
automáticamente, entonces se te pedirá que
la conigures manualmente.
Conigura una cuenta Microsoft®
Exchange
®
Utiliza la opción Microsoft Exchange para
conigurar cuentas de email de trabajo del
servidor Exchange. Ponte en contacto con
tu administrador de “IT” para requisitos de
ingreso a la cuenta.
1. Toca
> >
Ajustes del sistema >
Cuentas y sincronización.
2. Toca Agregar Cuenta > Microsoft Exchange.
3. Ingresa los detalles de la cuenta del servidor
Exchange y después toca Siguiente.
•Ponte en contacto con tu administrador
del servidor Exchange para los requisitos
de ingreso.
4. Selecciona el tipo de información que
quieres sincronizar y toca Finalizado.
Usa tu teléfono
para enviar el mensaje.
.
un archivo
toca >
o el nombre
.
5. Toca
Adjuntar
•Para agregar adjuntos,
4. Ingresa un asunto y un mensaje.
del contacto.
3. Ingresa una dirección de email
2. Toca .
1. Toca
> > Gmail .
> > Gmail .
o
Envía un mensaje de Gmail
3. Toca el mensaje que quieras visualizar.
2. Selecciona el buzón de entrada que desea ver.
1. Toca
Acceso a mensajes de Gmail
5. Toca
y seleccione un adjunto.
•Para agregar un adjunto de Email, toca
un adjunto.
> Adjuntar un archivo y seleccione
•Para agregar un adjunto de Gmail, toca
4. Ingresa un asunto y un mensaje.
para correo Para:.
3. Ingresa una dirección de email la casilla
o
.
> E-mail
o Gmail
.
2. Toca
y toca la cuenta de email que quieras usar.
•Si es necesario, toca Bandeja de entrada
1. Toca >
Envía un mensaje de email
que quieras visualizar.
2. Desde el buzón de entrada, toca el mensaje
que quieras usar.
•Si es necesario, toca la cuenta de email
1. Toca > > E-mail o Gmail .
Acceso a mensajes de email
Email
Page 51

visita sprint.com/support para obtener guías, tutoriales y más 1918
visita sprint.com/support para obtener guías, tutoriales y más 1918
quieres sincronizar y toca Finalizado.
4. Selecciona el tipo de información que
de ingreso.
del servidor Exchange para los requisitos
•Ponte en contacto con tu administrador
Exchange y después toca Siguiente.
3. Ingresa los detalles de la cuenta del servidor
2. Toca Agregar Cuenta > Microsoft Exchange.
Cuentas y sincronización.
1. Toca
Ajustes del sistema >
> >
ingreso a la cuenta.
tu administrador de “IT” para requisitos de
servidor Exchange. Ponte en contacto con
conigurar cuentas de email de trabajo del
la conigures manualmente.
automáticamente, entonces se te pedirá que
teléfono no puede conigurar tu cuenta
dirección de email y contraseña. Si tu
toca Siguiente después de ingresar tu
Nota: Si no estás seguro(a) sobre tu cuenta,
especíica de tu proveedor.
pantalla para ingresar la información
Exchange). Sigue las sugerencias en la
conexión manualmente (POP3, IMAP, o
conigurar tus composiciones de
•Toca Coniguración manual para
cuenta de email.
Utiliza la opción Microsoft Exchange para
E-mail
®
Exchange
Conigura una cuenta Microsoft®
.
2. Sigue las instrucciones para ingresar a tu
1. Toca > >
Conigura una cuenta de email
Page 52

visita sprint.com/support para obtener guías, tutoriales y más 1716
Envía un mensaje
1. Toca >
> Mensajes
>
.
2. Ingresa un número de teléfono o dirección
de email en el campo “Para”.
3. Toca el campo “Ingresar mensaje” e ingresa
el texto de tu mensaje.
• Para insertar fotos o otros archivos, toca
.
4. Cuando termines, toca Enviar.
Nota: Para información de tomar fotos y
videos con tu teléfono, consulta “Cámara y
videocámara” en la página 20.
Accede a mensajes
•Toca > > Mensajes . Toca un
mensaje para abrirlo y leerlo.
–o–
• Si tienes una notiicación de nuevo mensaje,
arrastra la barra de estado hacia abajo para
abrir el panel de notiicaciones. Toca un
mensaje para abrir y leerlo.
Lee y contesta mensajes
► Toca >
> Mensajes .
•Para abrir un mensaje, tócalo. Tocar un
mensaje de texto o un mensaje de red de
contacto social, abre el mensaje y todas
sus respuestas.
•Para contestar un texto o mensaje de red
de contacto social, ábrelo e ingresa tu
respuesta en el encasillado de texto en la
parte de abajo.
•Para reenviar un mensaje de texto, toca y
sujeta el mensaje para hacer subir un
menú de opciones, toca Reenviar y
selecciona o ingresa un destinatario.
Sé un héroe. No
conduzcas distraído
sprint.com/focusondriving
1
1
Disponible sólo en inglés.
Mensajería
Nota: Al conigurar una cuenta Google,
cuenta por defecto de tu teléfono.
Play™, no tienes que usar Gmail como la
para usar ciertas funciones tal como Google
Nota: Aunque necesitas una cuenta Gmail
ingresar a una cuenta Gmail.
2. Sigue las instrucciones para conigurar o
1. Toca > > Gmail .
Conigura una cuenta de Gmail™
de email.
menú de coniguraciones o aplicación
por medio directamente por medio del
server. Puedes conigurar cuentas de email
tu LG G Flex, incluyendo cuentas Exchange
Puedes enlazar múltiples cuentas de email a
Usa tu teléfono
Google y hacer compras en tu teléfono.
que puedas recobrar el acceso a servicios
enfáticamente a usuarios de Android para
olvides tu contraseña. Se le sugiere
caso de que alguna vez tengas problemas u
dirección se usa para autenticar tu cuenta en
actualmente envíes y recibas email. Esta
dirección de email desde la cual
segunda dirección Gmail o cualquier otra
dirección de email secundaria. Ingresa una
debes recibir instrucciones de agregar una
Page 53

visita sprint.com/support para obtener guías, tutoriales y más 1716
visita sprint.com/support para obtener guías, tutoriales y más 1716
Disponible sólo en inglés.
1
1
sprint.com/focusondriving
conduzcas distraído
Sé un héroe. No
selecciona o ingresa un destinatario.
menú de opciones, toca Reenviar y
sujeta el mensaje para hacer subir un
•Para reenviar un mensaje de texto, toca y
parte de abajo.
respuesta en el encasillado de texto en la
de contacto social, ábrelo e ingresa tu
•Para contestar un texto o mensaje de red
sus respuestas.
contacto social, abre el mensaje y todas
mensaje de texto o un mensaje de red de
•Para abrir un mensaje, tócalo. Tocar un
> Mensajes .
► Toca >
.
>
.
> Mensajes
mensaje para abrir y leerlo.
abrir el panel de notiicaciones. Toca un
arrastra la barra de estado hacia abajo para
–o–
mensaje para abrirlo y leerlo.
videocámara” en la página 20.
videos con tu teléfono, consulta “Cámara y
Nota: Para información de tomar fotos y
• Para insertar fotos o otros archivos, toca
el texto de tu mensaje.
de email en el campo “Para”.
Lee y contesta mensajes
Email
• Si tienes una notiicación de nuevo mensaje,
•Toca > > Mensajes . Toca un
Accede a mensajes
4. Cuando termines, toca Enviar.
3. Toca el campo “Ingresar mensaje” e ingresa
2. Ingresa un número de teléfono o dirección
1. Toca >
Envía un mensaje
Mensajería
Page 54

visita sprint.com/support para obtener guías, tutoriales y más 1514
Conigura tu correo de voz
Todas las llamadas no contestadas se
transieren automáticamente a tu correo de
voz, incluso si tu teléfono está en uso o
apagado. Debes conigurar tu correo de voz
y saludo personal tan pronto como se
active tu teléfono:
1. Toca > (Toca la pestaña Marcar,
si la pantalla no se encuentra en el
teclado numérico.)
2. Toca y sujeta .
3. Sigue las instrucciones de voz para crear
tu contraseña y grabar tu nombre y saludo.
Sprint recomienda enfáticamente que
establezcas una contraseña de correo de voz.
Recupera tus correo de voz
► Toca
> Teléfono
y después toca y
sujeta
.
Desde cualquier otro teléfono:
1. Marca tu número de teléfono móvil.
2. Cuando conteste tu correo de voz, toca
*
.
Correo de Voz Visual
Esto te da un acceso rápido y fácil a tu
correo de voz. Ahora puedes encontrar
el mensaje exacto que estás buscando
sin tener que escuchar cada mensaje
de voz primero.
1. Toca > > Correo de voz .
2. Toca Personalizar ahora y sigue las
instrucciones del sistema para conigurar
tu Correo de Voz Visual.
Correo de voz Contactos
Borrar > OK.
Usa tu teléfono
Nota: Para borrar un contacto, toca >
3. Toca Guardar cuando hayas acabado.
información.
•Toca un campo para agregar o editar
.
toca
2. Toca un contacto para abrirlo y después
1. Toca > > Contactos .
Editar contactos
automáticamente con tu teléfono.
con tu cuenta Gmail, se sincronizan
Nota: Si tienes contactos asociados
3. Toca Guardar cuando hayas acabado.
una foto nueva.
y toca una foto. También puedes tomar
del nombre, selecciona una localización
•Para asignar una foto, toca el icono arriba
al lado del
como CASA, MÓVIL,
campo del número o dirección.
TRABAJO, etc), toca la etiqueta
dirección (tal
• Para asignar un tipo de número o de
la pantalla táctil.
toca el campo para visualizar el teclado de
• Para agregar información en un campo,
tú quieras.
2. Agrega mucha o poca información, según
cuenta con la cual sincronizar tu nuevo contacto.
Nota: Se te puede pedir que selecciones una
1. Toca > > Contactos > .
Agrega una nueva contacto
2. Desplázate por la lista para revisar tus contactos.
1. Toca > > Contactos .
Visualiza Contactos
computadora y contactos “a la antigua”, ingresados a mano.
manejarlos, incluyendo Gmail, Exchange, Facebook, Twitter, contactos sincronizados de tu
Contactos en tu teléfono permite tener acceso a contactos de una variedad de fuentes y
Contactos
Page 55

visita sprint.com/support para obtener guías, tutoriales y más 1514
visita sprint.com/support para obtener guías, tutoriales y más 1514
y después toca y
► Toca
> Teléfono
Recupera tus correo de voz
tu Correo de Voz Visual.
instrucciones del sistema para conigurar
2. Toca Personalizar ahora y sigue las
1. Toca > > Correo de voz .
de voz primero.
sin tener que escuchar cada mensaje
el mensaje exacto que estás buscando
correo de voz. Ahora puedes encontrar
Esto te da un acceso rápido y fácil a tu
*
.
.
Correo de Voz Visual
2. Cuando conteste tu correo de voz, toca
1. Marca tu número de teléfono móvil.
Desde cualquier otro teléfono:
sujeta
establezcas una contraseña de correo de voz.
Sprint recomienda enfáticamente que
tu contraseña y grabar tu nombre y saludo.
3. Sigue las instrucciones de voz para crear
2. Toca y sujeta .
teclado numérico.)
si la pantalla no se encuentra en el
1. Toca > (Toca la pestaña Marcar,
active tu teléfono:
y saludo personal tan pronto como se
apagado. Debes conigurar tu correo de voz
voz, incluso si tu teléfono está en uso o
transieren automáticamente a tu correo de
Todas las llamadas no contestadas se
Conigura tu correo de voz
Correo de voz Contactos
Page 56

visita sprint.com/support para obtener guías, tutoriales y más 1312
Ingresa texto
Coniguraciones de idioma y teclado
Puedes cambiar tus opciones de ingreso de
texto mediante el menú Coniguraciones de
idioma y teclado. Estas pueden incluir
seleccionar opciones de teclado de la
pantalla táctil (Teclado LG, y Swype)
, o Dictado
por voz de Google, Correción ortográica,
Diccionario personal
, y idioma.
► Toca
> >
Ajustes del sistema >
Idioma y teclado y después toca una opción.
•Para cambiar el idioma de tu teclado,
toca Idioma.
•Para seleccionar un tipo de teclado, toca
Predeterminado y selecciona un método
de entrada.
•Para cambiar las coniguraciones de
teclado y métodos de entrada, toca
cerca de Dictado por voz de Google,
Teclado LG, o Swype.
Teclado LG
Usa el teclado LG para ingresar texto una
letra a la vez.
Uso de Swype para ingresar texto
Swype te permite ingresar palabras, trazando
sobre las letras con un solo movimiento.
• Toca un carácter en la pantalla y luego,
manteniendo tu dedo en la pantalla, arrástralo
al carácter neto de la palabra deseada.
Uso de dictado por voz de Google
para ingresar texto
Usa tu voz para ingresar texto en lugar de
un teclado.
1. De una pantalla donde puedas ingresar
texto, toca el campo de entradas para
mostrar el teclado en la pantalla.
2. Toca y hablar con claridad.
enviar un mensaje a quien llama.
cualquier lado para ignorar la llamada y
•Pica el icono Rechazar con mensaje hacia
de voz.
para enviar la llamada a tu buzón de correo
•Pica el icono Rechazar hacia cualquier lado
icono Responder hacia cualquier lado.
•En la pantalla de entrada de llamada, pica el
Responde a una llamada entrante
3. Toca para realizar la llamada.
para borrar uno o más de los dígitos.
llamar en el teclado del teléfono. Toca
2. Toca los dígitos del número que quieres
visualizar el teclado del teléfono.
1. Toca > Teléfono > Marcar para
Realiza una llamada
Usa tu teléfono
automáticamente.
rostro, la pantalla táctil vuelve a activarse
accidente. Cuando retires el teléfono de tu
para evitar que presiones la pantalla por
pantalla táctil se desactiva automáticamente
el teléfono cerca de tu rostro para hablar, la
Nota: Mientras estés en una llamada y sostengas
Usa tu teléfono: Llamadas
Page 57

visita sprint.com/support para obtener guías, tutoriales y más 1312
visita sprint.com/support para obtener guías, tutoriales y más 1312
Teclado LG, o Swype.
2. Toca y hablar con claridad.
mostrar el teclado en la pantalla.
texto, toca el campo de entradas para
1. De una pantalla donde puedas ingresar
un teclado.
Usa tu voz para ingresar texto en lugar de
para ingresar texto
Uso de dictado por voz de Google
al carácter neto de la palabra deseada.
manteniendo tu dedo en la pantalla, arrástralo
• Toca un carácter en la pantalla y luego,
sobre las letras con un solo movimiento.
Swype te permite ingresar palabras, trazando
Ajustes del sistema >
, y idioma.
, o Dictado
cerca de Dictado por voz de Google,
teclado y métodos de entrada, toca
•Para cambiar las coniguraciones de
de entrada.
Predeterminado y selecciona un método
•Para seleccionar un tipo de teclado, toca
toca Idioma.
•Para cambiar el idioma de tu teclado,
Idioma y teclado y después toca una opción.
► Toca
> >
Uso de Swype para ingresar texto
letra a la vez.
Usa el teclado LG para ingresar texto una
Teclado LG
Diccionario personal
por voz de Google, Correción ortográica,
pantalla táctil (Teclado LG, y Swype)
seleccionar opciones de teclado de la
idioma y teclado. Estas pueden incluir
texto mediante el menú Coniguraciones de
Puedes cambiar tus opciones de ingreso de
Coniguraciones de idioma y teclado
Ingresa texto
Page 58

visita sprint.com/support para obtener guías, tutoriales y más 1110
Visualizando pantallas extendidas
La pantalla de inicio de tu teléfono se
extiende horizontalmente hasta seis pantallas
adicionales. Ésto te da espacio para
personalizar tu teléfono y poner las cosas que
necesitas al frente y al centro, a sólo un roce
de distancia.
•Para visualizar la pantalla de inicio, toca
desde cualquier pantalla.
•Para visualizar pantallas extendidas, pasa
la pantalla izquierda o la derecha. Hay tres
pantallas adicionales a cada lado de la
pantalla de inicio.
Panel de notiicaciones
Cuando veas un icono de notiicación en el
lado izquierdo de la barra de estado, arrastra la
barra de estado hacia abajo para visualizar el
panel de notiicaciones. Toca una notiicación
para abrir la aplicación relacionada, tal como
mensajes, llamadas o calendario.
Para cerrar el panel, arrastra la barra de
abajo hacia arriba.
Agrega objetos a tus pantallas
1. Escoge una pantalla y toca y sujeta un
espacio vacío de la pantalla.
2. Toca ligeramente, cualquiera de Aplicaciones,
Widgets, o Fondos de pantalla.
3. Toca y sujeta el atajo deseado y arrástralo
a tu pantalla.
4. Suelta tu dedo.
regresar
Tecla para
menús de contextos específicos.
•Tecla de menú ( ) – Toca para abrir los
(aplicaciones usadas recientemente).
ventana “recently-used applications”
pantalla de inicio. Toca y sujeta para abrir la
• Tecla de inicio ( ) – Toca para volver a la
a la pantalla anterior.
•Tecla para regresar (
a cabo funciones especíicas.
una ila de tres teclas que te permiten llevar
Justo debajo de la pantalla táctil, encontrarás
Teclas de funciones
Básicos Android
encontrar la aplicación que buscas.
tener que desplazarte al lado para
aplicación en la lista alfabética. Podrías
aplicaciones y después presiona la
para visualizar la lista de
toca
(si no estás ya en la pantalla de inicio),
disponible desde tu pantalla de inicio, toca
•Si una aplicación no se encuentra
para abrirla.
de tus pantallas de inicio, sólo tócala
•Si una aplicación se encuentra en una
Abre aplicaciones
menú
Tecla de
) – Toca para volver
inicio
Tecla de
Page 59

visita sprint.com/support para obtener guías, tutoriales y más 1110
visita sprint.com/support para obtener guías, tutoriales y más 1110
4. Suelta tu dedo.
a tu pantalla.
3. Toca y sujeta el atajo deseado y arrástralo
Widgets, o Fondos de pantalla.
2. Toca ligeramente, cualquiera de Aplicaciones,
espacio vacío de la pantalla.
1. Escoge una pantalla y toca y sujeta un
Agrega objetos a tus pantallas
abajo hacia arriba.
Para cerrar el panel, arrastra la barra de
mensajes, llamadas o calendario.
para abrir la aplicación relacionada, tal como
panel de notiicaciones. Toca una notiicación
barra de estado hacia abajo para visualizar el
lado izquierdo de la barra de estado, arrastra la
Cuando veas un icono de notiicación en el
pantalla de inicio.
pantallas adicionales a cada lado de la
la pantalla izquierda o la derecha. Hay tres
desde cualquier pantalla.
Panel de notiicaciones
•Para visualizar pantallas extendidas, pasa
•Para visualizar la pantalla de inicio, toca
de distancia.
necesitas al frente y al centro, a sólo un roce
personalizar tu teléfono y poner las cosas que
adicionales. Ésto te da espacio para
extiende horizontalmente hasta seis pantallas
La pantalla de inicio de tu teléfono se
Visualizando pantallas extendidas
Page 60

visita sprint.com/support para obtener guías, tutoriales y más 98
Estas instrucciones te ayudan a establecer
varias opciones y aplicaciones, incluyendo
tu Cuenta Google™.*
Optimizador de conexiones
Después de la activación del teléfono, podrías
ver una notiicación del Optimizador de
Conexiones Sprint (Sprint Connections
Optimizer). Lee la notiicación y toca I Agree
(estoy de acuerdo) para permitir que tu teléfono
se conecte automáticamente a la mejor red de
datos disponible, incluyendo Wi-Fi.
Nota: Puedes apagar el Optimizador de
Conexiones
Sprint en cualquier momento. Toca
>
> Ajustes del sistema > Más... >
Redes móviles > Optimizador de conexiones.
Establece una Cuenta Google
Establecer una Cuenta Google te permite
acceder muchas funciones de tu teléfono
Android. También te permite sincronizar
contactos y aplicaciones Google que
podrías haber usado antes.
1. Toca
> >
Ajustes del sistema >
Cuentas y sincronización.
2. Toca Agregar Cuenta > Google.
3. Sigue las sugerencias para establecer una
Cuenta Google nueva o inscríbete a una
Cuenta Google existente.
* No necesitas registrarte en una cuenta de
Google para usar tu teléfono; sin embargo,
para descargar contenido de la Tienda de
aplicaciones Google Play™, deberás vincular
tu teléfono a una cuenta Google.
Básico del teléfono
veces para alejar.
para acercar, y luego vuelve a tocar dos
También puedes tocar dos veces la pantalla
acercarte y hacia adentro para alejarte).
Básicos Android
Internet. (Mueve los dedos hacia fuera para
alejar la imagen de una foto o sitio de
usando el pulgar y el índice para acercar o
Pellizca para ampliar: “Pellizca” la pantalla
de izquierda a derecha (y viceversa).
en las diferentes pantallas de Inicio al deslizar
para desplazar en una lista, o puedes buscar
deslizar la pantalla hacia arriba o hacia abajo
arrastrar algo en vez). Por ejemplo, puedes
pantalla, sin pausar al tocarla (para no
rápidamente a través de la supericie de la
Pasa o desliza: Para deslizar, mueve tu dedo
la lista hacia arriba o hacia abajo.
Por ejemplo, toca Contactos y luego arrastra
pantalla táctil en forma horizontal o vertical.
moverte lentamente, arrastra a través de la
Arrastra: Para desplazarte por una lista o
sencillamente toca y sujeta el ítem.
enlace en una página de Internet),
disponibles para un ítem (por ejemplo, un
Toca y sujeta: Para abrir las opciones
Un toque suave funciona mejor.
pantalla, sencillamente tócalos con el dedo.
coniguraciones, o presionar botones en
como íconos de aplicaciones y
teclado en pantalla, seleccionar ítems tales
Toca: Cuando quieres escribir usando el
toques o gestos.
controlar todo por medio de varios tipos de
La pantalla táctil de tu teléfono te permite
pantallas de tu teléfono usando gestos
Desplázate por los menús y las
Conceptos básicos Android: Explorando por tu teléfono
Page 61

visita sprint.com/support para obtener guías, tutoriales y más 98
visita sprint.com/support para obtener guías, tutoriales y más 98
tu teléfono a una cuenta Google.
aplicaciones Google Play™, deberás vincular
para descargar contenido de la Tienda de
Google para usar tu teléfono; sin embargo,
* No necesitas registrarte en una cuenta de
Cuenta Google existente.
Cuenta Google nueva o inscríbete a una
3. Sigue las sugerencias para establecer una
2. Toca Agregar Cuenta > Google.
Cuentas y sincronización.
1. Toca
Ajustes del sistema >
> >
podrías haber usado antes.
contactos y aplicaciones Google que
Android. También te permite sincronizar
acceder muchas funciones de tu teléfono
Establecer una Cuenta Google te permite
Sprint en cualquier momento. Toca
Redes móviles > Optimizador de conexiones.
> > Ajustes del sistema > Más... >
Conexiones
Nota: Puedes apagar el Optimizador de
Establece una Cuenta Google
datos disponible, incluyendo Wi-Fi.
se conecte automáticamente a la mejor red de
(estoy de acuerdo) para permitir que tu teléfono
Optimizer). Lee la notiicación y toca I Agree
Conexiones Sprint (Sprint Connections
ver una notiicación del Optimizador de
Después de la activación del teléfono, podrías
Optimizador de conexiones
tu Cuenta Google™.*
varias opciones y aplicaciones, incluyendo
Estas instrucciones te ayudan a establecer
Básico del teléfono
Page 62

Prepárate
TalkBack
Antes de comenzar el proceso de activación,
el móvil sugerirá la función de navegación
por voz TalkBack. TalkBack es un Servicio de
Accesibilidad que ayuda a los usuarios
ciegos o con discapacidad de la vista a
interactuar con sus equipos más fácilmente.
Para evitar esta función, toca Next.
Para desactivar TalkBack, sigue estos pasos:
1. Toca > > Ajustes del sistema.
2. Coloca dos dedos en la pantalla para
comenzar a desplazar y mueve tus dedos
en dirección hacia arriba para desplazar.
3. Toca Accesibilidad > TalkBack.
4. Toca el interruptor OFF/ON.
Nota: Cuando TalkBack está activado, la
coniguración de la pantalla táctil requiere
que el usuario primero toque el elemento
deseado y entonces toque el elemento de
nuevo dos veces para poder tener acceso
a la función.
Prepara tu teléfono Activa tu teléfono
76
otro teléfono.
Sprint 1-888-211-4727 desde qualquier
Firmware
al Internet, llama al Atención al Cliente
. Si no tienes acceso
1
a sprint.com/support
Si tu teléfono aún no está activado, visita
Disponible sólo en inglés.
1
conirmar la activación.
termines, haz una llamada para
Verás
cuando
diseñado para
instrucciones. Una vez que
y sigue las
1
ve a
sprint.com/activate
cambiando teléfono),
para un número existente (estás
correo postal y lo estás activando
Si has recibido tu teléfono por
visita sprint.com/readynow para obtener más ayuda en optimizar e iniciar tu nuevo móvil
instrucciones en la pantalla
Sigue las
Update (actualización de Firmware).
de PRL) y la pantalla
la pantalla PRL Update (actualización
libres), lo cual puede ser seguido por
Activation (activación de manos
una pantalla que pone Hands Free
lo enciendas por primera vez.
activarse automáticamente
teléfono está
una línea nueva de servicio, tu
tienes una cuenta Sprint nueva o
está activado y listo para usar.
Tienda Sprint, probablemente ya
para continuar.
Si recibiste tu teléfono por correo y
Si compraste tu teléfono en una
Activa tu teléfono
Activa tu teléfono
Page 63

a la función.
nuevo dos veces para poder tener acceso
deseado y entonces toque el elemento de
que el usuario primero toque el elemento
coniguración de la pantalla táctil requiere
Nota: Cuando TalkBack está activado, la
4. Toca el interruptor OFF/ON.
3. Toca Accesibilidad > TalkBack.
en dirección hacia arriba para desplazar.
comenzar a desplazar y mueve tus dedos
2. Coloca dos dedos en la pantalla para
1. Toca > > Ajustes del sistema.
Para desactivar TalkBack, sigue estos pasos:
Para evitar esta función, toca Next.
interactuar con sus equipos más fácilmente.
ciegos o con discapacidad de la vista a
Accesibilidad que ayuda a los usuarios
por voz TalkBack. TalkBack es un Servicio de
el móvil sugerirá la función de navegación
Antes de comenzar el proceso de activación,
TalkBack
Prepara tu teléfono Activa tu teléfono
Page 64

Prepárate
Prepárate − página 5 − Averigua lo
que tienes que hacer antes de usar tu
teléfono por primera vez, incluyendo
insertar la batería y activar el servicio
Sprint en tu teléfono.
Conceptos básicos Android − página 9
− Aprende algunos conceptos básicos
sobre cómo desplazarte por tu teléfono,
utilizarla pantalla de inicio e ingresar
texto. Si estás familiarizado con teléfonos
Android, probablemente puedes saltarte
estas páginas (aunque un curso para
refrescar nunca le ha hecho daño a nadie)
Usa tu teléfono
− página
13
− Aprovecha
las funciones de tu teléfono y los servicios
Sprint, desde los conceptos básicos
(realizar llamadas) a los más avanzados
(usar
Google Play™, Wi-Fi™
y más).
Herramientas y recursos − página 29 −
Encuentra consejos útiles para tu teléfono
y descubre recursos y otra información de
ayuda Sprint. Para información adicional
incluyendo la Guía del Usuario completa,
videos, tutorías y foros de la comunidad,
visita sprint.com/support
1
.
1
Disponible sólo en inglés.
Usando esta guía
Esta “guía para comenzar” está diseñada para ayudarte a conigurar y
continuar usando tu nuevo LG G Flex. Se divide en cuatro secciones para
ayudarte a encontrar la información que necesitas rápida y fácilmente.
54
.
y después toca
Apagar > OK para apagar el teléfono.
para encender
► Presiona y mantén presionado el botón
Apaga el teléfono
pantalla para desbloquearla.
► Desliza tu dedo sobre cualquier parte de la
Abre la pantalla
el botón para encender
pantalla de abrir la cerradura, presiona
•Para encender la pantalla y visualizar la
la parte trasera del teléfono.
en
presiona el botón para encender
•Para apagar la pantalla rápidamente,
Enciende y apaga la pantalla
visita sprint.com/readynow para obtener más ayuda en optimizar e iniciar tu nuevo móvil
el teléfono.
para encender
para encender
► Presiona y mantén presionado el botón
Enciende el teléfono
enchufe eléctrico.
2. Conecta el adaptador de corriente a un
accesorio de tu teléfono.
1. Conecta el conector USB en el cargador/
Carga la batería
se instale una batería.
remover, y por lo tanto no requiere que
estado sólido. La batería no se puede
Nota: Tu LG G Flex es un dispositivo de
calendarios y más desde tu anterior teléfono.
aprender acerca de la transferencia de contactos,
Antes de empezar: Visita sprint.com/readynow para
Prepara tu teléfono
Page 65

.
1
y más).
13
− Aprovecha
− página
Disponible sólo en inglés.
1
visita sprint.com/support
videos, tutorías y foros de la comunidad,
incluyendo la Guía del Usuario completa,
ayuda Sprint. Para información adicional
y descubre recursos y otra información de
Encuentra consejos útiles para tu teléfono
Herramientas y recursos − página 29 −
Google Play™, Wi-Fi™
(usar
(realizar llamadas) a los más avanzados
Sprint, desde los conceptos básicos
las funciones de tu teléfono y los servicios
Usa tu teléfono
refrescar nunca le ha hecho daño a nadie)
estas páginas (aunque un curso para
Android, probablemente puedes saltarte
texto. Si estás familiarizado con teléfonos
utilizarla pantalla de inicio e ingresar
sobre cómo desplazarte por tu teléfono,
− Aprende algunos conceptos básicos
Conceptos básicos Android − página 9
Sprint en tu teléfono.
insertar la batería y activar el servicio
teléfono por primera vez, incluyendo
que tienes que hacer antes de usar tu
Prepárate − página 5 − Averigua lo
ayudarte a encontrar la información que necesitas rápida y fácilmente.
continuar usando tu nuevo LG G Flex. Se divide en cuatro secciones para
Esta “guía para comenzar” está diseñada para ayudarte a conigurar y
Usando esta guía
Page 66

cargador/accesorio
auricular 3.5mm
Micrófono
Auricular
Sensor de
proximidad
Lente de
la cámara
frontal
Pantalla táctil
Altavoz
Gracias por elegir Sprint. Este folleto te introduce a lo básico
para empezar a usar Sprint y tu LG G Flex
habilitado* para
Sprint Spark™ y HD™ Voice
.
ReadyNow – Para obtener más ayuda en optimizar e iniciar
tu nuevo tableta, aprovecha los recursos del exclusivo Ready
Now en sprint.com/readynow
1
. Podrás incluso programar citas
en tu tienda Sprint más cercana.
Para obtener apoyo y recursos, visita sprint.com/support
1
.
Allí encontrarás guías, tutoriales y más para sacar el máximo
provecho a tu equipo.
Nota: Los servicios y las aplicaciones disponibles están sujetos a cambio.
* La red LTE mejorada con Sprint Spark y HD Voice están disponible en mercados selectos.
Visita sprint.com/cobertura para más información.
1
Disponible sólo en inglés.
¡Bienvenido!
de volumen
Botones
LED
Flash
la cámara
Lente de
Conector para
Conector del
NFC
contacto
Punto de
bloqueo
encender/
para
Botón
LED
IR (infrared)
de LED
Notificación
Tu LG G Flex
Page 67

Disponible sólo en inglés.
1
Visita sprint.com/cobertura para más información.
* La red LTE mejorada con Sprint Spark y HD Voice están disponible en mercados selectos.
Nota: Los servicios y las aplicaciones disponibles están sujetos a cambio.
provecho a tu equipo.
Allí encontrarás guías, tutoriales y más para sacar el máximo
.
1
. Podrás incluso programar citas
1
Para obtener apoyo y recursos, visita sprint.com/support
en tu tienda Sprint más cercana.
Now en sprint.com/readynow
tu nuevo tableta, aprovecha los recursos del exclusivo Ready
ReadyNow – Para obtener más ayuda en optimizar e iniciar
.
habilitado* para
Sprint Spark™ y HD™ Voice
para empezar a usar Sprint y tu LG G Flex
Gracias por elegir Sprint. Este folleto te introduce a lo básico
¡Bienvenido!
Page 68

MBM64378201 (1.0) W
Todo lo que tienes que saber para empezar
Printed in Korea
Vamos
 Loading...