

Page 1

SINGLE ZONE EXTENDED PIPE WALL MOUNTED
OWNER’S MANUAL
Single Zone Extended Pipe Systems
LS240HLV
LS300HLV
LS360HLV
Page 2

PROPRIETARY DATA NOTICE
This document, as well as all reports, illustrations, data, information, and
other materials is the property of LG Electronics U.S.A., Inc., and are
disclosed by LG Electronics U.S.A., Inc., only in confidence.
This document is for design purposes only.
OL-SZ-ExtendedPipe-ALL-07-14
For continual product development, LG Electronics U.S.A., Inc., reserves the right to change specifications without notice.
©LG Electronics U.S.A., Inc.
Page 3
TABLE OF CONTENTS
DANGER
CAUTION
Safety Instructions ................................................................................ 4
Unit Parts ................................................................................................ 7
Unit Operation ........................................................................................ 8
Basic Functions ................................................................................... 12
Cooling Operation - Adjusting the Air Flow (Swing) Direction
Timer Setting Functionality
Advanced Functions ........................................................................... 14
Jet Cool/Jet Heat Operation - Auto Changeover Operation
Energy Saving Operation - Auto Restart
Maintenance ......................................................................................... 16
Cleaning the Air Filter
Troubleshooting .................................................................................. 18
TABLE OF SYMBOLS
This symbol indicates an imminently hazardous situation which, if not avoided, will result in death or
serious injury.
This symbol indicates a potentially hazardous situation which, if not avoided, could result in death or
serious injury.
This symbol indicates a potentially hazardous situation which, if not avoided, may result in minor or
moderate injury.
This symbol Indicates situations that may result in equipment or property damage accidents only.
This symbol indicates an action should not be completed.
Page 4
SAFETY INSTRUCTIONS
CAUTION
DANGER
IMPORTANT!
•Please read this manual completely before operating this product.
•Follow the instructions in this manual to prevent product malfunction, property damage, injury or death to the user or other people.
•Incorrect operation due to ignoring any instruction will cause harm or damage.
•The level of seriousness is classified by the symbols described below.
This symbol indicates an imminently hazardous situation which, if not avoided, will result in death or serious injury.
This symbol indicates a potentially hazardous situation which, if not avoided, could result in death or serious injury.
This symbol indicates a potentially hazardous situation which, if not avoided, may result in minor or moderate injury.
This symbol Indicates situations that may result in equipment or property damage accidents only.
This symbol indicates an action should not be completed.
General Safety
•Installation and repair must always be done by a qualified technician.
•Installation MUST conform with local building codes or, in the absence
of local codes, with the Nation Electrical Code NFPA 70/ANSI C1-1003
or current edition and Canadian Electrical Code Part1 CSA C.22.1.
Power and Electrical Safety
•Immediately disconnect the product in the event of a blackout or
thunderstorm. Failure to do so may result in fire, electric shock and/
or damage.
•Always insure proper equipment ground. Failure to do so may result
in electric shock and/or product failure.
Single Zone Extended Pipe Wall Mounted Owner’s Manual
•Be sure a circuit breaker is installed before using the air conditioner.
Failure to do so may result in electric shock and/or product failure.
•Do not connect the ground wire to a gas pipe, a lightning rod or a
telephone ground wire; because it may result in electric shock and/
or product failure.
•Use a standard circuit breaker and fuse conforming to the rating of
the air conditioner. Failure to do so may result in electric shock and/
or product failure.
•Do not modify or extend the power cable; because it may result in
•Failure to carefully read and follow all instructions in this manual
may result in equipment malfunction, property damage, personal
injury and/or death.
electric shock and/or fire. If the power cable shows wear, such as
scratches or outer skin is peeling off or deteriorated, then it must be
replaced.
•Do not use a damaged power cord; because it may result in electric
shock and/or fire.
•Do not touch, operate or repair the air conditioner with wet hands;
because it may result in electric shock or product failure.
•Do not place a heater or other heat generating appliances near the
power cable; because it may result in electric shock and/or fire.
•Check that the power cord is not pulled or damaged while the air
conditioner is operating. Failure to do so may result in electric shock
and/or fire.
•Do no place any objects on the power cord; because it may result in
electric shock or product failure.
4
Due to our policy of continuous product innovation, some specications may change without notication.
LG Electr onics U.S.A., Inc., Englewood Cl iffs, NJ. All r ights reserved. “LG” is a registe red trademark of LG Corp.
©
Page 5
Installation Safety
SAFETY INSTRUCTIONS
•Do not install the air conditioner on an unstable surface or where
there is a danger of it falling; because it may result in death, serious
injury, and/or product failure.
•Contact an authorized service center when you install or relocate
the air conditioner. Failure to do so may result in serious injury and/
or product failure.
•Indoor/outdoor wiring connections must be secured tightly and the
cable should be routed properly so that there is no force pulling the
cable from the connection terminals. Improper or loose connections
may cause heat generation or fire.
• Install the panel and the cover of the control box safely. Failure to do
so may result in explosion or fire.
•Do not install the air conditioner near a place with a danger of
explosion or fire; because it may result in serious bodily injury or
death.
•Do not install air conditioner with direct exposure to sea water or sea
wind (salt spray); because it may result in product failure.
•Install the drain hose properly for smooth drainage of condensed
water. Failure to do so may result in product failure.
•Avoid exposure to leaking refrigerant which may occur during
Usage
•Ensure that the pipe and the power cable which connect the indoor
unit and the outdoor unit are not pulled tight when installing the air
conditioner. Failure to do so may result in electric shock or product
failure.
•Do not mix air or gas in the system except for the specific refrigerant. If air enters the refrigerant system, it may result in excessively high pressure that may lead to personal injury or damage to the
equipment.
•Safely dispose of packing materials such as screws, nails or
batteries in a packing bag after installation or repair. Failure to do so
may result in serious bodily injury.
•Use caution when unpacking or installing the air conditioner. Failure
to do so may result in bodily injury or product failure.
•When lifting or transporting the equipment, there should be 2 or more
people, or a forklift. Failure to do so may result in bodily injury.
installation or repair. Failure to do so may result in personal injury
and/or product failure.
•If there is a refrigerant leak during the installation of the air
conditioner, ventilate the area immediately. Failure to do so may
result in serious injury and/or product failure.
Safety Instructions
•Use only those parts which are listed in the service parts list. Never
attempt to modify the equipment; because that may result in death,
serious injury, and/or product failure.
• Discard the batteries in a safe manner and where there is no danger
of excessive heat or fire. Failure to do so may result in explosion or
fire.
•Contact an authorized service center when the air conditioner is
submerged into water due to flooding. Failure to do so may result in
explosion or fire.
•Only use components that are approved by the manufacturer and
do not repair or modify them; because it may result in electric shock
and/or product failure.
•Only use the refrigerant specified on the air conditioner label. Failure
to do so may result in explosion or fire.
•Do not allow water to run into the air conditioner; because it may
result in explosion or fire.
•Do not leave flammable substances such as gasoline, benzene and
other white spirits or solvents, including thinner near the air conditioner; because it may result in explosion or fire and may result in
bodily injury.
•Do not use the air conditioner for an extended period of time in a
small place without ventilation; because it may result in explosion or
fire. Make sure to ventilate the space regularly.
•Do not touch the electrostatic filter after opening the front grill;
because it may result in electric shock or product failure.
•For inner cleaning, contact an authorized service center or a dealer.
Do not use harsh detergent that causes corrosion or damage on the
unit; because it may cause product failure, fire, and/or electronic
shock.
•Disconnect power if there is a noise, smell or smoke coming from the
air conditioner. Failure to do so may result in explosion or fire.
•Ventilate room or area when air conditioner and a heating appliance
such as a heater are used simultaneously. Failure to do so may result in fire, serious injury, and/or product failure.
•Make sure that children do not climb up the outdoor unit or impact
it. Failure to do so may result in death, bodily injury and/or product
failure.
•If there is a gas leak, ventilate area sufficiently before using the air
conditioner again. Failure to do so may result in explosion or fire.
•Do not use the product for special purposes, such as preserving
foods, works of art, etc.; because it may result in death, fire and/
or electric shock. The product is a consumer air conditioner, not a
precision refrigeration system.
•Do not block the inlet or outlet of air flow; because it may result
explosion or product failure.
Due to our policy of continuous product innovation, some specications may change without notication.
LG Electr onics U.S.A., Inc., Englewood Cl iffs, NJ. All r ights reserved. “LG” is a registe red trademark of LG Corp.
©
5
Page 6
SAFETY INSTRUCTIONS
Usage - Continued
•Do not insert hands or other objects through the air inlet or outlet while the air conditioner is operating; because it may result in
personal bodily injury or electric shock.
•Do not expose people, animals or plants to the cold or hot wind from
the air conditioner; because it may result in serious injury.
•Do not drink the water drained from the air conditioner; because it
may result in serious health complications.
•During maintenance, be sure to turn the main power off when cleaning or repairing the air conditioner. Failure to do so may result in
death, serious bodily injury, and/or product failure.
•Do not recharge or disassemble the batteries; because it may result
in explosion, fire or serious bodily injury.
•Follow the standards of the corresponding region or country for
handling the refrigerant and the air conditioner, and for disassembling the air conditioner. Failure to do so may result in product failure.
•Do not mix the batteries for the remote control with other types of
batteries or mix new batteries with used batteries; because it may
result in product failure.
•Remove the batteries when the remote control is not in use for an extended period of time. Failure to do so may result in product failure.
Maintenance
•Do not dispose of the batteries in fire; because it may result in
explosion or fire.
•Stop using the remote controller if there is a battery fluid leak; and if
your clothes or skin is exposed to the battery fluid from a leak, wash
it off with clean water. Failure to do so may result in serious bodily
injury.
•Filter must be installed before operating the air conditioner. Failure
to do so may result in product failure.
•Do not place any objects on the air conditioner; because it may result
in product failure.
•Do not let the air conditioner run for a long time when the humidity is
very high or when a door or window has been left open; because it
may result in product failure.
•Do not use strong cleaning agents or solvents when you clean the
air conditioner, or spray water; because it may result in serious
bodily injury or product failure. Make sure to use a smooth cloth
when cleaning the product.
•Never touch the metal parts of the air conditioner when removing
Single Zone Extended Pipe Wall Mounted Owner’s Manual
the air filter; because it may result in serious bodily injury or product
failure.
•Use a sturdy stool or ladder when cleaning, maintaining or repairing
the air conditioner at a height. Failure to do so may result in serious
bodily injury or product failure.
6
Due to our policy of continuous product innovation, some specications may change without notication.
LG Electr onics U.S.A., Inc., Englewood Cl iffs, NJ. All r ights reserved. “LG” is a registe red trademark of LG Corp.
©
Page 7

The following tables show the available outdoor and indoor units, along with the factory provided controller.
ON/OFF Bbutton
Signal receiver
Vertical louver
Air outletHorizontal vane
Front panel
Air inlet vents
Air outlet vents
Connection
wires
Refrigerant pipes
Drain hose
Base plate
Table 1: Single Zone High Extended Pipe System Pairing Table
Outdoor Unit Model Indoor Unit Model Controller
LSU240HLV
LSU300HLV
LSU360HLV
LSN240HLV
LSN300HLV
LSN360HLV
UNIT PARTS
AKB74055401
Indoor Unit and Outdoor Unit Basic Components
Refer to Figure 1 and Figure 2 for the basic layout of the Single Zone Extended Pipe system when following operational, maintenance or
troubleshooting instructions in this manual.
Figure 1: Indoor Unit Basic Components
Figure 2: Outdoor Unit Basic Components
Unit Parts
The number of operation lamps and their locations
may vary, depending on the indoor unit model.
Due to our policy of continuous product innovation, some specications may change without notication.
©
LG Electr onics U.S.A., Inc., Englewood Cl iffs, NJ. All r ights reserved. “LG” is a registe red trademark of LG Corp.
7
Page 8

UNIT OPERATION
Display
screen
Control
panel
Remote Controller
Basic Remote Controller Operation
Table 2: Remote Controller Operation
Control Panel Display Screen Description
N/A
Air Circulation Button*: Used to circulate the room air without cooling
or heating.
Auto Cleaning/Energy Saving Buttons*: Sets time related to special
functions such as automatic cleaning
efficient cooling mode
On/Off Button: Turns the remote controller power on/off.
Temperature Adjustment Buttons: Press up or down “arrow” temp
buttons to adjust temperature during cooling or heating. Display screen will
show adjusted temperature.
.
and placing the unit into energy
Figure 3: Single Zone
Extended Pipe Remote
Controller - Model
AKB73635606
Single Zone Extended Pipe Wall Mounted Owner’s Manual
Operation Mode Selection Button: Cycles through the operation
mode, from top left symbols:
Cooling mode:
Auto operation or auto changeover:
Dehumidifying mode:
Heating mode:
Fan Speed Button: Adjusts the indoor fan speed by pressing repeatedly.
Also allows for natural air circulation (when wavy arrow is displayed).
Jet Mode Button (Heating/Cooling)*: Rapid heating or cooling of
indoor temperature. Temperature heats or cools in a short period of time.
Air Flow Direction (Swing) Buttons: Adjusts the directions of air flow;
vertically or horizontally through louvers.
Room Temperature Display Button: Displays the current room
temperature. Temperature value can be changed from °C or °F when button is
pressed and held for 5 seconds.
Sleep Mode Auto Button*: Pressing will activate sleep mode timer
selection. Pressing the allows you to select up to 7 hours prior to
the unit automatically turning off.
8
*Some functions may not be available on all models.
Due to our policy of continuous product innovation, some specications may change without notication.
LG Electr onics U.S.A., Inc., Englewood Cl iffs, NJ. All r ights reserved. “LG” is a registe red trademark of LG Corp.
©
Page 9

Basic Remote Controller Operation - Continued
Table 2: Remote Controller Operation (Continued)
Control Panel Display Screen Description
Timer Buttons (On/Off): Sets the clock timer to enable automatic start
and stop times for air conditioner activity.
Pressing the enables the user to set the actual time as shown on the
display screen.
Set/Clear Button: Either sets (commits) a function or clears (cancels) a
function.
N/A
N/A
N/A
When pressing and holding for 3 seconds or longer, allows the user to set
current time by using the buttons.
Up/Down (Directional) Buttons: Used in conjunction with other
primary mode and operation buttons. Once in desired mode, user can press
the Up and Down button to move forward or backward in selections. For
example these buttons can be used to set timer clock settings or brightness of
the indoor unit display.
Reset Button: Pin reset indention (shown under the “UP” button) allows
the user to reset the air conditioner to factory defaults by inserting a pen tip or
small screw driver into hole.
UNIT OPERATION
Remote Controller
Safety Instructions
Due to our policy of continuous product innovation, some specications may change without notication.
LG Electr onics U.S.A., Inc., Englewood Cl iffs, NJ. All r ights reserved. “LG” is a registe red trademark of LG Corp.
©
9
Page 10

UNIT OPERATION
Remote Controller
Installing Remote Controller Batteries
1. Insert AAA batteries (1.5V) before turning on the remote.
2. Remove the battery cover from the back of the unit, by pushing down the tab at
the top of the cover. Refer to #1 on Figure 4.
3. Lift battery cover off of the unit as shown on Figure 4 (#2).
4. Insert the batteries, following the + and - terminal indications inside the battery
compartment. Make sure batteries are securely in place (Figure 5).
5. Reattach the battery cover.
•If the display screen of the remote controller starts to fade, replace the batteries.
•When batteries are removed, the temperature unit will be reset to Celsius as the
default.
Installing the Remote Controller Holder
Installation of the remote controller holder should be out of direct
sunlight, in order to protect the remote controller from heat exposure.
1. Choose a safe and easily accessible place to attach the remote controller holder.
2. Using a phillips head screwdriver, insert and fasten the 2 screws into the holes at
the base (Figure 6).
3. Gently “wiggle” the base to make sure that it is firmly attached to the wall. Tighten the screws further if you feel the wall mount is still loose.
4. Slide the remote control vertically into the holder (Figure 7).
Figure 4: Remote Control Battery Cover
Figure 5: Battery Placement
Figure 6: Holder Attachment
Figure 7: Insertion of Remote into Holder
Single Zone Extended Pipe Wall Mounted Owner’s Manual
10
Due to our policy of continuous product innovation, some specications may change without notication.
LG Electr onics U.S.A., Inc., Englewood Cl iffs, NJ. All r ights reserved. “LG” is a registe red trademark of LG Corp.
©
Page 11

UNIT OPERATION
Indoor Unit
IDU Signal Receiver
Remote Controller, Indoor Unit
Initializing Remote Controller Operation
To begin communication between the indoor unit and the remote control, point the remote control towards the signal receiver, located at the
bottom right hand corner of the indoor unit (refer to Figure 8).
Figure 8: Initializing a Remote Control
•Make sure to point the remote controller directly at the indoor unit, otherwise
the remote may accidentally pick up a signal and activate and operate other
electronic devices.
•For optimum operation, periodically use a soft cloth to wipe the signal
transmitter on the remote controller and the receiver on the indoor unit.
•Jet Mode in heating operation does not work when equipped with a wired
remote controller.
•On/Off reserve mode does not work when equipped with a wired remote controller.
Unit Operation
Due to our policy of continuous product innovation, some specications may change without notication.
LG Electr onics U.S.A., Inc., Englewood Cl iffs, NJ. All r ights reserved. “LG” is a registe red trademark of LG Corp.
©
11
Page 12
BASIC FUNCTIONS
Cooling Operation - Adjusting the Air Flow (Swing) Direction
Cooling Operation
1. On the remote controller, press to turn on the indoor unit.
2. Press repeatedly until the cooling symbol (snowflake)
is displayed on the remote control display screen.
3. Press the up and down arrow buttons to increase or
decrease currently displayed temperature.
The cooling temperature range is 64.4° F (18° C) - 86° F (30° C).
Air Circulation Operation
This mode circulates indoor air without changing the room
temperature.
The cooling lamp lights up in air circulation mode on the indoor unit.
1. On the remote controller, press to turn on the indoor unit.
2. Press to activate air circulation operation. The fan symbol
will be displayed on the remote controller display screen.
3. Press to adjust the fan speed.
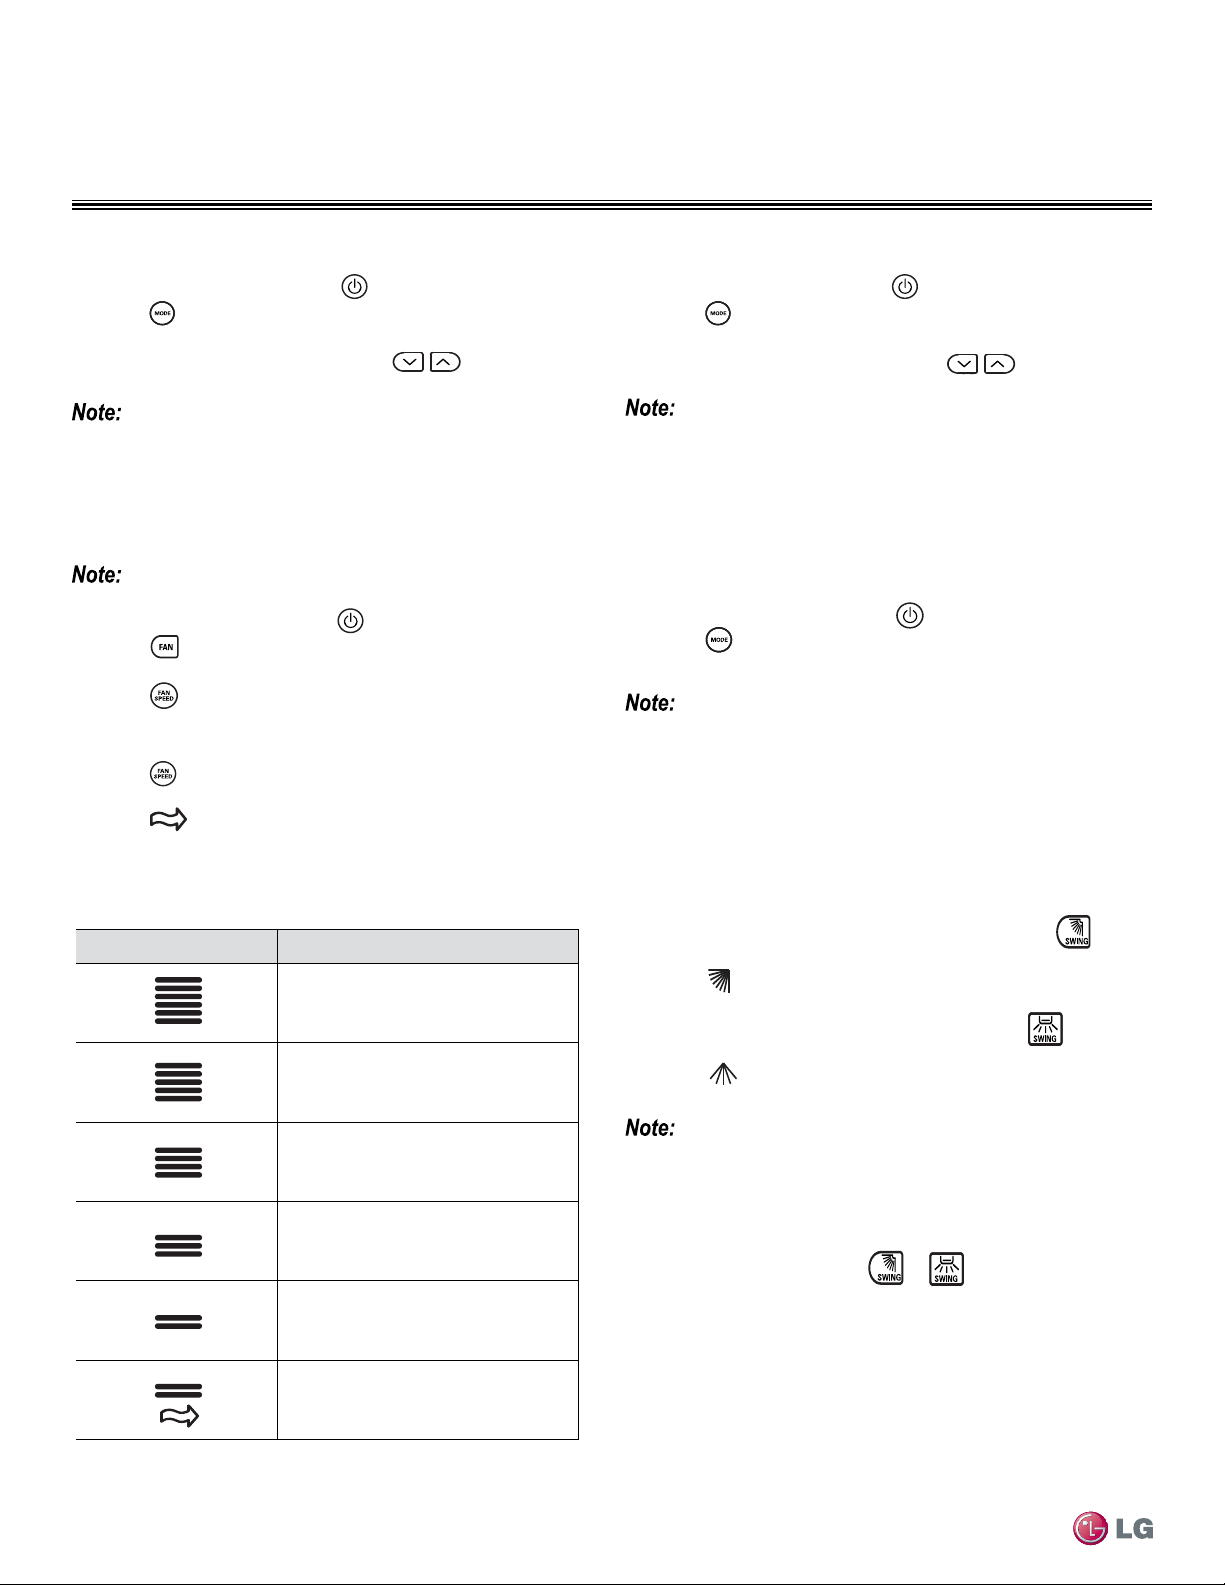
Adjusting the Fan Speed
1. Press repeatedly to adjust the fan speed. See Table 4 for
the various speed adjustments.
2. Select for natural air. The fan speed adjusts
automatically.
Table 3: Fan Speed Levels
Display Symbol Speed
High
Medium - High
Heating Operation
1. On the remote controller, press to turn on the indoor unit.
2. Press repeatedly until the heating symbol (sun) is
displayed on the remote controller display screen.
3. Press the up and down arrow buttons to increase or
decrease currently displayed temperature.
•The cooling temperature range is 60.8° F (16° C) - 86° F (30° C).
•Cooling only models do not support this function.
Dehumidifying Operation
In order to prevent mold, this mode removes excess moisture from
an environment with high humidity or during local rainy seasons.
This mode adjusts the room temperature and the fan speed automatically to maintain the optimal level of humidity.
1. On the remote controller, press to turn on the indoor unit.
2. Press repeatedly until the dehumidifying symbol (raindrop)
is displayed on the remote controller display screen.
•When the indoor unit is in dehumidifying mode, you cannot
adjust the room temperature. The temperature is being adjusted
automatically.
•While in dehumidifying mode, the display screen will not show
the room temperature.
Adjusting the Air Flow (Swing)
Direction
1. To adjust the direction of the air flow vertically, press
repeatedly and select the desired position.
2. Select on the remote control display screen to adjust the
desired vertical position automatically.
3. To adjust the horizontally air flow direction, press repeatedly
and select the desired position.
4. Select on the remote control display screen to adjust the
desired horizontal position automatically.
Single Zone Extended Pipe Wall Mounted Owner’s Manual
12
Medium
Medium - Low
•Some models may not support adjusting air flow direction.
Check your model to be sure it is an option.
•When restarting the air conditioner, it will remember the
previously set air flow direction. As a result, the air deflector
may not accurately reflect the icon displayed on the remote
controller. If this occurs, press or to adjust the direction of the air flow once more.
Low
Natural Wind
Due to our policy of continuous product innovation, some specications may change without notication.
LG Electr onics U.S.A., Inc., Englewood Cl iffs, NJ. All r ights reserved. “LG” is a registe red trademark of LG Corp.
©
Page 13

BASIC FUNCTIONS
Timer Setting Functionality
Setting the Timer
Single zone wall mount systems can be programmed through timer settings to turn the unit on and off at set times during the day and night.
This functionality allows you to save energy and utilize the air conditioner more efficiently.
Setting the Current Time
1. Press and hold for no longer than 3 seconds to initiate
setting functionality.
•The AM/PM icon will flicker at the bottom of the display screen.
2. Press the up and down buttons to scroll and then
select the minutes (hours will scroll).
3. Press when finished to exit the setting mode.
Setting Air Conditioner On Time
1. Press on the remote controller.
•The ON icon will flicker to the right of the time display on the
display screen.
2. Press the up and down buttons to scroll and then
select the minutes (hours will scroll).
3. Press when finished to exit the setting mode.
Setting Air Conditioner Off Time
Press on the remote controller.
•The OFF icon will flicker to the right of the time display on the
display screen.
1. Press the up and down buttons to scroll and then
select the minutes (hours will scroll).
2. Press when finished to exit the setting mode.
Setting Sleep Mode
Sleep mode is used to automatically turn off the air conditioner at a
set time. It is a “countdown” timer and can be set for up to 7 hours
ahead of the current time.
1. Press to turn on the indoor unit.
2. Press to initiate sleep mode settings.
3. Press the up and down buttons to select the number of
hours.
4. Press to exit the setting mode.
• appears on the display screen to signify the unit has been set
to sleep mode.
•Your display screen might appear slightly different depending on
your model.
Unit Operation
In cooling and dehumidifying mode, the temperature increases by 1.8°F (1°C) after 30 minutes and by an additional 1.8°F
(1°C) after another 30 minutes for a more comfortable sleep
environment. The temperature increases up to 3.6°F (2°C) from
the present temperature..
Cancelling Timer Settings
1. Press .
2. Press a second time to cancel all timer settings.
Due to our policy of continuous product innovation, some specications may change without notication.
LG Electr onics U.S.A., Inc., Englewood Cl iffs, NJ. All r ights reserved. “LG” is a registe red trademark of LG Corp.
©
13
Page 14

ADVANCED FUNCTIONS
Jet Cool/Jet Heat Operation - Auto Changeover Operation
Jet Cool/Jet Heat Operation
Rapid Cooling and Heating of Room Temperature
This mode allows you to rapidly cool indoor air (during
summer months) or warm indoor air (during winter months).
1. Press to turn on the indoor unit.
2. Press to initiate jet mode.
•In jet cool mode the unit operates at a setpoint of 64.4 °F (18° C) for
a duration of 30 minutes.
•In jet heat mode the unit operates at a setpoint of 86 °F (30° C) for
a duration of 30 minutes.
Auto Clean Operation
Indoor Air Purification
While in cooling and dehumidifying mode, the air conditioner
generates moisture on the interior of the indoor unit. The auto clean
operation is used to remove this type of moisture.
•Press to start dehumidifying operation.
is displayed on the remote control display screen.
•If the power is turned off, the fan will operate for 30 minutes and will
clean the inside of the indoor unit.
•Some buttons (functionality) will not operate while the system is in
auto cleaning mode.
•This function may not be available on all models.
°C/°F Screen Display
Single zone wall mount systems can display the temperature in
either Celsius (°C) or Fahrenheit (°F).
To adjust the screen display, press and hold for 5 seconds.
Auto Operation (Cooling Models Only)
During this functionality, the fan speed and the temperature adjust
automatically based on the room temperature.
1. Press to turn on the indoor unit.
2. Press repeatedly to select auto operation
will be displayed on the remote control display screen. Refer
to Figure 9 for additional information.
3. Press the up and down buttons to select the desired
numerical operation code for cooling/heating strength. See the
table in Figure 8 for a description of each numerical value.
•During auto operation mode you cannot adjust the fan speed.
•This function may not be available on models.
Figure 9: Auto Operation Display with Code Descriptions
Code Description
2 Cool
1 Cool slightly
Maintain
0
room
temperature
Heat slightly -1
2-taeH
Auto Changeover Operation
This function changes the operation mode automatically to maintain
a set temperature of ± 3.6 °F (± 2 °C).
1. Press to turn on the indoor unit.
2. Press repeatedly to select auto operation.
will be displayed on the remote control display screen.
3. Press the up and down buttons to select the desired
temperature. The temperature range is 64.4 °F (18 °C) through
86 °F (30°C).
4. Press repeatedly as needed to adjust the fan speed.
Single Zone Extended Pipe Wall Mounted Owner’s Manual
14
Figure 10: Auto Changeover Display
•Your screen display may look slightly different depending on
your model.
•This function may not be available on all models.
Due to our policy of continuous product innovation, some specications may change without notication.
LG Electr onics U.S.A., Inc., Englewood Cl iffs, NJ. All r ights reserved. “LG” is a registe red trademark of LG Corp.
©
Page 15

ADVANCED FUNCTIONS
ON/OFF
button
Energy Saving Operation - Auto Restart
Energy Saving Operation (Cooling)
Placing the unit in energy saving mode minimizes power consumption during cooling. It increases the set temperature to the optimal
level for a more comfortable environment.
1. Press to turn on the indoor unit.
2. Press repeatedly until the cooling symbol (snowflake)
is displayed on the remote controller display screen.
3. Press to place unit into energy saving mode.
appears on the display screen.
•During energy saving mode, you could see a different display
between the actual indoor unit and the remote controller display
screen. This does not mean that the unit is malfunctioning.
•This function may not be available on all models.
Manual Operation
Operating a Unit Without a Remote Controller
If the remote control is unavailable or inoperable (i.e., it needs new
batteries), you can use the On/Off button located on the indoor unit
to activate the air conditioner.
The fan speed will be automatically set to high when manually
operating the air conditioner from the wall unit.
1. Open the front panel of the indoor unit by lifting both sides of the
cover slightly as shown in Figure 11.
Figure 11: Lifting the Indoor Unit Panel
3. Immediately close the front panel after pressing the On/Off button
as shown in Figure 13. Use both hands when closing the panel.
Figure 13: Closing the Indoor Unit Front Panel
If your system is capable of both heating and cooling, the operation
mode will change depending on the room temperature. Refer to
Table 4 to determine what the set temperature will be (based on the
room temperature).
Table 4: Set Temperature
Room Temperature Set Temperature Operation Mode
Below 69.8 °F 75.2 °F Heating Operation
Above 69.8 °F but
below 75.2 °F
Above 75.2 °F 71.6 °F Cooling Operation
For cooling only models, the temperature will be set at 71.6°F.
73.4 °F Dehumidifying
Operation
Unit Operation
2. Press the On/Off button as shown in Figure 12.
Figure 12: Indoor Unit On/Off Button
Your indoor unit may appear slightly different depending on the model.
Auto Restart
After a power failure the unit can be programmed to automatically
restart (reboot) and remember the previous settings. This function is
a factory default setting, but it can be disabled.
Disable Auto Restart
1. Open the front cover of the indoor unit by lifting up both sides of
the cover slightly (use two hands). Refer to Figure 11.
2. Press and hold the On/Off button for 6 seconds. Refer to
Figure 12.
•The indoor unit will beep twice and the light will blink 6 times. Auto
restart is now disabled.
Enable Auto Restart
1. To re-enable the auto restart function, press and hold the On/Off
button for 6 seconds.
•The indoor unit will beep twice and the light will blink 4 times. Auto
restart is now enabled.
•This function may not be available on all models.
•If you press and hold the On/Off button for 3-5 seconds instead
of 6 seconds (in other words, a shorter duration), the unit will
be placed in test operation mode. In test operation mode, the
unit blows out strong air for cooling, for 18 minutes and then it
returns to the factory default settings.
Due to our policy of continuous product innovation, some specications may change without notication.
LG Electr onics U.S.A., Inc., Englewood Cl iffs, NJ. All r ights reserved. “LG” is a registe red trademark of LG Corp.
©
15
Page 16

MAINTENANCE
Air filter
Indoor Unit - Cleaning Intervals
Clean the product regularly to maintain optimal performance and to prevent possible breakdown. Refer to Figure 14 for proper filter
placement. Refer to Table 5 for instructions on maintenance. Review all safety instructions at the front of this manual, and adhere to all warnings and notes on this page before proceeding with maintenance.
Figure 14: Single Zone Extended Pipe Indoor Unit Filter Location
Maintenance Precautions
CAUTION
•Turn off power and unplug the cord before performing any maintenance to avoid electric shock.
•Never use water that is hotter than 104°F (40°C) when cleaning filters. It may cause deforming (warping) or discoloration.
•Never use volatile substances when cleaning filters; because they may damage the surface of the product.
•The location and shape of the filter may vary depending on the model.
•Be sure to clean the heat exchanger coils of the outdoor unit regularly. Dirt collected in the coils may decrease the
operational efficiency or increase energy costs.
Table 5: Maintenance and Cleaning Interval
Item Cleaning Interval Cleaning Instructions
Single Zone Extended Pipe Wall Mounted Owner’s Manual
Air filter
Indoor unit surface
Outdoor unit
2 weeks Refer to the “Air Filter - Cleaning/Maintenance” section on page 17.
Regularly Use a soft dry cloth. Do not use bleach or abrasives.
Regularly, as needed
•Use steam to clean the heat exchanger coils and the panel vents.
•If needed, consult with a technician on proper outdoor unit care.
16
Due to our policy of continuous product innovation, some specications may change without notication.
LG Electr onics U.S.A., Inc., Englewood Cl iffs, NJ. All r ights reserved. “LG” is a registe red trademark of LG Corp.
©
Page 17

CAUTION
MAINTENANCE
Cleaning the Air Filter
Air Filter - Cleaning/Maintenance
•Use two hands when lifting the front panel away from the indoor unit.
•Maintain a grip on the front panel at all times while removing filters.
Figure 15: Lifting Indoor Unit Front Panel
Figure 16: Removing the Filter
Clean the indoor unit air filter at least once every 2 weeks or more
often if necessary. Single zone wall mount systems have two filter
screens.
1. Turn off the power and unplug the power cord.
2. Open the indoor unit front cover by lifting up both sides of the
cover slightly. Refer to Figure 15.
3. Grasp the knob/tab at the bottom of the air filter, lift up slightly
and slide it from the indoor unit. Refer to Figure 16.
4. Clean the filter with a vacuum cleaner or with warm water.
•If the dirt is difficult to remove, wash the filter in luke warm water
with detergent.
5. Completely dry the filter before placing it back into the unit.
6. Replace the filter by sliding it back into the unit. While grasping
the bottom knob/tab, lower the filter back into the unit.
7. Close the front panel of the indoor unit.
•The location of the filter may differ depending on the model.
•Contact your installing contractor to obtain additional filters.
Maintenance
Due to our policy of continuous product innovation, some specications may change without notication.
LG Electr onics U.S.A., Inc., Englewood Cl iffs, NJ. All r ights reserved. “LG” is a registe red trademark of LG Corp.
©
17
Page 18

TROUBLESHOOTING
Single Zone Extended Pipe
Self-diagnosis Function
Single Extended Pipe systems have a built-in self-diagnosis function. If an error occurs, the indoor unit lamp will blink in 2 second intervals. If
this occurs, refer to Table 6 (Single Zone Extended Pipe System Troubleshooting Steps) and Table 7 (Troubleshooting Wired Remote Controllers)
for initial troubleshooting steps. If the problem persists, contact your local dealer or service center immediately.
LG Customer Information
Contact the LG Service Center immediately if you experience issues listed in Table 6 and Table 7.
LG Service Center
For USA calls:
LG Electronics USA
201 James Record Rd SW
Huntsville, AL 35824
888-865-3026
LGECI
LG Electronics Canada Inc.
20 Norelco Drive
North York, Ontario M9L 2X6
Canada
888-LG-CANADA
(888-542-2623)
www.LG.com
Press #2 for Packaged Terminal Air Conditioners or Through the
Wall products
Press #3 for Duct-free Split Systems or Multi V Systems
--Call the installing contractor to initiate your product warranty.
--Call the LG Service Center if service issues have not been
addressed by the contractor.
Contact LGECI for all service issues in Canada.
Online product registration
Single Zone Extended Pipe Wall Mounted Owner’s Manual
18
Due to our policy of continuous product innovation, some specications may change without notication.
LG Electr onics U.S.A., Inc., Englewood Cl iffs, NJ. All r ights reserved. “LG” is a registe red trademark of LG Corp.
©
Page 19

Table 6: Single Zone Extended Pipe System Troubleshooting
Issue Cause Corrective Action
There is a burning smell and strange sound
coming from the unit.
Water leaks from the indoor unit even when
the humidity level is low.
The power cord is damaged or generating
N/A
excessive heat.
A switch, a circuit breaker (safety, ground) or
a fuse is not operating properly.
The air conditioner will not turn on. Ensure the power cord is plugged into the outlet.
A fuse has blown or the power supply
is blocked.
A power failure has occurred.
The air conditioner does not work.
The air conditioner does not generate
cool air.
The voltage is too high or too low. Check if the circuit breaker has tripped.
The air conditioner turned off
automatically at a preset time.
Battery setting is wrong on the remote
controller.
Air is not circulating properly.
The air filter is dirty.
The room temperature is too high.
Cold air is escaping from the room.
The desired temperature is higher than
the set temperature.
There is a nearby heating source.
Air circulation operation is selected.
Outside temperature is too high.
TROUBLESHOOTING
Single Zone Extended Pipe
Immediately turn off the air conditioner and contact your
installing contractor.
Replace the fuse or check if the circuit breaker has tripped.
Turn off the air conditioner when a power failure occurs. When
the power is restored, wait 3 minutes, and then turn on the air
conditioner.
Press the power button.
• Check to see that the batteries are inserted with the correct
terminals (+) and (-).
• Replace with new batteries.
Make sure that no curtains, blinds or furniture are blocking the
front of the air conditioner.
Clean the air filter once every 2 weeks. Refer to the “Air Filter Cleaning/Maintenance” section for additional information.
In the summer it may take additional time to cool indoor air.
In this case, select jet cool operation to cool the indoor air
quickly. Refer to “Jet Cool/Jet Heat Operation” for additional
information.
Ensure cold air is not escaping through ventilation points in the
room.
Set the desired temperature to a level lower than the current
temperature.
Avoid using a heat generator such as an electric oven or gas
burner while the air conditioner is in operation.
During air circulation operation, air blows from the air
conditione without cooling or heating the indoor air. Switch the
operation mode to cooling operation.
Air conditioner cooling capacity may not be sufficient to handle
hot weather.
Troubleshooting
Due to our policy of continuous product innovation, some specications may change without notication.
LG Electr onics U.S.A., Inc., Englewood Cl iffs, NJ. All r ights reserved. “LG” is a registe red trademark of LG Corp.
©
19
Page 20

TROUBLESHOOTING
Single Zone Extended Pipe
Table 6: Single Zone Extended Pipe System Troubleshooting - Continued
Issue Cause Corrective Action
When heating mode is started.
Vane is almost closed and air flow does
not come out.
Outdoor unit is operating, but no warm
air is generating.
The air conditioner does not generate
warm air.
The air conditioner stops during operation.
Air conditioner is still operating, even after
being shut down.
Unable to adjust fan speed.
Unable to adjust the temperature.
Mist is discharged from the air outlet of the
indoor unit.
Water leaks from the outdoor unit.
Outdoor unit is in defrost mode at the
time
Outdoor temperature is too low.
The air conditioner suddenly turns off.
Power failure has occurred during air
conditioner operation.
Auto clean mode is in operation.
This function removes the rest of the
moisture from the indoor unit.
The auto operation, jet cool, heat
or dehumidifying mode is selected.
Air circulation or jet cool/jet heat model
is selected.
Cooled air from the indoor unit can form
a mist.
Cooled air from the air conditioner is
forming mist.
This is normal operation for the unit. During start-up, the unit is
preparing warm air.
• In heating mode, ice/frost is built up on the coils when the
outside temperature falls.
• Defrost mode removes a layer of frost from the coil.
• Wait until this operation is completed. It takes approximately
15 minutes.
Heating capacity of the unit may not by sufficient to effectively
warm air.
• Check to see if timer function has been set to turn off at a
designated time.
• Check timer settings and make adjustments as needed.
• Auto restart is the default setting and the system is rebooting.
• If you experience frequent power failures, it is helpful to
verify that the system is set to auto restart so the unit can
power up quickly.
Wait until the auto clean mode has finished and then turn off
this feature.
These modes do not allow you to adjust the fan speed. Change
the indoor unit mode in order to adjust the fan speed.
These modes do not allow you to adjust the temperature
Change the indoor unit mode in order to adjust the
temperature.
If the room temperature is lowered the mist will stop forming.
Install a drain hose under the base pan and contact the
installing contractor.
Single Zone Extended Pipe Wall Mounted Owner’s Manual
20
Due to our policy of continuous product innovation, some specications may change without notication.
LG Electr onics U.S.A., Inc., Englewood Cl iffs, NJ. All r ights reserved. “LG” is a registe red trademark of LG Corp.
©
Page 21

Table 6: Single Zone Extended Pipe System Troubleshooting Steps Continued
Issue Cause Corrective Action
Clicking noise during operation
A clicking sound can be heard either
when the unit starts or stops due to
movement of the reversing valve.
Creaking sound during operation.
Unusual noise or vibration during unit
operation.
Unusual odor emits from indoor unit.
The plastic parts of the indoor unit
make sounds due to shrinkage
and expansion during sudden
temperature shifts.
Water flowing sounds
Switching of the flow of refrigerant
through the air conditioner produces
water flowing noise.
A bad odor can emit from the indoor
unit due to mustiness or cigarette odor
being taken in by the indoor unit from
the room it is located in.
TROUBLESHOOTING
Single Zone Extended Pipe
These are normal noises for the air conditioner as it shifts into
different modes of operation. Once a mode is activated, noise
or vibration should stop.
If the smell does not disappear, clean the air filter. If the odor \
persists after cleaning the air filter, contact the installing
contractor.
Troubleshooting
Table 7: Troubleshooting Wired Remote Controllers
1
Issue Corrective Action
Directional buttons such as up/down or left/
right do not function when selected on wired
remote controller.
Directional swing buttons do not display
when selected on the wired remote controller.
If the air conditioner function is available (active), then the wired remote controller will be able to change
the air conditioning operation mode.
Unable to select power heating on indoor
unit.
Unable to set power heating on wired remote
controller.
Not possible to set time for automatic on/off operation with a wired remote controller or by using app
software.
The remaining time for the automatic on/off
timer is not shown on the app software.
1
Wired remote controllers - PQRCVSL0(QW) or LG Programmable Thermostat - PREMTB10U (only sold in the US)
Due to our policy of continuous product innovation, some specications may change without notication.
LG Electr onics U.S.A., Inc., Englewood Cl iffs, NJ. All r ights reserved. “LG” is a registe red trademark of LG Corp.
©
21
Page 22

LG Electronics USA, Inc.
20001747 ISO 9001: 2008
LG ELECTRONICS INC.
Commercial Air Conditioning Division
11405 Old Roswell Road
Alpharetta, Georgia 30009
www.lghvac.com
LG Electronics Commercial Products Support
1-888-865-3026 USA
Follow the prompts for commercial A/C products.
OL-SZ-ExtendedPipe-ALL-07-14
 Loading...