

LG LRSPC2041xx Service Manual

Please observe the following safety precautions in order to
use safely and correctly the refrigerator and to prevent
accident and danger during repair.
1. Be care of an electric shock. Disconnect power cord
from wall outlet and wait for more than three minutes
before replacing PWB parts. Shut off the power
whenever replacing and repairing electric components.
2. When connecting power cord, please wait for more than
five minutes after power cord was disconnected from the
wall outlet.
3. Please check if the power plug is pressed down by the
refrigerator against the wall. If the power plug was
damaged, it may cause fire or electric shock.
4. If the wall outlet is over loaded, it may cause fire. Please
use its own individual electrical outlet for the refrigerator.
5. Please make sure the outlet is properly earthed,
particularly in wet or damp area.
6. Use standard electrical components when replacing
them.
7. Make sure the hook is correctly engaged.
Remove dust and foreign materials from the housing
and connecting parts.
8. Do not fray, damage, machine, heavily bend, pull out,
or twist the power cord.
9. Please check the evidence of moisture intrusion in the
electrical components. Replace the parts or mask it
with insulation tapes if moisture intrusion was
confirmed.
10. Do not touch the icemaker with hands or tools to
confirm the operation of geared motor.
11. Do not let the customers repair, disassemble, and
reconstruct the refrigerator for themselves. It may
cause accident, electric shock, or fire.
12. Do not store flammable materials such as ether,
benzene, alcohol, chemicals, gas, or medicine in the
refrigerator.
13. Do not put flower vase, cup, cosmetics, chemicals,
etc., or container with full of water on the top of the
refrigerator.
14. Do not put glass bottles with full of water into the
freezer. The contents shall freeze and break the glass
bottles.
15. When you scrap the refrigerator, please disconnect the
door gasket first and scrap it where children are not
accessible.
WARNINGS AND PRECAUTIONS FOR SAFETY
- 3 -
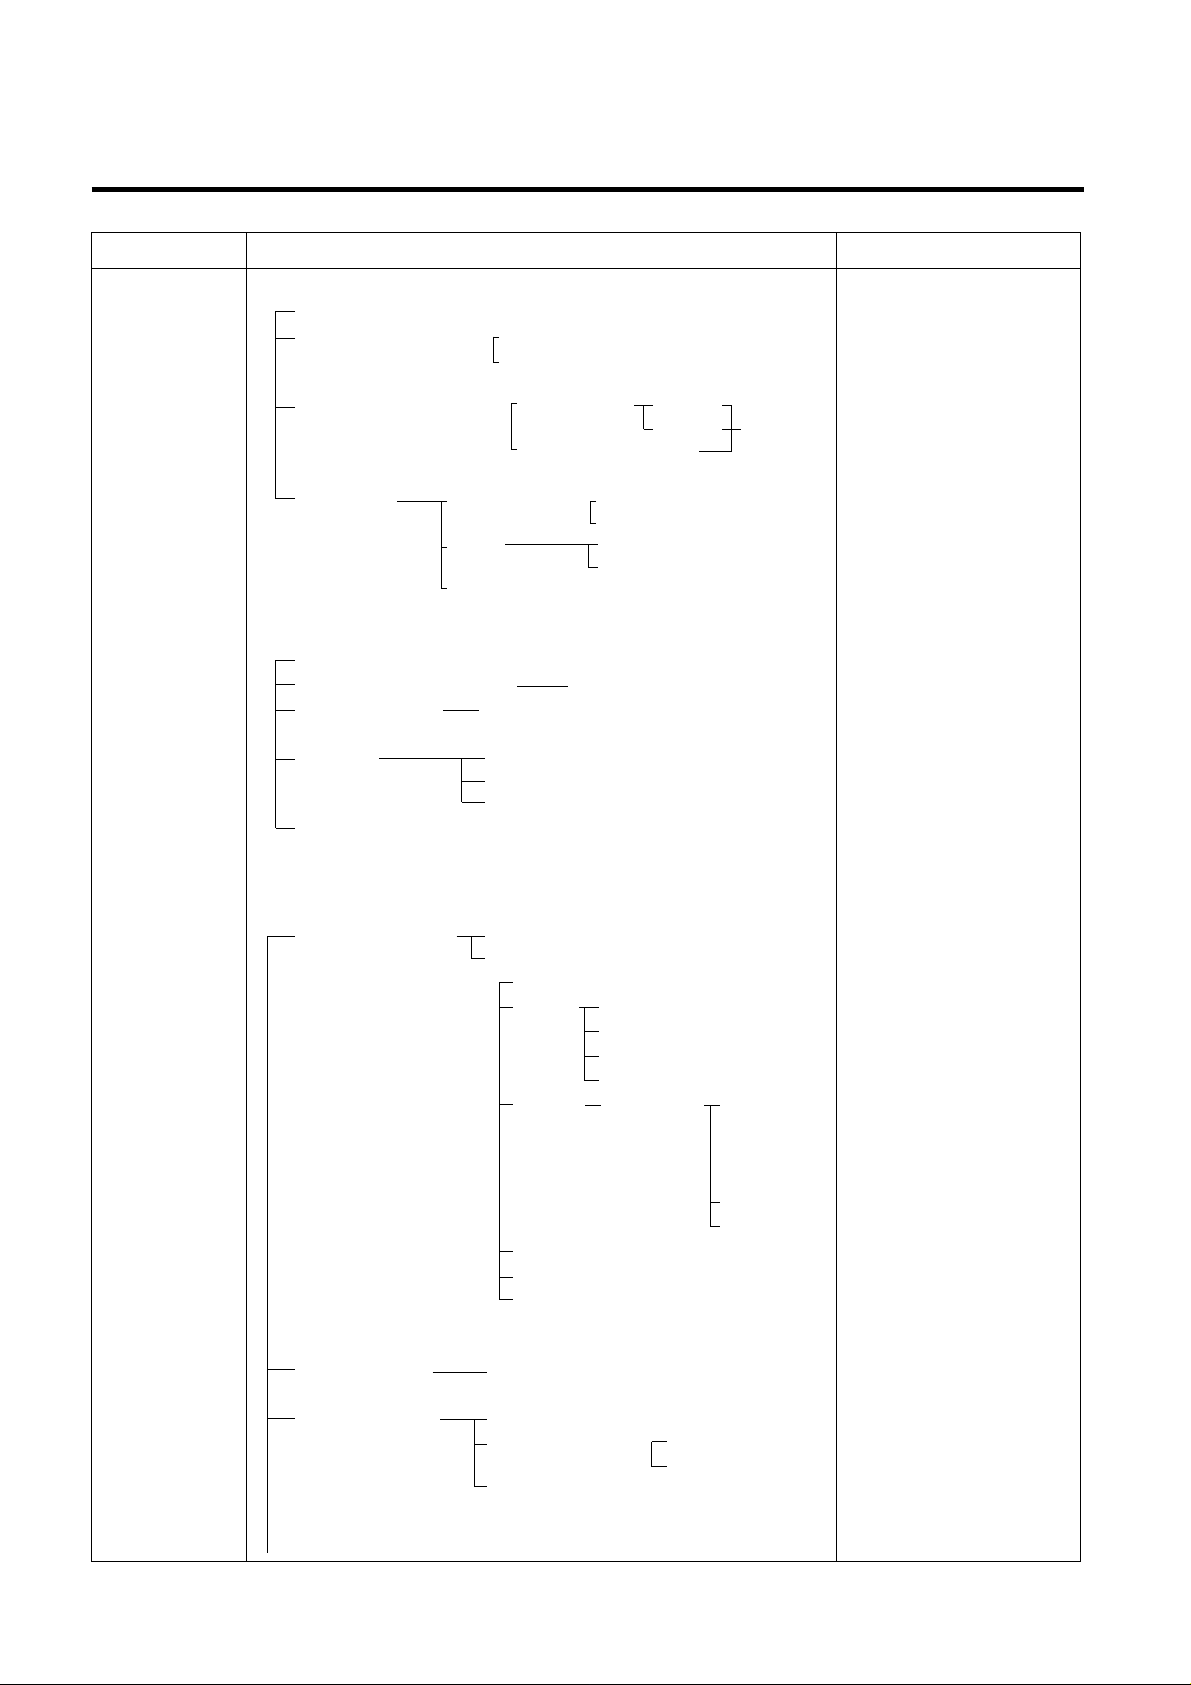
1. TROUBLE SHOOTING
TROUBLE DIAGNOSIS
- 72 -
CLAIMS. CAUSES AND CHECK POINTS. HOW TO CHECK
1. Faulty start
1) No power on outlet.
2) No power on cord.
3) Shorted start circuit.
4) During defrost.
* Measuring instrument :
Multi tester
■Check the voltage.
If the voltage is within ±85%
of the rated voltage, it is OK.
■ Check the terminal
movement.
■
Check both terminals of
power cord.
Power conducts : OK.
No power conducts : NG
■ Check both terminals of
O.L.P.
If power conducts : OK.
If not : NG.
■ Check the resistance of both
terminals.
At normal temperature 6 :
OK.
If disconnected : ∞.
Bad connection between adapter and outlet. (faulty adapter)
The Inner diameter of adapter.
The distance between holes.
The distance between terminals.
The thickness of terminal.
Bad connection between plug and adapter (faulty plug).
The distance between pins.
Pin outer diameter.
No power on
power cord.
O.L.P is off.
No electric power on compressor. - Faulty compressor .
Faulty PTC.
Disconnected copper wire.
Internal electrical short.
Faulty terminal contact.
Disconnected.
Capacity of O.L.P is small.
Characteristics of O.L.P is bad.
Bad connection.
Power is
disconnected.
Inner Ni-Cr wire blows out.
Bad internal connection.
Faulty terminal caulking (Cu wire is cut).
Bad soldering.
Weak connection.
Short inserted cord length.
Worn out tool blade.
Loose contact.
- Large distance between
male terminal.
- Thin female terminal.
T erminal disconnected.
Bad sleeve assembly .
Power cord is disconnected.
Faulty soldering.
Start automatic defrost.
Cycle was set at defrost when the refrigerator
was produced.
Power does not conduct. - Damage.
Bad characteristics. - Initial resistance is big.
Bad connection with
compressor.
Bad terminal connection.
T oo loose.
Assembly is not possible.

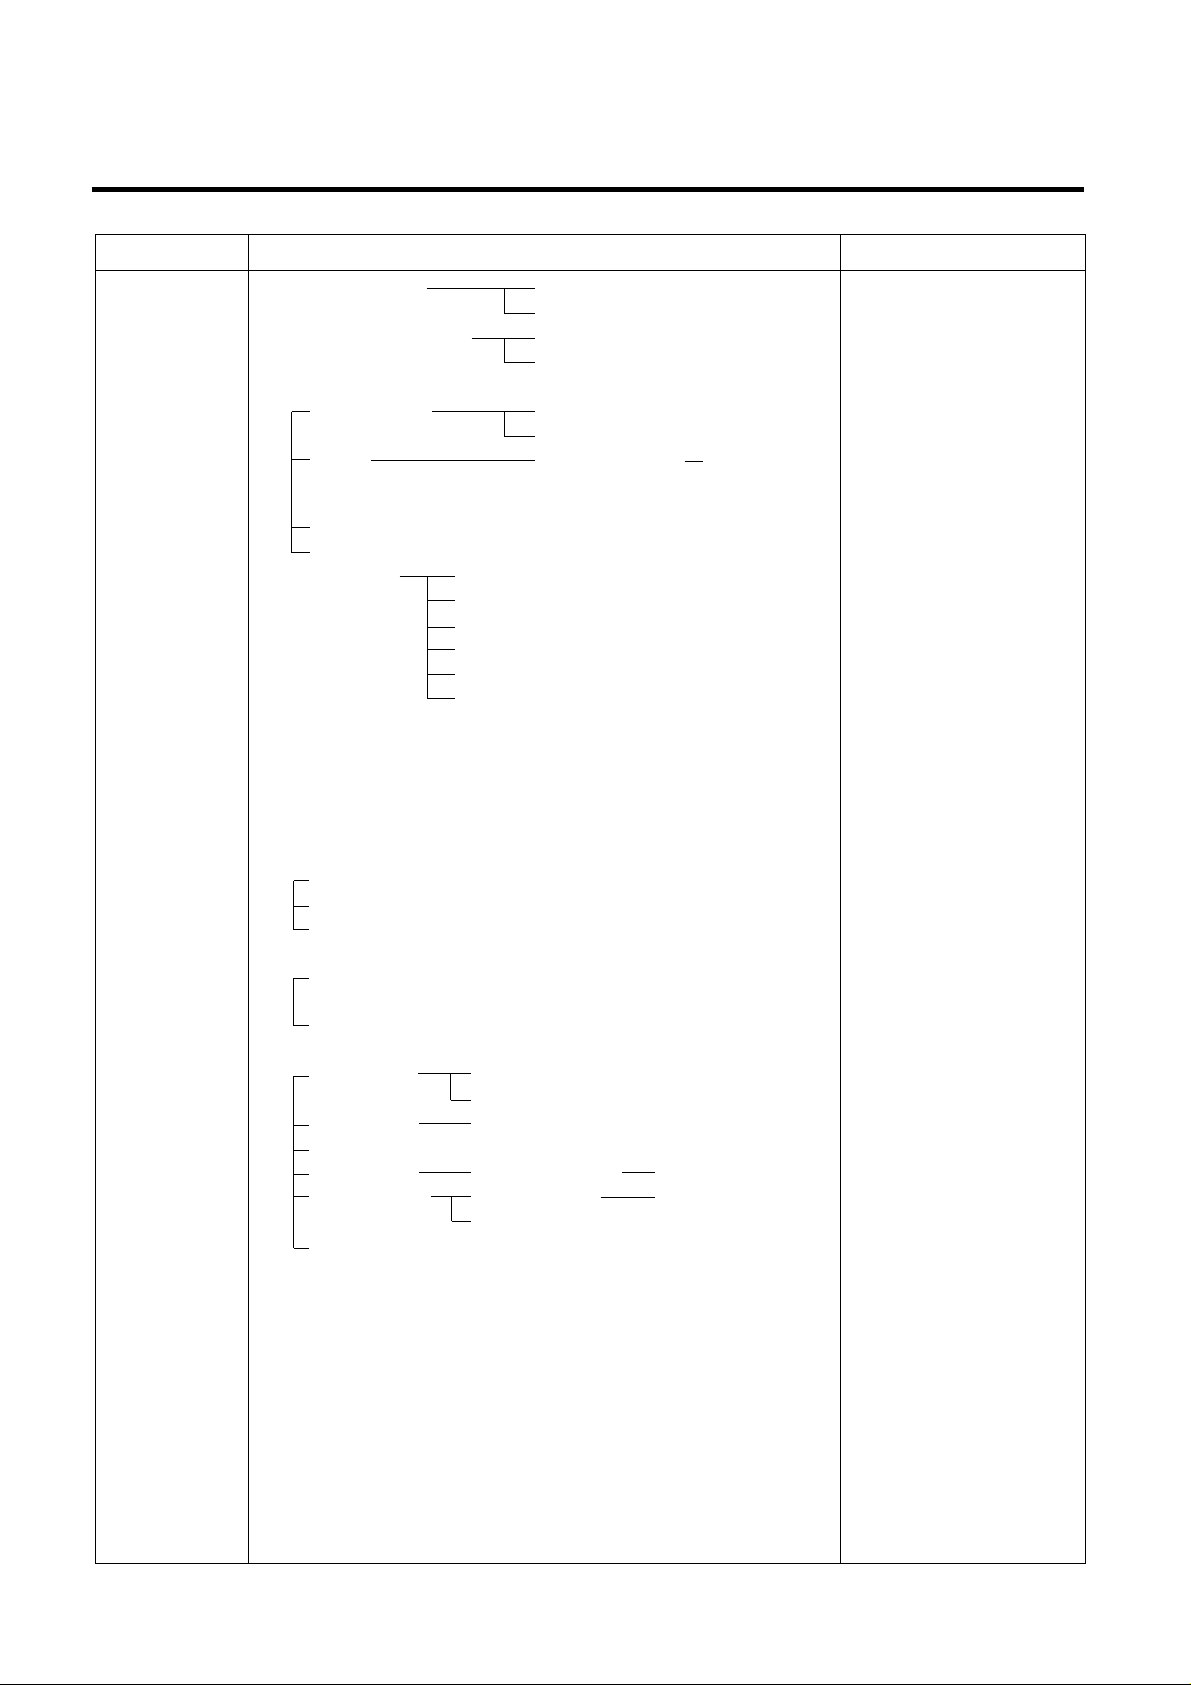
TROUBLE DIAGNOSIS
- 73 -
CLAIMS. CAUSES AND CHECK POINTS. HOW TO CHECK
2. No cooling.
2) Refrigeration system is clogged.
■Check the clogged
evaporator by heating (as
soon as the cracking sound
begins, the evaporator start
freezing)
■ The evaporator does not cool
from the beginnig (no evidece
of misture attached).
The evaporator is the same
as before even heat is
applied.
Moisture
clogged.
No electric
power on
thermostat.
Weld joint
clogged.
Drier cloggeing.
Foreign material clogging.
Residual moisture
in the evaporator.
Residual moisture.
Insufficient drier
capacity.
Residual moisture
in pipes.
Moisture penetration - Leave it in the air. - Moisture penetration.
into the refrigeration oil.
Caps are missed.
Air blowing.
During transportation.
During work.
Not performed.
Performed.
T oo short time.
Low air pressure.
Less dry air.
Air Blowing.
Leave it in the air.
Caps are missed.
Short pipe insert.
Pipe gaps.
T oo much solder .
T oo large.
Damaged pipes.
Not dried in the compressor.
Elapsed more than 6 months after drying
Caps are missed.
No pressure when it is open.
During rest time.
After work.
Compressor cap is disconnected.
Foreign materials are in the pipe.
Not performed.
T oo short.
Impossible moisture
confirmation.
Low air pressure.
Dry drier - Drier temperature.
Leave it in the air.
The capillary tube inserted depth. - T oo much.
Capillary tube melts. - Over heat.
Clogged with foreign materials.
Reduced cross section by cutting. - Squeezed.
Desiccant powder.
Weld oxides.
Drier angle.
Check on package
condition.
Good storage after
finishing.
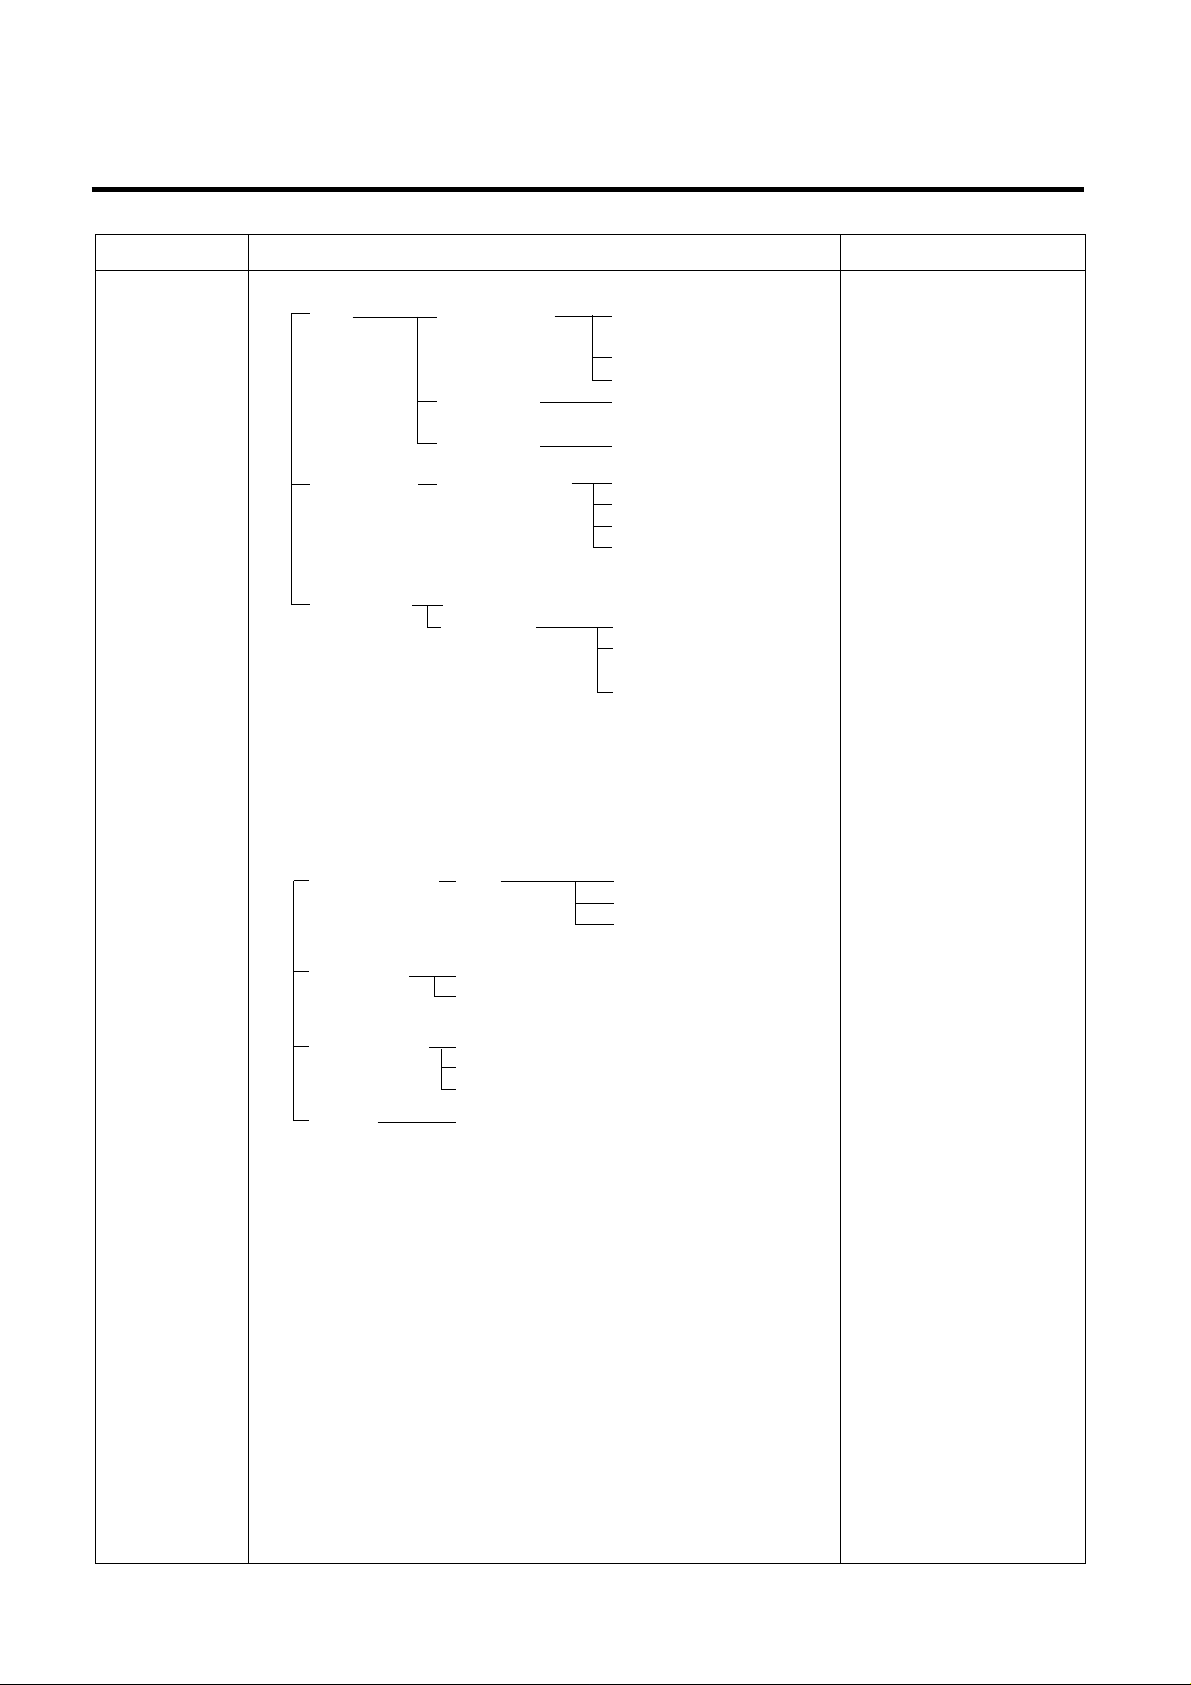
TROUBLE DIAGNOSIS
- 74 -
CLAIMS. CAUSES AND CHECK POINTS. HOW TO CHECK
3. Refrigeration
is weak.
Plate
heater
Cord
heater
1) Refrigerant Partly leaked.
2) Poor defrosting capacity.
Drain path (pipe) clogged.
Defrost heater does not
generate heat.
Weld joint leak.
Parts leak.
Inject P/U into drain hose.
Foreign materials
penetration.
Cap drain is not disconnected.
Inject through the
hole.
Seal with drain.
P/U lump input.
Screw input.
Other foreign materials
input.
Parts
disconnected.
Wire is cut.
- Heating wire.
- Contact point
between heating
and electric wire.
Dent by fin evaporator.
Poor terminal contacts.
Wire is cut.
- Lead wire.
- Heating wire.
- Contact point
between heating and
electric wire.
Heating wire is corroded
- Water penetration.
Bad terminal connection.
■Check visually.
■Check terminal
Conduction: OK.
No conduction: NG.
If wire is not cut, refer to
resistance.
P=Power
V=Voltage
R=Resistance
V
2
P= —
R
V
2
R= —
P

- 75 -
TROUBLE DIAGNOSIS
CLAIMS. CAUSES AND CHECK POINTS. HOW TO CHECK
3. Refrigeration
is weak.
3) Cooling air leak.
4) No cooling air circulation.
Residual
frost.
No automatic defrosting.
Defrost does not return.
Bad gasket adhestion
Door sag.
Faulty fan motor.
Weak heat from heater.
Bad heater assembly .
T oo short defrosting time. Defrost Sensor.
- Faulty characteristics.
Seat-D(missing, location. thickness).
Structural fault. Gasket gap.
Air inflow through the fan motor.
Bad insulation of case door.
Sheath Heater - rated.
Heater plate - rated.
Heater cord-L - rated.
Heater plate
Heater cord-L
Gap.
Bad attachment.
Contraction.
Bad adhesion.
Weak binding force at hinge.
Fan motor.
Door switch.
Self locked.
Wire is cut.
Bad terminal contact.
Contact distance.
Button pressure.
Melted contact.
Contact.
Poor door
attachment.
Door liner
(dimension).
Contraction inner
liner.
Misalignment.
Bad terminal
connection.
P/U liquid leak.
Faults.
Refrigerator and freezer switch reversed.
Button is not pressed.
No contact to drain.
Loosened stopper cord.
Not contact to the
evaporator pipe.
Location of assembly
(top and middle).
■Check the fan motor
conduction: OK.
No conduction: NG.
TROUBLE DIAGNOSIS
- 76 -
CLAIMS. CAUSES AND CHECK POINTS. HOW TO CHECK
3. Refrigeration
is weak.
4) No cooling air circulation.
5) Compressor capacity.
6) Refrigerant
too much or too little.
7) Continuous operation
- No contact of temperature controller. - Foreign materials.
8) Damper opens continuously.
Foreign materials
jammed.
Failed sensor. - Position of sensor.
Characteristics
of damper.
9) Food storing place. - Near the outlet of cooling air.
Faulty fan motor.
Small cooling air
discharge.
Fan is
constrained.
Insufficient
motor RPM
Faulty fan.
Shorud. Bent.
Ice and foreign materials on rotating parts.
Fan shroud contact. - Clearance.
Damping evaporator contact.
Accumulated residual frost.
Fan misuse.
Bad shape.
Loose connection. - Not tightly connected.
Insert depth.
Rating misuse.
Small capacity.
Low valtage.
Malfunction of charging cylinder.
Wrong setting of refrigerant.
Insufficient compressor. - Faulty compressor .
Fan overload. - Fan misuse.
Bad low termperature RPM characteristics.
Rated power misuse.
Low voltage.
P/U liquid dump.
EPS water sediment.
Screw.
Bad characteristics of its own temperatue.
Parts misuse.
Charge of temperature - Impact.
characteristics.
■Check visually after
disassembly.
■Check visually after
disassembly.
TROUBLE DIAGNOSIS
- 77 -
CLAIMS. CAUSES AND CHECK POINTS. HOW TO CHECK
4. Warm
refrigerator
compartment
temperature.
5. No automatic
operation.
(faulty
contacts.)
6. Dew and
ice formation.
1) Colgged cooling path.
2) Food storate.
1) Faulty temperature sensor in freezer or refrigerator compartment.
2) Refrigeration load is too much.
3) Poor insulation.
4) Bad radiation.
5) Refrigerant leak.
6) Inadequate of refrigerant.
7) Weak compressor discharging power.
8) Fan does not work.
9) Button is positioned at "strong."
1) Ice in freeezer compartment.
2) Condensation in the refrigerator compartment.
3) Condensation on liner foam.
P/U liquid leak.
Foreign materials. –– P/U dump liquid.
Faulty contact.
Faulty temperature characteristics.
External air inflow. –– Rubber motor assembly direction(reverse).
Door opens
but not closes.
Gap around gasket. –– Contraction, distortion, loose, door twisted, corner not
fully inserted.
Food vapor. –– Storing hot food. –– Unsealed food.
Door opens
but not closes.
Gasket gap.
Cool air leak
and transmitted.
High ambient temperature.
Space is secluded.
Different rating.
Small capacity.
Store hot food.
Store too much at once.
Door open.
Packages block air flow.
Food.
Frequent opening and closing.
Cool air leak.
Poor door close. – Partly opens.
T oo much food.
Hot food.
Weak door closing power.
Stopper malfunction.
Door sag.
Food hinders door closing.
Insufficient closing.
Door sag.
Food hinders door closing.
T oop table part.
Out plate R/L part.
Not fully filled.
Flange gap. –– Not sealed.
Gasket gap.
■Inspect parts measurements
and check visually.
TROUBLE DIAGNOSIS
- 78 -
CLAIMS. CAUSES AND CHECK POINTS. HOW TO CHECK
6. Dew and
ice formation.
7. Sounds
4) Dew on door.
Dew on the duct door. - Duct door heater is cut.
Dew on the dispense
recess.
Dew on the door surface. Not fully filled. Surface.
Cormer.
P/U liquid contraction.
Dew on the
gasket surface.
5) Water on the floor.
Dew in the refrigerator compartment.
Defrosted water overflows. Clogged discharging hose.
Discharging hose Evaporation tray located at wrong place.
location.
Tray drip. Damaged.
Breaks, holes.
Small Capacity.
Position of drain.
1) Compressor compartment operating sounds.
Compressor sound Sound from machine itself.
inserted. Sound from vibration.
Restrainer.
Rubber Too hard.
seat. Distorted.
Aged.
Burnt.
Stopper. Bad Stopper Not fit
assembly. (inner
diameter
of stopper).
Tilted.
Not
Compressor base not connected.
Bad welding compressor stand(fallen).
Foreign materials in the compressor
compartment.
O.L.P.
sound.
Chattering
sound.
Insulation paper vibration.
Capacitor noise.
Pipe contacts each other. – Narrow interval.
Pipe sound. No vibration damper. Damping rubber-Q.
Damping rubber-S.
Capillary tube unattached.
Recess Heater is cut.
Duct door is open. / Foreign material clogging.
Bad wing adhesion. Wing sag(lower part).
Door liner shape mismatch.
Corner. T oo much notch.
Broken.
Home Bar heater is cut.
Liquid shortage.
Liquid leak.

TROUBLE DIAGNOSIS
- 79 -
CLAIMS. CAUSES AND CHECK POINTS. HOW TO CHECK
7. Sounds
1) Compressor compartment operating sounds.
Transformer
sound.
Drip tray vibration sound.
Back cover machine sound.
Condenser drain sound.
2) Freezer compartment sounds.
Fan motor sound.
Sounds from fan
contact.
Unbalance fan sounds.
Motor shaft
contact sounds.
Resonance.
Evaporator noise.
3) Bowls and bottles make contact on top shelf.
4) Refrigerator roof contact.
5) Refrigerator side contact.
6) Insufficient Lubricants on door hinge.
Its own fault. –– Core gap.
Bad connection. –– Correct screw connection.
Bad assembly.
Distortion.
Foreign materials inside.
Bad connection.
Partly damaged.
Not connected.
Bad pipe caulking.
Normal operating sound.
Vibration sound.
Aged rubber seat.
Bad torque for assembling motor
bracket.
Fan guide contact.
Shroud burr contact.
Damping evaporator contact.
Residual frost contact.
Unbalance.
Ice on the fan. –– Air intake (opposite to motor
rubber assembly.)
Supporter disorted.
Tilted during motor assembly .
Evaporator pipe contact. –– No damping evaporator.
Sound from refrigerant. –– Stainless steel pipe shape in
accumulator.
Sound from fin evaporator and pipe during expansion
and contraction.
Poor treatment Cord heater.
Narrow evaporator interval.
Surface machining conditions.
Fan distortion.
Misshappen.
Burr.
TROUBLE DIAGNOSIS
- 80 -
CLAIMS. CAUSES AND CHECK POINTS. HOW TO CHECK
8. Faulty lamp
(freezer and
refrigerator
compartment).
9. Faulty internal
voltage(short).
1) Lamp problem. Filament blows out.
Glass is broken.
2) Bad lamp assembly. Not inserted.
Loosened by vibration.
3) Bad lamp socket.
Disconnection. Bad soldering.
Bad rivet contact.
Short. Water penetration. Low water
level in tray.
Bad elasticity of contact.
Bad contact(corrosion).
4) Door switch. Its own defect.
Refrigerator and freezer switch is reversed.
Travlel distance.
Bad connection.
Bad terminal contact.
P/U liquid leak..
1) Lead wire is damaged.
Wire damage when assembling P.T.C. Cover.
Outlet burr in the bottom plate.
Pressed by cord heater. lead wire, evaporator pipe.
2) Exposed terminal.
Compressor Compartment terminal. - Touching other
components.
Freezer compartment terminal. - Touching evaporator pipe.
3) Faulty parts.
Transformer. Coil contacts cover.
Welded terminal parts contact cover.
Compressor. Bad coil insulation.
Plate heater.
Melting fuse. Sealing is broken. Moisture penetration.
Cord heater. Pipe damaged. Moisture penetration.
Bad sealing.
Sheath heater.
■Connect conduction and
non-conduction parts and
check with tester.
Conduction: NG.
Resistance∞: OK.
TROUBLE DIAGNOSIS
- 81 -
CLAIMS. CAUSES AND CHECK POINTS. HOW TO CHECK
10. Structure,
appearance
and others.
1) Door foam.
Sag.
Noise during
operation.
Malfunction.
2) Odor.
Temperature of
refrigerator
compartment.
Deodorizer.
Food Storage.
Others.
Weak torque of
hinge connection.
Weak gasket
adhesion.
Fixed tape.
Hinge interference.
Not closed Interference between door liner and inner liner.
Refrigerator
compartment is
opened when freezer
compartment is
closed (faulty stopper).
High. Faulty damper control.
Button is set at "weak".
Door is open (interference by
food).
No deodorizer.
Poor capacity.
Seal condition.
Store special odorous food.
Long term storage.
Odors from chemical procucts.
Bigger door foam.
Hinge-Pin tilted-Poor flatness.
No washer.
No grease and not enough
quantity.
Stopper worn out.
Bad freezer compartment door
assembly.
No stopper.
Bolt is loosened during
transportaion.
Not tightly fastened.
Screw worn out .
Adhesion surface.
Not well fixed.

2-3. Temperature
TROUBLE DIAGNOSIS
-83-
Problems Causes Checks Measures Remarks
High Poor cool air circulation due to faulty - Lock –– Check resistance with a - Replace fan motor.
temperature fan motor. tester.
in the freezer 0Ω: short.
compartment. ∞Ω: cut. - Reconnect and reinsert.
- Rotate rotor manually and check
rotation.
- Wire is cut.
- Bad terminal contact: Check - Maintain clearance and remove ice
terminal visually. (Repair and/or replace shroud if fan
- Fan constraint. – Fan shroud is constrained by shroud
contact: Confirm deformation).
visually.
– Fan icing:
Confirm visually.
Faulty fan motor due to faulty door - Iced button (faulty) operation: - Confirm icing causes and repair.
switch operation. Press button to check - Replace door switch.
- Faulty button pressure and contact:
Press button to check operation.
- Door cannot press door switch - Door sag: fix door.
button: Check visually. - Door liner bent:replace door or
attach sheets.
Bad radiation conditions in - Check the clearance between the - Keep clearance between - The fan may be
compressor compartment. refrigerator and wall (50 mm in refrigerator and walls (minimum broken if cleaning
minimum). 50mm). performs while the
- Check dust on the grill in - Remove dust and contaminants refrigerator is on.
compressor compartment. from grill for easy heat radiation.
- Check dust on the coils condenser. - Remove the dust with vacuum
cleaner from the coils condenser
while the refrigerator is off.

2-7. Sound
TROUBLE DIAGNOSIS
-90-
Problems Causes Checks Measures Remarks
"Whizz" sound 1. Loud sound of compressor 1.1 Check the level of the 1) Maintain horizontal level.
operation. refrigerator. 2) Replace rubber and seat if they
1.2 Check the rubber seat are sagged and aged.
conditions (sagging and aging). 3) Insert rubber where hand contact
reduces noise in the pipe.
2. Pipes resonat sound which is 2.1 Check the level of pipes 4) Avoid pipe interference.
connected to the compressor. connected to the compressor 5) Replace defective fan and fan
and their interference. motor.
2.2 Check rubber inserting 6) Adjust fan to be in the center of
conditions in pipes. bell mouth of the fan guide.
2.3 Touch pipes with hands or screw 7) Leve a clearance between
-driver (check the change of interfering parts and seal gaps in
sound). the structures.
8) Reassemble the parts which make
3. Fan operation sound in the freezer 3.1 Check fan insertion depth and sound.
compartment. blade damage. 9) Leave a clearance if evaporator
3.2 Check the interference with pipes and suction pipe touch
structures. freezer shroud.
3.3 Check fan motor.
3.4 Check fan motor rubber insertion
and aging conditions.
4. Fan operation sound in the 4.1 Same as fan confirmation in the
compressor compartment. refrigerator.
4.2 Check drip tray leg insertion.
4.3 Check the screw fastening
conditions at condenser and
drip tray.
TROUBLE DIAGNOSIS
-91-
Problems Causes Checks Measures Remarks
Vibration sound. 1. Vibration of shelves and foods in 1-1. Remove and replace the 1) Reassemble the vibrating parts
("Cluck") the refrigerator. shelves in the refrigerator and insert foam or cushion where
2. Pipes interference and capillary 1-2. Check light food and container vibration is severe.
tube touching in the compressor. on the shelves. 2) Leave a clearance where parts
compartment. 2-1. Touch pipes in the compressore interfere with each other.
3. Compressor stopper vibration. compartment with hands. 3) Reduce vibration with rubber
4. Moving wheel vibration. 2-2 Check capillary tube touches and restrainer if it is severe.
5. Other structure and parts cover back. (especially, compressor and pipe).
vibration. 3-1 Check compressor stopper 4) Replace compressor stopper if it
vibration. vibtates severely.
4-1 Check vibration of front and rear
moving wheels.
5-1 Touch other structures and parts.
Irregular sound. 1. It is caused by heat expansion 1-1 Check time and place of sound 1)
Explain the principles of refrigeration
("Click"). and contraction of evaporator, sources.
and that the temperature difference
shelves, and pipes in the
between operation and defrosting
refrigerator.
can make sounds.
2)
If evaporator pipe contacts with other
structures, leave a clearance between
them (freezer shroud or inner case).
 Loading...