

LG LRSC26920SB, LRSC26960TT, LRSC26922SB Owner’s Manual
User°s Guide
Please read tl-_s guide thoroughly
before operating and keep it handy for
at _1 times.
TEUR
m_uel
le
esms
Table,of ntents
Important Safety Instruction
Identification of Parts
Where to Install
Door Removal
Do(jr Replacement
Water Pipe Installation
Water Connection Instruction Guide
Operation Instruction Guide
Height Adjustment
Suggestion on
Food Storage
Care and
Adjusting the Temperatures and functions
(Dispenser/Automatlc Icemaker)
Shelf
Wine Holder
Can Server Adjustment
Egg Bin
Humidity Control in the Vegetable Compartment
Convert Into a Vegetable or Meat Compartment
Opfichill Temperature Transition Cx)rner
Temperature Change, at Optichill
Location of Foods
S_oring _ds
How to Dismantle Parts
General Information
Ac_ssibility of
Supply Plug
Supply Cord
The model and serial numbers are found on the imler _ or b_k of refrigerator
compartment of this unit. Thee num_ a_ unique to this unit and not
available to o fiaersi. You should record _quested information here and _tain
this guide as a _rmanent record of your purcha_. Staple yoiur :receipt here.
Date of:purch_e
Dealer
Dealer _dress
Dealer phone no.
Model no.
_rial no.
Important safety in,ruction
Before use, this refdgeraor must be properly instaJled and Iocaed in accordan_ with
the instaJlaion instructions in this m_uaL
Never unplug your refr£erator by pulling on the power _rd Always grip the plug firmly
_d pull it straight out from the outleL
When moving your _pliance aw_ from the wa_l, be careful not to roll over the power
_rd or to dam_e Stin_y way. Do not crush or da'n_e the water line.
After your refrigerator is in operation, do not touch the cold su_l_acesin the freezer
compartment, paliculaly when your hands are damp or wet. _[n could _here to
these extremely cold surf,s.
Unplug the power cord from the power outlet for dewing or other requirements. Never
to_h it with wet hands because you can get an electric shock or _ injured.
Never d_e, bend, kink, pull out, or twist the power cord b_se dam_e to the
_wer cord ca_ _se p_u_ failure, fire, or electric sh_. If you h_e doubts the
_pli_ is properly grounded, _nsult a qualified electrician.
Never place glass products in the freezer bec._se they may be broken from expansion
when their contents are frozen.
Never put your hands within the i_ storage bin of the automatic icemaker. You can
injured by the operation of the automaic i_m_er.
_e applian_ is not intended for use by young children w ithout supervision.
"Youngchi_ren shou_ be supervi_ to ensure that they do not pl_ with the appli_.
Never _low anyone to climb, sit, stand, or hang on the door. _ese actions may
damage the refrigerator and even tip it over, causing severe _rsona_ injuq_'.
Before you move y_r refrigerator into its final _.,atbn,
it is im_rtant t:omake sure you have the proper electrical connectbn:
A 115 'dolt, 60 Hz, AC only 15,or 20 ampere fused, grounded
electri_ supply is required. It is recornmended th8 aseparate cir_Jit
ser¢ingonJyyour refrigerator be provided. Use an outlet th8 cannot
be turned off by a switch. _ not use anextension _rd.
The refrigerator-freezer should be so _ition_ th_ the supp_ plug
_essible for qui_ disconnection in the event d an emergency.
If the supply _rd is damaged, it must _ repl_ by the
manufacturer or its service _ent or a simila_'lyqualified person in or_r to avoidany h_d.

Child Entrapment
DANGER: Ri_ of child entr_menL
Before you throw away your old refrigerator or freezer:
Take off the doors but leave the shelves in pl_e so that cHdren m_! not eesily climb
inside.
De appliaqce is not intended for use by young chi_ren w ithout supervision.
Young children shou_ be supervised to ensure that they do not play w ith the applian_,
Don't Store
Grounding (Earthing)
_er Rack
Aulom_ic
Icem_er
L_p
Don't store or u_ g_oline or other flammable v_or and Iquids. in the vicinity of this or
any other _pliance.
In the event d an electric shod circuit, grounding (e_hing) redu_s the risk d electric
shock by providing an es_e wire for the electric current.
In order to prevent possible electr_ sh_k, this _plianc_ must be grounded,
impro_r use of the grounding plug can result in _ electric shock. Consult a qu_#ied
electrici_ or servia person if the grounding instructions are not completely
understood, or if you have doubts on whether the _plianc_ is properly grounded.
Identification of Parts
Ffeez_ P_friger_or
_mp_me_ Comp_ment
DairyComer
Waer Fi_er
b3mp
9_e/f
Can_rv_
Shelf
_k Dr_er
Shelf ...........
(steel or gl_)
Freezing
_er Rack
Drawer ............
_or Rack
_er Ce_r
_mp
Veg_ Drawer
D_r Pe_
Optichiii
Where to Locate
_lect a Good
t. Pi_e your appliance where it is easy to use.
2, Avoid pl_ing the unit: new heat sources, direct sunlight, or moisture.
3. To avoid vibrations, the appliance must be levebd.
4. Do not instgl this refrigerator in a_eas where the ambient temperature is below 41°F.
it will have an _verse effect on performance.
Door removal
Warning
Remove Lower
Cover and
Water Feed Tube
Remove the
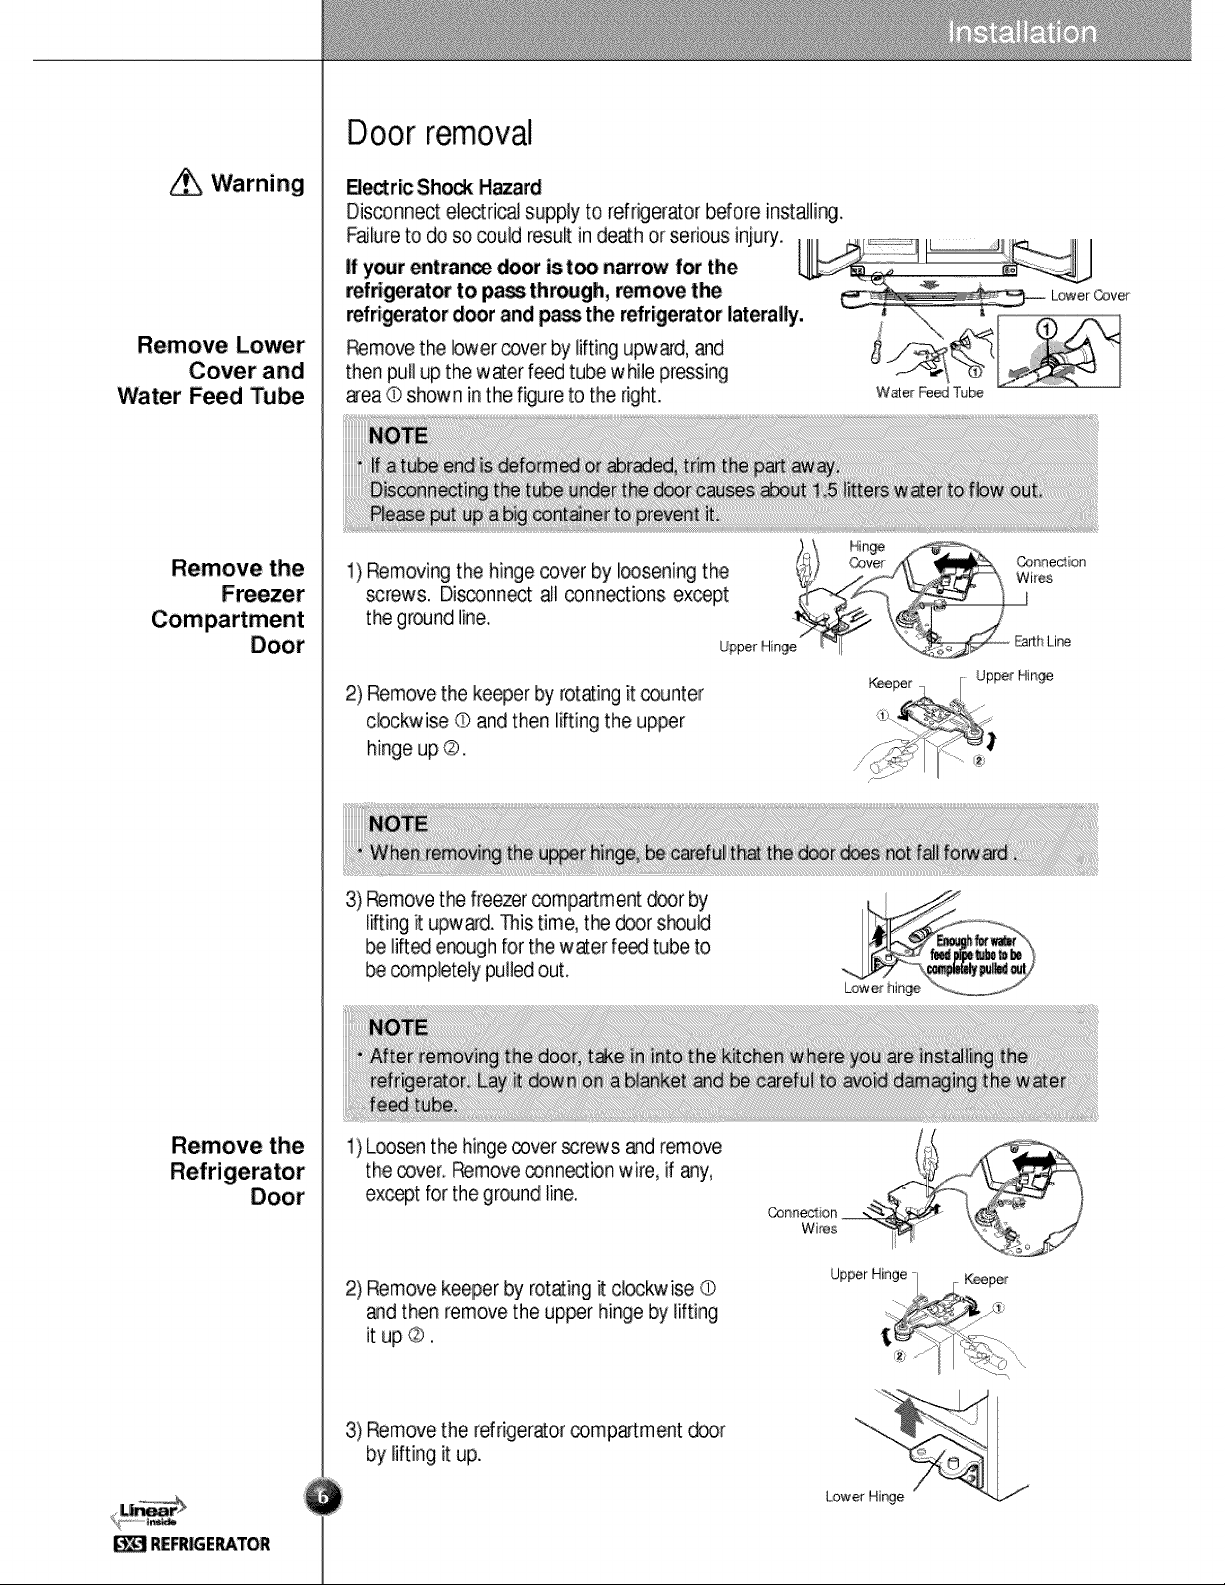
B_ric Shock Hazard
Disconnect eiectdc_ supply to refrigerator before instaJlir_,
then pulJup the w aterfeed tube whiie pressing
pea @ shown inthe figure to the right.
1) Removing the hinge cover by loosening the
} @ @nne_;en
screws. Disconnect _i connections except
the ground line,
Upper Hinge F_rth Line
2) Remove the keeper by rotating it counter
clockwise ® and then lifting the upper
hinge up ®.
W_er FeedTube
Wires
_r 1 ._ Up_r Nin_
Remove the
3) _move the freezer compartment d_r by
lifting Rupwa'd. This time, the dc_r s_uld
be lift_ enough for the water feed tube to
be completely pulledout.
1) Loosen the hinge cover _rews and remove
the cover. _move connexion wire, if any,
except for the ground line.
2) Remove keeper by rotating it cl_kwise ©
and then remove the upper hinge by lifting
it up ©.
3) Remove the refrigerator comp&rtment _r
by lifting it up.
Lower Hi_e

Move the
Pushthe refngerator sideways through the
entran_ door _ shown inthe right picture.
Door replacement
Mount the doors in the reverse order of removal after the refrigerator is brought to
the inst_lation area.
w er tube in lation
,, Automatic i_maker operation needs water pressure of 213~121psi(lbiincM) _hat
is, an inst_t p_er cup (7_9will be fully filled within 3 sec.).
- If water pressure does not re_h the rating 21.3psi(]b/inch =)or below, it is n_essa'y
to purchase a separate pressure pump for normal automatic icem_ing and _ol
water feed.
- Keep the total length of the water fe_ tube within 40 feet _d be careful not to
bend or kink the t:ube, tf the tube is longer th_ 40 feet, the icemaker and water
dispenser wiil not operate properly.
, install the water feed tube at apl_ free from heat.
-_nnect to potable water supply only.
- Refer to instructions with water filter kit for installation.
the Refri_rator
to a WaterSource
Water nn tion In,ruction
Read all directions carefully before you begin.
Conn_ to potable water _pply only.
Guide
Tools Required
Cold Water Supply
- Standard screwdriver
- 7/16-inch and 1/2°inch open-end wrenches or two _justable wrenches
,, 1/4-inch nut driver
,, 1/4-inch drill bit
- Hand drill or electric drill (properly grounded)
_e icemaker waer valve contains a flow w_her which is us_ _ a water
pressure regulator.
_e i_maker needs to be connected to a cold water line with water pressure
30 _-120psi(Ib/inch _)
the Tubing to
Water Line
1. Unplug refrigerator or disconnect power.
2. Turn OFF main water supply. Turn on the nearest fau_t to relieve the pressure
on the line. It may help to open an outside hydrant to allow the water to dran
from the line in the house,
3. Find a 1/2-in_ to 1-1i44nch verti_ _LD water pipe near the refrigerator
4. To determine the length d copper tubing you will ne_, measure from the
connection on the lower left rear d the refrigerator to the water pipe. Add 7
feet (2,1 m) to allow for moving refrigerator for clewing, Use 1/4-inch OD,
(outside diameter) copper tubing, Be sure both ends of _pper tubing are cut
_uare.
5. Using a drilll, drill a 1/44nch hole in the cold water pipe you have selectS.
6. Fasten shut-off valve to _ld water pipe with pipe clamp, Be sure outlet end is
solidly in the 1i44nch drilled hole in the water pipe _d that the washer is
under the pipe clamp. _ghten packing nut. _ghten the pipe clamp screws
cardully and evenly so washer makes a watertight seal. Do not overtighten or
you may crush the copper tubing, especially if salt (coiled) copper tubing is
used. Now you are rely to connect the copper tubing.
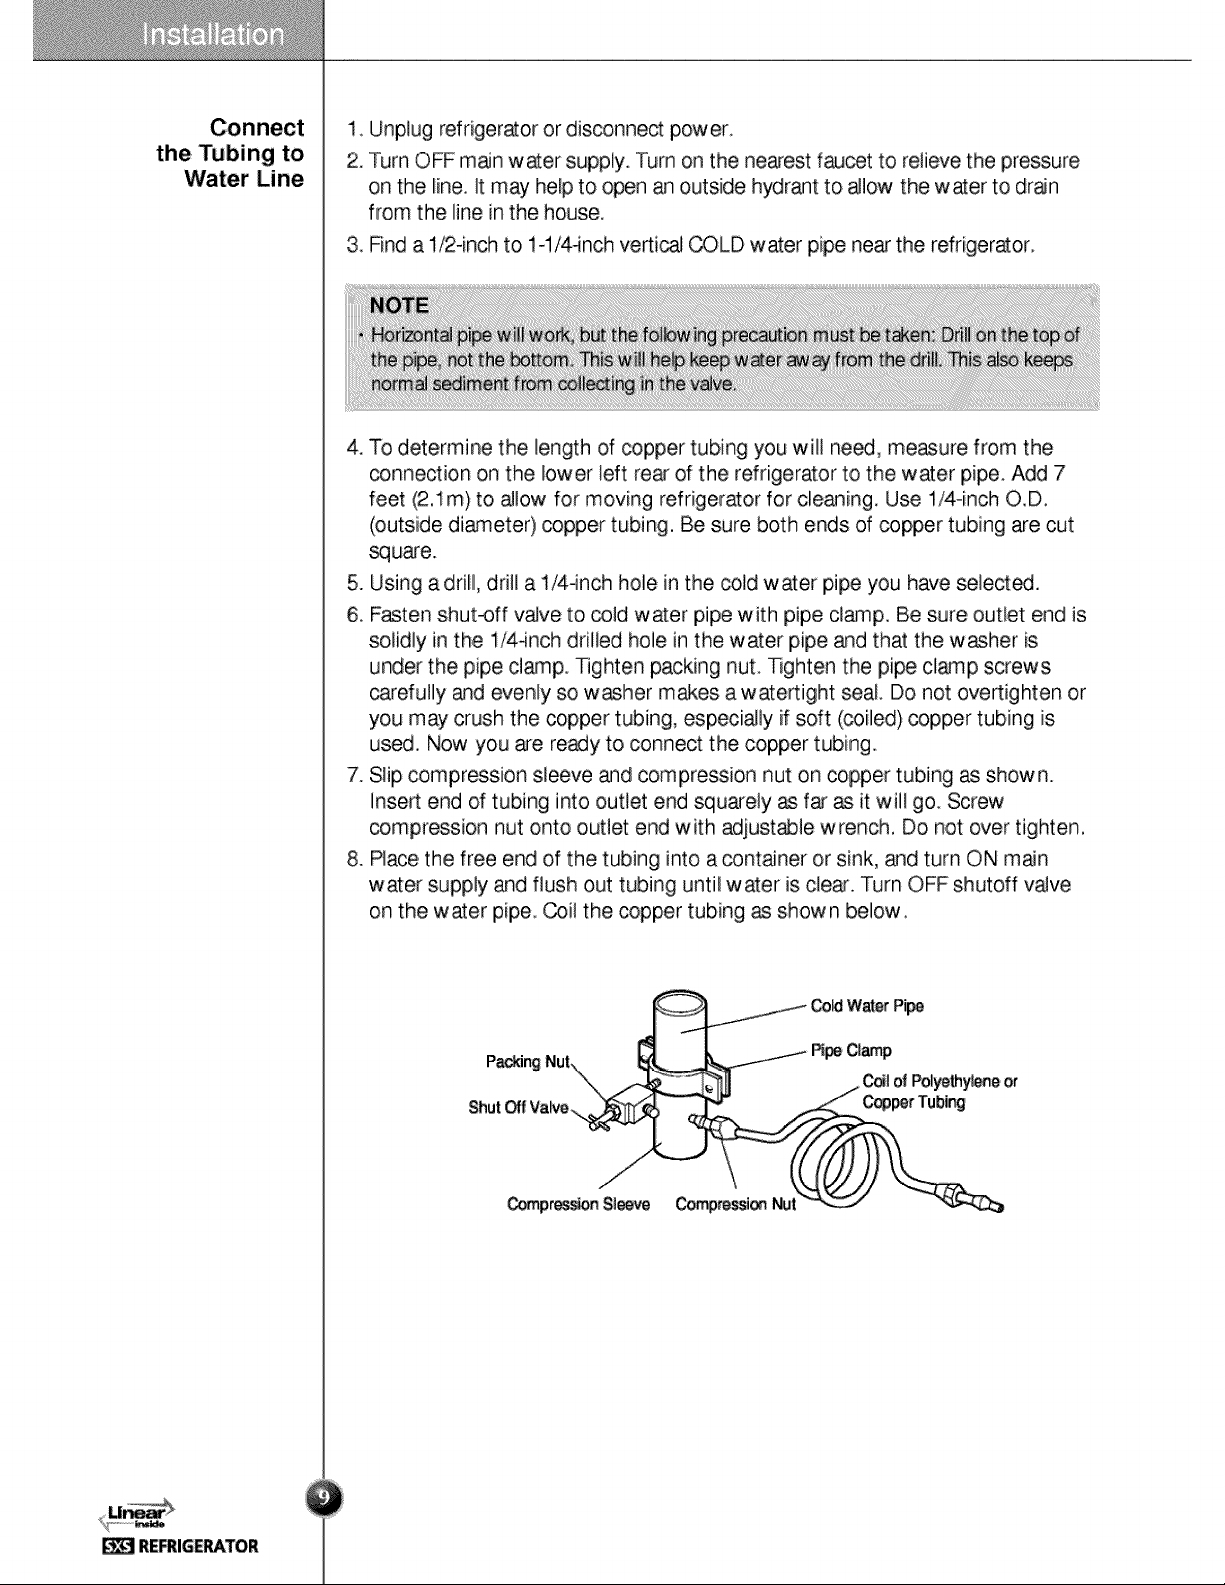
7. Slip compression sleeve and compression nut on copper tubing as shown.
Insert end d tubing into outtet end squarely as far as it will go. Screw
compression nut onto outlet end with adjustable wrench, Do not over tighten,
8. Place the free end of the tubing into a container or sink, and turn ON m_n
water supply and flush out tubing until water is clear. Turn OFF shutoff valve
on the water pipe. Coil the _pper tubing as shown below.
REFRIGERATOR
Operation In,ruction Guide
Connectthe Tubing
to the Refri_rator
Turn the Water On at
the Shutoff Valve
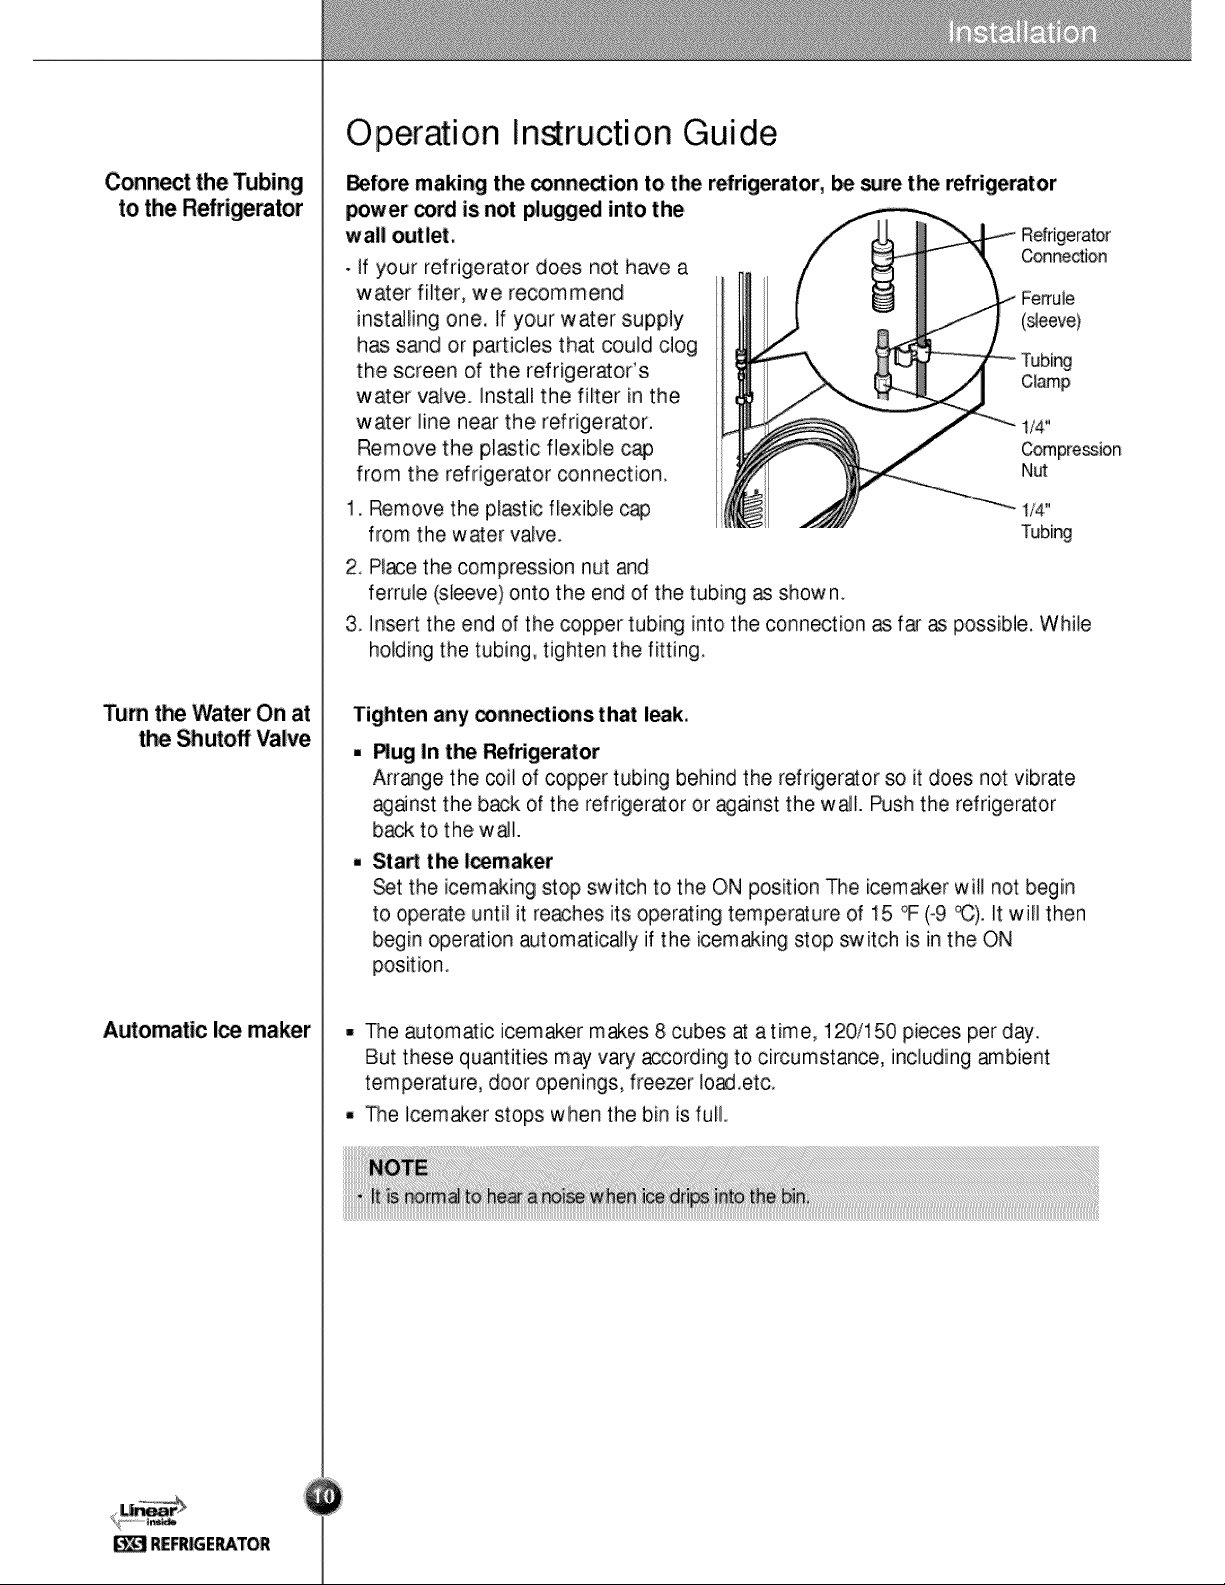
Before making the connection to the refrigerator, _ _re the refrigerator
power cord is not plugged into the
wall outlet,
. if your refrigerator does not have a
water filter, we recommend
installing one. if your water supply
has sand or particles that couid clog
the screen of the refrigeratoCs
water valve. Install the filter in the
water line near the refrigerator.
Remove the plastic flexible c_
from the refrigerator connection.
1. Remove the plastic flexible cap
from the water valve.
2. Place the compression nut and
ferrule (sleeve)onto the end of the tubing as shown.
3. lnsert the end of the copper tubing into the connection as far _ possible. While
holding the tubing, tighten the fitting.
Tighten any _nne_ions that leak,
,, Rug In the Refrigerator
Arr_ge the coil of copper tubing behind the refrigeraor so it does not vibrate
against the back of the refriger_or or against the wall. Push the refrigerator
back to the wail.
- Sta_ the Icemaker
_t the icemaking stop switch to the ON position The icemaker will not begin
to operate until it re_hes its operating temperature of 15 • (-9 _). It will then
begin operation automatically if the icemaking stop switch is in the ON
position.
Conne_on
(sleeve)
1/4"
_mpre_ion
Nut
1/4°
Tubing
Automatic Ice maker
- The automatic icemaker makes 8 cubes at a time, 120/150 pieces per day.
But these quantities may vary according to circumstance, including ambient
temperature, door openings, freezer Io_.etc.
,, The Icemaker stops when the bin is full.
 Loading...