

LG LRSC21934SB, LRSC21934SW, LRSC21934TT Owner’s Manual
.......... css£SW
REFRIGERATOR
UseCs Guide
Please read this guide thoroughly
before operating and keep it handy for
:e at all times.
manuel
le
Lea detenidamente
!@i!_i!ii!ii!ii!i!!i!!!!i!
iiiiiiiiiiiiiiiiiiiiiiii/ii@ii
i@/ii@iii_i
Table of contents
Introduction
Installation
Operation
Entry
Important safety instruction
Identification of parts
Where to install
Door removal
Door replacement
Feed water pipe installation
Water connection instruction guide
Operation instruction guide
Height adiustment
Starting
Adjusting the temperatures and functions
(Dispenser / Automatic ice maker)
Shelf (Applicable to some models only)
Suggestion on
food storage
Care and
maintenance
Wine holder (Applicable to some models only)
Egg box
Humidity control in the vegetable compartment
Convert into a vegetable or meat compartment
Deodorizer (Applicable to some models only)
Location of foods
Storing foods
How to dismantle parts
General information
Cleaning
Trouble shooting
Recommended
Grounding
Method
Entry
The model and serial numbers are found on the inner case or back of refrigerator
compartment of this unit. These numbers are unique to this unit and not
available to others. You should record requested information here and retain
this guide as a permanent record of your purchase. Staple your receipt here.
Date of purchase
Dealer purchased from
Dealer address
Dealer phone no.
Model no.
Serial no.
Important safety instruction
Before it is used, this refrigerator must be properly installed and located in accordance with
the installation instructions in this document,
Neverunplugyourrefrigeratorby pullingonthe power cord,Alwaysgrip plugfirmlyandpull
it straightoutfrom the outlet,
Whenmovingyour applianceaway fromthewall, becarefulnot to rolloverthe power cord
orto damageit inanyway,
Afteryour refrigeratoris inoperation,do nottouchthe coldsurfacesinthe freezer
compartment,particularlywhenyourhandsaredamp orwet, Skincould adhereto these
extremelycoldsurfaces,
Unplugthe powercord fromthe poweroutlet forcleaningor otherrequirements,Never
touch itwith wet handsbecauseyou canget anelectricshockor behurt,
Neverdamage,process,severelybend,pullout, ortwist the powercord becausedamage
the powercordmaycausea fireor electricshock,Youhavedoubtsonwhether the
applianceis properlygrounded,
Neverplaceglassproducts inthe freezerbecausetheymaybebrokendue to expansion
whentheir contentsarefrozen.
Neverallowyour handswithinthe ice storagebinof theautomaticice maker.Youcouldbe
hurtby the operationof theautomaticicemaker,
Theapplianceisnot intendedfor usebyyoung childrenor infirmpersonswithout
supervision,
Youngchilderenshouldbe supervisedto ensurethattheydo notplaywith the appliance,
Neverallowanyoneto climb,sit,standor hangonthe refreshmentcenterdoor,These
actionsmaydamagethe refrigeratorandeventip itover,causingseverepersonalinjury,
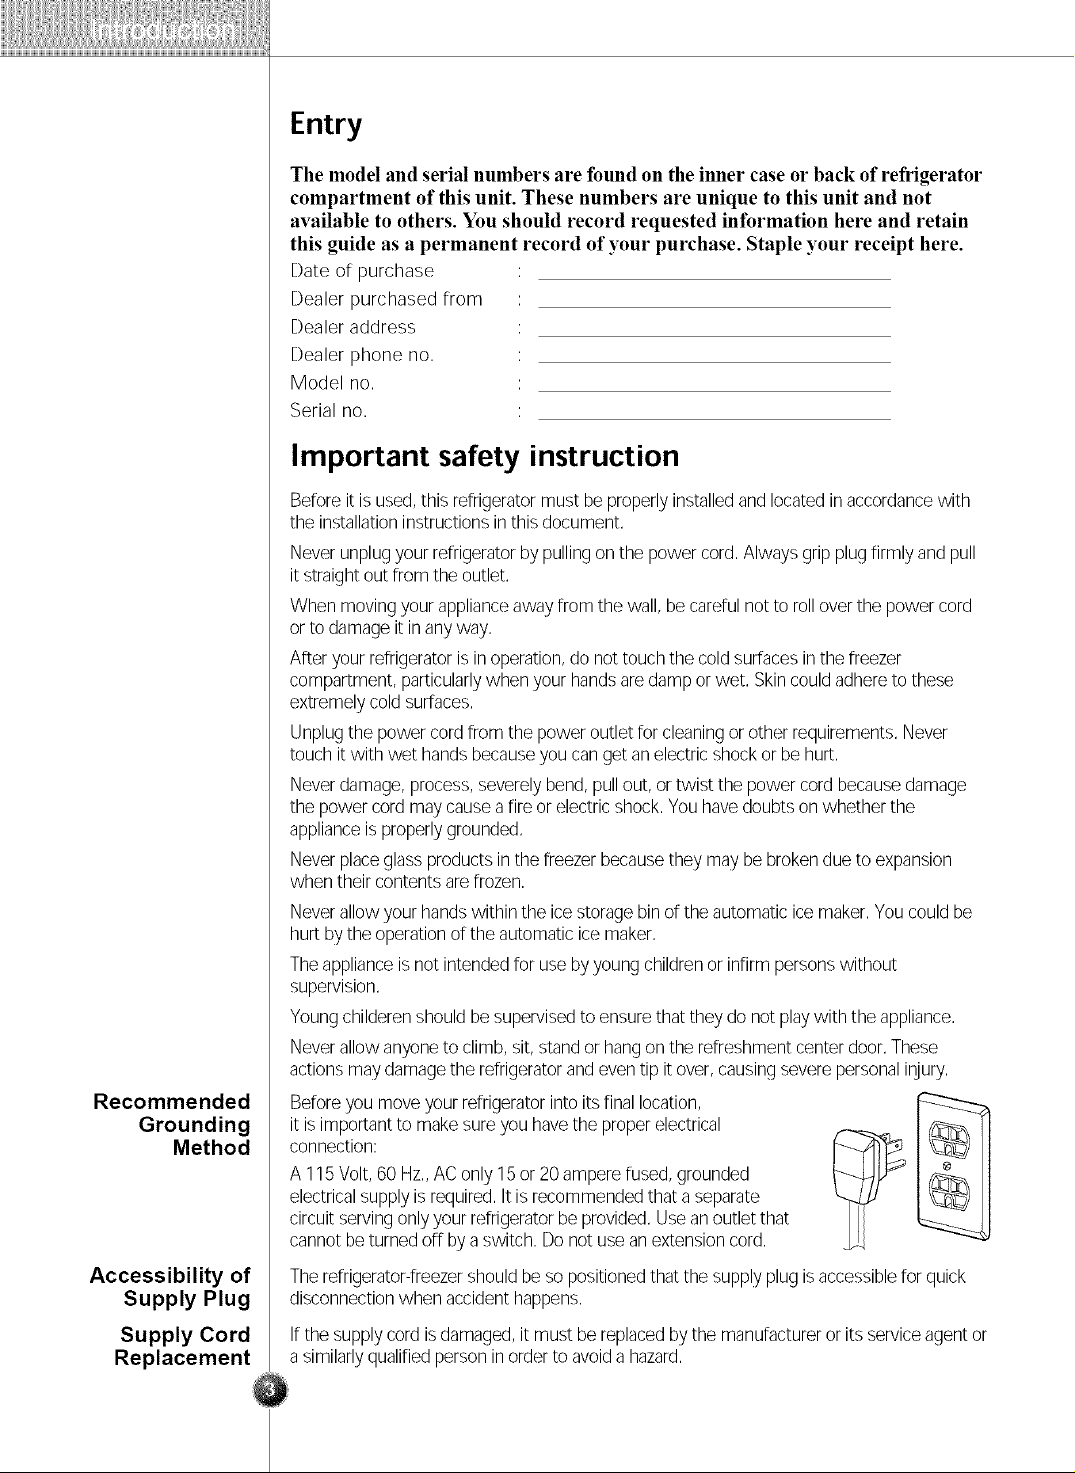
Before you move your refrigerator into its final location,
it is important to make sure you have the proper electrical
connection:
A 115Volt,60 Hz,,AConly 15or 20amperefused,grounded
electricalsupplyis required,It isrecommendedthataseparate
circuitservingonlyyourrefrigeratorbe provided,Useanoutlet that
cannotbeturnedoff byaswitch. Donot useanextensioncord.
Accessibility of
Supply Plug
Supply Cord
Replacement
Therefrigerator-freezershouldbesopositionedthat thesupplyplug isaccessibleforquick
disconnectionwhen accidenthappens.
If the supplycordis damaged,it must bereplacedby the manufactureror itsserviceagentor
asimilarlyqualifiedpersoninorderto avoida hazard,
Child entrapment
warning
DANGER:Riskof child entrapment.
Beforeyou throw away your oldrefrigerator or freezer:
Take off the doors but leavethe shelves inplaceso that children may not easilyclimb
inside.
The applianceisnot intendedfor use byyoung children or infirm persons without
supervision.
Young children should be supervised to ensure that they do not playwith the appliance.
Don't store
Grounding (Earthing)
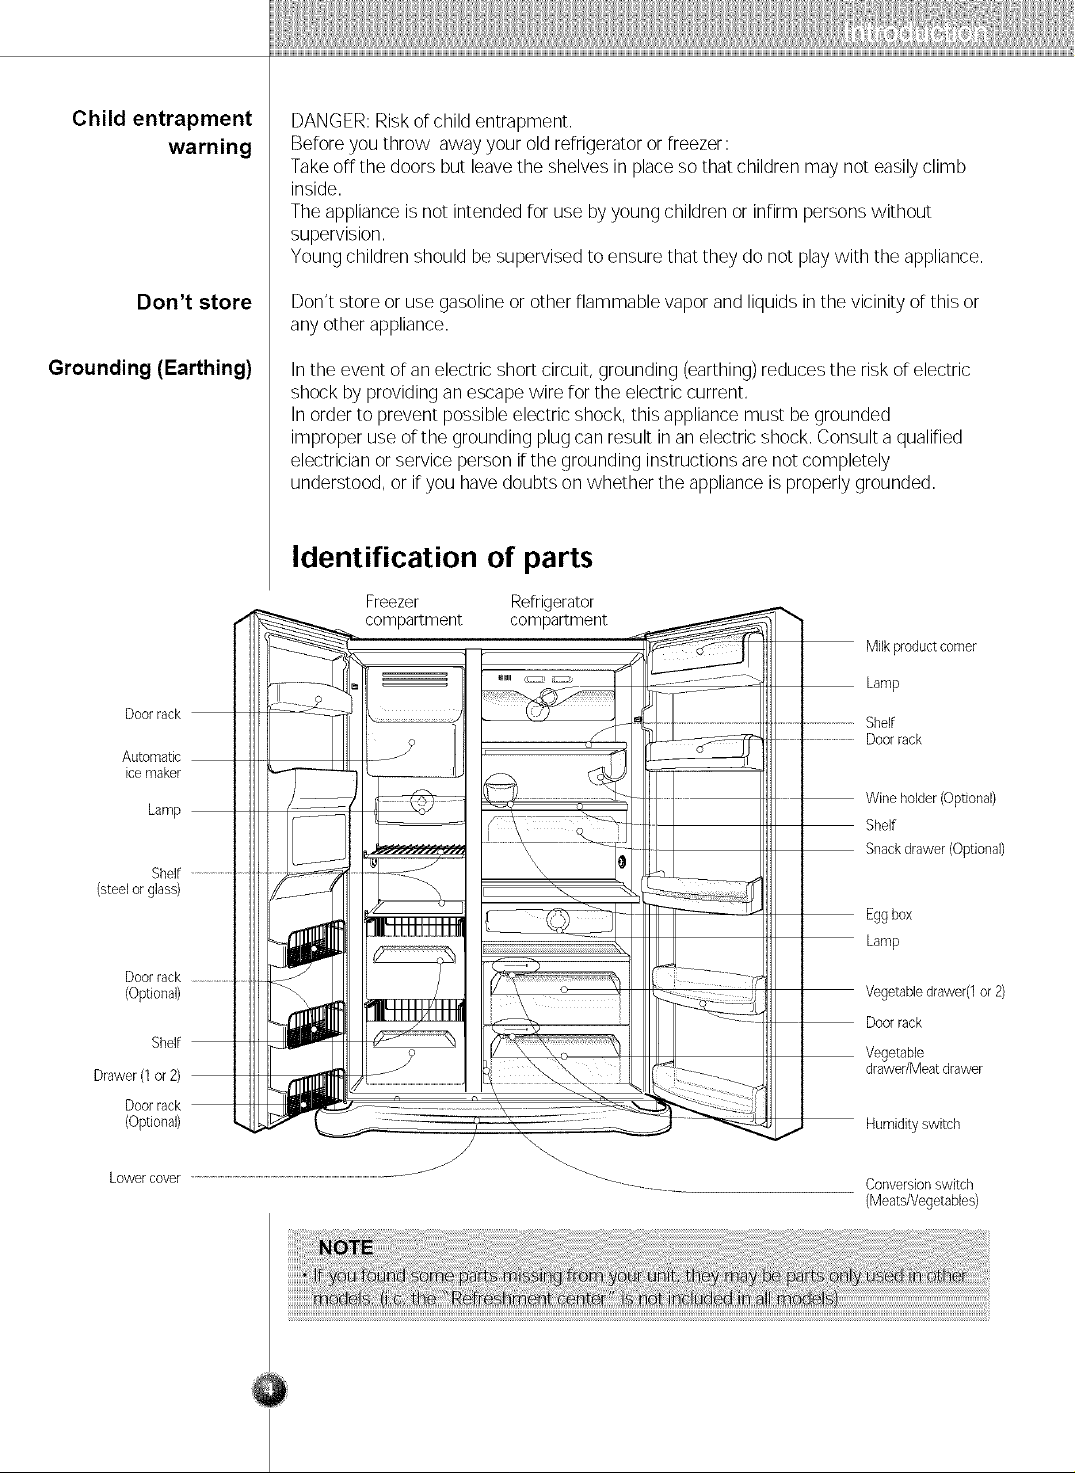
Doorrack
Automatic
icemaker
Lamp
Shelf
(steelor glass)
Doorrack .......................
(Optional)
Shelf
Drawer(1or 2)
Doorrack
(Optional)
Don't store or use gasolineor other flammable vapor and liquids inthe vicinity of this or
any other appliance.
Inthe event of an electric short circuit, grounding (earthing)reducesthe risk of electric
shock by providing anescape wire for the electriccurrent,
Inorder to prevent possibleelectric shock, this appliance must be grounded
improper use of the grounding plugcan result in an electric shock. Consulta qualified
electrician or service person ifthe grounding instructions are not completely
understood, or if you have doubts on whether the applianceisproperly grounded.
Identification of parts
Freezer Refrigerator
compartment compartment
Milk productcorner
Lamp
................... Shelf
...........................Doorrack
Wineholder(Optional)
Shelf
Snackdrawer(Optional)
Eggbox
Lamp
Vegetabledrawer(1or2)
Doorrack
Vegetable
drawer/Meatdrawer
Humidityswitch
Lowercover .................................................................................................................................
Conversionswitch
(Meats/Vegetables)

Where to install
Select a good
location
1. Placeyour appliance where it is easyto use.
2. Avoid placing the unit nearheat sources, direct sunlight or moisture.
3. Toavoid vibrations, the appliance must be leveled.
4. Don't install the appliance below 5°C. It may causeaffect the performance.
Door removal
z_ Warning
Remove lower
cover and
then feed water
tube
Remove the
freezer
compartment
door
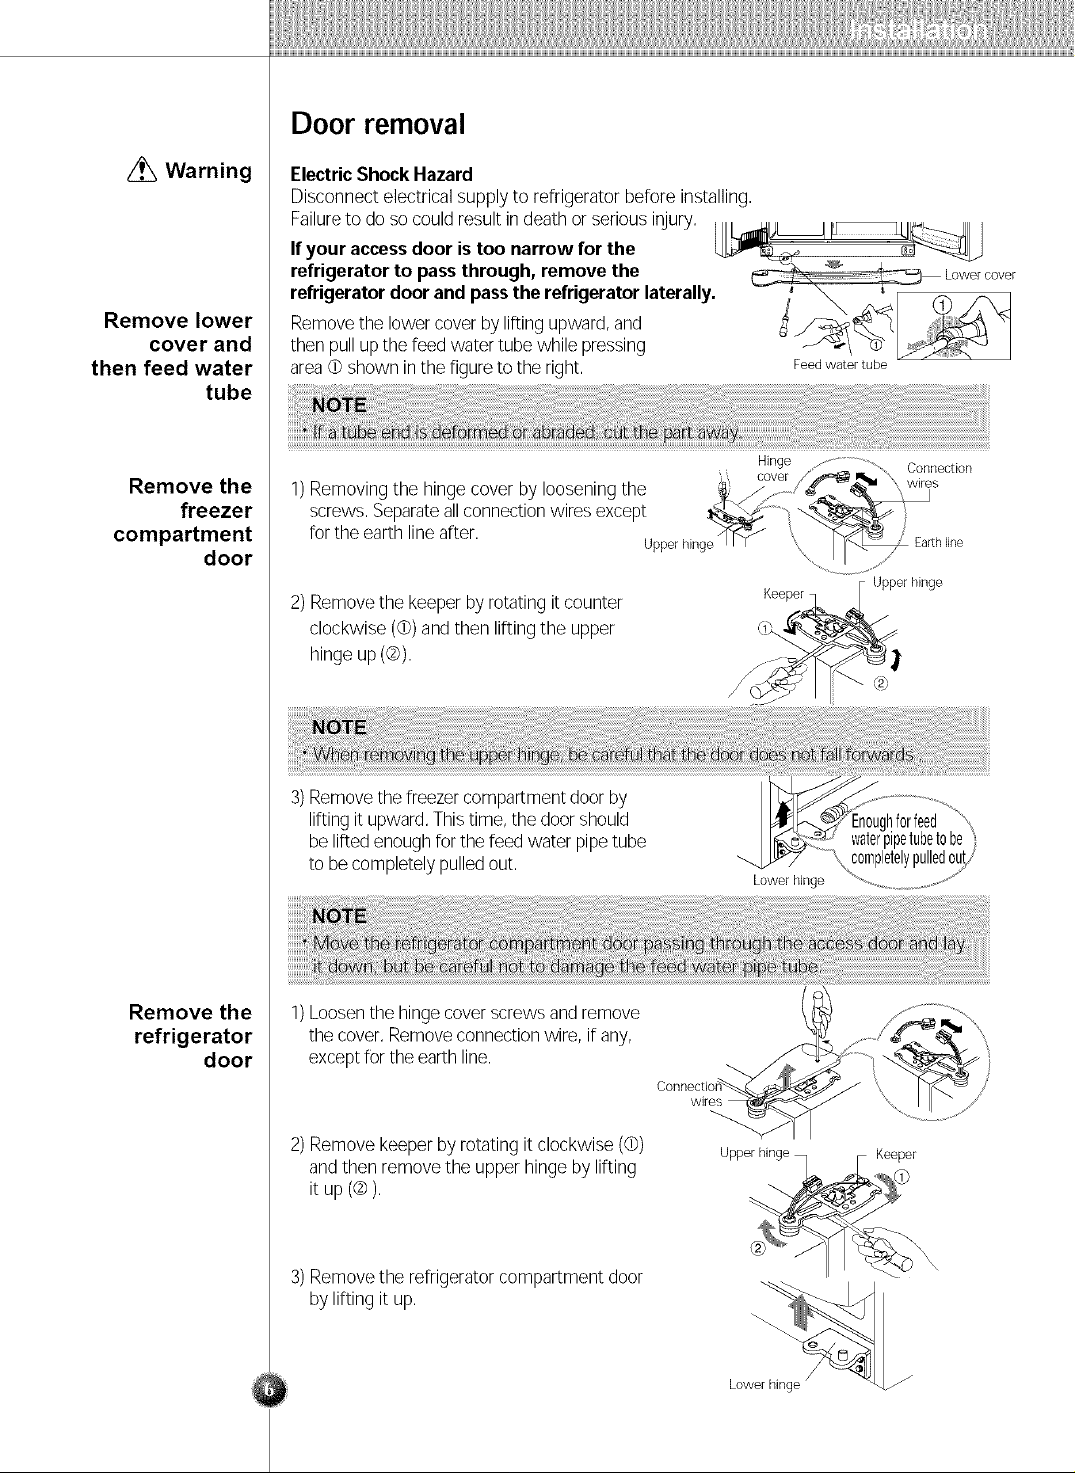
ElectricShock Hazard
Disconnectelectricalsupply to refrigerator before installing.
Failureto doso couldresult indeathor seriousinjury. [_
Ifyour accessdoor is too narrow for the _,_ _:::_-_--J_
refrigerator to passthrough, remove the Lower cover
refrigeratordoor and passthe refrigerator laterally. -- ; _ _ _
Removethe lowercover byliftingupward,and J _/:;_1
then pullupthe feed watertube while pressing _/ "@"k.
area¢ shown inthe figureto the right. Feed watertube
Hinge /" ........................ Connection
1)Removingthe hingecover by looseningthe
)_, cover //f_" w res
screws.Separateallconnectionwiresexcept
for the earth lineafter.
Uppe_hing /J'_ "j ',\ __ EarthNne
2) Removethe keeper byrotating itcounter
clockwise (@)andthen lifting the upper
Kee?_ [_pei hinge
,gx
hinge up(@).
Remove the
refrigerator
door
3) Removethe freezercompartmentdoorby
lifting it upward.Thistime, thedoor should
be liftedenoughfor thereed waterpipetube
to be completelypulledout.
1) Loosen the hinge cover screws and remove
the cover, Remove connection wire, if any,
except for the earth line.
2) Remove keeper by rotating it clockwise (@)
and then remove the upper hinge by lifting
it up (@).
3) Removethe refrigeratorcompartment door
bylifting it up.
Lower hinge
wires
Lower hinge
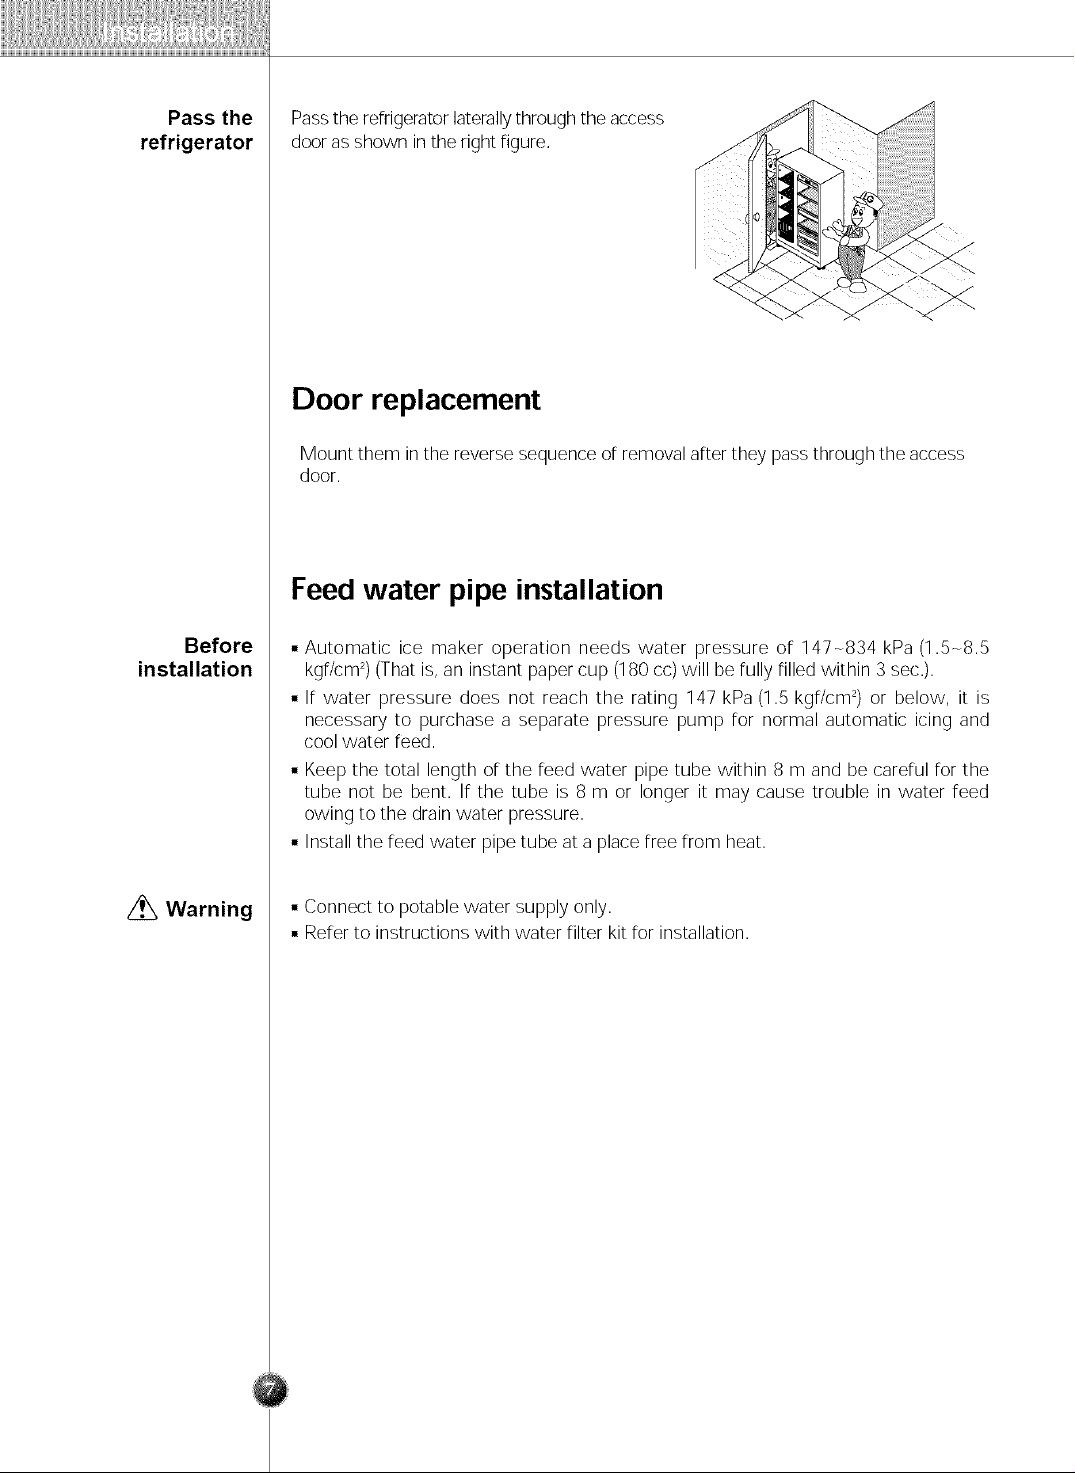
Pass the
refrigerator
Passthe refrigeratorlaterallythroughtheaccess
dooras shown inthe right figure,
Door replacement
Mount them inthe reversesequence of removal after they passthrough the access
door.
Feed water pipe installation
Before
installation
Warning • Connect to potable water supply only.
• Automatic ice maker operation needs water pressure of 147-834 kPa (1.5-8.5
kgr/cm2)(That is,an instant paper cup (180 cc) will be fully filled within 3 sec.).
• If water pressure does not reach the rating 147 kPa(1.5 kgf/cm2)or below, it is
necessary to purchase a separate pressure pump for normal automatic icing and
cool water reed.
• Keep the total length of the feed water pipe tube within 8 m and be careful for the
tube not be bent. If the tube is 8 m or longer it may cause trouble in water feed
owing to the drain water pressure.
• Install the reed water pipetube at a placefree from heat.
• Refer to instructions with water filter kit for installation.
Water connection instruction guide
Connecting
the refrigerator
to a water source
Warning
Tools required
Read all directions carefully before you begin.
Connect to potable water supply only.
• Standard screwdriver
• 7/16 - inch and 1/2 -inch open-end wrenches or two adjustable wrenches
• 1/4 -inch nut driver
• 1/4 -inch drill bit
• Hand drill or electric drill (properly grounded)
Cold water supply
The ice maker water valve contains aflow washer which is used as awater
pressure regulator.
The ice maker needs to be connected to a cold water line with water pressure
207 o-827 kPa (30 o-120 psi).
Ira problem occurs, callyour utility company.
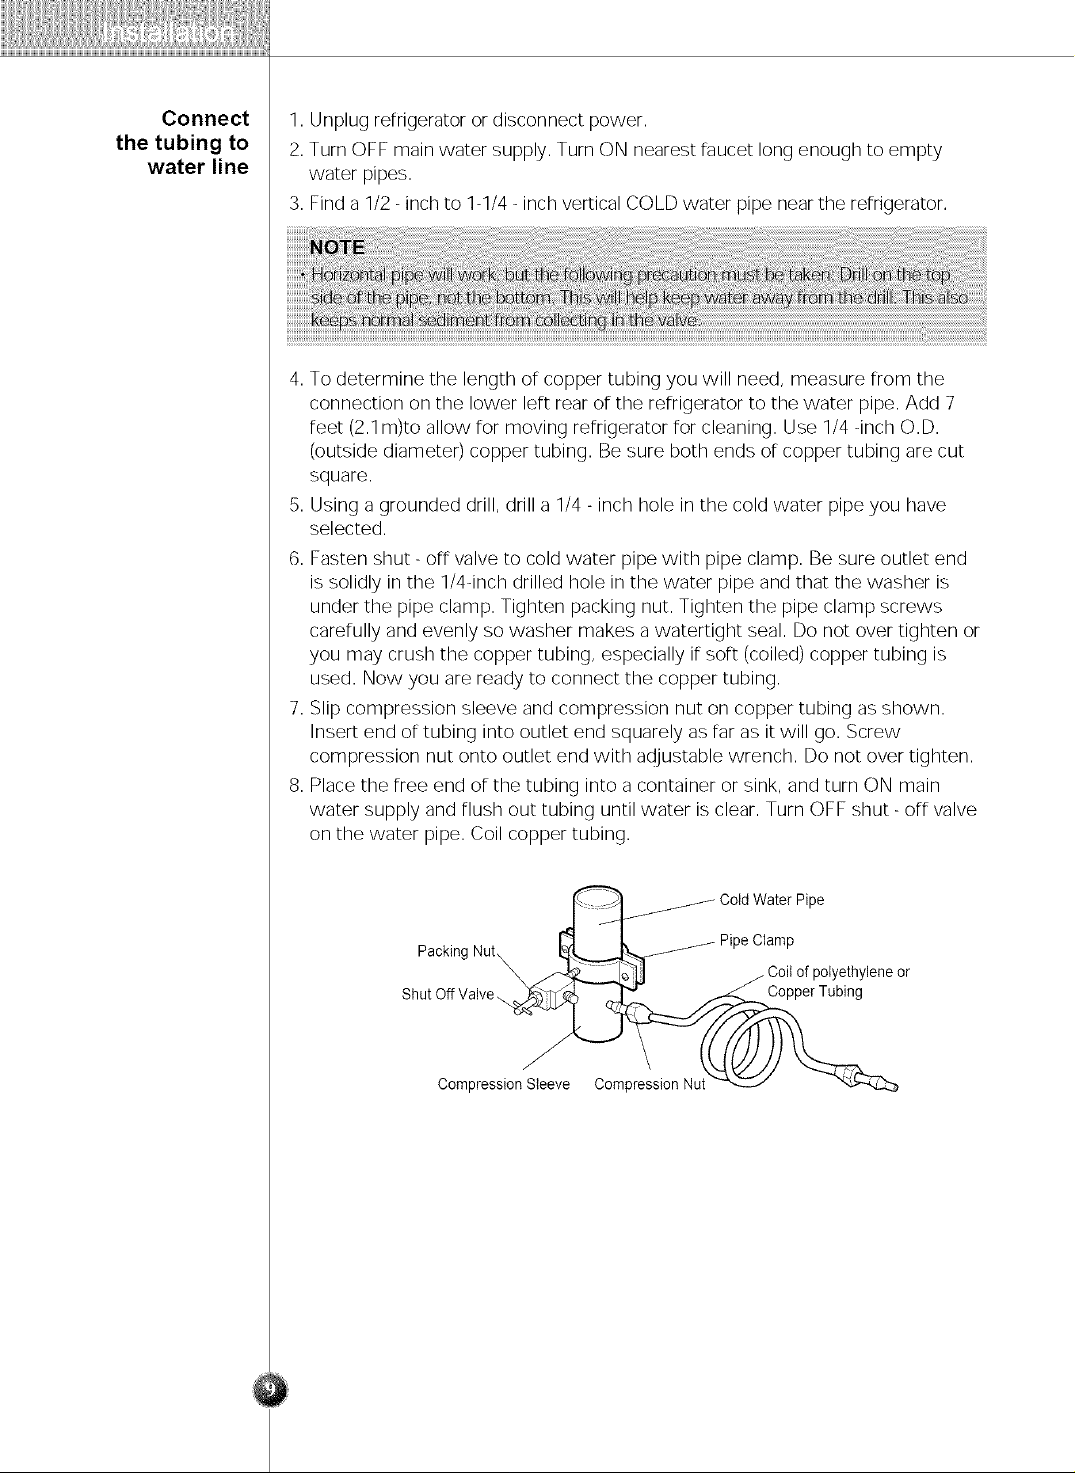
Connect
the tubing to
water line
1. Unplug refrigerator or disconnect power.
2.Turn OFF main water supply. Turn ON nearest faucet long enough to empty
water pipes.
3. Find a 1/2 -inch to 1-1/4 -inch vertical COLD water pipe nearthe refrigerator,
4. To determine the length of copper tubing you will need, measure from the
connection on the lower left rear of the refrigerator to the water pipe. Add 7
feet (2.1m)to allow for moving refrigerator for cleaning. Use 1/4 -inch O.D.
(outside diameter) copper tubing. Besure both ends of copper tubing are cut
square.
5. Using a grounded drill, drill a 1/4 - inch hole in the cold water pipe you have
selected.
6. Fasten shut - off valve to cold water pipe with pipe clamp. Be sure outlet end
is solidly in the 1/4dnch drilled hole in the water pipe and that the washer is
under the pipe clamp. Tighten packing nut. Tighten the pipe clamp screws
carefully and evenly so washer makes a watertight seal. Do not over tighten or
you may crush the copper tubing, especially if soft (coiled) copper tubing is
used. Now you are ready to connect the copper tubing.
7. Slip compression sleeve and compression nut on copper tubing as shown.
Insert end of tubing into outlet end squarely as far as it will go. Screw
compression nut onto outlet end with adjustable wrench. Do not over tighten.
8. Place the free end of the tubing into a container or sink, and turn ON main
water supply and flush out tubing until water is clear. Turn OFF shut- off valve
on the water pipe. Coil copper tubing.
Pipe
Packing Nut\
Coil of polyethylene or
Shut Off Valve Copper Tubing
Compression Sleeve Compression Nut
Operation instruction guide
Connect the tubing to
the refrigerator
Turn the water on at
the shutoff valve
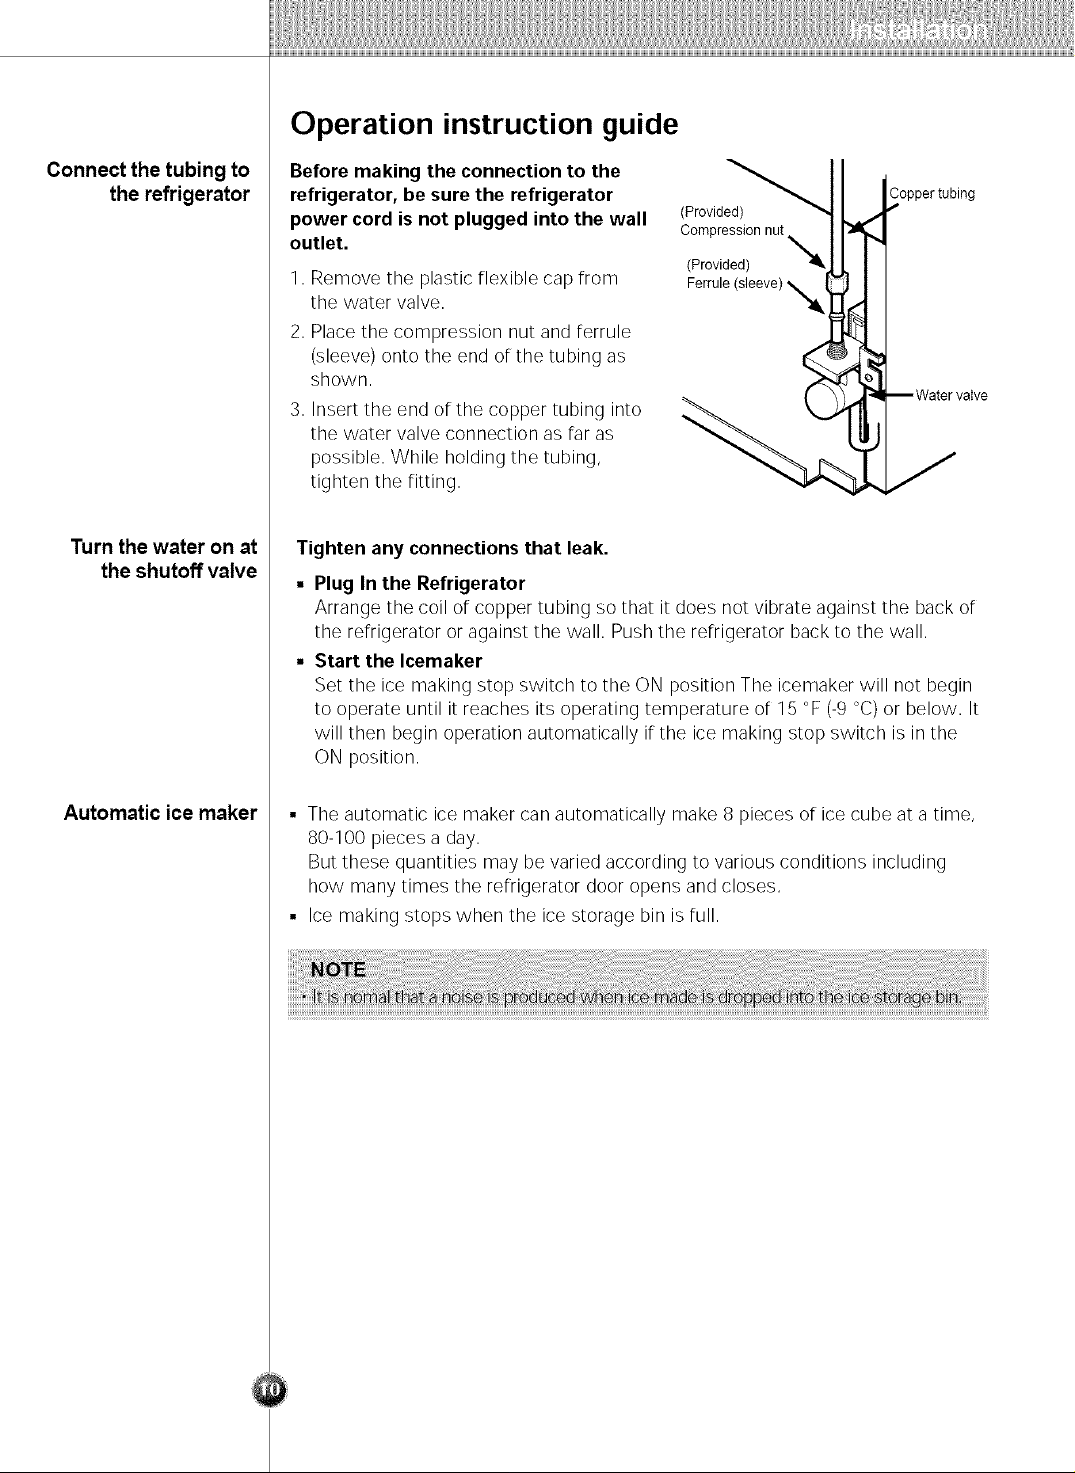
Before making the connection to the
refrigerator, be sure the refrigerator
power cord is not plugged into the wall
outlet.
1. Remove the plastic flexible cap from
(Provided)
Compression nut
(Provided) *_
Ferrule
Copper tubing
the water valve.
2. Place the compression nut and ferrule
(sleeve) onto the end of the tubing as
shown.
3. Insert the end of the copper tubing into
the water valve connection as far as
possible. While holding the tubing,
tighten the fitting.
Tighten any connections that leak.
• Plug In the Refrigerator
Arrange the coil of copper tubing so that it does not vibrate against the back of
the refrigerator or against the wall. Push the refrigerator back to the wall.
• Start the Icemaker
Set the ice making stop switch to the ON position The icemaker will not begin
to operate until it reaches its operating temperature of 15 °F (-9 °C) or below. It
will then begin operation automatically if the ice making stop switch is inthe
ON position.
Automatic ice maker
• The automatic ice maker can automatically make 8 pieces of ice cube at a time,
80-100 pieces a day.
But these quantities may be varied according to various conditions including
how many times the refrigerator door opens and closes,
• Ice making stops when the ice storage bin is full.
 Loading...