

Page 1

Digital Media Recorder with
Microsoft® Program Guide
User’s Guide
Model: LRM-519
Before connecting, operating or adjusting this product,
please read this instruction booklet carefully and completely.
© Copyright 2005, LG Electronics U.S.A., Inc.
Call us toll-free for
technical support,
or to subscribe
to the Microsoft®
Program Guide service:
1-800-984-6306
www.microsoftprogramguide.com
Page 2
2
CAUTION
RISK OF ELECTRIC SHOCK
DO NOT OPEN
CAUTION: TO REDUCE THE RISK
OF ELECTRIC SHOCK
DO NOT REMOVE COVER (OR BACK)
NO USER-SERVICEABLE PARTS INSIDE
REFER SERVICING TO QUALIFIED SERVICE
PERSONNEL.
This lightning ash with arrowhead symbol within
an equilateral triangle is intended to alert the user
to the presence of uninsulated dangerous voltage
within the product’s enclosure that may be of
sufcient magnitude to constitute a risk of electric
shock to persons.
The exclamation mark within an equilateral triangle
is intended to alert the user to the presence of
important operating and maintenance (servicing)
instructions in the instructions accompanying the
product.
WARNING: TO PREVENT FIRE OR ELECTRIC
SHOCK HAZARD, DO NOT EXPOSE THIS
PRODUCT TO RAIN OR MOISTURE.
WARNING: Do not install this equipment in a conned
space such as a book case or similar unit.
REGULATORY INFORMATION: FCC Part 15
This product has been tested and found to comply with the
limits for a Class B digital device, pursuant to Part 15 of the
FCC Rules. These limits are designed to provide reasonable
protection against harmful interference when the product is
operated in a residential installation. This product generates,
uses and can radiate radio frequency energy and, if not
installed and used in accordance with the instruction manual,
may cause harmful interference to radio communications.
However, there is no guarantee that interference will not
occur in a particular installation. If this product does cause
harmful interference to radio or television reception, which
can be determined by turning the product off and on, the
user is encouraged to try to correct the interference by one or
more of the following measures:
• Reorient or relocate the receiving antenna.
• Increase the separation between the product and receiver.
• Connect the product into an outlet on a circuit different
from that to which the receiver is connected.
• Consult the dealer or an experienced radio/TV technician
for help.
FCC Part 68
• This product complies with Part 68 of the FCC rules. On
the back of this product is a label that contains, among
other information, the FCC registration number and Ringer
Equivalent Number (REN) for this product. If requested, this
information must be provided to the telephone company.
• The REN is used to determine the quantity of devices that
may be connected to the telephone line. Excessive RENs on
the telephone line may result in the devices not ringing in
response to an incoming call. Typically, the sum of the RENs
should not exceed ve (5). To be certain of the number of
devices that may be connected to the line (as determined
by the total RENs) contact the local telephone company.
• If this product causes harm to the telephone network,
the telephone company will notify you in advance that
temporary discontinuance of service may be required. But
if advance notice isn’t practical, the telephone company will
notify the customer as soon as possible. Also, you will be
advised of your right to le a complaint with the FCC if you
believe it is necessary.
• The telephone company may make changes to its facilities,
equipment, operations or procedures that could affect the
operation of the product. If this happens, the telephone
company will provide advance notice so you can make the
necessary modications to maintain uninterrupted service.
• Connection to party line service is subject to state tariffs.
(Contact the state public utility commission, public service
commission, or corporate commission for information.)
• If trouble is experienced with this product, for repair or
warranty information, please contact LG Electronics Inc. If
the product is causing harm to the telephone network, the
telephone company may request that you disconnect the
product until the problem is resolved.
• An FCC compliant telephone cord and modular plug is
provided with this equipment. This equipment is designed
to be connected to the telephone network or premises
wiring using a compatible modular jack which is Part 68
compliant. See installation instructions for details.
SERIAL NUMBER: The serial number is located on the back of
this unit. This number is unique to this unit and not available
to others. You should record requested information here and
retain this guide as a permanent record of your purchase.
Model No. LRM-519
Serial No.
CAUTION:
This DVD/CD receiver employs a Laser System.
To ensure proper use of this product, please read this User’s
Guide carefully and retain it for future reference. Should
the unit require maintenance, contact an authorized service
location (see service procedure).
Performing controls, adjustments, or carrying out procedures
other than those specied herein may result in hazardous
radiation exposure.
To prevent direct exposure to laser beam, do not try to open
the enclosure. Visible laser radiation when open. DO NOT
STARE INTO BEAM.
CAUTION: The apparatus should not be exposed to water
(dripping or splashing) and no objects lled with liquids, such
as vases, should be placed on the apparatus.
CAUTION: Danger of explosion if battery is incorrectly
replaced. Replace only with the same or equivalent type.
FCC WARNING: This equipment may generate or use radio
frequency energy. Changes or modications to this equipment
may cause harmful interference unless the modications
are expressly approved in the instruction manual. The user
could lose the authority to operate this equipment if an
unauthorized change or modication is made.
FCC COMPLIANCE: The responsible party for this product’s
compliance is:
LG Electronics U.S.A., Inc. 1000 Sylvan Avenue
Englewood Cliffs, NJ 07632, USA
Phone: 1-847-941-8373.
Page 3

3
IMPORTANT SAFETY INSTRUCTIONS
CAUTION: PLEASE READ AND OBSERVE ALL WARNINGS AND INSTRUCTIONS IN THIS USER’S
GUIDE AND THOSE MARKED ON THE UNIT. RETAIN THIS MANUAL FOR FUTURE
REFERENCE.
This set has been designed and manufactured to assure personal safety. Improper use can result in electric shock
or re hazard. The safeguards incorporated in this unit will protect you if you observe the following procedures for
installation, use, and servicing.
This unit does not contain any parts that can be repaired by the user.
DO NOT REMOVE THE CABINET COVER, OR YOU MAY BE EXPOSED TO DANGEROUS VOLTAGE. REFER
SERVICING TO QUALIFIED SERVICE PERSONNEL ONLY.
9. Do not defeat the safety purpose of the
polarized or grounding-type plug. A polarized
plug has two blades with one wider than the
other. A grounding type plug has two blades
and a third grounding prong. The wide blade
or the third prong are provided for your safety.
If the provided plug does not t into your
outlet, consult an electrician for replacement
of the obsolete outlet.
10. Protect the power cord from being walked on
or pinched particularly at plugs, convenience
receptacles, and the point where they exit from
the apparatus.
11. Only use attachments/accessories specied by
the manufacturer.
12. Use only with the cart, stand, tripod, bracket,
or table specied by the manufacturer, or
sold with apparatus. When a cart is used,
use caution when moving the cart/apparatus
combination to avoid injury from tip-over.
13. Unplug this apparatus during lightning storms
or when unused for long periods of time.
14. Refer all servicing to qualied service
personnel. Servicing is required when the
apparatus has been damaged in any way, such
as power supply cord or plug is damaged,
liquid has been spilled or objects have fallen
into the apparatus, the apparatus has been
exposed to rain or moisture, does not operate
normally, or has been dropped.
1. Read these instructions.
- All these safety and
operating instructions should be read before the
product is operated.
2. Keep these instructions.
- The safety, operating
and use instructions should be retained for future
reference.
3. Heed all warnings.
- All warnings on the product
and in the operating instructions should be
adhered to.
4. Follow all instructions.
- All operating and use
instructions should be followed.
5. Do not use this apparatus near water.
– For
example: near a bath tub, wash bowl, kitchen
sink, laundry tub, in a wet basement; or near a
swimming pool; and like.
6. Clean only with dry cloth.
– Unplug this product
from the wall outlet before cleaning. Do not use
liquid cleaners.
7. Do not block any ventilation openings.
Install in accordance with the manufacturer’s
instructions. Slots and openings in the cabinet
are provided for ventilation and to ensure reliable
operation of the product and to protect it from
over-heating. The openings should never be
blocked by placing the product on a bed, sofa,
rug or other similar surface. This product should
not be placed in a built-in installation such as
a bookcase or rack unless proper ventilation is
provided or the manufacturer’s instructions have
been adhered to.
8. Do not install near any heat sources such
as radiators, heat registers, stoves, or other
apparatus (including ampliers) that produce
heat.
Page 4

4
ON COPYRIGHTS:
It is forbidden by law to copy, broadcast, show, broadcast via cable, play in public, or rent copyrighted material without permission.
This product features the copy protection function developed by Macrovision. Copy protection signals are recorded on some discs.
When recording and playing the pictures of these discs on a VCR, picture noise will appear.
This product incorporates copyright protection technology that is protected by method claims of certain U.S. patents and
other intellectual property rights owned by Macrovision Corporation and other rights owners. Use of this copyright protection
technology must be authorized by Macrovision Corporation, and is intended for home and other limited viewing uses only unless
otherwise authorized by Macrovision Corporation. Reverse engineering or disassembly is prohibited.
LEGAL NOTICE
This product is protected by certain intellectual property rights of Microsoft Corporation. Use or distribution of such
technology outside of this product is prohibited without a license from Microsoft Corporation or an authorized Microsoft
Corporation subsidiary.
This product is intended to be used with a program guide service provided by Microsoft and that any rights or claims the
purchaser may have regarding the use, content or availability of the service will be determined by the terms of service
agreement provided by Microsoft that govern such service.
Page 5

5
Table of Contents
LG LRM-519 FRONT PANEL AND
REAR PANEL . . . . . . . . . . . . . . . . . . . . . . . . 9
PACKAGE CONTENTS
. . . . . . . . . . . . . . . 10
Optional accessories . . . . . . . . . . . . . . . . . . . . . . . 10
SUBSCRIBE TO THE MICROSOFT®
PROGRAM GUIDE
. . . . . . . . . . . . . . . . . . 11
CONNECT THE RECORDER TO
THE TV, AUDIO COMPONENTS,
AND INTERNET
. . . . . . . . . . . . . . . . . . . . 12
Connect to the TV source . . . . . . . . . . . . . . . . . . . 12
Standard Cable . . . . . . . . . . . . . . . . . . . . . . . . 12
Digital Cable . . . . . . . . . . . . . . . . . . . . . . . . . . 13
Satellite . . . . . . . . . . . . . . . . . . . . . . . . . . . . . . . 14
Antenna . . . . . . . . . . . . . . . . . . . . . . . . . . . . . . 15
Multiple TV sources . . . . . . . . . . . . . . . . . . . . . . . . 16
Satellite and Antenna . . . . . . . . . . . . . . . . . . . 16
Satellite and Standard Cable . . . . . . . . . . . . . 17
Connect the Recorder to the TV . . . . . . . . . . . . . 19
Use Composite Cables . . . . . . . . . . . . . . . . . . 19
Use S-Video Cables . . . . . . . . . . . . . . . . . . . . . 19
Use Component Cables . . . . . . . . . . . . . . . . . 20
Using Composite versus 480i/480p . . . . . . . 20
The IR control cable and the Serial Data
Control Cable . . . . . . . . . . . . . . . . . . . . . . . . . . . . . 21
Digital or Optical Audio Setup . . . . . . . . . . . . . . . 23
Digital Audio cable . . . . . . . . . . . . . . . . . . . . . 23
TOS cable . . . . . . . . . . . . . . . . . . . . . . . . . . . . . 24
Connect to the Microsoft® Program
Guide Service . . . . . . . . . . . . . . . . . . . . . . . . . . . . . 24
Connect to a wired network (Ethernet) . . . . 24
Connect to a wireless network (802.11). . . . 25
Supported USB Wireless Network
Adaptors . . . . . . . . . . . . . . . . . . . . . . . . . . . . . . 25
Connect using dial-up . . . . . . . . . . . . . . . . . . 26
Program the Remote to Control the TV . . . . . . . 26
To program the remote control . . . . . . . . . . 27
TV Manufacturing Remote Control Codes . . . . . 28
Connect the Power to the Recorder and
Turn on the TV . . . . . . . . . . . . . . . . . . . . . . . . . . . . 30
SET UP THE RECORDER . . . . . . . . . . . . . . 31
Welcome to Setup . . . . . . . . . . . . . . . . . . . . . . . . . 31
Terms of Service and End-User License
Agreement . . . . . . . . . . . . . . . . . . . . . . . . . . . . . . . . 32
1. Set up Connection . . . . . . . . . . . . . . . . . . . . . . . 32
1a. Use Broadband . . . . . . . . . . . . . . . . . . . . . 32
Wireless Conguration . . . . . . . . . . . . . . 32
If You Select “Use USB Wireless
Network Adaptor” . . . . . . . . . . . . . . . . . . 32
If You Select “Use Wired
(Ethernet) Connection” . . . . . . . . . . . . . . 33
1b. Use Phone Line . . . . . . . . . . . . . . . . . . . . . 33
Phone Conguration . . . . . . . . . . . . . . . . 33
Enter Your Home Phone Number . . . . . 33
Phone Connection . . . . . . . . . . . . . . . . . . 34
Choose Dial-up Number . . . . . . . . . . . . . 34
2. Clock Setting . . . . . . . . . . . . . . . . . . . . . . . . . . . . 34
3. Subscription Status . . . . . . . . . . . . . . . . . . . . . . . 35
4. Enter your ZIP Code . . . . . . . . . . . . . . . . . . . . . . 35
5. Wiring Setup and TV Service Provider . . . . . . 35
TV Service Provider . . . . . . . . . . . . . . . . . 36
Choose Number of Digits and
How You Change Channels . . . . . . . . . . 36
6. Set up the Recorder to Change
Channels on the Set-top Box . . . . . . . . . . . . . . . . 37
The IR Control Cable and the Serial
Data Control Cable . . . . . . . . . . . . . . . . . 37
Prepare for Set-top Box Setup . . . . . . . . 37
Video Test . . . . . . . . . . . . . . . . . . . . . . . . . 37
Select Remote Control Code . . . . . . . . . 37
Test Changing Channels . . . . . . . . . . . . . 38
Speed Test . . . . . . . . . . . . . . . . . . . . . . . . . 38
Recorder Remote Control Settings . . . . 38
7. Watch TV . . . . . . . . . . . . . . . . . . . . . . . . . . . . . . . 38
Downloading the Program Guide and
Software Updates . . . . . . . . . . . . . . . . . . . . . . . . . . 39
The First Time You Setup The Recorder . . . . 39
Future Program Guide Updates . . . . . . . . . . 39
Future Software Updates . . . . . . . . . . . . . . . . 39
Page 6

6
Parental Controls and Locks . . . . . . . . . . . . . . . . . 40
Create a Parental Control PIN . . . . . . . . . . . . 40
Set the Parental Control Policy . . . . . . . . . . . 40
Lock by Rating . . . . . . . . . . . . . . . . . . . . . 40
Lock by Channel . . . . . . . . . . . . . . . . . . . . 41
Lock DVD . . . . . . . . . . . . . . . . . . . . . . . . . . 41
Turn on Lock Policy . . . . . . . . . . . . . . . . . . . . . 41
Change PIN . . . . . . . . . . . . . . . . . . . . . . . . . . . 41
Reset . . . . . . . . . . . . . . . . . . . . . . . . . . . . . . . . . 41
Forgot the Parental Control PIN? . . . . . . . . . 41
Changing Settings . . . . . . . . . . . . . . . . . . . . . . . . . 41
Recorder . . . . . . . . . . . . . . . . . . . . . . . . . . . . . . . . . . 42
Guide Setup . . . . . . . . . . . . . . . . . . . . . . . . . . . . . . . 42
DVD Settings . . . . . . . . . . . . . . . . . . . . . . . . . . . . . . 43
Parental Controls . . . . . . . . . . . . . . . . . . . . . . . . . . 44
Phone and Network Setup . . . . . . . . . . . . . . . . . . 44
Run Setup Again . . . . . . . . . . . . . . . . . . . . . . . . . . . 44
System Information . . . . . . . . . . . . . . . . . . . . . . . . 44
Send to PC . . . . . . . . . . . . . . . . . . . . . . . . . . . . . . . . 44
Audio Settings . . . . . . . . . . . . . . . . . . . . . . . . . . . . . 44
WINDOWS® MEDIA CONNECT:
ACCESS PICTURES AND MUSIC
STORED ON A COMPUTER . . . . . . . . . . . 45
Before You Use Windows
Media Connect . . . . . . . . . . . . . . . . . . . . . . . . . . . . 45
Connect to a Computer Running
Windows Media Connect . . . . . . . . . . . . . . . . . . . 45
GETTING AROUND THE
RECORDER MENUS . . . . . . . . . . . . . . . . . 46
(START) . . . . . . . . . . . . . . . . . . . . . . . . . . . . . . 46
Move Around the Menus . . . . . . . . . . . . . . . . . . . 46
Select a Menu Item . . . . . . . . . . . . . . . . . . . . . . . . 46
Enter Text by Using the Remote . . . . . . . . . . . . . . 47
Viewing Pay-Per-View or
Video-On-Demand Programs . . . . . . . . . . . . . . . 47
USING THE RECORDER . . . . . . . . . . . . . . 48
Watching TV . . . . . . . . . . . . . . . . . . . . . . . . . . . . . . 48
Change Channels on the TV . . . . . . . . . . . . . 48
Switch between the Current Channel
and the Previous Channel . . . . . . . . . . . . . . . 48
Display Information about the
Current TV Show . . . . . . . . . . . . . . . . . . . . . . . 48
Controlling Live TV . . . . . . . . . . . . . . . . . . . . . 49
Pause Live TV . . . . . . . . . . . . . . . . . . . . . . 49
Continue Playback of a Paused
TV Show . . . . . . . . . . . . . . . . . . . . . . . . . . . 49
Replay Live TV . . . . . . . . . . . . . . . . . . . . . . 49
Rewind Live TV . . . . . . . . . . . . . . . . . . . . . 49
Fast Forward . . . . . . . . . . . . . . . . . . . . . . . 49
Skip Ahead . . . . . . . . . . . . . . . . . . . . . . . . 49
Return to Live TV . . . . . . . . . . . . . . . . . . . . . . . 49
Turn the TV Off or On. . . . . . . . . . . . . . . . . . . 50
Change the TV Volume . . . . . . . . . . . . . . . . . 50
Mute the TV . . . . . . . . . . . . . . . . . . . . . . . . . . . 50
Change the TV Input Source . . . . . . . . . . . . . 50
The Program Guide . . . . . . . . . . . . . . . . . . . . . . . . 50
Turn off the Guide . . . . . . . . . . . . . . . . . . 51
Navigating within the Program Guide . . . . . 51
Recorded TV . . . . . . . . . . . . . . . . . . . . . . . . . . . . . . 51
Record the Current Show . . . . . . . . . . . . . . . . 51
Record a Show Using the Guide . . . . . . . . . . 52
Record Using Search . . . . . . . . . . . . . . . . . . . . 52
Record a TV Series. . . . . . . . . . . . . . . . . . . . . . 53
Manually Record a Show . . . . . . . . . . . . . . . . 53
Stop the Current Recording . . . . . . . . . . . . . . 53
Cancel Future Recordings . . . . . . . . . . . . . . . 53
Recording Conicts . . . . . . . . . . . . . . . . . . . . . 54
Change Recording Options . . . . . . . . . . . . . . 54
View Information about a Show
That is Recording. . . . . . . . . . . . . . . . . . . . . . . 54
Copy a Recording to a DVD
or a Computer . . . . . . . . . . . . . . . . . . . . . . . . . 54
Record-protected program content . . . . . . . 54
View a Recorded Show . . . . . . . . . . . . . . . . . . 55
View Scheduled Recordings . . . . . . . . . . . . . 55
View Info about a Recorded Show . . . . . . . . 55
Add Additional Storage . . . . . . . . . . . . . . . . . . . . . 55
Connect a USB drive for storage . . . . . . . . . 56
Remove a USB drive . . . . . . . . . . . . . . . . . . . . 56
Page 7

7
Search . . . . . . . . . . . . . . . . . . . . . . . . . . . . . . . . . . . . 57
Play a DVD/CD . . . . . . . . . . . . . . . . . . . . . . . . . . . . 57
Viewing a DVD . . . . . . . . . . . . . . . . . . . . . . . . 57
DVD Controls . . . . . . . . . . . . . . . . . . . . . . . . . . 58
Create a DVD. . . . . . . . . . . . . . . . . . . . . . . . . . . . . . 58
Copying Copy-protected Shows . . . . . . . . . . 58
Copy of Commercial/Retail
Copyrighted DVDs . . . . . . . . . . . . . . . . . . . . . 59
Copy a Recording to a DVD . . . . . . . . . . . . . 59
Copy a Large Recording to More
Than One DVD . . . . . . . . . . . . . . . . . . . . . . . . 59
My Pictures . . . . . . . . . . . . . . . . . . . . . . . . . . . . . . . 60
View Pictures with the Recorder . . . . . . . . . . 60
My Music . . . . . . . . . . . . . . . . . . . . . . . . . . . . . . . . . 61
Find Music to Play . . . . . . . . . . . . . . . . . . . . . . 61
Listen to Music . . . . . . . . . . . . . . . . . . . . . . . . . 61
Play Music on a CD or DVD . . . . . . . . . . 61
Play Music on a USB Device
or Another Computer . . . . . . . . . . . . . . . 62
Shufe and Repeat Music . . . . . . . . . . . . . . . 62
Add Music to a Slide Show . . . . . . . . . . . . . . 62
Send to PC . . . . . . . . . . . . . . . . . . . . . . . . . . . . . . . . 63
If Your Computer is Connected to a
Network Domain . . . . . . . . . . . . . . . . . . . . . . . 63
Before Using Send to PC . . . . . . . . . . . . . . . . 63
Your Network User Account
and Password . . . . . . . . . . . . . . . . . . . . . . . . . . 63
Windows XP Home Edition. . . . . . . . . . . 63
Windows XP Professional . . . . . . . . . . . . 63
The Shared Folder and the Location
of the Folder . . . . . . . . . . . . . . . . . . . . . . . . . . 64
Windows XP Home Edition. . . . . . . . . . . 64
Windows XP Professional . . . . . . . . . . . . 64
Use Send to PC to Copy a Recording
to a Computer . . . . . . . . . . . . . . . . . . . . . . . . . 65
Stop the Copy Process . . . . . . . . . . . . . . . . . . 65
APPENDIX A: THE MICROSOFT®
PROGRAM GUIDE . . . . . . . . . . . . . . . . . . 66
APPENDIX B: TROUBLESHOOTING
. . . . 67
SPECIFICATIONS
. . . . . . . . . . . . . . . . . . . 73
LRM-519 Limited Warranty . . . Rear Cover
Page 8
8
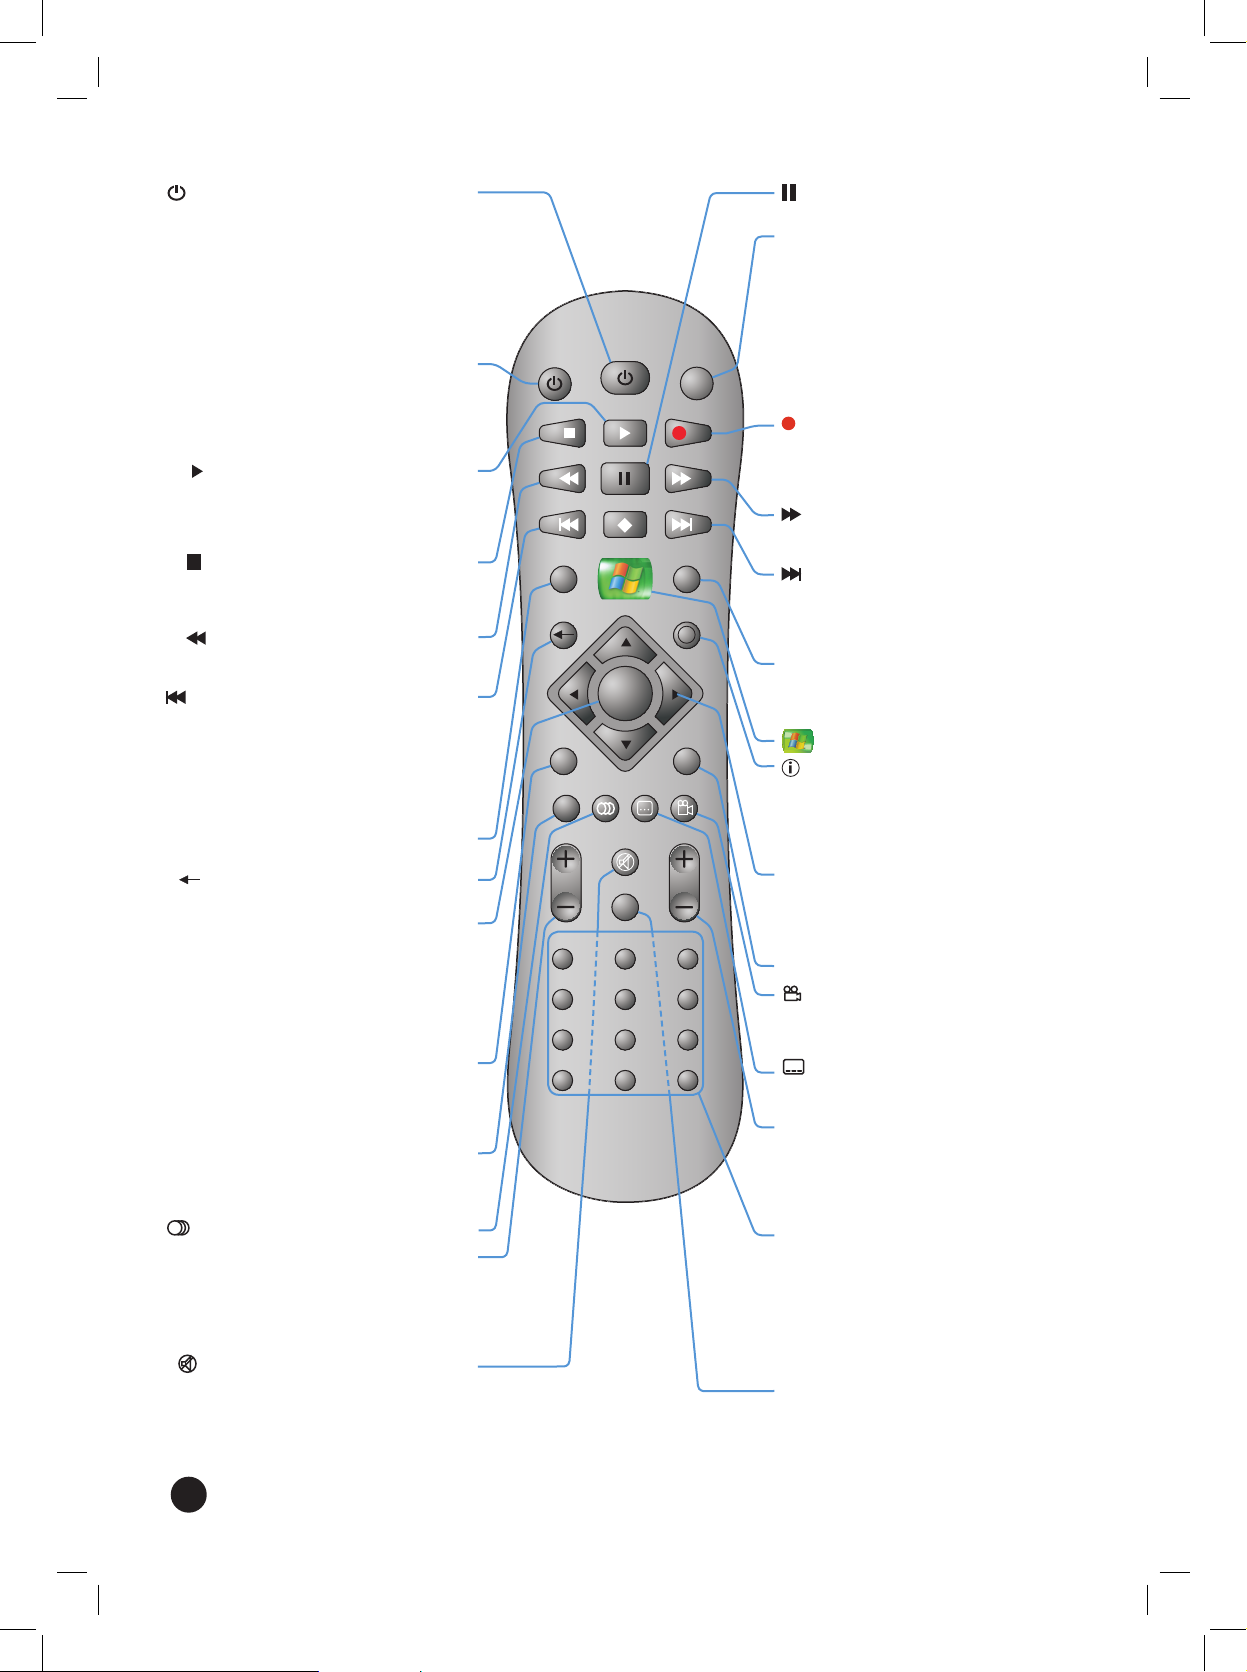
TV
POWER
TV
INPUT
4 5
GHI JKL MNO
PQRS
TUV WXYZ
2 31
7
8 9
0
ABC DEF
MUTE
CLEAR
VOL
CH / PG
TOP MENU AUDIO SUBTITLE ANGLE
BACK
GUIDE
RECORDED TV
LIVE TV
STOP
PLAY REC
REW
PAUSE
FWD
SKIPREPLAY
INFO
DVD
MENU
POWER
6
OK
*
#
i
POWER Turns on or turns off the
Recorder.
When the Recorder is turned
off, the Recorder is actually in a
standby mode. While in standby,
the Recorder will continue copying programs to a DVD (the
Create DVD/CD feature) and
record any programs you have
scheduled.
TV POWER Turn on or turn off the TV. To use
the TV POWER button, you must
program the remote to control
your TV. For more information,
see Program the Remote to
Control the TV.
PLAY Play a paused or stopped DVD,
CD, song, a recorded TV show
or a paused TV show. To play a
stopped DVD, you can also select
Play DVD on the Start menu.
STOP Stop playback of a DVD, a CD
track, a song from a USB drive
or another computer, and a recorded TV program.
REW Rewind through a recorded pro-
gram, live TV, the current chapter
of a DVD, or track of a CD.
REPLAY Replays the previous 7 seconds
of live TV or a recorded show.
Move back to the beginning of
the current chapter of a DVD
or track of a CD; press a second
time to go back to the preceding chapter of a DVD or track
of a CD.
RECORDED
TV
Display recorded TV shows.
BACK Return to the previous menu or
screen.
OK Selects the current on-screen
button such as Next, OK, Cancel,
or an item in a list such as the
Program Guide.
When watching live TV, press
once to switch from the current
channel to the previous channel.
Press OK again to switch back.
DVD
MENU
During DVD playback, displays
the top-level (main) DVD menu.
If you are within a DVD menu,
takes you back one level in the
menu.
TOP MENU During DVD playback or while
navigating DVD menus, takes
you back to the top-level (main)
menu on the DVD.
AUDIO Change DVD audio options.
VOL Increases (+) or decreases (-)
the TV volume. To use the VOL
button, you must program the
remote to control your TV. For
more information, see Program
the Remote to Control the TV.
MUTE Mutes the TV. To use the MUTE
button, you must program the
remote to control your TV. For
more information, see Program
the Remote to Control the TV.
PAUSE Pause a DVD, CD, song, live TV,
or recorded TV program.
TV INPUT Change the video inputs on
your TV. For example, the Re-
corder will be connected to one
video input (such as VIDEO 1)
and a Video Cassette Recorder
could be connected to VIDEO
2. To use the TV INPUT button,
you must program the remote
to control your TV. For more
information, see Program the
Remote to Control the TV.
REC When watching TV, records the
current program. In the Guide
or the mini-Guide, schedules
the selected show to be recorded.
FWD Fast forward through a record-
ed program, the current chapter
of a DVD, or track of a CD.
SKIP Jump forward 30 seconds of a
recorded program or paused
live TV.
Advances to the next chapter
of a DVD or track of a CD.
GUIDE Press once to display the Mini-
Guide. Press again to display
the Program Guide. Press a
third time to dismiss the Guide.
Start Display the Start menu.
INFO Display information info in a
window about the live TV show
or the recorded program you
are watching. Press INFO again
to display additional information in full-screen.
Up, down,
left, and
right
arrows
Move between on-screen buttons (menu buttons, navigation
buttons) and Guide items.
Moves between pictures in a
slideshow.
LIVE TV Displays live TV.
ANGLE View alternate scene angles.
If you enable this feature, this
icon appears when an alternate
angle is available.
SUBTITLE
Turn on or turn off DVD subtitles or scroll through available
subtitle languages.
CH/PG Change TV channels one at a
time on the Recorder.
In the on-screen lists (such as
the Program Guide) advances
the list one page at a time up
or down.
Numeric
keypad
When watching live TV, enter a
channel number and press OK
to change to that channel.
In onscreen menus, enter numbers (such as your zip code during setup or a channel number
when manually recording) or
text (such as when searching
for a program).
CLEAR Clears on-screen entries (such
as Search text) one character
to the left at a time. Clears the
Guide or any on-screen menu
or page.
Page 9

9
LG LRM-519 Front Panel and Rear Panel
Disc Tray:
Insert a
DVD or
CD here.
POWER:
Turns the
Recorder on and
off. A blue light
appears when
the Recorder is
turned on.
OPEN/CLOSE:
Opens or
closes the
disc tray.
(Play):
Play the
DVD or CD
inserted
into the
disc tray.
DVD PLAY:
Indicates
a DVD is
playing.
HDD REC.:
Indicates a
show is
being
recorded
to the hard
disk drive.
(Pause):
Pause playback of the
DVD or CD.
(Stop):
Stops playback of the
DVD or CD.
HDD PLAY:
Indicates a
recorded
show stored
on the hard
disk drive
is playing.
DVD REC.:
Indicates a
recorded
show is
being
copied to
a DVD.
Display Window:
Shows the current
status of the
Recorder.
ANT.IN:
Connect
VHF/UHF/
CATV TV
service.
RF BYPASS:
Passes
through the
ANT.IN signal.
S-VIDEO OUT:
Connect to
a TV with an
S-Video Input.
S-VIDEO IN:
Connect a digital cable or
satellite set-top
box with an
S-Video cable.
AUDIO IN:
Connect the
audio output
of a digital
cable or
satellite set-
top box with
audio cables.
VIDEO IN:
Connect the
video output
of a digital
cable or
satellite set-
top box with
a video cable.
AUDIO OUT:
Connect to a
TV with audio
inputs.
VIDEO OUT:
Connect to a
TV with video
inputs.
COMPONENT
OUT: Connect
to a TV with
component
(Y/Pb/Pr)
inputs and
audio inputs.
DIGITAL OUT –
COAXIAL:
Connect to digital (coaxial) audio
equipment.
DIGITAL OUT –
OPTICAL:
Connect to digital (optical) audio
equipment.
COMPOSITE/
480i/480p: Set
to COMPOSITE
if using a video
cable/S-Video
cable to connect
to the TV. Select
480i/480p if using component
cables.
CONTROL – IR:
Connect the IR
control cable (if
used).
CONTROL – SERIAL:
Connect the serial
data control cable
(if used).
ETHERNET:
Connect to
an Ethernet
network.
USB:
Connect USB
2.0 drives or
a USB wireless network
adaptor.
PHONE: Con-
nect a phone
cable for dialup connections.
Power cord:
Connect the AC
power cord.
Page 10

10
+
-
+
-
HDD & DVD RECORDING
OPEN/CLOSE
USB extender Telephone cable splitter
Package Contents
Recorder
Quick Setup Guide, User’s Guide Remote control
Composite audio/video cable RF (coax) cable
Phone cable (RJ-11)
IR Control Cable
Serial data control cable
2 AAA Batteries
Power cord
Optional accessories
Ethernet cable (RJ-45) Component video cable Antenna to RF/coax
converter (splitter)
Digital audio cable Optical (TOS) audio cable S-Video cable
2nd Composite audio/
video cable
2nd RF/Coax cable RF/coax cable splitter
Page 11

11
Subscribe to the Microsoft® Program Guide
To receive all of the features of the LG LRM-519 Digital Media Recorder,
you must subscribe to the Microsoft® Program Guide. Without a
subscription to this service, the Recorder will have limited features.
To sign-up for the Microsoft Program Guide visit
www.microsoftprogramguide.com on the web.
For a list of the features provided by the Microsoft Program Guide, see
The Microsoft® Program Guide in the Appendix A.
Page 12

12
Connect the Recorder to the TV, Audio Components, and Internet
There are four steps to connecting the Recorder.
• Connect a TV source or multiple TV sources (standard cable, digital
cable, satellite receiver, or antenna) to the Recorder.
• Connect the video and audio from the Recorder to the TV. (If
you have a Home Theater system, you can connect the audio to
the amplier or receiver instead of the TV.)
• Connect the Recorder to the Internet (broadband or dial-up service)
to download the Program Guide and Software Updates.
• Program the Recorder remote control to operate the TV.
More information about each step is provided in the following sections.
Connect to the TV source
The TV source provides the TV service to your home. The TV source is typically
an antenna, a standard cable, a digital cable service, or a satellite service.
Notes
· Labels for connections on TVs vary by brand. If you cannot nd a
connection as specied in the following instructions, refer to the
TV documentation.
· Depending on the TV service, you can connect the service to the
Recorder by using a S-Video cable, a composite cable, or an RF/coax
cable. See the following sections for connection instructions.
· When you connect a digital cable set-top box or a satellite set-top
box to the Recorder, you must use composite or S-Video cables.
Using an RF/coax cable to connect a cable set-top box or a satellite
set-top box to the Recorder is not supported.
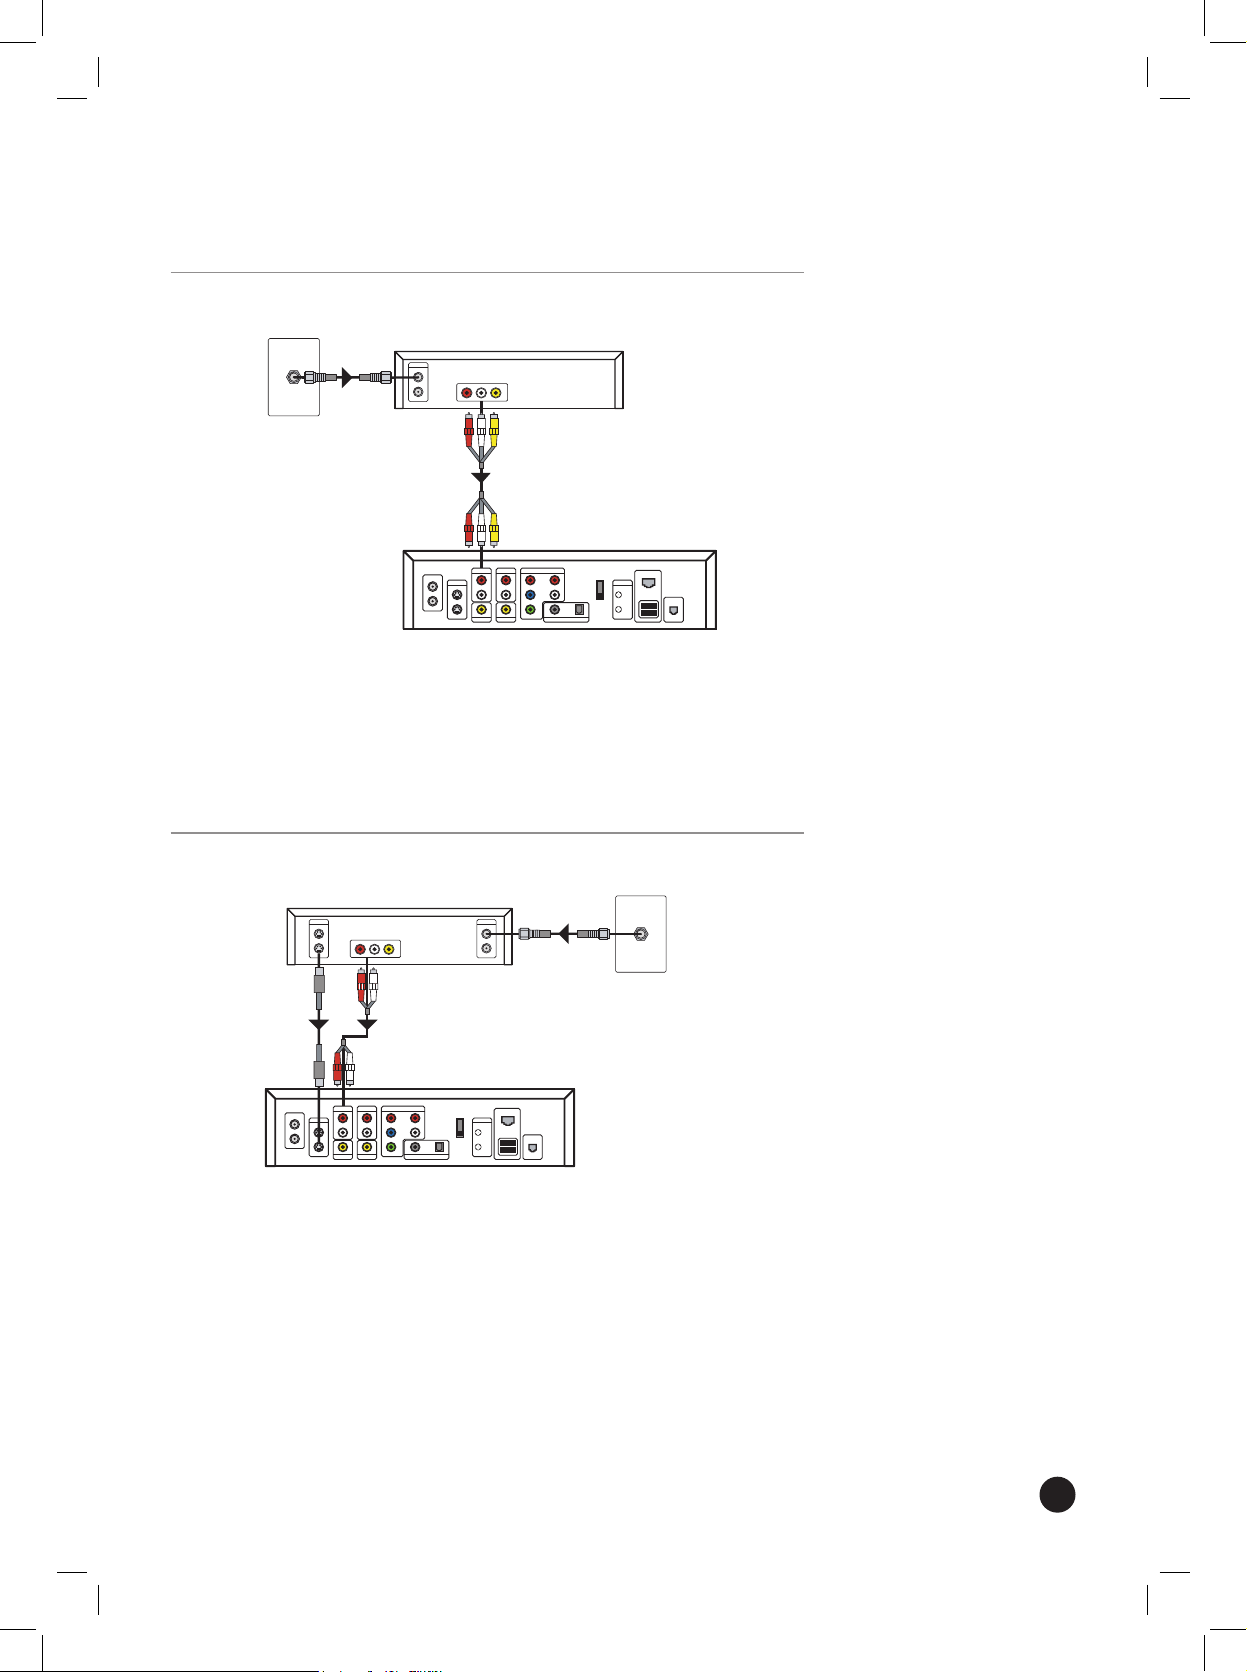
Standard Cable
If you use RF/coaxial cable (Included)
ANT.
IN
RF
BY-
PASS
Wall Outlet
Recorder
1. Connect an RF/coaxial cable to the cable connection in the wall.
2. On the Recorder, connect the RF/coaxial cable to the ANT.IN
connector.
Page 13
13
Digital Cable
Note Using an RF/coax cable to connect a cable set-top box to the
Recorder is not supported.
If you use composite cable (Included)
Digital Cable Set-Top Box
Recorder
Wall Outlet
1. Connect the composite audio/video cables (red/white/yellow) to
the composite out connection on the digital cable set-top-box.
2. On the Recorder, connect the composite video cable (yellow) to
VIDEO IN. Connect the composite audio cables (red and white)
to AUDIO IN.
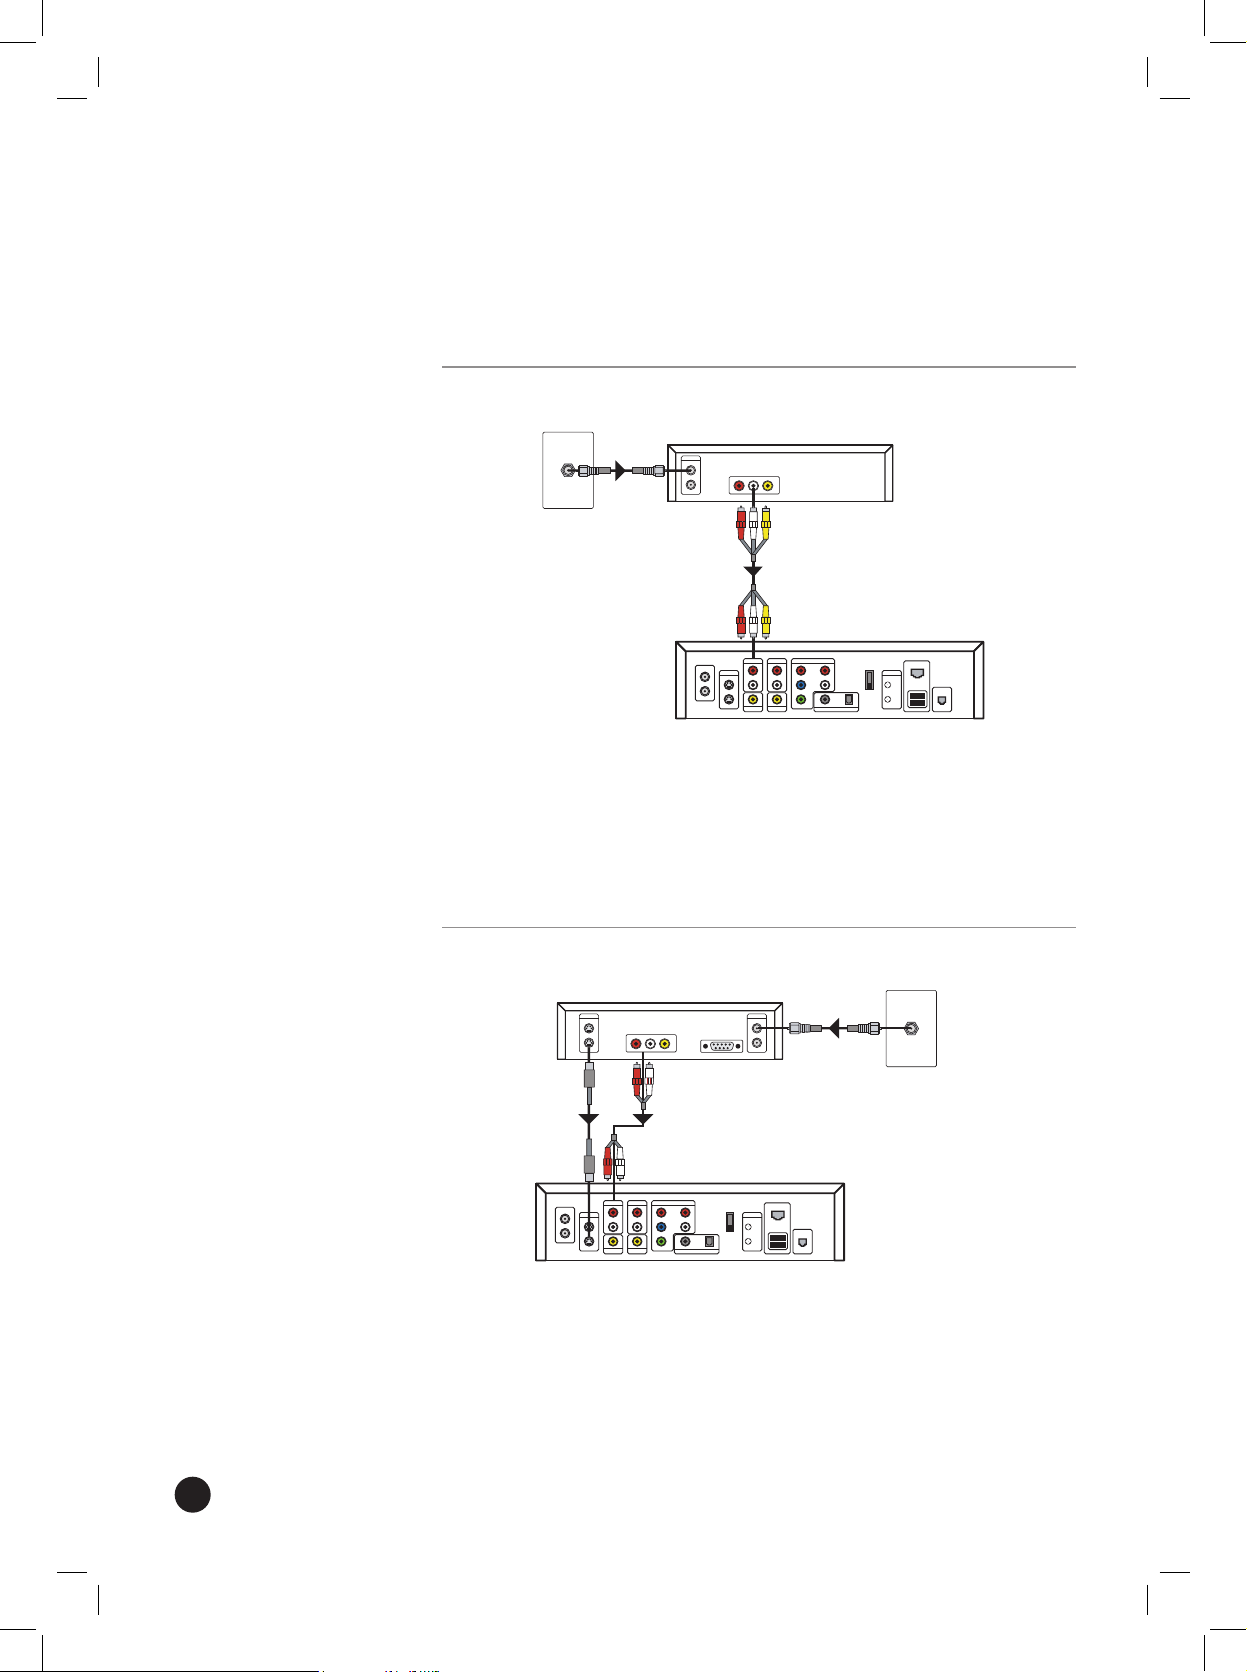
If you use S-Video cable (Not included)
Digital Cable Set-Top Box
Wall Outlet
Recorder
1. On the digital cable set-top box, connect the S-Video cable (not
included) to the S-Video out connection.
2. On the Recorder, connect the S-Video cable to the S-VIDEO IN
connection.
3. Connect the audio cables (red and white) from the audio out jacks
on the digital cable set-top-box to the AUDIO IN audio connectors
on the Recorder.
Page 14
14
Satellite
Notes
• The Recorder does not support satellite set-top boxes that do not
have Composite (red/white/yellow), or S-Video output connections.
• Using an RF/coax cable to connect a satellite set-top box to the
Recorder is not supported.
If you use composite cable (Included)
Satellite Receiver
Recorder
Wall Outlet
1. Connect the composite audio/video cable (red/white/yellow) to the
composite out connection on the satellite receiver.
2. On the Recorder, connect the composite video cable (yellow) to
VIDEO IN. Connect the composite audio cables (red and white)
to AUDIO IN.
If you use S-Video cable (Not included)
Satellite Receiver
Recorder
Wall Outlet
1. On the satellite receiver set-top box, connect the S-Video cable (not
included) to the S-Video out connection.
2. On the Recorder, connect the S-Video cable to the S-VIDEO IN
connection.
3. Connect the audio cables (red and white) from the audio out
connectors on the satellite receiver to the AUDIO IN audio
connectors on the Recorder.
Page 15

15
Antenna
Connect an antenna
Recorder
Wall OutletAntenna
OR
1. Connect the antenna leads
to an Antenna to an
RF/coaxial converter.
2. On the Recorder, connect
the RF/coaxial converter to
the ANT.IN connector.
OR
1. Connect an RF/coaxial cable
to the antenna connection
in the wall.
2. On the Recorder, connect
the RF/coaxial cable to the
ANT.IN connector.
Page 16

16
Multiple TV sources
The Recorder supports multiple TV sources connected at the same time.
You can connect satellite service and an antenna (for example, if you use
an antenna to receive local channels and satellite for all other channels),
or satellite service and standard cable service.
Satellite and Antenna
Connect the satellite receiver
Satellite Receiver
Recorder
Wall Outlet
1. Connect the S-Video cable
(not included) to the S-Video
out connection on the
satellite receiver.
2. On the Recorder, connect the
S-Video cable to the S-VIDEO
IN connection.
3. Connect the audio cables (red
and white) from the audio out
connectors on the satellite
receiver to the AUDIO IN
audio connectors on the
Recorder.
OR
1. Connect the audio/video
cables (red/white/yellow)
to the composite out
connection on the satellite
receiver.
2. On the Recorder, connect
the composite video cable
(yellow) to VIDEO IN.
Connect the composite
audio cables (red and white)
to AUDIO IN.
Page 17

17
Connect the antenna
Recorder
Wall OutletAntenna
OR
1. Connect the antenna leads to an Antenna to RF/coaxial converter or
connect an RF/coaxial cable to an antenna wall connector.
2. On the Recorder, connect the Antenna to RF/coaxial converter or the
RF/coaxial cable to the ANT.IN connector.
Satellite and Standard Cable
Note This conguration does not support standard cable with
premium services that require a set-top box
Connect the satellite receiver
Satellite Receiver
Recorder
Wall Outlet
1. Connect the S-Video
cable (not included) to the
S-Video out connection on
the satellite receiver.
2. On the Recorder, connect
the S-Video cable to the
S-VIDEO IN connection.
3. Connect the audio cables
(red and white) from the
audio out connectors
on the satellite receiver
to the AUDIO IN audio
connectors on the Recorder.
OR
1. Connect the audio/video
cables (red/white/yellow)
to the composite out
connection on the satellite
receiver.
2. On the Recorder, connect
the composite video cable
(yellow) to VIDEO IN.
Connect the composite
audio cables (red and
white) to AUDIO IN.
Page 18

18
Connect the standard cable
ANT.
IN
RF
BY-
PASS
Wall Outlet
Recorder
1. Connect the RF/coaxial cable to the cable wall connection.
2. On the Recorder, connect the RF/coaxial cable to the ANT.IN
connector.
Page 19

19
Connect the Recorder to the TV
To connect the Recorder to the TV, you can use S-Video, Composite, or
Component cables.
You may need to change the TV video source to use the Recorder. On
your TV remote control or the front panel of your TV, press TV/VIDEO
until you see the Recorder Welcome screen. The TV/VIDEO button
might be marked SOURCE, INPUT, VIDEO 1, or VIDEO 2.
Important Connecting the Recorder to a TV by using an RF/coaxial
cable is not supported.
Note Labels for connections on TVs vary by brand. If you cannot nd
a connection as specied in the following instructions, refer to the TV
documentation.
Use Composite Cables
AV IN
TV
Recorder
1. On the Recorder, connect the composite video cable (yellow) to
VIDEO OUT. Connect the composite audio cables (red and white)
to AUDIO OUT.
2. On the TV, connect the composite cable to the composite In
connections (for example, AV IN, TV IN).
Use S-Video Cables
AV IN
TV
Recorder
S-Video
1. On the Recorder, connect the S-Video cable (not included) to the
S-VIDEO OUT connection.
2. On the TV, connect the S-Video cable to the S-Video in connection.
Page 20
20
3. Connect the audio cables (red and white) from the AUDIO OUT
connections on the Recorder to the audio in (red and white)
connections on the TV.
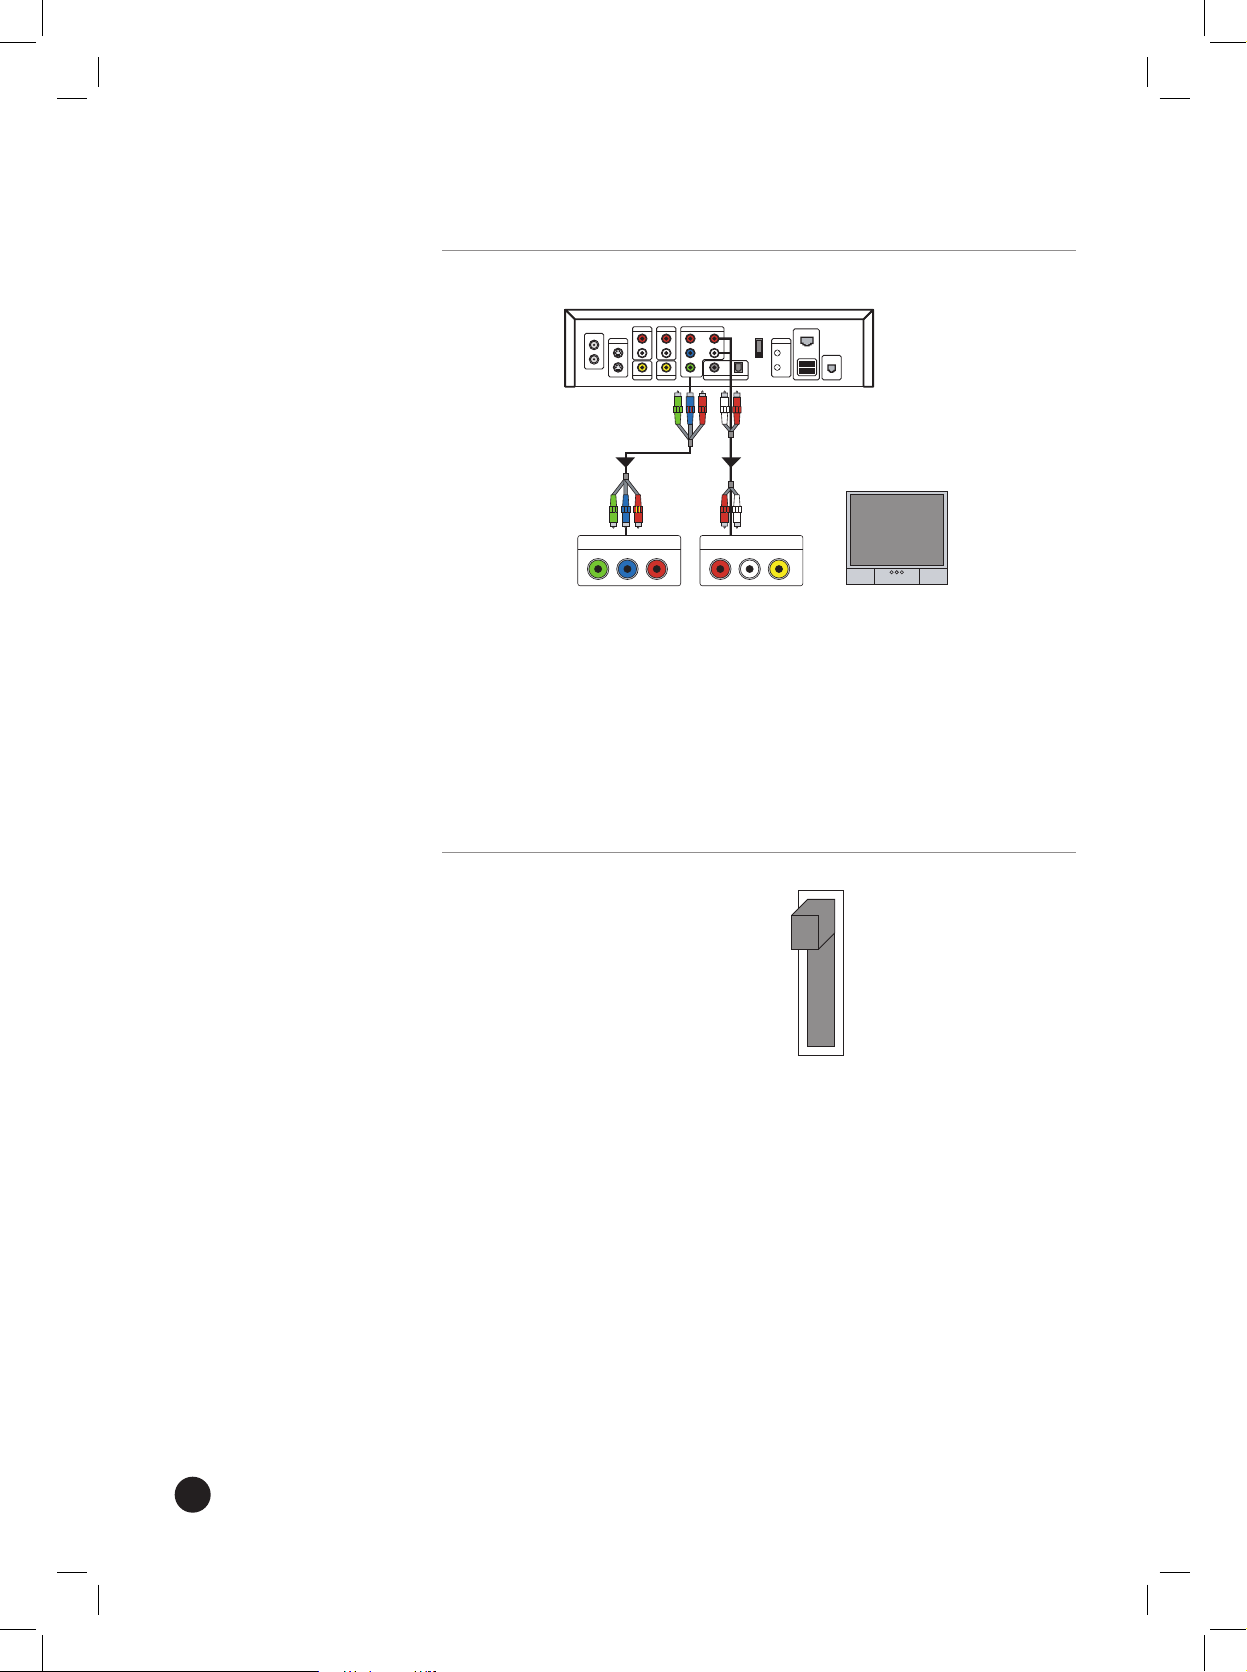
Use Component Cables
AV IN
TV
Recorder
COMPONENT IN
1. On the Recorder, connect the component cables (Y/Pr/Pb) (not
included) to the COMPONENT OUT connections.
2. On the TV, connect the component cables to the COMPONENT IN
connections. These connections may be labeled as AV IN or TV IN.
3. Connect the audio cables (red and white) from the AUDIO OUT
connections on the Recorder to the audio in connections (red and
white) on the TV.
Using Composite versus 480i/480p
Composite
480i
480p
• When using composite or S-Video cables, make sure the composite/
480i/480p switch is set to Composite.
• When using Component cables, make sure the switch is set to 480i
(interlaced) or 480p (progressive scan), depending on your TV. If your
TV supports both 480i and 480p, select 480p. To determine if your
TV supports 480i or 480p, refer to your TV documentation.
• To change the switch after you have been using the Recorder, make
sure the Recorder is in Standby mode. To place the Recorder into
Standby mode, press POWER on the front of the Recorder or POWER
on the remote. When the Recorder is in Standby mode, the Power
light will turn off and the time displays on the front panel. Change
the switch and then turn on the Recorder.
Page 21

21
The IR Control Cable and the Serial Data Control Cable
If you have digital cable TV service or satellite TV service, you must
use the IR control cable or the serial data control cable to connect the
Recorder to the digital cable set-top box or the satellite receiver set-
top box. When you change the channels by using the remote or when
the Recorder must change the channel to record a show you have
scheduled, the IR control cable or the serial data control cable sends a
code to the set-top box to change the channel.
02
The IR control cable works with any set-top box that has a remote
control. Plug the mini-jack on the cable into the Recorder, and then
place the other end of the cable in front of the remote control receiver
(or sensor) on the front of the set-top box.
The serial data control cable can only be connected to a satellite set-top
box with a 9-pin serial input port. The mini-plug on the cable connects
to the Recorder.
9-pin serial port
Notes
•
The serial data control cable provides the best connection between the
Recorder and a satellite set-top box. However, only a few satellite set-top
boxes have a serial input port. If your satellite set-top box does not have this
serial input port, you must use the IR control cable.
• During the on-screen setup process, the Recorder will ask you to select the
brand and a manufacturer code for the digital cable or satellite set-top
box to which your recorder is connected. Selecting the right brand and
manufacturer code will allow the recorder to change channels on the cable
or satellite set-top box using the IR control cable or serial control cable.
• Some satellite set-top boxes—including some DirecTV set-top boxes with
Home Control or non-standard serial connections—require an additional
cable to connect the Recorder to the satellite set-top box. To determine if
your satellite set-top box requires this cable or to purchase the cable, contact
your satellite set-top box retailer or the satellite service provider.
• Do not connect both the IR control cable and the serial data control cable to
the satellite set-top box at the same time.
• Before you connect the serial data control cable, make sure the power cord
for the Recorder and the power cord for the satellite set-top box are not
plugged into a power outlet or power strip.
Page 22

22
Connect the IR control cable
Digital Cable Set-Top Box/
Satellite Receiver
Recorder
Front
1. On the Recorder, connect the mini-jack of the IR control cable to the
IR port.
2. On the IR control cable, attach the adhesive tape (included) to the
at surface just below of the blaster on the IR control cable.
3. On the digital cable set-top box or satellite set-top box, locate the
remote control receiver/sensor.
The remote control receiver/sensor is usually behind a small window
on the front panel of the set-top box. If you cannot locate the
receiver, shine a ashlight along the front of the set-top box. Refer
to the set-top box documentation or contact your cable service or
satellite service provider for more information.
4. Place the IR control cable blaster in front of the remote control
sensor and press the top of the blaster (with the adhesive tape) to
the surface below the set-top box.
OR
Connect the serial data control cable
Satellite Receiver
Recorder
1. On the satellite set-top box, connect the serial data cable to the
9-pin serial port.
2. On the Recorder, connect the mini-jack to the SERIAL port.
Page 23

23
Digital Coaxial or Optical Audio Setup
Digital Audio cable
Digital audio cable provides 5.1 channel audio to an amplier or TV that
supports 5.1 channel audio.
Notes
• If the Recorder is connected to a home entertainment center
amplier/receiver or a TV that supports Dolby© Digital playback (a
Dolby Digital decoder), select Settings on the Start menu, select
DVD Settings, select DVD Audio Output, and then select Bitstream
under Dolby Digital. Otherwise, select PCM.
Note Dolby© Digital playback—5.1 audio—is only available if:
• The DVD that you are watching supports 5.1 channel audio.
• Your home entertainment center amplier/receiver supports 5.1
audio playback.
• You have selected Bitstream under Dolby Digital.
• If the Recorder is connected to a home entertainment center
amplier/receiver or a TV that supports DTS playback, select Settings
on the Start menu, select DVD Settings, select DVD Audio Output,
and then select Bitstream under DTS. Otherwise, select Off.
Note When Bitstream is selected, the Recorder sound effects are
disabled. Analog audio output (provided through red and white audio
cables connected to AUDIO OUT on the back of the Recorder) is also
disabled.
Digital coaxial audio
COAXIAL IN
Recorder
Entertainment Center
1. On the Recorder, connect a digital audio coax cable (not included) to
the DIGITAL OUT – COAXIAL connector.
2. On your home entertainment center amplier or receiver or your
TV, connect the digital audio coax cable to the Digital Audio In
connector.
Page 24

24
TOS cable
OPTICAL IN
Recorder
Entertainment Center
1. On the Recorder, connect an optical audio cable (not included) to
the DIGITAL OUT – OPTICAL connector.
2. On your home entertainment center amplier/receiver or your TV,
connect the optical audio cable to the Optical In connector.
Connect to the Microsoft® Program Guide service
To connect to the Internet to receive daily updates for the Microsoft
Program Guide service, the Recorder uses a broadband or dial-up
connection. For broadband service, you can connect the Recorder to
a wired network (Ethernet) or wireless network (802.11a, 802.11b, or
802.11g).
For information about the Microsoft Program Guide service, see
The Microsoft® Program Guide in Appendix A.
Connect to a wired network (Ethernet)
Wired network connection
Wall Outlet
Router/Cable Modem
ETHERNET
ETHERNET
OR
1. Connect the Ethernet cable to an Ethernet port in the wall, a router
or a cable modem.
2. On the Recorder, connect the Ethernet cable to the ETHERNET port.
Page 25

25
Connect to a wireless network (802.11)
The Recorder supports 802.11a, 802.11b, or 802.11g wireless networks.
Important The USB wireless network adaptor must be supported by
the Recorder. See the following list of supported USB wireless network
adaptors. Additional USB wireless network adaptors that are supported
can be found on the technical support website (www.LGusa.com/
DigitalMediaRecorders).
Supported USB Wireless Network Adaptors
Brand Model
D-Link DWL-G120
Netgear WG111
WG121
USB wireless network adaptor
Recorder
Wireless Router
Wireless Adapter
• Connect a USB wireless network adaptor to the USB port on the
Recorder.
Page 26

26
Connect using dial-up
The Recorder supports dial-up connections to the Microsoft® Program
Guide service.
The Recorder attempts to dial the Microsoft Program Guide service
once a day. If the Recorder receives a busy signal or no answer, another
attempt is made. So your telephone usage is not interrupted, the
Recorder dials the service during early morning hours.
Warning Toll charges may apply if using a long-distance number to
connect to the service. For more information, check with your phone
company.
Notes
• Assign more than one dial-up number. If a number is busy or fails
to answer, the Recorder will try dialing any additional numbers you
selected rst setup the Recorder.
• You can use a phone line splitter (included) to connect both the
Recorder and a telephone to the same phone jack in the wall.
Dial-up connection using a telephone line
Recorder
Wall Outlet
Telephone
• Connect the phone cable to a telephone jack and the PHONE port
on the Recorder.
Program the Remote to Control the TV
You can program the Recorder remote to control some of the functions
on your TV. These include:
• Turn on or turn off the TV
• Change the volume on the TV
• Mute the TV
• Change the input source on the TV (for example, if you have a VHS
player connected to the TV as well as the Recorder)
To use the remote to control your TV, you must program the remote
with a TV manufacturer code. See a list of the codes in the following
table of TV Manufacturer Remote Control Codes.
Page 27

27
To program the remote to control the TV
1. Make sure your TV is turned on.
2. On the Recorder remote, press and hold the TV POWER button.
3. Using the numeric keypad, enter the manufacturer code for your TV.
4. Your TV will turn off if the code is correct.
5. Press TV POWER. Your TV should turn on. Press VOL+/- to change
the volume or toggle MUTE to turn the sound on or off.
6. If the buttons do not turn the TV off or on, change the volume, or
mute the TV, repeat steps 2 to 5 using a different code for the TV
manufacturer.
Notes
• The remote control is programmed to control LG brand TVs by
default.
• If you enter a new code number, the code number previously entered
will be erased.
• After you replace the batteries in the remote, the code number you
have set may be reset to the default setting. If the remote does not
change the volume or mute the TV after you change the batteries,
re-enter the code.
Page 28

28
TV Manufacturer Remote Control Codes
Brand Codes Brand Codes
A MARK 112 143 JVC 034 038 070 083 145
ADMIRAL 072 081 161 KEC 043
AKAI 006 146 KENWOOOD 006 070
AMPRO 073 167 KLOSS 002 059
AMSTRAD 052 KMC 143
ANAM 026 043 054 056 080 104 108 112 115 118 121
131
KTV 006 043 143 154
AOC 004 006 058 112 LG 001 004 102 106 110 112 113 116 119 122 127
137 143
BLAUPUNKT 088 LODGENET 072
CANDLE 002 003 004 006 LOGIK 072
CAPEHEART 058 LUXMAN 004
CETRONIC 043 LXI 007 015 052 081 160 164 166
CITIZEN 002 003 004 006 043 101 103 143 MAGNAVOX 003 004 006 022 059 060 061 063 064 127 143
160 164
CLASSIC 043 MARANTZ 006 077 164
CONCERTO 004 MATSUI 164
CONTEC 039 043 050 051 MEMOREX 004 007 072 116
CORONADO 143 METZ 088
CRAIG 043 054 MGA 004 006 024 028 042 049 077 116
CROWN 043 143 MINERVA 088
CURTIS MATHES 004 006 101 116 143 MITSUBISHI 004 006 024 028 040 042 109 116 124 146
CXC 043 MTC 004 006 062 101
DAEWOO 004 016 017 043 044 055 071 076 103 107 111
114 117 120 123 125 127 128 136 143
NAD 015 025
DAYTRON 004 116 143 NEC 006 007 016 019 024 040 056 130 132 134
DYNASTY 043 NIKEI 043
DYNATECH 062 ONKING 043
ELECTROHOME 024 077 143 ONWA 043
EMERSON 004 005 006 028 043 047 048 050 051 096 116
143 151 153 154 155
OPTONICA 019 081
FISHER 007 057 PANASONIC 034 056 080 092 164
FUNAI 028 043 PHILCO 003 004 006 024 043 056 059 060 063 064 127
143 164
FUTURETECH 043 PHILIPS 003 004 005 006 038 059 070 093 143 160 164
GE 004 006 008 009 034 056 073 074 091 116 130
144 155 160 161 165
PIONEER 006 018 023 025 027 116 135 176
HALL MARK 004 116 PORTLAND 004 143
HITACHI 004 006 009 010 011 012 023 041 075 143 158
163 166 187
PROSCAN 144 160 161 165 167
INFINITY 164 PROTON 004 058 116 131 143 171 173
INKEL 129 QUASAR 034 056 092
JBL 164 RADIO SHACK 004
JCPENNY 004 006 008 009 024 030 065 101 143 156 160 REALISTIC 007 019 043 047
JENSEN 013 ROCTEC 186
Page 29

29
Brand Codes Brand Codes
RUNCO 168 169 TECHWOOD 004
SAMPO 004 006 058 116 TEKNIKA 002 003 004 006 024 028 031 043 072 077 101
103 143
SAMSUNG 004 050 089 101 105 113 116 127 133 137 143
160
TELEFUNKEN 037 046 086 087
SANYO 007 020 021 033 039 053 057 082 166 TELERENT 072
SCOTT 004 028 043 048 116 143 TERA 172
SEARS 004 007 015 028 030 057 082 094 101 116 143
160
TMK 004 116
SHARP 004 014 019 022 028 029 081 143 170 175 TOSHIBA 007 015 030 040 051 062 101 138
SIEMENS 088 TOTEVISION 143
SIGNATURE 072 UNIVERSAL 008 009
SONY 041 070 079 126 139 147 185 VIDEO CONCEPTS 146
SOUNDESIGN 003 004 028 043 116 VIDIKRON 174
SPECTRICON 112 VIDTECH 004 116
SSS 004 043 WARDS 004 008 009 019 028 060 061 063 064 072 074
116 143 164
SUPREMACY 002 YAMAHA 004 006
SYLVANIA 003 004 006 044 059 060 063 064 116 127 140
160 164
YORK 004 116
TANDY 081 YUPITERU 043
TATUNG 056 062 ZENITH 001 072 073 095 103 157
TECHNICS 034 080 084 ZONDA 112
Page 30

30
Connect the Power to the Recorder and Turn on the TV
1. Attach the power cord to the Recorder and plug the power cord into
a power strip/surge protector or a wall outlet.
2. Turn on the TV.
3. Press POWER on the Recorder.
The TV should now display the Welcome screen for the Recorder Setup
Wizard.
Note You may need to change the TV video source to use the
Recorder. On your TV remote control or the front panel of your TV,
press TV/VIDEO until you see the Welcome screen for the Recorder
Setup Wizard. The TV/VIDEO button might be marked SOURCE, INPUT,
VIDEO 1, or VIDEO 2.
Page 31

31
Set up the Recorder
To provide TV services, you must determine the following:
• Which type of TV service you are using
• Who provides your TV service (if using cable or satellite)
• If you will connect the Recorder to a broadband or dial-up
connection to download Microsoft® Program Guide service
information.
If you use a broadband connection, the Recorder can connect to
computers on your home network to share recorded shows or access
music and picture les.
Remember The rst time you schedule a recording, LG will guide you
through the process for free. Contact LG at 800-984-6306.
Subscribe to the Microsoft Program Guide
To receive all of the features of the LG LRM-519 Digital Media Recorder
powered by Windows® Media Center Technologies, you must subscribe
to the Microsoft® Program Guide. Without a subscription to this service,
the Recorder will have limited features.
To sign up for the Microsoft Program Guide service visit
www.microsoftprogramguide.com.
For a list of the features provided by the Microsoft Program Guide, see
The Microsoft® Program Guide in Appendix A.
Welcome to Setup
After you turn on the TV and press the POWER button on the Recorder,
the Welcome screen for the Setup Wizard displays. The Setup Wizard
gathers the information needed by the Recorder to provide you with
TV viewing, programming, and recording features.
As you proceed through the Setup Wizard, you will need to know the
following:
• what type of connection you will use for downloading Program
Guide information
• your ZIP code so the Recorder will know what TV providers are in
your area
• your TV provider
• the brand of your digital cable set-top box or satellite set-top box
(if you have digital cable service or satellite service).
Page 32

32
Terms of Service and End-User License Agreement
You must agree to the Terms of Service and the End-User License
Agreement before you can use the Recorder.
1. Set up Connection
The Recorder can connect to the Microsoft® Program Guide service
by using a broadband or dial-up connection to the Internet. When
connected, the Service will download updated TV show information
on a regular basis (up to 14 days of information at one time).
To connect to the service, select either Use Broadband or Use
Phone Line.
If you select Use Phone Line, see step 1b.
Note When you connect the Recorder by using a broadband network
connection, you can also copy recorded shows to another computer
and use Windows® Media Connect to access music and pictures stored
on another computer.
1a. Use Broadband
The Recorder supports both wired (Ethernet) and wireless
(802.11 a/b/g) networks.
Wireless Conguration
• To connect to a wireless network, select Use USB Wireless
Network Adaptor.
• To connect to a wired network, select Use Wired (Ethernet)
Connection.
If You Select “Use USB Wireless Network Adaptor”
If you have a wireless network, attach a USB wireless network adaptor
to a USB port on the Recorder. Make sure the adaptor is supported by
the Recorder. For a list of supported USB wireless network adaptors,
see Supported USB Wireless Network Adaptors.
Note When you attach a USB wireless network adaptor to the
Recorder, do not attach an Ethernet cable to the Ethernet port. You can
have only one connection to the network at a time.
A list of wireless networks is displayed. The list also includes whether
the networks are more secure and the signal strength of the connection.
To connect to one of the displayed networks, select the network in
the list.
If the network you connect to is secured, select the appropriate
security protocol:
• WEP
• WPA
Use the numeric keypad on the remote to enter the key or passphrase
for the network. If you make a mistake, use CLEAR to delete characters.
Page 33

33
If You Select “Use Wired (Ethernet) Connection”
If your network uses dynamic IP addresses and no Proxy server,
select Next.
If your network uses a static IP address or a Proxy server, select
Congure Network.
Select Static IP address, and then use the numeric keypad on the
remote to enter the IP address, subnet mask, default gateway address,
and DNS address.
Notes
• Each group of numbers in the addresses must be three digits; add
leading zeros (0) as needed. For example, if the fourth section of the
subnet mask is “0” enter 000.
• To clear an entry, use the arrow keys on the remote to select the
incorrect entry, and then enter the correct number.
If you use a proxy server, select Congure Proxy Server. Enter the
proxy server name by using the remote, and any port if needed.
Notes
• If the port is less than ve digits, add leading zeros (0) as needed. For
example, enter port 8085 as 08085.
• To clear an entry, use the arrow keys on the remote to select the
incorrect entry, and then enter the correct number.
1b. Use Phone Line
The Recorder can use a dial-up connection to the Internet to download
the Microsoft® Program Guide service and software updates.
Important When using a dial-up connection, a software update can
take up to 90 minutes to download; Program Guide updates can take
up to 20 minutes or longer. For more information, see Downloading
the Program Guide and Software Updates.
Phone Conguration
If your dial-up connection requires pulse dialing (instead of tone
dialing) or if you must dial a prex to get an outside phone line, select
Congure phone.
If the dial-up connection uses tone dialing and does not use a dialing
prex, select Next.
Enter Your Home Phone Number
To determine the best phone numbers the Recorder should use to
connect to the Microsoft Program Guide service, use the numeric
keypad on the remote to enter the area code and prex (rst three
digits) of your phone number.
Note To clear an entry, use the arrow keys on the remote to select
the incorrect entry, and then enter the correct number.
Page 34

34
Phone Connection
Select Next and the Recorder attempts to dial out using the phone
line. If the dial-out is successful, the Choose Dial-up Number screen
appears.
Note If the dial-out is not successful, try the following: check to
your phone connections; check to see if there is a voice mail message
indicator (tone) on your phone; and make sure your telephone
conguration options are correct (do you need to dial a 9 for an outside
line, for example).
Choose Dial-up Number
A list of phone numbers that the Recorder can use to connect to the
Microsoft® Program Guide service is displayed. If more than one phone
number is available, select at least two phone numbers. The second
number selected in the list is a backup phone number in case the rst
number is busy or out of order. You can select up to ten numbers.
Warning Toll charges may apply if using a long distance number to
connect to the service. For more information, check with your phone
company.
Note The Recorder can connect to a network by using broadband and
download Guide listings by using a dial-up connection, at the same
time. The Recorder uses the most recent connection you have selected
in Setup to connect to the Internet.
1. While setting up a connection in the Setup Wizard, select
Use
Broadband.
2. Follow the steps in section
1a. Use Broadband.
Note If you have completed setup and need to switch to broadband,
you can change the connection type by selecting Start > Settings >
Phone and Network Setup.
3. Complete the Setup Wizard.
4. On the
Start menu, select Settings > Phone and Network Setup.
5. Select
Use Phone Line.
6. Follow the steps in section
1b. Use Phone Line.
2. Clock Setting
The clock for the Recorder can be set automatically (recommended)
or manually.
• Select Set Clock Automatically, and then select your time zone and
whether the area where you live observes Daylight Savings Time.
• If the automatic clock settings do not work correctly—such as the
clock is one minute behind or ahead—select Set Clock Manually.
You can set the clock manually after setup is complete by selecting
Settings > System Information.
Page 35

35
3. Subscription Status
At this point, the Recorder checks the status of your subscription to the
Microsoft® Program Guide service. If a subscription was found, select
Next to continue.
Note If the connection to the Microsoft Program Guide service fails,
see Troubleshooting in Appendix B.
If a subscription to the Microsoft Program Guide service was not found,
try one of the following.
• If you have subscribed to the Microsoft Program Guide service, select
I registered, try again. The Recorder will attempt to locate your
registration information again. If the subscription cannot be found,
follow the instructions onscreen for assistance.
• If you have not subscribed to the service, select Continue without
registering. You can subscribe to the Microsoft Program Guide
service at a later time.
Note If you do not have a subscription, the Program Guide listings will
be unavailable and you will not have all the features of the Recorder.
For more information, see The Microsoft® Program Guide service in
Appendix A.
4. Enter your ZIP Code
Your ZIP code is used to provide the different service providers such as
cable providers and satellite providers available in your location.
Use the numeric keypad on the remote to enter your ZIP code, and
then select Next.
Note To clear an entry, use the arrow keys on the remote to select
the incorrect entry, and then enter the correct number.
5. Wiring Setup and TV Service Provider
The Recorder supports the following TV services:
• Standard cable (which includes basic cable and enhanced basic
cable services)
• Digital cable
• Satellite service
• Antenna (a TV set-top antenna or an exterior antenna attached
to your home)
• Satellite service and antenna
• Satellite service and standard cable service
Select your TV service. After you select the TV service, a wiring screen
appears to conrm the connections required between your TV service
and the Recorder. If the connections are correct, select Next to continue.
For more information about these connections, refer to Connect the
Recorder to the TV, Audio Components, and Internet.
Page 36

36
TV Service Provider
Select your TV service provider, including standard cable provider, digital
cable provider, or satellite provider.
If you have digital cable service or satellite TV service, select the brand
of TV service set-top box. If you do not know the brand, see your TV
service documentation or contact your TV service provider.
Choose Number of Digits and How You Change Channels
If you have digital cable service or satellite service, select the highest
number of channels you receive through your cable set-top box or
satellite set-top box: two digits, three digits, or four digits.
Note The Recorder adds leading zeros to channel numbers that have
fewer digits than you selected above. For example, if you select “4digits” the Recorder sends “0044” to the digital cable set-top box or the
satellite set-top box to change to channel 44. If the channel does not
change correctly, the set-top box may not recognize the leading zeros.
To correct this, select Yes, I have to press ENTER or OK on the How do
you change channels? page. You can change this setting by selecting
Start > Settings > Guide Setup > Set up TV Signal and Guide.
When you have to enter a channel manually, how do you enter it?
Do you:
• Enter the channel number using a remote control, and then the
channel changes?
• Enter the channel number using a remote control, and then
press OK or ENTER to change the channel?
If you press OK or ENTER, the Recorder enter the OK or ENTER for you.
When you enter a channel number by using the Recorder remote, the
Recorder will also “press” OK for you; you won’t have to press it.
After you select the actions that change the channels, set up the
Recorder to change the channels by using the IR control cable or the
serial data control cable.
Note Although many cable set-top boxes and satellite set-top boxes
do not require you to press OK or ENTER to change a channel by using
the set-top box remote control, some of these set-top boxes cannot be
controlled by the Recorder remote control without OK or ENTER being
pressed. You may need to select the OK or ENTER option if you nd the
Recorder remote does not change the set-top box channels properly.
Page 37

37
6. Set up the Recorder to Change Channels on the
Set-top Box
If you have digital cable or satellite TV service, you must connect the
cable set-top box or the satellite set-top box to the Recorder so the
Recorder can change the channels on the set-top box.
Important For the Recorder to record programs received through a
cable set-top box or a satellite set-top box, the cable set-top box or the
satellite set-top box must remain turned on at all times.
The IR Control Cable and the Serial Data Control Cable
The Recorder includes two cables used to change channels on a set-
top box. Some satellite set-top boxes have a 9-pin serial input port
that is connected to the Recorder by using the serial data control cable.
Digital set-top boxes and most satellite set-top boxes are connected to
the Recorder with an IR control cable. These cables allow the Recorder
to send the same codes that the set-top box remote controls send to
change channels on the set-top boxes.
Note Many cable set-top boxes and satellite set-top boxes do not
require you to press OK or ENTER to change a channel by using the set-
top box remote control. However, some of these set-top boxes cannot
be controlled by the Recorder remote without using OK or ENTER. To
change to using OK or ENTER when changing channels, display the
Start menu and select Settings > Guide Listings > Set up TV Signal
and Guide.
Prepare for Set-top Box Setup
If you have satellite TV service, select Use a serial cable or Use an
IR cable.
Note Some satellite set-top boxes have a 9-pin serial port that does
not support input information. In this case, make sure you connect the
IR control cable instead of the serial cable. For more information, see
your satellite service hardware documentation.
Video Test
On the Video Test page, make sure a TV show is playing on the page.
If a show is playing, select Next. If a show is not playing, verify your
connections between the TV service set-top box and the Recorder.
For more information, see Connect the Recorder to the TV, Audio
Components, and Internet.
Select Remote Control Code
You must determine which set of codes the Recorder will use to change
the channels on the set-top box. The list of codes displayed onscreen are
based on the brand of set-top box you selected. Each brand of set-top
box can have multiple sets of codes. One code will be tested at a time;
if the code does not work, select another code to test.
Page 38

38
Test Changing Channels
This test checks to see if the code you selected will change channels.
Use the numeric keypad on the Recorder remote to change to the
lowest channel you receive through your set-top box—such as
channel 2.
Note In this test the channel does not need to change to the lowest
channel; the TV image just needs to change to another channel.
• If the channel changed to a different show, select The channel
changed.
• If the channel did not change to another show, select Try another
code. Select another remote control code and run this test again.
Speed Test
At this point the code is tested for changing to the correct channel.
In addition, some remote controls send codes more quickly than other
remote controls. The speed test also tests the speed the Recorder
should send the code to the set-top box.
There are three possible speeds: Fast, Medium, and Slow. The rst
speed tested is Fast.
To test the speed
1. Tune to the highest channel you receive through the set-top box
by using the numeric keypad on the Recorder remote—the highest
channel in your channel list, such as channel 599 or channel 9406.
2. Change the channel at least six more times by using the numeric
keypad on the remote.
• If the channel changed correctly each time, select The channel
changed.
• If the channel did not change correctly each time, select Try
another speed.
If the fast speed test fails, repeat the same procedure for the medium
speed test. It the medium test fails, try the slow speed test. If the slow
speed test fails, select Try another code and select a different remote
control code to test.
Recorder Remote Control Settings
After all of the remote control settings for the Recorder are set up, the
Recorder displays the nal settings it will use to change the channels.
7. Watch TV
After Setup is complete, you are ready to watch TV.
Page 39

39
Downloading the Program Guide
and Software Updates
To receive the Program Guide, subscribe to the Microsoft® Program
Guide service. For more information about the service, see The
Microsoft® Program Guide service in Appendix A.
Note The Recorder can connect to a network by using broadband and
download Guide listings by using a dial-up connection, at the same
time. For more information, see 1. Set up Connection in Set up the
Recorder.
The First Time You Setup The Recorder
After you complete setting up the Recorder and begin to watch TV, the
Recorder checks to see if there is an update to the Recorder software.
If there is a newer version of the software, the Recorder automatically
downloads the updated software and then the current Program Guide.
Future Program Guide Updates
The Recorder attempts to download Program Guide updates daily,
during early morning hours.
Important
· When updating the Program Guide, the updated Guide information
is downloaded and then merged into the Guide. The download can
take 15 minutes or longer depending on your network connection
and network conditions. The process of merging the rst 12 hours
of Guide listings can take 30 minutes or longer. During the rst
download of the Program Guide listings, the Guide will not contain
information immediately. The complete Guide update may take up to
3 hours.
· You can check the status of the current Program Guide update or
the last time the Guide successfully updated by selecting Start >
Settings > Guide Settings > Get Latest Guide Listings.
· You can download the latest Program Guide by selecting
Start > Settings > Guide Settings > Get Latest Guide Listings and
select Download Now.
· When the Program Guide is being updated over a dial-up
connection, you can stop the download to make a phone call. If you
pick up your phone you will hear the the Recorder receiving data.
Hang up the phone, and then pick the phone up again. This will stop
the download and disconnect the Recorder. After you make your
phone call, the Recorder will automatically reconnect at a later time
and continue the download.
Page 40

40
Future Software Updates
Software updates download as necessary during updates to the Program
Guide.
Important
· If you have a broadband connection, a software update download
can take 5 minutes or longer, followed by the Program Guide
download and update. The download time can be shorter or longer
depending on network trafc.
· If you have a dial-up connection, a software update download can
take up to 90 minutes, followed by the Program Guide download and
update. The download time can be shorter or longer depending on
your modem speed and network conditions.
· When the software is being updated over a dial-up connection,
you can stop the download to make a phone call. If you pick up
your phone you will hear the the Recorder receiving data. Hang
up the phone, and then pick the phone up again. This will stop the
download and disconnect the Recorder. After you make your phone
call, the Recorder will automatically reconnect at a later time and
continue the download.
Parental Controls and Locks
Create a parental lock PIN to restrict what can be watched by show
rating or by channel.
The Parental Control PIN is requested when:
• You are watching an unrestricted show and tune to a restricted
show by entering a channel number or by using CH/PG on
the remote.
• By selecting a restricted show in the Program Guide.
• You are viewing an unrestricted show and a restricted show starts.
To set the Parental Control Lock, press Start on the remote, and then
select Settings > Parental Control.
Create a Parental Control PIN
Create a Parental Control PIN using the numeric keypad on the remote.
This PIN must be four digits long. Re-enter the PIN to conrm it.
Page 41

41
Set the Parental Control Policy
The Parental Control Policy sets which shows and channels are
restricted based upon ratings (both motion picture ratings such as
G-rated, PG-rated, or R-rated, and TV rating such as TV-MA or TV-17)
or you can lock by channel. You can also restrict the viewing of DVDs
based upon the DVD rating.
Note When you enter the Parental Control PIN, the Recorder is
unlocked and the restrictions for the ratings are removed. To lock
the Recorder again, select Settings > Parental Control > Turn on
Lock Policy.
Lock by Rating
To restrict watching shows and movies according to the rating for the
show, select Lock by Rating, and then select the rating you want to
restrict. When you select a rating, all ratings above the one you select
are restricted as well. For example, if you select PG-13, movies rated
PG-13 or R are restricted.
Note If the Program Guide does not contain any information, TV
shows cannot be locked by rating. Once the Program Guide contains
program information, the rating for each program is available and TV
shows can be restricted by rating. For information about updating the
Program Guide, see Downloading the Program Guide and Software
Updates.
Lock by Channel
To lock specic channels from view, select Lock by Channel. Then select
each channel you want to block with a parental lock.
Lock DVD
With Lock DVD you can restrict viewing of any DVD by DVD rating.
When a DVD is inserted into the Recorder the DVD rating (which is
different from a movie rating) is checked by the Recorder. If the rating
is locked, enter the Parental Control PIN to unlock the DVD.
Note When you enter the Parental Control PIN to watch a DVD, the
DVD is unlocked for the current session only. If you stop playback of a
DVD, the parental lock PIN will be required to watch the DVD again or
watch another DVD.
Turn on Lock Policy
Select Turn on Lock Policy to enable the parental control lock after you
have unlocked restricted shows or DVDs.
Change PIN
To change the PIN, select Change PIN, and then enter a new PIN.
Page 42

42
Reset
To remove all parental control locks and the Parental Control PIN,
select Reset.
Forgot the Parental Control PIN?
If you forget the Parental Control PIN, you can change the PIN by using
the Change PIN Authorization Number.
1. If a message requests the Parental Control PIN (see Parental Control
Locks earlier), select Forgot PIN.
2. Enter the following Change PIN Authorization Number: 2229566
3. Select Done.
4. Follow the instructions onscreen to create a new PIN.
Changing Settings
You can use the Settings menu to change Recorder settings. Following is
a list of the settings you can change.
Recorder
Change Recorder default settings, including:
• Change the default setting for how long a recording should be kept.
Set Keep from the default of Until Space Needed to Until I Delete.
• Set the default quality of recordings. Change Quality to Good,
Better, or Best.
Note Best quality requires the most storage space for a recording,
followed by Better quality and then Good quality (which uses the least
amount of storage space).
Guide Setup
Guide setup settings include:
• If you need to change your TV signal or TV service provider, how you
enter channels by using the remote and other TV settings select Set
up TV Signal and Guide to launch the Set up TV Signal and Guide
portion of the Setup Wizard.
• To add or remove channels from the Program Guide, select Edit
Channels. Any channel with a check next to it is displayed in the
Guide. To remove a channel from the Guide or add a channel
previously removed, select the channel and press OK. You can scroll
through the list by using the arrow keys or CH/PG on the remote.
• To download the latest Program Guide listings, check the status
of the current Guide download, or see the last time the Guide was
downloaded, select Get Latest Guide Listings. In addition to the
Program Guide download, any new software update for the Recorder
will be downloaded at the same time.
Page 43

43
DVD Settings
Set the default language options for DVD playback.
Note You cannot access DVD Settings during DVD playback.
• DVD Language
• Set the default DVD subtitle language.
• Change the language of the default audio track (such as English,
French, or Spanish).
• Set the default language of the DVD menu.
• Digital Audio Output
• If the Recorder is connected to a home entertainment center
amplier/receiver or a TV that supports Dolby© Digital playback
(5.1 channel audio through a Dolby Digital decoder), select
Bitstream under Dolby Digital. Otherwise, select PCM.
Note Dolby© Digital playback—5.1 audio—is only available if:
• The DVD that you are watching supports 5.1 channel audio.
• Your home entertainment center amplier/receiver supports 5.1
audio playback.
• You have selected Bitstream under Dolby Digital.
• If the Recorder is connected to a home entertainment center
amplier/receiver or a TV that supports DTS playback, select
Bitstream under DTS. Otherwise, select Off.
Note When Bitstream is selected, the Recorder sound effects are
disabled. Analog audio output (provided through red and white audio
cables connected to AUDIO OUT on the back of the Recorder) is also
disabled.
• Angle Indicator
• For DVDs with multiple camera angles, select Angle Indicator is
ON to display the angle indicator when multiple angles are
available.
• TV aspect ratio
• Set the TV aspect ratio to 4:3 letterbox, 16:9 widescreen, or
4:3 pan and scan. These settings depend on your TV; for more
information, see your TV documentation.
Page 44

44
Parental Control
Create a parental control PIN, assign the lock code to different types of
shows or change the parental lock code PIN. For more information, see
Set the Parental Control Policy.
Phone and Network Setup
Select Phone and Network Setup to update dial-up and networking
settings. You can switch from dial-up to broadband (or vice versa) or
change wired (Ethernet), wireless, or dial-up connection settings.
Run Setup Again
If you do not use the Setup Wizard for 30 minutes (such as leaving your
TV before completing setup), the wizard will stop running and display
the current TV show. To complete the Setup, select Run Setup Again
System Information
The System Information menu includes:
• The Recorder information such as the Service ID and software version.
• Your current Microsoft
®
Program Guide subscription information.
• Set Clock where you can change the clock settings.
Send to PC
Set the defaults for copying recorded shows to other PCs on your home
network. You can provide the following default information:
• Network path to the destination folder on the computer (in the
format \\PCname\foldername).
• Your network account user name.
• Your network account password.
Note You can only copy recordings to one computer at a time. To copy
to another computer, change the path and network account information
for the second computer, and then start the process over again.
Audio Settings
Select the default audio format: Mono, Stereo, or the Secondary
Audio (SAP).
Note A Secondary Audio Program is an audio broadcast or track in
a language other than English. The secondary audio may be Spanish,
French, Japanese or another language.
If the SAP is selected and you record a show, the show is recorded in the
SAP language, not stereo audio.
Some TV shows include an SAP that is inaudible. If you select SAP and
do not hear audio, switch to Stereo.
Page 45

45
Windows® Media Connect: Access Pictures and Music Stored on a Computer
Windows Media Connect provides digital media such as music les
(.WMA or .MP3) and pictures (JPEG) from a computer on your home
network to the Recorder. The computer must have Windows Media
Connect installed in order for the computer to share its les to
the Recorder.
On the computer containing the media, the Recorder must be registered
as a device that can access the les.
Before You Use Windows Media Connect
Before the Recorder can connect to a computer using Windows Media
Connect, make sure:
• Depending on the version of Windows Media Connect you have
installed, Microsoft® .NET framework 1.1 may be required. For more
information, visit the Microsoft website (www.microsoft.com).
• Any updates for Windows Media Connect are installed. For more
information, visit the Microsoft website (www.microsoft.com).
• The IP address for your home network must be within the following
ranges:
10.0.0.0–10.255.255.255
169.254.0.0–169.254.255.255
172.16.0.0–172.31.255.255
192.168.0.0–192.168.255.255
For more information about the IP address for your home network,
consult the network documentation.
Connect to a Computer Running
Windows Media Connect
1. Make sure the computer with Windows Media Connect is turned on.
2. After the Recorder is connected to the home network, Windows
Media Connect will display a message on the computer that a new
device has been connected to the network.
3. Follow the instructions onscreen to add the Recorder (LRM-519) to
the list of devices.
4. Select the folders you want to access from the Recorder.
After the Recorder is added, the computer will appear in My Pictures
and My Music.
Notes
• Computers that are part of a network domain (such as corporate
networks) instead of a workgroup are restricted to the domain
security policies. If the computer with Windows Media Connect is
part of a domain, there may be limitations on sharing les. For more
information, consult your network administrator.
•
The Recorder can connect to a network by using broadband and
download Guide listings by using a dial-up connection, at the same time.
For more information, see 1. Set up Connection in Set up the Recorder.
Page 46

46
Getting Around the Recorder Menus
The Recorder remote control (referred to in this User’s Guide as the
remote or the Recorder remote) is used to change channels while
watching live TV and pause, record, rewind, and fast forward through
live TV; control playback of recorded TV programs and DVDs; view
pictures; listen to music; navigate within the Recorder menus; and select
menu buttons such as Recorded TV, Next, Back, and Cancel.
The Start menu is where you access the Recorder functions. To display
the Start menu, press on the remote.
(START)
To display the Start menu, press . From the Start menu, select
Recorder features such as Guide, Create DVD, or My Music. Pressing
displays the on-screen menu or dismisses the menu if it is displayed.
Move Around the Menus
When a menu or other page is displayed, use the left, right, up, and
down arrows on the remote to move between on-screen buttons and TV
program listings or other on-screen elements. The currently highlighted
button is a green bar .
Select a Menu Item
To select the button or item, press OK.
Page 47

47
Enter Text by Using the Remote
To enter text on-screen, use the numeric keypad on the remote control
by pressing the number repeatedly for the desired letter. To enter the
letter “b” press the number 2 twice; to enter word “bl” (for example,
shows beginning with “blue”), press 2 twice for “b”, and then press
number 5 three times for the letter “l”.
a
2
ABC
b
2
ABC
c
2
ABC
1 2 3
When entering a word where the letters are on the same key such as
searching for shows that begin with “de” (both on the number 3 key),
enter the rst letter, press the right arrow on the remote (or wait a
few seconds and the cursor will move to the right), and then enter the
next letter.
If you make a mistake, press CLEAR on the remote to delete the previous
character.
Viewing Pay-Per-View or Video-On-Demand Programs
Important Some cable and satellite service providers offer pay-per-
view or video-on-demand programming. The Recorder remote cannot
be used to purchase these programs. To order this programming, use
the remote control for your digital cable or satellite set-top box. For
more information, contact your cable or satellite service provider.
Page 48

48
Using the Recorder
With the Recorder, you can watch TV shows, record shows, pause live TV,
replay live TV, and copy shows to a DVD. Many of these features can be
used at the same time. For example:
• You can watch a recorded show while recording a different show and
copying a recording to a DVD.
• You can watch a TV show while recording it and copying a recording
to a DVD.
• You can watch a DVD while recording a show.
This section describes all of the features of the Recorder.
Watching TV
Before you can watch TV by using the Recorder, make sure:
• The Recorder is set up correctly and you have completed the
Setup Wizard.
Once the Setup Wizard successfully completes, you can watch live TV.
Change Channels on the TV
Press CH/PG to change the TV channels. You can also enter the channel
number by using the numeric keypad on the remote and the channel
will change after a few seconds.
Switch between the Current Channel and the Previous
Channel
When watching a live TV show (and not in any menu or on-screen
page), you can jump between the current TV channel you are watching
and the previous channel by pressing OK. To switch back, press OK.
Note If you were previously watching a recorded show or a DVD,
pressing OK will return you to the recorded show or the DVD.
Display Information about the Current TV Show
To see the name of the TV show you are watching, the current TV
channel, and the current time, press INFO. To see detailed information
about the TV show, press INFO twice.
Page 49

49
Controlling Live TV
When you begin watching live TV, you can pause, instant replay the last
seven seconds of live TV, and fast forward through live TV. The Recorder
temporarily records the previous 90 minutes of live TV. The Recorder
even tracks when you switch channels during the previous 90 minutes.
When you pause, replay, rewind, skip over or fast forward live TV, a
status bar appears on screen. The status bar is a timeline that shows
when the start of the buffer and the end of the buffer (a light blue bar
within the timeline). Above the timeline is the current point within the
buffer itself. In addition, the status bar shows if the show is paused and
at what point time it is paused, if you are rewinding, replaying, skipping
or fast forwarding through the 90 minute buffer.
Pause Live TV
While watching live TV, you can pause the show you are watching by
pressing PAUSE on the remote.
Continue Playback of a Paused TV Show
To continue playback of a paused TV show, press PLAY or PAUSE .
Replay Live TV
If you want to see a the previous few seconds of the current TV show,
press REPLAY . The TV show jumps back seven seconds and plays the
show from that point. You can press REPLAY repeatedly.
Rewind Live TV
To replay more than seven seconds, press REW on the remote. While
the show is rewinding, you can press REW a second time or a third time
to speed up the rewinding. Pressing REW a fourth time returns to the
standard rewinding speed.
Fast Forward
If a live show is rewound (or replayed), you can forward ahead by
pressing FWD . Press FWD a second or third time to speed up the fast
forwarding. Pressing FWD a fourth time returns to the standard fast
forwarding speed.
Skip Ahead
When a TV show is rewound you can skip forward 30 seconds at a time
by pressing SKIP . For example, press SKIP to quickly forward through
a commercial.
Return to Live TV
If you have paused, rewound, or replayed live TV or you are in a
Recorder menu, the Program Guide, viewing pictures or listening to
music, press LIVE TV to return to the current TV show.
Page 50

50
Turn the TV Off or On
Press TV POWER to turn the TV off or on.
Note To turn the TV off or on by pressing TV POWER, you must
program the Recorder remote to control the TV. For more information,
see Program the Remote to Control the TV.
Change the TV Volume
To change the TV volume, press VOL.
Note To change the TV volume by pressing VOL, you must program the
Recorder remote to control the TV. For more information, see Program
the Remote to Control the TV.
Mute the TV
To turn the TV sound off (mute), press MUTE.
Note To mute the TV off or on by pressing MUTE, you must program
the Recorder remote to control the TV. For more information, see
Program the Remote to Control the TV.
Change the TV Input Source
If you have another device such as a video cassette recorder connected
to the TV, press TV INPUT to switch between the Recorder and the other
device.
Note To change the TV input source by pressing TV INPUT, you must
program the Recorder remote to control the TV. For more information,
see Program the Remote to Control the TV.
The Program Guide
The Program Guide provides listings of the shows currently available
for viewing. From within the Guide, you can change channels to watch
a show, view information about a show, record a show, and locate
additional showings.
The Recorder has two guides–the mini-Guide (displays a few upcoming
shows) and the Guide (the full version). To display one or the other
guide:
• Mini-Guide Press GUIDE on the remote once to display the mini-
Guide. The mini-Guide displays a small listing channels with current
and upcoming shows on the bottom of the screen.
• Full Guide Press GUIDE twice on the remote control or press
START on the remote, and then select Guide.
Page 51

51
Turn off the Guide
To turn off the Guide, press GUIDE or CLEAR on the remote.
Navigating within the Program Guide
To: Press:
Scroll through the show list Up or down arrows
Scroll one page up or down in the show list CH/PG +/-
Scroll to the right or left one show at a time Left or right arrows
Scroll three hours ahead FWD
Scroll three hours back REW
Advance the listings twelve hours SKIP
Scroll the listings back twelve hours REPLAY
(to the current time)
View more information about a show INFO or OK
(for future shows)
Turn off the Guide BACK or GUIDE
To record a show by using the Guide, see Record a Show Using the
Guide.
Recorded TV
Use Recorded TV to record shows for future viewing. When a show
is recorded, it is stored to the hard disk in the Recorder.
If you have attached a USB disk drive, you can increase the amount
of time available for recordings.
Note The amount of remaining time for recordings is an
approximation, not an exact amount because of factors including
quality of the recording and how long recordings are to be kept.
Record the Current Show
• To record a show you are currently watching, press REC on the
remote. Press REC again to stop the recording.
If you have subscribed to the Microsoft® Program Guide service, you
can record a TV series by pressing REC twice while displaying the mini-
Guide or the Guide.
• You can also press INFO on the remote, and then select Record.
To set recording options for the current show, press INFO twice on
the remote. These options include Record, Record Series, Advanced
Record, and Other Showings.
Note The recording features (except for Manual Record) require
a subscription to the Microsoft® Program Guide service. For more
information, see The Microsoft® Program Guide in Appendix A.
Page 52

52
Record a Show Using the Guide
• To record a show in the Guide, display the mini-Guide or the Guide,
select the show, and then press REC on the remote.
• To record the current and future episodes of a series, press REC twice.
Record Using Search
Note Program search does not contain listings unless you have
a subscription to the Microsoft® Program Guide service. For more
information, see The Microsoft® Program Guide in Appendix A.
You can nd shows to record by using the Search feature. The Recorder
can search for shows using the following methods.
• Title search The Recorder searches for any show title beginning
with each character you enter. For example, if you enter “b” a list is
displayed of show titles beginning with the letter B; if you enter “be”
the list displays those titles beginning with “be”.
• Category search The Recorder displays a list of different types of
shows, such as Comedy or Drama.
• Keyword search Use this option to display a list of shows by a
certain subject (enter “seattle” to see shows about Seattle), actor
name, or a specic word in a show description.
To record a show using Search
1. From the Start menu, select Search.
2. Select the type of search: Title, Category, or Keyword.
3. Do one of the following:
• For a Title search Use the numeric keypad on the remote to
enter the rst few characters of the show title.
• For a Category search Select the type of show you want
to watch.
• For a Keyword search Use the numeric keypad on the remote to
enter the rst few characters of a subject title, actor name, or other
keyword. Select Search to locate shows matching the keywords.
4. Select the show you want to record.
5. Press INFO, and then select Record.
Page 53

53
Record a TV Series
Note To record a TV series, you must subscribe to the Microsoft®
Program Guide service. For more information, see The Microsoft®
Program Guide in Appendix A.
1. Display the mini-Guide or the Guide.
2. Select an episode of the series.
3. Press REC on the remote twice.
or
Press INFO, and then select Record Series.
Manually Record a Show
Note If you have not subscribed to the Microsoft Program Guide
service, you must manually record shows. For more information about
subscribing and its advantages, see The Microsoft® Program Guide
in Appendix A.
1. On the Start menu, select Recorded TV.
2. Select Add Recording.
3. Select Record by Channel and Time.
4. Enter the channel number, date, time, and other options.
5. Select Record.
Stop the Current Recording
• Press STOP on the remote.
• If you are watching the show that is recording and no menus are
displayed, press REC on the remote.
• Press INFO, and then select Stop Recording.
Cancel Future Recordings
To cancel an upcoming recording:
• Display the mini-Guide or the Guide, and then select the show and
press REC until the record icon is no longer displayed.
• Display the mini-Guide or the Guide, select the show to be recorded,
press INFO on the remote, and then select Do Not Record or Do
Not Record Series if available.
Page 54

54
Recording Conicts
If you schedule a recording when another show is scheduled to be
recorded, you will have a recording conict. When a recording conict
occurs, you must decide which show to be recorded.
If there is a recording conict, a message will appear warning you
of the conict. You will also see next to the show title in the Guide.
If an episode of a series will not record, you will see
!
.
Change Recording Options
1. Display the mini-Guide or the Guide.
2. Select the show to be recorded.
3. Press OK or INFO to display information about the show, including
recording settings.
4. Select Record Settings. If a series, you will be asked which should
be changed: settings for this episode only or settings for entire
series.
5. Set the Keep, Quality, Start (On Time, 1 minute before, 2 minutes
before, 15, 30, 1 hour) and Stop (On Time, 1 minute before,
2 minutes before, 15, 30, 1 hour) options.
View Information about a Show That is Recording
• While a show is recording, press INFO on the remote twice.
Copy a Recording to a DVD or a Computer
After a show is recorded, you can copy the recording to a DVD or a
computer. Copying a recording allows you to save the recording for
future viewing and free up space on the Recorder for future recordings.
To copy a recording to DVD, see Create a DVD.
To copy a recording to a computer, see Send to PC.
Note The amount of remaining time for the copy process is an
approximation, not an exact amount.
Record-protected program content
The provider of a show can restrict the show or some of the program
content from recording. When the Recorder encounters this restriction,
it will not record the protected content.
• If an entire show is restricted from recording, the Recorder will not
record the show.
• If some program content is restricted, the Recorder will only record
the show until it reaches the rst restricted segment.
Shows can also be copy-protected, but recordable. This means you
can record the show but you are restricted when making copies of the
recording. For information about copy-protected shows, see Copying
Copy-protected Shows.
Page 55

55
View a Recorded Show
1. On the Start menu, select Recorded TV.
2. From the list of recordings, select the recorded show you want
to watch.
Note To change the list of recordings, select Sort by Date or Sort
by Title.
View Scheduled Recordings
1. On the Start menu, select Recorded TV.
2. Select Scheduled.
View Info about a Recorded Show
In Recorded TV, select the recorded show and press OK. You can view
information about a show, play it, delete it, change how long to keep
the show, and nd other airings of the show.
Add Additional Storage
You can add additional storage to the Recorder by attaching a USB
drive.
When you attach a USB drive for additional storage, the Recorder moves
recordings from the hard drive in the Recorder to the USB drive as
needed. This allows you to keep recordings for longer periods of time.
The number of additional recordings depends upon how much storage
the USB drive has available.
Notes
• For a list of recommended USB, visit the technical support website
(www.LGusa.com/DigitalMediaRecorders).
• To use a USB drive for additional storage:
• Make sure the USB drive is USB 2.0 compliant.
• The USB drive must use the FAT32 le system. For more
information about the FAT32 le system, see the Windows® XP
Help and Support Center.
• The USB drive must be 10GB (gigabytes) or larger.
• The Recorder supports USB drives with one or more drive partitions.
For more information, refer to your USB drive documentation.
• If you connect the USB drive while viewing pictures (My Pictures)
or listening to music (My Music), the Recorder will try to locate
pictures or music les on the USB drive instead of using the drive for
additional storage. To attach the USB drive for storage, press Start to
exit My Pictures or My Music before you connect the USB drive.
Page 56

56
Connect a USB drive for storage
1. Make sure the Recorder is turned on.
2. If you are viewing pictures (My Pictures) or listening to music (My
Music), press Start on the remote to exit My Pictures or My Music
and display the Start menu.
3. Connect the USB drive to one of the USB ports on the Recorder.
4. Follow the on-screen messages to use the USB device for additional
storage.
Remove a USB drive
Important When you disconnect a USB drive, make sure the Recorder
is powered off.
1. To power off the Recorder, press and hold Power on the front panel
of the Recorder or press and hold POWER on the Recorder remote.
Press and hold the button until the front panel of the Recorder turns
off (approximately ve seconds).
2. Disconnect the USB drive.
3. Turn the Recorder on by pressing Power on the front panel of the
Recorder or POWER on the Recorder remote.
Page 57

57
Search
Search nds shows based upon different conditions you specify.
Note Search does not contain listings unless you have a subscription
to the Microsoft® Program Guide service. For more information, see
The Microsoft® Program Guide in Appendix A.
• Title search the Recorder searches for any show title beginning
with each character you enter. For example, if you enter “b” a list is
displayed of show titles beginning with the letter B; if you enter “be”
the list displays those titles beginning with “be”.
• Category search the Recorder displays a list of different types of
shows, such as Comedy or Drama.
• Keyword search Use this option to display a list of shows by a
certain subject (enter “seattle” to view shows about Seattle), actor
name, or a specic word in a show description.
1. From the Start menu, select Search.
2. Select the type of search: Title, Category, or Keyword.
3. Do one of the following:
• For a Title search Use the numeric keypad on the remote to
enter the rst few characters of the show title.
• For a Category search Select the type of show you want
to watch.
• For a Keyword search Use the numeric keypad on the remote to
enter the rst few characters of a subject title, actor name, or other
keyword. Select Search to nd shows that meet your criteria.
4. Select the show you want to watch.
Play a DVD/CD
Viewing a DVD
The Recorder includes a DVD player and recorder. When you insert
a DVD into the Recorder the DVD will play automatically (unless it
contains mixed content; see the following note). To view a DVD, use
the following instructions.
1. Press Open/Close on the Recorder.
2. Load a DVD into the tray.
3. Press Open/Close to close the tray.
Note If the DVD contains mixed content–both TV shows and music,
music and photos, or TV shows and photos–then the DVD will not play
automatically. To view different content on the DVD, select My Music
or My Pictures on the Start menu.
Page 58

58
DVD Controls
On the Recorder remote, use the following buttons on the remote to
control DVD playback.
To Press
Start DVD playback PLAY
Pause DVD playback PAUSE
Stop the DVD STOP
Fast forward through the DVD FWD
Rewind through the DVD REW
Advance to the next chapter/track SKIP
Move back to the beginning of the current chapter/track REPLAY
or press twice to move back to the beginning of the
preceding chapter/track
Display the top menu of the DVD or return to the DVD MENU
previous menu (when navigating the DVD menus)
Display the top menu of the DVD TOP MENU
Change DVD audio options AUDIO
Turn on or turn off DVD subtitles or scroll through SUBTITLE
available subtitle languages
View alternate scene angles (if available; a camera icon ANGLE
appears when a chapter has alternate angles)
Create a DVD
To store a recorded show for future viewing, you can copy the recording
to a DVD. To create DVDs of your recorded shows, both single- and
double-layer DVDs may be used.
Note When the Recorder is creating a DVD, the Send to PC
functionality is not available.
Supported DVD formats Number of shows
DVD +/- R or DVD +/- RW Up to 7 shows or available recording
space, whichever comes rst.
DVD+R double layer Up to 16 shows or available recording
space, whichever comes rst
Copying Copy-protected Shows
The provider of a show can restrict content from being copied. When
the Recorder encounters a copy restriction within a recording of a show,
the Recorder will not allow the protected content to be copied to DVDs,
computers, or USB devices.
When you select recordings to copy to a DVD, recordings that cannot be
copied are not available.
Page 59

59
Copy of Commercial/Retail Copyrighted DVDs
The Recorder cannot copy or record commercial or retail copyrighted
DVDs (such as, motion picture DVDs or retail DVDs of TV shows) to the
Recorder disk drive, a USB device, or a computer.
Copy a Recording to a DVD
1. Insert a blank DVD into the disc tray.
2. On the Start menu, select Create DVD.
3. When the list of recorded shows is displayed, select the shows to
copy. You can view the list of recorded shows by selecting Sort by
Date or Sort by Title.
As you select shows to copy, the percentage of used space is shown
at the bottom of the screen.
4. After you have selected the recordings to copy, select Done.
5. Change the title of the DVD menu or the names of the shows
(tracks), if desired.
6. To begin the copy, select Create DVD.
Notes
• If a show is still recording, you cannot copy the recording until the
recording is complete.
• To clear all of the recordings you have selected to copy, select
Clear All.
• If a show is too large to t on one DVD, you can record the show
onto multiple DVDs. For more information, see Copy a Large
Recording to More than One DVD.
Copy a Large Recording to More Than One DVD
When copying a recorded show to a DVD, the recording may be too
large to t on one DVD. When the recording is too large to t on one
DVD, you can copy different portions of the recording to multiple DVDs.
Note You can copy one portion of a recording now and remaining
portions of the recording at a later time. The Recorder keeps track of
the remaining portions until the entire recording has been copied.
Copy the First Portion of a Recording onto a DVD
1. In Create DVD, select the recorded TV show you want to copy
to DVD.
2. If the recording is too large to t on the current DVD, a message
displays telling you how much will t on the current DVD. You
can copy the remaining portion of the show to one or more DVDs
(as needed).
3. To copy this portion of the show, select OK.
4. To cancel the copy, select Cancel.
Page 60

60
Copy the Next Portion of a Recording onto a DVD
1. Insert the next DVD you want to copy to.
2.
In the list of recorded shows, select the recorded show to continue copying.
3. If the remaining portion of the show will t on the DVD, you may
select additional shows to copy to the DVD (if there is enough
room). Select Create DVD.
4. A message displays telling you how much of the show has been
copied and how much will be copied now. If the remaining portion
of the recording will t, all of the portion will be copied to the DVD
(and anything else you selected). If only a portion of the recording
will be copied to the DVD, the Recorder will display how much is
remaining to be copied.
5. To begin the copy, select OK.
6. To cancel the copy and copy the same recording from the beginning,
select Restart.
My Pictures
The Recorder can display digital pictures that are stored on CDs, DVDs, USB
drives, and network devices connected with Windows® Media Connect.
You can display a single image or all the photos stored within a folder
or device. When the Recorder displays the photos the Recorder can also
play music.
Note To view digital photos stored on computers in your home, make
sure the computer is using Windows Media Connect. The Recorder
must be registered as a Windows Media Connect client. For more
information, see Windows Media Connect: Access Pictures and
Music Stored on a Computer.
View Pictures with the Recorder
Note The Recorder does not support multi-session CDs. Multi-session
CDs contain data recorded onto the disc at different times, not all at
once.
To display pictures on your TV:
1. On the Start menu, select My Pictures. The Recorder searches for
available pictures.
• If a DVD/CD is inserted into the disc tray, the Recorder will search
for pictures on the disc.
• If a USB device such as a USB drive or a USB key is connected to
the Recorder, the Recorder will search for pictures on the device.
•
If the Recorder is connected to another computer by using Windows
Media Connect, the Recorder will search folders on the computer.
2. In the list of folders, select the folder of pictures you want to view.
3. To display all pictures in the folder, select Play Slide Show.
To display a single picture, select the picture and press OK.
Page 61

61
My Music
The Recorder is a great way to play music on your TV. If you connect
the Recorder to your home entertainment center amplier, the music
will play through the amplier, providing a rich music experience.
Find Music to Play
When you select My Music on the Start menu, the Recorder searches
for collections of music stored on a CD or DVD in the disc tray, on an
attached USB device, or on computers connected to the home network
that use Windows Media Connect. For more information, see Windows®
Media Connect: Access Pictures and Music Stored on a Computer.
Note
The Recorder does not support multi-session CDs. Multi-session CDs
contain data recorded onto the disc at different times, not all at once.
When music is displayed and the music contains information including
artist, album title, and song titles, you can change the order of
the display:
• Albums View the collection by album title.
• All Music View the collection by song title.
• Artist View the collection by artist name.
• Genre View the collection by category or type of songs (for
example: Oldies or Adult Contemporary).
• Playlists View playlists of songs created with Windows
®
Media
Player on a computer.
Listen to Music
Note To listen to digital music stored on computers in your home,
make sure the computer is using Windows Media Connect. The Recorder
must be registered as a Windows Media Connect client. For more
information, see Windows Media Connect: Access Pictures and
Music Stored on a Computer.
Play Music on a CD or DVD
1. If the music is stored on a CD or DVD, insert the disc into the tray.
2. When the CD or DVD is inserted, the Recorder will play
automatically. If the CD or DVD does not play automatically, select
My Music on the Start menu.
Note If the CD or DVD contains mixed content–both TV shows and
music, music and photos, or TV shows and photos–then the CD/DVD
will not play automatically. To view different content on the DVD,
select My Music or My Pictures on the Start menu.
3.
To select a different song or view the music on the CD or DVD, press Start
on the remote, and then select My Music. Select the CD or DVD.
Note If the CD or DVD is a disc you created, artist and track title
information may not be available. Some software that creates CDs/DVDs
of music does not record this information. For more information about
adding artist and track title data to a CD or DVD you create, see the
documentation for the software used to create the disc.
Page 62

62
Use PLAY, PAUSE, SKIP, and REPLAY on the remote to control playback.
For more information, see the Remote Control Reference.
Play Music on a USB Device or Another Computer
1. On the Start menu, select My Music.
2. Select the USB device or a computer. (If a CD or DVD is inserted
in the Recorder, it will also appear. You may select that as well.)
3. To play all the tracks in order, select Play All.
To play a single track, select the track.
Shufe and Repeat Music
To play the songs (tracks) in a random order, you can select Shufe.
To repeat the same track (if a single song is selected) or all the tracks
(if Play All is selected), select Repeat.
1. On the Start menu, select My Music.
2. With a song playing, select Options.
3. Select the options you want.
Add Music to a Slide Show
The Recorder can play music while a slide show is running. Similar to
a soundtrack, you can assign any music to a slide show.
1. On the Start menu, select My Music.
2. Select a collection of music to play.
3. In the list of available songs, do one of the following:
• To use one song, select the song.
• To use the whole collection, select Play All.
4. Select More…
5. Select Choose Slide Show.
6. Select the pictures you want for the slide show, and then select
Play Slide Show.
Page 63

63
Send to PC
A recorded show that is not copy-protected can be copied from the
Recorder to a shared folder on a computer connected to a network.
Before you send a recording to a computer, you must know if the
computer is running
• Windows
®
XP Home Edition
• Windows
®
XP Professonal
Note When the Recorder is sending a recording to a computer, the
Create DVD functionality is not available.
If your computer is connected to a network domain
Network domains can have policies to control computer (or device)
access to the network. Since a policy can restrict access to a domain,
please contact your network administrator for assistance.
Before Using Send to PC
If you need assistance in creating a network user account and password
or creating a shared folder, go to the computer you are going to copy
recordings to. On the Start menu, search for Help topics listed below
in Help and Support.
Your Network User Account and Password
Follow the instructions below to make sure you have a user account
or if you need to create one.
Windows XP Home Edition
Make sure you have a network user account for your network. To
determine if you have a network user account or if you need to create
an account, select Start > Control Panel > User Accounts on the
computer.
1. If you do not have a network user account, select User Accounts
and then select Create a new account.
2. Enter a user account name and a password. A password is not
required; you can leave this option blank.
Note The Recorder does not support spaces in network user account
names. The Recorder does support the underscore character ( _ ) in
network user account names.
Windows XP Professional
Make sure you have a network user account for your network. To
determine if you have a network user account or if you need to create
an account, select Start > Control Panel > User Accounts on the
computer.
Page 64

64
If you do not have a network user account:
• Create a new user account. For more information, search for the topic
Create a new user account in Help and Support on the Windows®
XP Start menu.
Note The Recorder does not support spaces in network user account
names. The Recorder does support the underscore character ( _ ) in
network user account names.
• Make sure the network account is not disabled and you do not have
to change the network password the next time you log on. To check
this:
1. On the Start menu, click Control Panel.
2. Select User Accounts and then select User Accounts again.
3. Click the Advanced tab and then click the Advanced button.
4. Double-click the Users folder in the right pane and then right-click
the user account name and select Properties.
5. Make sure the User must change password at next logon and
Account is disabled are not checked.
• Keep track of your network password.
The Shared Folder And The Location Of The Folder
Make sure you have a shared folder on the computer that is ready to
receive recordings. For more information, search for Using shared
folders in Help and Support on the computer. For the process to share
a folder, search for To share a folder or drive in Help and Support.
Make sure to use the instructions for Using Windows Explorer.
Windows XP Home Edition
• Make sure the folder is stored at the top (root) level of a hard
drive. For example, if the shared folder is named CopiedShows
on the C: drive, make sure it is at the root level of the C: drive:
C:\CopiedShows.
• You must know the network name of your computer. This is usually
the name of the computer. For example, the name of your home
computer may be HomePC.
• The location of the shared folder on the network is the path to the
folder in the form \\ComputerName\FolderName. For this example,
the path to the shared folder is \\HomePC\CopiedShows.
Windows XP Professional
• Make sure the folder is stored at the top (root) level of a hard drive.
For example, if the shared folder is named CopiedShows on the
C: drive, make sure it is at the root level of the C: drive:
C:\CopiedShows.
• You have permission to change and read the folder. You can also
have full privileges for the folder. For more information, search
for the topic To set, view, change, or remove le and folder
permissions in Help and Support on the Windows XP Start menu.
Page 65

65
• You must know the network name of your computer. This is usually
the name of the computer. For example, the name of your home
computer may be HomePC.
• The location of the shared folder on the network is the path to the
folder in the form \\ComputerName\FolderName. For this example,
the path to the shared folder is \\HomePC\CopiedShows.
Note When connecting the Recorder to a computer, there is no need
to disable your rewall or network security.
Use Send to PC to Copy a Recording to a Computer
1. On the Start menu, select Send to PC.
2. Using the numeric keypad on the remote, enter the path (in the
format: \\PCname\foldername) to a shared folder on the computer.
Note Make sure you have write permissions for the shared folder.
3. Enter your network account user name.
4.
Enter your network account password (if the account has a password).
5. Select Next.
6. Select the recordings you want to copy.
7. Select Send to PC.
Note Once you enter the network path and account information (step
2 through step 5), the Recorder retains the settings. If you want to copy
recordings to another computer, select Start > Settings > Send to PC
and change the path to the shared folder, the network user account and
password as necessary.
Stop the Copy Process
• To stop the copy process, select Stop in the Copy Process message.
Note You can resume copying the recording to the computer at a later
time. When you continue the copy process, the Recorder synchronizes
the copy and only copies the remainder of the recording.
Important Before you can copy the remainder of a recording to the
computer, you must be logged on to the network by using the Send
to PC page. You may need to change your logon information (network
user account name and password) on the Start > Settings > Send
to PC page on the Recorder.If another person logs on to the network
to copy the remainder, the Recorder will not properly synchronize the
remainder of the recording.
Notes
• Recordings of shows can be restricted from copying. For more
information, see Copying Copy-protected Shows.
• The Recorder cannot copy commercial or retail copy-righted
DVDs. For more information, see Copy of Commercial/Retail
Copyrighted DVDs.
•
The Recorder can connect to a network by using broadband and
download Guide listings by using a dial-up connection, at the same time.
For more information, see 1. Set up Connection in Set up the Recorder.
Page 66

66
Appendix A: The Microsoft® Program Guide
The Microsoft® Program Guide service enables all of the features of
the Recorder. With a subscription, the following features are available
to you:
• The Program Guide, including up to two weeks of TV listings
• Search for upcoming shows
• Record shows by selecting the show in the Guide or Mini-Guide and
pressing REC on the remote.
• Record TV series
To subscribe to the service or for more information, visit www.
microsoftprogramguide.com or contact LG Customer Support at
1-800-984-6306.
Note If the Program Guide does not download after you subscribe to
the Microsoft Program Guide service, select Start > Settings > Guide
Settings > Get Latest Guide Listings > Download Now. When you
select Get Latest Guide Listings, you can also check the status of the
download.
Page 67

67
Appendix B: Troubleshooting
Issue
The Recorder Setup Wizard
disappeared.
Solution
The Setup Wizard automatically dismisses from the screen after
30 minutes of inactivity. Depending on your TV service, you may see
live TV or a snowy picture.
To resume Setup, select Start > Settings > Run Setup Again.
The Program Guide
is blank.
• To receive the Program Guide, you must subscribe to the Microsoft
®
Program Guide service. For more information, see The Microsoft®
Program Guide in Appendix A.
• The Program Guide could still be downloading. The download may
take 20 minutes or longer depending on your network connection
(broadband vs. dial-up) and network trafc. You can check the status
of the download by selecting Start > Settings > Guide Settings >
Get Latest Guide Listings.
• The Recorder may be downloading a software update and the
Program Guide. Over a dial-up connection, this may take 90 minutes
or longer. For more information, see Downloading the Program
Guide and Software Updates.
• The Recorder could not download the Guide because of network
issues. For more information, see The Recorder cannot connect
to the Microsoft Program Guide service or you receive a Service
Connection Error.
Can only record a TV
show by using REC on the
remote or by manually
scheduling a recording.
To record shows by using the Guide or Mini-Guide, you must subscribe
to the Microsoft Program Guide service. For more information, see
The Microsoft Program Guide in Appendix A.
The Recorder cannot
connect to the Microsoft
Program Guide service
or you receive a Service
Connection Error.
• Your network may be having problems. Make sure your home
network is working properly and that your broadband or dial-up
service is working:
If using a wired broadband connection:
• Make sure the Ethernet cable is connected to the ETHERNET port
on the back of the Recorder and is properly connected to your
home network.
• Make sure the Recorder is receiving an IP address. On the Start
menu, select Settings > System Information and conrm there
is an IP address and that the IP address is correct.
• Make sure your network settings are correct. On the Start menu,
select Settings > Phone and Network Setup.
• Make sure your broadband serivce is working. If other devices
such as a computer in your home also connect to your broadband
service, check to make sure you have service from those devices.
If not, contact your broadband service provider for more
information.
continued >>>
Page 68

68
<<< continued
If using wireless broadband connection:
• Make sure the Recorder is receiving an IP address. On the Start
menu, select Settings > System Information and conrm there is
an IP address and that the IP address is correct.
• Make sure your network settings are correct. On the Start menu,
select Settings > Phone and Network Setup.
• Make sure your broadband serivce is working. If other devices such
as a computer in your home also connect to your broadband service,
check to make sure you have service from those devices. If not,
contact your broadband service provider for more information.
If using a dial-up connection:
• Make sure your phone line is connected to the back of the Recorder
and to a phone jack.
• Make sure your phone service is working. Try to make a phone call
using the same phone line.
• Make sure there are no messages waiting signals on your phone line.
• Make sure your dial-up settings are correct. On the Start menu,
select Settings > Phone and Network Setup.
If you switched your connection from dial-up or wireless to wired
(Ethernet) and cannot connect to the service:
1. Check for the Recorder IP address. On the Start menu, select
Settings > Settings > System Information. Write down the
IP address.
2. Go to a computer connected to your network. Open a command
window (on the Start menu in Windows® XP, select Run and then
type cmd and select OK), type ping followed by the IP address
for the Recorder and press ENTER. If the request fails, then there
is a network error. See your network documentation for more
information.
• Your subscription may have expired. Visit www.
microsoftprogramguide.com to determine the status of your
subscription. To continue to receive Guide listings and schedule
recordings of your favorite shows, the Recorder must be connected
the Microsoft Program Guide service. Try connecting again. To
connect again, download the Guide listings. On the Start menu,
select Settings > Guide Settings > Get Latest Guide Listings and
then select Download Now.
Page 69

69
Cannot record a TV series. To record a TV series, you must subscribe to the Microsoft Program
Guide service. For more information, see The Microsoft® Program
Guide in Appendix A.
Solution
Make sure the Recorder is in Standby mode or the Recorder is turned
off if you change the Composite/480i/480p switch.
• Standby mode: Press Power on the front of the Recorder, or press
POWER on the remote. The power light will turn off and the front
panel displays the current time only.
• Turn off the Recorder: Press and hold Power on the Recorder or
POWER on the remote until the front panel of the Recorder is turned
off.
Turn the Recorder on: Press Power on the Recorder or POWER on the
remote to bring the Recorder out of Standby or to turn the power on.
Issue
The TV picture is lost when
the Composite/480i/480p
switch is changed.
The Recorder has locked
up or frozen–the Start
menu does not display,
the TV picture is frozen,
the DVD tray will not open.
Delete all of personal
settings such as ZIP code
and phone number.
To reset your own settings (such as ZIP code or phone number), press
and hold (Play) and (Stop) at the same time on the front of the
Recorder until the Recorder restarts.
Restart the Recorder.
1. Press and hold the Power button on the Recorder ve seconds or
press POWER on the remote for ve seconds. The Recorder will shut
down and the front panel display will turn off.
2. Wait ve seconds, and then press Power on the Recorder or press
POWER on the remote.
Forgot the Parental
Control PIN.
If you forget your PIN, you can enter the following Change PIN
Authorization Number, and then create a new PIN. In the Forgot PIN
message, enter the following authorization code, and then select Done:
Authorization Number: 2229566
You can then create a new PIN.
Unable to change the
volume on the TV or mute
the volume.
To change the volume on the TV or mute the volume, you must
program the remote control to work with your TV. For more
information, see Program the Remote to Control the TV.
Page 70

70
Issue
There is no audio.
Solution
• Make sure the remote is programmed to change the volume on
the TV or mute the TV. For mor information, see Program the
Remote to Control the TV.
• Check the audio connections between the cable set-top box or
the satellite set-top box and the Recorder. For more information,
see Connect the Recorder to the TV, Audio Components,
and Internet.
• Check the audio connections between the Recorder and the TV or
home entertainment system. For more information, see Connect
the Recorder to the TV, Audio Components, and Internet.
• If you have enabled Dolby
©
Digital playback—5.1 audio—in
Settings > DVD Settings > Digital Audio Settings:
• The DVD or other content you are watching supports 5.1 audio.
• Your home entertainment center amplier/receiver supports 5.1
audio playback.
• You have selected Bitstream under Dolby Digital.
• Check the Audio Settings. If Secondary Audio Program (SAP) is
selected, try switching to Stereo. To check the audio settings, select
Start > Settings > Audio Settings.
The TV picture is blurry,
snowy, or black and white.
Check the video connections between your TV source (cable or satellite)
and the Recorder. Also check the connections from the Recorder to
the TV.
Pay-per-view or video-on-
demand programming
cannot be purchased.
To purchase pay-per-view or video-on-demand shows, use the remote
control for your digital cable or satellite set-top box.
The Recorder does not
respond to the remote
control. (The remote
cannot turn off the
Recorder, the remote
cannot change channels,
the Start button does not
display the Start menu.)
• Check the batteries are correctly positioned in the remote, or replace
the batteries.
• The Recorder may be in Demonstration mode. To end Demonstration
mode, unplug the power cord from the back of the Recorder, wait
ve seconds, and then re-attach the power cord to the Recorder
while press OPEN/CLOSE on the front panel.
Page 71

71
Issue
Cannot change channels or
the cable set-top box or
satellite set-top box
changes to the wrong
channel.
Solution
The IR control cable may not be properly positioned or the IR settings
for the remote may be incorrect.
Make sure:
• The cable set-top box or satellite set-top box is turned on. The
set-top box must be left on at all times. If not, the Recorder cannot
change channels and cannot record TV shows you schedule.
• The IR control cable is properly positioned in front of the IR receiver
on the digital cable or satellite set-top box. If you are not sure, check
the documentation for you digital cable or satellite service.
For more information, see The IR control cable and the Serial Data
Control Cable.
• The IR control cable is connected to the IR port on the back of the
Recorder.
• The IR settings for the cable set-top box or satellite set-top box are
correct. These settings include the remote control code for the cable
set-top box or the satellite set-top box and the speed of the remote
control signal. If the remote control code is incorrect, incorrect codes
may be sent to change the channels. If the speed for sending codes
to the set-top box is incorrect, the set-top box may try to change
channels incorrectly. Or, the Recorder may need to send an ENTER or
OK code to set-top box after you enter a channel change. To change
these settings, run Setup again. On the Start menu, select Settings >
Guide Settings > Setup TV Signal and Guide. For additional
information about the cable set-top box or satellite set-top box,
contact the manufacturer or the TV service provider.
• Some cable set-top boxes and satellite set-top boxes require you
to press the OK or ENTER button on the remote control when
you enter a channel you want to change to. Make sure you have
correctly selected this option when you setup the Recorder. For more
information, see section 5. Wiring Setup and TV Service Provider
in Setup the Recorder.
Page 72

72
Issue
Channels do not change
with the serial data control
cable connected.
Solution
Restart both the satellite set-top box and the Recorder. If this channels
still do not change, use the IR control cable instead.
Notes:
• Some satellite set-top boxes support the use of the serial data
control cable to change channels and the IR control cable. However,
not all of theses specic satellite set-top boxes enable the serial input
port. For more information, check with the set-top box manufacturer.
• Before you connect the serial data control cable, make sure the
power cord for the Recorder and the power cord for the satellite
setBefore you connect the serial data control cable, make sure the
power cord for the Recorder and the power cord for the satellite settop box are not plugged into a power outlet or power strip.
• The Recorder supports serial data control by using the Serial-APG
and Serial-MPG serial data control protocols. Check with the set-top
box manufacturer or satellite service provider to make sure your
satellite set-top box uses this standard.
For more information, see The IR control cable and the Serial Data
Control Cable.
The message “<TV show>
cannot be recorded
because there are too
many recorded shows”
appears.
The Recorder disk drive contains too many recorded TV shows and
there is not enough disk space to record the current show. Go to
Recorded TV and delete some recorded shows, or add a USB device for
additional storage. For information about adding a USB device, see Add
Additional Storage.
Pictures and Music from
other computers are not
available.
To display pictures and play music stored on a computer, the computer
and the Recorder must be connected to the same network and the
computer must be running Window Media Connect.
If these two conditions are met, check the following:
• Make sure both the computer and the Recorder have network access.
For example, try downloading the Guide listings on the Recorder and
open a browser window on the computer.
• The computer must be turned on.
• Open Windows
®
Media Connect and make sure the Recorder is listed
as a recognized device.
For more information, see Windows® Media Connect: Access Pictures
and Music Stored on a Computer.
Cannot record a DVD
from a DVD player to the
Recorder.
You cannot connect a DVD player and then copy a DVD to the
Recorder. For more information, see Copying of Commercial/Retail
Copyrighted DVDs.
The Recorder plays a
sample video repeatedly.
The Recorder may be in Demonstration mode. To end Demonstration
mode, unplug the power cord from the back of the Recorder, wait ve
seconds, and then re-attach the power cord to the Recorder while press
OPEN/CLOSE on the front panel.
Page 73

73
Specications
General
Television System NTSC, Analog American Standard (480i)
Channel Coverage Unscrambled Air/Analog CATV 1-135
Power Requirement AC 120V, 60Hz
Power Consumption 65W
Hard Disk Drive 160GB
Operating Temperature 41°F to 95°F
Operating Humidity 5 % to 90 %
Dimension (W x D x H) 16.9 x 11.8 x 2.3 inches
Weight 11 lbs
Inputs/Output
RF Input Air/Cable TV (1)
RF Output Out To TV (1) (Loop Out)
Component Video Output Component Out (1), RCA Jack connector
480p, 480i -> YPbPr
S-Video Output Simultaneous Out with CVBS
S-Video Out (1), 4-pin Mini-DIN
Composite Video Output Video Out, RCA Jack connector (1-Port)
Simultaneous Out with S-video
Video Output Selection Switch 480i -> Composite
480i, 480p -> Component Selection
Video In 480i Composite NTSC
Video In with L/R in(2), RCA Jack connector
S-Video In S-Video In, 4-pin Mini-DIN
Audio out L/R Out(2), SPDIF Out (1: Optical, 1: Coaxial)
USB USB2.0 (2-Port)
Ethernet 10BASE-T/100BASE-T, RJ45 (1)
Modem 56kbps Data Modem, RJ11 (1)
Satellite/Cable Set-Top Box Control IR Controller (1), Serial Controller (1)
DVD ± R/W Specications
DVD DVD-ROM: 4.7GB (Single Layer) , 8.5GB (Dual Layer)
DVD-R: 4.7GB (Ver. 2.0 for Authoring : read & write)
4.7GB (Ver. 2.0 for General : read & write)
DVD-RW: 4.7GB (Ver. 1.1 read & write)
DVD+R: 4.7GB (Ver. 1.1 read & write)
DVD+R Dual Layer: 8.5GB (Ver. 1.0 read & write)
DVD+RW: 4.7GB (Ver. 2.1 read & write)
CD CD-ROM Mode-1 data disc
CD-ROM Mode-2 data disc
CD-ROM XA, CD-I, CD-Audio Disc
Mixed mode CD-ROM disc (data and audio)
CD-Extra, CD-Text
CD-R (Conforming to “Orange Book Part 2”: read)
CD-RW (Conforming to “Orange Book Part 3”: read)
Page 74

LG Electronics, Inc.
LRM-519 Limited Warranty - USA
This LG Electronics product, will be repaired or replaced, at LG’s option, if it proves to be defective in material or
workmanship, under normal use, during the warranty period (“Warranty Period”) listed below, effective from the
date (“Date of Purchase”) of original consumer purchase of the product. This warranty is good only to the original
purchaser of the product and effective only when used in the United States, excluding U.S. Territories.
THIS WARRANTY IS IN LIEU OF ANY OTHER WARRANTIES, EXPRESS OR IMPLIED, INCLUDING WITHOUT
LIMITATION, ANY WARRANTY OF MERCHANTABILITY OR FITNESS FOR A PARTICULAR PURPOSE. TO THE
EXTENT ANY IMPLIED WARRANTY IS REQUIRED BY LAW, IT IS LIMITED IN DURATION TO THE EXPRESS
WARRANTY PERIOD ABOVE. LG ELECTRONICS WILL NOT BE LIABLE FOR ANY INCIDENTAL, CONSEQUENTIAL,
INDIRECT, SPECIAL OR PUNITIVE DAMAGES OF ANY NATURE, EVEN IF ADVISED OF THE POSSIBILITY OF
SUCH DAMAGES, INCLUDING WITHOUT LIMITATION, LOST REVENUES OR PROFITS, LOST OR CORRUPTED
PROGRAMMING OR DATA, OR ANY OTHER DAMAGE WHETHER BASED IN CONTRACT, TORT OR OTHERWISE.
Some states do not allow the exclusion or limitation of incidental or consequential damages or limitation on how
long an implied warranty lasts, so the above exclusion or limitation may not apply to you. This warranty gives you
specic legal rights and you may also have other rights that may vary from state to state.
THIS LIMITED WARRANTY DOES NOT APPLY TO:
• Damages or operating problems that result from shipping, installation, adjustment of user controls, calibration,
maintenance or failure to maintain, or separate system components; and
• Damages or operating problems that result from normal wear and tear, misuse, abuse, operation outside
environmental specications or contrary to the requirements or precautions in the Operating Guide, accident,
lightning strikes or other natural causes, unauthorized modication or alteration, incorrect electrical current
or voltage, signal reception or input, software not licensed directly by LG, software errors that do not disable
functionality, operating and software protocols adopted after the date of manufacture or for outside the US,
institutional or commercial use, or other causes not arising out of defect in material or workmanship.
The cost of repair or replacement under these excluded circumstances shall be borne by the consumer.
CUSTOMER INTER-ACTIVE CENTER NUMBERS:
For Warranty Service, Where to buy,
Product Assistance, or Customer Assistance
Call 1-800-984-6306 (24 hours a day, 365 days per year) and
select appropriate options from the menu.
Or visit our website at http://www.lgservice.com
WARRANTY PERIOD:
LABOR: 90 days from the Date of Purchase.
PARTS: One Year from the Date of Purchase.
Replacement Units and Repair Parts may be
new or factory remanufactured.
Replacement units are warranted for the
remaining portion of the original warranty
period.
HOW SERVICE IS HANDLED:
Call 1-800-984-6306 for instructions on getting the defective
unit repaired or replaced.
Please retain dated sales receipt and your box to return the
unit to LG for repair or replacement.
Shipping both ways will be paid by LG during the rst 90 days
of the Warranty Period. During the remainder of the Warranty
Period (91-365 days), you pay inbound shipping charges and
LG pays return shipping charges.
Visit our website at: http://www.lgservice.com
TO CONTACT THE LGE CUSTOMER INTERACTIVE CENTER BY MAIL
LGE Customer Interactive Center
P.O. Box 240007
201 James Record Road
Huntsville, AL 35824
P/N : 3835RB0001Y
Issue 0
Printed in Korea
 Loading...