

Page 1
ENGLISH FRANÇAIS ESPAÑOL
OWNER'S MANUAL
REFRIGERATOR
Read this owner’s manual thoroughly before operating the appliance
and keep it handy for reference at all times.
LRKNC0505V
MFL69721105
Rev.00_031320
Copyright © 2020 LG Electronics Inc. All Rights Reserved.
www.lg.com
Page 2

2
TABLE OF CONTENTS
3 PRODUCT FEATURES
4 SAFETY INSTRUCTIONS
4 IMPORTANT SAFETY INSTRUCTIONS
8 PRODUCT SPECIFICATIONS
9 PRODUCT OVERVIEW
9 Exterior and Interior
10 Kimchi Containers
11 INSTALLATION
11 Installation Overview
12 Unpacking the Refrigerator
12 Choosing the Proper Location
13 Leveling
13 Turning on the Power
14 OPERATION
14 Before Use
15 Control Panel
20 Food Storage Guide
22 SMART FUNCTIONS
22 LG ThinQ Application
22 Smart Diagnosis™ Feature
23 MAINTENANCE
23 Cleaning
25 TROUBLESHOOTING
25 FAQs
26 Before Calling for Service
31 LIMITED WARRANTY
Page 3

ENGLISH
PRODUCT FEATURES
Depending on the model, some of the following functions may not be available.
STORES A VARIETY OF FOOD
This new model can be used not only to store and ferment kimchi, but also as a refrigerator or freezer, greatly
expanding its usability.
HIGH-QUALITY AIRTIGHT KIMCHI CONTAINERS
The kimchi containers are easy to use and airtight, to keep kimchi tasting fresh.
(The shape of the kimchi containers may vary by model.)
POWERFUL DEODORIZING FUNCTION
There are deodorizers in the left and right compartments to eliminate odors before they spread.
3PRODUCT FEATURES
EASY-OPEN/EASY-CLOSE CONTAINER LIDS
The lids are designed with dampers to open and close softly.
EASY INSTALLATION
The appliance can be installed in any location that maintains a temperature between 55 °F(13 °C) and
110 °F (43 °C).
Page 4

4 SAFETY INSTRUCTIONS
SAFETY INSTRUCTIONS
READ ALL INSTRUCTIONS BEFORE USE
Your safety and the safety of others are very important.
We have provided many important safety messages in this manual and on your appliance. Always read and
follow all safety messages.
This is the safety alert symbol.
This symbol alerts you to potential hazards that can kill or injure you and others.
All safety messages will follow the safety alert symbol and either the word WARNING or CAUTION.
These words mean:
WARNING
You may be killed or seriously injured if you do not follow instructions.
CAUTION
You may be injured or cause damage to the product if you do not follow instructions.
All safety messages will tell you what the potential hazard is, tell you how to reduce the chance of injury, and
tell you what may happen if the instructions are not followed.
IMPORTANT SAFETY INSTRUCTIONS
WARNING
To reduce the risk of explosion, re, death, electric shock, scalding or injury to
persons when using this product, follow basic precautions, including the following:
INSTALLATION
•To reduce the risk of injury to persons, adhere to all industry recommended safety procedures including the
use of long-sleeved gloves and safety glasses.
•Never attempt to operate this appliance if it is damaged, malfunctioning, partially disassembled, or has
missing or broken parts, including a damaged cord or plug.
•Only connect this product to a dedicated grounded electrical outlet rated for use with this product (115 V, 60
Hz, AC only). It is the user’s responsibility to replace a standard 2-prong wall outlet with a standard 3-prong
wall outlet.
•Do not use an outlet that can be turned off with a switch. Do not use an extension cord.
•The appliance must be positioned for easy access to a power source.
•When moving the refrigerator, be careful not to roll over or damage the power cord.
•Contact an authorized service center when installing or relocating the refrigerator.
•Do not, under any circumstances, cut or remove the third (ground) prong from the power cord.
•Keep packing materials out of the reach of children. Packaging material can be dangerous for children.
There is a risk of suffocation.
Page 5
ENGLISH
•Do not install the refrigerator in a damp or dusty place where insulation on electrical parts may deteriorate.
•Do not place the refrigerator in direct sunlight or expose it to the heat from heating appliances such as
stoves or heaters.
•Do not bend or pinch the power cord excessively or place heavy objects on it.
OPERATION
• This appliance is intended to be used in household and similar applications such as
- Staff kitchen areas in shops, ofces and other working environments;
- Farm houses and by clients in hotels, motels and other residential type environments;
- Bed and breakfast type environments;
- Catering and similar non-retail applications.
•This product is not to be used for special purposes such as the storage of medicine or test materials or for
use on ships, etc.
•DO NOT allow children to climb, stand, or hang on the refrigerator doors or on the shelves in the
refrigerator. They could damage the refrigerator and seriously injure themselves.
•Do not allow children to climb into the refrigerator. They could be trapped and suffocated.
•Children should be supervised to ensure that they do not play with the refrigerator.
•Keep ngers out of pinch point areas; clearances between the doors and cabinets are necessarily small. Be
careful closing doors when children are nearby.
•Do not touch frozen food or the metal parts in the freezer compartment with wet or damp hands. Doing so
may cause frostbite.
•Do not refreeze frozen food that has thawed completely. Doing so may result in a serious health hazard.
•If the refrigerator is tted with light bulbs that require replacing, unplug the refrigerator or turn off the power
before doing so.
•Do not use an adapter plug or plug the power plug into a multi-outlet extension cord.
•Do not use a cord that shows cracks or abrasion damage along its length or at either the plug or connector
end. Immediately have all power cords that have become frayed or otherwise damaged repaired or replaced
by qualied service personnel.
•Do not operate the refrigerator or touch the power cord with wet hands.
•Do not modify or extend the power cord.
•Do not use an uncertied power outlet. Do not plug appliance into a damaged wall outlet.
•Do not put hands, feet or other objects into the air vents or bottom of the refrigerator. Doing so could result
in personal injury or electric shock.
•In the event of a gas leak (propane/LPG), ensure the area is adequately ventilated and contact an
authorized service center before resuming use. Do not touch the refrigerator or power cord of the
refrigerator.
•Disconnect the power cord immediately and contact an authorized service center if there is a strange noise,
odor, or smoke coming from the appliance.
•Do not use any fuse (such as copper, steel wire, etc.) other than a standard fuse.
•Do not place or use an electrical appliance inside the refrigerator, unless it is of a type recommended by the
manufacturer.
•Do not put animals inside the appliance.
•Do not place heavy or fragile objects, liquid lled containers, combustible substances, or ammable objects
(such as candles and lamps) on the appliance.
• Keep or dispose of the packing materials out of reach of children. Plastic packing materials pose a risk of
suffocation.
•If connected to a circuit protected by fuses, use time delay fuse.
5SAFETY INSTRUCTIONS
Page 6

6 SAFETY INSTRUCTIONS
MAINTENANCE
•Do not use a hair dryer to dry the inside of the refrigerator.
•Do not light a candle to remove odors in the refrigerator.
•In the event of a refrigerant leak, move ammable objects away from the refrigerator. Ensure the area is
adequately ventilated and contact an authorized service center.
•Keep ammable materials and vapors, such as gasoline, away from the refrigerator.
•Unplug the power plug before cleaning or repairing the refrigerator.
•Unplug the power plug immediately in the event of a blackout or thunderstorm.
•Turn the power off if water or dust penetrates into the refrigerator. Call a service agent.
•Do not store glass containers or soda in the freezer compartment. Contents may expand when frozen,
break the container and cause injury.
•Do not store, disassemble or repair the appliance yourself or allow unqualied personnel to do so.
DISPOSAL
•Junked or abandoned refrigerators are dangerous, even if they are sitting for only a few days. When
disposing of the refrigerator, remove the packing materials from the door or take off the doors but leave the
shelves in place so that children may not easily climb inside.
•If disposing of a refrigerator, make sure the refrigerant is removed for proper disposal by a qualied servicer.
If you release the refrigerant, you may be ned or imprisoned in accordance with the relevant environmental
law.
WARNING
•Keep ventilation openings, in the appliance enclosure or in the built-in structure, clear of obstruction.
•Do not use mechanical devices or other means to accelerate the defrosting process, other than those
recommended by the manufacturer.
•Do not damage the refrigerant circuit.
•Do not use electrical appliances inside the food storage compartments of the appliance, unless they are of
the type recommended by the manufacturer.
•The refrigerant and insulation blowing gas used in the appliance require special disposal procedures. When
disposing, please consult with service agent or a similarly qualied person.
Risk of Fire and Flammable Materials
This appliance contains a small amount of isobutane refrigerant (R600a), which is combustible.
When transporting and installing the appliance, care should be taken to ensure that no parts of
the refrigerating circuit are damaged. Refrigerant squirting out of the pipes could ignite or cause
an eye injury. If a leak is detected, avoid any naked flames or potential sources of ignition and
air the room in which the appliance is standing for several minutes.
In order to avoid the creation of a flammable gas air mixture if a leak in the refrigerating circuit
occurs, the size of the room in which the appliance may be sited depends on the amount of
refrigerant used. The room must be 10.8 square feet (1 square meter) in size for every 8g of
R600a refrigerant inside the appliance. The amount of refrigerant in your particular appliance is
shown on the identification plate inside the appliance. Never start up an appliance showing any
signs of damage. If in doubt, consult your dealer.
Page 7

ENGLISH
GROUNDING INSTRUCTIONS
•Improper connection of the equipment-grounding conductor can result in a risk of electric shock. Check with
a qualied electrician or service person if you are in doubt whether the appliance is properly grounded. Do
not modify the plug provided with the appliance; if it will not t the outlet, have a proper outlet installed by a
qualied electrician.
•Have a certied electrician check the wall outlet and wiring for proper grounding.
•Never unplug the appliance by pulling on the power cord. Always grip the plug rmly and pull straight out
from the outlet. Failure to do so may damage the power cord, resulting in a risk of re and electric shock.
CAUTION
To reduce the risk of minor or moderate injury to persons, malfunction, or damage
to the product or property when using this product, follow basic precautions,
including the following:
INSTALLATION
•Do not install the refrigerator where there may be a danger of the unit falling.
•The refrigerator must be properly installed in accordance with the Installation Instructions.
7SAFETY INSTRUCTIONS
OPERATION
•Do not use aerosols near the refrigerator.
•This appliance is intended to be used only in domestic and similar applications.
•Do not strike or apply excessive force to any glass surface. Do not touch glass surfaces if they are cracked
or broken.
•Do not overll the appliance with food. Doing so may cause personal injury or property damage.
MAINTENANCE
•Do not use strong detergents like wax or thinners for cleaning. Clean with a soft cloth.
•Remove foreign objects (such as dust and water) from the prongs of the power plug and contact areas. Do
not use a wet or damp cloth when cleaning the plug.
•Do not spray water directly on the inside or outside of the refrigerator.
•Do not clean glass shelves or covers with warm water when they are cold. They may break if exposed to
sudden temperature changes.
SAVE THESE INSTRUCTIONS
Page 8

8 PRODUCT SPECIFICATIONS
PRODUCT SPECIFICATIONS
The appearance and specifications listed in this manual may vary due to constant product improvements.
Electrical requirements: 115 V, 60 Hz
Model LRKNC0505V
Description Refrigerator
Net weight 90 lb (41 kg)
Page 9

ENGLISH
PRODUCT OVERVIEW
The images in this guide may be different from the actual components and accessories, which are subject to
change by the manufacturer without prior notice for product improvement purposes.
Exterior and Interior
1
9PRODUCT OVERVIEW
2
1
Kimchi Container
Place food in the kimchi container and close
securely before storing.
2
Control Panel
Set controls using temperature or food type.
3
3
Leveling Leg
Extend or retract the legs to level the appliance.
Page 10

10 PRODUCT OVERVIEW
Kimchi Containers
Model Kimchi Container Part NO Capacity
LRKNC0505V
AKC72909303 : 6EA 3 1/2 gal (13.1 L)
Page 11
ENGLISH
2
inches
2
inches
INSTALLATION
Installation Overview
11INSTALLATION
Please read the following installation instructions first after purchasing this product or transporting it to another
location.
2
inches
Unpacking the Refrigerator Choosing the Proper Location
Leveling
Page 12

12 INSTALLATION
Unpacking the Refrigerator
WARNING
•Use two or more people to move and install the
refrigerator. Failure to do so can result in back
injury or other injury.
•The refrigerator is heavy. Protect the oor when
moving the refrigerator for cleaning or service.
Always pull the refrigerator straight out when
moving it. Do not wiggle or walk the refrigerator
when trying to move it, as oor damage could
occur.
•Keep ammable materials and vapors, such as
gasoline, away from the refrigerator. Failure to
do so can result in re, explosion, or death.
NOTE
•Remove tape and any temporary labels from your
refrigerator before using. Do not remove any
warning labels, the model and serial number label,
or the circuit diagram that is located behind the
refrigerator.
•To remove any remaining tape or glue, rub the area
briskly with your thumb. Tape or glue residue can
also be easily removed by rubbing a small amount
of liquid dish soap over the adhesive with your
ngers. Wipe with warm water and dry.
•Do not use sharp instruments, rubbing alcohol,
ammable uids, or abrasive cleaners to remove
tape or glue. These products can damage the
surface of your refrigerator.
•Reinstall or adjust shelves as needed. Refrigerator
shelves are installed in the shipping position.
Reinstall shelves according to your individual
storage needs.
Choosing the Proper Location
Electricity
Use an individual, grounded outlet:115 Volts, 60 Hz,
AC, 15 Amps minimum.
WARNING
•To reduce the risk of electric shock, do not install
the refrigerator in a wet or damp area.
•Do not install in any outdoor or sheltered outdoor
location or in direct sunlight.
•Do not overload house wiring and cause a re
hazard by plugging in multiple appliances in the
same outlet with the refrigerator.
Flooring
To avoid noise and vibration, the unit must be
installed and leveled on a solidly constructed floor. If
required, adjust the leveling legs to compensate for
the unevenness of the floor.
NOTE
•Installing on carpeting, soft tile surfaces, a platform
or weakly supported structure is not recommended.
Ambient Temperature
Install this appliance in an area where the temperature
is between 55 °F(13 °C) and 110 °F (43 °C).
If the temperature around the appliance is too low or
high, cooling ability may be adversely affected.
Page 13
13INSTALLATION
ENGLISH
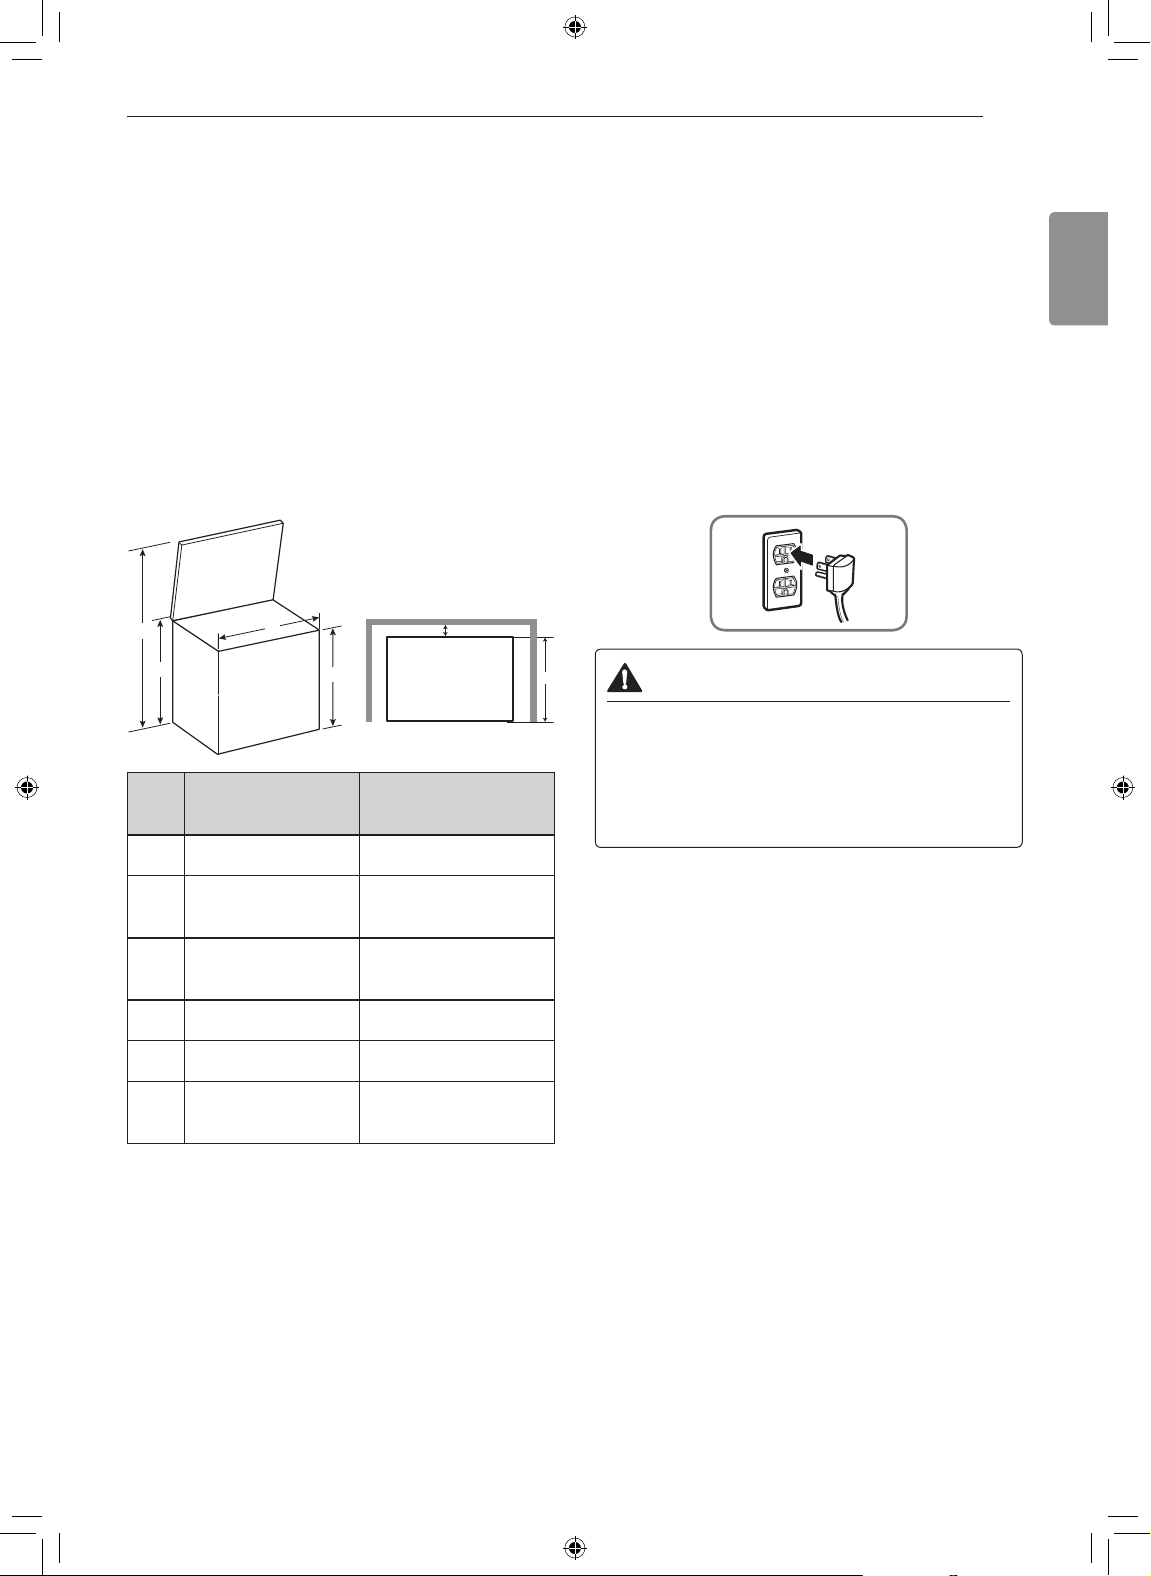
Dimensions and Clearances
•Check the dimensions of the appliance and the
installation path to ensure there is sufcient room to
move the refrigerator through doors or narrow
openings.
•The installation location chosen for the refrigerator
should allow space behind the unit for connections
and airow and space above it to open the door.
•Too small of a distance from adjacent items may
result in lowered freezing capability and increased
electricity consumption charges. Allow at least 2
inches (50.8 mm) between the back of the
refrigerator and the wall.
•Remember to allow enough room above the
refrigerator to fully open the door.
F
B
- Dimensions/
A Width 26 1/4″ (666 mm)
A
C
LRKNC0505V
Clearances
D
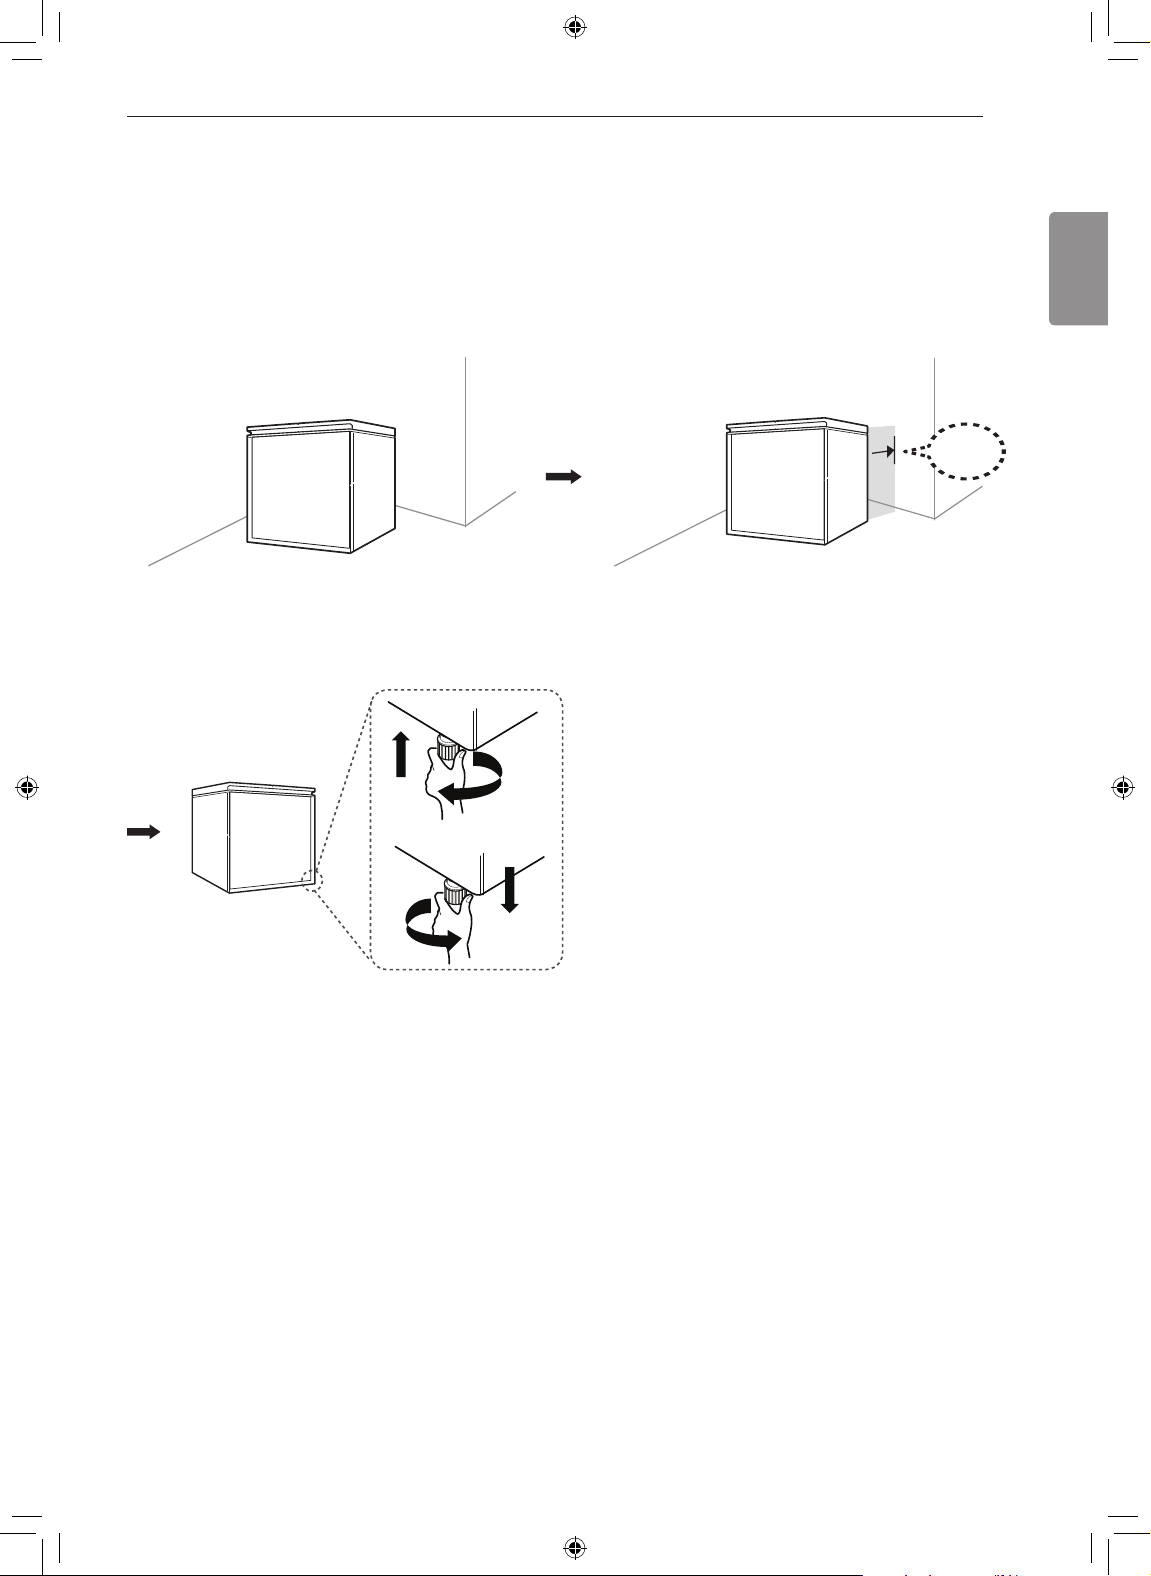
Leveling
For proper operation, make sure the product is level,
with all leveling legs in firm contact with the floor. If
the product seems unsteady, adjust the leveling legs.
The leveling legs can be turned easily by tipping the
cabinet slightly. Turn the legs to the left to raise the
product or to the right to lower it.
Turning on the Power
•After installing, plug the refrigerator’s power cord
into a 3-prong grounded outlet and push the
refrigerator into the nal position.
E
CAUTION
•Connect to a rated power outlet.
•Have a certied electrician check the wall outlet
and wiring for proper grounding.
•Do not damage or cut off the ground terminal of
the power plug.
B Height to Top of
Cover
C Height to Top of
Case
D Back Clearance 2″ (50 mm)
E Depth 24″ (612 mm)
F Height with Door
Open
35 7/16″ (900 mm)
33″ (837 mm)
56 57/64″ (1445 mm)
Page 14

14 OPERATION
OPERATION
Before Use
Clean the refrigerator.
Clean the refrigerator thoroughly and wipe off all dust that accumulated during shipping.
•Do not scratch the refrigerator with a sharp object or use a detergent that contains
alcohol, a ammable liquid or an abrasive when removing any tape or adhesive from
the refrigerator. Remove adhesive residue by wiping it off with your thumb or dish
detergent.
•Do not peel off the model or serial number label or the technical information on the
rear surface of the refrigerator.
Open refrigerator door to ventilate the interior.
The inside of the refrigerator may smell like plastic at first. Remove any adhesive tape from
inside the refrigerator and open the refrigerator door for ventilation.
CAUTION
Connect the power supply.
Check if the power supply is connected before use.
Wait for the refrigerator to cool.
Allow the refrigerator to run for at least two to three hours before putting food in it. Check
the flow of cold air in the compartments to ensure proper cooling.
CAUTION
•Putting food in the refrigerator before it has cooled could cause the food to spoil, or a
bad odor to remain inside the refrigerator.
The refrigerator makes a loud noise after initial operation.
This is normal. The volume will decrease as the temperature decreases.
Page 15

ENGLISH
Control Panel
Depending on the model, some of the following functions may not be available.
•Before storing or fermenting kimchi, use this section to become more familiar with the parts and functions of
the control panel.
•Before using the LG kimchi refrigerator, press and hold the Lock button for 3 seconds to unlock the display.
Control Panel Features
1 2 34
NOTE
•After 60 seconds of idle time, all lights on the display except the Lock icon (
This is normal operation. Press any button to wake the display and show current settings.
•Before using functions, you must press and hold the Lock button for 3 seconds to unlock the display.
) are turned off to save power.
15OPERATION
1
The Lock function prevents children or
others from accidentally changing settings.
•Before changing settings, press and hold Lock
for 3 seconds to unlock the display.
•After changing settings, press and hold Lock
for 3 seconds to lock the display and prevent
accidental changes.
※
The Lock function locks all display functions
except for the Lock button. If a button is
pressed, the Lock icon will blink 3 times. The
Lock function is automatically turned on after
60 seconds if the control panel remains idle.
※
The display turns on automatically when the
refrigerator is plugged in.
2
Press to select a temperature for storing
kimchi.
Kimchi: M→H → L
•Select the appropriate temperature for the type
and salinity of kimchi.
•L=Low Cooling (cold)
M=Medium Cooling (colder)
H=High Cooling (coldest)
3
Press to set up the compartment for
refrigerating food.
Storage: Produce → Meat/Fish → Freezer
•Select the appropriate temperature for the type
of food being stored.
4
Press to set up the compartment for normal
kimchi fermentation or for Kimchi+
fermentation.
Ferment: Fer. → Kimchi+
•When set to Kimchi+, the bars light up as the
fermentation progresses.
Page 16

16 OPERATION
Storing Kimchi
Once the appliance is connected to power, the display is activated. If desired, the product can be used to store
kimchi at the default settings without setting up additional refrigerator functions.
•The display turns on automatically when the refrigerator is plugged in.
1 23
1
Unlock the display.
• Press and hold the Lock button for
approximately 3 seconds to unlock the display.
•The display must be unlocked before settings
can be changed.
2
Press the Kimchi button.
•Press the button repeatedly to cycle through
the settings.
•As the button is pressed, the settings change
in the order shown.
Kimchi: M→H → L
•L=Low Cooling (cold)
M=Medium Cooling (colder)
H=High Cooling (coldest)
3
Lock the display.
•Press and hold the Lock button for 3 seconds
to lock the display.
Page 17

ENGLISH
Fermenting Kimchi
Kimchi ferments more quickly at the Ferment setting than at the Kimchi setting.
17OPERATION
•The display turns on automatically when the refrigerator is plugged in.
1 23
1
Unlock the display.
•Press and hold the Lock button for
approximately 3 seconds to unlock the display.
•The display must be unlocked before settings
can be changed.
2
Press the Ferment button.
•Press the button repeatedly to cycle through
the settings.
•As the button is pressed, the settings change
in the order shown.
Fer. → Kimchi+
NOTE
•Once fermentation is complete, Fer. Com.
lights up. Fermentation time depends on the
season and the room temperature.
3
Lock the display.
•Press and hold the Lock button for 3 seconds
to lock the display.
Canceling Fermentation
•To cancel fermentation, unlock the display and
select a different setting.
Storing Fermented Kimchi
•When fermentation is complete, the Fer. Com.
(Fermentation Complete) text lights up and
Kimchi M appears in the temperature display.
•Unlock the display to turn off the Fer. Com.
indicator and change settings.
Page 18

18 OPERATION
Using the Produce, Meat/Fish and Freezer Settings
•Produce setting: Designed to keep vegetables and fruit fresh for a long time.
•Meat/Fish setting: Designed to keep meat and sh fresh.
•Freezer setting: Stores frozen food.
•The display turns on automatically when the refrigerator is plugged in.
NOTE
•If kimchi is stored at the Meat/Fish setting, it may freeze.
1 23
1
Unlock the display.
•Press and hold the Lock button for
approximately 3 seconds to unlock the display.
•The display must be unlocked before settings
can be changed.
2
Press the Storage button.
•Press the button repeatedly to cycle through
the settings.
•As the button is pressed, the settings change
in the order shown.
Storage: Produce → Meat/Fish → Freezer
3
Lock the display.
•Press and hold the Lock button for 3 seconds
to lock the display.
•Remove all frozen food before switching from
Freezer to another setting.
•Refreezing food that has thawed can lead to
food-borne illnesses.
Page 19

ENGLISH
Using the Kimchi+ Setting
•The display turns on automatically when the refrigerator is plugged in.
Kimchi+
•Use this setting to rapidly cool cabbage kimchi and encourage lactic acid fermentation to keep kimchi fresher
longer.
※
Use this setting only for freshly prepared cabbage kimchi. Less salty types of kimchi may freeze if stored at
this setting.
※
Using the setting twice may over-ferment the kimchi. Use it only once.
※
The light bars in the display indicate the fermentation process. The kimchi is ready to eat when all the bars
are lit (approximately 6 days).
19OPERATION
1 23
1
Unlock the display.
•Press and hold the Lock button for
approximately 3 seconds to unlock the display.
•The display must be unlocked before settings
can be changed.
2
Press the Ferment button.
•Press the button repeatedly to cycle through
the settings.
•As the button is pressed, the settings change
in the order shown.
Fer. → Kimchi+
3
Lock the display.
•Press and hold the Lock button for 3 seconds
to lock the display.
Page 20

20 OPERATION
Food Storage Guide
Food Storage Tips
Storing Vegetables and Fruit
•The moisture left on vegetables after washing can
make them spoil faster. Wait to wash vegetables
until just before use.
•Leafy greens like kale or lettuce have a limited
storage life. Wrap them in newspaper or in sealed
containers to help them stay fresh longer.
•Do not store tropical fruits in the refrigerator.
•Bananas or uncut pineapples are damaged by cold
temperatures.
Kimchi Storage Tips
Do not overfill the kimchi containers.
•Allow space for the kimchi to expand as it ferments
or the contents may overow the container. Close
the container lids completely to prevent the kimchi
from fermenting too quickly or developing yeast
mold. Fill the container with kimchi up to the ll line
and make sure the lid is tightly closed before
storing. Cover the surface of the kimchi with plastic
wrap to extend the storage time.
Do not place kimchi directly into the refrigerator
compartment or store it in a plastic bag.
•Use the kimchi container provided to store kimchi.
Kimchi placed directly into the refrigerator
compartment may freeze and taste off. Do not block
the air outlet inside the refrigerator with food. Doing
so could cause the food to freeze, affect product
performance, or result in electric shock or injury.
For best results, check on kimchi within 3 to 4
days of storing it.
•If the kimchi has overowed from the container, it
may ferment too quickly and not store well.
Be sure to use enough salt when preparing kimchi
for longer storage.
•The rate of fermentation is mostly determined by the
amount of salt in the kimchi. Small batches of mild
kimchi can be successfully stored for short periods,
but add more salt if storing large amounts for use
over an extended period.
Use care when placing kimchi containers in the
refrigerator.
•Lift the container by the handles and avoid impacts
to the bottom of the container.
(The appearance of kimchi containers may vary by
model.)
Do not place foods that require different storage
conditions in the same compartment.
•Select the appropriate settings for the food being
stored.
A Guide to Kimchi
The first step in fermenting kimchi is salt pickling.
•The salt reacts with enzymes in the cabbage to
break down proteins and begin fermentation
immediately. This process continues even at cold
temperatures. Traditionally, kimchi was allowed to
ferment slowly during the cold winter weather.
The taste of kimchi also depends on the
seasonings used.
•Typical seasonings include green onion, garlic, ginger,
salted sh, and chili powder. The combination of spices
chosen determines the overall taste of the kimchi.
Fermentation Rates for Kimchi
•Adding a lot of garlic, seafood, onions, chili powder,
cucumber or green onions makes kimchi ferment
more quickly. Adding salted oysters, salted shrimp
or persimmon sauce really speeds up fermentation.
On the other hand, adding leeks, mustard or
ginseng slows down fermentation.
Kimchi begins fermenting as soon as it is prepared.
•Contact with air will make kimchi sour. If the kimchi
is not covered in sauce or has too little salt, a thin
skin of yeast will form on its surface. Keep air away
from the vegetables by covering them in sauce or
placing the kimchi in a plastic bag or covering it with
plastic wrap.
How Temperature Affects Kimchi
•Temperature affects the fermentation rate of kimchi.
When preparing kimchi for long-term storage, keep
the temperature below 50°F (10°C).
Long-Term Storage of Kimchi
•Like cheese, kimchi is a living organism and will
change over time. To keep kimchi fresh for long
periods, increase the salt content and store at a low
temperature, near 32°F (0°C). Press vegetables
down so they are covered with sauce and cover the
container with plastic wrap or a layer of cabbage
leaves to keep air out and keep kimchi fresh longer.
Choosing the Right Cabbage for Kimchi
•There are many different kinds of cabbage available.
For kimchi, choose a medium sized cabbage which
is rounded rather than long and thin. The inner
leaves should be sweet and paler than the outer
leaves. Outer leaves should be thin and light green.
Selecting Radishes for Kimchi
•There are many types of radish kimchi, and different
radishes are used for different types of kimchi.
•For radish kimchi, use Korean radishes that have
pale green tops and well-spread leaves.
•For chonggak (young radish) kimchi, use Seoul
radishes that have round, thick bottoms.
•For kkakdugi (cubed radish kimchi), try to nd
radishes with white rather than green tops.
•For dongchimi, use radishes with soft leaves and
white rather than green tops.
Page 21

21OPERATION
ENGLISH
Proper Food Storage Techniques
Store kimchi in the kimchi container.
•Fill the container with kimchi only up to the ll line
and make sure the lid is tightly closed before storing.
•If the lid is not closed properly, a thin lm of yeast
can form on the surface of the kimchi or the kimchi
may ferment too quickly. Cover the surface of the
kimchi with plastic wrap or a layer of cabbage leaves
before storing it to prevent yeast from forming.
Store vegetables or fruit in the designated
container.
•Some vegetables and fruits are damaged by cold
air.
•Vegetables which are damp from being washed
tend to spoil more quickly. For best results, don’t
wash vegetables before storing them.
•Do not refrigerate tropical fruits like bananas or
pineapples, which are damaged by cold
temperatures.
Allow hot food to cool to room temperature before
refrigerating it.
•Placing hot food directly into the refrigerator can
raise the temperature of surrounding food items,
leading to spoilage and higher utility bills.
Long-Term Storage of Kimchi
•Place newly prepared kimchi into the refrigerator
and select the Kimchi setting.
•Depending on the type and saltiness of the kimchi,
select the Low, Medium, or High setting.
•For best long-term storage, make sure the
vegetables are completely submerged in the sauce
and cover the kimchi with plastic wrap.
Before storing vegetable oils in the refrigerator,
read the storage instructions on the container.
•Vegetable oil bottles can become messy with use.
•Place oil bottles in disposable or left over plastic
containers to avoid having to clean the storage
containers.
Select the appropriate temperature for the food
being stored.
•Storing kimchi at the Fermentation setting may
cause it to spoil.
•Some types of kimchi may freeze if stored at the
High setting. Check on kimchi often when using the
High setting.
•Storing other food along with kimchi in a storage
container may result in the other food freezing.
Using the Different Containers
•For best results when using the Produce or Meat/
Fish setting, store containers which are similar in
size, smaller containers, or bottles.
※
Storing kimchi in the provided kimchi container in
the designated position makes the most delicious
kimchi.
※
Do not store kimchi in glass bottles. The kimchi will
expand when frozen and the bottle may break,
causing a risk of injury.
※
Do not place containers near the air outlet in the
refrigerator. The food may freeze.
Fermenting Kimchi
•Avoid opening the compartment door while kimchi is
fermenting.
•Allowing the warmer outside air in during
fermentation can affect the taste of the kimchi.
Getting Rid of Food Odors
•Cover open food containers with plastic wrap before
storing to prevent transfer of odors inside the
refrigerator.
After installation, allow the refrigerator to cool
completely before storing food.
•Food may spoil and cause lingering odors if it is
stored before the refrigerator has been allowed to
reach the set temperature.
CAUTION
•Do not store glass containers in the freezer.
Contents may expand when frozen, break the
container and cause injury.
NOTE
•Food packaging should be wiped down to prevent
adjacent foods from being contaminated.
•If the refrigerator is kept in a hot and humid place,
frequent opening of the door or storing a lot of
vegetables in the refrigerator may cause
condensation to form. Wipe off the condensation
with a clean cloth or a paper towel.
•If the refrigerator door is opened or closed too often,
warm air may penetrate the refrigerator and raise its
temperature. This can increase the running costs of
the unit.
Page 22

22 SMART FUNCTIONS
SMART FUNCTIONS
LG ThinQ Application
This feature is only available on models with the
logo.
or
The LG ThinQ application allows you to communicate
with the appliance using a smartphone.
LG ThinQ Application Features
•Smart Diagnosis™
−This function provides useful information for
diagnosing and solving issues with the appliance
based on the pattern of use.
NOTE
•This information is current at the time of publication.
The application is subject to change for product
improvement purposes without notice to users.
Installing the LG ThinQ Application
Search for the LG ThinQ application from the Google
Play Store or Apple App Store on a smart phone.
Follow instructions to download and install the
application.
Using Audible Diagnosis to Diagnose
Issues
Follow the instructions below to use the audible
diagnosis method.
•Launch the LG ThinQ application and select the
Smart Diagnosis feature in the menu. Follow the
instructions for audible diagnosis provided in the LG
ThinQ application.
Hold the Lock button for three seconds.
1
•If the display has been locked for over one
minute, you must deactivate the lock and then
reactivate it.
Press and hold the Ferment button until the
2
display screen turns off.
Smart Diagnosis™ Feature
This feature is only available on models with the
logo.
or
Use this feature to help you diagnose and solve
problems with your appliance.
NOTE
•For reasons not attributable to LGE’s negligence,
the service may not operate due to external factors
such as, but not limited to, Wi-Fi unavailability,
Wi-Fi disconnection, local app store policy, or app
unavailability.
•The feature may be subject to change without prior
notice and may have a different form depending on
where you are located.
As soon as the display turns off, hold the
3
microphone on your phone next to the display
screen.
•The microphone on the phone must face the
speaker opening on the refrigerator.
Keep the phone in place until the tone
4
transmission has finished. The display will count
down the time. Once the countdown is over and
the tones have stopped, the diagnosis will be
displayed in the application.
NOTE
•For best results, do not move the phone while the
tones are being transmitted.
Page 23

23MAINTENANCE
ENGLISH
MAINTENANCE
Cleaning
WARNING
•Use non-ammable cleaner. Failure to do so can
result in re, explosion, or death.
CAUTION
•Do not use an abrasive cloth or sponge when
cleaning the interior and exterior of the
refrigerator.
•Do not place your hand on the bottom surface of
the refrigerator when opening and closing the
doors.
General Cleaning Tips
•This model defrosts automatically; however, clean
the compartment once a month to prevent odors.
•Wipe up spills immediately.
•Unplug the refrigerator or disconnect power before
cleaning.
•Remove all removable parts, such as kimchi
containers.
•Use a clean sponge or soft cloth and a mild
detergent in warm water. Do not use abrasive or
harsh cleaners.
•Hand wash, rinse and dry all surfaces thoroughly.
Interior
If frost buildup inside the refrigerator makes it difficult
to remove the kimchi containers, empty the
compartment and turn the refrigerator off. Leaving the
refrigerator door open will speed up defrosting. After
ice has melted, wipe the interior of the compartment
with a dry cloth. Do not attempt to defrost the
refrigerator using other means or appliances. Doing
so could cause a fire.
Exterior
For products with black stainless steel exterior, spray
glass cleaner on a clean, microfiber cloth and rub in
direction of grain. Do not spray glass cleaner directly
at the display panel. Do not use harsh or abrasive
cleaners.
For products with a standard stainless steel exterior,
use a damp microfiber cloth and rub in the direction
of the grain. Dry with a paper towel to avoid streaks.
For stubborn stains and fingerprints, use a few drops
of liquid dish soap in water, and rinse with hot water
before drying. Do not use abrasive or harsh cleaners.
Inside Walls
•Allow compartment to warm up so the cloth will not
stick.
To help remove odors, wash the inside of the
refrigerator with a mixture of baking soda and warm
water. Mix 2 tablespoons of baking soda to 1 quart of
water (26 g soda to 1 liter water.) Be sure the baking
soda is completely dissolved so it does not scratch
the surfaces of the refrigerator.
Door Liners and Gaskets
Use a clean sponge or soft cloth and a mild detergent
in warm water. Do not use cleaning waxes,
concentrated detergents, bleaches, or cleaners
containing petroleum on plastic refrigerator parts.
Plastic Parts (covers and panels)
Use a clean sponge or soft cloth and a mild detergent
in warm water. Do not use glass cleaners, abrasive
cleansers, or flammable fluids. These can scratch or
damage the material.
Condenser Coils
Use a vacuum cleaner with a brush or crevice
attachment to clean the condenser cover and vents. Do
not remove the panel covering the condenser coil area.
Page 24

24 MAINTENANCE
Cleaning the Kimchi Containers
•Containers and bins can easily become dirty from
spilled food. Remove them occasionally and rinse
them out to avoid odors.
•Before cleaning the container lids, remove the
rubber packing from inside the lid. Remember to
replace the rubber packing once the lids are clean.
•Do not clean the containers and lids in water hotter
than 122°F (50°C).
•Gently clean the containers with a soft sponge to
avoid scratching the surface.
•Kimchi containers may emit a plastic odor when you
rst use them, so clean them using a soft sponge
and neutral detergent.
•You can remove the smell from the kimchi container
by placing nely chopped green leaves in, then
cover it with a lid and leave it for around a day. Then
leave rice rinse water in it for about 30 minutes and
wipe the container clean.
•When used for a long period of time, the distinct
color and odor of kimchi can permeate the
container.
CAUTION
•Do not wash the lid of the kimchi container using
a dishwasher or dryer.
Hand-wash only.
Page 25

ENGLISH
TROUBLESHOOTING
FAQs
25TROUBLESHOOTING
Q: Why is my kimchi freezing?
A: Kimchi’s storage temperature is around 32°F (0C°). The exact freezing point of kimchi varies
depending on the type of kimchi, seasoning, and the amount of salt. If your kimchi is freezing, change
the storage temperature.
• If the storage temperature is (H), change it to (M) or (L).
• If the storage temperature is (M), change it to (L).
• L=Low Cooling (cold)
M=Medium Cooling (colder)
H=High Cooling (coldest)
Q: Why is my kimchi fermenting too quickly?
A: If the storage temperature is too high, kimchi will turn sour quickly. To avoid this, change the storage
temperature. The storage temperature settings change in the order of (L) → (M) → (H). Kimchi may
ferment at different speeds depending on the type of kimchi, seasoning, and temperature at which it is
made. Cover kimchi containers with plastic wrap or tightly-fitting lids before storing them to keep
kimchi fresh longer.
Q: Why is my kimchi wilted or mushy?
A: Adding too little salt will result in kimchi that looks okay at first but wilts and turns mushy as it
ferments. Adding salty seafood can also cause kimchi to ferment more quickly and become mushy.
Q: Why is my kimchi turning dark?
A: If you store kimchi for a long time, contact with the air will cause it to oxidize and become dark.
Cover the inside of the kimchi container with plastic wrap to prevent kimchi from becoming dark.
Q: There is white mold on the surface of the Kimchi and the cabbage has dried out. What did I do
wrong?
A: If the lid of the kimchi container is not completely closed, the kimchi will come into contact with air,
resulting in white yeast forming on the surface of the kimchi or cabbage drying out. Cover containers
with plastic wrap before storing to prevent yeast from forming on kimchi.
Q: Is it normal for ice to form on the lid of the kimchi container?
A: When kimchi is stored at the best temperature for long-term storage, it is normal for some frost to form
on the lid of the container.
Page 26

26 TROUBLESHOOTING
Before Calling for Service
Review this section before calling for service; doing so will save you both time and money.
Cooling
Problem Possible Cause Solutions
Refrigerator
compartments are
not cooling.
Cooling system
runs too much.
The refrigerator control is set
to OFF (some models).
Refrigerator is in the defrost
cycle.
Refrigerator was recently
installed.
Refrigerator was recently
relocated.
Refrigerator is replacing an
older model.
Refrigerator was recently
plugged in or power
restored.
The door is opened often or
a large amount of food / hot
food was added.
Doors are not closed
completely.
Turn the control ON. Refer to the Setting the Controls
section for proper temperature settings.
During the defrost cycle, the temperature of each
compartment may rise slightly. Wait 30 minutes and
confirm the proper temperature has been restored
once the defrost cycle has completed.
It may take up to 24 hours for each compartment to
reach the desired temperature.
If the refrigerator was stored for a long period of time
or moved on its side, it is necessary for the refrigerator
to stand upright for 24 hours before connecting it to
power.
Modern refrigerators require more operating time but
use less energy due to more efficient technology.
The refrigerator will take up to 24 hours to cool
completely.
Adding food and opening the door warms the
refrigerator, requiring the compressor to run longer in
order to cool the refrigerator back down. In order to
conserve energy, try to get everything you need out of
the refrigerator at once, keep food organized so it is
easy to find, and close the door as soon as the food is
removed. (Refer to the Food Storage Guide.)
Firmly push the doors shut. If they will not shut all the
way, see the "Doors will not close correctly or pop
open" section.
Refrigerator is installed in a
hot location.
Condenser / back cover is
clogged.
The compressor will run longer under warm
conditions. At normal room temperatures (70 °F)
expect your compressor to run about 40% to 80% of
the time. Under warmer conditions, expect it to run
even more often. The refrigerator should not be
operated above 110 °F.
Use a vacuum cleaner with an attachment to clean
the condenser cover and vents. Do not remove the
panel covering the condenser coil area.
Page 27

ENGLISH
Cooling
Problem Possible Cause Solutions
When the doors are opened often or for long periods
Doors are opened often or
for long periods of time.
of time, warm, humid air enters the compartment. This
raises the temperature and moisture level within the
compartment. To lessen the effect, reduce the
frequency and duration of door openings.
27TROUBLESHOOTING
Interior moisture
buildup.
Food is freezing in
the refrigerator
compartment.
Doors are not closed
correctly.
Weather is humid.
Defrost cycle recently
completed.
Food is not packaged
correctly.
Food with high water content
was placed near an air vent.
Refrigerator temperature
control is set incorrectly.
Refrigerator is installed in a
cold location.
See the "Doors will not close correctly or pop open"
section.
Humid weather allows additional moisture to enter the
compartments when the doors are opened leading to
condensation or frost. Maintaining a reasonable level
of humidity in the home will help to control the amount
of moisture that can enter the compartments.
During the defrost cycle, the temperature of each
compartment may rise slightly and condensation may
form on the back wall. Wait 30 minutes and confirm
that the proper temperature has been restored once
the defrost cycle has completed.
Food stored uncovered or unwrapped, and damp
containers can lead to moisture accumulation within
each compartment. Wipe all containers dry and store
food in sealed packaging to prevent condensation and
frost.
Rearrange items with high water content away from
air vents.
If the temperature is too cold, adjust the control one
increment at a time and wait for the temperature to
stabilize. Refer to the Control Panel section for more
information.
When the refrigerator is operated in temperature
below 41°F (5°C), food can freeze in the refrigerator
compartment. The refrigerator should not be operated
in temperature below 55°F (13°C).
Refrigerator or
Freezer section is
too warm.
Refrigerator was recently
installed.
The air vents are blocked.
Cold air circulates from the
freezer to the fresh food
section and back again
through air vents in the wall
dividing the two sections.
It may take up to 24 hours for each compartment to
reach the desired temperature.
Locate air vents by using your hand to sense airflow
and move all packages that block vents and restrict
airflow. Rearrange items to allow air to flow throughout
the compartment.
Page 28
28 TROUBLESHOOTING
Cooling
Problem Possible Cause Solutions
When the doors are opened often or for long periods
Doors are opened often or
for long periods of time.
of time, warm, humid air enters the compartment. This
raises the temperature and moisture level within the
compartment. To lessen the effect, reduce the
frequency and duration of door openings.
Refrigerator or
Freezer section is
too warm.
Refrigerator is too
cold.
Frost or ice
crystals form on
frozen food (inside
of sealed
package).
Unit is installed in a hot
location.
A large amount of food or hot
food was added to the
compartment.
Doors not closed correctly.
Temperature control is not
set correctly.
Defrost cycle has recently
completed.
Incorrect temperature control
settings.
Condensation from food with
a high water content has
frozen inside of the food
package.
Food has been left in the
freezer for a long period of
time.
The refrigerator should not be operated in
temperatures above 110 °F.
Adding food warms the compartment requiring the
cooling system to run. Allowing hot food to cool to
room temperature before putting it in the refrigerator
will reduce this effect.
See the Doors will not close correctly or pop open
section in Parts & Features Troubleshooting.
If the temperature is too warm, adjust the control one
increment at a time and wait for the temperature to
stabilize.
During the defrost cycle, the temperature of each
compartment may rise slightly and condensation may
form on the back wall. Wait 30 minutes and confirm
the proper temperature has been restored once the
defrost cycle has completed.
If the temperature is too cold, adjust the control one
increment at a time and wait for the temperature to
stabilize. Refer to the Control Panel for more
information.
This is normal for food items with a high water
content.
Do not store food items with high water content in the
freezer for a long period of time.
Frost or ice
crystals form on
frozen food
(outside of
package).
Door is opened frequently or
for long periods of time.
Door is not closing properly.
When the doors are opened often or for long periods
of time, warm, humid air enters the compartment. This
raises the temperature and moisture level within the
compartment. Increased moisture will lead to frost and
condensation. To lessen the effect, reduce the
frequency and duration of door openings.
Refer to the Doors will not close correctly or pop open
section in the Troubleshooting section.
Page 29

ENGLISH
Parts & Features
Problem Possible Cause Solutions
29TROUBLESHOOTING
Doors will not
close correctly or
pop open.
Door is difficult to
open.
Refrigerator
wobbles or seems
unstable
Lights do not
work.
The interior of the
refrigerator is
covered with dust
or soot.
Food packages are blocking
the door open.
Refrigerator is not leveled
properly.
The gaskets are dirty or
sticky.
Door was recently closed.
Leveling legs are not
adjusted properly.
Floor is not level.
LED interior lighting failure.
The refrigerator is located
near a fire source, such as a
fireplace, chimney, or candle.
Rearrange food containers to clear the door and door
shelves.
See Leveling in the installation instructions to level
refrigerator.
Clean the gaskets and the surfaces that they touch.
Rub a thin coat of appliance polish or kitchen wax on
the gaskets after cleaning.
When you open the door, warmer air enters the
refrigerator. As the warm air cools, it can create a
vacuum. If the door is hard to open, wait one minute
to allow the air pressure to equalize, then see if it
opens more easily.
Refer to the Leveling section.
It may be necessary to add shims under the leveling
legs or rollers to complete installation.
The refrigerator compartment lamp is LED interior
lighting, and service should be performed by a
qualified technician.
Make sure that the refrigerator is not located near a
fire source, such as a fireplace, chimney or candle.
Page 30

30 TROUBLESHOOTING
Noises
Problem Possible Cause Solutions
The defrost control will click when the
automatic defrost cycle begins and
Clicking
ends. The thermostat control (or
refrigerator control on some models)
will also click when cycling on and off.
Rattling noises may come from the flow
of refrigerant, the water line on the back
of the unit, or items stored on top of or
around the refrigerator.
Normal Operation
Normal Operation
Rattling
Whooshing
Gurgling
Popping
Sizzling
Vibrating
Dripping
Pulsating or highpitched sound
Refrigerator is not resting solidly on the
floor.
Refrigerator with linear compressor
was jarred while running.
Evaporator fan motor is circulating air
through the refrigerator compartment.
Air is being forced over the condenser
by the condenser fan.
Refrigerant flowing through the cooling
system.
Contraction and expansion of the inside
walls due to changes in temperature.
Water dripping on the defrost heater
during a defrost cycle.
If the side or back of the refrigerator is
touching a cabinet or wall, some of the
normal vibrations may make an audible
sound.
Water running into the drain pan during
the defrost cycle.
Your refrigerator is designed to run
more efficiently to keep your food items
at the desired temperature. The high
efficiency compressor may cause your
new refrigerator to run longer than your
old one, but it is still more energy
efficient than previous models. While
the refrigerator is running, it is normal
to hear a pulsating or high-pitched
sound.
Floor is weak or uneven or leveling legs
need to be adjusted. See the Leveling and
Door Alignment section.
Normal Operation
Normal Operation
Normal Operation
Normal Operation
Normal Operation
Normal Operation
To eliminate the noise, make sure that the
sides and back cannot vibrate against any
wall or cabinet.
Normal Operation
Normal Operation
Page 31

ENGLISH
LIMITED WARRANTY
USA
31LIMITED WARRANTY
ARBITRATION NOTICE: THIS LIMITED WARRANTY CONTAINS AN ARBITRATION PROVISION THAT
REQUIRES YOU AND LG TO RESOLVE DISPUTES BY BINDING ARBITRATION INSTEAD OF IN COURT,
UNLESS YOU CHOOSE TO OPT OUT. IN ARBITRATION, CLASS ACTIONS AND JURY TRIALS ARE NOT
PERMITTED. PLEASE SEE THE SECTION TITLED “PROCEDURE FOR RESOLVING DISPUTES” BELOW.
Should your LG Refrigerator (“Product”) fail due to a defect in materials or workmanship under normal and
proper use, during the warranty period set forth below, LG Electronics (“LG”) will, at its option, repair or replace
the Product. This limited warranty is valid only to the original retail purchaser of the Product and applies only
when purchased and used within the United States including U.S. Territories.
WARRANTY PERIOD
Sealed System
Refrigerator/
Freezer
One (1) year from
the date of original
retail purchase
Parts and Labor
(internal/ functional
parts only)
•Replacement products and parts are warranted for the remaining portion of the original warranty period or
ninety (90) days, whichever is greater.
•Replacement products and parts may be new, reconditioned, refurbished, or otherwise factory remanufactured.
•Proof of original retail purchase specifying the Product model and date of purchase is required to obtain
warranty service under this limited warranty.
EXCEPT TO THE EXTENT PROHIBITED BY APPLICABLE LAW, ANY IMPLIED WARRANTY OF
MERCHANTABILITY OR FITNESS FOR A PARTICULAR PURPOSE ON THE PRODUCT IS LIMITED IN
DURATION TO THE DURATION OF THE ABOVE LIMITED WARRANTY. UNDER NO CIRCUMSTANCES
SHALL LG OR ITS U.S. DISTRIBUTORS/DEALERS BE LIABLE FOR ANY INDIRECT, INCIDENTAL,
CONSEQUENTIAL, SPECIAL, OR PUNITIVE DAMAGES, INCLUDING, WITHOUT LIMITATION, LOST
GOODWILL, LOST REVENUES OR PROFITS, WORK STOPPAGE, IMPAIRMENT OF OTHER GOODS,
COST OF REMOVAL AND REINSTALLATION OF THE PRODUCT, LOSS OF USE, OR ANY OTHER
DAMAGES WHETHER BASED IN CONTRACT, TORT, OR OTHERWISE. LG’S TOTAL LIABILITY, IF ANY,
SHALL NOT EXCEED THE PURCHASE PRICE PAID BY YOU FOR THE PRODUCT.
Some states do not allow the exclusion or limitation of incidental or consequential damages or limitations on how
long an implied warranty lasts, so the above exclusions or limitations may not apply to you. This limited warranty
gives you specific legal rights and you may also have other rights that vary from state to state.
(Condenser, Dryer,
Connecting Tube and
Evaporator)
Five (5) years from the date
of original retail purchase
Parts and Labor Parts and Labor
Five (5) years from
the date of original
retail purchase
Compressor
Linear / Inverter Compressor Only :
Parts Only for years 6-10 from the date
of original retail purchase (Consumer will
be charged for labor)
THIS LIMITED WARRANTY DOES NOT COVER:
•Service trips to deliver, pick up, or install, educate how to operate, correct wiring, or correct unauthorized
repairs.
•Damage or failure of the Product to perform during power failures and interrupted or inadequate electrical
service.
•Damage or failure caused by leaky or broken water pipes, frozen water pipes, restricted drain lines, inadequate
or interrupted water supply or inadequate supply of air.
•Damage resulting from operating the product in a corrosive atmosphere or contrary to the product owner’s
manual.
•Damage or failure to the Product caused by accidents, pests and vermin, lightning, wind, re, oods, acts of
God, or any other causes beyond the control of LG.
Page 32

32 LIMITED WARRANTY
•Damage or failure caused by unauthorized modication or alteration, or if used for other than the intended
purpose.
•Damage or failure resulting from misuse, abuse, improper installation, repair, or maintenance. Improper repair
includes use of parts not authorized by LG. Improper installation or maintenance includes installation or
maintenance contrary to the Product owner’s manual.
•Damage or failure caused by incorrect electrical current, voltage, or plumbing codes.
•Damage or failure caused by transportation and handling, including scratches, dents, chips, and/or other
damage to the nish of the Product, unless such damage is reported within one (1) week of delivery.
•Damage or missing items to any display, open box, or discounted Product.
•Refurbished Product or any Product sold “As Is”, “Where Is”, “With all Faults”, or similar disclaimer.
•Products with original serial numbers that have been removed, altered, or cannot be readily determined.
•Increases in utility costs and additional utility expenses.
•Any noises associated with normal operation.
•Use of accessories (e.g., water lters, etc.), components, or consumable cleaning products that are not
authorized by LG.
•Replacement of light bulbs, lters, or any consumable parts.
•When Product is used for other than normal and proper household use (e.g. commercial or industrial use,
ofces, and recreational facilities or vehicles) or contrary to the instructions outlined in the Product’s owner’s
manual.
•Costs associated with removal and reinstallation of your Product for repairs.
•Shelves, door bins, drawers, handle and accessories, except for internal/functional parts covered under this
limited warranty.
The cost of repair or replacement under these excluded circumstances shall be borne by the consumer.
TO OBTAIN WARRANTY SERVICE AND ADDITIONAL INFORMATION
Call 1-800-243-0000 and select the appropriate option from the menu.
Or visit our website at http://www.lg.com.
Or by mail: LG Electronics Customer Service P.O. Box 240007 Huntsville, AL 35813 ATTN: CIC
PROCEDURE FOR RESOLVING DISPUTES:
ALL DISPUTES BETWEEN YOU AND LG ARISING OUT OF OR RELATING IN ANY WAY TO THIS LIMITED
WARRANTY OR THE PRODUCT SHALL BE RESOLVED EXCLUSIVELY THROUGH BINDING ARBITRATION,
AND NOT IN A COURT OF GENERAL JURISDICTION. BINDING ARBITRATION MEANS THAT YOU AND LG
ARE EACH WAIVING THE RIGHT TO A JURY TRIAL AND TO BRING OR PARTICIPATE IN A CLASS ACTION.
Definitions. For the purposes of this section, references to “LG” mean LG Electronics U.S.A., Inc., its parents,
subsidiaries and affiliates, and each of their officers, directors, employees, agents, beneficiaries, predecessors in
interest, successors, assigns and suppliers; references to “dispute” or “claim” shall include any dispute, claim or
controversy of any kind whatsoever (whether based in contract, tort, statute, regulation, ordinance, fraud,
misrepresentation or any other legal or equitable theory) arising out of or relating in any way to the sale,
condition or performance of the product or this Limited Warranty.
Notice of Dispute. In the event you intend to commence an arbitration proceeding, you must first notify LG in
writing at least 30 days in advance of initiating the arbitration by sending a letter to LG at LG Electronics, USA,
Inc. Attn: Legal Department- Arbitration 1000 Sylvan Ave, Englewood Cliffs 07632. You and LG agree to engage
in good faith discussions in an attempt to amicably resolve your claim. The notice must provide your name,
address, and telephone number; identify the product that is the subject of the claim; and describe the nature of
the claim and the relief being sought. If you and LG are unable to resolve the dispute within 30 days, either party
may proceed to file a claim for arbitration.
Page 33

33LIMITED WARRANTY
ENGLISH
Agreement to Binding Arbitration and Class Action Waiver. Upon failure to resolve the dispute during the 30
day period after sending written notice to LG, you and LG agree to resolve any claims between us only by
binding arbitration on an individual basis, unless you opt out as provided below. Any dispute between you and
LG shall not be combined or consolidated with a dispute involving any other person’s or entity’s product or claim.
More specifically, without limitation of the foregoing, any dispute between you and LG shall not under any
circumstances proceed as part of a class or representative action. Instead of arbitration, either party may bring
an individual action in small claims court, but that small claims court action may not be brought on a class or
representative basis.
Arbitration Rules and Procedures. To begin arbitration of a claim, either you or LG must make a written
demand for arbitration. The arbitration will be administered by the American Arbitration Association (“AAA”) and
will be conducted before a single arbitrator under the AAA’s Consumer Arbitration Rules that are in effect at the
time the arbitration is initiated (referred to as the “AAA Rules”) and under the procedures set forth in this section.
The AAA Rules are available online at www.adr.org/consumer. Send a copy of your written demand for
arbitration, as well as a copy of this provision, to the AAA in the manner described in the AAA Rules. You must
also send a copy of your written demand to LG at LG Electronics, USA, Inc. Attn: Legal Department- Arbitration
1000 Sylvan Avenue Englewood Cliffs, NJ 07632. If there is a conflict between the AAA Rules and the rules set
forth in this section, the rules set forth in this section will govern. This arbitration provision is governed by the
Federal Arbitration Act. Judgment may be entered on the arbitrator’s award in any court of competent jurisdiction.
All issues are for the arbitrator to decide, except that issues relating to the scope and enforceability of the
arbitration provision and to the arbitrability of the dispute are for the court to decide. The arbitrator is bound by
the terms of this provision.
Governing Law. The law of the state of your residence shall govern this Limited Warranty and any disputes
between us except to the extent that such law is preempted by or inconsistent with applicable federal law.
Fees/Costs. You do not need to pay any fee to begin an arbitration. Upon receipt of your written demand for
arbitration, LG will promptly pay all arbitration filing fees to the AAA unless you seek more than $25,000 in
damages, in which case the payment of these fees will be governed by the AAA Rules. Except as otherwise
provided for herein, LG will pay all AAA filing, administration and arbitrator fees for any arbitration initiated in
accordance with the AAA Rules and this arbitration provision. If you prevail in the arbitration, LG will pay your
attorneys’ fees and expenses as long as they are reasonable, by considering factors including, but not limited to,
the purchase amount and claim amount. Notwithstanding the foregoing, if applicable law allows for an award of
reasonable attorneys’ fees and expenses, an arbitrator can award them to the same extent that a court would. If
the arbitrator finds either the substance of your claim or the relief sought in the demand is frivolous or brought for
an improper purpose (as measured by the standards set forth in Federal Rule of Civil Procedure 11(b)), then the
payment of all arbitration fees will be governed by the AAA Rules. In such a situation, you agree to reimburse LG
for all monies previously disbursed by it that are otherwise your obligation to pay under the AAA Rules. Except
as otherwise provided for, LG waives any rights it may have to seek attorneys’ fees and expenses from you if LG
prevails in the arbitration.
Hearings and Location. If your claim is for $25,000 or less, you may choose to have the arbitration conducted
solely on the basis of (1) documents submitted to the arbitrator, (2) through a telephonic hearing, or (3) by an
in-person hearing as established by the AAA Rules. If your claim exceeds $25,000, the right to a hearing will be
determined by the AAA Rules. Any in-person arbitration hearings will be held at a location within the federal
judicial district in which you reside unless we both agree to another location or we agree to a telephonic
arbitration.
Opt Out. You may opt out of this dispute resolution procedure. If you opt out, neither you nor LG can require the
other to participate in an arbitration proceeding. To opt out, you must send notice to LG no later than 30 calendar
days from the date of the first consumer purchaser’s purchase of the product by either: (i) sending an e-mail to
optout@lge.com, with the subject line: “Arbitration Opt Out” or (ii) calling 1-800-980-2973. You must include in
the opt out e-mail or provide by telephone: (a) your name and address; (b) the date on which the product was
purchased; (c) the product model name or model number; and (d) the serial number (the serial number can be
found (i) on the product; or (ii) online by accessing https://www.lg.com/us/support/repair-service/schedule-repair-
continued and clicking on “Find My Model & Serial Number”).
You may only opt out of the dispute resolution procedure in the manner described above (that is, by e-mail or
telephone); no other form of notice will be effective to opt out of this dispute resolution procedure. Opting out of
this dispute resolution procedure will not affect the coverage of the Limited Warranty in any way, and you will
continue to enjoy the full benefits of the Limited Warranty. If you keep this product and do not opt out, then you
accept all terms and conditions of the arbitration provision described above.
Page 34

34 LIMITED WARRANTY
LIMITED WARRANTY
CANADA
ARBITRATION NOTICE: THIS LIMITED WARRANTY CONTAINS AN ARBITRATION PROVISION THAT
REQUIRES YOU AND LG TO RESOLVE DISPUTES BY BINDING ARBITRATION INSTEAD OF IN COURT,
UNLESS THE LAWS OF YOUR PROVINCE OR TERRITORY DO NOT PERMIT THAT, OR, IN OTHER
JURISDICTIONS, IF YOU CHOOSE TO OPT OUT. IN ARBITRATION, CLASS ACTIONS AND JURY TRIALS
ARE NOT PERMITTED. PLEASE SEE THE SECTION TITLED “PROCEDURE FOR RESOLVING DISPUTES”
BELOW.
Should your LG Refrigerator (“Product”) fail due to a defect in materials or workmanship under normal and
proper use, during the warranty period set forth below, LG Electronics Canada, Inc. (“LGECI”) will, at its option,
repair or replace the Product upon receipt of proof of the original retail purchase. This limited warranty is valid
only to the original retail purchaser of the Product and applies only to a Product distributed, purchased and used
within Canada, as determined at the sole discretion of LGECI.
WARRANTY PERIOD (Note: If the original date of purchase cannot be verified, the warranty will begin
sixty (60) days from the date of manufacture)
Refrigerator
One (1) year from the
date of original retail
purchase
Parts and Labor (internal/
functional parts only)
Sealed System (Condenser, Dryer, Connecting Tube
and Evaporator)
One (1) year from the
date of original retail
purchase
Parts and Labor
Seven (7) years from the
date of original retail
purchase
Parts only (Consumer will
be charged for labor)
Linear / Inverter
Compressor
Ten (10) years from the
date of original retail
purchase
Part only (Consumer will be
charged for labor)
•Replacement products and parts are warranted for the remaining portion of the original warranty period or
ninety (90) days, whichever is greater.
•Replacement products and parts may be new, reconditioned, refurbished, or otherwise factory remanufactured,
all at the sole discretion of LGECI.
•Proof of original retail purchase specifying the Product model and date of purchase is required to obtain
warranty service under this Limited Warranty.
LGECI’S SOLE LIABILITY IS LIMITED TO THE LIMITED WARRANTY SET OUT ABOVE. EXCEPT AS
EXPRESSLY PROVIDED ABOVE, LGECI MAKES NO, AND HEREBY DISCLAIMS, ALL OTHER
WARRANTIES AND CONDITIONS RESPECTING THE PRODUCT, WHETHER EXPRESS OR IMPLIED,
INCLUDING BUT NOT LIMITED TO, ANY IMPLIED WARRANTY OR CONDITION OF MERCHANTABILITY
OR FITNESS FOR A PARTICULAR PURPOSE, AND NO REPRESENTATIONS SHALL BE BINDING ON
LGECI. LGECI DOES NOT AUTHORIZE ANY PERSON TO CREATE OR ASSUME FOR IT ANY OTHER
WARRANTY OBLIGATION OR LIABILITY IN CONNECTION WITH THE PRODUCT. TO THE EXTENT THAT
ANY WARRANTY OR CONDITION IS IMPLIED BY LAW, IT IS LIMITED TO THE WARRANTY PERIOD SET
OUT ABOVE. UNDER NO CIRCUMSTANCES SHALL LGECI, THE MANUFACTURER OR DISTRIBUTOR OF
THE PRODUCT, BE LIABLE FOR ANY INCIDENTAL, CONSEQUENTIAL, SPECIAL, DIRECT, INDIRECT,
PUNITIVE OR EXEMPLARY DAMAGES, INCLUDING, WITHOUT LIMITATION, LOSS OF GOODWILL, LOST
PROFITS, LOSS OF ANTICIPATED PROFITS, LOST REVENUE, LOSS OF USE, OR ANY OTHER DAMAGE,
WHETHER ARISING DIRECTLY OR INDIRECTLY FROM ANY CONTRACTUAL BREACH, FUNDAMENTAL
BREACH, TORT OR OTHERWISE, OR FROM ANY ACTS OR OMISSIONS. LGECI’S TOTAL LIABILITY, IF
ANY, SHALL NOT EXCEED THE PURCHASE PRICE PAID BY YOU FOR THE PRODUCT.
This Limited Warranty gives you specific legal rights. You may also have other rights that vary from province to
province depending on applicable provincial laws. Any term of this Limited Warranty that negates or varies any
implied condition or warranty under provincial law is severable where it conflicts with such provincial law without
affecting the remainder of this warranty’s terms.
Page 35

ENGLISH
THIS LIMITED WARRANTY DOES NOT COVER:
•Service trips to i) deliver, pick up, or install or; educate on how to operate the Product; ii) correct wiring or
plumbing; or iii) correct unauthorized repairs or installations of the Product;
•Damage or failure of the Product to perform during power failures and interrupted or inadequate electrical
service;
•Damage or failure caused by leaky or broken water pipes, frozen water pipes, restricted drain lines, inadequate
or interrupted water supply or inadequate supply of air;
•Damage or failure resulting from operating the Product in a corrosive atmosphere or contrary to the instructions
outlined in the Product’s owner’s manual;
•Damage or failure to the Product caused by accidents, pests and vermin, lightning, wind, re, oods, acts of
God, or any other causes beyond the control of LGECI or the manufacturer;
•Damage or failure resulting from misuse, abuse, improper installation, repair, or maintenance of the Product.
Improper repair includes use of parts not authorized or specied by LGECI. Improper installation or
maintenance includes installation or maintenance contrary to the Product’s owner’s manual;.
•Damage or failure caused by unauthorized modication or alteration of the Product, or if used for other than
the intended household purpose/use of the Product, or damage or failure resulting from any water leakage due
to improper installation of the Product;
•Damage or failure caused by incorrect electrical current, voltage or plumbing codes;
•Damage or failure caused by use that is other than normal household use, including, without limitation,
commercial or industrial use, including use in commercial ofces or recreational facilities, or as otherwise
outlined in the Product’s owner’s manual;
•Damage or failure caused by the use of any accessories, components or cleaning products, including, without
limitation, water lters, that are not approved/authorized by LGECI;
•Replacement of the water lter cartridge due to water pressure that is outside the specied operating range or
due to excessive sediment in the water supply;
•Damage or failure caused by transportation and handling, including scratches, dents, chips and/or other
damage to the nish of the Product, unless such damage results from defects in materials or workmanship
and is reported to LGECI within one (1) week of delivery of the Products;
•Damage or missing items to any display, open box, refurbished or discounted Product;
•Refurbished Product or any Product sold “As Is”, “Where Is”, “With all Faults”, or any similar disclaimer;
•Products with original serial numbers that have been removed, altered or cannot be readily determined at the
discretion of LGECI;
•Increases in utility costs and additional utility expenses in any way associated with the Product;
•Any noises associated with normal operation of the Product;
•Replacement of light bulbs, lters, fuses or any other consumable parts;
•Replacement of any part that was not originally included with the Product;
•Costs associated with removal and/or reinstallation of the Product for repairs; and
•Shelves, door bins, drawers, handle and accessories to the Product, except for internal/functional parts
covered under this Limited Warranty.
•Coverage for “in Home” repairs, for products in-warranty, will be provided if the Product is within a 150 km
radius from the nearest authorized service center (ASC), as determined by LG Canada. If your Product is
located outside a 150 km radius from a ASC, as determined by LG Canada, it will be your responsibility to
bring the Product, at your sole expense, to the ASC for in-warranty repair.
35LIMITED WARRANTY
All costs and expenses associated with the above excluded circumstances, listed under the heading,
This Limited Warranty Does Not Cover, shall be borne by the consumer.
TO OBTAIN WARRANTY SERVICE AND ADDITIONAL INFORMATION, PLEASE CALL OR VISIT OUR
WEBSITE:
Call 1-888-542-2623 (7 A.M. to 12 A.M., 365 days a year) and select the appropriate option from the menu, or.
Visit our website at http://www.lg.com
Page 36

36 LIMITED WARRANTY
PROCEDURE FOR RESOLVING DISPUTES:
EXCEPT WHERE PROHIBITED AT LAW, ALL DISPUTES BETWEEN YOU AND LG ARISING OUT OF OR
RELATING IN ANY WAY TO THIS LIMITED WARRANTY OR THE PRODUCT SHALL BE RESOLVED
EXCLUSIVELY THROUGH BINDING ARBITRATION, AND NOT IN A COURT OF GENERAL JURISDICTION.
EXCEPT WHERE PROHIBITED AT LAW, YOU AND LG BOTH IRREVOCABLY AGREE TO WAIVE THE RIGHT
TO A JURY TRIAL AND TO BRING OR PARTICIPATE IN A CLASS ACTION.
Definitions. For the purposes of this section, references to “LG” mean LG Electronics Canada, Inc., its parents,
subsidiaries and affiliates, and each of their officers, directors, employees, agents, beneficiaries, predecessors in
interest, successors, assigns and suppliers; references to “dispute” or “claim” shall include any dispute, claim or
controversy of any kind whatsoever (whether based in contract, tort, statute, regulation, ordinance, fraud,
misrepresentation or any other legal or equitable theory) arising out of or relating in any way to the sale,
condition or performance of the product or this Limited Warranty.
Notice of Dispute. In the event you intend to commence an arbitration proceeding, you must first notify LG in
writing at least 30 days in advance of initiating the arbitration by sending a letter to LGECI Legal Team at 20
Norelco Drive, North York, Ontario, Canada M9L 2X6 (the “Notice of Dispute”). You and LG agree to engage in
good faith discussions in an attempt to amicably resolve your claim. The notice must provide your name,
address, and telephone number; identify the product that is the subject of the claim; and describe the nature of
the claim and the relief being sought. If you and LG are unable to resolve the dispute within 30 days of LG’s
receipt of the Notice of Dispute, the dispute shall be resolved by binding arbitration in accordance with the
procedure set out herein. You and LG both agree that, during the arbitration proceeding, the terms (including any
amount) of any settlement offer made by either you or LG will not be disclosed to the arbitrator until the arbitrator
determines the dispute.
Agreement to Binding Arbitration and Class Action Waiver. Upon failure to resolve the dispute during the 30
day period after LG’s receipt of the Notice of Dispute, you and LG agree to resolve any claims between you and
LG only by binding arbitration on an individual basis, unless you opt out as provided below, or you reside in a
jurisdiction that prevents full application of this clause in the circumstances of the claims at issue (in which case
if you are a consumer, this clause will only apply if you expressly agree to the arbitration). To the extent permitted
by applicable law, any dispute between you and LG shall not be combined or consolidated with a dispute
involving any other person’s or entity’s product or claim. More specifically, without limitation of the foregoing,
except to the extent such a prohibition is not permitted at law, any dispute between you and LG shall not under
any circumstances proceed as part of a class or representative action. Instead of arbitration, either party may
bring an individual action in small claims court, but that small claims court action may not be brought on a class
or representative basis except to the extent this prohibition is not permitted at law in your province or territory of
jurisdiction as it relates to the claims at issue between you and LG.
Arbitration Rules and Procedures. To begin arbitration of a claim, either you or LG must make a written demand
for arbitration. The arbitration will be private and confidential, and conducted on a simplified and expedited basis
before a single arbitrator chosen by the parties under the provincial or territorial commercial arbitration law and
rules of the province or territory of your residence. You must also send a copy of your written demand to LG at LG
Electronics, Canada, Inc., Attn: Legal Department- Arbitration, 20 Norelco Drive, North York, Ontario M9L 2X6.
This arbitration provision is governed by your applicable provincial or territorial commercial arbitration legislation.
Judgment may be entered on the arbitrator’s award in any court of competent jurisdiction. All issues are for the
arbitrator to decide, except that, issues relating to the scope and enforceability of the arbitration provision and to
the arbitrability of the dispute are for the court to decide. The arbitrator is bound by the terms of this provision.
Governing Law. The law of the province or territory of your purchase shall govern this Limited Warranty and any
disputes between you and LG except to the extent that such law is preempted by or inconsistent with applicable
federal or provincial/territorial law. Should arbitration not be permitted for any claim, action, dispute or
controversy between you and LG, you and LG attorn to the exclusive jurisdiction of the courts of the province or
territory of your purchase for the resolution of the claim, action, dispute or controversy between you and LG.
Page 37

37LIMITED WARRANTY
ENGLISH
Fees/Costs. You do not need to pay any fee to begin an arbitration. Upon receipt of your written demand for
arbitration, LG will promptly pay all arbitration filing fees unless you seek more than $25,000 in damages, in
which case the payment of these fees will be governed by the applicable arbitration rules. Except as otherwise
provided for herein, LG will pay all filing, administration and arbitrator fees for any arbitration initiated in
accordance with the applicable arbitration rules and this arbitration provision. If you prevail in the arbitration, LG
will pay your attorneys’ fees and expenses as long as they are reasonable, by considering factors including, but
not limited to, the purchase amount and claim amount. Notwithstanding the foregoing, if applicable law allows for
an award of reasonable attorneys’ fees and expenses, an arbitrator can award them to the same extent that a
court would. If the arbitrator finds either the substance of your claim or the relief sought in the demand is
frivolous or brought for an improper purpose (as measured by the applicable laws), then the payment of all
arbitration fees will be governed by the applicable arbitration rules. In such a situation, you agree to reimburse
LG for all monies previously disbursed by it that are otherwise your obligation to pay under the applicable
arbitration rules. Except as otherwise provided for, LG waives any rights it may have to seek attorneys’ fees and
expenses from you if LG prevails in the arbitration.
Hearings and Location. If your claim is for $25,000 or less, you may choose to have the arbitration conducted
solely (1) on the basis of documents submitted to the arbitrator, (2) through a telephonic hearing, or (3) by an
in-person hearing as established by the applicable arbitration rules. If your claim exceeds $25,000, the right to a
hearing will be determined by the applicable arbitration rules. Any in-person arbitration hearings will be held at
the nearest, most mutually-convenient arbitration location available within the province or territory in which you
reside unless you and LG both agree to another location or agree to a telephonic arbitration.
Severability and Waiver. If any portion of this Limited Warranty (including these arbitration procedures) is
unenforceable, the remaining provisions will continue in full force and effect to the maximum extent permitted by
applicable law. Should LG fail to enforce strict performance of any provision of this Limited Warranty (including
these arbitration procedures), it does not mean that LG intends to waive or has waived any provision or part of
this Limited Warranty.
Opt Out. You may opt out of this dispute resolution procedure. If you opt out, neither you nor LG can require the
other to participate in an arbitration proceeding. To opt out, you must send notice to LG no later than 30 calendar
days from the date of the first consumer purchaser’s purchase of the product by either (i) sending an e-mail to
optout@lge.com, with the subject line: “Arbitration Opt Out;” or (ii) calling 1-800-980-2973. You must include in
the opt out e-mail or provide by telephone: (a) your name and address; (b) the date on which the product was
purchased; (c) the product model name or model number; and
(d) the serial number (the serial number can be found (i) on the product; or (ii) online by accessing https://www.
lg.com/ca_en/support/repair-service/schedule-repair and clicking on “Find My Model & Serial Number”).
In the event that you “Opt Out”, the law of the province or territory of your residence shall govern this Limited
Warranty and any disputes between you and LG except to the extent that such law is preempted by or
inconsistent with applicable federal or provincial/territorial law. Should arbitration not be permitted for any claim,
action, dispute or controversy between you and LG, you and LG agree to attorn to the exclusive jurisdiction of
the courts of the province or territory of your residence for the resolution of the claim, action, dispute or
controversy between you and LG.
You may only opt out of the dispute resolution procedure in the manner described above (that is, by e-mail or
telephone); no other form of notice will be effective to opt out of this dispute resolution procedure. Opting out of
this dispute resolution procedure will not affect the coverage of the Limited Warranty in any way, and you will
continue to enjoy the full benefits of the Limited Warranty. If you keep this product and do not opt out, then you
accept all terms and conditions of the arbitration provision described above.
Conflict of Terms. In the event of a conflict or inconsistency between the terms of this Limited Warranty and the
End User License Agreement (“EULA”) in regards to dispute resolution, the terms of this Limited Warranty shall
control and govern the rights and obligations of the parties and shall take precedence over the EULA.
Page 38

38
MEMO
Page 39

FRANÇAIS
MANUEL DU PROPRIÉTAIRE
RÉFRIGÉRATEUR
Veuillez lire attentivement le présent manuel de lʼutilisateur avant de faire
fonctionner lʼappareil et conservez-le à portée de la main pour le consulter
en tout temps.
LRKNC0505V
Copyright © 2020 LG Electronics Inc. Tous droits réservés
www.lg.com
Page 40

2
TABLE DES MATIÈRES
3 CARACTÉRISTIQUES DU
PRODUIT
4 CONSIGNES DE SÉCURITÉ
4 CONSIGNES DE SÉCURITÉ IMPORTANTES
8 CARACTÉRISTIQUES DU
PRODUIT
9 APERÇU DU PRODUIT
9 Extérieur et intérieur
10 Contenants pour kimchi
11 INSTALLATION
11 Aperçudelʼinstallation
12 Déballage du réfrigérateur
12 Choix de l’emplacement adéquat
13 Mise à niveau
13 Mise en marche
14 FONCTIONNEMENT
14 Avant l’utilisation
15 Panneau de contrôle
20 Guide de stockage des aliments
23 FONCTIONS INTELLIGENTES
23 Application LG ThinQ
23 Fonction Smart Diagnosis
MC
24 ENTRETIEN
24 Nettoyage
26 DÉPANNAGE
26 Foire aux questions
27 Avantdʼappelerleréparateur
32 GARANTIE LIMITÉE
Page 41

3CARACTÉRISTIQUES DU PRODUIT
FRANÇAIS
CARACTÉRISTIQUES DU PRODUIT
Selon le modèle, certaines des fonctions suivantes pourraient ne pas être offertes.
Stockage d’une variété d’aliments
Ce nouveau modèle peut être utilisé pour stocker et faire fermenter du kimchi, mais aussi pour réfrigérer ou congeler des
aliments, ce qui accroît grandement sa commodité.
Contenants hermétiques de haute qualité pour kimchi
Les contenants pour kimchi sont hermétiques et faciles à utiliser et sont conçus pour conserver la fraîcheur du kimchi.
(La forme des contenants pour kimchi peut varier selon le modèle.)
Fonction puissante de désodorisation
Les compartiments gauche et droit sont munis de désodorisants qui éliminent les odeurs avant qu’elles ne se propagent.
COUVERCLES DES CONTENANTS FACILES À OUVRIR/FERMER
Les couvercles sont munis d’amortisseurs pour en garantir une ouverture et une fermeture en douceur.
Installation facile
L’appareil peut être installé dans n’importe quelle pièce dont la température se situe entre 13 °C(55 °F) et
43 °C et (110 °F).
Page 42

4 CONSIGNES DE SÉCURITÉ
CONSIGNES DE SÉCURITÉ
LISEZ TOUTES LES CONSIGNES AVANT LʼUTILISATION
Il est très important dʼassurer votre sécurité et celle des autres.
Nous fournissons de nombreux conseils de sécurité importants dans ce manuel et sur votre appareil. Lisez toujours
l’ensemble des messages de sécurité et respectez-les.
Ceciestlesymboledʼalertedesécurité.
Ce symbole est destiné à vous alerter des dangers potentiels pouvant entraîner la mort ou des blessures.
TouslesmessagesdesécuritéserontprécédésdusymboledʼalertedesécuritéetdutermeAVERTISSEMENTou
MISE EN GARDE.
Voici le message que ces mots véhiculent :
AVERTISSEMENTS
Vous pouvez être tué ou grièvement blessé si vous ne suivez pas les consignes.
MISE EN GARDE
Vous pouvez être légèrement blessé ou pouvez endommager le produit si vous ne suivez pas les consignes.
Tous les messages de sécurité vous indiqueront quel est le danger potentiel, comment réduire les risques de blessures et
ce qui peut se produire en cas de non-respect des consignes.
CONSIGNES DE SÉCURITÉ IMPORTANTES
AVERTISSEMENTS
Pour réduire les risques dʼexplosion, dʼincendie, de mort, de décharge électrique,
de brûlure ou de blessures lors de lʼutilisation de lʼappareil, prenez les précautions
élémentaires, y compris les suivantes :
INSTALLATION
•Pour réduire le risque de blessures, veuillez suivre toutes les procédures de sécurité recommandées par l’industrie, ce
qui inclut le port de lunettes de sécurité et de longs gants.
•N’essayez jamais d’utiliser cet appareil s’il est endommagé, défectueux ou partiellement désassemblé, s’il manque des
piècesousidespièces,incluantlecâbleetlache,sontendommagées.
•Branchez seulement cet appareil sur une prise électrique mise à la terre dont la valeur nominale convient à celui-ci (115
V, 60 Hz, c.a. uniquement). L’utilisateur est responsable du remplacement de la prise de courant murale standard à
deux broches par une prise de courant murale standard à trois broches.
•N’utilisez pas une prise de courant qui peut être mise hors fonction à l’aide d’un interrupteur. N’utilisez pas de rallonge.
•L’appareil doit être placé de façon à ce que la source d’alimentation soit facilement accessible.
•Lorsque vous déplacez l’appareil, soyez prudent et évitez d’écraser le cordon d’alimentation ou de l’endommager.
•Communiquez avec un centre de services autorisé lorsque vous installez l’appareil ou que vous le replacez à un nouvel
endroit.
•Ne coupez ni n’enlevez jamais la broche de mise à la terre du câble d’alimentation.
•Gardezlematérieldʼemballagehorsdeportéedesenfants.Lematérieldʼemballageposeundangerpourlesenfants.Il
y a un risque de suffocation.
Page 43

5CONSIGNES DE SÉCURITÉ
FRANÇAIS
•N’installez pas l’appareil dans un endroit humide ou poussiéreux, là où les matériaux isolants qui se trouvent sur les
composants électriques pourraient se détériorer.
•N’exposez pas l’appareil directement à la lumière du soleil ni à la chaleur produite par des appareils comme un four ou
un appareil de chauffage.
•Ne pliez pas ou ne pincez pas le cordon d’alimentation de façon excessive; ne placez pas d’objets lourds sur celui-ci.
FONCTIONNEMENT
•Cetappareilestdestinéàêtreutiliséàdesnsdomestiquesetpourdesusagessimilaires,parexemple:
- Dans le coin cuisine du personnel des magasins, des bureaux et d’autres milieux de travail;
- Dans les fermes et par les clients des hôtels, des motels et d’autres milieux de type résidentiel;
- Dans des milieux comme les gîtes;
- Pour des utilisations dans le domaine de la restauration et de la vente en gros.
•L’appareiln’estpasconçupourêtreutiliséàdesnsspéciales,commel’entreposagedemédicamentsoudematériaux
d’essai, ni pour être utilisé sur des bateaux, etc.
•NE permettez PAS aux enfants de grimper ou de se tenir sur les portes de l’appareil ou les tablettes à l’intérieur de
celui-ci, ni de s’accrocher à ces mêmes portes et tablettes. Ils pourraient endommager le réfrigérateur et se blesser
sérieusement.
•Ne permettez pas aux enfants de grimper à l’intérieur de l’appareil. Ils pourraient demeurer coincés et suffoquer.
•Lasurveillancedesenfantsestrequiseandes’assurerqu’ilsnejouentpasavecl’appareil.
•Gardez vos doigts à distance des zones de coincement; les dégagements entre les portes et les armoires sont
inévitablement réduits. Soyez prudent lorsque vous fermez les portes de l’appareil et que des enfants se trouvent à
proximité de celui-ci.
•Ne touchez pas les aliments surgelés ou les composants métalliques du congélateur si vos mains sont mouillées ou
humides. Cela pourrait entraîner des gelures.
•Ne recongelez pas des aliments surgelés qui ont été complètement décongelés. Cela pourrait être dangereux pour la
santé.
•Si le réfrigérateur est équipé d’ampoules et qu’il faut les remplacer, débranchez le réfrigérateur ou coupez le courant
avant de le faire.
•N’utilisezpasdeched’adaptationetnebranchezpaslached’alimentationélectriquesurunerallongeélectriqueà
prises multiples.
•N’utilisezpasdecordonquiprésentedesssuresoudestracesd’abrasionsursalongueurouencoreàl’extrémitéde
lacheouàcelleduconnecteur.Demandezàunemployéd’uncentredeservicesautoriséderemplacerouderéparer
immédiatementtoutcordond’alimentationdénudé,eflochéouautrementendommagé.
•Ne faites pas fonctionner le réfrigérateur et ne touchez pas le cordon d’alimentation si vos mains sont mouillées.
•Nemodiezetneprolongezpaslecordond’alimentation.
•N’utilisez pas de prises de courant non homologuées. Ne branchez pas l’appareil sur une prise de courant murale si
celle-ci est endommagée.
•Ne placez pas vos pieds ou vos mains, ou encore des objets dans les évents d’aération ou au bas du réfrigérateur.
Cela pourrait causer des blessures ou provoquer une décharge électrique.
•En cas de fuite de gaz (propane, GPL), assurez-vous que les lieux sont bien ventilés et contactez un centre de services
autorisé avant de remettre l’appareil en fonction. Ne touchez pas l’appareil ou son cordon d’alimentation.
•Si un bruit étrange, une odeur particulière ou de la fumée provient de l’appareil, débranchez le cordon d’alimentation
sur-le-champ et contactez un centre de services autorisé.
•N’utilisezpasdefusible(commeducuivre,unld’acier),àl’exceptiond’unfusiblestandard.
•Ne placez pas et n’utilisez pas d’appareil électrique à l’intérieur de l’appareil, sauf s’il s’agit d’un type d’appareil
recommandé par le fabricant.
•Ne placez pas d’animaux à l’intérieur de l’appareil.
•Ne placez pas d’objets lourds ou fragiles, de contenants emplis de liquide, de produits combustibles ou d’objets
inammables(commedesbougiesetdeslampes)surl’appareil.
•Gardez ou jetez les matériaux d’emballage dans un endroit hors de la portée des enfants. Les matériaux d’emballage
en plastique présentent un risque de suffocation.
Page 44

6 CONSIGNES DE SÉCURITÉ
•En cas de branchement sur un circuit protégé par des fusibles, utilisez un fusible temporisé.
ENTRETIEN
•N’utilisez pas de séchoir à cheveux pour sécher l’intérieur de l’appareil.
•N’allumez pas de bougie pour dissiper les odeurs à l’intérieur de l’appareil.
•Si une fuite de frigorigène survient, éloignez les objets inammables de l’appareil. Assurez-vous que les lieux sont bien
ventilés et contactez un centre de services autorisé.
•Éloignez du réfrigérateur toutes les matières et vapeurs inammables comme l’essence.
•Débranchez l’appareil de la che d’alimentation avant de le nettoyer ou de le réparer.
•Débranchez l’appareil de la che d’alimentation immédiatement si une panne de courant ou un orage survient.
•Éteignez l’alimentation de l’appareil si de l’eau ou de la poussière pénètre à l’intérieur de celui-ci. Appelez un agent du
centre de services.
•Ne placez pas de contenants en verre ni de boissons gazeuses dans le congélateur. Le contenu liquide peut prendre
de l’expansion lorsqu’il est congelé, endommager le contenant et causer des blessures.
•N’entreposez pas, ne démontez pas et ne réparez pas l’appareil vous-même, et ne laissez pas un employé non qualié
le faire.
MISE AU REBUT
•Les appareils abandonnés sont dangereux, même si cette situation ne dure que quelques jours. Lorsque vous voulez
mettre l’appareil au rebut, retirez les matériaux d’emballage des portes ou retirez les portes en laissant les tablettes en
place an que les enfants ne puissent pas grimper facilement à l’intérieur de l’appareil.
•Si vous souhaitez mettre l’appareil au rebut, assurez-vous que le frigorigène a été retiré et qu’il sera éliminé de façon
adéquate par un employé d’un centre de services autorisé. Si vous êtes responsable d’une fuite de frigorigène, vous
pourriez devoir payer une amende ou vous pourriez être emprisonné en vertu des lois environnementales applicables.
AVERTISSEMENTS
•Maintenez libres de toute obstruction les ouvertures de ventilation qui se trouvent dans l’enceinte de l’appareil ou
dans la structure intégrée.
•N’utilisez pas de dispositifs mécaniques ou d’autres moyens pour accélérer le processus de dégivrage autres
que ceux recommandés par le fabricant.
•N’endommagez pas le circuit frigorique.
•N’utilisez pas d’appareils électriques à l’intérieur des compartiments pour nourriture de l’appareil, sauf s’ils sont
du type recommandé par le fabricant.
•En raison du réfrigérant et du gaz de soufage d’isolation utilisés dans cet appareil, des procédures spéciales de mise
au rebut sont nécessaires. Avant d’en disposer, veuillez consulter l’agent de service ou une autre personne qualiée.
Risque d’incendie et matériaux inammables
Cet appareil contient une petite quantité de réfrigérant isobutane (R600a); mais qui est également
combustible. Lors du transport et de l’installation de l’appareil, veillez à ce qu’aucune partie du circuit
frigorifique ne soit endommagée. En cas de fuite du réfrigérant, celui-ci pourrait s’enflammer ou provoquer
une blessure aux yeux. Si une fuite est détectée, éloignez les flammes nues ou les sources potentielles
d’inflammation et aérez la pièce dans laquelle l’appareil se trouve pendant plusieurs minutes.
Afin d’éviter la formation d’un mélange d’air et de gaz inflammable en cas de fuite dans le circuit
frigorifique, la taille de la pièce dans laquelle l’appareil est utilisé est déterminée selon la quantité de
réfrigérant utilisée. La pièce doit avoir une taille de 10,8 pi2 (1 m2) pour chaque 8 g de réfrigérant R600a
dans l’appareil. La quantité de réfrigérant qui se trouve dans votre appareil est indiquée sur la plaque
d’identification située à l’intérieur de celui-ci. Ne mettez jamais en marche un appareil qui présente des
signes de dommages. En cas de doute, consultez votre revendeur.
Page 45

7CONSIGNES DE SÉCURITÉ
FRANÇAIS
CONSIGNES DE MISE À LA TERRE
•La connexion incorrecte du conducteur pour relier les appareils à la terre peut créer un risque de décharge électrique.
Vériezavecunélectriciencompétentouunpersonneldeservicesivousn’êtespascertainquel’appareilest
correctementmisàlaterre.Nemodiezpaslachefournieavecl’appareil;siellen’entrepasdanslaprise,faites
installer une prise appropriée par un électricien compétent.
•Assurez-vousqu’unélectricienqualiéexaminelaprisedecourantmuraleetlecâblage,etqu’ilconrmequelamiseà
la terre est adéquate.
•Nedébranchezjamaisl’appareilentirantsurlecordond’alimentation.Teneztoujourslachefermementpourlaretirer
de la prise. Le non-respect de cette consigne peut endommager le cordon d’alimentation, ce qui peut causer un
incendie ou entraîner une décharge électrique.
MISE EN GARDE
Pour réduire les risques de blessures mineures, de pannes ou de dommages
causés à lʼappareil ou à la propriété lors de lʼutilisation de lʼappareil, prenez les
précautions élémentaires, y compris les suivantes :
• N’accrochez pas et ne placez pas d’objets lourds sur le distributeur de l’appareil.
INSTALLATION
•N’installez pas l’appareil à un endroit à partir duquel il risque de tomber.
•L’appareil doit être installé correctement, conformément aux instructions d’installation.
FONCTIONNEMENT
•N’utilisez pas d’aérosols à proximité de l’appareil.
•L’appareilestconçupourêtreutiliséseulementàdesnsdomestiquesetàd’autresnsdecetype.
•N’appliquez pas une force excessive et ne frappez pas sur toute surface de verre. Ne touchez pas les surfaces de verre
siellessontssuréesouendommagées.
•Ne placez pas une quantité excessive d’aliments dans l’appareil. Cela pourrait causer des blessures aux utilisateurs ou
des dommages matériels.
ENTRETIEN
•N’utilisez pas de puissants détergents comme de la cire ou des diluants pour nettoyer l’appareil.
Nettoyez-le à l’aide d’un linge doux.
•Retirezlescorpsétrangers(commelapoussièreetl’eau)deszonesdecontactetdesbrochesdelache
d’alimentation.N’utilisezpasdelingemouilléouhumidepournettoyerlache.
•Ne vaporisez pas d’eau directement sur les surfaces intérieures ou extérieures de l’appareil.
•Ne nettoyez pas les tablettes ou les couvercles en verre avec de l’eau chaude lorsqu’ils sont froids. Une exposition à
un changement brusque de température peut les endommager.
GARDEZ CES CONSIGNES
Page 46

8 CARACTÉRISTIQUES DU PRODUIT
CARACTÉRISTIQUES DU PRODUIT
Lʼaspectetlescaractéristiquesénumérésdansleprésentmanuelpeuventvarierenraisondesconstantesaméliorations
apportées au produit.
Exigences électriques : 115 V @ 60 Hz
Model LRKNC0505V
Description RÉFRIGÉRATEUR
Poids net 90 lb (41 kg)
Page 47

9APERÇU DU PRODUIT
FRANÇAIS
APERÇU DU PRODUIT
Les illustrations fournies dans ce manuel peuvent être différentes des composants et accessoires réels, lesquels peuvent
faire l’objet de modifications par le fabricant sans avis préalable à des fins d’amélioration du produit.
Extérieur et intérieur
1
2
1
Contenant pour kimchi
Placez les aliments dans le contenant pour kimchi et
fermez-le adéquatement avant de le ranger.
2
Panneau de contrôle
Réglez les commandes en fonction de la température
ou du type d’aliment.
3
3
Pied de nivellement
Réglez les pieds de nivellement pour mettre l’appareil
de niveau.
Page 48

10 APERÇU DU PRODUIT
Contenants pour kimchi
Modèle Contenant pour kimchi Numéro de pièce Capacité
LRKNC0505V
AKC72909303 : 6EA 3 1/2 gal (13.1 L)
Page 49

11INSTALLATION
FRANÇAIS
2
inches
2
inches
INSTALLATION
Aperçu de lʼinstallation
Veuillez d’abord lire ces instructions d’installation après l’achat de ce produit ou son déplacement dans un autre lieu.
2
pouces
Déballage du réfrigérateur Choix de l’emplacement adéquat
Nivellement
Page 50

12 INSTALLATION
Déballage du réfrigérateur
AVERTISSEMENTS
•Au moins deux personnes sont nécessaires pour
déplacer et installer le réfrigérateur. Ne pas le faire
pourrait entraîner des blessures, notamment au dos.
•Le réfrigérateur est lourd. Protégez le plancher lors du
déplacement du réfrigérateur pour le nettoyage ou
l’entretien. Déplacez toujours votre réfrigérateur en
position verticale. Ne remuez pas le réfrigérateur et ne
le déplacez pas en l’appuyant sur ses coins, car cela
pourrait endommager le plancher.
•Éloignez du réfrigérateur toutes les matières et
vapeursinammablescommel’essence.Lenon-
respect de cette consigne peut se traduire par un
incendie, une explosion ou un décès.
REMARQUES
•Retirez le ruban et les étiquettes temporaires de votre
réfrigérateur avant l’utilisation. N’enlevez pas les
étiquettes d’avertissement, l’étiquette du numéro de
modèleetdesérieoulachetechniquequisetrouve
sous l’avant du réfrigérateur.
•Pour supprimer des résidus de ruban adhésif ou de colle,
frottez vigoureusement la surface avec le pouce. Les
résidus de ruban adhésif ou de colle peuvent également
être enlevés en frottant une petite quantité de savon à
vaisselle liquide sur l’adhésif avec les doigts. Essuyez
avec de l’eau chaude, puis séchez.
•N’utilisez pas d’instruments tranchants, d’alcool à friction,
deliquidesinammablesoudenettoyantsabrasifspour
enlever du ruban adhésif ou de la colle.
Ces produits peuvent endommager la surface de votre
réfrigérateur.
•Réinstallez ou ajustez les tablettes à votre guise. Les
tablettes des réfrigérateurs sont installées de façon à
faciliter le transport. Réinstallez les tablettes selon vos
besoins de rangement.
Choix de l’emplacement
adéquat
Électricité
Le réfrigérateur doit être branché sur sa propre prise de
courant mise à la terre, d’une valeur nominale de 115 volts,
de 60 Hz, c.a. et de 15 ampères, au minimum.
AVERTISSEMENTS
•Pour réduire le risque de choc électrique ne pas
installer le réfrigérateur dans un endroit mouillé ou
humide.
•N’installez pas l’appareil à l’extérieur ou dans un
emplacement extérieur protégé, ni à la lumière directe
du soleil.
•Ne surchargez pas l’installation électrique. Brancher
plusieurs appareils dans la même prise que celle du
réfrigérateur peut entraîner un risque d’incendie.
Plancher
Pour éviter le bruit et les vibrations, l’appareil doit être
installé et mis à niveau sur un plancher stable. Au besoin,
ajustez les pieds de nivellement pour compenser les
inégalités du sol.
REMARQUE
•L’installation sur des tapis, des surfaces molles, une
plate-forme ou une structure faiblement soutenue n’est
pas conseillée
Température ambiante
Installez cet appareil dans un endroit où la température est
comprise entre 13 °C(55 °F) et 43 °C (110 °F).
Si la température autour de l’appareil est trop basse ou trop
élevée, la capacité de refroidissement peut être affectée.
Page 51

13INSTALLATION
FRANÇAIS
Dimensions et dégagements
•Vériez les dimensions de l’appareil et le chemin menant
à l’emplacement d’installation pour vous assurer qu’il y a
sufsamment d’espace pour passer le réfrigérateur dans
les ouvertures de porte et les passages étroits.
•Lors du choix de l’emplacement d’installation du
réfrigérateur, il faut prévoir sufsamment d’espace à
l’arrière de l’appareil pour les raccordements et la
circulation d’air et de l’espace sur le dessus de l’appareil
pour l’ouverture de la porte.
•Une trop petite distance entre les éléments adjacents
peut entraîner une diminution de la capacité de
congélation et une hausse des frais de consommation
d’électricité. Laissez un espace d’au moins 50,8 mm
(2 po) entre l’arrière du réfrigérateur et le mur.
•N’oubliez pas de laisser sufsamment d’espace au-
dessus du réfrigérateur pour permettre l’ouverture
complète de la porte.
F
B
- Dimensions et
A Largeur 26 1/4″ (666 mm)
A
C
dégagements
D
E
LRKNC0505V
Mise à niveau
Pour assurer le bon fonctionnement de l’appareil, veillez à
ce qu’il soit à niveau et que tous les pieds de nivellement
reposent fermement sur le sol. Si l’appareil semble instable,
ajustez les pieds de nivellement.
Vous pouvez facilement tourner les pieds de nivellement en
inclinant légèrement le réfrigérateur. Tournez les pieds de
nivellement vers la gauche pour soulever l’appareil ou vers
la droite pour l’abaisser.
Mise en marche
•Après l’installation, branchez le cordon d’alimentation du
réfrigérateur dans une prise à 3 broches mise à la terre et
poussez le réfrigérateur dans sa position nale.
MISES EN GARDE
•Branchez-le à une prise de puissance nominale.
•Assurez-vous qu’un électricien qualié examine la
prise de courant murale et le câblage, et qu’il conrme
que la mise à la terre est adéquate.
•Ne coupez pas et n’endommagez pas la borne de
terre de la prise de courant.
B Hauteur jusqu’au
sommet du couvercle
C Hauteur jusqu’au
sommet du caisson
D Dégagement à l’arrière 2″ (50 mm)
E Profondeur 24″ (612 mm)
F Hauteur avec porte
ouverte
35 7/16″ (900 mm)
33″ (837 mm)
56 57/64″ (1445 mm)
Page 52

14 FONCTIONNEMENT
FONCTIONNEMENT
Avant l’utilisation
Nettoyez le réfrigérateur.
Nettoyez le réfrigérateur à fond et enlevez toute la poussière qui s’est accumulée pendant le
transport.
MISES EN GARDE
•Ne grattez pas le réfrigérateur avec un objet pointu et n’utilisez pas de détergent qui contient de
l’alcool,duliquideinammableouunesubstanceabrasivepourretirerlerubanadhésifoula
colle du réfrigérateur. Enlevez les résidus de colle en les essuyant avec votre pouce ou du
détergent à vaisselle.
•Ne retirez pas l’étiquette du numéro de modèle ou de série ou les informations techniques sur
la surface arrière du réfrigérateur.
Ouvrez les portes du réfrigérateur pour ventiler l’intérieur.
L’intérieur du réfrigérateur peut au début dégager une odeur de plastique. Enlevez tout ruban adhésif
de l’intérieur du réfrigérateur et ouvrez les portes du réfrigérateur pour le ventiler.
Branchez l’alimentation.
Vérifiez que l’alimentation est branchée avant l’utilisation.
Attendez que le réfrigérateur refroidisse.
Laissez votre réfrigérateur en marche de deux à trois heures au moins avant d’y mettre des aliments.
Vérifiez le flux d’air froid dans le compartiment pour assurer un refroidissement correct.
MISE EN GARDE
•Attendez que les aliments aient refroidi avant de les placer dans le réfrigérateur, sinon ils
pourraient se gâter ou laisser une mauvaise odeur tenace à l’intérieur du réfrigérateur.
Le réfrigérateur émet un bruit fort après la mise en marche initiale.
C’est normal. Le volume diminue à mesure que la température baisse.
Page 53

15FONCTIONNEMENT
FRANÇAIS
Panneau de contrôle
Selon le modèle, certaines des fonctions suivantes pourraient ne pas être offertes.
•Avant de stocker ou de faire fermenter du kimchi, consultez cette section pour vous familiariser davantage avec les pièces
et les fonctionnalités du panneau de commande.
•Avant d’utiliser le réfrigérateur pour kimchi de LG, appuyez sur la touche Lock (verrouiller) et maintenez-la enfoncée
pendant 3 secondes pour déverrouiller l’écran.
Caractéristiques du panneau de commande
1 2 34
REMARQUES
•Après 60 secondes d’inactivité, tous les voyants de l’écran à l’exception de l’icône Lock (verrouiller) ( )s’éteignentan
d’économiser de l’énergie. Cela fait partie du fonctionnement normal de l’appareil. Appuyez sur n’importe quelle touche
pourréactiverl’écranetafcherlesréglagesactuels.
•Avant d’utiliser ces fonctionnalités, vous devez appuyer sur la touche Lock (verrouiller) et la maintenir enfoncée pendant
3 secondes pour déverrouiller l’écran.
1
La fonctionnalité Lock (verrouiller) empêche les
enfants ou d’autres personnes de modifier les
réglages accidentellement.
•Avantdemodierlesréglages,appuyezsurla
touche Lock (verrouiller) et maintenez-la enfoncée
pendant 3 secondes pour déverrouiller l’écran.
•Aprèsavoirmodiélesréglages,appuyezsurla
touche Lock (verrouiller) et maintenez-la enfoncée
pendant 3 secondes pour verrouiller l’écran et
empêchertoutemodicationaccidentelle.
※
La fonctionnalité Lock (verrouiller) verrouille toutes
les fonctionnalités de l’écran à l’exception de la
touche Lock (verrouiller). Si une touche est
enfoncée, l’icône Lock (verrouiller) clignotera 3 fois.
La fonctionnalité Lock (verrouiller) est activée
automatiquement après 60 secondes si le panneau
de commande reste inactif.
※
L’écran s’allume automatiquement lorsque le
réfrigérateur est branché.
2
Appuyez sur la touche Kimchi pour sélectionner
une température pour le stockage du kimchi.
Kimchi : M→H → L
•Sélectionnez la température appropriée selon le
type de kimchi et sa salinité.
•L = refroidissement faible [froid]
M = refroidissement moyen [plus froid]
H = refroidissement élevé [le plus froid]
3
Appuyez pour configurer le compartiment de
réfrigération des aliments.
Storage (stockage) : Produce (aliments frais) →
Meat/Fish (viande/poisson) → Freezer
(Congélateur)
•Sélectionnez la température appropriée pour le type
d’aliments stockés.
4
Appuyez pour configurer le compartiment de
fermentation de kimchi ordinaire ou de
compartiment de Kimchi+.
Ferment (Fermentation) : Fer. → Kimchi+
•Pour ce qui est de la fonctionnalité Kimchi+, la jauge
augmente à mesure que la fermentation progresse.
Page 54

16 FONCTIONNEMENT
Stockage du Kimchi
Lorsque l’appareil est branché à une source d’alimentation, l’écran s’allume. Si vous le souhaitez, vous pouvez utiliser
l’appareil pour stocker du kimchi en fonction des réglages par défaut sans avoir à régler d’autres fonctions.
•L’écran s’allume automatiquement lorsque le réfrigérateur est branché.
1 23
1
Déverrouillez l’écran.
•Appuyez sur la touche Lock (verrouiller) et
maintenez-la enfoncée pendant 3 secondes pour
déverrouiller l’écran.
•L’écran doit être déverrouillé avant de pouvoir
modierlesréglages.
2
Appuyez sur la touche Kimchi.
•Appuyez sur chaque touche à plusieurs reprises
pourfairedélerlesréglages.
•Lorsqu’on appuie sur les touches, les réglages
changent dans l’ordre indiqué.
Kimchi : M→H → L
•L = refroidissement faible [froid]
M = refroidissement moyen [plus froid]
H = refroidissement élevé [le plus froid]
3
Verrouillez l’écran
•Appuyez sur la touche Lock (verrouiller) et
maintenez-la enfoncée pendant environ 3 secondes
pour verrouiller l’écran.
Page 55

FRANÇAIS
Fermentation du kimchi
Le kimchi fermente plus vite lorsqu’il est réglé à Ferment que lorsqu’il est réglé à Kimchi.
•L’écran s’allume automatiquement lorsque le réfrigérateur est branché.
1 23
17FONCTIONNEMENT
1
Déverrouillez l’écran.
•Appuyez sur la touche Lock (verrouiller) et
maintenez-la enfoncée pendant 3 secondes pour
déverrouiller l’écran.
•L’écran doit être déverrouillé avant de pouvoir
modierlesréglages.
2
Appuyez sur la touche Ferment (fermentation).
•Appuyez sur chaque touche à plusieurs reprises
pourfairedélerlesréglages.
•Lorsqu’on appuie sur les touches, les réglages
changent dans l’ordre indiqué.
Fer. → Kimchi+
REMARQUES
•Lorsque la fermentation est terminée, le voyant Fer.
Com. (fermentation terminée) s’allume. Le temps de
fermentation varie selon la saison et la température
ambiante.
3
Verrouillez l’écran
•Appuyez sur la touche Lock (verrouiller) et
maintenez-la enfoncée pendant environ 3 secondes
pour verrouiller l’écran.
Annulation de la fermentation
•Pour annuler la fermentation, déverrouillez l’écran
et sélectionnez un réglage différent.
Stockage du kimchi fermenté
•Lorsque la fermentation est terminée, le voyant Fer.
Com. (fermentation terminée) s’allume et « Kimchi
M » apparaît sur l’écran de la température.
•Déverrouillez l’écran pour éteindre le voyant Fer.
Com.(fermentationterminée)etmodierles
réglages.
Page 56

18 FONCTIONNEMENT
Utilisation des réglages Produce, Meat/Fish et Freezer
•Réglage Produce (aliments frais) : utilisez ce réglage prolonger la fraîcheur des fruits et légumes.
•Réglage Meat/Fish (viande/poisson) : utilisez ce réglage pour préserver la fraîcheur de la viande et du poisson.
•Réglage Freezer (Congélateur) : permet de congeler des aliments.
•L’écran s’allume automatiquement lorsque le réfrigérateur est branché.
REMARQUE
•Si du kimchi est stocké alors que l’appareil est réglé sur Meat/Fish (viande/poisson), il peut geler.
1 23
1
Déverrouillez l’écran.
•Appuyez sur la touche Lock (verrouiller) et
maintenez-la enfoncée pendant 3 secondes pour
déverrouiller l’écran.
•L’écran doit être déverrouillé avant de pouvoir
modierlesréglages.
2
Appuyez sur la touche Storage (stockage).
•Appuyez sur cette touche à plusieurs reprises pour
fairedélerlesréglages.
•Lorsqu’on appuie sur cette touche, les réglages
changent dans l’ordre indiqué.
Storage (stockage) : Produce (aliments frais) →
Meat/Fish (poisson/viande) → Freezer
(Congélateur)
3
Verrouillez l’écran
•Appuyez sur la touche Lock (verrouiller) et
maintenez-la enfoncée pendant environ 3 secondes
pour verrouiller l’écran.
•Retirez tous les aliments congelés avant de passer
du réglage Freezer (Congélateur) à un autre
réglage.
•La recongélation d’aliments décongelés peut causer
des maladies d’origine alimentaire.
Page 57

19FONCTIONNEMENT
FRANÇAIS
Utilisation des réglages Kimchi+
•L’écran s’allume automatiquement lorsque le réfrigérateur est branché.
Kimchi+
•Utilisez ce réglage pour refroidir rapidement du chou kimchi et favoriser la fermentation lactique pour préserver la fraîcheur
du kimchi.
※
Utilisez ce réglage seulement pour le chou kimchi. Des types de kimchi moins salés peuvent geler s’ils sont stockés alors
que ce réglage est utilisé.
※
L’utilisation de ce réglage à deux reprises peut entraîner une surfermentation du kimchi. Utilisez-le une seule fois.
※
Les barres lumineuses indiquent que le processus de fermentation est en cours. Le kimchi est prêt à être dégusté lorsque
toutes les barres sont allumées, ce qui prend environ 6 jours.
1 23
1
Déverrouillez l’écran.
•Appuyez sur la touche Lock (verrouiller) et
maintenez-la enfoncée pendant 3 secondes pour
déverrouiller l’écran.
•L’écran doit être déverrouillé avant de pouvoir
modierlesréglages.
2
Appuyez sur le bouton de fermentation.
•Appuyez sur cette touche à plusieurs reprises pour
fairedélerlesréglages.
•Lorsqu’on appuie sur les touches, les réglages
changent dans l’ordre indiqué.
Fer. → Kimchi+
3
Verrouillez l’écran
•Appuyez sur la touche Lock (verrouiller) et
maintenez-la enfoncée pendant environ 3 secondes
pour verrouiller l’écran.
Page 58

20 FONCTIONNEMENT
Guide de stockage des
aliments
Conseils pour le stockage des
aliments
Stockage des fruits et légumes
•L’humidité laissée sur les légumes après les avoir lavés
peut les gâter plus rapidement. Lavez les légumes juste
avant de les consommer.
•Les légumes verts comme le chou frisé ou la laitue ont
une durée de stockage limitée. Enveloppez-les dans du
papier journal ou rangez-les dans des contenants scellés
pour les aider à conserver leur fraîcheur plus longtemps.
•Ne stockez pas de fruits tropicaux dans le réfrigérateur.
•Les températures froides abîment les bananes et les
ananas non tranchés.
Conseils pour le stockage du kimchi
Ne remplissez pas trop les contenants pour kimchi.
•Laissez au kimchi de l’espace pour se dilater alors qu’il
fermenteanqu’ilnedébordepasducontenant.Fermez
complètement le couvercle du contenant pour empêcher
le kimchi de fermenter trop rapidement ou pour éviter de
faire apparaître des levures et des moisissures.
Remplissez le contenant de kimchi jusqu’à la ligne et
assurez-vous que le couvercle est bien fermé avant de le
ranger. Couvrez la surface du kimchi avec une pellicule
de plastique pour prolonger sa durée de stockage.
Ne rangez pas le kimchi directement dans le
compartiment du réfrigérateur et ne le placez pas dans
un sac en plastique.
•Utilisez le contenant pour kimchi fourni pour stocker du
kimchi. Le kimchi rangé directement dans le compartiment
du réfrigérateur peut geler et perdre son goût. N’obstruez
pas la sortie d’air à l’intérieur du réfrigérateur avec des
aliments. Cela pourrait faire geler les aliments, affecter le
rendement de l’appareil, ou entraîner une décharge
électrique ou des blessures.
Pour des résultats optimaux, vérifiez l’état du kimchi 3
à 4 jours après l’avoir stocké.
•Si le kimchi a débordé, il peut fermenter trop rapidement
et ne pas bien se stocker.
Assurez-vous d’utiliser suffisamment de sel lors de la
préparation du kimchi lorsque celui-ci doit être stocké
plus longtemps.
•Le taux de fermentation est principalement déterminé par
la quantité de sel dans le kimchi. De petites portions de
kimchi doux peuvent être stockées pendant de courtes
périodes, mais ajoutez plus de sel si vous souhaitez en
stocker de grandes quantités pour le consommer sur une
période prolongée.
Soyez prudent lorsque vous rangez des contenants
pour kimchi dans le réfrigérateur.
•Soulevez le contenant par les poignées et évitez de
cogner le bas du contenant.
(L’aspect des contenants pour kimchi peut varier selon le
modèle.)
Ne placez pas d’aliments qui nécessitent d’autres
conditions de stockage dans le même compartiment.
•Sélectionnez les réglages appropriés pour les aliments
stockés.
Un guide pour la préparation du
kimchi
La première étape de la fermentation du kimchi est le
saumurage.
•Le sel réagit avec les enzymes présentes dans le chou
pour décomposer les protéines et commencer la
fermentation immédiatement. Ce processus se poursuit,
même à basse température. Autrefois, le kimchi fermentait
lentementsousl’inuencedestempératuresfroidesde
l’hiver.
Le goût du kimchi dépend aussi de l’assaisonnement
utilisé.
•Les assaisonnements typiques comprennent l’oignon
vert, l’ail, le gingembre, le poisson salé et la poudre de
chili. La combinaison des épices choisies détermine le
goût du kimchi.
Les taux de fermentation du kimchi
•L’ajout d’une grande quantité d’ail, de fruits de mer,
d’oignons, de poudre de chili, de concombre ou d’oignons
verts fait fermenter le kimchi plus rapidement. L’ajout
d’huîtres salées, de crevettes salées ou de sauce kaki
accélère dramatiquement la fermentation. D’autre part,
l’ajout de poireaux, de moutarde ou de ginseng ralentit la
fermentation.
La fermentation du kimchi commence aussitôt qu’il est
préparé.
•Le contact avec l’air va rendre le kimchi aigre. Si le kimchi
n’est pas recouvert de sauce ou s’il est trop peu salé, une
necouchedelevurevaseformeràsasurface.Évitez
que les légumes soient en contact avec l’air en les
recouvrant de sauce, en plaçant le kimchi dans un sac en
plastique ou en le couvrant d’une pellicule de plastique.
Comment la température influence la préparation du
kimchi
•Latempératureinuenceletauxdefermentationdu
kimchi. Lorsque vous préparez du kimchi dans le but de
le stocker à long terme, maintenez la température
au-dessous de 50 °F (10 °C).
Page 59

21FONCTIONNEMENT
FRANÇAIS
Stockage à long terme du kimchi
•Comme le fromage, le kimchi est un organisme vivant qui
vachangerauldutemps.Pourgarderlekimchifrais
pendant longtemps, augmentez la teneur en sel et
stockez-le à basse température, soit aux alentours de
32°F(0°C).Pesezsurleslégumesanqu’ilssoientbien
recouverts de sauce et couvrez le contenant d’une
pellicule de plastique ou d’une couche de feuilles de chou
pour protéger le kimchi de l’air et conserver la fraîcheur
du kimchi plus longtemps.
Le choix du bon chou pour le kimchi
•Il y a plusieurs types de choux offerts. Pour le kimchi,
choisissez un chou de taille moyenne qui est arrondi
plutôt que long et mince. Les feuilles intérieures doivent
être douces et plus pâles que les feuilles extérieures. Les
feuilles extérieures doivent être minces et d’un vert clair.
Le choix des radis pour le kimchi
•Il y a beaucoup de types de kimchi aux radis, et différents
radis sont utilisés pour différents types de kimchi.
•Pour le kimchi aux radis, utilisez des radis coréens qui
ont une tête vert pâle et des feuilles bien réparties.
•Pour le kimchi aux chonggak (jeunes radis), utilisez des
radis de Séoul qui ont une base ronde et épaisse.
•Pour le kkakdugi (kimchi aux radis coupés en cubes),
essayez de trouver des radis avec une tête blanche plutôt
que verte.
•Pour le dongchimi, utilisez des radis à feuilles tendres et
à tête blanche plutôt que verte.
Les bonnes techniques de stockage
des aliments
Stockez le kimchi dans le contenant pour kimchi.
•Remplissez le contenant de kimchi jusqu’à la ligne
seulement et assurez-vous que le couvercle est bien
fermé avant de le ranger.
•Silecouverclen’estpasferméadéquatement,unene
pellicule de levure peut se former à la surface du kimchi
ou le kimchi peut fermenter trop rapidement. Couvrez la
surface du kimchi d’une pellicule de plastique ou d’une
couchedefeuillesdechouavantdelerangeran
d’empêcher la formation de levure.
Stockez les légumes et les fruits dans le contenant
prévu à cet effet.
•Certains fruits et légumes peuvent être abîmés par l’air
froid.
•Les légumes qui sont humides après avoir été lavés ont
tendance à se gâter plus rapidement. Pour des résultats
optimaux, ne lavez pas les légumes avant de les stocker.
•Ne réfrigérez pas les fruits tropicaux, comme les bananes
ou les ananas, car les températures froides peuvent les
abîmer.
Laissez les aliments chauds refroidir à température
ambiante avant de les réfrigérer.
•Le fait de ranger les aliments chauds directement dans le
réfrigérateur peut élever la température des aliments
environnants, ce qui peut les gâter et entraîner des
factures d’électricité plus coûteuses.
Stockage à long terme du kimchi
•Rangez le kimchi fraîchement préparé dans le
réfrigérateur et sélectionnez le réglage Kimchi.
•Selon le type et la salinité du kimchi, sélectionnez le
réglage Low (basse), Medium (moyenne) ou High
(élevée).
•Pour un meilleur stockage prolongé, assurez-vous que
les légumes sont complètement submergés dans la
sauce et couvrez le kimchi d’une pellicule de plastique.
Avant de stocker les huiles végétales dans le
réfrigérateur, lisez les directives de stockage sur le
contenant.
•Les bouteilles d’huile végétale peuvent se salir à force
d’être utilisées.
•Rangez les bouteilles d’huile dans des contenants en
plastique jetables ou que vous avez en surplus pour
éviter d’avoir à nettoyer les contenants.
Page 60

22 FONCTIONNEMENT
Sélectionnez la température appropriée pour les
aliments stockés.
•Le stockage du kimchi avec le réglage Fermentation peut
le gâter.
•Certains types de kimchi peuvent geler s’ils sont stockés
alorsqueleréglageHigh(élevé)estutilisé.Vériez
régulièrement l’état du kimchi lorsque vous utilisez le
réglage High (élevé).
•Le fait de stocker d’autres aliments avec du kimchi dans
un contenant de stockage peut faire geler les autres
aliments.
Utilisation des différents contenants
•Pour obtenir des résultats optimaux lors de l’utilisation
des réglages Produce (aliments frais) ou Meat/Fish
(viande/poisson), stockez des contenants de taille
similaire, de petits contenants, ou des bouteilles.
※
Le fait de stocker du kimchi dans le contenant pour
kimchi fourni et à l’endroit prévu à cet effet rend le kimchi
extrêmement délicieux.
※
Ne stockez pas du kimchi dans des bouteilles en verre.
Le kimchi se dilate lorsqu’il est congelé et la bouteille
peut se briser et entraîner un risque de blessure.
※
Ne placez pas de contenants près de la sortie d’air dans
le réfrigérateur. Les aliments peuvent geler.
Fermentation du kimchi
•Évitez d’ouvrir la porte du compartiment lorsque le
kimchi est en processus de fermentation.
•Le fait de laisser l’air extérieur plus chaud entrer
pendant la fermentation peut affecter le goût du
kimchi.
Élimination des odeurs alimentaires
•Couvrez les contenants d’aliments ouverts d’une pellicule
deplastiqueavantdelesstockerand’éviterquedes
odeurs se répandent à l’intérieur du réfrigérateur.
Après son installation, laissez au réfrigérateur du
temps pour refroidir complètement avant de stocker
des aliments.
•Les aliments peuvent se gâter et causer des odeurs
persistantes s’ils sont stockés avant que le réfrigérateur
ait eu le temps d’atteindre la température réglée.
REMARQUES
•L’emballage des aliments doit être essuyé pour empêcher
de contaminer les aliments à proximité.
•Si le réfrigérateur est installé dans un endroit chaud et
humide, l’ouverture fréquente de la porte ou le fait de
stocker beaucoup de légumes dans le réfrigérateur peut
provoquer de la condensation. Essuyez la condensation
avec un chiffon propre ou une serviette en papier.
•Si la porte du réfrigérateur est ouverte ou fermée trop
souvent, l’air chaud peut pénétrer dans le réfrigérateur et
élever sa température. Cela peut aussi accroître le coût
de fonctionnement de l’appareil.
MISE EN GARDE
•Ne rangez pas de contenants en verre dans le
congélateur. Le contenu liquide peut prendre de
l’expansion lorsqu’il est congelé, endommager le
contenant et causer des blessures.
Page 61

23FONCTIONS INTELLIGENTES
FRANÇAIS
FONCTIONS
INTELLIGENTES
Application LG ThinQ
Cette fonctionnalité est offerte uniquement sur les modèles
portant le logo
L’application LG ThinQ vous permet de communiquer avec
l’appareil à l’aide d’un téléphone intelligent.
Caractéristiques de l’application LG
ThinQ
•Smart Diagnosis
−Cette fonction fournit des renseignements utiles pour
diagnostiquer et résoudre les problèmes avec
lʼappareilensebasantsurleproldʼutilisation.
REMARQUE
•Cette information est à jour au moment de la publication.
L’applicationestsujetteàdesmodicationsàdesns
d’amélioration du produit, et ce, sans que l’utilisateur en
soit préalablement avisé.
ou .
MC
Utilisation de la fonctionnalité de
diagnostic sonore pour diagnostiquer
les problèmes
Suivez les instructions ci-dessous pour utiliser la
fonctionnalité de diagnostic sonore.
•Lancez l’application LG ThinQ et sélectionnez la
fonctionnalité Smart Diagnosis qui se trouve dans le
menu. Suivez les instructions relatives au diagnostic
sonore indiquées dans l’application LG ThinQ.
Maintenez la touche de verrouillage enfoncée pendant
1
trois secondes.
•Sil’afchageaétéverrouillépendantplusd’une
minute, vous devez désactiver le verrou, puis le
réactiver.
Maintenez le bouton de fermentation enfoncée jusqu’à
2
ce que l’écran s’éteigne.
Installation de l’application LG ThinQ
À partir d’un téléphone intelligent, cherchez l’application LG
ThinQ dans la boutique Google Play ou l’App Store
d’Apple. Suivez les directives pour télécharger et installer
l’application.
Fonction Smart Diagnosis
Cette fonctionnalité est offerte uniquement sur les modèles
portant le logo
Utilisez cette fonctionnalité pour vous aider à diagnostiquer
et à résoudre les problèmes qu’éprouve votre appareil.
REMARQUE
•Pour des raisons ne relevant pas du contrôle de LGE, le
service pourrait ne pas fonctionner en raison de facteurs
externes, notamment la disponibilité du Wi-Fi, la
connexion Wi-Fi, la politique de la boutique d’applications
ou la disponibilité de l’application.
•Lafonctionnalitépourraitêtremodiéesanspréaviset
pourrait avoir une apparence différente selon votre
emplacement.
ou .
MC
Dès que l’écran s’éteint, tenez le microphone de votre
3
téléphone à côté de l’écran.
•Le microphone du téléphone doit faire face au
haut-parleur se trouvant sur le réfrigérateur.
Maintenez le téléphone dans cette position jusqu’à ce
4
que la transmission de la tonalité soit terminée. Un
compte à rebours s’affichera à l’écran. Lorsque le
décompte est terminé et que vous n’entendez plus les
tonalités, le diagnostic s’affichera dans l’application.
REMARQUE
•Pour obtenir les meilleurs résultats, évitez de bouger le
téléphone pendant la transmission sonore.
Page 62

24 ENTRETIEN
ENTRETIEN
Nettoyage
AVERTISSEMENT
•Utilisezunproduitdenettoyageininammable.Ne
pas le faire pourrait entraîner un incendie, une
explosion ou des blessures mortelles.
MISES EN GARDE
•N’utilisez pas de chiffons ou d’éponges rugueuses
pour nettoyer l’intérieur et l’extérieur du réfrigérateur.
•Ne placez pas votre main sur la surface inférieure du
réfrigérateur quand vous ouvrez ou fermez les portes.
Conseils généraux de nettoyage
•Les deux compartiments dégivrent automatiquement,
mais nettoyez le compartiment une fois par mois pour
éviter les odeurs.
•Essuyez immédiatement les aliments renversés.
•Débranchez toujours le réfrigérateur ou coupez le courant
avant de le nettoyer.
•Retirez toutes les pièces amovibles comme les
contenants pour kimchi.
•Utilisez une éponge propre ou un chiffon et un détergent
doux avec de l’eau chaude. N’utilisez pas de produits de
nettoyage abrasifs ou forts.
•Lavez à la main, rincez et séchez soigneusement toutes
les surfaces.
Extérieur
Pour les appareils avec un extérieur noir en acier
inoxydable, vaporisez du nettoyant à vitres sur un linge en
microfibre propre et frottez dans le sens du grain.
Ne vaporisez pas de nettoyant à vitres directement sur
l’écran. N’utilisez pas de produits de nettoyage abrasifs ou
forts.
Pour les appareils avec un extérieur en acier inoxydable
normal, frottez dans le sens du grain à l’aide d’un linge en
microfibre propre et mouillé. Essuyez avec du papier
essuie-tout pour éviter les marques. Pour éliminer les
taches tenaces et les marques laissées par les doigts,
versez quelques gouttes de savon à vaisselle liquide dans
de l’eau et lavez la surface avec ce mélange, rincez à l’eau
chaude, puis séchez. N’utilisez pas de produits de
nettoyage abrasifs ou forts.
Parois intérieures
•Laissez les compartiments se réchauffer pour éviter que
le chiffon colle.
Pour éliminer les odeurs, vous pouvez laver l’intérieur du
réfrigérateur avec un mélange de bicarbonate de soude et
d’eau chaude. Mélangez deux cuillères à soupe de
bicarbonate de soude à un litre d’eau (26 g de bicarbonate
de soude pour un litre d’eau). Assurez-vous que le
bicarbonate de soude est complètement dissous afin de ne
pas rayer les surfaces du réfrigérateur.
Revêtements et joints de porte
Utilisez une éponge propre ou un chiffon et un détergent
doux avec de l’eau chaude. N’utilisez pas de cire de
nettoyage, de détergent concentré, d’eau de Javel ou de
nettoyant contenant du pétrole sur les pièces en plastique
du réfrigérateur.
Intérieur
Si une accumulation de givre à l’intérieur du réfrigérateur
rend difficile le retrait des contenants pour kimchi, videz le
compartiment, puis mettez le réfrigérateur hors tension.
Laissez la porte du réfrigérateur ouverte pour accélérer le
dégivrage.. Lorsque la glace est fondue, essuyez l’intérieur
du compartiment à l’aide d’un chiffon sec. N’essayez pas
de dégivrer le réfrigérateur d’une autre façon ou au moyen
d’autres appareils. Cela pourrait provoquer un incendie.
Pièces en plastique (couvercles et
panneaux)
Utilisez une éponge propre ou un chiffon et un détergent
doux avec de l’eau chaude. N’utilisez pas de produits
nettoyants pour vitres, de nettoyants abrasifs ou de liquides
inflammables. Ces produits peuvent rayer ou endommager
la surface.
Page 63

FRANÇAIS
Serpentins du condensateur
Utilisez un aspirateur muni d’un embout plat court pour
nettoyer le couvercle du condensateur et ses évents.
Ne retirez pas le panneau qui recouvre la zone du
condensateur.
Nettoyage des contenants pour
kimchi
•Les contenants et les balconnets peuvent se salir
facilement à cause de la nourriture renversée. Enlevez-
lesetrincez-lesdetempsàautreand’éviterl’apparition
d’odeurs.
•Avant de nettoyer les couvercles des contenants, enlevez
le bourrage en caoutchouc à l’intérieur du couvercle.
N’oubliez pas de replacer le bourrage en caoutchouc une
fois que tous les couvercles sont propres.
•Ne nettoyez pas les contenants et les couvercles dans de
l’eau dont la température est supérieure à 122 °F (50 °C).
•Nettoyez doucement les contenants avec une éponge
douce pour éviter d’en rayer la surface.
•Comme les contenants pour kimchi peuvent dégager une
odeur de plastique lors de leur première utilisation,
nettoyez-les avec une éponge douce et un détergent
neutre.
•Pour éliminer l’odeur du contenant pour kimchi, placez-y
desfeuillesverteshachéesnement,puisrefermez-leà
l’aide du couvercle et laissez-le de côté pendant environ
une journée. Versez ensuite de l’eau de riz à l’intérieur du
contenant pendant environ 30 minutes, puis nettoyez-le.
•La couleur et l’odeur particulières du kimchi peuvent
imprégner le contenant si celui-ci est utilisé pendant une
période prolongée.
25ENTRETIEN
MISES EN GARDE
•Ne lavez pas le couvercle du contenant pour kimchi
au lave-vaisselle ni au séchoir.
Lavez le contenant à la main seulement.
Page 64

26 DÉPANNAGE
DÉPANNAGE
Foire aux questions
Q: Pourquoi mon kimchi gèle-t-il?
A: La température de stockage idéale du kimchi est d’environ 0 °C (32 °F). Le point de congélation exact du kimchi
varie selon le type de kimchi, son assaisonnement et sa teneur en sel. Si le kimchi gèle, modifiez la température
de stockage.
Si la température de stockage est (H), changez-la pour (M) ou (L).
•
Si la température de stockage est (M), changez-la pour (L).
•
•L = refroidissement faible [froid]
M = refroidissement moyen [plus froid]
H = refroidissement élevé [le plus froid]
Q: Pourquoi mon kimchi fermente-t-il trop rapidement?
A: Si la température de stockage est trop élevée, le kimchi fermentera trop rapidement. Pour éviter cela, changez la
température de stockage. Les réglages de la température de stockage changent dans l’ordre suivant : (L) → (M)
→ (H). La vitesse de fermentation du kimchi peut varier selon le type de kimchi, son assaisonnement et la
température à laquelle il a été préparé. Couvrez les contenants pour kimchi d’une pellicule de plastique ou
fermez-les hermétiquement à l’aide d’un couvercle afin de prolonger la fraîcheur du kimchi.
Q: Pourquoi mon kimchi est-il flétri ou spongieux?
A: L’ajout d’une trop petite quantité de sel donnera un kimchi d’apparence normale, mais celui-ci flétrira et deviendra
spongieux à mesure qu’il fermente. L’ajout de fruits de mer salés peut également entraîner une fermentation trop
rapide du kimchi, qui deviendra spongieux.
Q: Pourquoi mon kimchi devient-il plus sombre?
A: Si vous stockez du kimchi pendant une longue période, le contact de celui-ci avec l’air entraînera son oxydation,
ce qui lui donnera une couleur plus sombre.
Couvrez l’intérieur du contenant pour kimchi d’une pellicule de plastique pour empêcher le kimchi de devenir
sombre.
Q: Il y a de la moisissure blanche sur la surface du kimchi, et le chou s’est desséché. Quelle erreur ai-je
commise?
A: Si le couvercle du contenant pour kimchi n’est pas complètement fermé, le kimchi entrera en contact avec l’air,
ce qui entraînera la formation d’une levure blanche à la surface du kimchi ou le dessèchement du chou. Couvrez
les contenants d’une pellicule de plastique avant de les mettre au réfrigérateur pour empêcher la formation de
levure sur le kimchi.
Q: Est-ce normal que de la glace se forme sur le couvercle du contenant pour kimchi?
A: Lorsque le kimchi est stocké à la température idéale pendant une longue période, il est normal qu’un peu de
givre se forme sur le couvercle du contenant.
Page 65

27DÉPANNAGE
FRANÇAIS
Avant dʼappeler le réparateur
Consultez cette section du manuel avant de demander un service d’entretien; ce faisant, vous économiserez temps et
argent.
Refroidissement
Problème Cause possible Solutions
Les compartiments
du réfrigérateur ne
refroidissent pas.
Le système de
refroidissement est
trop puissant.
La commande du réfrigérateur
est réglée sur ARRÊT (sur
certains modèles).
Le réfrigérateur est dans un
cycle de dégivrage.
Le réfrigérateur vient d’être
installé.
Le réfrigérateur a récemment été
déplacé.
Le réfrigérateur remplace un
ancien modèle.
Le réfrigérateur vient d’être
branché ou remis sous tension.
La porte a souvent été ouverte,
ou beaucoup d’aliments ou des
aliments chauds y ont été
placés.
Les portes ne sont pas
complètement fermées.
Le réfrigérateur est installé dans
un environnement chaud.
Le condensateur ou le panneau
arrière est obstrué.
Réglez la commande sur MARCHE. Veuillez consulter la
section Panneau de contrôle pour un bon ajustement des
températures.
Durant le cycle de dégivrage, la température de chaque
compartiment peut augmenter légèrement. Attendez 30
minutes, puis vérifiez que la température est revenue à la
normale une fois le cycle de dégivrage terminé.
Chaque compartiment peut mettre jusqu’à 24 h pour
atteindre la température visée.
Si le réfrigérateur a été entreposé ou couché pendant une
longue période, celui-ci doit être placé à la verticale pendant
24 h avant d’être mis sous tension.
Les réfrigérateurs modernes nécessitent un temps de
fonctionnement plus long, mais consomment moins
d’énergie grâce à une technologie plus efficace.
Le réfrigérateur peut mettre jusqu’à 24 h pour refroidir
complètement.
L’ajout d’aliments ou l’ouverture de la porte réchauffe le
réfrigérateur, ce qui demande au compresseur de
fonctionner plus longtemps pour refroidir les compartiments.
Afin de conserver l’énergie, essayez de sortir tout ce dont
vous avez besoin du réfrigérateur en une seule fois, rangez
vos aliments de manière organisée afin de les trouver
facilement et fermez la porte dès que les aliments sont
sortis.
(Consultezle Guide de conservation des aliments.)
Poussez les portes fermement. Si elles ne se ferment pas
complètement, consultez la section Les portes ne se
ferment pas complètement ou s’ouvrent toutes seules dans
la partie Pièces et caractéristiques de la section
Dépannage.
Le compresseur fonctionnera plus longtemps dans un
environnement chaud. Lorsque la température ambiante est
normale (21 °C), votre compresseur fonctionne entre 40 %
et 80 % du temps. Si la pièce est plus chaude, attendezvous à ce qu’il fonctionne encore plus. Le réfrigérateur ne
doit pas être mis en fonction lorsque la température
ambiante est supérieure à 43 °C.
Utilisez un aspirateur muni d’un embout plat court pour
nettoyer le couvercle du condenseur et ses évents. Ne
retirez pas le panneau qui recouvre la zone du condenseur.
Page 66

28 DÉPANNAGE
Refroidissement
Problème Cause possible Solutions
Lorsque les portes sont souvent ouvertes ou restent
ouvertes longtemps, de l’air chaud et humide entre à
l’intérieur du compartiment. La température et le niveau
d’humidité augmentent ainsi à l’intérieur du compartiment.
Pour diminuer cet effet, réduisez la fréquence et la durée
d’ouverture des portes.
Si elles ne se ferment pas complètement, consultez la
section Les portes ne se ferment pas complètement ou
s’ouvrent toutes seules dans la partie Pièces et
caractéristiques de la section Dépannage.
Des conditions ambiantes humides font entrer plus
d’humidité dans les compartiments lorsque les portes sont
ouvertes, ce qui génère de la condensation ou du givre.
Maintenir un niveau d’humidité raisonnable dans la maison
aidera à contrôler la quantité d’humidité qui peut entrer dans
les compartiments.
Pendant le cycle de dégivrage, la température de chaque
compartiment peut augmenter légèrement et de la
condensation peut se former sur la paroi arrière. Une fois le
cycle de dégivrage terminé, attendez 30 minutes et vérifiez
que la température a bien été rétablie.
Accumulation
d’humidité à
l’intérieur.
Les portes sont souvent
ouvertes ou restent ouvertes
longtemps.
Les portes ne sont pas fermées
correctement.
Conditions ambiantes humides.
Cycle de dégivrage récemment
effectué.
Les aliments gèlent
dans le
compartiment du
réfrigérateur.
Les compartiments
du réfrigérateur et
du congélateur sont
trop chauds.
Les aliments ne sont pas
emballés correctement.
Des aliments à teneur élevée en
eau ont été placés à proximité
d’une bouche d’aération.
La température du réfrigérateur
est mal réglée.
Le réfrigérateur est installé dans
un endroit froid.
Le réfrigérateur vient d’être
installé.
Les bouches d’aération sont
obstruées. L’air froid circule du
congélateur vers les aliments
frais et ainsi de suite par les
bouches d’aération dans la paroi
entre les deux sections.
Les aliments qui sont rangés à découvert ou sans
emballage et les contenants humides peuvent entraîner une
accumulation d’humidité dans chaque compartiment.
Essuyez tous les contenants et rangez les aliments dans
des emballages scellés pour éviter la condensation et le
givre.
Placez les aliments à haute teneur en eau loin des bouches
d’aération.
Si la température est trop froide, ajustez-la une unité à la
fois et attendez que la température se stabilise. Pour plus
d’information, reportez-vous à la section Réglage des
commandes.
Lorsque le réfrigérateur fonctionne dans des conditions
inférieures à 41 °F (5 °C), les aliments peuvent geler dans
le compartiment du réfrigérateur. Le réfrigérateur ne doit
pas être utilisé à une température inférieure à 55 °F (13 °C).
Chaque compartiment peut mettre jusqu’à 24 h pour
atteindre la température visée.
Trouvez l’emplacement des bouches d’aération en détectant
le mouvement de l’air à l’aide de votre main, puis déplacez
tous les éléments qui les obstruent et empêchent une
bonne circulation d’air. Réorganisez les éléments afin de
permettre la libre circulation de l’air à l’intérieur du
compartiment.
Page 67

FRANÇAIS
Refroidissement
Problème Cause possible Solutions
Lorsque les portes sont souvent ouvertes ou restent
ouvertes longtemps, de l’air chaud et humide entre à
l’intérieur du compartiment. La température et le niveau
d’humidité augmentent ainsi à l’intérieur du compartiment.
Pour diminuer cet effet, réduisez la fréquence et la durée
d’ouverture des portes.
Le réfrigérateur ne doit pas être mis en fonction lorsque la
température ambiante est supérieure à 43 °C.
L’ajout d’aliments augmente la température du
compartiment, ce qui entraîne le déclenchement du système
de refroidissement. Pour limiter cet effet, laissez refroidir les
aliments chauds à température ambiante avant de les
placer dans le réfrigérateur.
Si elles ne se ferment pas complètement, consultez la
section Les portes ne se ferment pas complètement ou
s’ouvrent toutes seules dans la partie Pièces et
caractéristiques de la section Dépannage.
Les compartiments
du réfrigérateur et
du congélateur sont
trop chauds.
Les portes sont souvent
ouvertes ou restent ouvertes
longtemps.
Le réfrigérateur est installé dans
un endroit chaud.
Beaucoup d’aliments ou des
aliments chauds ont été placés
dans l’un des compartiments.
Les portes ne sont pas
correctement fermées.
29DÉPANNAGE
Les compartiments
du réfrigérateur et
du congélateur sont
trop froids.
Du givre ou des
cristaux de glace se
forment sur les
aliments surgelés (à
l’intérieur de
l’emballage
hermétique).
Du givre ou des
cristaux de glace se
forment sur les
aliments congelés (à
l’extérieur de
l’emballage).
La température n’est pas réglée
correctement.
Le cycle de dégivrage vient de
se terminer.
La température n’est pas réglée
correctement.
La condensation issue
d’aliments à haute teneur en eau
a gelé à l’intérieur de
l’emballage.
Les aliments ont été laissés
dans le congélateur pendant une
longue période.
La porte est ouverte trop
fréquemment ou trop
longtemps.
La porte ne se ferme pas
correctement.
Si la température est trop élevée, ajustez les réglages une
position à la fois et attendez que la température se stabilise.
Durant le cycle de dégivrage, la température de chaque
compartiment peut augmenter légèrement et des signes de
condensation peuvent apparaître sur la paroi arrière.
Attendez 30 minutes, puis vérifiez que la température est
revenue à la normale une fois le cycle de dégivrage terminé.
Si la température est trop basse, ajustez les réglages une
position à la fois et attendez que la température se stabilise.
Consultez le Panneau de commande pour plus de
renseignements à ce sujet.
Ce phénomène est normal pour des aliments à haute teneur
en eau.
Ne stockez pas des aliments à haute teneur en eau dans le
congélateur pendant une longue période.
Lorsque les portes sont ouvertes trop fréquemment ou trop
longtemps, de l’air chaud et humide entre dans le
compartiment. Ceci accroît la température et l’humidité à
l’intérieur du compartiment. Lorsqu’il y a plus d’humidité,
cela entraîne la formation de givre et de condensation. Pour
atténuer l’effet, ouvrez la porte moins souvent ou moins
longtemps.
Consultez la section du dépannage intitulée « Les portes ne
se ferment pas correctement ou s’ouvrent toutes seules.
Page 68

30 DÉPANNAGE
Pièces et caractéristiques
Problème Cause possible Solutions
Les portes ne se
ferment pas
complètement ou
s’ouvrent toutes
seules.
Les portes sont
difficiles à ouvrir.
Le réfrigérateur
vacille ou paraît
instable.
L’éclairage ne
fonctionne pas.
L’intérieur du
réfrigérateur est
couvert de poussière
ou de suie.
Des aliments empêchent la
fermeture de la porte.
Le réfrigérateur n’est pas
d’aplomb.
Les joints sont sales ou
collants.
La porte vient d’être refermée.
Les pieds de nivellement ne
sont pas correctement ajustés.
Le sol n’est pas égal.
Les lumières à DEL à l’intérieur
ne fonctionnent pas.
Le réfrigérateur est placé près
d’une flamme ou d’un feu,
comme une cheminée, un poêle
à bois ou une bougie.
Rangez les aliments d’une autre façon pour dégager la
porte et ses étagères.
Veuillez consulter la section Nivellement et alignement de la
porte dans la partie Installation pour positionner le
réfrigérateur de façon adéquate.
Nettoyez les joints et leurs surfaces de contact. Frottez un
chiffon avec du lustre ou de la cire pour meubles sur les
joints après les avoir nettoyés.
Lorsque vous ouvrez la porte, de l’air tiède entre dans le
réfrigérateur. À mesure que l’air tiède se refroidit, il peut
créer un effet d’aspiration. Si la porte est difficile à ouvrir,
veuillez patienter une minute pour permettre à la pression
de l’air de s’équilibrer, puis vérifiez que la porte s’ouvre plus
facilement.
Veuillez consulter la section Nivellement.
Il peut être nécessaire de placer des cales sous les pieds
de nivellement pour terminer l’installation.
La lampe du compartiment du réfrigérateur est une diode
d’éclairage interne, et son entretien doit être réalisé par un
professionnel.
Assurez-vous que le réfrigérateur n’est pas situé près d’une
flamme ou d’un feu, comme une cheminée, un poêle à bois
ou une bougie.
Page 69

FRANÇAIS
Noises
Problème Cause possible Solutions
La commande du dégivrage cliquette
lorsque le cycle de dégivrage automatique
Clic
se met en marche ou s’arrête. La commande
du thermostat (ou la commande du
réfrigérateur sur certains modèles) cliquette
aussi en début et en fin de cycle.
Des cliquetis peuvent être dus à la
circulation du fluide frigorigène, à la
conduite d’alimentation en eau à l’arrière de
l’appareil, ou aux éléments rangés audessus ou autour du réfrigérateur.
Fonctionnement normal
Fonctionnement normal
31DÉPANNAGE
Cliquetis
Sifflement
Gargouillement
Pop
Grésillement
Vibration
Le sol flanche ou est inégal, ou les pieds de
Le réfrigérateur n’est pas en position stable
sur le sol.
Le réfrigérateur doté d’un compresseur
linéaire a été déplacé brusquement.
Le moteur du ventilateur de l’évaporateur
fait circuler de l’air à travers les
compartiments du réfrigérateur et du
congélateur.
Le ventilateur du condenseur souffle de l’air
sur le condensateur.
Le fluide frigorigène circule dans le système
de refroidissement.
Contraction et expansion des parois
internes causées par les changements de
température.
Eau s’égouttant sur le radiateur de
dégivrage lors du cycle de dégivrage.
Si le côté ou l’arrière du réfrigérateur touche
un meuble ou un mur, certaines des
vibrations normales de l’appareil peuvent
émettre un son audible.
nivellement doivent être ajustés sous le
réfrigérateur. Veuillez consulter la section
Nivellement et alignement de la porte.
Fonctionnement normal
Fonctionnement normal
Fonctionnement normal
Fonctionnement normal
Fonctionnement normal
Fonctionnement normal
Pour supprimer ce bruit, assurez-vous que les
côtés et l’arrière du réfrigérateur ne peuvent
pas vibrer contre un meuble ou un mur.
Égouttement
Pulsations ou son
aigu
Eau s’écoulant à travers l’égouttoir au cours
du cycle de dégivrage.
Votre réfrigérateur est conçu pour
fonctionner de manière efficace pour
conserver vos aliments à la bonne
température. Le compresseur à haute
performance peut amener votre nouveau
réfrigérateur à fonctionner plus
régulièrement, mais il est toujours plus
économe en énergie que les anciens
modèles. Il est normal d’entendre des
pulsations ou un son aigu au cours du
fonctionnement de votre réfrigérateur.
Fonctionnement normal
Fonctionnement normal
Page 70

32 GARANTIE LIMITÉE
GARANTIE LIMITÉE
ÉTATS-UNIS
Si votre réfrigérateur LG (« produit ») ne fonctionne pas à cause d’un défaut de matériaux ou de fabrication malgré un usage
domestique normal au cours de la période de garantie énoncée ci-dessous, LG réparera ou remplacera le produit, à sa
discrétion. Cette garantie limitée est valide uniquement pour l’acheteur original du produit et ne s’applique que lorsqu’il est
acheté et utilisé aux États-Unis, y compris sur les territoires américains. Une preuve de l’achat original est exigée pour
obtenir le service de garantie en vertu de cette garantie limitée.
PÉRIODE DE GARANTIE
Système scellé
(condensateur,
Réfrigérateur / Congélateur
Un (1) an après la date
dʼachatoriginaldelʼappareil.
Pièces et main-d’œuvre
(pièces internes et
fonctionnelles uniquement)
sécheuse, tuyau de
raccordement et
évaporateur)
Cinq (5) ans après la
datedʼachatoriginal
delʼappareil.
Pièces et maind’œuvre
Cinq (5) ans après la date
dʼachatoriginalde
lʼappareil.
Pièces et main-d’œuvre
Compresseur
Compresseur linéaire/à inversion
seulement : Pièces seulement - de la 6
e
la 10
année à compter de la date d’achat
original de l’appareil. (Les frais de maind’œuvre seront facturés au
consommateur.)
e
à
•Les produits et pièces de remplacement sont garantis pour la portion restante de la période de garantie originale ou quatrevingt-dix (90) jours, selon la période la plus longue.
•Les produits et pièces de remplacement peuvent être neufs ou remis à neuf.
•Une preuve de l’achat original détaillant le modèle du produit et la date d’achat est exigée pour obtenir le service de
garantie en vertu de cette garantie limitée.
SAUF DANS LES LIMITES PRÉVUES PAR LA LÉGISLATION EN VIGUEUR, TOUTE GARANTIE IMPLICITE DE
QUALITÉ MARCHANDE OU D’ADAPTATION À UN USAGE PARTICULIER SUR LE PRODUIT EST LIMITÉE À LA
DURÉE DE LA PRÉSENTE GARANTIE LIMITÉE. EN AUCUN CAS, LG OU SES DISTRIBUTEURS OU REVENDEURS
AUX ÉTATS-UNIS NE SERONT RESPONSABLES DE TOUT DOMMAGE INDIRECT, ACCESSOIRE, CONSÉCUTIF,
SPÉCIAL OU PUNITIF, Y COMPRIS, MAIS SANS S’Y LIMITER, LES PERTES DE FONDS COMMERCiAUX, LES
PERTES DE REVENUS OU DE BÉNÉFICES, UN ARRÊT DE TRAVAIL, LA DÉTÉRIORATION D’AUTRES
MARCHANDISES, LES COÛTS ASSOCIÉS AU DÉPLACEMENT ET À LA RÉINSTALLATION DU PRODUIT, LA PERTE
D’UTILISATION, OU TOUT AUTRE DOMMAGE, QU’IL SOIT CONTRACTUEL, DÉLICTUEL OU AUTRE. LA
RESPONSABILITÉ TOTALE DE LG, LE CAS ÉCHÉANT, NE POURRA EN AUCUN CAS EXCÉDER LA SOMME QUE
VOUS AVEZ PAYÉE POUR ACQUÉRIR LE PRODUIT.
Certains États ne permettent pas l’exclusion ou la limitation des dommages indirects ou consécutifs, ou les limitations de la
durée de la garantie implicite, auquel cas l’exclusion ou la limitation susmentionnée peut ne pas s’appliquer à vous. Cette
garantie vous confère des droits juridiques particuliers, et vous avez peut-être aussi d’autres droits qui peuvent varier selon
l’État où vous habitez.
LA PRÉSENTE GARANTIE LIMITÉE NE COUVRE PAS CE QUI SUIT :
•Un appel de service pour livrer, ramasser, installer ou réparer le produit; renseigner le client sur le fonctionnement du
produit,rectierlecâblageoucorrigerdesréparationsnonautorisées.
•Le bris ou le dysfonctionnement du produit durant une panne, une interruption de l’alimentation électrique ou une mauvaise
alimentation en électricité.
•Lebrisouledysfonctionnementcauséspardestuyauxdʼeauquifuientquisontinadaptésougelés,despetitstuyauxde
vidange,unearrivéedʼeauinadaptéeoucoupée,ouunearrivéedʼairinadaptée.
•Les dommages dommages attribuables à l’utilisation du produit dans un milieu aux conditions corrosives ou de façon
contraire aux indications du manuel d’utilisation.
•Le bris ou le dysfonctionnement du produit causés par des accidents, des insectes nuisibles, de la vermine, la foudre, le
vent, un incendie, une inondation ou une catastrophe naturelle, ou toute autre situation hors du contrôle de LG.
Page 71

33GARANTIE LIMITÉE
FRANÇAIS
•Lebrisouledysfonctionnementattribuablesàtoutemodicationnonautoriséeouparuneutilisationautrequecelle
prévue, ou par une fuite d’eau résultant d’une installation inadéquate.
•Le bris ou le dysfonctionnement attribuables à une utilisation mauvaise ou abusive, ou à une installation, à une réparation
ou à un entretien inadéquats. Une réparation incorrecte comprend l’utilisation de pièces non autorisées par LG. Une
installation ou un entretien incorrect comprend l’installation ou l’entretien de façon contraire aux indications du manuel
d’utilisation.
•Le bris ou le dysfonctionnement causés par une alimentation électrique ou une plomberie inadéquate, une utilisation
commerciale ou industrielle, ou l’utilisation d’accessoires, de composants ou de produits de nettoyage non approuvés par
LG.
•Le bris ou le dysfonctionnement causés par le transport et la manutention, y compris les rayures, bosses, entailles ou
autresdommagesauproduitni,saufsidetelsdommagessontrapportésdansundélaid’une(1)semaineaprèsla
livraison.
•Lesdommagesetlespiècesmanquantespourtoutproduitutiliséauxnsdedémonstration,toutproduitdéjàdéballéavant
l’achat ou tout produit vendu à rabais.
•Tout produit remis à neuf ou tout autre produit vendu « tel quel », « tel que disponible », « avec tous les défauts », ou tout
avis de non-responsabilité semblable.
•Desproduitsdontlenumérodesérieoriginalaétéretiré,modiéounepeutêtrefacilementdéterminé.
•Les augmentations des frais de fonctionnement et des autres dépenses de fonctionnement.
•Tout bruit associé à un fonctionnement normal.
•L’utilisationd’accessoires(p.ex.,ltresàeau,etc.),decomposantsoudeproduitsdenettoyagenonapprouvésparLG.
•Leremplacementdesampoules,desltresoudesconsommables.
•Les réparations lorsque votre appareil est utilisé dans des conditions autres que normales et domestiques (utilisation
commerciale, dans des bureaux ou des installations récréatives ou des véhicules) ou contraires aux consignes établies
danslemanueldupropriétairedelʼappareil.
•Lescoûtsassociésauretraitetàlaréinstallationduproduitdevotrerésidenceauxnsderéparation.
•Les étagères, les bacs de la porte, les tiroirs, les poignées et les accessoires, à l’exception des pièces internes/
fonctionnelles couverte par la présente garantie limitée.
Le coût des réparations ou du remplacement dans les circonstances d’exclusion ci-dessus est assumé par le
consommateur.
OBTENIR DES SERVICES SOUS GARANTIE ET DES RENSEIGNEMENTS ADDITIONNELS
Composez le 1 800 243-0000 et sélectionnez l’option appropriée dans le menu.
Ou visitez notre site Web au http://www.lg.com.
Ou par courrier : Service à la clientèle de LG Electronics/LG Electronics Customer Service P.O. Box 240007 Huntsville, AL
35813 c/o: CIC
Page 72

34 GARANTIE LIMITÉE
GARANTIE LIMITÉE
CANADA
AVIS D’ARBITRAGE : LA PRÉSENTE GARANTIE LIMITÉE CONTIENT UNE DISPOSITION SUR L’ARBITRAGE QUI
EXIGE QUE LE RÈGLEMENT DES DIFFÉRENDS ENTRE VOUS ET LG S’EFFECTUE PAR ARBITRAGE EXÉCUTOIRE
PLUTÔT QUE DEVANT UN TRIBUNAL, À MOINS QUE LES LOIS DE VOTRE PROVINCE OU TERRITOIRE
L’INTERDISENT OU QUE, DANS UN AUTRE TERRITOIRE DE COMPÉTENCE, VOUS VOUS PRÉVALIEZ D’UNE OPTION
DE RETRAIT. LES RECOURS COLLECTIFS ET LES PROCÈS DEVANT JURY NE SONT PAS AUTORISÉS PAR LE
PROCESSUS D’ARBITRAGE. VEUILLEZ VOUS RÉFÉRER CI-DESSOUS À L’ARTICLE « PROCÉDURE DE RÈGLEMENT
DE DIFFÉREND ».
Si votre réfrigérateur LG («Produit») a tombé en panne en raison d’un défaut de matériaux ou de fabrication sous une
utilisation normale et appropriée, pendant la période de garantie indiquée ci-dessous, LG Electronics Canada Inc.
(«LGECI»), à son gré, réparera ou remplacera le «Produit» après réception de la preuve d’achat originale au détail. Cette
garantie limitée est valable uniquement qu’à l’acheteur original du «Produit» du détaillant et s’applique uniquement à un
produit distribué, acheté et utilisé au Canada, tel que déterminé à la seule discrétion de «LGECI».
PÉRIODE DE GARANTIE (Remarque : Dans le cas où la date d’achat initial ne peut pas être vérifiée, la garantie
commence soixante (60) jours après la date de fabrication.)
Réfrigérateur
Un (1) an après la date
dʼachat original de
lʼappareil.
Pièces et main-d’œuvre
(pièces internes et
fonctionnelles uniquement)
Système scellé (condensateur, sécheuse, tuyau de
raccordement et évaporateur)
Un (1) an après la date
dʼachat original de
lʼappareil.
Pièces et main-d’œuvre
Sept (7) ans après la date
d’achat original de
l’appareil.
Pièces uniquement (la
main-d’œuvre sera facturée
au client)
Compresseur linéaire /
à inversion
Dix (10) ans après la date
dʼachat original de
lʼappareil.
Pièces uniquement (la
main-d’œuvre sera facturée
au client)
•Les produits et pièces de remplacement sont garantis pour la portion restante de la période de garantie originale ou quatrevingt-dix (90) jours, selon la période la plus longue.
•Les produits et pièces de rechange peuvent être neufs, reconditionnés, remis à neuf ou autrement fabriqués en usine, tous
à la seule discrétion de «LGECI».
•Lapreuvedel’achatdedétailoriginalspéciantlemodèleduproduitetladated’achatestrequisepourobtenirunservice
sous garantie en vertu de la présente garantie limitée.
LA RESPONSABILITÉ DE LGECI EST LIMITÉE À LA GARANTIE LIMITÉE EXPRIMÉE CI-DESSUS. SAUF TEL
QU’EXPRESSÉMENT FOURNI CI-DESSUS, LGECI DÉCLINE TOUTE AUTRE GARANTIE ET CONDITION
CONCERNANT LE PRODUIT, EXPLICITE OU IMPLICITE, Y COMPRIS, MAIS SANS S’Y LIMITER, TOUTE GARANTIE
IMPLICITE OU CONDITION DE QUALITÉ MARCHANDE OU D’ADAPTATION À UN USAGE PARTICULIER, ET AUCUNE
REPRÉSENTATION NE SERA LIÉE À LGECI. LGECI N’AUTORISE AUCUNE PERSONNE À CRÉER OU ENSOSSER À
SA PLACE QUELCONQUE AUTRE OBLIGATION DE GARANTIE OU RESPONSABILITÉ RELATIVE AU PRODUIT.
DANS LA MESURE OÙ TOUTE GARANTIE OU CONDITION EST IMPLICITE PAR LA LOI, ELLE EST LIMITÉE À LA
PERIODE DE GARANTIE DÉCLARÉE CI-DESSUS. EN AUCUN CAS, LGECI, LE FABRICANT OU LE DISTRIBUTEUR
DU PRODUIT, NE SERA TENU RESPONSABLE DE TOUT DOMMAGE ACCESSOIRE, CONSÉCUTIF, SPÉCIAL, DIRECT,
INDIRECT, PUNITIF OU EXEMPLAIRE, Y COMPRIS, SANS LIMITATION, LA PERTE DE COTE D’ESTIME, PERTE DE
PROFITS, PERTE DE PROFITS ANTICIPÉS, PERTE DE REVENUS, PERTE D’UTILISATION OU DE TOUT AUTRE
DOMMAGE, QU’IL SOIT PROVENU DIRECTEMENT OU INDIRECTEMENT DE TOUTE INFRACTION CONTRACTUELLE,
VIOLATION FONDAMENTALE, DÉLICTUELLE OU AUTRE, OU DE TOUT ACTE OU OMISSION. LA RESPONSABILITÉ
TOTALE DE LGECI, S’IL EN EST, N’OUTREPASSERA PAS LE PRIX D’ACHAT PAYÉ PAR VOUS POUR LE PRODUIT.
Cette garantie limitée vous donne des droits légaux spécifiques. Vous pouvez également avoir d’autres droits qui varient
d’une province à l’autre selon les lois provinciales applicables. Tout terme de cette Garantie limitée qui nie ou modifie toute
condition ou garantie implicite en vertu de la loi provinciale est divisible lorsqu’elle est en conflit avec cette loi provinciale
sans affecter le reste des termes de cette garantie.
Page 73

35GARANTIE LIMITÉE
FRANÇAIS
LA PRÉSENTE GARANTIE LIMITÉE NE COUVRE PAS CE QUI SUIT :
•Tout déplacement du technicien pour : i) livrer, reprendre, installer ou; éduquer comment utiliser le Produit; ii) corriger
lecâblageouplomberie;ouiii)rectiertouteréparationouinstallationnon-autoriséeduProduit;
•Dommage ou panne du Produit à performer lors de panne de courant et service électrique inadéquat ou interrompu;
•Dommage ou panne en raison de tuyaux d’eau brisés ou dont l’eau fuit, conduite d’eau gelée, conduite de
récupération obstruée, approvisionnement d’eau inadéquat ou interrompu ou ravitaillement d’air inadéquat;
•Dommage ou panne résultant de l’utilisation du Produit dans un environnement corrosif ou contraire aux instructions
détaillées dans le manuel d’utilisation du Produit;
•Dommage ou panne du Produit en raison d’accidents, ravageurs et parasites, foudre, vent, feu, inondations, actes
de Dieu ou toute autre raison hors du contrôle de LGECI ou du fabricant;
•Dommage ou panne résultant d’utilisation inappropriée ou abusive ou d’installation, réparation ou entretien imparfait
duProduit.Réparationimparfaiteinclutl’utilisationdepiècesnonautoriséesouspéciéesparLGECI.Installationou
entretien imparfait inclut toute installation ou entretien contraire aux instructions détaillées au manuel d’utilisation du
Produit’;
•DommageoupanneenraisondemodicationoualtérationnonautoriséeduProduit,ousiutilisépournsautres
que celle d’appareil ménager domestique, ou dommage ou panne résultant de toute fuite d’eau due à une mauvaise
installation du produit;
•Dommage ou panne en raison de courant électrique, tension ou codes de plomberie incorrects;
•Dommage ou panne en raison d’utilisation autre que celle d’appareil ménager domestique normale, incluant, sans
limite, l’utilisation commerciale ou industrielle, incluant l’utilisation au bureau commercial ou centre récréatif, ou
détaillée autrement au manuel d’utilisation du Produit;
•Dommage ou panne en raison d’utilisation de tout accessoire, composant ou produit nettoyant, incluant, sans limite,
ltresàeaunonautorisésparLGECI;
•Remplacementdelacartouchedultreàeauenraisondelapressiond’eausituéeendehorsdelaplagede
fonctionnementspéciéeousédimentsexcessifsdansl’approvisionnementd’eau;
•Dommage ou panne provoqué par le transport et manipulation, incluant rayures, bosses, écaillage et/ou autre
endommagementàlanitionduProduit,à moins que tel dommage ait résulté de fabrication ou matériaux
défectueux et rapporter à LGECI dans la (1) semaine suivant livraison du Produit;
•Dommage or articles absents de tout Produit démonstrateur, boîte ouverte, réusiné ou escompté;
•Produit réusiné ou tout Produit vendu “Tel quel”, “Où est”, “Avec tous défauts”, ou toute mise en garde similaire;
•Produit dont le numéro de série original ait été retiré, altéré ou ne peut être facilement déterminé à la discrétion de
LGECI;
•Augmentation de la facture d’électricité et dépenses additionnelles d’utilité de quelque manière associée au Produit;
•Tout bruit associé au fonctionnement normal du Produit;
•Remplacementdesampoules,ltres,fusiblesoutoutautreélémentconsommable;
•Remplacement de toute pièce n’étant pas originalement inclue avec le Produit;
•Coûtsassociésairetraitet/ouréinstallationduProduitpournsderéparation;et
•Les clayettes, bacs, tiroirs, poignées et accessoires du Produit, sauf les pièces internes / fonctionnelles couvertes
par cette garantie limitée.
•Couverture pour réparations à domicile, pour produit sous garantie, sera fournie si le Produit se trouve dans un
rayon de 150 km du centre de service autorisé (ASC) le plus près, tel que déterminé par LG Canada. Si votre
Produit est situé à l’extérieur du rayon de 150 km d’un centre de service autorisé, tel que déterminé par LG Canada,
il en ira de votre responsabilité d’apporter votre Produit, à vos frais, au centre de service (ASC) pour réparation sous
garantie.
Tous coûts et dépenses associés aux circonstances exclues ci-dessus, énumérés sous la rubrique “Cette garantie
limitée ne couvre pas” sont à la charge du consommateur.
AFIN D’OBTENIR SOUTIEN DE GARANTIE ET INFORMATIONS SUPPLÉMENTAIRES VEUILLEZ NOUS APPELER OU
VISITER NOTRE SITE WEB :
Sans frais : 1-888-542-2623 (7h à minuit – l’année longue) et sélectionnez l’option appropriée au menu, ou; Visitez le site
web à : http://www.lg.com
Page 74

36 GARANTIE LIMITÉE
PROCÉDURE DE RÈGLEMENT DE DIFFÉREND :
SAUF LA OÙ LA LOI L’INTERDIT, TOUT DIFFÉREND ENTRE VOUS ET LG ASSOCIÉ DE QUELQUE FAÇON QUE CE
SOIT À LA PRÉSENTE GARANTIE LIMITÉE SE RÈGLE EXCLUSIVEMENT PAR ARBITRAGE EXÉCUTOIRE PLUTÔT
QUE DEVANT UN TRIBUNAL DE DROIT COMMUN. SAUF LA OÙ LA LOI L’INTERDIT, VOUS ET LG RENONCEZ
IRRÉVOCABLEMENT À TOUT DROIT À UN PROCÈS DEVANT JURY, AINSI QU’À EXERCER UN RECOURS COLLECTIF
OU À Y PARTICIPER.
Définitions. Aux fins du présent article, « LG » désigne LG Electronics Canada Inc., ses sociétés mères, ses filiales et ses
sociétés affiliées et tous leurs dirigeants, administrateurs, employés, agents, bénéficiaires, détenteurs précédents des
mêmes droits, successeurs, cessionnaires et fournisseurs; « différend » et « réclamation » englobent tout différend,
réclamation ou litige de quelque sorte que ce soit (fondés sur une responsabilité contractuelle, délictuelle, légale,
réglementaire ou découlant d’une ordonnance, par fraude, fausse représentation ou sous quelque régime de responsabilité
que ce soit) découlant de quelque façon que ce soit de la vente, des conditions ou de l’exécution du produit ou de la présente
Garantie limitée.
Avis de différend. Si vous prévoyez engager une procédure d’arbitrage, vous devez d’abord envoyer à LG un préavis écrit
d’au moins 30 jours à l’adresse suivante : Équipe juridique LGECI, Norelco Drive, North York, Ontario, Canada M9L 2X6 (l’ «
avis de différend »). Vous et LG convenez de discuter en toute bonne foi pour tenter de régler le différend à l’amiable. L’avis
doit mentionner votre nom, votre adresse, votre numéro de téléphone, le produit faisant l’objet de la réclamation, la nature de
la réclamation et la réparation demandée. Si vous et LG ne parvenez pas à régler le différend dans les 30 jours suivant la
réception de l’avis de différend par LG, le différend doit être réglé par arbitrage exécutoire conformément à la procédure
établie aux présentes. Vous et LG convenez que, tout au long du processus d’arbitrage, les modalités (y compris les
montants) de toute offre de règlement formulée par vous ou par LG ne seront pas divulguées à l’arbitre et resteront
confidentielles à moins d’accord contraire entre les deux parties ou que l’arbitre règle le différend.
Entente d’arbitrage exécutoire et renonciation à un recours collectif. Si la réclamation n’a pu être réglée dans les 30
jours suivant la réception de l’avis de différend par LG, vous et LG convenez de ne régler les réclamations vous opposant
que par arbitrage exécutoire au cas par cas, à moins que vous vous prévaliez de l’option de retrait évoquée plus haut ou que
vous résidiez dans un territoire de compétences qui interdit la pleine application de cette clause dans le cas de réclamations
de ce type (dans lequel cas, si vous êtes un consommateur, cette clause ne s’appliquera que si vous acceptez expressément
l’arbitrage). Dans la mesure où la loi en vigueur le permet, aucun différend entre vous et LG ne peut être combiné ou
regroupé avec un différend faisant intervenir le produit ou la réclamation d’une personne ou entité tierce. Plus précisément et
sans limiter la portée de ce qui précède, sauf dans la mesure où une telle interdiction n’est pas autorisée en droit, en aucun
cas un différend entre vous et LG ne peut être traité dans le cadre d’un recours collectif. Au lieu de l’arbitrage, les parties
peuvent intenter une action individuelle devant une cour des petites créances, mais cette action ne peut pas être intentée
dans le cadre d’un recours collectif, sauf dans la mesure où une telle interdiction n’est pas autorisée en droit dans votre
province ou territoire de compétences pour une réclamation en cause qui nous oppose.
Règles et procédures d’arbitrage. Pour soumettre une réclamation à un arbitrage, l’une des deux parties, soit vous ou LG,
doit déposer une demande écrite à cet effet. L’arbitrage est privé et confidentiel et s’effectue selon une procédure simplifiée
et accélérée devant un arbitre unique choisi par les parties conformément aux lois et règlements en vigueur portant sur
l’arbitrage commercial de votre province ou territoire de résidence. Vous devez également envoyer une copie de votre
demande écrite à LG Electronics Canada, Inc., Legal Department - Arbitration, 20 Norelco Drive, North York, Ontario M9L
2X6. La présente disposition sur l’arbitrage est régie par les lois et règlements sur l’arbitrage commercial applicables de votre
province ou territoire. La sentence arbitrale peut donner lieu à un jugement de n’importe quel tribunal compétent. Toutes les
décisions relèvent de l’arbitre, à l’exception des questions associées à la portée et à l’applicabilité de la disposition sur
l’arbitrage et à l’arbitrabilité du différend, qui sont du ressort du tribunal. L’arbitre est tenu de respecter les modalités de la
présente disposition.
Droit applicable. Les lois de votre province ou territoire de’achat régissent la présente Garantie limitée et tout différend entre
nous, sauf dans la mesure où de telles lois sont supplantées par des lois fédérales, provinciales ou territoriales applicables
ou sont incompatibles avec ces dernières. Si l’arbitrage n’est pas autorisé pour régler une réclamation, une poursuite, un
différend ou un litige nous opposant, nous nous en remettrons à la compétence exclusive des tribunaux de votre province ou
territoire de compétence pour le règlement de la réclamation, de la poursuite, du différend ou du litige nous opposant.
Page 75

37GARANTIE LIMITÉE
FRANÇAIS
Frais et coûts. Aucuns frais ne sont exigibles pour entamer une procédure d’arbitrage. À la réception de votre demande
d’arbitrage écrite, LG réglera rapidement la totalité des frais de dépôt de la demande d’arbitrage, sauf si vous réclamez des
dommages-intérêts supérieurs à 25 000 $. Dans ce cas, le paiement de ces frais sera régi par les règles d’arbitrage
applicables. Sauf disposition contraire aux présentes, LG paiera tous les frais de dépôt de demande et d’administration ainsi
que les honoraires de l’arbitre conformément aux règles d’arbitrage applicables et à la présente disposition sur l’arbitrage. Si
vous remportez l’arbitrage, LG règlera vos frais et honoraires juridiques après avoir déterminé s’ils sont raisonnables en se
fondant sur des facteurs comme, entre autres, le montant de l’achat et le montant de la réclamation. Si l’arbitre juge que le
motif de la réclamation ou les réparations demandées sont futiles ou se fondent sur des motifs déplacés (au regard des lois
applicables), le paiement de tous les frais d’arbitrage sera régi par les règles d’arbitrage applicables. Dans un tel cas, vous
acceptez de rembourser à LG la totalité des montants versés qu’il vous revient autrement de payer en vertu des règles
d’arbitrage applicables. Sauf disposition contraire et si elle remporte l’arbitrage, LG renonce à tous ses droits de vous
réclamer des frais et horaires juridiques.
Audience et lieu de l’arbitrage. Si votre réclamation est égale ou inférieure à 25 000 $, vous pouvez opter pour un arbitrage
conduit selon l’une des modalités suivantes uniquement : 1) sur examen des documents remis à l’arbitre, 2) par audience
téléphonique ou 3) par audience en personne selon les dispositions des règles d’arbitrage applicables. Si votre réclamation
dépasse 25 000 $, le droit à une audience sera défini par les règles d’arbitrage applicables. Les audiences arbitrales en
personne se tiendront à l’endroit le plus proche et le plus pratique pour les deux parties situé dans votre province ou votre
territoire de résidence, sauf si nous convenons mutuellement d’un autre lieu ou d’un arbitrage par téléphone.
Dissociabilité et renonciation. Si une partie de la présente Garantie limitée (y compris les présentes procédures
d’arbitrage) n’est pas applicable, les dispositions restantes demeurent en vigueur dans la mesure permise par la loi
applicable. Le fait de ne pas exiger la stricte exécution d’une disposition de la présente Garantie limitée (y compris les
présentes procédures d’arbitrage) ne signifie pas que nous ayons renoncé ni que nous ayons l’intention de renoncer à toute
disposition ou partie de la présente Garantie limitée.
Option de retrait. Vous pouvez vous retirer de la présente procédure de règlement de différend. Dans ce cas, ni vous ni LG
ne pouvez imposer à l’autre partie de participer à une procédure d’arbitrage. Pour vous prévaloir de l’option de retrait, vous
devez envoyer un préavis à LG dans les trente (30) jours civils à compter de la date de l’achat du produit par le premier
acheteur i) dans un courriel adressé à optout@lge.com et dont la ligne d’objet porte la mention « Retrait de l’arbitrage » ou ii)
en composant le 1-800-980-2973. Que ce soit par courriel ou par téléphone, vous devrez donner a) votre nom et votre
adresse; b) la date d’achat du produit; c) le nom ou le numéro de modèle du produit et d) le numéro de série (qu’il est
possible de trouver i) sur le produit ou ii) en liqne au https://www.lg.com/ca_fr/soutien/reparation-garantie/demandereparation, Trouver mes numéros de modèle et de série). Si vous vous prévalez de l’option de retrait, les lois de votre
province ou territoire de résidence régissent la présente Garantie limitée et tout différend entre nous, sauf dans la mesure où
de telles lois sont supplantées par des lois fédérales, provinciales ou territoriales applicables ou sont incompatibles avec ces
dernières. Si l’arbitrage n’est pas autorisé pour régler une réclamation, une poursuite, un différend ou un litige nous
opposant, nous nous en remettrons à la compétence exclusive des tribunaux de votre province ou territoire de compétence
pour le règlement de la réclamation, de la poursuite, du différend ou du litige nous opposant.
Vous ne pouvez vous prévaloir de l’option de retrait que de la manière décrite plus haut (c’est-à-dire par courriel ou par
téléphone). Aucun autre type d’avis ne sera pris en compte pour le retrait de la présente procédure de règlement de
différend. Le fait de se retirer de la présente procédure de règlement de différend ne compromet d’aucune façon la protection
accordée en vertu de la Garantie limitée, et vous continuerez à jouir de tous les avantages prévus par la Garantie limitée. Si
vous conservez ce produit sans vous prévaloir de l’option de retrait, vous acceptez les conditions générales de la disposition
sur l’arbitrage énoncée ci-dessus.
Conflit de modalités. En cas de conflit ou d’incompatibilité entre les modalités de la présente garantie limitée et le contrat
de licence d’utilisation (CLU) en ce qui concerne le règlement des différends, les modalités de la présente garantie limitée
contrôlent et régissent les droits et obligations des parties et ont préséance sur le CLU.
Page 76

38
MEMO
Page 77

ESPAÑOL
MANUAL DEL PROPIETARIO
REFRIGERADOR
Lea detenidamente el manual del propietario antes de poner el
electrodoméstico en funcionamiento y consérvelo a mano en todo
momento para su referencia.
LRKNC0505V
Copyright © 2020 LG Electronics Inc. Todos los Derechos Reservados.
www.lg.com
Page 78

2
TABLA DE CONTENIDOS
3 CARACTERÍSTICAS DEL
PRODUCTO
4 INSTRUCCIONES DE SEGURIDAD
4 INSTRUCCIONES IMPORTANTES DE
SEGURIDAD
8 ESPECIFICACIONES DEL
PRODUCTO
9 DESCRIPCIÓN GENERAL DEL
PRODUCTO
9 Exterior & Interior
10 Contenedor de kimchi
11 INSTALACIÓN
11 Descripción general de la instalación
12 Desempacando el refrigerador
12 Elección de la ubicación adecuada
13 Nivelación
13 Encendido
26 SOLUCIÓN DE PROBLEMAS
26 Preguntas frecuentes
27 Antes de llamar al servicio técnico
32 GARANTÍA LIMITADA
14 FUNCIONAMIENTO
14 Antes de Usar
15 Panel de control
20 Guía de Almacenaje de Alimentos
23 FUNCIONES INTELIGENTES
23 Aplicación LG ThinQ
23 Función Smart Diagnosis™
24 MANTENIMIENTO
24 Limpieza
Page 79

3CARACTERÍSTICAS DEL PRODUCTO
ESPAÑOL
CARACTERÍSTICAS DEL PRODUCTO
Según el modelo, es posible que algunas de las siguientes funciones no estén disponibles.
ALMACENA VARIEDAD DE ALIMENTOS
Este nuevo modelo puede utilizarse no solo para almacenar y fermentar kimchi, sino también como refrigerador o
congelador, lo que expande de gran manera su utilidad.
CONTENEDORES HERMÉTICOS DE KIMCHI DE ALTA CALIDAD
A manera de mantener el sabor del kimchi fresco, los contenedores de kimchi son herméticos y faciles de utilizar. (Puede
que la forma de los contenedores de kimchi varíe dependiendo del modelo.)
FUNCIÓN DESODORANTE PODEROSA
Hay desodorantes en los compartimientos izquierdo y derecho para eliminar olores antes de que se propaguen.
TAPAS DE ACERO EASY-OPEN/EASY-CLOSE
Las tapas han sido diseñadas con amortiguadores para que pueda abrirlas y cerrarlas suavemente.
INSTALACIÓN FÁCIL
El electrodoméstico puede instalarse en cualquier ubicación que mantenga una temperatura entre 55 °F(13 °C) y 110 °F (43
°C).
Page 80

4 INSTRUCCIONES DE SEGURIDAD
INSTRUCCIONES DE SEGURIDAD
LEA TODAS LAS INSTRUCCIONES ANTES DE UTILIZAR
Su seguridad y la de los demás son muy importantes.
Tanto en este manual como en el equipo, hemos proporcionado muchos mensajes de seguridad importantes.
Siempre debe leer y respetar todos los mensajes de seguridad.
Este es el símbolo de alerta de seguridad.
Este símbolo le advierte sobre posibles riesgos que pueden ocasionar lesiones o la muerte a usted o a otros.
El símbolo de alerta de seguridad siempre estará acompañado de las palabras “ADVERTENCIA” o
“PRECAUCIÓN” y seguido de un mensaje de seguridad importante.
Estos términos significan lo siguiente:
ADVERTENCIA
Podría sufrir lesiones graves o la muerte si no sigue las instrucciones.
PRECAUCIÓN
Puede resultar lesionado o causar daño al producto si no sigue las instrucciones.
Todos los mensajes de seguridad le indicarán cuál es el riesgo potencial, le indicarán cómo reducir la probabilidad de
lesiones y le proporcionarán información sobre qué podría suceder si no se siguen las instrucciones.
INSTRUCCIONES IMPORTANTES DE SEGURIDAD
ADVERTENCIA
Para disminuir el riesgo de explosiones, incendios, descargas eléctricas,
quemaduras, lesiones o muerte para las personas que usen este artefacto, siga las
precauciones básicas, incluidas las siguientes:
INSTALACIÓN
•Para reducir el riesgo de lesiones personales, respete todos los procedimientos de seguridad recomendados por la
industria, incluso el uso de guantes de manga larga y gafas de seguridad.
•Nunca intente operar este artefacto si se encuentra dañado, si no funciona correctamente, si no está ensamblado por
completo o si tiene piezas faltantes o rotas, incluido un cable o enchufe dañado.
•Conecte este producto únicamente a un tomacorriente dedicado, conectado a tierra, apto para usar con este producto
(115 voltios, 60 Hz, solo CA). El usuario tiene la responsabilidad de reemplazar un tomacorriente de pared estándar de
2 tomas por un tomacorriente de pared estándar de 3 tomas.
•No use un tomacorriente que pueda apagarse con un interruptor. No use un cable de extensión.
•Posicione el electrodoméstico de un modo que le permita acceder fácilmente a la alimentación eléctrica.
•Al mover el electrodoméstico, tenga cuidado de no torcer ni dañar el cable de alimentación.
•Póngase en contacto con un centro de servicio autorizado antes de instalar o cambiar de lugar el electrodoméstico.
•Por ninguna razón debe cortar o quitar la tercera clavija (tierra) del cable de alimentación.
•Mantenga los materiales de empaque fuera del alcance de los niños. Los materiales de empaque pueden ser
peligrosos para los niños. Corren riesgo de asxia.
Page 81

5INSTRUCCIONES DE SEGURIDAD
ESPAÑOL
•No instale el electrodoméstico en un lugar húmedo o polvoriento, donde el aislamiento de las piezas eléctricas podría
deteriorarse.
•No coloque el electrodoméstico bajo la luz solar directa ni lo exponga a electrodomésticos que emitan calor, como
cocinas o calefactores.
•No doble ni pellizque en exceso el cable de alimentación, ni coloque objetos pesados sobre este.
FUNCIONAMIENTO
• Este electrodoméstico ha sido diseñado para su uso en el hogar y para aplicaciones similares como
- Áreas de cocina para el personal de tiendas, ocinas y otros ambientes de trabajo;
- Granjas y clientes de hoteles, moteles y otros ambientes de tipo residencial;
- Ambientes de alojamiento y desayuno;
- Catering y otras aplicaciones no minoristas.
•No use este electrodoméstico para nes especiales, como para conservar medicamentos o materiales de
ensayo, usar en barcos, etc.
•NO permita que los niños entren y se paren o se cuelguen de las puertas o los estantes del electrodoméstico.
Podrían dañar el refrigerador o sufrir lesiones graves.
•No permita que los niños entren al electrodoméstico. Podrían quedar atrapados y sofocarse.
•Debe supervisar a los niños para asegurarse de que no jueguen con el electrodoméstico.
•Mantenga los dedos lejos de los puntos de riesgo de pinzamiento; las distancias de separación entre las puertas
y los gabinetes son necesariamente pequeñas. Tenga cuidado al cerrar las puertas cuando haya niños cerca.
•No toque los alimentos congelados ni las partes metálicas del compartimento del congelador si tiene las manos
mojadas o húmedas. Hacerlo podría causar congelación.
•No vuelva a congelar alimentos congelados que se hayan descongelado por completo. Esto podría ser peligroso
para su salud.
•Si el refrigerador está equipado con bombillas y necesita reemplazarlas, desconecte o apague el refrigerador
previo a proceder a cambiarlas.
•No use adaptadores ni enchufe el cable de alimentación a una extensión de múltiples tomacorrientes.
•No use un cable que tenga grietas o daño de abrasión en su longitud o en algún extremo del enchufe o conector.
Haga que personal de servicio calicado repare inmediatamente todo cable de energía que esté gastado o
dañado de alguna manera.
•No use el refrigerador ni toque el cable de alimentación con las manos mojadas.
•No modique ni extienda el cable de alimentación.
•No use un tomacorriente que no esté certicado. No enchufe el electrodoméstico en un tomacorriente de pared
dañado.
•No coloque las manos, los pies u otros objetos en la ventilación de aire ni en la parte inferior del refrigerador. Si
lo hace, podría sufrir lesiones personales o descargas eléctricas.
•Si se produce una fuga de gas (propano/GPL), asegúrese de que el área esté adecuadamente ventilada y
póngase en contacto con un centro de servicio autorizado antes de volver a usar el refrigerador. No toque ni
desarme el electrodoméstico ni el cable de alimentación del mismo.
•Ante la presencia de ruidos u olores extraños, o si sale humo del electrodoméstico, desconecte el cable de
alimentación de inmediato y póngase en contacto con un centro de servicio autorizado.
•No use fusibles (como cobre, alambre de acero, etc.) que no sean los fusibles estándar.
•No coloque ni use un aparato eléctrico dentro del electrodoméstico, a menos que sea de un tipo recomendado
por el fabricante.
•No introduzca animales con vida dentro del electrodoméstico.
•Conserve o deseche los materiales de empaque fuera del alcance de los niños. Los materiales de empaque
plásticos representan un riesgo de asxia.
•Al retirar hielo del dispensador, no use un contenedor frágil.
•Si se conecta a un circuito protegido con fusibles, utilice un fusible de retardo.
Page 82

6 INSTRUCCIONES DE SEGURIDAD
MANTENIMIENTO
•No use secadoras eléctricas para secar el interior del producto.
•No prenda velas para remover el olor interno del producto.
•En el caso de fuga del refrigerante, aleje los objetos inflamables del refrigerador. Asegúrese de que el área esté bien
ventilada y póngase en contacto con un centro de servicio autorizado.
•Mantenga materiales inflamables y vapores, como gasolina, alejados del refrigerador.
•Desenchufe el cable de alimentación antes de limpiar o reparar el electrodoméstico.
•En caso de apagón o tormenta eléctrica, desenchufe el cable de alimentación de inmediato.
•Apague la alimentación si ingresa agua o polvo en el electrodoméstico. Llame a un agente de servicio.
•No almacene contenedores de vidrio ni refrescos en el compartimento del congelador. Al congelarse, los contenidos
pueden expandirse, romper el contenedor y provocar lesiones.
•No almacene, desarme ni repare el electrodoméstico usted mismo ni permita que el personal no calificado lo haga.
ELIMINACIÓN
•Los electrodomésticos desechados o abandonados son peligrosos, incluso si se dejan de usar solo por unos pocos
días. Al momento de desechar el refrigerador, retire los materiales de embalaje de la puerta o quite las puertas, pero
deje los estantes en su lugar, a n de que los niños no puedan ingresar fácilmente a este.
•Si desechara un refrigerador, asegúrese de que el refrigerante sea removido para su desecho adecuado por parte de
personal de servicio calicado. Si usted libera el refrigerante, podría ser multado o encarcelado de conformidad con la
ley ambiental vigente.
ADVERTENCIA
•Mantenga las aperturas de ventilación, en la cubierta del electrodoméstico o en la estructura incorporada,
despejadas de obstrucciones.
•No utilice dispositivos mecánicos u otros medios para acelerar el proceso de descongelado, con excepción de
aquellos recomendados por el fabricante.
•No dañe el circuito refrigerante.
•No utilice aparatos eléctricos dentro de los compartimientos de almacenaje de alimentos del electrodoméstico, a
menos que sean de un tipo recomendado por el fabricante.
•El gas refrigerante y de aislamiento usado en el electrodoméstico requiere procedimientos de desechado
especiales. Al desechar, por favor consulte con un agente de servicio o persona similarmente calicada.
Riesgo de incendio y materiales inamables
Este electrodoméstico contiene una pequeña cantidad de refrigerante isobutano (R600a), pero también
combustible. Al transportar e instalar el electrodoméstico, debe prestar atención para asegurar que
ninguna parte del circuito refrigerante se dañe. Fuga del refrigerante fuera de las pipas podría generar un
incendio o causar una lesión ocular. Si se detecta una fuga, evite cualquier llama descubierta o causas
potenciales de incendio, y ventile el ambiente en el que se encuentra el electrodoméstico por varios
minutos.
A manera de evitar la creación de una mezcla de gas y aire inflamable en caso ocurra una fuga en el
circuito refrigerante, el tamaño del ambiente en el que el electrodoméstico se ubica deberá corresponder
a la cantidad de refrigerante usada. El espacio debe ser de 10.8 pies cuadrados (1 metro cuadrado) por
cada 8g de refrigerante R600a dentro del electrodoméstico. La cantidad de refrigerante en su
electrodoméstico particular se muestra en la placa de identificación ubicada dentro del mismo. Nunca
inicie un electrodoméstico mientras este muestre algún signo defectuoso. En caso de dudas, consulte
con su distribuidor.
Page 83

7INSTRUCCIONES DE SEGURIDAD
ESPAÑOL
INSTRUCCIONES DE CONEXIÓN A TIERRA
•La conexión inadecuada del conductor de conexión a tierra puede resultar en riesgo de choque eléctrico. Pregunte a
un electricista calicado o al personal de servicio si no está seguro si el artefacto está adecuadamente conectado a
tierra. No modique el enchufe que viene con el artefacto. Si no cabe en el contacto, pida que un electricista calicado
instale un contacto apropiado.
•Haga que un técnico certicado verique que el tomacorriente de pared y los cables estén adecuadamente conectados
a tierra.
•Nunca tire del cable de alimentación para desenchufar el electrodoméstico. Agarre siempre el enchufe rmemente y
tire del mismo para retirarlo del tomacorriente. Si no hace esto, podría dañar el cable de alimentación y generar un
riesgo de incendio y descarga eléctrica.
PRECAUCIÓN
Para reducir el riesgo de lesiones leves o moderadas a personas, el mal
funcionamiento o daño al producto o propiedad cuando use este producto, siga las
precauciones básicas, incluido lo siguiente:
•No cuelgue ni coloque objetos pesados en el dispensador del electrodoméstico.
INSTALACIÓN
•No coloque el electrodoméstico en un lugar donde podría caerse.
•El refrigerador debe instalarse correctamente, teniendo en cuenta las instrucciones de instalación.
FUNCIONAMIENTO
•No use aerosoles cerca del electrodoméstico.
•Este refrigerador está destinado únicamente a usos domésticos y similares.
•No golpee ni aplique demasiada fuerza en las supercies de vidrio. No toque las supercies de vidrio si están
agrietadas o rotas.
•No llene demasiado el electrodoméstico con alimento. Si lo hace, puede causar lesión personal o daño a la propiedad.
MANTENIMIENTO
•No use detergentes fuertes como cera o diluyentes para la limpieza. Limpie con un trapo suave.
•Retire los objetos extraños (como polvo y agua) de las clavijas del enchufe y las áreas de contacto. No use un trapo
mojado o húmedo para limpiar el enchufe.
•No rocíe agua directamente en el interior o exterior del electrodoméstico.
•Cuando estén fríos, no limpie los estantes de vidrio ni las tapas con agua caliente. Si se exponen a cambios de
temperatura repentinos, podrían romperse.
GUARDE ESTAS INSTRUCCIONES
Page 84

8 ESPECIFICACIONES DEL PRODUCTO
ESPECIFICACIONES DEL PRODUCTO
La apariencia y las especificaciones detalladas en este manual podrían variar debido a mejoras constantes en el producto.
Requerimientos Eléctricos: 115 V, 60 Hz
Modelo LRKNC0505V
Descripción REFRIGERADOR
Peso neto 90 lb (41 kg)
Page 85

9DESCRIPCIÓN GENERAL DEL PRODUCTO
ESPAÑOL
DESCRIPCIÓN GENERAL DEL PRODUCTO
Las ilustraciones en esta guía pueden diferir de los componentes y accesorios reales, los cuales están sujetos a cambios sin
previo aviso por parte del fabricante a fin de introducir mejoras en el producto.
Exterior & Interior
1
2
1
Contenedor de kimchi
Coloque alimentos en el contenedor de kimchi y
ciérrelo de forma segura previo a almacenarlo.
2
Panel de control
Ajuste los controles utilizando temperatura o tipo de
alimentos.
3
3
Pata niveladora
Extienda o retraiga las patas para nivelar el
electrodoméstico.
Page 86

10 DESCRIPCIÓN GENERAL DEL PRODUCTO
Contenedor de kimchi
Modelo Contenedor de kimchi Parte Número Capacidad
LRKNC0505V
AKC72909303 : 6EA 3 1/2 gal (13.1 L)
Page 87

ESPAÑOL
2
inches
2
inches
INSTALACIÓN
Descripción general de la instalación
Lea las siguientes instrucciones de instalación luego de adquirir este producto o transportarlo a otra ubicación.
2
pulgadas
Desempacando el refrigerador Eligiendo la ubicación adecuada
11INSTALACIÓN
Nivelando
Page 88

12 INSTALACIÓN
Desempacando el
refrigerador
ADVERTENCIA
•Utilice a dos o más personas para mover e instalar el
refrigerador. Si no lo hace, puede resultar en lesiones
en la espalda o de otro tipo.
•El refrigerador es pesado. Proteja el piso al mover el
refrigerador para limpieza o servicio. Siempre empuje
el refrigerador hacia afuera al moverlo. No menee o
sacuda el refrigerador al intentar moverlo pues puede
dañar el piso.
•Mantenga materiales inamables y vapores, como
gasolina, alejados del refrigerador. Si no lo hace
puede provocar un incendio, explosión o muerte.
NOTA
•Remueva la tapa y cualquier etiqueta temporal de su
refrigerador previo a su uso. No remueva ninguna
etiqueta de advertencia, modelo, número de serie, o el
diagrama de circuito ubicado detrás del refrigerador.
•Para remover cualquier cinta adhesiva o goma restante,
frote enérgicamente el área con su pulgar. La cinta
adhesiva o residuos de goma pueden ser fácilmente
removidos frotando una pequeña cantidad de jabón
líquido para platos con sus dedos. Limpie con agua
caliente y seque.
•No utilice instrumentos puntiagudos, alcohol para frotar,
uidos inamables o limpiadores abrasivos para remover
cinta adhesiva o goma. Estos productos pueden dañar la
supercie de su refrigerador.
•Reinstale o ajuste lo estantes como sea necesario.
Los estantes del refrigerador están instalados en su
posición de embarque. Reinstale los estantes de acuerdo
a sus necesidades de almacenamiento individuales.
Elección de la ubicación
adecuada
Electricidad
Utilice un enchufe con conexión a tierra individual: 115
Voltios, 60 Hz, AC Amps mínimo.
ADVERTENCIA
•Para reducir el riesgo de descarga eléctrica, no instale
el refrigerador en un área húmeda ni mojada.
•No lo instale en exteriores o donde reciba luz solar
directa.
•No sobrecargue el cableado de la casa y provoque
riesgo de incendio al conectar varios dispositivos en
el mismo tomacorriente que el refrigerador.
Suelo
Para evitar el ruido y la vibración, es necesario nivelar la
unidad e instalarla en un suelo sólidamente construido. Si
es necesario, ajuste las patas de nivelación para
compensar los desniveles del suelo.
NOTA
•No es recomendable la instalación sobre alfombrado,
baldosas suaves o estructuras débilmente apoyadas.
Temperatura ambiente
Instale este electrodoméstico en un área donde la
temperatura esté entre 55 °F(13 °C) y 110 °F (43 °C).
Si la temperatura alrededor del electrodoméstico es muy
baja o alta, la capacidad de enfriamiento puede ser
afectada negativamente.
Page 89

13INSTALACIÓN
ESPAÑOL
Dimensiones y Espacios Requeridos
•Revise las dimensiones del dispositivo y la ruta de
instalación para asegurarse de que tiene suciente
espacio para mover el refrigerador a través de puertas y
aperturas estrechas.
•El lugar elegido para la instalación del refrigerador debe
tener suciente espacio detrás para las conexiones y la
corriente de aire y también arriba para abrir la puerta.
•Una distancia muy reducida a elementos cercanos puede
causar que se reduzca la capacidad de congelación y se
aumente el coste del consumo energético. Debe haber al
menos 50.8 mm entre la parte de atrás del refrigerador y
la pared.
•Recuerde dejar suciente espacio arriba del refrigerador
para abrir la puerta por completo.
F
B
A
C
D
E
Nivelación
Para su correcto funcionamiento, asegúrese de que el
producto esté nivelado, y que todos sus patas niveladoras
están firmemente apoyadas en el piso. Si el producto
parece inestable, ajuste las patas niveladoras.
Las patas niveladoras se pueden girar fácilmente elevando
el armario ligeramente. Gire las patas hacia la izquierda
para subir el producto o hacia la derecha para bajarla.
Encendido
•Luego de la instalación, conecte el cable de corriente a
un enchufe con conexión a tierra de tres espigas y
empuje el refrigerador a su posición nal.
PRECAUCIÓN
- Dimensiones y
Espacios Requeridos
A Ancho 26 1/4″ (666 mm)
B Altura hasta la tapa 35 7/16″ (900 mm)
C Altura hasta la caja 33″ (837 mm)
D Espacio posterior
requerido
E Profundidad 24″ (612 mm)
F Altura con puerta
abierta
LRKNC0505V
2″ (50 mm)
56 57/64″ (1445 mm)
•Conecte a un enchufe de potencia nominal.
•Haga que un técnico certicado verique que el
tomacorriente de pared y los cables estén
adecuadamente conectados a tierra.
•No dañe o corte la terminal de tierra del enchufe de
poder.
Page 90

14 FUNCIONAMIENTO
FUNCIONAMIENTO
Antes de Usar
Limpie el refrigerador.
Limpie el refrigerador intensivamente y sacuda todo el polvo acumulado durante el envío.
PRECAUCIÓN
•No raye el refrigerador con objetos puntiagudos ni use detergente que contenga alcohol,
líquidos inamables o abrasivos al remover cualquier cinta o adhesivo del mismo. Remueva los
residuos de adhesivos borrándolos con su pulgar o detergente para platos.
•No despegue la etiqueta de número de serie, modelo o información técnica del panel trasero
del refrigerador.
Abra la puerta del refrigerador para ventilar el interior.
El interior del refrigerador puede oler a plástico al inicio. Remueva toda cinta adhesiva del interior del
refrigerador y abra las puertas del refrigerador para ventilación.
Conecte la fuente de energía.
Verifique que la fuente de energía esté conectada previo a usar.
Espere a que el refrigerador enfríe.
Permita que el refrigerador funcione por al menos dos o tres horas previo a colocar alimentos en él.
Verifique el flujo de aire frío en el compartimento para asegurar el enfriado adecuado.
PRECAUCIÓN
•Si coloca alimentos en el refrigerador previo a que éste haya enfriado puede causar que los
alimentos se echen a perder o que un mal olor permanezca en su interior.
El refrigerador hace un sonido fuerte luego de la operación inicial.
Esto es normal. El volumen disminuirá conforme la temperatura baje.
Page 91

15FUNCIONAMIENTO
ESPAÑOL
Panel de control
Según el modelo, es posible que algunas de las siguientes funciones no estén disponibles.
•Antes de almacenar o fermentar kimchi, utilice esta sección para familiarizarse con las partes y funciones del panel de
control.
•Antes de utilizar el refrigerador de kimchi LG, mantenga presionado el botón Lock (Bloquear) por 3 segundos para
desbloquear la pantalla.
Funciones del panel de control
1 2 34
NOTA
•Luego de 60 segundos de inactividad, todas las luces en la pantalla, a excepción del icono Lock (Bloquear) ( ) se
apagarán a manera de ahorrar energía. Esto es parte de la operación normal. Presione cualquier botón a manera de
activar la pantalla y mostrar los ajustes actuales.
•Previo a utilizar las funciones, debe mantener presionado el botón Lock (Bloquear) por 3 segundos para desbloquear la
pantalla.
1
La función Lock (Bloquear) previene que los niños
u otras personas cambien los ajustes
accidentalmente.
•Antes de cambiar los ajustes, mantenga presionado
Lock (Bloquear) por 3 segundos para desbloquear
la pantalla.
•Después de cambiar los ajustes, mantenga
presionado Lock (Bloquear) por 3 segundos para
bloquear la pantalla y prevenir cambios accidentales.
※
La función Lock (Bloquear) bloquea todas las
funciones de la pantalla a excepción del botón Lock
(Bloquear). Si un botón es presionado, el icono
Lock (Bloquear) parpadeará 3 veces. La función
Lock (Bloquear) se enciende automáticamente
luego de 60 segundos si el panel de control
permanece inactivo.
※
La pantalla se enciende automáticamente cuando
el refrigerador se conecta.
2
Presionelo para seleccionar una temperatura para
el almacenaje de kimchi.
Kimchi: M→H → L
•Seleccione la temperatura apropiada para el tipo de
kimchi y su salinidad.
•L = Enfriamiento Bajo (Frío)
M = Enfriamiento Medio (Más Frío)
H = Enfriamiento Alto (El más frío)
3
Presione para establecer el compartimento de
refrigeración de alimentos.
Storage: Produce → Meat/Fish → Freezer
•Seleccione la temperatura apropiada para el tipo de
alimentos a almacenar.
4
Presione para establecer la fermentación kimchi
normal o la fermentación Kimchi+.
Ferment: Fer. → Kimchi+
•Al congurarse en Kimchi+, el calibrador incrementa
conforme la fermentación progresa.
Page 92

16 FUNCIONAMIENTO
Almacenando Kimchi
Una vez haya conectado el electrodoméstico a la fuente eléctrica, la pantalla se activará. Si así lo desea, puede utilizar el
producto para almacenar kimchi bajo la configuración predeterminada sin necesidad de ajustar funciones de refrigeración
adicionales.
•La pantalla se enciende automáticamente cuando el refrigerador se conecta.
1 23
1
Desbloquee la pantalla.
•Mantenga presionado el botón Lock (Bloquear) por
aproximadamente 3 segundos para desbloquear la
pantalla.
•Debe desbloquear la pantalla previo a poder realizar
un cambio de ajustes.
2
Presione el botón Kimchi para el compartimiento
deseado.
•Presione repetidamente cada botón para navegar a
través de los ajustes para dicho compartimiento.
•Conforme presione los botones, los ajustes
cambiarán en el siguiente orden.
Kimchi: M→H → L
•L = Enfriamiento Bajo (Frío)
M = Enfriamiento Medio (Más Frío)
H = Enfriamiento Alto (El más frío)
3
Bloquee la pantalla.
•Mantenga presionado el botón Lock(Bloquear) por
aproximadamente 3 segundos para bloquear la
pantalla.
Page 93

ESPAÑOL
Fermentando Kimchi
El kimchi se fermenta más rapidamente en la configuración Fermentación que en la de Kimchi.
•La pantalla se enciende automáticamente cuando el refrigerador se conecta.
1 23
17FUNCIONAMIENTO
1
Desbloquee la pantalla.
•Mantenga presionado el botón Lock (Bloquear) por
aproximadamente 3 segundos para desbloquear la
pantalla.
•Debe desbloquear la pantalla previo a poder realizar
un cambio de ajustes.
2
Presione el botón Fermentar.
•Presione repetidamente cada botón para navegar a
través de los ajustes para dicho compartimiento.
•Conforme presione los botones, los ajustes
cambiarán en el siguiente orden.
Fer. → Kimchi+
NOTA
•Fer. Com., se ilumina una vez la fermentación se ha
completado. El tiempo de fermentación depende de
la temporada y de la temperatura ambiente.
3
Bloquee la pantalla.
•Mantenga presionado el botón Lock(Bloquear) por
aproximadamente 3 segundos para bloquear la
pantalla.
Cancelando la Fermentación
•Para cancelar la fermentación, desbloquee la
pantalla y seleccione una conguración diferente.
Almacenando Kimchi Fermentado
•Cuando la fermentación se ha completado, el texto
Fer. Com (Fermentación Completa) se ilumina y
“Kimchi M” aparece en la pantalla de temperatura.
•Desbloquee la pantalla para apagar el indicador
Fer. Com., y cambiar la conguración.
Page 94

18 FUNCIONAMIENTO
Uso de las conguraciones Produce, Meat/Fish y Freezer
•Conguración de Produce (Productos Frescos): Diseñado para mantener frescos los vegetales y las frutas por un largo
período de tiempo.
•Conguración de Meat/Fish (Carne/Pescado): Diseñado para mantener fresca la carne y el pescado.
•Conguración Freezer(Congelador) : Almacena alimentos congelados
•La pantalla se enciende automáticamente cuando el refrigerador se conecta.
NOTA
•Si el kimchi se almacena en la conguración Carne/Pescado, éste podría congelarse.
1 23
1
Desbloquee la pantalla.
•Mantenga presionado el botón Lock (Bloquear) por
aproximadamente 3 segundos para desbloquear la
pantalla.
•Debe desbloquear la pantalla previo a poder realizar
un cambio de ajustes.
2
Presione el botón Storage (Almacenaje).
•Presione repetidamente cada botón para navegar a
través de los ajustes.
•Conforme presione los botones, los ajustes
cambiarán en el siguiente orden.
Storage: Produce → Meat/Fish → Freezer
3
Bloquee la pantalla.
•Mantenga presionado el botón Lock (Bloquear) por
3 segundos para bloquear la pantalla.
•Quite todos los alimentos congelados antes de
cambiar de Freezer (Congelador) a otra
conguración.
•Volver a congelar alimentos que han sido
descongelados puede causar enfermedades.
Page 95

19FUNCIONAMIENTO
ESPAÑOL
Utilizando los ajustes Kimchi+
•La pantalla se enciende automáticamente cuando el refrigerador se conecta.
Kimchi+
•Utilice ésta conguración para enfriar rápidamente el kimchi y alentar la fermentación ácida láctea para mantener fresco el
kimchi por más tiempo.
※
Utilice esta configuración únicamente para kimchi de repollo. Tipos de kimchi menos salados podrían congelarse si se
almacenan en esta configuración.
※
Utilizar esta configuración dos veces podría fermentar demasiado el kimchi. Utilicela únicamente una vez.
※
Las barras de luz en la pantalla indican el proceso de fermentación. El kimchi está listo para ser ingerido cuando todas las
barras están encendidas (aproximadamente 6 días).
1 23
1
Desbloquee la pantalla.
•Mantenga presionado el botón Lock (Bloquear) por
aproximadamente 3 segundos para desbloquear la
pantalla.
•Debe desbloquear la pantalla previo a poder realizar
un cambio de ajustes.
2
Presione el botón Fermentar.
•Presione repetidamente cada botón para navegar a
través de los ajustes para dicho compartimiento.
•Conforme presione los botones, los ajustes
cambiarán en el siguiente orden.
Fer. → Kimchi+
3
Bloquee la pantalla.
•Mantenga presionado el botón Lock(Bloquear) por
aproximadamente 3 segundos para bloquear la
pantalla.
Page 96

20 FUNCIONAMIENTO
Guía de Almacenaje de
Alimentos
Consejos para el Almacenaje de
Alimentos
Almacenando Vegetales y Frutas
•La humedad que queda en los vegetales luego de
lavarlos puede que favorezca a que estos se echen a
perder más rapidamente. No lave sus vegetales hasta
que esté a punto de utilizarlos.
•Hojas frondosas como la del col o la lechuga tienen un
tiempo de almacenaje limitado. Envuélvalas en papel
periódico o colóquelas en contenedores sellados para
ayudar a mantenerlas frescas por más tiempo.
•No almacene frutas tropicales en el refrigerador.
•Los bananos y las piñas sin cortar se dañan a bajas
temperaturas.
Consejos para el Almacenaje de
Kimchi
No lleve demasiado los contenedores de kimchi.
•Deje suciente espacio para que el kimchi se expanda
conforme se fermente, o el contenido podría desbordarse
del contenedor. Cierre las tapas del contenedor
completamente para prevenir que el kimchi se fermente
muy rapidamente o que desarrolle levadura o moho.
Llene de kimchi el refrigerador hasta la línea de llenado y
asegúrese de que la tapa esté bien cerrada previo al
almacenaje. Cubra la supercie del kimchi con envoltorio
plástico para extender su tiempo de almacenaje.
No coloque kimchi directamente en el compartimiento
del refrigerador ni lo almacene en una bolsa plástica.
•Utilice el contenedor de kimchi suministrado para
almacenarlo. El kimchi colocado directamente en el
compartimiento del refrigerador podría congelarse y
adquirir un sabor agrio. No bloquee con alimentos la
salida de aire dentro del refrigerador. Hacerlo podría
provocar que esos se congelen, afectar el rendimiento del
refrigerador, u ocasionar una descarga eléctrica o
heridas.
Para obtener los mejores resultados, revise su kimchi 3
o 4 días desde su almacenaje.
•Si el kimchi se ha desbordado del contenedor, puede que
se fermente muy rapidamente y que no se almacene de
forma adecuada.
Asegúrese de utilizar suficiente sal al preparar kimchi
para almacenaje prolongado.
•La tasa de fermentación es usualmente determinada por
la cantidad de sal en el kimchi. Pequeños lotes de kimchi
suave pueden almacenarse exitosamente por cortos
períodos de tiempo, pero añada más sal si almacenará
mayores cantidades a utilizar durante un período de
tiempo prolongado.
Sea cuidadoso al colocar contenedores de kimchi en el
refrigerador.
•Levante el contenedor por las manijas y evite impactos al
fondo del mismo.(La apariencia de los contenedores de
kimchi podría variar dependiendo del modelo.)
No coloque alimentos que requieran diferentes
condiciones de almacenaje en el mismo
compartimiento.
•Seleccione los ajustes apropiados para el tipo de
alimentos a almacenar.
Una Guía para el Kimchi
El primer paso en la fermentación de kimchi es el
encurtido de sal.
•La sal reacciona a las encimas en el repollo para
descomponer las proteinas e iniciar la fermentación
inmediatamente. Este proceso continúa incluso a bajas
temperaturas. Tradicionalmente se permitía que el kimchi
se fermentara lentamente durante el frío clima de
invierno.
El sabor del kimchi también depende de los
condimentos utilizados.
•Condimentos tradicionales incluyen cebolla verde, ajo,
jengibre, pescado salado, y chile en polvo. La
combinación de especias elegidas determinará el sabor
del kimchi.
Tasas de Fermentación para el Kimchi
•Añadir mucho ajo, mariscos, cebolla, chile en polvo,
pepino o cebolla verde hace que el kimchi se fermente
más rapidamente. Añadir ostras saladas, camarón salado
o salsa de caqui realmente acelera la fermentación. Por
otro lado, añadir puerros, mostaza o ginseng enlentece la
fermentación.
El kimchi se empieza a fermentar en cuanto se ha
preparado.
•El contacto con el aire hará que el kimchi se torne
amargo. Si el kimchi no está cubierto con salsa o tiene
muy poca sal, una pequeña capa de levadura se formará
en su supercie. Mantenga el aire alejado de los
vegetales al cubrirlos en salsa o al colocar el kimchi en
una bolsa o envoltorio plástico.
Cómo Afecta al Kimchi la Temperatura
•La temperatura afecta la tasa de fermentación del kimchi.
Al preparar kimchi para un almacenaje por tiempo
prolongado, mantenga la temperatura a menos de 50°F
(10°C).
Page 97

21FUNCIONAMIENTO
ESPAÑOL
Almacenaje de Kimchi por Tiempo Prolongado
•El kimchi, al igual que el queso, es un organismo vivo y
cambiará con el pasar del tiempo. Para mantener el
kimchi fresco por largos períodos de tiempo, incremente
el contenido de sal y almacénelo a una baja temperatura,
cerca de 32°F (0°C). Presione los vegetales hacia abajo
a manera de que estos se cubran con salsa y luego
cubra el contenedor en un envoltorio plástico, o con una
capa de hojas de repollo, para mantener el aire fuera y el
kimchi fresco por más tiempo.
Eligiendo el Repollo Adecuado para el Kimchi
•Hay distintos tipos de repollo disponibles. Para el kimchi,
elija un repollo de tamaño mediano que sea redondo y no
largo y delgado. Las hojas internas deben ser dulces y
más palidas que las externas. Las hojas externas deben
ser delgadas y de color verde pálido.
Seleccionando Rábanos para el Kimchi
•Hay varios tipos de kimchi de rábano, y diferentes
rabanos son utilizados para diferentes tipos de kimchi.
•Para kimchi de rábano, utilice rábanos coreanos que
tengan hojas de color verde pálido bien dispersas en la
punta.
•Para Kimchi chonggak (rábano joven), utilice rábanos de
Seúl que tengan fondos redondos y gruesos.
•Para kkakdugi (kimchi de rábano en cubos), intente
encontrar rábanos con cabezas blancas y no verdes.
•Para dongchimi, utilice rábanos con hojas suaves y
cabezas blancas en vez de verdes.
Técnicas para el Almacenaje
Apropiado de Alimentos
Almacene el kimchi en el contenedor de kimchi.
•Llene de kimchi el contenedor hasta la línea de llenado y
asegúrese de que la tapa esté bien cerrada previo al
almacenaje.
•Si la tapa no está bien cerrada, se podría formar una
capa na de levadura en la supercie del kimchi, o éste
podría fermentarse muy rapidamente. Previo a
almacenarlo, cubra la supercie del kimchi con envoltorio
plástico o con una capa de hojas de repollo a manera de
prevenir la formación de levadura.
Almacene vegetales o frutas en el contenedor
designado para ello.
•Algunos vegetales y frutas pueden dañarse con el aire
frío.
•Los vegetales que se han humedecido por haber sido
lavados tienden a descomponerse más facilmente. Para
obtener los mejores resultados, no lave los vegetales
previo a almacenarlos.
•No refrigere frutas tropicales, como bananos o piñas, ya
que éstas se dañan a bajas temperaturas.
Permita que los alimentos calientes se enfríen a
temperatura ambiente previo a refrigerárlos.
•Colocar alimentos calientes directamente en el
refrigerador puede elevar la temperatura de los artículos
que se encuentren alrededor y provocar su
descomposición. Ésto también provocará un incremento
en la factura de servicios
Almacenaje de Kimchi por Tiempo Prolongado
•Coloque el kimchi preparado recientemente en el
refrigerador y seleccione la conguración Kimchi.
•Dependiendo del tipo y la salinidad del kimchi, seleccione
la conguración Low (Inferior), Medium (Medio), o High
(Superior).
•Para un mejor almacenaje por tiempo prolongado,
asegúrese de que los vegetales estén completamente
sumergidos en la salsa y cubra el kimchi con envoltorio
plástico.
Previo a almacenar aceites vegetales en el refrigerador,
lea las instrucciones de almacenaje en el contenedor.
•Las botellas de aceite vegetal pueden tornarse caóticas
con el uso.
•Coloque las botellas de aceite en contenedores plásticos
desechables para evitar tener que limpiar las
contenedores.
Page 98

22 FUNCIONAMIENTO
Seleccione la temperatura apropiada para el tipo de
alimentos a almacenar.
•Almacenar kimchi en la conguración Fermentation
(Fermentación) podría provocar su descomposición.
•Algunos tipos de kimchi podrían congelarse si se
almacenan en High (Alto). Siempre revise el kimchi al
almacenarlo en High (Alto).
•Almacenar otros alimentos junto al kimchi en un
contenedor de almacenaje podría provocar que éstos se
congelen.
Utilizando los Distintos Contenedores
•Para lograr mejores resultados utilizando las
conguraciones Produce (Productos Frescos) o Meat/
Fish (Carne/Pescado), almacene contenedores que sean
similares en tamaño, contenedores pequeños, o botellas.
※
Almacenar kimchi en el contenedor que ha sido proveido
y en su ubicación designada lo hace más delicioso.
※
No almacene kimchi en botellas de vidrio. El kimchi se
expandirá al congelarse y puede que la botella se
rompa, causando un riesgo de heridas.
※
No coloque contenedores cerca de la salida de aire del
refrigerador. Los alimentos podrían congelarse.
Fermentando Kimchi
•Evite abrir la puerta del compartimiento mientras el kimchi
está en proceso de fermentación.
•Permitir que ingrese el aire caliente exterior durante la
fermentación puede afectar el sabor del kimchi.
Eliminando Olores a Alimentos
•Cubra con plástico los contenedores de comida abiertos
previo a almacenarlos a manera de prevenir la
transferencia de olores dentro del refrigerador.
Después de la instalación, permita que el refrigerador
se enfríe completamente previo a almacenar alimentos.
•La comida podría descomponerse y causar que los olores
perduren si ha sido almacenada previo a que el
refrigerador alcanzara su temperatura objetivo.
NOTA
•Empaques de alimentos deben ser limpiados para evitar
que alimentos cercanos sean contaminados.
•Si el refrigerador se mantiene en un lugar caliente y
húmedo, abrir frecuentemente la puerta o almacenar
muchos vegetales en el refrigerador podría causar la
formación de condensación. Limpie la condensación con
un paño limpio o una toalla de papel.
•Si la puerta del refrigerador o el estante se abre y cierra
muy a menudo, aire caliente puede penetrarlo y elevar
así su temperatura. Esto puede incrementar los gastos
de funcionamiento de la unidad.
PRECAUCIÓN
•No almacene contenedores de vidrio en el congelador.
Al congelarse, los contenidos pueden expandirse,
romper el contenedor y provocar lesiones.
Page 99

23FUNCIONES INTELIGENTES
ESPAÑOL
FUNCIONES
INTELIGENTES
Aplicación LG ThinQ
Esta característica solo está disponible en el modelo con el
logo
o .
La aplicación LG ThinQ le permite comunicarse con el
electrodoméstico usando un teléfono inteligente.
Funciones de la aplicación LG ThinQ
•Smart Diagnosis™
−Esta función brinda información útil para diagnosticar y
resolver problemas con el producto conforme a su
patrón de uso.
NOTA
•Esta información está actualizada en el momento de su
publicación. La aplicación está sujeta a cambios, con
nes de mejorar el producto, sin previo aviso a los
usuarios.
Uso del diagnóstico audible para
diagnosticar problemas
Siga las instrucciones a continuación para utilizar el método
de diagnóstico audible.
•Inicie la aplicación LG ThinQ y seleccione la función
Smart Diagnosis en el menú. Siga las instrucciones para
el diagnóstico audible provistas en la aplicación LG
ThinQ.
Mantenga presionado el botón de bloqueo durante tres
1
segundos.
•Si la pantalla ha sido bloqueada por más de cinco
minutos, debe desactivar el bloqueo y luego
reactivarlo.
Presione el botón Fermentar y manténgalo presionado
2
hasta que se apague la pantalla.
Instalando la aplicación LG ThinQ
Busque la aplicación LG ThinQ desde la tienda Google
Play o Apple App Store en un teléfono inteligente. Siga las
instrucciones para descargar e instalar la aplicación.
Función Smart Diagnosis™
Esta característica solo está disponible en el modelo con el
logo
o .
Utilice esta función como ayuda para diagnosticar y
resolver problemas con su electrodoméstico.
NOTA
•Por motivos no atribuibles a la negligencia de LGE, es
posible que el servicio no pueda funcionar debido a
factores externos como por ejemplo, la indisponibilidad
de Wi-Fi, desconexión de Wi-Fi, política de la tienda de
aplicaciones local o indisponibilidad de aplicaciones,
entre otros.
•Esta función puede estar sujeta a cambios sin previo
aviso y puede tener una forma diferente según dónde se
encuentre ubicado.
En cuanto la pantalla se apague, sujete el microfono
3
de su teléfono contra la pantalla de visualización.
•El microfono en el teléfono debe estar frente a la
apertura del altavoz en el refrigerador.
Mantenga el teléfono en su sitio hasta que haya
4
terminado la transmisión de tonos. La pantalla mostrará
el recuento de tiempo. Una vez que haya finalizado el
recuento de tiempo y los tonos se hayan detenido,
aparecerá el diagnóstico en la aplicación.
NOTA
•Para obtener resultados óptimos, no mueva el teléfono
mientras se transmitan los tonos.
Page 100

24 MANTENIMIENTO
MANTENIMIENTO
Limpieza
ADVERTENCIA
•Utilice un limpiador no inamable. Si no lo hace,
puede resultar en incendio, explosión o muerte.
PRECAUCIÓN
•No use un trapo abrasivo o esponja mientras limpia el
interior y exterior del refrigerador.
•No coloque su mano en la supercie inferior del
refrigerador cuando abra y cierre las puertas.
Consejos Generales de Limpieza
•Tanto las secciones del refrigerador como del congelador
se descongelan automáticamente; sin embargo, Limpie el
compartimento una vez al mes para evitar olores.
•Limpie derrames inmediatamente.
•Desconecte el refrigerador o la corriente eléctrica previo
a la limpieza.
•Quite todas las partes movibles, como los contenedores
de kimchi.
•Use una esponja limpia o un paño suave y un detergente
ligero en agua tibia. No utilice abrasivos o limpiadores
ásperos.
•Lave a mano, enjuague y seque todas las supercies
intensivamente.
Interior
Si la escarcha dentro del refrigerador le dificulta remover
los contenedores de kimchi, vacíe el compartimiento y
apague el refrigerador. Dejar la puerta del refrigerador
abierta acelerará el descongelado. Luego de que el hielo
se haya derretido, limpie el interior del compartimiento con
un paño seco. No intente descongelar el refrigerador
utilizando otros medios o aparatos. Hacerlo podría causar
un incendio.
Exterior
Para productos con un exterior de acero inoxidable negro,
rocíe limpiador de vidrio en un paño limpio de microfibra y
frote en dirección de la fibra. No rocíe limpiador de vidrio
directamente al panel de pantalla. No utilice limpiadores
ásperos o abrasivos.
Para productos con un exterior de acero inoxidable
estándar, use un paño húmedo de microfibra y frote en
dirección de la fibra. Seque con una toalla de papel para
evitar rayones. Para manchas rebeldes y huellas digitales,
use algunas gotas de jabón líquido para platos en agua y
enjuague con agua caliente antes de secar. No utilice
abrasivos o limpiadores ásperos.
Paredes Interiores
•Permita que las secciones se caliente para que el paño
no se pegue.
Como ayuda para remover olores, lave el interior del
refrigerador con una mezcla de bicarbonato de sodio y
agua tibia. Mezcle 2 cucharadas de bicarbonato de sodio
con 1 cuarto de galón de agua (26 g de bicarbonato en 1
litro de agua). Asegúrese de que el bicarbonato de sodio
esté completamente disuelto para que éste no raye las
superficies del refrigerador.
Revestimientos de Puertas y Juntas
Use una esponja limpia o un paño suave y un detergente
ligero en agua tibia. No utilice ceras de limpieza,
detergentes concentrados, lejías o limpiadores que
contengan petróleo en las partes plásticas del refrigerador.
Partes Plásticas (Cubiertas y
Paneles)
Use una esponja limpia o un paño suave y un detergente
ligero en agua tibia. No utilice limpiadores de vidrio,
limpiadores abrasivos o líquidos inflamables. Estos pueden
rayar o dañar el material.
Bobinas del Condensador
Use una aspiradora con un cepillo o hendedura adjunta
para limpiar la cubierta y los respiraderos del
condensador. No remueva el panel que cubre el área de
las bobinas del condensador.
 Loading...