

Page 1
ENGLISH ESPAÑOL
OWNER’S MANUAL
ELECTRIC
RANGE
Read this owner’s manual thoroughly before operating the appliance
and keep it handy for reference at all times.
LREL6325** LREL6323** LREL6321**
MFL57206017 (REV.00 200319)
www.lg.com
Copyright © 2020 LG Electronics Inc. All Rights Reserved.
Page 2
2
TABLE OF CONTENTS
TABLE OF CONTENTS
IMPORTANT SAFETY
3
INSTRUCTIONS
PRODUCT OVERVIEW
9
9 Parts
9 Accessories
INSTALLATION
10
10 Installation Overview
10 Product Specifications
11 Before Installing the Range
12 Installing the Range
14 Connecting Electricity
18 Engaging the Anti-tip Device
18 Test Run
OPERATION
19
19 Control Panel Overview
20 Changing Oven Settings
20 Clock
20 Oven Light
20 Minimum & Maximum Default Settings
21 Timer On/Off
21 Settings
-Setting the Hour Mode
- Setting Convection Auto Conversion
(Model LREL6325** / LREL6323**)
-Adjusting the Oven Temperature
-Turning the Preheat Alarm Light On/Off
-Adjusting the Beeper Volume
-Selecting Fahrenheit or Celsius
23 Lockout
24 Cook Time (Timed Cook)
24 Start Time (Delayed Timed Cook)
25 InstaView™
26 Using the Cooktop
26 Cooking Areas
26 Hot Surface Indicator
26 Using the Cooktop Elements
27 Recommended Element Levels
28 Using the Proper Cookware
28 Choosing Cookware
28 Home Canning Tips
29 Using the Oven
29 Before Using the Oven
29 Oven Vent
29 Using Oven Racks
29 Bake
30 Convection Mode (Model LREL6325** /
LREL6323**)
31 Recommended Baking and Roasting Guide
32 Broil
33 Recommended Broiling Guide
34 Warm / Keep Warm
34 Proof
35 Sabbath Mode
35 Favorite (Model LREL6325**)
35 Wi-Fi
36 Remote Start
36 Frozen Meal (Model LREL6325**)
36 Slow Cook (Model LREL6325**)
36 Air Fry (Model LREL6325** / LREL6323**)
SMART FUNCTIONS
40
40 LG ThinQ Application
41 FCC Notice
41 FCC RF Radiation Exposure Statement
42 Smart Diagnosis™ Feature
MAINTENANCE
43
43 Cleaning the Glass-Ceramic Cooktop
44 EasyClean
47 Self Clean (Model LREL6325** / LREL6323**)
48 Changing the Oven Light
49 Cleaning the Exterior
50 Removing and Replacing the Lift-Off Oven
Doors and Drawer
51 Door Care Instructions
TROUBLESHOOTING
52
52 FAQs
54 Before Calling for Service
LIMITED WARRANTY
58
®
Page 3
IMPORTANT SAFETY INSTRUCTIONS
ENGLISH
IMPORTANT SAFETY INSTRUCTIONS
Read and follow all instructions when using the range to prevent the risk of fire, electric
shock, personal injury, or damage. This guide does not cover all possible conditions that
may occur. Always contact your service agent or manufacturer about problems that you do
not understand.
Download this owner's manual at: http://www.lg.com
This is the safety alert symbol. This symbol alerts you to potential hazards that
can result in property damage and/or serious bodily harm or death.
All safety messages will follow the safety alert symbol and either the word
WARNING or CAUTION. These words mean:
3
WARNING
CAUTION
- Indicates a hazardous situation which, if not avoided, could result
in death or serious injury.
Indicates a hazardous situation which, if not avoided, could result
in minor or moderate injury.
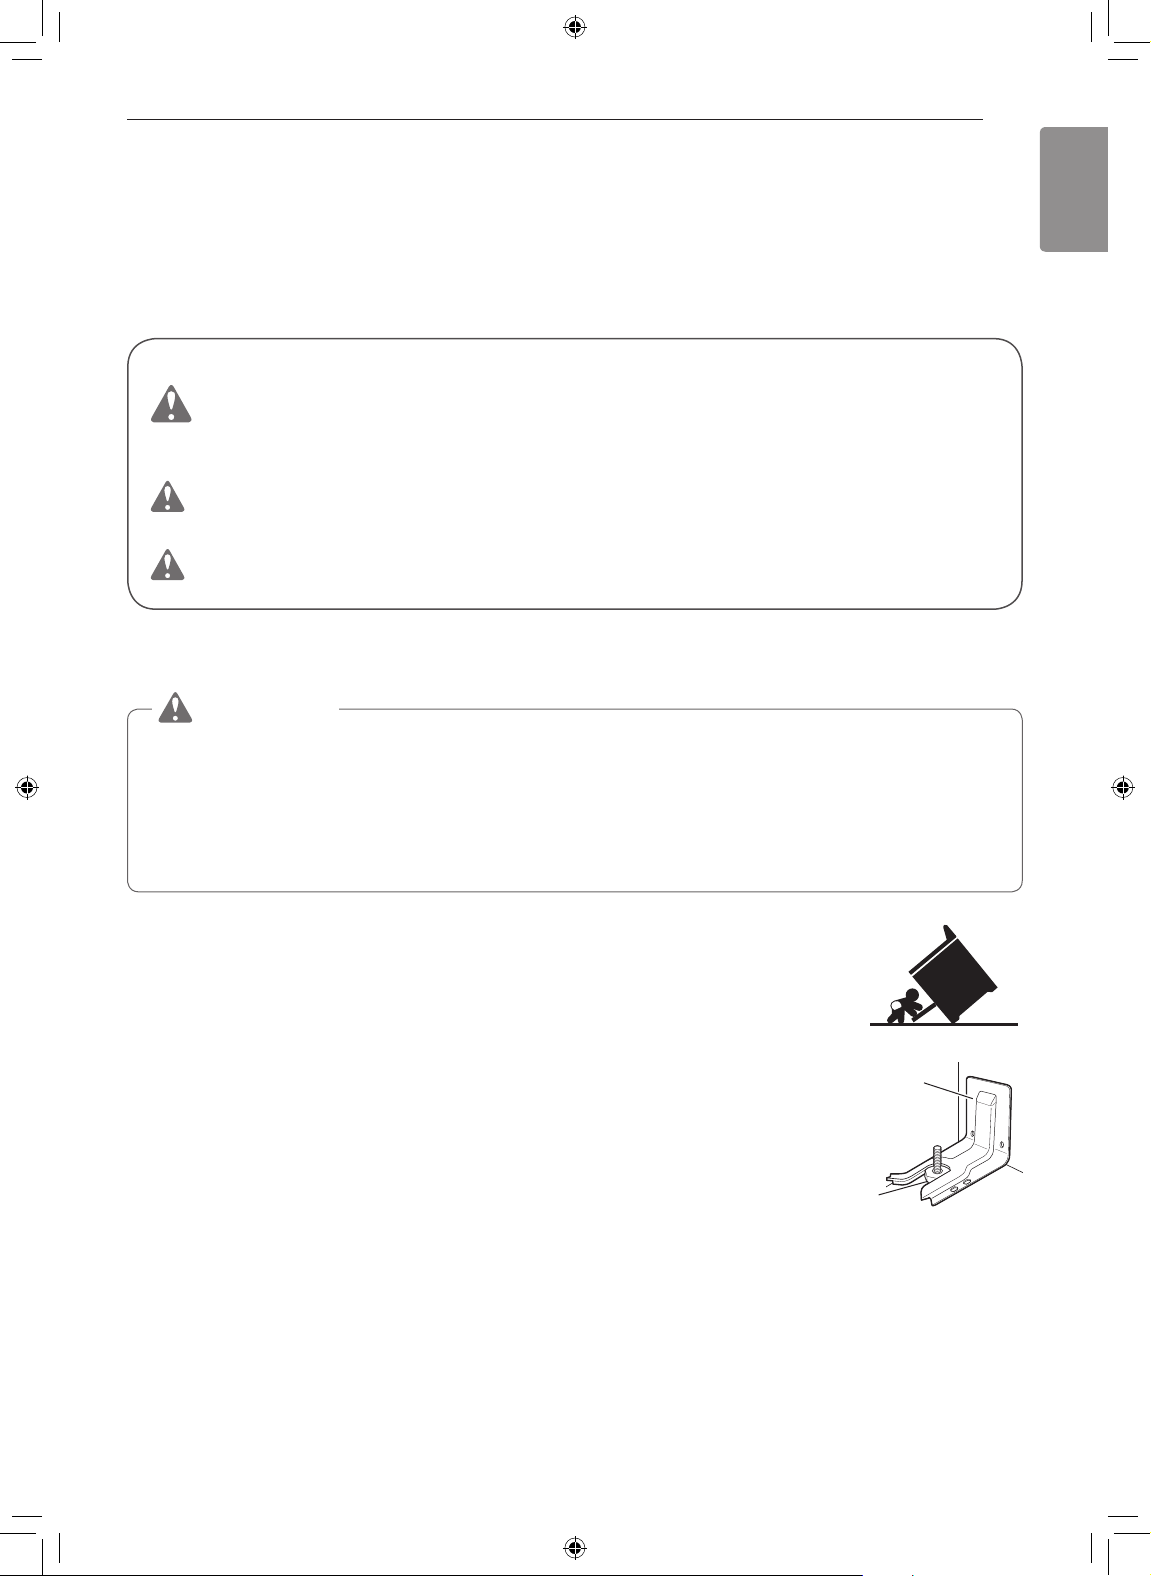
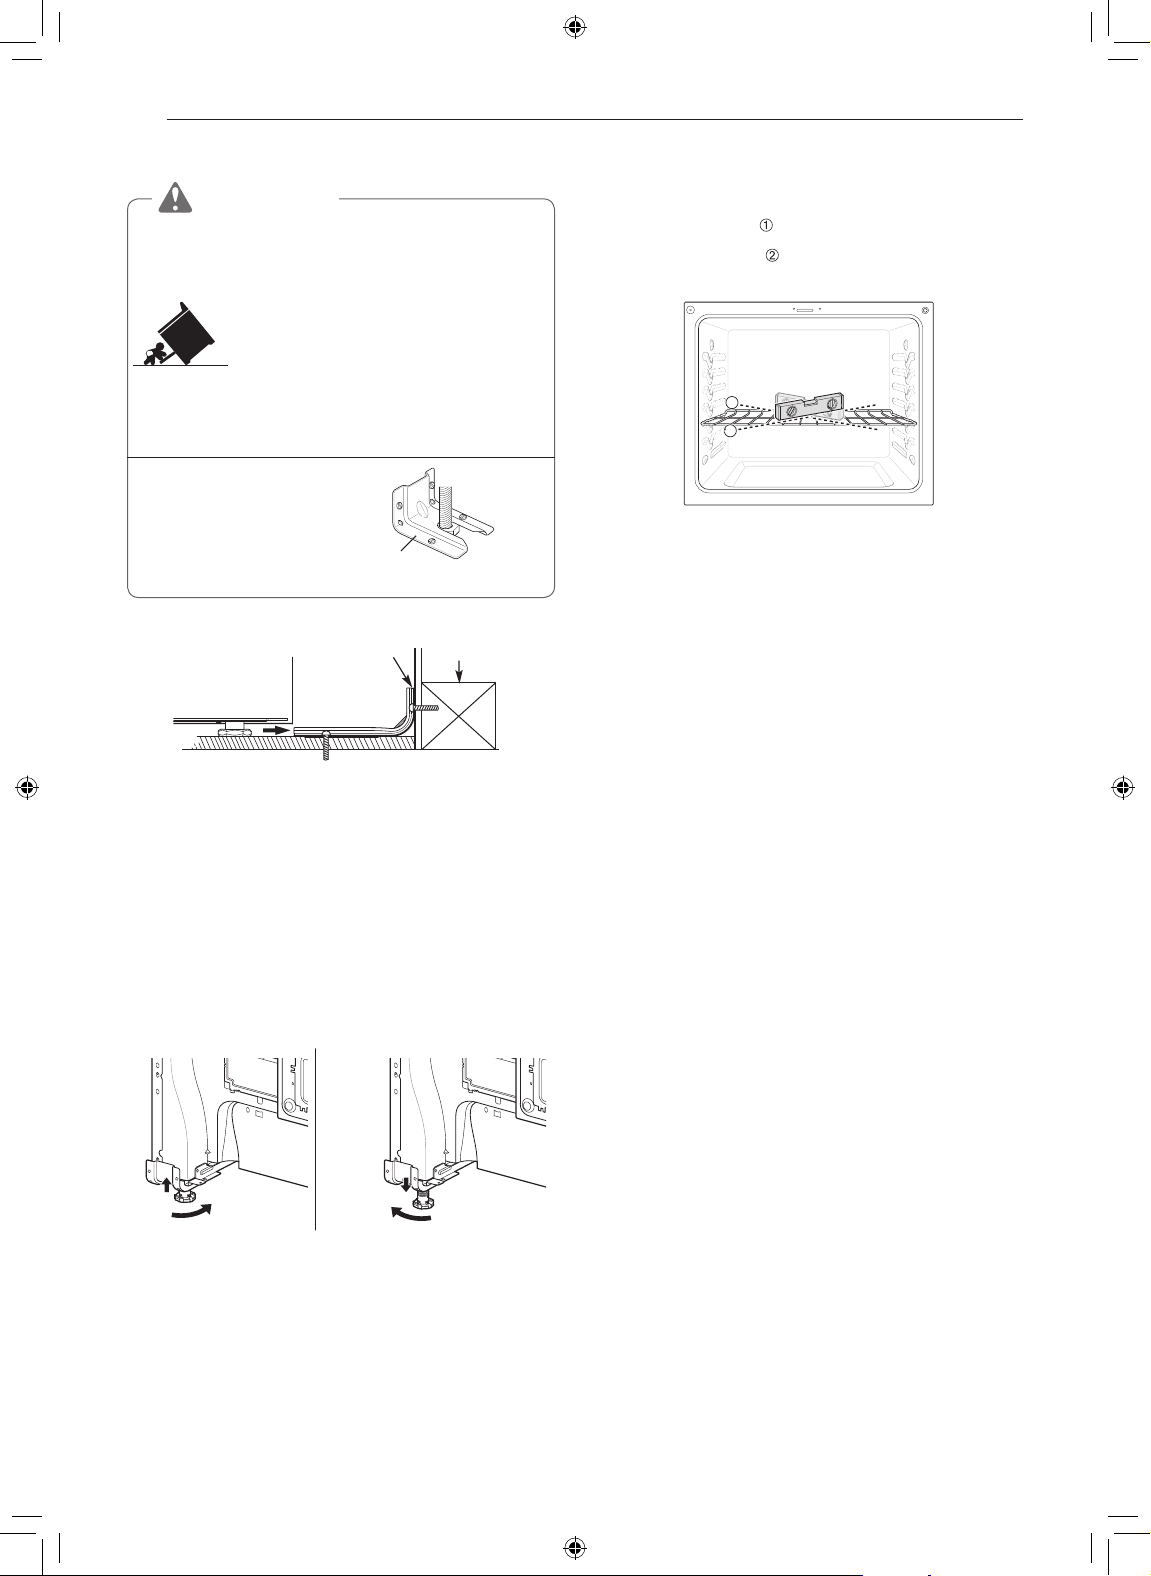
ANTI-TIP DEVICE
WARNING
TO REDUCE THE RISK OF TIPPING, THE APPLIANCE MUST BE SECURED BY A
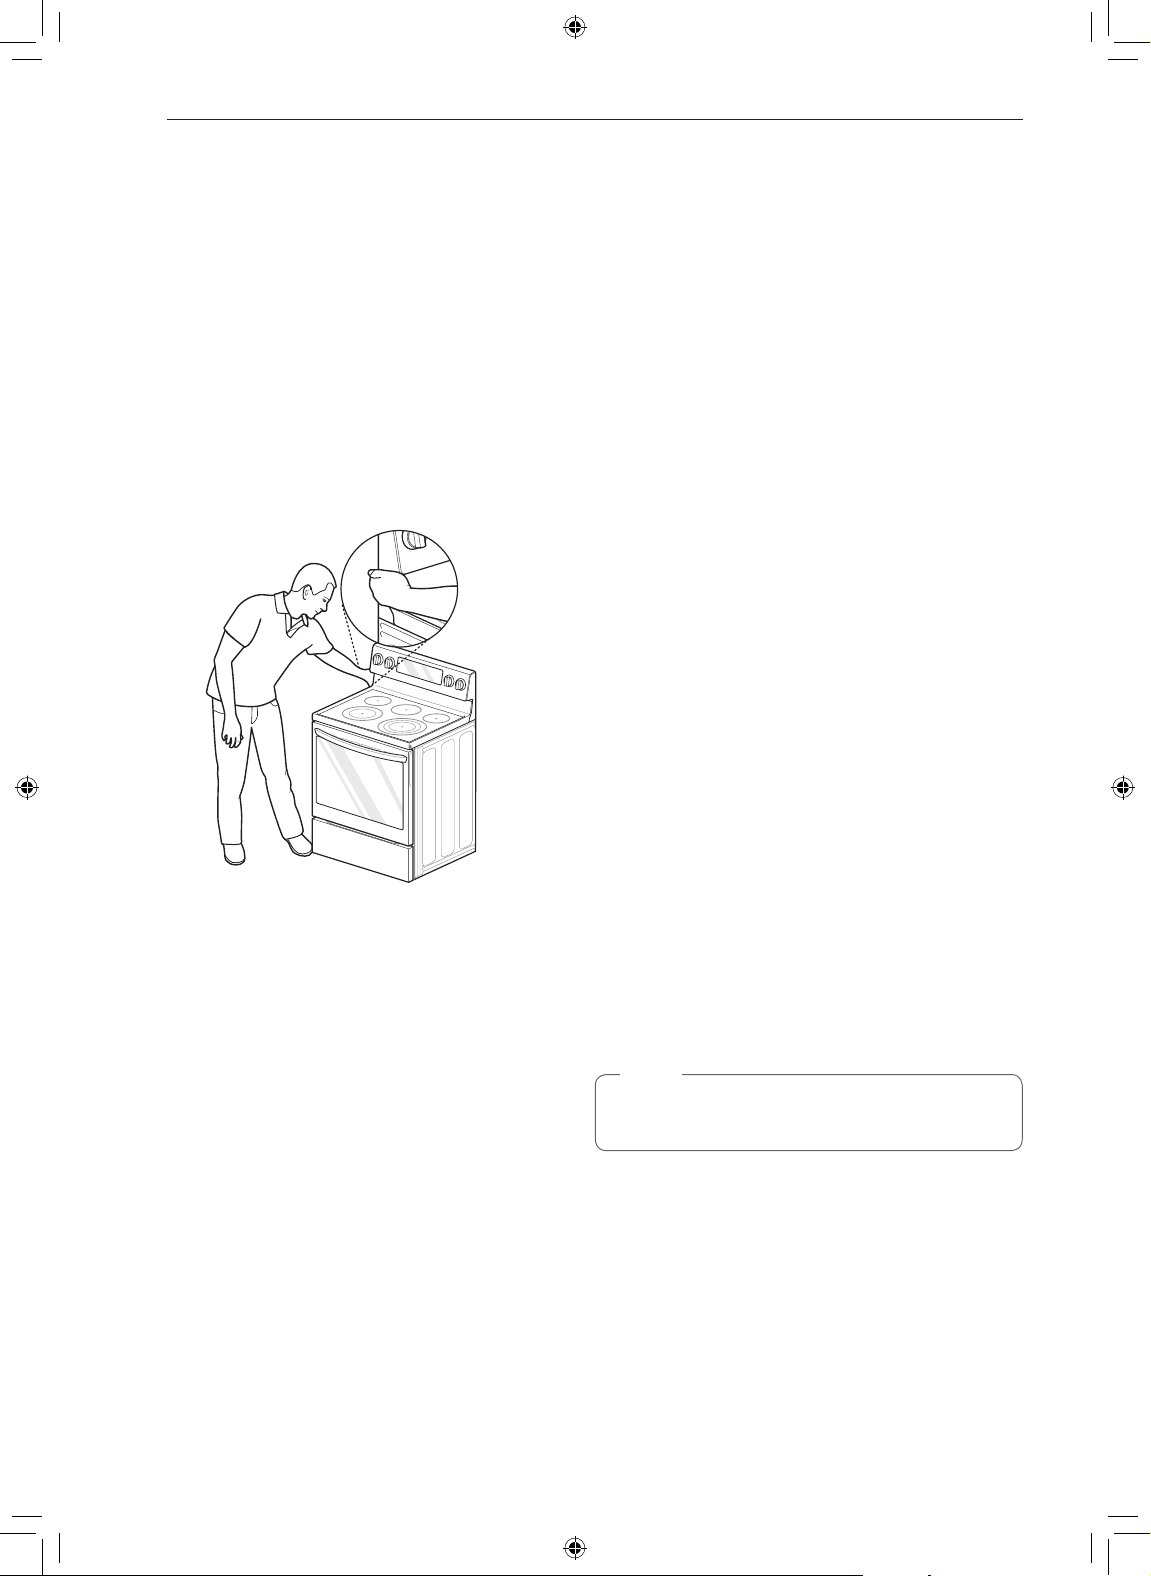
PROPERLY INSTALLED ANTI-TIP DEVICE. TO CHECK IF THE DEVICE IS INSTALLED
PROPERLY, REMOVE THE DRAWER BODY AND VERIFY THAT THE ANTI-TIP
DEVICE IS ENGAGED, OR GRASP THE TOP REAR EDGE OF THE RANGE BACK
GUARD AND CAREFULLY ATTEMPT TO TILT IT FORWARD. Refer to the installation
section for instructions.
•It is possible for a child or adult to tip the range and be killed.
•Verify that the anti-tip device has been properly installed and
attached to the floor or wall and engaged to the leveling leg of the
range.
•Do not operate the range without the anti-tip device in place and
engaged.
•Never remove the oven legs. The range will not be secured to the
anti-tip bracket if the legs are removed.
•Do not step or sit on the oven door. The range could be tipped and
injury might result from spilled hot liquid, food, or the range itself.
•Do not rest large, heavy items such as whole turkeys on the open
oven door. The range could tip forward and cause injury.
•Reengage the anti-tip device after pulling the range out for
cleaning, service, or any other reason.
•Failure to follow these instructions can result in death or serious burns to children or
adults.
Anti-tip
bracket
Leveling
leg
Page 4
4
IMPORTANT SAFETY INSTRUCTIONS
SAFETY PRECAUTIONS
•DO NOT TOUCH HEATING ELEMENTS OR INTERIOR SURFACES OF OVEN. Heating
elements may be hot even though they are dark in color. Interior surfaces of an oven
become hot enough to cause burns. During and after use, do not touch or let clothing or
other flammable materials contact heating elements or interior surfaces of oven until they
have had sufficient time to cool. Other surfaces, such as oven vent openings and surfaces
near these openings, oven doors, and windows of oven doors, also get hot and may cause
burns if not cooled.
•Use care when opening door. The hot air and steam that escape can cause burns to
hands, face and eyes. Let hot air or steam escape from the oven before removing or
replacing food in the oven.
•Do not repair or replace any part of the appliance unless specifically recommended in the
manual. All other servicing should be performed by a qualified technician.
•Do not use harsh etching, abrasive cleaners or sharp metal scrapers to clean the oven
door glass since they can scratch the surface. Scratches may cause the glass to shatter.
WARNING
If the door glass, cooktop glass, surface, or oven heating unit of the range are damaged,
discontinue use of the range and call for service.
•Do not operate the oven without the charcoal heater mesh.
•Do not use plastic to cover food. Use foil or oven-safe lids only.
•Do not allow anyone to climb, stand or hang on the door, storage drawer or cooktop. They
could damage the range and even tip it over, causing severe personal injury.
•Do not line the oven walls, racks, bottom, or any other part of the oven with aluminum foil
or any other material. Doing so will disrupt heat distribution, produce poor baking results
and cause permanent damage to the oven interior (aluminum foil will melt to the interior
surface of the oven)
•Never attempt to dry a pet in the oven.
•Never use your appliance for warming or heating the room.
•Always use pot holders or oven mitts when removing food from the oven or the surface
element. Cookware will be hot. Use only dry pot holders. Moist or damp pot holders on
hot surfaces may result in burns from steam. Do not let the pot holder touch hot heating
elements. Do not use a towel or other bulky cloth to remove food.
•Do not heat unopened food containers. Pressure in the containers may cause them to
burst which may result in injury.
Page 5
IMPORTANT SAFETY INSTRUCTIONS
ENGLISH
FLAMMABLE MATERIALS
WARNING
Be certain that all packing materials are removed from the appliance before operating.
Keep plastic, clothes, paper, and other flammable materials away from parts of the
appliance that may become hot.
•Do not store or use flammable material in the oven or near or on the cooktop. Flammable
materials include paper, plastic, pot holders, linens, wall coverings, curtains, and gasoline
or other flammable vapors and liquids such as grease or cooking oil. These materials can
be ignited when the oven and cooktop are in use.
•Wear proper apparel. Do not wear loose-fitting or hanging garments, which may ignite if
they contact hot surfaces, and cause severe burns.
•Do not use the oven for drying clothes. Only use the oven for its intended purpose.
•If a cabinet storage is provided directly above cooking surface, place items that are not
frequently used and can be safely stored in an area subjected to heat. Temperatures may
be unsafe for volatile items such as flammable liquids, cleaners or aerosol sprays.
ELECTRICAL SAFETY
CAUTION
Be certain that all packing materials are removed from the appliance before operating.
Keep plastic, clothes, paper, and other flammable materials away from parts of the
appliance that may become hot.
5
•Always disconnect power from the appliance before servicing.
•Do not use aluminum foil or any other material to line the oven bottom.
Improper installation of these liners may result in a risk of electric shock or fire.
•Do not allow aluminum foil or the temperature probe to contact heating elements.
WARNING
Before replacing the oven light bulb, switch off the electrical power to the oven at the
main fuse or circuit breaker panel. Failure to do so can result in severe personal injury,
death, or electrical shock.
DEEP FAT FRYER
•Use extreme caution when moving or disposing of hot grease.
•Always heat fat slowly, and watch as it heats.
•If frying combinations of oils and fats, stir them together before heating.
•Use a deep fat thermometer, if possible, to prevent overheating fat beyond the smoking
point.
•Use the least possible amount of fat for effective shallow or deep-fat frying. Filling the pan
with too much fat can cause spillovers when food is added.
Page 6
6
IMPORTANT SAFETY INSTRUCTIONS
CHILD SAFETY
•Do not touch the hot surface between the bottom of the oven door and the top of the
drawer on the front of the oven while the oven is in operation. The surface becomes hot
and can cause burns and other injury.
•Do not leave small children unattended near the oven.
WARNING
Do not leave children alone or unsupervised near the appliance when it is in use or is
still hot. Children should never be allowed to sit or stand on any part of the appliance as
they could be injured or burned.
CAUTION
Do not store items of interest to children in cabinets above a range or on the back guard
of a range – children climbing on the range to reach items could be seriously injured.
•Never let a child hang on the oven door.
•Do not allow children to crawl into the oven.
•Let hot utensils cool in a safe place, out of reach of small children.
•Children should not be allowed to play with controls or other parts of the appliance.
GLASS-CERAMIC COOKING SURFACE
•Surface units may be hot even though they are dark in color. Areas near surface units may
become hot enough to cause burns. During and after use, DO NOT TOUCH SURFACE
UNITS OR AREAS NEAR UNITS or let clothing or other flammable materials contact
surface units or areas near units until they have had sufficient time to cool. This includes
the cooktop and the area above the oven door.
•Do not cook on a broken cooktop. If the cooktop is broken, cleaning solutions and
spillovers may penetrate the broken cooktop and create a risk of electric shock. Contact a
qualified technician immediately.
•Do not use the glass cooktop surface as a cutting board.
•Do not place or store items that can melt or catch fire on the glass cooktop, even when it
is not being used.
•Choose proper burner size. For smaller pots and pans, use the smaller heating
elements. For larger pots and pans, use the larger heating elements. Select pans that
have flat bottoms large enough to cover the heating elements. Using undersized pans
exposes a portion of the heating element to direct contact and may result in clothing
burning.
•Glazed cookware. Only certain types of glass, glass-ceramic, ceramic, earthenware,
or other glazed cookware are suitable for range-top service without breaking due to the
sudden change in temperature.
•Never cook directly on the glass. Always use cookware.
•Always turn the surface units off before removing cookware.
•Turn cookware handles inward so they don't extend over adjacent surface units.
This reduces the risk of burns, ignition of flammable materials, and spillage due to
unintentional contact with the cookware.
•Immediately clean spills on the cooking area to prevent a tough cleaning chore later.
•Some cleaners can produce dangerous fumes if applied to a hot surface.
Page 7
IMPORTANT SAFETY INSTRUCTIONS
ENGLISH
•Always place the pan in the center of the surface unit you are cooking on. Never leave
surface units unattended at high heat settings. Proper contact of cookware to burner
also will improve efficiency. Boilovers cause smoking and greasy spills that may catch on
fire.
•Clean cooktop with caution. Do not use sponges or cloth to wipe spills on a hot cooking
area. Use a proper metal scraper. If a wet sponge or cloth is used to wipe spills on a hot
cooking area, it can cause steam burns. Some cleaners can produce noxious fumes if
applied to a hot surface.
•Do not turn surface units on before placing cookware.
•Do not store heavy items above the cooktop surface that could fall and damage it.
•Do not place aluminum foil or plastic items such as salt and pepper shakers, spoon
holders, or plastic wrappings or any other material on the range when it is in use.
•Do not use a steel-wool pad or scrub pad or abrasive cleaning pads. They can scratch the
surface.
ENERGY SAVING TIPS
•Multiple-rack cooking saves time and energy. Whenever possible, cook foods requiring the
same cooking temperature together in one oven.
•For optimal performance and energy savings, follow the guides on page 31 for proper rack
and pan placements.
•Match the size of the cookware to the amount of food being cooked to save energy when
heating. Heating ½ quart of water requires more energy in a 3-quart pot than in a 1-quart
pot.
•Use cookware with flat bottoms to provide the best contact with the cooktop surface when
cooking on the glass-ceramic cooktop.
•Match the size of the cooktop burner or element to the size of the cookware in use. Using
a large element for a small pan wastes heating energy, and the exposed surface of the
element is a burn or fire hazard.
•Reduce energy use by cleaning light oven soils with the EasyClean
self-clean.
•Avoid opening the oven door more than necessary during use. This helps the oven
maintain temperature, prevents unnecessary heat loss, and saves on energy use.
®
feature instead of
7
SAFETY DURING USE
•Do not touch the oven racks while they are hot.
•If a rack must be moved while the oven is hot, do not let the pot holder contact the hot
heating element in the oven.
•Use caution with the Timed Cook or Delayed Timed Cook features. Use the automatic
timer when cooking cured or frozen meats and most fruits and vegetables. Foods that can
easily spoil, such as milk, eggs, fish, meat or poultry, should be chilled in the refrigerator
first. Even when chilled, they should not stand in the oven for more than 1 hour before
cooking begins, and should be removed promptly when cooking is complete. Eating
spoiled food can result in sickness from food poisoning.
•Accessible parts may become hot when the grill is in use.
•Do not place food or cookware on the bottom of the oven cavity. Doing so will cause
permanent damage to the oven bottom finish.
•Do not use water on grease fires. Should an oven fire occur, leave the oven door closed
and turn the oven off. If the fire continues, throw baking soda on the fire or use a fire
extinguisher. Do not put water or flour on the fire. Flour may be explosive and water can
spread a grease fire and cause personal injury.
Page 8
8
IMPORTANT SAFETY INSTRUCTIONS
•Pull the oven rack to the stop-lock position when loading and unloading food from the
oven. This helps prevent burns caused by touching hot surfaces of the door and oven
walls.
•Do not use the oven if a heating element develops a glowing spot during use or shows
other signs of damage. A glowing spot indicates the heating element may fail and present
a potential burn, fire, or shock hazard. Turn the oven off immediately and have the heating
element replaced by a qualified service technician.
•When using cooking or roasting bags in the oven, follow the manufacturer’s directions.
SAFETY WHEN CLEANING (Model LREL6325** / LREL6323**)
•Open a window or turn on a ventilation fan or hood before self-cleaning.
•If the oven is heavily soiled with oil, self-clean the oven before using the oven again. The
oil could cause a fire.
•Wipe up heavy soil on the bottom of the oven before using the Self Clean function.
•Do not use oven cleaners. Commercial oven cleaner or oven liner protective coating of
any kind should not be used in or around any part of the oven.
•Never keep pet birds in the kitchen. The health of birds is extremely sensitive to the fumes
released during an oven self-clean cycle. Fumes may be harmful or fatal to birds. Move
birds to a well-ventilated room.
•Clean in the self-clean cycle only parts listed in this manual. Before self-cleaning the oven,
remove the broiler pan, all oven racks, the meat probe and any utensils or food from the
oven.
•Important Instruction. The oven displays an F error code and sounds three long beeps
during the self-cleaning process if it malfunctions in the self-clean mode. Switch off the
electrical power to the main fuse or breaker and have the oven serviced by a qualified
technician.
•It is normal for the cooktop of the range to become hot during a self-clean cycle.
Therefore, touching the cooktop during a self-clean cycle should be avoided.
•Never pour cold water over a hot oven for cleaning. Doing so may cause the oven to
malfunction.
•Make sure oven lights are cool before cleaning.
•Do not clean door gasket. The door gasket is essential for a good seal. Care should be
taken not to rub, damage, or move the gasket.
•If there is a fire in the oven during self-clean, turn the oven off and wait for the fire to go
out. Do not force the door open. Introduction of fresh air at self-clean temperatures may
lead to a burst of flame from the oven. Failure to follow this instruction may result in severe
burns.
COOK MEAT AND POULTRY THOROUGHLY
•To protect against food-borne illnesses, cook meat and poultry thoroughly. The USDA has
indicated the following as safe minimum internal temperatures for consumption:
•Ground beef: 160 °F (71.1 °C)
•Poultry: 165 °F (73.9 °C)
•Beef, veal, pork, or lamb: 145 °F (62.8 °C)
•Fish/seafood: 145 °F (62.8 °C)
Page 9

ENGLISH
PRODUCT OVERVIEW
Parts
Controller
PRODUCT OVERVIEW
9
Cooktop
Oven door
Warming drawer /
Storage drawer
Accessories
Included Accessories
Standard Rack
- Model LRGL5825** (3ea)
- Model LRGL5823**/LRGL5821** (2ea)
Glass-ceramic
Gasket
Rack
Model & serial
number plate
Optional Accessories
Grid
Air fry tray
Broiler pan
NOTE
•Contact LG Customer Service at 1-800-243-0000 (1-888-542-2623 in Canada) if any accessories are
missing.
•For your safety and for extended product life, only use authorized components.
•The manufacturer is not responsible for product malfunction or accidents caused by the use of separately
purchased, unauthorized components or parts.
•The images in this guide may be different from the actual components and accessories, which are subject
to change by the manufacturer without prior notice for product improvement purposes.
Page 10
10
INSTALLATION
INSTALLATION
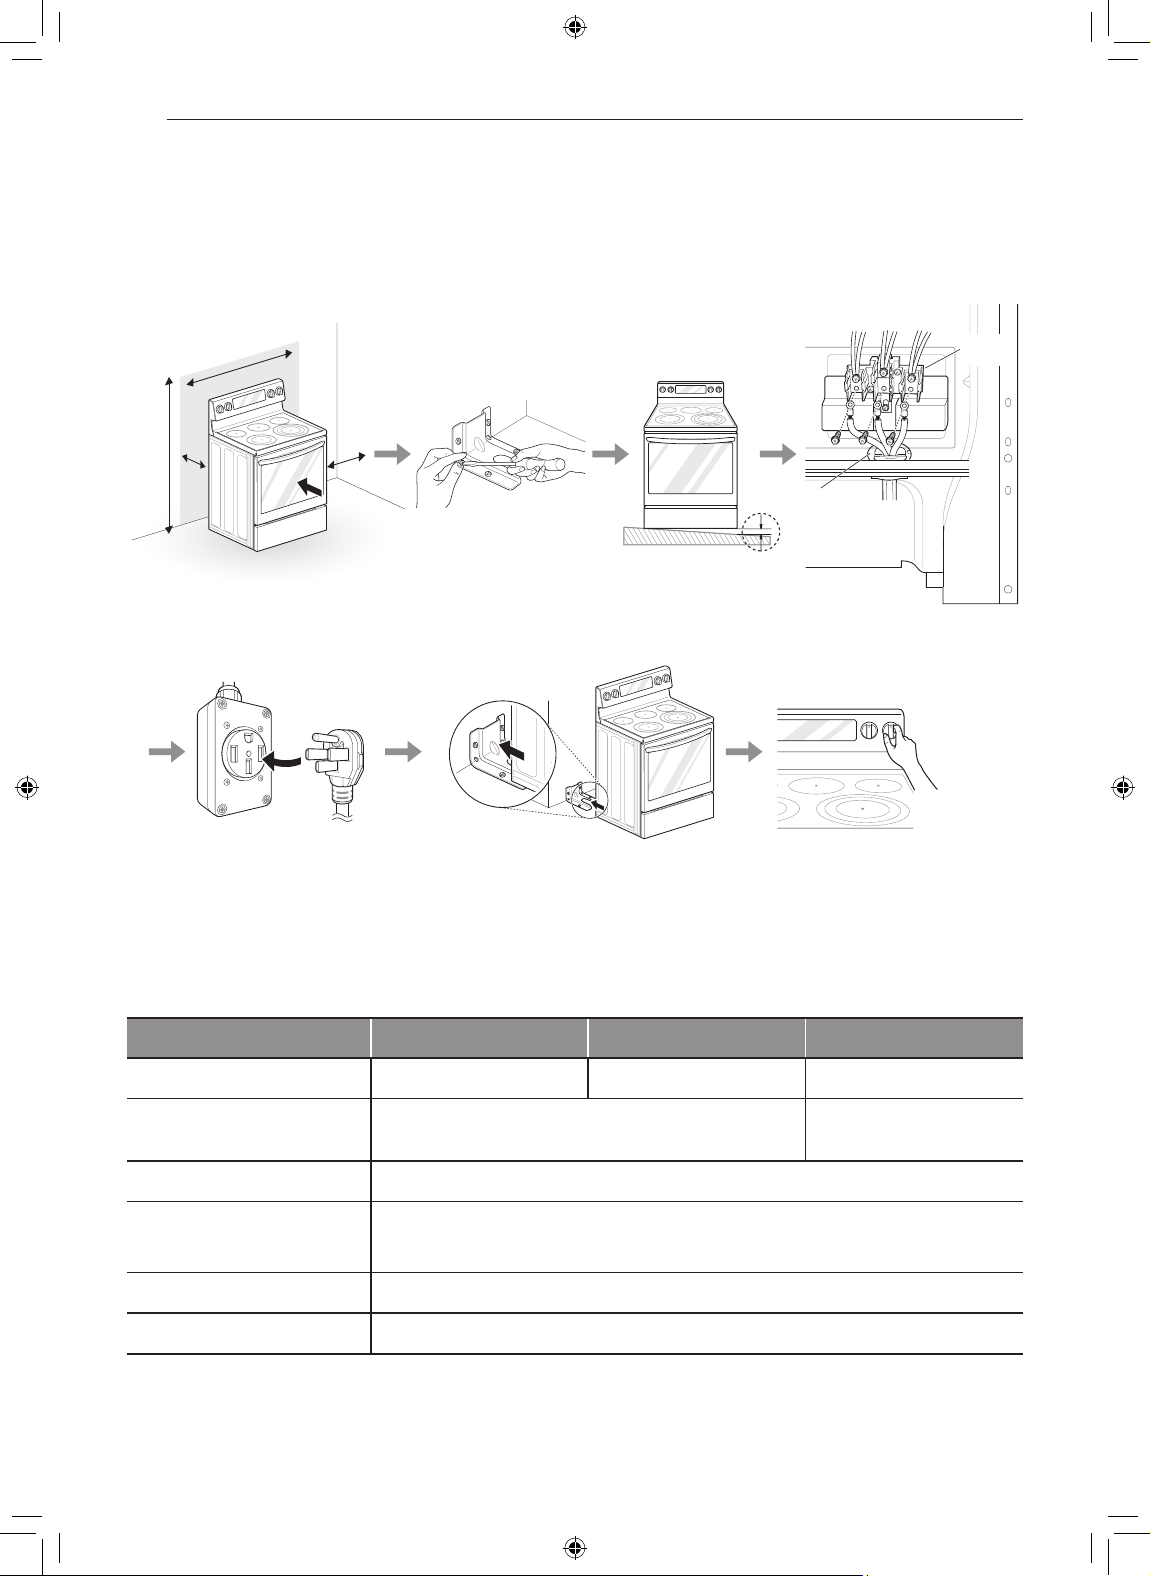
Installation Overview
Please read the following installation instructions first after purchasing this product or transporting it to another
location.
Black White Red
Conduit
connection
plate
Check and choose the
proper location
240 V
Plug in the power cord Engage the anti-tip device Test run
Install anti-tip device Level the range Connect electric range
Terminal
block
Product Specifications
The appearance and specifications listed in this manual may vary due to constant product improvements.
Oven Range Models LREL6325** LREL6323** LREL6321**
Net weight 139.6 lb (63.3 kg) 136.2 lb (61.78 kg) 130.5 lb (59.2 kg)
Electrical requirements 120/240 V: 12.9 kW, 120/208 V: 9.7 kW
Description Electric Single Oven Range
Exterior Dimensions
Height to cooking surface 36" (91.3 cm)
Total capacity 6.3 cu.ft.
29 4/5" (W) x 46 1/2" (H) x 26 1/2" (D) (D with door closed and excluding door handle)
75.9 cm (W) x 118.1 cm (H) x 67.4 cm (D)
(D with door closed and excluding door handle)
120/240 V: 13.1 kW,
120/208 V: 9.8 kW
Page 11
INSTALLATION
ENGLISH
11
Before Installing the Range
WARNING
Tip - Over Hazard
A child or adult can tip the range and
be killed. Verify the anti-tip bracket
has been installed. Ensure the
anti-tip bracket is engaged when the
range is moved.
Do not operate the range without the
anti-tip bracket in place. Failure to
follow these instructions can result
in death or serious burns to children
and adults.
To check that leveling leg is
inserted into anti-tip bracket,
grasp the top rear edge
of the range and carefully
attempt to tilt it forward.
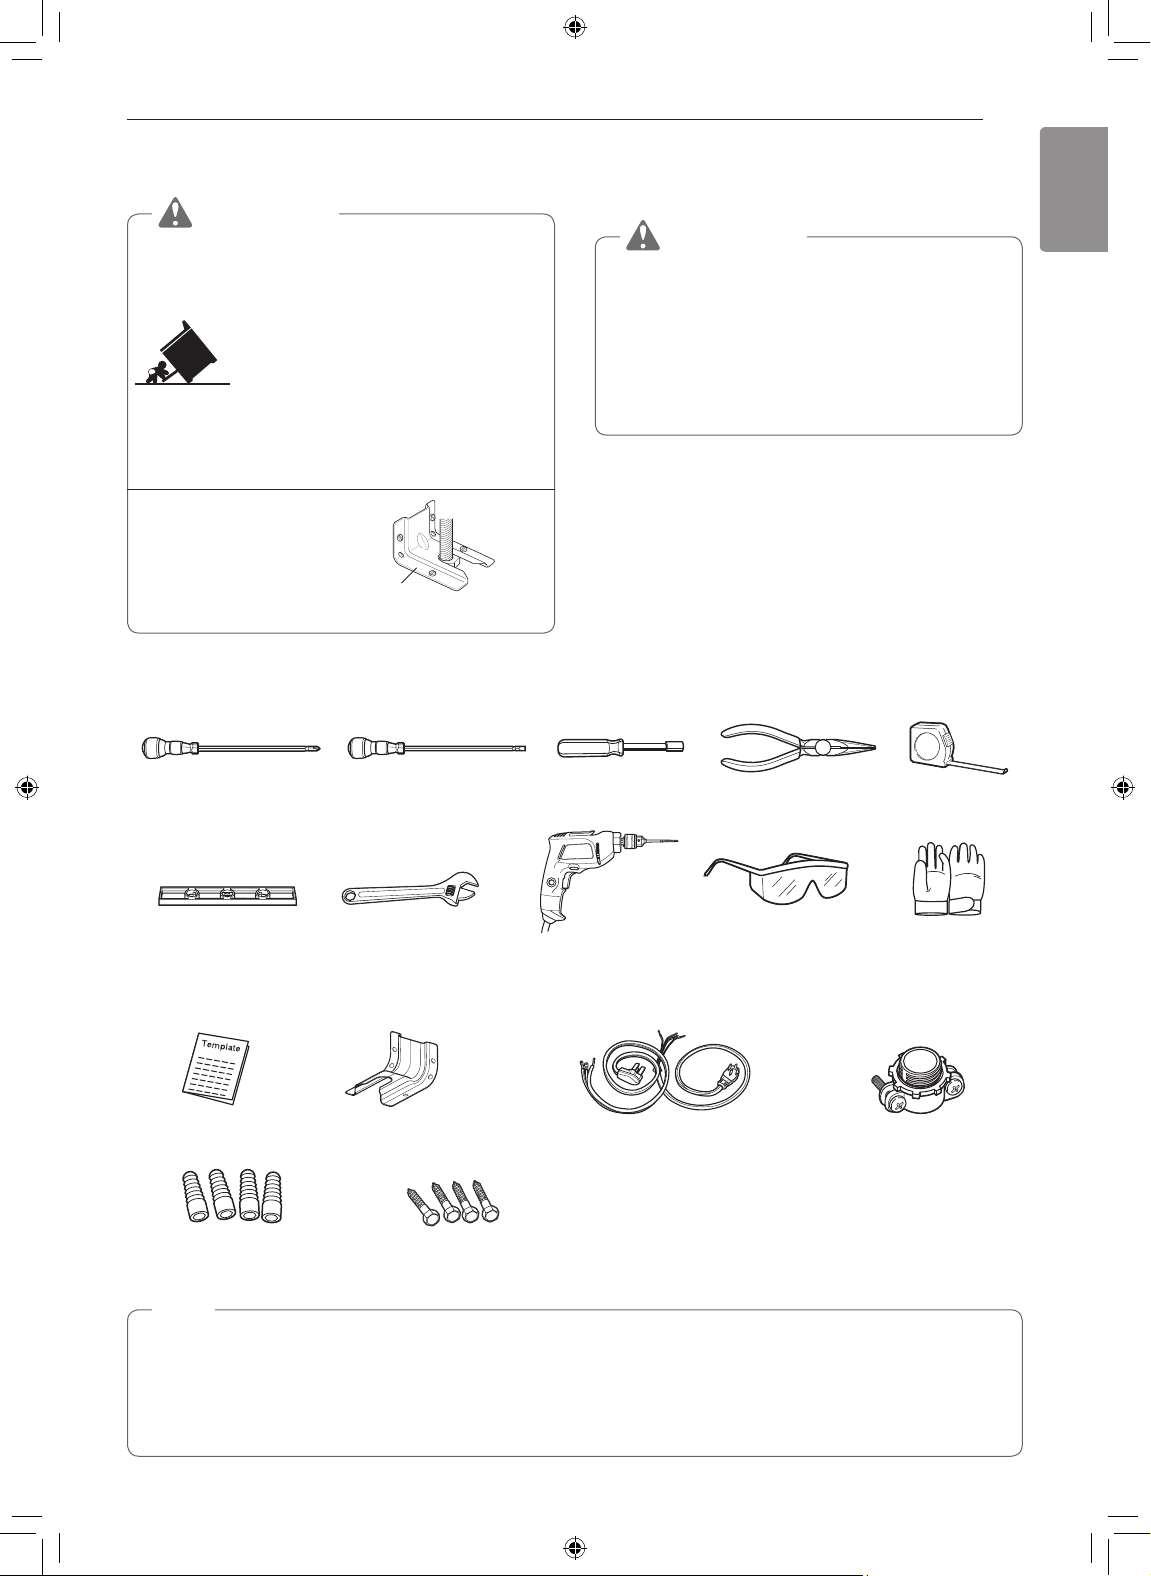
Tools Needed
Anti-tip
bracket
Leveling
leg
If you did not receive an anti-tip bracket with your
purchase, call 1-800-243-0000 (1-888-542-2623 in
CANADA) to receive one at no cost.
WARNING
•The information in this manual should be
followed exactly. Failure to do so may result
in fire, electrical shock, property damage,
personal injury, or death.
•Wear gloves during the installation
procedure. Failure to do so can result in bodily
injury.
Phillips screwdriver
Level
Flat-blade screwdriver
Adjustable wrench
Parts Provided
Template (1)
Anchor sleeves (4) Lag bolts (4)
Anti-tip bracket kit (1)
1
/4" Nut driver
Drill
Parts not Provided
4-Wire cord or
3-Wire cord
(UL approved 40 or 50
AMP)
Pliers
Safety glasses
Tape measure
Strain relief
(For conduit
Installations only)
NOTE
•Observe all governing codes and ordinances.
•Have the installer show you the location of the circuit breaker or fuse. Mark it for easy reference.
•As when using any appliance generating heat, there are certain safety precautions you should follow.
•Be sure your range is installed and grounded properly by a qualified installer or service technician.
Gloves
Page 12
12
INSTALLATION
Installing the Range
Unpacking and Moving the Range
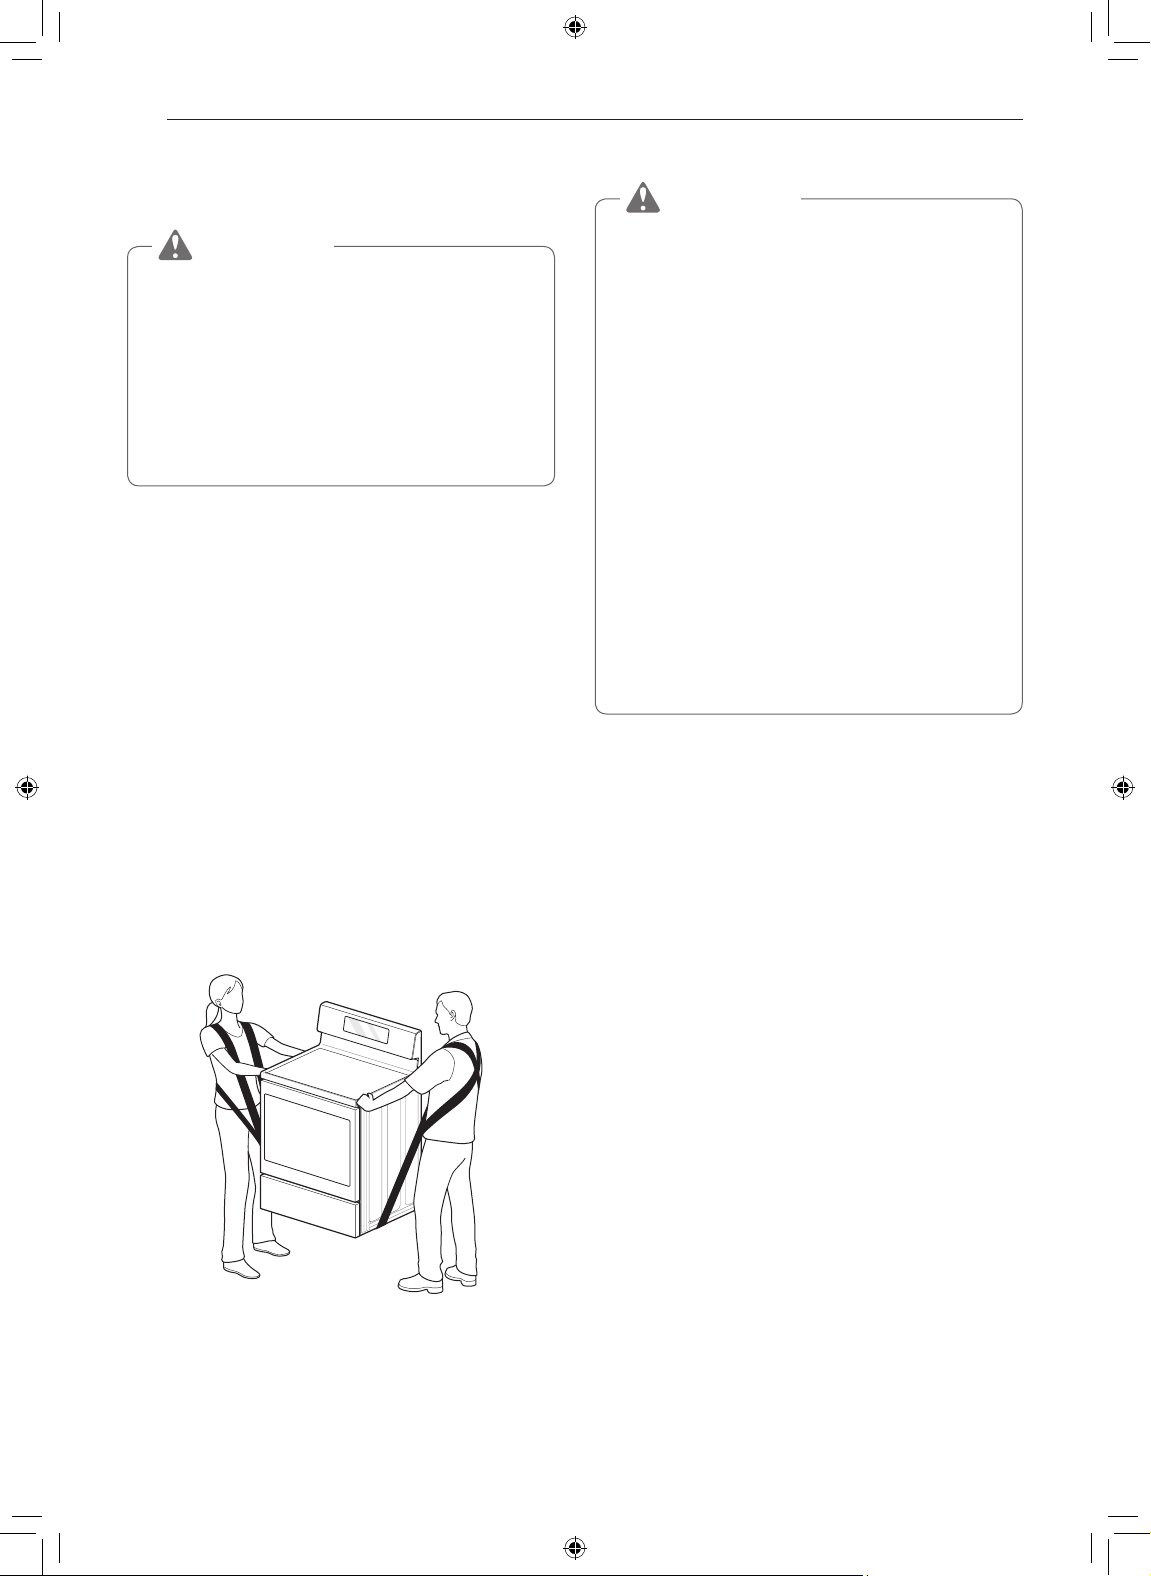
CAUTION
•You should use two or more people to move
and install the range. (Excessive Weight
Hazard) Failure to do so can result in back or
other injury.
•Do not use the door handles to push or
pull the range during installation or when
moving the range out for cleaning or
service. Doing so can result in serious damage
to the door of the range.
Remove packing material, tape and any temporary
labels from your range before using. Do not remove
any warning-type labels, the model and serial number
label, or the Tech Sheet that is located on the back of
the range.
To remove any remaining tape or glue, rub the area
briskly with your thumb. Tape or glue residue can also
be easily removed by rubbing a small amount of liquid
dish soap over the adhesive with your fingers. Wipe
with warm water and dry.
Do not use sharp instruments, rubbing alcohol,
flammable fluids, or abrasive cleaners to remove tape
or glue. These products can damage the surface of
your range.
Your range is heavy and can be installed on soft
floor coverings such as cushioned vinyl or carpeting.
Use care when moving the range on this type of
flooring. Use a belt when moving the range to prevent
damaging the floor. Or slide the range onto cardboard
or plywood to avoid damaging the floor covering.
Choosing the Proper Location
CAUTION
•Avoid placing cabinets above the range. To
minimize the hazard caused by reaching over
the open flames of operating burners, install a
ventilation hood over the range that projects
forward at least five inches beyond the front of
the cabinets.
•Make sure wall covering, countertop and
cabinets around the range can withstand
the heat (up to 194 °F) generated by the
range. Discoloration, delamination or melting
may occur. This range has been designed to
comply with the maximum allowable wood
cabinet temperature of 194 °F.
•Before installing the range in an area
covered with linoleum or other synthetic
floor covering, make sure the floor covering
can withstand temperatures of at least
200 °F (93 °C).
•Use an insulated pad or
plywood under the range if installing the
range over carpeting.
The range should always be plugged into its own
individual properly grounded electrical outlet. This
prevents overloading house wiring circuits which
could cause a fire hazard from overheated wires. It is
recommended that a separate circuit serving only this
appliance be provided.
Mobile Home - Additional Installation
Requirements
The installation of this range must conform to the
Manufactured Home Construction and Safety
Standard, Title 24 CFR, Part 3280 (formerly the
Federal Standard for Mobile Home Construction
and Safety, Title 24, HUD Part 280), or when
such standard is not applicable, the Standard for
Manufactured Home Installations, ANSI A225.1/NFPA
501A or with local codes.
•When this range is installed in a mobile home, it
must be secured to the floor during transit. Any
method of securing the range is adequate as long
as it conforms to the standards listed above.
•A four-wire power supply cord or cable must be
used in a mobile home installation.
1
/4 in. (0.64 cm)
Page 13
ENGLISH
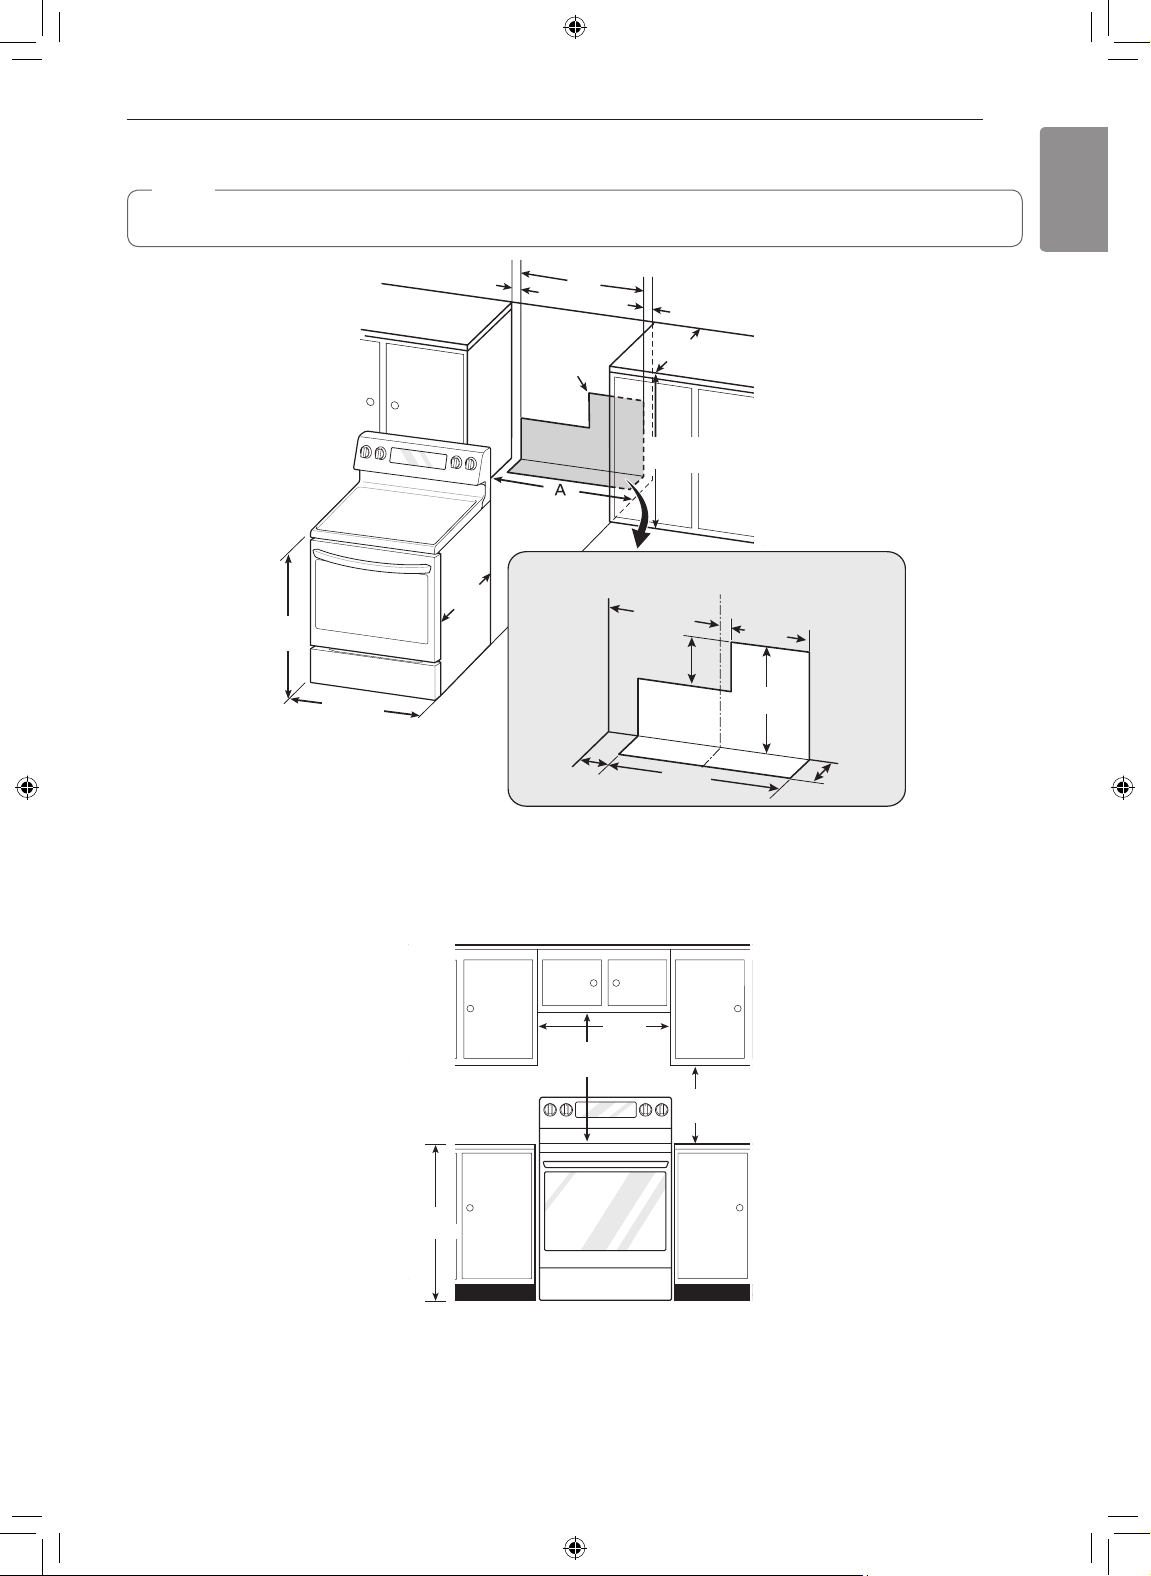
Dimensions and Clearances
INSTALLATION
13
NOTE
Save for the use of the local electrical inspector.
3" (7.6 cm)
24"
(60.9 cm)
36"
(91.4 cm)
29.8"
(75.7 cm)
24"
(60.9 cm)
Acceptable
electrical
outlet area
Cabinet
opening
Cabinet
1
3
(8.1cm)
3" (7.6 cm)
25"
Normal countertop
(63.5 cm)
depth
36"
(91.4 cm)
Countertop
height
Wall
Center
15" (38 cm)
5"
(12.6 cm)
/8"
23 1/2"
(60 cm)
1
7
/2"
(19 cm)
11 3/4"
(30 cm)
2"
(5.1 cm)
A = 30" (76.2 cm) For U.S.A
= 30" (76.2 cm) ~ 31" (78.7 cm) For CANADA
For installation in Canada, a free-standing range is not to be installed closer than
15
/32" (12 mm) from any
adjacent surface.
30"
(76.2 cm)
*30" (76.2 cm)
Minimum
**15"
(38.1 cm)
36"
(91.4 cm)
Minimum Dimensions
* 30" (76.2 cm) minimum clearance between the top of the cooking surface and the bottom of an unprotected
wood or metal cabinet; or 24" (60.9 cm) minimum when bottom of wood or metal cabinet is protected by not less
1
/4" (6.4 cm) flame retardant millboard covered with not less than no. 28 MSG sheet steel, 0.015"
than
(0.381 mm)
stainless steel, 0.024" (0.610 mm) aluminum or 0.020" (0.508 mm) copper.
** 15" (38.1 cm) minimum between countertop and adjacent cabinet bottom.
Page 14
14
INSTALLATION
Installing the Anti-tip Device
WARNING
Tip - Over Hazard
A child or adult can tip the range and
be killed. Verify the anti-tip bracket
has been installed. Ensure the anti-tip
bracket is engaged when the range
is moved. Do not operate the range
without the anti-tip bracket in place.
Failure to follow these instructions
can result in death or serious burns to
children and adults.
To check that leveling leg is
inserted into anti-tip bracket,
grasp the top rear edge
of the range and carefully
attempt to tilt it forward.
Screw must
enter wood or
concrete
Locate the anti-tip bracket using the template
An anti-tip bracket is packaged with the template.
The instructions include necessary information to
complete the installation. Read and follow the range
installation instruction sheet (template).
Anti-tip
bracket
Anti-tip
bracket
Leveling the Range
Level the range by adjusting the leveling legs with a
wrench. Extending the legs slightly may also make it
easier to insert the rear leg into the anti-tip bracket.
Leveling
leg
Wall plate
Use a level to check your adjustments. Place the level
diagonally on the oven rack, and check each direction
for level.
First check direction
Then check direction
on the rack, adjust the leveling legs with a wrench.
.
. If the level doesn’t show level
2
1
Connecting Electricity
Electrical Requirements
This appliance must be installed and grounded on a
branch circuit by a qualified technician in accordance
with the National Electrical code ANSI/NFPA NO. 70 latest edition.
All wiring should conform to Local and NEC codes.
This range requires a single-phase, 3 wire, A.C
120/208 V or 120/240 V 60 Hz electrical system. Use
only a 3-conductor or a 4-conductor UL- listed range
cord with closed-loop terminals, open-end spade
lugs with upturned ends or similar termination. Do not
install the power cord without a strain relief.
A range cord rated at 40 amps with 120/240
minimum volt range is required. If a 50 amp range
cord is used, it should be marked for use with 1
diameter connection openings. This appliance
may be connected by means of a conduit or power
cord. If a conduit is being used, go to page 17 for
3 wire conduit connections or 4 wire conduit
connections.
3
/8"
Page 15
INSTALLATION
ENGLISH
15
WARNING
•Allow 2 to 3 ft (61.0 cm to 91.4 cm) of slack
in the line so that the range can be moved if
servicing is ever necessary.
•The power supply cord and plug should
not be modified. If it will not fit the outlet,
have a proper outlet Installed by a qualified
electrician.
•Using an extension cord to connect the
power is prohibited. Connect the power
cord and plug directly.
•Electrical ground is required on this
appliance.
•Make sure that the power cord is not
pinched by the range or heavy objects.
Failure to do so can result in serious burns or
electrical shock.
Specified power-supply-cord kit rating
Diameter (inches)
Range rating, watts
Specified
rating of
power
120/240
volts
3-wire
8,750 16,500
16,501 22,500
120/208
volts
3-wire
7,801 12,500
12,501 18,500
supply-
cord kit,
amperes
40 or 50A
50
3, 4 - Wire electrical wall Receptacle
of Range
connection
Opening
Power
cord
3
/8"
1
1 3/4"
Conduit
1
/8"
1
1 3/8"
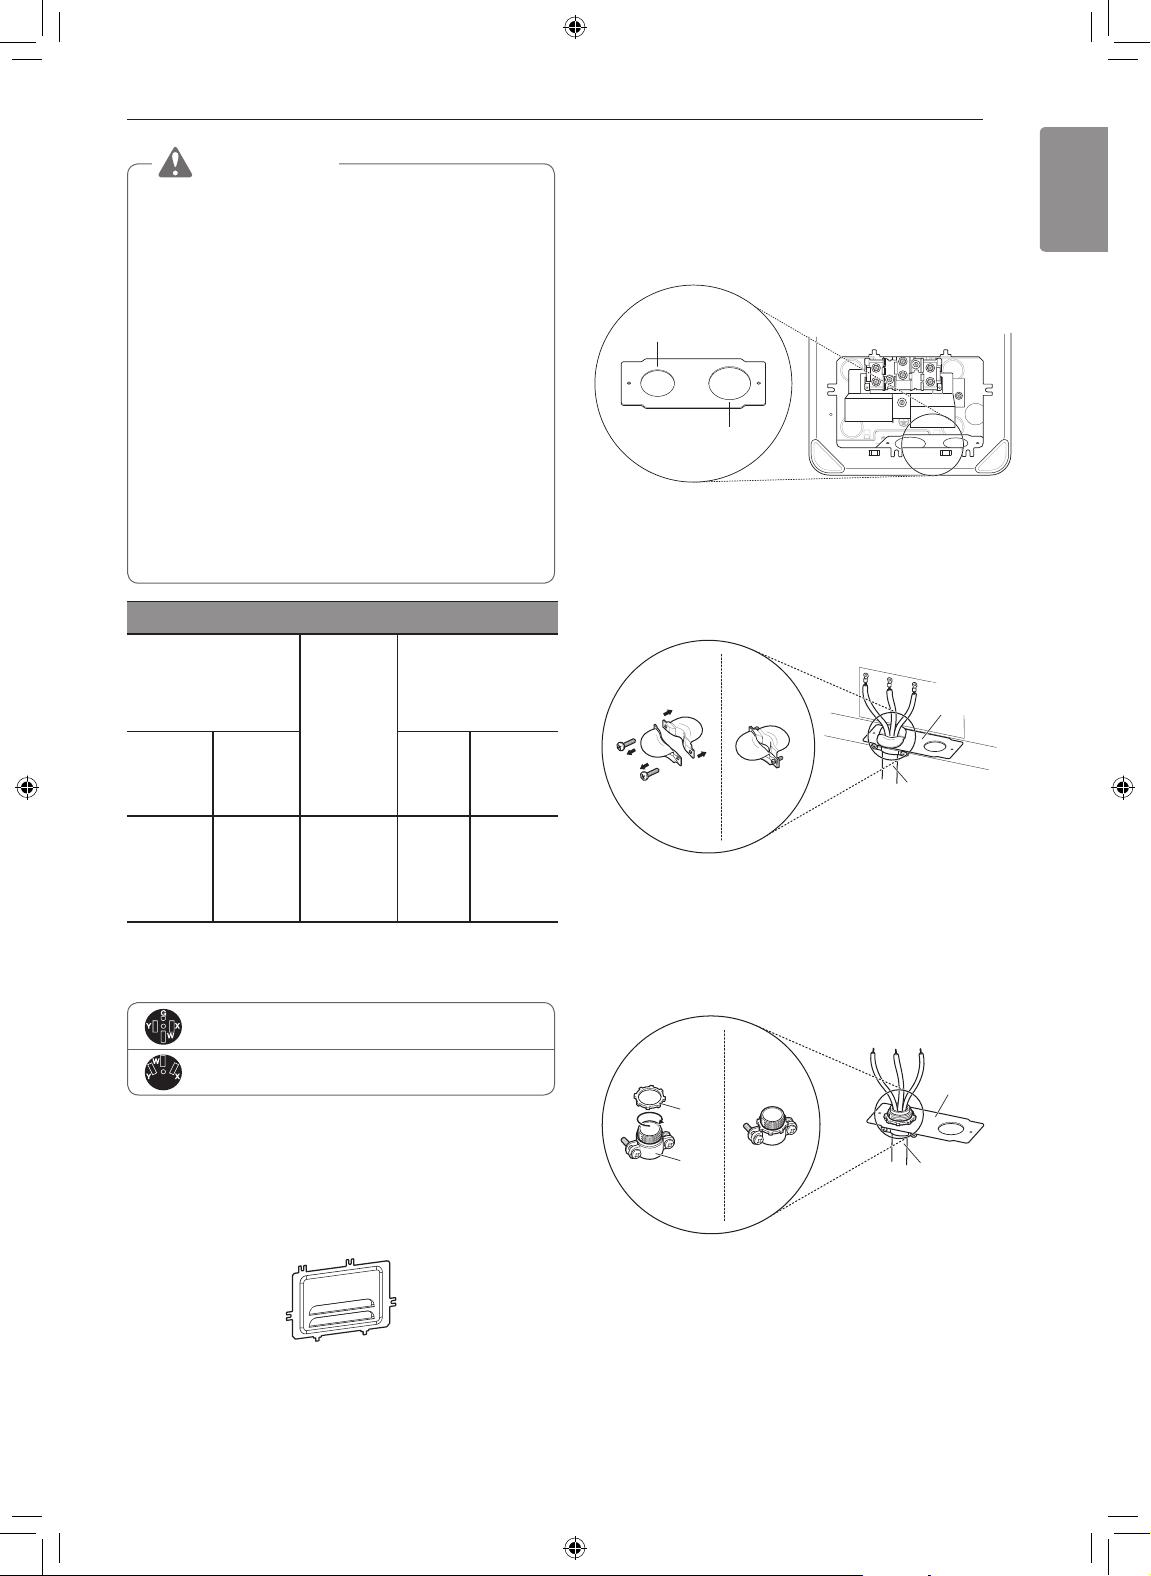
Use the cord/conduit connection plate to install the
power cord or conduit. Leave the connection plate
as installed for power cord installations. Remove the
connection plate for conduit installations and use the
smaller 11/8 in. (2.8 cm) conduit hole instead of the
13/8 in. (3.5 cm) power cord hole.
1
/8"
(2.8 cm) Conduit
1
13/8"
(3.5 cm) Cord
Remove the Conduit connection plate
For power cord installations, hook the strain relief
over the 13/8 in. (3.5 cm) power cord hole located
below the rear of the oven. Insert the power cord
through the strain relief and tighten it.
Conduit
connection
plate
Power cord
3
Assembling power cord strain relief at the 1
/8" opening
For conduit installations, insert the conduit strain
relief in the 11/8 in. (2.8 cm) conduit hole. Then install
the conduit through the body of the strain relief and
fasten the strain relief with its ring.
4 Wire receptacle (14-50R)
3 Wire receptacle (10-50R)
Connecting the Power Cord
The rear access cover must be removed. Loosen the
two screws with a screwdriver. The terminal block will
then be accessible.
Access cover
Ring
Body
Assembling conduit cord strain relief at the 1
Cord/
Conduit
connection
plate
Conduit
1
/8" opening
Page 16
16
INSTALLATION
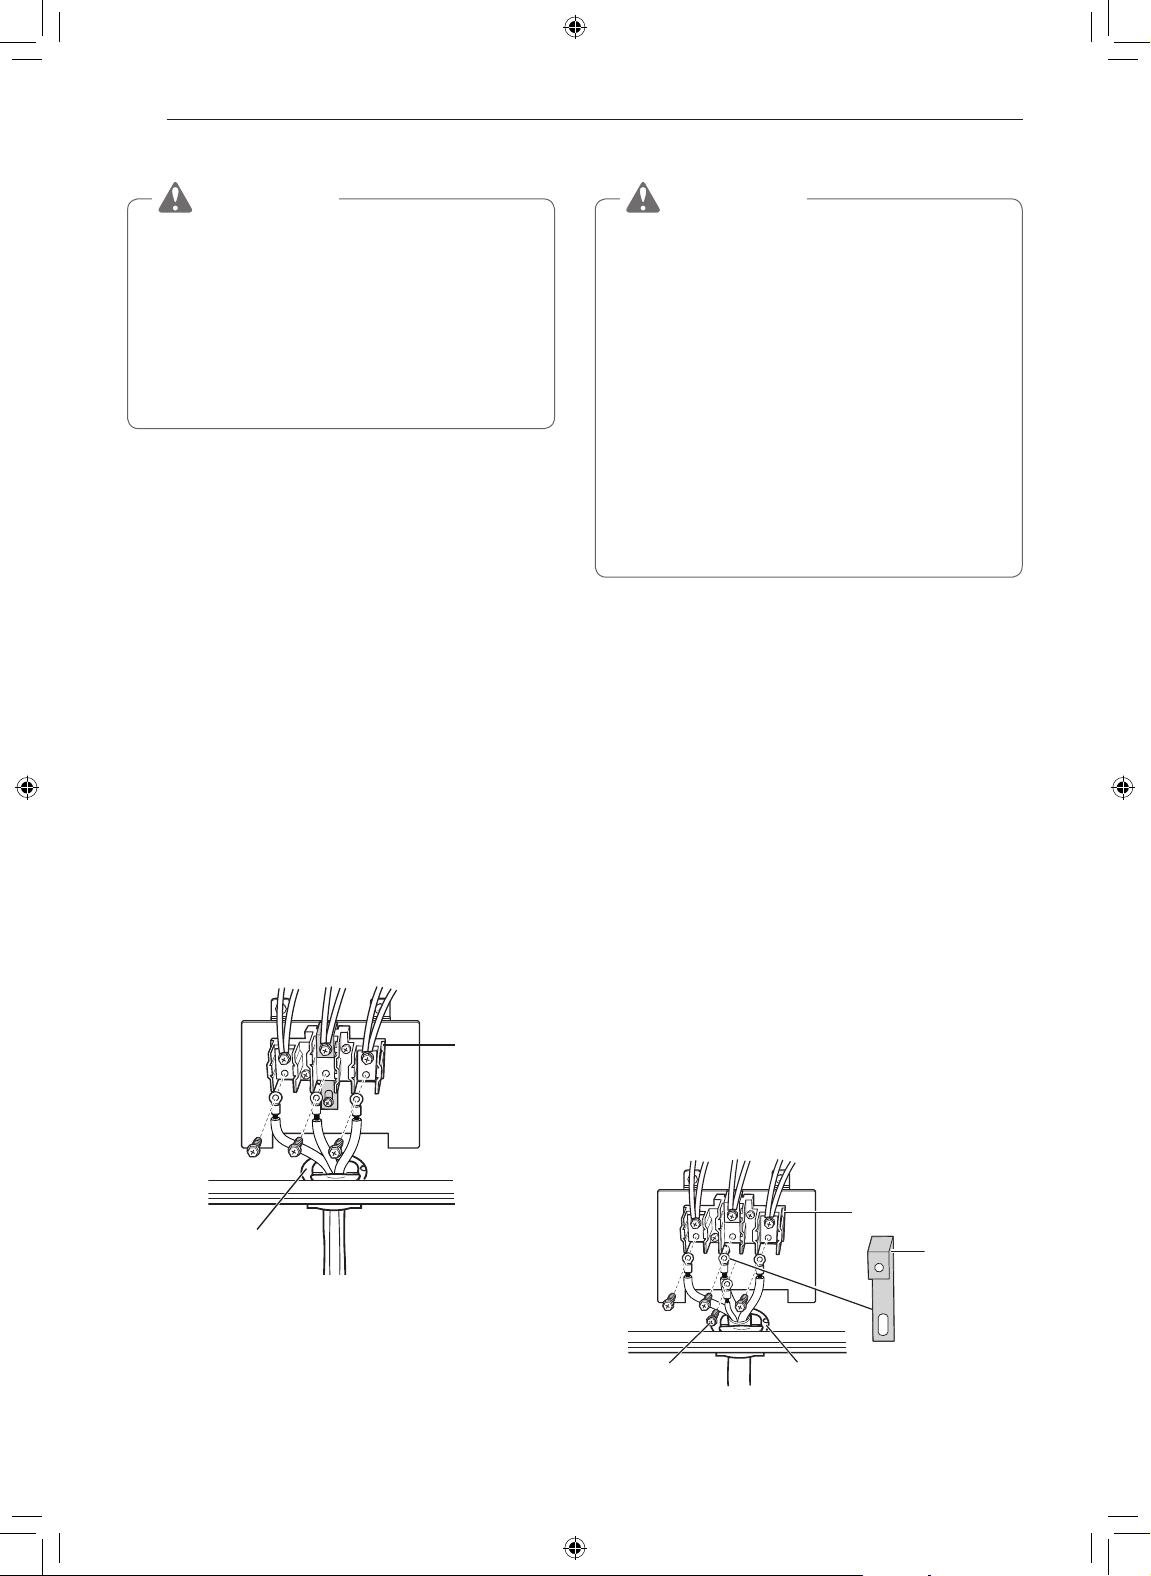
3-Wire Connection : Power Cord
WARNING
•The middle (neutral or ground) wire, which
is white, of a 3-wire power cord or a 3-wire
conduit has to be connected to the middle
post of the main terminal block. The
remaining two wires of the power cord or
conduit have to be connected to the outside
posts of the main terminal connection block.
Failure to do so can result in electrical shock,
severe personal injury or death.
Install the power cord as follows:
For power cord installations, hook the strain relief
over the power cord hole (1
rear of the oven. Insert the power cord through the
strain relief and tighten it.
Do not install the power cord without a strain
relief.
Remove the lower 3 screws from the terminal
1
block and retain them.
Insert the 3 screws through each power cord
2
terminal ring and into the lower terminals of
the terminal block. Make sure that the center
(neutral) wire, which is white, is connected to the
center lower position of the terminal block.
Tighten the 3 screws securely into the terminal
3
block. Do not remove the ground strap
connections.
3-wire connection
Black White Red
3
/8") located below the
4-Wire Connection : Power Cord
WARNING
•Only a 4-conductor power-supply cord
kit rated 120/240 volts, 50 amperes and
marked for use with ranges with closedloop connectors or opened spade lugs with
upturned ends shall be used.
The white middle (neutral) wire of the power
cord or 4-wire conduit has to be connected
to the middle post of the main terminal
block. The other two wires of the power
cord or conduit have to be connected to
the outside posts of the main terminal
connection block. The 4th ground wire
(green) must be connected to the frame of
the range with the ground screw. Failure
to do so can result in electrical shock, severe
personal injury or death.
Install the power cord as follows:
Do not install the power cord without a strain
relief.
Remove the lower 3 screws from the terminal
1
block and retain them.
Remove the ground screw and bend the end of
2
the ground strap up so the slot is over the hole
of the center screw removed in step 1.
Insert the ground screw into the power cord
3
ground wire (green) terminal ring and secure it to
the range frame.
Insert the 3 screws through each power cord
4
terminal ring and into the lower terminals of the
terminal block. Make sure that the white center
(neutral) wire is connected to the center lower
position of the terminal block.
Terminal
block
Conduit
connection plate
If screws are not tightened securely, it can result in
electrical spark and severe personal injury or death.
Tighten the 3 screws securely into the terminal
5
block. The center screw now attaches the bent
up ground strap to the block.
4-wire connection
Black White Red
Terminal
block
Ground
screw
If screws are not tightened securely, it can result in
electrical spark and severe personal injury or death.
Conduit
connection plate
Ground
strap
Bend strap up
and attach
Page 17
INSTALLATION
ENGLISH
17
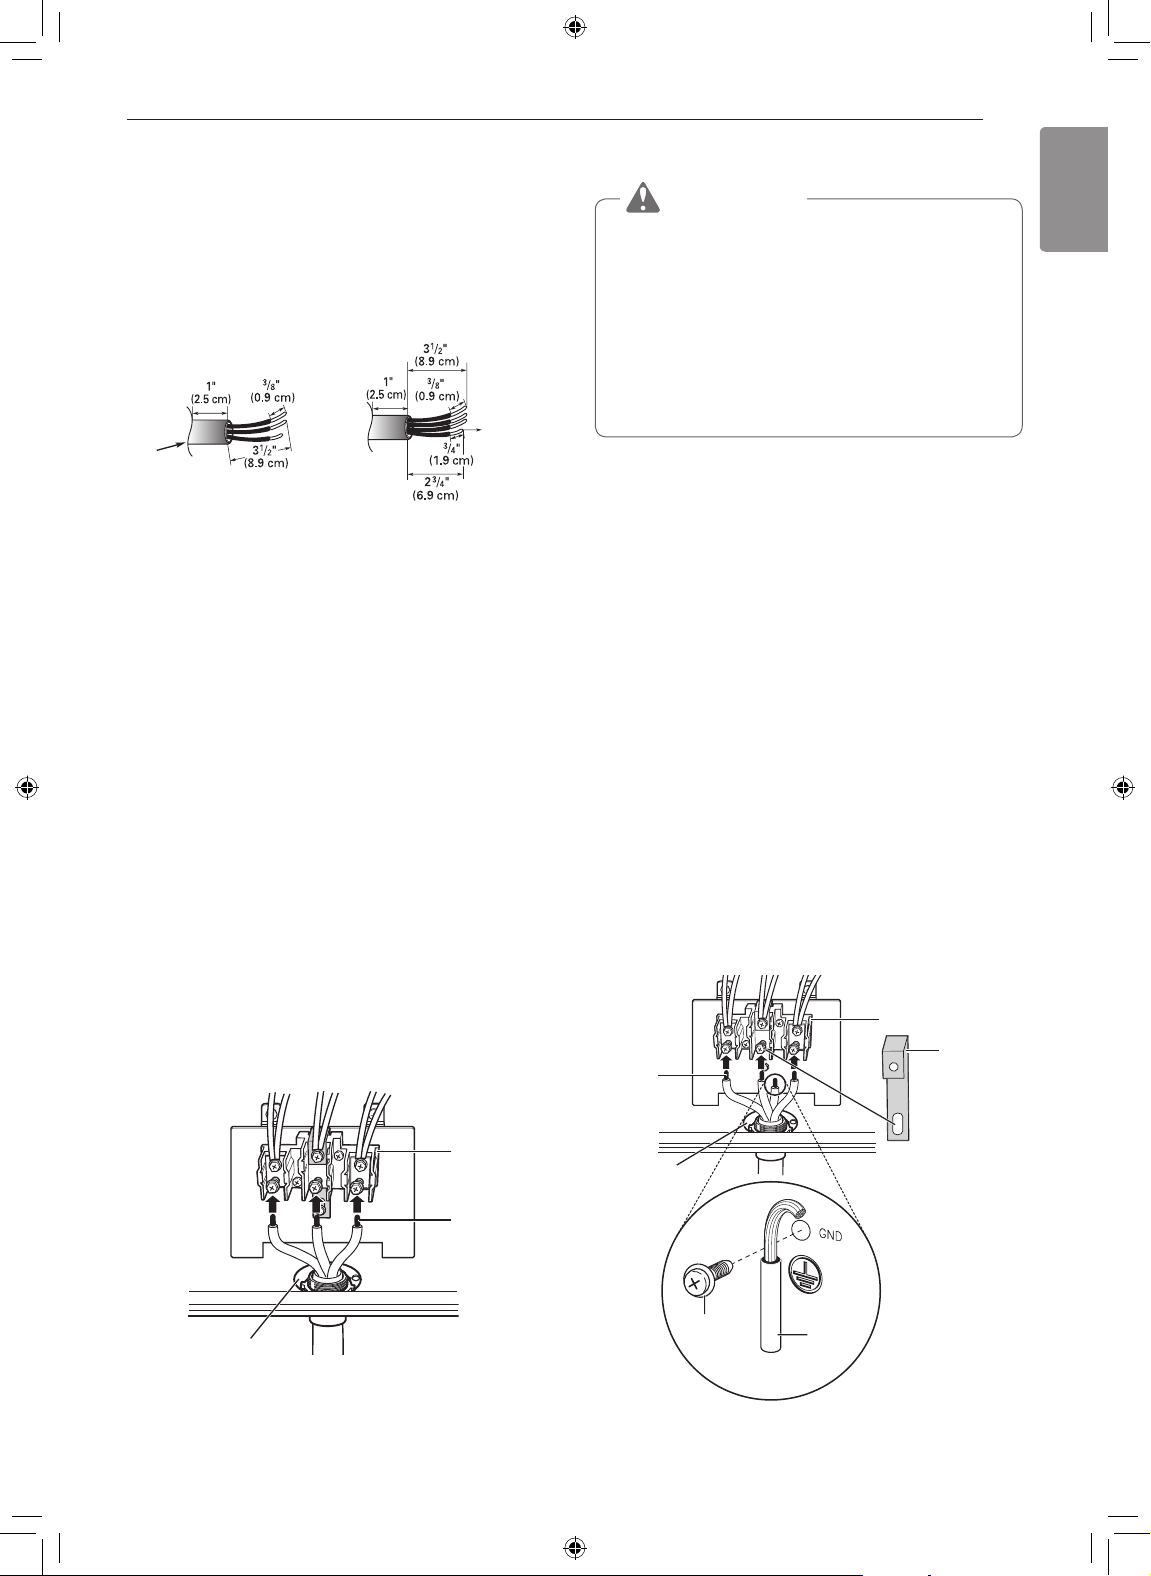
3-Wire Connection: Conduit
Install the conduit as follows:
Remove the conduit connection plate from the rear of
the oven and rotate it. The conduit hole (1
be used.
First, prepare the conduit wires as shown below.
3-Wire
Conduit
connection
plate
Second, install the conduit strain relief.
For conduit installations, purchase a strain relief and
insert it in the 1
install the conduit through the body of the strain relief
and fasten the strain relief with its ring. Reinstall the
bracket.
For conduit connections:
If the wire in the conduit is copper it must be 8 or 10
AWG wiring.
If the wire in the conduit is aluminum it must be 6 or 8
AWG wiring.
Loosen the lower 3 screws from the terminal
1
block.
Insert the bare wire (white/neutral) end through
2
the center terminal block opening. Do not
remove the ground strap connections.
1
/8 in. (2.8 cm) conduit hole. Then
or
4-Wire
1
/8") must
Ground
wire
4-Wire Connection: Conduit
WARNING
•The white middle (neutral) wire of the power
cord or 4-wire conduit has to be connected
to the middle post of the main terminal
block. The other two wires of the power
cord or conduit have to be connected to
the outside posts of the main terminal
connection block. The 4th ground wire
(green) must be connected to the frame of
the range with the ground screw. Failure
to do so can result in electrical shock, severe
personal injury or death.
Follow the instructions for installing the conduit
1
under 3-Wire Connection: Conduit until the strain
relief and bracket are installed. Do not install the
conduit without a strain relief.
Loosen the 2 lower left and right screws from
2
the terminal block. Remove the lower 2 center
screws. Do not discard any screws.
Remove the ground screw and bend the end of
3
the ground strap up so the slot is over the hole
of the center screw removed in step 1.
Attach the ground (green) bare wire end to
4
the range frame and secure it in place with the
ground screw.
Insert the bare wire (white/neutral) end through the
5
center terminal block opening. The center screw
now attaches the bent up ground strap to the block.
Insert the two side bare wire ends into the left
6
and the right terminal block openings. Tighten
the 3 screws securely into the terminal block.
(approximately 35 - 50 IN-LB)
Insert the two side bare wire ends into the lower
3
left and the lower right terminal block openings.
Tighten the 3 screws securely into the terminal
block. (approximately 35 - 50 IN-LB)
3-wire connection
Black White Red
Terminal
block
Wire
ends
Conduit
connection plate
If screws are not tightened securely, it can result in
electrical spark and severe personal injury or death.
4-wire connection
Black White Red
Terminal
block
Ground
Wire
ends
Conduit
connection
plate
Ground
screw
If screws are not tightened securely, it can result in
electrical spark and severe personal injury or death.
Ground
wire
strap
Bend strap
up and
attach
Page 18
18
INSTALLATION
Engaging the Anti-tip Device
•Move the range close enough to the opening to
plug into the receptacle.
•Slide the range into position ensuring that the back
leg slides under the anti-tip bracket. The range
should sit flush against the back wall when properly
installed.
•Carefully attempt to tip the range forward to ensure
that the anti-tip bracket is engaged properly. If
properly installed, the anti-tip bracket will prevent
the range from being tipped. If the range can be
tipped, reinstall the range until the anti-tip bracket is
properly installed and the range will not tip forward.
•Turn on electrical power. Check the range for
proper operation.
Test Run
Check if the range is properly installed and run a test
cycle.
Before using the cooktop for the first time, clean
1
it with a ceramic cooktop cleaner. This helps
protect the top and makes cleanup easier.
Press Clear/Off to start test.
2
Turn on each burner to the Hi setting to check
3
that the surface heating elements are working
properly. The elements should glow red and
radiate heat, and they should cycle on and off
periodically even when the setting is in the Hi
position. This cycling prevents the glass-ceramic
from being cracked by thermal shock.
IMPORTANT : The warming zone does not
consume enough power to glow red.
After checking all the surface heating elements,
4
check the locking system by pressing Clear/Off
for three seconds. The oven door should lock
and the cooktop should not operate while the
Lockout function is turned on. Press Clear/Off
for three seconds to disable Lockout.
The Lockout function should disable controls for
the oven and cooktop.
Now check the oven's operation. Press Bake
5
and press the number keys to set the oven
temperature to 350 °F.
The oven should finish preheating in 15 minutes,
6
and the convection fan should operate while the
oven is preheating.
After checking the oven's operation, turn the
7
temperature up to 450 °F and leave the oven on
for at least an hour to help remove any oil which
might cause smoke and odors when first using
the oven.
NOTE
Smoke may come out of the range when it is first
used.
Page 19
ENGLISH
OPERATION
2 1 3 4
5 67
2 1 41
5 637
2 1 41
5 637
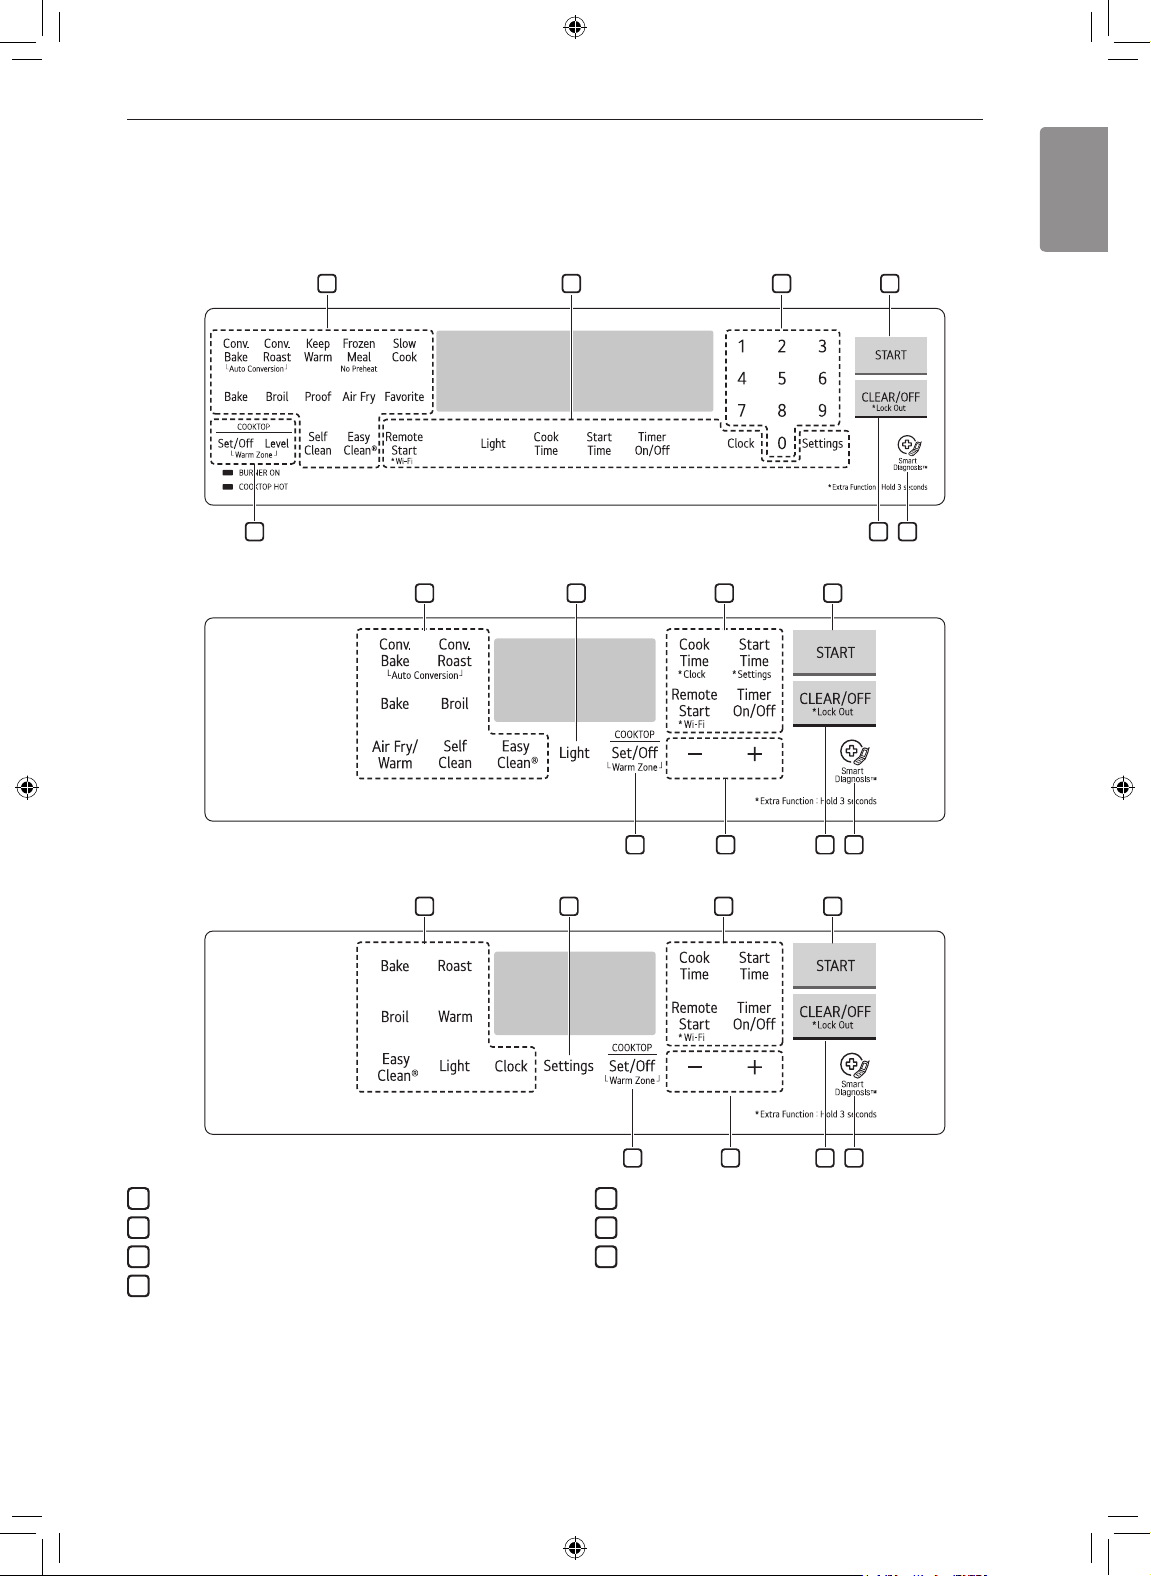
Control Panel Overview
Model LREL6325**
Model LREL6323**
OPERATION
19
Model LREL6321**
1
Features
2
Oven Control
3
Number Keys or +/- buttons
4
Start button
COOKTOP HOT Indicator
The COOKTOP HOT indicator appears in the display as long as any surface cooking area is too hot to touch.
It remains on after the element is turned off and until the surface has cooled to approximately 150 ˚F. The
COOKTOP HOT indicator also appears during the self clean cycle.
Flashing Time
If your oven displays a flashing clock, press Clock or press any key to stop the flashing.
5
Clear Off / Lockout button
6
Smart Diagnosis
7
Cooktop Control
TM
Page 20

20
OPERATION
Changing Oven Settings
Clock
The clock must be set to the correct time of day in
order for the automatic oven timing functions to work
properly.
Model LREL6325**
Press Clock.
1
Press numbers to enter the time.
2
Press Start.
3
Model LREL6323** / LRGL6321**
Model LREL6323**
1
Press and hold Cook Time for 3 seconds.
Model LREL6321**
Press Clock.
Press the +/– buttons to set the time.
2
Press Start.
3
NOTE
•The time of day cannot be changed during a
timed baking or self-clean cycle (available on
some models).
•To check the time of day when the display is
showing other information, press Clock.
•If no other keys are pressed within 25 seconds
of pressing Clock, the display reverts to the
original setting.
•If the display time is blinking, you may have
experienced a power failure. Reset the time.
Oven Light
The interior oven light automatically turns on when
the door is opened. Press Light or knock on the door
glass twice to manually turn the oven light on.
NOTE
•The oven light cannot be turned on if the Self
Clean (Model LREL6325** / LREL6323**)
function is active.
Minimum & Maximum Default
Settings
All of the features listed have a minimum and a
maximum time or temperature setting that may be
entered into the control. A beep sounds each time a
button is pressed.
Two short tones sound if the entry of the temperature
or time is below the minimum or above the maximum
setting for the feature.
min.
Feature
12 Hr.
Clock
24 Hr.
Timer
Cook Time 0:01 min.
Conv. Bake
Conv.
Roast
Broil Lo Hi
Bake
Favorite ①
- Bread
Favorite ②
- Meat
Favorite ③
- Chicken
Frozen
Meal
Air Fry 300 °F 550 °F
Slow Cook Lo Hi
Proof 12 Hr.
Warm 3 Hr.
Self Clean
(on some
models)
EasyClean
* Using Auto Conversion
•Default cook mode times are without setting cook
time.
®
Temp. /
Time
1:00
Hr. / min.
0:00
Hr. / min.
0:01
min. / sec.
300 °F /
150 °C
300 °F /
150 °C
170 °F /
80 °C
170 °F 550 °F
300 °F 550 °F
300 °F 550 °F
300 °F 550 °F
3 Hr. 5 Hr. 4 Hr.
max.
Temp. /
Time
12:59
Hr. / min.
23:59
Hr. / min.
11:59
Hr. / min.
11:59
Hr. / min.
550 °F /
285 °C
550 °F /
285 °C
550 °F /
285 °C
Default
350 °F
(*325 °F)/
12 Hr.
350 °F
(*325 °F)/
12 Hr.
Hi /
3 Hr.
350 °F /
12 Hr.
350 °F /
12 Hr.
350 °F /
12 Hr.
350 °F /
12 Hr.
400 °F /
12 Hr.
350 °F /
12 Hr.
Hi /
12 Hr.
10 min.
Page 21

OPERATION
ENGLISH
21
Timer On/Off
The Timer On/Off feature serves as an extra timer in
the kitchen that beeps when the set time has run out.
It does not start or stop cooking.
The Timer On/Off feature can be used during any of
the other oven control functions.
Setting the Timer
Press Timer On/Off button once to set the time
1
in hours and minutes, or press the button twice
to set the time in minutes and seconds. TIMER
flashes in the display.
Enter the desired length of time.
2
Model LREL6325**
Use the number buttons.
Model LREL6323** / LREL6321**
Use the +/– buttons.
Press Timer On/Off to start the Timer. The
3
remaining time countdown appears in the display.
NOTE
If Timer On/Off is not pressed, the timer returns to
the time of day.
Settings
Model LREL6323**
Press and hold Start Time for 3 seconds. Then press
the Start Time key repeatedly to toggle through and
change oven settings.
Model LREL6325** / LREL6321**
Press the Settings button repeatedly to toggle
through and change oven settings.
The Settings key allows you to:
•set the hour mode on the clock (12 or 24 hours)
•enable/disable convection auto conversion
(Model LREL6325** / LREL6323**)
•adjust the oven temperature
•activate/deactivate the preheating alarm light
•set the beeper volume
•switch the temperature scale between Fahrenheit
and Celsius
Setting the Hour Mode
The control is set to use a 12-hour clock. To reset the
clock to 24-hour mode, follow the steps below.
When the timer reaches 0:00, End shows in the
4
display. The clock beeps every 15 seconds until
the Timer On/Off button is pressed.
NOTE
If the remaining time is not in the display, recall
the remaining time by pressing Timer On/Off.
Canceling the Timer
Press Timer On/Off once.
1
The display returns to the time of day.
NOTE
Pressing Clear/Off will not turn off the timer.
Model LREL6325**
Press and hold Settings button.
1
Press 1 to toggle between a 12-hour and 24-hour
2
clock.
Press Start to accept the change.
3
Model LREL6323** / LREL6321**
Model LREL6323**
1
Press and hold the Start Time button for 3
seconds.
Model LREL6321**
Press and hold Settings button.
Press +/– to toggle between a 12-hour and 24-
2
hour clock.
Press Start to accept the change.
3
Page 22
22
OPERATION
Setting Convection Auto Conversion
(Model LREL6325** / LREL6323**)
When using convection bake, the convection auto
conversion feature will automatically convert entered
regular baking temperatures to convection baking
temperatures. When this feature is enabled, the display
will show the actual converted temperature.
For example, if you enter a regular recipe temperature
of 350°F and press the START button, the display will
show the converted temperature of 325˚F.
Model LREL6325**
Press Settings repeatedly until Auto appears in
1
the display.
Press 1 to switch Auto Conversion on or off.
2
Press Start to accept the change.
3
Model LREL6323**
Press and hold the Start Time button for 3
1
seconds.
Press Start Time repeatedly until Auto appears
2
in the display.
Press +/– button to switch Auto Conversion on
3
or off.
Model LREL6325**
Press Settings repeatedly until AdJU appears in
1
the display.
Use the number keys to enter the number of
2
degrees you want to adjust the oven temperature.
Press Settings again to add a minus sign if
decreasing the temperature.
Press Start to accept the change.
3
Model LREL6323** / LREL6321**
Model LREL6323**
1
Press and hold the Start Time button for 3
seconds. Press Start Time repeatedly until
AdJU appears in the display.
Model LREL6321**
Press Settings repeatedly until AdJU appears in
the display.
Set the number of degrees to adjust:
2
Press or press and hold the +/– buttons until
the desired number of degrees appears in the
display.
Press Settings again to add a minus sign if
decreasing the temperature.
Press Start to accept the change.
3
Adjusting the Oven Temperature
Your new oven may cook differently from the one
it replaced. Use your new oven for a few weeks to
become more familiar with it before changing the
temperature settings. If after familiarizing yourself with
the new oven, you still think that it is too hot or too
cold, you can adjust the oven temperature yourself.
NOTE
To begin, either raise or lower the thermostat
15 °F (8 °C). Try the oven with the new setting. If
the oven still needs adjustment, raise or lower the
thermostat again, using the first adjustment as a
gauge. For example, if the adjustment was too
much, raise or lower the thermostat 10 °F (5 °C).
If the adjustment was not enough, raise or lower
the thermostat 20 °F (12 °C). Proceed in this way
until the oven is adjusted to your satisfaction.
NOTE
•This adjustment does not affect the Broil or
Self Clean temperatures on models with these
features. The adjustment is retained in memory
after a power failure.
•The oven temperature can be increased or
decreased by a maximum of 35°F (19°C).
•Once the temperature is increased or
decreased, the adjustment shows in the AdJU
setting display until it is reset.
Page 23
OPERATION
ENGLISH
23
Turning the Preheat Alarm Light On/Off
When the oven reaches its set-temperature, the
preheating alarm light flashes 5 times or until the
oven door is opened.
You can activate or deactivate the preheating alarm light.
Model LREL6325**
Press Settings repeatedly until PrE appears in
1
the display.
Press 1 to turn the light on/off.
2
Press Start to accept the change.
3
Model LREL6323** / LREL6321**
Model LREL6323**
1
Press and hold the Start Time button for 3
seconds. Press Start Time repeatedly until PrE
appears in the display.
Model LREL6321**
Press Settings repeatedly until PrE appears in
the display.
Selecting Fahrenheit or Celsius
Set the oven temperature display to show either
Fahrenheit (°F) or Celsius (°C) units. The oven
defaults to Fahrenheit unless changed by the user.
Model LREL6325**
Press Settings repeatedly until Unit appears in
1
the display.
Press 1 to select F (Fahrenheit) or C (Celsius).
2
Press Start to accept the change.
3
Model LREL6323** / LREL6321**
Model LREL6323**
1
Press and hold the Start Time button for 3
seconds. Press Start Time repeatedly until Unit
appears in the display.
Model LREL6321**
Press Settings repeatedly until Unit appears in
the display.
Press +/– to select F (Fahrenheit) or C (Celsius).
2
Press +/– to turn the light on/off.
2
Press Start to accept the change.
3
Adjusting the Beeper Volume
Model LREL6325**
Press Settings repeatedly until Beep appears in
1
the display.
Press 1 to select Hi, Lo or Off.
2
Press Start to accept the change.
3
Model LREL6323**/LREL6321**
Model LREL6323**
1
Press and hold the Start Time button for 3
seconds. Press Start Time repeatedly until Beep
appears in the display.
Model LREL6321**
Press Settings repeatedly until Beep appears in
the display.
Press Start to accept the change.
3
Lockout
The Lockout feature automatically locks the oven door
and prevents most oven controls from being turned
on. It does not disable the timer and the interior oven
light.
Press and hold Clear/Off for three seconds.
1
The lock melody sounds, Loc appears in the
2
display and the lock
Once the oven door is locked, the lock
3
indicator stops blinking and remains on.
To deactivate the Lockout feature, press and hold
4
Clear/Off for three seconds. The unlock melody
sounds and the door and the controls unlock.
NOTE
In models without a self-clean mode, the Lockout
feature locks the controls but not the oven door.
The lock
indicator does not blink.
blinks in the display.
Press +/– to select Hi, Lo or Off.
2
Press Start to accept the change.
3
Page 24
24
OPERATION
Cook Time (Timed Cook)
Set the oven to cook for a specific length of time using
the Timed Cook feature. This feature can only be used
with the Bake, Conv. Bake and Conv. Roast modes.
Setting the Cook Time Function
For example, to bake at 300 °F for 30 minutes, first
set the clock to the correct time of day.
Model LREL6325**
Press Bake. 350 °F appears in the display.
1
Set the temperature. Press 3, 0 and 0.
2
Press Cook Time. Timed flashes in the display.
3
Bake, 300 °F and 0:00 appear in the display.
Set the baking time: Press 3 and 0.
4
The baking time can be set for any amount of
time between 1 minute and 11 hours and 59
minutes.
Press START.
5
Model LREL6323** / LREL6321**
Press Bake. 350 °F appears in the display.
1
Changing the Cook Time during Cooking
For example, to change the cook time from 30
minutes to 1 hour and 30 minutes, do the following.
Model LREL6325**
Press Cook Time.
1
Change the baking time: Press 1, 3 and 0.
2
Press START to accept the change.
3
Model LREL6325**
Press Cook Time.
1
Change the baking time: Press +/– button.
2
Press START to accept the change.
3
Start Time (Delayed Timed Cook)
The automatic timer of the Delayed Timed Cook
function turns the oven on and off at the time you
select. This feature can be used with the Bake, Conv.
Bake, Conv. Roast, Self Clean modes.
Set the temperature. Press +/– key.
2
Press Cook Time. Timed flashes in the display.
3
Bake, 300 °F and 0:00 appear in the display.
Set the baking time:
4
Press +/– key to set the baking time.
The baking time can be set for any amount of
time between 1 minute and 11 hours and 59
minutes.
Press START.
5
NOTE
To activate the Warm function at the end of the
timed cook cycle, repeat steps 1-4 and then press
Warm. Warm appears in the display.
(Refer to the Warm section on page 34)
The oven will continue to cook for the set amount
of time and then turn off automatically. When the
cooking time has elapsed:
•End and the time of day show in the display.
•The cook end indicator tone sounds every 60
seconds until Clear/Off is pressed.
•When Warm is set, the warming function is
activated after the cooking time ends.
Setting a Delayed Timed Cook
For example, to bake at 350 °F and delay the start of
baking until 4:30, first set the clock to the correct time
of day.
Model LREL6325**
Press Bake. 350 °F appears in the display.
1
Set the temperature: touch 3, 5 and 0.
2
Press Start Time and touch the number keys to
3
set the baking time.
Press Start.
4
Set the start time: press 4, 3 and 0 for 4:30.
5
Press Start. A short beep sounds and Timed
6
Delay appears in the display. The oven begins
baking at the set start time.
Page 25
OPERATION
ENGLISH
25
Model LREL6323** / LREL6321**
Press Bake. 350 °F appears in the display.
1
Set the temperature:
2
Press or press and hold the +/– buttons until the
desired temperature appears in the display
Press Cook Time and touch +/– keys to set the
3
baking time.
Press Start.
4
Set the start time:
5
Use the +/– buttons to adjust the time displayed
to match your desired start time.
Press Start. A short beep sounds and Timed
6
Delay and the start time appear in the display.
The oven begins baking at the set start time.
NOTE
•To cancel the Delayed Timed Cook function,
press Clear/Off at any time.
•To change the cooking time, repeat step 3 and
press START.
•If the oven clock is set as a 12-hour clock, you
can delay the cook time for 12 hours. If the
oven clock is set as a 24-hour clock, you can
delay the cook time for 24 hours.
The oven will continue to cook for the set amount
of time and then turn off automatically. When the
cooking time has elapsed:
•End and the time of day show in the display.
•The cook end indicator tone sounds every 60
seconds until Clear/Off is pressed.
•When Warm is set, the warming function is
activated after the cooking time ends.
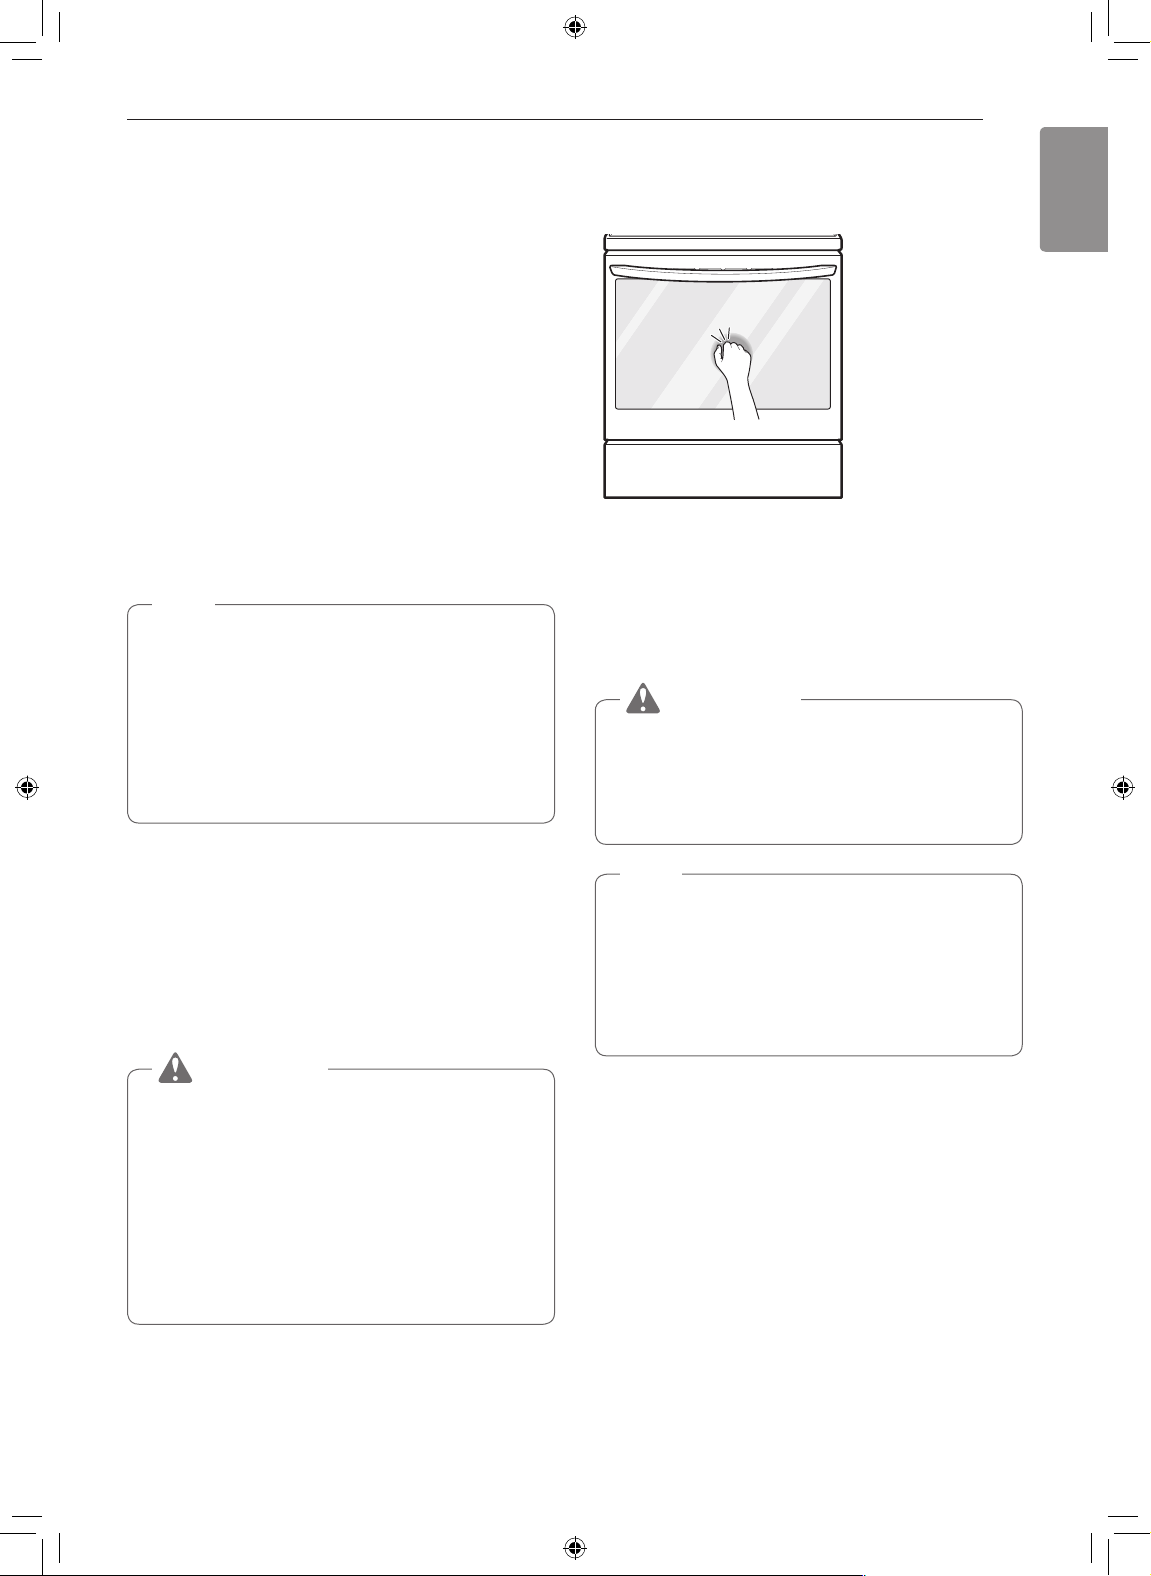
InstaView™
Knock twice on the center of the glass panel to reveal
the contents of the oven without opening the door.
•Knocking twice on the glass panel turns the interior
light on or off.
•The light turns off automatically after 90 seconds.
•The InstaView™ function is disabled when the oven
door is opened and for two seconds after closing
the door.
WARNING
Do not hit the glass door panel with excessive
force. Do not allow hard objects like cookware
or glass bottles to hit the glass door panel. The
glass could break, resulting in a risk of personal
injury or product damage.
NOTE
•Tapping the edges of the glass panel may not
activate the InstaView™ function.
•The taps on the glass panel must be hard
enough to be audible.
•Loud noises near the oven may activate the
InstaView™ function.
CAUTION
•Use the automatic timer when cooking cured or
frozen meats and most fruits and vegetables.
Foods that can easily spoil, such as milk, eggs,
fish, meat or poultry, should be chilled in the
refrigerator. Even when chilled, they should
not stand in the oven for more than 1 hour
before cooking begins, and should be removed
promptly when cooking is completed.
•Eating spoiled food can result in sickness from
food poisoning.
Page 26
26
OPERATION
Using the Cooktop
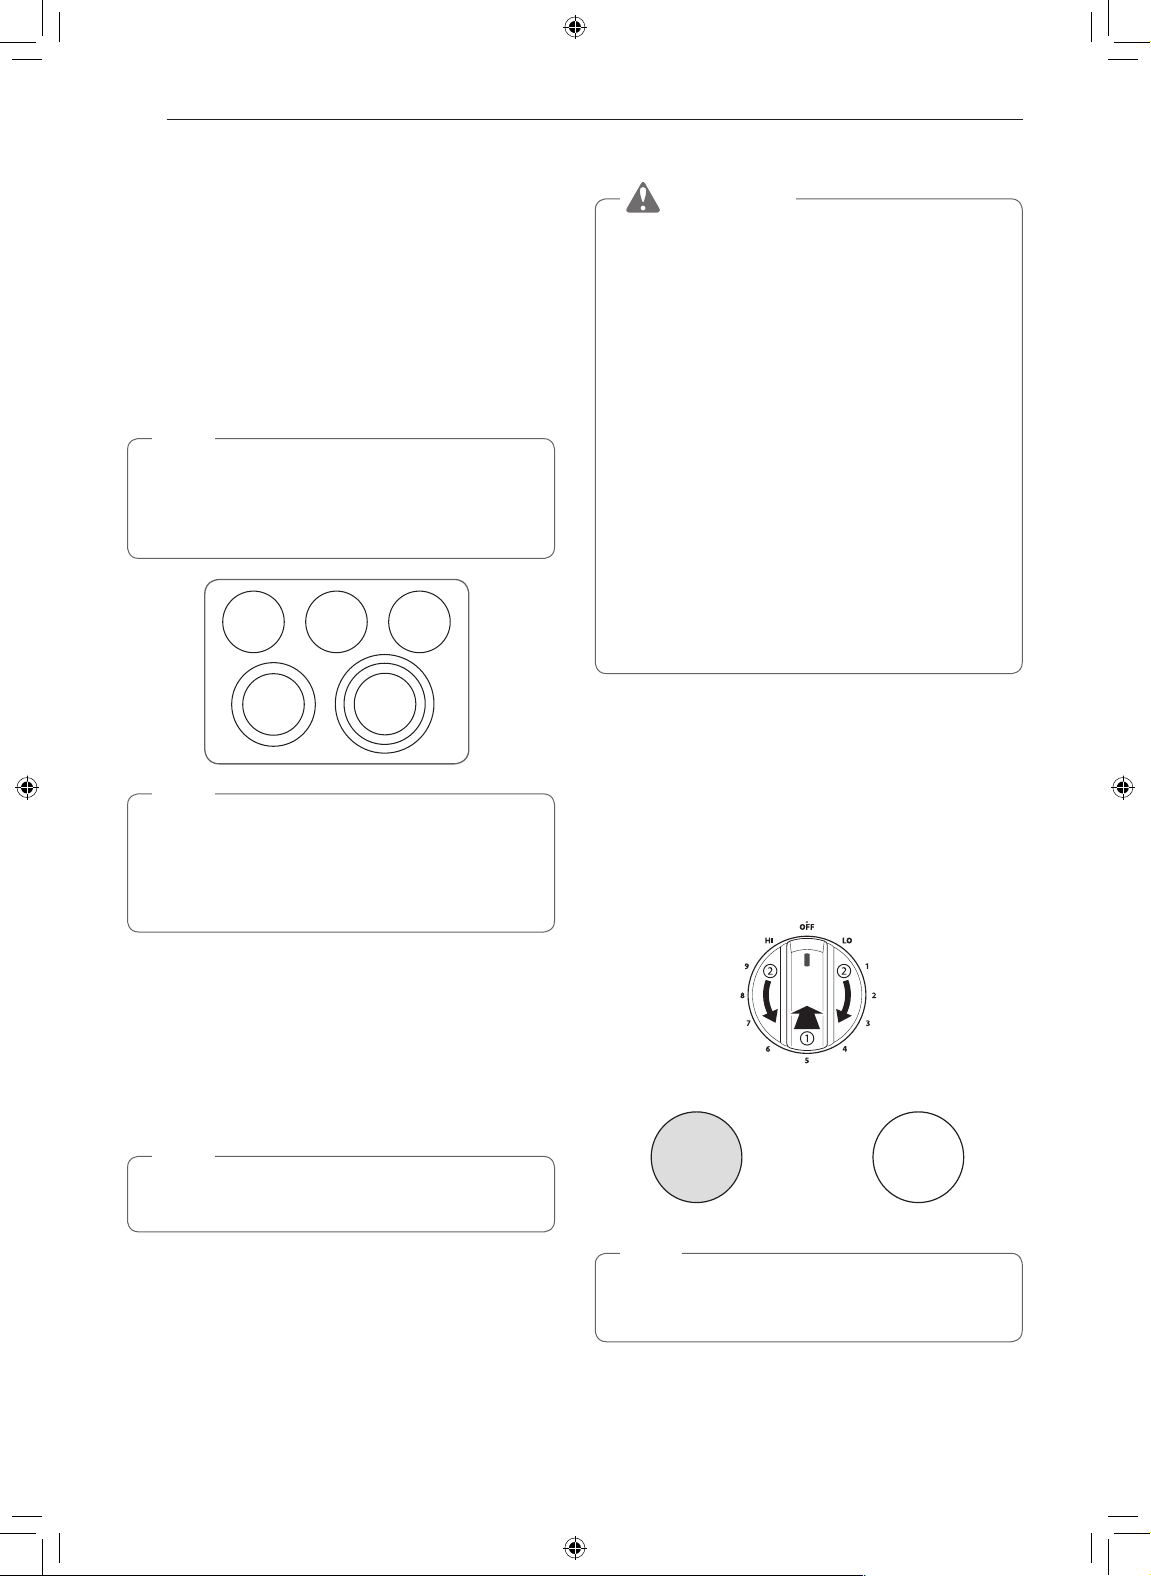
Cooking Areas
The cooking areas on your range are identified by
permanent circles on the glass cooktop surface.
For the most efficient cooking, fit the pan size to the
element size.
Pans should not extend more than
beyond the cooking area.
When a control is turned on, a glow can be seen
through the glass cooktop surface.
NOTE
It is normal for the surface elements to cycle on
and off during cooking, even on higher settings.
This will happen more frequently if cooking on a
lower temperature setting.
DUAL
WARM
ZONE
TRIPLE
SINGLE
1
/2 to 1-inch
SINGLE
Using the Cooktop Elements
CAUTION
•Only use cookware and dishes that are safe for
oven and cooktop use.
•Always use oven mitts when removing food
from the cooktop and oven.
•Do not place sealed containers on the cooktop.
•Do not use plastic wrap to cover food while on
the cooktop. Plastic may melt onto the surface
and be very difficult to remove.
•Never leave food on the cooktop
unattended. Spillovers can cause smoke.
Greasy spillovers may catch on fire.
•The surface element may appear to have
cooled after it has been turned off. The element
may still be hot and touching the element before
it has cooled sufficiently can cause burns.
•Do not use the cooktop at high temperatures for
an excessive period as the control panel could
be damaged.
Turning on a Single Element
NOTE
It is normal to see a very faint red ring around the
outer edge of a dual or triple element when using
it as a single element at a high heat setting. This
is only a reflection from the bright glow of the
center element and is not a malfunction.
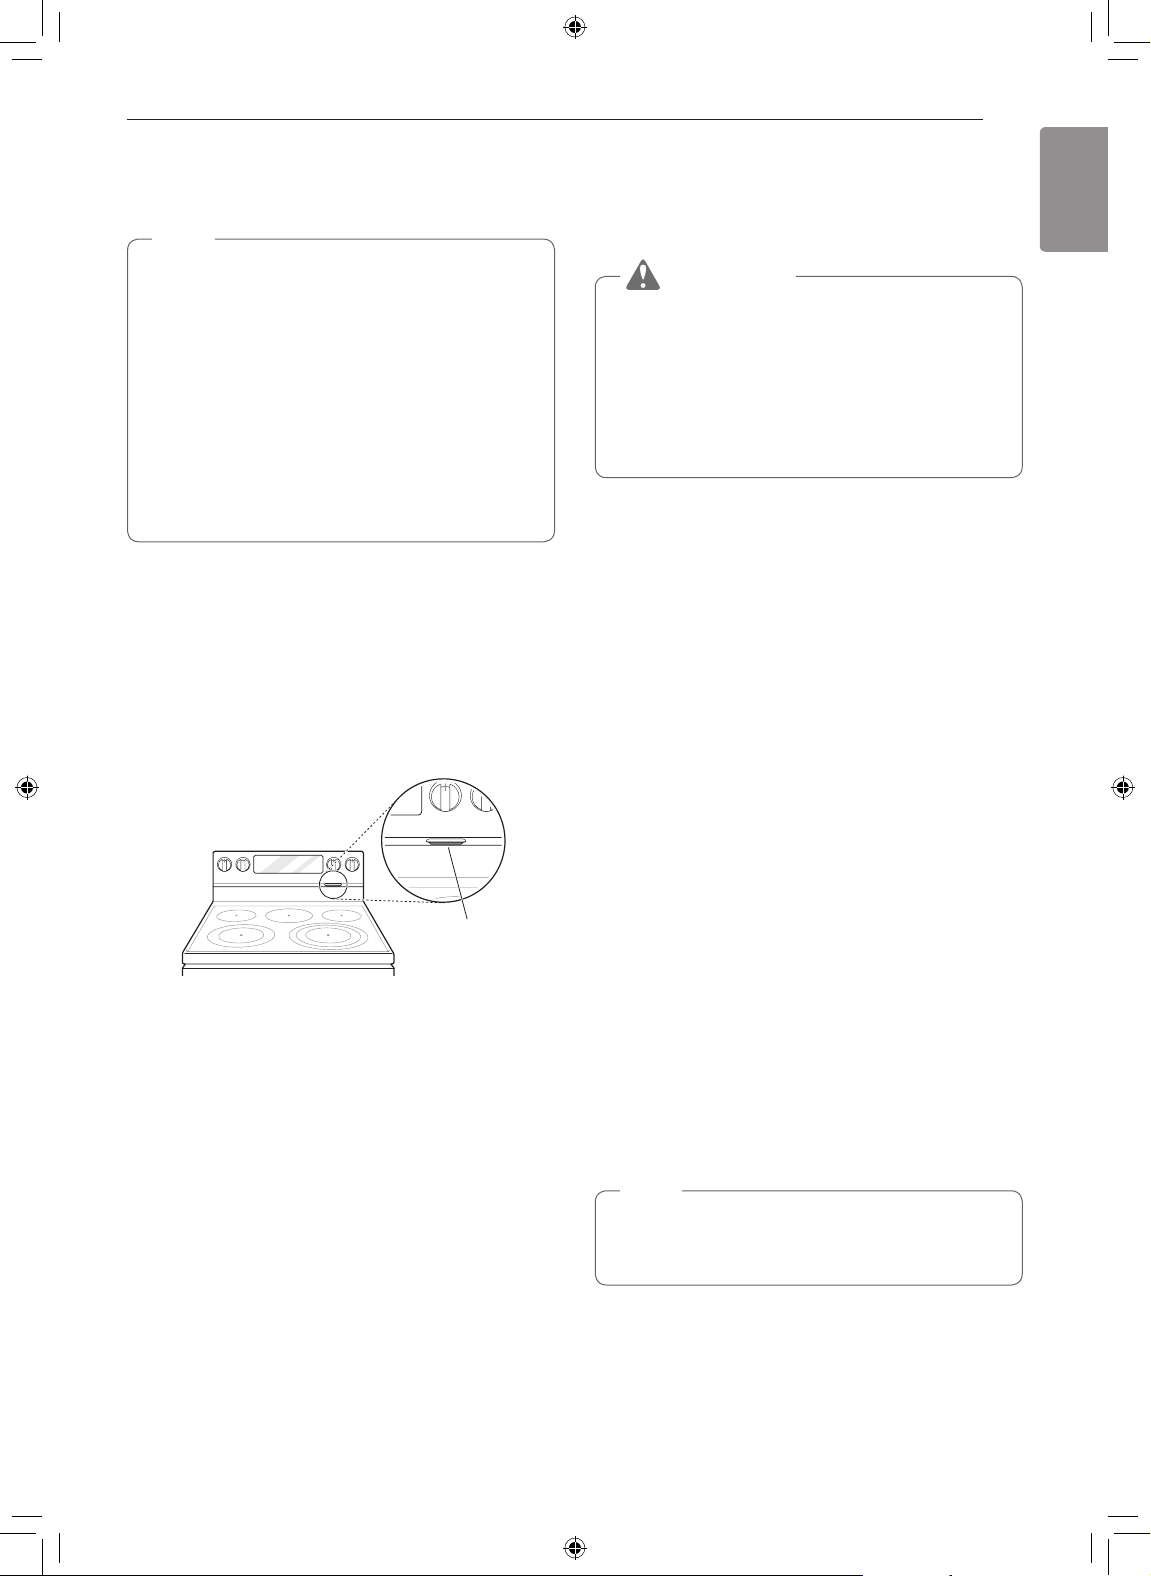
Hot Surface Indicator
Once the element is turned off, HS (hot surface
indicator) appears in the display as long as the
surface cooking area is too hot to touch.
It remains on until the surface has cooled to
approximately 150 °F.
NOTE
During Self Clean (available on some models),
HS remains on.
Push the Single element knob in.
1
Turn the knob in either direction to the desired
2
setting.
The control knob clicks when it is positioned at
both Off and Hi.
Heating element
Off
NOTE
•Hi is the highest temperature available.
•Lo is the lowest temperature available.
Single
Heating element
On
Page 27
OPERATION
ENGLISH
A B
27
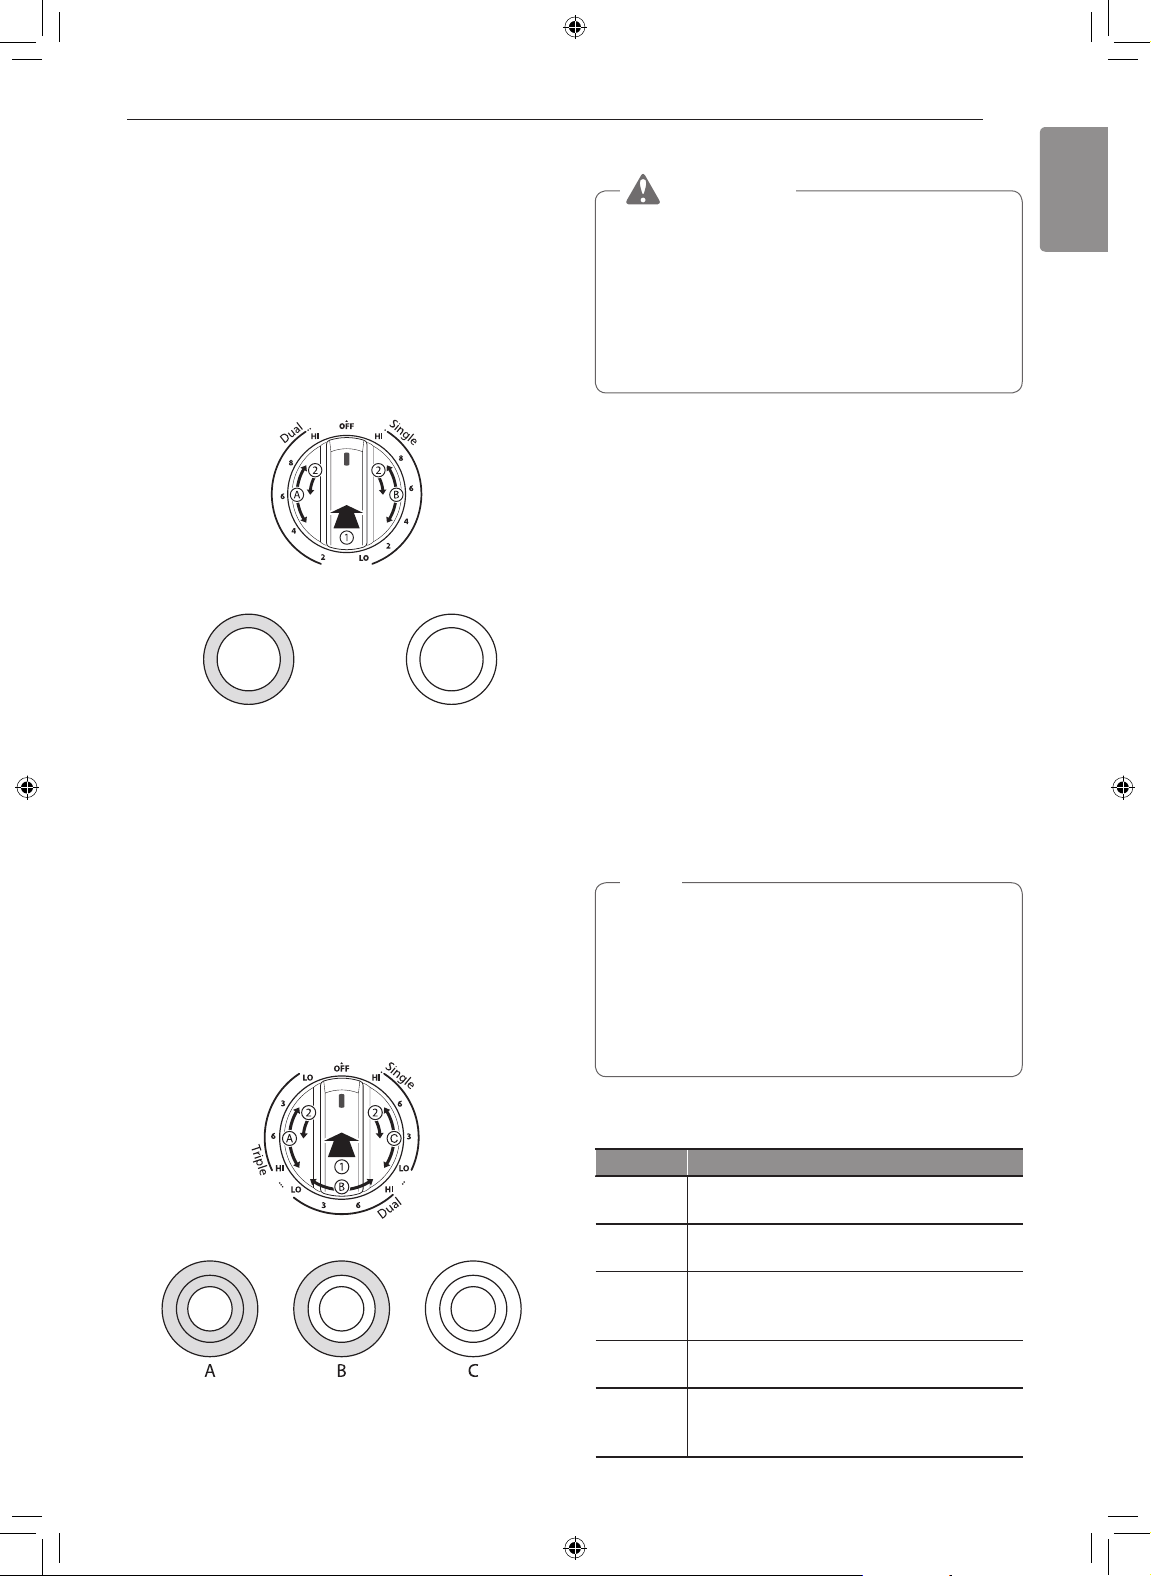
Turning on the Dual Element
There is one dual element located in the left front
position. Use the dual element as a dual or single
element.
1
2-A
2-B
Turning on a Triple Element (on some models)
There is one triple element that can be used as either
a single, dual or triple element.
1
2-A
2-B
2-C
Push in the appropriate knob.
Turn the knob counterclockwise to use it as
a Single element.
Turn the knob clockwise to use it as a Dual
unit.
Heating with inner
(smaller) element only
Push in the appropriate knob.
Turn the knob counterclockwise to use the
Single element.
Turn the knob clockwise to the Dual position
to use as a Dual element.
Turn the knob clockwise to the Triple
position to use as a Triple element.
Heating with both
elements together
Turning on the Warming Zone
CAUTION
FOOD POISON HAZARD: Bacteria may grow in
food at temperatures below 140 °F.
•Always start with hot food. Do not use the warm
setting to heat cold food.
•Do not use the warm setting for more than 2 hours.
•Always use pot holders or oven mitts when
removing food from the center warming element.
The Warming Zone, located in the back center of the
glass surface, will keep hot, cooked food at serving
temperature. Use the Warming Zone to keep food
warm after it has already been cooked. Attempting
to cook uncooked or cold food on the Warming Zone
could result in a food-borne illness.
Press the COOKTOP Set/Off button. The
1
warming zone indicator light flashes.
Model LREL6325**
2
Use the Level buttons to adjust the temperature
settings. The temperature settings are adjustable
at all times.
Model LREL6323** / LREL6321**
Use the – / + buttons to adjust the temperature
settings. The temperature settings are adjustable
at all times.
To turn off the warming zone, press the Set/Off
3
button once.
NOTE
•For best results, food on the warmer should
be kept in its container or covered with a lid or
aluminum foil to maintain food quality.
•The warmer will not glow red like the other
cooking elements.
•The Warming Zone can be operated as a single
element on some models.
Single Dual Triple
Recommended Element Levels
Setting Recommended Use
8.5-Hi
5.5-8.0
3.5-5.0
2.2-3.0
Lo-2.0
•Bring liquid to a boil
•Start cooking
•Hold a rapid boil, frying, deep fat fry
•Quickly brown or sear food
•Maintain a slow boil
•Fry or saute foods
•Cook soups, sauces and gravies
•Stew or steam food
•Simmer
•Keep food warm
•Melt chocolate or butter
•Simmer
Page 28
28
OPERATION
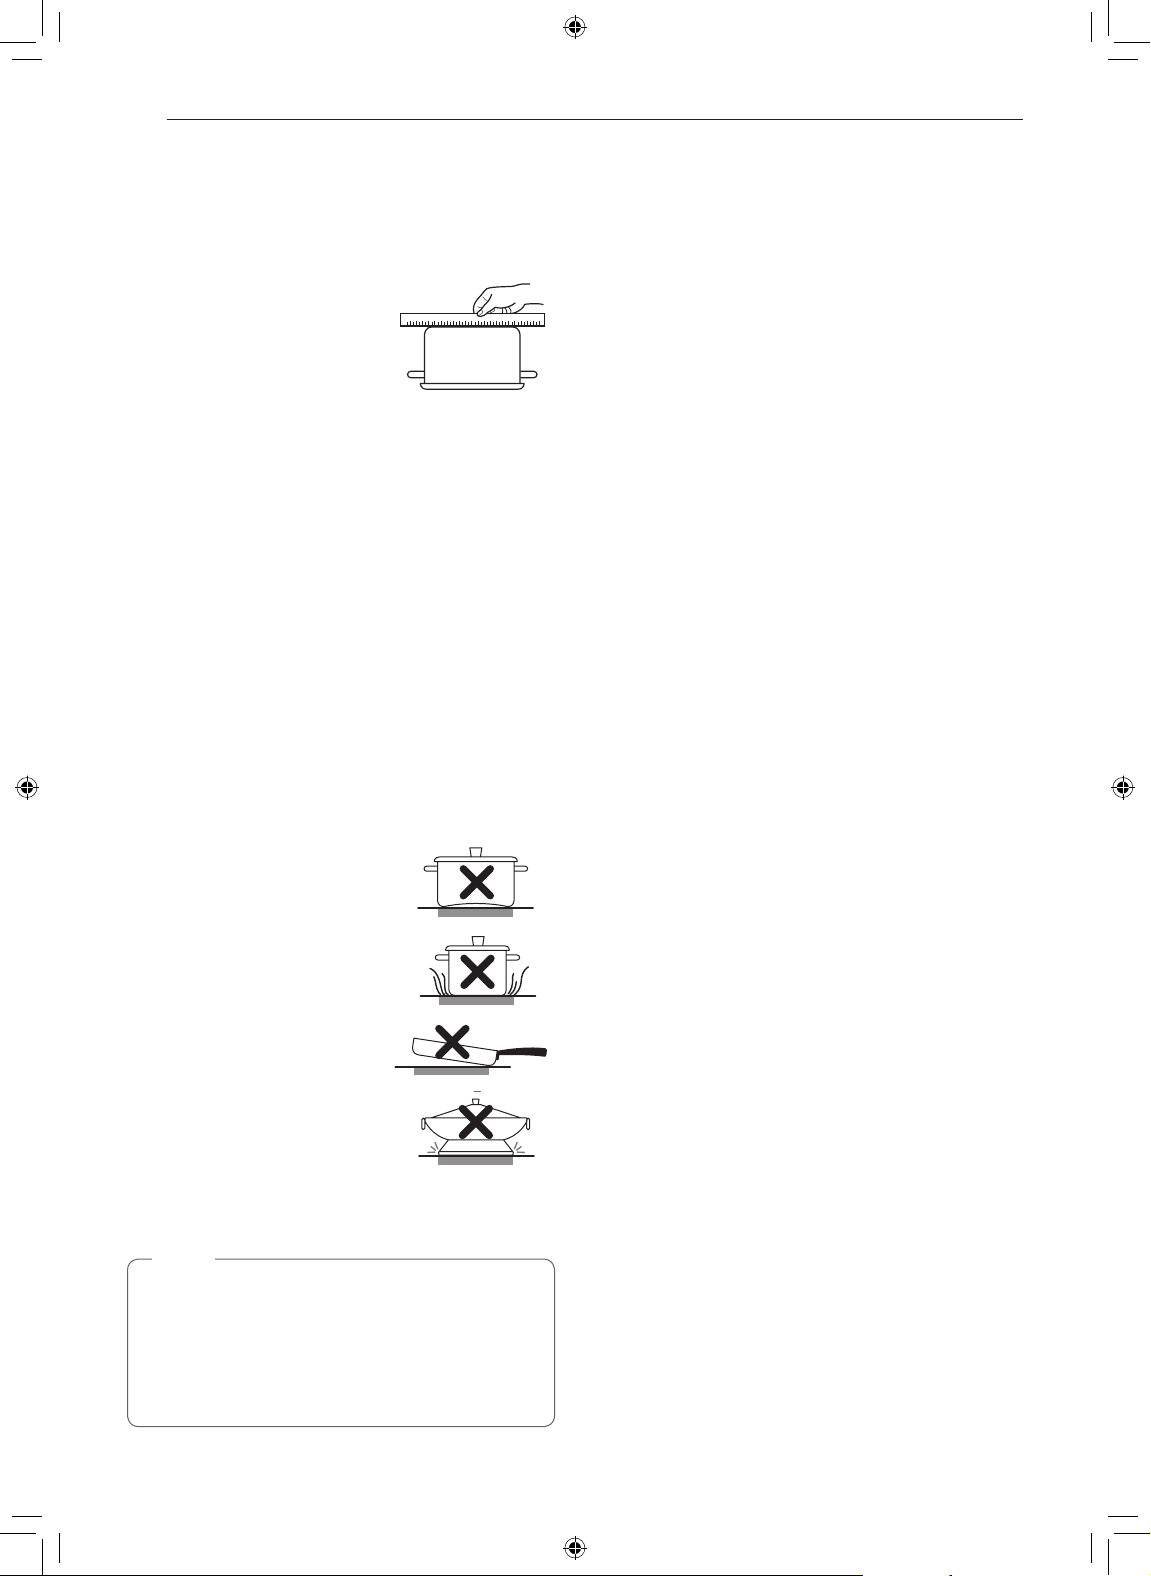
Using the Proper Cookware
The size and type of cookware will influence the
settings needed for the best cooking results. Be
sure to follow the recommendations for using proper
cookware.
Cookware should have flat
bottoms that make good
contact with the entire surface
heating element. Check for
flatness by placing a ruler
across the bottom of the
cookware. The ruler should
touch the cookware across
the entire bottom, with no
gaps.
Cookware recommendations
•Flat bottom and straight sides
•Heavy-gauge pans
•Pan sizes that match the amount of food to be
prepared and the size of the surface element
•Weight of handle does not tilt pan. Pan is well
balanced
•Tight-fitting lids
•Flat bottom woks
Cookware should not
Choosing Cookware
The cookware material determines how evenly and
quickly heat is transferred from the surface element to
the pan bottom. The most popular materials available
are:
•Aluminum - Excellent heat conductor. Some types
of food will cause it to darken (anodized aluminum
cookware resists staining and pitting). If aluminum
pans slide across the ceramic cooktop, they may
leave metal marks which will resemble scratches.
Remove these marks immediately.
•Copper - Excellent heat conductor but discolors
easily. May leave metal marks on glass-ceramic
(see Aluminum above).
•Stainless steel - Slow heat conductor with uneven
cooking results. Is durable, easy to clean and
resists staining.
•Cast iron - A poor heat conductor but retains heat
very well. Cooks evenly once cooking temperature
is reached. Not recommended for use on ceramic
cooktops.
•Porcelain-enamel on metal - Heating
characteristics will vary depending on base
material. Porcelain-enamel coating must be smooth
to avoid scratching ceramic cooktops.
•Glass - Slow heat conductor. Not recommended for
ceramic cooktop surfaces because it may scratch
the glass.
•have a curved or warped
bottom.
•be smaller or larger than the
surface burner.
•have a heavy handle that tilts
the pan.
•be a wok with a ring stand.
•have loose or broken handles.
•have loose-fitting lids.
NOTE
•Do not use pans less than 7 inches in
diameter on the front elements.
•Do not use foil or foil-type containers. Foil may
melt onto the glass. Do not use the cooktop if
metal has melted on it. Call an authorized LG
Service Center.
Home Canning Tips
Be sure that the canner is centered over the
surface element and is flat on the bottom.
•The base must not be more than 1 inch larger than
the element. Use of water bath canners with rippled
bottoms may extend the time required to bring the
water to a boil and may damage the cooktop.
•Some canners are designed with smaller bases for
use on smooth surfaces.
•Use the high heat setting only until the water comes
to a boil or pressure is reached in the canner.
•Reduce to the lowest heat setting that maintains
the boil, or pressure. If the heat is not turned down,
the cooktop may be damaged.
Page 29
OPERATION
ENGLISH
29
Using the Oven
Before Using the Oven
NOTE
•Because the oven temperature cycles, an oven
thermometer placed in the oven cavity may not
show the same temperature that is set on the
oven.
•It is normal for the convection fan to run while
preheating during a regular bake cycle.
•The convection fan motor may run periodically
during a regular bake cycle.
•The fan turns off if the door is left open during
baking. The fan turns back on automatically
once the door is closed.
Oven Vent
Areas near the vent may become hot during operation
and may cause burns. Do not block the vent opening.
Avoid placing plastics near the vent as heat may
distort or melt the plastic.
It is normal for steam to be visible when cooking
foods with high moisture content.
Replacing Racks
Place the end of the rack on the support.
1
Tilt the front end up and push the rack in.
2
CAUTION
•Replace oven racks before turning the oven on
to prevent burns.
•Do not cover the racks with aluminum foil, or
any other material, or place anything on the
bottom of the oven. Doing so will result in poor
baking and may damage the oven bottom.
•Only arrange oven racks when the oven is cool.
Bake
Bake is used to prepare foods such as pastries,
breads and casseroles. The oven can be programmed
to bake at any temperature from 170 °F (80 °C) to
550 °F (285 °C). The default temperature is 350 °F
(175 °C).
Setting the Bake Function (example, 375 °F)
Press Bake.
1
Oven Vent
Using Oven Racks
The racks have a turned-up back edge that prevents
them from being pulled out of the oven cavity.
Removing Racks
Pull the rack straight out until it stops.
1
Lift up the front of the rack and pull it out.
2
Set the oven temperature:
2
Model LREL6325**
Press 3, 7 and 5.
Model LREL6323**/LREL6321**
Use the +/– keys to set the temperature.
Press START. The oven starts to preheat.
3
As the oven preheats, the temperature is displayed
and rises in 5-degree increments. Once the oven
reaches the set temperature, a tone sounds and the
oven light blinks on and off.
When cooking is complete, press Clear/Off.
4
Remove food from the oven.
5
NOTE
It is normal for the convection fan to operate
periodically throughout a normal bake cycle in the
oven. This is to ensure even baking results.
Page 30
30
OPERATION
Baking Tips
•Baking time and temperature will vary depending
on the characteristics, size, and shape of the
baking pan used.
•Check for food doneness at the minimum recipe time.
•Use metal bakeware (with or without a nonstick
finish), heatproof glass-ceramic, ceramic or other
bakeware recommended for oven use.
•Dark metal pans or nonstick coatings will cook food
faster with more browning. Insulated bakeware will
slightly lengthen the cooking time for most foods.
NOTE
The oven bottom has a porcelain-enamel finish.
To make cleaning easier, protect the oven bottom
from excessive spillovers by placing a cookie sheet
on the rack below the rack you are cooking on.
This is particularly important when baking a fruit
pie or other foods with a high acid content. Hot fruit
fillings or other foods that are highly acidic may
cause pitting and damage to the porcelain-enamel
surface and should be wiped up immediately.
Convection Mode (Model LREL6325**
/ LREL6323**)
The convection system uses a fan to circulate
the heat evenly within the oven. Improved heat
distribution allows for even cooking and excellent
results while cooking with single or multiple racks.
Setting the Convection Function (example, 375 °F)
Tips for Convection Baking
•Use Convection Bake for faster and more even
multiple-rack cooking of pastries, cookies, muffins,
biscuits, and breads of all kinds.
•Bake cookies and biscuits on pans with no sides
or very low sides to allow heated air to circulate
around the food. Food baked on pans with a dark
finish will cook faster.
•When using Convection Bake with a single rack,
place the oven rack in position 4. If cooking on
multiple racks, place the oven racks in positions 2
and 4 (or 5) for two racks.
•Multiple oven rack cooking may slightly increase
cook times for some foods.
•You will have better results when baking cakes,
cookies and muffins using multiple racks.
The Convection Roast feature is designed to give
optimum roasting performance. Convection Roast
combines cooking with the convection fan to roast
meats and poultry. The heated air circulates around
the food from all sides, sealing in juices and flavors.
Foods are crispy brown on the outside while staying
moist on the inside. Convection roasting is especially
good for large tender cuts of meat, uncovered.
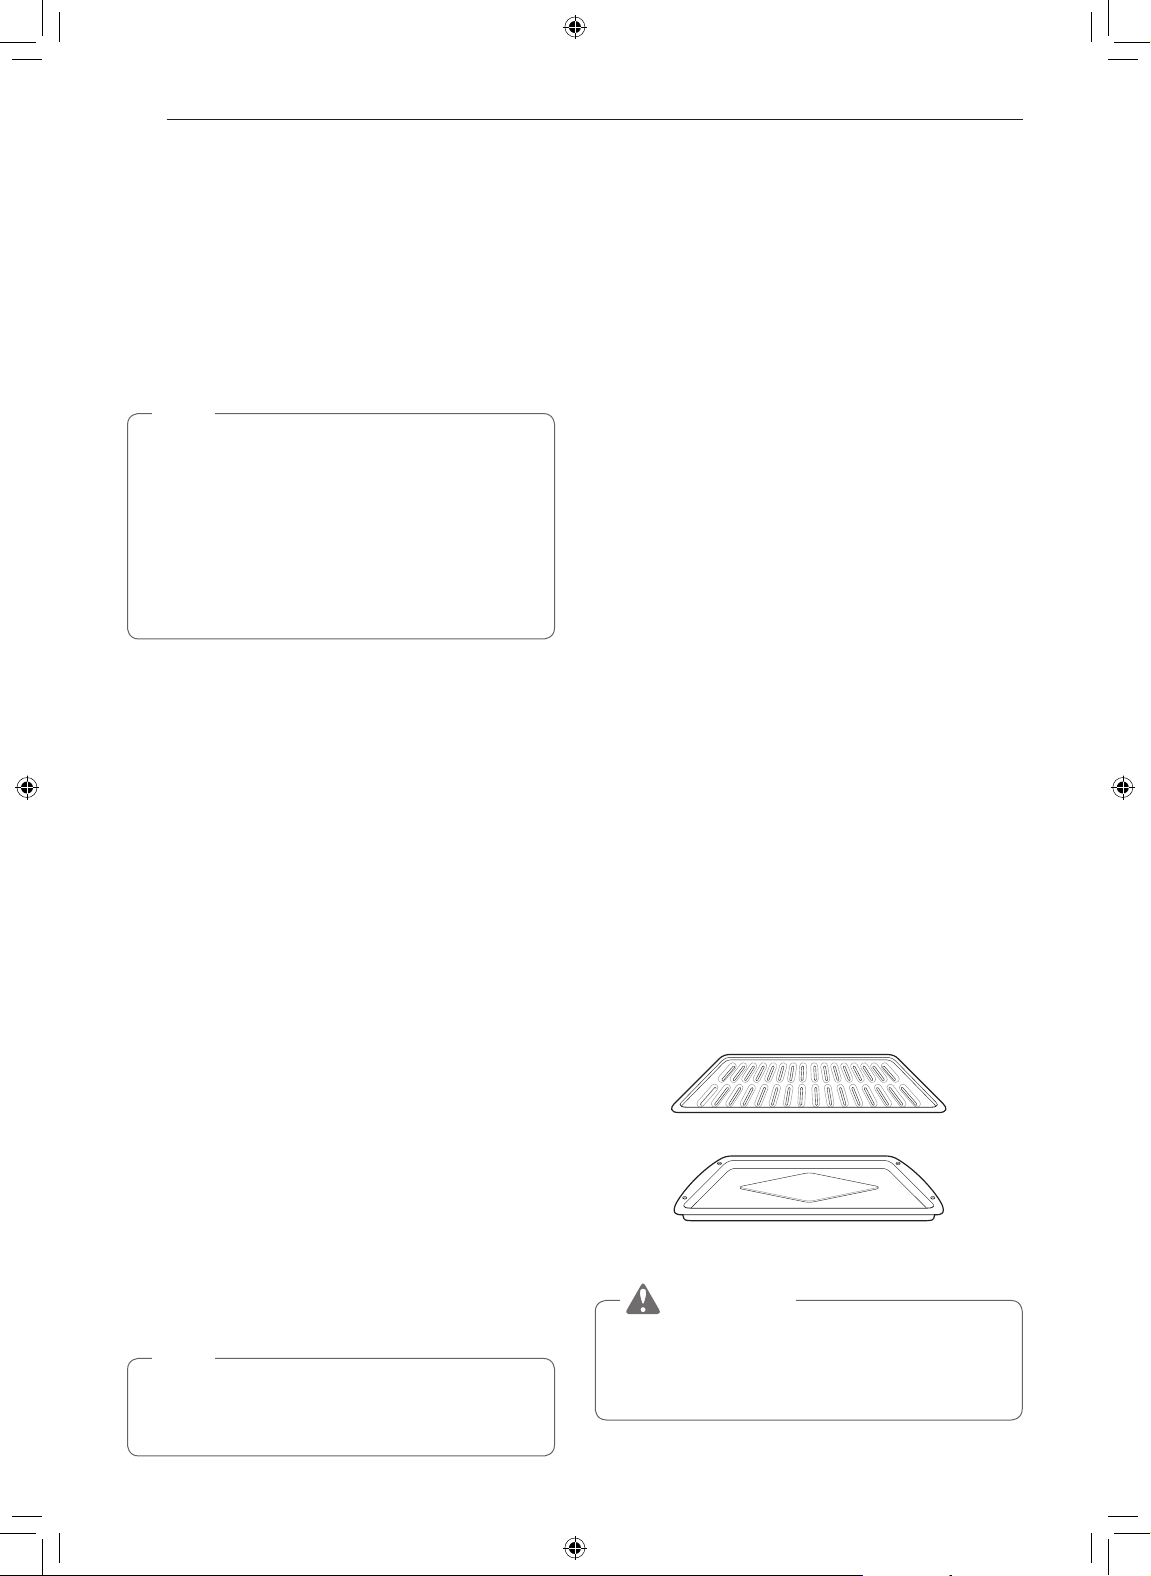
Tips for Convection Roasting
Use a broiler pan and grid when preparing meats for
convection roasting. The broiler pan catches grease
spills and the grid helps prevent grease splatters.
Press Conv. Bake or Conv. Roast. The display
1
flashes 350 °F.
Set the oven temperature:
2
Model LREL6325**
Press 3, 7 and 5.
Model LREL6323**
Using the +/– key set the temperature.
Press START. The display shows Conv. Bake or
3
Conv. Roast and the oven temperature starting
at 100 °F.
As the oven preheats, the display shows increasing
temperatures in 5-degree increments. Once the oven
reaches the set adjusted temperature, a tone sounds
and the oven light flashes on and off. The display
shows the auto converted oven temperature, 350 °F
and the fan icon.
When cooking has finished or to cancel, press
4
Clear/Off.
NOTE
The oven fan runs while convection baking. The fan
stops when the door is open. In some cases, the fan
may shut off during a convection bake cycle.
Place the oven rack on the bottom.
1
Place the grid in the broiler pan.
2
Place the broiler pan on the oven rack.
3
Grid (sold separately)
Broiler pan (sold separately)
CAUTION
•Do not use a broiler pan without a grid.
•Do not cover the grid with aluminum foil.
•Position food (fat side up) on the grid.
Page 31

OPERATION
ENGLISH
31
Recommended Baking and Roasting
Guide
Baking results will be better if baking pans are
centered in the oven as much as possible. If cooking
on multiple racks, place the oven racks in the
positions shown.
Rack and Pan Placement
Single rack baking
Rack
(Position 4)
Multiple rack baking
Baking rack guide
Food
•Layer cakes
Cakes
Cookies
Pizza
Pastry
Crust
Breads
Desserts
Custards
Soufflés •Sweet or savory 2
Casserole •Frozen lasagna 5
•Bundt cakes
•Angel food cake
•Sugar cookies
•Chocolate chips
•Brownies
•Fresh
•Frozen
•From scratch
•Refrigerator
•Biscuit, canned
•Biscuit, from scratch
•Muffins
•Fruit crisps and
cobblers, from scratch
•Pies, from scratch,
2-crust fruit
•Cheesecake,
crème brulée
position
Rack
4
3
3
4
4
4
3
3
4
4
5
5
5
4
4
2
Rack
(Position 2)
Rack
(Position 5)
Roasting rack guide
Food
Rib
Beef
Pork
Poultry
Boneless
rib, top
sirloin
Beef
tenderloin
Rib 2
Bone-in, sirloin 2
Ham, cooked 2
Whole chicken 2
Chicken pieces 2
Turkey 2
Rare
Medium
Well done
Rare
Medium
Well done
Rare
Medium
Rack
position
2
2
2
2
2
2
2
2
Page 32

32
OPERATION
Broil
The Broil function uses intense heat from the upper
heating element to cook food. Broiling works best for
tender cuts of meat, fish, and thinly cut vegetables.
Some models may feature a hybrid broiler consisting
of an inner broiler that utilizes a carbon heating
element which provides instantaneous heat, and
a traditional outer broiling element. During normal
broiler operation, it is normal for either element to
cycle off intermittently.
CAUTION
•Do not use a broiler pan without a grid. Oil can
cause a grease fire.
•Do not cover the grid and broiler pan with
aluminum foil. Doing so will cause a fire.
•Always use a broiler pan and grid for excess fat
and grease drainage. This will help to reduce
splatter, smoke, and flare-ups.
Smoking
Due to the intense heat associated with broiling, it
is normal to experience smoke during the cooking
process. This smoke is a natural byproduct of
searing and should not cause you to worry. If you are
experiencing more smoke than you are comfortable
with, use the following tips to reduce the amount of
smoke in your oven.
Always use a broiler pan. Do not use saute pans
1
or regular baking sheets for safety reasons.
The broiler pan should always be thoroughly
2
cleaned and at room temperature at the
beginning of cooking.
Always run your cooktop ventilation system or
3
vent hood during broiling.
Keep the interior of your oven as clean as
4
possible. Leftover debris from prior meals can
burn or catch fire.
Avoid fatty marinades and sugary glazes. Both
5
of these will increase the amount of smoke you
experience. If you would like to use a glaze,
apply it at the very end of cooking.
Setting the Oven to Broil
Oven door must always be closed during Broil
1
mode.
Press Broil once for Hi or twice for Lo.
2
Press START. The oven begins to heat.
3
Let the oven preheat for approximately five
4
minutes before cooking the food if using broil.
Press Clear/Off to cancel at any time or when
5
cooking is complete.
If you are experiencing significant smoke with
6
any food item, consider:
•Lowering the broiler to the Lo setting.
•Lowering the rack position to cook the food
further away from the broiler.
•Using the Hi broil setting to achieve the level of
searing you desire, and then either switching
to the Lo broil setting, or switching to the Bake
function.
As a rule, fattier cuts of meat and fish will
7
produce more smoke than leaner items.
Adhere to the recommended broil settings and
8
cooking guidelines in the chart on the following
page whenever possible.
Page 33

OPERATION
ENGLISH
33
Recommended Broiling Guide
The size, weight, thickness, starting temperature, and your preference of doneness will affect broiling times.
This guide is based on meats at refrigerator temperature. For best results when broiling, use a pan designed for
broiling.
Second
Side
(minutes)
2-4
2-4
3-5
4-6
6-8
8-10
4-6
5-7
turn over
4-7
5-8
2-5
4-7
7-9
7-9
3-5
4-6
Food
Ground Beef 1 lb. (4 patties)
Beef Steaks
Rare
Medium
Well done
Rare
Medium
Well done
Toast 7 0.5-1 0.5
Chicken 1 whole cut up
Lobster Tails 2–4
Fish Fillets
Ham Slices
(precooked)
Pork Chops
Well done
Lamb Chops
Medium
Well done
Medium
Well done
Salmon Steaks
Quantity and/or
Thickness
1
/2 to 3/
thick
"
4
thick
1
"
1
/2 lbs.
1 to 1
1
1
/
thick
"
2
1
/2 lbs.
2 to 2
1
/2 lbs., split
2 to 2
lengthwise
2 Breasts
10 to 12 oz. each
1
/4 to 1/
thick
"
2
1
/
thick
"
2
1
/
thick)
1 (
"
2
2 (1" thick)
about 1 lb.
thick) about
2 (1
"
10 to 12 oz.
1
/
thick)
2 (1
"
2
about 1 lb.
thick)
2 (1
"
4 (1" thick)
about 1 lb.
Rack
Position
First Side
(minutes)
7 4-6 2-4 Space evenly. Up to 8 patties may be broiled at once.
7
7
7
5
5
5
5
5
5 9-12 Do not
6 2-4 2-4 Handle and turn very carefully. Brush with lemon butter
5 2-4 2-4 Increase time 5 to 10 minutes per side for 1
6
5
6
6
6
6
5
5
3-5
4-6
5-7
7-9
9-11
11-13
8-10
8-10
3-6
5-8
3-5
5-7
7-9
9-11
8-10
9-11
Comments
Steaks less than 1" thick cook through before browning.
Pan frying is recommended. Slash fat.
Broil skin-side-down first.
Cut through back of shell. Spread open. Brush with
melted butter before broiling and after half of broiling
time.
before and during cooking, if desired.
home-cured ham.
Grease pan. Brush steaks with melted butter.
1
/2" thick or
•This guide is only for reference. Adjust cook time according to your preference.
NOTE
The USDA advises that consuming raw or undercooked fish, meat, or poultry can increase your risk of foodborne illness.
The USDA has indicated the following as safe minimum internal temperatures for consumption:
•Ground beef: 160 °F (71.1 °C)
•Poultry: 165 °F (73.9 °C)
•Beef, veal, pork, or lamb: 145 °F (62.8 °C)
•Fish / Seafood: 145 °F (62.8 °C)
Page 34

34
OPERATION
Tips for Broiling
Beef
•Steaks and chops should always be allowed to rest
for five minutes before being cut into and eaten.
This allows the heat to distribute evenly through the
food and creates a more tender and juicy result.
•Pieces of meat that are thicker than two inches
should be removed from the refrigerator 30 minutes
prior to cooking. This will help them cook more
quickly and evenly, and will produce less smoke
when broiling. Cooking times will likely be shorter
than the times indicated in the Broiling Chart.
•For bone-in steaks or chops that have been
frenched (all meat removed from around the bone),
wrap the exposed sections of bone in foil to reduce
burning.
Seafood
•When broiling skin-on fish, always use the Lo broil
setting and always broil the skin side last.
•Seafood is best consumed immediately after
cooking. Allowing seafood to rest after cooking can
cause the food to dry out.
•It is a good idea to rub a thin coating of oil on the
surface of the broiling pan before cooking to reduce
sticking, especially with fish and seafood. You can
also use a light coating of non-stick pan spray.
Vegetables
•Toss your vegetables lightly in oil before cooking to
improve browning.
Setting the Warm Function after a Timed Cook
Select the cooking function.
1
Enter the oven temperature using the number
2
keys or the +/- keys.
Model LREL6325**
3
Press Cook Time and enter the cook time using
the number keys.
Model LREL6323** / LREL6321**
Press Cook Time and enter the cook time using
the +/– key.
Press Warm or Keep Warm.
4
Press Start.
5
When cooking is finished, press Clear/Off to
6
cancel the Warm function.
NOTE
•The Warm function is intended to keep food
warm. Do not use it to cool food down.
•It is normal for the fan to operate during the
Warm function.
Proof
This feature maintains a warm oven for rising yeast
leavened products before baking.
Setting the Proof Function
Warm / Keep Warm
This function will maintain an oven temperature of
170 °F. The Warm function will keep cooked food
warm for serving up to three hours after cooking has
finished. The Warm function may be used without any
other cooking operations or can be used after cooking
has finished using a Timed Cook or a Delayed Timed
Cook.
Setting the Warm Function
Press Warm or Keep Warm.
1
Press Start.
2
Press Clear/Off at any time to cancel.
3
Use rack position 2 or 3 for proofing.
1
Press Proof until Proof appears in the display.
2
Press Start.
3
Press Clear/Off when proofing is finished.
4
NOTE
•To avoid lowering the oven temperature and
lengthening proofing time, do not open the oven
door unnecessarily. Check bread products early
to avoid over proofing.
•Do not use the proofing mode for warming
food or keeping food hot. The proofing oven
temperature is not hot enough to keep foods
at safe temperatures. Use the Warm feature
to keep food warm. Proofing does not operate
when the oven is above 125 °F. Hot shows in
the display.
•It is normal for the fan to operate during the
Proof function.
Page 35

OPERATION
ENGLISH
35
Sabbath Mode
Sabbath mode is typically used on the Jewish
Sabbath and Holidays. When the SABBATH mode
is activated, the oven does not turn off until the
SABBATH mode is deactivated. In SABBATH mode,
all function buttons, except for the CLEAR/OFF are
inactive. Sb will appear in both the cooktop and oven
displays.
NOTE
• If the oven light is turned ON and the
SABBATH mode is active, the oven light will
turn OFF. If the oven light needs to be OFF, be
sure to turn the oven light OFF before activating
the SABBATH mode. SABBATH mode can only
be used in Bake mode.
Setting the SABBATH mode
Press the Bake button.
1
Set the Bake temperature
2
Model LREL6325**
Use the number buttons.
Model LREL6323** / LREL6321**
Use the +/– buttons.
Press the START button.
3
Press and hold the Settings button for three
4
seconds. SB and
when the Sabbath mode is activated.
To cancel the Sabbath mode, press and hold the
5
Settings button for three seconds. To cancel the
Bake function, press the CLEAR/OFF button at
any time.
Changing the temperature while in SABBATH
mode
Press the Bake button. (No tones will sound and
1
the display will not change.)
will appear in the display
Favorite (Model LREL6325**)
The FAVORITE feature is used to record and recall
favorite recipe settings. This feature can store and
recall up to 3 different settings. The Favorite feature
can be used with the Cook Time mode. It will not
work with any other function including the Start Time
(delayed cook) mode.
Place the food in the oven.
1
Press FAVORITE once for Bread, twice for Meat,
2
and 3 times for Chicken. The default temperature
appears and COOK flashes.
Default Temp.
Category
1. Bread
2. Meat
3. Chicken
Press the numbers to set the desired oven
3
temperature. This temperature is stored and
recalled when next used.
Press START. The preheat indicator beeps
4
3 times when the oven reaches the set
temperature.
NOTE
•Only the selected temperature is stored, not the
cooking time.
•If the oven temperature is changed, the
changed temperature is stored.
How to
Select
Press
FAVORITE
once.
Press
FAVORITE
twice.
Press
FAVORITE
3 times.
(may be
changed and
recalled)
375°F BAKE
325°F
350°F
Operating
Feature
Convection
Roast
Convection
Roast
Set the Bake temperature
2
Model LREL6325**
Use the number buttons.
Model LREL6323** / LREL6321**
Use the +/– buttons.
Press the START button.
3
NOTE
•There is a 15 second delay before the oven will
recognize the temperature change.
Wi-Fi
Connect the appliance to a home Wi-Fi network to
use Remote Start and other smart functions. See the
Smart Functions section for more details.
Setting Up Wi-Fi
Press and hold Remote Start until the icon
1
blinks.
Follow the instructions in the LG ThinQ app to
2
connect the appliance.
Page 36

36
OPERATION
Remote Start
Remotely starts or stops the preheating function of
the appliance. The appliance must be connected to a
home Wi-Fi network to use Remote Start.
Setting Remote Start
Open the oven door and make sure that the
1
oven is empty.
Press the Remote Start button to enable the
2
function.
Start the preheat function on the oven from the
3
LG ThinQ app.
Frozen Meal (Model LREL6325**)
The Frozen Meal function is specially designed for
cooking frozen prepared meals. It heats from both the
top and bottom to brown food more evenly.
This system is designed to give the optimum cooking
performance by automatically selecting a combination
of the broil and bake heating systems.
Setting the Frozen Meal Function
Touch Frozen Meal. Frozen appears in the
1
display.
Enter the cook temperature using the number
2
buttons.
Touch Start. The Frozen Meal function starts
3
operation.
Touch Clear/Off to cancel Frozen Meal at any
4
time.
Slow Cook (Model LREL6325**)
The Slow Cook function is specially designed for
grilling beef, pork and poulty.
It is common for the surface of the food to darken
after the completion of the Slow Cook.
Air Fry (Model LREL6325** /
LREL6323**)
The air fry function is specially designed for oil-free
frying.
•No preheating is required when using the Air Fry
mode.
•For best results, cook food on a single rack placed
in position 4.
•Spread the food out evenly in a single layer.
•Use either the optional Air Fry Tray available from
LG or a dark baking tray with no sides or short
sides that does not cover the entire rack. This
allows for better air circulation.
•If desired, spray the baking tray with a pan spray.
•Place a foil-lined baking tray on a rack in position 2
to catch the oil falling from the food.
•Check food often and shake it or turn it over for
crisper results.
•Prepared frozen foods may cook faster with the Air
Fry mode than stated on the package. Reduce the
cooking time by about 20 percent, check food early,
and adjust cooking time as needed.
•If cooking multiple batches, the later batches may
take less time to cook.
•Use a food thermometer to make sure food has
reached a safe temperature for consumption.
Eating undercooked meats can increase your risk
of food-borne illness.
•Wet batters and coating will not crisp or set when
using the Air Fry mode.
•For the crispiest results, dredge fresh chicken
wings or tenders in seasoned flour. Use 1/3 cup
flour for 2 pounds.
Setting the Slow Cook Function
Touch Slow Cook once. Hi appears in the
1
display.
Touch Slow Cook repeatedly to toggle between
Hi and Lo.
Select the desired option.
Touch Start. The Slow Cook function starts
2
operation.
Touch Clear/Off to cancel Slow Cook at any time.
3
NOTE
•For best results, use a single rack in position 1
or 2.
Page 37

OPERATION
ENGLISH
37
Air Frying High-Fat Foods
Foods high in fat will smoke when using the Air Fry
mode. For best results, follow these recommendations
when air frying foods that are high in fat, such as
chicken wings, bacon, sausage, hot dogs, turkey
legs, lamb chops, ribs, pork loin, duck, or some plantbased proteins.
CAUTION
Never cover slots, holes, or passages in the oven
bottom or cover entire racks with materials such
as aluminum foil. Doing so blocks airflow through
the oven and can result in carbon monoxide
poisoning. Aluminum foil can also trap heat,
causing a fire hazard or poor oven performance.
•Turn on your exhaust hood at a high fan setting
before you start Air Fry and leave it on for 15
minutes after you're done.
•Open a window or sliding glass door, if possible, to
make sure the kitchen is well-ventilated.
•Clean the grease filters on your exhaust hood
regularly.
•Keep the oven free from grease buildup. Wipe
down the interior of the oven before and after air
frying (once the oven has cooled).
•Run oven cleaning cycles (Easy Clean™ or Self
Clean) regularly, depending on how often and what
types of food you Air Fry.
•Avoid opening the oven door more than necessary
to help maintain the oven temperature, prevent
heat loss, and save energy.
Setting the Air Fry Function
Press Air Fry. 400 °F appears in the display.
1
Set the oven temperature (Range:300°F~550°F)
2
Model LREL6325**
Press the number buttons to enter the desired
temperature.
Model LREL6323**
Use the +/– buttons to set the desired
temperature.
Press START.
3
When cooking is complete, press Clear/Off.
4
NOTE
•For best results, use the optional air fry tray,
available for purchase at www.lg.com.
•If you don't have the air fry tray, place food on a
wire rack inside a foil-lined cookie pan.
•The mesh section of the air fry tray can be
cleaned in a dishwasher.
Air fry tray
Baking Pan
Page 38

38
OPERATION
Air Fry Cook Guide
- Air Fry Tray
Menu
Frozen French Fries 21.2 425 4+2 20-30 -
Frozen French Fries
(Crinkle cut,
10x10 mm)
Frozen Sweet Potato
Fries
Frozen Tator Tots 49.4 450 4+2 22-32 -
Frozen Hash Browns 42.3 450 4+2 25-35 -
Homemade French
Fries (10x10 mm)
Homemade Potato
Wedges
Frozen Chicken
Nuggets, Crispy
Frozen Chicken Strips 35.3 450 4+3 30-40 -
Frozen Hot Wings,
Bone-in
Fresh Chicken
Drumsticks*
Fresh Chicken Wings* 42.3 450 4+2 25-35 Add 3 tablespoons of oil, and salt and pepper to
Frozen Onion Rings,
Breaded
Frozen Spring Rolls (20
g each)
Frozen Coconut Shrimp 24.7 425 4+2 30-40 Brush the surface of food with oil.
Fresh Scallops on the
Half Shell
Fresh Shrimp 49.4 450 4+2 20-30 -
Thin Sausage (70 g
each, diameter 2 cm)
Mixed Vegetables 35.3 450 4+2 17-28 Add 4 tablespoons of olive oil, and salt and
Quantity
(oz)
35.3 425 4+2 25-35 -
24.7 425 4+2 20-35 -
24.7 450 4+2 35-45 Cut the potatoes and soak for 30 minutes. Drain
60.0 450 4+2 35-45 Cut the potatoes and soak for 30 minutes. Drain
31.7 450 3+2 18-28 -
49.4 450 4+2 30-40 -
70.5 450 4+3 35-45 Add 3 tablespoons of oil, and salt and pepper to
21.2 450 4+2 20-30 -
49.4 425 4+2 28-38 -
35.3 425 4+2 20-30 Melt 4 tbsp. butter and brush on scallops. Mix
88.2 450 3+2 25-35 -
Temp.
(°F)
Rack
Position
Time
(min)
Guide
and season with 3 tablespoons of oil, salt and
pepper.
and season with 3 tablespoons of oil, salt and
pepper.
taste.
taste.
1
/2 cup bread crumbs, 1 tbsp. minced garlic,
1
/4 cup of grated parmesan cheese and other
seasonings to taste. Sprinkle mixture over
scallops.
pepper to taste.
Put a dark, nonstick baking pan on a rack in position 3 or 4.
Flip food over during cooking to avoid burning it.
Rack position = Air Fry tray + drip pan
Page 39

OPERATION
ENGLISH
Air Fry Cook Guide
- Dark Nonstick Baking Pan
Menu
Quantity
(oz)
Temp.
(°F)
Rack
Position
Frozen French Fries 21.2 425 4 26-32 - -
Frozen French Fries
35.3 425 4 27-33 5~11 -
(Crinkle cut,
10x10 mm)
Frozen Sweet Potato
24.7 425 4 26-33 5~11 -
Fries
Frozen Tator Tots 49.4 450 4 18-25 8~14 -
Frozen Hash Browns 42.3 450 4 16-22 4~11 -
Homemade French
24.7 450 4 23-29 8~14 Cut the potatoes and soak for 30
Fries (10x10 mm)
Homemade Potato
60.0 450 4 23-29 8~14 Cut the potatoes and soak for 30
Wedges
Frozen Chicken
31.7 450 4 14-21 2~8 -
Nuggets, Crispy
Frozen Chicken Strips 35.3 450 4 19-25 4~10 -
Frozen Hot Wings,
49.4 450 4 21-27 6~12 -
Bone-in
Fresh Chicken
70.5 450 4 35-40 - Add 3 tablespoons of oil, and salt
Drumsticks*
Fresh Chicken Wings* 42.3 450 4 20-27 2~9 Add 3 tablespoons of oil, and salt
Frozen Onion Rings,
21.2 450 4 14-21 4~11 -
Breaded
Frozen Spring Rolls (20
49.4 425 4 19-25 3~9 -
g each)
Frozen Coconut Shrimp 24.7 425 4 13-20 4~11 Brush the surface of food with oil.
Fresh Scallops on the
35.3 425 4 22-28 - Melt 4 tbsp. butter and brush on
Half Shell
Fresh Shrimp 49.4 450 4 21-27 - -
Thin Sausage (70 g
88.2 450 4 19-25 2~9 -
each, diameter 2 cm)
Mixed Vegetables 35.3 450 4 16-22 3~9 Add 4 tablespoons of olive oil, and
Time (min)
st
Side 2
1
nd
Side
Guide
minutes. Drain and season with
3 tablespoons of oil, and salt and
pepper to taste.
minutes. Drain and season with
3 tablespoons of oil, and salt and
pepper to taste.
and pepper to taste.
and pepper to taste.
scallops. Mix
1
/2 cup bread crumbs,
1 tbsp. minced garlic,
grated parmesan cheese and
other seasonings to taste. Sprinkle
mixture over scallops.
salt and pepper to taste.
1
/4 cup of
39
Put a dark, nonstick baking pan on a rack in position 3 or 4.
Flip food over during cooking to avoid burning it.
Page 40

40
SMART FUNCTIONS
SMART FUNCTIONS
LG ThinQ Application
This feature is only available on models with the
or
logo.
The LG ThinQ application allows you to communicate
with the appliance using a smartphone.
LG ThinQ Application Features
Smart Diagnosis™
This function provides useful information for
diagnosing and solving issues with the appliance
based on the pattern of use.
Settings
Allows you to set various options on the oven and in
the application.
Monitoring
This function shows the current status, remaining
cook time, and cook settings on one screen.
Push Alerts
Turn on the Push Alerts to receive appliance status
notifications.
The notifications are triggered even if the LG ThinQ
application is off.
Timer
You can set the timer from the app.
Firmware Update
Keep the appliance updated.
Remote Start
Control the appliance remotely or check the remaining
cook time from the LG ThinQ application.
NOTE
•If you change your wireless router, Internet
service provider, or password, delete the
registered appliance from the LG ThinQ
application and register it again.
•This information is current at the time of
publication. The application is subject to change
for product improvement purposes without
notice to users.
•This feature is only available on some models.
Before Using LG ThinQ Application
Use a smartphone to check the strength of
1
the wireless router (Wi-Fi network) near the
appliance.
•If the distance between the appliance and the
wireless router is too far, the signal becomes
weak. It takes long time to register or fails to
install the application.
Turn off the Mobile data or Cellular Data on
2
your smartphone.
Connect your smartphone to the wireless router.
3
NOTE
•To verify the Wi-Fi connection, check that Wi-Fi
icon on the control panel is lit.
•The appliance supports 2.4 GHz Wi-Fi networks
only. To check your network frequency, contact
your Internet service provider or refer to your
wireless router manual.
•LG ThinQ is not responsible for any
network connection problems or any faults,
malfunctions, or errors caused by network
connection.
•The surrounding wireless environment can
make the wireless network service run slowly.
•If the appliance is having trouble connecting
to the Wi-Fi network, it may be too far from
the router. Purchase a Wi-Fi repeater (range
extender) to improve the Wi-Fi signal strength.
•The network connection may not work properly
depending on the Internet service provider.
•The Wi-Fi connection may not connect or may
be interrupted because of the home network
environment.
•If the appliance cannot be registered due to
problems with the wireless signal transmission,
unplug the appliance and wait about a minute
before trying again.
•If the firewall on your wireless router is enabled,
disable the firewall or add an exception to it.
Page 41

SMART FUNCTIONS
ENGLISH
41
NOTE
•The wireless network name (SSID) should be a
combination of English letters and numbers. (Do
not use special characters.)
•Smartphone user interface (UI) may vary
depending on the mobile operating system (OS)
and the manufacturer.
•If the security protocol of the router is set to
WEP, network setup may fail. Change the
security protocol (WPA2 is recommended), and
register the product again.
Installing the LG ThinQ Application
Search for the LG ThinQ application from the Google
Play Store or Apple App Store on a smartphone.
Follow instructions to download and install the
application.
Open Source Software Notice
Information
To obtain the source code under GPL, LGPL,
MPL and To obtain the source code under GPL,
LGPL, MPL, and other open source licenses, that
is contained in this product, please visit http://
opensource.lge.com. In addition to the source code,
all referred license terms, warranty disclaimers and
copyright notices are available for download.
LG Electronics will also provide open source code
to you on CD-ROM for a charge covering the cost
of performing such distribution (such as the cost of
media, shipping, and handling) upon email request
to opensource@lge.com. This offer is valid for three
(3) years from the date on which you purchased the
product.
Wireless LAN Module Specifications
Model LCW-004
Frequency Range 2412 MHz - 2462 MHz
Output Power(max) < 30 dBm
FCC Notice
The following notice covers the transmitter module
contained in this product.
This equipment has been tested and found to comply
with the limits for a Class B digital device, pursuant
to Part 15 of the FCC Rules and also Part 18 of the
FCC Rules. These limits are designed to provide
reasonable protection against harmful interference in
a residential installation. This equipment generates,
uses, and can radiate radio frequency energy and,
if not installed and used in accordance with the
instructions, may cause harmful interference to radio
communications. However, there is no guarantee that
interference will not occur in a particular installation.
If this equipment does cause harmful interference to
radio or television reception, which can be determined
by turning the equipment off and on, the user is
encouraged to try to correct the interference by one
or more of the following measures:
•Reorient or relocate the receiving antenna.
•Increase the separation between the equipment
and the receiver.
•Connect the equipment into an outlet on a
circuit different from that to which the receiver is
connected.
•Consult the dealer or an experienced radio/TV
technician for help.
This device complies with Part 15, Part 18 of the
FCC Rules. Operation is subject to the following two
conditions:
1) This device may not cause harmful interference
and
2) This device must accept any interference received,
including interference that may cause undesired
operation.
Any changes or modifications in construction of this
device which are not expressly approved by the party
responsible for compliance could void the user’s
authority to operate the equipment.
FCC RF Radiation Exposure
Statement
This equipment complies with FCC radiation exposure
limits set forth for an uncontrolled environment. This
transmitter must not be co-located or operating in
conjunction with any other antenna or transmitter.
This equipment should be installed and operated with
a minimum distance of 20 cm (7.8 inches) between the
antenna and your body. Users must follow the specific
operating instructions for satisfying RF exposure
compliance.
Page 42

42
SMART FUNCTIONS
Smart Diagnosis™ Feature
This feature is only available on models with the
icon.
or
Use this feature to help you diagnose and solve
problems with your appliance.
NOTE
•For reasons not attributable to LGE’s
negligence, the service may not operate due to
external factors such as, but not limited to, WiFi unavailability, Wi-Fi disconnection, local app
store policy, or app unavailability.
•The feature may be subject to change without
prior notice and may have a different form
depending on where you are located.
Using LG ThinQ to Diagnose Issues
If you experience a problem with your Wi-Fi equipped
appliance, it can transmit troubleshooting data to a
smartphone using the LG ThinQ application.
•Launch the LG ThinQ application and select the
Smart Diagnosis feature in the menu. Follow the
instructions provided in the LG ThinQ application.
Using Audible Diagnosis to Diagnose
Issues
Follow the instructions below to use the audible
diagnosis method.
•Launch the LG ThinQ application and select the
Smart Diagnosis feature in the menu. Follow the
instructions for audible diagnosis provided in the
LG ThinQ application.
Open the LG ThinQ application on the smart
1
phone.
In the application, select the appliance from your
2
list of connected appliances and then press the
dots at the upper right of the screen.
Select Smart Diagnosis, then press the Start
3
Smart Diagnosis button.
NOTE
•If the diagnosis fails several times, use the
following instructions.
Select the Audible Diagnosis.
4
Follow the instructions on the smart phone.
5
Keep the phone in place until the tone
6
transmission has finished. View the diagnosis on
the phone.
NOTE
•For best results, do not move the phone while
the tones are being transmitted.
Page 43

MAINTENANCE
ENGLISH
43
MAINTENANCE
Cleaning the Glass-Ceramic
Cooktop
CAUTION
•Do not use scrub pads or abrasive cleaning
pads. They may damage your cooktop surface.
•For your safety, wear an oven mitt or pot
holder while using a scraper on the hot cooking
surface.
Use ceramic cooktop cleaner on the glass cooktop.
Other creams may not be as effective or may scratch,
damage or stain the cooktop surface.
To maintain and protect the surface of the glass
cooktop, follow these steps:
Before using the cooktop for the first time, clean
1
it with a ceramic cooktop cleaner. This helps
protect the top and makes cleanup easier.
Use ceramic cooktop cleaner daily to help keep
2
the cooktop looking new.
NOTE
•Sugary spillovers (such as preserves, ketchup,
tomato sauce, jellies, fudge, candy, syrups, or
chocolate) or melted plastics can cause pitting
on the surface of your cooktop. (This damage is
not covered by the warranty.)
•If food or water containing calcium (such as
baking powder, wine, milk, spinach, or broccoli)
is spilled on the cooktop, it can permanently
stain or discolor the surface. This damage is
not covered by the warranty.
Burned-On Residue
While the cooktop is still warm but not hot to the
1
touch, remove any burned-on deposits or spilled
food from the glass-ceramic cooking surface with
a suitable metal razor scraper. To prevent burns,
use an oven mitt or pot holder while using the
metal scraper.
Shake the cleaning cream well. Apply a few
3
drops of cleaner directly to the cooktop.
Use a paper towel to clean the entire cooktop
4
surface.
Rinse with clean water and use a dry cloth or
5
paper towel to remove all cleaning residue.
NOTE
Do not heat the cooktop until it has been cleaned
thoroughly.
IMPORTANT
•If sugar or food containing sugar spills, or plastic
or foil melts on the cooktop, remove the material
IMMEDIATELY with a metal razor scraper while
the cooking surface is still hot to avoid the risk of
damage to the glass-ceramic surface. When used
correctly, the scraper will not damage the cooktop
surface. For your safety, please use an oven mitt or
pot holder while scraping the hot cooking surface.
•If water or food containing water spills on the
cooktop, remove the spill IMMEDIATELY with a dry
paper towel.
NOTE
•Do not use a dull or nicked blade.
•Hold the scraper at approximately a 30° angle
to the cooktop.
•The razor scraper will not damage the markings
on the cooking surface.
When the cooking surface has completely
2
cooled, apply a few dime-sized dabs of a
ceramic glass cooktop cleaner in each burner
area. Work the cleaning cream over the cooktop
surface with a damp paper towel. Leave the
cleaner on for 10 minutes before rinsing it off.
Rinse with clean water and wipe the cooktop
3
surface with a clean, dry paper towel.
Page 44

44
MAINTENANCE
Maintaining the Cooktop
DO NOT use chlorine bleach, ammonia, or other
cleaners not specifically recommended for use on
glass-ceramic cooktops.
Let your glass-ceramic cooking surface cool off
before cleaning.
Regular
Recommended
after each use
Occasional
Recommended
every week
Thorough
Recommended
for tough stains
or burnt-on food
Wipe off
with a
damp towel
and mild
detergent
Use a metal
scraper
Apply
cooktop
cleaning
cream. Rub
with a towel.
Rinse with a
damp towel,
then wipe
dry.
For additional product information, visit our website at
www.lg.com
Metal Marks and Scratches
Be careful not to slide pots and pans across
1
the cooktop. Doing so will leave metal markings
on the cooktop surface. To help remove these
marks, use a ceramic cooktop cleaner with a
cleaning pad for ceramic cooktops. Scratches
from sliding cookware are permanent and are
not covered by the warranty.
If pots with a thin overlay of aluminum or copper
2
are allowed to boil dry, the overlay may leave a
black discoloration on the cooktop. This should
be removed immediately before heating again
or the discoloration may be permanent. This
damage is not covered by the warranty.
EasyClean
®
LG’s EasyClean® enamel technology provides two
cleaning options for the inside of the range. The
EasyClean
®
feature takes advantage of LG’s new
enamel to help lift soils without harsh chemicals, and
it runs using ONLY WATER for just 10 minutes in low
temperatures to help loosen LIGHT soils before handcleaning.
While EasyClean
®
is quick and effective for small
and LIGHT soils, the Self Clean feature can be
used to remove HEAVY, built up soils. The intensity
and high heat of the Self Clean cycle may result in
smoke which will require the opening up of windows
to provide ventilation. Compared to the more intense
Self Clean process, your LG oven gives you the
option of cleaning with LESS HEAT, LESS TIME, and
virtually NO SMOKE OR FUMES.
When needed, the range still provides the Self Clean
option for longer, more thorough oven cleaning for
heavier, built up soils.
Benefits of EasyClean
®
•Helps loosen light soils before hand-cleaning
•EasyClean
®
only uses water; no chemical cleaners
•Makes for a better self-clean experience
- Delays the need for a self-clean cycle
- Minimizes smoke and odors
- Can allow shorter self-clean time
NOTE
Some models don't include a self-clean option.
The EasyClean
®
feature may not be effective in
removing heavy, built-up soils. If the range does
not include a self-clean option, clean the oven
regularly using the EasyClean® feature to prevent
heavy, burnt-on soil from building up in the oven.
CAUTION
Cookware with rough or uneven bottoms can
mark or scratch the cooktop surface.
•Do not slide metal or glass across the cooktop
surface.
•Do not use cookware with any dirt build-up on
the bottom.
Page 45

MAINTENANCE
ENGLISH
45
When to Use EasyClean
Suggested
Cleaning Method
EasyClean
Self Clean*
* The Self Clean cycle can be used for soil that has been built up over time.
On models without the self-clean option, clean the oven frequently using EasyClean
tough, burnt-on soil.
®
Example of Oven Soiling Soil Pattern
®
Types of
Soils
Small drops or
spots
Light splatter Fat/grease
Medium to
heavy splatter
Drops or spots
Cheese
or other
ingredients
Fat/grease
Filling or
sugar based
soils
Cream or
tomato
sauce
Common Food Items
That Can Soil Your Oven
Pizza
Steaks, broiled
Fish, broiled
Meat roasted at low
temperatures
Meat roasted at high
temperatures
Pies
Casseroles
®
to avoid the build up of
Cleaning Tips
•Allow the oven to cool to room temperature before
using the EasyClean® cycle. If your oven cavity is
above 150 °F (65 °C), Hot will appear in the display,
and the EasyClean® cycle will not be activated until
the oven cavity cools down.
•A scraper can be used to scrape off any chunks or
debris before and during oven cleaning.
•Using the rough side of a non-scratch scouring pad
or scrubbing sponge may help to take off burnt-on
stains better than a soft sponge or towel.
•Certain non-scratch scrubbing sponges, such as
those made of melamine foam, available at your
local stores, can also help improve cleaning.
•The range should be level to ensure that the bottom
surface of the oven cavity is entirely covered by
water at the beginning of the EasyClean
•For best results, use distilled or filtered water. Tap
water may leave mineral deposits on the oven
bottom.
•Soil baked on through several cooking cycles will
be more difficult to remove with the EasyClean
cycle.
•Do not open the oven door during the EasyClean
cycle. Water will not get hot enough if the door is
opened during the cycle.
•For hard to reach areas such as the back surface it
is better to use the Self Clean cycle.
®
cycle.
®
EasyClean® Instruction Guide
Remove oven racks and accessories from the
1
oven.
Scrape off and remove any burnt-on debris with
2
a plastic scraper.
Suggested plastic scrapers:
•Hard plastic spatula
•Plastic pan scraper
•Plastic paint scraper
•Old credit card
Fill a spray bottle with water and use the spray
3
bottle to thoroughly spray the inside surfaces of
the oven.
Use at least 1/5 of the water in the bottle to
4
completely saturate the soil on both the walls
and in the corners of the oven
®
Page 46

46
MAINTENANCE
Spray or pour the remaining water onto the
5
bottom center of the oven cavity. The indentation
on the oven bottom should be fully covered to
submerge all soils. Add water if necessary.
NOTE
If cleaning multiple ovens, use an entire bottle
of water to clean each oven. Do not spray water
directly on the door. Doing so will result in water
dripping to the floor.
Close the oven door.
6
Press EasyClean®.
Press Start.
CAUTION
•Some surfaces may be hot after the
EasyClean® cycle. Wear rubber gloves while
cleaning to prevent burns.
•During the EasyClean® cycle, the oven
becomes hot enough to cause burns. Wait
until the cycle is over before wiping the inside
surface of the oven. Failure to do so may result
in burns.
•Avoid leaning or resting on the oven door glass
while cleaning the oven cavity.
If some light soils remain, repeat the above
11
steps, making sure to thoroughly soak the
soiled areas.
If stubborn soils remain after multiple
EasyClean® cycles, run the Self Clean cycle.
Be sure that the oven cavity is empty of oven
racks and other accessories, and that the oven
cavity surface is dry before running the Self
Clean cycle. Consult the Self Clean section of
your owner’s manual for further details.
If a self-clean option is not available, scrape
off and remove stubborn soil using a scraper.
NOTE
•If you forget to saturate the inside of the oven with
water before starting EasyClean®, press Clear/Off
to end the cycle. Wait for the range to cool to room
temperature and then spray or pour water into the
oven and start another EasyClean® cycle.
•The cavity gasket may be wet when the
EasyClean
clean the gasket.
•If mineral deposits remain on the oven bottom after
cleaning, use a cloth or sponge soaked in vinegar
to remove them.
•It is normal for the fan to operate during the
EasyClean
®
cycle finishes. This is normal. Do not
®
cycle.
A tone will sound at the end of the 10 minute
7
cycle. Press Clear/Off to clear the display and
end the tone.
After the cleaning cycle and during hand-
8
cleaning, enough water should remain on the
oven bottom to completely submerge all soils.
Add water if necessary. Place a towel on the
floor in front of the oven to capture any water
that may spill out during hand-cleaning.
Clean the oven cavity immediately after the
9
EasyClean® cycle by scrubbing with a wet,
non-scratch scouring sponge or
pad. (The scouring side will not
scratch the finish.)
NOTE
Do not use any steel scouring pads, abrasive
pads or cleaners as these materials can
permanently damage the oven surface.
Once the oven cavity is cleaned, wipe any
10
excess water with a clean dry towel. Replace
racks and any other accessories.
Page 47

MAINTENANCE
ENGLISH
47
Self Clean (Model LREL6325**
/ LREL6323**)
The Self Clean cycle uses extremely hot temperatures
to clean the oven cavity. While running the Self Clean
cycle, you may notice smoking or an odor. This is
normal; especially if the oven is heavily soiled.
During Self Clean, the kitchen should be well
ventilated to minimize the odors from cleaning.
Before Starting Self Clean
•Remove the oven racks, broiler pan, broiler grid, all
cookware, aluminum foil or any other material from
the oven.
•The kitchen should be well ventilated to minimize
the odors from cleaning.
•Wipe any heavy spillovers on the bottom of the
oven.
•Make sure that the oven light bulb cover is in place
and the oven light is off.
•The oven light cannot be turned on during a Self
Clean cycle. The oven light cannot be turned on
until the oven temperature has cooled below
500 ˚F (260 ˚C) after a Self Clean cycle is complete.
NOTE
•Remove oven racks and accessories before
starting the Self Clean cycle.
•If oven racks are left in the oven cavity during
the Self Clean cycle, they will discolor and
become difficult to slide in and out.
•Clean the frame of the oven and door with hot
soapy water. Rinse well.
•Do not clean the gasket. The fiberglass material
of the oven door gasket cannot withstand
abrasion. It is essential for the gasket to remain
intact. If you notice it becoming worn or frayed,
replace it.
•Wipe up any heavy spillovers on the oven
bottom.
•Make sure that the oven light bulb cover is in
place and the oven light is off.
•It is normal for the fan to operate during the Self
Clean cycle.
•If the cooktop is used during Self Clean
operation, a buzzer will sound for 1 minute and
then Self Clean will turn off.
•The Warm Zone/Cooktop control key cannot be
used during the Self Clean.
CAUTION
•Do not leave small children unattended near
the appliance. During the Self Clean cycle, the
outside of the range can become very hot to
the touch.
•If you have pet birds, move them to another
well-ventilated room. The health of some birds
is extremely sensitive to the fumes given off
during the Self Clean cycle of any range.
•Do not line the oven walls, racks, bottom or any
other part of the range with aluminum foil or
any other material. Doing so will destroy heat
distribution, produce poor baking results and
cause permanent damage to the oven interior
(aluminum foil will melt to the interior surface of
the oven).
•Do not force the door open. This can damage
the automatic door locking system. Use care
when opening the oven door after the Self
Clean cycle. Stand to the side of the oven when
opening the door to allow hot air or steam to
escape. The oven may still be VERY HOT.
During the Self Clean cycle, the cooktop elements
cannot be used.
Setting Self Clean
The Self Clean function has cycle times of 4, 5 or 3
hours.
Self Clean Soil Guide
Soil Level Cycle Setting
Lightly Soiled Oven Cavity 3-Hour Self Clean
Moderately Soiled Oven Cavity 4-Hour Self Clean
Heavily Soiled Oven Cavity 5-Hour Self Clean
Remove all racks and accessories from the oven.
1
Press Self Clean. The oven defaults to the
2
recommended four-hour self clean for a
moderately soiled oven. Press twice for a five-hour
self clean or three times for a three-hour self clean.
Press Start.
3
Once the self-clean cycle is set, the oven door
4
locks automatically and the lock icon displays.
You will not be able to open the oven door
until the oven has cooled. The lock releases
automatically when the oven has cooled.
CAUTION
Do not force the oven door open when the lock
icon is displayed. The oven door remains locked
until the oven temperature has cooled. Forcing
the door open will damage the door.
Page 48

48
MAINTENANCE
Setting Self Clean with a Delayed
Start
Remove all racks and accessories from the
1
oven.
Press the Self Clean button. The oven defaults
2
to the recommended four-hour self clean for a
moderately soiled oven.
Press Self Clean button to set the time.
Press Start Time.
3
Model LREL6325**
4
Use the number buttons to enter the time of day
you would like the Self Clean to start.
Model LREL6323**
Press the +/– buttons until the display shows the
time of day you would like the Self Clean to start.
Press Start.
5
NOTE
It may become necessary to cancel or interrupt a
Self Clean cycle due to excessive smoke or fire in
the oven. To cancel the Self Clean function, press
the CLEAR/OFF button.
•Fine lines may appear in the porcelain because it
went through heating and cooling. This is normal
and will not affect performance.
NOTE
•The Self Clean cycle cannot be started if the
Lockout feature is active.
•Once the Self Clean cycle is set, the oven door
locks automatically. You will not be able to open
the oven door until the oven is cooled. The lock
releases automatically.
•Once the door has been locked, the lock
indicator light stops flashing and remains on.
Allow about 15 seconds for the oven door lock
to activate.
•If the clock is set for a 12-hour display (default)
the Delayed Self Clean can never be set to
start more than 12 hours in advance.
Changing the Oven Light
The oven light is a standard 40-watt appliance bulb. It
turns on when the oven door is open. When the oven
door is closed, press Light to turn it on or off.
Unplug the range or disconnect power.
1
During Self Clean
•The Self Clean cycle uses extremely hot
temperatures to clean the oven cavity. While
running the Self Clean cycle, you may notice
smoking or an odor. This is normal, especially if the
oven is heavily soiled.
•As the oven heats, you may hear sounds of metal
parts expanding and contracting. This is normal
and will not damage the oven.
•Do not force the oven door open when the lock
is displayed. The oven door remains locked until
the oven temperature has cooled. Forcing the door
open will damage the door.
After the Self Clean Cycle
•The oven door remains locked until the oven
temperature has cooled.
•You may notice some white ash in the oven. Wipe it
off with a damp cloth or a soap-filled steel wool pad
after the oven cools. If the oven is not clean after
one self-clean cycle, repeat the cycle.
•If oven racks were left in the oven and do not slide
smoothly after a self-clean cycle, wipe racks and
rack supports with a small amount of vegetable oil
to make them glide more easily.
Turn the glass bulb cover in the back of the oven
2
counterclockwise to remove.
Pull the bulb out of the socket.
3
Insert a new bulb into the socket.
4
Insert the glass bulb cover and turn it clockwise.
5
Plug in the range or reconnect the power.
6
WARNING
•Make sure that the oven and bulb are cool.
•Disconnect the electrical power to the range at
the main fuse or circuit breaker panel. Failure
to do so can result in severe personal injury,
death, or electrical shock.
Page 49

MAINTENANCE
ENGLISH
49
Cleaning the Exterior
Painted and Decorative Trim
For general cleaning, use a cloth with hot soapy
water. For more difficult soil and built-up grease,
apply a liquid detergent directly onto the soil. Leave it
on for 30 to 60 minutes. Rinse with a damp cloth and
dry. Do not use abrasive cleaners.
Stainless Steel Surfaces
To avoid scratches, do not use steel wool pads.
Place a small amount of stainless steel
1
appliance cleaner or polish on a damp cloth or
paper towel.
Clean a small area, rubbing with the grain of the
2
stainless steel if applicable.
Dry and buff with a clean, dry paper towel or soft
3
cloth.
Repeat as necessary.
4
NOTE
To prevent scratching, do not use abrasive
cleaners on any of these materials.
NOTE
•Do not use a steel wool pad. it will scratch the
surface.
•To clean the stainless steel surface, use warm
sudsy water or a stainless steel cleaner or
polish.
•Always wipe in the direction of the metal
surface finish.
•Stainless steel appliance cleaner or polish can
be purchased online or from most retailers of
appliances or home goods.
Oven Door
•Use soapy water to thoroughly clean the oven door.
Rinse well. Do not immerse the door in water.
•You may use a glass cleaner on the outside glass
of the oven door. Do not spray water or glass
cleaner on the door vents.
•Do not use oven cleaners, cleaning powders, or
harsh abrasive cleaning materials on the outside of
the oven door.
•Do not clean the oven door gasket. The oven door
gasket is made of a woven material that is essential
for a good seal. Care should be taken not to rub,
damage, or remove this gasket.
CAUTION
Do not use harsh cleaners or harsh abrasive
cleaning materials on the outside of the oven
door. Doing so can cause damage.
Don’t hand
clean oven
door gasket
Do hand
clean door
Cleaning the Knobs
For general cleaning, use a cloth with hot soapy
water. For more difficult soil and built-up grease, wipe
gently with a brush such as a toothbrush.
Do not use abrasive cleaners.
Page 50

50
MAINTENANCE
Broiler Pan and Grid
•Do not store a soiled broiler pan or grid anywhere
in the range.
•Do not clean the broiler pan or grid in a
self-cleaning mode.
•Remove the grid from the pan. Carefully pour out
the grease from the pan into a proper container.
•Wash and rinse the broiler pan and grid in hot water
with a soap-filled or plastic scouring pad.
•If food has burned on, sprinkle the grid with cleaner
while hot and cover with wet paper towels or a
dishcloth. Soaking the pan will remove burned-on
foods.
•Both the broiler pan and grid may be cleaned with a
commercial oven cleaner or in the dishwasher.
Oven Racks
Remove the oven racks before operating the self
clean cycle.
Removing and Replacing
the Lift-Off Oven Doors and
Drawer
CAUTION
•Be careful when removing and lifting the
door.
•Do not lift the door by the handle. The door
is very heavy.
Removing the Door
Fully open the door.
1
Unlock the hinge locks, rotating them as far
2
toward the open door frame as they will go.
Lock
Slot
Hinge
lock
Unlock
Food spilled into the tracks could cause the
1
racks to become stuck. Clean racks with a mild,
abrasive cleaner.
Rinse with clean water and dry.
2
NOTE
If the racks are cleaned using the self clean cycle
(not recommended), the color will turn slightly
blue and the finish will become dull. After the self
clean cycle is complete, and the oven has cooled,
rub the sides of the racks with wax paper or a
cloth containing a small amount of vegetable oil.
This will make the racks glide more easily into the
rack tracks.
Firmly grasp both sides of the door at the top.
3
Close the door to the removal position
4
(approximately five degrees) which is halfway
between the broil stop position and fully closed.
If the position is correct, the hinge arms will
move freely.
about 5°
Lift door up and out until the hinge arms are
5
clear of the slots.
Page 51

MAINTENANCE
ENGLISH
51
Replacing the Door
Firmly grasp both sides of the door at the top.
1
With the door at the same angle as the removal
2
position, seat the indentation of the hinge arms
into the bottom edge of the hinge slots. The
notch in the hinge arms must be fully seated into
the bottom edge of the slots.
Hinge arm
Bottom
edge of slot
Indentation
Open the door fully. If the door will not open fully,
3
the indentation is not seated correctly in the
bottom edge of the slots.
Door Care Instructions
Most oven doors contain glass that can break.
CAUTION
•Do not close the oven door until all the oven
racks are fully in place.
•Do not hit the glass with pots, pans, or any
other object.
•Scratching, hitting, jarring, or stressing the
glass may weaken its structure causing an
increased risk of breakage at a later time.
Lock the hinge locks, rotating them back toward
4
the slots in the oven frame until they lock.
Hinge arm
Hinge lock
Close the oven door.
5
Page 52

52
TROUBLESHOOTING
TROUBLESHOOTING
FAQs
What types of cookware are recommended for
use with the cooktop?
•The pans must have a flat bottom and straight
sides.
•Only use heavy-gauge pans.
•The pan size must match the amount of food to be
prepared and the size of the surface element.
•Use tight fitting lids.
•Only use flat-bottom woks.
Why does “HS” appear on the cooktop display?
HS (Hot Surface) will appear in the display once the
element is turned off or during the self clean cycle.
The HS indicator will stay on until the surface has
cooled to approximately 150°F (66°C) or when the
self clean cycle ends.
Why do the heating elements appear to be turning
ON and OFF during use of the cooktop or oven?
Depending on your cooktop element setting or the
temperature selected in your oven, it is NORMAL for
the cooking elements to cycle on and off.
My new oven doesn’t cook like my old one. Is
there something wrong with the temperature
settings?
No, your oven has been factory tested and calibrated.
For the first few uses, follow your recipe times and
temperatures carefully. If you still think your new
oven is too hot or too cold, you can adjust the oven
temperature yourself to meet your specific cooking
needs. Refer to the Oven Temperature Adjustment
section in this manual for easy instructions on how to
adjust your thermostat.
Is it normal to hear a clicking noise coming from
the back of my oven when I am using it?
Your new range is designed to maintain a tighter
control over your oven’s temperature. You may hear
your oven’s heating elements click on and off more
frequently on your new oven. This is NORMAL.
Why is the time flashing?
This means that the product has just been plugged
in, or that it has experienced a power interruption. To
clear the flashing time, press any button and reset the
clock if needed.
During convection cooking the fan stops when I
open the door. Is that normal?
Yes, this is normal. When the door is opened, the
convection fan will stop until the door is closed.
Can I use aluminum foil to catch drippings in my
oven cavity?
Never use aluminum foil to line the bottom or sides of
the oven or the warming drawer. The foil will melt and
stick to the bottom surface of the oven and will not be
removable. Use a sheet pan placed on a lower oven
rack to catch drippings instead. (If foil has already
melted onto the bottom of the oven, it will not interfere
with the oven's performance.)
Can I use aluminum foil on the racks?
Do not cover racks with aluminum foil. Covering
entire racks with foil restricts air flow, leading to poor
cooking results. Use a sheet pan lined with foil under
fruit pies or other acidic or sugary foods to prevent
spillovers from damaging the oven finish.
CAUTION
Foil may be used to wrap food in the oven or
warming drawer, but do not allow the foil to come
into contact with the exposed heating/broiling
elements in the oven. The foil could melt or ignite,
causing smoke, fire, or injury.
Can I leave my racks in the oven when running a
Self Clean cycle?
No. Although it will not damage the racks, it will
discolor them and may make them hard to slide in
and out during use. Remove all items from the oven
before starting a Self Clean cycle.
What should I do if my racks are sticky and have
become hard to slide in and out?
Over time, the racks may become hard to slide in
and out. Apply a small amount of olive oil to the ends
of the racks. This will work as a lubricant for easier
gliding.
What should I do for hard to remove stains on my
cooktop?
The cooktop should be cleaned after every use to
prevent permanent staining. When cooking foods with
high sugar content, such as tomato sauce, clean the
stain off with a scraper while the cooktop is still warm.
Use an oven mitt when scraping to prevent burns.
Refer to the MAINTENANCE section of this owner's
manual for further instruction.
Why aren't the function buttons working?
Make sure that the range is not in Lockout mode. The
will show in the display if Lockout is activated.
lock
To deactivate Lockout, press and hold Clear/Off for
three seconds. The unlock melody sounds and Loc
appears in the display until the controls are unlocked.
Page 53

TROUBLESHOOTING
ENGLISH
53
How can I help keep children safe around the
range?
Children should be supervised around the range
whenever it is in use, and after use until surfaces
have cooled. You can also use the Lockout feature to
help prevent children from accidentally turning on the
cooktop or oven. The Lockout feature disables most
control panel buttons and the cooktop control knobs.
On some models, it also locks the oven door.
Consult the Lockout section of your owner’s manual
for details. (In models without a self-clean option, the
Lockout feature locks the controls but does not lock
the oven door.)
My range is still dirty after running the
®
EasyClean
The EasyClean
cycle. What else should I do?
®
cycle only helps to loosen light soils
in your oven range to assist in hand-cleaning of your
oven. It does not automatically remove all soils after
the cycle. Some scrubbing of your oven range is
required after running the EasyClean® cycle.
I tried scrubbing my oven after running
EasyClean
®
, but some soils still remain. What can
I do?
®
The EasyClean
feature works best when the soils
are fully soaked and submerged in water before
running the cycle and during hand-cleaning. If soils
are not sufficiently soaked in water, it can negatively
affect the cleaning performance. Repeat the
EasyClean® process using sufficient water.
Sugar-based and certain greasy soils are especially
hard to clean. If some stubborn soils remain, use the
Self Clean feature to thoroughly clean your oven.
If a self-clean feature is not available, use a scraper
to remove stubborn soil.
Soils on my oven walls are not coming off. How
can I get my walls clean?
Soils on the side and rear walls of your oven range
may be more difficult to fully soak with water. Try
®
repeating the EasyClean
process with more than
the 1/5 of spray recommended.
Will EasyClean
®
get all of the soils and stains out
completely?
It depends on the soil type. Sugar-based and certain
grease stains are especially hard to clean. Also, if
stains are not sufficiently soaked in water, this can
negatively affect cleaning performance. If stubborn
or built-up stains remain, use the Self Clean feature.
Refer to the Self Clean section of your owner's
manual.
Some models do not include a self-clean option. The
®
EasyClean
feature may not be effective in removing
heavy, built up soil. If a self-clean option is not
available, it may help to use EasyClean® more often
to avoid heavy soil build up.
Are there any tricks to getting some of the
stubborn soils out?
Scraping the soils with a plastic scraper before and
during hand cleaning is recommended. If using a metal
scraper, be careful not to damage the oven surface.
Fully saturating soils with water is also recommended.
Certain types of soil are harder to clean than others.
For these stubborn soils, use the Self Clean cycle.
Consult the Self Clean section of the owner's manual
for details.
Is it safe for my convection fan, broil burner or
®
heater element to get wet during EasyClean
?
Yes. The convection fan, broiler burner or heater
element may get a little wet during cleaning. However,
direct spray onto the broil burner and heater elements
is not necessary because these are self-cleaning
during regular use.
Do I need to use the full contents of the spray
®
bottle for EasyClean
Yes. It is highly recommended that
?
4
/5 of water be
sprayed or poured on the bottom and an additional
1/5 of water be sprayed on walls and other soiled
areas to fully saturate the soils for better cleaning
performance.
I see smoke coming out of my oven range’s
cooktop vents during EasyClean
®
. Is this normal?
This is normal. This is not smoke. It is actually water
vapor (steam) from the water in the oven cavity. As
®
the oven heats briefly during EasyClean
, the water
in the cavity evaporates and escapes through the
oven vents.
How often should I use EasyClean
®
EasyClean
can be performed as often as you wish.
®
?
However, if a self-clean option is not available on your
®
oven, you may want to use the EasyClean
option
often to prevent heavy, burnt-on soil from building up.
EasyClean® works best when your oven is LIGHTLY
soiled from such things as LIGHT grease splatter
and small drops of cheese. Please refer to the
EasyClean® section in your owner's manual for more
information.
What is required for EasyClean
®
?
A spray bottle filled with water, a scraper, a
nonscratch scrubbing pad and a towel. You should
not use abrasive scrubbers such as heavy-duty
scouring pads or steel wool.
Page 54

54
TROUBLESHOOTING
Before Calling for Service
Before you call for service, review this list. It may save you time and expense. The list includes common
occurrences that are not the result of defective workmanship or materials in this appliance.
Symptoms Possible Causes / Solutions
•Poor installation. Place oven rack in center of oven. Place a level on the oven
rack. Adjust leveling legs at base of range until the oven rack is level.
Range is not level.
Cannot move
appliance easily.
Appliance must be
accessible for service.
Oven control beeps
and displays any F
code error.
Surface units will not
maintain a rolling boil
or cooking is not fast
enough
Surface units do not
work properly
Surface unit stops
glowing when
changed to a lower
setting
Areas of discoloration
on the cooktop
Frequent cycling on
and off of surface
units
•Be sure floor is level and strong and stable enough to adequately support range.
•If floor is sagging or sloping, contact a carpenter to correct the situation.
•Kitchen cabinet alignment may make range appear unlevel. Be sure cabinets are
square and have sufficient room for range clearance.
•Cabinets not square or are built in too tightly. Contact builder or installer to make
appliance accessible.
•Carpet interferes with range. Provide sufficient space so range can be lifted over
carpet.
•Anti-tip device engaged.
•Electronic control has detected a fault
condition. Press Clear/Off to clear the
display and stop beeping. Reprogram
oven. If fault recurs, record fault
number. Press Clear/Off and contact
a Service agent.
•Improper cookware being used.
- Use pans which are flat and match the diameter of the surface unit selected.
•In some areas, the power (voltage)may be low.
- Cover pan with a lid until desired heat is obtained.
•A fuse in your home may be blown or the circuit breaker tripped.
- Replace the fuse or reset the circuit breaker.
•Cooktop controls improperly set.
- Check to see the correct control is set for the surface unit you are using.
•This is normal. The unit is still on and hot.
•Food spillovers not cleaned before next use.
- See Cleaning the Glass-Ceramic Cooktop section.
•Hot surface on a model with a light-colored cooktop.
- This is normal. The surface may appear discolored when it is hot. This is
temporary and will disappear as the glass cools.
•This is normal.
- The element will cycle on and off to maintain the heat setting.
CODE CAUSE
F-3 Key short error
F-9 Oven not heating
Page 55

ENGLISH
Symptoms Possible Causes / Solutions
•Plug on range is not completely inserted in the electrical outlet.
- Make sure electrical plug is plugged into a live, properly grounded outlet.
•A fuse in your home may be blown or the circuit breaker tripped.
Oven will not work
Steam is exhausted
through the oven
vent.
Appliance does not
operate.
Oven light does not
work.
Oven smokes
excessively during
broiling.
Food does not bake
or roast properly
Food does not broil
properly
- Replace the fuse or reset the circuit breaker.
•Oven controls improperly set.
- See the Using the Oven section.
•Oven too hot.
- Allow the oven to cool to below locking temperature.
•Cooking foods with high moisture produces steam. This is normal.
•Make sure cord is plugged correctly into outlet. Check circuit breakers.
•Service wiring is not complete. Contact your electrician for assistance.
•Power outage. Check house lights to be sure. Call your local electric company
for service.
•Replace or tighten bulb. See Changing the Oven Light section in this Owner’s
Manual.
•Control not set properly. Follow instructions under Setting Oven Controls.
•Meat too close to the element. Reposition the rack to provide proper clearance
between the meat and the element. Preheat broil element for searing.
•Meat not properly prepared. Remove excess fat from meat. Cut remaining fatty
edges to prevent curling.
•Insert on broiler pan wrong side up and grease not draining. Always place grid
on the broiler pan with ribs up and slots down to allow grease to drip into pan.
•Grease has built up on oven surfaces. Regular cleaning is necessary when
broiling frequently.
- Old grease or food spatters cause excessive smoking.
•Oven controls improperly set.
- See the Using the Oven section.
•Rack position is incorrect or the rack is not level.
- See the Using the Oven section.
•Incorrect cookware or cookware of improper size being used.
- See the Using the Oven section.
•Oven sensor needs to be adjusted.
- See Oven Temperature Adjustment in the Features section.
•Oven controls improperly set.
- Make sure you press Broil.
•Improper rack position being used.
- See the Broiling Guide.
•Cookware not suited for broiling.
- Use broiling pan and grid.
TROUBLESHOOTING
55
Page 56

56
TROUBLESHOOTING
Symptoms Possible Causes / Solutions
Food does not broil
properly
Oven temperature too
hot or too cold
Scratches or
abrasions on cooktop
surface
Metal marks
Brown streaks or
specks
Areas of discoloration
on cooktop
Oven will not Self
Clean
"Crackling" or
"popping" sound
Fan noise
Convection Fan stops
Displayed Time is
flashing
•Aluminum foil used on the broiling pan and grid has not been fitted properly and
slit as recommended.
- See the Using the Oven section.
•In some areas the power voltage may be low.
- Preheat the broil element for 5-7 minutes.
- See the Broiling Guide.
•Oven sensor needs to be adjusted.
- See Oven Temperature Adjustment in the Features section.
•Coarse particles such as salt or sand between cooktop and utensils can cause
scratches. Be sure the cooktop surface and bottoms of utensils are clean before
using. Small scratches do not affect cooking and will become less visible with
time.
•Cleaning materials not recommended for glass-ceramic cooktop have been
used. See Cleaning the Glass-Ceramic Cooktop in the MAINTENANCE section.
•Cookware with rough bottom has been used. Use smooth, flat-bottomed
cookware.
•Scraping of metal utensils on cooktop surface. Do not slide metal utensils
on cooktop surface. Use a glass-ceramic cooktop cleaning creme to remove
the marks. See Cleaning the Glass-Ceramic Cooktop in the MAINTENANCE
section.
•Boilovers are cooked onto surface. Use a blade scraper to remove soil. See
Cleaning the Glass-Ceramic Cooktop in the MAINTENANCE section.
•Mineral deposits from water and food. Remove using a glass-ceramic cooktop
cleaning creme. Use cookware with clean, dry bottoms.
•The oven temperature is too high to set a Self Clean operation.
- Allow the range to cool and reset the controls.
•Oven controls improperly set.
- See the Self Clean section.
•A Self Clean cycle cannot be started if the oven lockout feature is active.
•This is the sound of the metal heating and cooling during both the cooking and
Self Clean functions.
- This is normal.
•A convection fan may automatically turn on and off.
- This is normal.
•Convection fan stops during a convection bake cycle.
- This is normal and is done to allow for more even heating during the cycle.
This is not a failure of the range and should be considered normal operation.
•This is normal. This means that the product has just been plugged in, or that it
has experienced a power interruption. Press the Clock key and reset the time,
or press any key to stop the flashing.
Page 57

ENGLISH
Symptoms Possible Causes / Solutions
Excessive smoking
during a Self Clean
cycle.
Oven door does not
open after a Self
Clean cycle.
The oven does not
clean after a Self
Clean cycle.
CLEAN and door flash
in the display.
LOCKED is on in the
display when you
want to cook.
Burning or oily odor
emitting from the
vent.
Oven racks are
difficult to slide.
Moisture collects on
oven window or steam
comes from oven vent
•Excessive soil.
- Press the Clear/Off button. Open the windows to rid the room of smoke. Wait
until the Self Clean mode is cancelled. Wipe up the excess soil and reset the
clean.
•Oven is too hot.
- Allow the oven to cool below locking temperature.
•Allow about one hour for the oven to cool after the completion of a Self Clean
cycle. The door can be opened when the lock
•The control and door may be locked.
•Oven controls not properly set.
- See the Self Clean section.
•Oven was heavily soiled.
- Clean up heavy spillovers before starting the clean cycle. Heavily soiled ovens
may need to Self Clean again or for a longer period of time.
•The Self Clean cycle has been selected, but the door is not closed.
- Close the oven door.
•The oven door is locked because the temperature inside the oven has not
dropped below the locking temperature.
- Press the Clear/Off button. Allow the oven to cool.
•This is normal in a new oven and will disappear in time.
- To speed the process, set a Self Clean cycle for a minimum of 3 hours. See
the Self Clean section.
•The shiny, silver-colored racks were cleaned in a Self Clean cycle.
- Apply a small amount of vegetable oil to a paper towel and wipe the edges of
the oven racks with the paper towel.
•This is normal when cooking foods high in moisture.
•Excessive moisture was used when cleaning the window.
TROUBLESHOOTING
is no longer displayed.
57
Page 58

58
LIMITED WARRANTY
LIMITED WARRANTY (USA)
ARBITRATION NOTICE: THIS LIMITED WARRANTY CONTAINS AN ARBITRATION PROVISION THAT
REQUIRES YOU AND LG TO RESOLVE DISPUTES BY BINDING ARBITRATION INSTEAD OF IN COURT,
UNLESS YOU CHOOSE TO OPT OUT. IN ARBITRATION, CLASS ACTIONS AND JURY TRIALS ARE NOT
PERMITTED. PLEASE SEE THE SECTION TITLED “PROCEDURE FOR RESOLVING DISPUTES” BELOW.
Should your LG Electric Range ("Product") fail due to a defect in materials or workmanship under normal and
proper use, during the warranty period set forth below, LG Electronics (“LG”) will, at its option, repair or replace
the Product. This limited warranty is valid only to the original retail purchaser of the Product and applies only
when purchased and used within the United States including U.S. Territories.
Warranty Period Scope of Warranty HOW SERVICE IS HANDLED
One (1) year from date of
original retail purchase
•Replacement products and parts are warranted for the remaining portion of the original warranty period or
ninety (90) days, whichever is greater.
•Replacement products and parts may be new, reconditioned, refurbished, or otherwise factory remanufactured.
•Proof of original retail purchase specifying the Product model and date of purchase is required to obtain
warranty service under this limited warranty.
EXCEPT TO THE EXTENT PROHIBTED BY APPLICABLE LAW, ANY IMPLIED WARRANTY OF
MERCHANTABILITY OR FITNESS FOR A PARTICULAR PURPOSE ON THE PRODUCT IS LIMITED IN
DURATION TO THE DURATION OF THE ABOVE LIMITED WARRANTY. UNDER NO CIRCUMSTANCES
SHALL LG OR ITS U.S. DISTRIBUTORS/DEALERS BE LIABLE FOR ANY INDIRECT, INCIDENTAL,
CONSEQUENTIAL, SPECIAL, OR PUNITIVE DAMAGES, INCLUDING, WITHOUT LIMITATION, LOST
GOODWILL, LOST REVENUES OR PROFITS, WORK STOPPAGE, IMPAIRMENT OF OTHER GOODS, COST
OF REMOVAL AND REINSTALLATION OF THE PRODUCT, LOSS OF USE, OR ANY OTHER DAMAGES
WHETHER BASED IN CONTRACT, TORT, OR OTHERWISE. LG’S TOTAL LIABILITY, IF ANY, SHALL NOT
EXCEED THE PURCHASE PRICE PAID BY YOU FOR THE PRODUCT.
Some states do not allow the exclusion or limitation of incidental or consequential damages or limitations on how
long an implied warranty lasts, so the above exclusions or limitations may not apply to you. This limited warranty
gives you specific legal rights and you may also have other rights that vary from state to state.
THIS LIMITED WARRANTY DOES NOT COVER:
•Service trips to deliver, pick up, or install, educate how to operate, correct wiring, or correct unauthorized
repairs.
•Damage or failure of the Product to perform during power failures and interrupted or inadequate electrical
service.
•Damage or failure resulting from operating the Product in a corrosive atmosphere or contrary to the Product
owner’s manual.
•Damage or failure to the Product caused by accidents, pests and vermin, lightning, wind, fire, floods, acts of
God, or any other causes beyond the control of LG.
•Damage or failure caused by unauthorized modification or alteration, or if used for other than the intended
purpose.
•Damage or failure resulting from misuse, abuse, improper installation, repair, or maintenance. Improper repair
includes use of parts not authorized by LG. Improper installation or maintenance includes installation or
maintenance contrary to the Product owner’s manual.
•Damage or failure caused by incorrect electrical current, voltage, or ventilation/plumbing codes.
•Damage or failure caused by transportation and handling, including scratches, dents, chips, and/or other
damage to the finish of the Product, unless such damage is reported within one (1) week of delivery.
•Damage or missing items to any display, open box, or discounted Product.
•Refurbished Product or any Product sold “As Is”, “Where Is”, “With all Faults”, or similar disclaimer.
•Products with original serial numbers that have been removed, altered, or cannot be readily determined.
•Increases in utility costs and additional utility expenses.
Parts and Labor
(internal / functional
parts only)
LG will provide, free of charge, all labor and in-home
service to replace defective part(s).
Page 59

LIMITED WARRANTY
ENGLISH
•Any noises associated with normal operation.
•Use of accessories, components, or consumable cleaning products that are not authorized by LG.
•Replacement of light bulbs, filters, or any consumable parts.
•When Product is used for other than normal and proper household use (e.g. commercial or industrial use,
offices, and recreational facilities or vehicles) or contrary to the Product’s owner’s manual.
•Costs associated with removal and reinstallation of your Product for repairs.
•Shelves, drawers and accessories, except for internal/functional parts covered under this limited warranty.
Not Covered by this Limited Warranty
Problem Cause Prevention
•Cooktop crack Cooktop crack caused by impact of object •DO NOT store heavy items
above the cooktop surface as
they could fall and damage
it.
•DO NOT scratch the
cooktop or the cooktop could
crack.
•Clean the cooktop before
and after using.
Mechanical breakage
secondary crack
in warrantyout of warranty
•Damage caused after delivery
(Not covered by warranty)
primary crack
59
•Cooktop enamel
Improper usage •Do not hit the enamel
chipping off
•Pitting of the cooktop
glass
•If not removed immediately, sugary spillovers
(such as preserves, ketchup, tomato sauce,
jellies, fudge, candy, syrups, or chocolate) or
melted plastic or foil can cause surface pitting
of the cooktop. (Not covered by warranty)
•Unit has no power 1. House power turned off (power supply)
2. Tripped breaker
3. The power cord is not installed properly.
3-WIRE HOOK UP
White White
Black Black
OUTER WIRE
Red Red
(NEUTRAL)
CENTER WIRE
OUTER WIRE
4-WIRE HOOK UP
BLACK WIRE
WHITE WIRE
(NEUTRAL)
RED WIRE
cooktop.
•Remove the molten material
IMMEDIATELY with a metal
razor scraper.
•For safety, use an oven mitt
or hot pad while scraping the
hot surface.
•Check power at main board
before calling for service.
•Match power cord type and
outlet type
•Properly install the power
cord
GROUND
STRAP
<NEMA 10-50> <NEMA 14-50>
REMOVE
GROUND
STRAP
GREEN GROUND WIRE
Page 60

60
LIMITED WARRANTY
Problem Cause Prevention
•Oven or racks are
stained after using
aluminum foil
•Surface is not level
•Oven is tipping
Aluminum foil has melted in the oven •Never cover the oven bottom
or cover an entire rack with
materials such as aluminum
foil.
•If the foil has already melted
onto the oven, it will not
affect the performance of the
oven.
1. Range not leveled
•Check with installer first
2. Anti-tip device not installed correctly
Level both sides of range
Approximately
0.65"
(16.5 mm)
2
1
Anti-tip bracket
Screw must
enter wood or
concrete
Use carpenter’s level to
check level.
Wall plate
The cost of repair or replacement under the above excluded circumstances shall be borne by the
consumer.
TO OBTAIN WARRANTY SERVICE AND ADDITIONAL INFORMATION
Call 1-800-243-0000 and select the appropriate option from the menu.
Or visit our website at http://www.lg.com
Or by mail: LG Electronics Customer Service P.O. Box 240007 Huntsville, AL 35813 ATTN: CIC
PROCEDURE FOR RESOLVING DISPUTES:
ALL DISPUTES BETWEEN YOU AND LG ARISING OUT OF OR RELATING IN ANY WAY TO THIS LIMITED
WARRANTY OR THE PRODUCT SHALL BE RESOLVED EXCLUSIVELY THROUGH BINDING ARBITRATION,
AND NOT IN A COURT OF GENERAL JURISDICTION. BINDING ARBITRATION MEANS THAT YOU AND LG
ARE EACH WAIVING THE RIGHT TO A JURY TRIAL AND TO BRING OR PARTICIPATE IN A CLASS ACTION.
Definitions. For the purposes of this section, references to “LG” mean LG Electronics U.S.A., Inc., its parents,
subsidiaries and affiliates, and each of their officers, directors, employees, agents, beneficiaries, predecessors
in interest, successors, assigns and suppliers; references to “dispute” or “claim” shall include any dispute,
claim or controversy of any kind whatsoever (whether based in contract, tort, statute, regulation, ordinance,
fraud, misrepresentation or any other legal or equitable theory) arising out of or relating in any way to the sale,
condition or performance of the product or this Limited Warranty.
Notice of Dispute. In the event you intend to commence an arbitration proceeding, you must first notify LG in
writing at least 30 days in advance of initiating the arbitration by sending a letter to LG at LG Electronics, USA,
Inc. Attn: Legal Department- Arbitration 1000 Sylvan Ave, Englewood Cliffs 07632. You and LG agree to engage
in good faith discussions in an attempt to amicably resolve your claim. The notice must provide your name,
address, and telephone number; identify the product that is the subject of the claim; and describe the nature of
the claim and the relief being sought. If you and LG are unable to resolve the dispute within 30 days, either party
may proceed to file a claim for arbitration.
Page 61

LIMITED WARRANTY
ENGLISH
Agreement to Binding Arbitration and Class Action Waiver. Upon failure to resolve the dispute during the
30 day period after sending written notice to LG, you and LG agree to resolve any claims between us only by
binding arbitration on an individual basis, unless you opt out as provided below. Any dispute between you and
LG shall not be combined or consolidated with a dispute involving any other person’s or entity’s product or
claim. More specifically, without limitation of the foregoing, any dispute between you and LG shall not under any
circumstances proceed as part of a class or representative action. Instead of arbitration, either party may bring
an individual action in small claims court, but that small claims court action may not be brought on a class or
representative basis.
Arbitration Rules and Procedures. To begin arbitration of a claim, either you or LG must make a written
demand for arbitration. The arbitration will be administered by the American Arbitration Association (“AAA”)
and will be conducted before a single arbitrator under the AAA’s Consumer Arbitration Rules that are in effect
at the time the arbitration is initiated (referred to as the “AAA Rules”) and under the procedures set forth in this
section. The AAA Rules are available online at www.adr.org/consumer. Send a copy of your written demand for
arbitration, as well as a copy of this provision, to the AAA in the manner described in the AAA Rules. You must
also send a copy of your written demand to LG at LG Electronics, USA, Inc. Attn: Legal Department- Arbitration
1000 Sylvan Avenue Englewood Cliffs, NJ 07632. If there is a conflict between the AAA Rules and the rules set
forth in this section, the rules set forth in this section will govern. This arbitration provision is governed by the
Federal Arbitration Act. Judgment may be entered on the arbitrator’s award in any court of competent jurisdiction.
All issues are for the arbitrator to decide, except that issues relating to the scope and enforceability of the
arbitration provision and to the arbitrability of the dispute are for the court to decide. The arbitrator is bound by
the terms of this provision.
Governing Law. The law of the state of your residence shall govern this Limited Warranty and any disputes
between us except to the extent that such law is preempted by or inconsistent with applicable federal law.
Fees/Costs. You do not need to pay any fee to begin an arbitration. Upon receipt of your written demand for
arbitration, LG will promptly pay all arbitration filing fees to the AAA unless you seek more than $25,000 in
damages, in which case the payment of these fees will be governed by the AAA Rules. Except as otherwise
provided for herein, LG will pay all AAA filing, administration and arbitrator fees for any arbitration initiated in
accordance with the AAA Rules and this arbitration provision. If you prevail in the arbitration, LG will pay your
attorneys’ fees and expenses as long as they are reasonable, by considering factors including, but not limited to,
the purchase amount and claim amount. Notwithstanding the foregoing, if applicable law allows for an award of
reasonable attorneys’ fees and expenses, an arbitrator can award them to the same extent that a court would. If
the arbitrator finds either the substance of your claim or the relief sought in the demand is frivolous or brought for
an improper purpose (as measured by the standards set forth in Federal Rule of Civil Procedure 11(b)), then the
payment of all arbitration fees will be governed by the AAA Rules. In such a situation, you agree to reimburse LG
for all monies previously disbursed by it that are otherwise your obligation to pay under the AAA Rules. Except
as otherwise provided for, LG waives any rights it may have to seek attorneys’ fees and expenses from you if LG
prevails in the arbitration.
Hearings and Location. If your claim is for $25,000 or less, you may choose to have the arbitration conducted
solely on the basis of (1) documents submitted to the arbitrator, (2) through a telephonic hearing, or (3) by
an in-person hearing as established by the AAA Rules. If your claim exceeds $25,000, the right to a hearing
will be determined by the AAA Rules. Any in-person arbitration hearings will be held at a location within the
federal judicial district in which you reside unless we both agree to another location or we agree to a telephonic
arbitration.
Opt Out. You may opt out of this dispute resolution procedure. If you opt out, neither you nor LG can require the
other to participate in an arbitration proceeding. To opt out, you must send notice to LG no later than 30 calendar
days from the date of the first consumer purchaser’s purchase of the product by either: (i) sending an e-mail to
optout@lge.com, with the subject line: “Arbitration Opt Out” or (ii) calling 1-800-980-2973. You must include in
the opt out e-mail or provide by telephone: (a) your name and address; (b) the date on which the product was
purchased; (c) the product model name or model number; and (d) the serial number (the serial number can be
found (i) on the product; or (ii) online by accessing https://www.lg.com/us/support/repair-service/schedule-repaircontinued and clicking on “Find My Model & Serial Number”).
You may only opt out of the dispute resolution procedure in the manner described above (that is, by e-mail or
telephone); no other form of notice will be effective to opt out of this dispute resolution procedure. Opting out of
this dispute resolution procedure will not affect the coverage of the Limited Warranty in any way, and you will
continue to enjoy the full benefits of the Limited Warranty. If you keep this product and do not opt out, then you
accept all terms and conditions of the arbitration provision described above.
61
Page 62

62
MEMO
MEMO
Page 63

ESPAÑOL
MANUAL DEL USUARIO
ESTUFA
ELÉCTRICA
Lea atentamente este manual del usuario antes de poner el electrodoméstico en funcionamiento y
téngalo a mano en todo momento para su referencia.
LREL6325** LREL6323** LREL6321**
MFL57206017
Copyright © 2020 LG Electronics Inc. Todos los Derechos Reservados.
www.lg.com
Page 64

2
ÍNDICE
ÍNDICE
INSTRUCCIONES IMPORTANTES
3
DE SEGURIDAD
DESCRIPCIÓN GENERAL DEL
9
PRODUCTO
9 Piezas
9 Accesorios
INSTALACIÓN
10
10 Descripción general de la instalación
10 Especificaciones del producto
11 Antes de instalar la estufa
12 Instalación de la estufa
14 Conexión de la electricidad
18 Colocación del dispositivo antivuelco
18 Prueba de funcionamiento
FUNCIONAMIENTO
19
19 Descripción general del panel de control
20 Cambio de las configuraciones del horno
20 Clock (Reloj)
20 Oven Light (Luz del horno)
20 Configuraciones mínimas y máximas
predeterminadas
21 Timer On/Off (Temporizador encendido/
apagado)
21 Settings (Ajustes)
-Configuración del modo de hora
- Como Fijar la función de Auto Conversion
de Convección del horno Inferior (Modelo
LREL6325** / LREL6323**)
-Ajuste del termostato del horno
- Encendido/apagado de la luz de alarma de
precalentamiento
-Ajuste del volumen del indicador sonoro
-Selección de grados Fahrenheit o Celsius
23 Lockout (Bloqueo)
24 Cook Time (Timed Cook) (Tiempo de cocción
[Cocción temporizada])
24 Start Time (Delayed Timed Cook) (Hora de
inicio [Cocción temporizada retardada])
25 InstaView™
26 Uso de la placa de cocción
26 Áreas de cocción
26 Indicador de superficie caliente
26 Uso de las hornallas de la placa de cocción
27 Configuración recomendada de cocción en
superficie
28 Uso de batería de cocina adecuada
28 Elección de la batería de cocina
28 Sugerencias para preparar conservas caseras
29 Uso del horno
29 Antes de usar el horno
29 Ventilación del horno
29 Uso de los estantes del horno
29 Bake (Hornear)
30 Modo de convección (Modelo LREL6325** /
LREL6323**)
31 Guía de recomendaciones para hornear y
rostizar
32 Broil (Asar)
33 Guía de recomendaciones para asar
34 Warm (Calentar) / Keep Warm (Mantener
Caliente)
34 Proof (Leudar)
35 Modo sabbath
35 Favorita (Modelo LREL6325**)
35 Wi-Fi
36 Inicio Remoto
36 Comida congelada (Modelo LREL6325**)
36 Cocción lenta (Modelo LREL6325**)
36 Fritura con aire (Modelo LREL6325** /
LREL6323**)
FUNCIONES INTELIGENTES
40
40 Aplicación LG ThinQ
41 Aviso de la FCC
41 Declaración sobre exposición a la radiación de RF
de la FCC
42 Función Smart Diagnosis™
MANTENIMIENTO
43
43 Limpieza de la placa de cocción de vitrocerámica
44 EasyClean
47 Self Clean (Autolimpieza) (Modelo LREL6325** /
LREL6323**)
48 Cambio de la luz del horno
49 Limpieza del exterior
50 Retirar y reemplazar la puerta removible del horno
y el cajón
51 Instrucciones para el cuidado de la puerta
SOLUCIÓN DE PROBLEMAS
52
52 PREGUNTAS FRECUENTES
54 Antes de llamar al servicio técnico
GARANTÍA LIMITADA
58
®
Page 65

INSTRUCCIONES IMPORTANTES DE SEGURIDAD
ESPAÑOL
3
INSTRUCCIONES IMPORTANTES DE
SEGURIDAD
Lea y siga todas las instrucciones cuando utilice la estufa para evitar riesgos de incendios, descargas
eléctricas, lesiones personales o daños. Esta guía no incluye todas las situaciones posibles que
podrían ocurrir. Siempre comuníquese con su agente de servicio técnico o con el fabricante cuando
haya problemas que no comprenda.
Descargue este manual del propietario en: http://www.lg.com
Este es el símbolo de alerta de seguridad. Este símbolo le advierte sobre posibles riesgos
que pueden ocasionar daños materiales, lesiones personales graves o la muerte.
El símbolo de alerta de seguridad siempre estará acompañado de las palabras
"ADVERTENCIA" o "PRECAUCIÓN". Estos términos significan lo siguiente:
Indica una situación peligrosa que, de no evitarse, podría
ADVERTENCIA
PRECAUCIÓN
-
causar lesiones graves o la muerte.
Indica una situación peligrosa que, de no evitarse, podría
-
causar lesiones menores o moderadas.
DISPOSITIVO DE SEGURIDAD ANTIVUELCO
ADVERTENCIA
PARA REDUCIR EL RIESGO DE VUELCO, EL ELECTRODOMÉSTICO DEBE ESTAR
ASEGURADO CON UN DISPOSITIVO ANTIVUELCO INSTALADO DE MANERA ADECUADA.
PARA VERIFICAR QUE EL DISPOSITIVO ANTIVUELCO ESTÉ INSTALADO
CORRECTAMENTE, RETIRE EL CUERPO DEL CAJÓN Y VERIFIQUE QUE EL DISPOSITIVO
ANTIVUELCO ESTÉ BIEN SUJETO O TOME EL BORDE SUPERIOR TRASERO DE LA
PROTECCIÓN POSTERIOR DE LA ESTUFA E INTENTE INCLINARLA HACIA ADELANTE CON
CUIDADO. Consulte las instrucciones en la sección de instalación.
•Es posible que un niño o un adulto inclinen la estufa y el vuelco consecuente les produzca la
muerte.
•Verifique que el dispositivo antivuelco se haya instalado correctamente y
esté fijo al piso o a la pared y enganchado a la pata de nivelación de la
estufa.
•No ponga en funcionamiento la estufa sin el dispositivo antivuelco
colocado y enganchado.
•Nunca retire las patas del horno. La estufa no estará asegurada al
soporte antivuelco si se retiran las patas del horno.
•No se pare ni se siente sobre la puerta del horno. La estufa podría
inclinarse y usted podría sufrir lesiones con líquidos calientes
derramados, alimentos calientes o la estufa misma.
•No coloque objetos grandes y pesados, como pavos enteros, sobre la
puerta del horno abierta. La estufa podría inclinarse hacia adelante y
ocasionar lesiones.
•Vuelva a conectar el dispositivo antivuelco después de mover la estufa hacia adelante para tareas
de limpieza, reparaciones o cualquier otro motivo.
•El incumplimiento de estas instrucciones, puede tener como consecuencia la muerte o quemaduras
graves en niños o adultos.
Soporte
antivuelco
Pata de
nivelación
Page 66

4
INSTRUCCIONES IMPORTANTES DE SEGURIDAD
PRECAUCIONES DE SEGURIDAD
•NO TOQUE LAS HORNALLAS NI LAS SUPERFICIES INTERIORES DEL HORNO. Las
hornallas podrían estar calientes incluso cuando presenten un color oscuro. Las superficies
interiores del horno se calientan lo suficiente como para causar quemaduras. Durante y después del
uso, no toque ni permita que la vestimenta u otro material inflamable entren en contacto con las
hornallas o las superficies interiores del horno, hasta que hayan tenido tiempo suficiente para
enfriarse. Otras superficies, como los orificios de venteo del horno y las superficies cercanas a
estos orificios, las puertas del horno y las ventanas de las puertas del horno también se calientan y
podrían causar quemaduras si no se han enfriado.
•Abra la puerta del horno con cuidado. El aire caliente y el vapor que salen del horno pueden
causar quemaduras en las manos, el rostro y los ojos. Permita que el aire caliente o el vapor salgan
del horno antes de sacar o colocar nuevamente la comida en el horno.
•No repare ni reemplace ninguna parte del electrodoméstico, excepto en caso de que haya
recomendaciones específicas en el manual. Un técnico calificado debe estar a cargo de todas las
demás tareas de mantenimiento.
•No utilice limpiadores ásperos, abrasivos ni espátulas de metal para limpiar el vidrio de la puerta del
horno, ya que podrían rayar la superficie. Los arañazos podrían hacer que el vidrio se quiebre.
ADVERTENCIA
Si el vidrio de la puerta, la vitrocerámica de la placa de cocción, la superficie o la resistencia del
horno están dañados, deje de usar el horno y solicite servicio técnico.
•No ponga en funcionamiento el horno sin la malla calentadora de carbón.
•No utilice plástico para cubrir los alimentos. Utilice únicamente papel de aluminio o tapas seguras
para horno.
•No permita que nadie se suba, se pare o se cuelgue de la puerta, del cajón de almacenamiento ni
de la placa de cocción. Podrían causar daños a la estufa e incluso volcarla, lo que generaría
lesiones personales graves.
•No recubra las paredes del horno, los estantes, el fondo ni ninguna otra parte del horno con papel
de aluminio ni ningún otro material. Hacer esto interrumpe la distribución de calor, produce
resultados de horneado deficientes y causa daños permanentes al interior del horno (el papel de
aluminio se fundiría en la superficie interior del horno).
•Nunca intente secar a una mascota en el horno.
•Nunca utilice su electrodoméstico para calefaccionar el ambiente.
•Utilice siempre agarraderas o guantes para horno cuando retire alimentos del horno o de las
hornallas. La batería de cocina estará caliente. Utilice solo agarraderas secas. Las agarraderas
húmedas o mojadas sobre superficies calientes podrían producir quemaduras por vapor. No permita
que la agarradera toque las hornallas calientes. No utilice una toalla u otra tela gruesa para retirar
alimentos.
•No caliente recipientes cerrados de alimentos. La presión podría causar una explosión que
podría generar lesiones.
Page 67

INSTRUCCIONES IMPORTANTES DE SEGURIDAD
ESPAÑOL
5
MATERIALES INFLAMABLES
ADVERTENCIA
Asegúrese de retirar todos los materiales del embalaje antes de la puesta en funcionamiento.
Mantenga el plástico, telas, papel y otros materiales inflamables lejos de las partes del
electrodoméstico que se podrían calentar.
•No almacene ni utilice material inflamable en el horno ni cerca de la placa de cocción. Los
materiales inflamables incluyen papel, plástico, agarraderas, telas, recubrimientos para paredes,
cortinas y gasolina u otros vapores inflamables y líquidos como grasa o aceite de cocina. Estos
materiales pueden prenderse fuego cuando el horno y la placa de cocción están en uso.
•Use vestimenta adecuada. No use prendas holgadas o que cuelguen, ya que podría prenderse
fuego en contacto con superficies calientes y causar quemaduras graves.
•No utilice el horno para secar ropa. Solo use el horno para el propósito para el que fue diseñado.
•Si posee gabinetes de almacenamiento directamente sobre la superficie de cocción, guarde en
estos los objetos que use con poca frecuencia y que puedan almacenarse de manera segura en un
lugar expuesto al calor. Las altas temperaturas pueden ser peligrosas para objetos volátiles como
líquidos inflamables, limpiadores o aerosoles.
SEGURIDAD ELÉCTRICA
PRECAUCIÓN
Asegúrese de retirar todos los materiales del embalaje antes de la puesta en funcionamiento.
Mantenga el plástico, telas, papel y otros materiales inflamables lejos de las partes del
electrodoméstico que se podrían calentar.
•Desconecte siempre la energía del electrodoméstico antes de que se efectúen tareas de
mantenimiento.
•No utilice papel de aluminio ni ningún otro material para revestir la base del horno. La instalación
inadecuada de estos revestimientos podría causar riesgo de descarga eléctrica o incendio.
•No permita que el papel de aluminio ni la sonda de temperatura entren en contacto con las
hornallas.
ADVERTENCIA
Antes de reemplazar la bombilla de horno, desconecte la energía eléctrica del horno desde el
fusible principal o el panel disyuntor. El no hacerlo podría causar lesiones graves, descargas
eléctricas o la muerte.
FREIDORA
•Tenga extremo cuidado al trasladar o desechar grasa caliente.
•Siempre caliente la grasa lentamente y vigile mientras aumenta la temperatura.
•Si va a freír una combinación de aceites y grasas, mézclelos antes de calentarlos.
•Si es posible, utilice un termómetro para frituras para evitar que la grasa se caliente por encima del
punto de humeo.
•Utilice la menor cantidad posible de grasa para freír de manera efectiva. Llenar el sartén con
demasiada grasa podría causar derrames al agregar los alimentos.
Page 68

6
INSTRUCCIONES IMPORTANTES DE SEGURIDAD
SEGURIDAD DE LOS NIÑOS
•No toque la superficie caliente entre la parte inferior de la puerta del horno y la parte superior del
cajón, en el frente del horno, mientras está en funcionamiento. La superficie se calienta y puede
causar quemaduras y otras lesiones.
•No deje a los niños sin supervisión cerca del horno.
ADVERTENCIA
No deje solos a los niños o sin supervisión cerca del electrodoméstico cuando está en
funcionamiento o aún caliente. Nunca debe permitir que los niños se sienten o paren en ninguna
parte del electrodoméstico, ya que podrían sufrir lesiones o quemaduras.
PRECAUCIÓN
No guarde objetos de interés para los niños en los gabinetes que están arriba de la estufa o
sobre la protección trasera; si los niños subieran a la estufa para alcanzar algo que buscan,
podrían sufrir lesiones graves.
•Nunca permita que un niño se cuelgue de la puerta del horno.
•No permita que los niños se metan dentro del horno.
•Deje que los utensilios calientes se enfríen en un lugar seguro, fuera del alcance de los niños.
•No debe permitir que los niños jueguen con los controles ni con ninguna otra parte del
electrodoméstico.
SUPERFICIES DE COCCIÓN DE VITROCERÁMICA
•Las hornallas superficiales podrían estar calientes incluso cuando presenten un color oscuro. Las
áreas cercanas a las hornallas superficiales podrían calentarse lo suficiente como para causar
quemaduras. Durante y después de su uso, NO TOQUE LAS HORNALLAS SUPERFICIALES NI
LAS ÁREAS CERCANAS ni permita que la vestimenta u otro material inflamable entren en
contacto con las hornallas o las superficies cercanas hasta que hayan tenido tiempo suficiente para
enfriarse. Esto incluye la placa de cocción y el área sobre la puerta del horno.
•No cocine sobre una placa de cocción rota. Si la placa de cocción se rompe, los líquidos de
limpieza y los derrames podrían penetrar a través de la placa rota y provocar un riesgo de descarga
eléctrica. Comuníquese con un técnico calificado de inmediato.
•No utilice la superficie de vidrio de la placa de cocción como tabla para cortar.
•No coloque ni almacene objetos que puedan derretirse o prenderse fuego sobre la placa de cocción
de vidrio, incluso cuando no esté en uso.
•Elija el tamaño correcto del quemador. Para ollas y sartenes más pequeños, utilice las hornallas
más pequeñas. Para ollas y sartenes más grandes, utilice las hornallas más grandes. Seleccione
los sartenes con fondo plano del tamaño suficiente para cubrir las hornallas. Si utiliza sartenes
demasiado pequeños, una parte de la hornalla quedará expuesta al contacto directo y podría
quemar la ropa.
•Batería de cocina vidriada. Solo determinados tipos de vidrio, cerámica vidriada, cerámica,
recipientes de cocción de barro y otros utensilios de cocina vidriados son aptos para uso en las
hornallas de la estufa sin quebrarse, debido al cambio abrupto de temperatura.
•Nunca cocine directamente sobre el vidrio. Utilice siempre batería de cocina.
•Siempre apague las hornallas antes de retirar la batería de cocina.
•Gire las manijas de los recipientes hacia dentro, para que no se extiendan hacia las hornallas
adyacentes. Esto reduce el riesgo de quemaduras, el riesgo de incendio con materiales inflamables
y derrames debido a contacto involuntario con la batería de cocina.
•Limpie de inmediato los derrames en el área de cocción para prevenir una tarea de limpieza más
complicada posteriormente.
Page 69

INSTRUCCIONES IMPORTANTES DE SEGURIDAD
ESPAÑOL
7
•Algunos limpiadores pueden generar vapores peligrosos si se aplican sobre una superficie caliente.
•Coloque siempre el sartén en el centro de la hornalla sobre la que está cocinando. Nunca deje las
hornallas sin supervisión en configuraciones de altas temperaturas. El contacto adecuado de
la batería de cocina con el quemador también mejorará la eficiencia. Las ebulliciones causan
derrames humeantes y grasosos que podrían prenderse fuego.
•Limpie la placa de cocción con precaución. No utilice esponjas ni paños para limpiar derrames
sobre un área de cocción caliente. Utilice una espátula de metal adecuada para la tarea. Si utiliza
una esponja o paño húmedos para limpiar derrames sobre un área de cocción caliente, esto podría
causar quemaduras por vapor. Algunos limpiadores pueden generar vapores nocivos si se aplican
sobre una superficie caliente.
•No encienda las hornallas antes de colocar la batería de cocina.
•No guarde elementos pesados arriba la superficie de la placa de cocción que pudieran caer y
dañarla.
•No coloque papel de aluminio ni artículos plásticos, como salero y pimentero, soportes para
cucharas o envoltorios plásticos, ni ningún otro material sobre la estufa cuando esté en
funcionamiento.
•No utilice esponjas de lana de acero, esponjas para fregar ni esponjas abrasivas de limpieza. Estas
pueden rayar la superficie.
SUGERENCIAS PARA AHORRAR ENERGÍA
•Cocinar en varios estantes ahorra tiempo y energía. Siempre que sea posible, cocine alimentos que
requieran la misma temperatura de cocción en un único horno.
•Para un desempeño óptimo y ahorro de energía, siga las pautas de la página 30 para colocar
correctamente los estantes y las bandejas.
•Utilice piezas de la batería de cocina proporcionadas para la cantidad de alimentos que va a cocinar
y así ahorrar energía al calentarlos. Calentar un litro de agua requiere más energía en una olla de
tres litros, que en una de un litro.
•Utilice piezas de la batería de cocina con fondos planos para lograr el mejor contacto posible con la
superficie de la placa de cocción al cocinar en la placa de cocción de vitrocerámica.
•Haga coincidir el tamaño del quemador o la hornalla de la placa de cocción con el tamaño del
recipiente en uso. Utilizar una hornalla grande para una sartén pequeña desperdicia energía
térmica, y la superficie expuesta de la hornalla es un riesgo de quemadura o incendio.
•Reduzca el uso de energía al limpiar la suciedad ligera del horno con la función EasyClean
lugar del autolimpiante.
•Evite abrir la puerta del horno más de lo necesario durante el uso. Esto ayuda a que el horno
mantenga la temperatura, evita la pérdida innecesaria de calor y ahorra el consumo de energía.
®
, en
SEGURIDAD DURANTE EL USO
•No toque los estantes del horno mientras están calientes.
•Si se debe mover un estante mientras el horno está caliente, evite que la agarradera toque el
quemador del horno.
•Utilice con precaución las funciones Cocción temporizada o Cocción temporizada retardada. Utilice
el reloj temporizador automático al cocinar carnes curadas o congeladas y la mayoría de las frutas
y los vegetales. Los alimentos que pueden echarse a perder fácilmente como la leche, huevos,
pescado, carne o aves se deben enfriar primero en el refrigerador. Incluso cuando se hayan
enfriado, no deben permanecer en el horno durante más de 1 hora antes de iniciar la cocción y se
los debe retirar rápidamente una vez que la cocción haya terminado. Ingerir alimentos en mal
estado puede producir intoxicaciones alimentarias.
•Las partes accesibles podrían calentarse cuando se utiliza la parrilla.
•No coloque alimentos ni batería de cocina en el fondo de la cavidad del horno. Hacerlo podría
causar daños permanentes al acabado de la base del horno.
Page 70

8
INSTRUCCIONES IMPORTANTES DE SEGURIDAD
•No utilice agua para apagar incendios provocados por grasa. Si se produce un incendio en el
horno, mantenga la puerta del horno cerrada y apague el horno. Si el fuego continúa, arroje
bicarbonato de sodio sobre el fuego o utilice un extinguidor. No arroje agua ni harina sobre el fuego.
La harina podría ser explosiva y el agua podría hacer que un incendio causado por grasa se
propague y genere lesiones personales.
•Tire del estante del horno hasta llegar a la posición de bloqueo al cargar y descargar alimentos del
horno. Esto ayuda a prevenir quemaduras causadas al tocar superficies calientes de la puerta y las
paredes del horno.
•No utilice el horno si el quemador desarrolla un punto de brillo durante el uso o si muestra otros
signos de daño. Un punto de brillo indica que el quemador podría fallar y representar un peligro
potencial de quemadura, incendio o descarga eléctrica. Apague el horno de inmediato y solicite que
un técnico calificado reemplace el quemador.
•Al usar bolsas para hornear o asar en el horno, siga las instrucciones del fabricante.
SEGURIDAD AL LIMPIAR (Modelo LREL6325** / LREL6323**)
•Abra una ventana y encienda un ventilador o campana extractora antes de realizar la autolimpieza.
•Si el horno está muy sucio con aceite, realice la autolimpieza antes de volver a utilizarlo. El aceite
podría causar un incendio.
•Limpie la suciedad difícil de la base del horno antes de usar la función autolimpieza.
•No utilice limpiadores para hornos. No debe utilizarse ningún limpiador de hornos comercial ni
ningún tipo de revestimiento de protección dentro o alrededor de ninguna parte del horno.
•Nunca deje aves domésticas en la cocina. La salud de las aves es sumamente sensible a los gases
liberados durante un ciclo de autolimpieza del horno. Los gases podrían ser nocivos o fatales para
las aves. Traslade las aves a un ambiente bien ventilado.
•Limpie con el ciclo de autolimpieza solo las partes indicadas en este manual. Antes de realizar la
autolimpieza del horno, retire la asadera, todos los estantes del horno, la sonda para carne y
cualquier otro utensilio o alimento del horno.
•Instrucción importante. El horno muestra el código de error F y se escuchan tres tonos largos
durante el proceso de autolimpieza si está funcionando mal. Desconecte la energía eléctrica del
horno desde el fusible principal o el panel disyuntor y solicite reparación a cargo de un técnico
calificado.
•Es normal que la placa de cocción de la estufa se caliente durante el ciclo de autolimpieza. Por lo
tanto, debe evitar tocar la placa de cocción, durante un ciclo de autolimpieza.
•Nunca derrame agua fría sobre el horno caliente para limpiarlo. Hacerlo podría provocar el mal
funcionamiento del horno.
•Asegúrese de que las luces del horno estén frías antes de limpiar.
•No limpie las juntas de la puerta del horno. Las juntas de la puerta del horno son esenciales para
lograr un buen sellado. No debe frotar, dañar ni mover la junta.
•Si se produce un incendio durante la limpieza automática, apague el horno y espere que se apague
el incendio. No fuerce la puerta del horno para abrirla. La introducción de aire fresco a las
temperaturas de autolimpieza podría ocasionar una explosión con llamas desde el horno. El
incumplimiento de esta instrucción podría tener como consecuencia quemaduras graves.
MODO CORRECTO DE COCINAR CARNES Y AVES
•Para evitar enfermedades transmitidas por los alimentos, cocine bien las carnes rojas y aves. La
USDA ha indicado las siguientes como las temperaturas internas mínimas de seguridad para el
consumo:
•Carne molida de vaca: 160 °F (71,1 °C)
•Aves: 165 °F (73,9 °C)
•Carne de vaca, ternera, cerdo o cordero: 145 °F (62,8 °C)
•Pescado/mariscos: 145 °F (62,8 °C)
Page 71

DESCRIPCIÓN GENERAL DEL PRODUCTO
ESPAÑOL
DESCRIPCIÓN GENERAL DEL PRODUCTO
Piezas
Controlador
Placa de cocción
Puerta del horno
Cajón de calentamiento /
Cajón de almacenamiento
9
Vitrocerámica
Junta
Estante
Placa de modelo y
número de serie
Accesorios
Accesorios incluidos
Estante estándar
- Modelo LRGL5825** (3 c/u)
- Modelo LRGL5823**/LRGL5821** (2 c/u)
NOTA
•Comuníquese con el Servicio de atención al cliente de LG al 1-800-243-0000 (1-888-542-2623 en Canadá) si falta algún
accesorio.
•Para su seguridad y para extender la vida útil del producto, solo debe utilizar componentes autorizados.
•El fabricante no es responsable del mal funcionamiento del producto ni de accidentes causados por el uso de componentes
o piezas no autorizados y comprados por separado.
•Las imágenes de esta guía podrían ser diferentes a los componentes y accesorios reales, que están sujetos a cambios a
discreción del fabricante, sin previo aviso, con fines de mejorar el producto.
Accesorios opcionales
Rejilla
Rejilla Air fry
Asadera
Page 72

10
INSTALACIÓN
INSTALACIÓN
Descripción general de la instalación
Lea las siguientes instrucciones de instalación en primer lugar, después de comprar este producto o transportarlo a otra ubicación.
Negro
Blanco
Rojo
Bloque de
terminales
Placa de conexión
del conducto
Verique y elija la ubicación
adecuada
240 V
Enchufe el cable de alimentación Conecte el dispositivo antivuelco Prueba de
Instale el dispositivo
antivuelco
Nivele la estufa Conecte la estufa eléctrica
funcionamiento
Especificaciones del producto
La apariencia y las especificaciones detalladas en este manual podrían variar, debido a mejoras constantes en el producto.
Modelos de estufas con
horno
Peso neto 139,6 lb (63,3 kg) 136,2 lb (61,78 kg) 130,5 lb (59,2 kg)
Requisitos eléctricos 120/240 V: 12,9 kW, 120/208 V: 9,7 kW
Descripción Estufa eléctrica con horno simple
LREL6325** LREL6323** LREL6321**
120/240 V: 13,1 kW,
120/208 V: 9,8 kW
4
/5" (Ancho) x 46 1/2" (Alto) x 26 1/2" (Profundidad) (P con la puerta cerrada y excluyendo la
29
Dimensiones exteriores
Altura hasta la superficie de
cocción
Capacidad total 6,3 cu.ft.
manija de la puerta)
75,9 cm (Ancho) x 118,1 cm (Alto) x 67,4 cm (P con la puerta cerrada y excluyendo la manija
de la puerta)
36" (91,3 cm)
Page 73

INSTALACIÓN
ESPAÑOL
11
Antes de instalar la estufa
ADVERTENCIA
Riesgo de vuelco
Es posible que un niño o un adulto
inclinen la estufa y el vuelco consecuente
les produzca la muerte. Verifique que se
haya instalado el soporte antivuelco.
Asegúrese de que el soporte antivuelco
esté conectado cuando se mueva la estufa.
No ponga en funcionamiento la estufa sin
el soporte antivuelco colocado. El
incumplimiento de estas instrucciones,
puede tener como consecuencia la muerte
o quemaduras graves en niños y adultos.
Para verificar que se haya
insertado la pata de nivelación
en el soporte antivuelco, sujete
el borde superior trasero de la
estufa e intente inclinarla, con
cuidado.
Herramientas necesarias
Soporte
antivuelco
Pata de
nivelación
Si no recibió un soporte antivuelco con su compra, llame al
1-800-243-0000 (1-888-542-2623 en Canadá) para recibir uno
sin costo.
ADVERTENCIA
•Debe seguir con exactitud la información de este
manual. No hacerlo podría causar un incendio,
descarga eléctrica, daños a la propiedad, lesiones
personales o la muerte.
•Use guantes durante el procedimiento de
instalación. De no hacerlo, podría sufrir lesiones
corporales.
Destornillador phillips
Nivel
Destornillador plano
Llave ajustable
Piezas incluidas
Plantilla (1)
Casquillos de anclaje (4) Pernos de jación (4)
Juego del soporte antivuelco (1)
Llave para tuercas de 1
Taladro
/4"
Piezas no incluidas
Cable eléctrico de 4 o 3
(40 o 50 A aprobado por
hilos
UL)
Pinzas
Gafas de seguridad
Cinta medidora
Guantes
Pasacables
(Solo para
instalaciones de
conductos)
NOTA
•Cumpla todos los códigos y ordenanzas vigentes.
•Solicite al instalador que le muestre la ubicación del disyuntor o fusible. Márquelo para que sea fácil de detectar.
•Al igual que al utilizar cualquier otro electrodoméstico que genera calor, existen determinadas precauciones de seguridad
que se deben respetar.
•Asegúrese de que su estufa esté instalada correctamente y con la conexión a tierra adecuada, a cargo de un instalador o
técnico de mantenimiento calificado.
Page 74

12
INSTALACIÓN
Instalación de la estufa
Desembalaje y traslado de la estufa
PRECAUCIÓN
•Debe haber dos o más personas para mover e
instalar la estufa (Peligro de peso excesivo). De no
hacerlo, podría sufrir lesiones en la espalda o de otra
clase.
•No utilice la manija de la puerta para empujar ni
para tirar de la estufa durante la instalación o al
mover la estufa para tareas de limpieza o
reparaciones. Hacerlo podría causar daños graves a la
puerta de la estufa.
Retire el material de embalaje, la cinta y cualquier etiqueta
temporaria de la estufa, antes de usarla. No retire las
etiquetas de advertencia, la etiqueta de modelo y número de
serie ni la hoja técnica ubicada en la parte posterior de la
estufa.
Para quitar la cinta o el pegamento restantes, frote el área con
fuerza utilizando el dedo pulgar. También es sencillo retirar el
residuo de cinta o pegamento frotando una pequeña cantidad
de detergente para vajilla sobre el adhesivo con los dedos.
Enjuague con agua tibia y seque.
No utilice instrumentos filosos, alcohol para frotar, líquidos
inflamables ni limpiadores abrasivos para quitar cinta o
pegamento. Estos productos pueden dañar la superficie de la
estufa.
La estufa es pesada y puede instalarse sobre revestimientos
blandos para pisos como vinilo acolchado o piso alfombrado.
Tenga cuidado al mover la estufa sobre este tipo de pisos.
Utilice una correa al mover la estufa, para evitar dañar el piso.
O deslice la estufa sobre un cartón o madera enchapada para
evitar dañar el revestimiento del piso.
Elección de la ubicación adecuada
PRECAUCIÓN
•Evite colocar gabinetes sobre la estufa. Para
minimizar el peligro ocasionado al estirarse sobre las
llamas de las hornallas encendidas, instale una
campana de ventilación sobre la estufa, que se
proyecte hacia delante cinco pulgadas al frente de los
gabinetes como mínimo.
•Asegúrese de que el revestimiento de las paredes,
la mesada y los gabinetes de alrededor de la estufa
puedan soportar el calor (hasta 194 °F) generado
por la estufa. Podría producirse cambios de color,
deslaminación o derretimiento. Esta estufa ha sido
diseñada para cumplir con la temperatura máxima
permitida para gabinetes de madera de 194 °F.
•Antes de instalar la estufa en una área cubierta con
linóleo u otro revestimiento sintético para pisos,
asegúrese de que este pueda soportar temperaturas
de 200 °F (93 °C), como mínimo.
•Utilice una almohadilla de aislamiento o una placa
de madera enchapada de
debajo de la estufa si la instala sobre piso
alfombrado.
La estufa debe estar siempre enchufada en su propio
tomacorriente individual con conexión a tierra. Esto evita
sobrecargar los circuitos eléctricos de la casa, lo que podría
causar un peligro de incendio, debido a los cables
sobrecalentados. Se recomienda la instalación de un circuito
exclusivo para este electrodoméstico.
Casa rodante: requisitos adicionales de instalación
La instalación de esta estufa debe cumplir con el Estándar
de construcción y seguridad de casas prefabricadas, título 24
CFR, parte 3280 (anteriormente el Estándar federal de
construcción y seguridad de casas móviles, título 24, parte 280
del HUD), o cuando ese estándar no sea aplicable, debe
ajustarse al Estándar de instalaciones para casas
prefabricadas, ANSI A225.1/NFPA 501A o los códigos locales.
•Cuando se instala esta estufa en una casa rodante, debe
estar sujeta al piso durante el tránsito. Cualquier método
de fijación de la estufa al piso es adecuado, siempre que
cumpla los estándares detallados anteriormente.
•Se debe utilizar un cable de alimentación de cuatro hilos en
una instalación de casa rodante.
1
/4 pulgadas (0,64 cm)
Page 75

ESPAÑOL
Dimensiones y espacios libres
NOTA
Guarde para el uso del inspector eléctrico local.
INSTALACIÓN
13
3" (7,6 cm)
24"
(60,9 cm)
36"
(91,4 cm)
29,8"
(75,7 cm)
A = 30" (76,2 cm) para EE. UU.
= 30" (76,2 cm) ~ 31" (78,7 cm) para CANADÁ
24"
(60,9 cm)
Área
aceptable para
tomacorrientes
Hueco en el
gabinete
Gabinete
1
/8"
3
(8,1cm)
3" (7,6 cm)
25"
(63,5 cm)
36"
(91,4 cm)
15" (38 cm)
5"
(12,6 cm)
23 1/2"
(60 cm)
Ancho normal de
la encimera
Altura de la
encimera
Pared
Centro
7
(19 cm)
11 3/4"
(30 cm)
1
/2"
2"
(5,1 cm)
En Canadá, una estufa independiente no se debe instalar a una distancia menor a
15
/32" (12 mm) con respecto a cualquier
superficie adyacente.
30"
(76,2 cm)
*30" (76,2 cm)
Mínimo
**15"
(38,1 cm)
36"
(91,4 cm)
Dimensiones mínimas
* 30" (76,2 cm) de espacio mínimo entre la parte superior de la superficie de cocción y la parte inferior de un gabinete de madera
o metal no protegido; o 24" (60,9 cm) de espacio mínimo cuando el fondo del gabinete de madera o metal está protegido por no
menos de
1
/4" (6,4 cm) de material pirorresistente cubierto con una lámina de acero no inferior a n.° 28 MSG, 0,015" (0,381 mm) de
acero inoxidable, 0,024" (0,610 mm) de aluminio o 0,020" (0,508 mm) de cobre.
** 15" (38,1 cm) de espacio mínimo entre la encimera y la parte inferior del gabinete adyacente.
Page 76

14
INSTALACIÓN
Instalación del dispositivo antivuelco
ADVERTENCIA
Riesgo de vuelco
Es posible que un niño o un adulto
inclinen la estufa y el vuelco
consecuente les produzca la muerte.
Verifique que se haya instalado el soporte
antivuelco. Asegúrese de que el soporte
antivuelco esté conectado cuando se mueva
la estufa. No ponga en funcionamiento la
estufa sin el soporte antivuelco colocado.
El incumplimiento de estas instrucciones,
puede tener como consecuencia la muerte o
quemaduras graves en niños y adultos.
Para verificar que se haya
insertado la pata de nivelación
en el soporte antivuelco, sujete
el borde superior trasero de la
estufa e intente inclinarla, con
cuidado.
El tornillo debe
atravesar la
madera o el
hormigón
Soporte
antivuelco
Soporte
antivuelco
Ubique el soporte antivuelco con ayuda de la plantilla
Se incluye un soporte antivuelco con la plantilla. Las
instrucciones incluyen la información necesaria para completar
la instalación. Lea y siga la hoja de instrucciones de instalación
de la estufa (plantilla).
Nivelación de la estufa
Nivele la estufa al ajustar las patas de nivelación con una llave.
Si extiende las patas ligeramente, podría ser más fácil insertar
la pata trasera en el soporte antivuelco.
Pata de
nivelación
Placa de
pared
Utilice un nivelador para verificar sus ajustes. Ubique el
nivelador en diagonal sobre el estante el horno y verifique en
todas direcciones, para nivelar.
Primero verifique la dirección
Luego verifique la dirección
.
. Si el nivelador no queda
equilibrado sobre el estante, ajuste las patas de nivelación con
una llave.
2
1
Conexión de la electricidad
Requisitos eléctricos
Un técnico calificado debe instalar este electrodoméstico e
incluir una conexión a tierra en un circuito derivado, de
acuerdo con el Código eléctrico nacional ANSI/NFPA N.° 70,
en su edición más reciente.
Todo el cableado debe cumplir con el código Local y el código
NEC. Esta estufa requiere un cable monofásico de 3 hilos,
120/208 VCA o un sistema eléctrico de 120/240 V 60 Hz.
Utilice únicamente un cable para estufa de 3 o 4 conductores
homologados por UL con bornes de circuito cerrado, talones
de cable pala de extremo abierto o una terminación similar. No
instale el cable de alimentación sin un pasacables.
Se requiere un cable apto para estufas de 40 amperios con un
rango de voltaje mínimo de 120/240. Si se utiliza un cable para
estufas de 50 amperios, debe estar marcado para uso con
aberturas para conexión de 1
electrodoméstico puede conectarse por medio de un conducto
o un cable de alimentación. Si utiliza un conducto, vaya a la
página 17 para leer acerca de las conexiones de conductos
de 3 hilos o 4 hilos.
3
/8" de diámetro. Este
Page 77

INSTALACIÓN
ESPAÑOL
15
ADVERTENCIA
•Deje de 2 a 3 pies (61,0 cm a 91,4 cm) de lugar libre
en la línea, para que se pueda mover la estufa si es
necesario hacer reparaciones.
•No se deben modificar ni el cable de alimentación ni
el enchufe. Si el enchufe no entra en el
tomacorriente, debe solicitar que un electricista
calificado instale un tomacorriente adecuado.
•Se prohíbe utilizar un cable de extensión para
conectar la estufa a la energía eléctrica. Conecte el
cable de alimentación y el enchufe directamente.
•Se requiere una conexión eléctrica a tierra en este
electrodoméstico.
•Asegúrese de que el cable de alimentación no esté
presionado por la estufa ni por objetos pesados. Si
no verificara esto y el cable estuviera presionado,
podría sufrir quemaduras graves o descargas
eléctricas.
Valores nominales especificados del juego del cable
de alimentación
Tensión nominal de
la estufa, en vatios
Corriente
nominal
Diámetro (pulgadas) de
la abertura de conexión
especificada
del juego
120/240
voltios
3 hilos
8.750 -
16.500
16.501 -
22.500
120/208
voltios
3 hilos
7.801 -
12.500
12.501 -
18.500
del cable de
alimentación,
amperios
40 o 50 A
50
alimentación
Receptáculo eléctrico de pared para cables de 3 o 4 hilos
Receptáculo para cable de 4 hilos (14-50R)
Receptáculo para cable de 3 hilos (10-50R)
de la estufa
Cable de
3
/8"
1
1 3/4"
Conducto
1 1/8"
1 3/8"
Utilice la placa de conexión del cable/conducto para instalar el
cable de alimentación o el conducto. Deje la placa de conexión
según estaba instalada, para las instalaciones del cable de
alimentación. Retire la placa de conexión para las instalaciones
de conductos y utilice el orificio para conducto más pequeño
de 11/8 pulgadas (2,8 cm), en lugar del orificio para cable de
alimentación de 13/8 pulgadas (3,5 cm).
Conducto de 11/8" (2,8 cm)
Cable de 13/8" (3,5 cm)
Retire la placa de conexión de conductos
Para instalaciones con cable de alimentación, enganche el
pasacables sobre el orificio para cable de alimentación de
13/8 pulgadas (3,5 cm), ubicado por debajo de la parte
posterior del horno. Inserte el cable de alimentación a través
del pasacables y ajústelo.
Placa de
conexión del
conducto
Cable de
alimentación
Montaje del pasacables del cable de alimentación en la
abertura de 1
3
/8"
Para instalaciones de conductos, inserte el pasacables del
conducto en el orificio correspondiente de 11/8 pulgadas
(2,8 cm). Luego, instale el conducto a través del cuerpo del
pasacables y ajústelo con su anillo.
Placa de
conexión de
cables/
conductos
Conexión del cable de alimentación
Se debe retirar la cubierta de acceso trasera. Afloje los dos
tornillos con un destornillador. El bloque de bornes debe
quedar accesible.
Cubierta de acceso
Anillo
Cuerpo
Montaje del pasacables del conducto en la abertura de 11/8"
Conducto
Page 78

16
INSTALACIÓN
Conexión con cable de 3 hilos:
Cable de alimentación
ADVERTENCIA
•El hilo del medio (neutro o tierra), que es blanco, de
un cable de alimentación de 3 hilos o un
conducto de 3 hilos se debe conectar al poste
medio del bloque de terminales. Los dos hilos
restantes del cable de alimentación o del conducto
se deben conectar a los postes exteriores del
bloque de terminales. El no hacerlo podría causar
lesiones personales graves, descargas eléctricas o la
muerte.
Instale el cable de alimentación de la siguiente manera:
Para instalaciones con cable de alimentación, enganche el
pasacables sobre el orificio para cable de alimentación de 1
ubicado por debajo de la parte posterior del horno. Inserte el
cable de alimentación a través del pasacables y ajústelo.
No instale el cable de alimentación sin un pasacables.
Quite los 3 tornillos inferiores del bloque de terminales y
1
consérvelos.
Inserte los 3 tornillos a través de cada anillo de las
2
terminales del cable de alimentación y en los cables
inferiores del bloque de terminales. Asegúrese de que
el hilo central (neutro), que es blanco, esté conectado
a la posición central inferior del bloque de bloque de
terminales.
Ajuste los 3 tornillos de manera segura al bloque de
3
terminales. No retire las conexiones de la correa a tierra.
Conexión con cable de 3 hilos
Negro Blanco Rojo
Bloque de
terminales
3
"
/
8
Conexión con cable de 4 hilos:
Cable de alimentación
ADVERTENCIA
•Solo debe utilizar un juego de cable de alimentación
de 4 conductores con un valor nominal de 120/240
voltios, 50 amperios y marcado para uso en terminales
de conectores de circuito cerrado o talones de cable
pala de extremo abierto con puntas hacia arriba. El
hilo blanco (neutro) del cable de alimentación o el
conducto de 4 hilos se deben conectar al poste medio
del bloque de bornes principal.
El hilo medio (neutro) del cable de alimentación o
conducto de 4 hilos se debe conectar al poste medio
del bloque de bornes principal. Los otros dos hilos
del cable de alimentación o del conducto se deben
conectar a los postes exteriores del bloque de
bornes principal. El cuarto cable a tierra (verde) se
debe conectar al marco de la estufa con el tornillo de
conexión a tierra. El no hacerlo podría causar lesiones
personales graves, descargas eléctricas o la muerte.
Instale el cable de alimentación de la siguiente manera:
No instale el cable de alimentación sin un pasacables.
Quite los 3 tornillos inferiores del bloque de terminales y
1
consérvelos.
Retire el tornillo de conexión a tierra y doble el extremo de
2
la correa de conexión a tierra, para que la ranura quede
sobre el orificio del tornillo central que retiró en el paso 1.
Inserte el tornillo tierra en el anillo del cable tierra del
3
cable de alimentación (verde) y asegúrelo al marco de la
estufa.
Inserte los 3 tornillos a través de cada anillo de
4
terminales del cable de alimentación y en los cables
inferiores del bloque de terminales. Asegúrese de que el
hilo central (neutro) esté conectado a la posición central
inferior del bloque de bornes.
Ajuste los 3 tornillos de manera segura al bloque de
5
terminales. El tornillo central ahora fija la correa de
conexión a tierra, plegada hacia arriba, al bloque.
Placa de conexión
del conducto
Si los tornillos no están ajustados de manera segura, podría
generarse una chispa eléctrica y causar lesiones personales
graves o incluso la muerte.
Conexión con cable de 4 hilos
Negro Blanco Rojo
Bloque de
terminales
Tornillo de
conexión a tierra
Si los tornillos no están ajustados de manera segura, podría
generarse una chispa eléctrica y causar lesiones personales
graves o incluso la muerte.
Placa de conexión
del conducto
Correa de
conexión a
tierra
Pliegue la correa
hacia arriba y
ajuste
Page 79

INSTALACIÓN
ESPAÑOL
17
Conexión con cable de 3 hilos:
Conducto
Instale el conducto de la siguiente manera:
Retire la placa de conexión de conductos de la parte posterior
del horno y gírela. Se debe utilizar el orificio para conductos
1
(1
/8").
En primer lugar, prepare los hilos del conducto como se indica
a continuación.
3 hilos
3
(2,5 cm)
Placa de
conexión del
conducto
1"
/8"
(0,9 cm)
1
/2"
3
(8,9 cm)
o
En segundo lugar, instale el pasacables del conducto.
Para instalaciones de conductos, adquiera un pasacables e
insértelo en el orificio correspondiente de 1
Luego, instale el conducto a través del cuerpo del pasacables
y ajústelo con su anillo. Reinstale el soporte. Para conexiones
de conductos: si el hilo del conducto es de cobre, debe ser
cableado de 8 o 10 AWG. Si es de aluminio, debe ser cableado
de 6 u 8 AWG.
Afloje los 3 tornillos inferiores del bloque de terminales.
1
Inserte el extremo desnudo del cable (blanco/neutro) a
2
través de la abertura central del bloque de terminales.
No retire las conexiones de la correa a tierra.
Inserte los dos extremos desnudos del cable en las
3
aberturas inferiores izquierda y derecha del bloque de
terminales.
Ajuste los 3 tornillos de manera segura al bloque de
terminales (aproximadamente de 35 a 50 pulg-lb).
Conexión con cable de 3 hilos
Negro Blanco Rojo
1"
(2,5 cm)
4 hilos
1
/2"
3
(8,9 cm)
3
/8"
(0,9 cm)
Cable de
3
/4"
3
/4"
Bloque de
terminales
Extremos
del cable
conexión
a tierra
(1,9 cm)
2
(6,9 cm)
1
/8 pulgadas (2,8 cm)
Conducto
ADVERTENCIA
•El hilo medio (neutro) del cable de alimentación o
conducto de 4 hilos se debe conectar al poste medio
del bloque de bornes principal. Los otros dos hilos
del cable de alimentación o del conducto se deben
conectar a los postes exteriores del bloque de
terminales principal. El cuarto cable a tierra (verde) se
debe conectar al marco de la estufa con el tornillo de
conexión a tierra. El no hacerlo podría causar lesiones
personales graves, descargas eléctricas o la muerte.
Siga las instrucciones para instalar el conducto en la
1
conexión de 3 hilos: no instale el conducto hasta que el
pasacables y el soporte estén instalados. No instale el
conducto sin un pasacables.
Afloje los 2 tornillos inferiores izquierdo y derecho del
2
bloque de terminales. Retire los 2 tornillos centrales
inferiores. No descarte ningún tornillo.
Retire el tornillo de conexión a tierra y doble el extremo de
3
la correa de conexión a tierra, para que la ranura quede
sobre el orificio del tornillo central que retiró en el paso 1.
Una el extremo desnudo del cable de conexión a tierra
4
(verde) al marco de la estufa y asegúrelo con el tornillo
de conexión a tierra.
Inserte el extremo desnudo del cable (blanco/
5
neutro) a través de la abertura central del bloque de
terminales. El tornillo central ahora fija la correa de
conexión a tierra, plegada hacia arriba, al bloque.
Inserte los dos extremos desnudos del cable a través de
6
las aberturas izquierda y derecha del bloque de terminales.
Ajuste los 3 tornillos de manera segura al bloque de
terminales (aproximadamente de 35 a 50 pulg-lb).
Conexión con cable de 4 hilos
Negro Blanco Rojo
Bloque de
terminales
Extremos
del cable
Placa de
conexión del
conducto
Correa de
conexión
a tierra
Pliegue la
correa hacia
arriba y
ajuste
Placa de conexión
del conducto
Si los tornillos no están ajustados de manera segura, podría
generarse una chispa eléctrica y causar lesiones personales
graves o incluso la muerte.
Conexión con cable de 4 hilos:
Tornillo de
conexión a
tierra
Cable de
conexión
a tierra
Si los tornillos no están ajustados de manera segura, podría
generarse una chispa eléctrica y causar lesiones personales
graves o incluso la muerte.
Page 80

18
INSTALACIÓN
Colocación del dispositivo
antivuelco
•Mueva la terminales para que quede cerca de la abertura
para enchufar en el receptáculo.
•Deslice la estufa en posición y asegúrese de que la pata
trasera se deslice por debajo del soporte antivuelco. La
estufa debe quedar bien apoyada contra la pared trasera,
cuando está bien instalada.
•Con cuidado, intente inclinar la estufa hacia delante, para
asegurarse de que el soporte antivuelco esté colocado
correctamente. Si está bien instalado, el soporte
antivuelco evitará que la estufa se incline. Si la estufa se
puede inclinar, reinstale la estufa hasta que el soporte
antivuelco quede bien colocado y la estufa no se incline
hacia delante.
•Encienda la energía eléctrica. Verifique el buen
funcionamiento de la estufa.
Prueba de funcionamiento
Verifique que la estufa esté bien instalada y realice un ciclo de
prueba.
Antes de usar la placa de cocción por primera vez,
1
límpiela con un limpiador para placas de cocción de
cerámica. Esto ayudará a protegerla y facilitará la
limpieza.
Presione Clear/Off para iniciar la prueba.
2
Encienda todos los quemadores en la posición HI para
3
verificar que los elementos funcionan apropiadamente.
Las hornallas deben emitir un brillo rojo e irradiar calor y
deben cumplir el ciclo de encendido y apagado
periódicamente, incluso cuando las perillas estén en
la posición Hi. Este ciclo evita que la vitrocerámica se
quiebre debido al choque térmico.
IMPORTANTE: La zona de calentamiento no consume
energía suficiente como para emitir un brillo rojo.
Después de controlar todas las hornallas superficiales,
4
verifique el sistema de bloqueo presionando Clear/
Off durante tres segundos. La puerta del horno debe
bloquearse y la placa de cocción no debe funcionar
mientras que la función Bloqueo está encendida.
Presione Clear/Off durante tres segundos para inhabilitar
el bloqueo.
La función de Lockout [Bloqueo] debe deshabilitar la
operación del horno y la cubierta.
Ahora verifique el funcionamiento del horno. Presione
5
Bake y presione las teclas numéricas necesarias, para
configurar la temperatura del horno a 350 °F.
El horno debe terminar de precalentarse en 15 minutos
6
y el ventilador de convección debe funcionar mientras el
horno se está precalentando.
Después de controlar el funcionamiento del horno,
7
suba la temperatura a 450 °F y deje el horno encendido
durante una hora, como mínimo, para ayudar a remover
cualquier resto de aceite que pudiera causar humo y
olores al usar el horno por primera vez.
NOTA
Cuando la estufa se usa por primera vez, podría salir
humo.
Page 81

ESPAÑOL
FUNCIONAMIENTO
2 1 3 4
5 67
2 1 41
5 637
2 1 41
5 637
Descripción general del panel de control
Modelo LREL6325**
Modelo LREL6323**
FUNCIONAMIENTO
19
Modelo LREL6321**
1
Funciones
2
Control del horno
3
Botones numéricos o botón +/-
4
Tecla de inicio
Indicador de superficie caliente
El indicador de HS (superficie caliente) permanecerá encendido en el tablero mientras cualquier área de la superficie de cocción
se encuentre demasiado caliente para tocarla. Permanecerá encendido hasta que sea apagado y hasta que la superficie se haya
enfriado aproximadamente a 150°F. También, el indicador de HS (superficie caliente) se mostrará durante el ciclo de self clean.
Temporizador intermitente
Si el horno muestra un reloj intermitente, toque Clock y restablezca la hora o presione cualquier tecla para detener el indicador
intermitente.
5
Tecla Borrar apagado / Bloqueo
6
Smart Diagnosis
7
Hornallas de la placa de cocción
TM
(en algunos modelos)
Page 82

20
FUNCIONAMIENTO
Cambio de las configuraciones
del horno
Clock (Reloj)
El reloj se debe configurar en la hora correcta del día para que
las funciones automáticas del temporizador del horno
funcionen de manera adecuada.
Modelo LREL6325**
Presione Clock.
1
Presione los Number para ingresar la hora.
2
Presione Start.
3
Modelo LREL6323** / LREL6321**
Modelo LREL6323**
1
Mantenga presionado el Cook Time botón durante tres
segundos.
Modelo LREL6321**
Presione Clock.
Presione el botón +/– para seleccionar la hora.
2
Presione Start.
3
NOTA
•No se puede cambiar la hora del día durante un
proceso de horneado con temporizador o un ciclo de
autolimpieza (en algunos modelos).
•Para verificar la hora del día cuando la pantalla muestra
otra información, presione Clock.
•Si no se presiona ninguna otra tecla en el lapso de
25 segundos después de haber presionado Clock, la
pantalla volverá a la configuración original.
•Si la hora en pantalla parpadea, podría haber un fallo
en el suministro eléctrico. Restablezca la hora.
Oven Light (Luz del horno)
La luz interior del horno se enciende automáticamente cuando
se abre la puerta. Presione Light para encender manualmente
la luz del horno.
NOTA
La luz del horno no se puede encender si la función
Autolimpieza (en algunos modelos) está activa.
Conguraciones mínimas y máximas
predeterminadas
Todas las funciones detalladas tienen un ajuste mínimo y
máximo de tiempo o temperatura, que puede ingresarse en el
control. Cada vez que se presiona una tecla de control, suena
un tono de aceptación de entrada.
Si la entrada de temperatura o tiempo está por debajo o por
encima de la configuración mínima o máxima para esa función,
suena un tono de error de entrada (dos tonos cortos).
Función
12 h.
Clock (Reloj)
24 h.
Clock (Reloj)
Cook Time
(Tiempo de
cocción)
Conv. Bake
(Hornear por
convección)
Conv. Roast
(Rostizar por
convección)
Broil (Asar)
Bake
(Hornear)
Favorite ① Pan
Favorite ② Carne
Favorite ③ Pollo
Comida
congelada
Freír con aire 300 °F 550 °F
Cocción lenta
Proof (Leudar) 12 h
Warm
(Calentar)
Self Clean
(Autolimpieza)
(en algunos
modelos)
EasyClean
®
Temp. /
tiempo
mín.
1:00
h / min
0:00
h / min
0:01
min / seg
0:01 min
300 °F /
150 °C
300 °F /
150 °C
Lo
(Bajo)
170 °F /
80 °C
170 °F 550 °F
300 °F 550 °F
300 °F 550 °F
300 °F 550 °F
Lo
(Bajo)
3 h 5 h 4 h
Temp. /
tiempo
máx.
12:59
h / min
23:59
h / min
11:59
h / min
11:59
h / min
550 °F /
285 °C
550 °F /
285 °C
Hi
(Alto)
550 °F /
285 °C
Hi
(Alto)
Valor
predeter-
minado
350 °F
(*325 °F)/
12 h
350 °F
(*325 °F)/
12 h
Hi /
3 h
350 °F /
12 h
350 °F /
12 h
350 °F /
12 h
350 °F /
12 h
400 °F /
12 h
350 °F /
12 h
Hi /
12 h
3 h
10 min
* Uso de la conversión automática
•Los tiempos predeterminados del modo de cocción se
habilitan sin configurar el tiempo de cocción.
Page 83

FUNCIONAMIENTO
ESPAÑOL
21
Timer On/Off (Temporizador
encendido/apagado)
La función Temporizador encendido/apagado sirve de
temporizador adicional en la estufa y emite un tono cuando
el tiempo configurado se ha agotado. No inicia ni detiene la
cocción.
La función Temporizador encendido/apagado se puede utilizar
durante cualquiera de las funciones de control del horno.
Configuración del temporizador
Presione el botón Timer On/Off una vez para establecer
1
el tiempo en horas y minutos, o presione el botón dos
veces para establecer el tiempo en minutos y segundos.
TIMER empezara a parpadear en la pantalla.
Ingrese el período de tiempo deseado
2
Modelo LREL6325**
Use los botones Number.
Modelo LREL6323** / LREL6321**
Use los botones +/–.
Presione Timer On/Off para iniciar el temporizador. La
3
cuenta regresiva del tiempo restante aparece en pantalla.
NOTA
Si no presiona Timer On/Off, la pantalla volverá a mostrar
la hora.
Settings (Ajustes)
Modelo LREL6323**
Mantenga presionado Start Time durante tres segundos.
Luego, presione la tecla Start Time varias veces para ir
cambiando entre las diferentes configuraciones del horno y
modificarlas.
Modelo LREL6325** / LREL6321**
Presione la tecla Settings varias veces para ir cambiando
entre las diferentes configuraciones del horno y modificarlas.
La tecla Settings permite:
•configure el modo de horas en el reloj (12 o 24 horas)
•Fijar la función de Auto Conversion de Convección del horno
Inferior (Modelo LRGL5825**/ LRGL5823**)
•ajustar la temperatura del horno
•activar/desactivar la luz de alarma de precalentamiento
•configurar el volumen del indicador sonoro
•cambiar la escala de temperatura entre Fahrenheit y Celsius
Configuración del modo de hora
El control está configurado para usar un reloj de 12 horas.
Para restablecer el reloj al modo de 24 horas, siga los pasos a
continuación.
Al agotarse el tiempo ajustado, la pantalla mostrara el
4
mensaje END. El reloj emitirá avisos cada 15 segundos
hasta que presione el botón Timer On/Off.
NOTA
Si el tiempo restante no se indica en pantalla, consúltelo
pulsando el botón Timer On/Off.
Cancelación el temporizador
Presione el Timer On/Off una vez.
1
La pantalla regresa a la hora del día
NOTA
Presionando Clear/Off no apagará el temporizador.
Modelo LREL6325**
Mantenga presionado el botón Settings.
1
Presione el 1 para seleccionar entre el reloj de 12 hrs y el
2
de 24 hrs.
Presione el botón Start para aceptar el cambio deseado.
3
Modelo LREL6323** / LREL6321**
Modelo LREL6323**
1
Mantenga presionado el botón Start Time durante 3
segundos.
Modelo LREL6321**
Mantenga presionado el botón Settings.
Presione el +/– para seleccionar entre el reloj de 12 hrs y
2
el de 24 hrs.
Presione el botón Start para aceptar el cambio deseado.
3
Page 84

22
FUNCIONAMIENTO
Como Fijar la función de Auto Conversion de Convección
del horno Inferior (Modelo LREL6325** / LREL6323**)
Cuando use el horneado por convección, la característica
de funcionamiento de auto conversión, convertirá
automáticamente las temperaturas regulares a temperaturas
de convección.
Esta característica de funcionamiento es activada para que la
pantalla muestre la temperatura actual auto convertida.
Por ejemplo, si se introduce una temperatura regular de alguna
receta de 350°F y se toque el tecla q , la pantalla mostrará la
temperatura convertida de 325˚F.
Modelo LREL6325**
Presione el Settings varias veces hasta que Auto
1
aparezca en pantalla.
Presione el 1 para seleccionar la auto conversión
2
HABILITAR o DESHABILITAR.
Presione el Start para aceptar el cambio.
3
Modelo LREL6323**
Mantenga presionado el botón Start Time durante 3
1
segundos.
Presione la tecla Start Time varias veces hasta que la
2
palabra Auto aparezca en pantalla
Presione el botón +/- para activar o desactivar la función
3
Auto Conversion.
Modelo LREL6325**
Presione el Settings varias veces hasta que AdJU
1
aparezca en la pantalla.
Use las teclas numéricas para ingresar el número de
2
grados a los que desea ajustar la temperatura del horno.
Presione Settings nuevamente para agregar un signo de
menos si la temperatura baja.
Presione el Start para aceptar el cambio.
3
Modelo LREL6323** / LREL6321**
Modelo LREL6323**
1
Mantenga presionado el botón Start Time durante 3
segundos. Presione el Start Time varias veces hasta que
AdJU aparezca en la pantalla.
Modelo LREL6321**
Presione el Settings varias veces hasta que AdJU
aparezca en la pantalla.
Establecer el número de grados para ajustar:
2
Presione o presione y mantenga presionados los botones
+/- hasta que el número deseado de grados aparezca en
la pantalla.
Presione Settings nuevamente para agregar un signo de
menos si la temperatura baja.
Presione el Start para aceptar el cambio.
3
Ajuste del termostato del horno
El horno nuevo podría cocinar de manera diferente a su
horno anterior. Use el horno nuevo durante algunas semanas
para familiarizarse con él antes de cambiar los ajustes de
temperatura. Si, después de familiarizarse con el horno nuevo,
sigue pensando que la temperatura es muy elevada o muy
baja, puede ajustar el termostato del horno.
NOTA
Para comenzar, suba o baje el termostato 15 °F (8 °C).
Pruebe el horno con la nueva configuración. Si el horno
aún necesita ajuste, suba o baje nuevamente el termostato
y utilice el primer ajuste como referencia medidora.
Por ejemplo, si el ajuste fue excesivo, suba o baje el
termostato 10 °F (5 °C). Si el ajuste no fue suficiente,
suba o baje el termostato 20 °F (12 °C). Proceda de
esta manera hasta que el horno quede ajustado para su
satisfacción.
NOTA
•Este ajuste no afecta a las temperaturas de asar. El
ajuste se retiene en la memoria después de una falla
eléctrica.
•Es posible subir (+) o bajar (-) el termostato del horno
hasta 35 °F o 19 °C.
•Una vez que haya subido o bajado el termostato, la
pantalla mostrará la temperatura ajustada hasta que la
misma se vuelva a ajustar
Page 85

FUNCIONAMIENTO
ESPAÑOL
23
Encendido/apagado de la luz de alarma de
precalentamiento
Cuando el horno alcanza la temperatura programada, la luz de
alarma de precalentamiento parpadea 5 veces o hasta que se
abra la puerta del horno.
Puede activar o desactivar la luz de alarma de
precalentamiento.
Modelo LREL6325**
Presione Settings varias veces hasta que PrE aparezca
1
en pantalla.
Presione el 1 para encender/apagar la luz.
2
Presione Start para aceptar el cambio.
3
Modelo LREL6323** / LREL6321**
Modelo LREL6323**
1
Mantenga presionado el botón Start Time durante 3
segundos. Presione Start Time varias veces hasta que
PrE aparezca en pantalla.
Modelo LREL6321**
Presione Settings varias veces hasta que PrE aparezca
en pantalla.
Presione el +/– para encender/apagar la luz.
2
Presione Start para aceptar el cambio.
3
Selección de grados Fahrenheit o Celsius
Configure la visualización de la temperatura del horno para
que muestre unidades Fahrenheit (°F) o Celsius (°C). El ajuste
predeterminado del horno es en unidades Fahrenheit, a menos
que lo cambie el usuario.
Modelo LREL6325**
Presione el Settings varias veces hasta que Unit
1
aparezca en pantalla.
Presione el 1 para seleccionar F (Fahrenheit) o C
2
(Celsius).
Presione el Start para aceptar el cambio.
3
Modelo LREL6323** / LREL6321**
Modelo LREL6323**
1
Mantenga presionado el botón Start Time durante 3
segundos. Presione el Start Time varias veces hasta que
Unit aparezca en pantalla.
Modelo LREL6321**
Presione el Settings varias veces hasta que Unit
aparezca en pantalla.
Presione el +/– para seleccionar F (Fahrenheit) o C
2
(Celsius).
Presione el Start para aceptar el cambio.
3
Ajuste del volumen del indicador sonoro
Modelo LREL6325**
Presione el Settings varias veces hasta que Beep
1
aparezca en la pantalla.
Presione el 1 para seleccionar Hi, Lo u Off.
2
Presione el Start para aceptar el cambio.
3
Modelo LREL6323**/LREL6321**
Modelo LREL6323**
1
Mantenga presionado el botón Start Time durante 3
segundos. Presione el Start Time varias veces hasta que
Beep aparezca en la pantalla.
Modelo LREL6321**
Presione el Settings varias veces hasta que Beep
aparezca en la pantalla.
Presione el +/– para seleccionar Hi, Lo u Off.
2
Presione el Start para aceptar el cambio.
3
Lockout (Bloqueo)
La función de Lockout (Bloqueo) deshabilita la mayoría de los
controles del horno. No deshabilita el temporizador ni la luz del
horno ni el bloqueo de la puerta.
Mantenga presionado Clear/Off durante tres segundos.
1
Suena la melodía de bloqueo, aparece Loc en la pantalla
2
y el candado
Una vez que se haya bloqueado la puerta del horno,
3
el indicador
encendido.
Para desactivar la función Bloqueo, mantenga presionado
4
Clear/Off durante tres segundos. Suena la melodía de
desbloqueo y la puerta y los controles se destraban.
NOTA
En los modelos sin el modo de autolimpieza, la función
de Bloqueo bloquea los controles, pero no la puerta del
horno. El indicador de bloqueo
titila en la pantalla.
de bloqueo deja de titilar y permanece
no titila.
Page 86

24
FUNCIONAMIENTO
Cook Time (Timed Cook) (Tiempo de
cocción [Cocción temporizada])
Configure el horno para que realice la cocción durante un
período específico de tiempo mediante la función Cocción
temporizada. Esta función solo puede usarse con los modos
Bake, Conv. Bake y Conv. Roast.
Configuración de la función Cook Time
Por ejemplo, para hornear a 300 °F durante 30 minutos,
primero debe configurar el reloj en la hora correcta del día.
Modelo LREL6325**
Presione Bake. 350 °F aparece en la pantalla.
1
Ajuste la temperatura. Presione 3, 0 y 0.
2
Presione Cook Time. Timed parpadea en la pantalla.
3
Aparecen Bake, 300 °F y 0:00 en la pantalla.
Configure el tiempo de horneado: Presione 3 y 0.
4
El tiempo de horneado se puede configurar para
cualquier cantidad de tiempo entre 1 minuto y 11 horas y
59 minutos.
Presione START.
5
Modelo LREL6323** / LREL6321**
Presione Bake. 350 °F aparece en la pantalla.
1
Cambio del tiempo de cocción durante la cocción
Por ejemplo, para cambiar el tiempo de cocción de 30 minutos
a 1 hora y 30 minutos, haga lo siguiente.
Modelo LREL6325**
Presione Cook Time.
1
Cambie el tiempo de horneado: Presione 1, 3 y 0.
2
Presione START para aceptar el cambio.
3
Modelo LREL6325**
Presione Cook Time.
1
Cambie el tiempo de horneado: Presione el botón +/–.
2
Presione START para aceptar el cambio.
3
Start Time (Delayed Timed Cook)
(Hora de inicio [Cocción temporizada
retardada])
El temporizador automático de la función Cocción temporizada
retardada enciende y apaga el horno a la hora que usted
seleccione. Esta función puede usarse con los modos Bake,
Conv. Bake, Conv. Roast y Self-Cleaning.
Ajuste la temperatura. Presione el botón +/–.
2
Presione Cook Time. Timed parpadea en la pantalla.
3
Aparecen Bake, 300 °F y 0:00 en la pantalla.
Configure el tiempo de horneado:
4
Presione el botón +/– para ajustar el tiempo de horneado.
El tiempo de horneado se puede configurar para
cualquier cantidad de tiempo entre 1 minuto y 11 horas y
59 minutos.
Presione START.
5
NOTA
Para activar la función de Calentamiento al final del ciclo
de cocción programado, repita los pasos 1-4 y luego
presione la tecla Warm. La palabra Warm aparecerá en la
pantalla. (consulte la sección de Warm en la página 34)
El horno seguirá cocinando durante la cantidad de tiempo
configurada y luego se apagará automáticamente. Cuando
haya transcurrido el tiempo de cocción:
•Aparecen End y la hora del día en pantalla.
•El tono indicador de fin de cocción suena cada 60 segundos
hasta presionar la tecla Clear/Off (Borrar/Apagado).
•Cuando se configura Warm, se activa la función de
calentamiento después de que termina el tiempo de cocción.
Configuración de una cocción temporizada retardada
Por ejemplo, para hornear a 350 °F y retardar el inicio del
proceso de horneado hasta las 4:30, primero debe configurar
el reloj en la hora correcta del día.
Modelo LREL6325**
Presione Bake. 350 °F aparece en la pantalla.
1
Ajuste la temperatura: toque 3, 5 y 0.
2
Presione Start Time y toque las teclas numéricas para
3
ajustar el tiempo de horneado.
Presione Start.
4
Ajuste la hora de inicio: presione 4, 3 y 0 para 4:30.
5
Presione Start. Se activará un indicador sonoro breve
6
y en la pantalla aparecerá Timed Delay y la hora de
inicio. El horno comenzará a hornear a la hora de inicio
configurada
Page 87

FUNCIONAMIENTO
ESPAÑOL
25
Modelo LREL6323** / LREL6321**
Presione Bake. 350 °F aparece en la pantalla.
1
Ajuste la temperatura:
2
Presione o mantenga presionados los botones +/– hasta
que aparezca en pantalla la temperatura deseada.
Presione Cook Time y toque las teclas +/– para ajustar
3
el tiempo de horneado.
Presione Start.
4
Configure la hora de inicio:
5
Use los botones +/– para ajustar el tiempo que aparezca
en pantalla de forma que coincida con su tiempo de inicio
deseado.
Presione Start. Se activará un indicador sonoro breve
6
y en la pantalla aparecerá Timed Delay y la hora de
inicio. El horno comenzará a hornear a la hora de inicio
configurada.
NOTA
•Para cancelar la función Delayed Timed Cook (Cocción
temporizada retardada), toque Clear/Off.
•Para cambiar el tiempo de cocción, repita el paso 3 y
toque Start.
•Si el reloj del horno está configurado en un formato de
12 horas, puede retardar la hora de inicio de la cocción
por 12 horas. Si el reloj de su horno está configurado
para 24 horas, puede retardar la hora de inicio de la
cocción por 24 horas.
El horno seguirá cocinando durante la cantidad de tiempo
configurada y luego se apagará automáticamente. Cuando
haya transcurrido el tiempo de cocción:
•Aparecen End y la hora del día en pantalla.
•El tono indicador de fin de cocción suena cada 60 segundos
hasta presionar la tecla Clear/Off.
•Cuando se configura Warm, se activa la función de
calentamiento después de que termina el tiempo de cocción.
InstaView™
Golpee dos veces el centro del panel de cristal para revelar los
contenidos del horno sin abrir la puerta.
•Al golpear dos veces el panel de cristal enciende y apaga la
luz interior.
•La luz se apaga automáticamente después de 90 segundos.
•La función InstaView™ se desactiva cuando se abre la
puerta del horno y permanece desactivada durante dos
segundos después de que se cierra la puerta.
ADVERTENCIA
No golpee con mucha fuerza el panel de la puerta de
cristal. No permita que objetos duros, como los utensilios
de cocina o las botellas de vidrio, golpeen el panel de la
puerta de cristal. El cristal se podría romper y provocar un
riesgo de lesiones personales o dañar el producto.
NOTA
•Es probable que si golpea suavemente sobre los bordes
del panel de cristal no active la función InstaView™.
•Los golpes en el panel de cristal deben ser los
suficientemente fuertes como para escucharse.
•Los ruidos fuertes cerca del horno pueden activar la
función InstaView™.
PRECAUCIÓN
•Utilice el temporizador automático al cocinar carnes
curadas o congeladas, y la mayoría de las frutas y los
vegetales. Los alimentos que pueden echarse a perder
fácilmente como la leche, huevos, pescado, carne o
aves se deben enfriar en el refrigerador. Incluso cuando
se hayan enfriado, no deben permanecer en el horno
durante más de 1 hora antes de iniciar la cocción y se
los debe retirar rápidamente una vez que la cocción
haya terminado.
•Ingerir alimentos en mal estado puede producir
intoxicaciones alimentarias.
Page 88

26
FUNCIONAMIENTO
Uso de la placa de cocción
Áreas de cocción
Las áreas de cocción de la estufa están identificadas por
círculos permanentes en la superficie de vidrio de la placa
de cocción. Para una cocción más eficiente, utilice el tamaño
correcto de batería de cocina para el tamaño de cada hornalla.
1
La batería de cocina no deben extenderse más de
pulgada del área de cocción.
Cuando se enciende un control, se produce un brillo visible a
través de la superficie de vidrio de la placa de cocción.
NOTA
Es normal que las hornallas de la superficie se enciendan
y apaguen durante la cocción, incluso en configuraciones
muy elevadas. Esto sucede con más frecuencia si se
cocina en un ajuste de temperatura inferior.
SIMPLE
DOBLE TRIPLE
ZONA
CALIENTE
SIMPLE
/2 a 1
Uso de las hornallas de la placa de
cocción
PRECAUCIÓN
•Utilice únicamente batería de cocina y fuentes que sean
seguras para uso en el horno y la placa de cocción.
•Use siempre agarraderas o guantes para horno al
retirar alimentos de la placa de cocción y del horno.
•No coloque recipientes sellados sobre la placa de
cocción.
•No utilice envolturas plásticas para cubrir alimentos
mientras estén sobre la placa de cocción. El plástico
podría derretirse sobre la superficie y resulta muy difícil
de limpiar.
•NUNCA deje alimentos sin supervisión sobre la
placa de cocción. Los derrames podrían causar
humo. Los derrames grasosos podrían iniciar un
incendio.
•Es posible que la hornalla parezca que se ha enfriado
después de apagarla. La hornalla aún podría estar
caliente y tocarla antes de se haya enfriado lo suficiente
puede causar quemaduras
•No use la placa de cocción a altas temperaturas
durante un período excesivo, ya que el panel de control
podría dañarse.
NOTA
Es normal notar un tono rojizo muy pálido alrededor
del borde externo de una hornalla doble o triple cuando
se utiliza como hornalla simple en un ajuste de alta
temperatura. Esto es solo un reflejo del brillo intenso de la
hornalla central y no constituye un mal funcionamiento.
Indicador de supercie caliente
Una vez que el elemento es apagado, HS (el indicador de
superficie caliente) aparecerá en la pantalla durante todo el
momento que la superficie sea demasiado caliente para ser
tocada.
Se mantiene encendido hasta que la superficie se haya
Enfriado aproximadamente a 150°F.
NOTA
Durante Auto Limpieza (en algunos modelos), HS se
mantiene encendido.
Encendimiento de una hormalla simple
Empuje hacia dentro la perilla de la hornalla simple.
1
Gire la perilla en cualquiera de ambas direcciones hasta
2
lograr el ajuste deseado. La perilla de control haga clic
cuando está posicionada tanto en Off como en Hi.
Hornallas
Apagado
Simple
Hornallas
Encendido
NOTA
•Hi es la temperatura más elevada disponible.
•Lo es la temperatura más baja disponible.
Page 89

FUNCIONAMIENTO
ESPAÑOL
A B
27
Encendimiento de una hormalla doble
En la posición frontal izquierda encontrará una hornalla doble.
Utilice la hornalla doble como tal o como una hornalla simple.
1
2-A
2-B
Empuje hacia dentro la perilla correspondiente.
Gire la perilla en sentido contrario a las agujas del
reloj para usarla como hornalla simple.
Gire la perilla en sentido de las agujas del reloj para
usarla como hornalla doble.
Calentar solo con la hornalla
interno (más pequeña)
Calentar con ambas
hornallas combinadas
Encendimiento de la Zona de calentamiento
PRECAUCIÓN
PELIGRO DE INTOXICACIÓN ALIMENTARIA: En los
alimentos cocinados a temperaturas inferiores a 140 °F,
pueden crecer bacterias.
•Siempre debe comenzar con comida caliente. No
caliente alimentos fríos en la zona de calentamiento.
•No utilice la configuración de calentamiento durante más
de 2 horas.
•Siempre use un sostenedor de ollas o guantes
para horno cuando retire alimentos de la zona de
calentamiento central.
La Zona de calentamiento, ubicada en la parte central posterior de
la superficie vidriada, mantendrá calientes los alimentos cocidos
a una temperatura para servir. Use la Zona de calentamiento para
mantener la comida caliente, después de haberla cocinado. Intentar
cocinar alimentos crudos o fríos en la Zona de calentamiento
podría causar enfermedades transmitidas por los alimentos.
Presione el COOKTOP Seht/Off una vez. La luz
1
indicadora de la zona de calentamiento parpadea
Modelo LREL6325**
2
Use los botones de Level para ajustar la configuración de
temperatura. Los ajustes de temperatura son ajustables
en todo momento.
Encendimiento de una hormalla triple (en alaunos
modelos)
En algunos modelos, existe una hornalla triple que se puede
utilizar como hornalla simple, doble o triple.
1
2-A
2-B
2-C
Empuje hacia dentro la perilla correspondiente.
Gire la perilla en sentido contrario a las agujas del
reloj para usar la hornalla simple.
Gire la perilla en sentido de las agujas del reloj
hasta la posición doble para usarla como hornalla
doble.
Gire la perilla en sentido de las agujas del reloj
hasta la posición triple para usarla como hornalla
triple.
Simple Doble Triple
Modelo LREL6323** / LREL6321**
Use los botones - / + para ajustar la configuración de
temperatura. Los ajustes de temperatura son ajustables
en todo momento.
Para apagar la zona de calentamiento, presione el botón
3
Set/Off una vez
NOTA
•Para obtener mejores resultados, mantenga la comida
que está sobre la zona de calentamiento dentro de su
recipiente o cubierta con una tapa adecuada o papel de
aluminio para mantener la calidad de la comida.
•El calentador no emite un brillo rojizo como las demás
hornallas.
•Es posible operar la Zona de calentamiento como una
hornalla simple en algunos modelos de cocinas.
Conguración recomendada de
cocción en supercie
Configuración
8,5 a Hi
(alto)
5,5-8,0
3,5-5,0
2,2-3,0
Lo (bajo) a
2,0
•Llevar líquidos al hervor
•Comenzar a cocinar
•Mantener un hervor rápido, rehogado o fritura
•Dorado o sellado rápido de alimentos
•Mantener un hervor lento
•Fritura o salteado de alimentos
•Cocinar sopas, salsas y aderezos
•Cocinar alimentos estofados o al vapor
•Cocción a fuego lento
•Mantener calientes los alimentos
•Derretir chocolate o manteca
•Cocción a fuego lento
Uso recomendado
Page 90

28
FUNCIONAMIENTO
Uso de batería de cocina adecuada
El tamaño y tipo de batería de cocina influye en los ajustes
necesarios para obtener resultados óptimos de cocción.
Asegúrese de seguir las recomendaciones para utilizar la
batería de cocina adecuada.
La batería de cocina debe tener
fondo plano para hacer buen
contacto con la superficie completa
de la hornalla. Verifique que los
recipientes sean planos colocando
una regla a lo largo del fondo. La
regla debe tocar todo el fondo del
recipiente, sin dejar brechas.
Recomendaciones para la batería de cocina
•Con fondo plano y lados rectos
•Sartenes gruesos.
•Sartenes cuyos tamaños coincidan con la cantidad de
alimentos a preparar y el tamaño de la hornalla
•El peso de la manija no debe inclinar el sartén. El sartén
debe estar bien equilibrado.
•Tapas que queden bien ajustadas
•Woks con fondo plano
La batería de cocina
•No debe tener fondo curvo ni
torcido.
•No debe ser ni más pequeña ni
más grande que la hornalla.
•No debe tener una manija pesada
que la incline.
•No debe ser un wok con base
circular.
•No debe tener manijas flojas ni rotas.
•No debe tener tapas flojas.
NOTA
•No utilice sartenes que midan menos de 7 pulgadas
de ancho sobre las hornallas frontales.
•No use recipientes de papel de aluminio o de tipos
similares. El papel aluminio podría derretirse sobre el
vidrio del área de cocción. No utilice la placa de cocción
si se ha derretido metal sobre ella. Llame a un Centro
de servicio al cliente de LG autorizado.
Elección de la batería de cocina
El material de la batería de cocina determina la uniformidad y
la rapidez en que se transfiere el calor de la hornalla al fondo
del recipiente. Los materiales más populares disponibles son:
•Aluminio: excelente conductor de calor. Algunos tipos de
alimentos pueden oscurecer este tipo de recipientes
(la batería de cocina de aluminio anodizado resiste las
manchas y las picaduras). Si los sartenes o cacerolas de
aluminio se deslizan por la placa de cocción de cerámica,
podrían dejar marcas de metal parecidas a rayaduras. Quite
estas marcas de inmediato.
•Cobre: excelente conductor de calor, pero se decolora con
facilidad. Podría dejar marcas de metal en la vitrocerámica
(consulte Aluminio más arriba).
•Acero inoxidable: conductor lento del calor con resultados
de cocción disparejos. Es duradero, fácil de limpiar y resiste
las manchas.
•Hierro forjado: conductor de calor deficiente, pero retiene el
calor perfectamente. Cocina de manera pareja una vez que
alcanzada la temperatura de cocción. No se recomienda
para el uso sobre placas de cocción de cerámica.
•Porcelana esmaltada sobre metal: las características de
calentamiento varían según el material de base. El
revestimiento de porcelana esmaltada debe ser suave, para
no rayar las placas de cocción de cerámica.
•Vidrio: conductor lento del calor. No se recomienda para
superficies con placa de cocción de cerámica porque podría
rayar el vidrio.
Sugerencias para preparar conservas
caseras
Asegúrese de que el envasador esté bien centrado sobre
la hornalla y que sea de fondo plano.
•La base no debe ser más de 1 pulgada más grande con
respecto a la hornalla. El uso de envasadores a baño María
con fondos ondulados podría extender el tiempo requerido
para que el agua hierva y podría dañar la placa de cocción.
•Algunos envasadores están diseñados con bases más
pequeñas para usar sobre superficies suaves.
•Use la configuración de temperatura alta solo hasta que el
agua hierva o el producto a conservar alcance la presión
deseada.
•Reduzca a la configuración de temperatura más baja que
mantenga el hervor o la presión. Si el calor no se reduce,
podría dañarse la placa de cocción.
Page 91

FUNCIONAMIENTO
ESPAÑOL
29
Uso del horno
Antes de usar el horno
NOTA
•Como la temperatura del horno es cíclica, el
termómetro que está dentro de la cavidad del horno
podría no indicar la misma temperatura que está
configurada.
•Es normal que el ventilador de convección funcione
durante el precalentamiento en un ciclo normal de
horneado.
•El motor del ventilador de convección podría funcionar
periódicamente durante un ciclo normal de horneado.
•Si la puerta queda abierta durante el proceso de
horneado, el calor se escapa. El calor regresa
automáticamente cuando la puerta se cierra.
Ventilación del horno
Las áreas cercanas a la ventilación podrían calentarse durante
el funcionamiento y causar quemaduras. No bloquee la
abertura de ventilación. Evite colocar plásticos cerca de la
ventilación, ya que el calor podría deformar o derretir el
plástico.
Es normal que se vea vapor cuando se cocinan alimentos con
un alto contenido de humedad.
Colocación de los estantes
Coloque el extremo del estante sobre el soporte.
1
Incline el extremo frontal hacia arriba y empuje el estante
2
hacia dentro.
PRECAUCIÓN
•Coloque los estantes del horno antes de encenderlo
para evitar quemaduras.
•No cubra los estantes con papel de aluminio ni ningún
otro material, ni coloque nada sobre el fondo el horno.
Si lo hace, podría generar un proceso de horneado
deficiente y dañar la base del horno.
•Acomode los estantes del horno solo cuando el horno
esté frío.
Bake (Hornear)
Hornear se utiliza para preparar alimentos como pasteles,
panes y estofados. Es posible programar el horno para hornear
a cualquier temperatura entre 170 °F (80 °C) y 550 °F (285
°C). La temperatura predeterminada es 350 °F (175 °C).
Configuración de la función Hornear (por ejemplo a 375 °F)
Presione Bake.
1
Ventilación del horno
Uso de los estantes del horno
Los estantes tienen un borde posterior hacia arriba que evita
que salgan de la cavidad del horno.
Extracción de los estantes
Tire del estante hacia fuera, sin inclinarlo, hasta que se
1
detenga.
Levante el frente del estante y tire hacia fuera.
2
Establecer la hora del día.
2
Modelo LREL6325**
Presione 3, 7 y 5.
Modelo LREL6323**/LREL6321**
Utilice los botones +/– para configurar la temperatura
deseada.
Presione Start. El horno comienza a precalentar.
3
A medida que el horno se precalienta, la temperatura aparece
en pantalla y se eleva en incrementos de 5 grados. Una vez
que el horno alcanza la temperatura configurada, suena un
tono y la luz del horno se enciende y apaga.
Cuando se completa la cocción, presione Clear/Off.
4
Retire los alimentos del horno.
5
NOTA
Es normal que el ventilador de convección funcione
periódicamente durante un ciclo de cocción normal en el
horno. Esto sirve para asegurar resultados uniformes al
hornear.
Page 92

30
FUNCIONAMIENTO
Sugerencias de horneado
•El tiempo y la temperatura de horneado variarán según las
características, el tamaño y la forma del recipiente que se
utilice para hornear.
•Verifique el punto de cocción de los alimentos en el tiempo
mínimo de la receta.
•Use recipientes metálicos (con o sin acabado antiadherente),
vitrocerámica templada, cerámica u otro tipo de recipiente
recomendado para uso en el horno.
•Las bandejas metálicas oscuras o con revestimientos
antiadherentes cocinarán los alimentos más rápido y más
dorados. Los recipientes aislados prolongarán ligeramente
el tiempo de cocción de la mayoría de los alimentos.
NOTA
La base del horno tiene un acabado de porcelana esmaltada.
Para facilitar la limpieza, proteja la base del horno de
derrames excesivos colocando una placa para horno sobre
el estante inferior al que está usando para cocinar. Esto es
especialmente importante al hornear un pastel de frutas u
otros alimentos con alto contenido de ácido. Los rellenos
frutales calientes u otros alimentos con alto contenido de
ácido pueden causar picaduras y daños en la superficie de
porcelana esmaltada y se deben limpiar de inmediato.
Modo de convección (Modelo
LREL6325** / LREL6323**)
El sistema de convección usa un ventilador para hacer circular
el calor de manera pareja dentro del horno. La distribución
de calor mejorada permite una cocción uniforme y resultados
excelentes mientras cocina con uno o más estantes.
Configuración de la función CONVECTION BAKE (por
ejemplo, 375° F):
Presione el botón Conv. Bake o Conv. Roast. Aparecerá
1
en la pantalla 350° F.
Establecer la hora del día.
2
Modelo LREL6325**
Presione 3, 7 y 5.
Modelo LREL6323**
Utilice los botones +/– para configurar la temperatura
deseada.
Presione START. La pantalla despliega el mensaje
3
Conv. Bake o Conv. Roast, y la temperatura del horno
comenzara en los 100˚F.
A medida que el horno se precalienta, la temperatura aumenta
en incrementos de cinco grados. Una vez que el horno alcanza
la temperatura configurada, suena un tono y la luz del horno se
enciende y apaga. La pantalla muestra la temperatura del horno
convertida automáticamente a 350 °F y el icono del ventilador.
WCuando la cocción ha finalizado o para cancelar,
4
presione el botón Clear/Off.
NOTA
El ventilador del horno funciona mientras se hornea por
convección. El ventilador se detiene cuando la puerta está
abierta. En algunos casos, el ventilador podría apagarse
durante un ciclo de horneado por convección.
Sugerencias para hornear por convección
•Use el horneado por convección para cocinar más rápido y
de manera más pareja en varios estantes: pasteles, galletas,
muffins, bizcochos y panes de todo tipo.
•Hornee galletas y bizcochos en bandejas sin bordes o con
bordes muy bajos para que el aire caliente circule alrededor
de los alimentos. Los alimentos horneados en bandejas con
un acabado oscuro se cocinan más rápido.
•Cuando utilice la función Horneado por convección con un
solo estante, coloque el estante del horno en la posición 4.
Si cocina en varios estantes, coloque los estantes del horno
en las posiciones 2 y 4 (o 5) para dos estantes.
•La cocción en distintos estantes del horno puede aumentar
ligeramente los tiempos de cocción para algunos alimentos.
•Obtendrá mejores resultados al hornear pasteles, galletas y
magdalenas usando varios estantes.
La función Rostizar por convección está diseñada para brindar
un desempeño óptimo del asador. La función para Rostizar por
convección combina la cocción con el ventilador de
convección, para asar carnes rojas y blancas. El aire caliente
circula alrededor de los alimentos desde todos los ángulos y
sella los jugos y sabores. Los alimentos quedan dorados y
crocantes por fuera y jugosos por dentro. La función para
rostizar por convección es ideal para cortes grandes de carne
tierna sin cubrir.
Sugerencias para rostizar por convección
Use una asadera y una rejilla al preparar carnes para rostizar
por convección. La asadera recibe los derrames de grasa y la
rejilla ayuda a evitar salpicaduras de grasa.
Coloque el estante del horno en la parte inferior.
1
Coloque la rejilla en la asadera.
2
Coloque la asadera sobre el estante del horno.
3
Rejilla (se vende por separado)
Asadera (se vende por separado)
PRECAUCIÓN
•No utilice una asadera sin rejilla.
•No cubra la rejilla con papel de aluminio.
•Posicione los alimentos (el lado de la grasa hacia
arriba) sobre la rejilla.
Page 93

FUNCIONAMIENTO
ESPAÑOL
31
Guía de recomendaciones para
hornear y rostizar
Los resultados del horneado serán mejores si las bandejas
están centradas en el horno lo mejor posible. Si se cocina en
varios estantes del horno, colóquelos en la posición que se
ilustra.
Colocación de estantes y bandejas
Horneado en un solo estante
Estante
(Posición 4)
Guía de ubicación de los estantes para hornear
Alimento
•Pasteles en capas
Pasteles
Galletas
Pizza
Masa de
hojaldre
Panes
Postres
Cremas •Cheesecake, crème brulée 2
Suflés •Dulce o salado 2
Cazuela •Lasaña congelada 5
•Pasteles savarín
•Pastel de ángel
•Galletas azucaradas
•Con chispas de chocolate
•Brownies
•Fresca
•Congelada
•Casera
•Refrigerada
•Bizcochos, enlatados
•Bizcochos, caseros
•Muffins
•Frutas azucaradas y
crujientes, caseras
•Tartas de frutas con 2
cubiertas, caseras
Posición del
estante
4
3
3
4
4
4
3
3
4
4
5
5
5
4
4
Horneado en varios estantes
Estante
(Posición 2)
Estante
(Posición 5)
Guía de posición de los estantes para asar
Posición del
Filete
Cerdo
Aves
Alimento
Poco
Costilla
Costilla
deshuesada,
sirlon
Lomo de
ternera
Costilla 2
Con hueso, sirlon 2
Jamón, cocido 2
Pollo entero
Piezas de pollo
Pavo
cocidos
Medias
Bien cocidas
Poco
cocidos
Medias
Bien cocidas
Poco
cocidos
Medias
estante
2
2
2
2
2
2
2
2
2
2
2
Page 94

32
FUNCIONAMIENTO
Broil (Asar)
La función Asar usa calor intenso proveniente del elemento
calentador superior para cocinar el alimento. Este método
de cocción es ideal para cortes de carne tiernos, pescados y
verduras finamente cortadas.
Algunos modelos pueden contar con un asador híbrido
formado por un asador interno que utiliza un calentador de
carbón que irradia calor instantáneo y un asador externo
tradicional. Durante el funcionamiento normal del asador, es
común que estos se apaguen en forma intermitente.
PRECAUCIÓN
•No utilice una asadera sin rejilla. El aceite puede
provocar un incendio causado por grasa.
•No cubra la rejilla ni la asadera con papel de aluminio.
Si lo hace, se prenderá fuego.
•Siempre use una asadera con rejilla para drenar el
exceso de grasa. Esto ayuda a reducir las salpicaduras,
el humo y las llamaradas ocasionales.
Configuración del horno en Asar
La puerta debe estar cerrada en modo Broil.
1
Presione Broil una vez para Hi o dos veces para Lo.
2
Presione Start. El horno comienza a calentar.
3
Deje que el horno se precaliente aproximadamente cinco
4
minutos antes de cocinar los alimentos al utilizar Asar.
Humo
Debido al calor intenso que se produce cuando se asa, es
normal que haya humo durante el proceso de cocción. Este
humo es un subproducto natural del chamuscado y no es
motivo de preocupación. Si se genera más humo del que
puede tolerar, aplique los siguientes consejos para reducir la
cantidad de humo del horno.
Siempre use una asadera. Por seguridad, no use
1
sartenes ni placas para horneado comunes.
La asadera siempre se debe limpiar bien y a temperatura
2
ambiente antes de empezar a cocinar.
Siempre haga funcionar el sistema de ventilación de la
3
placa de cocción o la campana de ventilación mientras
asa.
Mantenga el interior del horno lo más limpio posible. Los
4
residuos de comidas anteriores se pueden quemar o
encender.
Evite los marinados grasos y los glaseados azucarados.
5
Estos aumentan la cantidad de humo que se genera. Si
desea usar un glaseado, aplíquelo al final de la cocción.
Si hay una cantidad significativa de humo con cualquier
6
alimento, considere las siguientes opciones:
•Bajar el asador al ajuste Lo.
•Bajar el estante para cocinar la comida más lejos del
asador.
•Usar el ajuste de asado Hi para lograr el nivel de
dorado deseado y, luego, cambiar al ajuste Lo, o
cambiar a la función Hornear.
Generalmente, los cortes de carne y pescados más
7
grasos siempre producirán más humo que los alimentos
más magros.
Siga las recomendaciones de ajuste para asar y las
8
pautas de cocción del cuadro de la página siguiente
siempre que sea posible.
Presione Clear/Off para cancelar la cocción en cualquier
5
momento o cuando haya terminado de cocinar.
Page 95

FUNCIONAMIENTO
ESPAÑOL
33
Guía de recomendaciones para asar
El tamaño, peso, espesor, temperatura inicial y su preferencia de cocción afectarán el tiempo de asado.
Esta guía se basa en carnes a temperatura de refrigerador. Para obtener mejores resultados al asar, use una bandeja especial para
asar.
Alimento
Carne molida de
vaca
Bistecs
Poco cocido
Medio
Bien cocido
Poco cocido
Medio
Bien cocido
Tostados 7 0,5-1 0,5
Pollo 1 corte entero de
Colas de langosta 2–4
Filetes de pescado
Pedazos de jamón
(precocidas)
Chuletas de cerdo
Bien cocidas
Chuletas de
cordero
Medio
Bien cocidas
Medio
Bien cocidas
Filetes de salmón
Cantidad y/o
espesor
1 lb
(4 hamburguesas)
1
/2 a 3/
" de espesor
4
de grosor
1
"
1
/2 lb
1 a 1
1
/2" de espesor
1
1
/2 lb
2 a 2
hasta
1
/2 lb, cortado a
2 a 2
lo largo 2 pechugas
10 a 12 oz cada una
1
/4 a 1/
" de espesor
2
1
/
" de espesor
2
1
/
de grosor)
1 (
"
2
2 (1" de grosor)
1 lb aprox.
de espesor) de
2 (1
"
10 a 12 oz aprox.
1
/
de grosor) 1
2 (1
"
2
lb aprox.
de grosor)
2 (1
"
4 (1" de grosor)
1 lb aprox.
Posición
del
estante
7 4-6 2-4
7
7
7
5
5
5
5
5
5 9-12 No voltee Corte la parte trasera del caparazón. Abra bien. Pincele con
6 2-4 2-4 Mueva y voltee con mucho cuidado. Pincele con mantequilla y
5 2-4 2-4 Aumente el tiempo de 5 a 10 minutos por lado para un grosor
6
5
6
6
6
6
5
5
Primer
lado
(minutos)
3-5
4-6
5-7
7-9
9-11
11-13
8-10
8-10
3-6
5-8
3-5
5-7
7-9
9-11
8-10
9-11
Segundo
lado
(minutos)
2-4
2-4
3-5
4-6
6-8
8-10
4-6
5-7
4-7
5-8
2-5
4-7
7-9
7-9
3-5
4-6
Comentarios
Espaciar de manera uniforme. Se pueden asar hasta
8 hamburguesas.
Los bistecs de menos de 1" de espesor se cocinan totalmente
antes de dorarse. Se recomienda usar un sartén. Corte la
grasa.
Ase primero con el lado de la piel hacia abajo.
mantequilla derretida antes de asar y a la mitad de la cocción.
limón antes de la cocción y durante la cocción si lo desea.
1
/2" o para jamón ahumado casero.
de 1
Engrase la asadera. Pincele los filetes con mantequilla
derretida.
•Este guía es meramente de referencia. Ajuste el tiempo de cocción según su preferencia.
NOTA
La USDA explica que consumir carne, aves o pescado crudos o poco cocinados puede aumentar el riesgo de sufrir
intoxicaciones alimentarias.
La USDA ha indicado las siguientes como las temperaturas internas mínimas de seguridad para el consumo:
•Carne molida de vaca: 160 °F (71,1 °C)
•Aves: 165 °F (73,9 °C)
•Carne de vaca, ternera, cerdo o cordero: 145 °F (62,8 °C)
•Pescado/mariscos: 145 °F (62,8 °C)
Page 96

34
FUNCIONAMIENTO
Consejos para asar
Filete
•Los bistecs y las chuletas siempre se deben dejar reposar
durante cinco minutos antes de cortarlos y comerlos. Esto
permite que el calor se distribuya uniformemente en el
alimento y resulta más tierno y jugoso.
•Los trozos de carne que tengan más de dos pulgadas de
espesor deberán retirarse del refrigerador 30 minutos antes
de su cocción. Esto permite una cocción más rápida y
uniforme, y produce menos humo al asar. Los tiempos de
cocción probablemente sean menores que los indicados en
el Cuadro para asar.
•En el caso de bistecs con hueso o chuletas cortadas a la
francesa (se retira toda la carne alrededor del hueso),
envuelva las partes expuestas del hueso en papel de
aluminio para que no se quemen demasiado.
Mariscos
•Cuando ase mariscos con su caparazón, siempre use el
ajuste Lo (Bajo) y ase el lado de la piel por último.
•Es mejor consumir los mariscos inmediatamente después
de la cocción. Si se dejan reposar los mariscos después de
la cocción, se secarán.
•Resulta buena idea aplicar una fina capa de aceite en la
superficie de la asadera antes de cocinar para evitar que se
pegue la comida, especialmente los pescados y mariscos.
También puede usar una capa fina de aerosol
antiadherente.
Configuración de la función de calentar después de una
cocción temporizada
Seleccione la función de cocción.
1
Enter the oven temperature using the number keys or the
2
+/- keys.
Modelo LREL6325**
3
Presione Cook Time y toque las teclas numéricas para
ajustar el tiempo de horneado.
Modelo LREL6323** / LREL6321**
Presione Cook Time y toque las teclas +/– para ajustar
el tiempo de horneado
Presione Warm o Keep Warm.
4
Presione Start.
5
Cuando la cocción haya finalizado, ㅔresione Clear/Off
6
para cancelar la función Calentar.
NOTA
•La función Calentar tiene como finalidad mantener la
comida caliente. No la use para bajar la temperatura de
los alimentos.
•Es normal que el ventilador funcione durante la función
Calentar.
Verduras
•Mezcle las verduras levemente en aceite antes de
cocinarlas para mejorar el dorado.
Warm (Calentar) / Keep Warm
(Mantener Caliente)
Esta función mantiene la temperatura del horno a 170 °F. La
función Calentar mantiene la comida cocida caliente para servir
hasta tres horas después de terminada la cocción. La función
Calentar se puede usar sin ninguna otra función de cocción o
puede usarse después de que haya terminado la cocción con
Cocción temporizada o Cocción temporizada retardada.
Configuración de la función Calentar
Presione Warm o Keep Warm.
1
Presione Start.
2
Presione Clear/Off en cualquier momento para cancelar.
3
Proof (Leudar)
Esta característica mantiene el horno tibio para leudar
productos con levadura antes de hornearlos.
Configuración de la función Leudar
Use el estante en la posición 2 o 3 para el leudado.
1
Presione Proof hasta que aparezca PrF en la pantalla.
2
Presione Start.
3
Presione Clear/Off cuando haya terminado de leudar.
4
NOTA
•Para evitar que la temperatura del horno baje y que se
prolongue el tiempo de leudado, no abra la puerta del
horno si no es necesario. Revise los alimentos
panificados con tiempo para evitar un leudado excesivo.
•No use el modo de leudado para calentar comida ni
para mantener calientes los alimentos. La temperatura
del horno para el leudado no es lo suficientemente alta
para mantener alimentos a temperaturas seguras. Use
la función Calentar para mantener la comida caliente. El
leudado no funciona cuando el horno está por encima
de los 125 °F. Hot aparece en la pantalla.
•Es normal que el ventilador funcione durante la función
Leudar.
Page 97

FUNCIONAMIENTO
ESPAÑOL
35
Modo sabbath
El modo Sabbath se usa principalmente en el Sabbath y las
fiestas judías. Cuando se activa el modo Sabbath, el horno no
se enciende hasta que se desactiva el modo Sabbath. En el
modo Sabbath, todos los botones de función, salvo el botón
CLEAR OFF están inactivos. Aparecerá Sb en las pantallas del
horno y de la estufa.
NOTA
•Si la luz del horno está ENCENDIDA y el modo
SABBATH está activo, la luz del horno se APAGARÁ.
Si la luz del horno debe estar apagada, asegúrese de
que lo esté antes de activar el modo SABBAT. El modo
SABBATH solo se puede usar en el modo Bake.
Configuración del modo SABBATH
Presione el botón Bake.
1
Configure la temperatura para hornear.
2
Modelo LREL6325**
Utilice los botones numéricos.
Modelo LREL6323** / LREL6321**
Utilice los botones +/–.
Presione el botón START.
3
Presione y mantenga el botón Settings durante tres
4
segundos. Aparecerá SB y en la pantalla cuando se
active el modo Sabbath.
Para cancelar el modo Sabbath, presione y mantenga
5
el botón Settings durante tres segundos. Para cancelar
la función Hornear, presione el botón CLEAR/OFF en
cualquier momento.
Cambiar la temperatura en el modo SABBATH
Presione el botón Bake. (No sonará ningún tono y la
1
pantalla no cambiará.)
Configure la temperatura para hornear.
2
Modelo LREL6325**
Utilice los botones numéricos.
Modelo LREL6323** / LREL6321**
Utilice los botones +/–.
Presione el botón START.
3
Favorita (Modelo LREL6325**)
La función FAVORITE se utiliza para registrar y recuperar las
configuraciones de las recetas favoritas. Esta función puede
almacenar y recordar hasta 3 configuraciones diferentes. La
función Favorite se puede usar en el modo Cook Time. No
funcionará con ninguna otra función, incluido el modo Start
Time (cocción retrasada).
Coloque los alimentos en el horno.
1
Presione FAVORITE una vez para pan, dos veces para
2
carne y 3 veces para pollo. Aparece la temperatura
predeterminada y parpadea COOK.
Temp.
Categoría
1. Pan
2. Carne
3. Pollo
Presione los botones numéricos para configurar la
3
temperatura del horno deseada. Esta temperatura se
almacena y se recupera en el próximo uso.
Presione START (Iniciar). El indicador de
4
precalentamiento emite un pitido 3 veces cuando el
horno alcanza la temperatura deseada.
NOTA
•Solo se almacena la temperatura seleccionada, no el
tiempo de cocción.
•Si se cambia la temperatura del horno, se almacenará
la temperatura modificada.
Cómo
seleccionar
Presione
FAVORITE
una vez.
Presione
FAVORITE
dos veces.
Presione
FAVORITE 3
veces.
predeterminada
(se puede
cambiar y
recordar)
375°F HORNEAR
325°F
350°F
operativa
Rostizar
por
convección
Rostizar
por
convección
Función
Wi-Fi
Conecte el dispositivo a la red Wi-Fi doméstica para usar la
funcion Remote Start y otras funciones inteligentes. Consulte
la sección Smart Functions para obtener más detalles.
NOTA
•Hay un retraso de 15 segundos hasta que el horno
reconoce el cambio de temperatura.
Configuración de Wi-Fi
Mantenga presionado la tecla Remote Start hasta que el
1
icono parpadee.
Siga las instrucciones en la aplicación LG ThinQ de LG
2
para conectar el dispositivo.
Page 98

36
FUNCIONAMIENTO
Inicio Remoto
Inicia o detiene remotamente la función de precalentamiento
del aparato. El dispositivo debe estar conectado a una red WiFi doméstica para usar la funcion Remote Start.
Configuración de Remote Start
Abra la puerta del horno y asegúrese de que el horno
1
esté vacío.
Presione la tecla Remote Start para habilitar la función.
2
Inicie la función de precalentamiento en el horno desde
3
la aplicación LG ThinQ.
Comida congelada (Modelo
LREL6325**)
La función Frozen Meal (Comida congelada) está
especialmente diseñada para cocinar comidas preparadas y
congeladas. Calienta tanto desde arriba como desde abajo
para dorar la comida de manera más pareja.
Este sistema está diseñado para ofrecer un desempeño
óptimo de cocción, ya que selecciona automáticamente una
combinación de los sistemas calentadores para hornear y asar.
Configuración de la función Frozen Meal
Toque Frozen Meal. Aparece Frozen en la pantalla.
1
Ingrese la temperatura de cocción utilizando los botones
2
numéricos.
Toque Start. La función Frozen Meal comienza a
3
funcionar.
Toque Clear/Off para cancelar la función Frozen Meal en
4
cualquier momento.
Cocción lenta (Modelo LREL6325**)
La función Slow Cook está especialmente diseñada para asar
carne de res, cerdo y pollo.
Es común que la superficie de la comida se oscurezca
después de que finaliza la función Slow Cook.
Fritura con aire (Modelo LREL6325** /
LREL6323**)
La función Air Fry (Freír con aire) está especialmente diseñada
para freír sin aceite.
•No es necesario precalentar al usar el modo Air Fry.
•Para obtener mejores resultados, cocine en un solo rack
posicionado en la posicion 4.
•Extienda la comida de manera uniforme en una sola capa.
•Use la Bandeja para freír opcional disponible en LG o una
bandeja para hornear oscura sin lados o lados cortos que
no cubra toda la rejilla del horno. Esto permite una mejor
circulación.
•Si lo desea, rocíe la bandeja de soporte con un spray de
sartén.
•Coloque una bandeja para hornear forrada con papel de
aluminio en un estante en la posición 2 para atrapar el
aceite que cae de los alimentos.
•Revise los alimentos con frecuencia y agítelos o gírelos para
obtener resultados más crujientes.
•Los alimentos congelados preparados pueden cocinar más
rápido con el modo Air Fry de lo que se indica en el paquete.
Reduzca el tiempo de cocción en aproximadamente un 20
por ciento, revise los alimentos temprano y ajuste el tiempo
de cocción según sea necesario.
•Si se cocinan varios lotes, el lote posterior puede tardar
menos tiempo en cocinar.
•Utilice un termómetro de alimentos para asegurarse de que
los alimentos han alcanzado una temperatura segura para
el consumo. Comer carnes poco cocidas puede aumentar
el riesgo de padecer enfermedades transmitidas por los
alimentos.
•La masa humeda y recubrimiento no se crujen ni se ajustan
al usar el modo Air Fry.
•Para obtener los resultados más crujientes, draga las alitas
de pollo frescas o tiernas en harina sazonada. Use 1/3 de
taza de harina para 2 libras.
Configuración de la función Slow Cook
Toque Slow Cook una vez. Hi aparece en la pantalla.
1
Toque Slow Cook varias veces para cambiar entre Hi y
Lo.
Seleccione la opción deseada.
Toque Start. La función Slow Cook comienza a funcionar.
2
Toque Clear/Off para cancelar la función Slow Cook en
3
cualquier momento.
NOTA
•Para obtener los mejores resultados, utilice un solo
estante en la posición 1 o 2.
Page 99

FUNCIONAMIENTO
ESPAÑOL
37
Freir con Aire Alimentos con alto contenido de grasa
Los alimentos ricos en grasa se ahumaran cuando se usa el
modo Air Fry. Para obtener mejores resultados, siga estas
recomendaciones al usar el modo Air Fry los alimentos con alto
contenido de grasa, como alitas de pollo, tocino, salchichas,
perritos calientes, patas de pavo, chuletas de cordero, costillas,
lomos de cerdo, pato o algunas proteínas a base de plantas.
PRECAUCIÓN
Nunca cubra ranuras, agujeros o pasajes en la parte
inferior del horno o cubra estantes enteros con materiales
como papel de aluminio. Al hacerlo, se bloquea el flujo de
aire a través del horno y puede provocar una intoxicación
por monóxido de carbono. La lámina de aluminio también
puede atrapar el calor, causando un peligro de incendio o
un bajo rendimiento excesivo.
•Encienda la capucha de escape en un ajuste de ventilador
alto antes de iniciar el modo Air Fry y déjela encendida
durante 15 minutos después de que haya terminado.
•Abra alguna ventana o puerta, de ser posible, para
asegurarse que la cocina este bien ventilada.
•Limpie los filtros de grasa de la campana de escape con
regularidad.
•Mantenga el horno libre de acumulación de grasa. Limpie el
interior del horno antes y después de freír con aire (una vez
que el horno se haya enfriado).
•Recorre los ciclos de limpieza (Easy Clean o Self Clean)
con regularidad, dependiendo de la frecuencia y los tipos de
alimentos que se hayan freido con aire.
•Evite abrir la puerta del horno más de lo necesario para
ayudar a mantener la temperatura del horno, evitar la
pérdida de calor y ahorrar energía.
Configuración de la función Air Fry
Presione Air Fry. 400 °F aparece en la pantalla.
1
Configure la temperatura del horno
2
(Rango: 300 °F~550 °F)
Modelo LREL6325**
Presione los botones numéricos para ingresar la
temperatura deseada.
Modelo LREL6323**
Utilice los botones +/– para configurar la temperatura
deseada.
Presione START.
3
Cuando la cocción esté completa, presione Clear/Off.
4
NOTA
•La función Air Fry se puede utilizar con un estante de
alambre dentro de una bandeja para hornear forrada
con papel de aluminio.
•Para obtener los mejores resultados, utilice la bandeja
Air Fry que se vende por separado www.lg.com y use
una bandeja para hornear forrada de papel de aluminio
debajo de ella como una bandeja de goteo.
•La sección de malla de la bandeja de freír se puede
limpiar en el lavavajillas.
Rejilla Air fry
Sartén
antiadherente
Page 100

38
FUNCIONAMIENTO
Guía de cocina para freir
- Bandeja de freir
Menú
Papas a la francesa
congeladas
Papas a la francesa
congeladas (corte
arrugado, 10x10 mm)
Papas a la francesa dulces
congeladas
Firituras de papa
congelada
Tarta de papa congelada 42.3 450 4+2 25-35 -
Papas a la francesa
caseras (10x10 mm)
Porciones de patata
caseras
Nuggets de pollo
congelado, crujientes
Tiras de pollo congelado 35.3 450 4+3 30-40 -
Alitas picantes
congeladas, con hueso
Muslos de pollo fresco * 70.5 450 4+3 35-45 Agrega 3 cucharadas de aceite, y sal y pimienta al
Alitas de pollo frescas * 42.3 450 4+2 25-35 Agrega 3 cucharadas de aceite, y sal y pimienta al
Aros De Cebolla
Congelados,
Empanizados
Rollos primavera
congelados
(20 g cada uno)
Camarones Con Coco
Congelados
Ostiones frescos en la
media concha
Camarones frescos 49.4 450 4+2 20-30 -
Salchicha delgada (70 g
cada una, diámetro 2 cm)
Verduras mixtas 35.3 450 4+2 17-28 Agrega 4 cucharadas de aceite, y sal y pimienta al
Cantidad
(oz)
21.2 425 4+2 20-30 -
35.3 425 4+2 25-35 -
24.7 425 4+2 20-35 -
49.4 450 4+2 22-32 -
24.7 450 4+2 35-45 Corta las papas y sumergalas durante 30 minutos.
60.0 450 4+2 35-45 Corta las papas y sumergalas durante 30 minutos.
31.7 450 3+2 18-28 -
49.4 450 4+2 30-40 -
21.2 450 4+2 20-30 -
49.4 425 4+2 28-38 -
24.7 425 4+2 30-40 Cepille la superficie de los alimentos con un poco
35.3 425 4+2 20-30 Derrita 4 cucharadas de mantequilla y proceda
88.2 450 3+2 25-35 -
Temperatur
(°F)
Posición
del
estante
Tiempo de
cocción
(min)
Guía
Desagüe y sasone con 3 cucharadas de aceite, sal
y pimienta.
Desagüe y sasone con 3 cucharadas de aceite, sal
y pimienta.
gusto.
gusto.
de aceite.
a untarla sobre los ostiones. Mezcle
migas de pan, 1 cucharada de ajo picado, 1/4 taza
de queso parmesano rallado y otros condimentos
al gusto. Espolvorea la mezcla sobre los ostiones.
gusto.
1
/2 taza de
Coloque la bandeja antiadherente para hornear en la 3 o 4 posición de la parrilla.
Voltee los alimentos para que no se quemen.
Posición del estante = Bandeja de freir + bandeja de goteo
 Loading...