

LG LREL6323D Owner’s Manual [en,fr]
ENGLISH FRANÇAIS
OWNER’S MANUAL
ELECTRIC
RANGE
Read this owner’s manual thoroughly before operating the appliance
and keep it handy for reference at all times.
LREL6325* LREL6323* LREL6321*
MFL55646616
(REV.00 200709)
www.lg.com
Copyright © 2020 LG Electronics Inc. All Rights Reserved.
2
TABLE OF CONTENTS
TABLE OF CONTENTS
IMPORTANT SAFETY
3
INSTRUCTIONS
PRODUCT OVERVIEW
9
9 Parts
9 Accessories
INSTALLATION
10
10 Installation Overview
10 Product Specifications
11 Before Installing the Range
12 Installing the Range
15 Electrical Connection Requirements
15 Engaging the Anti-tip Device
15 Test Run
OPERATION
16
16 Control Panel Overview
17 Changing Oven Settings
17 Clock
17 Oven Light
17 Minimum & Maximum Default Settings
18 Timer On/Off
18 Settings
-Setting the Hour Mode
- Setting Convection Auto Conversion
(Model LREL6325* / LREL6323*)
-Adjusting the Oven Temperature
-Turning the Preheat Alarm Light On/Off
-Adjusting the Beeper Volume
-Selecting Fahrenheit or Celsius
20 Lockout
21 Cook Time (Timed Cook)
21 Start Time (Delayed Timed Cook)
22 InstaView™ (Model LREL6325*)
23 Using the Cooktop
23 Cooking Areas
23 Recommended Element Levels
23 COOKTOP HOT Indicator
23 Using the Cooktop Elements
25 Using the Proper Cookware
25 Choosing Cookware
25 Home Canning Tips
26 Using the Oven
26 Before Using the Oven
26 Oven Vent
26 Using Oven Racks
26 Bake
27 Convection Mode (Model LREL6325* /
LREL6323*)
28 Recommended Baking and Roasting Guide
29 Broil
30 Recommended Broiling Guide
31 Warm / Keep Warm
31 Proof (Model LREL6325*)
32 Sabbath Mode
32 Favorite (Model LREL6325*)
32 Wi-Fi
33 Remote Start
33 Frozen Meal (Model LREL6325*)
33 Slow Cook (Model LREL6325*)
33 Air Fry (Model LREL6325* / LREL6323*)
SMART FUNCTIONS
37
37 LG ThinQ Application
38 Industry Canada Statement
38 IC Radiation Exposure Statement
39 Smart Diagnosis™ Feature
MAINTENANCE
40
40 Cleaning the Glass-Ceramic Cooktop
41 EasyClean
44 Self Clean (Model LREL6325* / LREL6323*)
45 Changing the Oven Light
46 Cleaning the Exterior
47 Door Care Instructions
47 Removing and Replacing the Lift-Off Oven
Doors and Drawer
TROUBLESHOOTING
49
49 FAQs
51 Before Calling for Service
LIMITED WARRANTY
55
®
IMPORTANT SAFETY INSTRUCTIONS
ENGLISH
IMPORTANT SAFETY INSTRUCTIONS
Read and follow all instructions when using the range to prevent the risk of fire, electric
shock, personal injury, or damage. This guide does not cover all possible conditions that
may occur. Always contact your service agent or manufacturer about problems that you do
not understand.
Download this owner's manual at: https://www.lg.com/ca_en
This is the safety alert symbol. This symbol alerts you to potential hazards that
can result in property damage and/or serious bodily harm or death.
All safety messages will follow the safety alert symbol and either the word
WARNING or CAUTION. These words mean:
3
WARNING
CAUTION
- Indicates a hazardous situation which, if not avoided, could result
in death or serious injury.
Indicates a hazardous situation which, if not avoided, could result
in minor or moderate injury.
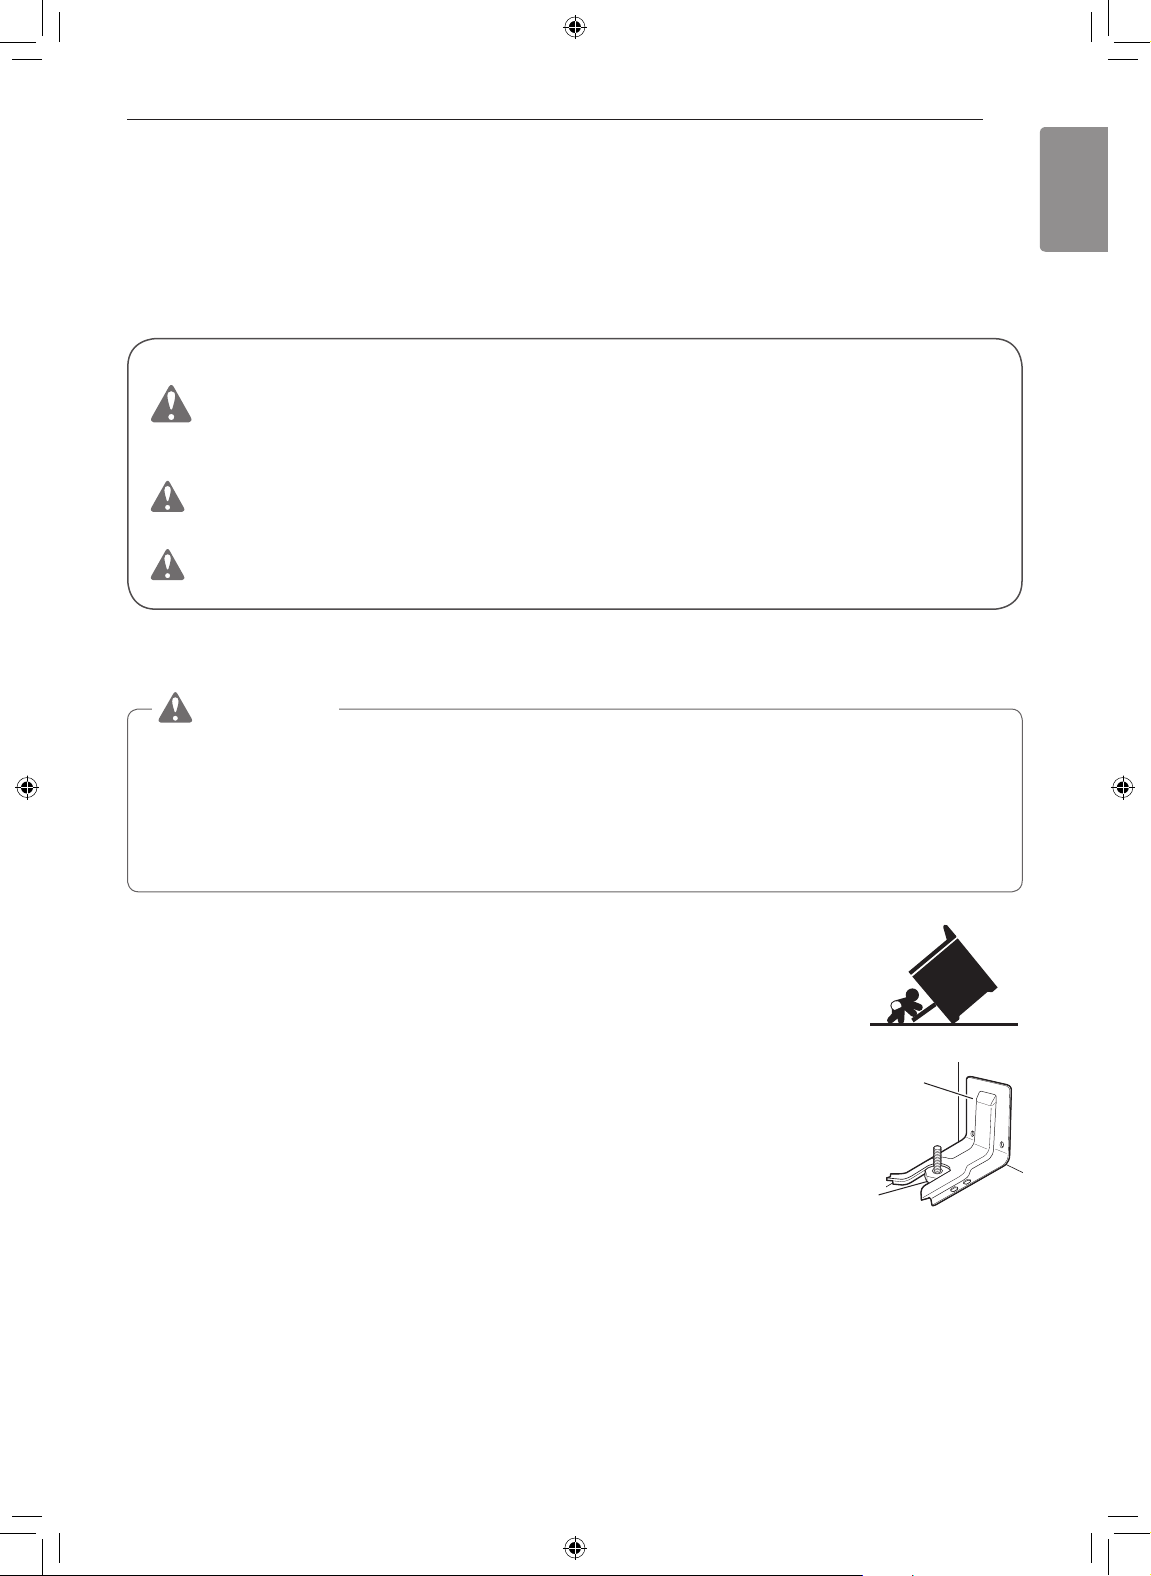
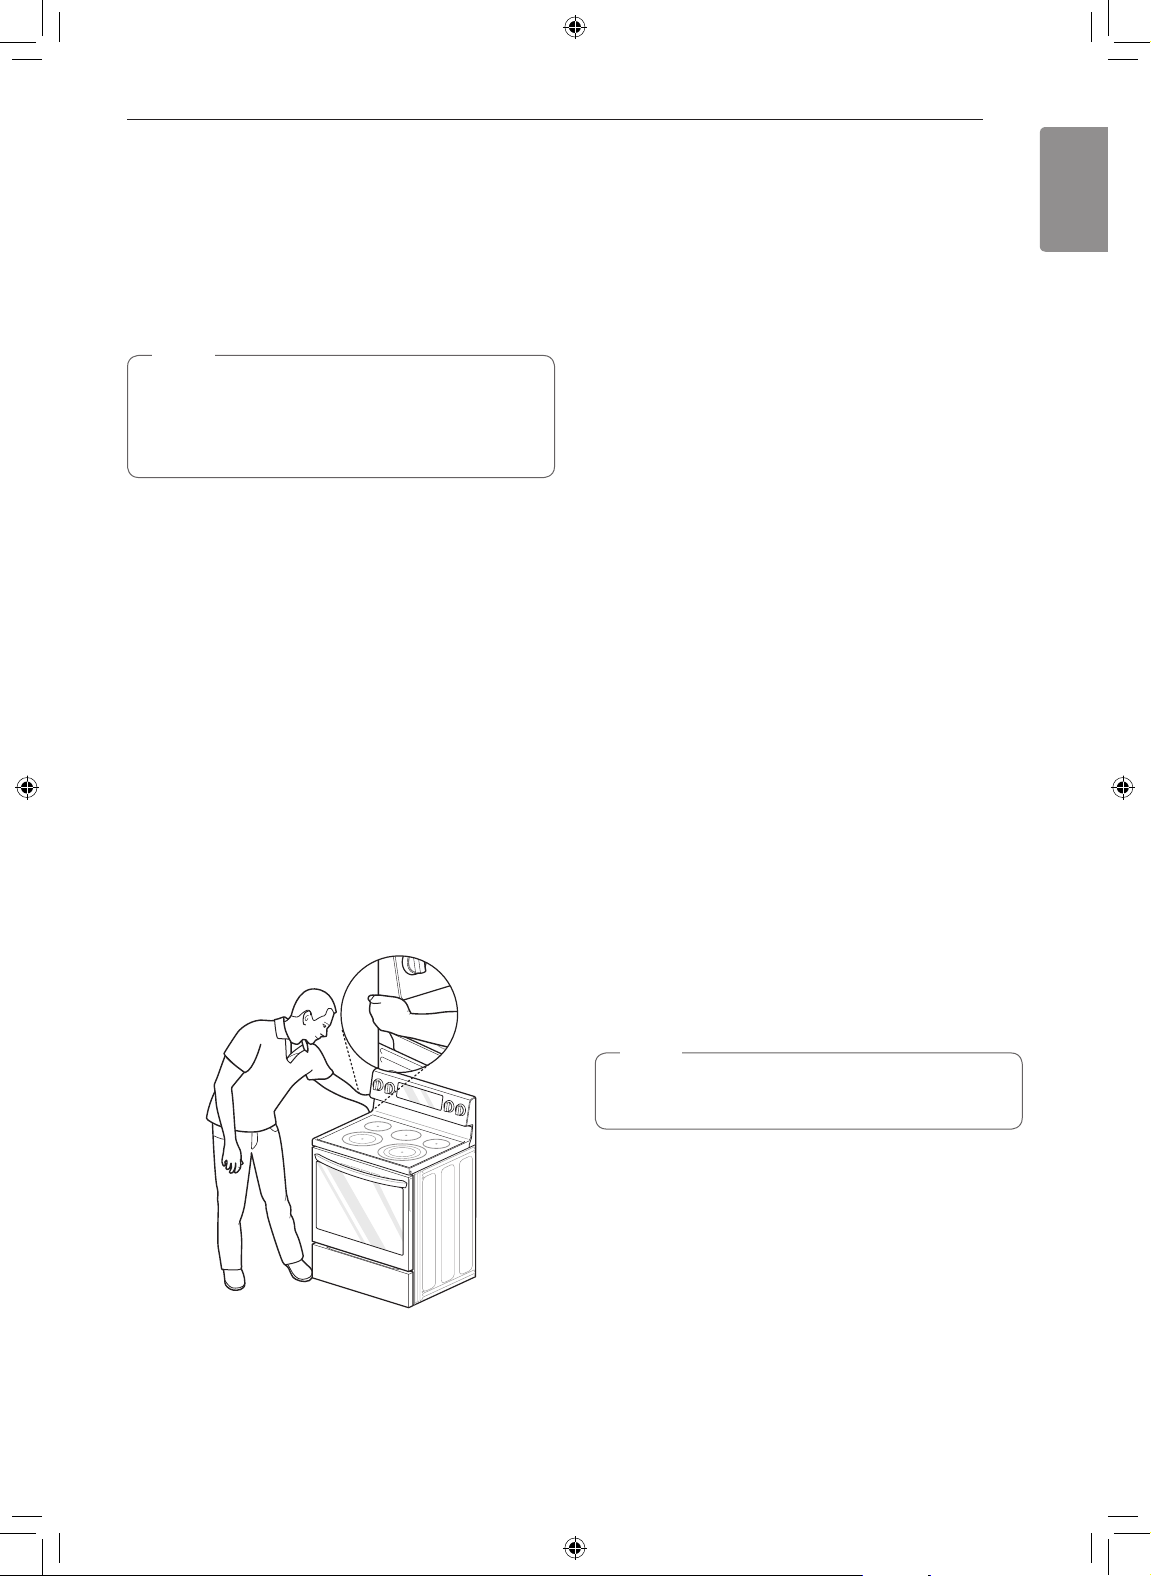
ANTI-TIP DEVICE
WARNING
TO REDUCE THE RISK OF TIPPING, THE APPLIANCE MUST BE SECURED BY A
PROPERLY INSTALLED ANTI-TIP DEVICE. TO CHECK IF THE DEVICE IS INSTALLED
PROPERLY, REMOVE THE DRAWER BODY AND VERIFY THAT THE ANTI-TIP
DEVICE IS ENGAGED, OR GRASP THE TOP REAR EDGE OF THE RANGE BACK
GUARD AND CAREFULLY ATTEMPT TO TILT IT FORWARD. Refer to the installation
section for instructions.
•It is possible for a child or adult to tip the range and be killed.
•Verify that the anti-tip device has been properly installed and
attached to the floor or wall and engaged to the leveling leg of the
range.
•Do not operate the range without the anti-tip device in place and
engaged.
•Never remove the oven legs. The range will not be secured to the
anti-tip bracket if the legs are removed.
•Do not step or sit on the oven door. The range could be tipped and
injury might result from spilled hot liquid, food, or the range itself.
•Do not rest large, heavy items such as whole turkeys on the open
oven door. The range could tip forward and cause injury.
•Reengage the anti-tip device after pulling the range out for
cleaning, service, or any other reason.
•Failure to follow these instructions can result in death or serious burns to children or
adults.
Anti-tip
bracket
Leveling
leg
4
IMPORTANT SAFETY INSTRUCTIONS
SAFETY PRECAUTIONS
•DO NOT TOUCH HEATING ELEMENTS OR INTERIOR SURFACES OF OVEN. Heating
elements may be hot even though they are dark in color. Interior surfaces of an oven
become hot enough to cause burns. During and after use, do not touch or let clothing or
other flammable materials contact heating elements or interior surfaces of oven until they
have had sufficient time to cool. Other surfaces, such as oven vent openings and surfaces
near these openings, oven doors, and windows of oven doors, also get hot and may cause
burns if not cooled.
•Use care when opening door. The hot air and steam that escape can cause burns to
hands, face and eyes. Let hot air or steam escape from the oven before removing or
replacing food in the oven.
•Do not repair or replace any part of the appliance unless specifically recommended in the
manual. All other servicing should be performed by a qualified technician.
•Do not use harsh etching, abrasive cleaners or sharp metal scrapers to clean the oven
door glass since they can scratch the surface. Scratches may cause the glass to shatter.
WARNING
If the door glass, cooktop glass, surface, or oven heating unit of the range are damaged,
discontinue use of the range and call for service.
•Do not operate the oven without the charcoal heater mesh.
•Do not use plastic to cover food. Use foil or oven-safe lids only.
•Do not allow anyone to climb, stand or hang on the door, storage drawer or cooktop. They
could damage the range and even tip it over, causing severe personal injury.
•Do not line the oven walls, racks, bottom, or any other part of the oven with aluminum foil
or any other material. Doing so will disrupt heat distribution, produce poor baking results
and cause permanent damage to the oven interior (aluminum foil will melt to the interior
surface of the oven)
•Never attempt to dry a pet in the oven.
•Never use your appliance for warming or heating the room.
•Always use pot holders or oven mitts when removing food from the oven or the surface
element. Cookware will be hot. Use only dry pot holders. Moist or damp pot holders on
hot surfaces may result in burns from steam. Do not let the pot holder touch hot heating
elements. Do not use a towel or other bulky cloth to remove food.
•Do not heat unopened food containers. Pressure in the containers may cause them to
burst which may result in injury.
IMPORTANT SAFETY INSTRUCTIONS
ENGLISH
FLAMMABLE MATERIALS
WARNING
Be certain that all packing materials are removed from the appliance before operating.
Keep plastic, clothes, paper, and other flammable materials away from parts of the
appliance that may become hot.
•Do not store or use flammable material in the oven or near or on the cooktop. Flammable
materials include paper, plastic, pot holders, linens, wall coverings, curtains, and gasoline
or other flammable vapors and liquids such as grease or cooking oil. These materials can
be ignited when the oven and cooktop are in use.
•Wear proper apparel. Do not wear loose-fitting or hanging garments, which may ignite if
they contact hot surfaces, and cause severe burns.
•Do not use the oven for drying clothes. Only use the oven for its intended purpose.
•If a cabinet storage is provided directly above cooking surface, place items that are not
frequently used and can be safely stored in an area subjected to heat. Temperatures may
be unsafe for volatile items such as flammable liquids, cleaners or aerosol sprays.
ELECTRICAL SAFETY
CAUTION
Be certain that all packing materials are removed from the appliance before operating.
Keep plastic, clothes, paper, and other flammable materials away from parts of the
appliance that may become hot.
5
•Always disconnect power from the appliance before servicing.
•Do not use aluminum foil or any other material to line the oven bottom.
Improper installation of these liners may result in a risk of electric shock or fire.
•Do not allow aluminum foil or the temperature probe to contact heating elements.
WARNING
Before replacing the oven light bulb, switch off the electrical power to the oven at the
main fuse or circuit breaker panel. Failure to do so can result in severe personal injury,
death, or electrical shock.
DEEP FAT FRYER
•Use extreme caution when moving or disposing of hot grease.
•Always heat fat slowly, and watch as it heats.
•If frying combinations of oils and fats, stir them together before heating.
•Use a deep fat thermometer, if possible, to prevent overheating fat beyond the smoking
point.
•Use the least possible amount of fat for effective shallow or deep-fat frying. Filling the pan
with too much fat can cause spillovers when food is added.
6
IMPORTANT SAFETY INSTRUCTIONS
CHILD SAFETY
•Do not touch the hot surface between the bottom of the oven door and the top of the
drawer on the front of the oven while the oven is in operation. The surface becomes hot
and can cause burns and other injury.
•Do not leave small children unattended near the oven.
WARNING
Do not leave children alone or unsupervised near the appliance when it is in use or is
still hot. Children should never be allowed to sit or stand on any part of the appliance as
they could be injured or burned.
CAUTION
Do not store items of interest to children in cabinets above a range or on the back guard
of a range – children climbing on the range to reach items could be seriously injured.
•Never let a child hang on the oven door.
•Do not allow children to crawl into the oven.
•Let hot utensils cool in a safe place, out of reach of small children.
•Children should not be allowed to play with controls or other parts of the appliance.
GLASS-CERAMIC COOKING SURFACE
•Surface units may be hot even though they are dark in color. Areas near surface units may
become hot enough to cause burns. During and after use, DO NOT TOUCH SURFACE
UNITS OR AREAS NEAR UNITS or let clothing or other flammable materials contact
surface units or areas near units until they have had sufficient time to cool. This includes
the cooktop and the area above the oven door.
•Do not cook on a broken cooktop. If the cooktop is broken, cleaning solutions and
spillovers may penetrate the broken cooktop and create a risk of electric shock. Contact a
qualified technician immediately.
•Do not use the glass cooktop surface as a cutting board.
•Do not place or store items that can melt or catch fire on the glass cooktop, even when it
is not being used.
•Choose proper burner size. For smaller pots and pans, use the smaller heating
elements. For larger pots and pans, use the larger heating elements. Select pans that
have flat bottoms large enough to cover the heating elements. Using undersized pans
exposes a portion of the heating element to direct contact and may result in clothing
burning.
•Glazed cookware. Only certain types of glass, glass-ceramic, ceramic, earthenware,
or other glazed cookware are suitable for range-top service without breaking due to the
sudden change in temperature.
•Never cook directly on the glass. Always use cookware.
•Always turn the surface units off before removing cookware.
•Turn cookware handles inward so they don't extend over adjacent surface units.
This reduces the risk of burns, ignition of flammable materials, and spillage due to
unintentional contact with the cookware.
•Immediately clean spills on the cooking area to prevent a tough cleaning chore later.
•Some cleaners can produce dangerous fumes if applied to a hot surface.

IMPORTANT SAFETY INSTRUCTIONS
ENGLISH
•Always place the pan in the center of the surface unit you are cooking on. Never leave
surface units unattended at high heat settings. Proper contact of cookware to burner
also will improve efficiency. Boilovers cause smoking and greasy spills that may catch on
fire.
•Clean cooktop with caution. Do not use sponges or cloth to wipe spills on a hot cooking
area. Use a proper metal scraper. If a wet sponge or cloth is used to wipe spills on a hot
cooking area, it can cause steam burns. Some cleaners can produce noxious fumes if
applied to a hot surface.
•Do not turn surface units on before placing cookware.
•Do not store heavy items above the cooktop surface that could fall and damage it.
•Do not place aluminum foil or plastic items such as salt and pepper shakers, spoon
holders, or plastic wrappings or any other material on the range when it is in use.
•Do not use a steel-wool pad or scrub pad or abrasive cleaning pads. They can scratch the
surface.
ENERGY SAVING TIPS
•Multiple-rack cooking saves time and energy. Whenever possible, cook foods requiring the
same cooking temperature together in one oven.
•For optimal performance and energy savings, follow the guides on page 28 for proper rack
and pan placements.
•Match the size of the cookware to the amount of food being cooked to save energy when
heating. Heating ½ quart of water requires more energy in a 3-quart pot than in a 1-quart
pot.
•Use cookware with flat bottoms to provide the best contact with the cooktop surface when
cooking on the glass-ceramic cooktop.
•Match the size of the cooktop burner or element to the size of the cookware in use. Using
a large element for a small pan wastes heating energy, and the exposed surface of the
element is a burn or fire hazard.
•Reduce energy use by cleaning light oven soils with the EasyClean
self-clean.
•Avoid opening the oven door more than necessary during use. This helps the oven
maintain temperature, prevents unnecessary heat loss, and saves on energy use.
®
feature instead of
7
SAFETY DURING USE
•Always place oven racks in desired location while oven is cool.
•If a rack must be moved while the oven is hot, do not let the pot holder contact the hot
heating element in the oven.
•Use caution with the Timed Cook or Delayed Timed Cook features. Use the automatic
timer when cooking cured or frozen meats and most fruits and vegetables. Foods that can
easily spoil, such as milk, eggs, fish, meat or poultry, should be chilled in the refrigerator
first. Even when chilled, they should not stand in the oven for more than 1 hour before
cooking begins, and should be removed promptly when cooking is complete. Eating
spoiled food can result in sickness from food poisoning.
•Accessible parts may become hot when the grill is in use.
•Do not place food or cookware on the bottom of the oven cavity. Doing so will cause
permanent damage to the oven bottom finish.
•Do not use water on grease fires. Should an oven fire occur, leave the oven door closed
and turn the oven off. If the fire continues, throw baking soda on the fire or use a fire
extinguisher. Do not put water or flour on the fire. Flour may be explosive and water can
spread a grease fire and cause personal injury.

8
IMPORTANT SAFETY INSTRUCTIONS
•Pull the oven rack to the stop-lock position when loading and unloading food from the
oven. This helps prevent burns caused by touching hot surfaces of the door and oven
walls.
•Do not use the oven if a heating element develops a glowing spot during use or shows
other signs of damage. A glowing spot indicates the heating element may fail and present
a potential burn, fire, or shock hazard. Turn the oven off immediately and have the heating
element replaced by a qualified service technician.
•When using cooking or roasting bags in the oven, follow the manufacturer’s directions.
SAFETY WHEN CLEANING (Model LREL6325* / LREL6323*)
•Open a window or turn on a ventilation fan or hood before self-cleaning.
•If the oven is heavily soiled with oil, self-clean the oven before using the oven again. The
oil could cause a fire.
•Wipe up heavy soil on the bottom of the oven before using the Self Clean function.
•Do not use oven cleaners. Commercial oven cleaner or oven liner protective coating of
any kind should not be used in or around any part of the oven.
•Never keep pet birds in the kitchen. The health of birds is extremely sensitive to the fumes
released during an oven self-clean cycle. Fumes may be harmful or fatal to birds. Move
birds to a well-ventilated room.
•Clean in the self-clean cycle only parts listed in this manual. Before self-cleaning the oven,
remove the broiler pan, all oven racks, the meat probe and any utensils or food from the
oven.
•Important Instruction. The oven displays an F error code and sounds three long beeps
during the self-cleaning process if it malfunctions in the self-clean mode. Switch off the
electrical power to the main fuse or breaker and have the oven serviced by a qualified
technician.
•It is normal for the cooktop of the range to become hot during a self-clean cycle.
Therefore, touching the cooktop during a self-clean cycle should be avoided.
•Never pour cold water over a hot oven for cleaning. Doing so may cause the oven to
malfunction.
•Make sure oven lights are cool before cleaning.
•Do not clean door gasket. The door gasket is essential for a good seal. Care should be
taken not to rub, damage, or move the gasket.
•If there is a fire in the oven during self-clean, turn the oven off and wait for the fire to go
out. Do not force the door open. Introduction of fresh air at self-clean temperatures may
lead to a burst of flame from the oven. Failure to follow this instruction may result in severe
burns.
COOK MEAT AND POULTRY THOROUGHLY
•To protect against food-borne illnesses, cook meat and poultry thoroughly. The USDA has
indicated the following as safe minimum internal temperatures for consumption:
•Ground beef: 160 °F (71.1 °C)
•Poultry: 165 °F (73.9 °C)
•Beef, veal, pork, or lamb: 145 °F (62.8 °C)
•Fish/seafood: 145 °F (62.8 °C)
ENGLISH
PRODUCT OVERVIEW
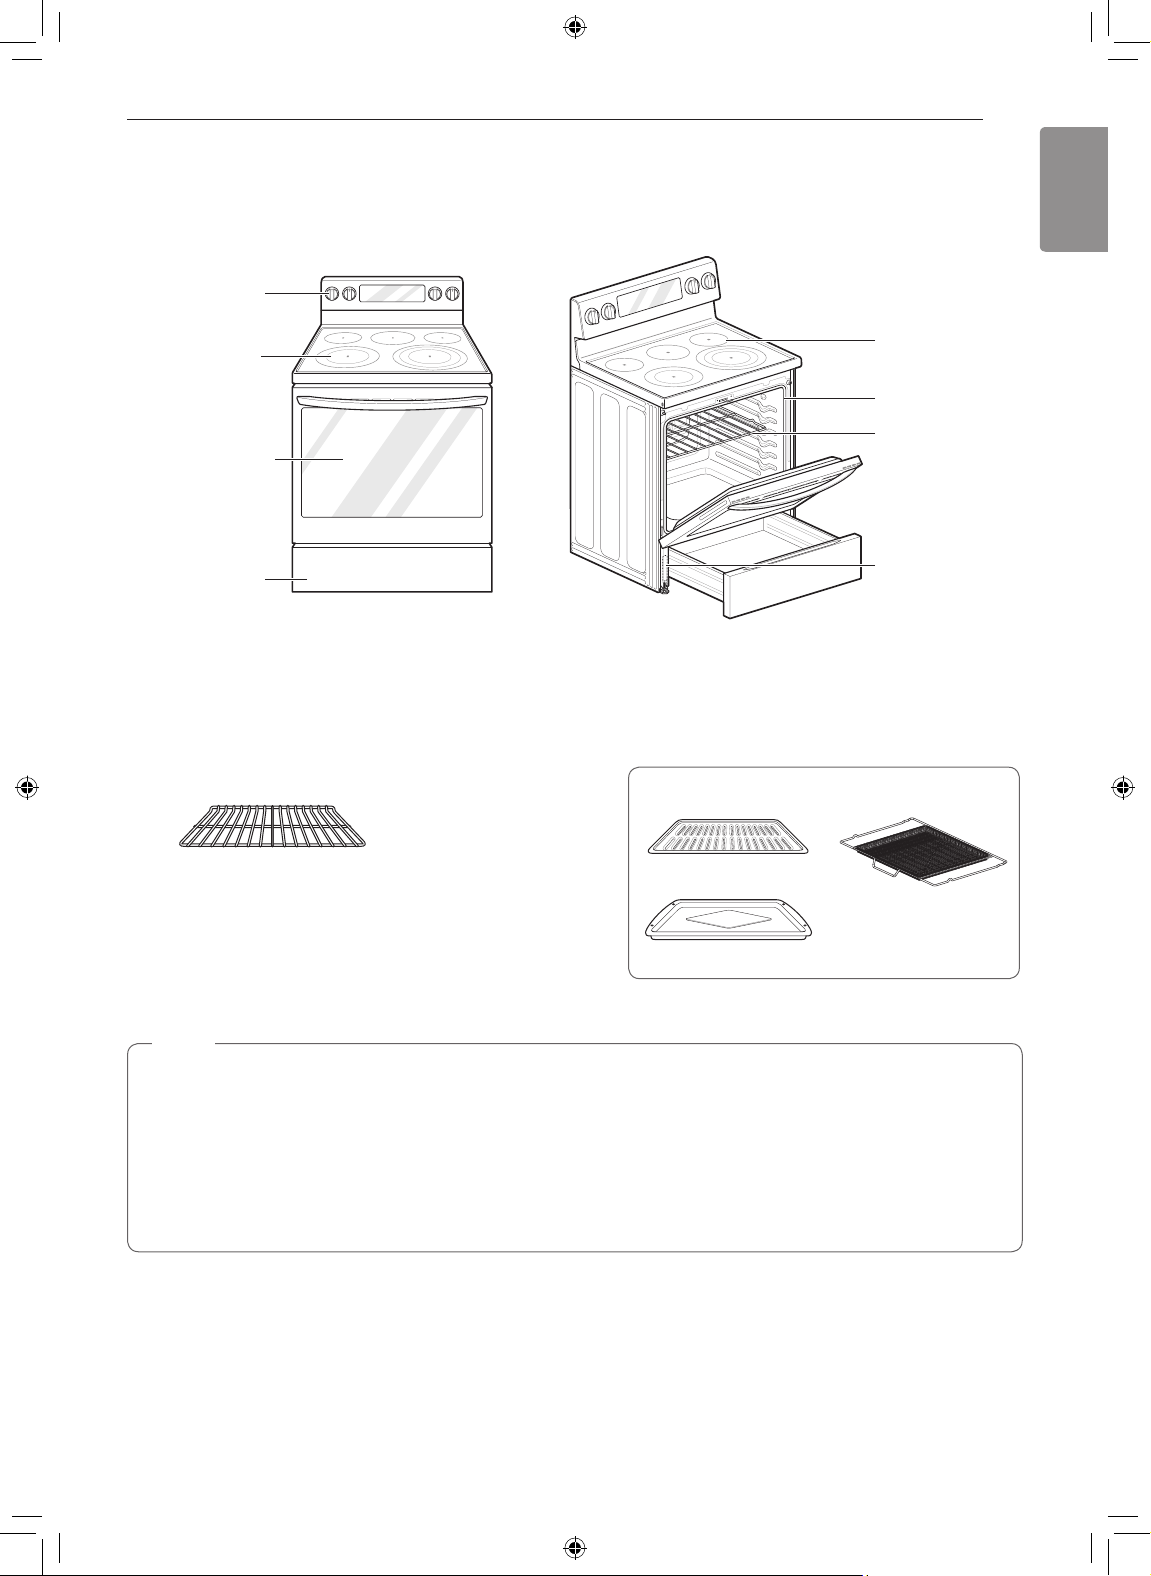
Parts
Controller
PRODUCT OVERVIEW
9
Cooktop
Oven door
Storage drawer
Accessories
Included Accessories
Standard Rack
- Model LREL6325* (3ea)
- Model LREL6323*/LREL6321* (2ea)
Glass-ceramic
Gasket
Rack
Model & serial
number plate
Optional Accessories
Grid
Air fry tray
Broiler pan
NOTE
•Contact LG Customer Service at (LG U.S.) 1-800-243-0000 or (LG Canada) 1-888-542-2623, if any
accessories are missing.
•For your safety and for extended product life, only use authorized components.
•The manufacturer is not responsible for product malfunction or accidents caused by the use of separately
purchased, unauthorized components or parts.
•The images in this guide may be different from the actual components and accessories, which are subject
to change by the manufacturer without prior notice for product improvement purposes.
10
INSTALLATION
INSTALLATION
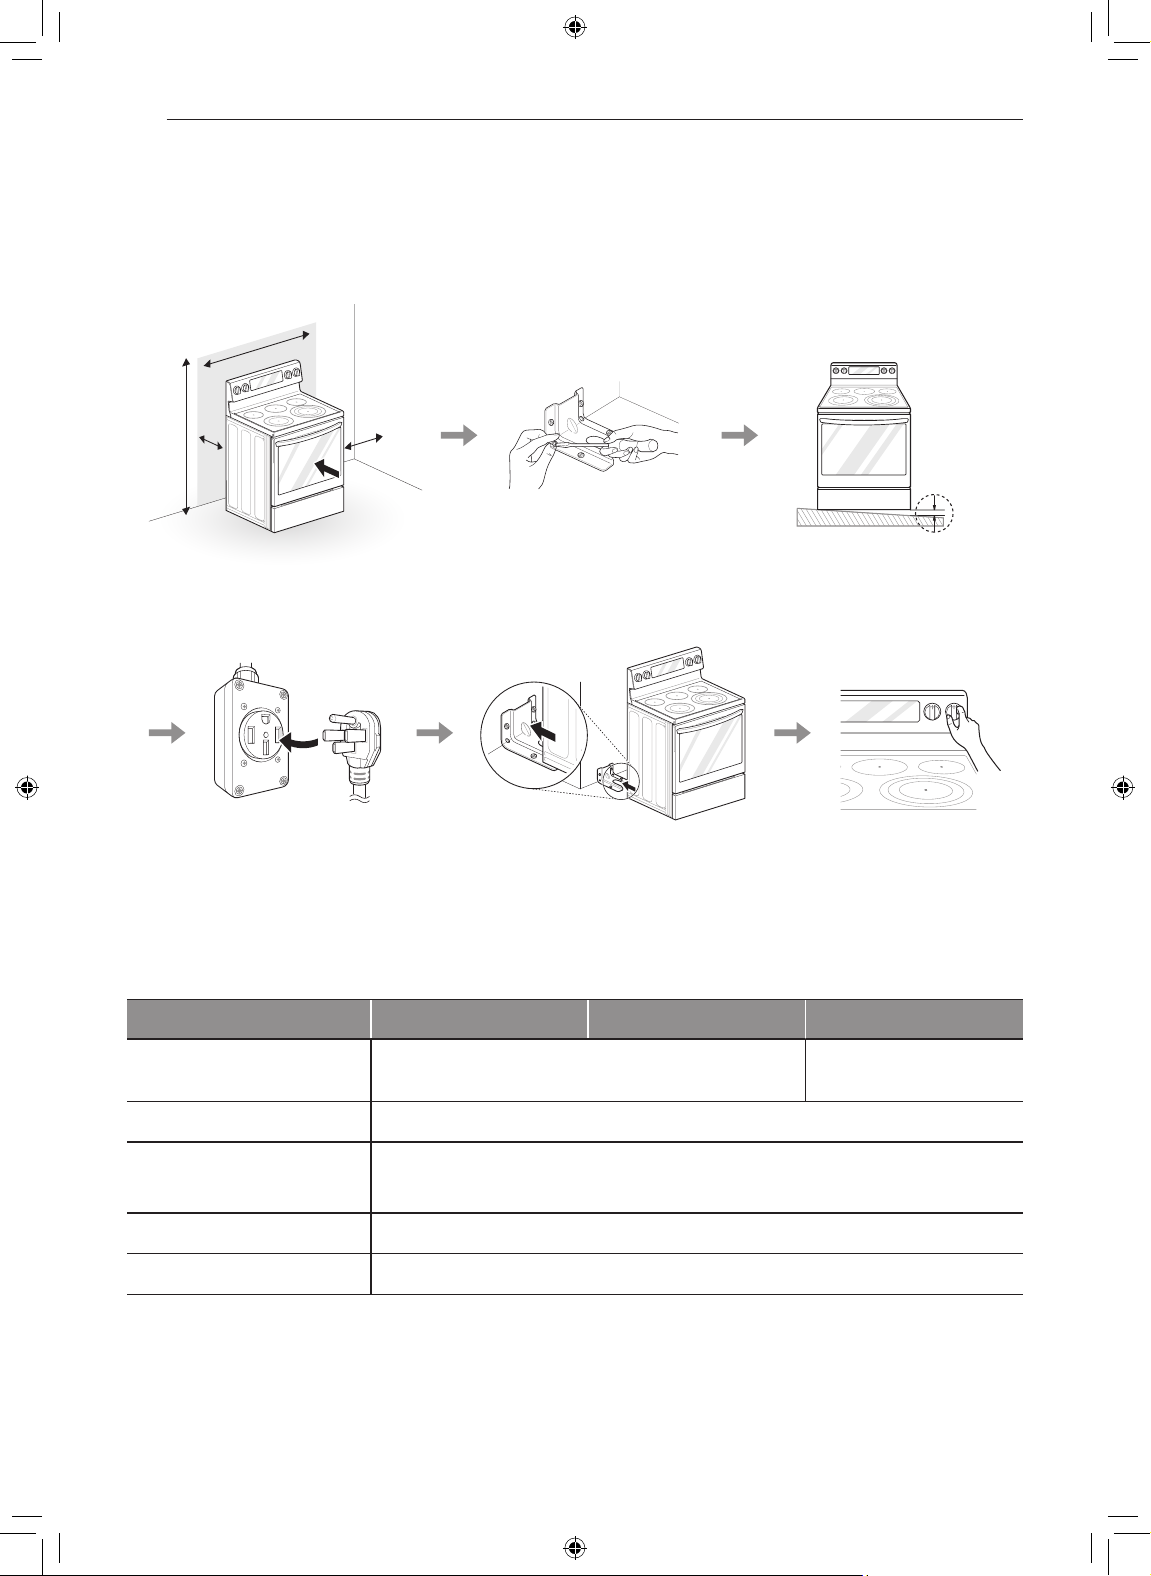
Installation Overview
Please read the following installation instructions first after purchasing this product or transporting it to another
location.
Check and choose the
proper location
240 V
Plug in the power cord Engage the anti-tip device Test run
Install anti-tip device Level the range
Product Specifications
The appearance and specifications listed in this manual may vary due to constant product improvements.
Oven Range Models LREL6325* LREL6323* LREL6321*
Electrical requirements 120/240 V: 12.9 kW, 120/208 V: 9.7 kW
Description Electric Single Oven Range
Exterior Dimensions
29 7/8" (W) x 46 1/2" (H) x 26 1/2" (D) (D with door closed and excluding door handle)
75.9 cm (W) x 118.1 cm (H) x 67.4 cm (D)
(D with door closed and excluding door handle)
120/240 V: 13.1 kW,
120/208 V: 9.8 kW
Height to cooking surface 36" (91.4 cm)
Total capacity 6.3 cu.ft.
INSTALLATION
ENGLISH
11
Before Installing the Range
WARNING
Tip - Over Hazard
A child or adult can tip the range and
be killed. Verify the anti-tip bracket
has been installed. Ensure the
anti-tip bracket is engaged when the
range is moved.
Do not operate the range without the
anti-tip bracket in place. Failure to
follow these instructions can result
in death or serious burns to children
and adults.
To check that leveling leg is
inserted into anti-tip bracket,
grasp the top rear edge
of the range and carefully
attempt to tilt it forward.
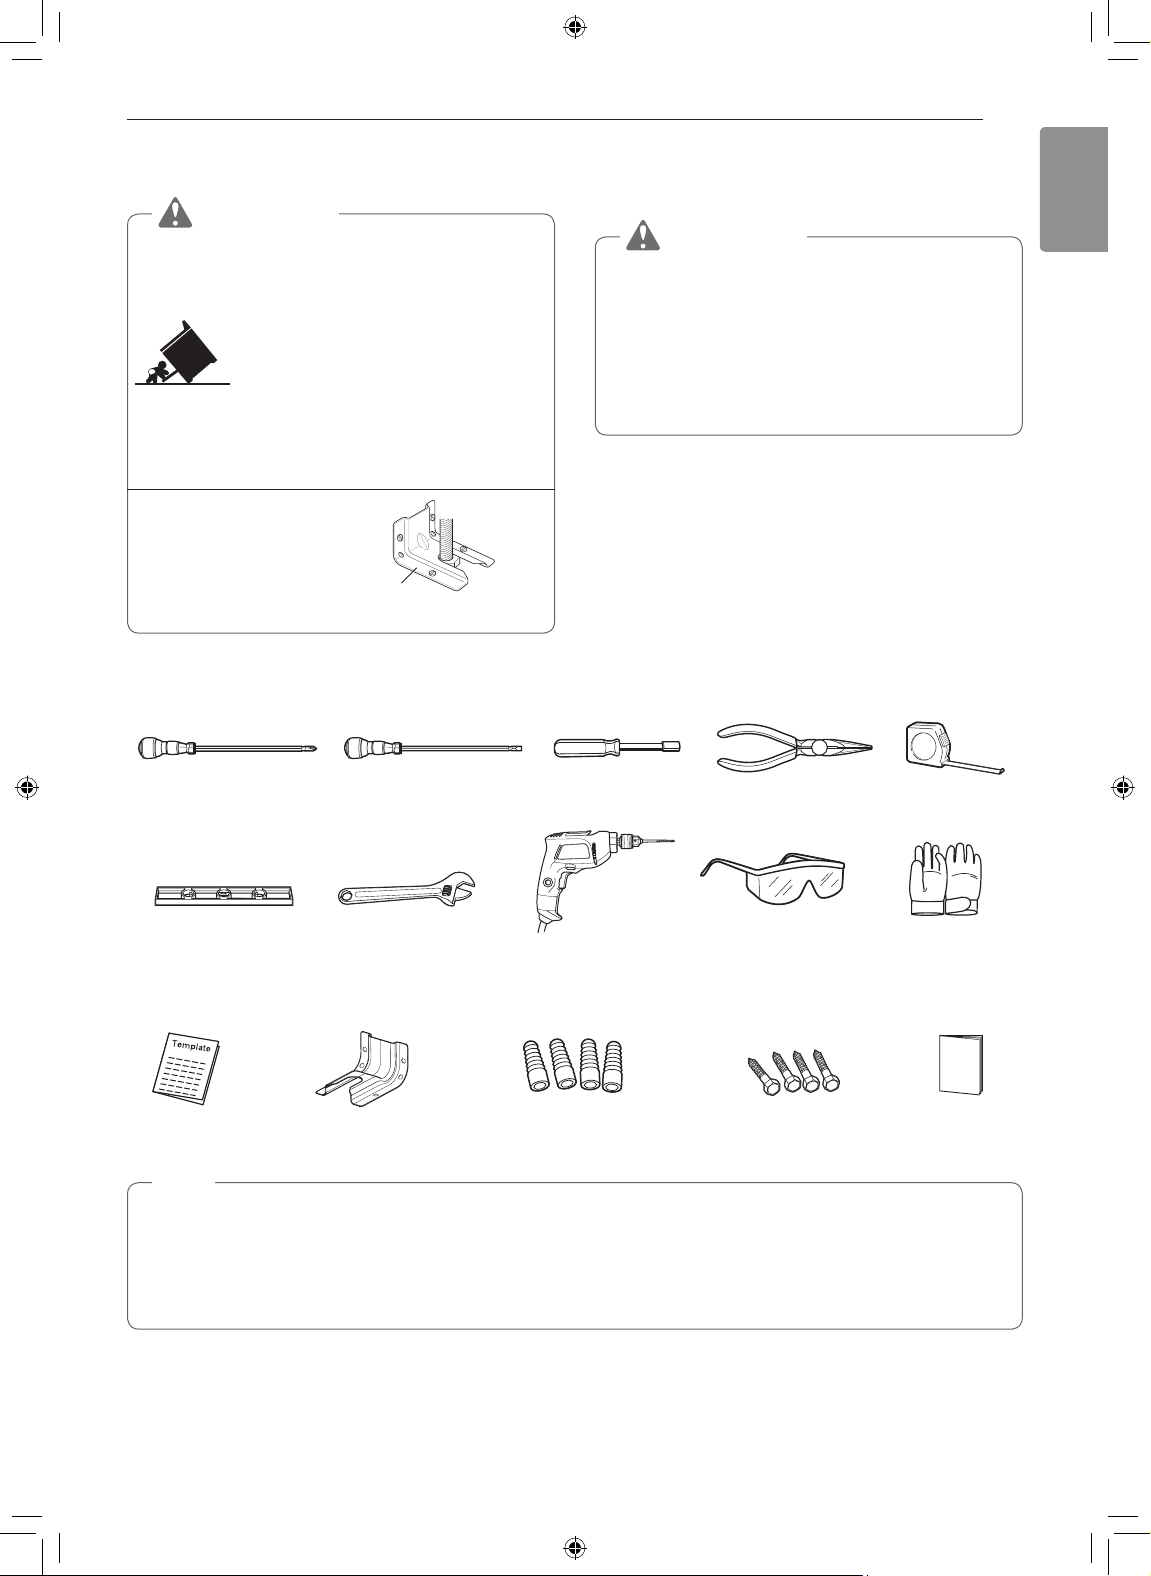
Tools Needed
Anti-tip
bracket
Leveling
leg
If you did not receive an anti-tip bracket with your
purchase, call 1-800-243-0000 (1-888-542-2623 in
CANADA) to receive one at no cost.
WARNING
•The information in this manual should be
followed exactly. Failure to do so may result
in fire, electrical shock, property damage,
personal injury, or death.
•Wear gloves during the installation
procedure. Failure to do so can result in bodily
injury.
Phillips screwdriver
Level
Flat-blade screwdriver
Adjustable wrench
1
/4" Nut driver
Drill
Pliers
Safety glasses
Tape measure
Gloves
Parts Provided
Template (1) Anti-tip bracket kit (1) Anchor sleeves (4) Lag bolts (4) Manual
NOTE
•Observe all governing codes and ordinances.
•Have the installer show you the location of the circuit breaker or fuse. Mark it for easy reference.
•As when using any appliance generating heat, there are certain safety precautions you should follow.
•Be sure your range is installed and grounded properly by a qualified installer or service technician.
12
INSTALLATION
Installing the Range
Unpacking and Moving the Range
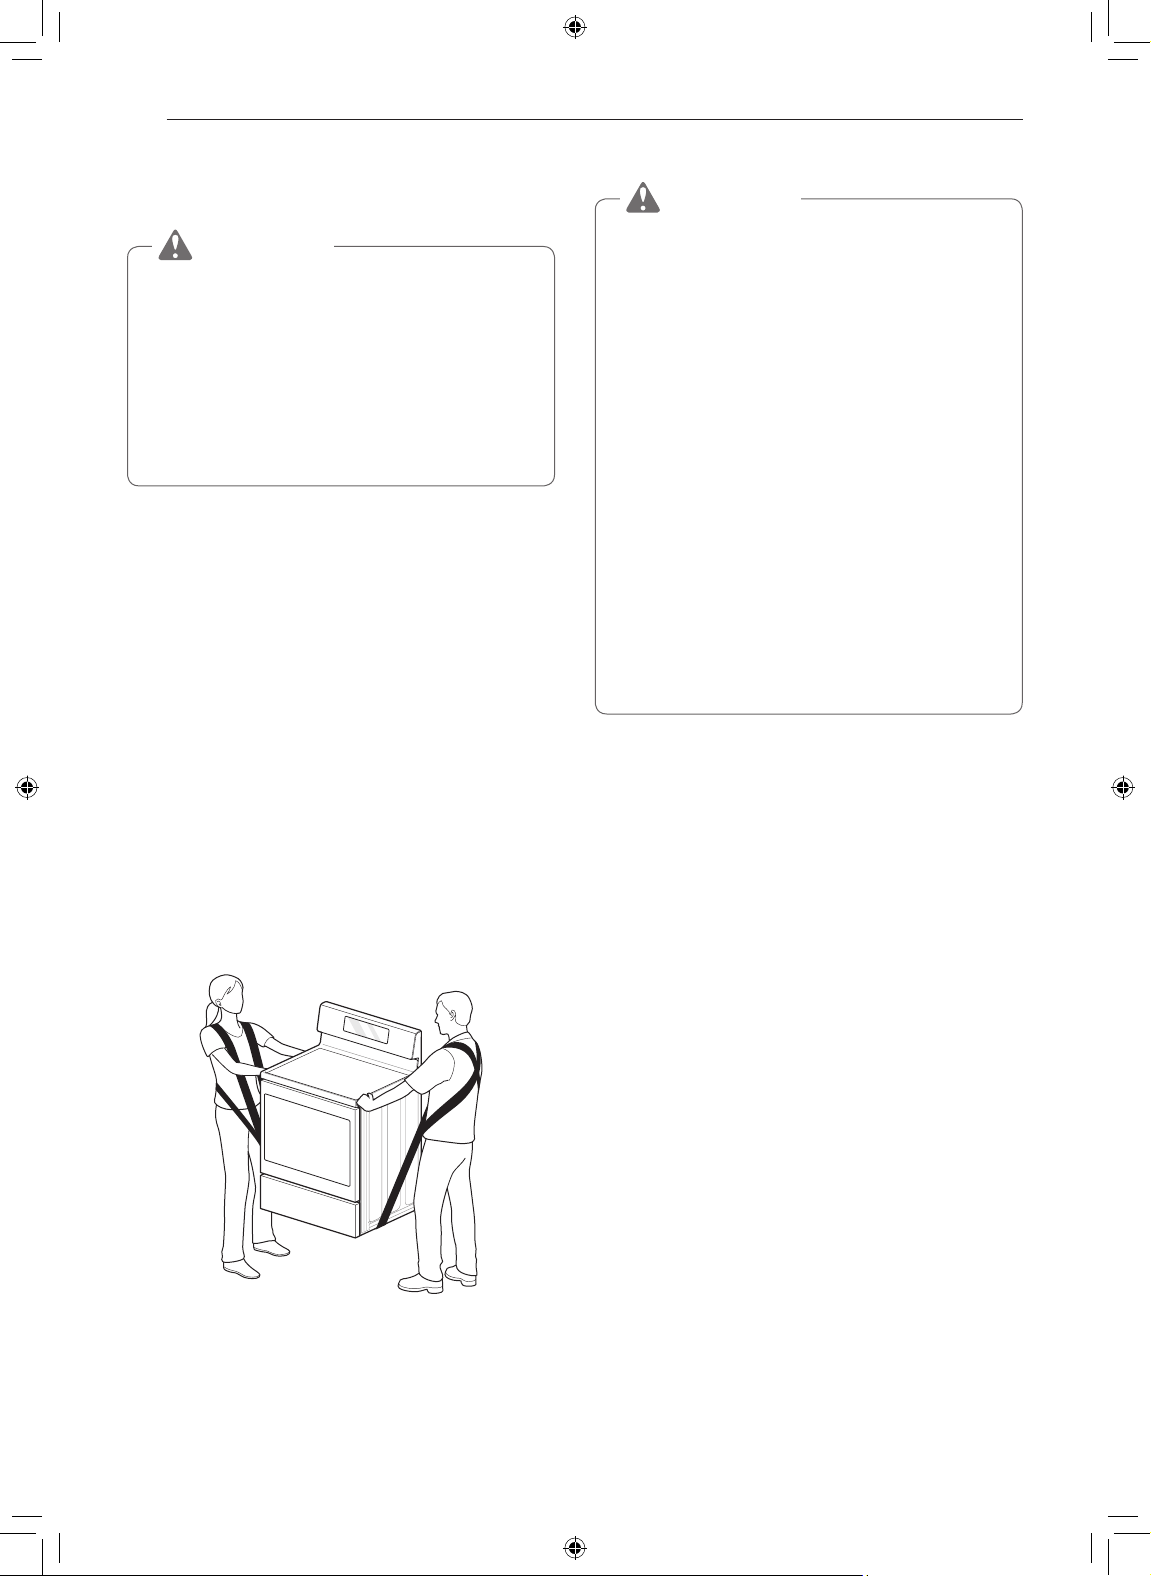
CAUTION
•You should use two or more people to move
and install the range. (Excessive Weight
Hazard) Failure to do so can result in back or
other injury.
•Do not use the door handles to push or
pull the range during installation or when
moving the range out for cleaning or
service. Doing so can result in serious damage
to the door of the range.
Remove packing material, protective film, tape and
any temporary labels from your range before using.
Do not remove any warning-type labels, the model
and serial number label, or the Tech Sheet that is
located on the back of the range.
To remove any remaining tape or glue, rub the area
briskly with your thumb. Tape or glue residue can also
be easily removed by rubbing a small amount of liquid
dish soap over the adhesive with your fingers. Wipe
with warm water and dry.
Do not use sharp instruments, rubbing alcohol,
flammable fluids, or abrasive cleaners to remove tape
or glue. These products can damage the surface of
your range.
Your range is heavy and can be installed on soft
floor coverings such as cushioned vinyl or carpeting.
Use care when moving the range on this type of
flooring. Use a belt when moving the range to prevent
damaging the floor. Or slide the range onto cardboard
or plywood to avoid damaging the floor covering.
Choosing the Proper Location
CAUTION
•Avoid placing cabinets above the range. To
minimize the hazard caused by reaching over
the open flames of operating burners, install a
ventilation hood over the range that projects
forward at least five inches beyond the front of
the cabinets.
•Make sure wall covering, countertop and
cabinets around the range can withstand
the heat (up to 194 °F) generated by the
range. Discoloration, delamination or melting
may occur. This range has been designed to
comply with the maximum allowable wood
cabinet temperature of 194 °F.
•Before installing the range in an area
covered with linoleum or other synthetic
floor covering, make sure the floor covering
can withstand temperatures of at least
200 °F (93 °C).
•Use an insulated pad or
plywood under the range if installing the
range over carpeting.
The range should always be plugged into its own
individual properly grounded electrical outlet. This
prevents overloading house wiring circuits which
could cause a fire hazard from overheated wires. It is
recommended that a separate circuit serving only this
appliance be provided.
Mobile Home - Additional Installation
Requirements
The installation of this range must conform to the
Manufactured Home Construction and Safety
Standard, Title 24 CFR, Part 3280 (formerly the
Federal Standard for Mobile Home Construction
and Safety, Title 24, HUD Part 280), or when
such standard is not applicable, the Standard for
Manufactured Home Installations, ANSI A225.1/NFPA
501A or with local codes.
•When this range is installed in a mobile home, it
must be secured to the floor during transit. Any
method of securing the range is adequate as long
as it conforms to the standards listed above.
•A four-wire power supply cord or cable must be
used in a mobile home installation.
1
/4 in. (0.64 cm)
ENGLISH
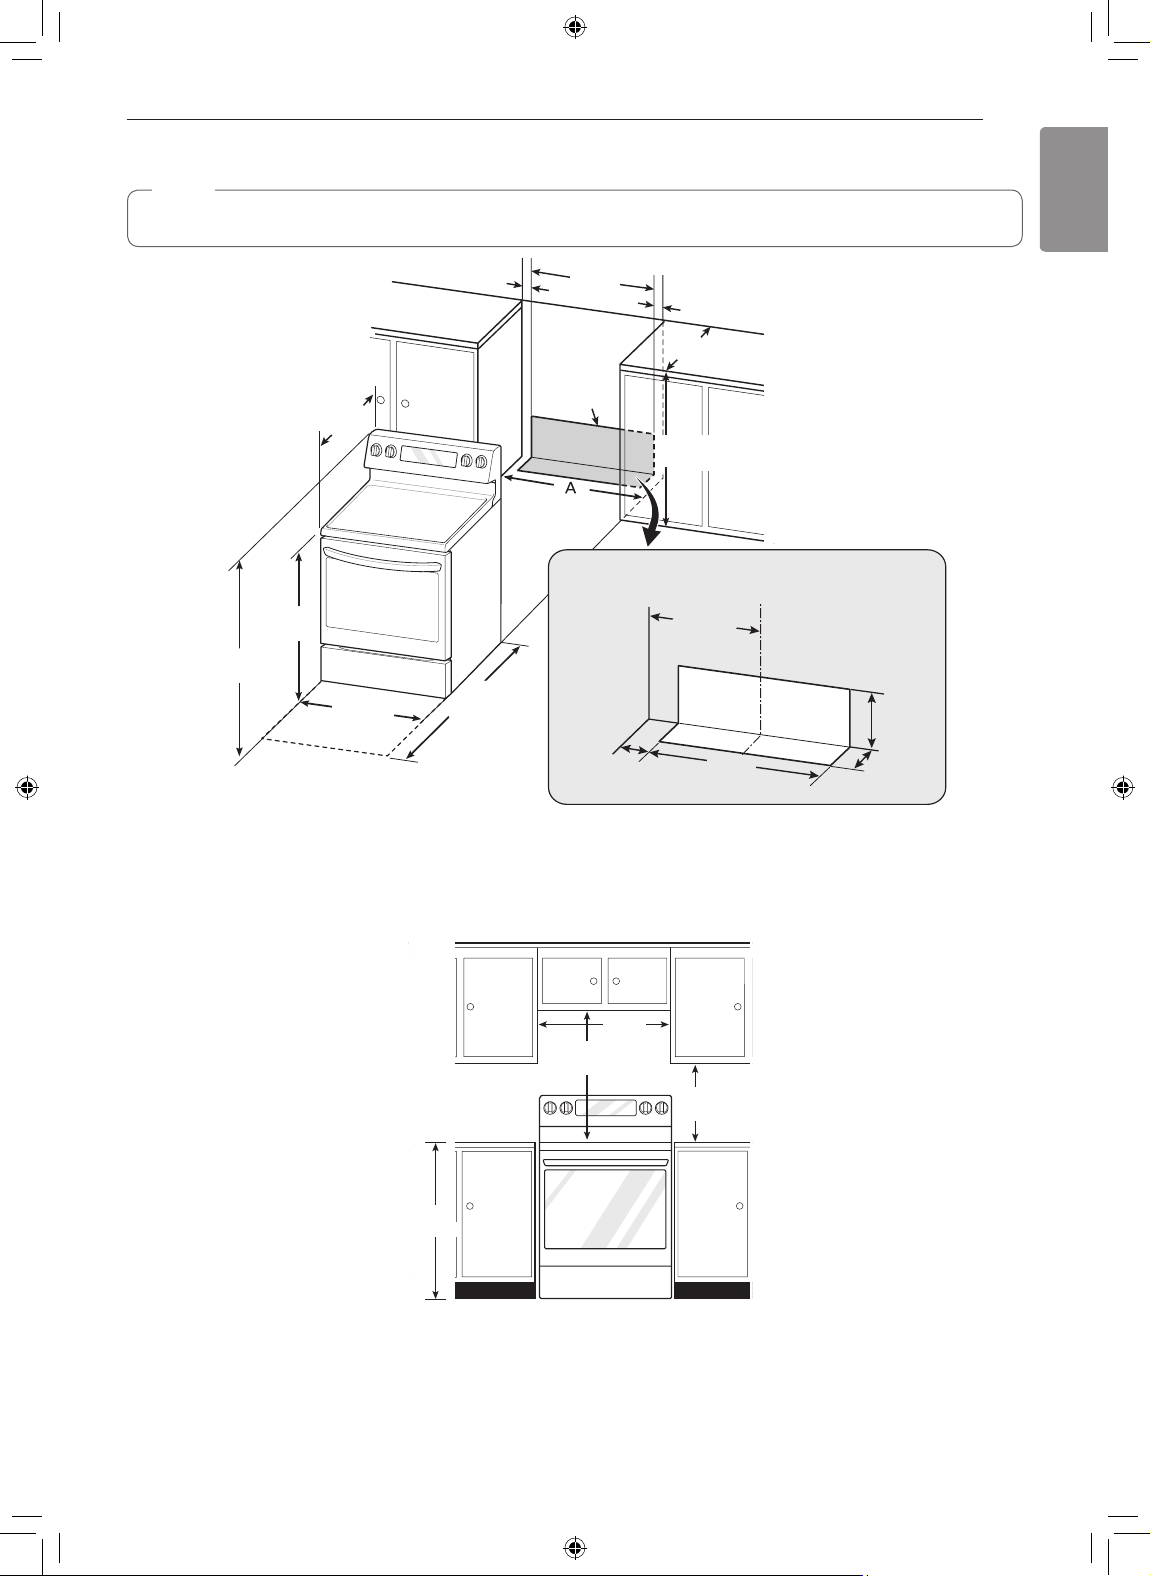
Dimensions and Clearances
INSTALLATION
13
NOTE
Important - Save for the use of the local electrical inspector.
23 1/2"
(60 cm)
Acceptable
electrical
outlet area
Cabinet
opening
Cabinet
(7.6 cm)
Depth with door closed
(includes door handle)
28 29/32"
(73.4 cm)
36"
(91.4 cm)
46 1/2"
(118.1 cm)
29 7/8"
(75.9 cm)
3" (7.6 cm)
48 1/2"
(123.3 cm)
Depth with
door open
3" (7.6 cm)
25"
Normal countertop
(63.5 cm)
depth
36"
(91.4 cm)
Countertop
height
Wall
Center
15" (38 cm)
6"
(15.2 cm)
3"
23 1/2"
(60 cm)
1
2
/2"
(6.3 cm)
A = 30" (76.2 cm) For U.S.A
= 30" (76.2 cm) ~ 31" (78.7 cm) For CANADA
For installation in Canada, a free-standing range is not to be installed closer than
15
/32" (12 mm) from any
adjacent surface.
30"
(76.2 cm)
*30" (76.2 cm)
Minimum
**15"
(38.1 cm)
36"
(91.4 cm)
Minimum Dimensions
* 30" (76.2 cm) minimum clearance between the top of the cooking surface and the bottom of an unprotected
wood or metal cabinet; or 24" (60.9 cm) minimum when bottom of wood or metal cabinet is protected by not less
1
/4" (6.4 cm) flame retardant millboard covered with not less than no. 28 MSG sheet steel, 0.015"
than
(0.381 mm)
stainless steel, 0.024" (0.610 mm) aluminum or 0.020" (0.508 mm) copper.
** 15" (38.1 cm) minimum between countertop and adjacent cabinet bottom.
14
INSTALLATION
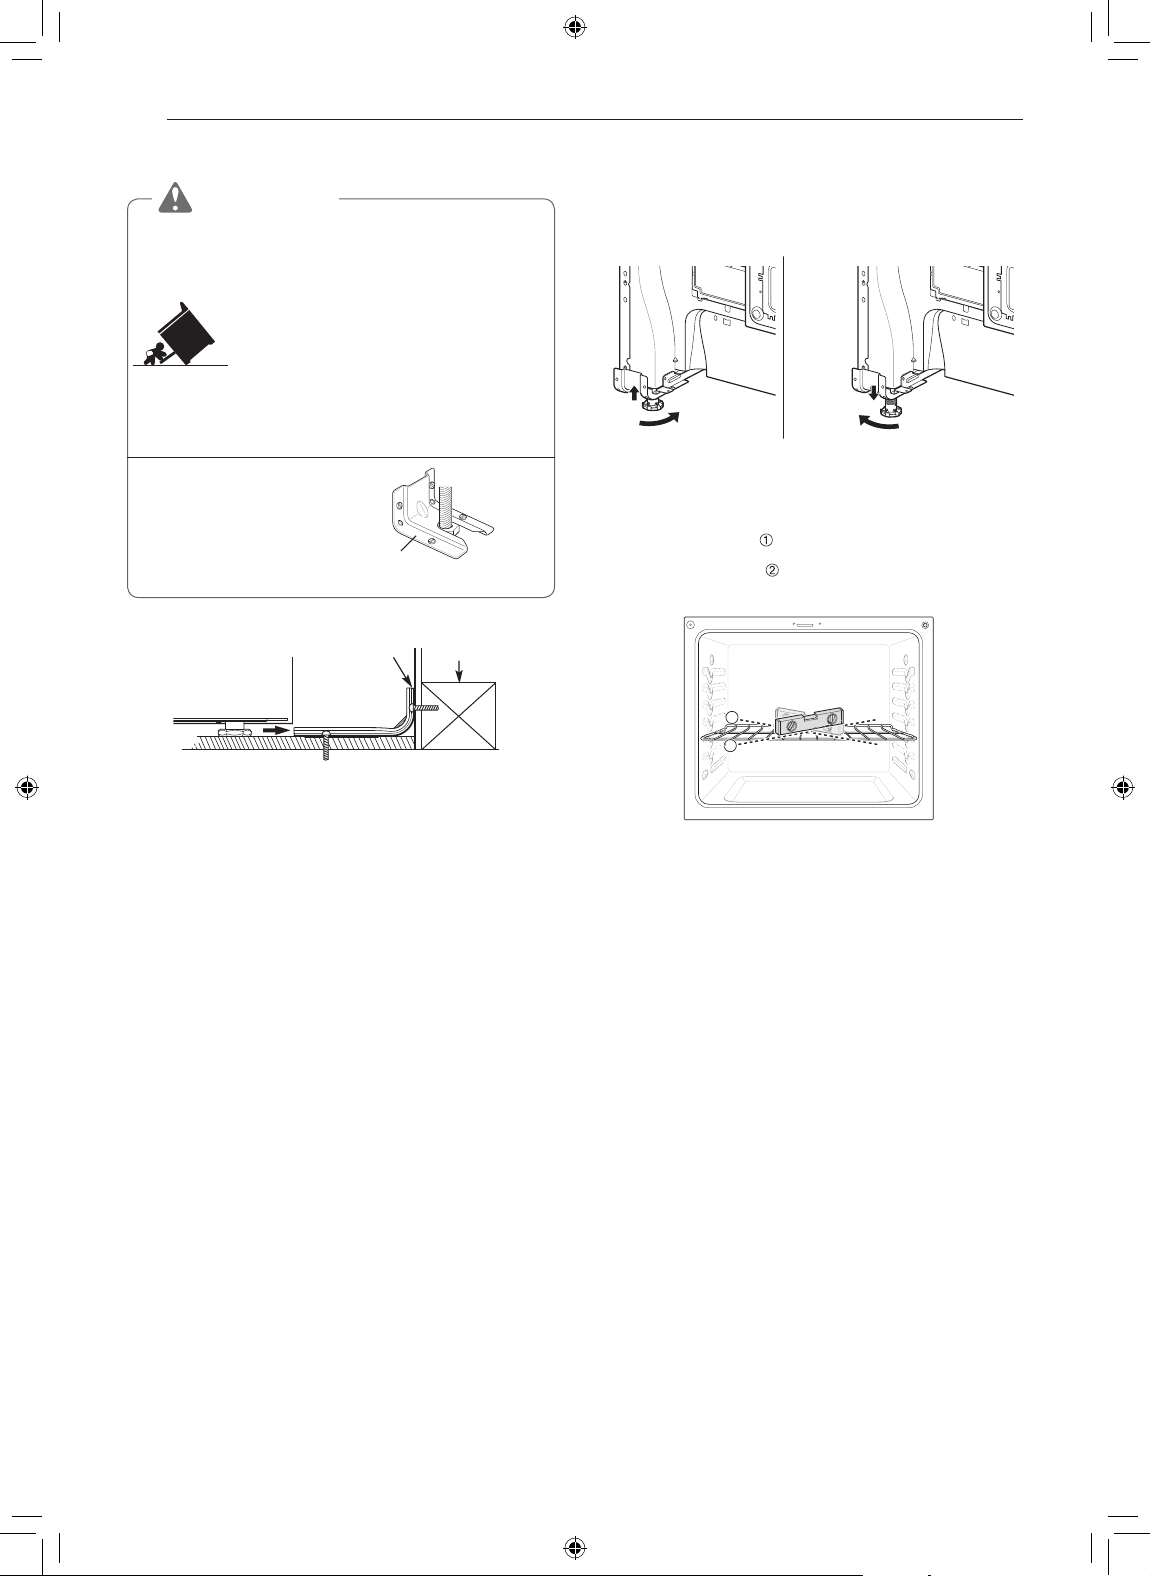
Installing the Anti-tip Device
WARNING
Tip - Over Hazard
A child or adult can tip the range and
be killed. Verify the anti-tip bracket
has been installed. Ensure the anti-tip
bracket is engaged when the range
is moved. Do not operate the range
without the anti-tip bracket in place.
Failure to follow these instructions
can result in death or serious burns to
children and adults.
To check that leveling leg is
inserted into anti-tip bracket,
grasp the top rear edge
of the range and carefully
attempt to tilt it forward.
Screw must
enter wood or
concrete
Anti-tip
bracket
Anti-tip
bracket
Wall plate
Leveling
leg
Leveling the Range
Level the range by adjusting the leveling legs with a
wrench. Extending the legs slightly may also make it
easier to insert the rear leg into the anti-tip bracket.
Use a level to check your adjustments. Place the level
diagonally on the oven rack, and check each direction
for level.
First check direction
Then check direction
on the rack, adjust the leveling legs with a wrench.
.
. If the level doesn’t show level
2
1
Locate the anti-tip bracket using the template
An anti-tip bracket is packaged with the template.
The instructions include necessary information to
complete the installation. Read and follow the range
installation instruction sheet (template).
INSTALLATION
ENGLISH
15
Electrical Connection
Requirements
The range must be installed in accordance with Local
and Canadian Electrical Codes (latest edition). See
rating plate for total connected Amp rating. This model
was shipped direct from the factory with Service cord
attached. There are no range connections necessary.
NOTE
Only a range cord rated at 40 amps with 120/240
minimum volt range is required. If a 50 amp range
cord is used, it should be marked for use with
3
1
/8" diameter connection openings.
Engaging the Anti-tip Device
•Move the range close enough to the opening to
plug into the receptacle.
•Slide the range into position ensuring that the back
leg slides under the anti-tip bracket. The range
should sit flush against the back wall when properly
installed.
•Carefully attempt to tip the range forward to ensure
that the anti-tip bracket is engaged properly. If
properly installed, the anti-tip bracket will prevent
the range from being tipped. If the range can be
tipped, reinstall the range until the anti-tip bracket is
properly installed and the range will not tip forward.
•Turn on electrical power. Check the range for
proper operation.
Test Run
Check if the range is properly installed and run a test
cycle.
Before using the cooktop for the first time, clean
1
it with a ceramic cooktop cleaner. This helps
protect the top and makes cleanup easier.
Press Clear/Off to start test.
2
Turn on each burner to the Hi setting to check
3
that the surface heating elements are working
properly. The elements should glow red and
radiate heat, and they should cycle on and off
periodically even when the setting is in the Hi
position. This cycling prevents the glass-ceramic
from being cracked by thermal shock.
IMPORTANT : The warming zone does not
consume enough power to glow red.
After checking all the surface heating elements,
4
check the locking system by pressing Clear/Off
for three seconds. The oven door should lock.
Press Clear/Off for three seconds to disable
Lockout.
The Lockout function should disable controls for
the oven.
Now check the oven's operation. Press Bake
5
and press the number keys to set the oven
temperature to 350 °F.
The oven should finish preheating in 15 minutes.
6
The convection fan should operate while the
oven is preheating. Model LREL6325*
After checking the oven's operation, turn the
7
temperature up to 450 °F and leave the oven on
for at least an hour to help remove any oil which
might cause smoke and odors when first using
the oven.
NOTE
Smoke may come out of the range when it is first
used.
16
2 1 3 4
5 687
2 1 41
5 6378
2 1 41
5 6378
OPERATION
OPERATION
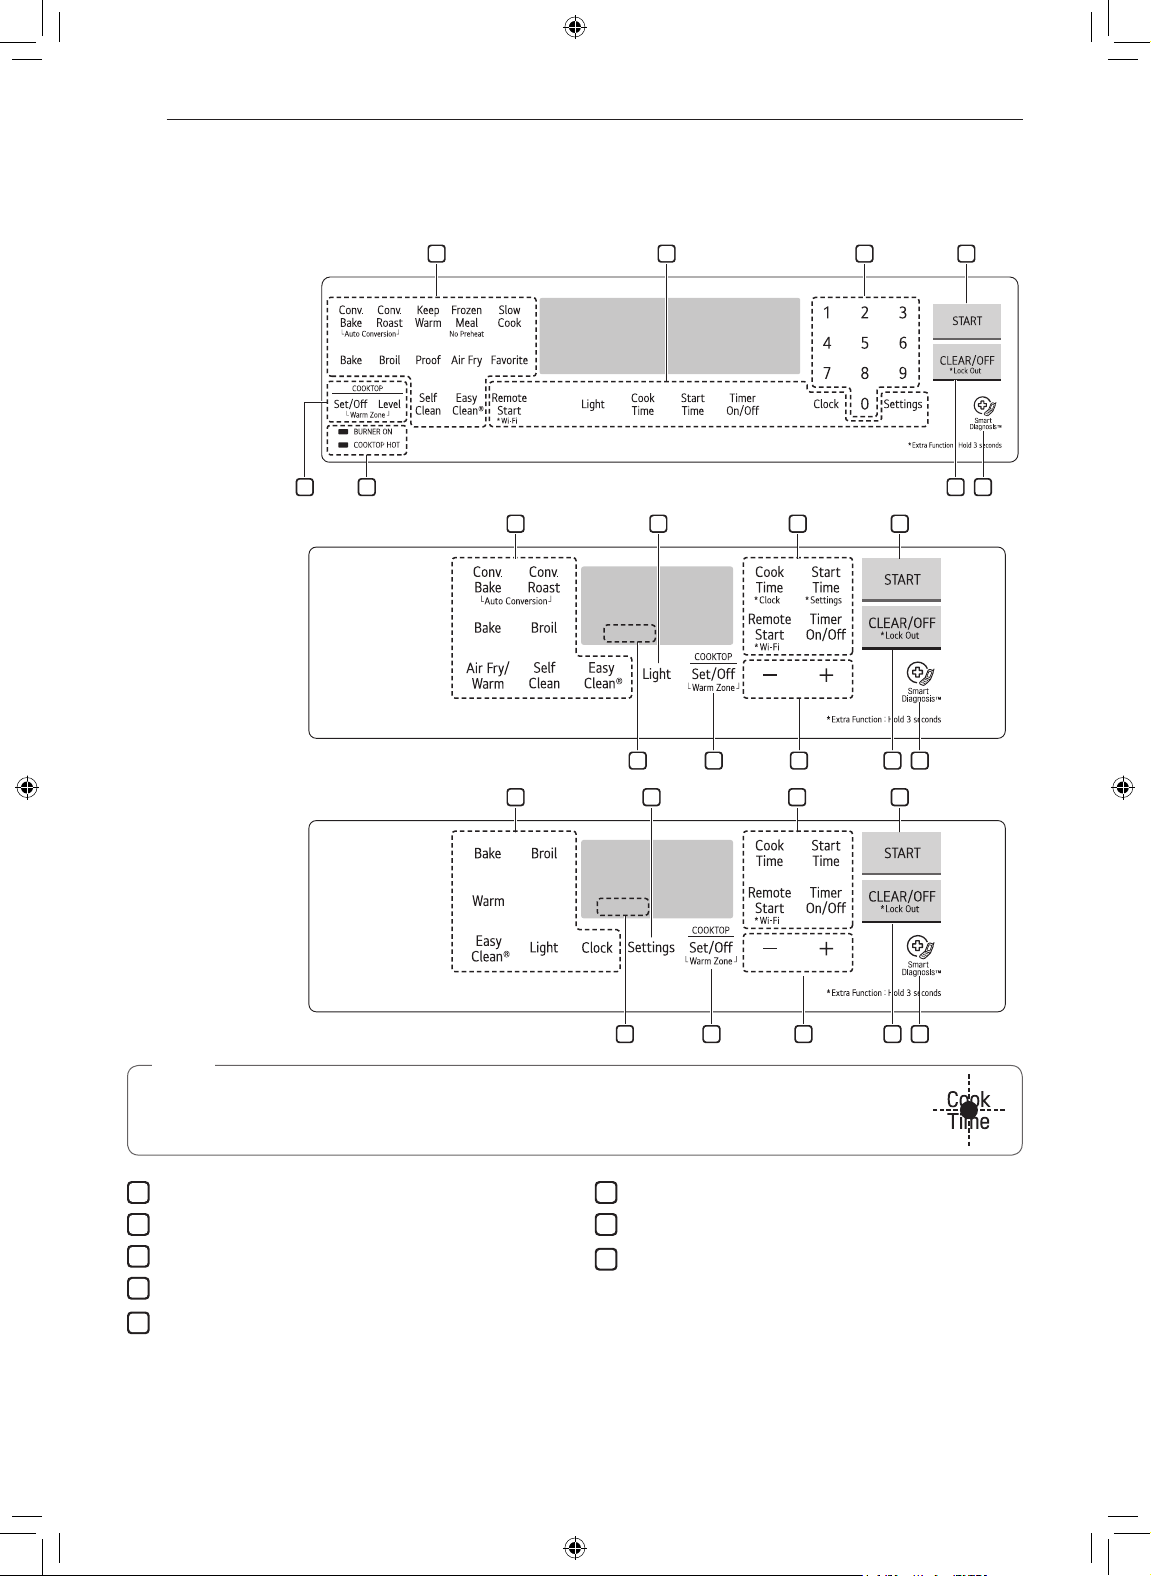
Control Panel Overview
Model LREL6325*
Model LREL6323*
Model LREL6321*
NOTE
For best results, press buttons in the center, even when activating a button's secondary function.
The buttons may not work properly if pressed too far from the center.
1
Features
2
Oven Control
3
Number Keys or +/- buttons
4
Start button
8
COOKTOP HOT Indicator
The COOKTOP HOT indicator appears in the display as long as any surface cooking area is too hot to touch.
It remains on after the element is turned off and until the surface has cooled to approximately 150 ˚F. The
COOKTOP HOT indicator also appears during the self clean cycle.
Flashing Time
If your oven displays a flashing clock, press Clock or press any key to stop the flashing.
5
Clear Off / Lockout button
6
Smart Diagnosis™
7
Cooktop Control
OPERATION
ENGLISH
17
Changing Oven Settings
Clock
The clock must be set to the correct time of day in
order for the automatic oven timing functions to work
properly.
Model LREL6325*
Press Clock.
1
Press numbers to enter the time.
2
Press Start.
3
Model LREL6323* / LREL6321*
Model LREL6323*
1
Press and hold Cook Time for 3 seconds.
Model LREL6321*
Press Clock.
Press the +/– buttons to set the time.
2
Press Start.
3
NOTE
•The time of day cannot be changed during a
timed baking or self-clean cycle (available on
some models).
•To check the time of day when the display is
showing other information, press Clock.
•If no other keys are pressed within 25 seconds
of pressing Clock, the display reverts to the
original setting.
•If the display time is blinking, you may have
experienced a power failure. Reset the time.
Oven Light
The interior oven light automatically turns on/off when
the door is opened and closed. Press Light or knock
on the door glass twice to manually turn the oven light
on/off.
The lamp of the oven will turn off after 1 minutes and
30 seconds to save power.
NOTE
•The oven light cannot be turned on if the
Self Clean (Model LREL6325* / LREL6323*)
function is active.
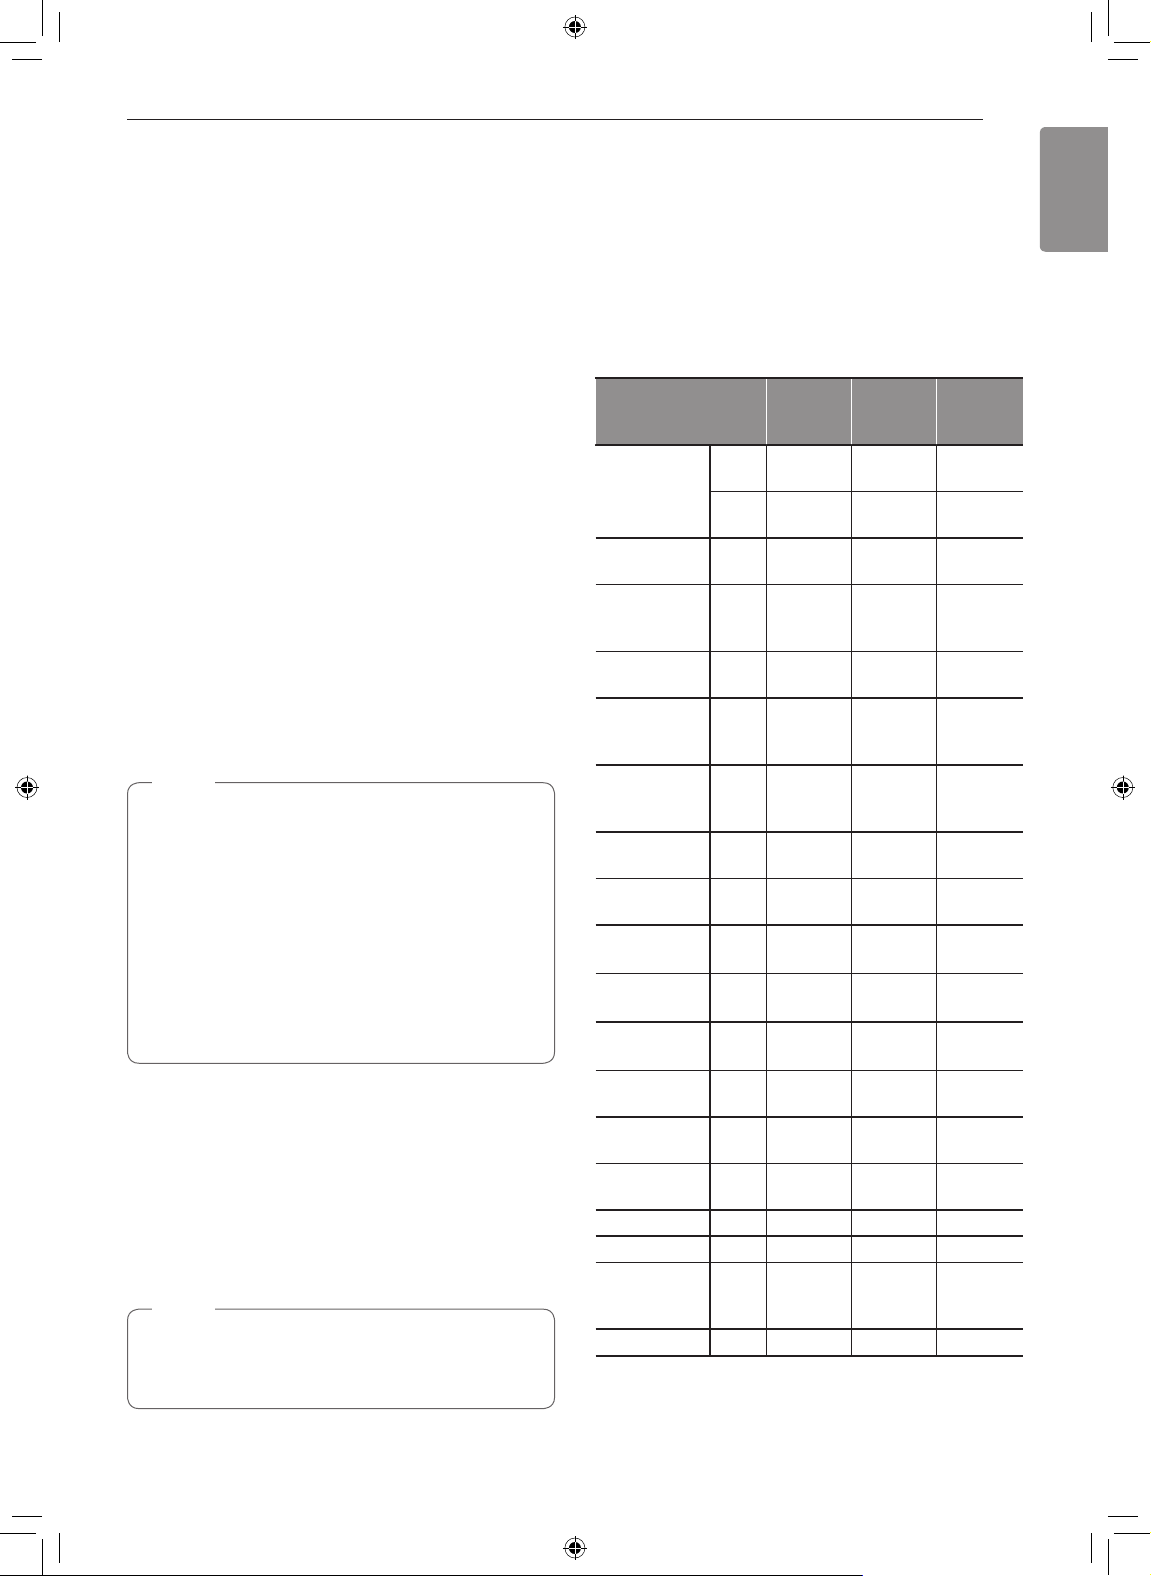
Minimum & Maximum Default
Settings
All of the features listed have a minimum and a
maximum time or temperature setting that may be
entered into the control. A beep sounds each time a
button is pressed.
Two short tones sound if the entry of the temperature
or time is below the minimum or above the maximum
setting for the feature.
min.
Feature
12 Hr.
Clock
24 Hr.
Timer
(LREL6325*)
Timer
(LREL6323*/
LREL6321*)
Cook Time 0:01 min.
*Conv. Bake
*Conv. Roast
Broil Lo Hi
Bake
Favorite ① Bread
Favorite ② Meat
Favorite ③ Chicken
Frozen Meal 300 °F 550 °F
Air Fry 300 °F 550 °F
Slow Cook Lo Hi
Proof 12 Hr.
Warm 3 Hr.
Self Clean
(on some
models)
EasyClean
®
Temp. /
Time
1:00
Hr. / min.
0:00
Hr. / min.
0:01
min. / sec.
0:10
min. / sec.
300 °F /
150 °C
300 °F /
150 °C
170 °F /
80 °C
170 °F 550 °F
300 °F 550 °F
300 °F 550 °F
3 Hr. 5 Hr. 4 Hr.
* Using Auto Conversion (Model LREL6325*/
LREL6321*)
•Default cook mode times are without setting cook
time.
max.
Temp. /
Time
12:59
Hr. / min.
23:59
Hr. / min.
11:59
Hr. / min.
11:59
Hr. / min.
11:59
Hr. / min.
550 °F /
285 °C
550 °F /
285 °C
550 °F /
285 °C
Default
(• 325 °F)/
(• 325 °F)/
350 °F /
375 °F /
325 °F /
350 °F /
400 °F /
400 °F /
10 min.
350 °F
12 Hr.
350 °F
12 Hr.
Hi /
3 Hr.
12 Hr.
12 Hr.
12 Hr.
12 Hr.
12 Hr.
12 Hr.
Hi /
12 Hr.
18
OPERATION
Timer On/Off
The Timer On/Off feature serves as an extra timer in
the kitchen that beeps when the set time has run out.
It does not start or stop cooking.
The Timer On/Off feature can be used during any of
the other oven control functions.
Setting the Timer
Press Timer On/Off button once to set the time
1
in hours and minutes, or press the button twice
to set the time in minutes and seconds. TIMER
flashes in the display.
Enter the desired length of time.
2
Model LREL6325*
Use the number buttons.
Model LREL6323* / LREL6321*
Use the +/– buttons.
Press Timer On/Off to start the Timer. The
3
remaining time countdown appears in the display.
NOTE
If Timer On/Off is not pressed, the timer returns to
the time of day.
Settings
Model LREL6323*
Press and hold Start Time for 3 seconds. Then press
the Start Time key repeatedly to toggle through and
change oven settings.
Model LREL6325* / LREL6321*
Press the Settings button repeatedly to toggle
through and change oven settings.
The Settings key allows you to:
•set the hour mode on the clock (12 or 24 hours)
•enable/disable convection auto conversion
(Model LREL6325* / LREL6323*)
•adjust the oven temperature
•activate/deactivate the preheating alarm light
•set the beeper volume
•switch the temperature scale between Fahrenheit
and Celsius
Setting the Hour Mode
The control is set to use a 12-hour clock. To reset the
clock to 24-hour mode, follow the steps below.
When the timer reaches 0:00, End shows in the
4
display. The clock beeps every 15 seconds until
the Timer On/Off button is pressed.
NOTE
If the remaining time is not in the display, recall
the remaining time by pressing Timer On/Off.
Canceling the Timer
Press Timer On/Off once.
1
The display returns to the time of day.
NOTE
Pressing Clear/Off will not turn off the timer.
Model LREL6325*
Press Settings button.
1
Press 1 to toggle between a 12-hour and 24-hour
2
clock.
Press Start to accept the change.
3
Model LREL6323* / LREL6321*
Model LREL6323*
1
Press and hold the Start Time button for 3
seconds.
Model LREL6321*
Press Settings button.
Press +/– to toggle between a 12-hour and 24-
2
hour clock.
Press Start to accept the change.
3
OPERATION
ENGLISH
19
Setting Convection Auto Conversion
(Model LREL6325* / LREL6323*)
When using convection bake, convection roast the
convection auto conversion feature will automatically
convert entered regular baking temperatures to
convection baking temperatures. When this feature
is enabled, the display will show the actual converted
temperature.
For example, if you enter a regular recipe temperature
of 350°F and press the START button, the display will
show the converted temperature of 325˚F.
Model LREL6325*
Press Settings repeatedly until Auto appears in
1
the display.
Press 1 to switch Auto Conversion on or off.
2
Press Start to accept the change.
3
Model LREL6323*
Press and hold the Start Time button for 3
1
seconds.
Press Start Time repeatedly until Auto appears
2
in the display.
Press +/– button to switch Auto Conversion on
3
or off.
Model LREL6325*
Press Settings repeatedly until AdJU appears in
1
the display.
Use the number keys to enter the number of
2
degrees you want to adjust the oven temperature.
Press Settings again to add a minus sign if
decreasing the temperature.
Press Start to accept the change.
3
Model LREL6323* / LREL6321*
Model LREL6323*
1
Press and hold the Start Time button for 3
seconds. Press Start Time repeatedly until
AdJU appears in the display.
Model LREL6321*
Press Settings repeatedly until AdJU appears in
the display.
Set the number of degrees to adjust:
2
Press or press and hold the +/– buttons until
the desired number of degrees appears in the
display.
Press Settings again to add a minus sign if
decreasing the temperature.
Press Start to accept the change.
3
Adjusting the Oven Temperature
Your new oven may cook differently from the one
it replaced. Use your new oven for a few weeks to
become more familiar with it before changing the
temperature settings. If after familiarizing yourself with
the new oven, you still think that it is too hot or too
cold, you can adjust the oven temperature yourself.
NOTE
To begin, either raise or lower the thermostat
15 °F (8 °C). Try the oven with the new setting. If
the oven still needs adjustment, raise or lower the
thermostat again, using the first adjustment as a
gauge. For example, if the adjustment was too
much, raise or lower the thermostat 10 °F (5 °C).
If the adjustment was not enough, raise or lower
the thermostat 20 °F (12 °C). Proceed in this way
until the oven is adjusted to your satisfaction.
NOTE
•This adjustment does not affect the Broil or
Self Clean temperatures on models with these
features. The adjustment is retained in memory
after a power failure.
•The oven temperature can be increased or
decreased by a maximum of 35°F (19°C).
•Once the temperature is increased or
decreased, the adjustment shows in the AdJU
setting display until it is reset.
20
OPERATION
Turning the Preheat Alarm Light On/Off
When the oven reaches its set-temperature, the
preheating alarm light flashes 5 times or until the
oven door is opened.
You can activate or deactivate the preheating alarm light.
Model LREL6325*
Press Settings repeatedly until PrE appears in
1
the display.
Press 1 to turn the light on/off.
2
Press Start to accept the change.
3
Model LREL6323* / LREL6321*
Model LREL6323*
1
Press and hold the Start Time button for 3
seconds. Press Start Time repeatedly until PrE
appears in the display.
Model LREL6321*
Press Settings repeatedly until PrE appears in
the display.
Selecting Fahrenheit or Celsius
Set the oven temperature display to show either
Fahrenheit (°F) or Celsius (°C) units. The oven
defaults to Fahrenheit unless changed by the user.
Model LREL6325*
Press Settings repeatedly until Unit appears in
1
the display.
Press 1 to select F (Fahrenheit) or C (Celsius).
2
Press Start to accept the change.
3
Model LREL6323* / LREL6321*
Model LREL6323*
1
Press and hold the Start Time button for 3
seconds. Press Start Time repeatedly until Unit
appears in the display.
Model LREL6321*
Press Settings repeatedly until Unit appears in
the display.
Press +/– to select F (Fahrenheit) or C (Celsius).
2
Press +/– to turn the light on/off.
2
Press Start to accept the change.
3
Adjusting the Beeper Volume
Model LREL6325*
Press Settings repeatedly until Beep appears in
1
the display.
Press 1 to select Hi, Lo or Off.
2
Press Start to accept the change.
3
Model LREL6323*/LREL6321*
Model LREL6323*
1
Press and hold the Start Time button for 3
seconds. Press Start Time repeatedly until Beep
appears in the display.
Model LREL6321*
Press Settings repeatedly until Beep appears in
the display.
Press +/– to select Hi, Lo or Off.
2
Press Start to accept the change.
3
Lockout
The Lockout feature automatically locks the oven door
and prevents most oven controls from being turned
on. It does not disable the timer and the interior oven
light.
Press and hold Clear/Off for three seconds.
1
The lock melody sounds, Loc appears in the
2
display(available on some models) and the lock
blinks in the display.
Once the oven door is locked, the lock
3
indicator stops blinking and remains on.
To deactivate the Lockout feature, press and hold
4
Clear/Off for three seconds. The unlock melody
sounds and the door and the controls unlock.
NOTE
In models without a self-clean mode, the Lockout
feature locks the controls but not the oven door.
The lock
indicator does not blink.
Press Start to accept the change.
3

OPERATION
ENGLISH
21
Cook Time (Timed Cook)
Set the oven to cook for a specific length of time using
the Timed Cook feature. This feature can only be used
with the Bake, Conv. Bake, Conv. Roast, Frozen
Meal, Slow Cook and Favorite Cook modes.
Setting the Cook Time Function
For example, to bake at 300 °F for 30 minutes, first
set the clock to the correct time of day.
Model LREL6325*
Press Bake. 350 °F appears in the display.
1
Set the temperature. Press 3, 0 and 0.
2
Press Cook Time. Timed flashes in the display.
3
Bake, 300 °F and 0:00 appear in the display.
Set the baking time: Press 3 and 0.
4
The baking time can be set for any amount of
time between 1 minute and 11 hours and 59
minutes.
Press START.
5
Model LREL6323* / LREL6321*
Press Bake. 350 °F appears in the display.
1
Changing the Cook Time during Cooking
For example, to change the cook time from 30
minutes to 1 hour and 30 minutes, do the following.
Model LREL6325*
Press Cook Time.
1
Change the baking time: Press 1, 3 and 0.
2
Press START to accept the change.
3
Model LREL6323* / LREL6321*
Press Cook Time.
1
Change the baking time: Press +/– button.
2
Press START to accept the change.
3
Start Time (Delayed Timed Cook)
The automatic timer of the Delayed Timed Cook
function turns the oven on and off at the time you
select. This feature can be used with the Bake, Conv.
Bake, Conv. Roast, Self Clean modes.
Set the temperature. Press +/– key.
2
Press Cook Time. Timed flashes in the display.
3
Bake, 0:00 appear in the display.
Set the baking time:
4
Press +/– key to set the baking time.
The baking time can be set for any amount of
time between 1 minute and 11 hours and 59
minutes.
Press START.
5
NOTE
To activate the Warm function at the end of the
timed cook cycle, repeat steps 1-4 and then press
Warm. Warm appears in the display. (Model
LREL6325*)
(Refer to the Warm section on page 31)
The oven will continue to cook for the set amount
of time and then turn off automatically. When the
cooking time has elapsed:
•End and the time of day show in the display.
•The cook end indicator tone sounds every 60
seconds until Clear/Off is pressed.
•When Warm is set, the warming function is
activated after the cooking time ends.
Setting a Delayed Timed Cook
For example, to bake at 300 °F for 30 minutes and
delay the start of baking until 4:30, first set the clock
to the correct time of day.
Model LREL6325*
Press Bake. 350 °F appears in the display.
1
Set the temperature: touch 3, 5 and 0.
2
Press Cook Time and touch the number keys to
3
set the baking time: touch 3 and 0.
Press Start Time.
4
Set the start time: press 4, 3 and 0 for 4:30.
5
Press Start. A short beep sounds and Timed
6
Delay appears in the display. The oven begins
baking at the set start time.
22
OPERATION
Model LREL6323* / LREL6321*
Press Bake. 350 °F appears in the display.
1
Set the temperature:
2
Press or press and hold the +/– buttons until the
desired temperature appears in the display
Press Cook Time and +/– buttons to set the
3
baking time.
Press Start.
4
Set the start time:
5
Use the +/– buttons to adjust the time displayed
to match your desired start time.
Press Start. A short beep sounds and Timed
6
Delay and the start time appear in the display.
The oven begins baking at the set start time.
NOTE
•To cancel the Delayed Timed Cook function,
press Clear/Off at any time.
•To change the cooking time, repeat step 3 and
press START.
•If the oven clock is set as a 12-hour clock, you
can delay the cook time for 12 hours. If the
oven clock is set as a 24-hour clock, you can
delay the cook time for 24 hours.
The oven will continue to cook for the set amount
of time and then turn off automatically. When the
cooking time has elapsed:
•End and the time of day show in the display.
•The cook end indicator tone sounds every 60
seconds until Clear/Off is pressed.
•When Warm is set, the warming function is
activated after the cooking time ends.
CAUTION
•Use the automatic timer when cooking cured or
frozen meats and most fruits and vegetables.
Foods that can easily spoil, such as milk, eggs,
fish, meat or poultry, should be chilled in the
refrigerator. Even when chilled, they should
not stand in the oven for more than 1 hour
before cooking begins, and should be removed
promptly when cooking is completed.
•Eating spoiled food can result in sickness from
food poisoning.
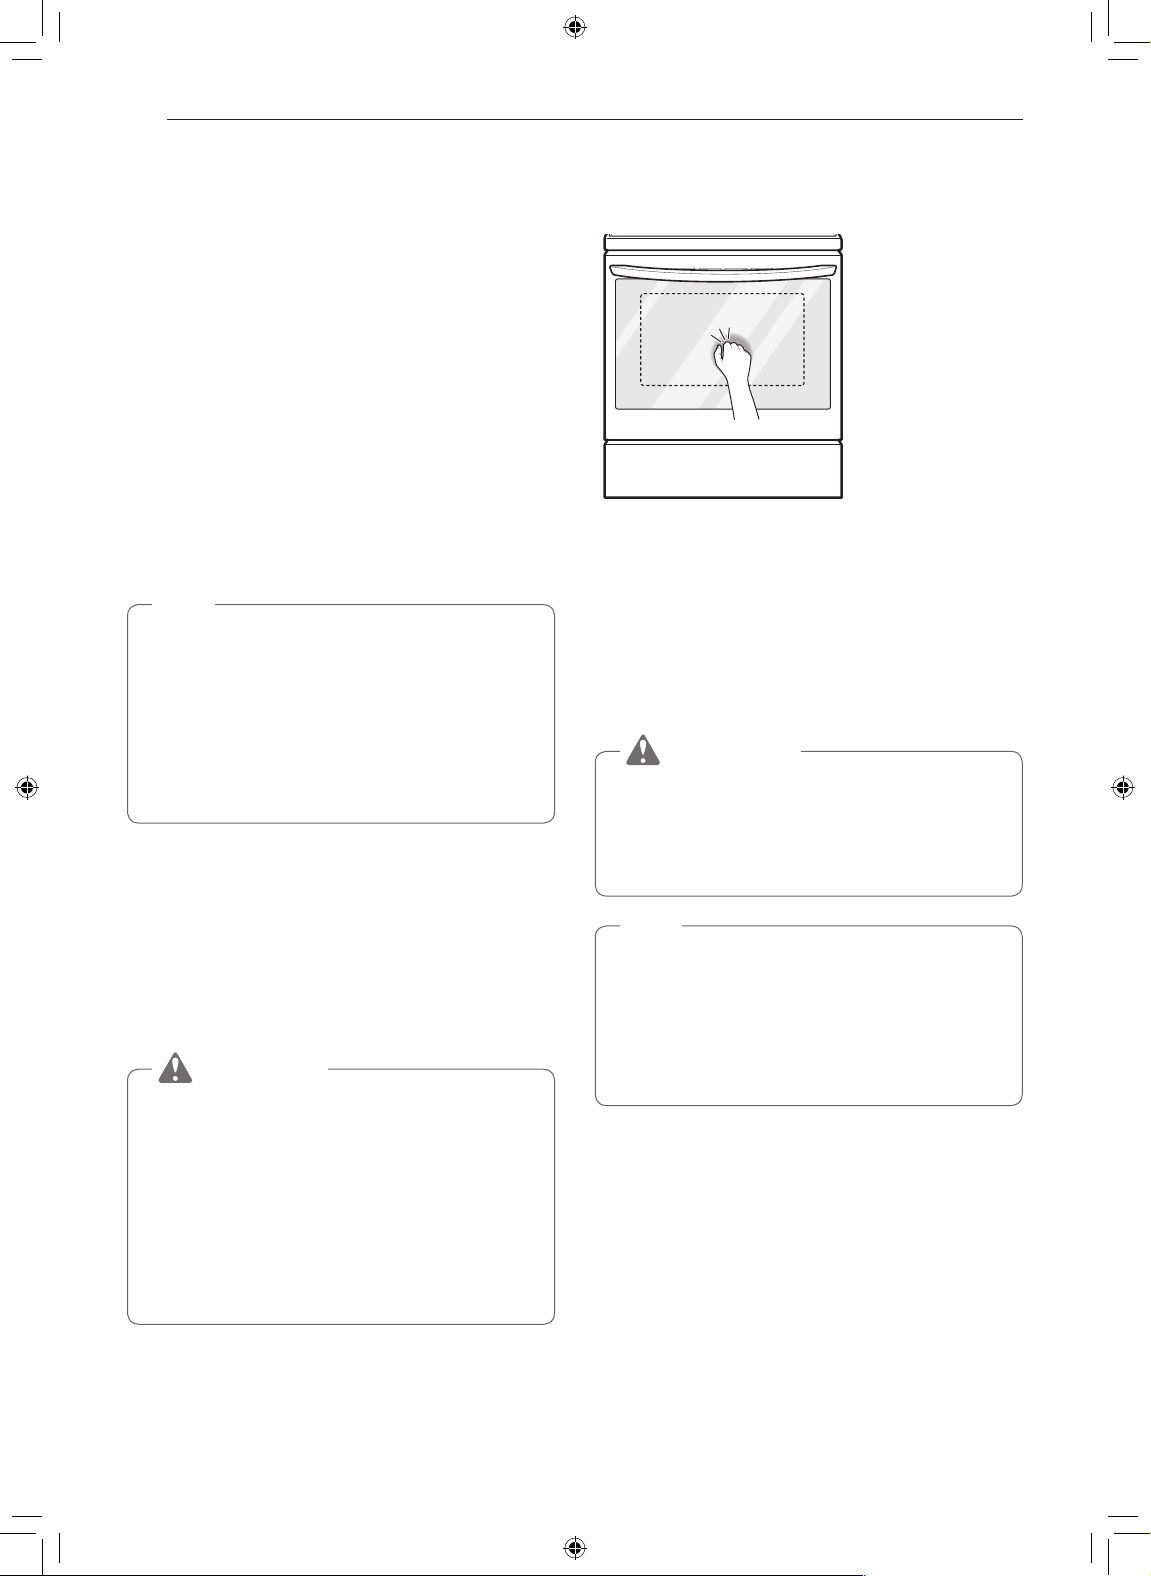
InstaView™ (Model LREL6325*)
Knock twice on the center of the glass panel to reveal
the contents of the oven without opening the door.
Knock lightly twice
•Knocking twice on the glass panel turns the interior
light on or off.
•The light turns off automatically after 90 seconds.
•The InstaView™ function is disabled when the oven
door is opened and for one seconds after closing
the door.
•The InstaView™ function is disabled during Self
Clean, Lockout, and initial power input.
WARNING
Do not hit the glass door panel with excessive
force. Do not allow hard objects like cookware
or glass bottles to hit the glass door panel. The
glass could break, resulting in a risk of personal
injury or product damage.
NOTE
•Tapping the edges of the glass panel may not
activate the InstaView™ function.
•The taps on the glass panel must be hard
enough to be audible.
•Loud noises near the oven may activate the
InstaView™ function.

OPERATION
ENGLISH
23
Using the Cooktop
Cooking Areas
The cooking areas on your range are identified by
permanent circles on the glass cooktop surface.
For the most efficient cooking, fit the pan size to the
element size.
1
Pans should not extend more than
beyond the cooking area.
When a control is turned on, a glow can be seen
through the glass cooktop surface.
NOTE
It is normal for the surface elements to cycle on
and off during cooking, even on higher settings.
This will happen more frequently if cooking on a
lower temperature setting.
LREL6325* LREL6323*
SINGLE
WARM
ZONE
DUAL TRIPLE
SINGLE
SINGLE
LREL6321*
DUAL
WARM
ZONE
SINGLE
DUAL
SINGLE
NOTE
It is normal to see a very faint red ring around the
outer edge of a dual or triple element when using
it as a single element at a high heat setting. This
is only a reflection from the bright glow of the
center element and is not a malfunction.
Recommended Element Levels
/2 to 1-inch
WARM
ZONE
DUAL DUAL
SINGLE
COOKTOP HOT Indicator
Once the element is turned off, COOKTOP HOT
appears in the display as long as the surface cooking
area is too hot to touch.
It remains on until the surface has cooled to
approximately 150 °F.
NOTE
During Self Clean (available on some models),
COOKTOP HOT remains on.
Using the Cooktop Elements
CAUTION
•Only use cookware and dishes that are safe for
oven and cooktop use.
•Always use oven mitts when removing food
from the cooktop and oven.
•Do not place sealed containers on the cooktop.
•Do not use plastic wrap to cover food while on
the cooktop. Plastic may melt onto the surface
and be very difficult to remove.
•Never leave food on the cooktop
unattended. Spillovers can cause smoke.
Greasy spillovers may catch on fire.
•The surface element may appear to have
cooled after it has been turned off. The element
may still be hot and touching the element before
it has cooled sufficiently can cause burns.
•Do not use the cooktop at high temperatures for
an excessive period as the control panel could
be damaged.
Turning on a Single Element
Push the Single element knob in.
1
Turn the knob in either direction to the desired
2
setting.
The control knob clicks when it is positioned at
both Off and HI.
Setting Recommended Use
8.5-Hi
5.5-8.0
•Bring liquid to a boil
•Start cooking
•Hold a rapid boil, frying, deep fat fry
•Quickly brown or sear food
•Maintain a slow boil
3.5-5.0
•Fry or saute foods
•Cook soups, sauces and gravies
2.2-3.0
•Stew or steam food
•Simmer
•Keep food warm
Lo-2.0
•Melt chocolate or butter
•Simmer
Heating element
Off
Single
Heating element
On
24
OPERATION
NOTE
•HI is the highest temperature available.
•LO is the lowest temperature available.
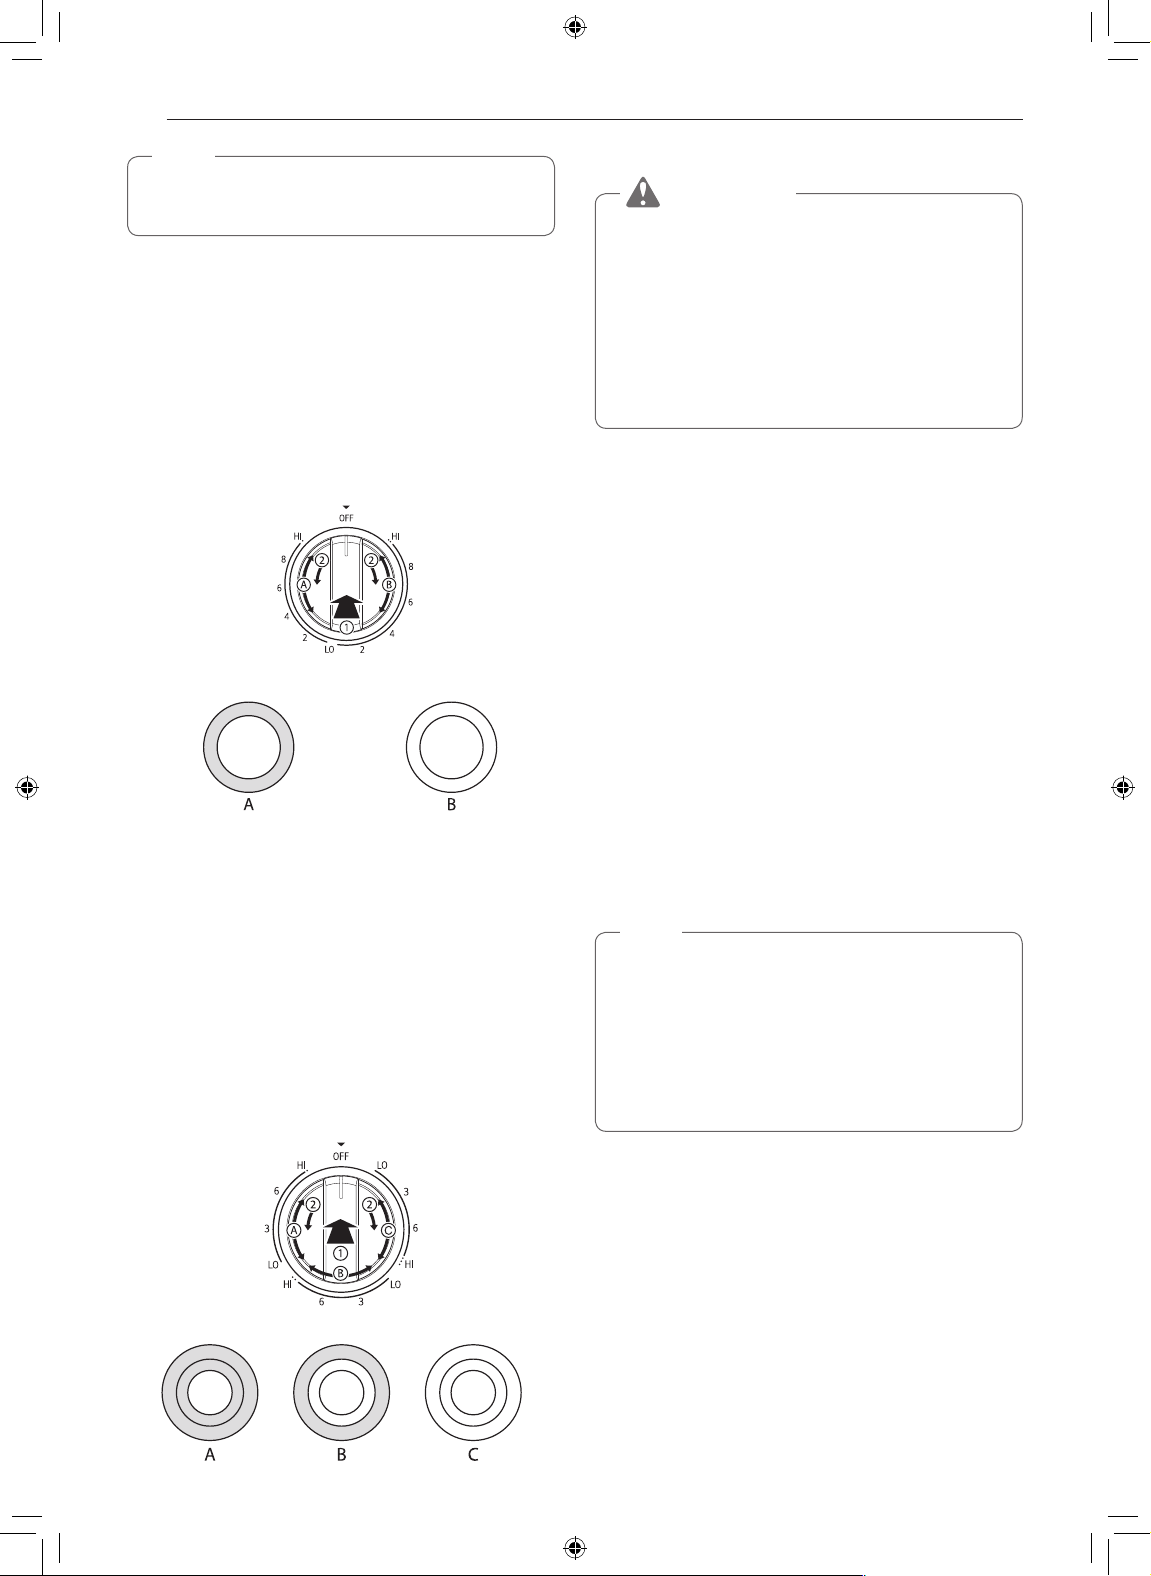
Turning on the Dual Element
There is one dual element located in the left front position.
Use the dual element as a dual or single element.
1
2-A
2-B
Push in the appropriate knob.
Turn the knob counterclockwise to use it as
a Single element.
Turn the knob clockwise to use it as a Dual
unit.
Heating with inner
(smaller) element only
Heating with both
elements together
Turning on the Warming Zone
CAUTION
FOOD POISON HAZARD: Bacteria may grow in
food at temperatures below 140 °F.
•Always start with hot food. Do not use the warm
setting to heat cold food.
•Do not use the warm setting for more than 2
hours.
•Always use pot holders or oven mitts when
removing food from the center warming element.
The Warming Zone, located in the back center of the
glass surface, will keep hot, cooked food at serving
temperature. Use the Warming Zone to keep food
warm after it has already been cooked. Attempting
to cook uncooked or cold food on the Warming Zone
could result in a food-borne illness.
Press the COOKTOP Set/Off button. The
1
warming zone indicator light flashes.
Model LREL6325*
2
Use the Level buttons to adjust the temperature
settings. The temperature settings are adjustable
at all times.
Turning on a Triple Element (on some models)
There is one triple element that can be used as either
a single, dual or triple element.
1
2-A
2-B
2-C
Push in the appropriate knob.
Turn the knob counterclockwise to use the
Single element.
Turn the knob clockwise to the Dual position
to use as a Dual element.
Turn the knob clockwise to the Triple
position to use as a Triple element.
Single Dual Triple
Model LREL6323* / LREL6321*
Use the – / + buttons to adjust the temperature
settings. The temperature settings are adjustable
at all times.
To turn off the warming zone, press the Set/Off
3
button once.
NOTE
•For best results, food on the warmer should
be kept in its container or covered with a lid or
aluminum foil to maintain food quality.
•The warmer will not glow red like the other
cooking elements.
•The Warming Zone can be operated as a single
element on some models.
OPERATION
ENGLISH
25
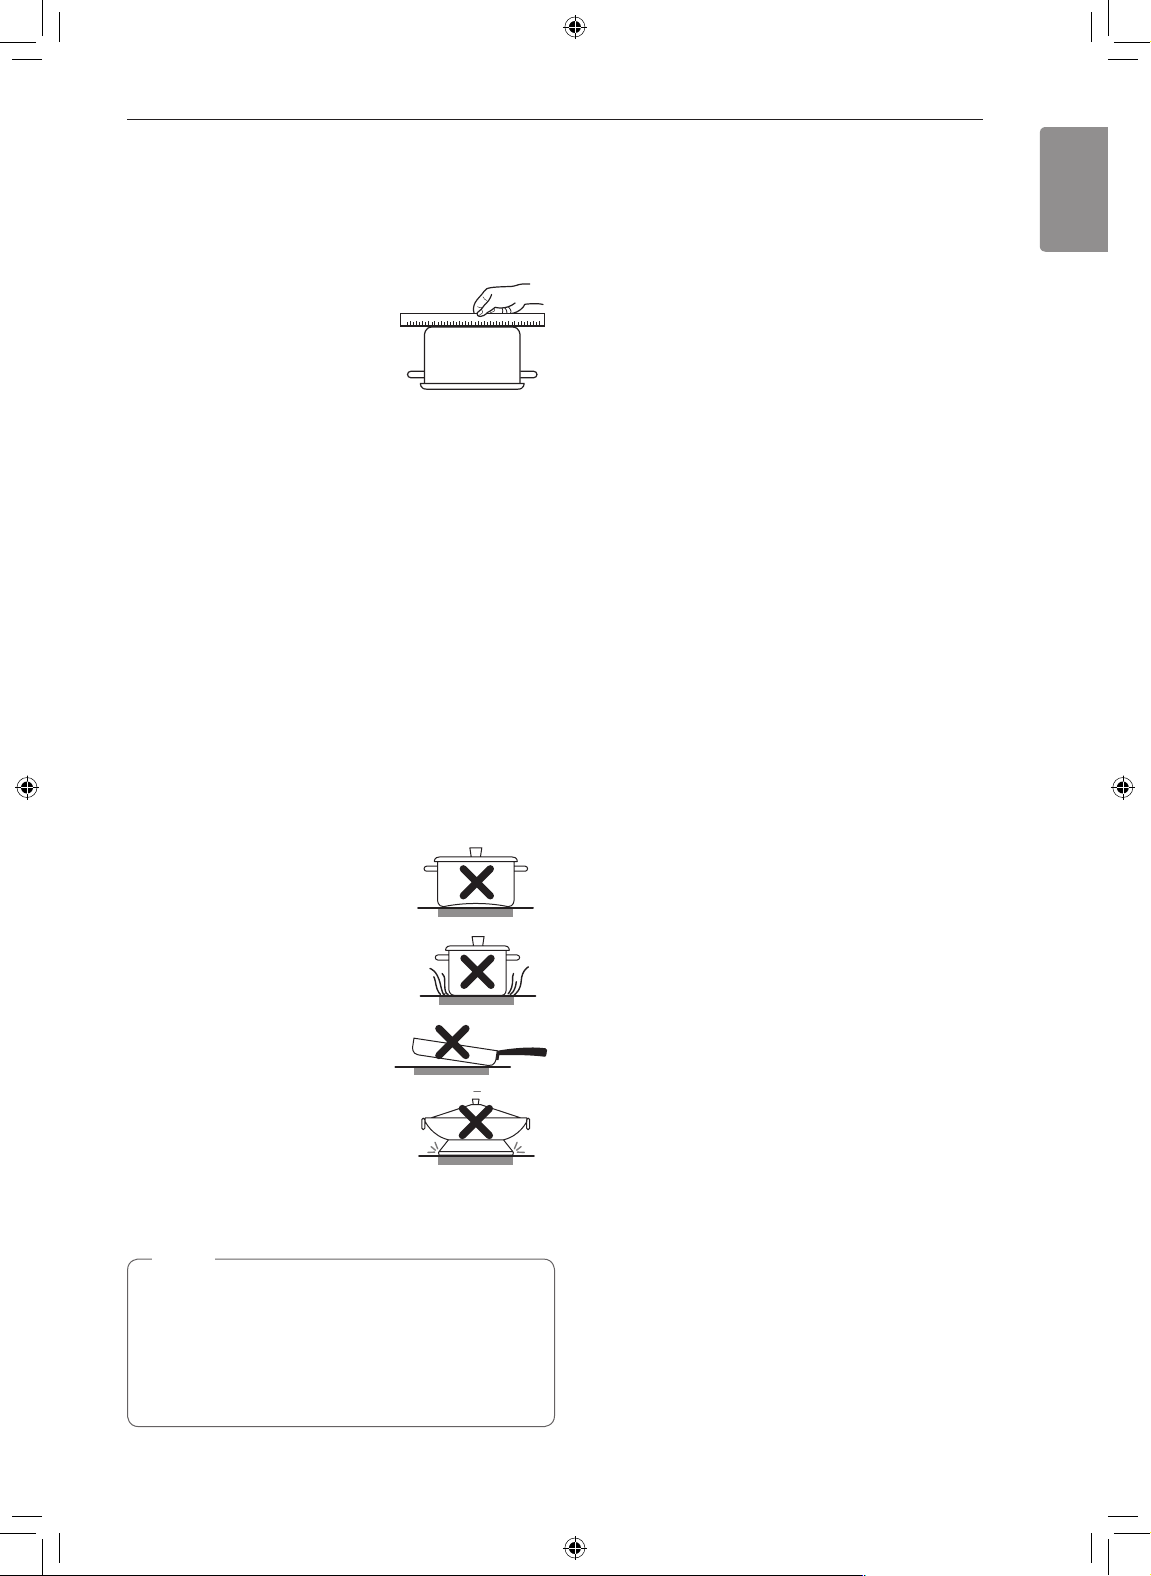
Using the Proper Cookware
The size and type of cookware will influence the
settings needed for the best cooking results. Be
sure to follow the recommendations for using proper
cookware.
Cookware should have flat
bottoms that make good
contact with the entire surface
heating element. Check for
flatness by placing a ruler
across the bottom of the
cookware. The ruler should
touch the cookware across
the entire bottom, with no
gaps.
Cookware recommendations
•Flat bottom and straight sides
•Heavy-gauge pans
•Pan sizes that match the amount of food to be
prepared and the size of the surface element
•Weight of handle does not tilt pan. Pan is well
balanced
•Tight-fitting lids
•Flat bottom woks
Cookware should not
Choosing Cookware
The cookware material determines how evenly and
quickly heat is transferred from the surface element to
the pan bottom. The most popular materials available
are:
•Aluminum - Excellent heat conductor. Some types
of food will cause it to darken (anodized aluminum
cookware resists staining and pitting). If aluminum
pans slide across the ceramic cooktop, they may
leave metal marks which will resemble scratches.
Remove these marks immediately.
•Copper - Excellent heat conductor but discolors
easily. May leave metal marks on glass-ceramic
(see Aluminum above).
•Stainless steel - Slow heat conductor with uneven
cooking results. Is durable, easy to clean and
resists staining.
•Cast iron - A poor heat conductor but retains heat
very well. Cooks evenly once cooking temperature
is reached. Not recommended for use on ceramic
cooktops.
•Porcelain-enamel on metal - Heating
characteristics will vary depending on base
material. Porcelain-enamel coating must be smooth
to avoid scratching ceramic cooktops.
•Glass - Slow heat conductor. Not recommended for
ceramic cooktop surfaces because it may scratch
the glass.
•have a curved or warped
bottom.
•be smaller or larger than the
surface burner.
•have a heavy handle that tilts
the pan.
•be a wok with a ring stand.
•have loose or broken handles.
•have loose-fitting lids.
NOTE
•Do not use pans less than 7 inches in
diameter on the front elements.
•Do not use foil or foil-type containers. Foil may
melt onto the glass. Do not use the cooktop if
metal has melted on it. Call an authorized LG
Service Center.
Home Canning Tips
Be sure that the canner is centered over the
surface element and is flat on the bottom.
•The base must not be more than 1 inch larger than
the element. Use of water bath canners with rippled
bottoms may extend the time required to bring the
water to a boil and may damage the cooktop.
•Some canners are designed with smaller bases for
use on smooth surfaces.
•Use the high heat setting only until the water comes
to a boil or pressure is reached in the canner.
•Reduce to the lowest heat setting that maintains
the boil, or pressure. If the heat is not turned down,
the cooktop may be damaged.
26
OPERATION
Using the Oven
Before Using the Oven
NOTE
•Because the oven temperature cycles, an oven
thermometer placed in the oven cavity may not
show the same temperature that is set on the
oven.
•It is normal for the convection fan to run while
preheating during a regular bake cycle.
•The convection fan motor may run periodically
during a regular bake cycle.
•The fan turns off if the door is left open during
baking. The fan turns back on automatically
once the door is closed.
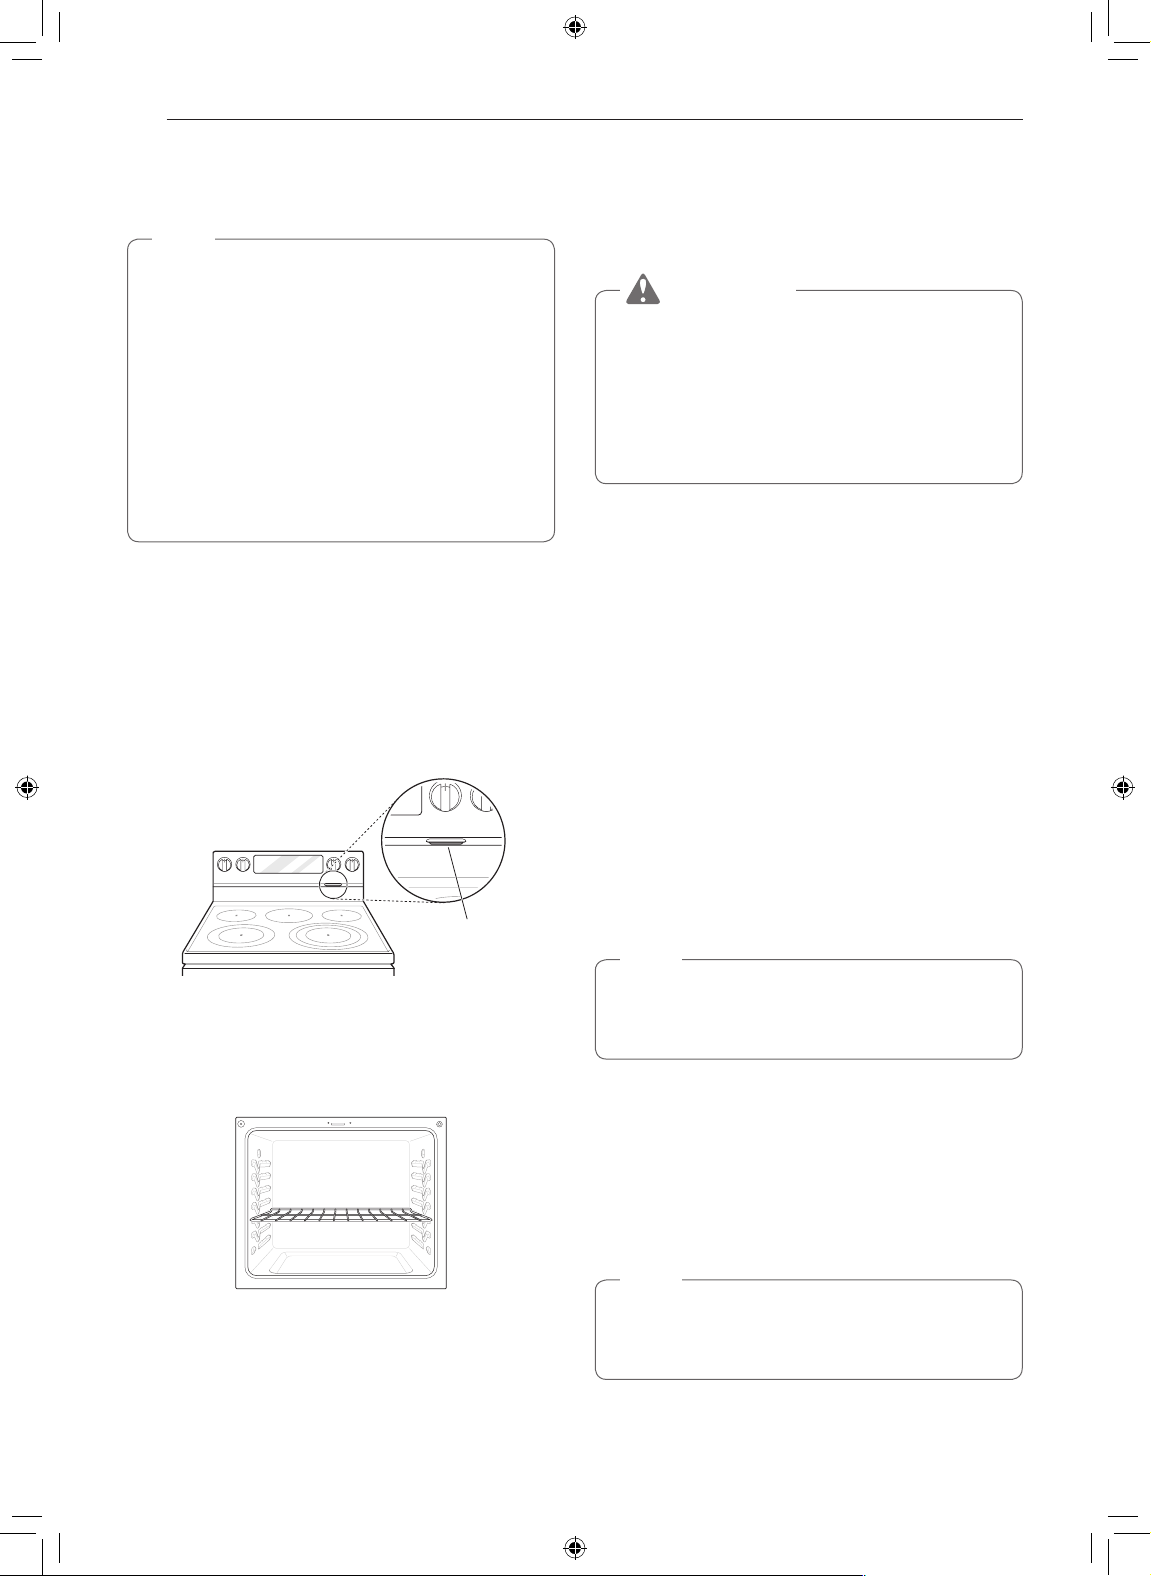
Oven Vent
Areas near the vent may become hot during operation
and may cause burns. Do not block the vent opening.
Avoid placing plastics near the vent as heat may
distort or melt the plastic.
It is normal for steam to be visible when cooking
foods with high moisture content.
Replacing Racks
Place the end of the rack on the support.
1
Tilt the front end up and push the rack in.
2
CAUTION
•Replace oven racks before turning the oven on
to prevent burns.
•Do not cover the racks with aluminum foil, or
any other material, or place anything on the
bottom of the oven. Doing so will result in poor
baking and may damage the oven bottom.
•Only arrange oven racks when the oven is cool.
Bake
Bake is used to prepare foods such as pastries, breads
and casseroles. The oven can be programmed to bake
at any temperature from 170 °F (80 °C) to 550 °F (285
°C). The default temperature is 350 °F (175 °C).
Setting the Bake Function (example, 375 °F)
Press Bake.
1
Set the oven temperature:
2
Model LREL6325*
Press 3, 7 and 5.
Oven Vent
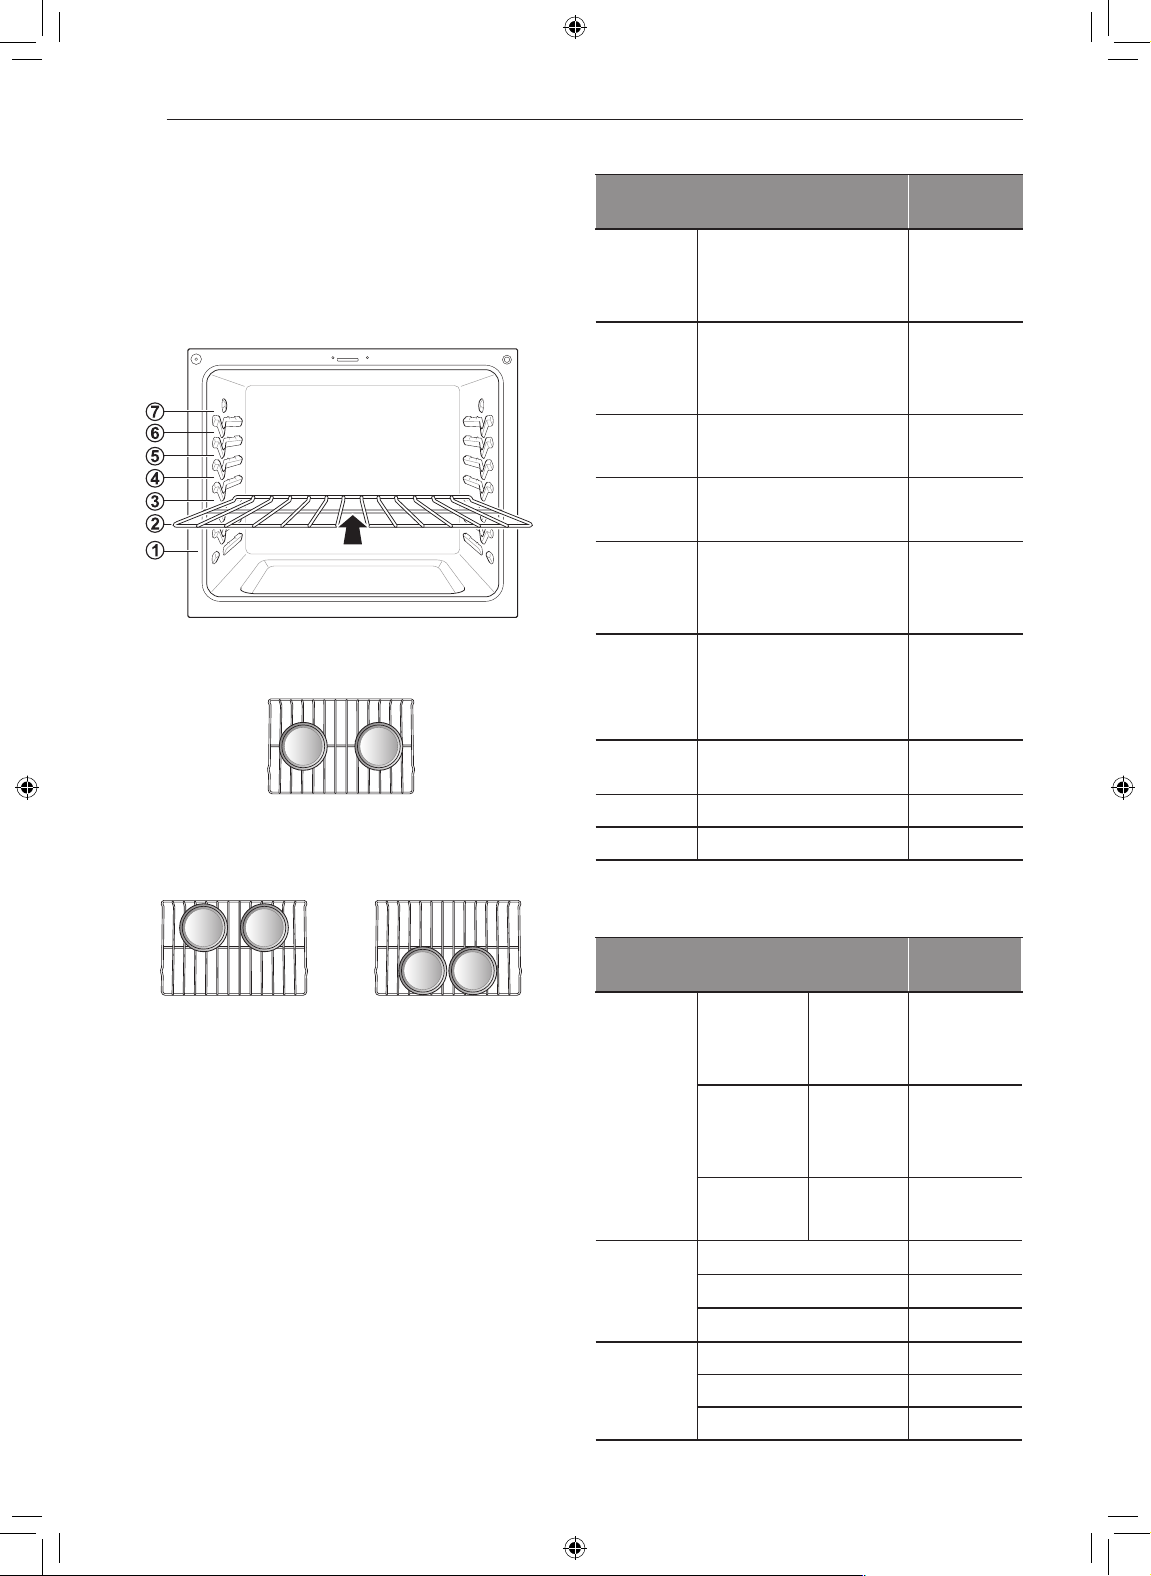
Using Oven Racks
The racks have a turned-up back edge that prevents
them from being pulled out of the oven cavity.
Removing Racks
Pull the rack straight out until it stops.
1
Lift up the front of the rack and pull it out.
2
Model LREL6323*/LREL6321*
Use the +/– keys to set the temperature.
Press Start to accept the change.
3
NOTE
If the door is opened during baking, the bake
burner turns off after 30 seconds. The burner turns
back on automatically once the door is closed.
As the oven preheats, the temperature is displayed
and rises in 5-degree increments. Once the oven
reaches the set temperature, a tone sounds and the
oven light blinks on and off.
When cooking is complete, press Clear/Off.
4
Remove food from the oven.
5
NOTE
It is normal for the convection fan to operate
periodically throughout a normal bake cycle in the
oven. This is to ensure even baking results.
OPERATION
ENGLISH
27
Baking Tips
•Baking time and temperature will vary depending
on the characteristics, size, and shape of the
baking pan used.
•Check for food doneness at the minimum recipe time.
•Use metal bakeware (with or without a nonstick
finish), heatproof glass-ceramic, ceramic or other
bakeware recommended for oven use.
•Dark metal pans or nonstick coatings will cook food
faster with more browning. Insulated bakeware will
slightly lengthen the cooking time for most foods.
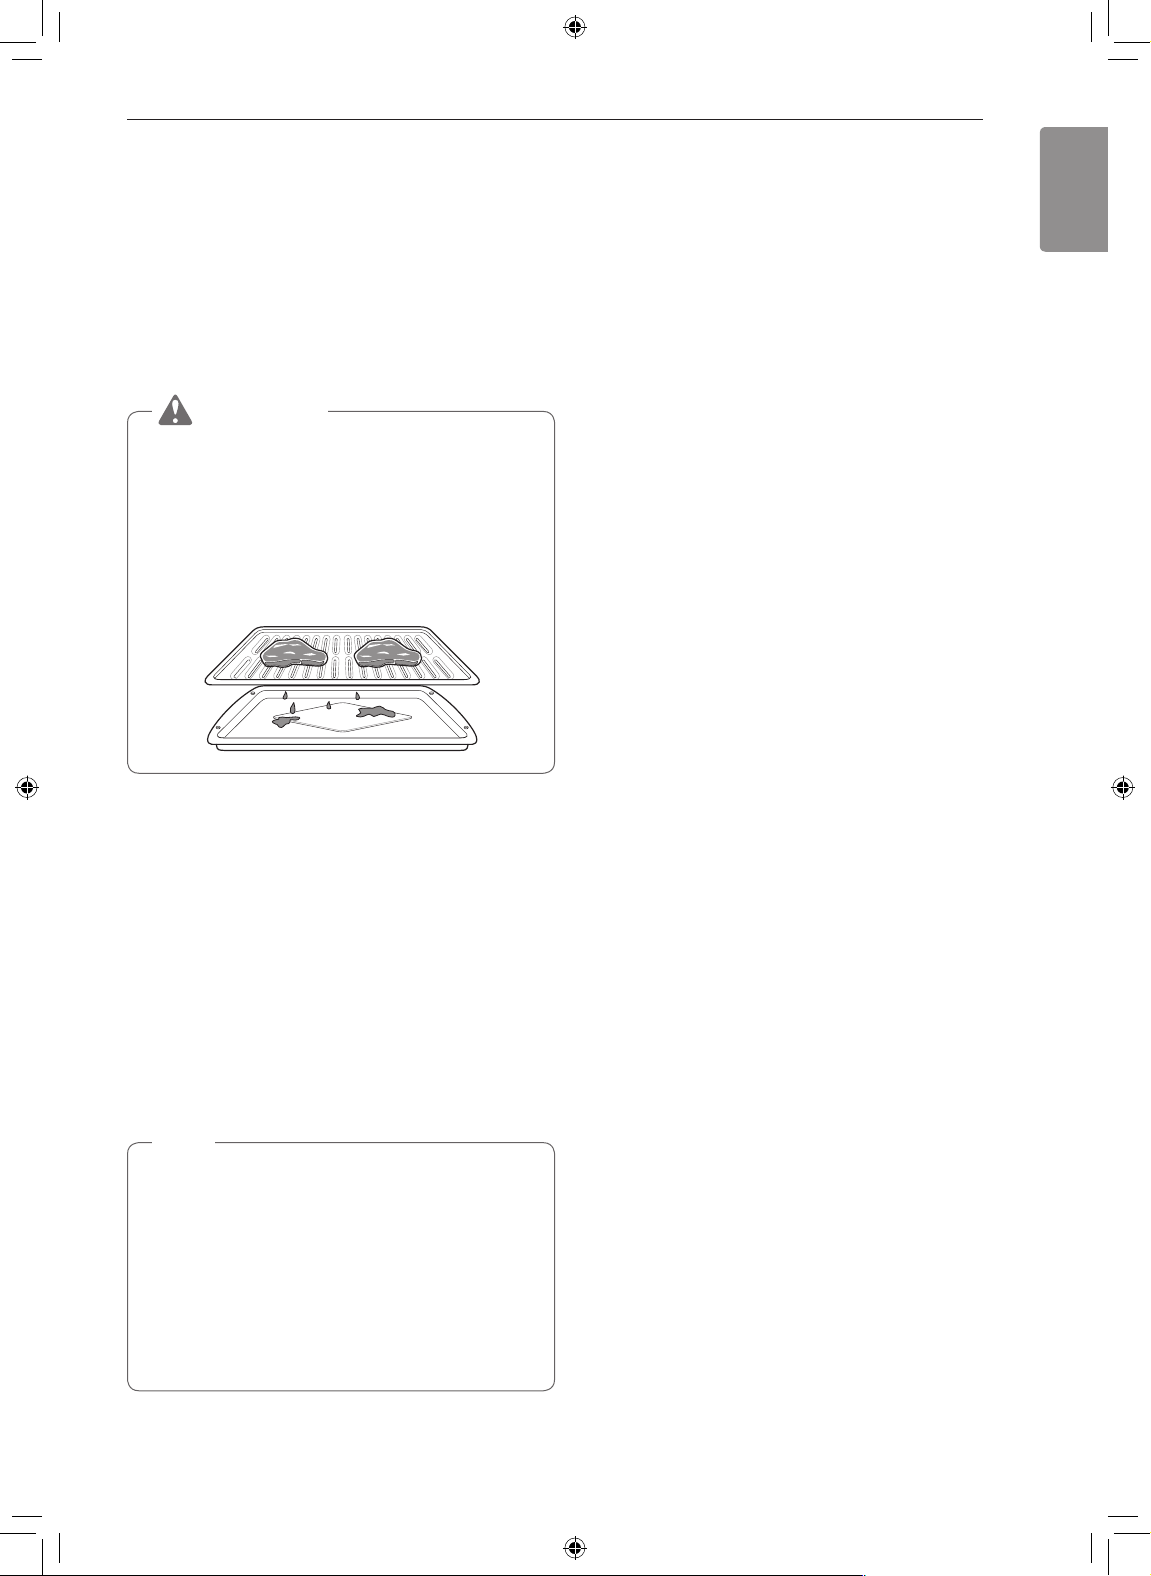
NOTE
The oven bottom has a porcelain-enamel finish.
To make cleaning easier, protect the oven bottom
from excessive spillovers by placing a cookie sheet
on the rack below the rack you are cooking on.
This is particularly important when baking a fruit
pie or other foods with a high acid content. Hot fruit
fillings or other foods that are highly acidic may
cause pitting and damage to the porcelain-enamel
surface and should be wiped up immediately.
Convection Mode (Model LREL6325*
/ LREL6323*)
The convection system uses a fan to circulate
the heat evenly within the oven. Improved heat
distribution allows for even cooking and excellent
results while cooking with single or multiple racks.
Setting the Convection Function (example, 375 °F)
Press Conv. Bake or Conv. Roast. The display
1
flashes 350 °F.
Set the oven temperature:
2
Model LREL6325*
Press 3, 7 and 5.
Model LREL6323*
Using the +/– key set the temperature.
Press START. The display shows Conv. Bake or
3
Conv. Roast and the oven temperature starting
at 100 °F.
As the oven preheats, the display shows increasing
temperatures in 5-degree increments. Once the oven
reaches the set adjusted temperature, a tone sounds and
the oven light flashes on and off. The display shows the
auto converted oven temperature, 350 °F and the fan icon.
When cooking has finished or to cancel, press
4
Clear/Off.
NOTE
•The oven fan runs while convection baking. The fan
stops when the door is open. In some cases, the
fan may shut off during a convection bake cycle.
•It's normal that convection fan is not turning on
directly. The fan will turn on later.
Tips for Convection Baking
•Use Convection Bake for faster and more even
multiple-rack cooking of pastries, cookies, muffins,
biscuits, and breads of all kinds.
•Bake cookies and biscuits on pans with no sides
or very low sides to allow heated air to circulate
around the food. Food baked on pans with a dark
finish will cook faster.
•When using Convection Bake with a single rack,
place the oven rack in position 4. If cooking on
multiple racks, place the oven racks in positions 2
and 5 (or 4) for two racks.
•Multiple oven rack cooking may slightly increase
cook times for some foods.
•You will have better results when baking cakes,
cookies and muffins using multiple racks.
The Convection Roast feature is designed to give
optimum roasting performance. Convection Roast
combines cooking with the convection fan to roast
meats and poultry. The heated air circulates around
the food from all sides, sealing in juices and flavors.
Foods are crispy brown on the outside while staying
moist on the inside. Convection roasting is especially
good for large tender cuts of meat, uncovered.
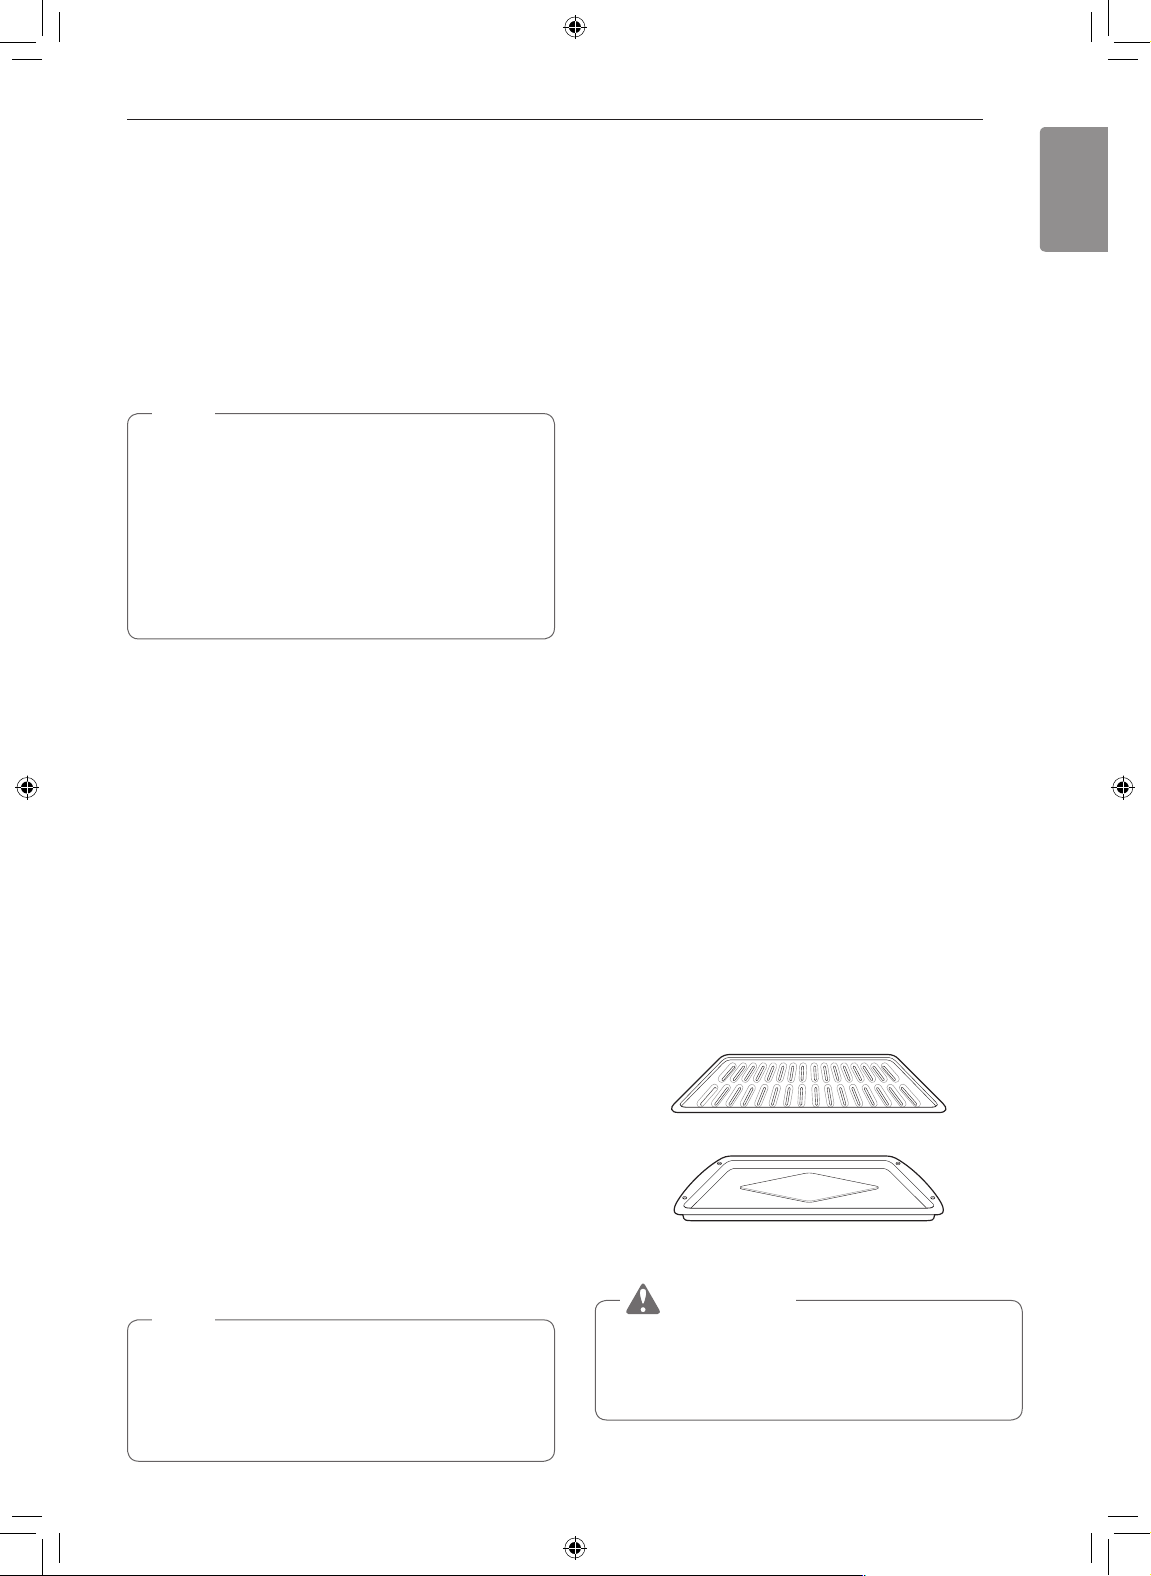
Tips for Convection Roasting
Use a broiler pan and grid when preparing meats for
convection roasting. The broiler pan catches grease
spills and the grid helps prevent grease splatters.
Place the oven rack on the bottom.
1
Place the grid in the broiler pan.
2
Place the broiler pan on the oven rack.
3
Grid (sold separately)
Broiler pan (sold separately)
CAUTION
•Do not use a broiler pan without a grid.
•Do not cover the grid with aluminum foil.
•Position food (fat side up) on the grid.
28
OPERATION
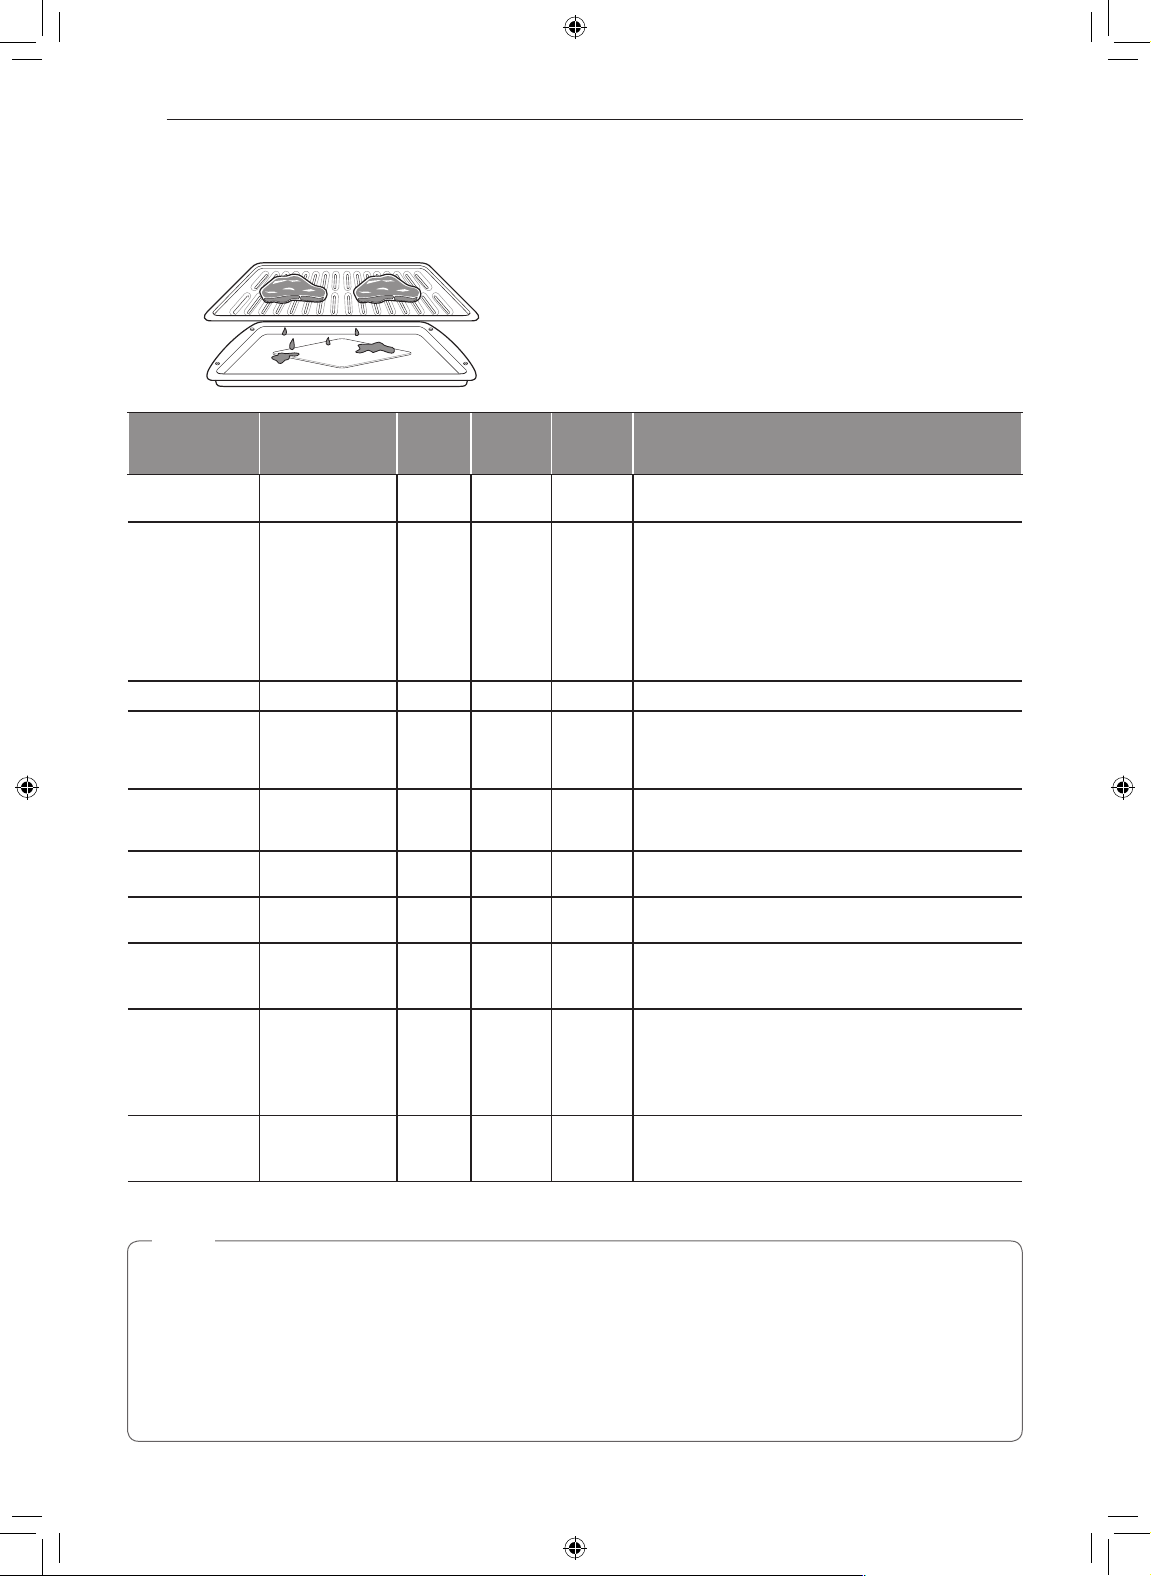
Recommended Baking and Roasting
Guide
Baking results will be better if baking pans are
centered in the oven as much as possible. If cooking
on multiple racks, place the oven racks in the
positions shown.
Rack and Pan Placement
Single rack baking
Rack
(Position 4)
Multiple rack baking
Baking rack guide
Food
•Layer cakes
Cakes
Cookies
Pizza
Pastry
Crust
Breads
Desserts
Custards
Soufflés •Sweet or savory 2
Casserole •Frozen lasagna 3
•Bundt cakes
•Angel food cake
•Sugar cookies
•Chocolate chips
•Brownies
•Fresh
•Frozen
•From scratch
•Refrigerator
•Biscuit, canned
•Biscuit, from scratch
•Muffins
•Fruit crisps and
cobblers, from scratch
•Pies, from scratch,
2-crust fruit
•Cheesecake,
crème brulée
Rack
position
3 or 2
4
3
3
4
4
4
3
4
4
3
3
5
4
4
2
Rack
(Position 2)
Rack
(Position 5)
Roasting rack guide
Food
Rib
Beef
Pork
Poultry
Boneless
rib, top
sirloin
Beef
tenderloin
Rib 2
Bone-in, sirloin 2
Ham, cooked 2
Whole chicken 2
Chicken pieces 2
Turkey 2
Rare
Medium
Well done
Rare
Medium
Well done
Rare
Medium
Rack
position
2
2
2
2
2
2
2
2
OPERATION
ENGLISH
29
Broil
The Broil function uses intense heat from the upper
heating element to cook food. Broiling works best for
tender cuts of meat, fish, and thinly cut vegetables.
Some models may feature a hybrid broiler consisting
of an inner broiler that utilizes a carbon heating
element which provides instantaneous heat, and
a traditional outer broiling element. During normal
broiler operation, it is normal for either element to
cycle off intermittently.
CAUTION
•Do not use a broiler pan without a grid. Oil can
cause a grease fire.
•Do not cover the grid and broiler pan with
aluminum foil. Doing so will cause a fire.
•Always use a broiler pan and grid for excess fat
and grease drainage. This will help to reduce
splatter, smoke, and flare-ups.
Smoking
Due to the intense heat associated with broiling, it
is normal to experience smoke during the cooking
process. This smoke is a natural byproduct of
searing and should not cause you to worry. If you are
experiencing more smoke than you are comfortable
with, use the following tips to reduce the amount of
smoke in your oven.
Always use a broiler pan. Do not use saute pans
1
or regular baking sheets for safety reasons.
The broiler pan should always be thoroughly
2
cleaned and at room temperature at the
beginning of cooking.
Always run your cooktop ventilation system or
3
vent hood during broiling.
Keep the interior of your oven as clean as
4
possible. Leftover debris from prior meals can
burn or catch fire.
Avoid fatty marinades and sugary glazes. Both
5
of these will increase the amount of smoke you
experience. If you would like to use a glaze,
apply it at the very end of cooking.
Setting the Oven to Broil
Oven door must always be closed during Broil
1
mode.
Press Broil once for Hi or twice for Lo.
2
Press START. The oven begins to heat.
3
Let the oven preheat for approximately five
4
minutes before cooking the food if using broil.
Press Clear/Off to cancel at any time or when
5
cooking is complete.
NOTE
This range is designed for closed-door broiling.
Close the door to set the Broil function. If the door
is open, the Broil function cannot be set and door
appears on the display. Close the door and reset
the Broil function. Opening the door turns off the
broil burner during broiling.
If the door is opened during broiling, the broil
burner turns off after 5 seconds. The broiler turns
back on automatically once the door is closed.
If you are experiencing significant smoke with
6
any food item, consider:
•Lowering the broiler to the Lo setting.
•Lowering the rack position to cook the food
further away from the broiler.
•Using the Hi broil setting to achieve the level of
searing you desire, and then either switching
to the Lo broil setting, or switching to the Bake
function.
As a rule, fattier cuts of meat and fish will
7
produce more smoke than leaner items.
Adhere to the recommended broil settings and
8
cooking guidelines in the chart on the following
page whenever possible.
30
OPERATION
Recommended Broiling Guide
The size, weight, thickness, starting temperature, and your preference of doneness will affect broiling times.
This guide is based on meats at refrigerator temperature. For best results when broiling, use a pan designed for
broiling.
Second
Side
(minutes)
2-4
2-4
3-5
4-6
6-8
8-10
4-6
5-7
turn over
4-7
5-8
2-5
4-7
7-9
7-9
3-5
4-6
Food
Ground Beef 1 lb. (4 patties)
Beef Steaks
Rare
Medium
Well done
Rare
Medium
Well done
Toast 7 0.5-1 0.5
Chicken 1 whole cut up
Lobster Tails 2–4
Fish Fillets
Ham Slices
(precooked)
Pork Chops
Well done
Lamb Chops
Medium
Well done
Medium
Well done
Salmon Steaks
Quantity and/or
Thickness
1
/2 to 3/
thick
"
4
thick
1
"
1
/2 lbs.
1 to 1
1
1
/
thick
"
2
1
/2 lbs.
2 to 2
1
/2 lbs., split
2 to 2
lengthwise
2 Breasts
10 to 12 oz. each
1
/4 to 1/
thick
"
2
1
/
thick
"
2
1
/
thick)
1 (
"
2
2 (1" thick)
about 1 lb.
thick) about
2 (1
"
10 to 12 oz.
1
/
thick)
2 (1
"
2
about 1 lb.
thick)
2 (1
"
4 (1" thick)
about 1 lb.
Rack
Position
First Side
(minutes)
7 4-6 2-4 Space evenly. Up to 8 patties may be broiled at once.
7
7
7
5
5
5
5
5
5 9-12 Do not
6 2-4 2-4 Handle and turn very carefully. Brush with lemon butter
5 2-4 2-4 Increase time 5 to 10 minutes per side for 1
6
5
6
6
6
6
5
5
3-5
4-6
5-7
7-9
9-11
11-13
8-10
8-10
3-6
5-8
3-5
5-7
7-9
9-11
8-10
9-11
Comments
Steaks less than 1" thick cook through before browning.
Pan frying is recommended. Slash fat.
Broil skin-side-down first.
Cut through back of shell. Spread open. Brush with
melted butter before broiling and after half of broiling
time.
before and during cooking, if desired.
home-cured ham.
Grease pan. Brush steaks with melted butter.
1
/2" thick or
•This guide is only for reference. Adjust cook time according to your preference.
NOTE
The USDA advises that consuming raw or undercooked fish, meat, or poultry can increase your risk of foodborne illness.
The USDA has indicated the following as safe minimum internal temperatures for consumption:
•Ground meat: 160 °F (71.1 °C)
•Poultry: 165 °F (73.9 °C)
•Beef, veal, pork, or lamb: 145 °F (62.8 °C)
•Fish / Seafood: 145 °F (62.8 °C)
 Loading...