

CAUTION
RISK OF ELECTRIC SHOCK
DO NOT OPEN
CAUTION: TO REDUCE THE RISK OF ELECTRIC SHOCK
REFER SERVICING TO QUALIFIED SERVICE PERSONNEL.
FCC WARNING: This equipment may generate or use radio frequency energy. Changes or
modifications to this equipment may cause harmful interference unless the modifications are
expressly approved in the instruction manual. The user could lose the authority to operate this
equipment if an unauthorized change or modification is made.
REGULATORY INFORMATION: FCC Part 15
This equipment has been tested and found to comply with the limits for a Class A digital
device, pursuant to Part 15 of the FCC Rules. These limits are designed to provide reasonable
protection against harmful interference when the equipment is operated in a commercial
environment.
This equipment generates, uses, and can radiate radio frequency energy and, if not installed
and used in accordance with the instruction manual, may cause harmful interference to radio
communications.
Operation of this equipment in a residential area is likely to cause harmful interference in
which case the user will be required to correct the interference at his own expense.
• A suitable conduit entries, knock-outs or glands shall be provided in the cable entries of
this product in the end user.
• Caution: Danger of explosion if battery is incorrectly replaced. Replaced only with the
same or equivalent type recommended by the manufacturer. Dispose of used batteries
according to the manufacturer’s instructions.
• Holes in metal, through which insulated wires pass, shall have smooth well rounded
surfaces or shall be provided with brushings.
This Class A digital apparatus complies with Canadian ICES-003.
Cet appareil numérique de la classe A est conforme à la norme NMB-003 du Canada.
Warning: Do not install this equipment in a confined space such as a bookcase or similar unit.
Wiring methods shall be in accordance with the National Electric Code, ANSI/NFPA 70.
Warning:
Warning: This is a class A product. In a domestic environment this product may cause radio
interference in which case the user may be required to take adequate measures.
Warning: To reduce a risk of fire or electric shock, do not expose this product to rain or
moisture.
Caution: This installation should be made by a qualified service person and should conform
to all local codes.
Caution: To avoid electrical shock, do not open the cabinet. Refer servicing to qualified
personnel only.
Caution: The apparatus should not be exposed to water (dripping or splashing) and no
objects filled with liquids, such as vases, should be placed on the apparatus.
Caution:
This product employs a Laser System. To ensure proper use of this product, please read
this owner’s manual carefully and retain it for future reference. Should the unit require
maintenance, contact an authorized service center. Use of controls, adjustments, or the
performance of procedures other than those specified herein may result in hazardous
radiation exposure. To prevent direct exposure to laser beam, do not try to open the enclosure.
The Power Plug is the disconnecting device. In case of an emergency, the Power Plug must
remain readily accessible.
• Please note that this is NOT a Customer Service contact point. For Customer Service
Information, see Warranty Card or contact the dealer that you purchased this product.
DO NOT REMOVE COVER (OR BACK)
NO USER-SERVICEABLE PARTS INSIDE
This lightning flash with arrowhead symbol within an equilateral
triangle is intended to alert the user to the presence of uninsulated
dangerous voltage within the product’s enclosure that may be of
sufficient magnitude to constitute a risk of electric shock to persons.
The exclamation point within an equilateral triangle is intended to alert
the user to the presence of important operating and maintenance
(servicing) instructions in the literature accompanying the product.
LG Electronics hereby declares that this/these product(s) is/are in
compliance with the essential requirements and other relevant
provisions of Directive 2004/108/EC, 2006/95/EC, and 2011/65/EU.
Contact office for compliance of this product :
LG Electronics Inc.
EU Representative, Krijgsman 1,
1186 DM Amstelveen, The Netherlands
Disposal of your old appliance
1. This crossed-out wheeled bin symbol indicates that waste electrical and
electronic products (WEEE) should be disposed of separately from the
municipal waste stream.
2. Old electrical products can contain hazardous substances so correct
disposal of your old appliance will help prevent potential negative
consequences for the environment and human health. Your old
appliance may contain reusable parts that could be used to repair other
products, and other valuable materials that can be recycled to conserve
limited resources.
3. You can take your appliance either to the shop where you purchased
the product, or contact your local government waste office for details of
your nearest authorised WEEE collection point. For the most up to date
information for your country please see www.lg.com/global/recycling
Disposal of waste batteries/accumulators
1. This symbol may be combined with chemical
symbols for mercury (Hg), cadmium (Cd) or lead
(Pb) if the battery contains more than 0.0005% of
mercury, 0.002% of cadmium or 0.004% of lead.
2. All batteries/accumulators should be disposed
separately from the municipal waste stream via
Pb
3. The correct disposal of your old batteries/accumulators will help to prevent potential
negative consequences for the environment, animal and human health.
4. For more detailed information about disposal of your old batteries/ accumulators,
please contact your city office, waste disposal service or the shop where you
purchased the product. (http://www.lg.com/global/sustainability/environment/takeback-recycling/global-network-europe)
Safety way to remove the battery or the battery from the equipment:
Remove the old battery or battery pack, follow the steps in reverse order than the assembly.
To prevent contamination of the environment and bring on possible threat to human and
animal health, the old battery or the battery put it in the appropriate container at designated
collection points. Do not dispose of batteries or battery together with other waste. It is
recommended that you use local, free reimbursement systems batteries and accumulators.
The battery shall not be exposed to excessive heat such as sunshine, fire or the like.
Removal of waste batteries and accumulators
(Product with embedded battery ONLY)
In case this product contains a battery incorporated within the product which cannot be readily
removed by end-users, LG recommends that only qualified professionals remove the battery, either
for replacement or for recycling at the end of this product’s working life. To prevent damage to
the product, and for their own safety, users should not attempt to remove the battery and should
contact LG Service Helpline, or other independent service providers for advice.
CAUTION: Internal lithium battery in the unit should not be replaced by user because of
danger of explosion if battery is incorrectly replaced ,and must be replaced with the same
type battery by expert.
designated collection facilities appointed by the
government or the local authorities.
Replacement of battery
Символ «не для пищевой
продукции» применяется в
соответствие с техническим
регламентом Таможенного
союза «О безопасности
упаковки» 005/2011 и указывает
на то, что упаковка данного
продукта не предназначена для
повторного использования и
подлежит утилизации. Упаковку
данного продукта запрещается
использовать для хранения
пищевой продукции.
Символ «петля Мебиуса»
указывает на возможность
утилизации упаковки.
Символ может быть дополнен
обозначением материала
упаковки в виде цифрового и/или
буквенного обозначения.
Символ Кедендік одақтың
005/2011 техникалық
регламентіне сәйкес
қолданылады және осы
өнімнің қаптамасын
екінші рет пайдалануға
арналмағанын және жоюға
жататынын көрсетеді.
Осы өнімнің қаптамасын
азық-түлік өнімдерін сақтау
үшін пайдалануға тыйым
салынады.
Символ қаптаманы жою
мүмкіндігін көрсетеді. Символ
сандық код және/немесе әріп
белгілері түріндегі қаптама
материалының белгісімен
толықтырылуы мүмкін.
SIMPLE MANUAL
Digital Video Recorder
LRD5160 Series
LRD5080 Series
An extended Owner’s Manual that contains information on the advanced features is located on the CD-ROM provided in an electronic version. To read
these files, you will need to use a Personal Computer (PC) equipped with a CD-ROM drive.
Model LRD5160 (16 Channel) is used for the description, operation and details provided in this operating guide.
Note: It is strongly recommended that you change the password of the administrator for the protection of the security of personal information. Do not
leave 000000 as the default password. Make sure that you keep your password and write it down in a safe place so that you do not forget it.
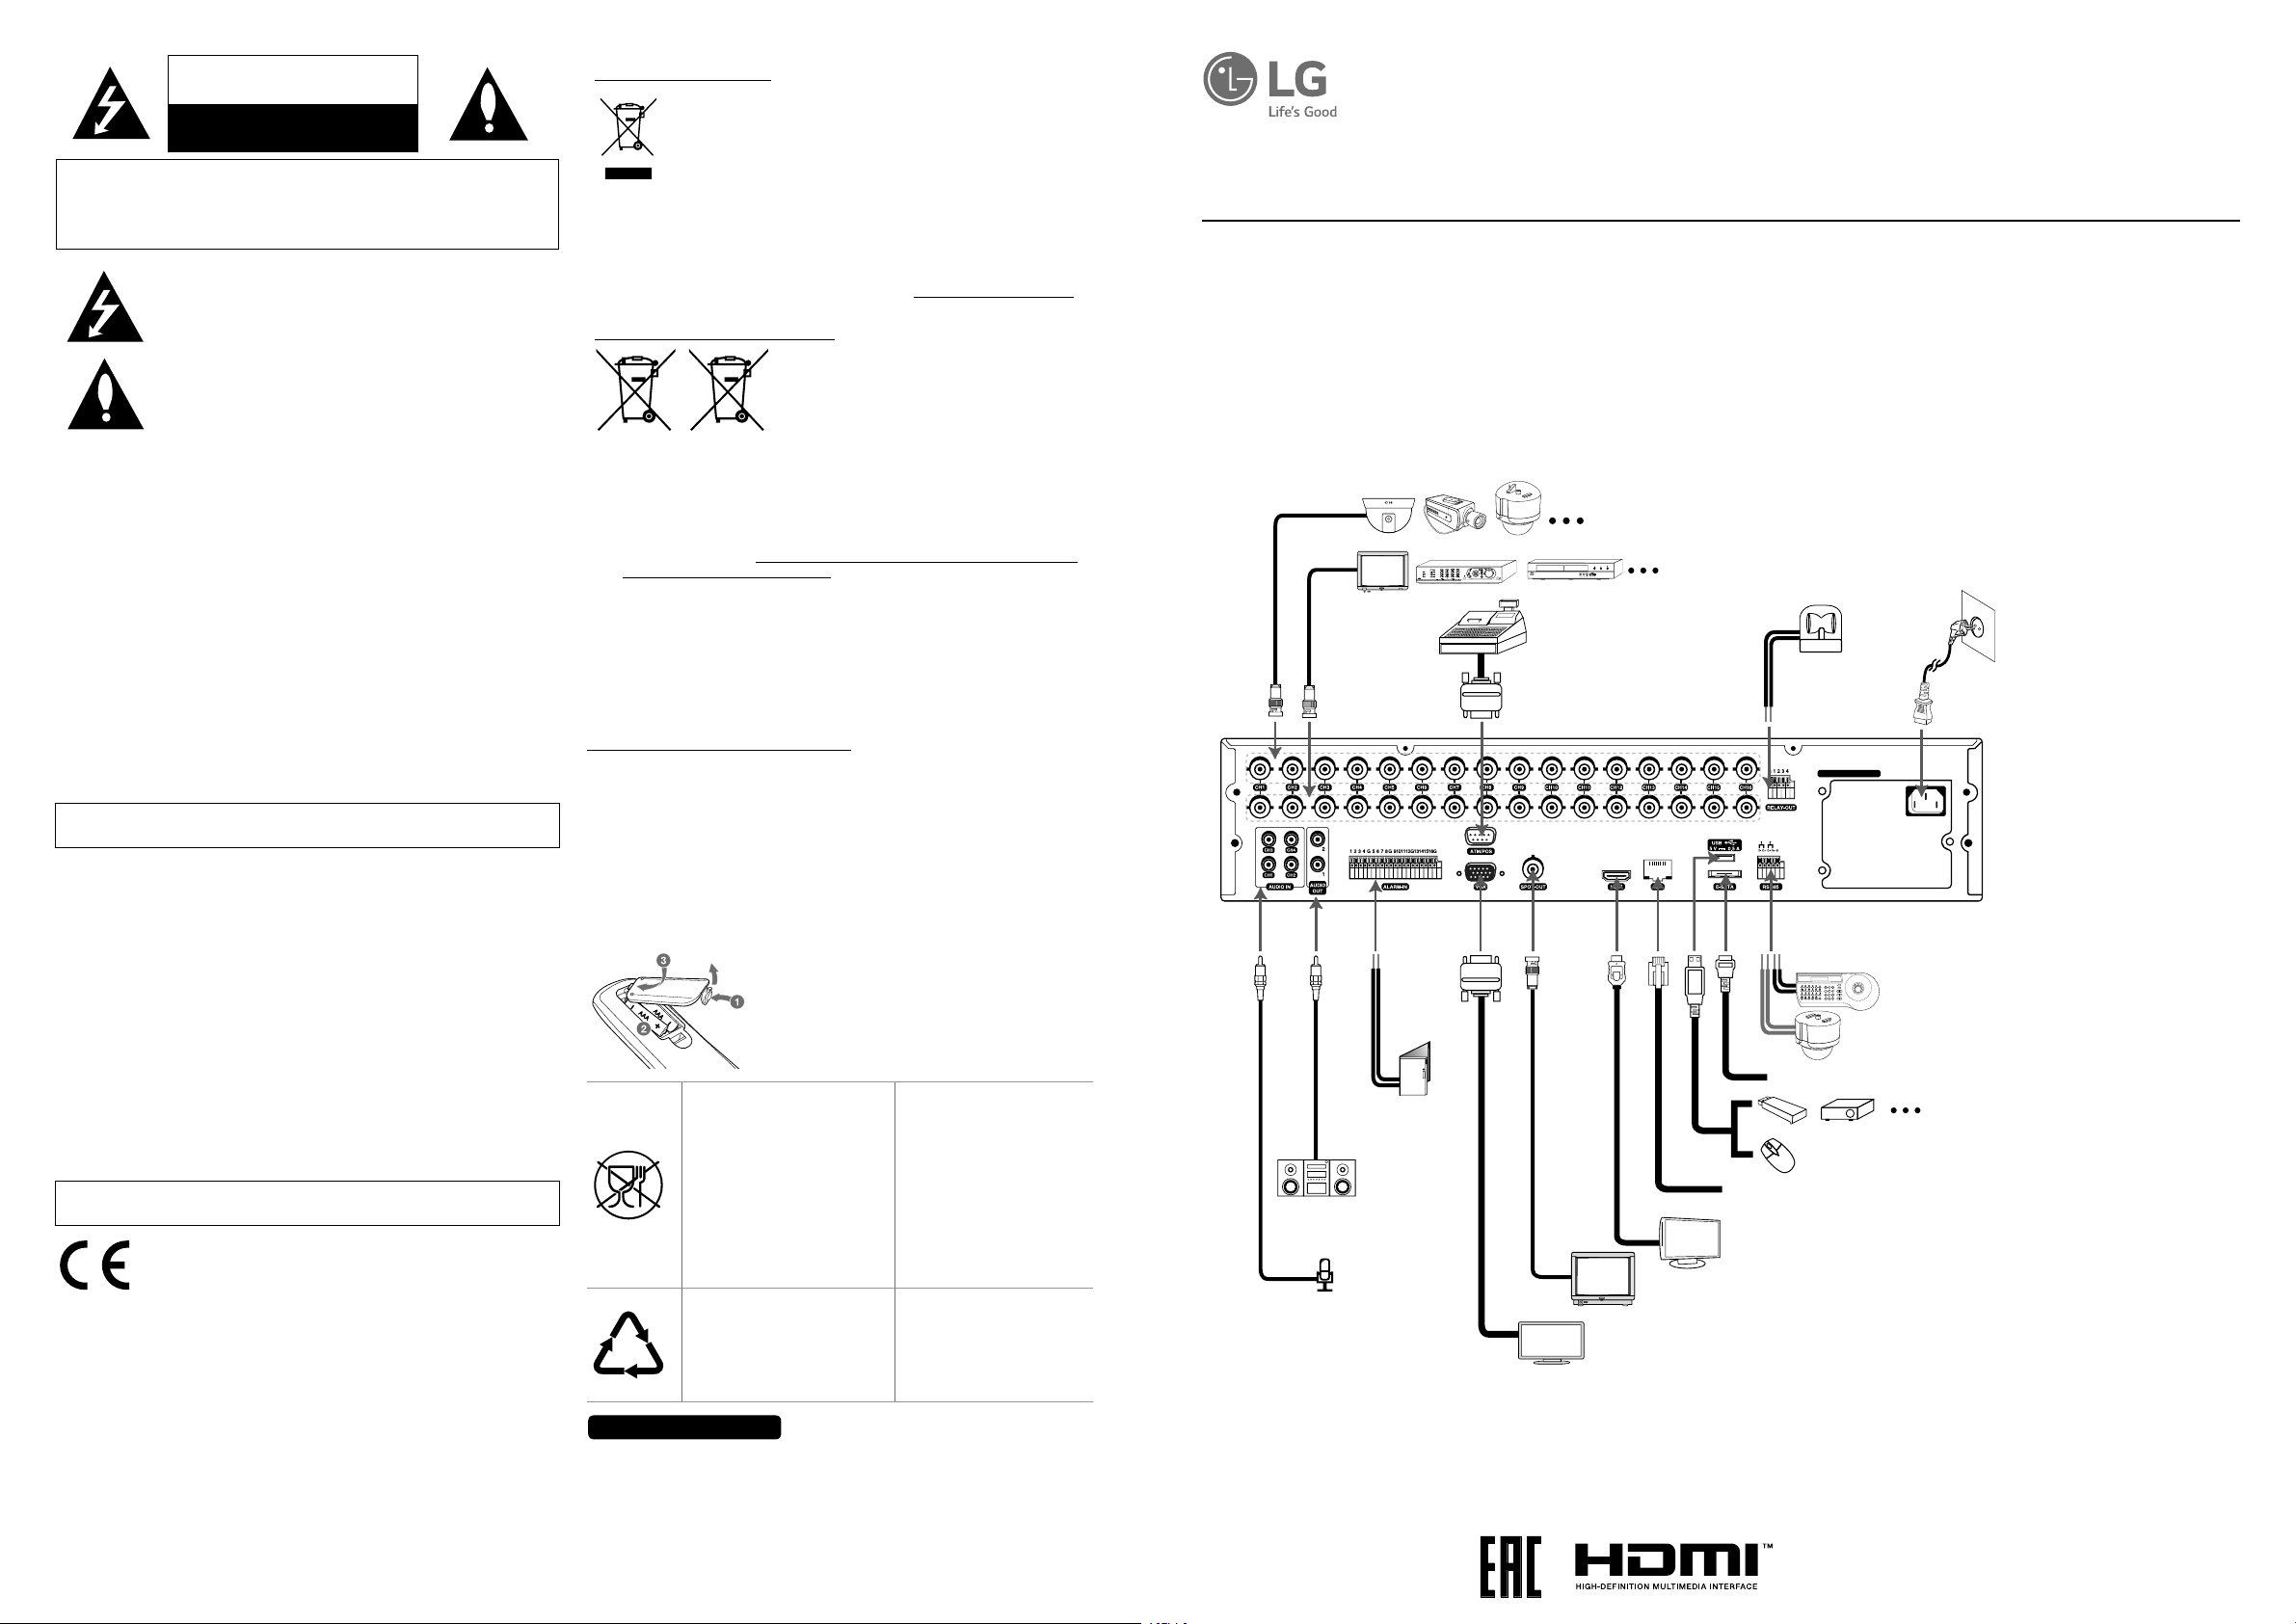
Basic Connection Overview
Connect the coaxial-type cameras
Connect the Monitor, DVR, VCR, or others.
Connect ATM/POS
unit.
Connect the
VIDEO
INPUT
LOOP
OUT
Connect audio
amplifier.
Connect audio
(line input).
Connect
alarm
sensors.
alarm (relay).
100 - 240 V ~ 50 / 60 Hz
Connect PTZ cameras, DVRs
or keypads (optional).
Connect the external SATA device.
Connect a mouse device.
Connect network cable for client control.
Connect HDMI type mon4itor (MAIN).
Connect BNC type monitor (SPOT).
Connect VGA monitor.
Connect power
cord.
Connect an external USB device for
backup or playback.
Российская Федерация
Импортер ООО “ЛГ Электроникс Рус”
Адрес импортера: 143160 Российская Федерация, Московская область, Рузский район,
сельское поселение Дороховское, 86 км. Минского шоссе, д.9
Адрес производителя: ЛГ ЭЛЕКТРОНИКС (ХУЖОУ) ИНК., ЗАВОД ХАТАИ
ЛГ Электроникс (Хужоу) Инк., завод Хатаи
516006, Китай, пров. ГуанДонг, г. Хужоу, Промышленная зона
Жонгкай, Индустриальный парк Хутаи, ХуФенг Донг Уи Роуд, 13.
Сделано в Китае
*MFL69441507*
1512 (V6.0)
Front Panel and Remote Control
OSD PTZ FOCUS+IRIS+
INFO ALM.OFFFOCUS -IRIS -
1234
5678
OK
OSD PTZ FOCUS+IRIS+
INFO ALM.OFFFOCUS -IRIS -
1234
5678
OSD PTZ FOCUS+IRIS+
INFO ALM.OFFFOCUS -IRIS -
1234
OSD PTZ FOCUS+IRIS+
INFO ALM.OFFFOCUS -IRIS -
1234
5678
OSD PTZ FOCUS+IRIS+
INFO ALM.OFFFOCUS -IRIS -
1234
OSD PTZ FOCUS+IRIS+
INFO ALM.OFFFOCUS -IRIS -
1234
5678
+I
-I
1234
5678
OK
OK
PTZ FOCUS+IRIS+
1234
FOCUS+IRIS+
+IRIS+
-IRIS -
OSD PTZ FOCUS+IRIS+
ALM.OFFFOCUS -IRIS -
1234
5678
OK
FFOCUS -IRIS -
OK
OSD PTZ FOCUS+IRIS+
INFO ALM.OFFFOCUS -IRIS -
TEXT OFFSET CLEAR
1234
5678
10/0 11 12
OK
FSET CLEAR
11 12
OK
CLEAR
12
OK
OK
OSD PTZ FOCUS+IRIS+
INFO ALM.OFFFOCUS -IRIS -
LOG TEXT OFFSET CLEAR
MARK MOVE TOUR
1234
5678
14 15 16
9 10/0 11 12
OK
MOVE TOUR
15 16
OK
TOUR
16
OK
OK
OK
LOGIN SEARCH SETUP VIEW CAM BACK REC
OK
SETUP VIEW CAM BACK REC
OK
VIEW CAM BACK REC
OK
CAM BACK REC
OK
OSD PTZ FOCUS+IRIS+
INFO ALM.OFFFOCUS -IRIS -
LOG TEXT OFFSET CLEAR
COPY MARK MOVE TOUR
1234
5678
13 14 15 16
9 10/0 11 12
OK
Setup Wizard
Front
Panel
OSD PTZ FOCUS
INFO ALM.OFFFOCUS
LOG TEXT OFFSET CLEAR
9 10/0 11 12
COPY MARK MOVE TOUR
13 14 15 16
OSD
PTZ
FOCUS
OCUS
RIS+
RIS -
INFO
ALM.OF
LOG
9
TEXT OF
10/0
ET
11
CLEAR
12
COPY
13
MARK
14
MOVE
15
TOUR
16
OK
SEARCH
SETUP
VIEW
Remote
Control
Description
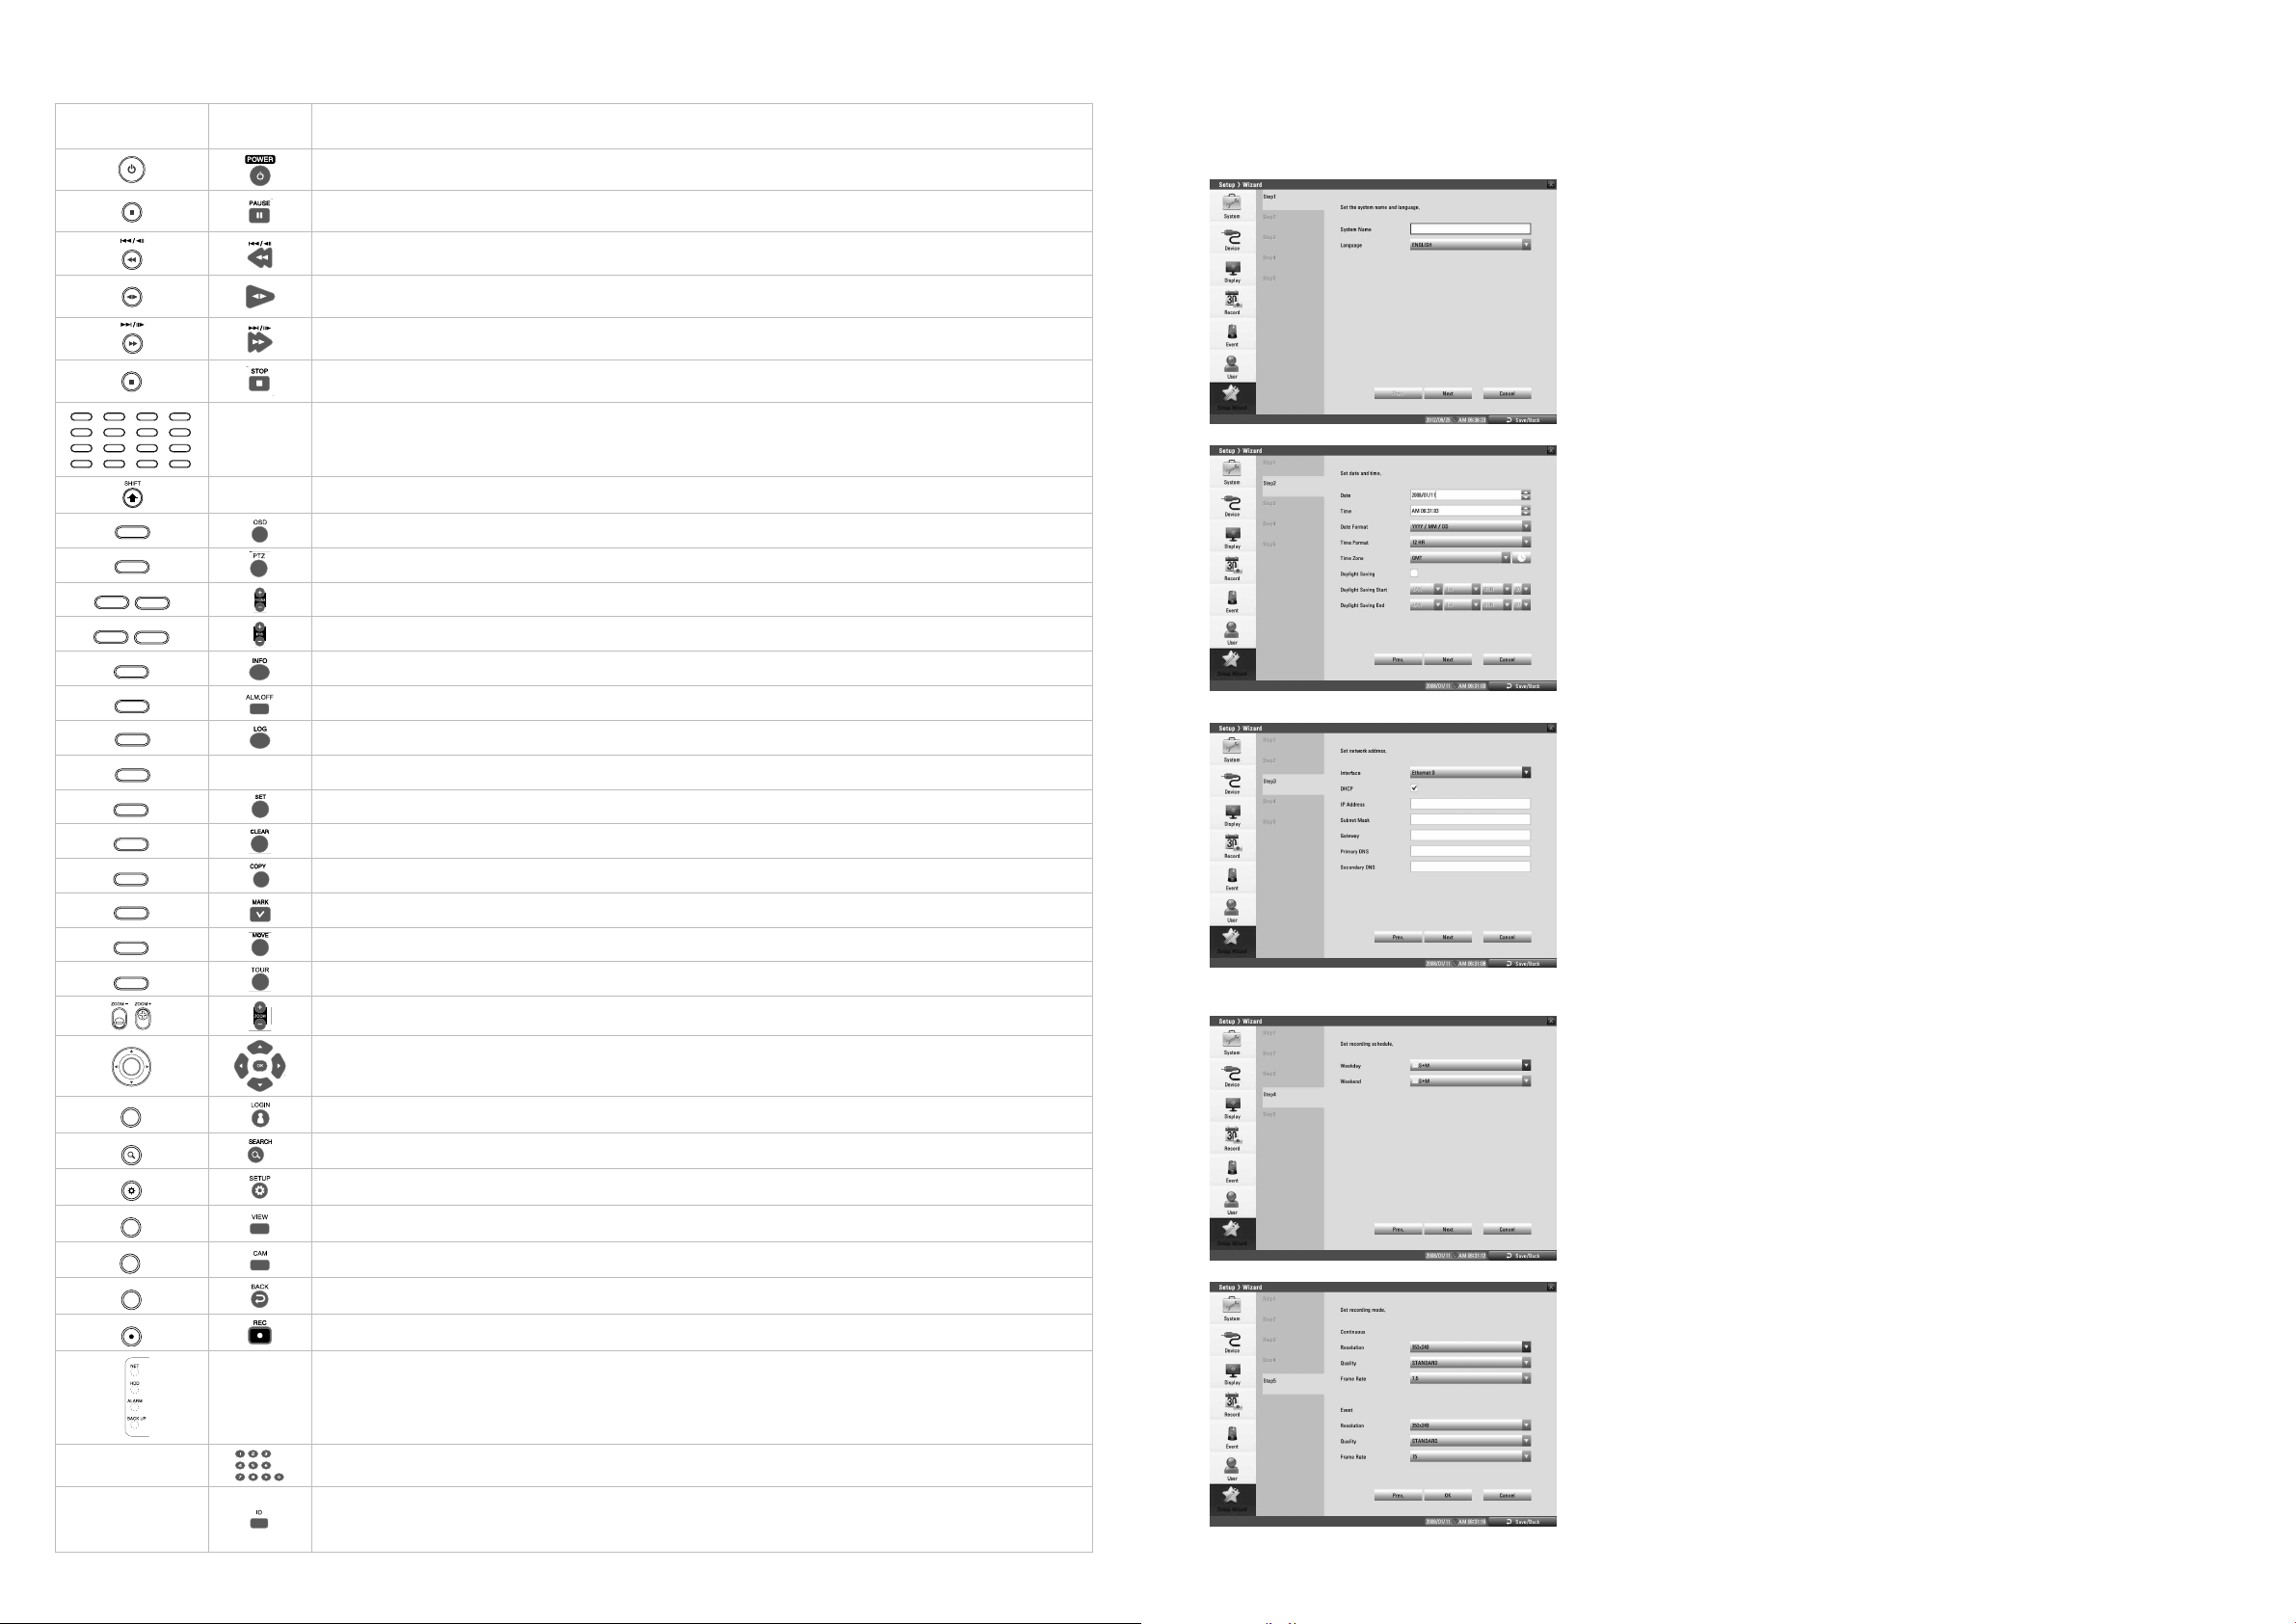
The Setup Wizard appears on the screen when you turn on the unit for the first time or select [Setup Wizard] on the Setup menu. You can set the
system name, display language, date, time, network settings, recording schedule and recording mode on the initial setup wizard.
Turns DVR on or off. Press and hold for more than 2 seconds to turn on or off.
Step 1
Pauses playback.
Searches the recorded images in reverse or skips the recorded images.
Playback or reverse playback of recorded images.
Forward searches the recorded images or skips the recorded images.
Stops playback.
RIS+
RIS -
-
You can input a number with channel buttons.
Note: You can also use the channel buttons for sub-function with SHIFT button.
- If you use the Sub-function of the channel button, the button is activated.
Accesses or minimizes the System Control Bar (OSD).
Switches this unit to PTZ mode to control the connected PTZ camera.
Adjusts focus position.
Adjust iris position.
Displays the system information.
Cancels alarm activation and returns the system to the condition before the alarm was activated.
Displays the System Log List.
- Displays or disappears the text information if the recording data includes text data.
Registers the PTZ camera’s preset position.
Deletes a memorized preset position.
Displays the export menu.
Sets the mark point for recording search.
Moves the camera to the preset position.
Tours all registered preset positions in the camera.
Zooms in/out on playback window.
•
wsad
: Select or move between the menu options.
• OK: Confirms menu selections.
Displays the User Log-In dialog box or logs out.
Displays the search menu.
Displays the setup menu.
Displays the split mode menu for MAIN Monitor and SPOT Monitor.
Set system name and display language.
• System Name: Enter the system name by using alphabetic letter, numeric digit and
symbols up to 21 characters.
• Language: Select a language for the setup menu and information display.
Step 2
Set date and time.
• Date: Select the current year, month and day.
• Time: Select the current time.
• Date Format: Select the date display format.
• Time Format: Select the time display format.
• Time Zone: Select the time zone in the area where the DVR is installed.
• Daylight Saving: Mark up when you use the daylight saving function.
• Daylight Saving Start: Select the Daylight Saving start time.
• Daylight Saving End: Select the Daylight Saving end time.
Step 3
Set network address for LAN ports.
• Interface: Select a LAN port you want to use (Ethernet 0).
• DHCP: Select this option when a DHCP server is installed on the network to allow IP
address assignment. With this setting, the IP address is assigned automatically.
• IP Address: Enter the IP address.
• Subnet Mask: Enter the subnet mask address.
• Gateway: Enter the gateway address.
• Primary DNS: Enter the Primary domain name server that translates the hostnames into IP
address.
• Secondary DNS : Enter the Secondary DNS server address that backups the Primary DNS.
Step 4
Set recording schedule.
• Weekday: Sets the recording mode to weekday (Mon-Fri).
• Weekend: Sets the recording mode to weekend (Sat-Sun).
-
-
Displays the Monitor menu to set the first camera channel.
Exits the menu or returns to the previous screen.
Starts or stops instant recording.
• NET: Blinks when the network is connected.
-
• HDD: Lights when the HDD is accessed.
• ALARM: Lights when the alarm out is in progress.
• BACK UP: Lights when the data back up is in progress.
To select the PTZ preset number, ID or channel.
Set the appropriate DVR system ID to operate via the IR Remote Controller when using the multiple DVR. Press
the ID button then press the number button within 2 seconds to select the system ID of the DVR. If you set the
system ID to “0”, you can control multiple DVR at the same time.
Step 5
Set recording mode for the Continuous and Event recording.
• Resolution: Selects the recording resolution.
• Quality: Selects the recording picture quality.
• Frame Rate: Selects the frame rate. The frame rate is the number of recorded frames per
second. According to resolution, the frame rate is set automatically.
 Loading...