

Page 1
ENGLISH
ESPAÑOL
Read this owner's manual thoroughly before operating
the appliance and retain it for future reference.
TYPE : PORTABLE AIR CONDITIONER
MODEL : LP0818WNR
LP1018WNR
LP1218GXR
P/NO : COV34636801
Rev.0
Copyright © 2016 - 2017 LG Electronics Inc. All Rights Reserved.
www.lg.com
Page 2
TABLE OF CONTENTS
Important Safety Instructions
Electrical Safety
Before Using the Air Conditioner
Control Panel and Remote
Operation
Installation in Vertical-Sliding Windows
Installation in Horizontal-Sliding Windows
Emptying the Water Collection Tank
...........................................................6
...................................................................12
......................................3
........................................7
.................................8
........................................10
...........................................13
.............................14
..............................14
........................15
.....................................................21
..............................................21
........................20
.......................................22
........................................23
....................16
................18
LG Portable Air Conditioner Limited Warranty..........25
Arbitration Notice…..................................…………..26
2
Page 3
SAFETY INSTRUCTIONS
Your safety and the safety of others are very important.
We have provided many important safety messages in this manual and on your appliance. Always read and
follow all safety messages.
This is the safety alert symbol.
This symbol alerts you to potential hazards that can kill or injure you and others.
All safety messages will follow the safety alert symbol and either the word WARNING or CAUTION.
WARNING
If you do not follow instructions, it could result in death or serious injury.
CAUTION
If you do not follow instructions, it could result in minor or moderate injury or damage to the
product.
All safety messages will tell you what the potential hazard is, tell you how to reduce the chance of injury,
and tell you what may happen if the instructions are not followed.
IMPORTANT SAFETY INSTRUCTIONS
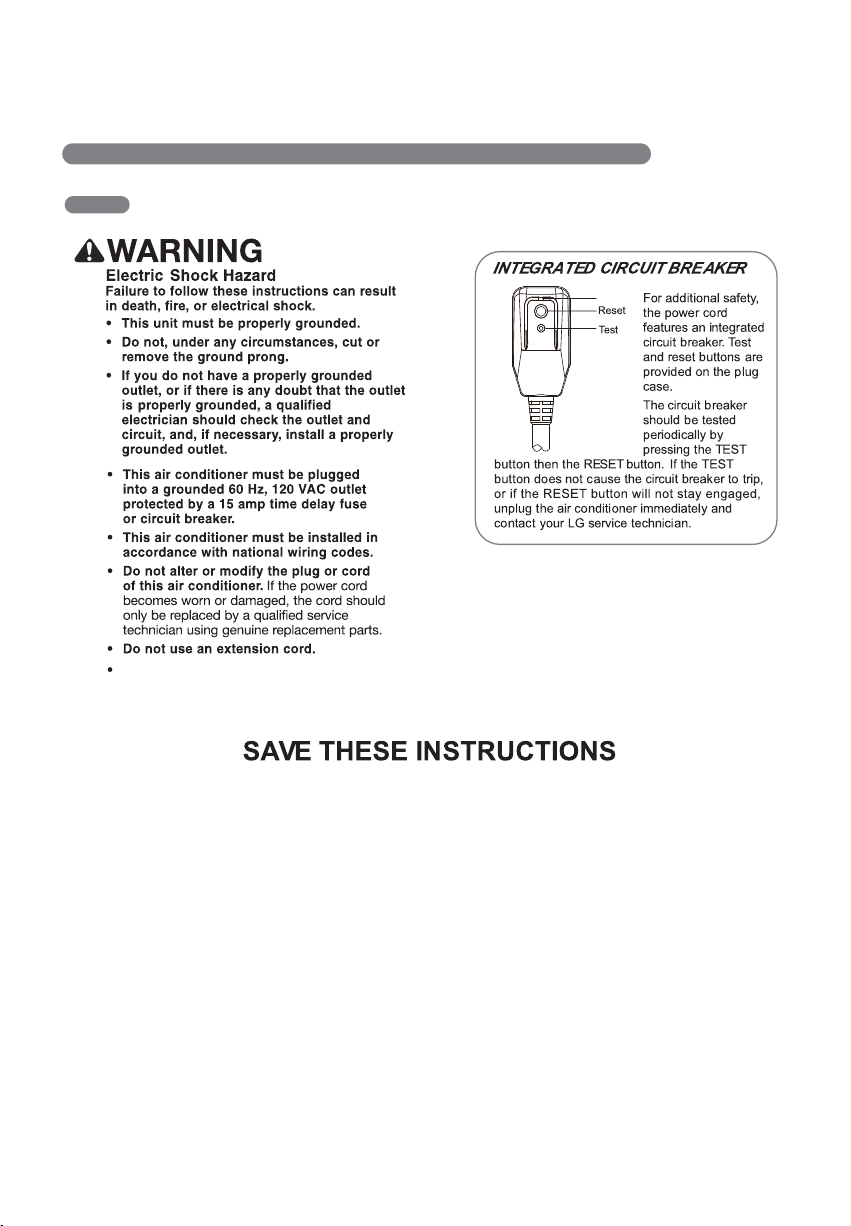
WARNING
To reduce the risk of explosion, fire, death, electric shock, injury or scalding to persons when using this product,
follow basic precautions, including the following:
Installation
• Before use, the appliance must be properly installed as described in this manual.
• Connect to a properly rated, protected, and sized power circuit to avoid electrical overload.
• Always plug into a grounded outlet.
• Do not, under any circumstances, cut or remove the third (ground) prong from the power cord.
• When installing or moving the appliance, be careful not to pinch, crush, or damage the power cord.
• Do not modify or extend the power cord.
• Do not disassemble or modify the product.
• Adhere to all industry recommended safety procedures including the use of long-sleeved gloves and safety
glasses.
• Use care when unpacking and installing. The edges of the product may be sharp.
• Disconnect the power cord or circuit breaker before installing or servicing the appliance.
• Keep packaging materials out of the reach of children. These materials can pose a suffocation risk to
children.
• Store and install the product where it will not be exposed to temperatures below freezing or exposed to
outdoor weather conditions.
• Do not store or use gasoline or other flammable vapors and liquids in the vicinity of this or any other
appliance.
ENGLISH
3
Page 4
SAFETY INSTRUCTIONS
Operation
• Use this appliance only for its intended purpose.
• Never attempt to operate this appliance if it is damaged, malfunctioning, partially disassembled, or has
missing or broken parts, including a damaged cord or plug.
• Repair or immediately replace all power cords that have become frayed or otherwise damaged. Do not use a
cord that shows cracks or abrasion damage along its length or at either end.
• Do not run cord under carpets or mats where it could be stepped on and damaged.
• Keep the cord out from under heavy objects like tables or chairs.
• Do not place the power cord near a heat source.
• Do not use an adaptor or plug the product into a shared outlet.
• If you detect a strange sound, a chemical or burning smell, or smoke coming from the appliance, unplug it
immediately, and contact an LG Electronics Customer Information Center.
• Never unplug the appliance by pulling on the power cord. Always grip the plug firmly and pull straight out
from the outlet.
• Do not grasp the power cord or touch the appliance controls with wet hands.
• If water enters the product, turn off the power at the main circuit, then unplug the product and call for service.
• If the product has been submerged, contact an LG Electronics Customer Information Center for instructions
before resuming use.
• Unplug the product when unused for long periods.
• Unplug the product before cleaning.
• In the event of a gas leak (propane gas, etc.) do not operate this or any other appliance. Open a window or
door to ventilate the area immediately.
• This appliance is not intended for use by persons (including children) with reduced physical, sensory or
mental capabilities, or lack of experience and knowledge, unless they have been given supervision or
instruction concerning the use of the appliance by a person responsible for their safety.
• Do not tamper with controls.
• The interior of the product must only be cleaned by an authorized service center or a dealer.
• Do not use solvent-based detergent on the product. Doing so can cause corrosion or damage, product
failure, electrical shock, or fire.
4
Page 5

SAFETY INSTRUCTIONS
CAUTION
To reduce the risk of minor injury to persons, malfunction, or damage to the product or property when using this
product, follow basic precautions, including the following:
Operation
• This appliance is not intended for use as a precision refrigeration system. Do not use it for special purposes
such as maintaining pets, food, precision machinery, or art objects.
• Make sure the air inlet and outlet are free from obstructions.
• Use a soft cloth to clean the appliance. Do not use waxes, thinners, or harsh detergents.
• Do not step on or place heavy objects on top of the appliance.
• Do not operate the appliance without the filter securely installed.
• Clean the filter every two weeks.
• Do not drink water drained from the appliance.
• If the batteries leak onto your clothes or skin, remove contaminated clothing and rinse skin thoroughly with
soap and water. Do not use the remote if the battery has leaked.
• If the battery or the liquid inside it are ingested, do not induce vomiting or give food or drink. Contact a
physician immediately.
ENGLISH
5
Page 6
SAFETY INSTRUCTIONS
ELECTRICAL SAFETY
Do not use an adapter with this appliance.
Lamp
6
Page 7
temperature, and
using the bottom drain port.
ENGLISH
8
7
6
7
7
Page 8
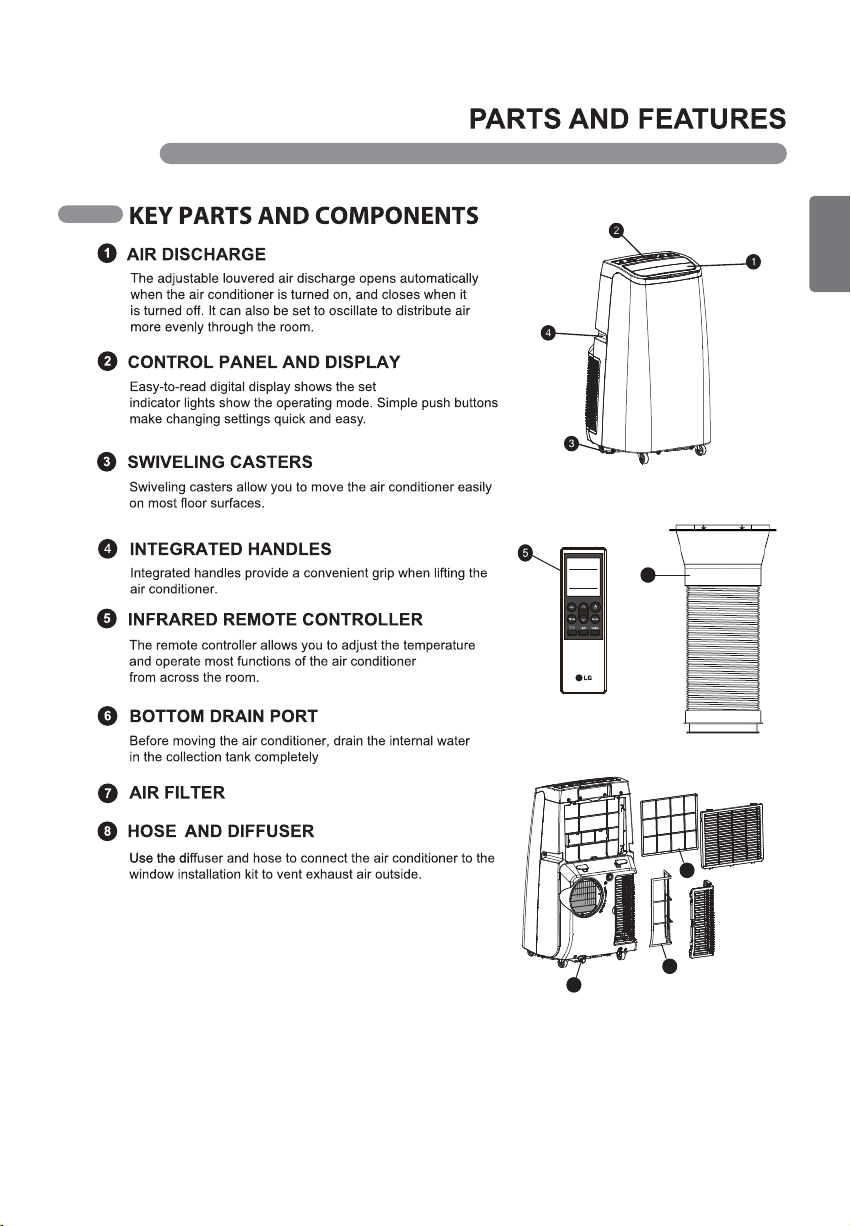
BEFORE USING THE AIR CONDITIONER
Doing so
they do
place the appliance near
are
8
Page 9
BEFORE USING THE AIR CONDITIONER
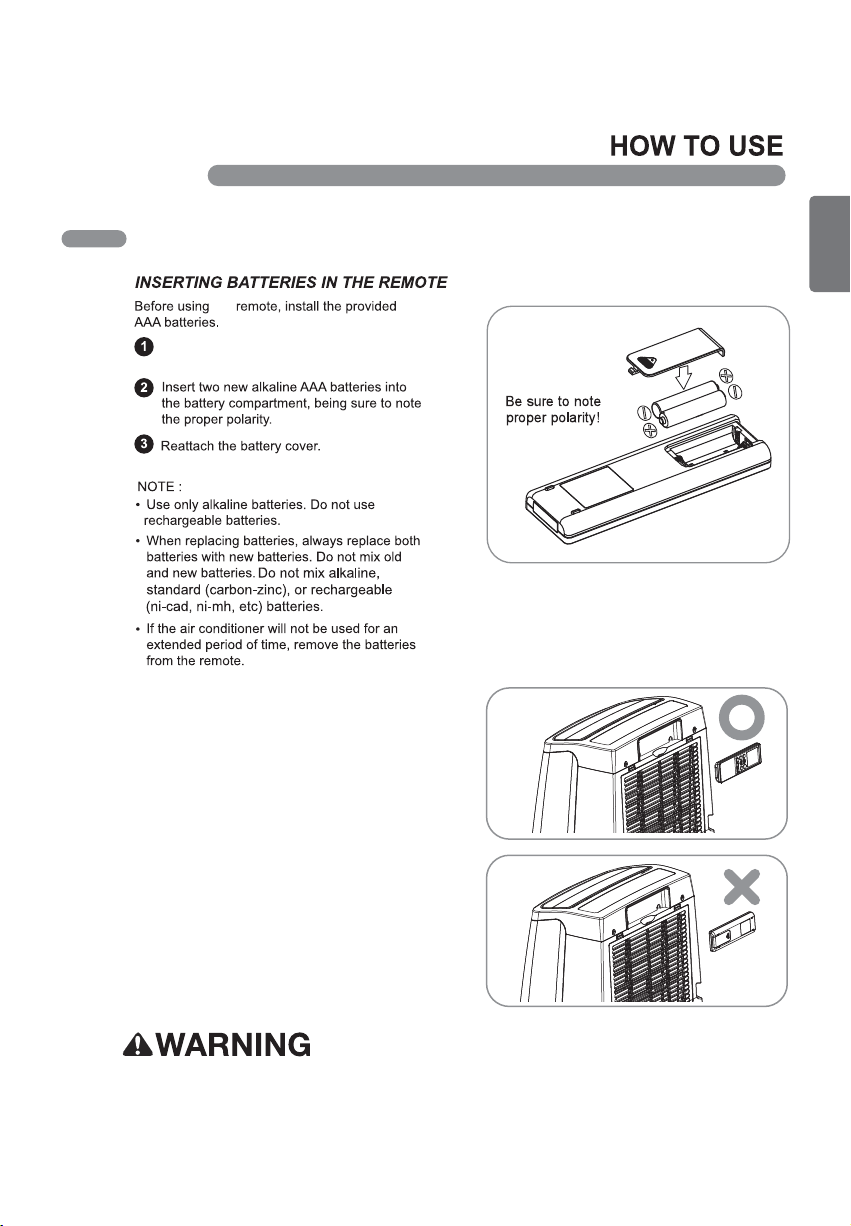
the
Press and slide to remove the battery cover
on the back of the remote.
REMOTE STORAGE
The air conditioner is designed with a convenient
storage compartment for the remote.
NOTE:
When not in use, store the remote in the storage
compartment with the buttons facing out.
ENGLISH
• If the batteries leak onto your clothes or skin, remove contaminated clothing and rinse skin
thoroughly with soap and water. Do not use the remote if the battery has leaked.
• If the battery or the liquid inside it are ingested, do not induce vomiting or give food or drink. Contact
a physician immediately.
9
Page 10

5
3
4
8
7
1 2 9 5
Operation of functions is the same when using the
remote or the control panel, unless otherwise stated.
The remote and the control panel are not in sync.
For best results when using the remote, remember
to check that all desired settings are correct on the
remote as well as on the control panel.
NOTE:
The remote sensor is located on the front panel of
1
2
6
the air conditioner. Point the remote from anywhere
at the sensor.
The remote may not work if the sensor is in bright
light or if there is not a clear path between the
remote and the sensor.
Some functions may not be supported, depending
on the model.
Turns the air conditioner on and off.
A chime sounds to confirm you have turned it on or off.
Press this button repeatedly to toggle through and select
the operating mode. Modes include Cool, Dry (dehumidify), and Fan. An LED illuminates to indicate the selected
mode. The default mode is Cool. See the Operation
section for more information.
Press repeatedly to toggle the fan speed between High
and Low settings. An LED illuminates to indicate the
selected fan speed. The fan speed can be changed in the
364
8
7
Cool, and Fan modes. The fan speed is preset in the Dry
mode. After pressing the button, there is a brief delay
before the fan motor changes speed.
10
Use the timer function to set the air conditioner to turn on
or off at a desired time. See the Operation section for more
information.
Page 11

ENGLISH
5
3
4
8
7
1 2 9 5
In COOL mode, the
temperature up to 86°F or down to 60°F, in one-degree
increments. When the TIMER function is selected, use
the
Ʒ/Ƹ
hours, in one-hour increments.
NOTE : In COOL mode, the thermostat in the air
conditioner runs the compressor until the set
temperature is reached, then cycles the
compressor on and off to maintain the set
1
temperature.
Ʒ/Ƹ
buttons adjust the set
buttons to adjust the delay time from 0 to 24
2
6
Sets the air discharge louvers to open and shut,
circulating the air more effectively through the room.
If the louvers do not move properly, unplug and plug in
the power cord.
NOTE : Press and hold the Fan button on the control
panel for 3 seconds to set Swing.
LIGHT
Turn on/off the Display screen.
NOTE : Press and hold the Timer button on the control
panel for 3 seconds to set Light.
°C/°F
Remotely change units between °C and °F
NOTE : To change units from the control panel, press
364
8
7
and hold the
time.
Ʒ
and Ƹ buttons at the same
LED display shows the set temperature, fan speed, or
the selected TIMER delay.
LEDs illuminate to indicate the active Mode, fan speed,
and other settings. An FL error code displays when the
water drain tank needs to be emptied.
11
Page 12

HOW TO USE
OPERATION
MODES
COOL
Compressor runs and cools the room. Use the
and FAN buttons to set the desired temperature and
fan speed. The desired temperature can be set from
60°F to 86°F (16°C to 30°C) in one-degree
increments.
FAN
Fan circulates air but compressor does not run. Use
the FAN button to set the desired fan speed to either
High or Low.
DRY
Use the Dry mode to remove humidity from the room
without additional cooling. This mode adjusts the
room temperature and the fan speed automatically to
maintain the optimal level of humidity.
Ʒ/Ƹ
RESTARTING THE AIR CONDITIONER
AUTOMATICALLY
When the air conditioner is turned on again after a
power failure, this function restores the previous
Settings.
TIMER
Use the Timer function to turn the air conditioner
ON/OFF automatically.
Setting the Air Conditioner to Turn ON
1. Plug in the air conditioner and power it ON.
2. Set the desired mode, temperature, fan speed, etc.
3. Power OFF the air conditioner.
4. Press Timer and use the
desired delay time until the air conditioner turns
ON. The delay time can be set from 0 to 24 hours
in one-hour increments.
5. The Timer LED on the air conditioner illuminates,
and the delay time appears on the remote and in
the control panel.
6. To cancel the Timer function, press Timer twice.
Setting the Air Conditioner to Turn OFF
1. Plug in the air conditioner and power it ON.
2. Set the desired mode, temperature, fan speed, etc.
3. Press Timer and use the
desired delay time until the air conditioner turns
OFF. The delay time can be set from 0 to 24 hours
in one-hour increments.
4. The Timer LED on the air conditioner illuminates,
and the delay time appears on the remote. The
delay time appears briefly in the control panel and
is then replaced by the set temperature.
5. To cancel the Timer function, press Timer twice.
NOTE: To check the remaining time, press Timer.
Ʒ/Ƹ
buttons to set the
Ʒ/Ƹ
buttons to set the
12
Page 13

ENGLISH
Bracket
Flexible Vent Hose DiffuserMounting
13
Page 14

Assembling the Mounting Bracket, Diffuser, and
Vent Hose
1. Use a pliers to extend the first four or five
accordioned folds at both ends of the vent hose.
2. To attach the mounting bracket to one end of the
vent hose, insert the extended folds on one side
of the vent hose between the ridges inside one
side of the mounting bracket.
3. Use a pliers to pull the folds on the opposite side
of the vent hose up and between the ridges
inside the opposite side of the mounting bracket.
4. Tug the mounting bracket to make sure it is
securely attached to the vent hose.
5. To attach the diffuser to the other end of the vent
hose, use a Phillips screwdriver to remove the
four screws holding the grill on the end of the
diffuser. Set the grill and screws aside.
6. Insert the vent hose in the round end of the
diffuser in the same manner as assembling the
hose to the mounting bracket. (See steps 2 and
3.)
7. Tug the diffuser to make sure it is securely
attached to the vent hose.
8. Reattach the grill on the diffuser, using the four
screws removed in step 5.
14
Lock
Unlock
Attach the hose assembly onto the back of
the air conditioner by inserting the edges of
the mounting bracket behind the tabs at the
top and bottom and sliding the mounting
bracket to the left until it snaps into place.
Page 15

INSTALLATION INSTRUCTIONS
WINDOW VENT PANEL AND EXTENSIONS
The window installation kit allows you to install the air conditioner in most vertical-sliding windows 18” to
50” wide, or horizontal-sliding windows from 18” to 50” high.
1. Select the panels required based on the window
opening, as shown above.
2. If the installation requires 2 or 3 panels, assemble
the panels to the proper length and fix them in
place with 1 type A screw.
For window openings from 19” to 26”, use the
window vent panel (Panel A) and an extension
panel (Panel B).
For window openings from 27” to 34”, use the
window vent panel (Panel A) and an extension
panel (Panel C).
For window openings from 35” to 50”, use the
window vent panel and two extension panels
(Panel C and Panel D)
Window opening
Fig. a Fig. b
Fig. c Fig. d
For an 18” window opening, use the window
vent panel by itself.
ENGLISH
15
Page 16

INSTALLATION INSTRUCTIONS
INSTALLATION IN VERTICAL-SLIDING WINDOWS
NOTE : The window installation kit can be used with vertical-sliding windows between 18” and 50” wide.
Cut the foam seal A (adhesive type) & C
(adhesive type-shorter) to the proper length,
and attach them to the window sash and frame.
Cut the foam seal B (Non-adhesive type) to
the window width. Stuff the foam seal B
between the glass and the window to
prevent air and insects from getting into the
room.
Insert the vent panel assembly, including
extension panels, if needed, into the opening.
Extend the extension panels, if used.
Install the security bracket with a type B
screw as shown, it desired.
16
Page 17

INSTALLATION INSTRUCTIONS
INSTALLATION IN VERTICAL-SLIDING WINDOWS
Insert the diffuser into the opening in the vent
5
panel and slide it to lock it into place.
Slot
ENGLISH
(2) Slide
(1) Insert
Align the tabs on the diffuser with the slots in the vent
panel. Insert the diffuser into the opening in the vent
panel and slide the diffuser to lock the tabs in place.
Insert the type C screw in the hole in the diffuser to
prevent the diffuser from sliding out of the vent
opening.
17
Page 18

INSTALLATION INSTRUCTIONS
INSTALLATION IN HORIZONTAL-SLIDING WINDOWS
NOTE : The window installation kit can be used with horizontal-sliding windows between 18” and 50” tall.
Cut the foam seal A (adhesive type) & C
(adhesive type-shorter) to the proper length,
and attach them to the window sash and frame.
Cut the foam seal B (Non-adhesive type) to
the window width. Stuff the foam seal B
between the glass and the window to prevent
air and insects from getting into the room.
Insert the vent panel assembly, including
extension panels, if needed, into the opening.
Extend the extension panels, if used.
Install the security bracket with a type B
screw as shown, it desired.
18
Page 19

INSTALLATION INSTRUCTIONS
INSTALLATION IN HORIZONTAL-SLIDING WIDOWS
Insert the diffuser into the opening in the vent
5
panel and slide it to lock it into place.
Slot
ENGLISH
(2) Slide
(1) Insert
Align the tabs on the diffuser with the slots in the vent
panel. Insert the diffuser into the opening in the vent
panel and slide the diffuser to lock the tabs in place.
Insert the type C screw in the hole in the diffuser to
prevent the diffuser from sliding out of the vent
opening.
19
Page 20
CARE AND CLEANING
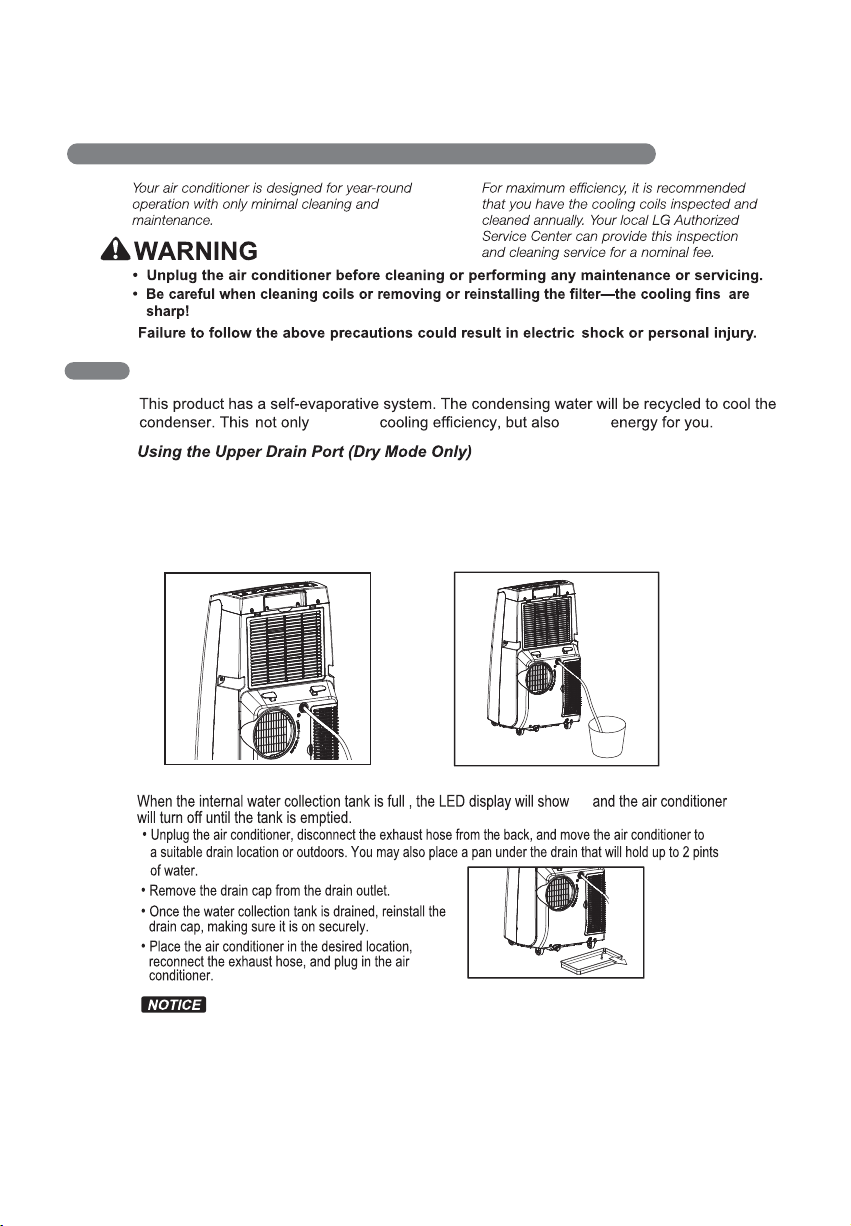
EMPTYING THE WATER COLLECTION TANK
improves saves
• This can be used when you need dehumidification in high humidity.
• The upper drain port is not used in the Cool or Fan mode.
• Remove the drain plug when using the Dry (dehumidifying) mode.
• Install a drain hose (12mm [1/2˝] outer diameter) and place the open end of the hose over a drain or bucket
or out the window.
20
Using the Lower Drain Port
FL
If the FL error appears in the display:
The water collection tank is full. Unplug the air conditioner, drain the tank, then plug the air conditioner
back in and restart it.
NOTE: After the air conditioner is unplugged, it defaults to the Cool mode with a temperature setting
of 72°F (22°C) once restarted.
Page 21

CARE AND CLEANING
CLEANING THE CASE
CLEANING THE AIR FILTER
filters
each
Use a vacuum cleaner to clean the filters. If the
filters are heavily soiled, they can be washed in
warm water using a mild detergent.
ENGLISH
filters
filters.
21
Page 22

CARE AND CLEANING
STORING THE AIR CONDITIONER
extended period of time:
Remove and clean the filters, allow them to
dry completely, then reinstall them.
Make sure the filters and drain cap are in
place.
22
Page 23

TROUBLESHOOTING
BEFORE CALLING FOR SERVICE
Problem Possible causes
Air
Conditioner
does not
start.
FL
Air Conditioner
does not cool
as it should.
The air filters are dirty.
Set the desired temperature to a level lower
than the current temperature.
Set the desired temperature to a level lower
than the current temperature.
Corrective Action
filters
ENGLISH
unplug the unit.
room temperature
Air Conditioner
freezing up.
Air Conditioner
runs too oftern
or too long.
Noise when
unit is cooling.
Remote
sensing
deactivating
prematurely.
Air movement sound. This is normal. If too loud, set to lower Fan
Remote control not located
within range.
Remote control signal
obstructed.
setting.
Place remote control within 20 feet and 120º
radius of the front of unit.
Remove obstruction.
23
Page 24
TROUBLESHOOTING
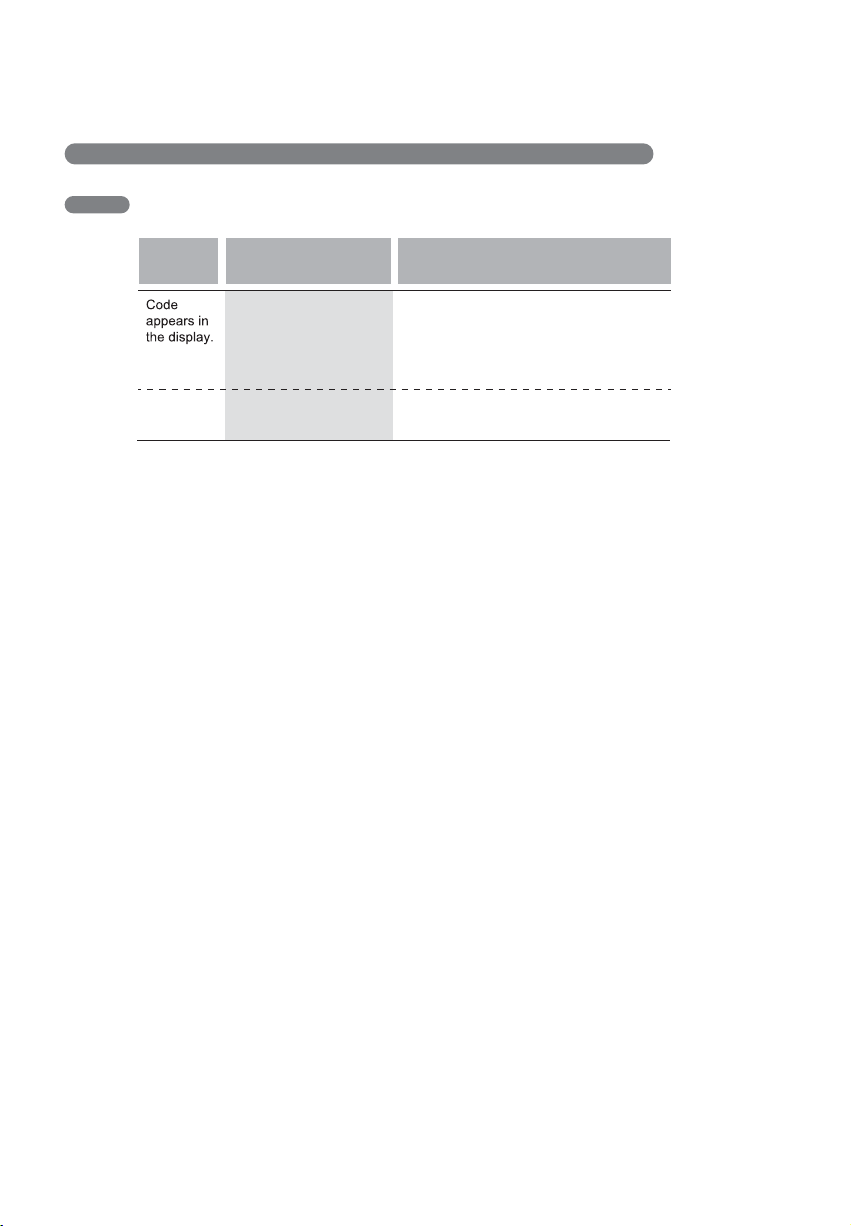
BEFORE CALLING FOR SERVICE
Error
Code
FL
CH 01
CH 02
Corrective ActionPossible causes
Water tank is full. Drain water from the product through drain
Short/open circuit in
thermistor.
hole and reset settings.
Unplug the air conditioner and contact an
authorized LG service center.
24
Page 25

ENGLISH
25
Page 26

WARRANTY
ARBITRATION NOTICE: THIS LIMITED WARRANTY CONTAINS AN ARBITRATION PROVISION THAT REQUIRES YOU
AND LG TO RESOLVE DISPUTES BY BINDING ARBITRATION INSTEAD OF IN COURT, UNLESS YOU CHOOSE TO OPT
OUT. IN ARBITRATION, CLASS ACTIONS AND JURY TRIALS ARE NOT PERMITTED. PLEASE SEE THE SECTION
TITLED “PROCEDURE FOR RESOLVING DISPUTES” BELOW.
PROCEDURE FOR RESOLVING DISPUTES:
ALL DISPUTES BETWEEN YOU AND LG ARISING OUT OF OR RELATING IN ANY WAY TO THIS LIMITED WARRANTY
OR THE PRODUCT SHALL BE RESOLVED EXCLUSIVELY THROUGH BINDING ARBITRATION, AND NOT IN A COURT OF
GENERAL JURISDICTION. BINDING ARBITRATION MEANS THAT YOU AND LG ARE EACH WAIVING THE RIGHT TO A
JURY TRIAL AND TO BRING OR PARTICIPATE IN A CLASS ACTION.
Definitions. For the purposes of this section, references to “LG” mean LG Electronics U.S.A., Inc., its parents, subsidiaries and affiliates, and each of
their officers, directors, employees, agents, beneficiaries, predecessors in interest, successors, assigns and suppliers; references to “dispute” or
“claim” shall include any dispute, claim or controversy of any kind whatsoever (whether based in contract, tort, statute, regulation, ordinance, fraud,
misrepresentation or any other legal or equitable theory) arising out of or relating in any way to the sale, condition or performance of the product or
this Limited Warranty.
Notice of Dispute.
initiating the arbitration by sending a letter to LG at LG Electronics, USA, Inc. Attn: Legal Department- Arbitration 1000 Sylvan Ave, Englewood Cliffs
07632. You and LG agree to engage in good faith discussions in an attempt to amicably resolve your claim. The notice must provide your name,
address, and telephone number; identify the product that is the subject of the claim; and describe the nature of the claim and the relief being sought.
If you and LG are unable to resolve the dispute within 30 days, either party may proceed to file a claim for arbitration.
Agreement to Binding Arbitration and Class Action Waiver.
notice to LG, you and LG agree to resolve any claims between us only by binding arbitration on an individual basis, unless you opt out as provided
below. Any dispute between you and LG shall not be combined or consolidated with a dispute involving any other person’s or entity’s product or claim.
More specifically, without limitation of the foregoing, any dispute between you and LG shall not under any circumstances proceed as part of a class or
representative action. Instead of arbitration, either party may bring an individual action in small claims court, but that small claims court action may not
be brought on a class or representative basis.
Arbitration Rules and Procedures.
be administered by the American Arbitration Association (“AAA”) and will be conducted before a single arbitrator under the AAA’s Consumer Arbitration Rules that are in effect at the time the arbitration is initiated (referred to as the “AAA Rules”) and under the procedures set forth in this section.
The AAA Rules are available online at www.adr.org/consumer. Send a copy of your written demand for arbitration, as well as a copy of this provision,
to the AAA in the manner described in the AAA Rules. You must also send a copy of your written demand to LG at LG Electronics, USA, Inc. Attn:
Legal Department- Arbitration 1000 Sylvan Avenue Englewood Cliffs, NJ 07632. If there is a conflict between the AAA Rules and the rules set forth in
this section, the rules set forth in this section will govern. This arbitration provision is governed by the Federal Arbitration Act. Judgment may be
entered on the arbitrator’s award in any court of competent jurisdiction. All issues are for the arbitrator to decide, except that issues relating to the
scope and enforceability of the arbitration provision and to the arbitrability of the dispute are for the court to decide. The arbitrator is bound by the
terms of this provision.
Governing Law.
such law is preempted by or inconsistent with applicable federal law.
Fees/Costs.
tration filing fees to the AAA unless you seek more than $25,000 in damages, in which case the payment of these fees will be governed by the AAA
Rules. Except as otherwise provided for herein, LG will pay all AAA filing, administration and arbitrator fees for any arbitration initiated in accordance
with the AAA Rules and this arbitration provision. If you prevail in the arbitration, LG will pay your attorneys’ fees and expenses as long as they are
reasonable, by considering factors including, but not limited to, the purchase amount and claim amount. Notwithstanding the foregoing, if applicable
law allows for an award of reasonable attorneys’ fees and expenses, an arbitrator can award them to the same extent that a court would. If the arbitrator finds either the substance of your claim or the relief sought in the demand is frivolous or brought for an improper purpose (as measured by the
standards set forth in Federal Rule of Civil Procedure 11(b)), then the payment of all arbitration fees will be governed by the AAA Rules. In such a situation, you agree to reimburse LG for all monies previously disbursed by it that are otherwise your obligation to pay under the AAA Rules. Except as
otherwise provided for, LG waives any rights it may have to seek attorneys’ fees and expenses from you if LG prevails in the arbitration.
Hearings and Location.
submitted to the arbitrator, (2) through a telephonic hearing, or (3) by an in-person hearing as established by the AAA Rules. If your claim exceeds
$25,000, the right to a hearing will be determined by the AAA Rules. Any in-person arbitration hearings will be held at a location within the federal judicial district in which you reside unless we both agree to another location or we agree to a telephonic arbitration.
Opt Out.
proceeding. To opt out, you must send notice to LG no later than 30 calendar days from the date of the first consumer purchaser’s purchase of the
product by either: (i) sending an e-mail to optout@lge.com, with the subject line: “Arbitration Opt Out” or (ii) calling 1-800-980-2973. You must include
in the opt out e-mail or provide by telephone: (a) your name and address; (b) the date on which the product was purchased; (c) the product model
name or model number; and (d) the serial number (the serial number can be found (i) on the product; or (ii) online by accessing
https://www.lg.com/us/support/repair-service/schedule-repair-continued and clicking on “Find My Model & Serial Number”).
You may only opt out of the dispute resolution procedure in the manner described above (that is, by e-mail or telephone); no other form of notice will
be effective to opt out of this dispute resolution procedure. Opting out of this dispute resolution procedure will not affect the coverage of the Limited
Warranty in any way, and you will continue to enjoy the full benefits of the Limited Warranty. If you keep this product and do not opt out, then you
accept all terms and conditions of the arbitration provision described above.
In the event you intend to commence an arbitration proceeding, you must first notify LG in writing at least 30 days in advance of
Upon failure to resolve the dispute during the 30 day period after sending written
To begin arbitration of a claim, either you or LG must make a written demand for arbitration. The arbitration will
The law of the state of your residence shall govern this Limited Warranty and any disputes between us except to the extent that
You do not need to pay any fee to begin an arbitration. Upon receipt of your written demand for arbitration, LG will promptly pay all arbi-
If your claim is for $25,000 or less, you may choose to have the arbitration conducted solely on the basis of (1) documents
You may opt out of this dispute resolution procedure. If you opt out, neither you nor LG can require the other to participate in an arbitration
26
Page 27

Memo
ENGLISH
27
Page 28

 Loading...