

LG Electronics LN510 User Manual

User Guide
©2010 Sprint. SPRINT and the logo are trademarks of Sprint.
Other marks are the property of their respective owners.
8/26/10
LG RUMOR TOUCH
www.sprint.com
TM
Consejo: Para encontrar esta guía para usuarios en español,
por favor visita a
Support > Phones & Devices.
To find this user guide in Spanish, please visit
www.sprint.com and click Support > Phones &
Devices
Important Privacy Message – Sprint’s policies often do not
apply to third-party applications. Third-party applications may
access your personal information or require Sprint to disclose
your customer information to the third-party application
provider. To find out how a third-party application will collect,
access, use, or disclose your personal information, check the
application provider’s policies, which can usually be found on
their website. If you aren’t comfortable with the third-party
application’s policies, don’t use the application.
Spr int UG_ 9a_ 070709
www.sprint.com y haz clic en
.

Table of Contents
Tip: Looking for something? If you don’t see it in the headings
listed here, try the Index on page 142.
Introduction . . . . . . . . . . . . . . . . . . . . . . . . . . . . . . . i
Your Phone’s Menu . . . . . . . . . . . . . . . . . . . . . . . . i
Section 1: Getting Started . . . . . . . . . . . . . . . . . 1
1A. Setting Up Service . . . . . . . . . . . . . . . . . . . 2
Setting Up Your Phone . . . . . . . . . . . . . . . . . . . . . . 2
Activating Your Phone . . . . . . . . . . . . . . . . . . . . . . . 3
Setting Up Your Voicemail . . . . . . . . . . . . . . . . . . . 3
Sprint Account Passwords . . . . . . . . . . . . . . . . . . . 4
Getting Help . . . . . . . . . . . . . . . . . . . . . . . . . . . . . . . 5
Section 2: Your Phone . . . . . . . . . . . . . . . . . . . . 7
2A. Phone Basics . . . . . . . . . . . . . . . . . . . . . . . . 8
Your Phone . . . . . . . . . . . . . . . . . . . . . . . . . . . . . . . . 8
Viewing the Display Screen . . . . . . . . . . . . . . . . . 12
Getting to Know the Touch Screen . . . . . . . . . . . 16
Turning Your Phone On and Off . . . . . . . . . . . . . 16
Calibrating the Touch Screen . . . . . . . . . . . . . . . 17
Battery and Charger . . . . . . . . . . . . . . . . . . . . . . . 17
Navigating Through the Menus . . . . . . . . . . . . . 19
Displaying Your Phone Number . . . . . . . . . . . . . 20
Making and Answering Calls . . . . . . . . . . . . . . . 21
Entering Text . . . . . . . . . . . . . . . . . . . . . . . . . . . . . . 28
2B. Settings . . . . . . . . . . . . . . . . . . . . . . . . . . . . 33
Sound Settings . . . . . . . . . . . . . . . . . . . . . . . . . . . 33
Display Settings . . . . . . . . . . . . . . . . . . . . . . . . . . . 37
Text Entry Settings . . . . . . . . . . . . . . . . . . . . . . . . . 39
Location Settings . . . . . . . . . . . . . . . . . . . . . . . . . . 39
Messaging Settings . . . . . . . . . . . . . . . . . . . . . . . 40
Airplane Mode . . . . . . . . . . . . . . . . . . . . . . . . . . . . 41
TTY Use With Sprint Service . . . . . . . . . . . . . . . . 42
Phone Setup Options . . . . . . . . . . . . . . . . . . . . . . 43
Security Settings . . . . . . . . . . . . . . . . . . . . . . . . . . 44
2C. History . . . . . . . . . . . . . . . . . . . . . . . . . . . . . 49
Viewing History . . . . . . . . . . . . . . . . . . . . . . . . . . . 49
History Options . . . . . . . . . . . . . . . . . . . . . . . . . . . 49
Making a Call From History . . . . . . . . . . . . . . . . . 50
Saving a Number From History . . . . . . . . . . . . . 50
Prepending a Number From History . . . . . . . . . 51

Erasing History . . . . . . . . . . . . . . . . . . . . . . . . . . . . 51
2D. Contacts . . . . . . . . . . . . . . . . . . . . . . . . . . . 52
Adding a New Contacts Entry . . . . . . . . . . . . . . . 52
Saving a Phone Number . . . . . . . . . . . . . . . . . . 53
Contacts Entry Options . . . . . . . . . . . . . . . . . . . . 53
Editing a Contacts Entry . . . . . . . . . . . . . . . . . . . 54
Adding a Number to a Contacts Entry . . . . . . . 54
Editing a Contacts Entry’s Numbers . . . . . . . . . 55
Assigning Speed Dial Numbers . . . . . . . . . . . . 55
Selecting a Ringer Type for an Entry . . . . . . . . 56
Assigning a Picture to an Entry . . . . . . . . . . . . . . 57
Creating a Group . . . . . . . . . . . . . . . . . . . . . . . . . . 57
Finding Contacts Entries . . . . . . . . . . . . . . . . . . . 58
Secret Contacts Entries . . . . . . . . . . . . . . . . . . . . 58
Dialing Sprint Services . . . . . . . . . . . . . . . . . . . . 59
Wireless Backup . . . . . . . . . . . . . . . . . . . . . . . . . . 60
Hello UI . . . . . . . . . . . . . . . . . . . . . . . . . . . . . . . . . . . 61
2E. Calendar & Tools . . . . . . . . . . . . . . . . . . . . 64
Calendar . . . . . . . . . . . . . . . . . . . . . . . . . . . . . . . . 64
File Manager . . . . . . . . . . . . . . . . . . . . . . . . . . . . . . 67
Alarm Clock . . . . . . . . . . . . . . . . . . . . . . . . . . . . . . 68
Notepad . . . . . . . . . . . . . . . . . . . . . . . . . . . . . . . . . . 69
Document Viewer . . . . . . . . . . . . . . . . . . . . . . . . . 70
EZ Tips . . . . . . . . . . . . . . . . . . . . . . . . . . . . . . . . . . . 70
Calculator . . . . . . . . . . . . . . . . . . . . . . . . . . . . . . . . 71
Stopwatch . . . . . . . . . . . . . . . . . . . . . . . . . . . . . . . . 71
World Clock . . . . . . . . . . . . . . . . . . . . . . . . . . . . . . 71
Unit Converter . . . . . . . . . . . . . . . . . . . . . . . . . . . . . 72
Updating Phone Software . . . . . . . . . . . . . . . . . . 72
Updating the PRL . . . . . . . . . . . . . . . . . . . . . . . . . . 72
2F. Voice Services . . . . . . . . . . . . . . . . . . . . . . 73
Automatic Speech Recognition (ASR) . . . . . . . . 73
Managing Voice Memos . . . . . . . . . . . . . . . . . . . 75
2G. microSD Card . . . . . . . . . . . . . . . . . . . . . . 77
Your Phone’s microSD Card and Adapter . . . . 77
microSD Card Settings . . . . . . . . . . . . . . . . . . . . . 79
microSD Card Folders . . . . . . . . . . . . . . . . . . . . . 80
Connecting Your Phone to Your Computer . . . 80
2H. Camera . . . . . . . . . . . . . . . . . . . . . . . . . . . . 82
Taking Pictures . . . . . . . . . . . . . . . . . . . . . . . . . . . . 82
Recording Videos . . . . . . . . . . . . . . . . . . . . . . . . . 85
Storing Pictures and Videos . . . . . . . . . . . . . . . . 87

Sending Sprint Picture Mail . . . . . . . . . . . . . . . . . 89
Printing Pictures From Your Phone . . . . . . . . . . . 91
2I. Bluetooth . . . . . . . . . . . . . . . . . . . . . . . . . . . 94
Turning Bluetooth On and Off . . . . . . . . . . . . . . . 94
Bluetooth Settings . . . . . . . . . . . . . . . . . . . . . . . . . 95
Pairing Bluetooth Devices . . . . . . . . . . . . . . . . . . 95
Sending Items via Bluetooth . . . . . . . . . . . . . . . . 96
Section 3: Sprint Service. . . . . . . . . . . . . . . . . 97
3A. Sprint Service: The Basics . . . . . . . . . . . 98
Voicemail . . . . . . . . . . . . . . . . . . . . . . . . . . . . . . . . . 98
Messaging (SMS/MMS) . . . . . . . . . . . . . . . . . . . 100
Caller ID . . . . . . . . . . . . . . . . . . . . . . . . . . . . . . . . . 102
Call Waiting . . . . . . . . . . . . . . . . . . . . . . . . . . . . . . 103
Making a 3-Way Call . . . . . . . . . . . . . . . . . . . . . . 103
Call Forwarding . . . . . . . . . . . . . . . . . . . . . . . . . . 104
Roaming . . . . . . . . . . . . . . . . . . . . . . . . . . . . . . . . 104
3B. Web and Data Services . . . . . . . . . . . . . 108
Getting Started With Data Services . . . . . . . . . 108
Accessing Messages . . . . . . . . . . . . . . . . . . . . . 112
Downloading Games, Ringers, and More . . . . 114
Applications . . . . . . . . . . . . . . . . . . . . . . . . . . . . . 116
Browser Menu . . . . . . . . . . . . . . . . . . . . . . . . . . . 117
Data Services FAQs . . . . . . . . . . . . . . . . . . . . . . 118
3C. Entertainment: TV and Music . . . . . . . . 120
TV . . . . . . . . . . . . . . . . . . . . . . . . . . . . . . . . . . . . . . 120
Music – Sprint Music Store . . . . . . . . . . . . . . . . 123
Streaming Music . . . . . . . . . . . . . . . . . . . . . . . . . 127
3D. GPS Navigation . . . . . . . . . . . . . . . . . . . . 128
GPS Services . . . . . . . . . . . . . . . . . . . . . . . . . . . . 128
Sprint Navigation . . . . . . . . . . . . . . . . . . . . . . . . . 128
Sprint Family Locator . . . . . . . . . . . . . . . . . . . . . 129
Section 4: Safety and
Warranty Information. . . . . . . . . . . . . . . . . . . . 131
4A. Important Safety Information . . . . . . . . 132
General Precautions . . . . . . . . . . . . . . . . . . . . . . 132
Maintaining Safe Use of and
Access to Your Phone . . . . . . . . . . . . . . . . . . . . 133
Using Your Phone With a Hearing Aid Device 134
Caring for the Battery . . . . . . . . . . . . . . . . . . . . . 136
Radio Frequency (RF) Energy . . . . . . . . . . . . . 136
Owner’s Record . . . . . . . . . . . . . . . . . . . . . . . . . . 138

4B. Manufacturer’s Warranty . . . . . . . . . . . . 139
Manufacturer’s Warranty . . . . . . . . . . . . . . . . . . 139
Index. . . . . . . . . . . . . . . . . . . . . . . . . . . . . . . . . . . 142
Introduction
Your Phone’s Menu
This User Guide introduces you to Sprint® service and
all the features of your new phone. It’s divided into four
sections:
⽧ Section 1: Getting Started
⽧ Section 2: Your Phone
⽧ Section 3: Sprint Service Features
⽧ Section 4: Safety and Warranty Information
Note: Because of updates in phone software, this printed
guide may not be the most current version for your
phone. Visit
to access the most recent version of the user guide.
WARNING: Please refer to the Important Safety Information
www.sprint.com and sign on to My Sprint
section on page 132 to learn about information
that will help you safely use your phone. Failure to
read and follow the Important Safety Information
in this phone guide may result in serious bodily
injury, death, or property damage.
The following table outlines your phone’s main menu
structure. For more information about using your
phone’s menus, see “Navigating Through the Menus”
on page 19.
Web
Maps
Sprint Navigation
Sprint Family Locator
Entertainment
Music
Sprint TV
Games
My Stuff
Application Manager
Games
i
Ringers
Screen Savers
Applications
Call Tones
Options
Memory Info My Content Manager
Get New
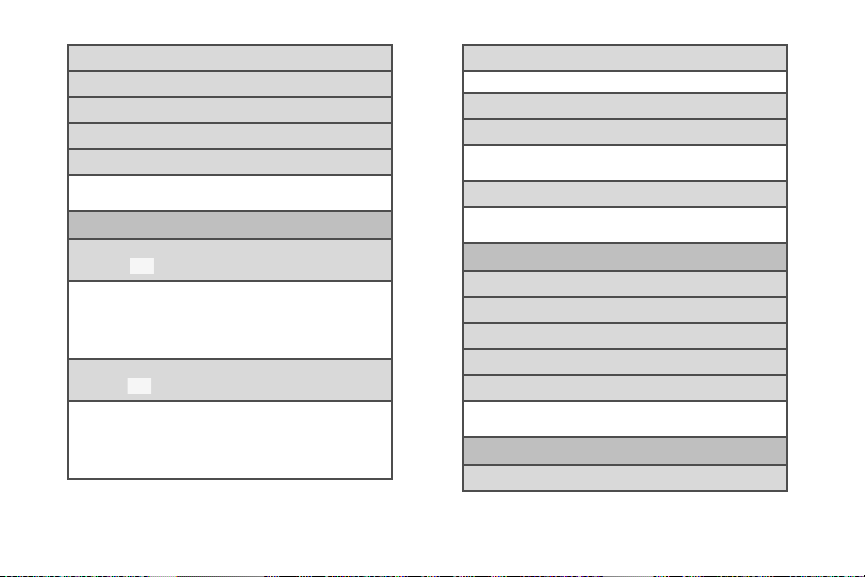
Photos & Videos
Camera
Touch > to view the following options:
Color Tone Enable Auto-Send
Image Controls Zoom
Fun Frames Go to Album
Settings Camcorder Mode
Self Timer Cancel
Camcorder (Video Mail/Long Video)
Touch > to view the following options:
Color Tone Zoom
Image Controls Go to Album
Settings Camera Mode
Self Timer Cancel
Enable Auto-Send
ii
My Photos & Videos
In Phone Memory Card
My Places
Auto-Send
Auto-Send Places Enable Notifications
Enable Auto-Send
Other Settings
Auto-Save to Location
Status Bar Slideshow Interval
Messaging
Voi cema il
Send Message
Messages
Email
Settings
Callback Number Signature
Preset Messages
Social Networking
Faceb ook

MySpace
Twi t te r
Social Zone
Settings
Display
Screen Savers
Brightness
Backlight
Backlight Dim Backlight Of f
Picture ID
Contacts Private/Unknown
Unsaved Numbers
Font Size
Messages Notepad
Browser Applications
Power Save Mode
Whisper Notification
Touch Calibration
Vol ume
Incoming Ringer
Playback Volume
Power Up/Down
Key Beeps
Tone Length Tone Type
Ton e Vol ume
Ringers
Incoming Calls
Contacts Private/Unknown
Unsaved Numbers
Call Alerts
Beep Each Minute Connect
Out of Service Signal Fade/Call Drop
Voicemail
Messages
Alarm/Calendar
Power Up/Down
iii

Vibration
Tex t Ent ry
Phone Info
Lock Phone
Parental Controls
iv
Incoming Calls
Contacts Private/Unknown
Unsaved Numbers
Voicemail
Messages
Alarm/Calendar
Touch Vibration
Vibration Level Vibration Type
Word Complete Word Scan
Next Word Complete
Phone#/User ID Version
Icon Glossary Advanced
Memory Info My Account
Battery Status
Lock Now Change Lock Code
Parental Control
Change Parental Control Code
Restriction
Voice Call Camera / Camcorder
Messaging Force Location On
Web
Call Setup
Auto-Answer Contacts Match
Abbreviated Dialing
TTY
Airplane/Music Mode
Data
On/Off Update Profile
Net Guard
Headset Mode
Language (Idioma)
Location
Roaming
Set Mode Data Roam Guard
Call Guard

Reset/Delete
Reset Settings Delete Stuff
Reset Phone Change Lock Code
Tools
Clock
Alarm Stopwatch
World Clock
Calendar
Bluetooth
Bluetooth Trusted Devices
Visibility My Bluetooth Info
Add New Help
Update Phone
Update Firmware Update PRL
Wireless Backup
Mass Storage
Connect to PC Format Memory Card
File Manager Memory Info
Voice Service
Voice Command
Call [Name][Type]/[Number]
Send Msg to [Name][Type]/[Number]
Find [Name][Type]
Go to [Menu]
Check [Item]
Voice command Training
Exit Voice Command
Voice Reader
Voice Guide Phone Status
Voice Memo
Settings & Info
Set Speaker Help
Calculator
Calculator Unit Converter
Ez Tip Calculator
Notepad
Document Viewer
Shopping
In Call Menu
Mute
Speaker
v

Dial Pad
End Call
More
Save Voice Memo
Main Menu Phone Info
3-Way Call Cancel
Contacts
vi

Section 1
Getting Started

⽧ Setting Up Your Phone (page 2)
1A. Setting Up Service
Tal k
⽧ Activating Your Phone (page 3)
⽧ Setting Up Your Voicemail (page 3)
⽧ Sprint Account Passwords (page 4)
⽧ Getting Help (page 5)
Setting Up Your Phone
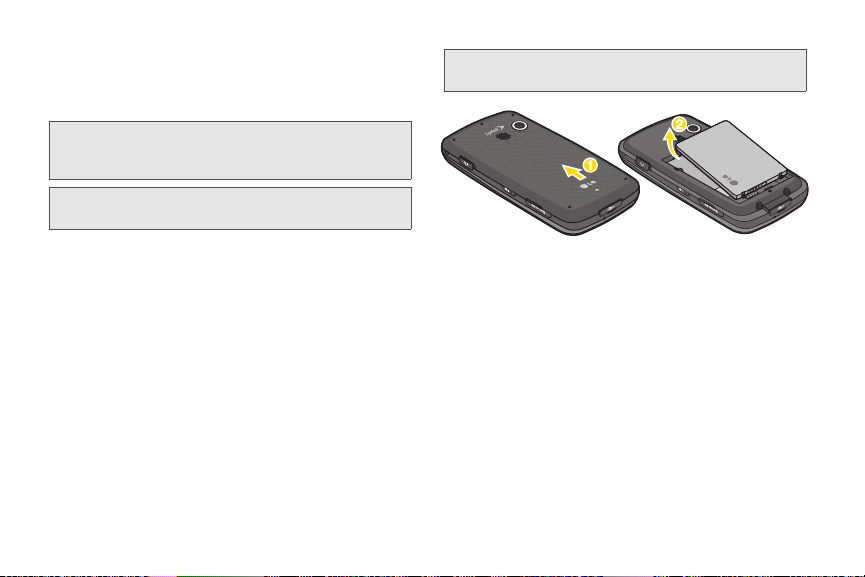
1. Install the battery.
䡲 Remove the battery from its packaging.
䡲 Press up on the bottom part of the battery cover
with your thumb and slide the cover upward to
remove it from the back of the phone.
䡲 Insert the battery into the opening in the back of
the phone, making sure the connectors align.
Gently press down to secure the battery.
2 1A. Setting Up Service
䡲 Position the battery cover over the battery
compartment and slide it downward until you
hear a click.
2. Press and hold on the right side of the
phone to turn the phone on.
䡲 If your phone is activated, it will turn on, search for
Sprint service, and enter standby mode.
䡲 If your phone is not yet activated, see “Activating
Your Phone” on page 3 for more information.
3. Make your first call.
䡲 Press to display the dial pad.
䡲 Use your dial pad to enter a phone number.
䡲 Touch or press .
Note: Your phone’s battery should have enough charge for
1
your phone to turn on and find a signal, set up your
voicemail, and make a call. You should fully charge
your battery as soon as possible. See “Charging the
Battery” on page 18 for details.
Activating Your Phone
䢇 If you purchased your phone at a Sprint Store, it is
probably activated and ready to use.
䢇 If you received your phone in the mail and it is for a new
Sprint account or a new line of service, it is designed to
activate automatically. To confirm your activation,
make a phone call.
䢇 If you received your phone in the mail and you are
activating a new phone for an existing number on your
account, you will need to go online to activate your
new phone.
䡲 From your computer’s Web browser, go to
www.sprint.com/activate and complete the
onscreen instructions to activate your phone.
When you have finished, make a phone call to
confirm your activation. If your phone is still not
activated or you do not have access to the Internet,
contact Sprint Customer Service at
1-88 8-211-4727
for assistance.
Tip: Do not press while the phone is being activated.
Pressing
Note: If you are having difficulty with activation, contact Sprint
Customer Service by dialing
other phone.
cancels the activation process.
1-888- 211- 4727 from any
Setting Up Your Voicemail
Your phone automatically transfers all unanswered
calls to your voicemail, even if your phone is in use or
turned off. You should set up your Sprint Voicemail and
personal greeting as soon as your phone is activated.
Always use a passcode to protect against unauthorized
access.
1. From home screen, press to display the
dial pad.
2. Touch and hold .
3. Follow the system prompts to:
䡲 Create your passcode.
䡲 Record your name announcement.
1A. Setting Up Service 3
Setting Up Service

䡲 Record your greeting.
Note: Voicemail Passcode
Sprint strongly recommends that you create a
passcode when setting up your voicemail to protect
against unauthorized access. Without a passcode,
anyone who has access to your phone is able to
access your voicemail messages.
For more information about using your voicemail, see
“Voicemail” on page 98.
Sprint Account Passwords
As a Sprint customer, you enjoy unlimited access to
your personal account information, your voicemail
account, and your data services account. To ensure
that no one else has access to your information, you
will need to create passwords to protect your privacy.
Account Username and Password
If you are the account owner, you will create an account
username and password when you sign on to
www.sprint.com. (Click Need to register for access? to get
started.) If you are not the account owner (if someone
4 1A. Setting Up Service
else receives the bill for your Sprint service), you can
get a sub-account password at
www.sprint.com.
Voicemail Password
You’ll create your voicemail password (or passcode)
when you set up your voicemail. See “Setting Up Your
Voicemail” on page 3 for more information on your
voicemail password.
Data Services Password
With your Sprint phone, you may elect to set up an
optional data services password to control access and
authorize Premium Service purchases.
For more information, or to change your passwords,
sign on to
Service at
www.sprint.com or call Sprint Customer
1-888-211-4727.

Getting Help
4
Tal k3Tal k2Tal k7Tal k411Tal k
Managing Your Account
Online: www.sprint.com
䢇 Access your account information.
䢇 Check your minutes used (depending on your Sprint
service plan).
䢇 View and pay your bill.
䢇 Enroll in Sprint online billing and automatic payment.
䢇 Purchase accessories.
䢇 Shop for the latest Sprint phones.
䢇 View available Sprint service plans and options.
䢇 Learn more about data services and other products
like Sprint Picture Mail, games, ringers, screen
savers, and more.
From Your Sprint Phone
Press and choose from these options:
䢇 Touch to check minute usage and
account balance.
䢇 Touch to make a payment.
䢇 Touch to access a summary of your
Sprint service plan or get answers to other questions.
䢇 Touch to add a new line of service,
upgrade your phone, or access other account
services.
From Any Other Phone
䢇 Sprint Customer Service: 1-88 8-211-4727.
䢇 Business Customer Service: 1-800-927-2199.
Sprint 411
Sprint 411 gives you access to a variety of services and
information, including residential, business, and
government listings; movie listings or showtimes;
driving directions, restaurant reservations, and major
local event information. You can get up to three pieces
of information per call, and the operator can
automatically connect your call at no additional charge.
There is a per-call charge to use Sprint 411, and you
will be billed for airtime.
䊳 Touch .
1A. Setting Up Service 5
Setting Up Service

Sprint Operator Services
0
Tal k
Sprint Operator Services provides assistance when you
place collect calls or when you place calls billed to a
local telephone calling card or third party.
䊳 Tou c h .
For more information or to see the latest in products
and services, visit us online at
6 1A. Setting Up Service
www.sprint.com.

Section 2
Your Phone
Your Phone
2A. Phone Basics
⽧ Your Phone (page 8)
⽧ Viewing the Display Screen (page 12)
⽧ Getting to Know the Touch Screen (page 16)
⽧ Turning Your Phone On and Off (page 16)
⽧ Calibrating the Touch Screen (page 17)
⽧ Battery and Charger (page 17)
⽧ Navigating Through the Menus (page 19)
⽧ Displaying Your Phone Number (page 20)
⽧ Making and Answering Calls (page 21)
⽧ Entering Text (page 28)
Tip: Phone Software Upgrades – Updates to your phone’s
software may become available from time to time. Sprint will
automatically upload critical updates to your phone. You can
also use the menu to check for and download updates.
Tou c h
more menu items) >
Firmware
> Main Menu > (slide the screen up to display
Tools > Update Phone > Update
to search for and download available updates.
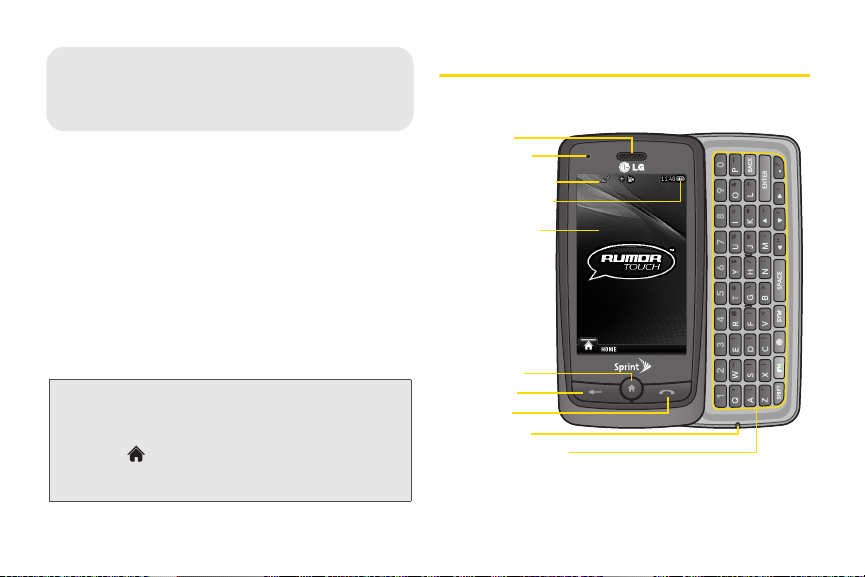
8 2A. Phone Basics
1. Earpiece
2. Status Light
3. Status Bar Icons
4. Battery Strength
Indicator
5. Touch Screen
6. Home Key
7. Back Key
8. Talk Key
9. Microphone
10.
QWERTY Keyboard

Key Functions
1. Earpiece lets you hear the caller and automated
prompts.
2. Status Light indicates incoming calls, new
messages, or other events by blinking. It is red
while charging and turns green when charging is
completed.
3. Status Bar Icons provide information about your
phone’s status and options, such as signal
strength, roaming, ringer setting, messaging, and
battery charge.
4. Battery Strength Indicator represents the amount of
remaining battery charge currently available in
your phone. When all bars are displayed in the
battery icon, the phone’s battery is fully charged.
When no bars are displayed, the phone’s battery is
nearly completely discharged.
5. Touch Screen displays all the information needed
to operate your phone, such as the call status, the
Contacts list, the date and time, and the signal and
battery strength.
6. Home Key lets you go back to Home screen in any
menu display. To go back to standby mode, press
this key again.
7. Back Key returns you to the previous menu when in
a sub-menu. This key also allows you to return to
the previous screen in a data session.
8. Ta lk Key brings the dial pad on the screen. Hold
down to activate Voice Command while in standby
mode.
9. Microphone allows other callers to hear you clearly
when you are speaking to them.
10. QWERTY Keyboard lets you enter numbers, letters,
and characters. Press number keys for speed
dialing.
2A. Phone Basics 9
Phone Basics
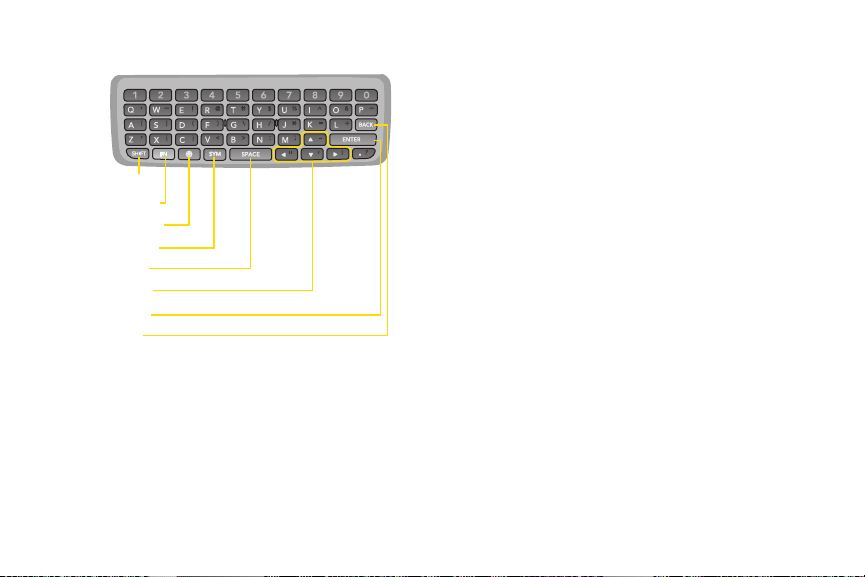
<QWERTY Keyboard>
18. BACK Key
17. ENTER Key
13. Emoticon Key
15. SPACE Key
14. Symbols Key
12. Function Key
11. SHIFT Key
16. Arrow Keys
11. SHIFT Key lets you change letter capitalization
when entering text using the QWERTY keyboard.
12. Function Key allows you enter the alternate
character (such as @ for the R key) on the
QWERTY keyboard. (See “Entering Text With the
QWERTY Keyboard” on page 32 for details.)
10 2A. Phone Basics
13. Emoticon Key lets you enter emoticons when
composing text messages.
14 . Symbols Key lets you enter symbols when
composing text messages.
15. SPACE Key lets you enter a space.
16. Arrow Keys let you move the cursor up, down, right
or left.
17. ENTER Key lets you move the cursor to the
beginning of the next line when composing text
messages.
18. BACK Key deletes characters from the display in
text entry mode. When in a menu, pressing the
Back key returns you to the previous menu. This
key also allows you to return to the previous screen
in a data session.
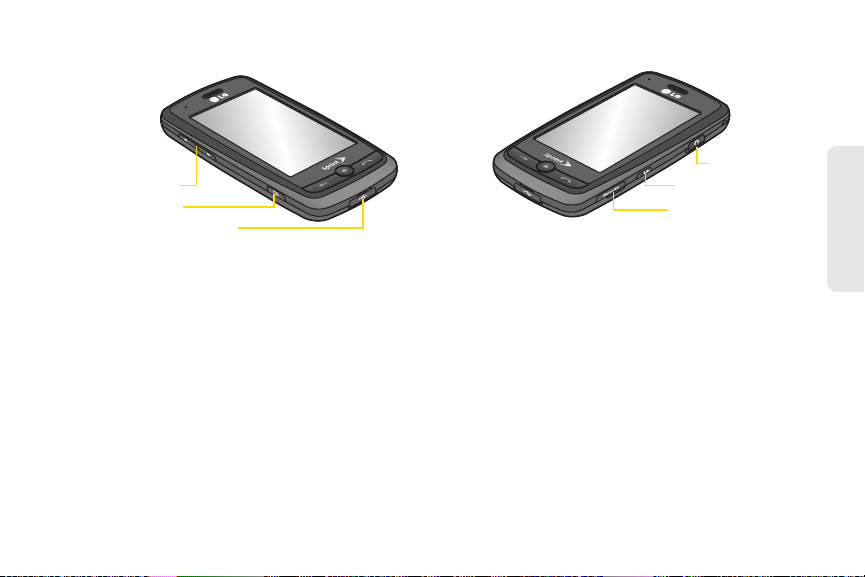
19. Volume Button allows you to adjust the ringer
19. Volume Button
20. Camera Button
21. Charger/Accessory Jack
22. Headset Jack
23. Power/Lock Button
24. microSDTM Card Slot
volume or adjust the voice volume during a call.
20. Camera Button lets you activate the camera and
camcorder and take pictures and videos.
21. Charger/Accessory Jack allows you to connect the
phone charger or an optional USB cable.
CAUTION! Inserting an accessory into the incorrect
jack may damage the phone.
22. Headset Jack allows you to plug in either a stereo
headset or an optional headset for convenient,
hands-free conversations. CAUTION! Inserting an
accessory into the incorrect jack may damage the
phone.
23. Power/Lock Button lets you turn the phone on or
off. It also locks or unlocks the phone.
24. microSD™ Card Slot lets you use the microSD card
to expand the memory of your phone. (See
“Inserting the microSD Card” on page 77.)
Phone Basics
2A. Phone Basics 11
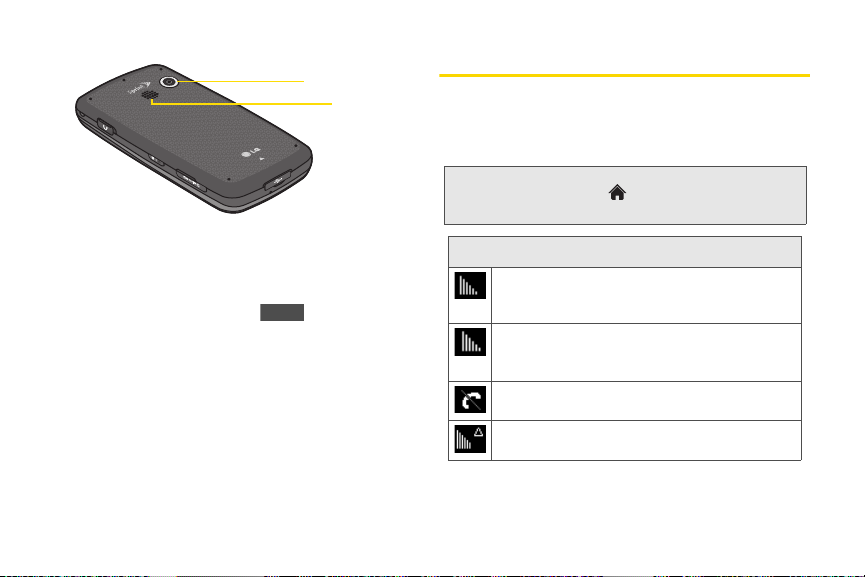
Camera Lens used for picture taking and video
25. Camera Lens
26. Speaker
Mute
25.
recording. Keep clean for optimal performance.
26. Speaker lets you hear the different ringers and
sounds. You can mute the ringer when receiving
incoming calls by touching . The speaker
also lets you hear the caller’s voice when in
speakerphone mode.
12 2A. Phone Basics
Viewing the Display Screen
Your phone’s display screen provides information
about your phone’s status and options. This list
identifies the symbols you’ll see on your phone’s
display screen:
Tip: To view a list of your phone’s icons and descriptions, from
the main menu touch
Phone Info > Icon Glossary
Status Bar – Service Icons
1x Signal Strength – Shows your current 1xRTT
signal strength. (More bars = stronger signal.)
(Bars are yellow.)
EVDO Signal Strength – Shows your current
EVDO signal strength. (More bars = stronger
signal.) (Bars are white.)
No Service – Your phone cannot find a usable
signal.
Roaming – Your phone is “roaming” off the
Nationwide Sprint Network.
> Main Menu > Settings >
.
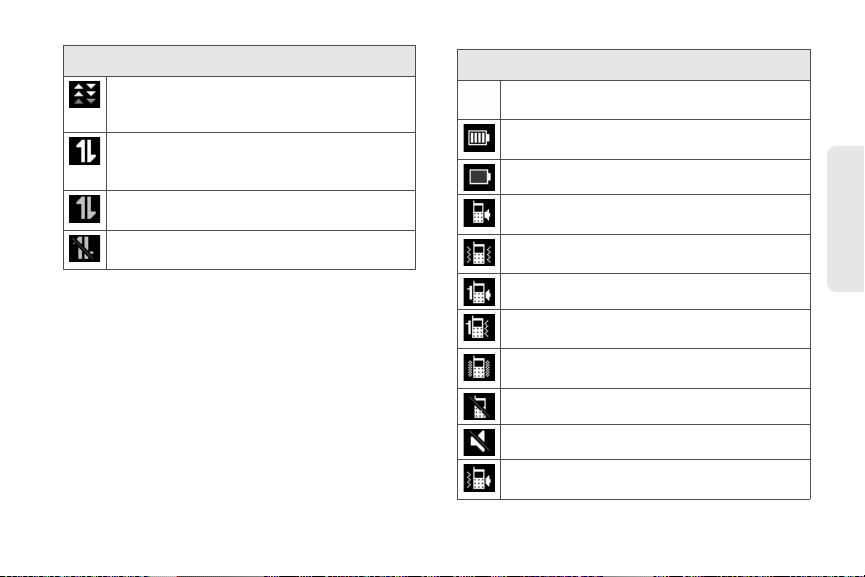
Status Bar – Service Icons
EVDO Data Service – Sprint mobile broadband
data service (EVDO) is available. When active,
the icon is animated.
1x Service Activated – Indicates that Sprint
1xRTT data service is available. When active, the
icon is animated.
1x Service Deactivated – Indicates that Sprint
1xRTT data service is deactivated.
1x Service Unavailable – Data service is
currently unavailable.
Status Bar – Status Icons
Airplane/Music Mode – Indicates that the phone
is in Airplane/Music Mode.
Full Battery – Shows your current battery charge
level. (Icon shown is fully charged.)
Low Battery – Shows the battery is low.
Ringer Only – Indicates ringer only is set for call
alert.
Vibrate Only – Indicates ringer volume is set to
vibrate only.
1 Beep – Indicates one beep is set for call alert.
1 Beep & Vibrate – Indicates one beep and
vibration is set for call alert.
Vibrate All – Indicates ringer volume is set to
vibrate all.
Ringer Off – The ringer is set to off.
Silence All – All sounds are turned off.
Ringer & Vibrate – Indicates ringer and vibrate
mode is set.
2A. Phone Basics 13
Phone Basics
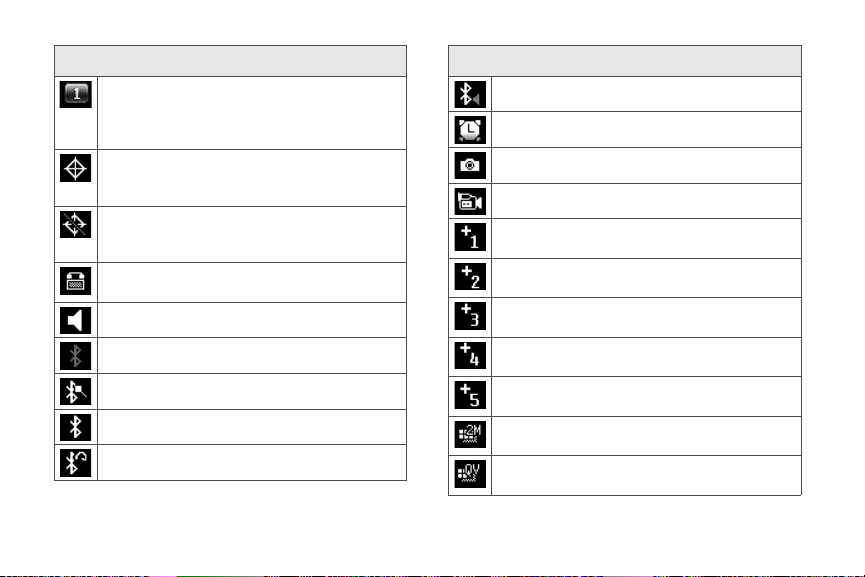
Status Bar – Status Icons
Bubble Icon – Indicates you have missed alerts
such as voicemail, missed calls, new messages,
scheduled events, or a completed wireless
backup.
Location On – Your phone’s location feature is
on and available for location-based services
such as GPS Navigation.
Location Off – Your phone’s location feature is
off. Your location is available only for 911 (see
page 39).
TTY – Indicates your phone is operating in TTY
mode.
Speaker – Indicates speaker is activated.
Bluetooth Enabled (Hidden)
Bluetooth Enabled (Visible)
Bluetooth Connected
Bluetooth Connected (Mono/Stereo Headset)
14 2A. Phone Basics
Status Bar – Status Icons
Bluetooth Connected (Stereo Speaker)
Alarm Clock – Indicates alarm is activated.
Camera/Picture – Indicates camera mode.
Camcorder/Video – Indicates camcorder mode.
1 Background Application – Indicates that one
application is active.
2 Background Applications – Indicates that 2
applications are active.
3 Background Applications – Indicates that 3
applications are active.
4 Background Applications – Indicates that 4
applications are active.
5 Background Applications – Indicates that 5
applications are active.
Camera Resolution 2M – Indicates camera
resolution is set to 2M.
Camcorder Resolution QVGA – Indicates
camcorder resolution is set to QVGA.
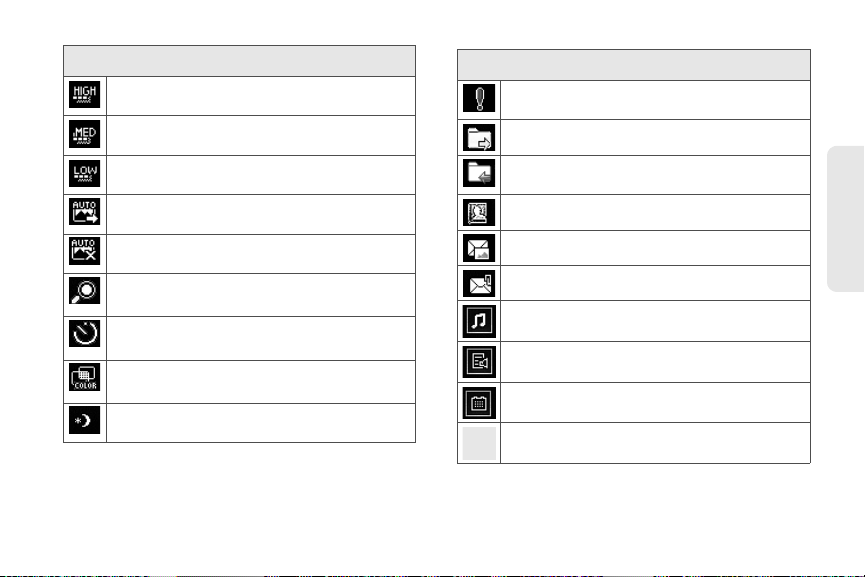
Status Bar – Status Icons
Camera Resolution High – Indicates camera
resolution is set to High.
Camera/Camcorder Resolution Med – Indicates
camera resolution is set to Med.
Camera/Camcorder Resolution Low – Indicates
camera resolution is set to Low.
Enable Auto-Send – Indicates Auto-Send feature
is enabled.
Disable Auto- Send – Indicates Auto-Send
feature is disabled.
Zoom
Self Timer
Color Tone
Night Mode Setting
– Indicates that Night mode
is set.
Status Bar – Messaging Icons
ls
Urgent Message – Indicates you have new
urgent messages.
Sent Message – Indicates the message is sent.
Received Message – Indicates the message is
received.
Recipient – Indicates recipient field.
File Attachment – Indicates file attachment field.
Phone Basics
File Attached – Indicates a file is attached.
Audio file attached – Indicates an audio file is
attached.
Voice file attached – Indicates a voice file is
attached.
Calendar file attached – Indicates a calendar file
is attached.
Contact file attached – Indicates a contact file is
attached.
2A. Phone Basics 15
Getting to Know the Touch Screen
䢇 Touch key sensors are very sensitive and require
only a light touch — you don’t need to press them
forcefully to use them. Pressing touch keys too hard
may damage the touch keypad.
䢇 Use the tip of your finger to touch the center of a
touch key. If you touch off-center it may activate an
adjacent key instead.
䢇 The touch screen is automatically locked when the
backlight is off. To lock manually, press the lock
button on the right side of the phone.
䢇 To unlock the touch screen, press and hold the lock
button on the right side of the phone.
– or –
Touch and hold the lock toggle key and
drag to .
16 2A. Phone Basics
WARNING: Don’t place anything heavy on the touch screen.
Be careful not to scratch the touch screen with
sharp objects.
Do not store your phone in extreme conditions
(places that are too humid, hot, or cold), or
around chemicals, which may change the
cosmetic or functional features of your phone.
Turning Your Phone On and Off
Turning Your Phone On
䊳 Press and hold .
Once your phone is on, it may display “Searching for
Service.” When your phone finds a signal, it enters
standby mode – the phone’s idle state. At this point,
you are ready to begin making and receiving calls.
If your phone is unable to find a signal after 15 minutes
of searching, a Power Save feature is automatically
activated. When a signal is found, your phone
automatically returns to standby mode.
In Power Save mode, your phone searches for a signal
periodically without your intervention. You can also
initiate a search for Sprint service by pressing any key
(when your phone is turned on).
Tip: The Power Save feature conserves your battery power
when you are in an area where there is no signal.
4. When the message “Complete Calibration?”
appears, touch an option:
䡲 Accept to accept the calibration.
䡲 Tr y Ag ain to restart touch calibration.
Turning Your Phone Off
䊳 Press and hold for two seconds until you
see the powering-down animation on the display
screen.
Your screen remains blank while your phone is off
(unless the battery is charging).
Calibrating the Touch Screen
When you first activate the phone, you will be asked to
calibrate the touch screen to improve touch accuracy,
based on your touch. If you don’t want this, touch
Time or Never.
1. When the phone is turned on, touch Calibrate Now.
2. Touch the screen to start touch calibration.
3. Touch the target each time it appears.
Next
Battery and Charger
WARNING: Use only Sprint-approved or LG-approved
Sprint-approved or LG-approved batteries and
accessories can be found at Sprint Stores or through
LG; or you can call 1-866-866-7509 to order. They’re
also available at
Battery Capacity
Your phone is equipped with a Lithium-Ion Polymer (Lipoly) battery. It allows you to recharge your battery
before it is fully drained. The battery provides up to 7
hours of continuous digital talk time.
batteries and chargers with your phone. The
failure to use a Sprint-approved or LG-approved
battery and charger may increase the risk that
your phone will overheat, catch fire, or explode,
resulting in serious bodily injury, death, or
property damage.
www.sprint.com.
2A. Phone Basics 17
Phone Basics
When the battery reaches 5% of its capacity, the battery
icon blinks. When there are approximately two minutes
of talk time left, the phone sounds an audible alert and
then turns off.
Note: Long backlight settings, searching for service, vibrate
mode, browser use, and other variables may reduce
the battery’s talk and standby times.
Tip: Watch your phone’s battery level indicator and charge the
battery before it runs out of power.
Installing the Battery
䊳 See “Setting Up Your Phone” on page 2.
Removing the Battery
1. Make sure the power is off so that you don’t lose
any stored numbers or messages.
2. Hold the phone securely with both hands.
3. Place your thumb on the bottom of the phone and
push the cover upward until it clicks out of place.
Then, remove the battery cover.
4. Use the opening near the top of the battery to lift
the battery out.
18 2A. Phone Basics
WARNING: Do not handle a damaged or leaking Li-poly
battery as you can be burned.
Charging the Battery
Keeping track of your battery’s charge is important. If
your battery level becomes too low, your phone
automatically turns off, and you will lose any
information you were working on.
Always use a Sprint-approved or LG-approved desktop
charger, travel charger, or vehicle power adapter to
charge your battery.
 Loading...