

Page 1
P/No. MFL37933514
Please read this guide
thoroughly before
operating and keep it handy
for reference at all times.
Veuillez lire ce guide attentivement
avant la mise en service de l’appareil
et gardez-le à portée de main
pour le consulter en cas de besoin.
Lea detenidamente estas
instrucciones antes utilizar
el frigorífico y guárdelas como
referencia para el futuro.
LMX25981**, LMX21981**
To contact LG Electronics, 24 hours a day,
7 days a week:
1-800-243-0000
Or visit us on the Web at: us.lge.com
Pour contacter LG Electronics, 24 heures par
jour, 7 jours par semaine:
1-800-243-0000
Ou visitez notre site Web à l’adresse: us.lge.com
Para comunicarse con LG Electronics,
24 horas al día, 7 días a la semana:
1-800-243-0000
O visítenos en la Web en: us.lge.com
Page 2

2
IMPORTANT SAFETY INFORMATION
Basic Safety Precautions ........................................3
CFC Disposal ..........................................................4
How to Connect Electricity ......................................5
PARTS AND FEATURES
Special Features .....................................................6
Key Parts and Components ....................................7
INSTALLATION
Choose the Proper Location ...................................8
Clearances ..............................................................8
Flooring ...................................................................9
Handle Removal......................................................9
Door and Drawer Removal....................................10
Connecting the Water Supply ...............................18
Connecting the Water Lines..................................18
Leveling the Refrigerator Doors ............................20
Starting..................................................................21
HOW TO USE
Control Panel Features .........................................22
The LED Display ...................................................23
Adjusting the Temperatures and Display .............24
Operating the Dispenser ......................................25
Setting the Functions ...........................................26
In-Door Ice Bin .....................................................27
Automatic Icemaker .............................................28
Storing Foods .......................................................29
Location of Foods .................................................30
Shelf Height Adjustment .......................................31
CARE AND CLEANING
Removing and Replacing Components ................32
Cleaning the Refrigerator .....................................35
General Information .............................................35
Replacing the Water Filter.....................................36
TROUBLESHOOTING
Before Calling for Service …………………………37
SPECIFICATIONS
Key Dimensions and Specifications .....................41
WARRANTY
Product Registration Information ..........................42
THANK YOU!
Congratulations on your purchase
and welcome to the LG family.
Your new LG French Door
Refrigerator combines
advanced cooling technology
with simple operation and high
efficiency. Follow the operating
and care instructions in this
this manual and your refrigerator
will provide you with many years
of reliable service.
Page 3

3
BASIC SAFETY PRECAUTIONS
This guide contains many important safety messages. Always read and obey all
safety messages.
w This is the safety alert symbol. It alerts you to safety messages that inform you of hazards that can kill
or hurt you or others or cause damage to the product. All safety messages will be preceded by the safety
alert symbol and the hazard signal word DANGER, WARNING, or CAUTION. These words mean:
wDANGER
You might be killed or seriously injured if you don’t follow instructions.
wWARNING
You can be killed or seriously injured if you don’t follow instructions.
wCAUTION
Indicates an imminently hazardous situation which, if not avoided, may
result in minor or moderate injury, or product damage.
All safety messages will identify the hazard, tell you how to reduce the chance of injury, and tell you
what can happen if the instructions are not followed.
wWARNING
To reduce the risk of fire, electric shock, or
injury to persons when using your product,
basic safety precautions should be followed,
including the following.
Read all instructions before using this appliance.
• NEVER unplug your refrigerator by pulling on the
power cord. Always grip the plug firmly and pull it
straight out from the outlet.
• Repair or replace immediately all electric service
cords that have become frayed or otherwise
damaged. Do not use a cord that shows cracks or
abrasion damage along its length or at either the
plug or connector end.
• When moving your refrigerator away from the wall,
be careful not to roll over or damage the power cord.
• DO NOT store or use gasoline or other flammable
vapors and liquids in the vicinity of this or any other
appliance.
• Do NOT allow children to climb, stand, sit or hang
on doors, drawers or shelves of the refrigerator.
They could damage the refrigerator and seriously
injure themselves.
• Keep fingers out of pinch point areas; clearances
between the doors and cabinet are necessarily
small. Be careful closing doors when children are
in the area.
• Unplug your refrigerator before cleaning or making
any repairs.
NOTE: Service should be performed by a qualified
technician.
• Before replacing a burned-out light bulb, unplug the
refrigerator or turn off power at the circuit breaker
or fuse box in order to avoid contact with a live wire
filament. (A burned-out light bulb may break when
being replaced.)
NOTE: Some models have LED interior lighting and
service should be performed by a qualified
technician.
NOTE: Setting either or both controls to the OFF
position does not remove power to the light circuit.
• When you are finished, reconnect the refrigerator to
the electrical source and reset the control
(Thermostat Refrigerator Control, or Freezer
Control, or Freezer Control, depending on the
model) to the desired setting.
• This refrigerator must be properly installed in
accordance with the Installer Instructions that
were taped to the front of the refrigerator.
• After your refrigerator is in operation, do not touch
the cold surfaces in the freezer compartment when
hands are damp or wet. Skin may adhere to the
extremely cold surfaces.
• In refrigerators with automatic icemakers, avoid
contact with the moving parts of the ejector
mechanism or with the heating element that
releases the cubes. DO NOT place fingers or hands
on the automatic icemaking mechanism while the
refrigerator is plugged in.
• Do not modify or extend the power cord length.
It will cause electric shock or fire.
Page 4
4
BASIC SAFETY PRECAUTIONS (CONT.)
• DO NOT refreeze frozen foods which have
thawed completely. The United States
Department of Agriculture in Home and Garden
Bulletin No. 69 says:
…You may safely refreeze frozen foods that have
thawed if they still contain ice crystals or if they are
still cold—below 40°F (4°C).
…Thawed ground meats, poultry, or fish that have
any off-odor or off-color should not be refrozen
and should not be eaten. Thawed ice cream
should be discarded. If the odor or color of any
food is poor or questionable, dispose of it. The
food may be dangerous to eat.
Even partial thawing and refreezing reduces the
quality of foods, particularly fruits, vegetables,
and prepared foods. The eating quality of red
meats is affected less than that of many other
foods. Use refrozen foods as soon as possible to
save as much of their quality as you can.
CFC DISPOSAL
Your old refrigerator may have a cooling system
that used CFCs (chlorofluorocarbons). CFCs are
believed to harm stratospheric ozone.
If you are throwing away your old refrigerator,
make sure the CFC refrigerant is removed for
proper disposal by a qualified servicer. If you
intentionally release this CFC refrigerant, you can
be subject to fines and imprisonment under
provisions of environmental legislation.
wDANGER
Risk of Child Entrapment
Discarded or abandoned refrigerators are
dangerous, even if they will sit for just a few
days. If you are disposing of your old refrigerator,
please follow the instructions below to help prevent
accidents.
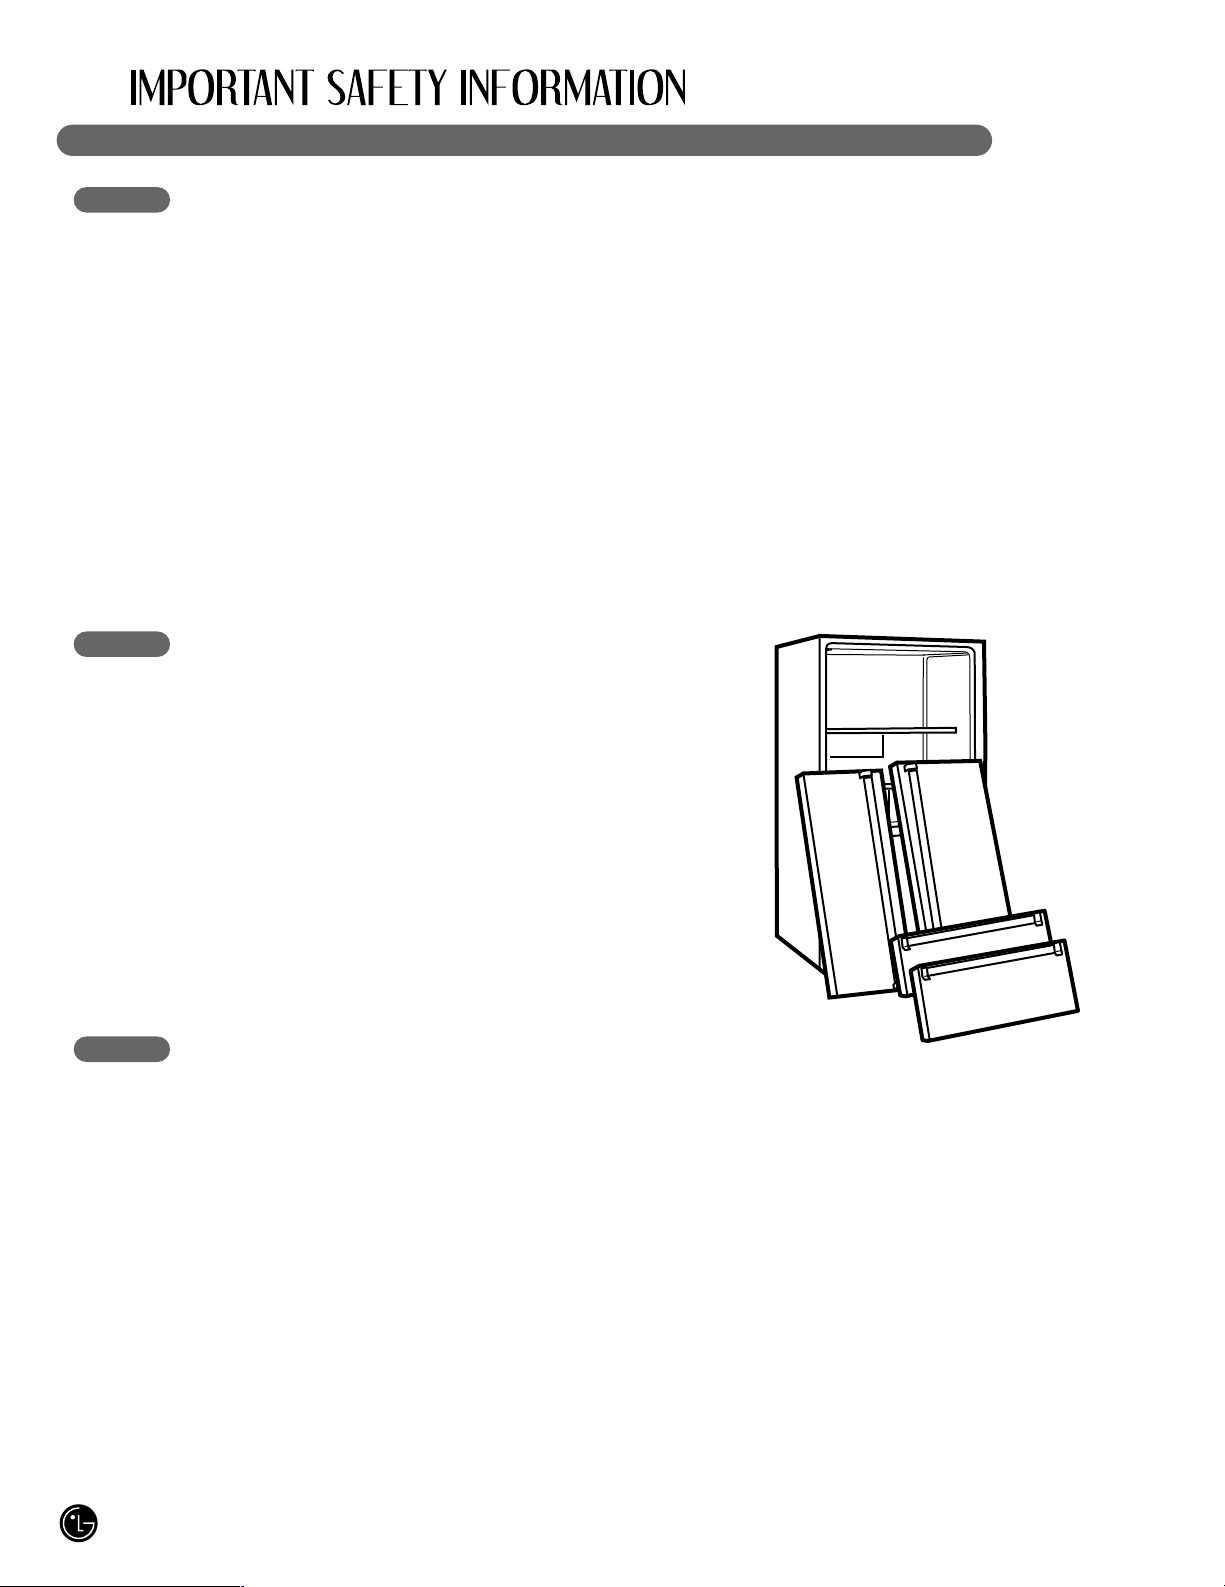
Before you throw away your old refrigerator or
freezer:
• Take off the doors.
• Leave the shelves in place so that children may
not easily climb inside.
Page 5
5
HOW TO CONNECT ELECTRICITY
IMPORTANT: Please read carefully.
wWARNING
Electrical Shock Hazard
For personal safety, this appliance must be
properly grounded. Have the wall outlet and
the circuit checked by a qualified electrician to
make sure the outlet is properly grounded.
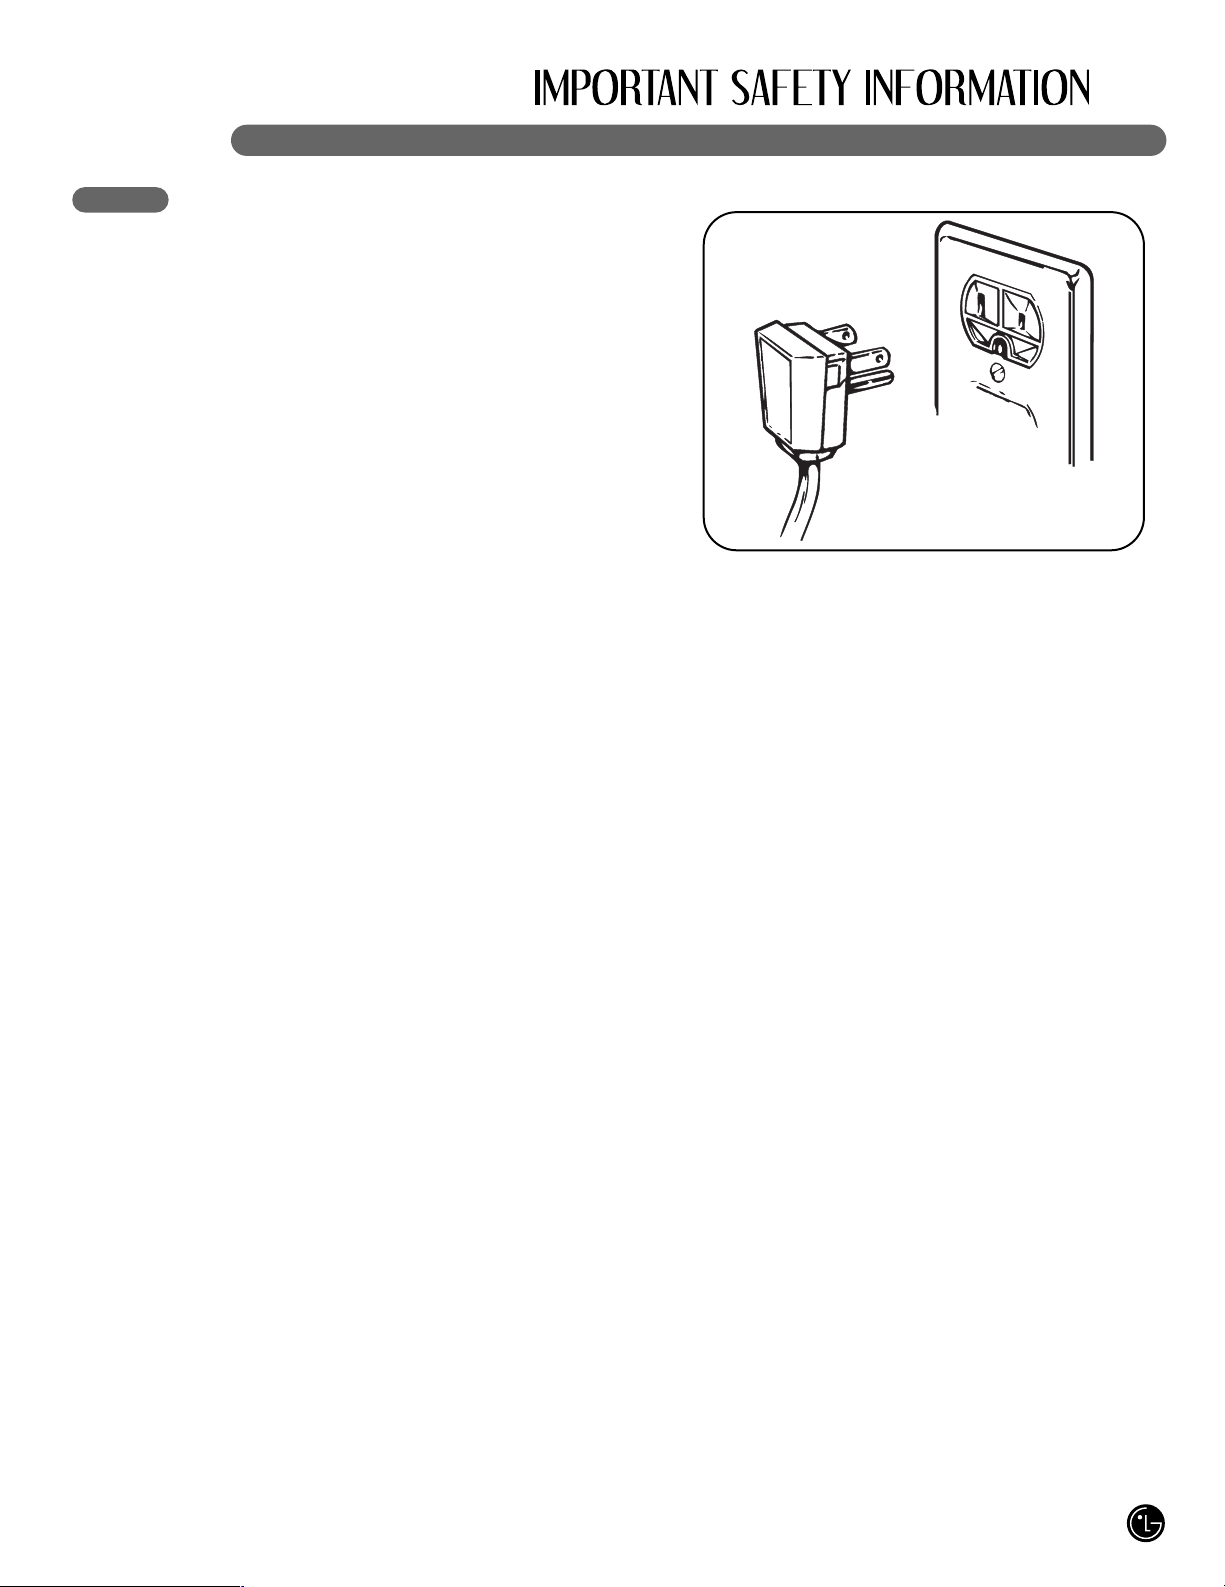
RECOMMENDED GROUNDING METHOD
The refrigerator should always be plugged into
its own individual properly grounded electrical
outlet rated for 120 volts, 60 Hz, AC only, and
fused at 20 amperes. This provides the
best performance and also prevents overloading
house wiring circuits which could cause a fire
hazard from overheated wires. It is
recommended that a separate circuit serving
only this appliance be provided.
Use a receptacle which cannot be turned off with
a switch or pull chain. Do not use an extension
cord. Where a standard two-prong wall outlet is
encountered, it is your personal responsibility
and obligation to have it replaced with a properly
grounded three-prong wall outlet.
Do not, under any circumstances, cut or
remove the third (ground) prong from the
power cord.
Do not use an adapter plug.
NOTE: Some models have LED interior lighting and
service should be performed by a qualified technician.
When you are finished, reconnect the refrigerator to
the electrical source and reset the control
(Thermostat, Refrigerator Control, or Freezer Control,
depending on the model) to the desired setting.
USE OF EXTENSION CORDS
Because of potential safety hazards under
certain conditions, we strongly recommend
against the use of an extension cord.
However, if you still elect to use an extension
cord, it is absolutely necessary that it be a UL-listed
(USA), 3-wire grounding-type appliance
extension cord having a grounding-type plug
and outlet and that the electrical rating of the
cord be 20 amperes (minimum) and 120 volts.
Use of an extension cord will increase the
clearance needed for the back of the
refrigerator.
SAVE THESE INSTRUCTIONS
Page 6

6
SPECIAL FEATURES
CONTROL PANEL LED DISPLAY SCREEN
Simple electronic controls are user-friendly.
The LED screen shows refrigerator and freezer
temperatures, displays water filter status,
dispenser information, and more.
ICE PLUS
When this feature is activated, the freezer section
will run at the coldest temperature for a 24- hour
period to increase ice production by about 20
percent.
FILTERED WATER AND ICE DISPENSER
The water dispenser offers fresh, chilled, filtered
water through the door. The ice dispenser offers
cubed or crushed ice.
DOOR ALARM
A warning alarm sounds at 30-second intervals
when the refrigerator or freezer door is left open
for more than 60 seconds.
IN-DOOR ICE BIN
The icemaker automatically produces 80–130
ice cubes in a 24-hour period to keep the ice
dispenser fully supplied. The in-door design
creates more shelf space.
CRISPERS
LG’s crispers preserve humidity and
help vegetables stay crisp.
1
2
3
4
5
6
1
2
3
4
5
6
Page 7
7
KEY PARTS AND COMPONENTS
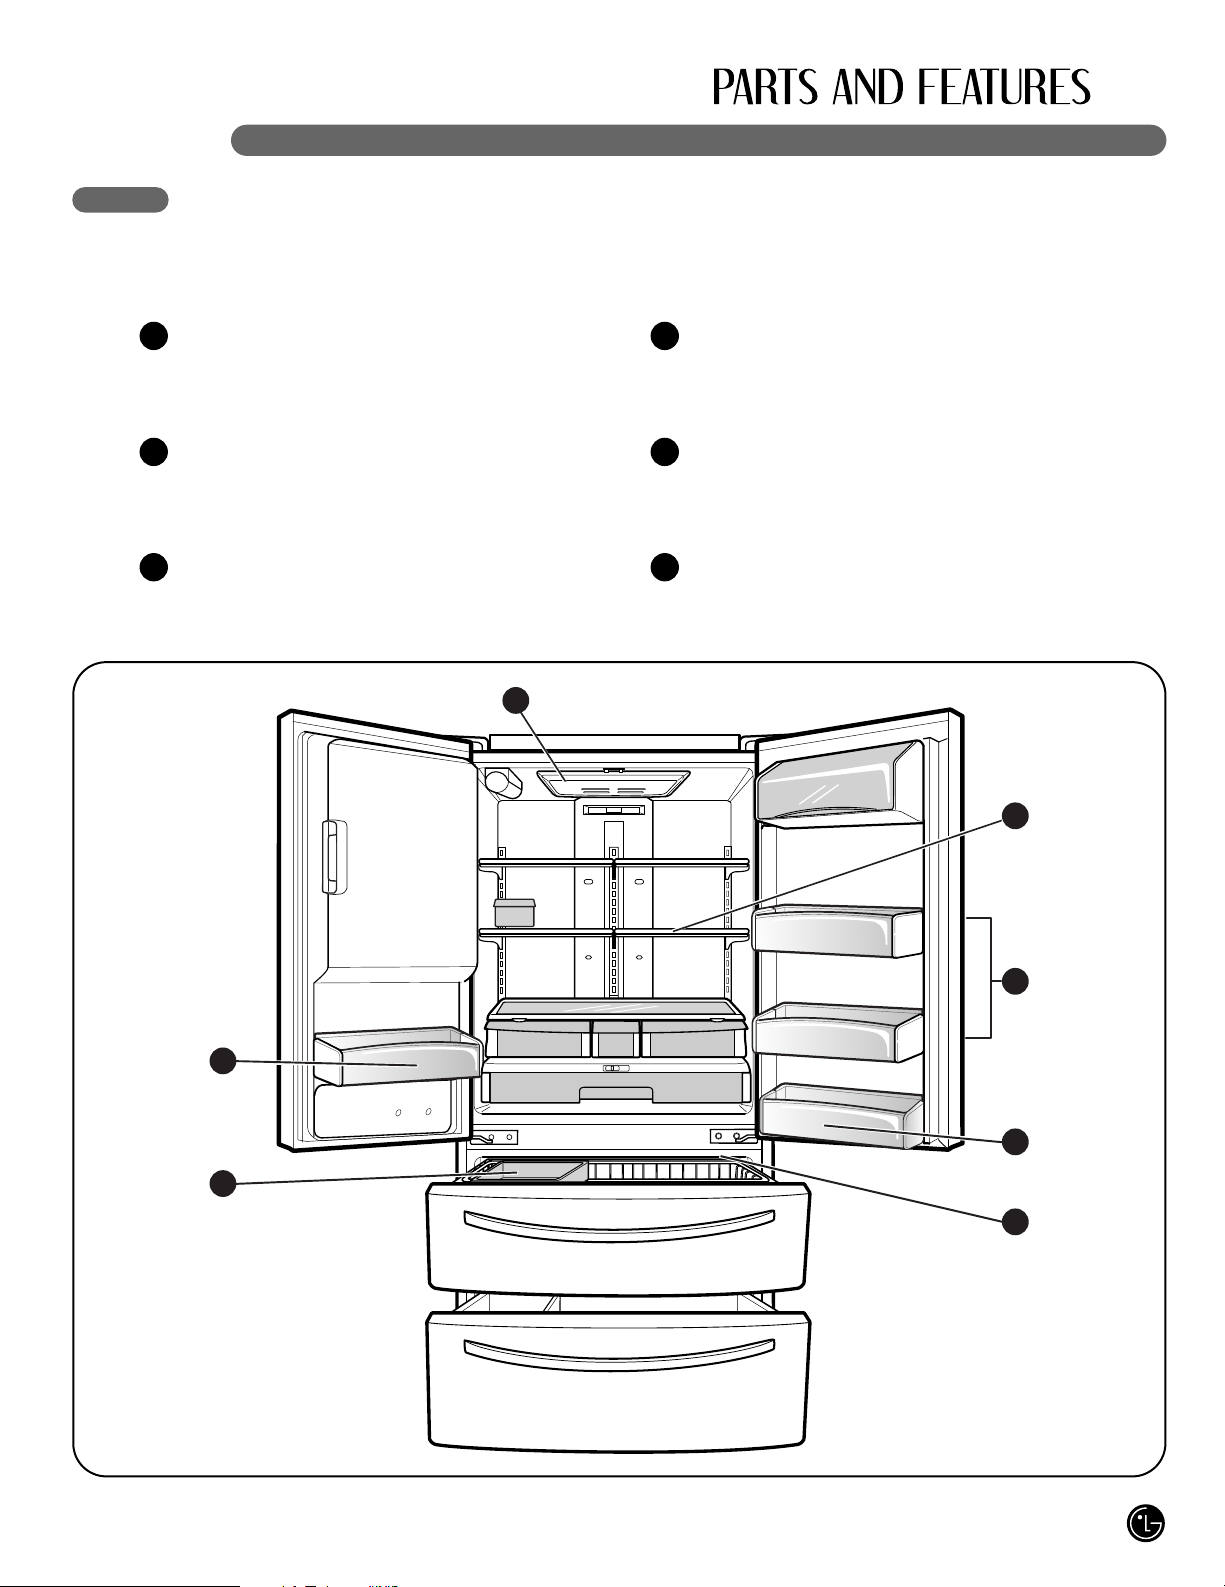
In addition to the special features and components outlined in the Special Features section,
there are several other important components that are referenced in this manual.
ADJUSTABLE REFRIGERATOR SHELVING
The refrigerator compartment shelves are
adjustable to allow flexibility for storage needs.
MODULAR DOOR BINS
Three interchangeable bins can be arranged to
suit your storage needs.
REMOVABLE ICE STORAGE BIN
The ice storage bin can be removed to fill ice
buckets, coolers, or pitchers.
LED INTERIOR LAMPS
Two separate LED arrays light the freezer and
refrigerator interiors.
TILTING DOOR BIN
FIXED DOOR BIN
1
2
4
5
3 6
3
5
4
6
1
2
4
Page 8
8
CHOOSE THE PROPER LOCATION
wWARNING
Excessive Weight Hazard
Two or more people are required when
moving and unpacking the appliance.
• Store and install the refrigerator where it will not
be exposed to temperatures below freezing or
exposed to outdoor weather conditions.
• Install this appliance in an area where the
temperature is between 55°F (13°C) and 110°F
(43°C). If the temperature around the appliance
is too low or too high, cooling ability may be
adversely affected.
• If this refrigerator is installed where the
temperature is above 110°F (43°C), the
freezing capacity is compromised and the cost
of electricity used increases.
• To reduce the risk of electric shock, do not
install the refrigerator in a wet or damp area.
• Select a place where a water supply can be
easily connected for the automatic icemaker
and dispenser.
• Unstable installation may cause vibration and
noise. If the floor is not even, make the
refrigerator level by rotating the height adjusting
screws.
• Properly ground the refrigerator to conform with
all governing codes and ordinances.
wCAUTION
Avoid placing the unit near heat sources,
direct sunlight, or moisture.
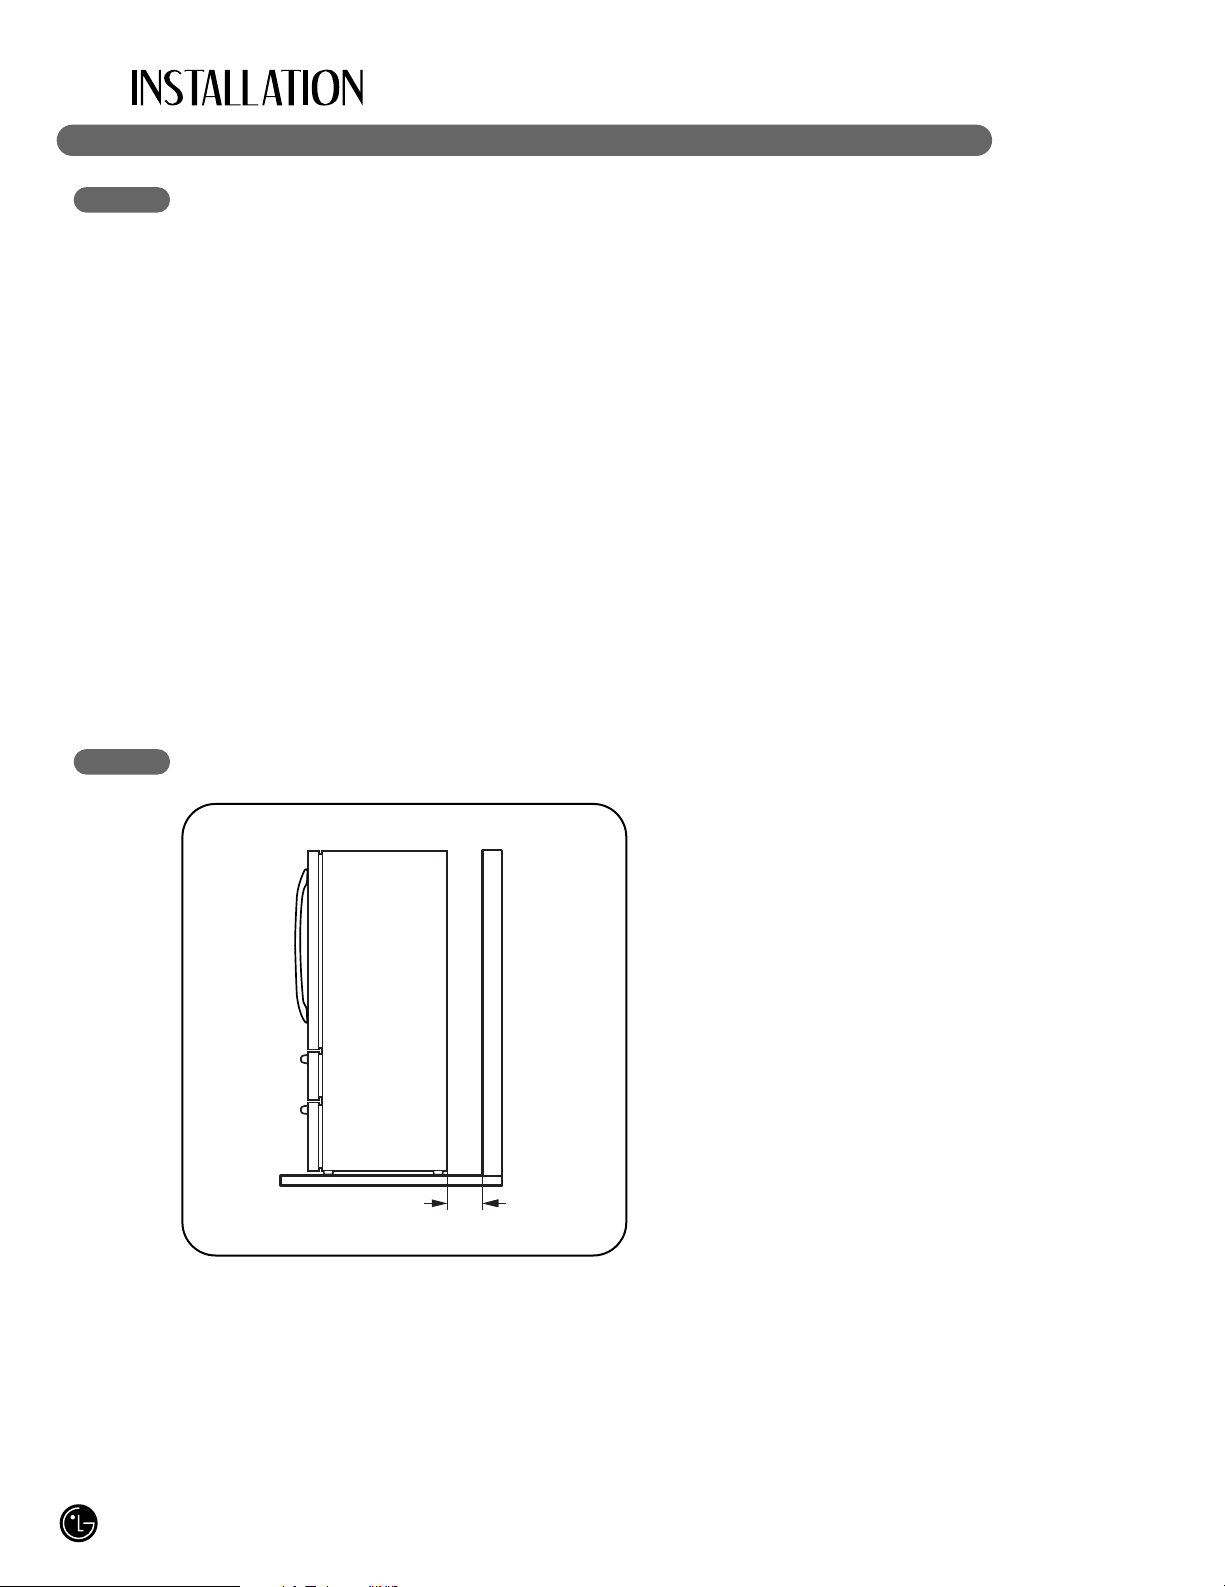
CLEARANCES
• Too small a distance from adjacent items may
result in lowered freezing capability and
increased electricity consumption charges.
Allow at least 24 in. (61 cm) in front of the
refrigerator to open the doors.
NOTE: For complete dimensions and specifications,
see page 41.
1" (2.54 cm)
Page 9

9
FLOORING
• To minimize noise and vibration, the refrigerator
MUST be installed on a solidly constructed
floor.
• To avoid vibration, the unit must be level. If
required, adjust the leveling legs to compensate
for unevenness of the floor. The front should be
slightly higher than the rear to aid in door
closing. The leveling legs can be turned easily
by pushing against the top of the refrigerator to
take the weight off the feet. Turn the leveling
legs clockwise to raise the unit or
counterclockwise to lower it.
• Carpeting and soft tile surfaces are not
recommended.
• Never install the refrigerator on a platform or
weakly supported structure.
NOTE: When moving the refrigerator for cleaning
or service, be sure to protect the floor. Always
pull the refrigerator straight out when moving it.
Do not wiggle or walk the refrigerator when trying
to move it; floor damage could occur.
HANDLE REMOVAL
To move the refrigerator through a house door, it
may be necessary to remove the refrigerator
door handles.
NOTE: Handle appearance may vary from
illustrations on this page.
wCAUTION
• Use special care when removing handles to
prevent scratching the doors.
• The handle could be damaged if you hit it with
a hammer while removing or attaching.
• When you assemble or disassemble a handle,
you must push or pull with reasonable force.
NOTE: It is recommend that the doors be removed when it is necessary to move the refrigerator through a
narrow opening.
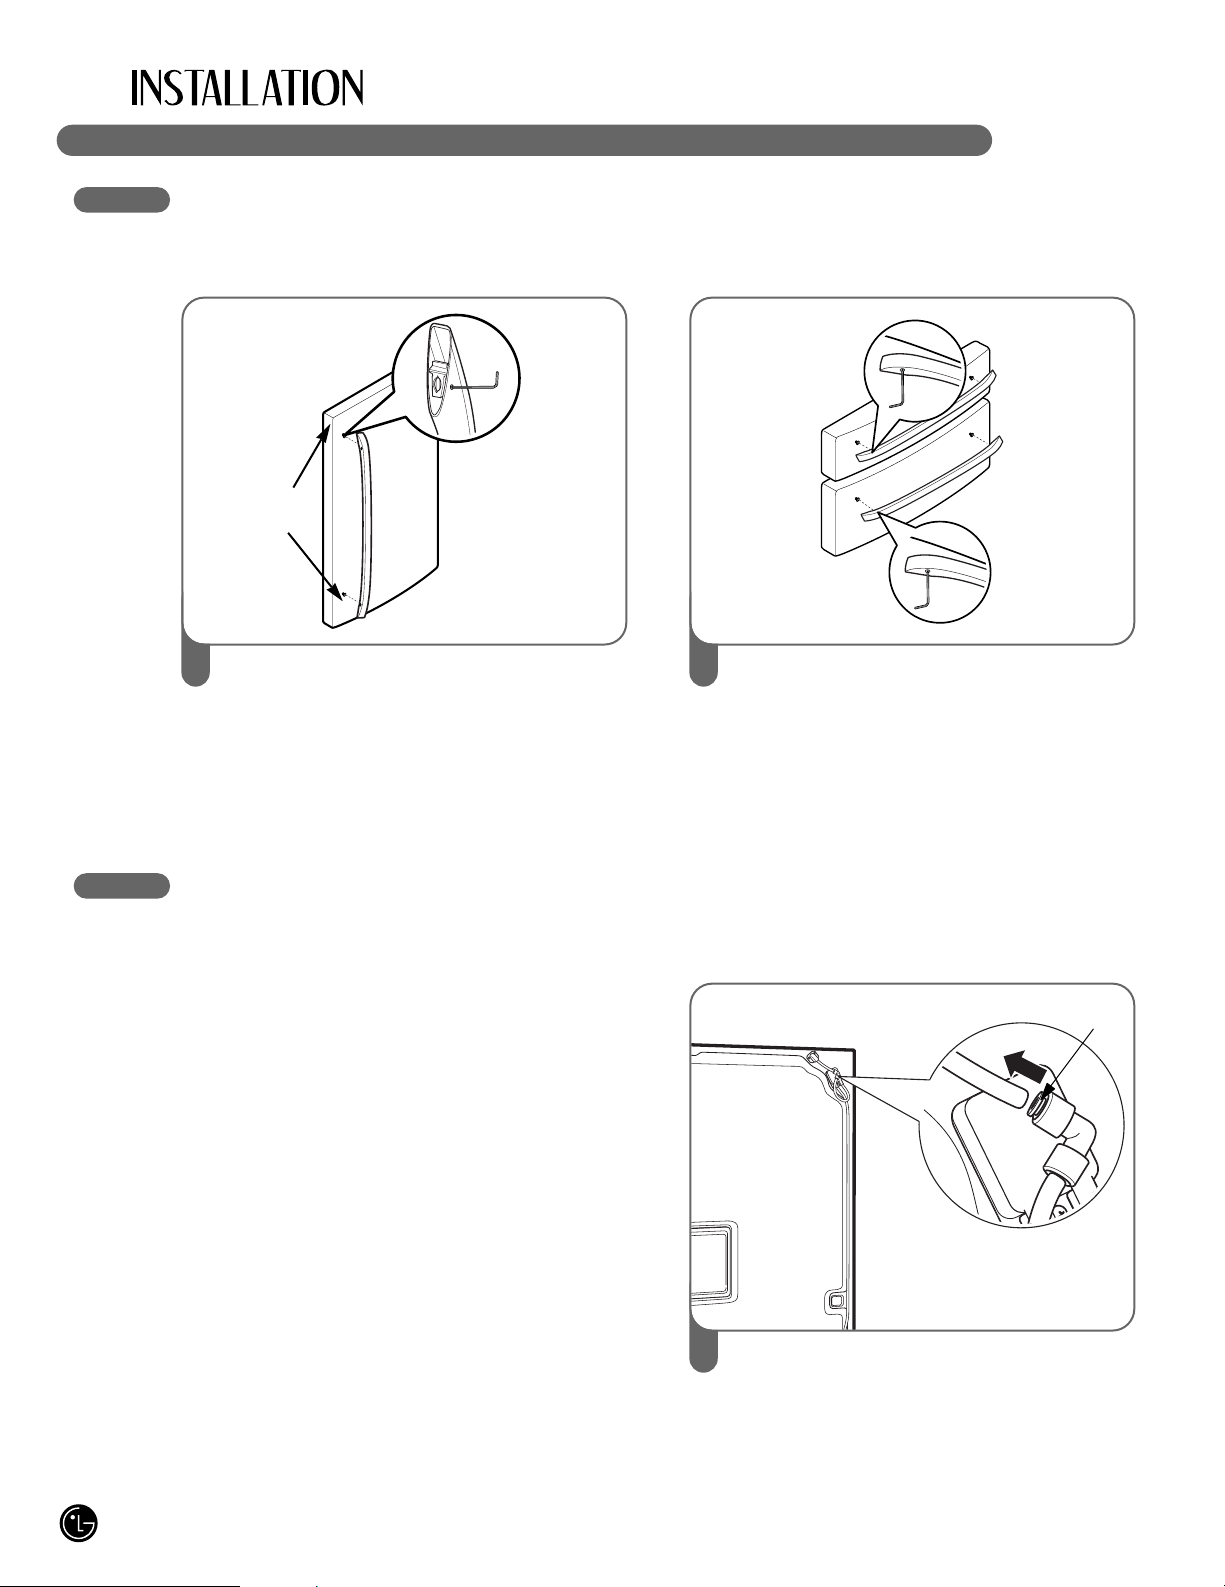
Loosen the set screws with a 2.5 mm (3/32")
Allen wrench and remove the handle.
NOTE: If the handle mounting fasteners need
to be tightened or removed, use a 1/4" Allen
wrench.
1
Loosen the set screws located on the lower
side of the handle with a 2.5 mm (3/32") Allen
wrench and remove the handle.
NOTE: If the handle mounting fasteners need
to be tightened or removed, use a 1/4" Allen
wrench.
2
Mounting
Fasteners
Set Screw
Allen Wrench
Page 10
10
HANDLE REMOVAL (CONT.)
HANDLE REINSTALLATION
DOOR AND DRAWER REMOVAL
DOOR REMOVAL
wWARNING
Electric Shock Hazard
• Disconnect electrical supply to the refrigerator
before installing. Failure to do so could result in
death or serious injury.
• Do not put hands or feet or metal sticks into the air
vents, base grille, or bottom of the refrigerator. You
may be injured or receive an electrical shock.
• Be careful when you work with the hinge, base
grille, and stopper. You may be injured.
Before you begin, remove food and bins from the
doors.
If your entrance door is too narrow for the refrigerator
to pass through, remove the refrigerator door and
move the refrigerator sideways through the doorway.
Place the handle on the door by aligning
handle footprints to fit mounting fasteners and
tighten the set screws with a 2.5 mm (3/32")
Allen wrench.
NOTE: If the handle mounting fasteners need
to be tightened or removed use a 1/4"Allen
wrench
1 Place the handle on the door by aligning
handle footprints to fit mounting fasteners and
tighten the set screws on the bottom of the
handle with a 2.5 mm (3/32") Allen wrench.
NOTE: If the handle mounting fasteners need
to be tightened or removed use a 1/4"Allen
wrench.
2
To remove the left refrigerator door:
Pull the water tube out of the fitting while
pressing the release ring on the fitting.
NOTE : When you pull out the tube, first you
have to push the collet by opposite direction
of arrow in the upper picture and pull the tube
out by direction of arrow.
1
Mounting
Fasteners
Collet
Page 11
11
DOOR AND DRAWER REMOVAL (CONT.)
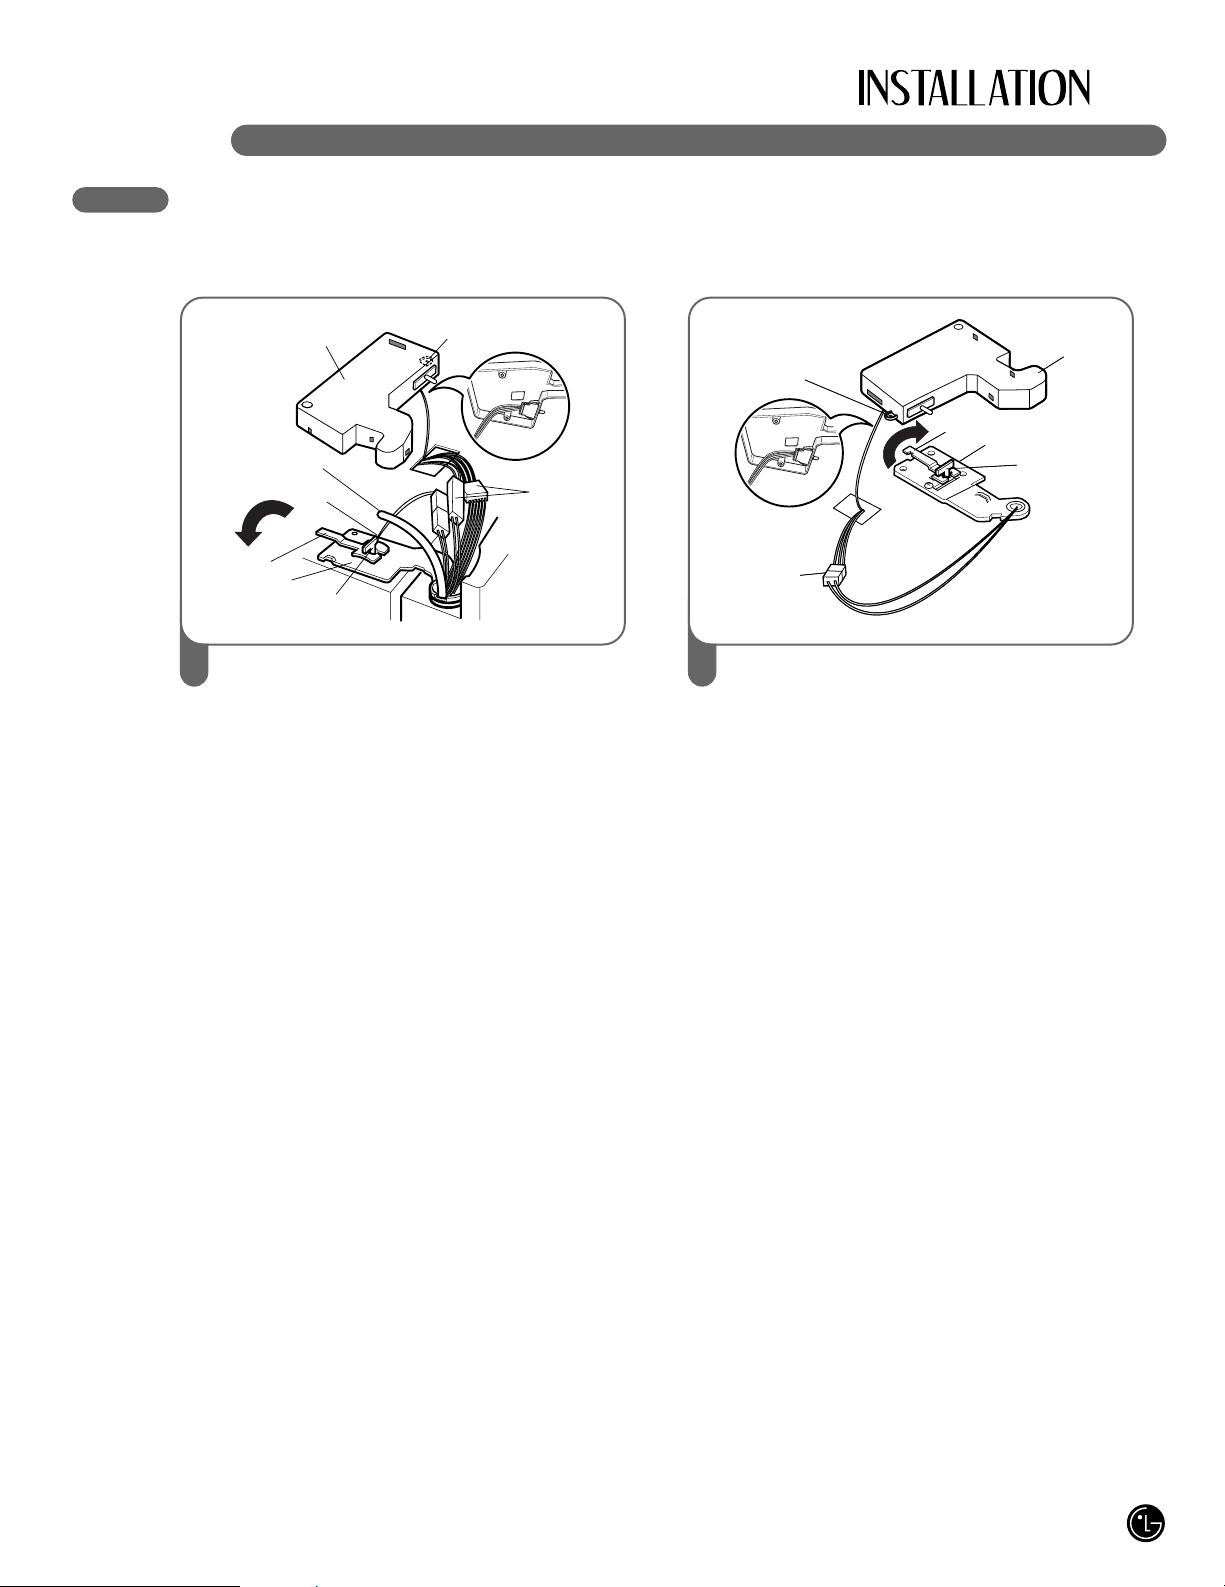
DOOR REMOVAL (CONT.)
• Open the door. Remove the top hinge cover
screw (1 ).
• Use a flat-head screwdriver to pry back the
hooks (not shown) on the front underside of
the cover (2). Lift up the cover.
• Remove the cover. Pull out the tube (3).
• Disconnect all the wire harnesses (4).
• Remove the grounding screw(5)
• Rotate hinge lever (6) counterclockwise and
remove. Lift the top hinge (7) free of the
hinge lever latch (8).
IMPORTANT: When lifting the hinge free of
the latch, be careful that the door does not fall
forward.
• Lift the door from the middle hinge pin and
remove the door.
CAUTION : Always attach/detach with the
door open to 90°.
• Place the door, inside facing up, on a nonscratching surface.
(1)
(2)
(4)
(3)
(6)
(7)
(8)
(5)
2 To remove the right refrigerator door:
• Open the door. Remove the top hinge cover
screw (1 ). Lift up the cover (2).
• Remove the cover.
• Disconnect the wire harness (3).
• Rotate the hinge lever (4) clockwise and
remove. Lift the top hinge (5) free of the
hinge lever latch (6).
IMPORTANT: When lifting the hinge free of
the latch, be careful that the door does not fall
forward.
• Lift the door from the middle hinge pin and
remove the door.
CAUTION : Always attach/detach with the
door open to 90°.
• Place the door, inside facing up, on a nonscratching surface.
(1)
(2)
(3)
(4)
(5)
(6)
3
Page 12

12
DOOR AND DRAWER REMOVAL (CONT.)
DOOR REINSTALLATION
Install the right-side door first.
• Lower the door onto the middle hinge pin as
shown.
1 • Fit the top hinge (1) over the hinge lever
latch (2) and into place. Insert the hinge
lever (3) under the lever latch. Rotate the
lever counterclockwise to secure the hinge.
• Connect the wire harness (4).
• Hook the tab on the door-switch side of the
cover (5) under the edge of the wire opening
in the cabinet top. Position the cover into
place. Insert and tighten the cover screw (6).
(3)
(2)
(1)
(6)
(5)
(4)
2
Install the left-side door.
• Lower the door onto middle hinge pin.
3 • Fit the top hinge (1) over the hinge lever
latch (2) and into place. Insert the hinge
lever (3) under the lever latch. Rotate the
lever clockwise to secure the hinge.
• Install the grounding screw (4) and connect
all the wire harnesses (5).
(2)
(1)
(3)
(4)
(5)
4
Page 13
13
DOOR AND DRAWER REMOVAL (CONT.)
DOOR REINSTALLATION (CONT.)
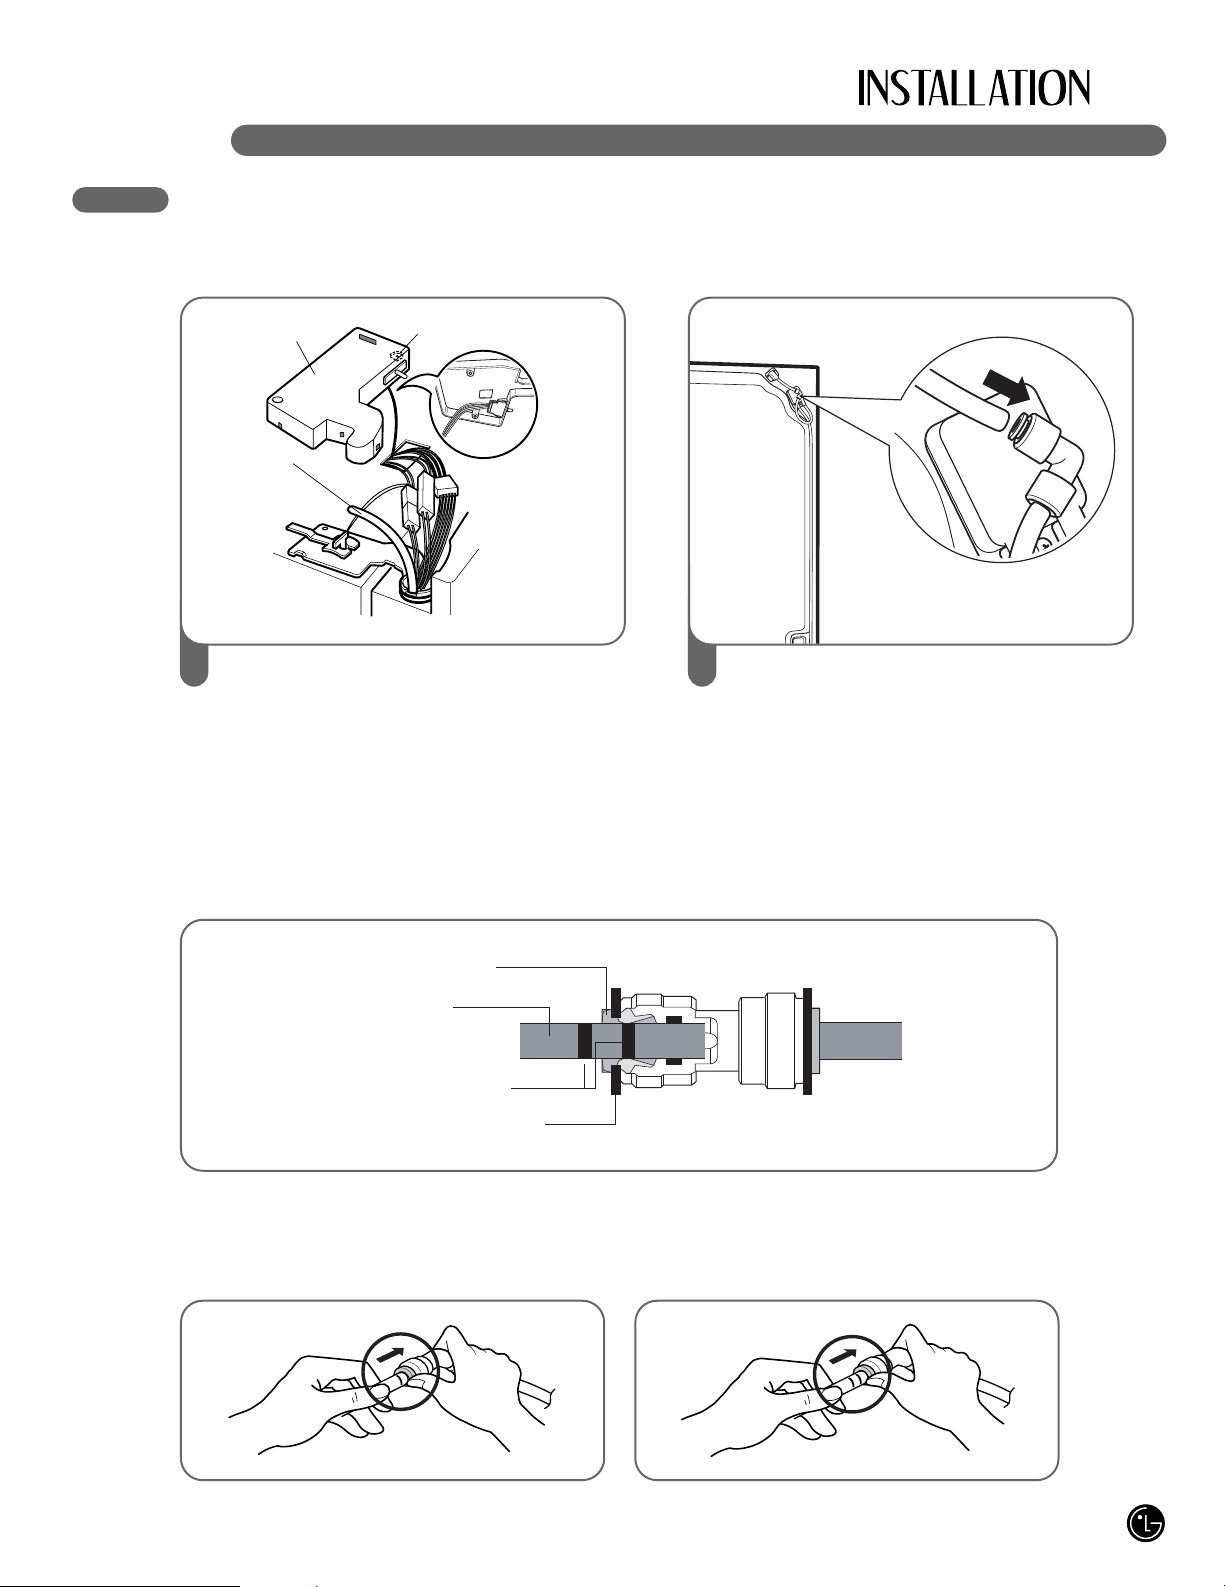
• Push the water supply tube (6) into the hole
on the top case and pull it through the
backplate.
(6)
5 Insert the water supply tube into the
connector.
• Insert the tube at least 5/8 in. (15 mm) into
the connector.
• Hook the tab on the door-switch side of the
cover under the edge of the wire opening in
the cabinet top. Position the cover into
place. Insert and tighten the cover screw.
6
Cover
Cover Screw
wCAUTION
1. Insert the tube until you can see only one of the lines printed on the tube.
2. After inserting, pull the tube to ascertain that it is secure.
3. Assemble the clip.
Collet
Correct Incorrect
Insert Line
Clip
Tube
Page 14
14
DOOR AND DRAWER REMOVAL (CONT.)
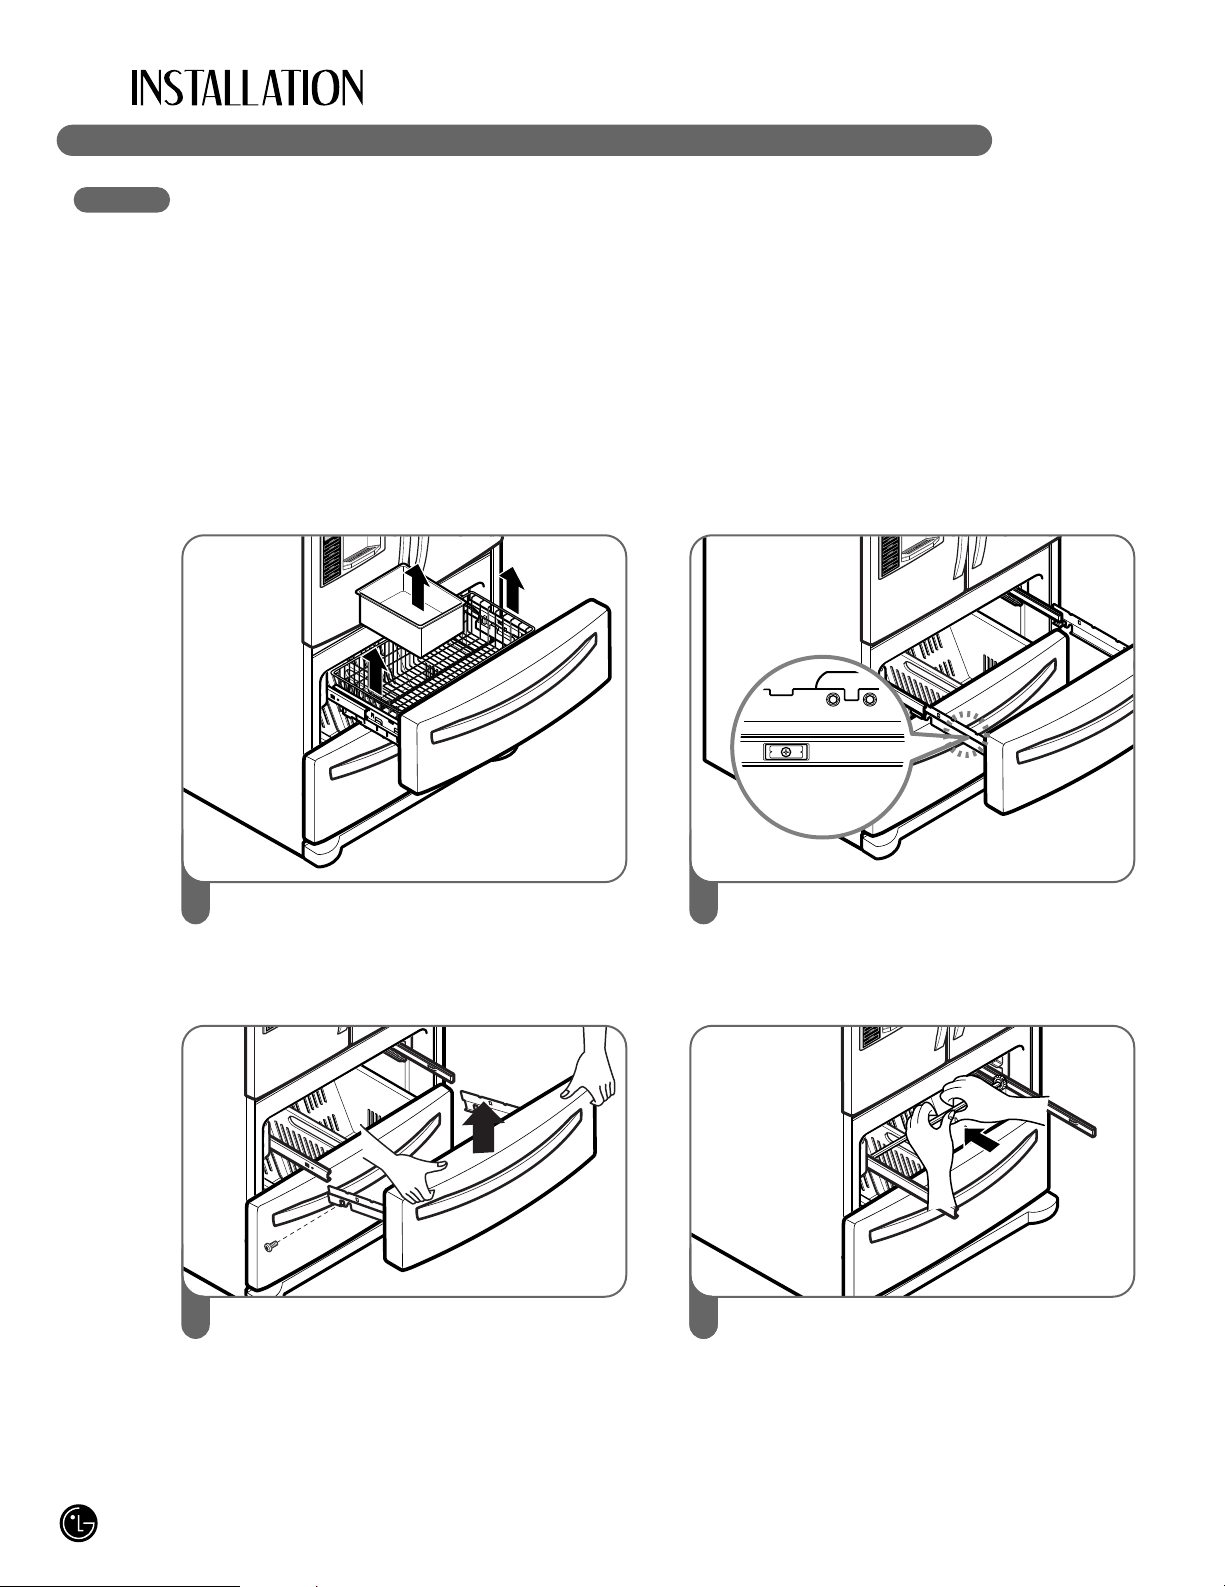
FREEZER DRAWER REMOVAL
wCAUTION
• To avoid possible injury or product or property
damage, you will need two people to perform the
following instructions.
• When you remove the drawer, do not hold the
handle. It may come off and could cause injury.
• When laying the drawer down, be careful not to
damage the floor or hurt your feet with the sharp
edges on the hinge side.
wCAUTION: When you remove the drawer, do not hold the handle. If it may come off and it could cause
personal injury.
wCAUTION: When laying the drawer down, be careful not to damage the floor or hurt your feet by the
sharp edges on hinge side.
Remove the screws of the rail on both sides.2To remove the freezer drawer, pull the drawer
open to full extension. Remove the drawer
and Ice bin by lifting the basket from the rail
system.
1
With both hands, hold both sides of the door
and pull it up to separate it from the rails.
3 With both hands, flex the center bar enough
to allow the gears on both ends to release
from the track.
54
TOP DRAWER
Page 15
15
DOOR AND DRAWER REMOVAL (CONT.)
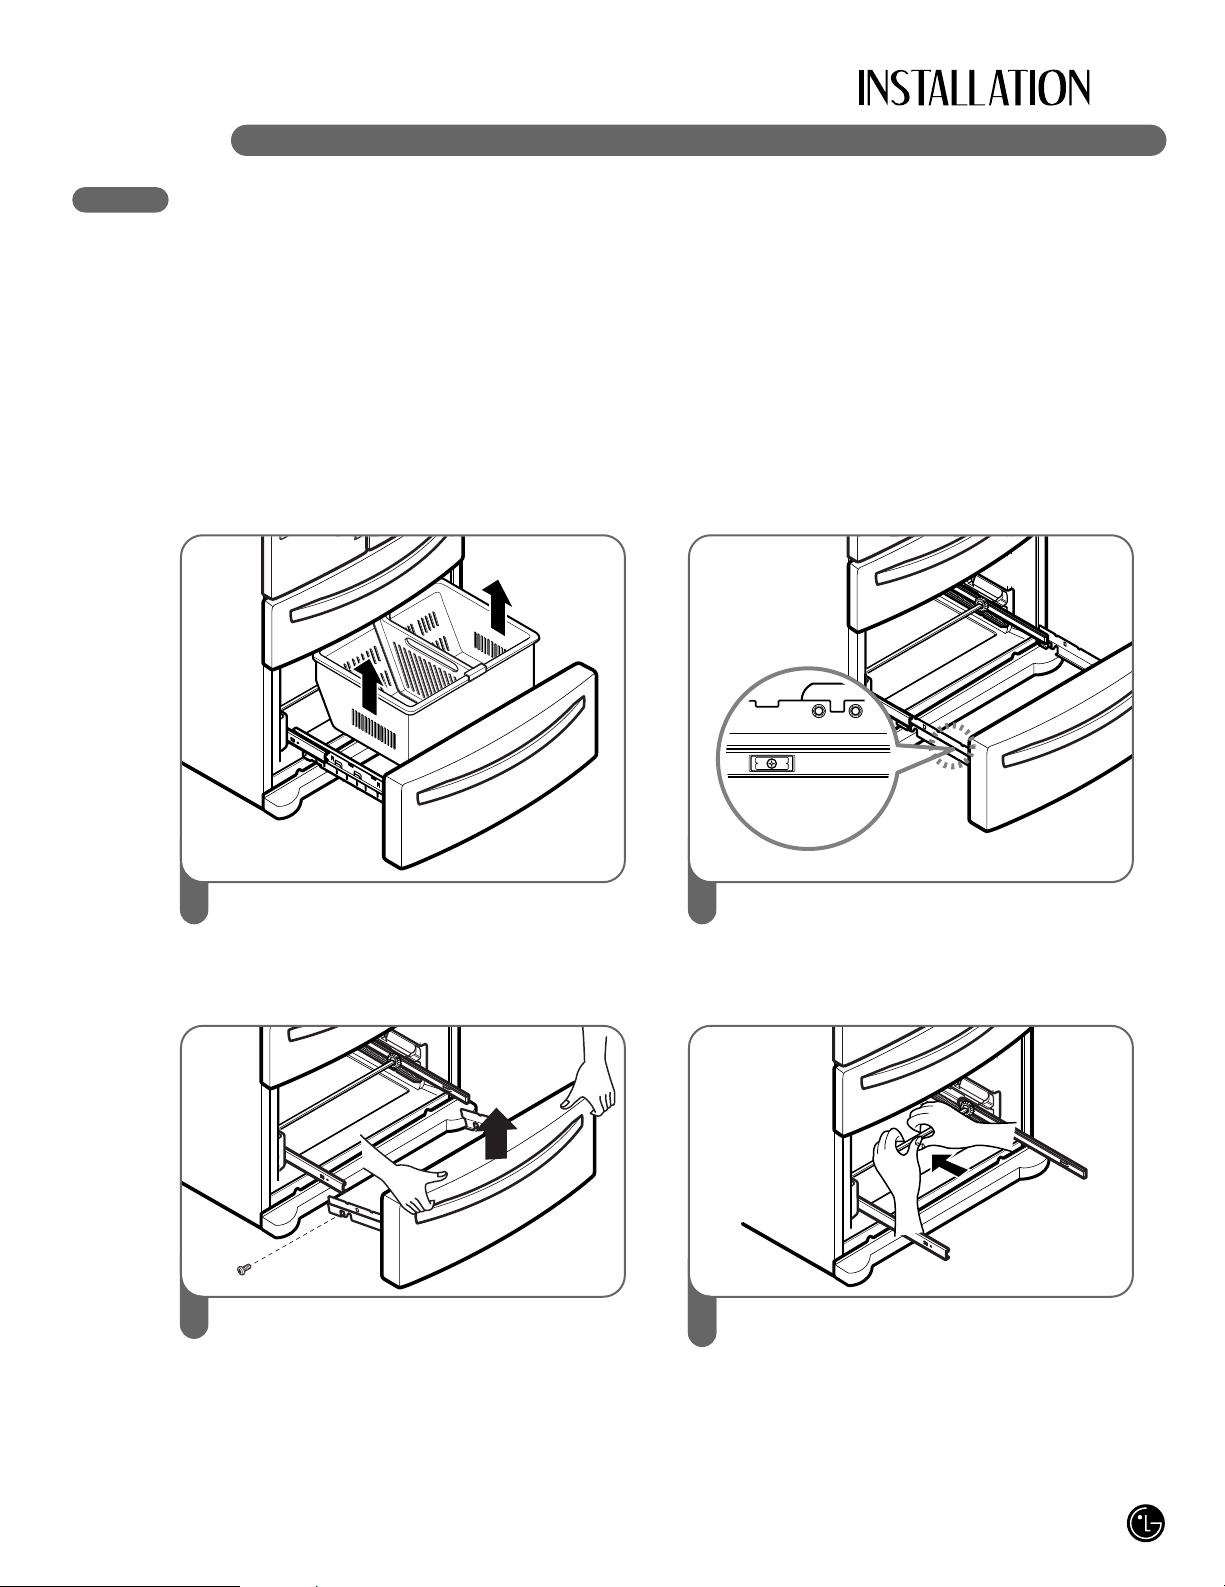
FREEZER DRAWER REMOVAL
wCAUTION
• To avoid possible injury or product or property
damage, you will need two people to perform the
following instructions.
• When you remove the drawer, do not hold the
handle. It may come off and could cause injury.
• When laying the drawer down, be careful not to
damage the floor or hurt your feet with the sharp
edges on the hinge side.
wCAUTION: When you remove the drawer, do not hold the handle. If it may come off and it could cause
personal injury.
wCAUTION: When laying the drawer down, be careful not to damage the floor or hurt your feet by the
sharp edges on hinge side.
Remove the screws of the rail on both sides.2To remove the freezer drawer, pull the drawer
open to full extension. Remove the lower
DuraBase ® basket by lifting the basket from
the rail system.
1
With both hands, hold both sides of the door
and pull it up to separate it from the rails.
3 With both hands, flex the center bar enough
to allow the gears on both ends to release
from the track.
54
BOTTOM DRAWER
Page 16
16
DOOR AND DRAWER REMOVAL (CONT.)
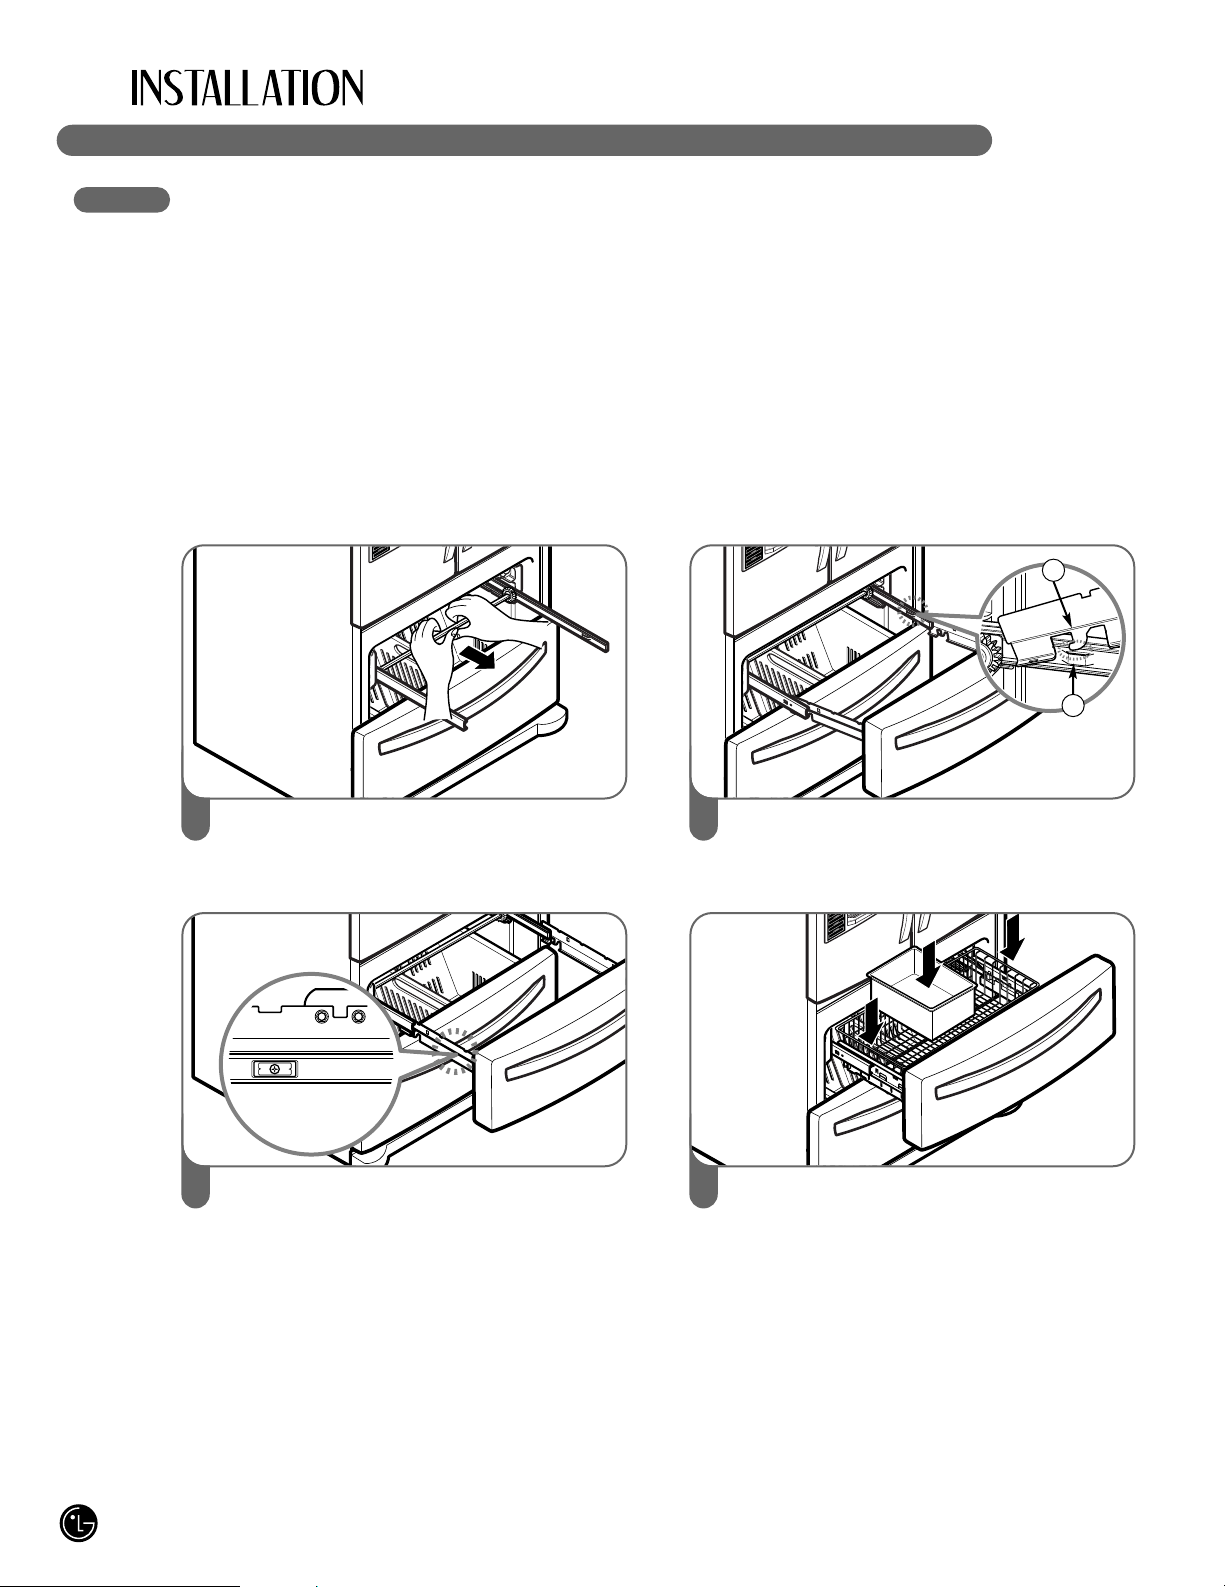
FREEZER DRAWER REINSTALLATION
wWARNING: To prevent accidental child and pet entrapment or suffocation risk.
DO NOT allow them to play inside of drawer.
wWARNING: DO NOT step or sit down on freezer.
wCAUTION
• To avoid possible injury or product or property
damage, you will need two people to perform the
following instructions.
wDANGER
Risk of Child Entrapment
• To prevent accidental child and pet entrapment
or suffocation risk, DO NOT allow them to play
inside of the freezer drawer.
• DO NOT step or sit on the freezer drawer.
To reinstall the freezer drawer, hold the center
bar with both hands and pull it out until both
rails are fully extended.
1 Hook door supports (1) into rail tabs (2).
2
1
2
Lower door into final position and tighten the
screws (3). Make sure you have a right rail
cover for each side.
3 Con el cajón completamente abierto, inserte
el cajón y el recipiente para el hielo en el
conjunto de la guía.
4
TOP DRAWER
Page 17
17
DOOR AND DRAWER REMOVAL (CONT.)
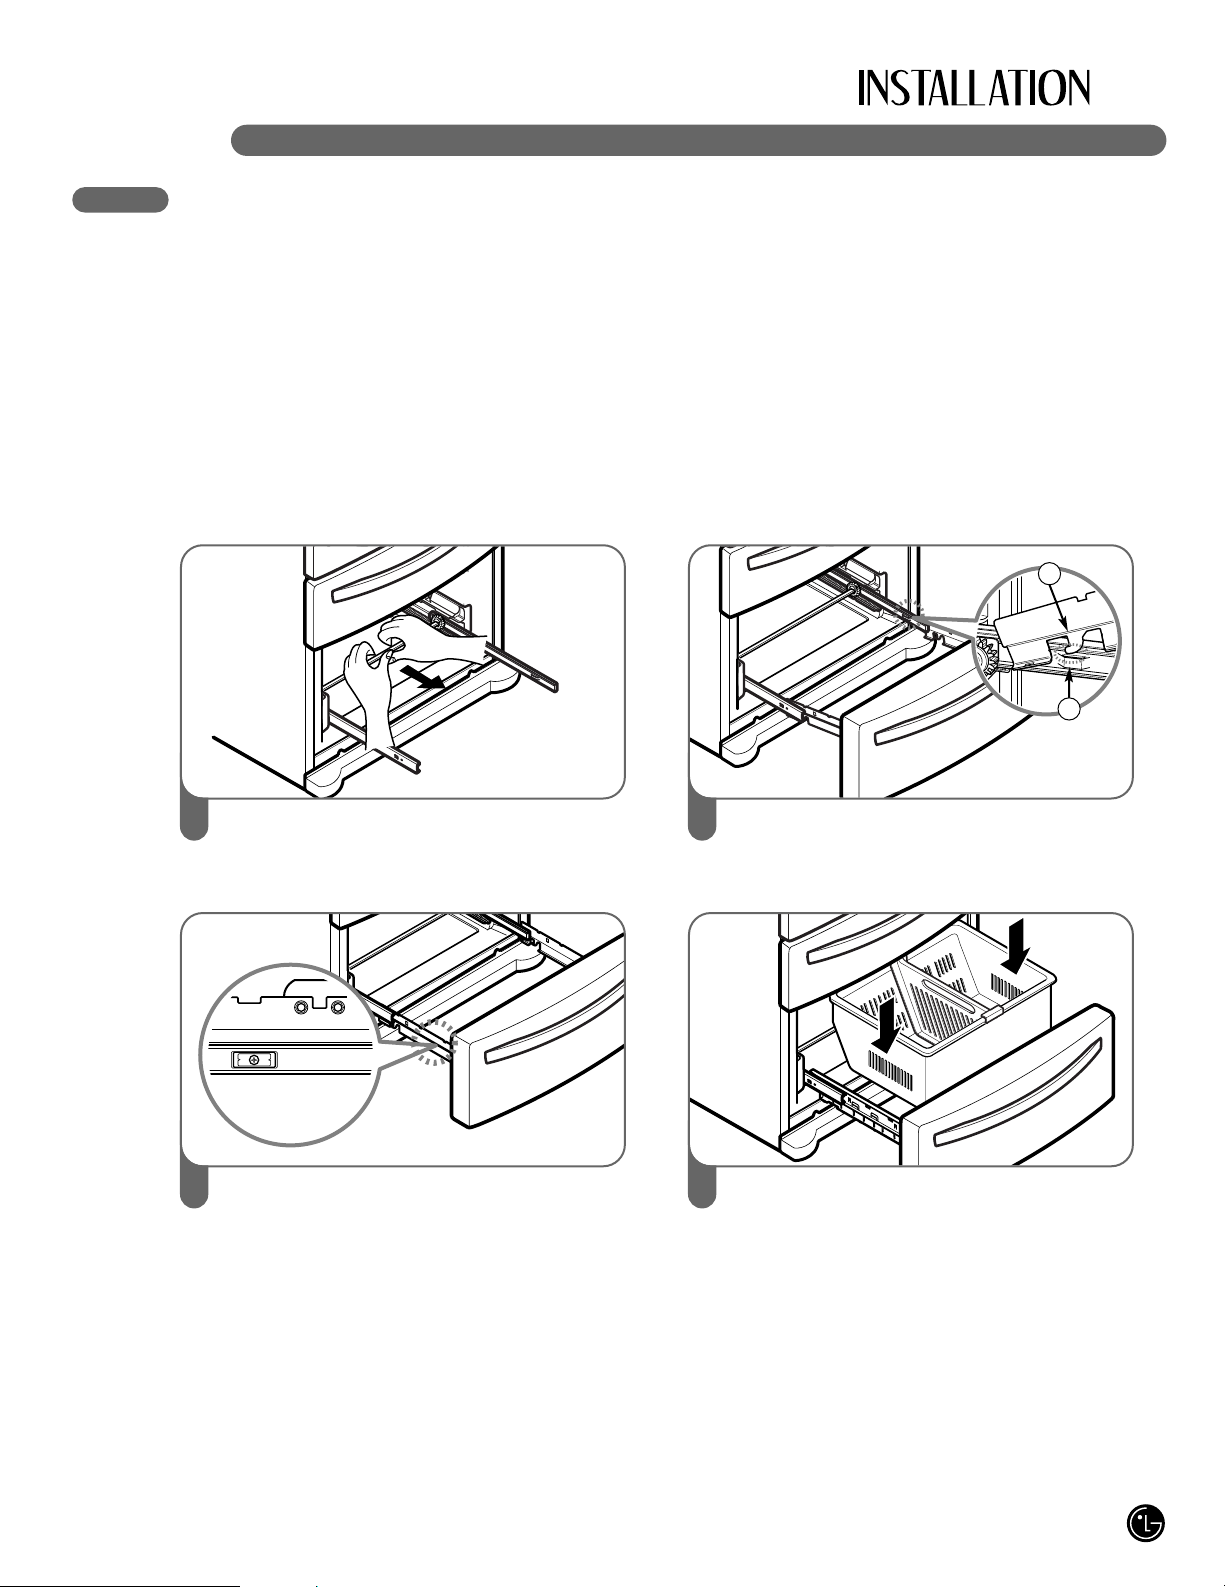
FREEZER DRAWER REINSTALLATION
wWARNING: To prevent accidental child and pet entrapment or suffocation risk.
DO NOT allow them to play inside of drawer.
wWARNING: DO NOT step or sit down on freezer.
wCAUTION
• To avoid possible injury or product or property
damage, you will need two people to perform the
following instructions.
wDANGER
Risk of Child Entrapment
• To prevent accidental child and pet entrapment
or suffocation risk, DO NOT allow them to play
inside of the freezer drawer.
• DO NOT step or sit on the freezer drawer.
To reinstall the freezer drawer, hold the center
bar with both hands and pull it out until both
rails are fully extended.
1 Hook door supports (1) into rail tabs (2).
2
1
2
Lower door into final position and tighten the
screws (3). Make sure you have a right rail
cover for each side.
3 With the drawer pulled out to full extension,
insert the lower basket in the rail assembly.
4
BOTTOM DRAWER
Page 18

18
CONNECTING THE WATER SUPPLY
wWARNING
Connect to safe drinking water supply
only.
• The water pressure must be between 21 and
121 p.s.i. (1.5~8.5 kgf/cm2 ) on models without a
water filter and between 43 and 121 p.s.i.
(3~8.5 kgf/cm2) on models with a water filter.
• If water pressure does not reach 21 psi
(1.5kgf/cm2) or falls below, it is necessary to
purchase a separate pressure pump for normal
automatic icemaker and water dispensing
operation.
• It is recommended that the total length of the
water feed tube does not exceed 26 ft. (8 m).
• Install the water supply line where it will not be
affected by heat.
IMPORTANT: Read all directions thoroughly
before you begin.
• If operating the refrigerator before installing the
water connection, turn the icemaker to the OFF
position to prevent operation without water.
• All installations must be in accordance with local
plumbing code requirements.
• Use copper tubing and check for leaks.
• Install tubing only in areas where temperatures
will remain above freezing.
• It may take up to 24 hours for the icemaker to
begin producing ice.
Tools Required
• Standard screwdriver
• 7/16-in. and 1/2-in. open-end wrenches or two
adjustable wrenches
• 1/4-in. nut driver
• 1/4-in. drill bit
• Hand drill or electric drill (properly grounded)
NOTE: Refrigerator dealers offer a kit with a 1/4-in.
saddle-type shutoff valve, a union, and copper
tubing. Before purchasing, make sure a saddletype valve complies with local plumbing codes.
Do not use a piercing-type or 3/16-in. saddle
valve which reduces water flow and clogs more
easily.
NOTE: The Commonwealth of Massachusetts
Plumbing Code 248CMR shall be adhered to.
Saddle valves are illegal and use is not permitted in
Massachusetts. Consult with your licensed plumber.
Cold Water Supply
• The icemaker water valve contains a flow washer
which is used as a water pressure regulator.
• The icemaker needs to be connected to a cold
water line with water pressure between 21~121
psi (1.5~8.5 kgf/cm2) on models without a water
filter and between 43 and 121 p.s.i. (3~8.5kgf/cm2)
on models with a water filter.
CONNECTING THE WATER LINES
IMPORTANT: Before connecting the tubing to
the water line, unplug the refrigerator or
disconnect the power.
• Turn off the main water supply and open the
nearest faucet to relieve pressure in the line.
Opening an outside faucet may help drain
water from the line in the house.
• Find a 1/2-in. vertical COLD water pipe near
the refrigerator.
NOTE: A horizontal pipe will work, but the
following precaution must be taken: drill on the
top of the pipe, not the bottom. This will help
keep water away from the drill and also keep
normal sediment from collecting in the valve.
• To determine the length of copper tubing you
will need, measure from the connection on the
lower left rear of the refrigerator to the water
pipe. Add 7 ft. (2.1 m) to allow for moving the
refrigerator for cleaning. Use 1/4-in. O.D.
(outside diameter) copper tubing. Be sure both
ends of the copper tubing are cut square.
• Using a drill, drill a 1/4-in. hole in the cold water
pipe you have selected.
Page 19
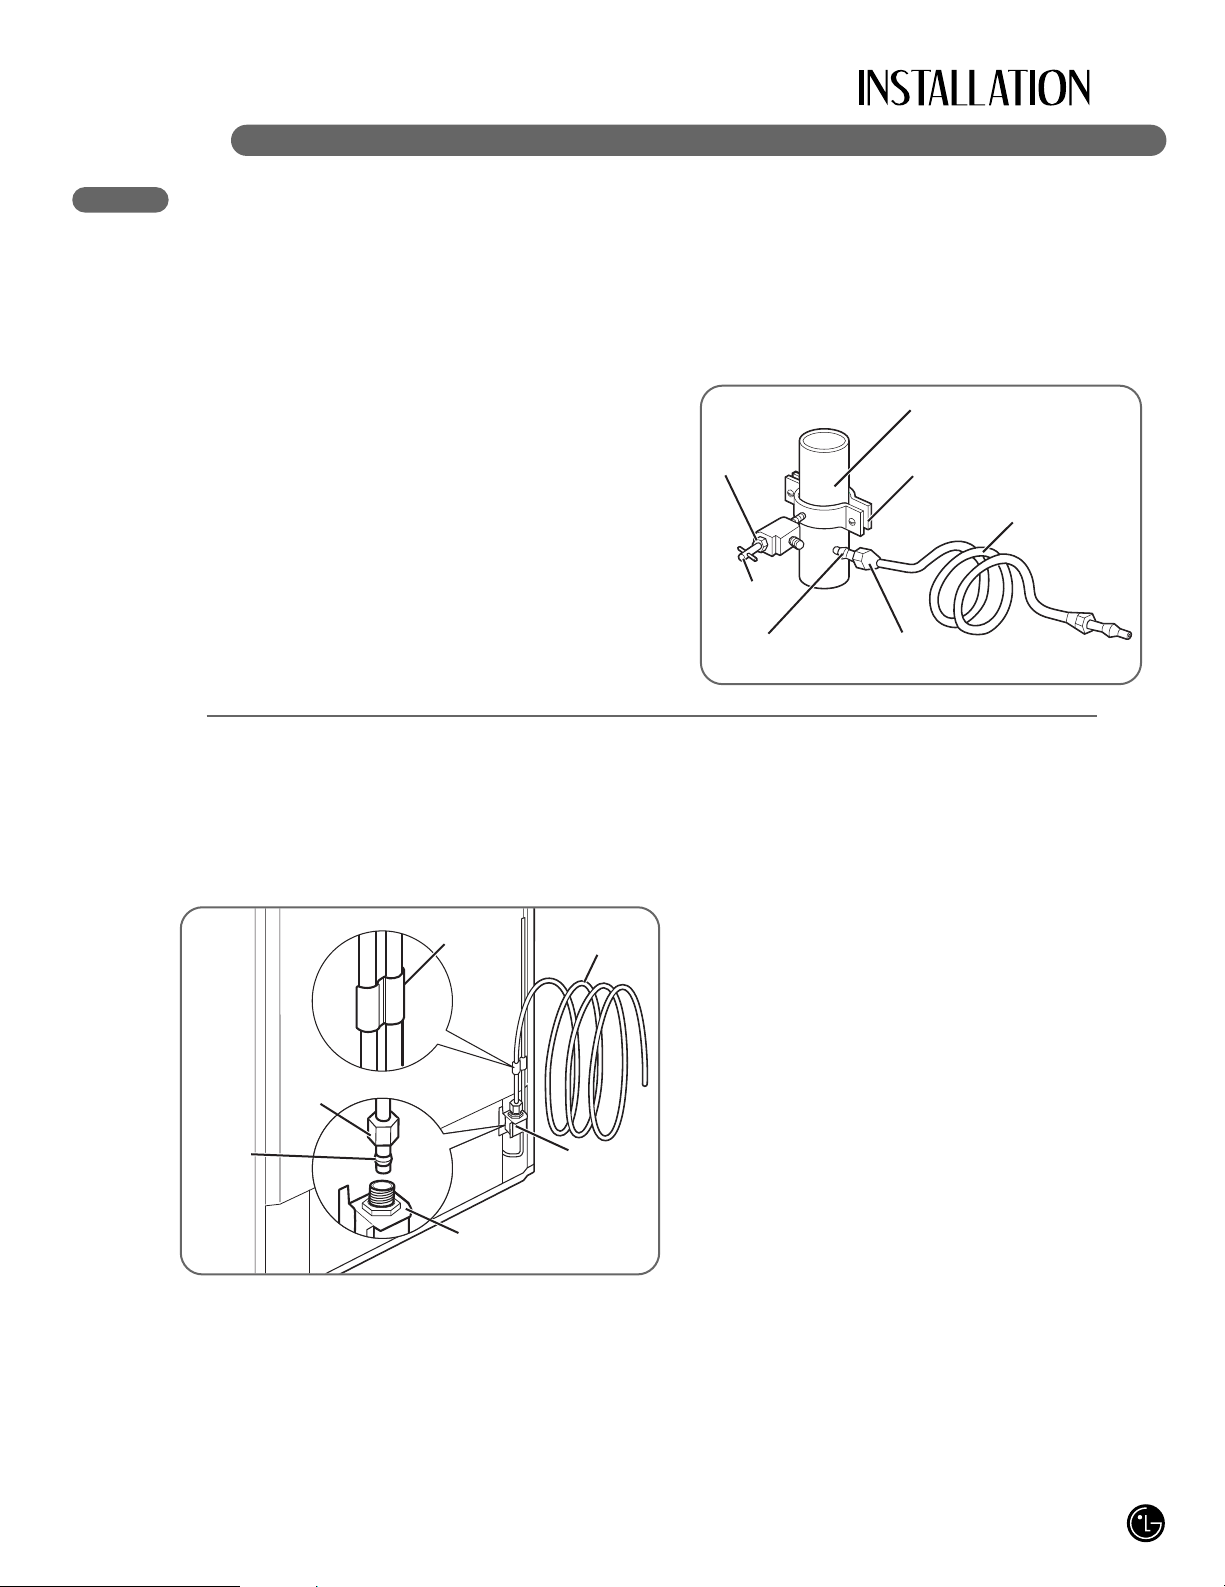
• Fasten the shutoff valve to the cold water pipe
with the pipe clamp. Be sure the outlet end is
solidly in the 1/4-in. drilled hole in the water
pipe and the washer is under the pipe clamp.
Tighten the packing nut. Tighten the pipe clamp
screws carefully and evenly so the washer
makes a watertight seal. Do not overtighten or
you may crush the copper tubing, especially if
soft (coiled) copper tubing is used. Now you are
ready to connect the copper tubing.
• Slip the compression sleeve and the
compression nut onto the copper tubing as
shown. Insert the end of the tubing into the
outlet end squarely as far as it will go. Screw
the compression nut onto the outlet end with a
wrench. A flare nut wrench works best, but an
open-end wrench will suffice. Do not
overtighten.
• Place the free end of the tubing into a container
or sink, and turn on the main water supply.
Flush out the tubing until the water is clear.
Turn off the shutoff valve on the water pipe.
Coil the copper tubing as shown below.
19
CONNECTING THE WATER LINES (CONT.)
IMPORTANT: Before connecting the tubing to the
refrigerator, be sure the refrigerator power cord is
not plugged into the wall outlet.
NOTE: If your refrigerator is equipped with an
internal water filter, an external in-line water filter
should not be used.
• Remove the plastic flexible cap from the water
valve.
• Place the compression nut and ferrule (sleeve)
onto the end of the tubing as shown.
• Insert the end of the copper tubing into the
connection as far as possible. While holding the
tubing, tighten the fitting.
IMPORTANT: Tighten any connections that leak.
Open the water at the shutoff valve.
• Plug in the refrigerator.
• Arrange the coil of copper tubing behind the
refrigerator so it does not vibrate against the
back of the refrigerator or against the wall.
• Check for leaks.
• Before connecting the water line to house, purge
house line for 2 minute.
NOTE: It may take a few seconds for water to
begin to flow as the internal tank fills and air clears
from the lines.
• Push the refrigerator back to the wall.
• Set the icemaker switch to the ON position.
NOTE: The icemaker will not begin to operate until
it reaches its operating temperature of 15°F (-9°C).
It will then begin operation automatically.
NOTE: Throw away the first few batches of ice
(about 20 pieces).
Packing
Nut
Shutoff
Valve
Compression
Sleeve
Compression
Nut
Cold Water Pipe
Pipe Clamp
Coil of Polyethelyne
or Copper Tubing
Ferrule
(Sleeve)
Refrigerator
Connection
Water
valve
Tubing
Clamp
1
/
4"
Tubing
1
/
4"
Compression
Nut
Page 20

20
LEVELING THE REFRIGERATOR DOORS
wWARNING
Electrical Shock Hazard
• Be careful when you work with the hinges,
base grille, and stopper. You may be injured.
• Do not put hands, feet, or metal items into
the air vents, base grille, or the bottom of the
refrigerator. You may be injured or receive
an electrical shock.
Leveling
After installing, secure the product with the LEG
not to move left or right.
Your refrigerator has two front leveling legs—
one on the right and one on the left. Adjust the
legs to alter the tilt from front to back or side to
side. If your refrigerator seems unsteady or you
want the doors to close more easily, adjust the
refrigerator’s tilt using the following instructions:
wCAUTION
• To avoid possible injury or product or property
damage, you will need two people to perform the
following instructions.
Plug the power cord into a 3-prong grounded
outlet, and move the refrigerator into its final
position. Remove the kick plate screws and
then the kick plate.
• Open the Freezer Drawer.
• Once the drawer is open, there is sufficient
clearance to remove the screws on top of
the kick plate.
NOTE: To replace the kick plate, place it into
position, and then insert and tighten the
screws.
1
Level the refrigerator by using an 11/32 inch
(8mm) wrench or a flat blade screw driver.
Turn the leveling legs (CCW) to raise or (CW)
to lower the height of the front of the
refrigerator.
NOTE: The front of the refrigerator should be
slightly higher than the back.
NOTE: If someone pushes backward against
the top of the refrigerator, weight is lifted off of
the leveling legs, which makes adjustment
easier.
Open both doors to make sure they close
easily. If not, raise the leveling legs higher by
turning both clockwise the same amount.
Once the refrigerator is level, replace the kickplate.
NOTE: Your new refrigerator is uniquely
designed with two fresh food doors. Either
door can be independently opened or closed.
You will have to exert slight pressure on the
doors to close them completely.
NOTE: In order not to move the refrigerator
back and forth, fix it with the 'Adjust' to the
floor to install and use.
2
Kick Plate
Page 21
21
LEVELING THE REFRIGERATOR DOORS (CONT.)
DOOR ALIGNMENT
STARTING
Before loading your refrigerator with fresh foods:
• Remove tape and any temporary labels from
your refrigerator before using. To remove any
remaining adhesive residue, rub the area briskly
with your thumb, or rub a small amount of liquid
dish soap over the adhesive with your fingers.
Wipe with warm water and dry. Do not use sharp
instruments, rubbing alcohol, flammable fluids,
or abrasive cleaners to remove tape or glue.
NOTE: Do not remove any warning-type labels,
the model and serial number label, or the tech
sheet that is taped to the back of the refrigerator.
• Thoroughly clean your refrigerator and wipe off all
dust that may have accumulated during shipping.
• Install accessories such as the ice cube bin,
drawers, and shelves, in their proper places.
They are packed together to prevent possible
damage during shipment.
• Adjust the desired temperature for the
refrigerator and freezer (see Adjusting the
Temperature and Functions).
• Let your refrigerator run for at least 2 or 3 hours
before putting food in it. Check the flow of cold
air in the freezer compartment to ensure proper
cooling. Your refrigerator is now ready for use.
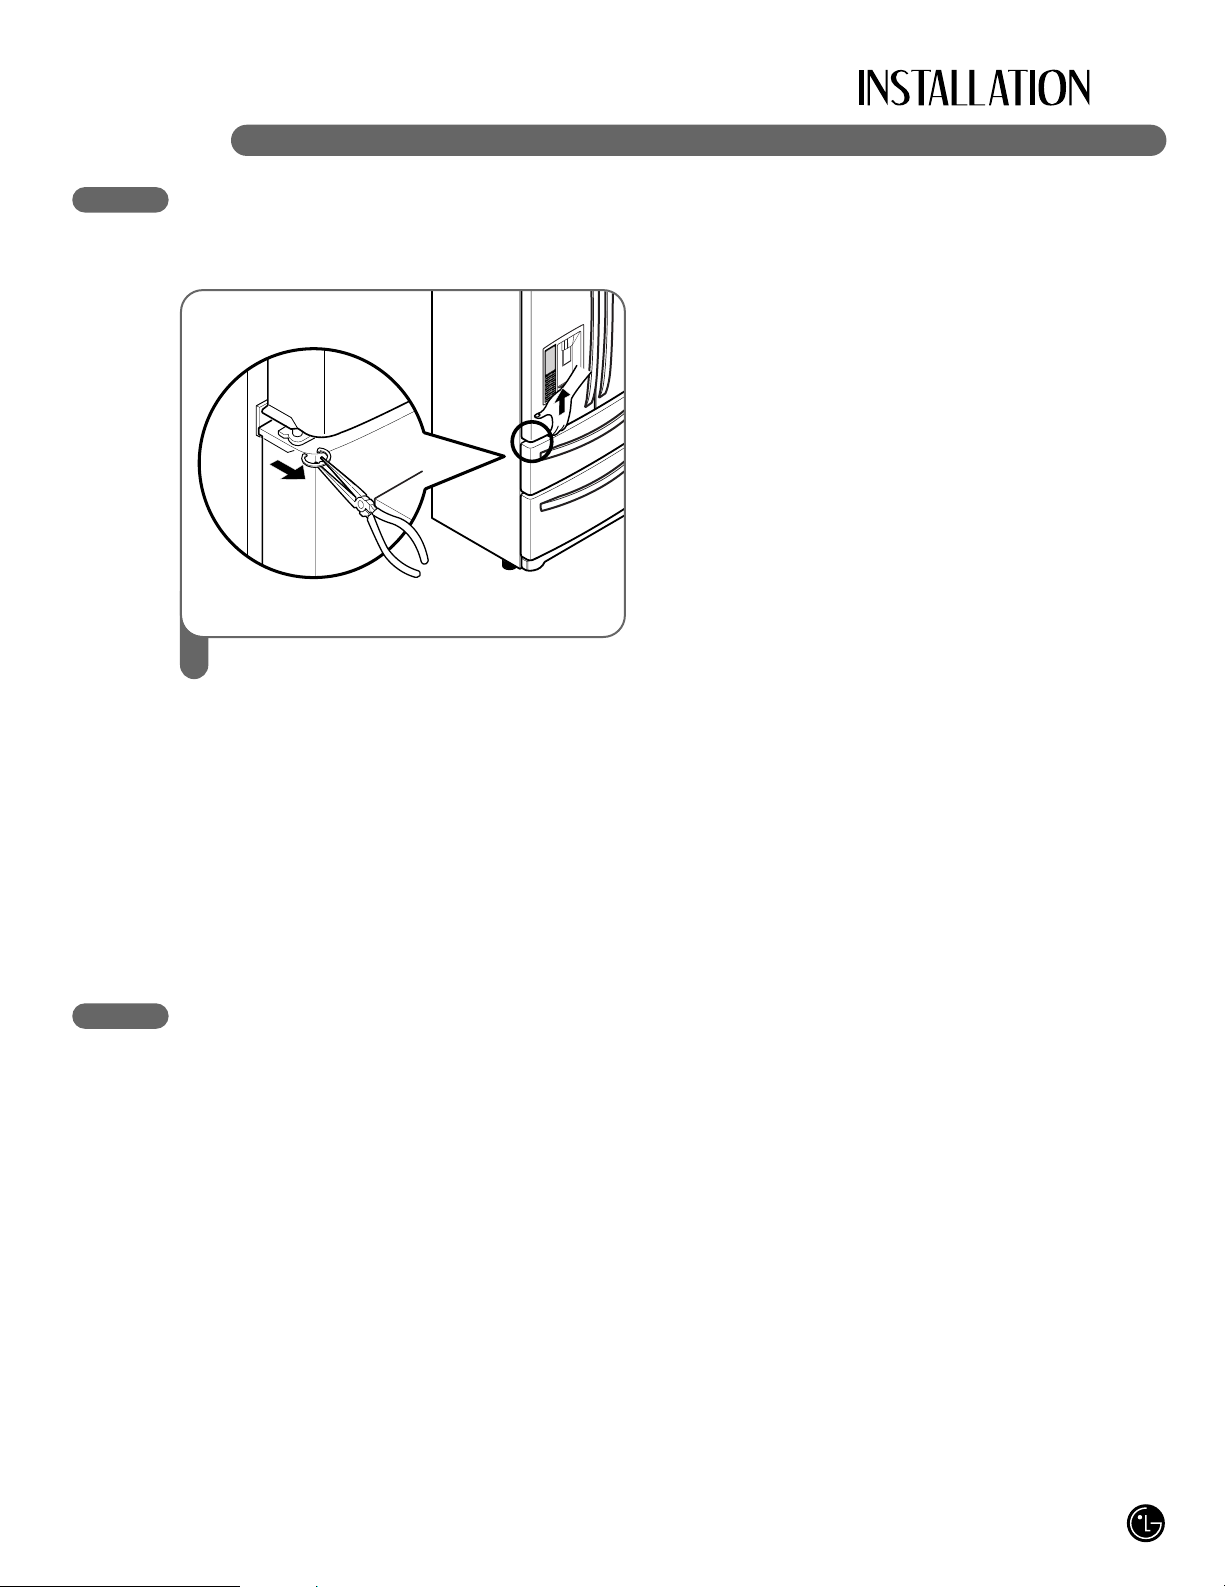
If the space between your doors is uneven,
follow the instructions below to align the
doors:
• With one hand, lift up the door you want to
raise at middle hinge.
• With other hand, use pliers to insert snap
ring as shown.
• Insert additional snap rings until the doors
are aligned.
(Three snap rings are provided with the
refrigerator.)
1
Page 22
22
CONTROL PANEL FEATURES
For complete details on button functions, see pages 24–26.
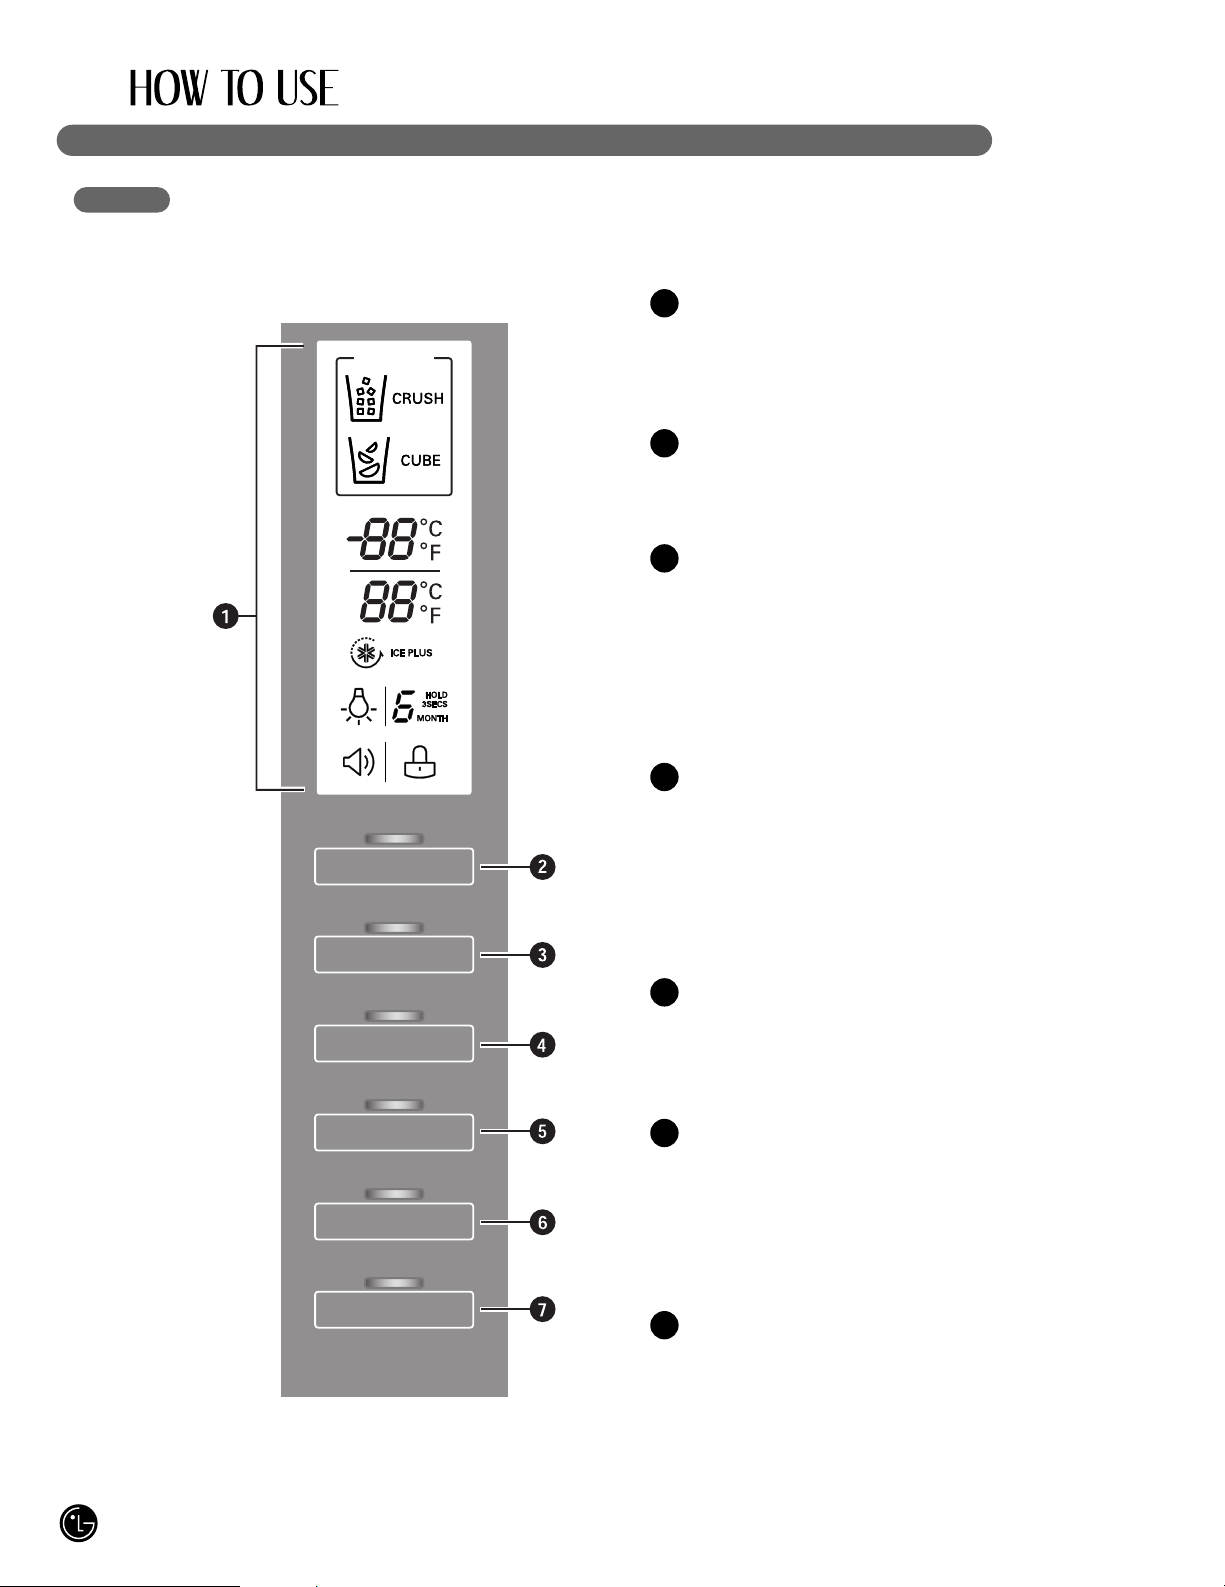
LED DISPLAY
The LED display shows the temperature
settings, dispenser options, water filter,
door alarm, and locking status messages.
ICE TYPE BUTTON
The ICE TYPE button is used to select Cubed Ice or
Crushed Ice.
FREEZER BUTTON
Press the FREEZER button to adjust the temperature
in the freezer compartment.
NOTE: When pressed simultaneously with the
REFRIGERATOR button for more than five seconds,
the temperature display will change from Fahrenheit
to Celsius or vice versa.
REFRIGERATOR BUTTON
Press the REFRIGERATOR button to adjust the
temperature in the refrigerator compartment.
NOTE: When pressed simultaneously with the
FREEZER button for more than five seconds, the
temperature display will change from Fahrenheit to
Celsius or vice versa.
ICE PLUS BUTTON
Press this button to turn on the ICE PLUS. feature,
which increases icemaking capabilities up to about 20
percent.
LIGHT/FILTER BUTTON
The LIGHT/FILTER button controls the lamp in the
dispenser.
The LIGHT/FILTER button resets the water filter
replacement indicator when the water filter has been
replaced.
ALARM/LOCK BUTTON
Press this button to control the door-open alarm.
Press this button to lock or unlock all the other
function buttons on the control panel, including
operation of the dispenser.
2
1
3
4
5
6
7
ICE TYPE
ICE TYPE
FREEZER
REFRIGERATOR
ICE PLUS
ALARM / LOCK
3SECS
LIGHT / FILTER
Page 23
23
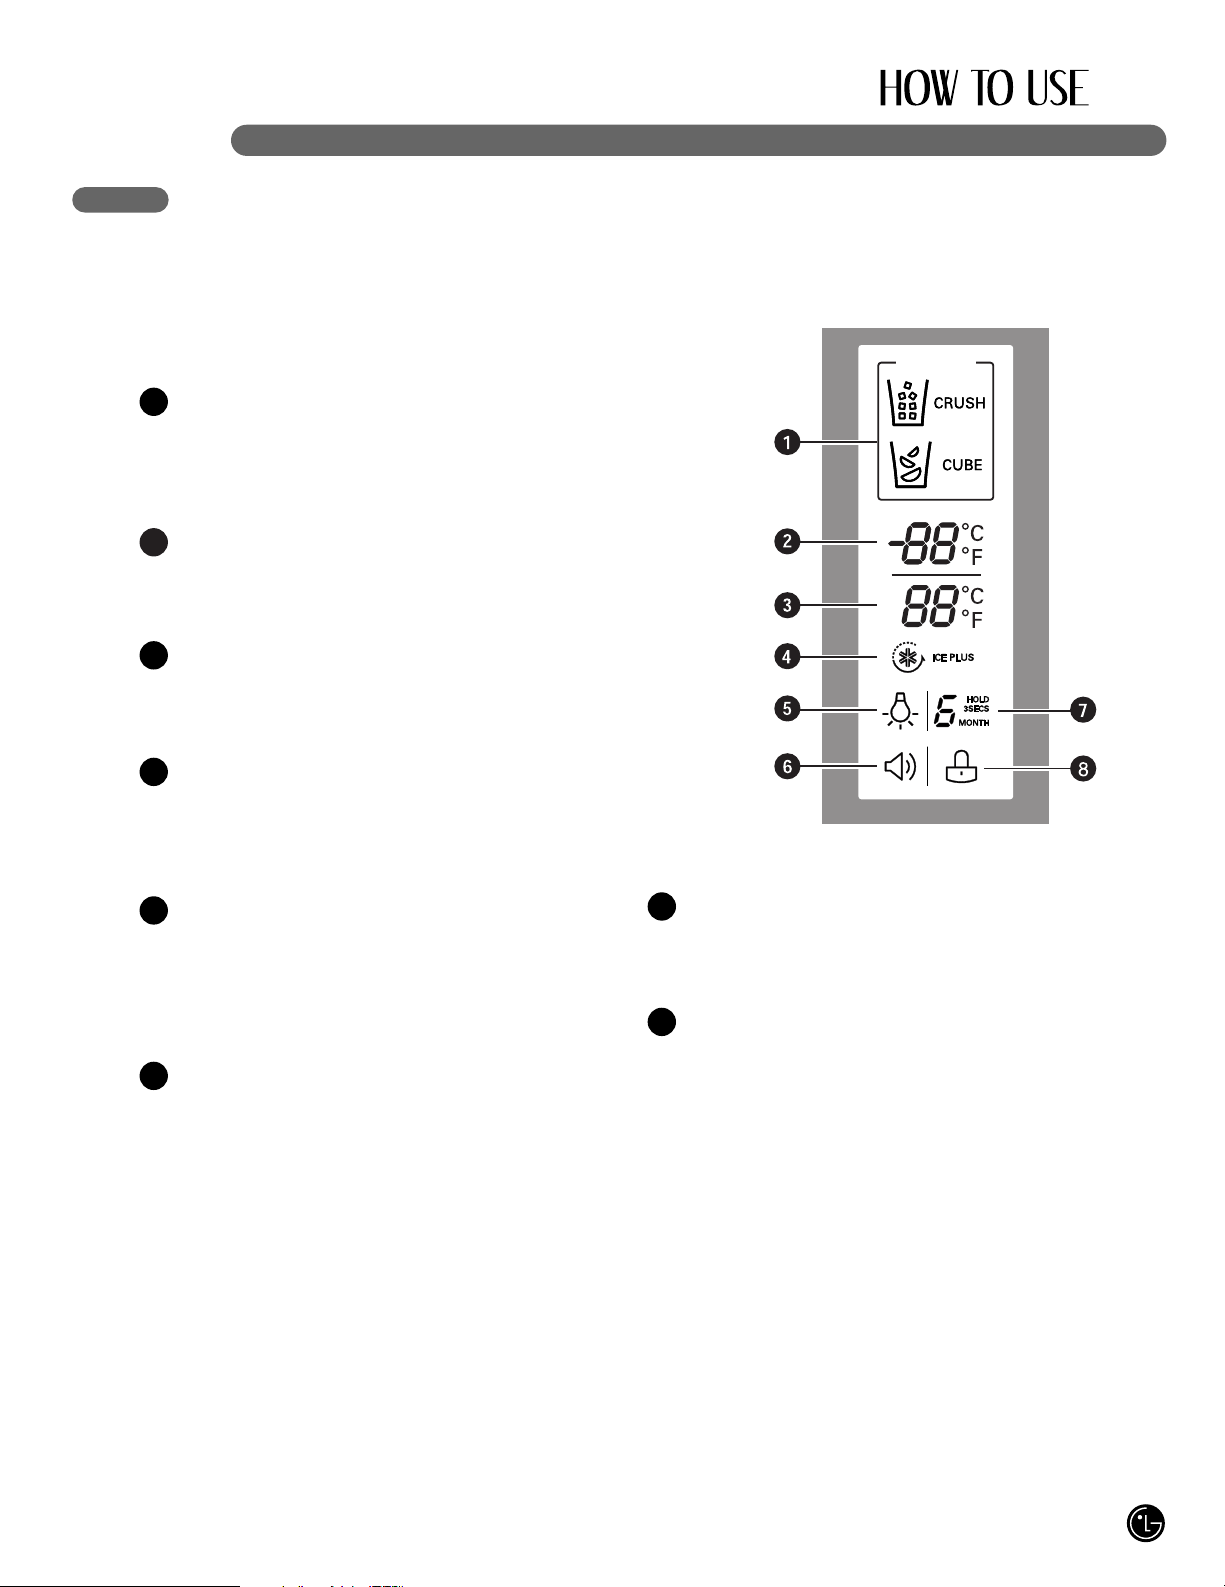
THE LED DISPLAY
The LED display shows the temperature settings,
dispenser options, water filter, door alarm, and
locking status messages.
DISPENSER SELECTION INDICATOR
Shows Cubed ice or Crushed Ice selection
that will be dispensed when the push switch
is pressed.
FREEZER TEMPERATURE
Indicates the set temperature of the freezer
compartment in Celsius or Fahrenheit.
REFRIGERATOR TEMPERATURE
Indicates the set temperature of the refrigerator
compartment in Celsius or Fahrenheit.
ICE PLUS
When the ICE PLUS button is pressed,
the display will indicate the selected function
has been activated.
DISPENSER LIGHT INDICATOR
When the LIGHT button is pressed,
the display will indicate the selected function:
The dispenser light is on, this indicator will
appear on the display panel.
DOOR ALARM INDICATOR
This indicator shows that the door-open
warning alarm is activated.
WATER FILTER STATUS
This indicator shows the current status for
the water filter. See Resetting the Filter Indicator.
LOCK STATUS
This indicator shows the current status for
the control panel functions is set to LOCK.
2
1
3
4
5
6
7
8
ICE TYPE
Page 24
24
ADJUSTING THE TEMPERATURES AND DISPLAY
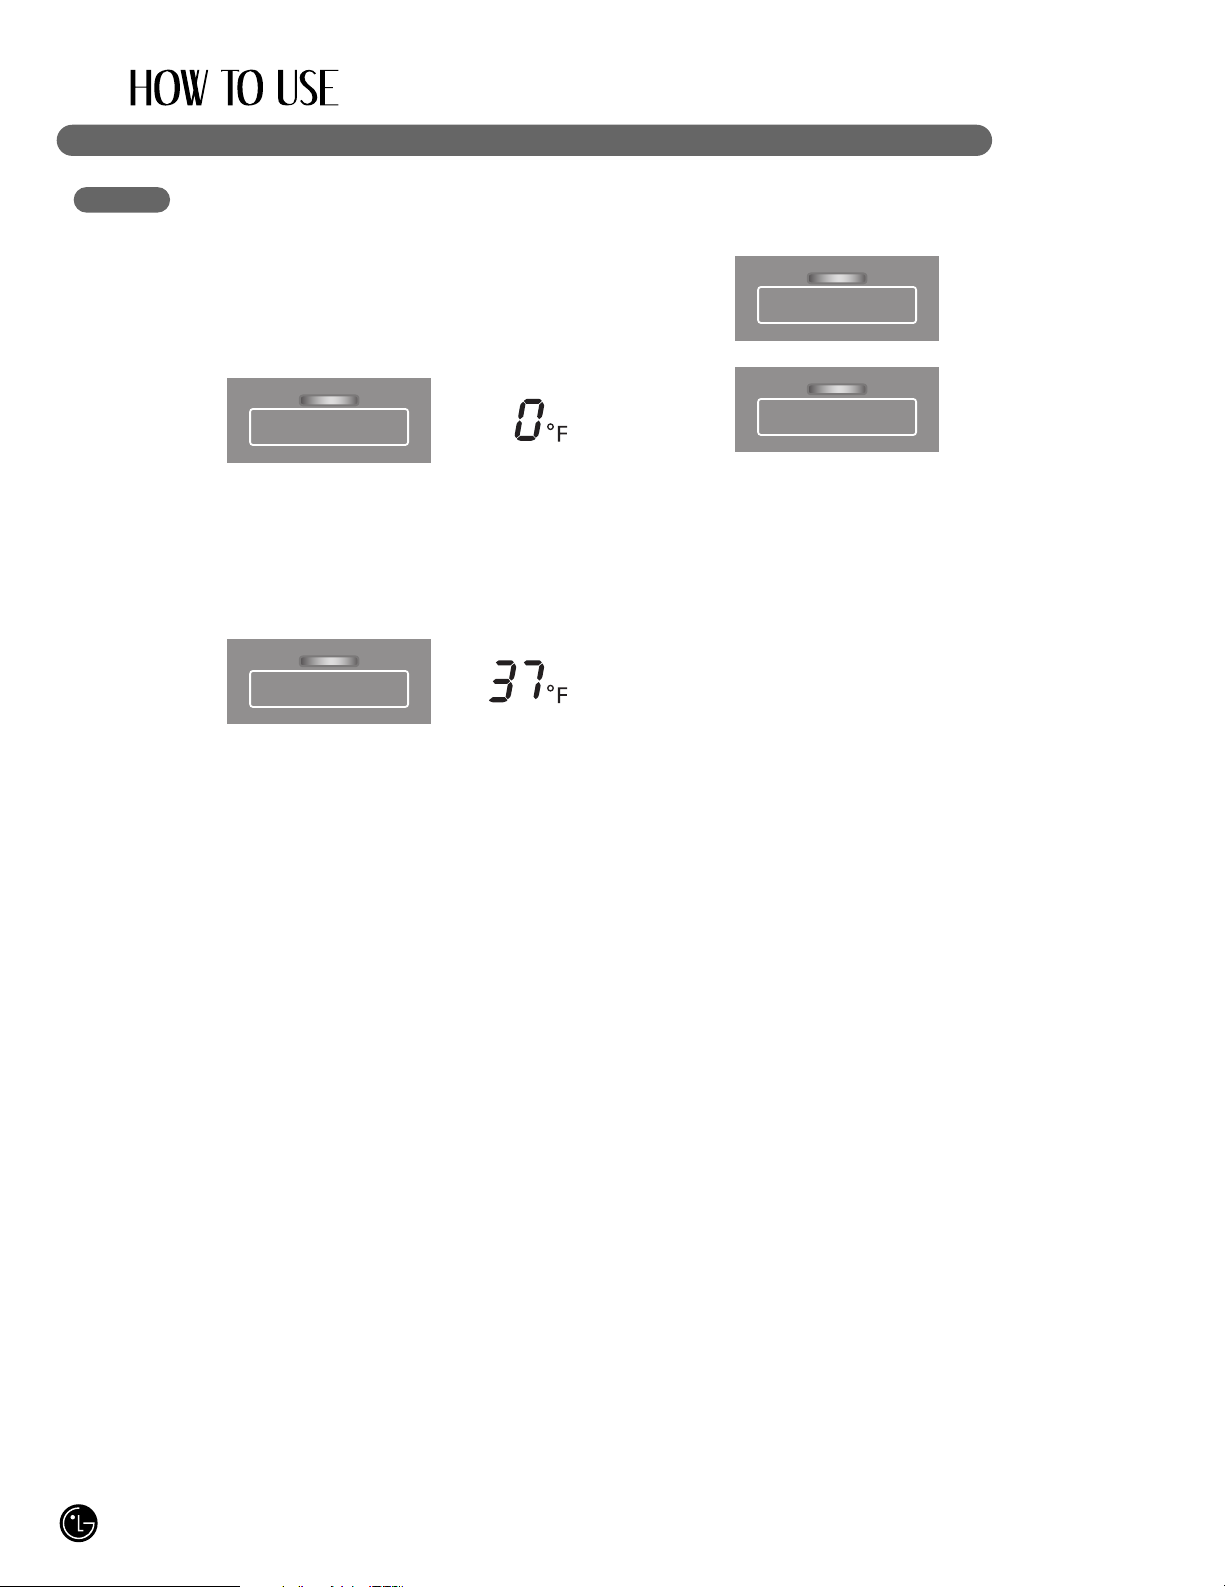
Adjust Freezer Temperature
To adjust the temperature in the freezer
compartment, press the FREEZER button to cycle
through the the range of available settings.
Adjust Refrigerator Temperature
To adjust the temperature in the refrigerator
compartment, press the REFRIGERATOR button to
cycle through the range of available settings.
NOTE: The actual inner temperature varies
depending on the food status, since the indicated
temperature setting is the target temperature and not
the actual temperature within the refrigerator.
Initially set the REFRIGERATOR CONTROL at 37
degrees F and the FREEZER CONTROL at 0
degrees F. Leave them at these setting for 24 hours
(one day) to stabilize. Then adjust the compartment
temperature as illustrated above.
Temperature Display
To change the temperature display from Fahrenheit
to Celsius:
• Simultaneously press and hold the FREEZER and
REFRIGERATOR buttons for more than 5 seconds.
• Do the same to convert back to Fahrenheit.
FREEZER
FREEZER
REFRIGERATOR
REFRIGERATOR
Page 25
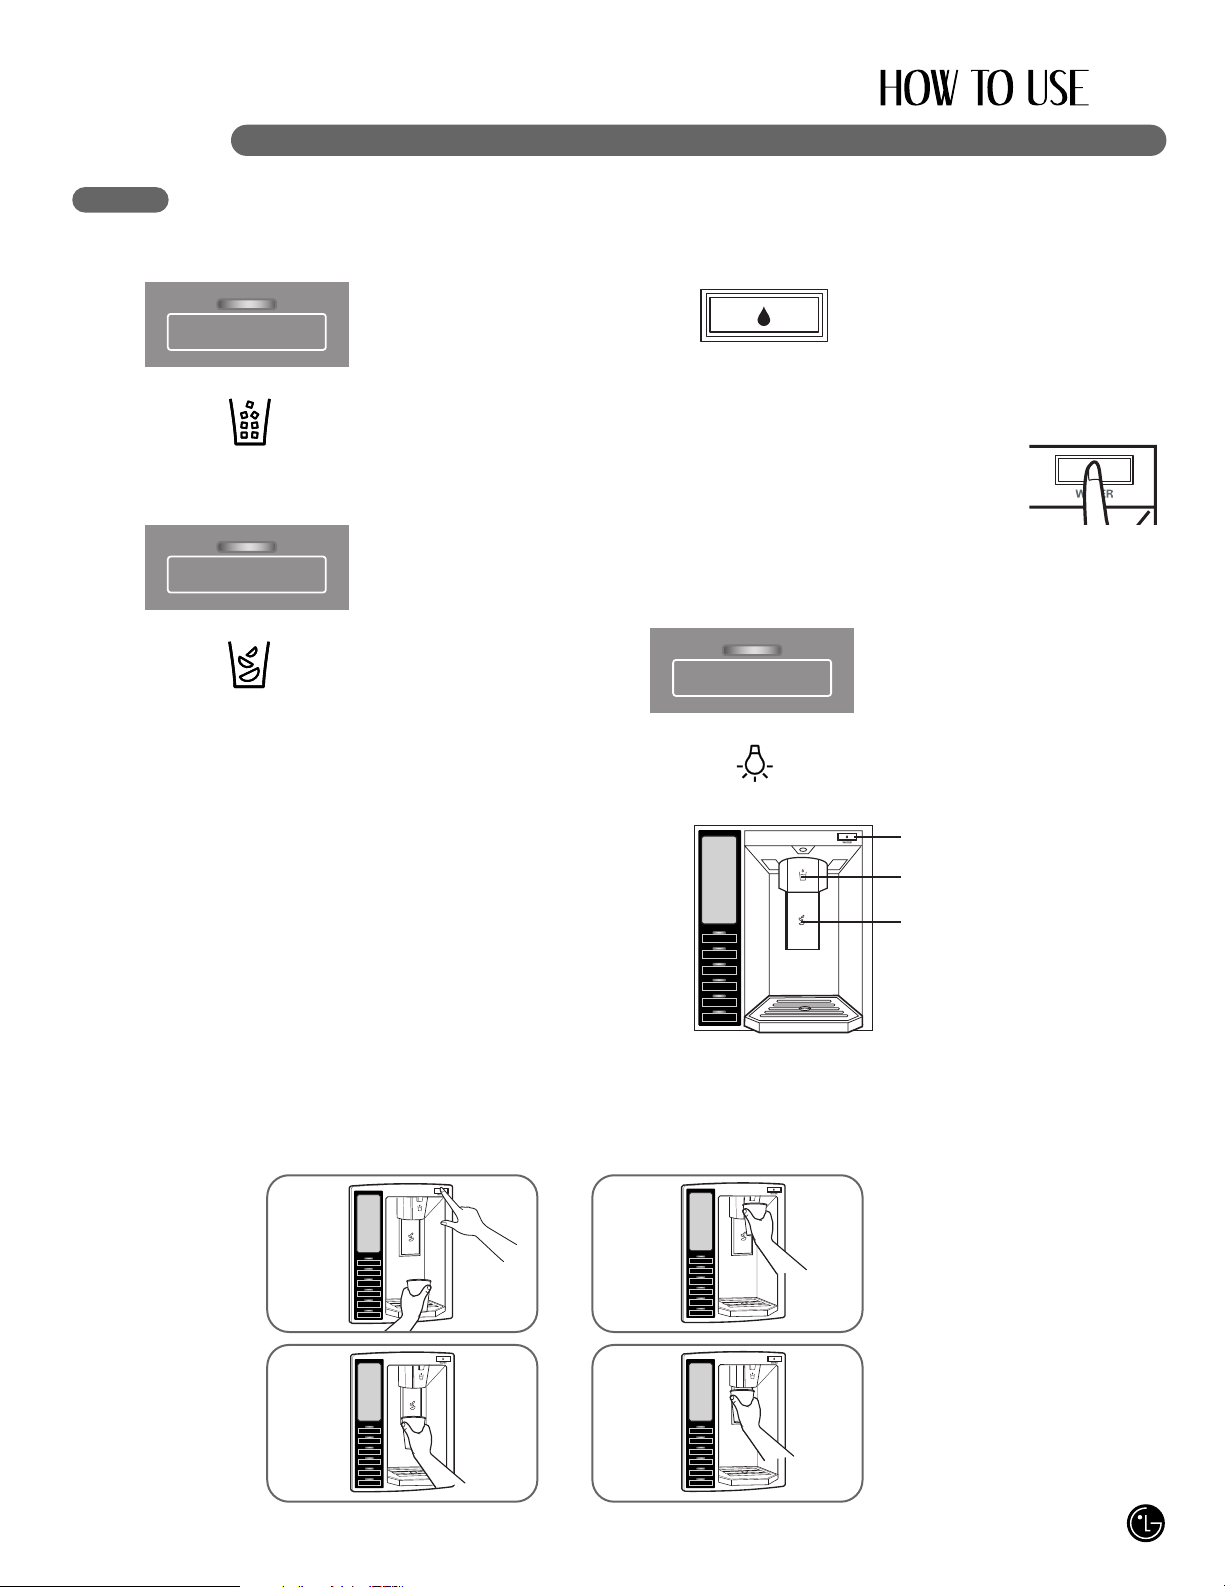
DISPENSING CRUSHED ICE
Press the ICE TYPE
button to illuminate the
Crushed Ice icon.
Press the push ice switch
with a glass or other
container and crushed ice
will be dispensed.
DISPENSING CUBED ICE
Press the ICE TYPE
button to illuminate the
Cubed Ice icon.
Press the push switch
with a glass or other
container and cubed ice
will be dispensed.
NOTE: Hold the glass or other container in place
for a couple of seconds after dispensing ice or
water to catch the last few cubes or drops. The
dispenser is designed to not operate while either
refrigerator door is open.
DISPENSING WATER
Press the push water switch
or active water button with a
glass or other container and
chilled water will be dispensed.
When the water switch or active water switch is
pressed, the light will be illuminated.
NOTE: When operating the Water
Button, it does not work when you
press both ends and not the center.
It only works when you press the
center of the button.
CONTROLLING THE DISPENSER LIGHT
Press the LIGHT/FILTER
button to turn the dispenser
light on and off.
25
OPERATING THE DISPENSER
wCAUTION
When filling the container with a small opening, use it near the opening of the water or ice dispenser
as close as possible.
Incorrect
Water
Ice
Correct
ACTIVE WATER BUTTON
WATER SWITCH
ICE SWITCH
ICE TYPE
LIGHT / FILTER
ICE TYPE
Page 26
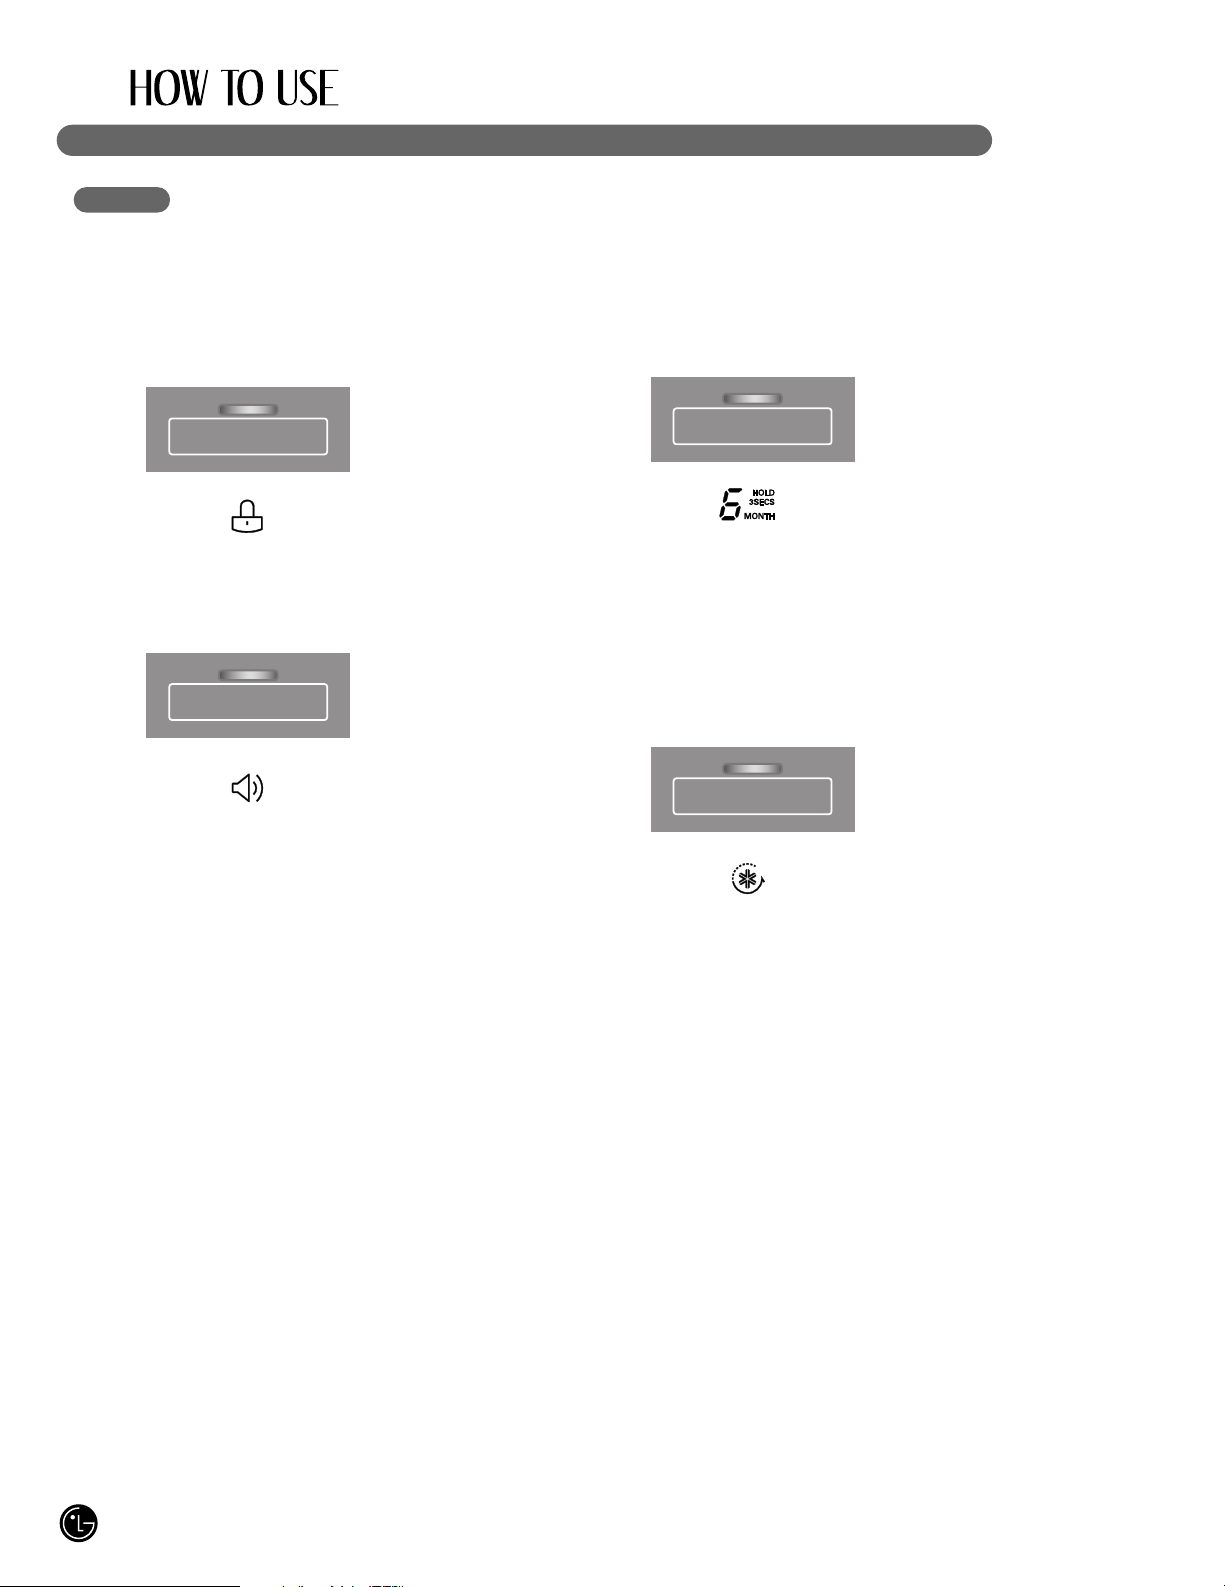
SETTING THE DISPENSER LOCK
Press and hold the
ALARM/LOCK
button for three seconds
to lock the dispenser and
all of the other control panel
functions. Press and hold
again for 3 seconds to
unlock.
SETTING THE DOOR ALARM
The ALARM/LOCK button
also controls the door
alarm that sounds three
times in 30-second
intervals when a
compartment door is
left open for more than
60 seconds. The alarm
stops sounding when
the door is closed.
Press the ALARM/LOCK button once to activate
and deactivate the door alarm function.
NOTE: Contact your local service center
if the alarm continues to sound after the
doors are closed.
RESETTING THE FILTER INDICATOR
Press and hold the
LIGHT/FILTER button for more
than 3 seconds to reset
the filter indicator after the
water filter has been
replaced.
NOTE: It is recommended that you replace the filter
when the water filter indicator light reaches 0 or
whenever the water or ice cube taste deteriorates
noticeably.
ACTIVATING ICE PLUS
Press the ICE PLUS button
once to activate the ICE PLUS
function. The ICE PLUS icon on
the display panel will illuminate
when activated.
The ICE PLUS function runs the
freezer compartment at the
coldest setting for a 24-hour
period to increase icemaking by
up to about 20%, and then turns
off automatically.
NOTE: Press the button again to cancel
the ICE PLUS function.
26
SETTING THE FUNCTIONS
Press the button for the desired function to view and
select other settings.
DIAGNOSTIC FAILURE DETECTION
The diagnostic function automatically detects problems with your refrigerator, and a diagnostic code will
appear in the display. NOTE: If a diagnostic code appears in the display during use, note the code and
then call 1-800-243-0000 (24 hours per day/7 days per week) and select the option to locate an
authorized servicer.
ALARM / LOCK
3SECS
LIGHT / FILTER
ICE PLUS
ALARM / LOCK
3SECS
Page 27
27
IN-DOOR ICE BIN
wCAUTION
• Keep hands and tools out of the ice bin door
and dispenser chute. You could break
something or injure yourself.
The icemaker will stop producing ice when the ice bin
is full. If you need more ice, empty the ice bin into the
extra ice bin in the freezer compartment so the
icemaker can keep producing ice.
Shake the ice bin occasionally to level the ice in it.
Sometimes the ice piles up near the icemaker,
causing the icemaker to misread the amount of ice
cubes and stop producing ice.
NOTE: Storing cans or other items in the ice bin may
damage the icemaker.
Keep the ice bin door closed tightly. If the ice bin door
is not closed tightly, the cold air in the ice bin will
freeze food in the refrigerator compartment. This
could also cause the icemaker to not produce ice.
NOTE: If the On/Off switch on the icemaker is set to
Off for an extended time, the ice compartment will
gradually warm up to the temperature of the
refrigerator compartment. To prevent ice cubes from
melting and leaking from the dispenser, ALWAYS
empty the ice bin when the icemaker is set to Off for
more than a few.
Push on the latch firmly where noted to close the
ice bin door; it will make a clicking sound when it
is closed completely.
To remove the in-door ice bin, grip the front
handle, slightly lift the lower part, and slowly pull
out the bin as shown.
To reinstall the in-door ice bin, slightly slant the
bin during replacement to avoid contact with the
icemaker.
Avoid touching the automatic shutoff arm when
replacing the ice bin. See the label on the ice bin
door for details.
Automatic
shutoff Arm
Page 28
28
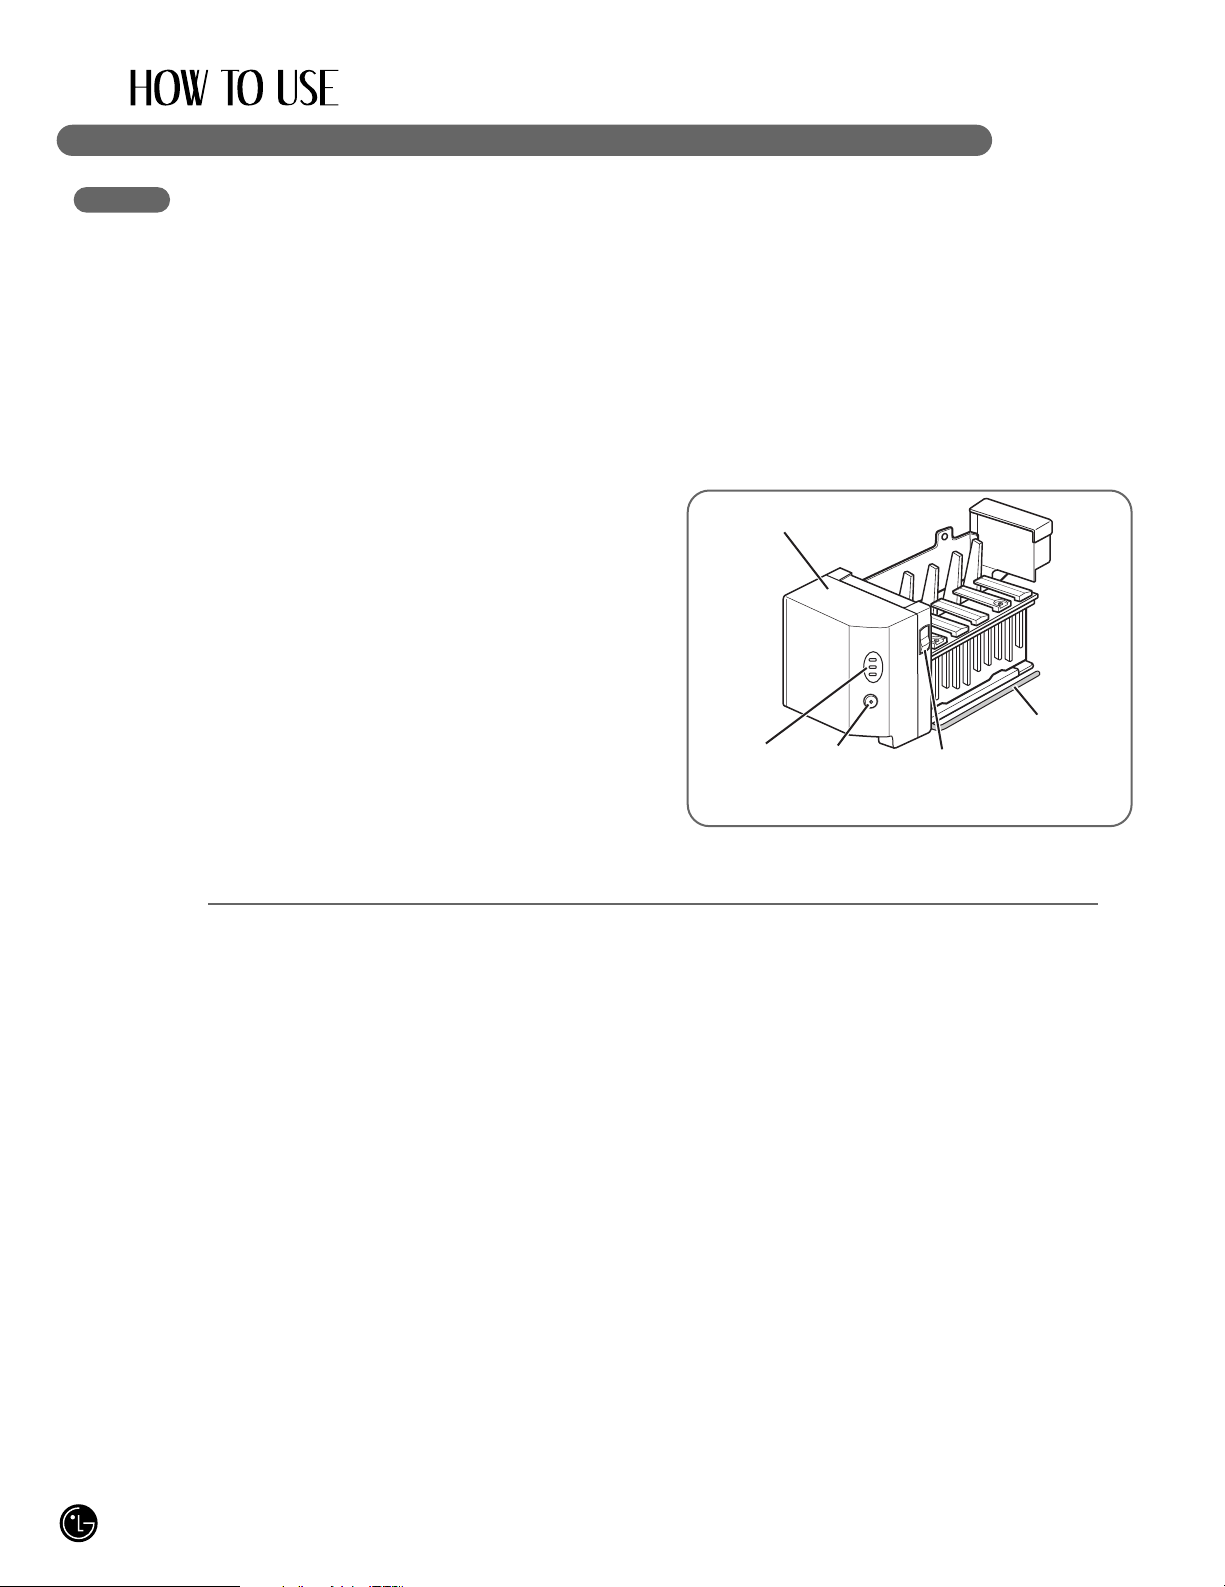
AUTOMATIC ICEMAKER
Ice is made in the automatic icemaker and sent to
the dispenser. The automatic icemaker can make 6
ice cubes at a time, 80–130 cubes per 24-hour
period. This quantity may vary by circumstance,
including freezer compartment temperature, room
temperature, number of door openings, freezer load,
and other operating conditions.
• It takes about 12 to 24 hours for a newly installed
refrigerator to make ice.
• Icemaking stops when the ice storage bin is full.
• To turn off the automatic icemaker, set the
icemaker switch to OFF (O). To turn on the
automatic icemaker, set the switch to ON (I).
• The cube size will vary depending on the Water
Amount Selection Setting, as well as the water
pressure of the connected water line.
• You can regulate the cube size by pressing the
Water Amount Selection Button.
NOTE: It is normal that a noise is produced when
ice drops into the ice storage bin.
• Even when the water pipe is not connected and
the Ice Maker is turned on, the water valve
operates. The noise is generated because the
water pipe is not connected, which does not
mean the icemaker is defective.
wWARNING
Personal Injury Hazard
• Avoid contact with the moving parts of the
ejector mechanism or with the heating element
that releases the cubes.
• DO NOT place fingers or hands on the automatic
icemaking mechanism while the refrigerator is
plugged in.
NOTE: Raising the automatic shutoff arm does
not turn off the icemaker.
wCAUTION
• The first ice and water may include particles or
odor from the water supply line or the water tank.
• Throw away the first few batches of ice (about
20 pieces) and purge the water line for 2 minutes
after installation to eliminate air and odd tastes.
• This is also necessary if the refrigerator has not
been used for a long time.
• Never store beverage cans or other foods in the
ice bin for the purpose of rapid cooling.
Doing so may damage the icemaker or the
containers may burst.
• If discolored ice is dispensed, check the water
filter and water supply. If the problem continues,
contact an Authorized Service Center. Do not
use the ice or water until the problem is corrected.
• Keep children away from the dispenser.
Do not allow children to play in or around dispenser.
• The ice passage may also become blocked
with frost if only crushed ice is used. Remove
the frost that accumulates.
• Never use thin crystal glass or crockery to
collect ice. Such glasses or containers may
break, and glass fragments could be in the ice.
• Dispense ice into a glass before filling it with
water or other beverages. Splashing may occur
if ice is dispensed into a glass that already
contains liquid.
• Never use a glass that is exceptionally narrow
or deep. Ice may jam in the ice passage and
refrigerator performance may be affected.
• Keep the glass at a proper distance from the
ice outlet. A glass held too close to the outlet
may prevent ice from dispensing.
• To avoid personal injury, keep hands out of
the ice door and passage.
• Never remove the icemaker cover.
• If you find ice or water dispensed unexpectedly,
turn off the water supply and contact an Authorized
Service Center. Call
1-800-243-0000 (24 hours
a day, 365 days a year) and select the option to
locate an authorized servicer.
lcemaker
Water
Amount
Indicator
Lights
Water
Amount
Selection
Button
ON/OFF
Switch
Automatic
Shutoff Arm
Page 29

29
STORING FOODS
• Store fresh food in the refrigerator compartment.
• How food is frozen and thawed is an important
factor in maintaining freshness and flavor.
• Do not store food that spoils easily, such as
bananas and melons, at low temperatures.
• Allow hot food to cool prior to storing; placing hot
food in the refrigerator could spoil other food and
lead to higher energy consumption.
• When storing food, cover it with vinyl wrap or store
in a container with a lid. This prevents moisture from
evaporating and helps food to keep its flavor and
nutrition.
• Do not block air vents with food or containers.
Smooth circulation of chilled air keeps the
refrigerator temperatures even.
• Do not open the doors frequently. Opening the
doors allows warm air to enter the refrigerator and
freezer compartments, which causes temperatures
to rise.
• Never overload the door racks; overloading may
push against the inner racks and prevent the doors
from closing correctly.
Freezer compartment
• Do not store glass bottles in the freezer
compartment; glass may break when the contents
are frozen.
• Do not refreeze food that has been thawed.
This causes loss of flavor and nutrition.
• Do not touch cold foods or containers, especially
those made of metal, with wet hands or place glass
products in the freezer compartment.
• Do not use the egg box as an ice bin in the freezer.
The egg box will break easily if it freezes.
Refrigerator compartment
• Avoid placing moist food on the top refrigerator
shelves; it could freeze from direct contact with
chilled air.
• Always clean food prior to refrigeration.
Vegetables and fruits should be washed and wiped
and packed food should be wiped to prevent
adjacent food from spoiling.
NOTE: If you keep the refrigerator in a hot and humid
place, frequent opening of the door or storing a lot of
vegetables in the refrigerator may cause
condensation to form. Wipe the condensation with a
clean cloth or a paper towel.
Page 30
30
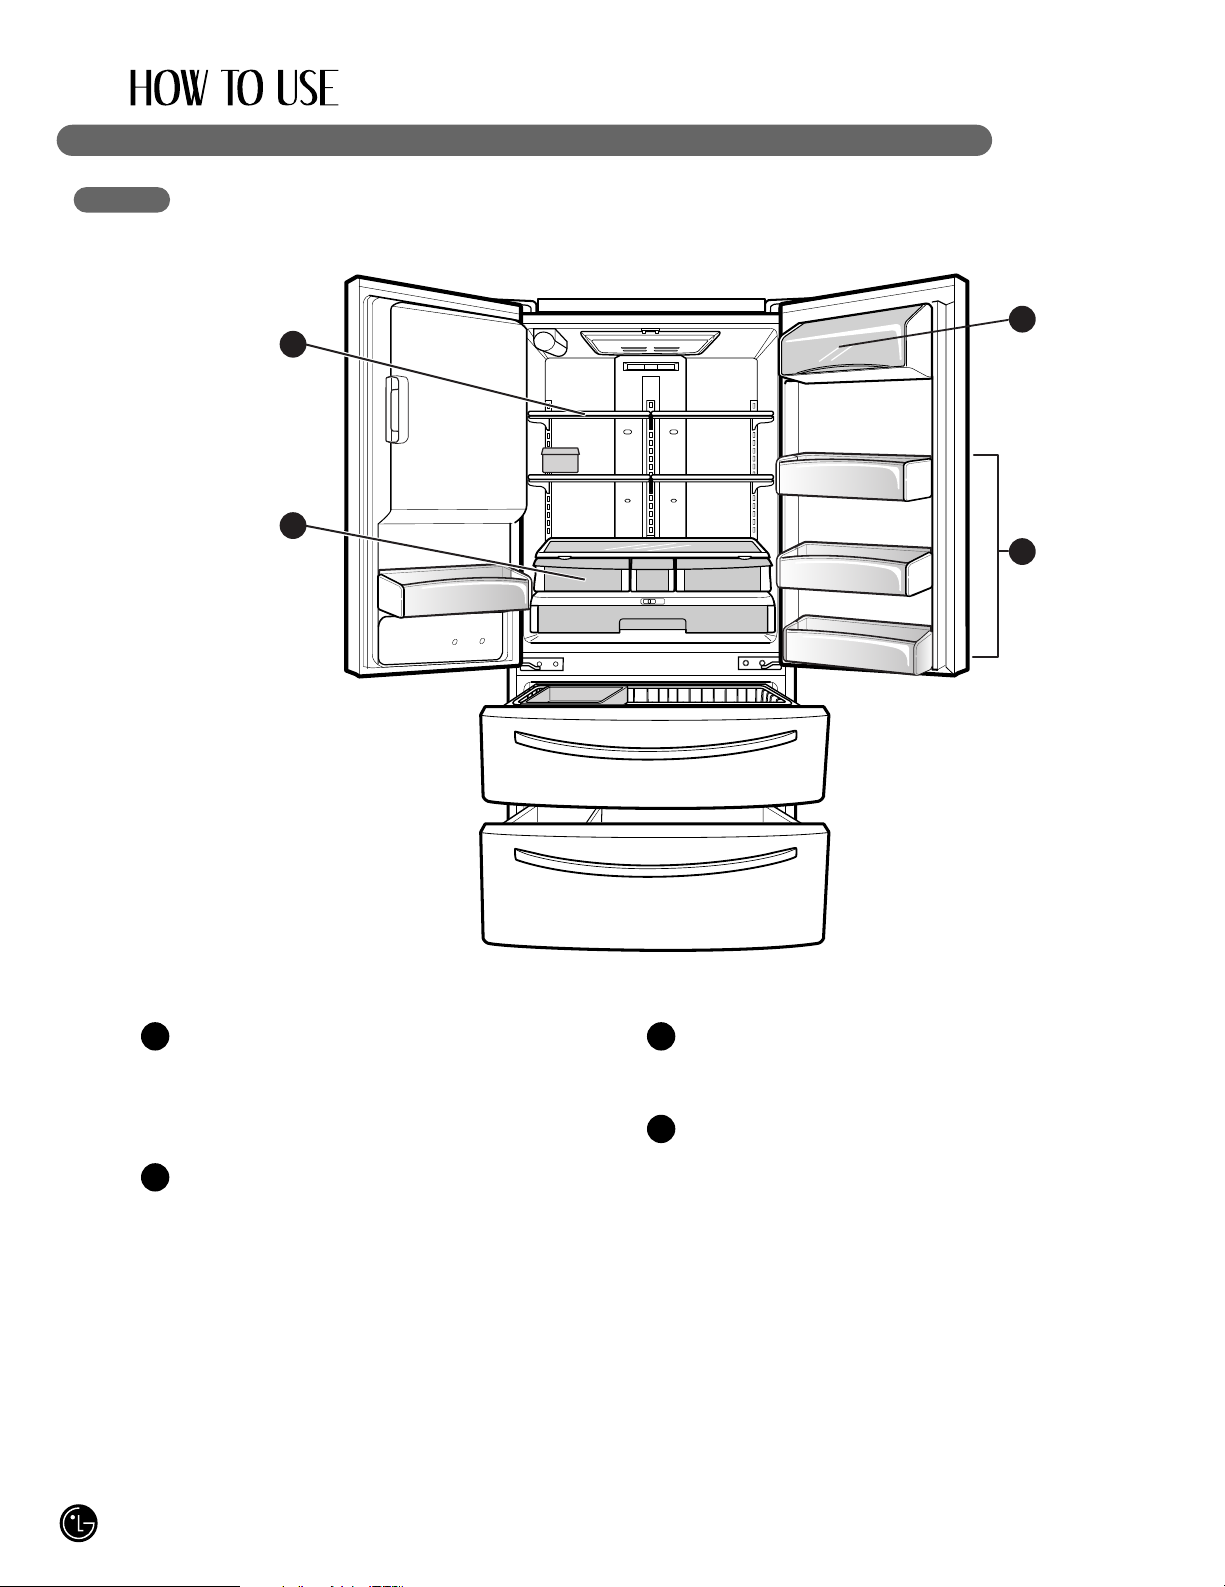
LOCATION OF FOODS
REFRIGERATOR COMPARTMENT SHELVES
Store larger food items, platters, and containers
on the expansive refrigerator compartment
shelves.
CRISPERS
Store vegetables or fruits with humidity control.
DAIRY CORNER
Store milk products such as butter and cheese.
MODULAR REFRIGERATOR DOOR BINS
Store small packed food or beverages such as
condiments, salad dressings, baby foods, milk,
or juice.
1
2
3
4
2
1
3
4
Page 31

31
SHELF HEIGHT ADJUSTMENT
The shelves in your refrigerator are adjustable to
meet your individual storage needs.
Storing similar food items together in your
refrigerator and adjusting the shelves to fit
different heights of items will make finding the
exact item you want easier; it will also reduce
the amount of time the refrigerator door is open,
saving energy.
IMPORTANT: Do not clean glass shelves with warm
water when they are cold. Shelves may break if
exposed to sudden temperature changes or impact,
such as bumping. For your protection, glass shelves
are made with tempered glass, which will shatter into
small, pebble-sized pieces.
NOTE: Glass shelves are heavy. Use special care
when removing them to avoid dropping them.
Adjusting Shelves
Remove shelves from the shipping position and place
shelves in the position you want.
wCAUTION
Make sure that shelves are level from one side to the
other. Failure to do so may result in the shelf’s falling
or spilling food.
Remove Shelf Reinstall Shelf
Tilt up the front of the shelf. Lift up the back
and pull out the shelf.
Folding Shelf
You can store taller items such as a gallon
container or bottles by simply pushing the front
half of shelf underneath back half of shelf.
Pull toward you to returm to a full shelf.
Tilt up the front of the shelf and guide the shelf
hooks into the slots at a desired height. Then
lower the front of the shelf so that the hooks drop
into the slots.
Page 32

32
REMOVING AND REPLACING COMPONENTS
NOTE: When reinstalling components, reverse
the order of steps for removal. To prevent damage,
never use excessive force when removing or
reinstalling components.
wCAUTION
• Crispers, Door Bins and interior shelves are
not dishwasher safe.
wCAUTION
• Personal injury can occur if the door bins are not
firmly assembled.
NOTE: DO NOT adjust a loaded bin.
• DO NOT allow children to play with baskets.
The sharp corners on the baskets could cause
injury.
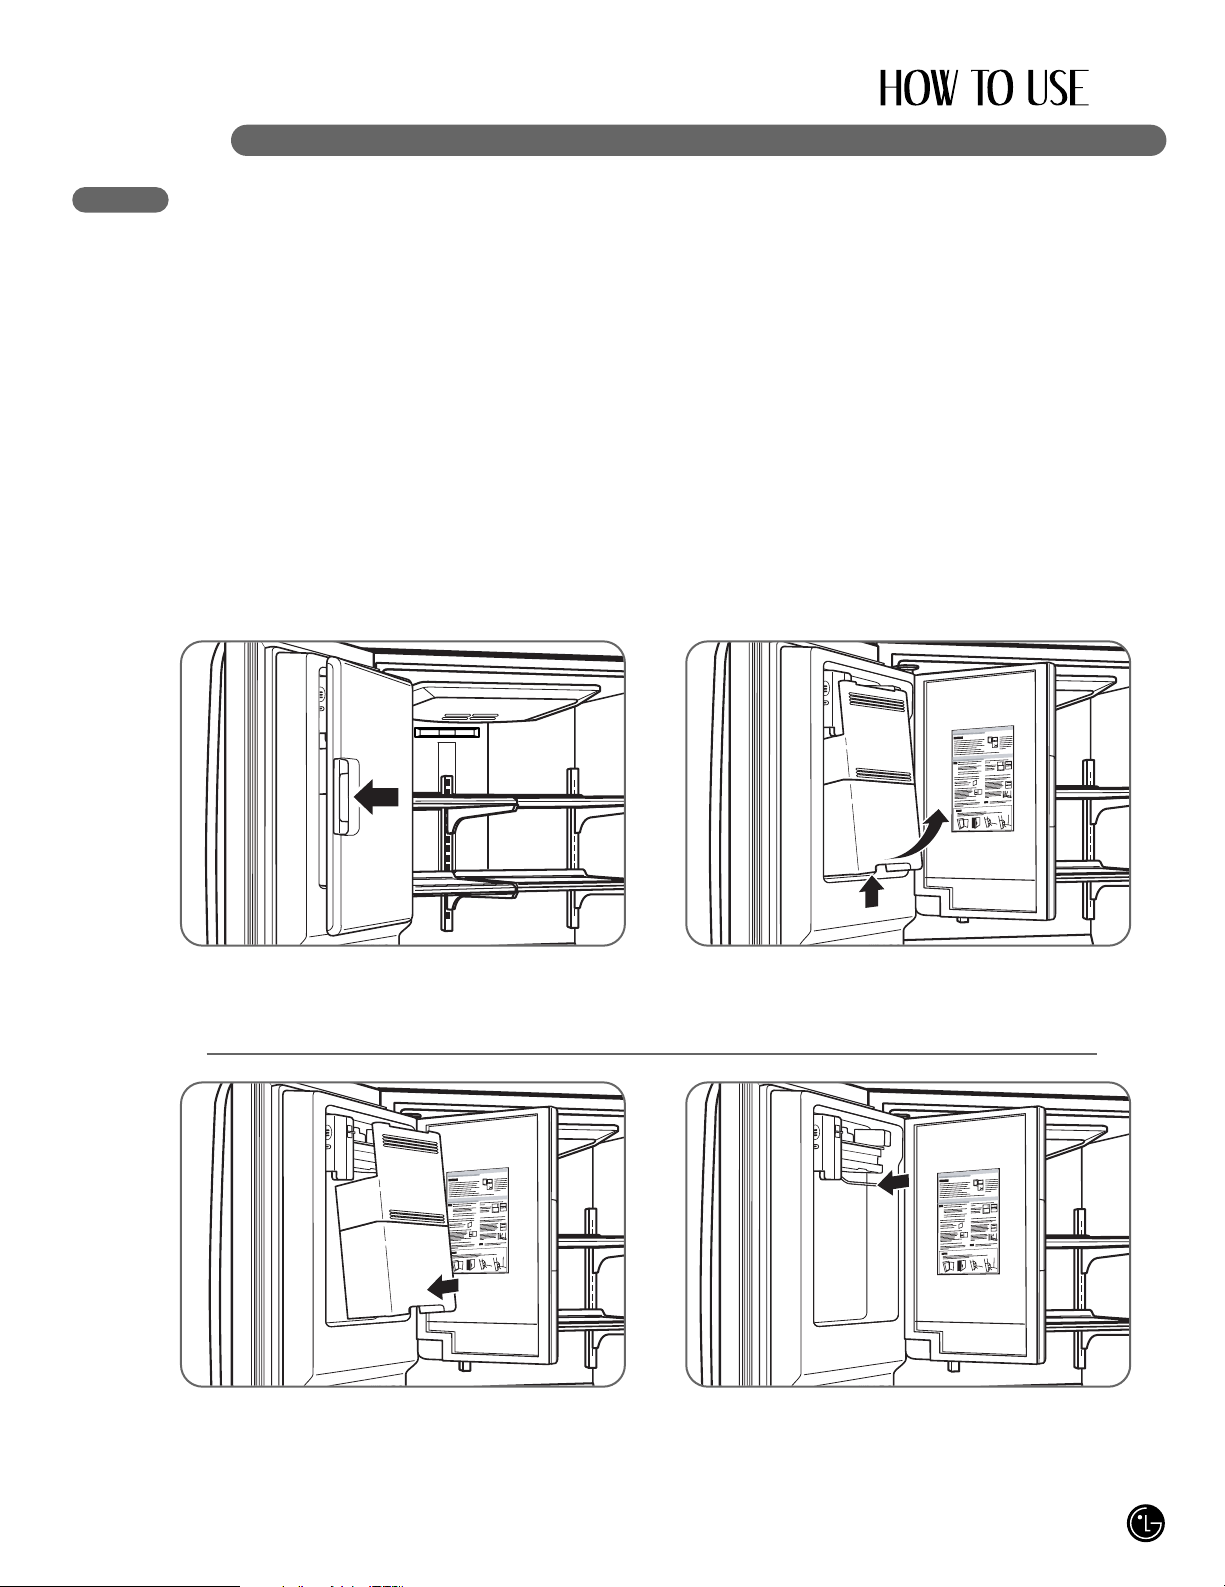
Dairy Bin Modular Door Bin
To remove the dairy bin, simply lift it and pull
straight out. To replace the dairy bin, slide it into
place and push down until it stops.
NOTE: The dairy bin will only fit in the top space
on the right-hand door.
The door bins are removable for easy cleaning
and adjusting. Simply lift the bin and pull it straight
out to remove it. To replace the bin, slide it in
above the desired support button and push down
until it stops.
Dispenser Drip Tray
The dispenser drip tray has no self-draining function. It should be cleaned regularly.
Remove the cover by pressing and pulling the tray.
Dry it with a cloth. To reinstall the tray, slightly tilt the front of the tray and snap the ribs into the holes.
Page 33

33
REMOVING AND REPLACING COMPONENTS (CONT.)
Crisper humidity control
You can control the amount of humidity in the
moisture-sealed crispers. Store vegetables or
fruits requiring more or less humidity in separate
crispers. Adjust the control to any setting
between HIGH and LOW.
• LOW lets moist air out of the crisper for best
storage of fruits.
• HIGH keeps moist air in the crisper for best
storage of fresh, leafy vegetables.
CAUTION : The glass shelf over the crisper is not
firmly secured. Be careful when tilting.
To remove the glass
• Lift up the glass under the crisper cover.
• Pull the glass up and out.
Removing crisper
• To remove, pull the drawer out to full extension.
• Lift the front of the crisper up, then pull it straight
out.
• To install, slightly tilt up the front and insert the
drawer into the frame and push it back into
place.
Glide‘N’Serve
The Glide‘N’Serve provides storage space with a
variable temperature control that keeps the
compartment colder than refrigerator.
This drawer can be used for large party trays, deli
items, or beverages.
Controls
The control regulates the air temperature in the
drawer. Set control level to COLD (print on
surface) to provide normal refrigerator
temperature. Use the COLDER (print on surface)
setting for meats or other deli items.
NOTE: Cold air directed to the Glide‘N’Serve can
decrease refrigerator temperature. Refrigerator
control may need to be adjusted.
Page 34

34
REMOVING AND REPLACING COMPONENTS (CONT.)
wCAUTION
• Pinch hazard! Keep hands and feet clear of the
bottom of the door when opening and closing.
wWARNING
Child Entrapment Hazard
• When the divider of the freezer drawer is removed,
children may crawl inside.
Ice Bin DuraBase ® Divider
To separate the ice bin, pull out the drawer to full
extension. Gently lift and pull out the ice bin.
To reinstall, simply set the ice bin in its correct
position.
The DuraBase divider organizes the DuraBase
area into sections. Pull the divider upward in a
straight motion to remove it. To reinstall it, hook
the top corners of the divider over the top edge of
the DuraBase.
Drawer
To replace Glide‘N’Serve
• To remove, pull the drawer out to full extension.
• Lift the front of the drawer up, then pull it straight
out.
• To install, slightly tilt up the front and insert the
drawer into the frame and push it back into
place.
1
Page 35

35
CLEANING THE REFRIGERATOR
wWARNING
Explosion Hazard
• Use nonflammable cleaner.
• Failure to do so can result in death,
explosion, or fire.
Both the refrigerator and freezer sections defrost
automatically. However, clean both sections about
once a month to prevent odors. Wipe up spills
immediately.
• Unplug the refrigerator.
• Remove all removable parts, such as shelves and
crispers.
• Use a clean sponge or soft cloth and a mild
detergent in warm water. Do not use abrasive or
harsh cleaners.
• Hand wash, rinse, and thoroughly dry all surfaces.
• Plug in the refrigerator.
NOTE: Window sprays, abrasive cleaners, or
flammable fluids can scratch or damage plastic
covers or panels.
Cleaning the Exterior
For models with a stainless steel exterior, use a
commercially available stainless steel cleaner in
accordance with the manufacturer’s instructions.
You may also use a clean sponge or soft cloth and
a mild detergent in warm water. Do not use abrasive
or harsh cleaners. Dry thoroughly with a soft cloth.
IMPORTANT: Do not use cleaning waxes,
concentrated detergents, or cleaners containing
petroleum on plastic refrigerator parts such as door
liners or gaskets.
Care and Cleaning of the Interior
NOTE: Allow the freezer to warm so the cleaning
cloth will not stick.
To help remove odors, you can wash the inside of
the refrigerator with a mixture of baking soda and
warm water. Mix 2 tbsp. baking soda to 1 qt. of water
(26 g soda to 1 L of water). Be sure the baking soda
dissolves completely so it does not scratch the
surfaces of the refrigerator.
IMPORTANT: Do not use a spray nozzle to clean
the interior.
GENERAL INFORMATION
Storage
During average-length vacations, you will
probably find it best to leave the refrigerator in
operation. Place freezable items in the freezer for
longer life.
When you plan to store the refrigerator, remove
all food, disconnect the power cord, clean the
interior thoroughly, and block the doors open to
prevent mold and mildew. Be certain the stored
refrigerator does not present a child entrapment
danger.
Moving
Unload the refrigerator to move it. (This is probably
not necessary when pulling it out to clean behind it.)
Be sure to let the refrigerator warm up to room
temperature, and dry the inside before closing the
doors to pack it for moving. To avoid damaging the
height-adjusting screws, turn them all the way into the
base.
Power Failure
Most power failures that are corrected within an
hour or two will not affect your refrigerator
temperatures. However, you should minimize the
number of door openings while the power is off.
Water may drip from the ice bin during a power
outage. To prevent this, remove the ice bin, discard
all of the ice, towel dry, and replace.
Page 36

It is recommended that you replace the filter when
the water filter indicator reaches 0 or the water
dispenser or icemaker noticeably decreases
production.
After replacing the filter, dispense for 2 minutes from
the water dispenser to purge the water system.
Check the filter for leaks.
When the water filter indicator displays the
message 0 Filter Month, Hold 3 Seconds,
reset the water filter status display and indicator
light by pressing and holding the LIGHT/FILTER
button for more than 3 seconds.
To purchase replacement water filter cartridges,
visit your local appliance dealer or parts distributor.
You can also call 1-877-714-7486.
The replacement water filter cartridge’s part
number is 5231JA2006A.
36
REPLACING THE WATER FILTER
Rotate the knob of the old cartridge
counterclockwise. When the cartridge is
released, you will feel it click out of place.
NOTE: Replacing the filter causes a small
amount of water (around 1 oz. or 25 cc) to
drain. Place a cup under the filter hole to
contain it.
1 Remove the old cartridge. Take the new
cartridge out of its packaging, and remove the
protective cover from the o-rings. Hold the
cartridge handle in its vertical position, and
firmly push the new filter cartridge into place
until it stops.
2
Use the handle to twist the cartridge
clockwise about one turn, until the handle is in
a horizontal position. You will feel the filter
click into place.
NOTE: If the filter will not turn from side to
side, it isn’t fully inserted.
1
LIGHT / FILTER
Page 37

37
Before calling for service, review this list. It may save you both time and expense. This list includes
common occurrences that are not the result of defective workmanship or materials in this appliance.
BEFORE CALLING FOR SERVICE
Problem Possible Causes Solutions
Refrigerator
compressor does
not run.
Refrigerator runs
too frequently or
too long.
Refrigerator
compressor
cycles on and off.
Temperature in
the freezer is too
cold, but the
refrigerator
temperature is
satisfactory.
Temperature in
the refrigerator is
too cold, but the
freezer
temperature is
satisfactory.
• Refrigerator control is off.
• Refrigerator is in defrost
cycle.
• Plug at the wall outlet is
disconnected.
• Power outage. Check house
lights.
• Refrigerator is larger than the
previous one you owned.
• The room or the outdoor
weather is hot.
• Refrigerator was recently
disconnected for a while.
• Large amounts of warm or
hot food may have been
stored recently.
• Doors are opened too
frequently or for too long.
• Refrigerator or freezer door
may be slightly open.
• Refrigerator control is set too
cold.
• Refrigerator or freezer gasket
is dirty, worn, cracked, or
poorly fitted.
• The thermostat is keeping the
refrigerator at a constant
temperature.
• Freezer control is set too
cold.
• Refrigerator control is set too
cold.
• Set the refrigerator control.
• This is normal for a fully automatic defrosting
refrigerator. The defrost cycle occurs periodically.
• Make sure the plug is tightly pushed into the
outlet.
• Call the local electric company.
• This is normal. Larger, more efficient units run
longer.
• It is normal for the refrigerator to work longer
under these conditions.
• It takes a few hours for the refrigerator to reach
cooling temperatures.
• Warm food will cause the refrigerator to run longer
until the desired temperature is reached.
• Warm air entering the refrigerator causes it to run
more. Open the door less often.
• Make sure the refrigerator is level. Keep food and
containers from blocking the door.
• Adjust the refrigerator control to a warmer setting
until the refrigerator temperature is satisfactory.
• Clean or change the gasket. Leaks in the door
seal will cause the refrigerator to run longer in
order to maintain desired temperatures.
• This is normal. The refrigerator cycles on and off
to keep the temperature constant.
• Adjust the freezer control to a warmer setting until
the freezer temperature is satisfactory.
• Adjust the refrigerator control to a warmer setting.
Page 38

38
BEFORE CALLING FOR SERVICE (CONT.)
Problem Possible Causes Solutions
Food stored in
refrigerator
drawers freezes.
Temperatures in
the refrigerator or
freezer are too
warm.
Temperature in
the refrigerator
is too warm,
but the freezer
temperature is
satisfactory.
Louder sound
levels when
compressor
comes on.
Vibrating or
rattling noise.
Moisture collects
on the inside walls
of the refrigerator.
Moisture forms on
the outside of the
refrigerator or
between the doors.
• Refrigerator control is set too
cold.
• Freezer or refrigerator control
is set too warm.
• Doors are opened too
frequently or for too long.
• Door is slightly open.
• Large amounts of warm or
hot food may have been
stored recently.
• Refrigerator has recently
been disconnected for a
period of time.
• Refrigerator control is set too
warm.
• Refrigerator operates at
higher pressures during the
start of the ON cycle.
• Floor is uneven or weak. The
refrigerator rocks on the floor
when it is moved slightly.
• Items placed on the top of the
refrigerator are vibrating.
• Dishes are vibrating on the
shelves in the refrigerator.
• The refrigerator is touching
the wall or cabinets.
• The weather is hot and humid
which increases the rate of
frost buildup and internal
sweating.
• Door is slightly open.
• Door is opened too often or
for too long.
• Weather is humid.
• Door is slightly open.
• Adjust the refrigerator to a warmer setting.
• Adjust the freezer or refrigerator control to a colder
setting until the freezer or refrigerator temperature
is satisfactory.
• Warm air enters the refrigerator/freezer whenever
the door is opened. Open the door less often.
• Close the door completely.
• Wait until the refrigerator or freezer has had a
chance to cool food to the set temperature.
• It takes a few hours for the refrigerator to reach
the set temperatures.
• Adjust the refrigerator control to a colder setting.
• This is normal.
• Be sure floor is level and solid and can adequately
support the refrigerator.
• Remove items.
• It is normal for dishes to vibrate slightly. Move
dishes slightly. Make sure refrigerator is level and
firmly set on floor.
• Move the refrigerator so that it does not touch the
wall.
• This is normal.
• Close the door.
• Open the door less often.
• This is normal in humid weather. When humidity is
lower, the moisture should disappear.
• Close the door completely.
Page 39

39
BEFORE CALLING FOR SERVICE (CONT.)
Problem Possible Causes Solutions
Moisture forms
on the dispenser.
Odors in the
refrigerator.
The door(s) will
not close.
Drawers are
difficult to move.
The dispenser
will not dispense
water.
Water has an odd
taste and/or odor.
• Moisture may form when the
temperature or humidity are
high.
• Interior needs to be cleaned.
• Food with strong odor is in
the refrigerator.
• Some containers and
wrapping materials produce
odors.
• Food package is keeping the
door open.
• Door was closed too hard,
causing other door to open
slightly.
• Refrigerator is not level. It
rocks on the floor when it is
moved slightly.
• Floor is uneven or weak. The
refrigerator rocks on the floor
when it is moved slightly.
• Refrigerator is touching the
wall or the cabinets.
• Food is touching the shelf on
top of the drawer.
• The drawer track is dirty.
• The household water-line
valve is not open.
• The refrigerator or freezer
door is not closed.
• When a installed tube is bent.
• When a filter is old.
• The water has been in the
tank for too long.
• The unit is not properly
connected to cold water line.
• When a filter is old.
• Wipe off the moisture.
• Clean interior with sponge, warm water, and
baking soda. Be sure the soda is completely
dissolved so it will not act as an abrasive
compound.
• Cover food completely.
• Use a different container or brand of wrapping
materials.
• Move the packages that keep the door from
closing.
• Gently close both doors.
• Adjust the height-adjusting screw.
• Be sure the floor is level and can adequately
support the refrigerator. Contact a carpenter to
correct sagging or sloping floor.
• Move the refrigerator.
• Keep less food in the drawer.
• Clean the drawer and the track.
• Open the household water-line valve.
• Be sure both doors are closed.
• Check the installed tube.
• Replace with a new filter.
• Dispense for 2 minutes and discard to freshen the
supply. Dispense and discard for an additional 2
minutes to rinse the tank completely.
• Connect the unit to a cold water line that supplies
water to the kitchen faucet.
• Replace with a new filter.
Page 40

40
BEFORE CALLING FOR SERVICE (CONT.)
Problem Possible Causes Solutions
The dispenser
will not dispense
ice.
Sound of ice
dropping.
Sound of water
trickling.
Other
• The ice storage bin is empty.
• The household water line
valve is not open.
• The refrigerator or freezer
door is not closed.
• Ice has melted and frozen
around the auger due to
infrequent use, temperature
fluctuations, and/or power
outages.
• Ice cubes are jammed
between the icemaker arm
and the back of the bin.
• Ice cubes are frozen
together.
• Ice cubes that have been
purchased or made in some
other way have been used in
the dispenser.
• Water input tube is bent.
• Filter is old or needs
changing
• A batch of ice has been
released into the ice bin.
• The icemaker is being
supplied with water.
Please thoroughly read the Automatic Icemaker and Operating the Dispenser sections in
this manual.
• When the first supply of ice is dropped into the
bin, the dispenser should operate.
• Open the household water line valve and allow
sufficient time for ice to be made. When ice is
made, the dispenser should operate.
• Be sure both of the doors are closed.
• Remove the ice storage bin and thaw the
contents.
Clean the bin, wipe it dry, and replace it in its
proper position. When new ice is made, the
dispenser should operate.
• Remove the ice cubes that are jamming the
dispenser.
• Use the dispenser often to prevent the cubes from
freezing together.
• Only the ice cubes made by the icemaker should
be used with the dispenser.
• Check the installed tube
• Replace with a new filter.
• This sound is made when automatically made ice
is dropped into the ice storage bin. The volume
may vary according to the location of the
refrigerator.
• This sound is normally made when the icemaker
is supplied with water after dropping the
automatically made ice.
• If this sound lasts more than 10 seconds, check
for a leak.
Page 41

41
KEY DIMENSIONS AND SPECIFICATIONS
The appearance and specifications listed in this guide may vary due to constant product improvements.
Bottom-Freezer Refrigerator Model LMX25981
Description
Electrical Requirements
Min. / Max. Water Pressure
Dimensions
Net Weight
Refrigerator Storage Capacity
Freezer Storage Capacity
French Door Refrigerator
115 VAC @ 60 Hz
21~121 PSI (1.5~8.5 kgf/cm
2
)
35
3
/
4" (W) X 34
1
/
4" (D) X 69
3
/
4" (H), 46
1
/
2" (D w/ door open)
908 mm (W) X 870 mm (D) X 1772 mm (H), 1181 mm (D w/ door open)
324 lb. (147 kg)
17.6 cu. ft.
7.1 cu. ft.
Bottom-Freezer Refrigerator Model LMX21981
Description
Electrical Requirements
Min. / Max. Water Pressure
Dimensions
Net Weight
Refrigerator Storage Capacity
Freezer Storage Capacity
French Door Refrigerator
115 VAC @ 60 Hz
21~121 PSI (1.5~8.5 kgf/cm
2
)
35
3
/
4" (W) X 30
1
/
4" (D) X 69
3
/
4" (H), 42
1
/
4" (D w/ door open)
908 mm (W) X 768 mm (D) X 1772 mm (H), 1073 mm (D w/ door open)
288 lb. (131 kg)
14.7 cu. ft.
5.8 cu. ft.
Page 42

42
LG ELECTRONICS, INC.
LG BOTTOM-FREEZER REFRIGERATOR LIMITED WARRANTY – USA
Your LG Refrigerator will be repaired or replaced, at LG’s option, if it proves to be defective in material or workmanship
under normal use, during the warranty period ("Warranty Period") set forth below, effective from the date ("Date of
Purchase") of original consumer purchase of the product. This warranty is good only to the original purchaser of the
product and effective only when used in the United States, including Alaska, Hawaii, and U.S. Territories.
THIS WARRANTY IS IN LIEU OF ANY OTHER WARRANTY, EXPRESS OR IMPLIED, INCLUDING WITHOUT
LIMITATION, ANY WARRANTY OF MERCHANTABILITY OR FITNESS FOR A PARTICULAR PURPOSE. TO THE
EXTENT ANY IMPLIED WARRANTY IS REQUIRED BY LAW, IT IS LIMITED IN DURATION TO THE EXPRESS
WARRANTY PERIOD ABOVE. NEITHER THE MANUFACTURER NOR ITS U.S. DISTRIBUTOR SHALL BE LIABLE
FOR ANY INCIDENTAL, CONSEQUENTIAL, INDIRECT, SPECIAL, OR PUNITIVE DAMAGES OF ANY NATURE,
INCLUDING WITHOUT LIMITATION, LOST REVENUES OR PROFITS, OR ANY OTHER DAMAGE WHETHER
BASED IN CONTRACT, TORT, OR OTHERWISE. Some states do not allow the exclusion or limitation of incidental or
consequential damages or limitations on how long an implied warranty lasts, so the above exclusion or limitation may not
apply to you. This warranty gives you specific legal rights and you may also have other rights that vary from state to state.
THIS LIMITED WARRANTY DOES NOT APPLY TO:
• Service trips to your home to deliver, pick up, and/or install the product, instruct, or replace house fuses or correct wiring, or
correction of unauthorized repairs.
• Damages or operating problems that result from misuse, abuse, operation outside environmental specifications or contrary to the
requirements of precautions in the Operating Guide, accident, vermin, fire, flood, improper installation, acts of God, unauthorized
modification or alteration, incorrect electrical current or voltage, or commercial use, or use for other than intended purpose.
• Repairs when your LG refrigerator is used in other than normal, single-family household use.
• Damages caused during and/or after delivery.
• Display, discount, or refurbish units purchased with scratches, dents, or defects.
The cost of repair or replacement under these excluded circumstances shall be borne by the consumer.
Proof of purchase is required and must be provided to LG in order to validate warranty.
CUSTOMER INTERACTIVE CENTER NUMBERS
TO CONTACT LG ELECTRONICS BY MAIL:
LG Customer Interactive Center
P. O. Box 240007
201 James Record Road
Huntsville, Alabama 35813
ATTN: CIC
Product Registration Information
Model:
Serial Number:
Date of Purchase:
The model and serial number can be located on the inner
case or back of the refrigerator compartment.
WARRANTY PERIOD:
REFRIGERATOR/FREEZER
LABOR: One Year from the Date of Purchase.
PARTS: One Year from the Date of Purchase.
SEALED SYSTEM
(Compressor, Condenser, and Evaporator)
LABOR: One Year from the Date of Purchase.
PARTS: Seven years from the Date of Purchase.
Replacement Units and Repair Parts are warranted for
the remaining portion of the original unit’s warranty
period.
HOW SERVICE IS HANDLED:
In-Home Service:
Please retain dealer’s dated bill of sale or delivery
ticket as evidence of the Date of Purchase for proof of
warranty, and submit a copy of the bill of sale to the
service person at the time warranty service is
provided.
Please call 1-800-243-0000 and choose the
appropriate option to locate your nearest LG
Authorized Service Center.
Or visit our website at: http://us.lgservice.com
To obtain Customer Assistance, Product Information, or
Dealer or Authorized Service Center location:
Call
1-800-243-0000 (24 hours a day, 365 days a year)
and select the appropriate option from the menu.
Or visit our Web site at
http://us.lgservice.com
Page 43

43
LG ELECTRONICS, INC.
LG BOTTOM-FREEZER REFRIGERATOR LIMITED WARRANTY – CANADA
LG Electronics will repair or at its option replace, without charge, your product which proves to be defective in material or
workmanship under normal use, during the warranty period listed below from the date of original purchase.
This warranty is good only to the original purchaser of the product during the warranty period as long as it is in
any Canadian Province.
No other express warranty is applicable to this product. THE DURATION OF ANY IMPLIED WARRANTIES, INCLUDING
THE IMPLIED WARRANTY OF MERCHANTABILITY, INC. IS LIMITED TO THE DURATION OF THE EXPRESS
WARRANTY HEREIN. LG ELECTRONICS CANADA, INC. SHALL NOT BE LIABLE FOR THE LOSS OF THE USE OF
THE PRODUCT, INCONVENIENCE, LOSS OR ANY OTHER DAMAGES, DIRECT OR CONSEQUENTIAL, ARISING
OUT OF THE USE OF, OR INABILITY TO USE, THIS PRODUCT OR FOR ANY BREACH OF ANY EXPRESS OR
IMPLIED WARRANTY, INCLUDING THE IMPLIED WARRANTY OF MERCHANTABILITY APPLICABLE TO THIS
PRODUCT. Some provinces do not allow the exclusion or limitation of incidental or consequential damages or limitations
on how long an implied warranty lasts; so these limitations or exclusions may not apply to you. This warranty gives you
specific legal rights and you may also have other rights which vary from province to province.
THIS LIMITED WARRANTY DOES NOT APPLY TO:
• Service trips to your home to deliver, pick up, and/or install the product, instruct, or replace house fuses or correct wiring, or
correction of unauthorized repairs.
• Damages or operating problems that result from misuse, abuse, operation outside environmental specifications or contrary to the
requirements of precautions in the Operating Guide, accident, vermin, fire, flood, improper installation, acts of God, unauthorized
modification or alteration, incorrect electrical current or voltage, or commercial use, or use for other than intended purpose.
• Repairs when your LG refrigerator is used in other than normal, single-family household use.
• Damages caused during and/or after delivery.
• Display, discount, or refurbish units purchased with scratches, dents, or defects.
The cost of repair or replacement under these excluded circumstances shall be borne by the consumer.
Proof of purchase is required and must be provided to LG in order to validate warranty.
CUSTOMER ASSISTANCE NUMBERS
Product Registration Information
Model:
Serial Number:
Date of Purchase:
The model and serial number can be located on the inner
case or back of the refrigerator compartment.
WARRANTY PERIOD:
REFRIGERATOR/FREEZER
LABOR: One Year from the Date of Purchase.
PARTS: One Year from the Date of Purchase.
SEALED SYSTEM
(Compressor, Condenser, and Evaporator)
LABOR: One Year from the Date of Purchase.
PARTS: Seven Years from the Date of Purchase.
HOW SERVICE IS HANDLED:
Call 1-888-542-2623 (1-888-LG-CANADA) and
choose the appropriate prompt. Please have product
type (refrigerator) and Postal Code ready.
See our Web site at www.lg.ca
This warranty provides in-home service.
NOTE: To prove warranty covers, retain your Sales
Receipt to prove date of purchase. A copy of your Sales
Receipt must be submitted at the time warranty service
is provided.
To obtain Customer Assistance, Product
Information, or Dealer or Authorized Service
Center location:
Call
1-888-542-2623 (1-888-LG-CANADA) and
choose the appropriate prompt. Please have your product type
(refrigerator) and Postal Code ready.
Or visit our Web site at
www.lg.ca.
Page 44

444546
Page 45

Page 46

CONSIGNES DE SÉCURITÉ
IMPORTANTES
Mesures de sécurité fondamentales ....................47
Élimination des CFC ............................................48
Raccordement à l’alimentation électrique ............49
COMPOSANTS ET FONCTIONS
Fonctions spéciales ..............................................50
Pièces et composants principaux .........................51
INSTALLATION
Choisir l’emplacement approprié ..........................52
Dégagements .......................................................52
Revêtement de sol ...............................................53
Enlèvement des poignées ....................................53
Enlèvement des portes et du tiroir .......................54
Raccordement à l’alimentation d’eau ...................62
Raccordement des conduites d’eau .....................62
Mise à niveau des portes du réfrigérateur ............64
Démarrage ...........................................................65
UTILISATION DU RÉFRIGÉRATEUR
Fonctions du panneau de commande...................66
L’affi cheur DEL ....................................................67
Réglage des températures et de l’affi chage ........68
Fonctionnement du distributeur ............................69
Réglage des fonctions ..........................................70
Bac à glace de porte ............................................71
Machine à glaçons automatique ..........................72
Conservation des aliments ...................................73
Rangement des aliments .....................................74
Réglage de la hauteur des clayettes ....................75
ENTRETIEN ET NETTOYAGE
Enlèvement et remise en place des
composants...........................................................76
Nettoyage du réfrigérateur ....................................79
Renseignements généraux ...................................79
Remplacement du fi ltre à eau ..............................80
DÉPANNAGE
Avant de faire un appel de service........................81
CARACTÉRISTIQUES TECHNIQUES
Dimensions et caractéristiques principales ...........85
GARANTIE
Enregistrement du produit.....................................86
MERCI!
Félicitations pour votre achat et
bienvenue dans la famille LG.
Votre nouveau réfrigérateur à
portes françaises combine la
technologie de réfrigération
la plus évoluée à une utilisation
simple et une grande efficacité
En respectant les instructions
d’utilisation et d’entretien
de ce manuel, votre réfrigérateur
vous apportera de nombreuses
années de service fiable.
Page 47

47
MESURES DE SÉCURITÉ FONDAMENTALES
Ce manuel contient plusieurs messages de sécurité importants. Lisez ces
messages de sécurité et observez-les en tout temps.
w Ceci est un symbole d’avis de sécurité. Le message de sécurité qu’il signale vous renseigne sur un
risque pouvant entraîner la mort, des blessures corporelles ou l’endommagement du produit. Tous les
messages de sécurité sont précédés de ce symbole et des mots DANGER, AVERTISSEMENT, ou MISE
EN GARDE. La signification de ces mots est la suivante :
wDANGER
Vous prenez un risque de mort ou de blessure grave si vous ne
respectez pas les instructions.
wAVERTISSEMENT
Vous pouvez perdre la vie ou être sévèrement blessé si
vousn’observez pas les instructions.
wMISE EN GARDE
Indique une situation de risque imminente qui, si elle n’est pas
évitée, peut entrainer une blessure mineure ou modérée, ou
endommager le produit.
Tous les messages de sécurité identifient les risques, indiquent la façon de les réduire, et décrivent les
conséquences susceptibles de se produire si l’on ne se conforme pas aux instructions.
wAVERTISSEMENT
Afin de réduire les risques d’incendie,
d’électrocution, ou de blessures lors de l’utilisation
du produit, des mesures de sécurité fondamentales
doivent être prises, y compris celles qui suivent.
Lisez toutes les instructions avant d’utiliser cet
appareil.
• Ne débranchez jamais le réfrigérateur en tirant sur le
cordon d’alimentation. Saisissez toujours la fi che
fermement et retirez-la de la prise en droite ligne.
• Réparez ou remplacez immédiatement les cordons
électriques effi lochés ou autrement endommagés.
N’utilisez pas un cordon qui montre des signes de
craquelures ou d’abrasion, que ce soit sur sa longueur,
sa fi che ou une autre extrémité.
• Veillez à ne pas endommager le cordon lorsque vous
éloignez le réfrigérateur du mur.
• Ne rangez ni n’utilisez d’essence ou autres vapeurs ou
liquides infl ammables à proximité de cet appareil ou
de n’importe quel autre appareil.
• NE PAS laisser les enfants grimper, se tenir debout et
s’asseoir sur les clayettes, les tiroirs ou les portes du
réfrigérateur, ou s’accrocher à eux. Ils risqueraient
d’endommager celui-ci ou de se blesser sérieusement.
• Gardez vos doigts à l’écart des zones de coincement,
l’espace entre les portes et la carrosserie étant
nécessairement restreint.Fermez les portes avec
précaution lorsque des enfants se trouvent à proximité.
• Débranchez le réfrigérateur avant de procéder au
nettoyage ou à toute réparation.
REMARQUE : Les réparations doivent être effectuées
par un technicien agréé.
• Avant de remplacer une ampoule grillée, débranchez le
réfrigérateur ou coupez
l’alimentation au niveau du disjoncteur ou de la boîte
de fusible afi n d’éviter tout contact avec un fi l sous
tension. (Une ampoule grillée peut se briser lors de son
remplacement.)
REMARQUE : Certains modèles sont munis d’un
éclairage LED intérieur et leur entretien doit être
effectué par un technicien qualifié.
REMARQUE : Le fait de mettre les deux ou l’une des
commandes à la position OFF (Arrêt) ne coupe pas
l’alimentation du circuit de la lumière.
• Lorsque vous avez terminé, rebranchez le réfrigérateur
à la source électrique et réinitialisez la commande
(thermostat, commande du réfrigérateur ou du
congélateur, dépendant du modèle) au réglage
souhaité
• Ce réfrigérateur doit être correctement installé,
conformément aux instructions d’installation
indiquées à l’avant du réfrigérateur.
• Lorsque le réfrigérateur est en marche, ne touchez pas
aux surfaces froides du compartiment congélation si
vos mains sont moites ou mouillées. La peau risque
d’adhérer aux surfaces très froides.
• Évitez de toucher à l’élément chauffant ou aux pièces
mobiles du mécanisme d’éjection de la machine à
glaçons d’un réfrigérateur qui en est équipé. Ne mettez
PAS les doigts ou les mains dans la machine à glaçons
automatique si le réfrigérateur est branché.
• Ne modifi ez ni n’allongez le cordon électrique.
Une électrocution ou un incendie en résulterait.
Page 48

48
MESURES DE SÉCURITÉ FONDAMENTALES (SUITE)
• Ne congelez pas de nouveau les aliments qui se
sont complètement décongelés. Le Ministère de
l’Agriculture des États-Unis stipule dans son
bulletin Home and Garden n o 69 :
…Vous pouvez, en toute sécurité, congeler de
nouveau des aliments décongelés s’ils
contiennent encore des cristaux de glace ou sont
encore froids—au-dessous de 40°F (4°C).
…La viande hachée, la volaille, ou le poisson
décongelés ayant une odeur ou une couleur
anormales ne doivent être ni recongelés ni
mangés. La crème glacée fondue doit être jetée.
Débarrassez-vous de tout aliment dont l’odeur
ou la couleur est mauvaise ou douteuse.
Il pourrait être dangereux de manger de tels
aliments.
Une décongélation même partielle suivie
d’une recongélation altère la qualité des
aliments, particulièrement les fruits, les légumes
et les plats préparés. La qualité des viandes rouges
est moins affectée que celle de la plupart des autres
aliments. Utilisez les aliments recongelés dès que
possible pour une préservation optimale de leur
qualité.
ÉLIMINATION DES CFC
Votre vieux réfrigérateur est peut-être équipé d’un
système de refroidissement qui contient des CFC
(chlorofluorocarbures). Or ceux-ci sont considérés
comme dommageables pour la couche d’ozone.
Si vous jetez votre vieux réfrigérateur, assurez-vous
qu’un technicien qualifié mettra correctement
au rebut le frigorigène qui contient des CFC. Si
vous libérez intentionnellement ce frigorigène dans
l’atmosphère, vous encourez une amende ou
l’emprisonnement en vertu des lois sur
l’environnement.
wDANGER
Risque de piégeage des enfants
Les réfrigérateurs jetés ou abandonnés sont
dangereux, même s’ils ne restent que quelques jours.
Si vous vous départissez de votre vieux réfrigérateur,
veuillez suivre les instructions ci-dessous afin de
prévenir les accidents :
Avant de jeter votre vieux réfrigérateur ou
congélateur :
• Enlevez les portes.
• Laissez les clayettes en place de sorte que les
enfants ne puissent entrer facilement à l’intérieur.
Page 49

49
RACCORDEMENT À L’ALIMENTATION ÉLECTRIQUE
IMPORTANT: Veuillez lire cette section
attentivement.
wAVERTISSEMENT
Risque d’électrocution
Pour la sécurité des personnes, cet appareil
doit être correctement mis à la terre. Demandez
à un électricien agréé de vérifi er l’exactitude
de la mise à la terre de la prise murale et du
circuit.
MÉTHODE DE MISE À LA TERRE
RECOMMANDÉE
Le réfrigérateur doit toujours être branché dans
une prise électrique dédiée et correctement
mise à la terre, classée pour une alimentation
de 120 V, 60 Hz, uniquement à c.a. et munie
d’un fusible de 20 ampères. Ces caractéristiques
procurent le meilleur rendement
et préviennent la surcharge du circuit de câblage
domestique qui peut entraîner un risque
d’incendie. Il est recommandé d’affecter un
circuit particulier à l’alimentation de cet appareil.
Utilisez une prise de courant dont la mise hors
tension par un interrupteur ou une chaîne est
impossible. N’utilisez pas de cordon rallonge.
Si vous êtes en présence d’une prise de courant
bipolaire standard (deux trous), vous avez la
responsabilité et l’obligation de la faire
remplacer par une prise tripolaire (trois trous)
correctement mise à la terre.
En aucun cas vous ne devez couper ou
enlever la troisième broche (mise à la terre)
de la fiche du cordon.
N’utilisez pas une fiche adaptatrice.
REMARQUE : Certains modèles sont munis d’un
éclairage LED intérieur et leur entretien doit être
effectué par un technicien qualifié.
Quand vous avez terminé, rebranchez le réfrigérateur
dans la prise électrique et remettez la commande
(thermostat, commande du réfrigérateur, ou du
congélateur, selon le modèle) au réglage voulu.
UTILISATION DE CORDONS RALLONGES
Étant donné les risques potentiels pour la
sécurité, nous recommandons vivement de
ne pas utiliser un cordon rallonge. Si vous
tenez cependant à en utiliser un, le cordon
rallonge doit absolument être doté des
caractéristiques suivantes : trifilaire, certifié UL
(États-Unis), classé 20 ampères minimum
pour 120V, avec fiche et prise murale mises à la
terre.
L’utilisation d’un cordon rallonge augmentera
l’espace libre requis à l’arrière du réfrigérateur.
CONSERVEZ CES INSTRUCTIONS
Page 50

50
FONCTIONS SPÉCIALES
AFFICHEUR DEL DU PANNEAU DE
COMMANDE
Les commandes électroniques simples sont
conviviales. L’afficheur DEL indique les
températures du réfrigérateur et du congélateur,
affiche l’état du filtre à eau, des données sur le
distributeur et d’autres renseignements.
ICE PLUS (GLACE PLUS)
Quand ce dispositif est activé, la section congélateur
fonctionnera à la température la plus froide pendant
une période de 24 heures pour augmenter la
production de glace d’environ 20 pour cent.
DISTRIBUTEURS D’EAU FILTRÉE ET DE
GLAÇONS
Le refroidisseur d’eau fournit de l’eau fraîche, glacée
et filtrée à travers la porte.
Le distributeur de glaçons fournit de la glace en
cubes ou broyée.
ALARME DE PORTE
Une alarme retentit à des intervalles de 30 secondes
si une porte du réfrigérateur ou du congélateur est
laissée ouverte pour plus de 60 secondes.
BAC A GLACE DE PORTE
La machine à glaçons automatique produit de
80 à 130 glaçons sur une période de 24 heures
afin de maintenir le distributeur de glace à pleine
capacité. Le design de la contre-porte libère de
l’espace pour les clayettes.
BAC À LÉGUMES
Les bacs à légumes LG’s préservent de l’humidité et
aident à conserver les légumes sèches.
1
2
3
4
5
6
1
2
3
4
5
6
Page 51

51
PIÈCES ET COMPOSANTS PRINCIPAUX
En plus des fonctions et composants spéciaux décrits dans la section Fonctions Spéciales, de nombreux
autres composants importants sont mentionnés dans ce guide.
RAYONNAGE DU REFRIGERATEUR
AJUSTABLE
Les clayettes du compartiment réfrigérateur sont
réglables pour permettre un rangement polyvalent.
PORTE-BOUTEILLES
Vous pouvez arranger trois bacs interchangeables
pour satisfaire vos besoins de stockage.
BAC À COLLATIONS
Le bac à collations est idéal pour ranger le pain,
les viandes froides, et les grignotines.
LED ÉCLAIRAGE INTÉRIEUR
Deux ensembles de LED illuminent l’intérieur du
congélateur et du réfrigérateur.
CASIER DE PORTE BASCULANT
CASIER DE PORTE FIXE
1
2
4
5
3
6
3
5
4
6
1
2
4
Page 52

52
CHOISIR L’EMPLACEMENT APPROPRIÉ
wAVERTISSEMENT
Risque de poids excessif
Au moins deux personnes sont nécessaires
pour déplacer et déballer l’appareil.
• Rangez et installez le réfrigérateur dans un
endroit où il ne sera pas exposé aux
intempéries ou à des températures sous le
point de congélation.
• Installez cet appareil dans un endroit où la
température se maintient entre 55°F (13°C) et
110°F (43°C). Si la température autour de
l’appareil est trop basse ou trop élevée, la
capacité de congélation peut être compromise.
• Si le réfrigérateur est installé dans un endroit
où la température s’élève au-dessus de 110°F
(43°C), la capacité de congélation sera
compromise et les coûts d’électricité
augmenteront.
• Pour réduire le risque d’é lectrocution,
n’installez pas le réfrigérateur dans un endroit
mouillé ou humide.
• Sélectionnez un endroit où il soit facile de
connecter l’arrivée d’eau pour la machine à
glaçons et le distributeur automatique.
• Une installation instable peut engendrer des
vibrations et du bruit. Si le plancher n'est pas
nivelé, nivelez le réfrigérateur en tournant les
vis d’ajustement de hauteur.
• Mettez le réfrigérateur à la terre conformément
aux codes et règlements en vigueur.
wMISE EN GARDE
N’installez pas votre réfrigérateur en vicinité
des sources de chaleur, en la lumière du
soleil, ou de humidité.
DÉGAGEMENTS
• Une distance trop courte par rapport aux objets
adjacents peut réduire la capacité de congélation
et augmenter les frais de consommation
d’électricité.
Laissez au moins 24 po (61 cm) devant le
réfrigérateur pour ouvrir les portes.
REMARQUE : Reportez-vous à la page 85 pour les
dimensions et les caractéristiques complètes.
1" (2,54 cm)
Page 53

53
REVÊTEMENT DE SOL
• Pour réduire le bruit et les vibrations au
minimum, le réfrigérateur DOIT reposer sur un
plancher solidement construit.
• Pour éviter les vibrations, l’appareil doit être de
niveau. Au besoin, réglez les pattes de
nivellement pour compenser les inégalités du
plancher. Le devant doit être légèrement plus
haut que l’arrière pour faciliter la fermeture des
portes. Les pieds de mise à niveau peuvent être
tournés facilement en repoussant le haut du
réfrigérateur pour soulager les pieds du poids du
réfrigérateur. Vissez les pattes dans le sens
horaire pour remonter l’appareil et dans le sens
antihoraire pour l’abaisser.
• Un revêtement de tapis ou de tuiles souples n’est
pas recommandé.
• N’installez jamais le réfrigérateur sur une
plateforme ou une structure faiblement soutenue.
REMARQUE : Assurez-vous de protéger le
plancher lorsque vous déplacez le réfrigérateur
pour le nettoyage ou une réparation. Tirez
toujours sur le réfrigérateur en ligne droite pour
le déplacer. Évitez de le branler ou le faire
pivoter pour éviter d’endommager le plancher.
ENLÈVEMENT DES POIGNÉES
Pour déplacer le réfrigérateur à travers
l’embrasure d’une porte, il peut s’avérer
nécessaire d’enlever les poignées des portes du
réfrigérateur.
REMARQUE : L’aspect des poignées peut
différer des illustrations de cette page.
wMISE EN GARDE
• Enlevez les poignées avec précaution pour
éviter d’é gratigner les portes.
• Vous risquez d’endommager la poignée si vous la
frappez avec un marteau lors de son enlèvement ou
de sa fi xation.
• En enlevant ou fi xant la poignée, tirez ou poussez
avec une force raisonnable.
Desserrez les vis de l’ensemble à l’aide d’une
clé Allen de 2,5 mm (3/32 po.) et enlevez la
poignée.
REMARQUE : Si vous devez resserrer ou
enlever les fixations de montage de la
poignée, utilisez la clé Allen de 1/4 po.
1 Desserrez les vis de l’ensemble situées en
bas de la poignée à l’aide de la clé Allen de
2,5 mm (3/32 po.) et enlevez la poignée.
REMARQUE : Si vous devez resserrer ou
enlever les fixations de montage de la
poignée, utilisez la clé Allen de 1/4 po.
2
Fixations de
montage
Vis de serrage
Clé Allen
REMARQUE : il est recommandé de démonter les portes s’il est nécessaire de passer le réfrigérateur dans
une ouverture étroite.
Page 54

54
ENLÈVEMENT DES POIGNÉES (SUITE)
RÉINSTALLATION DES POIGNÉES
ENLÈVEMENT DES PORTES ET DU TIROIR
ENLÈVEMENT DES PORTES
wAVERTISSEMENT
Risque d’électrocution
• Débranchez l’alimentation électrique vers le
réfrigérateur avant d’installer. Négliger de le faire
pourrait occasionner des blessures fatales ou
graves.
• Ne pas placer les mains ou les pieds ou des bâtons
en métal dans les grilles d’aération, la grille de la
base ou à la base du réfrigérateur. Vous pouvez
vous blesser ou recevoir un choc électrique.
• Soyez prudent lorsque vous travaillez avec la
charnière, la grille basale, ou la butée. Vous
pourriez vous blesser.
Avant de commencer, retirez les aliments et les bacs
des contre-portes.
Si votre porte d’entrée est trop étroite pour laisser
passer le réfrigérateur, enlevez la porte du
réfrigérateur, puis faites passez le réfrigérateur sur le
côté dans l’embrasure.
Placez la poignée sur la porte en alignant
les empreintes de la poignée pour les
adapter aux attaches de montage et serrez
les vis de fixation à l’aide d’une clé Allen
2,5 mm (3/32 po)
REMARQUE: Si vous devez resserrer ou
enlever les fixations de montage de la
poignée, utilisez la clé Allen de 1/4 po.
1
Placez la poignée sur la porte en alignant
les empreintes de la poignée pour les adapter
aux attaches de montage et serrez les vis de
fixation au bas de la poignée à l’aide d’une
clé Allen 2,5 mm (3/32 po)
REMARQUE: Si vous devez resserrer ou
enlever les fixations de montage de la
poignée, utilisez la clé Allen de 1/4 po.
2
Pour enlever la porte de réfrigérateur
gauche :
Sortez le tube du raccord tout en pressant
l’anneau de dégagement sur le raccord.
REMARQUE: Pour retirer le tube, vous devez
pousser le collier dans la direction opposée à la
flèche dans l’image supérieure, et tirer le tube
dans la direction de la flèche.
1
Fixations de
montage
collet
Page 55

55
ENLÈVEMENT DES PORTES ET DU TIROIR (SUITE)
ENLÈVEMENT DES PORTES (SUITE)
• Ouvrez la porte. Enlevez la vis supérieure
de couverture de charnière (1).
• Utilisez un tournevis à lame plate pour
dégager les crochets (non illustrés) sur le
devant de la face inférieure du couvercle (2).
Soulevez le couvercle.
• Retirez le couvercle. Dégagez le tube (3).
• Débranchez tous les faisceaux de fi ls (4).
• Retirez la vis de mise à la terre (5).
• Tournez le levier de charnière (6) dans le
sens antihoraire et enlevez-le. Soulevez la
charnière supérieure (7) pour la dégager du
loquet du levier (8).
IMPORTANT : En soulevant la charnière pour
la dégager, veillez à ce que la porte ne tombe
pas par en avant.
• Soulevez la porte par la tige de charnière
centrale et enlevez la porte.
ATTENTION : Démontez/remontez toujours
avec la porte ouverte à 90°.
• Placez la porte, face intérieure vers le haut,
sur une surface non abrasive.
(1)
(2)
(4)
(3)
(6)
(7)
(8)
(5)
2 Pour enlever la porte de réfrigérateur
droite :
• Ouvrez la porte. Enlevez la vis supérieure
de couverture de charnière (1). Soulevez le
couvercle (2).
• Retirez le couvercle.
• Débranchez le faisceau de fi ls (3).
• Tournez le levier de charnière (4) dans le
sens horaire et enlevez-le. Soulevez la
charnière supérieure (5) pour la dégager du
loquet du levier (6).
IMPORTANT : En soulevant la charnière pour
la dégager, veillez à ce que la porte ne tombe
pas par en avant.
• Soulevez la porte à partir de la tige de
charnière centrale et enlevez la porte.
ATTENTION : Démontez/remontez toujours
avec la porte ouverte à 90°.
• Placez la porte, face intérieure vers le haut,
sur une surface non abrasive.
(1)
(2)
(3)
(4)
(5)
(6)
3
Page 56

56
ENLÈVEMENT DES PORTES ET DU TIROIR (SUITE)
RÉINSTALLATION DES PORTES
Commencez par installer la porte de droite.
• Abaissez la porte sur la tige de charnière
centrale, comme illustré.
1
• Placez la charnière supérieure (1) au dessus
du loquet du levier de charnière (2) puis
mettez-la en place. Insérez le levier (3) sous
le loquet du levier. Tournez le levier dans le
sens antihoraire pour fi xer la charnière.
• Branchez le faisceau de fi ls (4).
• Accrochez la languette du couvercle située
côté interrupteur (5) sous le bord de l’orifi ce
des fi ls dans le haut de la carrosserie.
Mettez le couvercle en place. Insérez la vis
du couvercle et serrez (6).
(3)
(2)
(1)
(6)
(5)
(4)
2
Installez la porte de gauche.
• Abaissez la porte sur la tige de charnière
centrale.
3
• Placez la charnière supérieure (1) au dessus
du loquet du levier de charnière (2) puis
mettez-la en place. Insérez le levier (3) sous
le loquet. Tournez le levier dans le sens
horaire pour fi xer la charnière.
• Installez la vis de mise à la terre (4) et reliez
tous les harnais (5).
(2)
(1)
(3)
(4)
(5)
4
Page 57

57
ENLÈVEMENT DES PORTES ET DU TIROIR (SUITE)
RÉINSTALLATION DES PORTES (CONT.)
• Poussez le tube d'approvisionnement en
eau (6) dans le trou sur le bac supérieur et
tirez-le par la plaque arrière.
(6)
5 Insérez le tube d’alimentation d’eau dans le
connecteur.
• Insérez le tube dans le connecteur sur une
distance d’au moins 5/8 po (15 mm).
• Accrochez la languette du couvercle située
côté interrupteur sous le bord de l’orifi ce
des fi ls dans le haut de la carrosserie.
Mettez le couvercle en place. Insérez la vis
du couvercle et serrez.
6
(Couvercle)
(Vis du couvercle)
wAVERTISSEMENT
1. Insérez le tuyau jusqu’à ce que vous ne voyiez qu’une seule ligne d’alimentation.
2. Ensuite, tirez du tuyau pour vérifier qu’il est correctement inséré.
3. Montez l’attache.
Bague de serrage
Correct Incorrect
Insertion de ligne
Attache
Tuyau
Page 58

58
ENLÈVEMENT DES PORTES ET DU TIROIR (SUITE)
ENLÈVEMENT DU TIROIR DU CONGÉLATEUR
wMISE EN GARDE
• Afi n d’é carter tout risque de blessures ou de
dommages au produit ou à la propriété, deux
personnes seront nécessaires pour exécuter
les instructions suivantes.
• Lorsque vous démontez le tiroir, ne le tenez pas
par la poignée. Elle pourrait se casser et provoquer
des blessures.
• En déposant le tiroir, veillez à ne pas
endommager le plancher ni heurter vos pieds sur
les bords coupants du côté charnière.
wATTENTION: Lorsque vous enlevez le tiroir, ne saisissez pas la poignée.
Si elle est enlevée, vous pourriez subir des blessures.
wATTENTION: Lorsque vous déposer le tiroir sur le plancher, veillez à ne pas endommager le plancher
et à ne pas vous faire mail au pied avec les bords affilés du côté de la charnière.
Retirez les vis du rail des deux côtés.2Pour retirer le tiroir de congélateur, tirez le
tiroir à sa pleine extension.
Retirez le tiroir et le bac à glace en soulevant
le panier du système de rail.
1
Avec les deux mains, maintenez les deux
côtés de la porte et tirez pour les séparer.
3 Avec les deux mains, tordez la barre centrale
suffisamment pour déverrouiller du chariot les
deux extrémités.
54
TIROIR DU HAUT
Page 59

59
ENLÈVEMENT DES PORTES ET DU TIROIR (SUITE)
wMISE EN GARDE
• Afi n d’é carter tout risque de blessures ou de
dommages au produit ou à la propriété, deux
personnes seront nécessaires pour exécuter
les instructions suivantes.
• Lorsque vous démontez le tiroir, ne le tenez pas
par la poignée. Elle pourrait se casser et provoquer
des blessures.
• En déposant le tiroir, veillez à ne pas
endommager le plancher ni heurter vos pieds sur
les bords coupants du côté charnière.
ENLÈVEMENT DU TIROIR DU CONGÉLATEUR
wATTENTION: Lorsque vous enlevez le tiroir, ne saisissez pas la poignée.
Si elle est enlevée, vous pourriez subir des blessures.
wATTENTION: Lorsque vous déposer le tiroir sur le plancher, veillez à ne pas endommager le plancher
et à ne pas vous faire mail au pied avec les bords affilés du côté de la charnière.
Retirez les vis du rail des deux côtés.2
Pour enlever le tiroir du congélateur,
ouvrez-le jusqu’au bout. Retirez le panier
inférieur DuraBase ® en le soulevant pour
le dégager des rails.
1
Avec les deux mains, maintenez les deux
côtés de la porte et tirez pour les séparer.
3 Avec les deux mains, tordez la barre centrale
suffisamment pour déverrouiller du chariot les
deux extrémités.
54
TIROIR DU BAS
Page 60

60
ENLÈVEMENT DES PORTES ET DU TIROIR (SUITE)
RÉINSTALLATION DU TIROIR DU CONGÉLATEUR
wAVERTISSEMENT: Pour éviter que les enfants ou les animaux domestiques puissent rester attrapés ou
suffoqués dedans, ne leur permettez pas de jouer dans l'intérieur du tiroir.
wAVERTISSEMENT: Ne marchez ni ne vous asseyez sur la porte du congélateur.
wMISE EN GARDE
• Afi n d’é carter tout risque de blessures ou de
dommages au produit ou à la propriété, deux
personnes seront nécessaires pour exécuter les
instructions suivantes.
wDANGER
Risque de piégeage des enfants
• Pour éviter le piégeage accidentel des enfants ou
des animaux domestiques et les risques de
suffocation, NE leur permettez PAS de jouer à
l’intérieur du tiroir du congélateur.
• ÉVITEZ de mettre le pied ou de vous asseoir sur le
tiroir.
Pour remettre le tiroir en place, tenez la barre
centrale avec les deux mains et tirez-la
jusqu’à la pleine extension des rails.
1 Montez le connecteur de la porte (1) sur le
bras du rail (2).
2
1
2
Vérifiez la forme de gauche et droite du rail du
couvercle.
3 Lorsque le tiroir est tiré vers l’extérieur à sa
pleine extension, insérez le tiroir et le bac à
glace dans le système de rail.
4
TIROIR DU HAUT
Page 61

61
ENLÈVEMENT DES PORTES ET DU TIROIR (SUITE)
RÉINSTALLATION DU TIROIR DU CONGÉLATEUR
wAVERTISSEMENT: Pour éviter que les enfants ou les animaux domestiques puissent rester attrapés ou
suffoqués dedans, ne leur permettez pas de jouer dans l'intérieur du tiroir.
wAVERTISSEMENT: Ne marchez ni ne vous asseyez sur la porte du congélateur.
wMISE EN GARDE
• Afi n d’é carter tout risque de blessures ou de
dommages au produit ou à la propriété, deux
personnes seront nécessaires pour exécuter les
instructions suivantes.
wDANGER
Risque de piégeage des enfants
• Pour éviter le piégeage accidentel des enfants ou
des animaux domestiques et les risques de
suffocation, NE leur permettez PAS de jouer à
l’intérieur du tiroir du congélateur.
• ÉVITEZ de mettre le pied ou de vous asseoir sur le
tiroir.
Pour remettre le tiroir en place, tenez la barre
centrale avec les deux mains et tirez-la
jusqu’à la pleine extension des rails.
1 Montez le connecteur de la porte (1) sur le
bras du rail (2).
2
1
2
Vérifiez la forme de gauche et droite du rail du
couvercle.
3 Avecletiroirétendu àsonextensiontotale,
insérezlepanierinférieur dans
lesystèmedeguidage jusqu'àcequ'ilne
sedéplacepasen avant.
4
TIROIR DU BAS
Page 62

62
RACCORDEMENT À L’ALIMENTATION D’EAU
wAVERTISSEMENT
Raccordez-vous à une alimentation
d’eau potable seulement.
• La machine à glaçons automatique nécessite une
pression d’eau de 21 à 121 psi (1,5 à 8,5 kgf/cm2) sur
les modèles sans filtre à eau, et de 43 à 121 psi (3 à
8,5 kgf/cm2) sur les modèles avec filtre à eau.
• Si la pression d’eau n’atteint pas 21 psi (1,5
kgf/cm2) ou tombe sous cette valeur, la machine à
glaçons et le distributeur d’eau doivent chacun être
dotés d’une pompe de pression distincte pour
fonctionner normalement.
• Il est recommandé que la longueur totale du tube
d’alimentation d’eau ne dépasse pas 26 pi (8 m).
• Installez la conduite d’eau à un endroit où elle ne
sera pas affectée par la chaleur.
IMPORTANT : Lisez toutes les directives
attentivement avant de commencer.
• Si le réfrigérateur doit fonctionner avant d’effectuer
le raccordement à l’alimentation d’eau, mettez la
machine à glaçons à la position OFF (Arrêt) pour
empêcher son fonctionnement à vide.
•
Toutes les installations doivent se conformer aux
codes locaux qui régissent les travaux de plomberie.
•
Utilisez des conduites en cuivre et vérifiez les fuites.
• Installez les conduites uniquement dans des
endroits où la température se maintiendra audessus du point de congélation.
• La machine à glaçons peut prendre jusqu’à 24
heures pour commencer à produire de la glace.
Outils requis
• Tournevis standard
• Clés à fourche de 7/16 et 1/2 po ou deux clés
réglables
• Tournevis à douille de 1/4 po
• Mèche de 1/4 po
• Perceuse manuelle ou électrique (correctement
mise à la terre)
REMARQUE : Les concessionnaires de
réfrigérateurs offrent une trousse qui comprend un
robinet d’arrêt à étrier de 1/4 po, un raccord, et une
conduite en cuivre. Avant de vous la procurer,
assurez-vous de la conformité du robinet d’arrêt à
étrier aux codes locaux qui régissent les travaux de
plomberie. N’utilisez pas un robinet de type perforant
ou un robinet d’arrêt à étrier de 3/16 po car ceux-ci
réduisent le débit d’eau et s’obstruent plus
facilement.
Alimentation d’eau froide
• Le robinet d’adduction d’eau de la machine à
glaçons est doté d’une électrovanne qui sert de
régulateur de pression.
• La machine à glaçons doit être raccordée à une
conduite d’eau froide dont la pression est de 21 à
121 psi (1,5 à 8,5 kgf/cm2) sur les modèles sans fi
ltre à eau, et de 43 à 121 psi (3 à 8,5 kgf/ cm2) sur
les modèles avec fi ltre à eau.
RACCORDEMENT DES CONDUITES D’EAU
IMPORTANT : Avant de raccorder les tubes à la
conduite d’eau, débranchez le réfrigérateur de la
prise ou coupez l’alimentation électrique.
• Coupez la conduite d’eau principale et ouvrez le
robinet le plus proche afin de libérer la pression
dans la conduite. L’ouverture d’un robinet extérieur
peut faciliter le drainage de l’eau de la conduite de
la maison.
• Repérez une conduite d’eau FROIDE verticale de
1/2 po à proximité du réfrigérateur.
REMARQUE : Un conduite horizontale fera aussi
l’affaire, à condition cependant de prendre la
précaution suivante : percez sur le dessus de la
conduite et non en dessous. Ceci contribuera à
éloigner l’eau de la perceuse et à empêcher les
sédiments de s’accumuler dans le robinet d’arrêt.
• Pour déterminer la longueur du tube de cuivre qu’il
vous faut, mesurez la distance entre le raccord du
réfrigérateur (situé dans la partie inférieure gauche
à l’arrière du réfrigérateur) et la conduite d’eau.
Ajoutez 7 pi (2,1 m) pour être en mesure de
déplacer le réfrigérateur lors du nettoyage. Utilisez
un tube de cuivre d’un diamètre extérieur de 1/4
po. Assurez-vous que les deux extrémités du tube
sont coupées à angle droit.
• À l’aide d’une perceuse, percez un trou de 1/4 po
dans la conduite d’eau froide que vous avez
repérée.
Page 63

• Fixez le robinet d’arrêt sur la conduite d’eau froide à
l’aide de la bride pour tuyau. Assurez-vous que
le raccord du robinet est bien inséré dans le trou
de 1/4 po qui a été percé dans la conduite d’eau et
que la rondelle d’é tanchéité se trouve sous la
bride. Serrez l’é crou de serrage.
Ensuite, serrez uniformément et avec soin les
vis de la bride afin que la rondelle forme un
joint bien étanche. Ne serrez pas trop car vous
pourriez écraser le tube de cuivre, en particulier
s’il s’agit d’un serpentin souple. Vous êtes
maintenant prêt à raccorder le tube de cuivre.
• Glissez le manchon et l’é crou à compression
sur le tube de cuivre, comme illustré. Insérez
en ligne droite et aussi loin que possible
l’extrémité du tube dans l’orifice de sortie du
robinet. À l’aide d’une clé, vissez l’é crou de
compression sur l’orifice de sortie. Une clé
polygonale ouverte est l’idéal, mais une clé à
fourche fera l’affaire. Ne serrez pas à l’excès.
• Placez l’extrémité libre du tube dans un
contenant ou un évier, puis rétablissez
l’alimentation d’eau dans la conduite principale.
Rincez le tube jusqu’à l’obtention d’une eau
claire. Fermez le robinet d’arrêt sur la conduite
d’eau. Enroulez le tube de cuivre comme illustré cidessous.
63
RACCORDEMENT DES CONDUITES D’EAU (SUITE)
IMPORTANT : Avant de raccorder le tube au
réfrigérateur, assurez-vous que le cordon du
réfrigérateur n’est pas branché dans la prise murale.
REMARQUE : Un filtre externe est proscrit si
votre réfrigérateur est déjà équipé d’un filtre
intégré.
• Retirez le capuchon fl exible en plastique du robinet
d’eau.
• Placez l’é crou de serrage et la bague sur
l’extrémité du tube, comme illustré.
• Insérez aussi loin que possible l’extrémité du tube
de cuivre dans l’orifi ce d’entrée. Serrez le raccord
tout en tenant le tube.
IMPORTANT : Serrez tout raccordement où une fuite
est détectée. Ouvrez l’eau au niveau du robinet
d’arrêt.
• Branchez le réfrigérateur dans la prise.
• Disposez le tube de cuivre à l’arrière du
réfrigérateur de manière à ce qu’il ne vibre pas
contre le mur ou le réfrigérateur.
• Vérifi ez la présence de fuites.
• Avant de raccorder la conduite d’eau sur la maison,
vidanger la conduite d’eau pendant deux minutes.
REMARQUE : L’é coulement de l’eau peut prendre
quelques secondes pour laisser le réservoir se
remplir et l’air s’expulser des conduites.
• Poussez le réfrigérateur contre le mur.
• Mettre l’interrupteur de la machine à glaçons à la
position ON (Marche).
REMARQUE : La machine à glaçons devra atteindre
15°F (-9°C) pour commencer à fonctionner. Le
démarrage se fera alors automatiquement.
REMARQUE : Jetez les premiers lots de glaçons
(environ 20 glaçons).
Écrou de
serrage
Robinet
d’arrêt
Manchon de
compression
Écrou de
compression
Conduite d’eau froide
Bride pour
tuyau
Serpentin en
polyéthylène ou
tube de cuivre
Bague
(manchon)
Orifice d’entrée du
réfrigérateur
Robinet
d’eau
Bride pour
tubes
Tube de
1
/
4 po
Écrou de
serrage de
1
/
4 po
Page 64

64
MISE À NIVEAU DES PORTES DU RÉFRIGÉRATEUR
wAVERTISSEMENT
Risque d’électrocution
• Soyez prudent lorsque vous travaillez avec la
charnière, la grille basale, ou la butée. Vous
pourriez vous blesser.
• Ne mettez pas les mains, les pieds ni de pièces
métalliques dans les évents, dans la grille, ou dans
le bas du réfrigérateur. Vous pourriez vous blesser
ou subir un choc électrique.
Nivellement
Une fois installé, sécurisez l’appareil à l’aide de la
JAMBE pour éviter qu’il ne bouge.
Votre réfrigérateur est doté de deux pattes de
nivellement frontales, l’une à gauche et l’autre à
droite. Réglez les pattes pour corriger le balancement
d’avant en arrière ou d’un côté à l’autre. Si votre
réfrigérateur semble instable ou si vous voulez que
les portes ferment plus facilement, ajustez
l'inclinaison du réfrigérateur en utilisant les
instructions suivantes:
wMISE EN GARDE
• Afi n d’é carter tout risque de blessures ou de
dommages au produit ou à la propriété, deux
personnes seront nécessaires pour exécuter les
instructions suivantes.
Branchez le cordon électrique dans une prise
trifilaire à contact de mise à la terre et
déplacez le réfrigérateur à sa position finale.
Enlevez les vis de la plaque de bas de porte,
puis la plaque.
• Ouvrez le tiroir du congélateur.
• Une fois ouvert, vous disposez de suffi
samment d’espace pour enlever les vis sur
le dessus de la plaque de bas de porte.
REMARQUE : Pour replacer la plaque,
mettez-la en position, insérez les vis puis
serrez.
1
Nivelez le réfrigérateur en employant une clé
11/32 pouces (8mm) ou un tournevis
plat,augmentez (dans le sens des aiguilles
d'une montre) ou diminuez (dans le sens
contraire aux aiguilles d'une montre) la
hauteur du pied de nivellement gauche/droit
pour niveler le réfrigérateur.
REMARQUE : Une poussée vers l’arrière sur
le dessus du réfrigérateur enlève du poids sur
les pattes de nivellement et facilite ainsi leur
réglage.
Ouvrez les deux portes pour vous assurez
qu’elles se referment aisément. Sinon, vissez
encore les deux pattes de nivellement dans la
même proportion et dans le sens horaire pour
accroître la hauteur.
Une fois le réfrigérateur de niveau, replacez la
plaque de bas de porte.
REMARQUE : Le compartiment réfrigérateur
de votre nouvel électroménager présente un
design exclusif à deux portes. Chacune peut
s’ouvrir ou se fermer indépendamment. Vous
devrez exercer une légère pression sur les
portes pour les fermer complètement.
REMARQUE : Pour éviter que le réfrigérateur
ne bouge, fixez-le au sol en vissant ou en
dévissant les pieds avant de l’utiliser.
2
Plaque de bas de porte
Page 65

65
NIVELLEMENT DES PORTES DU RÉFRIGÉRATEUR (SUITE)
ALIGNEMENT DES PORTES
DÉMARRAGE
Avant de placer des aliments frais dans votre
réfrigérateur :
• Enlevez le ruban adhésif et toute étiquette
temporaire avant d’utiliser le réfrigérateur.
Pour faire partir les résidus de colle, frottez
vivement la surface collante avec le pouce,
ou frottez avec les doigts en ajoutant du
liquide à vaisselle. Essuyez ensuite avec
de l’eau chaude puis asséchez. N’utilisez pas
d’outils coupants, d’alcool à friction, de liquides
infl ammables, ni de nettoyants abrasifs pour
enlever le ruban adhésif ou la colle.
REMARQUE : N’enlevez pas les étiquettes
d’avertissement ou de mise en garde, celles
qui affi chent les numéros de modèle et de
série, ni les fi ches techniques fi xées à l’arrière
du réfrigérateur.
• Nettoyez votre réfrigérateur à fond et essuyez
toute la poussière qui a pu se déposer pendant le
transport.
• Installez les accessoires comme le bac à glaçons,
les tiroirs et les étagères à leurs emplacements
prévus. Ils sont emballés ensemble pour prévenir
les dommages durant le transport.
• Réglez selon vos besoins les températures du
réfrigérateur et du congélateur (voir la section
Réglage des températures et des fonctions).
• Laissez votre réfrigérateur fonctionner pendant
au moins 2 ou 3 heures avant d’y placer des
aliments. Vérifi ez la circulation d’air froid dans
le compartiment congélateur pour vous assurer
que le refroidissement est adéquat. Votre
réfrigérateur est maintenant prêt à servir.
Si l'espace entre les portes est irrégulier,
suivez les instructions ci-dessous pour
aligner les portes:
• D’une main, soulevez la porte que vous
souhaitez élever au niveau de la charnière
du milieu.
• De l’autre main, utilisez des pinces afin
d’insérer l’anneau élastique comme sur
l’illustration.
• Insérez des anneaux élastiques
supplémentaires jusqu’à ce que les
portes se trouvent l’une en face de l’autre.
(Trois anneaux élastiques sont fournis
avec l’appareil.)
1
Page 66

66
FONCTIONS DU PANNEAU DE COMMANDE
Pour une description détaillée des fonctions des touches, consultez les pages 68 à 70.
AFFICHEUR DEL
L’affichage à Leds indique les réglages de
température, les options du distributeur, les
messages d’état du filtre à eau, de l’alarme
de porte et de verrouillage.
TOUCHE TYPE DE GLACE
La touche TYPE DE GLACE sert à sélectionner
de la glace en cubes ou pilée.
TOUCHE FREEZER (CONGÉLATEUR)
Appuyez sur le bouton FREEZER pour régler la
température du compartiment réfrigération.
REMARQUE : Lorsque cette touche est enfoncée
simultanément avec la touche REFRIGERATOR
(Réfrigérateur) pendant plus de cinq secondes,
l’affichage de la température passe de Fahrenheit à
Celsius ou inversement.
TOUCHE REFRIGERATOR (RÉFRIGÉRATEUR)
Pressez la touche REFRIGERATOR (Réfrigérateur)
pour régler la température du compartiment
réfrigérateur.
REMARQUE : Lorsque cette touche est enfoncée
simultanément avec la touche FREEZER
(Congélateur) pendant plus de cinq secondes,
l’affichage de la température passe de Fahrenheit
à Celsius ou inversement.
TOUCHE ICE PLUS (GLACE PLUS)
Appuyez sur ce bouton pour activer la fonction
ICE PLUS qui augmente ma capacite de creation
de glace d’environ 20%.
TOUCHE LUMIÈRE/FILTRE
La touche LUMIÈRE/FILTRE contrôle la lampe du
distributeur.
La touche LUMIÈRE/FILTRE sert à régler à nouveau
l’indicateur de remplacement du filtre d’eau lorsque
le filtre d’eau a été remplacé.
TOUCHE ALARME/VERROUILLAGE
Appuyez sur cette touche pour contrôler l’alarme
d’ouverture de porte.
Appuyez sur cette touche pour verrouiller ou
déverrouiller toutes les autres touches de fonction
du panneau de contrôle, y compris le fonctionnement
du distributeur.
2
3
4
1
5
6
7
ICE TYPE
ICE TYPE
FREEZER
REFRIGERATOR
ICE PLUS
ALARM / LOCK
3SECS
LIGHT / FILTER
Page 67

67
L’AFFICHEUR DEL
L’affichage à Leds indique les réglages de
température, les options du distributeur, les
messages d’état du filtre à eau, de l’alarme
de porte et de verrouillage.
INDICATEURS DE SÉLECTION DU
DISTRIBUTEUR
Affiche l’é lément qui sera distribué lorsque
l’interrupteur à poussoir sera enfoncé: Crushed
Ice (Glace broyée), Water (Eau), ou Cubed Ice
(Glaçons).
TEMPÉRATURE DU CONGÉLATEUR
Indique le réglage de température du
compartiment congélateur en Celsius ou
Fahrenheit.
TEMPÉRATURE DU RÉFRIGÉRATEUR
Indique le réglage de température du
compartiment réfrigérateur en Celsius ou
Fahrenheit.
ICE PLUS
Lorsque la touche ICE PLUS est enfoncée,
l’affichage indiquera que la fonction
sélectionnée a été activée.
INDICATEUR LUMIÈRE DU DISTRIBUTEUR
Lorsque vous appuyez sur la touche LUMIÈRE,
l’affichage indiquera la fonction sélectionnée :
Si la lumière du distributeur est allumée,
l’indicateur apparaîtra sur le panneau d’affichage.
INDICATEUR D’ALARME DE PORTE
Signale l’activation de l’alarme de porte
ouverte.
ÉTAT DU FILTRE À EAU
Affiche l’é tat actuel du filtre à eau. Voir la section
Réinitialisation de l’indicateur du filtre.
ÉTAT DU VERROUILLAGE
Affiche le mot LOCK (Verrouillage) lorsque les
fonctions du panneau de commande sont
verrouillées.
2
1
3
4
5
6
7
8
ICE TYPE
Page 68

68
RÉGLAGE DES TEMPÉRATURES ET DE L’AFFICHAGE
Réglage de la température du
congélateur
Pour régler la température du compartiment
congélateur, pressez la touche FREEZER
(Congélateur) pour faire défi ler la plage des
températures.
Réglage de la température du
réfrigérateur
Pour régler la température du compartiment
réfrigérateur, pressez la touche REFRIGERATOR
(Réfrigérateur) pour faire défi ler la plage des
températures.
REMARQUE : La température interne réelle varie
selon l’é tat des aliments, puisque c’est la
température ciblée qui est affi chée et non la
température réelle à l’intérieur du réfrigérateur.
Réglez initialement la COMMANDE DU
RÉFRIGÉRATEUR (REFRIGERATOR CONTROL) à
37 degrés F et la COMMANDE DU CONGÉLATEUR
(FREEZER CONTROL) à 0 degré F.
Laissez-les avec ces réglages durant 24 heures (un
jour) pour qu’ils se stabilisent.
Puis réglez la température du compartiment
réfrigérateur comme illustré ci-dessus.
Affichage de la température
Pour faire passer l’affi chage des températures
de Fahrenheit à Celsius :
• Maintenez simultanément la pression sur les
touches FREEZER (Congélateur) et
REFRIGERATOR (Réfrigérateur) pendant plus
de 5 secondes.
• Faites de même pour revenir en Fahrenheit.
FREEZER
FREEZER
REFRIGERATOR
REFRIGERATOR
Page 69

DISTRIBUTION DE GLACE BROYÉE
Pressez la touche
ICE TYPE pour allumer
l’icône de la glace broyée.
Pressez l’interrupteur
à poussoir avec un verre
ou un autre contenant
pour y verser la
glace broyée.
DISTRIBUTION DE GLAÇONS
Pressez la touche
ICE TYPE pour allumer
l’icône des glaçons.
Pressez l’interrupteur
à poussoir avec un verre
ou un autre contenant
pour y verser des glaçons.
REMARQUE : Tenez le verre ou un autre
contenant en place pendant quelques secondes
après la distribution d’eau ou de glace pour
récupérer les dernières gouttes ou glaçons.
Le distributeur est conçu pour cesser de
fonctionner lorsque la porte du réfrigérateur est
ouverte.refrigerator door is open.
DISTRIBUTION D’EAU
Appuyez sur l’interrupteur à
bouton-poussoir de l’eau ou la
touche d’activation de l’eau avec
un verre ou un autre contenant et
de l’eau glacée sera distribuée.
Pressez l’interrupteur à poussoir avec un verre ou un
autre contenant pour y verser de l’eau froide. Lorsque
le levier à eau est enfoncé, la lumière s’allume.
REMARQUE : Le bouton Water ne
fonctionne pas si vous appuyez aux
deux extrémités et non au centre.
Il fonctionne uniquement si vous
appuyez au centre du bouton.
COMMANDE DE LA LAMPE DU
DISTRIBUTEUR
Pressez la touche
LIGHT/FILTER (Lampe/Filtre)
pour allumer ou éteindre la
lampe du distributeur.
69
FONCTIONNEMENT DU DISTRIBUTEUR
wATTENTION
Si vous remplissez un contenant avec une petite ouverture, utilisez-le à proximité immédiate du distributeur
d’eau ou de glace.
TOUCHE ACTIVE D’EAU
INTERRUPTEUR D’EAU
INTERRUPTEUR DE GLACE
ICE TYPE
LIGHT / FILTER
ICE TYPE
Incorrect
Eau
Glace
Correct
Page 70

RÉGLAGE DU VERROUILLAGE DU
DISTRIBUTEUR
Maintenez une pression
sur la touche
ALARM/LOCK
(Alarme/Verrouillage)
pendant 3 secondes pour
verrouiller le distributeur et
toutes les autres fonctions
du panneau de commande.
Maintenez à nouveau une
pression pendant 3 secondes
pour déverrouiller.
RÉGLAGE DE L’ALARME DE PORTE
La touche ALARM/LOCK
(Alarme/ Verrouillage)
commande aussi l’alarme
de porte qui se fait
entendre trois fois à
intervalles de 30 secondes
lorsque la porte d’un
compartiment reste
ouverte pendant plus de
60 secondes.
La sonnerie d’alarme arrête dès que la porte est
refermée. Pressez la touche ALARM/LOCK
(Alarme/Verrouillage) une fois pour activer ou
désactiver la fonction d’alarme de porte.
REMARQUE : Communiquez avec votre centre
de service local si la sonnerie d’alarme se
poursuit malgré la fermeture des portes.
RÉGLAGE DE L’INDICATEUR
DE FILTRE
Maintenez une pression
sur la touche
LIGHT/FILTER (Lampe/Filtre)
pendant plus de 3 secondes
pour réinitialiser l’indicateur
de filtre après le remplacement
du filtre à eau.
REMARQUE : Il est recommandé que vous
remplaciez le filtre quand le voyant de
signalisation du filtre d'eau atteigne 0, ou lorsque
le goût des glaçons ou de l’eau soit sensiblement
détérioré.
ACTIVATING ICE PLUS
Pressez la touche ICE PLUS
(Glace plus) une fois pour
activer cette fonction.
L’icône de la fonction s’allumera
alors sur l’afficheur. La fonction
ICE PLUS fait marcher le
compartiment congélateur
à la température la plus
froide pendant une période
de 24 heures pour augmenter
la production de glaçons
d’environ 20%, et puis s’arrête
automatiquement.
REMARQUE : Appuyez encore sur la touche pour
annuler la fonction ICE PLUS.
70
RÉGLAGE DES FONCTIONS
Pressez la touche de la fonction désirée pour
afficher et sélectionner d’autres réglages.
FONCTION DE DIAGNOSTIC DES PROBLÈMES
La fonction de diagnostic détecte automatiquement les problèmes de votre réfrigérateur en faisant
apparaître un code de diagnostic sur l’afficheur. REMARQUE : Si un code de diagnostic apparaît sur
l’afficheur, prenez le code en note, composez le 1-800-243-0000 (24 heures par jour/7 jours par
semaine), puis choisissez l’option de localisation d’un centre de service autorisé.
ALARM / LOCK
3SECS
LIGHT / FILTER
ICE PLUS
ALARM / LOCK
3SECS
Page 71

71
BAC A GLACE DE PORTE
wMISE EN GARDE
• Maintenez les mains et les outils à distance du bac
à glace et de l’orifice du distributeur. Vous pourriez
casser quelque chose ou vous blesser.
La machine à glace s’arrête de produire de la glace
lorsque le bac à glace est plein.
Si vous avez besoin de plus de glace, videz le bac à
glace dans le bac à glace supplémentaire du
compartiment du congélateur pour permettre à la
machine à glace de produire plus de glace.
Secouez parfois le bac à glace pour égaliser le
niveau. Parfois, la glace s’accumule dans la machine,
et la quantité de glace produite est alors mal estimée
et la production de glace s’arrête.
REMARQUE :
Le stockage de canettes ou autre dans
le bac à glace peut endommager la machine à glace.
Si la porte du bac à glace n’est pas fermée
fermement, l’air froid dans le bac à glace pourrait
geler dans le compartiment du réfrigérateur.
En conséquence, la machine à glace pourrait ne pas
produire de glace.
REMARQUE : Si le commutateur Marche/Arrêt sur la
machine à glaçons est arrêté pendant un temps
prolongé, le compartiment à glace réchauffera
graduellement jusqu’à la température du
compartiment réfrigérateur. Pour empêcher la fonte
des glaçons et leur sortie du distributeur, videz
TOUJOURS le bac à glace quand la machine à
glaçons est arrêtée pendant plus de.
Poussez fermement le verrou à l’endroit indiqué
pour fermer la porte du bac à glace ; il est
complètement fermé au son clic.
Pour retirer le bac à glace de porte, agrippez la
poignée avant, et tirez doucement sur le bac à
glace comme indiqué.
Pour réinstaller le bac à glace de porte, inclinez
légèrement le bac au cours du remplacement afin
d’éviter tout contact avec la machine à glace.
Evitez de toucher le bras de fermeture
automatique lors du remplacement du bac.
Reportez-vous à l’étiquette située sur le bac à
glace pour plus de détails.
Automatic
shutoff Arm
Bras d’arrêt
automatique
Page 72

72
MACHINE À GLAÇONS AUTOMATIQUE
La glace est produite dans la machine à glaçons
automatique puis acheminée au distributeur. La
machine peut produire 6 glaçons à la fois et de 80 à
130 glaçons sur une période de 24 heures.
Cette quantité peut varier selon divers facteurs,
notamment la température ambiante, l’ouverture des
portes, le contenu du congélateur, et d’autres
conditions de fonctionnement.
• Un réfrigérateur nouvellement installé prend de 12 à
24 heures pour produire de la glace.
• La production de glace cesse lorsque le bac à glace
est plein.
• Pour éteindre cet appareil automatique à glaçons,
mettre l’interrupteur sur OFF (O). Pour allumer cet
appareil automatique à glaçons, mettre l’interrupteur
sur ON (I).
• Vous pouvez régler la taille du glaçon en pressant le
Bouton de sélection de quantité d’eau
• Vous pouvez choisir la taille en appuyant sur le
bouton de sélection de la taille des glaçons.
REMARQUE : Il est normal d’entendre un bruit lorsque
les glaçons tombent dans le bac.
• La valve d’eau marche même si le tuyau d’eau n’est
pas connecté et le Distributeur de glaçons est en
marche. Le bruit est produit parce que le conduit
d'eau n'est pas relié, ce qui ne signifie pas que la
machine à glaçons est en panne.
wAVERTISSEMENT
Risque de blessures corporelles
• Évitez de toucher à l’é lément chauffant ou aux
pièces mobiles du mécanisme d’é jection de la
machine à glaçons.
• NE mettez PAS les doigts ou les mains dans le
mécanisme de la machine à glaçons automatique si
le réfrigérateur est branché.
REMARQUE : Le soulèvement du bras d’arrêt
automatique n’interrompt pas le fonctionnement de la
machine à glaçons.
wMISE EN GARDE
• La première production de glace et d’eau peut
contenir des particules ou des odeurs provenant de
la conduite d’eau ou du réservoir.
• Jetez les premiers lots de glace (environ vingt
glaçons) et purgez pendant 2 minutes après
l’installation du réfrigérateur.
• Cette précaution s’impose également si le
réfrigérateur n’a pas servi depuis longtemps.
• Ne stockez jamais de canettes ou autre nourriture
dans le bac à glace afin de les refroidir plus
rapidement. Vous endommageriez la machine à
glace, ou les contenants pourraient éclater.
• Si la couleur de la glace est douteuse, vérifi ez le fi
ltre à eau et l’alimentation d’eau. Si le problème
persiste, communiquez avec un centre de service
autorisé. N’utilisez pas de glace ni d’eau tant que le
problème n’est pas corrigé.
• Gardez les enfants à l’é cart du distributeur.
N’autorisez pas les enfants à jouer autour du
distributeur.
• Le givre peut aussi obstruer le passage de la glace si
l’on utilise uniquement de la glace broyée.
Enlevez le givre qui s’accumule à cet endroit.
• N’utilisez jamais de la verrerie de cristal ou de la
vaisselle fragiles pour recueillir la glace. Ces
contenants sont susceptibles de se briser et des
éclats peuvent se retrouver dans la glace.
• Mettez d’abord la glace dans le verre avant de le
remplir d’eau ou d’une autre boisson. La glace risque
de vous éclabousser si du liquide s’y trouve déjà.
• N’utilisez jamais un verre très étroit ou profond.
La glace peut se coincer, obstruer le passage et
affecter le fonctionnement du réfrigérateur.
• Gardez le verre à une distance suffi sante du bec
verseur. Une distance trop courte peut empêcher la
glace de tomber.
• Pour prévenir les blessures corporelles, gardez les
mains à l’é cart de la porte et du passage de la glace.
• N’enlevez jamais le couvercle de la machine à
glaçons.
• Si vous constatez que l’eau ou la glace est distribuée
d’une façon imprévue, communiquez avec un centre
de service autorisé. Composez le
1-800-243-0000
(24 heures par jour/7 jours par semaine), puis
choisissez l’option de localisation d’un centre de
service autorisé.
Machine à glaçons
Lumières de
l’indicateur de
quantité
d’eau
Bouton de
sélection de
quantité
d’eau
Interrupteur
ON/OFF
(Marche/Arrêt)
Bras d’arrêt
automatique
Page 73

73
CONSERVATION DES ALIMENTS
• Entreposez les aliments frais dans le
compartiment réfrigérateur.
• La façon dont les aliments sont congelés et
décongelés constitue un facteur important de
préservation de la fraîcheur et de la saveur.
• N’entreposez pas les aliments qui se gâtent
facilement, tels les bananes et melons, à de
basses températures.
• Laissez refroidir les aliments chauds avant de les
entreposer, sinon ils présentent un risque de gâter
les autres aliments et d’augmenter la
consommation d’é lectricité.
• Recouvrez les aliments que vous entreposez d’une
pellicule de plastique ou placez-les dans un
contenant muni d’un couvercle. En empêchant ainsi
l’humidité de s’é vaporer, les aliments conserveront
davantage leur saveur et leur valeur nutritive.
• Ne bloquez pas les ouvertures d’aération avec des
aliments ou des contenants. La libre circulation d’air
froid contribue à uniformiser la température.
• N’ouvrez pas les portes trop fréquemment.
L’ouverture des portes fait pénétrer de l’air chaud
dans les compartiments réfrigérateur et congélateur
et entraîne ainsi une élévation de la température.
• Ne surchargez jamais les balconnets de contreporte, car les articles risquent de percuter les
clayettes à l’intérieur et ainsi empêcher les portes
de fermer correctement.
Compartiment congélateur
• N’entreposez pas de bouteilles de verre dans le
compartiment congélateur puisque le verre risque
d’é clater quand les contenu gelent.
• Ne recongelez pas les aliments décongelés car une
perte de saveur et de valeurs nutritives s’en suivrait.
• Ne touchez pas avec les mains mouillées aux
contenants froids, en particulier s’ils sont faits de
métal, ni aux aliments congelés; ne placez pas
d’articles en verre dans le compartiment
congélateur.
• Ne vous servez pas du casier à oeufs comme d’un
bac à glace dans le congélateur, la boite à œufs
casse facilement si elle gèle.
Compartiment réfrigérateur
• Évitez de placer des aliments humides sur les
clayettes supérieures du réfrigérateur; ces aliments
pourraient geler au contact direct de l’air froid.
• Lavez toujours les aliments avant de les réfrigérer.
Lavez et essuyez les légumes et les fruits et
essuyez les aliments emballés pour éviter de gâter
les aliments adjacents.
REMARQUE : Si le réfrigérateur est situé dans un
endroit chaud et humide, l’ouverture fréquente des
portes ou l’entreposage d’une grande quantité de
légumes entraînera la formation de condensation.
Essuyez cette condensation à l’aide d’un linge propre
ou d’une serviette de papier.
Page 74

74
RANGEMENT DES ALIMENTS
CLAYETTE DU COMPARTIMENT
CONGÉLATEUR
Reçoit les aliments, plats, et contenants plus
volumineux sur les clayettes réglables du
compartiment réfrigérateur.
BAC À LÉGUMES
Reçoit des fruits et légumes, avec contrôle de
l’humidité.
BALCONNET DES PRODUITS LAITIERS
Reçoit des produits laitiers comme le beurre et le
fromage.
BALCONNETS MODULAIRES DU
COMPARTIMENT RÉFRIGÉRATEUR
Reçoivent des petits emballages et breuvages tels
que condiments, sauces pour salade, aliments pour
bébés, lait et jus.
1
2
3
4
2
1
3
4
Page 75

75
RÉGLAGE DE LA HAUTEUR DES CLAYETTES
Les clayettes de votre réfrigérateur sont réglables
afin de s’adapter à vos besoins.
Le rangement d’articles similaires au même
endroit et le réglage en hauteur des clayettes
faciliteront le repérage de l’article particulier dont
vous avez besoin et réduiront le temps
d’ouverture des portes, abaissant ainsi votre
consommation d’é nergie.
IMPORTANT : Ne nettoyez pas les clayettes en
verre avec de l’eau chaude lorsqu’elles sont froides.
Elles pourraient se briser suite à un brusque
changement de température ou un impact, par
exemple en s’y cognant. Pour votre protection, ces
clayettes sont faites de verre trempé qui se brisera en
petits morceaux de la taille d’un caillou.
REMARQUE : Les clayettes en verre sont lourdes.
Retirez-les avec précaution pour éviter de les
échapper.
Positionnement des clayettes
Retirez les clayettes de leur position de transport et
replacez-les à la position de votre choix.
wMISE EN GARDE
Assurez-vous que les clayettes sont à niveau d’un
côté à l’autre. Négliger de le faire pourrait
occasionner la chute des clayettes ou des aliments
qui s’y trouvent.
Enlèvement d’une clayette Remise en place de la clayette
Soulevez l’avant de la clayette. Soulevez
ensuite l’arrière et tirez pour la sortir.
Soulevez l’avant de la clayette et placez ses
crochets dans les fentes à la hauteur voulue.
Abaissez ensuite l’avant de la clayette de façon à
ce que les crochets tombent dans les fentes.
Tablette pliante
Vous pouvez stocker des articles plus grands
comme des bouteilles simplement en repoussant
devant vous la moitié de l’étagère en dessous de
l’étagère.
Tirer vers vous pour la rétablir complètement.
Page 76

76
ENLÈVEMENT ET REMISE EN PLACE DES COMPOSANTS
REMARQUE : Lors de la remise en place des
composants, inversez l’ordre suivi pour
l’enlèvement. Afin de prévenir les dommages,
n’utilisez jamais de force excessive lors de
l’enlèvement ou de la remise en place de
composants.
wMISE EN GARDE
• Les bacs pour légumes, les bacs dans les portes et
étagères ne peuvent être lavés au lave-vaisselle.
wMISE EN GARDE
• Des blessures corporelles peuvent résulter de
balconnets qui ne sont pas assemblés
correctement.
REMARQUE : N’ajustez PAS un balconnet chargé.
•
NE permettez PAS aux enfants de jouer avec les paniers.
Les coins pointus des paniers peuvent les blesser.
Balconnet des produits laitiers Balconnet modulaire
Pour enlever le balconnet des produits laitiers,
vous n’avez qu’à le soulever et le tirer en ligne
droite. Pour le replacer, glissez-le en place et
poussez par en bas jusqu’à ce qu’il s’immobilise.
REMARQUE : Le balconnet des produits laitiers
ne peut se placer que dans la zone supérieure de
la contre-porte de droite.
Les balconnets sont amovibles pour faciliter le
nettoyage et l’ajustement. Soulevez simplement le
balconnet et tirez-le en ligne droite pour l’enlever.
Pour le replacer, glissez-le au-dessus du bouton
de support voulu, puis poussez-le vers le bas
jusqu’à ce qu’il s’immobilise.
Plateau d’égouttage du distributeur
Le plateau d’é gouttage du distributeur ne se draine pas de lui-même. Il doit donc être nettoyé régulièrement.
Retirez le couvercle en appuyant et tirant sur le plateau. Asséchez le plateau avec un chiffon. Pour remettre le
plateau en place, penchez légèrement sa partie avant et engagez les nervures dans les orifices.
Page 77

77
ENLÈVEMENT ET REMISE EN PLACE DES COMPOSANTS (SUITE)
Contrôle d’humidité des bacs à légumes
Vous pouvez contrôler le taux d’humidité dans les
bacs à légumes protégés contre l'humidité.
Stockez les fruits et les légumes nécessitant un
taux d’humidité plus ou moins important dans des
bacs à légumes séparés. Réglez le contrôle
comme vous le souhaitez entre HIGH (élevé) et
LOW (bas).
• LOW Enlève l’air humide du bac à légumes pour
un meilleur stockage des fruits.
• HIGH Garde l’air humide dans le bac à légumes
pour un meilleur stockage des légumes frais et
feuillu.
ATTENTION: La tablette de verre sur le bac à
légumes n’est pas solidement installée. Faites
attention au moment de l’incliner.
Pour enlever le verre
• Insérez un doigt dans le trou qui se trouve audessous du couvercle du bac à légumes, puis
soulevez le verre.
• Tirez du verre en dehors vers le haut.
Enlevement des bacs a legumes
• Pour l’enlever, ouvrez complètement le tiroir.
• Levez le front du bac à légumes et retirez-le.
• Pour le replacer, inclinez à peine le front du bac
à légumes, introduisez le tiroir dans le cadre et
poussez-le jusqu’à la position originelle.
Glide‘N’Serve (Glissez et servez)
Le Glide‘N’Serve fournit un espace de stockage avec un
contrôle de température variable qui permet de disposer
d’un compartiment plus froid que le reste du réfrigérateur.
Ce tiroir peut être utilisé pour les grands plateaux,
la charcuterie ou les boissons.
Commandes
La commande permet de réguler la température d’air
dans le tiroir. Réglez la commande sur COLD
(imprimé sur la surface) pour obtenir une
température normale, identique au réfrigérateur.
Réglez sur COLDER (imprimé sur la surface) pour
les viandes et autre charcuterie.
REMARQUE: L'air refroidi orienté vers le
Glide‘N’Serve (Glissez et servez) peut faire diminuer
la température du réfrigérateur. Il pourrait alors être
nécessaire de régler la commande du réfrigérateur.
Page 78

78
ENLÈVEMENT ET REMISE EN PLACE DES COMPOSANTS (SUITE)
wMISE EN GARDE
• Risque de coincement ! Gardez les mains
et les pieds à l’é cart du bas de la porte lors
de l’ouverture et de la fermeture.
wAVERTISSEMENT
Risque de piégeage des enfants
• Les enfants peuvent ramper dans le tiroir du
congélateur lorsque le diviseur du tiroir est enlevé.
Bac à glace Diviseur DuraBase ®
Pour dégager le bac à glace, tirez le tiroir vers
l’extérieur à sa pleine extension. En procédant
délicatement, soulevez puis tirez le bac à glace
pour le sortir. Pour le remettre en place, placez
simplement le bac dans la position correcte.
Le diviseur sépare la zone DuraBase en sections.
Tirez le diviseur vers le haut en ligne droite pour
le retirer. Pour le remettre en place, accrochez les
coins supérieurs du diviseur par-dessus le bord
supérieur du DuraBase.
Tiroir
Pour réinstaller le Glide‘N’Serve (Glissez et servez)
• Pour le retirer, tirer le tiroir en totalité.
• Soulevez l’avant du tiroir, puis retirez-le tout
droit.
• Pour le replacer, soulevez légèrement l’avant du
tiroir et insérez-le dans l’encadrement, et
poussez-le jusqu’à ce qu’il soit en place.
1
Page 79

79
NETTOYAGE DU RÉFRIGÉRATEUR
wAVERTISSEMENT
Risque d’explosion
• Utilisez un nettoyant qui n’est pas inflammable.
• L’omission d’observer cette directive peut
entraîner le décès, une explosion, ou un incendie.
Les compartiments réfrigérateur et congélateur se
dégivrent automatiquement. Cependant, nettoyez ces
deux compartiments une fois par mois pour prévenir
les odeurs. Nettoyez les déversements
immédiatement.
• Débranchez le réfrigérateur.
• Enlevez les composants amovibles comme les
clayettes et les bacs à légumes.
• Utilisez une éponge ou un linge doux propre imbibé
d’un mélange d’eau chaude et de détergent doux.
N’utilisez pas de nettoyants abrasifs ni corrosifs.
• Lavez à la main, rincez, puis asséchez
complètement toutes les surfaces.
• Rebranchez le réfrigérateur.
REMARQUE : Les vaporisateurs pour fenêtres, les
nettoyants abrasifs, ou les liquides inflammables
peuvent égratigner ou endommager les couvercles et
panneaux de plastique.
Nettoyage de l’extérieur
Dans le cas de modèles à carrosserie en acier
inoxydable, procurez-vous dans le commerce un
nettoyant spécialement conçu pour ce matériau et
observez les directives du fabricant. Vous pouvez
aussi utiliser une éponge ou un chiffon doux propre,
imbibé d’un mélange d’eau chaude et de détergent
doux. N’utilisez pas de nettoyants abrasifs ni
corrosifs. Asséchez à fond à l’aide d’un chiffon doux.
IMPORTANT : N’utilisez pas de cires nettoyantes, de
détergents concentrés, ni de produits nettoyants qui
contiennent du pétrole sur les pièces en plastique du
réfrigérateur comme les contre-portes ou les joints
d’é tanchéité.
Entretien et nettoyage de l’intérieur
REMARQUE : Laissez le congélateur se réchauffer pour
éviter que le chiffon de nettoyage ne colle aux parois.
Pour éliminer les odeurs, vous pouvez laver l’intérieur
du réfrigérateur à l’aide d’un mélange de bicarbonate
de soude et d’eau chaude. Mélangez 2 cuillerée à
table de bicarbonate de soude dans 1 pinte d’eau
(26 g de bicarbonate de soude dans 1 L d’eau).
Assurez-vous de dissoudre totalement le bicarbonate
de soude pour éviter son action abrasive qui peut
égratigner le réfrigérateur.
IMPORTANT : N’utilisez pas un pistolet arrosoir pour
nettoyer l’intérieur.
RENSEIGNEMENTS GÉNÉRAUX
Remisage
Lors de vacances de moyenne durée, vous voudrez
sans doute maintenir votre réfrigérateur en fonction.
Placez les articles congelables dans le congélateur
pour prolonger leur durée.
Si vous prévoyez remiser le réfrigérateur, retirez-en
tous les aliments, débranchez le cordon
d’alimentation, nettoyez l’intérieur à fond, et bloquez
les portes en position ouverte pour prévenir les
moisissures. Faites en sorte que le réfrigérateur ne
présente pas un risque de piégeage des enfants.
Déplacement
Videz le réfrigérateur si vous devez le déplacer sur
une bonne distance (généralement inutile s’il s’agit
simplement de le tirer pour nettoyer l’arrière). Laissez
le réfrigérateur atteindre la température ambiante,
puis asséchez l’intérieur avant de fermer les portes
en vue de le transporter. Vissez complètement les
pattes de nivellement contre la base pour éviter de
les endommager.
Pannes de courant
La plupart des pannes de courant qui ne durent
qu’une heure ou deux n’affecteront pas les
températures de votre réfrigérateur. Vous devriez
cependant réduire la fréquence d’ouverture des
portes au minimum durant ces événements.
De l’eau peut s’égoutter du bac à glace durant une
panne d’électricité. Pour éviter ceci, retirez le bac à
glace, jetez toute la glace, séchez avec une serviette
et remplacez.
Page 80

80
REMPLACEMENT DU FILTRE À EAU
Il est recommandé de remplacer le filtre lorsque
l’indicateur de filtre atteint 0 ou lorsque le distributeur
d’eau ou la machine à glaçons diminuent
sensiblement leur production.
Une fois le filtre remplacé, laissé 2 minutes au
dispenseur d’eau afin qu’il vidange le circuit d’eau.
Vérifier l’absence de fuite du filtre.
Lorsque l’indicateur du filtre à eau affiche le message
"0 Filter Month, Hold 3 Seconds" (« 0 mois filtre,
tenir 3 secondes », réinitialisez l’écran et la lampe
témoin d’état du filtre à eau en appuyant sur la touche
LIGHT/FILTER (TÉMOIN/FILTRE) et en la
maintenant enfoncée durant plus de 3 secondes.
Pour vous procurer des cartouches de filtre à eau,
rendez-vous chez votre concessionnaire d’é
lectroménagers ou distributeur de pièces de
rechange local.
Vous pouvez aussi composer le 1-877-714-7486.
Le numéro de pièce de la cartouche de filtre à eau de
rechange est 5231JA2006A.
Tournez le bouton de la cartouche de filtre
usée dans le sens antihoraire. Vous sentirez
une détente lors du dégagement de la
cartouche.
REMARQUE : Une petite quantité d’eau
(environ 1 oz ou 25 cc) se drainera lors du
remplacement du filtre. Placez une tasse sous
le filtre pour recueillir cette eau.
1 Enlevez la cartouche usée. Déballez la
nouvelle cartouche de filtre et retirez le
capuchon protecteur des joints toriques.
Tenez la poignée de la cartouche dans la
position horizontale, puis poussez la nouvelle
cartouche en place jusqu’à ce qu’elle
s’immobilise.
2
Utilisez la poignée pour tourner la cartouche
dans le sens des aiguilles d’une montre d’un
tour environ, jusqu’à ce que la poignée soit en
position horizontale. Vous sentirez le filtre
s’encliqueter en place.
REMARQUE : Un filtre qui ne peut tourner
d’un côté à l’autre n’est pas engagé à fond.
1
LIGHT / FILTER
Page 81

81
AVANT DE FAIRE UN APPEL DE SERVICE
Avant de faire un appel de service, consultez cette liste. Vous pourriez ainsi économiser temps et
argent. La liste énumère des situations fréquentes qui ne sont pas attribuables à des vices de matière
ou de fabrication.
Problème Causes probables Solutions
Le compresseur du
réfrigérateur ne
fonctionne pas.
Le réfrigérateur
fonctionne trop
fréquemment ou trop
longtemps.
Le compresseur du
réfrigérateur effectue
des cycles d’arrêt et de
redémarrage.
La température du
congélateur est trop froide,
mais celle du réfrigérateur
est satisfaisante.
La température du
réfrigérateur est trop froide,
mais celle du congélateur
est satisfaisante.
• La commande du réfrigérateur
est à OFF (Arrêt).
• Le réfrigérateur est dans un
cycle de dégivrage.
• La fiche n’est pas branchée
dans la prise murale.
• Panne de courant. Vérifiez l’é
clairage du domicile.
• Ce réfrigérateur est plus gros
que celui que vous possédiez
avant.
• La température de la pièce ou
extérieure est élevée.
• Le réfrigérateur a récemment
été débranché pendant un
certain temps.
• Une grande quantité d’aliments
chauds a récemment été
rangée.
• Les portes ont été ouvertes
trop fréquemment ou trop
longtemps.
• La porte du compartiment
réfrigérateur ou congélateur est
entrouverte.
• Le réfrigérateur est réglé à une
température trop froide.
• Le joint d’é tanchéité du
réfrigérateur ou congélateur est
sale, usé, craquelé, ou mal
posé.
• Le thermostat garde constante
la température du réfrigérateur.
• La commande du congélateur
est réglée à une température
trop froide.
• La commande du réfrigérateur
est réglée à une température
trop froide.
• Réglez la commande du réfrigérateur.
• Ceci est normal pour un réfrigérateur doté d’une
fonction de dégivrage entièrement automatique.
• Assurez-vous que la fiche est insérée à fond dans la
prise.
• Communiquez avec la compagnie d’é lectricité.
• C’est normal. Les appareils plus volumineux, plus
efficaces, fonctionnent plus longtemps.
• Il est normal que le réfrigérateur fonctionne plus
longtemps dans ces conditions.
• Le réfrigérateur prend quelques heures pour
atteindre les températures de refroidissement.
• Les aliments chauds font que le réfrigérateur prend
plus de temps pour atteindre la température choisie.
• L’air chaud qui pénètre dans le réfrigérateur prolonge
son fonctionnement. Ouvrez les portes moins
souvent.
• Assurez-vous que le réfrigérateur est de niveau. Ne
laissez pas des aliments ou contenants bloquer les
portes.
• Réglez le réfrigérateur à une température plus basse
jusqu’à obtenir satisfaction.
• Nettoyez ou changez le joint d’é tanchéité. Un joint
qui fuit oblige le réfrigérateur à fonctionner plus
longtemps pour maintenir la température voulue.
• Ceci est normal. Le réfrigérateur effectue des cycles
d’arrêt et de redémarrage pour garder la température
constante.
• Réglez la commande du congélateur à une
température plus chaude jusqu’à obtenir satisfaction.
• Réglez la commande du réfrigérateur à une
température plus chaude.
Page 82

82
AVANT DE FAIRE UN APPEL DE SERVICE (SUITE)
Problème Causes probables Solutions
La nourriture du
réfrigérateur placée
dans les tiroirs gèle.
La température du
réfrigérateur ou du
congélateur est trop
chaude.
La température du
réfrigérateur est trop chaude,
mais celle du congélateur est
satisfaisante.
Le compresseur fait plus
de bruit au démarrage.
Des vibrations ou des
cliquetis se font
entendre.
De la condensation se
forme sur les parois
internes du
réfrigérateur.
De la condensation se
forme sur les parois
externes du
réfrigérateur ou entre
les portes.
• La commande du réfrigérateur
est réglée à une température trop
froide.
• La commande du réfrigérateur ou
du congélateur est réglée à une
température trop chaude.
• Les portes sont ouvertes trop
fréquemment ou trop longtemps.
• La porte est entrouverte.
• Une grande quantité d’aliments
chauds a récemment été rangée.
• Le réfrigérateur a récemment été
débranché pendant un certain
temps.
• La commande du réfrigérateur
est réglée à une température trop
chaude.
• Le réfrigérateur fonctionne à des
pressions plus élevées lors du
démarrage.
• Le plancher n’est pas égal ou
supporte mal la charge. Le
réfrigérateur se balance contre le
plancher quand on le pousse.
• Les articles placés sur le dessus
du réfrigérateur vibrent.
• Les assiettes placées sur les
clayettes du réfrigérateur vibrent.
• Le réfrigérateur touche au mur ou
aux armoires.
• Le temps est chaud et humide,
ce qui accélère l’accumulation de
givre et la condensation interne.
• La porte est entrouverte.
• La porte s’ouvre trop souvent ou
trop longtemps.
• Le temps est humide.
• La porte est entrouverte.
• Réglez le réfrigérateur à une température plus basse.
• Réglez la commande du congélateur ou du réfrigérateur
à une température plus froide jusqu’à obtenir satisfaction.
• De l’air chaud pénètre dans le réfrigérateur ou le
congélateur dès qu’une porte s’ouvre. Ouvrez les portes
moins souvent.
• Fermez la porte complètement.
• Laissez au réfrigérateur ou congélateur le temps de
refroidir les aliments à la température choisie.
• Le réfrigérateur prend quelques heures pour atteindre les
températures choisies.
• Réglez la commande du réfrigérateur à une température
plus froide.
• Ceci est normal.
• Assurez-vous que le plancher est de niveau et
suffisamment solide pour supporter le réfrigérateur.
• Retirez les articles.
• Il est normal que les assiettes vibrent un peu. Déplacezles légèrement. Assurez-vous que le réfrigérateur est de
niveau et qu’il repose solidement sur le plancher.
• Déplacez le réfrigérateur de façon à ce qu’il ne touche
plus au mur.
• Ceci est normal.
• Fermez la porte.
• Ouvrez la porte moins souvent.
• Ceci est normal lorsque le temps est humide.
La condensation devrait disparaître à mesure que
l’humidité se dissipe.
• Fermez la porte complètement.
Page 83

83
AVANT DE FAIRE UN APPEL DE SERVICE (SUITE)
Problème Causes probables Solutions
De la condensation
se forme sur le
distributeur.
Des odeurs dans le
réfrigérateur.
La ou les portes ne
ferment pas.
Les tiroirs sont
difficiles à déplacer.
Le distributeur ne
fournit pas d’eau.
Le goût et/ou
l’odeur de l’eau est
douteuse.
• De la condensation peut se
produire lorsque la température
ou l’humidité est élevée.
• L’intérieur a besoin d’ê tre
nettoyé.
• Des aliments dégageant de
fortes odeurs se trouvent dans le
réfrigérateur.
• Certains contenants ou
emballages dégagent des
odeurs.
• Un emballage d’aliment empêche
la fermeture de la porte.
• Une porte s’est entrouverte
lorsqu’une autre a été fermée
trop brusquement.
• Le réfrigérateur n’est pas de
niveau. Il se balance contre le
plancher quand on le pousse.
• Le plancher n’est pas égal ou
supporte mal la charge. Le
réfrigérateur se balance contre le
plancher quand on le pousse.
• Le réfrigérateur touche au mur ou
aux armoires.
• Des aliments touchent à la
clayette au-dessus du tiroir.
• Les rails du tiroir sont encrassés.
• L’eau a séjourné trop longtemps
dans le réservoir.
• L’é lectroménager n’est pas
correctement raccordé à la
conduite d’eau froide.
• Lorsqu’un tube installé est tordu.
• Lorsqu’un filtre est vieux.
• Le robinet de la conduite d’eau
du domicile n’est pas ouvert.
• La porte du réfrigérateur ou du
congélateur n’est pas fermée.
• Lorsqu’un filtre est vieux.
• Essuyez la condensation.
• Nettoyez l’intérieur avec une éponge, de l’eau chaude, et
du bicarbonate de soude. Assurez-vous de dissoudre
totalement le bicarbonate de soude pour éviter son action
abrasive.
• Enveloppez complètement les aliments.
• Utilisez un autre contenant ou marque de pellicule
d’emballage.
• Déplacez les emballages qui nuisent à la fermeture de la
porte.
• Fermez les portes délicatement.
• Réglez les vis de nivellement.
• Assurez-vous que le plancher est égal et peut supporter le
réfrigérateur. Contactez un menuisier pour corriger le fl
échissement ou l’inclinaison du plancher.
• Déplacez le réfrigérateur.
• Gardez moins d’aliments dans le tiroir.
• Nettoyez le tiroir et les rails.
• Ouvrez le robinet de la conduite d’eau du domicile.
• Assurez-vous que les deux portes sont fermées.
• Vérifier le tube installé.
• Remplacer par un nouveau filtre.
• Faites couler l’eau du distributeur d’eau pendant 2 minutes
pour rafraichir l’alimentation. Faites couler l’eau du
distributeur d’eau pendant 2 minutes supplémentaires pour
rincer complètement le réservoir.
• Raccordez l’é lectroménager à la conduite d’eau froide qui
alimente le robinet de la cuisine.
• Remplacer par un nouveau filtre.
Page 84

84
AVANT DE FAIRE UN APPEL DE SERVICE (SUITE)
Problème Causes probables Solutions
Le distributeur ne
fournit pas de
glace.
Un son de glace qui
tombe.
Un son d’eau qui
s’écoule.
Autres
• Le bac à glace est vide.
• Le robinet de la conduite
d’eau du domicile n’est pas
ouvert.
• La porte du réfrigérateur ou
du congélateur n’est pas
fermée.
• La glace a fondu puis regelé
autour de la vis sans fi n à
cause de la fréquence
d’utilisation, des variations de
température, et/ou de pannes
de courant.
• Les glaçons sont bloqués
entre le bras de la machine à
glaçons et l’arrière du bac à
glace.
• Les glaçons sont soudés les
uns aux autres.
• Des glaçons provenant
d’ailleurs ou fabriqués
autrement ont été utilisés
dans le distributeur.
• Le tube d’arrivée d’eau est tordu.
• Le filtre est ancien, ou nécessite
son remplacement.
• Un lot de glace est tombé dans
le bac à glace.
• La machine à glaçons est
alimentée en eau.
Veuillez lire attentivement les sections Machine à glaçons automatique et Fonctionnement
du distributeur de ce guide.
• Le distributeur devrait fonctionner une fois que le
premier lot de glace est tombé dans le bac.
• Ouvrez le robinet de la conduite d’eau du domicile
et laissez à la glace le temps de se former. Le
distributeur devrait fonctionner lorsque la glace est
prête.
• Assurez-vous que les deux portes sont fermées.
• Retirez le bac à glace et faites fondre son
contenu.
Nettoyez le bac, asséchez-le, puis remettez-le en
place. Le distributeur devrait fonctionner dès que
de la nouvelle glace est prête.
• Retirez les glaçons qui bloquent le distributeur.
• Utilisez le distributeur plus souvent pour éviter la
fusion des glaçons.
• Seuls les glaçons produits par la machine à
glaçons doivent être utilisés.
• Vérifier le tube installé.
• Remplacer par un nouveau filtre.
• Ce son se fait entendre lorsque de la glace
fabriquée automatiquement tombe dans le bac à
glace. L’intensité du son variera selon
l’emplacement du réfrigérateur.
• Ce son normal se fait entendre lorsque la machine
à glaçons est alimentée en eau suite au dépôt
automatique de glace dans le bac.
• Si le bruit dure plus de 10 secondes, contrôler les
fuites.
Page 85

85
DIMENSIONS ET CARACTÉRISTIQUES PRINCIPALES
Les caractéristiques visuelles et techniques listées dans ce tableau peuvent varier en fonction de l’é volution
qualitative du produit.
Réfrigérateur à congélateur au bas de modèle LMX21981
Description
Alimentation électrique
Pression d’eau min. / max.
Dimensiones
Poids net
Capacité de rangement du
réfrigérateur
Capacité de rangement du
congélateur
Réfrigérateur à portes françaises
115 V c.a. à 60 Hz
21 à 121 PSI (1,5 à 8,5 kgf/cm
2
)
35
3
/
4 (W) X 30
1
/
4 (D) X 69
3
/
4 (H), 42
1
/
4 (P avec porte ouverte)
908 mm (W) X 768 mm (D) X 1772 mm (H), 1073 mm (P avec porte ouverte)
288 lb. (131 kg)
14,7 pi
3
5,8 pi
3
Réfrigérateur à congélateur au bas de modèle LMX25981
Description
Alimentation électrique
Pression d’eau min. / max.
Dimensiones
Poids net
Capacité de rangement du
réfrigérateur
Capacité de rangement du
congélateur
Réfrigérateur à portes françaises
115 V c.a. à 60 Hz
21 à 121 PSI (1,5 à 8,5 kgf/cm
2
)
35
3
/
4 (W) X 34
1
/
4 (D) X 69
3
/
4 (H), 46
1
/
2 (P avec porte ouverte)
908 mm (W) X 870 mm (D) X 1772 mm (H), 1181 mm (P avec porte ouverte)
324 lb. (147 kg)
17,6 pi
3
7,1 pi
3
Page 86

86
LG ELECTRONICS, INC.
GARANTIE LIMITÉE DU RÉFRIGÉRATEUR À CONGÉLATEUR AU BAS LG – CANADA
Votre réfrigérateur LG sera réparé ou remplacé, à la discrétion de LG, s’il s’avère défectueux à cause d’un vice de
matière ou de fabrication dans des conditions d’utilisation normale et ce, pendant la période de garantie (“Période de
garantie”) défi nie ci-dessous, en vigueur à partir de la date d’achat (“Date d’achat”) d’origine. Cette garantie n’est
valable que pour l’acheteur d’origine du produit et les provinces canadiennes.
Aucune autre garantie expresse ne couvre ce produit. LA DURÉE DE TOUTE GARANTIE IMPLICITE, Y COMPRIS LES
GARANTIES IMPLICITES DE QUALITÉ MARCHANDE, SE LIMITE À LA DURÉE DE LA PRÉSENTE GARANTIE
EXPRESSE. LG ELECTRONICS CANADA, INC. NE POURRA ÊTRE TENUE RESPONSABLE DE LA PERTE DE
JOUISSANCE DU PRODUIT, DES NUISANCES, DES PERTES OU DE TOUT AUTRE DOMMAGE, DIRECT OU INDIRECT,
DÉCOULANT DE L’UTILISATION OU DE L’INAPTITUDE À UTILISER CE PRODUIT, AINSI QUE DE TOUTE AUTRE
VIOLATION D’UNE GARANTIE EXPRESSE OU IMPLICITE QUELLE QU’ELLE SOIT, Y COMPRIS LA GARANTIE
IMPLICITE DE QUALITÉ MARCHANDE APPLICABLE À CE PRODUIT. Certaines provinces ne permettent pas les exclusions
ou les limitations des dommages accessoires ou indirects, ni les limitations de la durée de la garantie implicite; il est donc
possible que ces limitations ou exclusions ne s’appliquent pas à votre cas. La présente garantie vous accorde des droits légaux
spécifi ques. Il est possible que vous ayez d’autres droits qui peuvent varier d’une province à l’autre.
CETTE GARANTIE LIMITÉE NE S'APPLIQUE PAS:
• aux déplacements du service technique vers votre maison pour livrer, retirer et/ou installer le produit, pour vous instruire, pour remplacer
les fusibles de la maison ou effectuer un câblage correct ou pour la correction de réparations non autorisées;
• aux dommages ou aux problèmes de fonctionnement résultant d'une mauvaise utilisation, d'un emploi abusif, de la mise en marche de
l'unité en dehors des spécifications d'ambiance ou dans des conditions contraires aux conditions requises ou aux précautions indiquées
dans le Mode d'Emploi, d'un accident, de la vermine, d'un incendie, d'une inondation, d'une installation incorrecte, des cas de force
majeure, d'une modification ou altération non autorisée, d'un courant électrique ou tension incorrects, d'une utilisation commerciale ou de
tout usage différent de celui pour lequel l'unité a été conçue;
• aux réparations effectuées lorsque votre réfrigérateur LG subi une utilisation autre que l'utilisation normale par un ménage unifamilial.
• Dommages causés pendant ou après la livraison.
• Affichage, remise ou les appareils soldés achetés avec des rayures, des marques ou des défauts.
Les coûts des réparations ou des remplacements sous ces circonstances exclues seront supportés par le consommateur.
Une preuve d’achat est exigée et doit être fournie à LG pour valider la garantie.
NUMÉROS DE L’ASSISTANCE À LA CLIENTÈLE
Enregistrement du produit
Modèle :
Numéro de série :
Date d’achat :
Le modèle et le numéro de série figurent sur l’enveloppe
intérieure ou l’arrière du compartiment réfrigérateur.
PÉRIODE DE GARANTIE :
RÉFRIGÉRATEUR/CONGÉLATEUR
MAIN D’OEUVRE : Un an à partir de la date d’achat.
PIÈCES : Un an à partir de la date d’achat.
SYSTÈME HERMÉTIQUE
(Compresseur, condenseur, et évaporateur)
MAIN D’OEUVRE : Un an à partir de la date d’achat.
PIÈCES : Sept ans à partir de la date d’achat.
APPEL DE SERVICE :
Veuillez composer le 1-888-542-2623
(1-888-LG-CANADA)
et choisir l’option appropriée.
Soyez prêt à mentionner le type de produit
(réfrigérateur) et votre code postal.
Visitez notre site Web à : www.lg.ca
Cette garantie vous donne droit au service à domicile.
REMARQUE : Pour vous prévaloir de la garantie,
conservez votre facture pour fournir une preuve d’achat
datée. Une copie de votre facture devra être présentée
au moment où le service sous garantie sera fourni.
Pour obtenir l’assistance à la clientèle, des
renseignements sur les produits ou localiser
un revendeur ou un centre de service après-vente agréé :
Veuillez composer le
1-888-542-2623 (1-888-LG-
CANADA)
et choisir l’option appropriée. Soyez prêt à
mentionner le type de produit (réfrigérateur) et votre code postal.
Ou visitez notre site Web à :
www.lg.ca
Page 87

878889
Page 88

Page 89

Page 90

90
INFORMACIÓN IMPORTANTE DE
SEGURIDAD
Precauciones básicas de seguridad ....................91
Eliminación de CFC ..............................................92
Cómo conectar la electricidad ..............................93
PIEZAS Y CARACTERÍSTICAS
Características especiales ...................................94
Piezas y componentes importantes .....................95
INSTALACIÓN
Elija la ubicación adecuada ..................................96
Espacios libres .....................................................96
Pisos ....................................................................97
Cómo quitar la manija ..........................................97
Cómo quitar la puerta y el cajón ..........................98
Cómo conectar el suministro de agua ................106
Cómo conectar las líneas de agua .....................106
Cómo nivelar las puertas del refrigerador ..........108
Inicio ...................................................................109
CÓMO UTILIZAR
Características del panel de control ...................110
Pantalla de LED .................................................111
Cómo ajustar las temperaturas
y las funciones ...................................................112
Cómo operar el dispensador ..............................113
Confi guración de las funciones .........................114
Depósito de hielo del interior de la puerta ..........115
Máquina automática para hacer hielo ................116
Almacenamiento de alimentos ...........................117
Ubicación de los alimentos ................................118
Ajuste de altura de los estantes .........................119
CUIDADO Y LIMPIEZA
Cómo quitar y cambiar los componentes ...........120
Limpieza del refrigerador ...................................123
Información general ...........................................123
Cómo cambiar el fi ltro de agua .........................124
DETECCIÓN DE PROBLEMAS
Antes de solicitar servicio técnico ......................125
ESPECIFICACIONES
Dimensiones y especifi caciones importantes ...129
GARANTÍA
Información sobre registro de producto .............130
¡GRACIAS!
Felicitaciones por su compra y
bienvenido a la familia de LG.
Su nuevo refrigerador de doble
puerta LG, combina la más
avanzada tecnología de frío
con un funcionamiento sencillo
y un alto rendimiento.
Siga las instrucciones de
funcionamiento y cuidados de este
manual y su refrigerador le
proporcionará un servicio eficaz
durante muchos años.
Page 91

91
PRECAUCIONES BÁSICAS DE SEGURIDAD
Esta guía contiene varios mensajes importantes de seguridad. Siempre lea y
obedezca todos los mensajes de seguridad.
w Este es el símbolo de alerta de seguridad. Lo alerta sobre mensajes de seguridad que informan
sobre peligros que pueden matarlo o lastimarlo a usted o a otros o provocar daños al producto. Todos los
mensajes de seguridad serán precedidos por el símbolo de alerta de seguridad y las palabras PELIGRO,
ADVERTENCIA, o PRECAUCIÓN. Estas palabras significan:
wPELIGRO
Si no sigue las instrucciones descritas a continuación podría
experimentar lesiones serias e incluso fatales.
wADVERTENCIA
El usuario puede morir o sufrir graves lesiones si no sigue
las instrucciones.
wPRECAUCIÓN
Indica una situación de riesgo inminente que, de no evitarse,
podría ocasionar lesiones menores o moderadas o daños al
producto.
Todos los mensajes identificarán el peligro, le señalarán cómo reducir las posibilidades de lesiones, y le
explicarán qué puede suceder si no se siguen las instrucciones.
wADVERTENCIA
Para reducir el riesgo de incendio, descarga
eléctrica, o lesiones a personas cuando utilice el
producto, deben cumplirse precauciones básicas
de seguridad, incluyendo las siguientes.
Lea todas las instrucciones antes de utilizar este
artefacto.
• NUNCA desenchufe el refrigerador tirando del cable
de energía. Siempre tome el enchufe con fi rmeza y
quítelo del tomacorriente.
• Repare o reemplace de manera inmediata todos los
cables eléctricos que se hayan desgastado o
dañado. No utilice cables que den muestras de
grietas o desgaste en su longitud o en el enchufe o
extremo del conector.
• Cuando aleje el refrigerador de la pared, tenga
cuidado de no aplastar o dañar el cable de energía.
• NO almacene o use gasolina u otros vapores o
líquidos infl amables cerca de este o cualquier otro
artefacto.
• NO permitir a los niños subirse, pararse, sentarse o
colgarse de las puertas, cajones o repisas del
refrigerador. Podrían dañarlo y provocarse serias
lesiones ellos mismos.
• Mantenga los dedos alejados de los puntos de
pellizco; los espacios entre las puertas y armario son
necesariamente pequeños. Tenga cuidado al cerrar
puertas cuando hay niños en la cercanía.
• Desenchufe su refrigerador antes de limpiar o hacer
reparaciones.
NOTA: Las reparaciones debe realizarlas un técnico
califi cado.
• Antes de reemplazar un bombilla de luz quemada,
desenchufe el refrigerador o desconecte la
electricidad del disyuntor o caja de fusibles para
evitar contacto con un fi lamento cargado (una
bombilla quemada puede romperse al cambiarla).
NOTA: Algunos modelos tienen iluminación interior
mediante LED y la reparación debe llevarse a cabo
por personal técnico cualificado.
NOTA: Confi gurar cualquiera de los dos controles
en la posición OFF (apagado) no elimina la corriente
de electricidad dirigida al circuito de la luz.
• Una vez haya terminado, vuelva a enchufar la
refrigeradora al suministro eléctrico y restablezca el
control (dependiendo del modelo: termostato, control
de la refrigeradora o la heladera) al ajuste deseado.
• Este refrigerador debe ser instalado correctamente
de acuerdo con las Instrucciones del instalador,
adjuntas en la parte frontal del refrigerador.
• Después de instalar su refrigerador, no toque las
superfi cies frías del congelador con las manos
mojadas o húmedas. La piel puede adherirse a las
superfi cies muy frías.
• En refrigeradores con máquinas automáticas para
hacer hielo, evite el contacto con las piezas en
movimiento del mecanismo eyector o con el
elemento calentador que libera los cubitos. NO
coloque sus dedos o manos en el mecanismo de la
máquina para hacer hielo mientras el refrigerador se
encuentre enchufado.
• No modifi que o extienda la longitud del cable de
energía. Esto provocará una descarga eléctrica o un
incendio.t.
Page 92

92
PRECAUCIONES BÁSICAS DE SEGURIDAD (CONT.)
• NO vuelva a congelar alimentos que se hayan
descongelado por completo. El Ministerio de
Agricultura de los EE.UU., Boletín N° 69 sobre
Hogares y Jardines señala:
... Pueden volverse a congelar los alimentos que
hayan sido descongelados si todavía contienen
cristales de hielo o si todavía están fríos, por debajo
de 40°F (4°C).
... Las carnes rojas picadas, carnes de ave, o
pescado que tengan olores o colores extraños no
deben volver a congelarse y tampoco deben
consumirse. Los helados descongelados deben
eliminarse. Si el olor o color de cualquier alimento
es pobre o dudoso, elimínelo.
Volver a congelar, incluso habiendo descongelado
sólo parcialmente, reduce la calidad de los alimentos,
particularmente en el caso de frutas, verduras y
alimentos preparados.
La calidad comestible de las carnes rojas se ve
menos afectada que la de otros alimentos. Utilice
alimentos recongelados lo antes posible para
preservar la mayor calidad posible.
ELIMINACIÓN DE CFC
Su viejo refrigerador puede tener un sistema de
enfriamiento con CFC (clorofluorocarbonos).
Se cree que los CFC son dañinos para el ozono
estratosférico.
Si va a tirar su viejo refrigerador, asegúrese que
quitar el refrigerante CFC para una eliminación
adecuada por parte de un técnico calificado.
Si libera este refrigerante de CFC de manera
intencional, usted puede ser objeto de multas y de
prisión según lo indicado por la legislación ambiental.
wPELIGRO
Riesgo de encierro para niños
Los refrigeradores desechados o abandonados
representan un gran peligro, aunque sólo
permanezcan en la basura durante unos días.
Si va a desechar su viejo refrigerador, siga las
siguientes instrucciones para prevenir accidentes.
Antes de eliminar su viejo refrigerador o
congelador:
• Quite las puertas.
• Deje los estantes en su lugar para que los niños no
puedan subirse fácilmente.
Page 93

93
CÓMO CONECTAR LA ELECTRICIDAD
IMPORTANTE: Lea cuidadosamente.
wADVERTENCIA
Peligro de descarga eléctrica
Para seguridad personal, este artefacto debe
conectarse a tierra de manera adecuada. Haga
que un técnico calificado verifique el
tomacorriente de pared y el circuito para
verificar que tengan una conexión a tierra
adecuada.
MÉTODO DE CONEXIÓN A TIERRA
RECOMENDADO
El refrigerador siempre debe estar conectado a
un tomacorriente individual con conexión a tierra
clasificado para 120 voltios, 60 Hz, sólo CA, y
con fusibles de 20 amperes. Esto otorga un mejor
desempeño y también evita la sobrecarga
de los circuitos de cableado de la casa, lo que
podría generar un peligro de incendio por
sobrecarga. Se recomienda que este artefacto
cuente con un circuito individual.
Utilice un tomacorriente que no pueda apagarse
con un interruptor o cadena. No utilice un cable
de extensión. Para el uso de este artefacto, es
su responsabilidad y obligación cambiar un
tomacorriente estándar de dos patas por uno de
tres patas con adecuada conexión a tierra.
Bajo ninguna circunstancia corte o quite la
tercera pata (a tierra) del cable de energía.
No utilice un enchufe adaptador.
NOTA: Algunos modelos tienen iluminación interior
mediante LED y la reparación debe llevarse a cabo
por personal técnico cualificado.
Cuando haya terminado, vuelva a conectar el
refrigerador a la fuente de energía y cambie el control
(termostato, control de refrigerador, o control de
congelador, dependiendo del modelo) a la
configuración deseada.
USO DE LOS CABLES DE EXTENSIÓN
Debido a peligros potenciales de seguridad
en ciertas condiciones, recomendamos
enfáticamente no utilizar un cable de
extensión. Sin embargo, si aún así decide
utilizar un cable de extensión, es absolutamente
necesario que se trate de un cable de extensión de
tres patas listado UL (EE.UU.) con enchufe y
tomacorriente a tierra, y que la clasificación
eléctrica del cable sea de 20 amperes (mínimo)
y 120 voltios. El uso de un cable de extensión
incrementará el espacio necesario en la parte
trasera del refrigerador.
GUARDE ESTAS INSTRUCCIONES
Page 94

94
CARACTERÍSTICAS ESPECIALES
PANTALLA DE LED DEL PANEL
DE CONTROL
Los simples controles electrónicos son fáciles
de usar. La pantalla de LED indica temperaturas
del refrigerador y del congelador, muestra el
estado del filtro de agua, información sobre el
dispensador, y más.
ICE PLUS
Si está activada esta función, la sección del
refrigerador funcionará a la temperatura más
baja posible durante 24 horas para aumentar la
producción de hielo un 20 por cien.
DISPENSADOR DE AGUA FILTRADA
Y HIELO
El dispensador ofrece agua fresca, fría y filtrada
a través de la puerta.
El dispensador ofrece hielo en cubitos o picado.
ALARMA DE LA PUERTA
Si la puerta del refrigerador o la heladera
permaneciese abierta durante más de
60 segundos, la unidad emitiría avisos
de alarma a intervalos de 30 segundos.
DEPÓSITO DE HIELO DEL INTERIOR
DE LA PUERTA
La máquina para hacer hielo automáticamente
produce 80-130 cubitos en un período de 24
horas para mantener el dispensador de hielo
bien abastecido. El diseño dentro de la puerta
crea más espacio en los estantes.
CAJONES DE VERDURAS Y FRUTAS
Los cajones de LG mantienen los vegetales
frescos.
1
2
3
4
5
6
1
2
3
4
5
6
Page 95

95
PIEZAS Y COMPONENTES IMPORTANTES
Además de las características y componentes especiales señalados en la sección
Características Especiales, existen otros componentes importantes mencionados en este manual.
REPISA DEL CONGELADOR, REGULABLE.
Los estantes del refrigerador son ajustables para
mayor flexibilidad en el almacenamiento.
RECIPIENTES DE PUERTA MODULARES
Tres cajones intercambiables que pueden
disponerse para satisfacer las necesidades de
almacenamiento.
RECIPIENTE DE ALMACENAMIENTO DE
HIELO DESMONTABLE
El recipiente de almacenamiento de hielo puede
quitarse para llenar hieleras, heladeritas, o jarras.
LED LÁMPARAS INTERIORES
Dos conjuntos separados de LED iluminan el
interior del congelador y el frigorífico.
DEPÓSITO PARA PUERTA INCLINABLE
DEPÓSITO PARA PUERTA FIJO
1
2
4
5
3
6
3
5
4
6
1
2
4
Page 96

96
ELIJA LA UBICACIÓN ADECUADA
wADVERTENCIA
Peligro de peso excesivo
Se necesitan dos o más personas para
trasladar o desempacar el artefacto.
• Almacene e instale el refrigerador donde no
vaya a sufrir temperaturas bajo cero o
condiciones climáticas externas.
• Instale este artefacto en un área donde la
temperatura se encuentre entre los 55°F (13°C)
y 110°F (43°C). Si la temperatura alrededor del
artefacto es demasiado alta o baja, la
capacidad de enfriamiento puede verse
afectada negativamente.
• Si este refrigerador se instala donde la
temperatura supera los 110°F (43°C), la
capacidad de congelado se ve comprometida y
el costo de electricidad consumida se elevará.
• A fi n de reducir el riesgo de una descarga
eléctrica, no instale el refrigerador en un área
húmeda o mojada.
• Seleccione una ubicación donde pueda
conectar fácilmente el suministro de agua
necesario para la máquina automática de hielo
y el dispensador.
• Una instalación inestable puede provocar
vibraciones y ruidos. Si el suelo no está
nivelado, nivélelo haciendo rotar la altura de los
tornillos de ajuste.
• Conecte a tierra el refrigerador para cumplir
con los códigos y ordenanzas vigentes.
wPRECAUCIÓN
Evite ubicar la unidad cerca de fuentes de
calor, luz directa del sol, o humedad.
ESPACIOS LIBRES
• Una distancia muy pequeña desde los elementos
adyacentes puede disminuir la capacidad de
enfriamiento y elevar el gasto de electricidad.
Deje por lo menos 24 pul. (61 cm) frente al
refrigerador para poder abrir las puertas.
NOTA: Para obtener información detallada acerca de
las dimensiones y especificaciones de la unidad,
consulte la página 129.
1" (2,54 cm)
Page 97

97
PISOS
• Para minimizar ruidos y vibraciones, el
refrigerador DEBE estar instalado en un piso de
construcción sólida.
• Para evitar vibraciones, la unidad debe estar
nivelada. Si fuera necesario, ajuste las patas
niveladoras para compensar el desequilibrio del
piso. La parte delantera debe estar un poco más
elevada que la trasera para facilitar el cierre de la
puerta. Los pies de nivelación pueden girarse
fácilmente empujando contra la parte superior del
refrigerador para quitar el peso de los apoyos. Gire
las patas de nivelación en sentido de las agujas del
reloj para levantar la unidad o en sentido contrario a
las agujas del reloj para bajarla.
• No se recomienda el uso de alfombras y de
baldosas frágiles.
• Nunca instale el refrigerador en una plataforma
o una estructura de apoyo débiles.
NOTA: Cuando desplace el refrigerador para
realizar la limpieza o para efectuar un servicio,
asegúrese de proteger el piso. Siempre tire del
refrigerador hacia afuera cuando lo mueva. No
menee o contonee el refrigerador cuando quiera
desplazarlo, porque podría dañar el piso.
CÓMO QUITAR LA MANIJA
Para trasladar el refrigerador a través de una
puerta, puede ser necesario quitar las manijas
de la puerta del refrigerador.
NOTA: La apariencia de las manijas puede
diferir de las incluidas en la ilustración.
wPRECAUCIÓN
• Tenga mucho cuidado al quitar las manijas
para evitar rayar las puertas.
• La manija puede dañarse si la golpea con un
martillo mientras la quita o coloca.
• Cuando coloque o quite una manija, usted
debe empujar y tirar de ella con bastante fuerza.
Afloje los tornillos de fijación con una llave
Allen de 2,5 mm (3/32") y retire la manija.
NOTA: Para ajustar o retirar los tornillos de
montaje de la manija utilice una llave Allen
de 1/4".
1 Afloje los tornillos de fijación ubicados en la
parte inferior de la manija con una llave
Allen de 2,5 mm (3/32") y retire la manija.
NOTA: Para ajustar o retirar los tornillos de
montaje de la manija utilice una llave Allen
de 1/4".
2
Tornillos de
montaje
Tornillo de fijación
Llave Allen
NOTA: Es recomendable desmontar las puertas cuando sea necesario desplazar el refrigerador a través de
un hueco estrecho.
Page 98

98
CÓMO QUITAR LA MANIJA (CONT.)
REINSTALACIÓN DE LA MANIJA
CÓMO QUITAR LA PUERTA Y EL CAJÓN
CÓMO QUITAR LA PUERTA
wADVERTENCIA
Peligro de descarga eléctrica
• Desconecte el suministro eléctrico de la
refrigeradora antes de la instalación. No hacerlo
podría causar lesiones graves o incluso la muerte.
• No introduzca sus manos o pies, ni objetos
metálicos, en los conductos de ventilación, rejilla de
la base o la parte inferior de la refrigeradora. Podría
sufrir daños o recibir una descarga eléctrica.
• Tenga cuidado al trabajar con la bisagra, parrilla
de la base y retén. Puede resultar herido.
Antes de comenzar, retire los alimentos y recipientes
de las puertas.
Si la puerta de entrada de su hogar es demasiado
angosta para que pase el refrigerador, quite la puerta
del refrigerador y traslade el mismo de costado a
través de la puerta.
Coloque el tirador en la puerta, alineándolo
según su plantilla, para fijar los pasadores
de montaje y apriete los tornillos del conjunto
con ayuda de una llave Allen de 2,5 mm
(3/32").
NOTA: Para ajustar o retirar los tornillos de
montaje de la manija utilice una llave Allen de
1/4".
1 Coloque el tirador en la puerta, alineándolo
según su plantilla, para fijar los pasadores
de montaje y apriete los tornillos del conjunto
en la parte de abajo del tirador con ayuda de
una llave Allen de 2,5 mm (3/32").
NOTA: Para ajustar o retirar los tornillos de
montaje de la manija utilice una llave Allen de
1/4".
2
Para quitar la puerta izquierda del
refrigerador:
Saque el tubo de agua del accesorio mientras
presiona el anillo de liberación del mismo.
NOTA: Al extraer el tubo, primero deberá
empujar el collar en la dirección opuesta a la
flecha indicada en la imagen superior
mientras tira del tubo en la dirección de la
flecha.
1
Tornillos de
montaje
adaptador
Page 99

99
CÓMO QUITAR LA PUERTA Y EL CAJÓN (CONT.)
CÓMO QUITAR LA PUERTA (CONT.)
• Abra la puerta. Retire el tornillo de la tapa
de la bisagra superior (1).
• Use un destornillador de lados planos para
destrabar los ganchos (no se muestran) en
el lado inferior frontal de la tapa (2). Levante
la tapa.
• Retire la tapa. Quite el tubo (3).
• Desconecte todos los arneses de cableado
(4).
• Quite el tornillo de conexión a tierra (5).
• Gire la palanca de la bisagra (6) en sentido
contrario a las agujas del reloj y quítelo.
Levante la bisagra superior (7) separada del
sujetador de la palanca de la bisagra (8).
IMPORTANTE: Cuando levante la bisagra
separada del sujetador, tenga cuidado de que
la puerta no caiga hacia delante.
• Levante la puerta desde la clavija de la
bisagra del medio y quite la puerta.
PRECAUCIÓN: Monte/desmonte siempre
con la puerta abierta en un ángulo de 90º.
• Coloque la puerta, con la parte interna hacia
arriba, sobre una superfi cie que no raye.
(1)
(2)
(4)
(3)
(6)
(7)
(8)
(5)
2 Para quitar la puerta derecha del
refrigerador:
• Abra la puerta. Retire el tornillo de la tapa
de la bisagra superior (1). Levante la tapa
(2).
• Retire la tapa.
• Desconecte el arnés de cableado (3).
• Gire la palanca de la bisagra (4) en sentido
de las agujas del reloj y quítela. Levante la
bisagra superior (5) separada del sujetador
de la palanca de la bisagra (6).
IMPORTANTE: Cuando levante la bisagra
separada del sujetador, tenga cuidado de que
la puerta no caiga hacia delante.
• Levante la puerta desde la clavija de la
bisagra del medio y quite la puerta.
PRECAUCIÓN: Monte/desmonte siempre
con la puerta abierta en un ángulo de 90º.
• Coloque la puerta, con la parte interna hacia
arriba, sobre una superfi cie que no raye.
(1)
(2)
(3)
(4)
(5)
(6)
3
Page 100

100
CÓMO QUITAR LA PUERTA Y EL CAJÓN (CONT.)
REINSTALACIÓN DE LA PUERTA
Instale primero la puerta derecha.
• Baje la puerta sobre la clavija de la bisagra
del medio como puede verse.
1
• Coloque la bisagra superior (1) sobre el sujetador
de la palanca de la bisagra (2) y en su lugar.
Introduzca la palanca de la bisagra (3) bajo el
sujetador de la palanca. Gire la palanca en
sentido contrario a las agujas del reloj y ajuste la
bisagra.
• Conecte el arnés de cableado (4).
• Enganche la lengüeta sobre el lado del interruptor
de la puerta de la tapa (5) bajo el extremo de la
apertura del cableado en la parte superior del
gabinete. Coloque la tapa en su lugar. Introduzca
y ajuste el tornillo de la tapa (6).
(3)
(2)
(1)
(6)
(5)
(4)
2
Instale la puerta izquierda.
• Baje la puerta sobre la clavija de la bisagra
del medio.
3
• Coloque la bisagra superior (1) sobre el sujetador
de la palanca de la bisagra (2) y en su lugar.
Introduzca la palanca de la bisagra (3) bajo el
sujetador de la palanca. Gire la palanca en
sentido de las agujas del reloj y ajuste la bisagra.
• Instale el tornillo de toma a tierra (4) y conecte
todos los arneses (5).
(2)
(1)
(3)
(4)
(5)
4
 Loading...