

LG LMVM2085ST User Manual

MICROWAVE OVEN
OWNER’S MANUAL
LMVM2085SB
LMVM2085SW
LMVM2085ST
http://us.lgservice.com
PLEASE READ THIS OWNER’S MANUAL
THOROUGHLY BEFORE OPERATING.
P/NO.: MFL56516407
Printed in China

2
PRECAUTIONS TO AVOID POSSIBLE
EXPOSURE TO EXCESSIVE
MICROWAVE ENERGY...
(a) Do not attempt to operate this oven with the
door open since open-door operation can
result in harmful exposure to microwave
energy. It is important not to defeat or tamper
with the safety interlocks.
(b) Do not place any object between the oven
front face and the door or allow soil or
cleaner residue to accumulate on sealing
surfaces.
(c) Do not operate the oven if it is damaged. It is
particularly important that the oven door
closes properly and that there is no
damage to the:
(1) Door (bent),
(2) Hinges and latches (broken or loosened),
(3) Door seals and sealing surfaces.
(d) The oven should not be adjusted or repaired
by anyone except properly qualified service
personnel.
Thank you for purchasing a LG microwave oven.
Please record the model number and serial
number of this unit for future reference. We also
suggest you record the details of your contact with
LG (LG Electronics U.S.A., Inc.) concerning this unit.
Staple your receipt here for proof of purchase.
Model No: _________________________________
Serial No: _________________________________
Dealer:___________________________________
_________________________________________
_________________________________________
Dealer Phone No:___________________________
Customer Relations
LG Electronics U.S.A., Inc.
Service Division Bldg. #3
201 James Record Rd.
Huntsville, AL 35824-0126

3
TABLE OF CONTENTS
PRECAUTIONS TO AVOID POSSIBLE
EXPOSURE TO EXCESSIVE MICROWAVE
ENERGY. .................................................................. 2
TABLE OF CONTENTS............................................ 3
SAFETY .................................................................... 4
Important Safety Instructions ............................... 4
UNDERSTANDING YOUR MICROWAVE OVEN
...... 6
Location of Model Number ................................... 6
Oven Specifications ............................................. 6
Electrical Requirements. ...................................... 6
Grounding Instructions ......................................... 6
Microwave Oven Features. .................................. 7
Installing Glass Tray ............................................. 8
Installation Instructions for Glass Tray ................. 9
Using Oblong Dish ............................................... 9
Control Panel Features ...................................... 10
USING YOUR MICROWAVE OVEN ..................... 12
Learn About Your Microwave Oven ................... 12
Clock .................................................................. 12
Vent Auto Time Set ............................................ 12
Vent Fan ............................................................. 12
Light Hi/Low/Off ................................................... 12
Child Lock .......................................................... 12
Kids Meal ........................................................... 13
EZ-ON ................................................................ 13
Warming Lamp ................................................... 13
Custom Set ........................................................ 14
More/Less .......................................................... 14
Cooking at High Power Levels ........................... 14
Microwave Power Levels ................................... 14
Multi Stage Cooking ........................................... 14
Cooking Guide for Lower Power Levels ............. 15
Sensor Operating Instructions ............................ 16
Sensor Cooking Guide ....................................... 16
Sensor Popcorn ................................................. 16
Sensor Cook ...................................................... 17
Sensor Reheat ................................................... 17
Sensor Cook Table ............................................ 18
Sensor Reheat Table ......................................... 18
Soften ................................................................. 19
Melt .................................................................... 19
Soften Table ....................................................... 20
Melt Table .......................................................... 20
Defrost ................................................................ 21
Quick Defrost ..................................................... 21
Time Defrost ....................................................... 21
Defrost Tips ........................................................ 22
Metal Rack ......................................................... 22
COOKING ............................................................. 23
Getting the Best Cooking Results ...................... 23
Fish and Shellfish ............................................... 23
Fish and Shellfish Cooking Table ....................... 23
Appetizers /Sauces /Soups ................................ 24
Meat ................................................................... 24
Meat Cooking Table ........................................... 25
Chicken .............................................................. 26
Chicken Cooking Table ...................................... 26
Pasta and Rice ................................................... 27
Pasta Cooking Table .......................................... 27
Rice Cooking Table ............................................ 27
CARING FOR YOUR MICROWAVE OVEN ......... 28
Caring for Your Microwave Oven
....................... 28
Metal Rack ......................................................... 29
Cleaning the Grease Filters ............................... 29
Charcoal Filter Replacement .............................. 30
Cooktop/Night Light Replacement ..................... 30
Oven and Warming Lamp Light Replacement
....... 30
COOKING UTENSILS .......................................... 31
Microwave Utensil Guide ................................... 31
TROUBLESHOOTING .......................................... 32
Before Calling for Service .................................. 32
Questions and Answers ..................................... 33
LIMITED WARRANTY .......................................... 34
Kitchen Timer
.. ... ... ... .... .. .. ... .. .. ... .. .. ... .. .. ... .. .. ... .. .. ... .. .. ... .
19

SAFETY
4
IMPORTANT SAFETY INSTRUCTIONS
The safety instructions below will tell you how to use your oven and avoid harm to yourself or
damage to your oven.
WARNING - To reduce the risk of burns,
electric shock, fire, injury to persons, or exposure to
excessive microwave energy.
• Read all the instructions before using your oven.
• Do not allow children to use this oven without
close supervision.
• Read and follow the specific
PRECAUTIONS TO
AVOID POSSIBLE EXPOSURE TO
EXCESSIVE MICROWAVE ENERGY found
on page 2.
• Do not use corrosive chemicals or vapors, such as
sulfide and chloride, in this appliance. This type of
oven is specifically designed to heat, cook, or dry
food. The microwave is made for household use only.
• Do not use or store this appliance outdoors. Do not
use this product near water - for example, near a
kitchen sink, in a wet basement, or near a swimming
pool, or similar location.
• Do not use the cavity for storage purposes. Do not
leave paper products, cooking utensils, or food in
the cavity when not in use.
• Clean the ventilating hood frequently. Do not
allow grease to accumulate on the hood or the
filters.
• Use care when cleaning the vent hood filters.
Corrosive cleaning agents such as lye-based oven
cleaners may damage the filters.
• Do not tamper with the built-in safety switches
on the oven door. The oven has several built-in
safety switches to make sure the power is off when
the door is open.
• If food flames under the hood, turn the fan on.
• Suitable for use above both gas and electric cooking
equipment 36 inches wide or less.
• Do not use this oven for commercial purposes.
It is made for household use only.
• When cleaning the door and the surfaces that
touch the door, use only mild, non-abrasive
soaps or detergents and a sponge or soft cloth.
• If your oven is dropped or damaged, have it
thoroughly checked by a qualified service technician
before using it again.
• To avoid a fire hazard:
- Do not severely overcook food. Severely
overcooked foods can start a fire in the oven.
Watch the oven carefully, especially if you have
paper, plastic, or other combustibles in the oven.
- Do not store combustible items (bread,
cookies, etc.) in the oven, because if lightning
strikes the power lines it may cause the oven to
turn on.
- Do not use wire twist-ties in the oven. Be sure
to inspect purchased items for wire twist-ties and
remove them before placing the item in the oven.
• If a fire should start:
- Keep the oven door closed.
- Turn the oven off.
- Disconnect the power cord or shut off the
power at the fuse or circuit breaker panel.
• To avoid electric shock:
- This appliance must be grounded. Connect it
only to a properly grounded outlet. See the
electrical GROUNDING INSTRUCTIONS
on page 6.
- Do not operate this appliance if it has a
damaged cord or plug, if it is not working
properly or if it has been damaged or dropped.
- Do not immerse the electrical cord or plug
in water.
- Keep the cord away from heated surfaces.
• Take care when The Door is opened.
There is a possibility of being injured.
5
SAFETY
SAVE THESE INSTRUCTIONS
FEDERAL COMMUNICATIONS COMMISSION RADIO FREQUENCY
INTERFERENCE STATEMENT ( U.S.A. ONLY)
• To avoid improperly cooking some foods.
- Do not heat any types of baby bottles or baby
food. Uneven heating may occur and possibly
cause personal injury.
- Do not heat small-necked containers, such as
syrup bottles.
- Do not deep-fat fry in your microwave oven.
- Do not attempt home canning in your
microwave oven.
- Do not heat the following items in the
microwave oven: whole eggs in the shell, water
with oil or fat, sealed containers, or closed glass
jars. These items may explode.
• Do not cover or block any openings in the oven.
• Use your oven only for the operations described in
this manual.
• Do not run the microwave empty.
• Secure the cord in the cabinet above the oven.
• Preserve the oven floor:
- Do not heat the oven floor excessively.
- Do not allow the gray film on special microwave-
cooking packages to touch the oven floor. Put the
package on a microwavable dish.
- Do not cook anything directly on the oven floor or
turntable. Use a microwavable dish.
- Keep a browning dish at least 3/16 inch above floor.
Carefully read and follow the instructions for the
browning dish. If you use a browning dish
incorrectly, you could damage the oven floor.
• Install or locate this appliance only in accordance
with the provided installation instructions.
• This appliance should be serviced only by qualified
service personnel. Contact the nearest authorized
service facility for examination, repair, or adjustment.
• Liquids, such as water, coffee, or tea can be
overheated beyond the boiling point without appearing
to be boiling due to surface tension of the liquid. Visible
bubbling or boiling when the container is removed from
the microwave oven is not always present.
THIS COULD RESULT IN VERY HOT LIQUIDS
SUDDENLY BOILING OVER WHEN THE
CONTAINER IS DISTURBED OR A SPOON OR
OTHER UTENSIL IS INSERTED INTO THE LIQUID.
To reduce the risk of injury to persons;
- Do not overheat the liquid.
- Stir the liquid both before and halfway through
heating it.
- Do not use straight-sided containers with narrow
necks.
- After heating, allow the container to stand in the
microwave oven for a short time before removing
the container.
- Use extreme care when inserting a spoon or other
utensil into the container.
This equipment generates and uses ISM frequency
energy and if not installed and used properly, that is
in strict accordance with the manufacturer's
instructions, may cause interference to radio and
television reception. It has been type tested and
found to comply with limits for ISM Equipment
pursuant to part 18 of FCC Rules, which are
designed to provide reasonable protection against
such interference in a residential installation.
However, there is no guarantee that interference will
not occur in a particular installation. If this equipment
does cause interference to radio or television
reception, which can be determined by turning the
equipment off and on, the user is encouraged to try
to correct the interference by one or more of the
following:
• Reorient the receiving antenna of the radio or
television.
• Relocate the Microwave Oven with respect to the
receiver.
• Move the microwave oven away from the receiver.
• Plug the microwave oven into a different outlet so
that the microwave oven and the receiver are on
different branch circuits.
The manufacturer is not responsible for any radio or
TV interference caused by unauthorized
modification to this microwave oven. It is the
responsibility of the user to correct such interference.
WARNING:
UNDERSTANDING YOUR MICROWAVE OVEN
Please read this owner’s manual. It will tell you how
to use all the fine features of this microwave oven.
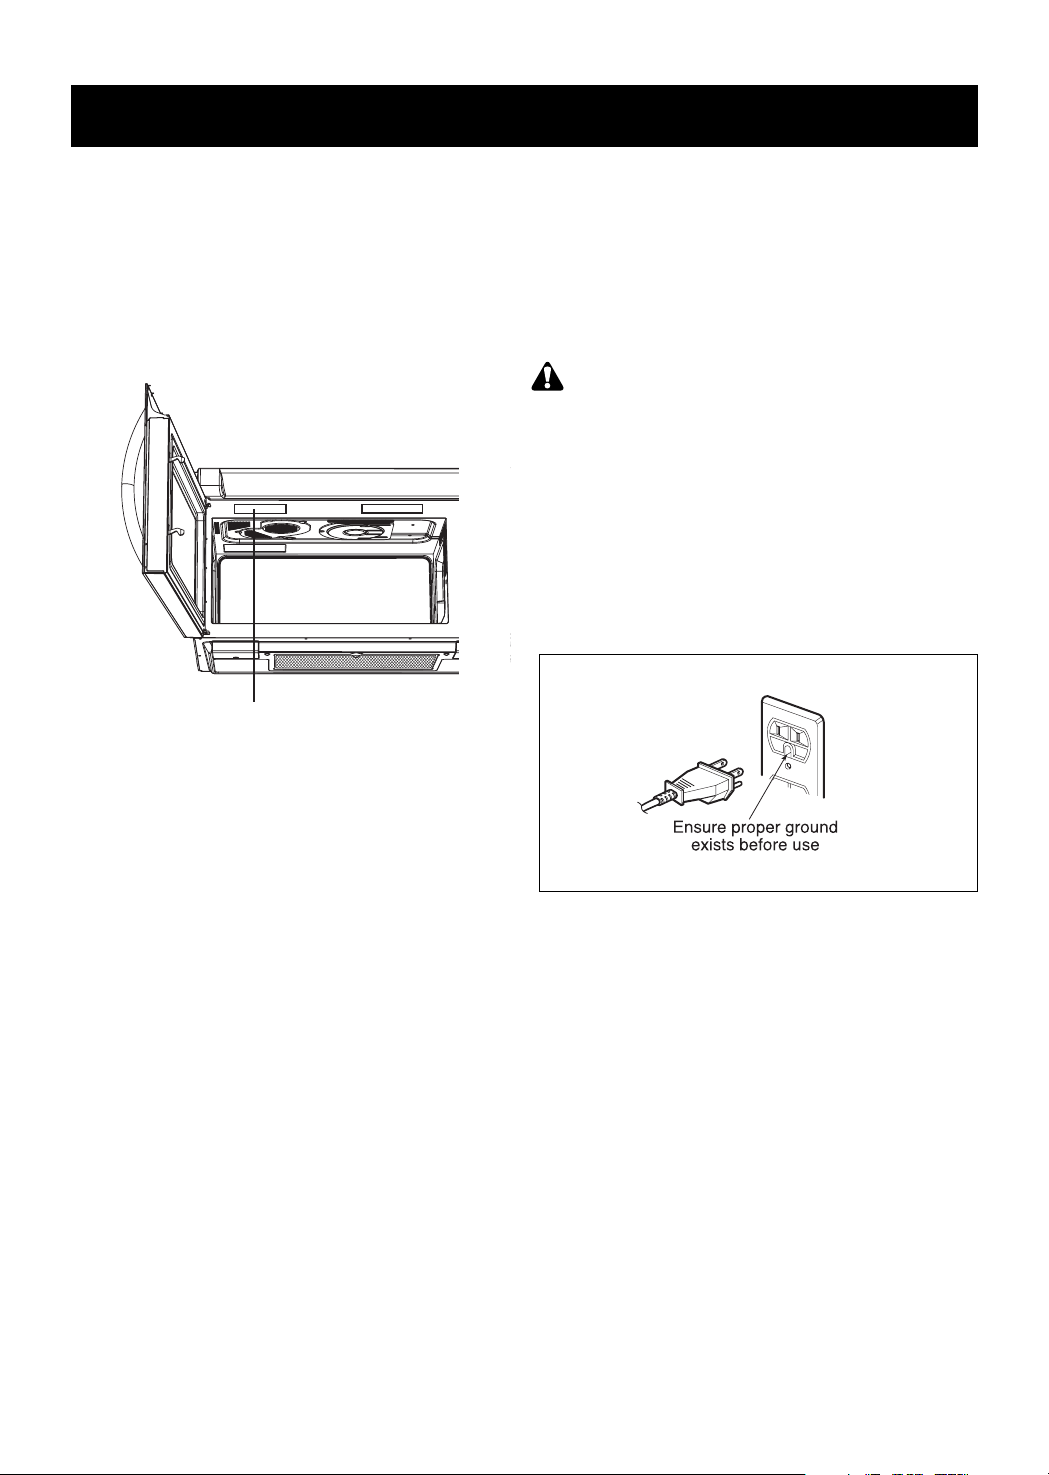
LOCATION OF MODEL NUMBER
To request service information or replacement parts,
the service center will require the complete model
number of your microwave oven. The number is on the
oven front as shown in the illustration below.
OVEN SPECIFICATIONS
Output Power 1,100W (IEC60705)
Outer Dimensions 29
15
/16” x 167/16” x 155/8”
Cavity Volume 2.0 Cu.ft
Net Weight 60 lbs.
ELECTRICAL REQUIREMENTS
The oven is designed to operate on a Standard
120V/60Hz household outlet. Be sure the circuit is at
least 15A or 20A and the microwave oven is the only
appliance on the circuit. It is not designed for 50Hz
or any circuit other than a 120V/60Hz circuit.
GROUNDING INSTRUCTIONS
This appliance must be grounded. If an electrical
short circuit occurs, grounding reduces the risk of
electric shock by providing an escape wire for the
electric current. The appliance is equipped with a cord
having a grounded wire with a grounded plug.
Put the plug into an outlet that is properly installed and
grounded.
WARNING -
If you use the grounding
plug improperly, you risk electric shock.
Ask a qualified electrician if you do not understand the
grounding instructions or if you wonder whether the
appliance is properly grounded.
This appliance has a short power supply cord to
reduce the risk of anyone tripping over or becoming
entangled in the cord. See the separate Installation
Instructions for directions on placing the cord properly.
Keep the electrical power cord dry and do not pinch or
crush it in any way.
6
MODEL NUMBER LABEL
UNDERSTANDING YOUR MICROWAVE OVEN
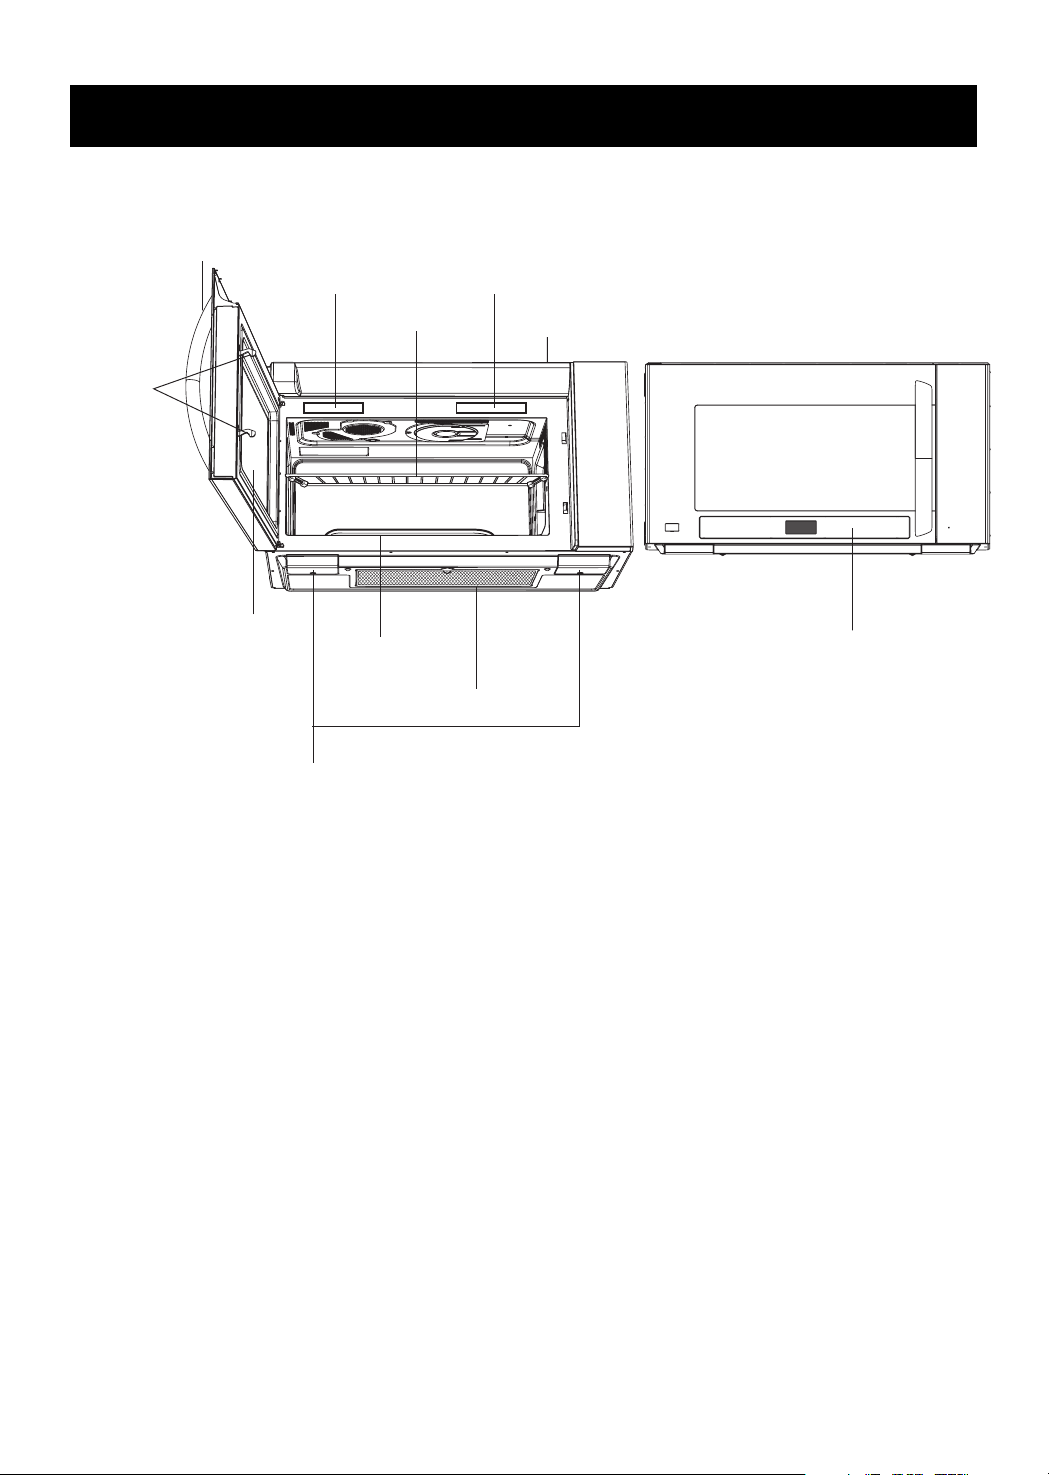
MICROWAVE OVEN FEATURES
7
Your microwave oven is designed to make your
cooking experience as enjoyable and productive as
possible. To get you up and running quickly, the
following is a list of the oven’s basic features:
1. Metal Shielded Window. The shield prevents
microwaves from escaping. It is designed as a
screen to allow you to view food as it cooks.
2. Model and Serial Number Plate & Cooking
Guide Label
3. Charcoal Filter (behind Vent Grille)
4. Vent Grille
5. Glass Turntray / Guide Tray. The glass tray
moves food as it cooks for more even cooking. It
must be in the oven during operation for best
cooking results.
NOTE: the Even Glide Plus system is capable of
handling dishes up to 12 X 15 inches.
6. Cooktop/Countertop Light
7. Control Panel. Touch the pads on this panel to
perform all functions.
8. Metal Rack. Use for extra space when
cooking in more than one container at the
same time. Remove cooking rack when you are
not using it.
9. Grease Filter
Door Safety
Lock System
Door Handle
Window with
Metal Shield
Cooktop/Countertop Light
Model and Serial
Number Plate
Metal Rack
Guide Tray
Cooking Guide
yGlass Turntra
Grease Filter
eVent Grill
Control Panel
UNDERSTANDING YOUR MICROWAVE OVEN
8
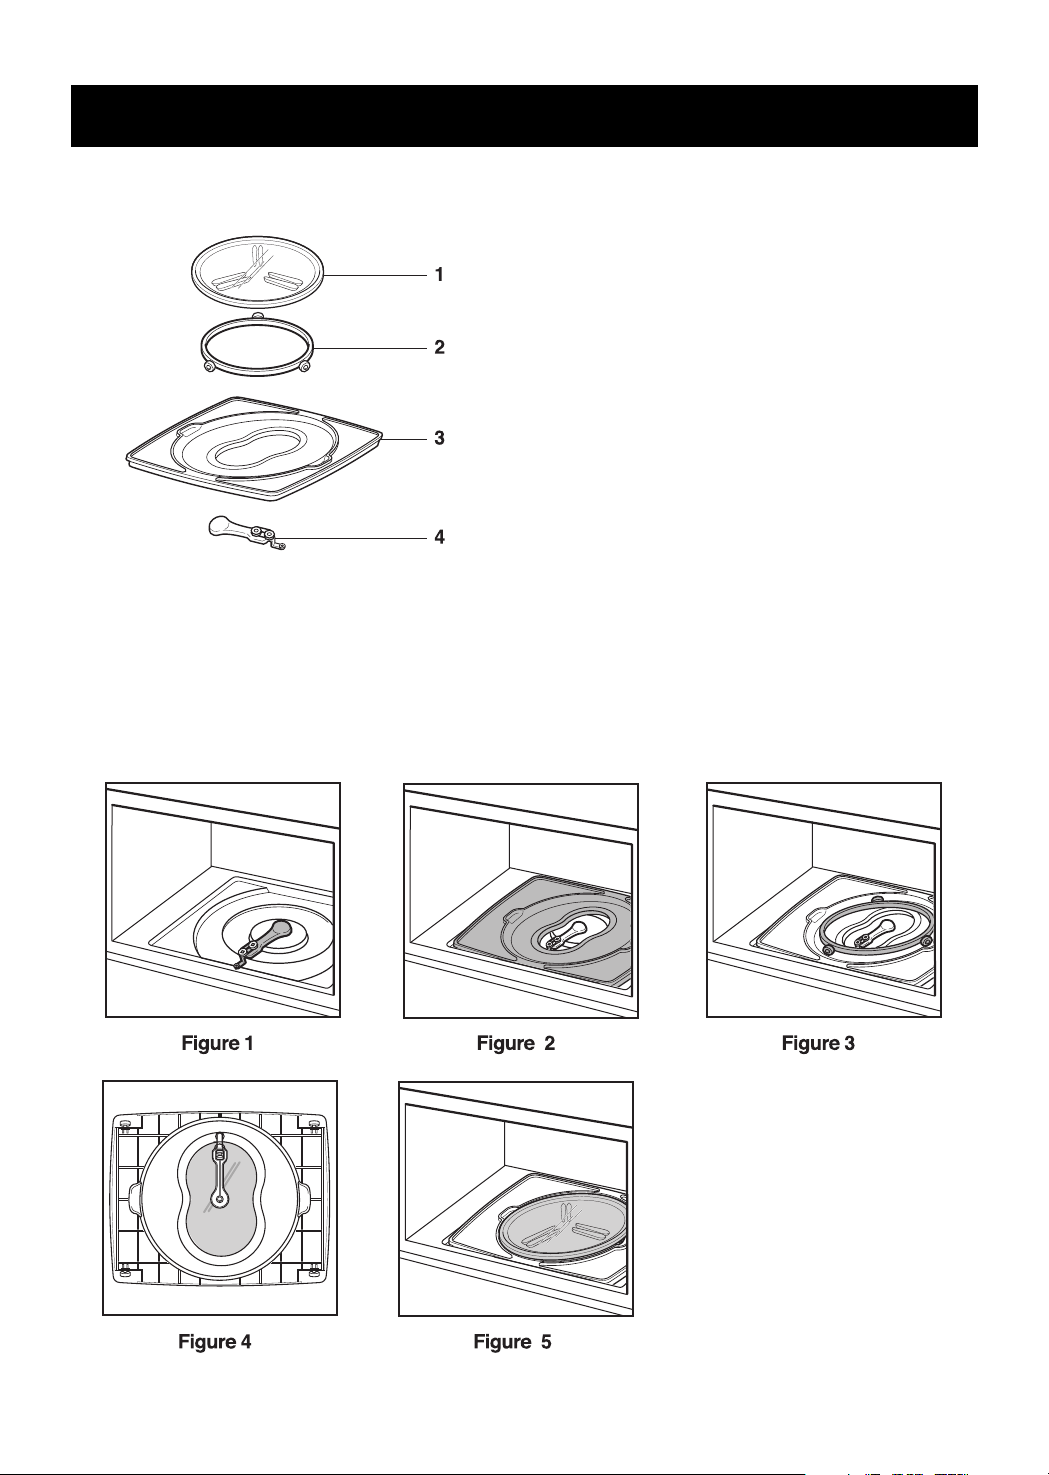
INSTALLING GLASS TRAY
1. Glass Tray
2. Rotating Ring
3. Guide Tray
4. Shaft
The glass tray moves in both direction and
turns to help cook food more evenly. Do not
operate the microwave oven without the glass
tray in place.
To Install:
1. Place the guide tray on the oven cavity bottom.
The rollers on the shaft should fit inside the guide tray bottom groove.(see figure 1,2)
2. Place the rotating ring on the guide tray.
(see figure 3)
3. Place the glass tray on the rotating ring. Fit the rollers of the shaft between the raised,
hollowed groove of the glass tray bottom. The rollers on the rotating ring should fit inside
the glass tray bottom ridge.(see figure 4,5)
UNDERSTANDING YOUR MICROWAVE OVEN
9
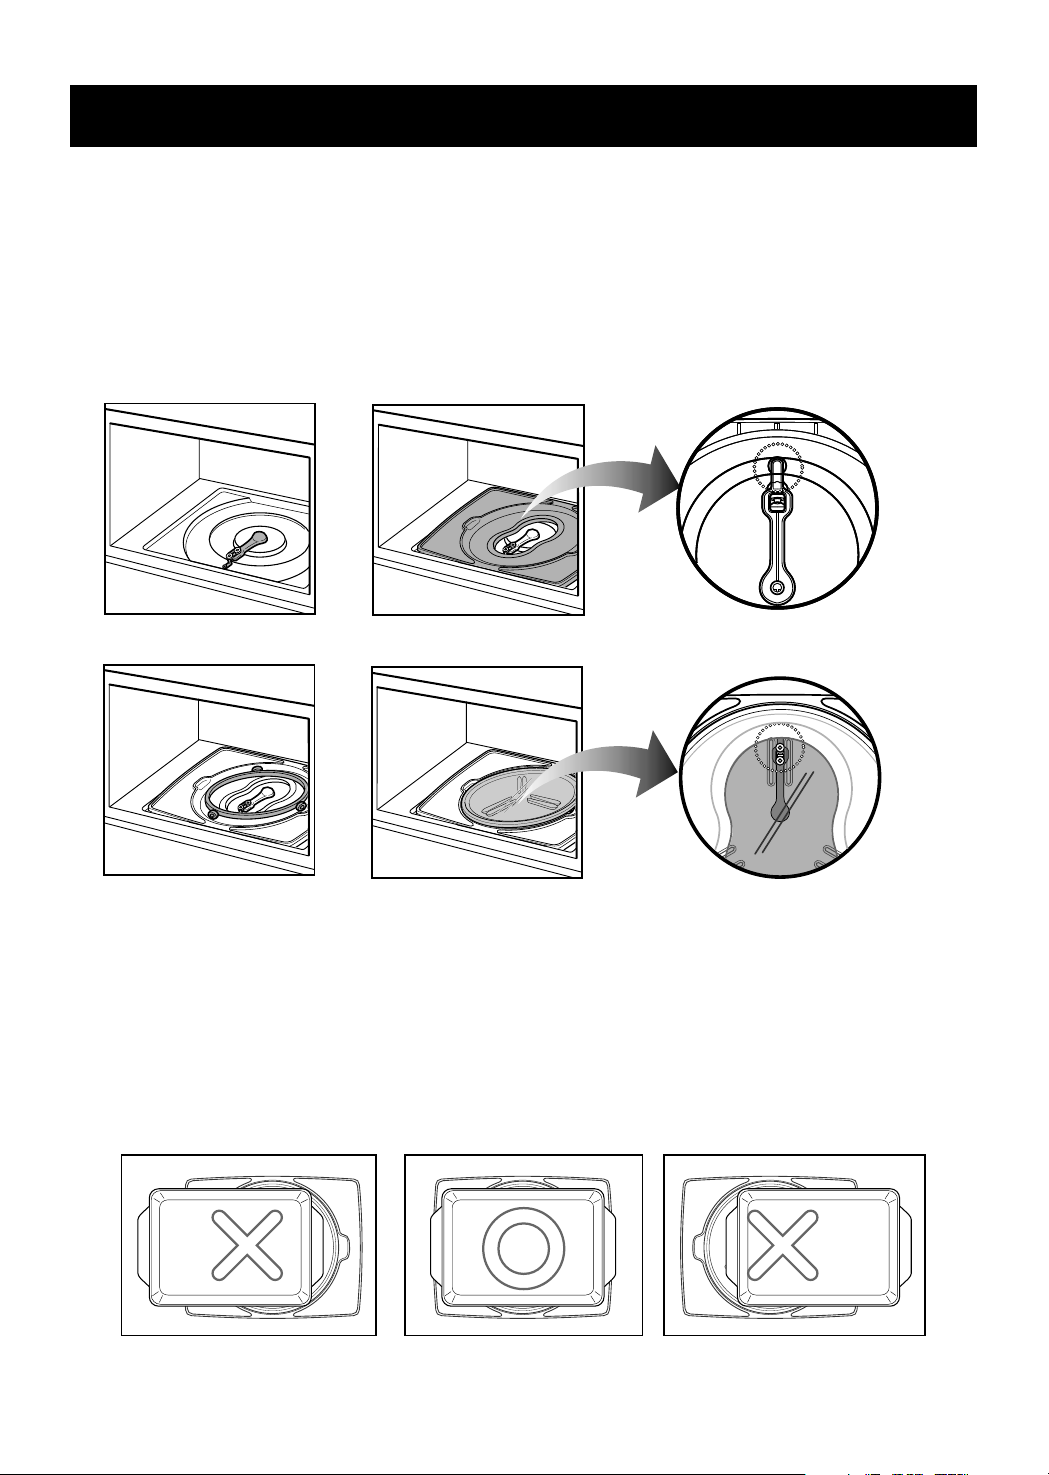
INSTALLATION INSTRUCTIONS FOR GLASS TRAY
Figure 1 Figure 2-1 Figure 2-2
Figure 3
(the back of guide tray)
Figure 4-1 Figure 4-2
Figure 5 Figure 6 Figure 7
To Install:
1. Place the guide tray on the oven cavity bottom. The rollers on the shaft should fit inside the guide
tray bottom groove. (see figure 1, 2-1, 2-2)
2. Place the rotating ring on the guide tray. (see figure 3)
3. Place the glass tray on the rotating ring. Fit the rollers of the shaft between the raised, hollowed
groove of the glass tray bottom. The rollers on the rotating ring should fit inside the glass tray
bottom ridge. (see figure 4-1, 4-2)
USING OBLONG DISH
When using an oblong dish, don’t forget to place it in the center of the guide tray, or poor
performance will result.
An oblong dish which is smaller than 13 inches should be placed on the glass tray. A dish larger than
13 inches should be placed on the raised edge of the guide tray preventing it from touching the glass
tray.
Otherwise, poor performance will result. (see figure 6)

UNDERSTANDING YOUR MICROWAVE OVEN
CONTROL PANEL FEATURES
Your microwave oven control panel lets you select the desired cooking function quickly and easily. All you have
to do is touch the necessary Command pad. The following is a list of all the Command and Number pads
located on the control panel. For more information on these features, see the OPERATION section.
10
37 1112
124569108
13 15 16 18 24
14 17 19 21 22 23
20

UNDERSTANDING YOUR MICROWAVE OVEN
NOTE: Styling and features vary by model.
1. DISPLAY: The Display includes a clock and indicators
to tell you time of day, cooking time setting, and
cooking functions selected.
2. SOFTEN: Touch this pad to soften Butter, Ice Cream,
Cream Cheese, and Frozen Juice.
3. MELT: Touch this pad to melt Butter / Magarine,
Chocolate, Cheese, and Marshmallows.
4. COOK: Touch this pad to cook Baked Potato,
Vegetable Casserole, Rice, and Frozen Entrée. The
oven’s sensor will tell the oven how long to cook
depending on the amount of humidity coming from the
food.
5. REHEAT: Touch this pad to reheat Pizza Slice, Dinner
Plate, Soup/Sauce, and Casserole. The oven’s sensor
will tell the oven how long to cook depending on the
amount of humidity coming from the food.
6. POPCORN: Touch this pad when popping popcorn in
your microwave oven. The oven’s sensor will tell the
oven how long to cook depending on the amount of
humidity it detects from the popcorn.
7. KIDS MEAL: Select type of dish to reheat HOT DOG,
MAC & CHEESE or CHICKEN NUGGETS.
8. WARMING LAMP: Touch this pad to keep hot cooked
foods warm in your oven.
9. CLOCK: Touch this pad to enter the time of day.
10. EZ-ON: Touch this pad to set and start quickly at
100% power level.
11. DEFROST: Touch this key to defrost food by entering
weight, cook time or Quickly.
Touch this key 2 times to Quick Defrost Cook.
Touch this key 3 times to Time Defrost Cook.
12. CUSTOM SET: Touch this pad to change the oven’s
default setting for sound, clock, disply speed, and
defrost weight.
13. COOK TIME: Touch this pad to to set a cooking time.
14. POWER LEVEL: Touch this pad to select a cooking
power level.
15. NUMBER: Touch number pads to enter cooking time,
power level, quantities, or weights.
16. MORE: Touch this pad to add ten seconds of cooking
time each time you press it.
17. LESS: Touch this pad to subtract ten seconds of
cooking time each time you press it.
18. START/ENTER: Touch this pad to start a function. If
you open the door after oven begins to cook, touch
START/ENTER again.
19. STOP/CLEAR: Touch this pad to stop the oven or to
clear all entries.
KITCHEN TIMER:
20.
kitchen timer.
21. VENT ON/OFF: Touch this pad to turn the fan on/off.
22. VENT 5-SPEED: Touch this pad to choose one of 5
fan speeds.
23. VENT AUTO TIME SET: Touch this pad when setting
ventilation time. (1, 3, 5, 10, and 30 minutes.)
Touch this pad to set the
24. LIGHT HI/LOW/OFF: Touch this pad to turn the light
on high, low, or off.
11
 Loading...