


APPENDIX G :
USER’S MANUAL
FCC ID : BEJLM805L

A1
This unit has been engineered and manufactured to ensure your personal
safety, however improper use may result in potential e shock or fire hazards.
In order to allow the proper operation of all safeguards incorporated in this
display, observe the following basic rules for its installation, use, and
servicing.
On Safety
Use only the power cord supplied with the unit. In case you use another power
cord, make sure that it is certified by the applicable national standards if not being
provided by the supplier. If the power cable is faulty in any way, please contact the
manufacturer or the nearest authorized repair service provider for a replacement.
The power supply cord is used as the main disconnection device. Ensure that the
socket-outlet is easily accessible after installation.
Operate the display only from a power source indicated in the specifications of
this manual or listed on the display. If you are not sure what type of power supply
you have in your home, consult with your dealer.
Overloaded AC outlets and extension cords are dangerous. So are frayed power
cords and broken plugs. They may result in a shock or fire hazard. Call your service
technician for replacement.
Do not Open the Display.
There are no user serviceable components inside.
There are Dangerous High Voltages inside, even when the power is OFF.
Contact your dealer if the display is not operating properly.
To Avoid Personal Injury :
Do not place the display on a sloping shelf unless properly secured.
Use only a stand recommended by the manufacturer.
To Prevent Fire or Hazards:
Always turn the display OFF if you leave the room for more than a short period
of time. Never leave the display ON when leaving the house.
Keep children from dropping or pushing objects into the display's cabinet
openings. Some internal parts carry hazardous voltages.
Do not add accessories that have not been designed for this display.
During a lightning storm or when the display is to be left unattended for an
extended period of time, unplug it from the wall outlet.
Important Precautions

A2
Important Precautions
On Installation
Do not allow anything to rest upon or roll over the power cord, and do not place
the display where the power cord is subject to damage.
Do not use this display near water such as near a bathtub, washbowl, kitchen
sink, laundry tub, in a wet basement, or near a swimming pool.
Displays are provided with ventilation openings in the cabinet to allow the release
of heat generated during operation. If these openings are blocked, built-up heat
can cause failures which may result in a fire hazard. Therefore, NEVER:
Block the bottom ventilation slots by placing the display on a bed, sofa, rug, etc.
Place the display in a built-in enclosure unless proper ventilation is provided.
Cover the openings with cloth or other material.
Place the display near or over a radiator or heat source.
Do not rub or strike the Active Matrix LCD with anything hard as this may scratch,
mar, or damage the Active Matrix LCD permanently.
Do not press the LCD screen with your finger for a long time as this may cause
some afterimages.
Some dot defects may appear as Red, Green or Blue spots on the screen.
However, this will have no impact or effect on the display performance.
If possible, use the recommended resolution to obtain the best image quality for
your LCD display. If used under any mode except the recommended resolution,
some scaled or processed images may appear on the screen. However, this is
characteristic of the fixed-resolution LCD panel.
On Cleaning
Unplug the display before cleaning the face of the display screen.
Use a slightly damp (not wet) cloth. Do not use an aerosol directly on the display
screen because over-spraying may cause electrical shock.
On Repacking
Do not throw away the carton and packing materials. They make an ideal
container in which to transport the unit. When shipping the unit to another
location, repack it in its original material.
A3
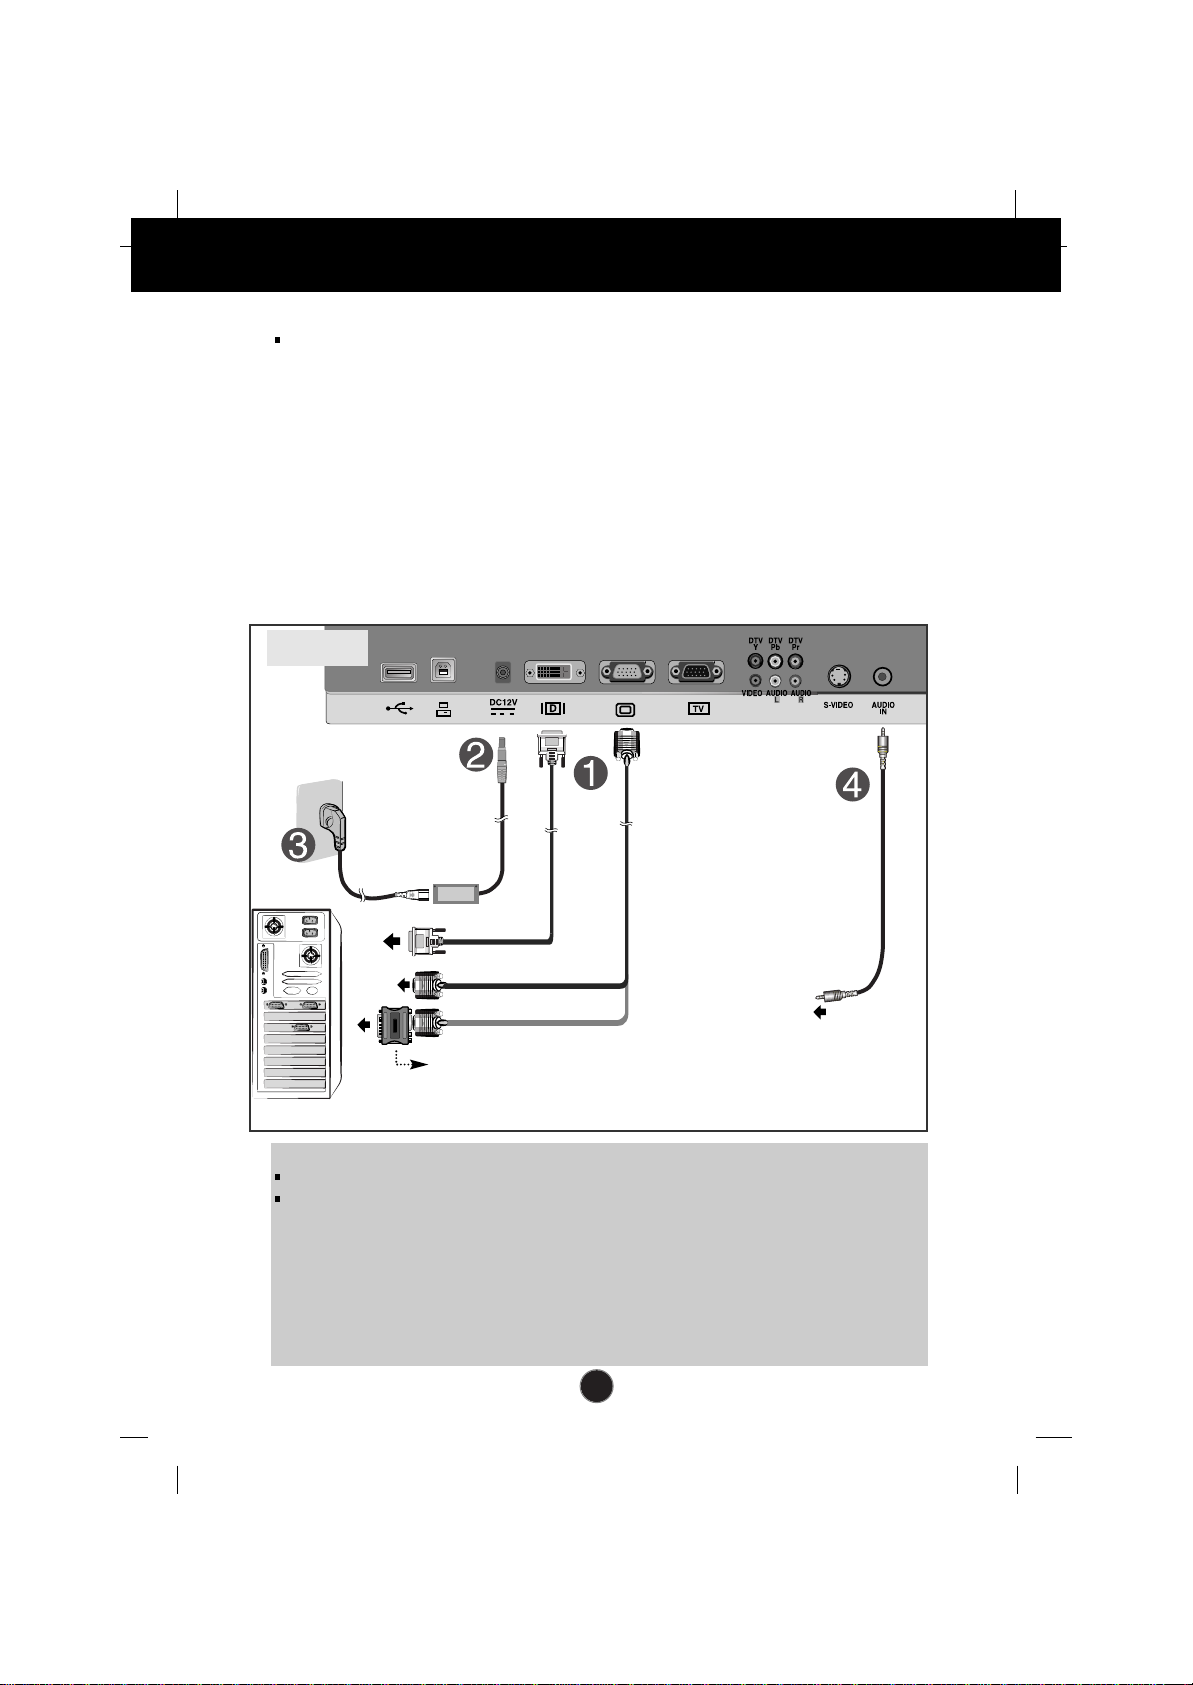
Connecting the Display
Before setting up the monitor, ensure that the power to the monitor, the
computer system, and other attached devices is turned off.
Using the Computer
1. Connect the signal cable. When attached, tighten the thumbscrews to secure
the connection.
2. Connect the plug from the AC adapter into the back of the monitor.
3. Connect the power cord into a proper power outlet that is easily accessible and
close to the display.
4. Connect the audio cable to the *LINE OUT jack of the PC sound card.
PC
PC
MAC
NOTE
This is a simplified representation of the rear view.
This rear view represents a general model; your display may differ from the view as shown.
*LINE OUT
A terminal used to connect to the speaker including a built-in amplifier (Amp). Make sure that
the connecting terminal of the PC sound card is checked before connecting. If the Audio Out of
PC sound card has only Speaker Out, reduce the PC volume.
If the Audio Out of the PC sound card supports both Speaker Out and Line Out, convert to
Line Out using the card jumper of the program (Refer to the Sound Card Manual).
Bottom
Mac adapter
For Apple Macintosh use, a separate plug adapter is needed to
change the 15 pin high density (3 row) D-sub VGA connector
on the supplied cable to a 15 pin 2 row connector.
A4
Connecting the Display
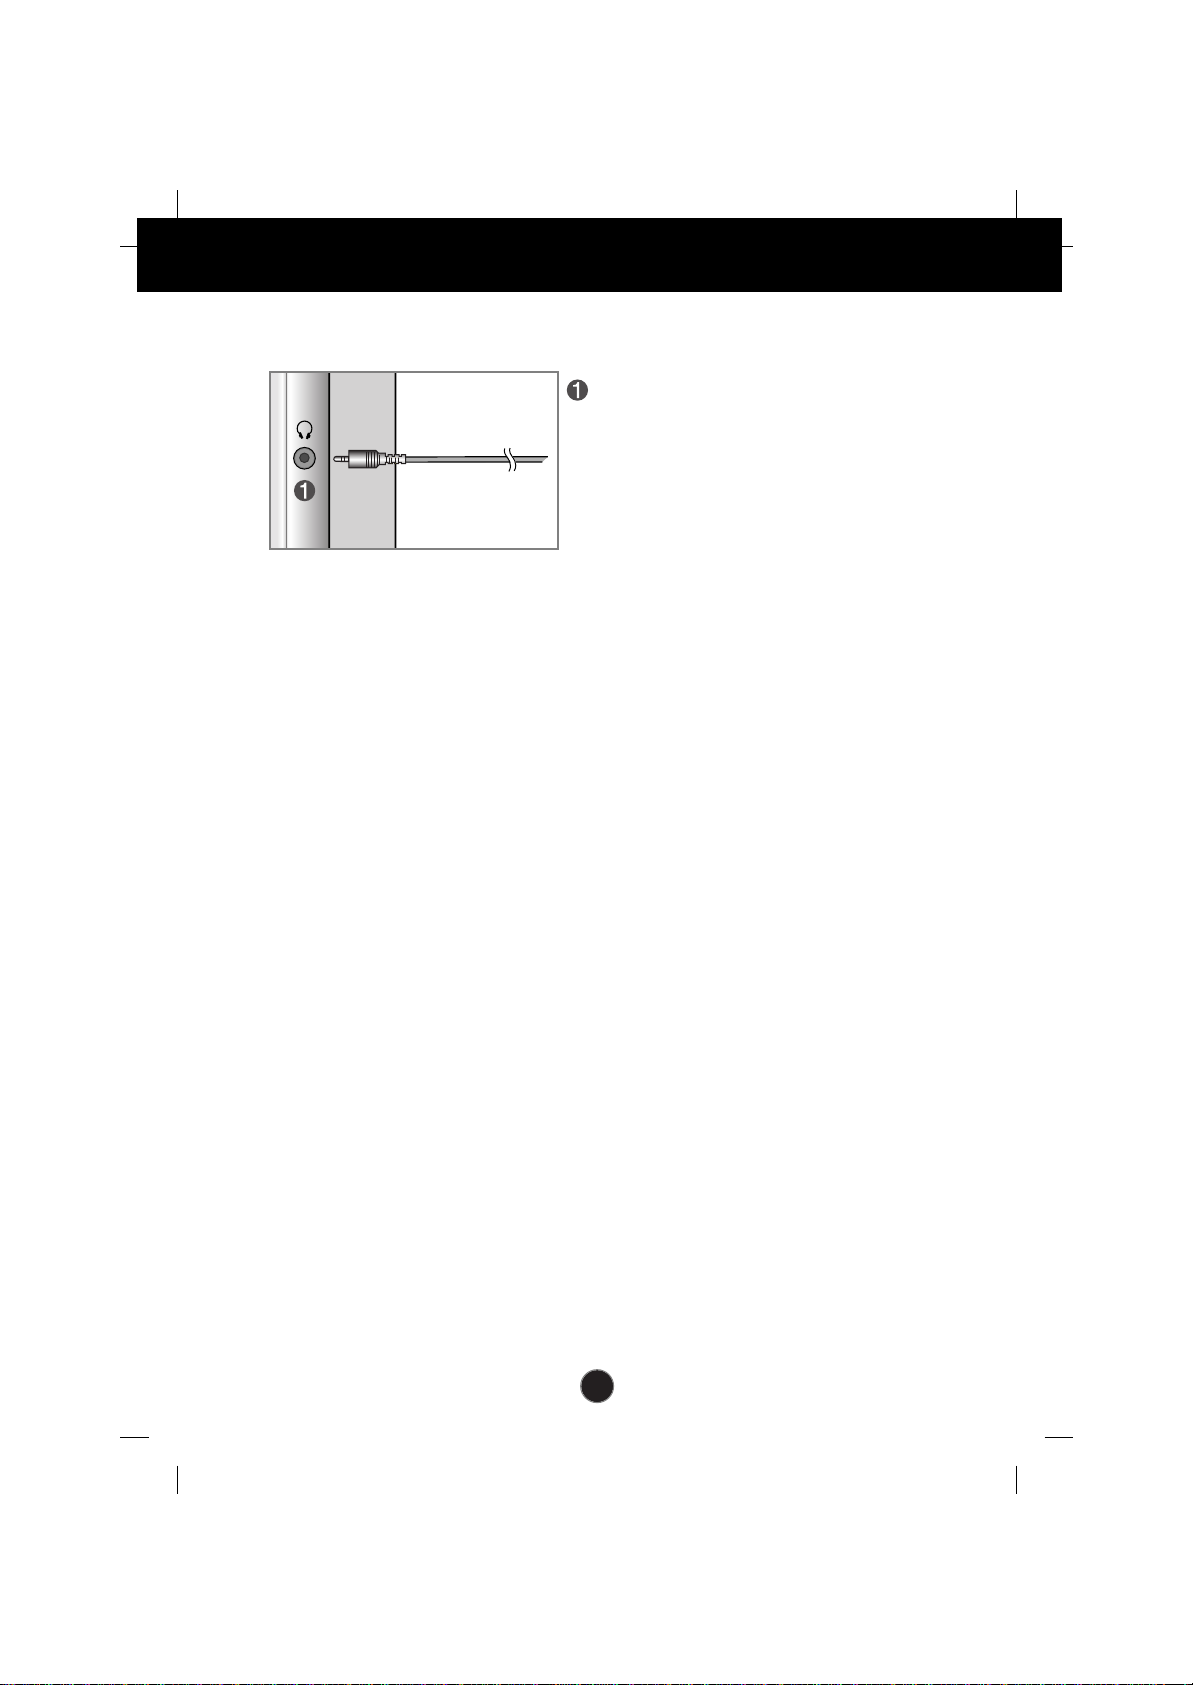
Side Jack
Headphone/Earphone Input
Automatically mutes the speaker volume
when the headphones are plugged in.
<Display>
A5
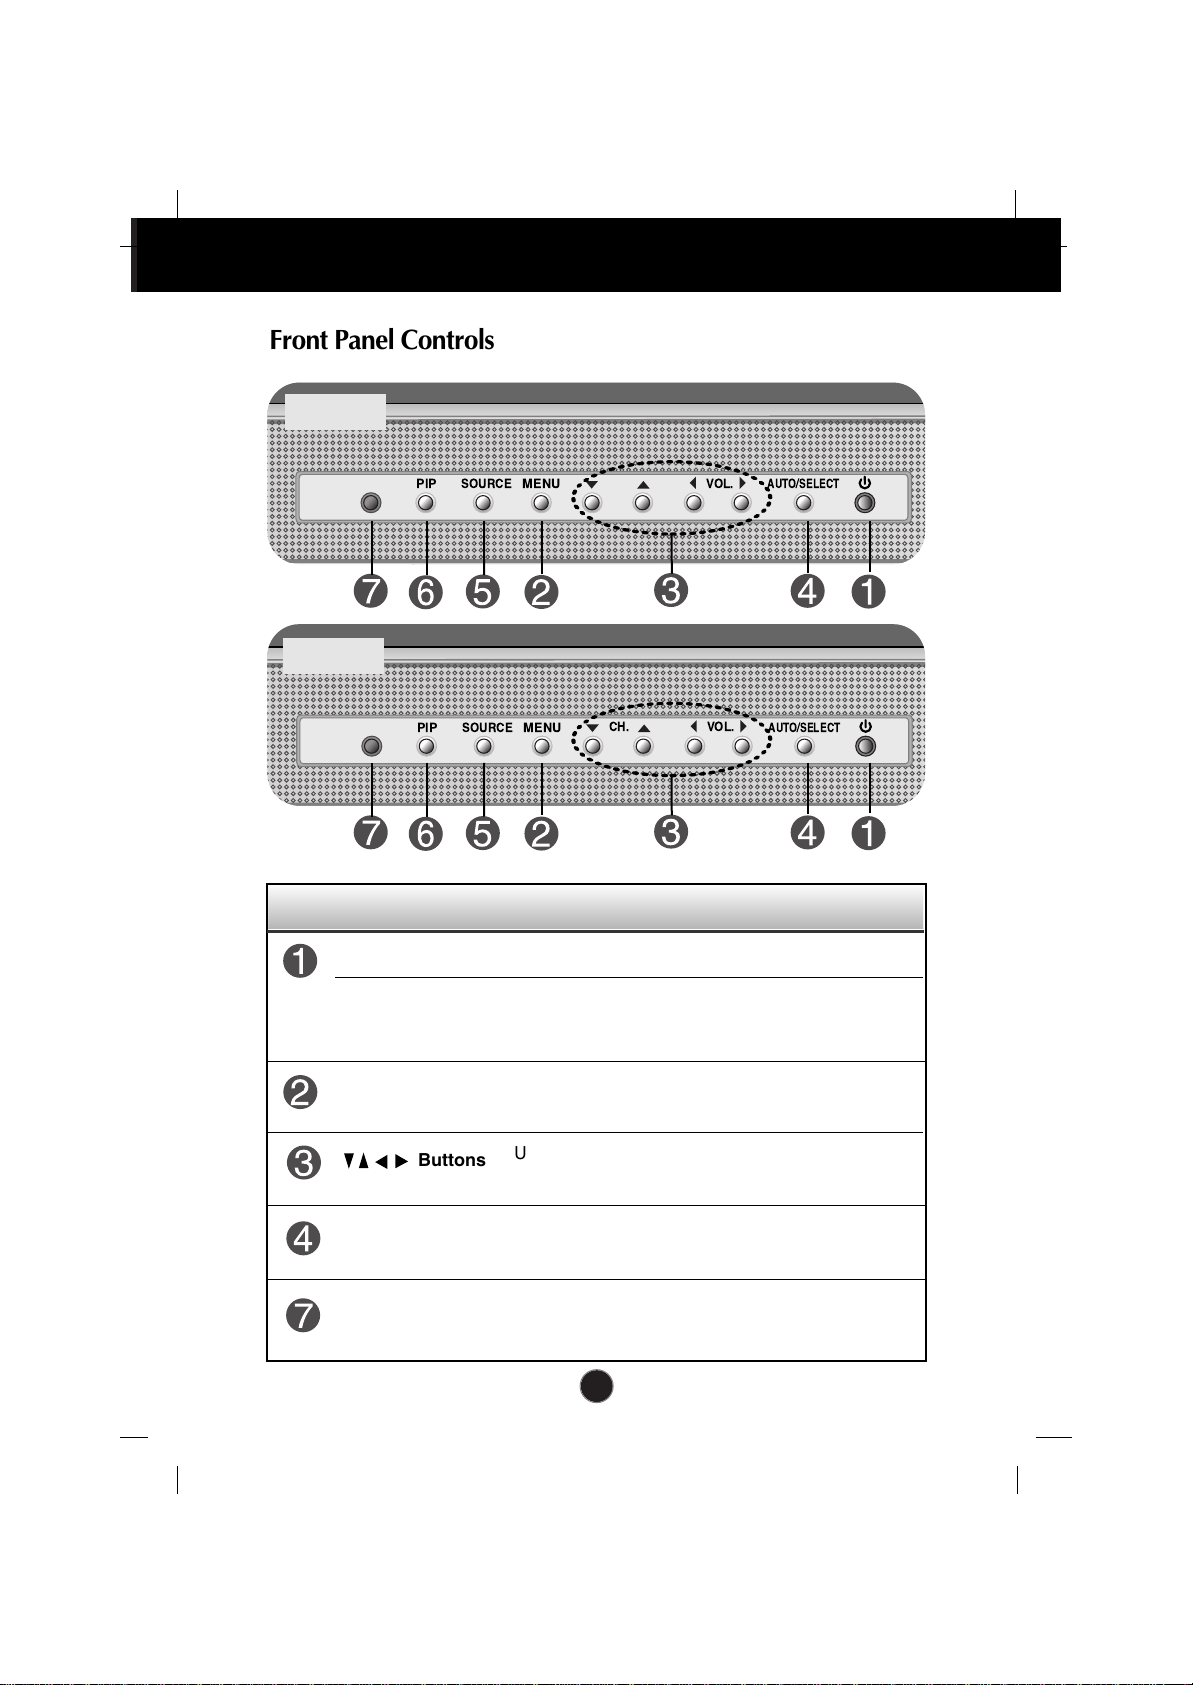
Control Panel Functions
SOURCE
VOL.
MENU
AUTO/SELECT
PIP
Front Panel Controls
Buttons
Use these buttons to choose or adjust items in
the On Screen Display.
MENU Button
Use this button to enter or exit the On Screen
Display.
Use this button to turn the display on or off.
This Indicator lights up green when the display
operates normally. If the display is in DPM (Energy
Saving) mode, this indicator color changes to amber.
Power Button
Power (DPMS)
Indicator
Use this button to enter a selection in the On Screen
Display.
AUTO/SELECT
Button
Remote Control Sensor
SOURCE
CH. VOL.
MENU
AUTO/SELECT
PIP
Control Function
L1810A
L1810T
A6
Control Panel Functions
Control Direct Access Function
•
Bring up Contrast and Brightness adjustment.
• Use these buttons to go up and down the channel
when the TV source is available.
100
100
AUTO IN PROGRESS
When adjusting your display settings, always press the
AUTO/SELECT button before entering the On Screen
Display(OSD). This will automatically adjust your display
image to the ideal settings for the current screen
resolution size (display mode).
The best display mode is 1280x1024.
This function allows you to secure the current control settings,
so that they cannot be inadvertently changed. Press and hold
the MENU button and button for 3 seconds: the message
“CONTROLS LOCKED” appears.
You can unlock the OSD controls at any time by pushing the
MENU button and button for 3 seconds:
the message “CONTROLS UNLOCKED” will appear.
AUTO adjustment function
CONTROLS LOCKED/UNLOCKED :
MENU and
Use these buttons to decrease or increase the volume level.
VOLUME:
37
INPUT SELECT
DVI DIGITAL
V1 (AV)
V2 (S)
HDTV
DSUB ANALOG
Use this button to select an input signal.
• DVI DIGITAL: DVI digital signal
• DSUB ANALOG: 15-pin D-sub analog signal
• TV: TV
• V1 (AV): Composite video
• V2 (S): S video
• HDTV: HDTV
Source Selection:
INPUT SELECT
DVI DIGITAL
V1 (AV)
V2 (S)
HDTV
DSUB ANALOG
TV
CONTROLS LOCKED
CONTROLS UNLOCKED
AUTO/SELECT
SOURCE
This PIP (Picture-in-Picture) function allows the image
from the TV (HDTV), VCR or DVD to be displayed on a
sub-screen while you are using a computer.
The sub-screen is changed in the order shown below.
: SMALL -> LARGE -> OFF
PIP (Picture in Picture) function
INPUT MENU
AUTO/SELECT
PIP
* When the TV source is available.
A7
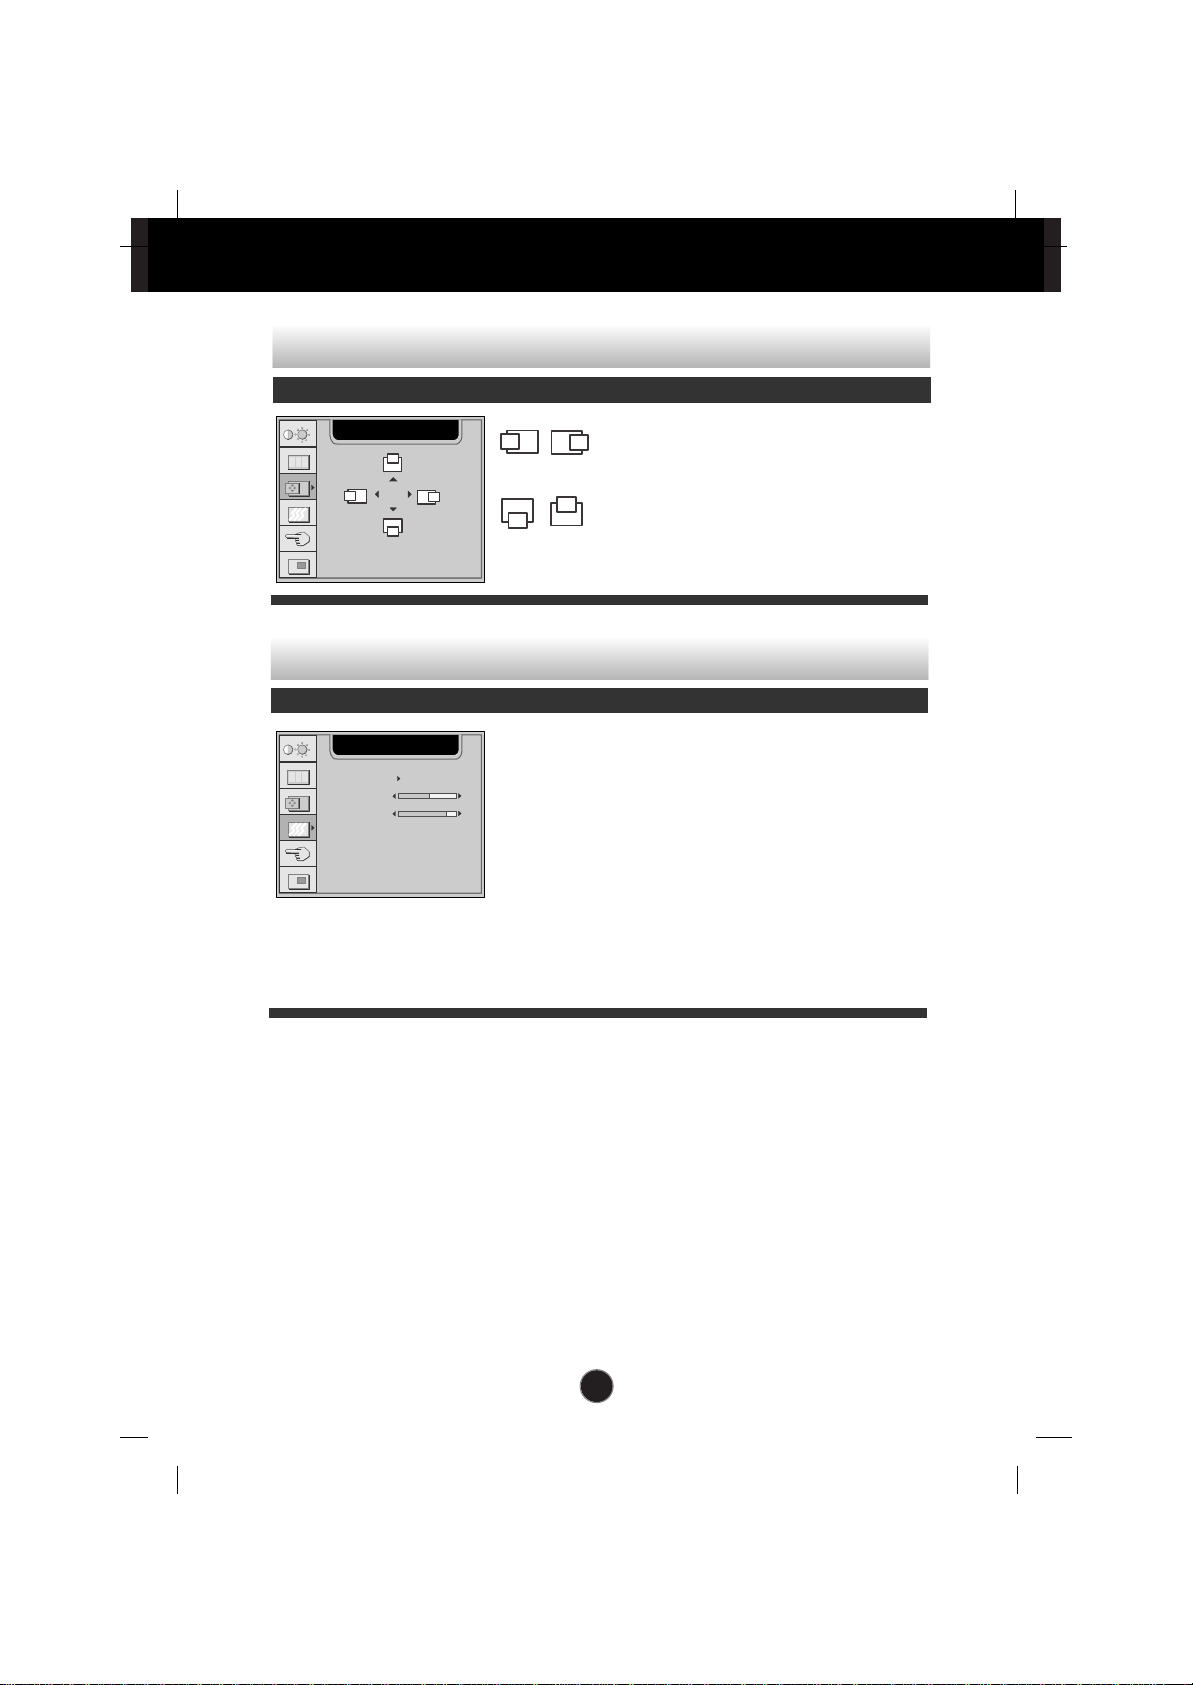
On Screen Display (OSD) Control Adjustment
Screen Adjustment
Making adjustments to the image size, position and operating parameters of
the display is quick and easy with the On Screen Display Control system. A
short example is given below to familiarize you with the use of the controls.
The following section is an outline of the available adjustments and selections
you can make using the OSD.
To make adjustments in the On Screen Display, follow these steps:
Press the MENU Button, then the main menu of the OSD appears.
To access a control, use the or Buttons. When the icon you want
becomes highlighted, press the AUTO/ SELECT Button.
Use the Buttons to adjust the item to the desired level.
Accept the changes by pressing the AUTO/SELECT Button.
Exit the OSD by Pressing the MENU Button.
NOTE
Allow the display to stabilize for at least 30 minutes before making image adjustments.
AUTO/SELECT
AUTO/SELECT
MENU
MENU
A8
On Screen Display(OSD) Selection and Adjustment
The following table indicates all the On Screen Display control, adjustment,
and setting menus.
NOTE
The order of icons may differ depending on the model (A8~A15).
*
This function is available for designated models only.
To adjust the brightness and
contrast of the screen
BRIGHTNESS
CONTRAST
COLOR
ADJUSTMENT
IMAGE
POSITION
TRACKING
SETUP
PIP
Main menu Sub menu A D Reference
PRESET
9300K
6500K
R/G/B(User Color)
To adjust the position of the
screen
To customize the color of the
screen
To customize the screen status
for a user's operating environment
To improve the clarity and
stability of the screen
: Adjustable A : Analog Input D : Digital Input
BRIGHTNESS
CONTRAST
V POSITION
H POSITION
AUTO
CLOCK
PHASE
LANGUAGE
IMAGE SIZE
OSD POSITION
TRANSPARENCY
ZOOM
To adjust the PIP of the screen
PIP ON/OFF
PIP SOURCE
PIP SIZE
PIP POSITION
PIP IMAGE
PIP SOUND
Using the computer
A9
On Screen Display(OSD) Selection and Adjustment
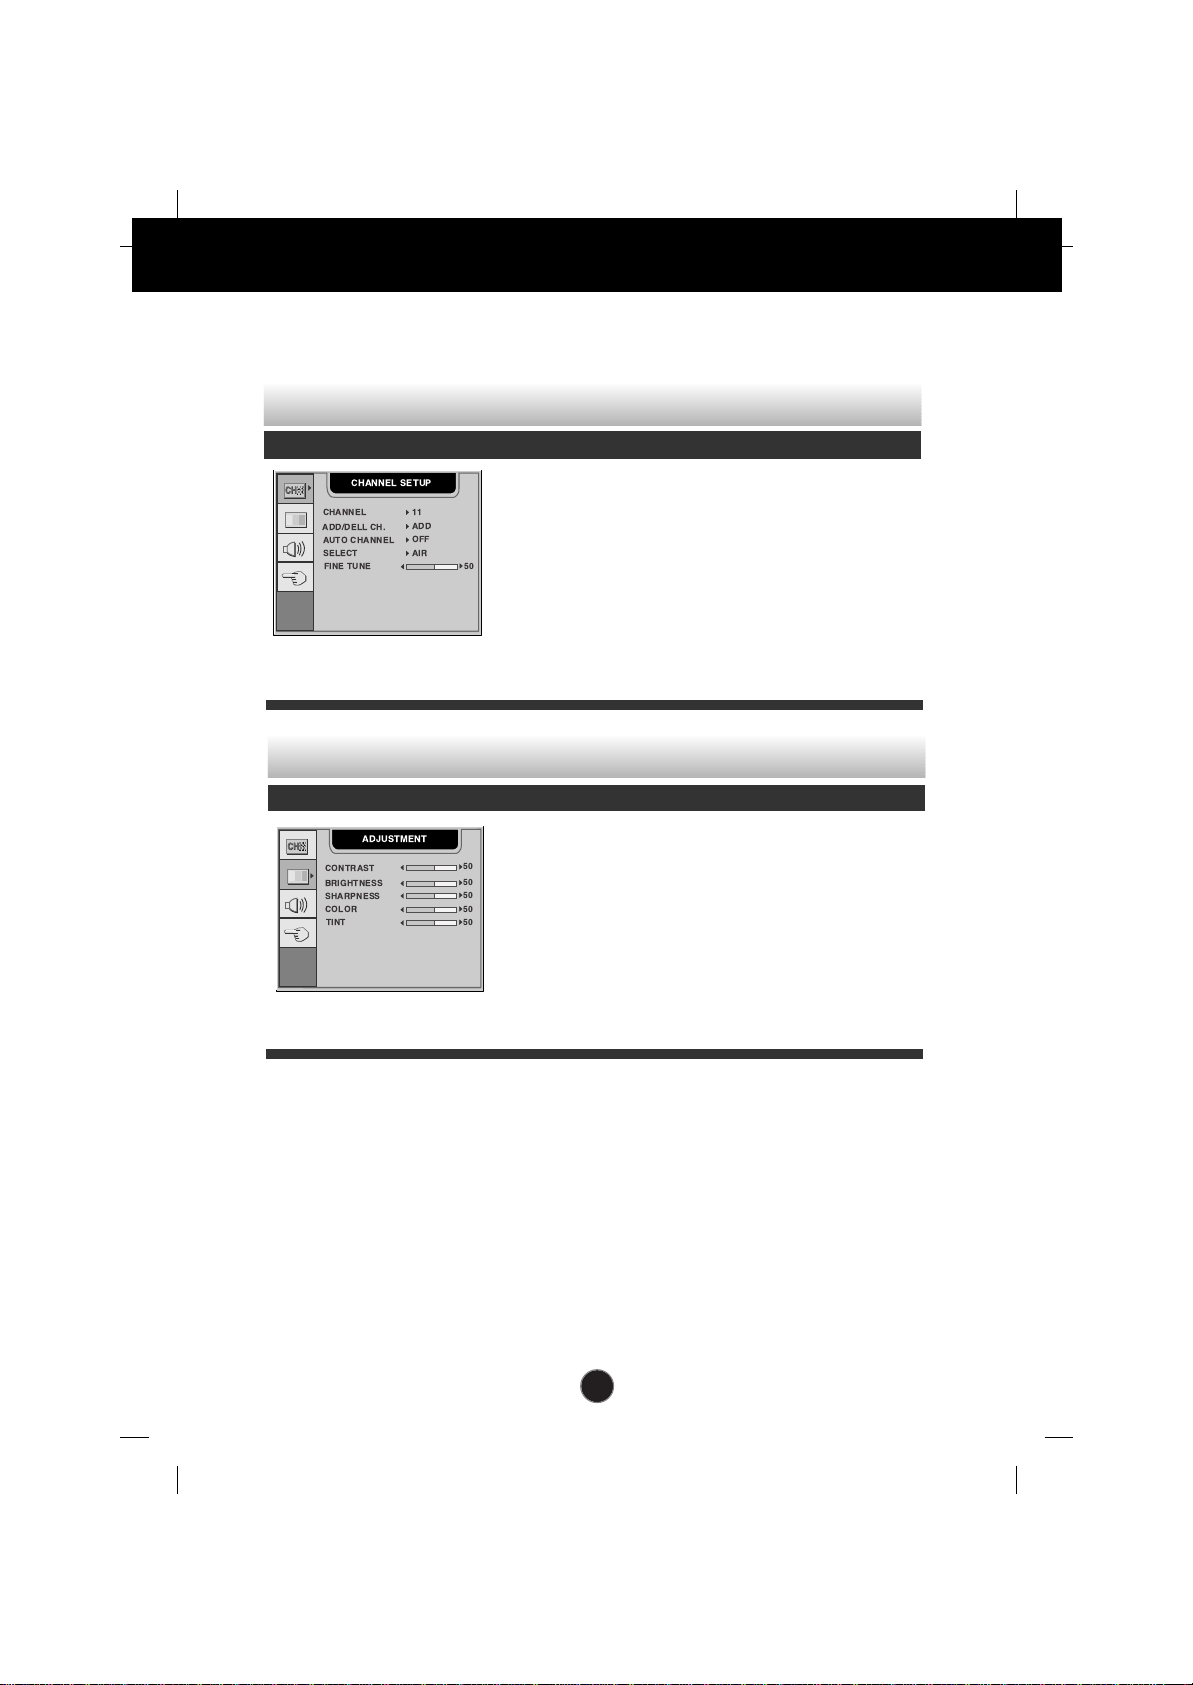
CHANNEL
SETUP
ADJUSTMENT
AUDIO
SETUP
Main menu Sub menu V T Reference
CONTRAST
BRIGHTNESS
SHARPNESS
COLOR
TINT
To customize the screen status
for a user's operating environment
To improve the clarity and
stability of the screen
LANGUAGE
IMAGE SIZE
OSD POSITION
TRANSPARENCY
To adjust the audio function
VOLUME
BASS
TREBLE
MUTE
SOUND
CHANNEL
ADD/DELL CH.
AUTO CHANNEL
SELECT
FINE TUNE
To select the TV channel settings
and adjust the channel quality.
Using the VCR/DVD/TV/HDTV
: Adjustable V : VCR/DVD T : TV/HDTV
A10
On Screen Display(OSD) Selection and Adjustment
You were introduced to the procedure of selecting and adjusting an item
using the OSD system. Listed below are the icons, icon names, and icon
descriptions of the all items shown on the Menu.
OSD Adjust Description
BRIGHTNESS
To adjust the brightness of the screen.
CONTRAST
To adjust the contrast of the screen.
To adjust the brightness and contrast of the screen
CONTRAST/BRIGHTNESS
CONTRAST 100
BRIGHTNESS 99
RGB
PIP
COLOR ADJUSTMENT
USER 9300K 6500K
RGB
PIP
RED 50
50
50
GREEN
BLUE
USER
9300K
6500K
RED/GREEN/BLUE
Set your own color levels.
Select the screen color.
• 9300K: Slightly bluish white.
• 6500K: Slightly reddish white.
To customize the color of the screen
OSD Adjust Description
To adjust the screen when using the computer
A11
On Screen Display(OSD) Selection and Adjustment
Vertical Position
To move image up and down.
Horizontal Position
To move image left and right.
To adjust the position of the screen
OSD Adjust Description
IMAGE POSITION
RGB
PIP
HORIZONTAL 50
VERTICAL 50
This function is suitable for analog signal
input only. This button is for the
automatic adjustment of the screen
position, clock and phase.
To minimize any vertical bars or stripes
visible on the screen background.The
horizontal screen size will also change.
To adjust the focus of the display. This
item allows you to remove any horizontal
noise and clear or sharpen the image of
characters.
AUTO
CLOCK
PHASE
To improve the clarity and stability of the screen
OSD Adjust Description
TRACKING
AUTO
CLOCK
PHASE
ON
RGB
PIP
50
86
A12
On Screen Display(OSD) Selection and Adjustment
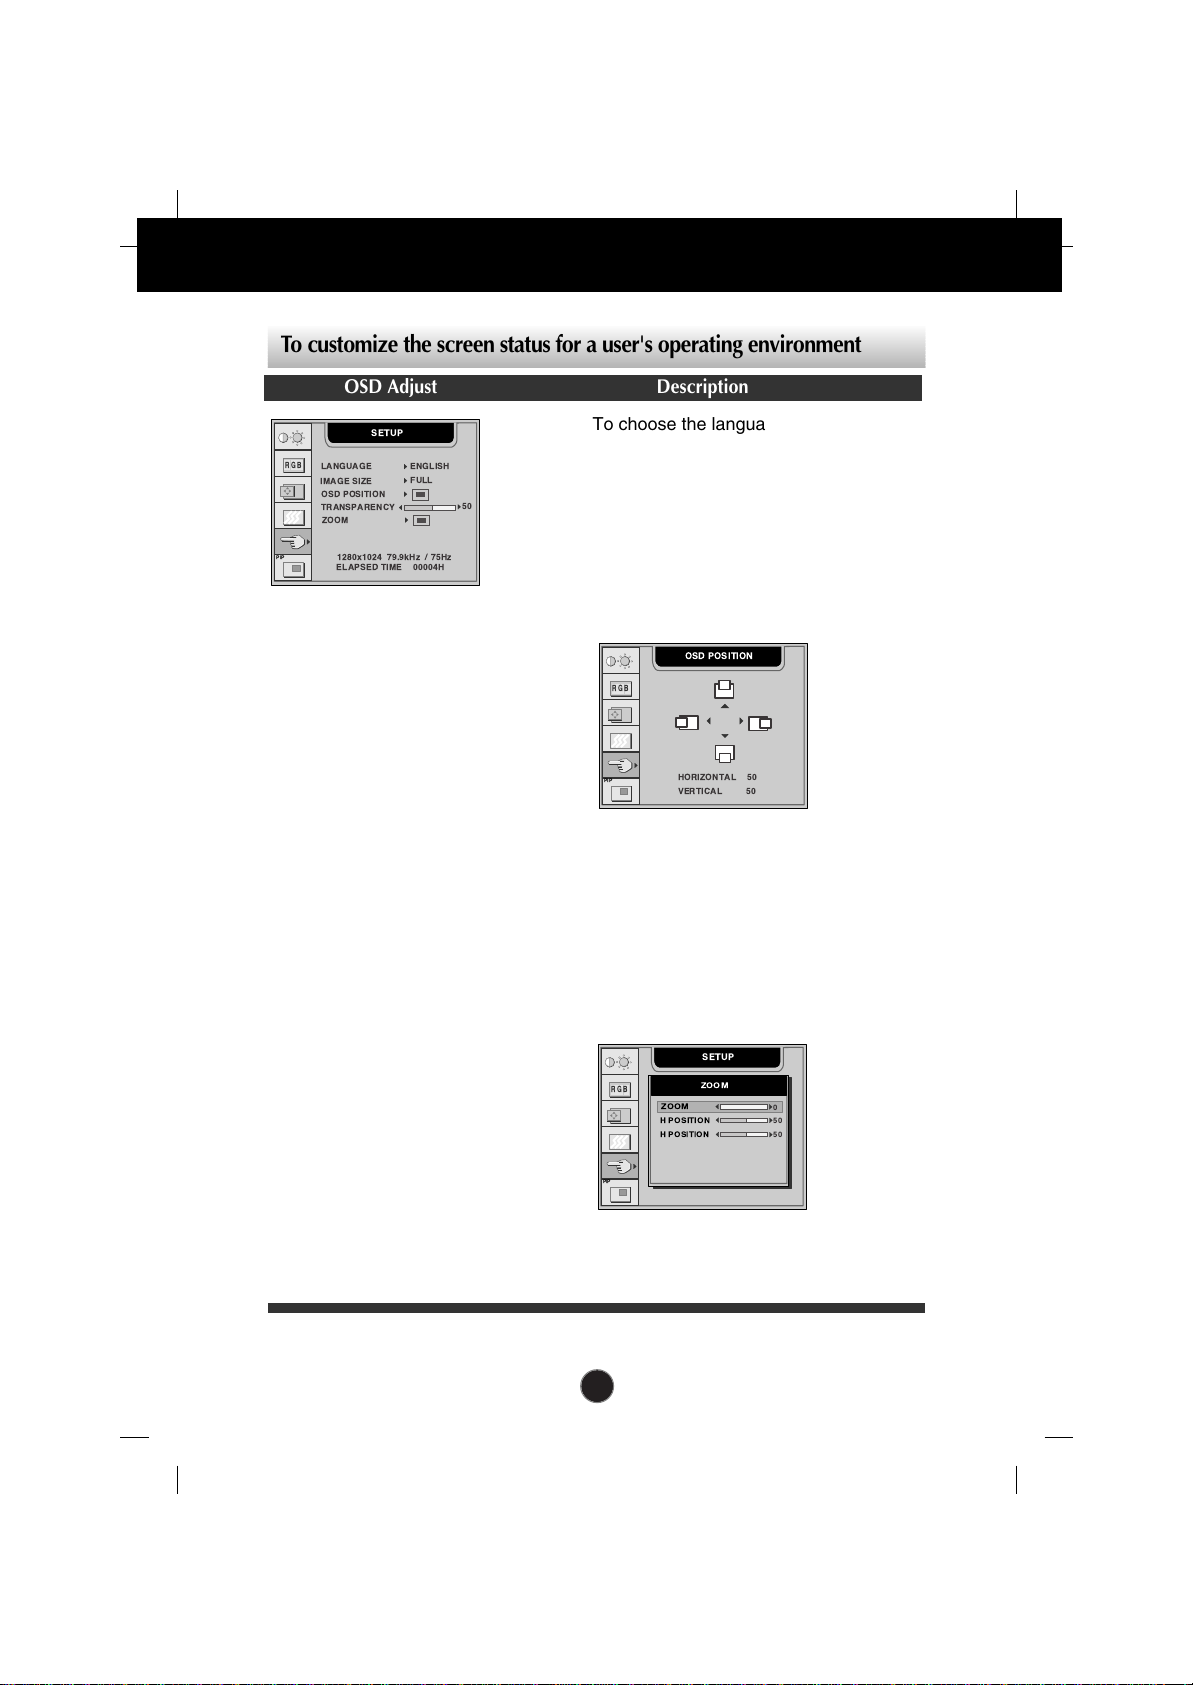
SETUP
LANGUAGE
1280x1024 79.9kHz / 75Hz
ELAPSED TIME 00004H
ENGLISH
RGB
PIP
IMAGE SIZE
FULL
TRANSPARENCY
50
OSD POSITION
ZOOM
To customize the screen status for a user's operating environment
OSD Adjust Description
To choose the language in which the
control names are displayed.
This function displays the image in its
original size or enlarged size so as to fit
in the full screen of the LCD panel.
To adjust position of the OSD window on
the screen. Press the AUTO/SELECT
button to display the submenu for OSD
POSITION.
To adjust the transparency of the OSD
menu screen.
To adjust horizontal and vertical image
size simultaneously.
If you want to move the zooming point,
use the H/V POSITION function in the
sub-menu. However, if the monitor turns
off when zooming in and out the screen,
the monitor will be returned to original
screen.
ELAPSED TIME
To display the use time of display.
LANGUAGE
IMAGE SIZE
OSD
POSITION
TRANSPARENCY
ZOOM
OSD POSITION
RGB
PIP
HORIZONTAL 50
VERTICAL 50
SETUP
RGB
PIP
ZOOM
H POSITION
H POSITION
50
50
ZOOM
0

A13
To adjust the image of the PIP screen;
Press the AUTO/SELECT button to display
the submenu for PIP IMAGE. Use the
buttons to adjust the item to the desired
level.
To turn the PIP sound on/off.
On Screen Display(OSD) Selection and Adjustment
PIP
PIP ON/OFF OFF
RGB
PIP
PIP SOUND OFF
PIP SOURCE V1(AV)
PIP SIZE LARGE
PIP POSITION
PIP IMAGE
To adjust the PIP of the screen
OSD Adjust Description
This PIP (Picture-in-Picture) function allows the image
from the TV (HDTV), VCR or DVD to be displayed on a
sub-screen while you are using a computer.
PIP ON/OFF
PIP
SOURCE
PIP SIZE
PIP
POSITION
PIP
IMAGE
PIP
SOUND
PIP
RGB
PIP
PIP IMAGE
PIP BRIGHTNESS
PIP SHARPNESS
50
50
PIP COLOR
PIP TINT
50
50
PIP CONTRAST
50
PIP CONTRAST
To adjust the contrast of the screen.
PIP BRIGHTNESS
To adjust the brightness of the screen.
PIP SHARPNESS
To adjust the clearness of the screen.
PIP COLOR
To adjust the color to desired level.
PIP TINT
To adjust the tint to desired level. This function is
available only in NTSC broadcasting mode.
To select the sub-screen on/off.
To select an input signal for PIP.
To adjust the size of the PIP screen:
SMALL/LARGE
To adjust the position of PIP screen. Press
the AUTO/SELECT button to display the
submenu for PIP POSITION.
PIP POSITION
RGB
PIP
HORIZONTAL 50
VERTICAL 50
A14
On Screen Display(OSD) Selection and Adjustment
To select TV channel settings and adjust the channel quality
OSD Adjust Description
To change the channel.
To add/delete the selected channels.
To automatically search the available
channels.
To select the channel reception type.
: AIR/CABLE
To adjust the channel quality.
CHANNEL
ADD/DELL
CH.
AUTO
CHANNEL
SELECT
FINE TUNE
To adjust the screen when using the VCR/DVD/TV
To improve the clarity and stability of the screen
OSD Adjust Description
To adjust the contrast of the screen.
To adjust the brightness of the screen.
To adjust the clearness of the screen.
To adjust the color to desired level.
To adjust the tint to desired level.
This function is available only in NTSC
broadcasting mode.
CONTRAST
BRIGHTNESS
SHARPNESS
COLOR
TINT
CHANNEL SETUP
CHANNEL 11
AIR
ADD/DELL CH.
ADD
OFF
SELECT
50
AUTO CHANNEL
FINE TUNE
ADJUSTMENT
CONTRAST
BRIGHTNESS
COLOR
50
50
50
50
50
SHARPNESS
TINT
A15
On Screen Display(OSD) Selection and Adjustment
To choose the language in which the
control names are displayed.
This function displays the image in its
original size or enlarged size so as to fit
in the full screen of the LCD panel.
To adjust position of the OSD window on
the screen. Press the AUTO/SELECT
button to display the submenu for OSD
POSITION.
To adjust the transparency of the OSD
menu screen.
To adjust the audio function
OSD Adjust Description
To decrease or increase volume level.
To decrease or increase bass level.
To decrease or increase treble level.
Used to select mute on (means sound off)
and mute off (means sound on).
To select the audio mode.
: MONO/STEREO
VOLUME
BASS
TREBLE
MUTE
SOUND
AUDIO
VOLUME
BASS
MUTE
50
50
50
TREBLE
SOUND
OFF
STEREO
SETUP
LANGUAGE
IMAGE SIZE
TRANSPARENCY
TV(AIR:11)
50
OSD POSITION
ENGLISH
FULL
OSD POSITION
HORIZONTAL 50
VERTICAL 50
To customize the screen status for a user's operating environment
OSD Adjust Description
LANGUAGE
IMAGE SIZE
OSD
POSITION
TRANSPARENCY

A16
Troubleshooting
No image appears
Check the following before calling for service.
No image appears
Is the power cord of the
display connected?
Is the power indicator
light on?
Is the power on and the
power indicator green?
Is the power indicator
amber?
Do you see an "OUT
OF RANGE" message
on the screen?
Do you see a "NO
SIGNAL "message on
the screen?
Do you see a "CONTROLS LOCKED" message on the screen.
Do you see
“CONTROLS LOCKED”
when you push MENU
button?
You can secure the current control settings, so
that they cannot be inadvertently changed. You
can unlock the OSD controls at any time by
pushing the MENU button and button for 3
seconds: the message “CONTROLS
UNLOCKED” will appear.
Check and see if the power cord is connected
properly to the power outlet.
Press the Power button.
Adjust the brightness and the contrast.
If the display is in power saving mode, try moving
the mouse or pressing any key on the keyboard
to bring up the screen.
Make sure if the power is on.
Try to turn on the PC.
This message appears when the signal from the
PC (video card) is out of horizontal or vertical
frequency range of the display. See the
'Specifications' section of this manual and
configure your display again.
This message appears when the signal cable
between your PC and your display is not
connected. Check the signal cable and try again.

A17
Troubleshooting
Display image is incorrect
Display Position is
incorrect.
On the screen
background, vertical
bars or stripes are
visible.
Any horizontal noise
appearing in any
image or characters
are not clearly
portrayed.
The screen color is
mono or abnormal.
The screen blinks.
Press the AUTO/SELECT button to
automatically adjust your display image to the
ideal setting.
If the results are unsatisfactory, adjust the image
position using the H position and V position
icon in the on screen display.
Check Control Panel --> Display --> Settings
and see if the frequency or the resolution were
changed. If yes, readjust the video card to the
recommend resolution.
Press the AUTO/SELECT button to
automatically adjust your display image to the
ideal setting.
If the results are unsatisfactory, decrease the
vertical bars or stripes using the CLOCK icon in
the on screen display.
Press the AUTO/SELECT button to
automatically adjust your display image to the
ideal setting.
If the results are unsatisfactory, decrease the
horizontal bars using the PHASE icon in the on
screen display.
Check Control Panel --> Display --> Settings
and adjust the display to the recommended
resolution or adjust the display image to the ideal
setting. Set the color setting higher than 24 bits
(true color).
Check if the signal cable is properly connected
and use a screwdriver to fasten if necessary.
Make sure the video card is properly inserted in
the slot.
Set the color setting higher than 24 bits (true
color) at Control Panel - Settings.
Check if the screen is set to interlace mode and if
yes, change it to the recommend resolution.
Make sure the power voltage is high enough, It
has to be hgher than AC100-240V 50/60Hz.

A18
Troubleshooting
USB function
“IMAGE SIZE” function on OSD menu does not work.
Check if the resolution is set as 1280x1024 or less
than 512x360.
The optimal resolution is 1280x1024 and the
image is fully displayed on the monitor and is not
converted as 1:1 image size. If the resolution is
less than 512x360, the image size is smaller than
that of the OSD’s and is also not converted as 1:1
image size.
Check if the USB cable is correctly connected.
Check if the PC and OS are USB compliant.
For verification of USB support, consult the
manufacturer of each system.
“IMAGE SIZE” function
on OSD menu does not
work?
Have you installed the display driver?
Have you installed the
display driver?
Do you see an
"Unrecognized monitor,
Plug&Play (VESA DDC)
monitor found"
message?
Be sure to install the display driver from the
display driver CD (or diskette) that comes with
your display. Or, you can also download the
driver from our web site: http://www.lge.com.
Make sure to check if the video card supports
Plug&Play function.
USB function cannot be
setup.

Troubleshooting
A19
TV function
TV signal is not
received.
Check the channel system and make sure you
chose the correct channel system.
Check the AUTO CHANNEL function to
automatically search the available channels.
Check and see if the TV adapter is properly
connected between your display and antenna
cable.
Audio function
Check if the audio cable is correctly connected.
Check the volume level.
Adjust the TREBLE to an appropriate level.
Adjust the BASS to an appropriate level.
Check the volume level.
No sound.
Sound is too high
pitched or too low
piched.
Sound level is too low.

A20
Specifications
NOTE
Information in this document is subject to change without notice.
18.1 inches (45.97cm) Flat Panel Active matrix-TFT LCD
Anti-Glare coating
18.1 inches viewable
0.28mm pixel pitch
Horizontal Freq. Analog:30 - 80kHz (Automatic)
Digital:30 - 71kHz (Automatic)
Vertical Freq. 56 - 85Hz (Automatic)
Input Form Separate TTL, Positive/Negative
Composite TTL, Positive/Negative
SOG (Sync On Green)
Digital
Signal Input 15 pin D-Sub Connector
DVI - D connector (Digital)
Input Form RGB Analog (0.7Vp-p/75ohm), Digital
Max Digital:VESA 1280 x 1024@60Hz
Analog:VESA 1280 x 1024@75Hz
Recommend VESA 1280 x 1024@60Hz
Input PC : 700mVrms
TV:100%modulation
Video : 400mVrms
Audio output and its ratio
1W + 1W (left+right)/10%
Speaker Impedance 8Ω
DDC 2B
Input AC 100-240V, 50 /60Hz, ~2.0A
Output DC 12V 5.0A
Normal :
65W
Stand-by/Suspend
≤ 5W
Power Off ≤ 5W
Width 40.6 cm / 15.98 inches
Height 43.1 cm / 16.97 inches
Depth 22.3 cm / 8.78 inches
Net 8.0 kg (17.64 lbs)
Tilt -5˚~30˚
Swivel 360˚
DC 12V 5.0A
Display
Sync Input
Video Input
Resolution
Audio Signal
Plug&Play
AC Adapter
Power
Power
Consumption
Dimensions
&Weight
(with tilt/ swivel
stand)
Tilt/Swivel Range
Power Input
-
+

A21
Specifications
Operating Conditions
Temperature 10˚C to 35 ˚C
Humidity 10 % to 80 % non-Condensing
Storage Conditions
Temperature -20˚C to 60 ˚C
Humidity 5 % to 95 % non-Condensing
Attached( O ), Detached ( )
Attached( ), Detached ( O )
Wall-outlet type or PC-outlet type
TCO99
Environmental
Conditions
Tilt/Swivel Stand
Signal cable
Power cord
Regulations
VESA wall mounting
Connected to another object (stand
type and wall-mounted type. This
monitor accepts a VESA-compliant
mounting interface pad.)
Kensington Security Slot- optional
Connected to a locking
cable that can be purchased
separately at most computer
stores

A22
Specifications
Display Modes (Resolution) Horizontal Freq. (kHz) Vertical Freq. (Hz)
1
2
3
4
5
6
7
8
9
10
11
12
13
14
15
16
640 x 350
720 x 400
640 x 480
640 x 480
640 x 480
800 x 600
800 x 600
800 x 600
832 x 624
1024 x 768
1024 x 768
1024 x 768
1152 x 870
1152 x 900
1280 x 1024
1280 x 1024
31.469
31.468
31.469
37.500
43.269
37.879
46.875
53.674
49.725
48.363
60.123
68.677
68.681
61.805
63.981
79.976
70
70
60
75
85
60
75
85
75
60
75
85
75
65
60
75
VGA
VGA
VGA
VESA
VESA
VESA
VESA
VESA
MAC
VESA
VESA
VESA
MAC
VESA
VESA
VESA
Display Modes (Resolution)

A23
Specifications
Signal Connector Pin Assignment
1
8
9
17
24
16
Pin Signal(DVI-D)
1
2
3
4
5
6
7
8
9
10
11
12
13
14
15
T. M. D. S. Data2T. M. D. S. Data2+
T. M. D. S. Data2/4 Shield
T. M. D. S. Data4T. M. D. S. Data4+
DDC Clock
DDC Data
Analog Vertical Sync.
T. M. D. S. Data1T. M. D. S. Data1+
T. M. D. S. Data1/3 Shield
T. M. D. S. Data3T. M. D. S. Data3+
+5V Power
Ground
(return for +5V,
H. Sync. and V. Sync.)
Pin Signal(DVI-D)
16
17
18
19
20
21
22
23
24
Hot Plug Detect
T. M. D. S. Data0T. M. D. S. Data0+
T. M. D. S. Data0/5 Shield
T. M. D. S. Data5T. M. D. S. Data5+
T. M. D. S. Clock Shield
T. M. D. S. Clock+
T. M. D. S. Clock-
T. M. D. S. (Transition Minimized Differential Signaling)
DVI-D Connector

A24
PIP
POWER
REW PLAY FF
REC STOP
P/STILL
*
POWER
APC
MENU
SOURCE
UP
VOL VOL
SET
DOWN
MUTE
AUTO
Using the Remote Controller
Remote Controller
For detailed instructions of each button on the remote control, refer to the
appropriate pages of this manual.
MENU Button
VOLUME( ) Buttons
SET Button
SOURCE Selection
Button
AUTO Button
•
This function is to automatically
search the available channels. It is
available to the TV signal inputs only.
•
This function is to automatically adjust
your display image to the ideal settings
for the current screen resolution size
(display mode). It is available to the PC
signal inputs only.
MUTE Button
To select mute on or off.
DOWN/UP ( )
Buttons
VCR Buttons
These buttons are available for
LG VCR remote controls only.
Refer to the Owner’s Manual for
your VCR .
Power Button
TV/AV Button
PIP Button
The sub-screen is changed in the order
shown below.
: SMALL -> LARGE -> OFF
Number buttons
This function optimizes the brightness, contrast or color value
to the surrounding conditions and settings and enables you to
enjoy the most suitable picture by adjusting the surroundings
(DAY/NIGHT/USER MODE).
•
TEXT: For viewing letters
•
MOVIE: For viewing movies
•
PHOTO: For viewing pictures or the photographs
•
USER MODE: This function memorizes the manual
adjustment -Brightness, Contrast and Color value on the
On Screen Display.
LIGHTVIEW
DAY
TEXT
MOVIE
PHOTO
NIGHT
USER MODE
TEXT
MOVIE
PHOTO
LIGHT VIEW

A25
Using the Remote Controller
Insert the batteries into the remote
control to operate the monitor.
Preparing the Remote
Control
1. Open the battery cover.
2. Insert batteries (AAA size).
Make sure to match the + and on the batteries to the marks
inside the battery compartment.
3. Close the cover.
AAA
AAA
This section shows you how to use
the remote control.
Operating with the Remote
Control
Point the remote control at the remote
sensor and press the buttons.
Distance : About 23 ft (7 m) from the
front of the remote sensor.
Angle : About 30° in each direction
of the front of the remote
sensor.
Do not expose the sensor of remote
control in the monitor to a strong light
source such as direct sunlight or
illumination. If so, may not be able to
operate the monitor with the remote
control.
SOURCE
MENUPIP
30° 30°
*
POWER
Note
Do not drop the remote control or handle it
roughly.
Do not leave the remote control in extremely hot
or humid conditions.
Do not expose the remote control to water or
anything wet.
Note
Do not insert the batteries into the remote
control in the wrong direction.
Do not charge, heat, open, or short-circuit the
batteries. Also do not throw the batteries into
the fire.
Do not use different types of batteries together,
nor mix old and new batteries.
Within about 23ft (about 7m)

A26
Connection of external equipment
Bottom
• VCR/DVD
Connecting the VCR/DVD
1. Connect the each audio/video output jack of the VCR/DVD to the
corresponding input port as shown on the Display.
If you connect the S-Video input port to external equipment, you can have an
improved definition image.
2. Select an input signal.
Press the INPUT button on the front panel of the display to
select an input.
• V1(AV): Composite video
• V2(S): S video
INPUT SELECT
DVI DIGITAL
V2 (S)
HDTV
DSUB ANALOG
TV
V1 (AV)
S-Video cable
RCA cable
AUTO/SELECT
SOURCE
Red
White
Yellow

A27
Connection of external equipment
Watching TV- Optional
Before setting up the monitor, ensure that the power to the monitor, the
computer system, and other attached devices is turned off.
1-1. Connect the TV tuner pack with antenna.
1-2. Connect the HDTV cable (Y/Pb/Pr) with audio cable (Audio L/R).
2. Connect the plug from the AC adapter into the back of the monitor.
3. Connect the power cord into a proper power outlet that is easily accessible and
close to the display.
4. Select an input signal.
Press the INPUT button on the front panel of the display to
select an input.
• TV: TV
• HDTV: HDTV
INPUT SELECT
DVI DIGITAL
V1 (AV)
V2 (S)
HDTV
DSUB ANALOG
TV
AUTO/SELECT
SOURCE
Bottom
Antenna
(Optional)
HDTV cable
(Optional)
Audio cable
(Optional)
• HDTV Set-Top
(Optional)
TV tuner pack
(Optional)
Red
Blue
Green

A28
A28
Making use of USB (Universal Serial Bus)
- Optional
USB (Universal Serial Bus) is an innovation in connecting your different
desktop peripherals conveniently to your computer. By using the USB, you will
be able to connect your mouse, keyboard, and other peripherals to your display
instead of having to connect them to your computer. This will give you greater
flexibility in setting up your system. USB allows you to connect a chain of up to
120 devices on a single USB port; and you can “hot” plug (attach them while
the computer is running) or unplug them while maintaining the Plug and the
Plug auto detection and configuration. This display has an integrated Selfpowered USB hub, allowing up to 2 other USB devices to be attached it.
USB connection
1. Connect the upstream port of the display to the downstream port of the USB
compliant PC or another hub using the USB cable. (Computer must have a
USB port)
2. Connect the USB compliant peripherals to the downstream ports of the
display.
NOTE
To activate the USB hub function, the display must be connected to a USB compliant PC(OS)
or another hub with the USB cable(enclosed).
When connecting the USB cable, check that the shape of the connector at the cable side
matches the shape at the connecting side.
Even if the display is in a power saving mode, USB compliant devices will function when they
are connected the USB ports(both the upstream and downstream) of the display.
To USB downstream port
of the USB compliant PC
or another hub cable
USB upstream Port
USB downstream Port
connect the cables from USB
compliant peripherals-such as
keyboard, mouse, etc

A29
Making use of USB (Universal Serial Bus)
Rev. 1.0 complied Self-powered hub
500mA for each (MAX)
12 Mbps (full), 1.5 Mbps (low)
1 Upstream port
2 Downstream ports
USB standard
Downstream power supply
Communication speed
USB port
USB Specifications

Reference Guide
for Precaution,
Service, Warranty
and Diskette Install
English
Deutsch
Français
Italiano
Español
Nederlands
Português

i
Monitor Registration
The model and serial numbers are found
on the rear of this unit. These numbers
are unique to this unit and not available to
others. You should record requested
information here and retain this guide as
a permanent record of your purchase.
Staple your receipt here.
Date of Purchase :
Dealer Purchased From
:
Dealer Address :
Dealer Phone No. :
Model No. :
Serial No. :
English
Important Precautions ..................................................1
DDC (Display Data Channel) .......................................1
Energy Saving Design .................................................2
Service ..........................................................................2
Deutsch
Wichtige Hinweise ........................................................2
DDC (Display Data Channel) ......................................3
Energieversorgung .......................................................3
Wartung ........................................................................3
Français
Consignes de Sécurité ..................................................4
DDC (Display Data Channel) .......................................4
Caractéristique D’économie D’énergie ........................5
Maintenance du Moniteur .............................................5
Italiano
Precauzioni Importanti ..................................................5
DDC (Display Data Channel) Canale Dati del Monitor 6
Modello Conforme alla Normativa sul Risparmio
Energetico ......................................................................6
Manutenzione ................................................................6
Español
Precauciones Importantes ............................................7
DDC (Canal de despliegue de información) ................7
Diseño de Ahorro de Energía .......................................8
Servicio ..........................................................................8
Nederlands
Belangrijke voorzorgsmaatregelen ..............................8
DDC (Display Data Channel) .......................................9
Energiebesparingssysteem ..........................................9
Onderhoud .....................................................................9
Português
Precauções Importantes .............................................10
DDC (Display Data Channel) .....................................10
Sistema de Gerenciamento de Energia ....................11
Manutenção .................................................................11
Regulatory Information
FCC Compliance Statement .....................................11
Canadian DOC Notice ................................................11
CE Conformity Notice (for Europe) .............................12
Low Radiation Compliance (MPR II)...........................12
TCO95 ..........................................................................12
TCO99 ..........................................................................13
EPA (U.S.A only)..........................................................14
NOM MARK (Mexico only)..........................................14
Warranty
the United States and Canada - CDT Monitor ...........15
the United States and Canada - LCD Monitor............16
Australia - CDT & LCD Monitor...................................17
Brazil - CDT & LCD Monitor ........................................18
Mexico - CDT Monitor..................................................19
the United Kingdom - CDT&LCD Monitor ..................21
Monitor Driver Installation
Monitor Driver Installation ..........................................22
USB Install Guide ........................................................22

1
English
Important Precautions
This unit has been engineered and manufactured to
assure your personal safety, but improper use can
result in potential electrical shock or fire hazard. In
order not to defeat the safeguards incorporated in this
monitor, observe the following basic rules for its
installation, use, and servicing. Also follow all
warnings and instructions marked directly on your
monitor.
On Safety
Use only the power cord supplied with the unit. In case you
use another power cord, make sure that it is certified by the
applicable national standards if not being provided by the
supplier. If the power cable is faulty in any way, please
contact the manufacturer or the nearest authorized repair
service provider for a replacement.
Operate the monitor only from a power source indicated in
the specifications of this manual or listed on the monitor. If
you are not sure what type of power supply you have in
your home, consult with your dealer.
Overloaded AC outlets and extension cords are dangerous.
So are frayed power cords and broken plugs. They may
result in a shock or fire hazard. Call your service technician
for replacement.
Do not Open the Monitor.
There are no user serviceable components inside.
There are Dangerous High Voltages inside, even when
the power is OFF.
Contact your dealer if the monitor is not operating
properly.
To Avoid Personal Injury :
Do not place the monitor on a sloping shelf unless
properly secured.
Use only a stand recommended by the manufacturer.
Do not try to roll a stand with small casters across
thresholds or deep pile carpets.
To Prevent Fire or Hazards:
Always turn the monitor OFF if you leave the room for
more than a short period of time. Never leave the
monitor ON when leaving the house.
Keep children from dropping or pushing objects into the
monitor's cabinet openings. Some internal parts carry
hazardous voltages.
Do not add accessories that have not been designed for
this monitor.
During a lightning storm or when the monitor is to be left
unattended for an extended period of time, unplug it from
the wall outlet.
Do not bring magnetic devices such as magnets or
motors near the picture tube.
On Installation
Do not allow anything to rest upon or roll over the power
cord, and do not place the monitor where the power cord is
subject to damage.
Do not use this monitor near water such as near a bathtub,
washbowl, kitchen sink, laundry tub, in a wet basement, or
near a swimming pool.
Monitors are provided with ventilation openings in the
cabinet to allow the release of heat generated during
operation. If these openings are blocked, built-up heat can
cause failures which may result in a fire hazard. Therefore,
NEVER:
Block the bottom ventilation slots by placing the monitor
on a bed, sofa, rug, etc.
Place the monitor in a built-in enclosure unless proper
ventilation is provided.
Cover the openings with cloth or other material.
Place the monitor near or over a radiator or heat source.
LCD Monitor only
Do not rub or strike the Active Matrix LCD with anything
hard as this may scratch, mar, or damage the Active Matrix
LCD permanently.
Do not press the LCD screen with your finger for a long
time as this may incur some afterimages.
Some dot defects may appear on the screen, like Red,
Green or Blue spots on the screen. However, this will have
no impact or effect on the monitor performance.
If possible, use the recommended resolution to obtain the
best image quality for your LCD monitor. If used under any
modes except the recommended resolution, some scaled
or processed images may appear on the screen. However,
this is the characteristics of the LCD panel which has a
fixed resolution.
On Cleaning
Unplug the monitor before cleaning the face of the
monitor screen.
Use a slightly damp (not wet) cloth. Do not use an
aerosol directly on the monitor screen because
overspray may cause electrical shock.
On Repacking
Do not throw away the carton and packing materials.
They make an ideal container in which to transport the
unit. When shipping the unit to another location, repack it
in its original material.
DDC (Display Data Channel)
DDC is a communication channel over which the monitor
automatically informs the host system (PC) about its
capabilities.
DDC protocol
① DDC1/DDC2B
An uni-directional communication channel.
② DDC 2AB/DDC2B+/DDC2Bi
A bi-directional communication channel.
Note
PC must support DDC functions to do this.

2
Mode
Normal
Standby
Suspend
Off
Horizontal
Sync.
On
Off
On
Off
Vertical
Sync.
On
On
Off
Off
LED
Color
Green
Amber
Amber
Amber
English
Deutsch
Energy Saving Design
This monitor complies with the EPA's Energy Star program,
which is a program designed to have manufacturers of
computer equipment build circuitry into their products to
reduce power consumption during time of non-use.
When this monitor is used with a Green or EPA Energy
Star PC, or a PC with a screen blanking software following
the VESA Display Power Management Signalling (DPMS)
protocol, this monitor can conserve significant energy by
reducing power consumption during periods of non-use.
There are 2 signal lines, 4 modes of operation.
; Normal, Standby, Suspend and Off.
When you awaken your PC by hitting a key or moving the
mouse, the monitor will also awaken to its normal operating
mode, indicated by the green Power LED light.
Note
The energy saving Design for monitors only work when
connected to computers that have energy saving
features.
Service
Unplug the monitor from the wall outlet and refer servicing
to qualified service personnel when :
The power cord or plug is damaged or frayed.
Liquid has been spilled into the monitor.
The monitor has been exposed to rain or water.
The monitor does not operate normally following the
operating instructions. Adjust only those controls that are
covered in the operating instructions. An improper
adjustment of other controls may result in damage and
often requires extensive work by a qualified technician to
restore the monitor to normal operation.
The monitor has been dropped or the cabinet has been
damaged.
The monitor exhibits a distinct change in performance.
Snapping or popping from the monitor is continuous or
frequent while the monitor is operating. It is normal for
some monitors to make occasional sounds when being
turned on or off, or when changing video modes.
Do not attempt to service the monitor yourself, as opening
or removing covers may expose you to dangerous voltage
or other hazards. Refer all servicing to qualified service
personnel.
Wichtige Hinweise
Bei der Konstruktion bzw. Herstellung dieses Monitors
wurde insbesondere auf eine höchstmögliche
Betriebssicherheit geachtet. Um eine eventuell durch
Fehlbedienung verursachte Brand - und Stromschlaggefahr
auszuschliessen, sollten Sie jedoch bei Inbetriebnahme
und Benutzung des Gerätes die nachfolgenden
Sicherheitshinweise genau beachten. Beachten Sie
ausserdem die am Monitorgehäuse angebrachten
warnhinweise und Anweisungen.
Zur Sicherheit
Benutzen Sie ausschliesslich das mitgelieferte abgeschirmte
Netzkabel. Falls Sie ein anderes als das vom Hersteller
gelieferte Netzkabel verwenden, achten Sie darauf, daß es der
nationalen Norm entspricht. Wenn das Netzkabel in irgendeiner
Weise defekt ist. Wenden Sie sich an den Hersteller oder den
nächsten autorisierten Reparaturservice, um Ersatz zu erhalten.
Stellen Sie sicher, dass die angelegte Netzspannung den
Geräteanforderungen entpricht (siehe dazu die technischen
Daten in diesem Handbuch bzw. die Angaben auf der Rückseite
des Monitors). Bei Fragen zur Spannungsversorgung den
Händler zu Rate ziehen.
Vermeiden Sie eine Überlastung des benutzten Stromkreises
oder einer eventuell eingesetzten Mehrfachstec1Sie ausserdem
unbedingt darauf, dass Netzkabel und -stecker unbeschädigt
sind, um Brand und Stromschlaggefahr auszuschliessen.
Lassen Sie alle notwendigen Reparaturen von einem
qualifizierten Service-Techniker ausführen.
Öffnen Sie den Monitor auf keinen Fall.
Im Innern des Monitors befinden sich keinerlei vom Benutzer
zu wartende Teile.
Da allerdings selbst bei ausgeschaltetem Monitor im Gehäuse
gefährliche Spannungen anliegen, sollte bei einer Fehlfunktion
des Monitors unbedingt der Händler zu Rate gezogen werden.
Um eine Verletzung des Benutzers auszuschliessen:
den Monitor keinesfalls auf einer instabilen unterlage abstellen.
ausschliesslich vom Hersteller empfohlene Monitorsockel und
-tische benutzen.
den Monitor nicht mit einem Rolltisch über hohe Türschwellen
oder sehr weiche Teppiche fahren.
Um die Gefahr eines Brandes oder elektrischen Schlages
auszuschliessen:
den Monitor ausschalten, wenn Sie ihn für längere Zeit nicht
benutzen bzw. wenn Sie das Büro oder die Wohnung
verlassen.
auf keinen Fall irgendwelche Gegenstände in die
Gehäuseschlitze stecken, da spannungsführende Teile
beruhrt oder Kurzschlüsse verursacht werden könnten.
Keine Zubehörteile installieren, die nicht für diesen Monitor
geeignet sind.
bei Gewitter oder wenn Sie den Monitor für längere Zeit nicht
benutzen, das Netzkabel aus der Steckdose ziehen.
keine magnetisch aufgeladenen Gegenstände wie permanentmagneten oder Motoren id die Nähe des Bildschirms bringen.
Zur Installation
Stellen Sie keine Gegenstände auf das Netzkabel. Plazieren Sie
den Monitor so, dass das Netzkabel auf keinen Fall beschädigt
werden kann.

3
Betreiden Sie den Monitor nicht in der Nähe von Wasser
(Waschbecken etc.) bzw. in Räumen mit überdurchschnittlich
hoher Luftfeuchte.
Die Schlitze im Monitorgehäuse dienen der Belüftung des
Geräts.
Diese Öffnungen dürfen auf keinen Fall blockiert oder vedeckt
werden, da sie den Monitor vor Überhitzung schützen und einen
störungsfreien Betrieb des Geräts garantieren. Um die Gefahr
eines Brandes weitgehend auszuschliessen, sollten Sie deshalb:
den Monitor niemals auf eine weiche Unterlage stellen, da auf
diese Weise die Belüftungsschlitze an der Gehäuseunterseite
blockiert werden.
den Monitor nicht eingebaut betreiben, sofern nicht für eine
ausreichende Belüftung gesorgt ist.
die Belüftungsschlitze des Monitors auf keinen Fall mit einer
Textil- oder sonstigen Abdeckung blockieren
den Monitor nicht in die Nähe einer Heizung oder auf einen
Heizkörper stellen.
Nur LCD-Monitor
Das Aktivmatrix-LCD nicht mit etwas härterem als HB reiben
oder schlagen, da das das Aktivmatrixdisplay dauerhaft
verkratzen oder beschädigen kann.
Nicht mit Ihrem Finger für längere Zeit auf den LCD-Bildschirm
drücken, da das Schattenbilder hervorrufen kann.
Einige Punktdefekte können auf dem Bildschirm erscheinen.
Das können rote, grüne oder blaue Stellen auf dem Bildschirm
sein. Das hat jedoch keinen Einfluß auf die Leistungsfähigkeit
des Bildschirms.
Verwenden Sie, wenn möglich, die empfohlene Auflösung, um
die bestmögliche Bildqualität für den LCD-Monitor zu erzielen.
Bei Verwendung anderer Modi als die empfohlene Auflösung
können einige skalierte oder verarbeitete Bilder auf dem
Bildschirm erscheinen . Hierbei handelt es sich jedoch um die
Eigenschaften der LCD-Anzeige mit einer festen Auflösung.
Zur Reinigung
Ziehen Sie das Netzkabel des Monitors, bevor Sie die
Vorderseite des Bildschirms reinigen.
Verwenden Sie ein leicht feuchtes (kein nasses) Tuch.
Sprühen Sie ein Spray niemals direkt auf den Bildschirm, da
zuviel Spray einen elektrischen Schock verursachen kann.
Zur Verpackung
Das Verpackungsmaterial des Monitors sollte aufbewahrt
werden, um das Gerät gegebenenfalls lagern, transportieren
oder versenden zu können. Beispielsweise sollte der Monitor
im Falle einer Störung wie auf dem Karton dargestellt
ausschliesslich in der Originalverpackung zur Reparatur
zurückgeschickt werden.
DDC (Display Data Channel)
DDC ist ein Kommunikationskanal, über weiche Sie von lhrem
Monitor automatisch über das verbundene System (PC) und
seine Fähigkeiten informiert werden.
DDC Protokoll
① DDC1/DDC2B
Ein unidirektionaler Kommunikationskanal.
② DDC 2AB/DDC2B+/DDC2Bi
Ein bidirektionaler Kommunikationskanal.
Anmerkung
Der PC muß für DDC Funktionen eingerichtet sein.
Energieversorgung
Dieser Monitor entspricht den Richtlinien des EPA Energy Star
Program. Er beinhaltet neuartige Schaltungen, um den
Energiever-brauch wahrend der Nichtbennutzung zu verringern.
Wird dieser Monitor mit einem grünen oder EPA Energy Star-PC
oder einem PC mit einer Software verwendet, die den Bildschirm
gemäß des VESA Display Power Management Signaling
(DPMS)–Protokolls abschaltet, läßt sich eine beträchtliche
Energiemenge sparen, indem der Stromverbrauch bei Inaktivität
gesenkt wird.
Es gibt 2 Signalreihen und 4 Betriebsmodi.
; Normal, Standby, Bereitschaft und Aus.
Wenn Sie den PC durch Drücken einer Taste oder Bewegen der
Maus wieder aktivieren, wird der Monitor ebenfalls in den
Normalmodus umgeschaltet, was durch die grüne Netz-LED
angezeigt wird.
Hinweis
Die Energiesparfunktion für Monitore kann nur bei Anschluß
an Computern verwendet werden, die ebenfalls
Energiesparfunktionen unterstützen
Wartung
Bei folgenden Fehlerbedingungen ist der Netzstecker des
Monitors zu ziehen und der Kundendienst zu benachrichtigen:
Wenn der Netzstecker beschadigt oder das Netzkabel
ausgefranst ist.
Wenn Flussigkeit in den Monitor gelaufen ist.
Wenn der Monitor Regen oder Feuchtigkeit ausgesetzt
worden ist.
Wenn der Monitor trotz Befolgung aller
Bedienungsanweisungen nicht ordnungsgemass arbeitet.
Benutzen Sie ausschliesslich die Bedienelemente, die in den
Hinweisen dieses Handbuchs beschrieben werden. Werden
andere Bedienelemente geandert oder verstellt, konnen
Schaden entstehen, die nur von einem qualifizierten ServiceTechniker behoben werden konnen.
Wenn der Monitor fallengelassen und das Gehause
beschadigt wurde.
Wenn beim Betrieb des Monitors haufig oder lang anhaltend
knackende oder knallende Nebengerausche auftreten.
Hiermit sind nicht die typischen Gerausche gemeint, die beim
Ein- oder Ausschalten des Monitors zu horen sind.
Fuhren Sie keine Wartungsarbeiten selbst durch. Durch Offnen
oder Entfernen wichtiger Abdeckungen werden
spannungsfuhrende Teile freigelegt, so dass eine erhohte
Gefahrdung besteht. Fur Wartungsarbeiten in diesen Bereichen
ist der Kundendienst zustandig.
Modus
Normal(Max.)
Standby
Bereitschaft
Aus
Hori
Sync.
Ein
Aus
Ein
Aus
Vert.
Sync.
Ein
Ein
Aus
Aus
LED
Farbe
Grün
Gelb
Gelb
Gelb
Deutsch

4
Consignes de Sécurité
Cet appareil a été conçu et fabriqué de façon à vous
garantir une sécurité optimale, mais une utilisation
inadéquate peut entraîner des risques de décharges
électriques ou d’incendie. Afin de conserver intacts les
dispositifs de sécurité incorporés à ce moniteur, nous vous
recommandons de respecter les règles de base suivantes
concernant son installation, son utilisation et sa
maintenance, ainsi que les avertissements et consignes
apposés directement sur votre moniteur.
Pour Votre Sécurité
Utilisez uniquement le cordon d’alimentation fourni avec votre
moniteur. Si vous utilisez un autre cordon d’alimentation, au cas
où le fournisseur n’en aurait pas procuré, assurez-vous qu’il est
conforme aux normes nationales en vigueur.Si le câble
d’alimentation est défectueux, adressez-vous au fabricant ou au
plus proche mainteneur agréé afin de le changer.
N’utilisez, pour l’utilisation de votre moniteur, que la source
d’alimentation indiquée dans les spécifications techniques de ce
manuel ou directement sur le moniteur. Si vous n’êtes pas sûr
de votre type de source d’alimentation, demandez conseil à
votre distributeur.
Il est dangereux de surcharger les prises secteur et les
rallonges. Les cordons secteur dénudés et les prises cassées
présentent également un danger. Ils peuvent entraîner des
décharges électriques ou un incendie. Si tel est le cas de vos
prises ou cordons secteur, demandez à votre technicien de
maintenance de vous les remplacer.
N’ouvrez Pas le Moniteur.
l ne contient pas d’éléments utiles à l’utilisateur pour le
fonctionnement de l’appareil.
Il contient en revanche une haute tension dangereuse, même
lorsque le moniteur est à l’arrêt.
S’il ne fonctionne pas normalement, contactez votre
distributeur.
Pour Votre Sécurité Personnelle, Respectez les Consignes
Suivantes :
Ne placez pas le moniteur su r une surface inclinée, à moins
de l’avoir solidement fixé.
Ne l’installez que sur les supports recommandés par le
fabricant.
Ne tentez pas de le déplacer sur une table roulante avec des
pas de porte à franchir ou des tapis épais.
Pour éviter les risques d’incendie ou de décharges électriques :
Veillez à mettre votre moniteur en position d’arrêt si vous
quittez la pièce plus d’un court moment. Ne laissez jamais le
moniteur en position de marche lorsque vous partez.
Ne laissez pas des enfants faire tomber ou enfoncer des
objets dans les ouvertures du boîtier de votre moniteur.
Certaines pièces internes ont une haute tension dangereuse.
N’ajoutez pas d’accessoires qui n’auraient pas été conçus
pour ce moniteur.
En cas d’orage, ou si vous ne vous servez pas du moniteur
pen dant une période prolongée, débranchez la prise murale.
N’approchez pas d’appareils magnétiques tels que des
aimants ou des moteurs électriques à proximité du tubeimage.
Consignes D’installation
Ne placez aucun objet sur le cordon d’alimentation, et ne placez
pas le moniteur à un endroit où le cordon d’alimentation risque
d’être endommagé.
Ne placez pas le moniteur à proximité d’endroits humides, par
exemple baignoire, lavabo, évier de cuisine, machine à laver,
dans un sous-sol humide ou à proximité d’une piscine.
Les moniteurs sont équipés d’ouvertures de ventilation dans le
boîtier, qui lui permettent d’évacuer la chaleur générée par le
fonctionnement de l’appareil. Si ces ouvertures sont obturées,
l’accumulation de chaleur peut provoquer des défaillances allant
jusqu’au risque d’incendie. Par conséquent, ne JAMAIS:
obturer les trous de ventilation en plaçant le moniteur sur un lit,
un canapé, une couverture, etc.
placer le moniteur sur un support encastré si l’aération requise
n’est pas assurée.
recouvrir les ouvertures d’une étoffe ou de tout autre matière.
placer le moniteur à proximité ou au dessus d’un radiateur ou
d’une source de chaleur.
Moniteur LCD (à affichage à cristaux liquides) uniquement
Ne passez pas un produit ou objet dur sur l’écran à cristaux
liquides à matrice active et ne heurtez pas ce dernier avec un
produit similaire, car cela risquerait de rayer, d’abîmer ou
d’endommager de façon permanente cet écran.
N’appuyez pas pendant longtemps avec les doigts sur l’écran à
cristaux liquides car cela risquerait de provoquer l’apparition
d’images fantômes.
Certains défauts ponctuels peuvent apparaître sur l’écran. Des
points rouges, verts ou bleus peuvent ainsi faire leur apparition.
Cependant, cela n’a aucun impact ou effet sur les performances
du moniteur.
Dans la mesure du possible, utilisez la résolution recommandée
pour obtenir une qualité d’image optimale sur votre moniteur
LCD. Si vous l’utilisez dans d’autres modes que la résolution
conseillée, certaines images affichées peuvent être mises à
l’échelle ou subir un traitement particulier. Ce sont des
caractéristiques propres à l’écran LCD, dont la résolution est fixe.
Consignes de Nettoyage
Débranchez le moniteur avant de nettoyer l’écran.
Utilisez un chiffon légèrement humide (mais pas mouillé). Ne
projetez jamais de produit en aérosol directement sur le
moniteur car les éclaboussures pourraient provoquer un courtcircuit.
Consignes de Transport
Ne jetez pas le carton et l’emballage d’origine de votre
moniteur. Ils peuvent vous servir pour le transport de
l’appareil, ils sont par faitement indiqués en cas de
déplacement du moniteur vers un autre site.
DDC (Display Data Channel)
DDC est une chaine de communication par le biais de
laquelle le moniteur prévient automatiquement le systéme
central (PC) de ces capacités.
Protocole DDC
① DDC1/DDC2B
Canal de communication unidirectionnel.
② DDC 2AB/DDC2B+/DDC2Bi
Canal de communication bidirectionnel.
Remarque
Le PC doit posséder les fonctions DDC pour cela.
Français

5
Caractéristique D’économie D’énergie
Ce moniteur a été conçu en conformité avec le programme
Energy Star de l’EPA, qui est un programme destiné aux
fabricants d’équipement informatique, les incitant à construire
des systèmes internes de réduction de la consommation
pendant les périodes de non-utilisation.
Lorsque ce moniteur est connecté à un PC ayant le label Green
ou EPA Energy Star, ou utilisant un économiseur d’écran
compatible avec le protocole VESA DPMS (Display Power
Management Signalling), le moniteur permet de réaliser une
économie d’énergie importante en réduisant la consommation
électrique lorsqu’il n’est pas utilisé.
Il y a 2 lignes de signaux et 4 modes de fonctionnement : Normal,
Standby (Attente), Suspend (Suspens) et Off (Désactivé).
Lorsque vous réactivez votre PC en appuyant sur une touche ou
en déplaçant la souris, le moniteur revient également à son
mode de fonctionnement normal, signalé par l’allumage du
voyant vert d’alimentation.
Remarque
La fonction d’économie d’énergie des moniteurs ne peut être
activée que si le moniteur est connecté à un ordinateur
prenant en charge l’économie d’énergie.
Maintenance du Moniteur
Débranchez le moniteur (prise murale) et contactez un
technicien qualifié de maintenance de ce type d’équipement
dans les cas suivants:
Le cordon d’alimentation ou la prise est endommagé(e) ou
dénudé.
Du liquide a coulé à l’intérieur du moniteur.
Le moniteur a été exposé à la pluie ou à l’humidité.
Le moniteur ne fonctionne pas normalement lorsque vous
suiv ez les instructions du mode d’emploi. Ne réglez que les
éléments décrits dans le mode d’emploi. Un Réglage
indadapté d’autres éléments peut entraîner une déterioration
de l’appareil et nécessite souvent un important travail du
technicien qualifié pour remet tre le moniteur en bon état de
fonctionnement.
Le moniteur est tombé ou son boîtier a été endommagé.
Le moniteur présente un changement net dans ses capacités
de fonctionnement.
Des bruits secs ou des bruits d’encliquetage 'clic' se font enten
dre en continu ou fréquemment en cours de fonctionnement
du moniteur. Il est normal que certains moniteurs fassent des
bruits occasionnels lorsqu’ils sont mis sous tension ou hors
tension, ou lors de changements de mode vidéo.
Ne tentez pas de réparer vous-même votre moniteur, car ouvrir
le moniteur ou retirer son boîtier peut vous exposer à des
décharges électriques dangereuses et présente par ailleurs
d’autres risques. Pour toute réparation du moniteur, contactez un
technicien qualifié.
Precauzioni Importanti
Questa unità è stata progettata e realizzata per garantire la
massima sicurezza personale dell'utente, tuttavia un uso
improprio potenzialmente potrebbe comunque provocare
una scarica elettrica o un incendio. Al fine di non alterare i
dispositivi di sicurezza incorporati nel monitor, osservare le
seguenti norme basilari per l'istallazione, l'uso e la
manutenzione. Seguire inoltre tutte le avvertenze e le
istruzioni riportate direttamente sul monitor.
Per la Sicurezza
Utilizzare unicamente il cavo d'alimentazione fornito insieme
all'unità. Se si utilizza un altro cavo di alimentazione, non fornito
dal rivenditore, assicurarsi che sia conforme agli standard in
vigore nella propria nazione. Se il cavo di alimentazione è
difettoso, contattare il produttore oppure il più vicino fornitore
autorizzato alla sostituzione.
Mettere in funzione il monitor collegandolo unicamente ad una
delle fonti elettriche indicate nelle specifiche di questo manuale o
elencate sul monitor stesso. Se non si è certi del voltaggio della
corrente delle prese a cui si dovrebbe collegare l'apparecchio,
consultarsi prima con un tecnico.
Le prese di corrente sovraccaricate e le prolunghe elettriche
sono pericolose. Altrettanto vale per i cavi d'alimentazione
danneggiati e per le spine consumate. Questi elementi possono
provocare scariche elettriche o incendi. Rivolgersi ad un tecnico
della manutenzione per richiederne la sostituzione.
Non Aprire il Monitor.
All'interno non vi sono componenti che possono essere puliti
o sostituiti dallutente.
Vi è comunque il pericolo di scariche elettriche all'interno,
anche quando l'apparecchio è spento.
Contattare il proprio negoziante se il monitor non funziona
correttamente.
Per Evitare il Rischio di Danni Alla Persona:
Non posizionare il monitor su scaffalature inclinate, a meno
che non siano state opportunamente regolate e fissate.
Utilizzare unicamente la base di appoggio consigliata dal
produttore.
Non cercare di trascinare la base di appoggio lungo pavimenti
irregolari o tappeti a pelo alto.
Per Evitare il Rischio di Incendi o Pericoli:
Spegnere sempre il monitor quando si lascia la stanza per un
periodo lungo. Non lasciare mai acceso il monitor quando si
esce di casa.
Impedire ai bambini di lasciar cadere o infilare oggetti nelle
fes sure della struttura del monitor. Alcune parti interne
possono provocare scariche elettriche.
Non aggiungere accessori che non siano stati specificamente
disegnati per questo monitor.
In caso di temporale, o comunque quando non c'è nessuno
che possa controllare il monitor per un lungo periodo di
tempo, stac care la spina dalla presa del muro.
Non avvicinare oggetti magnetici, quali calamite o motori, al
tubo catodico.
Per l'istallazione
Non appoggiare né far rotolare nulla sul cavo di alimentazione,
inoltre non posizionare il monitor dove il cavo di alimentazione
potrebbe essere soggetto danni.
Français
Mode
Normal(Max.)
Standby
Suspend
Off
Sync Hori.
On
Off
On
Off
Sync Verti.
On
On
Off
Off
Couleur du
Voyante DEL
Vert
Ambre
Ambre
Ambre
Italiano

6
Non utilizzare questo monitor in prossimità dell'acqua, per
esempio vicino a vasche da bagno, lavandini, lavelli, vasche da
bucato, superfici bagnate o vicino a una piscina.
La struttura dei monitor è dotata di fessure di ventilazione che
consentono la fuoriuscita del calore generato durante il
funzionamento. Se queste fessure restano bloccate, il calore
imprigionato causa danni che potrebbero provocare incendi.
Dunque non bisogna MAI:
Bloccare le fessure di ventilazione inferiori posizionando il
moni tor su letti, divani, tappeti, ecc.
Posizionare il monitor in uno scomparto chiuso a meno che
non si possa garantire un'adeguata ventilazione.
Coprire le fessure con tessuto o altro materiale.
Posizionare il monitor in prossimità di un termosifone o sopra
di esso o comunque vicino ad una fonte di calore.
Solo per monitor LCD
Non strofinare né percuotere il Display a Cristalli Liquidi Active
Matrix con oggetti duri (più duri di HB), altrimenti si rischia di
graffiare, compromettere o danneggiare permanentemente il
Display a Cristalli Liquidi Active Matrix.
Non fare pressione a lungo sullo schermo del display a cristalli
liquidi con i polpastrelli, altrimenti si potranno avere immagini
residue.
Su schermo potranno apparire difetti puntiformi, come puntini di
colore rosso, verde o blu. Questo non avrà tuttavia alcun effetto
o ripercussione negativa sulle prestazioni del monitor.
Se possibile, utilizzare la risoluzione consigliata per ottenere la
migliore qualità dell’immagine sul vostro monitor LCD. Nel caso
si utilizzino modalità diverse da quella consigliata, alcune
immagini potrebbero apparire processate o scalate. In ogni caso,
queste sono le caratteristiche del pannello LCD a risoluzione
fissa.
Per la Pulizia
Scollegare il monitor prima di pulire lo schermo.
Utilizzare un panno leggermente inumidito (non bagnato). Se
si usano prodotti spray, non spruzzare il prodotto direttamente
sullo schermo del monitor perché una quantità eccessiva
potrebbe causare scosse elettriche.
Per l'imballaggio
Non getti via la scatola di cartone e i materiali di imballaggio.
Sono il contenitore ideale per trasportare l’apparecchio.
Quando lo trasferisce in un altro posto, lo reimballi nel suo
materiale originale.
Utilizzare uno panno leggermente umido (non bagnato). Non
uti lizzare nebulizzatori direttamente sul tubo catodico perché
la vaporizzazione potrebbe provocare scariche elettriche.
DDC (Display Data Channel)
Il DDC è un canale di comunicazione attraverso il quale il
monitor informa automaticamente il sistema ospite (PC) circa le
proprie capacità.
Protocollo DDC
① DDC1/DDC2B
Un canale di comunicazione uni-direzionale.
① DDC 2AB/DDC2B+/DDC2Bi
Un canale di comunicazione bi-direzionale.
Nota
Per fare questo il PC deve supportare le funzioni DDC.
Modello Conforme alla Normativa sul
Risparmio Energetico
Questo monitor è conforme al programma Energy Star
dell'EPA, che è stato messo a punto affinché le case
produttrici di computer realizzino macchine dotate di un
circuito inteso a ridurre il consumo energetico durante i
tempi di non utilizzo.
Quando si utilizza il monitor insieme a un personal
computer conforme agli standard Green o EPA Energy
Star, oppure con un PC dotato di software di soppressione
di sfondo conforme al protocollo VESA per Display Power
Management Signalling (DPMS), il monitor può conservare
una grande quantità di energia riducendone il consumo
durante i periodi di non utilizzo.
Vi sono 2 linee di segnale e 4 modalità operative.
; Normale, Standby, Sospensione e Spento.
Quando si riattiva il PC premendo un tasto o muovendo il
mouse, il monitor tornerà alla modalità operativa normale,
indicata dalla luce verde del led di alimentazione.
Nota
La funzionalità di risparmio energetico per i monitor è
disponibile solo su monitor connessi a computer a
risparmio energetico.
Manutenzione
Staccare il monitor dalla presa elettrica e consultare il
personale addetto alla manutenzione quando:
Il cavo elettrico o la spina sono danneggiati o consumati.
Si è rovesciato del liquido sul monitor.
Il monitor è stato esposto alla pioggia o all'acqua.
Il monitor non funziona correttamente secondo le
istruzioni oper ative. Regolare unicamente quei controlli
contemplati nelle istruzioni operative. La manomissione
di altri controlli può provo care danni e spesso poi è
necessario un lungo lavoro da parte dei tecnici
specializzati per ripristinare le normali funzionalità del
monitor.
Il monitor è caduto o si è danneggiata la struttura.
Il monitor funziona in maniera evidentemente diversa da
prima.vIl monitor lampeggia in maniera continua o
frequente mentre è in funzione. E' normale che alcuni
monitor emettano suoni occa sionali quando vengono
accesi o spenti, oppure quando si cam bia la modalità
video.
Non cercare di effettuare da soli la manutenzione poiché
l'apertura della struttura potrebbe esporre l'utente al
pericolo di scariche elettriche o ad altri rischi. Rivolgersi al
personale tecnico qualificato.
Italiano
Modalità
Normal
Stand by
Sospensione
Spento
Sinc.
Oriz.
On
Off
On
Off
Sinc.
Vert.
On
On
Off
Off
Colore
LED
Verde
Giallo
Giallo
Giallo

7
Precauciones Importantes
Esta unidad ha sido diseñada y fabricada para asegurar su
seguridad personal, pero el uso indebido puede resultar en
sacudidas elétricas potenciales o en peligro de incendio.
Para no destruir los dispositivos de seguridad en este
monitor, observe las siguientes reglas básicas para su
instalación, uso y servicio. También siga todas las
advertencias e instrucciones marcadas directamente en su
monitor.
En Cuanto a Seguridad
Utilice únicamente el cable de energía proporcionado con esta
unidad. En caso de utilizar otro cable de alimentación,
compruebe que está certificado por los estándares nacionales
aplicables, si esta información no ha sido facilitada por el
proveedor. Si el cable de alimentación de corriente tiene algún
fallo, póngase en contacto con el fabricante o con el distribuidor
autorizado más cercano para cambiarlo.
Opere el monitor únicamente de una fuente de energía indicada
en las especificaciones de este manual o listado en el monitor.
Si usted no está seguro del tipo de fuente de energía que tiene
en su hogar, consulte con su distribuidor.
Las salidas de corriente alterna (AC) sobrecargadas y las
extensiones de los cables son peligrosas. También lo son los
cables de energía desgastados y los enchufes rotos. Ello puede
resultar en una sacudida eléctrica o en un peligro de incendio.
Llame a su técnico de servicio para su reemplazo.
No abra el monitor.
No hay componentes adentro que se puedan utilizar.
Hay Voltaje de Alto Peligro en el interior, aún cuando la
energía está apagada.
Contacte a su distribuidor si el monitor no está operando
adecuadamente.
Para Evitar Lesión Personal:
No coloque el monitor en una repisa inclinada, al menos que
esté apropiadamente asegurda.
Utilice únicamente un mueble recomendado por el fabricante.
No trate de rodar el mueble con ruedecillas a través de
umbrales o alfombras gruesas.
Para Prevenir Incendio o Riesgos:
Simpre apague el monitor si usted deja la habitación por más
de un período corto de tiempo. Nunca deje su monitor
encendido cuando salga de la casa.
Evite que los niños dejen caer o metan objetos dentro de las
ranuras del gabinete del monitor. algunas piezas internas
tienen voltajes peligrosos.
No adicione accesorios que no han sido diseñadas para este
monitor.
Durante una tomenta eléctrica o cuando el monitor no se va
a utilizar, por un período extendido de tiempo, desconéctelo
del tomacorriente. motores cerca del tubo de imagen.
No coloque dispositivos magnéticos tales como imanes o
motores cerca del tubo de imagen.
Sobre la Instalación
No permita que nada descanse encima o ruede sobre el cable, y
no coloque el monitor donde el cable de energía pueda causar
daño.
No use este monitor cerca del agua o cerca de una bañera,
lavamanos, fregador de cocina, fregador de ropa o en un sótano
húmedo, o cerca de una piscina.
Los monitores tienen ranuras de ventilación en su gabinete para
permitir la liberación de calor generada durante su operación. Si
estas ranuras se bloquean, el calor en aumento puede causar
fallas que pueden resultar en peligro de incendio. Por lo tanto,
NUNCA:
Bloquee las ranuras inferiores colocando el monitor en una
cama, sofá, alfombra, etc.
Coloque el monitor en un área empotrada a no ser que haya
una ventilación adecuada.
Cubra las ranuras con telas u otros materiales.
Coloque el monitor cerca o sobre un radiador o fuente de
calor.
Monitor LCD exclusivamente
No frote o golpee el LCD de Matriz Activa con algo que sea duro
(más de H) ya que podría rayar, estropear o dañar con carácter
permanente LCD de Matriz Activa.
No apriete la pantalla de LCD con los dedos durante un largo
tiempo, ya que ello podría producir alguna imagen posterior.
Pueden aparecer en la pantalla algunos defectos de puntos, en
los puntos rojo, verde o azul de la pantalla. No obstante, esto no
tendría impacto o efecto en el rendimiento del monitor.
Si es posible, utilice la resolución recomendada para obtener la
mejor calidad de imagen en su monitor LCD. Si utiliza cualquier
otro modo, pueden aparecer imágenes escaladas o procesadas
en pantalla. Esta es una característica del panel LCD, que tiene
una resolución fija.
Sobre la Limpieza
Antes de limpiar la superficie de la pantalla, desconecte el
monitor.
Utilice un paño ligéramente húmedo (no empapado.) No
utilice un aerosol directamente sobre la pantalla del monitor
porque un exceso de pulverización puede provocar una
descarga eléctrica.
Sobre el Reempaque
No bote la caja y los materiales de empaque. Son ideales
para transportar la unidad. Cuando embarque la unidad a
otra ubicación, reempáquelo en su material original.
DDC (Canal de despliegue de
información)
DDC es un canal de comunicación sobre el cual el monitor
automáticamente informa al sistema anfitrión (PC) sobre sus
capacidades.
Protocolo DDC
① DDC1/DDC2B
Un canal de comunicación unidireccional.
② DDC 2AB/DDC2B+/DDC2Bi
Un canal de comunicación bidireccional.
Nota
La PC debe soportar las funciones DDC para poder hacer
esto.
Espanõl

8
Diseño de Ahorro de Energía
Este monitor cumple con el programa EPA'S Energy Star el cual
es un programa diseñado para que fabricantes de equipo de
computadora fabriquen sistema de circuitos en sus productos
para reducir el consumo de energía durante el tiempo que no
está en uso el equipo.
Si este monitor se utiliza con un PC Green o EPA Energy Star, o
con un PC con software de blanqueo de pantalla que siga el
protocolo VESA Display Power Management Signalling
(DPMS), ahorrará mucha energía al reducir el consumo cuando
está encendido pero no se usa.
Hay 2 líneas de señal, 4 modos de operación.
; Normal, Espera (Standby), Suspendido y Apagado.
Si activa de nuevo el PC pulsando una tecla o moviendo el
mouse, el monitor también recuperará su modo de operación
normal y se iluminará el indicador LED de encendido de color
verde.
Nota
La característica de ahorro de energía de los monitores sólo
funciona cuando están conectados a equipos que también
tienen la característica de ahorro de energía.
Servicio
Desconecte el monitor del tomacorriente de la pared y
refiera el servicio a personal de servicio calificado cuando:
El cable o enchufe de energía está dañado o
desgastado.
Se ha derramado líquido en el monitor.
El monitor ha sido expuesto a la lluvia o al agua.
El monitor no funciona normal aunque se hayan seguido
las instrucciones de operación. Ajuste sólo los controles
que están cubiertos en las instrucciones de operación.
Un ajuste incorrecto de estos controles pueden causar
daño y a veces requiere de trabajo extenso por un
técnico calificado para restaurar el monitor al
funcionamiento normal.
El monitor se ha dejado caer o el gabinete se ha
dañado.
El monitor exhibe un cambio distinto en la ejecución.
Los chasquidos o explosivos que emanan del monitor
son continuos o frecuentes mientras el monitor está
operando. Los ruidos ocasionales son normales para
algunos monitores cuando se prende o se apaga, o
cambia el modo de video.
No trate de arreglar usted mismo el monitor, ya que abrir y
sacar las tapas pueden exponerlo a niveles de voltaje
peligrosos u otros peligros. Refiera el arreglo a un personal
técnico calificado para ello.
Belangrijke voorzorgsmaatregelen
Dit apparaat is zodanig ontworpen en geproduceerd
dat uw persoonlijke veiligheid is gewaarborgd. Bij
onjuist gebruik bestaat er echter gevaar voor
elektrische schokken of brand. Als u onderstaande
basisregels voor het installeren, gebruiken en
onderhouden van de monitor in acht neemt, blijven de
veiligheidsvoorzieningen van deze monitor goed
functioneren. Neem ook alle waarschuwingen en
aanwijzingen die rechtstreeks op uw monitor
verschijnen, in acht.
Veiligheid
Gebruik het netsnoer dat bij dit apparaat is meegeleverd.
Mocht u een ander netsnoer gebruiken, dat niet door de
leverancier van de monitor is geleverd, zorg dan dat het
snoer is goedgekeurd volgens de van toepassing zijnde
nationale normen. Als het netsnoer op enigerlei wijze is
beschadigd, neem dan contact op met de fabrikant of met
het dichtstbijzijnde erkende servicepunt voor vervanging
van het snoer.
Sluit de monitor uitsluitend aan op een spanningsbron zoals
vermeld bij de specificaties in deze handleiding of op de
monitor. Als u niet weet welk type stroomvoorziening u in
uw huis gebruikt, raadpleeg dan uw dealer.
Overbelaste stopcontacten en verlengsnoeren zijn
gevaarlijk. Dat geldt ook voor versleten snoeren en
gebroken stekkers. Elektrische schokken en brand kunnen
het gevolg zijn.
Neem contact op met uw onderhoudsmonteur voor
vervanging.
Maak de monitor niet open
In de monitor bevinden zich geen onderdelen die door
de gebruiker kunnen worden onderhouden.
In de monitor bevinden zich gevaarlijke, hoge elektrische
spanningen, zelfs wanneer de stroom is uitgeschakeld.
Neem contact op met uw dealer, wanneer de monitor
niet naar behoren functioneert.
Voorkom persoonlijk letsel:
Zet de monitor niet op een hellende plank, tenzij u de
monitor goed hebt vastgezet.
Gebruik alleen een monitorvoet die door de fabrikant
wordt aanbevolen.
Rol een monitorvoet die voorzien is van kleine wieltjes,
niet over drempels of over hoogpolig tapijt.
Voorkom brand of onveilige situaties:
Zet de monitor altijd uit als u de ruimte voor meer dan
een korte tijd verlaat. Laat de monitor nooit aanstaan als
u het pand verlaat.
Zorg ervoor dat kinderen niets in de monitorbehuizing
kunnen laten vallen of naar binnen kunnen duwen.
Sommige interne onderdelen zijn namelijk geladen met
gevaarlijk hoge spanningen.
Gebruik geen accessoires die niet voor deze monitor zijn
ontworpen.
Haal de stekker uit het stopcontact als het onweert of als
u de monitor voor langere tijd onbeheerd laat.
Zet geen magnetisch geladen voorwerpen zoals
magneten of motoren in de buurt van de beeldbuis.
Espanõl
Modo
Normal
En espera
Suspendido
Apagado
Hori.
Sinc.
Encendido
Apagado
Encendido
Apagado
Sinc.
Vert.
Encendido
Encendido
Apagado
Apagado
Color
LED
Verde
Ambar
Ambar
Ambar
Nederlands

9
Installeren
Zorg dat er niets op het netsnoer wordt geplaatst of er over heen
wordt gerold en zet de monitor niet op een plaats waar het
netsnoer makkelijk kan worden beschadigd.
Gebruik deze monitor niet in de buurt van water, zoals bij een
badkuip, gootsteen of wasteil, in een natte kelderruimte of in de
buurt van een zwembad.
De monitorbehuizing is voorzien van ventilatieopeningen om de
warmte die door de monitor wordt geproduceerd, kwijt te kunnen
raken. Als deze openingen worden geblokkeerd, kan de
opgehoopte warmte brandgevaarlijke storingen veroorzaken.
Neem daarom de volgende voorschriften in acht:
Zet de monitor nooit op een bed, sofa, kleed enz., omdat dan
de onderste ventilatieopeningen worden geblokkeerd.
Zet de monitor nooit in een ombouw, tenzij er maatregelen zijn
getroffen om een goede ventilatie te waarborgen.
Dek de openingen nooit af met een doek of met ander
materiaal.
Zet de monitor nooit in de buurt van of boven een radiator of
een andere warmtebron.
Alleen LCD-monitor
Wrijf of veeg niet met een hard voorwerp over de actieve-matrix
LCD, want hierdoor kunnen niet meer te verwijderen krassen of
beschadigingen aan de actieve-matrix LCD ontstaan.
Druk niet gedurende langere tijd met uw vinger tegen het LCDscherm, omdat dit nabeelden kan veroorzaken.
Er kunnen een aantal foutpuntjes op het scherm verschijnen,
zoals rode, groene of blauwe vlekjes op het scherm. Dit is echter
niet van invloed op de prestaties van de monitor. Dit is
kenmerkend voor LCD-schermen met een vaste resolutie.
Gebruik indien mogelijk de aanbevolen resolutie. Zo bent u er
zeker van dat de LCD-monitor de beste beeldkwaliteit biedt. Als
u een andere dan de aanbevolen resolutie gebruikt, kunnen
sommige afbeeldingen op een gewijzigde grootte of anderszins
bewerkt worden afgebeeld. Dit is kenmerkend voor LCDschermen met een vaste resolutie.
Reinigen
Haal de stekker van de monitor uit het stopcontact voordat u
het monitorscherm schoonmaakt.
Gebruik een vochtige (geen natte) doek. Spuit
schoonmaakmiddelen nooit direct op de monitor, dit kan een
elektrische schok veroorzaken.
Inpakken
Gooi het karton en het verpakkingsmateriaal niet weg. Deze
materialen zijn uitstekend te gebruiken als u de monitor nog
eens moet vervoeren. Wanneer u de monitor naar een andere
locatie overbrengt, verpak het dan in het originele
verpakkingsmateriaal.
DDC (Display Data Channel)
DDC is een communicatiekanaal waarmee de monitor het hostsysteem (PC) automatisch informeert over zijn mogelijkheden.
DDC-protocol
① DDC1/DDC2B
Een unidirectioneel communicatiekanaal.
② DDC 2AB/DDC2B+/DDC2Bi
Een bidirectioneel communicatiekanaal.
OPMERKING
Dit kan alleen als de PC DDC ondersteunt.
Energiebesparingssysteem
Deze monitor voldoet aan het Energy Star-programma van EPA.
Dit programma is bedoeld om fabrikanten van
computerapparatuur zo ver te krijgen elektronica in hun
producten op te nemen die ervoor zorgt dat het energieverbruik
wordt teruggedrongen op momenten dat de apparatuur niet
wordt gebruikt.
Wanneer u deze monitor gebruikt in combinatie met een
energiezuinige pc, een pc die voldoet aan de EPA Energy Starnorm of schermsoftware die werkt met het DPMS-protocol
(Display Power Management Signalling) van VESA, kan het
energiegebruik van deze monitor flink worden gereduceerd.
Er zijn twee signaallijnen en vier gebruiksmodi:
; Normal, Standby, Onderbroken en Uit.
Wanneer u de pc activeert door op een toets te drukken of de
muis te bewegen, wordt de normale gebruiksmodus van de
monitor ook hersteld. Dit wordt aangegeven door de groene
LED-indicatie van de Aan/Uit-schakelaar.
Opmerking
De energiesparende functie van de monitor werkt alleen als
de computer waar hij op is aangesloten ook een
energiebesparende functie heeft.
Onderhoud
In de volgende gevallen haalt u de stekker van de monitor uit het
stopcontact en roept u de hulp in van een gekwalificeerde
technicus:
Het netsnoer of de stekker is beschadigd of versleten.
Er is vloeistof in de monitor gemorst.
De monitor heeft blootgestaan aan regen of water.
De monitor werk niet goed, ondanks het feit dat u handelt
volgens de gebruiksaanwijzing. Beperk u bij het instellen van
de monitor tot de items die in de gebruiksaanwijzing worden
besproken. Het onjuist instellen van andere items kan
storingen veroorzaken. Vaak is dan een omvangrijke reparatie
door een gekwalificeerde technicus nodig, om de monitor
weer voor normaal gebruik in gereedheid te brengen.
De monitor is gevallen of de behuizing is beschadigd.
De monitor functioneert wezenlijk anders dan normaal het
geval is.
De monitor produceert voortdurend of regelmatig kraak- en
knalgeluiden. Bij sommige monitoren is het normaal dat ze af
en toe geluiden produceren bij het in- en uitschakelen, of
wanneer ze veranderen van videomodus.
Probeer de monitor niet zelf te repareren, aangezien u bij het
openen of verwijderen van de behuizing blootgesteld kunt
worden aan gevaarlijke elektrische schokken of andere gevaren.
Laat alle reparatiewerkzaamheden over aan gekwalificeerde
technici.
Nederlands
Modi
Normaal
Stand-by
Onderbroken
Uit
Hor.
Sync
Aan
Uit
Aan
Uit
Vert
Sync
Aan
Aan
Uit
Uit
Indicator
Green
Amber
Amber
Amber

10
Precauções Importantes
Este monitor foi projetado e fabricado de forma a
assegurar a sua segurança pessoal, porém o uso ou
operação inadequada podem resultar em risco
potencial de incêndio ou choque elétrico. Além disso,
o não cumprimento destas regras podem invalidar a
garantia.
Na Segurano
Use somente o cabo de força fornecido pelo monitor. Em
caso de necessitar outro cabo de força, certifique-se que o
mesmo suporta os níveis de tensão e corrente exigidos
pelo monitor(veja item especificações).
Se o cabo de alimentação tiver algum defeito, entre em
contacto com o fabricante ou com o fornecedor de serviços
de reparação da sua zona para o substituir.
Ligue o monitor somente em tomadas com a mesma
especificação de tensão que a mencionada neste manual
ou no corpo do monitor.
Tomadas sobrecarregadas e extensões podem provocar
incêndios e danificar o monitor. Verifique bem as tomadas
antes de efetuar a conexão do cabo de força.
Não abra o Monitor
Não existem componentes que possam ser trocados
pelo usuário dentro do monitor e mesmo que ele esteja
desligado e com o cabo de força desconectado, existem
pontos de ALTA TENSÃO altamente perigosos
presentes.
Sinais de abertura do monitor invalidarão definitivamente
a garantia.
Para Evitar Acidentes Pessoais :
Não coloque o monitor em superfícies inclinadas.
Não coloque o monitor sobre superfícies que não
suportem seu peso.
Não tente arrastar a mesa onde se encontra o monitor.
Retire o monitor da mesa, coloque-a em sua nova
posição e depois coloque o monitor sobre ela.
Para Evitar Incêndios e Choques Elétricos :
Sempre desligue o monitor ao abandonar a sala onde
ele se encontra Nunca deixe o monitor ligado ao sair do
escritório ou de casa.
Evite que crianças coloquem objetos nas aberturas do
monitor. Algumas partes internas do monitor
apresentam tensões elevadas (da ordem de milhares de
volts).
Não adicione acessórios que não tenham sido
projetados para este monitor.
Durante tempestades elétricas (com raios e trovões) ou
durante períodos em que o monitor permanecerá sem
uso, desconecte-o da tomada.
Não deixe dispositivos magnéticos (alto falantes,
motores, imãs, etc.) próximos do tubo do monitor.
Na Instalação
Não deixe nenhum objeto sobre o cabo de força e nem
coloque o monitor em locais onde o cabo de força possa
ser danificado.
Não use o monitor em locais próximos a água, tais como
banheiras, aquários, pias, ou em locais úmidos.
Os monitores possuem frestas para ventilação. Se estas
frestas são bloqueadas, o calor gerado pelo monitor pode
causar falhas de funcionamento que podem gerar um
incêndio. Portanto, NUNCA:
Bloqueie as frestas de ventilação colocando o monitor
sobre camas, sofás, almofadas, etc.
Coloque o monitor em locais fechados, a não ser que
ventilação adequada tenha sido providenciada.
Fechar as frestas de ventilação com panos ou outros
materiais.
Colocar o monitor sobre ou próximo a superfícies
geradoras de calor.
Somente para monitores LCD
Não esfregue ou toque no Active Matrix LCD com objetos
duros que possam riscá-lo, estragá-lo ou danificá-lo
permanentemente.
Não esfregue ou toque no Active Matrix LCD com objetos
duros que possam riscá-lo, estragá-lo ou danificá-lo
permanentemente.
Talvez surjam alguns defeitos de pontos na tela, como
manchas vermelhas, verdes ou azuis. Entretanto, isso não
afetará o desempenho do monitor.
Se possível, utilize a resolução recomendada para obter a
melhor qualidade de imagem do seu monitor LCD. Se for
utilizado qualquer modo que não seja a resolução
recomendada, podem aparecer imagens redimensionadas
ou processadas na tela. Entretanto, trata-se de uma
característica da tela LCD com resolução fixa.
Na Limpeza
Desconecte o monitor antes de limpar sua tela.
Utilize um tecido macio umedecido (não molhado). Não
utilize produtos em aerossol diretamente na tela, pois o
jato em excesso pode causar choque elétrico.
Na Reembalagem
Não jogue fora a caixa e os suportes originais do
produto. Caso necessite transportar o monitor, a caixa
original é a embalagem ideal O uso de outras
embalagens pode danificar o monitor durante o
transporte, mesmo que a embalagem permaneça
intacta.
DDC (Display Data Channel)
DDC é um canal de comunicação através do qual o
monitor informa ao computador a respeito de suas
características.
Protocolo DDC
① DDC1/DDC2B
Um canal de comunicação unidirecional.
② DDC 2AB/DDC2B+/DDC2Bi
Um canal de comunicação bidirecional.
Ovservação
O PC deve suportar DDC para fazer isso.
Português

11
Regulatory Information
Sistema de Gerenciamento de
Energia
Este monitor está de acordo com o programa Energy Star
da EPA (Agência de Proteção Ambiental Americana), cujo
objetivo é determinar aos produtores de equipamentos de
informática padrões para projetos de circuitos que gastam
menos energia quando não estão em uso.
Quando o monitor for utilizado com Green ou EPA Energy
Star PC ou com um PC com software protetor de tela de
acordo com o protocolo VESA Display Power Management
Signalling (DPMS), este monitor pode economizar uma
quantidade considerável de energia reduzindo seu
consumo enquanto não estiver sendo utilizado.
Existem 2 linhas de sinal, 4 modos de operação.
; Normal, Em espera, Suspenso e Desligado.
Quando você acionar o PC pressionando alguma tecla ou
movendo o mouse, o monitor também será acionado,
passando para o modo normal de operação, indicado pela
luz verde do LED.
Observação
O Projeto de economia de energia para monitores
funciona somente se eles estiverem conectados a
computadores com esse recurso.
Manutenção
Desligue o monitor da tomada e procure por serviço
autorizado, quando:
O cabo de força ou plugue estiver danificado ou
rompido.
Houve queda de líquido no monitor.
O monitor foi exposto à chuva ou água.
O monitor não opera normalmente seguindo as
instruções de operação. Ajuste somente os controles
descritos nas instruções de operação. Uma tentativa de
ajuste de outros controles invali-dará a garantia, além de
exigir diversas horas de trabalho de pessoal qualificado
para restaurar as condições originais de fun-cionamento
do monitor.
O monitor caiu ou está com o gabinete quebrado.
O monitor exibe uma distinta mudança de performance.
O monitor emite estalos ou estouros continuamente
durante sua operação normal. Para alguns monitores é
normal se ouvirem estalos quando se liga ou desliga o
monitor ou quando há mudança de modo de vídeo.
Não tente efetuar a manutenção do monitor você mesmo.
Abrir ou remover as tampas do gabinete deixarão expostos
pontos de alta tensão em diversas partes do monitor.
Procure sempre pessoal qualificado para execução de
serviços de manutenção.
FCC Compliance Statement
This equipment has been tested and found to comply within
the limits of a Class B digital device pursuant to Part 15 of
the FCC Rules. These limits are designed to provide
reasonable protection against harmful interference in a
residential installation.
This equipment generates, uses, and can radiate radio
frequency energy and if not installed and used in
accordance with the instructions, may cause harmful
interference to radio communications. However, there is no
guarantee that interference will not occur in a particular
installation.
If this equipment does cause harmful interference to radio
or television reception (which can be determined by turning
the equipment on and off), the user is encouraged to try to
correct the interference by using one or more of the
following measures:
Reorient or relocate the receiving antenna.
Increase the separation between the equipment and the
receiver.
Connect the equipment into an outlet on a circuit
different from that to which the receiver is connected.
Consult the dealer or an experienced radio/TV
technician for help.
Caution: Changes or modifications not expressly approved
by the party responsible for compliance could void the
user's (or your) authority to operate the equipment. Only
peripherals (digital input/output devices, terminals, printers,
etc.) certified to comply with the Class B limits may be
attached to this monitor. Operation with non-certified
peripherals is likely to result in interference to radio and TV
reception.
Only shielded signal cables may be used with this System.
Canadian DOC Notice
This Class B digital apparatus meets all requirements of the
Canadian Interference-Causing Equipment Regulations.
Cet appareil numérique de la classe B respecte toutes les
exigences du Règlement sur le matériel brouilleur du
Canada.
Português
Modo
Normal
Em espera
Suspenso
Desligado
Sinc.
Horiz.
Ligado
Desligado
Ligado
Desligado
Sinc.
Vert.
Ligado
Ligado
Desligado
Desligado
Cor do
LED
Verde
Laranja
Laranja
Laranja
NOTICE
The regulations are applied only to the products with the
ID LABEL indicating specific requirements.
NOTICE
The regulations are applied only to the products with the
ID LABEL indicating specific requirements.

12
Regulatory Information cont.
NUTEK
Naturskydds
föreningen
Närings- och teknikutvecklingsverket
SEMKO
CE Conformity Notice (for Europe)
Products with the “CE” Marking comply with the EMC
Directive(89/336/EEC) and LOW VOLTAGE Directive
(73/23/EEC) issued by the Commission of the European
Community.
Compiance with these directives implies conformity to the
following European Norms :
• EN 55022 ; Radio Frequency Interference
• EN 50082-1:1992 ; Electromagnetic Immunity
• EN 60555-2 ; Power Line Harmonics
• EN 60555-3 ; Voltage Fluctuations
• EN 60950 ; Product Safety
Low Radiation Compliance (MPR II)
This monitor meets one of the strictest guidelines available
today for low radiation emissions, offering the user extra
shielding and an antistatic screen coating. These
guidelines, set forth by a government agency in Sweden,
limit the amount of emission allowed in the Extremely Low
Frequency (ELF) and Very Low Frequency (VLF)
electromagnetic range.
TCO95
Congratulations!
You have just purchased a TCO’95 approved and labelled
product! Your choice has provided you with a product
developed for professional use. Your purchase has also
contributed to reducing the burden on the environment and
to the further development of environmentally-adapted
electronic products.
Why do we have environmentally labelled computers?
In many countries, environmental labelling has become an
established method for encouraging the adaptation of
goods and services to the environment. The main problem
as far as computers and other electronic equipment are
concerned is that environmentally harmful substances are
used both in the products and during their manufacture.
Since it has not been possible so far for the majority of
electronic equipment to be recycled in a satisfactory way,
most of these potentially damaging substances sooner or
later enter Nature.
There are also other characteristics of a computer, such as
energy consumption levels, that are important from both the
working and natural environment viewpoints. Since all
types of conventional electricity generation have a negative
effect on the environment (acidic- and climatic-influencing
emissions, radioactive waste, etc.), it is vital to conserve
energy. Electronic equipment in offices consumes as
enormous amount of energy, since it is often routinely left
running continuously.
What does the environmenal labelling involve?
This product meets the requirements for the TCO’95
scheme, which provides for international environmental
labelling of personal computers. The labelling scheme was
developed as a joint effort by the TCO (The Swedish
Confederation of Professional Employees),
Naturckyddsföreningen (The Swedish Society for Nature
Conservation), and NUTEK (The National Board for
Industrial and Technical Development in Sweden), and
SEMKO AB (an international certification agency).
The requirements cover a wide range of issues:
environment, ergonomics, usability, emission of electrical
and magnetic fields, energy consumption and electrical and
fire safety.
The environmental demands concern, among other things,
restriction on the presence and use of heavy metals,
brominated and chlorinated flame retardants, CFCs
(freons), and chlorinated solvents. The product must be
prepared for recycling, and the manufacturer is obliged to
have an environmental plan, which must be adhered to in
each country where the company implements its
operational policy.
The energy requirements include a demand that the
computer and/or display, after a certain period of inactivity,
shall reduce its power consumption to a lower level, in one
or more stages. The length of time to reactivate the
computer shall be reasonable for the user.
Labelled products must meet strict environmental
demands, for example, in respect of the reduction of electric
and magnetic fields, along with physical and visual
ergonomics and good usability.
The following is a brief summary of the environmental
requirements met by this product. The complete
environmental criteria document may be ordered from:
TCO Development Unit
Linnegatan 14, S-11494 Stockholm, Sweden
FAX +46-8 782 92 07
E-mail (Internet): development@tco.se
Current information regarding TCO’95 approved and
labelled products may also be obtained on the Internet
using the address: http://www.tco-info.com/
TCO’95 is a co-operative project between:
Environmental requirements
Brominated flame retardants are present in printed circuit
boards, cabling, casings, and housings, and are added to
delay the spread of fire. Up to 30% of the plastic in a
computer casing can consist of flame-retardant substances.
These are related to another group of environmental toxins,
PCBs, and are suspected of giving rise to similar harm,
including reproductive damage in fish-eating birds and
mammals. Flame retardants have been found in human
blood, and researchers fear that they can disturb fetus
development.
Bio-accumulative1TCO’95 demands require that plastic
components weighing more than 25 grams must not
contain flame retardants with organically bound chlorine or
bromine.
NOTICE
The regulations are applied only to the products with the
ID LABEL indicating specific requirements.

13
Lead can be found in picture tubes, display screens, solder,
and capacitors. Lead damages the nervous system and in
higher doses causes lead poisoning. The relevant bioaccumulative TCO’95 requirement permits the inclusion of
lead, as no replacement has yet been developed.
Cadmium is present in rechargeable batteries and in the
color-generating layers of certain computer displays.
Cadmium damages the nervous system and is toxic in high
doses. The relevant bio-accumulative TCO’95 requirement
states that batteries may not contain more than 25 ppm
(parts per million) of cadmium. The color-generating layers
of display screens must not contain any cadmium.
Mercury is sometimes found in batteries, relays and
switches. Mercury damages the nervous system and is
toxic in high doses. The relevant bio-accumulative TCO’95
requirement states that batteries may not contain more than
25 ppm of mercury and that no mercury is present in any of
the electrical or electronic components concerned with the
display unit.
CFCs (freons) are sometimes used for washing printed
circuit boards and in the manufacture of expanded foam for
packaging. CFCs break down ozone and thereby damage
the ozone layer in the atmosphere, causing increased
reception on Earth of ultra-violet light with consequent
increased risks of skin cancer (malignant melanoma). The
relevant TCO’95 requirement: Neither CFCs nor HCFCs
may be used during the manufacture of the product or its
packaging.
1
Bio-accumulative means that the substance accumulates
within living organisms.
Shipping Package
The packaging material can be recycled, or you can save it
to return the monitor to a service center for repair or
disposal.
CFC Compounds in Distribution Packaging
Cushioning material used for shipping finished monitors are
not manufactured with nor do they contain any CFC
compounds.
Design for Disassembly/Recycling
These monitors have been designed for easy end-of-life
disassembly and recycling. Fasteners are generally of the
same type for efficient disassembly. Components made of
different materials can be easily separated and plastics
have been identified using intermational symbols to aid in
recycling.
Monitor Disposal
TCO99
Congratulations!
You have just purchased a TCO’99 approved and labelled
product! Your choice has provided you with a product
developed for professional use. Your purchase has also
contributed to reducing the burden on the environment and
also to the further development of environmentally adapted
electronics products.
Why do we have environmentally labelled computers?
In many countries, environmental labelling has become an
established method for encouraging the adaptation of
goods and services to the environment. The main problem,
as far as computers and other electronics equipment are
concerned, is that environmentally harmful substances are
used both in the products and during their manufacture.
Since it is not so far possible to satisfactorily recycle the
majority of electronics equipment, most of these potentially
damaging substances sooner or later enter nature.
There are also other characteristics of a computer, such as
energy consumption levels, that are important from the
viewpoints of both the work (internal) and natural (external)
environments. Since all methods of electricity generation
have a negative effect on the environment (e.g. acidic and
climate-influencing emissions, radioactive waste), it is vital
to save energy. Electronics equipment in offices is often left
running continuously and thereby consumes a lot of
energy.
What does labelling involve?
This product meets the requirements for the TCO’99
scheme which provides for international and environmental
labelling of personal computers. The labelling scheme was
developed as a joint effort by the TCO (The Swedish
Confederation of Professional Employees), Svenska
Naturskyddsforeningen (The Swedish Society for Nature
Conservation) and Statens Energimyndighet (The Swedish
National Energy Administration).
Approval requirements cover a wide range of issues:
environment, ergonomics, usability, emission of electric and
magnetic fields, energy consumption and electrical and fire
safety.
The environmental demands impose restrictions on the
presence and use of heavy metals, brominated and
chlorinated flame retardants, CFCs (freons) and chlorinated
solvents, among other things. The product must be
prepared for recycling and the manufacturer is obliged to
have an environmental policy which must be adhered to in
each country where the company implements its
operational policy.
The energy requirements include a demand that the
computer and/or display, after a certain period of inactivity,
shall reduce its power consumption to a lower level in one
or more stages. The length of time to reactivate the
computer shall be reasonable for the user.
Labelled products must meet strict environmental
demands, for example, in respect of the reduction of electric
and magnetic fields, physical and visual ergonomics and
good usability.
WARNING
If you need to dispose of a monitor, ask a qualified service
representative for the proper procedure. Improper disposal
could result in personal injury from implosion.
Regulatory Information cont.

14
Regulatory Information cont.
EPA POLLUTION PREVENTER
As an ENERGY STAR Partner LG
Electronics U. S. A.,Inc. has
determined that this product meets the
ENERGY STAR guidelines for
energy efficiency.
Below you will find a brief summary of the environmental
requirements met by this product. The complete
environmental criteria document may be ordered from:
TCO Development
SE-114 94 Stockholm, Sweden
Fax: +46 8 782 92 07
Email (Internet): development@tco.se
Current information regarding TCO’99 approved and labelled
products may also be obtained via the Internet, using the
address: http://www.tco-info.com/
Environmental requirements
Flame retardants
Flame retardants are present in printed circuit boards,
cables, wires, casings and housings. Their purpose is to
prevent, or at least to delay the spread of fire. Up to 30% of
the plastic in a computer casing can consist of flame
retardant substances. Most flame retardants contain
bromine or chloride, and those flame retardants are
chemically related to another group of environmental toxins,
PCBs. Both the flame retardants containing bromine or
chloride and the PCBs are suspected of giving rise to
severe health effects, including reproductive damage in
fish-eating birds and mammals, due to the bioaccumulative* processes. Flame retardants have been
found in human blood and researchers fear that
disturbances in foetus development may occur.
The relevant TCO’99 demand requires that plastic
components weighing more than 25 grams must not
contain flame retardants with organically bound bromine or
chlorine. Flame retardants are allowed in the printed circuit
boards since no substitutes are available.
Cadmium**
Cadmium is present in rechargeable batteries and in the
colour-generating layers of certain computer displays.
Cadmium damages the nervous system and is toxic in high
doses. The relevant TCO’99 requirement states that
batteries, the colour-generating layers of display screens
and the electrical or electronics components must not
contain any cadmium.
Mercury**
Mercury is sometimes found in batteries, relays and
switches. It damages the nervous system and is toxic in
high doses. The relevant TCO’99 requirement states that
batteries may not contain any mercury. It also demands
that mercury is not present in any of the electrical or
electronics components associated with the labelled unit.
CFCs (freons)
The relevant TCO’99 requirement states that neither CFCs
nor HCFCs may be used during the manufacture and
assembly of the product. CFCs (freons) are sometimes
used for washing printed circuit boards. CFCs break down
ozone and thereby damage the ozone layer in the
stratosphere, causing increased reception on earth of
ultraviolet light with e.g. increased risks of skin cancer
(malignant melanoma) as a consequence.
Lead**
Lead can be found in picture tubes, display screens,
solders and capacitors. Lead damages the nervous system
and in higher doses, causes lead poisoning. The relevant
TCO’99 requirement permits the inclusion of lead since no
replacement has yet been developed.
* Bio-accumulative is defined as substances which accumulate
within living organisms
** Lead, Cadmium and Mercury are heavy metals which are Bioaccumulative.
EPA (U.S.A only)
ENERGYSATR is a set of power-saving guidelines
issued by the U.S. Environmental Protection
Agency(EPA).
NOM MARK (Mexico only)

15
MONITOR LIMITED WARRANTY
LG Electronics will repair or at its option replace, without charge, your product which proves to be defective in material or
workmanship under normal use, during the warranty period listed below from the date of original purchase. This warranty is good
only to the original purchaser of the product during the warranty period as long as it is in the U.S., including Alaska,
Hawaii, U.S. Territories; and all Canadian Provinces.
WARRANTY PERIOD:
No other express warranty is applicable to this product. THE DURATION OF ANY IMPLIED WARRANTIES,
INCLUDING THE IMPLIED WARRANTY OF MERCHANTABILITY, IS LIMITED TO THE DURATION OF THE
EXPRESS WARRANTY HEREIN. LG ELECTRONICS SHALL NOT BE LIABLE FOR THE LOSS OF THE USE OF
THE PRODUCT, INCONVENIENCE, LOSS OR ANY OTHER DAMAGES, DIRECT OR CONSEQUENTIAL,
ARISING OUT OF THE USE OF, OR INABILITY TO USE, THIS PRODUCT OR FOR ANY BREACH OF ANY
EXPRESS OR IMPLIED WARRANTY, INCLUDING THE IMPLIED WARRANTY OF MERCHANTABILITY
APPLICABLE TO THIS PRODUCT.
Some states do not allow the exclusion or limitation of incidental or consequential damages or limitations on how long an implied
warranty lasts; so these limitations or exclusions may not apply to you. This warranty gives you specific legal rights and you may
also have other rights which vary from state to state or province to province.
THE ABOVE WARRANTY DOES NOT APPLY:
• To damages or problems which result from delivery or improper installation.
• To damages or problems which result from misuse, abuse, accident, alteration, or incorrect electrical current or voltage.
• To service calls, which do not involve defective workmanship or material, such as explaining the operation of the unit.
Therefore, these costs are paid by the consumer.
CUSTOMER ASSISTANCE NUMBERS:
MODEL # PARTS & LABOR 3 Years HOW SERVICE IS HANDLED
Call 1 (800) 243-0000 and select the appropriate menu
option, 24 hrs a day, 7 days per week.
Please have your product type (MONITOR) and ZIP/Postal
code ready.
To Prove Warranty Coverage:
To obtain Technical Support
or Customer Assistance:
For Your Nearest Authorized
Service Center
→ Retain your sales receipt to prove date of purchase.
→ A copy of your sales receipt must be submitted at the time warranty service is provided.
→ CALL 1 (800) 243-0000, (Mon.-Fri. 7 a.m.-10 p.m. Central Time) and select the
appropriate menu option.
See our website at http://www.LGEservice.com
or send e-mail via our submission form at
http://www.LGEservice.com/techsup.html
→ Call 1 (800) 243-0000 and select the appropriate option, 24 hours a day, 7 days per
week. Please have your product type (MONITOR) and ZIP/Postal Code ready.
This information subject to change at any time without notice.
Warranty
the United States and Canada - CDT Monitor:

16
Warranty cont.
the United States and Canada - LCD Monitor:
LG ELECTRONICS USA and CANADA
LCD MONITOR LIMITED WARRANTY
LG Electronics, will repair or at its option replace, without charge, your product which proves to be defective in material or workmanship
under normal use, during the warranty period listed below from the date of original purchase. This warranty is good only to the original
purchaser of the product during the warranty period as long as it is in the U.S., including Alaska, Hawaii, U.S. Territories, and in
all Canadian Provinces.
WARRANTY PERIOD:
No other express warranty is applicable to this product. THE DURATION OF ANY IMPLIED WARRANTIES, INCLUDING THE
IMPLIED WARRANTY OF MERCHANTABILITY, IS LIMITED TO THE DURATION OF THE EXPRESS WARRANTY
HEREIN. LG ELECTRONICS, SHALL NOT BE LIABLE FOR THE LOSS OF THE USE OF THE PRODUCT,
INCONVENIENCE, LOSS OR ANY OTHER DAMAGES, DIRECT OR CONSEQUENTIAL, ARISING OUT OF THE USE OF,
OR INABILITY TO USE, THIS PRODUCT OR FOR ANY BREACH OF ANY EXPRESS OR IMPLIED WARRANTY,
INCLUDING THE IMPLIED WARRANTY OF MERCHANTABILITY APPLICABLE TO THIS PRODUCT.
Some states/provinces do not allow the exclusion or limitation of incidental or consequential damages or limitations on how long an implied
warranty lasts; so these limitations or exclusions may not apply to you. This warranty gives you specific legal rights and you may also have
other rights which vary from state to state or province to province.
THE ABOVE WARRANTY DOES NOT APPLY:
• To damages or problems which result from delivery or improper shipping.
• To damages or problems which result from misuse, abuse, accident, alteration, or incorrect electrical current or voltage.
• To service calls which do not involve defective workmanship or material, such as explaining the operation of the unit.
Therefore, these costs are paid by the consumer.
CUSTOMER ASSISTANCE NUMBERS:
FOR SERVICE
You must call Product Assistance to confirm the product needs servicing and to obtain Return Authorization (RA).
(1-800-243-0000 Mon. - Fri. 7AM to10PM CST please select the appropriate option from the menu)
During the first year of warranty, LGE
will send you a return shipping label; thereafter, customer has to pay for freight in to LGE. After you obtain authorization for return, please
box your unit with a copy of the sales receipt and enough packing material to insure safe delivery of your product. When you receive the
label, place it on the box and call the 800 # in the instruction for pick-up. When your unit is received, LGE will repair your unit in 2 working
days and return to you via 2-day delivery service.
MODEL #
Please write in
Serial #
LABOR
3 Year
PARTS
3 Year
BACK LIGHT
1 Year
HOW SERVICE IS HANDLED
2 working day repair service after receiving at LG Electronics. Please retain your
box to return the unit for repair.
For further instructions please see below.
1
st
year freight both ways paid by LGE
2
nd
& 3rdcustomer pays one-way, LGE pays return freight
Retain your Sales Receipt to prove date of purchase and your box for shipping
the unit in for repair.
Copy of your Sales Receipt must be submitted with the unit at the time warranty
service is provided.
Call 1-800-243-0000 (Mon. - Fri. 7AM to 10PM CST)
Please select the appropriate option from the menu.
See our web site at http://www/LGEservice.com or send e-mail via our form at
http://www.LGEservice.com/techsup.html
To prove warranty coverage:
To obtain where to buy,
product or customer assistance:

17
COLOUR MONITOR WARRANTY
Complete the details on this form and retain in the event of warranty service being required (purchase receipt attached).
PURCHASER'S NAME
ADDRESS
CITY STATE POST CODE
MODEL NO. SERIAL NO.
DATE OF PURCHASE INVOICE/SALES DOCKET NO.
RETAILER'S NAME
ADDRESS
CITY STATE POST CODE
TERMS OF WARRANTY
Should a defect in this product due to either FAULTY
MATERIAL or WORKMANSHIP become apparent
within the period of 36 months from the date of original
purchase of the product such defect will be rectified,
without cost to you for either labor or
material, at the
premises of Authorized Service Centre.
subject to:
1. Particulars of the model and serial number, the date
of
original purchase and invoice/ salesdocket number
being
given to the authorized service centre when a claim
under warranty is made, Purchase receipt must be
produced.
2. All (a) damage resulting from incorrect installation or
use other than in accordance with the operating
instructions issued by the Company(b)
consequentia
l
damage, being excluded from this Warranty.
3. The Warranty being rendered invalid if the product is
misused or if any unauthorized alteration, modification,
or substitution of any part of the product be made or the
serial number of the product is defaced or altered.
4. Cost of transportation both ways to and from the
authorized service centre being met by the owner if it is
necessary to return the product or any part to an
authorized service centre.
5. The Warranty not applying except to the servicing
within Australia of products purchased in Australia.
6. LG shall not be liable for the loss of use of product,
inconvenience, loss or any other damages, direct or
consequential arising out of the use, or the inability to
use this product during the terms and conditions of the
warranty period. If any legislation whether Federal or
State to applies to this transaction, certain non-exclude
conditions and may be implied and certain non-exclude
rights may arise but except for such
conditions,warranties and rights, all conditions and
warranties which might otherwise be implied in this
transaction are hereby excluded and negated.
IMPORTANT NOTICE
1. LG Electronics Australia Pty,. Ltd. has arranged for
authorized service centres to perform all after-sales and
warranty service on its behalf.
2. The authorized service centre can accept no
responsibility for damage in transit to and from his
premises.
3. If the product or any parts returned to an authorized
service centre for any cause not covered by this
warranty, all costs involved, including a charge for
inspection and handling must be paid to the authorized
service centre.
4. Changes not covered by the terms of this Warranty must
be borne by the owner. Such charges may arise through
the cost of any service call where the product is found to
be incorrected installed, maladjustment of user controls,
or failure to follow operating instructions, mains supply
defects or external interference.
5. No retailer has authority to very the terms of the above
warranty.
ADDRESS: 23 Pike Street, Rydalmere NSW 2116
Toll Free Line: 1800 643 156
TEL: 9684-8000
Warranty cont.
Australia - CDT & LCD Monitor:

TERMO DE GARANTIA
18
A LG Electronics de São Paulo Ltda. garante este produto
pelo período de 3(três) anos, contados a partir da data de
emissão da Nota Fiscal de compra, desde que o mesmo
tenha sido instalado conforme orientações descritas neste
manual de instruções e, somente em Território Nacional.
Durante o período estipulado, a garantia cobre peças e mãode-obra que apresentarem defeito de fabricação. Somente o
técnico do Serviço Autorizado credenciado pela LG
Electronics de São Paulo Ltda., está autorizado a reparar
defeitos cobertos pela garantia, mediante apresentação da
Nota Fiscal de compra.
O consumidor tem o prazo de 90 dias para reclamar de
irregularidades (vícios) aparentes, ou seja, de fácil e imediata
observação no produto, tais como os ítens que constituam a
parte externa e qualquer outro acessível ao usuário.
A garantia de peça sujeita ao desgaste natural (peças
plásticas e acessórios em geral), fica restrita ao prazo legal
de 90 dias, a contar da data de emissão da Nota Fiscal de
compra.
A garantia perde seu efeito se:
• A instalação ou utilização do produto estiver em
desacordo com as recomendações do manual de
instruções;
• O produto sofrer qualquer dano provocado por acidente,
queda, agentes da natureza ou consertos realizados por
pessoas não credenciadas pela LG Electronics de São
Paulo Ltda;.
• O número de série do produto estiver danificado ou
adulterado.
A garantia não cobre:
• Transporte e remoção de produtos para conserto, ou
daqueles que estejam instalados fora do perímetro urbano
onde se localiza o Serviço Autorizado LG mais próximo;
• Desempenho insatisfatório do produto devido a
instalação ou rede elétrica local inadequadas;
• Transporte e remoção de produtos que estejam instalados
em locais de risco até o Serviço Autorizado LG mais
próximo.
OBS: Se o consumidor desejar ser atendido no local em que
o produto estiver instalado, ficará a critério do Serviço
Autorizado a cobrança de taxa de visita e deslocamento,
devendo o consumidor consultá-lo antes de solicitar o
serviço.
Este produto destina-se exclusivamente ao uso doméstico ou
amador. A LG Electronics de São Paulo Ltda. não cobrirá
qualquer prejuízo do usuário, amador ou profissional,
decorrente da impossibilidade de utilização do produto.
A GARANTIA SOMENTE É VÁLIDA
MEDIANTE A APRESENTAÇÃO DA NOTA
FISCAL DE COMPRA DESTE PRODUTO
LG Electronics de São Paulo Ltda.
Central LG de Atendimento ao Consumidor
Ligue: 0800.171514
LIGAÇÃO GRATUITA
TERMO DE GARANTIA
A LG Electronics de São Paulo Ltda. garante este produto
pelo período de 90 dias, mais 2 anos e nove meses contados
a partir da data de emissão da Nota Fiscal de compra, desde
que o mesmo tenha sido instalado conforme orientações
descritas neste manual de instruções e, somente em
Território Nacional.
Durante o período estipulado, a garantia cobre peças e mãode-obra que apresentarem defeito de fabricação. Somente o
técnico do Serviço Autorizado credenciado pela LG
Electronics de São Paulo Ltda., está autorizado a reparar
defeitos cobertos pela garantia, mediante apresentação da
Nota Fiscal de compra.
O consumidor tem o prazo de 90 dias para reclamar de
irregularidades (vícios) aparentes, ou seja, de fácil e imediata
observação no produto, tais como os ítens que constituam a
parte externa e qualquer outro acessível ao usuário.
A garantia de peça sujeita ao desgaste natural (peças
plásticas e acessórios em geral), fica restrita ao prazo legal
de 90 dias, a contar da data de emissão da Nota Fiscal de
compra.
A garantia perde seu efeito se:
• A instalação ou utilização do produto estiver em
desacordo com as recomendações do manual de
instruções;
• O produto sofrer qualquer dano provocado por acidente,
queda, agentes da natureza ou consertos realizados por
pessoas não credenciadas pela LG Electronics de São
Paulo Ltda;.
• O número de série do produto estiver danificado ou
adulterado.
A garantia não cobre:
• Transporte e remoção de produtos para conserto, ou
daqueles que estejam instalados fora do perímetro urbano
onde se localiza o Serviço Autorizado LG mais próximo;
• O mal funcionamento do produto devido a instalaçaõ ou
rede elétrica local inadequadas.
OBS: Se o consumidor desejar ser atendido no local em que
o produto estiver instalado, ficará a critério do Serviço
Autorizado a cobrança de taxa de visita e deslocamento,
devendo o consumidor consultá-lo antes de solicitar o
serviço.
Este produto destina-se exclusivamente ao uso amador ou
profissional. A LG Electronics de São Paulo Ltda. não
cobrirá qualquer prejuízo do usuário, amador ou
profissional, decorrente da impossibilidade de utilização do
produto.
A GARANTIA SOMENTE É VÁLIDA
MEDIANTE A APRESENTAÇÃO DA NOTA
FISCAL DE COMPRA DESTE PRODUTO
LG Electronics de São Paulo Ltda.
Central LG de Atendimento ao Consumidor
Ligue: 0800.171514
LIGAÇÃO GRATUITA
Warranty cont.
Brazil - CDT Monitor:
LCD Monitor:

19
LG Electronics México, S.A. de C.V. GARANTIZA LOS MONITORES GOLDSTAR/LG POR EL TERMINO DE TRES
AÑOS EN TODAS SUS PARTES Y MANO DE OBRA, CONTRA CUALQUIER DEFECTO DE FABRICACION A
PARTIR DE LA FECHA DE ENTREGA DEL PRODUCTO BAJO LAS SIGUIENTES
1.- PARA HACER EFECTIVA ESTA GARANTIA ES NECESARIO PRESENTAR ESTA POLIZA DEBIDAMENTE
SELLADA POR LA CASA VENDEDORA O FACTURA DE COMPRA EN CUALQUIERA DE LOS CENTROS DE
SERVICIO QUE SE INDICAN EN EL ANEXO.
2.- LA EMPRESA SE COMPROMETE A REPARAR O CAMBIAR, EL PRODUCTO DEFECTUOSO SIN NINGUN
CARGO PARA EL CLIENTE Y CUBRIR LOS GASTOS QUE SE DERIVEN DE LA PRESENTE GARANTIA.
3.- EL TIEMPO DE REPARACION EN NINGUN CASO SERA MAYOR DE 30 DIAS CONTADOS A PARTIR DE LA
FECHA DE RECEPCION DEL PRODUCTO EN CUALQUIERA DE LOS SITIOS DONDE PUEDE HACERSE
EFECTIVA ESTA GARANTIA.
4.- LAS REFACCIONES Y PARTES PARA LA REPARACION DEL APARATO QUE AMPARA ESTA POLIZA
PODRAN SER ADQUIRIDAS EN LOS CENTROS DE SERVICIO AUTORIZADOS.
ESTA GARANTIA NO ES VALIDA EN LOS SIGUIENTES CASOS
A) SI EL PRODUCTO NO HA SIDO OPERADO CONFORME AL INSTRUCTIVO ANEXO.
B) SI NO SE HAN OBSERVADO LAS ADVERTENCIAS SEÑALADAS.
C) DAÑOS OCASIONADOS POR FENOMENOS NATURALES COMO INCENDIO, INUNDACION, TEMBLORES,
RAYOS, DESCARGAS ELECTRICAS.
D) DAÑOS POR GOLPES, RASPADURAS, ROTURAS EN EL PRODUCTO Y EN SUS ACCESORIOS.
E) SI EL PRODUCTO HA TRATADO DE SER REPARADO POR PERSONAS NO AUTORIZADAS POR:
LG Electronics México, S.A. de C.V.
PRODUCTO: MONITORS
MODELO:
SERIE:
DISTRIBUIDOR:
DIRECCION: COLONIA
CIUDAD EDO.
FECHA DE ENTREGA
CENTRO DE SERVICIO DIRECTO.
México D.F. (5)3 211900
Av. Sor Juana Inés de la Cruz No. 555 . Col. San Lorenzo, Tlalnepantla Edo. Mex
Guadalajara (3)6195523 Chicago No. 120, Col. Ferrocarril Guadalajara, Jalisco.
Monterrey (8)3 549111
Ruiz Cortines Ote No 2822 Col. La Moderna. Monterrey, Nuevo León.
Mérida (99) 255049 Calle 60 No 360, Col. Centro, Merida Yucatán.
POLIZA DE GARANTIA
CONDICIONES
CENTRO DE SOLUCION AL CLIENTE
Teléfono Lada sin costo 01 (800) 50 48100 y en el DF 3 211900
Fax Lada sin costo 01 (800) 50 73300 y en el DF 5 657549
LG Electronics México S.A. de C.V.
Av. Sor Juana Inés de la Cruz No. 555. Col. San Lorenzo, Tlalnepantla, Edo. de Mex. Tel. 3 21 19 00
SELLO Y FIRMA
Garantia Limitada Para México
NOTA : EN CASO DE EXTRAVIO DE LA PRESENTE GARANTIA EL CONSUMIDOR PUEDE SOLICITAR UNA REPOSICION. PREVIA PRESENTACION
CON FACTURA DE COMPRA CON EL PROVEEDOR O DIRECTAMENTE A LG ELECTRONICS MEXICO.
Warranty cont.
Mexico- CDT Monitor:

20
Centro de Servicio Gobal Cibernetico (México)
Servicio Directo LG
Ciudad E-mail Teléfono Línea
Celaya, Guanajuato pedro4@ibm.net (461)-238-10 E
Toluca, Edo. Méx. shureeoi@yahoo.com (72)-13-34-24 E
Hermosillo, Sonora macamax@hotmail.com (62)-11-59-24 E, LB
Hermosillo, Sonora alfrgs@prodigy.net.mx (62)-13-14-60 LB, RAC, IRAC
(62)-12-22-00
Cancun, Quintana Roo amador@qrool.telnex.net.mx (98)-87-96-89 LB, RAC, IRAC
Guadalajara, Jalisco setesa@vianet.com.mx (3)-635-18-75 E
México, D.F. mhkim@infosel.net.mx (5)-611-87-06 E
Veracruz, Veracruz servicenterv@mexis.com (29)-32-00-18 E, LB, RAC, IRAC
Mazatlan, Sinaloa eracitti@sin.telmex.net.mx (69)-85-37-48 LB
México D.F. meretivallejo@hotmail.com (5)-739-09-93 LB
Chalco, Edo. Méx. asalasg@edomex1.telmex.net.mx (5)-975-21-49 E, LB
Merida, Yucatan cena@sureste.com (99)-26-11-53 E, LB
México, D.F. alflonat@hotmail.com.mx (5)-544-31-55 IRAC
Tuxtla Gutierrez, Chiapas elba7@yupimail.com.mx (961)-323-06 E
Villahermosa, Tabasco svmaster@podigy.net.mx (93)-16-32-06 E, LB
Zamora, Michoacan multis@cerse.com.mx (351)-554-16 E, LB
Merida, Yucatan mixers@prodigy.net.mx (99)-27-30-79 IRAC
Cd. Juarez, Chihuahua servitecjrz@hotmail.com (16)-16-38-83 LB
México D.F. laagsi@correoweb.com (5)-797-61-48 E, MM
Guasave, Sinaloa zynkoleo@debtel.com.mx (687)-223-31 E
Ciudad Domicilio Telefono Fax
Mexico, Estado de México Sor. Juana Ines de la Cruz No. 555 (5)-321-19-00 (5)-321-19-18
Col. San Lorenzo LADA S/COSTO (5)-321-19-08
Tlalnepantla, Edo. Méx 01-800-504-8100 01-800-507-3300
Monterrey, Nuevo Leon Av. Ruiz Cortinez No. 2822 Oriente (8)-354-91-11 (8)-354-91-11
Col. Moderna 01-800-34-716-00
Guadalajara, Jalisco Chicago No. 120 (3)-619-55-22/23 (3)-619-55-24
Col. Ferrocarril 01-800-96-722-00
Merida, Yucatan Calle 60No. 360 x 37 (99)-25-50-49 (99)-25-50-49
Col. Centro 01-800-34-718-00
Nomenclatura:
E-mail: Correo electrónico
L/B: Centro de Servicio Autorizado de Línea Blanca
E: Centro de Servicio Autorizado de Línea Electrónica
RAC: Centro de Servicio Autorizado de Aire Acondicionado
MM: Centro de Servicio Autorizado de Multimedia
IRAC: Instalador de Aire Acondicionado
Acceso directo a la página de Internet de LG:
Consumidores: http://mx.lgservice.com/
ASC: http://biz.lgservice.com/
Warranty cont.

FAQ's - Frequently asked questions - Please check before calling
21
LG Electronics U.K. Ltd
Thank you for choosing LG.
This Monitor is supplied with a 3-year
on-site swap-out warranty from the
first date of purchase.
The Replacement will normally be a
model of same or higher specification
BRANDS ELECTRONICS will
normally provide this Service on a
"Next Working Day" basis, for calls
received before 3 p.m.
For Ireland & Outlying areas, this may
take a little longer.
In the event of a fault, please call:
UK 01475 744788
Ireland 0044 1475 744788
Or Fax your details to:
UK 01475 742629
Ireland 0044 1475 742629
Brands Website: http://www.brands.co.uk
LG Service site: http://www.lgelectronics.co.uk
Sales Website: http://www.lge.co.kr
Conditions
1) This Warranty applies for 3 years from the first date of
purchase only. The right to request sight of the original
proof of purchase is reserved.
2) This warranty is valid in the UK Mainland, Ireland,
Channel Islands and Isle of Man.
3) It is the user’s responsibility to ensure that the product
is used in accordance with the Manufacturer’s
guidelines detailed in the Instruction Manual supplied
with your Monitor. Failure to do so may invalidate your
Warranty.
4) All warranties will be immediately invalidated if
unauthorised repairs or modifications are made to the
monitor or in any case of accident, misuse, damage
caused by improper installation and altered serial
numbers. Pollution of the monitor with smoke, food,
liquid or similar will be deemed as misuse.
5) LCD & TFT Monitors have 1 year on site and 2 years
collect for repair. The Backlight in these units is
warranted for 1 year only. Replacements are
chargeable
6) LG Electronics reserves the right to collect repairs and
return any monitor which has cabinet defilement,
including security marking. We may also collect units
for repair where no suitable replacement is
immediately available.
7) The END USER will be liable for all costs associated
with "Invalid Warranty Claims".
8) The Liability is limited to the cost of repair and/or
replacement of the unit under warranty.
9) This warranty does not affect the purchaser’s statutory
rights.
10) In the event that the Courier cannot obtain access on
his first visit on the day agreed with the "End User", we
reserve the right to charge for the second or
subsequent delivery attempts.
Power is on, but no picture visible
No Power
Colour is distorted down one side
Colour is flickering
Check the leads are connected fully and that the
Contrast/Brightness controls are set to normal
Check Mains Plug to see if fuse is blown.
If your monitor takes power from the PC, then try
a separate Power Supply (Wall Socket)
Make sure Speakers, Transformers or anything
else magnetic are well away from the monitor
Make sure the 15 pin signal connector from the
PC to the Monitor is correctly seated in the
socket at both the PC and the Monitor end (If
applicable to the Monitor, some Cables are hard
wired.)
Try another cable if available.
3333 YYYYeeeeaaaarrrr OOOOnnnn----SSSSiiiittttee
ee
MMMMoooonnnniiiittttoooorrrr SSSSwwwwaaaapppp OOOOuuuutttt WWWWaaaarrrrrrrraaaannnnttttyy
yy
BRANDS
ELECTRONICS
the United Kingdom - CDT&LCD Monitor:
Warranty cont.

22
Monitor Driver Installation
<Windows 98>
<Windows 2000>
Monitor Driver Installation
for Windows® 95/98
When you install the Monitor Driver, resolution and
frequency are automatically set to the Monitor. So
you can work on the clearer display.
Monitor Driver Diskette will be provided for the 17inch or higher Model ( higher than 70kHz) with LCD.
If your monitor is not the one above or you lost the
diskette, you can download the driver on
http://www.lge.com
INSTALL
① Start Settings Control Panel.
② Double-click the Display icon.
③ Click the Settings tab, then click Change Display
Type.
④ Under Monitor Type, click Change Have Disk.
⑤ Insert the Monitor Installation Diskette into the floppy
drive and click OK.
⑥ Under Model list, select your LG Monitor, then click
OK. The monitor files are copied to the hard drive.
⑦ Click OK Close to save the settings.
⑧ Restart the system to activate the setting.
USB Install Guide
The following guide is only for the USB-Monitor
software support Monitor.
INSTALL
① Before Setting up the USB Program, Connect the
monitor to PC with the USB signal cable.
② Insert the “Monitor Installation Disk”into the floppy
disk drive.
③ Select the MNT_USB folder, and double click the
setup.
④“USB Monitor”window is displayed, click the “Next”,
and repeat that.
⑤ Click the “Finish”button and setup is completed.
⑥ Select the “Display properties”, and then you use the
USB Monitor Function.
UNINSTALL
① Select the Settings and Control Panel, Double click
the “Add/Remove Programs”.
② Select the “USB Monitor”.
③ Click the “Add/Remove”button and the Program is
removed..
Caution: This Program is supported WINDOWS98 and Higher.
IMPORTANT NOTICE
This message may appear several times during
the installation of your monitor diskette.
Click Skip File to continue (Windows 98), Click
Yes to continue (Windows 2000).
This action will not harm your monitor or system.

For LG Customer Support:
World Wide Web:
http://www.lge.com
U.S. and Canada only:
website: http://www.LGEservice.com
e-mail: http://www.LGEservice.com/techsup.html
Brazil only:
LG Electronics de São Paulo LTDA.
C.G.C. NO. : 011666 372/0001-55
AV. D. Pedro 1, W-7777, Jardim Silvia Maria, Taubate-SP
Mexico only:
LG Electronics México S.A. de C.V.
Sor Juana Inés de la Cruz No. 555 Col. San Lorenzo
Tlalnepantla, Edo. de México C.P. 54033
Tel. 321 19 00 fax. 565 75 49
Lada sin costo 01 800 50 481 00
Printed in Korea
(3828TUL100D)
 Loading...