

Page 1
User’ s Guide Specification
MODEL
BRAND
47LM761T
ZA
LG
2. Printi
6. L
h/Turkish (2)
E
* LG
담 당 관리자
1.
Model Description
SUFFIX
2.
PD SUFFIX
Printing Specification
1. Trim Size (Format) : 182mm x 257 mm
ng Colors
Cover : 1 COLOR (BLACK)
Inside : 1 COLOR (BLACK)
3. Stock (Paper)
Cover : Uncoated paper , 백상지 60 g/㎡
Inside : Uncoated paper , 백상지 60 g/㎡
4. Printing Method : Off-set
5. Bindery : Saddle stitch
anguage : Englis
7. Number of pages : 84
YJ JEON
12.02.24
-
Part No.
Product Name
47LM761T
HJ SHIN
12.02.24
MFL67441706
(1202-REV00)
JO KIM
12.02.24
“This part contain Eco-hazardous substances (Pb, Cd, Hg, Cr6+, PBB, PBDE, etc.) within LG standard level,
N
O
T
S
3.
Details should be followed Eco-SCM management standard[LG(56)-A -2 52 4 ].
Especially, Part should be followed and controlled the following specification.
(1)Eco-hazardous substances test report should be submitted
when Part certification test and First Mass Production.
(2) Especially, Don’t use or contain lead(Pb) and cadmium(Cd) in ink.
Special Instructions
(1) Origin Notification
* LGEIN : Printed in Indonesia * LGEWA : Printed in U.K.
* LGESP : Printed in Brazil * LGEMX : Printed in Mexico
END : Printed in China * LGEIL : Printed in India
* LGEMA : Printed in Poland
4.
Changes
10
9
8
7
6
5
4
3
2
1
REV.
NO.
MM/DD/YY
SIGNATURE
CHANGE NO.
CHANGE CONTENTS
Page 2
Set u
p
p
227Blank
Guide
(EN)
Pagination sheet
P/NO. MFL67441706
Total pages : 84 pages
P/NO.
Front
Cover
(EN)
Front
Cover
(TR)
………A-2
………
……282 29 Blank
……
…
…A-6
Back
Cover
(EN)
B-17B-1 Blank Blank
Page 3

OWNER’S MANUAL
LED LCD TV
Please read this manual carefully before operating
your set and retain it for future reference.
LM62**
LM64**
LM66**
LM67**
LM76**
LS57**
P/NO : MFL67441706 (1202-REV00)
Printed in Korea
www.lg.com
Page 4

TABLE OF CONTENTS
A-2
TABLE OF CONTENTS
A-3 SETTING UP THE TV
A-3 Attaching the stand
A-6 Tidying cables
LANGUAGE LIST
English
Türkçe
B-1 MAKING CONNECTIONS
B-1 Antenna connection
B-1 Satellite dish connection
B-2 HDMI connection
B-3 DVI to HDMI connection
B-4 RGB-PC connection
B-4 Component connection
B-5 Composite connection
B-6 Audio connection
B-6 - Digital optical audio connection
B-7 USB connection
B-7 CI module connection
B-8 Headphone Connection
B-9 Euro Scart connection
COMMON
LANGUAGE
B-11 SPECIFICATIONS
COMMON
Page 5
SETTING UP THE TV
A-3
SETTING UP THE TV
Image shown may differ from your TV.
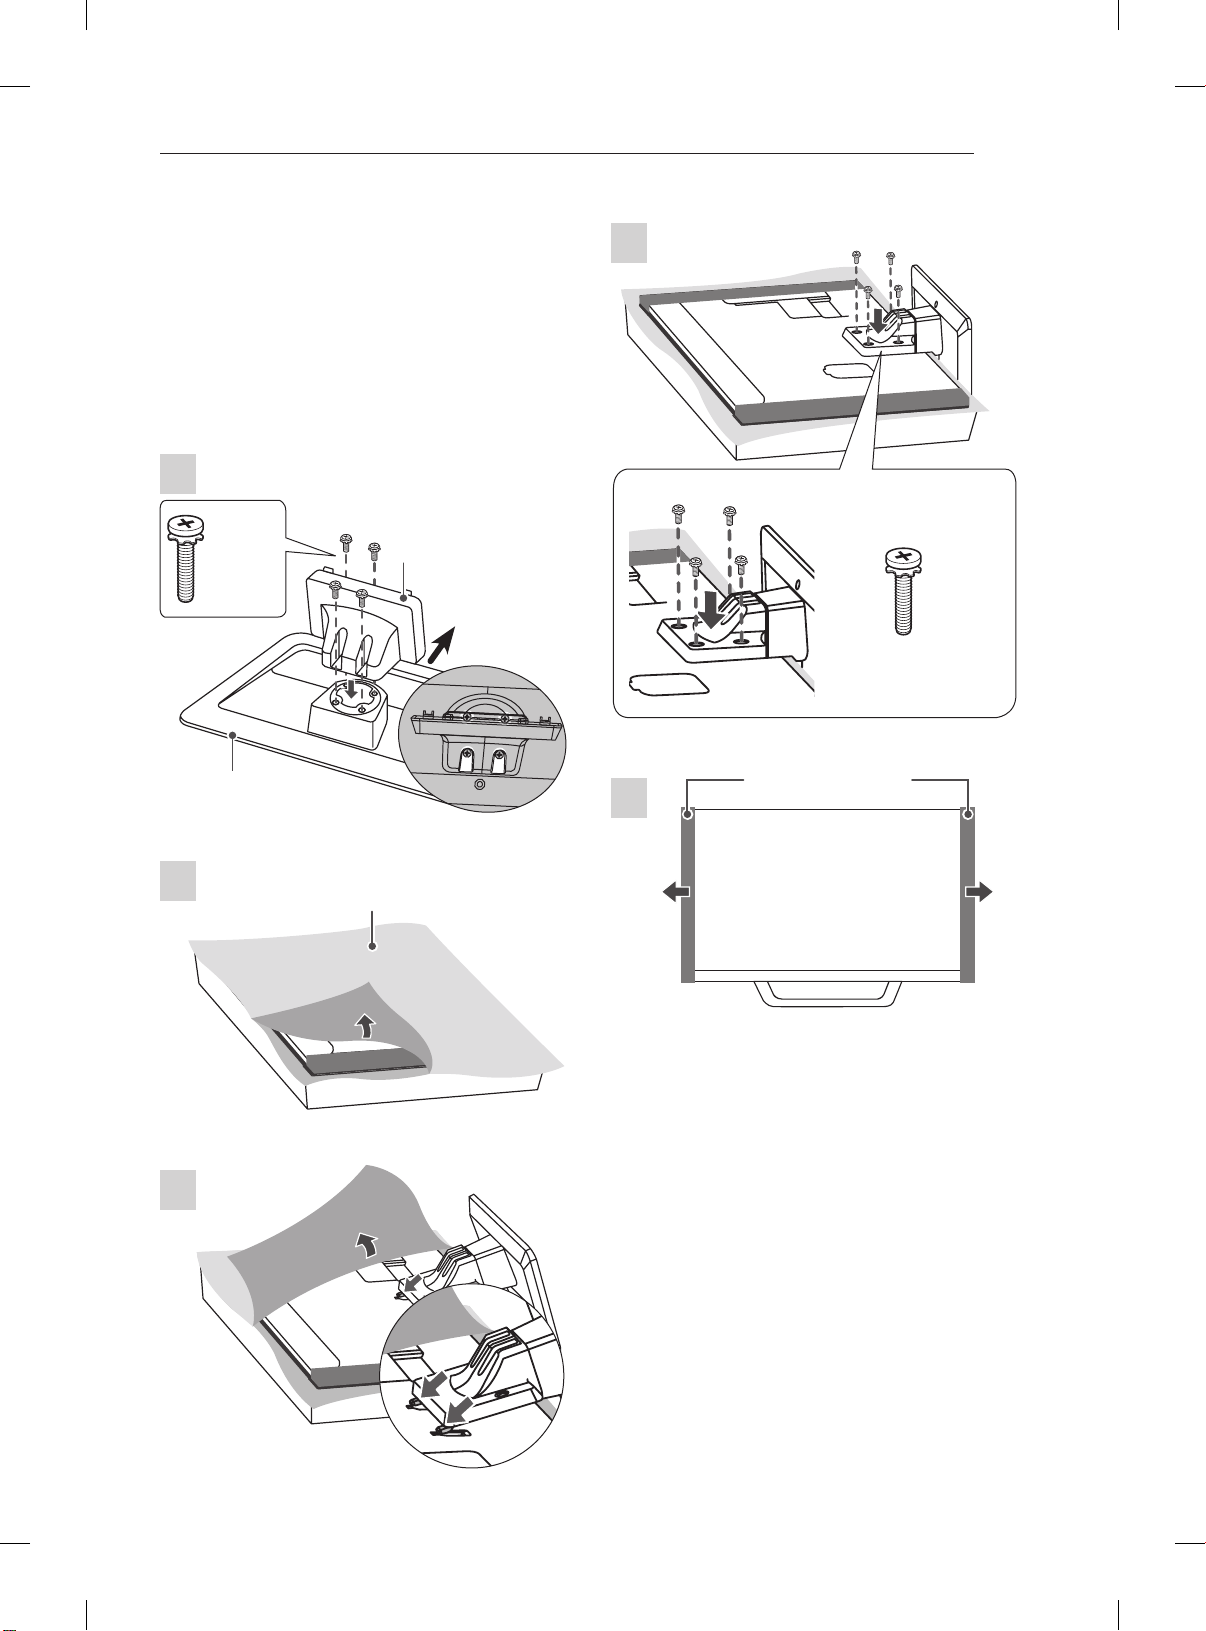
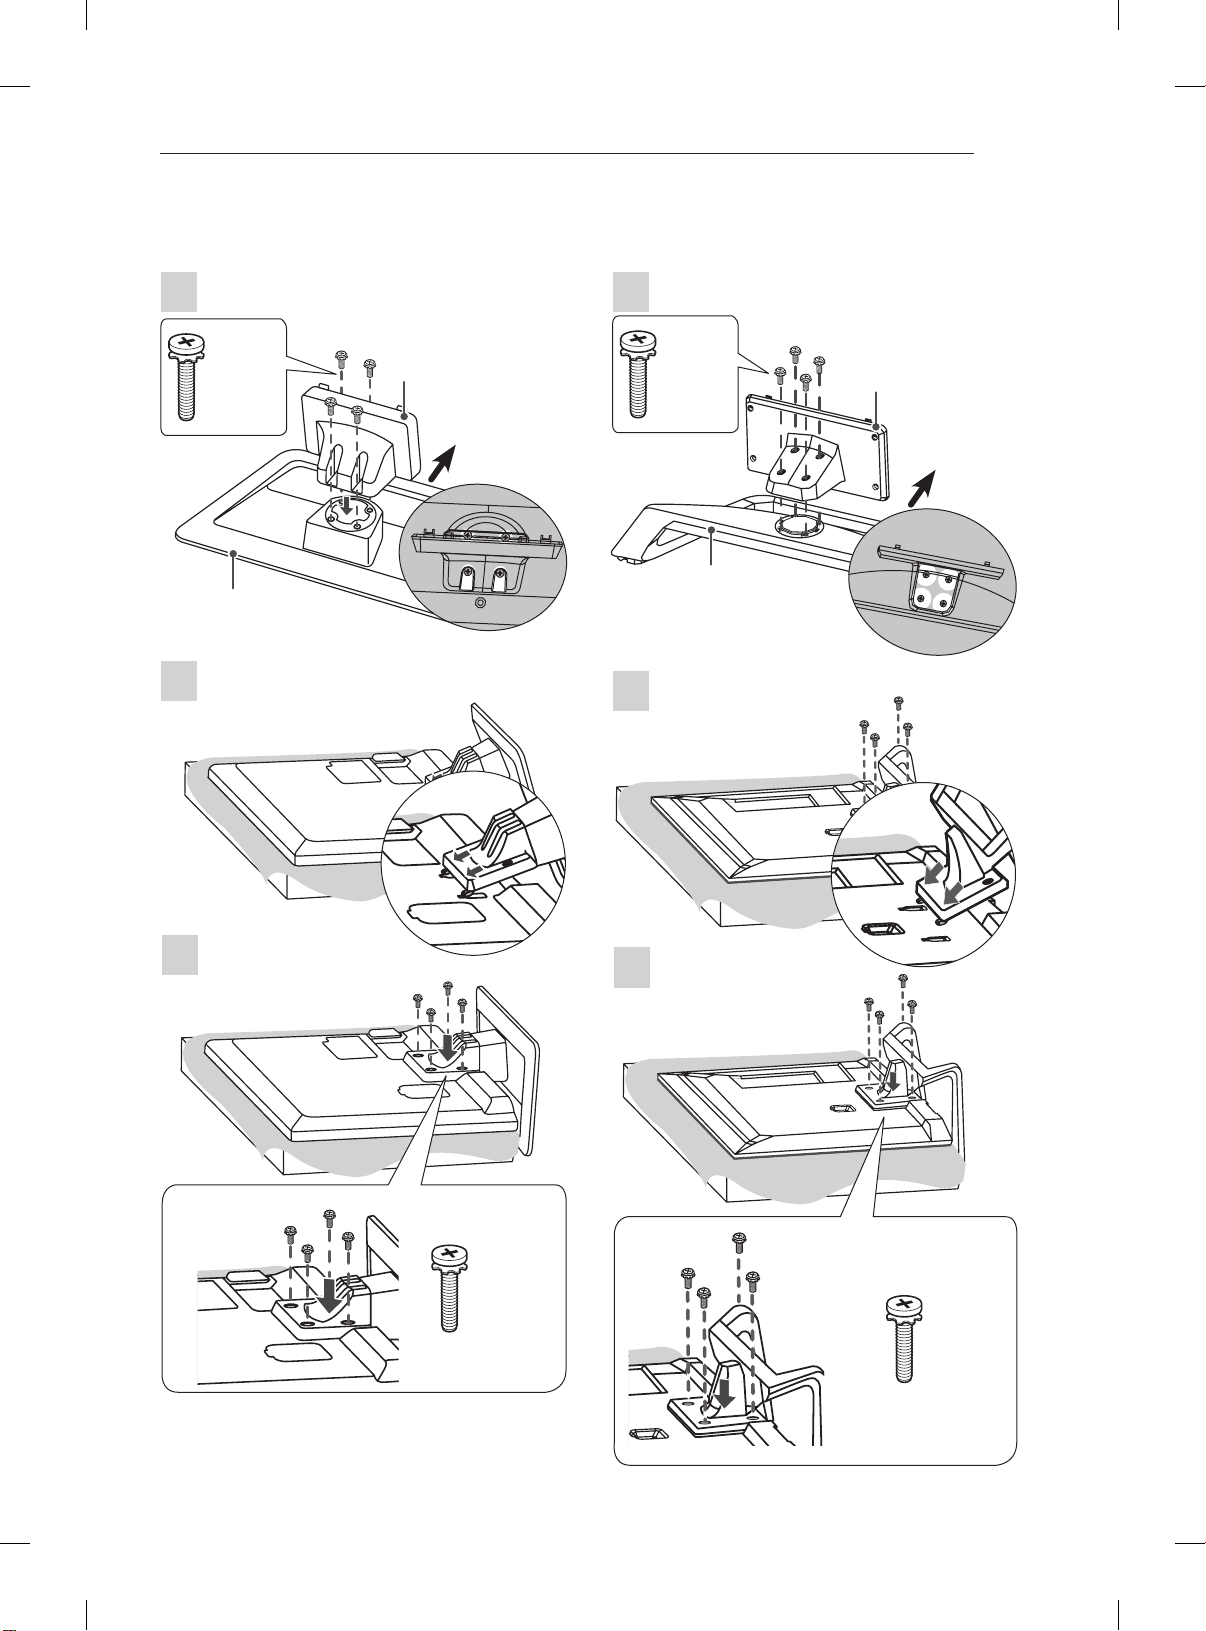
Attaching the stand
42/47LM669*
1
M4 x 20
Stand Body
4EA
Front
Stand Base
Top View
4
M4 x 20
4EA
Protection pad
5
2
Wrapping bag
3
Page 6
SETTING UP THE TV
A-4
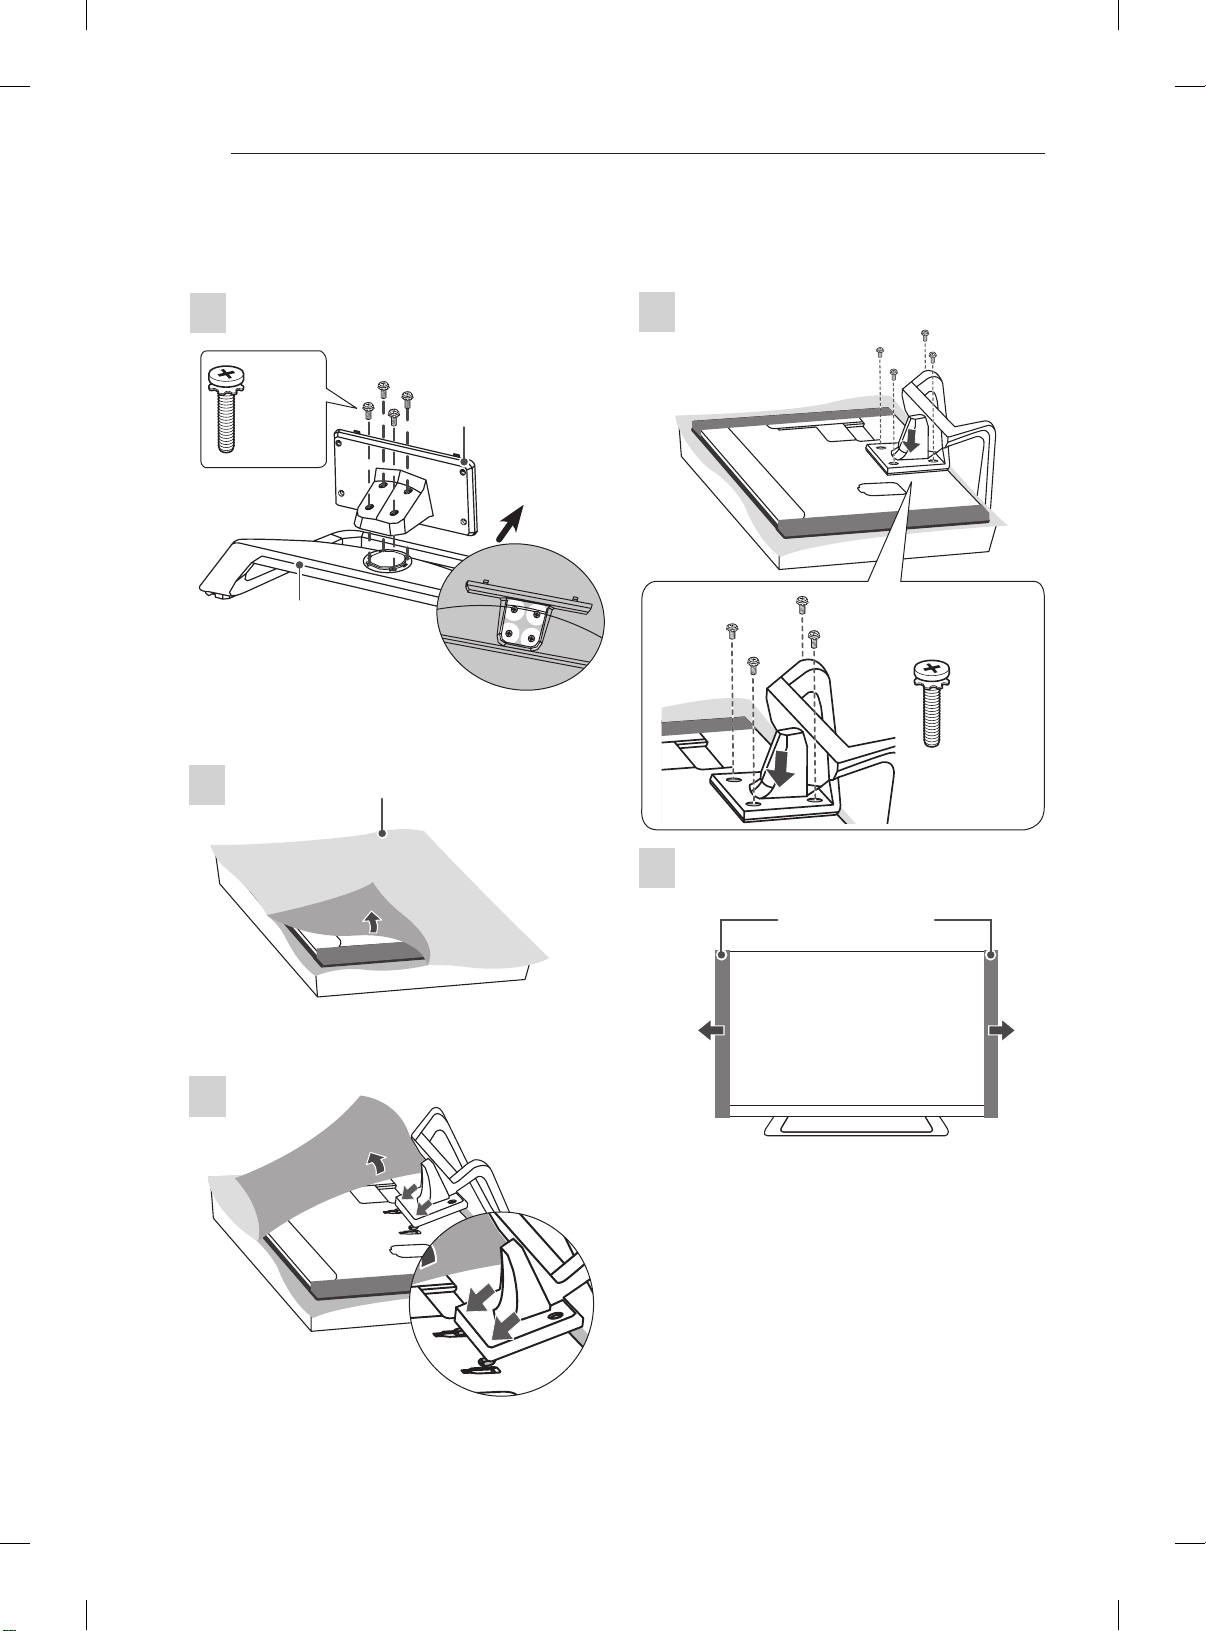
42/47/55/60LM64**, 42/47/55LM660*, 42/47/55LM67**, 42/47/55LM76**
1
M4 x 20
4EA
Stand Base
2
Wrapping bag
Stand Body
Front
Top View
4
M4 x 20
4EA
5
Protection pad
3
Page 7
SETTING UP THE TV
32/37/42LS57**, 65LM62**, 32LM669* 32LM64**, 32/37/42/47/55LM62**, 32LM660*
A-5
1
M4 x 20
4EA
Stand Base
2
Stand Body
Front
Top View
1
M4 x 20
Stand Body
4EA
Front
Stand Base
Top View
2
3
M4 x 20
4EA
3
M4 x 20
4EA
Page 8
SETTING UP THE TV
A-6
CAUTION
yWhen attaching the stand to the TV
set, place the screen facing down on a
cushioned table or flat surface to protect the
screen from scratches.
yMake sure that the screws are fastened
completely. (If they are not fastened securely
enough, the TV may tilt forward after being
installed.)
Do not fasten the screws with too much
force; otherwise they may be worn out and
get loosened.
NOTE
Remove the stand before installing the TV
on a wall mount by performing the stand
attachment in reverse.
Tidying cables
Only 32/37/42LS57**, 65LM62**, 32/42/47LM669*
1 Gather and bind the cables with the Cable
Holder.
Cable Holder
Only 32/37/42/47/55LM62**,
32/42/47/55/60LM64**, 32/42/47/55LM660*,
42/47/55LM67**, 42/47/55LM76**
1 Gather and bind the cables with the Cable
Management.
2 Fix the Cable Management rmly to the TV.
Cable Holder
Cable Management
CAUTION
Do not move the TV by holding the cable
holders, as the cable holders may break, and
injuries and damage to the TV may occur.
Page 9

OWNER’S MANUAL
LED LCD TV
Please read this manual carefully before operating
your set and retain it for future reference.
www.lg.com
Page 10
TABLE OF CONTENTS
2
ENGLISH
ENG
TABLE OF CONTENTS
3 LICENSES
3 OPEN SOURCE SOFTWARE NOTICE
4 SAFETY INSTRUCTIONS
10 - Viewing 3D Imaging (Only 3D models)
12 INSTALLATION PROCEDURE
12 ASSEMBLING AND PREPARING
12 Unpacking
15 Separate purchase
16 Parts and buttons
17 Lifting and moving the TV
18 Mounting on a table
20 Mounting on a wall
21 REMOTE CONTROL
23 MAGIC REMOTE CONTROL
FUNCTIONS
24 Registering Magic Remote Control
24 How to use Magic Remote Control
24 Precautions to Take when Using the Magic
Remote Control
25 USING THE USER GUIDE
26 MAINTENANCE
26 Cleaning your TV
26 - Screen, frame, cabinet and stand
26 - Power cord
26 TROUBLESHOOTING
27 SPECIFICATIONS
WARNING
yIf you ignore the warning message, you may
be seriously injured or there is a possibility
of accident or death.
CAUTION
yIf you ignore the caution message, you may
be slightly injured or the product may be
damaged.
NOTE
yThe note helps you understand and use
the product safely. Please read the note
carefully before using the product.
Page 11
LICENSES / OPEN SOURCE SOFTWARE NOTICE
3
LICENSES
Supported licenses may differ by model. For more information about licenses, visit www.lg.com.
Manufactured under license from Dolby Laboratories. “Dolby” and the double-D
symbol are trademarks of Dolby Laboratories.
HDMI, the HDMI logo and High-Definition Multimedia Interface are trademarks or
registered trademarks of HDMI Licensing LLC.
ABOUT DIVX VIDEO: DivX® is a digital video format created by DivX, LLC, a
subsidiary of Rovi Corporation. This is an ofcial DivX Certied® device that plays
DivX video. Visit divx.com for more information and software tools to convert your
les into DivX video.
ABOUT DIVX VIDEO-ON-DEMAND: This DivX Certied® device must be registered
in order to play purchased DivX Video-on-Demand (VOD) movies. To obtain your
registration code, locate the DivX VOD section in your device setup menu. Go to vod.
divx.com for more information on how to complete your registration.
ENGENGLISH
“DivX Certied® to play DivX® video up to HD 1080p, including premium content.”
“DivX®, DivX Certied® and associated logos are trademarks of Rovi Corporation or
its subsidiaries and are used under license.”
“Covered by one or more of the following U.S. patents :
7,295,673; 7,460,668; 7,515,710; 7,519,274”
Manufactured under license under U.S. Patent Nos: 5,956,674; 5,974,380; 6,487,535
& other U.S. and worldwide patents issued & pending. DTS, the Symbol & DTS and
the Symbol together are registered trademarks & DTS 2.0+Digital Out is a trademark
of DTS, Inc. Product includes software. © DTS, Inc. All Rights Reserved.
OPEN SOURCE SOFTWARE NOTICE
To obtain the source code under GPL, LGPL, MPL and other open source licenses, that is contained in this
product, please visit http://opensource.lge.com .
In addition to the source code, all referred license terms, warranty disclaimers and copyright notices are
available for download.
LG Electronics will also provide open source code to you on CD-ROM for a charge covering the cost of
performing such distribution (such as the cost of media, shipping and handling) upon email request to
opensource@lge.com. This offer is valid for three (3) years from the date on which you purchased the
product.
Page 12
SAFETY INSTRUCTIONS
4
ENGLISH
ENG
SAFETY INSTRUCTIONS
Please read these safety precautions carefully before using the product.
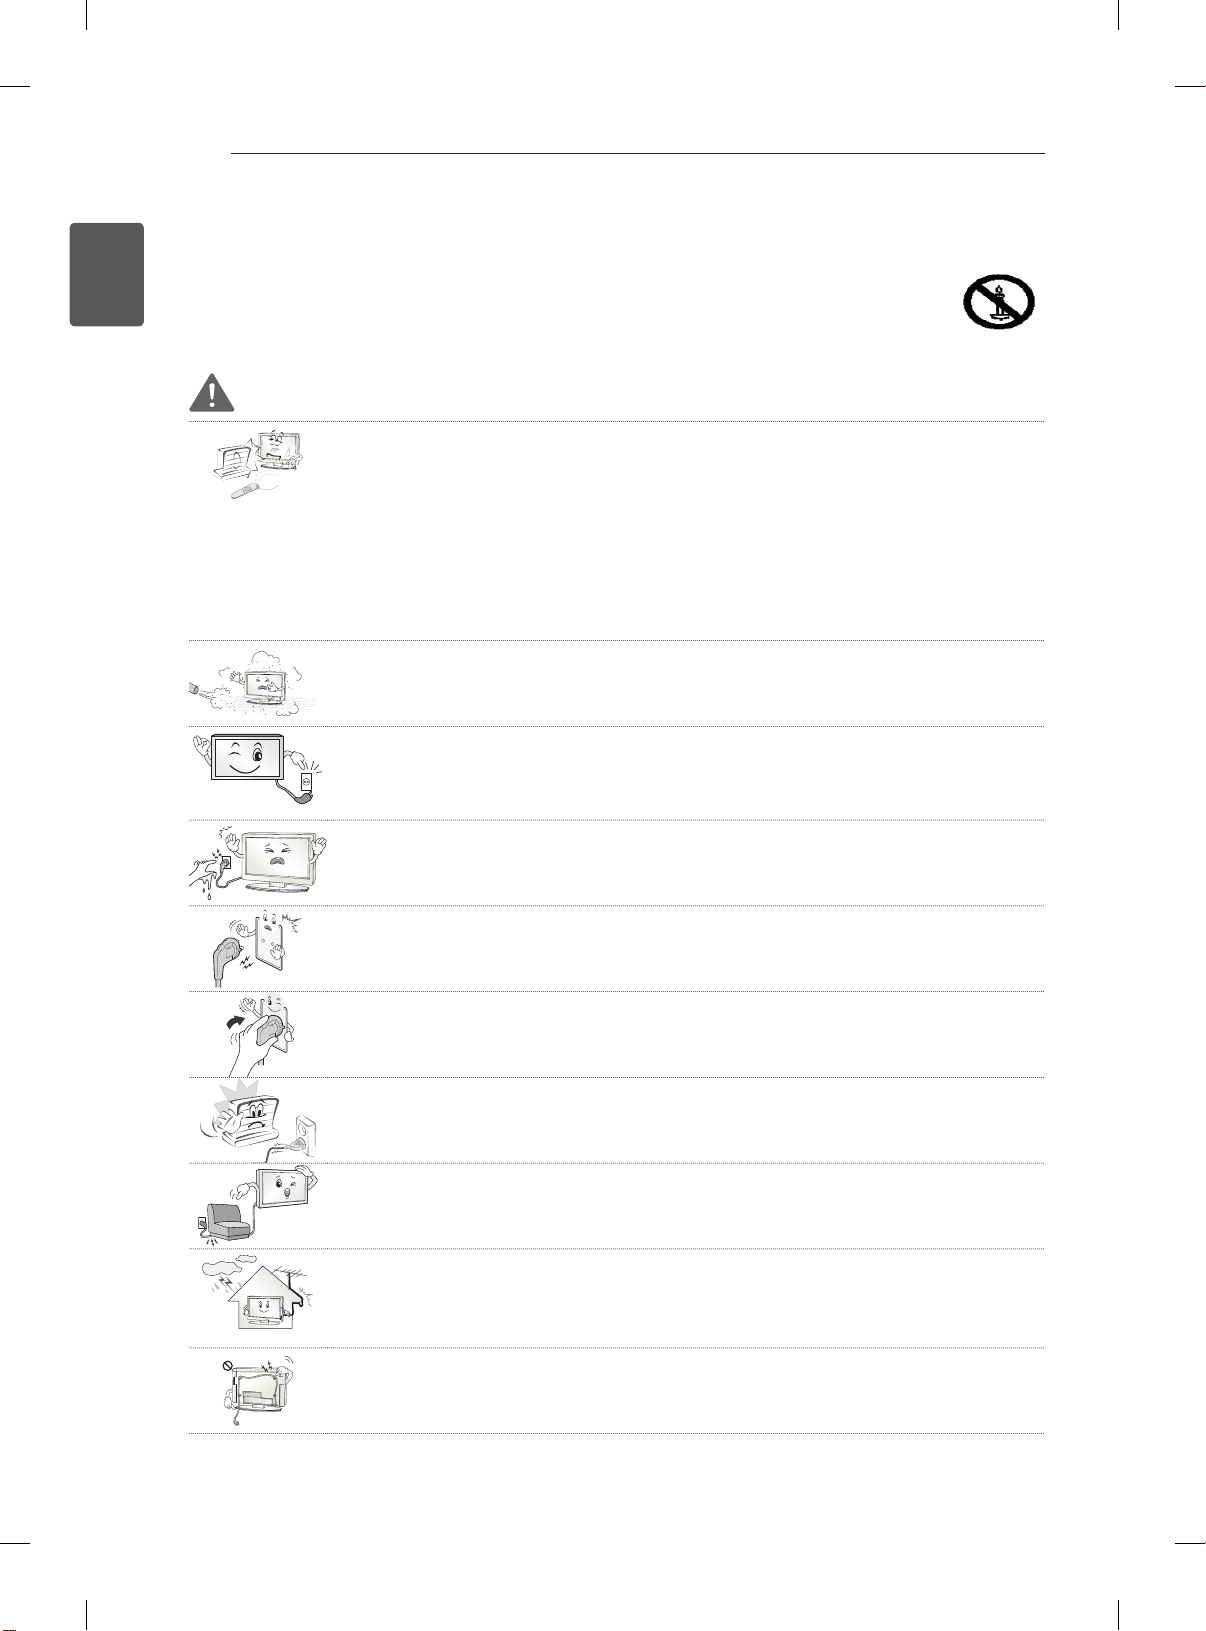
WARNING
Do not place the TV and remote control in the following environments:
y
- A location exposed to direct sunlight
- An area with high humidity such as a bathroom
- Near any heat source such as stoves and other devices that produce heat
- Near kitchen counters or humidifiers where they can easily be exposed to steam
or oil
- An area exposed to rain or wind
- Near containers of water such as vases
Otherwise, this may result in fire, electric shock, malfunction or product deformation.
Do not place the product where it might be exposed to dust.
y
This may cause a fire hazard.
Mains plug is the disconnecting device. The plug must remain readily operable.
y
Do not touch the power plug with wet hands. Additionally, if the cord pin is wet or
y
covered with dust, dry the power plug completely or wipe dust off.
You may be electrocuted due to excess moisture.
Make sure to connect the power cable to the grounded current. (Except for devices
y
which are not grounded.)
You may be electrocuted or injured.
Fix the power cable completely.
y
If the power cable is not fixed completely, a fire can break out.
Ensure the power cord does not come into contact with hot objects such as a
y
heater.
This may cause a fire or an electric shock hazard.
Do not place a heavy object, or the product itself, on power cables.
y
Otherwise, this may result in fire or electric shock.
Bend antenna cable between inside and outside building to prevent rain from
y
flowing in.
This may cause water damaged inside the Product and could give an electric
shock.
When mounting a TV it on the wall, make sure not to install TV by hanging power
y
and signal cables on the back of the TV.
It may cause fire, electric shock.
Page 13
Desiccant
SAFETY INSTRUCTIONS
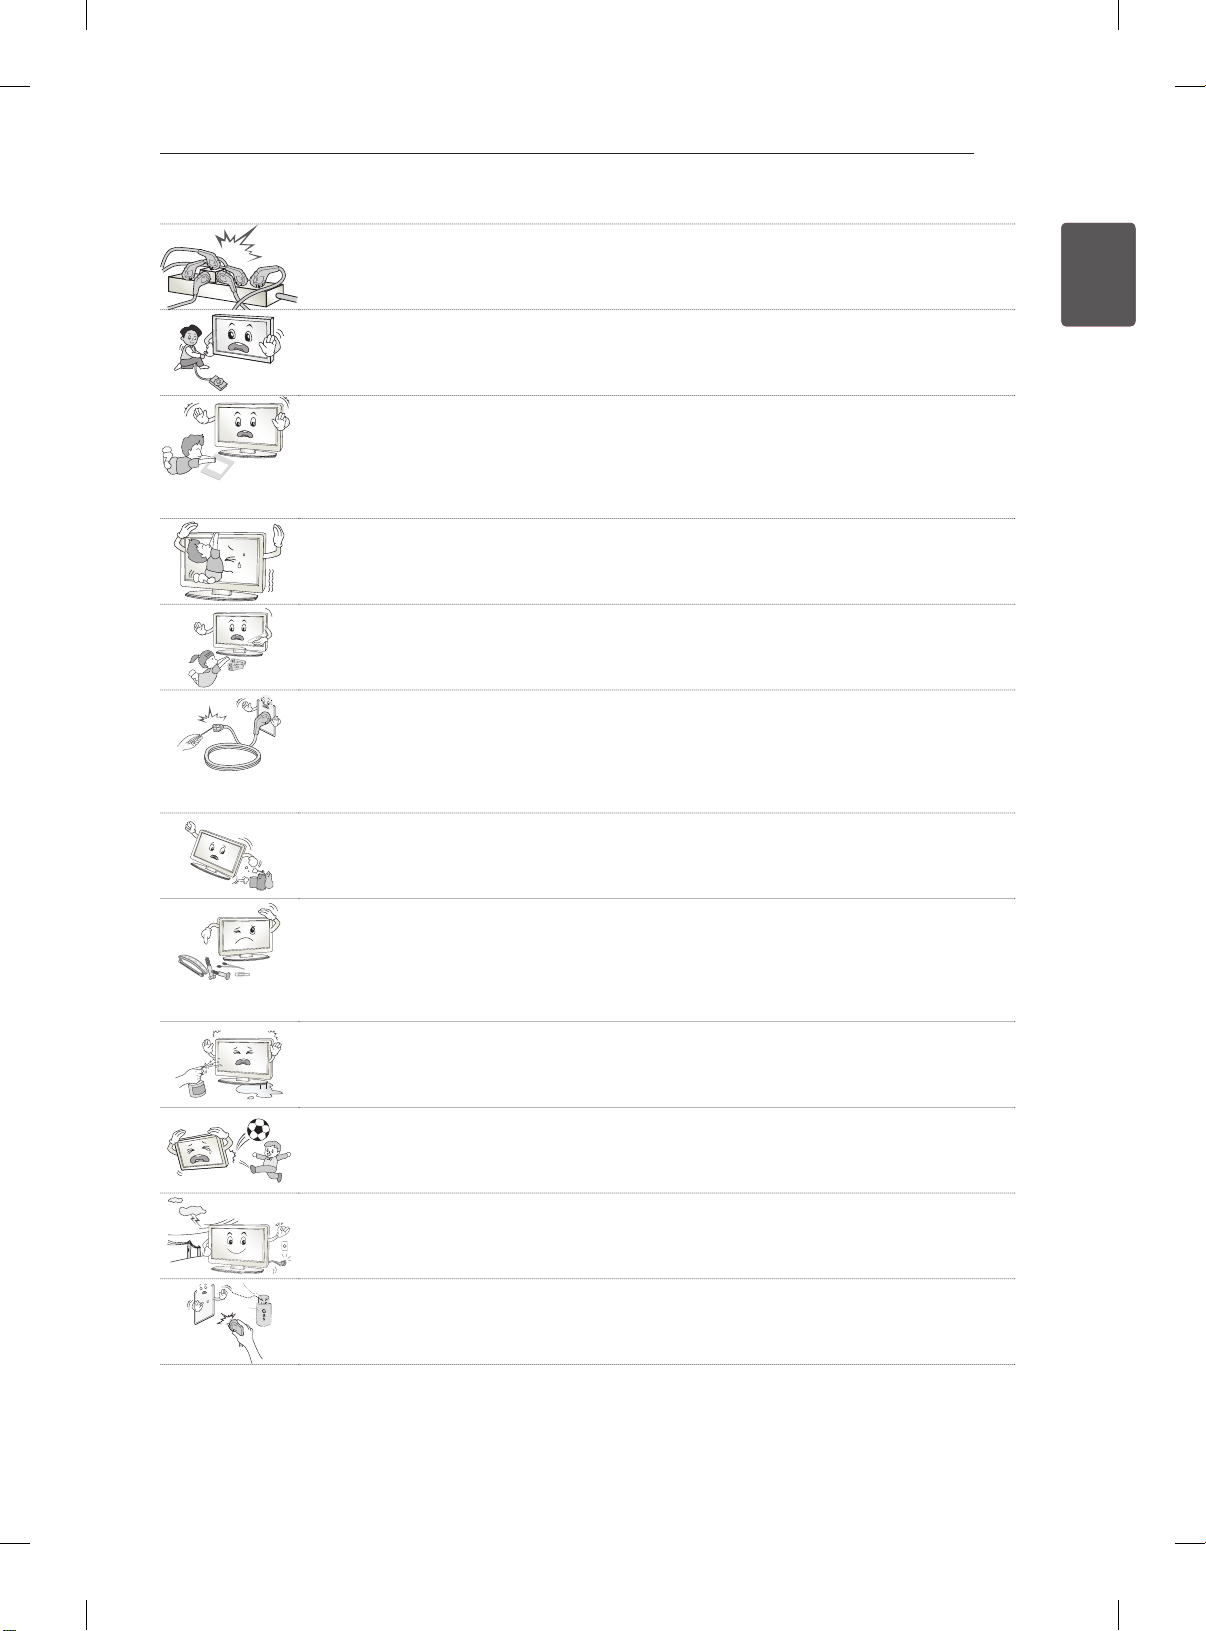
Do not plug too many electrical devices into a single multiple electrical outlet.
y
Otherwise, this may result in fire due to over-heating.
Do not drop the product or let it fall over when connecting external devices.
y
Otherwise, this may result in injury or damage to the product.
Keep the packing anti-moisture material or vinyl packing out of the reach of
y
children.
Anti-moisture material is harmful if swallowed. If swallowed by mistake, force the
patient to vomit and visit the nearest hospital. Additionally, vinyl packing can cause
suffocation. Keep it out of the reach of children.
Do not let your children climb or cling onto the TV.
y
Otherwise, the TV may fall over, which may cause serious injury.
Dispose of used batteries carefully to protect a child from eating them.
y
In case that it eats them, take it to see a doctor immediately.
Do not insert a conductor (like a metal chopstick) into one end of the power cable
y
while the other end is connected to the input terminal on the wall. Additionally, do
not touch the power cable right after plugging into the wall input terminal.
You may be electrocuted.
(Depending on model)
Do not put or store inflammable substances near the product.
y
There is a danger of explosion or fire due careless handling of the inflammable
substances.
5
ENGENGLISH
Do not drop metallic objects such as coins, hair pins, chopsticks or wire into the
y
product, or inflammable objects such as paper and matches. Children must pay
particular attention.
Electrical shock, fire or injury can occur. If a foreign object is dropped into the
product, unplug the power cord and contact the service centre.
Do not spray water on the product or scrub with an inflammable substance (thinner
y
or benzene). Fire or electric shock accident can occur.
Do not allow a impact shock or any objects to fall into the product, and do not drop
y
onto the screen with something.
You may be injured or the product can be damaged.
Never touch this product or antenna during a thunder or lighting storm.
y
You may be electrocuted.
Never touch the wall outlet when there is leakage of gas, open the windows and
y
ventilate.
It may cause a fire or a burn by a spark.
Page 14
SAFETY INSTRUCTIONS
6
ENGLISH
ENG
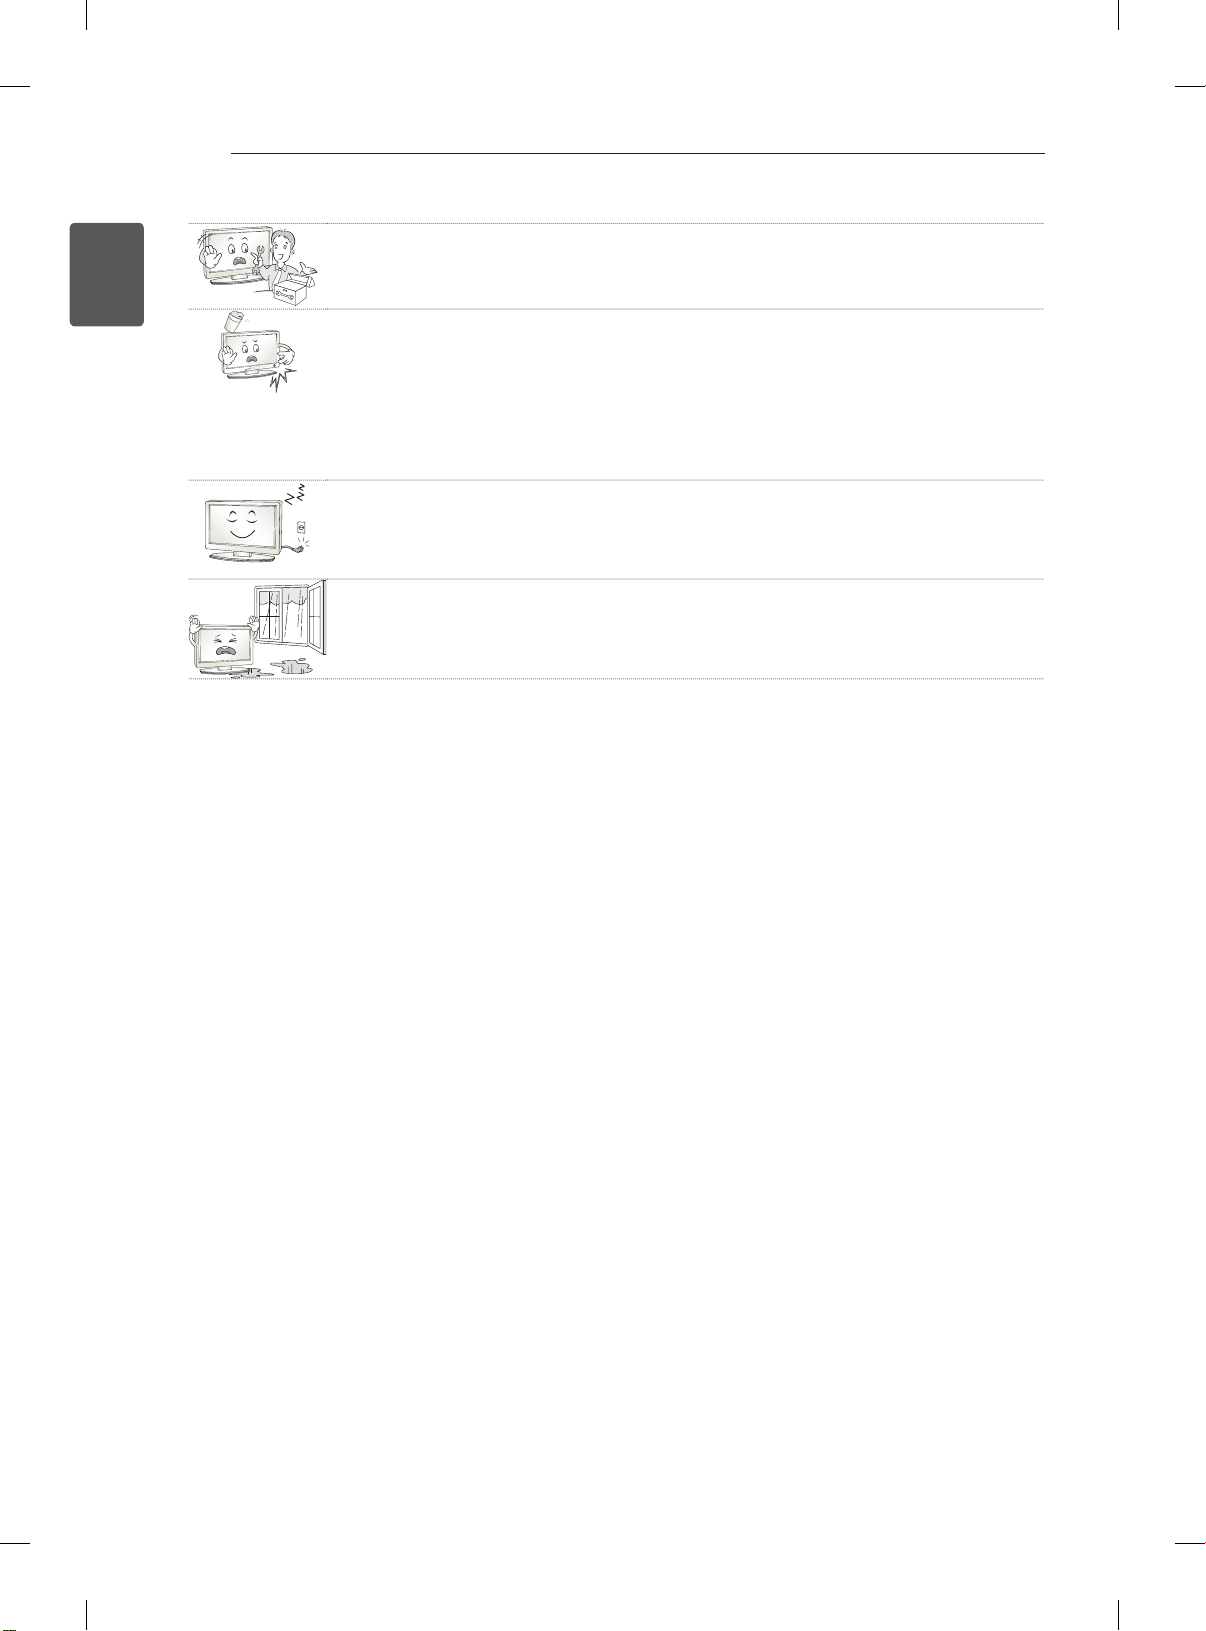
Do not disassemble, repair or modify the product at your own discretion.
y
Fire or electric shock accident can occur.
Contact the service center for check, calibration or repair.
If any of the following occur, unplug the product immediately and contact your local
y
service centre.
- The product has been impacted by shock
- The product has been damaged
- Foreign objects have entered the product
- The product produced smoke or a strange smell
This may result in fire or electric shock.
If you don’t intend to use the product for a long time, unplug the power cable from
y
the product.
Covering dust can cause a fire, or insulation deterioration can cause electric
leakage, electric shock or fire.
Apparatus shall not be exposed to dripping or splashing and no objects filled with
y
liquids, such as vases, shall be placed on the apparatus.
Page 15
SAFETY INSTRUCTIONS
5~7 times
7
CAUTION
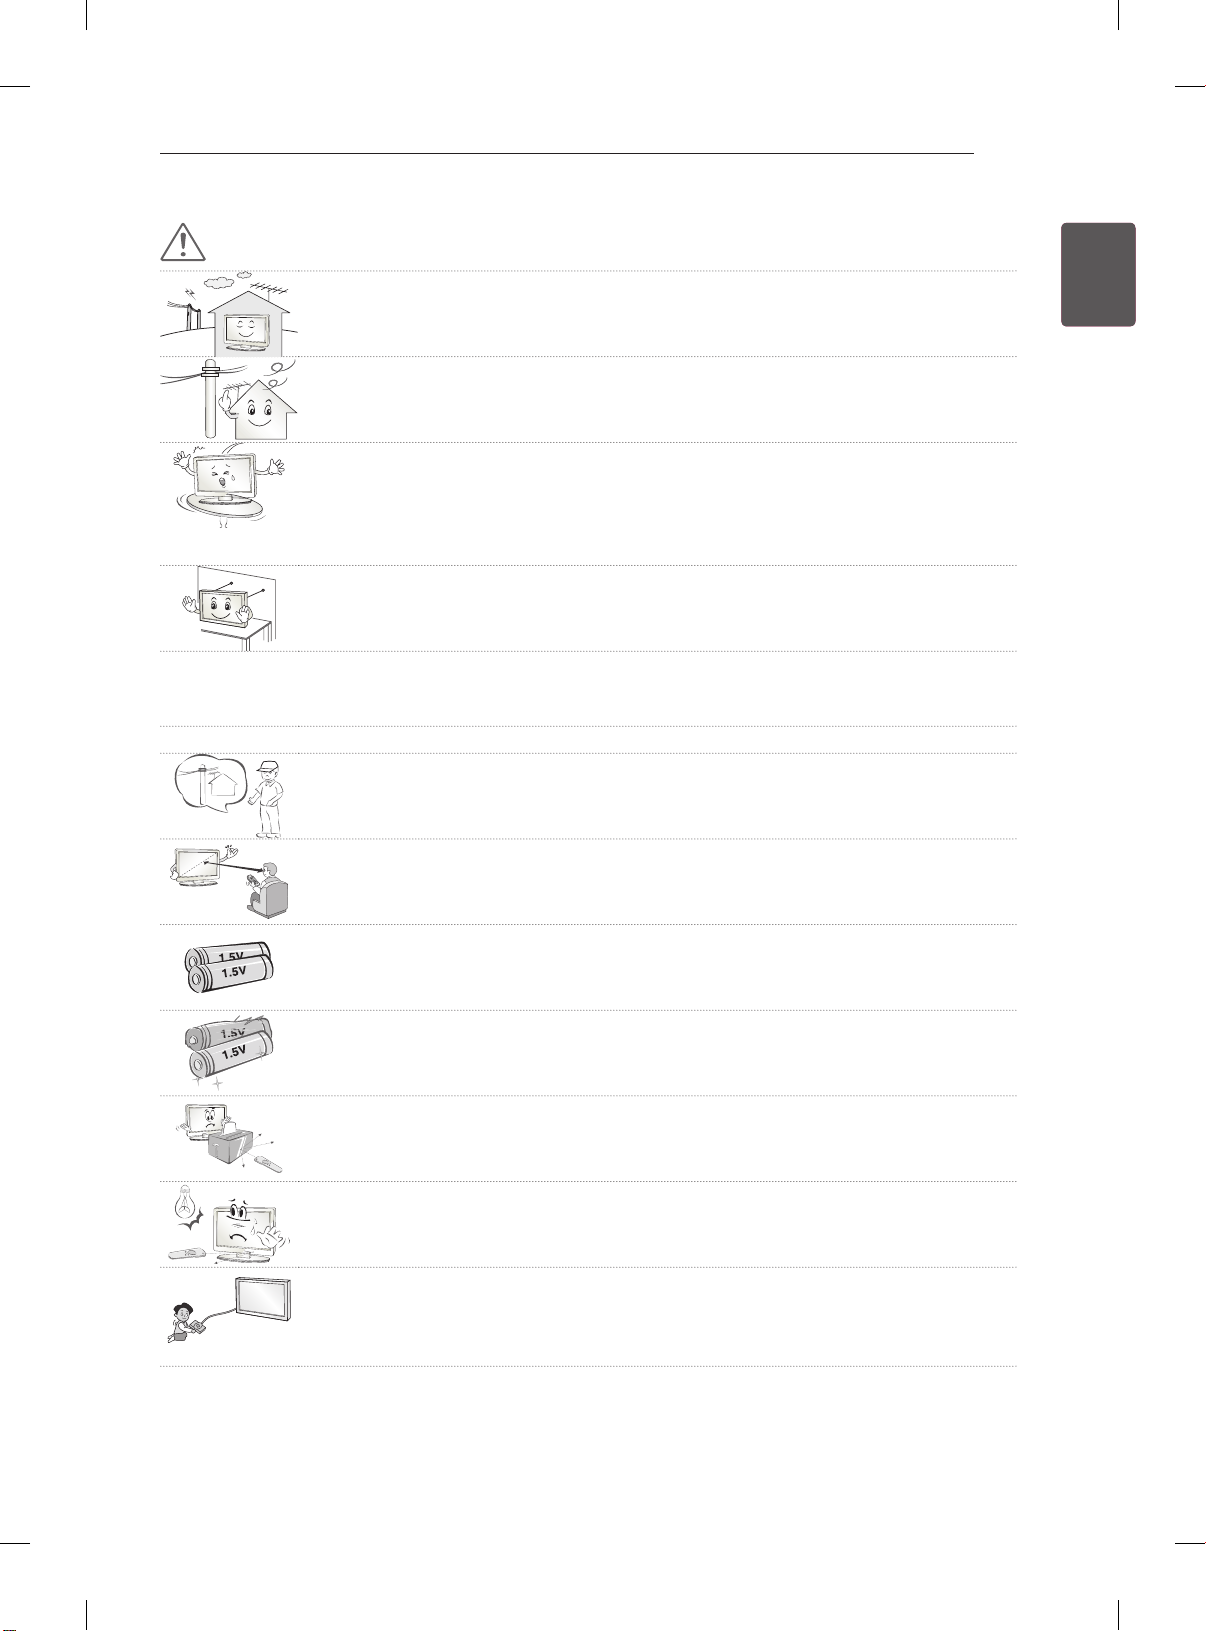
Install the product where no radio wave occurs.
y
There should be enough distance between an outside antenna and power lines to
y
keep the former from touching the latter even when the antenna falls.
This may cause an electric shock.
Do not install the product on places such as unstable shelves or inclined surfaces.
y
Also avoid places where there is vibration or where the product cannot be fully
supported.
Otherwise, the product may fall or flip over, which may cause injury or damage to
the product.
If you install the TV on a stand, you need to take actions to prevent the product
y
from overturning. Otherwise, the product may fall over, which may cause injury.
If you intend to mount the product to a wall, attach VESA standard mounting interface (optional
y
parts) to the back of the product. When you install the set to use the wall mounting bracket (optional
parts), fix it carefully so as not to drop.
Only use the attachments / accessories specified by the manufacturer.
y
When installing the antenna, consult a qualified service man.
y
This may create a fire hazard or an electric shock hazard.
ENGENGLISH
We recommend that you maintain a distance of at least 5 to 7 times the diagonal
y
screen size when watching TV.
If you watch TV for a long period of time, this may cause blurred vision.
Only use the specified type of battery.
y
This could cause damage to the remote control.
Do not mix new batteries with old batteries.
y
This may cause the batteries to overheat and leak.
Make sure there are no objects between the remote control and its sensor.
y
Signal from the remote control may be disturbed by sun light or other strong light.
y
In this case, darken the room.
When connecting external devices such as video game consoles, make sure the
y
connecting cables are long enough.
Otherwise, the product may fall over, which may cause injury or damage the
product.
Page 16

SAFETY INSTRUCTIONS
8
ENGLISH
ENG
Do not turn the product On/Off by plugging-in or unplugging the power plug to the
y
wall outlet. (Do not use the power plug for switch.)
It may cause mechanical failure or could give an electric shock.
Please follow the installation instructions below to prevent the product from
y
overheating.
- The distance between the product and the wall should be more than 10 cm.
- Do not install the product in a place with no ventilation (e.g., on a bookshelf or in
a cupboard).
- Do not install the product on a carpet or cushion.
- Make sure the air vent is not blocked by a tablecloth or curtain.
Otherwise, this may result in fire.
Take care not to touch the ventilation openings when watching the TV for long
y
periods as the ventilation openings may become hot. This does not affect the
operation or performance of the product.
Periodically examine the cord of your appliance, and if its appearance indicates damage or
y
deterioration, unplug it, discontinue use of the appliance, and have the cord replaced with an exact
replacement part by an authorized servicer.
Prevent dust collecting on the power plug pins or outlet.
y
This may cause a fire hazard.
Protect the power cord from physical or mechanical abuse, such as being twisted,
y
kinked, pinched, closed in a door, or walked upon. Pay particular attention to plugs,
wall outlets, and the point where the cord exits the appliance.
Do not press strongly upon the panel with a hand or sharp object such as nail,
y
pencil or pen, or make a scratch on it.
Avoid touching the screen or holding your finger(s) against it for long periods of
y
time. Doing so may produce some temporary distortion effects on the screen.
When cleaning the product and its components, unplug the power first and wipe it
y
with a soft cloth. Applying excessive force may cause scratches or discolouration.
Do not spray with water or wipe with a wet cloth. Never use glass cleaner, car or
industrial shiner, abrasives or wax, benzene, alcohol etc., which can damage the
product and its panel.
Otherwise, this may result in fire, electric shock or product damage (deformation,
corrosion or breakage).
As long as this unit is connected to the AC wall outlet, it is not disconnected from the AC power
y
source even if you turn off this unit by SWITCH.
When unplugging the cable, grab the plug and unplug it.
y
If the wires inside the power cable are disconnected, this may cause fire.
When moving the product, make sure you turn the power off first. Then, unplug the
y
power cables, antenna cables and all connecting cables.
The TV set or power cord may be damaged, which may create a fire hazard or
cause electric shock.
Page 17
SAFETY INSTRUCTIONS
When moving or unpacking the product, work in pairs because the product is
y
heavy.
Otherwise, this may result in injury.
Contact the service center once a year to clean the internal parts of the product.
y
Accumulated dust can cause mechanical failure.
Refer all servicing to qualified service personnel. Servicing is required when the
y
apparatus has been damaged in any way, such as power supply cord or plug is
damaged, liquid has been spilled or objects have fallen into the apparatus, the
apparatus has been exposed to rain or moisture, does not operate normally, or has
been dropped.
If the product feels cold to the touch, there may be a small “flicker” when it is turned
y
on. This is normal, there is nothing wrong with product.
The panel is a high technology display product with resolution of two million to six
y
million pixels. You may see tiny black dots and/or brightly coloured dots (red, blue
or green) at a size of 1 ppm on the panel. This does not indicate a malfunction and
does not affect the performance and reliability of the product.
This phenomenon also occurs in third-party products and is not subject to
exchange or refund.
You may find different brightness and color of the panel depending on your viewing
y
position(left/right/top/down).
This phenomenon occurs due to the characteristic of the panel. It is not related with
the product performance, and it is not malfunction.
9
ENGENGLISH
Displaying a still image (e.g., broadcasting channel logo, on-screen menu, scene from a video
y
game) for a prolonged time may cause damage to the screen, resulting in retention of the image,
which is known as image sticking. The warranty does not cover the product for image sticking.
Avoid displaying a fixed image on your television’s screen for a prolonged period (2 or more hours
for LCD, 1 or more hours for Plasma).
Also, if you watch the TV at a ratio of 4:3 for a long time, image sticking may occur on the borders of
the panel.
This phenomenon also occurs in third-party products and is not subject to exchange or refund.
Generated Sound
y
“Cracking” noise: A cracking noise that occurs when watching or turning off the TV is generated by
plastic thermal contraction due to tempera-ture and humidity. This noise is common for products
where thermal deformation is required. Electrical circuit humming/panel buzzing: A low level noise is
generated from a high-speed switching circuit, which supplies a large amount of current to operate a
product. It varies depending on the product.
This generated sound does not affect the performance and reliability of the product.
Page 18

SAFETY INSTRUCTIONS
10
ENGLISH
ENG
Viewing 3D Imaging (Only 3D models)
WARNING
Viewing Environment
yViewing Time
- When watching 3D contents, take 5 - 15 minute breaks every hour. Viewing 3D contents for a long
period of time may cause headache, dizziness, fatigue or eye strain.
Those that have a photosensitive seizure or chronic illness
ySome users may experience a seizure or other abnormal symptoms when they are exposed to a
ashing light or particular pattern from 3D contents.
yDo not watch 3D videos if you feel nausea, are pregnant and/ or have a chronic illness such as epilepsy,
cardiac disorder, or blood pressure disease, etc.
y3D Contents are not recommended to those who suffer from stereo blindness or stereo anomaly. Double
images or discomfort in viewing may be experienced.
yIf you have strabismus (cross-eyed), amblyopia (weak eyesight) or astigmatism, you may have trouble
sensing depth and easily feel fatigue due to double images. It is advised to take frequent breaks than
the average adult.
yIf your eyesight varies between your right and left eye, revise your eyesight prior to watching 3D
contents.
Symptoms which require discontinuation or refraining from watching 3D contents
yDo not watch 3D contents when you feel fatigue from lack of sleep, overwork or drinking.
yWhen these symptoms are experienced, stop using/watching 3D contents and get enough rest until the
symptom subsides.
- Consult your doctor when the symptoms persist. Symptoms may include headache, eyeball pain,
dizziness, nausea, palpitation, blurriness, discomfort, double image, visual inconvenience or fatigue.
Page 19
SAFETY INSTRUCTIONS
11
CAUTION
Viewing Environment
y Viewing Distance
- Maintain a distance of at least twice the screen diagonal length when watching 3D contents. If you
feel discomfort in viewing 3D contents, move further away from the TV.
Viewing Age
yInfants/Children
- Usage/ Viewing 3D contents for children under the age of 5 are prohibited.
- Children under the age of 10 may overreact and become overly excited because their vision is in
development (for example: trying to touch the screen or trying to jump into it. Special monitoring
and extra attention is required for children watching 3D contents.
- Children have greater binocular disparity of 3D presentations than adults because the distance
between the eyes is shorter than that of adults. Therefore they will perceive more stereoscopic
depth compared to adults for the same 3D image.
yTeenagers
- Teenagers under the age of 19 may react with sensitivity due to stimulation from light in 3D
contents. Advise them to refrain from watching 3D contens for a long time when they are tired.
yElderly
- The elderly may perceive less 3D effect compared to the young. Do not sit closer to the TV than the
recommended distance.
ENGENGLISH
Cautions when using the 3D glasses
y Make sure to use LG 3D glasses. Otherwise, you may not be able to view 3D videos properly.
y Do not use 3D glasses instead of your normal glasses, sunglasses or protective goggles.
y Using modied 3D glasses may cause eye strain or image distortion.
y Do not keep your 3D glasses in extremely high or low temperatures. It will cause deformation.
y The 3D glasses are fragile and are easily scratched. Always use a soft, clean piece of cloth when wiping
the lenses. Do not scratch the lenses of the 3D glasses with sharp objects or clean/wipe them with
chemicals.
Page 20
ENGLISH
<
<
ENG
INSTALLATION PROCEDURE / ASSEMBLING AND PREPARING
12
NOTE
yImage shown may differ from your TV.
yYour TV’s OSD (On Screen Display) may differ slightly from that shown in this manual.
yThe available menus and options may differ from the input source or product model that you are
using.
yNew features may be added to this TV in the future.
yThe TV can be placed in standby mode in order to reduce the power consumption. And the TV should
be turned off if it will not be watched for some time, as this will reduce energy consumption.
yThe energy consumed during use can be significantly reduced if the level of brightness of the picture
is reduced, and this will reduce the overall running cost.
INSTALLATION PROCEDURE
1 Open the package and make sure all the accessories are included.
2 Attach the stand to the TV set.
3 Connect an external device to the TV set.
4 Make sure the network connection is available.
You can use the TV network functions only when the network connection is made.
ASSEMBLING AND PREPARING
Unpacking
Check your product box for the following items. If there are any missing accessories, contact the local
dealer where you purchased your product. The illustrations in this manual may differ from the actual
product and item.
CAUTION
yDo not use any unapproved items to ensure the safety and product life span.
yAny damag or injuries caused by using unapproved items are not covered by the warranty.
ySome models have a thin film attached on to the screen and this must not be removed.
NOTE
yThe items supplied with your product may vary depending on the model.
yProduct specifications or contents of this manual may be changed without prior notice due to upgrade
of product functions.
yFor an optimal connection, HDMI cables and USB devices should have bezels less than 10 mm thick
and 18 mm width. Use an extension cable that supports USB 2.0 if the USB cable or USB memory
stick does not fit into your TV’s USB port.
B
A
B
*A
10 mm
=
18 mm
*B
A
=
Page 21

ASSEMBLING AND PREPARING
13
ENERGY
SAVING
AV MODE
1 2 3
4 5 6
7 809
LIST
MENU
BACK
INPUT
TV
FLASHBK
MARK
FAV
P
A
G
3D
CHVOL
E
MUTE
INFO
Q.MENU
ENTER
EXIT
L/R SELECT
FREEZE
RATIO
Remote control and
batteries (AAA)
P
(See p. 21, 22)
Magic Remote Control,
Batteries (AA)
(Only 60LM645*,
32/42/47/55LM66**,
42/47/55LM67**,
42/47/55LM76**)
(See p. 23)
ENGENGLISH
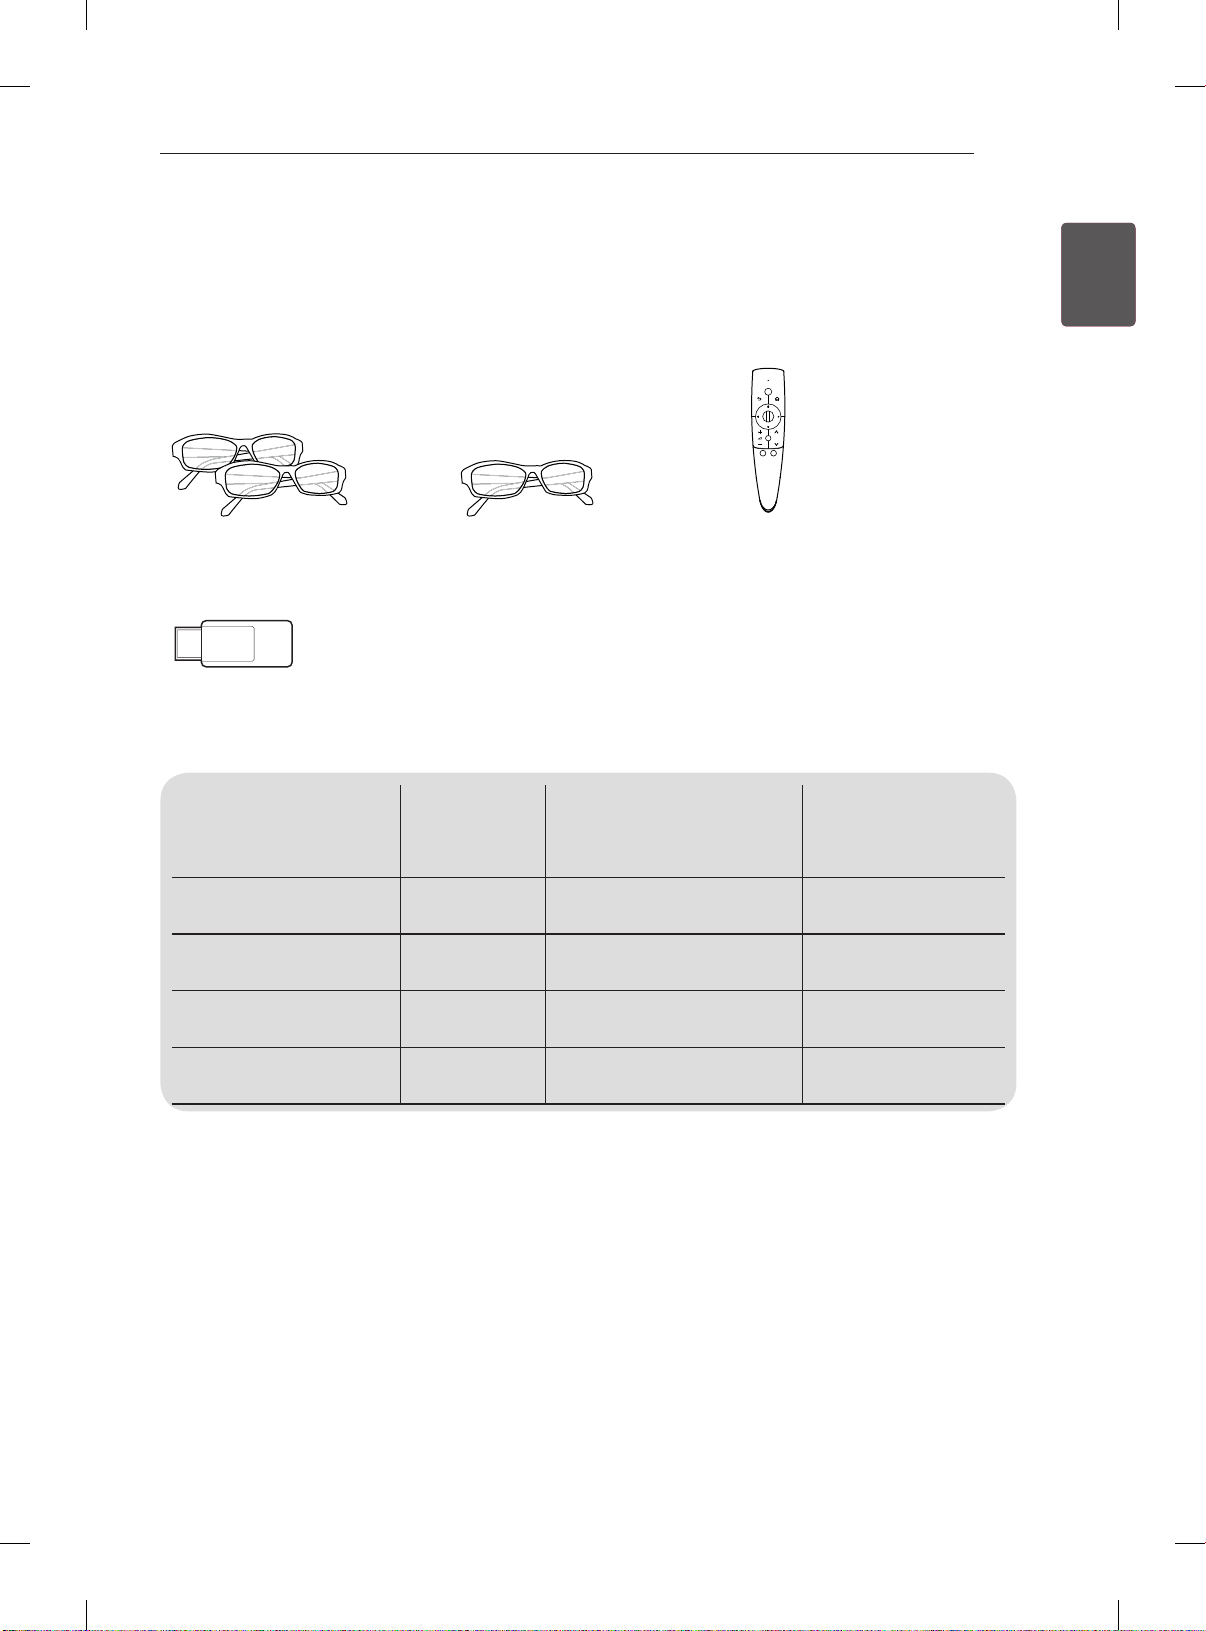
Polishing cloth
(Depending on model)
Use this to remove dust
Owner’s manual
Component video cable
(See p. B-4)
from the cabinet.
Composite video cable
(See p. B-4 , B-5)
Cinema 3D Glasses
The number of 3D glasses
may differ depending on
the model or country.
(Except 32/37/42LS57**)
Cable holder
(Depending on model)
(See p. A-6)
Dual play glasses
(Only 42/47/55LM76**)
Power Cord
(Only 32/37/42LS57**,
32/37/42/47/55LM62**)
or
Stand Screws
8EA, M4 x 20
(See p. A-3, A-4, A-5)
Desk-mount Cable
2EA
(Only 32/37LM62**,
32LM660*)
(See p. 18)
Wall mount inner spacers
4EA
(Only 32/37/42LS57**,
32/37/42/47/55LM62**)
(See p.20)
Isolator
(Depending on model)
(See p. 14)
Desk-mount Screw
(1EA: Only
32/37/42LS57**,
32/42/47LM669*)
(2EA: Only 32/37LM62**,
32LM660*)
(See p. 18)
Bracket Screw
2EA, M4 x 8
(Only 32/37LM62**,
32LM660*)
(See p. 18)
SCART Gender Cable
(See p. B-9)
Page 22
ENGLISH
ENG
ASSEMBLING AND PREPARING
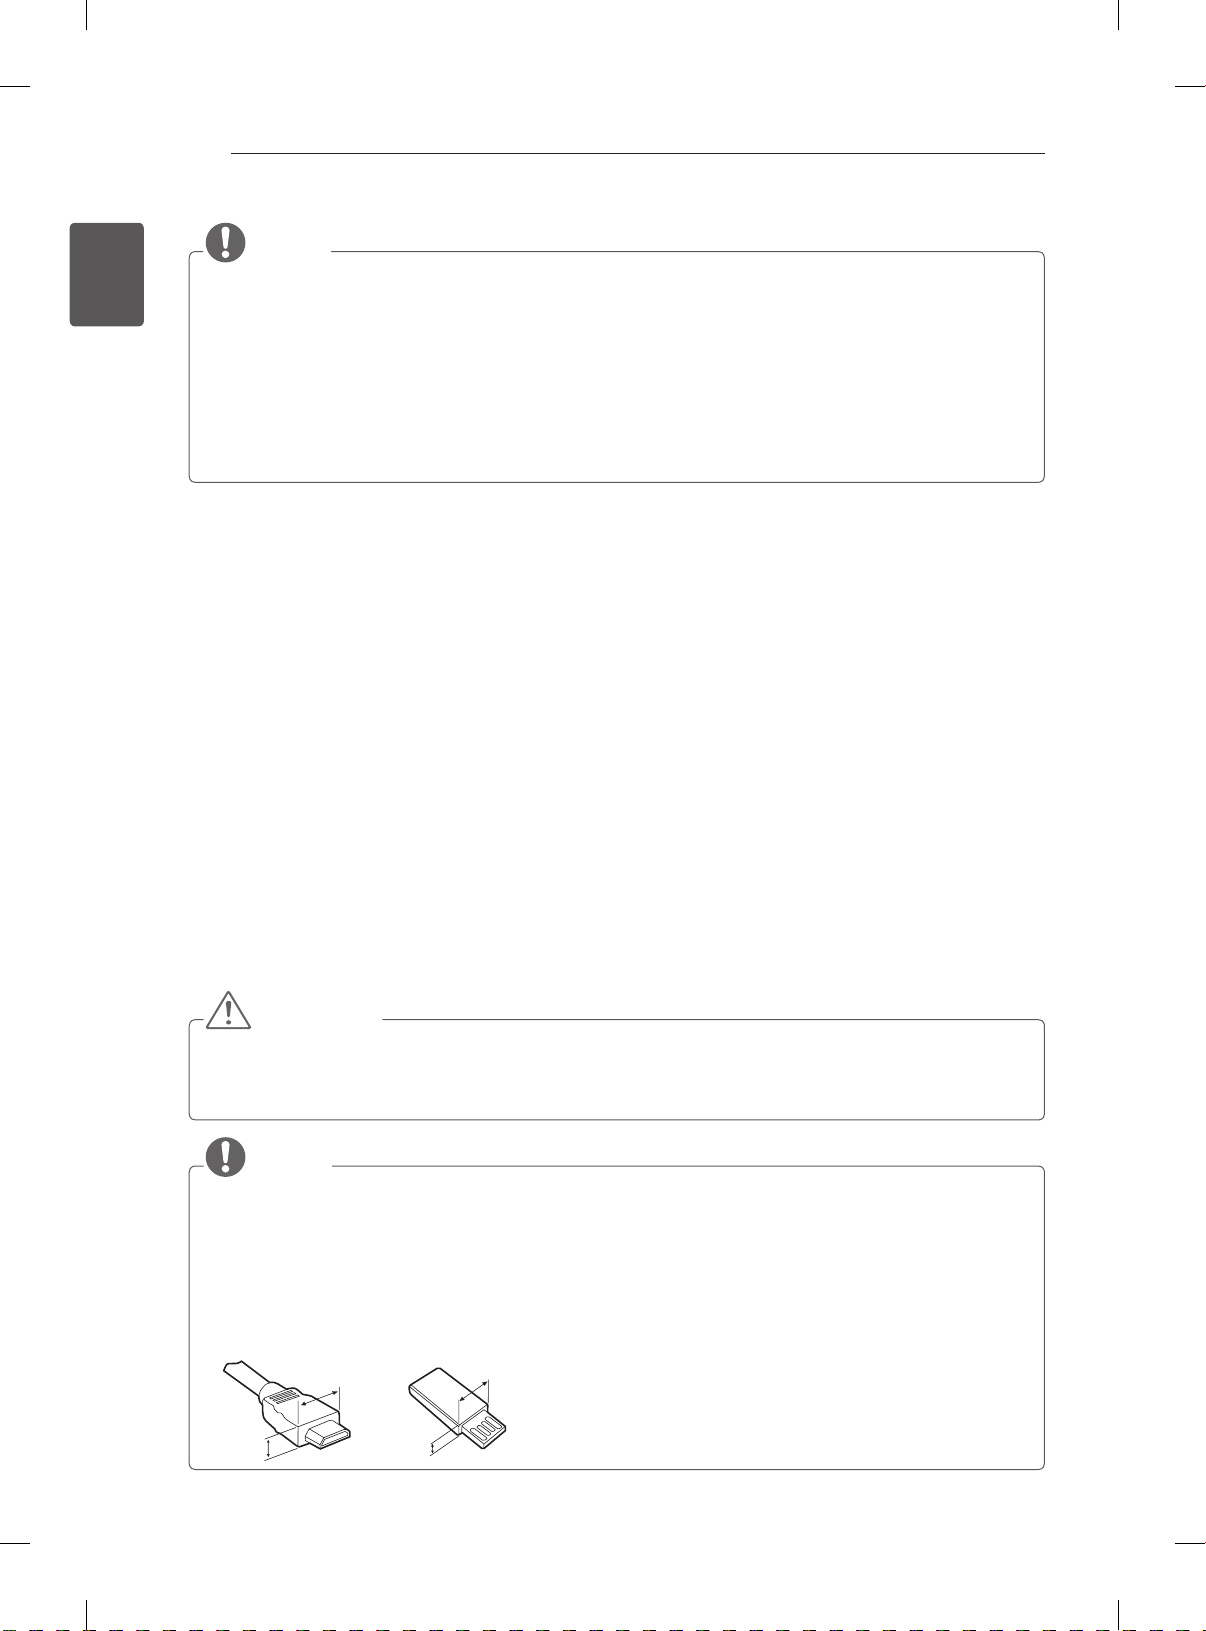
14
Stand Body / Stand Base
(Only 32/37/42LS57**, 65LM62**, 32/42/47LM669*)
(See p. A-3, A-5)
Stand Body / Stand Base
(Only 32/37/42/47/55LM62**, 32/42/47/55/60LM64**, 32/42/47/55LM660*,
42/47/55LM67**, 42/47/55LM76**)
(See p. A-4, A-5)
NOTE
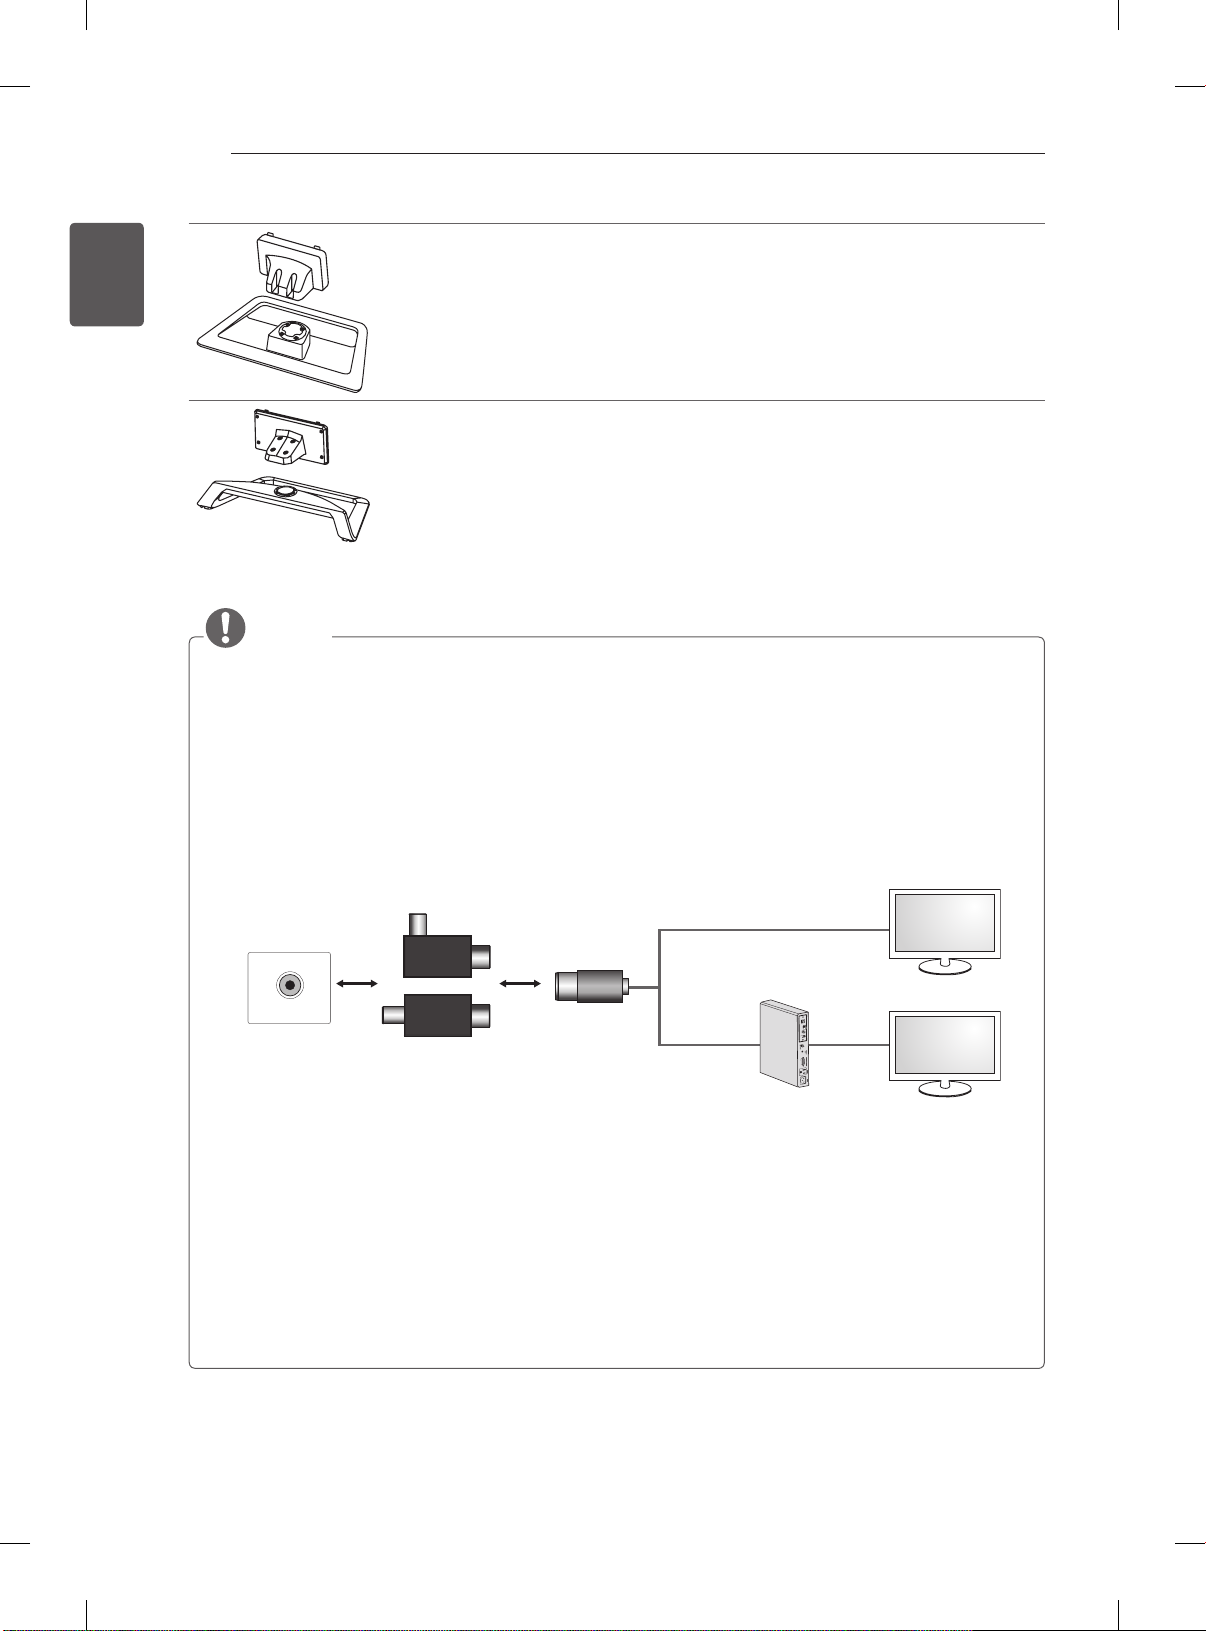
yAntenna Isolator Installation Guide
- Use this to install TV in a place where there is a voltage difference between TV Set and GND of
antenna signal.
»If there is a voltage difference between TV Set and GND of antenna signal, the antenna contact
might be heated and excessive heat might cause an accident.
- You can improve the safety when watching TV by efficiently removing power voltage from TV
antenna. It is recommended to mount the isolator to the wall. If it cannot be mounted to the wall,
mount it on the TV. Avoid disconnecting the antenna Isolator after installation.
- Before starting, be sure that the TV antenna is connected.
Wall
1. Connect to TV.
ANTENNA/
CABLE IN
Cable / Antenna
or
Isolator
2. Connect to Set-Top box.
Connect one end of the isolator to cable/antenna jack and the other to TV set or set-top box.
“Equipment connected to the protective earthing of the building installation through the mains connection
or through other equipment with a connection to protective earthing - and to a cable distribution system
using coaxial cable, may in some circumstances create a re hazard. Connection to a cable distribution
system has therefore to be provided through a device providing electrical isolation below a certain
frequency range (galvanic isolator, see EN 60728-11)”
When applying the RF Isolator, a slight loss of signal sensitivity can occur.
Page 23
ASSEMBLING AND PREPARING
15
Separate purchase
Separate purchase items can be changed or modied for quality improvement without any notication.
Contact your dealer to buy these items.
These devices only work with certain models.
P
AG-F2**DP, AG-F3**DP
Dual play glasses
AN-WF100
Wireless LAN
Compatibility
AG-F2**DP, AG-F3**DP
Dual play glasses
AG-F2**, AG-F3
Cinema 3D Glasses
AN-MR300
Magic Remote Control
AN-WF100
Wireless LAN
**
AG-F2**, AG-F3
Cinema 3D Glasses
32/37/42LS57**
**
32/37/42/47/55/65LM62**,
32/42/47/55/60LM64**
(Except 60LM645*)
AN-MR300
Magic Remote Control
• •
• •
• • •
• •
60LM645*,
32/42/47/55LM66**,
42/47/55LM67**,
42/47/55LM76**
ENGENGLISH
The model name or design may be changed depending on the upgrade of product functions, manufacturer’s
circumstances or policies.
Page 24
ASSEMBLING AND PREPARING
H
H
H
16
ENGLISH
ENG
Parts and buttons
32/42/47/55LM66**, 42/47/55LM67**,
42/47/55LM76**
Screen Screen
Speakers Speakers
Remote control and
intelligent sensors
Power indicator
1
OK
SETTINGS
INPUT
Buttons
B type : 32/37/42LS57**, 32/37/42/47/55/65LM62**A type : 32/42/47/55/60LM64**,
Remote control and
intelligent sensors
1
Power indicator
OK
SETTINGS
INPUT
Touch buttons
2
Button Description
A type B type
Scrolls through the saved programmes.
Adjusts the volume level.
OK
ꔉ
Selects the highlighted menu option or confirms an input.
S SETTINGS Accesses the main menu, or saves your input and exits the menus.
INPUT Changes the input source.
/ I
Turns the power on or off.
1 Intelligent sensor - Adjusts the image quality and brightness based on the surrounding environment.
2 B type buttons are touch sensitive and can be operated through simple touch with your nger.
NOTE
yYou can set the power indicator light to on or off by selecting OPTION in the main menus.
Page 25
ASSEMBLING AND PREPARING
17
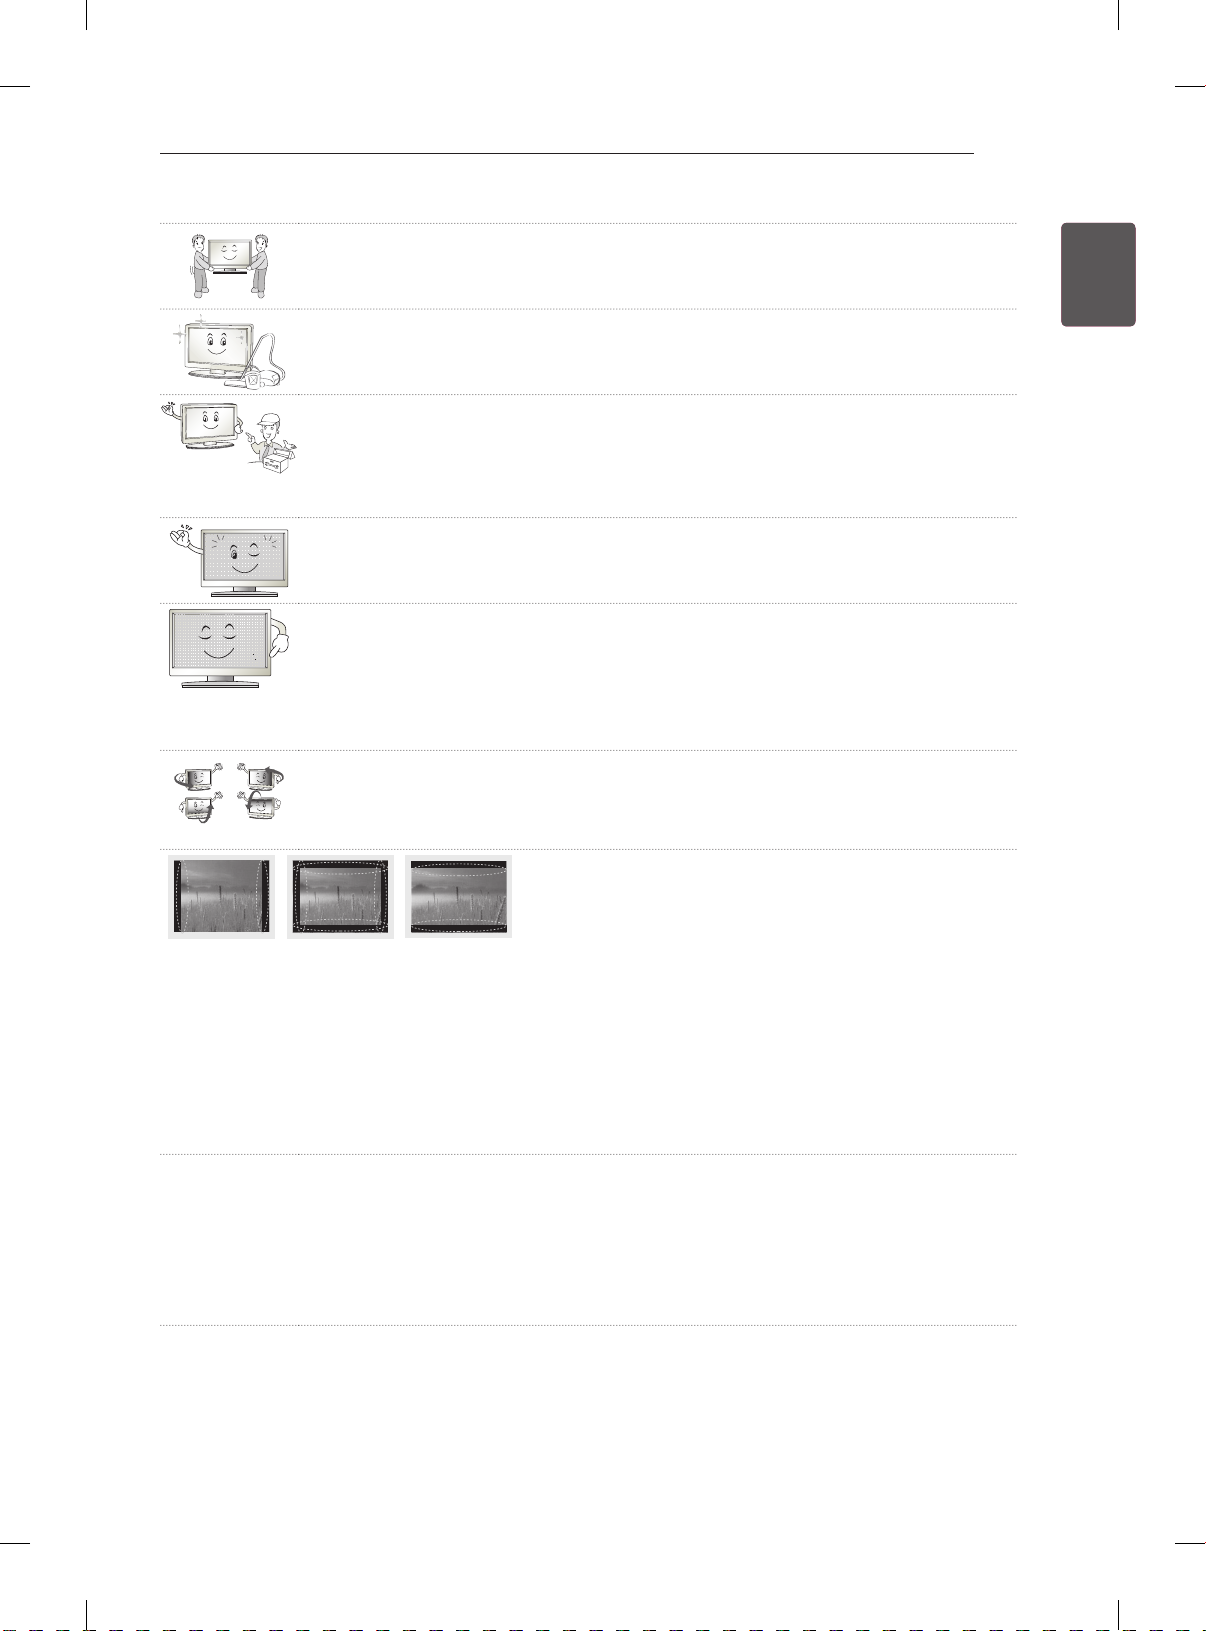
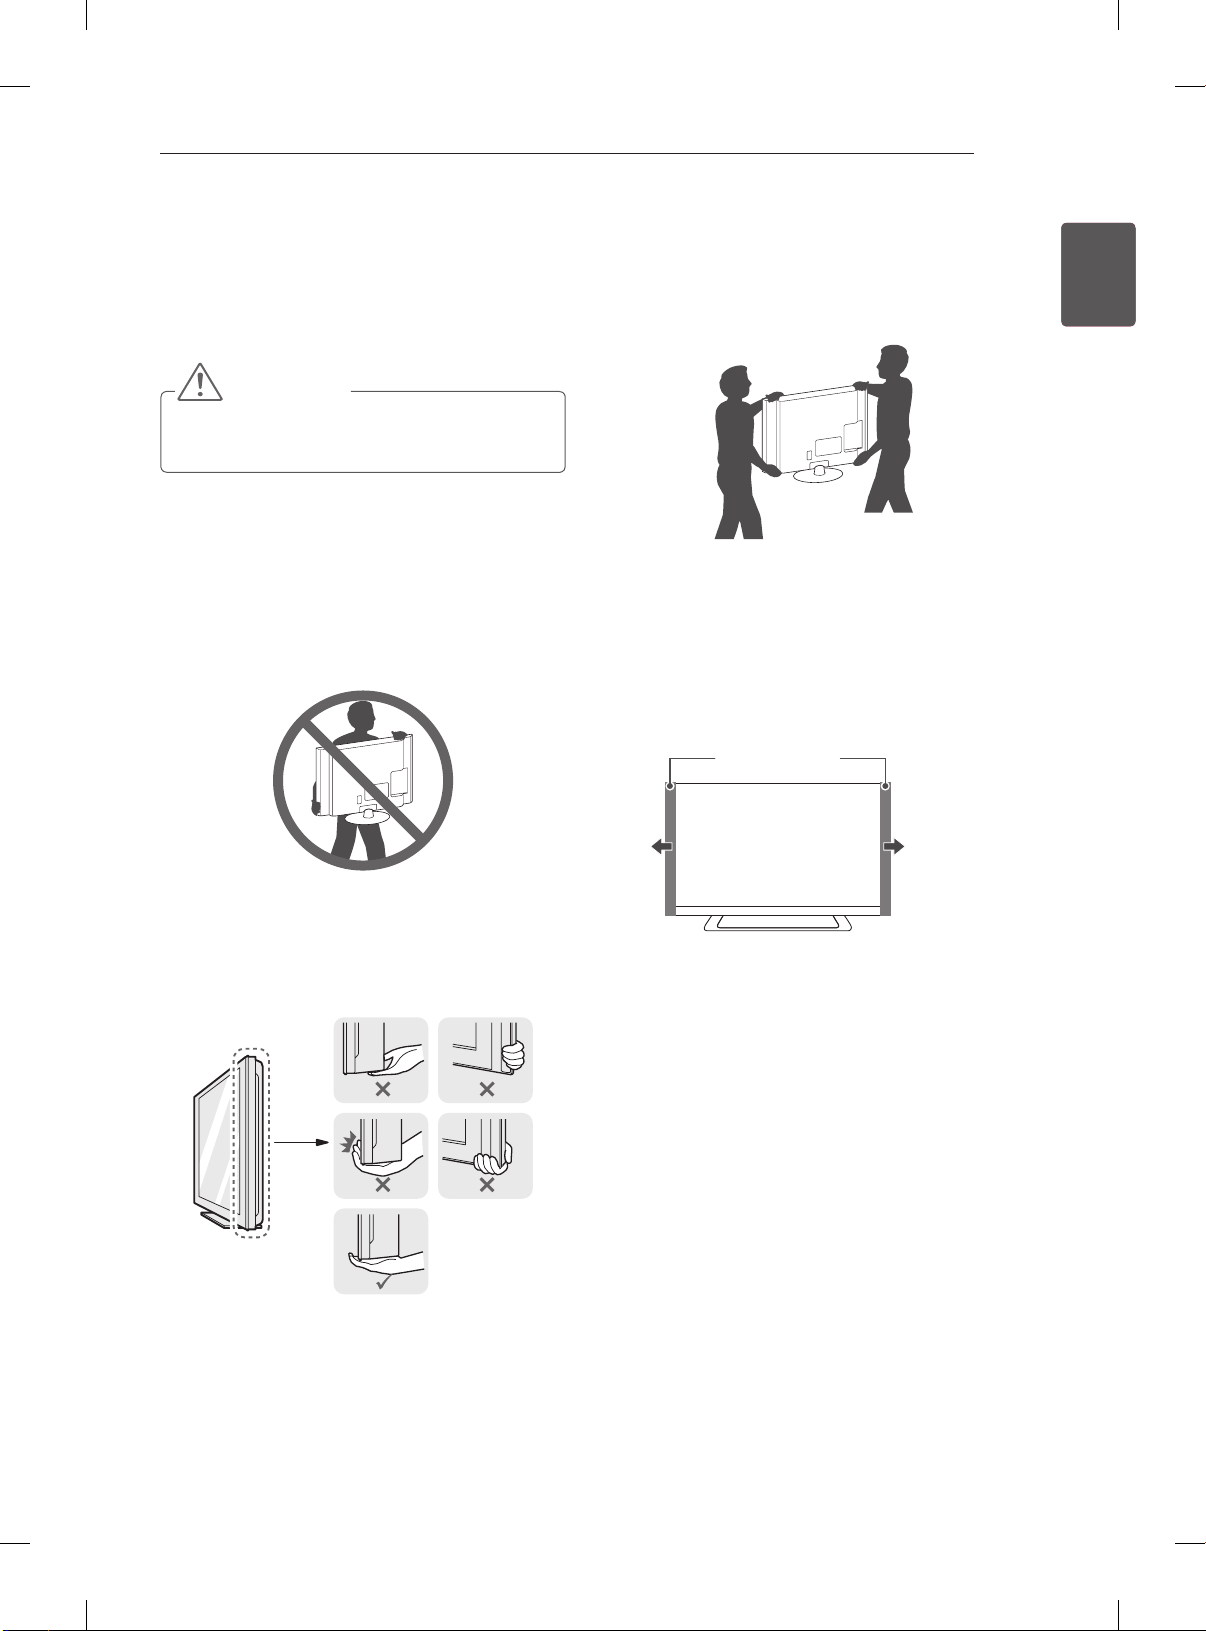
Lifting and moving the TV
Please note the following advice to prevent the
TV from being scratched or damaged and for safe
transportation regardless of its type and size.
CAUTION
yAvoid touching the screen at all times, as
this may result in damage to the screen.
yIt is recommended to move the TV in the box
or packing material that the TV originally came
in.
yBefore moving or lifting the TV, disconnect the
power cord and all cables.
yWhen holding the TV, the screen should face
away from you to avoid damage.
yWhen transporting a large TV, there should be
at least 2 people.
yWhen transporting the TV by hand, hold the TV
as shown in the following illustration.
yWhen transporting the TV, do not expose the
TV to jolts or excessive vibration.
yWhen transporting the TV, keep the TV upright,
never turn the TV on its side or tilt towards the
left or right.
yWhenever you handle TV, Protection pad
should be covered with side of TV. (Depending
on model)
Protection Pad
ENGENGLISH
yHold the top and bottom of the TV frame rmly.
Make sure not to hold the transparent part,
speaker, or speaker grill area.
Page 26
ASSEMBLING AND PREPARING
18
ENGLISH
ENG
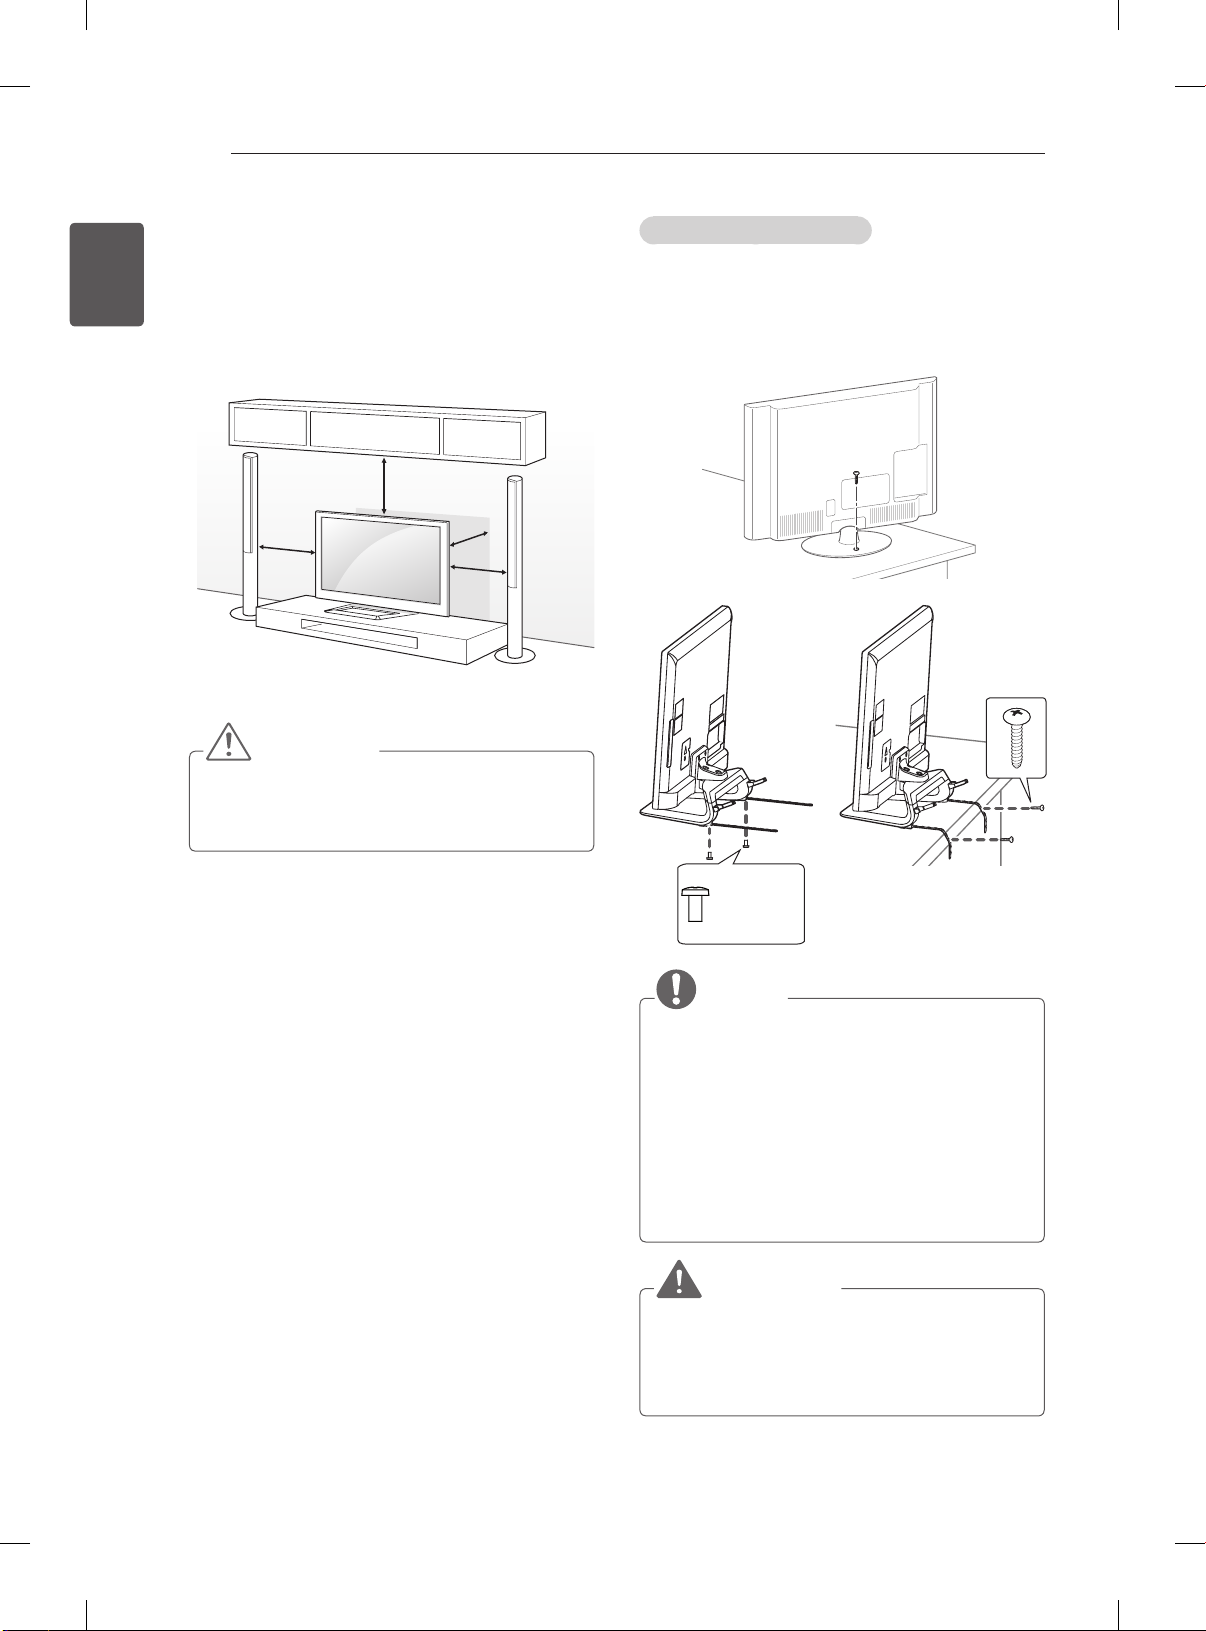
Mounting on a table
1 Lift and tilt the TV into its upright position on a
table.
- Leave a 10 cm (minimum) space from the
wall for proper ventilation.
10 cm
10 cm
2 Connect the power cord to a wall outlet.
CAUTION
yDo not place the TV near or on sources
of heat, as this may result in fire or other
damage.
10 cm
10 cm
Securing the TV to a table
Fix the TV to a table to prevent from tilting forward,
damage, and potential injury.
To secure the TV to a table, insert and tighten the
supplied screw on the rear of the stand.
(Only 32/37/42LS57**, 32/42/47LM669*)
(Only 32/37LM62**, 32LM660*
)
M4 x 8
2EA
NOTE
(Only 32/37LM62**, 32LM660*)
How to fix the TV to a table
1. Connect the Desk-mount Cables to the
Stand Base using the Bracket Screws.
2. Fix the Desk-mount Cables to a table using
the Desk-mount Screws.
3. Once the TV is fixed, move the table close
to the wall. Children may go in, causing
injuries.
WARNING
yTo prevent TV from falling over, the TV
should be securely attached to the floor/
wall per installation instructions. Tipping,
shaking, or rocking the TV may cause injury.
Page 27

ASSEMBLING AND PREPARING
19
Adjusting the angle of the TV to suit view
(This feature is not available for all models.)
Adjusting the angle of the TV to suit view
Swivel 20 degrees to the left or right and adjust the
angle of the TV to suit your view.
(Only 32/37/42LS57**, 65LM62**,
32/42/47LM669*)
2020
Swivel 10 degrees to the left or right and adjust the
angle of the TV to suit your view.
(Only 32/37/42/47/55LM62**,
32/42/47/55/60LM64**, 32/42/47/55LM660*,
42/47/55LM67**, 42/47/55LM76**)
1010
CAUTION
When adjusting the angle of the product,
watch out for your fingers.
»
Personal injury may occur if hands or fingers
are pinched. If the product is tilted too much, it
may fall, causing damage or injury.
(Only 32/37/42/47/55LM62**,
32/42/47/55/60LM64**, 32/42/47/55LM660*,
42/47/55LM67**, 42/47/55LM76**)
Securing the TV to a wall
(This feature is not available for all models.)
1 Insert and tighten the eye-bolts, or TV brackets
and bolts on the back of the TV.
- If there are bolts inserted at the eye-bolts
position, remove the bolts first.
2 Mount the wall brackets with the bolts to the
wall.
Match the location of the wall bracket and the
eye-bolts on the rear of the TV.
3 Connect the eye-bolts and wall brackets tightly
with a sturdy rope.
Make sure to keep the rope horizontal with the
at surface.
CAUTION
yMake sure that children do not climb on or
hang on the TV.
NOTE
yUse a platform or cabinet that is strong and
large enough to support the TV securely.
yBrackets, bolts and ropes are not provided.
You can obtain additional accessories from
your local dealer.
ENGENGLISH
<Rear> <Front>
Page 28

ASSEMBLING AND PREPARING
20
ENGLISH
ENG
Mounting on a wall
Attach an optional wall mount bracket at the rear
of the TV carefully and install the wall mount
bracket on a solid wall perpendicular to the
oor. When you attach the TV to other building
materials, please contact qualied personnel.
LG recommends that wall mounting be performed
by a qualied professional installer.
10 cm
10 cm
10 cm
10 cm
Make sure to use screws and wall mount
bracket that meet the VESA standard. Standard
dimensions for the wall mount kits are described in
the following table.
Separate purchase(Wall Mounting Bracket)
Model 32/37LS57**
32/37LM62**
32LM64**
32LM66**
VESA (A x B) 200 x 200 400 x 400
Standard screw M6 M6
Number of screws 4 4
Wall mount bracket LSW200BX,
LSW200BXG
42LS57**
42/47/55LM62**
42/47/55/60LM64**
42/47/55LM66**
42/47/55LM67**
42/47/55LM76**
LSW400BX,
LSW400BXG
CAUTION
yDisconnect the power first, and then move
or install the TV. Otherwise electric shock
may occur.
yIf you install the TV on a ceiling or slanted
wall, it may fall and result in severe injury.
Use an authorised LG wall mount and
contact the local dealer or qualified
personnel.
yDo not over tighten the screws as this may
cause damage to the TV and void your
warranty.
yUse the screws and wall mounts that meet
the VESA standard. Any damages or injuries
by misuse or using an improper accessory
are not covered by the warranty.
NOTE
yUse the screws that are listed on the VESA
standard screw specifications.
yThe wall mount kit includes an installation
manual and necessary parts.
yThe wall mount bracket is not provided. You
can obtain additional accessories from your
local dealer.
yThe length of screws may differ depending
on the wall mount. Make sure to use the
proper length.
yFor more information, refer to the manual
supplied with the wall mount.
yWhen attaching a third-party wall mounting
bracket to the TV, insert the wall mount inner
spacers into the TV wall mount holes to
move your TV in vertical angle. Please make
sure not to use the spacers for LG wall
mounting bracket. (Only 32/37/42LS57**,
32/37/42/47/55LM62**)
Model
VESA (A x B)
Standard screw
Number of screws
Wall mount bracket
65LM62**
600 x 400
M8
4
LSW600B
A
B
Wall Mount Inner Spacer
(Depending on model)
yIn order to protect the TV screen(scratch,
fingerprint), put TV on flat table without
removing wrapping bag.
yAfter removing the wrapping bag on the
back of the TV, install TV according to
manual included in wall mounting bracket
product.
yRemove protection pads after installing TV.
Page 29

REMOTE CONTROL
21
REMOTE CONTROL
The descriptions in this manual are based on the buttons on the remote control.
Please read this manual carefully and use the TV correctly.
To replace batteries, open the battery cover, replace batteries (1.5 V AAA) matching
the
and ends to the label inside the compartment, and close the battery cover.
To remove the batteries, perform the installation actions in reverse.
CAUTION
yDo not mix old and new batteries, as this may damage the remote control.
Make sure to point the remote control toward the remote control sensor on the TV.
(Only LM669*)
3D
Used for viewing 3D video.
TV/RAD
Selects Radio, TV and DTV programme.
GUIDE
Shows programme guide.
INFO
Views the information of the current
programme and screen.
SUBTITLE
Recalls your preferred subtitle in digital mode.
Q. MENU
Accesses the quick menus.
INPUT
Changes the input source.
LIST
Accesses the saved programme list.
Q.VIEW
Returns to the previously viewed programme.
HOME
Accesses the Home menus.
MY APPS
Shows the list of Apps.
Navigation buttons (up/down/left/right)
Scrolls through menus or options.
OK
Selects menus or options and confirms your
input.
(Back)
Returns to the previous level.
POWER
INFO
GUIDE
HOME MY APPS
2
LIVE TV
SUBTITLE
Q.MENU
LIST
FAV
1
MUTE
TEXT
EXIT
Clears on-screen displays and return to TV
TV/RAD
viewing.
INPUT
FAV
Accesses your favourite programme list.
APP/
1
APP/
Select the MHP TV menu source. (Only Italy)
*
(Depending on model)
Q.VIEW
1
@ ORANGE
Direct access to your internet portal of
entertainment and news services developed
by Orange. (Only France)
PAGE
Moves to the previous or next screen.
EXIT
2
Colour buttons
These access special functions in some
menus.
( : Red, : Green, : Yellow, : Blue)
P
A
P
G
E
LIVE TV
Return to LIVE TV.
Control buttons (
REC
Controls the Premium contents, DVR or
T.OPT
Smart Share menus or the SIMPLINK
3
compatible devices (USB or SIMPLINK or
DVR).
REC
Uses to adjust DVR menu.
3
TELETEXT BUTTONS
These buttons are used for teletext.
For further details, see the ‘Teletext’ section.
ENGENGLISH
)
Page 30

REMOTE CONTROL
22
ENGLISH
ENG
(Only LS57**, LM62**, LM64**, LM660*, LM67**, LM76**)
(User Guide)
Sees user-guide.
RATIO
Resizes an image.
INPUT
RATIO INPUT
Changes the input source.
TV/RAD
Selects Radio, TV and DTV programme.
LIST
Accesses the saved programme list.
(Space)
Opens an empty space on the screen
keyboard.
Q.VIEW
1
4
7
pqrs
LIST
.,;@
ghi
2
abc
5
jkl
8
tuv
0
FAV
Returns to the previously viewed programme.
SETTINGS
1
MUTE
FAV
Accesses your favourite programme list.
1
3D
Used for viewing 3D video.
(Only LM62**, LM64**, LM66**, LM67**,
LM76**)
OK
PAGE
Moves to the previous or next screen.
SETTINGS
Accesses the main menus.
HOME
Accesses the Home menus.
GUIDE
2
3
TEXT
T.OPT
LIVE TV
MY APPS
Shows the list of Apps.
Navigation buttons (up/down/left/right)
AD
4 5
Scrolls through menus or options.
OK
Selects menus or options and confirms your
input.
(Back)
Returns to the previous level.
GUIDE
Shows programme guide.
TV/
RAD
3
def
6
mno
wxyz
9
Q.VIEW
MY APPS
EXIT
SUBTITLE
Q.MENU
REC
EXIT
Clears on-screen displays and return to TV
viewing.
2
Colour buttons
These access special functions in some
menus.
( : Red, : Green, : Yellow, : Blue)
3
TELETEXT BUTTONS
These buttons are used for teletext.
For further details, see the ‘Teletext’ section.
SUBTITLE
Recalls your preferred subtitle in digital mode.
Q. MENU
Accesses the quick menus.
P
A
LIVE TV
G
E
Return to LIVE TV.
Control buttons (
)
Controls the Premium contents, DVR or
Smart Share menus or the SIMPLINK
compatible devices (USB or SIMPLINK or
DVR).
REC
Uses to adjust DVR menu.
4
ENERGY SAVING
Adjusts the brightness of the screen to reduce
energy consumption. (Only LS57**)
INFO
INFO
Views the information of the current
programme and screen.
1
: Only LS57**)
(
4
: Only LM62**, LM64**, LM660*, LM67**,
(
LM76**)
AD
Switches the Audio Description On or Off.
APP/
5
APP/
Select the MHP TV menu source. (Only Italy)
*
(Depending on model)
5
@ ORANGE
Direct access to your internet portal of
entertainment and news services developed
by Orange. (Only France)
Page 31

MAGIC REMOTE CONTROL FUNCTIONS
23
MAGIC REMOTE CONTROL FUNCTIONS
This item is not included for all models.
When the message “Magic Remote Control battery is low. Change the battery.” is
displayed, replace the battery.
To replace batteries, open the battery cover, replace batteries (1.5 V AA) matching
and ends to the label inside the compartment, and close the battery cover. Be
sure to point the remote control toward the remote control sensor on the TV.
To remove the batteries, perform the installation actions in reverse.
CAUTION
yDo not mix old and new batteries, as this may damage the remote control.
(Only 60LM645*, 32/42/47/55LM66**, 42/47/55LM67**, 42/47/55LM76**)
(POWER)
Turns the TV on or off.
BACK
Returns to the previous level.
Wheel(OK)
Selects menus or options and
confirms your input.
Scrolls through the saved
programmes.
If you press the navigation
button while moving the pointer
on the screen, the pointer
disappears, and the Magic
Remote Control works as a
regular remote control.
To display the pointer again,
shake the Magic Remote
Control from side to side.
BACK
HOME
P
MY APPS
Pointer (RF transmitter)
HOME
Accesses the Home menu.
Navigation buttons (up/down/
left/right)
Scrolls through menus or options.
+ -
Adjusts the volume level.
ꕌPꕍ
Scrolls through the saved
programmes or channels.
MUTE
Mutes all sounds.
MY APPS
Shows the list of Apps.
3D
Used for viewing 3D video.
ENGENGLISH
11-1 Brief Info Title Test...
My Apps
3
Info.
If you press Wheel(OK) on the Magic Remote
Control, the following screen appears.
1
Shows information about the current
programme and screen.
Pressing this button will display number keypad
2
which you can select programme number.
You can select My Apps Menu.
3
Page 32

MAGIC REMOTE CONTROL FUNCTIONS
HOME
24
ENGLISH
ENG
Registering Magic Remote
Control
It is necessary to ‘pair’ (register) the magic remote
control to your TV before it will work.
How to register the Magic Remote Control
1 To register automatically,
turn the TV on and press the
Wheel(OK) button. When
registration is completed, the
completion message appears
on the screen.
2 If registration fails, turn the TV
off and back on, then press
the Wheel(OK) button to
complete registration.
How to re-register the Magic Remote Control
BACK
HOME
1 Press and hold the BACK
and HOME
for 5 seconds to reset, then
register it by following “How
to register the Magic Remote
Control” above.
2 To re-register the Magic
Remote Control, press and
hold the BACK
seconds toward the TV. When
registration is completed, the
completion message appears
on the screen.
buttons together
button for 5
How to use Magic Remote
Control
1 If the pointer disappears, move
the Magic Remote Control
slightly to left or right. Then, it
will automatically appear on
the screen.
»
If the pointer has not been
used for a certain period of
time, it will disappear.
2 You can move the pointer by
aiming the Pointer Receiver of
the Magic Remote Control at
your TV then move it left, right,
up or down.
»
If the pointer does not work
properly, leave the Magic
Remote Control for 10
seconds then use it again.
Precautions to Take when
Using the Magic Remote
Control
Use the Magic Remote Control within the
y
maximum communication distance (10 m).
Using the Magic Remote Control beyond this
distance, or with an object obstructing it, may
cause a communication failure.
A communication failure may occur due to
y
nearby devices. Electrical devices such as
a microwave oven or wireless LAN product
may cause interference, as these use the
same bandwidth (2.4 GHz) as the Magic
Remote Control.
The Magic Remote Control may be damaged
y
or may malfunction if it is dropped or receives
a heavy impact.
Take care not to bump into nearby furniture
y
or other people when using the Magic
Remote Control.
Manufacturer and installer cannot provide
y
service related to human safety as the
applicable wireless device has possibility of
electric wave interference.
It is recommended that an Access Point (AP)
y
be located more than 1 m away from the
TV. If the AP is installed closer than 1 m, the
Magic Remote Control may not perform as
expected due to frequency interference.
Page 33

USING THE USER GUIDE
25
USING THE USER GUIDE
User Guide allows you to more easily access the detailed TV information.
1 Press the
HOME button to access the HOME
menu.
2 Select User Guide and press Wheel(OK).
My Apps
Input List Settings Live TV
Search
Internet3DLG Smart W
Programme Guide
User Guide
Recent List
User Guide
NOTE
yYou can also access the User Guide by
pressing
control.
User Guide
1
PROGRAMME Setting
PICTURE, SOUND Setting
OPTION
LG SMART Function
Advanced Function
Information
(User Guide) in the remote
3
To use input device
To use Energy Saving feature
To set time options
To set TV lock options
To set language
Disabled Assistance
To set Magic Remote Control
4
2
User Guide
PROGRAMME Setting
PICTURE, SOUND Setting
OPTION
LG SMART Function
Advanced Function
Information
Shows the description of the selected menu.
1
You can use ꕌ/ꕍto move between pages.
Moves to the selected menu directly from the
2
User Guide.
Zooms in or out the screen.
3
1
HOME Settings OPTION Language
Selects Menu Language and Audio Language displayed on the screen.
Menu Language
Audio Language
Subtitle
Language
Try Now Close
OPTION > To set language
HOME Settings OPTION Language
Selects Menu Language and Audio Language displayed on the screen.
Menu Language
Selects a language for the display text.
[In Digital Mode Only]
Audio Language
When watching a digital broadcast containing several
audio languages, you can select the language you want.
[In Digital Mode Only]
Use the Subtitle function when two or more subtitle
Subtitle
languages are broadcast.
Language
✎ If subtitle data in a selected language is not broadcast,
the default language subtitle will be displayed.
Try Now Close
2
Selects a language for the display text.
[In Digital Mode Only]
When watching a digital broadcast containing several
audio languages, you can select the language you want.
[In Digital Mode Only]
Use the Subtitle function when two or more subtitle
languages are broadcast.
✎ If subtitle data in a selected language is not broadcast,
the default language subtitle will be displayed.
Zoom Out
3
Zoom In
3
ENGENGLISH
Shows the current watching programme or
1
input source screen.
Allows to select the category you want.
2
Allows to select the item you want.
3
You can use ꕌ/ꕍto move between pages.
Allows to browse the description of the
4
function you want from the index.
Page 34

MAINTENANCE / TROUBLESHOOTING
26
ENGLISH
ENG
MAINTENANCE
Cleaning your TV
Clean your TV regularly to keep the best performance and to extend the product lifespan.
CAUTION
yMake sure to turn the power off and disconnect the power cord and all other cables first.
yWhen the TV is left unattended and unused for a long time, disconnect the power cord from the wall
outlet to prevent possible damage from lightning or power surges.
Screen, frame, cabinet and stand
yTo remove dust or light dirt, wipe the surface with a dry, clean, and soft cloth.
yTo remove major dirt, wipe the surface with a soft cloth dampened in clean water or a diluted mild
detergent. Then wipe immediately with a dry cloth.
CAUTION
yAvoid touching the screen at all times, as this may result in damage to the screen.
yDo not push, rub, or hit the screen surface with your fingernail or a sharp object, as this may result in
scratches and image distortions.
yDo not use any chemicals as this may damage the product.
yDo not spray liquid onto the surface. If water enters the TV, it may result in fire, electric shock, or
malfunction.
Power cord
Remove the accumulated dust or dirt on the power cord regularly.
TROUBLESHOOTING
Problem Solution
Cannot control
the TV with the
remote control.
No image display
and no sound is
produced.
The TV turns off
suddenly.
When connecting
to the PC (RGB/
HDMI DVI),
‘No signal’ or
‘Invalid Format’ is
displayed.
yCheck the remote control sensor on the product and try again.
yCheck if there is any obstacle between the product and the remote control.
yCheck if the batteries are still working and properly installed (
yCheck if the product is turned on.
yCheck if the power cord is connected to a wall outlet.
yCheck if there is a problem in the wall outlet by connecting other products.
yCheck the power control settings. The power supply may be interrupted.
yCheck if the Auto sleep feature is activated in the Time settings.
yIf there is no signal while the TV is on, the TV will turn off automatically after
15 minutes of inactivity.
yTurn the TV off/on using the remote control.
yReconnect the RGB/HDMI cable.
yRestart the PC with the TV on.
to , to ).
Page 35

SPECIFICATIONS
27
SPECIFICATIONS
Product specifications may be changed without prior notice due to upgrade of product functions.
(Only 60LM645*, 32/42/47/55LM66**, 42/47/55LM67**, 42/47/55LM76**)
Wireless LAN module(TWFM-B003D) specification
Standard IEEE802.11a/b/g/n
2400 to 2483.5 MHz
Frequency Range
Modulation CCK / OFDM / MIMO
Output Power
(Typical)
Data rate
Antenna Gain
(Typical)
Occupied bandwidth
Because band channel used by the country could be different, the user can not change or adjust the
y
operating frequency and this product is set for the regional frequency table.
5150 to 5250 MHz
5725 to 5850 MHz
802.11a: 11 dBm
802.11b: 15 dBm
802.11g: 13 dBm
802.11n - 2.4GHz: 13 dBm
802.11n - 5GHz: 13 dBm
802.11a/g: 54 Mbps
802.11b: 11 Mbps
802.11n: 300 Mbps
2400 to 2483.5 MHz: -2.5dBi
5150 to 5250 MHz: -2.2dBi
5725 to 5850 MHz: -2.9dBi
802.11a/b/g: HT20
802.11n: HT20/40
ENGENGLISH
Bluetooth module (BM-LDS302) specification
Standard Bluetooth Version 3.0
Frequency Range 2400 ~ 2483.5 MHz
Output Power (Max.) 10 dBm or lower
Data rate (Max.) 3 Mbps
Communication Distance Line of Open Sight approx. 10 m
Page 36

Page 37

KULLANIM KILAVUZU
LED LCD TV
Setinizi çalıştırmadan önce bu kılavuzu lütfen
dikkatle okuyun ve ileride başvurmak için saklayın.
www.lg.com
Page 38

İÇİNDEKİLER
2
İÇİNDEKİLER
TÜRKÇE
TR
3 LISANSLAR
3 AÇIKKAYNAKLIYAZILIMBİLDİRİMİ
4 GÜVENLIK TALIMATLARI
10 - 3D Görüntü İzleme (Yalnızca 3D
modelleri)
12 KURULUM PROSEDÜRÜ
12 MONTAJ VE HAZIRLIK
12 Paketin Açılması
15 Ayrı satılan öğeler
16 Parçalar ve düğmeler
17 TV'nin kaldırılması ve taşınması
18 Sehpa üzerine montaj
20 Duvara montaj
21 UZAKTAN KUMANDA
23 SIHIRLI UZAKTAN KUMANDA
FONKSIYONLARI
24 Sihirli Uzaktan Kumandanın Kaydettirilmesi
24 Sihirli Uzaktan Kumandanın kullanılması
24 Sihirli Uzaktan Kumandayı Kullanırken
Alınacak Önlemler
25 KULLANICI KILAVUZUNUN
KULLANILMASI
26 BAKIM
26 TV'nizin temizlenmesi
26 - Ekran, çerçeve, kabin ve ayaklık
26 - Güç kablosu
26 SORUNGİDERME
27 ÇEVRESEL BILGILER
27 WEEE
27 Pil
28 TEKNİKÖZELLİKLER
UYARI
yUyarı mesajını ciddiye almazsanız, ciddi
şekilde yaralanabilir veya bir kaza ya da
ölüme sebebiyet verebilirsiniz.
DİKKAT
yDikkat mesajını ciddiye almazsanız, hafifçe
yaralanabilir veya ürüne zarar verebilirsiniz.
NOT
yNotlar ürünü tanımanızı ve güvenli bir
şekilde kullanmanızı sağlar. Lütfen ürünü
kullanmadan önce notları dikkatli bir şekilde
okuyun.
Page 39

LİSANSLAR / AÇIK KAYNAKLI YAZILIM BİLDİRİMİ
LİSANSLAR
Desteklenen lisanslar modele göre değişiklik gösterebilir. Lisanslar hakkında daha fazla bilgi için www.
lg.com adresini ziyaret edin.
Dolby Laboratories'den alınan lisansla üretilmektedir. “Dolby” ve çift-D sembolü Dolby
Laboratories’in ticari markalarıdır.
HDMI, HDMI logosu ve High-Definition Multimedia Interface, HDMI Licensing LLC'ye
ait ticari marka ve tescilli ticari markalardır.
DIVX VIDEO HAKKINDA: DivX®, Rovi Corporation şirketine bağlı DivX, LLC
tarafından oluşturulan bir dijital video biçimidir. Bu cihaz resmi olarak, DivX video
gösterimi için DivX Certied® bir cihazdır. Dosyalarınızı DivX videoya dönüştürme
hakkında daha fazla bilgi ve yazılım araçları edinmek için divx.com adresini ziyaret
edin.
3
TRTÜRKÇE
DIVX VIDEO-ON-DEMAND HAKKINDA: Bu DivX Certied® cihazın satın alınan
DivX Video-on-Demand (VOD) lmleri oynatması için kaydedilmesi gerekmektedir.
Kayıt kodunuzu almak için aygıt kurulum menüsünde DivX VOD bölümünü bulun.
Kaydınızı tamamlama hakkında ek bilgi almak için vod.divx.com adresine gidin.
“Maksimum HD 1080p DivX video oynatmak için DivX Certied®, premium içerik
dahil.”
"DivX®, DivX Certied® ve ilgili logolar Rovi Corporation veya bağlı şirketlerin ticari
markalarıdır ve lisansla kullanılır."
“Aşağıdaki bir veya birkaç ABD patentiyle korunmaktadır:
7,295,673; 7,460,668; 7,515,710; 7,519,274”
5,956,674, 5,974,380, 6,487,535 numaralı ABD Patentleri ve ABD ve dünya çapında
verilmiş ya da beklemedeki diğer patentler çerçevesinde üretilmiştir. DTS, Symbol &
DTS ve Symbol kayıtlı ticari markalardır; DTS 2.0+Digital Out, DTS, Inc rmasının
ticari markasıdır. Ürün yazılım içerir. © DTS, Inc. Tüm Hakları Saklıdır.
AÇIKKAYNAKLIYAZILIMBİLDİRİMİ
GPL, LGPL, MPL ve bu ürünün içerdiği diğer açık kaynaklı lisanslar altında kaynak kodu elde etmek için
lütfen http://opensource.lge.com adresini ziyaret edin.
Kaynak koduna ek olarak, adı geçen tüm lisans koşulları, garanti feragatnameleri ve telif hakkı bildirimleri
indirilmek üzere mevcuttur.
LG Electronics, opensource@lge.com adresine e-posta atarak talep etmeniz durumunda dağıtım masraarı
(medya, sevkiyat ve taşıma ücretleri gibi) size ait olmak üzere ürünün kaynak kodunu bir CD-ROM'a kayıtlı
olarak da gönderecektir. Bu teklif, ürünü satın aldığınız tarihten itibaren üç (3) yıl süreyle geçerlidir.
Page 40

GÜVENLİK TALİMATLARI
4
GÜVENLİKTALİMATLARI
TÜRKÇE
TR
Lütfen ürünü kullanmadan önce bu güvenlik önlemlerini dikkatlice okuyun.
UYARI
TV'yi ve uzaktan kumandayı aşağıdaki ortamlara koymayın:
y
- Doğrudan güneş ışığına maruz kalan bir yer
- Banyo gibi yüksek oranda nem içeren bir alan
- Fırın gibi herhangi bir ısı kaynağının ya da ısı üreten diğer aygıtların çevresi
- Ürünün buhara ve yağa kolaylıkla maruz kalabileceği mutfak tezgahları veya
hava nemlendiricilerin çevresi
- Yağmura veya rüzgara maruz kalan bir alan
- Vazo gibi su içeren kapların çevresi
Aksi halde yangın, elektrik çarpması, arıza veya ürün bozulması gibi durumlar yaşanabilir.
Ürünü toza maruz kalabileceği bir yere yerleştirmeyin.
y
Bu durum yangın tehlikesi oluşturabilir.
Şebeke fişi bağlantıyı kesen cihazdır. Fişin her zaman kullanıma hazır durumda ol-
y
ması gerekir.
Islak elle fişe dokunmayın. Ayrıca kablo pimi ıslaksa ya da tozlanmışsa fişi iyice ku-
y
rutun ya da üzerindeki tozu alın.
Aşırı nem nedeniyle elektrik çarpılabilirsiniz.
Güç kablosunu topraklanmış bir elektrik tesisatına bağladığınızdan emin olun.
y
(Topraklama yapılmış aygıtlar hariç.)
Elektrik çarpılabilir veya yaralanabilirsiniz.
Güç kablosunu tam olarak takın.
y
Güç kablosu tam olarak takılmazsa yangın çıkabilir.
Güç kablosunu ısıtıcı gibi sıcak nesnelerle temas ettirmeyin.
y
Bu durum, yangına veya elektrik çarpmasına neden olabilir.
Ürünün veya güç kablolarının üzerine ağır bir nesne koymayın.
y
Aksi halde bu durum yangın veya elektrik çarpması ile sonuçlanabilir.
Yağmur suyunun girmesini önlemek için binanın içi ile dışı arasındaki anten kablo-
y
sunu bükün.
Bu durum suyun Ürünün iç kısmına zarar vermesine sebep olabilir ve elektrik çarpmasına yol açabilir.
TV'yi duvara monte ederken, TV'yi güç ve sinyal kabloları TV'nin arkasından sarka-
y
cak şekilde kurmayın.
Bu durum yangına ve elektrik çarpmasına yol açabilir.
Page 41

Desiccant
GÜVENLİK TALİMATLARI
Tek bir çoklu elektrik prizine çok fazla elektrikli aygıt takmayın.
y
Aksi halde bu durum aşırı ısınmaya bağlı olarak yangına yol açabilir.
Ürünü düşürmeyin veya harici cihazlar bağlarken bu cihazların ürünün üzerine düş-
y
memesine dikkat edin.
Aksi halde bu durum yaralanmayla veya ürünün zarar görmesiyle sonuçlanabilir.
Nem önleyici malzemeyi ya da vinil ambalajı çocukların erişemeyeceği yerde sak-
y
layın.
Nem önleyici malzemenin yutulması zararlıdır. Kazara yutulursa hastanın kusmasını sağlayın ve en yakın hastaneye gidin. Ayrıca vinil ambalaj boğulmaya neden
olabilir. Çocukların erişemeyeceği yerde saklayın.
Çocuklarınızın TV üzerine çıkmasına veya TV'ye asılmasına izin vermeyin.
y
Aksi halde TV düşebilir ve ciddi yaralanmalara yol açabilir.
Çocukların yemesini önlemek için kullanılmış pilleri dikkatli bir şekilde atın.
y
Çocukların pili yemesi halinde derhal bir doktora götürün.
Bir ucu duvar prizine takılıyken güç kablosunun diğer ucuna bir iletken (metal çu-
y
buk gibi) takmayın. Ayrıca, duvar prizine taktıktan hemen sonra güç kablosuna dokunmayın.
Elektrik çarpılabilirsiniz.
(Modele bağlı olarak)
Ürünün yakınlarında yanıcı maddeler bulundurmayın veya saklamayın.
y
Alev alabilen maddelerin dikkatsiz kullanımı nedeniyle patlama veya yangın tehli-
kesi olabilir.
5
TRTÜRKÇE
Madeni para, metal toka, metal çubuk veya tel gibi metal nesneleri ya da kağıt
y
veya kibrit gibi kolayca alev alabilen nesneleri ürünün içine düşürmeyin. Çocuklar
özellikle dikkat etmelidir.
Elektrik çarpması, yangın veya yaralanma gibi durumlar oluşabilir. Ürünün içine yabancı bir nesne düşerse güç kablosunu prizden çekin ve servis merkeziyle temas
kurun.
Ürünün üzerine su püskürtmeyin veya alev alabilir maddelerle (tiner veya benzen)
y
silmeyin. Yangın veya elektrik çarpması kazaları olabilir.
Ürüne çarpmayın ya da içine bir şey düşürmeyin ve ekrana bir cisimle vurmayın.
y
Aksi takdirde yaralanabilirsiniz veya ürün zarar görebilir.
Şimşekli havalarda bu ürüne ya da antene kesinlikle dokunmayın.
y
Elektrik çarpılabilirsiniz.
Gaz kaçağı olduğu zaman duvar prizine kesinlikle dokunmayın ve camları açarak
y
ortamı havalandırın.
Aksi halde yangın çıkabilir veya kıvılcım sıçramasına bağlı yanıklar oluşabilir.
Page 42

TÜRKÇE
TR
GÜVENLİK TALİMATLARI
6
Ürünü kendi başınıza sökmeyin, tamir veya tadil etmeyin.
y
Yangın veya elektrik çarpması kazaları olabilir.
Kontrol, kalibrasyon veya onarım için servis merkezi ile temasa geçin.
Aşağıdaki durumlardan biri oluşursa derhal ürünün fişini çekin ve yerel servis mer-
y
kezinizle temasa geçin.
- Ürün darbelerden etkilendiyse
- Ürün zarar gördüyse
- Ürünün içine yabancı nesneler girdiyse
- Üründen duman veya garip bir koku çıkıyorsa
Bu durum yangın veya elektrik çarpması ile sonuçlanabilir.
Ürünü uzun süre kullanmayı düşünmüyorsanız güç kablosunu üründen çıkarın.
y
Ürünün tozlanması yangına neden olabilir veya kabloların bozulması elektrik kaçağına, elektrik çarpmasına veya yangına neden olabilir.
Bu cihaz su ile (damlama veya sıçrama yoluyla) temas etmemelidir ve vazo gibi içi
y
su dolu nesneler cihazın üzerine yerleştirilmemelidir.
Page 43

GÜVENLİK TALİMATLARI
5~7 times
DİKKAT
Ürünü radyo dalgasının bulunmadığı bir yere monte edin.
y
Harici antenin düşmesi halinde elektrik hatlarına değmesini önlemek için harici an-
y
tenle elektrik hatları arasında yeterli mesafe olmalıdır.
Böyle bir durum elektrik çarpmasına yol açabilir.
Ürünü dengesiz raf veya eğimli yüzeyler üzerine kurmayın. Ayrıca titreşimli olan ve
y
ürünün tam olarak desteklenmeyeceği yerlere monte etmekten kaçının.
Aksi halde ürün düşebilir veya devrilebilir ve yaralanmaya ya da ürünün zarar gör-
mesine yol açabilir.
TV'yi bir ayaklığa monte ederseniz ürünün aşırı dönmesini önlemek için gerekli ön-
y
lemleri almanız gerekir. Aksi halde ürün düşebilir ve yaralanmalara yol açabilir.
Ürünü duvara monte etmeyi düşünüyorsanız ürünün arkasına VESA standart montaj aparatı (isteğe
y
bağlı parçalar) takın. Seti duvara montaj braketine (isteğe bağlı parçalar) takarken düşmeyecek şekilde dikkatlice sabitleyin.
Yalnızca, üreticinin onayladığı bağlantıları / aksesuarları kullanın.
y
Anteni kurarken kalifiye bir servis görevlisine danışın.
y
Bu durum yangın tehlikesi veya elektrik çarpması tehlikesi oluşturabilir.
7
TRTÜRKÇE
TV izlerken en az ekranın çapraz boyutunun 5-7 katı kadar bir mesafe bırakmanızı
y
öneririz.
Uzun süre TV seyretmek görüşünüzün bulanıklaşmasına yol açabilir.
Yalnızca belirtilen türde pil kullanın.
y
Aksi halde uzaktan kumanda zarar görebilir.
Yeni pillerle eski pilleri bir arada kullanmayın.
y
Bu durum pillerin aşırı ısınmasına ve sızıntı yapmasına neden olabilir.
Uzaktan kumanda ile sensörü arasında bir nesne bulunmamasına dikkat edin.
y
Uzaktan kumandanın sinyali güneş ışığından veya başka güçlü ışıklardan etkilene-
y
bilir. Bu durumda odadaki ışığı azaltın.
Video oyun konsolu gibi harici aygıtlar bağlarken bağlantı kablolarının yeterli uzun-
y
lukta olmasına dikkat edin.
Aksi halde ürün devrilebilir ve yaralanmaya ya da ürünün zarar görmesine yol açabilir.
Page 44

TÜRKÇE
TR
GÜVENLİK TALİMATLARI
8
Ürünü elektrik fişini duvar prizine takarak veya prizden çıkartarak açıp kapatmayın.
y
(Açıp kapatmak için fişi kullanmayın.)
Bu durum mekanik arızaya veya elektrik çarpmasına yol açabilir.
Ürünün aşırı ısınmasını önlemek için lütfen aşağıdaki kurulum talimatlarını izleyin.
y
- Ürünle duvar arasındaki mesafe en az 10 cm olmalıdır.
- Ürünü havalandırması olmayan bir yere kurmayın (örn., bir kitaplığa ya da dola-
ba).
- Ürünü halı veya minderin üzerine kurmayın.
- Havalandırma kapağının bir masa örtüsü veya perdeyle kapanmamasına dikkat
edin.
Aksi halde yangın çıkabilir.
Uzun süre boyunca TV izleyeceğiniz zaman, havalandırma açıklıkları sıcak hale
y
gelebileceğinden havalandırma açıklıklarına dokunmamaya özen gösterin. Bu durum ürünün işleyişini veya performansını etkilemez.
Cihazınızın kablosunu düzenli aralıklarla inceleyin ve kablonun görünümü hasara veya bozulmaya
y
işaret ediyorsa, fişi prizden çekin, cihazı kullanmayın ve kablonun bir yetkili servis personeli tarafın-
dan aynısıyla değiştirilmesini sağlayın.
Elektrik fişi pimlerinde veya prizde toz birikmesini önleyin.
y
Bu durum yangın tehlikesi oluşturabilir.
Elektrik kablosunu bükülme, dolanma, sıkışma, kapıya sıkışma veya üzerine basıl-
y
ma gibi fiziksel veya mekanik zararlardan koruyun. Özellikle fişlere, duvar prizlerine
ve kablonun cihazdan çıktığı noktaya dikkat edin.
Panele elinizle veya tırnak, kurşun kalem ya da tükenmez kalem gibi keskin bir
y
nesne ile bastırmayın veya üzerini çizmeyin.
Ekrana dokunmayın veya uzun süre parmaklarınızla bastırmayın. Aksi halde ekran
y
üzerinde geçici şekil bozuklukları ortaya çıkabilir.
Ürünü ve bileşenlerini temizlerken öncelikle ürünü prizden çekin ve yumuşak bir
y
bezle silin. Aşırı kuvvet uygulamak çizilmelere veya renk değişimine yol açabilir. Su
püskürtmeyin veya ıslak bezle silmeyin. Ürüne ve paneline zarar verebilecek cam
temizleyiciler, otomobil parlatıcısı veya sanayi tipi parlatıcı, aşındırıcı maddeler
veya cila, benzen, alkol ve benzeri maddeler kesinlikle kullanmayın.
Aksi halde yangın çıkabilir, elektrik çarpabilir veya ürün zarar görebilir (deformasyon,
aşınma veya kırılma).
Bu ünite AC duvar prizine bağlı olduğu sürece, üniteyi DÜĞMESİNDEN kapatsanız bile AC güç kay-
y
nağı ile bağlantısı kesilmez.
Kabloyu fişinden tutarak prizden çekin.
y
Güç kablosunun içindeki teller koparsa yangın çıkabilir.
Ürünü taşırken öncelikle kapattığınızdan emin olun. Ardından güç kablolarını, an-
y
ten kablolarını ve tüm bağlantı kablolarını çıkarın.
TV seti veya güç kablosu zarar görerek yangın tehlikesine veya elektrik çarpması-
na yol açabilir.
Page 45

GÜVENLİK TALİMATLARI
Ürünü taşırken veya paketini açarken, ürünün ağır olması sebebiyle bir kişiden
y
daha yardım alın.
Aksi halde yaralanabilirsiniz.
Ürünün iç kısımlarını temizlemek için yılda bir kez servis merkezi ile temasa geçin.
y
Biriken toz mekanik arızaya yol açabilir.
Tüm servis işlemlerinin kalifiye servis personeli tarafından yapılmasını sağlayın.
y
Elektrik kablosunun ya da fişinin hasar görmesi, üzerine sıvı dökülmesi ya da yabancı nesnelerin cihaza girmesi, cihazın yağmur ya da neme maruz kalması, normal çalışmaması veya bir yerden düşmesi gibi cihazın hasar gördüğü tüm durumlarda servis işlemi gereklidir.
Cihaz dokunduğunuzda soğuksa, açıldığında küçük bir “titreşme” olabilir. Bu nor-
y
mal bir durumdur ve ürünle ilgili bir sorun yoktur.
Panel, iki milyon ila altı milyon piksel çözünürlüğe sahip yüksek teknolojili bir ürü-
y
nüdür. Panelin üzerinde 1 ppm boyutunda siyah ve/veya parlak renkli küçük nokta-
lar görebilirsiniz. Bu noktalar ürünün arızalı olduğunu göstermez ve performansını
ve güvenilirliğini etkilemez.
Bu durum üçüncü taraf ürünlerde de oluşmaktadır ve ürün değişimi veya para iadesine tabi değildir.
İzleme konumunuza (sol/sağ/yukarı/aşağı) bağlı olarak panelin parlaklığında ve
y
renginde farklılıklar olduğunu görebilirsiniz.
Bu durum panelin özelliğine bağlı olarak oluşur. Ürün performansıyla ilgisi yoktur
ve arıza değildir.
9
TRTÜRKÇE
Hareketsiz görüntülerin (örn., kanal logosu, ekran üstü menü, bir video oyunu sahnesi) uzun süre
y
görüntülenmesi ekrana zarar vererek görüntü yapışması adıyla bilinen görüntü tutulmasına yol açabilir. Görüntü yapışması garanti kapsamında değildir.
Televizyonunuzun ekranında sabit bir görüntüyü uzun süre (LCD için 2 saat veya daha fazla, Plazma
için 1 saat veya daha fazla) görüntülemekten kaçının.
Ayrıca TV'nizi uzun süre boyunca 4:3 oranında izlerseniz panelin kenarlarında görüntü yapışması
oluşabilir.
Bu durum üçüncü taraf ürünlerde de oluşmaktadır ve ürün değişimi veya para iadesine tabi değildir.
OluşanSesler
y
“Çatlama” sesi: TV izlerken veya kapatıldığında oluşan çatlama sesi, sıcaklık ve neme bağlı olarak
termal plastik kasılmasından kaynaklanır. Bu ses termal deformasyon gerektiren ürünlerde yaygın
olarak görülür. Elektrik devresi uğultusu/panel cızırtısı: Ürünü çalıştırmak için yüksek miktarda akım
sağlayan yüksek hızlı anahtar devresi düşük seviyeli bir gürültüye sebep olur. Bu ses ürüne bağlı
olarak değişir.
Oluşan ses ürünün performansını ve güvenilirliğini etkilemez.
Page 46

TÜRKÇE
TR
GÜVENLİK TALİMATLARI
10
3DGörüntüİzleme(Yalnızca3Dmodelleri)
UYARI
İzlemeOrtamı
yİzleme Süresi
- 3D içerik izlerken saatte bir 5 - 15 dakika ara verin. Uzun süre 3D içerik izlemek baş ağrısı, baş
dönmesi, yorgunluk veya göz yorgunluğuna yol açabilir.
Fotosensitivitenöbetleriveyakronikhastalığıolankişiler
yBazı kullanıcılar 3D içeriklerdeki yanıp sönen ışığa veya belirli şekillere maruz kaldıklarında nöbet
geçirebilir veya başka anormal semptomlar gösterebilir.
yBulantı hissediyorsanız, hamileyseniz ve/veya sara, kalp bozukluğu, tansiyon hastalığı gibi kronik bir
hastalığınız varsa 3D video izlemeyin.
yStereo körlük veya stereo anomali yaşayan kişilerin 3D içerik izlemesi tavsiye edilmemektedir. Çift
görme veya görme rahatsızlığı oluşabilir.
yStrabismus (şaşılık), ambliyopi (zayıf görme) veya astigmatizminiz varsa çift görüntülerden dolayı
derinliği algılamakta güçlü çekebilir ve kendini kolaylıkla yorgun hissedebilirsiniz. Ortalama bir
yetişkinden daha sık ara vermeniz tavsiye edilir.
yGörme yeteneğiniz sağ ile sol gözünüz arasında farklılık gösteriyorsa 3D içerik izlemeden önce gözlerini
kontrol ettirin.
3Diçerikizlemektenvazgeçilmesiniveyakaçınılmasınıgerektirensemptomlar
yUykusuzluk, aşırı çalışmak veya alkol almaktan kaynaklanan bir yorgunluk hissediyorsanız 3D içerik
izlemeyin.
yBu semptomlar görüldüğünde 3D içerik kullanmayı/izlemeyi bırakın ve semptomlar geçene kadar
dinlenin.
- Semptomlar devam ederse doktorunuza danışın. Bu semptomlar arasında baş ağrısı, göz küre-
sinde acı, baş dönmesi, bulantı, çarpıntı, bulanık görme, rahatsızlık, çift görme, görme rahatsızlığı
veya yorgunluk sayılabilir.
Page 47

GÜVENLİK TALİMATLARI
DİKKAT
İzlemeOrtamı
yİzleme Uzaklığı
- 3D içerik izlerken en az ekranın çapraz uzunluğunun iki katı kadar bir mesafe bırakın. 3D içerik iz-
lerken kendinizi rahatsız hissederseniz TV'den uzaklaşın.
İzlemeYaşı
yBebekler/Çocuklar
- 5 yaşından küçük çocukların 3D içerik kullanması/izlemesi yasaktır.
- 10 yaşından küçük çocuklar, görme duyuları gelişme aşamasında olduğundan aşırı tepki gösterebi-
lir veya aşırı heyecanlanabilirler (örneğin, ekrana dokunmaya veya üzerine atlamaya çalışabilirler).
Çocuklar 3D içerik izlerken özellikle takip edilmeli ve daha fazla dikkat gösterilmelidir.
- Gözlerinin arasındaki uzaklık yetişkinlere göre daha kısa olduğu için çocuklar 3D sunumlara karşı
daha fazla binoküler fark gösterirler. Bu nedenle aynı 3D görüntüyü izlerken yetişkinlere göre daha
fazla stereoskopik derinlik algılarlar.
yGençler
- 19 yaşından küçük gençler 3D içeriklerdeki ışıktan kaynaklanan uyarımlara bağlı olarak duyarlılık
gösterebilirler. Yorulduklarında uzun süre 3D içerik izlememelerini tavsiye edin.
yYaşlılar
- Yaşlıklar, 3D efektini gençlere göre daha az algılayabilirler. TV’ye önerilen uzaklıktan daha yakın
oturmayın.
11
TRTÜRKÇE
3Dgözlüklerinkullanımınailişkinuyarılar
yLG 3D gözlüğü kullanmaya dikkat edin. Aksi halde 3D videoları düzgün bir şekilde izleyemeyebilirsiniz.
y3D gözlüğü normal gözlük, güneş gözlüğü veya koruyucu gözlük yerine kullanmayın.
yDeğiştirilmiş 3D gözlük kullanmak göz yorgunluğuna veya görüntülerin bozulmasına yol açabilir.
y3D gözlüğünüzü aşırı yüksek veya düşük sıcaklıklarda bırakmayın. Aksi halde deformasyon oluşabilir.
y3D gözlükler hassas nesnelerdir, kolaylıkla çizilirler. Gözlüğün camlarını silerken her zaman yumuşak,
temiz bir bez kullanın. 3D gözlüğün camlarını keskin nesnelerle çizmeyin veya kimyasal maddelerle
temizlemeyin/silmeyin.
Page 48

TÜRKÇE
<
<
TR
KURULUM PROSEDÜRÜ / MONTAJ VE HAZIRLIK
12
NOT
yGösterilen resim sizin TV’nizden farklı olabilir.
yTV’nizin OSD’si (Ekran Üstü Gösterim) bu kılavuzda gösterilenlerden farklı olabilir.
yMevcut menü ve opsiyonlar kullanmakta olduğunuz ürün modelinden veya giriş kaynağından farklı
olabilir.
yGelecekte bu TV'ye yeni özellikler eklenebilir.
yTV, güç tüketimini azaltmak için bekleme moduna alınabilir. Enerji tasarrufu amacıyla, bir süre
izlenmeyecekse TV kapatılmalıdır.
yGörüntü parlaklığı seviyesinin düşürülmesiyle, kullanım sırasında tüketilen enerji miktarı önemli
ölçüde azaltılabilir; bu durum genel çalıştırma maliyetini düşürecektir.
KURULUM PROSEDÜRÜ
1 Paketi açın ve tüm aksesuarların sağlandığından emin olun.
2 Ayaklığı TV setine takın.
3 Harici bir aygıtı TV setine bağlayın.
4 Ağ bağlantınızın olduğundan emin olun.
TV ağ fonksiyonlarını yalnızca ağ bağlantısı yapıldığında kullanabilirsiniz.
MONTAJ VE HAZIRLIK
PaketinAçılması
Ürün kutunuzda aşağıdaki öğelerin olup olmadığını kontrol edin. Aksesuarlarda herhangi bir eksiklik olması
durumunda ürünü satın aldığınız yerel satıcıyla iletişime geçin. Bu kılavuzdaki resimler gerçek ürün ve
öğeden farklı olabilir.
DİKKAT
yÜrün kullanım ömrü ve güvenliğiniz için onaylanmamış öğeler kullanmayın.
yOnaylanmamış öğelerin kullanılmasından kaynaklanan hasar ve yaralanmalar garanti kapsamına
girmez.
yBazı modellerde ekrana yapıştırılmış ince bir film bulunur ve bu film sökülmemelidir.
NOT
yÜrününüzle birlikte verilen öğeler modele göre değişiklik gösterebilir.
yÜrün özellikleri veya bu kılavuzun içeriği, ürün fonksiyonlarının yükseltilmesine bağlı olarak önceden
haber verilmeksizin değiştirilebilir.
yOptimum bağlantı için, HDMI kabloları ve USB aygıtları 10 mm kalınlıktan ve 18 mm genişlikten az
çıkıntıya sahip olmalıdır. USB kablo veya USB taşınabilir bellek TV'nizin USB bağlantı noktasına
uymazsa, USB 2.0'ı destekleyen bir uzatma kablosu kullanın.
B
A
B
*A
10 mm
=
18 mm
*B
A
=
Page 49

MONTAJ VE HAZIRLIK
13
AV MODE
INPUT
ENERGY
TV
SAVING
1 2 3
4 5 6
7 809
FLASHBK
LIST
MARK
FAV
P
A
G
3D
CHVOL
E
MUTE
INFO
MENU
Q.MENU
ENTER
EXIT
BACK
L/R SELECT
FREEZE
RATIO
Uzaktan kumanda ve piller (AAA)
(Bkz. s. 21, 22)
P
Sihirli Uzaktan Kumanda,
Piller (AA)
(Yalnızca 60LM645*
, 32/42/47/55LM66**,
42/47/55LM67**,
42/47/55LM76**)
(Bkz. s. 23)
TRTÜRKÇE
Temizleme bezi
(Modele bağlı olarak)
Bu bezi kabindeki tozu te-
Kullanımkılavuzu
mizlemek için kullanın.
Komponent video kablosu
(Bkz. s. B-4)
Kompozit video kablosu
(Bkz. s. B-4 , B-5)
Cinema 3D Gözlükleri
3D gözlük sayısı modele
veya ülkeye göre değişebi-
lir.
(32/37/42LS57** hariç)
Kablo tutucu
(Modele bağlı olarak)
(Bkz. s. A-6)
Çift oynatma gözlükleri
(Yalnızca 42/47/55LM76**)
Güç Kablosu
(Yalnızca 32/37/42LS57**,
32/37/42/47/55LM62**)
veya
AyaklıkVidaları
8EA, M4 x 20
(Bkz. s. A-3, A-4, A-5)
Sehpaya Montaj Kablosu
2EA
(Yalnızca 32/37LM62**,
32LM660*)
(Bkz. s. 18)
Duvaramontajaparatıiç
aralıkları
4EA
(Yalnızca 32/37/42LS57**,
32/37/42/47/55LM62**)
(Bkz. s. 20)
İzolatör
(Modele bağlı olarak)
(Bkz. s. 14)
SehpayaMontajVidası
(1EA: Yalnızca
32/37/42LS57**,
32/42/47LM669*)
(2EA: Yalnızca
32/37LM62**,
32LM660*)
(Bkz. s. 18)
BraketVidası
2EA, M4 x 8
(Yalnızca 32/37LM62**,
32LM660*)
(Bkz. s. 18)
SCART Kablosu
(Bkz. s. B-9)
Page 50

MONTAJ VE HAZIRLIK
14
TÜRKÇE
TR
AyaklıkGövdesi/AyaklıkTabanı
(Yalnızca 32/37/42LS57**, 65LM62**, 32/42/47LM669*)
(Bkz. s. A-3, A-5)
AyaklıkGövdesi/AyaklıkTabanı
(Yalnızca 32/37/42/47/55LM62**, 32/42/47/55/60LM64**,
32/42/47/55LM660*, 42/47/55LM67**, 42/47/55LM76**)
(Bkz. s. A-4, A-5)
NOT
yAnten İzolatörü Kurulum Kılavuzu
- TV Setiyle anten sinyalinin topraklaması arasında voltaj farkı olan bir yere TV’yi kurmak için anten
izolatörü kullanın.
»TV Setiyle anten sinyali topraklaması arasında bir voltaj farkı varsa, anten temas noktası ısınabilir
ve aşırı ısı kazalara sebep olabilir.
- TV izlerken TV anteninden güç voltajını etkili bir şekilde kaldırarak güvenliği arttırabilirsiniz. İzolatörü
duvara monte etmeniz önerilir. Duvara monte edilemezse, TV’nin üzerine monte edin. Kurulumdan
sonra anten İzolatörünün bağlantısını kesmeyin.
- Başlamadan önce TV anteninin bağlı olduğundan emin olun.
Duvar
1. TV’ye bağlayın.
ANTENNA/
CABLE IN
Kablo / Anten
veya
İzolatör
2. Set Üstü kutuyu bağlayın.
İzolatörün bir ucunu kablo/anten jakına, diğer ucunu TV setine veya set üstü kutuya bağlayın.
“Ana şebeke bağlantısı olan bina kurulumlarının koruyucu topraklamasına bağlı ekipman ya da koruyucu
topraklama bağlantısı olan ya da koruyucu topraklama bağlantısına ve koaksiyel kablo kullanarak kablo
dağıtım sistemine bağlı olan ekipmanlar, bazı durumlarda yangın tehlikesine yol açabilir. Bu sebeple,
kablo dağıtım sistemine yapılan bağlantı, belirli bir frekans aralığı altında elektrik yalıtımı sağlayan bir
aygıt vasıtasıyla sağlanmalıdır (galvanik izolatör, bkz. EN 60728-11)”
RF İzolatörünü uyguladığınızda, haf bir sinyal hassasiyeti kaybı yaşanabilir.
Page 51

MONTAJ VE HAZIRLIK
15
Ayrısatılanöğeler
Ayrı satılan öğeler haber verilmeksizin değiştirilebilir veya kalitesinin artırılması amacıyla üzerinde değişiklik
yapılabilir.
Bu öğeleri satın almak için satıcınızla temas kurun.
Bu cihazlar yalnızca belirli modellerle birlikte çalışır.
P
TRTÜRKÇE
AG-F2**DP, AG-F3**DP
Çift oynatma gözlükleri
AN-WF100
Kablosuz LAN
Uyumluluk
AG-F2**DP, AG-F3**DP
Çift oynatma gözlükleri
AG-F2
Cinema 3D Gözlükleri
AN-MR300
Sihirli Uzaktan Kumanda
AN-WF100
Kablosuz LAN
Model adı veya tasarımı, ürün fonksiyonlarının yükseltilmesine, üreticinin koşullarına veya politikalarına
bağlı olarak değiştirilebilir.
**,
AG-F3
**
AG-F2
Cinema 3D Gözlükleri
32/37/42LS57**
AG-F3
**,
**
32/37/42/47/55/65LM62**,
32/42/47/55/60LM64**
(60LM645* hariç)
AN-MR300
Sihirli Uzaktan Kumanda
• •
• •
• • •
• •
60LM645*,
32/42/47/55LM66**,
42/47/55LM67**,
42/47/55LM76**
Page 52

TÜRKÇE
H
H
H
TR
MONTAJ VE HAZIRLIK
16
Parçalarvedüğmeler
32/42/47/55LM66**, 42/47/55LM67**,
42/47/55LM76**
Ekran Ekran
B tipi: 32/37/42LS57**, 32/37/42/47/55/65LM62**A tipi: 32/42/47/55/60LM64**,
Hoparlörler Hoparlörler
Uzaktan kumanda ve
akıllı sensörler
1
Güç göstergesi
Düğme Açıklama
A tipi B tipi
Kayıtlı programlar arasında gezinmenizi sağlar.
Ses seviyesini ayarlar.
ꔉ
OK
Vurgulanan menü opsiyonunu seçer veya bir girişi onaylar.
(Tamam)
S SETTINGS
Ana menüye erişim sağlar veya girişinizi kaydeder ve menülerden çıkmanızı sağlar.
(Ayarlar)
INPUT
Giriş kaynağını değiştirir.
(Giriş)
/ I
Gücü açar veya kapatır.
OK
SETTINGS
INPUT
düğmeler
OK
Uzaktan kumanda
ve akıllı sensörler
Güç göstergesi
SETTINGS
INPUT
Dokunmatik düğmeler
1
2
1 Akıllı sensör - Çevreleyen alana göre görüntü kalitesini ve parlaklığını ayarlar.
2 B tipi düğmeler dokunmatiktir ve sadece parmağınızla dokunarak çalıştırılabilir.
NOT
yAna menülerdeki OPSİYON öğesini seçerek güç göstergesi ışığını açıp kapayabilirsiniz.
Page 53

MONTAJ VE HAZIRLIK
17
TV'ninkaldırılmasıve
taşınması
TV'nin kaldırılırken veya taşınırken çizilmesini
ya da hasar görmesini önlemek ve tipi ve boyutu
ne olursa olsun emniyetli ve uygun şekilde
taşınmasını sağlamak için aşağıdakileri okuyun.
DİKKAT
yHasar görmesine yol açabileceğinden
ekrana hiçbir koşulda dokunmayın.
yTV'nin kutuda ya da TV'nin orijinal ambalaj
malzemesinde taşınması önerilir.
yTV kaldırılmadan ya da taşınmadan önce, güç
kablosunu ve diğer tüm kabloları çıkarın.
yTV'yi tutarken hasar görmesini önlemek
amacıyla ekran size doğru bakmamalıdır.
yBüyük bir TV taşınırken, en az 2 kişi hazır
bulunmalıdır.
yTV'yi elde taşırken aşağıdaki şekilde
gösterildiği gibi tutun.
TRTÜRKÇE
yTaşıma esnasında, TV'yi sarsmayın veya aşırı
titreşime maruz bırakmayın.
yTaşıma esnasında, TV'yi dik tutun, kesinlikle
yan döndürmeyin ya da sola veya sağa doğru
yatırmayın.
yTV’yi tutarken, TV’nin yanlarında Koruma pedi
olmalıdır. (Modele bağlı olarak)
Koruma Pedi
yTV çerçevesinin alt ve üst kısmını sıkıca tutun.
Saydam kısım, hoparlör ve hoparlör ızgarası
alanından tutmadığınızdan emin olun.
Page 54

MONTAJ VE HAZIRLIK
18
TÜRKÇE
TR
Sehpa üzerine montaj
1 TV'yi kaldırıp sehpa üzerinde dik konuma
getirin.
- Uygun havalandırma için duvarla arasında
10 cm (minimum) boşluk bırakın.
10 cm
10 cm
2 Güç kablosunu prize takın.
DİKKAT
yYangına ya da başka hasarlara neden
olabileceğinden TV'yi ısı kaynaklarının
üzerine veya yakınına kurmayın.
10 cm
10 cm
TV'nin sehpaya sabitlenmesi
TV'nin öne yatmasını, hasar görmesini ve olası
yaralanmaları önlemek için bir sehpaya sabitleyin.
TV'yi sehpaya sabitlemek için verilen vidayı
ayaklığın arkasına takın ve sıkıştırın.
(Yalnızca 32/37/42LS57**, 32/42/47LM669*)
(Yalnızca 32/37LM62**, 32LM660*)
M4 x 8
2EA
NOT
(Yalnızca 32/37LM62**, 32LM660*)
TV’nin sehpaya sabitlenmesi
1. Braket Vidalarını kullanarak Montaj
Kablolarını Ayaklık Tabanına bağlayın.
2. Montaj Vidalarını kullanarak
Montaj Kablolarını sehpaya sabitleyin.
3. TV sabitlendiğinde sehpayı duvara
yaklaştırın. Aksi halde, çocuklar yaralanmaya
yol açabilecek hareketlerde bulunabilir.
UYARI
yDüşmesini önlemek için TV kurulum
talimatları izlenerek zemine/duvara güvenli
bir şekilde bağlanmalıdır. TV'nin devrilmesi,
titremesi veya sallanması yaralanmalara yol
açabilir.
Page 55

MONTAJ VE HAZIRLIK
19
TV'ninaçısınıizlemeyönüneuygunolarak
ayarlama
(Bu özellik her modelde mevcut değildir.)
TV'nin açısını izleme yönünüze uygun olarak
ayarlarken 20 derece sola veya sağa döndürün
ve TV'nin açısını izleme yönünüze uygun olacak
şekilde ayarlayın.
(Yalnızca 32/37/42LS57**, 65LM62**,
32/42/47LM669*)
2020
TV'nin açısını İzleme yönünüze uygun olarak
sola ya da sağa doğru 10 dereceye kadar
döndürebilirsiniz.
(Yalnızca 32/37/42/47/55LM62**,
32/42/47/55/60LM64**, 32/42/47/55LM660*,
42/47/55LM67**, 42/47/55LM76**)
1010
TV'nin duvara sabitlenmesi
(Bu özellik her modelde mevcut değildir.)
TRTÜRKÇE
1 Delikli cıvataları ya da TV braketlerini ve
cıvatalarını TV'nin arka tarafına takarak sıkın.
- Delikli cıvataların konumunda takılı cıvata
varsa öncelikle bu cıvataları sökün.
2 Duvara montaj braketlerini cıvatalarla duvara
monte edin.
Duvara montaj braketinin konumuyla TV'nin
arkasındaki delikli cıvataları birbirine hizalayın.
3 Delikli cıvatalarla duvara montaj braketlerini
sağlam bir iple sıkıca bağlayın.
İpin düz yüzeyle yatay konumda kalmasını
sağlayın.
DİKKAT
Ürünün açısını ayarlarken parmaklarınıza
dikkat edin.
»
Eliniz veya parmaklarınız sıkışırsa yaralanabilirsiniz. Ürünün çok fazla eğilmesi düşmesine
ve hasara ya da yaralanmaya yol açabilir.
Yalnızca 32/37/42/47/55LM62**,
(
32/42/47/55/60LM64**, 32/42/47/55LM660*,
42/47/55LM67**, 42/47/55LM76**)
<Arka> <Ön>
DİKKAT
yÇocukların TV üzerine çıkmamasına ve
TV'ye asılmamasına dikkat edin.
NOT
yTV'yi emniyetli bir şekilde destekleyecek
kadar büyük ve sağlam bir platform veya
kabin kullanın.
yBraket, cıvata ve ipler ürünle birlikte
verilmez. Yerel satıcınızdan ilave
aksesuarlar alabilirsiniz.
Page 56

MONTAJ VE HAZIRLIK
20
TÜRKÇE
TR
Duvara montaj
TV'nin arka tarafına dikkatli bir şekilde isteğe
bağlı bir duvara montaj braketi bağlayın ve duvara
montaj braketini zemine dik ve sağlam bir duvara
takın. TV'yi başka yapı malzemelerine bağlamanız
durumunda, lütfen yetkili personelle temas kurun.
LG, duvar montajının kaliye bir kurulum uzmanı
tarafından yapılmasını önerir.
10 cm
10 cm
10 cm
10 cm
VESA standartlarını karşılayan duvara montaj
braketleri ve vidaları kullandığınızdan emin olun.
Duvar montaj kitlerinin standart ölçüleri aşağıdaki
tabloda belirtilmiştir.
Ayrısatılır(DuvaraMontajBraketi)
Model 32/37LS57**
VESA (A x B) 200 x 200 400 x 400
Standart vida M6 M6
Vida sayısı 4 4
Duvara montaj
braketi
32/37LM62**
32LM64**
32LM66**
LSW200BX,
LSW200BXG
42LS57**
42/47/55LM62**
42/47/55/60LM64**
42/47/55LM66**
42/47/55LM67**
42/47/55LM76**
LSW400BX,
LSW400BXG
DİKKAT
yÖncelikle fişi çekin, ardından TV'yi taşıyın
veya kurun. Aksi halde elektrik çarpabilir.
yTV'yi tavana veya eğimli bir duvara monte
ederseniz TV düşerek ciddi yaralanmalara
yol açabilir. LG tarafından onaylanmış bir
duvara montaj aparatı kullanın ve yerel
satıcınızla veya yetkili personelle temas
kurun.
yTV'ye hasar verebileceği ve garantinizin
geçersiz kalmasına yol açabileceğinden
vidaları çok fazla sıkmayın.
yVESA standartlarını karşılayan vidaları ve
duvar montaj aparatlarını kullanın. Hatalı
kullanım veya uygun olmayan aksesuarların
kullanılmasından kaynaklanan hasar ve
yaralanmalar garanti kapsamına girmez.
NOT
yVESA standart vida teknik özelliklerinde
belirtilen vidaları kullanın.
yDuvara montaj kiti kurulum kılavuzunu ve
gerekli parçaları içerir.
yDuvara montaj braketi isteğe bağlı bir
aksesuardır. Yerel satıcınızdan ilave
aksesuarlar alabilirsiniz.
yVidaların boyları duvara montaj aparatına
göre değişiklik gösterebilir. Uygun boyda
vida kullandığınızdan emin olun.
yDaha fazla bilgi için duvara montaj
aparatıyla birlikte verilen kılavuza bakın.
yTV'ye bir üçüncü taraf duvara montaj aparatı
bağlarken TV'nizi dikey açıda hareket
ettirmek için duvara montaj aparatının iç
aralıklarını TV duvara montaj deliklerine
takın. Lütfen LG duvara montaj braketine
ait aralıkları kullanmayın. (Yalnızca
32/37/42LS57**, 32/37/42/47/55LM62**)
Model
VESA (A x B)
Standart vida
Vida sayısı
Duvara montaj
braketi
65LM62**
600 x 400
M8
4
LSW600B
A
B
Duvara Montaj Aparatı İç Aralığı
(Modele bağlı olarak)
yTV ekranını korumak için (çizik, parmak izi)
ambalaj malzemesini çıkarmadan TV’yi düz
bir masaya koyun.
yTV’nin arkasındaki ambalaj malzemesini
çıkardıktan sonra, TV’yi duvara montaj
braketiyle birlikte sağlanan kılavuza göre
kurun.
yTV’yi kurduktan sonra koruma pedlerini
çıkarın.
Page 57

UZAKTAN KUMANDA
UZAKTAN KUMANDA
Bu kılavuzdaki açıklamalar uzaktan kumanda üzerinde bulunan düğmeler temel
alınarak verilmiştir.
Lütfen bu kılavuzu dikkatlice okuyun ve TV'yi doğru şekilde kullanın.
Pilleri değiştirmek için pil kapağını açın, pilleri (1.5 V AAA)
yuvasındaki etiketle eşleşecek şekilde değiştirin ve pil kapağını kapatın.
Pilleri yerinden çıkarmak için pil takma işlemlerini ters sıra ile yapın.
DİKKAT
yEski ve yeni pilleri birlikte kullanmayın, aksi halde uzaktan kumanda hasar görebilir.
Uzaktan kumandayı, TV üzerindeki uzaktan kumanda sensörüne doğru tuttuğunuzdan emin olun.
(Yalnızca LM669*)
ve uçları pil
21
TRTÜRKÇE
3D
3D video izlemek için kullanılır.
TV/RAD (TV/Radyo)
Radyo, TV ve DTV programını seçer.
GUIDE (Rehber)
Program kılavuzunu gösterir.
INFO
(Bilgi)
Mevcut program ve ekran bilgilerini görüntüler.
SUBTITLE(Altyazı)
Dijital modda tercih ettiğiniz altyazıyı çağırır.
Q.MENU(HızlıMenü)
Hızlı menülere erişim sağlar.
INPUT(Giriş)
Giriş kaynağını değiştirir.
LIST (Liste)
Kayıtlı program listesine erişim sağlar.
Q.VIEW(HızlıGörüntüleme)
İzlediğiniz bir önceki programa döner.
HOME (Ana Menü)
Ana menülere erişim sağlar.
MYAPPS(Uygulamalarım)
Uygulama listesini gösterir.
Gezinmedüğmeleri(yukarı/aşağı/sol/sağ)
Menüler veya opsiyonlar arasında gezinmenizi sağlar.
OK (Tamam)
Menüleri ve opsiyonları seçer ve girişinizi
onaylar.
(Geri)
Önceki seviyeye döner.
POWER
INFO
GUIDE
HOME MY APPS
2
LIVE TV
SUBTITLE
Q.MENU
LIST
FAV
1
MUTE
TEXT
EXIT(Çıkış)
Ekran üstünde görüntülenenleri silerek TV iz-
TV/RAD
leme moduna geri döner.
INPUT
FAV (Favori)
Favori kanal listenize erişim sağlar.
APP/
1
APP/* (Uygulama/*)
MHP TV menü kaynağını seçmenizi sağlar.
(Yalnızca İtalya) (Modele bağlı olarak)
Q.VIEW
1
@ ORANGE
Orange tarafından geliştirilen eğlence ve haber servisi İnternet portalına doğrudan erişim.
(Yalnızca Fransa)
PAGE (Sayfa)
Bir önceki veya bir sonraki ekrana geçer.
EXIT
2
Renklidüğmeler
Bu düğmeler bazı menülerde bulunan özel
fonksiyonlara erişim sağlar.
(
P
A
P
G
E
: Kırmızı, : Yeşil, : Sarı, : Mavi)
LIVETV(CanlıTV)
Canlı TV'ye geri dönmenizi sağlar.
Kontroldüğmeleri(
REC
Premium içeriği, DVR veya Smart Share me-
T.OPT
nülerini veya SIMPLINK uyumlu cihazları
3
(USB veya SIMPLINK ya da DVR) kumanda
eder.
REC(Kayıt)
DVR menüsünü ayarlamak için kullanılır.
3
TELETEXTDÜĞMELERİ
Bu düğmeler teletext için kullanılır.
Daha fazla bilgi için ‘Teletext’ bölümüne ba-
kın.
)
Page 58

UZAKTAN KUMANDA
22
(Yalnızca LS57**, LM62**, LM64**, LM660*, LM67**, LM76**)
TÜRKÇE
TR
(KullanıcıKılavuzu)
Kullanıcı kılavuzunu gösterir.
RATIO (Oran)
Bir görüntüyü yeniden boyutlandırır.
INPUT(Giriş)
Giriş kaynağını değiştirir.
TV/RAD (TV/Radyo)
Radyo, TV ve DTV programını seçer.
LIST (Liste)
Kayıtlı program listesine erişim sağlar.
(Boşluk)
Ekran klavyesinde bir boşluk açar.
Q.VIEW(HızlıGörüntüleme)
İzlediğiniz bir önceki programa döner.
FAV (Favori)
Favori kanal listenize erişim sağlar.
1
3D
3D video izlemek için kullanılır.
(Yalnızca LM62**, LM64**, LM66**, LM67**,
LM76**)
PAGE (Sayfa)
Bir önceki veya bir sonraki ekrana geçer.
SETTINGS (Ayarlar)
Ana menülere erişim sağlar.
HOME (Ana Menü)
Ana menülere erişim sağlar.
MYAPPS(Uygulamalarım)
Uygulama listesini gösterir.
Gezinmedüğmeleri(yukarı/aşağı/sol/sağ)
Menüler veya opsiyonlar arasında gezinmenizi sağlar.
OK (Tamam)
Menüleri ve opsiyonları seçer ve girişinizi
onaylar.
(Geri)
Önceki seviyeye döner.
GUIDE (Rehber)
Program kılavuzunu gösterir.
RATIO INPUT
1
.,;@
2
abc
3
4
ghi
5
jkl
6
7
pqrs
8
tuv
9
0
FAV
1
MUTE
OK
GUIDE
Q.VIEW
MY APPS
EXIT
LIST
SETTINGS
2
T.OPT
AD
SUBTITLE
Q.MENU
REC
3
TEXT
LIVE TV
4 5
EXIT(Çıkış)
Ekran üstünde görüntülenenleri silerek TV izleme moduna geri döner.
2
Renklidüğmeler
Bu düğmeler bazı menülerde bulunan özel
TV/
fonksiyonlara erişim sağlar.
RAD
(
: Kırmızı, : Yeşil, : Sarı, : Mavi)
def
3
TELETEXTDÜĞMELERİ
Bu düğmeler teletext için kullanılır.
mno
Daha fazla bilgi için ‘Teletext’ bölümüne ba-
kın.
wxyz
SUBTITLE(Altyazı)
Dijital modda tercih ettiğiniz altyazıyı çağırır.
Q.MENU(HızlıMenü)
P
Hızlı menülere erişim sağlar.
A
G
E
LIVETV(CanlıTV)
Canlı TV'ye geri dönmenizi sağlar.
Kontroldüğmeleri(
Premium içeriği, DVR veya Smart Share menülerini veya SIMPLINK uyumlu cihazları
(USB veya SIMPLINK ya da DVR) kumanda
eder.
REC(Kayıt)
DVR menüsünü ayarlamak için kullanılır.
4
ENERGY SAVING (Enerji Tasarru-
fu)
Enerji tüketimini azaltmak için ekranın parlaklığını ayarlar. (Yalnızca LS57**)
INFO
INFO (Bilgi)
Mevcut program ve ekran bilgilerini görüntüler.
1
(
: Yalnızca LS57**)
4
(
: Yalnızca LM62**, LM64**, LM660*,
LM67**, LM76**)
AD(SesTanımı)
Ses Tanımını Açar veya Kapatır.
APP/
5
APP/* (Uygulama/*)
MHP TV menü kaynağını seçmenizi sağlar.
(Yalnızca İtalya) (Modele bağlı olarak)
5
@ ORANGE
Orange tarafından geliştirilen eğlence ve haber servisi İnternet portalına doğrudan erişim.
(Yalnızca Fransa)
)
Page 59

SİHİRLİ UZAKTAN KUMANDA FONKSİYONLARI
23
SİHİRLİUZAKTANKUMANDAFONKSİYONLARI
Bu öğe her modelde mevcut değildir.
“Sihirli Uzak Kumanda pili zayıf. Pili değiştirin.” mesajı gösterildiğinde pili değiştirin.
Pilleri değiştirmek için pil kapağını açın, pilleri (1,5 V AA)
etiketle eşleşecek şekilde değiştirin ve pil kapağını kapatın. Uzaktan kumandayı, TV
üzerindeki uzaktan kumanda sensörüne doğru tuttuğunuzdan emin olun.
Pilleri yerinden çıkarmak için pil takma işlemlerini ters sıra ile yapın.
ve uçları pil yuvasındaki
DİKKAT
yEski ve yeni pilleri birlikte kullanmayın, aksi halde uzaktan kumanda hasar görebilir.
(Yalnızca 60LM645*, 32/42/47/55LM66**, 42/47/55LM67**, 42/47/55LM76**)
(GÜÇ)
TV'yi açar veya kapatır.
Önceki seviyeye döner.
Tekerlek(OK) (Tamam)
Menüleri ve opsiyonları seçer
Kayıtlı kanallar arasında gezin-
Ekran üzerinde imleci hareket
ettirirken gezinme düğmesine
basarsanız, imleç kaybolur ve
Sihirli Uzaktan Kumanda normal bir uzaktan kumanda gibi
çalışmaya devam eder.
İmleci tekrar görüntülemek
için Sihirli Uzaktan Kumandayı
yanlara doğru sallayın.
BACK (Geri)
ve girişinizi onaylar.
menizi sağlar.
BACK
HOME
P
MY APPS
İmleç(RFverici)
HOME (Ana Menü)
Ana menüye erişim sağlar.
Gezinmedüğmeleri (yukarı/
aşağı/sol/sağ)
Menüler veya opsiyonlar ara-
sında gezinmenizi sağlar.
+ -
Ses seviyesini ayarlar.
ꕌPꕍ
Kaydedilen programlar veya kanal-
lar arasında gezinmenizi sağlar.
MUTE (Sessiz)
Tüm sesleri kapatır.
MYAPPS(Uygulamalarım)
Uygulama listesini gösterir.
3D
3D video izlemek için kullanılır.
TRTÜRKÇE
11-1 Brief Info Title Test (Kısa Bilgi Başlık Testi)...
Uygulamalarım
3
Info.
Sihirli Uzaktan Kumandadaki Hareket
Tuşuna(OK) (Tamam) bastığınızda aşağıdaki
ekran görüntülenir.
1
Geçerli program ve ekran hakkındaki bilgileri
gösterir.
Bu düğmeye bastığınızda program numarası
seçmek için kullanabileceğiniz numara tuş takı-
2
mı görüntülenir.
Uygulamalarım Menüsü’nü seçebilirsiniz.
3
Page 60

SİHİRLİ UZAKTAN KUMANDA FONKSİYONLARI
HOME
24
TÜRKÇE
TR
SihirliUzaktanKumandanın
Kaydettirilmesi
Çalıştırmadan önce sihirli uzaktan kumandayı
TV’nizle ‘eşleştirmeniz’ (kaydetmeniz) gerekir.
SihirliUzaktanKumandanınkaydettirilmesi
1 Otomatik olarak kaydetmek
için TV’yi açıp Hareket
Tuşuna(OK) basın. Kayıt
işlemi tamamlandıktan sonra
ekranda tamamlama mesajı
görüntülenir.
2 Kayıt başarısız olursa TV’yi
kapatıp yeniden açın ve kayıt
işlemini tamamlamak için
HareketTuşuna(OK) basın.
SihirliUzaktanKumandanınyeniden
kaydettirilmesi
BACK
(Geri)
HOME (Ana
Menü)
1 Sıfırlamak için BACK
HOME
de 5 saniye boyunca basılı
tutun, ardından yukarıdaki
“Sihirli Uzaktan Kumandanın
kaydettirilmesi” bölümünü
takip ederek kumandayı
kaydedin.
2 Sihirli Uzaktan Kumandayı
yeniden kaydettirmek için
uzaktan kumandayı TV’ye
doğru tutarak BACK
düğmesine 5 saniye
boyunca basın. Kayıt işlemi
tamamlandıktan sonra
ekranda tamamlama mesajı
görüntülenir.
düğmelerinin ikisini
ve
SihirliUzaktanKumandanın
kullanılması
1 İmleç kaybolursa uzaktan
kumandayı hafçe sola veya
sağa hareket ettirin. İmleç
otomatik olarak yeniden
ekranda görüntülenecektir.
»
İmleç belirli bir süre boyunca
kullanılmazsa kaybolur.
2 Uzaktan kumandanın İmleç
Alıcısını TV'ye doğru tutarak
imleci oynatabilir, ardından
sola, sağa, yukarı ve aşağı
hareket ettirebilirsiniz.
»
İmleç düzgün çalışmıyorsa
uzaktan kumandayı 10 sa-
niye bekledikten sonra yeni-
den kullanmayı deneyin.
SihirliUzaktanKumandayı
KullanırkenAlınacak
Önlemler
Uzaktan kumandayı maksimum iletişim uzak-
y
lığı dahilinde kullanın (10 m). Uzaktan kumanda bu uzaklığın ötesinde veya engelleyen bir nesne ile kullanıldığında bir iletişim
arızası oluşabilir.
Yakındaki cihazlar nedeniyle bir iletişim arı-
y
zası oluşabilir. Sihirli Uzaktan Kumanda ile
aynı bant genişliğini (2.4 GHz) kullandıkları
için mikrodalga fırın veya kablosuz LAN ürünü gibi elektrikli cihazlar girişime neden olabi-
lir.
Sihirli Uzaktan Kumanda düşürülürse veya
y
ağır bir darbe alırsa zarar görebilir veya arızalanabilir.
Sihirli Uzaktan Kumandayı kullanırken mobil-
y
yaların kenarına veya diğer insanlara çarpmamaya dikkat edin.
Söz konusu kablosuz cihazda elektrik dalga-
y
sı girişimi olasılığı bulunduğu için üretici ya
da kurulum uzmanı, insanların emniyetine
ilişkin bir hizmet sunamaz.
Erişim Noktasının (AP) TV'den en az 1 m
y
uzaklıkta bulunması önerilir. AP 1 metreden
daha yakındaysa frekans girişimi sebebiyle Sihirli Uzaktan Kumanda beklenen şekilde
çalışmayabilir.
Page 61

KULLANICI KILAVUZUNUN KULLANILMASI
KULLANICI KILAVUZUNUN KULLANILMASI
Kullanıcı Kılavuzu ayrıntılı TV bilgilerine daha kolay erişmenizi sağlar.
25
1 Ana menüye erişmek için
HOME (Ana
Menü) düğmesine basın.
2 KullanıcıKılavuzu opsiyonunu seçin ve
HareketTuşuna(OK) (Tamam) basın.
Uygulamalarım
Ayarlar Canlı TV
Ara
İnternet3DLG Smart W
Program Kılavuzu
Kullanıcı Kılavuzu
Öncekiler Listesi
Giriş Listesi
Kullanıcı Kılavuzu
NOT
yKullanıcı Kılavuzu'na uzaktan kumandadaki
(KullanıcıKılavuzu) düğmesine basarak
da erişebilirsiniz.
Kullanıcı Kılavuzu
1
KANAL Ayarı
RESİM, SES Ayarı
SEÇENEK
LG SMART Fonksiyonu
Gelişmiş Fonksiyon
Bilgi
3
Giriş aygıtı kullanmak için
Enerji Tasarrufu özelliğini kullanmak için
Saat opsiyonlarını ayarlamak için
TV kilidi opsiyonlarını ayarlamak için
Dili ayarlamak için
Engelli Yardımı
Sihirli Uzaktan Kumandayı ayarlamak için
2
4
Kullanıcı Kılavuzu
KANAL Ayarı
RESİM, SES Ayarı
SEÇENEK
LG SMART Fonksiyonu
Gelişmiş Fonksiyon
Bilgi
Seçilen menünün açıklamasını gösterir.
1
1
OPSİYON > Dili ayarlamak için
HOME Ayarlar OPSİYON Dil
Ekranda görüntülenen Menü Dili (Language) ve Ses Dili’ni seçer.
Görüntü metni için bir dil seçer.
Menü Dili (Language)
[Yalnızca Dijital Modda]
Ses Dili
Birkaç ses dili içeren dijital bir yayını izlerken, istediğiniz dili seçebilirsiniz.
[Yalnızca Dijital Modda]
İki veya daha fazla altyazı dili yayınlanıyorsa Altyazı fonk-
Altyazı Dili
siyonunu kullanın.
✎ Seçilen dilde altyazı verisi yayınlanmazsa varsayılan
dildeki altyazı görüntülenir.
3
Yakınlaştır
Git Kapat
2
HOME Ayarlar OPSİYON Dil
Ekranda görüntülenen Menü Dili (Language) ve Ses Dili’ni seçer.
Görüntü metni için bir dil seçer.
Menü Dili (Language)
[Yalnızca Dijital Modda]
Birkaç ses dili içeren dijital bir yayın izlerken, istediği-
Ses Dili
niz dili seçebilirsiniz.
[Yalnızca Dijital Modda]
İki veya daha fazla altyazı dili yayınlanıyorsa Altyazı
Altyazı Dili
fonksiyonunu kullanın.
✎ Seçilen dilde altyazı verisi yayınlanmazsa varsayılan
dildeki altyazı görüntülenir.
3
Uzaklaştır
Git Kapat
Sayfalar arasında gezinmek için ꕌ/ꕍ düğmelerini kullanabilirsiniz.
Doğrudan Kullanıcı Kılavuzu'ndan seçilen
2
menüye gider.
Ekranı yakınlaştırır veya uzaklaştırır.
3
TRTÜRKÇE
O an izlenmekte olan programı veya giriş
1
kaynağı ekranını gösterir.
İstediğiniz kategoriyi seçmenizi sağlar.
2
İstediğiniz öğeyi seçmenizi sağlar.
3
Sayfalar arasında gezinmek için
ꕌ
/ꕍdüğmelerini kullanabilirsiniz.
Dizinden istediğiniz fonksiyonunun açıklama-
4
sına bakmanızı sağlar.
Page 62

BAKIM / SORUN GİDERME
26
BAKIM
TÜRKÇE
TR
TV'nizin temizlenmesi
Yüksek performansı korumak ve ürünün kullanım ömrünü uzatmak için TV'nizi düzenli olarak temizleyin.
DİKKAT
yGücün kapandığından, güç kablosu ve diğer tüm kabloların çıkarıldığından emin olun.
yTV’nin uzun süre kullanılmayacaksa, olası yıldırım ve voltaj dalgalanmalarından dolayı hasar
görmesini önlemek için güç kablosunu duvar prizinden çekin.
Ekran,çerçeve,kabinveayaklık
yTozu ve haf kirleri temizlemek için, yüzeyi kuru, temiz ve yumuşak bir bezle silin.
yAğır kirleri temizlemek için, yüzeyi temiz su veya haf deterjana batırılmış bir bezle silin. Ardından
hemen kuru bir bezle kurulayın.
DİKKAT
yHasar görmesine yol açabileceğinden ekrana hiçbir koşulda dokunmayın.
yEkranda çiziklere ve görüntü bozulmalarına neden olabileceğinden dolayı, ekran yüzeyine tırnağınızla
veya sivri bir nesneyle dokunmayın, bastırmayın ve vurmayın.
yYüzeye zarar verebileceğinden dolayı herhangi bir kimyasal madde kullanmayın.
yYüzeye sıvı püskürtmeyin. TV'ye su girmesi durumunda, yangın, elektrik çarpması ya da arıza
meydana gelebilir.
Güç kablosu
Güç kablosunda biriken toz ve kirleri düzenli olarak temizleyin.
SORUNGİDERME
Sorun Çözüm
TV uzaktan
kumandayla kontrol
edilemiyor.
Görüntü ve ses
gelmiyor.
TV aniden kapanıyor. yGüç kontrol ayarlarını gözden geçirin. Güç kaynağı kesintiye uğramış olabilir.
PC’ye (RGB/ HDMI
DVI) bağladığımda
‘Sinyal yok’ veya
‘Geçersiz Format’
mesajı görüntüleniyor.
yÜrün üzerindeki uzaktan kumanda sensörünü kontrol edin ve tekrar deneyin.
yÜrün ve uzaktan kumanda arasında engel olup olmadığını kontrol edin.
yPillerin hala çalışır durumda olduğunu ve düzgün takılıp takılmadığını kontrol edin (pilin ucu
yuvanın ucuna, ucu ise yuvanın ucuna gelmelidir).
yÜrünün açık olup olmadığını kontrol edin.
yGüç kablosunun bir duvar prizine bağlı olup olmadığını kontrol edin.
yBaşka ürünler bağlayarak prizde bir sorun olup olmadığını kontrol edin.
ySaat ayarlarında Otomatik kapanma özelliğinin devrede olup olmadığını kontrol edin.
yTV açıkken sinyal yoksa 15 dakika sonra TV otomatik olarak kapanacaktır.
yUzaktan kumandayı kullanarak TV’yi açıp kapatın.
yRGB/HDMI kablosunu yeniden bağlayın.
yTV açıkken PC’yi yeniden başlatın.
Page 63

ÇEVRESELBİLGİLER
WEEE
ÇEVRESEL BİLGİLER
27
Eskicihazınızınatılması
Üzerinde çarpı işareti olan bu çöp kutusu sembolü, ürünün 2002/96/EC sayılı Avrupa
Direkti ile uyumlu olduğunu belirtir.
Tüm elektrikli ve elektronik ürünler belediye çöp döngüsünden ayrı olarak, devlet veya
yerel kurumlarca belirlenen özel toplama tesisleri yoluyla ayrı olarak atılmalıdır.
Eski cihazınızın doğru şekilde atılması, çevre ve insan sağlığı üzerinde oluşabilecek olası
olumsuz sonuçların önlenmesine yardımcı olacaktır.
Eski cihazınızın atılması konusunda daha ayrıntılı bilgi için lütfen belediye, ilgili yerel çöp toplama hizmet
merkezi ya da ürünü satın aldığınız mağaza ile temas kurun.
Pil
Kullanılmışpillerin/bataryalarınatılması
Ürünün üzerinde çarpı işareti olan bu çöp kutusu sembolü, ürünün 2006/66/EC sayılı
Avrupa Direkti kapsamında olduğunu gösterir.
Pilde %0,0005'ten fazla cıva, %0,002'den fazla kadmiyum veya %0,004'ten fazla kurşun
varsa, bu sembolle birlikte cıva (Hg), kadmiyum (Cd) veya kurşun (Pb) kimyasallarına
ilişkin semboller de kullanılır.
Tüm piller/bataryalar evsel atıklardan ayrı olarak, devlet veya yerel kurumlarca belirlenen toplama tesisleri
yoluyla atılmalıdır.
Eski pillerinizin/bataryalarınızın doğru şekilde atılması, çevre, hayvanlar ve insan sağlığı üzerinde
oluşabilecek olası olumsuz sonuçların önlenmesine yardımcı olacaktır.
Eski pillerinizin/bataryalarınızın atılması konusunda daha ayrıntılı bilgi için lütfen belediye, ilgili yerel çöp
toplama hizmet merkezi ya da ürünü satın aldığınız mağaza ile temasa geçin.
Ürün özellikleri, ürün fonksiyonlarının yükseltilmesine bağlı olarak önceden haber verilmeksizin
değiştirilebilir.
TRTÜRKÇE
Page 64

TEKNİK ÖZELLİKLER
28
TEKNİKÖZELLİKLER
TÜRKÇE
TR
Ürün özellikleri, ürün fonksiyonlarının yükseltilmesine bağlı olarak önceden haber verilmeksizin
değiştirilebilir.
(Yalnızca 60LM645*, 32/42/47/55LM66**, 42/47/55LM67**, 42/47/55LM76**)
Kablosuz LAN modülü (TWFM-B003D) teknik özellikleri
Standart IEEE802.11a/b/g/n
2400 - 2483,5 MHz
Frekans Aralığı
Modülasyon CCK / OFDM / MIMO
Çıkış Gücü
(Tipik)
Veri hızı
Anten Kazancı
(Tipik)
Kullanılan bant genişliği
Ülkede kullanılan bant kanalı farklı olabileceği için, kullanıcı çalışma frekansını değiştiremez veya ayar-
y
layamaz ve bu ürün bölgesel frekans tablosuna göre ayarlanmıştır.
5150 - 5250 MHz
5725 - 5850 MHz
802.11a: 11 dBm
802.11b: 15 dBm
802.11g: 13 dBm
802.11n - 2.4 GHz: 13 dBm
802.11n - 5 GHz: 13 dBm
802.11a/g: 54 Mbps
802.11b: 11 Mbps
802.11n: 300 Mbps
2400 - 2483,5 MHz: -2,5 dBi
5150 - 5250 MHz: -2,2 dBi
5725 - 5850 MHz: -2,9 dBi
802.11a/b/g: HT20
802.11n: HT20/40
Bluetooth modülü (BM-LDS302) teknik özellikleri
Standart Bluetooth Sürüm 3.0
Frekans Aralığı 2400 ~ 2483.5 MHz
Çıkış Gücü (Maks.) 10 dBm veya daha az
Veri hızı (Maks.) 3 Mbps
İletişim Uzaklığı Görüş alanı içerisinde yaklaşık 10 m
Page 65

Kullanım süresi 10 yıldır. (Ürünün fonksiyonlarını yerine getirebilmesi için gerekli yedek parça temin süresi).
NAKLİYEVETAŞIMASIRASINDADİKKATEDİLMESİGEREKENLER
1- Cihazın fişini prizden çıkarınız
2- Taşıma sırasında ekranı düşürmeyin, sarsmayarak darbe görmesini önleyiniz.
3- Ürünü normal kullanma konumunda taşıyınız, mümkünse orjinal malzemesiyle paketleyerek taşıyın.
4- Taşıma sırasında cihazın üstüne ağır bir şey koymayınız.
5- Mümkünse iki kişi taşıyınız.
6- Kesinlikle cihazınızı panel üzerine yatırmayınız.
ENERJİTASARRUFBİLGİLERİ
1- Plazma veya LCD TV nizi kullanmadığınız sürede kapalı tutun
2- Uzun süre kullanmayacaksınız cihazın fişini muhakkak çıkarın
3- Kısa aralıklarda cihazınızı stand-by konumunda bırakabilirsiniz
LGELECTRONICSTİCARETA.Ş.
KaptanpaşaMah.PiyalepaşaBulvarıNo:73
OrtadoğuPlazaKat:7
Şişli-İstanbul-Turkey
Tel: (0 212) 314 52 52
Fax: (0 212) 222 61 44
YETKİLİSERVİSLİSTESİ
DeğerliMüşterimiz,
LG Çağrı Yönetim Merkezi 444 6 543 (LGE) no.lu telefon numarası ile, 7 gün / 24 saat hizmet vermektedir
(Saat 20:00 ile 09:00 saatleri arasında otomatik kayıt sistemi ile). Bu saatler dışında aradığınızda adınızı,
soyadınızı ve telefon numaranızı alan kodu ile bıraktığınızda ilk mesai saatinde sizinle irtibata geçilecektir.
Doğrudan bu numarayı çevirerek size en yakın Yetkili Servis telefonunu alabilir veya arzu ettiğiniz hizmeti
talep edebilirsiniz.
ÇağrıMerkezi
444 6 543 (LGE)
ÇAĞRIMERKEZİMİZİSABİTTELEFONLARDAN
VEYA CEP TELEFONLARINDAN ALAN KODU
ÇEVİRMEKSİZİNARAYABİLİRSİNİZ.
Page 66

Page 67

MAKING CONNECTIONS
B-1
MAKING
CONNECTIONS
This section on MAKING CONNECTIONS mainly
uses diagrams for the LM76** models.
Antenna connection
IN
ANTENNA
/CABLE
English
Connect the TV to a wall antenna socket with an
RF cable (75 Ω).
Satellite dish connection
(Only satellite models)
IN
13/18V
700mA MAx
LNB IN
Satellite
English
Connect the TV to a satellite dish to a satellite
socket with a satellite RF cable (75 Ω).
Türkçe
TV’yi uydu RF kablosu (75 Ω) kullanarak çanak
antene ve uydu soketine bağlayın.
NOTE
yUse a signal splitter to use more than 2 TVs.
yIf the image quality is poor, install a signal
amplifier properly to improve the image
quality.
yIf the image quality is poor with an antenna
connected, try to realign the antenna in the
correct direction.
yAn antenna cable and converter are not
supplied.
Türkçe
TV’yi RF kablosu (75 Ω) ile duvar anten soketine
bağlayın.
NOT
yİkiden fazla TV’de kullanmak için bir sinyal
ayırıcısı kullanın.
yGörüntü kalitesinin kötü olması durumunda
görüntü kalitesini artırmak üzere bir sinyal
güçlendiricisi kullanın.
yAnten bağlıyken görüntü kalitesinin kötü
olması durumunda anteni doğru yönde
yeniden hizalamayı deneyin.
yAnten kablosu ve dönüştürücü ürünle birlikte
verilmemektedir.
Page 68

MAKING CONNECTIONS
B-2
HDMI connection
DVD/ Blu-Ray / HD Cable
Box / HD STB / PC
(*Not Provided)
HDMI
IN
(PC)
4
2 3 1
(ARC)
Türkçe
Harici cihazdan TV’ye dijital video ve ses sinyalleri
gönderir. Harici cihaz ile TV’yi HDMI kablosuyla
aşağıdaki şekilde gösterildiği gibi bağlayın.
Bağlanmak için herhangi bir HDMI giriş bağlantı
noktasını seçin. Kullandığınız bağlantı noktası
önemli değildir.
NOT
yEn iyi görüntü kalitesi için, TV’nin HDMI
bağlantısıyla kullanılması önerilir.
yCEC (Tüketici Elektronik Kontrolü)
fonksiyonlu en son Yüksek Hızlı HDMI™
Kablosunu kullanın.
yYüksek Hızlı HDMI™ Kablolarının 1080p ve
üzerine kadar HD sinyalini taşıyabildiği test
edilmiştir.
yDesteklenen DTV Ses: MPEG, Dolby Digital,
Dolby Digital Plus, HE-AAC
yDesteklenen HDMI Ses biçimi: Dolby Digital,
PCM (En fazla 192 KHz, 32k/44.1k/48k/88k/
96k/176k/192k, DTS desteklenmez.)
English
Transmits the digital video and audio signals from
an external device to the TV. Connect the external
device and the TV with the HDMI cable as shown.
Choose any HDMI input port to connect. It does
not matter which port you use.
NOTE
yIt is recommended to use the TV with the
HDMI connection for the best image quality.
yUse the latest High Speed HDMI™ Cable
with CEC (Customer Electronics Control)
function.
yHigh Speed HDMI™ Cables are tested to
carry an HD signal up to 1080p and higher.
ySupported DTV Audio: MPEG, Dolby Digital,
Dolby Digital Plus, HE-AAC
ySupported HDMI Audio format : Dolby
Digital, PCM (Up to 192 KHz, 32k/44.1k/48k
/88k/96k/176k/192k, DTS Not supported.)
ARC (Audio Return Channel)
English
An external audio device that supports
y
SIMPLINK and ARC must be connected
using HDMI IN 1 (ARC) port.
When connected with a high-speed HDMI
y
cable, the external audio device that
supports ARC outputs optical SPDIF without
additional optical audio cable and supports
the SIMPLINK function.
Türkçe
HDMI IN 1 (ARC) bağlantı noktası kullanıla-
y
rak SIMPLINK ve ARC’yi destekleyen harici
bir ses cihazının bağlanması gerekir.
ARC’yi destekleyen harici ses cihazı, yüksek
y
hızlı bir HDMI kablosuyla bağlandığında ek
optik ses kablosu eklemeye gerek kalmadan
optik SPDIF çıkışı sağlar ve SIMPLINK fonksiyonunu destekler.
Page 69

MAKING CONNECTIONS
B-3
DVI to HDMI connection
(PC)
4
IN
2 3 1
IN
(RGB/HDMI-PC)
AUDIO
(ARC)
(*Not Provided)
Türkçe
Harici cihazdan TV’ye dijital video sinyali gönderir.
Harici cihaz ile TV’yi DVI-HDMI kablosuyla
aşağıdaki şekilde gösterildiği gibi bağlayın. Ses
sinyali göndermek için bir ses kablosu bağlayın.
NOT
yGrafik kartına bağlı olarak, HDMI-
DVI Kablosu kullanılıyorsa DOS modu
çalışmayabilir.
yDVI-HDMI’yı HDMI IN 4’e bağlamanız
önerilir.
AUDIO OUT
DVD/ Blu-Ray / HD Cable Box / PC
English
Transmits the digital video signal from an external
device to the TV. Connect the external device and
the TV with the DVI-HDMI cable as shown. To
transmit an audio signal, connect an audio cable.
DVI OUT
NOTE
yDepending on the graphics card, DOS mode
may not work if a HDMI to DVI Cable is in use.
yIt is recommended to connect the DVI-HDMI to
HDMI IN 4.
Page 70

MAKING CONNECTIONS
B-4
RGB-PC connection
IN
(RGB/HDMI-PC)
(PC)
RGB
(*Not Provided)
RGB OUT (PC)
PC
English
Transmits the video signal from PC to the TV. To
transmit an audio signal, connect an audio cable.
Türkçe
AUDIO
AUDIO OUT
Component connection
IN
(Use the composite
video cable provided.)
YELLOW
DVD / Blu-Ray /
HD Cable Box
VIDEO
AV2
AUDIO
WHITE WHITE WHITE
COMPONENT
PB Y
PR
(Use the component
video cable provided.)
GREENYELLOW
RED RED RED
GREEN GREEN GREEN
BLUE BLUE BLUE
RED RED RED
(*Not Provided)
PC’den TV’ye video sinyali gönderir. Ses sinyali
göndermek için bir ses kablosu bağlayın.
L R
AUDIO
VIDEO
English
Transmits analog video and audio signals from an
external device to the TV. Connect the external
device and the TV with a component cable as
shown.
NOTE
yIf cables are installed incorrectly, it could
cause the image to display in black and
white or with distorted colour.
Page 71

MAKING CONNECTIONS
B-5
Türkçe
Harici cihazdan TV’ye analog video ve ses
sinyalleri gönderir. Harici cihaz ile TV’yi komponent
kablosuyla aşağıdaki şekilde gösterildiği gibi
bağlayın.
NOT
yKabloların yanlış takılması, görüntünün siyah
beyaz veya bozuk renklerle gösterilmesine
neden olabilir.
Composite connection
IN
AV2
AUDIO
COMPONENT
PR Y
PB
YELLOW
WHITE
WHITE
VIDEO
(Use the composite video
cable provided.)
YELLOW
VCR / DVD / Blu-Ray
/ HD Cable Box
YELLOW
RED
RED
(*Not Provided)
RED
WHITE
YELLOW
VIDEO
( )
MONO
AUDIOL R
English
Transmits analog video and audio signals from an
external device to the TV. Connect the external
device and the TV with the composite cable as
shown.
Türkçe
Harici cihazdan TV’ye analog video ve ses
sinyalleri gönderir. Harici cihaz ile TV’yi kompozit
kablosuyla aşağıdaki şekilde gösterildiği gibi
bağlayın.
Page 72

MAKING CONNECTIONS
B-6
Audio connection
(*Not Provided)
OPTICAL
Digital Audio System
OUT
OPTICAL
DIGITAL
AUDIO
AUDIO IN
Türkçe
Dahili hoparlör yerine isteğe bağlı bir harici ses
sistemi kullanabilirsiniz.
NOT
yDahili hoparlör yerine isteğe bağlı bir harici
ses cihazı kullanırsanız, TV hoparlörü
özelliğini kapalı olarak ayarlayın.
Dijitaloptiksesbağlantısı
TV’den harici cihaza dijital ses sinyali gönderir.
Harici cihaz ile TV’yi optik ses kablosuyla
aşağıdaki şekilde gösterildiği gibi bağlayın.
NOT
yOptik çıkış bağlantı noktasına doğru
bakmayın. Lazer ışınına bakmak gözlerinize
zarar verebilir.
yACP (Ses Kopyalama Koruması) özelliğine
sahip sesler dijital ses çıkışını engelleyebilir.
English
You may use an optional external audio system
instead of the built-in speaker.
NOTE
yIf you use an optional external audio device
instead of the built-in speaker, set the TV
speaker feature to off.
Digital optical audio connection
Transmits a digital audio signal from the TV to an
external device. Connect the external device and
the TV with the optical audio cable as shown.
NOTE
yDo not look into the optical output port.
Looking at the laser beam may damage
your vision.
yAudio with ACP (Audio Copy Protection)
function may block digital audio output.
Page 73

MAKING CONNECTIONS
B-7
USB connection
USB Apps
3
USB IN
Hub
USB Hub
HDD
(*Not Provided)
English
Connect a USB storage device such as a USB
ash memory, external hard drive, or a USB
memory card reader to the TV and access the
Smart Share menu to use various multimedia les.
2
USB IN
HDD IN
1
USB
(*Not Provided)
CI module connection
▼PCMCIA CARD SLOT▼
NOTE
yTo use a USB Hub device, make sure that it
is connected to the USB IN 2 USB Hub port.
ySome USB Hubs may not work. If a USB
device connected using a USB Hub is not
detected, connect it to the USB port on the
TV directly.
Türkçe
Çeşitli multimedya dosyalarını kullanmak için
TV’ye USB aş bellek, harici sabit disk ya da USB
bellek kartı okuyucu gibi bir USB depolama aygıtı
bağlayın ve Smart Share menüsüne gidin.
NOT
yUSB Hub cihazı kullanmak için cihazın
USB IN 2 USB Hub bağlantı noktasına
bağlandığından emin olun.
yBazı USB Hubları çalışmayabilir. USB Hubı
ile bağlanan bir USB aygıtı çalışmazsa,
doğrudan TV üzerindeki USB bağlantı
noktasına bağlayın.
English
View the encrypted (pay) services in digital TV
mode. This feature is not available in all countries.
NOTE
yCheck if the CI module is inserted into the
PCMCIA card slot in the right direction. If
the module is not inserted properly, this can
cause damage to the TV and the PCMCIA
card slot.
Türkçe
Dijital TV modunda şifreli (ücretli) servisleri
görüntüler. Bu özellik her ülkede mevcut değildir.
NOT
yCI modülünün PCMCIA kart yuvasına doğru
yönde takıldığından emin olun. Modül doğru
takılmadığında, TV’nin ve PCMCIA kart
yuvasının zarar görmesine neden olabilir.
Page 74

MAKING CONNECTIONS
B-8
Headphone connection
(*Not Provided)
OUT
H/P
English
Transmits the headphone signal from the TV to
an external device. Connect the external device
and the TV with the headphone as shown on the
following illustration.
NOTE
AUDIO menu items are disabled when
y
connecting a headphone.
When changing AV MODE with a headphone
y
connected, the change is applied to video
but not to audio.
Optical Digital Audio Out is not available
y
when connecting a headphone.
Headphone impedance: 16 Ω
y
Max audio output of headphone: 10 mW to
y
15 mW
Headphone jack size: 0.35 cm
y
Türkçe
TV’den harici bir cihaza kulaklık sinyali gönderir.
Harici cihaz ile TV’yi kulaklıkla aşağıdaki şekilde
gösterildiği gibi bağlayın.
NOT
Kulaklık bağlandığında SES menüsü öğeleri
y
devre dışı bırakılır.
Kulaklık bağlıyken AV MODU değiştirilirse,
y
değişiklik videoya uygulanır ancak sese uygulanmaz.
Optik Dijital Ses Çıkışı kulaklık takılı olduğun-
y
da kullanılamaz.
Kulaklık empedansı: 16 Ω
y
Kulaklığın maks. ses çıkışı: 10 mW - 15 mW
y
Kulaklık jakı boyutu: 0,35 cm
y
Page 75

MAKING CONNECTIONS
B-9
Euro Scart connection
AUDIO / VIDEO
AV1
(TV Out
(*Not Provided)
AV1
(When DTV scheduled
recording is in progress
1
)
using recording
equipment.)
O
(The input mode is
converted to DTV.)
IN/OUT
(RGB)
AV1
(Use the scart
gender cable
provided.)
English
Transmits the video and audio signals from an
external device to the TV set. Connect the external
device and the TV set with the euro scart cable as
shown. To display images by using progressive
scan, make sure to use the euro scart cable.
Output
Type
Current
input mode
Digital TV Digital TV O
Analogue TV, AV
Component / RGB
Analogue TV
HDMI
1 TV Out : Outputs Analogue TV or Digital TV
signals.
Türkçe
Harici cihazdan TV setine video ve ses sinyalleri
gönderir. Harici cihaz ve TV setini aşağıdaki
şekilde gösterildiği gibi Euro Scart kablosuyla
bağlayın. Görüntüleri aşamalı tarama ile görüntülemek için, Euro Scart kablosunu kullandığınızdan
emin olun.
Geçerli
girişmodu
Çıkıştipi
AV1
(TV Çıkışı
1
)
AV1
(Kayıt ekipmanı
kullanılarak
zamanlanmış DTV
kaydı devam ederken.)
Dijital TV Dijital TV O
Analog TV, AV
Komponent / RGB
HDMI
Analog TV
O
(Giriş modu DTV’ye
dönüştürülür.)
1 TV Çıkışı: Analog TV veya Dijital TV sinyal
çıkışı sağlar.
NOT
yKullanılacak Euro Scart kablosu sinyal
korumalı olmalıdır.
y3D görüntü modunda dijital TV izlerken,
TV çıkış sinyallerinin SCART kablosu
aracılığıyla çıkışı sağlanamaz. (Yalnızca 3D
modeller)
yDijital TV’de programlanmış kayıt yapılırken,
3D modunu Açık olarak ayarladığınızda
SCART kablosu aracılığıyla monitör çıkış
sinyallerinin çıkışı sağlanamaz ve kayıt
yapılamaz. (Yalnızca 3D modeller)
NOTE
yAny Euro scart cable used must be signal
shielded.
yWhen watching digital TV in 3D imaging
mode, TV out signals cannot be output
through the SCART cable. (Only 3D models)
yIf you set the 3D mode to On while a
scheduled recording is performed on digital
TV, monitor out signals cannot be output
through the SCART cable, and the recording
cannot be performed. (Only 3D models)
Page 76

MAKING CONNECTIONS
B-10
English
Connect various external devices to the TV
and switch input modes to select an external
device. For more information of external device’s
connection, refer to the manual provided with each
device.
Available external devices are: HD receivers,
DVD players, VCRs, audio systems, USB storage
devices, PC, gaming devices, and other external
devices.
NOTE
yThe external device connection may differ
from the model.
yConnect external devices to the TV
regardless of the order of the TV port.
yIf you record a TV program on a DVD
recorder or VCR, make sure to connect the
TV signal input cable to the TV through a
DVD recorder or VCR. For more information
of recording, refer to the manual provided
with the connected device.
yRefer to the external equipment’s manual for
operating instructions.
yIf you connect a gaming device to the TV,
use the cable supplied with the gaming
device.
yIn PC mode, there may be noise associated
with the resolution, vertical pattern, contrast
or brightness. If noise is present, change
the PC output to another resolution, change
the refresh rate to another rate or adjust the
brightness and contrast on the PICTURE
menu until the picture is clear.
yIn PC mode, some resolution settings may
not work properly depending on the graphics
card.
Türkçe
TV’ye çeşitli harici cihazlar bağlayın ve bir harici
cihaz seçmek için giriş modlarına geçin. Harici
cihaz bağlantısı hakkında daha fazla bilgi için
cihazlarla birlikte verilen kılavuza bakın.
Kullanılabilir harici cihazlar şunlardır: HD alıcılar,
DVD oynatıcılar, VCR cihazları, ses sistemleri,
USB depolama aygıtları, PC, oyun cihazları ve
diğer harici cihazlar.
NOT
yHarici cihaz bağlantısı modele göre
değişiklik gösterebilir.
yHarici cihazları TV’ye, TV bağlantı
noktalarını dikkate almaksızın bağlayın.
yDVD kayıt cihazına ya da VCR cihazına
bir TV programı kaydederken TV sinyal
giriş kablosunun DVD kayıt cihazı ya da
VCR üzerinden TV’ye bağlandığından emin
olun. Kayıt hakkında daha fazla bilgi için,
bağlanan cihazla birlikte verilen kılavuza
bakın.
yKullanım talimatları için harici cihazın
kullanım kılavuzuna başvurun.
yTV’ye bir oyun cihazı bağlarsanız, oyun
cihazıyla birlikte verilen kabloyu kullanın.
yPC modunda, çözünürlük, dikey desen,
kontrast veya parlaklığa bağlı parazit
görülebilir. Parazit varsa PC çıkışını başka
bir çözünürlüğe ayarlayın, yenileme hızını
değiştirin veya net bir görüntü elde edene
kadar RESİM menüsünden parlaklık ve
kontrast ayarlarını değiştirin.
yPC modunda bazı çözünürlük ayarları grafik
kartına bağlı olarak çalışmayabilir.
Page 77

SPECIFICATIONS
SPECIFICATIONS
Product specifications may be changed without prior notice due to upgrade of product functions.
For the power supply and power consumption, refer to the label attached to the product.
32LS57** 37LS57** 42LS57**
MODELS
Dimensions
(W x H x D)
Weight With stand (kg)
Power requirement
Power consumption
MODELS
Dimensions
(W x H x D)
Weight With stand (kg)
Power requirement
Power consumption
MODELS
Dimensions
(W x H x D)
Weight With stand (kg)
Power requirement
Power consumption
With stand (
Without stand(
Without stand (kg)
With stand (
Without stand(
Without stand (kg)
With stand (
Without stand(
Without stand (kg)
mm
mm
mm
32LS570S-ZA
32LS570T-ZA
32LS570S-ZB
32LS570T-ZB
746.0 x 527.0 x 204.0 856.0 x 590.0 x 204.0
)
746.0 x 462.0 x 35.5 856.0
mm)
9.7 12.4
8.4 10.5
AC 100-240 V~ 50 / 60 HzAC 100-240 V~ 50 / 60 HzAC 100-240 V~ 50 / 60
80 W 90 W
32LM62** 37LM62** 42LM62**
32LM620S-ZA
32LM620T-ZA
32LM620S-ZE
32LM620T-ZE
32LM621S-ZD
32LM621T-ZD
746.0 x 528.0 x 225.0 855.0 x 587.0 x 225.0 979.0 x 670.0x 263.0
)
746.0 x 462.0 x 35.5 855.0 x 524.0 x 35.5 979.0 x 594.0 x 35.5
mm)
10.0 12.0 15.3
8.5 10.4 13.1
AC 100-240 V~ 50 / 60 HzAC 100-240 V~ 50 / 60 HzAC 100-240 V~ 50 / 60
80 W 90 W 100 W
47LM62** 55LM62** 65LM62**
47LM620S-ZE
47LM620T-ZE
47LM621S-ZD
47LM621T-ZD
1089.0 x 730.0 x 263.0 1263.0 x 830.0 x 331.0
)
x
655.0
1089.0
mm)
17.8 25.7
15.6 21.9
AC 100-240 V~ 50 / 60 HzAC 100-240 V~ 50 / 60 HzAC 100-240 V~ 50 / 60
120 W 150 W
x
37LS570S-ZA
37LS570T-ZA
37LS570S-ZB
37LS570T-ZB
x
524.0
x
35.5
37LM620S-ZE
37LM620T-ZE
37LM621S-ZD
37LM621T-ZD
55LM620S-ZE
55LM620T-ZE
55LM621S-ZD
55LM621T-ZD
35.5 1263.0 x 754.0 x 35.5
42LS570S-ZA
42LS570T-ZA
42LS570S-ZB
42LS570T-ZB
979.0 x 660.0 x 269.0
979.0 x 594.0 x 35.5
15.1
12.6
Hz
100 W
42LM620S-ZA
42LM620T-ZA
42LM620S-ZE
42LM620T-ZE
42LM621S-ZD
42LM621T-ZD
Hz
65LM620S-ZB
65LM620T-ZB
65LM621S-ZA
65LM621T-ZA
65LM621S-ZD
65LM621T-ZD
1539.0 x 993.0 x 354.0
1539.0
x
924.0
45.8
40.6
Hz
270 W
x
B-11
38.1
Page 78

SPECIFICATIONS
B-12
MODELS
Dimensions
(W x H x D)
Weight With stand (kg)
Power requirement
Power consumption
MODELS
Dimensions
(W x H x D)
Weight With stand (kg)
Power requirement
Power consumption
MODELS
Dimensions
(W x H x D)
Weight With stand (kg)
Power requirement
Power consumption
MODELS
Dimensions
(W x H x D)
Weight With stand (kg)
Power requirement
Power consumption
With stand (
Without stand(
Without stand (kg)
With stand (
Without stand(
Without stand (kg)
With stand (
Without stand(
Without stand (kg)
With stand (
Without stand(
Without stand (kg)
mm
mm
mm
mm
32LM64** 42LM64** 47LM64**
32LM640S-ZA
855.0 x 587.0x 225.0 979.0 x 670.0x 263.0 1089.0 x 730.0 x 263.0
)
855.0 x 524.0 x 35.6 979.0 x 594.0 x 35.5 1089.0
mm)
9.5 15.3 17.8
8.0 13.1 15.6
AC 100-240 V~ 50 / 60 HzAC 100-240 V~ 50 / 60 HzAC 100-240 V~ 50 / 60
90 W 100 W 110 W
55LM64** 60LM64**
55LM640S-ZA
55LM640T-ZA
55LM664S-ZA
55LM664T-ZA
1263.0 x 830.0 x 331.0
)
1263.0 x 754.0 x 35.5
mm)
25.7
21.9
AC 100-240 V~ 50 / 60 HzAC 100-240 V~ 50 / 60
120 W
32LM660* 32LM669* 42LM660*
32LM660S-ZA
32LM660T-ZA
719.0 x 499.0 x 225.0 719.0 x 499.0 x 204.0 953.0 x 636.0 x 263.0
)
x
435.0
x
719.0
mm)
9.5 9.4 14.8
8.0 8.0 12.6
AC 100-240 V~ 50 / 60 HzAC 100-240 V~ 50 / 60 HzAC 100-240 V~ 50 / 60
90 W 90 W 100 W
42LM669* 47LM660* 47LM669*
42LM669S-ZC
42LM669T-ZC
953.0 x 627.0 x 269.0 1063.0 x 701.0 x 263.0 1063.0 x 692.0 x 269.0
)
953.0 x 566.0 x 33.4 1063.0 x 628.0 x 33.4 1063.0 x 628.0 x 33.4
mm)
15.1 17.4 17.7
12.6 15.2 15.2
AC 100-240 V~ 50 / 60 HzAC 100-240 V~ 50 / 60 HzAC 100-240 V~ 50 / 60
100 W 110 W 110 W
35.6 719.0
42LM640S-ZA
42LM640T-ZA
42LM664T-ZA
60LM640S-ZA
60LM640T-ZA
60LM645S-ZA
60LM645T-ZA
1391.1 x 905.2 x 334.7
1391.1 x 835.5 x 52.5
42.6
38.5
Hz
250 W
32LM669S-ZC
32LM669T-ZC
x
435.0
x
35.6 953.0 x 566.0 x 33.4
47LM660S-ZA
47LM660T-ZA
47LM640S-ZA
47LM640T-ZA
47LM664S-ZA
47LM664T-ZA
x
Hz
42LM660S-ZA
42LM660T-ZA
Hz
47LM669S-ZC
47LM669T-ZC
Hz
655.0
x
35.5
Page 79

MODELS
Dimensions
(W x H x D)
Weight With stand (kg)
Power requirement
Power consumption
MODELS
Dimensions
(W x H x D)
Weight With stand (kg)
Power requirement
Power consumption
MODELS
Dimensions
(W x H x D)
Weight With stand (kg)
Power requirement
Power consumption
With stand (
Without stand(
Without stand (kg)
With stand (
Without stand(
Without stand (kg)
With stand (
Without stand(
Without stand (kg)
mm
mm
mm
SPECIFICATIONS
55LM66**
55LM660S-ZA
55LM660T-ZA
1232.0 x 795.0 x 331.0
)
x
723.0
x
1232.0
mm)
25.0
21.3
AC 100-240 V~ 50 / 60
Hz
120 W
42LM67** 47LM67** 55LM67**
42LM670S-ZA
42LM670T-ZA
42LM671S-ZB
42LM671T-ZB
953.0 x 636.0 x 263.0 1063.0 x 701.0 x 263.0
)
x
953.0
mm)
14.8 17.5
12.6 15.3
AC 100-240 V~ 50 / 60 HzAC 100-240 V~ 50 / 60 HzAC 100-240 V~ 50 / 60
100 W 110 W
42LM76** 47LM76** 55LM76**
42LM760S-ZA
42LM760T-ZA
42LM760S-ZB
42LM760T-ZB
42LM761S-ZA
42LM761T-ZA
953.0 x 636.0 x 263.0
)
953.0 x 566.0 x 33.4
mm)
15.0 17.5
12.8 15.3
AC 100-240 V~ 50 / 60 HzAC 100-240 V~ 50 / 60 HzAC 100-240 V~ 50 / 60
110 W 130 W
566.0
33.6
47LM670S-ZA
47LM670T-ZA
47LM671S-ZB
47LM671T-ZB
x
33.4 1063.0
47LM760S-ZA
47LM760T-ZA
47LM760S-ZB
47LM760T-ZB
47LM761S-ZA
47LM761T-ZA
1063.0 x 701.0 x 263.0
1063.0 x 628.0 x 33.4
x
628.0
x
55LM670S-ZA
55LM670T-ZA
55LM671S-ZB
55LM671T-ZB
1232.0 x 795.0 x 331.0
33.4
1232.0
25.0
21.3
Hz
120 W
55LM760S-ZA
55LM760T-ZA
55LM760S-ZB
55LM760T-ZB
55LM761S-ZA
55LM761T-ZA
1232.0 x 795.0 x 331.0
1232.0
25.0
21.3
Hz
160 W
x
x
723.0
723.0
x
x
B-13
33.6
33.6
Page 80

SPECIFICATIONS
B-14
CI Module Size
(W x H x D)
Operating
Temperature
Environment
condition
Television system DVB-T
Programme coverage VHF, UHF
Maximum number of
storable programmes
External antenna impedance 75 Ω
1 Only satellite models
2 Only DVB-T2 support models
Operating Humidity Less than 80 %
Storage Temperature -20 °C to 60 °C
Storage Humidity Less than 85 %
Satellite Digital TV1Digital TV2Digital TV Analogue TV
DVB-C
DVB-S/S2
C-Band, Ku-Band
6,000 1,500
100.0 mm x 55.0 mm x 5.0 mm
0 °C to 40 °C
DVB-T/T2
DVB-C
VHF, UHF VHF: E2 to E12, UHF :
DVB-T
DVB-C
PAL/SECAM B/G/I/D/K
SECAM L/L’
E21 to E69, CATV: S1 to
S20, HYPER: S21 to S47
Page 81

SPECIFICATIONS
B-15
HDMI/DVI-DTV supported mode
Resolution
720X480
Horizontal
Frequency (kHz)
31.469
31.5
720X576 31.25 50
37.5
1280X720
44.96
45
33.72
33.75
28.125
26.97
1920X1080
27
33.716
33.75
56.25
67.43
67.5
Vertical
Frequency
(Hz)
59.94
60
50
59.94
60
59.94
60
50
23.97
24
29.976
30.00
50
59.94
60
Component port connecting information
Component ports on
the
Y P
B
TV
Video output ports
on DVD player
Y P
Y B-Y R-Y
Y Cb Cr
B
Y Pb Pr
Signal Component
480i/576i O
480p/576p O
720p/1080i O
1080p
(50 Hz / 60 Hz only)
O
P
R
P
R
Page 82

SPECIFICATIONS
B-16
3D supported mode
Video, which is input as below media contents is switched into the 3D screen automatically.
y
The method for 3D digital broadcast may differ depending on the signal environment. If video is not
y
switched automatically into 3D, manually convert the settings to view 3D images.
3D supported mode automatically
Input Signal
640 X 480
480p
576p
720p
HDMI
1080i
1080p
USB 1080p 33.75 30
DLNA 1080p 33.75 30
DTV Frame Compatible Side by Side(Half), Top & Bottom
Horizontal
Frequency (kHz)
31.469 / 31.5
62.938 / 63 Frame Packing, Line Alternative
31.469 / 31.5
62.938 / 63 Frame Packing, Line Alternative
31.25
62.5 Frame Packing, Line Alternative
37.50 50
44.96 / 45 59.94 / 60
75 50
89.91 / 90 59.94 / 60
28.125 50
33.72 / 33.75 59.94 / 60
56.25 50
67.5 59.94 / 60
26.97 / 27 23.97 / 24
28.125 25
33.72 / 33.75 29.976 / 30
43.94 / 54 23.97 / 24
67.432 / 67.5 29.976 / 30
56.25 50
67.432 / 67.5 59.94 / 60
Signal Playable 3D video format
Vertical
Frequency (Hz)
59.94 / 60
50
Playable 3D video format
Top & Bottom,
Side by Side(Half), Side by Side(Full)
Top & Bottom,
Side by Side(Half), Side by Side(Full)
Top & Bottom,
Side by Side(Half), Side by Side(Full)
Top & Bottom,
Side by Side(Half), Side by Side(Full)
Frame Packing, Line Alternative
Top & Bottom,
Side by Side(Half), Side by Side(Full)
Frame Packing, Field Alternative
Top & Bottom,
Side by Side(Half), Side by Side(Full)
Frame Packing, Line Alternative56.25 25
Top & Bottom, Side by Side(Half)
Side by Side(Half), Top & Bottom,
Checker Board, MPO(Photo)
Page 83

SPECIFICATIONS
For models supporting WiDi, you can set the 3D mode in the same way as in RGB (PC) mode.
y
3D supported mode manually
B-17
Input Signal
720p
1080i
HDMI-DTV
1080p
1024x768 48.36
1360x768 47.71
HDMI-PC
RGB-PC
Component
USB 1080p 33.75 30
DLNA 1080p 33.75 30
DTV
1920x1080 67.50
Others - 1024x768 48.36
1360x768 47.71
1920x1080 67.50
Others - -
720p
1080i
1080p
Others - -
Horizontal
Frequency (kHz)
37.50 50
45.00 60
28.12 50
33.75 60
27.00 24
28.12 25
33.75 30
56.25 50
67.50 60
37.50 50
45.00 60
28.12 50
33.75 60
27.00 24
28.12 25
33.75 30
56.25 50
67.50 60
Signal
HD
SD
Frequency (Hz)
Vertical
60
60
Playable 3D video format
2D to 3D, Side by Side(Half), Top & Bottom,
Single Frame Sequential
2D to 3D, Side by Side(Half), Top & Bottom
2D to 3D, Side by Side(Half), Top & Bottom,
Checker Board
2D to 3D, Side by Side(Half), Top & Bottom,
Checker Board, Single Frame Sequential,
Row Interleaving, Column Interleaving
2D to 3D, Side by Side(Half), Top & Bottom
2D to 3D, Side by Side(Half), Top & Bottom,
Checker Board, Single Frame Sequential,
Row Interleaving, Column Interleaving
2D to 3D
2D to 3D, Side by Side(Half), Top & Bottom
2D to 3D
2D to 3D, Side by Side(Half), Top & Bottom
2D to 3D
2D to 3D, Side by Side(Half),Top & Bottom,
Checker Board, Row Interleaving, Column
Interleaving(Photo : Side by Side(Half),
Top & Bottom)
Playable 3D video format
2D to 3D, Side by Side(Half), Top & Bottom
2D to 3D
Page 84

Page 85

Page 86

Record the model number and serial number of
the TV.
Refer to the label on the back cover and quote
this information to your dealer when requiring any
service.
MODEL
SERIAL
Trade Mark of the DVB Digital
Video Broadcasting Project
(1991 to 1996)
Please contact LG First.
If you have any inquiries or comments,
please contact LG customer information centre.
Customer Information Centre
Country
Service
0 810 144 131 0900 543 5454
32 15 200255
07001 5454 808 78 54 54
810 555 810 031 228 3542
8088 5758 0850 111 154
0800 0 54 54 902 500 234
3220 54
01803 11 54 11 0848 543 543
801 11 200 900 0844 847 5454
06 40 54 54 54 8 800 200 7676
0818 27 6955 800 9990
199600099 0 800 303 000
8 820 0071 1111 2255
8 0003 271
8 800 30 800
Country
Service
800 187 40
801 54 54 54
0770 54 54 54
800 0071 0005
 Loading...