

Page 1
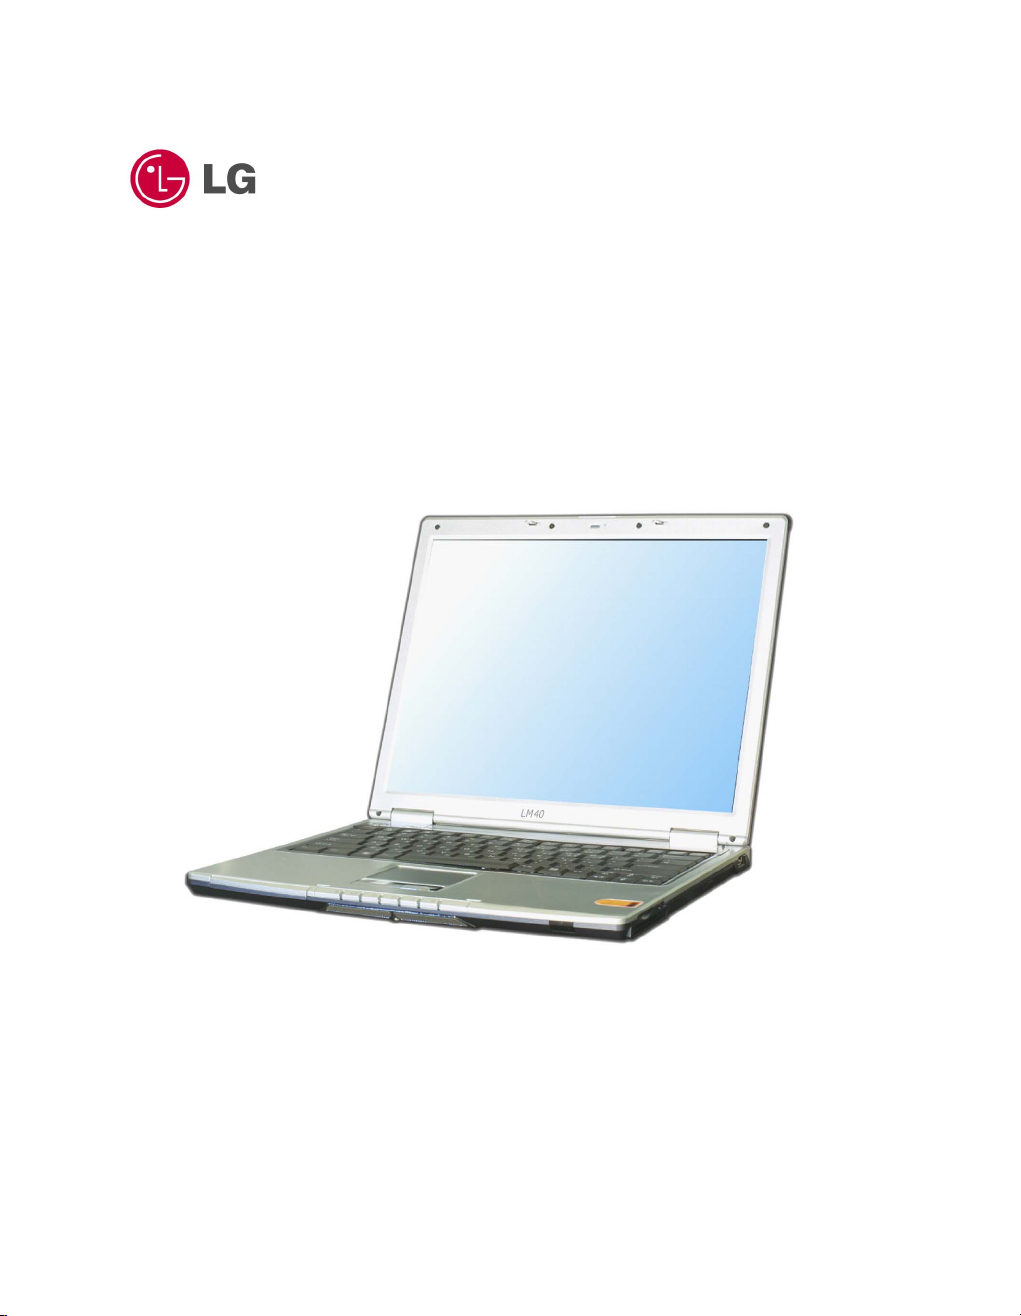
User’s Guide
Model : LM 40/50, LS 40/50
Page 2

User’s guide.................................................................................................. 6
Important Safety Instructions ...................................................................... 8
Selecting a place to work................................................................................. 8
Using the battery pack .................................................................................... 9
Replacing and disposing of the backup (standby) battery ................................... 10
Connecting to an AC power source .................................................................. 11
Using the computer ...................................................................................... 12
Using the computer ...................................................................................... 13
Upgrading the computer ................................................................................ 15
Carrying and storing the computer.................................................................. 16
Preventing data loss (handling hard disk drives) ............................................... 17
Ergonomic information .................................................................................. 18
For Australian Users ................................................................................... 19
Laser compliance statement ....................................................................... 20
Overview .................................................................................................... 21
Package contents ......................................................................................... 21
Components (LM 40/50)................................................................................ 23
Front view ................................................................................................... 23
Components (LS40/50) ................................................................................. 25
Front view ................................................................................................... 25
Rear view (LM 40/50, LS 40/50) ..................................................................... 26
Left view ..................................................................................................... 27
Right view ................................................................................................... 28
Status indicators .......................................................................................... 29
Basics ......................................................................................................... 31
Using the battery pack .................................................................................. 31
- 1 -
Page 3

Using the AC adapter .................................................................................... 34
Connecting the AC adapter to an AC outlet (100~240V)..................................... 34
Opening and positioning the LCD panel............................................................ 35
Power switch ............................................................................................... 35
Turning the power on and off ......................................................................... 36
Turning on the computer ............................................................................... 36
Turning off the computer ............................................................................... 40
Using Windows XP ........................................................................................ 42
Overview..................................................................................................... 42
Help and Support ......................................................................................... 43
Windows XP desktop ..................................................................................... 44
Start menu.................................................................................................. 45
Changing the look of the Start menu ............................................................... 45
Changing the pinned items in the Start menu ................................................... 45
Showing the recently used items on the Start menu .......................................... 45
Control Panel ............................................................................................... 46
Setting up Local Area Network (LAN) connections.............................................. 47
Changing the Themes and Desktop background ................................................ 49
Using the Windows Classic Theme................................................................... 49
Using a different theme ................................................................................. 49
Changing the desktop background .................................................................. 50
Setting the Screen Saver............................................................................... 50
Taskbar....................................................................................................... 51
Desktop cleanup........................................................................................... 51
Using the Power Options................................................................................ 51
Power Options Properties............................................................................... 52
Power Options Properties............................................................................... 53
Advanced tab............................................................................................... 54
Power Meter ................................................................................................ 54
System Hibernation ...................................................................................... 55
Attaching external devices ............................................................................. 56
Attaching a USB device ................................................................................. 56
Attaching a television using an S-Video port..................................................... 56
Attaching an external monitor ........................................................................ 58
Attaching a printer........................................................................................ 59
Using S/PDIF output connector....................................................................... 61
- 2 -
Page 4

When listening to music as MP3...................................................................... 61
When enjoying DVD Player ............................................................................ 63
Attaching an IEEE 1394 device ....................................................................... 63
Using the IrDA port....................................................................................... 64
About IrDA port............................................................................................ 64
Using IrDA port ............................................................................................ 64
Using Wireless LAN ....................................................................................... 66
Connecting and using the wireless network ...................................................... 66
Using IP Operator......................................................................................... 67
Using Battery Miser....................................................................................... 69
Input/Output.............................................................................................. 71
Using the keyboard....................................................................................... 71
About the keyboard – 14.1inch....................................................................... 71
About the keyboard – 15 inch......................................................................... 72
Modifier and special function keys................................................................... 74
Hot keys ..................................................................................................... 76
Using the touch pad...................................................................................... 77
Moving the pointer on the screen.................................................................... 78
Making the selection (Click) ........................................................................... 78
Double-click (Run)........................................................................................ 79
Drag and drop.............................................................................................. 79
Using the scroll up/down function ................................................................... 82
System Setup.............................................................................................. 83
Starting the system setup.............................................................................. 83
Keys used in the system setup ....................................................................... 83
Setting a password ....................................................................................... 84
Setting a supervisor password........................................................................ 85
Setting a user password ................................................................................ 86
Changing or removing the password................................................................ 87
Recovering the factory default settings ............................................................ 88
System Recovery.......................................................................................... 89
- 3 -
Page 5

Using Full Recovery ...................................................................................... 89
Driver re-installation ..................................................................................... 93
Storage/Memory......................................................................................... 94
Using the optical disk drive ............................................................................ 94
Inserting a CD ............................................................................................. 94
Removing a CD ............................................................................................ 95
Playing an audio CD...................................................................................... 96
Using Windows Media Player .......................................................................... 96
Using Power DVD ......................................................................................... 97
Using an SD Memory Card / SONY Memory Stick............................................... 99
Inserting an SD Memory Card / Memory Stick................................................... 99
Removing the SD Memory Card / Memory Stick ................................................ 99
Installing memory .......................................................................................100
About memory ............................................................................................100
Before installing memory..............................................................................100
Purchasing memory .....................................................................................101
Installing memory .......................................................................................101
Features.................................................................................................... 104
Model ........................................................................................................104
Processor ...................................................................................................104
Memory .....................................................................................................104
BIOS ROM ..................................................................................................104
Storage devices...........................................................................................104
External I/O Interfaces.................................................................................105
Display ......................................................................................................105
Sound........................................................................................................105
Dimension ..................................................................................................105
LAN ...........................................................................................................105
Modem ......................................................................................................105
Power specification................................................................................... 106
AC Adaptor (Free Voltage) ............................................................................106
Battery Pack (Li-Ion)....................................................................................106
- 4 -
Page 6

Charging time .............................................................................................106
Battery Life ................................................................................................106
Backup (standby) battery .............................................................................106
Operating environment............................................................................. 107
Operating...................................................................................................107
Non-operating.............................................................................................107
- 5 -
Page 7

User’s guide
Thank you for using the LG product.
LG has manufactured and tested this product to provide you with a reliable computing
environment.
Please read this manual carefully before using the computer.
The following signs call attention to features and operations that may be dangerous to
the user. Follow the instruction closely to reduce the risk of physical harm or damage
to the equipment.
Danger: Not following the instruction will result in immediate death or
serious injury.
Warning: Not following the instruction could result in death or serious
injury.
Caution: Not following the instruction could result in minor or moderate
injury and/or damage to the product.
Microsoft, MS, WinPE, and Windows are trademarks of Microsoft Corporation in the
United States and/or other countries.
“Memory Stick” and are trademarks of Sony Corporation.
is a trademark of LG.
Copyright 2003 LG Electronics, Inc., DigitalMate Co., Ltd.
Information in this manual may include technical inaccuracies or typographical errors.
Images in this manual are for illustrative purposes only and may be different from the
actual product.
LG reserves the rights to make improvements and/or changes to the product without
notice.
Reproducing any or all of the information contained in this publication without written
permission is prohibited.
- 6 -
Page 8

Your computer complies with the radio frequency and safety standards of any country
or region in which it has been approved for wireless use.
- 7 -
Page 9
Important Safety Instructions
These safety instructions will ensure many years of safe enjoyment from the product.
Set up your computer on a flat, stable surface. (LG is not responsible for the problems
and damages caused by incorrect use of the computer in an unsafe environment.)
Selecting a place to work
Warning
Do not operate your computer near water; for example, in a bathroom or near a
swimming pool.
The computer may not function correctly, and there is the risk of electric shock.
Operate the computer within a temperature range of 50 to 95 degrees F (10 to 35
degrees C) and 20 to 80% of relative humidity.
Safely dispose of the packing materials, such as desiccant and plastic bags.
Children may swallow desiccant or suffocate from plastic bags.
Caution
Keep your computing environment clean and free of dust.
There is a risk of dysfunction to the computer.
Keep your computer away from electromagnetic fields.
Exposure to the electromagnetic field may result in loss of data in the hard disk drive
and/or damage to the LCD.
Do not block the fan louvers and leave enough space around the computer for
ventilation. The computer may overheat and result in fire or injuries.
- 8 -
Page 10

Using the battery pack
Warning
Use only a battery pack recommended by LG.
Using a battery pack of a different type may result in explosion.
Keep metallic objects, such as keys and clips, away from the battery pack.
Objects that conduct electricity can short-circuit the battery pack and result in fire
and/or injuries.
Keep the battery pack away from heat.
There is a risk of explosion or fire.
Do not short-circuit battery terminals.
There is a risk of explosion.
Do not subject the battery pack to temperatures above 140 degrees F (60 degrees
C).
There is a risk of explosion or fire.
Keep the battery pack away from children and/or pet.
There is a risk of injury and damage to the battery pack.
Do not put the battery pack in the water.
There is a risk of fire or damage to the batter pack.
Be cautious when handling the keen part of the battery pack hook.
It may hurt you.
Lock the Notebook locker at the bottom surface.
There is a risk of battery damage.
- 9 -
Page 11

Replacing and disposing of the backup (standby) battery
Warning
If the backup battery is incorrectly replace, there is danger of explosion.
The lithium batterry contains lithium and can explode if it is not properly handled
or disposed of.
Replace only with a battery of the same type.
)( .
.
) ( .
.
.
.
.
.
- 10 -
Page 12

Connecting to an AC power source
Warning
Do not use loose or damaged power plugs.
There is a risk of electric shock or fire.
Use properly grounded outlet.
Connecting the computer to an outlet without proper grounding may result in electric
shock and damages to your computer.
Do not touch or grab the power plug with wet hands.
There is a risk of electric shock.
Hold the plug body when removing the power cord from an outlet.
There is a risk of fire and damages to the computer.
Use your computer at the proper voltage/current level indicated.
Supplying improper levels of voltage/current may result in electric shock, fire, and/or
damage to the computer.
If you hear a noise from the power cord or outlet, unplug the power cord
immediately, and contact the customer service for help.
There is a risk of fire or electric shock.
Make sure the power plug fits snugly into the electrical outlet.
Loose fit may result in fire.
Do not bend or place a heavy object on top of the power cord. Keep the children and
pets from damaging the power cord.
Damaged power cord may result in electric shock or fire.
Keep the power cord and plug clean and free of dust.
There is a risk of fire.
- 11 -
Page 13

If an object or liquid enters the computer or an adaptor, remove power cord, battery,
and any other cables from the computer, and contact the customer service for help.
There is a risk of an electric shock, fire, or damage to the computer.
Before cleaning the computer, disconnect the power cord, battery, and any other
cables from the computer.
There is a risk of electric shock or damage to the computer.
Using the computer
Warning
For cleaning your computer, use mild detergent or computer cleaning products. Be
sure to dry completely before using the computer.
Using the computer without completely drying it may result in electric shock or fire.
During a lightning storm, disconnect the power cord, telephone line, and LAN cable
from the computer.
There is a risk of electric shock or fire.
Do not place water, chemicals, or liquid of any kind on the computer.
Liquid of any kind entering inside the computer may result in an electric shock, fire,
or damage to the computer.
Do not connect the modem directly to a multi-line telephone.
There is a risk of fire or damage to the computer.
If you drop your computer, remove the power cord and battery pack, and then
contact the customer service for check up.
There is a risk of electric shock or fire.
Do not place a burning candle or cigarette on the computer.
- 12 -
Page 14
There is a risk of fire.
If you see or smell smoke from the computer or adaptor, turn off the computer,
remove the power cord, and then contact the customer service for help.
There is a risk of fire.
The LCD monitor’s fluorescent lamp include hydrargyrum.
Avoid direct contact with liquid from the broken LCD. If it spills into eyes or the other
parts of your body, wash it out several times with clean water. If you feel something
different, contact a doctor or a health administrator immediately.
Using the computer
Caution
Do not place an object, such as a pen or clip, on the keyboard.
If you close the LCD cover with an object on the keyboard, you may damage or
break the LCD.
Do not touch or scratch the LCD with sharp objects.
The LCD may be damaged.
Be sure to turn off the computer before closing the LCD cover.
The computer may overheat, and be damaged or deformed.
Do not exert excessive pressure on the LCD.
LCD is made of glass, and an excessive force can break the LCD.
Follow the instructions in the user's guide.
There is a risk of damage to the computer.
Do not place objects into the PC Card slot.
There is the risk of electric shock or injury.
- 13 -
Page 15

Upon completion of any service or repairs, ask service technician to perform safety
checks.
Ignoring safety checks may result in electric shock or fire.
Use the Wireless LAN at least 5m away from a microwave oven or plasma lamp.
When using the Wireless LAN near a plasma lamp, use the channel 11, 12, or 13.
the connection may be unavailable or slow.
Keep the computer away from heat.
The computer may deform and there is the risk of fire.
When attaching an external device, make sure the connector from the device and the
port on the computer are of the same type.
There is a risk of damage to the computer.
Do not insert a damaged CD-ROM or floppy disk.
There is a risk of damage to the computer.
- 14 -
Page 16

Upgrading the computer
Warning
Before disassembling the computer for upgraing purposes, turn off the power and
remove the power cord, phone line, and battery pack.
There is the risk of electric shock or fire. If you need to open the computer cover,
contact the customer service for help.
Keep screws and other small parts away from children.
Children may choke on a screw or other small part. If a child swallows a small part,
receive a medical care.
Caution
Do not attempt to disassemble or modify the computer without consulting customer
service.
There is a risk of electric shock.
Replace only with the parts approved by LG.
There is a risk of fire and damage to the computer.
Consult with the customer service before connecting and using the computer with
any non-LG product.
There is a risk of damage to the computer.
- 15 -
Page 17

Carrying and storing the computer
Caution
Before moving the computer, turn the power off and remove all the cables.
You may trip over the loose cables and fall.
When traveling on an airplane, follow the instruction by flight attendant.
Using the computer on an airplane may result in an airline accident.
Do not travel with LCD monitor open.
Do not expose your computer to the direct sunlight in a closed area such as inside a
car.
Prolonged exposure to high temperatures may deform the computer and also
result in fire.
- 16 -
Page 18

Preventing data loss (handling hard disk drives)
Caution
Be cautious when handling the hard disk drive.
The hard disk drive is very delicate to any physical impact. Always make backups for
your data. LG is not responsible for the data lose caused by users.
The data on the hard disk or the drive itself may be damaged in the following
situations:
1. Exposure to a physical shock during the disassembling or installing process.
2. The computer is reset (rebooted), for example by power outage, while the
hard disk drive is operating.
3. Exposure to virus.
4. The computer is turned off during operation.
5. Exposure to a physical shock while the hard disk drive is operating.
To prevent data loss due to hard disk drive damages, always backup your data.
LG is not responsible for the loss of data.
- 17 -
Page 19

Ergonomic information
Warning
Adjust the display position to avoid glare or reflections from a direct ray of light.
The top of the display should be on or below the level of your eyes.
Keep your head and neck in an upright position.
Keep your forearms, wrists, and hands in a horizontal position.
Adjust your chair to keep your arms and hands in a comfortable position.
Using the computer in the same position for a prolonged period of time may cause
discomfort to your body.
Take short frequent breaks from working with your computer. No more than 2 hours
of computing per day is recommended.
Stretch periodically to reduce muscular discomfort.
Check the volume level
Check if the volume level is too high before using headphones.
Do not use the headphones for a prolonged period of time.
- 18 -
Page 20
For Australian Users
Warning
For safety reasons, only connect equipment with a telecommunications compliance
label. This includes customer equipment previously labelled or certified.
- 19 -
Page 21

Laser compliance statement
An optical disk drive (device), such as a CD-ROM, CD-RW,DVD-ROM drive, which
can be installed in this unit is a laser product. The driver’s classification label is on
the surface of the drive as shown below.
CLASS 1 LASER PRODUCT
LASER KLASSE 1
LUOKAN 1 LASERLAITE
APPAREIL A LASER DE CLASSE 1
KLASS 1 LASER APPARAT
The drive is certified by the manufacturer to comply with the requirements of the
Department of Health and Human Services 21 Code of Federal Regulations (DHHS
21 CFR) Subchapter J for Class I laser products at the date of manufacture.
In other countries, the drive is certified to conform to the requirements of IEC825
and EN60825 for Class 1 laser products.
DANGER
Do not open the optical disk drive unit: no user adjustments or serviceable parts are
inside. Use of controls, adjustments, or the performance of procedures other than
those specified might result in hazardous radiation exposure.
- 20 -
Page 22
Overview
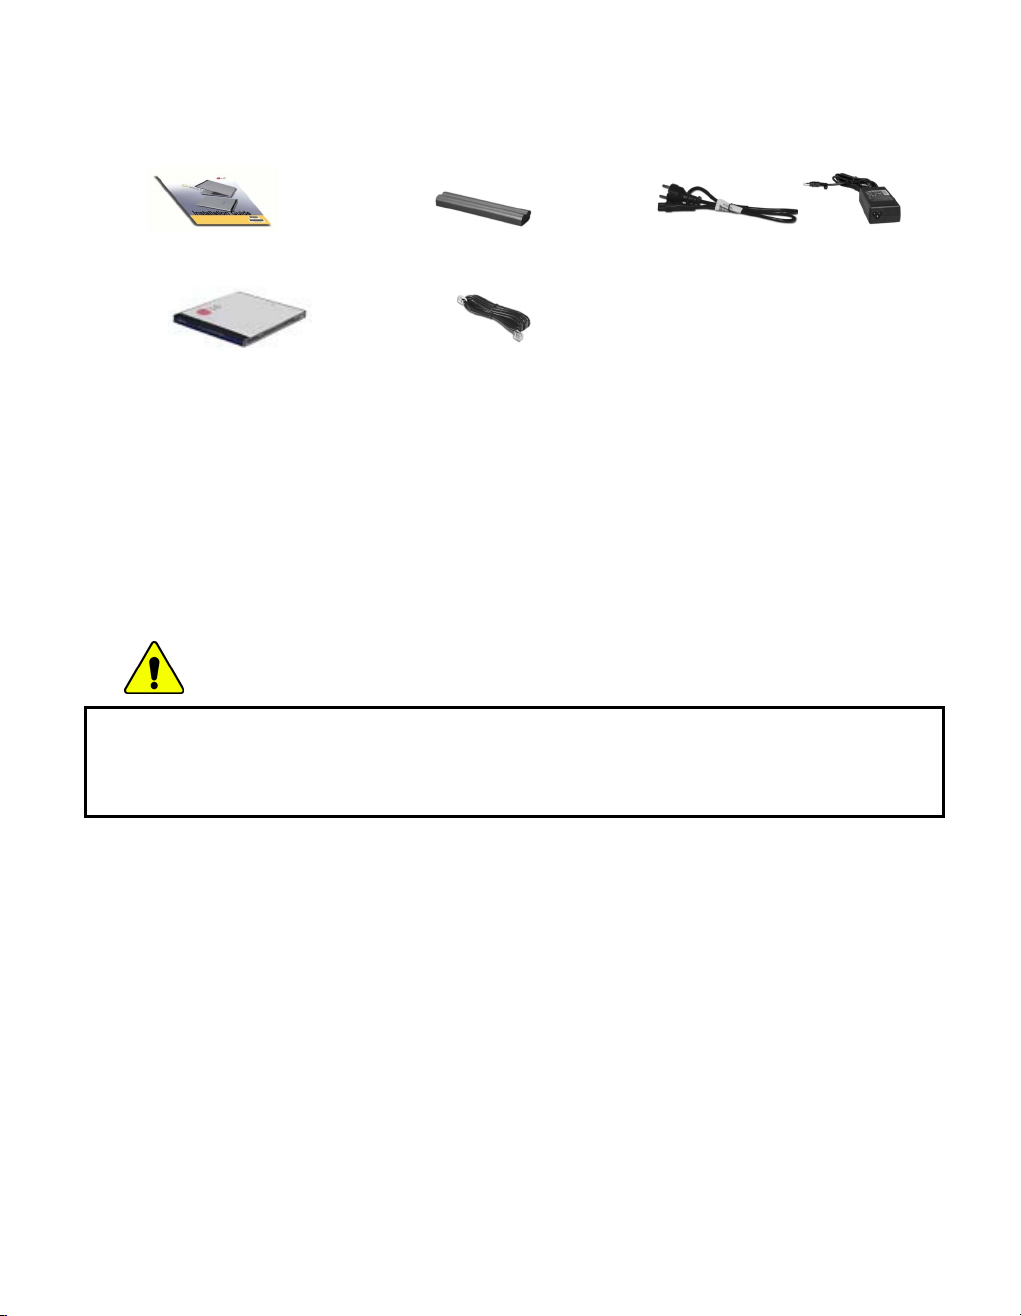
Package contents
The following items are included in the package. Match the items on this list
with the items in the box. Some items may look different from the pictures.
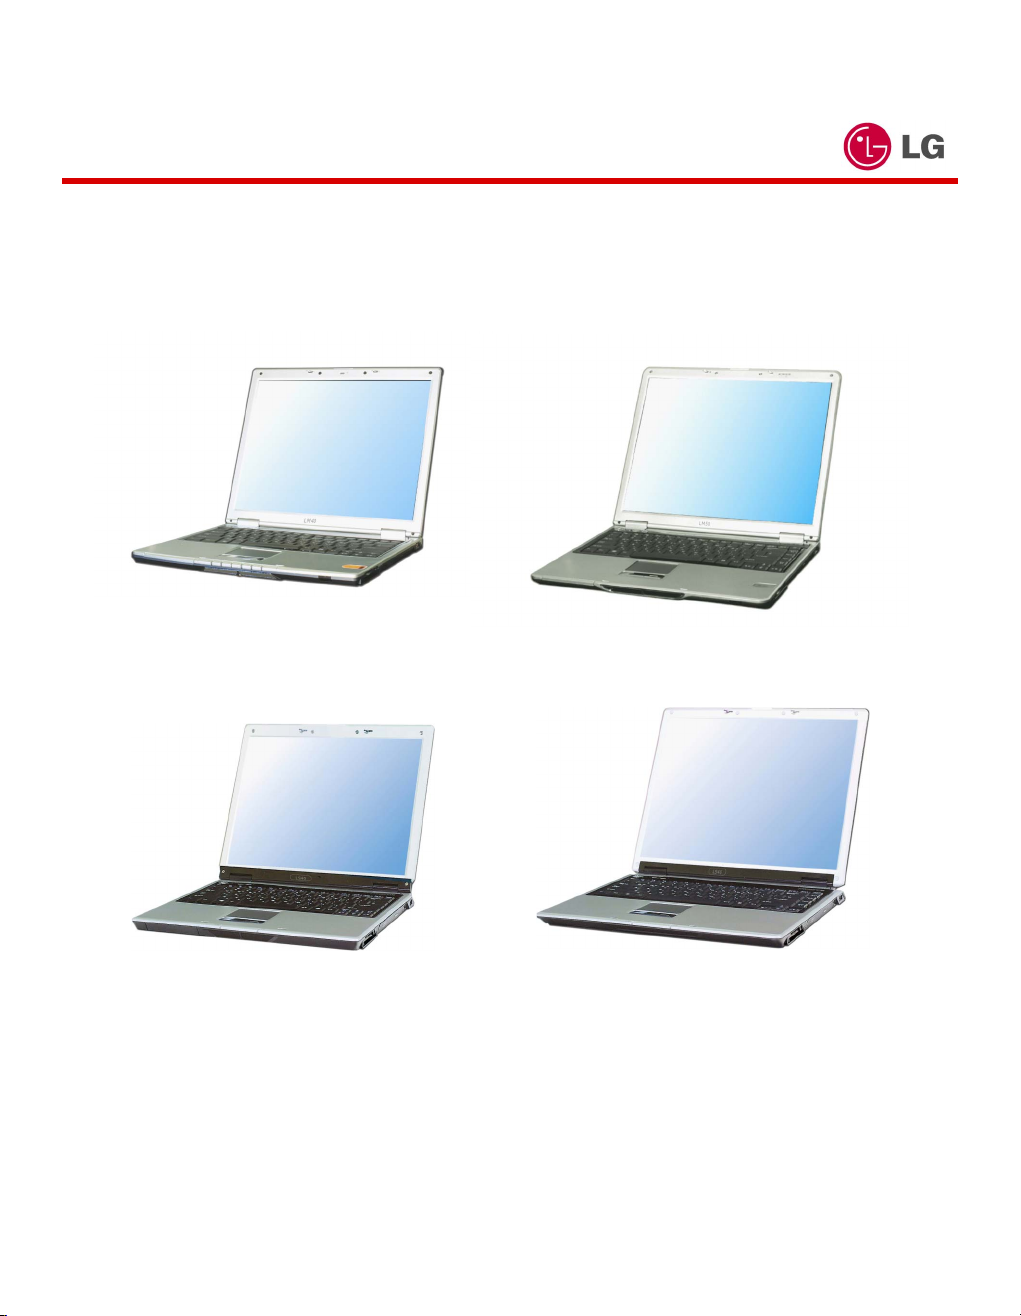
LM40 14.1 inch Notebook PC LM50 15 inch Notebook PC
LS40 14.1 inch Notebook PC LS50 15 inch Notebook PC
- 21 -
Page 23
Note:
Make sure you have the correct AC adapter before connecting it to the computer.
Installation guide Battery pack power cord / AC adapter
Software installation CD Telephone cable
Note:
- Battery is consumables, so its capacity and lifetime will decrease gradually
as using time goes by.
- Battery pack(9 cell) is optional.
- Below mentioned functions are not offered by each product
*IEEE1394 / Wireless LAN / SD Memory card / S-Video port / IrDA port/
Memory Stick
Caution
When cleaning your computer, use cleaning products manufactured specifically for
computing equipment. Using abrasive chemicals, such as paint thinner, benzene, or
alcohol, may damage your computer.
- 22 -
Page 24

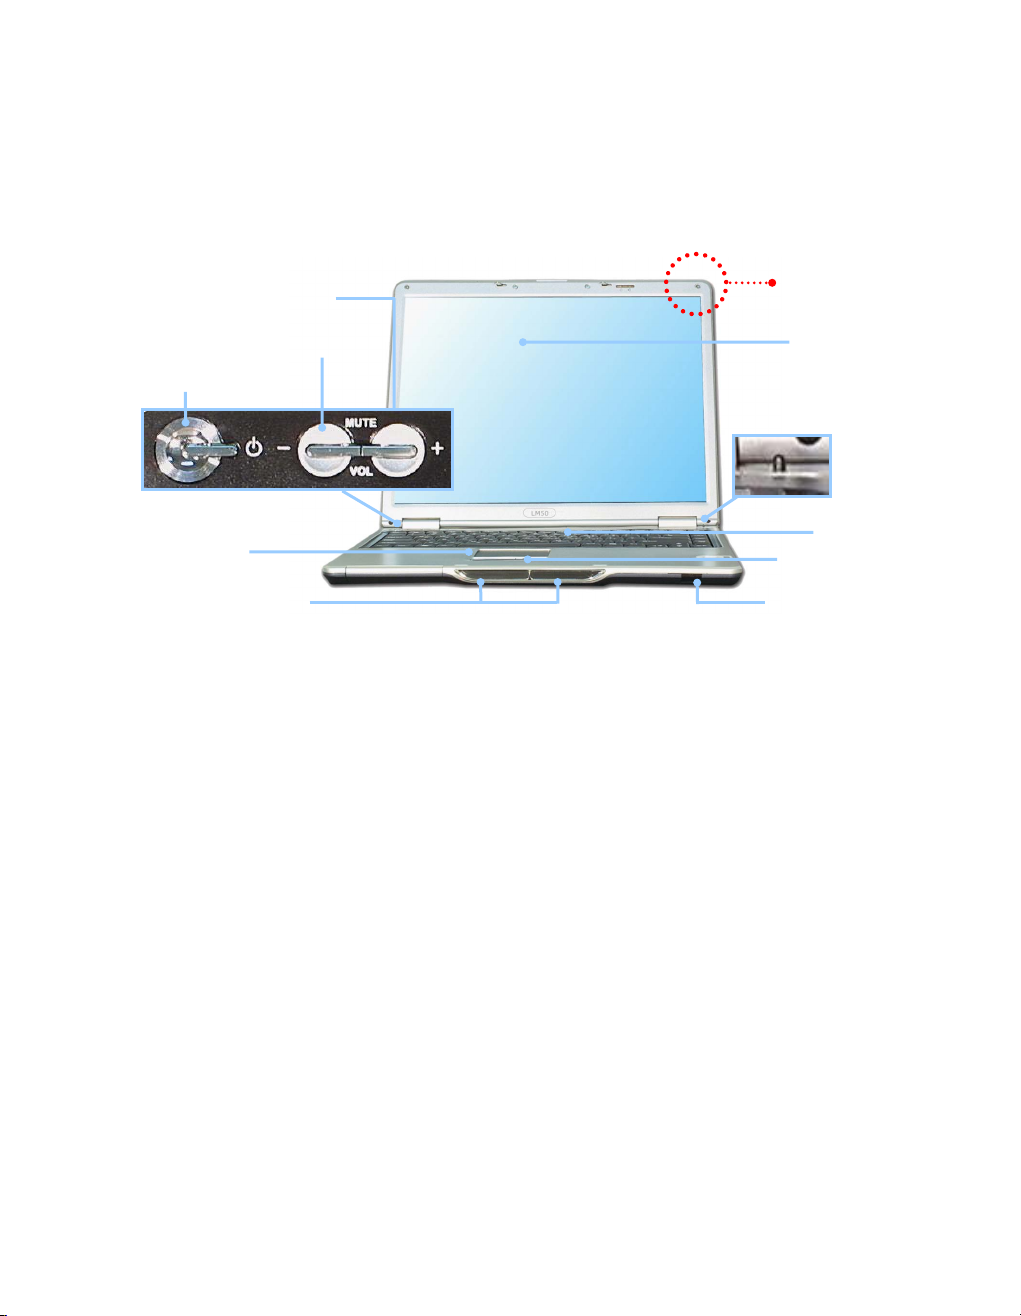
Components (LM 40/50)
Learning the components and their functions helps you use the computer
more easily and thoroughly.
Front view
Volume up button
Volume down button
Power switch
TouchPad
Built-in
Speakers
LM40 14.1 inch
Wireless LAN (option)
TouchPad button
IrDA port (option)
LCD
Power-Saving
mode switch
Keyboard
- 23 -
Page 25
ode switc
LM50 15 inch
Volume up button
Volume down button button
Power switch
Wireless LAN
(option)
LCD
Power-saving
m
h
TouchPad
Built-in speakers
Keyboard
TouchPad button
IrDA port (option)
Note:
Pressing the Volume up and down buttons at the same time mutes the sound.
- 24 -
Page 26
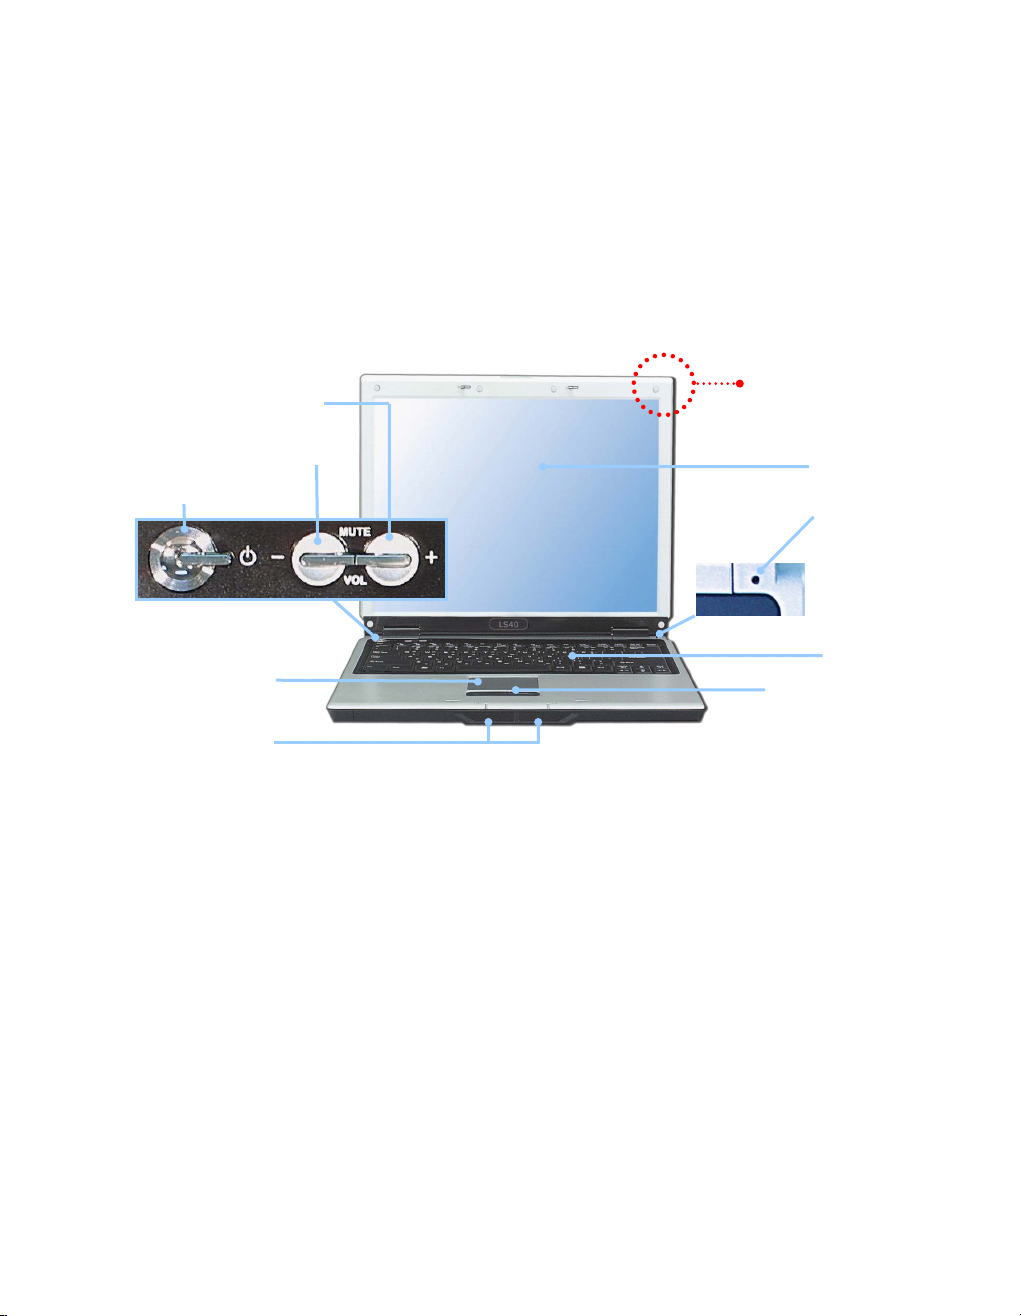
Components (LS40/50)
Front view
Volume up button
Volume down button
Power switch
TouchPad
Built-in
Speakers
LS40 14.1 inch
Wireless LAN (option)
LCD
Power-Saving
mode switch
Keyboard
TouchPad button
- 25 -
Page 27

ode switc
Note:
Pressing the Volume up and down buttons at the same time mutes the sound.
Note: Some models may look different from the picture below.
Volume up button
Volume down button
Power switch
TouchPad
Built-in speakers
Rear view (LM 40/50, LS 40/50)
S-Video connector (option)
LS50 15 inch
- 26 -
Modem port
LAN port
Wireless LAN (option)
Power-saving
m
Power jack
LCD
h
Keyboard
TouchPad button
Page 28

Note:
To open the display panel
1. Push the latch button to the right 1,
2. and lift the LCD panel 2.
3. Adjust the slope of the display panel for a comfortable viewing angle.
1
2
2
Left view
Security keyhole
Fan louvers
Parallel port
Monitor
port
USB device port
Headphone jack/
S/PDIF jack
Microphone jack
- 27 -
Page 29
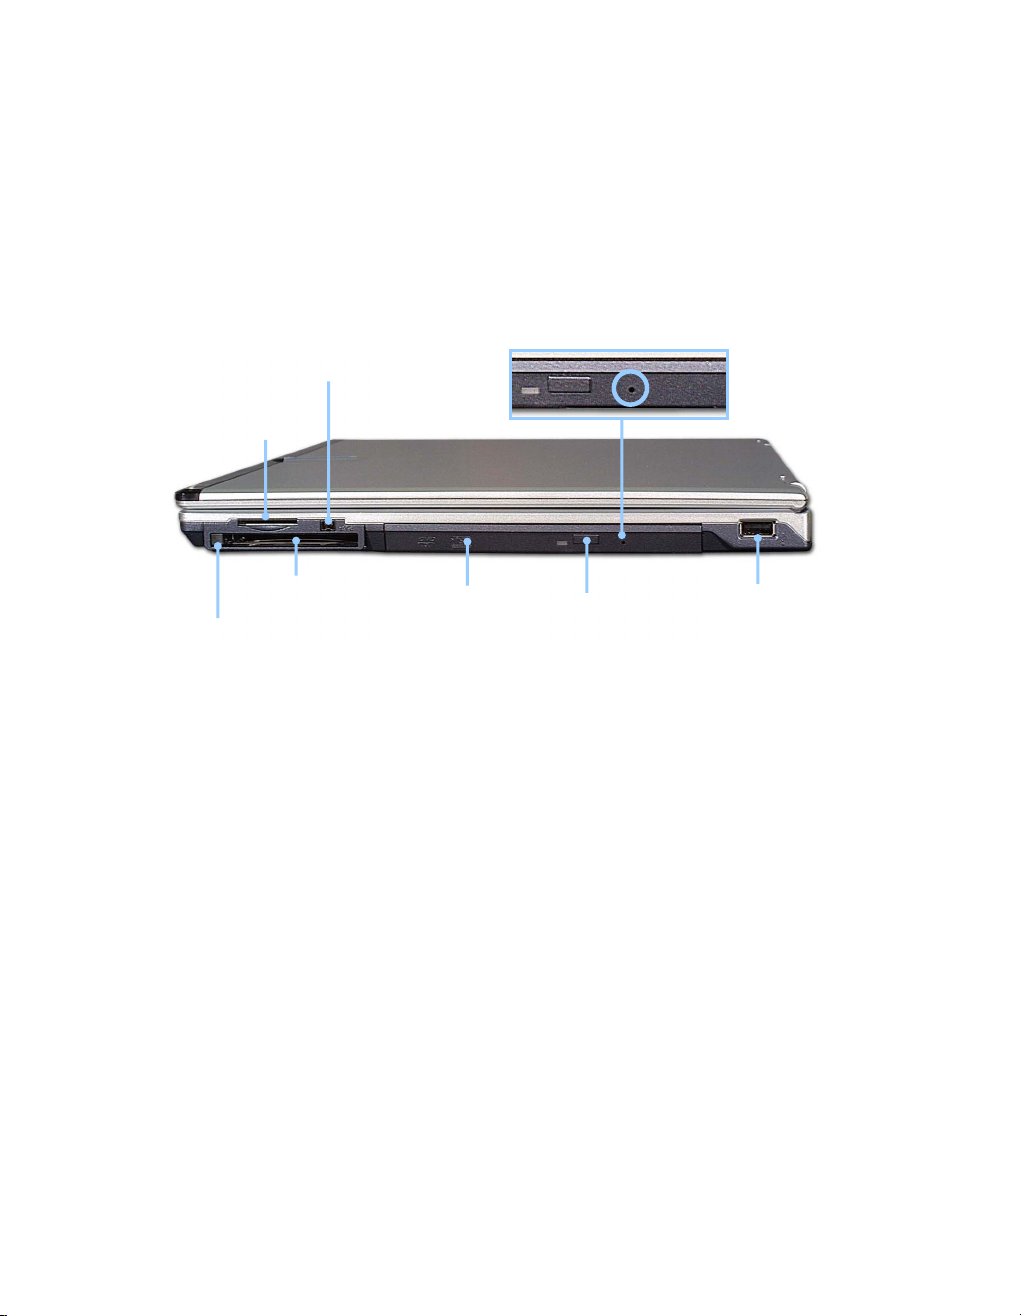
Security keyhole: User can attach a separately purchased chain lock into the
security keyhole and connect it to a fixed object to prevent a notebook theft.
Note:
A position of security keyhole can be different from the model type.
Right view
SD Memory Card
/Memory Stick Slot
PC Card eject button
Emergency eject hole: Insert a thin and hard pin into this hole, and you can open the
disc tray manually.
Note:
Below mentioned functions are not offered by each product
*IEEE1394 / Wireless LAN / SD Memory card / S-Video port / IrDA port
Memory Stick
Your computer has a built-in DVD-ROM, CD-ROM, or CD-RW/DVD-ROM combo
drive depending on the model type.
IEEE 1394 port
PC Card slot
DVD Drive
Emergency
eject hole
USB port
DVD drive
eject button
- 28 -
Page 30
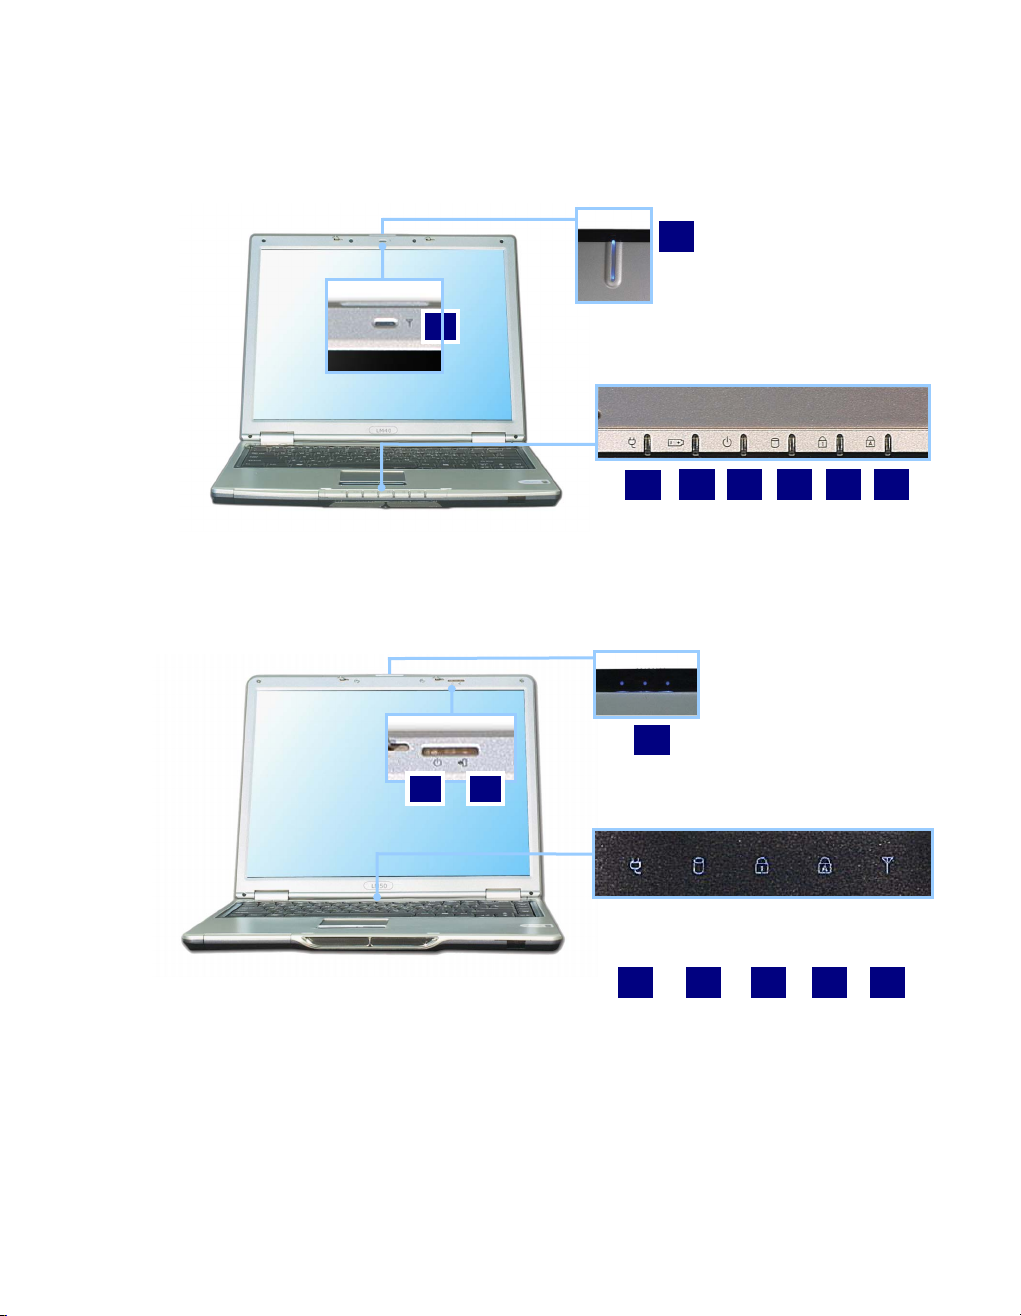
Status indicators
Note: Some models may look different from the picture below.
1.AC Power:
Power indicator lights up when the power cord is connected to the computer.
7
2 3
1
8
8
2
3 4 5 6
7 6 5 4 1
- 29 -
Page 31

2.Battery:
Battery status indicator indicates the following status of the battery.
Green: The computer is connected to an AC adaptor and is being charged.
Off: The battery is fully charged OR the computer is not connected to an AC
Adapter.
Blinking: The battery power is under 10% of its maximum capacity.
3.Power:
Power status indicator indicates the following status of the computer.
Green: The computer is turned on.
Off: The computer is turned off or is in hibernation mode.
Blinking: The computer is in standby mode.
4.Drive in use:
Drive in use indicator lights up when data is being written to or read from the
hard disk or optical disk drive.
5.Num lock:
Num lock indicator lights up when the combination of the Fn and Num lock key is
pressed. When this indicator lights up, you can use the embedded numeric keys.
(To use the numeric keys, you must enable the Internal Keypad setting under the
Advanced menu in the BIOS Setup Utility)
6.Caps lock:
Caps lock indicator lights up when the Caps lock key is pressed. When this
indicator lights up, you can type capital letters without pressing the Shift key.
7-8. Wireless activity indicator:
Wireless activity indicator indicates the following.
Off: The wireless card does not have the power or RF is off.
Blinking: The wireless client is not associated with the network.Slow blinking (3-4
seconds interval): the wireless card powered on and attempting to connect.
Fast blinking: The wireless card transmitting and/or receiving data by the rate
depending on blinking speed.
- 30 -
Page 32

Basics
This section describes how to use the basic features of your computer. Read this
section before using the computer.
Using the battery pack
The battery pack must be fully charged before first use.
Note:
Battery is consumables, so its capacity and lifetime will decrease gradually
as using time goes by.
Caution
You must turn off the computer before replacing the battery pack.
Use only the battery pack that comes with the computer.
1. Turn the computer over so that the battery slot faces up.
- 31 -
Page 33

2. Place the battery pack in the battery slot, and align the two protrusions on the
battery pack with the two slits on the side of the battery slot.
3. Gently push the battery pack into the slot until it clicks. The battery pack is
inserted. You can lock the battery pack in place by pushing the left battery latch
in the direction shown above. If you hear a click, the battery pack is locked in.
4. Connect the AC adapter and open the LCD panel. Start charging the battery.
(Refer to Page 34 “Using the AC adapter”)
5. Check the battery status indicator.
If the battery is fully charged, the indicator is turned off.
6. To remove the battery pack, unlock the left battery latch to the right until it
clicks, and push the right battery latch to the left and hold; then slide the
battery pack out of the slot.
- 32 -
Page 34

Caution
When you are not using the computer, remove the battery pack.
Note:
The battery pack has the following characteristics.
Self-discharge: The battery gradually loses its power over time without ever being
used.
Periodic full discharge/charge: Frequent recharging of the battery pack can reduce
the duration of the battery pack. Periodic performance of full discharge/charge will
restore the capacity of the battery pack, in every 30 ~ 60 days. You should use the
battery until its power is low; then fully charge the battery.
To use the battery pack safely and effectively,
1. Do not short-circuit the battery pack.
2. Keep the battery pack away from heat or fire.
3. Store the battery pack at room temperature. (32 ~140 °F/0 ~ 60 °C)
4. Do not disassemble the battery pack.
5. Do not expose the battery pack to water.
6. Keep the battery pack away from children.
If the temperature of the battery pack drops below 50 °F (10 °C), the trickle charging
begins. The trickle charging may take up to 32 hours for the battery pack to be fully
charged.
- 33 -
Page 35

Using the AC adapter
An AC adapter or battery pack is needed to supply power to your computer. The AC
adapter can be used with a 100~240V AC power source. Use only the AC adapter
that comes with your computer. Using any other adaptor may cause damage to your
computer.
Connecting the AC adapter to an AC outlet (100~240V)
Connect the power cord to the adapter, and then plug the other end into an AC outlet.
Warning
Do not overload an electrical outlet with connections to multiple devices.
Overloading an electrical outlet may result in fire or electric shock.
Do not touch the power cord or plug with wet hands. Doing so may result in electric
shock.
Connect the power cord to the adapter, and then plug the power cord into an AC
outlet.
- 34 -
Page 36

Opening and positioning the LCD panel
Push the latch button in the direction of the arrow1, and open the display panel 2.
Adjust the slope of the display panel for comfortable viewing.
1
2
2
Power switch
Press the power switch to turn on the computer.
Note:
The power switch, volume up/down buttons are coated for preventing
static electricity purposes.
- 35 -
Page 37

Turning the power on and off
Before turning on the computer, make sure the AC adaptor is connected or the
battery is charged.
Turning on the computer
1. Push the latch button to the right1 and open the display panel2.
1
2. Press the power switch.
2
2
- 36 -
Page 38

3. Pressing the power switch starts the self-diagnostic procedures; then
Windows(R) XP startup screen is displayed.
4. If you turn the power on the computer for the first time, you have to register
your copy of Windows XP. The registration process may differ depending on
the model, but the difference does not affect the use of your computer.
5. In a moment, ‘Welcome to Microsoft Windows’ appears on the screen. Click
[Next].
6. ‘The End User License Agreement’ appears on the screen. Be sure to read the
agreement, select ‘Yes, I accept’, and click [Next].
- 37 -
Page 39

7. ‘What’s your computer’s name?’ appears on the screen. Type the name and
description for your computer, and click [Next].
8. ‘Ready to register with Microsoft?’ appears on the screen. Select ‘No, not at
this time’ and click [Next].
9. ‘Who will use this computer?’ appears on the screen. Type the names of the
users and click [Next].
- 38 -
Page 40

10. ‘Thank you!’ appears on the screen. Click [Finish] to complete the
registration process.
- 39 -
Page 41

Turning off the computer
Quit all running applications; click [Start] and choose [Turn Off Computer] from
the start up menu.
In the Turn off computer window, choose Shut down.
The computer is turned off automatically, and pull down the LCD panel
until it clicks.
LG
- 40 -
Page 42

Caution
If the Drive in use indicator is on, do not turn off the computer, as doing so may
damage the data being read from or written to the drive.
Warning
If Windows does not shut down correctly, press and hold the power switch for more
than 5 seconds; the system will shut down.
Turning off the computer this way may damage the system. It is recommended that
you always turn off the computer by choosing Shut down in the Start menu.
If the computer does not shut down correctly while running applications, the data in
the hard disk drive may be damaged.
If a program does not respond, press the Ctrl+Alt+Delete combination to start the
Task manager; then quit the program or restart the system.
If Windows or program file is damaged by shutting down the system incorrectly,
reinstall the program. The user is responsible for the loss of data caused by incorrect
use of the computer.
- 41 -
Page 43

Using Windows XP
Windows XP is new, brilliant and easy-to-use. Background and title bar have been
rearranged concisely, and it became easier to access the application programs from
the start menu. Also, it allows the users with more diverse options to choose from
when decorating their desktop.
Overview
Windows XP is an operating system that runs a computer. Learning the basics
features in Windows is recommended to utilize a computer effectively. Click [Start]-
>[Tour Windows XP] to explore the features and tools available in Windows XP.
Window Buttons
1. Minimize
2. Maximize
3. Close
1
2
3
- 42 -
Page 44

Help and Support
Click [Help and Support] to learn how to troubleshoot problems you may
encounter while using the computer.
Click [Start]->[Help and Support].
The following window appears.
Click to learn the features and troubleshooting information
LG
You can search for useful
Help and Support
information.
You can connect to the
Internet and ask for
assistance online.
You can setup and
configure your computer
to personalize your
computing environment
- 43 -
Page 45

Windows XP desktop
1.[Start] button
Click [Start] button to open the [Start] menu. Click [All Programs] to open
the list of programs installed in the computer.
2.[Start] menu
[Start menu] shows everything you need to start working in the Windows XP
environment.
3.Taskbar
Taskbar shows programs that are currently open and running.
4.Taskbar icons and clock
Taskbar icons show and let you configure ongoing activities such as battery
power status, display properties, LAN settings, etc.
5.Recycle Bin
LG
5
2
1
4 3
- 44 -
Page 46

Put your unused items and files in the Recycle Bin. Right-click the Recycle Bin
and select [Empty Recycle Bin] to permanently delete the items inside the
Recycle Bin.
Start menu
LG
Pinned items
Control Panel lets
you change the
settings in your
computer
Recently used items
My computer shows
the drive and network
information for your
computer
Changing the look of the Start menu
Right click [Start] button and select [Properties].
In the Start menu tab, choose from either Start menu or Classic Start menu.
Click [OK] to apply the new setting.
Changing the pinned items in the Start menu
Right-click the item you want to pin it to the Start menu.
Select [Pin To Start Menu].
The item is pinned at the top of the Start menu.
Showing the recently used items on the Start menu
Right-click on [Start] button and click [Properties].
In [Start Menu] tab, select [Start menu] and click [Customize].
In [Advanced] tab, check [List my most recently opened documents] and
click [OK].
In Taskbar and Start Menu Properties window, click [Apply]->[OK].
If you click [Start] button the next time, recently used items appear on the Start
Menu.
- 45 -
Page 47

Control Panel
The Windows XP Control Panel can display items in either Category View or Classic
View.
Switch to
Classic
View
Category View
Classic View
- 46 -
Page 48

Setting up Local Area Network (LAN) connections
Local Area Network (LAN) connection provides high-speed network connection for
your home or company. When using Wireless LAN, refer to “Using Wireless LAN”
(page 65).
Attach a LAN cable to the Ethernet (LAN) connector.
Click [Start]->[Control Panel]->[Switch to Classic View]->
[Network Connections].
Right-click a Local Area Connection and select [Properties].
- 47 -
Page 49

If the following window appears, click [General] tab and 1. Check if 3COM 3C920
Integrated Fast Ethernet Controller is installed in the computer 2. Then, check
Internet Protocol, and 3. Click on [Properties]
1
2
3
Click on [General] tab, and Select [Obtain an IP address automatically]
Click [Ok] when Internet protocol (TCP/IP) setting is completed.
Note:
Ask your network administrator for the appropriate IP settings.
When using LAN or Wireless LAN, refer to “Using IP Operator” (page 67).
IP Operator is useful to access to network everywhere by notebook.
- 48 -
Page 50

Changing the Themes and Desktop background
Using the Windows Classic Theme
Click [Start]->[Control Panel]->[Switch to Classic View]->[Display].
Click [Themes] tab
Select [Windows Classic] from the [Theme] drop down menu.
Using a different theme
1. Click [Start]->[Control Panel]->[Switch to Classic View]->[Display].
2. Click [Themes] tab
3. Select another theme from the [Theme] drop down menu.
Note:
In Appearance tab, you can click [Advanced] button and change the color
scheme, font size, and windows and button styles.
In Themes tab, you can change the overall appearance of the desktop.
If there are more than one user using the computer, each user can
apply different theme and desktop appearances.
- 49 -
Page 51

Changing the desktop background
Click [Start]->[Control Panel]->[Switch to Classic View]->[Display].
Click [Desktop] tab. (OR you can right click on the mouse while in desktop
background. When a short cut menu pops up, choose [Properties]
Scroll down the [Background] drop down menu and select an image for the
background. You can also click [Browse] button and select an image you have
saved.
Setting the Screen Saver
Click [Start]->[Control Panel]->[Switch to Classic View]->[Display].
Click [Screen Saver] tab.
Select the idle time before activating the Screen Saver from [Wait] drop down
menu. Check [On resume, password protect] to protect the computer from
- 50 -
Page 52

unauthorized users.
Taskbar
Taskbar displays programs and files that are currently open. If there are
many programs running on the computer, the Taskbar group together files
from the same program to prevent taskbar icons from cluttering up the Taskbar.
Desktop cleanup
Desktop Cleanup Wizard removes unused desktop items to a folder. The
Desktop Cleanup Wizard runs every 60 days but you can also run it manually.
1. Click [Start]->[Control Panel]->[Switch to Classic view]
->[Display].
2. Click [Desktop] tab.
3. Click [Customize Desktop] -> [Clean Desktop Now] button.
Using the Power Options
Windows XP uses its own power-saving program to manage the battery power.
Click [Start]->[Control Panel]->[Switch to Classic View].
Double-click [Power Options].
- 51 -
Page 53

In Power Options Properties window, change the settings best suited for your
computing environment.
Power Options Properties
Click [Power Schemes] tab.
Drop down the menu and select [Portable/Laptop] to set notebook PC with the
appropriate power schemes. This includes detailed timeline for [Turn off monitor],
[Turn off hard disks], [System standby], and [System hibernates].
Note:
If the computer enters System standby mode, the hard disk is turned off to conserve
the battery power.
In System standby mode, you cannot save your work. Be sure to save your work
before entering System standby mode.
When the computer enters System hibernation, the computer saves all your work in
the hard disk and turns off the computer.
Caution
If the computer enters System standby or hibernation mode while playing a
computer game, a serious error may occur. Be sure to quit the computer game
before entering a power-saving mode.
- 52 -
Page 54

Power Options Properties
Click [Alarms] tab. Check [Low battery alarm] and [Critical battery alarm],
and move the sliders to set the power level to activate low battery alarm and critical
battery alarm.
You can be notified with Sound alarm or Display message. You can also set the alarm
action such as putting the computer into System standby mode or System
hibernation mode. You can also run a specific program when the alarm goes off.
- 53 -
Page 55

Advanced tab
In Options, you can set the computer to prompt for password when
computer resumes from standby. You can also set the computer to enter
a power-saving mode when closing the display panel, pressing the power
switch or the combination of Fn+F4.
Power Meter
You can click the Power Meter icon on the Taskbar to check the power level
of your computer.
- 54 -
Page 56

System Hibernation
In Hibernate tab, you can enable or disable System hibernation mode and
check the disk space needed for hibernation.
Caution
Do not remove the battery pack when the AC adapter is not connected to the
computer.
If you keep using the computer while low on the battery power, you may lose the
data when the battery power goes out. If you are notified of low battery power, save
your data and connect the AC adapter, or turn off the computer and change the
battery pack.
- 55 -
Page 57

Attaching external devices
Attaching a USB device
USB mouse (not included)
You can connect keyboard, hub, digital camera and other devices that support USB.
Attaching a television using an S-Video port
Note:
Below mentioned functions are not offered by each product
*IEEE1394 / Wireless LAN / SD Memory card / S-Video port / IrDA port/
Memory Stick
1. Attach the S-Video cable from a TV to the S-Video connector on the computer
Connecting to system Connecting to TV
(Works only with TV that has S-Video port)
- 56 -
Page 58

2. Click [Start]->[Control Panel] -> [Display] -> [Settings] tab ->
[Advanced].
3. In [Display]tab, select TV as the main display
- 57 -
Page 59

4. You can also switch the main display to and from TV and LCD by pressing the
combination of Fn+F7.
Note: You cannot use switch the main display while playing a game. You cannot
display a movie or game on a TV and LCD at the same time.
Attaching an external monitor
Note: Turn off the computer before attaching an external monitor. An external VGA
connector should be no wider than 17mm otherwise it will not fit in.
Monitor toggle function (switch the monitor by short-cut keys)
After install the external monitor to the notebook PC, use Fn + F7 to switch
the main monitor to LCD only, monitor only, and LCD + monitor both,
in sequence.
External monitor
(not included)
- 58 -
Page 60

Attaching a printer
Note: Use a standard parallel port connector that should be 16mm wide. Connectors
wider than 17mm will not fit in.
Attach a printer cable to the computer, then click [Start] from the Taskbar and
[Printers and Faxes].
Printer (not included)
LG
- 59 -
Page 61

If the following window appears on the screen, click [Add a printer]
In the Add Printer Wizard, follow the instruction to set up a printer.
When the Add Printer Wizard completes setting up the printer, the new printer
appears on the Printers and Faxes window.
- 60 -
Page 62

Warning
Do not overload an electrical outlet with connections to multiple devices.
Overloading an electrical outlet may result in fire or electric shock.
Do not touch the power cord or plug with wet hands.
Doing so may result in electric shock
Using S/PDIF output connector
Using S/PDIF(Sony/Philips Digital Interface) output connector you can
enjoy the digital sound by connecting S/PDIF supporting amplifier to the
S/PDIF output connector. You must have the following items (A/V receiver,
components of digital amplifier) to enjoy the digital 5.1 channel sound.
Digital output of this product is provided by S/PDIF output connector.
For your enjoyment, you must have below mentioned environment.
A DVD title recorded by digital 5.1 channel sound.
A DVD player supported by digital 5.1 channel sound
(For example, POWER DVD XP 4.0 or newer)
A/V receiver or digital amplifier to support the digital 5.1 channel sound.
When listening to music as MP3
Double click to open Volume Control from the toolbar.
Go to [Options] -> [Advanced Controls] -> [Advanced]
- 61 -
Page 63

Check [Digital output] checkbox in the volume control.
Enjoy music after connecting A/V receiver, Digital amplifier, MD with cable.
- 62 -
Page 64

When enjoying DVD Player
Follow the same procedure as above. Set DVD payer program setting in compliance
with digital output (Refer to [Help] on DVD player). Connect A/V receiver, or digital
amplifier to S/PDIF by cable. Enjoy DVD 5.1 channel.
Note:
1. Check Digital Output only when using S/PDIF supporting amplifier. When it
is checked, you will not hear any sound with regular speakers.
2. Notebook PC doesn’t support analogue 5.1 channel amplifier. Use A/V receiver, or
5.1 channel supporting digital input
3. When enjoying 5.1 channel on Power DVD, set up S/PDIF.
4. To support 5.1 channel is not available when S/PDIF doesn’t set up on amplifier
environment.
5. Check [Digital Output] when you use S/PDIF amplifier.
6. Uncheck Digital Output from the advanced control and restart the program after
finishing.
Attaching an IEEE 1394 device
You can connect external hard disk drive, external CD-RW, digital camera, video
camcorder and other devices that support IEEE1394.
Note:
Below mentioned functions are not offered by each product
*IEEE1394 / Wireless LAN / SD Memory card / S-Video port / IrDA port
Memory Stick
Digital Camera
(Purchased separately)
- 63 -
Page 65

Using the IrDA port
Your computer supports IrDA (Infrared Data Association) standard for
infrared communication.
About IrDA port
Range: 1m
Beam angle: +-15
Data transmission speed: 4.0 Mbps
Your computer has an IrDA V3.0 Fast Infrared port allowing the data
transmission speed of Serial Infrared (115.2Kbps) and Fast Infrared
(4Mbps). Transmission speed depends on programs and devices used in
IrDA communication.
IrDA communication programs
General serial communication programs can be used, but programs
specifically designed for IrDA communication is recommended.
Your computer is configured to use COM port for IrDA communication in
FIR mode.
Using IrDA port
Your computer can communicate with another IrDA standard compatible
device supporting FIR data communication. IrDA communication provides
useful wireless communication between your computer and other computer
or devices. The following section describes how to establish IrDA
communication between 2 computers.
Make sure Wireless Link program is installed in your computer.
1. Turn on the computer.
2. Click Start button and right-click My computer to select Properties.
3. On Hardware tab, click Device Manager.
4. Right-click IrDA Fast Infrared Port and select Properties.
5. Click Advanced tab, and configure the device.
6. Align 2 computers so that their IrDA ports point to each other.
- 64 -
Page 66

The distance and the beam angle between the ports must be less than 1m and
smaller than +-15 degrees respectively.
Remove any obstruction between the ports.
7. When the connection is established, Wireless Link program starts automatically.
Wireless Link icon appears on the taskbar, and shortcut to Wireless link is created
on the desktop.
Shortcut to Wireless link Wireless link icon
8. Double-click Wireless link icon on the taskbar. Wireless Link windows opens.
9. Select the file that you want to send, and click Send.
Sending and receiving computers show the following windows.
Sender Receiver
- 65 -
Page 67

10. Click Yes to start a data transfer. The data transfer is complete.
Note:
The default directory for the received data is C:\Documents and Settings\
User Name\Desktop. To change the default directory, open Wireless Link and
click Properties, and then choose a new default directory.
Using Wireless LAN
You can use Wireless LAN to connect to the network and use the Internet in
your home and office. You can share files and folders over the network
without the attaching network cables to the computer. It is composed of
Wireless LAN on Windows when shipping.
Note:
Below mentioned functions are not offered by each product
*IEEE1394 / Wireless LAN / SD Memory card / S-Video port/ IrDA port/
Memory Stick
When using LAN or Wireless LAN, refer to “Using IP Operator” (page 66).
IP Operator is useful to access to network everywhere by notebook.
Connecting and using the wireless network
Right-click the Wireless network icon on the Taskbar and select [View available
wireless network].
- 66 -
Page 68

Select AP(Access Point) you want to connect to and type necessary information. Click
[Connect].
If you place the mouse pointer on the Wireless network icon on the Taskbar, you can
see the status of the wireless network.
Using IP Operator
IP Operator is useful to access to network everywhere by notebook.
User access to network at the several places (Home, Office, and Vendor etc.)
can save and modify the network environment (IP address, Domain, Workgroup).
For more detailed information, refer to [IP Operator].
Double click [IP Operator] icon on Desktop System tray.
- 67 -
Page 69

If the following window appears, select LAN or High-Speed Internet at the
drop down menu and type the computer name you use.
Type the name is appropriate at [Profile List] after making a decision whether
a user belonging to [Domain], or a member of [Work Group].
Choose one of setting options as below.
When setting [Obtain an IP address automatically],
- IP address, Subnet mask, Default Gateway windows are changed the color as grey
automatically.
When setting [Use the following IP address]
Insert IP address, Subnet mask, Default Gateway window. Then, insert
DNS Server.
Click the [Profile Save] button when finishing inserting items in [Profile List]
Note:
When setting [Obtaining an IP address automatically], it is unavailable
to insert IP address, Subnet mask, and Default gateway.
When pressing [Profile Apply], no items appear at [Profile List].
If a user needs to apply the specific item, select one of items at
[Profile List], and click [Profile Apply].
- 68 -
Page 70

Using Battery Miser
Battery Miser is the program to manage energy saving function makes
the battery of notebook computer maximum. When using Battery Miser, it
is available to use both original power management functions of Windows and
the advanced power management functions of battery miser.
For more detailed information, refer to [About Battery Miser]
Double click [Battery Miser] icon on Desktop System tray.
Battery Miser main screen appears as below.
Power scheme:
The group that manages the power to reduce power consumption of computer
peripheral units.
- 69 -
Page 71

Battery alarm:
If the battery power gets down to low alarm, critical alarm, user can define the option
for alarm is working.
Note:
When pressing the keys Fn + F8, it keeps unused sound device power
management(Sound device is always ON).
When pressing one more, it return to the original set point.
When pressing the keys Fn + F9, it keeps unused Monitor power
management(Monitor is always ON).
When pressing one more, it return to the original set point.
- 70 -
Page 72

Input/Output
Using the keyboard
The keyboard is used for entering text and commands in the computer.
About the keyboard – 14.1inch
The keyboard is composed of character, number, and other special function keys.
Function keys: Function keys enable you to perform different operations depending
on the operating system and application program you use.
Hot keys: Hot keys (shortcuts) are used in conjunction with Fn key to provide
shortcuts for some of the predefined operations, such as entering power-saving
mode.
Cursor control keys: You can move the cursor in the direction of the arrows.
- 71 -
Page 73

Editing keys: You can move the cursor to the beginning or end of the current line, or
up and down the screen.
About the keyboard – 15 inch
The keyboard is composed of character, number, and other special function keys.
Function keys: Function keys enable you to perform different operations depending
on the operating system and application program you use.
Hot keys: Hot keys (shortcuts) are used in conjunction with Fn key to provide
shortcuts for some of the predefined operations, such as entering power-saving
mode.
Cursor control keys: You can move the cursor in the direction of the arrows.
Editing keys: You can move the cursor to the beginning or end of the current line, or
- 72 -
Page 74

up and down the screen.
Character and number keys: consist of character keys, number keys, special
character keys, and spacebar. Spacebar is used for creating a space between
characters.
Embedded numeric keys: You can press the combination of Fn and ScrLk keys to
enable the embedded numeric keypad. Num Lock indicator lights up and enables you
to use the embedded numeric keypad shown below. You can press the combination
of Fn and ScrLk keys again to disable the embedded numeric keys. (To use the
numeric keys, you must set the Advanced -> Internal Keypad setting to Enabled in
the BIOS Setup Utility.)
- 73 -
Page 75

Caution
Do not spill water, juice, coffee, etc on the keyboard as it may damage the computer
and cause an electric shock.
Note:
In the middle of entering characters, if numbers are entered instead of characters,
press the combination of Shift and ScrLk to disable the embedded numeric keys.
Modifier and special function keys
3
2
1
Shift key: Hold Shift key down and press another key to enter the upper case letter
for the key.
Caps Lock key: Press Caps Lock key to lock the keyboard in the upper case position.
When the Caps Lock indicator lights up, you can press another key in combination
with Shift to enter the lower case letter for the key.
Esc key: Use Esc key to quit programs or cancel a operation in a program.
7
6
4
5
- 74 -
Page 76

PrtSc (Print Screen) key: Press PrtSc key to take the snapshot of the entire area
visible on your screen and store it in the clipboard.
Enter key: Press Enter key to enter a command or to end a line.
Shortcut menu key: Press Shortcut menu key to view shortcuts for the current
program. (Shortcut menu key works the same as the right-clicking the mouse
button)
Windows(R) key: Press Windows key to view the Start menu.
LG
Note:
You can lock the keyboard in the upper/lower case position by pressing Caps Lock
key. Caps Lock indicator is lighted up in upper case position. You can use the
combination of Shift and a character key to enter its upper/lower case letter.
- 75 -
Page 77

Hot keys
The following Hot keys provide you with shortcuts to operations, such
as adjusting the brightness of the computer display.
Fn+F4:
Force the computer to enter power-saving mode. (ex: system standby
and hibernation)
Fn+F5:
Press the combination once to disable the touch pad, and press again to enable
the touch pad. (The touch pad initialization takes 1~2 seconds, so wait for the
initialization to end before using the touch pad)
Fn+F6:
Wireless LAN Enable/Disable Toggle
Fn+F7:
When the computer is attached to an external monitor, you can change
the display output location with Fn+F7 combination. You can switch to and
from the three types of display modes, LCD display only, the external
monitor only, or both at the same time.
Fn+Home:
The computer display becomes brighter.
Fn+End:
The computer display becomes darker.
Fn+F8:
Enbale/disable Auto Sound power management (battery mode only). Refer
to Battery Miser Help.
Fn+F9:
Enable/disable Auto Brightness control. Refer to Battery Miser Help.
Fn+F12:
Maximum power-saving mode. (when OSD is installed)
- 76 -
Page 78

Using the touch pad
The touch pad can be used with a mouse at the same time. It has a scroll
button, which functions similar to a scroll wheel on a mouse.
1. Touch pad: used to move the pointer.
2. Left button: used to select or click items.
3. Right button: functions similar to the right button on a mouse.
2
1
3
Caution
Guidelines on using the touch pad
Do not touch the touch pad with a sharp or pointed object as doing so may damage
the touch pad.
Do not remove the cover sheet of the touch pad as doing so may damage the touch
pad.
Do not use the touch pad with two fingers, wearing gloves, or wet hand as it may not
function correctly. Using the touch pad with a dirty or oily finger may damage the
touch pad.
Do not exert too much pressure on the touch pad as doing so may result in injuries
to your finger or wrist.
- 77 -
Page 79

Moving the pointer on the screen
Gently place your finger on the touch pad and slide it in the direction in which
you want the pointer to move.
Making the selection (Click)
To click a button, quickly press and release the left button. You can click the
left button or gently tap the touch pad once to select an item on a menu or
an icon on the screen, or position the cursor in a document.
OR
- 78 -
Page 80

Double-click (Run)
To double-click a button, quickly press and release the left button twice.You can also
tap the touch pad twice to get the same result. To launch an application, you can
select and double-click the .exe file or the program icon.
Drag and drop
To drag an object, select and move the object by clicking and holding the
left button and sliding the finger across the touch pad without releasing the
button.
To drop the object you have just dragged, release the left button.
You can use drag and drop to move files from one location to another.
For example, if you want to place a file in the recycle bin, place the pointer
above the file you want to move, press the left button and hold, slide your
finger across the touch pad to move the file and release the left button above
the recycle bin.
- 79 -
Page 81

.
Drag: Move the icon without releasing the left button
Drop: Release the left button above the recycle bin.
ClickLock: enables you to select text or drag a file without having
to continuously hold down the mouse button or touch pad button.
Follow the instruction below to enable ClickLock. If ClickLock is enabled,
you can hold down the mouse button or touch pad button for a moment and
then release it, and still get the same effect as continuously holding down
the button. You can drag an object with ClickLock enabled and press again
to release the button and drop the object.
Click and open the Mouse Properties window.
On the Buttons tab, under ClickLock, select Turn on ClickLock check box.
- 80 -
Page 82

Click Settings and adjust how long you need to hold down a mouse or touch pad
button to enable ClickLock, and then Select OK.
- 81 -
Page 83

Using the scroll up/down function
Your computer supports scroll function. When using scroll function, mouse
cursor at the arrow does not move. Only the scroll function will move.
You can use the scroll up/down function by pressing Fn + direction key.
In a program window with a scroll bar, you can move up and down the
windows using Fn + direction key. When you scroll a window using the
scroll up/down function, the pointer on the screen does not move
- 82 -
Page 84

System Setup
The system setup saves your computer’s hardware configurations in CMOS
RAM. The system setup provides you with information, such as the size and
type of your hard disk, size of the installed memory, date, and time.
Starting the system setup
Setting a password. (Page 83)
Changing or removing the password. (Page 86)
Recovering the factory default settings. (Page 87)
Caution
Do not change the system setup arbitrarily. Incorrect system setup may result in
errors while using the computer.
The menu and default factory settings of the BIOS Setup Utility may look different
from this manual. They may have been changed to improve the performance of the
system.
Keys used in the system setup
Enter: Select the current item.
Esc: Close the current window or move to the previous window.
CursorControl Keys: Move up, down, left, and right.
+ -: Increase and decrease the value.
Page Up: Move to the first item.
Page Down: Move to the last item.
F10: Save and exit the system setup.
- 83 -
Page 85

Note:
Cursor control keys (arrow keys) move the cursor up, down, to the left and right.
Turn on the computer.
When LG logo appears on the screen, press F2.
The BIOS Setup Utility window appears.
Setting a password
If you want to protect the system setup from an unauthorized user, follow
the instructions below to set a password.
You can set a password in the BIOS Setup Utility program.
Caution
If you forget the password, you cannot gain access to your system. Make sure you
write down the password in a safe place only you can refer to in case you forget the
password.
- 84 -
Page 86

Setting a supervisor password
A password protects your computer from unauthorized users. The factory
default setup does not have a password. A supervisor password
prevents unauthorized users from changing the system setup.
Start the BIOS Setup Utility.
Use arrow keys to select Set Supervisor Password under Security menu, and then
press Enter.
Note:
You can use a supervisor password to gain access and change items in the
BIOS Setup Utility, and select Power on Boot. We recommend to use a
user password if someone else has to use the computer.
If the following message appears, enter a new password and press Enter. A
password must be consisted of character A~Z and numbers 0~9, and have the
maximum length of 8.
If the following message appears, press Enter.
- 85 -
Page 87

Press F10 to save the new settings.
If the following message appears, select Yes and press Enter to restart the computer.
Setting a user password
A user password is a secondary compared to a supervisor password. You must
set a supervisor password in order to set a power-on password.
Start the BIOS Setup Utility and use arrow keys to select Security menu.
Use arrow keys to select Set User Password and press Enter.
Note:
A power-on password gives limited access for changing the settings in the
BIOS Setup Utility compared to a supervisor password.
If the following message appears, enter a new password and then press Enter. A
password must be consisted of character A~Z and numbers 0~9, and have the
maximum length of 8.
- 86 -
Page 88

If the following message appears, press Enter.
Press F10 to save the new settings.
If the following message appears, select Yes and press Enter to restart the computer.
Changing or removing the password
Start the BIOS Setup Utility, enter your password, and then press Enter.
To change the password, follow the instruction on Setting a password.
To remove the password, follow the instructions below.
Use arrow keys to select Security menu, and select a password you want to remove,
and then press Enter.
If the following message appears, enter the current password in the bracket next to
Enter Current Password, and then press Enter. Press Enter without entering a
password in the brackets next to Enter New Password and Confirm New Password.
If the following message appears, press Enter.
Press F10 to save the new settings.
If the following message appears, select Yes and press Enter to restart the computer.
- 87 -
Page 89

Recovering the factory default settings
If a user accidentally modifies the system setup, follow the instruction below
to recover the factory default settings.
Start the BIOS Setup Utility, and use arrow keys to select Exit.
Use arrow keys to select Load Setup Defaults, and press Enter.
If the following message appears, select Yes and press Enter to recover the factory
default settings.
Press F10 to save the new settings.
If the following message appears, select Yes and press Enter to restart the computer.
- 88 -
Page 90

System Recovery
System Recovery offers to format the hard disk as shipping status of
the product. User must make backup files to minimize a risk of losing data.
Windows CD is provided with the product that offers system recovery
contracted by Microsoft.
Using Full Recovery
To recover hard disk completely, you must make backup for all software and
data on the computer.
If Windows installation is complete, you must fill out “Windows user
Registration information” as the first time to buy the product.
Press F11 with appearing preload image on the screen.
2. If the following screen appears, select one of items that works.
- 89 -
Page 91

3. Select [Full Recovery without Format], or [Full Recovery after format].
* In the case of selecting [Full Recovery without Format].
- 90 -
Page 92

[Recovering factory default] appears.
* In the case of selecting [Full Recovery after format]
Click [Start Recovery] .
- 91 -
Page 93

"Formatting to NTFS" appears.
When starting [Full Recovery], next procedures appears on the screen.
If the following screen appears after restarting system, fill out Windows user
registration information.
When clicking [Finish], the system returns to normal.
- 92 -
Page 94

Driver re-installation
1. Turn on the computer and go to [Start]-[All Programs]-[LG GILJABI].
2. Select the device driver you want to install.
3. Follow the instructions to complete the installation. Some device drivers
require you to restart the computer after the installation.
- 93 -
Page 95

Storage/Memory
Using the optical disk drive
Different model types provide different optical disk drives. (Some models
have CD-ROM drives and others have CD-RW/DVD-ROM combo drives)
Inserting a CD
Turn on the computer, and press the eject button on the CD-ROM drive.
Place the CD in the middle of the tray. (Label on the CD must face upward)
- 94 -
Page 96

Push the tray into the CD-ROM drive.
Note:
When you use the CD-ROM or CD-RW/DVD-ROM drive, place your computer on
a flat surface. The drive may not function correctly on an uneven surface.
Your computer has a CD-ROM drive with the speed of 24X or faster;
therefore, the drive may rattle when you first insert a CD.
Be careful not to scratch the surface of a CD-ROM or CD-RW/DVD-ROM disk.
Do not clean a CD-ROM or CD-RW/DVD-ROM disk with abrasive chemicals,
such as Benzene or Paint thinner.
Do not drop or bump a CD-ROM or CD-RW/DVD-ROM disk.
Use a clean, soft cloth when removing dust or fingerprints on a CD-ROM
or CDRW/DVD-ROM disk.
Removing a CD
1. Press the eject button on the CD-ROM drive to eject the disk tray.
2. Lift the CD in the middle of the disk tray.
3. Place the CD in its protective case.
4. Push the disk tray into the drive.
- 95 -
Page 97

Playing an audio CD
Using Windows Media Player
You can use Windows(R) Media Player to play various types of audio and
video files.
You can play and make a copy of an audio CD, listen to the Internet
radio broadcast, play movie clips, and listen to music or watch a video on a
web site. If you have a DVD drive, you can play a DVD. If you have a CDRW drive, you can use Windows Media Player to make your own music CD.
Starting Windows Media Player 1
Turn on the computer.
Press the eject button on the drive to open the disk tray, and then insert an audio
CD and close the tray.
Select the Windows Media Player and click OK. Windows Media Player starts playing
the audio CD. (If you select another audio CD program, that program will play the
CD instead of Windows Media Player)
Starting Windows Media Player 2
Press Start -> All Programs -> Accessories -> Entertainment -> Windows Media
Player.
When Windows Media Player opens, press Open under File menu, and then select an
audio or video file you want to play.
- 96 -
Page 98

Using Power DVD
1. Insert DVD title in the DVD-COMBO drive, and close the tray.
When the following window opens, select Play DVD Play and click [Ok]
2. As you insert the DVD title, the DVD Auto-Resume window will open as shown
below. Set the preference and click [Ok]. If you check “Don’t ask me this question
again”, it will not open next time automatically and play as you preferred.
3. Power DVD will now play. You can read the detailed instruction of the Power DVD
in the Help menu from the main control.
- 97 -
Page 99

Note:
If unchecked on “Don’t ask me this question again”, you will receive the
message every time you open the Power DVD. If you delete the DVD title
and play it again, you will also receive the preference window.
You can change the region counter only 5 times. After the 5
th
change, it is
not possible to change. Be cautious when you try to change the regional code.
Do not open the DVD tray and remove the DVD title while it is still playing. It
may damage the system or the DVD title.
- 98 -
Page 100

Using an SD Memory Card / SONY Memory Stick
Your computer can read from and write to an SD Memory Card / Memory Stick.
Note: Photo images may look different from the actual product.
Inserting an SD Memory Card / Memory Stick
Turn on the computer, and place the SD Memory Card / Memory Stick in the SD
Memory Card slot.
Push the SD Memory Card / Memory Stick into the slot until it clicks.
Removing the SD Memory Card / Memory Stick
1. Press the SD Memory Card / Memory Stick with the tip of your finger.
2. The SD Memory Card / Memory Stick ejects.
Note:
Below mentioned functions are not offered by each product
*IEEE1394 / Wireless LAN / SD Memory card / S-Video port / IrDA port/
Memory Stick
- 99 -
 Loading...