

LG LHB335 Owner’s Manual

i _iiixila
iiii i
i i
Life's Good
x iiii
OWNER'S
Network Blu-ray Disc T_
Home Theater System
Please read this manual carefully before operating
your set and retain it for future reference.
MODEL
LHB335
P/NO : MFL62863597
HB905SA-AH.BUSALL_OM.indd 1 2010-01-08 4,_,_,Li11:49:58
www.lgusa.com
2 Safety Information
1
Co
Safety Information
F
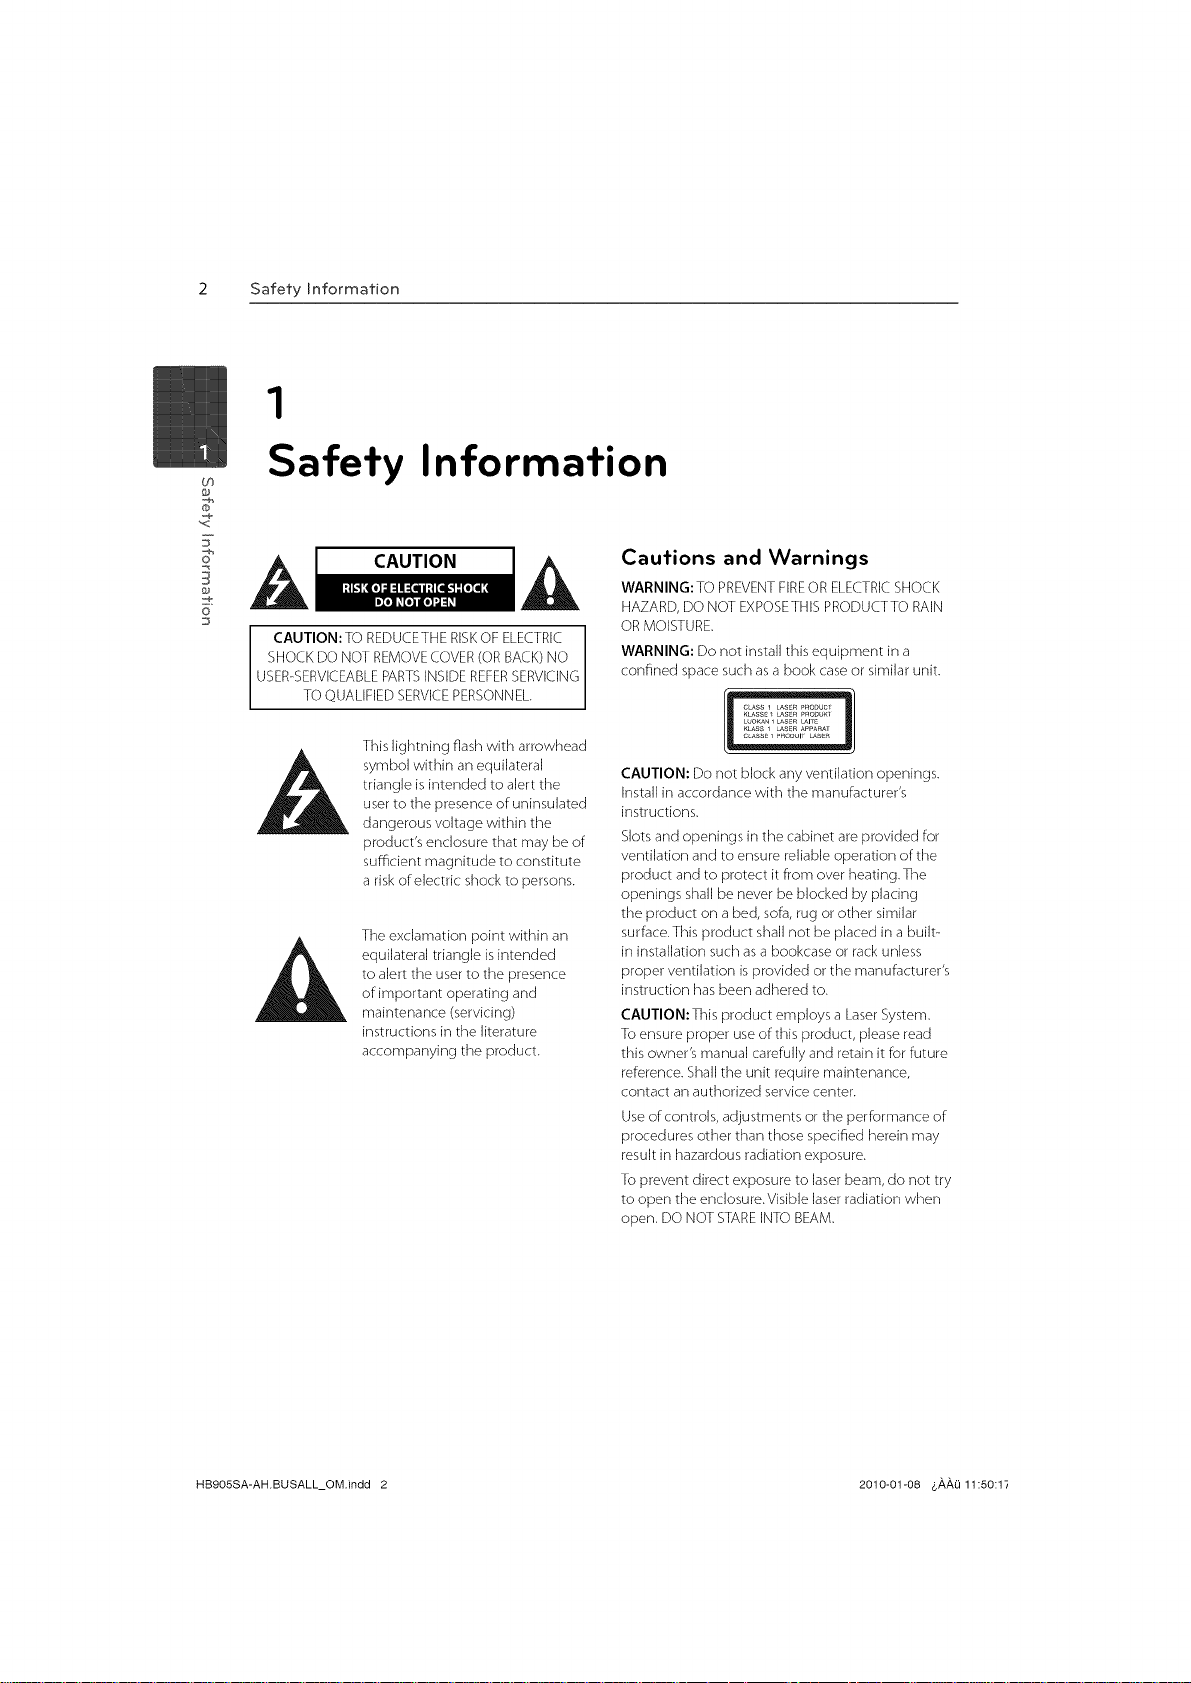
CAUTION
o
CAUTION: TOREDUCETHERISKOFELECTRIC
SHOCKDO NOTREMOVECOVER(ORBACK)NO
USER-SERVICEABLEPARTSINSIDEREFERSERVICING
TOQUALIFIEDSERVICEPERSONNEL.
This lightning flash with arrowhead
symbol within an equilateral
triangle is intended to alert the
user to the presence of uninsulated
dangerous voltage within the
product's enclosure that may be of
sufficient magnitude to constitute
a risk of electric shock to persons.
The exclamation point within an
equilateral triangle is intended
to alert the user to the presence
of important operating and
maintenance (servicing)
instructions in the literature
accompanying the product.
Cautions and Warnings
WARNING: TO PREVENT FIREOR ELECTRIC SHOCK
HAZARD, DO NOT EXPOSETHIS PRODUCTTO RAIN
OR MOISTURE.
WARNING: Do not install this equipment in a
confined space such as a book case or similar unit.
CLASS1 LASERP_OOUCr
K_SSS1 CASS_PRO_UKI
LUOKaN1 LaSeRLAIRS
K_SS 1 _SS_ APPARA_
CLASSS1 _£OaUlr L_SS£
CAUTION: Do not block any ventilation openings.
Install in accordance with the manufacturer's
instructions.
Slots and openings in the cabinet are provided for
ventilation and to ensure reliable operation of the
product and to protect it from over heating.The
openings shall be never be blocked by placing
the product on a bed, sofa, rug or other similar
surface.This product shall not be placed in a built-
in installation such as a bookcase or rack unless
proper ventilation is provided or the manufacturer's
instruction has been adhered to.
CAUTION: This product employs a Laser System.
To ensure proper use of this product, please read
this owner's manual carefully and retain it for future
reference. Shall the unit require maintenance,
contact an authorized service center.
Use of controls, adjustments or the performance of
procedures other than those specified herein may
result in hazardous radiation exposure.
To prevent direct exposure to laser beam, do not try
to open the enclosure.Visible laser radiation when
open. DO NOT STARE INTO BEAM.
HB905SA-AH.BUSALL_OM.indd 2 2010-01-08 &AA{i 11:50:17
Safety Information 3
CAUTION concerning the Power Cord
Most appliances recommend they be placed upon a
dedicated circuit;
That is, a single outlet circuit which powers only
that appliance and has no additional outlets or
branch circuits. Check the specification page of this
owner's manual to be certain. Do not overload wall
outlets. Overloaded wall outlets, loose or damaged
wall outlets, extension cords, frayed power cords, or
damaged or cracked wire insulation are dangerous.
Any of these conditions could result in electric
shock or fire. Periodically examine the cord of your
appliance, and if its appearance indicates damage
or deterioration, unplug it, discontinue use of the
appliance, and have the cord replaced with an exact
replacement part by an authorized service center.
Protect the power cord from physical or mechanical
abuse, such as being twisted, kinked, pinched, closed
in a door, or walked upon. Pay particular attention
to plugs, wall outlets, and the point where the cord
exits the appliance.To disconnect power from the
mains, pull out the mains cord plug.When installing
the product, ensure that the plug is easily accessible.
CAUTION:The apparatus shall not be exposed to
water (dripping or splashing) and no objects filled
with liquids, such as vases, shall be placed on the
apparatus.
This device is equipped with a portable battery or
accumulator.
Safety way to remove the battery or the battery
from the equipment: Remove the old battery
or battery pack, follow the steps in reverse order
than the assembly.To prevent contamination of
the environment and bring on possible threat
to human and animal health, the old battery or
the battery put it in the appropriate container at
designated collection points. Do not dispose of
batteries or battery together with other waste.
It is recommended that you use local, flee
reimbursement systems batteries and accumulators.
The battery shall not be exposed to excessive heat
such as sunshine, fire or the ]fie.
FCC Compliance Statement
This device complies with part 15 of the FCC rules.
Operation is subject to the following two conditions:
(1) This device may not cause harmful interference,
and
(2) This device must accept any interference received,
including interference that may cause undesired
operation.
NOTE:This equipment has been tested and found
to comply with the limits for a Class B digital device,
pursuant to Part 15 of the FCC Rules.These limits are
designed to provide reasonable protection against
harmful interference in a residential installation.This
equipment generates, uses, and can radiate radio
frequency energy and, if not installed and used in
accordance with the instructions, may cause harmful
interference to radio communications. However,
there is no guarantee that interference will not occur
in a particular installation.
If this equipment does cause harmful interference
to radio or television reception, which can be
determined by turning the equipment off and
on, the user is encouraged to try to correct the
interference by one or more of the following
measures:
• Reorient or relocate the receiving antenna.
• Increase the separation between the equipment
and receiver.
• Connect the equipment into an outlet on a
circuit different from that to which the receiver is
connected.
• Consult the dealer or an experienced radio/TV
technician for help.
CAUTION :Any changes or modifications not
expressly approved by the party responsible for
compliance could void the user's authority to
operate this equipment.
th
o
HB905SA-AH.BUSALL_OM.indd 3 2010-01-08 6,_,,_,_11:50:1
4 Safety Information
Notes on Copyrights
• Because AACS (Advanced Access Content System)
is approved as content protection system for BD
format, similar to use of CSS (Content Scramble
System) for DVD format, certain restrictions are
co
,<
F
imposed on playback, analog signal output, etc.,
of AACS protected contents. The operation of this
product and restrictions on this product may vary
depending on your time of purchase as those
restrictions may be adopted and/or changed by
AACS after the production of this product.
• Furthermore, BD-ROM Mark and BD+ are
o
additionally used as content protection systems
for BD format, which imposes certain restrictions
including playback restrictions for BD-ROM
Mark and/or BD+ protected contents. To obtain
additional information on AACS, BD-ROM Mark,
BD+, or this product, please contact an authorized
Customer Service Center.
• Many BD-ROM/DVD discs are encoded with
copy protection. Because of this, you should only
connect your player directly to your TV, not to a
VCR. Connecting to aVCR results in a distorted
picture from copy-protected discs.
• This product incorporates copyright protection
technology that isprotected by U.S.patents
and other intellectual property rights. Use of
this copyright protection technology must be
authorized by Macrovision, and is intended for
home and other limited viewing uses only unless
otherwise authorized by Macrovision. Reverse
engineering or disassembly is prohibited.
• Under the U.S. Copyright laws and Copyright
laws of other countries, unauthorized recording,
use, display, distribution, or revision of television
programs, videotapes, BD-ROM discs, DVDs, CDs
and other materials may subject you to civil and/
or criminal liability.
HB905SA-AH.BUSALL_OM.indd 4 2010-01-08 &,_,,_,Q11:50:1_
Safety Information 5
IMPORTANT SAFETY
INSTRUCTIONS
1. Read these instructions.
2. Keep these instructions.
3. Heed all warnings.
4. Followall instructions.
5. Do not use this apparatus near water.
6. Clean only with dry cloth.
7. Do not block any ventilation openings. Install in
accordance with the manufacturer's instructions.
8. Do not install near any heat sources such as
radiators, heat registers, stoves, or other apparatus
(including amplifiers) that produce heat.
9. Do not defeat the safety purpose of the polarized
or grounding-type plug. A polarized plug has
two blades with one wider than the other. A
grounding type plug has two blades and a third
grounding prong.The wide blade or the third
prong are provided for your safety. If the provided
plug does not fit into your outlet, consult an
electrician Forreplacement of the obsolete outlet.
10. Protect the power cord from being walked on
or pinched particularly at plugs, convenience
receptacles, and the point where they exit from
the apparatus.
11. Only use attachments/accessories specified by
the manufacturer.
12. Use only with the cart, stand, tripod, bracket, or
table specified by the manufacturer, or sold with
the apparatus.When a cart is used, use caution
when moving the cart/apparatus combination to
avoid injury from tip-over.
13. Unplug this apparatus during lightning storms or
when unused for long periods of time.
14. Refer all servicing to qualified service personnel.
Servicing is required when the apparatus has
been damaged in any way, such as power-supply
cord or plug is damaged, liquid has been spilled
or objects have fallen into the apparatus, the
apparatus has been exposed to rain or moisture,
does not operate normally, or has been dropped.
to
,<
F
o
HB905SA-AH.BUSALL_OM.indd 5 2010-01-08 &,&,,&,Q11:50:18
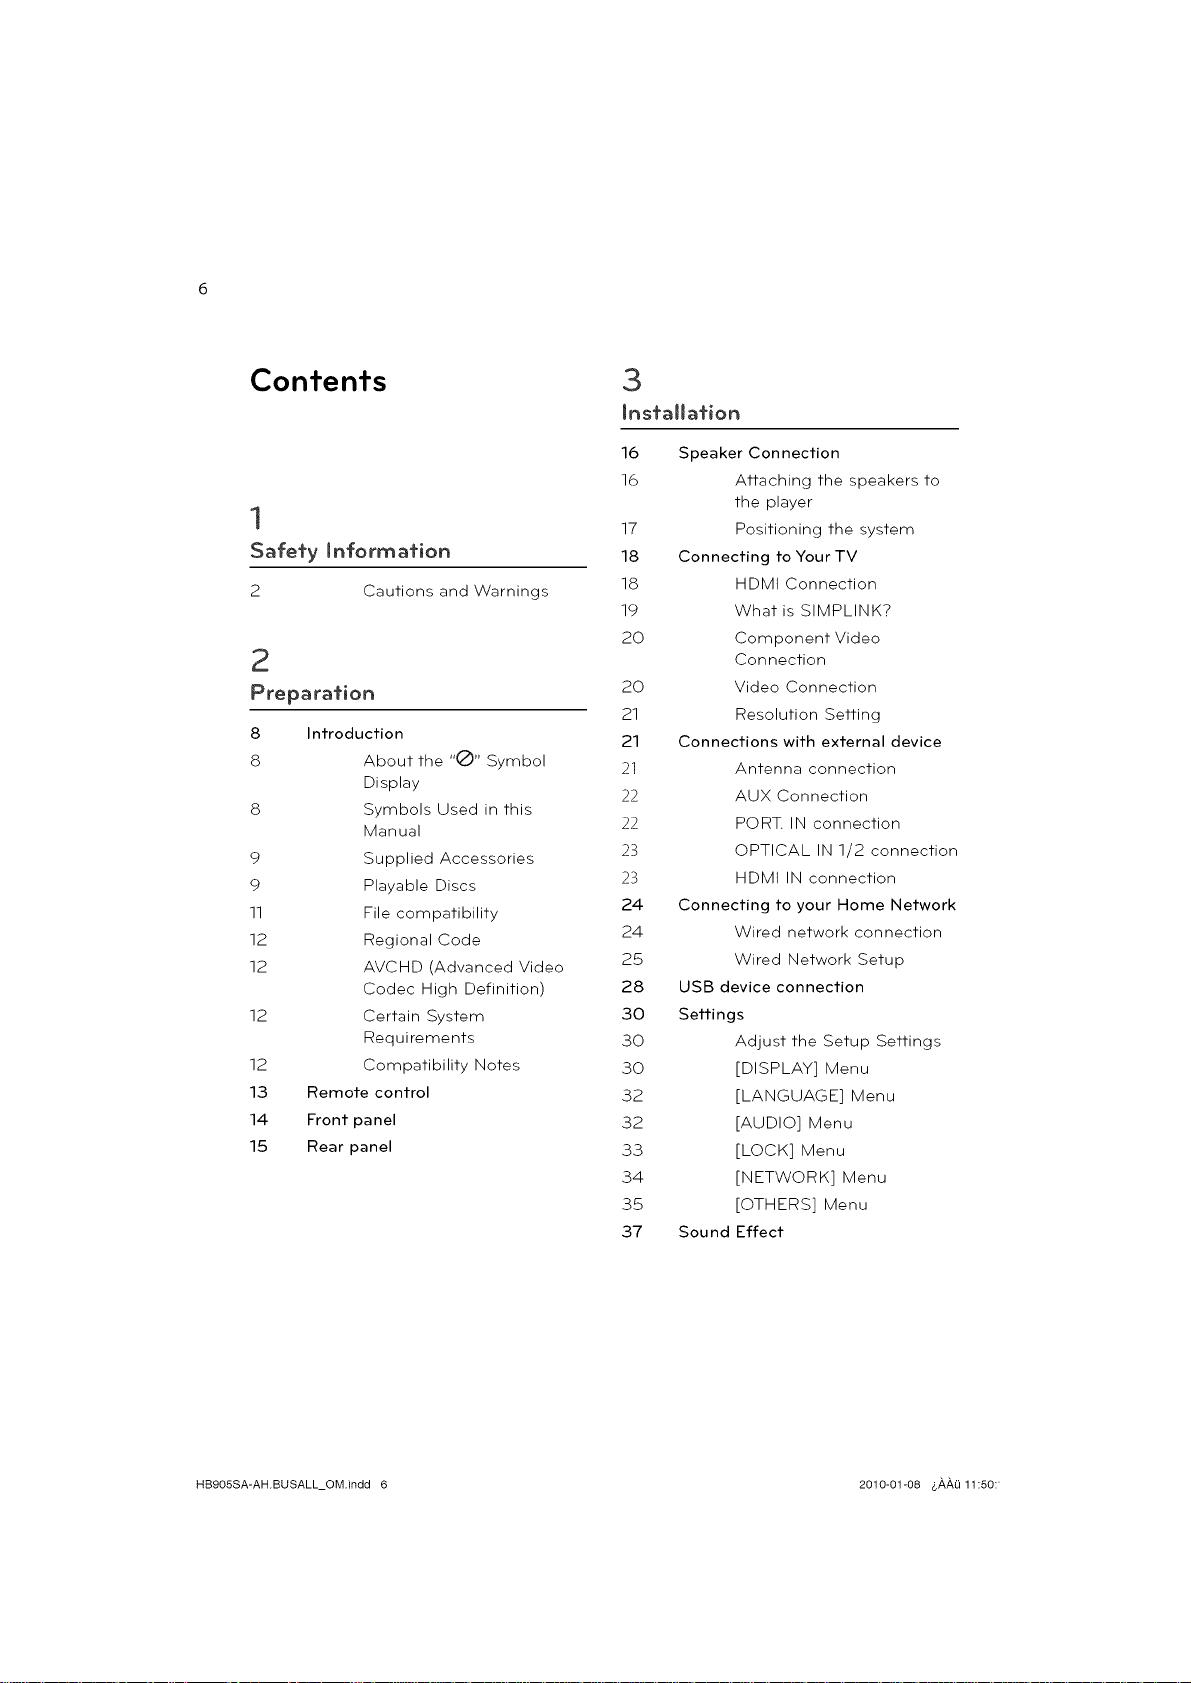
Contents
1
Safely Informafion
2 Cautions and Warnings
Preparation
8 Introduction
8 About the "(_)" Symbol
Display
S Symbols Used in this
Manual
9 Supplied Accessories
9 Playable Discs
11 File compatibility
12 Regional Code
12 AVCHD (Advanced Video
Codec High Definition)
12 Certain System
Requirements
12 Compatibility Notes
13 Remote control
14 Front panel
15 Rear panel
16 Speaker Connection
1.6 Attaching the speakers to
the player
17 Positioning the system
18 Connecting to Your TV
1S HDMI Connection
19 What is SIMPLINK?
20 Component Video
Connection
20 Video Connection
21 Resolution Setting
21 Connections with external device
21 Antenna connection
22 AUX Connection
22 PORT. IN connection
23 OPTICAL IN 1/2 connection
23 HDMI IN connection
24 Connecting to your Home Network
24 Wired network connection
25 Wired Network Setup
28 USB device connection
30 Settings
30 Adjust the Setup Settings
30 [DISPLAY] Menu
32 [LANGUAGE] Menu
32 [AUDIO] Menu
33 [LOCK] Menu
34 [NETWORK] Menu
35 [OTHERS] Menu
37 Sound Effect
HB905SA-AH.BUSALL_OM.indd 6 2010-01-08 &,_,,_,Q11:50:
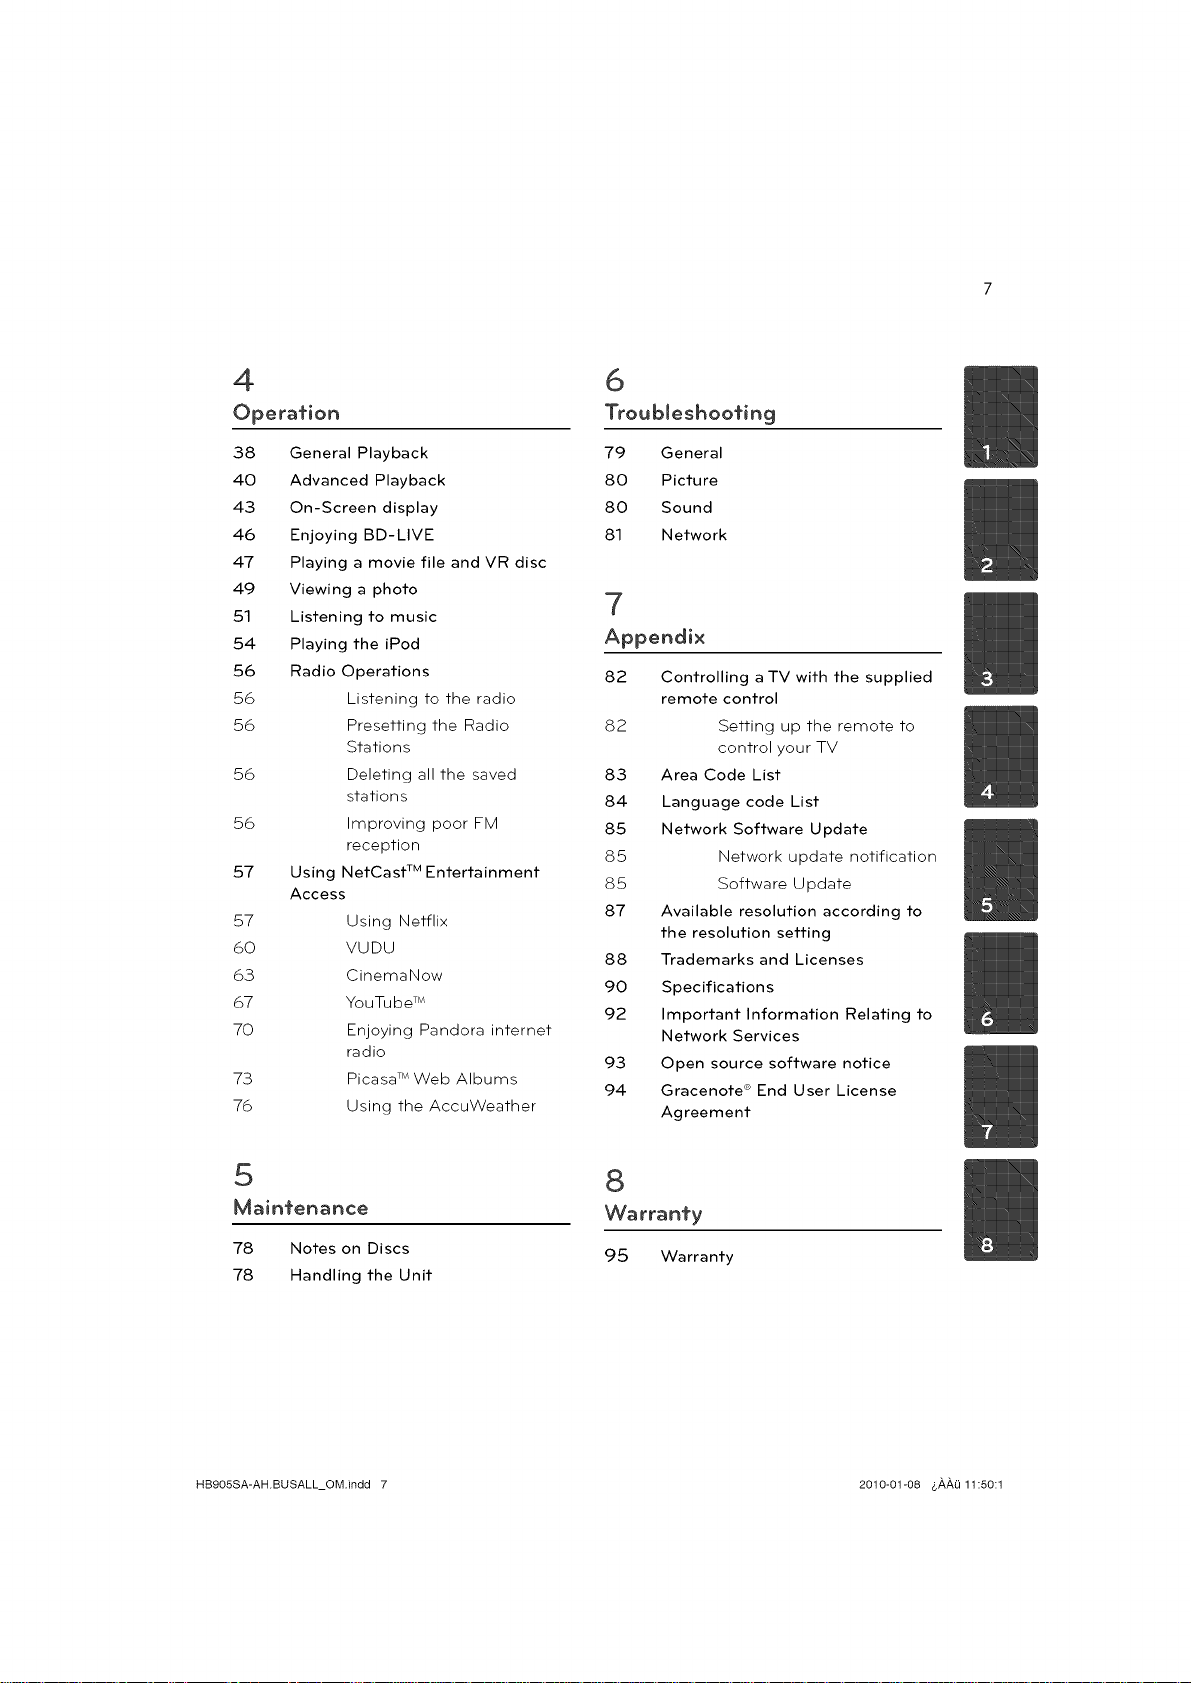
6
Troubleshooting
38 General Playback
40 Advanced Playback
43 On-Screen display
46 Enjoying BD-LIVE
47 Playing a movie file and VR disc
49 Viewing a photo
51 Listening to music
54 Playing the iPod
56 Radio Operations
56 Listening to the radio
56 Presetting the Radio
Stations
56 Deleting all the saved
stations
56 Improving poor FM
reception
57 Using NetCast TM Entertainment
Access
57 Using Netflix
60 VUDU
63 CinemaNow
67 YouTube TM
70 Enjoying Pandora internet
radio
73 Picasa TM Web Albums
76 Using the AccuWeather
79 General
80 Picture
80 Sound
81 Network
7
Appendix
82 Controlling a TV with the supplied
remote control
82 Setting up the remote to
control your TV
83 Area Code List
84 Language code List
85 Network Software Update
85 Network update notification
85 Software Update
87 Available resolution according to
the resolution setting
88 Trademarks and Licenses
90 Specifications
92 Important Information Relating to
Network Services
93 Open source software notice
94 Gracenote ® End User License
Agreement
8
Warranty
78 Notes on Discs
78 Handling the Unit
HB905SA-AH.BUSALL_OM.indd 7 2010-01-08 &AA{) 11:50:1
95 Warranty
8 Preparation
2
Preparation
Introduction
About the "®" Symbol Display
"®"may appear on yourTV display during
operation and indicates that the function
explained in this owner's manual is not
available on that specific media.
Symbols Used in this Manual
NOTE
Indicates specialnotes and operating features.
CAUTION
Indicates cautions for preventing possible
damages from abuse.
A section whose title hasone of tile following
symbols areapplicable only to the disc
represented bythe symbol.
I:]D]
I ID_V4D]
I r:\V['lll,]
I r:T,ID]
JLv_[,lvl1:1
_Lv_Ll_'J[,I
i',,1:[,)I[,]
BD-ROMdisc
DVD-Video,DVD_+R/RWin
Video mode or VRmode
and finalized
DVD_+R/RWin AVCHD
format
Audio CDs
Movie files
Music files
Photo files
IqB9OSSA-AH.BUSALL_OM.indd 8 2010-01-08 4,_,_,0 11:50:1;
Preparation 9
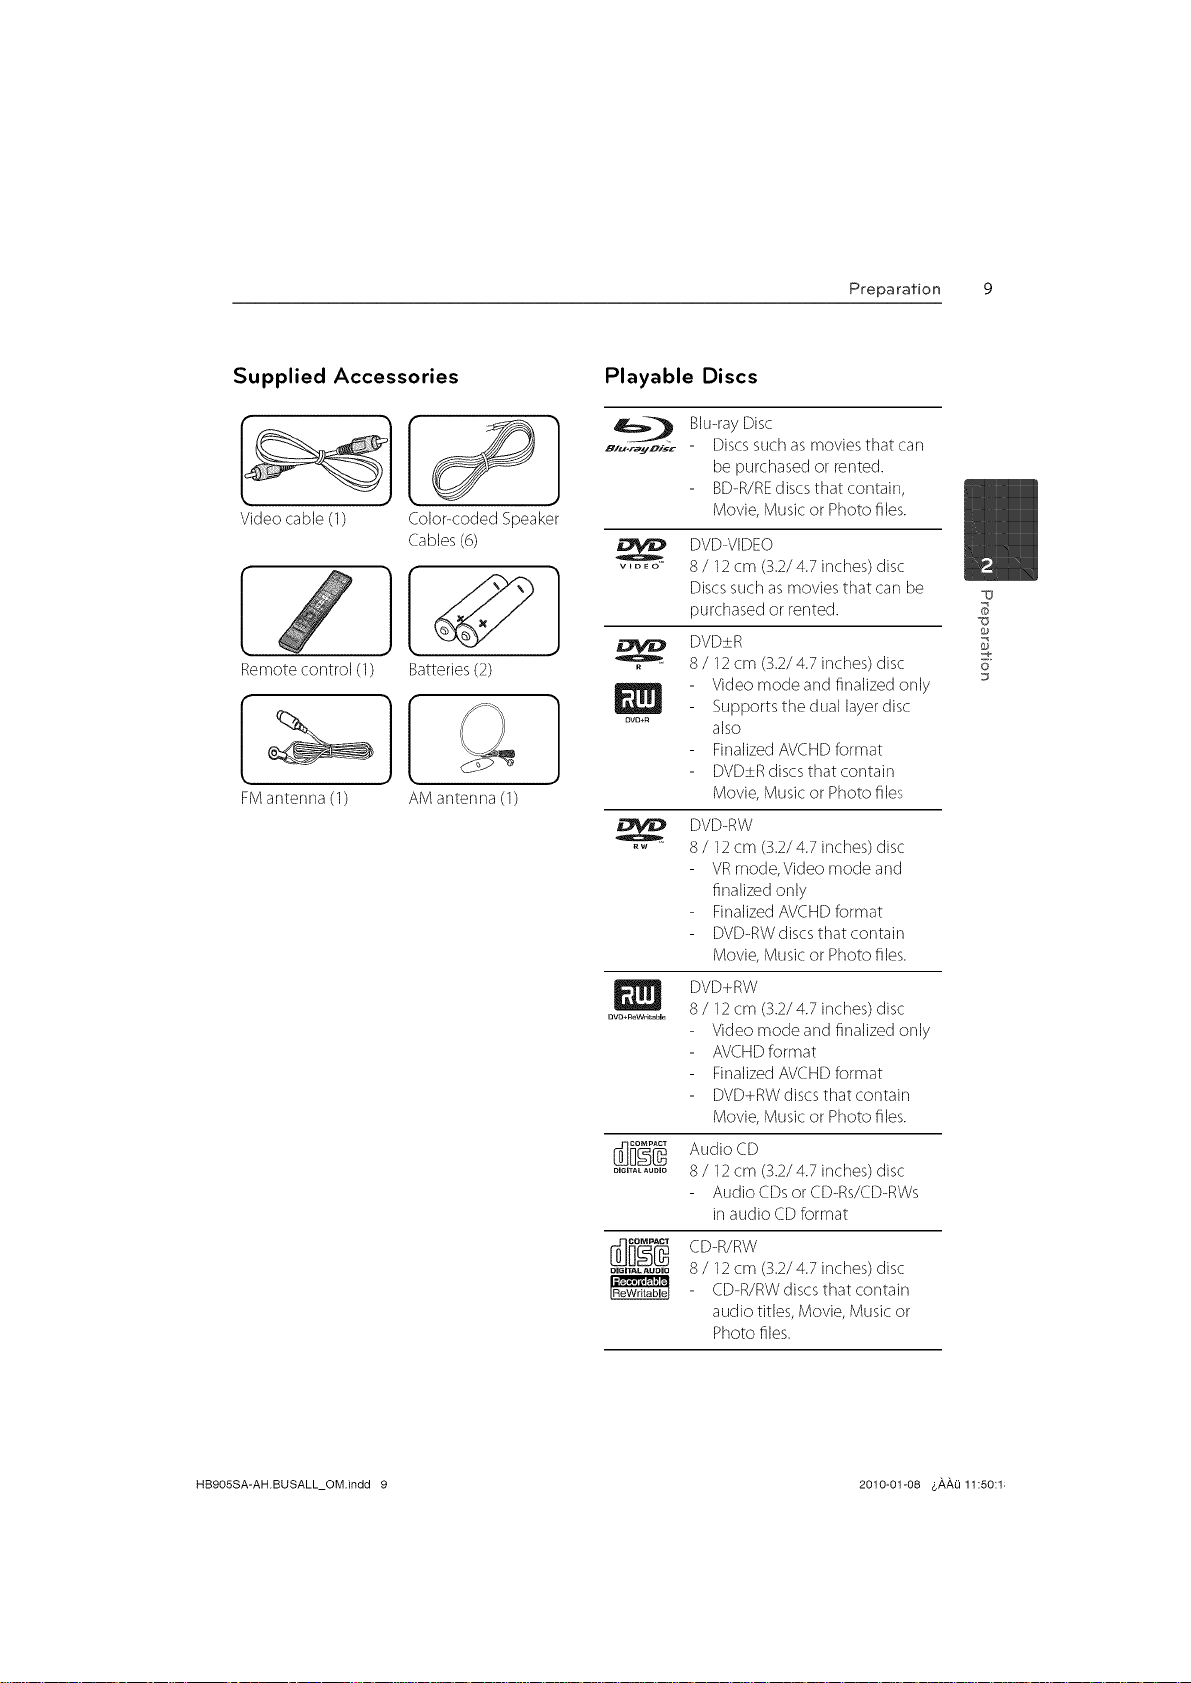
Supplied Accessories
Videocable (1)
Color<oded Speaker
Cables(6)
[
Remote control (1)
FManterma (1)
Batteries(2)
AM anterma (1)
Playable Discs
8/,-r_yo,-sc - Discssuch asmoviesthat carl
..... 8/ 12cm (3.2/4.7 inches) disc
DVD_R aJSO
Blu-rayDisc
be purchased or rented.
BD-R/REdiscs that contain,
Movie, Musicor Photo files.
DVD-VIDEO
Discssuch asmovies that carl be
purchasedor rented.
DVD±R
8/ 12cm (32/4.7 inches) disc
Video mode and finalized only
Supports the dual layer disc
FinalizedAVCHDformat
DVD±Rdiscsthat contain
Movie, Musicor Photo files
DVD-RW
RW
8/ 12cm (3.2/4.7 inches) disc
VRmode,Video mode and
finalizedonly
FinalizedAVCHDformat
DVD-RWdiscsthat contain
Movie, Musicor Photo files.
S3_
6"
.............. 8 / 12cm (3.2/4.7 inches) disc
............ 8 / 12cm (3.2/4.7 inches) disc
DiGiTAL AUDIO
HB9OSSA-AHBUSALL_OMindd 9 2010-01-08 4,_,_,Li11:50:1;
DVD+RW
Video mode and finalized only
AVCHDformat
FinalizedAVCHDformat
DVD+RWdiscs that contain
Movie, Musicor Photo files.
Audio :D
Audio CDsor CD-Rs/CD-RWs
in audio CDformat
CD-R/RW
8/ 12cm (S.2/4.7 inches) disc
CD-R/RWdiscsthat contain
audio titles, Movie, Musicor
Photo files.
10 Preparation
qJ
HB905SA-AH.BUSALL_OM.indd 10 2010-01-08 &,_,,_,Q11:50:2(
File compatibility
Overall
Available Fileextensions:
"jpg","j peg",".png",".avi",".divx",".rnpg",".mpeg","
.mkv",'tm p4",'tmp3",'twma",'twav"
Some"wav"files are not supported on this
player.
The file name is limited to 180 characters.
Depending on tile sizeand number of tile
files,it maytake severalminutes to readthe
contents on the media.
Maximum Files/Folder: Lessthan 2000(total
number of files and folders)
CD-R/RW, DVD_+R/RW,BD-R/REFormat:
ISO9660+JOLIET,UDFand UDFBridgeformat
Video files
Available resolution size:
Less than 1920 x 1080 (W x H) pixels
Playable subtitle: SubRip (.srt/.txt), SAMI
(.smi), SubStation Alpha (.ssa/.txt), MicroDVD
(.sub/.txt), VobSub (.sub), SubViewer 1.0 (.sub),
SubViewer 2.0 (.sub/.txt), TMPlayer (.txt), DVD
Subtitle System (.txt)
Playable Codec format: "DIVX3.xx", "DIVX4.
xx", "DIVXS.xx", "XVID", "DIVX6.xx" (Stand ard
playback only), H.264/MPEG-4 AVE, MPEG1 SS,
MPEG2 PS,MPEG2 TS
Playable Audio format: "Dolby Digital", "DTS",
"MP3", "WMA", "AAC", "AC3"
Not all tile WMA and AAC Audio format is
compatible with this unit.
Sampling frequency:
within 32 kHz to 48 kHz (WMA),
within 16 kHz to 48 kHz (MP3)
Bit rate:
within 20 kbps to 320 kbps (WMA),
within 32 kbps to 320 kbps (MP3)
Preparation 11
6"
Audio files
Sampling frequency:
within 8 kHzto 48 KHz(WMA),
within 11kHzto48 kHz(MP3)
Bit rate:
within 8 kbps to 320 kbps (WMA, MP3)
Photo files
Recommended size:
Lessthan 4,000x 3,000x 24 bit/pixel
Lessthan 3,000x 3,000x 32 bit/pixel
Progressiveand Iosslesscompression photo
image files are not supported.
HB905SA-AH.BUSALL_OM.indd 11 2010-01-08 4,#,#,L111:50::
12 Preparation
Regional Code
This unit hasa regional code printed on the
rearof the unit. This unit carl play only BD-ROM
or DVDdiscs labeled sameas tile rearof the
unit or "ALL't
AVCHD (Advanced Video Codec
High Definition)
_o
S3_
-e
This player carl playbackAVCHDformat
discs.Thesediscsare normally recordedand
usedin camcorders.
The AVCHDformat isa high definition
digital video cameraformat.
The MPEG4 AVC/H.264format iscapable
of compressing images at higher eMciency
than that of the conventional image
compressing format.
SomeAVCHDdiscs use the"x.v.Color"
format.
This player carl playbackAVCHDdiscs using
"x.v.Color"format.
SomeAVCHDformat discsmay not play,
depending on the recording condition.
AVCHDformat discsneed to befinalized.
"x.v.Color"offersawider color range than
normal DVDcamcorder discs.
Certain System Requirements
Forhigh definition video playback:
High definition display that has
COMPONENTor HDMIinput jacks.
BD-ROMdiscwith high definition content.
HDMIor HDCPcapable DVIinput on your
display device is required for some content
(asspecified bydisc authors).
Forup-conversion of standard definition
DVD,a HDMIor HDCPcapable DVIinput
on your display device isrequired for copy
protected content.
Compatibility Notes
BecauseBD-ROMisa new format,
certain disc, digital connection and other
compatibility issuesare possible. If you
experience compatibility problems, please
contact an authorized Customer Service
Center.
Viewing high-definition content and up-
converting standard DVDcontent may
require a HDMl<apable input or HDCP-
capable DVIinput on your display device.
Some BD-ROMand DVDdiscs may restrict
the useof some operation commands or
features.
You carl usea USBdevice that isused
to store some disc related information,
including downloaded omline content. The
disc you are using will control how long this
information isretained.
HB9OSSA-AH.BUSALL_OM.indd 12 2010-01-08 4,_,_,0 11:50:;
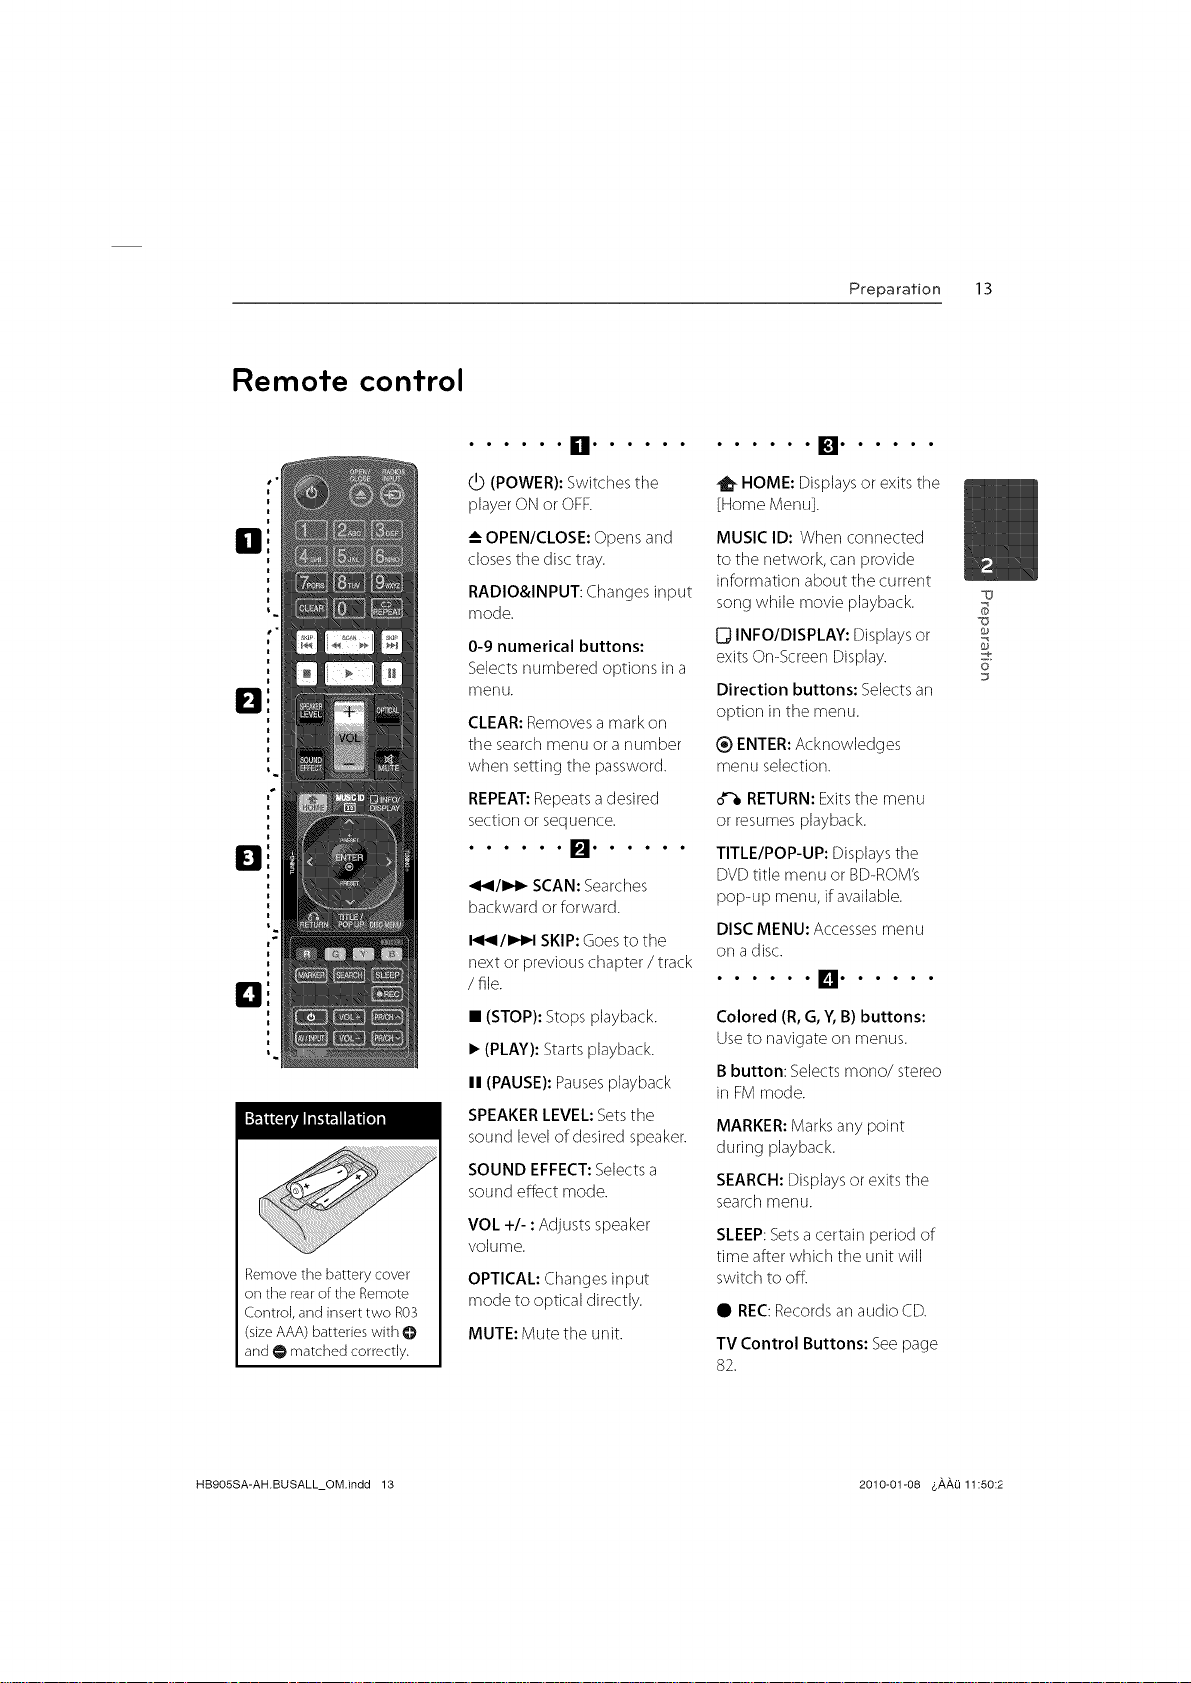
Remote control
s"
H
s"
E!
El
i"
=]
Remove the battery cover
on the rear o[ the Remote
Control, and insert two R03
(size AAA) batteries with @
and O matched correctly.
• • • • • • n• • • • • •
(POWER):Switches the
playerON or OFR
OPEN/CLOSE:Opensand
closestile disc tray.
RADIO&INPUT: Changesinput
mode.
0-9 numerical buttons:
Selectsnumbered options in a
menu.
CLEAR:Removesa mark on
tile searchmenu ora number
when setting the password.
REPEAT:Repeatsa desired
section or sequence.
• • • • • • []• • • • • •
_1_1/1_1_SCAN:Searches
backward or forward.
I_1_111,,t_1SKIP:Goesto the
next or previous chapter / track
/file.
• (STOP): Stops playback.
• (PLAY): Starts playback.
II (PAUSE): Pauses playback
SPEAKER LEVEL: Sets the
sound level of desired speaker.
SOUND EFFECT: Selects a
sound effect mode.
VOL +/- : Adjusts speaker
volume.
OPTICAL:Changesinput
mode to optical directly.
MUTE: Mute the unit.
Preparation 13
HOME: Displaysor exits the
[Home Menu].
MUSICID: When connected
to the network, carl provide
information about tile current
songwhile movie playback.
0 INFOIDISPLAY:Displaysor
exitsOn-Screen Display.
Direction buttons: Selectsan
option in the menu.
_) ENTER:Acknowledges
menu selection.
RETURN:Exitsthe menu
or resumes playback.
TITLE/POP-UP: Displaystile
DVDtitle menu or BD-ROM's
pop-up menu, if available.
DISCMENU: Accessesmenu
on a disc.
Colored (R, G,Y, B) buttons:
Useto navigate on menus.
Bbutton: Selectsmono/stereo
in FM mode.
MARKER:Marks any point
during playback.
SEARCH:Displaysor exits the
searchmenu.
SLEEP:Setsa certain period of
time after which the unit will
switch to off.
• REC:Recordsan audio CD.
TV Control Buttons: See page
82.
6"
HB9OSSA-AH.BUSALL_OM.indd 13 2010-01-08 _,_,_,0 11:50:2
14 Preparation
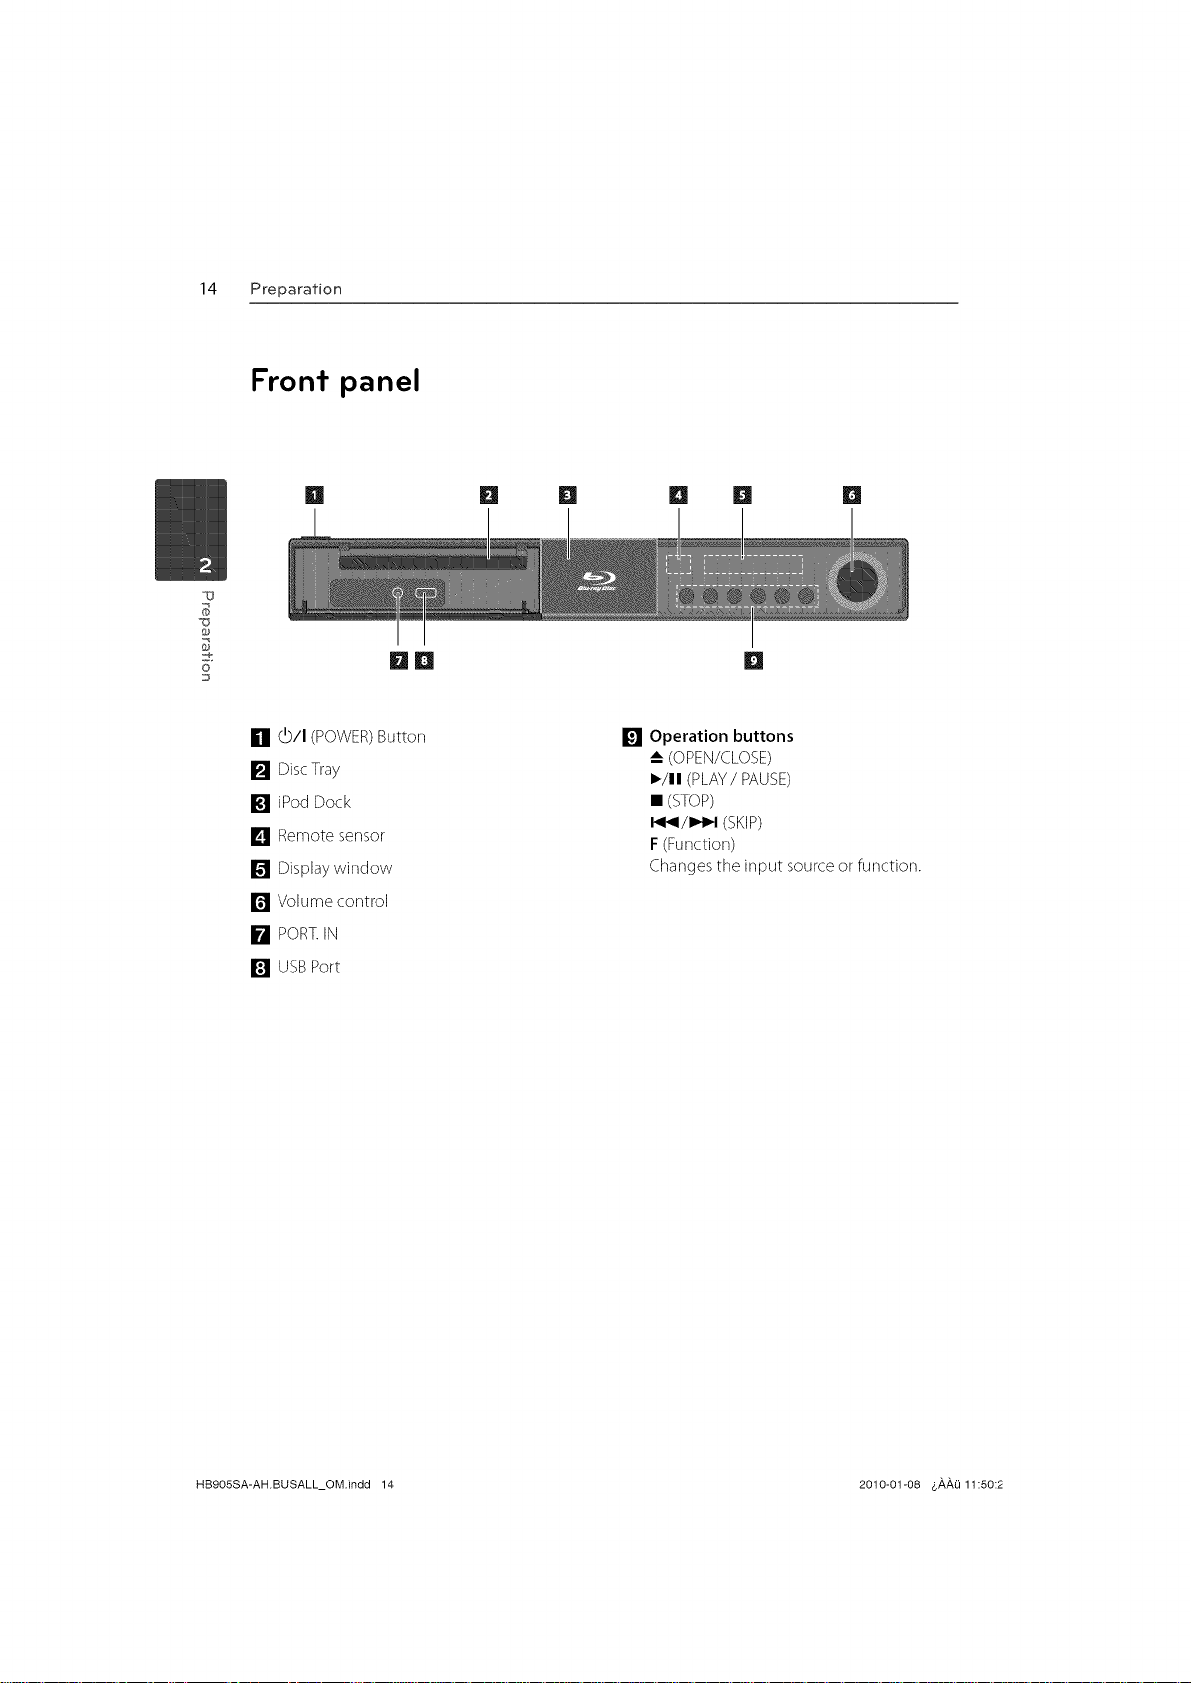
Front panel
[] [] [] [] [] []
__ []
[] (b/I (POWER)Button
[] DiscTray
[] iPod Dock
] Remote sensor
[] Displaywindow
[] Volume control
[] PORT.IN
[] USBPort
[] Operation buttons
-_ (OPEN/CLOSE)
I_/11(PLAY/PAUSE)
• (STOP)
I_/I_1 (SKIP)
F(Function)
Changes the input source or function.
HB905SA-AH.BUSALL_OM.indd 14 2010-01-08 _,,&,,&,O11:50:2

Rear panel
H n m nm
Preparation 15
[] AC Powercord
Pluginto the power source.
[] Speakersconnectors
[] Cooling Fan
[] Ar_ter_naConnector
[] VIDEOOUT
[] AUX (L/R)INPUT
DmD D []in
[] COMPONENTVIDEO(Y PBPR)
OUTPUT(PROGRESSIVESCAN)
[] OPTICALIN I(TV)/2
[] HDMI IN(type A,Version 1.3)
[] HDMI OUT(type A, Version 1.3)
Connect to TV with HDMI inputs.
[] LANport
6"
HB9OSSA-AH.BUSALL_OM.indd 15 2010-01-08 6#,#,0 11:50:2
16 installation
3
Installation
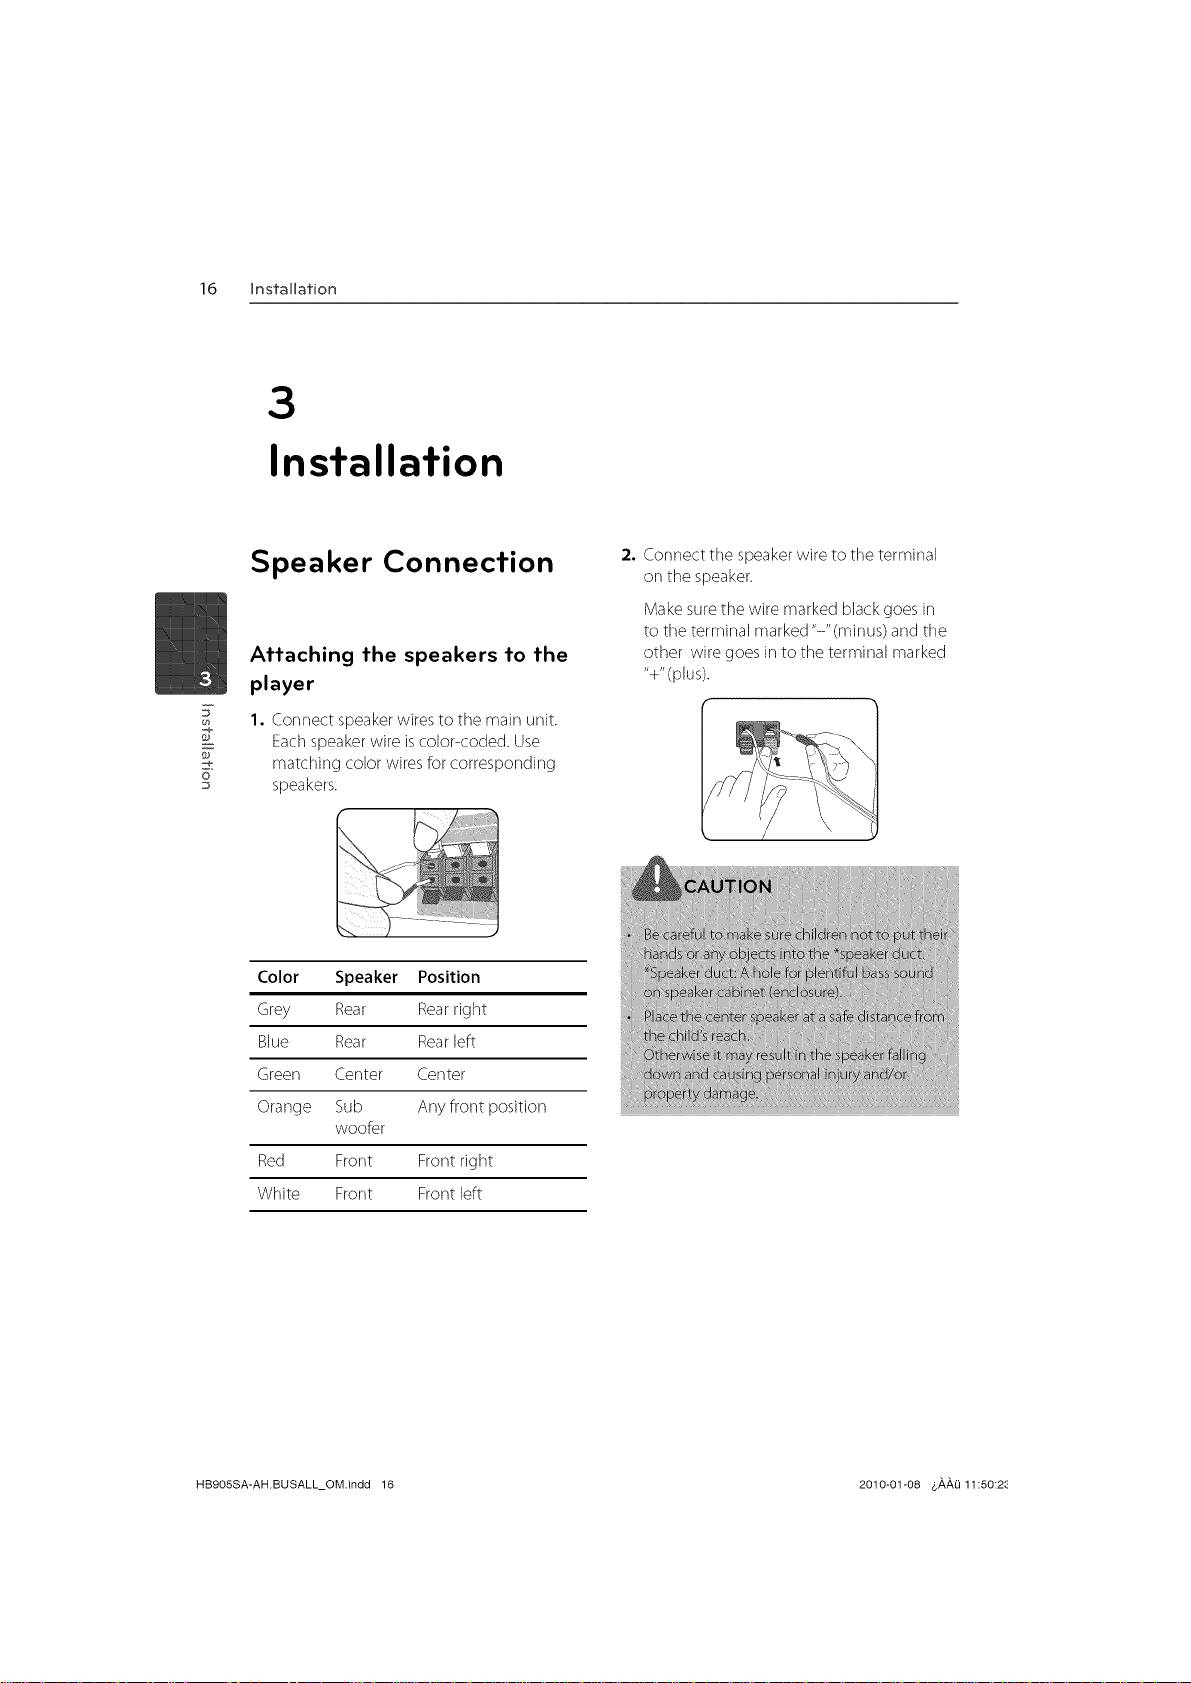
Speaker Connection
Attaching the speakers to the
player
I.Connect speakerwires to the main unit.
F
o
Eachspeakerwire is color<oded. Use
matching color wires for corresponding
speakers.
Color Speaker Position
Grey Rear Rearright
Blue Rear Rearleft
Green Center Center
Orange Sub Any front position
woofer
2. Connect tile speakerwire to tile terminal
on the speaker.
Makesure the wire marked black goes in
to the terminal marked"-"(minus) and the
other wire goes in to tile terminal marked
"+"(plus).
fui! ss
k:
Red Front Front right
White Front Front left
HB9OSSA-AH.BUSALL_OM.indd 16 2010-01-08 $#,#,1_11:50:28
installation 17
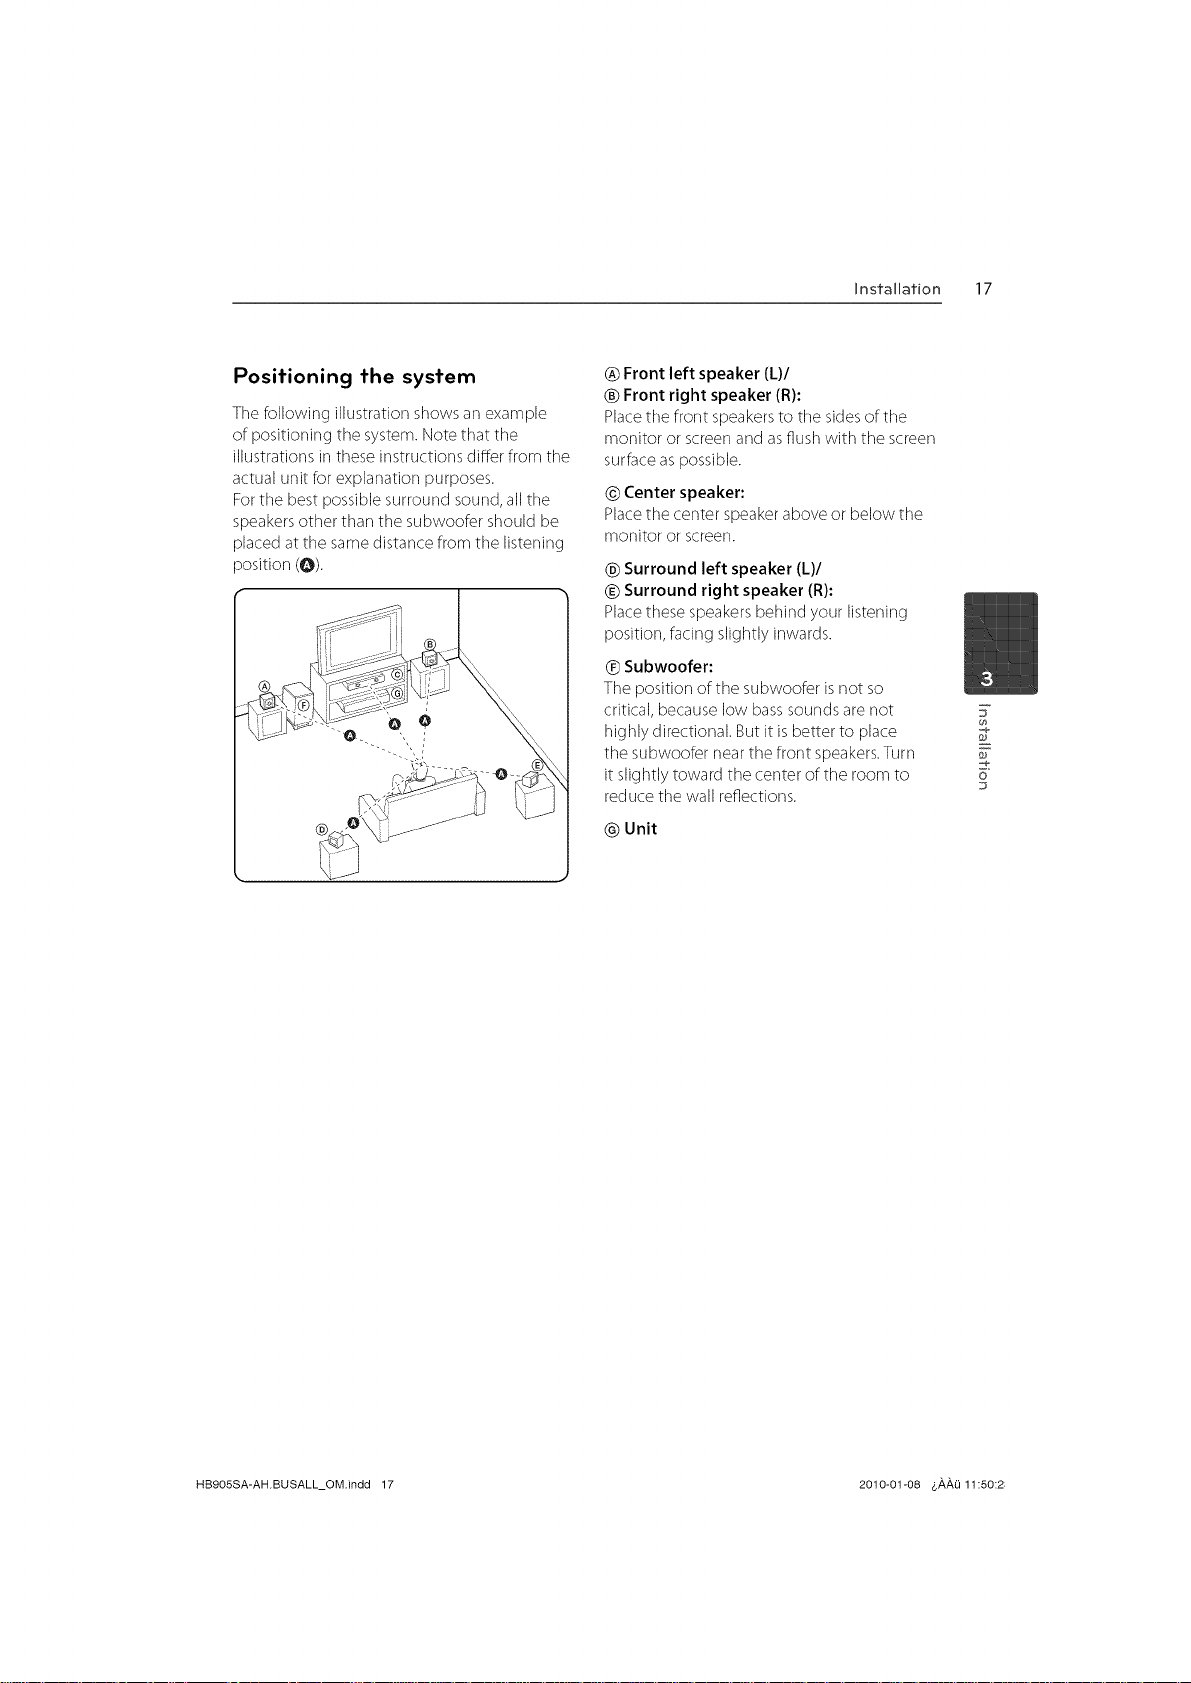
Positioning the system
Thefollowing illustration shows an example
of positioning the system. Note that the
illustrations in theseinstructions differ from tile
actual unit for explanation purposes.
Forthe best possible surround sound, all tile
speakersother than the subwoofer should be
placed at tile samedistance from tile listening
position (@).
_) Front left speaker (L)/
® Front right speaker (R):
Place the front speakers to the sides of the
monitor or screen and as flush with the screen
surface as possible.
© Center speaker:
Placethe center speakerabove or below the
monitor or screen.
© Surround left speaker (L)/
Surround right speaker (R):
Placethese speakers behind your listening
position, facing slightly inwards.
® Subwoofer:
The position of the subwoofer isnot so
critical, because low basssounds arenot
highly directional. But it is better to place
the subwoofer near the front speakers.Turn
it slightly toward the center of tile room to
reduce tile wall reflections.
@ Unit
7
o
HB905SA-AH.BUSALL_OM.indd 17 2010-01-08 &,a,,a,O11:50:2;
18 Installation
Connecting to Your TV
Makeone of tile following cormections,
depending on the capabilities of your existing
equipment
HDMIcormection (pages 18-19)
Component Video connection (page 20)
Video connection (page 20)
g
o
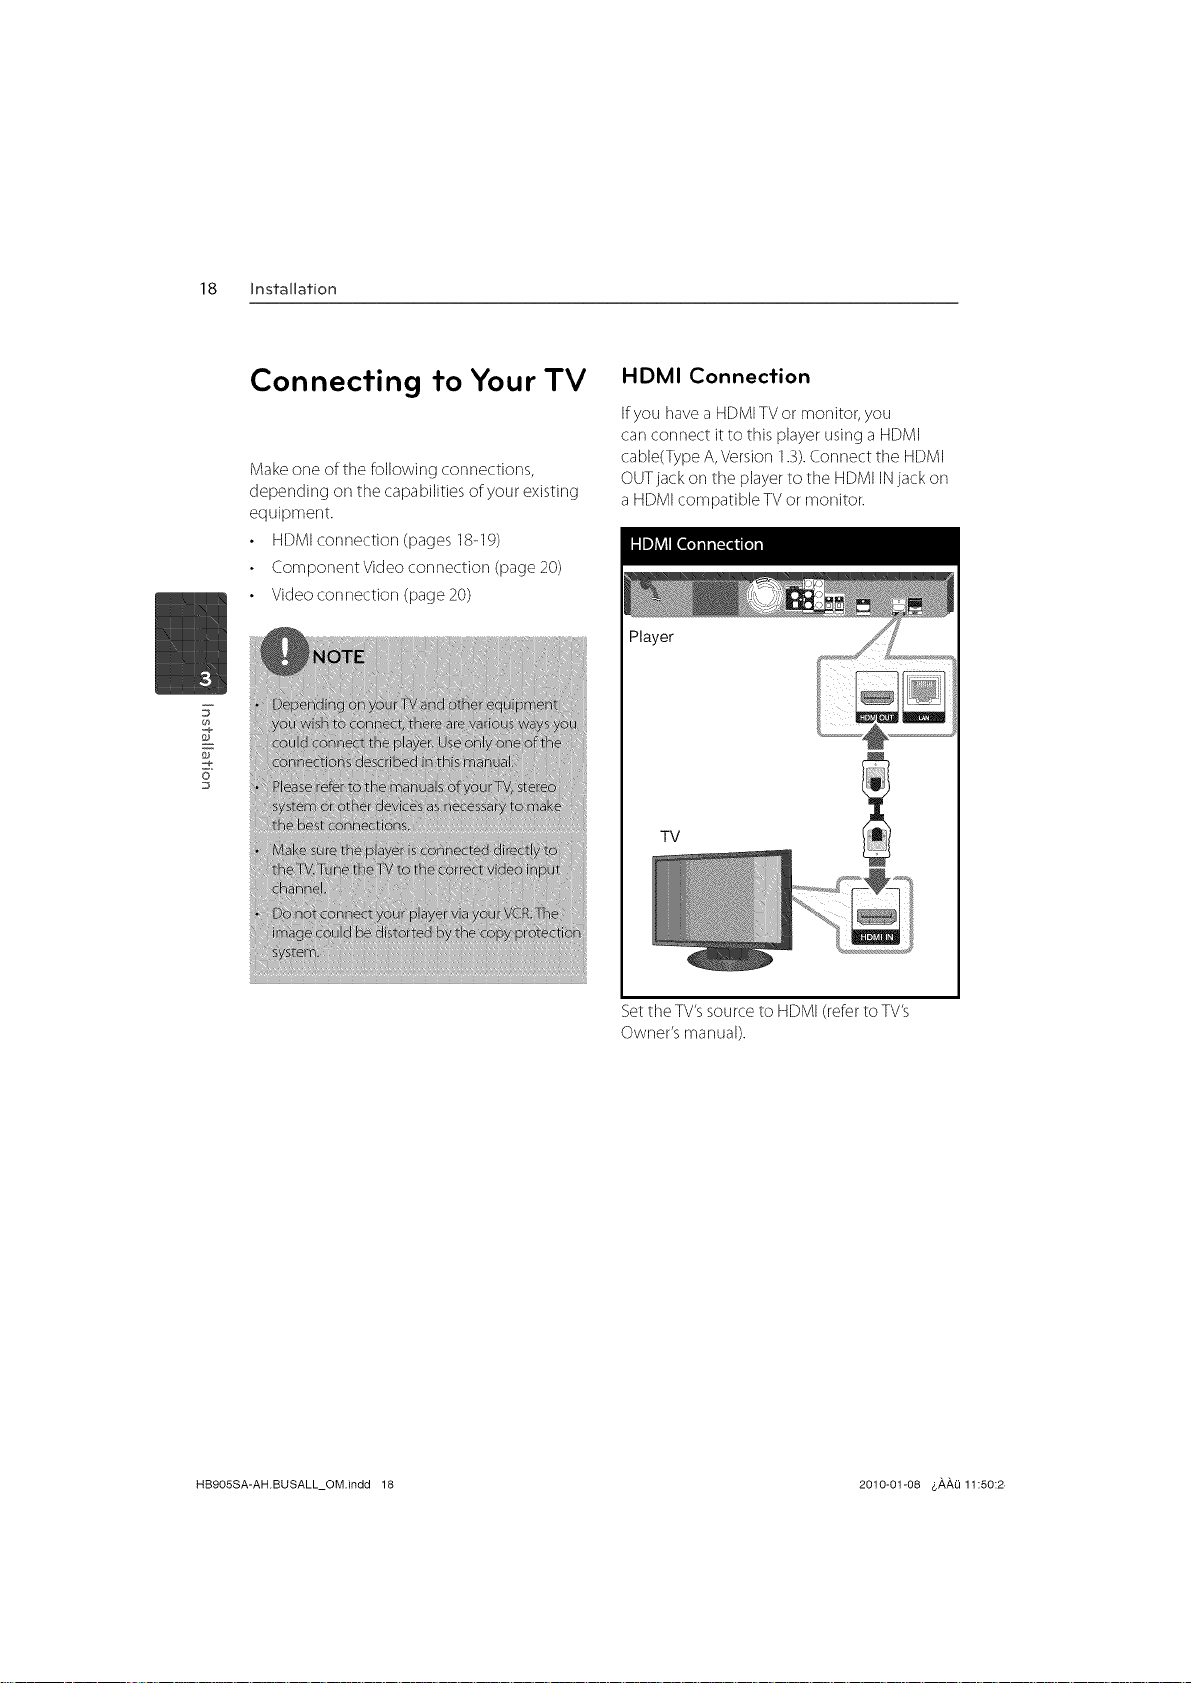
HDMI Connection
Ifyou [lave a HDMITVor monitor, you
carl connect it to this player using a HDMI
cable(TypeA, Version 1.3).Connect tile HDMI
OUTjack on tile playerto the HDMI INjack on
a HDMIcompatible TVor monitor.
Player
TV
Setthe TV'ssource to HDMI(referto TV's
Owner's manual).
HB905SA-AH.BUSALL_OM.indd 18 2010-01-08 &AAO 11:50:2

installation 19
What is SIMPLINK?
IITIPLInK
Some functions of this unit are controlled by
the TV's remote control when this unit and LG
TV's with SIMPLINK are connected through
HDMI connection.
Controllable functions by LGTV's remote
control; Play, Pause, Scan, Skip, Stop, Power Off,
etc.
Refer to tile TV owner's manual for tile details
of SIMPLINK function.
LGTV's with SIMPLINK function has tile logo as
shown above.
7
F
o
HB905SA-AH.BUSALL_OM.indd 19 2010-01-08 &,_,_Q 11:50:2,
20 Installation
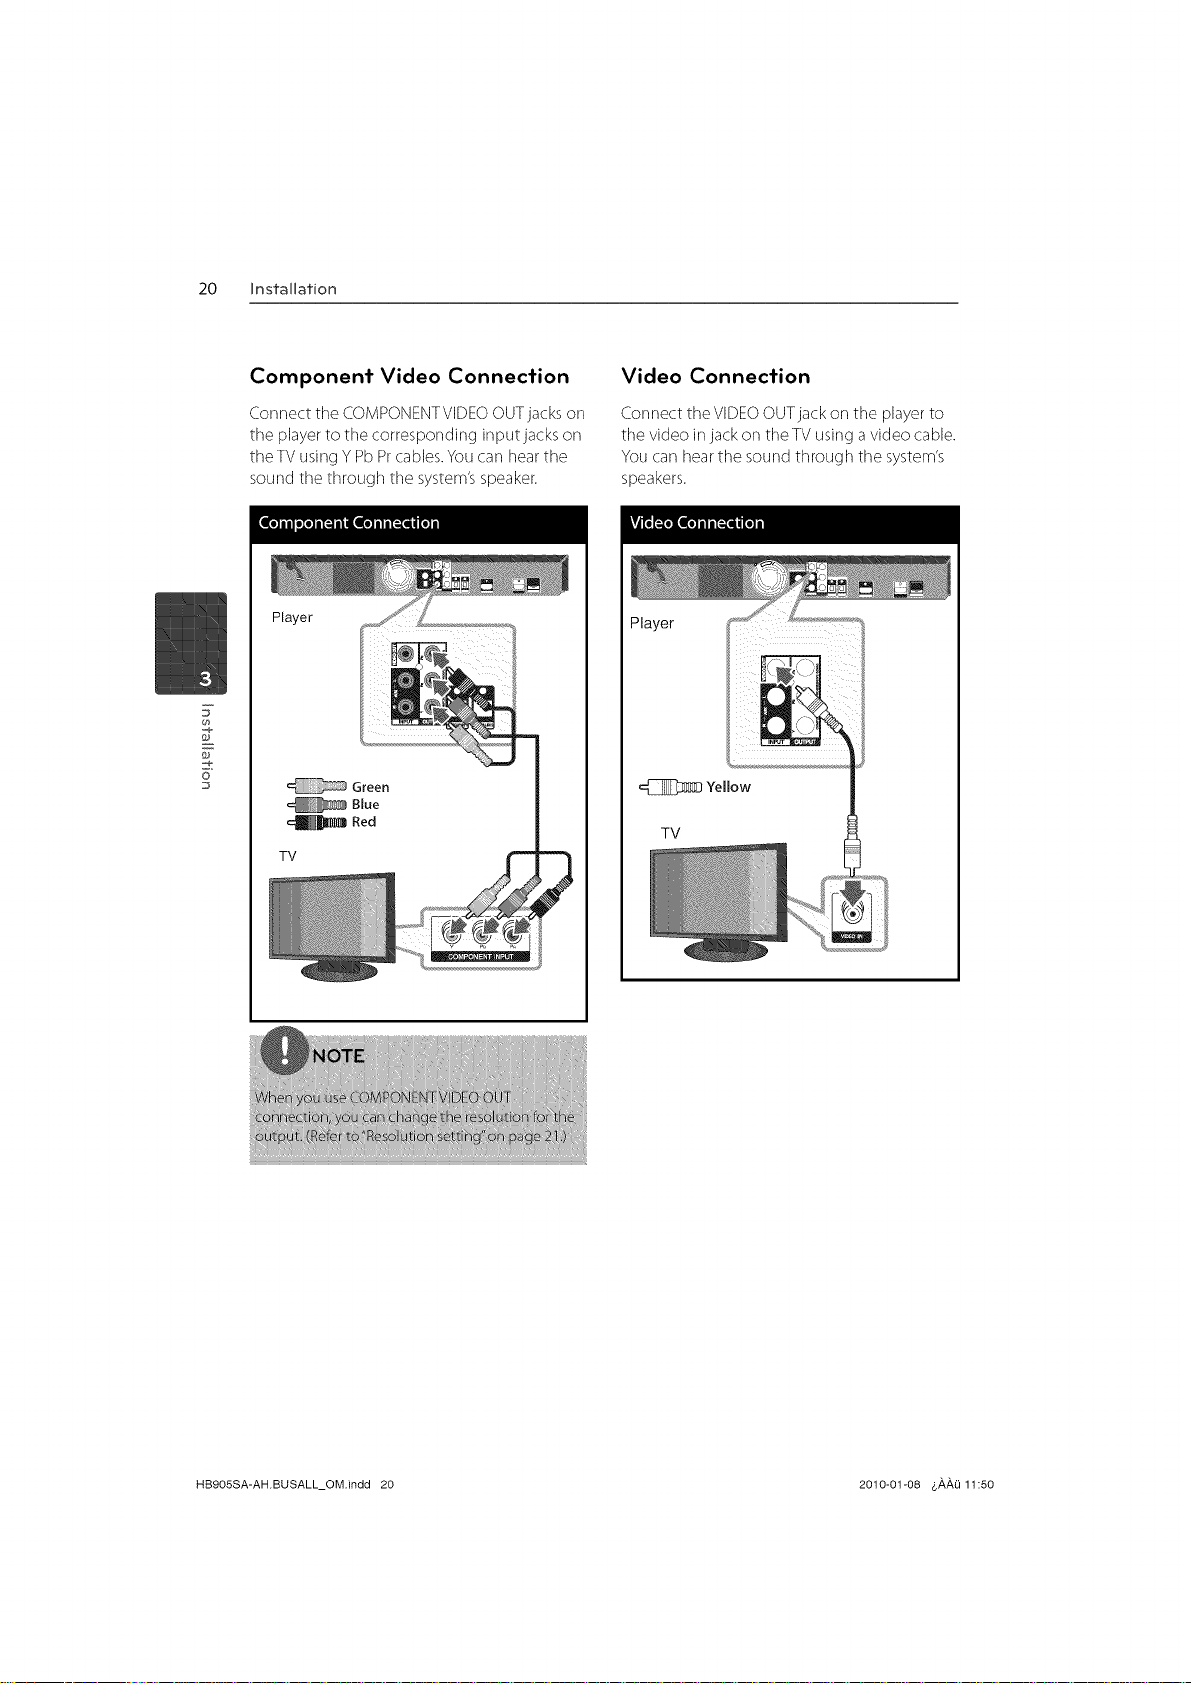
Component Video Connection
Connect the COMPONENTVIDEO OUTjacks on
the player to the corresponding input jacks on
the TV using Y Pb Prcables. You carl hear the
sound tile through tile system's speaker.
Player
o
TV
Green
Blue
Red
Video Connection
Connect theVIDEOOUTjackon the playerto
tile video injack on theTV using a video cable.
You carl hearthe sound through tile system's
speakers.
Player
=E]]_;ZD Yellow
TV
HB905SA-AH.BUSALL_OM.indd 20 2010-01-08 &,_,,_,Q11:50
Installation 21
Resolution Setting
Tile player provides severaloutput resolutions
for HDMI OUTandCOMPONENTVIDEOOUT
jacks.You carl change the resolution using
[Setup] menu.
1, PressHOME.
2. Use </> to select tile [Setup] and press
ENTER.Tile [Setup] menu appears.
3. Use A/V to select [DISPLAY] option then
press > to move to the second level.
4. Use A/V to select tile [Resolution] option
then press ENTERor > to move to tile third
level.
Connections with
external device
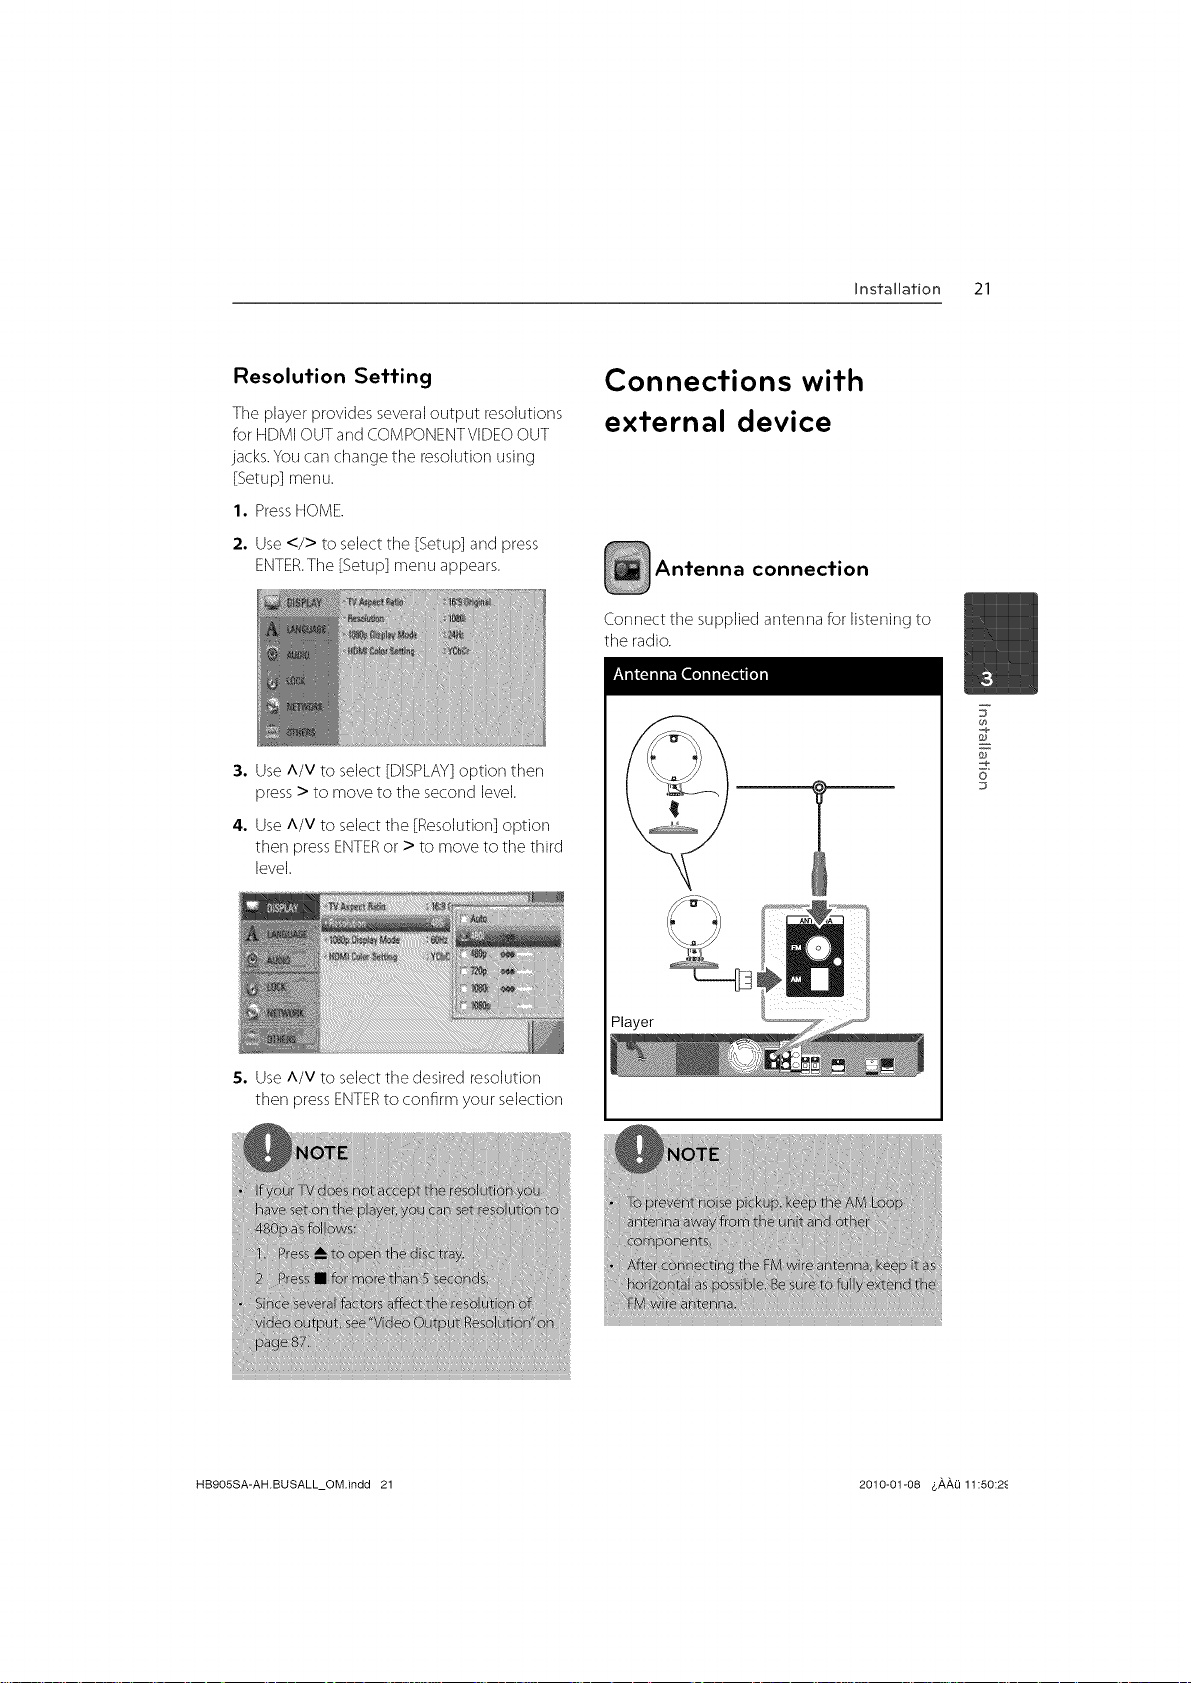
Antenna connection
Connect the supplied anterma for listening to
the radio.
7
F
o
D
5. Use A/V to select tile desired resolution
then press ENTERto confirm your selection
HB9OSSA-AH.BUSALL_OM.indd 21 2010-01-08 4,#,#,Li 11:50:2_
22 Installation
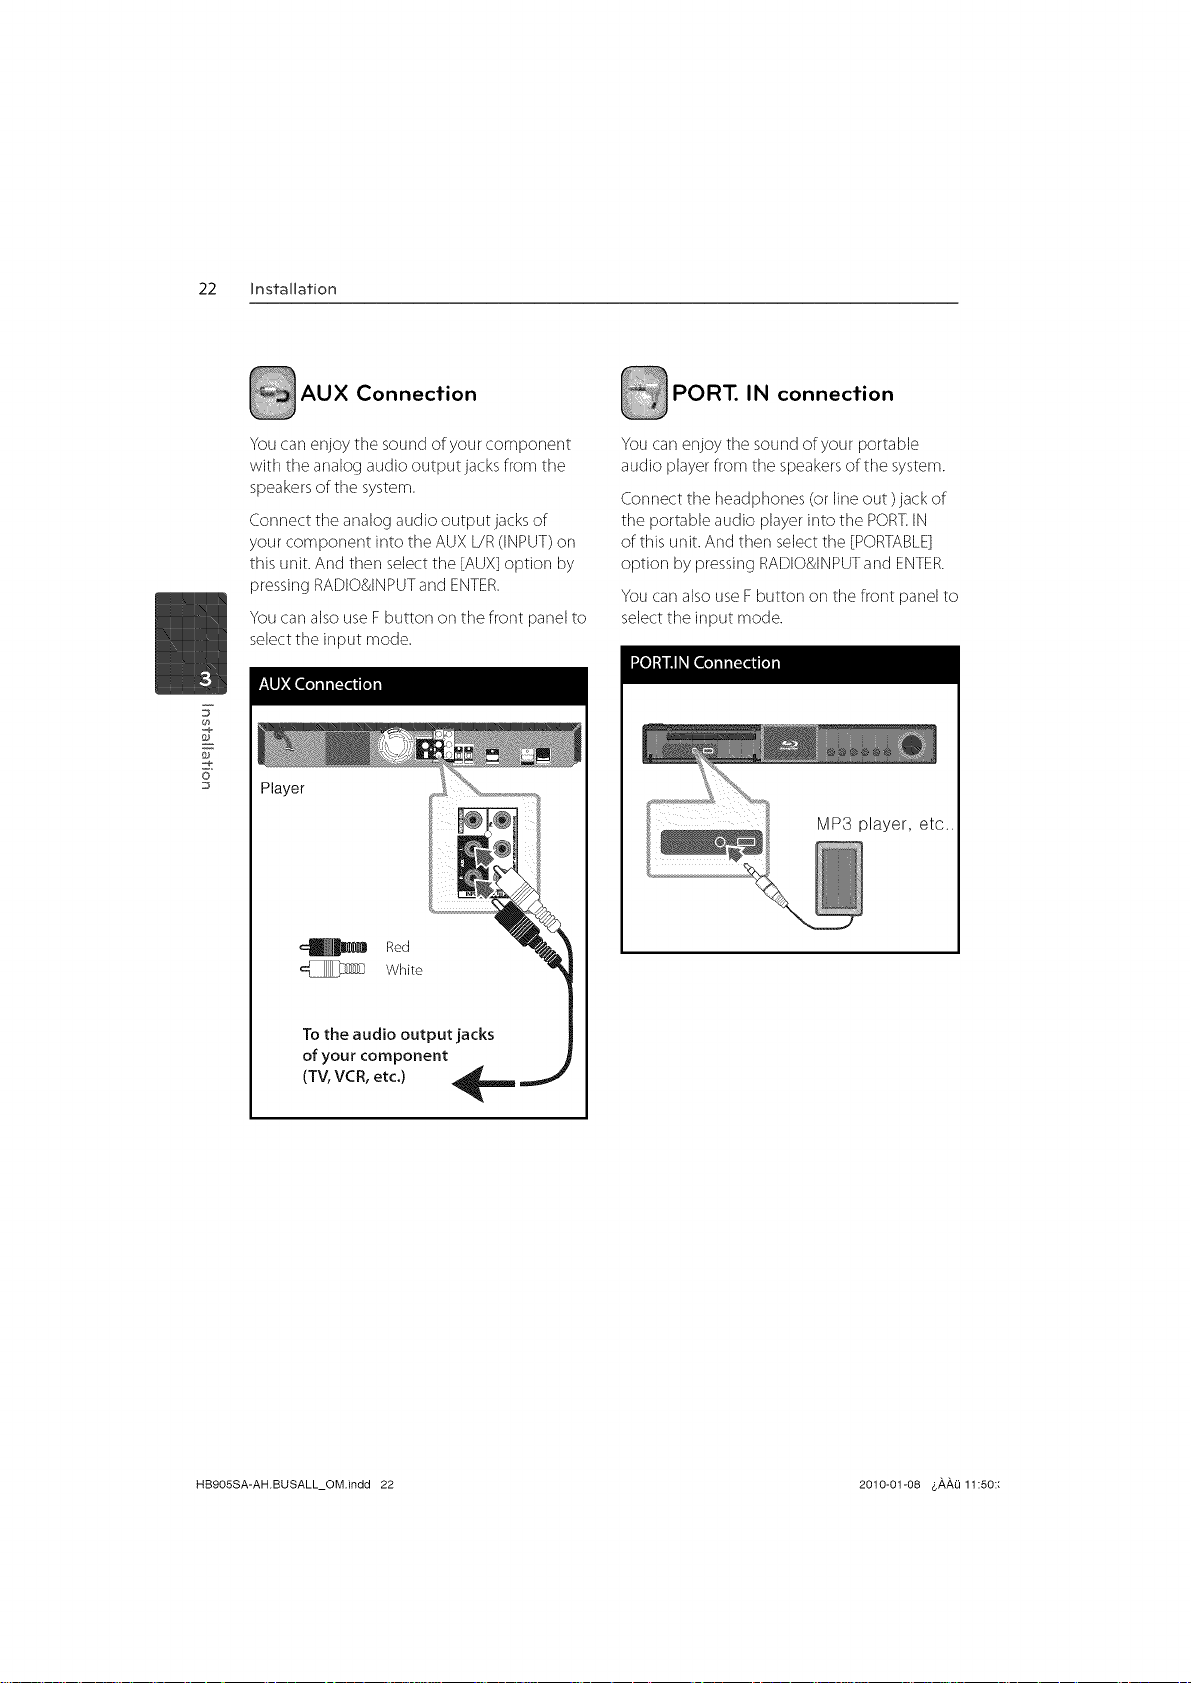
AUX Connection
You carl enjoy the sound of your component
with the analog audio outputjacks from the
speakersof tile system.
Connecttile analogaudiooutputjacksof
yourcomponentintotheAUXL/R(INPUT)orl
this unit.Andthenselecttile [AUX]optionby
pressirlgRADIO&INPUTandENTER.
You carl alsouse Fbutton on the front panel to
selectthe input mode.
o
Player
Red
White
PORT. IN connection
You carl enjoy tile sound of your portable
audio playerfrom tile speakersof the system.
Connect the headphones (or line out )lack of
tile portable audio playerinto the PORT.IN
of this unit. And then selecttile [PORTABLE]
option by pressing RADIO&INPUTandENTER.
You carl alsouse Fbutton on tile front panel to
select the input mode.
MP3 player, etc..
To the audio output jacks
of your component
(TV, VCR, etc.)
HB905SA-AH.BUSALL_OM.indd 22 2010-01-08 &,a,,a,Q11:50::
Installation 23
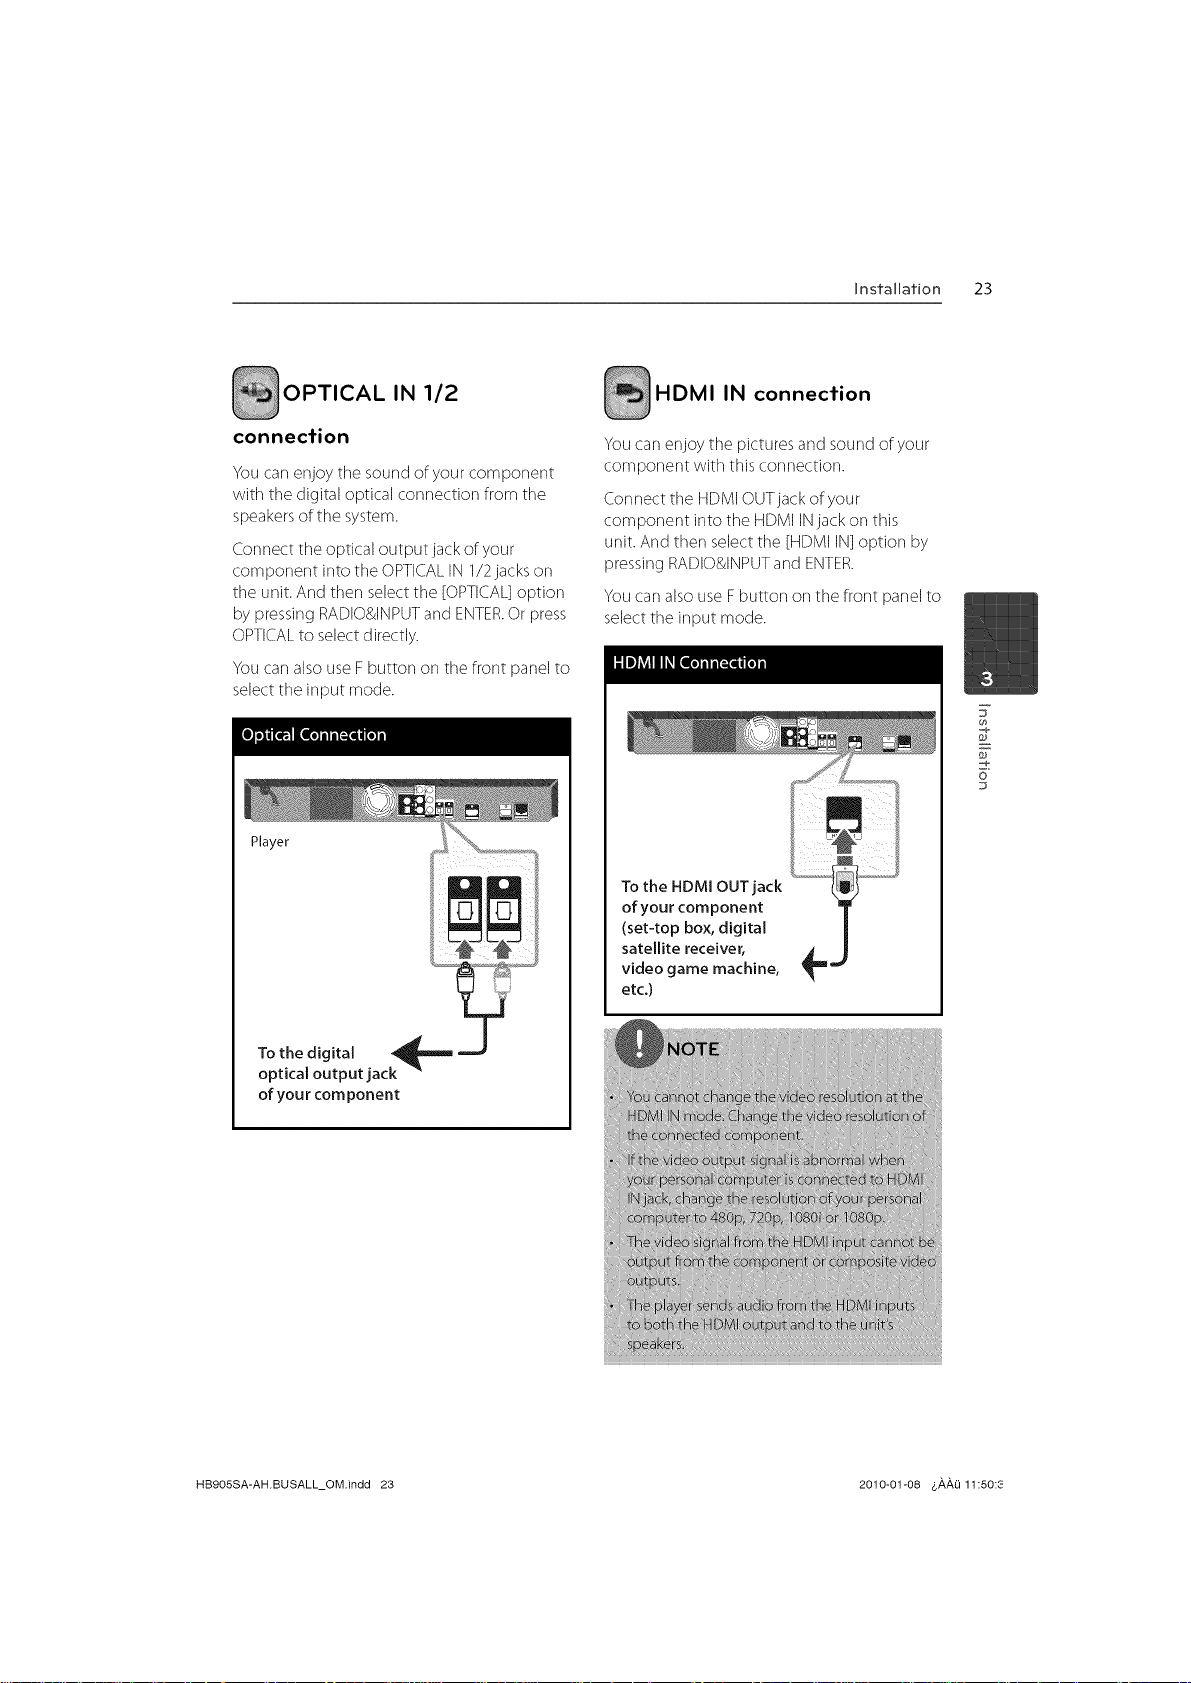
OPTICAL IN 1/2
connection
You carl enjoy the sound of your component
with the digital optical corlrlection from the
speakersof the system.
Connect theoptical output jack of your
component into the OPTICALIN112jacks on
tile unit. And then selectthe [OPTICAL]option
by pressing RADIO&INPUTand ENTER.Or press
OPTICALto selectdirectly.
You carl also useF button on tile front panel to
select the input mode.
Player
irT,iml
HDMI IN connection
You carl enjoy the pictures and sound of your
component with this corlrlection.
Connect the HDMIOUTjack of your
component into the HDMI INjack on this
unit. And then select tile [HDMI IN] option by
pressing RADIO&INPUTand ENTER.
You carl alsouse Fbutton on the front panel to
selecttile input mode.
7
F
o
To the HDMI OUT jack
of your component
(set-top box, digital
satellite receiver,
video game machine,
etc.)
Tothe digital _,_m J
optical output jack
of your cornponent
HB905SA-AH.BUSALL_OM.indd 23 2010-01-08 &#,#,O 11:50:3
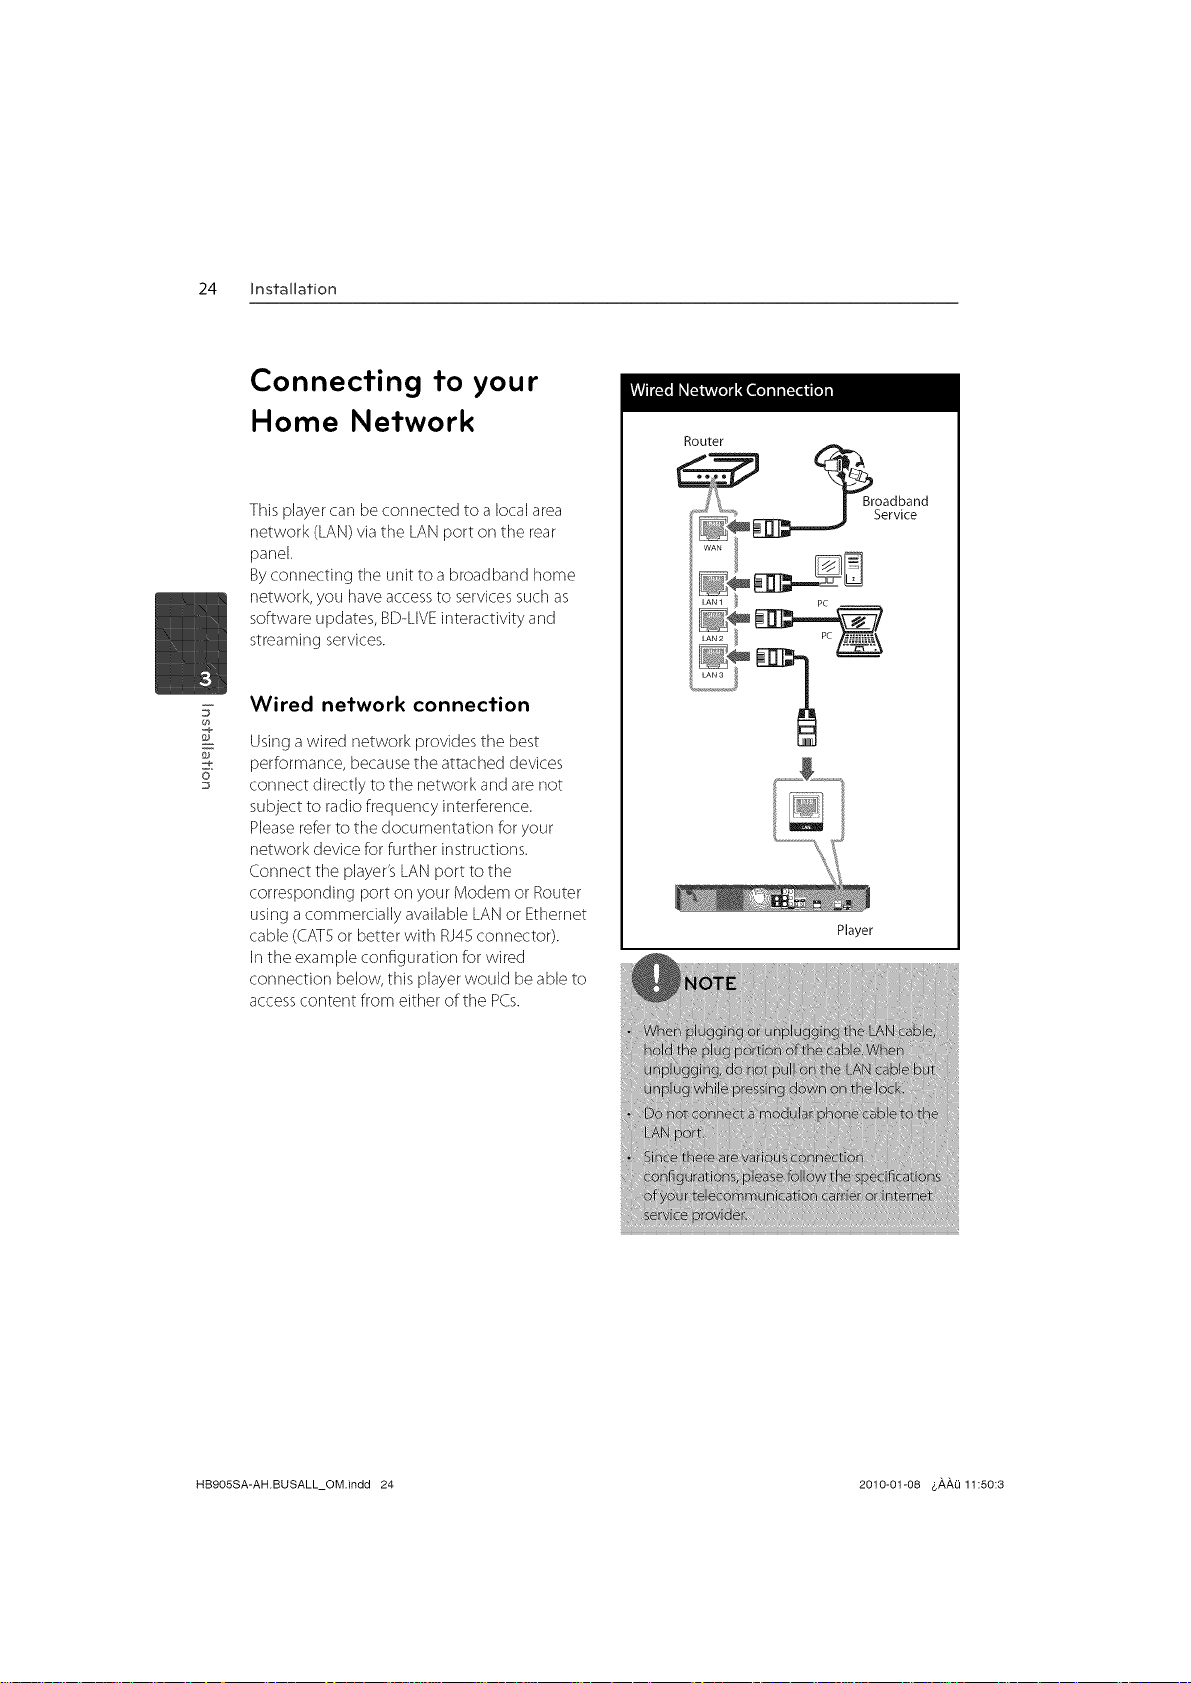
24 Installation
Connecting to your
Home Network
This player carl be connected to a local area
network (LAN) via the LAN port on the rear
panel.
By corlnecting tile unit to a broadband home
network, you have access to services such as
software updates, BD-LIVE interactivity and
streaming services.
Wired network connection
F
Usinga wired network provides the best
performance, becausethe attached devices
o
connect directly to the network and are not
subject to radio frequency interference.
Pleasereferto the documentation for your
network device forfurther instructions.
Connect tile player'sLANport to the
corresponding port on your Modem or Router
using acommercially available LANor Ethernet
cable (CAT5or better with RJ45connector).
Inthe example configuration for wired
connection below, this player would be able to
accesscontent from either of tile PCs.
Router
_ _Broadband
Serw_e
Player
HB905SA-AH.BUSALL_OM.indd 24 2010-01-08 &,&,,&,Q11:50:3
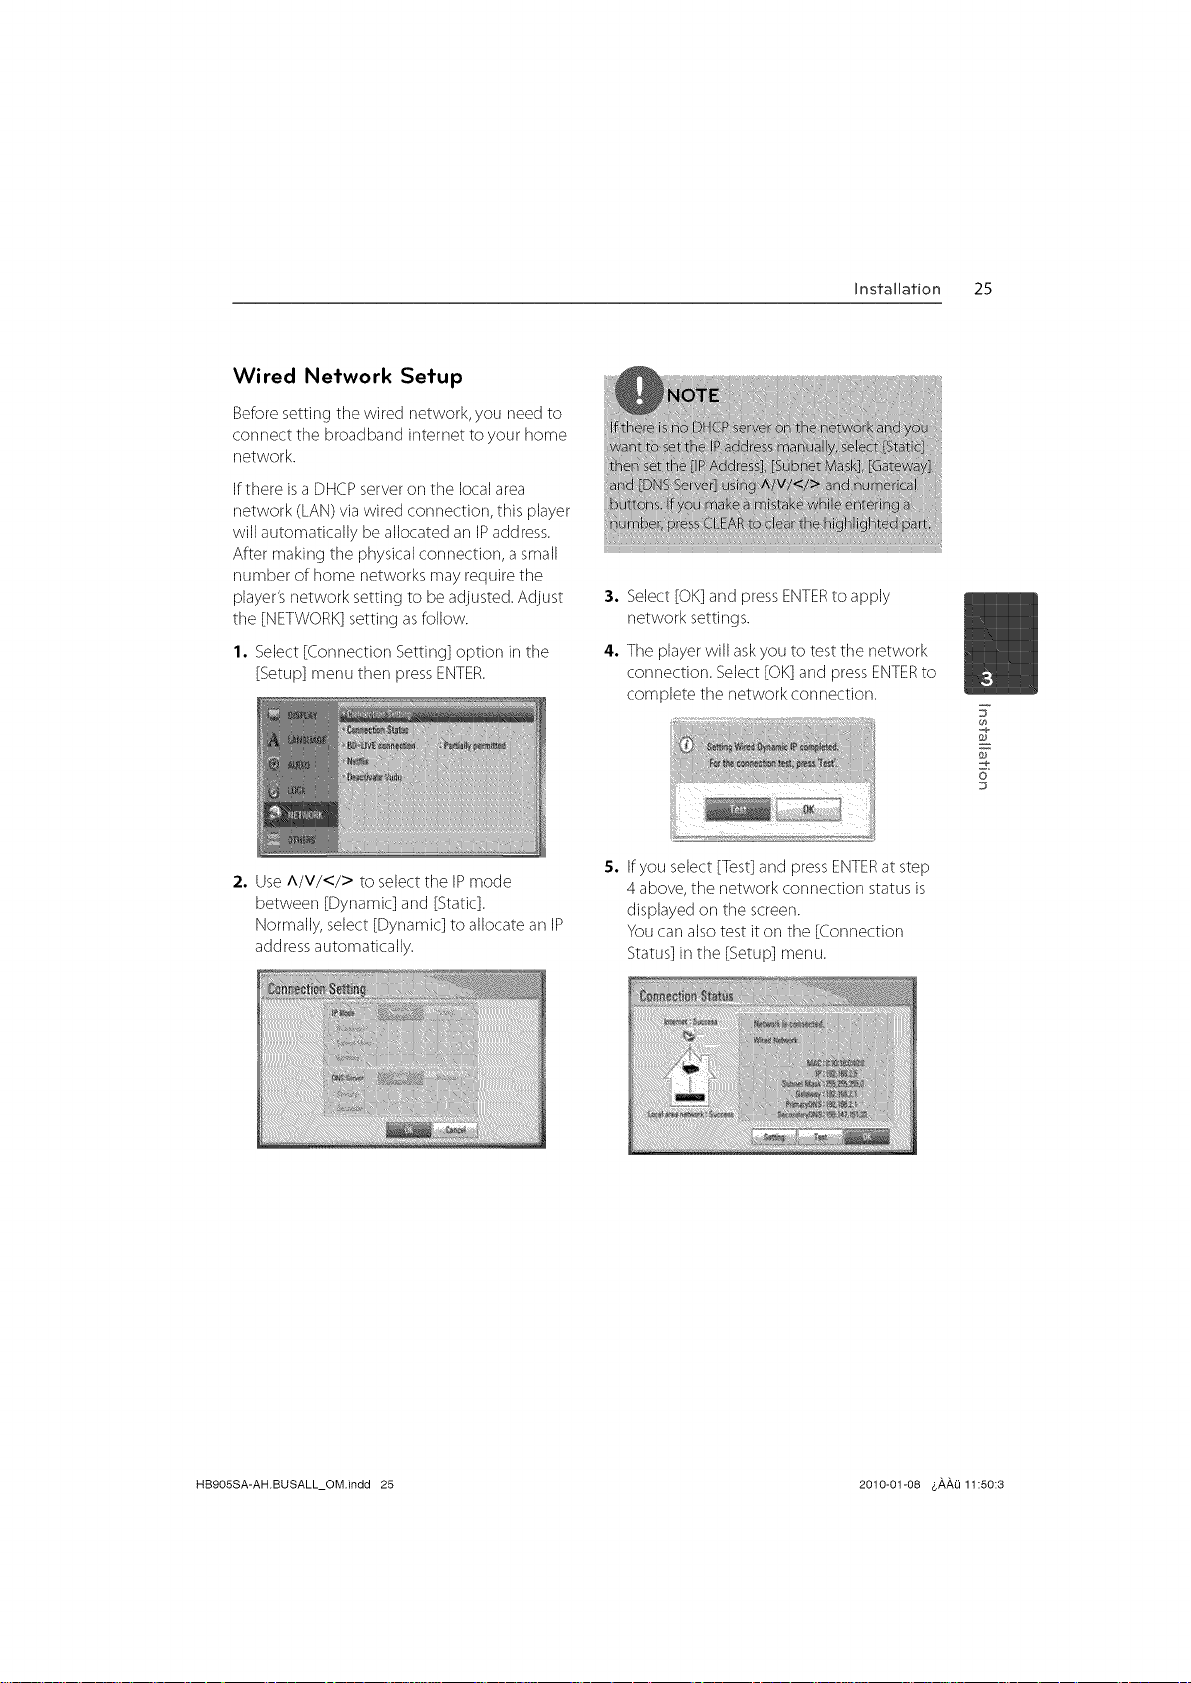
Wired Network Setup
Beforesetting the wired network, you need to
connect tile broadband intemet to your home
network.
Ifthere isa DHCPserveron tile local area
network (LAN)via wired connection, this player
will automatically be allocated an IPaddress.
After making tile physicalconnection, a small
number of home networks may require the
player'snetwork setting to be adjusted. Adjust
tile [NETWORK]setting asfollow.
1. Select[Corlrlection Setting] option in tile
[Setup] menu then pressENTER.
Installation 25
3. Select [OK]and pressENTERto apply
network settings.
4. Tile playerwill askyou to test tile network
connection. Select [OK]and pressENTERto
cornplete tile network con nection.
7
F
o
D
:2. Use A/V/</> to select tile IP mode
between [Dynamic] and [Static].
Normally,select [Dynamic] to allocate an IP
addressautomatically.
5. If you select [Test] and press ENTERat step
4 above, the network connection status is
displayed on tile screen.
You carl also test it on tile [Corlrlection
Status] in tile [Setup] menu.
HB9OSSA-AH.BUSALL_OM.indd 25 2010-01-08 &#,#,O 11:50:3
26 installation
Notes on Network Connection:
Marly network cormection problems during
set up carl often be fixed by re-setting the
router or modem. After connecting tile
player to the home network, quickly power
off and/or disconnect the power cable of
the home network router or cable modem.
Then power on and/or connect the power
cable again.
Depending on the internet service provider
(ISP),the number of devices that carl
receiveinternet service may be limited by
the applicable terms of service.Fordetails,
contact your ISR
Ourcompany is not responsible for
(h
F
any malfunction of the player and/or
the internet connection feature due to
communLation errors/malfunctions
o
associatedwith your broadband internet
connection, or other connected equipment.
The featuresof BD-ROMdiscsmade
availablethrough the Internet Connection
feature are not created or provided
by our company, and our company is
not responsible for their functionality
or continued availability. Some disc
related material available by tile Internet
Connection may not be compatible with
this player.Ifyou havequestions about such
content, pleasecontact tile prod ucer of tile
disc.
Some internet contents may require a
higher bandwidth cormection.
Evenifthe player isproperly connected and
configured, someinternet contents may
not operate properly because of internet
congestion, tile quality or bandwidth of
your internet service,or problems at tile
provider of tile content.
Someinternet connection operations may
not be possibledue to certain restrictions
setby tile Internet service provider (ISP)
supplying your broadband Internet
corlrlection.
Any fees charged byan ISPincluding,
without limitation, connection charges are
your responsibility.
A 10Base-Tor 100 Base-TXLAN port is
required for wired connection to this player.
Ifyour internet servicedoes not allow for
suchaconnection, you will not beable to
connect the player.
You must useaRouterto usexDSLservice.
A DSLmodem is required to useDSLservice
and a cable modem isrequired to usecable
modem service.Depending on the access
method of and subscriberagreement with
your ISP,you may not be able to usethe
internet corlnection feature contained in
this playeror you may be limited to tile
number of devices you carl connect at tile
sametime. (Ifyour ISPlimits subscription
to one device,this player may not be
allowed to connect when a PCisalready
con netted.)
B9OSSA-AH.BUSALL_OM.indd 26 2010-01@8 4,#,#,Li11:50:82
The useof a "Router"may not be allowed
or its usage may be limited depending on
the policies and restrictions of your ISRFor
details,contact your ISPdirectly.
Turnoffall unused network equipment in
your localhome network. Some devices
maygenerate network traffic.
Fortile purpose of the better transmission,
placing the player from the accesspoint as
close aspossible.
Movecloser to tile accesspoint if possible
or re-orient the player so there isnothing
between it and the accesspoint.
Installation 27
7
o
HB9OSSA-AH.BUSALL_OM.indd 27 2010-01-08 6#,#,Li 11:50:3;
28 Installation
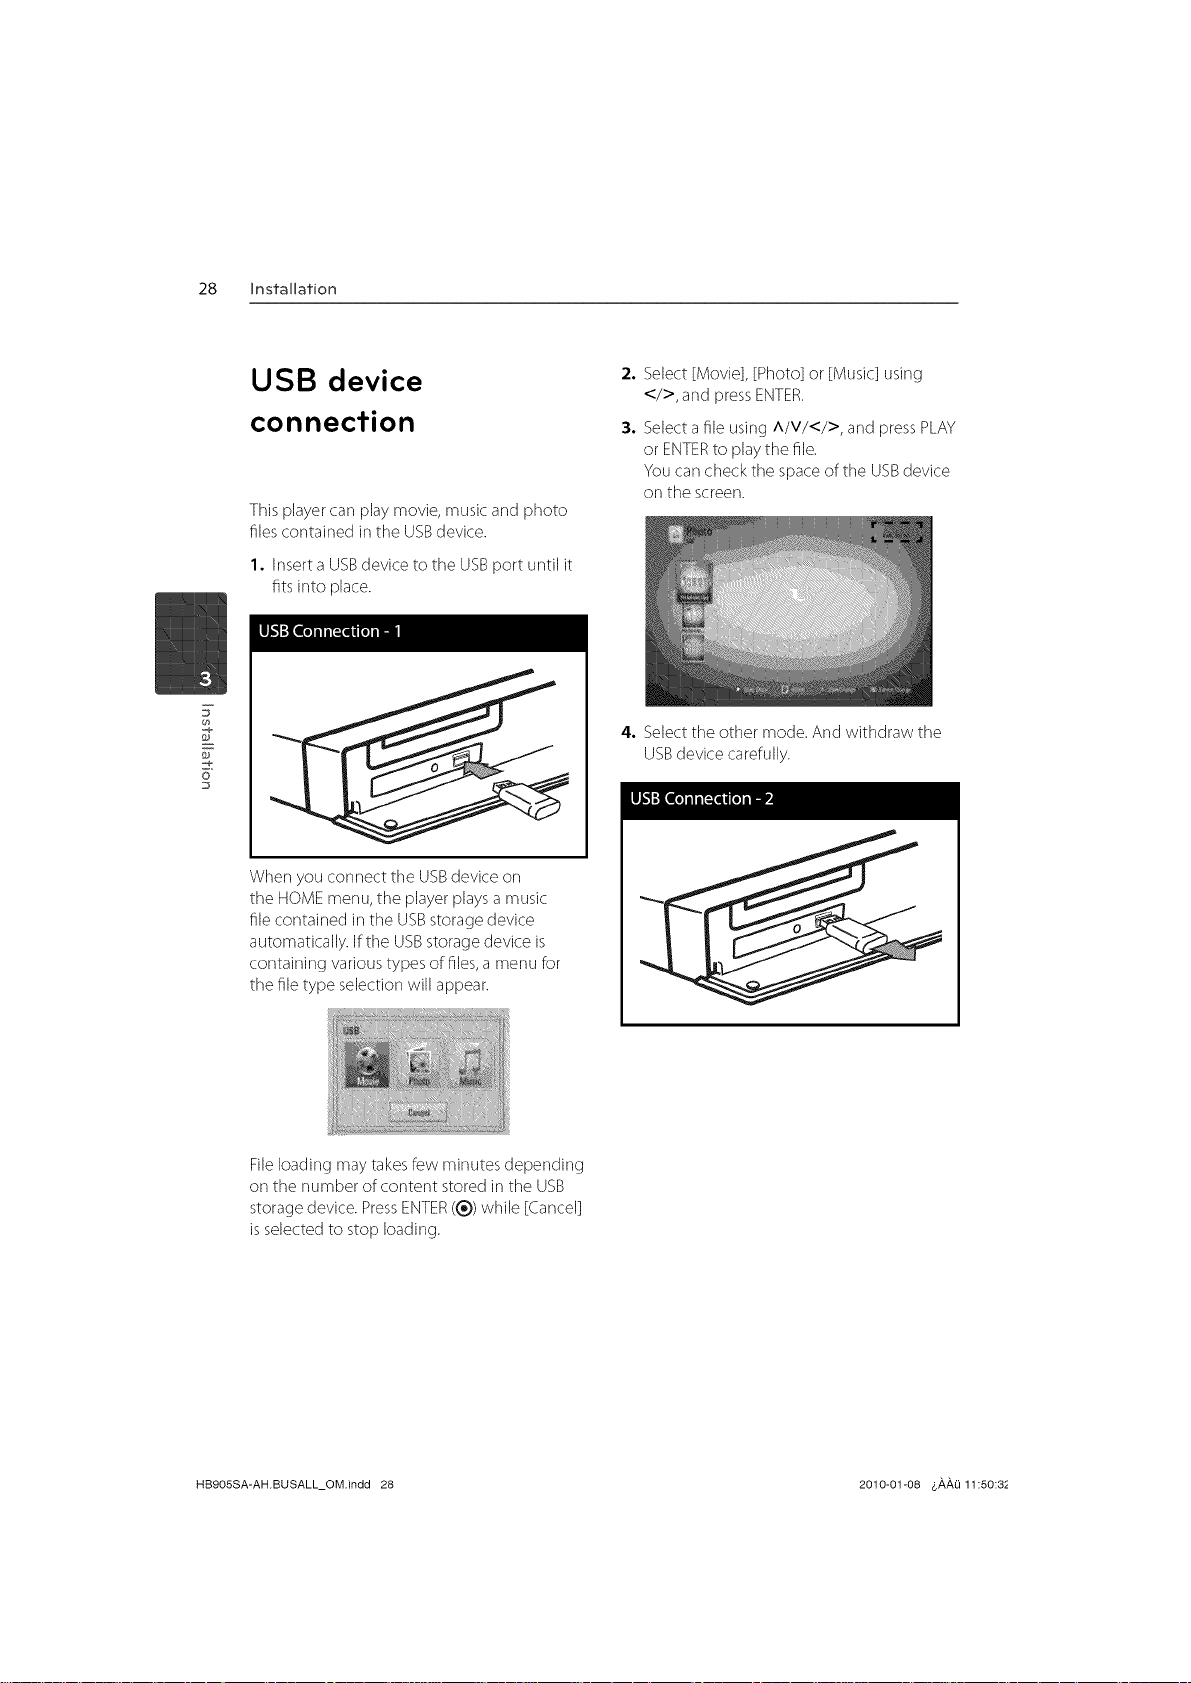
USB device
connection
This playercarl play movie, music and photo
files contained in the USBdevice.
1. Insert a USBdevice to the USBport until it
fits into place.
o
When you connect the USBdevice on
the HOMEmenu, the player playsa music
file contained in the USBstoragedevice
automatically. If tile USBstoragedevice is
containing various types of files,a menu for
the file type selection will appear.
2. Select [Movie], [Photo] or [Music] using
</>, and press ENTER.
3. Selectafile using A/V/</>, and pressPLAY
or ENTERto play the file.
You carl check tile space of the USBdevice
on the screen.
4. Selecttile other mode. And withdraw the
USBdevicecarefully.
Fileloading maytakesfew minutes depending
on the number of content stored in tile USB
storagedevice. PressENTER((_))willie [Cancel]
isselected to stop loading.
HB9OSSA-AH.BUSALL_OM.indd 28 2010-01-08 4,_,_,Li 11:50:8 _-
Installation 29
7
F
o
HB905SA-AH.BUSALL_OM.indd 29 2010-01-08 &,&,,&,Q11:50:_
 Loading...