

LG LGVX10KSLK, VOYAGER User Manual

TM
TM
TM
by
V CAST MULTIMEDIA PHONE with TOUCH SCREEN
Voyager™ is a trademark of Plantronics, Inc. used under license by Verizon Wireless
User Guide
by
TELÉFONO MULTIMEDIOS V CAST
con PANTALLA SENSIBLE AL TACTO
Guía del Usuario
USER GUIDE
MMBB0300401(1.0) G
VX10KS_cover_1.0.qxd 7/18/08 2:58 PM Page 1

Copyright©2008 LG Electronics, Inc. All rights reserved.
LG and the LG logo are registered trademarks of LG Group
and its related entities. is a trademark of
Plantronics, Inc. used under license by Verizon Wireless. All
other trademarks are the property of their respective owners.
VX10KS_cover_1.0.qxd 7/18/08 2:58 PM Page 4
Read these simple guidelines. Breaking the rules may be dangerous
or illegal. Further detailed information is given in this user guide.
Violation of the instructions may cause serious injury or death.
●
Never use an unapproved battery since this could
damage the phone and/or battery and could cause
the battery to explode.
●
Never place your phone in a microwave oven as it will
cause the battery to explode.
●
Never store your phone in temperatures less than
-4°F or greater than 122°F.
●
Do not dispose of your battery near fire or with
hazardous or flammable materials.
●
When riding in a car, do not leave your phone or set
up the hands-free kit near the air bag. If wireless
equipment is improperly installed and the air bag is
deployed, you may be seriously injured.
●
Do not use a hand-held phone while driving.
●
Do not use the phone in areas where its use is
prohibited. (For example: aircraft)
Important Safety Precautions
1
Important Safety Precautions
●
Do not expose the battery charger or adapter to direct
sunlight or use it in places with high humidity, such as
a bathroom.
●
Do not use harsh chemicals (such as alcohol,
benzene, thinners, etc.) or detergents to clean your
phone. This could cause a fire.
●
Do not drop, strike, or shake your phone severely. It
may harm the internal circuit boards of the phone.
●
Do not use your phone in high explosive areas as the
phone may generate sparks.
●
Do not damage the power cord by bending, twisting,
pulling, or heating. Do not use the plug if it is loose as
it may cause electric shock or fire.
●
Do not place any heavy items on the power cord. Do
not allow the power cord to be crimped as it may
cause electric shock or fire.
●
Do not handle the phone with wet hands while it is
being charged. It may cause an electric shock or
seriously damage your phone.
●
Do not disassemble the phone.
2
●
Do not place or answer calls while charging the
phone as it may short-circuit the phone and/or cause
electric shock or fire.
●
Do not hold or let the antenna come in contact with
your body during a call.
●
Make sure that no sharp-edged items, such as
animal’s teeth or nails, come into contact with the
battery. This could cause a fire.
●
Store the battery out of reach of children.
●
Be careful that children do not swallow any parts
(such as earphone, connection parts of the phone,
etc.) This could cause asphyxiation or suffocation
resulting in serious injury or death.
●
Unplug the power cord and charger during lightning
storms to avoid electric shock or fire.
●
Only use the batteries and chargers provided by LG.
The warranty will not be applied to products provided
by other suppliers.
●
Only authorized personnel should service the phone
and its accessories. Faulty installation or service may
result in accidents and consequently invalidate the
warranty.
●
Your service provider programs one or more
emergency phone numbers, such as 911, that you can
call under any circumstances, even when your phone
is locked. Your phone’s preprogrammed emergency
number(s) may not work in all locations, and
sometimes an emergency call cannot be placed due
to network, environmental, or interference issues.
3

Table of Contents
Important Safety Precautions .1
Welcome . . . . . . . . . . . . . . . . . . . .8
Technical Details . . . . . . . . . . . . .9
Important Information . . . . . . . . . . . .9
Phone Overview . . . . . . . . . . . .12
Touch Sensitive Soft Keys . . . . . . . .14
Quick Glance of Touchpad and
How to Use It . . . . . . . . . . . . . . .14
Calibrating the Touch Screen 15
Shortcut Menu . . . . . . . . . . . . . .16
Touch Screen Shortcut Menu . . . .16
Entering and Editing
Information . . . . . . . . . . . . . . . . .17
Text Input . . . . . . . . . . . . . . . . . . . . . . .17
From the internal Qwerty
®
keypad 18
Menu Tree on the Internal
Screen . . . . . . . . . . . . . . . . . . . . .19
Menu Tree on the External
Touch Screen . . . . . . . . . . . . . . .21
Menu Access . . . . . . . . . . . . . . . . . . .21
Shortcut Menu on the External
Touchpad . . . . . . . . . . . . . . . . . . .22
Touch Screen Shortcut Menu . . . . .22
Getting Started with Your
Phone . . . . . . . . . . . . . . . . . . . . . .23
The Battery . . . . . . . . . . . . . . . . . . . .23
Installing the Battery . . . . . . . . . . . .23
Removing the Battery . . . . . . . . . .23
Charging the Battery . . . . . . . . . . . .23
Charging with USB . . . . . . . . . . . . . .23
How to Install Your microSD™ Card24
How to Remove Your microSD™
Card . . . . . . . . . . . . . . . . . . . . . . . . . .24
Battery Temperature Protection . . .25
Battery Charge Level . . . . . . . . . . . .25
Turning the Phone On and Off . . . .25
Turning the Phone On . . . . . . . . . .25
Turning the Phone Off . . . . . . . . . .25
Signal Strength . . . . . . . . . . . . . . . . .26
Screen Icons . . . . . . . . . . . . . . . . . . .26
Making Calls . . . . . . . . . . . . . . . . . . .26
Correcting Dialing Mistakes . . . . . .26
Redialing Calls . . . . . . . . . . . . . . . . . .27
Receiving Calls . . . . . . . . . . . . . . . . .27
Quick Access to Convenient
Features . . . . . . . . . . . . . . . . . . . .28
Vibrate Mode . . . . . . . . . . . . . . . . . . .28
Mute Function . . . . . . . . . . . . . . . . . . .28
Volume Quick Adjustment . . . . . . . .28
Call Waiting . . . . . . . . . . . . . . . . . . . . .28
Voice Commands . . . . . . . . . . . . . . . .29
Contacts in Your Phone’s
Memory . . . . . . . . . . . . . . . . . . . .30
Storing Basics . . . . . . . . . . . . . . . . . .30
Customizing Individual Entries . . . .31
Speed Dial . . . . . . . . . . . . . . . . . . . . . .31
Storing a Number with Pauses . . .32
Adding Another Phone Number . .33
Changing the Default Number . . . .33
Deleting . . . . . . . . . . . . . . . . . . . . . . . .34
Speed Dialing . . . . . . . . . . . . . . . . . . .35
Media Center . . . . . . . . . . . . . . . . . .37
1. Music & Tones . . . . . . . . . . . . . . . .37
4

1.1 V CAST Music | Rhapsody . . . . .38
1.2 Get New Ringtones . . . . . . . . . .38
1.3 My Ringtones . . . . . . . . . . . . . . .39
1.4 My Music . . . . . . . . . . . . . . . . . .40
Playing Your Music . . . . . . . . . . . . .40
Controlling the Music Player . . . . .41
Exit From the Music Player . . . . . .41
1.5 My Sounds . . . . . . . . . . . . . . . . .42
1.6 Sync Music . . . . . . . . . . . . . . . . .43
2. Picture & Video . . . . . . . . . . . . . . .44
2.1 V CAST Mobile TV . . . . . . . . . . .45
2.2 V CAST Videos . . . . . . . . . . . . . .49
2.3 Get New Pictures . . . . . . . . . . . .51
2.4 My Pictures . . . . . . . . . . . . . . . .52
2.5 My Videos . . . . . . . . . . . . . . . . . .53
2.6 Take Picture . . . . . . . . . . . . . . . .55
2.7 Record Video . . . . . . . . . . . . . .57
2.8 Online Album . . . . . . . . . . . . . . .58
3. Games . . . . . . . . . . . . . . . . . . . . . . . .59
4. Browse & Download . . . . . . . . . .59
5. Extras . . . . . . . . . . . . . . . . . . . . . . . .64
MESSAGING . . . . . . . . . . . . . . . . . .65
1. New Message . . . . . . . . . . . . . . . .65
1.1 TXT Msg . . . . . . . . . . . . . . . . . . .65
1.2 Pictur
e Msg . . . . . . . . . . . . . . . .67
1.3 Video Msg . . . . . . . . . . . . . . . . .69
2. Inbox . . . . . . . . . . . . . . . . . . . . . . . .71
3. Sent . . . . . . . . . . . . . . . . . . . . . . . . .73
4. Drafts . . . . . . . . . . . . . . . . . . . . . . . .74
5. Voicemail . . . . . . . . . . . . . . . . . . . . .75
6. Visual Voice Mail . . . . . . . . . . . . . .76
7. Mobile IM . . . . . . . . . . . . . . . . . . . .77
8. Mobile Email . . . . . . . . . . . . . . . . . .77
MSG Settings . . . . . . . . . . . . . . . . . . .78
1. Entry Mode (Word/ Abc/ ABC/
123) . . . . . . . . . . . . . . . . . . . . . . . . .78
2. Auto Save (On/ Off/ Prompt) . . .78
3. Auto Erase (On/ Off) . . . . . . . . . .78
4. TXT Auto View (On/On+Readout/
Off) . . . . . . . . . . . . . . . . . . . . . . . . . .78
5. TXT Auto Play (On/Off) . . . . . . . .78
6. Pic-Video Auto Receive (On/Off) 78
7. Quick Text . . . . . . . . . . . . . . . . .79
8. Voicemail # . . . . . . . . . . . . . . . . .79
9. Callback # (On/Off) . . . . . . . . . .79
10. Signature (None/ Custom) . . . .79
Erasing Messages . . . . . . . . . . . . . . .79
CONTACTS . . . . . . . . . . . . . . . . . . . .81
1. New Contact . . . . . . . . . . . . . . . . . .81
2. Contact List . . . . . . . . . . . . . . . . . . .81
3. Groups . . . . . . . . . . . . . . . . . . . . . . .82
4. Speed Dials . . . . . . . . . . . . . . . . . . .83
5. In Case of Emergency (ICE) . . . .84
6. My Name Card . . . . . . . . . . . . . . . .85
RECENT CALLS . . . . . . . . . . . . . . . .86
1. Missed . . . . . . . . . . . . . . . . . . . . . . .86
2. Received . . . . . . . . . . . . . . . . . . . . .87
3. Dialed . . . . . . . . . . . . . . . . . . . . . . . .88
4. All . . . . . . . . . . . . . . . . . . . . . . . . . . . .89
5. View Timers . . . . . . . . . . . . . . . . . . .90
SETTINGS & TOOLS . . . . . . . . . . . .91
1. My Verizon . . . . . . . . . . . . . . . . . . . .91
5

Table of Contents
2. Tools . . . . . . . . . . . . . . . . . . . . . . . . .91
2.1 Voice Commands . . . . . . . . . . . .91
2.1.1 Call <Name or Number> . . .92
2.1.2 Send Msg to <Name or
Number> . . . . . . . . . . . . . . . . . . . . .92
2.1.3 Go to <Menu> . . . . . . . . . . .93
2.1.4 Check <Item> . . . . . . . . . . . .93
2.1.5 Lookup <Name> . . . . . . . . . .93
2.1.6 My Verizon . . . . . . . . . . . . . . .93
2.1.7 Help . . . . . . . . . . . . . . . . . . . .93
2.2 Calculator . . . . . . . . . . . . . . . . . .93
2.3 Calendar . . . . . . . . . . . . . . . . . . .94
2.4 Alarm Clock . . . . . . . . . . . . . . . .95
2.5 Stopwatch . . . . . . . . . . . . . . . . . .96
2.6 World Clock . . . . . . . . . . . . . . . .97
2.7 Notepad . . . . . . . . . . . . . . . . . . .98
2.8 Ez Tip Calc . . . . . . . . . . . . . . . . . .98
2.9 USB Mass Storage . . . . . . . . . .99
3. Bluetooth Menu . . . . . . . . . . . . . .100
3.1 Add New Device . . . . . . . . . . .101
My Phone Name . . . . . . . . . . . . . .103
Turn On . . . . . . . . . . . . . . . . . . . . . .104
Discovery Mode . . . . . . . . . . . . . . .104
Supported Profiles . . . . . . . . . . . . .105
Last Search . . . . . . . . . . . . . . . . . . .105
Auto Pair Handsfree . . . . . . . . . . . .105
Transferring Audio . . . . . . . . . . . . .105
4. Sounds Settings . . . . . . . . . . . . . .107
4.1 Master Volume . . . . . . . . . . . . .107
4.2 Call Sounds . . . . . . . . . . . . . . . .107
4.2.1 Call Ringtone . . . . . . . . . . .108
4.2.2 Call Vibrate . . . . . . . . . . . . . .108
4.3 Alert Sounds . . . . . . . . . . . . . . .109
4.4 Keypad Volume . . . . . . . . . . . .109
4.5 Service Alerts . . . . . . . . . . . . . .110
4.6 Power On/Off . . . . . . . . . . . . . .111
5. Display Settings . . . . . . . . . . . . . .111
5.1 Banner . . . . . . . . . . . . . . . . . . .111
5.1.1.1 Internal Banner . . . . . . . . .111
5.1.1.2 External Banner . . . . . . . .112
5.1.2 ERI Banner . . . . . . . . . . . . . .112
5.2 Backlight . . . . . . . . . . . . . . . . . .113
5.3 Wallpaper . . . . . . . . . . . . . . . . .114
5.4 Charging Screen . . . . . . . . . . . .115
5.5 Display Themes . . . . . . . . . . . .116
5.6 Menu Fonts . . . . . . . . . . . . . . .116
5.7 Dial Fonts . . . . . . . . . . . . . . . . .117
5.8 Clock Format . . . . . . . . . . . . . .118
6. Phone Settings . . . . . . . . . . . . . . .119
6.1 Airplane Mode . . . . . . . . . . . . .119
6.2 Set Shortcuts . . . . . . . . . . . . . .119
6.3 Voice Commands . . . . . . . . . . .120
6.4 Language . . . . . . . . . . . . . . . . .121
6.5 Location . . . . . . . . . . . . . . . . . .122
6.6 Security . . . . . . . . . . . . . . . . . . .122
6.6.1 Edit Codes . . . . . . . . . . . . . .123
6.6.2 Restrictions . . . . . . . . . . . . .124
6.6.3 Phone Lock . . . . . . . . . . . . .125
6.6.4 Lock Phone Now . . . . . . . .126
6.6.5 Reset Default . . . . . . . . . . .126
6.6.6 Restore Phone . . . . . . . . . .127
6.7 System Select . . . . . . . . . . . . .128
6.8 NAM Select . . . . . . . . . . . . . . .129
7. Call Settings . . . . . . . . . . . . . . . . .129
6

7.1 Answer Options . . . . . . . . . . . .129
7.2 End Call Options . . . . . . . . . . . .130
7.3 Show Dialpad . . . . . . . . . . . . . .131
7.4 Auto Retry . . . . . . . . . . . . . . . .131
7.5 TTY Mode . . . . . . . . . . . . . . . . .132
7.6 One Touch Dial . . . . . . . . . . . . .134
7.7 Voice Privacy . . . . . . . . . . . . . . .135
8. Touch Settings . . . . . . . . . . . . . . .136
9. USB Auto Detection . . . . . . . . . .136
10. Memory . . . . . . . . . . . . . . . . . . . .137
10.1 Save Options . . . . . . . . . . . . .138
10.2 Phone Memory . . . . . . . . . . .139
10.3 Card Memory . . . . . . . . . . . . .139
11. Phone Info . . . . . . . . . . . . . . . . . .140
11.1 My Number . . . . . . . . . . . . . .141
11.2 SW/HW Version . . . . . . . . . . .141
11.3 Icon Glossary . . . . . . . . . . . . .142
Music . . . . . . . . . . . . . . . . . . . . . . . . .143
Browser . . . . . . . . . . . . . . . . . . . . . . .143
Ending a Browser Session . . . . . . .143
Browser Navigating . . . . . . . . . . . .143
Navigator . . . . . . . . . . . . . . . . . . . . . .147
Safety . . . . . . . . . . . . . . . . . . . . .148
TIA Safety Information . . . . . . . . .148
Exposure to Radio Frequency
Signal . . . . . . . . . . . . . . . . . . . . . . .148
Antenna Care . . . . . . . . . . . . . . . .148
Phone Operation . . . . . . . . . . . . . .148
Tips on Efficient Operation . . . . . .149
Driving . . . . . . . . . . . . . . . . . . . . . .149
Electronic Devices . . . . . . . . . . . .149
Pacemakers . . . . . . . . . . . . . . . . .149
Hearing Aids . . . . . . . . . . . . . . . . .150
Other Medical Devices and Health
Care Facilities . . . . . . . . . . . . . . . .150
Vehicles . . . . . . . . . . . . . . . . . . . . .150
Aircraft . . . . . . . . . . . . . . . . . . . . . .150
Blasting Areas . . . . . . . . . . . . . . . .150
Potentially Explosive Atmosphere150
For Vehicles Equipped with an Air
Bag . . . . . . . . . . . . . . . . . . . . . . . .151
Safety Information . . . . . . . . . . . .151
Charger and Adapter Safety . . . .152
Battery Information and Care . . .152
Explosion, Shock, and Fire
Hazards . . . . . . . . . . . . . . . . . . . . .153
General Notice . . . . . . . . . . . . . . .153
Caution: Avoid potential hearing
loss. . . . . . . . . . . . . . . . . . . . . . . . . . .154
FDA Consumer Update . . . . . . . .156
10 Driver Safety Tips . . . . . . . . . . .164
Consumer Information on SAR .166
FCC Hearing-Aid Compatibility
(HAC) Regulations for Wireless
Devices . . . . . . . . . . . . . . . . . . . . . .168
Accessories . . . . . . . . . . . . . . .171
LIMITED WARRANTY
STATEMENT . . . . . . . . . . . . . .172
Glossary . . . . . . . . . . . . . . . . . . .175
Terminology . . . . . . . . . . . . . . . . . .175
Acronyms and Abbreviations . .175
7

Welcome
Thank you for choosing the
VOYAGERTMcellular phone
designed to operate with the latest
digital mobile communication
technology, Code Division Multiple
Access (CDMA). Along with the
many advanced features of the
CDMA system, such as greatly
enhanced voice clarity, this
compact phone offers:
●
V CASTSMMobile TV
●
V CASTSMMusic | Rhapsody
●
V CAST Video
●
Mobile IM
●
VZ Navigator
●
Mobile Email
●
Visual Voice Mail
●
City ID
●
54-key internal numeric keypad,
the external Touch Screen and
auto Touch Screen lock.
●
Customizable display themes and
screensavers.
●
Built-in 2.0 Megapixel digital
camera.
●
Large, easy-to-read, 8-line
backlit LCD with status icons.
●
Paging, messaging, Voicemail,
and caller ID.
●
Quick Access to the HTML
Browser.
●
Media Center
●
Long battery standby and talk
time.
●
Easy operation; use the keypad
or Touch Screen to choose
menus and answer prompts.
●
Any key answer, auto with
handsfree, auto retry, onetouch
and speed dialing with 99
memory locations.
●
Bilingual (English and Spanish)
Capability.
●
Bluetooth®wireless technology.
NOTE
The Bluetooth®word mark and logos
are owned by the Bluetooth SIG, Inc.
and any use of such marks by LG
Electronics is under license. Other
trademarks and trade names are
those of their respective owners.
TIP
Find the interactive user guide on the web for
your convenience where you can freely surf
and interactively learn how to use your phone
step-by-step.
Go to http://www.verizonwireless.com ->
Support -> Phones & Devices -> then choose
Equipment Guide -> then select your phone
model.
8
VOYAGER
TM
is a trademark of
Plantronics, Inc. used under license
by Verizon Wireless.

Important Information
This user’s guide provides important
information on the use and operation
of your phone. Please read this
guide carefully prior to using the
phone to be able to use your phone
to its greatest advantage and to
prevent any accidental damage or
misuse. Any unapproved changes or
modifications will void your
warranty.
Technical Details
The VOYAGERTMis an all digital
phone that operates on both Code
Division Multiple Access (CDMA)
frequencies: cellular services at 800
MHz and Personal Communication
Services (PCS) at 1.9 GHz.
CDMA technology uses a feature
called DSSS (Direct Sequence
Spread Spectrum) that enables the
phone to keep communication from
being crossed and to use one
frequency channel by multiple
users in the same specific area.
This results in a 10-fold capacity
increase when compared with
analog mode. In addition, features
such as soft/ softer handoff, hard
handoff, and dynamic RF power
control technologies combine to
reduce call interruptions.
The Cellular and PCS CDMA
networks consist of MSO (Mobile
Switching Office), BSC (Base
Station Controller), BTS (Base
Station Transmission System), and
MS (Mobile Station).
1xRTT system receives twice as
many subscribers in the wireless
section as IS-95. Its battery life is
twice as long as IS-95. High-speed
data transmission is also possible.
EV-DO system is optimized for data
service and is much faster than
1xRTT system in applicable area.
V CAST Mobile TV uses a
technology called MediaFLO.
This Technology is used to
broadcast data to portable devices
such as cell phones and PDAs.
Broadcast data includes audio and
video streams, individual video and
audio clips, as well as information
such as stock market quotes, sports
scores, and weather reports. The
"F-L-O" in MediaFLO stands for
Forward Link Only which means
that the data transmission path is
one-way, from the tower to the
device. The MediaFLO system
transmits data on a frequency
separate from the frequencies used
by current cellular networks.
The following table lists some major
CDMA standards.
Technical Details
9

Technical Details
10
CDMA
Standard
Designator Description
Basic Air
Interface
TIA/EIA-95A
TSB-74
ANSI J-STD-008
TIA/EIA-IS2000
CDMA Dual-Mode Air Interface
14.4kbps radio link protocol and
inter-band operations
IS-95 adapted for PCS frequency band CDMA2000
1xRTT AirInterface
Network
TIA/EIA/IS-634
TIA/EIA/IS/651
TIA/EIA/IS-41-C
TIA/EIA/IS-124
MAS-BS
PCSC-RS
Intersystem operations
Non-signaling data comm.
Service
TIA/EIA/IS-96-B
TIA/EIA/IS-637
TIA/EIA/IS-657
IS-801
TIA/EIA/IS-707-A
Speech CODEC
Short Message Service
Packet Data
Position Determination Service (gpsOne)
High Speed Packet Data
1x EV-DO
Related
interface
TIA/EIA/IS-856
TIA/EIA/IS-878
TIA/EIA/IS-866
TIA/EIA/IS-890
CDMA2000 High Rate Packet Data Air Interface
1xEV-DO Inter-Operability Specification for HRPD
Access Network Interfaces
Recommended Minimum Performance Standards for
HRPD High Rate Packet Data Access Terminal
Test Application Specification(TAS) for High Rate
Packet Data Air Interface
FCC RF Exposure Information
WARNING! Read this information
before operating the phone.
In August 1996, the Federal
Communications Commission (FCC)
of the United States, with its action
in Report and Order FCC 96-326,
adopted an updated safety standard
for human exposure to Radio
Frequency (RF) electromagnetic
energy emitted by FCC regulated
transmitters. Those guidelines are
consistent with the safety standard
previously set by both U.S. and
international standards bodies. The
design of this phone complies with
the FCC guidelines and these
international standards.

Bodily Contact During Operation
This device was tested for typical
use with the back of the phone kept
0.79 inches (2.0 cm) from the body.
To comply with FCC RF exposure
requirements, a minimum
separation distance of 0.79 inches
(2.0 cm) must be maintained
between the user’s body and the
back of the phone, including the
antenna, whether extended or
retracted. Third-party belt-clips,
holsters, and similar accessories
containing metallic components
should not be used. Avoid the use
of accessories that cannot maintain
0.79 inches (2.0 cm) distance
between the user’s body and the
back of the phone and have not
been tested for compliance with
FCC RF exposure limits.
Vehicle-Mounted the External
Antenna
(Optional, if available.)
To satisfy FCC RF exposure
requirements, keep 8 inches (20 cm)
between the user / bystander and
vehicle-mounted the external
antenna. For more information
about RF exposure, visit the FCC
website at www.fcc.gov.
FCC Notice and Cautions
This device and its accessories comply
with part 15 of FCC rules. Operation is
subject to the following two conditions:
(1) This device and its accessories may
not cause harmful interference, and (2)
this device and its accessories must
accept any interference received,
including interference that causes
undesired operation.
Any changes or modifications not
expressly approved in this user guide
could void your warranty for this
equipment. Use only the supplied
antenna. Use of unauthorized antennas
(or modifications to the antenna) could
impair call quality, damage the phone,
void your warranty and/or violate FCC
regulations.
Don't use the phone with a damaged
antenna. A damaged antenna could
cause a minor skin burn. Contact your
local dealer for a replacement antenna.
TIP
It is recommended to pull out the antenna on
the left bottom of your phone for better TV
reception while watching V CAST Mobile TV.
11
The antenna is on the left bottom of your phone.
12
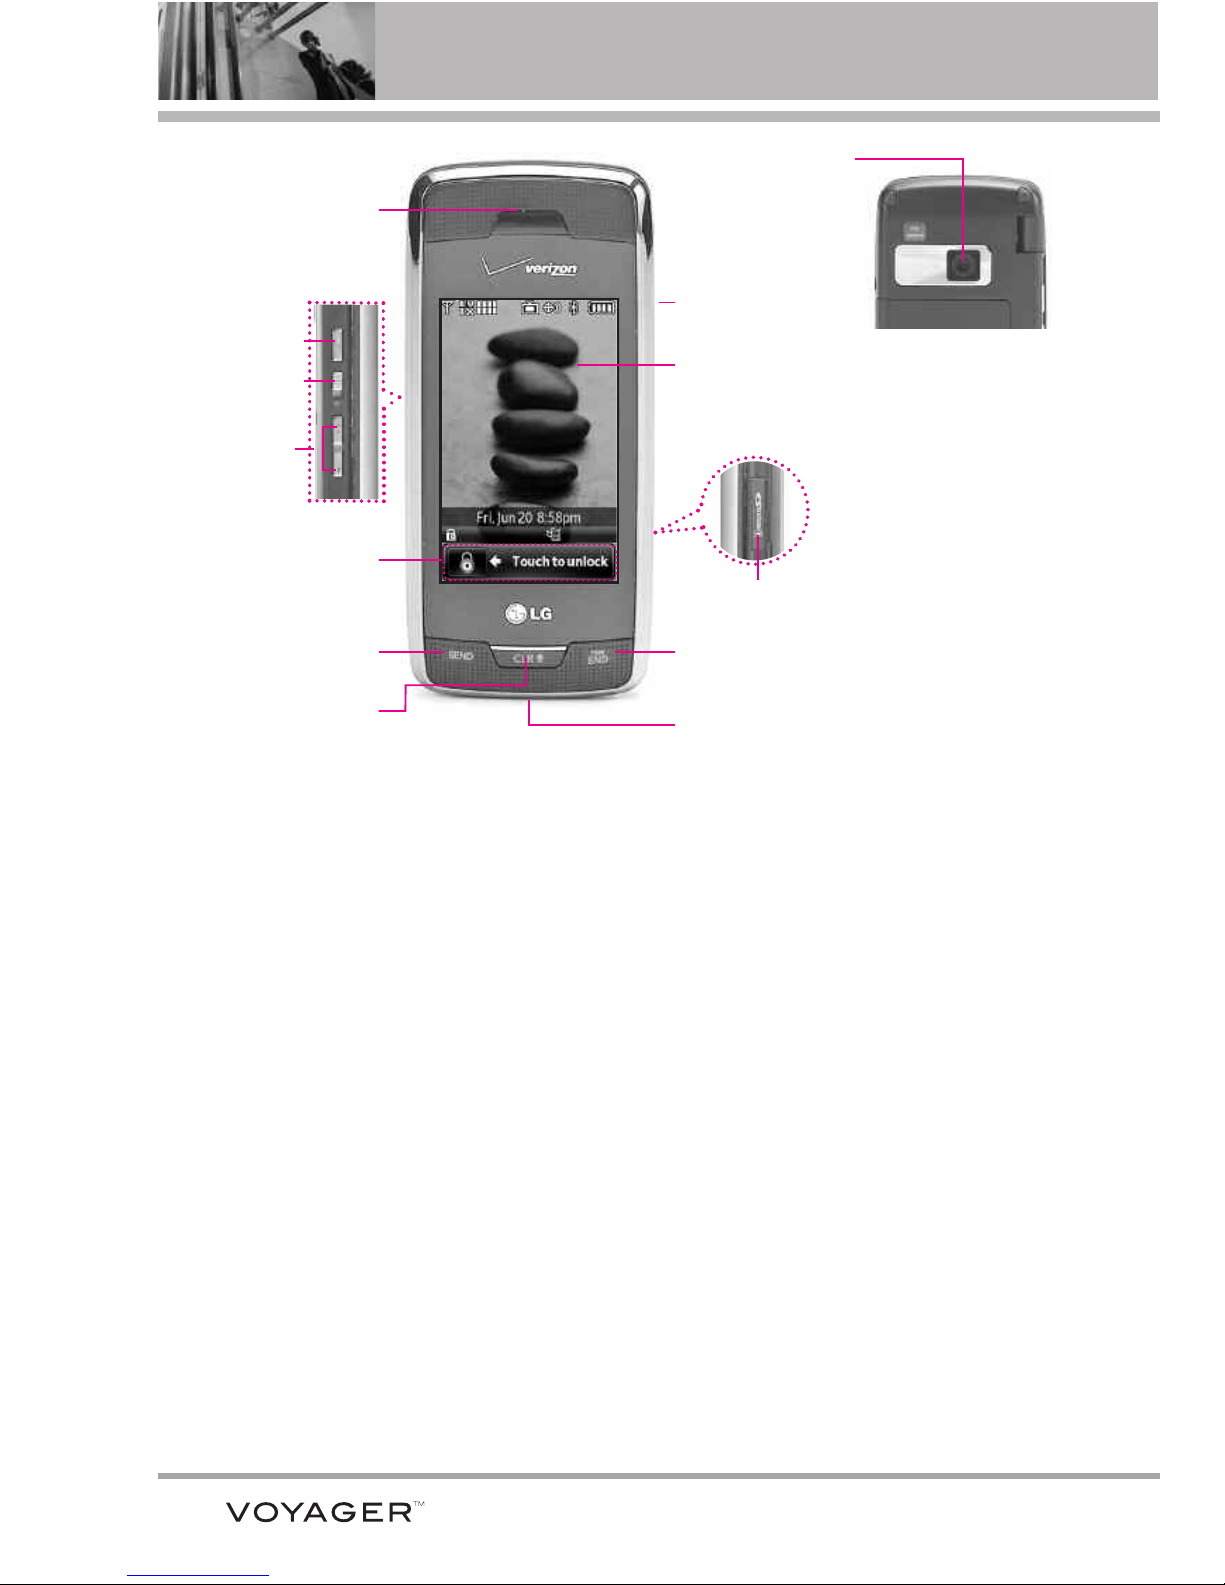
Phone Overview
1. Earpiece
2. Camera Key Use for quick access to Camera
function. Press and hold the camera key to
record Video.
3. Lock/ Unlock Key Move the slide down and
immediately release to lock or unlock the
outside display and keys when the flip is
closed.
4. Side Volume Keys Use to adjust the Master
Volume in standby mode* and the Earpiece
Volume during a call.
5. Touch Soft Keys Touch Keys on this Touchpad
include Messaging, Call, Menu, and Contacts
which easily activate with the touch of your
fingertip.
6. SEND Key Use to make calls.
7. CLR Key / Voice Command Key Deletes single
spaces or characters with a quick touch, but
touch and hold to delete entire words. Also
backs out of menus, one level at a time. Use
for quick access to Voice Command or press
and hold to access Voice Recorder.
8. Accessory Charger Port Connects the phone to
the battery charger, or other compatible
accessory.
9. PWR/END Key Use to turn the power on/off
and to end a call. Also returns to standby
mode.
10. microSD™ Slot Accommodates optional
microSD card up to 8GB.
11. Touch Screen Displays incoming calls,
messages and indicator icons as well as a
wide variety of content you select to view.
12. Headset Jack Allows you to plug in an
optional headset for convenient, hands-free
conversations.
Plug headset into the 2.5mm jack
located on the top left of device.
13. Camera Lens Keep it clean for optimal photo
quality.
12. Headset Jack
1. Earpiece
6. SEND Key
7. CLR Key / Voice
Command Key
11. Touch Screen
10. microSD™ Slot
9. PWR/END Key
5. Touch Soft Keys
8. Accessory
Charger Port
* Standby mode is when the phone is waiting for input from you.
No menu is displayed and the phone isn’t performing any
action. It’s the starting point for all of the instruction steps.
4. Side Volume
Keys
2. Camera Key
3. Lock/ Unlock
Key
13. Camera Lens
NOTE
SEND Key, CLR / Voice
Commands Key, and PWR
/ END Key are not
illuminated when the
display is locked. Slide and
release the Unlock Key to
unlock the outside display
and illuminate the Touch
Soft Keys. You can touch
any side key to illuminate,
then touch the lock that
displays on screen to
unlock.

13
1. Left Soft Key Use to access to Message menu
or other function displayed at the bottom left of
the LCD.
2. Fn Key (Shortcut Key in standby mode) Use for
quick access to assigned menus. See page 18.
3. Microphone Lets callers hear you.
4. Shift Key Use to change letter case when
typing.
5. Sym Key Use to insert symbols at the top of
each key into text.
6. Game Directional Keys Use for game
navigation.
7. Alphanumeric Keypad Use to enter numbers
and characters and select menu items.
8. Space/Voice Command Key Use to enter a
space while editing. TTS (Text to Speech)
function is available with in Messaging
Inbox, Notepad and Email screen. Use for
quick access to Voice Command or press and
hold to access Voice Recorder in standby
mode.
9. Return Key Moves cursor to the next line.
10. CLR Key Press to delete a single space or
character, or press and hold to delete a
specific word plus its space. Press once in a
menu to go back one level.
11. Speakerphone Key Use to activate
Speakerphone Mode.
12. Directional Keys Use for quick, convenient
navigation. From standby mode, access
Media Center, Scheduler, Picture & Video,
and Mobile Web (you can change any of
these to other menus in the Settings menu). In
menus use to scroll to choices and settings.
13. OK Key Use to activate a selected screen
item.
14. END/PWR Key Use to turn the power on/off
and to end a call. Use to return to the main
menu display screen.
15. SEND Key Use to make or answer calls.
16. Right Soft Key Use to select Contacts menu,
or other action displayed at the bottom right
of the LCD.
17. LCD Screen Displays incoming calls,
messages and indicator icons as well as a
wide variety of content you select to view.
18. Speaker Lets you hear callers.
18. Speaker
2. Fn Key
(Shortcut Key
in standby
mode)
3. Microphone
7. Alphanumeric
Keypad
8. Space/Voice
Command Key
9. Return Key
4. Shift Key
1. Left Soft Key
5. Sym Key
10. CLR Key
13. OK Key
15. SEND Key
16. Right Soft Key
11. Speakerphone Key
12. Directional Keys
14. END/PWR Key
6. Game Directional Keys
17. LCD Screen
14
Quick Glance of Touchpad and How to Use It
Touch Sensitive Soft Keys
(,,,)
1. Make sure your hands are clean
and dry. Remove moisture from
the surface of your hands. Don't
use the touch keys in a humid
environment.
2. Touch key sensors are sensitive
to your light touch. You don't
need to press them forcefully to
use them. Protect your phone
from severe impact because
touch key sensors may become
damaged from harsh use.
3. Use the tip of your finger to touch
the center of a touch key. If you
touch off-center it may activate
the nearby function instead.
4. The touch sensor level can be
adjusted to your preference.
5. When both the outside LCD
screen and touch key lights are
off, touch keys are deactivated.
Pull down and release the Unlock
Key ( ) to turn on the Touch
Screen and touch key lights.
6. If the flip is closed and the Touch
Protection function is on, during
calls the Touch Protection
feature is automatically enabled.
7. Keep metal and other conductive
material away from the surface
of touch keys because contact
may cause electronic interference.
WARNING
●
Do not put heavy objects on the Touch
Screen.
●
Do not sit on your phone, which may damage
the Touch Screen.
●
Do not drag or scratch your phone with any
sharp materials.
●
Do not keep your phone in extreme conditions
(places that are too humid, hot, or cold).
●
Keep chemicals away from your phone, which
may change the cosmetic or functional
features of your phone.
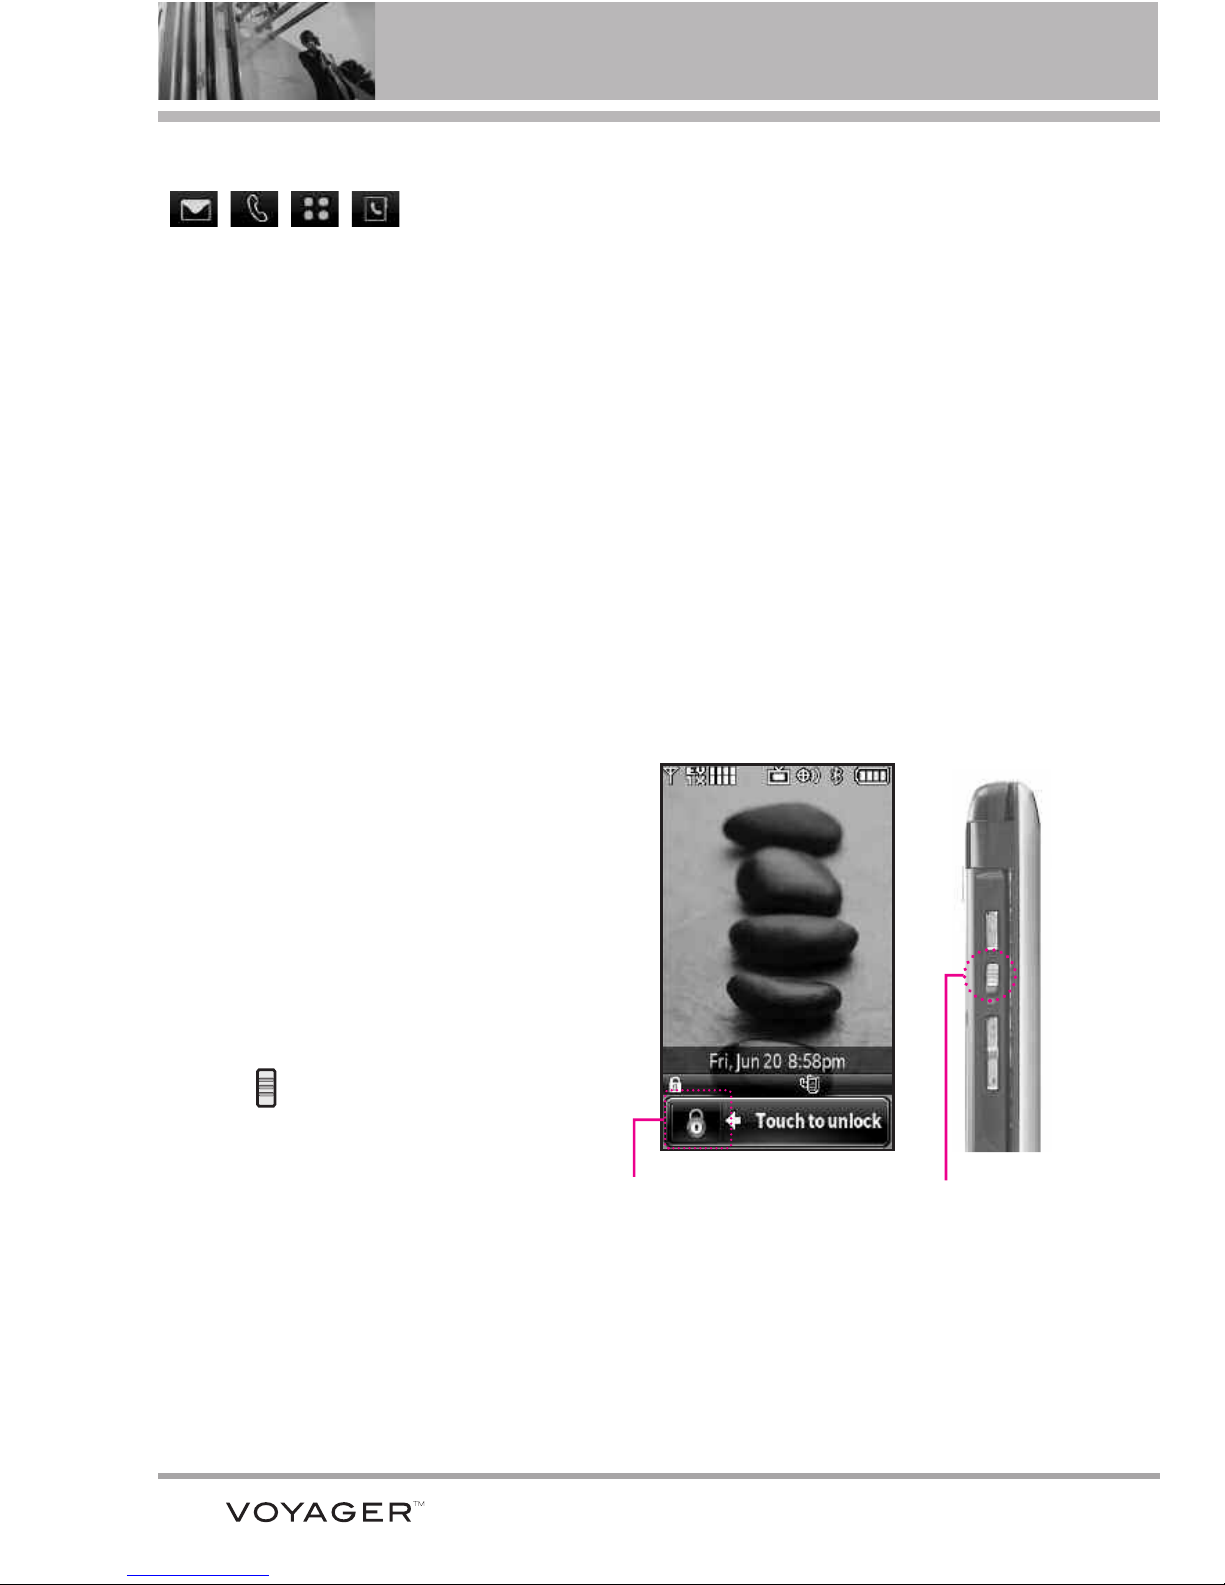
How to Unlock
Touch the padlock
image to unlock.
Pull down and
release the
Unlock Key on
the side of your
phone.
OR
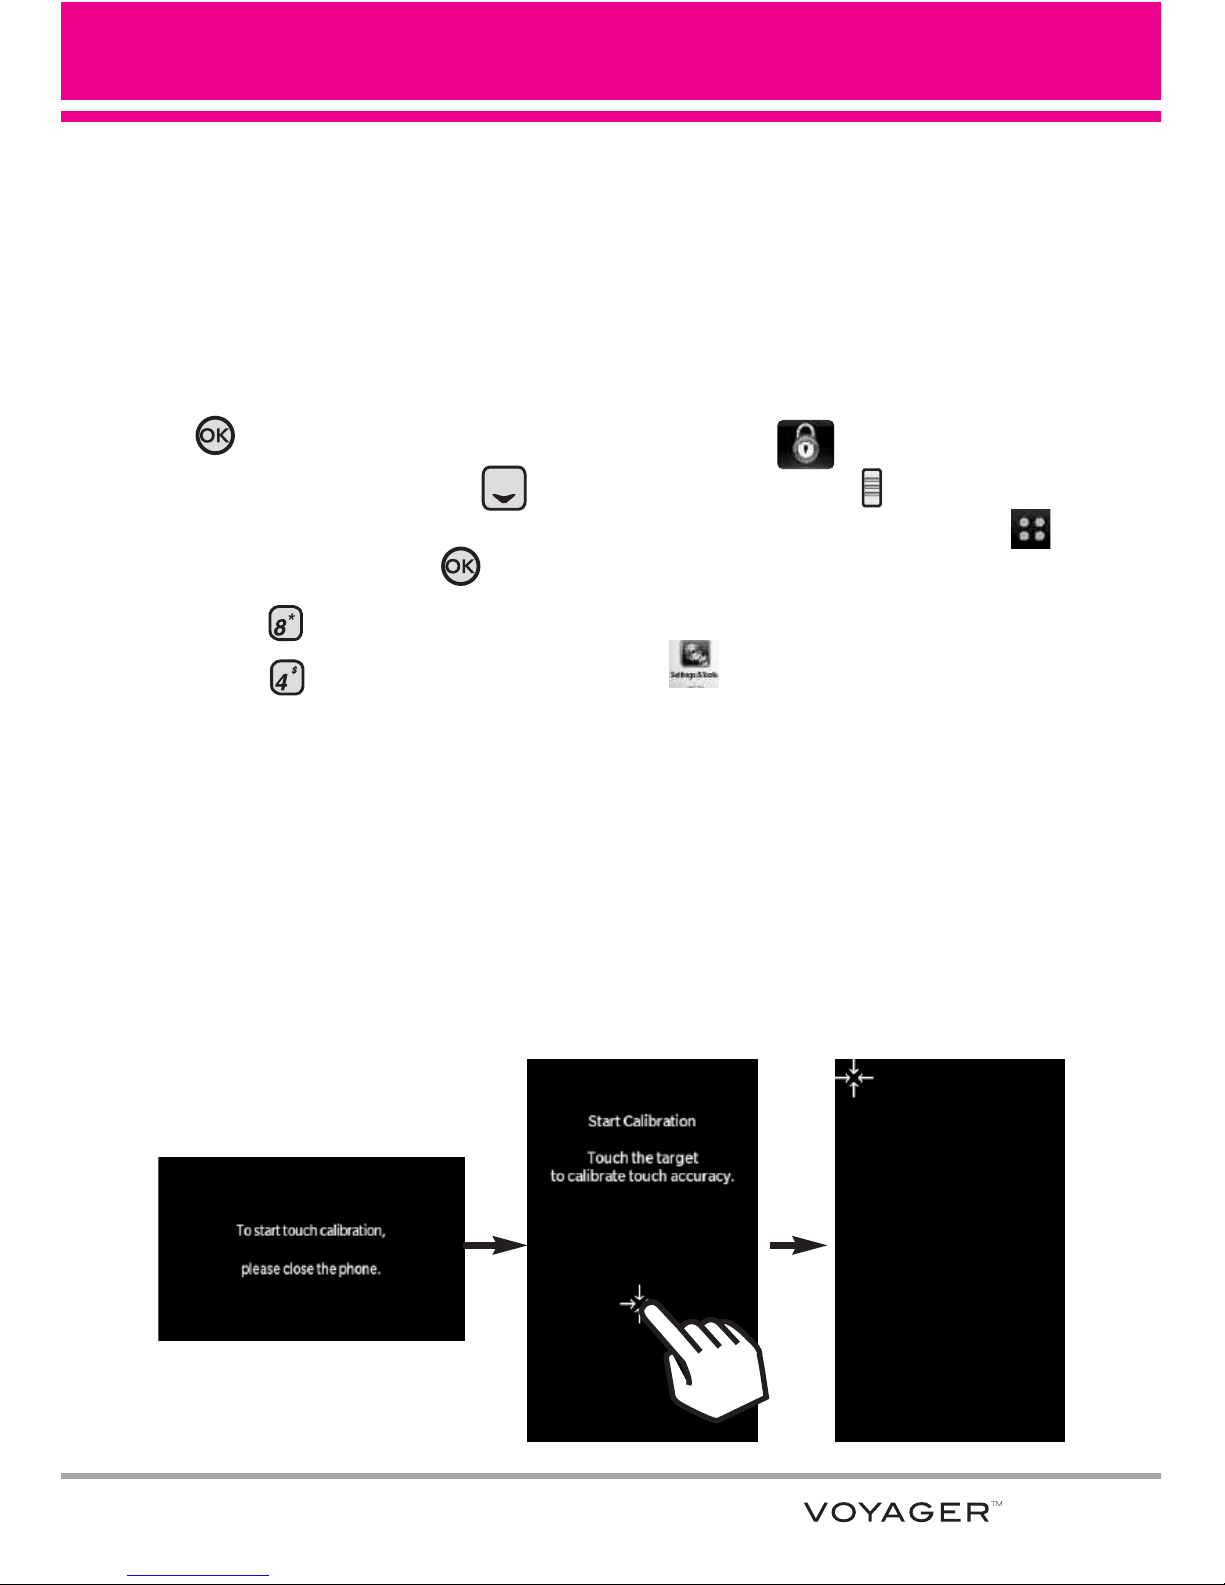
Calibrating the Touch Screen
15
The Touch Screen is a great way to interact with the VOYAGER’s software.
Take a little time to become accustomed to using it. If it doesn’t react as you
expect, adjust the Touch Screen calibration.
TIP
Keep in mind that the smaller the text appears on the screen, the smaller the area of touch
activation. Try zooming the screen in, if available, to increase the touch area.
Using the Internal Keypad
1.
Open the flip and press
the OK Key
[MENU].
2. Press the Directional Key to
scroll to the
Settings & Tools
menu
and press
the OK Key .
3. Press
Touch Settings
.
4. Press Calibration.
5. Close the flip to start calibration.
6. Touch the target on the screen
each time it appears.
Using the External Touch Screen
1. Unlock the Touch Screen by
touching or pulling down
the Unlock Key ( ) on the left
side of your phone and touch
to access the menu.
2. Touch the Settings & Tools icon
.
3. Place your finger on the Touch
Screen and apply gentle upward
pressure to scroll the list up, then
touch 8. Touch Settings.
4. Touch
4. Calibration.
5. Touch the target on the screen to
start calibration, then touch the
target each time it appears.

Shortcut Menu
16
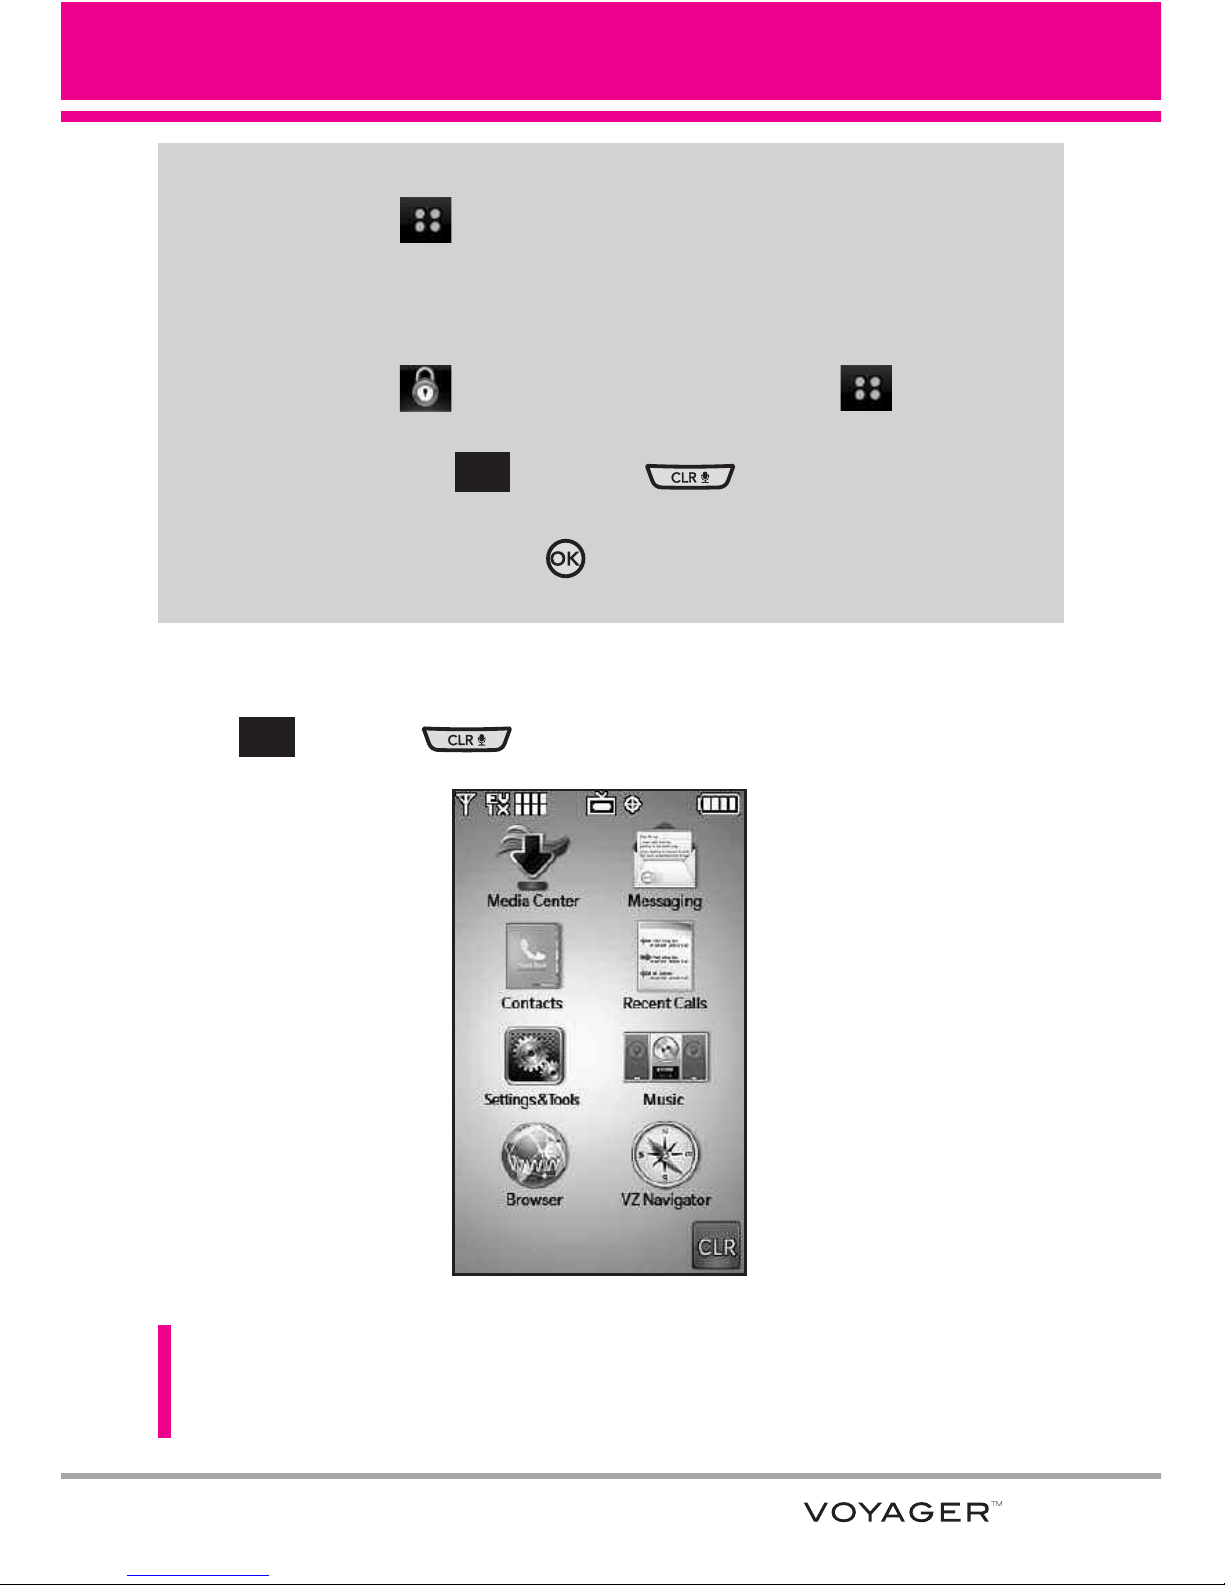
Touch Screen Shortcut Menu
The Touch Screen Shortcut Menu allows instant access to menus with the
quick touch of your fingertip. To use the Shortcut Menu:
1. With the flip closed, touch the standby screen once above the Touch Soft
Keys. You may need to touch first if the screen is locked.
2. The Shortcut Menu will open. Touch any of the twelve options to open the
application or a further menu.
3. To close the Shortcut Menu, press or the external Key.
Menu: Displays a list of menus.
Message: Displays the
Messaging menu.
Contacts: Displays your
Contact List.
Phone: Displays additional touch keys so you can
make a call without opening the flip. Dial
manually using the numeric keys or automatically
from Recent Calls and Contacts.
Access
From standby mode, touch the
Touch Screen with your finger.
Entering and Editing Information
17
Text Input
You can enter information using the exterior Touch Screen or the interior
keypad. Each has special key functions to help you with text entry.
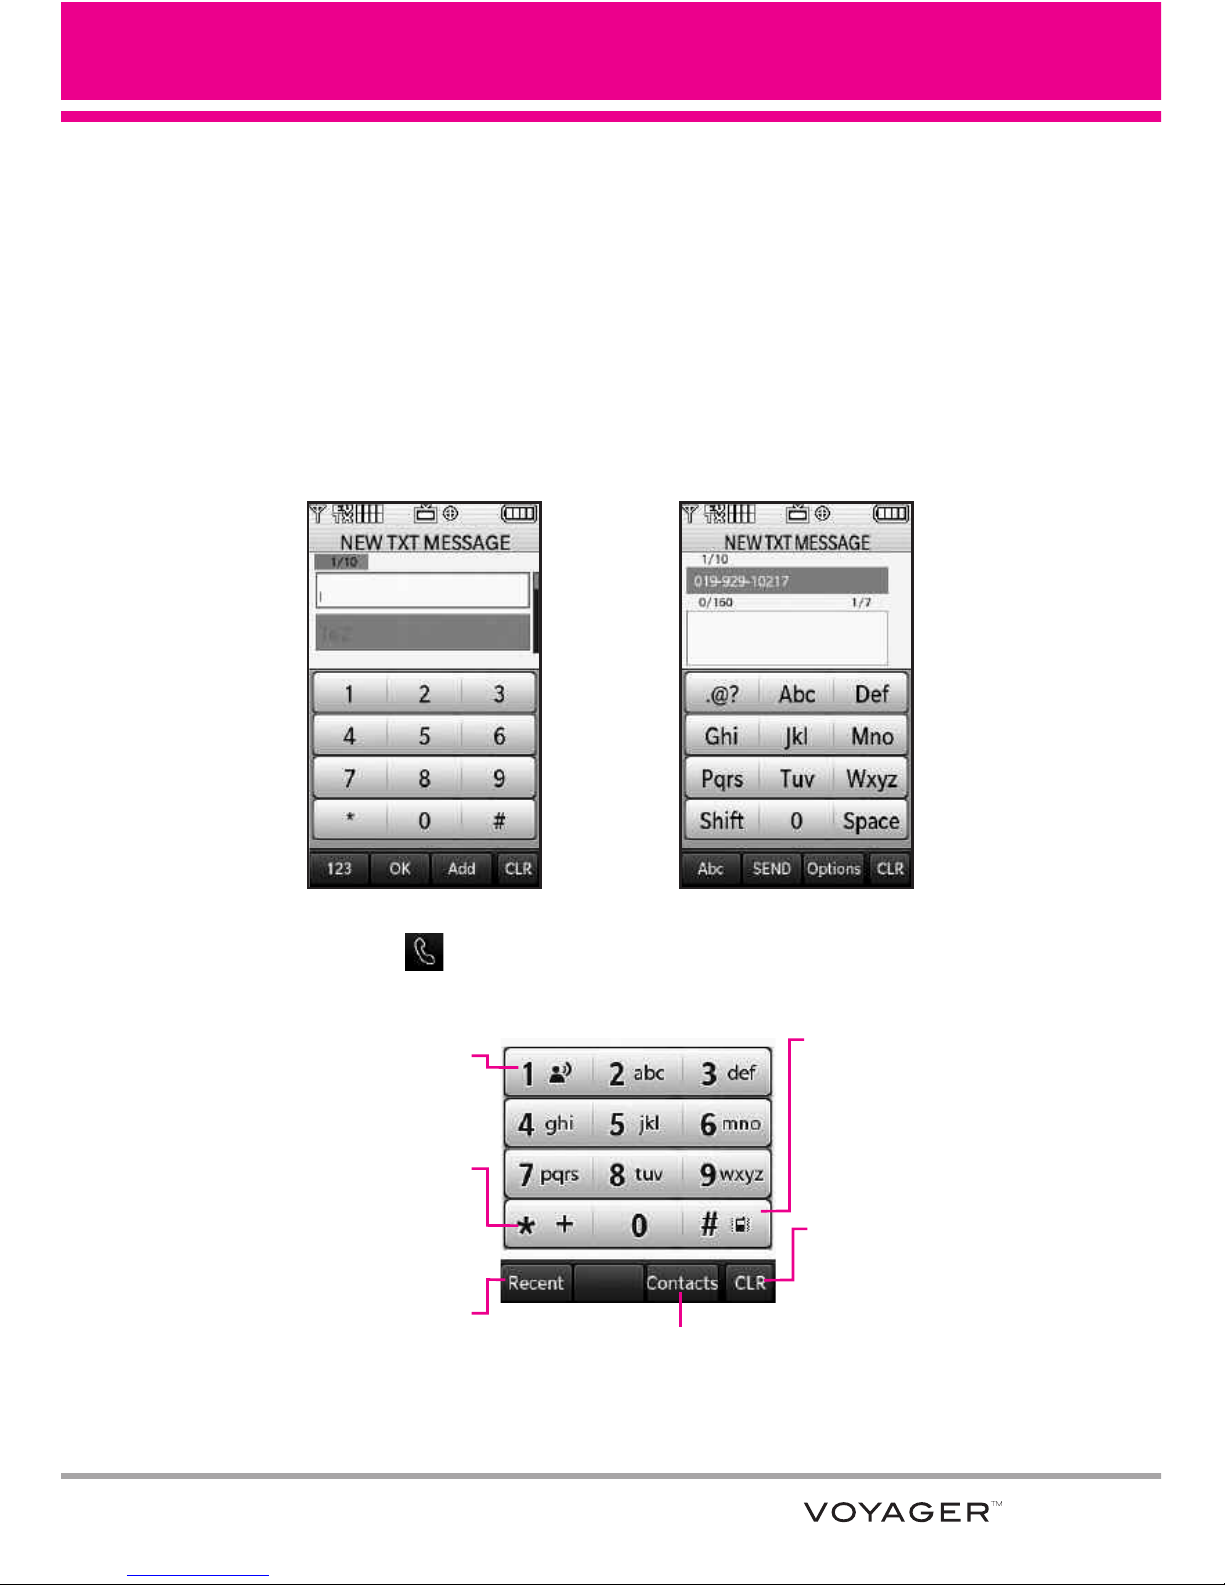
Using the Touch Screen
When creating a Text, Picture or Video message using the outside LCD, the
Touch Screen provides you with Touch Keys specific to the type of field.
Refer to the examples below:
Touch and hold this key to
access your voice mail box
Touch this key to view the
recent call history and
simply touch a phone
number to call it.
Touch this key to search for contact
information so that you can call someone.
Touch and hold will enable
you to add a "+" sign to
the display screen.
Touch this key to go
back to standby
mode.
When you touch the Touch Key the following dialing keypad is displayed.
Touch and hold this
key to set your phone
on vibrate and touch it
once again to return to
normal mode.

Entering and Editing Information
18
From the internal Qwerty®keypad
Fn Key Shortcut Menu
The function key Shortcut Menu allows
quick access to ten menus.
1. With the flip open, press the Key.
2. Press the number keys to go to the
menu, or use Directional Keys to select
the menu you want and press
Go.
Use the arrow keys to go to next field such as
recipient address, text, picture and video
depending on the message types. Use the OK
Key to send a message when finished.
Use to enter
letters.
Use to insert a space
between a letter,
words and sentences.
Press this key first and then any
key with a symbol on it to insert
that symbol in your message.
Use to go to next line
editing your message.
Use to delete a letter,
words or sentences.
Also use it to exit the
menu and go back to
standby mode.
Numeric Keypad to enter
numbers in your message.
When creating a Text, Picture or Video message using the inside LCD, use the
Qwerty keypad.
To reassign a shortcut, highlight the shortcut you wish to
change, then press the Left Soft Key
Reassign.
Select the application you wish to assign to that location
by pressing .
Read the instruction to
understand the Shortcut
Menu setting feature.

19
Menu Tree on the Internal Screen
M
M
EDIA
EDIA
C
C
ENTER
ENTER
1. Music & Tones
1. V CAST Music |
Rhapsody
2. Get New
Ringtones
3. My Ringtones
4. My Music
5. My Sounds
6. Sync Music
2. Picture & Video
1. V CAST Mobile
TV
2. V CAST Videos
3. Get New
Picture
4. My Pictures
5. My Videos
6. Take Picture
7. Record Video
8. Online Album
3. Games
4. Browse &
Download
5. Extras
MMESSAGING
ESSAGING
1. New Message
2. Inbox
3. Sent
4. Drafts
5. Voicemail
6. Visual Voice Mail
7. Mobile IM
8. Mobile Email
CCONT
ONT
ACTS
ACTS
1. New Contact
2. Contact List
3. Groups
4. Speed Dials
5. In Case of
Emergency
6. My Name Card
RRECENT CALLS
ECENT CALLS
1. Missed
2. Received
3. Dialed
4. All
5. View Timers
SETTINGS &
SETTINGS &
TOOLS
TOOLS
1. My Verizon
2. Tools
1. Voice
Commands
2. Calculator
3. Calendar
4. Alarm Clock
1. Alarm 1
2. Alarm 2
3. Alarm 3
5. Stopwatch
6. World Clock
7. Notepad
8. Ez Tip Calc
9. USB Mass
Storage
3. Bluetooth Menu
1. Add New
Device
4. Sounds Settings
1. Master Volume
2. Call Sounds
1. Call
Ringtone
2. Call Vibrate
3. Alert Sounds
1. TXT
Message
Menu Tree on the Internal Screen
20
2. Pic-Video
Message
3. Voicemail
4. Emergency
Tone
4. Keypad
Volume
5. Service Alerts
1. ERI
2. Minute Beep
3. Call Connect
4. Charge
Complete
6. Power On/Off
1. Power On
2. Power Off
5. Display Settings
1. Banner
1. Personal
Banner
2. ERI Banner
2. Backlight
1. Display
2. Keypad
3. Wallpaper
1. Internal
Wallpaper
2. External
Wallpaper
4. Charging
Screen
5. Display
Themes
6. Menu Fonts
7. Dial Fonts
8. Clock Format
6. Phone Settings
1. Airplane Mode
2. Set Shortcuts
3. Voice
Commands
4. Language
5. Location
6. Security
1. Edit Codes
2. Restrictions
3. Phone Lock
4. Lock Phone
Now
5. Reset
Default
6. Restore
Phone
7. System Select
8. NAM Select
7. Call Settings
1. Answer
Options
2. End Call
Options
3. Show Dialpad
4. Auto Retry
5. TTY Mode
6. One Touch Dial
7. Voice Privacy
8. Touch Settings
1. Auto Lock
2. Vibrate
3. Sound
4. Calibration
9. USB Auto
Detection
10. Memory
1. Save Options
2. Phone
Memory
3. Card Memory
11. Phone Info
1. My Number
2. SW/HW
Version
3. Icon Glossary
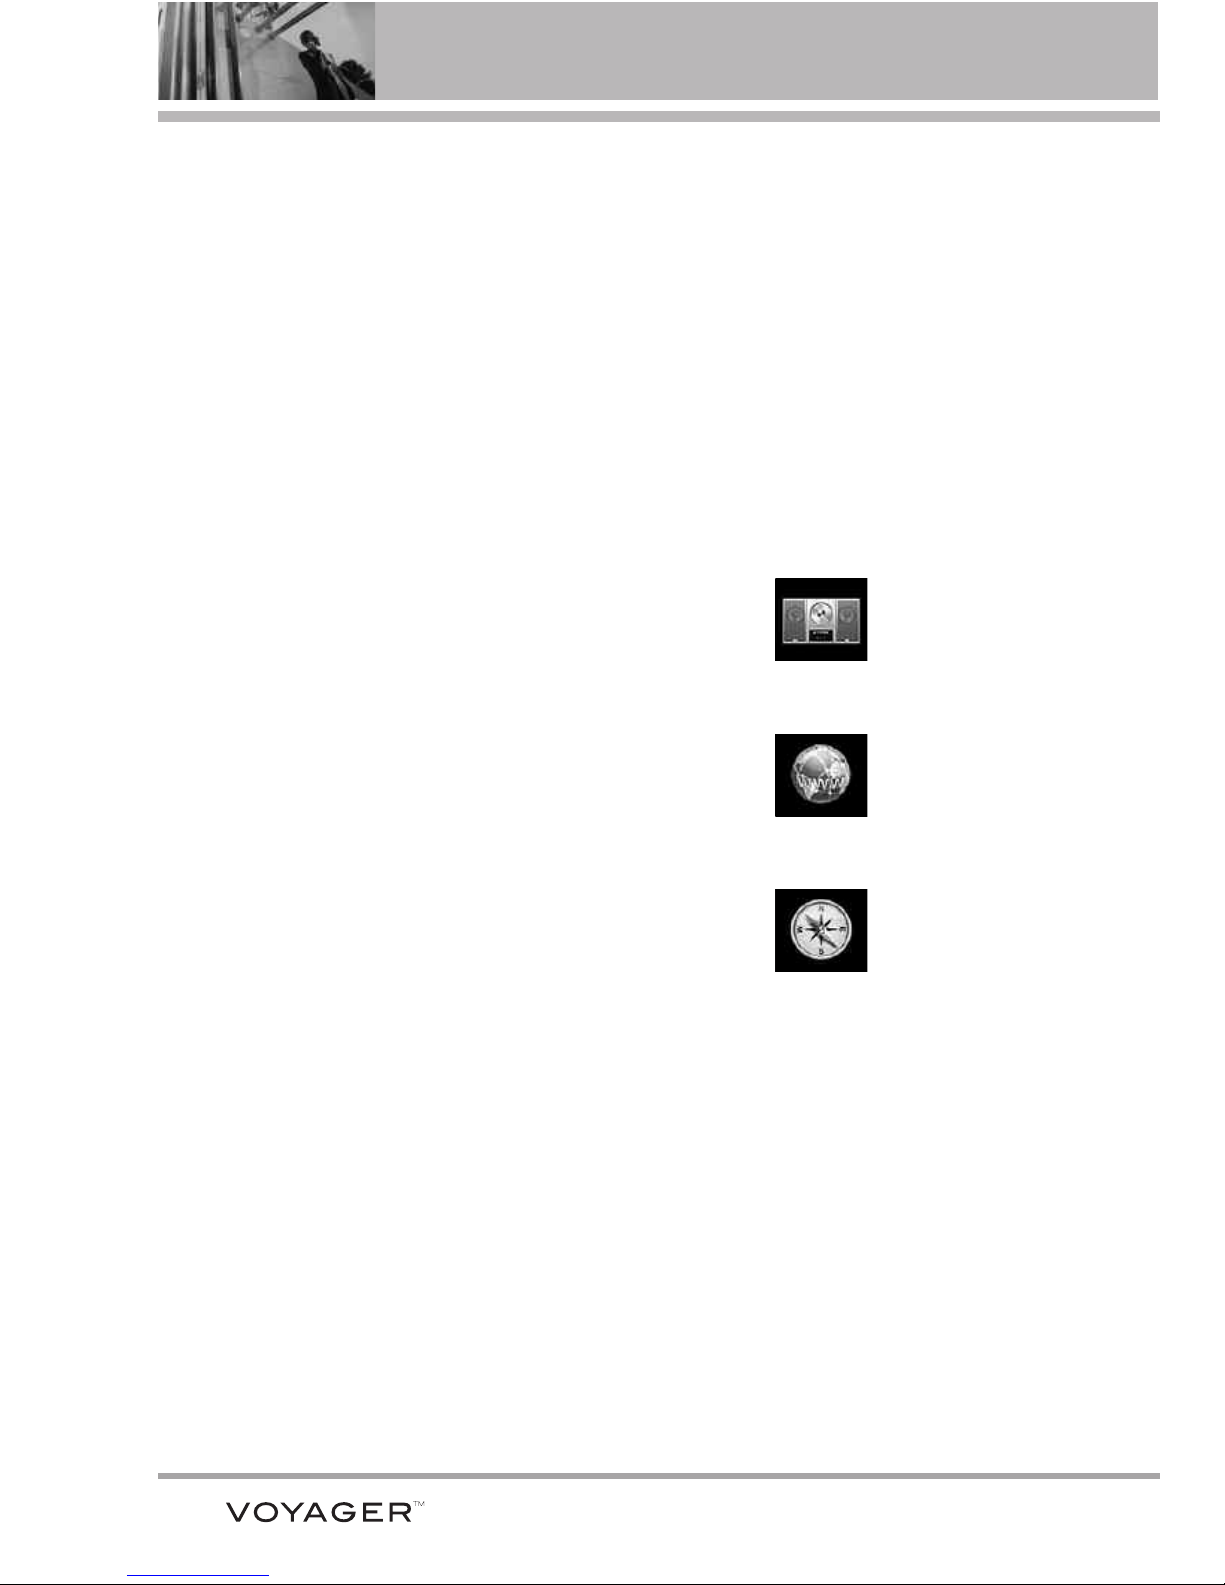
MUSIC
MUSIC
1. Music
BROWSER
BROWSER
1. Browser
VZ NA
VZ NA
VIGA
VIGA
TOR
TOR
1. VZ Navigator
Menu Tree on the External Touch Screen
21
Some content in this user guide may differ from your phone depending on
the phone software. Features and specifications are subject to change
without prior notice.
Menu Access
Touch the MENU Touch Key to have access to eight phone
menus. With the flip closed, the Touch Screen is locked by default.
To access the MENU from the external screen, unlock first by
pressing down the unlock key on the left side of your phone or
touch the unlock Touch Key. Touch the MENU Touch Key
at the bottom of the screen to open the main menus. To go back to
standby mode, touch or press at the bottom center of
your phone.
When the flip is open, press
[MENU] to have access to eight
phone menus.
CLR
From the external Touch Screen, the main menus are displayed as shown
below. Touch any of the menu icons with your fingertip to go to that menu.
Touch (or press ) to go back to standby mode.
CLR
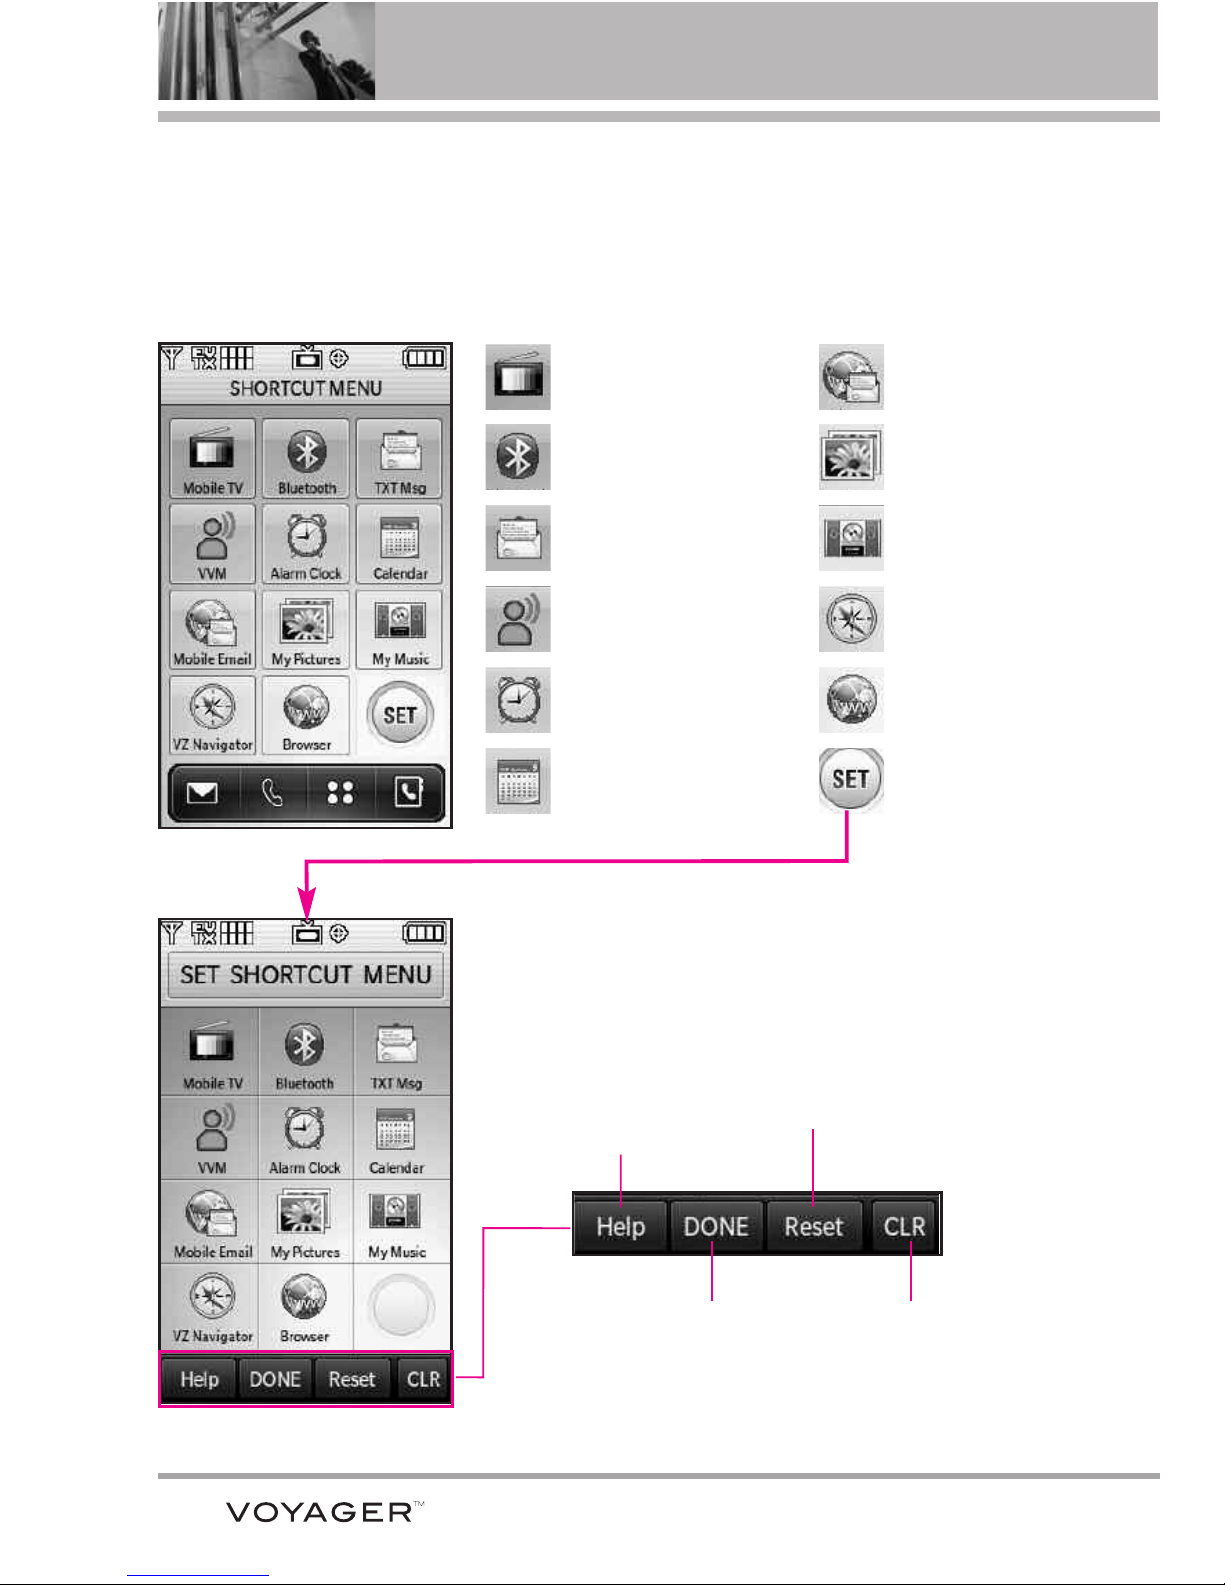
Shortcut Menu on the External Touchpad
22
Mobile TV
Bluetooth
TXT Msg
VVM
Alarm Clock
Calendar
Mobile Email
My Pictures
My Music
VZ Navigator
Browser
Set
Read the instruction to
understand the Shortcut
Menu setting feature.
Touch it when you are done in
renewing the Shortcut Menus.
Reset to Default and touch
Yes to save the change.
Touch it to go back to the
Shortcut Menu screen.
Use to customize your Shortcut Menus by touching the
menu you want to replace and touching a new one to
replace it from the list.
Touch Screen Shortcut Menu
Allows quick, direct access to several frequently used device features when
the flip is closed. To access the Shortcut Menu, press the Unlock Key to
unlock the outside LCD, then touch anywhere above the Touch Soft Keys.
Getting Started with Your Phone
23
The Battery
NOTE
It is important to fully charge the
battery before initial use of the phone.
The phone comes with a
rechargeable battery. Keep the
battery charged while not in use in
order to maximize talk and standby
time. The battery charge level is
shown at the top of the LCD screen.
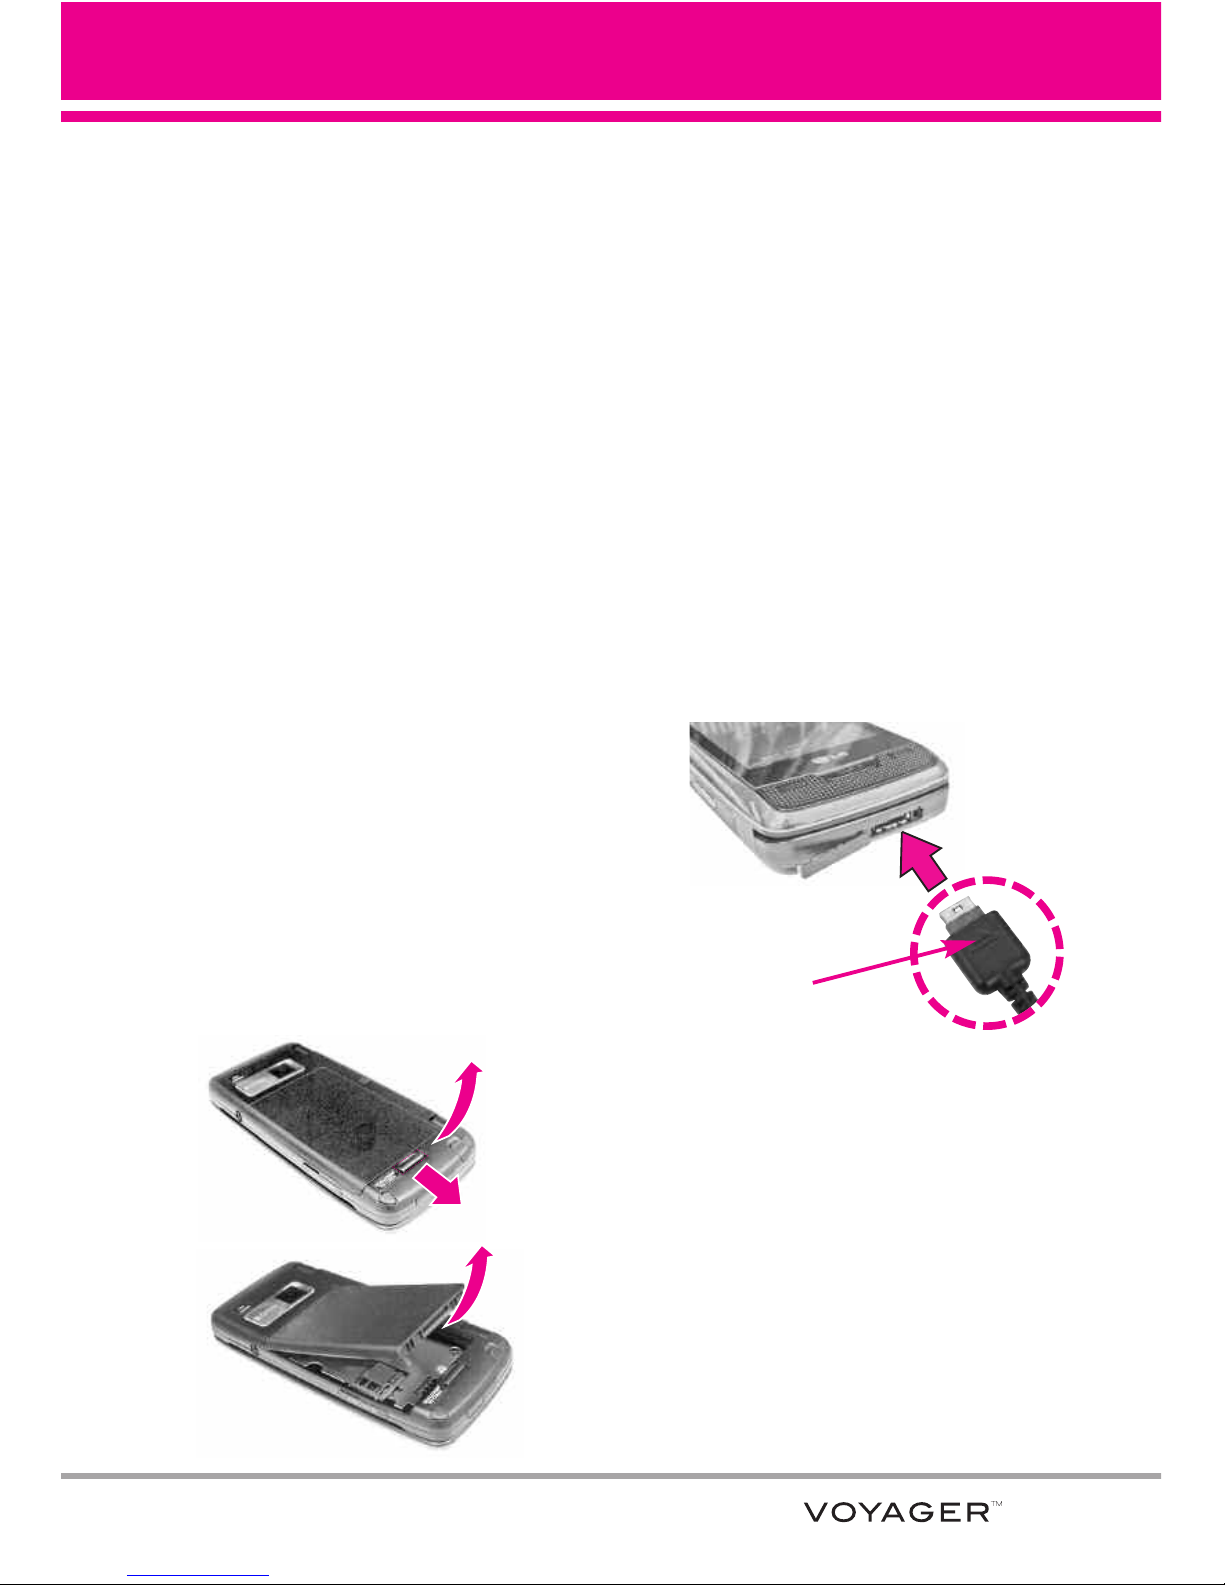
Installing the Battery
To install the battery, insert the
bottom of the battery into the
opening on the back of the phone.
Push the battery down until it clicks
into place.
Removing the Battery
Turn power off. Slide the battery
release latch away from the edge of
the battery, then lift the edge of the
battery to remove it.
Charging the Battery
To use the charger provided with
your phone:
NOTICE
Please use only an approved charging
accessory to charge your LG phone.
Improper handling of the charging port, as well
as the use of an incompatible charger, may
cause damage to your phone and void the
warranty.
1. Plug the end of the AC adapter
into the phone’s charger port and
the other end into an electrical
outlet.
2. The charge time varies
depending upon the battery level.
Charging with USB
You can use your computer to
charge your phone. Connect one
end of a USB cable to the charging
accessory port on your phone and
NOTICE
Triangle symbol should face up.
(for both your charger and USB)
Getting Started with Your Phone
24
the other end to a highpower USB port on your PC (commonly located on the
front panel of the computer).
NOTE
Lower USB port is not supported, such as the USB port on your keyboard or bus-powered
USB hub.
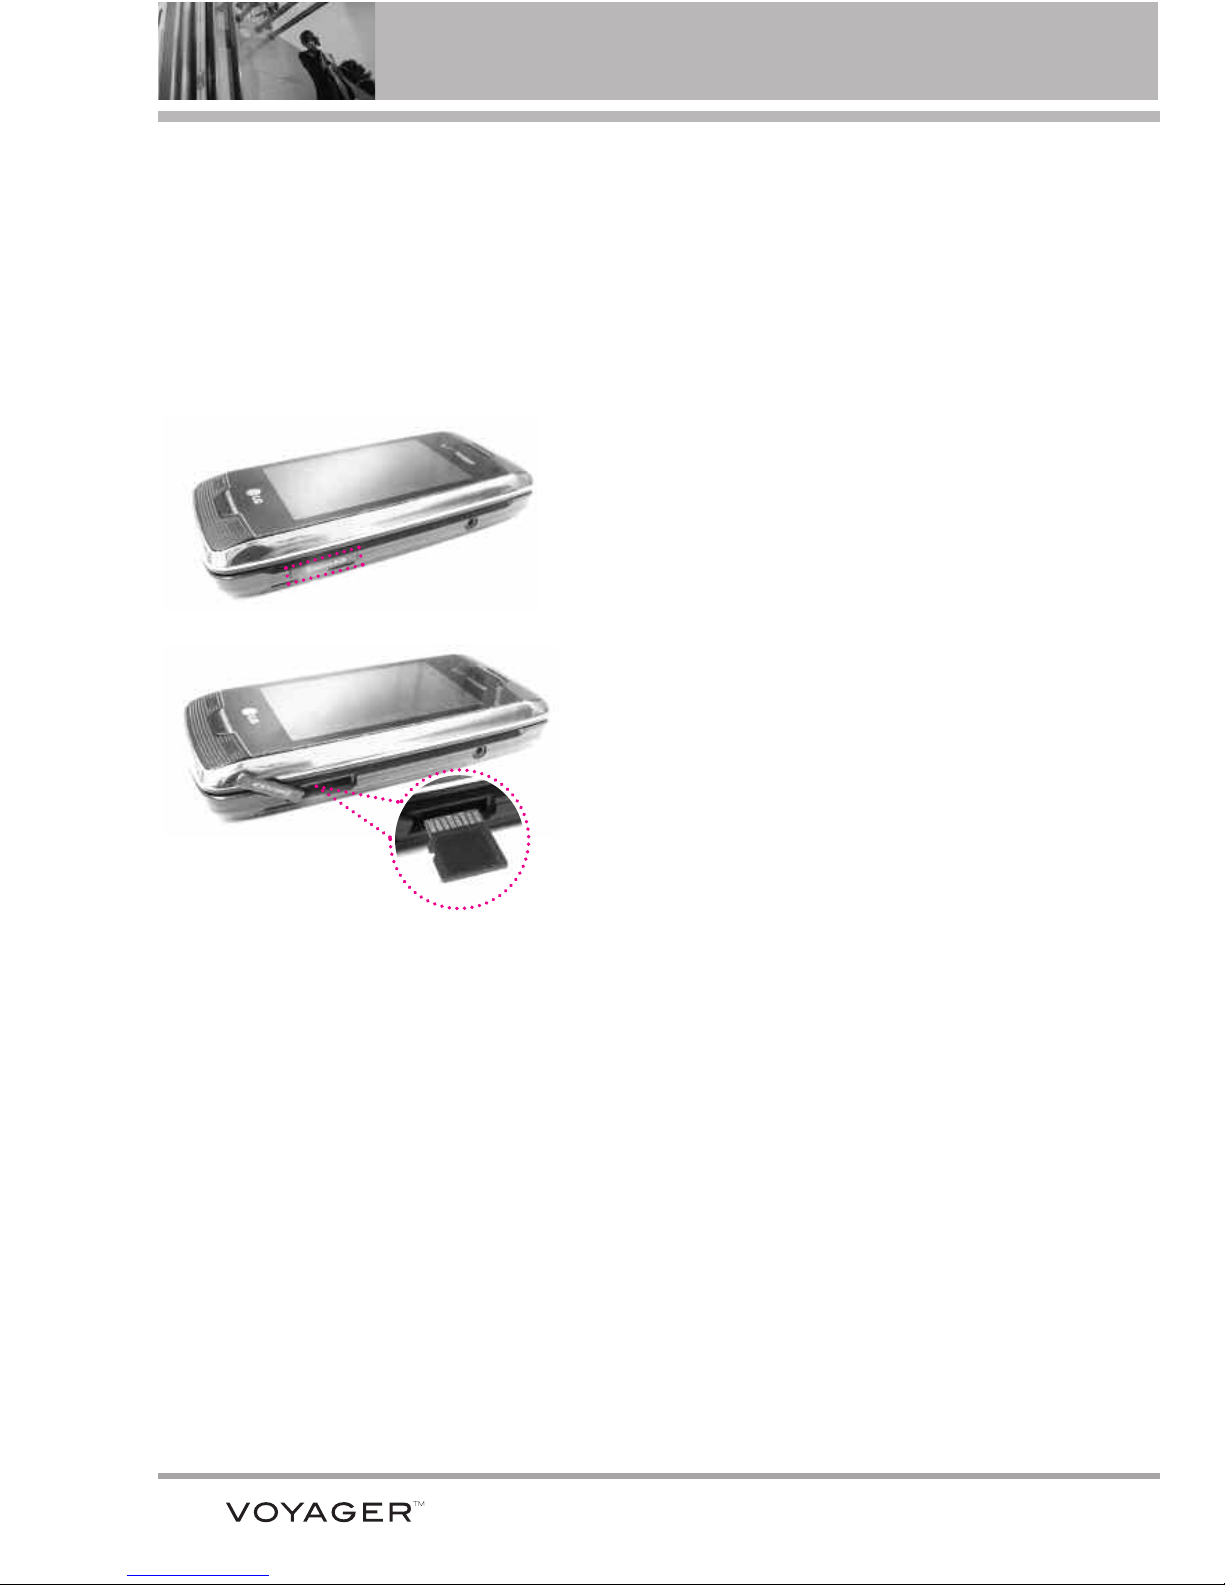
How to Install Your microSD™ Card
1. Locate the microSD™ slot on the right
side of the phone and gently uncover
the slot opening (microSD™ slot cover
stays attached to the phone so you
don't lose it).
2. Insert the microSD™ card in the
correct direction until it clicks into the
slot. If you insert the card in the wrong
direction, it may damage your phone or
your card.
How to Remove Your microSD™ Card
1. Gently press and release the exposed edge of the microSD™ card
to eject it.
2. Remove the microSD™ card from the slot and replace the cover.
NOTE
Do not attempt to remove the microSD™ card while reading or writing to the card.
25
Battery Temperature Protection
If the battery gets overheated, the
phone will automatically turn off.
When you turn the phone back on, a
message pops up alerting you that
the phone was powered off for your
safety.
Battery Charge Level
You can find the battery charge level
at the top right of the LCD screen.
When the charge level becomes
low, the battery sensor sounds a
warning tone, blinks the battery icon,
and displays a warning message. As
the charge level approaches empty,
the phone automatically switches off
without saving.
Turning the Phone On and Off
Turning the Phone On
Using the Internal Keypad
1. Install a charged battery or
connect the phone to an the
external power source.
2. Open the flip and press the
internal key for a few
seconds until the LCD screen
lights up.
Using the External Touch screen
1. Install a charged battery or
connect the phone to an the
external power source.
2. Press the external key for
a few seconds until the Touch
Screen lights up.
Turning the Phone Off
Using the Internal Keypad
1. Press and hold the internal
key until the display turns off.
Using the External Touch Screen
1. Unlock the Touch Screen by
touching or pulling down
the Unlock Key ( ) on the left
side of your phone.
2.
Press and hold the external
key until the display turns off.
Getting Started with Your Phone
26
Signal Strength
Call quality depends on the signal
strength in your area. You can tell
how much signal strength you have
by the number of bars next to the
signal strength icon: the more bars,
the stronger the signal. If you’re
having problems with signal quality,
move to an open area or, when
inside a building, try moving near a
window.
Screen Icons
When the phone is on, the top line
of the LCD screen displays phone
status icons.
Using the Internal Keypad
To see the icon glossary, go to
MENU -> Settings & Tools -> Phone
Info -> Icon Glossary on your phone.
Using the External Touch Screen
1. Unlock the Touch Screen by
touching or pulling down
the Unlock Key ( ) on the left
side of your phone and touch
to access the menu.
2. Touch .
3. Touch
11. Phone Info.
4. Touch 3. Icon Glossary.
Making Calls
NOTE
To activate the speakerphone during a
call, simply open the flip.
NOTE
If the external Touch Screen backlight
dims while on a call, touch any side
key to turn the backlight back on.
Using the Internal Keypad
1. Make sure the phone is turned
on. If not, press the internal
key for about three seconds. If
necessary, enter the lock code.
2. Enter the phone number (include
the area code if needed).
3. Press the internal key.
4. Press the internal key to
end the call.
Correcting Dialing Mistakes
If you make a mistake while dialing
a number, press once to erase
the last digit entered, or hold down
for at least 2 seconds to delete
all digits.
27
Using the External Touch screen
1. Touch the Touch Key that looks
like a phone , then a numeric
keypad is displayed. Enter the
phone number you want to call or
search for a number in Contacts
or Recent Calls.
2. Press the external key or
touch .
Redialing Calls
Press and hold the external
key or the internal key to
redial the last number you dialed,
received or missed in call history.
The last 270 numbers are stored in
the call history list and you can also
select one of these to redial.
Receiving Calls
Using the Internal Keypad
1. When the phone rings or
vibrates, there are several ways
of answering a call, depending
on the phone setting:
●
Flip Open
: Open the flip (by
default).
●
Any Key
: Press the
internal
key
or any other key except the
internal key
.
●
Auto with Handsfree
: The call
automatically connects when
connected to a handsfree device.
NOTE
If you press the Left Soft Key
[Quiet] while the phone is ringing, the
ringing or vibration is muted for that call.
NOTE
If you press the Right Soft Key
[Ignore] while the phone is ringing and
unlocked, the call will end or go to
voicemail.
Using the External Touch screen
1. When the phone rings or vibrates,
simply touch and press the
external key
or touch the
Touch Key.
2. Press the external key to
end the call.
Answer
Call
28
Vibrate Mode
Sets the phone to vibrate instead of
ring ( is displayed). To set
Vibrate Mode, press and hold on
the internal keypad or touch and hold
the .
To return to Normal Mode, press and
hold again or touch and hold the
.
Mute Function
The Mute Function prevents the
transmission of your voice to the
caller. To quickly activate Mute press
the Left Soft Key
[Mute]
above
the internal keypad or touch
then to unmute press the Left Soft
Key
[Unmute]
or touch
.
Volume Quick Adjustment
Quickly adjust ringer and earpiece
volumes by pressing the upper side
key to increase and lower side key to
decrease.
NOTE
The earpiece volume can only be
adjusted during a call and Keypad
volume can only be adjusted through
the Menu.
NOTE
To turn off sounds, press and hold the
lower side key for 3 seconds when the
flip is open or closed, then press and
hold the upper side key to return to
normal sounds mode.
Call Waiting
During a call, one beep indicates that
you have another incoming call.
Ignoring a Call Waiting
If you don't want to answer the
incoming call, press the Right Soft
Key [Ignore] when the flip is
open. If the flip is closed, touch
on the Touch Screen. The
Call Waiting beep stops and the call
goes to your voicemail, if available.
Answering a Call Waiting
1. Press the internal key/ the
external key (whether the
flip open or closed) to
automatically put the first call on
hold and answer the new call.
2. Press the internal key/ the
external key again to put
the second call on hold and
return to the first caller.
Ignore
Unmute
Mute
Quick Access to Convenient Features
 Loading...