

Page 1
LG Optimus™ Slider
User Manual
Page 2

P/NO : MFL67014002 (1.0)
Page 3
VM701 User Guide
Some of the contents in this manual may differ from your phone depending on the software of the
phone or your service provider.
- English
Page 4

Table of Contents
Table of Contents 2
Device Basics 4
Your Device Overview 4
Viewing the Display Screen 8
Turning Your Device On and Off 11
Battery and Charger 12
Device Function Keys 17
Touchscreen Navigation 22
Your Home Screen 24
Displaying Your Phone Number 36
Entering Text 36
Creating a Google Account 43
Phone 45
Making Calls 45
Call Log 53
Prepending a Number From the Call Log 55
Saving a Phone Number 56
Finding a Phone Number 56
Device Settings 57
Wireless & networks settings 57
Display Settings 64
Location & security settings 66
Accounts Settings 73
Removing an Account 74
Configuring Account Sync and Display
Options 75
Contacts 77
Creating a New Contacts Entry 77
Adding a Contact to Your Favorites 78
Editing a Contacts Entry 78
Adding a Number to a Contacts Entry 81
Editing a Contacts Entry’s Numbers 81
Assigning Direct Dialing Numbers 82
Assigning a Picture to an Entry 83
Selecting which Contacts are Displayed 84
Communicating with Your Contacts 84
Importing, Exporting, and Sharing Contacts 86
Accounts and Messaging 88
Text Messaging 95
Multimedia Messaging 10 2
Synchronizing Accounts 117
Synchronizing Your Google Account 118
Applications and Entertainment 122
Android Market
Music 124
GPS Navigation 127
Google Maps
Navigation 131
™
™
12 2
12 7
2
Page 5

Table of Contents
Web and Data 132
Connecting to Wi-Fi Networks 132
Data Services 134
Virtual Private Networks (VPN) 135
Voice Dialer 146
Opening Menus With Voice Dialer 148
Text-to-Speech 148
Camera and Video 150
Taking Pictures 150
Recording Videos 154
Tools and Calendar 157
Calendar 157
Folders 164
Clock 165
Alarms 166
Calculator 168
LG Mobile Phone Software update via
Over-the-Air (OTA) 169
Bluetooth 169
Turning Bluetooth On and Off 169
The Bluetooth Settings Menu 170
Pairing Bluetooth Devices 171
Sending Items via Bluetooth 173
Disconnecting Bluetooth Connection
During an Active Call 174
Your Device's microSD Card and Adapter 175
microSD Card Settings 177
Connecting Your Device to Your Computer 178
Important Health Information and
Safety Precautions 181
Technical Details 187
Safety 190
LIMITED WARRANTY STATEMENT 213
Index 216
3
Page 6
Device Basics
Tip
Phone Software Upgrades – Updates to your device’s software may become available from time to time. Press
tap >
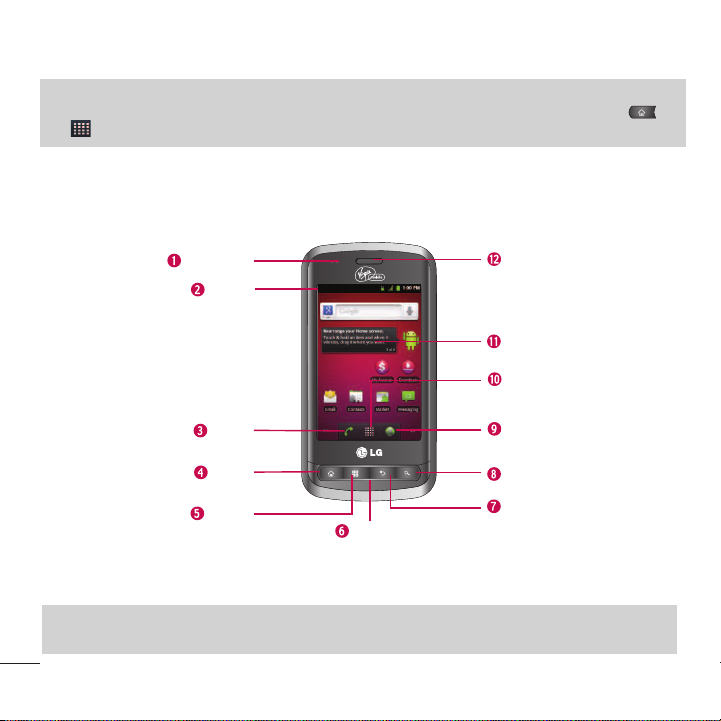
Your Device Overview
Front View
Settings > About phone > Software Update.
and
Proximity Sensor
Status Bar
Phone Key
Home Key
Menu Key
Microphone
Earpiece
Touchscreen
Appplications
Ta b
Browser Key
Search Key
Back Key
1. Proximity Sensor sense proximity towards other objects (such as your head) so that touch commands
are not accidentally activated during a call.
Note
Please be careful not to cover the sensor with a protective film, pouch, or a protective case not authorized by LG.
4
Page 7

Device Basics
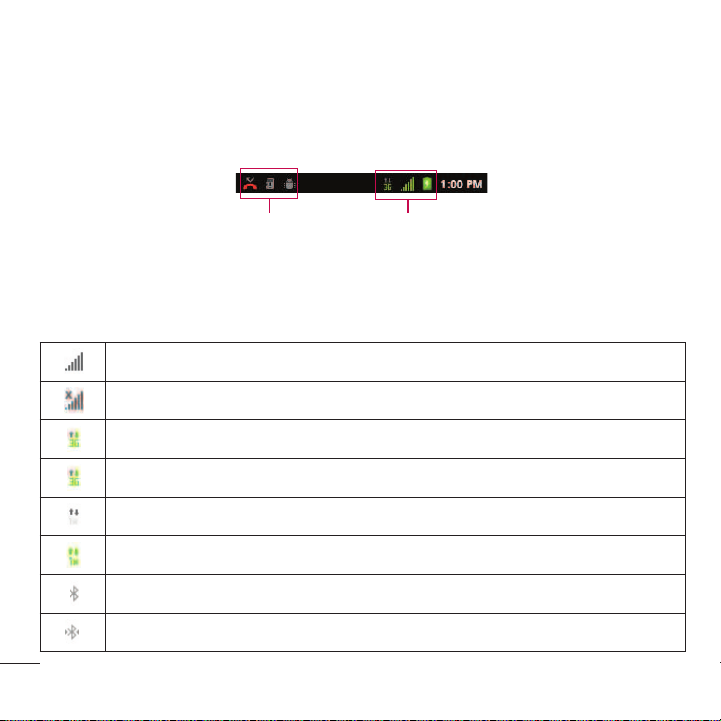
2. Status Bar provides information about your device’s status and options, such as signal strength,
ringer setting, messaging, and battery charge. The Status Bar displays icons indicating that you’ve
received notifications (on the left) and icons indicating the device's status (on the right), along with
the current time.
Notification icons
3. Phone Key displays the dialpad so you can dial a number. Also provides additional tabs to access
,
Contacts
log
, and your
Favorites
.
Status icons
Call
4. Home Key returns to the Home screen. If you're already viewing one of extension panes, it opens the
central Home screen. Press and hold to display recently used applications.
Add
5. Menu Key allows you to access your device's main functions menu from the Home screen:
Wallpaper,Settings,Search,Manage apps
and
Notifications
. While in a an application, press to open
,
a list of options available.
6. Microphone allows other callers to hear you clearly when you are speaking to them.
7. Back Key returns to the previous screen. Also closes pop-up display items such as menus and dialog boxes.
8. Search Key displays the Quick Search box that can be used to search for a key term both on the
device and online. See Search Key on page 20.
●
For example, entering the word “Pa” will display any matching entries from your device’s Contacts list,
installed applications, or will suggest search terms.
●
Press and hold to launch Voice Search where you can initiate a Google™ search by verbally entering
search terms. The device recognizes your spoken words and initiates a Web search.
9. Browser Key launches the Web Browser.
5
Page 8
Device Basics
10. Applications Tab opens the Applications screen to view installed applications.
11. Touchscreen displays all the information needed to operate your device, such as the applications,
call status, the Contacts list, the date and time, and the signal and battery strength.
12. Earpiece lets you hear the caller and automated prompts.
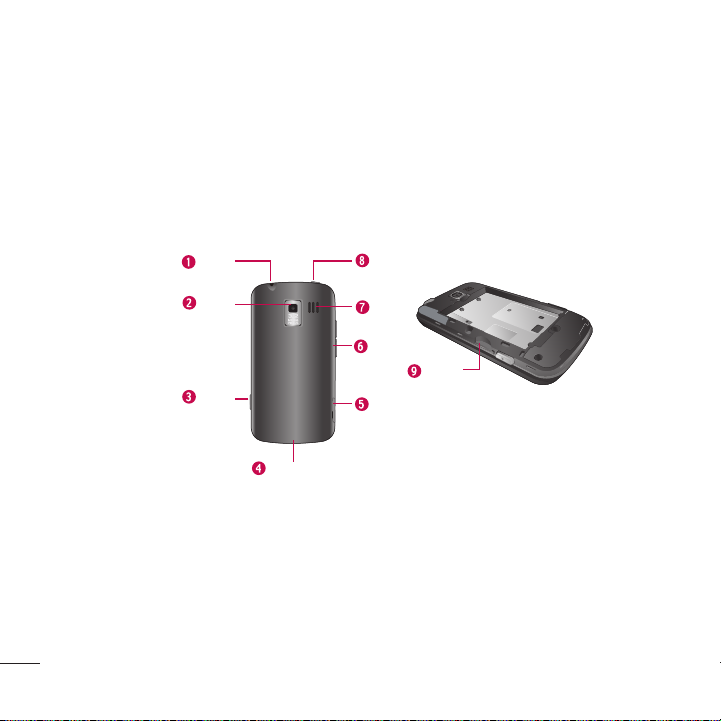
Rear View
3.5 mm
Headset Jack
Camera
Lens
Camera
Key
Fingertip Cutout
Power/Lock
Key
Speaker
Volume
Keys
Charger/
Accessory Port
MicroSD
Slot
™
6
Page 9

Device Basics
1. 3.5mm Headset Jack allows you to plug in a headset for convenient, hands-free conversations.
CAUTION! Inserting an accessory into the incorrect jack may damage the device.
2. Camera Lens as part of the camera, lets you take pictures and videos.
3. Camera Key lets you activate the camera and camcorder. Once the Camera function is open, you can
access the Video recorder function as well.
4. Fingertip Cutout allows you to lift and remove the device's back cover.
5. Charger/Accessory Port allows you to connect the device charger or an optional USB cable
(included). CAUTION! Inserting an accessory into the incorrect port may damage the device.
6. Volume Keys allow you to adjust the ringer and media volumes, or to adjust the in-call volume during
a call. When you press and hold the Volume Key, the phone switches to the Sound-off mode.
7. Speaker lets you hear the different ringers and sounds. The speaker also lets you hear the caller’s voice in
speakerphone mode.
8. Power/Lock Key locks the screen. Press and hold to open the Phone options menu (for the following
options):
9. microSD Slot accommodates the pre-installed microSD™ card (expandable up to 32GB).
Note
Insert a microSD card to use the camera and other multimedia features. Multimedia contents will be saved in the
microSD card. LG VM701 has a microSD™card pre-installed.
Silent mode,Airplane mode
, and
Power off.
7
Page 10
Device Basics
Viewing the Display Screen
The Status Bar appears at the top of the screen. It displays icons indicating that you’ve received notifications
(on the left) and icons indicating the device’s status (on the right), along with the current time.
Notification icons
Status icons
If you have more notifications than can fit in the Status Bar, a plus icon prompts you to open the Status
Bar to view them all. (See Using the Notifications Panel on page 19.) The following list identifies the
symbols you’ll see on your device's display screen:
Signal Strength – Shows your current signal strength. (More bars = stronger signal.)
No Service – Your phone cannot find a usable signal.
3G Connected – Indicates that 3G data service is available.
3G In Use – Indicates that 3G data service is in use.
1x Data Connected – Indicates that 1x data service is available.
1x Data Service In Use – Indicates that 1x data service is in use.
Bluetooth On – Indicates that Bluetooth is on.
Connected
Bluetooth
– Indicates that the phone is connected to a Bluetooth device.
8
Page 11
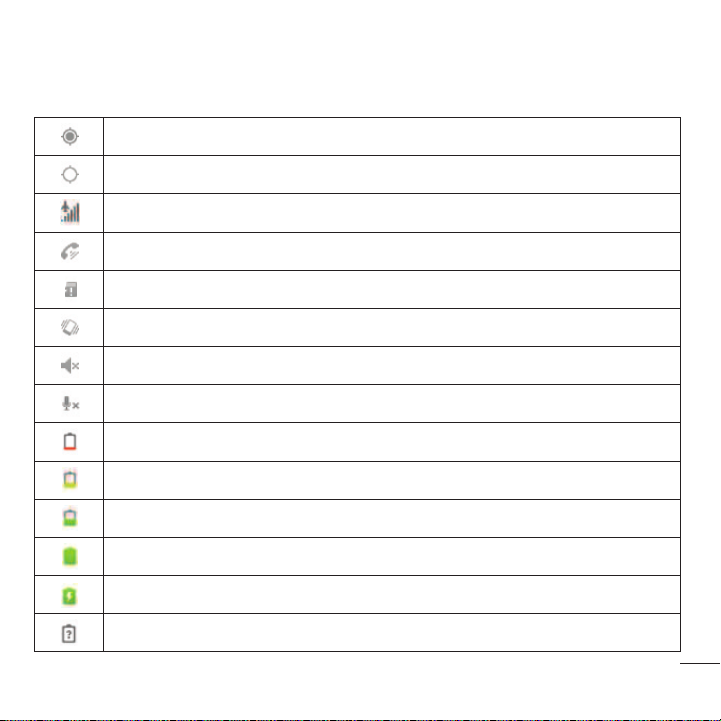
GPS On – Indicates that GPS is on.
GPS Communicating – Indicates that the device is receiving location data from GPS.
Airplane Mode – Indicates that the device is in Airplane Mode.
Speakerphone On – Indicates that Speakerphone is on.
No microSD – Indicates that no microSD card is installed.
Vibrate Mode – Indicates that the ringer volume is set to vibrate and any sounds are silenced.
Ringer Silenced – Indicates that all sounds are turned off.
Muted – Indicates that phone microphone is muted.
Very Low Battery – Indicates that the battery level is very low.
Low Battery – Indicates that the battery level is low.
Battery Drained (40%) – Indicates that the battery level is partially drained.
ttery Full
Ba
– Shows your current battery charge level. (Icon shown is fully charged.)
Battery Charging – Indicates that the battery is charging.
Device Basics
Unknown Battery – Indicates that an unknown battery is inserted.
9
Page 12
Device Basics
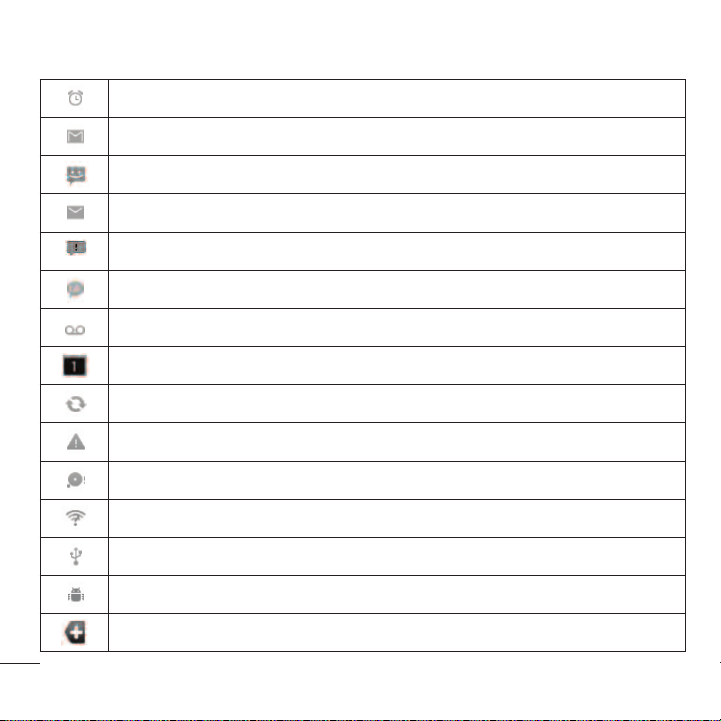
Alarm Clock – Indicates that an alarm is set.
New Gmail Message – Indicates a new Gmail message.
New Text or Multimedia Message – Indicates that you have received a new text or multimedia message.
New Email – Indicates a new Email message.
Problem With Text Or Multimedia Message Delivery – Indicates a text or multimedia message is undeliverable.
10
New Google Talk Me
New Voicemail – Indicates that you have received a new voicemail message.
Upcoming Event – Alerts you to an upcoming event.
Data Is Syncing – Application sync is active and synchronization is in progress for Gmail, Calendar, and Contacts.
Problem With Sign-In Or Sync – There has been an issue with your connection to the Google server, or you were not properly signed
into your account. In order to use Google application or sync features, you must set up and sign into an active Google account.
Full microSD Card – Indicates that the microSD card is full.
An Open Wi-Fi Network Available – Indicates that an open Wi-Fi network is available.
Connected
USB
USB Debugging Connected – The device has detected an active USB connection and is in USB Debugging mode.
More Notifica
ssage
– Indicates that you have received a new Google Talk message.
– The device has detected an active USB connection.
tions Not Displayed
– Indicates that there are more notifications which are not displayed in the Status Bar.
Page 13
Device Basics
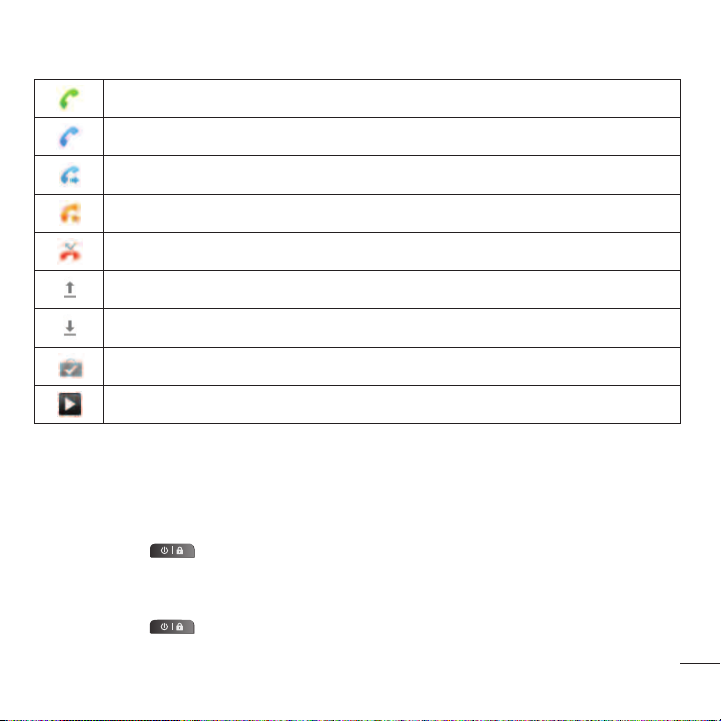
Call In Progress – Indicates that a call is in progress.
Call In Progress Using Bluetooth Headset – Indicates that a call is in progress using the Bluetooth headset.
Call Being Forwarded – Indicates that a call is being forwarded.
Call On Hold – Indicates that a call is on hold.
Missed Call – Indicates that you have missed calls.
Uploading Data – Indicates that your device is uploading data.
Downloading Data – Indicates that your device is downloading data.
Download Finished – Indicates that a download is complete.
Song Is Playing – Indicates that a song is playing.
Turning Your Device On and Off
Turn your device on and off and wake-up the screen by using the Power/Lock Key.
Turning Your Device On
●
Press and hold .
Turning Your Device Off
1. Press and hold for two seconds until you see the powering-down animation on the display
screen.
11
Page 14
Device Basics
2. Tap
Power off
Your screen remains blank while your phone is off (unless the battery is charging).
Wake Up the Screen
If you don’t use the device for a while, the screen and backlight will shut off to conserve battery power. To
wake up the device's screen
1. Press . Your lock screen will appear. See Your Device's Lock Feature on page 68.
2. Touch and drag the green Unlock icon to the right. The last screen you were working on opens.
(This is the default lock screen.)
and then OKto power off the device.
Battery and Charger
Warning! Use only LG-approved batteries and chargers with your device. The failure to use a LG-approved
battery and charger may increase the risk that your phone will overheat, catch fire, or explode, resulting in
serious bodily injury, death, or property.
Battery Capacity
Your device is equipped with a Lithium Ion (Li-Ion) battery. It allows you to recharge your battery before
it is fully drained. The battery provides up to 5 hours of continuous digital talk time.
When the battery reaches 5% of its capacity, the battery icon blinks. When there are approximately two
minutes of talk time left, the device can sound an audible alert and then turn off.
Note
Long backlight settings, searching for service, using vibrate mode, browser use, and other variables may reduce the
battery’s talk and standby times.
Tip
Watch your device's battery level indicator and charge the battery before it runs out of power.
12
Page 15
Device Basics
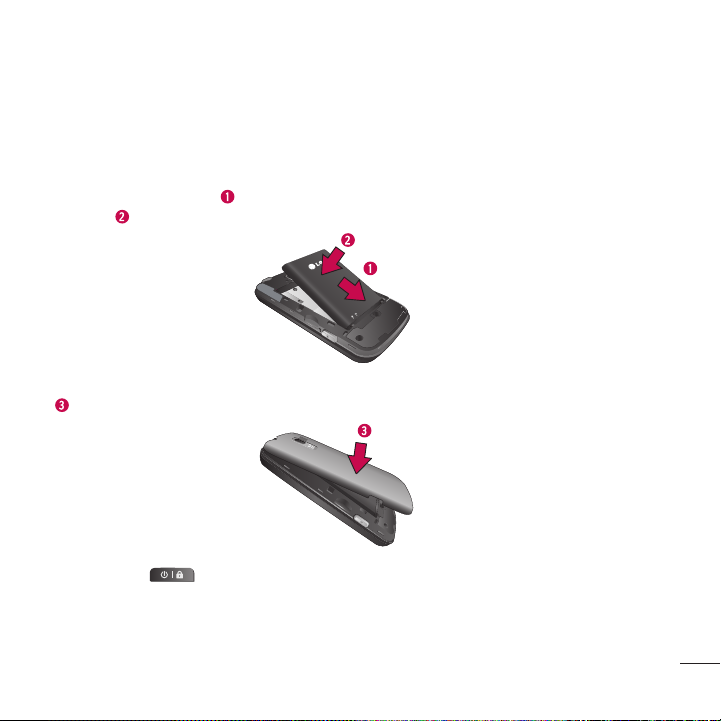
Installing the Battery
1. Install the battery.
●
Remove the battery from its packaging.
●
Insert the battery into the battery compartment in the back of the device, making sure the
connectors align (see step in the following illustration). Gently press down to secure the battery
(see step in the following illustration).
●
Position the back cover over the battery compartment and press down until you hear a click (see step
in the following illustration).
2. Press and hold located on the top right of the phone to turn the device on.
13
Page 16
Device Basics
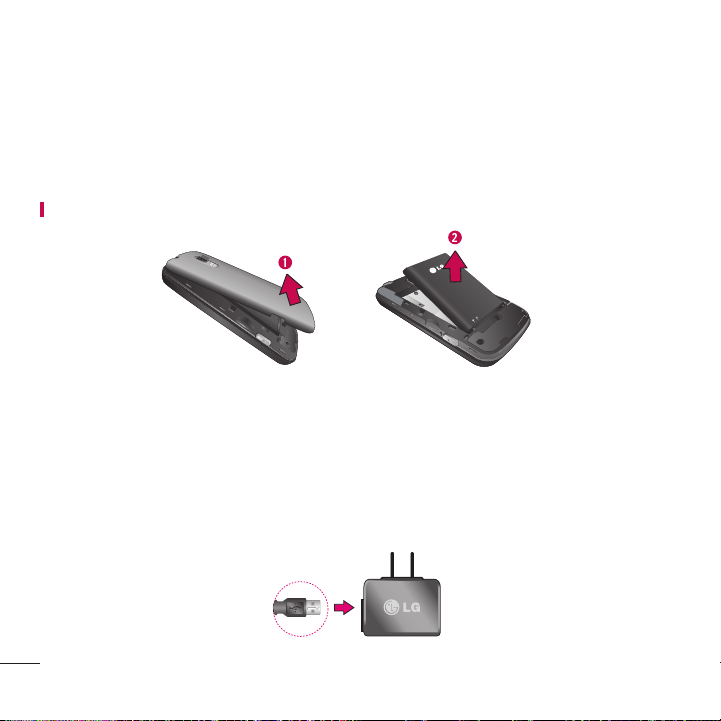
Removing the Battery
1. Make sure the power is turned off so that you don’t lose any unsaved items.
2. Lift the back cover using the fingertip cutout located on bottom of the cover and remove it.
3. Lift the battery using the fingertip cutout at the top of the battery compartment and remove it from the device.
Warning! Do not handle a damaged or leaking Li-Ion battery as you can be burned.
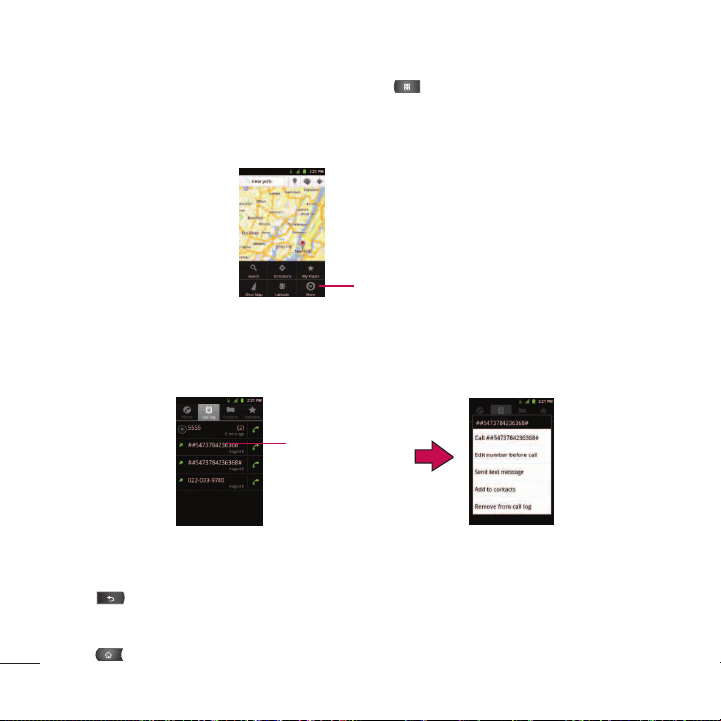
Charging the Battery
Keeping track of your battery’s charge is important. If your battery level becomes too low, your device
automatically turns off, and you will lose any information you were just working on.
Always use a LG-approved desktop charger, travel charger, or vehicle power adapter to charge your
battery.
1. Connect the wall adapter and USB cable as shown; the LG logo on the USB cable should face toward
you.
14
Page 17

Device Basics
2. Plug one end of the USB cable into the device's Charger/Accessory Port and the other end into an
electrical outlet. The charge time varies depending upon the battery level.
With the LG-approved Li-Ion battery, you can recharge the battery before it becomes completely rundown.
Battery Temperature Protection
Though extremely rare, if the battery becomes overheated, the phone will automatically turn off.
Charging with USB
You can use your computer to charge your device. To be able to charge with the USB cable, you need
to install the necessary USB drivers on your computer first. Connect one end of the USB cable to the
Charger/Accessory Port on your device and connect the other end to a USB port on your computer. It
is best to use the rear USB port when connecting to a desktop computer. The USB hub should be
powered by an external power source.
Note
Low-power USB ports are not supported, such as the USB port on your keyboard or bus-powered USB hub.
LG USB Driver is downloadable from the following site: http://www.lg.com/us > Click
> Select the Carrier(Virgin Mobile) > Select the Model (VM701) > Click USB Cable Driver to download.
Support
Always unplug the charger from the wall socket after the phone is fully charged to save unnecessary power consumption
of the charger.
Extending Your Battery Life
You can extend your battery's life between charges by turning off features that run in the background.
You can also monitor how applications and system resources consume battery power.
●
Reduce your Backlight time.
●
Turn Bluetooth off when not in use.
Support > Click Mobile Phone
15
Page 18

Device Basics
●
Turn Wi-Fi off when not in use.
●
Deactivate the GPS when not needed. Most applications using this function will periodically query
the GPS satellites for your current location; each query drains your battery.
●
Do not wait until your battery is completely depleted before charging your device. Repeating this
process of a complete discharge and recharge can over time reduce the storage capacity of any battery.
●
Turn off Automatic application sync.
●
Use the Power Control Widget to deactivate hardware functions such as Wi-Fi, Bluetooth, GPS,
Synchronization, or the LCD brightness setting.
●
Check the Running Services and close any unnecessary applications.
●
Turn down screen brightness and set a shorter screen timeout.
To check the battery's charge level:
Press > >
The battery status (charging or discharging) and level (as a percentage of fully charged) are displayed at
the top of the screen.
To monitor and control what uses the battery:
The Battery use screen shows which applications consume the most battery power. You can also use it
to turn off applications that you’ve downloaded, if they are consuming too much power.
1. Press > >
2. Tap any of the listed items for more options.
●
Cell standby
●
Display
●
Phone idle
16
Settings>About phone>Status
Settings>About phone>Battery use
to view battery used by cell radio.
to adjust the display settings.
to view battery used when phone is idle.
.
.
Page 19

Device Basics
Device Function Keys
The LG VM701 comes equipped with four main function keys that can be used on any screen to access
added functions.
Menu Key
The
Menu Key
on the Home screen, the following menu options are available:
●
Add
Widgets, Folders, and Wallpapers.
●
Manage apps
memory, stop a misbehaving application, or uninstall an application.
●
Wallpaper
can be obtained from either your Pictures folder or from any of the available images within the
device’s Wallpaper gallery.
●
Search
device and on the Web.
●
Notifications
current on-screen notification icons.
●
Settings
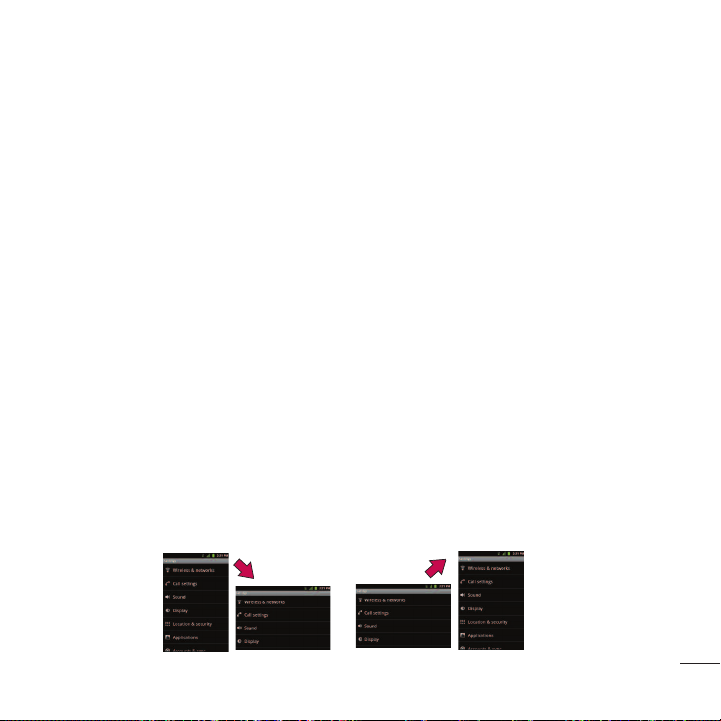
Working with Menus
There are two Android menu types: Options menus and Context menus.
Options menus
Options menus contain tools that apply to the activities of the current screen or application, not to any
specific item on the screen. To open the available options menu, press .
( ) activates an available menu function for the current screen or application. When
( ) adds one of the following functions to a selected screen. Options include: Shortcuts,
( ) displays the Manage applications screen. You can manage how applications use
( ) provides the ability to customize the current screen’s wallpaper image. This image
( ) displays the Quick Search box that can be used to search for a key term both on the
( ) allows you to expand the Status Bar to provide more detailed information about the
( ) provides quick access to the device’s settings menu.
17
Page 20
Device Basics
●
Not all applications have Options menus; if you press on a screen that has no Options menu,
nothing will happen.
Some applications have more Options menu items than can fit in the options menu; tap
the additional items.
Tap to open more menu items.
Using Context menus
Context menus contain options that apply to a specific item on the screen. To open a Context menu,
touch and hold an item on the screen. Not all items have Context menus. If you touch and hold an item
that has no Context menu, nothing will happen.
When you touch and hold
certain items on a screen,
a Context menu opens.
Backing Up Within a Menu
To go to the previous menu:
●
Press .
To return to standby mode:
●
Press .
More
to open
18
Page 21

Device Basics
Using the Notifications Panel
Notification icons report the arrival of new messages, calendar events, alarms, as well as ongoing events,
such as when you are on a call.
When you receive a notification, text appears briefly and the notification icon will be displayed in the
Status Bar. For descriptions of the various notification icons, see Viewing the Display Screen on page 8.
You can open the Notifications Panel to view a list of all recent notifications. Depending on your
settings, you may hear a notification sound, and the device may vibrate.
Applications whose activities produce notifications, such as Gmail
settings, which you can use to configure whether, and how, they send notifications. See the sections on
those applications for details.
To open the Notifications Panel:
●
Touch and drag the Status Bar to the bottom of the screen.
– or –
●
Press > >
Notifications
.
The Notifications Panel displays a list of your current notifications, organized into ongoing and eventbased notifications.
To respond to a notification:
1. Open the Notifications Panel. Your current notifications are listed in the panel, each with a brief
description.
2. Tap a notification to view it. The Notifications Panel will close and the application that corresponds
to your response will open.
For example, new voicemail notifications dial your voicemail box, and new email notifications open the
Email application.
™
and Google Talk, have their own
19
Page 22

Device Basics
To clear all notifications:
1. Open the Notifications Panel.
2. Tap
Clear
at the top right corner of the panel.
All event-based notifications will be cleared; ongoing notifications will remain in the list.
To close the Notifications Panel:
Touch and drag the tab at the bottom of the Notifications Panel to the top of the screen.
- or -
Press .
- or -
Tap a notification and the Notifications Panel will close.
Home Key
The
Home Key
Back Key
The
Back Key
open, this key closes the keyboard.
Search Key
The
Search Key
the device and on the Web. Some applications, such as Contacts, Gmail
the ability to search contents within those specific applications. Along with being able to search by
typing in search terms, you are also able to search by voice.
takes you back to your main Home screen. (of the 5 total available screens.)
returns you to the previously active screen. If the on-screen keyboard is currently
displays the Quick Search Box that can be used to search for a key term both on
™
, and Google Maps™, have
20
Page 23

Device Basics
●
Press to launch the Quick Search Box.
●
Press and hold to launch the Voice Search function.
Device and Web Search Using Text Entry
1. Press > . When you press on the Home screen or in the other applications that support
this, the Quick Search Box will open automatically.
Voice Search
Touch to search by voice.
Recent search results
Provides one t
to previously searched terms.
●
In some applications, such as Gmail, Contacts, Browser, and Android MarketTM, the application’s own
ouch shortcut
search box opens when you press . This is indicated by the application's icon on the left side of
the search box.
2. Enter the text you're searching for in the Quick Search Box.
Tap to conduct the search.
As you type, search results from
your device, previous search
terms, and Web search
suggestions appear. Tap an item
to search for that term.
21
Page 24
Device Basics
●
You can use the Search preferences to configure some aspects of Google Web search (for example,
whether it makes suggestions below the Quick Search Box as you type), and what device features you
want to include in searches.
3. Tap to search for the entered text.
– or –
If what you want to search for appears in the suggestions list, tap that item to conduct the search.
To search different by type:
●
Tap >
All,Web,Apps
, or
Contacts
.
To search using voice command:
●
press and hold .
– or –
Tap from the Quick Search Box.
When you stop speaking, Google Search by Voice analyzes your speech and displays the results of your
search.
Touchscreen Navigation
The VM701 is a touch-sensitive device which allows you to not only select an on-screen option with a
single touch, but to easily scroll through long lists. Simply slide up and down through the display with your
fingertip. Your touchscreen provides an excellent way to interact with and use your Android phone. With
the touch of your finger, you can access available applications, make menu selections, and access data
saved to your device. The following terms are used for describing the different available actions using the
touchscreen:
22
Page 25
Device Basics
●
Ta p
: A single finger tap selects items, links, shortcuts and letters on the on-screen keyboard.
●
Touch and hold
an action occurs. For example, to open a contact’s available options, touch and hold the contact in the
Contacts list until the context menu opens.
●
Drag
: Touch and hold an item for a moment and then, without lifting your finger, move your finger on
the screen until you reach the target position. You can drag items on the Home screen to reposition
them, as described in Changing the Device’s Wallpaper on page 34, or drag the Notifications Panel
open, as described in Using the Notifications Panel on page 19.
●
Swipe or slide
pausing when you first touch it (so you don’t drag an item instead). For example, you can slide the
screen up or down to scroll through a list, or browse through the different Home screens by swiping
from left to right (and vice versa).
●
Double-tap
of a Web page to adjust that section to fit the width of the screen. You can also double-tap to zoom
in and out when taking a picture (using the Camera), and when using Maps.
●
Pinch-to-Zoom
when using the Browser, Maps, or browsing pictures.
●
Rotate the screen
device’s physical orientation. (See Changing the Screen Orientation on page 35.)
: Touch and hold an item on the screen by touching it and not lifting your finger until
: To swipe or slide, quickly move your finger across the surface of the screen, without
: Double-tap to zoom on a Web page or a map. For example, quickly double-tap a section
: Use your index finger and thumb in a pinch or spread motion to zoom in or out
: From many applications and menus, the orientation of the screen adjusts to the
23
Page 26
Device Basics
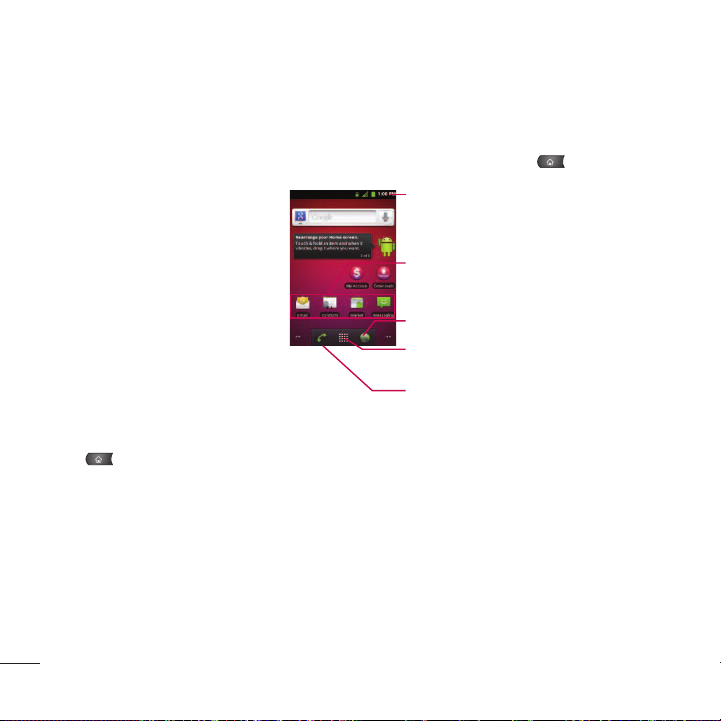
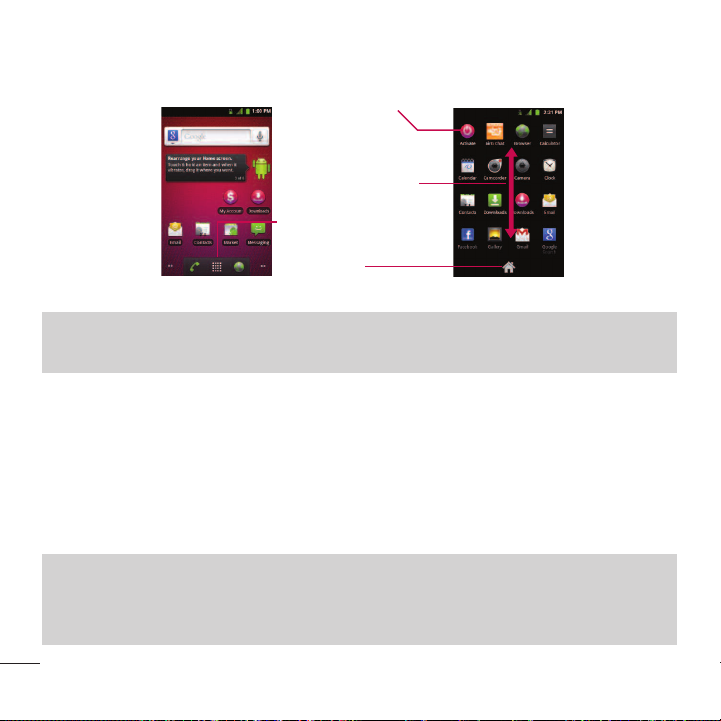
Your Home Screen
The Home screen is the starting point for many applications and functions, and it allows you to add
items like application shortcuts, folders, or Google widgets to give you instant access to information and
applications. This is the default page and accessible from any menu by pressing .
Status Bar
Shows device status information including the time,
signal strength, battery status, and notification icons.
To return to the Home screen:
●
Tap at any time, from any application.
Application Icons
use it.
Browser Key
Applications Tab Tap to open the Applications screen to view
installed applications.
Call Key
Tap to open the dial pad. Also provides additional tabs to access
Call log, Contacts, and your Favorites.
Tap an icon (application, folder, etc.) to open and
Tap to access the Web Browser.
Extended Home Screens
The operating system provides multiple Home screens to provide more space for adding icons, widgets,
and more.
●
Slide your finger left or right across the Home screen. The main screen is in the center with two
extension screens on either side of it.
24
Page 27
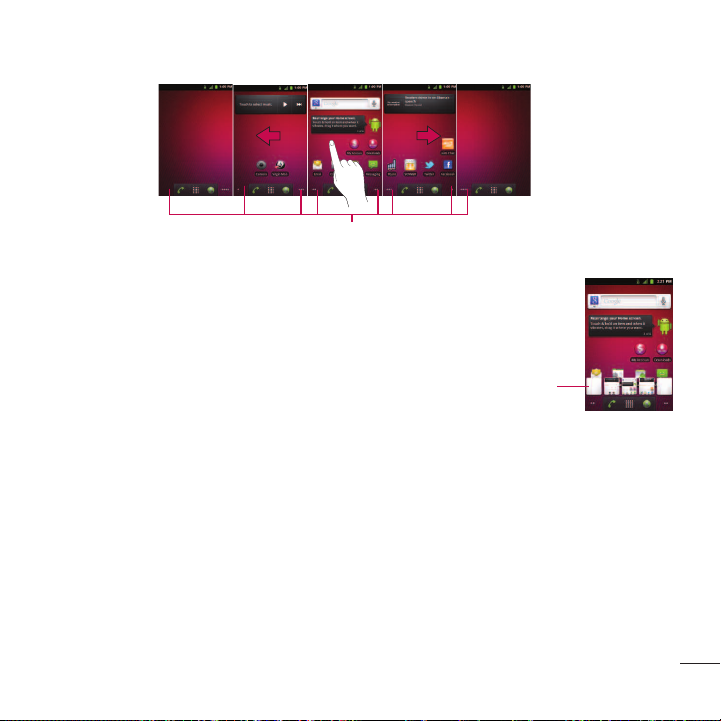
Device Basics
The dots at the bottom right and left corners of the screen
●
Touch and hold the Home screen dots on the lower left or right of the screen to view
Location Indicator
indicate which Home screen you are viewing.
thumbnails of the Extended Home screens, then touch one to go to that specific screen.
Home screen thumbnails
Touch one for immediate access.
Applications: How to View, Open and Switch
All of the applications on your device, including any applications that you downloaded and installed from Android
Market™ or other sources, are grouped together on one Applications screen that you access from your Home
screen. If you have more applications than you can currently see on the Applications screen, slide the screen up or
down to view more.
The Applications screen contains all of the device's applications (though not downloaded widgets and
other downloaded material that isn't an application),including the Clock, Browser, Calculator, Camera,
Market, YouTube, Voice Search, and much more.
25
Page 28
Device Basics
Overview
Tap an application icon
to open the application.
Slide the screen up or down to
bring more icons into view.
Tap to open the
Applications screen.
Tap to close the
Home screen
Applications screen.
Note
The Applications screen closes automatically when you tap an icon to open its Application. Dragging an icon onto
your Home screen also closes the Applications screen automatically.
Opening and Switching Applications
Multi-tasking is easy with Android™. Opened applications can keep running in the background when you
open another application. There’s no need to quit an application before opening another. You can easily
switch among several open applications. Android manages each application, pausing and starting them as
needed to ensure that unused applications don’t waste your device's resources.
To open an application:
●
Simply tap its icon on the screen.
Note
You can customize your Home screen with shortcuts to the applications you use most often. Applications are located
on the Applications screen, but you can add an application shortcut to your Home screen for faster access. No
matter where the icon is, on the Applications screen or your Home screen, just touch it to open and use it. See
Adding Application Icons to the Homescreen
on page 27
for more information.
Applications screen
26
Page 29

Device Basics
To open multiple applications:
1. Tap an application icon to open it.
2. Press .
3. Tap and tap the icon for the other application you want to open.
– or –
Simply tap the icon if the application you want is already on your Home screen.
To switch between multiple applications:
1. press and hold . A small window opens with icons of applications that you’ve used recently.
2. Tap the application icon you want to open.
– or –
Press to return to the current application.
Adding Application Icons to the Home Screen
Customize your Home screen with shortcuts to the applications you use most often.
1. Press > .
2. Touch and hold the application icon you want to add to your Home screen.
3. Lift your finger to place the app on your Home screen, or drag the icon to where you want it on the
screen, then lift your finger.
27
Page 30

Device Basics
Applications
The following is a listing of the default applications available on both the Home/Extended screens and
the Applications screen.
Application Icons
Activate
- Allows you to activate your phone.
airG Chat
- Launches the airG Chat application.
Browser
– Launches the Web browser.
Calculator
– Launches the Calculator application.
Calendar
– Launches the Calendar application that can sync to either your Google or Outlook®Work calendar. Events can only be synched to a
managed account.
Camcorder
– Launches the Camcorder.
Camera
– Launches the Camera.
Clock
- Access the Clock application.
Contacts
– Displays the Contacts that can be synchronized with your device from either your Google or Outlook account. Contacts can only be
synched to a managed account.
Downloads
– Launches the Downloads application that you can view, reopen, or delete what you've downloaded.
28
Virgin Mobile Downloads
Email
– Provides access your POP3, IMAP, and Exchange Server (Outlook) email accounts. Also provides access to your Gmail account.
Facebook
– Launches the Facebook application.
– Allows you to view your Virgin Mobile downloads.
Page 31

Application Icons
Gallery
– Displays a Gallery of camera images and video saved on your microSD™card .
Gmail
– Provides access to your Gmail account.
Device Basics
Google Search
Latitude
map or in a list.
Maps
Market
Messaging
Music
My Account
Navigation
News & Weather
Phone
Places
Poynt
more.
SCVNGR
Settings
– Displays the Quick Search Box to search for a key term both on your device and the Web.
– Lets you see your friends' locations and share yours with them. The application also lets you see your friends' locations on a
– Launches a dynamic map that helps you find local businesses, locate friends, view maps and get driving directions.
– Browse, search for, and download applications on the Android Market.
– Provides acce
– Launches the Music Player.
– Launches the GPS Navigation feature on your phone, allowing you to get quick turn-by-turn directions.
– Accesses the phone keypad.
– Allows others to find your business on local search results using either Google Search or Google Maps.
– Launches to Poynt application so that you can find businesses and people, get maps and directions, purchase movie tickets, and
– Launches the SCVNGR application.
– Accesses the device’s Settings menu.
ss to your text messages.
– Allows you to view your account information.
– Launches the application that allows you to stay up to date on news and weather.
29
Page 32

Device Basics
Application Icons
Talk
– Launches the Google Talk application that lets you chat with family and friends over the Internet for free.
Twitter
– Launches the Twitter application.
Virgin Mobile Live
Voice Dialer
in our Contacts or to launch phone functions .
Voice Search
speech.
YouTube
– Launches the Virgin Mobile application, where you can stream music, view video and blog content, and find concerts.
– Launches your device’s built-in automatic speech recognition (ASR) software, called Voice Control, to dial a phone number
– Launches your device’s built-in speech recognition software and initiates a Google search based on the recognized
– Launches the YouTube application.
Note
The Email application can access both Exchange Server-based email (such as Work email) and other Internet-based
email providers such as Yahoo! and Gmail.
Customizing Your Home Screen
You can customize your Home screen by doing the following:
●
Creating Shortcuts
●
Adding Widgets
●
Creating Contact shortcuts
●
Creating Folders
●
Changing the Background (Wallpaper)
30
Page 33

Device Basics
Creating Shortcuts
Shortcuts are different from the Home screen Widgets. Shortcuts can access a specific contact, activate
a feature, action, or launch an application.
To add a shortcut from the Applications Tab:
1. Press to access the Home screen.
2. Select a location (screen) for your new shortcut by scrolling across your available screens until you
reach the desired one. (See Extended Home Screens on page 24.)
3. Tap to display all your current applications. By default, the applications are listed in a Grid view.
4. Scroll down through the list and locate your desired application.
5. Touch and hold the on-screen icon. This creates an immediate shortcut of the selected icon and
closes the Applications screen. The new shortcut then appears to hover over the Home screen.
Note
The same shortcut can be added to any of the available screens (Home or Extended). The application you add to
the screen will still appear within the Applications screen.
6. While holding the on-screen icon, position it on the current screen. Once complete, release the
screen to lock the shortcut into its new position.
To add a shortcut via the Home screen:
1. Press to access the Home screen.
2. Touch and hold on an empty area of the screen.
3. From the Add to Home screen window, tap
Shortcuts
.
31
Page 34

Device Basics
4. Tap a selection from the list. Default options include:
●
Applications
●
Bookmark
●
Contact
●
Direct dial
●
Direct message
●
Directions & Navigation
●
Gmail label
●
Latitude
●
Music playlist
●
Settings
5. Follow the on-screen instructions (if necessary) to add the new shortcut to your current Home screen.
To delete a shortcut:
1. Press to access the Home screen.
2. Touch and hold the desired shortcut. This unlocks it from its location on the current screen.
3. Drag the icon over the
Adding and Removing Widgets
Widgets are self-contained applications that can be accessed through your Applications Tab or on the
Home or Extended screens. Unlike a shortcut, this Widget appears as an on-screen application.
Trash
and release it.
32
Page 35

Device Basics
To add a Widget:
1. Press to access the Home screen.
2. Touch and hold on an empty area of the screen.
3. From the Add to Home screen window, tap
4. Tap an available Widget to place it on your current screen.
●
Default widgets include: Analog clock, Calendar, Facebook, Google Search, Home screen tips,
Latitude, Market, Music, News & Weather, Picture frame, Power Control, Poynt Gas Prices, Poynt Top
10 Movie Widget, Rate Places, Traffic, Twitter (large), Twitter (small), and YouTube.
To remove a Widget:
1. Go to the Home screen on which the widget is located.
2. Touch and hold the widget. This unlocks it from its location on the current screen.
3. Drag the widget over the
●
This action does not delete the Widget, just removes it from the current screen.
Trash
To place a Widget onto a different screen
1. Touch and hold the widget you want to move.
2. Drag the widget to the edge of the screen (the left side if moving to a screen located on the left,
right side if moving to a screen located on the right).
3. After about one second, the current screen will change. Repeat until you get to the desired screen.
Widgets
and release it.
.
33
Page 36

Device Basics
Creating and Managing Folders
Folders can be located on any of the available screens and can contain multiple shortcuts or different
Contact entries
To create a folder on the Home screen:
1. Press to access the Home screen.
2. Touch and hold on an empty area of the screen.
3. From the Add to Home screen window, tap
4. Tap an available folder type to place it on your current screen.
●
Choices include
New folder,All contacts,Contacts with phone numbers
Note
Starred contacts are those Contact entries you have tagged as very important.
Changing the Device's Wallpaper
To change the Home screen wallpaper:
1. From the Home screen, press >
– or –
Touch and hold an empty spot on the Home screen, then tap
Gallery,Live wallpapers
2. Tap
●
Gallery
to use a picture saved on your device as a wallpaper. You can crop the picture before setting
, or
Wallpapers
it as a wallpaper.
Folders
Wallpaper
.
.
, or
Starred contacts
.
Wallpapers
.
.
34
Page 37

Device Basics
●
Live wallpapers
animated or even interactive. More Live wallpapers are available on the Android Market.
●
Wallpapers
left and right to view the available images.
3. Tap
Set wallpaper
Accessing Recently-Used Applications
Your device keeps a running list of your eight most recently used applications.
1. Press and hold to open the recently-used applications window.
2. Tap an icon to open the related application.
Changing the Screen Orientation
This device is capable of changing the orientation of screen content when the orientation of the device
itself has changed. The device’s built-in accelerometer senses movement and changes its angle/
orientation. Note that some of the screens, applications and widgets do not support orientation changes.
The automatic screen orientation feature can be manually enabled to change the orientation for all
enabled screens when rotation is detected.
Note
An example of a screen that automatically re-orients by moving the device is the Messaging screen. This only
requires you turn the device on its side.
To manually activate the auto-rotate feature:
1. Press > >
Auto-rotate screen
2. Tap
to open a list of animated wallpapers installed on your device. Live wallpapers can be
to open a screen of wallpaper images saved on your device. Slide the thumbnail images
or
Save
.
Settings>Display
.
to enable or disable the screen auto-rotation.
35
Page 38

Device Basics
Displaying Your Phone Number
Display your phone number and other information about your phone and account.
●
Press > >
Settings>About phone>Status
.
Entering Text
Your device has a built-in QWERTY keyboard, specifically designed for easy and comfortable text entry.
You can also enter text using your device's on-screen QWERTY keyboard.
Entering Text With the QWERTY Keyboard
The QWERTY keyboard uses the same layout and works just like the keyboard on your computer. The
easiest way to enter text is by using your thumbs to type on the QWERTY keyboard.
Search Key
Back Key
Menu Key
Home Key
Function Key
Smiley Key
Symbols Key
1. Slide the QWERTY keyboard out to enter text.
2. Use your fingers to enter the desired text.
36
Space Key
Navigation Keys
Delete Key
Enter Key
OK Key
Page 39

Device Basics
●
Press to delete characters to the left of the cursor.
●
Press once to capitalize the next letter you type.
●
Press twice for all caps; press it again to switch back.
●
Press and hold vowels, or the C, N, or S keys, to open a pop-up window where you can touch other
variations for the letter (e.g., accents, tilda, etc.).
●
Press to enter alternate characters, such as 1 for the . To lock the Function Key, press it
twice; press it again to switch back to normal entry mode.
●
Press to open a pop-up window with a set of symbol keys.
Entering Text With the On-screen Keyboard
The on-screen keyboard displays automatically when you tap a text entry field. To manually display the
keyboard, simply touch a text field where you want to enter text. There are two types of methods that
you can use: Android keyboard and Swype.
To select the keyboard:
1. Touch and hold the text entry field and tap
2. Tap the method you want to use between
Using Swype Method
Swype is a text entry method that allows you to enter a word by sliding your finger from letter to letter,
lifting your finger between words. Swype uses error correcting algorithms and a language model to
predict the next word. Swype also includes a predictive text system. For more information, please refer
to the Swype Tutorial and Help on your device.
Input method
.
Android keyboard
and
Swype
.
37
Page 40

Device Basics
Shift Key
Tap once to capitalize the next letter you type.
Double-tap for all caps.
Swype Tips Key
Tap to see Tutorial or More Help, or set Swype
settings.
Number and Symbols Key
Tap to change input to number and symbol entry.
ey
Language K
Tap to select the t
Shift Key
Tap once to capitalize the next letter you type. Tap again
to turn on CAPS lock. And tap again to turn off CAPS lock.
Swype Tips Key
Tap to see Tutorial or More Help, or set Swype settings.
Letters Key
Tap to change input to letters entry.
Language Key
Tap to select the text input language.
ext input language.
Numbers and Symbols Entry Keyboard
Letters Entry Keyboard
Delete Key
Tap to delete characters to the left of the cursor.
Emoticon Key
Tap to enter various emoticons.
Voice to Text Key
Tap to enter text by voice.
Space Key
Tap to enter space.
Delete Key
Tap to delete characters to the left of the cursor.
Emoticon Key
Tap to enter various emoticons.
Voice to Text Key
Tap to enter text by voice.
Space Key
Tap to enter space.
38
Page 41

Device Basics
●
Create a squiggle (like an S shape) to create a double letter (such as “pp” in “apple”).
●
To enter a capitalized word, slide your finger above the top row of the keyboard and then slide back
down to the next letter(s).
●
Move your finger over the apostrophe to enter contractions For common punctuated suffixes, lift
your finger off between the suffix and the main part of the word.
To configure Swype settings:
1. When the Swype keyboard is displayed, tap .
2. Tap
Options.
3. Tap any of the following settings:
●
Language
the language set when you first activated the phone.
●
Word prediction
●
Audio feedback
●
Vibrate on keypress
keypad.
●
Enable tip indicator
user information.
●
Auto-spacing
just lift your finger and start the next word.
●
Auto-capitalization
●
Show complete trace
display.
allows you to select the current text input language. The default language depends on
predicts words when typing in Swype.
allows you to turn on sounds generated by the Swype application.
allows you to activate a vibration sensation as you enter text using the
allows you to turn on an on-screen flashing indicator that provides helpful
allows you to automatically insert a space between words. When you finish a word,
allows you to automatically capitalize the first letter of a sentence.
allows you choose whether or not you want the complete Swype path to
39
Page 42

Device Basics
●
Word choice window
screen. Move the slider between
●
Speed vs. accuracy
on-screen input. Move the slider between
and tap
OK
.
●
Swype help
●
Tutorial
provides an on-screen tutorial.
Shift Key
Tap once to capitalize the next letter you type.
Double-tap for all caps.
Number and Symbols Key
Tap to change input to number and symbol entry.
Settings Key
Tap to change the input method or set various
Android keyboard settings.
Voice to Text Key
Tap to enter text by voice.
sets the amount of times the word choice selection window displays on the
sets how quickly Swype responds to
displays the Swype User Manual.
Never
or
Always
Fast Response
Letters Entry Keyboard
and tap OK.
(speed) or
Error Tolerance
Delete Key
Tap to delete characters to the left of the cursor.
Emoticon Key
Tap to enter various emoticons.
Space Key
Tap to enter space.
(accuracy)
40
Page 43

Numbers Entry Keyboard
Alt Key
Tap to enter additional symbols. The keyboard will
change to alternate characters. Touch and hold to lock
the alternate characters keyboard layout.
Letters Key
Tap to change input to letters entry.
Settings Key
Tap to change the input method or set various Android
keyboard settings.
1. Tap a text field where you want to enter text.
2. Enter text.
●
To enter numbers or symbols, tap .
●
To enter letters again, tap .
●
To configure Android keyboard settings, tap >
●
Vibrate on keypress
allows you to activate a vibration sensation as you enter text using the
keypad.
●
Sound on keypress
●
Popup on keypress
●
Touch to correct words
allows you to activate a sound sensation as you enter text using the keypad.
displays the larger image of each key you tap.
underlines a word in a text field if you tap the word and the keyboard has
suggestions for other words you may have intended.
●
Auto-capitalization
allows you to automatically capitalize the first letter of a sentence.
Delete Key
Tap to delete characters to the left of the cursor.
Emoticon Key
Tap to enter various emoticons.
Space Key
Tap to enter space.
Android keyboard settings
Device Basics
.
41
Page 44

Device Basics
●
Show settings key
●
Voice input
key or turn voice input off.
●
Input languages
depends on the language set when you first activated the phone.
●
Quick fixes
●
Show suggestions
type.
●
Auto-complete
the keyboard, when you enter a space or punctuation.
●
Rotate the screen to use the larger keyboard.
3. When you finished typing, press to close the keyboard.
Note
If you do not want the screen to change orientations automatically, uncheck the Auto-rotate screen. Press
> Settings > Display and deselect Auto-rotate screen.
allows you to set whether to display the Settings Key or always hide it.
allows you to set on which on-screen keyboard you want the voice-input Microphone
allows you to select the current text input language. The default language
allows you to correct some common misspellings as you type.
shows you suggested words in a strip above the on-screen keyboard as you
allows you to automatically enter a suggested word, highlighted in the strip above
Letters Entry Keyboard Numbers and Symbols Etry Keyboard
>
42
Page 45

Device Basics
Tips for Editing Text
You can edit the text you enter in text fields and use menu commands to cut, copy, and paste text,
within or across most applications. To cut/copy and paste the text:
1. Touch and hold the text field that contains the text.
2. Tap
Select word orSelect all
orange, with a tab at each end of the selection.
3. Drag either selection tab to expand or reduce the range of selected text.
●
To cancel the selection, simply tap unselected text or empty area.
4. Tap the selected text.
5. When the Context menu opens, tap
6. Place the cursor on the location where you want to paste the text.
7. Touch and hold the text field.
8. When the Context menu opens, tap
memory (temporarily), so you can paste that same text in another location.
in the Context menu that opens. The selected text is highlighted in
Cut
or
Copy
.
Paste
. The text that you pasted also remains in the device’s
Creating a Google Account
Your Google Account
You must create and/or sign into a Google Account to use GmailTM, Google TalkTM, Google CalendarTM,
and other Google Apps. Signing into a Google Account is also necessary to download applications from
the Android Market
of any other available Google services on your device.
If you don’t have a Google Account, you will be prompted to create one. If you have an enterprise
account through your company or other organization, your IT department may have special instructions
on how to sign into that account.
TM
, to sync your data (if applicable) with the Google servers, and to take advantage
43
Page 46

Device Basics
1. From a computer, or from your device's Browser, navigate to
2. On the main page, select
3. Follow the on-screen prompts to create your free account.
4. Log into your provided email address, locate the email from Google, and respond to the new email to
both confirm and activate your new account.
Sign-in >Create an account now
www.google.com
.
.
Signing into Your Google Account
1. Launch an application that requires a Google account (such as Android Market or Gmail).
2. Click
Next>Sign in
Note
If you do not already have a Google account, tap Create and follow the on-screen prompts to create your new
account.
3. Touch the
4. Tap
Sign in
Important: Some applications, such as Calendar, work only with the primary Google account (the first Google
account set up with your device). If you plan to use more than one Google Account with your device, be sure to sign
into the one you want to use with such applications first. When you sign in, your contacts, Gmail messages, Calendar
events, and other information from these applications and services on the Web can be synchronized with your device.
You will be prompted to sign in or to create a Google Account the first time you start an application that requires
one, such as Gmail or Android Market.
.
Username
. Your device then communicates with the Google servers to confirm your information.
and
Password
fields and enter your information.
44
Page 47

Phone
Making Calls
There are several convenient ways to place calls from your device.
1. Press > .
Note
If necessary, tap the Phone tab to access the dialpad.
2. Enter a phone number using the on-screen dial pad and tap .
●
If you enter a wrong number, tap to erase digits one by one.
●
To erase the entire number, touch and hold .
Otions during a call:
●
You can open other applications during a call. The will appear in the Status Bar while the call is
underway.
●
Press the Up/Down Volume Keys to adjust the call volume.
●
Use the on-screen buttons to add another call on hold, to use the speakerphone, and for other
options, as described in In-Call Options.
3. Tap to end the call.
Tip
To redial your last outgoing call, follow step 1 to access the dial pad, tap the Call log tab, locate the call entry and
tap .
You can also make calls from your Contacts list, from the Call log, and using Voice Dialer.
45
Page 48

Phone
Dialing Options
After entering numbers with the dialpad, you can use the following dialing options.
Press to view the following options:
●
Add to contacts
Saving a Phone Number on page 56.)
●
Add 2-sec pause:
following sequence of digits is dialed by the phone. (See Dialing and Saving Phone Numbers With
Pauses on page 49.)
●
Add wait
then dial the following sequence of digits when you tap
Phone Numbers With Pauses on page 49. )
Missed Call Notification
A missed call icon displays when you do not answer a call. When you do not answer an incoming call ,
is displayed in the Status Bar. To display the Missed Call entry from the notification screen:
1. Touch and drag the Status Bar to the bottom of the screen to open the Notifications Panel.
2. Tap the missed call notification. The Call log screen will be displayed. (To dial the phone number, tap
Calling Emergency Numbers
You can place calls to 911 (tap and dial ), even if your phone is locked or
your account is restricted.
: Tap to add the entered number as a new contact, or to an existing contact entry. (See
Enter digits and select this option to introduce a two-second pause before the
: Enter digits and select this option to have the phone dial the preceding set of digits first, and
Ye s
on the pop up screen. (See Dialing and Saving
.)
46
Page 49

Phone
Note
When you place an emergency call, your phone automatically enters Emergency mode.
During an emergency call, tap an option.
●
Speaker On
displayed as
●
Dialpad/Hide
●
End
To exit Emergency mode:
1. Tap to end the emergency call.
2. Tap
Exit
Enhanced 911 (E911) Information
This phone features an embedded Global Positioning System (GPS) chip necessary for utilizing
E911emergency location services where available. When you place an emergency 911 call, the GPS
feature of your phone seeks information to calculate your approximate location. Depending on several
variables, including availability and access to satellite signals, it may take up to 30 seconds or more to
determine and report your approximate location.
Important: Always report your location to the 911 operator when placing an emergency call. Some designated
emergency call takers, known as Public Safety Answering Points (PSAPs) may not be equipped to receive GPS
location information from your phone.
to activate speakerphone mode. (If you are in speakerphone mode, the option is
Speaker Off
to deactivate.)
to show or hide the on-screen dialpad.
to end the current call.
on the Emergency Call Back mode.
47
Page 50

Phone
TTY Use
A TTY (also known as a TDD or Text Telephone) is a telecommunications device that allows people who
are deaf, hard of hearing, or who have speech or language disabilities, to communicate by telephone.
Your device is compatible with select TTY devices. Please check with the manufacturer of your TTY
device to ensure that it is compatible with digital cell phones.
Your phone and TTY device will connect via a special cable that plugs into your device's headset jack. If
this cable was not provided with your TTY device, contact your TTY device manufacturer to purchase
the connector cable.
To turn TTY Mode on or off:
1. Press > >
2. Tap
TTY Off
– or –
Tap any of the following to enable the feature:
●
TTY Full,TTY HCO
Note
In TTY Mode, your device will display the TTY access icon. When enabled, TTY mode may impair the audio quality
of non-TTY devices connected to the headset jack.
In-Call Options
Once you initiate a call, you will see these on-screen options:
●
Contacts
●
End
to call another contact and initiate a 3-way call.
to end the call.
Settings>Call settings>TTY mode
to turn TTY mode off.
, or
TTY VCO
.
.
48
Page 51

Phone
●
Dialpad
to display the dialpad.
●
Bluetooth
via the Bluetooth headset for hands-free conversation. (For details about pairing the phone with a
Bluetooth headset, see Pairing Bluetooth Devices on page 171.)
Note
When using the Bluetooth headset during a call, the Ongoing Call notification icon is blue in the Status Bar.
●
Mute
Status Bar to indicate the microphone is muted. To unmute the microphone, tap Mute again.
●
Speaker
the Status Bar to indicate that the speakerphone is on.
WARNING: Because of higher volume levels, do not place the device near your ear while using the
speakerphone.
Dialing and Saving Phone Numbers With Pauses
You can dial or save phone numbers with pauses for use with automated systems, such as voicemail or
credit card billing numbers.
There are two types of pauses available on your device:
●
2-Second Pause
●
Hard Pause (Wait)
Note
You can have multiple pauses in a phone number and combine two-second and hard pauses.
(Only available when a Bluetooth headset is connected to your phone) to conduct the call
to mute the microphone during a call. The Mute button lights up and is displayed on the
to turn the speakerphone on or off. The Speaker button lights up and is displayed on
automatically sends the next set of numbers after two seconds.
sends the next set of numbers when you tap
Ye s
.
49
Page 52

Phone
To dial or save phone numbers with pauses:
1. Enter the phone number.
2. Press >
3. Enter the additional numbers.
4. Tap to dial the number.
– or –
Press >
Note
When dialing a number with a hard pause (Wait) , tap Ye s to send the next set of numbers.
Dialing From the Contacts List
Dial directly from your contacts list.
1. Press > >
– or –
Press > >
2. Find a contact to call and tap it to open its entry, then tap .
– or –
Touch and hold the contact. When a Context menu opens, tap
Add 2-sec pause
Add to contacts
Contacts
Contacts
or
Add wait
.
to save the number in your Contacts.
.
.
Call contact
.
50
Page 53

Phone
Using Direct Dialing
With Direct Dialing, you are able to directly save a contact to your Home screen.
1. Press > >
2. Tap a contact from your Contacts List. The contact will appear on your home screen.
To use Direct Dial:
●
Simply tap the contact on the Home screen.
Plus (+) Code Dialing
When placing international calls, Plus Code Dialing automatically enters the international access code
for your location (for example, 011 for international calls made from the U.S.).
1. In the Dial screen, touch and hold until you see a “+” on the display screen.
2. Dial the country code and phone number, and then tap . (The phone automatically prepends the
access code for international dialing, followed by the country code and phone number.)
Answering Calls
When you receive a phone call, the Incoming Call screen opens with the caller ID and any other available
information (such as the caller's name, if saved in the Contact’s list). The most recent incoming calls are
recorded in the Call log.
To answer a call:
●
Touch and drag to the right.
If you were already on a call, the first call is placed on hold while you answer the new call. To silence the
ringer of an incoming call, press the down Volume Key.
Add>Shortcuts>Direct dial
.
51
Page 54

Phone
Your phone notifies you of incoming calls in the following ways:
●
The phone rings or vibrates.
●
The backlight illuminates.
●
The screen displays an incoming call message.
To decline a call and divert it to voicemail:
●
Touch and drag to the left.
The caller is sent directly to your voicemail box to leave a message.
Note
When your phone is off, calls go directly to voicemail
Ending a Call
When you have finished the conversation, please make sure to tap .
– or –
If you opened other applications while on a call:
1. Open the Notifications Panel.
●
Touch and drag the Status Bar to the bottom of the screen.
2. Tap
Current call
3. Tap .
to redisplay the
Phone
application.
52
Page 55

Phone
Call Log
The Call log tab of the Phone application lists all recent incoming, outgoing, and missed calls.
Viewing the Call log
The Call log is a list of the most recently placed, received, or missed calls. It offers a convenient way to
redial a number, return a call, or add a number to your Contacts.
To open the Call log:
●
Press > >
Calls are listed in the Call log tab, the most recent calls are located at the top of the list. Scroll down to
see older entries.
Note
Call log records only calls that occur while the device is turned on. If a call is received while your device is turned
off, it will not be included in the call log. If you return a call from the voicemail menu, it will not be included in your
phone’s Call log.
Call Log Options
Tap an entry to view the date and time of the call and call duration. The following options are available:
●
Call again
●
Send text message
●
Add to contacts
If several calls were made to one number or received by one number, the calls are displayed as one entry.
When you tap this entry, the individual call logs are opened.
to make a call.
Call log
.
to send a text message.
to add an entry's number to your Contacts.
53
Page 56

Phone
Tap to view specific call logs.
Tap to call back.
Tap and hold an entry for more options.
You can also touch and hold the entry to open a menu with more options, to communicate with that
contact in other ways.
●
Call
to make a call.
●
View contact
●
Edit number before call
●
Send text message
●
Add to contacts
●
Remove from call log
Making a Call From the Call Log
●
From the Call log, tap the at the right of the entry.
Saving a Number From the Call Log
1. Tap an entry and tap
– or –
Touch and hold an entry and tap
(for entries saved in Contacts) to view contact information.
to edit a number before you redial.
to send a text message.
to add an entry's number to your Contacts.
to remove the entry from the Call log.
Add to contacts
.
Add to contacts
.
54
Page 57

Phone
2. Tap
Create new contact
– or –
Search for an existing contact name and tap an existing contact to add the new number to that
existing contact.
(For more information about creating and editing contacts, see Contacts on page 77.)
.
Note
You cannot save phone numbers already in your Contacts or from calls identified as No ID or Restricted.
Prepending a Number From the Call Log
If you need to make a call from the Call log and you are outside your local area code, you can add the
appropriate prefix by prepending the number.
1. Touch and hold an entry and tap
2. Tap the area immediately to the left of the phone number and enter the prefix.
3. Tap to call the number.
– or –
Press >
Add to contacts
Edit number before call
to save the amended number in your Contacts.
Clearing the Call Log
1. From the Call log, press >
2. If you are certain you want to clear the Call log, tap OK.
– or –
Cancel
Tap
.
Clear call log.
.
55
Page 58

Phone
Saving a Phone Number
You can store phone numbers and contact entries in your phone. You can also synchronize them with your
TM
Google
Account, Microsoft Exchange account, or other accounts that support syncing contacts. (For more
information, see Contacts on page 77.)
To save a number from standby mode:
1. Press > .
2. Enter a phone number, press and tap
3. Tap
Create new contact
– or –
Search for an existing contact name and tap an existing contact to add the new number to that
existing contact.
For more information about creating and editing contacts, see Contacts on page 77.
.
Add to contacts
.
Finding a Phone Number
Your contacts are displayed alphabetically in a list. It is easy to search for a contact by name.
1. Press > >
– or –
Press > .
2. Start entering the name of the contact you’re searching for. As you type, contacts with matching
names will appear above the keyboard.
3. Tap a matching contact in the list to open its entry. To dial a number, tap .
Contacts
> .
56
Page 59

Device Settings
Wireless & networks settings
This group of settings lets you control your device's Wi-Fi settings, Bluetooth, VPN, and Mobile
networks.
Airplane mode
Airplane mode (Flight mode) allows you to use many of your device’s features, such as Games and
Music, when you are in an airplane or in any other area where making or receiving calls or data is
prohibited. When you set your device to Airplane mode, it cannot send or receive any calls or access
online data.
1. Press and hold to reveal the Phone options.
Airplane mode
2. Tap
– or –
1. Press > >
2. Tap
Airplane mode
will display .
To deactivate Airplane Mode:
1. Press and hold to reveal the Phone options.
2. Tap
Airplane mode.
– or –
1. Press > >
Airplane mode
2. Tap
.
Settings>Wireless & networks.
. (A green checkmark appears.) While in Airplane Mode, your device’s Status Bar
Settings>Wireless & networks
to remove the checkmark.
.
57
Page 60

Device Settings
Wi-Fi settings
For details on your device’s Wi-Fi features and settings, see Connecting to Wi-Fi Networks on page 132.
Bluetooth settings
Your device’s Bluetooth capabilities let you use wireless headsets, send and receive pictures and files, and more.
For details on your device’s Bluetooth settings, see The Bluetooth Settings Menu on page 170.
VPN settings
From your device, you can add, set up, and manage virtual private networks (VPNs) that allow you to
connect and access resources inside a secured local network, such as your corporate network. For details
on your device's VPN settings, see Virtual Private Networks (VPN) on page 135.
Mobile networks settings
You can set whether to enable or disable data access on your device.
1. Press > >
Data enabled
2. Tap
Call settings
Your device's Call settings menu lets you configure International call options and TTY mode.
North American Dialing
Replace + code as needed for outgoing calls.
1. Press > >
2. Tap
North American Dialing
Settings>Wireless & networks>Mobile networks
to check or uncheck it.
Settings>Call settings
to check or uncheck it.
.
.
58
Page 61

Device Settings
International Dialing
Set the international dialing code for outgoing calls.
1. Press > >
2. Enter the international dialing code and tap
Note
North American Dialing has to be disabled for International Dialing to be active.
TTY mode
A TTY (also known as a TDD or Text Telephone) is a telecommunications device that allows people who
are deaf, hard of hearing, or who have speech or language disabilities, to communicate by telephone.
Your device is compatible with select TTY devices. Please check with the manufacturer of your TTY
device to ensure that it is compatible with digital cell phones. Your phone and TTY device will connect
via a special cable that plugs into your device's headset jack. If this cable was not provided with your
TTY device, contact your TTY device manufacturer to purchase the connector cable.
To turn TTY Mode on or off:
1. Press > >
2. Tap
TTY Off
Settings>Call settings>International Dialing
OK
.
Settings>Call settings>TTY mode
to turn TTY mode off or tap
TTY Full,TTY HCO
.
or
TTY VCO
.
.
59
Page 62

Device Settings
Sound settings
In the Sound settings menu, you can configure call and notification ringtones, audio volumes, as well as
some related settings.
Ringer Types
The Phone ringtone alerts you of incoming calls.
Selecting Ringtones for Voice Calls
1. Press > >
2. Tap a ringtone to select it and to hear it. If you want to set the ringtone, tap
another ringtone or tap
Using a Song as a Ringtone
You can use a song as your phone ringtone, in place of one of the ringtones that come with the phone.
1. Press > >
2. Touch and hold a song in your collection. In the pop-up menu, tap
– or –
On the Playback screen, press >
For details about using the Music application, see Music on page 124.
Settings>Sound>Phone ringtone
Cancel
.
Music
.
Use as ringtone
.
OK
. If not, select
Use as phone ringtone
.
.
60
Page 63

Device Settings
Adjusting the Device's Volume Settings
Adjust your device's volume settings to suit your needs and your environment.
1. Press > >
2. Adjust each volume level.
●
Ringtone
: Changes the volume of your call ringtones and notifications (if applicable).
●
Media
: Changes the volume of your music, videos and other media.
●
Alarm
: Changes the volume of your alarms.
●
Notification
this volume level. This is the volume of the ringtone when you receive a notification.
OK
3. Tap
.
Tip
You can adjust the ringer volume on the Home screen or Applications screen, or almost any screen by using the Volume Key
on the left side of your device. In other applications such as Music, YouTube, spoken directions, and other audio, Volume
Keys control the volume of the application.
Vibrate and Silent Mode
To set your device to vibrate instead of making any sounds:
1. Press > >
2. Tap one of the four options.
To set your device to always vibrate:
Settings>Sound>Volume
.
: If you deselect the checkmark (below the Alarm volume bar), you will be able to set
Settings>Sound>Vibrate
.
61
Page 64

Device Settings
1. Press > >
2. Tap
Always
.
To switch to silent mode:
1. Press > >
Silent mode
2. Tap
– or –
Press the down volume button until you see on the screen.
– or –
On the default lock screen, drag to the left.
Settings>Sound>Vibrate
Settings>Sound
. (A green checkmark will appear.)
.
.
Selecting a Notification Ringtone
When you receive a notification, such as the arrival of new messages, calendar events, or alarms, the
device sounds a ringtone.
1. Press > >
Settings>Sound>Notification ringtone
.
62
Page 65

Device Settings
2. Tap a ringtone to select it and to hear it. If you want to set the ringtone, tap OK. If not, select
another ringtone or tap
Setting Various Feedback Tones
To hear tones when you use the dial pad to dial a number:
1. Press > >
2. Tap
Audible touch
To hear sound when you tap buttons, icons, and other on-screen items:
1. Press > >
2. Tap
Audible selection
To hear sound when the screen is locked or unlocked:
1. Press > >
2. Tap
Screen lock sounds
To set your device to vibrate when touching buttons and keys:
1. Press > >
2. Tap
Haptic feedback
To set how the phone reacts when you make an emergency call:
1. Press > >
Emergency tone
2. Tap
3. Tap
Off,Alert
, or
Cancel
.
Settings>Sound
tones. (A green checkmark will appear.)
Settings>Sound
. (A green checkmark will appear.)
Settings>Sound
. (A green checkmark will appear.)
Settings>Sound
. (A green checkmark will appear.)
Settings>Sound
.
Vibrate
.
.
.
.
.
.
63
Page 66

Device Settings
Display Settings
Adjusting your device's display settings not only helps you see what you want, it can also help increase
battery life.
Changing the Backlight Time Length
Select how long the display screen remains backlit after touch the screen or press a key before the
screen darkens.
1. Press > >
2. Tap
15 seconds, 30 seconds, 1 minute, 2 minutes, 10 minutes, or 30 minutes
Settings>Display>Screen timeout
Note
Long backlight settings reduce the battery’s talk and standby times. For the best battery performance, use the shortest
convenient timeout.
Changing the Contrast
Adjust your screen’s contrast (brightness) to suit your surroundings.
1. Press > >
2. Use the slider to set a brightness level and tap
Settings>Display>Brightness
OK
Note
For the best battery performance, use the dimmer levels.
Display Language
You can choose to display your device's on-screen menus in another language.
.
.
.
.
64
Page 67

Device Settings
1. Press > >
2. Tap
English, Spanish, Korean, Simplified Chinese, or Traditional Chinese.
Settings>Language & keyboard>Select language
.
Setting the Device Automatically to Rotate the Screen
Choose whether the device automatically switches the orientation of the screen as you turn it sideways or
even upside down.
1. Press > >
Auto-rotate screen
2. Tap
– or –
To disable this, tap
Settings>Display
to automatically rotate the screen (a green checkmark will appear).
Auto-rotate screen
.
so that the checkmark is removed.
Note
Some applications on your device do not support the Auto-rotate feature.
Date & time settings
Set your preferences for how dates and time are displayed.
1. Press > >
2. Tap
Use 24-hour format
than 1:00 pm.
Select date format
3. Tap
Settings>Date & time
to display the time using 24-hour time format—for example, 13:00 rather
to open a dialog to select the format for displaying dates.
.
65
Page 68

Device Settings
Animation Options
Choose whether you want to enjoy animated transitions for some effects (such as when opening
menus), for all supported effects (such as when navigating from one screen to another), or to remove all
animated transitions (this setting does not affect transitions in non-native applications).
1. Press > >
2. Tap
No animations,Some animations
Settings>Display>Animation
, or
All animations.
.
Location & security settings
Your Location & security settings menu lets you select how your device determines its location (using
the wireless network, GPS satellites, both, or neither, set device security, lock codes, passwords,
administrator settings, and more.
The Location feature allows the network to detect your position. Turning Location off will hide your location
from everyone except 911.
Note
Turning Location on will allow the network to detect your position using GPS technology making some applications and
services easier to use. Turning Location off will disable the GPS location function for all purposes except 911, but will
not hide your general location based on the cell site serving your call. No application or service may use your location
without your request or permission. GPS-enhanced 911 is not available in all areas.
66
Page 69

Device Settings
Using Wireless Networks
You can use information from Wi-Fi and your service provider's networks to determine your approximate
location, for use in GPS applications, when you search, and so on. To use information about your location
when navigating and searching in GPS applications (see GPS Navigation on page 127) you must turn on
location services.
1. Press > >
Use wireless networks
2. Tap
3. When you check this option, you’re asked whether you consent to sharing your location anonymously with
Google’s location service.
4. Read the disclaimer and tap
Using GPS Satellites
You can use your device's global positioning system (GPS) satellite receiver to pinpoint your location to
within accuracy as close as several meters (“street level”). Actual GPS accuracy depends on a clear view
of the sky and other factors.
1. Press > >
Use GPS satellites
2. Tap
Note
Uncheck this option when you do not use Maps to conserve battery.
Settings>Location & security
. (A green checkmark will appear.)
Agree
.
Settings>Location & security
. (A green checkmark will appear.)
.
.
67
Page 70

Device Settings
Your Device's Lock Feature
Locking Your Device
Press . Locking the screen prevents accidental screen touches from activating phone functions.
Unlocking Your Device
1. Press to wake up the phone. (See Wake Up the Screen on page 12).
2. On your lock screen, touch and drag the green Unlock icon to the right.
●
If you have set up an Unlock Pattern (see Your Device's Lock Feature on this page), use your
fingertip to draw the pattern.
68
Page 71

Device Settings
●
If you have set up PIN or Password, enter the PIN or Password. After entering it, tap . The
last screen you were working on opens.
Note
You have five opportunities to enter your unlock Pattern, PIN or Password. If you've entered the wrong information five
times, you must wait 30 seconds before you can attempt again.
If you cannot remember your Pattern, PIN, or Password, try the following actions:
●
If you’ve set up a Google account on the device, tap the Forgot pattern? button. You will be able to unlock the device
with your Google account username and password.
●
If you haven’t created a Google account on the device, you must perform a factory reset. (CAUTION! If you perform a
factory reset, all user applications and user data will be deleted. Please remember to back up any important data
before performing a factory reset.)
When you can’t recall your unlock Pattern, PIN or Password:
1. Turn the power off.
2. Press and hold the following keys for over 10 seconds: Down Volume Key + + .
3. You will enter the Android system recovery mode.
4. Press the down Volume Key to scroll to
5. Press the down Volume Key to scroll to
6. After the data wipe is complete, press the down Volume Key to scroll to
press to select it.
wipe data/factory reset
Yes -- delete all user data
and press to select it.
and press to select it.
reboot system now
and
69
Page 72

Device Settings
Your Device's Unlock Pattern, Pin, or Password Feature
You can increase your device’s security by creating a screen unlock pattern (disabled by default), by
creating a PIN, or by choosing a Password. When these features are enabled, you must draw the correct
unlock Pattern, enter the PIN, or enter the Password on the screen to unlock and regain access to the
device.
Your Device's Lock Feature
1. Press > >
2. Tap
Set up screen lock
3. Select
Pattern,PIN,
●
Pattern
: The first time you set unlock pattern, you will see a tutorial with instructions on how to
create it. Read the tutorial and tap
your pattern and tap
●
PIN
: Enter a PIN (at least of four digits) and tap
●
Password
: Enter a Password (at least of four characters) and tap
Password and tap
70
Settings>Location & security
.
or
Password
.
Next
(twice). Draw your pattern and tap
Confirm
. (Connect at least four dots.)
OK.
.
Continue
. Then re-enter your PIN and tap OK.
Continue
. Then re-enter your
Continue
. Then redraw
Page 73

Device Settings
From then on, any time you wish to turn the phone on or unlock the screen, you must draw your unlock
pattern or enter the PIN or Password to unlock the screen.
Changing the Lock Code
1. Press > >
2. Confirm the saved Pattern, or your PIN or Password.
3. Select
Pattern,PIN,
To disable your device's lock feature:
1. Press > >
2. Enter the PIN, Password, or Pattern.
None
3. Tap
.
Calling in Lock Mode
Even if the screen is locked, you will still be able to place emergency calls.
●
To call an emergency number, tap the
.
Silence Your Device from the Lock Screen
If you are in a place where your device's sounds may disturb others, you can quickly silence your device
from the lock screen.
●
Drag to the left. To turn the phone sounds back on, drag to the left.
Settings>Location&security>Change screen lock
or
Password
.
Settings>Location & security>Change screen lock
Emergency call
button, enter the phone number and tap
.
.
71
Page 74

Device Settings
Credential Storage Settings
You use credential storage to establish some kinds of VPN and Wi-Fi connections.
To allow applications to access your device's encrypted store of secure certificates and related
passwords and other credentials:
1. Press > >
Use secure credentials
2. Tap
To install a secure certificate from a microSD card:
1. Press > >
2. Tap the file name of the certificate to install. Only the names of certificates that you have not already
installed on your device are displayed.
3. If prompted, enter the certificate's password and tap
4. Enter a name for the certificate and tap
connecting to a secure network. For security purposes, the certificate will be deleted from the
microSD card.
●
If you have not already set a password for your device’s credential storage, you will be prompted
to enter a password for it, twice, then tap
To set or change the password for your secure credential storage:
1. Press > >
2. Enter the current password, a new password, and confirm the new password. (Please note that your
password must have at least 8 characters.)
Settings>Location & security
. (A green checkmark will appear.)
Settings>Location & security >Install from SD card
OK
Settings>Location & security > Set password
.
.
OK
.
. You can now use the certificate that you installed when
OK
.
.
72
Page 75

Device Settings
To delete all secure certificates and related credentials and reset its password:
1. Press >
2. Tap
OK
Settings>Location & security>Clear storage
in the confirmation dialog box.
.
Accounts Settings
The Accounts settings menu lets you add and manage all your email, social networking, and picture and
video sharing accounts.
Accounts
You can add multiple Google™ Accounts and Exchange accounts. You may also be able to add other
kinds of accounts, depending on the applications downloaded and installed on your device.
When you add an account, the Contacts application compares any new contacts with your existing
contacts and will join contact entries if matches are found. This does not join the contact entries on the
accounts themselves; they are only displayed as a single contact on your device.
(See Configuring Account Sync and Display Options on page 75 to learn how to separate contact
information that was joined incorrectly.)
To add an account:
Note
To add some accounts, you must contact a network administrator for account setup information. For example, you may
need to know the account’s domain or server address.
1. Press > >
your current sync settings and accounts. (For more information, see Configuring Account Sync and
Display Options on page 75).
Settings>Accounts&sync.
The Accounts & sync settings screen displays
73
Page 76

Device Settings
2. Tap
Add account.
3. Tap the type of account you want to add.
4. Follow the on-screen steps to enter the required (and optional) account information.
Note
Many accounts require only a user name and password, but some accounts will require more information.
5. Configure the account.
Depending on the kind of account, you may be asked to configure the types of data you want to sync to
the device, name of the account, and other details. When you're finished, the account will be added to
the list in the Accounts & sync settings screen.
Removing an Account
You can remove an account to delete all information associated with it from your device, including email,
contacts, settings, etc.
Some accounts cannot be removed, such the first Google Account you set up on the device. That
account can only be removed by resetting your device entirely.
To remove an account:
1. Press > >
2. Tap the account you want to delete.
Remove account
3. Tap
Remove account
4. Tap
Settings>Accounts & sync
.
again to confirm that you want to remove the account.
.
74
Page 77

Device Settings
Configuring Account Sync and Display Options
You can configure background data and synchronization options for the applications on your device. You can also
configure synchronization options for each individual account. Some applications, such as Gmail
their own synchronization settings. Some applications, such as Contacts and Gmail, can sync data for multiple accounts.
Others, such as Calendar, sync data only from the first Google Account you set up with your device, or from an account
associated specifically with that application.
For some accounts, syncing is two-directional; changes that you make to the information on your device are
synchronized with the accounts on the Web or computer. Your Google Account synchronizes in a twodirectional manner. Other accounts support only one-way sync; the information changed on your phone is
only changed on your phone.
To configure general sync settings:
1. Press >
●
Settings>Accounts & sync.
Indicates that some, or all, of an account’s information is configured to sync automatically
with your device.
●
Indicates that none of an account’s information is configured to sync automatically with your
device.
Background data
2. Tap
to enable or disable whether applications can use your data connection to
synchronize data while the applications run in the background.
TM and Calendar, have
75
Page 78

Device Settings
If you disable this option, the Gmail and Calendar applications will not automatically receive updates
until they are manually refreshed (using their respective options menu).
3. Tap
Auto-sync
the web are automatically synced with each other.
●
For example, when this option is enabled, changes that you make in the Contacts application on
your device are automatically made to your web-based Google Contacts
●
If you uncheck this option, you may be able to use an application's tools to sync data manually.
(See To sync information manually in the section below).
To sync information manually:
1. Press > >
2. Tap the account whose data you want to sync.
3. Press >
To change an account’s sync settings:
1. Press > >
2. Tap the account whose data you want to change.
●
The Data and synchronization screen will open, displaying a list of the types of data the account
can sync.
3. Tap the items you want to sync. (A green checkmark indicates that synchronization has been
enabled.)
●
By disabling synchronization for an item, it will not remove the previously synchronized data from
your device, it will simply stop future synching. To remove the information previously synced for
the account, you must remove the account.
76
to enable or disable whether changes you make to information on the device or on
™
.
Settings>Accounts & sync
Sync now
.
Settings>Accounts & sync
.
.
Page 79

Contacts
The Contacts application lets you store and manage contacts from a variety of sources, including
contacts you enter and save directly in your device as well as contacts synchronized with your Google
account, your PC, compatible email programs (including Exchange Server), and your Facebook friends.
Use the Contacts application to add, view, and communicate with your family, friends and
acquaintances.
To open your Contacts application:
●
Press > >
All of your contacts are displayed alphabetically in a list. If you have a new phone and haven't added any
contacts yet, the Contacts application will display hints on how to start adding contacts to your phone.
Creating a New Contacts Entry
You can add contacts on your phone and synchronize them with the contacts in your Google™
Account, Microsoft Exchange account, or other accounts that support syncing contacts.
The Contacts application tries to join new addresses with existing contacts, to create a single entry. You
can also manage that process manually.
1. Press > >
2. Press >
3. Tap a destination type (
4. Tap the Picture Frame icon to select a picture to display next to the name in your list of contacts and
in the Caller ID.
5. Tap the
6. Tap the label button (to the left of the Phone number field) to select one of the following categories:
First name
Mobile, Home, Work, Work Fax, Home Fax, Pager, or any other available options.
Contacts
.
Contacts
.
New contact
.
Phone, Google, or Corporate
and
Last name
), if applicable.
fields, and enter a name for the new entry.
77
Page 80

Contacts
7. Tap a phone number field and enter a phone number. Tap
More
to input additional contact information.
8. When you're finished, tap
Done
.
Email, postal address, Organization,
or
Adding a Contact to Your Favorites
Favorites contains a short list of the contacts you communicate with most often.
To add a contact to your favorites:
1. Press > >
2. Tap a contact entry to view its details.
3. Tap the star to the right of the contact's name. (A gold star appears.)
To remove a contact from your favorites list:
1. Press > >
2. Tap a contact entry to view its details.
3. Tap the gold star to the right of the contact's name. The star will turn gray, meaning it has been
removed from your Favorites.
Contacts
Favorites
.
.
Editing a Contacts Entry
You can change or add details saved in your contact entries, such as setting specific ringtones to
specific contacts or setting calls from specific contacts to divert to your voicemail. Some contact entries
contain information from multiple sources: information that you added manually, information joined from
multiple accounts to consolidate duplicates, etc.
78
Page 81

Contacts
If you find duplicate entries in Contacts, you can join them into a single entry. If you find that unrelated
contacts were joined in error, you can separate them.
Changes made to information from one source do not automatically change the information on the
other sources. For example, if you have information about a contact from a Google Account and an
Exchange account and both are configured to sync contacts, changes to the contact from the Google
Account are synced to that account on the Web, but the information from the Exchange account will
remain unchanged.
For more information about working with multiple accounts, see Accounts on page 73.
To edit contact details:
1. Press > >
2. Touch and hold the contact whose details you want to edit.
3. Tap
Edit contact
4. Edit the desired contact information.
Done
5. Tap
To change a contact’s default phone number:
The default phone number is used when you initiate a call or send a text message using the context
menu (by touching and holding a contact).
1. Press > >
2. Tap the name of a contact to view its details.
3. Touch and hold the phone number you want to set as the contact's default phone number.
4. Tap
.
Make default number
Contacts
.
.
Contacts
.
. (A checkmark will appear next to the default phone number.)
79
Page 82

Contacts
To divert calls from a contact to your voicemail:
1. Press > >
2. Tap the name of a contact to view its details.
3. Press >
4. Tap
Incoming Calls
5. Press .
When this contact calls you, your phone will not ring and the caller will be forwarded directly to your
voicemail.
To set a ringtone for a contact:
1. Press > >
2. Tap the name of a contact to view its details.
3. Press >
4. Tap
Ringtone
OK
5. Tap
To delete a contact:
1. Press > >
2. Tap the name of a contact.
3. Press >
.
Contacts
.
Options
.
. (A green checkmark will appear.)
Contacts
.
Options
.
and tap a ringtone to select it.
Contacts
.
Delete contact
.
80
Page 83

Contacts
●
If the contact contains information from a read-only account, you will not be able to delete it; you
will only be able to change the sync settings for that account or delete the account itself.
●
If the contact contains information joined from a read-only account, a dialog box will inform you that you
must separate the contact entry into individual contacts to delete the contact.
4. Tap
OK
to confirm that you want to delete the contact.
Adding a Number to a Contacts Entry
1. Press > >
2. Touch and hold the contact's entry.
Edit contact
3. Tap
4. Tap the Phone category’s plus button.
5. Tap the label button to the left of the phone number field and select the relevant label.
●
To create your own label, tap
6. Enter a phone number and tap
Contacts
.
in the menu that opens.
Custom
Done
.
.
Editing a Contacts Entry’s Numbers
1. Press > >
2. Touch and hold a contact's entry.
Edit contact
3. Tap
4. Tap a phone number to edit.
5. Re-enter or edit the number and tap
.
Contacts
.
Done
.
81
Page 84

Contacts
Assigning Direct Dialing Numbers
Speed dialing, as available in other feature phones, is not available. However, you are able to directly save a
contact to your Home screen.
To set a contact as Direct dial:
1. Press > >
2. Tap a contact from your Contact List. The contact will be shown on the Home screen.
Note
If there is no available space on a particular Home screen pane, Add will not be available; you must delete or remove an
item before you can add another item. In this case, you have the option of switching to another Home screen pane.
Direct Dial
Simply tap the contact on the Home screen.
Selecting a Ringtone for an Entry
Assign a ringtone to a Contacts entry so you can identify the caller by the ringtone. (See Ringer Types
on page 60).
1. Press > >
2. Tap the name of a contact to view its details.
3. Press >
Ringtone
4. Tap
OK
5. Tap
.
Add>Shortcuts>Direct dial
Contacts
.
Options
.
and tap a ringtone to select it.
.
82
Page 85

Contacts
Assigning a Picture to an Entry
Assign a picture to display each time a certain contact calls you.
Contacts
Contacts
.
to select a picture from the Gallery.
.
Save
.
1. Press > >
2. Touch and hold the contact's entry.
3. Tap
Edit contact
4. Tap the Picture Frame icon.
5. Tap
Take photo
– or –
Select photo from Gallery
Tap
6. After cropping the picture as you want, (see Gallery Options on page 152) tap
.
to take a new picture. The camera will launch.
Finding Contacts Entries
Finding Contacts by Name
1. Press > >
2. Press .
3. Start entering the name of the contact you’re searching for. As you type, contacts with matching
names will appear below the search box.
4. Tap a matching contact in the list to open its entry.
83
Page 86

Contacts
Selecting which Contacts are Displayed
You can hide contacts that don't have phone numbers. You can also configure which groups of contacts
you want to display in the Contacts List.
To set whether contacts without phone numbers are displayed:
Shortcut
From the Home screen, press to display the Search feature.
1. Press > >
2. Press >
3. Tap
Only contacts with phones
4. Tap
Done
.
Contacts
Display options
.
.
. (A green checkmark will appear.)
Communicating with Your Contacts
From the Contacts or Favorites tab, you can quickly call or send a text (SMS) or multimedia message
(MMS) to a contact's default phone number. You can also open a menu to access different methods of
communicating with that contact.
™
The Contacts application shares your contacts with many other applications, such as Gmail
on page 103) and messaging (see Accessing Text Messages on page 96).
84
(see Gmail
Page 87

Contacts
To connect by using Quick Contact for Android™:
1. Tap a contact's picture to open Quick Contact for Android.
Tap the icon that corresponds to the
method you want to communicate
with the contact.
Tap contact's picture.
2. Tap the icon corresponding to the type of communication you want to start.
Depending on the contact information saved, the available actions will be displayed above the name.
To communicate with a contact:
1. Press > >
2. Tap the contact's entry.
3. In the contact's details screen, tap the method you wish to communicate with the contact.
●
Tap next to the number you want to call to directly.
●
Tap next to the number you want to message.
●
Tap next to the email address you want to email.
Note
Anytime you see the green dial button next to a number, such as in your Favorites or Call log, just tap it to call
that number.
Contacts
.
85
Page 88

Contacts
To call a contact’s default number:
1. Press > >
2. Touch and hold the contact's entry.
3. Tap
Call contact
(For more information about placing phone calls, see Making Calls on page 45.)
To send a text or multimedia message to a contact’s default number:
1. Press > >
2. Touch and hold the contact's entry.
Text contact.
3. Tap
For more information about sending text and multimedia messages, see Text Messaging and MMS on
page 95.
.
Contacts
Contacts
.
.
Importing, Exporting, and Sharing Contacts
If you have contacts stored in vCard format on a microSD card you can import them into your Contacts
application on your device. You can also export contacts in vCard format onto a microSD card. Export your
contacts to back them up to a computer or another device.
Importing contacts from your microSD card
Note
See Connecting Your Device to Your Computer on page 178 for details about copying files to a microSD card from your computer.
1. Insert the microSD card (that contains the vCard files) into your device.
2. Press > >
Contacts
.
86
Page 89

Contacts
3. Press >
4. If you have more than one account on your phone, tap the account into which you want to import
the contacts.
5. Tap the importing option and then tap
Import/Export>Import from SD card
OK
.
.
Exporting contacts to your microSD card
You can export all of the contacts on your phone to your microSD card, as vCard files. You can then copy this file to a
computer or another device that is compatible with this format, such as an address book application. (See Connecting
Your Device to Your Computer on page 178).
Contacts
1. Press > >
2. Press >
3. Tap
4. Tap
Import/Export
Export to SD card
OK
to confirm your selection and to begin exporting your Contact List to the microSD card.
.
.
.
Sharing a contact
You can share a contact with someone by sending it to the person as a vCard file.
1. Press > >
2. Open the contact you want to share.
3. Press >
4. Choose the method for sending.
Share
Contacts
.
.
87
Page 90

Accounts and Messaging
Email
Your device's Email application lets you access and manage multiple email accounts simultaneously in
one convenient location.
Although there is a separate Gmail application, the main email application can manage both Internet
based email services (Gmail
be manually configured to connect to other email systems.
Note
If you multiple email accounts, you must configure each account with its own settings.
If you want to send and receive email messages through an ISP (Internet Service Provider) account
(such as Outlook), you will first need to set up an IMAP or POP account.
●
Internet Message Access Protocol(IMAP) – This mail retrieval protocol is frequently used in large
networks and commercial and institutional settings. IMAP4 is the current standard.
●
Post Office Protocol(POP) - This protocol is supported by most ISPs and is currently more
common among consumer applications. POP3 is the current standard.
Note
For more information, review your email carrier’s support documents or contact your IT administrator.
Email Icons/Shortcuts
- Email shortcut
- Gmail shortcut
Status Bar - Notifications
- New Email message received
- New Gmail message received
™
and Yahoo!™) and Corporate Work Email (Outlook®). The device can also
88
Page 91

Accounts and Messaging
Corporate Email (Outlook)
The main Email application also provides access to your Outlook Exchange server via your device. If your
company uses Microsoft Exchange Server 2003, 2007 and 2010 as the corporate email system, you can use
this email application to wirelessly synchronize your email, Contacts and directly with your company’s Exchange
server.
Important: This Outlook application does not utilize Microsoft® ActiveSync to synchronize the device to
your remote Exchange Server. This synchronization is done wirelessly over the air(OTA) and not via a direct
connection.
Setting Up a Corporate Email
1. Press > >
2. Press >
3. Press >
4. Enter your
Administrator for further details.
●
Email address
●
Password
Exchange
5. Tap
6. Enter a Domain\Username, Password, and Server information and tap Next.
●
Domain\Username
●
Password
Email
.
Accounts
.
Add account
Email address
.
and
Password
information, then tap
Next
: Your Outlook work email address.
: Typically your network access password (case-sensitive).
(from the add new email account screen).
: Enter your network domain\login username.
: Typically your network access password (Case-sensitive).
. Consult your Network
89
Page 92

Accounts and Messaging
●
Server
: Your exchange server remote email address. Typically starts with mail.XXX.com. Obtain this
information from your company network administrator.
●
If your network requires SSL encryption, tap the
checkmark and activate this additional level of security.
●
If your exchange server requires this feature, leaving this field unchecked can prevent connection.
Note
Signal interruptions or incorrect username or password information can cause completion issues.
7. Read the on-screen activation disclaimer and, if prompted, tap
8. Configure your
Inbox checking frequency, Period to synchronize
device and server), and activate any other email settings, then tap
9. Identify your new account with a unique name and provide the outgoing name, then tap
Important: You can synchronize over the air (not directly) with an Exchange Server running Microsoft
Exchange Server 2003 Service Pack 2 (SP2) or Microsoft Exchange Server 2010.
Note
You can have multiple Work Email (Microsoft Exchange) accounts active on your device.
Opening Corporate Email
1. Press > >
Email
.
2. Tap a message to read, manage, or reply to.
●
From your Inbox screen, press to select options, such as
or
Accounts,
Account settings
.
Use secure connection (SSL)
Next
.
(days to synchronize between your
Next
.
Refresh, Compose, Folders,
box to place a
Done
.
90
Page 93

Accounts and Messaging
●
While in a message, press to select messaging options, such as
Reply all,
Mark as unread
.
or
Create and Send Email
1. From the Inbox, press >
Compose
.
2. Enter the recipient’s email address in the To field.
●
If you are sending the email to several recipients, separate the email addresses with a comma.
●
You can add as many message recipients as you want.
Subject
3. Tap the
4. Tap the
●
To add a picture attachment, press >
field and enter the email subject.
Body field
and compose your email.
Add attachment
Note
To send an additional carbon copy (Cc) or a blind carbon copy (Bcc) of the current email to other recipients, press
>
Add Cc/Bcc
●
You can access
●
Tap the file you wish to attach.
5. Tap
Send
.
Gallery
and navigate to the file you wish to attach.
to send the email.
Delete, Forward, Reply,
.
91
Page 94

Accounts and Messaging
To reply to an email message:
1. From the Inbox, tap an email message to view it.
2. With the email message displayed, tap either
– or –
With the email message displayed, press and tap either
●
If you select
3. Enter a new message body and tap
To delete an email message:
Touch and hold an email (from your Inbox list) and tap Delete from the pop-up context menu.
– or –
With the email message displayed, tap
Forward
, you must specify the message’s recipients.
Send
Configuring Corporate Email Settings
Account Settings: Allow you to configure various settings for your account.
1. Press > >
2. Tap the Corporate account to reveal the account’s synchronization settings screen.
3. Place a checkmark next to each option if you want the device to automatically synchronize. If you
want to manually synchronize, press >
To configure Corporate Email settings:
1. Press > >
Settings>Accounts & sync
Settings>Accounts & sync
Delete
.
.
Reply
.
Sync now
.
or
Reply all
.
.
Reply
or
Reply all
.
92
Page 95

Accounts and Messaging
2. Tap the Corporate account field to reveal the account’s synchronization settings screen.
3. Tap
Account settings.
●
Account name
●
Your name
●
Signature
●
Period to synchronize email
synchronize. Choose from
●
Period to synchronize calendar
server should synchronize. Choose from
●
Email check frequency
new email changes. Choose from
Every hour, Every 2 hour, or Every 4 hour.
●
Inbox Sort by
●
Roaming
●
Default account
●
Ask before deleting:
●
Email notifications
●
Select ringtone
●
Vibrate
●
Incoming settings
●
Sync contacts:
checkmark indicates the feature is enabled.
: Displays the name used by the device to track the account.
: Displays the name that recipients view when receiving email from you.
: To add a signature or other information to outgoing email.
: Configures how many days worth of emails the device and server should
One day,Three days, One week, Two weeks, or All
.
: Configures how many days worth of calendar the device and
Two weeks,One month,Three month,Six month
: Configures the frequency which the device queries the remote server for
Automatic (Push), Never, Every 15 minutes, Every 30 minutes,
: Set the sort order of Inbox. Choose from Date, Subject, Sender, or Size.
: Allows you to automatically receive messages while roaming.
: Assigns this account as the default account used when sending out new emails.
When mail is going to delete the first asks whether to delete.
: Allows the phone to notify you when you receive new emails.
: Allows you to assign a ringtone to notify you of new email.
: Allows you to set the phone to vibrate when new email is received.
: Allows you to view and modify your incoming server settings.
Synchronizes the contacts between your device and the remote exchange server. A
, or
All
93
Page 96

Accounts and Messaging
●
Sync calendar
exchange server. A check mark indicates the feature is enabled.
●
Out Of Office
4. Press to return to the previous screen.
For more detailed Corporate email information, see Corporate Email (Outlook) on page 89. For more
information on Corporate Calendar synchronizing, see Synchronizing Your Corporate Account on page 119.
To create a Corporate Email Signature:
This signature can differ from any current Email signature on your local Outlook client. This signature is
applied to any outgoing emails originating on your device.
1. Press > >
2. Tap the Corporate account to reveal the account’s synchronization settings screen.
Account settings.
3. Tap
4. Tap
Signature
5. Delete the current default text and enter your new email signature.
6. Tap
OK
Configuring Data Synchronization Settings
This feature allows you to determine which current applications are synchronized with the external
server and at what intervals.
1. Press > >
please refer to your current data plan for more details.
: Synchronizes your exchange calendar entries between your device and the remote
: Allows you to configure your Out Of Office settings.
Settings>Accounts & sync
.
.
to store the new signature.
Settings>Accounts & sync
. These settings can affect data minute usage,
94
Page 97

Accounts and Messaging
2. Tap any of the following options:
●
Background data
affect any current use of the device.
●
Auto-sync
selected applications.
3. Press to store your changes and return to the Home screen.
: Allows data synchronization to occur as a background function and does not
: Requires the device to maintain synchronized with the remote server providing data to your
Text Messaging
With text messaging (SMS), you can send and receive instant text messages between your wireless phone and another
messaging-ready phone. When you receive a new message, you will be notified by your device.
Messaging is available via the Messaging application in your Applications screen. The icon appears in
Status Bar when a new text message is received.
Note
See your service plan for applicable charges for text messaging and MMS .
Composing Text Messages
1. Press > >
To
2. Tap the
keyboard.
●
field and enter the recipient’s phone number or email information using the on-screen
Contacts
current contact’s entry information, you will see a match. When you see a match, tap the
associated name to complete the addressing.
Messaging>New message
As you enter either a phone number or email address, if the information matches a
.
95
Page 98

Accounts and Messaging
●
Mobile
Tap to use the keypad to enter a wireless phone number directly.
●
Email
You can also enter the recipient’s email address.
3. Tap a matching entry from the on-screen dropdown list. This list is populated by matches found from
your managed accounts.
4. Tap the text field and enter your message.
5. Insert an Emoticon or a Smiley.
●
To enter an emoticon, touch and hold on the on-screen keyboard.
●
To enter a smiley from the menu options, press >
to insert it into your current message.
●
Touch and hold to choose an emoticon.
6. Review your message and tap
Send
.
Accessing Text Messages
To read a text message:
When you receive a text message, your phone will notify you. You can access the message by:
●
Opening the Notifications Panel and tapping the text message notification.
●
Press > >
To reply to a text message:
1. While viewing a message, tap the text field.
Messaging
and select the new message.
Insert smiley
. Make a selection from the list
96
Page 99

Accounts and Messaging
2. Compose your reply or use the preset messages or icons.
●
To enter a message, use your on-screen keyboard. (See Entering Text on page 36).
3. Insert an emoticon or a Smiley.
●
To enter an emoticon, touch and hold on the on-screen keyboard.
●
To enter a smiley from the menu options, press >
list to insert it into the message.
●
Touch and hold to choose an emoticon.
4. You may select additional messaging options by pressing .
●
Options include:
Add subject, Attach, Send, Insert Smiley, Preset Message, Set priority, or More
[Delete thread, Preset Message, All threads, Add to Contacts]
5. Review your reply and tap
Send
.
Multimedia Messaging (MMS)
With multimedia messaging (MMS), you can send and receive instant multimedia messages that contain
text, pictures, audio, recorded voice, or a picture slideshow. Messaging is available via the Messaging
application in your Applications screen.
Note
See your service plan for applicable charges for multimedia messaging and MMS voice messaging.
Insert smiley
.
. Make a selection from the
97
Page 100

Accounts and Messaging
Composing MMS Messages
1. Press > >
2. Tap the
To
number or email address, matching contacts appear on-screen. Tap an available matching recipient or
continue entering the phone number or email address.
3. Tap the text field and enter your message.
4. Press >
5. Select a multimedia attachment type:
●
Pictures
: Opens the Gallery application. Use the on-screen navigation to select the picture you
wish to send with the outgoing message.
●
Capture picture
in your message. (See Taking Pictures on page 150).
●
Videos
: Opens the Gallery application. Use the on-screen navigation to select a video and attach it to your
outgoing message.
●
Capture video
in your message. (See Recording Videos on page 154).
●
Audio
: Opens a menu that allows you to choose between
Use the on-screen navigation with the
OK or record a new audio file using the
●
Record audio
●
Record Duration
Messaging>New message
.
field and enter the recipient’s phone number or email information. As you enter the phone
Attach
.
: Opens the Camera application. Take a picture, and then tap OK to use this image
: Opens the Camcorder application. Record a video, then tap OK to use this video
Select music track
Sound Recorder
Select music track
option to select an audio file and tap
option.
and
Sound Recorder
: Opens the message recorder.
: Displays the length of the recorded voice message.
.
98
 Loading...