

Page 1
User Guide
ENGLISH
MFL68264001 (1.0)
www.lg.com
Page 2

Page 3
User Guide
• Screen displays and illustrations may differ
from those you see on actual device.
• Some of the contents of this guide may
not apply to your device, depending on
the software and your service provider. All
information in this document is subject to
change without notice.
• This device is not suitable for people who
have a visual impairment due to the touch
screen keyboard.
• Copyright ©2014 LG Electronics, Inc. All
rights reserved. LG and the LG logo are
registered trademarks of LG Group and its
related entities. All other trademarks are
the property of their respective owners.
• Google™, Google Maps™, Gmail™,
YouTube™, Hangouts™ and Google Play™
are trademarks of Google, Inc.
ENGLISH
Page 4

Table of contents
About this user guide ......................... 5
About this user guide ........................... 5
Trademarks ............................................. 5
DivX HD .................................................. 6
Dolby Digital Plus .................................. 6
Important notice ................................. 7
Getting to know your device ............ 12
Tablet Overview .....................................12
Charging your tablet ............................14
Optimizing Battery Life .......................15
To extend the life of your battery .........15
To view the battery charge level ...........16
To monitor and control what uses
the battery .....................................................16
Inserting a microSD card .....................16
Removing the microSD card ...............17
Formatting the microSD card .............18
Locking and unlocking the screen......18
Your Home screen ............................. 19
Touch screen tips ..................................19
Tap or touch .................................................19
Touch and hold ...........................................19
Drag .................................................................19
Swipe or slide ............................................. 20
Double-tap .................................................. 20
Pinch-to-Zoom ......................................... 20
Rotate the screen .....................................20
KnockON .......................................................21
Home screen ........................................22
2
Customizing the Home screen .......... 23
Customizing app icons on the
Home screen ........................................23
Home screen clean view .....................25
Quick access ........................................25
Returning to recently-used
applications ..........................................26
Notifications .........................................26
Accessing notifications .......................... 26
Quick Settings on the Notifications
Panel ..............................................................27
To rearrange Quick Setting
options on the Notification Panel .......27
QSlide apps on the Notifications
Panel ..............................................................27
Using the QSlide apps ........................... 28
Notification icons on the Status
Bar .................................................................. 28
Multiple Users ......................................29
Slide Aside .............................................31
Plug & Pop ...........................................32
Capturing a Screenshot ......................32
Using QuickMemo to capture a
screenshot .................................................. 33
Using Capture plus to capture a
screenshot .................................................. 33
Entering Text.........................................33
Entering special characters .................. 34
Google account setup .......................35
Connecting to Networks and
Devices ...............................................36
Page 5

Wi-Fi .....................................................36
Connecting to Wi-Fi networks ............ 36
Turning Wi-Fi on and connecting
to a Wi-Fi network .................................... 36
Bluetooth ..............................................36
Turning on Bluetooth and pairing up
your tablet with a Bluetooth device ....37
Send data using the Bluetooth
feature ...........................................................38
Receive data using the Bluetooth
feature ...........................................................38
SmartShare ..........................................38
Enjoying the content via a variety of
devices ......................................................... 39
Playing/Sending ....................................... 39
Enjoying the content from Nearby
devices ..................................................39
Connecting devices ................................ 39
Searching other devices........................ 39
Using the content from the Cloud ....40
Using the Cloud ....................................... 40
PC connections with a USB cable .....40
Transferring music, photos and
videos using the USB mass
storage mode ............................................ 40
Synchronize with Windows Media
Player ..............................................................41
Contacts ............................................ 42
Searching for a contact ......................42
Adding a new contact .........................42
Favorite Contacts .................................42
Creating a group ..................................43
Email .................................................. 44
Managing an email account ...............44
Working with account folders ............45
Composing and sending email ..........45
Receiving emails ..................................45
Camera ...............................................46
Getting to know the viewfinder ..........46
Using the advanced settings .............. 47
Taking a photo ......................................48
Once you've taken a photo .................49
Viewing your saved photos .................50
Video camera ..................................... 51
Getting to know the viewfinder ...........51
Using the advanced settings ..............52
Recording a video ................................53
After recording a video .......................53
Watching your saved videos ...............54
Adjusting the volume when
viewing a video .....................................54
Multimedia .........................................55
Gallery ...................................................55
Viewing pictures ....................................... 55
Zooming in and out ................................ 56
Playing videos ............................................ 56
Deleting images and videos ................ 56
Setting as wallpaper ................................ 56
Slideshow .............................................. 57
Videos ...................................................57
Playing a video ........................................... 57
Music .....................................................58
Playing a song ........................................... 58
Tools .....................................................61
3
Page 6

QPair ......................................................61
QSlide ...................................................62
QuickMemo ..........................................64
QuickRemote .......................................66
QuickTranslator ....................................68
Voice Mate ............................................ 69
Alarm ..................................................... 70
Calculator ..............................................71
Calendar ................................................71
Tasks ...................................................... 72
File Manager ........................................ 73
Voice Recorder ..................................... 73
Task Manager ....................................... 74
POLARIS Office 5 .............................. 74
Google+.................................................75
Voice Search ......................................... 76
Downloads ............................................ 76
Box......................................................... 76
The Web .............................................77
Internet.................................................. 77
Opening a page ........................................ 77
Searching the web by voice..................78
Bookmarks ...................................................78
History ............................................................ 78
Using QSlide ...............................................78
Chrome ................................................. 78
Viewing web pages ..................................79
Opening a page ........................................79
Searching the web by voice..................79
Syncing with other devices ....................79
Adding and viewing bookmarks .........79
Chrome Options menu .........................80
Settings .............................................. 81
Access the Settings menu ..................81
WIRELESS NETWORKS .....................81
DEVICE .................................................84
PERSONAL ..........................................88
SYSTEM .................................................91
LG Backup ..........................................95
About backing up and restoring
device data ...........................................95
LG Backup your tablet data ................ 96
Scheduling automatic backups .........96
Restoring tablet data ..........................96
Tablet software update .....................98
Tablet software update .......................98
LG tablet software update via
Over-the-Air (OTA) ..............................98
Accessories ......................................100
Troubleshooting ................................101
For Your Safety ................................103
4
Page 7

About this user guide
About this user guide
•Before using your device, please carefully read this manual. This will ensure
that you use your device safely and correctly.
•Some of the images and screenshots provided in this guide may appear
differently on your tablet.
•Your content may differ from the final product, or from software supplied
by service providers or carriers, This content may be subject to change
without prior notice. For the latest version of this manual, please visit the
LG website at www.lg.com.
•Your device's applications and their functions may vary by country, region,
or hardware specifications. LG cannot be held liable for any performance
issues resulting from the use of applications developed by providers other
than LG.
•LG cannot be held liable for performance or incompatibility issues resulting
from edited registry settings being edited or operating system software
being modified. Any attempt to customize your operating system may
cause the device or its applications to not work as they should.
•Software, audio, wallpaper, images, and other media supplied with your
device are licensed for limited use. If you extract and use these materials
for commercial or other purposes is, you may be infringing copyright laws.
As a user, you are fully are entirely responsible for the illegal use of media.
•Additional charges may be applied for data services, such as messaging,
uploading and downloading, auto-syncing, or using location services. To
avoid additional charges, select a data plan to is suitable for your needs.
Contact your service provider to obtain additional details.
Trademarks
•LG and the LG logo are registered trademarks of LG Electronics.
•All other trademarks and copyrights are the property of their respective
owners.
5
Page 8

DivX HD
ABOUT DIVX VIDEO: DivX® is a digital video format created by DivX, LLC, a
subsidiary of Rovi Corporation. This is an official DivX Certified® device that
has passed rigorous testing to verify that it plays DivX video. Visit divx.com
for more information and software tools to convert your files into DivX videos.
ABOUT DIVX VIDEO-ON-DEMAND: This DivX Certified® device must be
registered in order to play purchased DivX Video-on-Demand (VOD) movies.
To obtain your registration code, locate the DivX VOD section in your device
setup menu. Go to vod.divx.com for more information on how to complete
your registration.
DivX Certified® to play DivX® video up to HD 720p, including premium
content.
DivX®, DivX Certified® and associated logos are trademarks of Rovi
Corporation or its subsidiaries and are used under license.
Notice: Open Source Software
To obtain the corresponding source code under GPL, LGPL, MPL and
other open source licences, please visit http://opensource.lge.com/
All referred licence terms, disclaimers and notices are available for
download with the source code.
Dolby Digital Plus
Manufactured under license from Dolby Laboratories. Dolby, Dolby Digital
Plus, and the double-D symbol are trademarks of Dolby Laboratories.
6
Page 9

Important notice
Please read this before you start using your tablet!
Please check to see whether any problems you encountered with your tablet
are described in this section before taking the tablet in for service or calling
a service representative.
1. Tablet Memory
You need to check your tablet memory and delete some data, such as
applications, to make more memory available.
To uninstall applications:
1 Tap > > Apps tab > Settings > Apps.
2 Once all of the applications appear, select the application you want to
uninstall.
3 Tap Uninstall and OK to confirm.
2. Before installing an open source application and
operating system (OS)
WARNING
If you install and use an OS other than the one provided by the
manufacturer it may cause your tablet to malfunction. In addition, your
tablet will no longer be covered by the warranty.
7
Page 10
WARNING
To protect your tablet and personal data, only download applications
from trusted sources, such as Play Store. If there are improperly installed
applications on your tablet, the tablet may not work normally or a serious
error may occur. You must uninstall those applications and all associated
data and settings from the tablet.
3. Using a Screen Lock
Set an screen lock to secure your tablet. Tap > > Apps tab >
Settings > Display > Lock screen > Select screen lock and select a
desired screen lock from Swipe, Face Unlock, Pattern, PIN and Password.
You can create a Backup PIN as a safety measure in case you forget your
screen lock.
Caution: Create or sign into a Google account before setting a screen lock
and remember the Backup PIN you created when creating your screen lock.
WARNING
Precautions to take when using a screen lock.
It is very important to remember the screen lock you set. You will not be
able to access your tablet if you use an incorrect screen lock 5times. You
have 5 opportunities to enter your unlock pattern, PIN or password. If you
have used all 5 opportunities, you can try again after 30seconds.
8
Page 11

When you can’t recall your Pattern, PIN or Password:
< If you have forgotten your pattern >
If you logged in to your Google account on the tablet but failed to enter the
correct pattern 5 times, tap the Forgot pattern? button at the bottom of the
screen. You are then required to log in with your Google Account or you have
to enter the Backup PIN which you entered when creating your Pattern Lock.
If you have not created a Google account on the tablet or you forgot the
Backup PIN, you have to perform a hard reset.
< If you have forgotten your PIN or Password >
If you forget your PIN or Password, you will need to perform a hard reset.
Caution: If you perform a hard reset, all user applications and user data will
be deleted.
NOTE: If you have not logged into your Google Account and have
forgotten your Pattern, you will need to enter your Backup PIN.
4. Using the Hard Reset (Factory Reset)
If your tablet does not restore to its original condition, use a Hard Reset
(Factory Reset) to initialize it.
1 Turn the tablet off.
2 Press and hold the Power/Lock Key + Volume Down Key on the right
side of the tablet.
3 Release only the Power/Lock Key when the LG logo is displayed and
keep pressing the Volume Down Key .
4 Immediately press and hold the Power/Lock Key + Volume Up Key at
the same time while maintaining the Volume Down Key pressed.
9
Page 12
5 Release all keys when the Factory hard reset screen is displayed.
6 Press the Power/Lock Key to continue or either of the Volume Keys
to cancel.
7 Press the Power/Lock Key once more to confirm or either of the Volume
Keys to cancel.
8 Your device will perform a hard reset.
WARNING
If you perform a Hard Reset, all user applications, user data and DRM
licenses will be deleted. Please remember to backup any important data
before performing a Hard Reset.
5. Opening and switching applications
Multi-tasking is easy with Android, you can keep more than one application
running at the same time. There is no need to quit an application before
opening another one.
Use and switch between several open applications. Android manages each
application, stopping and starting them as needed to ensure that idle
applications don't consume resources unnecessarily.
1 Touch and hold the Home Key . A list of recently used applications
will be displayed.
2 Tap the application you want to access. This does not stop the previous
app running in the background on the tablet. Make sure to tap Back Key
to exit an app after using it.
10
Page 13

•To stop applications, tap Task Manager from the recent apps list, then tap
Stop or Stop all.
•To remove an app from the recent apps list, swipe the app preview to the
left or right. To clear all apps, tap Clear all.
6. When the screen freezes
If the screen freezes or the tablet does not respond when you try to operate
it: Press and hold the Power/Lock Key for 8 seconds to restart your tablet.
Ifit still does not work, please contact the service center.
11
Page 14
Getting to know your device
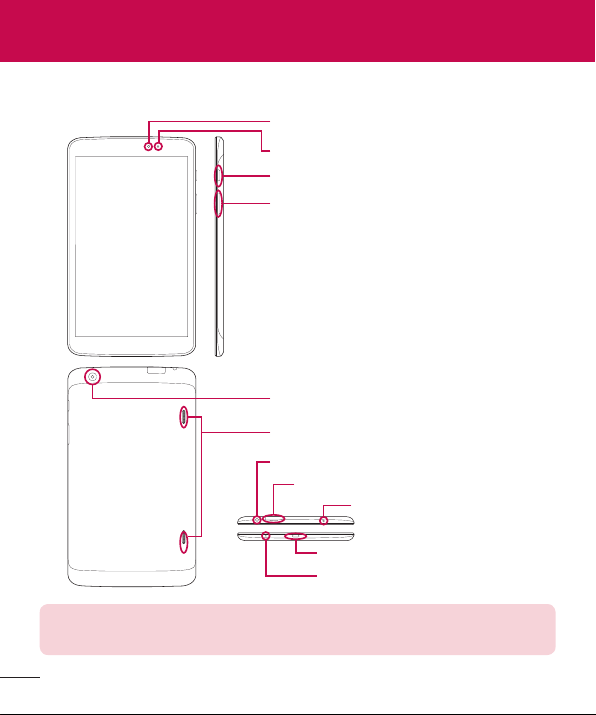
Tablet Overview
Front-Facing Camera Lens
Ambient Light Sensor
Power/Lock Key
Volume Keys
Back-Facing Camera Lens
Speakers
Earphone Jack
microSD Card Slot
Infrared (IR) LED
Charger/USB Port
Microphone
NOTE: Make sure that the microphone is not blocked when recording a
video or audio clip.
12
Page 15

Front-Facing
Camera Lens
microSD Card
Slot
Earphone Jack
Ambient Light
Sensor
Power/Lock Key
Volume Keys
Charger/USB
Port
Back-Facing
Camera Lens
Speakers
Microphone
Infrared (IR)
LED
Use to take pictures and record videos of yourself. You
can also use this for video chatting. Keep it clean for
optimal performance.
Insert a microSD Card for storing files such as music,
videos and photos.
Allows you to plug in an optional headset for convenient,
hands-free conversations. You can also plug in
headphones to listen to music.
Measures the surrounding light and adjusts the LCD
brightness to provide a vivid screen.
Press to lock/unlock the screen. Press and hold to turn
the tablet on/off, restart it, activate/deactivate airplane
mode, and change the sound settings.
Allow you to adjust the media volumes. Press and hold
both keys at the same time to access the QuickMemo
feature.
Allows you to connect the tablet and the USB Cable
for use with the charger adapter, your PC, or other
compatible accessories.
Use to take photos and record videos. Keep it clean for
optimal performance.
Use to listen to the audio from the selected function
(e.g., music, videos, sound clips, etc.).
Record your voice and is used for voice-activated
functions.
Used as a sensor for the QuickRemote app.
13
Page 16
WARNING
Placing a heavy object on the tablet or sitting on it can damage the LCD
and touch screen functions. Do not cover the LCD Ambient Light Sensor
with protective film. This could cause the sensor to malfunction.
TIP!
•Tap the Menu Key
options are available.
•If the device is locked and does not work, press and hold the Power/
Lock Key
for 8 seconds to turn it off.
whenever you open an application to check what
Charging your tablet
A rechargeable Li-ion battery is used to power your tablet. A USB adapter,
which is included with your tablet, is used to charge the battery. Before using
your tablet for the first time, make sure the battery is fully charged.
NOTE: Your device has an internal rechargeable battery. For your safety, do
not remove the battery incorporated in the product.
Warning! If the touch screen does not function while the tablet’s in the
process of charging, this may be due to an unstable power supply. As
a result, disconnect the USB cable from the device or unplug the USB
adapter from the power outlet.
14
Page 17
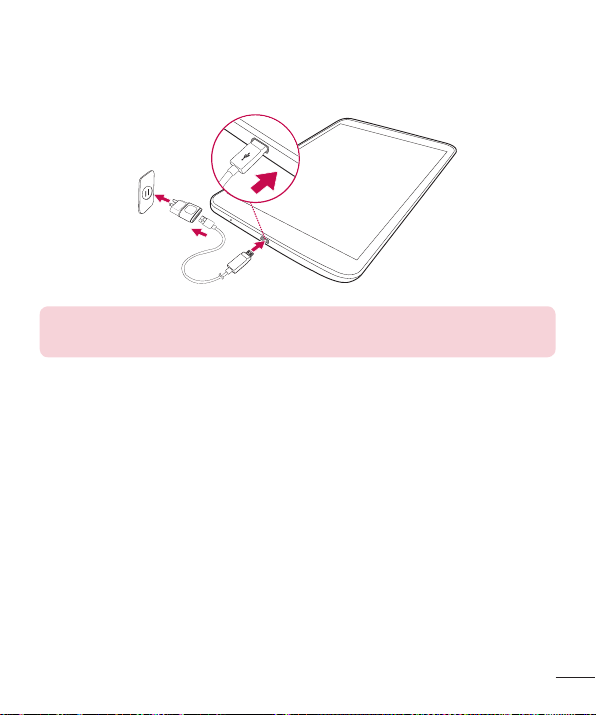
1 Connect the USB adapter and USB cable.
2 Plug the USB cable (as shown below) into the tablet’s Charger/USB port.
3 Plug the charger into an electrical socket.
NOTE: The battery must be fully charged initially to improve battery
lifetime.
Optimizing Battery Life
You can extend your battery’s life between charges by turning off features
that you don’t need to run constantly in the background. You can also
monitor how applications and system resources consume battery power.
To extend the life of your battery
•Turn off radio communications that you aren’t using, such as Wi-Fi,
Bluetooth, or GPS.
•Lower screen brightness and set a shorter screen timeout.
•Turn off automatic syncing for Gmail™, Calendar, Contacts, and other
applications.
15
Page 18

•Some applications you have downloaded may cause your battery power to
be reduced.
•While using downloaded applications, check the battery charged level.
To view the battery charge level
1 From the Home screen, tap Apps > Settings > About tablet >
Battery.
2 The battery status (charging or discharging) and level are displayed on the
top menu of the screen.
To monitor and control what uses the battery
1 From the Home screen, tap Apps > Settings > About tablet >
Battery > Battery use.
2 The bottom of the screen displays battery usage time and also lists
applications or services using battery power from greatest amount to least.
Inserting a microSD card
Your device supports the use of microSD memory cards of up to 64GB
capacity. Multimedia contents can be saved in the microSD card.
1 Place your fingernail in the cutout and pull the memory card tray out.
16
Page 19
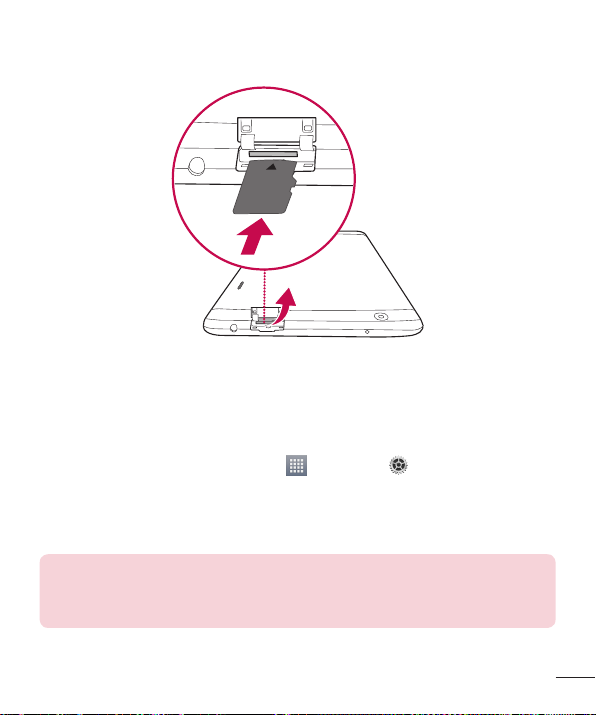
2 Insert the microSD card into the slot with the contacts facing down.
Carefully push the tray gently into the device.
Removing the microSD card
To safely remove the microSD card from your tablet, first you need to
unmount it.
1 From the Home screen, tap Apps > Settings > Storage >
Unmount SD card.
2 Open the microSD card tray and push the card in to release it.
3 Gently pull the microSD card from the slot.
Warning! Do not remove the microSD card without unmounting it first.
Otherwise, it may damage the microSD card as well as your tablet, and
the data stored on the microSD card may be corrupted.
17
Page 20
Formatting the microSD card
Warning! All files stored on your microSD card are deleted when you
format the card.
1 From the Home screen, tap Apps > Settings > Storage.
2 Tap Erase SD card (twice).
3 If you set an unlock pattern, enter it and tap Erase everything. The card
will then be formatted and ready to use.
NOTE: If there is content on your microSD card, the folder structure may
be different after formatting since all the files will have been deleted.
Locking and unlocking the screen
If you do not use the tablet for a while, the screen will be automatically
turned off and locked. This helps to prevent accidental touches and saves
battery power. When you are not using the your tablet, press the Power/Lock
Key to lock your tablet.
If there are any programs running when you lock your screen, they may be
still running in Lock mode. It is recommended that you exit all programs
before entering Lock mode to avoid unnecessary charges (e.g. web access,
data communications).
To wake up your tablet, press the Power/Lock Key . The Lock screen will
appear. Touch and slide the Lock screen in any direction to unlock your
Home screen. The last screen you viewed will open.
18
Page 21

Your Home screen
Touch screen tips
Here are some tips on how to navigate on your tablet.
NOTE:
•To select an item, touch the center of the icon.
•Do not press too hard; the touch screen is sensitive enough to pick up a
light, yet firm touch.
•Use the tip of your finger to touch the option you want. Be careful not to
touch any other keys.
Tap or touch
A single finger tap selects items, links, shortcuts and letters on the
on-screen keyboard.
Touch and hold
Touch and hold an item on the screen by touching it and not lifting your
finger until an action occurs. For example, to open a contact's available
options, touch and hold the contact in the Contacts list until the context
menu opens.
Drag
Touch and hold an item for a moment and then, without lifting your finger,
move your finger on the screen until you reach the target position. You can
drag items on the Home screen to reposition them.
19
Page 22

Swipe or slide
To swipe or slide, quickly move your finger across the surface of the screen,
without pausing when you first touch it (so you don’t drag an item instead).
For example, you can slide the screen up or down to scroll through a list, or
browse through the different Home screen canvases by swiping from left to
right (and vice versa).
Double-tap
Double-tap to zoom on a webpage or a map. For example, quickly doubletap a section of a webpage to adjust that section to fit the width of the
screen. You can also double-tap to zoom in and out when viewing a picture
and when using Maps. Double-tap a word to highlight it. Double-tap can also
activate the KnockON feature to turn the touchscreen on or off.
Pinch-to-Zoom
Use your index finger and thumb in a pinching or spreading motion to zoom
in or out when using the browser, Maps, or when browsing pictures.
Rotate the screen
From many applications and menus, the orientation of the screen adjusts to
the device's physical orientation.
20
Page 23
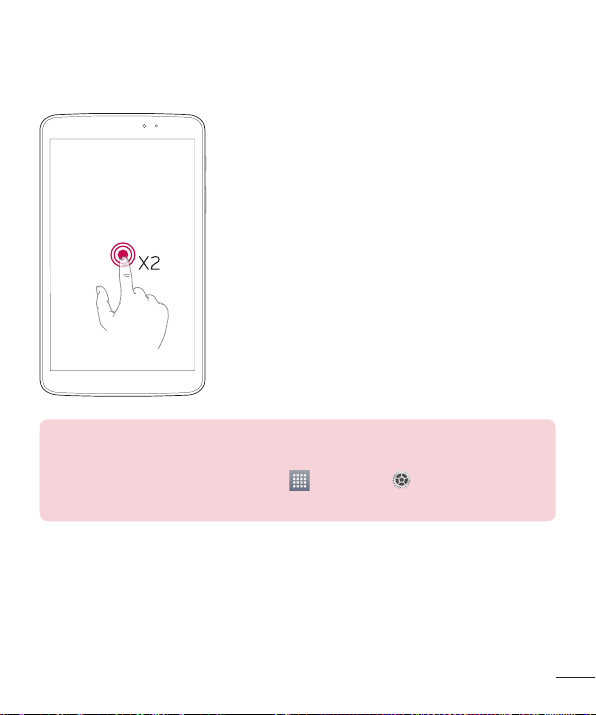
KnockON
The KnockON feature allows you to double-tap the screen to easily turn the
screen on or off.
•Quickly double-tap the center of the screen
to turn the screen on.
•Quickly double-tap the Status Bar, an empty
area on the Home screen, or the Lock screen
to turn the screen off.
NOTE:
•You can disable this feature in the Display settings.
From the Home screen, tap Apps
KnockON > tap the KnockON checkbox.
> Settings > Display >
21
Page 24
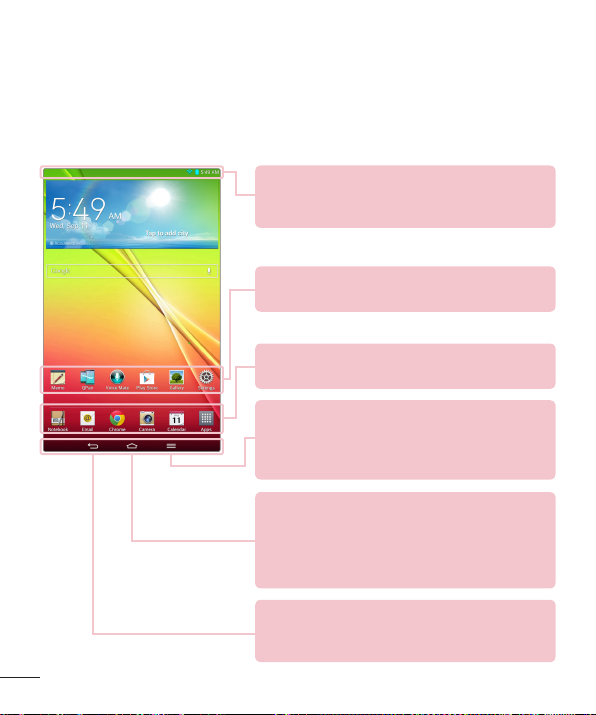
Home screen
Simply swipe your finger to the left or right to view the panels. You can
customize each panel with apps, downloads, widgets and wallpapers.
The Quick Keys are available at the bottom part of the Home screen and
provide easy, one-touch access to the functions you use the most.
Status Bar – Shows device status information,
including the time, Wi-Fi signal strength, battery
status, and notification icons.
Application icons – Tap an icon (application, widget,
folder, etc.) to open and use it.
Quick Keys – Provide easy, one-touch access to the
functions used most often.
Menu Key – Opens an Options menu with options
that affect the current screen or application. This
only applies when available, depending on the
screen or application.
Home Key – Returns to the Home screen (or
returns to your default Home screen canvas from
any of the Home screen extension canvases). Touch
and hold it to display recently used applications with
access to the Task Manager application.
Back Key – Returns to the previous screen. Also
closes pop-up items such as menus, dialog boxes,
and the on-screen keyboard.
22
Page 25

Customizing the Home screen
You can customize your Home screen by adding apps, downloads, widgets
or wallpapers. For more convenience using your tablet, add your favorite apps
and widgets to the Home screen.
To add items on your Home screen:
1 Touch and hold the empty part of the Home screen.
2 Tap the Apps or Widgets tab.
3 Drag the desired item to the desired location and lift your finger.
To remove an item from the Home screen:
Touch and hold the icon you want to remove, drag it to , and lift your
finger.
TIP! To add an application icon to the Home screen from the Apps
screen, touch and hold the application you want to add and drag it to the
desired location.
TIP! You can add several app icons in a folder. Drop one app icon over
another one on a Home screen, and a folder will be created.
Customizing app icons on the Home screen
You can customize each application icon with images from your Gallery.
23
Page 26
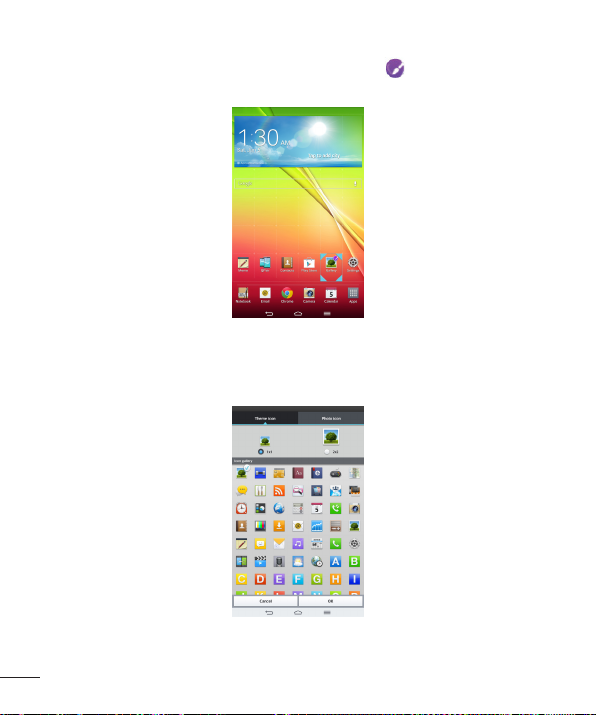
1 Touch and hold an application icon until it’s unlocked from its current
position. Then drop it on the screen. The editing icon will appear in the
upper right corner of the application.
2 Tap the application icon again and select the desired icon design and
size from the Theme icon tab. Or touch the Photo icon tab to take a new
picture or select a picture from the Gallery.
24
Page 27
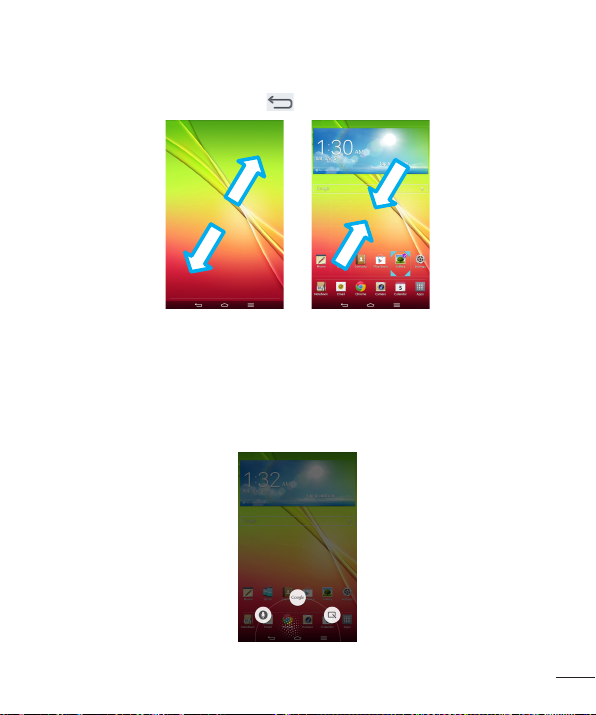
Home screen clean view
You can see the wallpaper without items on the Home screen by pinching
out. Pinch in or tap the Back Key to see applications and widgets again.
Quick access
To view the quick access items, touch anywhere in the front key area and
drag up. The following options are available: Voice Mate, Google Now, and
QuickMemo.
25
Page 28
Returning to recently-used applications
1 Touch and hold the Home Key . The screen displays a pop-up
containing the icons of applications you used recently.
2 Touch an icon to open the application. Or touch the Back Key to
return to your previous screen.
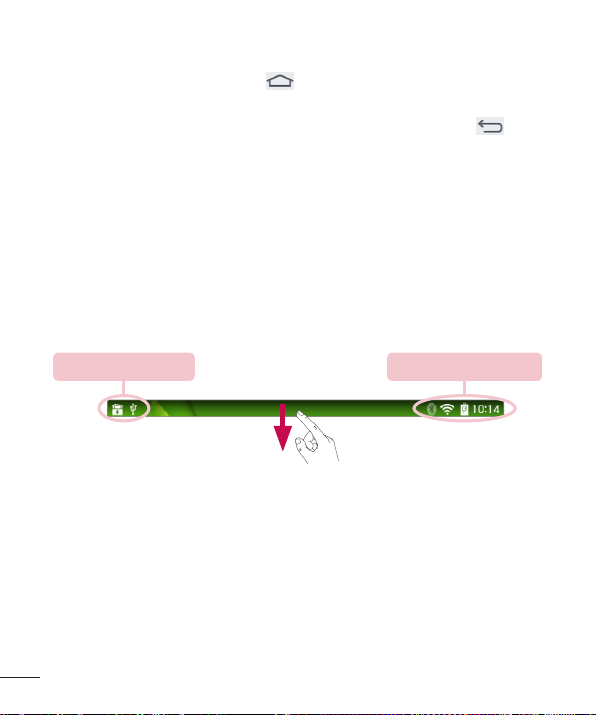
Notifications
Notifications alert you to the arrival of new messages, calendar events, and
alarms, as well as to ongoing events, such as downloads.
From the Notifications Panel, you can view your tablet’s current status and
pending notifications. When a notification arrives, its icon appears at the top
of the screen. Icons for pending notifications appear on the left, and system
icons showing things like Wi-Fi or battery strength on the right.
Pending notifications System notifications
Accessing notifications
Swipe the Status Bar down to open the Notifications Panel and access
notifications. To close the Notifications Panel, swipe the bar that is at the
bottom of the screen upwards.
26
Page 29

Quick Settings Bar – Swipe to the right
or left to scroll through the list. Tap an
icon to activate/deactivate the feature.
QSlide Apps Bar – Tap to activate a
QSlide feature.
Slide to the left and right to adjust the
screen brightness and volume.
Quick Settings on the Notifications Panel
Use the Quick Settings to easily toggle function settings like Wi-Fi. The
Quick Settings are located at the top of the Notifications Panel.
NOTE: Touch and hold an icon in the Quick Settings Bar to view the
function's settings menu.
To rearrange Quick Setting options on the Notification Panel
Open the Notifications Panel, swipe the Quick Settings to the left, and tap
. To rearrange items, drag to the desired location. To add more icons,
checkmark the desired functions.
QSlide apps on the Notifications Panel
QSlide apps are displayed in a bar on the Notifications Panel below the
Quick Settings Bar. These icons provide a quick, convenient way to multi-task
on the same screen (similar to picture-in-picture on a TV). QSlide displays a
small application window on the screen that can be moved, resized, or made
transparent.
27
Page 30
Using the QSlide apps
Tap any of the QSlide apps in the bar to activate it. When activated, the
QSlide feature opens the application in a window in the foreground, allowing
you to access other applications in the background. You can open up to two
QSlide windows at a time.
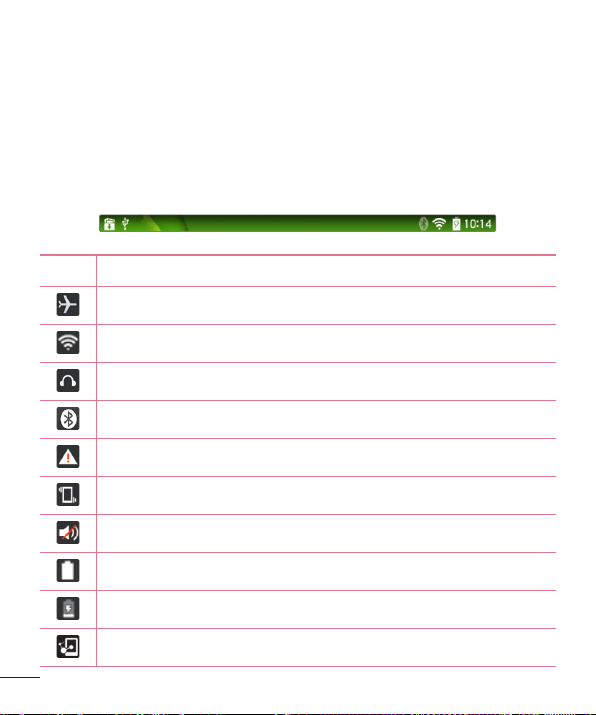
Notification icons on the Status Bar
The icons listed in the table below are some of the most common ones.
Icon Description
Airplane mode
Connected to a Wi-Fi network
Wired headset connected
Bluetooth is on
System warning
Vibrate mode is on
Silent mode is on
Battery fully charged
Battery is charging
28
DLNA is on
Page 31

Downloading data
Uploading data
An alarm is set
SmartShare music playing
GPS is on
Data is syncing
New Gmail message
New Hangouts message
A song is currently playing
Tablet is connected to PC via USB cable
Battery saver mode is on
Slide Aside is on
Multiple Users
Only one tablet owner ID can be created, but multiple user IDs can be
added so that others can log in and use the tablet independently. Each user
can configure their own tablet settings, use their own storage space, and
have their own app update privileges.
29
Page 32

Tablet owner privileges
•Only the tablet owner ID can add a new user log in ID and remove user
IDs.
•Only the tablet owner ID can access and use the microSD card.
•The tablet owner can uninstall any of the user's apps.
Multiple tablet user limitations
• All users share the same battery, internal memory, and data usage with all of
the other users.
• The language settings set by one user applies to all of the other users.
• Each user can configure and use only their own content and data (e.g.,Home
screen settings, Sound settings, etc.).
• Any user can accept updated app permissions on the behalf of all of the
other users.
• Alarms will sound at the set time no matter which user activated the alarm(s).
• Messages and scheduled calendar events will be sent to notify the specified
user ID only.
• Once a user starts printing a document using Mobile Print, the print job will
continue even if the user ID is changed.
• Data transfer, download, multimedia play, and communication services will
stop if the user ID is changed.
To add a new user on your tablet
1 From the Home screen, tap Apps > Settings > Users > Add user.
2 Select the type of user you want to add.
• User: Users have their own apps and content.
• Restricted profile: You can restrict access to apps and content from
your account.
30
Page 33

3 The setup wizard opens to help you add a new user. Touch Set up now.
• After creating a new user, that person needs to go through the setup
process upon their first login.
To switch users
1 Press the Power/Lock Key to lock the tablet's screen.
2 Press the Power/Lock Key once more to wake the tablet's screen.
3 Touch one of the colored icons at the bottom of the screen. Choose from
the owner ID or any other user IDs you created.
Slide Aside
Slide Aside allows you to quickly switch between three open applications (or
tasks) using a three finger gesture.
1 While an application is open, place three
fingers on the screen and slide to the left.
The current screen is saved and the Home
screen appears.
2 To re-open the saved apps, place three
fingers on the screen and slide to the right.
Tap the desired app you want to open.
31
Page 34

Tip! The Slide Aside feature does not recognize fewer fingers, additional
fingers, or your palm.
Plug & Pop
Plug & Pop allows you to quickly choose apps to use when plugging in an
earphone or On-the-Go device, such as a mouse or keyboard.
1 Plug an earphone or OTG (On-the-Go) device (i.e., mouse, keyboard, etc.).
2 The applications panel will display and you can select an app to run.
NOTE: You can edit the applications to display on the panel and set not to
show the applications panel.
Setting up Plug & Pop
1 From the Home screen, tap Apps > Settings > Accessory.
2 Tap one of the desired Plug & Pop features and select the apps you want
to make available.
NOTE: Drag to rearrange the order of the available apps.
3 Tap to activate Plug & Pop.
Capturing a Screenshot
Press and hold the Volume Down Key and Power/Lock Key at the same
time for 2 seconds to capture a screenshot of the current screen.
To view the captured image, go to Apps > Gallery > Screenshots
folder.
32
Page 35

Using QuickMemo to capture a screenshot
On the screen you want to capture, drag the Status Bar downward and select
QuickMemo .
OR
Press and hold both Volume Keys at the same time.
Using Capture plus to capture a screenshot
This feature allows you to capture a portion of the screen in the default
Internet browser.
1 Open the Internet app and navigate to the page you want to capture a
screen shot of.
2 Tap the Menu Key > Capture plus. Choose Crop photo or Crop
picture and select Always or Just once.
3 Adjust the blue box to the desired size, and then tap OK. The selected
area is saved to the Capture plus folder in the Gallery.
Entering Text
You can enter text using the on-screen keyboard. The on-screen keyboard
appears automatically on the screen when you need to enter text. To
manually display the keyboard, simply touch a text field where you want to
enter text.
Using the keypad & entering text
Tap once to capitalize the next letter you type. Double-tap for all caps.
Tap to switch to the numbers and symbols keyboard.
Tap to use the handwriting function. Touch and hold to access the
keyboard settings and Clip Tray. This key changes depending on the
last feature you use.
33
Page 36

Tap to enter a space.
Tap to create a new line in the message field.
Tap to delete the previous character.
Entering special characters
The on-screen keyboard allows you to enter special characters (e.g. "á").
For example, touch and hold the desired key (for example, the "a" key). After
the desired character appears, slide your finger over it and lift it off to enter
it.
NOTE: A symbol at the top right corner of a key indicates that additional
characters are available.
34
Page 37

Google account setup
When you first turn on your tablet, you have the opportunity to activate the
network, to sign into your Google Account and select how you want to use
certain Google services.
To set up your Google account
•Sign into a Google Account from the prompted setup screen.
OR
•From the Home screen, tap Apps > Apps tab > Settings >
Accounts & sync > Add account > Google.
If you have a Google account, touch Existing, enter your email address and
password, then touch . Otherwise, touch New and enter the necessary
information to create a new Google Account.
Once you have set up your Google account on your tablet, your tablet
automatically synchronizes with your Google account on the Web.
Your contacts, Gmail messages, Calendar events and other information from
these applications and services on the Web are synchronized with your tablet.
(This will depend on your synchronization settings.)
After signing in, you can use Gmail™ and take advantage of Google services
on your tablet.
35
Page 38

Connecting to Networks and Devices
Wi-Fi
With Wi-Fi, you can use high-speed Internet access within the coverage of
the wireless access point (AP). Enjoy wireless Internet using Wi-Fi, without
extra charges.
Connecting to Wi-Fi networks
To use Wi-Fi on your tablet, you need to access a wireless access point or
‘hotspot’. Some access points are open and you can simply connect to them.
Others are hidden or use security features; you must configure your tablet to
be able to connect to them. Turn off Wi-Fi when you're not using it to extend
the life of your battery.
Turning Wi-Fi on and connecting to a Wi-Fi network
1 From the Home screen, tap Apps > Apps tab > Settings > Wi-Fi.
2 Tap to turn Wi-Fi on and start scanning for available Wi-Fi networks.
3 Tap Search to see a list of active and in-range Wi-Fi networks.
• Secured networks are indicated by a lock icon.
4 Touch a network to connect to it.
• If the network is secured, you are prompted to enter a password or
other credentials. (Ask your network administrator for details)
5 The Status Bar displays icons that indicate your Wi-Fi status.
Bluetooth
You can use Bluetooth to send data by running a corresponding application,
but not from the Bluetooth menu as on most other mobile phones.
36
Page 39

NOTE:
•LG is not responsible for the loss, interception or misuse of data sent or
received via the Bluetooth wireless feature.
•Always ensure that you share and receive data with devices that are
trusted and properly secured. If there are obstacles between the devices,
the operating distance may be reduced.
•Some devices, especially those that are not tested or approved by
Bluetooth SIG, may be incompatible with your device.
Turning on Bluetooth and pairing up your tablet with a Bluetooth device
You must pair your device with another device before you connect to it.
1 From the Home screen, tap Apps > Apps tab > Settings >
Bluetooth.
2 Tap the Bluetooth switch to turn it on.
3 Tap the check box next to your tablet's name to make your tablet visible to
other Bluetooth devices.
NOTE: To select the length of time that your device will be visible, tap the
Menu Key
4 A list of available devices will be displayed. Tap the device you want to pair
with from the list.
NOTE: Depending on the type of device, you may have to enter matching
codes, confirm matching codes, or the devices may automatically pair.
> Visibility timeout.
Once pairing is successful, your tablet will connect to the other device.
37
Page 40

NOTE: Your tablet doesn't support Handsfree Profile. Therefore, the use
of call features with some of accessories, such as Bluetooth headsets or
Bluetooth-enabled devices, may not be available for this device.
Send data using the Bluetooth feature
1 Open the item and tap .
OR
Touch and hold the item and select Share.
OR
Open the item and tap the Menu Key > Share.
2 Tap Bluetooth to share via Bluetooth.
NOTE: The method for selecting an option may vary by data type.
3 Search for and pair with a Bluetooth-enabled device.
Receive data using the Bluetooth feature
1 Refer to the Bluetooth device's user guide to send a file to your tablet.
Both devices must be paired and Bluetooth must be on.
2 Pair the devices and tap Accept when you receive a Bluetooth
Authorization Request to accept the file(s).
SmartShare
You can use the SmartShare feature easily in the Gallery, Music, Video apps,
and others.
38
Page 41

Enjoying the content via a variety of devices
You can share your tablet's content with a variety devices. Tap to share
the content in the Gallery, Music, Videos, POLARIS Viewer 5 apps.
Playing/Sending
Play – You can play the content via a TV, a Bluetooth speaker or etc.
Beam – You can send the content to the device of Bluetooth and
SmartShare Beam supported.
•SmartShare Beam – This allows to transfer the content feature fast via
Wi-Fi Direct.
< Play > < Beam >
Enjoying the content from Nearby devices
You can enjoy the content from nearby devices (i.e. PC, NAS, Mobile) in the
Gallery, Music, Videos apps.
Connecting devices
Connect your device and other devices supported by DLNA in the same
Wi-Fi network.
Searching other devices
Tap Nearby devices, then you can see the DLNA-supported devices.
Connect to the device to view the content.
39
Page 42

Using the content from the Cloud
You can use the content from the cloud (i.e., Dropbox) in the Gallery, Music,
Videos apps.
Using the Cloud
NOTE: The supported features may vary depending on the cloud.
Retrieving data may take some time depending on the cloud.
1 Select Cloud in the Gallery, Music, Videos apps.
2 Select the cloud what you want to use and log in.
3 You can use the content of the cloud after logging in.
4 Set the cloud settings to select the app to use the cloud.
PC connections with a USB cable
You can connect your tablet to your PC to charge it, transfer items to the PC
from the tablet and vice versa.
Transferring music, photos and videos using the USB mass storage mode
1 Connect your tablet to a PC using a USB cable.
2 If you haven't installed the LG Android Platform Driver on your PC, you
will need to manually change the settings. From the Home screen, tap
the Menu Key > System settings > PCconnection > Select USB
connection method > Media sync (MTP).
3 You can now view the mass storage content on your PC and transfer the
files.
40
Page 43

Synchronize with Windows Media Player
Ensure that Windows Media Player is installed on your PC.
1 Use the USB cable to connect the tablet to a PC on which Windows
Media Player has been installed.
2 Select the Media sync (MTP) option.
3 When connected, a pop-up window will appear on the PC. Select the
Windows Media Player option to synchronize music files.
4 Edit or enter your device’s name in the pop-up window (if necessary).
5 Select and drag music files to the sync list.
6 Start synchronization.
•The following requirements must be satisfied to synchronize with Windows
Media Player.
Items Requirement
OS
Window Media Player version Windows Media Player 10 or higher
•If the Windows Media Player version is older than 10, install version 10 or
newer.
Microsoft Windows XP SP2, Vista or
higher
41
Page 44

Contacts
You can add contacts on your tablet and synchronize them with the contacts
in your Google Account or other accounts that support syncing contacts.
Searching for a contact
1 From the Home screen, tap Contacts to open your contact list.
2 Tap the Search contacts box and enter the contact's name. You can also
tap a letter along the left side of the screen to access names starting with
the chosen letter.
Adding a new contact
1 From the Home screen, tap Contacts .
2 Tap the . Select the desired account (if applicable).
3 If you want to add a picture to the new contact, tap . Choose from
Take photo to take a picture using the camera or Select from Gallery.
Then browse for an image and select it.
4 Tap to enter more specific name information.
5 Enter the details about your contact.
6 Tap Save.
Favorite Contacts
You can classify frequently called contacts as favorites.
To add a contact to your favorites
1 From the Home screen, tap Contacts to open your contacts.
2 Tap a contact to view its details.
42
Page 45

3 Tap the star to the right of the contact’s name. The star turns gold
and the contact is added to your favorites.
To remove a contact from your favorites list
1 From the Home screen, tap Contacts to open your contacts.
2 Tap the Favorites tab to view your favorite contacts.
3 Tap a contact to view its details.
4 Tap the gold star to the right of the contact’s name. The star turns grey
and the contact is removed from your favorites.
Creating a group
1 From the Home screen, tap Contacts to open your contacts.
2 Touch the Groups tab , then touch .
3 Enter a name for the new group.
•Tap Add members to add contact entries to your new group.
•Tap the ACCOUNT field to change the account(s) you want to save the
new group to.
4 Touch Save to save the group.
NOTE: If you delete a group, the contacts assigned to that group will not
be lost. They will remain in your contacts.
43
Page 46

You can use the Email application to read emails from services like Yahoo!,
MSN, and AOL. The Email application supports the following account types:
POP3, IMAP and Exchange.
Your service provider or system administrator can provide you with the
account settings you need.
Managing an email account
Tap the Email on the Home screen. The first time you open the Email
application, a set-up wizard opens to help you to set up an email account.
After the initial setup, the contents of your inbox are displayed. If you have
added more than one account, you can switch among accounts.
To add another email account:
•Open the Email application and tap the Menu Key > Settings > .
To switch between accounts:
If you've added more than one account, you can easily switch between them.
From any email folder, tap the current account (at the top of the screen),
then tap the account you want to access.
To change an email account’s settings:
Open the Email application and tap the Menu Key > Settings > General
settings to configure settings that apply to all of your accounts. Tap an
individual account to configure settings only for that particular account.
To delete an email account:
•Open the Email application and tap the Menu Key > Settings > Menu
Key > Remove account > touch an account you want to delete >
Remove > Yes .
44
Page 47

Working with account folders
Open the Email application and tap the Menu Key and select Folders.
Each account has an Inbox, Outbox, Sent and Drafts folder. Depending on
the features supported by your account’s service provider, you may have
additional folders.
Composing and sending email
1 While in the Email application, tap Compose .
2 Enter an address for the message’s intended recipient. As you enter
text, matching addresses will be proposed from your Contacts. Separate
multiple addresses using semicolons.
3 Tap Attach to attach files, if required.
4 Enter the subject and your message.
5 Tap Send to send the message.
If you aren’t connected to a network, for example, if you’re working in
airplane mode, the messages that you send will be stored in your Outbox
folder until you connect to a network again. If it contains any pending
messages, the Outbox will be displayed on the Accounts screen.
Receiving emails
When a new email arrives in your Inbox, you'll be notified by a sound
or vibration (depending on your sound and vibration settings) and its
notification icon appears on the Status Bar.
45
Page 48

Camera
To open the Camera application, tap Camera on the Home screen.
Getting to know the viewfinder
Swap camera – Switch between the back-facing camera lens and the
front–facing camera lens.
Shot mode – Allows you to choose a shot mode to define how the picture
will be taken.
Settings – Touch this icon to open the settings menu. See Using the
advanced settings on the following page.
Video mode – Tap (or slide) to toggle between Camera mode and Video
mode.
Capture – Takes a picture.
Gallery – Touch to view the last photo you captured. This enables you to
access your Gallery and view saved photos while in camera mode.
NOTE: Please ensure the camera lens is clean before taking pictures.
46
Page 49

Using the advanced settings
In the viewfinder, tap to open the advanced options. After selecting the
option, tap the Back Key .
Take photos by voice command.
Defines and controls the amount of sunlight entering the photo.
Sets the focus mode.
Selects photo resolution. If you choose a high resolution, the file size
will increase, which means you will be able to store fewer photos in
the memory.
The ISO rating determines the sensitivity of the camera's light
sensor. The higher the ISO, the more sensitive the camera. This is
useful in darker conditions when you cannot use the flash.
Improves color quality in various lighting conditions.
Applies artistic effects to your pictures.
Sets a delay after the capture button is pressed. This is ideal if you
want to be in the photo.
Activate this to use your tablet's location-based services. Take
pictures wherever you are and tag them with the location. If you
upload tagged pictures to a blog that supports geo-tagging, you
can see the pictures displayed on a map.
NOTE: This function is only available when GPS is turned on.
Selects a shutter sound.
47
Page 50

Set to use the Volume Key for capturing pictures or zooming.
This sets the location where you want to save your pictures. Choose
from Internal storage and SD card.
Opens the help guide to know how a function operates.
Restores all camera default settings.
TIP!
•When you exit the camera, some settings return to their defaults, such
as white balance, color effect, and timer. Check these before you take
your next photo.
•The Settings menu is superimposed over the viewfinder, so when you
change photo color or quality elements, you will see a preview of the
changed image behind the Settings menu.
Taking a photo
1 Open the Camera application.
2 Point the lens towards the subject you want to photograph.
3 A focus box will appear in the center of the viewfinder screen. You can
also tap anywhere on the screen to focus on that spot.
4 When the focus box turns green, the camera has focused on your subject.
5 Touch to capture the photo.
48
Page 51

Once you've taken a photo
1 Tap the image preview at the bottom of the screen to view the last photo
you captured.
2 Tap Gallery, then tap Always or Just once.
Touch to share your photo using the SmartShare function.
Touch to take another photo immediately.
Touch to send your photo to others.
Touch to delete the photo.
TIP! If you have a social networking account and set it up on your tablet,
you can share your photo with your social networking community.
Touch the Menu Key to open the following options.
Set image as – Touch to use the photo as a Contact photo, Home screen
wallpaper, Lock screen wallpaper or Wallpaper.
Move – Touch to move the photo to another album.
Copy – Touch to copy the selected photo and save it to another album.
Copy to Clip Tray – Touch to copy the photo and store in the Clip Tray.
Rename – Touch to edit the name of the selected photo.
Rotate left/right – Touch to rotate the picture to the left or right.
Crop – Crop your photo. Move your finger across the screen to select the
area to be cropped.
Edit – Touch to edit the photo.
49
Page 52

Slideshow – Automatically displays a slideshow of all your pictures.
Add location – To add the location information.
Print – Allows you to print the picture.
Details – Displays more information about the picture.
Viewing your saved photos
You can access your saved photos when in camera mode. Just tap the
image preview in the bottom of the screen and your Gallery will be displayed.
1 Choose the app to use to view and/or edit your photos. Tap Gallery or
Photos.
2 Tap Always or Just once.
•To view more photos, scroll left or right.
•To zoom in or out, double-tap the screen or place two fingers and
spread them apart (move your fingers closer together to zoom out).
50
Page 53

Video camera
To open the video camera, tap Camera on the Home screen, then tap
the Video mode icon (on the viewfinder) to switch to video mode.
Getting to know the viewfinder
Swap camera – Switch between the back-facing camera lens and the
front–facing camera lens.
Record Mode – Allows you to choose a record mode to define how the
video will be recorded.
Settings – Touch this icon to open the settings menu. See Using the
advanced settings on the following page.
Camera mode – Touch and slide up this icon to switch to camera mode.
Record – Touch to start recording a video.
Gallery – Touch to view the last video you recorded. This enables you to
access your Gallery and view your saved videos while in video mode.
51
Page 54

TIP! When recording a video, place two fingers on the screen and pinch
to use the Zoom function.
NOTE: Make sure that the microphone is not blocked when recording a
video or audio clip.
Using the advanced settings
Using the viewfinder, touch to open all the advanced options.
Tap to set the size (in pixels) of the video you are recording.
Defines and controls the amount of sunlight entering the video.
Prevents shaking while recording to get high video quality.
Improves color quality in various lighting conditions.
Choose a color tone to use for your new view.
Activate this to use your tablet's location-based services.
Set to use the Volume Key for recording video or zooming.
This sets the location where you want to save your videos. Choose
from Internal memory and SD card.
Opens the help guide to know how a function operates.
Restores all camera default settings.
52
Page 55

Recording a video
1 Open the Camera application and touch the Video mode icon .
2 The video camera viewfinder appears on the screen.
3 Point the lens towards the subject you wish to capture in your video.
4 Touch once to start recording.
5 A timer showing the length of the video will appear.
6 Touch on the screen to stop recording.
TIP!
•Tap
to pause the recording.
•Tap
to take a screen shot while recording a video.
After recording a video
Tap the image preview at the bottom of the screen to view the last video you
recorded.
Touch to share your video using the SmartShare function.
Touch to record another video immediately.
Touch to send your video to others.
Touch to delete the video.
53
Page 56

Watching your saved videos
Access your saved videos when in video camera mode by tapping the image
preview in the lower-right corner of the viewfinder.
1 In the viewfinder, tap the image preview at the bottom of the screen.
2 Your Gallery will appear on the screen with your most recent recorded
video displayed. Swipe to the left to scroll to your other videos.
3 Tap the Play icon on a video to play it automatically.
NOTE: You can view your videos in the Gallery, Photos, and Videos apps.
NOTE: Do not to press too hard; the touch screen is sensitive enough to
pick up a light, but firm touch.
Adjusting the volume when viewing a video
To adjust the volume of a video while it is playing, use the Volume Keys on
the right side of the tablet.
54
Page 57

Multimedia
Gallery
You can store multimedia files in internal memory for easy access to all your
multimedia files. Use this application to view multimedia files like pictures
and videos.
From the Home screen, tap Apps > Apps tab > Gallery .
You can manage and share all your image and video files with the Gallery.
NOTE:
•Some file formats are not supported, depending on the software
installed on the device.
•Some files may not play properly, depending on how they are encoded.
•If the file size exceeds the available memory, an error can occur when
you open files.
Viewing pictures
Launching the Gallery displays your available folders. When another
application, such as Email, saves a picture, the Downloads folder is
automatically created to contain the picture. Likewise, capturing a screenshot
automatically creates the Screenshots folder. Tap a folder to open it.
Pictures are displayed in order by creation date. Select a picture to view it full
screen. Scroll left or right to view the next or previous image.
55
Page 58

Zooming in and out
Use one of the following methods to zoom in on an image:
•Double-tap anywhere to zoom in. Double-tap again to return to fullscreen
view.
•Place two fingers anywhere on the image and spread them apart to zoom
in. To zoom back out, pinch them together or double-tap the screen.
Playing videos
Open the Gallery app and select an album. The Play icon is
displayed on video files. Tap an image to select it. Select the app to play it
(tap the Photos app or the Videos app ), then tap Always or Just
once and the video begins playback.
NOTE:
•When using the Videos app to play a video, slide the left side of the
screen up and down to adjust the screen brightness. Slide the right side
of the screen up and down to adjust the volume.
•When using the Videos app to play a video, slide the screen left or right
to rewind or fast-forward.
Deleting images and videos
Use one of the following methods:
•In a folder, tap and select the photos and videos you want to delete,
then tap Delete.
•When viewing a photo or video, tap , then tap Ye s to confirm.
Setting as wallpaper
When viewing a photo, touch the Menu Key > Set image as and select
Contact photo, Home screen wallpaper, Lock screen wallpaper or Wallpaper.
56
Page 59

Slideshow
You can view your photos in a slideshow by album or by selecting all of your
photos. From the Home screen, tap Gallery .
•Tap the album with the photos you want to view, then tap the Menu Key
> Slideshow > verify the slideshow settings > Start.
•Tap the Menu Key > View all files > Menu Key > Slideshow >
verify the slideshow settings > Start.
Tap the Back Key to stop playing the slideshow.
Videos
Your tablet has a video player that lets you play all of your favorite videos.
Playing a video
1 From the Home screen, tap Apps > Apps tab > Videos .
2 Select the video you want to play.
Touch to pause video playback.
Touch to resume video playback.
Touch and hold to fast-forward in 3 second increments.
Tap once to fast-forward 10 seconds.
Touch and hold to rewind in 3 second increments. Tap
once to rewind 10 seconds.
Touch to manage the video volume.
Touch to change the ratio of the video screen.
57
Page 60

Touch access QSlide and display the video in small
window.
Touch to share your video via the SmartShare function.
Touch to capture image during playing a video.
To change the volume while watching a video, press the Volume Keys on the
right side of the tablet.
Touch and hold a video in the list to access the following options:
Share,Delete, Trim and Details.
TIP! While watching a video, slide up and down along the left side of the
screen to adjust the screen brightness. Slide up and down along the right
side of the screen to adjust the volume.
Touch to lock/unlock a video screen.
Music
Your tablet has a music player that lets you play all your favorite tracks. To
access the music player, from the Home screen, tap Apps > Apps tab >
Music .
Playing a song
1 From the Home screen, tap Apps > Apps tab > Music .
2 Touch the Songs tab.
3 Select the song you want to play.
58
Page 61

Touch to find the song on YouTube.
Touch to see the current playlist.
Touch to set the current song as a favorite.
Touch to share your music via the SmartShare function.
Touch to set shuffle mode.
Touch to set repeat mode.
Touch to manage the music volume.
Touch to pause playback.
Touch to resume playback.
Touch to skip to the next track on the album or in the playlist. Touch
and hold to fast-forward 3 seconds.
Touch to go back to the beginning of the song. Touch twice to
return to the previous song. Touch and hold to rewind 3 seconds.
Touch to set the audio effect.
To change the volume while listening to music, press the Volume Keys on
the right side of the tablet.
Touch and hold any song in the list to access the following options:
Play, Add to playlist, Share, Delete, Details and Search.
59
Page 62

NOTE:
•Some file formats are not supported, depending on the device software.
•If the file size exceeds the available memory, an error can occur when
you open files.
•Music file copyrights may be protected by international treaties and
national copyright laws. Therefore, it may be necessary to obtain
permission or a licence to reproduce or copy music. In some countries,
national laws prohibit private copying of copyrighted material. Before
downloading or copying the file, check the national laws of the relevant
country concerning the use of such material.
60
Page 63

Tools
QPair
By connecting your tablet and mobile phone via QPair, you can sync
incoming calls, messages, and social networking notifications between your
tablet and mobile phone.
1 Run QPair and tap Get started > Start on your tablet first and then
run the same steps on your phone.
TIP! QPair may not be pre-installed on the phone. Go to Google Play
Store and search for QPair and install it.
NOTE: QPair works with phones running Android 4.1 or later. Some
features may be limited depending on your phone model.
2 Bluetooth connection will be turned on automatically.
61
Page 64

QPair features
Call notifications – Sends the tablet a notification when the phone receives a
call. The notification displays the caller's number and allows you to decline the
call.
Message notifications – Sends the tablet a notification when the phone
receives a message.
Social network notifications – Displays a social networking notification on
your tablet's Status Bar when it arrives on your phone.
NOTE: To enable this feature, turn the QPair social network notifications
option on your phone (Settings > Accessibility > QPair social network
notifications). This option allows you to be notified of social networking
notifications on your tablet.
QuickMemo transfer – Saves your current QuickMemo in the tablet's Gallery,
and then syncs the tablet's Gallery with the Gallery on your phone.
Recent app sticker – When the paired device's screen is unlocked, a sticker
will display the last app used on the other device if the app is installed both
on the tablet and the phone.
QSlide
The QSlide function enables an overlay window on your tablet’s display for
easy multi-tasking. QSlide windows can be opened from the QSlide apps bar
on the Notifications panel, or directly from the applications that support the
QSlide function.
62
Page 65

1 Open the Notifications Panel and tap the desired app from the QSlide
apps section.
OR
While using an application that supports QSlide, tap . The function will
be displayed continuously as a small window on your screen.
2 Slide to adjust the transparency level. Drag the QSlide title bar to
move it to another position on the screen.
OR
Tap to run QSlide.
Tap to exit the QSlide and return to full window.
Tap to adjust transparency.
Tap to end the QSlide.
Tap to adjust the size.
NOTE: The QSlide function can support up to two windows at the same
time. QSlide only supports the following applications: Videos, Internet,
Memo, Calendar, Calculator, Email, File Manager, and QVoice.
63
Page 66

QuickMemo
The QuickMemo feature allows you to create memos and capture screen
shots. Capture screens, draw on them, and share them with family and
friends with QuickMemo.
Creating a QuickMemo
1 To access the QuickMemo feature, slide
the Status Bar downwards and touch
.
OR
Press both of the Volume Keys at the
same time for one second.
2 Select the desired menu option from
the toolbar and create a memo.
3 Tap to save the memo. To exit
QuickMemo at any time, tap the Back
Key .
64
Page 67

NOTE:
Please use a fingertip while using the QuickMemo. Do not use your
fingernail.
Using the QuickMemo options
The following options are available in the QuickMemo toolbar at the top of
the screen.
Touch to keep the current memo on the screen and use the
tablet simultaneously.
Allows you to choose the type of background you want to use.
Allows you to undo and redo previous actions.
Selects the pen type and color and the cropping tool.
Erases edits you've made to the memo.
Touch to send your memo to others or share it via social
networking services.
Saves the memo in the Notebook or Gallery.
Viewing the saved QuickMemo
From the Home screen, tap Apps > Gallery or Notebook and
select the QuickMemo album.
65
Page 68

QuickRemote
QuickRemote turns your tablet into a Universal Remote for your home TV or
cable box.
NOTE: QuickRemote may not be available for some devices and areas.
To open the QuickRemote application and set up your
QuickRemote(s)
1 From the Home screen, tap the Apps > Apps tab > QuickRemote .
You can also perform the initial set up of your QuickRemote from the
Notifications Panel. Swipe the Status Bar downward, tap the QuickRemote
icon , then tap ADD REMOTE.
2 Touch to select a room type and touch to add the device.
3 Select the type and brand of device, then follow the on-screen instructions
to configure the device(s).
66
Page 69

NOTE: The QuickRemote operates the same way as an ordinary infrared
(IR) remote control in your region or country. Be careful not to cover the
infrared sensor at the top of the tablet when you use the QuickRemote
function. This function may not be supported depending on the model,
the manufacturer or service company.
Using QuickRemote
1 Open QuickRemote and choose the room where you configured the
remote.
2 Select the remote you want by tapping its type/name on the QuickRemote
bar along the left side of the screen.
3 Tap the buttons on the displayed remote.
NOTE: When adding the TV remote control, QuickRemote can use the
INPUT button to configure appropriate remote control. When configuring
the INPUT button, the TV input source can be changed. To reset the
TV input source, tap the INPUT button on QuickRemote several times
(depending on the number of devices connected to the TV).
QuickRemote options
To access the QuickRemote options menu, tap the Menu Key to select
the desired option.
NOTE: While playing music in the background, pressing any QuickRemote
button will mute the sound for a second.
67
Page 70

QuickTranslator
Simply aim the camera of your smart tablet at the foreign sentence you want
to understand. You can get the real-time translation anywhere and anytime.
You can buy additional dictionaries for offline translation from the Google
Play Store.
Home language.
Destination language.
Switches to Voice mode. Tap the
language button, then speak.
Translation of a written word.
Translation of a written sentence.
Translation of a paragraph.
Accesses the QuickTranslator
settings. You can set the home and
destination languages here.
1 From the Home screen, tap Apps > Apps tab > QuickTranslator .
2 Tap the translation format. Choose from , Word, Line, or Block.
3 Tap the Settings icon and set the home and destination languages.
4 Hold the tablet toward the subject you want to translate for a few seconds.
NOTE: Only one dictionary is provided free of charge. Additional
dictionaries must be purchased. Please select the dictionary you would
like to install as your complimentary dictionary.
68
Page 71

NOTE: There may be a difference in the rate of recognization depending
on the size, font, color, brightness and angle of the letters that need to be
translated.
Voice Mate
Voice Mate allows you hands-free interaction with your devices. You can ask
Voice Mate to perform tablet functions using your voice, such as setting
alarms, or searching the web. When you access Voice Mate for the first time,
it displays help information to assist you in learning how to use this function.
To open the Voice Mate application
•From the Home screen, tap the Apps > Voice Mate .
Using the Voice Mate application
1 Open the Voice Mate application.
2 Tap the Speak icon to turn it on. Say what you want it to do for you.
• If you say “Wake me up at 6 AM", Voice Mate will set the alarm for that
time.
NOTE: Use Voice Mate in a quiet environment so it can accurately
recognize your commands.
69
Page 72

Voice Mate Icons
The following Voice Mate icons are displayed at the bottom of the screen:
• Tap to display the Voice Mate QSlide window on the Home screen.
• Tap to say a voice command to execute.
• Tap to type a command to execute.
Voice Mate Options menu
Tap the Menu Key to access Settings and Help.
NOTE:
•When the language setting for Voice Mate is not the same as the
default language setting on your tablet, some commands, such as
launching apps, may not work.
•When entering text, you can only use letters or numbers.
•Voice Mate recognizes your speech better when you speak slowly.
•You can view examples of various commands by swiping the Voice Mate
main screen to the left.
Alarm
Setting your alarm
1 From the Home screen, tap Apps > Apps tab > Alarm/Clock >
.
2 Set the desired alarm time.
3 Set Repeat, Snooze duration, Vibration, Alarm sound, Alarm volume, Auto
app starter, Puzzle lock and Memo.
4 Touch Save.
70
Page 73

NOTE: To change alarm settings in the alarm list screen, touch the Menu
Key
and select Settings.
Calculator
Using your calculator
1 From the Home screen, tap Apps > Apps tab > Calculator .
2 Touch the number keys to enter numbers.
3 For simple calculations, touch the function you want to perform
( , , or ) followed by .
NOTE:
•For more complex calculations, touch the Menu Key
Scientific calculator, then choose the desired function.
•To view the calculation history, tap Menu Key
, select the
> Calculation history.
Calendar
Adding an event to your calendar
1 From the Home screen, tap Apps > Apps tab > Calendar .
2 Tap the drop-down menu at the top left corner to change the calendar
view (Day, Week, Month, Year, Agenda).
3 Tap the date you wish to add an event to and tap .
4 Touch the Event name field and enter the event name.
71
Page 74

5 Touch the Location field and enter the location. Check the date and enter
the time you wish your event to start and finish.
6 If you wish to add a note to your event, touch the Description field and
enter the details.
7 If you wish to repeat the alarm, set REPEAT and set REMINDERS, if
necessary.
8 Touch Save to save the event in the calendar.
NOTE: Touch and hold a spot on the calendar to quickly save a calendar
event on that date. Simply enter the event name and time, then tap Save.
You can tap Details and enter more information, or update the event with
additional details later.
Tasks
The Tasks app can be synchronized with your MS Exchange account. You
can create and manage your tasks using your tablet or from MS Outlook or
MS Office Outlook Web Access.
1 From the Home screen, tap Apps > Tasks .
2 Tap the Add task icon (in the upper-right corner of the screen).
3 Enter the Subject, Due date, Description, Repeat, and Reminder, as
necessary.
4 Tap Save.
72
Page 75

File Manager
The File Manager application allows you to manage files in your internal/
external storage.
To open the File Manager application
•From the Home screen, tap Apps > File Manager .
Voice Recorder
Use the voice recorder to record voice memos or other audio files.
Recording a sound or voice
1 From the Home screen, tap Apps > Apps tab > Voice Recorder .
2 Touch to begin recording.
3 Touch to end the recording.
4 Touch to listen to the recording.
NOTE: Touch to access your list of recordings. You can listen to the
saved recordings. The available recording time may differ from actual
recording time.
Sending the voice recording
1 Once you have finished recording, you can send the audio clip by
touching .
2 Choose from any of the available methods for sharing.
73
Page 76

Task Manager
You can manage your applications using Task Manager. You can easily check
the number of applications that are currently running and shut down certain
applications.
Task Manager Options
•Touch Stop to stop individual apps.
•Tap Stop all to stop all currently running apps.
•Tap the Menu Key to access Help, Sort by, and Settings.
POLARIS Office 5
POLARIS Office 5 is a professional mobile office solution that lets users
conveniently view various types of office documents, including Word, Excel
and PowerPoint files, anywhere or anytime, using their mobile devices.
To create a new document
1 From the Home screen, tap Apps > Apps tab > POLARIS Office 5
.
2 Register your email address on the Registration page.
NOTE: You can tap Skip to ignore the registration information.
3 Tap to start a new document.
4 Tap a document type from the drop-down list, then choose a template.
5 Enter contents in the document using the tools at the top of the screen
and the on-screen keyboard.
74
Page 77

6 When you're done working on the document, tap (in the top left corner
of the screen), then tap Save (or Save as to enter a new document name)
to save.
7 Enter the document name and touch Save.
To view and edit a document on your device
You can now easily view and edit a wide variety of file types, including
Microsoft Office documents and Adobe PDF, right on their mobile devices.
1 Open POLARIS Office 5 and search for a document.
2 Touch the document that you want to view or edit.
When viewing documents using POLARIS Office 5, the objects and layout
remain the same as in the original documents.
3 To edit the document, tap .
Google+
Use the Google+ app to stay connected with people via Google’s social
network service.
From the Home screen, tap Apps > Apps tab > Google+ .
NOTE: This application may not be available depending on the region or
service provider.
75
Page 78

Voice Search
The Voice Search app allows you to search webpages using your voice
instead of typing.
1 From the Home screen, tap Apps > Apps tab > Voice Search .
2 Say a keyword or phrase when Speak now appears on the screen. Select
one of the suggested keywords that appear.
NOTE: This application may not be available depending on the region or
service provider.
Downloads
Use the Downloads app to see what files have been downloaded.
From the Home screen, tap Apps > Apps tab > Downloads .
Box
The Box app makes you easy to access and edit your files, share content and
stay connected with your files from anywhere on any device.
To open the Box application
•FromtheHomescreen,tapApps > Apps tab > Box .
76
Page 79

The Web
Internet
Use this application to browse the Internet. Browser gives you a fast, full-color
world of games, music, news, sports, entertainment and much more, right on
your tablet wherever you are and whatever you enjoy.
From the Home screen, tap Apps > Apps tab > Internet .
Tap to go back one page.
Tap to go forward one page, to the page you connected to after the
current one. This is the opposite of what happens when you touch
the Back Key , which takes you to the previous page.
Tap to go to the Home page.
Tap to add a new tab.
Tap to access your bookmarks.
Tap to run QSlide.
Tap to close the current tab.
Tap to refresh or stop the current page.
Opening a page
•To open a new page, tap at the top of the browser.
•To go to another web page, tap a tab at the top of the screen to view the
page.
77
Page 80

Searching the web by voice
Tap the web address field, tap , speak a keyword, and then select one of
the suggested keywords that appear.
NOTE: This feature may not be available depending on the region or
service provider.
Bookmarks
To open a bookmarked web page, tap on the browser toolbar and select
one.
History
Tap on the browser toolbar and select the History tab to open a web
page from the list of recently-visited web pages. To clear the history, tap the
Menu Key > Clear all history.
Using QSlide
Use this feature to access the Internet without closing the current
application.
While viewing content on the browser, tap . You can then browse other
information on your tablet. To view the browser in full screen, tap .
Chrome
Use Chrome to search for information and browse web pages.
From the Home screen, tap Apps > Apps tab > Chrome .
NOTE: This application may not be available, depending on your region
and service provider.
78
Page 81

Viewing web pages
Tap the address field (at the top of the screen), enter a web address or
search criteria, and tap on the keyboard.
Opening a page
•To go to a new page, tap at the top of the browser.
•To go to another web page, tap the a tab at the top of the screen to select
the page.
Searching the web by voice
Tap the address field, tap , speak a keyword and select one of the
suggested keywords that appear.
NOTE: This feature may not be available depending on the region or
service provider.
Syncing with other devices
Sync open tabs and bookmarks to use with Chrome on another device when
you are logged in with the same Google account.
To view open tabs on other devices, tap the Menu Key > Other devices.
You must be signed in to the same Google account on all devices. Select a
web page to open.
Adding and viewing bookmarks
To add bookmarks, tap in the URL bar.
To open a bookmarked web page, tap the Menu Key > Bookmarks and
select the desired page.
79
Page 82

Chrome Options menu
Tap the Menu Key to access the following options.
•New tab – Tap to open a new web page tab.
•New incognito tab – Tap to open a new incognito tab.
•Bookmarks – Displays your bookmarked web pages.
•Other devices – Displays your open web pages on other devices.
•History – Displays your browsing data (web pages you've visited).
•Share... – Allows you to share the web page.
•Print... – Tap to print the web page. Choose to automatically find a printer
on your network, or manually enter one to use.
•Find in page – Allows you to search for text on the current web page.
•Request desktop site – Checkmark to access the desktop site when you
view web pages on your tablet.
•Settings – Allows you to change the settings specific to the Chrome app.
•Help – Displays information about using the Chrome app on your tablet.
80
Page 83

Settings
Access the Settings menu
1 From the Home screen, tap Apps > Apps tab > Settings .
OR
From the Home screen, tap the Menu Key > System settings.
2 Select a setting category and set the desired option.
WIRELESS NETWORKS
Wi-Fi
Wi-Fi – Turns on Wi-Fi to connect to available Wi-Fi networks.
A list of all available Wi-Fi networks will be displayed. Tap one to connect to
it.
NOTE: Tap Search to scan for available Wi-Fi networks.
Tap the Menu Key in the Wi-Fi menu to access the following options.
WPS Push Button – Allows you to connect to a secured Wi-Fi network with
a WPS button.
WPS Pin Entry – Allows you to connect to a secured Wi-Fi network with a
WPS PIN.
Add network – Allows you to manually enter a new Wi-Fi network.
81
Page 84

Wi-Fi Direct – Allows direct connection with Wi-Fi devices without any
access point.
Advanced Wi-Fi – Accesses the advanced Wi-Fi settings.
Interactive tutorial – Displays some useful tutorials for the Wi-Fi function.
TIP! How to obtain the MAC address
To set up a connection in some wireless networks with MAC filters, you
may need to enter the MAC address of your tablet in the router.
You can find the MAC address in the following user interface: From the
Home screen, tap Apps
Advanced Wi-Fi > MAC address.
> Settings > Wi-Fi > Menu Key >
Bluetooth
Turn the Bluetooth wireless feature on or off to use Bluetooth. Turning
Bluetooth on allows you to pair and connect to other Bluetooth devices.
Tap the Menu Key in the Bluetooth menu to access the following
options.
Edit tablet name – Changes your tablet name for easy identification when
pairing and connecting. Enter your new tablet name, then tap Save.
Visibility timeout – Sets the amount of time other Bluetooth devices can see
your tablet for pairing and connection. Choose from 2minutes, 5minutes,
1hour, and Never time out.
Show received files – Displays a list of your Bluetooth received files.
Interactive tutorial – Displays some useful tutorials about Bluetooth features.
82
Page 85

Data usage
Displays the data usage during the chosen periods of time. Tap an app from
the list to view the app's data usage.
More...
Allows you to share folders with other devices via wireless connection.
Airplane mode – Allows you to set Airplane mode. Activating Airplane mode
disables all wireless connections.
Wireless storage – You can manage files on your tablet in the computer or
copy files to the tablet from the computer without a USB connection. Make
sure that the tablet and computer are connected to the same network.
Then, enter the web addresses shown on your tablet into the address bar of
the browser on your computer.
Miracast – Allows you to wirelessly mirror your tablet screen and sound onto
a Miracast dongle or TV.
SmartShare Beam – Allows you to receive multimedia content via
SmartShare Beam from LG phones or tablets.
Media server – Allows to share media contents with nearby devices via
DLNA.
VPN – Displays the list of Virtual Private Networks (VPNs) that you've
previously configured. Allows you to add different types of VPNs.
NOTE: You must set a lock screen PIN or password before you can use
credential storage.
83
Page 86

DEVICE
Sound
Sound profile – Allows you to set the sound profile to Sound, Vibrate only or
Silent.
Volumes – Manage the volume for Notifications, Touch feedback & system,
and Music, video, games & other media.
Notification sound – Allows you to set your default notification ringtone.
Touch sounds – Allows you to set your tablet to play a sound when you touch
buttons, icons and other onscreen items that react to your touch.
Screen lock sound – Allows you to set your tablet to play a sound when
locking and unlocking the screen.
Vibrate on touch – Allows you to set the vibration feedback when the tablet
screen is touched.
Display
Home screen
Theme – Sets the screen theme for your device.
Wallpaper – Sets the wallpaper to use on your Home screen.
Screen swipe effect – Sets the effect when you swipe to change screens.
Allow Home screen looping – Checkmark to set the Home screens to
scroll continuously, eliminating the need to scroll back in the opposite
direction when you reach one end.
Home backup & restore – Allows you to backup and restore app and
widget configurations and themes.
84
Page 87

Do you know? – Enable this option to display the Do you know? help page
as an additional Home screen canvas.
Help – Displays information about the Home screen.
Lock screen
Select screen lock – Set a screen lock type to secure your tablet.
Screen swipe effect – Sets the screen swipe effect options.
Weather animation – Checkmark to show weather animation for the
current location or primary city set in Weather based on auto data
updates.
Wallpaper – Sets your Lock screen wallpaper. Select it from Gallery or
Wallpaper gallery.
Shortcuts – Allows you to change the shortcuts on the Swipe Lock screen.
Contact info for lost phone – Checkmark to set contact info to be
displayed on the Lock screen in case the tablet is lost. Tap to enter
the text you want displayed as the contact info.
Portrait view only – Checkmark to always display the Lock screen in
portrait view.
Lock timer – Sets the amount of time before the screen automatically
locks after the screen has timed-out.
Power button instantly locks – Checkmark to instantly lock the screen
when the Power/Lock Key is pressed. This setting overrides the Security
lock timer setting.
Brightness – Adjust the screen brightness. Touch Auto to set the brightness
to automatically change.
Screen timeout – Set the time delay before the screen automatically turns
off.
85
Page 88

KnockON – This feature allows you to turn the screen on and off. Quickly
double-tap the center of the screen to turn it on. Double-tap the Status Bar,
an empty area on the Home screen, or the Lock screen to turn the screen
off. For the best results, do not move the tablet while using the KnockON
feature.
Screen-off effect – Sets the screen-off effect used when the screen turns
off.
Auto-rotate screen – Set to switch orientation automatically when you rotate
the tablet.
Daydream – Tap the Daydream switch to toggle it On or Off. On allows
the set screen saver to be displayed when the tablet is sleeping while docked
and/or charging. Choose from Clock, Colors, Google Photos, Photo Frame,
and Photo Table.
NOTE: Charging might be slow while the screen saver is on.
Font type – Change the type of display font.
Font size – Change the size of the display font.
Smart screen – Keeps the screen on when the device detects your eyes
looking at the screen.
Smart video – Checkmark to pause the video when it doesn't detect your
eyes looking at the screen.
Front touch buttons – Set the Front Touch Keys displayed at the bottom of
all of the screens. Set which ones are displayed, their position on the bar,
and what they look like. You can also select the theme and the background.
Motion sensor calibration – Allows you to improve the accuracy of the tilt
and speed of the sensor.
86
Page 89

Storage
INTERNAL STORAGE – Displays the total amount of space in the device’s
memory and lists what type of data is using up space.
SD CARD – Displays the total amount of memory space on the microSD
card.
Mount/Unmount SD card – Mounts and unmounts the microSD card
from your tablet so that you can access the data stored in it, format the
card, or safely remove it. This setting is dimmed if there’s no microSD
card installed, if you’ve already unmounted it, or if you’ve mounted the
microSD card on your computer.
Erase SD card – Permanently erases everything on the microSD card and
prepares it for use with your tablet.
Battery
BATTERY INFORMATION – See how much battery power is used for device
activities. The battery level displays in a percentage. The remaining time of
use is also displayed.
Battery percentage on status bar – Displays the battery percentage on the
Status Bar.
Battery saver – Manage the battery for the power saving items. Tap the
switch to turn this feature on. Tap Battery saver for the following
options.
• Turn Battery save on: Set the battery level at which you want Battery
saver to turn on.
• Auto-sync: Turns off Auto-sync.
• Wi-Fi: Turns off Wi-Fi if data is not in use.
87
Page 90

• Bluetooth: Turns off Bluetooth if not connected.
• Vibrate on touch: Turns off touch feedback.
• Brightness: Adjusts the brightness.
• Screen timeout: Adjusts the screen timeout.
Help – Touch to access some tips for Power saver.
Apps
Display the list of applications such as currently running or downloaded.
Swipe left and right to view one of the three tabs across the top of the
screen to view detailed information for DOWNLOADED, RUNNING, and ALL
applications.
Tap an entry to view more information, tap Force stop (or Stop), then OK to
stop it from running.
Slide Aside
Slide Aside allows you to quickly switch between three open applications (or
tasks) using a three finger gesture. Refer to page 31 for more information.
PERSONAL
Accounts & sync
Permits applications to synchronize data in the background, whether or
not you are actively working in them. Deactivating Auto-sync data can save
battery power and lower (but not eliminate) data usage.
Cloud
Tap Add account to add a cloud account.
88
Page 91

Users
Checkmark to set the device owner’s name to be displayed on the Lock
screen. Tap to enter the text to be displayed as the Owner info.
Add user – Allows you to add new account for the tablet and use the Multiuser feature.
Location access
Mode
High accuracy – Use GPS and Wi-Fi networks to estimate location.
Battery saving – Use Wi-Fi networks to estimate location.
Device sensors only – Use GPS to pinpoint your location.
RECENT LOCATION REQUESTS – Displays apps that have recently
requested your location information.
LOCATION SERVICES
Google Location Reporting – Allows you to view your Google location
settings.
Security
Encrypt tablet – Allows you to encrypt data on the tablet for security. You will
be required to enter a PIN or password to decrypt your tablet each time you
power it on.
Encrypt SD card storage – Allows you to encrypt data on the MicroSD for
security.
Password typing visible – Shows the last character of the hidden password
as you type.
89
Page 92

Tablet administrators – View or deactivate tablet administrators.
Unknown sources – Allows installation of apps from non-Play Store
applications.
Verify apps – Disallow or warn before installation of apps that may cause
harm.
Storage type – Displays the storage type for certificates.
Trusted credentials – Displays trusted CA certificates.
Install from storage – Choose to install encrypted certificates.
Clear credentials – Remove all certificates.
Language & input
Use the Language & input settings to select the language for the text on
your tablet and to configure the on-screen keyboard, including words you've
added to its dictionary.
Backup & reset
Back up my data – Set to backup your settings and application data to the
Google server.
Backup account – Set the account to which you want to backup data to.
Automatic restore – Set to restore your settings and application data when
the applications are reinstalled on your device.
LG Backup service – Backs up all information on the device and restores it in
the event of data loss or replacement.
Factory data reset – Reset your settings to the factory default values and
delete all your data. If you reset the tablet this way, you are prompted to
re-enter the same information as when you first started Android.
90
Page 93

SYSTEM
Date & time
Use Date & time settings to set how dates will be displayed. You can also
use these settings to set your own time and time zone rather than obtaining
the current time from the mobile network.
Accessibility
Use the Accessibility settings to configure accessibility plug-ins you have
installed on your tablet.
NOTE: Requires additional plug-ins to become selectable.
TalkBack – Allows you to set up the TalkBack function which assists people
with impaired vision by providing verbal feedback. Tap the TalkBack switch
at the top right corner of the screen to turn it on. Tap Settings at the
bottom of the screen to adjust the TalkBack settings.
On-Screen Phone – Allows you to turn the On-Screen Phone feature on and
off.
Large text – Checkmark to increase the size of the text.
Invert colors – Checkmark to invert the colors of the screen and content.
Color adjustment – Sets to view the screen with greater color contrast. Tap
the switch to turn it on. Then tap the screen and drag across the
screen in any direction until you see the color contrast you want to use.
Touch zoom – Allows you to zoom in and out by triple-tapping the screen.
Screen shades – Dims the screen's backlight.
Mono audio – Checkmark to combine both audio channels to play in each
ear. To manually set the audio route, move the slider on the mono audio
slide bar.
91
Page 94

Captions – Allows to customize caption settings for those with hearing
impairments. Tap the switch to turn this feature on. Set the language,
text size, and caption style options as desired.
Touch feedback time – Sets the touch and feedback time. Choose from
Short, Medium, and Long.
Universal touch – Touch the switch to toggle between on and off. On
allows you to replace the hardware keys with a Universal touch board .
Tap the Universal touch icon to access the Power, Home, Volume down,
Volume up, and Pinch buttons. Draw a "W" on the board to automatically
launch the browser application.
Auto-rotate screen – Checkmark to allow the device to rotate the screen
depending on the device orientation (portrait or landscape).
Read passwords – Checkmark to have verbal confirmation when inputting
passwords.
Accessibility settings shortcut – Sets quick, easy access to selected features
when you triple-tap Home Key.
Text-to-speech output – Sets the text-to-speech preferred engine and
speech rate setting. Also plays a short demonstration of speech synthesis.
The default language status is also displayed.
PC connection
Select USB connection method – Opens a dialog box to choose the default
connection mode when connecting your tablet to a PC via USB. Choose
from Charge tablet, Media sync (MTP), LG software or Send images (PTP).
Ask upon connecting – Checkmark to have the tablet ask you to choose
which USB connection mode it should connect with to a PC.
92
Page 95

Help – Touch to get information on the different types of USB connections.
PC Suite – Allow Wi-Fi connection to transfer music and images between a
computer and the tablet.
Help – Displays help information for the PC Suite function.
Accessory
Quick Cover – Activate the Quick Cover to turn the screen on or off
automatically.
USB storage Plug & Pop – Sets the Plug & Pop feature for USB storage.
Checkmark each desired option to automatically display that app on the app
panel. Drag to change the icon location.
Earphone Plug & Pop – Sets the Plug & Pop feature for earphones.
Checkmark each desired option to automatically display that app on the app
panel. Drag to change the icon location.
Dock Plug & Pop – Sets the Plug & Pop features for Dock. Checkmark each
desired option to automatically display that app on the app panel. Drag
to change the icon location.
Printing
Allows you to print the content of certain screens (such as web pages
displayed in Chrome) to a printer connected to the same Wi-Fi network as
your Android device.
About tablet
This menu allows you to manage your software updates and view various
information relating to your tablet.
Tablet name – Allows you to set your tablet name.
Update Center – Allows you to check for app and software updates.
93
Page 96

Battery – Allows you to view battery status, battery level, and battery use
information.
Hardware information – Allows you to view the model number, IP address,
up time, CSN, Wi-Fi MAC address and Bluetooth address.
Software information – Allows you to view Android version, kernel version,
build number, and software version.
Legal information – Allows you to view open source licenses and Google
legal information.
94
Page 97

LG Backup
About backing up and restoring device data
It is recommended that you regularly create and save a backup file on the
internal storage, especially before updating any software. Maintaining a
current backup file in storage memory may allow you to recover device data
if your device is lost, stolen, or corrupted by an unforeseen issue.
This LG Backup application is supported between LG smartphones and
tablets, other software or operating system versions. As a result, when you
buy the new LG smartphones and tablets, you can backup the current device
data to your new device.
If you have the LG Backup application preloaded on your smartphones and
tablets, you can backup and restore most of your data, including downloaded
and pre-installed applications, bookmarks, calendar entries, contacts, home
screen settings, and system settings. You may also:
•Perform a manual LG Backup of your device.
•Schedule automatic backups of your device.
•Restore your device data.
Warning! To protect against an unexpected power off during backup or
restore operations, due to insufficient battery power, you should always
keep your battery fully charged.
95
Page 98

LG Backup your tablet data
1 From the Home screen, tap Apps > Apps tab > LG Backup >
Backup.
2 Select the check box for the items you want to backup and select Next.
3 On the Backup Location screen, touch Internal storage or SD card, then
tap Next, followed by Start.
4 When all selected files have been backed up, you will see the message
Backup completed.
Scheduling automatic backups
You can also program automatic backups for the data on your tablet
according to your schedule setting. To do this, complete the following steps:
1 From the Home screen, tap Apps > Apps tab > LG Backup >
Scheduled backup.
2 Tap Backup items and select the check box next to the item you want to
backup.
3 Tap Backup location, and select Internal storage or SD card.
4 Set the backup time and scheduled backup files.
5 Tap the switch to activate automatic backups.
Restoring tablet data
NOTE: All files that are stored on your tablet are deleted before the
backup file is restored.
96
Page 99

1 From the Home screen, tap Apps > Apps tab > LG Backup > File
restore & management.
2 On the Restore screen, select a backup file that contains the data you
wish to restore.
3 Select the check box next to the item you wish to restore and select Next
to restore it to your tablet.
NOTE: Please note that your tablet data will be overwritten with the
content of your backup.
4 If the backup file is encrypted, type the password that you created to
encrypt it.
5 When all selected files have been restored, the tablet will automatically be
restart.
NOTE: You can set the lock option when creating a backup to encrypt
your backup files for extra protection.
On the LG Backup main screen, touch the Menu Key > Set password
and enter a password and hint in case you forgot your password. Once you
have set up a password, you need to enter it every time you want to do
backup/restore.
97
Page 100

Tablet software update
Tablet software update
This feature allows you to update the firmware of your tablet to the latest
version conveniently from the internet without the need to visit a service
center. For more information on how to use this function, please visit:
http://www.lg.com
As the tablet firmware update requires the user’s full attention for the
duration of the update process, please make sure to check all instructions
and notes that appear at each step before proceeding. Please note that
removing the USB cable or battery during the upgrade may seriously
damage your tablet.
LG tablet software update via Over-the-Air (OTA)
This feature allows you to update the firmware of your tablet to the newer
version conveniently via OTA without connecting the USB data cable. This
feature is only available if and when LG makes the newer version of the
firmware available for your device. First, you can check the software version
on your tablet:
From the Home screen, tap the Menu Key > System settings > About
tablet > Software information.
To perform the tablet software update, from the Home screen, tap the Menu
Key > System settings > About tablet > Update Center > Software
Update > Check now for update.
98
 Loading...