

Page 1
LGV32
《auNanoICCard04》
auNanoICCard04slot
auNanoICCard04slotGroove
memo
BasicManual
Fordetailedoperationmethods,referto"BasicManual"applicationinstalledontheproduct.
September 2015, 2nd Edition
MFL69165002(1.1)
Forinquiries,call:
Customer Service Center
For general, charge, operations (toll free)
Business hours 9:00 – 20:00
From fixed-line phones:
0077-7-111
PRESSING ZERO WILL CONNECT YOU TO AN OPERATOR
AFTER CALLING 157 ON YOUR au CELL PHONE
For service canceling procedure in case of loss or theft
Business hours 24-hour (7 days a week)
From fixed-line phones:
0077-7-113
In case above numbers are not available,
0120-977-033 (except Okinawa)
0120-977-699 (Okinawa)
Keitai Guarantee Service Center
For loss, theft or damage (toll free)
Business hours 9:00 – 21:00 (7 days a week)
From fixed-line phones/au cell phones,
0120-925-919
(7 days a week)
From au cell phones:
157
area code not required
(toll free)
From au cell phones:
113
area code not required
Cell phone and PHS operators collect and
recycle unused telephones, batteries and
battery chargers at stores bearing the
logo regardless of brand and manufacturer
to protect the environment and reuse
valuable resources.
Sold by: KDDI CORPORATION,
OKINAWA CELLULAR TELEPHONE COMPANY
Imported by: LG Electronics Japan Inc.
Manufactured by: LG Electronics Inc.
It is very dangerous to charge
the product in a wet state,
this could cause abnormal
heat generation or a burnout.
Preface
Thank you for purchasing the "isai vivid (LGV32)"
(simply called the "product" from here on).
Before using the product, be sure to read the "Setting
Guide", "Notes on Usage", "Basic Manual" (this manual) or
"取扱説明書 詳細版 (Full Instruction Manual)" (Japanese)
available on the au homepage to ensure correct use.
After you have nished reading this PDF and the printed
manuals, be sure to store them in safe places so that
you can retrieve them whenever needed.
List of Packaged Items
Before you start using the product, make sure that you
have all of the following packaged with the product.
●Main unit
(including back cover)
●Battery pack
(LGV32UAA)
●LG TV antenna cable 01 ●設定ガイド (Setting
Guide) (Japanese)
●ご利用にあたっての注意
事項 (Notes on Usage)
(Japanese)
●取扱説明書 (Basic
Manual) (Japanese)
●保証書 (Warranty)
(Japanese)
The following items are not included in the package.
●microUSB cable
●microSD memory card
●Earphone
●AC adapter
●Desktop holder
memo
• Purchase a specied charger (sold separately).
• The illustrations of the cell phone in the manual
are used only for explaining. They may dier from
the actual product.
• When watching TV, connect the antenna cable. For
details on connecting, refer to "TV antenna cable."
About Operating Instructions
Basic Manual (this manual)
Handles only basic operations for main features.
For detailed descriptions on various functions,
refer to the "Basic Manual" application installed on
the product or "取扱説明書 詳細版 (Full Instruction
Manual)" (Japanese) available on the au homepage.
http://www.au.kddi.com/support/mobile/guide/manual/
• All company names and product names in this manual
are either trade marks or registered trade marks.
Basic Manual application
You can use the "Basic Manual" application on the
product to conrm detailed operational procedures.
Certain functions can be directly activated from the
application screens on which their operations are
described.
● Operation procedures
On the home screen u " " u "サ ポ ート
a
(Support)" u "Basic Manual"
• When you activate for the rst time, follow the
onscreen instructions to download and install the
application.
- 1 -
- 2 - - 3 - - 4 - - 5 - - 6 -
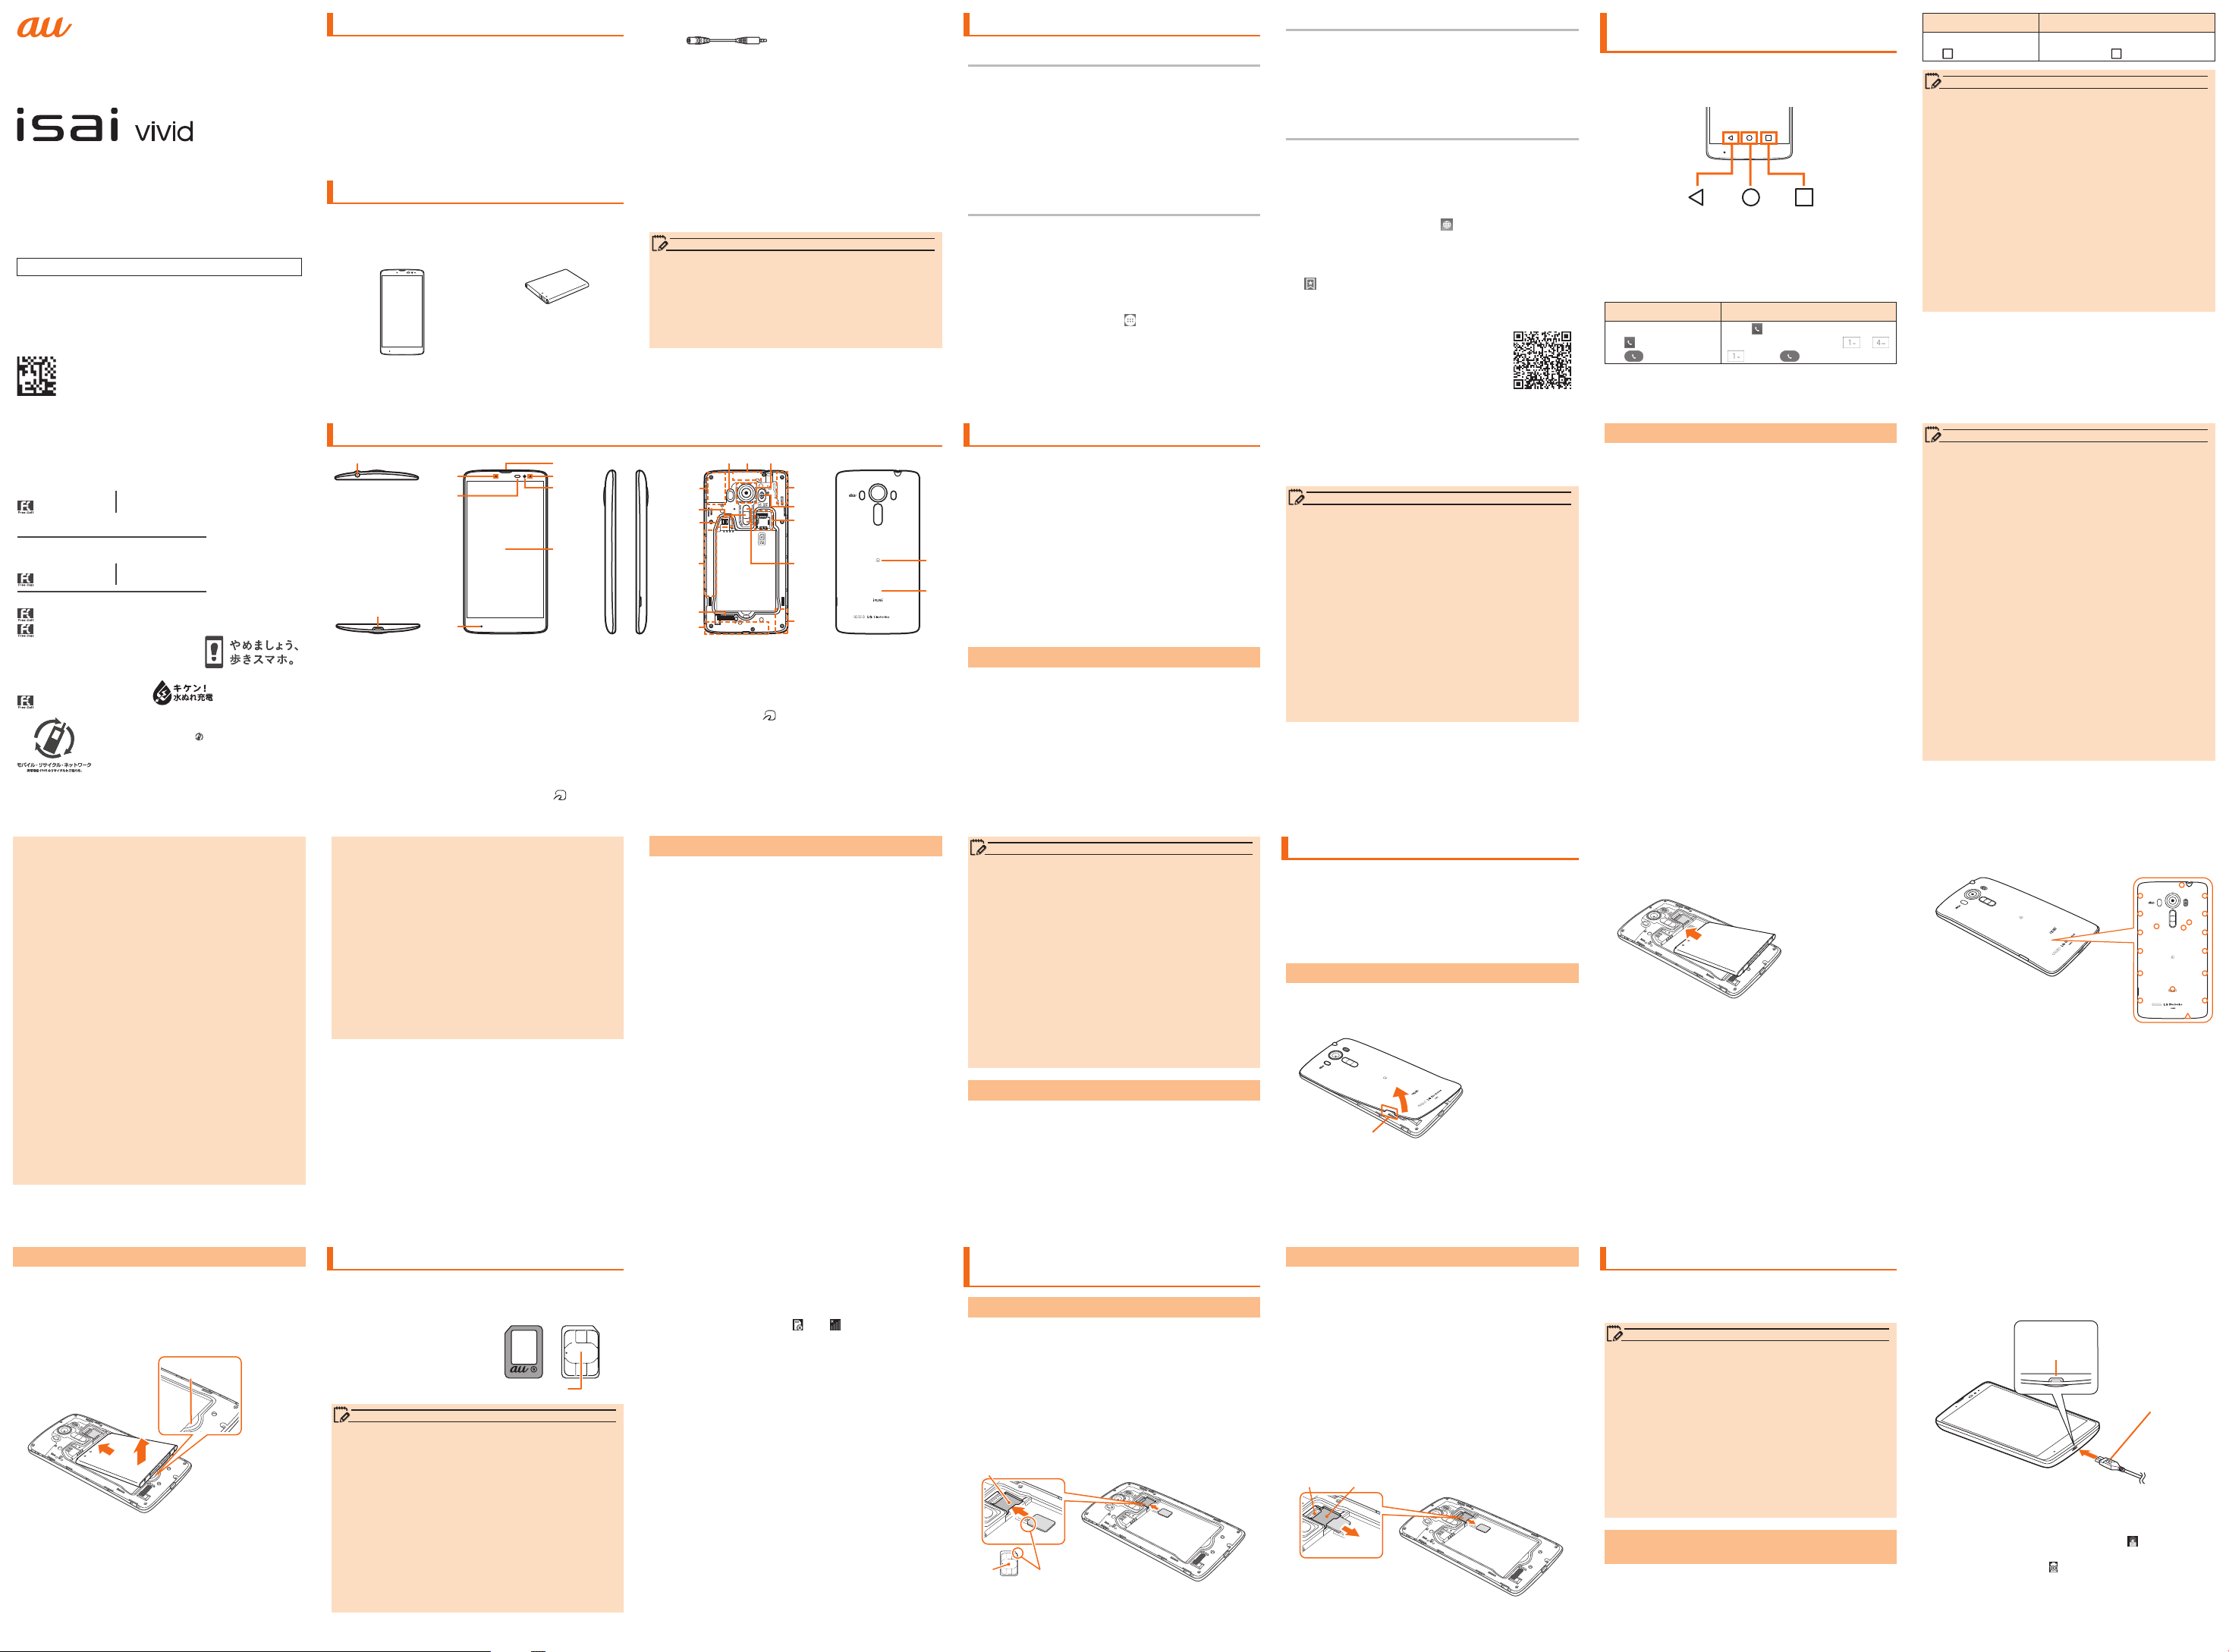
Names and Functions of Parts Using au Disaster Countermeasure
a
c
d
f
g
h
m
n
o
i
k
b
e
Earphone■jack
a
External■connection■terminal
b
LED■Notication
c
Proximity■sensor/Light■sensor
d
Mouthpiece■(Microphone)
e
Earpiece■(Receiver)
f
Sub■microphone
g
Inward-facing■camera■(lens)
h
*1 When shooting with the main camera, you can use the laser to detect the distance in order to focus on objects
further away and more accurately.
*2 Do not cover the built-in antenna with your hand or put stickers etc. Call/data communication quality becomes worse.
*3 Be careful not to forcefully touch the FeliCa terminal as you may damage it.
*4 A portion of the back cover (Leather black, Leather brown) diers from that of the back cover design in the illustration.
When using a reader/writer, refer to the
- 7 - - 8 - - 9 - - 10 - - 11 - - 12 -
Display■(Touch■panel)
i
Laser■auto■focus■sensor
j
Built-in■antenna■(sub■antenna)
k
Outward-facing■camera■(lens)
l
Built-in■antenna■(sub■antenna,■GPS)
m
Power■key
n
FeliCa■terminal
o
Speaker
p
■in the illustration and swipe it near the center of the product.
*3
p
q
*1
*2
l
kj
r
s
t
u
q
Built-in■antenna■(Call,■Internet)
q
Built-in■antenna■(Wi-Fi®,■Bluetooth®)
r
Photo■light/RGB■sensor
s
au■Nano■IC■Card■04■slot/microSD■
t
*2
memory■card■slot
Volume■key■(DOWN/UP)
u
v
w
*4
■Mark
Back■cover
*4
au災害対策■(au■Disaster■Countermeasure)■is■
an■application■with■which■you■can■use■災害用伝
言板■(Disaster■Message■Board),■緊急速報メール■
(Emergency■Rapid■Mail)■(緊急地震速報■(Earthquake■
Early■Warning),■災害・避難情報■(Disaster■and■
Evacuation■Information),■津波警報(Tsunami■Warning)),■
災害用音声お届けサービス■(Disaster■Voice■Messaging■
Service)■and■災害関連情報■(Disaster-related■
v
information).
w
LGV32
*2
*2
On the home screen u "au災害対策 (au Disaster
a
Countermeasure)"
au災害対策 (au Disaster Countermeasure) menu
appears.
Using■Disaster■Message■Board
Disaster Message Board service enables you to
register information of well-being from an area of
distress via LTE NET in case of large-scale disaster
such as earthquake with a seismic intensity of over
6 lower. Registered information can be viewed on any
carriers and PCs besides by au cell phone users.
For details, refer to "Disaster Message Board" of au
homepage.
Downloading Manuals
You can download the "Basic Manual" (this PDF
manual), the "Setting Guide", the "Notes on Usage"
and "取扱説明書 詳細版 (Full Instruction Manual)"
(Japanese) in PDF format from the au homepage.
Download URL: http://www.au.kddi.com/support/
mobile/guide/manual/
Support information
You can view videos and images describing basic
operations and recommended functions as well as
instruction manuals, update information, and other
support information.
● Operation procedures
On the home screen u " " u Slide the browser
a
screen page down
A tool bar is displayed at the bottom of the
browser screen.
" " u "isai vividサポート情報 (isai vivid support
b
information)"
● From a computer or smartphone
http://www.au.kddi.com/support/
mobile/guide/smartphone/lgv32/
index.html?bid=cs-cs-mobile0002
au災害対策 (au Disaster Countermeasure)
a
menu screen u "災害用伝言板 (Disaster
Message Board)"
Follow the onscreen to register/conrm.
memo
• To register information of well-being, E-mail
address ( ~ ezweb.ne.jp) is required. Set up E-mail
address beforehand. For details on the settings of
an e-mail address, refer to "Setting Guide".
• Deleting or changing the setting for information of
well-being is unavailable during wireless LAN (Wi-Fi
connection.
• The Company makes no guarantees about the
quality of this service. The Company is not liable
in the event of any non-conformities about the
registration of well-being information or damages
by the loss of well-being information arising from
intense access to this service or equipment failure
or damages caused by the registered well-being
information.
Regarding Notations Used in This
Manual
■■ Key■indications■used■in■this■manual
In this manual, keys are represented by simplied
illustrations as shown below.
■■ Indications■used■for■the■operation■of■selecting■
items/icons/buttons,■etc.
The notations used for operation procedures in this
manual are as follows.
Tap means to lightly touch and release the button or
icon shown on the display to select it.
Description Explanation
On the home screen
u
u
" "
"1" "4" "1"
u
" "
Using■Emergency■Rapid■Mail
Emergency Rapid Mail is a service that distributes
Earthquake Early Warning or Tsunami Warning
delivered from the meteorological bureau or Disaster
and Evacuation Information delivered from the
government or local public organization to all au cell
phones in specied areas simultaneously.
When you purchase the product, "受信設定 (Receive
options)" of the Emergency Rapid Mail is set to "
受信する (Receive)". Reception setting of Tsunami
®
Warning is available in the settings of Disaster and
)
Evacuation Information.
When you receive Earthquake Early Warning, ensure
your safety and take proper action according to the
situation around you.
When you receive a Tsunami Warning, stay away from
sea coast immediately and evacuate to safe place
such as upland or well-built high building.
au災害対策 (au Disaster Countermeasure)
a
menu screen u "緊急速報メール (Emergency
Rapid Mail)"
Inbox appears.
Tap " (Phone)" on the bottom
of home screen. Tap " " " "
" " and " " .
Description Explanation
On the home screen
u
"
"
On the bottom of the home
screen, tap " " .
memo
• This manual uses screenshots and describes
operations with the au Nano IC Card 04 inserted.
• Descriptions in this manual are based on the
operations of portrait screen. Items, icons, or
the keys on the screen may look dierent with
landscape screen.
• Items, title levels, and icons in this manual may
look dierent based on dierent functions you use
or dierent conditions, etc.
• In this manual, "microSD™ memory card",
"microSDHC™ memory card" or "microSDXC™
memory card" is called "microSD memory card" or
"microSD" for short.
• All of the indicated amounts exclude tax unless
otherwise specied.
■■ Illustrations■and■screen■displays■used■in■this■manual
Illustrations and screens shown in this manual may
look dierent from the actual product or screen.
In some cases, minor details or a part of a screen
may be omitted.
memo
• Reception of Emergency Rapid Mail is notied
by a special warning tone and vibration. It is not
possible to change the warning tone.
ñ Reception of Earthquake Early Warning is
notied by a special warning tone, voice ("地震で
す"Jishindesu"" (An earthquake)) and vibration.
• When you receive Emergency Rapid Mail during a
call, the warning tone does not sound.
• Earthquake Early Warning is sent to areas where
strong quakes (over 4 degrees) are expected
when the earthquake whose the maximum seismic
intensity 5 lower is anticipated occurs.
• Immediately after an earthquake occurs, quakes
(P waves and initial tremors) near the epicenter
are detected and position, scale, and expected
strength are automatically calculated and
notication is sent as soon as possible within a
few seconds to tens of seconds before the strong
quakes (S waves and major tremors) caused by
the earthquake start.
• Earthquake Early Warning may not arrive before
strong tremors in arrears near the epicenter.
• Tsunami Warning is a notication delivered from
the meteorological bureau (major tidal wave,
seismic sea wave) to the area including target
coast.
• Disaster and Evacuation Information is a service
that distributes bulletins concerning residents'
safety including evacuation advisories, evacuation
orders and other warnings issued by the national
and local governments.
• The service is available only in Japan (it cannot be
used overseas).
• No information fee or communication charge is
required for receiving Emergency Rapid Mail.
• KDDI is not liable for damages suered by
customers resulting from the service's information,
lack or delay in the information caused by
transmission or system breakdowns, or other
events that are outside the responsibility of KDDI.
• Refer to the Japan Meteorological Agency web
page for details about distribution of Earthquake
Early Warning.
http://www.jma.go.jp/
• You cannot receive any Emergency Rapid Mail if
the product is turned o.
- 13 - - 14 - - 15 - - 16 - - 17 - - 18 - - 19 -
Removing■Battery■Pack
Remove the back cover
a
Insert your ngernail in the recess of the unit,
b
and while pushing the battery pack in the
direction of the arrow (a), lift it in the direction
of the arrow (b)
Recess
b
a
Attach the back cover
c
- 20 - - 21 - - 22 - - 23 - - 24 - - 25 - - 26 -
• Emergency Rapid Mail may not be received when
your cell phone is communicating if you are in a
place where signal does not reach even in the
service area (e.g. in a tunnel, basement) or in a
place with a poor reception.
• You cannot receive Emergency Rapid Mail once
the reception is failed.
• This delivery system is dierent from Earthquake
Early Warning provided through TV, radio, or other
communication procedures, which means that the
time the Earthquake Early Warning arrives may
vary.
• Information from someplace other than your
current location may be received.
au Nano IC Card 04
au■Nano■IC■Card■04■stores■your■personal■information■
such■as■a■phone■number.
• The product is
compatible with au Nano
IC Card 04 only. You
cannot use the product
with an IC card other
than au Nano IC Card 04.
memo
• Note the following points, which may cause
malfunction or damage, when handling the au Nano
IC Card 04.
- Do not touch the IC (metal) part of the au Nano IC
Card 04 or the IC card terminal inside the product.
- Insert the au Nano IC Card 04 in the correct
orientation.
- Do not use force to attach or remove the IC card.
• Do not lose the au Nano IC Card 04 after it has
been removed.
• Before attaching/removing au Nano IC Card 04, be
sure to remove the microUSB connector of specied
AC adapter (sold separately) etc. from the product.
IC(metal)part
Using■Disaster■Voice■Messaging■Service
Disaster Voice Messaging Service is a service which
allows you to record your voice and send someone
you want to inform your well-being in case of a largescale disaster.
au災害対策 (au Disaster Countermeasure)
a
menu screen u "災害用音声お届けサービス
(Disaster Voice Messaging Service)"
■■ Sending■voice■(sending)
Select "声をお届け (Sending voice)", "①お届け先を選択 (Select
delivery)*" → "②お届けしたい声を録音 (Record voice)"
* Alternatively, delivery address can be selected in Contacts.
■■ Receiving■voice■(receiving)
Receiving voice messages is notied on a pop-up screen or
SMS. To listen to voice messages, receive (download) and
play it.
• When a recipient uses a smartphone without au災
害対策 (au Disaster Countermeasure) activated or
au cell phone, SMS is sent.
• In case of receiving SMS, the information is not
saved on au災害対策 (au Disaster Countermeasure).
When■au■Nano■IC■Card■04■is■not■inserted
■■
You cannot use this product with any cards other
than au Nano IC Card 04.
If you turn the product on when the au Nano IC Card
04 is not inserted or when you insert any cards other
than au Nano IC Card 04,
and are displayed on
the status bar and the following operations are not
available.
• Make a call*/receive a call
• Receiving/sending and initial settings of e-mail (@
ezweb.ne.jp)
• Receiving/sending SMS
•
Conrm your own phone number
• Set up UIM card lock
* Emergency calls to 110 (Police), 119 (Fire department
or ambulance service), 118 (Japan Coast Guard), and
157 (Customer Service Center) are also not available.
Besides the above, some functions requiring your
phone number might not be available.
■■
Restriction■settings■with■PIN
You can set the product to restrict the use of the
product by others through changing the PIN code
or locking the UIM card in order to protect your
important private information while you are using your
au Nano IC Card 04.
memo
• For use over Wi-Fi®, it is necessary to carry out
initial settings over 4G (LTE/WiMAX 2+) network.
• Voice messages can be recorded for up to 30
seconds.
• Messages can be sent and received to or from au
cell phones, other network operators' cell phones
and PHS.
• Voice message may be dicult to hear if the media
volume is low or Silent mode (sets Sound prole to
"Vibrate only") is set.
• Saving or playing Voice messages may fail if a
phone does not have available memory.
• Some cell phones do not support receiving voice
messages. For details, refer to au homepage.
Using■Disaster-related■information
You can check Disaster and Evacuation Information
history delivered by local government, and disasterrelated portals, etc.
au災害対策 (au Disaster Countermeasure)
a
menu screen u "災害関連情報 (Disaster-related
information)"
Follow the onscreen instructions
b
Attaching/Removing au Nano IC
Card 04
Attaching■au■Nano■IC■Card■04
Before attaching the au Nano IC Card 04, rst turn
o this product, and remove the back cover and
battery pack.
Remove the back cover
a
Remove the battery pack
b
Insert the au Nano IC Card 04 card into the
c
au Nano IC Card 04 slot in the direction of the
arrow
• Note the direction of the notch.
IC
Notch
Attaching/Removing Battery Pack
• Before attaching/removing the back cover and/
or battery pack, be sure to turn o the product. Do
not attach/remove the back cover and/or battery
pack with AC adapter (sold separately) connected
to the external connection terminal.
• Only use the battery pack made for this product.
Attaching■Battery■Pack
Hook the groove of the back cover with your
a
ngernail, then lift it from the bottom in the
direction of the arrow to remove it
Groove
Removing■au■Nano■IC■Card■04
Before removing the au Nano IC Card 04, rst turn o
this product, and remove the back cover and battery
pack.
Remove the back cover
a
Remove the battery pack
b
Insert your ngernail into the groove at the
c
back of the au Nano IC Card 04 slot and push
the au Nano IC Card 04 in the direction of the
arrow (a)
• If a microSD memory card is inserted, remove that
rst.
Gently pull out the au Nano IC Card 04 in a
d
straight line (b)
a
b
Place the face of the battery pack with the
b
au logo upwards, align the product connector
with the battery pack terminal, and insert the
battery pack in the direction of the arrow (a)
a
Check the orientation of the back cover, align
c
it with the top of the unit (camera lens and
keys, etc.), and press each tab rmly to attach
the cover
Charging
When■you■purchase■your■cell■phone,■the■battery■pack■is■
not■fully■charged.■Charge■the■battery■pack■when■you■use■
it■for■the■rst■time■or■when■its■battery■is■not■enough.
• While charging, the product and its battery pack
might become hot. It is not abnormal. (When
activating camera or communicating data while
charging, the battery pack becomes hot.)
• It may take longer to charge the built-in battery
when you use camera function, etc. while charging
the battery.
• Operating with the specied charging equipment
(sold separately) being connected might cause
short-time charge/discharge repeatedly. Life of the
battery pack becomes shorter when you repeatedly
charge it frequently.
Charging with the Specied AC Adapter
(Sold Separately)
Describe how to charge by using the common AC
adapter 05 (sold separately).
For details on the specied AC adapter (sold separately),
refer to "Introduction of Related Accessories".
• To maintain waterproof performance, securely close
the cover to make sure that the cover is not partially
open.
△:Thereisnotabhereontheback
cover(Leatherblack,Leatherbrown).
Insert the microUSB connector of the common
a
AC adapter 05 (sold separately) straight into
the external connection terminal of the product
• Insert the microUSB connector straight with the "▲"
mark facing up.
External
connection
terminal
microUSB
connector
(▲-engraved
sidefacingup)
Insert the power plug of the common AC
b
adapter 05 (sold separately) into a 100 V AC
power outlet
On the status bar of the screen top,
is displayed
to show the charging is starting. When the
charging is nished,
is displayed.
Page 2

When charging is completed, remove the
c
microUSB connector of the common AC
adapter 05 (sold separately) straight from the
external connection terminal of the product
Remove the power plug of the common AC
d
adapter 05 (sold separately) from power
outlet
memo
When■ ■is■not■displayed
• Wait until is displayed on the status bar of
the top screen. Bad connection is assumed if it
does not appear after a while. Check if Common
AC Adapter 05 (sold separately) is securely
connected. If it still does not appear, stop charging
and contact an au shop or a Keitai Guarantee
Service Center.
Charging■with■a■PC
Insert the microUSB connector of the
a
microUSB cable (sold separately) directly into
the external connection terminal of the product
• Insert the microUSB connector straight with the "B"
mark facing up.
- 27 - - 28 - - 29 - - 30 - - 31 - - 32 - - 33 -
Insert the microUSB connector of the
b
microUSB cable (sold separately) straight into
the USB port of the PC
External
connection
terminal
b
a
USBportofPC
memo
• Although charging with the power of the product
on is available, it takes longer.
• It may take longer to charge with USB than the
specied AC adapter (sold separately).
• When the "Start new hardware search wizard"
window appears, select "Cancel".
microUSBcable
(soldseparately)
Turning the Power On/O
Turning■the■Power■On
Power key (Press and hold for more than 2
a
seconds)
The lock screen appears.
Swipe the screen to unlock.
Turning■the■Power■O
Power key (Press and hold for more than 2
a
seconds)
"Power o" u "OK"
b
Lock screen
The■Lock■screen■is■displayed■when■the■power■is■
turned■on■or■after■sleep■mode■has■been■deactivated.
On■the■Lock■screen,■you■can■check■the■date■and■
time,■and■notication■information■as■well■as■use■
application■shortcuts.
Status■bar
a
Date■&■time
b
Address■Book■Plus
c
Displays various information
registered in the Address
Book. You can also display
information about favorites
and contacts that you
contact frequently in the
notication area.
Notication■information
d
Application■shortcut
e
Swipe to launch an
application.
Unlocking■the■Lock■screen
Swipe the Lock screen
a
The home screen appears.
• The unlock method diers depending on the screen
lock settings.
a
b
c
d
e
Using the Home Screen
Viewing■Home■Screen
The■home■screen■is■congured■of■multiple■desktops,■
and■desktops■can■be■switched■by■sliding/icking■to■
the■right■and■left.■Shortcuts,■widgets,■and■folders■
can■be■added■by■adding■a■desktop.
Status■bar
a
Quick■search■box■(widget)
b
Smart■Notice■(widget)
c
Shortcuts/Folders
d
Apps
e
Main menu is open and
the application list is
displayed.
Quick■menu
f
Desktop
g
Home■touch■button
h
Back key
Returns to the
previous screen.
a
b
c
d
e
f
h
Home key
Displays home screen.
Task key
Displays a list of active applications. Touch and hold
to congure settings.
memo
• When you tap an icon to use its functions,
communication fee may be charged depending on
the function.
g
f
Using■the■Home■Screen
Changing Desktop
Desktops can be switched by sliding/icking to left
or right.
memo
• Thumbnails can be displayed by pinching in on the
home screen to add/delete desktop, change order,
etc.
Adding shortcuts/widgets etc.
On the home screen u Touch and hold " " u
a
"Add apps & widgets"
Tap an item shown below
b
Apps Create a shortcut of an application.
Widgets
Wallpapers Select from Gallery, Multi-photo, Live
Drag to the area to add shortcuts/widgets
c
■■ Adding■a■folder
Touch and hold app/shortcut to store into a
a
You can add widgets such as
calendar, music, etc. You can add
shortcut of settings menu also.
wallpapers, Photos, etc.
folder
Drag onto another app/shortcut and release
b
your nger
App/shortcut is stored into the folder.
- 34 - - 35 - - 36 - - 37 - - 38 - - 39 - - 40 -
Switching■the■Software■Keyboard
Character input screen u Touch and hold " "
a
" (QWERTY keyboard)"/" (10-key
b
keyboard)"
• On the 10-key keyboard, tap the same key repeatedly or
ick up/down/left/right to enter the desired character.
• On the QWERTY keyboard, tap the key of your
desired character to enter. Romaji input is applied
for "Hiragana-Kanji" mode.
memo
• LG Japanese keyboard is initially installed as an
input software.
• To switch input mode, character input screen u
Touch and hold " " u " "
input mode.
• To set ringtone and vibration for key operations on
LG Japanese keyboard, character input screen u
Touch and hold " " u " "
u
"Touch feedback".
• Tap " " to switch Input Mode.
• Tap " " to delete the selected character or
characters on the left side of cursor.
• Tap " " to enter numbers, symbols, and tap again
to enter smiley, symbol and emoticon.
u
"Input Mode" to select
u
"Keyboard Settings"
- 41 - - 42 - - 43 - - 44 - - 45 - - 46 - - 47 -
Smart■Notice■and■Weather■Information
Smart Notice
Displays notications (card notications), such
as current time, weather information, and terminal
information.
Weather■information
a
Date■&■time
b
Notications■from■
c
Smart■Notice
Update
d
Smart■Notice■settings
e
a
b
c
d
e
Weather information
Display weather information for the set city. You can
also check hourly and weekly forecasts.
On the home screen u Tap Smart Notice
a
weather information
Detailed weather information is displayed.
Using a microSD Memory Card
Installing■a■microSD■Memory■Card
Remove the back cover
a
Remove the battery pack
b
Place the face of the microSD memory card
c
with the logo upwards and insert all the way
into the microSD memory card slot in the
direction of the arrow
Checking The Product State
Understanding■Icons
Notication icons such as a missed call, new mail, or
other operations in use are displayed on the left side
of status bar. On the right side, status icons showing
the state of the product are displayed.
Also slide the status bar downwards to display the
notication panel.
Statusbar
■■ Major■notication■icons
Icon
Missed call
New mail message (E-mail)
New mail message (PC mail)
New mail message (Gmail)
New SMS message
Display notication for Address Book Plus
setting
Receiving a call
Displayed during a high quality call from an
au cell phone that supports VoLTE
memo
• Make sure that the top and bottom of the microSD
memory card are facing correctly.
Trying to force a wrongly oriented card into the
slot could make it impossible to remove the card
and result in damage.
Removing■a■microSD■Memory■Card
On the home screen u Touch and hold " " u
a
"System settings" u "General" tab u "Storage"
u "Unmount SD card"
Remove the back cover
b
Remove the battery pack
c
Gently pull out the microSD memory card
d
Gently and straightly pull it out.
Description
Icon
Enable screenshot setting
Major■status■icons
■■
Icon Description
Time
Battery level
Airplane mode
Signal reception (signal reception area)
4G (LTE/WiMAX 2+)* data communication
status
Roaming
Vibrate only
Wi-Fi® signal strength
* Two networks, "LTE" and "WiMAX 2+", are available in
Japan. Screen display of the product will be "4G" in
any case. This product will be connected to the less
busy network determined by au to prevent network
congestion.
memo
• Do not touch connector part of microSD memory
card.
• Do not apply excessive force to pull microSD
memory card. Doing so might cause malfunction or
data loss.
• microSD memory card might become warm after
using a long time. It is not malfunction.
• The procedure to remount a microSD memory card
that has been unmounted is, home screen u Touch
and hold " "
u
"Storage" u "Mount SD card".
u
"System settings" u "General" tab
Description
Notication■Panel
When a notication icon appears on the status bar,
slide the status bar down to open the notication
panel to check the notication or launch the
application.
Slide the status bar downwards
a
Date■&■time
a
Quick■Settings
b
Brightness
c
Volume
d
Settings
e
Notication■information
f
Clear
g
Clear notication
information and
notication icons.
a
b
c
d
e
f
g
Viewing the Setting Menu
On the home screen u Touch and hold " " u
a
"System settings"
■■ Setting■menu■item■list
Networks■tab
Make communication settings such as Wi-Fi®,
Bluetooth
Sound■&■notication■tab
Congure sound and vibration for the ringtone and
music playback as well as notication settings.
Display■tab
Make settings of home screen, lock screen, display
brightness, etc.
General■tab
Set security, add/delete accounts for online services,
set such as backup and reset, check about phone,
etc.
®
, call settings.
LED■Notication
LED notication informs charging prompt, battery level
while charging, missed calls, etc. by lighting on or
ashing.
LED color and
movement
Flashing red Indicates that it is charging.
Flashing
green
Lighting
green
Flashing
rainbow
Indicates incoming call, missed call,
notication message.
Indicates that charging is complete.
Indicates that an alarm is sounding.
Description
Checking■Your■Phone■Number
On the home screen u Touch and hold " " u
a
"System settings" u "General" tab u "About
phone" u "Status"
Status screen appears and your phone number is
shown in My phone number eld
memo
• For details on making/receiving a call, refer to
"Setting Guide".
Introduction of Related Accessories
■■ Battery■pack■(LGV32UAA)
■■ Back■cover■(LGV32TNA/LGV32TWA/LGV32TKA/
LGV32TFA/LGV32TTA)
■■
LG■TV■antenna■cable■01■(01LGHSA)
■■ au■Carrying■Case■G■Black■(0106FCA)■(sold■
separately)
■■
AC■Adapter■(sold■separately)
• Common AC adapter 03 (0301PQA)
• Common AC adapter 03 Navy (0301PBA)
• Common AC adapter 03 Green (0301PGA)
• Common AC adapter 03 Pink (0301PPA)
• Common AC adapter 03 Blue (0301PLA)
• Common AC adapter 05 (0501PWA)
• AC Adapter JUPITRIS (White) (L02P001W)
• AC Adapter JUPITRIS (Red) (L02P001R)
• AC Adapter JUPITRIS (Blue) (L02P001L)
• AC Adapter JUPITRIS (Pink) (L02P001P)
• AC Adapter JUPITRIS (Champagne Gold)
(L02P001N)
■■ Common■DC■adapter■03■(0301PEA)■(sold■
separately)
Setting Silent Mode
Set■Silent■mode■(Sound■prole)■not■to■inconvenience■
people■around■you■in■a■public■place.
Open the Notications panel u
a
"Sound"/"Vibrate"
Setting Airplane Mode
When■Airplane■mode■is■set,■wireless■functions■are■
disabled■(telephone,■packet■transmission,■wireless■
LAN■(Wi-Fi®),■Bluetooth®).
Power key (Press and hold for more than 2
a
seconds) u "Turn on Airplane mode
"
u
"OK"
Entering Text
Use■the■software■keyboard■to■enter■characters.
To■display■the■software■keyboard,■tap■a■character■
input■box■in■the■character■input■screen■when■adding■
contacts,■creating■a■message,■etc.
microUSB■cable■(sold■separately)
■■
• microUSB cable 01 (0301HVA)
• microUSB cable 01 Navy (0301HBA)
• microUSB cable 01 Green (0301HGA)
• microUSB cable 01 Pink (0301HPA)
• microUSB cable 01 Blue (0301HLA)
■■ Portable■Charger■02■(0301PFA)■(sold■separately)
memo
• The Portable Charger 02 (sold separately) may not
be able to suciently charge the product.
• For the latest information on accessories, visit the
au homepage (http://www.au.kddi.com/) or contact
the Customer Service Center.
• This product does not support ASYNC/Fax
transmission.
• You can purchase accessories on this page from
au online shop.
Some accessories may not be purchased due to
the availability.
http://auonlineshop.kddi.com/
Troubleshooting
Before■you■assume■that■this■product■is■malfunctioning,■
check■the■following:
Symptom Check item
Cannot charge
the battery
Battery usage
time is short
Cannot operate
touch panel as
intended
Cannot operate
the keys/touch
panel
Screen response
is slow when
you tap on the
screen/press the
keys
Is the AC adapter securely
plugged into an outlet?
Do you use this product more
in the places without signal
reception
Is the battery pack end-of-life?
Are you operating with gloved
hands?
Make sure you are not operating
with your nger tip or there is no
foreign object in the middle of
the panel.
Is the screen lock set?
Turn o the power and turn it on
again.
Screen response may slow down
when a large amount of data is
stored in this product or being
transmitted between the product
and a microSD memory card.
(out of service)?
Symptom Check item
No UIM card is
displayed
Phone is SIM
Network Subset
locked is displayed
The volume of the
ringtone is low at
rst
Cannot make
calls
Cannot receive
calls
Display is dark Is "Brightness" set to dark?
Cannot hear the
other party
Is your au Nano IC Card 04
inserted?
Is an IC card other than au Nano
IC Card 04 inserted?
The volume of the ringtone
gradually increases to the volume
that you have set not to aect
your ears.
Is your au Nano IC Card 04
inserted?
Did you enter the wrong phone
number?
(Did you enter the phone number
starting with an area code?)
Is reception good enough?
Are you out of service area?
Is Call forwarding service set?
Is the earpiece volume too low?
Do you bring earpiece close to
your ear? Put the earpiece close
to your ear hold.
- 49 - - 50 - - 51 - - 52 - - 53 -- 48 - - 54 -
Symptom Check item
Cannot use NFC/
Osaifu-Keitai
Cannot recognize
a microSD
memory card
If the symptom does not improve after checking the
above items, contact the below au website or au
customer support.
http://www.au.kddi.com/support/mobile/trouble/repair
Has the battery run out?
®
Is "NFC/Osaifu-Keitai lock" set?
Do you hold this product so that
the mark area is placed over
the reader?
Is a microSD memory card
inserted properly?
Is the microSD memory card
unmounted?
Updating Software
Notes■on■Software■Update
• You are charged for data communication when
connecting to the Internet from the product by
using packet communication.
• When software update is necessary, you will be
informed on au homepage, etc. For details, contact
an au shop or Customer Service Center (157/
call toll-free). In addition, users of this product will
receive a notice from au, when software update
is necessary to improve the functionality of the
product.
• Make sure to charge your phone before software
update. If battery is not enough, software update
may fail.
• Check out the signal reception. Software update may
fail if you are at a place with bad signal reception.
• Data registered on the product (Contacts, mail,
still images, music, etc.) and setting information
will not be changed even after software is updated.
However, note that data might not be protected
depending on the state of the product (malfunction,
damage, getting wet, etc.).
You are recommended to back up your data before
updating software.
• If software update has failed or stopped, update
the software again.
• Update is unavailable during international roaming.
Do■not■conduct■the■following■operations■during■
software■update.
• Do not move this product during software update.
The■following■operations■are■not■available■during■
software■update
• Operations are not available during software update.
Calls to 110 (Police), 119 (Fire department or
ambulance service), 118 (Japan Coast Guard)
and 157 (Customer Service Center) are also not
available.
Also, alarm, etc. cannot be used.
When■software■update■is■not■available,■etc.
• If you fail to update software, it may become
impossible to operate the product. In that case,
bring the product to an au shop or PiPit (not
accepted by some shops).
Downloading■and■Updating■Software
On the home screen u Touch and hold " " u
a
"System settings" u "General" tab u "About
phone" u "Update Center" u "Software Update"
When you use the product for the rst time, a
screen conrming software updates appears.
Check the content and tap "AGREE".
"Check now for update"
b
Check if there is new software.
Software update screen is displayed when software
updates available.
Select a communication method to download
c
Select a communication method to download
software.
"DOWNLOAD"
d
A new software download starts.
"INSTALL NOW"
e
Software update starts.
The product will restart a couple of times during
the software update.
"OK"
f
After-sales Service
■■ When■asking■for■repair
For repair, contact a Keitai Guarantee Service Center.
During■the■
warranty■period
Outside■the■
warranty■period
memo
• Before handing in the product for repair, make a
backup of the contents of memory since they may
disappear during repair. Note that the Company shall
not be liable for any damages and loss of income
should the contents of memory be altered or lost.
• Recycled parts that meet the Company's quality
standards are sometimes used for repair.
• Collected au cell phones by Replacement cell
phone delivery service which you used before
are recycled to cell phones for replacement after
repairs. Also replaced parts by au after-sales
service are collected and recycled by KDDI. They
are not returned to customers.
Repairs will be done based on the
terms of services of the free-ofcharge repair warranty described
on the warranty card.
We shall repair the product for
a charge as requested by the
customer if repair renders it usable.
Page 3

• If this unit is machined, altered, analyzed (including
memo
software modications and analysis (including
rooting) reverse engineering, decompiling, and
reverse assembling) or is repaired by a repair
facility that is not an au-specied ocial repair
facility may not be covered by warranty or eligible
for repair.
Performance■parts■for■repair
■■
The Company retains performance parts for repair
of main unit and its peripherals for 4 years after
discontinuation of production. "Performance parts
for repair" refers to parts required for maintaining the
functions of the product.
■■
Warranty■card
At the store of purchase, thoroughly check and read
the name of the retailer, date of purchase and other
necessary details lled in on the warranty card, and
be sure to keep it in a safe place.
- 55 - - 56 - - 57 - - 58 - - 59 - - 60 - - 61 -
■■
Keitai■Guarantee■Service■Plus■LTE
An after-sales service membership program on a
monthly basis called "Keitai Guarantee Service
Plus LTE" (monthly fee: 380 yen, tax excluded) is
available for using your au cell phone for a long time
without worries. This service expands coverage for
many troubles including malfunction, theft and loss.
For details of this service, refer to au homepage or
contact a Keitai Guarantee Service Center.
• You can apply for membership only at the time of
purchasing your au cell phone.
• Once you cancel the membership, you cannot reapply for it until you purchase an au cell phone
next time.
• Note that when changing the model or purchasing
an extra cell phone, this service only covers the
most recently purchased au cell phone.
• When an au cell phone is handed over to you
or someone else, the Keitai Guarantee Service
Plus LTE membership is also handed over to the
successor of the cell phone.
• When you get a new au cell phone by changing the
model or purchasing an extra cell phone, the "Keitai
Guarantee Service Plus"/"Keitai Guarantee Service
Plus LTE" membership for the old au cell phone is
automatically canceled.
• Service contents are subject to change without
notice.
■■
au■Nano■IC■Card■04
The au Nano IC Card 04 is lent to you by au. In case
of loss or damage, the card will be replaced at your
expense. When a malfunction is suspected, or in case
of theft or loss, contact an au shop or PiPit.
■■
After-sales■Service
If you are unsure about anything regarding after-sales
service, contact the following service contact.
Customer■Service■Center■(for■service■canceling■
procedure■in■case■of■loss■or■theft)
From a land-line phone, 0077-7-113 (toll-free)
From an au mobile phone, 113 without area code (toll
free)
Business hours 24-hour (7 days a week)
Keitai■Guarantee■Service■Plus■(for■loss,■theft,■damage)
From a land-line phone/From an au cell phone,
0120-925-919 (toll free)
Business hours 9:00 ~ 9:00 PM (7 days a week)
Repair■service■from■online■(24■hours■a■day■over■the■
Internet)
* Reception only from PC or smartphone
https://cs.kddi.com/support/n_login.html
• The Application for the Internet acceptance, if
"damage", "wet", "theft" and "loss" are eligible. In
the case of spontaneous failure (not the cause
damage, such as water wet, but does not power
on, the screen does not function or other), it will be
accepted by phone for interview is required.
• To apply for the Internet, you need the e-mail
address.
au■after-sales■service■information
■■
Service Contents
Replacement
cell phone
delivery
service
Spontaneous
failure
1st
year
2nd
year
or
later
Partial damage,
water stained,
irreparable
damage, theft, or
loss
Keitai Guarantee
Service Plus LTE
Member
Nonmember
Free N/A
Customer
charge
1st:
5,000 yen
2nd:
8,000
yen
Keitai Guarantee
Service Contents
Service Plus LTE
Member
Holding
over and
repair
Spontaneous
failure
1st
year
2nd
year
or
later
Partial damage
Free Free
Free of
charge
(3-year
warranty)
Customer
charge
Upper
limit:
5,000 yen
Water stained,
irreparable
damage
Customer
charge
10,000
yen
Theft, loss N/A N/A
*Charge amounts are all tax excluded.
Nonmember
Actual
cost
(model
change)
memo
Replacement■cell■phone■delivery■service
• When you have trouble with your au cell phone, a
replacement cell phone (same model, same color,
including new battery) is delivered to the specified
place by calling to. Return your damaged cell
phone within 14 days after the replacement cell
phone is delivered.
• Available up to twice in a year from the day you
use this service as a start day. If you do not use
this service in the past year for the subscription to
this service, it will be 1st time and if you use, it will
be the 2nd.
* For details, refer to au homepage.
Holding■over■and■repair
• Damages and malfunctions intentionally caused by
the customer as well as those due to modication
(e.g. disassembly, change of parts, painting, etc.)
by the customer are not covered by this service.
• You cannot receive a refund for the replacement
of the outer casing due to stains, scratches, paint
removal, etc. on the outer casing.
Unlocking the SIM lock
You■can■unlock■the■SIM■lock■for■this■product.■If■you■
unlock■the■SIM■lock,■you■can■use■other■carrier's■SIM■
cards.
• The au homepage and au shops are accepting
requests to unlock the SIM lock.
• If you use another carrier's SIM card, some services
and functions may be restricted. Note that au does
not guarantee any operations.
• To unlock the SIM lock, go to home screen u
Touch and hold " "
"General" tab u "About phone" u "SIM card".
• For more details, refer to the au homepage.
u
"System settings" u
- 62 - - 63 - - 64 - - 65 - - 66 -
TV Antenna Cable
When■watching■TV,■connect■the■supplied■LG■TV■
antenna■cable■01■to■the■product.
Also,■connect■the■commercial■earphone■to■the■LG■TV■
antenna■cable■01■to■listen■to■the■TV's■audio.
The■connection■procedures■for■the■LG■TV■antenna■
cable■01■are■described■here.
Insert the commercial earphone plug into the
a
LG TV antenna cable 01 earphone jack
Insert the LG TV antenna cable 01 connection
b
plug into this product's earphone jack
Earphonejack
b
LGTVantennacable01
Commercial
earphone
a
Main Specications
Display Approx. 5.5 inches, Approx.
Weight Approx. 150 g (including
Size■(W■x■H■x■D) Approx.
CPU MSM8992:(1.8 GHz x 2 ea)
Memory■(Internal) ROM : 32 GB, RAM : 3 GB
Continuous■
calling■time
In■Japan Approx. 1,300 minutes
Overseas■
(GSM)
Continuous■
standby■
*3
time
In■Japan Approx. 380 hours
Overseas■
(GSM)
16.77 million colors, AHIPS liquid crystal
2560 x 1440 dots (WQHD)
*1
battery pack)
Approx. 151 g (including
battery pack)
/
*2
76 mm × 150 mm ×
10.3 mm (thickest part 11.3
*1
/
mm)
Approx. 76 mm × 150 mm ×
10.5 mm (thickest part 11.3
*2
mm)
+ (1.4 GHz x 4 ea)
Approx. 870 minutes
Approx. 400 hours
Continuous■tethering■
time
Number■of■concurrent■
connections■with■
tethering
Approx. 500 minutes
®
13 devices (Wi-Fi
tethering; 8, Bluetooth
tethering; 4 and USB
®
tethering; 1)
Charging■
time
AC■
adapter
Approx. 110 minutes (When
using Common AC adapter
05 (sold separately))
DC■
adapter
Approx. 630 minutes (When
using Common DC adapter
03 (sold separately))
Continuous■
watching■
*4
time
*1 When the back cover is mounted (White, Champagne,
Black).
*2 When the back cover is mounted (Leather black,
Leather brown).
*3 Continuous standby times are measurements in a
static state.
*4 Continuous viewing time may change depending on
the usage condition.
Full■Seg Approx. 5 hours 10 minutes
1Seg Approx. 5 hours 50 minutes
memo
• The continuous talk time and continuous standby
time may drop to less than half depending on the
battery charging status, usage environment such
as temperature, reception condition at the location
where the product is used, and the function
settings.
 Loading...