

Page 1

OWNER'S MANUAL
SIDE BY SIDE
REFRIGERATOR
ENGLISH
Read this owner's manual thoroughly before operating the appliance
and keep it handy for reference at all times.
GS73SXS
GS74SXS
LSXS26396S
LSXC22396S
LS74SXS
MFL67653459
Rev.03
Copyright © 2017 LG Electronics Inc. All Rights Reserved.
www.lg.com
Page 2
2
TABLE OF CONTENTS
3 PRODUCT FEATURES
4 SAFETY INSTRUCTIONS
4 IMPORTANT SAFETY INSTRUCTIONS
8 PRODUCT SPECIFICATIONS
9 PRODUCT OVERVIEW
9 Exterior
10 Interior
11 INSTALLATION
11 Installation Overview
12 Unpacking the Refrigerator
12 Choosing the Proper Location
14 Removing/Assembling Handles
14 Removing/Assembling the Doors
17 Connecting the Water Line
20 Leveling and Door Alignment
21 Turning on the Power
37 MAINTENANCE
37 Cleaning
38 Replacing the Water Filter
43 TROUBLESHOOTING
43 FAQs: Frequently Asked Questions
44 Before Calling for Service
53 WARRANTY (USA)
55 WARRANTY (CANADA)
22 OPERATION
22 Before Use
23 Control Panel
24 Airflow
25 Ice and Water Dispenser
26 Ice Compartment
27 Automatic Icemaker
28 Storing Food
30 Detaching/Assembling the Storage Bins
31 InstaView Function
31 Door-in-Door
32 Adjusting the Refrigerator Shelves
33 SMART FUNCTIONS
33 Smart ThinQ Application
35 Smart Grid Function
36 Smart Diagnosis™ Function
Page 3

ENGLISH
PRODUCT FEATURES
Depending on the model, some of the following functions may not be available.
FILTERED WATER AND ICE DISPENSER
The water dispenser dispenses fresh, chilled water.
The ice dispenser dispenses cubed and crushed ice.
DOOR ALARM
The Door Alarm function is designed to prevent refrigerator malfunctioning that could occur if a refrigerator
door or freezer door remains open. If a refrigerator door or freezer door is left open for more than 60 seconds,
a warning alarm sounds at 30-second intervals.
DOOR-IN-DOOR REFRESHMENT CENTER
The Door-in-Door Refreshment Center provides a convenient area for frequently used items that require easy
access.
FRESH ZONE DRAWERS
The Fresh Zone drawers are designed to help keep fruits and vegetables fresh.
3PRODUCT FEATURES
AUTO-CLOSING HINGE
The refrigerator doors and freezer drawers close automatically with a slight push. (The door only closes
automatically when it is open at an angle less than 30°.)
ICE PLUS
Ice production is increased when the freezer section is maintained at the coldest temperature for a 24-hour
period.
Page 4
4 SAFETY INSTRUCTIONS
SAFETY INSTRUCTIONS
READ ALL INSTRUCTIONS BEFORE USE
Your safety and the safety of others are very important.
We have provided many important safety messages in this manual and on your appliance. Always read and
follow all safety messages.
These words mean:
CAUTION
You may be injured or cause damage to the product if you do not follow instructions.
All safety messages will tell you what the potential hazard is, tell you how to reduce the chance of injury, and
tell you what may happen if the instructions are not followed.
IMPORTANT SAFETY INSTRUCTIONS
WARNING
To reduce the risk of explosion, re, death, electric shock, scalding or injury
to persons when using this product, follow basic precautions, including the
following:
California Safe Drinking Water and Toxic Enforcement Act
• This product contains chemicals known to the state of California to cause cancer and birth defects or other
reproductive harm. Wash hands after handling.
INSTALLATION
• To reduce the risk of injury to persons, adhere to all industry recommended safety procedures including the
use of long-sleeved gloves and safety glasses.
• Never attempt to operate this appliance if it is damaged, malfunctioning, partially disassembled, or has
missing or broken parts, including a damaged cord or plug.
• Only connect this product to a dedicated grounded electrical outlet rated for use with this product (115 V, 60
Hz, AC only). It is the user’s responsibility to replace a standard 2-prong wall outlet with a standard 3-prong
wall outlet.
• Do not use an outlet that can be turned off with a switch. Do not use an extension cord.
• The appliance must be positioned for easy access to a power source.
• When moving the refrigerator, be careful not to roll over or damage the power cord.
• Contact an authorized service center when installing or relocating the refrigerator.
• Do not, under any circumstances, cut or remove the third (ground) prong from the power cord.
Page 5
ENGLISH
• Keep packing materials out of the reach of children. Packaging material can be dangerous for children.
There is a risk of suffocation.
• Do not install the refrigerator in a damp or dusty place where insulation on electrical parts may deteriorate.
• Do not place the refrigerator in direct sunlight or expose it to the heat from heating appliances such as
stoves or heaters.
• Do not bend or pinch the power cord excessively or place heavy objects on it.
OPERATION
• This product is not to be used for special purposes such as the storage of medicine or test materials or for
use on ships, etc.
• DO NOT allow children to climb, stand, or hang on the refrigerator doors or on the shelves in the
refrigerator. They could damage the refrigerator and seriously injure themselves.
• Do not allow children to climb into the refrigerator. They could be trapped and suffocated.
• Children should be supervised to ensure that they do not play with the refrigerator.
• Keep ngers out of pinch point areas; clearances between the doors and cabinets are necessarily small. Be
careful closing doors when children are nearby.
• Do not touch frozen food or the metal parts in the freezer compartment with wet or damp hands. Doing so
may cause frostbite.
• Do not refreeze frozen food that has thawed completely. Doing so may result in a serious health hazard.
• Do not use an adapter plug or plug the power plug into a multi-outlet extension cord.
• Do not use a cord that shows cracks or abrasion damage along its length or at either the plug or connector
end. Immediately have all power cords that have become frayed or otherwise damaged repaired or replaced
by qualied service personnel.
• Do not operate the refrigerator or touch the power cord with wet hands.
• Do not modify or extend the power cord.
• Do not use an uncertied power outlet. Do not plug appliance into a damaged wall outlet.
• Do not put hands, feet or other objects into the air vents or bottom of the refrigerator. Doing so could result
in personal injury or electric shock.
• In the event of a gas leak (propane/LPG), ensure the area is adequately ventilated and contact an
authorized service center before resuming use. Do not touch the refrigerator or power cord of the
refrigerator.
• Disconnect the power cord immediately and contact an authorized service center if there is a strange noise,
odor, or smoke coming from the appliance.
• Do not use any fuse (such as copper, steel wire, etc.) other than a standard fuse.
• Do not place or use an electrical appliance inside the refrigerator, unless it is of a type recommended by the
manufacturer.
• Do not put animals inside the appliance.
• Do not place heavy or fragile objects, liquid lled containers, combustible substances, or ammable objects
(such as candles and lamps) on the appliance.
• Avoid contact with any moving parts of the ejector mechanism or with the heater that releases the ice
cubes. DO NOT place ngers in the automatic icemaker when the refrigerator is plugged in.
• When dispensing ice from the dispenser, do not use a fragile container.
5SAFETY INSTRUCTIONS
Page 6

6 SAFETY INSTRUCTIONS
• If connected to a circuit protected by fuses, use time delay fuse.
• Do not store explosive substances such as aerosol cans with a ammable propellant in this appliance.
MAINTENANCE
• Do not use a hair dryer to dry the inside of the refrigerator.
• Do not light a candle to remove odors in the refrigerator.
• In the event of a refrigerant leak, move ammable objects away from the refrigerator. Ensure the area is
adequately ventilated and contact an authorized service center.
• Keep ammable materials and vapors, such as gasoline, away from the refrigerator.
• This appliance can be used by children aged from 8 years and above and persons with reduced physical,
sensory or mental capabilities or lack of experience and knowledge if they have been given supervision or
instruction concerning use of the appliance in a safe way and understand the hazards involved. Children
shall not play with the appliance. Cleaning and user maintenance shall not be made by children without
supervision.
• Unplug the power plug before cleaning or repairing the refrigerator.
• The refrigerator and freezer compartment lights are interior LED lighting, and service should be performed
by a qualied technician.
• Unplug the power plug immediately in the event of a blackout or thunderstorm.
• Turn the power off if water or dust penetrates into the refrigerator. Call a service agent.
• Do not store glass containers or soda in the freezer compartment. Contents may expand when frozen,
break the container and cause injury.
• Do not store, disassemble or repair the appliance yourself or allow unqualied personnel to do so.
DISPOSAL
• Junked or abandoned refrigerators are dangerous, even if they are sitting for only a few days. When
disposing of the refrigerator, remove the packing materials from the door or take off the doors but leave the
shelves in place so that children may not easily climb inside.
• If disposing of a refrigerator, make sure the refrigerant is removed for proper disposal by a qualied servicer.
If you release the refrigerant, you may be ned or imprisoned in accordance with the relevant environmental
law.
GROUNDING INSTRUCTIONS
• Improper connection of the equipment-grounding conductor can result in a risk of electric shock. Check with
a qualied electrician or service personnel if you are in doubt whether the appliance is properly grounded.
Do not modify the plug provided with the appliance; if it will not t the outlet, have a proper outlet installed by
a qualied electrician.
• Have a certied electrician check the wall outlet and wiring for proper grounding.
• Never unplug the appliance by pulling on the power cord. Always grip the plug rmly and pull straight out
from the outlet. Failure to do so may damage the power cord, resulting in a risk of re and electric shock.
Page 7
ENGLISH
CAUTION
To reduce the risk of minor or moderate injury to persons, malfunction, or damage
to the product or property when using this product, follow basic precautions,
including the following:
• Do not hang on to or place heavy objects on the refrigerator’s dispenser.
INSTALLATION
• Do not install the refrigerator where there may be a danger of the unit falling.
• The refrigerator must be properly installed in accordance with the Installation Instructions.
OPERATION
• Do not use aerosols near the refrigerator.
• This appliance is intended to be used only in domestic and similar applications.
• Do not strike or apply excessive force to any glass surface. Do not touch glass surfaces if they are cracked
or broken.
• Do not overll or pack items too tightly into door bins. Doing so may cause damage to the bin or personal
injury if items are removed with excessive force.
• Do not overll the appliance with food. Doing so may cause personal injury or property damage.
• Do not hang on to or place heavy objects on the refrigerator’s dispenser.
7SAFETY INSTRUCTIONS
MAINTENANCE
• Do not use strong detergents like wax or thinners for cleaning. Clean with a soft cloth.
• Remove foreign objects (such as dust and water) off the prongs of the power plug and contact areas. Do
not use a wet or damp cloth when cleaning the plug.
• Do not spray water directly on the inside or outside of the refrigerator.
• Do not clean glass shelves or covers with warm water when they are cold. They may break if exposed to
sudden temperature changes.
SAVE THESE INSTRUCTIONS
Page 8

8 PRODUCT SPECIFICATIONS
PRODUCT SPECIFICATIONS
The appearance and specications listed in this manual may vary due to constant product improvements.
Electrical requirements: 115 V, 60 Hz
Min. / Max. water pressure: 20 - 120 psi (138 - 827 kPa) on models without water lter.
40 – 120 psi (276 – 827 kPa) on models with lter.
Model LSXS26396S
Description Standard-depth, Side by Side refrigerator
Net weight 306.5 lb. ( 139 kg )
Model LSXC22396S
Description Counter-depth, Side by Side refrigerator
Net weight 280 lb. (127 kg)
Page 9
ENGLISH
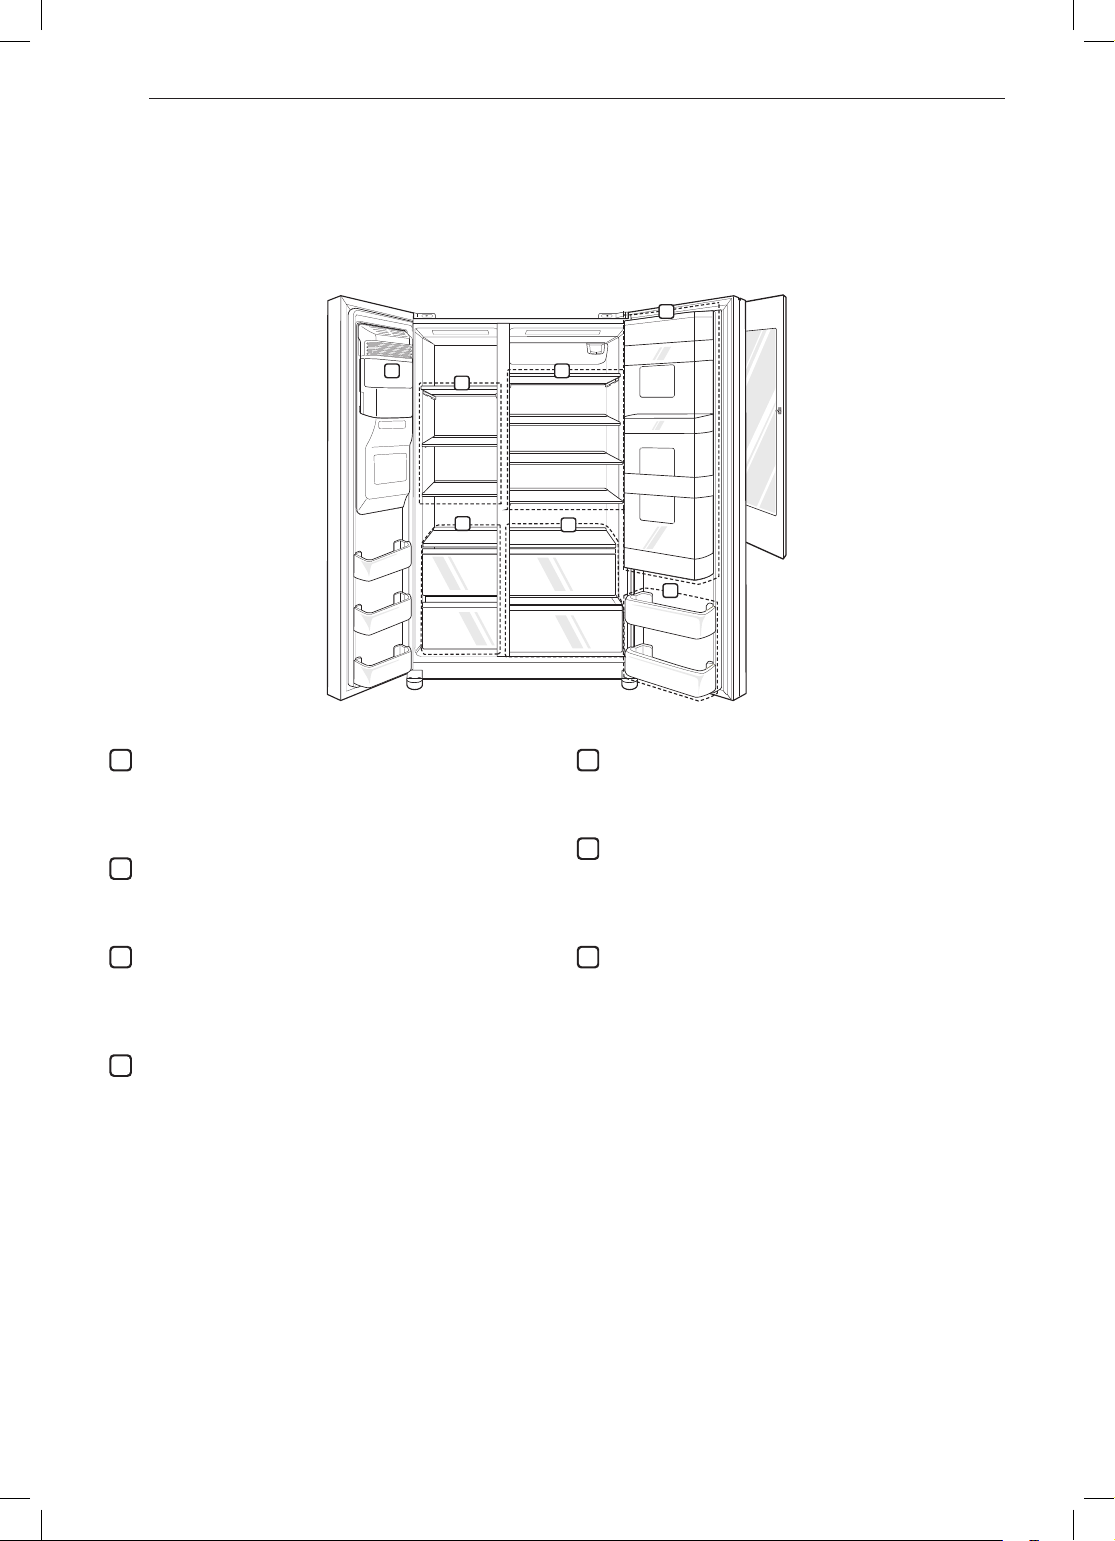
PRODUCT OVERVIEW
1
8
5
The images in this guide may be different from the actual components and accessories, which are subject to
change by the manufacturer without prior notice for product improvement purposes.
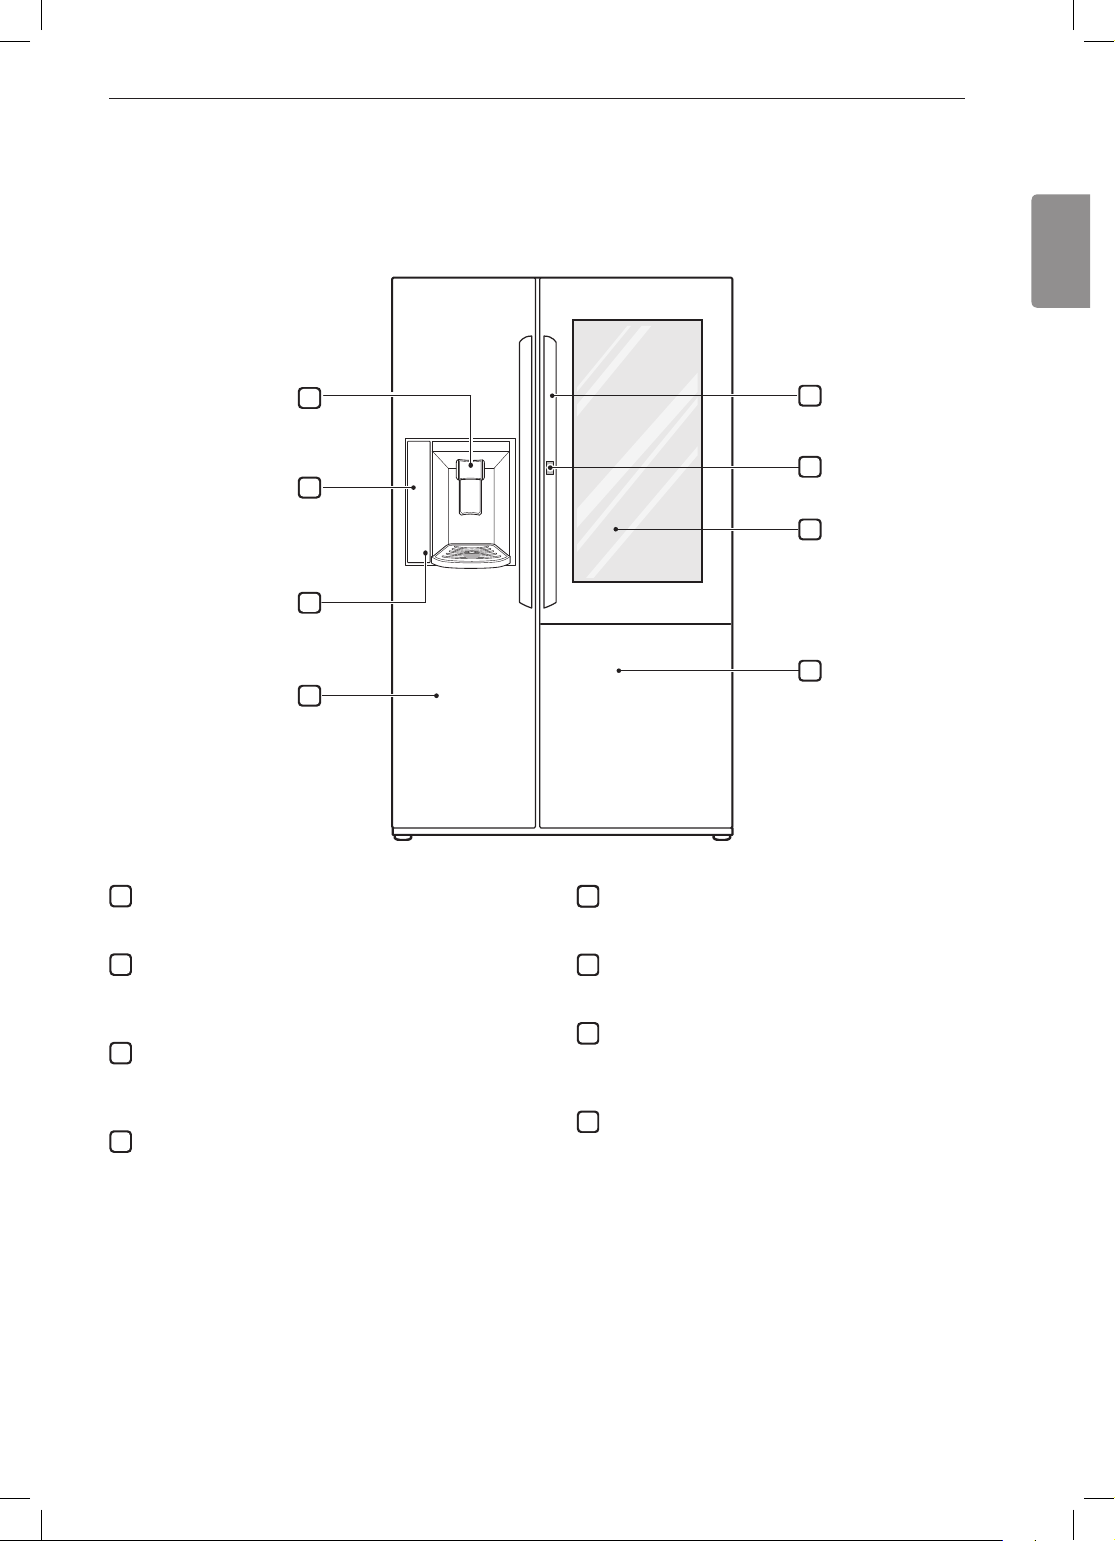
Exterior
9PRODUCT SPECIFICATIONS
1
2
3
4
Filtered Water and Ice Dispenser
Dispenses puried water and ice.
LED Display
2
Displays the refrigerator and freezer temperature,
the water lter condition and the dispenser mode.
Control Panel
3
Sets the refrigerator and freezer temperatures,
the water lter condition and the dispenser mode.
Freezer
4
Frozen food compartment
5
6
7
8
Handle
Opens and closes the refrigerator door.
Door-in-Door Button
6
Press this button to open the Door-in-Door.
InstaView Door-in-Door
7
The InstaView Door-in-Door compartment allows
for easy access to commonly used food items.
Refrigerator
8
Fresh food compartment
Page 10
10 PRODUCT SPECIFICATIONS
3
9
Interior
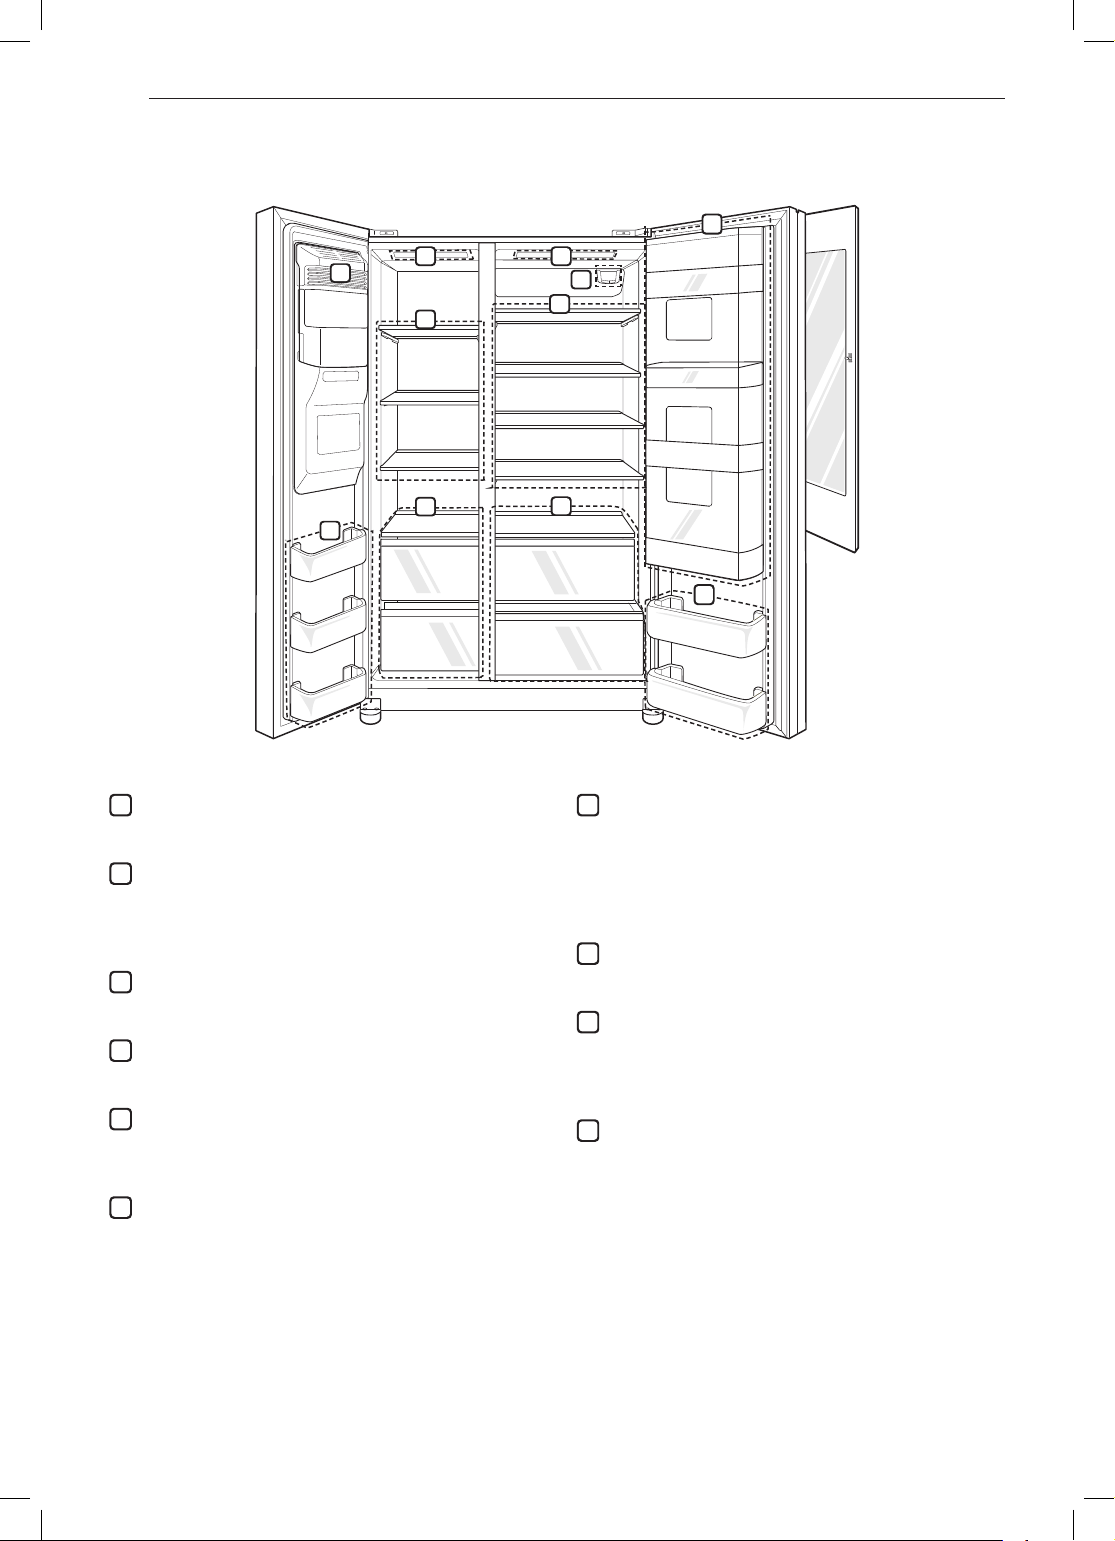
LSXS26396S/LSXC22396S
1
9
3
4
3
6
7
5
2
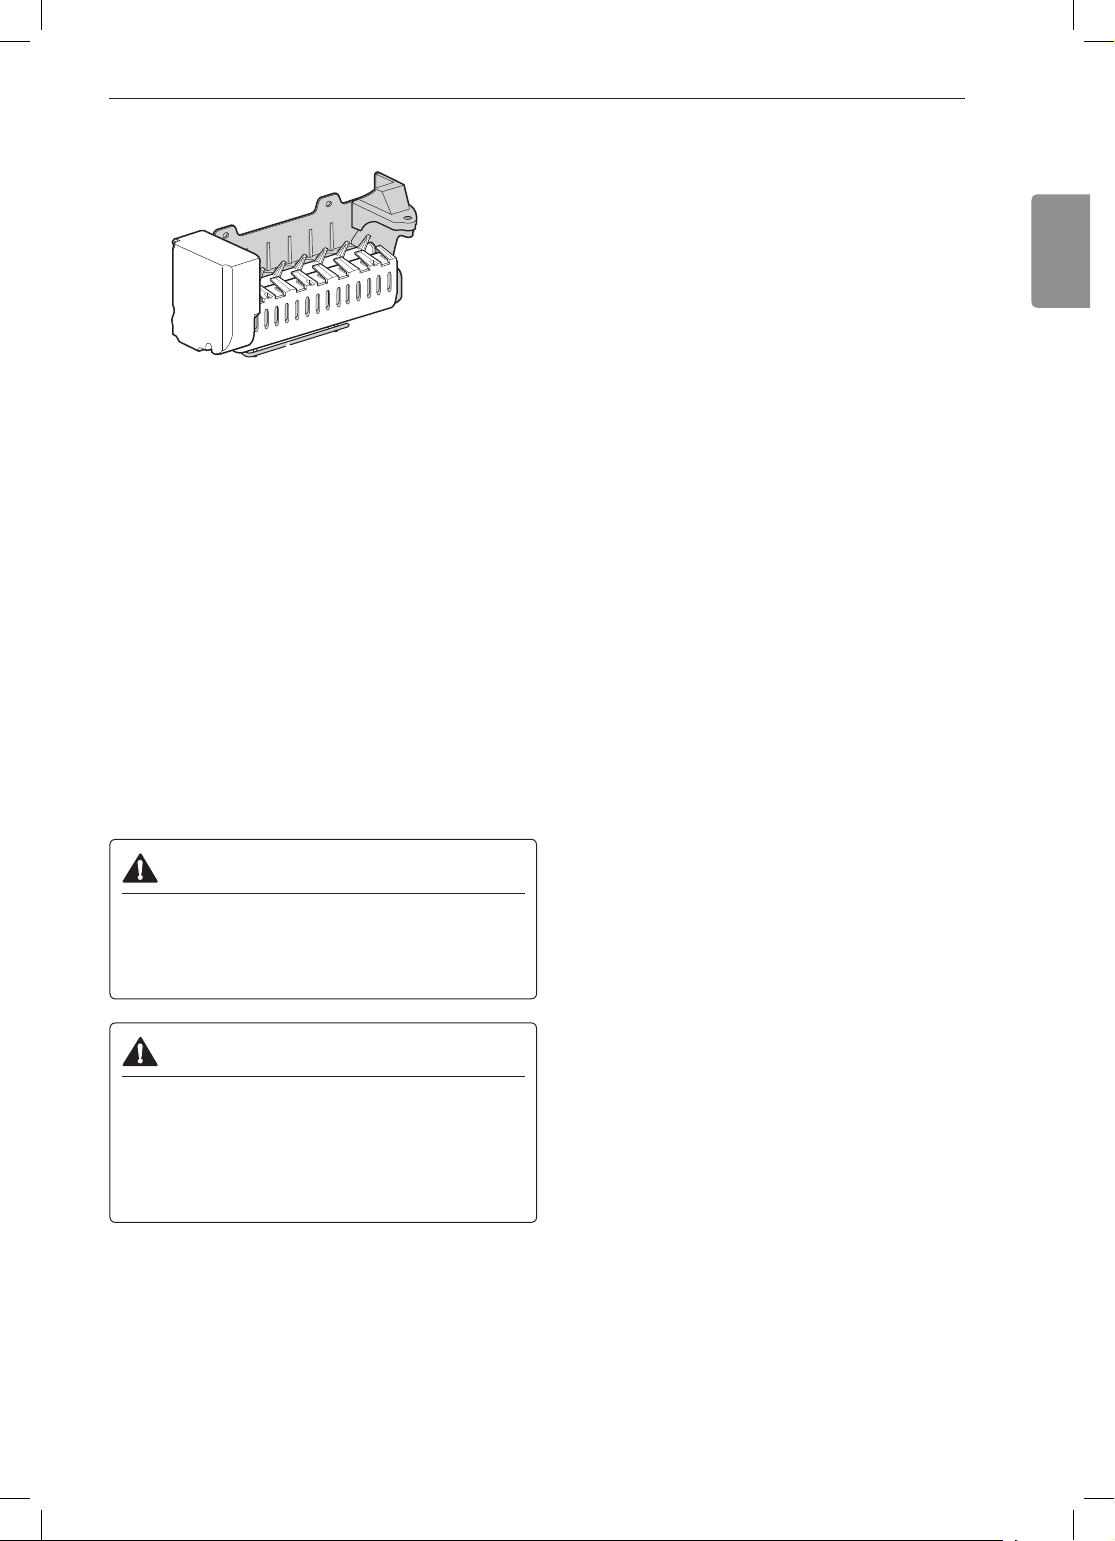
Automatic Icemaker
1
Automatically produce and store ice.
Freezer Door Bins
2
Store small packages of frozen food. Do not
store ice cream or food which will be stored for a
long period of time within these baskets.
LED interior lamps
Light up the inside of the refrigerator.
Freezer Shelf
4
Adjust the freezer shelves to t large or tall items.
Freezer Drawer
5
Store long-term frozen items. The number of
drawers may vary by model.
Water lter
6
Purify water.
8
10
Refrigerator Shelf
7
Shelves are adjustable to suit individual storage
needs. Adjust the shelf height by emptying and
removing the shelf and inserting it on a different
set of shelf supports. The number of refrigerator
shelves varies by model.
Fresh Zone
8
Storage for deli, fruit, or vegetables.
Door-in-Door Case
Open the outer Door-in-Door for easy access to
frequently used items without letting a lot of cold
air out of the refrigerator.
Refrigerator Door Bins
10
Standard door bins are adjustable to t taller
items.
NOTE
• The lter should be replaced every 6 months. See
the Replacing the Water Filter section in this manual
for details.
Page 11
ENGLISH
INSTALLATION
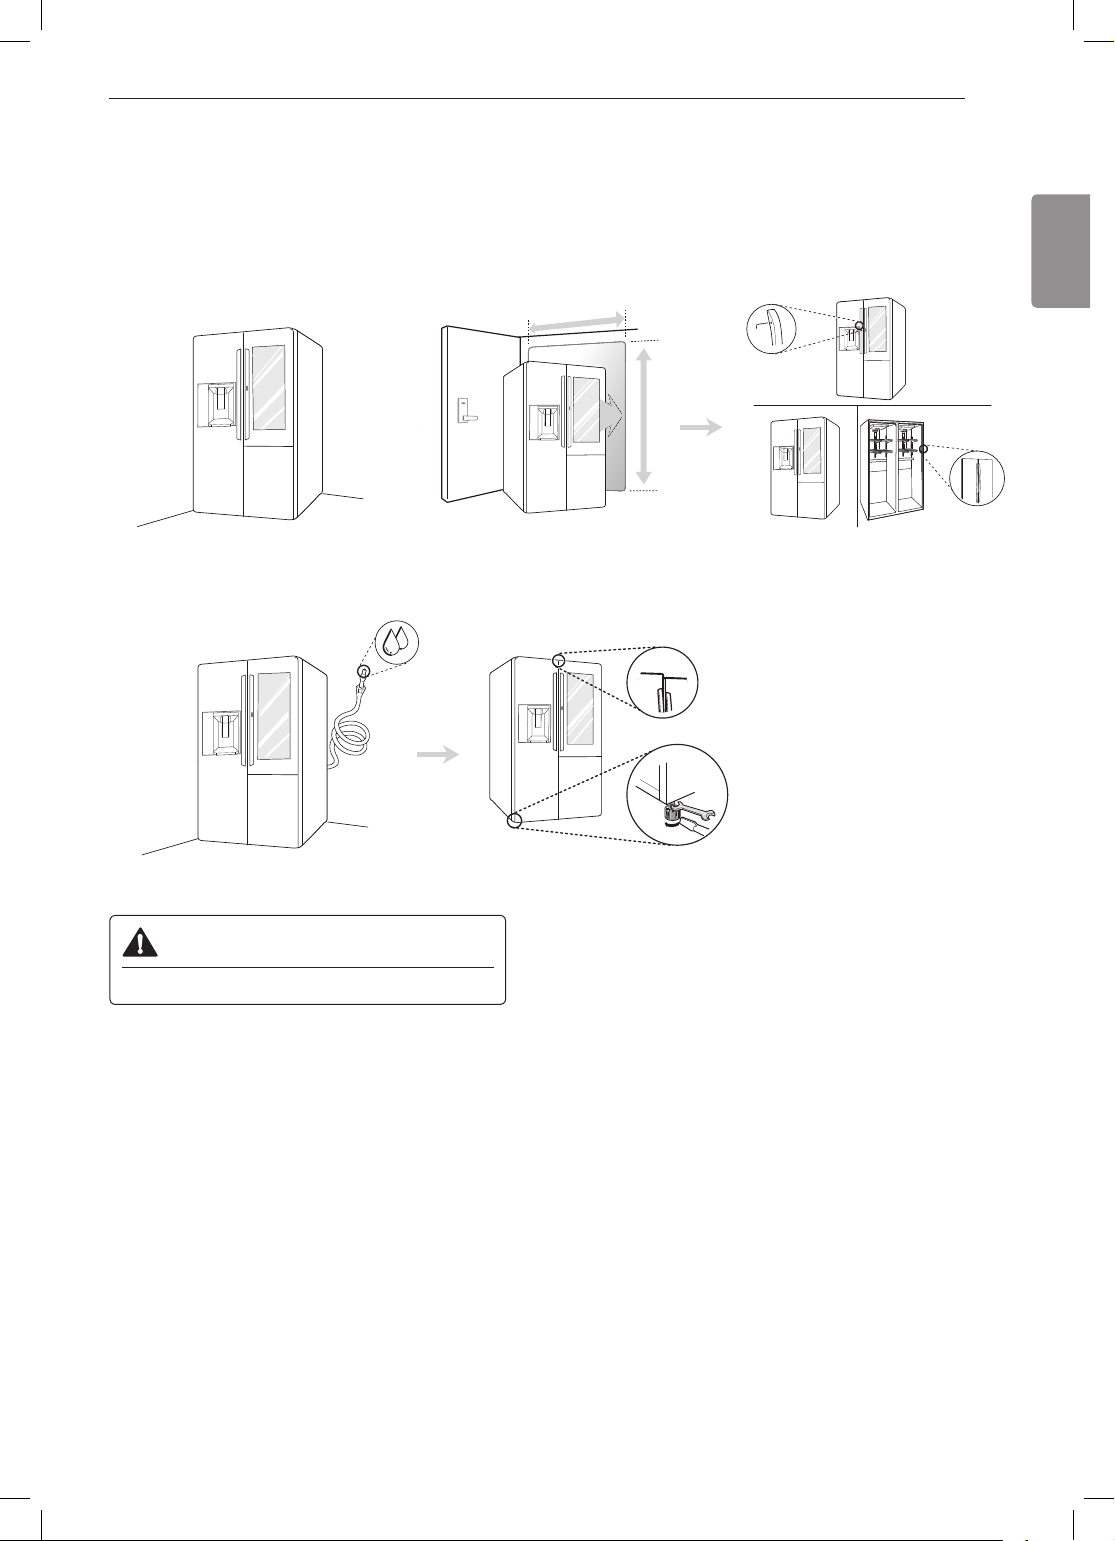
Installation Overview
Please read the following installation instructions rst after purchasing this product or transporting it to another
location.
Unpacking the Refrigerator Choosing the Proper Location Disassembling/Assembling
11INSTALLATION
Connecting the Water Line Leveling and Door Alignment
CAUTION
• Connect to a potable water supply only.
Page 12
12 INSTALLATION
Unpacking the Refrigerator
WARNING
• Use two or more people to move and install the
refrigerator. Failure to do so can result in back
injury or other injury.
• The refrigerator is heavy. Protect the oor when
moving the refrigerator for cleaning or service.
Always pull the refrigerator straight out when
moving it. Do not wiggle or walk the refrigerator
when trying to move it, as oor damage could
occur.
• Keep ammable materials and vapors, such as
gasoline, away from the refrigerator. Failure to
do so can result in re, explosion, or death.
NOTE
• Remove tape and any temporary labels from
your refrigerator before using. Do not remove any
warning labels, the model and serial number label,
or the Tech Sheet that is located under the front of
the refrigerator.
• To remove any remaining tape or glue, rub the area
briskly with your thumb. Tape or glue residue can
also be easily removed by rubbing a small amount
of liquid dish soap over the adhesive with your
ngers. Wipe with warm water and dry.
• Do not use sharp instruments, rubbing alcohol,
ammable uids, or abrasive cleaners to remove
tape or glue. These products can damage the
surface of your refrigerator.
• Reinstall or adjust shelves as needed. Refrigerator
shelves are installed in the shipping position.
Reinstall shelves according to your individual
storage needs.
Choosing the Proper
Location
Water
Water supply must be easily connected for the
automatic icemaker.
NOTE
• The water pressure must be 20 - 120 psi or 138 -
827 kPa or 1.4 - 8.4 kgf/cm
installed in an area with low water pressure (below
20 psi or 138 kPa or 1.4 kgf/cm
booster pump to compensate for the low pressure.
Electricity
Use an individual, grounded outlet:115 Volts, 60 Hz,
AC, 15 Amps minimum.
WARNING
• Don't use existing holes unless they are in the
target area. Otherwise, the water supply and
drain hose may be damaged by being crushed
or kinked.
Flooring
To avoid noise and vibration, the unit must be
installed and leveled on a solidly constructed oor. If
required, adjust the leveling legs to compensate for
the unevenness of the oor.
NOTE
• Installing on carpeting, soft tile surfaces, a platform
or weakly supported structure is not recommended.
2
. If the refrigerator is
2
), you can install a
Ambient Temperature
Install this appliance in an area where the
temperature is between 55 °F (13 °C) and 110 °F
(43 °C).
If the temperature around the appliance is too low or
high, cooling ability may be adversely affected.
Page 13
ENGLISH
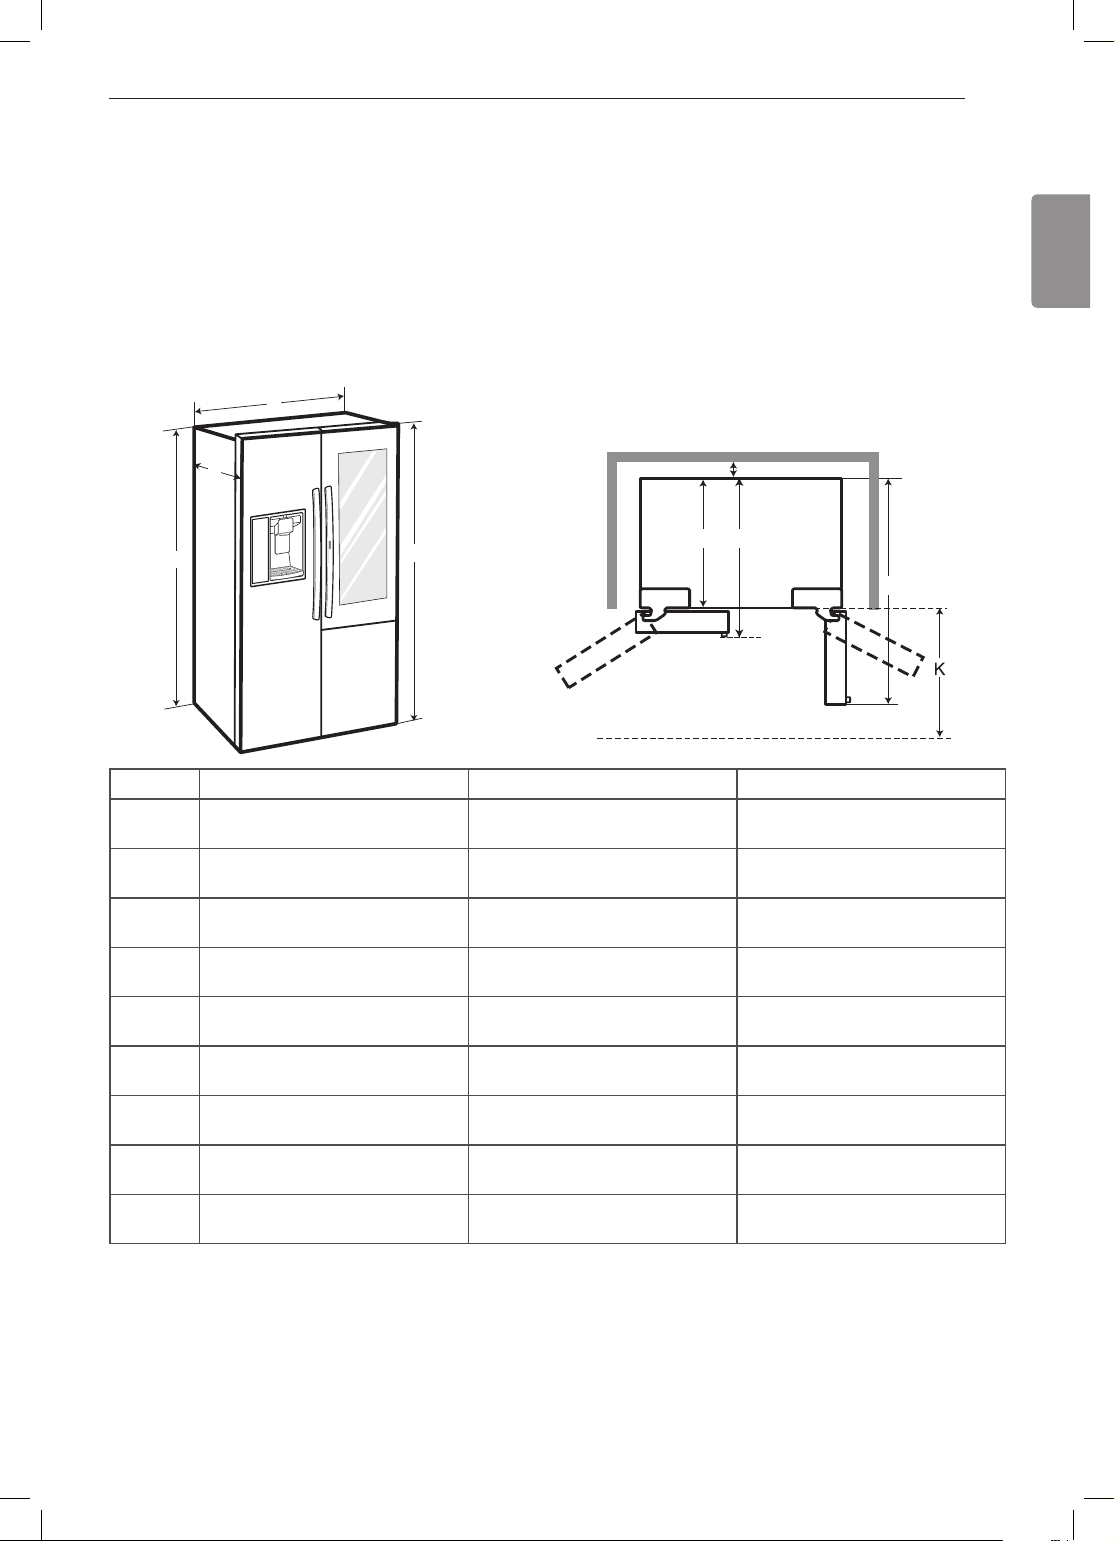
Dimensions and Clearances
• Check the dimensions of the appliance and the installation path to ensure there is sufcient room to move the
refrigerator through doors or narrow openings.
• If an opening is too narrow to t the refrigerator through, remove the refrigerator doors. See Removing/
Assembling the Doors and Drawers in this manual.
• The installation location chosen for the refrigerator should allow space behind the unit for connections and
airow and space in front to open the doors and drawers.
• Too small of a distance from adjacent items may result in lowered freezing capability and increased electricity
consumption charges. Allow at least 24 inches (610 mm) in front of the refrigerator to open the doors, and at
least 2 inches (50.8 mm) between the back of the refrigerator and the wall.
B
13INSTALLATION
A
C
D
E
F
M
G
- List LSXS26396S LSXC22396S
A Depth without handle
B Width
C Height to Top of Case
D Height to Top of Hinge
E Back Clearance
F Depth without Door
G
K Front Clearance
M Depth With handle
Depth (Total with Door Open
90°)
33 2/5"
(848 mm)
35 9/10"
(912 mm)
68 9/10"
(1750 mm)
70 3/10"
(1785 mm)
2"
(50 mm)
28 7/10"
(730 mm)
50 3/5"
(1285 mm)
24"
(610 mm)
35 9/10"
(912 mm)
29 2/5"
747 mm)
35 9/10"
912 mm)
68 9/10"
(1750 mm)
70 3/10"
(1785 mm)
2"
(50 mm)
24 3/5"
(624mm)
46 1/2"
(1180 mm)
24"
(610 mm)
31 4/5"
(807 mm)
Page 14
14 INSTALLATION
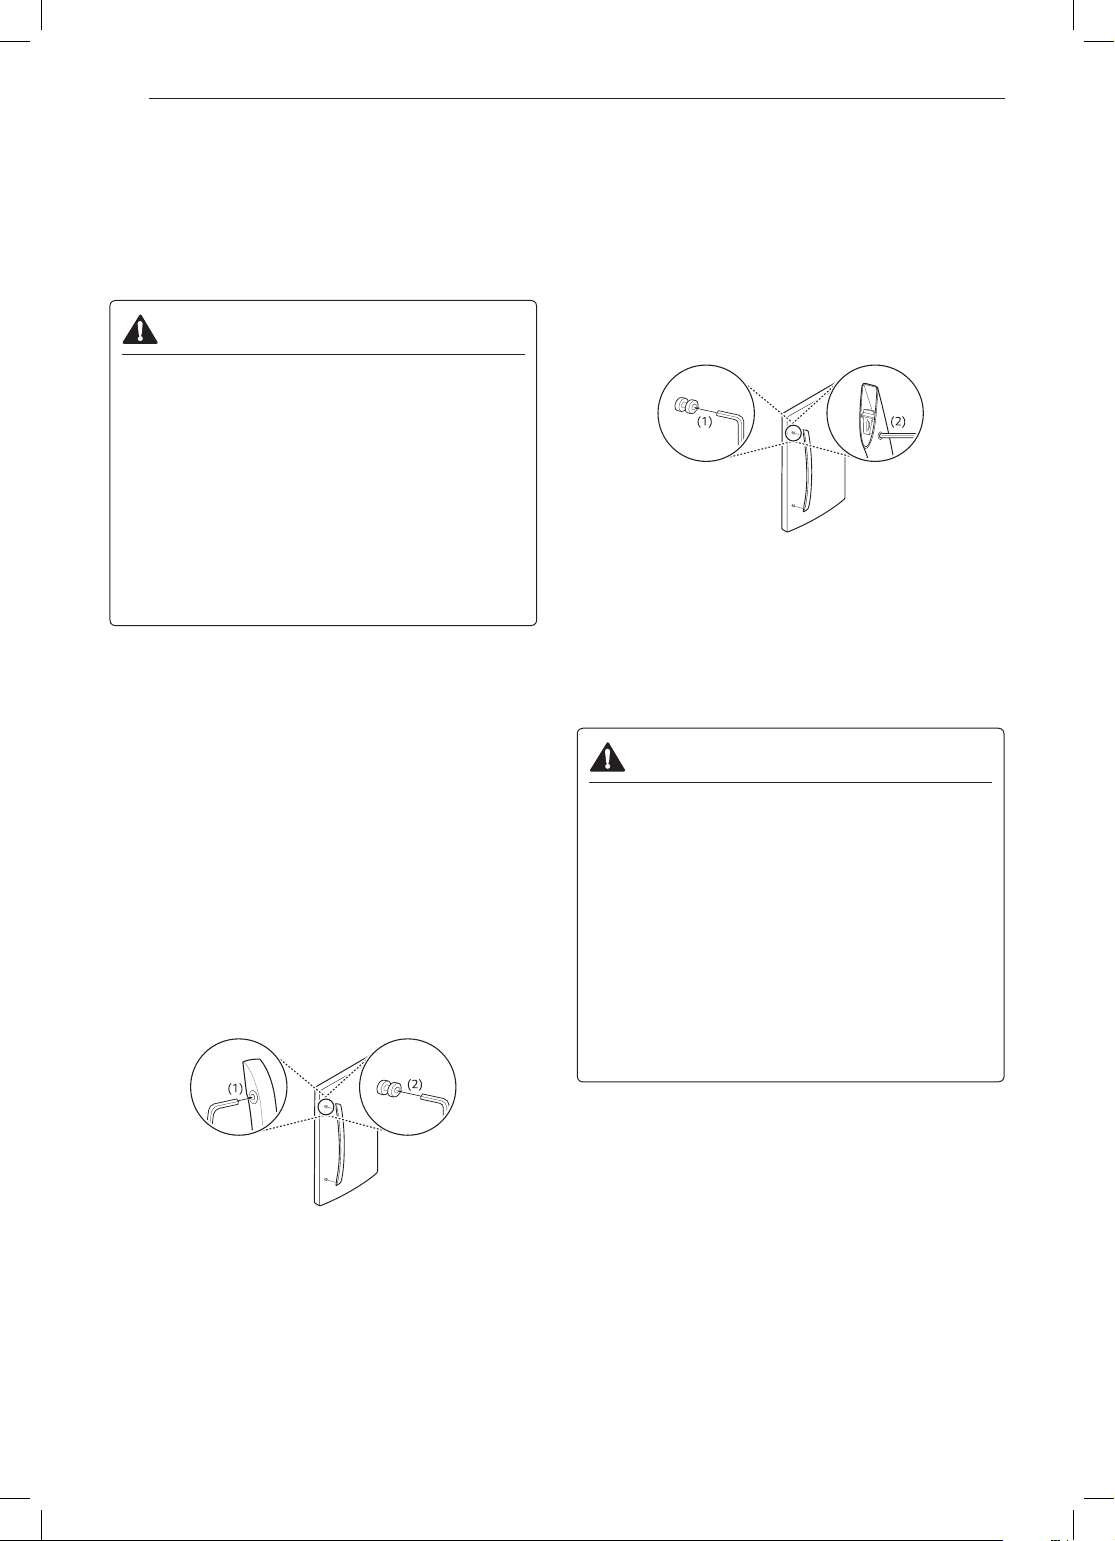
Removing/Assembling
Handles
• When moving the refrigerator through a narrow
opening, removing the doors is preferred.
• The appearance of the handles may vary from what
is shown.
WARNING
When assembling or disassembling the
refrigerator handles:
• Grasp the handle rmly to avoid dropping it.
• Do not swing the handle into nearby people or
animals.
• Make sure that the bracket hole of the handle
ts properly into the stopper bolt of the door.
Assemble the set screws to x the handle into
place.
• Make sure that there is not a gap between the
door and handle after assembling the handle.
Tools Needed
3/32 in. Allen wrench
1/8 in. Allen wrench
1/4 in. Allen wrench
Assembling the Refrigerator Handles
Assemble the mounting fasteners (1) at both ends
1
of the handle with a 1/4 in. Allen rench.
Place the handle on the door by tting the handle
2
footprints over the mounting fasteners and
tightening the set screws (2) with a 3/32 in. Allen
wrench.
Removing/Assembling the
Doors
If the entrance door is too narrow for the refrigerator
to pass through, remove the refrigerator doors and
move the refrigerator sideways through the doorway.
WARNING
Removing the Refrigerator Handles
Loosen the set screws (1) with a 3/32 in. Allen
1
wrench and remove the handle.
Loosen the mounting fasteners (2) that connect
2
to the refrigerator door and handle using a 1/4
in. Allen wrench, and remove the mounting
fasteners.
• Use two or more people to remove and install
the refrigerator doors.
• Disconnect the electrical supply to the
refrigerator before installing.
• Do not put hands, feet or other objects into the
air vents or bottom of the refrigerator.
• Be careful when handling the hinge and stopper.
• Remove food and bins before detaching the
doors and drawers.
• Do not hold the handle when removing or
replacing the doors and drawer as the handle
may come off.
Tools Needed
3/32 in. Allen wrench
1/8 in. Allen wrench
1/4 in. Allen wrench
Page 15
15INSTALLATION
ENGLISH
(1)
(2)
Removing the Freezer Door (with
Water Line Connection)
Before removing freezer door, disconnect water
1
line connectors (one white tube, one blue tube).
• Do not remove freezer door if either the white or
blue tube is still connected.
• Use the support block shipped on the upper
shelf in the refrigerator to keep the front of
the refrigerator tilted up while removing the
connectors.
NOTE
Disassembling/Assembling the Water Lines
Collet
Tube
Lift the door to remove it from the lower hinge pin.
4
Be careful to pull the water lines from behind the
lower hinge pin.
Enough for the water feed tube to be completely
pulled out.
water feed tube
Lower Hinge
CAUTION
• When lifting the hinge free of the latch, be careful
that the door does not fall forward.
• Place the door, inside facing up, on a
nonscratching surface.Be careful not to damage
the water lines.
Removing the Refrigerator Door
Insert line
Clip
Loosen the hinge cover screws and remove the
2
(Correct)
hinge cover. Disconnect all wire harnesses.
Hinge Cover
Wire Harness
Upper Hinge
Rotate the hinge lever counterclockwise (1) and
3
lift the upper hinge (2).
Hinge Lever
Upper Hinge
Open the door and remove the top hinge cover
1
screw.
Use a at blade screwdriver to pry back the hooks
2
(not shown) of the hinge cover from the top of
the refrigerator cabinet. Remove the cover and
disconnect all wire harnesses.
Rotate the hinge lever (1) clockwise. Lift the top
3
hinge (2) free of the hinge lever latch.
Hinge Lever
Upper Hinge
(1)
(2)
Page 16
16 INSTALLATION
Lift the door from the lower hinge pin.
4
Lower Hinge
CAUTION
• When lifting the hinge free of the latch, be careful
that the door does not fall forward.
• Place the door, inside facing up, on a
nonscratching surface.Be careful not to damage
the water lines.
NOTE
• Do not remove the grease on the surface of the
gasket or hinge.
• Do not remove the sensor assembly in the right
upper hinge cover.
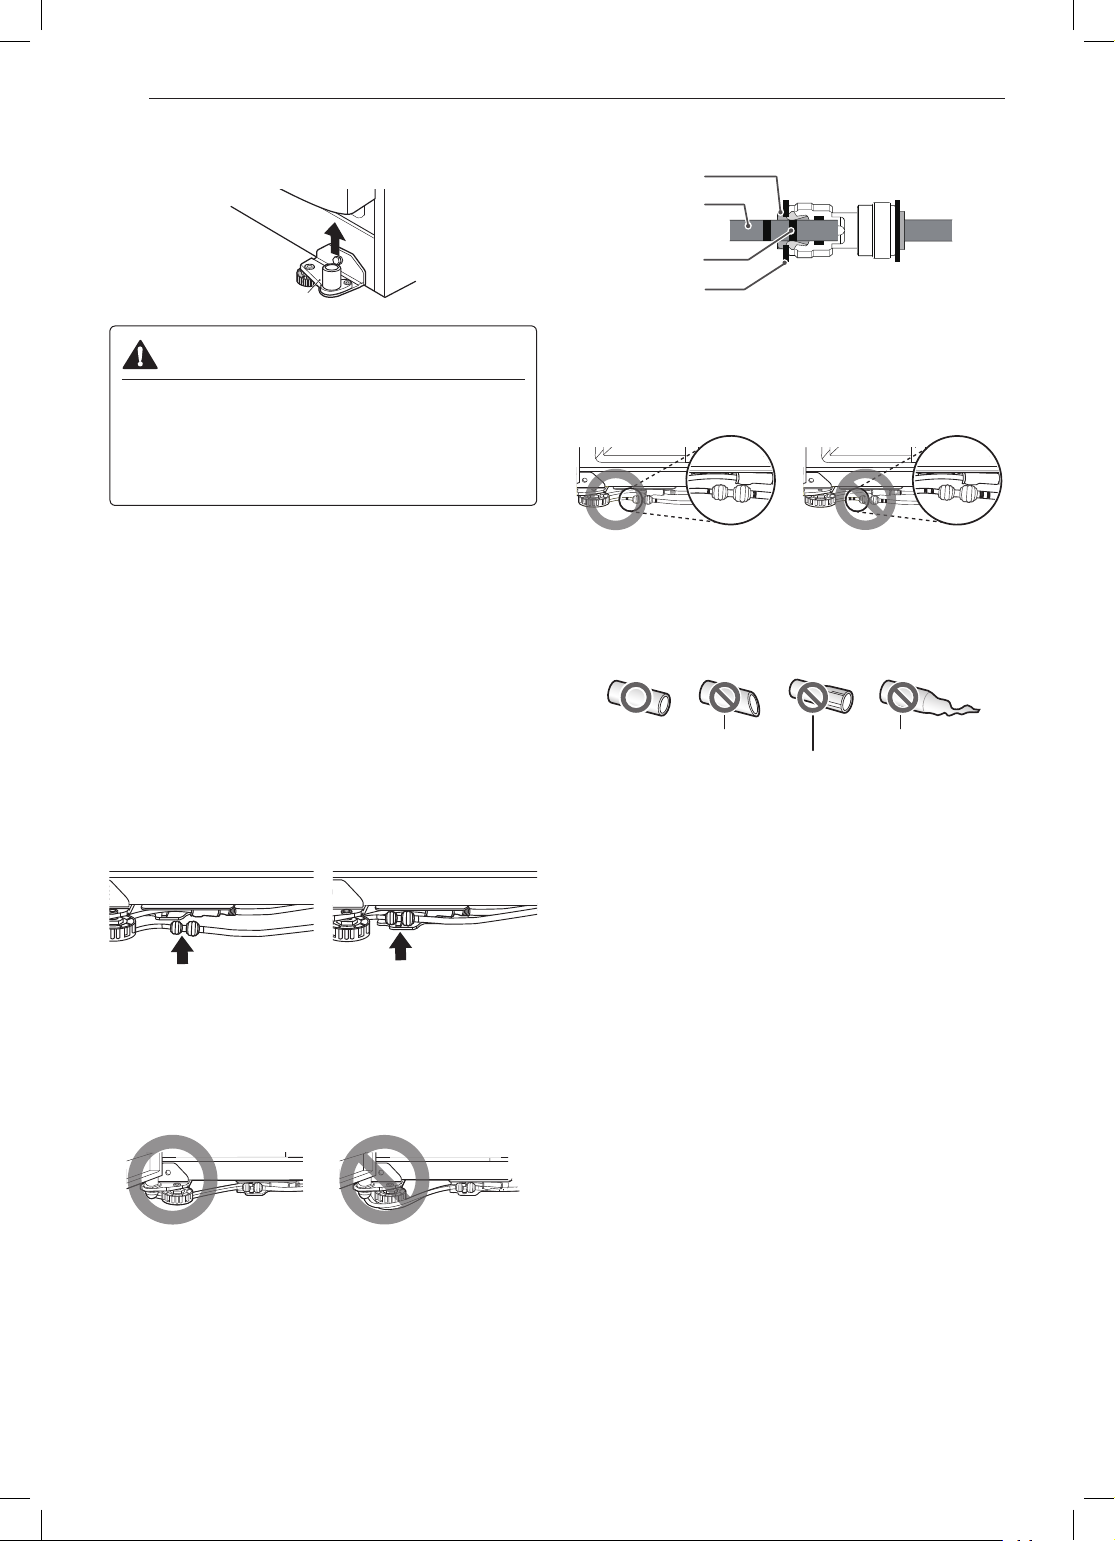
Assembling the Freezer Door
Disassembling/Assembling the Water Lines
Collet
Tube
Insert line
Clip
Gently press the collet and insert the tube until
2
only one line shows on the tube.
Correct Incorrect
NOTE
• Water hoses should be cut with a clean, straight
edge to avoid leaks.
(Correct)
Feed the water tubes through the lower hinge
1
pin and place the door onto the lower hinge pin.
Make sure the water hoses are behind the leg to
prevent damage.
NOTE
• Open the door and turn the hose toward the inside.
Water hoses should be behind the leg to prevent
damage.
Correct Incorrect
Fit the top over the hinge lever latch and into
3
place. Rotate the lever clockwise to secure the
hinge.
Install the grounding screw and connect all the
4
wire harnesses.
Hook the tab on the door switch side of the cover,
5
under the edge of the wire opening in the cabinet
top. Position the cover into place. Insert and
tighten the cover screw.
Reconnect the water tubes by inserting the tubes
6
into the connectors. The tube is inserted correctly
when only one guide line is showing out of two.
Page 17

17INSTALLATION
ENGLISH
Assembling the Refrigerator Door
Place the door onto the lower hinge pin.
1
Lower Hinge
Fit the upper hinge over the hinge lever latch and
2
into place. Rotate the lever counterclockwise to
secure the hinge.
(1)
(2)
Reconnect all wire harnesses. Hook the tab on
3
the switch side of the cover under the edge of the
wire opening in the cabinet top. Position the cover
and replace the screw.
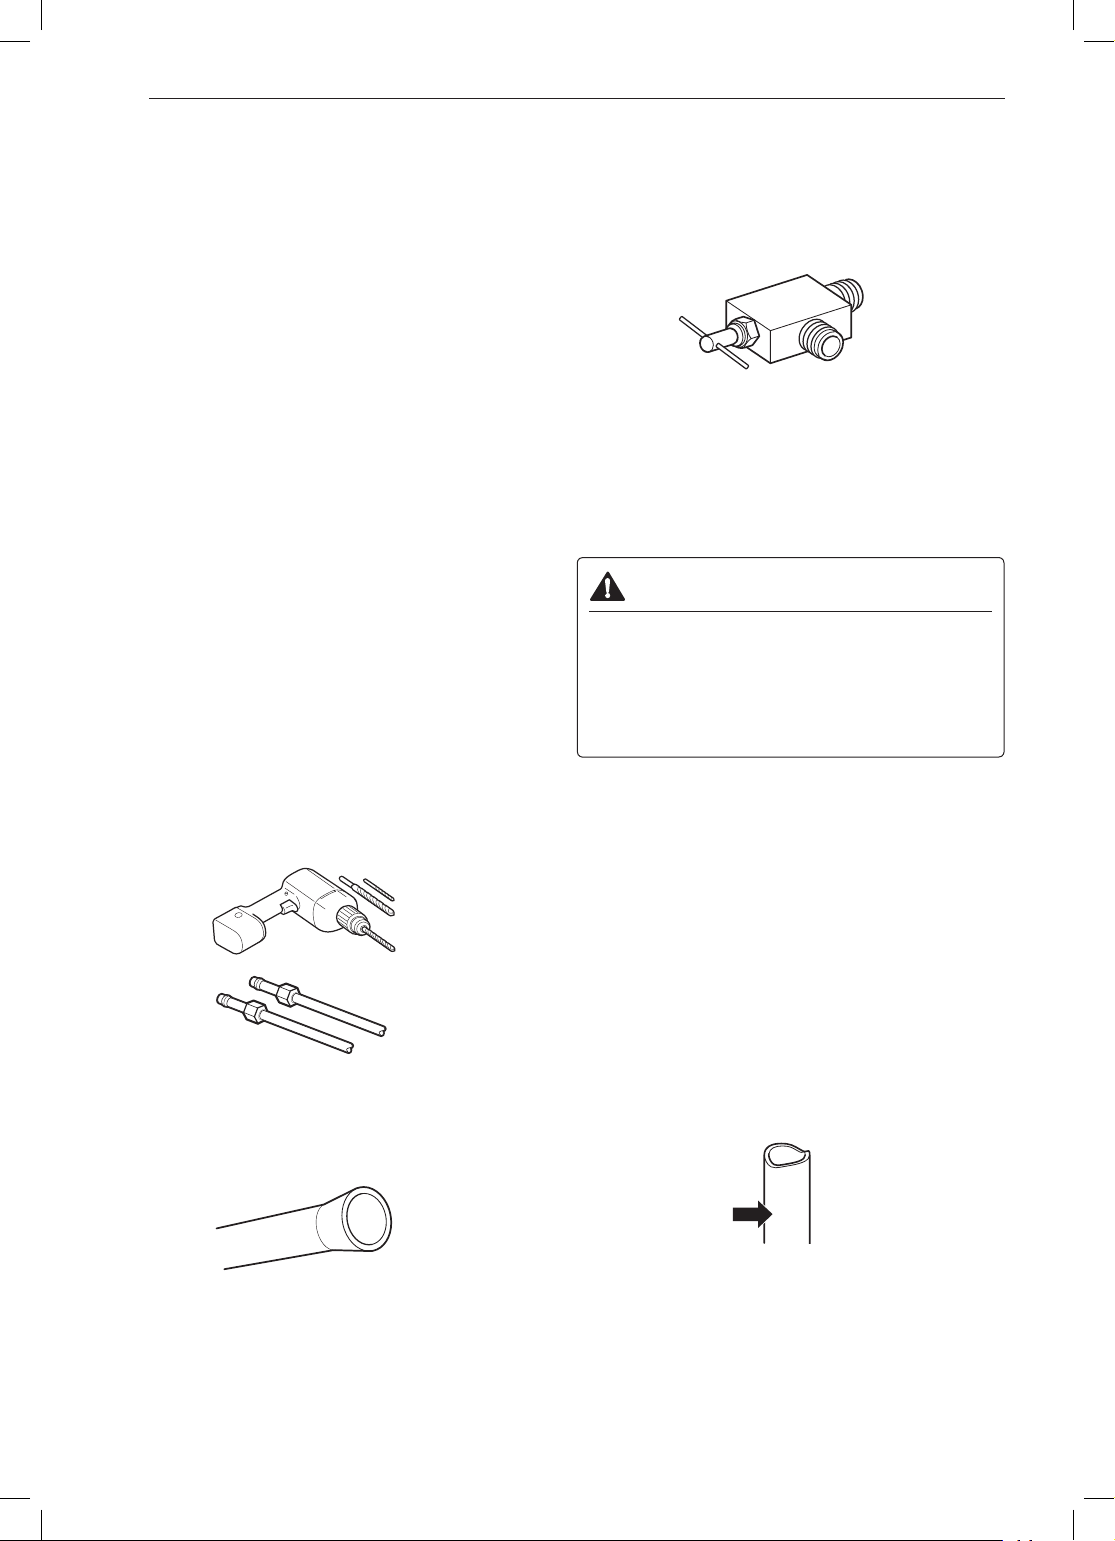
Connecting the Water Line
Before Beginning
This water line installation is not covered by the
refrigerator warranty. Follow these instructions
carefully to minimize the risk of expensive water
damage.
If necessary, call a qualied plumber to correct water
hammer before installing the water supply line to
the refrigerator. Water banging in the pipes, or water
hammer in residential plumbing can cause damage
to refrigerator parts and lead to water leakage or
ooding.
• Turn the icemaker OFF if the refrigerator will be
used before the water line is connected.
• Do not install the icemaker tubing in areas where
the ambient temperatures fall below freezing.
WARNING
• Connect to a potable water supply only.
CAUTION
• To prevent burns and product damage, only
connect the refrigerator water line to a cold water
supply.
• Wear eye protection during installation toprevent
injury.
Water Pressure
You will need a cold water supply.
Water Pressure
models with water lter
where reverse osmosis
water ltration system is
connected to a cold water
supply
20–120 psi
(138 - 827 kPa)
40–60 psi minimum to
reverse osmosis system
(2.8 kgf/cm
2
cm
,or less than 2–3
seconds to ll a cup of 7
oz capacity)
2
– 4.2 kgf/
Page 18
18 INSTALLATION
If the water pressure from the reverse osmosis
system is less than 20 psi or 138 kPa or 1.4 kgf/ cm
(takes more than 4 seconds to ll a cup of 7 oz or
198 cc capacity):
• Check to see if the sediment lter in the reverse
osmosis system is blocked. Replace the lter if
necessary.
• Allow the storage tank on the reverse osmosis
system to rell after heavy usage.
• If the water pressure remains low, call a licensed,
qualied plumber.
• All installations must be in accordance with local
plumbing code requirements.
Supplies Needed
• Copper or PEX Tubing, ¼ in. outer diameter, to
connect the refrigerator to the water supply. Be sure
both ends of the tubing are cut square. To determine
how much tubing you need, measure the distance
from the water valve on the back of the refrigerator
to the water supply pipe. Then, add 8 feet (2.4 m).
Be sure there is sufcient extra tubing (about 8 feet
[2.4 m] coiled into 3 turns of about 10 in. [25 cm]
diameter) to allow the refrigerator to move out from
the wall after installation.
• Power drill.
• ½ in. or adjustable wrench.
• Flat-blade and Phillips-head screwdrivers.
• Two ¼ in. outer diameter compression nuts and
2 ferrules (sleeves) to connect the copper tubing to
the shutoff valve and the refrigerator water valve.
2
• Shutoff valve to connect to the cold water line.
The shutoff valve should have a water inlet with a
minimum inside diameter of 5/32 in. at the point of
connection to the COLD WATER LINE. Saddle-type
shutoff valves are included in many water supply
kits. Before purchasing, make sure a saddle-type
valve complies with your local plumbing codes.
NOTE
• A self-piercing saddle type water valve should not
be used.
Water Line Installation Instructions
WARNING
Electric Shock Hazard:
• When using any electrical device (such as a
power drill) during installation, be sure the device
is battery-powered, double-insulated or grounded
in a manner that will prevent the hazard of
electric shock.
Install the shutoff valve on the nearest frequently
used drinking water line.
Shut off the main water supply.
1
Turn on the nearest faucet to relieve the pressure
on the line.
• If your existing copper water line has a ared tting
at the end, purchase an adapter (available at
plumbing supply stores) to connect the water line
to the refrigerator OR cut off the ared tting with a
tube cutter and then use a compression tting.
Choose the valve location.
2
Choose a location for the valve that is easily
accessible. It is best to connect into the side of
a vertical water pipe. When it is necessary to
connect into a horizontal water pipe, make the
connection to the top or side, rather than at the
bottom, to avoid drawing off any sediment from
the water pipe.
Page 19
19INSTALLATION
ENGLISH
Drill the hole for the valve.
3
• Drill a ¼ in. hole in the water pipe using a sharp
bit. Remove any burrs resulting from drilling the
hole in the pipe. Be careful not to allow water
to drain into the drill. Failure to drill a ¼ in. hole
may result in reduced ice production or smaller
cubes.
NOTE
• The hookup line cannot be white, plastic tubing.
Licensed plumbers must use only copper tubing
(NDA tubing #49595 or #49599) or Cross Link
Polyethylene (PEX) tubing.
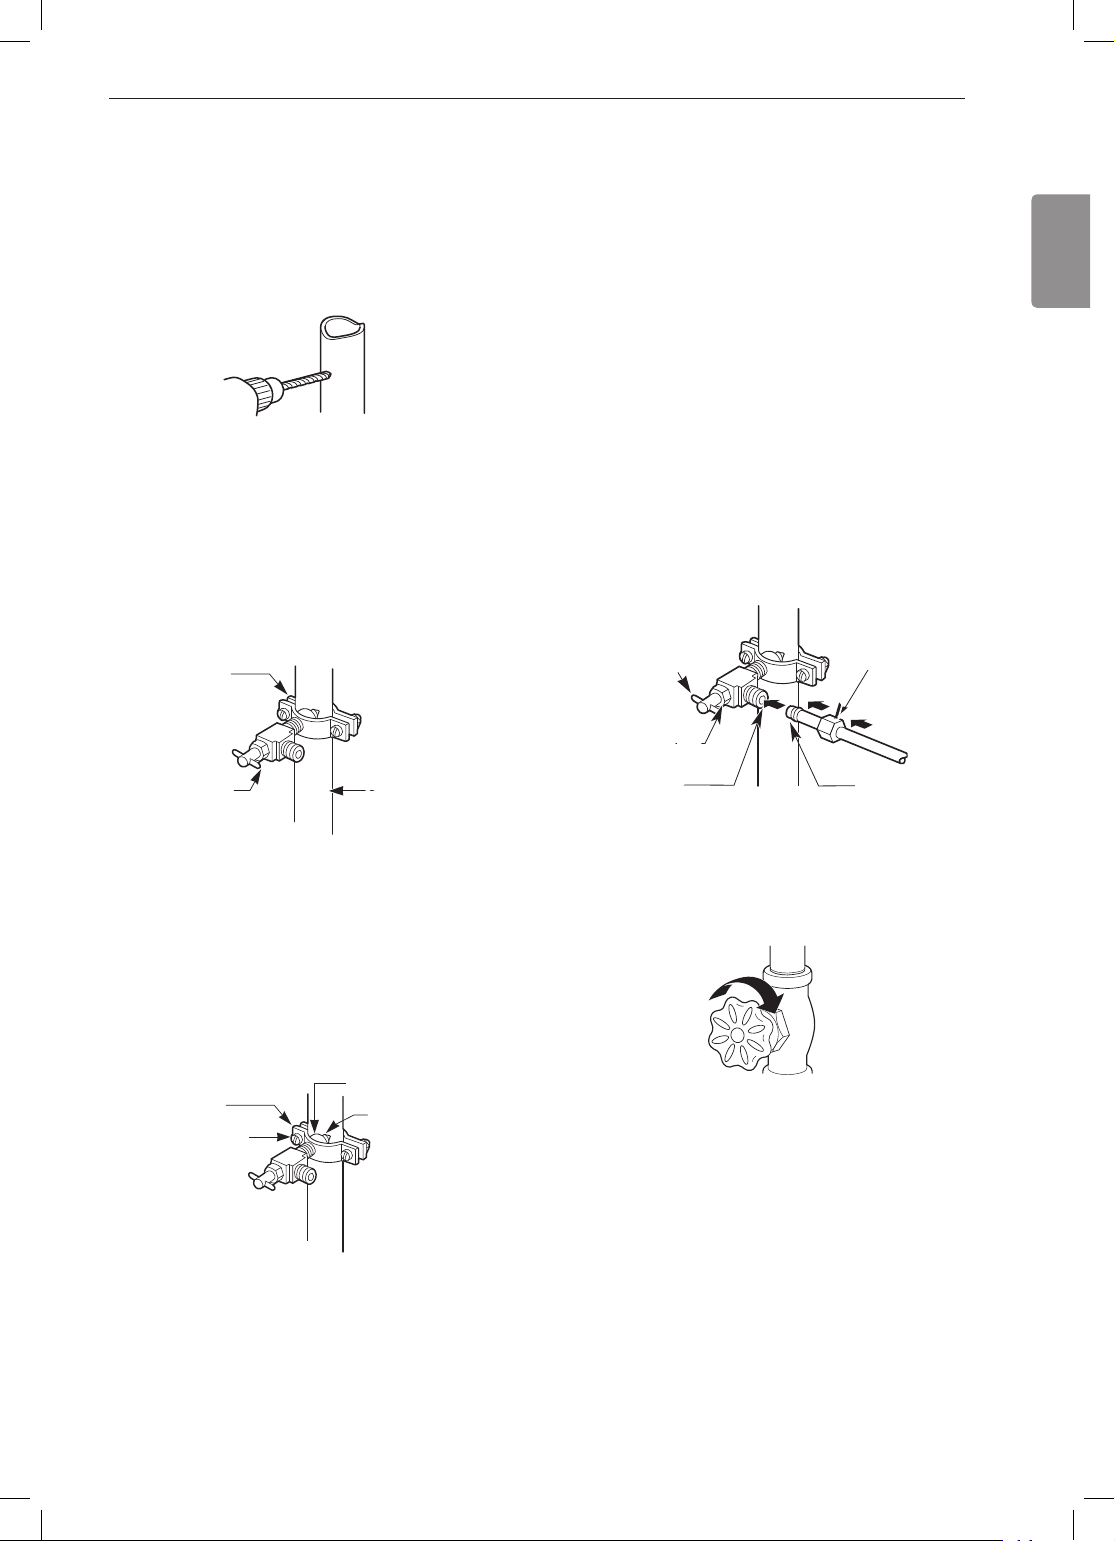
Fasten the shutoff valve.
4
Fasten the shutoff valve to the cold water pipe
with the pipe clamp.
Pipe Clamp
Route the tubing.
6
Route the tubing between the cold water line and
the refrigerator.
Route the tubing through a hole drilled in the wall
or oor (behind the refrigerator or adjacent base
cabinet) as close to the wall as possible.
NOTE
• Be sure there is sufcient extra tubing (about 8 ft.
coiled into three turns of about 10 in. diameter) to
allow the refrigerator to move out from the wall after
installation.
Connect the tubing to the valve.
7
Place the compression nut and ferrule (sleeve)
for copper tubing onto the end of the tubing and
connect it to the shutoff valve.
Make sure the tubing is fully inserted into the
valve. Tighten the compression nut securely.
Saddle-Type
Shutoff Valve
Compression
Nut
Saddle-Type
Shutoff Valve
Vertical Cold
Water Pipe
NOTE
• Commonwealth of Massachusetts Plumbing Codes
248CMR shall be adhered to. Saddle valves are
illegal and use is not permitted in Massachusetts.
Consult with your licensed plumber.
Tighten the pipe clamp.
5
Tighten the clamp screws until the sealing washer
begins to swell.
Inlet End
Pipe Clamp
Clamp Screw
Washer
NOTE
• Do not over tighten clamp or you may crush the
tubing.
Packing Nut
Outlet Valve
Flush out the tubing.
8
Ferrule
(sleeve)
Turn the main water supply on and ush out the
tubing until the water is clear. Shut the water off at
the water valve after about one quart of water has
been ushed through the tubing.
Page 20

20 INSTALLATION
Connect the tubing to the refrigerator.
9
NOTE
• Before making the connection to the refrigerator, be
sure that the refrigerator power cord is not plugged
into the wall outlet.
• Remove the plastic exible cap from the water
valve.
• Place the compression nut and ferrule (sleeve) onto
the end of the tubing as shown.
• Insert the end of the copper tubing into the
connection as far as possible. While holding the
tubing, tighten the tting.
Tubing
Clamp
¼ in. Compression Nut
Ferrule
(sleeve)
Turn the water on at the shutoff valve.
10
Tighten any connections that leak.
¼ in. Tubing
Refrigerator
Connection
Leveling and Door Alignment
Leveling
The refrigerator has two front leveling legs. Adjust the
legs to alter the tilt from front-to-back or side-to side.
If the refrigerator seems unsteady, or the doors do
not close easily, adjust the refrigerator’s tilt using the
instructions below:
Turn the leveling leg to the left to raise that side
1
of the refrigerator or to the right to lower it. It may
take several turns of the leveling leg to adjust the
tilt of the refrigerator.
NOTE
• A are nut wrench works best, but an open-end
wrench will sufce. Do not over-tighten.
Open both doors and check to make sure that
2
they close easily. If the doors do not close easily,
tilt the refrigerator slightly more to the rear by
turning both leveling legs to the left. It may take
several more turns, and be sure to turn both
leveling legs the same amount.
CAUTION
• Check to see if leaks occur at the water line
connections.
Page 21
21INSTALLATION
ENGLISH
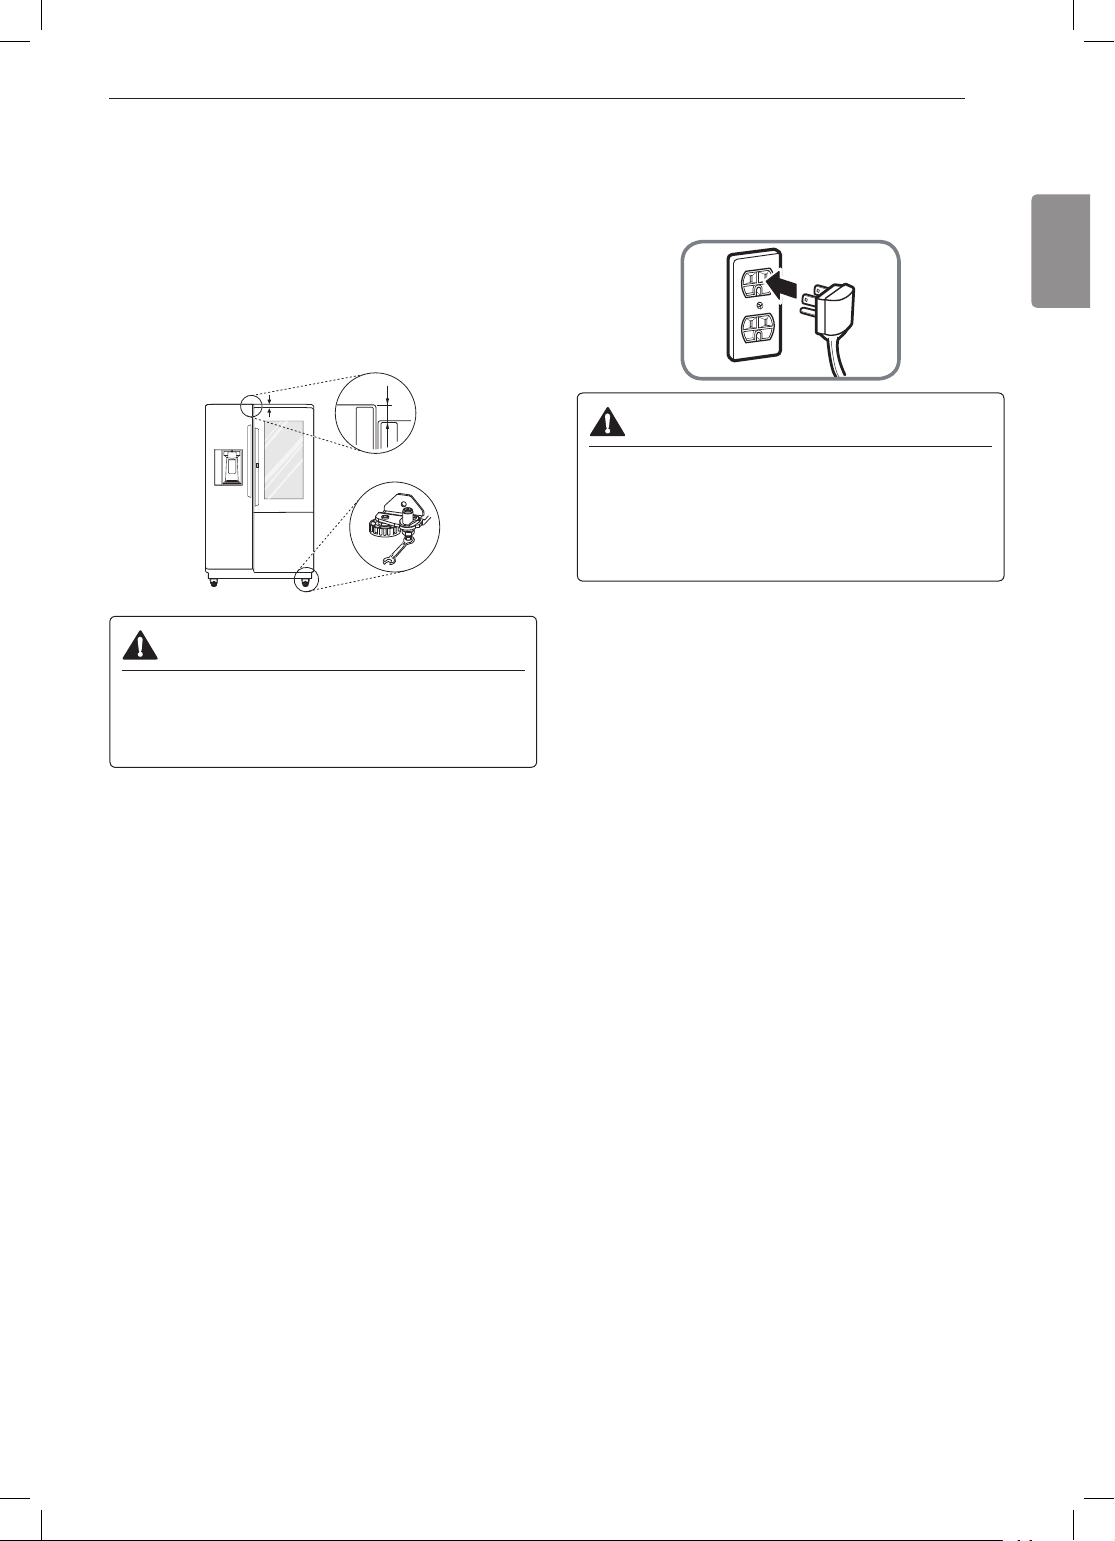
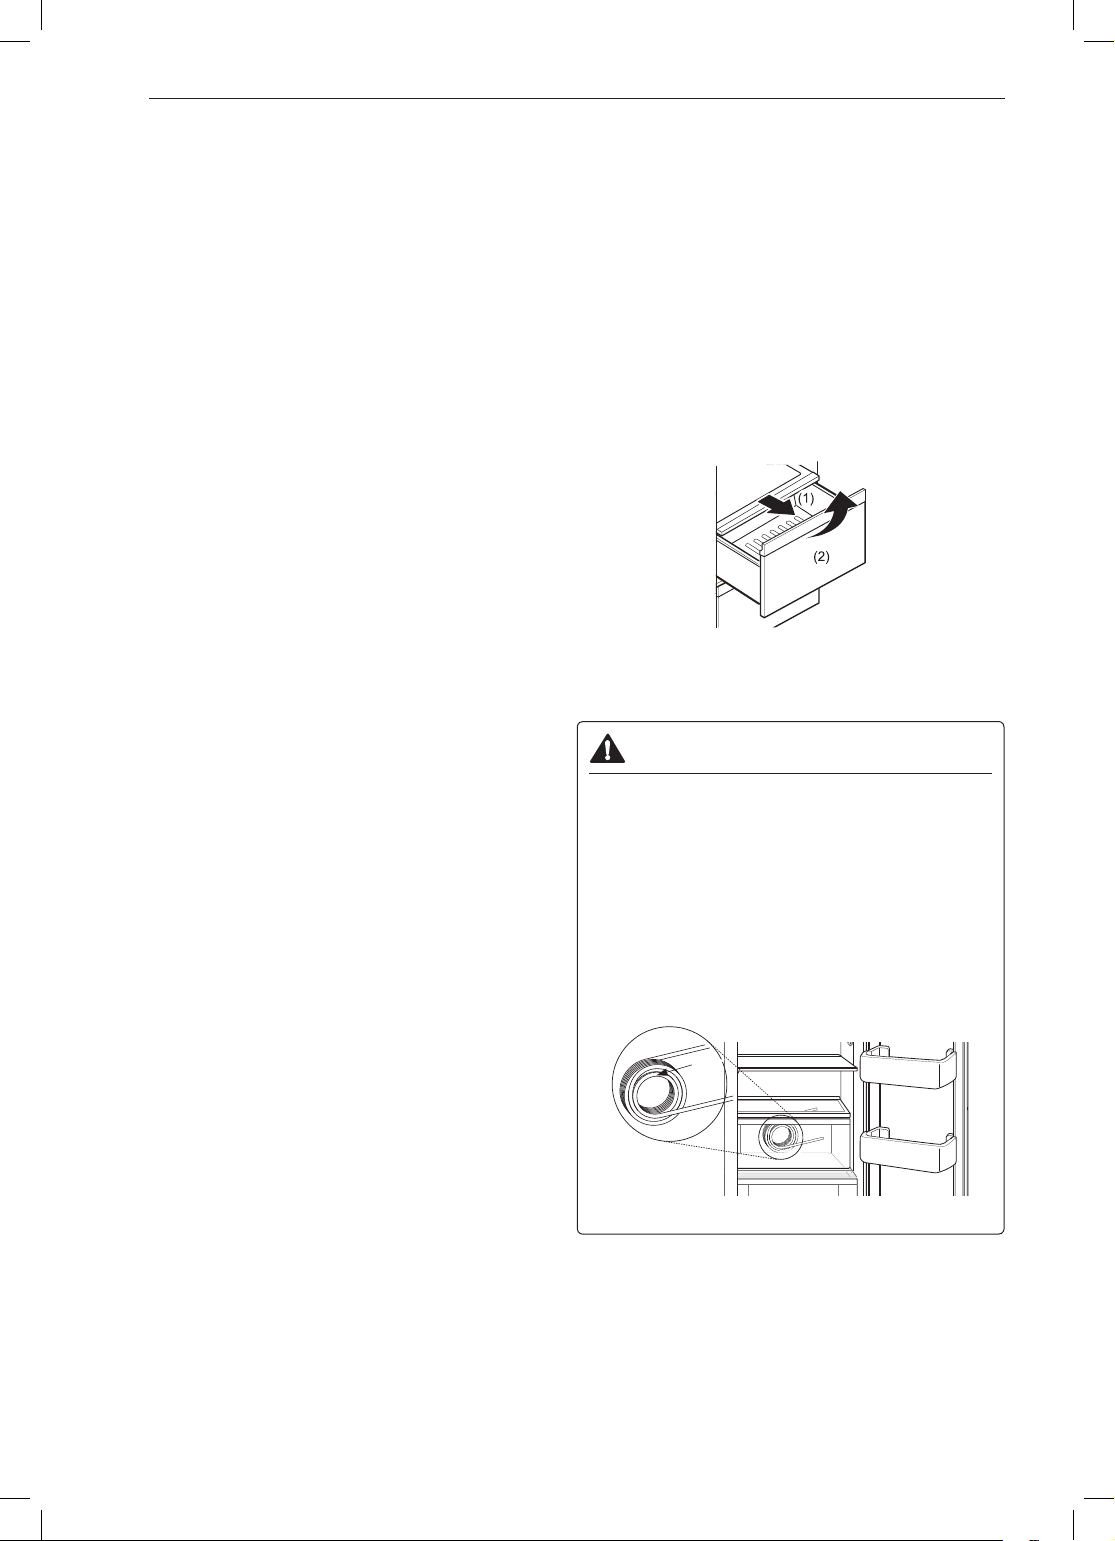
Door Alignment
Both the left and right refrigerator doors have an
adjustable nut, located on the bottom hinge, to raise
and lower them to align properly.
If the space between the doors is uneven, follow the
instructions below to align the doors evenly:
Use the wrench (included with the owner's manual)
to turn the nut in the door hinge to adjust the height.
Turn the nut to the right to raise the door or to the left
to lower it.
CAUTION
• Do not overtighten the door adjustment screw.
The hinge pin can be pulled out and the
adjustable range of height is a maximum of 2 in.
(5 cm).
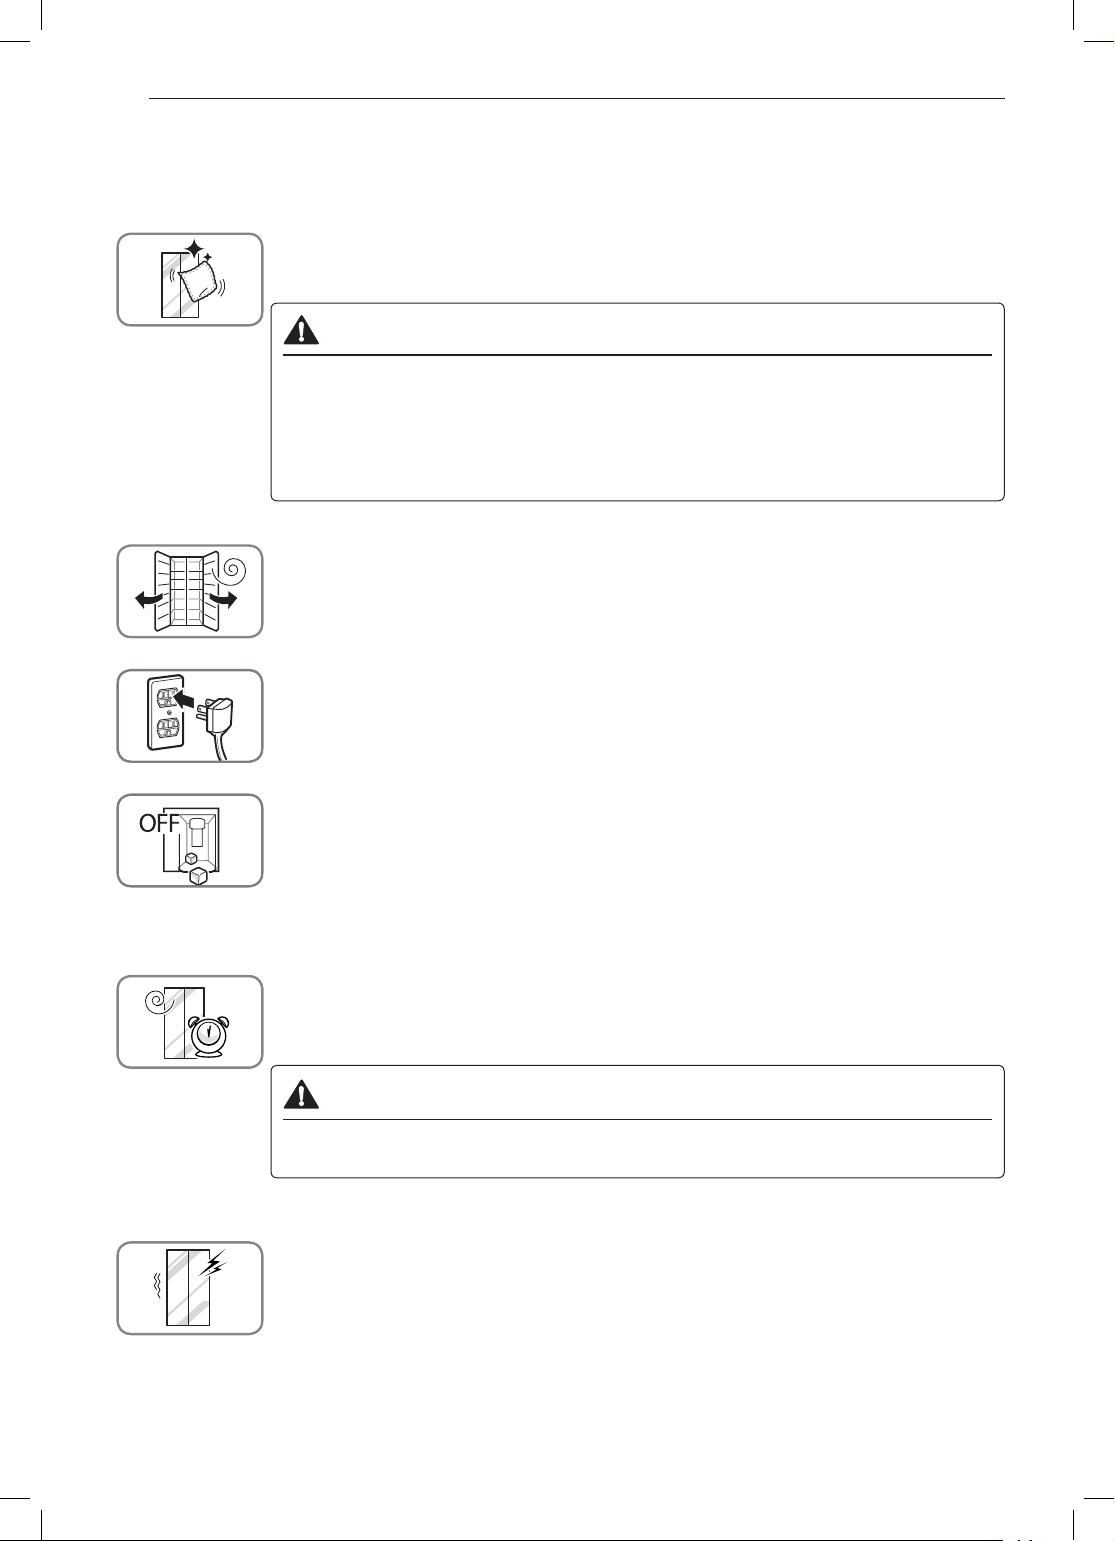
Turning on the Power
• After installing, plug the refrigerator’s power cord
into a 3-prong grounded outlet and push the
refrigerator into the nal position.
CAUTION
• Connect to a rated power outlet.
• Have a certied electrician check the wall outlet
and wiring for proper grounding.
• Do not damage or cut off the ground terminal of
the power plug.
Position the Rrigerator
• Arrange the coil of tubing so that it does not vibrate
against the back of the refrigerator or against the
wall. Push the refrigerator back to the wall.
Start the Icemaker
• If the water line is connected, set the icemaker
power switch to the ON position.
• The icemaker will not begin to operate until it
reaches its operating temperature of 15 °F (–9 °C)
or below. It will then begin operation automatically if
the icemaker power switch is in the ON (I) position.
Page 22
22 OPERATION
OPERATION
Before Use
Clean the refrigerator.
Clean the refrigerator thoroughly and wipe off all dust that accumulated during shipping.
• Do not scratch the refrigerator with a sharp object or use a detergent that contains
alcohol, a ammable liquid or an abrasive when removing any tape or adhesive from
the refrigerator. Remove adhesive residue by wiping it off with your thumb or dish
detergent.
• Do not peel off the model or serial number label or the technical information on the rear
surface of the refrigerator.
Open refrigerator doors and freezer drawers to ventilate the interior.
The inside of the refrigerator may smell like plastic at rst. Remove any adhesive tape
from inside the refrigerator and open the refrigerator doors and the freezer drawers for
ventilation.
CAUTION
Connect the power supply.
Check if the power supply is connected before use.
Turn off the icemaker
Turn off the icemaker if the refrigerator is not yet connected to the water supply.
NOTE
• The icemaker water valve may buzz if the icemaker is turned on while the refrigerator is
not connected to the water supply.
Wait for the refrigerator to cool.
Allow the refrigerator to run for at least two to three hours before putting food in it. Check the
ow of cold air in the freezer compartment to ensure proper cooling.
CAUTION
• Putting food in the refrigerator before it has cooled could cause the food to spoil, or a
bad odor to remain inside the refrigerator.
The refrigerator makes a loud noise after initial operation.
This is normal. The volume will decrease as the temperature decreases.
Page 23
ENGLISH
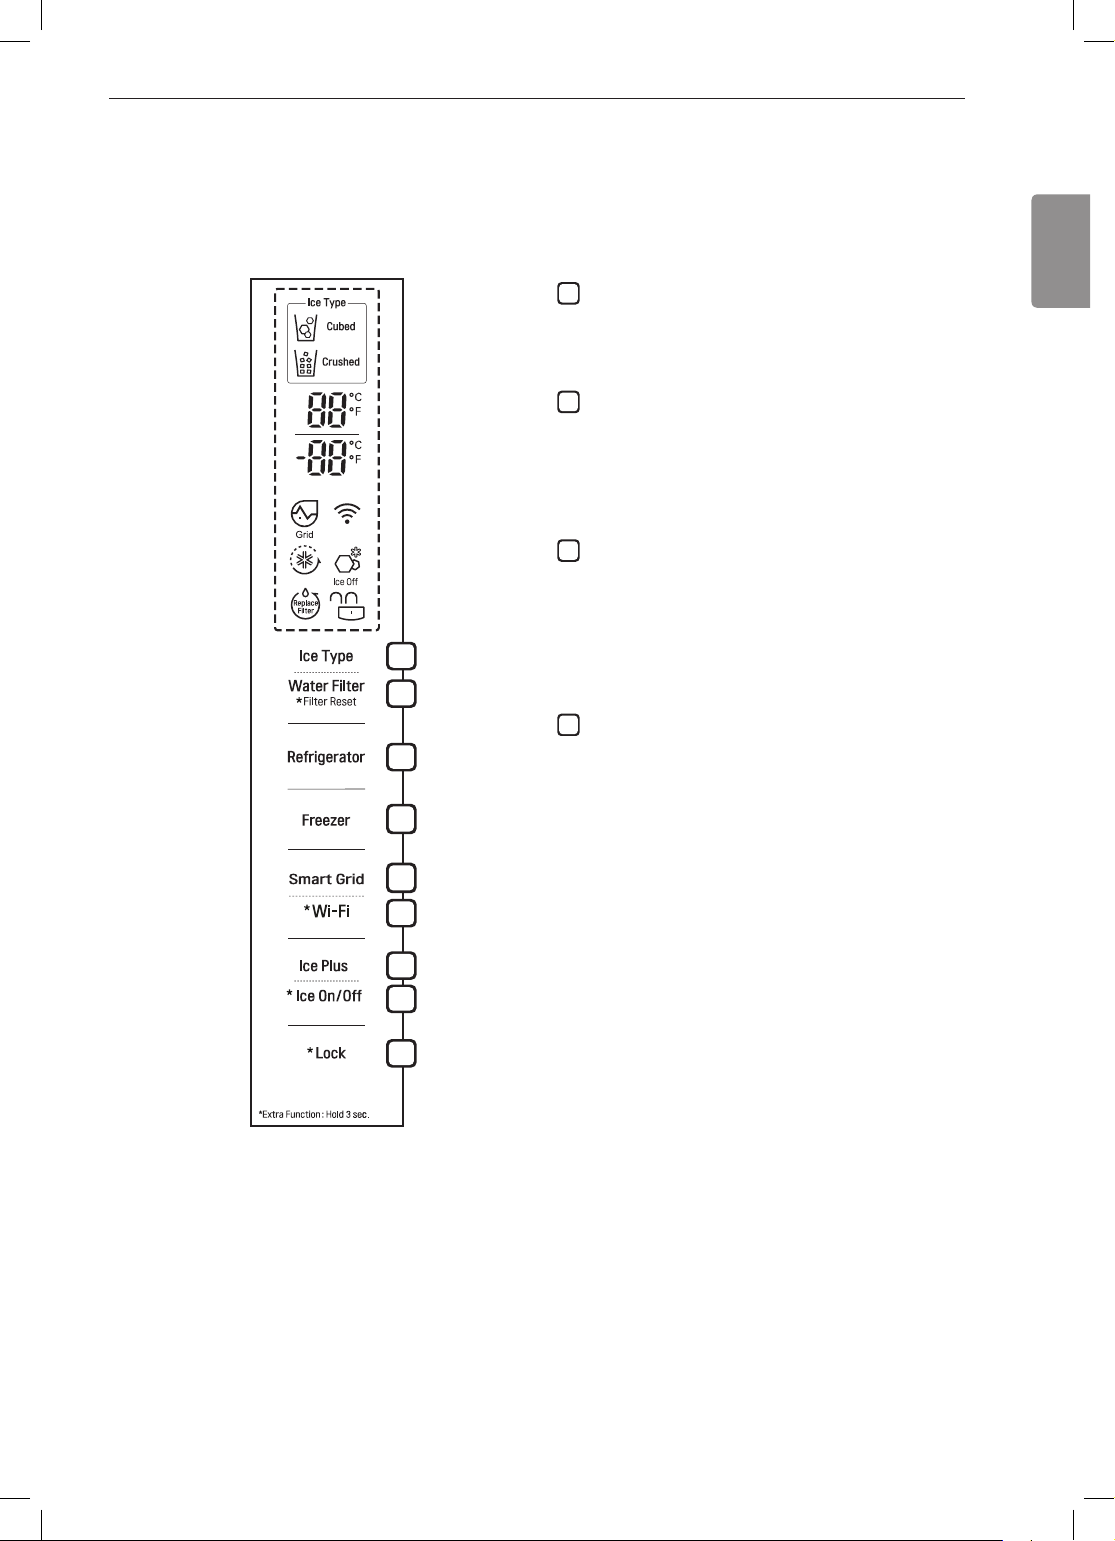
Control Panel
2
Depending on the model, some of the following functions may not be available.
23OPERATION
Control Panel Features
Ice Type
1
Press the Ice Type button to choose either cubed
or crushed ice. The Cubed or Crushed Ice icon
illuminates.
* Water Filter
Replace the water lter when the Replace Filter
icon turns on. After replacing the water lter, press
and hold the Water Filter button for three seconds
to turn the icon light off. Replace the water lter
approximately every six months.
Refrigerator Temperature
3
Indicates the set temperature of the refrigerator
compartment in Celsius (°C) or Fahrenheit (°F).
The default refrigerator temperature is 37 °F (3 °C).
1
2
3
4
Press the Refrigerator button repeatedly to select
a new set temperature from 33 °F to 46 °F (1 °C to
8 °C).
Freezer Temperature
4
Indicates the set temperature of the freezer
compartment in Celsius (°C) or Fahrenheit (°F).
The default freezer temperature is 0°F (-18 °C).
Press the Freezer button repeatedly to select a
new set temperature from -6 °F to 8 °F (-21 °C to
-13 °C).
5
6
7
8
9
NOTE
• To change the temperature mode from °F
to °C (or vice versa) press and hold the
Refrigerator and Freezer Temperature buttons
simultaneously for approximately ve seconds.
The temperature indicator on the display window
switches between Celsius and Fahrenheit.
• The displayed temperature is the target
temperature, and not the actual temperature
of the refrigerator. The actual refrigerator
temperature depends on the food inside the
refrigerator.
NOTE
• When the refrigerator is in the Power Saving Mode, the display remains off until a door is opened or a button is
pressed. Once on, the display remains on for 20 seconds.
Page 24
24 OPERATION
5
9
Smart Grid
Press the Smart Grid button to turn the Smart
Grid function On/Off. When the function is on,
the icon illuminates. The Smart Grid function
automatically turns on when the refrigerator is
connected to the Wi-Fi network.
When the refrigerator is responding to a Demand
Response (DR) message from the electric
company, the Grid text illuminates.
* Wi-Fi
6
The Wi-Fi button, when used with the LG
Smart Refrigerator smart phone app, allows the
refrigerator to connect to a home Wi-Fi network.
Refer to Smart Function for information on the
initial setup of the application.
The Wi-Fi icon shows the status of the
refrigerator's network connection. The icon
illuminates when the refrigerator is connected to
the Wi-Fi network.
Press and hold the Wi-Fi button for 3 seconds to
connect to the network. The icon blinks while the
connection is being made, then turns on once the
connection is successfully made.
Ice Plus
7
This function increases both ice making and
freezing capabilities.
• Press the Ice Plus button to illuminate the icon
and activate the function for 24 hours. The
function automatically shuts off after 24 hours.
• Stop the function manually by pressing the
button once more.
CAUTION
Display Mode (For Store Use Only)
• The Display Mode disables all cooling in the
refrigerator and freezer sections to conserve
energy while on display in a retail store. When
activated, OFF is displayed on the control panel
and the display remains on for 20 seconds.
To deactivate / activate:
• With either refrigerator door opened, press and
hold the Refrigerator and Ice Plus buttons at the
same time for ve seconds. The control panel
beeps and the temperature settings display to
conrm that Display Mode is deactivated. Use
the same procedure to activate Display Mode.
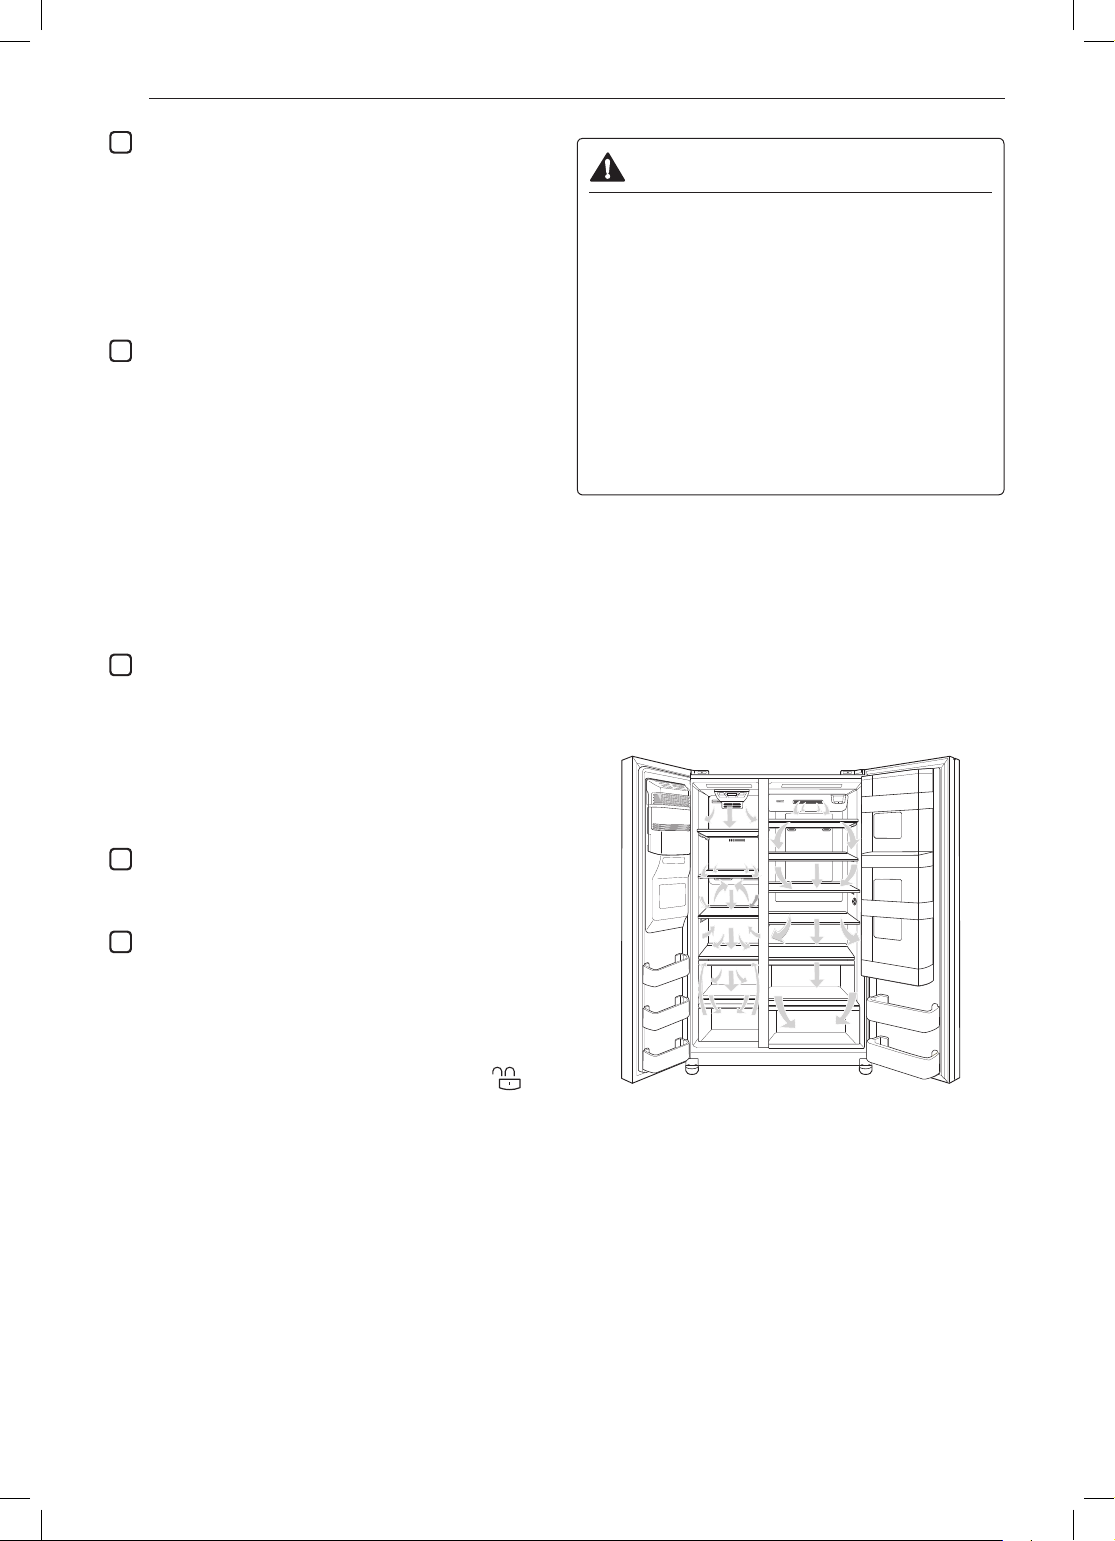
Airow
Cold air circulates from the freezer to the fresh food
section and back again through air vents in the
wall dividing the two sections. Be sure not to block
vents while storing food in the refrigerator. Doing so
will restrict airow and may cause the refrigerator
temperature to become too warm or cause interior
moisture buildup. (See airow diagram below.)
* Ice On/Off
8
Press the Ice On/Off button for three seconds to
turn the icemaker on/off.
* Lock
The Lock function disables every other button on
the display.
• When power is initially connected to the
refrigerator, the Lock function is off.
• To lock the control panel buttons, press and
hold the Lock button until the closed Lock
icon appears in the display and the function is
activated.
• To disable the Lock function, press and hold the
Lock button for approximately three seconds.
Page 25
25OPERATION
NOTE
• Because air circulates between both sections, any
odors formed in one section will transfer to the
other. You must thoroughly clean both sections to
eliminate odors.
• To prevent odor transfer and dried out food, wrap
or cover foods tightly. (See the Food Storage Guide
section for details.)
• If you close the refrigerator door, you may see the
freezer door open and close again due to pressure
Ice and Water Dispenser
CAUTION
• Keep children away from the dispenser. Children
may play with or damage the controls.
•
140 - 160 cubes) after installation. This is also
necessary if the refrigerator has not been used
for a long time.
• If ice or water dispenses unexpectedly, turn off
the water supply and contact an LG Electronics
Customer Information Center.
• Never use a glass that is exceptionally narrow
or deep. Ice may jam in the ice passage and
refrigerator performance may be affected.
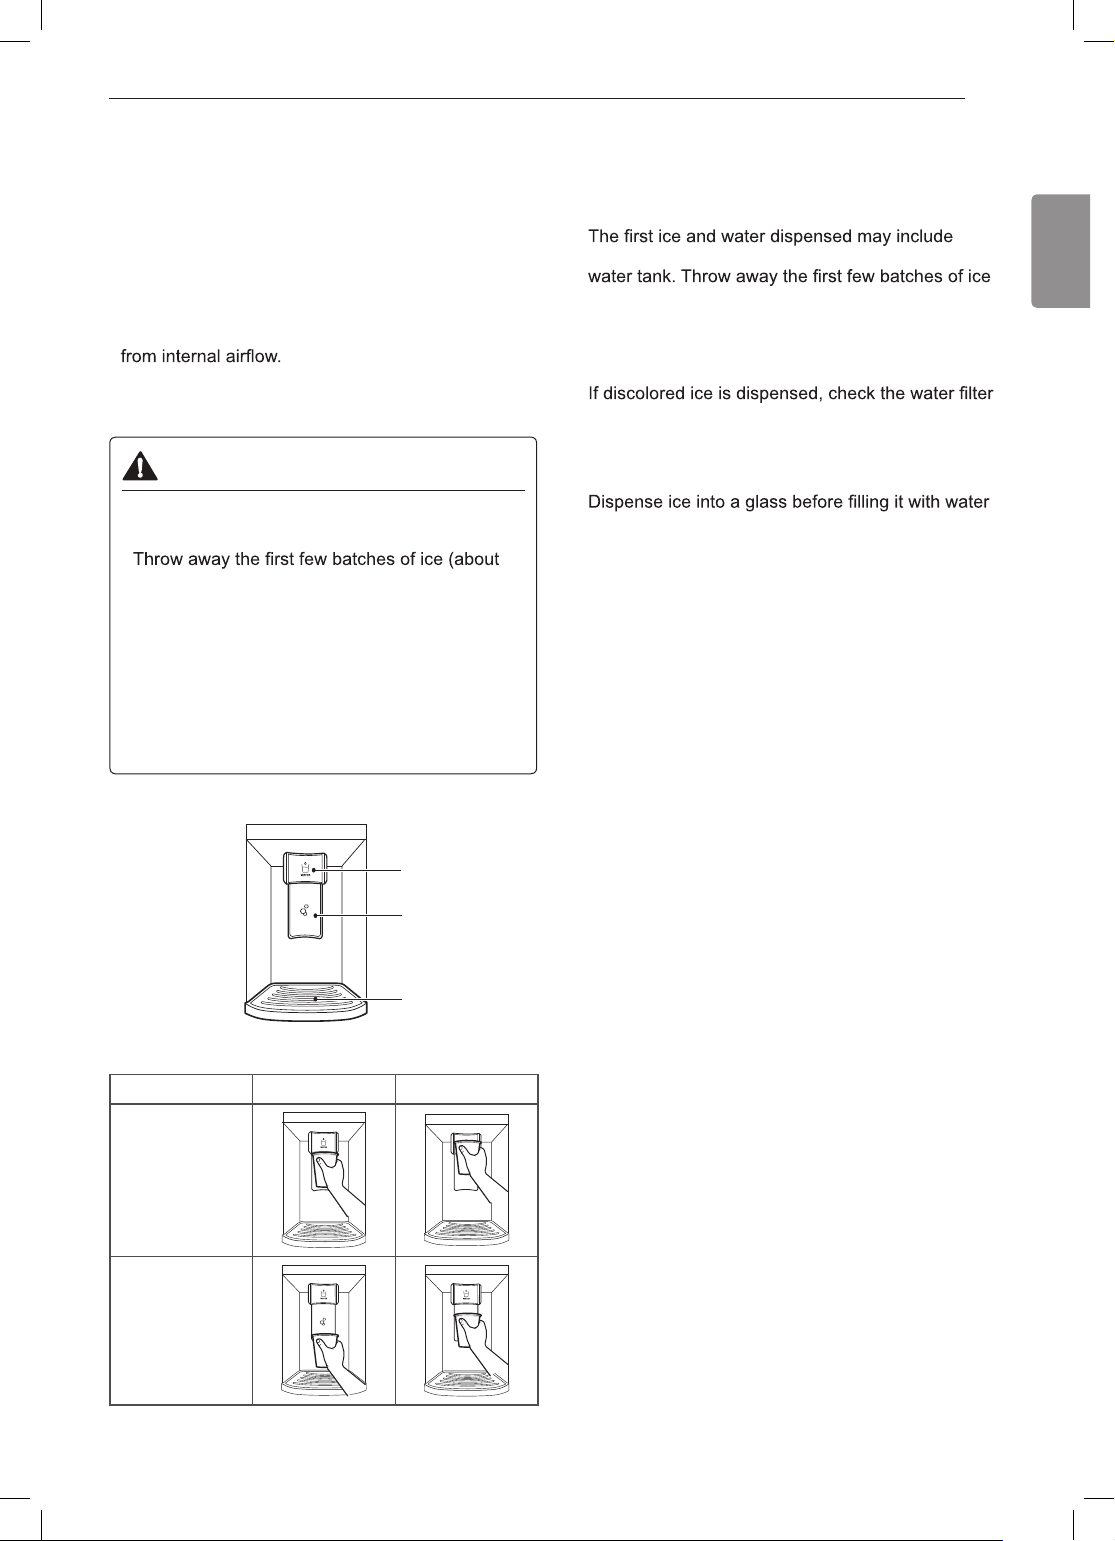
Dispenser Structure
NOTE
• To dispense cold water, push on the water switch
with a glass.
• To dispense ice, push on the ice switch with a glass.
•
particles or odor from the water supply line or the
(about 140 - 160 cubes). This is also necessary ifthe
refrigerator has not been used for a long time.
• The dispenser will not operate when either of the
refrigerator doors is open.
•
and water supply. If the problem continues, contact
an LG Electronics Customer Information Center.
Do not use the water or ice until the problem is
corrected.
•
or other beverages. Splashing may occur if ice is
dispensed into a glass that already contains liquid.
• Some dripping may occur after dispensing. Hold the
cup beneath the dispenser for a few seconds after
dispensing to catch all of the drops.
• Keep containers at an appropriate distance from
the dispensers. Tall, narrow glasses should be
held far enough from the ice outlet to prevent ice
from jamming in the ice chute. A container with a
very small opening should be held as close to the
dispenser as possible to avoid spilling.
• Keep the glass at a proper distance from the ice
outlet. A glass held too close to the outlet may
prevent ice from dispensing.
ENGLISH
Using the Dispenser
Incorrect Correct
Water
Ice
Water Switch
Ice Switch
Tray
• Not dispensing ice continuously for more than 30 sec.
Locking the Dispenser
Press and hold the Lock button for three seconds to
lock the dispenser and all the control panel functions.
Follow the same instructions to unlock.
Page 26
26 OPERATION
Cleaning the Dispenser Drip Tray
Grip the drip tray with both hands and pull it out.
1
Wipe out dirty areas with a clean cloth.
2
Ice Compartment
CAUTION
• Keep hands and tools out of the ice compartment
door and dispenser chute. Failure to do so may
result in damage or personal injury.
CAUTION
• When handling the ice bin, keep hands away
from the icemaker tray area to avoid personal
injury.
• Storing cans or other items in the ice bin will
damage the icemaker.
• Never use thin crystal glasses or containers to
collect ice. Such containers may chip or break
resulting in glass fragments in the ice.
If the icemaker is turned OFF for an extended period
of time, the ice compartment will gradually warm up
to the temperature of the refrigerator compartment.
To prevent ice cubes from melting and leaking from
the dispenser, ALWAYS empty the ice bin when the
icemaker is turned OFF for more than a few hours.
The ice passage may become blocked with frost
if only crushed ice is used. Remove the frost that
accumulates by removing the ice bin and clearing the
passage with a rubber spatula. Dispensing cubed ice
can also help prevent frost buildup.
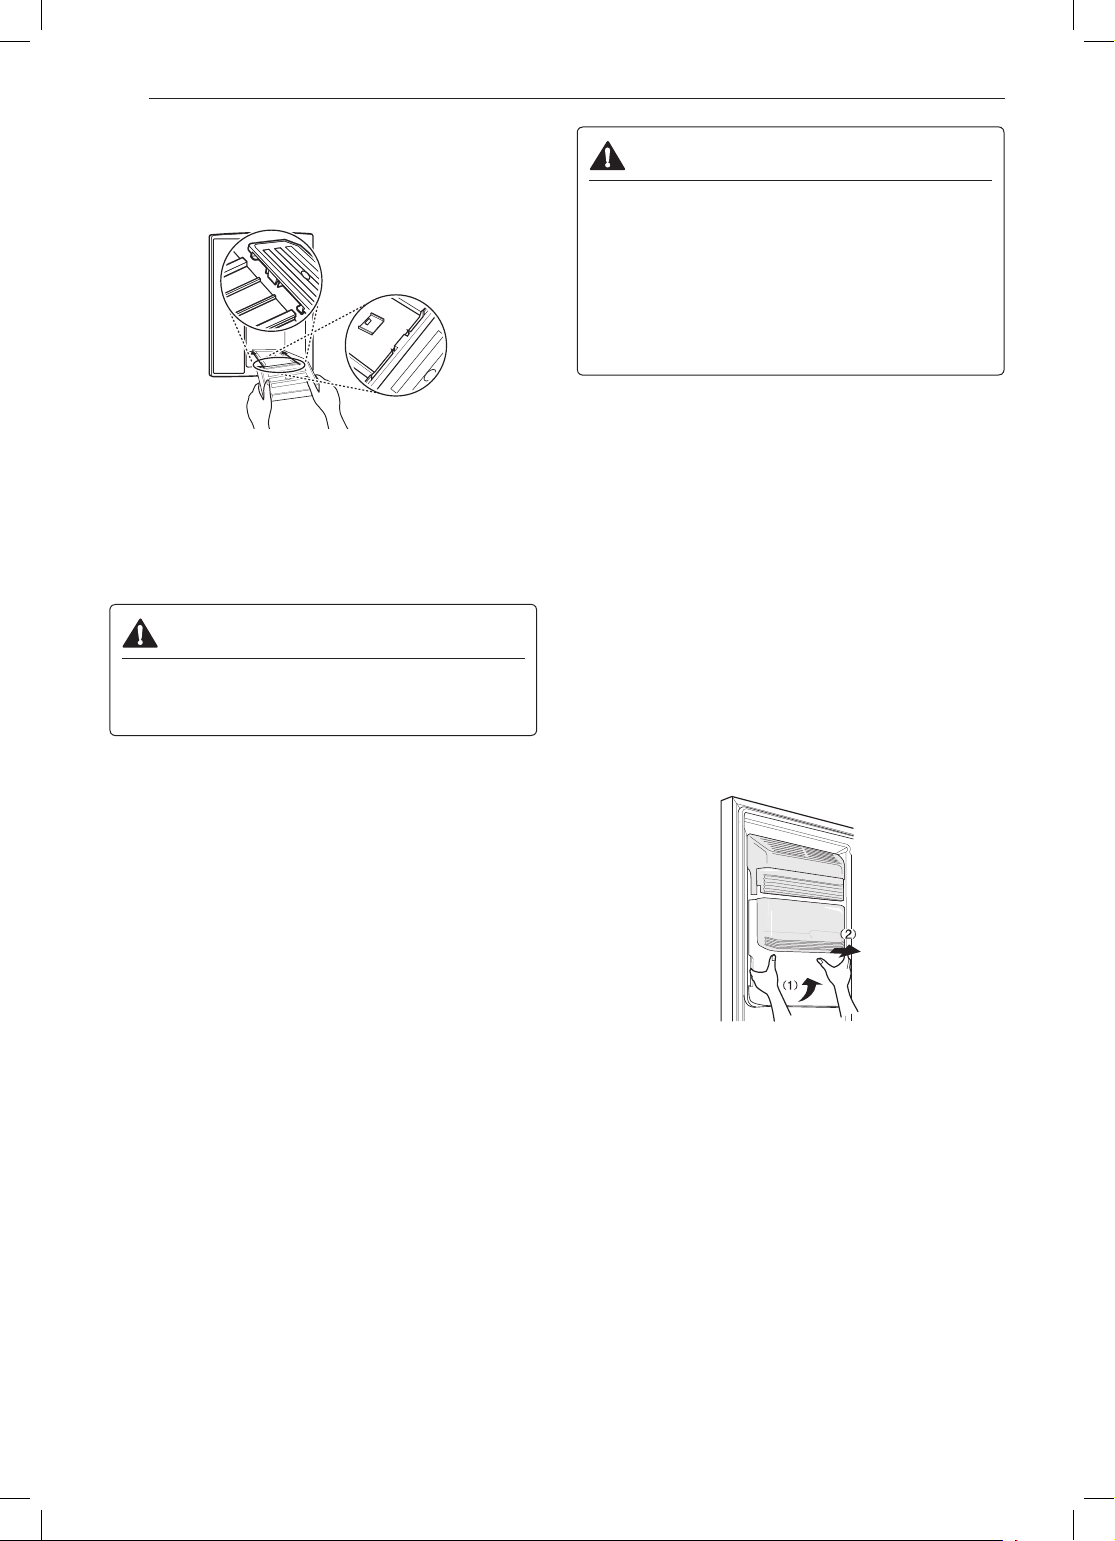
Detaching the In-Door Ice Bin
Lift the ice storage bin slightly (1).
1
Keep the ice compartment door closed tightly. If the
ice compartment door is not closed tightly, the cold
air in the ice bin will freeze food in the refrigerator
compartment. This could also cause the icemaker to
stop producing ice.
In-Door Ice Bin
The icemaker stops producing ice when the indoor
ice bin is full. To make room for additional ice,
empty the ice bin into the extra ice bin in the freezer
compartment. During use, the ice may stack unevenly
in the bin, causing the icemaker to misread the
number of ice cubes and stop producing ice. Shaking
the ice bin to level the ice within it can reduce this
problem.
pull it out as (2) shown in the gure.
2
( )
( )
NOTE
• Use both hands to remove the ice bin to avoid
dropping it.
Assembling the In-Door Ice Bin
Mount them in the reverse order of the removal
process.
Page 27
27OPERATION
ENGLISH
Automatic Icemaker
Auto shutoff (feeler arm)
NOTE
• Ice is made in the automatic icemaker and sent
to the dispenser. The icemaker produces 70 - 182
cubes in a 24-hour period, depending on freezer
compartment temperature, room temperature,
number of door openings and other operating
conditions.
• It takes about 12 to 24 hours for a newly installed
refrigerator to begin making ice.
• Ice-making stops when the in-door ice bin is full.
When full, the in-door ice bin holds approximately 6
to 8 (12-16 oz.) glasses of ice.
• Foreign substances or frost on the ice-detecting
sensor can interrupt ice production. Make sure
the sensor area is clean at all times for proper
operation.
• To increase ice production, use the Ice Plus
function. The function increases both ice making
and freezing capabilities.
WARNING
Turning the Automatic Icemaker On
To turn the automatic icemaker On/Off, press and
hold the Ice On/Off button on the control panel for
three seconds.
Normal Sounds You May Hear
• Keeping the power turned on to the icemaker
before the water line is connected can damage the
icemaker.
• The icemaker water valve buzzes as the icemaker
lls with water. If the Ice On/Off button is in the ON
mode, it will buzz even if it has not yet been hooked
up to water. To stop the buzzing, press the Ice On/
Off button to turn it off.
• You will hear the sound of cubes dropping into the
bin and water running in the pipes as the icemaker
rells.
Preparing for Vacation
Set the Ice On/Off button to OFF and shut off the
water supply to the refrigerator.
NOTE
• The ice bin should be emptied any time the Ice On/
Off button is turned to the OFF mode.
If the ambient temperature will drop below freezing,
have a qualied technician drain the water supply
system to prevent serious property amage due
to ooding caused by ruptured water lines or
connections.
Personal Injury Hazard
• DO NOT place ngers or hands on the automatic
ice making mechanism while the refrigerator is
plugged in.
CAUTION
Never store beverage cans or other items in
the ice bin for the purpose of rapid cooling.
Doing so may damage the icemaker or the
ontainers may burst.
• To avoid personal injury, keep hands out of the
ice door and passage.
Page 28
28 OPERATION
1
5
Storing Food
Where to Store Food
Each compartment inside the refrigerator is designed to store different types of food.
Store food in the optimal space to enjoy the freshest taste.
6
1
In-Door Ice Bin
If a large amount of ice is needed, transfer the
ice in the in-door ice bin to an ice storage bin in
the freezer.
Freezer Shelves
2
Store various frozen foods such as meat, sh,
and ice cream.
2
3
4
5
7
Fresh Zone
Store fruit and vegetables in the crisper drawers
to keep them fresh.
Door-in-Door Case
6
Convenient storage for frequently used items
such as beverages, butter, margarine,cream
cheese,peanut butter, and condiments.
Freezer Drawers
3
Wrap and store meat, sh, chicken, or other
items for long-term storage. Can also be used for
Refrigerator Door Bins
7
Store small refrigerated items such as beverages
and condiments.
supplemental ice storage.
Refrigerator Shelf
4
Store various fresh food items. Adjust the shelf
positions to suit individual storage needs. Store
food with higher water content at the front of the
shelves.
Page 29
ENGLISH
CAUTION
• Do not overll or pack items too tightly into door
bins. Doing so may cause damage to the bin
or personal injury if items are removed with
excessive force.
• Do not store glass containers in the freezer.
Contents may expand when frozen, break the
container and cause injury.
NOTE
• If you are leaving home for a short period, like a
short vacation, the refrigerator should be left on.
Refrigerated foods that are able to be frozen will
stay preserved longer if stored in the freezer.
• If you are leaving the refrigerator turned off for
an extended period, remove all food and unplug
the power cord. Clean the interior, and leave the
door open to prevent fungi from growing in the
refrigerator.
• Do not store food with high moisture content
towards the top of the refrigerator. The moisture
could come in direct contact with the cold air and
freeze.
• Wash food before storing it in the refrigerator.
Vegetables should be washed, and food packaging
should be wiped down to prevent adjacent foods
from being contaminated.
• If the refrigerator is kept in a hot and humid
place, frequent opening of the door or storing a
lot of vegetables in the refrigerator may cause
condensation to form. Wipe off the condensation
with a clean cloth or a paper towel.
• If the refrigerator door or freezer drawer is opened
or closed too often, warm air may penetrate the
refrigerator and raise its temperature. This can
increase the running costs of the unit.
Food Storage Tips
Wrap or store food in the refrigerator in airtight and
moisture-proof material unless otherwise noted. This
prevents food odor and taste transfer throughout the
refrigerator. For dated products, check date code to
ensure freshness.
Food How to
Keep opened butter in covered dish or
Butter or
Margarine
Cheese
Milk
Eggs
Fruit
Leafy
Vegetables
Vegetables
with skins
(carrots,
peppers)
Fish
Leftovers
closed compartment. When storing an
extra supply, wrap in freezer packaging
and freeze.
Store in original wrapping until used.
Once opened, rewrap tightly in plastic
wrap or aluminum foil.
Wipe milk cartons. For coldest milk,
place containers on an interior shelf.
Store in original carton on interior shelf,
not on door shelf.
Do not wash or hull fruit until it is ready
to be used. Sort and keep fruit in
original container in a crisper, or store
in completely closed paper bag on
refrigerator shelf.
Remove store wrapping, trim or tear off
bruised and discolored areas, wash in
cold water, and drain. Place in plastic
bag or plastic container and store in
crisper.
Place in plastic bags or plastic container
and store in crisper.
Freeze fresh sh and shellsh if they
are not being eaten the same day
purchased. Eating fresh sh and
shellsh the same day purchased is
recommended.
Cover leftovers with plastic wrap
or aluminum foil, or store in plastic
containers with tight lids.
29OPERATION
Page 30
30 OPERATION
Storing Frozen Food
Check a freezer guide or a reliable cookbook for
further information about preparing food for freezing
or food storage times.
Freezing
Your freezer will not quick-freeze a large quantity of
food. Do not put more unfrozen food into the freezer
than will freeze within 24 hours (no more than 2 to
3 pounds of food per cubic foot of freezer space).
Leave enough space in the freezer for air to circulate
around packages. Be careful to leave enough room
at the front so the door can close tightly.
Storage times will vary according to the quality and
type of food, the type of packaging or wrap used
(how airtight and moisture-proof) and the storage
temperature. Ice crystals inside a sealed package are
normal. This simply means that moisture in the food
and air inside the package have condensed, creating
ice crystals.
NOTE
• Allow hot foods to cool at room temperature for 30
minutes, and then package and freeze. Cooling hot
foods before freezing saves energy.
Packaging
Successful freezing depends on correct packaging.
When you close and seal the package, it must not
allow air or moisture in or out. If it does, you could
have food odor and taste transfer throughout the
refrigerator and could also dry out frozen food.
Packaging recommendations
• Rigid plastic containers with tight-tting lids
• Straight-sided canning/freezing jars
• Heavy-duty aluminum foil
• Plastic-coated paper
• Non-permeable plastic wraps
• Specied freezer-grade self-sealing plastic bags
Follow package or container instructions for proper
freezing methods.
Detaching/Assembling the
Storage Bins
Fresh Zone Drawer
The Fresh Zone drawers provide storage for fruit and
vegetables.
• When removing or installing the lower Fresh Zone
drawer, lift the cover to help remove or insert the
drawer.
To remove the Fresh Zone drawers, pull out the
1
drawer to full extension (1), lift the front up (2),
and pull straight out.
To install, slightly tilt up the front, insert the drawer
2
into the frame and push it back into place.
CAUTION
• Use both hands to assemble and disassemble
the Fresh Zone. The compartment is heavy when
lled with food and may cause injury if dropped.
• Open the refrigerator door fully when
disassembling or reassembling the Fresh Zone.
• You will see the water tank while removing the
Fresh Zone drawer. Do not remove the water
tank or water leakage may occur. The water tank
is not a removable part.
Tank
Do not use
• Bread wrappers
• Non-polyethylene plastic containers
• Containers without tight lids
• Wax paper or wax-coated freezer wrap
• Thin, semi-permeable wrap
Page 31

31OPERATION
ENGLISH
Removing the Fresh Zone Cover
Hold the cover with both hands and pull it out.
NOTE
• Remove the Fresh Zone drawers before removing
the Fresh Zone cover.
Door Bins
The door bins are removable for easy cleaning and
adjustment.
Some bins may vary in appearance and will only t in
one location.
To remove the bin, simply lift the bin up and pull
1
straight out.
To replace the bin, slide it in above the desired
2
support and push down until it snaps into place.
InstaView Function
The InstaView function on the Door-in-Door lets you
see if you’re running low on frequently used items
like beverages and snacks, without opening the
refrigerator door.
Knock twice on the glass to turn the LED light
1
inside the Door-in-Door on or off.
The LED light turns off automatically after 10
2
seconds.
• The InstaView Door-in-Door function is disabled
when the right refrigerator door and the left freezer
door are open, for 2 seconds after closing the door,
and when the ice dispenser is in use.
• Knock near the center of the glass. Knocking
near the edges of the glass may not activate the
InstaView Door-in-Door function properly.
• Knock hard enough that the knocking sound is
audible.
• The InstaView Door-in-Door function may activate if
a loud noise occurs near the refrigerator.
CAUTION
• Regularly detach and wash the storage bins and
shelves; they can become easily contaminated
by food.
• Do not apply excessive force while detaching or
assembling the storage bins.
• Do not use the dishwasher to clean the storage
bins and shelves.
Door-in-Door
The Door-in-Door compartment allows for easy
access to commonly used food items.
To access the Door-in-Door compartment, lightly
press the button on the refrigerator door handle until
you hear a click and the door opens.
Page 32

32 OPERATION
Door-in-Door Case
To open the Door-in-Door case, pull evenly on the
marked area. The Door-in-Door Case is removable
for easy cleaning and adjustment.
CAUTION
• Remove contents from Door-in-Door case before
disassembly.
To remove the Door-in-Door case, lift up and pull
1
out.
To replace the Door-in-Door case, line up the tabs
2
on the Door-In-Door case with the slots on the
door and push down until it snaps into place.
Detaching the Shelf
Remove all items from the shelf. Lift the back of
1
the shelf slightly to disengage the rail stops.
Holding the shelf with both hands, tilt the shelf
2
and pull it out.
Assembling the Shelf
Tilt the front of the shelf up and guide the shelf
1
into the slots at a desired height, keeping shelf
holder down.(1)
Slide the shelf in, then lower the front of the shelf.
2
(2)
Adjusting the Refrigerator
Shelves
The shelves in the refrigerator are adjustable to meet
individual storage needs. Your model may have full or
split shelves.
Adjusting the shelves to t items of different heights
will make nding the exact item you want easier.
CAUTION
• Make sure that shelves are level from one side
to the other. Failure to do so may result in the
shelf falling or spilled food.
• Do not clean glass shelves with warm water
while they are cold. Shelves may break if
exposed to sudden temperature changes or
impact.
• Glass shelves are heavy. Use special care when
removing them.
Page 33

33SMART FUNCTIONS
ENGLISH
SMART FUNCTIONS
Smart ThinQ Application
The Smart ThinQ application allows you to
communicate with the appliance using a smartphone.
Installing Smart ThinQ Application
Search for the LG Smart ThinQ application from the
Google Play Store or Apple App Store on a smart
phone. Follow instructions to download and install the
application.
Smart ThinQ Application Features
• For appliances with the or logo
Manage Food
This feature helps track items in the refrigerator and
freezer, sends alerts when items are near their use
by dates, generates grocery lists, and links to related
recipes.
Energy Monitoring
This feature keeps track of the refrigerator’s power
consumption and the number of door openings.
Remote Control
Control the Refrigerator Temperature, Fresh Air Filter
and Ice Plus from the smart phone app.
Push Messages
If the door remains open for more than ten minutes,
you will receive a push message. When Ice Plus is
nished, you will receive a push message.
NOTE
• To verify the Wi-Fi connection, check that the Wi-Fi
icon on the control panel is lit.
• LG Smart ThinQ is not responsible for any network
connection problems or any faults, malfunctions, or
errors caused by network connection.
• The machine supports 2.4 GHz Wi-Fi networks only.
• If the appliance is having trouble connecting to the
Wi-Fi network, it may be too far from the router.
Purchase a Wi-Fi repeater (range extender) to
improve the Wi-Fi signal strength.
• The Wi-Fi connection may not connect or may
be interrupted because of the home network
environment.
• The network connection may not work properly
depending on the internet service provider.
• The surrounding wireless environment can make
the wireless network service run slowly.
• This information is current at the time of publication.
The application is subject to change for product
improvement purposes without notice to users.
Wireless LAN Module Specications
Model LCW-004
Frequency
Range
Output
Power(Max)
2412 to 2462 MHz
IEEE 802.11b: 22.44 dBm
IEEE 802.11g: 24.68 dBm
IEEE 802.11n: 24.11 dBm
Settings
Allows you to set various options on the refrigerator
and in the application.
Page 34

34 SMART FUNCTIONS
FCC Notice
• For transmitter module contained in this product
This equipment has been tested and found to comply
with the limits for a Class B digital device, pursuant
to Part 15 of the FCC Rules. These limits are
designed to provide reasonable protection against
harmful interference in a residential installation. This
equipment generates, uses, and can radiate radio
frequency energy and, if not installed and used in
accordance with the instructions, may cause harmful
interference to radio communications. However, there
is no guarantee that interference will not occur in a
particular installation. If this equipment does cause
harmful interference to radio or television reception,
which can be determined by turning the equipment
off and on, the user is encouraged to try to correct
the interference by one or more of the following
measures:
• Reorient or relocate the receiving antenna.
• Increase the separation between the equipment and
the receiver.
• Connect the equipment to an outlet on a circuit
different from that to which the receiver is
connected.
• Consult the dealer or an experienced radio/TV
technician for help.
This device complies with part 15 of the FCC Rules.
Operation is subject to the following two conditions:
1) This device may not cause harmful interference
and
2) This device must accept any interference received,
including interference that may cause undesired
operation of the device.
Any changes or modications in construction of this
device which are not expressly approved by the party
responsible for compliance could void the user’s
authority to operate the equipment.
FCC RF Radiation Exposure Statement
This equipment complies with FCC radiation
exposure limits set forth for an uncontrolled
environment. This transmitter must not be co-located
or operating in conjunction with any other antenna or
transmitter.
This equipment should be installed and operated with
a minimum distance of 20 cm (7.8 inches) between
the antenna and your body. Users must follow the
specic operating instructions for satisfying RF
exposure compliance.
Industry Canada Statement (For transmitter
module contained in this product)
This device complies with Industry Canada’s
applicable licence-exempt RSSs. Operation is subject
to the following two conditions:
1) This device may not cause interference; and
2) This device must accept any interference,
including interference that may cause undesired
operation of the device.
IC Radiation Exposure Statement
This equipment complies with IC radiation exposure
limits set forth for an uncontrolled environment.
This equipment should be installed and operated with
a minimum distance of 20 cm (7.8 inches) between
the antenna and your body.
NOTE
• THE MANUFACTURER IS NOT RESPONSIBLE
FOR ANY RADIO OR TV INTERFERENCE
CAUSED BY UNAUTHORIZED MODIFICATIONS
TO THIS EQUIPMENT. SUCH MODIFICATIONS
COULD VOID THE USER’S AUTHORITY TO
OPERATE THE EQUIPMENT.
Open Source Software Notice Information
To obtain the source code under GPL, LGPL, MPL,
and other open source licenses, that is contained in
this product, please visit http://opensource.lge.com.
In addition to the source code, all referred license
terms, warranty disclaimers and copyright notices are
available for download.
LG Electronics will also provide open source code
to you on CD-ROM for a charge covering the cost
of performing such distribution (such as the cost of
media, shipping, and handling) upon email request
to opensource@lge.com. This offer is valid for three
(3) years from the date on which you purchased the
product.
Page 35

35SMART FUNCTIONS
ENGLISH
Smart Grid Function
When the refrigerator operates in Smart Grid mode,
the Smart Refrigerator function can control energy
usage or delay the operation of some functions to
save energy during peak usage periods.
• You can override the Smart Grid function any time
(using the Smart Grid button or application).
• To use the Smart Grid function, you need to register
your appliance with your electric utility company.
Smart Grid Application Features
Smart Saving_Demand Response
You can lower energy usage based on Demand
Response (DR) signals from the utility company. If
the refrigerator is operating in Smart Saving mode
according to the DR signal, you can see a pop up.
Seasonal Energy Savings
Lower energy usage based on time period.
Using the Smart Grid Function
This feature responds to notication events from your
utility company to run high energy consuming tasks
during off-peak periods when demand is lower. These
notication events are known as Demand Response
signals.
If the refrigerator receives a Demand Response
signal from the utility company, the refrigerator will
turn on the Grid LED on the refrigerator display and
control its power consumption according to the signal.
The refrigerator will respond to the signals received
from the utility company as long as product
performance is maintained.
If the refrigerator receives a Demand Response
signal, the refrigerator will operate in Delay Appliance
Load (DAL) or Temporary Appliance Load Reduction
(TALR) mode.
Delay Appliance Load (DAL)
The refrigerator responds to a DAL signal by
providing a moderate load reduction for the duration
of the delay period.
This mode controls functions that consume a lot of
energy such as adjusting the cooling system, running
the defrost cycle, and making ice.
• When the refrigerator operates in DAL mode, the
Grid LED is illuminated on the refrigerator display.
• DAL mode is automatically deactivated after the
period stipulated by the DAL signal (max. 4 hours)
or when you override the Smart Grid function.
Temporary Appliance Load Reduction
(TALR)
The refrigerator responds to a TALR signal by
aggressively reducing the load for a short time
period, typically 10 minutes. This mode reduces
energy consumption by stopping the compressor and
controlling the functions that consume a lot of energy
such as the defrost cycle and fan.
• When the refrigerator operates in TALR mode, the
Grid LED is illuminated on the refrigerator display.
• TALR mode is automatically deactivated after the
received duration (max. 10 minutes), or when you
override the Smart Grid function. The mode is
immediately deactivated and the refrigerator returns
to its normal state when the door is opened or
closed, or the dispenser is used.
Override Smart Grid Mode
To ignore the Demand Response signal from the
utility company and override the Smart Grid function,
push the Smart Grid button while the refrigerator is
in Smart Grid mode.
When you override the Smart Grid function, the
refrigerator ignores the Demand Response signal
and is no longer controlled by the utility company until
the next Demand Response signal is sent. You can
also override the Smart Grid function using the smart
phone app.
LG Open API
You can manage Smart Grid features for the LG
Smart Refrigerator.
Please check the detailed specications on the notice
page on us.smartthinq.com.
API list
Demand Response
• Send demand response signal
Power Saving
• Set saving mode
• Get schedule of DR/Delay Defrost
Energy Monitoring
• Get door open event
• Get energy consumption
Delay Defrost Capability
• Insert a delay defrost schedule event
• Update a delay defrost schedule event
• Delete a delay defrost schedule event
• Get the delay defrost schedule
Page 36

36 SMART FUNCTIONS
NOTE
• Smart Diagnosis™ cannot be activated unless
the appliance can be turned on using the Power
button. If the appliance cannot be turned on,
troubleshooting must be done without using Smart
Diagnosis™.
Smart Diagnosis™ Function
Should you experience any problems with the
appliance, it has the capability of transmitting data
via your telephone to the LG Customer Information
Center. NFC or Wi-Fi equipped models can also
transmit data to a smartphone using the LG Smart
ThinQ application.
Smart Diagnosis™ through the
Customer Information Center
• For appliances with the or logo
This gives you the capability of speaking directly to
our trained specialists. The specialist records the
data transmitted from the appliance and uses it to
analyze the issue, providing a fast and effective
diagnosis.
Hold the mouthpiece of your phone in front of the
4
speaker that is located on the right hinge of the
refrigerator door, when instructed to do so by the
call center.
Press and hold the Freezer button for three
5
seconds while continuing to hold your phone to
the speaker.
After you hear three beeps, release the Freezer
6
button.
Call the LG Electronics Customer Information
1
Center at:
(LG U.S.A.) 1-800-243-0000
(LG Canada) 1-888-542-2623
Hold the Lock button for three seconds.
2
• If the display has been locked for over ve
minutes, you must deactivate the lock and then
reactivate it.
Open the right refrigerator door.
3
Keep the phone in place until the tone
7
transmission has nished. The display will
count down the time. Once the countdown is
over and the tones have stopped, resume your
conversation with the specialist, who will then
be able to assist you in using the information
transmitted for analysis.
NOTE
• For best results, do not move the phone while the
tones are being transmitted.
• If the call center agent is not able to get an accurate
recording of the data, you may be asked to try
again.
• The Smart Diagnosis™ function depends on the
local call quality.
• Bad call quality may result in poor data transmission
from your phone to the call center, which could
cause Smart Diagnosis™ to malfunction.
Smart ThinQ Smart Diagnosis™
• For appliances with the or logo
Use the Smart Diagnosis feature in the Smart ThinQ
application for help diagnosing issues with the
appliance without the assistance of the LG Customer
Information Center.
Follow the instructions in the Smart ThinQ application
to perform a Smart Diagnosis using your smartphone.
Page 37

37MAINTENANCE
ENGLISH
MAINTENANCE
Cleaning
WARNING
• Use non-ammable cleaner. Failure to do so can
result in re, explosion, or death.
CAUTION
• Do not use an abrasive cloth or sponge
when cleaning the interior and exterior of the
refrigerator.
• Do not place your hand on the bottom surface
of the refrigerator when opening and closing the
doors.
• When lifting the hinge free of the latch, be careful
that the door does not fall forward.
General Cleaning Tips
• Both the refrigerator and freezer sections defrost
automatically; however, clean both sections once a
month to prevent odors.
• Wipe up spills immediately.
• Unplug the refrigerator or disconnect power before
cleaning.
• Remove all removable parts, such as shelves.
• Use a clean sponge or soft cloth and a mild
detergent in warm water. Do not use abrasive or
harsh cleaners.
• Hand wash, rinse and dry all surfaces thoroughly.
For products with a standard stainless steel exterior,
use a damp microber cloth and rub in the direction
of the grain. Dry with a paper towel to avoid streaks.
For stubborn stains and ngerprints, use a few drops
of liquid dish soap in water, and rinse with hot water
before drying. Do not use abrasive or harsh cleaners.
Inside Walls
• Allow freezer to warm up so the cloth will not stick.
To help remove odors, wash the inside of the
refrigerator with a mixture of baking soda and warm
water. Mix 2 tablespoons of baking soda to 1 quart of
water (26 g soda to 1 liter water.) Be sure the baking
soda is completely dissolved so it does not scratch
the surfaces of the refrigerator.
Door Liners and Gaskets
Use a clean sponge or soft cloth and a mild
detergent in warm water. Do not use cleaning waxes,
concentrated etergents, bleaches, or cleaners
containing petroleum on plastic refrigerator parts.
Plastic Parts (covers and panels)
Use a clean sponge or soft cloth and a mild detergent
in warm water. Do not use glass cleaners, abrasive
cleansers, or ammable uids. These can scratch or
damage the material.
Condenser Coils
Use a vacuum cleaner with a brush or crevice
attachment to clean the condenser cover and vents.
Do not remove the panel covering the condenser coil
area.
Exterior
Waxing external painted metal surfaces helps provide
rust protection. Do not wax plastic parts. Wax painted
metal surfaces at least twice a year using appliance
wax (or auto paste wax). Apply wax with a clean, soft
cloth.
For products with black stainless steel exterior, spray
glass cleaner on a clean, microber cloth and rub in
direction of grain. Do not spray glass cleaner directly
at the display panel. Do not use harsh or abrasive
cleaners.
Page 38

38 MAINTENANCE
Replacing the Water Filter
Replace the Water Filter :
• Approximately every six months.
• When the Replace Filter
• When the water dispenser output decreases.
Before Replacing the Water Filter:
If the top shelf, located below the water lter, is in the
highest position, it will need to be removed prior to
replacing the water lter.
To remove any shelf : Tilt up the front of the shelf (1)
and lift (2). Pull the shelf out.
icon turns on.
Make sure to rotate the lter down completely
2
before pulling it out of the lter head.
Pull the water lter downward and turn to
counterclockwise.
Replace with a new water lter.
3
Take the new water lter out of its packing and
remove the protective cover from the o-rings.
With the water lter tabs in the horizontal position,
push the new water lter into the lter head and
turn to clockwise.
Remove the old water lter.
1
Lower or remove the top left shelf to allow the
water lter to rotate all the way down.
Pinch the sides to open the water lter cover.
NOTE
• Replacing the water lter causes a small amount of
water (around 1 oz. or 25 cc) to drain.
• Wrap a cloth around the front end of the water lter
cover to collect any leaking water. Hold the water
lter upright, once it is removed, to prevent any
remaining water from spilling out of the water lter.
Rotate the water lter up into position and close
4
the cover. The cover will click when closed
correctly.
After the water lter is replaced, dispense 2.5
5
gallons of water (ush for approximately 5
minutes) to remove trapped air and contaminants
from the system.
NOTE
• Do not dispense the entire 2.5 gallon amount
continuously. Press and release the dispenser pad
for cycles of 30 seconds ON and 60 seconds OFF.
Page 39

ENGLISH
After changing the lter, press and hold the
6
Water Filter button for three seconds to reset the
indicator light.
NOTE
To purchase a replacement water lter:
• Visit your local dealer or distributor
• Search using "water lter" on lg.com
• Use replacement cartridge:
ADQ74793501(LT1000P)
For further assistance, call:
1-800-243-0000 (USA)
1-888-542-2623 (Canada)
39MAINTENANCE
Page 40

40 MAINTENANCE
Performance Data Sheet
Model: LT1000P Use Replacement Cartridge: MDJ64844601(LT1000P)
The concentration of the indicated substances in water entering the system was reduced to a concentration
less than or equal to the permissible limit for water leaving the system as specied in NSF/ANSI Standard 42,
Standard 53 and Standard 401.
System tested and certied by NSF International against NSF/ANSI Standard 42,
Standard 53 and Standard 401 for the reduction of substances listed below.
substance
Reduction
Chlorine Taste
and Odor
Nominal
Particulate Class
I, , ≥ 0.5 to < 1.0
μm
Asbestos 180 MFL
Atrazine 8.5 µg/L 9.0 µg/L ± 10% >94.10% 0.500 µg/L 3.0 µg/L NA
Benzene 15.0 µg/L
Carbofuran 74.0 µg/L
Lindane 1.9 µg/L
P-Dichlorobenzene
2,4-D 210.0 µg/L 210.0 µg/
Lead pH @6.5 140.0 µg/L 150.0 µg/
Lead pH @8.5 150.0 µg/L 150.0 µg/
Mercury @ pH
6.5
Mercury @ pH
8.5
Cyst*
Average
Inuent
Challenge
2.0 µg/L
12,000,000
pts/mL
230.0 µg/L 225.0 µg/L ± 10% >99.80% 0.460 µg/L 75.0 µg/L NA
5.9 µg/L 6.0 µg/
5.6 µg/L 6.0 µg/
100,000
cysts/L
NSF specied
Challenge
Concentration
2.0 µg/L ± 10%
At least 10,000
particles/mL
7
10
to 108 MFL;
bers greater
than 10 µg/L in
length
15.0 µg/L ± 10%
80.0 µg/L ± 10%
2.0 µg/L ± 10%
L ± 10%
L ± 10%
L ± 10%
L ± 10%
L ± 10%
Minimum 50,000
cysts/L
Avg %
Reduction
>97.5% 0.050 µg/L N/A ≥ 50.00%
99.80% 24,000 pts/ml N/A ≥ 85.00%
>99.00% < 1 MFL N/A ≥ 99.00%
>96.60% 0.510 µg/L 5.0 µg/L NA
98.30% 1.258 µg/L 40 µg/L NA
>99.00% 0.019 µg/L 0.2 µg/L NA
>99.90% 0.210 µg/L 70.0 µg/L NA
99.60% 0.560 µg/L 10.0 µg/L NA
>99.70% <0.500 µg/L 10.0 µg/L NA
91.00% 0.531 µg/L 2.0 µg/L NA
92.50% 0.420 µg/L 2.0 µg/L NA
>99.99% 10 cysts/L N/A ≥ 99.95%
Average
Product Water
Concentration
Max
Permissible
Product Water
Concentration
Requirements
NSF
Reduction
Page 41

41MAINTENANCE
ENGLISH
substance
Reduction
Atenolol 240 ng/L 200 ± 40% ng/L > 95.50% 10.80 ng/L 30 ng/L NA
Carbamazepine 1600 ng/L 1400 ± 40% ng/L 98.40% 25.60 ng/L 200 ng/L NA
DEET 1600 ng/L 1400 ± 40% ng/L 97.10% 46.40 ng/L 200 ng/L NA
Trimethoprim 170 ng/L 140 ± 40% ng/L >96.80% 5.44 ng/L 20 ng/L NA
Linuron 160 ng/L 140 ± 40% ng/L >96.60% 5.44 ng/L 20 ng/L NA
Phenytoin 200 ng/L 200 ± 40% ng/L >94.80% 10.40 ng/L 30 ng/L NA
Ibuprofen 400 ng/L 400 ± 40% ng/L >94.50% 22.00 ng/L 60 ng/L NA
Naproxen 140 ng/L 140 ± 40% ng/L >96.10% 5.46 ng/L 20 ng/L NA
Estrone 120 ng/L 140 ± 40% ng/L >96.10% 4.68 ng/L 20 ng/L NA
Bisphenol A 2000 ng/L 2000 ± 40% ng/L >98.90% 22.00 ng/L 300 ng/L NA
Nonyl Phenol 1600 ng/L 1400 ± 40% ng/L >97.10% 46.40 ng/L 200 ng/L NA
Average
Inuent
Challenge
NSF specied
Challenge
Concentration
Avg %
Reduction
Average
Product Water
Concentration
Max
Permissible
Product Water
Concentration
Requirements
• Based on the use of Cryptosporidium parvum oocysts.
NSF
Reduction
Page 42

42 MAINTENANCE
Application Guidelines/Water Supply
Service Flow 0.5 gpm (1.9 lpm)
Water Supply
Water Pressure 20 – 120 psi (138 – 827 kPa)
Water Temperature
Capacity 200 gallons (757 liters)
It is essential that the manufacturer’s recommended
installation, maintenance and lter replacement
requirements be carried out for the product to perform
as advertised.
NOTE
• While the testing was performed under standard
laboratory conditions, actual performance may vary.
Replacement Cartridge: ADQ74793501(LT1000P)
NSF System Trade Name Code: MDJ64844601
For replacement lters, visit your local dealer or
distributor or search under "water lters" on the
lg.com website.
For further assistance, the LG Electronics Customer
Information Center is open 24 hours a day/7 days a
week.
USA: 1-800-243-0000
Canada: 1-888-542-2623
LG is a trademark of LG corp.
NSF is a trademark of NSF International.
Manufactured for LG
LG Electronics, INC
170, Sungsanpaechoungro, Seongsan-gu,
Gyeongsangnam-do, THE REPUBLIC OF KOERA
Parameters
Community or Private Well -
Potable Water
33 °F – 100 °F (0.6 °C – 37.8
®
Electronics by:
°C)
CAUTION
To reduce the risk associated with property
damage due to water leakage:
• Read and follow Use Instructions before
installation and use of this system.
• Installation and use MUST comply with all state
and local plumbing codes.
• Do not install if water pressure exceeds 120 psi
(827 kPa). If your water pressure exceeds 80
psi, you must install a pressure limiting valve.
Contact a plumbing uncertain how to check your
water pressure.
• Do not install where water hammer conditions
may occur. If water hammer conditions exist you
must install a water hammer arrester. Contact a
plumbing professional if you are uncertain how to
check for this condition.
• Do not install on hot water supply lines. The
maximum operating water temperature of this
lter system is 100 °F (37.8 °C).
• Protect lter from freezing. Drain lter when
temperatures drop below 40 °F (4.4 °C).
• The disposable lter cartridge MUST be replaced
every 6 months, at the rated capacity or if a
noticeable reduction in ow rate occurs.
• Protect from freezing, remove lter cartridge
when temperatures are expected to drop below
33° F.
• Do not install systems in areas where ambient
temperatures may go above 110° F (43.3° C).
• Where a backow prevention device is installed
on a water system, a device for controlling
pressure due to thermal expansion must be
installed.
• Ensure all tubing and ttings are secure and free
of leaks.
WARNING
To reduce the risk associated with choking:
• Do not allow children under 3 years of age to
have access to small parts during the installation
of this product.
To reduce the risk associated with the
ingestion of contaminants:
• Do not use with water that is microbiologically
unsafe or of unknown quality without adequate
disinfection before or after the system. Systems
certied for cyst reduction may be used on
disinfected water that may contain lterable
cysts. EPA Establishment # 070595-MEX-001
Page 43

ENGLISH
TROUBLESHOOTING
FAQs: Frequently Asked Questions
Q: What are the best temperature settings for my refrigerator and freezer?
43TROUBLESHOOTING
A: The default setting for the refrigerator is 37° Fahrenheit (3° Celsius). The default setting for the
Q: How do I set the refrigerator and freezer temperatures?
A: Continually press the Refrigerator or Freezer button on the control panel until the desired
Q: Why do I hear a buzzing noise from my refrigerator periodically?
A: This may happen if you do not have a water source attached to your refrigerator and the icemaker is
Q: Why does the icemaker tray look crooked?
A: This is a normal part of the icemaker cycle. The icemaker tray may appear level or with a slight tilt.
Q:
freezer is 0° Fahrenheit (-18° Celsius). Adjust these settings as necessary to keep food at desired
temperatures. Milk should be cold when stored on the inner shelf of the refrigerator. Ice cream should
be rm and ice cubes should not melt in the freezer. To switch the display from Fahrenheit to Celsius,
press and hold the Freezer and Refrigerator buttons until you hear a beep and the settings in the
display change.
temperature appears. The numbers will cycle from highest to lowest and then return to the highest
again with continuous pressing.
turned on. If you do not have a water source attached to the back of the refrigerator you should turn
the icemaker off.
The change in position is to assist in the freezing process.
My refrigerator is powered on and the controls are working, but it’s not cooling and the display
shows “OFF” (see below). What is wrong?
A: The refrigerator is in Demo Mode. This mode disables cooling to save energy while the appliance
is on display in a store. To restore normal operation, press and hold the Refrigerator and Ice Plus
buttons for 5 seconds or until you hear a beep and the temperature settings appear on the display.
Use the same procedure to return the refrigerator to Demo Mode, if desired.
Page 44

44 TROUBLESHOOTING
Before Calling for Service
Review this section before calling for service; doing so will save you both time and money.
Cooling
Problem Possible Cause Solutions
Refrigerator and
Freezer section are
not cooling.
Cooling system
runs too much.
The refrigerator control is set
to OFF (some models).
Refrigerator is set to Demo
Mode.
Refrigerator is in the defrost
cycle.
Refrigerator was recently
installed.
Refrigerator was recently
relocated.
Refrigerator is replacing an
older model.
Refrigerator was recently
plugged in or power restored.
The door is opened often or a
large amount of food / hot food
was added.
Doors are not closed
completely.
Refrigerator is installed in a
hot location.
Condenser / back cover is
clogged.
Turn the control ON. Refer to the Setting the Controls
section for proper temperature settings.
Demo Mode allows the lights and control display to work
normally while disabling cooling, to save energy while
the refrigerator is on the showroom oor. See the FAQs
section of this manual for instructions on how to disable
Demo Mode.
During the defrost cycle, the temperature of each
compartment may rise slightly. Wait 30 minutes and
conrm the proper temperature has been restored once
the defrost cycle has completed.
It may take up to 24 hours for each compartment to
reach the desired temperature.
If the refrigerator was stored for a long period of time or
moved on its side, it is necessary for the refrigerator to
stand upright for 24 hours before connecting it to power.
Modern refrigerators require more operating time but use
less energy due to more efcient technology.
The refrigerator will take up to 24 hours to cool
completely.
Adding food and opening the door warms the refrigerator,
requiring the compressor to run longer in order to cool
the refrigerator back down. In order to conserve energy,
try to get everything you need out of the refrigerator at
once, keep food organized so it is easy to nd, and close
the door as soon as the food is removed. (Refer to the
Food Storage Guide.)
Firmly push the doors shut. If they will not shut all the
way, the "Doors will not close correctly or pop open"
section.
The compressor will run longer under warm conditions.
At normal room temperatures (70 °F) expect your
compressor to run about 40 % to 80 % of the time. Under
warmer conditions, expect it to run even more often. The
refrigerator should not be operated above 110 °F.
Use a vacuum cleaner with an attachment to clean the
condenser cover and vents. Do not remove the panel
covering the condenser coil area.
Page 45

ENGLISH
Cooling
Problem Possible Cause Solutions
When the doors are opened often or for long periods
of time, warm, humid air enters the compartment. This
raises the temperature and moisture level within the
compartment. To lessen the effect, reduce the frequency
and duration of door openings.
See the "Doors will not close correctly or pop open"
section.
Humid weather allows additional moisture to enter the
compartments when the doors are opened leading to
condensation or frost. Maintaining a reasonable level of
humidity in the home will help to control the amount of
moisture that can enter the compartments.
During the defrost cycle, the temperature of each
compartment may rise slightly and condensation may
form on the back wall. Wait 30 minutes and conrm that
the proper temperature has been restored once the
defrost cycle has completed.
Food stored uncovered or unwrapped, and damp
containers can lead to moisture accumulation within each
compartment. Wipe all containers dry and store food in
sealed packaging to prevent condensation and frost.
Rearrange items with high water content away from air
vents.
If the temperature is too cold, adjust the control one
increment at a time and wait for the temperature to
stabilize. Refer to the Control Panel section for more
information.
When the refrigerator is operated in temperature
below 41°F (5°C), food can freeze in the refrigerator
compartment. The refrigerator should not be operated in
temperature below 55°F (13°C).
It may take up to 24 hours for each compartment to
reach the desired temperature.
Locate air vents by using your hand to sense airow and
move all packages that block vents and restrict airow.
Rearrange items to allow air to ow throughout the
compartment.
Interior moisture
buildup.
Food is freezing
in the refrigerator
compartment.
Refrigerator or
Freezer section is
too warm.
Doors are opened often or for
long periods of time.
Doors are not closed correctly.
Weather is humid.
Defrost cycle recently
completed.
Food is not packaged
correctly.
Food with high water content
was placed near an air vent.
Refrigerator temperature
control is set incorrectly.
Refrigerator is installed in a
cold location.
Refrigerator was recently
installed.
The air vents are blocked. Cold
air circulates from the freezer
to the fresh food section and
back again through air vents
in the wall dividing the two
sections.
45TROUBLESHOOTING
Page 46

46 TROUBLESHOOTING
Cooling/Ice & Water
Problem Possible Cause Solutions
When the doors are opened often or for long periods
of time, warm, humid air enters the compartment. This
raises the temperature and moisture level within the
compartment. To lessen the effect, reduce the frequency
and duration of door openings.
The refrigerator should not be operated in temperatures
above 110 °F.
Adding food warms the compartment requiring the
cooling system to run. Allowing hot food to cool to room
temperature before putting it in the refrigerator will
reduce this effect.
See the Doors will not close correctly or pop open
section in Parts & Features Troubleshooting.
If the temperature is too warm, adjust the control one
increment at a time and wait for the temperature to
stabilize.
During the defrost cycle, the temperature of each
compartment may rise slightly and condensation may
form on the back wall. Wait 30 minutes and conrm the
proper temperature has been restored once the defrost
cycle has completed.
If the temperature is too cold, adjust the control one
increment at a time and wait for the temperature to
stabilize. Refer to the Control Panel for more information.
This is normal for food items with a high water content.
Do not store food items with high water content in the
freezer for a long period of time.
When the doors are opened often or for long periods
of time, warm, humid air enters the compartment. This
raises the temperature and moisture level within the
compartment. Increased moisture will lead to frost and
condensation. To lessen the effect, reduce the frequency
and duration of door openings.
Refer to the Doors will not close correctly or pop open
section in the Troubleshooting section.
Refrigerator or
Freezer section is
too warm.
Refrigerator or
Freezer section is
too cold.
Frost or ice crystals
form on frozen food
(inside of sealed
package).
Frost or ice crystals
form on frozen
food (outside of
package).
Doors are opened often or for
long periods of time.
Unit is installed in a hot
location.
A large amount of food or
hot food was added to either
compartment.
Doors not closed correctly.
Temperature control is not set
correctly.
Defrost cycle has recently
completed.
Incorrect temperature control
settings.
Condensation from food with a
high water content has frozen
inside of the food package.
Food has been left in the
freezer for a long period of
time.
Door is opened frequently or
for long periods of time.
Door is not closing properly.
Page 47

ENGLISH
Ice & Water
Problem Possible Cause Solutions
Demand exceeds ice storage
capacity.
House water supply is not
connected, valve is not turned on
fully, or valve is clogged.
The icemaker will produce approximately 70-184 cubes
in a 24 hour period.
Connect the refrigerator to a cold water supply with
adequate pressure and turn the water shutoff valve fully
open. If the problem persists, it may be necessary to
contact a plumber.
Replacing the water lter is recommended:
Approximately every six months.
47TROUBLESHOOTING
Icemaker is
not making
enough ice.
Icemaker is
not making
ice
Water lter has been exhausted.
Low house water supply pressure.
Reverse Osmosis ltration system
is used.
Tubing connecting refrigerator to
house supply valve is kinked.
Doors are opened often or for long
periods of time.
Doors are not closed completely.
The temperature setting for the
freezer is too warm.
Refrigerator was recently installed
or icemaker recently connected.
Icemaker not turned on.
When the water lter indicator turns on.
When the water dispenser output decreases.
When the ice cubes are smaller than normal.
The water pressure must be between 20 and 120 psi on
models without a water lter and between 40 and 120 psi
on models with a water lter. If the problem persists, it
may be necessary to contact a plumber.
Reverse osmosis ltration systems can reduce the
water pressure below the minimum amount and result
in icemaker issues. (Refer to the Connecting the Water
Line section.)
The tubing can kink when the refrigerator is moved
during installation or cleaning resulting in reduced water
ow. Straighten or repair the water supply line and
arrange it to prevent future kinks.
If the doors of the unit are opened often, ambient air
will warm the refrigerator which will prevent the unit
from maintaining the set temperature. Lowering the
refrigerator temperature can help, as well as not opening
the doors as frequently.
If the doors are not properly closed, ice production will be
affected. See the "Doors will not close correctly or pop
open" section in Parts & Features Troubleshooting for
more information.
The recommended temperature for the freezer
compartment for normal ice production is 0°F. If the
freezer temperature is warmer, ice production will be
affected.
It may take up to 24 hours for each compartment to
reach the desired temperature and for the icemaker to
begin making ice.
Locate the icemaker ON/OFF and conrm that it is
turned on.
Page 48

48 TROUBLESHOOTING
Ice & Water
Problem Possible Cause Solutions
Foreign substances or frost on the ice-detecting sensor
can interrupt ice production. Make sure that the sensor
area is clean at all times for proper operation.
Connect the refrigerator to the water supply and turn the
water shutoff valve fully open.
If your icemaker is equipped with an ice shutoff arm,
make sure that the arm moves freely. If your icemaker
is equipped with the electronic ice shutoff sensor, make
sure that there is a clear path between the two sensors.
Reverse osmosis ltration systems can reduce the
water pressure below the minimum amount and result
in icemaker issues. (Refer to the Connecting the Water
Line section.)
A water lter may need to be installed to eliminate taste
and odor problems. NOTE: In some cases, a lter may
not help. It may not be possible to remove all minerals/
odor/taste in all water supplies.
Ice that has been stored for too long will shrink, become
cloudy, and may develop a stale taste. Throw away old
ice and make a new supply.
Rewrap the food. Odors may migrate to the ice if food is
not wrapped properly.
See the Maintenance section for more information.
Empty and wash the bin (discard old cubes). Make sure
that the bin is completely dry before reinstalling it.
Empty the ice bin. If your icemaker is equipped with an
ice shutoff arm, make sure that the arm moves freely. If
your icemaker is equipped with the electronic ice shutoff
sensor, make sure that there is a clear path between the
two sensors. Reinstall the ice bin and wait 24 hours to
conrm proper operation.
In the control panel, select the modes for cubed ice and
crushed ice alternately to dispense the ice.
Ice will not dispense if any of the refrigerator doors are
left open.
Icemaker is
not making
ice
Ice has bad
taste or odor.
Icemaker is
making too
much ice.
Ice is not
dispensing.
The ice detecting sensor is
obstructed.
The refrigerator is not connected to
a water supply or the supply shutoff
valve is not turned on.
Icemaker shutoff (arm or sensor)
obstructed.
Reverse osmosis water ltration
system is connected to your cold
water supply.
Water supply contains minerals
such as sulfur.
Icemaker was recently installed.
The food has not been stored
properly in either compartment.
The interior of the refrigerator needs
to be cleaned.
The ice storage bin needs to be
cleaned.
Icemaker shutoff (arm/ sensor) is
obstructed.
Unable to hear the sound of ice
coming out?
Doors are not closed completely.
Page 49

ENGLISH
Ice & Water
Problem Possible Cause Solutions
Infrequent use of the ice dispenser will cause the cubes
to stick together over time, which will prevent them from
properly dispensing. Check the ice bin for ice cubes
clumping/sticking together. If they are, break up the ice
cubes to allow for proper operation.
Eliminate the frost or ice fragments by removing the
ice bin and clearing the chute with a plastic utensil.
Dispensing cubed ice can also help prevent frost or ice
fragment buildup.
Press and hold the Lock button for three seconds to
unlock the control panel and dispenser.
It may take up to 24 hours for each compartment to
reach the desired temperature and for the icemaker
to begin making ice. Make sure that the shutoff (arm/
sensor) is not obstructed. Once the ice supply in the
bin has been completely exhausted, it may take up
to 90 minutes before additional ice is available, and
approximately 24 hours to completely rell the bin.
Replacing the water lter is recommended:
Approximately every six months.
Ice is not
dispensing.
Infrequent use of the dispenser.
The delivery chute is clogged with
frost or ice fragments.
The dispenser display is locked.
Ice bin is empty.
49TROUBLESHOOTING
Water is
dispensing
slowly.
Water is not
dispensing.
Water lter has been exhausted.
Reverse Osmosis ltration system
is used.
Low house water supply pressure.
New installation or water line
recently connected.
The dispenser panel is locked.
The dispenser is not set for water
dispensing.
When the water lter indicator turns on.
When the water dispenser output decreases.
When the ice cubes are smaller than normal.
Reverse osmosis ltration systems can reduce the
water pressure below the minimum amount and result
in icemaker issues. If the problem persists, it may be
necessary to contact a plumber.
The water pressure must be between 20 and 120 psi on
models without a water lter and between 40 and 120 psi
on models with a water lter. If the problem persists, it
may be necessary to contact a plumber.
Dispense 2.5 gallons of water (ush for approximately 5
minutes) to remove trapped air and contaminants from
the system. Do not dispense the entire 2.5 gallon amount
continuously. Depress and release the dispenser pad for
cycles of 30 seconds ON and 60 seconds OFF.
Press and hold the Lock button for three seconds to
unlock the control panel and dispenser.
The dispenser can be set for ice or water. Make certain
that the control panel is set for the proper operation.
Press the Water button on the control panel to dispense
water.
Page 50

50 TROUBLESHOOTING
Ice & Water
Problem Possible Cause Solutions
Water is not
dispensing.
Dispensing
warm water.
Refrigerator or freezer doors are not
closed properly.
Water lter has been recently
removed or replaced.
Tubing connecting refrigerator to
house supply valve is kinked.
The house water supply is not
connected, the valve is not turned
on fully, or the valve is clogged.
Refrigerator was recently installed.
The water dispenser has been used
recently and the storage tank was
exhausted.
Dispenser has not been used for
several hours.
Refrigerator is connected to the hot
water supply.
Water supply contains minerals
such as sulfur.
Water will not dispense if any of the refrigerator doors
are left open.
After the water lter is replaced, dispense 2.5 gallons of
water (ush for approximately ve minutes) to remove
trapped air and contaminants from the system. Do not
dispense the entire 2.5 gallon amount continuously.
Depress and release the dispenser pad for cycles of 30
seconds ON and 60 seconds OFF.
The tubing can kink when the refrigerator is moved
during installation or cleaning. Resulting in reduced
water ow. Straighten or repair the water supply line and
arrange it to prevent future kinks.
Connect the refrigerator to the water supply and turn the
water shutoff valve fully open. If the problem persists, it
may be necessary to contact a plumber.
Allow 24 hours after installation for the water storage
tank to cool completely.
Depending on your specic model, the water storage
capacity will range from approximately 20 to 30 oz.
If the dispenser has not been used for several hours, the
rst glass dispensed may be warm. Discard the rst 10
oz.
Make sure that the refrigerator is connected to a cold
water pipe.
WARNING: Connecting the refrigerator to a hot water
line may damage the icemaker.
A water lter may need to be installed to eliminate taste
and odor problems.
Replacing the water lter is recommended:
Water has bad
taste or odor.
Water lter has been exhausted.
Refrigerator was recently installed.
Approximately every six months.
When the water lter indicator turns on.
When the water dispenser output decreases.
When the ice cubes are smaller than normal.
Dispense 2.5 gallons of water (ush for approximately 5
minutes) to remove trapped air and contaminants from
the system. Do not dispense the entire 2.5 gallon amount
continuously. Depress and release the dispenser pad for
cycles of 30 seconds ON and 60 seconds OFF.
Page 51

ENGLISH
Parts & Features
Problem Possible Cause Solutions
Doors will
not close
correctly or
pop open.
Doors are
difcult to
open.
Refrigerator
wobbles
or seems
unstable
Lights do not
work.
Refrigerator
has an
unusual odor.
The interior
of the
refrigerator is
covered with
dust or soot.
Food packages are blocking the
door open.
Ice bin, crisper cover, pans, shelves,
door bins, or baskets are out of
position.
The doors were removed during
product installation and not properly
replaced.
Refrigerator is not leveled properly.
The gaskets are dirty or sticky.
Door was recently closed.
Leveling legs are not adjusted
properly.
Floor is not level.
LED interior lighting failure.
The Air Filter may need to be set to
the MAX setting or replaced.
The refrigerator is located near a
re source, such as a replace,
chimney, or candle.
Rearrange food containers to clear the door and door
shelves.
Push bins all the way in and put crisper cover, pans,
shelves and baskets into their correct positions. See the
Operation section for more information.
Remove and replace the doors according to the
Removing and Replacing Refrigerator Handles and
Doors section.
See Door Alignment in the Refrigeration Installation
section to level refrigerator.
Clean the gaskets and the surfaces that they touch. Rub
a thin coat of appliance polish or kitchen wax on the
gaskets after cleaning.
When you open the door, warmer air enters the
refrigerator. As the warm air cools, it can create a
vacuum. If the door is hard to open, wait one minute to
allow the air pressure to equalize, then see if it opens
more easily.
Refer to the Leveling and Door Alignment section.
It may be necessary to add shims under the leveling legs
or rollers to complete installation.
The refrigerator compartment lamp is LED interior
lighting, and service should be performed by a qualied
technician.
Set the Air Filter to the MAX setting. If the odor does
not go away within 24 hours, the lter may need to be
replaced. See the Replacing the Air Filter section for
replacement instructions.
Make sure that the refrigerator is not located near a re
source, such as a replace, chimney or candle.
51TROUBLESHOOTING
Page 52

52 TROUBLESHOOTING
Noises
Problem Possible Cause Solutions
The defrost control will click when
the automatic defrost cycle begins
Clicking
Rattling
Whooshing
Gurgling
Popping
Sizzling
Vibrating
Dripping
Pulsating or
high-pitched
sound
and ends. The thermostat control
(or refrigerator control on some
models) will also click when cycling
on and off.
Rattling noises may come from the
ow of refrigerant, the water line on
the back of the unit, or items stored
on top of or around the refrigerator.
Refrigerator is not resting solidly on
the oor.
Refrigerator with linear compressor
was jarred while running.
Evaporator fan motor is circulating
air through the refrigerator and
freezer compartments.
Air is being forced over the
condenser by the condenser fan.
Refrigerant owing through the
cooling system.
Contraction and expansion of the
inside walls due to changes in
temperature.
Water dripping on the defrost heater
during a defrost cycle.
If the side or back of the refrigerator
is touching a cabinet or wall, some
of the normal vibrations may make
an audible sound.
Water running into the drain pan
during the defrost cycle.
Your refrigerator is designed to run
more efciently to keep your food
items at the desired temperature.
The high efciency compressor
may cause your new refrigerator
to run longer than your old one,
but it is still more energy efcient
than previous models. While the
refrigerator is running, it is normal
to hear a pulsating or high-pitched
sound.
Normal Operation
Normal Operation
Floor is weak or uneven or leveling legs need to be
adjusted. See the Leveling and Door Alignment section.
Normal Operation
Normal Operation
Normal Operation
Normal Operation
Normal Operation
Normal Operation
To eliminate the noise, make sure that the sides and
back cannot vibrate against any wall or cabinet.
Normal Operation
Normal Operation
Page 53

53WARRANTY (USA)
ENGLISH
WARRANTY (USA)
WARRANTY: Should your LG Refrigerator ("Product") fail due to a defect in materials or workmanship under
normal home use, during the warranty period set forth below, LG will at its option repair or replace the product.
This limited warranty is valid only to the original retail purchaser of the product and applies only when purchased
and used within the United States including U.S. Territories. Proof of original retail purchase is required to obtain
warranty service under this limited warranty.
WARRANTY PERIOD
Refrigerator
One (1) year from the
date of original retail
purchase
Parts and Labor (internal/
functional parts only)
Noises associated with normal operation and failure to follow instructions found in the use and care and
installation guides or operating the unit in an unsuitable environment will not be covered under this warranty.
• Replacement products and parts are warranted for the remaining portion of the original warranty period or
ninety (90) days, whichever is greater.
• Replacement products and parts may be new or remanufactured.
THIS WARRANTY IS IN LIEU OF ANY OTHER WARRANTY, EXPRESS OR IMPLIED, INCLUDING WITHOUT
LIMITATION, ANY WARRANTY OF MERCHANTABILITY OR FITNESS FOR A PARTICULAR PURPOSE. TO
THE EXTENT ANY IMPLIED WARRANTY IS REQUIRED BY LAW, IT IS LIMITED IN DURATION TO THE
EXPRESS WARRANTY PERIOD ABOVE. NEITHER THE MANUFACTURER NOR ITS U.S. DISTRIBUTOR
SHALL BE LIABLE FOR ANY INCIDENTAL, CONSEQUENTIAL, INDIRECT, SPECIAL, OR PUNITIVE
DAMAGES OF ANY NATURE, INCLUDING WITHOUT LIMITATION, LOST REVENUES OR PROFITS, OR
ANY OTHER DAMAGE WHETHER BASED IN CONTRACT, TORT, OR OTHERWISE.
Some states do not allow the exclusion or limitation of incidental or consequential damages or limitations on how
long an implied warranty lasts, so the above exclusion or limitation may not apply to you. This warranty gives
you specic legal rights and you may also have other rights that vary from state to state.
Sealed System (Condenser, Dryer, Connecting Tube
One (1) year from the
date of original retail
purchase
Parts and Labor
and Evaporator)
Seven (7) years from
the date of original retail
purchase
Parts only (Consumer will
be charged for labor)
Linear Compressor
Ten (10) years from the
date of original retail
purchase
Part only (Consumer will
be charged for labor)
THIS LIMITED WARRANTY DOES NOT COVER:
• Service trips to deliver, pick up, or install or repair the product; instruction to the customer on operation of
the product; repair or replacement of fuses or correction of wiring or plumbing, or correction of unauthorized
repairs/installation.
• Failure of the product to perform during power failures and interrupted or inadequate electrical service.
• Damage caused by leaky or broken water pipes, frozen water pipes, restricted drain lines, inadequate or
interrupted water supply or inadequate supply of air.
• Damage resulting from operating the product in a corrosive atmosphere or contrary to the instructions outlined
in the product’s owner’s manual.
• Damage to the product caused by accidents, pests and vermin, lightning, wind, re, oods, or acts of God.
• Damage resulting from misuse, abuse, improper installation, repair, or maintenance. Improper repair includes
use of parts not approved or specied by LG.
• Damage or failure caused by unauthorized modication or alteration, or if it is used for other than the intended
purpose, or any water leakage where the unit was not properly installed.
Page 54

54 WARRANTY (USA)
• Damage or failure caused by incorrect electrical current, voltage, or plumbing codes, commercial or industrial
use, or use of accessories, components, or consumable cleaning products that are not approved by LG.
• Damage caused by transportation and handling, including scratches, dents, chips, and/or other damage to the
nish of your product, unless such damage results from defects in materials or workmanship and is reported
within one (1) week of delivery.
• Damage or missing items to any display, open box, discounted, or refurbished product.
• Products with original serial numbers that have been removed, altered, or cannot be readily determined. Model
and serial numbers, along with original retail sales receipts, are required for warranty validation.
• Increases in utility costs and additional utility expenses.
• Replacement of light bulbs, lters, or any consumable parts.
• Repairs when your product is used for other than normal and usual household use (e.g. commercial use, in
ofces and recreational facilities) or contrary to the instructions outlined in the product’s owner’s manual.
• Costs associated with removal of your product from your home for repairs.
• The removal and reinstallation of the product if it is installed in an inaccessible location or is not installed in
accordance with published installation instructions, including LG’s owner’s and installation manuals.
• Shelves, door bins, drawers, handles, accessories, and other parts besides those that were originally included
with this particular model.
The cost of repair or replacement under these excluded circumstances shall be borne by the consumer.
TO OBTAIN WARRANTY SERVICE AND ADDITIONAL INFORMATION
For additional product information, visit the LG website at http://www.lg.com
For assistance using this product or to schedule service, contact LG Electronics at 1-800-243-0000.
For further assistance, write: LG Electronics, 201 James Record Road, Huntsville, Alabama 35813
Page 55

55WARRANTY (CANADA)
ENGLISH
WARRANTY (CANADA)
WARRANTY: Should your LG Refrigerator (“Product”) fail due to a defect in material or workmanship under
normal home use during the warranty period set forth below, LG Canada will at its option repair or replace the
Product upon receipt of proof of original retail purchase. This warranty is valid only to the original retail purchaser
of the product and applies only to a Product distributed in Canada by LG Canada or an authorized Canadian
distributor thereof. The warranty only applies to Products located and used within Canada.
WARRANTY PERIOD: (Note: If the original date of purchase cannot be veried, the warranty will begin sixty
Refrigerator/Freezer
One (1) year from the
date of original retail
purchase
Parts and Labor (internal/
functional parts only)
(60) days from the date of manufacture)
Sealed System (Condenser, Dryer, Connecting Tube
One (1) year from the
date of original retail
purchase
Parts and Labor
and Evaporator)
Seven (7) years from
the date of original retail
purchase
Parts only (Consumer will
be charged for labor)
Linear Compressor
Ten (10) years from the
date of original retail
purchase
Part only (Consumer will
be charged for labor)
Noises associated with normal operation and failure to follow instructions found in the use and care and
installation guides or operating the unit in an unsuitable environment will not be covered under this warranty.
• Replacement products and parts are warranted for the remaining portion of the original warranty period or
ninety (90) days, whichever is greater.
• Replacement products and parts may be new or remanufactured.
• LG Authorized Service Center warranties their repair work for thirty (30) days.
LG CANADA’S SOLE LIABILITY IS LIMITED TO THE WARRANTY SET OUT ABOVE. EXCEPT AS
EXPRESSLY PROVIDED ABOVE, LG CANADA MAKES NO AND HEREBY DISCLAIMS ALL OTHER
WARRANTIES AND CONDITIONS RESPECTING THE PRODUCT, WHETHER EXPRESS OR IMPLIED,
INCLUDING, BUT NOT LIMITED TO, ANY IMPLIED WARRANTY OR CONDITION OF MERCHANTABILITY
OR FITNESS FOR A PARTICULAR PURPOSE, AND NO REPRESENTATIONS SHALL BE BINDING ON
LG CANADA. LG CANADA DOES NOT AUTHORIZE ANY PERSON TO CREATE OR ASSUME FOR IT
ANY OTHER WARRANTY OBLIGATION OR LIABILITY IN CONNECTION WITH THE PRODUCT. TO THE
EXTENT THAT ANY WARRANTY OR CONDITION IS IMPLIED BY LAW, IT IS LIMITED TO THE EXPRESS
WARRANTY PERIOD ABOVE. LG CANADA, THE MANUFACTURER OR DISTRIBUTOR SHALL NOT BE
LIABLE FOR ANY INCIDENTAL, CONSEQUENTIAL, SPECIAL, DIRECT OR INDIRECT DAMAGES, LOSS
OF GOODWILL, LOST PROFITS, PUNITIVE OR EXEMPLARY DAMAGES OR ANY OTHER DAMAGE,
WHETHER ARISING DIRECTLY OR INDIRECTLY FROM ANY CONTRACTUAL BREACH, FUNDAMENTAL
OR OTHERWISE, OR FROM ANY ACTS OR OMISSIONS, TORT, OR OTHERWISE.
This warranty gives you specic legal rights. You may have other rights which may vary from province to
province depending on applicable provincial laws. Any term of this warranty that negates or varies any implied
condition or warranty under provincial law is severable where it conicts with provincial law without affecting the
remainder of this warranty’s terms.
THIS LIMITED WARRANTY DOES NOT COVER:
• Service trips to deliver, pick up, or install or repair the product; instruction to the customer on operation of
the product; repair or replacement of fuses or correction of wiring or plumbing, or correction of unauthorized
repairs/installation.
• Failure of the product to perform during power failures and interrupted or inadequate electrical service.
Page 56

56 WARRANTY (CANADA)
• Damage caused by leaky or broken water pipes, frozen water pipes, restricted drain lines, inadequate or
interrupted water supply or inadequate supply of air.
• Damage resulting from operating the product in a corrosive atmosphere or contrary to the instructions outlined
in the product’s owner’s manual.
• Damage to the product caused by accidents, pests and vermin, lightning, wind, re, oods, or acts of God.
• Damage resulting from the misuse, abuse, improper installation, repair, or maintenance of the Product.
Improper repair includes use of parts not approved or specied by LG Canada.
• Damage or product failure caused by unauthorized modication or alteration, or use for other than its intended
purpose, or resulting from any water leakage due to improper installation.
• Damage or Product failure caused by incorrect electrical current, voltage, or plumbing codes, commercial or
industrial use, or use of accessories, components, or cleaning products that are not approved by LG Canada.
• Damage caused by transportation and handling, including scratches, dents, chips, and/or other damage to the
nish of your product, unless such damage results from defects in materials or workmanship and is reported
within one (1) week of delivery.
• Damage or missing items to any display, open box, discounted, or refurbished Product.
• Products with original serial numbers that have been removed, altered, or cannot be readily determined. Model
and Serial numbers, along with original retail sales receipt, are required for warranty validation.
• Increases in utility costs and additional utility expenses.
• Replacement of light bulbs, lters, or any consumable parts.
• Repairs when your Product is used in other than normal and usual household use (including, without limitation,
commercial use, in ofces or recreational facilities) or contrary to the instructions outlined in the Product
owner’s manual.
• Costs associated with removal of the Product from your home for repairs.
• The removal and reinstallation of the Product if it is installed in an inaccessible location or is not installed in
accordance with published installation instructions, including the Product owner’s and installation manuals.
• Shelves, door bins, drawers, handles, and accessories to the Product. Also excluded are parts besides those
that were originally included with the Product.
All costs associated with the above excluded circumstances shall be borne by the consumer.
For complete warranty details and customer assistance, please call or visit our website:
Call 1-888-542-2623 (24 hours a day, 365 days a year) and select the appropriate option from the menu, or visit
our website at http://www.lg.ca
Page 57

57NOTE
Page 58

LG Customer Information Center
Register your product Online!
www.lg.com
For inquiries or comments,
visit www.lg.com or call:
1-800-243-0000
U.S.A.
1-888-542-2623
CANADA
Page 59

2
TABLE OF CONTENTS
3 PRODUCT FEATURES
4 SAFETY INSTRUCTIONS
4 IMPORTANT SAFETY INSTRUCTIONS
8 PRODUCT SPECIFICATIONS
9 PRODUCT OVERVIEW
9 Exterior
10 Interior
11 INSTALLATION
11 Installation Overview
12 Unpacking the Refrigerator
12 Choosing the Proper Location
14 Removing/Assembling Handles
14 Removing/Assembling the Doors
17 Connecting the Water Line
20 Leveling and Door Alignment
21 Turning on the Power
37 MAINTENANCE
37 Cleaning
38 Replacing the Water Filter
43 TROUBLESHOOTING
43 FAQs: Frequently Asked Questions
44 Before Calling for Service
53 WARRANTY (USA)
55 WARRANTY (CANADA)
22 OPERATION
22 Before Use
23 Control Panel
24 Airflow
25 Ice and Water Dispenser
26 Ice Compartment
27 Automatic Icemaker
28 Storing Food
30 Detaching/Assembling the Storage Bins
31 InstaView Function
31 Door-in-Door
32 Adjusting the Refrigerator Shelves
33 SMART FUNCTIONS
33 Smart ThinQ Application
35 Smart Grid Function
36 Smart Diagnosis™ Function
Page 60

ENGLISH
PRODUCT FEATURES
Depending on the model, some of the following functions may not be available.
FILTERED WATER AND ICE DISPENSER
The water dispenser dispenses fresh, chilled water.
The ice dispenser dispenses cubed and crushed ice.
DOOR ALARM
The Door Alarm function is designed to prevent refrigerator malfunctioning that could occur if a refrigerator
door or freezer door remains open. If a refrigerator door or freezer door is left open for more than 60 seconds,
a warning alarm sounds at 30-second intervals.
DOOR-IN-DOOR REFRESHMENT CENTER
The Door-in-Door Refreshment Center provides a convenient area for frequently used items that require easy
access.
FRESH ZONE DRAWERS
The Fresh Zone drawers are designed to help keep fruits and vegetables fresh.
3PRODUCT FEATURES
AUTO-CLOSING HINGE
The refrigerator doors and freezer drawers close automatically with a slight push. (The door only closes
automatically when it is open at an angle less than 30°.)
ICE PLUS
Ice production is increased when the freezer section is maintained at the coldest temperature for a 24-hour
period.
Page 61

4 SAFETY INSTRUCTIONS
SAFETY INSTRUCTIONS
READ ALL INSTRUCTIONS BEFORE USE
Your safety and the safety of others are very important.
We have provided many important safety messages in this manual and on your appliance. Always read and
follow all safety messages.
These words mean:
CAUTION
You may be injured or cause damage to the product if you do not follow instructions.
All safety messages will tell you what the potential hazard is, tell you how to reduce the chance of injury, and
tell you what may happen if the instructions are not followed.
This device is intended for use in domestic and similar appliances, such as: kitchen personnel in stores,
offices and other work environments; Country houses and by clients in hotels, motels and other
residential environments; Bed and breakfast type environments; Hospitality and similar non-commercial
applications.
IMPORTANT SAFETY INSTRUCTIONS
WARNING
to persons when using this product, follow basic precautions, including the
following:
California Safe Drinking Water and Toxic Enforcement Act
• This product contains chemicals known to the state of California to cause cancer and birth defects or other
reproductive harm. Wash hands after handling.
INSTALLATION
• To reduce the risk of injury to persons, adhere to all industry recommended safety procedures including the
use of long-sleeved gloves and safety glasses.
••Never attempt to operate this appliance if it is damaged, malfunctioning, partially disassembled, or has
missing or broken parts, including a damaged cord or plug.
The refrigerator should be leveled and on a firm floor.
• Only connect this product to a dedicated grounded electrical outlet rated for use with this product (115 V, 60
Hz, AC only). It is the user’s responsibility to replace a standard 2-prong wall outlet with a standard 3-prong
wall outlet.
• Do not use an outlet that can be turned off with a switch. Do not use an extension cord.
• The appliance must be positioned for easy access to a power source.
• When moving the refrigerator, be careful not to roll over or damage the power cord.
• Contact an authorized service center when installing or relocating the refrigerator.
• Do not, under any circumstances, cut or remove the third (ground) prong from the power cord.
Page 62

ENGLISH
• Keep packing materials out of the reach of children. Packaging material can be dangerous for children.
There is a risk of suffocation.
• Do not install the refrigerator in a damp or dusty place where insulation on electrical parts may deteriorate.
• Do not place the refrigerator in direct sunlight or expose it to the heat from heating appliances such as
stoves or heaters.
• Do not bend or pinch the power cord excessively or place heavy objects on it.
OPERATION
• This product is not to be used for special purposes such as the storage of medicine or test materials or for
use on ships, etc.
• DO NOT allow children to climb, stand, or hang on the refrigerator doors or on the shelves in the
refrigerator. They could damage the refrigerator and seriously injure themselves.
• Do not allow children to climb into the refrigerator. They could be trapped and suffocated.
• Children should be supervised to ensure that they do not play with the refrigerator.
• Keep ngers out of pinch point areas; clearances between the doors and cabinets are necessarily small. Be
careful closing doors when children are nearby.
• Do not touch frozen food or the metal parts in the freezer compartment with wet or damp hands. Doing so
may cause frostbite.
• Do not refreeze frozen food that has thawed completely. Doing so may result in a serious health hazard.
• Do not use an adapter plug or plug the power plug into a multi-outlet extension cord.
• Do not use a cord that shows cracks or abrasion damage along its length or at either the plug or connector
end. Immediately have all power cords that have become frayed or otherwise damaged repaired or replaced
by qualied service personnel.
• Do not operate the refrigerator or touch the power cord with wet hands.
• Do not modify or extend the power cord.
• Do not use an uncertied power outlet. Do not plug appliance into a damaged wall outlet.
• Do not put hands, feet or other objects into the air vents or bottom of the refrigerator. Doing so could result
in personal injury or electric shock.
• In the event of a gas leak (propane/LPG), ensure the area is adequately ventilated and contact an
authorized service center before resuming use. Do not touch the refrigerator or power cord of the
refrigerator.
• Disconnect the power cord immediately and contact an authorized service center if there is a strange noise,
odor, or smoke coming from the appliance.
• Do not use any fuse (such as copper, steel wire, etc.) other than a standard fuse.
• Do not place or use an electrical appliance inside the refrigerator, unless it is of a type recommended by the
manufacturer.
• Do not put animals inside the appliance.
• Do not place heavy or fragile objects, liquid lled containers, combustible substances, or ammable objects
(such as candles and lamps) on the appliance.
• Avoid contact with any moving parts of the ejector mechanism or with the heater that releases the ice
cubes. DO NOT place ngers in the automatic icemaker when the refrigerator is plugged in.
• When dispensing ice from the dispenser, do not use a fragile container.
5SAFETY INSTRUCTIONS
Page 63

6 SAFETY INSTRUCTIONS
• If connected to a circuit protected by fuses, use time delay fuse.
•
MAINTENANCE
• Do not use a hair dryer to dry the inside of the refrigerator.
• Do not light a candle to remove odors in the refrigerator.
•
adequately ventilated and contact an authorized service center.
•
••This appliance can be used by children aged from 8 years and above and persons with reduced physical,
sensory or mental capabilities or lack of experience and knowledge if they have been given supervision or
instruction concerning use of the appliance in a safe way and understand the hazards involved. Children
shall not play with the appliance. Cleaning and user maintenance shall not be made by children without
supervision.
Before installation, clean the refrigerator unpluged. Once done, reconnect the refrigerator and set the control
(thermostat, refrigerator or freezer depending on your model) to the desired position.
• Unplug the power plug before cleaning or repairing the refrigerator.
• The refrigerator and freezer compartment lights are interior LED lighting, and service should be performed
• Unplug the power plug immediately in the event of a blackout or thunderstorm.
• Turn the power off if water or dust penetrates into the refrigerator. Call a service agent.
• Do not store glass containers or soda in the freezer compartment. Contents may expand when frozen,
break the container and cause injury.
•
•
This device is not meant for being used by people (including children) Whose physical, sensory or mental
capacities are different or reduced, or lack experience or knowledge, unless such persons are supervised
or trained to operate the device by a person responsible for their safety.
. Ensure the area is
.
DISPOSAL
• Junked or abandoned refrigerators are dangerous, even if they are sitting for only a few days. When
disposing of the refrigerator, remove the packing materials from the door or take off the doors but leave the
shelves in place so that children may not easily climb inside.
•
law
.
•
If this unit is no longer needed, contact your local authorities for safe disposal of this product because it
contains cyclopentane or pentane as gas for insulation. Insulation gases require a special disposal process.
This product contains flammable insulation.
GROUNDING INSTRUCTIONS
••Improper connection of the equipment-grounding conductor can result in a risk of electric shock. Check with
If the power cord is damaged, it must be replaced by the manufacturer, its authorized service agent or
qualified personnel in order to avoid a hazard.
•
•
Page 64

CAUTION
7SAFETY INSTRUCTIONS
To reduce the risk of minor or moderate injury to persons, malfunction, or damage
to the product or property when using this product, follow basic precautions,
including the following:
• Do not hang on to or place heavy objects on the refrigerator’s dispenser.
INSTALLATION
• Do not install the refrigerator where there may be a danger of the unit falling.
• The refrigerator must be properly installed in accordance with the Installation Instructions.
OPERATION
• Do not use aerosols near the refrigerator.
• This appliance is intended to be used only in domestic and similar applications.
• Do not strike or apply excessive force to any glass surface. Do not touch glass surfaces if they are cracked
or broken.
•
injury if items are removed with excessive force.
•
• Do not hang on to or place heavy objects on the refrigerator’s dispenser.
MAINTENANCE
• Do not use strong detergents like wax or thinners for cleaning. Clean with a soft cloth.
• Remove foreign objects (such as dust and water) off the prongs of the power plug and contact areas. Do
not use a wet or damp cloth when cleaning the plug.
• Do not spray water directly on the inside or outside of the refrigerator.
•
Do not clean glass shelves or covers with warm water when they are cold. They may break if exposed to
ENGLISH
•
•
Do not use extensions or adapters without grounding.
SAVE THESE INSTRUCTIONS
Page 65

8 PRODUCT SPECIFICATIONS
PRODUCT SPECIFICATIONS
The appearance and specications listed in this manual may vary due to constant product improvements.
Electrical requirements: 115 V, 60 Hz
Min. / Max. water pressure: 20 - 120 psi (138 - 827 kPa) on models without water lter.
40 – 120 psi (276 – 827 kPa) on models with lter.
Model LSXS26396S
Description Standard-depth, Side by Side refrigerator
Net weight 306.5 lb. ( 139 kg )
Model LSXC22396S
Description Counter-depth, Side by Side refrigerator
Net weight 280 lb. (127 kg)
Page 66

ENGLISH
PRODUCT OVERVIEW
1
8
5
The images in this guide may be different from the actual components and accessories, which are subject to
change by the manufacturer without prior notice for product improvement purposes.
Exterior
9PRODUCT SPECIFICATIONS
1
2
3
4
Filtered Water and Ice Dispenser
Dispenses puried water and ice.
LED Display
2
Displays the refrigerator and freezer temperature,
the water lter condition and the dispenser mode.
Control Panel
3
Sets the refrigerator and freezer temperatures,
the water lter condition and the dispenser mode.
Freezer
4
Frozen food compartment
5
6
7
8
Handle
Opens and closes the refrigerator door.
Door-in-Door Button
6
Press this button to open the Door-in-Door.
InstaView Door-in-Door
7
The InstaView Door-in-Door compartment allows
for easy access to commonly used food items.
Refrigerator
8
Fresh food compartment
Page 67

10 PRODUCT SPECIFICATIONS
3
9
Interior
LSXS26396S/LSXC22396S
1
9
3
4
3
6
7
5
2
Automatic Icemaker
1
Automatically produce and store ice.
Freezer Door Bins
2
Store small packages of frozen food. Do not
store ice cream or food which will be stored for a
long period of time within these baskets.
LED interior lamps
Light up the inside of the refrigerator.
Freezer Shelf
4
Adjust the freezer shelves to t large or tall items.
Freezer Drawer
5
Store long-term frozen items. The number of
drawers may vary by model.
Water lter
6
Purify water.
8
10
Refrigerator Shelf
7
Shelves are adjustable to suit individual storage
needs. Adjust the shelf height by emptying and
removing the shelf and inserting it on a different
set of shelf supports. The number of refrigerator
shelves varies by model.
Fresh Zone
8
Storage for deli, fruit, or vegetables.
Door-in-Door Case
Open the outer Door-in-Door for easy access to
frequently used items without letting a lot of cold
air out of the refrigerator.
Refrigerator Door Bins
10
Standard door bins are adjustable to t taller
items.
NOTE
• The lter should be replaced every 6 months. See
the Replacing the Water Filter section in this manual
for details.
Page 68

ENGLISH
INSTALLATION
Installation Overview
Please read the following installation instructions rst after purchasing this product or transporting it to another
location.
Unpacking the Refrigerator Choosing the Proper Location Disassembling/Assembling
11INSTALLATION
Connecting the Water Line Leveling and Door Alignment
CAUTION
• Connect to a potable water supply only.
Page 69

12 INSTALLATION
Unpacking the Refrigerator
WARNING
• Use two or more people to move and install the
refrigerator. Failure to do so can result in back
injury or other injury.
• The refrigerator is heavy. Protect the oor when
moving the refrigerator for cleaning or service.
Always pull the refrigerator straight out when
moving it. Do not wiggle or walk the refrigerator
when trying to move it, as oor damage could
occur.
• Keep ammable materials and vapors, such as
gasoline, away from the refrigerator. Failure to
do so can result in re, explosion, or death.
NOTE
• Remove tape and any temporary labels from
your refrigerator before using. Do not remove any
warning labels, the model and serial number label,
or the Tech Sheet that is located under the front of
the refrigerator.
• To remove any remaining tape or glue, rub the area
briskly with your thumb. Tape or glue residue can
also be easily removed by rubbing a small amount
of liquid dish soap over the adhesive with your
ngers. Wipe with warm water and dry.
• Do not use sharp instruments, rubbing alcohol,
ammable uids, or abrasive cleaners to remove
tape or glue. These products can damage the
surface of your refrigerator.
• Reinstall or adjust shelves as needed. Refrigerator
shelves are installed in the shipping position.
Reinstall shelves according to your individual
storage needs.
Choosing the Proper
Location
Water
Water supply must be easily connected for the
automatic icemaker.
NOTE
• The water pressure must be 20 - 120 psi or 138 -
827 kPa or 1.4 - 8.4 kgf/cm
installed in an area with low water pressure (below
20 psi or 138 kPa or 1.4 kgf/cm
booster pump to compensate for the low pressure.
Electricity
Use an individual, grounded outlet:115 Volts, 60 Hz,
AC, 15 Amps minimum.
WARNING
• Don't use existing holes unless they are in the
target area. Otherwise, the water supply and
drain hose may be damaged by being crushed
or kinked.
Flooring
To avoid noise and vibration, the unit must be
installed and leveled on a solidly constructed oor. If
required, adjust the leveling legs to compensate for
the unevenness of the oor.
NOTE
• Installing on carpeting, soft tile surfaces, a platform
or weakly supported structure is not recommended.
2
. If the refrigerator is
2
), you can install a
Ambient Temperature
Install this appliance in an area where the
temperature is between 55 °F (13 °C) and 110 °F
(43 °C).
If the temperature around the appliance is too low or
high, cooling ability may be adversely affected.
Page 70

ENGLISH
Dimensions and Clearances
• Check the dimensions of the appliance and the installation path to ensure there is sufcient room to move the
refrigerator through doors or narrow openings.
• If an opening is too narrow to t the refrigerator through, remove the refrigerator doors. See Removing/
Assembling the Doors and Drawers in this manual.
• The installation location chosen for the refrigerator should allow space behind the unit for connections and
airow and space in front to open the doors and drawers.
• Too small of a distance from adjacent items may result in lowered freezing capability and increased electricity
consumption charges. Allow at least 24 inches (610 mm) in front of the refrigerator to open the doors, and at
least 2 inches (50.8 mm) between the back of the refrigerator and the wall.
B
13INSTALLATION
A
C
D
E
F
M
G
- List LSXS26396S LSXC22396S
A Depth without handle
B Width
C Height to Top of Case
D Height to Top of Hinge
E Back Clearance
F Depth without Door
G
K Front Clearance
M Depth With handle
Depth (Total with Door Open
90°)
33 2/5"
(848 mm)
35 9/10"
(912 mm)
68 9/10"
(1750 mm)
70 3/10"
(1785 mm)
2"
(50 mm)
28 7/10"
(730 mm)
50 3/5"
(1285 mm)
24"
(610 mm)
35 9/10"
(912 mm)
29 2/5"
747 mm)
35 9/10"
912 mm)
68 9/10"
(1750 mm)
70 3/10"
(1785 mm)
2"
(50 mm)
24 3/5"
(624mm)
46 1/2"
(1180 mm)
24"
(610 mm)
31 4/5"
(807 mm)
Page 71

14 INSTALLATION
Removing/Assembling
Handles
• When moving the refrigerator through a narrow
opening, removing the doors is preferred.
• The appearance of the handles may vary from what
is shown.
WARNING
When assembling or disassembling the
refrigerator handles:
• Grasp the handle rmly to avoid dropping it.
• Do not swing the handle into nearby people or
animals.
• Make sure that the bracket hole of the handle
ts properly into the stopper bolt of the door.
Assemble the set screws to x the handle into
place.
• Make sure that there is not a gap between the
door and handle after assembling the handle.
Tools Needed
3/32 in. Allen wrench
1/8 in. Allen wrench
1/4 in. Allen wrench
Assembling the Refrigerator Handles
Assemble the mounting fasteners (1) at both ends
1
of the handle with a 1/4 in. Allen rench.
Place the handle on the door by tting the handle
2
footprints over the mounting fasteners and
tightening the set screws (2) with a 3/32 in. Allen
wrench.
Removing/Assembling the
Doors
If the entrance door is too narrow for the refrigerator
to pass through, remove the refrigerator doors and
move the refrigerator sideways through the doorway.
WARNING
Removing the Refrigerator Handles
Loosen the set screws (1) with a 3/32 in. Allen
1
wrench and remove the handle.
Loosen the mounting fasteners (2) that connect
2
to the refrigerator door and handle using a 1/4
in. Allen wrench, and remove the mounting
fasteners.
• Use two or more people to remove and install
the refrigerator doors.
• Disconnect the electrical supply to the
refrigerator before installing.
• Do not put hands, feet or other objects into the
air vents or bottom of the refrigerator.
• Be careful when handling the hinge and stopper.
• Remove food and bins before detaching the
doors and drawers.
• Do not hold the handle when removing or
replacing the doors and drawer as the handle
may come off.
Tools Needed
3/32 in. Allen wrench
1/8 in. Allen wrench
1/4 in. Allen wrench
Page 72

15INSTALLATION
ENGLISH
(1)
(2)
Removing the Freezer Door (with
Water Line Connection)
Before removing freezer door, disconnect water
1
line connectors (one white tube, one blue tube).
• Do not remove freezer door if either the white or
blue tube is still connected.
• Use the support block shipped on the upper
shelf in the refrigerator to keep the front of
the refrigerator tilted up while removing the
connectors.
NOTE
Disassembling/Assembling the Water Lines
Collet
Tube
Lift the door to remove it from the lower hinge pin.
4
Be careful to pull the water lines from behind the
lower hinge pin.
Enough for the water feed tube to be completely
pulled out.
water feed tube
Lower Hinge
CAUTION
• When lifting the hinge free of the latch, be careful
that the door does not fall forward.
• Place the door, inside facing up, on a
nonscratching surface.Be careful not to damage
the water lines.
Removing the Refrigerator Door
Insert line
Clip
Loosen the hinge cover screws and remove the
2
(Correct)
hinge cover. Disconnect all wire harnesses.
Hinge Cover
Wire Harness
Upper Hinge
Rotate the hinge lever counterclockwise (1) and
3
lift the upper hinge (2).
Hinge Lever
Upper Hinge
Open the door and remove the top hinge cover
1
screw.
Use a at blade screwdriver to pry back the hooks
2
(not shown) of the hinge cover from the top of
the refrigerator cabinet. Remove the cover and
disconnect all wire harnesses.
Rotate the hinge lever (1) clockwise. Lift the top
3
hinge (2) free of the hinge lever latch.
Hinge Lever
Upper Hinge
(1)
(2)
Page 73

16 INSTALLATION
Lift the door from the lower hinge pin.
4
Lower Hinge
CAUTION
• When lifting the hinge free of the latch, be careful
that the door does not fall forward.
• Place the door, inside facing up, on a
nonscratching surface.Be careful not to damage
the water lines.
NOTE
• Do not remove the grease on the surface of the
gasket or hinge.
• Do not remove the sensor assembly in the right
upper hinge cover.
Assembling the Freezer Door
Disassembling/Assembling the Water Lines
Collet
Tube
Insert line
Clip
Gently press the collet and insert the tube until
2
only one line shows on the tube.
Correct Incorrect
NOTE
• Water hoses should be cut with a clean, straight
edge to avoid leaks.
(Correct)
Feed the water tubes through the lower hinge
1
pin and place the door onto the lower hinge pin.
Make sure the water hoses are behind the leg to
prevent damage.
NOTE
• Open the door and turn the hose toward the inside.
Water hoses should be behind the leg to prevent
damage.
Correct Incorrect
Fit the top over the hinge lever latch and into
3
place. Rotate the lever clockwise to secure the
hinge.
Install the grounding screw and connect all the
4
wire harnesses.
Hook the tab on the door switch side of the cover,
5
under the edge of the wire opening in the cabinet
top. Position the cover into place. Insert and
tighten the cover screw.
Reconnect the water tubes by inserting the tubes
6
into the connectors. The tube is inserted correctly
when only one guide line is showing out of two.
Page 74

17INSTALLATION
ENGLISH
Assembling the Refrigerator Door
Place the door onto the lower hinge pin.
1
Lower Hinge
Fit the upper hinge over the hinge lever latch and
2
into place. Rotate the lever counterclockwise to
secure the hinge.
(1)
(2)
Reconnect all wire harnesses. Hook the tab on
3
the switch side of the cover under the edge of the
wire opening in the cabinet top. Position the cover
and replace the screw.
Connecting the Water Line
Before Beginning
This water line installation is not covered by the
refrigerator warranty. Follow these instructions
carefully to minimize the risk of expensive water
damage.
If necessary, call a qualied plumber to correct water
hammer before installing the water supply line to
the refrigerator. Water banging in the pipes, or water
hammer in residential plumbing can cause damage
to refrigerator parts and lead to water leakage or
ooding.
• Turn the icemaker OFF if the refrigerator will be
used before the water line is connected.
• Do not install the icemaker tubing in areas where
the ambient temperatures fall below freezing.
WARNING
• Connect to a potable water supply only.
CAUTION
• To prevent burns and product damage, only
connect the refrigerator water line to a cold water
supply.
• Wear eye protection during installation toprevent
injury.
Water Pressure
You will need a cold water supply.
Water Pressure
models with water lter
where reverse osmosis
water ltration system is
connected to a cold water
supply
20–120 psi
(138 - 827 kPa)
40–60 psi minimum to
reverse osmosis system
(2.8 kgf/cm
2
cm
,or less than 2–3
seconds to ll a cup of 7
oz capacity)
2
– 4.2 kgf/
Page 75

18 INSTALLATION
If the water pressure from the reverse osmosis
system is less than 20 psi or 138 kPa or 1.4 kgf/ cm
(takes more than 4 seconds to ll a cup of 7 oz or
198 cc capacity):
• Check to see if the sediment lter in the reverse
osmosis system is blocked. Replace the lter if
necessary.
• Allow the storage tank on the reverse osmosis
system to rell after heavy usage.
• If the water pressure remains low, call a licensed,
qualied plumber.
• All installations must be in accordance with local
plumbing code requirements.
Supplies Needed
• Copper or PEX Tubing, ¼ in. outer diameter, to
connect the refrigerator to the water supply. Be sure
both ends of the tubing are cut square. To determine
how much tubing you need, measure the distance
from the water valve on the back of the refrigerator
to the water supply pipe. Then, add 8 feet (2.4 m).
Be sure there is sufcient extra tubing (about 8 feet
[2.4 m] coiled into 3 turns of about 10 in. [25 cm]
diameter) to allow the refrigerator to move out from
the wall after installation.
• Power drill.
• ½ in. or adjustable wrench.
• Flat-blade and Phillips-head screwdrivers.
• Two ¼ in. outer diameter compression nuts and
2 ferrules (sleeves) to connect the copper tubing to
the shutoff valve and the refrigerator water valve.
2
• Shutoff valve to connect to the cold water line.
The shutoff valve should have a water inlet with a
minimum inside diameter of 5/32 in. at the point of
connection to the COLD WATER LINE. Saddle-type
shutoff valves are included in many water supply
kits. Before purchasing, make sure a saddle-type
valve complies with your local plumbing codes.
NOTE
• A self-piercing saddle type water valve should not
be used.
Water Line Installation Instructions
WARNING
Electric Shock Hazard:
• When using any electrical device (such as a
power drill) during installation, be sure the device
is battery-powered, double-insulated or grounded
in a manner that will prevent the hazard of
electric shock.
Install the shutoff valve on the nearest frequently
used drinking water line.
Shut off the main water supply.
1
Turn on the nearest faucet to relieve the pressure
on the line.
• If your existing copper water line has a ared tting
at the end, purchase an adapter (available at
plumbing supply stores) to connect the water line
to the refrigerator OR cut off the ared tting with a
tube cutter and then use a compression tting.
Choose the valve location.
2
Choose a location for the valve that is easily
accessible. It is best to connect into the side of
a vertical water pipe. When it is necessary to
connect into a horizontal water pipe, make the
connection to the top or side, rather than at the
bottom, to avoid drawing off any sediment from
the water pipe.
Page 76

19INSTALLATION
ENGLISH
Drill the hole for the valve.
3
• Drill a ¼ in. hole in the water pipe using a sharp
bit. Remove any burrs resulting from drilling the
hole in the pipe. Be careful not to allow water
to drain into the drill. Failure to drill a ¼ in. hole
may result in reduced ice production or smaller
cubes.
NOTE
• The hookup line cannot be white, plastic tubing.
Licensed plumbers must use only copper tubing
(NDA tubing #49595 or #49599) or Cross Link
Polyethylene (PEX) tubing.
Fasten the shutoff valve.
4
Fasten the shutoff valve to the cold water pipe
with the pipe clamp.
Pipe Clamp
Route the tubing.
6
Route the tubing between the cold water line and
the refrigerator.
Route the tubing through a hole drilled in the wall
or oor (behind the refrigerator or adjacent base
cabinet) as close to the wall as possible.
NOTE
• Be sure there is sufcient extra tubing (about 8 ft.
coiled into three turns of about 10 in. diameter) to
allow the refrigerator to move out from the wall after
installation.
Connect the tubing to the valve.
7
Place the compression nut and ferrule (sleeve)
for copper tubing onto the end of the tubing and
connect it to the shutoff valve.
Make sure the tubing is fully inserted into the
valve. Tighten the compression nut securely.
Saddle-Type
Shutoff Valve
Compression
Nut
Saddle-Type
Shutoff Valve
Vertical Cold
Water Pipe
NOTE
• Commonwealth of Massachusetts Plumbing Codes
248CMR shall be adhered to. Saddle valves are
illegal and use is not permitted in Massachusetts.
Consult with your licensed plumber.
Tighten the pipe clamp.
5
Tighten the clamp screws until the sealing washer
begins to swell.
Inlet End
Pipe Clamp
Clamp Screw
Washer
NOTE
• Do not over tighten clamp or you may crush the
tubing.
Packing Nut
Outlet Valve
Flush out the tubing.
8
Ferrule
(sleeve)
Turn the main water supply on and ush out the
tubing until the water is clear. Shut the water off at
the water valve after about one quart of water has
been ushed through the tubing.
Page 77

20 INSTALLATION
Connect the tubing to the refrigerator.
9
NOTE
• Before making the connection to the refrigerator, be
sure that the refrigerator power cord is not plugged
into the wall outlet.
• Remove the plastic exible cap from the water
valve.
• Place the compression nut and ferrule (sleeve) onto
the end of the tubing as shown.
• Insert the end of the copper tubing into the
connection as far as possible. While holding the
tubing, tighten the tting.
Tubing
Clamp
¼ in. Compression Nut
Ferrule
(sleeve)
Turn the water on at the shutoff valve.
10
Tighten any connections that leak.
¼ in. Tubing
Refrigerator
Connection
Leveling and Door Alignment
Leveling
The refrigerator has two front leveling legs. Adjust the
legs to alter the tilt from front-to-back or side-to side.
If the refrigerator seems unsteady, or the doors do
not close easily, adjust the refrigerator’s tilt using the
instructions below:
Turn the leveling leg to the left to raise that side
1
of the refrigerator or to the right to lower it. It may
take several turns of the leveling leg to adjust the
tilt of the refrigerator.
NOTE
• A are nut wrench works best, but an open-end
wrench will sufce. Do not over-tighten.
Open both doors and check to make sure that
2
they close easily. If the doors do not close easily,
tilt the refrigerator slightly more to the rear by
turning both leveling legs to the left. It may take
several more turns, and be sure to turn both
leveling legs the same amount.
CAUTION
• Check to see if leaks occur at the water line
connections.
Page 78

21INSTALLATION
ENGLISH
Door Alignment
Both the left and right refrigerator doors have an
adjustable nut, located on the bottom hinge, to raise
and lower them to align properly.
If the space between the doors is uneven, follow the
instructions below to align the doors evenly:
Use the wrench (included with the owner's manual)
to turn the nut in the door hinge to adjust the height.
Turn the nut to the right to raise the door or to the left
to lower it.
CAUTION
• Do not overtighten the door adjustment screw.
The hinge pin can be pulled out and the
adjustable range of height is a maximum of 2 in.
(5 cm).
Turning on the Power
• After installing, plug the refrigerator’s power cord
into a 3-prong grounded outlet and push the
refrigerator into the nal position.
CAUTION
• Connect to a rated power outlet.
• Have a certied electrician check the wall outlet
and wiring for proper grounding.
• Do not damage or cut off the ground terminal of
the power plug.
Position the Rrigerator
• Arrange the coil of tubing so that it does not vibrate
against the back of the refrigerator or against the
wall. Push the refrigerator back to the wall.
Start the Icemaker
• If the water line is connected, set the icemaker
power switch to the ON position.
• The icemaker will not begin to operate until it
reaches its operating temperature of 15 °F (–9 °C)
or below. It will then begin operation automatically if
the icemaker power switch is in the ON (I) position.
Page 79

22 OPERATION
OPERATION
Before Use
Clean the refrigerator.
Clean the refrigerator thoroughly and wipe off all dust that accumulated during shipping.
• Do not scratch the refrigerator with a sharp object or use a detergent that contains
alcohol, a ammable liquid or an abrasive when removing any tape or adhesive from
the refrigerator. Remove adhesive residue by wiping it off with your thumb or dish
detergent.
• Do not peel off the model or serial number label or the technical information on the rear
surface of the refrigerator.
Open refrigerator doors and freezer drawers to ventilate the interior.
The inside of the refrigerator may smell like plastic at rst. Remove any adhesive tape
from inside the refrigerator and open the refrigerator doors and the freezer drawers for
ventilation.
CAUTION
Connect the power supply.
Check if the power supply is connected before use.
Turn off the icemaker
Turn off the icemaker if the refrigerator is not yet connected to the water supply.
NOTE
• The icemaker water valve may buzz if the icemaker is turned on while the refrigerator is
not connected to the water supply.
Wait for the refrigerator to cool.
Allow the refrigerator to run for at least two to three hours before putting food in it. Check the
ow of cold air in the freezer compartment to ensure proper cooling.
CAUTION
• Putting food in the refrigerator before it has cooled could cause the food to spoil, or a
bad odor to remain inside the refrigerator.
The refrigerator makes a loud noise after initial operation.
This is normal. The volume will decrease as the temperature decreases.
Page 80

ENGLISH
Control Panel
2
Depending on the model, some of the following functions may not be available.
23OPERATION
Control Panel Features
Ice Type
1
Press the Ice Type button to choose either cubed
or crushed ice. The Cubed or Crushed Ice icon
illuminates.
* Water Filter
Replace the water lter when the Replace Filter
icon turns on. After replacing the water lter, press
and hold the Water Filter button for three seconds
to turn the icon light off. Replace the water lter
approximately every six months.
Refrigerator Temperature
3
Indicates the set temperature of the refrigerator
compartment in Celsius (°C) or Fahrenheit (°F).
The default refrigerator temperature is 37 °F (3 °C).
1
2
3
4
Press the Refrigerator button repeatedly to select
a new set temperature from 33 °F to 46 °F (1 °C to
8 °C).
Freezer Temperature
4
Indicates the set temperature of the freezer
compartment in Celsius (°C) or Fahrenheit (°F).
The default freezer temperature is 0°F (-18 °C).
Press the Freezer button repeatedly to select a
new set temperature from -6 °F to 8 °F (-21 °C to
-13 °C).
5
6
7
8
9
NOTE
• To change the temperature mode from °F
to °C (or vice versa) press and hold the
Refrigerator and Freezer Temperature buttons
simultaneously for approximately ve seconds.
The temperature indicator on the display window
switches between Celsius and Fahrenheit.
• The displayed temperature is the target
temperature, and not the actual temperature
of the refrigerator. The actual refrigerator
temperature depends on the food inside the
refrigerator.
NOTE
• When the refrigerator is in the Power Saving Mode, the display remains off until a door is opened or a button is
pressed. Once on, the display remains on for 20 seconds.
Page 81

24 OPERATION
5
9
Smart Grid
Press the Smart Grid button to turn the Smart
Grid function On/Off. When the function is on,
the icon illuminates. The Smart Grid function
automatically turns on when the refrigerator is
connected to the Wi-Fi network.
When the refrigerator is responding to a Demand
Response (DR) message from the electric
company, the Grid text illuminates.
* Wi-Fi
6
The Wi-Fi button, when used with the LG
Smart Refrigerator smart phone app, allows the
refrigerator to connect to a home Wi-Fi network.
Refer to Smart Function for information on the
initial setup of the application.
The Wi-Fi icon shows the status of the
refrigerator's network connection. The icon
illuminates when the refrigerator is connected to
the Wi-Fi network.
Press and hold the Wi-Fi button for 3 seconds to
connect to the network. The icon blinks while the
connection is being made, then turns on once the
connection is successfully made.
Ice Plus
7
This function increases both ice making and
freezing capabilities.
• Press the Ice Plus button to illuminate the icon
and activate the function for 24 hours. The
function automatically shuts off after 24 hours.
• Stop the function manually by pressing the
button once more.
CAUTION
Display Mode (For Store Use Only)
• The Display Mode disables all cooling in the
refrigerator and freezer sections to conserve
energy while on display in a retail store. When
activated, OFF is displayed on the control panel
and the display remains on for 20 seconds.
To deactivate / activate:
• With either refrigerator door opened, press and
hold the Refrigerator and Ice Plus buttons at the
same time for ve seconds. The control panel
beeps and the temperature settings display to
conrm that Display Mode is deactivated. Use
the same procedure to activate Display Mode.
Airow
Cold air circulates from the freezer to the fresh food
section and back again through air vents in the
wall dividing the two sections. Be sure not to block
vents while storing food in the refrigerator. Doing so
will restrict airow and may cause the refrigerator
temperature to become too warm or cause interior
moisture buildup. (See airow diagram below.)
* Ice On/Off
8
Press the Ice On/Off button for three seconds to
turn the icemaker on/off.
* Lock
The Lock function disables every other button on
the display.
• When power is initially connected to the
refrigerator, the Lock function is off.
• To lock the control panel buttons, press and
hold the Lock button until the closed Lock
icon appears in the display and the function is
activated.
• To disable the Lock function, press and hold the
Lock button for approximately three seconds.
Page 82

25OPERATION
NOTE
• Because air circulates between both sections, any
odors formed in one section will transfer to the
other. You must thoroughly clean both sections to
eliminate odors.
• To prevent odor transfer and dried out food, wrap
or cover foods tightly. (See the Food Storage Guide
section for details.)
• If you close the refrigerator door, you may see the
freezer door open and close again due to pressure
Ice and Water Dispenser
CAUTION
• Keep children away from the dispenser. Children
may play with or damage the controls.
•
140 - 160 cubes) after installation. This is also
necessary if the refrigerator has not been used
for a long time.
• If ice or water dispenses unexpectedly, turn off
the water supply and contact an LG Electronics
Customer Information Center.
• Never use a glass that is exceptionally narrow
or deep. Ice may jam in the ice passage and
refrigerator performance may be affected.
Dispenser Structure
NOTE
• To dispense cold water, push on the water switch
with a glass.
• To dispense ice, push on the ice switch with a glass.
•
particles or odor from the water supply line or the
(about 140 - 160 cubes). This is also necessary ifthe
refrigerator has not been used for a long time.
• The dispenser will not operate when either of the
refrigerator doors is open.
•
and water supply. If the problem continues, contact
an LG Electronics Customer Information Center.
Do not use the water or ice until the problem is
corrected.
•
or other beverages. Splashing may occur if ice is
dispensed into a glass that already contains liquid.
• Some dripping may occur after dispensing. Hold the
cup beneath the dispenser for a few seconds after
dispensing to catch all of the drops.
• Keep containers at an appropriate distance from
the dispensers. Tall, narrow glasses should be
held far enough from the ice outlet to prevent ice
from jamming in the ice chute. A container with a
very small opening should be held as close to the
dispenser as possible to avoid spilling.
• Keep the glass at a proper distance from the ice
outlet. A glass held too close to the outlet may
prevent ice from dispensing.
ENGLISH
Using the Dispenser
Incorrect Correct
Water
Ice
Water Switch
Ice Switch
Tray
• Not dispensing ice continuously for more than 30 sec.
Locking the Dispenser
Press and hold the Lock button for three seconds to
lock the dispenser and all the control panel functions.
Follow the same instructions to unlock.
Page 83

26 OPERATION
Cleaning the Dispenser Drip Tray
Grip the drip tray with both hands and pull it out.
1
Wipe out dirty areas with a clean cloth.
2
Ice Compartment
CAUTION
• Keep hands and tools out of the ice compartment
door and dispenser chute. Failure to do so may
result in damage or personal injury.
CAUTION
• When handling the ice bin, keep hands away
from the icemaker tray area to avoid personal
injury.
• Storing cans or other items in the ice bin will
damage the icemaker.
• Never use thin crystal glasses or containers to
collect ice. Such containers may chip or break
resulting in glass fragments in the ice.
If the icemaker is turned OFF for an extended period
of time, the ice compartment will gradually warm up
to the temperature of the refrigerator compartment.
To prevent ice cubes from melting and leaking from
the dispenser, ALWAYS empty the ice bin when the
icemaker is turned OFF for more than a few hours.
The ice passage may become blocked with frost
if only crushed ice is used. Remove the frost that
accumulates by removing the ice bin and clearing the
passage with a rubber spatula. Dispensing cubed ice
can also help prevent frost buildup.
Detaching the In-Door Ice Bin
Lift the ice storage bin slightly (1).
1
Keep the ice compartment door closed tightly. If the
ice compartment door is not closed tightly, the cold
air in the ice bin will freeze food in the refrigerator
compartment. This could also cause the icemaker to
stop producing ice.
In-Door Ice Bin
The icemaker stops producing ice when the indoor
ice bin is full. To make room for additional ice,
empty the ice bin into the extra ice bin in the freezer
compartment. During use, the ice may stack unevenly
in the bin, causing the icemaker to misread the
number of ice cubes and stop producing ice. Shaking
the ice bin to level the ice within it can reduce this
problem.
pull it out as (2) shown in the gure.
2
( )
( )
NOTE
• Use both hands to remove the ice bin to avoid
dropping it.
Assembling the In-Door Ice Bin
Mount them in the reverse order of the removal
process.
Page 84

27OPERATION
ENGLISH
Automatic Icemaker
Auto shutoff (feeler arm)
NOTE
• Ice is made in the automatic icemaker and sent
to the dispenser. The icemaker produces 70 - 182
cubes in a 24-hour period, depending on freezer
compartment temperature, room temperature,
number of door openings and other operating
conditions.
• It takes about 12 to 24 hours for a newly installed
refrigerator to begin making ice.
• Ice-making stops when the in-door ice bin is full.
When full, the in-door ice bin holds approximately 6
to 8 (12-16 oz.) glasses of ice.
• Foreign substances or frost on the ice-detecting
sensor can interrupt ice production. Make sure
the sensor area is clean at all times for proper
operation.
• To increase ice production, use the Ice Plus
function. The function increases both ice making
and freezing capabilities.
WARNING
Turning the Automatic Icemaker On
To turn the automatic icemaker On/Off, press and
hold the Ice On/Off button on the control panel for
three seconds.
Normal Sounds You May Hear
• Keeping the power turned on to the icemaker
before the water line is connected can damage the
icemaker.
• The icemaker water valve buzzes as the icemaker
lls with water. If the Ice On/Off button is in the ON
mode, it will buzz even if it has not yet been hooked
up to water. To stop the buzzing, press the Ice On/
Off button to turn it off.
• You will hear the sound of cubes dropping into the
bin and water running in the pipes as the icemaker
rells.
Preparing for Vacation
Set the Ice On/Off button to OFF and shut off the
water supply to the refrigerator.
NOTE
• The ice bin should be emptied any time the Ice On/
Off button is turned to the OFF mode.
If the ambient temperature will drop below freezing,
have a qualied technician drain the water supply
system to prevent serious property amage due
to ooding caused by ruptured water lines or
connections.
Personal Injury Hazard
• DO NOT place ngers or hands on the automatic
ice making mechanism while the refrigerator is
plugged in.
CAUTION
Never store beverage cans or other items in
the ice bin for the purpose of rapid cooling.
Doing so may damage the icemaker or the
ontainers may burst.
• To avoid personal injury, keep hands out of the
ice door and passage.
Page 85

28 OPERATION
1
5
Storing Food
Where to Store Food
Each compartment inside the refrigerator is designed to store different types of food.
Store food in the optimal space to enjoy the freshest taste.
6
1
In-Door Ice Bin
If a large amount of ice is needed, transfer the
ice in the in-door ice bin to an ice storage bin in
the freezer.
Freezer Shelves
2
Store various frozen foods such as meat, sh,
and ice cream.
2
3
4
5
7
Fresh Zone
Store fruit and vegetables in the crisper drawers
to keep them fresh.
Door-in-Door Case
6
Convenient storage for frequently used items
such as beverages, butter, margarine,cream
cheese,peanut butter, and condiments.
Freezer Drawers
3
Wrap and store meat, sh, chicken, or other
items for long-term storage. Can also be used for
Refrigerator Door Bins
7
Store small refrigerated items such as beverages
and condiments.
supplemental ice storage.
Refrigerator Shelf
4
Store various fresh food items. Adjust the shelf
positions to suit individual storage needs. Store
food with higher water content at the front of the
shelves.
Page 86

ENGLISH
CAUTION
• Do not overll or pack items too tightly into door
bins. Doing so may cause damage to the bin
or personal injury if items are removed with
excessive force.
• Do not store glass containers in the freezer.
Contents may expand when frozen, break the
container and cause injury.
NOTE
• If you are leaving home for a short period, like a
short vacation, the refrigerator should be left on.
Refrigerated foods that are able to be frozen will
stay preserved longer if stored in the freezer.
• If you are leaving the refrigerator turned off for
an extended period, remove all food and unplug
the power cord. Clean the interior, and leave the
door open to prevent fungi from growing in the
refrigerator.
• Do not store food with high moisture content
towards the top of the refrigerator. The moisture
could come in direct contact with the cold air and
freeze.
• Wash food before storing it in the refrigerator.
Vegetables should be washed, and food packaging
should be wiped down to prevent adjacent foods
from being contaminated.
• If the refrigerator is kept in a hot and humid
place, frequent opening of the door or storing a
lot of vegetables in the refrigerator may cause
condensation to form. Wipe off the condensation
with a clean cloth or a paper towel.
• If the refrigerator door or freezer drawer is opened
or closed too often, warm air may penetrate the
refrigerator and raise its temperature. This can
increase the running costs of the unit.
Food Storage Tips
Wrap or store food in the refrigerator in airtight and
moisture-proof material unless otherwise noted. This
prevents food odor and taste transfer throughout the
refrigerator. For dated products, check date code to
ensure freshness.
Food How to
Keep opened butter in covered dish or
Butter or
Margarine
Cheese
Milk
Eggs
Fruit
Leafy
Vegetables
Vegetables
with skins
(carrots,
peppers)
Fish
Leftovers
closed compartment. When storing an
extra supply, wrap in freezer packaging
and freeze.
Store in original wrapping until used.
Once opened, rewrap tightly in plastic
wrap or aluminum foil.
Wipe milk cartons. For coldest milk,
place containers on an interior shelf.
Store in original carton on interior shelf,
not on door shelf.
Do not wash or hull fruit until it is ready
to be used. Sort and keep fruit in
original container in a crisper, or store
in completely closed paper bag on
refrigerator shelf.
Remove store wrapping, trim or tear off
bruised and discolored areas, wash in
cold water, and drain. Place in plastic
bag or plastic container and store in
crisper.
Place in plastic bags or plastic container
and store in crisper.
Freeze fresh sh and shellsh if they
are not being eaten the same day
purchased. Eating fresh sh and
shellsh the same day purchased is
recommended.
Cover leftovers with plastic wrap
or aluminum foil, or store in plastic
containers with tight lids.
29OPERATION
Page 87

30 OPERATION
Storing Frozen Food
Check a freezer guide or a reliable cookbook for
further information about preparing food for freezing
or food storage times.
Freezing
Your freezer will not quick-freeze a large quantity of
food. Do not put more unfrozen food into the freezer
than will freeze within 24 hours (no more than 2 to
3 pounds of food per cubic foot of freezer space).
Leave enough space in the freezer for air to circulate
around packages. Be careful to leave enough room
at the front so the door can close tightly.
Storage times will vary according to the quality and
type of food, the type of packaging or wrap used
(how airtight and moisture-proof) and the storage
temperature. Ice crystals inside a sealed package are
normal. This simply means that moisture in the food
and air inside the package have condensed, creating
ice crystals.
NOTE
• Allow hot foods to cool at room temperature for 30
minutes, and then package and freeze. Cooling hot
foods before freezing saves energy.
Packaging
Successful freezing depends on correct packaging.
When you close and seal the package, it must not
allow air or moisture in or out. If it does, you could
have food odor and taste transfer throughout the
refrigerator and could also dry out frozen food.
Packaging recommendations
• Rigid plastic containers with tight-tting lids
• Straight-sided canning/freezing jars
• Heavy-duty aluminum foil
• Plastic-coated paper
• Non-permeable plastic wraps
• Specied freezer-grade self-sealing plastic bags
Follow package or container instructions for proper
freezing methods.
Detaching/Assembling the
Storage Bins
Fresh Zone Drawer
The Fresh Zone drawers provide storage for fruit and
vegetables.
• When removing or installing the lower Fresh Zone
drawer, lift the cover to help remove or insert the
drawer.
To remove the Fresh Zone drawers, pull out the
1
drawer to full extension (1), lift the front up (2),
and pull straight out.
To install, slightly tilt up the front, insert the drawer
2
into the frame and push it back into place.
CAUTION
• Use both hands to assemble and disassemble
the Fresh Zone. The compartment is heavy when
lled with food and may cause injury if dropped.
• Open the refrigerator door fully when
disassembling or reassembling the Fresh Zone.
• You will see the water tank while removing the
Fresh Zone drawer. Do not remove the water
tank or water leakage may occur. The water tank
is not a removable part.
Tank
Do not use
• Bread wrappers
• Non-polyethylene plastic containers
• Containers without tight lids
• Wax paper or wax-coated freezer wrap
• Thin, semi-permeable wrap
Page 88

31OPERATION
ENGLISH
Removing the Fresh Zone Cover
Hold the cover with both hands and pull it out.
NOTE
• Remove the Fresh Zone drawers before removing
the Fresh Zone cover.
Door Bins
The door bins are removable for easy cleaning and
adjustment.
Some bins may vary in appearance and will only t in
one location.
To remove the bin, simply lift the bin up and pull
1
straight out.
To replace the bin, slide it in above the desired
2
support and push down until it snaps into place.
InstaView Function
The InstaView function on the Door-in-Door lets you
see if you’re running low on frequently used items
like beverages and snacks, without opening the
refrigerator door.
Knock twice on the glass to turn the LED light
1
inside the Door-in-Door on or off.
The LED light turns off automatically after 10
2
seconds.
• The InstaView Door-in-Door function is disabled
when the right refrigerator door and the left freezer
door are open, for 2 seconds after closing the door,
and when the ice dispenser is in use.
• Knock near the center of the glass. Knocking
near the edges of the glass may not activate the
InstaView Door-in-Door function properly.
• Knock hard enough that the knocking sound is
audible.
• The InstaView Door-in-Door function may activate if
a loud noise occurs near the refrigerator.
CAUTION
• Regularly detach and wash the storage bins and
shelves; they can become easily contaminated
by food.
• Do not apply excessive force while detaching or
assembling the storage bins.
• Do not use the dishwasher to clean the storage
bins and shelves.
Door-in-Door
The Door-in-Door compartment allows for easy
access to commonly used food items.
To access the Door-in-Door compartment, lightly
press the button on the refrigerator door handle until
you hear a click and the door opens.
Page 89

32 OPERATION
Door-in-Door Case
To open the Door-in-Door case, pull evenly on the
marked area. The Door-in-Door Case is removable
for easy cleaning and adjustment.
CAUTION
• Remove contents from Door-in-Door case before
disassembly.
To remove the Door-in-Door case, lift up and pull
1
out.
To replace the Door-in-Door case, line up the tabs
2
on the Door-In-Door case with the slots on the
door and push down until it snaps into place.
Detaching the Shelf
Remove all items from the shelf. Lift the back of
1
the shelf slightly to disengage the rail stops.
Holding the shelf with both hands, tilt the shelf
2
and pull it out.
Assembling the Shelf
Tilt the front of the shelf up and guide the shelf
1
into the slots at a desired height, keeping shelf
holder down.(1)
Slide the shelf in, then lower the front of the shelf.
2
(2)
Adjusting the Refrigerator
Shelves
The shelves in the refrigerator are adjustable to meet
individual storage needs. Your model may have full or
split shelves.
Adjusting the shelves to t items of different heights
will make nding the exact item you want easier.
CAUTION
• Make sure that shelves are level from one side
to the other. Failure to do so may result in the
shelf falling or spilled food.
• Do not clean glass shelves with warm water
while they are cold. Shelves may break if
exposed to sudden temperature changes or
impact.
• Glass shelves are heavy. Use special care when
removing them.
Page 90

33SMART FUNCTIONS
ENGLISH
SMART FUNCTIONS
Smart ThinQ Application
The Smart ThinQ application allows you to
communicate with the appliance using a smartphone.
Installing Smart ThinQ Application
Search for the LG Smart ThinQ application from the
Google Play Store or Apple App Store on a smart
phone. Follow instructions to download and install the
application.
Smart ThinQ Application Features
• For appliances with the or logo
Manage Food
This feature helps track items in the refrigerator and
freezer, sends alerts when items are near their use
by dates, generates grocery lists, and links to related
recipes.
Energy Monitoring
This feature keeps track of the refrigerator’s power
consumption and the number of door openings.
Remote Control
Control the Refrigerator Temperature, Fresh Air Filter
and Ice Plus from the smart phone app.
Push Messages
If the door remains open for more than ten minutes,
you will receive a push message. When Ice Plus is
nished, you will receive a push message.
NOTE
• To verify the Wi-Fi connection, check that the Wi-Fi
icon on the control panel is lit.
• LG Smart ThinQ is not responsible for any network
connection problems or any faults, malfunctions, or
errors caused by network connection.
• The machine supports 2.4 GHz Wi-Fi networks only.
• If the appliance is having trouble connecting to the
Wi-Fi network, it may be too far from the router.
Purchase a Wi-Fi repeater (range extender) to
improve the Wi-Fi signal strength.
• The Wi-Fi connection may not connect or may
be interrupted because of the home network
environment.
• The network connection may not work properly
depending on the internet service provider.
• The surrounding wireless environment can make
the wireless network service run slowly.
• This information is current at the time of publication.
The application is subject to change for product
improvement purposes without notice to users.
Wireless LAN Module Specications
Model LCW-004
Frequency
Range
Output
Power(Max)
2412 to 2462 MHz
IEEE 802.11b: 22.44 dBm
IEEE 802.11g: 24.68 dBm
IEEE 802.11n: 24.11 dBm
Settings
Allows you to set various options on the refrigerator
and in the application.
Page 91

34 SMART FUNCTIONS
FCC Notice
• For transmitter module contained in this product
This equipment has been tested and found to comply
with the limits for a Class B digital device, pursuant
to Part 15 of the FCC Rules. These limits are
designed to provide reasonable protection against
harmful interference in a residential installation. This
equipment generates, uses, and can radiate radio
frequency energy and, if not installed and used in
accordance with the instructions, may cause harmful
interference to radio communications. However, there
is no guarantee that interference will not occur in a
particular installation. If this equipment does cause
harmful interference to radio or television reception,
which can be determined by turning the equipment
off and on, the user is encouraged to try to correct
the interference by one or more of the following
measures:
• Reorient or relocate the receiving antenna.
• Increase the separation between the equipment and
the receiver.
• Connect the equipment to an outlet on a circuit
different from that to which the receiver is
connected.
• Consult the dealer or an experienced radio/TV
technician for help.
This device complies with part 15 of the FCC Rules.
Operation is subject to the following two conditions:
1) This device may not cause harmful interference
and
2) This device must accept any interference received,
including interference that may cause undesired
operation of the device.
Any changes or modications in construction of this
device which are not expressly approved by the party
responsible for compliance could void the user’s
authority to operate the equipment.
FCC RF Radiation Exposure Statement
This equipment complies with FCC radiation
exposure limits set forth for an uncontrolled
environment. This transmitter must not be co-located
or operating in conjunction with any other antenna or
transmitter.
This equipment should be installed and operated with
a minimum distance of 20 cm (7.8 inches) between
the antenna and your body. Users must follow the
specic operating instructions for satisfying RF
exposure compliance.
Industry Canada Statement (For transmitter
module contained in this product)
This device complies with Industry Canada’s
applicable licence-exempt RSSs. Operation is subject
to the following two conditions:
1) This device may not cause interference; and
2) This device must accept any interference,
including interference that may cause undesired
operation of the device.
IC Radiation Exposure Statement
This equipment complies with IC radiation exposure
limits set forth for an uncontrolled environment.
This equipment should be installed and operated with
a minimum distance of 20 cm (7.8 inches) between
the antenna and your body.
NOTE
• THE MANUFACTURER IS NOT RESPONSIBLE
FOR ANY RADIO OR TV INTERFERENCE
CAUSED BY UNAUTHORIZED MODIFICATIONS
TO THIS EQUIPMENT. SUCH MODIFICATIONS
COULD VOID THE USER’S AUTHORITY TO
OPERATE THE EQUIPMENT.
Open Source Software Notice Information
To obtain the source code under GPL, LGPL, MPL,
and other open source licenses, that is contained in
this product, please visit http://opensource.lge.com.
In addition to the source code, all referred license
terms, warranty disclaimers and copyright notices are
available for download.
LG Electronics will also provide open source code
to you on CD-ROM for a charge covering the cost
of performing such distribution (such as the cost of
media, shipping, and handling) upon email request
to opensource@lge.com. This offer is valid for three
(3) years from the date on which you purchased the
product.
Page 92

35SMART FUNCTIONS
ENGLISH
Smart Grid Function
When the refrigerator operates in Smart Grid mode,
the Smart Refrigerator function can control energy
usage or delay the operation of some functions to
save energy during peak usage periods.
• You can override the Smart Grid function any time
(using the Smart Grid button or application).
• To use the Smart Grid function, you need to register
your appliance with your electric utility company.
Smart Grid Application Features
Smart Saving_Demand Response
You can lower energy usage based on Demand
Response (DR) signals from the utility company. If
the refrigerator is operating in Smart Saving mode
according to the DR signal, you can see a pop up.
Seasonal Energy Savings
Lower energy usage based on time period.
Using the Smart Grid Function
This feature responds to notication events from your
utility company to run high energy consuming tasks
during off-peak periods when demand is lower. These
notication events are known as Demand Response
signals.
If the refrigerator receives a Demand Response
signal from the utility company, the refrigerator will
turn on the Grid LED on the refrigerator display and
control its power consumption according to the signal.
The refrigerator will respond to the signals received
from the utility company as long as product
performance is maintained.
If the refrigerator receives a Demand Response
signal, the refrigerator will operate in Delay Appliance
Load (DAL) or Temporary Appliance Load Reduction
(TALR) mode.
Delay Appliance Load (DAL)
The refrigerator responds to a DAL signal by
providing a moderate load reduction for the duration
of the delay period.
This mode controls functions that consume a lot of
energy such as adjusting the cooling system, running
the defrost cycle, and making ice.
• When the refrigerator operates in DAL mode, the
Grid LED is illuminated on the refrigerator display.
• DAL mode is automatically deactivated after the
period stipulated by the DAL signal (max. 4 hours)
or when you override the Smart Grid function.
Temporary Appliance Load Reduction
(TALR)
The refrigerator responds to a TALR signal by
aggressively reducing the load for a short time
period, typically 10 minutes. This mode reduces
energy consumption by stopping the compressor and
controlling the functions that consume a lot of energy
such as the defrost cycle and fan.
• When the refrigerator operates in TALR mode, the
Grid LED is illuminated on the refrigerator display.
• TALR mode is automatically deactivated after the
received duration (max. 10 minutes), or when you
override the Smart Grid function. The mode is
immediately deactivated and the refrigerator returns
to its normal state when the door is opened or
closed, or the dispenser is used.
Override Smart Grid Mode
To ignore the Demand Response signal from the
utility company and override the Smart Grid function,
push the Smart Grid button while the refrigerator is
in Smart Grid mode.
When you override the Smart Grid function, the
refrigerator ignores the Demand Response signal
and is no longer controlled by the utility company until
the next Demand Response signal is sent. You can
also override the Smart Grid function using the smart
phone app.
LG Open API
You can manage Smart Grid features for the LG
Smart Refrigerator.
Please check the detailed specications on the notice
page on us.smartthinq.com.
API list
Demand Response
• Send demand response signal
Power Saving
• Set saving mode
• Get schedule of DR/Delay Defrost
Energy Monitoring
• Get door open event
• Get energy consumption
Delay Defrost Capability
• Insert a delay defrost schedule event
• Update a delay defrost schedule event
• Delete a delay defrost schedule event
• Get the delay defrost schedule
Page 93

36 SMART FUNCTIONS
NOTE
• Smart Diagnosis™ cannot be activated unless
the appliance can be turned on using the Power
button. If the appliance cannot be turned on,
troubleshooting must be done without using Smart
Diagnosis™.
Smart Diagnosis™ Function
Should you experience any problems with the
appliance, it has the capability of transmitting data
via your telephone to the LG Customer Information
Center. NFC or Wi-Fi equipped models can also
transmit data to a smartphone using the LG Smart
ThinQ application.
Smart Diagnosis™ through the
Customer Information Center
• For appliances with the or logo
This gives you the capability of speaking directly to
our trained specialists. The specialist records the
data transmitted from the appliance and uses it to
analyze the issue, providing a fast and effective
diagnosis.
Hold the mouthpiece of your phone in front of the
4
speaker that is located on the right hinge of the
refrigerator door, when instructed to do so by the
call center.
Press and hold the Freezer button for three
5
seconds while continuing to hold your phone to
the speaker.
After you hear three beeps, release the Freezer
6
button.
Call the LG Electronics Customer Information
1
Center at:
(LG U.S.A.) 1-800-243-0000
(LG Canada) 1-888-542-2623
Hold the Lock button for three seconds.
2
• If the display has been locked for over ve
minutes, you must deactivate the lock and then
reactivate it.
Open the right refrigerator door.
3
Keep the phone in place until the tone
7
transmission has nished. The display will
count down the time. Once the countdown is
over and the tones have stopped, resume your
conversation with the specialist, who will then
be able to assist you in using the information
transmitted for analysis.
NOTE
• For best results, do not move the phone while the
tones are being transmitted.
• If the call center agent is not able to get an accurate
recording of the data, you may be asked to try
again.
• The Smart Diagnosis™ function depends on the
local call quality.
• Bad call quality may result in poor data transmission
from your phone to the call center, which could
cause Smart Diagnosis™ to malfunction.
Smart ThinQ Smart Diagnosis™
• For appliances with the or logo
Use the Smart Diagnosis feature in the Smart ThinQ
application for help diagnosing issues with the
appliance without the assistance of the LG Customer
Information Center.
Follow the instructions in the Smart ThinQ application
to perform a Smart Diagnosis using your smartphone.
Page 94

37MAINTENANCE
ENGLISH
MAINTENANCE
Cleaning
WARNING
• Use non-ammable cleaner. Failure to do so can
result in re, explosion, or death.
CAUTION
• Do not use an abrasive cloth or sponge
when cleaning the interior and exterior of the
refrigerator.
• Do not place your hand on the bottom surface
of the refrigerator when opening and closing the
doors.
• When lifting the hinge free of the latch, be careful
that the door does not fall forward.
General Cleaning Tips
• Both the refrigerator and freezer sections defrost
automatically; however, clean both sections once a
month to prevent odors.
• Wipe up spills immediately.
• Unplug the refrigerator or disconnect power before
cleaning.
• Remove all removable parts, such as shelves.
• Use a clean sponge or soft cloth and a mild
detergent in warm water. Do not use abrasive or
harsh cleaners.
• Hand wash, rinse and dry all surfaces thoroughly.
For products with a standard stainless steel exterior,
use a damp microber cloth and rub in the direction
of the grain. Dry with a paper towel to avoid streaks.
For stubborn stains and ngerprints, use a few drops
of liquid dish soap in water, and rinse with hot water
before drying. Do not use abrasive or harsh cleaners.
Inside Walls
• Allow freezer to warm up so the cloth will not stick.
To help remove odors, wash the inside of the
refrigerator with a mixture of baking soda and warm
water. Mix 2 tablespoons of baking soda to 1 quart of
water (26 g soda to 1 liter water.) Be sure the baking
soda is completely dissolved so it does not scratch
the surfaces of the refrigerator.
Door Liners and Gaskets
Use a clean sponge or soft cloth and a mild
detergent in warm water. Do not use cleaning waxes,
concentrated etergents, bleaches, or cleaners
containing petroleum on plastic refrigerator parts.
Plastic Parts (covers and panels)
Use a clean sponge or soft cloth and a mild detergent
in warm water. Do not use glass cleaners, abrasive
cleansers, or ammable uids. These can scratch or
damage the material.
Condenser Coils
Use a vacuum cleaner with a brush or crevice
attachment to clean the condenser cover and vents.
Do not remove the panel covering the condenser coil
area.
Exterior
Waxing external painted metal surfaces helps provide
rust protection. Do not wax plastic parts. Wax painted
metal surfaces at least twice a year using appliance
wax (or auto paste wax). Apply wax with a clean, soft
cloth.
For products with black stainless steel exterior, spray
glass cleaner on a clean, microber cloth and rub in
direction of grain. Do not spray glass cleaner directly
at the display panel. Do not use harsh or abrasive
cleaners.
Page 95

38 MAINTENANCE
Replacing the Water Filter
Replace the Water Filter :
• Approximately every six months.
• When the Replace Filter
• When the water dispenser output decreases.
Before Replacing the Water Filter:
If the top shelf, located below the water lter, is in the
highest position, it will need to be removed prior to
replacing the water lter.
To remove any shelf : Tilt up the front of the shelf (1)
and lift (2). Pull the shelf out.
icon turns on.
Make sure to rotate the lter down completely
2
before pulling it out of the lter head.
Pull the water lter downward and turn to
counterclockwise.
Replace with a new water lter.
3
Take the new water lter out of its packing and
remove the protective cover from the o-rings.
With the water lter tabs in the horizontal position,
push the new water lter into the lter head and
turn to clockwise.
Remove the old water lter.
1
Lower or remove the top left shelf to allow the
water lter to rotate all the way down.
Pinch the sides to open the water lter cover.
NOTE
• Replacing the water lter causes a small amount of
water (around 1 oz. or 25 cc) to drain.
• Wrap a cloth around the front end of the water lter
cover to collect any leaking water. Hold the water
lter upright, once it is removed, to prevent any
remaining water from spilling out of the water lter.
Rotate the water lter up into position and close
4
the cover. The cover will click when closed
correctly.
After the water lter is replaced, dispense 2.5
5
gallons of water (ush for approximately 5
minutes) to remove trapped air and contaminants
from the system.
NOTE
• Do not dispense the entire 2.5 gallon amount
continuously. Press and release the dispenser pad
for cycles of 30 seconds ON and 60 seconds OFF.
Page 96

ENGLISH
After changing the lter, press and hold the
6
Water Filter button for three seconds to reset the
indicator light.
NOTE
To purchase a replacement water lter:
• Visit your local dealer or distributor
• Search using "water lter" on lg.com
• Use replacement cartridge:
ADQ74793501(LT1000P)
For further assistance, call:
1-800-243-0000 (USA)
1-888-542-2623 (Canada)
39MAINTENANCE
Page 97

40 MAINTENANCE
Performance Data Sheet
Model: LT1000P Use Replacement Cartridge: MDJ64844601(LT1000P)
The concentration of the indicated substances in water entering the system was reduced to a concentration
less than or equal to the permissible limit for water leaving the system as specied in NSF/ANSI Standard 42,
Standard 53 and Standard 401.
System tested and certied by NSF International against NSF/ANSI Standard 42,
Standard 53 and Standard 401 for the reduction of substances listed below.
substance
Reduction
Chlorine Taste
and Odor
Nominal
Particulate Class
I, , ≥ 0.5 to < 1.0
μm
Asbestos 180 MFL
Atrazine 8.5 µg/L 9.0 µg/L ± 10% >94.10% 0.500 µg/L 3.0 µg/L NA
Benzene 15.0 µg/L
Carbofuran 74.0 µg/L
Lindane 1.9 µg/L
P-Dichlorobenzene
2,4-D 210.0 µg/L 210.0 µg/
Lead pH @6.5 140.0 µg/L 150.0 µg/
Lead pH @8.5 150.0 µg/L 150.0 µg/
Mercury @ pH
6.5
Mercury @ pH
8.5
Cyst*
Average
Inuent
Challenge
2.0 µg/L
12,000,000
pts/mL
230.0 µg/L 225.0 µg/L ± 10% >99.80% 0.460 µg/L 75.0 µg/L NA
5.9 µg/L 6.0 µg/
5.6 µg/L 6.0 µg/
100,000
cysts/L
NSF specied
Challenge
Concentration
2.0 µg/L ± 10%
At least 10,000
particles/mL
7
10
to 108 MFL;
bers greater
than 10 µg/L in
length
15.0 µg/L ± 10%
80.0 µg/L ± 10%
2.0 µg/L ± 10%
L ± 10%
L ± 10%
L ± 10%
L ± 10%
L ± 10%
Minimum 50,000
cysts/L
Avg %
Reduction
>97.5% 0.050 µg/L N/A ≥ 50.00%
99.80% 24,000 pts/ml N/A ≥ 85.00%
>99.00% < 1 MFL N/A ≥ 99.00%
>96.60% 0.510 µg/L 5.0 µg/L NA
98.30% 1.258 µg/L 40 µg/L NA
>99.00% 0.019 µg/L 0.2 µg/L NA
>99.90% 0.210 µg/L 70.0 µg/L NA
99.60% 0.560 µg/L 10.0 µg/L NA
>99.70% <0.500 µg/L 10.0 µg/L NA
91.00% 0.531 µg/L 2.0 µg/L NA
92.50% 0.420 µg/L 2.0 µg/L NA
>99.99% 10 cysts/L N/A ≥ 99.95%
Average
Product Water
Concentration
Max
Permissible
Product Water
Concentration
Requirements
NSF
Reduction
Page 98

41MAINTENANCE
ENGLISH
substance
Reduction
Atenolol 240 ng/L 200 ± 40% ng/L > 95.50% 10.80 ng/L 30 ng/L NA
Carbamazepine 1600 ng/L 1400 ± 40% ng/L 98.40% 25.60 ng/L 200 ng/L NA
DEET 1600 ng/L 1400 ± 40% ng/L 97.10% 46.40 ng/L 200 ng/L NA
Trimethoprim 170 ng/L 140 ± 40% ng/L >96.80% 5.44 ng/L 20 ng/L NA
Linuron 160 ng/L 140 ± 40% ng/L >96.60% 5.44 ng/L 20 ng/L NA
Phenytoin 200 ng/L 200 ± 40% ng/L >94.80% 10.40 ng/L 30 ng/L NA
Ibuprofen 400 ng/L 400 ± 40% ng/L >94.50% 22.00 ng/L 60 ng/L NA
Naproxen 140 ng/L 140 ± 40% ng/L >96.10% 5.46 ng/L 20 ng/L NA
Estrone 120 ng/L 140 ± 40% ng/L >96.10% 4.68 ng/L 20 ng/L NA
Bisphenol A 2000 ng/L 2000 ± 40% ng/L >98.90% 22.00 ng/L 300 ng/L NA
Nonyl Phenol 1600 ng/L 1400 ± 40% ng/L >97.10% 46.40 ng/L 200 ng/L NA
Average
Inuent
Challenge
NSF specied
Challenge
Concentration
Avg %
Reduction
Average
Product Water
Concentration
Max
Permissible
Product Water
Concentration
Requirements
• Based on the use of Cryptosporidium parvum oocysts.
NSF
Reduction
Page 99

42 MAINTENANCE
Application Guidelines/Water Supply
Service Flow 0.5 gpm (1.9 lpm)
Water Supply
Water Pressure 20 – 120 psi (138 – 827 kPa)
Water Temperature
Capacity 200 gallons (757 liters)
It is essential that the manufacturer’s recommended
installation, maintenance and lter replacement
requirements be carried out for the product to perform
as advertised.
NOTE
• While the testing was performed under standard
laboratory conditions, actual performance may vary.
Replacement Cartridge: ADQ74793501(LT1000P)
NSF System Trade Name Code: MDJ64844601
For replacement lters, visit your local dealer or
distributor or search under "water lters" on the
lg.com website.
For further assistance, the LG Electronics Customer
Information Center is open 24 hours a day/7 days a
week.
USA: 1-800-243-0000
Canada: 1-888-542-2623
LG is a trademark of LG corp.
NSF is a trademark of NSF International.
Manufactured for LG
LG Electronics, INC
170, Sungsanpaechoungro, Seongsan-gu,
Gyeongsangnam-do, THE REPUBLIC OF KOERA
Parameters
Community or Private Well -
Potable Water
33 °F – 100 °F (0.6 °C – 37.8
®
Electronics by:
°C)
CAUTION
To reduce the risk associated with property
damage due to water leakage:
• Read and follow Use Instructions before
installation and use of this system.
• Installation and use MUST comply with all state
and local plumbing codes.
• Do not install if water pressure exceeds 120 psi
(827 kPa). If your water pressure exceeds 80
psi, you must install a pressure limiting valve.
Contact a plumbing uncertain how to check your
water pressure.
• Do not install where water hammer conditions
may occur. If water hammer conditions exist you
must install a water hammer arrester. Contact a
plumbing professional if you are uncertain how to
check for this condition.
• Do not install on hot water supply lines. The
maximum operating water temperature of this
lter system is 100 °F (37.8 °C).
• Protect lter from freezing. Drain lter when
temperatures drop below 40 °F (4.4 °C).
• The disposable lter cartridge MUST be replaced
every 6 months, at the rated capacity or if a
noticeable reduction in ow rate occurs.
• Protect from freezing, remove lter cartridge
when temperatures are expected to drop below
33° F.
• Do not install systems in areas where ambient
temperatures may go above 110° F (43.3° C).
• Where a backow prevention device is installed
on a water system, a device for controlling
pressure due to thermal expansion must be
installed.
• Ensure all tubing and ttings are secure and free
of leaks.
WARNING
To reduce the risk associated with choking:
• Do not allow children under 3 years of age to
have access to small parts during the installation
of this product.
To reduce the risk associated with the
ingestion of contaminants:
• Do not use with water that is microbiologically
unsafe or of unknown quality without adequate
disinfection before or after the system. Systems
certied for cyst reduction may be used on
disinfected water that may contain lterable
cysts. EPA Establishment # 070595-MEX-001
Page 100

ENGLISH
TROUBLESHOOTING
FAQs: Frequently Asked Questions
Q: What are the best temperature settings for my refrigerator and freezer?
43TROUBLESHOOTING
A: The default setting for the refrigerator is 37° Fahrenheit (3° Celsius). The default setting for the
Q: How do I set the refrigerator and freezer temperatures?
A: Continually press the Refrigerator or Freezer button on the control panel until the desired
Q: Why do I hear a buzzing noise from my refrigerator periodically?
A: This may happen if you do not have a water source attached to your refrigerator and the icemaker is
Q: Why does the icemaker tray look crooked?
A: This is a normal part of the icemaker cycle. The icemaker tray may appear level or with a slight tilt.
Q:
freezer is 0° Fahrenheit (-18° Celsius). Adjust these settings as necessary to keep food at desired
temperatures. Milk should be cold when stored on the inner shelf of the refrigerator. Ice cream should
be rm and ice cubes should not melt in the freezer. To switch the display from Fahrenheit to Celsius,
press and hold the Freezer and Refrigerator buttons until you hear a beep and the settings in the
display change.
temperature appears. The numbers will cycle from highest to lowest and then return to the highest
again with continuous pressing.
turned on. If you do not have a water source attached to the back of the refrigerator you should turn
the icemaker off.
The change in position is to assist in the freezing process.
My refrigerator is powered on and the controls are working, but it’s not cooling and the display
shows “OFF” (see below). What is wrong?
A: The refrigerator is in Demo Mode. This mode disables cooling to save energy while the appliance
is on display in a store. To restore normal operation, press and hold the Refrigerator and Ice Plus
buttons for 5 seconds or until you hear a beep and the temperature settings appear on the display.
Use the same procedure to return the refrigerator to Demo Mode, if desired.
 Loading...