

Page 1
OWNER'S MANUAL
FRENCH DOOR
REFRIGERATOR
Read this owner's manual thoroughly before operating the
appliance and keep it handy for reference at all times.
ENGLISH / ESPAÑOL / FRANÇAIS
LMWS27626*
MFL70761724
Rev.00_110719
www.lg.com
Copyright © 2019 LG Electronics Inc. All Rights Reserved.
Page 2

TABLE OF CONTENTS
2
3 SAFETY INSTRUCTIONS
3 READ ALL INSTRUCTIONS BEFORE USE
3 WARNING
6 CAUTION
7 PRODUCT OVERVIEW
7 Product Features
10 INSTALLATION
10 Before Installing
11 Choosing the Proper Location
13 Removing/Assembling the Handles
14 Removing/Assembling the Doors and Drawer
18 Connecting the Water Line
22 Leveling and Door Alignment
22 Turning on the Power
23 OPERATION
23 Before Use
24 Control Panel
25 Sabbath Mode
25 Water Dispenser
25 Automatic Icemaker
26 Storing Food
28 Humidity Controlled Crispers
29 Glide‘N’Serve
29 Refrigerator Shelves
30 Door Bins
30 Durabase
46 LIMITED WARRANTY
46 For USA
49 For Canada
31 SMART FUNCTIONS
31 LG ThinQ Application
31 Smart Diagnosis™ Feature
32 MAINTENANCE
32 Cleaning
33 Water Filter
36 TROUBLESHOOTING
36 FAQs
37 Before Calling for Service
Page 3
SAFETY INSTRUCTIONS
3SAFETY INSTRUCTIONS
READ ALL INSTRUCTIONS BEFORE USE
Safety Messages
Your safety and the safety of others are very important.
We have provided many important safety messages in this manual and on your appliance. Always read and
follow all safety messages.
This is the safety alert symbol.
This symbol alerts you to potential hazards that can kill or injure you and others. All safety messages
will follow the safety alert symbol and either the word WARNING or CAUTION.
These words mean:
WARNING
You may be killed or seriously injured if you do not follow instructions.
CAUTION
You may be injured or cause damage to the product if you do not follow instructions.
All safety messages will tell you what the potential hazard is, tell you how to reduce the chance of injury,
and tell you what may happen if the instructions are not followed.
WARNING
WARNING
• To reduce the risk of explosion, fire, death, electric shock, scalding or injury to persons when using this
product, follow basic precautions, including the following:
ENGLISH
Installation
• To reduce the risk of injury to persons, adhere to all industry recommended safety procedures including
the use of long-sleeved gloves and safety glasses.
• Never attempt to operate this appliance if it is damaged, malfunctioning, partially disassembled, or has
missing or broken parts, including a damaged cord or plug.
• Only connect this product to a dedicated grounded electrical outlet rated for use with this product (115
V, 60 Hz, AC only). It is the user’s responsibility to replace a standard 2-prong wall outlet with a standard
3-prong wall outlet.
• Do not use an outlet that can be turned off with a switch. Do not use an extension cord.
• The appliance must be positioned for easy access to a power source.
• When moving the refrigerator, be careful not to roll over or damage the power cord.
• Contact an authorized service center when installing or relocating the refrigerator.
• Do not, under any circumstances, cut or remove the third (ground) prong from the power cord.
• Keep packing materials out of the reach of children. Packaging material can be dangerous for children.
There is a risk of suffocation.
• Do not install the refrigerator in a damp or dusty place where insulation on electrical parts may
deteriorate.
• Do not place the refrigerator in direct sunlight or expose it to the heat from heating appliances such as
stoves or heaters.
Page 4

4 SAFETY INSTRUCTIONS
• Do not bend or pinch the power cord excessively or place heavy objects on it.
Operation
• This appliance is intended to be used in household and similar applications such as :
- staff kitchen areas in shops, offices and other working environments;
- farm houses and by clients in hotels, motels and other residential type environments;
- bed and breakfast type environments;
- catering and similar non-retail applications.
• This product is not to be used for special purposes such as the storage of medicine or test materials or
for use on ships, etc.
• DO NOT allow children to climb, stand, or hang on the refrigerator doors or on the shelves in the
refrigerator. They could damage the refrigerator and seriously injure themselves.
• Do not allow children to climb into the refrigerator. They could be trapped and suffocated.
• Children should be supervised to ensure that they do not play with the refrigerator.
• Keep fingers out of pinch point areas; clearances between the doors and cabinets are necessarily small.
Be careful closing doors when children are nearby.
• Do not touch frozen food or the metal parts in the freezer compartment with wet or damp hands. Doing
so may cause frostbite.
• Do not refreeze frozen food that has thawed completely. Doing so may result in a serious health hazard.
• Do not use an adapter plug or plug the power plug into a multi-outlet extension cord.
• If the supply cord is damaged, it must be replaced by the manufacturer or its service agent or a similarly
qualified person in order to avoid a hazard.
• Do not operate the refrigerator or touch the power cord with wet hands.
• Do not modify or extend the power cord.
• Do not use an uncertified power outlet. Do not plug appliance into a damaged wall outlet.
• Do not put hands, feet or other objects into the air vents or bottom of the refrigerator. Doing so could
result in personal injury or electric shock.
• In the event of a gas leak (propane/LPG), ensure the area is adequately ventilated and contact an
authorized service center before resuming use. Do not touch the refrigerator or power cord of the
refrigerator.
• Disconnect the power cord immediately and contact an authorized service center if there is a strange
noise, odor, or smoke coming from the appliance.
• Do not use any fuse (such as copper, steel wire, etc.) other than a standard fuse.
• Do not place or use an electrical appliance inside the refrigerator, unless it is of a type recommended by
the manufacturer.
• Do not put animals inside the appliance.
• Do not place heavy or fragile objects, liquid filled containers, combustible substances, or flammable
objects (such as candles and lamps) on the appliance.
• Avoid contact with any moving parts of the ejector mechanism or with the heater that releases the ice
cubes.
• If connected to a circuit protected by fuses, use time delay fuse.
• Keep ventilation openings, in the appliance enclosure or in the built-in structure, clear of obstruction.
• Do not use mechanical devices or other means to accelerate the defrosting process, other than those
recommended by the manufacturer.
• Do not use electrical appliances inside the food storage compartments of the appliance, unless they are
of the type recommended by the manufacturer.
• Do not store explosive substances such as aerosol cans with a flammable propellant in this appliance.
Page 5

• DO NOT place fingers in the automatic icemaker when the refrigerator is plugged in.
• When dispensing ice from the dispenser, do not use a fragile container.
Maintenance
• Do not use a hair dryer to dry the inside of the refrigerator.
• Do not light a candle to remove odors in the refrigerator.
• In the event of a refrigerant leak, move flammable objects away from the refrigerator. Ensure the area is
adequately ventilated and contact an authorized service center.
• Keep flammable materials and vapors, such as gasoline, away from the refrigerator.
• This appliance is not intended for use by persons (including children) with reduced physical, sensory or
mental capabilities, or lack of experience and knowledge, unless they have been given supervision or
instruction concerning use of the appliance by a person responsible for their safety.
• Unplug the power plug before cleaning or repairing the refrigerator.
• The refrigerator and freezer compartment lights are interior LED lighting, and service should be
performed by a qualified technician.
• Unplug the power plug immediately in the event of a blackout or thunderstorm.
• Turn the power off if water or dust penetrates into the refrigerator. Call a service agent.
• Do not store glass containers or soda in the freezer compartment. Contents may expand when frozen,
break the container and cause injury.
• Do not store, disassemble or repair the appliance yourself or allow unqualified personnel to do so.
5SAFETY INSTRUCTIONS
ENGLISH
Disposal
• Junked or abandoned refrigerators are dangerous, even if they are sitting for only a few days. When
disposing of the refrigerator, remove the packing materials from the door or take off the doors but leave
the shelves in place so that children may not easily climb inside.
• If disposing of a refrigerator, make sure the refrigerant and insulation foam are removed for proper
disposal by a qualified servicer. If you release the refrigerant or throw away the insulation foam, you
may be fined or imprisoned in accordance with the relevant environmental law. Insulation foam contains
flammable blowing gas.
• When discarding the appliance, remove the door gasket while leaving the shelves and baskets in place,
and keep children away from the appliance.
Grounding Instructions
• Improper connection of the equipment-grounding conductor can result in a risk of electric shock. Check
with a qualified electrician or service personnel if you are in doubt whether the appliance is properly
grounded. Do not modify the plug provided with the appliance; if it will not fit the outlet, have a proper
outlet installed by a qualified electrician.
• Have a certified electrician check the wall outlet and wiring for proper grounding.
• Never unplug the appliance by pulling on the power cord. Always grip the plug firmly and pull straight
out from the outlet. Failure to do so may damage the power cord, resulting in a risk of fire and electric
shock.
Page 6
6 SAFETY INSTRUCTIONS
Risk of Fire and Flammable Materials
This appliance contains a small amount of isobutane refrigerant (R600a), which is combustible.
When transporting and installing the appliance, care should be taken to ensure that no parts
of the refrigerating circuit are damaged. Refrigerant squirting out of the pipes could ignite or
cause an eye injury. If a leak is detected, avoid any naked flames or potential sources of
ignition and air the room in which the appliance is standing for several minutes.
In order to avoid the creation of a flammable gas air mixture if a leak in the refrigerating
circuit occurs, the size of the room in which the appliance may be sited depends on the
amount of refrigerant used. The room must be 10.8 square feet (1 square meter) in size for
every 8g of R600a refrigerant inside the appliance. The amount of refrigerant in your
particular appliance is shown on the identification plate inside the appliance. Never start up an
appliance showing any signs of damage. If in doubt, consult your dealer.
CAUTION
CAUTION
• To reduce the risk of minor or moderate injury to persons, malfunction, or damage to the product or
property when using this product, follow basic precautions, including the following:
Installation
• Do not install the refrigerator where there may be a danger of the unit falling.
• The refrigerator must be properly installed in accordance with the Installation Instructions.
Operation
• Do not use aerosols near the refrigerator.
• This appliance is intended to be used only in domestic and similar applications.
• Do not strike or apply excessive force to any glass surface. Do not touch glass surfaces if they are
cracked or broken.
• Do not overfill or pack items too tightly into door bins. Doing so may cause damage to the bin or
personal injury if items are removed with excessive force.
• Do not hang on to or place heavy objects on the refrigerator’s dispenser.
Maintenance
• Do not use strong detergents like wax or thinners for cleaning. Clean with a soft cloth.
• Remove foreign objects (such as dust and water) off the prongs of the power plug and contact areas. Do
not use a wet or damp cloth when cleaning the plug.
• Do not spray water directly on the inside or outside of the refrigerator.
• Do not clean glass shelves or covers with warm water when they are cold. They may break if exposed to
sudden temperature changes.
SAVE THESE INSTRUCTIONS
Page 7
PRODUCT OVERVIEW
7PRODUCT OVERVIEW
Product Features
The images in this guide may be different from the actual components and accessories, which are subject
to change by the manufacturer without prior notice for product improvement purposes.
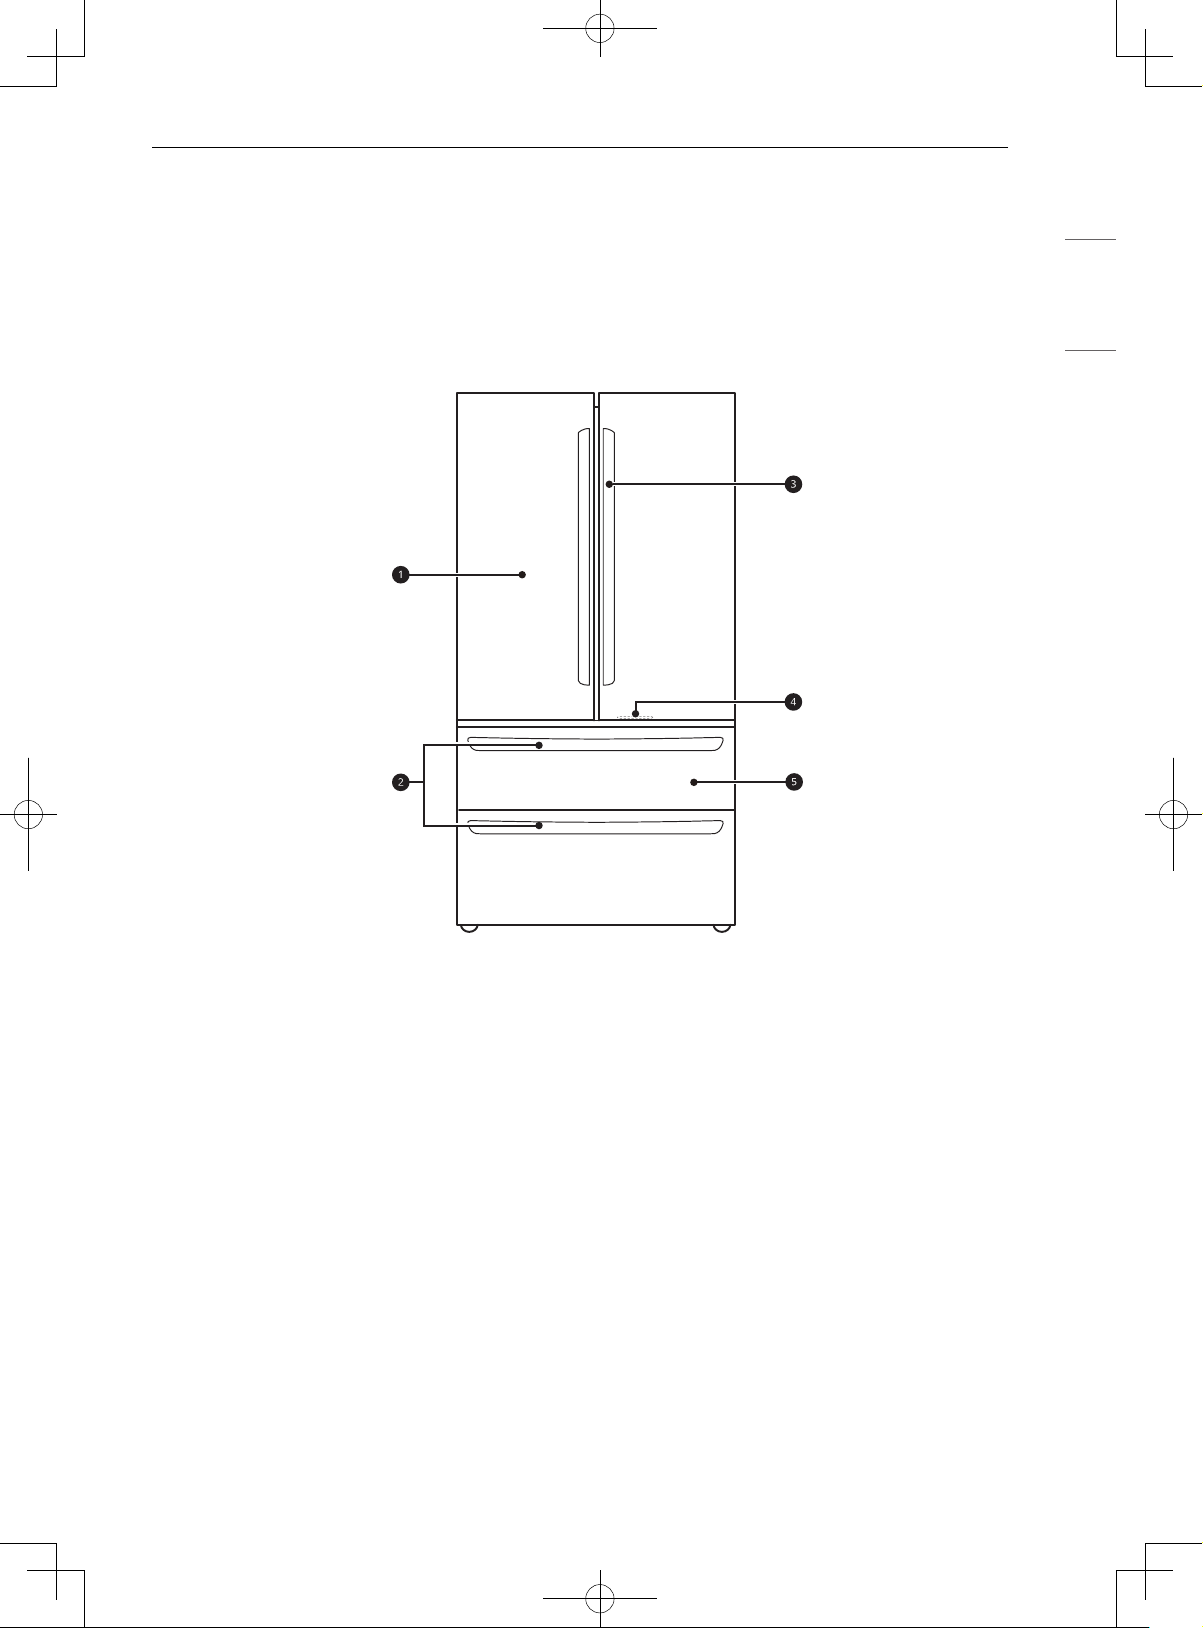
Exterior
ENGLISH
a Refrigerator
Fresh food compartment
b Freezer Handle
Opens the freezer drawer.
c Refrigerator Handle
Opens and closes the refrigerator door.
d LED Light
Lights up when the freezer door is opened.
e Freezer
Frozen food compartment
Page 8
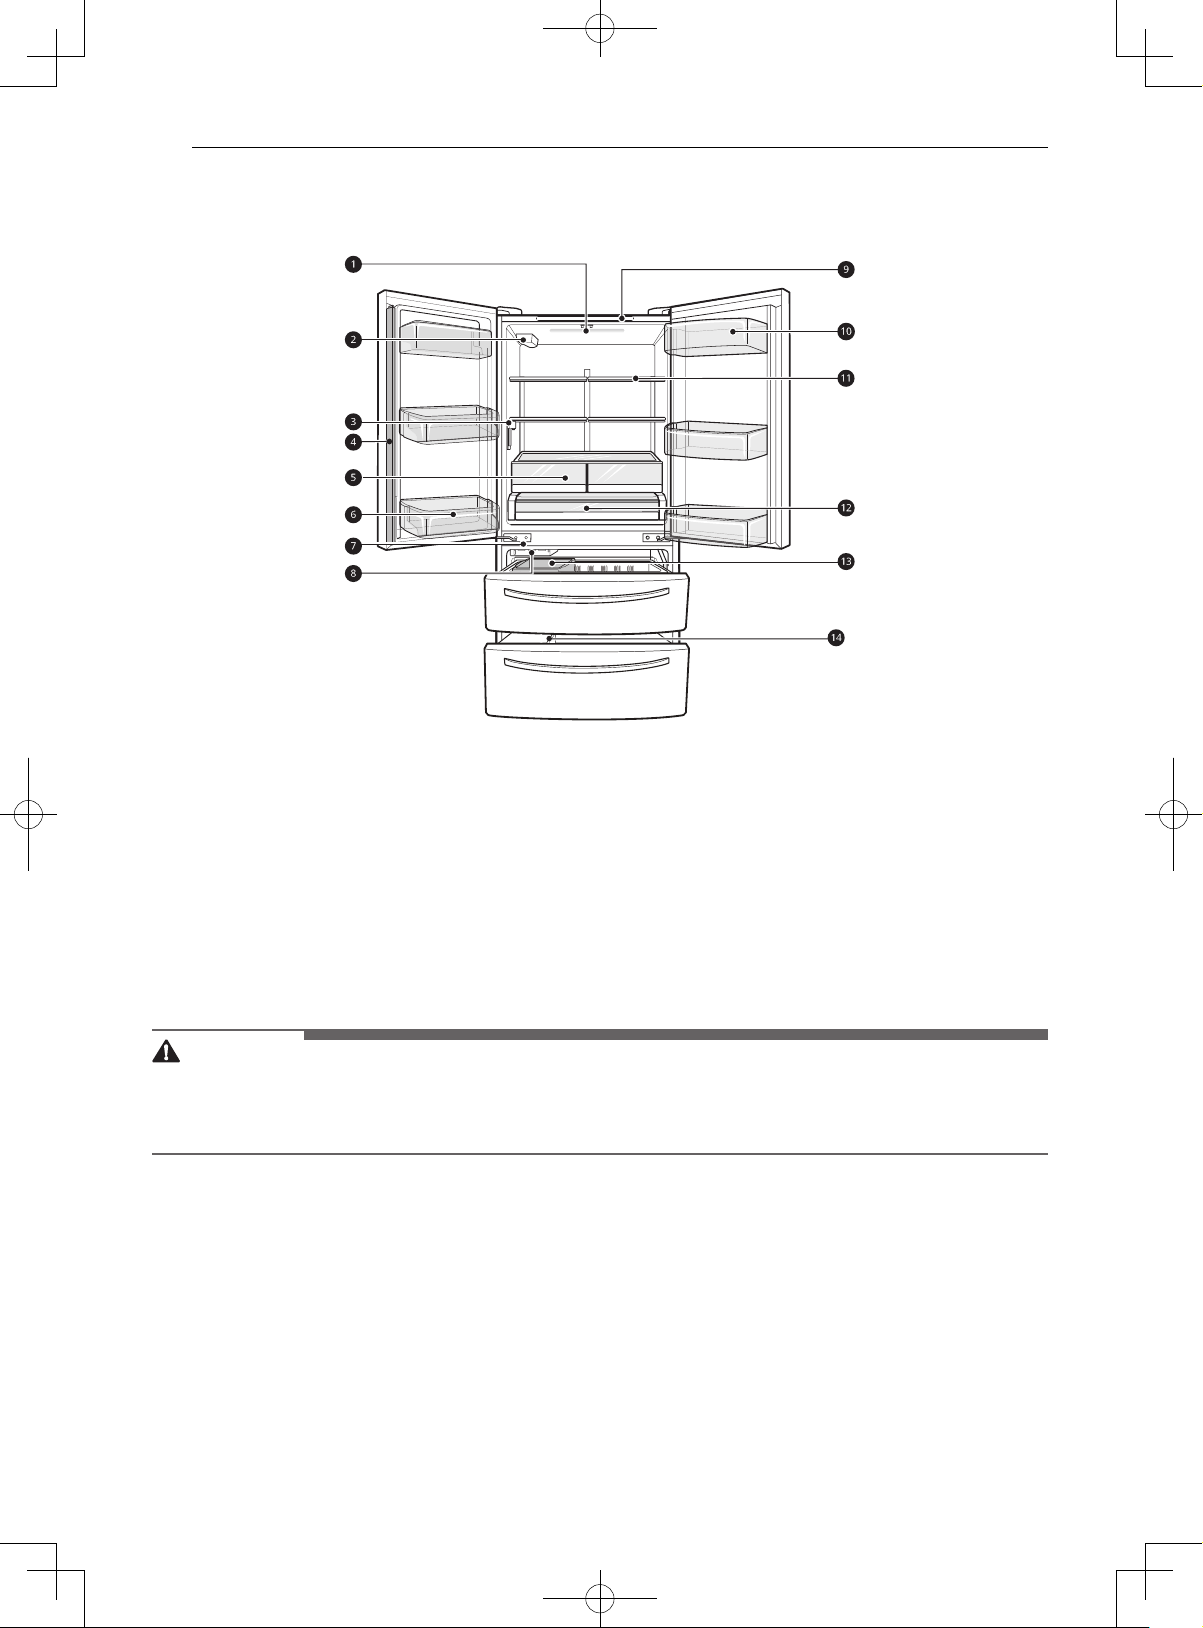
8 PRODUCT OVERVIEW
Interior
LMWS27626*
a LED Interior Lighting
Lights up the inside of the refrigerator.
b Water Filter
Purifies water.
c Water Dispenser
Dispenses purified water.
d Door Mullion
Prevents the cold air in the refrigerator from escaping when the doors are closed.
CAUTION
• To reduce the risk of scratching the door or breaking the center door mullion, make sure that the folding
door mullion is folded in before closing the left-hand door.
• The door alarm will sound every 30 seconds if the door remains open longer than one minute.
e Humidity Controlled Crisper
Helps vegetables and fruit to stay crisp and controls humidity.
f Fixed Door Bin
Stores chilled food or drinks.
g Auto-Closing Hinge
The refrigerator doors and freezer drawers close automatically when pushed slightly. (The door only
closes automatically when it is open at an angle of less than 30°.)
h Automatic Icemaker (Freezer)
Dispenses ice automatically.
Page 9

i Control Panel
Sets the refrigerator and freezer temperatures.
9PRODUCT OVERVIEW
j Modular Door Bin
Interchangeable bins can be arranged to suit storage needs.
k Adjustable Refrigerator Shelf
The refrigerator shelves are adjustable to meet individual storage needs.
l Glide'N'Serve
Stores food items at a different temperature than the regular refrigerator area.
m Ice Bin
Stores ice from the freezer icemaker.
n Durabase and Durabase Divider
Provides storage for large frozen food items.
Product Specifications
The appearance and specifications listed in this manual may vary due to constant product improvements.
Electrical requirements: 115 V, 60 Hz
Min. / Max. water pressure: 20 - 120 psi (138 - 827 kPa)
Model LMWS27626*
Description Standard-depth, French door refrigerator, bottom freezer
ENGLISH
Net weight 287 lb (130 kg)
Page 10
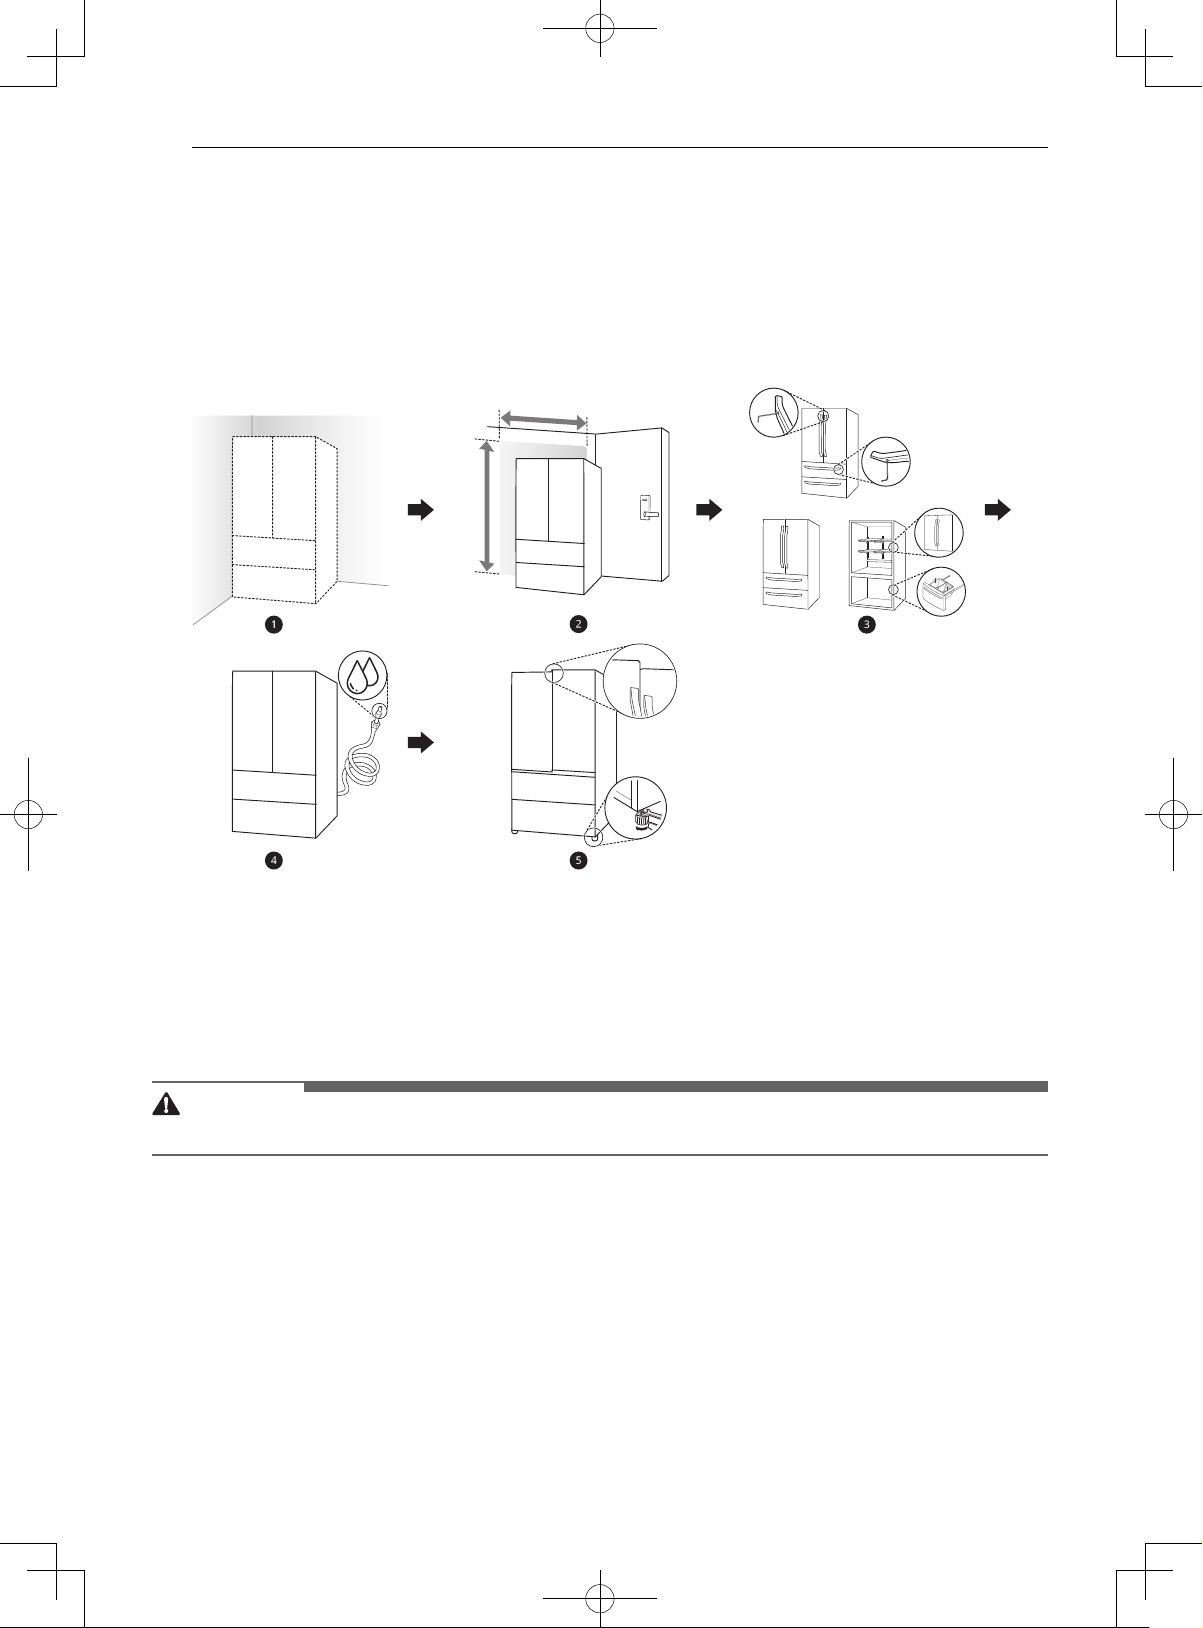
10 INSTALLATION
INSTALLATION
Before Installing
Installation Overview
Please read the following installation instructions first after purchasing this product or transporting it to
another location.
a Unpacking the Refrigerator
b Choosing the Proper Location
c Disassembling/Assembling
d Connecting the Water Line
e Leveling and Door Alignment
WARNING
• Connect to potable water supply only.
Page 11

11INSTALLATION
Unpacking the Refrigerator
WARNING
• Use two or more people to move and install the
refrigerator. Failure to do so can result in back
injury or other injury.
• The refrigerator is heavy. Protect the floor when
moving the refrigerator for cleaning or service.
Always pull the refrigerator straight out when
moving it. Do not wiggle or walk the refrigerator
when trying to move it, as floor damage could
occur.
• Keep flammable materials and vapors, such as
gasoline, away from the refrigerator. Failure to
do so can result in fire, explosion, or death.
NOTE
• Remove tape and any temporary labels from
your refrigerator before using. Do not remove
any warning labels, the model and serial number
label, or the Tech Sheet that is located under the
front of the refrigerator.
NOTE
• To remove any remaining tape or glue, rub the
area briskly with your thumb. Tape or glue
residue can also be easily removed by rubbing a
small amount of liquid dish soap over the
adhesive with your fingers. Wipe with warm
water and dry.
• Do not use sharp instruments, rubbing alcohol,
flammable fluids, or abrasive cleaners to remove
tape or glue. These products can damage the
surface of your refrigerator.
• Reinstall or adjust shelves as needed.
Refrigerator shelves are installed in the shipping
position. Reinstall shelves according to your
individual storage needs.
Choosing the Proper
Location
Water
Must be located where a water supply can be
connected for the automatic icemaker.
NOTE
• The water pressure must be 20 - 120 psi or 138 827 kPa or 1.4 - 8.4 kgf/cm
installed in an area with low water pressure
(below 20 psi or 138 kPa or 1.4 kgf/cm
install a booster pump to compensate for the
low pressure.
Electricity
Use an individual, grounded outlet:115 Volts, 60
Hz, AC, 15 Amps minimum.
WARNING
• Do not overload house wiring and cause a fire
hazard by plugging in multiple appliances in the
same outlet with the refrigerator.
• To reduce the risk of electric shock, do not install
the refrigerator in a wet or damp area.
Flooring
To avoid noise and vibration, the unit must be
installed and leveled on a solidly constructed floor.
If required, adjust the leveling legs to compensate
for the unevenness of the floor.
NOTE
• Installing on carpeting, soft tile surfaces, a
platform or weakly supported structure is not
recommended.
2
. If the refrigerator is
2
), you can
ENGLISH
Ambient Temperature
Install this appliance in an area where the
temperature is between 55 °F (13 °C) and 110 °F
(43 °C).
If the temperature around the appliance is too low
or high, cooling ability may be adversely affected.
Page 12
12 INSTALLATION
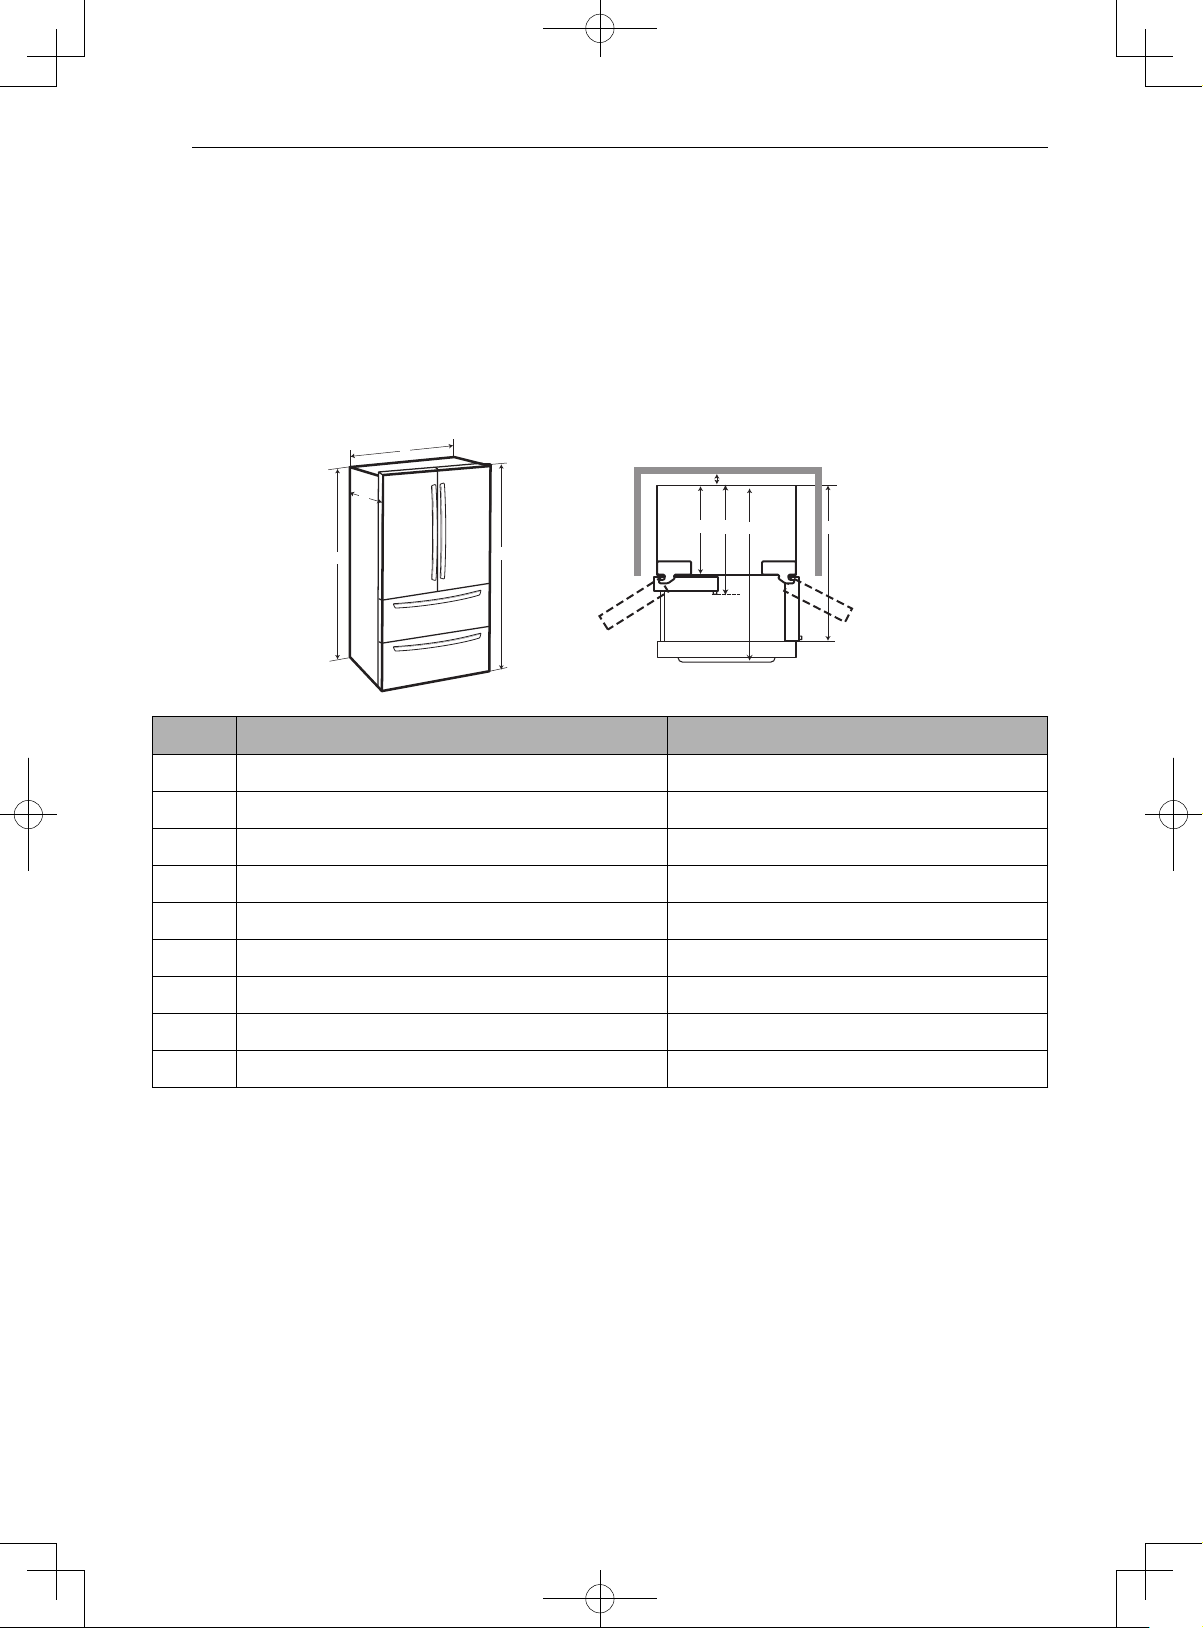
Dimensions and Clearances
• Check the dimensions of the appliance and the installation path to ensure there is sufficient room to
move the refrigerator through doors or narrow openings.
• If an opening is too narrow to fit the refrigerator through, remove the refrigerator doors. See Removing/
Assembling the Doors and Drawers in this manual.
• The installation location chosen for the refrigerator should allow space behind the unit for connections
and airflow and space in front to open the doors and drawers.
• Too small of a distance from adjacent items may result in lowered freezing capability and increased
electricity consumption charges. Allow at least 24 inches (610 mm) in front of the refrigerator to open the
doors, and at least 2 inches (50.8 mm) between the back of the refrigerator and the wall.
B
A
F
HEG
C
D
I
- Dimension/Clearance LMWS27626*
A Depth without Handle 32 3/8˝ (822 mm)
B Width 35 3/4" (908 mm)
C Height to Top of Case 68 3/8" (1737 mm)
D Height to Top of Hinge 69 3/4" (1772 mm)
E Back Clearance 2" (50 mm)
F Depth without Door 28 1/2˝ (724 mm)
G Depth with Handle 34 7/8˝ (886 mm)
H Depth (Total with Freezer Drawer Open) 54 3/4˝ (1391 mm)
I Depth (Total with Door Open 90°) 47 1/8˝ (1197 mm)
Page 13

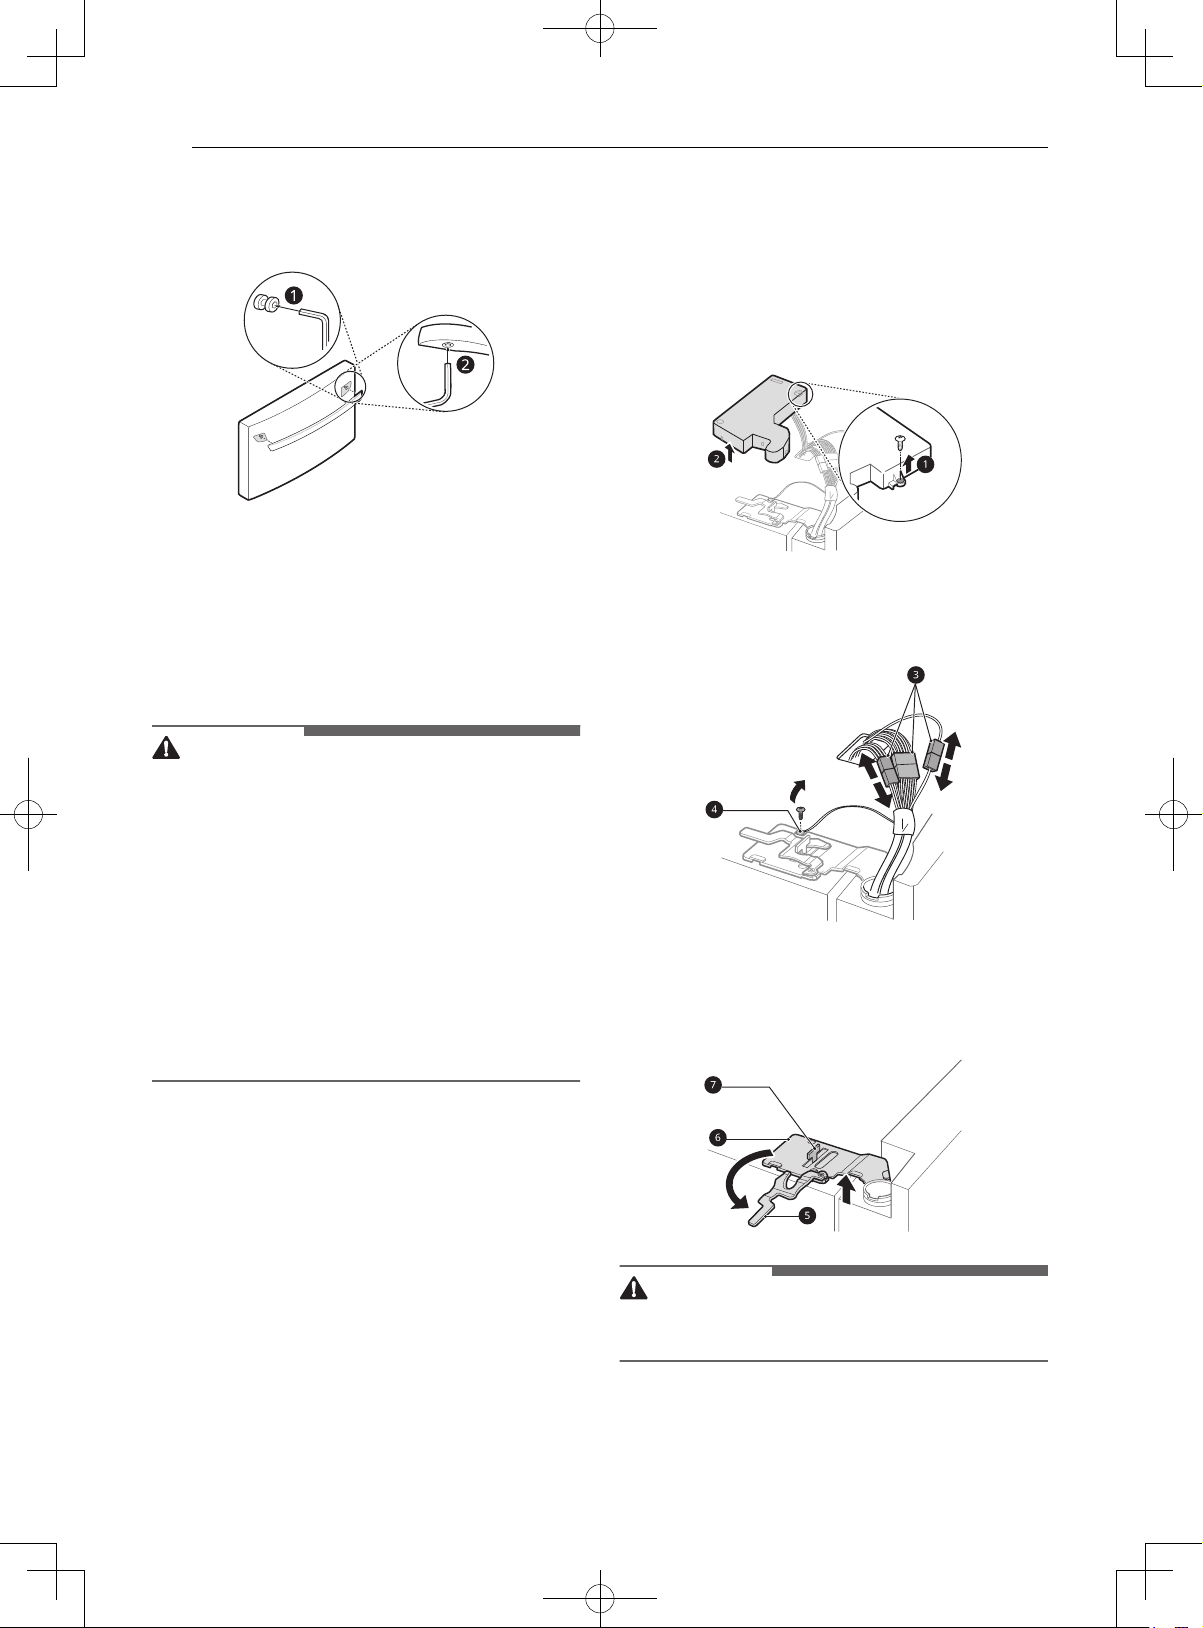
13INSTALLATION
Removing/Assembling the
Handles
When moving the refrigerator through a narrow
opening, removing the doors is preferred.
The appearance of the handles may vary from
what is shown.
WARNING
• When assembling or disassembling the
refrigerator handles, grasp the handle firmly to
avoid dropping it.
• Do not swing the handle into nearby people or
animals.
• Make sure that the bracket hole of the handle
fits properly into the stopper bolt of the door.
Assemble the set screws to fix the handle into
place.
• Make sure that there is not a gap between the
door and handle after assembling the handle.
Tools Needed
• 3/32 in. Allen wrench
• 1/8 in. Allen wrench
• 1/4 in. Allen wrench
2 Place the handle on the door by fitting the
handle footprints over the mounting
fasteners and tightening the set screws
with a 3/32 in. Allen wrench.
b
Removing the Freezer Drawer
Handle
1 Loosen the set screws a located on the lower
side of the handle with a 1/8 in. Allen wrench
and remove the handle.
2 Loosen the mounting fasteners b with a 1/4
in. Allen wrench, and remove the mounting
fasteners.
ENGLISH
Removing the Refrigerator Handles
1 Loosen the set screws a with a 3/32 in. Allen
wrench and remove the handle.
2 Loosen the mounting fasteners b that
connect to the refrigerator door and handle
using a ¼ in. Allen wrench, and remove the
mounting fasteners.
Assembling the Refrigerator
Handles
1 Assemble the mounting fasteners a at both
ends of the handle with a 1/4 in. Allen wrench.
Assembling the Freezer Drawer
Handle
1 Assemble the mounting fasteners a at both
ends of the handle with a 1/4 in. Allen wrench.
Page 14
14 INSTALLATION
2 Place the handle on the door by fitting the
handle footprints over the mounting
fasteners and tightening the set screws
with a 1/8 in. Allen wrench.
b
Removing/Assembling the
Doors and Drawer
If the entrance door is too narrow for the
refrigerator to pass through, remove the
refrigerator doors and move the refrigerator
sideways through the doorway.
WARNING
• Use two or more people to remove and install
the refrigerator doors and freezer drawer.
• Disconnect the electrical supply to the
refrigerator before installing.
• Do not put hands, feet or other objects into the
air vents or bottom of the refrigerator.
• Be careful when handling the hinge and stopper.
• Remove food and bins before detaching the
doors and drawer.
• Do not hold the handle when removing or
replacing the doors and drawer as the handle
may come off.
Removing the Left Refrigerator
Door
1 Remove the screw a from the hinge cover at
the top of the refrigerator. Lift the hook (not
visible), located at the bottom of the front side
of the cover
Remove the cover
b with a flat-head screwdriver.
2 Disconnect all wire harnesses c. Unscrew the
ground wire
d .
3 Rotate the hinge lever e counterclockwise.
Lift the top hinge
latch
g .
f free of the hinge lever
Tools Needed
3/32 in. Allen wrench
1/8 in. Allen wrench
1/4 in. Allen wrench
CAUTION
• When lifting the hinge free of the latch, be
careful that the door does not fall forward.
Page 15
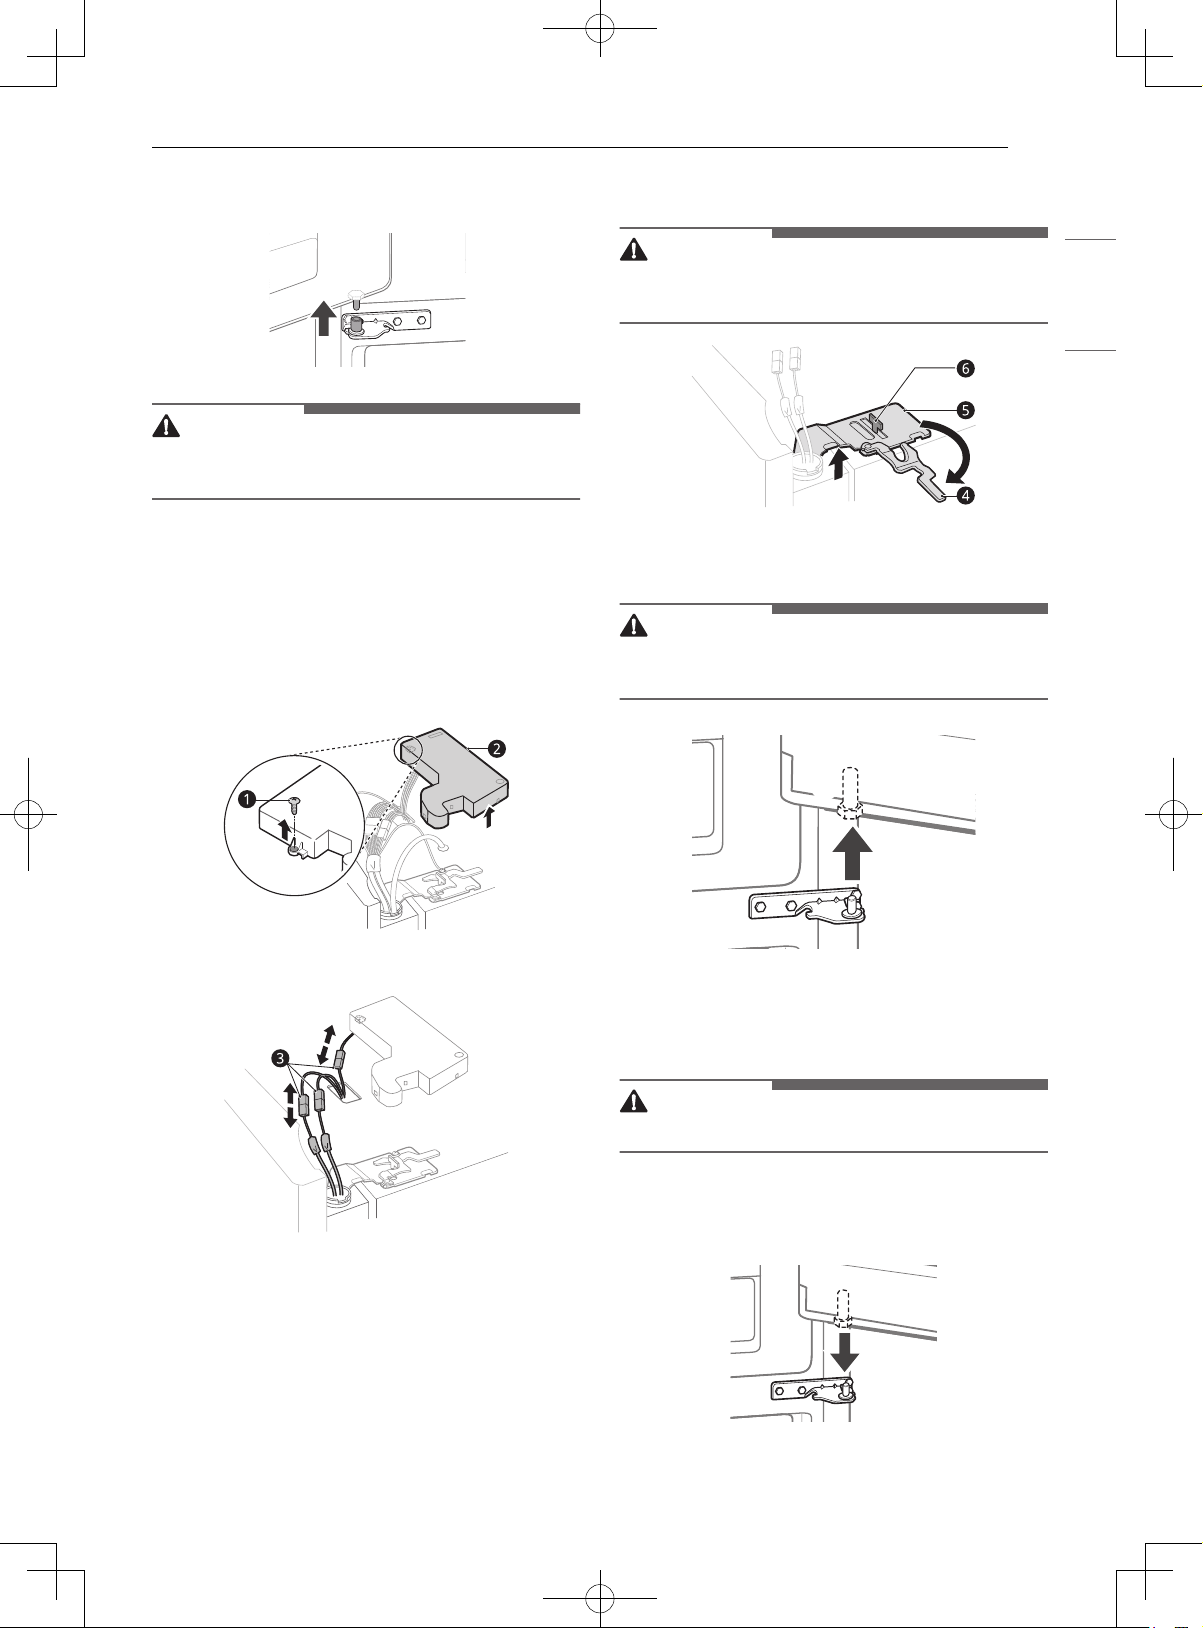
15INSTALLATION
4 Lift the door from the middle hinge pin and
remove the door.
CAUTION
• Place the door, inside facing up, on a
nonscratching surface.
Removing the Right Refrigerator
Door
1 Remove the top hinge cover screw a. Lift the
hook (not visible), located at the bottom of the
front side of the cover
screwdriver.
b, with a flat-head
3 Rotate the hinge lever d clockwise. Lift the
top hinge
CAUTION
• When lifting the hinge free of the latch, be
careful that the door does not fall forward.
e free of the hinge lever latch f.
4 Lift the door from the middle hinge pin and
remove the door.
CAUTION
• Place the door, inside facing up, on a
nonscratching surface.
ENGLISH
2 Detach all the wire harnesses c.
Assembling the Right Refrigerator
Door
CAUTION
• Install the right-side door first.
1 Make sure that the plastic sleeve is inserted in
the bottom of the door. Lower the door onto
the middle hinge pin as shown in the figure.
Page 16

16 INSTALLATION
2 Fit the hinge a over the hinge lever latch b
and slot it into place. Rotate the lever
counterclockwise to secure the hinge.
c
3 Connect the wire harnesses d.
4 Place the cover e in its place. Insert and
tighten the cover screw
f .
2 Fit the hinge a over the hinge lever latch b
and slot it into place. Rotate the lever
clockwise and fasten the hinge.
c
3 Connect all the wire harnesses d and the
ground screw
e.
4 Place the hinge cover f in place. Insert and
tighten the cover screw
g.
Assembling the Left Refrigerator
Door
CAUTION
• Install the left refrigerator door after the right
door is installed.
1 Make sure that the plastic sleeve is inserted in
the bottom of the door. Install the refrigerator
door onto the middle hinge.
Page 17

17INSTALLATION
Removing the Freezer Drawer
Removing the lower freezer drawer in the same
way.
WARNING
• Use two or more people to remove and install
the refrigerator doors and freezer drawer.
• Be careful of sharp hinges on both sides of the
drawer.
• When you lay the drawer down, be careful not to
damage the floor.
• Do not sit or stand on the freezer drawer.
• To prevent accidents, keep children and pets
away from the drawer. Do not leave the drawer
open. If the Durabase
from the freezer drawer, there is sufficient space
for a small child or pet to crawl inside.
®
storage bin is removed
1 Pull the drawer open to full extension.
Removing the basket and ice bin from the
rails.
3 Grip both sides of the drawer and pull it up to
remove it from the rails.
ENGLISH
CAUTION
• Do not hold the handle when removing or
replacing the drawer. The handle may come off,
causing personal injury.
4 Hold both rails and push them in
simultaneously.
2 Remove the screws from the rails at both
ends.
Assembling the Freezer Drawer
Assembling the lower freezer drawer in the same
way.
1 Pull out both rails simultaneously, until they
are fully extended.
Page 18

18 INSTALLATION
2 Grasp the drawer on each side and hook the
drawer supports into the rail tabs located on
both sides.
CAUTION
• Do not hold the handle when removing or
replacing the drawer. The handle may come off,
causing personal injury.
3 Lower the door into its final position and
insert the screws in the rails on both sides.
Connecting the Water Line
Before Beginning
This water line installation is not covered by the
refrigerator warranty. Follow these instructions
carefully to minimize the risk of expensive water
damage.
If necessary, call a qualified plumber to correct
water hammer before installing the water supply
line to the refrigerator. Water banging in the
pipes, or water hammer in residential plumbing
can cause damage to refrigerator parts and lead to
water leakage or flooding.
• Turn the icemaker OFF if the refrigerator will be
used before the water line is connected.
• Do not install the icemaker tubing in areas
where the ambient temperatures fall below
freezing.
WARNING
• Connect to potable water supply only.
CAUTION
• To prevent burns and product damage, only
connect the refrigerator water line to a cold
water supply.
4 Insert the basket into the frame, and push the
drawer back until it clicks into place.
CAUTION
• Wear eye protection during installation to
prevent injury.
Water Pressure
You will need a cold water supply.
Water Pressure
models with water filter 20 - 120 psi (138 - 827
kPa)
where reverse osmosis
water filtration system
is connected to a cold
water supply
If the water pressure from the reverse osmosis
system is less than 20 psi or 138 kPa or 1.4 kgf/
2
cm
(takes more than 4 seconds to fill a cup of 7 oz
or 198 cc capacity):
40 - 60 psi minimum to
reverse osmosis system
(2.8 kgf/cm
2
cm
seconds to fill a cup of 7
oz capacity)
2
- 4.2 kgf/
, or less than 2 - 3
Page 19
19INSTALLATION
• Check to see if the sediment filter in the reverse
osmosis system is blocked. Replace the filter if
necessary.
• Allow the storage tank on the reverse osmosis
system to refill after heavy usage.
• If the water pressure remains low, call a
licensed, qualified plumber.
• All installations must be in accordance with local
plumbing code requirements.
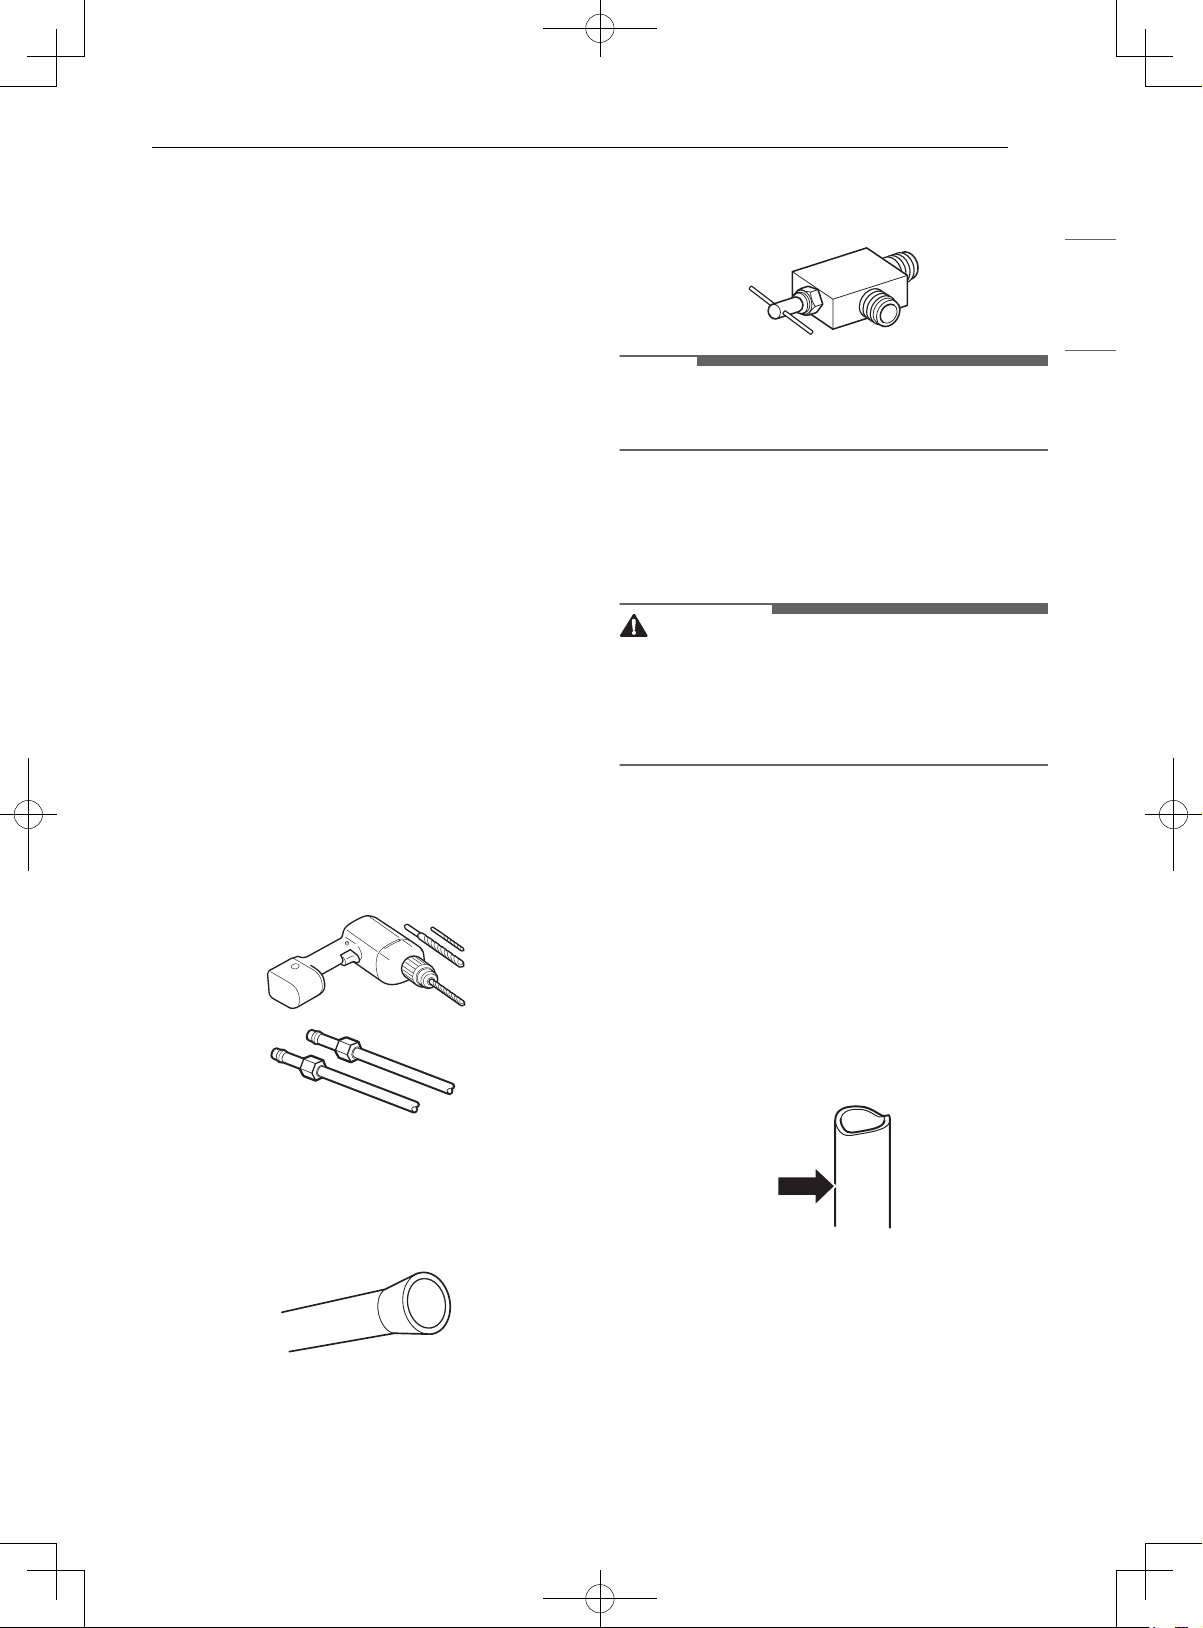
Supplies Needed
• Copper or PEX Tubing, ¼ in. outer diameter, to
connect the refrigerator to the water supply. Be
sure both ends of the tubing are cut square. To
determine how much tubing you need, measure
the distance from the water valve on the back of
the refrigerator to the water supply pipe. Then,
add 8 feet (2.4 m). Be sure there is sufficient
extra tubing (about 8 feet [2.4 m] coiled into 3
turns of about 10 in. [25 cm] diameter) to allow
the refrigerator to move out from the wall after
installation.
• Power drill.
• ½ in. or adjustable wrench.
• Flat-blade and Phillips-head screwdrivers.
• Two ¼ in. outer diameter compression nuts
and 2 ferrules (sleeves) to connect the copper
tubing to the shutoff valve and the refrigerator
water valve.
water supply kits. Before purchasing, make sure
a saddle-type valve complies with your local
plumbing codes.
ENGLISH
NOTE
• A self-piercing saddle type water valve should
not be used.
Water Line Installation Instructions
Install the shutoff valve on the nearest frequently
used drinking water line.
WARNING
• When using any electrical device (such as a
power drill) during installation, be sure the
device is battery-powered, double-insulated or
grounded in a manner that will prevent the
hazard of electric shock.
1 Shut off the main water supply.
• Turn on the nearest faucet to relieve the
pressure on the line.
2 Choose the valve location.
• Choose a location for the valve that is easily
accessible. It is best to connect into the side
of a vertical water pipe. When it is necessary
to connect into a horizontal water pipe,
make the connection to the top or side,
rather than at the bottom, to avoid drawing
off any sediment from the water pipe.
• If your existing copper water line has a flared
fitting at the end, purchase an adapter (available
at plumbing supply stores) to connect the water
line to the refrigerator OR cut off the flared
fitting with a tube cutter and then use a
compression fitting.
• Shutoff valve to connect to the cold water line.
The shutoff valve should have a water inlet with
a minimum inside diameter of 5/32 in. at the
point of connection to the COLD WATER LINE.
Saddle-type shutoff valves are included in many
3 Drill the hole for the valve.
• Drill a ¼ in. hole in the water pipe using a
sharp bit. Remove any burrs resulting from
drilling the hole in the pipe. Be careful not
to allow water to drain into the drill. Failure
to drill a ¼ in. hole may result in reduced ice
production or smaller cubes.
Page 20
20 INSTALLATION
NOTE
• The hookup line cannot be white, plastic tubing.
Licensed plumbers must use only copper tubing
(NDA tubing #49595 or #49599) or Cross Link
Polyethylene (PEX) tubing.
4 Fasten the shutoff valve.
• Fasten the shutoff valve to the cold water
pipe with the pipe clamp.
5 Tighten the pipe clamp.
• Tighten the clamp screws until the sealing
washer begins to swell.
NOTE
• Do not over tighten clamp or you may crush the
tubing.
NOTE
• Commonwealth of Massachusetts Plumbing
Codes 248CMR shall be adhered to. Saddle
valves are illegal and use is not permitted in
Massachusetts. Consult with your licensed
plumber.
a Pipe Clamp
b Saddle-Type Shutoff Valve
c Vertical Cold Water Pipe
a Pipe Clamp
b Inlet End
c Clamp Screw
d Washer
6 Route the tubing.
• Route the tubing between the cold water
line and the refrigerator. Route the tubing
through a hole drilled in the wall or floor
(behind the refrigerator or adjacent base
cabinet) as close to the wall as possible.
NOTE
• Be sure there is sufficient extra tubing (about 8
ft. coiled into three turns of about 10 in.
diameter) to allow the refrigerator to move out
from the wall after installation.
Page 21

21INSTALLATION
7 Connect the tubing to the valve.
• Place the compression nut and ferrule
(sleeve) for copper tubing onto the end of
the tubing and connect it to the shutoff
valve. Make sure the tubing is fully inserted
into the valve. Tighten the compression nut
securely.
a Saddle-Type Shutoff Valve
b Compression Nut
c Packing Nut
d Outlet Valve
e Ferrule (sleeve)
• Insert the end of the copper tubing into the
connection as far as possible. While holding the
tubing, tighten the fitting.
ENGLISH
a Tubing Clamp
b ¼ in. Tubing
c ¼ in. Compression Nut
d Ferrule (sleeve)
e Refrigerator Connection
10 Turn the water on at the shutoff valve.
• Tighten any connections that leak.
8 Flush out the tubing.
• Turn the main water supply on and flush
out the tubing until the water is clear. Shut
the water off at the water valve after about
one quart of water has been flushed
through the tubing.
9 Connect the tubing to the refrigerator.
NOTE
• Before making the connection to the
refrigerator, be sure that the refrigerator power
cord is not plugged into the wall outlet.
• Remove the plastic flexible cap from the water
valve.
• Place the compression nut and ferrule (sleeve)
onto the end of the tubing as shown.
CAUTION
• Check to see if leaks occur at the water line
connections.
Page 22
22 INSTALLATION
Leveling and Door
Alignment
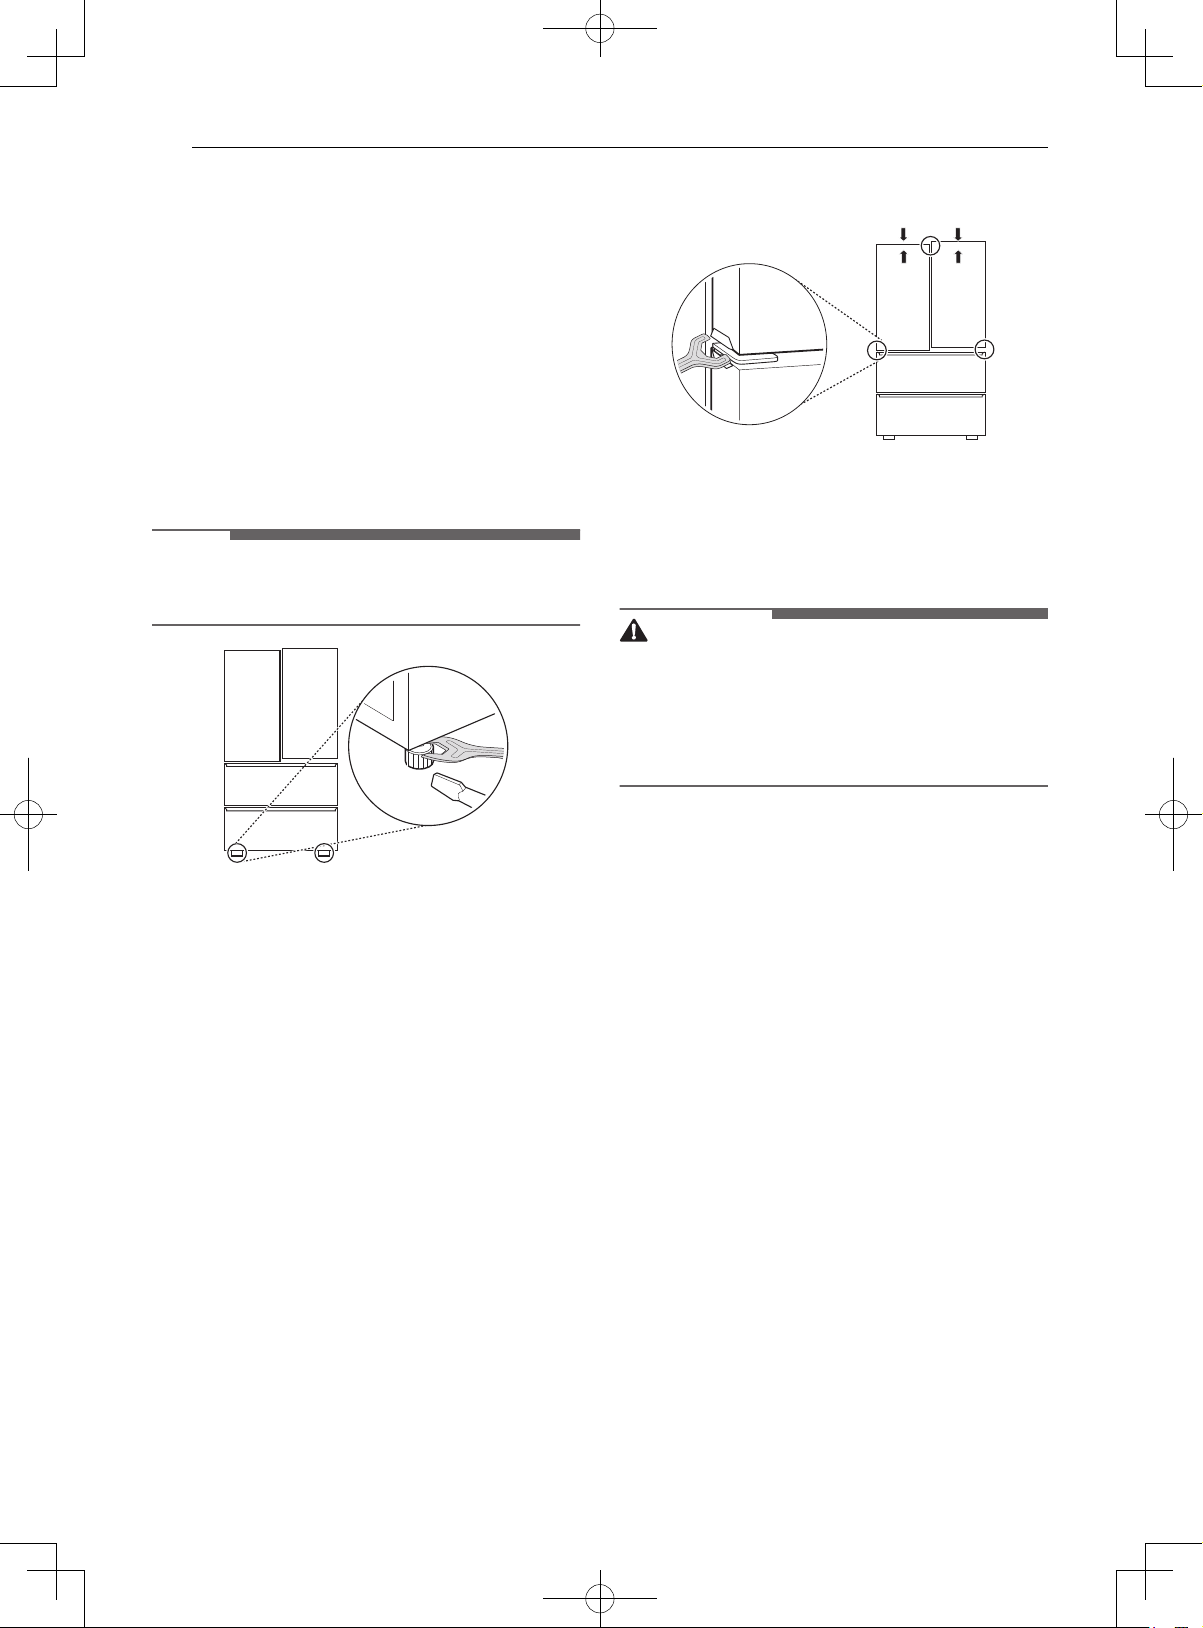
Leveling
The refrigerator has two front leveling legs. Adjust
the legs to alter the tilt from front-to-back or sideto side. If the refrigerator seems unsteady, or the
doors do not close easily, adjust the refrigerator’s
tilt using the instructions below:
1 Turn the leveling leg to the left to raise that
side of the refrigerator or to the right to lower
it. It may take several turns of the leveling leg
to adjust the tilt of the refrigerator.
NOTE
• A flare nut wrench works best, but an open-end
wrench will suffice. Do not over-tighten.
the height. Turn the nut to the right to raise the
door or to the left to lower it.
Turning on the Power
• After installing, plug the refrigerator’s power
cord into a 3-prong grounded outlet and push
the refrigerator into the final position.
CAUTION
• Connect to a rated power outlet.
• Have a certified electrician check the wall outlet
and wiring for proper grounding.
• Do not damage or cut off the ground terminal of
the power plug.
2 Open both doors and check to make sure that
they close easily. If the doors do not close
easily, tilt the refrigerator slightly more to the
rear by turning both leveling legs to the left. It
may take several more turns, and be sure to
turn both leveling legs the same amount.
Door Alignment (Standard Door
Model)
Both the left and right refrigerator doors have an
adjustable nut, located on the bottom hinge, to
raise and lower them to align properly.
If the space between the doors is uneven even
after the door bins are filled, follow the
instructions below to align the doors evenly:
Use the wrench (included with the owner's
manual) to turn the nut in the door hinge to adjust
Position the Refrigerator
• Arrange the coil of tubing so that it does not
vibrate against the back of the refrigerator or
against the wall. Push the refrigerator back to
the wall.
Page 23

OPERATION
23OPERATION
Before Use
Checklist
ENGLISH
Clean the refrigerator.
Clean the refrigerator thoroughly and wipe off all dust that accumulated
during shipping.
CAUTION
• Do not scratch the refrigerator with a sharp object or use a detergent that
contains alcohol, a flammable liquid or an abrasive when removing any
tape or adhesive from the refrigerator. Remove adhesive residue by wiping
it off with your thumb or dish detergent.
• Do not peel off the model or serial number label or the technical
information on the rear surface of the refrigerator.
Open refrigerator doors and freezer drawers to ventilate the
interior.
The inside of the refrigerator may smell like plastic at first. Remove any
adhesive tape from inside the refrigerator and open the refrigerator doors
and the freezer drawers for ventilation.
Connect the power supply.
Check if the power supply is connected before use.
Turn off the icemaker.
Turn off the icemaker if the refrigerator is not yet connected to the water
supply.
NOTE
• The icemaker water valve may buzz if the icemaker is turned on while the
refrigerator is not connected to the water supply.
Wait for the refrigerator to cool.
Allow the refrigerator to run for at least two to three hours before putting
food in it. Check the flow of cold air in the freezer compartment to ensure
proper cooling.
CAUTION
• Putting food in the refrigerator before it has cooled could cause the food to
spoil, or a bad odor to remain inside the refrigerator.
The refrigerator makes a loud noise after initial operation.
This is normal. The volume will decrease as the temperature decreases.
Page 24

24 OPERATION
Control Panel
Depending on the model, some of the following functions may not be available.
The actual control panel may differ from model to model.
Control Panel Features
a Freezer
Indicates the set temperature of the freezer compartment in Celsius (°C) or Fahrenheit (°F). The default
freezer temperature is 0°F (-18 °C). Press the Freezer button repeatedly to select a new set
temperature from - 7 °F to 5 °F (-23 °C to -15 °C).
b Refrigerator
Indicates the set temperature of the refrigerator compartment in Celsius (°C) or Fahrenheit (°F). The
default refrigerator temperature is 37 °F (3 °C). Press the Refrigerator button repeatedly to select a
new set temperature from 33 °F to 43 °F (1 °C to 7 °C).
NOTE
• To change the temperature mode from °F to °C (or vice versa) press and hold the Refrigerator and
Freezer buttons simultaneously for approximately five seconds. The temperature indicator on the
display window switches between Celsius and Fahrenheit.
• The displayed temperature is the target temperature, and not the actual temperature of the refrigerator.
The actual refrigerator temperature depends on the food inside the refrigerator.
c Water Filter
Replace the water filter when the h icon turns on. After replacing the water filter, press and hold the
Water Filter button for three seconds to turn the icon light off. Replace the water filter approximately
every six months.
d Ice Plus
This function increases both ice making and freezing capabilities.
Press the Ice Plus button to illuminate the icon and activate the function for 24 hours. The function
automatically shuts off after 24 hours. Stop the function manually by pressing the button once more.
CAUTION
Display Mode (For Store Use Only)
• The Display Mode disables all cooling in the refrigerator and freezer sections to conserve energy while
on display in a retail store. When activated, OFF is displayed on the control panel and the display remains
on for 20 seconds.
• To deactivate / activate:
- With either refrigerator door opened, press the Ice Plus button 3 times consecutively while pressing
the Refrigerator button. The control panel beeps and the temperature settings display to confirm that
Display Mode is deactivated. Use the same procedure to activate Display Mode.
Page 25
NOTE
• When the refrigerator is in the Power Saving Mode, the display remains off until a door is opened or a
button is pressed. Once on, the display remains on for 20 seconds.
25OPERATION
ENGLISH
Sabbath Mode
Using the Sabbath Mode
Sabbath mode is used on the Jewish Sabbath and
holidays.
• To turn Sabbath mode on, touch the display to
activate it, then press and hold the Freezer and
Water Filter buttons for 3 seconds until
appears in the display.
• To turn Sabbath mode off manually, press and
hold the Freezer and Water Filter buttons for 3
seconds.
NOTE
• Sabbath mode automatically turns off after 96
hours.
• Once turned on, Sabbath mode is maintained
even after a power outage.
• Selecting Sabbath mode automatically turns off
the Alarm functions.
• The dispenser or InstaView is disabled in
Sabbath Mode. This information is only available
on models with the dispenser or InstaView.
sb
• Some dripping may occur after dispensing. Hold
the cup beneath the dispenser for a few seconds
after dispensing to catch all of the drops.
• Keep containers at an appropriate distance from
the dispenser. A container with a very small
opening should be held as close to the dispenser
as possible to avoid spilling.
Using the Water Dispenser
Press the dispenser paddle a with a glass or other
container to dispense water.
Automatic Icemaker
Water Dispenser
Before Using the Water Dispenser
CAUTION
• Keep children away from the dispenser. Children
may play with or damage the controls.
• If water dispenses unexpectedly, turn off the
water supply and contact an LG Electronics
Customer Information Center.
• Never use a glass that is exceptionally narrow or
deep.
NOTE
• The first water dispensed may include particles
or odor from the water supply line or the water
tank. This is also necessary if the refrigerator has
not been used for a long time.
Before Using the Freezer Icemaker
This feature is only available on some models.
The feature may vary depending on model
purchased.
NOTE
• Throw away the first few batches of ice (about
140 - 160 cubes) after installation. This is also
necessary if the refrigerator has not been used
for a long time.
• The icemaker begins producing ice
approximately 48 hours after the appliance is
initially installed.
• The sound of ice dropping into the ice bin is
normal.
• If the ice bin is completely filled with ice, ice
production will stop.
• The amount and shape of ice may vary according
to the environment (ambient temperature
around the appliance, frequency of the door
being opened, amount of food stored in the
appliance, water pressure, etc.).
Page 26
26 OPERATION
NOTE
• In the event of a power outage, throw away the
ice stored in the ice bin.
Freezer Icemaker (Cubed Ice)
This feature is only available on some models.
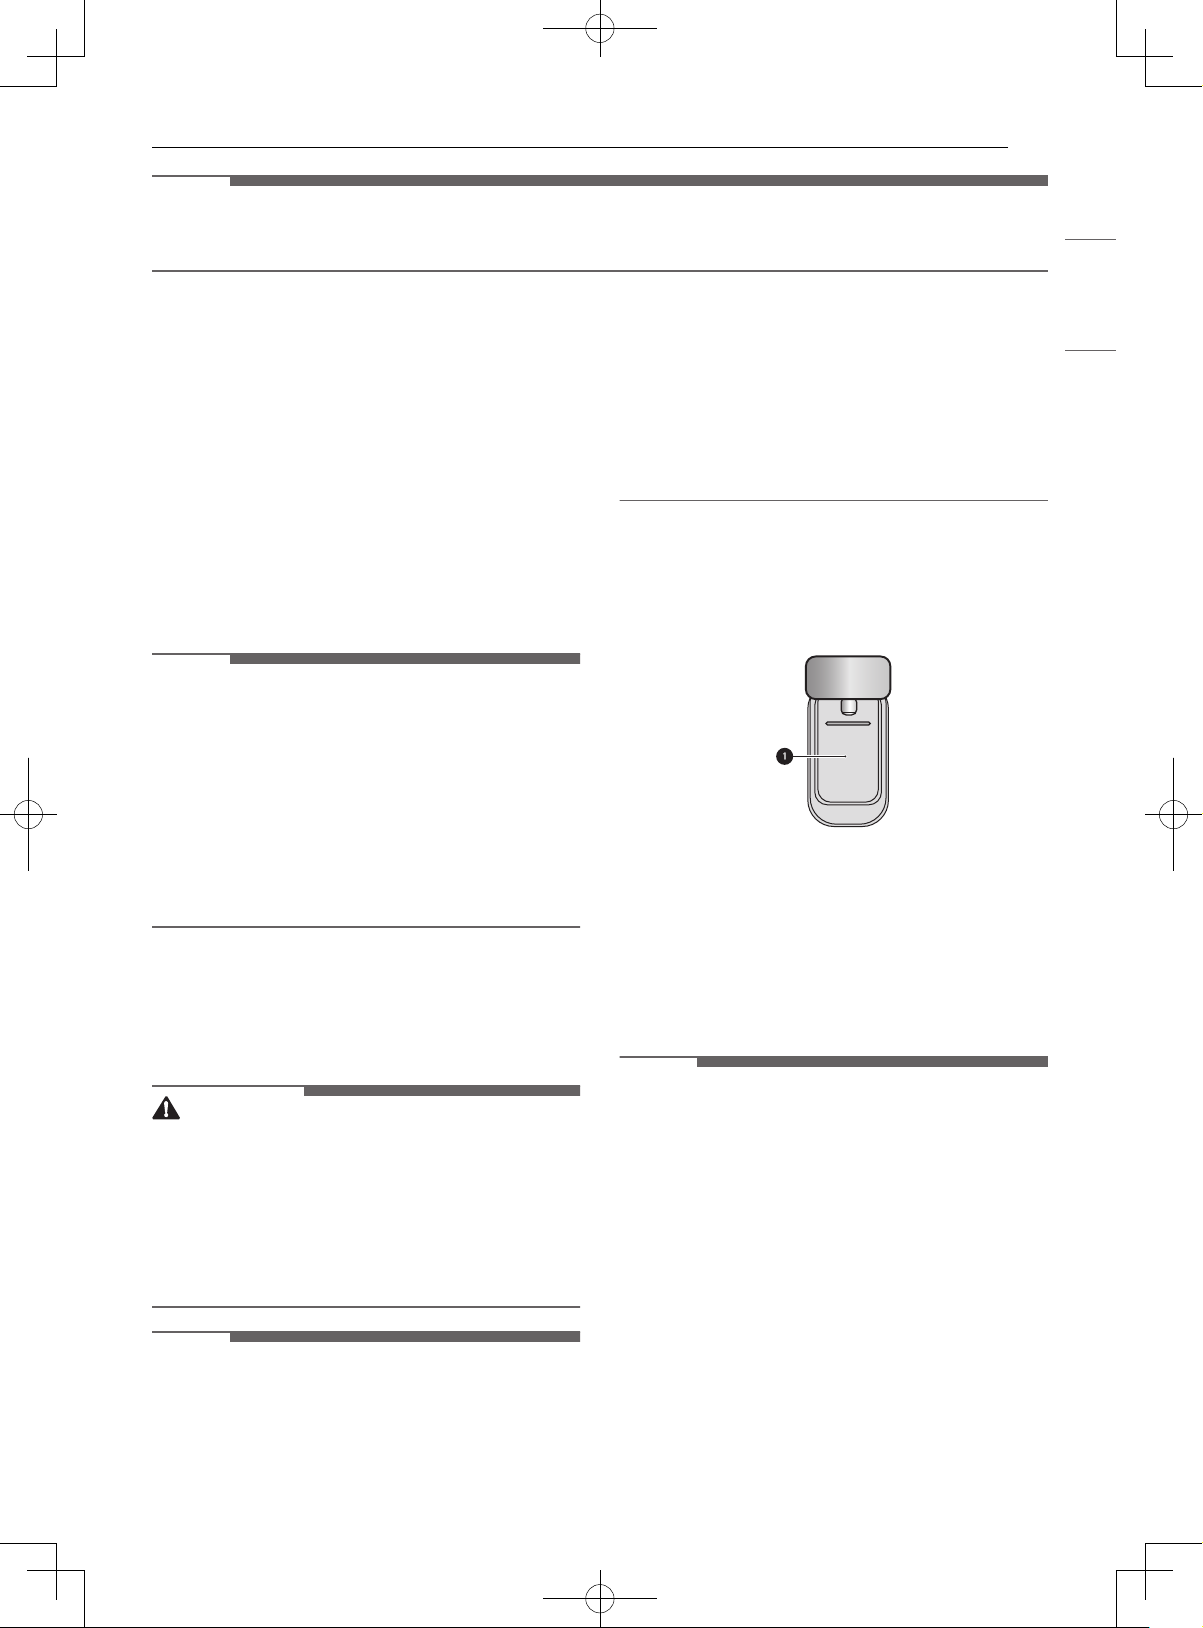
a Feeler Arm
b Power Switch
NOTE
• This automatic freezer icemaker produces 12
cubes at a time, 50-110 pieces within a 24 hour
period if conditions are favorable. This amount
may vary according to the environment (ambient
temperature around the appliance, frequency of
the door being opened, amount of food stored
in the appliance, etc.).
• Ice cubes which are stored in the ice bin for a
long time may clump together and be difficult to
separate. If this happens, empty the ice bin
completely and clean it before reinstalling it.
Turning the Icemaker On/Off
To turn the automatic icemaker On/Off, press the
power switch on the icemaker to the ON ( | ) or
OFF (O) position.
Normal Sounds You May Hear
• Keeping the power turned on to the icemaker
before the water line is connected can damage
the icemaker.
• The icemaker water valve buzzes as the
icemaker fills with water. If the icemaker power
button is in the ON mode, it will buzz even if it
has not yet been hooked up to water. To stop the
buzzing, press the icemaker power button to
turn it off.
• You will hear the sound of cubes dropping into
the bin and water running in the pipes as the
icemaker refills.
Preparing for Vacation
Set the icemaker power button to OFF and shut off
the water supply to the refrigerator.
NOTE
• The ice bin should be emptied any time the
icemaker power button is turned to the OFF
mode.
If the ambient temperature will drop below
freezing, have a qualified technician drain the
water supply system to prevent serious property
damage due to flooding caused by ruptured water
lines or connections.
Storing Food
Food Storage Tips
Wrap or store food in the refrigerator in airtight
and moisture-proof material unless otherwise
noted. This prevents food odor and taste transfer
throughout the refrigerator. For dated products,
check date code to ensure freshness.
CAUTION
• Do not overfill or pack items too tightly into door
bins. Doing so may cause damage to the bin or
personal injury if items are removed with
excessive force.
• Do not store glass containers in the freezer.
Contents may expand when frozen, break the
container and cause injury.
Food How to Store
Butter or
Margarine
Cheese Store in original wrapping until
Milk Wipe milk cartons. For coldest milk,
Eggs Store in original carton on interior
Fruit Do not wash or hull fruit until it is
Keep opened butter in covered dish
or closed compartment. When
storing an extra supply, wrap in
freezer packaging and freeze.
used. Once opened, rewrap tightly
in plastic wrap or aluminum foil.
place containers on an interior shelf.
shelf, not on door shelf.
ready to be used. Sort and keep fruit
in original container in a crisper, or
store in completely closed paper
bag on refrigerator shelf.
Page 27
27OPERATION
Food How to Store
Leafy
Vegetables
Vegetables
with skins
(carrots,
peppers)
Fish Freeze fresh fish and shellfish if they
Leftovers Cover leftovers with plastic wrap or
Remove store wrapping, trim or tear
off bruised and discolored areas,
wash in cold water, and drain. Place
in plastic bag or plastic container
and store in crisper.
Place in plastic bags or plastic
container and store in crisper.
are not being eaten the same day
purchased. Eating fresh fish and
shellfish the same day purchased is
recommended.
aluminum foil, or store in plastic
containers with tight lids.
Storing Frozen Food
Check a freezer guide or a reliable cookbook for
further information about preparing food for
freezing or food storage times.
Freezing
Your freezer will not quick-freeze a large quantity
of food. Do not put more unfrozen food into the
freezer than will freeze within 24 hours (no more
than 2 to 3 pounds of food per cubic foot of freezer
space). Leave enough space in the freezer for air to
circulate around packages. Be careful to leave
enough room at the front so the door can close
tightly.
Storage times will vary according to the quality
and type of food, the type of packaging or wrap
used (how airtight and moisture-proof) and the
storage temperature. Ice crystals inside a sealed
package are normal. This simply means that
moisture in the food and air inside the package
have condensed, creating ice crystals.
NOTE
• Allow hot foods to cool at room temperature for
30 minutes, and then package and freeze.
Cooling hot foods before freezing saves energy.
Packaging recommendations
• Rigid plastic containers with tight-fitting lids
• Straight-sided canning/freezing jars
• Heavy-duty aluminum foil
• Plastic-coated paper
• Non-permeable plastic wraps
• Specified freezer-grade self-sealing plastic bags
Follow package or container instructions for
proper freezing methods.
Do not use
• Bread wrappers
• Non-polyethylene plastic containers
• Containers without tight lids
• Wax paper or wax-coated freezer wrap
• Thin, semi-permeable wrap
NOTE
• If you are leaving home for a short period, like a
short vacation, the refrigerator should be left on.
Refrigerated foods that are able to be frozen will
stay preserved longer if stored in the freezer.
• If you are leaving the refrigerator turned off for
an extended period, remove all food and unplug
the power cord. Clean the interior, and leave the
door open to prevent fungi from growing in the
refrigerator.
• Do not store food with high moisture content
towards the top of the refrigerator. The moisture
could come in direct contact with the cold air and
freeze.
• Wash food before storing it in the refrigerator.
Vegetables should be washed, and food
packaging should be wiped down to prevent
adjacent foods from being contaminated.
• If the refrigerator is kept in a hot and humid
place, frequent opening of the door or storing a
lot of vegetables in the refrigerator may cause
condensation to form. Wipe off the
condensation with a clean cloth or a paper towel.
• If the refrigerator door or freezer drawer is
opened or closed too often, warm air may
penetrate the refrigerator and raise its
temperature. This can increase the running costs
of the unit.
ENGLISH
Packaging
Successful freezing depends on correct packaging.
When you close and seal the package, it must not
allow air or moisture in or out. If it does, you could
have food odor and taste transfer throughout the
refrigerator and could also dry out frozen food.
Page 28

28 OPERATION
Humidity Controlled
Crispers
Using the Humidity Controlled
Crispers
This feature is only available on some models.
The crispers provide fresher tasting fruit and
vegetables by letting you easily control humidity
inside the drawer.
You can control the amount of humidity in the
moisture-sealed crispers by adjusting the control
to any setting between Vegetables and Fruit.
• Vegetables keeps moist air in the crisper for
best storage of fresh, leafy vegetables.
• Fruit lets moist air out of the crisper for best
storage of fruit.
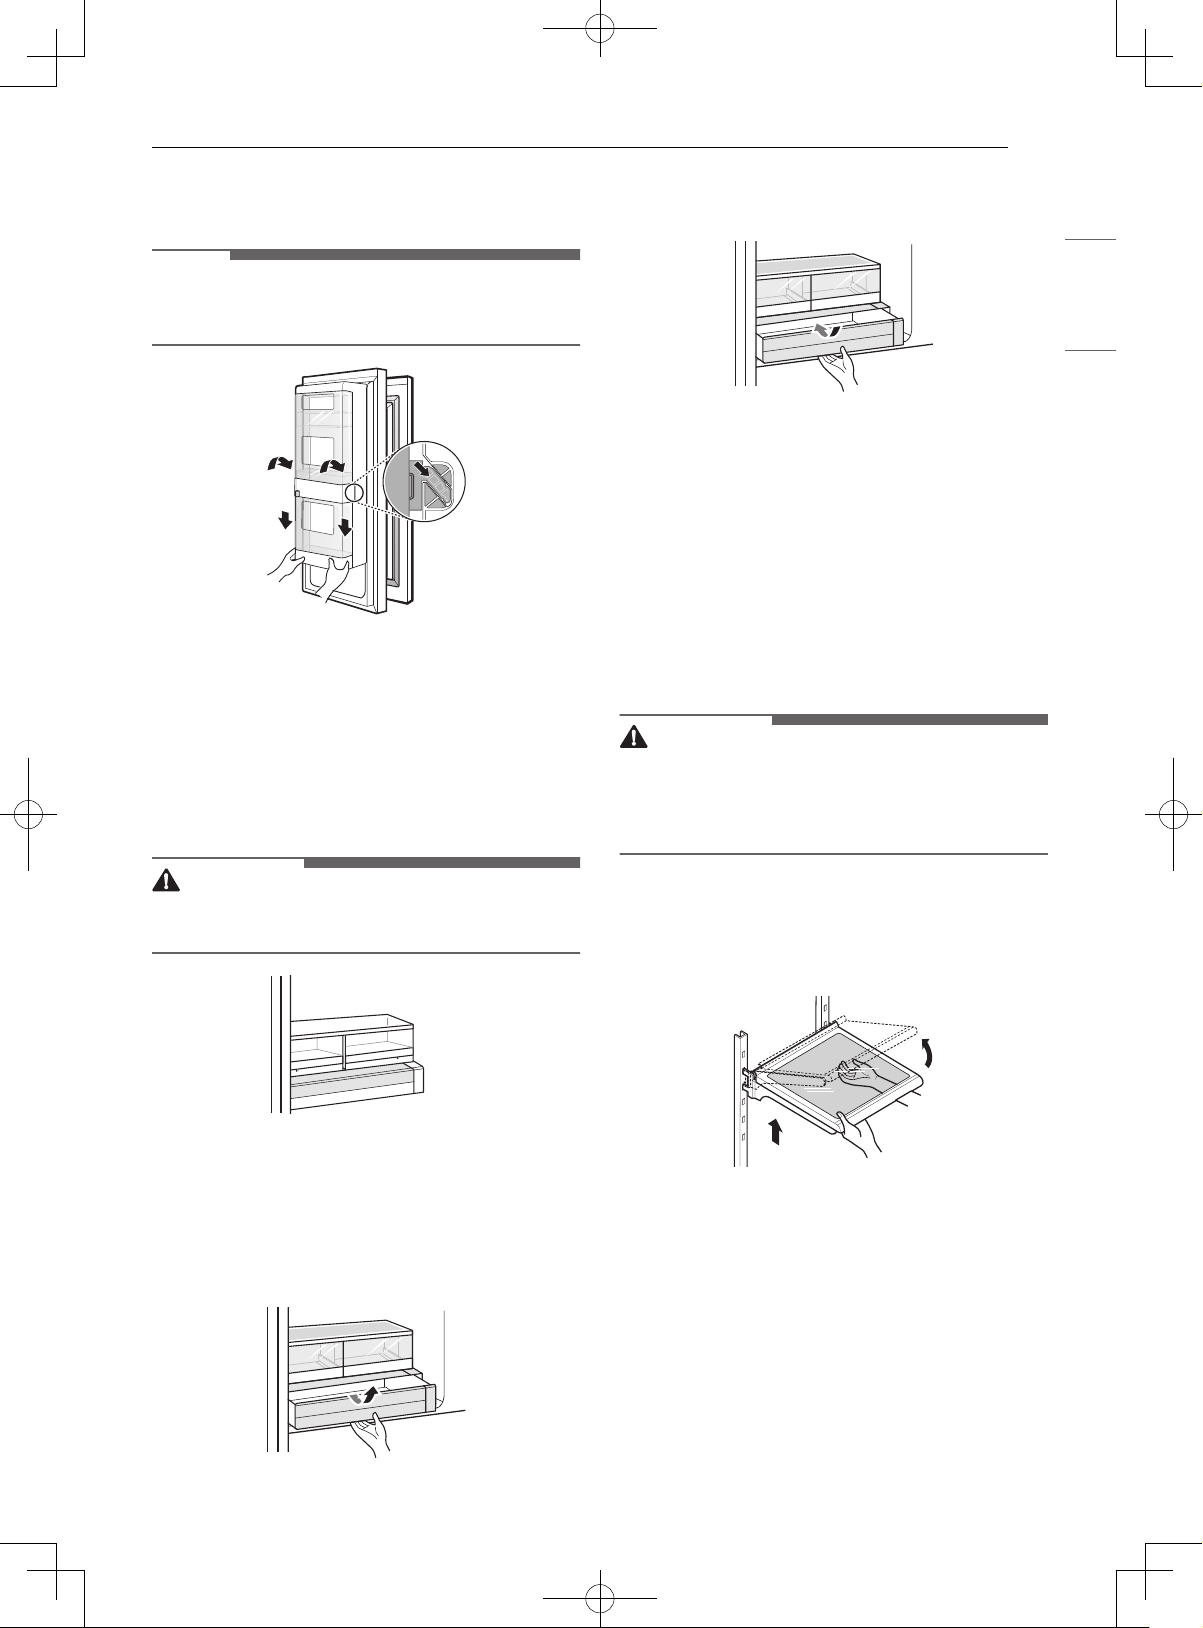
2 Pull out the crisper to full extension, lift the
front up, and pull straight out.
3 Lift the front of the cover up with both hands
until it detaches from the back wall of the
cabinet, then pull it out.
4 To reassemble, insert the cover into the
refrigerator with both hands and lower it onto
the guides.
Removing/Assembling the
Humidity Controlled Crispers
1 Open the doors completely and remove the
contents of the Door-in-Door case. Lift up and
pull out the Door-in-Door case.
NOTE
• The Door-in-Door feature is only available on
some models.
5 Slightly tilt up the front, insert the crisper into
the frame and push it back into place.
Page 29
29OPERATION
6 Line up the tabs on the Door-in-Door case
with the slots on the door and push down
until it snaps into place.
NOTE
• The Door-in-Door feature is only available on
some models.
Glide‘N’Serve
Using the Glide‘N’Serve
This drawer can be used for large party trays, deli
items and beverages. This drawer should not be
used to store vegetables that require high
humidity.
2 To assemble, slightly tilt up the front, insert
the Glide'N'Serve into the frame and push it
back into place.
ENGLISH
Refrigerator Shelves
The shelves in the refrigerator are adjustable to
meet individual storage needs. Your model may
have full or split shelves.
Adjusting the shelves to fit items of different
heights will make finding the exact item you want
easier.
Detaching/Assembling the Half
Width Shelf
CAUTION
• Do not clean glass shelves with warm water
while they are cold. Shelves may break if
exposed to sudden temperature changes or
impact.
CAUTION
• Do not place any items on the Glide‘N’Serve
cover.
Detaching/Assembling the
Glide‘N’Serve
1 To remove the Glide'N'Serve, pull out the
Glide'N'Serve to full extension, lift the front
up, and pull straight out.
1 To detach, tilt up the front of the shelf and lift
the shelf straight up.
2 Pull the shelf out.
3 To assemble, tilt the front of the shelf up and
guide the shelf hooks into the slots at a
desired height.
Page 30
30 OPERATION
4 Lower the front of the shelf so that the hooks
drop into the slots.
CAUTION
• Make sure that shelves are level from one side to
the other. Failure to do so may result in the shelf
falling or spilled food.
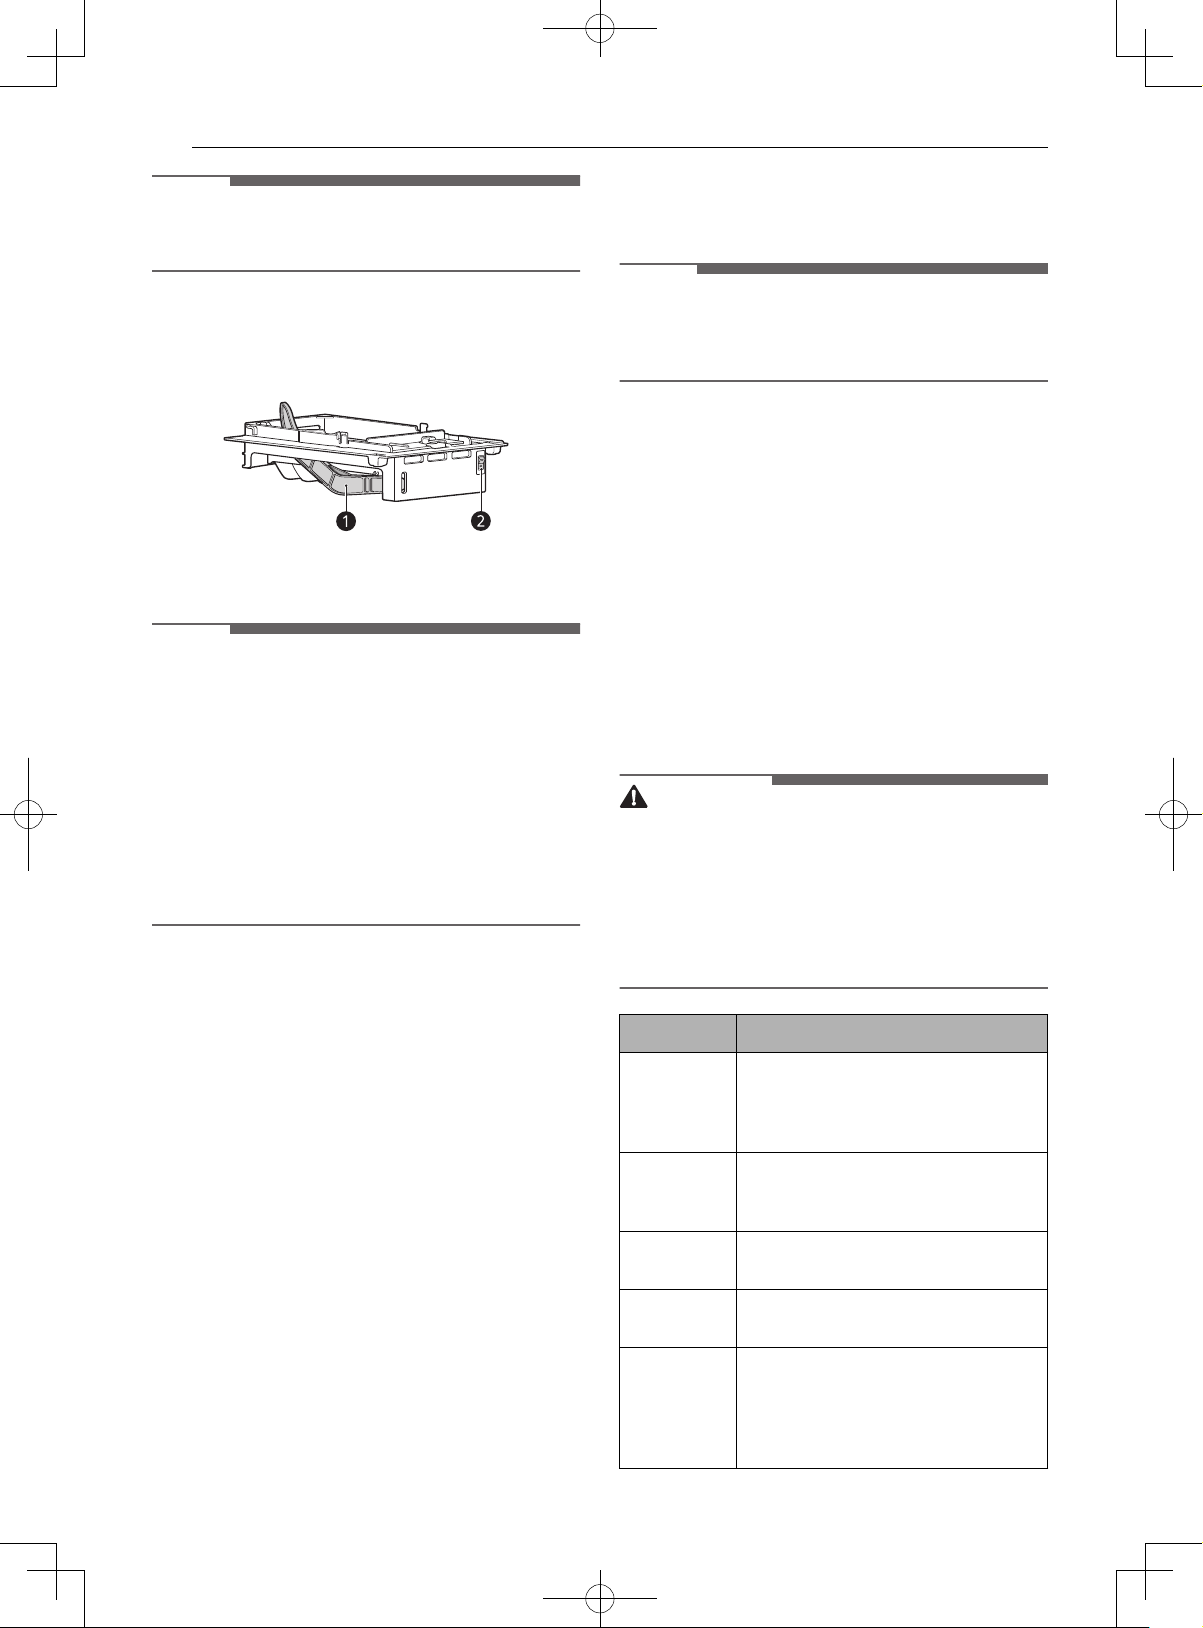
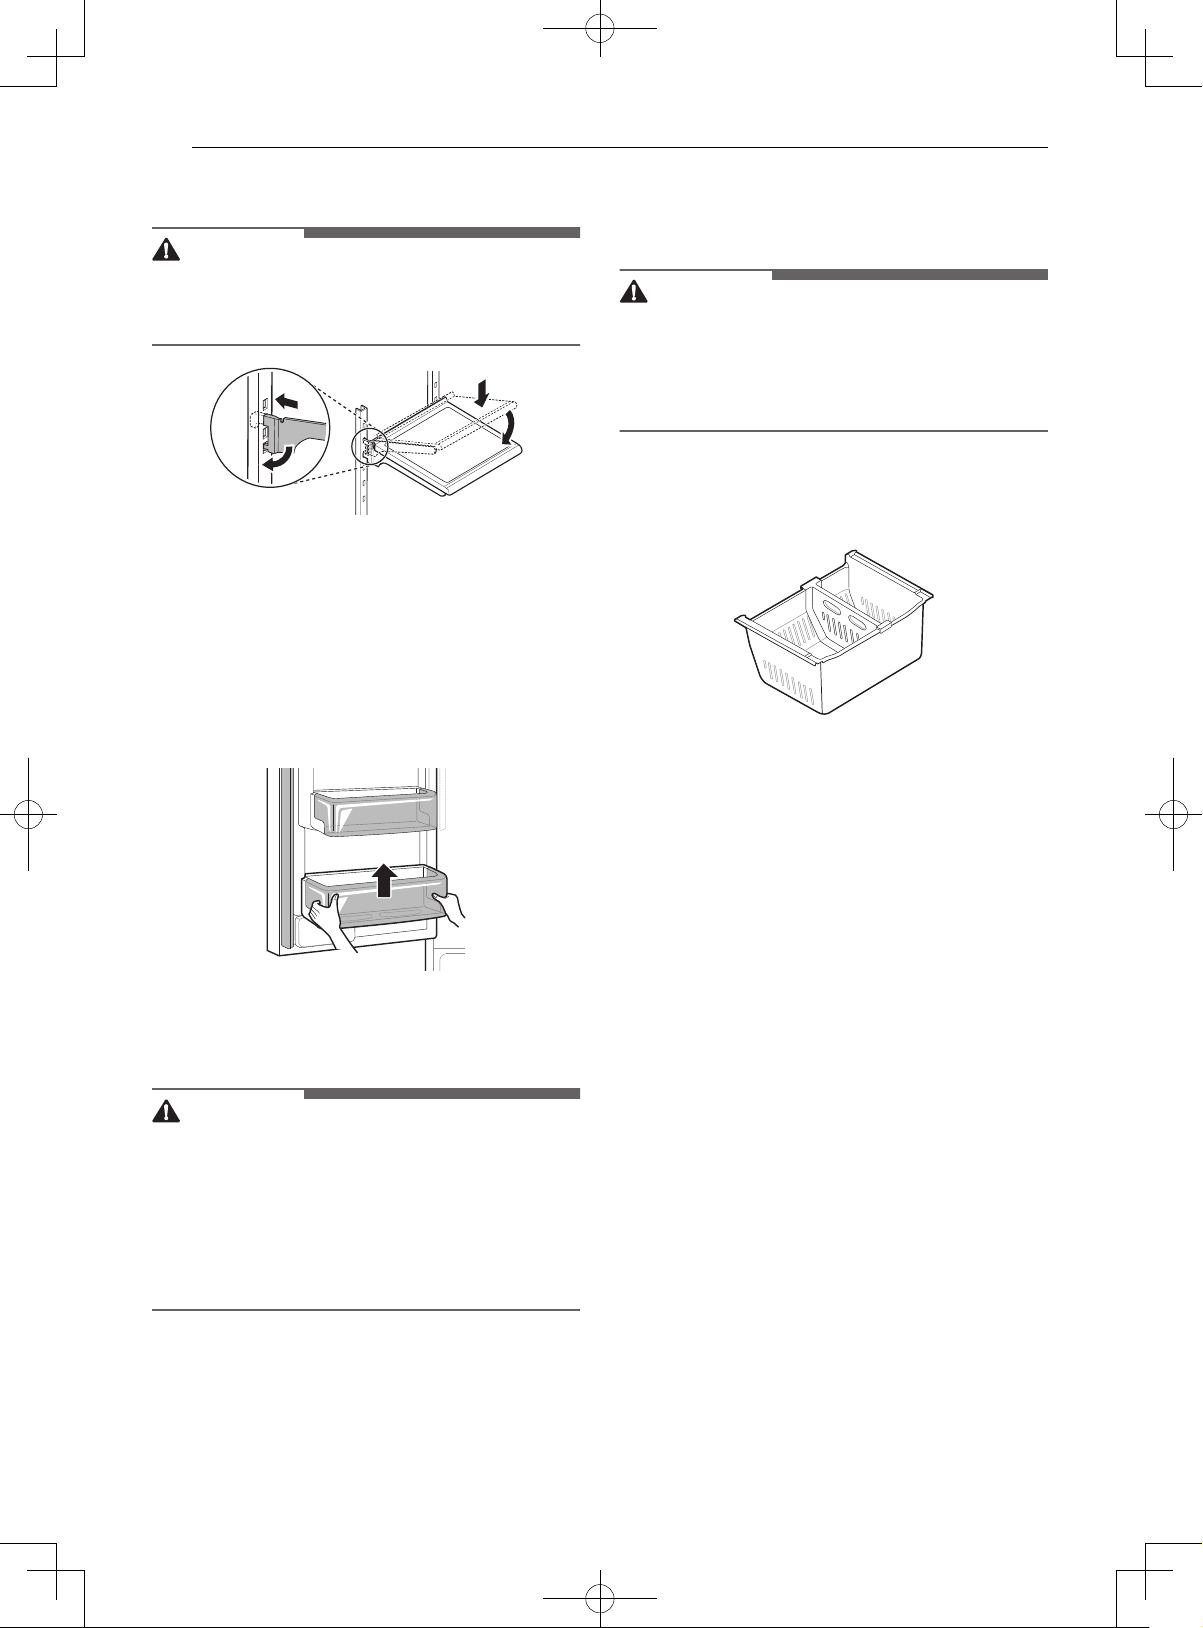
Door Bins
Detaching/Refitting the Door Bin
The door bins are removable for easy cleaning and
adjustment.
1 To remove the bin, simply lift the bin up and
pull straight out.
Durabase
Using the Durabase
CAUTION
• If the Durabase divider is removed, there is
enough open space for children or pets to crawl
inside. To prevent accidental child and pet
entrapment or suffocation risk, DO NOT allow
children or pets to touch or go near the drawer.
The Durabase divider allows you to organize the
Durabase area into 2 sections. It can be adjusted
from side to side to accommodate items of
different sizes.
2 To replace the bin, slide it in above the desired
support and push down until it snaps into
place.
CAUTION
• Regularly detach and wash the storage bins and
shelves; they can become easily contaminated
by food.
• Do not apply excessive force while detaching or
assembling the storage bins.
• Do not use the dishwasher to clean the storage
bins and shelves.
Page 31

SMART FUNCTIONS
31SMART FUNCTIONS
LG ThinQ Application
This feature is only available on models with the c
or
d logo.
The LG ThinQ application allows you to
communicate with the appliance using a
smartphone.
Installing the LG ThinQ Application
Search for the LG ThinQ application from the
Google Play Store or Apple App Store on a smart
phone. Follow instructions to download and install
the application.
LG ThinQ Application Feature
Smart Diagnosis
If you experience a problem while using the
appliance, this smart diagnosis feature will help
you diagnose the problem.
Smart Diagnosis™ Feature
This feature is only available on models with the c
or
d logo.
Use this feature to help you diagnose and solve
problems with your appliance.
NOTE
• For reasons not attributable to LGE’s negligence,
the service may not operate due to external
factors such as, but not limited to, Wi-Fi
unavailability, Wi-Fi disconnection, local app
store policy, or app unavailability.
• The feature may be subject to change without
prior notice and may have a different form
depending on where you are located.
2 Hold the mouthpiece of your phone in front of
the speaker that is located on the right hinge
of the refrigerator door.
3 Press and hold the Freezer button for three
seconds while continuing to hold your phone
to the speaker.
4 After you hear three beeps, release the
Freezer button.
5 Keep the phone in place until the tone
transmission has finished. The display will
count down the time. Once the countdown is
over and the tones have stopped, the
diagnosis will be displayed in the application.
NOTE
• For best results, do not move the phone while
the tones are being transmitted.
ENGLISH
Using Audible Diagnosis to
Diagnose Issues
Follow the instructions below to use the audible
diagnosis method.
• Launch the LG ThinQ application and select the
Smart Diagnosis feature in the menu. Follow
the instructions for audible diagnosis provided
in the LG ThinQ application.
1 Open the right refrigerator door.
Page 32

32 MAINTENANCE
MAINTENANCE
Cleaning
WARNING
• Use non-flammable cleaner. Failure to do so can
result in fire, explosion, or death.
CAUTION
• Do not use an abrasive cloth or sponge when
cleaning the interior and exterior of the
refrigerator.
• Do not place your hand on the bottom surface of
the refrigerator when opening and closing the
doors.
General Cleaning Tips
• Both the refrigerator and freezer sections
defrost automatically; however, clean both
sections once a month to prevent odors.
• Wipe up spills immediately.
• Unplug the refrigerator or disconnect power
before cleaning.
• Remove all removable parts, such as shelves.
• Use a clean sponge or soft cloth and a mild
detergent in warm water. Do not use abrasive or
harsh cleaners.
• Hand wash, rinse and dry all surfaces
thoroughly.
Inside Walls
• Allow freezer to warm up so the cloth will not
stick.
To help remove odors, wash the inside of the
refrigerator with a mixture of baking soda and
warm water. Mix 2 tablespoons of baking soda to 1
quart of water (26 g soda to 1 liter water.) Be sure
the baking soda is completely dissolved so it does
not scratch the surfaces of the refrigerator.
Door Liners and Gaskets
Use a clean sponge or soft cloth and a mild
detergent in warm water. Do not use cleaning
waxes, concentrated detergents, bleaches, or
cleaners containing petroleum on plastic
refrigerator parts.
Plastic Parts (Covers and Panels)
Use a clean sponge or soft cloth and a mild
detergent in warm water. Do not use glass
cleaners, abrasive cleansers, or flammable fluids.
These can scratch or damage the material.
Condenser Coils
Use a vacuum cleaner with a brush or crevice
attachment to clean the condenser cover and
vents. Do not remove the panel covering the
condenser coil area.
Exterior
Waxing external painted metal surfaces helps
provide rust protection. Do not wax plastic parts.
Wax painted metal surfaces at least twice a year
using appliance wax (or auto paste wax). Apply
wax with a clean, soft cloth.
For products with black stainless steel exterior,
spray glass cleaner on a clean, microfiber cloth
and rub in direction of grain. Do not spray glass
cleaner directly at the display panel. Do not use
harsh or abrasive cleaners.
For products with a standard stainless steel
exterior, use a damp microfiber cloth and rub in
the direction of the grain. Dry with a paper towel
to avoid streaks. For stubborn stains and
fingerprints, use a few drops of liquid dish soap in
water, and rinse with hot water before drying. Do
not use abrasive or harsh cleaners.
Page 33

Water Filter
33MAINTENANCE
Replacing the Water Filter
Replace the water filter:
• Approximately every six months.
• When the water dispenser output decreases.
To purchase a replacement water filter:
• Visit your local dealer or distributor
• Search using "water filter" on lg.com
• Use replacement cartridge: LT1000P, LT1000PC
or LT1000PCS
1 If the top shelf, located below the water filter,
is in the highest position, it will need to be
removed prior to replacing the water filter.
• To remove any shelf, tilt up the front of the
shelf and lift it. Pull the shelf out.
ENGLISH
4 Replace with a new water filter.
• Take the new water filter out of its packing
and remove the protective cover from the orings. With the water filter tabs in the
horizontal position, push the new water
filter into the manifold hole and turn it
clockwise until it stops.
5 Close the water filter cover. The cover will click
when closed correctly.
2 Pinch the sides to open the water filter cover.
3 Pull the water filter downward and turn it
counterclockwise before pulling it out.
• Make sure to rotate the filter down
completely before pulling it out of the
manifold hole.
NOTE
• Replacing the water filter causes a small amount
of water (around 1 oz. or 25 cc) to drain.
• Wrap a cloth around the front end of the water
filter cover to collect any leaking water. Hold the
water filter upright, once it is removed, to
prevent any remaining water from spilling out of
the water filter.
6 After the water filter is replaced, dispense 2.5
gallons of water (flush for approximately 5
minutes) to remove trapped air and
contaminants from the system.
NOTE
• Do not dispense the entire 2.5 gallon amount
continuously. Press and release the dispenser
pad for cycles of 30 seconds ON and 60 seconds
OFF.
7 After changing the filter, press and hold the
Water Filter button for three seconds to reset
the indicator light.
Page 34

34 MAINTENANCE
For further assistance, call:
CAUTION
• LG strongly recommends that you use LGauthorized water filters to prevent water quality
• 1-800-243-0000 (USA)
• 1-888-542-2623 (Canada)
issues, water leakage and appliance
malfunction.
Performance Data Sheet
Model: LT1000P, LT1000PC, LT1000PCS
NSF System Trade Name Code: MDJ64844601
The concentration of the indicated substances in water entering the system was reduced to a
concentration less than or equal to the permissible limit for water leaving the system as specified in NSF/
ANSI Standard 42, Standard 53 and Standard 401.
System tested and certified by NSF International against NSF/ANSI Standard 42, Standard 53 and
Standard 401 for the reduction of substances listed below.
Substance
Reduction
Chlorine Taste and
Odor
Nominal Particulate
Class I, , 2 0.5 to <
1.0 μm
Asbestos 180 MFL
Atrazine 8.5 μg/L 9.0 μg/L ± 10% >94.10% 0.500 μg/L 3.0 μg/L NA
Benzene 15.0 μg/L 15.0 μg/L ± 10% >96.60% 0.510 μg/L 5.0 μg/L NA
Carbofuran 74.0 μg/L 80.0 μg/L ± 10% 98.30% 1.258 μg/L 40 μg/L NA
Lindane 1.9 μg/L 2.0 μg/L ± 10% >99.00% 0.019 μg/L 0.2 μg/L NA
P-Dichlorobenzene 230.0 μg/L 225.0 μg/L ±
2,4-D 210.0 μg/L 210.0 μg/L ±
Lead pH @6.5 140.0 μg/L 150.0 μg/L ±
Lead pH @8.5 150.0 μg/L 150.0 μg/L ±
Mercury @ pH6.5 5.9 μg/L 6.0 μg/L ± 10% 91.00% 0.531 μg/L 2.0 μg/L NA
Average
Influent
Challenge
2.0 μg/L 2.0 μg/L± 10% >97.5% 0.050 μg/L N/A 2 50.00%
12,000,000 pts/mLAt least 10,000
NSF specified
Challenge
Concentration
particles/mL
107 to 108 MFL;
fibers greater
than 10 μg/Lin
length
10%
10%
10%
10%
Avg %
Reduction
99.80% 24,000 pts/ml N/A 2 85.00%
>99.00% < 1 MFL N/A 2 99.00%
>99.80% 0.460 μg/L 75.0 μg/L NA
>99.90% 0.210 μg/L 70.0 μg/L NA
99.60% 0.560 μg/L 10.0 μg/L NA
>99.70% <0.500 μg/L 10.0 μg/L NA
Average
Product Water
Concentration
Max
Permissible
Product Water
Concentration
NSF
Reduction
Requireme
nts
Mercury @ pH8.5 5.6 μg/L 6.0 μg/L ± 10% 92.5% 0.420 μg/L
Cyst* 100,000 cysts/L Minimum
50,000 cysts/L
Atenolol 240 ng/L 200 ± 40% ng/L > 95.50% 10.80 ng/L 30 ng/L NA
Carbamazepine 1600 ng/L 1400 ± 40% ng/L 98.40% 25.60 ng/L 200 ng/L NA
>99.99% 10 cysts/L N/A 2 99.95%
2.0 μg/L NA
Page 35

35MAINTENANCE
Substance
Reduction
DEET 1600 ng/L 1400 ± 40% ng/L 97.10% 46.40 ng/L 200 ng/L NA
Trimethoprim 170 ng/L 140 ± 40% ng/L >96.80% 5.44 ng/L 20 ng/L NA
Linuron 160 ng/L 140 ± 40% ng/L >96.60% 5.44 ng/L 20 ng/L NA
Phenytoin 200 ng/L 200 ± 40% ng/L >94.80% 10.40 ng/L 30 ng/L NA
Ibuprofen 400 ng/L 400 ± 40% ng/L >94.50% 22.00 ng/L 60 ng/L NA
Naproxen 140 ng/L 140 ± 40% ng/L >96.10% 5.46 ng/L 20 ng/L NA
Estrone 120 ng/L 140 ± 40% ng/L >96.10% 4.68 ng/L 20 ng/L NA
Bisphenol A 2000 ng/L 2000 ± 40% ng/L >98.90% 22.00 ng/L 300 ng/L NA
Nonyl Phenol 1600 ng/L 1400 ± 40% ng/L >97.10% 46.40 ng/L 200 ng/L NA
Average
Influent
Challenge
NSF specified
Challenge
Concentration
Avg %
Reduction
Average
Product Water
Concentration
Max
Permissible
Product Water
Concentration
• Based on the use of Cryptosporidium parvum oocysts.
Guidelines for Application / Water Supply Parameters
Service Flow 0.5 gpm (1.9 lpm)
Water Supply Community or Private Well - Potable Water
Water Pressure 20 – 120 psi (138 – 827 kPa)
NSF
Reduction
Requireme
nts
ENGLISH
Water Temperature 33 °F – 100 °F (0.6 °C – 37.8°C)
Capacity 200 gallons (757 liters)
It is essential that the manufacturer’s recommended installation, maintenance and filter replacement
requirements be carried out for the product to perform as advertised.
NOTE
• While the testing was performed under standard laboratory conditions, actual performance may vary.
For replacement filters, visit your local dealer or distributor or search under "water filters" on the lg.com
website.
For further assistance, contact the LG Electronics Customer Information Center.
USA: 1-800-243-0000
Canada: 1-888-542-2623
Replacement Cartridge: LT1000P, LT1000PC or LT1000PCS
LG is a trademark of LG Corp.
NSF is a trademark of NSF International.
Manufactured by LG Electronics, INC:
170, Sungsanpaechoungro, Seongsan-gu, Gyeongsangnam-do, THE REPUBLIC OF KOREA
Page 36

36 TROUBLESHOOTING
TROUBLESHOOTING
FAQs
Frequently Asked Questions
Q: What are the best temperature settings for my refrigerator and freezer?
A: The default setting for the refrigerator is 37° Fahrenheit (3° Celsius). The default setting for the
freezer is 0° Fahrenheit (-18° Celsius). Adjust these settings as necessary to keep food at desired
temperatures. Milk should be cold when stored on the inner shelf of the refrigerator. Ice cream
should be firm and ice cubes should not melt in the freezer. To switch the display from Fahrenheit to
Celsius, press and hold the Freezer and Refrigerator buttons until you hear a beep and the settings
in the display change.
Q: How do I set the refrigerator and freezer temperatures?
A: Continually press the Refrigerator or Freezer button on the control panel until the desired
temperature appears. The numbers will cycle from highest to lowest and then return to the highest
again with continuous pressing.
Q: Why do I hear a buzzing noise from my refrigerator periodically?
A: This may happen if you do not have a water source attached to your refrigerator and the icemaker is
turned on. If you do not have a water source attached to the back of the refrigerator you should turn
the icemaker off.
Q: Why does the icemaker tray look crooked?
A: This is a normal part of the icemaker cycle. The icemaker tray may appear level or with a slight tilt.
The change in position is to assist in the freezing process.
Q: My refrigerator is powered on and the controls are working, but it’s not cooling and the display
shows “OFF” (see below). What is wrong?
A: The refrigerator is in Display Mode. The Display Mode disables all cooling in the refrigerator and
freezer sections to conserve energy while on display in a retail store. When activated, OFF is displayed
on the control panel and the display remains on for 20 seconds. With either refrigerator door opened,
press the Ice Plus button 3 times consecutively while pressing the Refrigerator button. The control
panel beeps and the temperature settings display to confirm that Display Mode is deactivated. Use
the same procedure to activate Display Mode.
Page 37

Before Calling for Service
Review this section before calling for service; doing so will save you both time and money.
Cooling
Problem Possible Cause & Solution
Refrigerator and
Freezer section are
not cooling.
Cooling system runs
too much.
The refrigerator control is set to OFF (some models).
• Turn the control ON. Refer to the Setting the Controls section for proper temperature
settings.
Refrigerator is set to Demo Mode.
• Demo Mode allows the lights and control display to work normally while disabling cooling,
to save energy while the refrigerator is on the showroom floor. See the FAQs section of
this manual for instructions on how to disable Demo Mode.
Refrigerator is in the defrost cycle.
• During the defrost cycle, the temperature of each compartment may rise slightly. Wait 30
minutes and confirm the proper temperature has been restored once the defrost cycle has
completed.
Refrigerator was recently installed.
• It may take up to 24 hours for each compartment to reach the desired temperature.
Refrigerator was recently relocated.
• If the refrigerator was stored for a long period of time or moved on its side, it is necessary
for the refrigerator to stand upright for 24 hours before connecting it to power.
Refrigerator is replacing an older model.
• Modern refrigerators require more operating time but use less energy due to more
efficient technology.
Refrigerator was recently plugged in or power restored.
• The refrigerator will take up to 24 hours to cool completely.
The door is opened often or a large amount of food / hot food was added.
• Adding food and opening the door warms the refrigerator, requiring the compressor to
run longer in order to cool the refrigerator back down. In order to conserve energy, try to
get everything you need out of the refrigerator at once, keep food organized so it is easy
to find, and close the door as soon as the food is removed. (Refer to the Food Storage
Guide.)
Doors are not closed completely.
• Firmly push the doors shut. If they will not shut all the way, the "Doors will not close
correctly or pop open" section in Troubleshooting.
Refrigerator is installed in a hot location.
• The compressor will run longer under warm conditions. At normal room temperatures (70
°F or 21 °C) expect your compressor to run about 40 % to 80 % of the time. Under warmer
conditions, expect it to run even more often. The refrigerator should not be operated
above 110 °F (43 °C).
Condenser / back cover is clogged.
• Use a vacuum cleaner with an attachment to clean the condenser cover and vents. Do not
remove the panel covering the condenser coil area.
37TROUBLESHOOTING
ENGLISH
Page 38

38 TROUBLESHOOTING
Problem Possible Cause & Solution
Interior moisture
buildup.
Food is freezing in
the refrigerator
compartment.
Refrigerator or
Freezer section is too
cold.
Frost or ice crystals
form on frozen food
(inside of sealed
package).
Frost or ice crystals
form on frozen food
(outside of package).
Doors are opened often or for long periods of time.
• When the doors are opened often or for long periods of time, warm, humid air enters the
compartment. This raises the temperature and moisture level within the compartment. To
lessen the effect, reduce the frequency and duration of door openings.
Doors are not closed correctly.
• See the "Doors will not close correctly or pop open" section.
Weather is humid.
• Humid weather allows additional moisture to enter the compartments when the doors are
opened leading to condensation or frost. Maintaining a reasonable level of humidity in the
home will help to control the amount of moisture that can enter the compartments.
Defrost cycle recently completed.
• During the defrost cycle, the temperature of each compartment may rise slightly and
condensation may form on the back wall. Wait 30 minutes and confirm that the proper
temperature has been restored once the defrost cycle has completed.
Food is not packaged correctly.
• Food stored uncovered or unwrapped, and damp containers can lead to moisture
accumulation within each compartment. Wipe all containers dry and store food in sealed
packaging to prevent condensation and frost.
Food with high water content was placed near an air vent.
• Rearrange items with high water content away from air vents.
Refrigerator temperature control is set incorrectly.
• If the temperature is too cold, adjust the control one increment at a time and wait for the
temperature to stabilize. Refer to the Control Panel section for more information.
Refrigerator is installed in a cold location.
• When the refrigerator is operated in temperature below 41 °F (5 °C), food can freeze in the
refrigerator compartment. The refrigerator should not be operated in temperature below
55 °F (13 °C).
Incorrect temperature control settings.
• If the temperature is too cold, adjust the control one increment at a time and wait for the
temperature to stabilize. Refer to the Control Panel for more information.
Condensation from food with a high water content has frozen inside of the food
package.
• This is normal for food items with a high water content.
Food has been left in the freezer for a long period of time.
• Do not store food items with high water content in the freezer for a long period of time.
Door is opened frequently or for long periods of time.
• When the doors are opened often or for long periods of time, warm, humid air enters the
compartment. This raises the temperature and moisture level within the compartment.
Increased moisture will lead to frost and condensation. To lessen the effect, reduce the
frequency and duration of door openings.
Door is not closing properly.
• Refer to the "Doors will not close correctly or pop open" section in the Troubleshooting.
Page 39

Problem Possible Cause & Solution
Refrigerator or
Freezer section is too
warm.
Refrigerator was recently installed.
• It may take up to 24 hours for each compartment to reach the desired temperature.
The air vents are blocked. Cold air circulates from the freezer to the fresh food section
and back again through air vents in the wall dividing the two sections.
• Locate air vents by using your hand to sense airflow and move all packages that block
vents and restrict airflow. Rearrange items to allow air to flow throughout the
compartment.
Doors are opened often or for long periods of time.
• When the doors are opened often or for long periods of time, warm, humid air enters the
compartment. This raises the temperature and moisture level within the compartment. To
lessen the effect, reduce the frequency and duration of door openings.
Unit is installed in a hot location.
• The refrigerator should not be operated in temperatures above 110 °F (43 °C).
A large amount of food or hot food was added to either compartment.
• Adding food warms the compartment requiring the cooling system to run. Allowing hot
food to cool to room temperature before putting it in the refrigerator will reduce this
effect.
Doors are not closed correctly.
• See the "Doors will not close correctly or pop open" section in the Troubleshooting.
Temperature control is not set correctly.
• If the temperature is too warm, adjust the control one increment at a time and wait for the
temperature to stabilize.
Defrost cycle has recently completed.
• During the defrost cycle, the temperature of each compartment may rise slightly and
condensation may form on the back wall. Wait 30 minutes and confirm the proper
temperature has been restored once the defrost cycle has completed.
39TROUBLESHOOTING
ENGLISH
Page 40

40 TROUBLESHOOTING
Ice
Problem Possible Cause & Solution
Icemaker is not
making enough ice.
Demand exceeds ice storage capacity.
• The icemaker will produce approximately 70-184 cubes in a 24 hour period.
House water supply is not connected, valve is not turned on fully, or valve is clogged.
• Connect the refrigerator to a cold water supply with adequate pressure and turn the water
shutoff valve fully open. If the problem persists, it may be necessary to contact a plumber.
Water filter has been exhausted.
• Replacing the water filter is recommended:
Approximately every six months.
When the water filter indicator turns on.
When the water dispenser output decreases.
When the ice cubes are smaller than normal.
Low house water supply pressure.
• The water pressure must be between 20 and 120 psi on models without a water filter and
between 40 and 120 psi on models with a water filter. If the problem persists, it may be
necessary to contact a plumber.
Reverse osmosis filtration system is used.
• Reverse osmosis filtration systems can reduce the water pressure below the minimum
amount and result in icemaker issues. (Refer to the Connecting the Water Line section.)
Tubing connecting refrigerator to house supply valve is kinked.
• The tubing can kink when the refrigerator is moved during installation or cleaning
resulting in reduced water flow. Straighten or repair the water supply line and arrange it to
prevent future kinks.
Doors are opened often or for long periods of time.
• If the doors of the unit are opened often, ambient air will warm the refrigerator which will
prevent the unit from maintaining the set temperature. Lowering the refrigerator
temperature can help, as well as not opening the doors as frequently.
Doors are not closed completely.
• If the doors are not properly closed, ice production will be affected. See the "Doors will not
close correctly or pop open" section in Parts & Features Troubleshooting for more
information.
The temperature setting for the freezer is too warm.
• The recommended temperature for the freezer compartment for normal ice production is
0°F. If the freezer temperature is warmer, ice production will be affected.
Page 41

Problem Possible Cause & Solution
Icemaker is not
making ice
Ice has bad taste or
odor.
Icemaker is making
too much ice.
Refrigerator was recently installed or icemaker recently connected.
• It may take up to 24 hours for each compartment to reach the desired temperature and
for the icemaker to begin making ice.
Icemaker is not turned on.
• Locate the icemaker ON/OFF and confirm that it is turned on.
The ice detecting sensor is obstructed.
• Foreign substances or frost on the ice-detecting sensor can interrupt ice production. Make
sure that the sensor area is clean at all times for proper operation.
The refrigerator is not connected to a water supply or the supply shutoff valve is not
turned on.
• Connect the refrigerator to the water supply and turn the water shutoff valve fully open.
Icemaker shutoff (arm or sensor) obstructed.
• If your icemaker is equipped with an ice shutoff arm, make sure that the arm moves freely.
If your icemaker is equipped with the electronic ice shutoff sensor, make sure that there is
a clear path between the two sensors.
Reverse osmosis water filtration system is connected to your cold water supply.
• Reverse osmosis filtration systems can reduce the water pressure below the minimum
amount and result in icemaker issues. (Refer to the Connecting the Water Line section.)
Water supply contains minerals such as sulfur.
• A water filter may need to be installed to eliminate taste and odor problems. NOTE: In
some cases, a filter may not help. It may not be possible to remove all minerals/odor/taste
in all water supplies.
Icemaker was recently installed.
• Ice that has been stored for too long will shrink, become cloudy, and may develop a stale
taste. Throw away old ice and make a new supply.
The food has not been stored properly in either compartment.
• Rewrap the food. Odors may migrate to the ice if food is not wrapped properly.
The interior of the refrigerator needs to be cleaned.
• See the Maintenance section for more information.
The ice storage bin needs to be cleaned.
• Empty and wash the bin (discard old cubes). Make sure that the bin is completely dry
before reinstalling it.
Icemaker shutoff (arm/ sensor) is obstructed.
• Empty the ice bin. If your icemaker is equipped with an ice shutoff arm, make sure that the
arm moves freely. If your icemaker is equipped with the electronic ice shutoff sensor,
make sure that there is a clear path between the two sensors. Reinstall the ice bin and wait
24 hours to confirm proper operation.
41TROUBLESHOOTING
ENGLISH
Page 42

42 TROUBLESHOOTING
Problem Possible Cause & Solution
Ice is not dispensing. Unable to hear the sound of ice coming out?
• In the control panel, select the modes for cubed ice and crushed ice alternately to dispense
the ice.
Doors are not closed completely.
• Ice will not dispense if any of the refrigerator doors are left open.
Infrequent use of the dispenser.
• Infrequent use of the ice dispenser will cause the cubes to stick together over time, which
will prevent them from properly dispensing. Check the ice bin for ice cubes clumping/
sticking together. If they are, break up the ice cubes to allow for proper operation.
The delivery chute is clogged with frost or ice fragments.
• Eliminate the frost or ice fragments by removing the ice bin and clearing the chute with a
plastic utensil. Dispensing cubed ice can also help prevent frost or ice fragment buildup.
The dispenser display is locked.
• Press and hold the Lock button for three seconds to unlock the control panel and
dispenser.
Ice bin is empty.
• It may take up to 24 hours for each compartment to reach the desired temperature and
for the icemaker to begin making ice. Make sure that the shutoff (arm/sensor) is not
obstructed. Once the ice supply in the bin has been completely exhausted, it may take up
to 90 minutes before additional ice is available, and approximately 24 hours to completely
refill the bin.
Water
Problem Possible Cause & Solution
Water is dispensing
slowly.
Water filter has been exhausted.
• Replacing the water filter is recommended:
Approximately every six months.
When the water filter indicator turns on.
When the water dispenser output decreases.
When the ice cubes are smaller than normal.
Reverse osmosis filtration system is used.
• Reverse osmosis filtration systems can reduce the water pressure below the minimum
amount and result in icemaker issues. If the problem persists, it may be necessary to
contact a plumber.
Low house water supply pressure.
• The water pressure must be between 20 and 120 psi on models without a water filter and
between 40 and 120 psi on models with a water filter. If the problem persists, it may be
necessary to contact a plumber.
Page 43

Problem Possible Cause & Solution
Water is not
dispensing.
Dispensing warm
water.
New installation or water line recently connected.
• Dispense 2.5 gallons of water (flush for approximately 5 minutes) to remove trapped air
and contaminants from the system. Do not dispense the entire 2.5 gallon amount
continuously. Depress and release the dispenser pad for cycles of 30 seconds ON and 60
seconds OFF.
The dispenser panel is locked.
• Press and hold the Lock button for three seconds to unlock the control panel and
dispenser.
The dispenser is not set for water dispensing.
• The dispenser can be set for ice or water. Make certain that the control panel is set for the
proper operation. Press the Water button on the control panel to dispense water.
Refrigerator or freezer doors are not closed properly.
• Water will not dispense if any of the refrigerator doors are left open.
Water filter has been recently removed or replaced.
• After the water filter is replaced, dispense 2.5 gallons of water (flush for approximately five
minutes) to remove trapped air and contaminants from the system. Do not dispense the
entire 2.5 gallon amount continuously. Depress and release the dispenser pad for cycles of
30 seconds ON and 60 seconds OFF.
Tubing connecting refrigerator to house supply valve is kinked.
• The tubing can kink when the refrigerator is moved during installation or cleaning.
Resulting in reduced water flow. Straighten or repair the water supply line and arrange it
to prevent future kinks.
The house water supply is not connected, the valve is not turned on fully, or the valve is
clogged.
• Connect the refrigerator to the water supply and turn the water shutoff valve fully open. If
the problem persists, it may be necessary to contact a plumber.
Refrigerator was recently installed.
• Allow 24 hours after installation for the water storage tank to cool completely.
The water dispenser has been used recently and the storage tank was exhausted.
• Depending on your specific model, the water storage capacity will range from
approximately 20 to 30 oz.
Dispenser has not been used for several hours.
• If the dispenser has not been used for several hours, the first glass dispensed may be
warm. Discard the first 10oz.
Refrigerator is connected to the hot water supply.
• Make sure that the refrigerator is connected to a cold water pipe.
WARNING: Connecting the refrigerator to a hot water line may damage the
icemaker.
43TROUBLESHOOTING
ENGLISH
Page 44

44 TROUBLESHOOTING
Problem Possible Cause & Solution
Water has bad taste
or odor.
Water supply contains minerals such as sulfur.
• A water filter may need to be installed to eliminate taste and odor problems.
Water filter has been exhausted.
• Replacing the water filter is recommended:
Approximately every six months.
When the water filter indicator turns on.
When the water dispenser output decreases.
When the ice cubes are smaller than normal.
Refrigerator was recently installed.
• Dispense 2.5 gallons of water (flush for approximately 5 minutes) to remove trapped air
and contaminants from the system. Do not dispense the entire 2.5 gallon amount
continuously. Depress and release the dispenser pad for cycles of 30 seconds ON and 60
seconds OFF.
Parts & Features
Problem Possible Cause & Solution
Doors will not close
correctly or pop
open.
Doors are difficult to
open.
Refrigerator wobbles
or seems unstable
Lights do not work. LED interior lighting failure.
Refrigerator has an
unusual odor.
Food packages are blocking the door open.
• Rearrange food containers to clear the door and door shelves.
Ice bin, crisper cover, pans, shelves, door bins, or baskets are out of position.
• Push bins all the way in and put crisper cover, pans, shelves and baskets into their correct
positions. See the Operation section for more information.
The doors were removed during product installation and not properly replaced.
• Remove and replace the doors according to the Removing and Replacing Refrigerator
Handles and Doors section.
Refrigerator is not leveled properly.
• See Door Alignment in the Refrigeration Installation section to level refrigerator.
The gaskets are dirty or sticky.
• Clean the gaskets and the surfaces that they touch. Rub a thin coat of appliance polish or
kitchen wax on the gaskets after cleaning.
Door was recently closed.
• When you open the door, warmer air enters the refrigerator. As the warm air cools, it can
create a vacuum. If the door is hard to open, wait one minute to allow the air pressure to
equalize, then see if it opens more easily.
Leveling legs are not adjusted properly.
• Refer to the Leveling and Door Alignment section.
Floor is not level.
• It may be necessary to add shims under the leveling legs or rollers to complete installation.
• The refrigerator compartment lamp is LED interior lighting, and service should be
performed by a qualified technician.
The Air Filter may need to be set to the MAX setting or replaced.
• Set the Air Filter to the MAX setting. If the odor does not go away within 24 hours, the filter
may need to be replaced. See the Replacing the Air Filter section for replacement
instructions.
Page 45

Problem Possible Cause & Solution
The interior of the
refrigerator is
covered with dust or
soot.
The refrigerator is located near a fire source, such as a fireplace, chimney, or candle.
• Make sure that the refrigerator is not located near a fire source, such as a fireplace,
chimney or candle.
Noises
Problem Possible Cause & Solution
Clicking The defrost control will click when the automatic defrost cycle begins and ends. The
thermostat control (or refrigerator control on some models) will also click when cycling
on and off.
• Normal Operation
Rattling Rattling noises may come from the flow of refrigerant, the water line on the back of
the unit, or items stored on top of or around the refrigerator.
• Normal Operation
Refrigerator is not resting solidly on the floor.
• Floor is weak or uneven or leveling legs need to be adjusted. See the Leveling and Door
Alignment section.
Refrigerator with linear compressor was jarred while running.
• Normal Operation
Whooshing Evaporator fan motor is circulating air through the refrigerator and freezer
compartments.
• Normal Operation
Air is being forced over the condenser by the condenser fan.
• Normal Operation
Gurgling Refrigerant flowing through the cooling system.
• Normal Operation
Popping Contraction and expansion of the inside walls due to changes in temperature.
• Normal Operation
Sizzling Water dripping on the defrost heater during a defrost cycle.
• Normal Operation
Vibrating If the side or back of the refrigerator is touching a cabinet or wall, some of the normal
vibrations may make an audible sound.
• To eliminate the noise, make sure that the sides and back cannot vibrate against any wall
or cabinet.
Dripping Water running into the drain pan during the defrost cycle.
• Normal Operation
Pulsating or highpitched sound
Your refrigerator is designed to run more efficiently to keep your food items at the
desired temperature. The high efficiency compressor may cause your new refrigerator
to run longer than your old one, but it is still more energy efficient than previous
models. While the refrigerator is running, it is normal to hear a pulsating or highpitched sound.
• Normal Operation
45TROUBLESHOOTING
ENGLISH
Page 46

46 LIMITED WARRANTY
LIMITED WARRANTY
For USA
TERMS AND CONDITIONS
ARBITRATION NOTICE: THIS LIMITED WARRANTY CONTAINS AN ARBITRATION PROVISION THAT
REQUIRES YOU AND LG TO RESOLVE DISPUTES BY BINDING ARBITRATION INSTEAD OF IN COURT,
UNLESS YOU CHOOSE TO OPT OUT. IN ARBITRATION, CLASS ACTIONS AND JURY TRIALS ARE NOT
PERMITTED. PLEASE SEE THE SECTION TITLED “PROCEDURE FOR RESOLVING DISPUTES” BELOW.
Should your LG Refrigerator ("Product") fail due to a defect in materials or workmanship under normal and
proper use, during the warranty period set forth below, LG Electronics (“LG”) will, at its option, repair or
replace the Product. This limited warranty is valid only to the original retail purchaser of the Product and
applies only when purchased and used within the United States including U.S. Territories.
WARRANTY PERIOD
Sealed System
Refrigerator/Freezer
(Condenser, Dryer,
Connecting Tube and
Evaporator)
Compressor
One (1) year from the
date of original retail
purchase
Parts and Labor (internal/
functional parts only)
• Replacement products and parts are warranted for the remaining portion of the original warranty period
or ninety (90) days, whichever is greater.
• Replacement products and parts may be new, reconditioned, refurbished, or otherwise factory
remanufactured.
• Proof of original retail purchase specifying the Product model and date of purchase is required to obtain
warranty service under this limited warranty.
EXCEPT TO THE EXTENT PROHIBITED BY APPLICABLE LAW, ANY IMPLIED WARRANTY OF
MERCHANTABILITY OR FITNESS FOR A PARTICULAR PURPOSE ON THE PRODUCT IS LIMITED IN
DURATION TO THE DURATION OF THE ABOVE LIMITED WARRANTY. UNDER NO CIRCUMSTANCES
SHALL LG OR ITS U.S. DISTRIBUTORS/DEALERS BE LIABLE FOR ANY INDIRECT, INCIDENTAL,
CONSEQUENTIAL, SPECIAL, OR PUNITIVE DAMAGES, INCLUDING, WITHOUT LIMITATION, LOST
GOODWILL, LOST REVENUES OR PROFITS, WORK STOPPAGE, IMPAIRMENT OF OTHER GOODS, COST OF
REMOVAL AND REINSTALLATION OF THE PRODUCT, LOSS OF USE, OR ANY OTHER DAMAGES WHETHER
BASED IN CONTRACT, TORT, OR OTHERWISE. LG’S TOTAL LIABILITY, IF ANY, SHALL NOT EXCEED THE
PURCHASE PRICE PAID BY YOU FOR THE PRODUCT.
Some states do not allow the exclusion or limitation of incidental or consequential damages or limitations
on how long an implied warranty lasts, so the above exclusions or limitations may not apply to you. This
limited warranty gives you specific legal rights and you may also have other rights that vary from state to
state.
Five (5) years from the
date of original retail
purchase
Parts and Labor Parts and Labor
Five (5) years from the
date of original retail
purchase
Linear / Inverter
Compressor Only : Parts
Only for years 6-10 from
the date of original retail
purchase (Consumer will
be charged for labor)
THIS LIMITED WARRANTY DOES NOT COVER:
• Service trips to deliver, pick up, or install, educate how to operate, correct wiring, or correct
unauthorized repairs.
• Damage or failure of the Product to perform during power failures and interrupted or inadequate
electrical service.
Page 47

47LIMITED WARRANTY
• Damage or failure caused by leaky or broken water pipes, frozen water pipes, restricted drain lines,
inadequate or interrupted water supply or inadequate supply of air.
• Damage resulting from operating the product in a corrosive atmosphere or contrary to the product
owner’s manual.
• Damage or failure to the Product caused by accidents, pests and vermin, lightning, wind, fire, floods, acts
of God, or any other causes beyond the control of LG.
• Damage or failure caused by unauthorized modification or alteration, or if used for other than the
intended purpose.
• Damage or failure resulting from misuse, abuse, improper installation, repair, or maintenance.
Improper repair includes use of parts not authorized by LG. Improper installation or maintenance
includes installation or maintenance contrary to the Product owner’s manual.
• Damage or failure caused by incorrect electrical current, voltage, or plumbing codes.
• Damage or failure caused by transportation and handling, including scratches, dents, chips, and/or
other damage to the finish of the Product, unless such damage is reported within one (1) week of
delivery.
• Damage or missing items to any display, open box, or discounted Product.
• Refurbished Product or any Product sold “As Is”, “Where Is”, “With all Faults”, or similar disclaimer.
• Products with original serial numbers that have been removed, altered, or cannot be readily determined.
• Increases in utility costs and additional utility expenses.
• Any noises associated with normal operation.
• Use of accessories (e.g., water filters, etc.), components, or consumable cleaning products that are not
authorized by LG.
• Replacement of light bulbs, filters, or any consumable parts.
• When Product is used for other than normal and proper household use (e.g. commercial or industrial
use, offices, and recreational facilities or vehicles) or contrary to the instructions outlined in the Product’s
owner’s manual.
• Costs associated with removal and reinstallation of your Product for repairs.
• Shelves, door bins, drawers, handle and accessories, except for internal/functional parts covered under
this limited warranty.
The cost of repair or replacement under these excluded circumstances shall be borne by the
consumer.
TO OBTAIN WARRANTY SERVICE AND ADDITIONAL INFORMATION
Call 1-800-243-0000 and select the appropriate option from the menu.
Or visit our website at http://www.lg.com
Or by mail: LG Electronics Customer Service P.O. Box 240007 Huntsville, AL 35813 ATTN: CIC
ENGLISH
PROCEDURE FOR RESOLVING DISPUTES:
ALL DISPUTES BETWEEN YOU AND LG ARISING OUT OF OR RELATING IN ANY WAY TO THIS LIMITED
WARRANTY OR THE PRODUCT SHALL BE RESOLVED EXCLUSIVELY THROUGH BINDING ARBITRATION, AND
NOT IN A COURT OF GENERAL JURISDICTION. BINDING ARBITRATION MEANS THAT YOU AND LG ARE EACH
WAIVING THE RIGHT TO A JURY TRIAL AND TO BRING OR PARTICIPATE IN A CLASS ACTION.
Definitions. For the purposes of this section, references to “LG” mean LG Electronics U.S.A., Inc., its
parents, subsidiaries and affiliates, and each of their officers, directors, employees, agents, beneficiaries,
predecessors in interest, successors, assigns and suppliers; references to “dispute” or “claim” shall include
any dispute, claim or controversy of any kind whatsoever (whether based in contract, tort, statute,
regulation, ordinance, fraud, misrepresentation or any other legal or equitable theory) arising out of or
relating in any way to the sale, condition or performance of the product or this Limited Warranty.
Notice of Dispute. In the event you intend to commence an arbitration proceeding, you must first notify
LG in writing at least 30 days in advance of initiating the arbitration by sending a letter to LG at LG
Page 48

48 LIMITED WARRANTY
Electronics, USA, Inc. Attn: Legal Department- Arbitration 1000 Sylvan Ave, Englewood Cliffs 07632. You
and LG agree to engage in good faith discussions in an attempt to amicably resolve your claim. The notice
must provide your name, address, and telephone number; identify the product that is the subject of the
claim; and describe the nature of the claim and the relief being sought. If you and LG are unable to resolve
the dispute within 30 days, either party may proceed to file a claim for arbitration.
Agreement to Binding Arbitration and Class Action Waiver. Upon failure to resolve the dispute during
the 30 day period after sending written notice to LG, you and LG agree to resolve any claims between us
only by binding arbitration on an individual basis, unless you opt out as provided below. Any dispute
between you and LG shall not be combined or consolidated with a dispute involving any other person’s or
entity’s product or claim. More specifically, without limitation of the foregoing, any dispute between you
and LG shall not under any circumstances proceed as part of a class or representative action. Instead of
arbitration, either party may bring an individual action in small claims court, but that small claims court
action may not be brought on a class or representative basis.
Arbitration Rules and Procedures. To begin arbitration of a claim, either you or LG must make a written
demand for arbitration. The arbitration will be administered by the American Arbitration Association
(“AAA”) and will be conducted before a single arbitrator under the AAA’s Consumer Arbitration Rules that
are in effect at the time the arbitration is initiated (referred to as the “AAA Rules”) and under the
procedures set forth in this section. The AAA Rules are available online at www.adr.org/consumer. Send a
copy of your written demand for arbitration, as well as a copy of this provision, to the AAA in the manner
described in the AAA Rules. You must also send a copy of your written demand to LG at LG Electronics,
USA, Inc. Attn: Legal Department- Arbitration 1000 Sylvan Avenue Englewood Cliffs, NJ 07632. If there is a
conflict between the AAA Rules and the rules set forth in this section, the rules set forth in this section will
govern. This arbitration provision is governed by the Federal Arbitration Act. Judgment may be entered on
the arbitrator’s award in any court of competent jurisdiction. All issues are for the arbitrator to decide,
except that issues relating to the scope and enforceability of the arbitration provision and to the
arbitrability of the dispute are for the court to decide. The arbitrator is bound by the terms of this
provision.
Governing Law. The law of the state of your residence shall govern this Limited Warranty and any
disputes between us except to the extent that such law is preempted by or inconsistent with applicable
federal law.
Fees/Costs. You do not need to pay any fee to begin an arbitration. Upon receipt of your written demand
for arbitration, LG will promptly pay all arbitration filing fees to the AAA unless you seek more than $25,000
in damages, in which case the payment of these fees will be governed by the AAA Rules. Except as
otherwise provided for herein, LG will pay all AAA filing, administration and arbitrator fees for any
arbitration initiated in accordance with the AAA Rules and this arbitration provision. If you prevail in the
arbitration, LG will pay your attorneys’ fees and expenses as long as they are reasonable, by considering
factors including, but not limited to, the purchase amount and claim amount. Notwithstanding the
foregoing, if applicable law allows for an award of reasonable attorneys’ fees and expenses, an arbitrator
can award them to the same extent that a court would. If the arbitrator finds either the substance of your
claim or the relief sought in the demand is frivolous or brought for an improper purpose (as measured by
the standards set forth in Federal Rule of Civil Procedure 11(b)), then the payment of all arbitration fees will
be governed by the AAA Rules. In such a situation, you agree to reimburse LG for all monies previously
disbursed by it that are otherwise your obligation to pay under the AAA Rules. Except as otherwise
provided for, LG waives any rights it may have to seek attorneys’ fees and expenses from you if LG prevails
in the arbitration.
Hearings and Location. If your claim is for $25,000 or less, you may choose to have the arbitration
conducted solely on the basis of (1) documents submitted to the arbitrator, (2) through a telephonic
hearing, or (3) by an in-person hearing as established by the AAA Rules. If your claim exceeds $25,000, the
right to a hearing will be determined by the AAA Rules. Any in-person arbitration hearings will be held at a
location within the federal judicial district in which you reside unless we both agree to another location or
we agree to a telephonic arbitration.
Opt Out. You may opt out of this dispute resolution procedure. If you opt out, neither you nor LG can
require the other to participate in an arbitration proceeding. To opt out, you must send notice to LG no
later than 30 calendar days from the date of the first consumer purchaser’s purchase of the product by
either: (i) sending an e-mail to optout@lge.com, with the subject line: “Arbitration Opt Out” or (ii) calling 1800-980-2973. You must include in the opt out e-mail or provide by telephone: (a) your name and address;
(b) the date on which the product was purchased; (c) the product model name or model number; and (d)
Page 49

49LIMITED WARRANTY
the serial number (the serial number can be found (i) on the product; or (ii) online by accessing https://
www.lg.com/us/support/repair-service/schedule-repair continued and clicking on “Find My Model & Serial
Number”).
You may only opt out of the dispute resolution procedure in the manner described above (that is, by e-mail
or telephone); no other form of notice will be effective to opt out of this dispute resolution procedure.
Opting out of this dispute resolution procedure will not affect the coverage of the Limited Warranty in any
way, and you will continue to enjoy the full benefits of the Limited Warranty. If you keep this product and
do not opt out, then you accept all terms and conditions of the arbitration provision described above.
For Canada
TERMS AND CONDITIONS
ARBITRATION NOTICE: THIS LIMITED WARRANTY CONTAINS AN ARBITRATION PROVISION THAT
REQUIRES YOU AND LG TO RESOLVE DISPUTES BY BINDING ARBITRATION INSTEAD OF IN COURT,
UNLESS THE LAWS OF YOUR PROVINCE OR TERRITORY DO NOT PERMIT THAT, OR, IN OTHER
JURISDICTIONS, IF YOU CHOOSE TO OPT OUT. IN ARBITRATION, CLASS ACTIONS AND JURY TRIALS
ARE NOT PERMITTED. PLEASE SEE THE SECTION TITLED “PROCEDURE FOR RESOLVING DISPUTES”
BELOW.
Should your LG Refrigerator ("Product") fail due to a defect in materials or workmanship under normal and
proper use, during the warranty period set forth below, LG Electronics Canada, Inc. (“LGECI”) will, at its
option, repair or replace the Product upon receipt of proof of the original retail purchase. This limited
warranty is valid only to the original retail purchaser of the Product and applies only to a Product
distributed, purchased and used within Canada, as determined at the sole discretion of LGECI.
ENGLISH
WARRANTY PERIOD (Note: If the original date of purchase cannot be verified, the warranty will
begin sixty (60) days from the date of manufacture)
Refrigerator
One (1) year from the
date of original retail
purchase
Parts and Labor (internal/
functional parts only)
• Replacement products and parts are warranted for the remaining portion of the original warranty period
or ninety (90) days, whichever is greater.
• Replacement products and parts may be new, reconditioned, refurbished, or otherwise factory
remanufactured, all at the sole discretion of LGECI.
• Proof of original retail purchase specifying the Product model and date of purchase is required to obtain
warranty service under this Limited Warranty.
LGECI’S SOLE LIABILITY IS LIMITED TO THE LIMITED WARRANTY SET OUT ABOVE. EXCEPT AS
EXPRESSLY PROVIDED ABOVE, LGECI MAKES NO, AND HEREBY DISCLAIMS, ALL OTHER WARRANTIES
AND CONDITIONS RESPECTING THE PRODUCT, WHETHER EXPRESS OR IMPLIED, INCLUDING BUT NOT
LIMITED TO, ANY IMPLIED WARRANTY OR CONDITION OF MERCHANTABILITY OR FITNESS FOR A
PARTICULAR PURPOSE, AND NO REPRESENTATIONS SHALL BE BINDING ON LGECI. LGECI DOES NOT
AUTHORIZE ANY PERSON TO CREATE OR ASSUME FOR IT ANY OTHER WARRANTY OBLIGATION OR
LIABILITY IN CONNECTION WITH THE PRODUCT. TO THE EXTENT THAT ANY WARRANTY OR
CONDITION IS IMPLIED BY LAW, IT IS LIMITED TO THE WARRANTY PERIOD SET OUT ABOVE. UNDER
NO CIRCUMSTANCES SHALL LGECI, THE MANUFACTURER OR DISTRIBUTOR OF THE PRODUCT, BE
LIABLE FOR ANY INCIDENTAL, CONSEQUENTIAL, SPECIAL, DIRECT, INDIRECT, PUNITIVE OR
EXEMPLARY DAMAGES, INCLUDING, WITHOUT LIMITATION, LOSS OF GOODWILL, LOST PROFITS, LOSS
OF ANTICIPATED PROFITS, LOST REVENUE, LOSS OF USE, OR ANY OTHER DAMAGE, WHETHER ARISING
DIRECTLY OR INDIRECTLY FROM ANY CONTRACTUAL BREACH, FUNDAMENTAL BREACH, TORT OR
Sealed System (Condenser, Dryer, Connecting
Tube and Evaporator)
One (1) year from the
date of original retail
purchase
Parts and Labor Parts only (Consumer will
Seven (7) years from the
date of original retail
purchase
be charged for labor)
Linear / Inverter
Compressor
Ten (10) years from the
date of original retail
purchase
Part only (Consumer will
be charged for labor)
Page 50

50 LIMITED WARRANTY
OTHERWISE, OR FROM ANY ACTS OR OMISSIONS. LGECI’S TOTAL LIABILITY, IF ANY, SHALL NOT
EXCEED THE PURCHASE PRICE PAID BY YOU FOR THE PRODUCT.
This Limited Warranty gives you specific legal rights. You may also have other rights that vary from
province to province depending on applicable provincial laws. Any term of this Limited Warranty that
negates or varies any implied condition or warranty under provincial law is severable where it conflicts
with such provincial law without affecting the remainder of this warranty’s terms.
THIS LIMITED WARRANTY DOES NOT COVER:
• Service trips to i) deliver, pick up, or install or; educate on how to operate the Product; ii) correct wiring or
plumbing; or iii) correct unauthorized repairs or installations of the Product;
• Damage or failure of the Product to perform during power failures and interrupted or inadequate
electrical service;
• Damage or failure caused by leaky or broken water pipes, frozen water pipes, restricted drain lines,
inadequate or interrupted water supply or inadequate supply of air;
• Damage or failure resulting from operating the Product in a corrosive atmosphere or contrary to the
instructions outlined in the Product’s owner’s manual;
• Damage or failure to the Product caused by accidents, pests and vermin, lightning, wind, fire, floods, acts
of God, or any other causes beyond the control of LGECI or the manufacturer;
• Damage or failure resulting from misuse, abuse, improper installation, repair, or maintenance of the
Product. Improper repair includes use of parts not authorized or specified by LGECI. Improper
installation or maintenance includes installation or maintenance contrary to the Product’s owner’s
manual;.
• Damage or failure caused by unauthorized modification or alteration of the Product, or if used for other
than the intended household purpose/use of the Product, or damage or failure resulting from any water
leakage due to improper installation of the Product;
• Damage or failure caused by incorrect electrical current, voltage or plumbing codes;
• Damage or failure caused by use that is other than normal household use, including, without limitation,
commercial or industrial use, including use in commercial offices or recreational facilities, or as
otherwise outlined in the Product’s owner’s manual;
• Damage or failure caused by the use of any accessories, components or cleaning products, including,
without limitation, water filters, that are not approved/authorized by LGECI;
• Replacement of the water filter cartridge due to water pressure that is outside the specified operating
range or due to excessive sediment in the water supply;
• Damage or failure caused by transportation and handling, including scratches, dents, chips and/or other
damage to the finish of the Product, unless such damage results from defects in materials or
workmanship and is reported to LGECI within one (1) week of delivery of the Products;
• Damage or missing items to any display, open box, refurbished or discounted Product;
• Refurbished Product or any Product sold “As Is”, “Where Is”, “With all Faults”, or any similar disclaimer;
• Products with original serial numbers that have been removed, altered or cannot be readily determined
at the discretion of LGECI;
• Increases in utility costs and additional utility expenses in any way associated with the Product;
• Any noises associated with normal operation of the Product;
• Replacement of light bulbs, filters, fuses or any other consumable parts;
• Replacement of any part that was not originally included with the Product;
• Costs associated with removal and/or reinstallation of the Product for repairs; and
• Shelves, door bins, drawers, handle and accessories to the Product, except for internal/functional parts
covered under this Limited Warranty.
• Coverage for "in Home" repairs, for products in-warranty, will be provided if the Product is within a 150
km radius from the nearest authorized service center (ASC), as determined by LG Canada. If your Product
Page 51

51LIMITED WARRANTY
is located outside a 150 km radius from a ASC, as determined by LG Canada, it will be your responsibility
to bring the Product, at your sole expense, to the ASC for in-warranty repair.
All costs and expenses associated with the above excluded circumstances, listed under the heading,
This Limited Warranty Does Not Cover, shall be borne by the consumer.
TO OBTAIN WARRANTY SERVICE AND ADDITIONAL INFORMATION, PLEASE CALL OR VISIT OUR WEBSITE:
Call 1-888-542-2623 (7 A.M. to 12 A.M., 365 days a year) and select the appropriate option from the menu,
or visit our website at http://www.lg.com
PROCEDURE FOR RESOLVING DISPUTES:
EXCEPT WHERE PROHIBITED AT LAW, ALL DISPUTES BETWEEN YOU AND LG ARISING OUT OF OR RELATING
IN ANY WAY TO THIS LIMITED WARRANTY OR THE PRODUCT SHALL BE RESOLVED EXCLUSIVELY THROUGH
BINDING ARBITRATION, AND NOT IN A COURT OF GENERAL JURISDICTION. EXCEPT WHERE PROHIBITED
AT LAW, YOU AND LG BOTH IRREVOCABLY AGREE TO WAIVE THE RIGHT TO A JURY TRIAL AND TO BRING
OR PARTICIPATE IN A CLASS ACTION.
Definitions. For the purposes of this section, references to “LG” mean LG Electronics Canada, Inc., its
parents, subsidiaries and affiliates, and each of their officers, directors, employees, agents, beneficiaries,
predecessors in interest, successors, assigns and suppliers; references to “dispute” or “claim” shall include
any dispute, claim or controversy of any kind whatsoever (whether based in contract, tort, statute,
regulation, ordinance, fraud, misrepresentation or any other legal or equitable theory) arising out of or
relating in any way to the sale, condition or performance of the product or this Limited Warranty.
Notice of Dispute. In the event you intend to commence an arbitration proceeding, you must first notify
LG in writing at least 30 days in advance of initiating the arbitration by sending a letter to LGECI Legal
Team at 20 Norelco Drive, North York, Ontario, Canada M9L 2X6 (the “Notice of Dispute”). You and LG
agree to engage in good faith discussions in an attempt to amicably resolve your claim. The notice must
provide your name, address, and telephone number; identify the product that is the subject of the claim;
and describe the nature of the claim and the relief being sought. If you and LG are unable to resolve the
dispute within 30 days of LG’s receipt of the Notice of Dispute, the dispute shall be resolved by binding
arbitration in accordance with the procedure set out herein. You and LG both agree that, during the
arbitration proceeding, the terms (including any amount) of any settlement offer made by either you or LG
will not be disclosed to the arbitrator until the arbitrator determines the dispute.
Agreement to Binding Arbitration and Class Action Waiver. Upon failure to resolve the dispute during
the 30 day period after LG’s receipt of the Notice of Dispute, you and LG agree to resolve any claims
between you and LG only by binding arbitration on an individual basis, unless you opt out as provided
below, or you reside in a jurisdiction that prevents full application of this clause in the circumstances of the
claims at issue (in which case if you are a consumer, this clause will only apply if you expressly agree to the
arbitration). To the extent permitted by applicable law, any dispute between you and LG shall not be
combined or consolidated with a dispute involving any other person’s or entity’s product or claim. More
specifically, without limitation of the foregoing, except to the extent such a prohibition is not permitted at
law, any dispute between you and LG shall not under any circumstances proceed as part of a class or
representative action. Instead of arbitration, either party may bring an individual action in small claims
court, but that small claims court action may not be brought on a class or representative basis except to
the extent this prohibition is not permitted at law in your province or territory of jurisdiction as it relates to
the claims at issue between you and LG.
Arbitration Rules and Procedures. To begin arbitration of a claim, either you or LG must make a written
demand for arbitration. The arbitration will be private and confidential, and conducted on a simplified and
expedited basis before a single arbitrator chosen by the parties under the provincial or territorial
commercial arbitration law and rules of the province or territory of your residence. You must also send a
copy of your written demand to LG at LG Electronics, Canada, Inc., Attn: Legal Department- Arbitration, 20
Norelco Drive, North York, Ontario M9L 2X6. This arbitration provision is governed by your applicable
provincial or territorial commercial arbitration legislation. Judgment may be entered on the arbitrator’s
award in any court of competent jurisdiction. All issues are for the arbitrator to decide, except that, issues
relating to the scope and enforceability of the arbitration provision and to the arbitrability of the dispute
are for the court to decide. The arbitrator is bound by the terms of this provision.
Governing Law. The law of the province or territory of your purchase shall govern this Limited Warranty
and any disputes between you and LG except to the extent that such law is preempted by or inconsistent
ENGLISH
Page 52

52 LIMITED WARRANTY
with applicable federal or provincial/territorial law. Should arbitration not be permitted for any claim,
action, dispute or controversy between you and LG, you and LG attorn to the exclusive jurisdiction of the
courts of the province or territory of your purchase for the resolution of the claim, action, dispute or
controversy between you and LG.
Fees/Costs. You do not need to pay any fee to begin an arbitration. Upon receipt of your written demand
for arbitration, LG will promptly pay all arbitration filing fees unless you seek more than $25,000 in
damages, in which case the payment of these fees will be governed by the applicable arbitration rules.
Except as otherwise provided for herein, LG will pay all filing, administration and arbitrator fees for any
arbitration initiated in accordance with the applicable arbitration rules and this arbitration provision. If you
prevail in the arbitration, LG will pay your attorneys’ fees and expenses as long as they are reasonable, by
considering factors including, but not limited to, the purchase amount and claim amount. Notwithstanding
the foregoing, if applicable law allows for an award of reasonable attorneys’ fees and expenses, an
arbitrator can award them to the same extent that a court would. If the arbitrator finds either the
substance of your claim or the relief sought in the demand is frivolous or brought for an improper purpose
(as measured by the applicable laws), then the payment of all arbitration fees will be governed by the
applicable arbitration rules. In such a situation, you agree to reimburse LG for all monies previously
disbursed by it that are otherwise your obligation to pay under the applicable arbitration rules. Except as
otherwise provided for, LG waives any rights it may have to seek attorneys’ fees and expenses from you if
LG prevails in the arbitration.
Hearings and Location. If your claim is for $25,000 or less, you may choose to have the arbitration
conducted solely (1) on the basis of documents submitted to the arbitrator, (2) through a telephonic
hearing, or (3) by an in-person hearing as established by the applicable arbitration rules. If your claim
exceeds $25,000, the right to a hearing will be determined by the applicable arbitration rules. Any inperson arbitration hearings will be held at the nearest, most mutually-convenient arbitration location
available within the province or territory in which you reside unless you and LG both agree to another
location or agree to a telephonic arbitration.
Severability and Waiver. If any portion of this Limited Warranty (including these arbitration procedures)
is unenforceable, the remaining provisions will continue in full force and effect to the maximum extent
permitted by applicable law. Should LG fail to enforce strict performance of any provision of this Limited
Warranty (including these arbitration procedures), it does not mean that LG intends to waive or has waived
any provision or part of this Limited Warranty.
Opt Out.You may opt out of this dispute resolution procedure. If you opt out, neither you nor LG can
require the other to participate in an arbitration proceeding. To opt out, you must send notice to LG no
later than 30 calendar days from the date of the first consumer purchaser’s purchase of the product by
either (i) sending an e-mail to optout@lge.com, with the subject line: “Arbitration Opt Out;” or (ii) calling 1800-980-2973. You must include in the opt out e-mail or provide by telephone: (a) your name and address;
(b) the date on which the product was purchased; (c) the product model name or model number; and (d)
the serial number (the serial number can be found (i) on the product; or (ii) online by accessing https://
www.lg.com/ca_en/support/repair-service/schedule- repair and clicking on “Find My Model & Serial
Number”).
In the event that you “Opt Out”, the law of the province or territory of your residence shall govern this
Limited Warranty and any disputes between you and LG except to the extent that such law is preempted
by or inconsistent with applicable federal or provincial/territorial law. Should arbitration not be permitted
for any claim, action, dispute or controversy between you and LG, you and LG agree to attorn to the
exclusive jurisdiction of the courts of the province or territory of your residence for the resolution of the
claim, action, dispute or controversy between you and LG.
You may only opt out of the dispute resolution procedure in the manner described above (that is, by e-mail
or telephone); no other form of notice will be effective to opt out of this dispute resolution procedure.
Opting out of this dispute resolution procedure will not affect the coverage of the Limited Warranty in any
way, and you will continue to enjoy the full benefits of the Limited Warranty. If you keep this product and
do not opt out, then you accept all terms and conditions of the arbitration provision described above.
Conflict of Terms. In the event of a conflict or inconsistency between the terms of this Limited Warranty
and the End User License Agreement (“EULA”) in regards to dispute resolution, the terms of this Limited
Warranty shall control and govern the rights and obligations of the parties and shall take precedence over
the EULA.
Page 53

53Memo
Page 54

54 Memo
Page 55

55Memo
Page 56

Page 57

MANUAL DEL PROPIETARIO
REFRIGERADOR CON
PUERTA FRANCESA
Lea detenidamente el manual del propietario antes de poner el
electrodoméstico en funcionamiento y consérvelo a mano en
todo momento para su referencia.
www.lg.com
Copyright © 2019 LG Electronics Inc. Todos los derechos reservados
Page 58

ÍNDICE
2
3 INSTRUCCIONES DE SEGURIDAD
3 LEA TODAS LAS INSTRUCCIONES ANTES DE
UTILIZAR
3 ADVERTENCIA
6 PRECAUCIÓN
8 DESCRIPCIÓN GENERAL DEL
PRODUCTO
8 Características del Producto
11 INSTALACIÓN
11 Antes de la Instalación
12 Elección de la ubicación adecuada
14 Removiendo/Ensamblando Agarradores
15 Removiendo/Ensamblando puertas y estantes
19 Conectando la línea de agua
23 Nivelando y Alineando la Puerta
23 Encendido
24 FUNCIONAMIENTO
49 PARA EE. UU.
52 PARA CANADÁ
24 Antes de Usar
25 Panel de control
26 Modo Sabbath
26 Dispensador de Agua
26 Dispensador de Hielo Automático
27 Almacenando Alimentos
29 Cajón de verduras con humedad controlada
31 Glide‘N’Serve
31 Estantes del refrigerador
31 Contenedores de la Puerta
32 Durabase
33 FUNCIONES INTELIGENTES
33 Aplicación LG ThinQ
33 Función Smart Diagnosis™
34 MANTENIMIENTO
34 Limpieza
35 Water Filter (Filtro de agua)
38 SOLUCIÓN DE PROBLEMAS
38 Preguntas Frecuentes
39 Antes de llamar al servicio técnico
49 GARANTÍA LIMITADA
Page 59

INSTRUCCIONES DE SEGURIDAD
3INSTRUCCIONES DE SEGURIDAD
LEA TODAS LAS INSTRUCCIONES ANTES DE UTILIZAR
Mensajes de Seguridad
Su seguridad y la de los demás son muy importantes.
Tanto en este manual como en el equipo, hemos proporcionado muchos mensajes de seguridad
importantes. Siempre debe leer y respetar todos los mensajes de seguridad.
Este es el símbolo de alerta de seguridad.
Este símbolo le advierte de posibles peligros que pueden matarlos o lastimarlos a usted y a otros.
Todos los mensajes de seguridad seguirán el símbolo de alerta de seguridad y la palabra
ADVERTENCIA o PRECAUCIÓN.
Estos términos significan lo siguiente:
ADVERTENCIA
Podría sufrir lesiones graves o la muerte si no sigue las instrucciones.
PRECAUCIÓN
Puede resultar lesionado o causar daño al producto si no sigue las instrucciones.
Todos los mensajes de seguridad le indicarán cuál es el riesgo potencial, le indicarán cómo reducir la
probabilidad de lesiones y le proporcionarán información sobre qué podría suceder si no se siguen las
instrucciones.
ADVERTENCIA
ESPAÑOL
ADVERTENCIA
• Para disminuir el riesgo de explosiones, incendios, descargas eléctricas, quemaduras, lesiones o muerte
para las personas que usen este artefacto, siga las precauciones básicas, incluidas las siguientes:
Instalación
• Para reducir el riesgo de lesiones personales, respete todos los procedimientos de seguridad
recomendados por la industria, incluso el uso de guantes de manga larga y gafas de seguridad.
• Nunca intente operar este artefacto si se encuentra dañado, si no funciona correctamente, si no está
ensamblado por completo o si tiene piezas faltantes o rotas, incluido un cable o enchufe dañado.
• Conecte este producto únicamente a un tomacorriente dedicado, conectado a tierra, apto para usar con
este producto (115 voltios, 60 Hz, solo CA). El usuario tiene la responsabilidad de reemplazar un
tomacorriente de pared estándar de 2 tomas por un tomacorriente de pared estándar de 3 tomas.
• No use un tomacorriente que pueda apagarse con un interruptor. No use un cable de extensión.
• Posicione el electrodoméstico de un modo que le permita acceder fácilmente a la alimentación eléctrica.
• Al mover el electrodoméstico, tenga cuidado de no torcer ni dañar el cable de alimentación.
• Póngase en contacto con un centro de servicio autorizado antes de instalar o cambiar de lugar el
electrodoméstico.
• Por ninguna razón debe cortar o quitar la tercera clavija (tierra) del cable de alimentación.
• Mantenga los materiales de empaque fuera del alcance de los niños. Los materiales de empaque
pueden ser peligrosos para los niños. Corren riesgo de asfixia.
• No instale el electrodoméstico en un lugar húmedo o polvoriento, donde el aislamiento de las piezas
eléctricas podría deteriorarse.
Page 60

4 INSTRUCCIONES DE SEGURIDAD
• No coloque el electrodoméstico bajo la luz solar directa ni lo exponga a electrodomésticos que emitan
calor, como cocinas o calefactores.
• No doble ni pellizque en exceso el cable de alimentación, ni coloque objetos pesados sobre este.
Funcionamiento
• Este refrigerador está destinado únicamente a usos domésticos y similares aplicaciones, tales como:
- áreas de cocina en tiendas, oficinas y lugares de trabajo;
- granjas; por clientes en hoteles, moteles y otros tipos de ambientes residenciales;
- hospedajes tipo bed and breakfast;
- aplicaciones de abastecimiento y de servicios similares de no distribución.
• No use este electrodoméstico para fines especiales, como para conservar medicamentos o materiales de
ensayo, usar en barcos, etc.
• NO permita que los niños entren y se paren o se cuelguen de las puertas o los estantes del
electrodoméstico. Podrían dañar el refrigerador o sufrir lesiones graves.
• No permita que los niños entren al electrodoméstico. Podrían quedar atrapados y sofocarse.
• Debe supervisar a los niños para asegurarse de que no jueguen con el electrodoméstico.
• Mantenga los dedos lejos de los puntos de riesgo de pinzamiento; las distancias de separación entre las
puertas y los gabinetes son necesariamente pequeñas. Tenga cuidado al cerrar las puertas cuando haya
niños cerca.
• No toque los alimentos congelados ni las partes metálicas del compartimento del congelador si tiene las
manos mojadas o húmedas. Hacerlo podría causar congelación.
• No vuelva a congelar alimentos congelados que se hayan descongelado por completo. Esto podría ser
peligroso para su salud.
• No use adaptadores ni enchufe el cable de alimentación en un alargador de múltiples tomacorrientes.
• Si el cordón de alimentación es dañado, este debe ser reemplazado por el fabricante o por su agente de
servicio o por personal similarmente calificado con el fin de evitar un peligro.
• No use el refrigerador ni toque el cable de alimentación con las manos mojadas.
• No modifique ni extienda el cable de alimentación.
• No use un tomacorriente que no esté certificado. No enchufe el electrodoméstico en un tomacorriente
de pared dañado.
• No coloque las manos, los pies u otros objetos en la ventilación de aire ni en la parte inferior del
refrigerador. Si lo hace, podría sufrir lesiones personales o descargas eléctricas.
• Si se produce una fuga de gas (propano/GPL), asegúrese de que el área esté adecuadamente ventilada y
póngase en contacto con un centro de servicio autorizado antes de volver a usar el refrigerador. No
toque ni desarme el electrodoméstico ni el cable de alimentación del electrodoméstico.
• Ante la presencia de ruidos u olores extraños, o si sale humo del electrodoméstico, desconecte el cable
de alimentación de inmediato y póngase en contacto con un centro de servicio autorizado.
• No use fusibles (como cobre, alambre de acero, etc.) que no sean los fusibles estándar.
• No coloque ni use un aparato eléctrico dentro del electrodoméstico, a menos que sea de un tipo
recomendado por el fabricante.
• No introduzca animales con vida dentro del electrodoméstico.
• No coloque objetos pesados o frágiles, contenedores llenos de líquido, sustancias combustibles u
objetos inflamables (como velas y lámparas) sobre el electrodoméstico.
• Evite el contacto con las partes móviles del mecanismo eyector o con el elemento de calor que dispensa
los cubos de hielo.
• Si se conecta a un circuito protegido con fusibles, utilice un fusible de retardo.
• Mantenga las aperturas de ventilación, en la cubierta del electrodoméstico o en la estructura
incorporada, despejadas de obstrucciones.
Page 61

• No utilice dispositivos mecánicos u otros medios para acelerar el proceso de descongelado, con
excepción de aquellos recomendados por el fabricante.
• No utilice aparatos eléctricos dentro de los compartimientos de almacenaje de alimentos del
electrodoméstico, a menos que sean de un tipo recomendado por el fabricante.
• No almacene sustancias explosivas como latas de aerosol con propulsores inflamables en este
electrodoméstico.
• NO introduzca los dedos en el mecanismo de fabricación automática de hielo con el refrigerador
enchufado.
• Al retirar hielo del dispensador, no use un contenedor frágil.
Mantenimiento
• No use secadoras eléctricas para secar el interior del producto.
• No prenda velas para remover el olor interno del producto.
• En el caso de fuga del refrigerante, aleje los objetos inflamables del refrigerador. Asegúrese de que el
área esté bien ventilada y póngase en contacto con un centro de servicio autorizado.
• Mantenga materiales inflamables y vapores, como gasolina, alejados del refrigerador.
• Este aparato no esta destinado para utilizarse por personas (incluyendo niños) con capacidades fisicas,
sensoriales o mentales reducidas, o con falta de experiencia o conocimiento, a menos que hayan
recibido una supervisión o capacitación concerniente a el uso del aparato por una persona responsable
de su seguridad.
• Desenchufe el cable de alimentación antes de limpiar o reparar el electrodoméstico.
• Las luces del refrigerador y el compartimento del congelador son luces LED para interiores, y un técnico
calificado debe realizar el mantenimiento.
• En caso de apagón o tormenta eléctrica, desenchufe el cable de alimentación de inmediato.
• Apague la alimentación si ingresa agua o polvo en el electrodoméstico. Llame a un agente de servicio.
• No almacene contenedores de vidrio ni refrescos en el compartimento del congelador. Al congelarse, los
contenidos pueden expandirse, romper el contenedor y provocar lesiones.
• No almacene, desarme ni repare el electrodoméstico usted mismo ni permita que el personal no
calificado lo haga.
5INSTRUCCIONES DE SEGURIDAD
ESPAÑOL
Desecho
• Los electrodomésticos desechados o abandonados son peligrosos, incluso si se dejan de usar solo por
unos pocos días. Al momento de desechar el refrigerador, retire los materiales de embalaje de la puerta
o quite las puertas, pero deje los estantes en su lugar, a fin de que los niños no puedan ingresar
fácilmente a este.
• Si desecha el refrigerador, asegúrese de que el refrigerante y la espuma de aislamiento sean removidos
para su adecuada eliminación por un técnico calificado. Si libera el refrigerante o tira la espuma de
aislamiento, puede ser multado o encarcelado de acuerdo con la legislación ambiental pertinente. La
espuma de aislamiento contiene un gas expansor inflamable.
• Cuando se deshace del electrodoméstico, remueva la junta de la puerta dejando los estantes y cestas en
su lugar, y mantenga a los niños alejados del electrodoméstico.
Instrucciones de Conexión a Tierra
• La conexión inadecuada del conductor de conexión a tierra puede resultar en riesgo de choque eléctrico.
Pregunte a un electricista calificado o al personal de servicio si no está seguro si el artefacto está
adecuadamente conectado a tierra. No modifique el enchufe que viene con el artefacto. Si no cabe en el
contacto, pida que un electricista calificado instale un contacto apropiado.
Page 62

6 INSTRUCCIONES DE SEGURIDAD
• Haga que un técnico certificado verifique que el tomacorriente de pared y los cables estén
adecuadamente conectados a tierra.
• Nunca tire del cable de alimentación para desenchufar el electrodoméstico. Agarre siempre el enchufe
firmemente y tire del mismo para retirarlo del tomacorriente. Si no hace esto, podría dañar el cable de
alimentación y generar un riesgo de incendio y descarga eléctrica.
Riesgo de incendio y materiales inflamables
Este electrodoméstico contiene una pequeña cantidad de refrigerante isobutano (R600a), que
es combustible. Al transportar e instalar el electrodoméstico, debe prestar atención para
asegurar que ninguna parte del circuito refrigerante se dañe. Fuga del refrigerante fuera de
las pipas podría generar un incendio o causar una lesión ocular. Si se detecta una fuga, evite
cualquier llama descubierta o fuentes potenciales de incendio, y ventile el ambiente en el que
se encuentra el electrodoméstico por varios minutos.
A manera de evitar la creación de una mezcla de gas y aire inflamable en caso ocurra una fuga
en el circuito refrigerante, el tamaño del ambiente en el que el electrodoméstico se ubica
deberá corresponder a la cantidad de refrigerante usada. El espacio debe ser de 10.8 pies
cuadrados (1 metro cuadrado) por cada 8g de refrigerante R600a dentro del electrodoméstico.
La cantidad de refrigerante en su electrodoméstico particular se muestra en la placa de
identificación ubicada dentro del mismo. Nunca inicie un electrodoméstico mientras este
muestre algún signo defectuoso. En caso de dudas, consulte con su distribuidor.
PRECAUCIÓN
PRECAUCIÓN
• Para reducir el riesgo de lesiones leves o moderadas a personas, el mal funcionamiento o daño al
producto o propiedad cuando use este producto, siga las precauciones básicas, incluido lo siguiente:
Instalación
• No coloque el electrodoméstico en un lugar donde podría caerse.
• El refrigerador debe instalarse correctamente, teniendo en cuenta las instrucciones de instalación.
Funcionamiento
• No use aerosoles cerca del electrodoméstico.
• Este refrigerador está destinado únicamente a usos domésticos y similares.
• No golpee ni aplique demasiada fuerza en las superficies de vidrio. No toque las superficies de vidrio si
están agrietadas o rotas.
• No llene ni envase en exceso los alimentos en los compartimentos de la puerta. Esto podría dañar el
compartimento o provocar lesiones personales al retirar los alimentos aplicando una fuerza excesiva.
• No cuelgue ni coloque objetos pesados en el dispensador del electrodoméstico.
Mantenimiento
• No use detergentes fuertes como cera o diluyentes para la limpieza. Limpie con un trapo suave.
• Retire los objetos extraños (como polvo y agua) de las clavijas del enchufe y las áreas de contacto. No use
un trapo mojado o húmedo para limpiar el enchufe.
• No rocíe agua directamente en el interior o exterior del electrodoméstico.
Page 63

• Cuando estén fríos, no limpie los estantes de vidrio ni las tapas con agua caliente. Si se exponen a
cambios de temperatura repentinos, podrían romperse.
7INSTRUCCIONES DE SEGURIDAD
ESPAÑOL
GUARDE ESTAS INSTRUCCIONES
Page 64

8 DESCRIPCIÓN GENERAL DEL PRODUCTO
DESCRIPCIÓN GENERAL DEL PRODUCTO
Características del Producto
Las ilustraciones en esta guía pueden diferir de los componentes y accesorios reales, los cuales están
sujetos a cambios sin previo aviso por parte del fabricante a fin de introducir mejoras en el producto.
Exterior
a Refrigerador
Mantiene los alimentos frescos.
b Manija del congelador
Abre el estante del congelador.
c Manija del refrigerador
Abre y cierra la puerta del refrigerador.
d Luz LED
Se ilumina cuando la puerta del congelador está abierta.
e Congelador
Mantiene los alimentos congelados.
Page 65

Interior
LMWS27626*
9DESCRIPCIÓN GENERAL DEL PRODUCTO
ESPAÑOL
a Iluminación Interior LED
Ilumina el interior del refrigerador.
b Water Filter (Filtro de agua)
Purifica el agua.
c Dispensador de Agua
Dispensa agua purificada.
d Mainel de la puerta
Previene que se escape el aire frío del refrigerador cuando las puertas están cerradas.
PRECAUCIÓN
• Para reducir el riesgo de rayar la puerta o de romper el mainel central de la puerta, asegúrese de que el
mainel esté plegado antes de cerrar la puerta izquierda.
• La alarma de la puerta sonará cada 30 segundos si la puerta permanece abierta por más de un minuto.
e Cajón de verduras con humedad controlada
Ayuda a mantener los vegetales y las frutas crujientes, y controla la humedad.
f Bandeja de puerta fija
Almacena alimentos o bebidas frías.
g Bisagra de cierre automático
Las puertas del refrigerador y los cajones del congelador se cierran automáticamente mediante una
leve presión. (La puerta únicamente se cierra automáticamente cuando se encuentra abierta a un
ángulo menor a 30°).
h Máquina de Hielo Automática (Congelador)
Dispensa hielo automáticamente.
Page 66

10 DESCRIPCIÓN GENERAL DEL PRODUCTO
i Panel de control
Ajusta la temperatura del refrigerador y congelador.
j Bandeja de puerta modular
Las bandejas intercambiables pueden acomodarse según las necesidades de almacenamiento.
k Estante ajustable del refrigerador
Los estantes del refrigerador son ajustables para satisfacer sus necesidades personales de
almacenamiento.
l Glide'N'Serve
Almacena alimentos a una temperatura diferente a la del área del refrigerador regular.
m Contenedor de hielo
Almacena hielo de la máquina de hielo del congelador.
n Durabase y divisor Durabase
Provee almacenaje para productos alimenticios congelados de gran tamaño.
Especificaciones del producto
La apariencia y las especificaciones detalladas en este manual podrían variar debido a mejoras constantes
en el producto.
Requerimientos eléctricos: 115 V, 60 Hz
Presión de Agua Min/Max: 20 - 120 psi (138 - 827 kPa)
Modelo LMWS27626*
Descripción Profundidad-estándar, Refrigerador de puerta francesa, congelador bajo
Peso neto 287 lb (130 kg)
Page 67

INSTALACIÓN
11INSTALACIÓN
Antes de la Instalación
Descripción general de la instalación
Lea las siguientes instrucciones de instalación inmediatamente después de adquirir este producto o
transportarlo a otra ubicación.
ESPAÑOL
a Desempacando el refrigerador
b Elección de la ubicación adecuada
c Desensamblando / Ensamblando
d Conectando la línea de agua
e Nivelando y Alineando la Puerta
ADVERTENCIA
• Conecte únicamente a un suministro de agua potable.
Page 68

12 INSTALACIÓN
Desempacando el refrigerador
ADVERTENCIA
• Utilice a dos o más personas para mover e
instalar el refrigerador. Si no lo hace, puede
resultar en lesiones en la espalda o de otro tipo.
• El refrigerador es pesado. Proteja el piso al
mover el refrigerador para limpieza o servicio.
Siempre empuje el refrigerador hacia afuera al
moverlo. No menee o sacuda el refrigerador al
intentar moverlo pues puede dañar el piso.
• Mantenga materiales inflamables y vapores,
como gasolina, alejados del refrigerador. Si no lo
hace puede provocar un incendio, explosión o
muerte.
NOTA
• Remueva la tapa y cualquier etiqueta temporal
de su refrigerador previo a su uso. No remueva
ninguna etiqueta de precaución, modelo y
número de serie, o la Hoja Técnica que se
encuentra bajo la parte frontal del refrigerador.
NOTA
• Para remover cualquier cinta adhesiva o goma
restante frote enérgicamente el área con su
pulgar. La cinta adhesiva o residuos de goma
pueden ser fácilmente removidos frotando una
pequeña cantidad de jabón líquido para platos
con sus dedos. Limpie con agua caliente y seque.
• No utilice instrumentos puntiagudos, alcohol
para frotar, fluidos inflamables o limpiadores
abrasivos para remover cinta adhesiva o goma.
Estos productos pueden dañar la superficie de
su refrigerador.
• Reinstale o ajuste lo estantes como sea
necesario. Los estantes del refrigerador están
instalados en su posición de embarque.
Reinstale los estantes de acuerdo a sus
necesidades de almacenamiento individuales.
Elección de la ubicación
adecuada
NOTA
• La presión del agua debe ser de 20 - 120 psi ó
138 - 827 kPa o 1.4 - 8.4 kgf/cm
refrigerador es instalado en un área con baja
presión de agua (debajo de 20 psi o 138 kPa o
1.4 kgf/cm
refuerzo para compensar la baja presión.
2
), puede instalar una bomba de
2
. Si el
Electricidad
Utilice un enchufe con conexión a tierra individual:
115 Volts, 60 Hz, AC Amps mínimo.
ADVERTENCIA
• No sobrecarge el cableado del hogar causando
peligro de incendio al conectar múltiples
electrodomésticos en el mismo enchufe del
refrigerador.
• Para reducir el riesgo de descarga eléctrica, no
instale el refrigerador en un área húmeda ni
mojada.
Suelo
Para evitar ruido y vibración, la unidad debe ser
instalada y nivelada en un piso sólidamente
construido. De ser necesario, ajuste el nivel de las
patas para compensar la irregularidad del piso.
NOTA
• No es recomendable la instalación sobre
alfombrado, baldosas suaves o estructuras
débilmente apoyadas.
Temperatura ambiente
Instale este electrodoméstico en un área donde la
temperatura esté entre 55 °F (13 °C) y 110 °F (43
°C).
Si la temperatura alrededor del electrodoméstico
es muy baja o alta, la capacidad de enfriamiento
puede ser afectada negativamente.
Agua
Se debe ubicar donde se pueda conectar a un
suministro de agua para el dispensador de hielo
automático.
Page 69

13INSTALACIÓN
Dimensiones y Espacios
• Revise las dimensiones del electrodoméstico y el proceso de instalación para asegurar que haya
suficiente espacio para mover el refrigerador a través de puertas o aperturas angostas.
• Si una apertura es muy angosta para que pase el refrigerador, remueva las puertas del refrigerador. Vea
Removiendo/ensamblando puertas y estantes en este manual.
• La ubicación de instalación elegida para el refrigerador debería considerar espacio en la parte trasera de
la unidad para conexiones, circulación de aire y espacio en el frente para abrir las puertas y estantes.
• Una distancia muy pequeña entre los elementos adyacentes puede resultar en capacidad de
enfriamiento reducida y en cargos altos de consumo eléctrico. Deje al menos 24 pulgadas (610 mm)
frente al refrigerador para abrir las puertas, y al menos 2 pulgadas (50.8 mm) entre la parte trasera del
refrigerador y la pared.
B
A
F
HEG
C
D
I
ESPAÑOL
- Dimensión/Espacio LMWS27626*
A Profundidad sin agarrador 32 3/8˝ (822 mm)
B Ancho 35 3/4" (908 mm)
C Altura a la Punta de la Caja 68 3/8" (1737 mm)
D Altura a la Punta de la Bisagra 69 3/4" (1772 mm)
E Espacio Trasero 2" (50 mm)
F Profundidad sin Puerta 28 1/2˝ (724 mm)
G Profundidad con agarrador 34 7/8˝ (886 mm)
H Profundidad (Total con el cajón del congelador
54 3/4˝ (1391mm)
abierto)
I Profundidad (Total con Puerta Abierta 90°) 47 1/8˝ (1197 mm)
Page 70

14 INSTALACIÓN
Removiendo/Ensamblando
Agarradores
Es preferible remover las puertas del refrigerador
al moverlo a través de una apertura estrecha.
La apariencia de los agarradores puede variar de
como se muestra.
ADVERTENCIA
• Cuando ensamble o remueva los agarradores
del refrigerador, sujete el agarrador firmemente
para evitar que se le caiga.
• No balancee el agarrador cerca de personas o
animales cercanos.
• Asegúrese de que el agujero en el soporte del
agarrador calce adecuadamente en el tornillo de
la tapa de la puerta. Ensamble los tornillos de
presión para fijar el agarrador en su lugar.
• Asegúrese de que no existe una brecha entre la
puerta y el agarrador luego de haber
ensamblado el agarrador.
Herramientas necesarias
• Llave Allen de 3/32 pulgadas
• Llave Allen de 1/8 pulgadas
• Llave Allen de 1/4 pulgadas
2 Coloque el agarrador en la puerta calzando la
parte inferior del mismo con la tornillería de
montaje y asegurando los tornillos de presión
b con una llave Allen de 3/32 pulg.
Removiendo el Agarrador del
Estante del Congelador.
1 Afloje los tornillos de presión a ubicados en
la parte inferior del agarrador con una llave
Allen de 1/8 pulgadas y extráigalo.
2 Afloje la tornillería de montaje b con una
llave Allen de 1/4 pulgadas y extráigala.
Removiendo los Agarradores del
Refrigerador
1 Afloje los tornillos de presión a con una llave
Allen de 3/32 pulg. y remueva el agarrador.
2 Afloje la tornillería de montaje b que conecta
la puerta del refrigerador y el agarrador
usando una llave Allen de ¼ pulg., y remueva
la tornillería.
Ensamblando los Agarradores del
Refrigerador
1 Ensamble la tornillería de montaje a en
ambos extremos del agarrador con una llave
Allen de 1/4 pulgadas.
Page 71

15INSTALACIÓN
Ensamblando el Agarrador del
Estante del Congelador.
1 Ensamble la tornillería de montaje a en
ambos extremos del agarrador con una llave
Allen de 1/4 pulgadas.
2 Coloque el agarrador en la puerta calzando la
parte inferior del mismo con la tornillería de
montaje y asegurando los tornillos de presión
b con una llave Allen de 1/8 pulg.
Removiendo/Ensamblando
puertas y estantes
Removiendo la Puerta Izquierda del
Refrigerador
1 Remueva el tornillo a de la cubierta de la
bisagra en la parte superior del refrigerador.
Levante el gancho (no visible), ubicado en la
parte inferior del lado delantero de la cubierta
b con un destornillador plano. Retire la
cubierta.
2 Desconecte todos los arneses de cable c.
Desatornille el cable de conexión a tierra
d .
ESPAÑOL
Si la puerta de entrada es muy angosta para que el
refrigerador pase, remueva las puertas del mismo
y mueva el refrigerador, de costado, a través de la
puerta.
ADVERTENCIA
• Utilice a dos o más personas para remover e
instalar las puertas del refrigerador y el estante
del congelador.
• Desconecte la fuente de electricidad del
refrigerador previo a instalarlo.
• No coloque las manos, los pies u otros objetos
en la ventilación de aire ni en la parte inferior del
refrigerador.
• Tenga cuidado al manejar la bisagra y el tapón.
• Extraiga los alimentos y recipientes antes de
desprender las puertas y el estante.
• No sujete el agarrador al remover o reemplazar
las puertas y el estante ya que esta podría
destrabarse.
Herramientas necesarias
Llave Allen de 3/32 pulgadas
Llave Allen de 1/8 pulgadas
Llave Allen de 1/4 pulgadas
3 Rote la palanca de la bisagra e hacia la
izquierda. Libere la bisagra superior
picaporte de la manija de la bisagra
PRECAUCIÓN
• Al liberar la bisagra del picaporte, tenga cuidado
de que la puerta no se caiga hacia adelante.
f del
g.
Page 72

16 INSTALACIÓN
4 Levante la puerta del centro del perno de la
bisagra y remuévala.
PRECAUCIÓN
• Coloque la puerta, de adentro hacia afuera, en
una superficie que no la raye.
Removiendo la Puerta Derecha del
Refrigerador
1 Remueva el tornillo de la cubierta superior de
la bisagra
ubicado en la parte inferior del lado delantero
de la cubierta
a. Levante el gancho (no visible),
b, with a flat-head screwdriver.
3 Rote la palanca de la bisagra d hacia la
derecha. Libere la bisagra superior
picaporte de la manija de la bisagra
PRECAUCIÓN
• Al liberar la bisagra del picaporte, tenga cuidado
de que la puerta no se caiga hacia adelante.
e del
f.
4 Levante la puerta del centro del perno de la
bisagra y remuévala.
PRECAUCIÓN
• Coloque la puerta, de adentro hacia afuera, en
una superficie que no la raye.
2 Remueva todos los arneses de cables c.
Ensamblando la Puerta Derecha del
Refrigerador
PRECAUCIÓN
• Instale la puerta del lado derecho primero.
1 Asegúrese de que la funda de plástico esté
insertada al fondo de la puerta. Baje la puerta
al centro del perno de la bisagra como se
muestra en la figura.
Page 73

17INSTALACIÓN
2 Ajuste la bisagra a sobre el picaporte de la
manija de la bisagra
Rote la manija
asegurar la bisagra.
b y encájela en su lugar.
c hacia la izquierda para
3 Conecte los arneses de cables d.
4 Coloque la cubierta e en su lugar. Inserte y
ajuste el tornillo de la cubierta
f .
Ensamblando la Puerta Izquierda
del Refrigerador
PRECAUCIÓN
• Instale la puerta izquierda del refrigerador luego
de haber instalado la puerta derecha.
1 Asegúrese de que la funda de plástico esté
insertada al fondo de la puerta. Instale la
puerta del refrigerador en la bisagra del
medio.
2 Ajuste la bisagra a sobre el picaporte de la
manija de la bisagra
Rote la manija
asegure la bisagra.
b y encájela en su lugar.
c en la dirección del reloj y
ESPAÑOL
3 Conecte todos los arneses de cables d y el
cable a tierra
e.
Page 74

18 INSTALACIÓN
4 Coloque la cubierta de la bisagra f en su
lugar. Inserte y asegure el tornillo de la
cubierta
g.
Extracción del Cajón del Congelador
Extraiga el estante inferior del congelador de la
misma manera.
ADVERTENCIA
• Utilice a dos o más personas para remover e
instalar las puertas del refrigerador y el estante
del congelador.
• Sea cuidadoso de bisagras cortantes en ambos
lados del estante.
• Al bajar el estante tenga cuidado de no dañar el
piso.
• No se siente o pare en el estante del congelador.
• Para prevenir accidentes, mantenga a los niños y
mascotas alejadas del estante. No deje el estante
abierto. Si el recipiente de almacenamiento
Durabase
congelador, hay espacio suficiente para que un
niño o mascota se introduzca en él.
®
es removido del estante del
1 Abra el estante por completo. Extraiga la
canasta y el recipiente de hielo de las guías.
2 Quite los tornillos de ambos extremos de las
guías.
3 Agarre ambos lados del estante y levántelo
para removerlo de los rieles.
PRECAUCIÓN
• No sujete el agarrador mientras remueve o
reemplaza el estante. El agarrador puede caerse
y causar una herida personal.
4 Sujete ambos rieles y empújelos dentro
simultáneamente.
Ensamblando el Estante del
Congelador
Ensamblar del estante inferior del congelador de
la misma manera.
Page 75

19INSTALACIÓN
1 Retire ambos rieles simultaneámente hasta
que estos se hayan extendido
completamente.
2 Agarre el estante a cada lado y enganche los
soportes del mismo a las pestañas ubicadas a
ambos lados de los rieles.
PRECAUCIÓN
• No sujete el agarrador mientras remueve o
reemplaza el estante. El agarrador puede caerse
y causar una herida personal.
4 Inserte el cajón en el marco y empújelo hacia
atrás hasta que haga un clic en su lugar.
ESPAÑOL
Conectando la línea de agua
Antes de Iniciar
La instalación de esta línea de agua no está
cubierta por la garantía del refrigerador. Siga las
instrucciones cuidadosamente para minimizar el
riesgo de costosos gastos de agua.
De ser necesario, llame a un plomero calificado
para corregir el golpe de ariete previo a instalar la
línea de suministro de agua al refrigerador. Agua
golpeando o forjando tuberías residenciales puede
causar daños a partes del refrigerador y provocar
fugas de agua o inundaciones.
• Apague el dispensador de hielo (OFF) si el
refrigerador será usado previo a conectar la
línea de agua.
• No instale la tubería del dispensador de hielo en
áreas donde la temperatura ambiente cae al
punto de congelación.
3 Baje la puerta a su posición final y asegure los
tornillos localizados en ambos lados.
ADVERTENCIA
• Conecte únicamente a un suministro de agua
potable.
PRECAUCIÓN
• Para prevenir quemaduras y daños al producto,
únicamente conecte la línea de agua del
refrigerador a un suministro de agua fría.
• Utilice protección visual durante la instalación
para prevenir heridas.
Page 76

20 INSTALACIÓN
Presión de Agua
Necesitará un suministro de agua fría.
Presión de Agua
modelos con filtro de
agua
donde un sistema de
filtración de agua de
osmosis inversa está
conectado a un
suministro de agua fría
Si la presión del agua del sistema de osmosis
inversa es menor a 20 psi o 138 kPa o 1.4 kgf/cm
(toma más de 4 segundos llenar una taza con
capacidad de 7 oz o de 198 cc):
• Revise para ver si el filtro de sedimentos en el
sistema de osmosis inversa está bloqueado.
Reemplace el filtro de ser necesario.
• Permita que el tanque de almacenamiento en el
sistema de osmosis inversa se vuelva a llenar
luego de uso intensivo.
• Si la presión del agua continúa baja, llame a un
plomero calificado y con licencia.
• Todas las instalaciones deben ser de acuerdo a
los requerimientos del código de plomería local.
20 - 120 psi (138 - 827
kPa)
Mínimo 40 - 60 psi para
revertir el sistema de
osmosis (2.8 kgf/cm
4.2 kgf/cm
2 - 3 segundos para
llenar una taza con
capacidad de 7 oz)
2
, o menos de
2
-
2
conectar el tubo de cobre a la válvula de cierre y
a la válvula de agua del refrigerador.
• Si su línea de agua de cobre existente tiene una
adaptación acampanada al final, compre un
adaptador (disponible en tiendas de plomería)
para conectar la línea de agua al refrigerador O
corte la adaptación acampanada con un
cortador de tubos y luego use un accesorio de
compresión.
• Válvula de cierre para conectar a la línea de agua
fría. La válvula de cierre debe tener una toma de
agua con un diámetro interior mínimo de 5/32
pulgadas al punto de conexión a la LÍNEA DE
AGUA FRÍA. Las válvulas de cierre tipo silla están
incluidas en varios kits de suministro de agua.
Previo a su compra, asegúrese de que la válvula
de tipo silla acate sus códigos de plomería
locales.
Suministros Requeridos
• Cobre o Tubería PEX, ¼ pulgadas. diámetro
externo, para conectar el refrigerador al
suministro de agua. Asegúrese de que ambos
extremos de la tubería sean cortados de forma
recta. Para determinar cuánta tubería necesita,
mida la distancia desde la válvula de agua en la
parte trasera del refrigerador hasta la cañería de
suministro de agua. Luego, agregue 8 pies
(2.4m). Asegúrese de que haya suficiente tubería
extra (alrededor de 8 pies [2.4m] enrollados en 3
vueltas de alrededor de 10 pulgadas. [25 cm] de
diámetro) para permitir movimiento al
refrigerador desde la pared luego de la
instalación.
• Taladro eléctrico.
• Llave de ½ pulg. o una llave inglesa.
• Destornillador de hoja plana y Phillips.
• Dos tuercas de presión de ¼ pulgadas de
diámetro externo y 2 casquillos (fundas) para
NOTA
• Una válvula autopunzante de agua tipo silla no
debería ser utilizada.
Instrucciones de Instalación Línea
de Agua
Instale la válvula de cierre en la línea frecuente de
agua potable más cercana.
ADVERTENCIA
• Cuando use cualquier dispositivo eléctrico
(Como un taladro eléctrico) durante la
instalación, asegúrese de que su dispositivo está
alimentado por batería, tenga doble aislado o
esté en tierra de manera que prevenga el peligro
de descarga eléctrica.
Page 77

21INSTALACIÓN
1 Apague el suministro de agua principal.
• Abra el grifo más cercano para aliviar la
presión en la línea.
2 Elija la ubicación de la válvula
• Elija una ubicación para la válvula que sea
fácilmente accesible. Es mejor conectar a un
lado de la tubería vertical de agua. Cuando
sea necesario conectar a una tubería
horizontal de agua, haga la conexión a la
parte superior o de costado, en vez de a la
parte inferior, para evitar el trasiego de
cualquier sedimento desde la tubería de
agua.
3 Perfore el agujero para la Válvula
• Perfore un agujero de ¼ pulgadas en la
tubería de agua utilizando una broca
punzante. Remueva cualquier rebaba
resultante de la perforación del agujero en
la tubería. Tenga cuidado de no permitir
que agua escurra dentro del taladro. No
perforar un agujero de ¼ pulgadas puede
resultar en una producción reducida de
hielo o en cubos más pequeños.
su uso en Massachusetts. Consulte a su
fontanero certificado.
ESPAÑOL
a Abrazadera
b Válvula de Cierre Tipo Silla
c Tubería Vertical de Agua Fría
5 Apriete la abrazadera.
• Apriete los tornillos de la abrazadera hasta
que la arandela de sellado comience a
hincharse.
NOTA
• No apriete en exceso la arandela o puede
aplastar la tubería.
NOTA
• La línea de montaje no puede ser tubería
plástica blanca. Plomeros certificados deben
usar únicamente tubería de cobre (tubería NDA
#49595 o #49599) o tubería de Polietileno de
Vínculo Cruzado (PEX).
4 Sujete la válvula de cierre.
• Sujete la válvula de cierre a la tubería de
agua fría con la abrazadera.
NOTA
• Se debe cumplir con los Códigos de fontanería
248 CMR del estado de Massachusetts. Las
válvulas de montura son ilegales y no se permite
a Abrazadera
b Extremo de la Entrada de la Arandela
c Arandela de Sellado
d Arandela
6 Encamine la tubería
• Encamine la tubería entre la línea de agua
fría y el refrigerador. Encamine la tubería a
través del agujero en la pared o piso (detrás
del refrigerador o gabinete base adyacente)
lo más cerca de la pared posible.
Page 78

22 INSTALACIÓN
NOTA
• Asegúrese de que haya suficiente tubería extra
(alrededor de 8 pies enrollados en 3 vueltas de
alrededor de 10 pulgadas de diámetro) para
permitir movimiento al refrigerador desde la
pared luego de la instalación.
7 Conecte la tubería a la válvula.
• Coloque la tuerca de compresión y el
casquillo (lengüeta) para tubería de cobre al
final del tubo y conéctelo a la válvula de
cierre. Asegúrese de que la tubería esté
totalmente insertada en la válvula. Ajuste la
tuerca de compresión de forma segura.
energía de este no esté conectado al enchufe de
la pared.
• Remueva el tapón plástico flexible de la válvula
de agua.
• Coloque la tuerca de presión y el casquillo
(lengüeta) al final del tubo esté como se
muestra.
• Introduzca el final del tubo de cobre lo más lejos
posible en la conexión. Mientras sujeta el tubo,
apriete la adaptación.
a Tubo Abrazadera
b Tubo de 1/4 Pulgadas.
a Válvula de Cierre Tipo Silla
b Tuerca de Compresión
c Tuerca Espaciadora
d Válvula de Salida
e Casquillo (lengüeta)
8 Enjuague el tubo.
• Encienda el suministro de agua y Enjuague
el tubo hasta que el agua esté clara. Cierre
el agua en la válvula de agua cuando se
haya eliminado alrededor de 1/4 de agua a
través del tubo.
c Tuerca de Compresión de 1/4 pulgadas.
d Casquillo (lengüeta)
e Conexión del Refrigerador
10 Abra el agua en la válvula de cierre.
• Apriete cualquier conexión que muestre
fugas.
PRECAUCIÓN
• Compruebe si hay pérdidas en las conexiones de
las líneas de agua.
9 Conecte el tubo al refrigerador.
NOTA
• Previo a llevar a cabo la conexión del
refrigerador, asegúrese de que el cable de
Page 79

23INSTALACIÓN
Nivelando y Alineando la
Puerta
Nivelando
El refrigerador tiene dos puertas niveladoras
frontales. Ajuste las patas para alterar la
inclinación de adelante hacia atrás o de un lado al
otro. Si el refrigerador se ve inestable o las puertas
no cierran fácilmente, ajuste la inclinación del
mismo siguiendo las instrucciones a continuación:
1 Gire la pata de nivelación hacia la izquierda
para levantar ese lado del refrigerador o hacia
la derecha para bajarlo. Puede ser necesario
nivelar las patas varias veces para ajustar la
inclinación del refrigerador.
NOTA
• Una llave de tuerca acampanada funciona mejor,
pero una llave abierta será suficiente. No apriete
demasiado.
ajustar su altura. Gire la tuerca hacia la derecha
para levantar la puerta o hacia la izquierda para
bajarla.
ESPAÑOL
Encendido
• Luego de la instalación, conecte el cable de
corriente a un enchufe con conexión a tierra de
tres espigas y empuje el refrigerador a su
posición final.
PRECAUCIÓN
• Conecte a un enchufe de potencia nominal.
• Haga que un técnico certificado verifique que el
tomacorriente de pared y los cables estén
adecuadamente conectados a tierra.
• No dañe o corte la terminal de tierra del enchufe
de poder.
2 Abra ambas puertas y verifique que cierren
fácilmente. Si las puertas no cierran
fácilmente, mueva un poco el refrigerador
hacia atrás girando ambas patas hacia la
izquierda. Puede ser necesario hacerlo varias
veces, asegúrese de girar ambas patas
niveladoras en la misma proporción.
Alineamiento de la puerta (modelo
de puerta estándar)
Tanto la puerta izquierda como la derecha del
refrigerador tienen una tuerca ajustable en la
bisagra inferior para levantarlas o bajarlas a
manera de alinearlas apropiadamente.
Si el espacio entre las puertas es desigual incluso
después de llenar los contenedores de las puertas,
siga las instrucciones a continuación para alinear
las puertas de manera pareja:
Use la llave (Incluida con el manual del usuario)
para girar la tuerca en la bisagra de la puerta y así
Posicione el Refrigerador
• Arregle la bobina de tubería para que esta no
vibre contra la parte trasera del refrigerador o
contra la pared. Empuje el refrigerador hacia la
pared.
Page 80

24 FUNCIONAMIENTO
FUNCIONAMIENTO
Antes de Usar
Lista de verificación
Limpie el refrigerador.
Limpie el refrigerador intensivamente y sacuda todo el polvo acumulado
durante el envío.
PRECAUCIÓN
• No raye el refrigerador con objetos puntiagudos ni use detergente que
contenga alcohol, líquidos inflamables o abrasivos al remover cualquier
cinta o adhesivo del mismo. Remueva los residuos de adhesivos
borrándolos con su pulgar o detergente para platos.
• No despegue la etiqueta de número de serie, modelo o información técnica
del panel trasero del refrigerador.
Abra las puertas del refrigerador y los estantes del congelador
para ventilar el interior.
El interior del refrigerador puede oler a plástico al inicio. Remueva toda cinta
adhesiva del interior del refrigerador y abra las puertas del refrigerador y los
estantes del congelador para ventilación.
Conecte la fuente de energía.
Verifique que la fuente de energía esté conectada previo a usar.
Apague el dispensador de hielo.
Apague el dispensador de hielo si el refrigerador aún no está conectado al
suministro de agua.
NOTA
• La válvula de agua del dispensador de hielo puede generar un zumbido si el
dispensador de hielo es encendido mientras el refrigerador no está
conectado al suministro de agua.
Espere a que el refrigerador enfríe.
Permita que el refrigerador funcione por al menos dos o tres horas previo a
colocar alimentos en él. Verifique el flujo de aire frío en el compartimento del
congelador para asegurar el enfriado adecuado.
PRECAUCIÓN
• Si coloca alimentos en el refrigerador previo a que este haya enfriado
puede causar que los alimentos se echen a perder o que un mal olor
permanezca en su interior.
El refrigerador hace un sonido fuerte luego de la operación
inicial.
Esto es normal. El volumen disminuirá conforme la temperatura baje.
Page 81

Panel de control
Según el modelo, es posible que algunas de las siguientes funciones no estén disponibles.
El panel de control real podría variar entre modelo y modelo.
Funciones del panel de control
a Freezer
Indica la temperatura del compartimento del congelador configurada en Celsios (°C) o Fahrenheit (°F).
La temperatura predeterminada del congelador es de 0 °F (-18 °C). Presione repetidamente el botón
Freezer para seleccionar una nueva temperatura desde 7 °F hasta 5 °F (-23 °C hasta -15 °C).
b Refrigerator
Indica la temperatura del compartimento del refrigerador configurada en Celsios (°C) o Fahrenheit (°F).
La temperatura predeterminada del refrigerador es de 37 °F (3 °C). Presione repetidamente el botón
Refrigerator para seleccionar una nueva temperatura desde 33 °F hasta 43 °F (1 °C hasta 7 °C).
NOTA
• Para cambiar el modo de temperatura de °F a °C (o viceversa) mantenga presionados los botones
Refrigerator y Freezer simultáneamente por aproximadamente cinco segundos. El indicador de
temperatura de la ventana de viualización cambia entre Celsius and Fahrenheit.
• Cuando el icono Replace Filter se encienda, es necesario reemplazar el filtro de aire. Luego de
reemplazar el filtro de aire, mantenga presionado el botón Fresh Air Filter por tres segundos para
apagar la luz del icono. Es recomendable cambiar el filtro de aire aproximadamente cada seis meses.
25FUNCIONAMIENTO
ESPAÑOL
c Water Filter
Reemplace el filtro de agua cuando el ícono h se encienda. Luego de reemplazar el filtro de agua,
mantenga presionado el botón por tres segundos para apagar la luz del ícono. Reemplace el filtro de
agua aproximadamente cada seis meses.
d Ice Plus
Esta función incrementa tanto la producción de hielo como la capacidad de congelamiento.
Presione el botón para iluminar el ícono y activar la función por 24 horas. La función se desactiva
automáticamente después de 24 horas. Desactive la función manualmente presionando el botón una
vez más.
PRECAUCIÓN
Modo de Visualización (Únicamente Para Uso de Tiendas)
• El Modo de Visualización deshabilita toda refrigeración en las secciones del refrigerador y congelador
para conservar energía mientras se exhibe en una tienda minorista. Cuando se activa, se muestra
apagado (OFF) en el panel de control y la pantalla permanece encendida por 20 segundos.
• Para desactivar / activar:
- Con cualquier puerta del refrigerador abierta, presione el botón Ice Plus 3 veces de manera
consecutiva mientras presiona el botón Refrigerator. El panel de control emite un pitido y la
configuración de la temperatura muestra la confirmación de que el Modo de Exhibición está
desactivado. Use el mismo procedimiento para activar el Modo de Exhibición.
Page 82

26 FUNCIONAMIENTO
NOTA
• Cuando el refrigerador está en Modo de Ahorro de Energía (Power Saving Mode), la pantalla
permanecerá apagada hasta que se abra una puerta o se presione un botón. Una vez hecho, la pantalla
se mantendrá encendida por 20 segundos.
Modo Sabbath
Modo Sabbath
El modo Sabbath es utilizado en el Sabbat y las
festividades Judías.
• Para activar el modo Sabbath, presione la
pantalla para encenderla, luego mantenga
presionados los botones Freezer y Water Filter
por 3 segundos hasta que aparezca
pantalla.
• Para desactivar el modo Sabbath de forma
manual, mantenga presionados los botones
Freezer y Water Filter por 3 segundos.
NOTA
• El modo Sabbath se desactiva automáticamente
después de 96 horas.
• Una vez encendido, el modo Sabbath se
mantendrá activo incluso si ocurre un apagón.
• Al seleccionar el modo Sabbath, las funciones de
alarma se desactivan automáticamente.
• El dispensador o InstaView está desactivado en
el modo Sabbath. Esta información solo está
disponible en los modelos con dispensador o
InstaView.
sb en la
NOTA
• El agua dispensada en el primer uso puede
incluir partículas u olor provenientes de la línea
de suministro o el tanque de agua. Esto también
es necesario si el refrigerador no se ha usado
por un largo tiempo.
• Algo de goteado puede ocurrir luego de
dispensar. Sostenga la taza debajo del
dispensador por algunos segundos luego de
dispensar para que esta recoja todas las gotas.
• Mantenga los contenedores a una distancia
apropiada del dispensador. Un contenedor con
una apertura muy pequeña debe sostenerse lo
más cerca posible del dispensador para evitar
derrames.
Uso del dispensador de agua
Presione la palanca del dispensador a con un
vaso u otro recipiente para dispensar agua.
Dispensador de Agua
Antes de utilizar el dispensador de
agua
PRECAUCIÓN
• Mantenga a los niños alejados del dispensador.
Pueden jugar o dañar los controles.
• Si inesperadamente se dispensa agua, apague el
suministro de agua y contacte al Centro de
Información al Cliente LG Electronic.
• Nunca use un vaso que sea excepcionalmente
puntiagudo o filoso.
Dispensador de Hielo
Automático
Antes de utilizar la máquina de
hielo del congelador.
Esta característica solo está disponible en algunos
modelos.
Esta característica puede variar según el modelo
adquirido.
NOTA
• Deseche las primeras series de hielo (alrededor
de 140-160 cubos) luego de la instalación. Eso
Page 83

27FUNCIONAMIENTO
también es necesario si el refrigerador no ha
sido usado por un largo tiempo.
NOTA
• La máquina de hielo comienza a producir hielo
aproximadamente 48 horas después de la
instalación inicial del electrodoméstico.
• Es normal escuchar el sonido del hielo cayendo
en el recipiente.
• Si el recipiente de hielo está completamente
lleno, la producción de hielo se detendrá.
• La cantidad y la forma del hielo podrían variar de
acuerdo con el ambiente (temperatura ambiente
alrededor del electrodoméstico, frecuencia con
la que se abre la puerta, cantidad de alimentos
almacenados en el electrodoméstico, presión del
agua, etc.).
• Si se produce un apagón, deseche el hielo
almacenado en el recipiente de hielo.
Máquina de hielo del congelador
(cubos de hielo)
Esta característica solo está disponible en algunos
modelos.
Encendido y apagado del
dispensador de hielo
Para encender/apagar la máquica de hielo
automática, ajuste el interruptor de la máquina de
hielo a la posición ON ( | ) o OFF (O).
Sonidos Normales Que Puede
Escuchar
• Mantener el dispensador de hielo encendido
previo a conectar la linea de agua podría
dañarlo.
• La válvula de agua del dispensador de hielo
genera un zumbido mientas este se llena de
agua. Si el interruptor de la máquina de hielo
está en modo Encendido (ON) se generará un
zumbido incluso sin que haya sido conectado al
agua. Para detener el zumbido, presione el
interruptor para apagarla.
• Escuchará el sonido de cubos de hielo cayendo
en el contenedor y agua corriendo por la tubería
mientras el dispensador de hielo se llena
nuevamente.
Preparando para Vacaciones
Ajuste el botón de encendido de la máquina de
hielo a la posición OFF (Apagado) y cierre el
suministro de agua del refrigerador.
ESPAÑOL
a Brazo Sensitivo
b Switch de Encendido
NOTA
• Esta máquina de hielo automática del
congelador produce 12 cubos a la vez, 50-110
cubos en un periodo de 24 horas si las
condiciones son favorables. Esta cantidad podría
variar de acuerdo al ambiente (temperatura
ambiente alrededor del electrodoméstico,
frecuencia con la que se abre la puerta, cantidad
de alimentos almacenados en el
electrodoméstico, etc.).
• Los cubos de hielo que se almacenen en el
recipiente por un largo periodo de tiempo
podrían amonotonarse y esto le podría dar
dificultades al separarlos. Si esto sucede, vacíe
completamente el recipiente de hielo y limpielo
antes de re-instalarlo.
NOTA
• El contenedor de hielo debe ser vaciado cada vez
que el botón de encendido sea ajustado al modo
apagado (OFF).
Si la temperatura ambiente cae al punto de
congelación, contacte a un técnico calificado para
drenar el sistema de suministro de agua y así
prevenir serios daños a la propiedad debido a
inundaciones causadas por la ruptura de líneas de
agua o conexiones.
Almacenando Alimentos
Consejos de Almacenamiento de
Alimentos
Envuelva o almacene alimentos en el refrigerador
en materiales herméticos y a prueba de humedad
a menos que se indique lo contrario. Esto previene
que el olor y sabor de los alimentos se transfiera a
través del refrigerador . Para productos con fecha
Page 84

28 FUNCIONAMIENTO
de caducidad, revise las fechas para asegurar su
frescura.
PRECAUCIÓN
• No llene ni envase en exceso los alimentos en los
compartimentos de la puerta. Esto podría dañar
el compartimento o provocar lesiones
personales al retirar los alimentos aplicando una
fuerza excesiva.
• No almacene contenedores de vidrio en el
congelador. Al congelarse, los contenidos
pueden expandirse, romper el contenedor y
provocar lesiones.
Comida Cómo Almacenar
Manteca o
Margarina
Queso Almacene en empaquetado original
Leche Limpie las cajas de leche. Para leche
Huevos Almacene en cartón original en el
Fruta No lave o pele fruta hasta que esté
Vegetales
Frondosos
Vegetales
con piel
(zanahorias,
pimientos)
Mantenga manteca abierta en un
plato cerrado o compartimento
cerrado. Cuando almacene
suministros adicionales,
envuélvalos en empaquetado de
congelado y congele.
hasta que se use. Una vez abierto,
reempaque ajustadamente en
envoltorio plástico o papel
aluminio.
más fría coloque los contenedores
en un estante interior.
estante interior, no en el estante de
la puerta.
lista para ser usada. Organice y
mantenga la fruta en el cajón de
verduras en sus contenedores
originales, o almacénelas en bolsas
de papel completamente cerradas
en el estante del refrigerador.
Remueva el empaquetado de la
tienda, recorte o arranque áreas
descoloridas y dañadas, lave en
agua fría y escurra. Coloque en
bolsas o contenedores plásticos y
almacene en el cajón de verduras.
Coloque en bolsas o contenedores
plásticos y almacene en el cajón de
verduras.
Comida Cómo Almacenar
Pescado Congele pescado fresco y mariscos
si éstos no son consumidos el
mismo día de la compra. Es
recomendable comer pescado
fresco y mariscos el mismo día de la
compra.
Restos de
comida
Cubra los restos de comida con
envoltorio plástico o papel
aluminio, o almacénelos en
contenedores plásticos con tapas
ajustadas.
Almacenando Alimentos
Congelados
Revise una guía de congelado o un libro de cocina
confiable para mayor información acerca del
preparado de alimentos para congelado o tiempos
de almacenamiento.
Congelando
Su congelador no congelará rápidamente una
gran cantidad de alimentos. No coloque más
alimentos descongelados en el congelador que los
que se enfriarán durante las próximas 24 horas
(no más de 2 a 3 libras de comida por pie cúbico
del espacio del congelador). Deje suficiente
espacio en el congelador para que circule aire
alrededor de los empaquetados. Tenga cuidado de
dejar suficiente espacio en la parte frontal para
que la puerta pueda cerrar correctamente.
El tiempo de almacenamiento variará
dependiendo de la calidad y el tipo de alimentos, el
tipo de empaquetado o envoltura utilizada (cuán
hermética o a prueba de humedad) y la
temperatura de almacenaje. Los cristales de hielo
dentro de paquetes sellados son normales. Esto
simplemente significa que la humedad en la
comida y el aire dentro del empaquetado se han
condensado, creando hielos de cristal.
NOTA
• Permita que los alimentos calientes se enfríen a
temperatura ambiente por 30 minutos, y luego
empaque y congele. Enfriar alimentos calientes
previo a congelarlos ahorra energía.
Empaquetado
El congelamiento exitoso dependerá del
empaquetado correcto. Cuando cierre y selle el
empaquetado, éste no debe permitir que entre o
salga aire o humedad. Si lo hace, puede que el olor
y sabor de sus alimentos se transfieran a través del
Page 85

29FUNCIONAMIENTO
refrigerador y esto puede también causar que los
alimentos congelados se sequen.
Recomendaciones de empaquetado
• Contenedores plásticos rígidos con tapas
ajustadas.
• Enlatado de lados rectos / tarros de
congelamiento
• Papel aluminio pesado
• Papel plastificado
• Empaques plásticos impermeables
• Bolsas plásticas autosellables para congelador.
Siga las instrucciones del empaque o contenedor
para métodos de congelamiento apropiados.
No use
• Envoltorios de pan
• Contenedores plásticos que no sean de
polietileno
• Contenedores sin tapas ajustadas
• Papel de cera o envoltorios de congelado
recubiertos de cera.
• Envoltorio delgado y semipermeable.
temperatura. Esto puede incrementar los gastos
de funcionamiento de la unidad.
ESPAÑOL
Cajón de verduras con
humedad controlada
Usando el cajón de verduras con
humedad controlada
Esta característica solo está disponible en algunos
modelos.
Los cajones proveen fruta y vegetales con un
sabor más fresco al permitirle controlar la
húmedad dentro del estante fácilmente.
Puede controlar la cantidad de humedad en los
cajones sellados ajustando el control a cualquier
configuración entre Vegetables y Fruit.
• Vegetables mantiene aire húmedo en el cajón
para el mejor almacenaje de vegetales frescos y
frondosos.
• Fruit deja salir el aire húmedo del cajón para el
mejor almacenaje de fruta.
NOTA
• Si se ausentará de casa por un corto período de
tiempo, como unas pequeñas vacaciones, el
refrigerador debe dejarse encendido. La comida
refrigerada que pueda ser congelada se
preservará por más tiempo si es almacenada en
el congelador.
• Si dejará el refrigerador apagado por un período
largo de tiempo, saque toda la comida y
desconecte el cable de corriente. Limpie el
interior y deje la puerta abierta para prevenir la
formación de hongos en el refrigerador.
• No almacene alimentos con contenido muy
húmedo cerca del área superior del refrigerador.
La humedad podría entrar en contacto directo
con el aire frío y congelarse.
• Lave los alimentos previo a almacenarlos en el
refrigerador. Frutas y vegetales deben ser
lavados, y empaques de alimentos deben ser
limpiados para evitar que alimentos cercanos
sean contaminados.
• Si el refrigerador se mantiene en un lugar
caliente y húmedo, abrir frecuentemente la
puerta o almacenar muchos vegetales en el
refrigerador podría causar la formación de
condensación. Limpie la condensación con un
paño limpio o una toalla de papel.
• Si la puerta del refrigerador o el estante del
congelador se abre y cierra muy a menudo, aire
caliente puede penetrarlo y elevar así su
Page 86

30 FUNCIONAMIENTO
Removiendo/ensamblando el cajón
de verduras con humedad
controlada
1 Abra las puertas completamente y remueva
los contenidos de la caja Door-in-Door
(Puerta-en-Puerta), luego, levántela y
extráigala.
NOTA
• Esta característica Door-In-Door (Puerta en
Puerta) solo está disponible en algunos
modelos.
4 Para volver a ensamblar, inserte la cubierta en
el refrigerador con ambas manos y bájela
sobre las guías.
5 Incline el frente levemente hacia arriba,
inserte el cajón de verduras en el marco y
empújelo hacia atrás en su lugar.
6 Alinee las pestañas en la caja con las ranuras
en la puerta y empuje hacia abajo hasta que
calce en su lugar.
2 Extraiga el cajón de verduras a su máxima
extensión y retírelo completamente.
3 Levante la parte frontal de la cubierta con
ambas manos hasta que ésta se separe de la
pared trasera del gabinete, luego retírela.
NOTA
• Esta característica Door-In-Door (Puerta en
Puerta) solo está disponible en algunos
modelos.
Page 87

31FUNCIONAMIENTO
Glide‘N’Serve
Usando Glide‘N’Serve
Este estante se puede utilizar para bandejas de
fiesta, fiambrería y bebidas. No se debe utilizar
para almacenar vegetales que requieren alta
humedad.
PRECAUCIÓN
• No coloque nigún objeto sobre la cubierta del
Glide'N'Serve.
Desprendiendo/Ensamblando
Glide‘N’Serve
1 Para remover el Glide'N'Serve, extraiga el
Glide'N'Serve a su máxima extensión, levante
la parte frontal, y retírelo completamente.
Desprendiendo/ensamblando el
estante de mitad de ancho
PRECAUCIÓN
• No limpie los estantes de vidrio con agua
caliente mientras estén fríos. Los estantes
podrían romperse si se exponen a cambios de
temperatura o impactos repentinos.
1 Para desprender, incline hacia arriba la parte
frontal del estante y luego levántelo.
2 Retire el estante.
3 Para ensamblarlo, incline hacia arriba la parte
frontal del estante y guíe los ganchos hacia
dentro de las ranuras a la altura deseada.
ESPAÑOL
2 Para instalar, incline el frente levemente hacia
arriba, inserte el Glide'N'Serve en el marco y
empújelo hacia atrás en su lugar.
Estantes del refrigerador
Los estantes del refrigerador son ajustables para
satisfacer necesidades de almacenamiento
individuales. Su modelo puede tener estantes
completos o divididos.
Ajustar los estantes para que quepan artículos de
diferentes tamaños hará más fácil la búsqueda de
artículos específicos.
4 Baje el frente del estante para que los
ganchos caigan dentro de las ranuras.
PRECAUCIÓN
• Asegúrese de que los estantes estén nivelados
de un lado al otro. No hacerlo puede ocasionar
que el estante caiga o los alimentos se
derramen.
Contenedores de la Puerta
Desprendiendo/colocando el
contenedor de la puerta
Los contenedores de la puerta son removibles
para limpieza y ajuste fácil.
Page 88

32 FUNCIONAMIENTO
1 Para remover el recipiente, simplemente
levántelo y extraiga directamente hacia
afuera.
2 Para reubicar el recipiente, deslícelo hacia
adentro sobre el soporte deseado y empújelo
hasta que calce en su lugar.
PRECAUCIÓN
• Desprenda regularmente y lave los recipientes y
estantes de almacenamiento; estos pueden
contaminarse fácilmente por los alimentos.
• No aplique fuerza en exceso mientras desprende
o ensambla los recipientes de almacenamiento.
• No use lava platos para limpiar los recipientes y
estantes de almacenamiento.
Durabase
Usando Durabase
PRECAUCIÓN
• Si el divisor Durabase es removido, hay espacio
suficiente para que niños o mascotas se
introduzcan en él. Para prevenir que un niño o
mascota se atasque o sofoque, NO permita que
niños o mascotas toquen o se acerquen al
estante.
El divisor Durabase le permite organizar el área
Durabase en 2 secciones. Puede ser ajustado de
lado a lado para acomodar artículos de diferentes
tamaños.
Page 89

FUNCIONES INTELIGENTES
33FUNCIONES INTELIGENTES
Aplicación LG ThinQ
Esta característica solo está disponible en el
modelo con el logo c o d.
La aplicación LG ThinQ le permite comunicarse
con el electrodoméstico usando un teléfono
inteligente.
Instalación de la aplicación LG
ThinQ
Busque la aplicación LG ThinQ en la tienda Google
Play o App Store desde su teléfono inteligente.
Siga las instrucciones para descargar e instalar la
aplicación.
Función de la aplicación LG ThinQ
Smart Diagnosis
Si experimenta un problema a utilizar el
electrodoméstico, la función de diagnóstico
inteligente lo ayudará a diagnosticar el
inconveniente.
instrucciones para el diagnóstico audible
provistas en la aplicación LG ThinQ.
1 Abra la puerta derecha del refrigerador.
2 Mantenga el micrófono de su teléfono frente
al altavoz que se encuentra ubicado en la
bisagra derecha de la puerta del refrigerador.
3 Mantenga presionado el botón por tres
segundos mientras continúa sujetando su
teléfono frente al altavoz.
ESPAÑOL
Función Smart Diagnosis™
Esta característica solo está disponible en el
modelo con el logo
Utilice esta función como ayuda para diagnosticar
y resolver problemas con su electrodoméstico.
NOTA
• Por motivos no atribuibles a la negligencia de
LGE, es posible que el servicio no pueda
funcionar debido a factores externos como por
ejemplo, la indisponibilidad de Wi-Fi,
desconexión de Wi-Fi, política de la tienda de
aplicaciones local o indisponibilidad de
aplicaciones, entre otros.
• Esta función puede estar sujeta a cambios sin
previo aviso y puede tener una forma diferente
según dónde se encuentre ubicado.
Uso del diagnóstico audible para
diagnosticar problemas
Siga las instrucciones a continuación para utilizar
el método de diagnóstico audible.
• Inicie la aplicación LG ThinQ y seleccione la
función Smart Diagnosis en el menú. Siga las
c o d.
4 Tras escuchar tres pitidos, suelte el botón .
5 Mantenga el teléfono en su sitio hasta que
haya terminado la transmisión de tonos. La
pantalla mostrará el recuento de tiempo. Una
vez que haya finalizado el recuento de tiempo
y los tonos se hayan detenido, aparecerá el
diagnóstico en la aplicación.
NOTA
• Para obtener resultados óptimos, no mueva el
teléfono mientras se transmitan los tonos.
Page 90

34 MANTENIMIENTO
MANTENIMIENTO
Limpieza
ADVERTENCIA
• Utilice un limpiador no inflamable. Si no lo hace,
puede resultar en incendio, explosión o muerte.
PRECAUCIÓN
• No use un trapo abrasivo o esponja mientras
limpia el interior y exterior del refrigerador.
• No coloque su mano en la superficie inferior del
refrigerador cuando abra y cierre las puertas.
Consejos Generales de Limpieza
• Tanto las secciones del refrigerador como del
congelador se descongelan automáticamente;
sin embargo, limpie ambas secciones una vez al
mes para prevenir olores.
• Limpie derrames inmediatamente.
• Desconecte el refrigerador o la corriente
eléctrica previo a la limpieza.
• Remueva todas las partes removibles, como los
estantes.
• Use una esponja limpia o un paño suave y un
detergente ligero en agua tibia. No utilice
abrasivos o limpiadores ásperos.
• Lave a mano, enjuague y seque todas las
superficies intensivamente.
Exterior
Sustancias inflamables: alcohol (etanol, metanol,
alcohol isopropílico, alcohol isobutílico, etc.),
disolventes, cloro, benceno, líquidos inflamables,
abrasivos, etc.
Para productos con un exterior de acero
inoxidable negro, rocíe limpiador de vidrio en un
paño limpio de microfibra y frote en dirección de la
fibra. No rocíe limpiador de vidrio directamente al
panel de pantalla. No utilice limpiadores ásperos o
abrasivos.
Para productos con un exterior de acero
inoxidable estándar, use un paño húmedo de
microfibra y frote en dirección de la fibra. Seque
con una toalla de papel para evitar rayones. Para
manchas rebeldes y huellas digitales, use algunas
gotas de jabón líquido para platos en agua y
enjuague con agua caliente antes de secar. No
utilice abrasivos o limpiadores ásperos.
Paredes Interiores
• Permita que el congelador se caliente para que
el paño no se pegue.
Como ayuda para remover olores, lave el interior
del refrigerador con una mezcla de bicarbonato de
sodio y agua tibia. Mezcle 2 cucharadas de
bicarbonato de sodio con 1 cuarto de galón de
agua (26 g de bicarbonato en 1 litro de agua).
Asegúrese de que el bicarbonato de sodio está
completamente disuelto para que este no raye las
superficies del refrigerador .
Revestimientos de Puertas y Juntas
Use una esponja limpia o un paño suave y un
detergente ligero en agua tibia. No utilice ceras de
limpieza, detergentes concentrados, lejías o
limpiadores que contengan petróleo en las partes
plásticas del refrigerador.
Partes Plásticas (Cubiertas y
Paneles)
Use una esponja limpia o un paño suave y un
detergente ligero en agua tibia. No utilice
limpiadores de vidrio, limpiadores abrasivos o
líquidos inflamables. Estos pueden rayar o dañar el
material.
Bobinas del Condensador
Use una aspiradora con un cepillo o hendedura
adjunta para limpiar la cubierta y los respiraderos
del condensador. No remueva el panel que cubre
el área de las bobinas del condensador.
Page 91

35MANTENIMIENTO
Water Filter (Filtro de agua)
Reemplazo del Filtro de Agua
Reemplace el filtro de agua:
• Aproximadamente cada seis meses.
• Cuando disminuya la potencia del dispensador
de agua.
Para comprar un filtro de agua de repuesto:
• Visite a su proveedor o distribuidor local
• Busque usando "filtro de agua" en lg.com
• Utilice cartucho de reemplazo: LT1000P,
LT1000PC o LT1000PCS
1 Si el estante superior, localizado debajo del
filtro de agua, está en la posición más alta,
este deberá ser removido previo a reemplazar
el filtro de agua.
• Para retirar cualquier estante, levante el
frente del estante y tire hacia arriba. Retire
el estante.
recoger cualquier goteo. En cuanto sea
removido, sostenga el filtro de agua en posición
vertical, para prevenir que cualquier remanente
de agua salga del filtro.
4 Reemplace con un nuevo filtro de agua.
• Desempaque su nuevo filtro de agua y
remueva la cubierta protectora de los
anillos. Con las pestañas del filtro de agua
en posición horizontal, introduzca el nuevo
filtro en la abertura y gírelo hacia la derecha
hasta que se detenga.
ESPAÑOL
2 Pulse el botón de presión para abrir la
cubierta del filtro de agua.
3 Tire hacia abajo el filtro de agua y gírelo hacia
la izquierda antes de retirarlo.
• Asegúrese de rotar completamente el filtro
hacia abajo antes de retirarlo de la
abertura.
NOTA
• Reemplazar el filtro de agua causa que una
pequeña cantidad de agua (alrededor de 1 oz o
25 cc) se drene.
• Envuelva un paño alrededor de la parte
delantera de la cubierta del filtro de agua para
5 Cierre la cubierta del filtro de agua. La
cubierta hará clic al cerrarla correctamente.
6 Luego de reemplazar el filtro de agua,
dispense 2.5 galones de agua (deje correr el
agua por aproximadamente 5 minutos) para
remover el aire atrapado y los contaminantes
del sistema.
NOTA
• No dispense los 2.5 galones completos de
manera continua. Presione y suelte el botón del
dispensador en ciclos de 30 segundos
ENCENDIDO y 60 segundos APAGADO.
Page 92

36 MANTENIMIENTO
7 Luego de cambiar el filtro, mantenga
presionado el botón Water Filter por tres
segundos para reiniciar el sensor del filtro.
Hoja de Datos de Rendimiento
Modelo: LT1000P, LT1000PC, LT1000PCS
Código del Nombre Comercial del Sistema NSF: MDJ64844601
La concentración de las sustancias indicadas en el agua que entra al sistema se redujo a una concentración
menor o igual al límite permisible para el agua de salida según lo especificado en NSF/ANSI Estándar 42,
Estándar 53 y Estándar 401.
Sistema probado y certificado por NSF Internacional en contra de NSF/ANSI Estándar 42, Estándar 43
y Estándar 401 para la reducción de las siguientes sustancias.
PRECAUCIÓN
• LG recomienda que utilice filtros de agua
autorizados por LG para prevenir problemas con
la calidad del agua, pérdida de agua o
malfuncionamiento del electrodoméstico.
Para mayor asistencia, llame al:
• 1-800-243-0000 (USA)
• 1-888-542-2623 (Canadá)
Reducción de
Sustancia
Olor y Sabor a
Cloro
Partícula
Nominal Clase I,
, 2 0.5 a < 1.0 μm
Asbesto 180 MFL
Atracina 8.5 μg/L 9.0 μg/L ± 10% >94.10% 0.500 μg/L 3.0 μg/L NA
Benceno 15.0 μg/L 15.0 μg/L ± 10% >96.60% 0.510 μg/L 5.0 μg/L NA
Carbofurano 74.0 μg/L 80.0 μg/L ± 10% 98.30% 1.258 μg/L 40 μg/L NA
Lindano 1.9 μg/L 2.0 μg/L ± 10% >99.00% 0.019 μg/L 0.2 μg/L NA
PDiclorobenceno
2,4-D 210.0 μg/L 210.0 μg/L ±
Plomo pH @6.5 140.0 μg/L 150.0 μg/L ±
Plomo pH @8.5 150.0 μg/L 150.0 μg/L ±
Mercurio @
pH6.5
Mercurio @
pH8.5
Dificultad de
Afluencia
Promedio
2.0 μg/L 2.0 μg/L± 10% >97.5% 0.050 μg/L N/A 2 50.00%
12,000,000 pts/mLAl menos 10,000
230.0 μg/L 225.0 μg/L ±
5.9 μg/L 6.0 μg/L ± 10% 91.00% 0.531 μg/L 2.0 μg/L NA
5.6 μg/L
Concentración
Objetivo
especificada
por NSF
partículas/mL
7
10
to 108 MFL;
fibras de una
longitud mayor
a 10 μg/L in
10%
10%
10%
10%
6.0 μg/L ± 10% 92.5% 0.420 μg/L 2.0 μg/L NA
% Reducción
Promedio
99.80% 24,000 pts/ml N/A 2 85.00%
>99.00% < 1 MFL N/A 2 99.00%
>99.80% 0.460 μg/L 75.0 μg/L NA
>99.90% 0.210 μg/L 70.0 μg/L NA
99.60% 0.560 μg/L 10.0 μg/L NA
>99.70% <0.500 μg/L 10.0 μg/L NA
Concentración
Media de
Producto en
Agua
Concentración
Máxima
Permisible de
Producto en
Agua
Reducción NSF
Requisitos de
Page 93

37MANTENIMIENTO
Reducción de
Sustancia
Bacterias* 100,000 quistes/LMínimo de
Atenolol 240 ng/L 200 ± 40% ng/L > 95.50% 10.80 ng/L 30 ng/L NA
Carbamazepina 1600 ng/L 1400 ± 40% ng/L 98.40% 25.60 ng/L 200 ng/L NA
DEET 1600 ng/L 1400 ± 40% ng/L 97.10% 46.40 ng/L 200 ng/L NA
Trimetoprima 170 ng/L 140 ± 40% ng/L >96.80% 5.44 ng/L 20 ng/L NA
Linuron 160 ng/L 140 ± 40% ng/L >96.60% 5.44 ng/L 20 ng/L NA
Fenitoína 200 ng/L 200 ± 40% ng/L >94.80% 10.40 ng/L 30 ng/L NA
Ibuprofeno 400 ng/L 400 ± 40% ng/L >94.50% 22.00 ng/L 60 ng/L NA
Naproxeno 140 ng/L 140 ± 40% ng/L >96.10% 5.46 ng/L 20 ng/L NA
Estrona 120 ng/L 140 ± 40% ng/L >96.10% 4.68 ng/L 20 ng/L NA
Bisfenol A 2000 ng/L 2000 ± 40% ng/L >98.90% 22.00 ng/L 300 ng/L NA
Nonilfenol 1600 ng/L 1400 ± 40% ng/L >97.10% 46.40 ng/L 200 ng/L NA
Dificultad de
Afluencia
Promedio
Concentración
Objetivo
especificada
por NSF
50,000
bacterias/L
% Reducción
Promedio
>99.99% 10 quistes/L N/A 2 99.95%
Concentración
Media de
Producto en
Agua
Concentración
Máxima
Permisible de
Producto en
Agua
• Basado en el uso de ooquistes de Crypstosporidium parvum.
Requisitos de
Reducción NSF
ESPAÑOL
Lineamientos de Aplicación / Parámetros de Suministro de Agua
Flujo de Servicio 0.5 gpm (1.9 lpm)
Suministro de Agua Pozo Comunitario o Privado - Agua Potable
Presión de Agua 20 – 120 psi (138 – 827 kPa)
Temperatura del agua 33 °F – 100 °F (0.6 °C – 37.8°C)
Capacidad 200 galones (757 litros)
Es indispensable que se realicen la instalación recomendada por el fabricante, el mantenimiento y los
requerimientos de remplazo del filtro para que el producto se desempeñe adecuadamente.
NOTA
• Aunque se llevaron a cabo las pruebas en condiciones estándar de laboratorio, el desempeño real podría
variar.
Para filtros de reemplazo, visite a su proveedor o distribuidor local o busque "filtros de agua" en el sitio
web lg.com.
Para mayor asistencia, contácte al Centro de Información al Cliente de LG Electronics.
USA: 1-800-243-0000
Canadá: 1-888-542-2623
Cartucho de reemplazo: LT1000P, LT1000PC o LT1000PCS
LG es una marca registrada de la corporación LG.
NSF es una marca comercial de NSF International.
Manufacturado por LG Electronics, INC:
170, Sungsanpaechoungro, Seongsan-gu, Gyeongsangnam-do, THE REPUBLIC OF KOREA
Page 94

38 SOLUCIÓN DE PROBLEMAS
SOLUCIÓN DE PROBLEMAS
Preguntas Frecuentes
Preguntas frecuentes
P: ¿Cuál es la mejor configuración de temperatura para mi refrigerador y congelador?
R: La configuración predeterminada del refrigerador es 37° Fahrenheit (3° Celsios). La configuración
predeterminada del congelador es 0° Fahrenheit (-18° Celsios). Ajuste esta configuración según sus
necesidades a manera de mantener los alimentos a la temperatura deseada. La leche deberá
mantenerse fría al almacenarse en el estante interior del refrigerador. El helado deberá estar firme y
los cubos de hielo no deberán derretirse en el congelador. Para cambiar la pantalla de Fahrenheit a
Celsios, mantenga presionados los botones Freezer y Refrigerator hasta que escuche un sonido y
vea el cambio de ajustes en la pantalla.
P: ¿Cómo establezco la temperatura del refrigerador y del congelador?
R: Presione continuamente el botón Refrigerator o Freezer en el panel de control hasta que aparezca
la temperatura deseada. Los números se mostrarán de mayor a menor y volverán a comenzar por el
mayor a medida que siga presionando.
P: ¿Por qué escucho un zumbido periódicamente desde mi refrigerador?
R: Esto puede suceder si no tiene una fuente de agua conectada a su refrigerador y el dispensador de
hielo está encendido. Si no tiene una fuente de agua conectada a la parte trasera del refrigerador,
debe apagar el dispensador de hielo.
P: ¿Por qué el recipiente del dispensador de hielo se ve encorvado?
R: Esta es una parte normal del ciclo del dispensador de hielo. La bandeja del dispensador de hielo
puede parecer nivelada o con una leve inclinación. El cambio de posición es para asistir el proceso de
congelación.
P: Mi refrigerador está encendido y los controles están funcionando, pero no está enfriando y la
pantalla muestra "OFF" (Apagado) (Vea abajo). ¿Qué está mal?
R: El refrigerador está en Modo de Exhibición. El Modo de Exhibición deshabilita toda refrigeración en
las secciones del refrigerador y congelador para conservar energía mientras se exhibe en una tienda
minorista. Cuando se activa, se muestra apagado (OFF) en el panel de control y la pantalla permanece
encendida por 20 segundos. Con cualquier puerta del refrigerador abierta, presione el botón Ice Plus
3 veces de manera consutiva mientras presiona el botón Refrigerator. El panel de control emite un
pitido y la configuración de la temperatura muestra la confirmación de que el Modo de Exhibición
está desactivado. Utilice el mismo procedimiento para activar el Modo de Exhibición.
Page 95

Antes de llamar al servicio técnico
Revise esta sección antes de llamar para servicio; hacerlo le ahorrará tiempo y dinero.
Enfriamiento
Problemas Causas posibles y solución
Las secciones del
Refrigerador y
Congelador no están
enfriando.
El sistema de
enfriamiento se
ejecuta mucho.
El control del refrigerador está configurado en APAGADO (algunos modelos).
• Configure el control en ENCENDIDO. Consulte la Configuración en la sección Controles
para los ajustes apropiados de temperatura.
El Refrigerador está configurado en Modo Demo.
• Modo Demo permite que la iluminación y la pantalla de control funcionen normalmente
mientras que deshabilita el enfriamiento para ahorrar energía mientras el refrigerador
está en exhibición. Vea las Preguntas Frecuentes y la Configuración en la sección Controles
de este manual para instrucciones sobre cómo deshabilitar el Modo Demo.
El refrigerador está en el ciclo de descongelado.
• Durante el ciclo de descongelado, la temperatura de cada compartimento puede
incrementarse levemente. Espere 30 minutos y confirme que la temperatura apropiada
haya sido restaurada una vez que el ciclo de descongelado haya sido completado.
El refrigerador fue instalado recientemente.
• Puede tomar hasta 24 horas para que cada compartimento alcance la temperatura
deseada.
El refrigerador fue reubicado recientemente.
• Si el refrigerador estaba almacenado por un período largo de tiempo o reclinado, es
necesario que éste se mantenga en posición vertical por 24 horas previo a conectarlo a la
corriente eléctrica.
El refrigerador está reemplazando un modelo anterior.
• Los refrigeradores modernos requieren más tiempo de operación pero usan menos
energía debido a tecnología más eficiente.
El refrigerador fue conectado recientemente o su fuente de energía fue restablecida.
• Puede tomar hasta 24 horas para que el refrigerador enfríe completamente.
La puerta es abierta frecuentemente o una gran cantidad de alimentos / alimentos
calientes fueron añadidos.
• Al añadir alimentos y abrir las puertas el refrigerados se calienta, requiriendo que el
compresor se ejecute más tiempo a manera de enfriarlo de nuevo. A manera de conservar
energía, intente retirar todo lo que necesita del refrigerador al mismo tiempo, mantenga
los alimentos organizados para que sea fácil encontrarlos, y cierre la puerta en cuanto los
alimentos sean retirados. (Consulte la Guía de Almacenamiento de Alimentos.)
Las puertas no están completamente cerradas.
• Cierre las puertas firmemente. Si éstas no cierran completamente, vea la sección "Puertas
no cierran o abren completamente" en Solución de Problemas.
El refrigerador está instalado en una ubicación caliente.
• El compresor se ejecutará por más tiempo en condiciones templadas. En temperaturas
normales de habitación (70 °F o 21 °C) espere que su compresor se ejecute de 40% a 80%
del tiempo. Bajo condiciones más calientes, espere que este se ejecute más seguido. El
refrigerador no debe ser operado sobre 110 °F (43 °C).
Condensador / cubierta trasera está obstruida.
• Use una aspiradora con un accesorio adjunto para limpiar la cubierta y los respiraderos
del condensador. No remueva el panel que cubre el área de las bobinas del condensador.
39SOLUCIÓN DE PROBLEMAS
ESPAÑOL
Page 96

40 SOLUCIÓN DE PROBLEMAS
Problemas Causas posibles y solución
Acumulación de
humedad interior.
Los alimentos se
están congelando en
el compartimento
del refrigerador.
La sección del
Refrigerador o
Congelador está muy
fría.
Se forma escarcha o
cristales de hielo en
alimentos
congelados (dentro
de paquete sellado).
Formación de
escarcha o cristales
de hielo en
alimentos
congelados (fuera
del empaque).
Las puertas están abiertas constantemente o por períodos largos de tiempo.
• Cuando las puertas están abiertas constantemente o por períodos largos de tiempo, el
aire caliente y húmedo entra al compartimento. Esto eleva la temperatura y el nivel de
humedad dentro del compartimento. Para disminuir el efecto, reduzca la frecuencia y
duración de apertura de la puerta.
Las puertas no están cerradas correctamente.
• Vea la sección Puertas no cierran o abren completamente en Solución de Problemas de
Partes & Características.
El clima es húmedo.
• El clima húmedo permite que humedad adicional ingrese a los compartimentos cuando las
puertas se abren, provocando condensación o escarcha. Mantener un nivel de humedad
razonable en el hogar ayudará a controlar la cantidad de humedad que pueda ingresar a
los compartimentos.
Ciclo de descongelado recientemente completado.
• Durante el ciclo de descongelado, la temperatura de cada compartimento puede
incrementar levemente y puede que se forme condensación en la pared trasera. Espere 30
minutos y confirme que la temperatura adecuada se ha restaurado una vez el ciclo de
descongelado ha sido completado.
Los alimentos no están empacados correctamente.
• Los alimentos almacenados, descubiertos o desenvueltos, y contenedores húmedos
pueden llegar a generar acumulación de humedad dentro de cada compartimento. Seque
todos los contenedores y almacene los alimentos en empaques sellados para prevenir
condensación y escarcha.
Alimentos con contenido alto en agua fueron ubicados cerca de una ranura de
ventilación.
• Reorganice los artículos con contenido alto en agua alejados de las ranuras de ventilación.
La temperatura del refrigerador está configurada incorrectamente.
• Si la temperatura es muy baja, ajuste el control mediante un incremento a la vez y espere a
que la temperatura se estabilice. Consulte la sección Ajustando los Controles para más
información.
El refrigerador está instalado en una ubicación fría.
• Cuando el refrigerador es operado en una temperatura inferior a 41 °F (5 °C), los alimentos
pueden congelarse en el compartimento del refrigerador. El refrigerador no debe ser
operado en temperaturas inferiores a 55 °F (13 °C).
Ajustes de control de temperatura incorrectos.
• Si la temperatura es muy fría, ajuste el control un incremento a la vez y espere a que la
temperatura se estabilice. Consulte el Panel de Control para mayor información.
Condensación de alimentos con un alto contenido de agua se ha congelado dentro del
paquete.
• Esto es normal para alimentos con un alto contenido de agua.
Alimentos se han dejado en el congelador por un largo período de tiempo.
• No almacene alimentos con un alto contenido de agua en el congelador por un largo
período de tiempo.
La puerta es abierta frecuentemente o por períodos prolongados de tiempo.
• Cuando las puertas son abiertas constantemente o por períodos largos de tiempo, aire
caliente y húmedo entra al compartimento. Esto eleva la temperatura y el nivel de
humedad dentro del compartimento. Para disminuir el efecto, reduzca la frecuencia y
duración de apertura de la puerta.
La puerta no cierra correctamente.
• Vea la sección "Puertas no cierran o abren correctamente" en Solución de Problemas.
Page 97

Problemas Causas posibles y solución
Las secciones del
Refrigerador y
Congelador están
muy calientes.
El refrigerador fue instalado recientemente.
• Puede tomar hasta 24 horas para que cada compartimento alcance la temperatura
deseada.
Los respiraderos están bloqueados. Aire frío circula desde el congelador hasta la
sección de alimentos frescos y luego de regreso a través de los respiraderos en la pared
que divide las dos secciones.
• Reorganice los artículos con contenido alto en agua alejados de las ranuras de ventilación.
Las puertas están abiertas constantemente o por períodos largos de tiempo.
• Cuando las puertas están abiertas constantemente o por períodos largos de tiempo, el
aire caliente y húmedo entra al compartimento. Esto eleva la temperatura y el nivel de
humedad dentro del compartimento. Para disminuir el efecto, reduzca la frecuencia y
duración de apertura de la puerta.
Reorganice los artículos con contenido alto en agua alejados de las ranuras de
ventilación.
• El refrigerador no debe ser operado en temperaturas por encima de 110 °F (43 °C).
Reorganice los artículos con contenido alto en agua alejados de las ranuras de
ventilación.
• Reorganice los artículos con contenido alto en agua alejados de las ranuras de ventilación.
Las puertas no están cerradas correctamente.
• Vea la sección "Puertas no cierran o abren correctamente" en Solución de Problemas.
Reorganice los artículos con contenido alto en agua alejados de las ranuras de
ventilación.
• Si la temperatura es muy alta, ajuste el control un incremento a la vez y espere a que la
temperatura se estabilice.
Reorganice los artículos con contenido alto en agua alejados de las ranuras de
ventilación.
• Durante el ciclo de descongelado, la temperatura de cada compartimento puede
incrementar levemente y formar condensación en la pared trasera. Espere 30 minutos y
confirme que la temperatura apropiada haya sido restaurada una vez el ciclo de
descongelado haya sido completado.
41SOLUCIÓN DE PROBLEMAS
ESPAÑOL
Page 98

42 SOLUCIÓN DE PROBLEMAS
Hielo
Problemas Causas posibles y solución
El dispensador de
hielo no está
produciendo
suficiente hielo.
La demanda excede la capacidad de almacenamiento de hielo.
• El dispensador de hielo producirá aproximadamente 70-184 cubos en un período de 24
horas.
El suministro de agua principal no está conectado, la válvula no está completamente
encendida o la válvula está obstruida.
• Conecte el refrigerador a un suministro de agua fría con presión adecuada y abra la
válvula de cierre de agua completamente. Si el problema continúa, puede que sea
necesario contactar a un plomero.
El filtro de agua ha sido agotado.
• El reemplazo del filtro de agua se recomienda:
Aproximadamente cada seis meses.
Cuando se encienda el indicador de filtro de agua.
Cuando disminuya la potencia del dispensador de agua.
Cuando los cubos de hielo sean más pequeños de lo normal.
Baja presión de suministro de agua principal.
• La presión del agua debe estar entre los 20 y los 120 psi en modelos sin filtro de agua y
entre los 40 y 120 psi en modelos con filtro de agua. Si el problema continúa, puede que
sea necesario contactar a un plomero.
Se está usando el Sistema de Filtración de Osmosis Inversa.
• Los sistemas de filtración de osmosis inversa pueden reducir la presión de agua por
debajo de la cantidad mínima y provocar problemas en el dispensador de hielo. (Consulte
la sección Conectando la Línea de Agua.)
La tubería que conecta el refrigerador a la válvula de suministro del hogar está
retorcida.
• La tubería se puede retorcer cuando el refrigerador es movido durante la instalación o
limpieza, provocando un flujo reducido de agua. Enderece o repare la línea del suministro
de agua y arréglela para prevenir futuras torceduras.
Las puertas están abiertas constantemente o por períodos largos de tiempo.
• Si las puertas de la unidad se abren a menudo, el aire ambiental calentará el refrigerador,
lo que impedirá que la unidad pueda mantener la temperatura establecida. Puede ayudar
el bajar la temperatura del refrigerador, así como no abrir las puertas con tanta
frecuencia.
Las puertas no están completamente cerradas.
• Si las puertas no están cerradas correctamente, la producción de hielo se verá afectada.
Para obtener mayor información, vea la sección Las puertas no se cierran completamente
o quedan abiertas en la sección Componentes y Características de la Guía de resolución de
problemas.
El ajuste de temperatura del congelador es demasiado cálido.
• La temperatura recomendada para el compartimento del congelador para una producción
normal de hielo es de 0 °F. Si la temperatura del congelador es superior, la producción se
verá afectada.
Page 99

Problemas Causas posibles y solución
El dispensador de
hielo no está
produciendo hielo.
El hielo tiene mal
sabor u olor.
El dispensador de
hielo está
produciendo
demasiado hielo.
El refrigerador fue instalado recientemente o el dispensador de hielo fue conectado
recientemente.
• Puede tomar hasta 24 horas para que cada compartimento alcance la temperatura
deseada y para que el dispensador de hielo empiece a producir hielo.
El dispensador de hielo no está conectado.
• Localice el botón Encendido/Apagado y confirme que está en la posición de Encendido
(On).
El sensor de detección de hielo está obstruido.
• Las sustancias desconocidas o escarcha en el sensor detector de hielo pueden interrumpir
la producción del mismo. Asegúrese de que el área del sensor está limpia todo el tiempo
para que opere apropiadamente.
El refrigerador no está conectado a un suministro de agua o la válvula de cierre del
suministro no está abierta.
• Conecte el refrigerador al suministro de agua y abra completamente la válvula de cierre de
agua.
Corte del dispensador de hielo (brazo o sensor) obstruido.
• Si su dispensador de hielo está equipado con un brazo de corte de hielo, asegúrese de que
el brazo se mueve libremente. Si su dispensador de hielo está equipado con un sensor de
corte de hielo, asegúrese de que haya un espacio limpio entre los dos sensores.
El sistema de filtración de agua de osmosis inversa está conectado a su suministro de
agua fría.
• Los sistemas de filtración de osmosis inversa pueden reducir la presión de agua por
debajo de la cantidad mínima y provocar problemas en el dispensador de hielo. (Consulte
la sección Conectando la Línea de Agua.)
El suministro de agua contiene minerales como azufre.
• Puede ser necesario instalar un filtro de agua para eliminar problemas de sabor y olor.
NOTA: En algunos casos, un filtro puede no ayudar. Puede no ser posible remover todo
mineral/olor/sabor del suministro de agua.
El dispensador de hielo fue instalado recientemente.
• El hielo que ha sido almacenado por mucho tiempo se encogerá, tornará turbio y podrá
desarrollar un sabor a viejo. Tire el hielo viejo y haga un nuevo suministro.
Los alimentos no han sido almacenados apropiadamente en los compartimentos.
• Empaque nuevamente los alimentos. Los olores pueden migrar hacia el hielo si los
alimentos no son empacados apropiadamente.
El interior del refrigerador debe ser limpiado.
• Vea la sección de Mantenimiento para mayor información.
El recipiente de almacenamiento de hielo necesita ser limpiado.
• Vacíe y lave el recipiente (deseche cubos viejos). Asegúrese de que el recipiente está
completamente seco previo a reinstalarlo.
Corte del dispensador de hielo (brazo/sensor) está obstruido.
• Vacíe el recipiente de hielo. Si su dispensador de hielo está equipado con un brazo de corte
de hielo, asegúrese de que el brazo se mueve libremente. Si su dispensador de hielo está
equipado con el sensor de corte de hielo electrónico, asegúrese de que haya un espacio
limpio entre los dos sensores. Reinstale el recipiente de hielo y espere 24 horas para
confirmar que opera apropiadamente.
43SOLUCIÓN DE PROBLEMAS
ESPAÑOL
Page 100

44 SOLUCIÓN DE PROBLEMAS
Problemas Causas posibles y solución
No se está
dispensando hielo
¿No escucha el sonido de hielo saliendo?
• En el panel de control, seleccione los modos para cubitos de hielo y hielo picado
alternadamente para dispensar el hielo.
Las puertas no están completamente cerradas.
• El hielo no será dispensado si alguna de las puertas del refrigerador se ha dejado abierta.
Uso infrecuente del dispensador.
• El uso infrecuente del dispensador de hielo causará que con el tiempo los cubos se peguen
unos con otros, lo que prevendrá el dispensado apropiado de los mismos. Revise si hay
cubos de hielo aglutinados/pegados unos con otros en el recipiente de hielo. Si los hay,
quiebre los cubos de hielo para permitir la operación apropiada.
El paso de hielo puede bloquearse con escarcha o fragmentos de hielo.
• Remueva la escarcha o fragmentos de hielo retirando el recipiente de hielo y despejando
el paso con un utensilio plástico. Dispensar cubos de hielo también puede ayudar a
prevenir la formación de escarcha o fragmentos de hielo.
La pantalla del dispensador está bloqueada.
• Mantenga presionado el botón Lock por tres segundos para desbloquear el panel de
control y dispensador.
El recipiente de hielo está vacío.
• Puede tomar hasta 24 horas para que cada compartimento alcance la temperatura
deseada y para que el dispensador de hielo empiece a producir hielo. Asegúrese de que el
corte del dispensador (brazo/sensor) no está obstruido. Una vez que el suministro de hielo
en el recipiente se ha agotado completamente, puede tomar hasta 90 minutos para que
haya hielo adicional disponible y aproximadamente 24 horas para llenar completamente el
recipiente de nuevo.
Agua
Problemas Causas posibles y solución
El agua está siendo
dispensada
lentamente.
El filtro de agua ha sido agotado.
• El reemplazo del filtro de agua se recomienda:
Aproximadamente cada seis meses.
Cuando se encienda el indicador de filtro de agua.
Cuando disminuya la potencia del dispensador de agua.
Cuando los cubos de hielo sean más pequeños de lo normal.
Se está usando el Sistema de Filtración de Osmosis Inversa.
• Los sistemas de filtración de osmosis inversa pueden reducir la presión de agua por
debajo de la cantidad mínima y provocar problemas en el dispensador de hielo. Si el
problema continúa, puede que sea necesario contactar a un plomero.
Baja presión de suministro de agua principal.
• La presión del agua debe estar entre los 20 y los 120 psi en modelos sin filtro de agua y
entre los 40 y 120 psi en modelos con filtro de agua. Si el problema continúa, puede que
sea necesario contactar a un plomero.
 Loading...