

LG LGRD2710 Owner’s Manual [in]
LG-RD2710
User Guide
LG-RD2710
eekkWWMMyy%%
mmiiHHkkkkssDDrrkk eekkxxZZnnff''kkZZddkk
P/N : MMBB0209301 (1.1)
G
CONTENTS
PHONE COMPONENTS 2
ONSCREEN ICONS 4
USING THE BATTERY AND
CHARGER 5
Installing and Removing the Battery 5
Charging the Battery 6
Battery Charge Level 6
BASIC FUNCTIONS 7
Turning the Phone On and Off 7
Changing the display language 7
Airplane Mode 8
Making a Call 8
Receiving Calls 9
MENU TREE 10
ENTERING AND EDITING
INFORMATION 11
Entering Information Using T9
Text Input 11
To Edit in Hindi Mode 13
MESSAGES 14
Write Text 14
Write E-mail 16
1234 Services 17
INTRODUCTION 19
MENU FEATURES 20
SAFETY INFORMATION 30
Charger and Adapter Safety 30
Battery Information and Care 30
General Notice 30
LIMITED WARRANTY
STATEMENT 32
SERVICE CENTER LIST 34
1
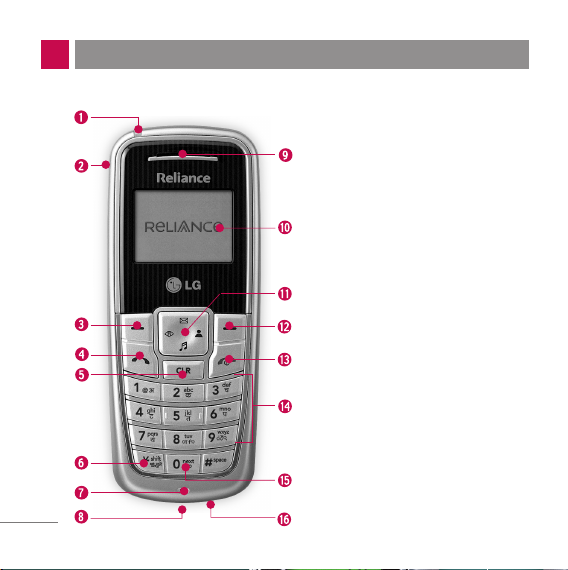
PHONE COMPONENTS
The following shows key components of your mobile phone.
1. Service LED
2. Headset Jack
3. Soft Key1
4. CALL Key
5. Clear Key
6. Vibrate Mode Key
7. Microphone
8. Data Port
9. Earpiece
10. LCD Screen
11. 4 Way Navigation Key
12. Soft Key2
13. END/PWR Key
14. Alphanumeric Keypad
15. Key Pad Lock Key
16. Charger Port
2
LCD ScreenDisplays messages &
indicator icons.
Soft Keys The names of the functions of
these keys appear at the bottom of the
screen
G
Soft Key 1
Used to display the function setting
menu. Accepts the highlighted choice
when navigating through a menu.
G
Soft Key 2
Press this key once in a menu, to go
back one level.
CALL Key Allows user to place or answer
calls, See and redial from call history.
END/PWR Key Used to turn power
On/Off and to end a call. Using this key, you
can return to the main menu display
screen. When you press once, when a call
is received, the phone stops ringing or
vibrating depending on the mode it is in.
Press twice to reject the call.
Alphanumeric Keypad These keys
enable you to enter numbers and
characters and choose menu items.
Navigation Key This Navigation key
allows quick access Messages and
Voice Mail notification messages.
Ring Tone, R World, Profiles.
Vibrate Mode Key In standby mode, set
the vibrate mode by pressing and holding
the key about 2 seconds.
Clear Key Press to delete a single space
or character. Press and hold to delete
entire words. You can access "My Menu"
by Clear Key.
3
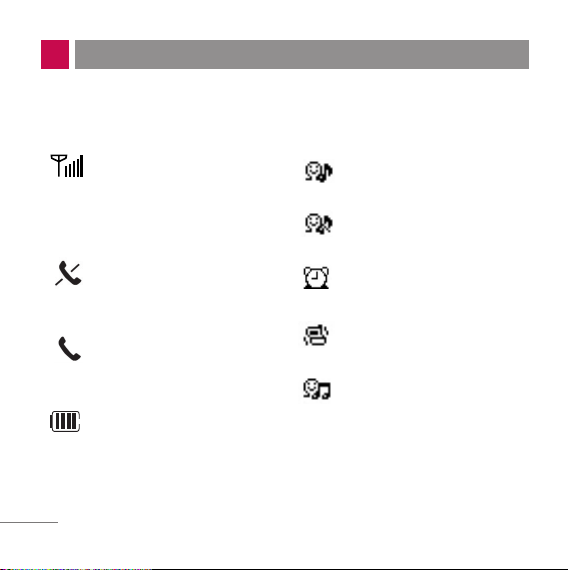
ONSCREEN ICONS
The phone screen displays several onscreen icons which appear
when the phone is powered on.
Displays the strength of the
signal received by the phone and
current signal strength is
indicated by the number of bars
displayed on the screen.
No service
The phone is not receiving a
system signal.
In use. A call is in progress.
* No icon indicates the phone is
in standby mode.
Charge level. Indicates battery
charge level.
4
In General mode
In Silent mode
In Alarm mode
In Vibrate mode
In Outdoor mode
USING THE BATTERY AND CHARGER
Charge the battery fully before the initial use of the phone.
The phone comes with a rechargeable battery. Keep the battery
charged while not in use in order to maximize talk and standby time
when using the phone.
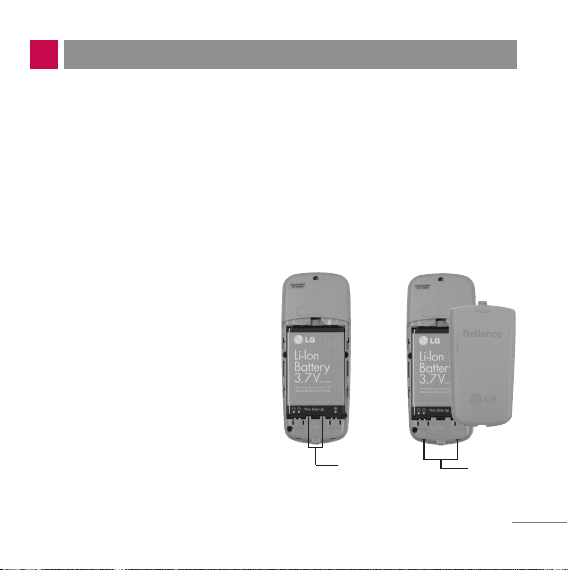
Installing and Removing the Battery
G
To install, insert the battery
into the opening on the back
of the phone, and insert the
bottom of battery into groove
at the bottom of the handset.
Gently press down the cover
until the latch snaps into
place.
G
To remove, push the back
cover down. Push the tab
with one hand and lift the top
of the battery to separate.
groove
slot
5
Charging the Battery
To use the AC adapter charger provided with your phone:
1. Plug the AC adapter into the electrical outlet.
2. Insert the round end of the adapter into the AC adapter jack on the
bottom of the phone. (Make sure the battery is installed.)
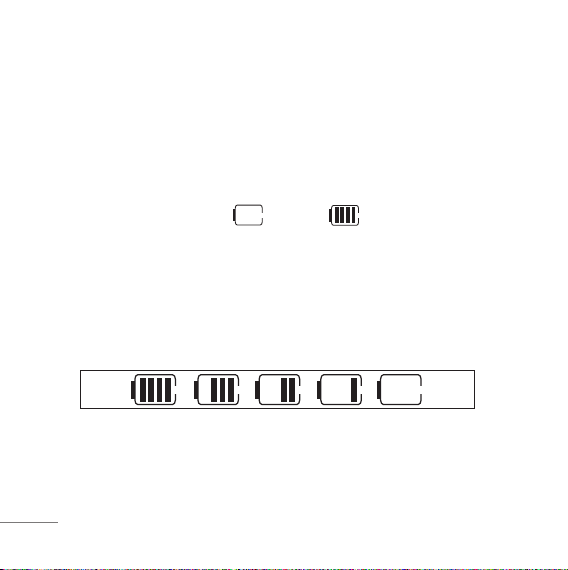
G
As the phone charges, the battery icon continually displays a
progression from empty ( ) to full ( ).
It takes about three hours to fully recharge a completely rundown
battery. When fully charged, battery icon indicates charging by
twinkling.
Battery Charge Level
The battery charge level is shown at the top right of the LCD screen.
When the battery charge level becomes low, the low battery sensor
will alert you in three ways: sounding an audible tone, blinking the
battery icon outline, and displaying Recharge the battery If the battery
charge level becomes exceedingly low, the phone will automatically
switch off and any function in progress will not be saved
6

BASIC FUNCTIONS
Turning the Phone On and Off
1. Install a charged battery pack or connect the phone to an external
power source such as the cigarette lighter charger, car kit or AC
adaptor.
2. Hold down the Key for 2 seconds until the LCD screen flashes.
NNoo tt ee
As any other communication device, avoid any unnecessary contact with the
antenna while your phone is turned on.
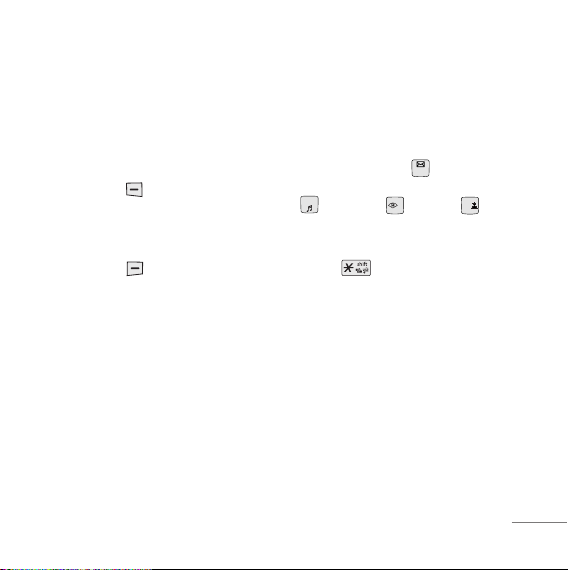
Changing the display language
1. In standby mode, press Soft Key 1 Menu.
2. Press , .
ffggUUnnhh
3. Set English/
with and then press Soft Key 1.
7
Airplane Mode
When your phone is in Airplane Mode, it cannot send or receive any
calls or access online information. You may use the phone’s other
features, such as Game, Scheduler, Memo, etc. When Airplane Mode
is enabled, a message “Airplane Mode On” is displayed on the screen.
1. In standby mode, press Soft Key 1 Menu, , , .
2. Select On or Off and press Soft Key 1.
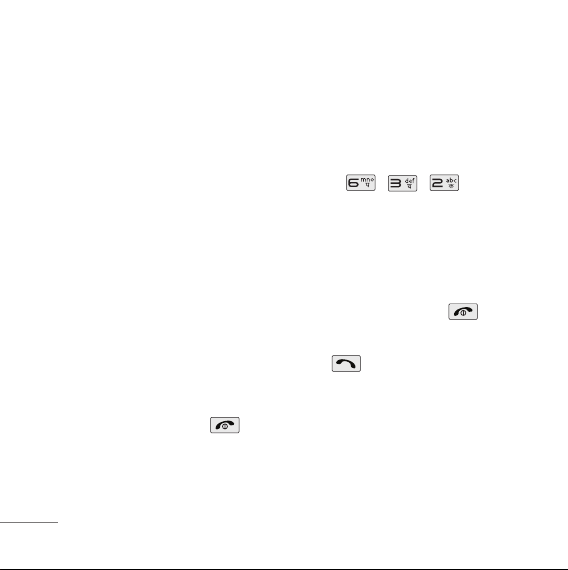
Making a Call
Every time you make a call, follow these steps:
1. Make sure that the phone is turned on. If not, hold down for 2
seconds.
2. Type the phone number and then press .
G
If the phone is locked, type the lock code.
3. To end the call press .
8
Receiving Calls
1. When the phone rings or vibrate (if the Vibrate Mode is enabled),
press any key (except ) or depending on the Call setting.
G
When you press once, when a call is received, the phone
stops ringing or vibrating depending on the mode it is in. Press
twice to disconnect.
2. To end an answered call, press .
9
MENU TREE
1. Names
1. Add Name
2. Find
3. Groups
4. Speed Dials
5. Memory Status
6. Help
2. Messages
1. Write
2. Inbox
3. 1234 Services
4. Outbox
5. Voice Mail
6. Archive
7. Drafts
8. Templates
9. Msg Groups
0. Erase Msgs
. Message Settings
*
#. Help
3. Call History
1. Missed
2. Received
10
3. Dialled
4. In Call Memo
5. Call Duration
6. Erase History
7. Help
4. Profiles
1. Vibrate Only
2. Silent
3. General
4. Outdoor
5. Headset
6. Carkit
7. Help
5. Display
1. Language
2. Service Area
3. Clock
4. Wallpaper
5. Screensaver
6. Menu Style
7. Rhythmic Lighting
8. Backlight
9. Contrast
0. Help
6. Settings
1. My Menu
2. Call
3. Phone
4. Security
7. Organiser
1. Scheduler
2. Memo
3. Alarm
4. Reserved Call
5. Stopwatch
6. Calculator
7. Currency Converter
8. World Clock
9. Help
8. R World
1. R-Menu
2. Dial 1234
3. Games
4. Reset R-Menu
ENTERING AND EDITING INFORMATION
Entering Information Using T9 Text Input
In the text input field. you can scroll through the modes using
Soft Key 2 in the following order : T9En, Abc, 123, Symbol, :-), Hindi.
- Shift Key : Used to change the letter case.
Typing In T9 Mode
For example, to write “Call the office”, follow these steps:
1. Press: Soft Key 2 to change letter case to T9En mode.
2. Press: .
3. Press: to complete the word and add a space.
4. Press: .
5. Display: Call the office.
11
Typing In ABC (Multi-tap) Mode
For example, to type “LG”, follow these steps:
1. Press: Soft Key 2 to change letter case to Abc mode.
2. Press: to change to ABC Caps Lock mode.
3. Press: .
4. Display: LG.
123 (Numbers) Mode
Type numbers using one keystroke per number.
To change to 123 mode in a text entry field, press Soft Key 2 until 123
mode is displayed.
Symbol/Smileys Mode
To change to Symbol/Smileys mode in a text entry field, press right Soft
Key until Symbol/Smileys mode is displayed.
Press to cycle through the desired items. To select item, Press
the assigned number key.
12
To Edit in Hindi Mode
Press Soft Key 2 , until the soft menu changes to Hindi mode.
For E.g., To type " "
1. Press 2 times.
2. Press 8 times.
3. Press 5 times.
4. Press 3 times.
5. Press 3 times.
6. Press 3 times.
13
MESSAGES
Write Text
LMS(Long Message Service) allows you to send a message up to 462
characters at a time. Before sending LMS message, total number of
SMS packets formed are intimated to the user and confirmation is
taken to send.
Maximum 3 packets for English and 4 for Hindi messages can be sent.
Each LMS packet is received as individual message. Every LMS
message shows the packet sequence number in the message for ex:
In case of 3 packets, <1/3>, <2/3>, <3/3>.
1. Press Soft Key 1 Menu, or .
2. Select Write.
3. Select Write Text.
4. After entering a message to be sent by selecting Send, press Soft
Key 1 Options.
G
Send Use to send the message.
G
Save Save to Draft message.
G
Templates Select a sample message.
14

5. After entering the phone number where the message is to be sent,
press Soft Key 1 Options.
G
Send Use to send the message.
G
NextRecipient Enter the next recipients address you can add
up to 10 recipients.
G
Priority Allows you to give the priority to message.
Normal or Urgent.
G
Delivery Ack This function allows you to know whether the
message is successfully transmitted to other
party or not when the transmitted message is
received in other party’s phone. If you want to
activate this function, set to On.
G
Save Sent Msg You can save this message in Outbox.
6. If you select Send, it notifies you whether the message was sent
successfully.
G
Send Use to send the message.
G
Last Select a recent sent number.
G
SMS Groups Select SMS Group.
G
Names Select a phonebook entry.
15
Write E-mail
Send message to an E-mail ID with Write E-mail.
1. Press Soft Key 1 Menu, or .
2. Select Write.
3. Select Write E-mail.
There are four optional menus of Send, Last, E-mail Groups and
Names.
G
Send Use to send the message.
G
Last Select a recent sent E-mail.
G
E-mail Groups Select E-mail Group.
G
Names Select a phonebook entry.
4. After entering the e-mail address where the message is to be sent,
enter the next recipients address in the Soft Key 1. You can add up
to 10 recipients. Press Soft Key 1 Options.
G
Send Use to send the message.
G
Domain Select a domain.
G
NextRecipient Select a next recipient. (up to 10)
5. After entering a subject, press Soft Key 1 Next.
16

6. After entering a message to be sent by selecting Send, press Soft
Key 1 Options.
G
Send Use to send the message.
G
Save Save to Drafts message.
G
Templates Select a Templates message.
G
Priority Allows you to give the priority to message.
Normal or Urgent.
G
Delivery Ack This function allows you to know whether the
message is successfully transmitted to other
party or not when the transmitted message is
received in other party’s phone. If you want to
activate this function, set to On.
G
Save Sent Msg You can save this message in Outbox.
1234 Services
Exciting SMS-based Infotainment services such as News, Joke,
Horoscope etc are available to Reliance subscribers. Using the SMS
1234 services, the user will be able to access interesting information
on common subjects through SMS. User needs to select the Menu
corresponding to the Service Keyword.
17
1. Press Soft Key 1 Menu, or .
2. Select 1234 Services.
3. Place the cursor on the item that you wants to be served, and then
press Soft key 1 Select. You may select from eleven items. (1.News
2. Cricket 3.Joke of The Day 4.Thought of The Day 5.Contest 6.
Beauty Tips 7.Health 8.Horoscope 9.Bill Info 0.Unbilled Info *.Help)
You may select the keyword that you want to send in subsequentMenu.
Example
For example, to receive the "sports news" you can operate the phone
as follow;
1. Press Menu +2(Messages) + 3(1234 Services) + 1(News) + 6(NEWS
SPORTS)
2. Press Soft Key 1 Send.
3. Display: Sending...(1/1) To:1234
18
INTRODUCTION
Congratulations on your purchase of the LG-RD2710 cellular phone that has been designed
to operate with the latest digital mobile communication technology, Code Division Multiple
Access (CDMA). The CDMA system has greatly enhanced voice clarity and can provide
various types of advanced features.
This is an advanced and compact phone which has diverse features as follows:
G
Large, easy-to-read, 2 lines display + 1 Icon Line + 1 Menu Line.
G
Paging, Messaging, Voice Mail, and Caller ID.
G
18-key keypad (10 number keys / 2 function keys / 2 Soft keys / 1 Clear key /
4 way navigation 1 key / 1 Call key / 1 End key).
G
Long battery stand-by and talk time.
G
Choice of 19 Ring sounds + 3 downloadable Ring tones by SMS + 50KB R World
downloadable Ring tones.
G
Choice of 3 Wallpapers + 3 downloadable by SMS.
G
Menu-driven interface with prompt for easy operation and configuration.
G
Voice Privacy inherent with CDMA encoding.
G
Any Key Answer, Auto Redial, Speed Dial up to 99 memory locations.
G
Optional accessories with greater convenience and enhanced functionality.
G
In Call Memo, 1234 Services, R World, Games
G
Airplane Mode, Rhythmic Lighting.
G
SMS, LMS, SMS to E-mail, Group SMS.
19
MENU FEATURES
Names
Add Name Menu 1.1
Store up to 600 contacts, adding 4
phone numbers + E-mail + Memo
with each entry and assign Group
+ Ring Tone + Message Alert
Tone to each entry.
Find Menu 1.2
To find phone numbers you have
stored in the Phone Book.
Groups Menu 1.3
This is a function for changing
Group Name and setting Ring
tones by Group.
20
Speed Dials Menu 1.4
Speed Dial allows you to make a
call faster by just pressing a
corresponding number.
Memory Status Menu 1.5
This feature allows user to view
number of records occupied in
phonebook and percentage of
occupied space in Phonebook
Memory. Memory status is
indicated by progress bar.
Messages
Write Menu 2.1
(Refer to 12~15 page)
Write and send Message and

E-Mail. Allows you to send a
message up to 462 characters at
a time.
Inbox Menu 2.2
Received Text messages, Page,
E-mail messages, Delivery ack,
lists may be searched, and the
contents may be viewed. Up to 30
can be stored.
1234 Services Menu 2.3
(Refer to 16 page)
Exciting SMS-based Infotainment
services such as News, Joke,
Horoscope etc are available to
Reliance subscribers.
Outbox Menu 2.4
Up to 30 sent messages can be
stored in the Outbox.
Voice Mail Menu 2.5
Allows you to view the new voice
messages recorded in the voice
mail box.
Archive Menu 2.6
Archive stores what is preferred
to save among messages
received. Up to 30 can be stored.
Drafts Menu 2.7
When a user is interrupted by a
call while composing a message,
messages automatically get
saved. Up to 30 can be stored.
Templates Menu 2.8
There are 10 predefined phrases
included in the Templates. You
can add up to 20 templates more.
21

Msg Groups Menu 2.9
Msg Groups consists of 5 SMS/
E-mail Groups with each group
consisting of maximum 10
members.
Erase Msgs Menu 2.0
Allows you to erase messages in
each message box.
Message Settings Menu 2.
Message Settings can be
configured for receiving new
messages.
Call History
numbers are possible including
Missed, Received, Dialled and In
Call Memo)
Received Menu 3.2
Allows you to view list of all
Received Calls. (Maximum 60
numbers are possible including
Missed, Received, Dialled and In
Call Memo)
*
Dialled Menu 3.3
Allows you to view list of all
Dialled Calls. (Maximum 60
numbers are possible including
Missed, Received, Dialled and In
Call Memo)
Missed Menu 3.1
Allows you to view list of all
Missed Calls. (Maximum 60
22
In Call Memo Menu 3.4
Save the phone numbers taken
while talking and can view the list
 Loading...