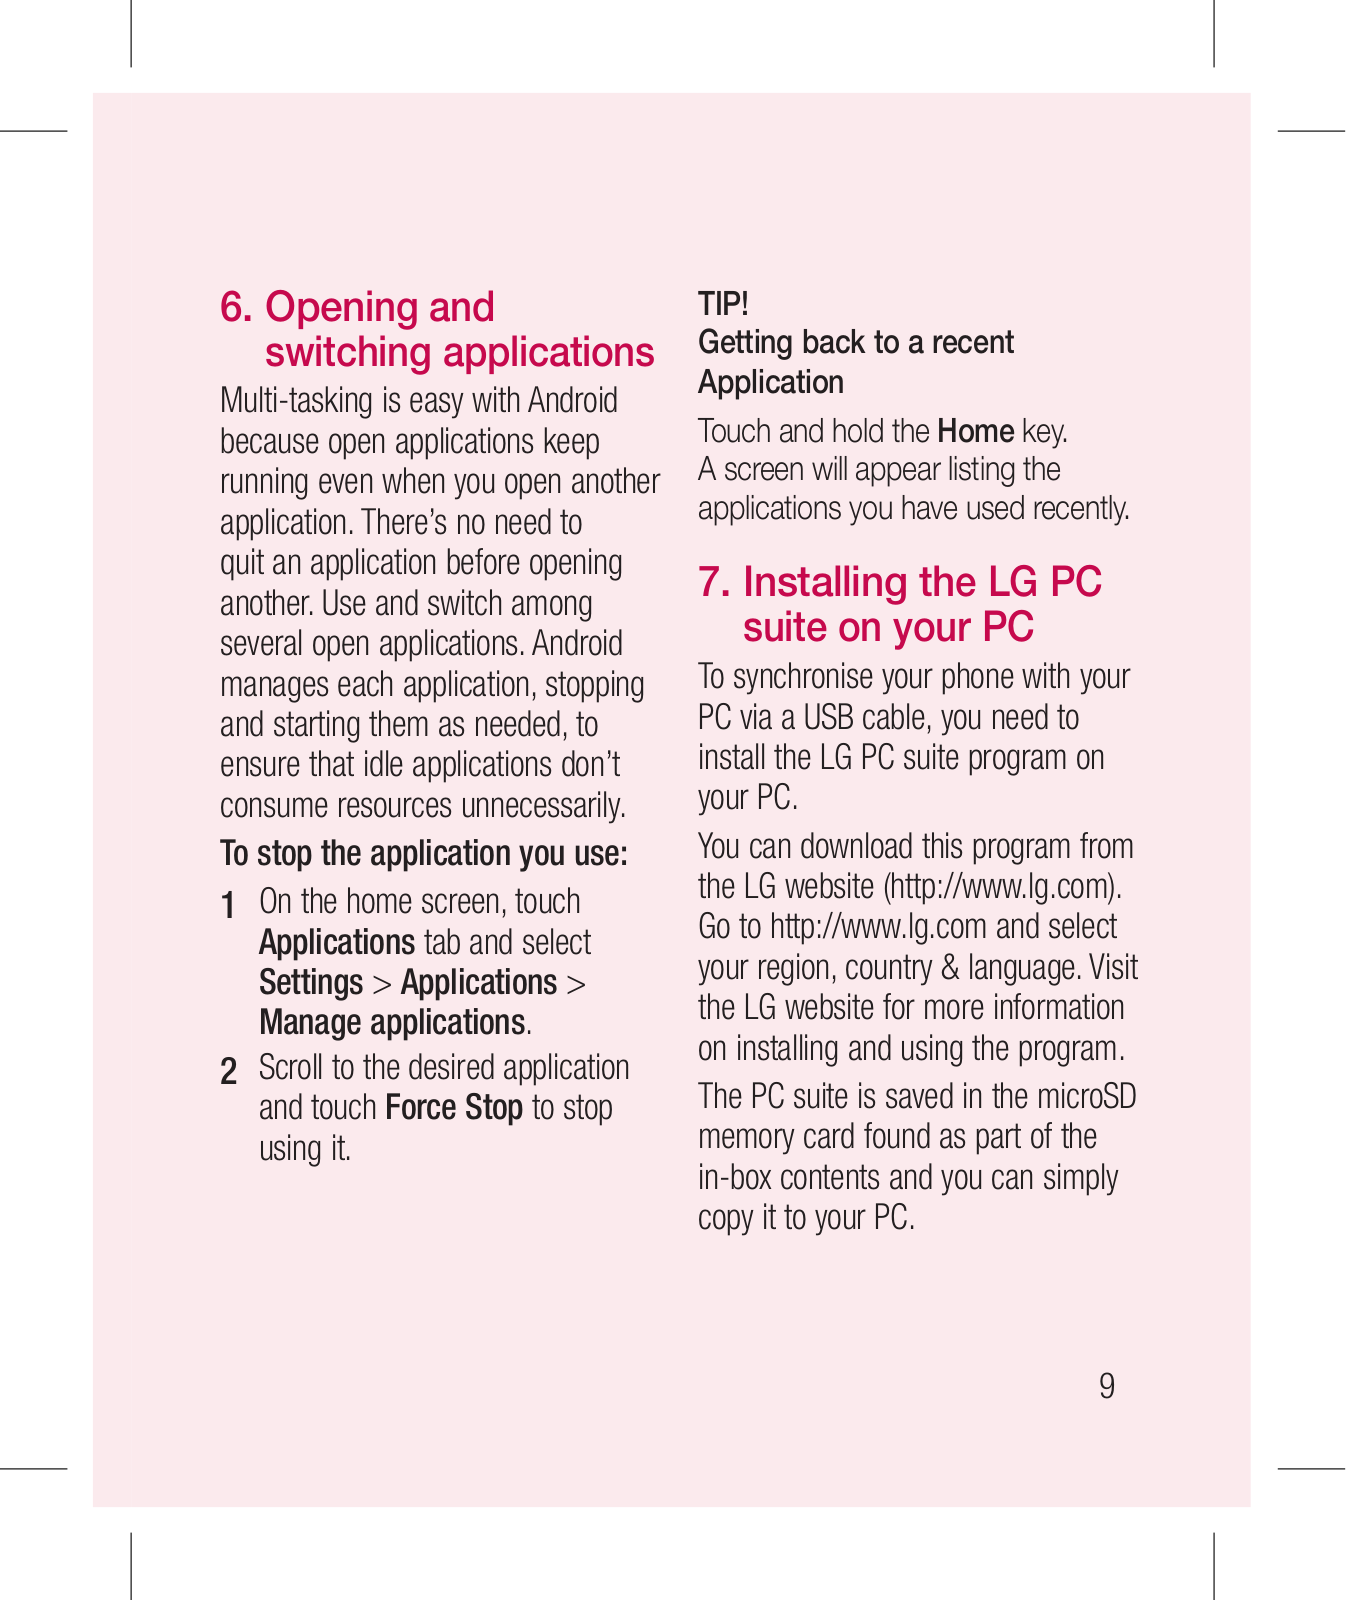
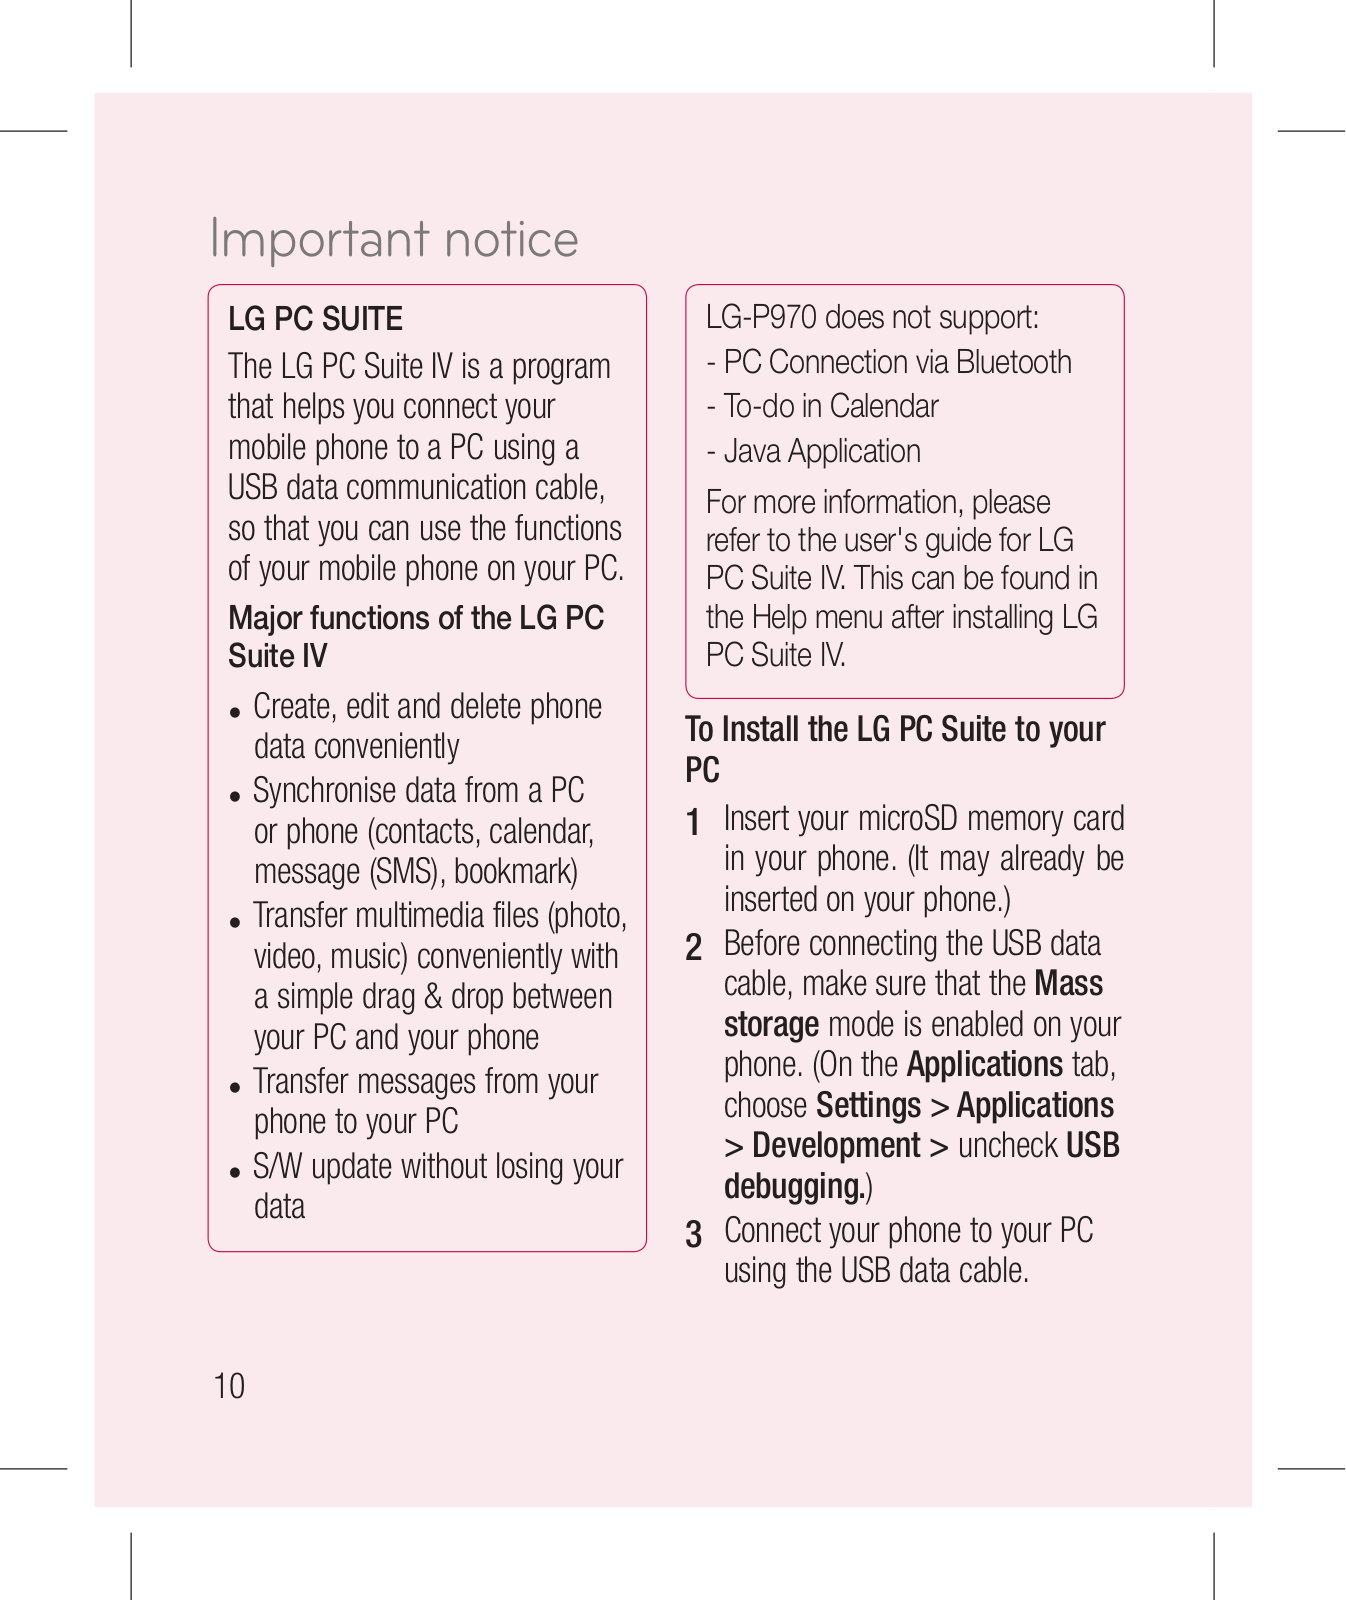
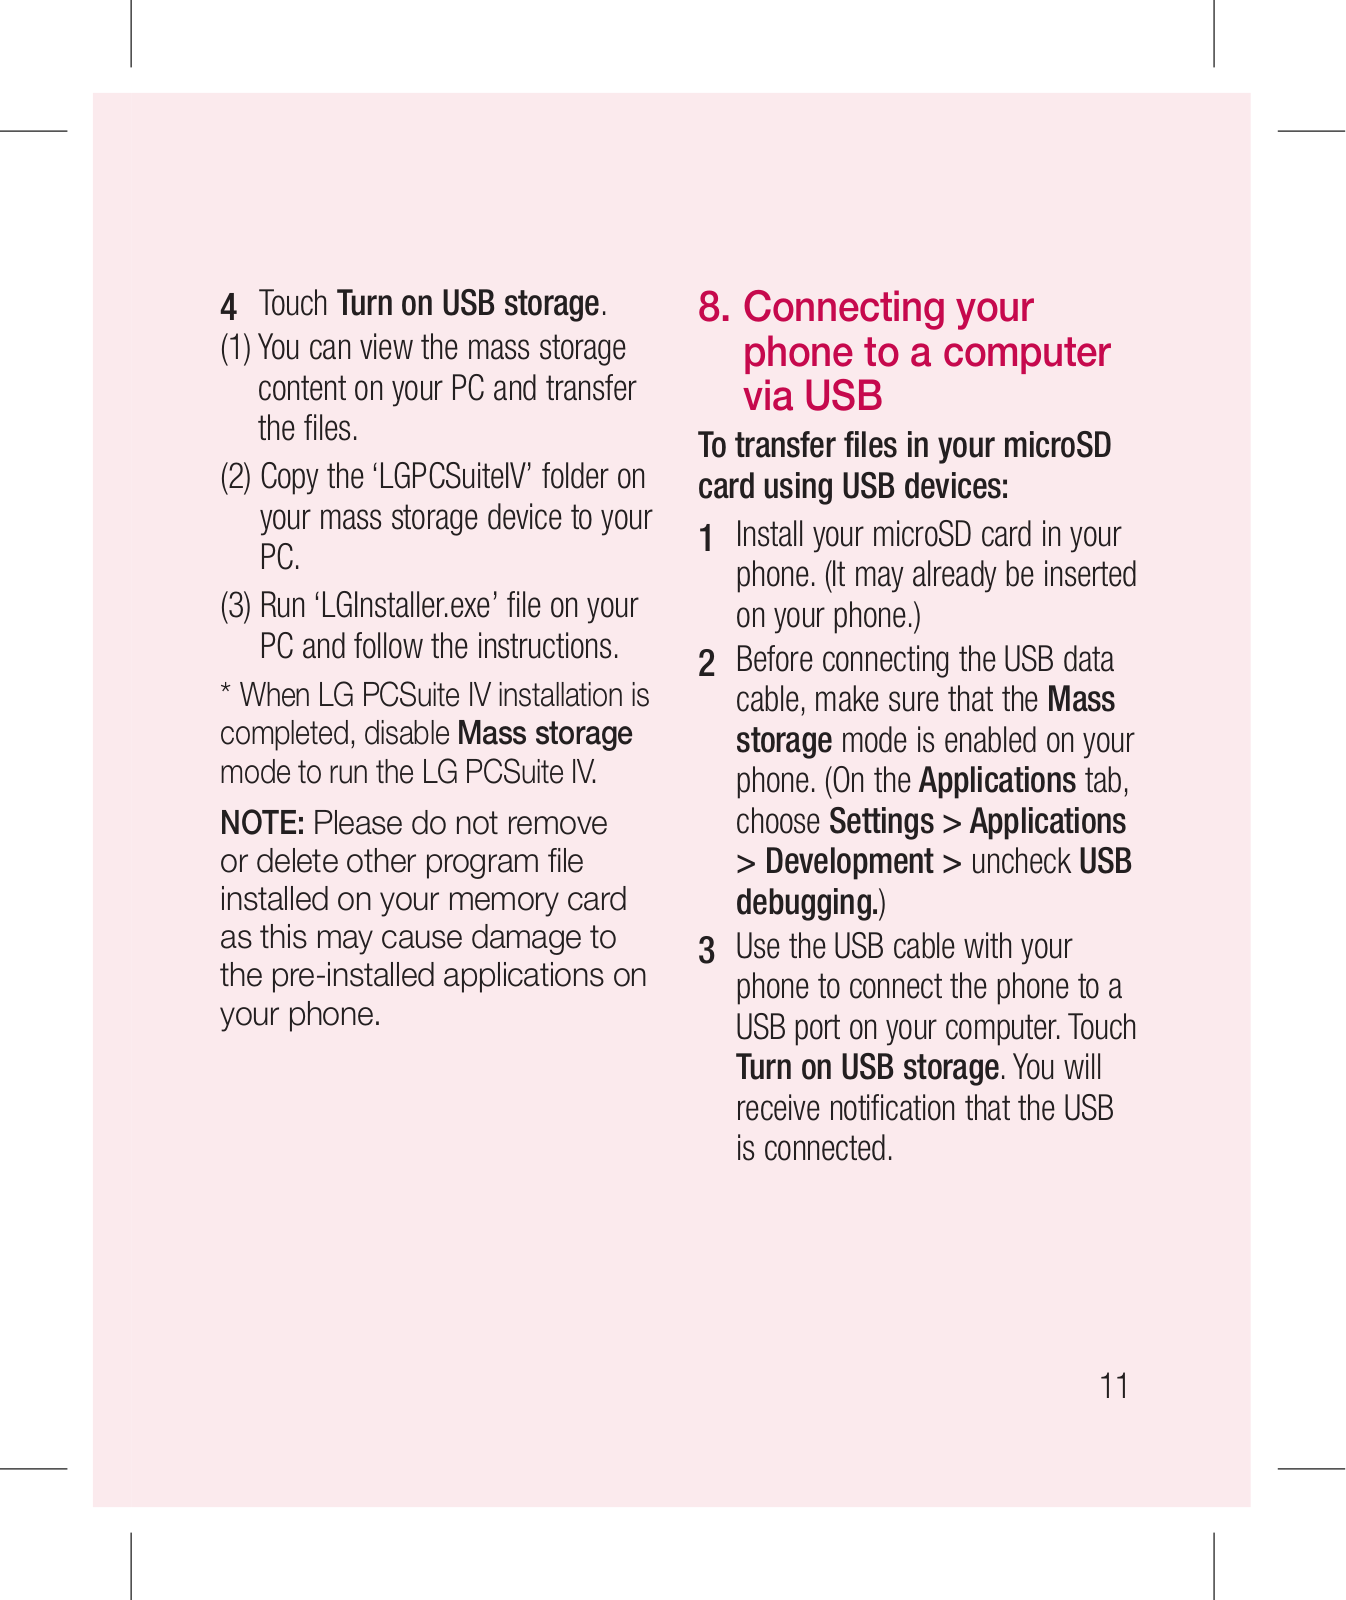
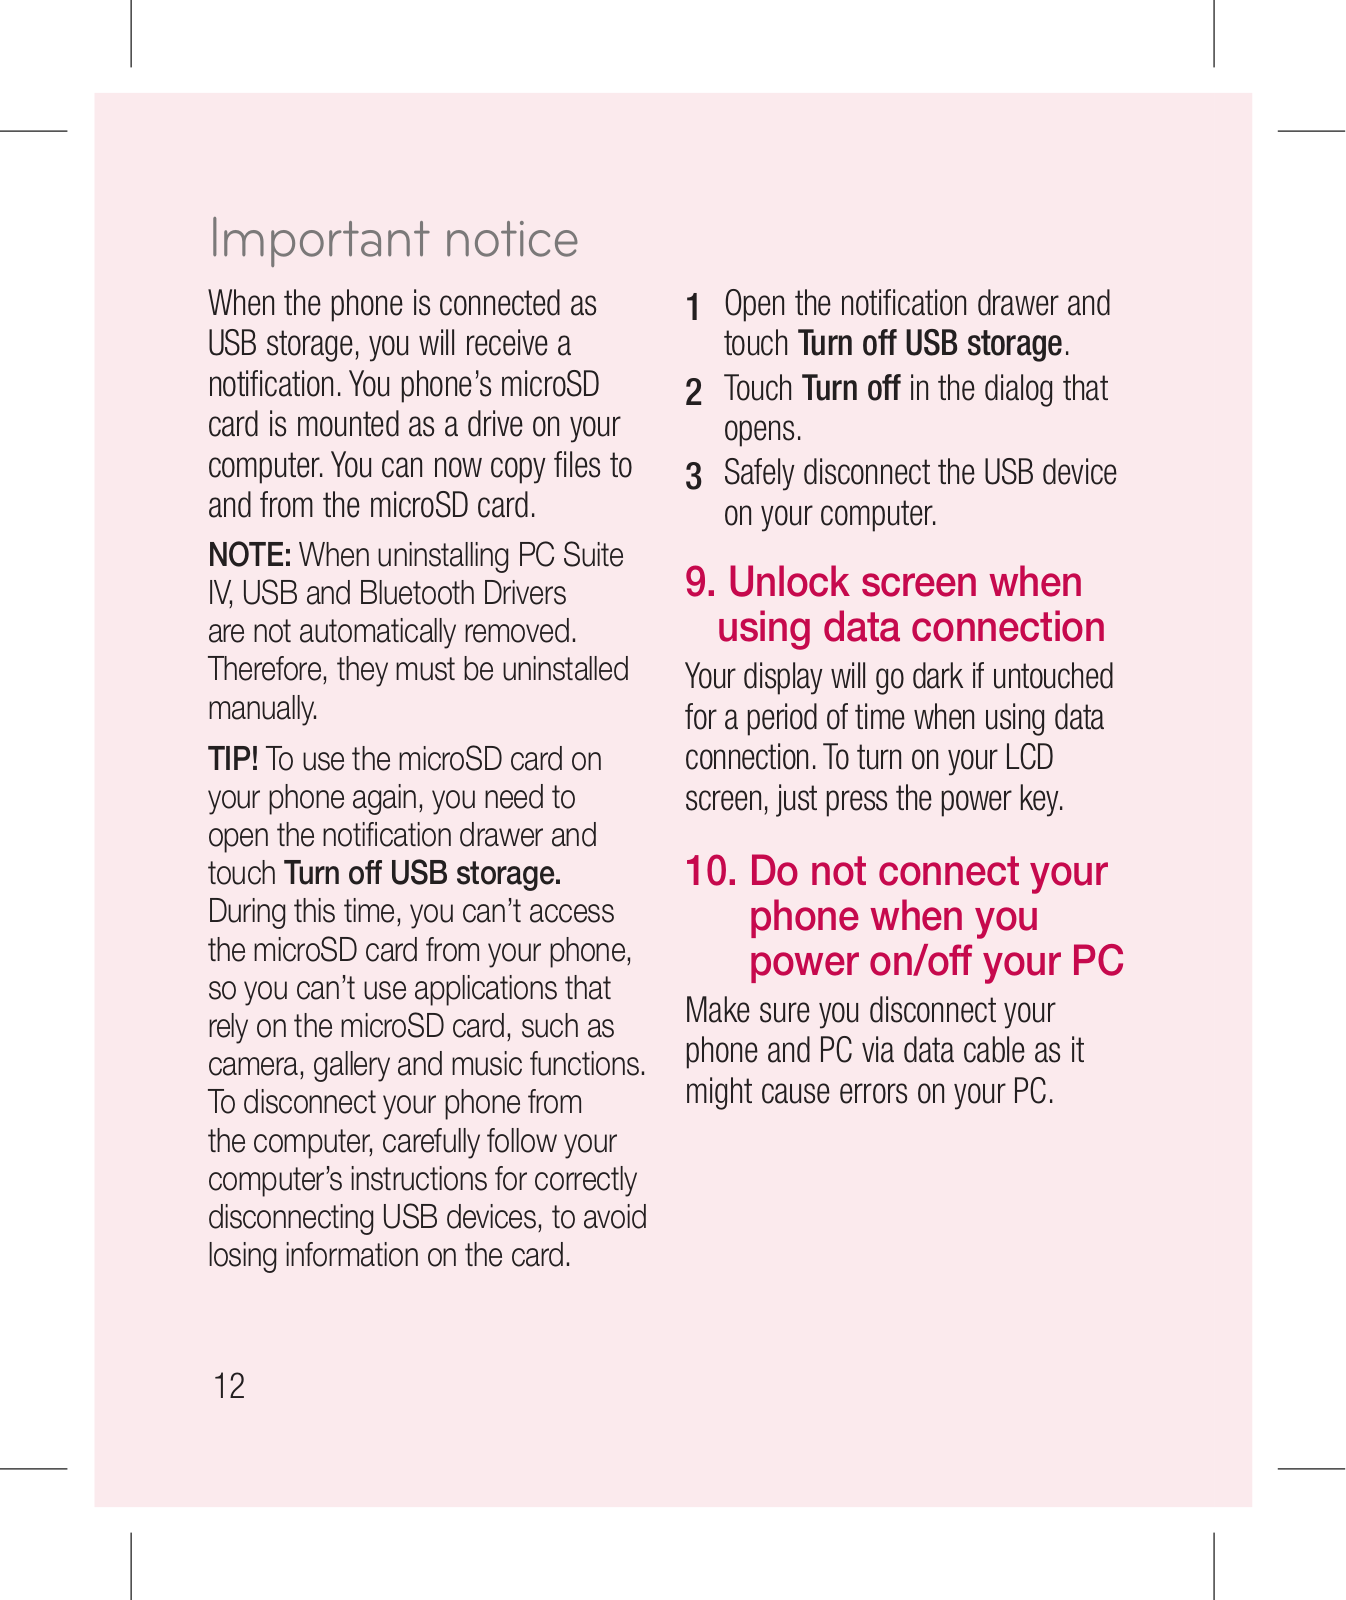
LG LGP970 Owner’s Manual [zh]

LG LGP970 Owner’s Manual

E N G L I S H

USER GUIDE

LG-P970


P/N: MFL67204216(1.0)


www.lg.com


W


Bluetooth QD ID B017629

LG-P970 User Guide - English

Some of the contents of this manual may not apply to your phone depending on your phone’s software or your service provider.

This handset is not recommended for the visually impaired because of its touch-screen keypad.

Copyright ©2011 LG Electronics, Inc. All rights reserved. LG and the LG logo are registered trademarks of LG Group and its related entities. All other trademarks are

the property of their respective owners.

Contents

Important notice..........................

5

Adding widgets to your home


1. Phone memory........................

5

screen.......................................

21

2. Optimising battery life..............

5

Getting back to a recently used


3. Installing an open source OS....

6

application.................................

22

4. Using unlock pattern................

7

Onscreen keyboard....................

24

5. Connecting to Wi-Fi networks......

8

Entering accented letters............

24

6. Opening and switching

9

Google Account Set-up..............

25

applications.................................

Creating your Google account

25

7. Installing the LG PC suite on your

Signing in to your Google


PC

9


account

25

8. Connecting your phone to a


Calls/Contacts

27

computer via USB

11

Making a voice call

27

9. Unlock screen when using data

Making a video call

27

connection

12

In Video call Menu

28

10. Do not connect your phone


Calling your contacts

28

when you power on/off your PC .12

Answering and rejecting a call

28

11. Hold your phone upright

13

Adjusting call volume

29

12. If the screen freezes

13

Making a second call

29

Getting to know your phone

14

Viewing your call logs

29

Installing the SIM card and


Call settings

29

battery

16

Contacts

31

Charging your phone

17

Searching for a contact

31

Installing the memory card

17

Adding a new contact

31

Formatting the memory card

18

Favourite contacts

32

Your Home screen

19

Messaging/Email

33

Touch-screen tips

19

Messaging

33

Lock your phone

19

Sending a message

33

Unlock screen

20

Changing your message settings.34

Home

20


2

Setting up your email.................

34

Using the advanced settings.......

47

Microsoft Exchange email


Watching your saved videos.......

48

account.....................................

34

Adjusting the volume when viewing

Others (POP3, IMAP, GME) email


a video......................................

48

account.....................................

35

Multimedia.................................

49

Composing and sending email...

36

Gallery

49

Working with account folders

37

To change how the contents of an

Adding and editing email


album are displayed

49

accounts

37

Music........................................

50

Social networking......................

38

Playing a song...........................

50

Adding your account to your


Using the radio..........................

51

phone.......................................

38

Searching for stations................

51

Viewing and updating your


Listening to the radio.................

51

status .......................................

38

Transferring files using USB mass

Removing accounts on your


storage devices.........................

52

phone.......................................

39

How to save music/video files to


What’s New...............................

39

your phone................................

52

Camera.......................................

40

How to move contacts from your


Getting to know the viewfinder

40

old phone to your current phone.53

How to send data from your phone

Taking a quick photo

41

via Bluetooth

54

Once you’ve taken the photo......

41

Using the advanced settings.......

41

Google applications...................

56

Using the focus mode................

43

Maps........................................

56

Viewing your saved photos.........

44

Market......................................

56

Video camera.............................

45

Gmail........................................

56

Getting to know the viewfinder

45

Talk...........................................

57

Google Search

57

Shooting a quick video...............

46

After shooting a video................

46


3

Contents

Utilities.......................................

58

Sharing your phone’s mobile data

Setting your alarm.....................

58

connection................................

69

Using your calculator.................

58

Portable Wi-Fi hotspot settings...

69

Adding an event to your calendar58.

To share your phone’s data


Recording a sound or voice........

59

connection as a portable Wi-Fi


Sending the voice recording.......

59

hotspot......................................

70

The Web.....................................

60

To rename or secure your portable

Browser

60

hotspot......................................

70

Using SmartShare

71

Using options

60

Enabling Wi-Fi Direct to share


Settings

61


through SmartShare

73

Wireless & networks

61

How to use On-Screen Phone

74

Sound

62

On-Screen Phone icons

74

Display

63

On-Screen Phone features

74

Gesture

63

How to install On-Screen Phone on

Location & security

64

your PC

75

Applications

65

How to connect your mobile phone

Accounts & sync

66

to your PC

75

Privacy

66

To check the phone to PC


SD card & phone storage

66


connection

76

Language & keyboard

67

To disconnect your phone from your

Voice input & output

67

PC

77

Accessibility

67

Copyrights and trademarks

78

Dock settings............................

67

Date & time...............................

68

Technical data............................

80

About phone..............................

68

Troubleshooting.........................

81

Wi-Fi.........................................

68


Turn on Wi-Fi.............................

68


To connect to Wi-Fi....................

68


4

Important notice

Please check to see if any problems you have encountered with your phone are described in this section, before taking the phone in for service or calling a service representative.

1. Phone memory

When available space on your phone memory is less than 10%, your phone can't receive new messages. You will need to check your phone memory and delete some data, such as applications or messages to make more memory available.

To manage the application:

1On the home screen, touch

Applications tab and select Settings > Applications > Manage applications.

2When all applications appear, scroll and select the application you want to uninstall.

3Tap Uninstall and touch OK to uninstall application you desired.

2. Optimising battery life

You can extend your battery's life by turning off features that you don't need constantly running in the background. You can also monitor how applications and system resources consume battery power.

To extend the life of your battery:

Turn off radio communications that you aren't using. If you aren't using Wi-Fi, Bluetooth or GPS, turn them off.

Turn down screen brightness and set a shorter screen timeout.

Turn off automatic syncing for Gmail, Calendar, Contacts and other applications.

Some applications you have downloaded may cause your battery’s life to be reduced.

To check the battery charge level:

1On the home screen, touch

Applications tab and select Settings > About phone > Status.

5

Important notice

2The battery status (charging, discharging) and level (as a percentage of fully charged) are displayed at the top of the screen.

To monitor and control what uses the battery:

1On the home screen, touch

Applications tab and select Settings > About phone > Battery use.

2The top of the screen displays battery usage time. This is either how long since your phone

was last connected to a power source or if connected to a power source, how long since your phone was last run on battery power. The body of the screen lists applications or services using battery power from greatest amount to least.

3.Installing an open source OS

If you install an open source OS on your phone and you do not use the OS provided by the manufacturer, this may cause your phone to malfunction.

WARNING

If you install and use an OS other than the one provided by the manufacturer, your phone is no longer covered by the warranty.

6

WARNING

To protect your phone and personal data, download applications only from trusted sources, such as Android Market. If some applications are not properly installed on your phone, your phone may not work properly or serious errors may occur. You will need to uninstall those applications and all of its data and settings from the phone.

4. Using unlock pattern

Set unlock pattern to secure your phone. Opens a set of screens that guide you through drawing a screen unlock pattern.

You can draw your own unlock pattern by connecting four or more dots.

If you set a pattern, the phone screen will lock. To unlock the phone, draw the pattern you have set on the screen.

Caution: When you set an unlock pattern, you need to create your Gmail account first.

WARNING Precautions to take when using the Pattern Lock

It is very important that you remember the unlock pattern you set. You have 5 opportunities to enter your unlock pattern, PIN or

password. If you have used all five chances, you can try again after 30 seconds.

If you can’t recall your unlock pattern:

If you have tried to log on to your Google account on the phone and failed to use correct pattern five times, tab the Forgot pattern button. You will then be required to sign in with your Google account to unlock your phone.

7

Important notice

5.Connecting to Wi-Fi networks

To use Wi-Fi on your phone, you need to access a wireless access point or “hotspot.” Some access points are open and you can simply connect to them. Others are hidden or implement other security features, so you must configure your phone to connect to them.

Turn off Wi-Fi when you're not using it to extend the life of your battery.

To turn Wi-Fi on and connect to a Wi-Fi network:

1On the home screen, touch

Applications tab and select Settings > Wireless & networks > Wi-Fi settings.

2Touch Wi-Fi to turn it on and begin scanning for available Wi-Fi networks.

List of available Wi-Fi networks is displayed. Secured networks are indicated by a lock icon.

3 Touch a network to connect to it.

If the network is open, you are prompted to confirm that you want to connect to that network by touching Connect.

If the network is secured, you are prompted to enter a password or other credentials. (Ask your network administrator for details.)

4The status bar displays icons that indicate Wi-Fi status.

8

6.Opening and switching applications

Multi-tasking is easy with Android because open applications keep running even when you open another application. There’s no need to

quit an application before opening another. Use and switch among several open applications. Android manages each application, stopping and starting them as needed, to ensure that idle applications don’t consume resources unnecessarily.

To stop the application you use:

1On the home screen, touch

Applications tab and select Settings > Applications > Manage applications.

2Scroll to the desired application and touch Force Stop to stop using it.

TIP!

Getting back to a recent Application

Touch and hold the Home key. A screen will appear listing the

applications you have used recently.

7.Installing the LG PC suite on your PC

To synchronise your phone with your PC via a USB cable, you need to install the LG PC suite program on your PC.

You can download this program from the LG website (http://www.lg.com). Go to http://www.lg.com and select your region, country & language. Visit the LG website for more information on installing and using the program.

The PC suite is saved in the microSD memory card found as part of the in-box contents and you can simply copy it to your PC.

9

Important notice

LG PC SUITE

The LG PC Suite IV is a program that helps you connect your mobile phone to a PC using a USB data communication cable, so that you can use the functions of your mobile phone on your PC.

Major functions of the LG PC Suite IV

Create, edit and delete phone data conveniently

Synchronise data from a PC or phone (contacts, calendar, message (SMS), bookmark)

Transfer multimedia files (photo, video, music) conveniently with a simple drag & drop between your PC and your phone

Transfer messages from your phone to your PC

S/W update without losing your data

LG-P970 does not support:

-PC Connection via Bluetooth

-To-do in Calendar

-Java Application

For more information, please refer to the user's guide for LG PC Suite IV. This can be found in the Help menu after installing LG PC Suite IV.

To Install the LG PC Suite to your PC

1Insert your microSD memory card in your phone. (It may already be inserted on your phone.)

2Before connecting the USB data cable, make sure that the Mass storage mode is enabled on your phone. (On the Applications tab, choose Settings > Applications > Development > uncheck USB debugging.)

3Connect your phone to your PC using the USB data cable.

10

4 Touch Turn on USB storage.

(1)You can view the mass storage content on your PC and transfer the files.

(2)Copy the ‘LGPCSuiteIV’ folder on your mass storage device to your PC.

(3)Run ‘LGInstaller.exe’ file on your PC and follow the instructions.

* When LG PCSuite IV installation is completed, disable Mass storage mode to run the LG PCSuite IV.

NOTE: Please do not remove or delete other program file installed on your memory card as this may cause damage to the pre-installed applications on your phone.

8.Connecting your phone to a computer via USB

To transfer files in your microSD card using USB devices:

1Install your microSD card in your phone. (It may already be inserted on your phone.)

2Before connecting the USB data cable, make sure that the Mass storage mode is enabled on your phone. (On the Applications tab, choose Settings > Applications > Development > uncheck USB debugging.)

3Use the USB cable with your phone to connect the phone to a USB port on your computer. Touch

Turn on USB storage. You will receive notification that the USB is connected.

11

Important notice

When the phone is connected as USB storage, you will receive a notification. You phone’s microSD card is mounted as a drive on your computer. You can now copy files to and from the microSD card.

NOTE: When uninstalling PC Suite IV, USB and Bluetooth Drivers

are not automatically removed. Therefore, they must be uninstalled manually.

TIP! To use the microSD card on your phone again, you need to open the notification drawer and touch Turn off USB storage.

During this time, you can’t access the microSD card from your phone, so you can’t use applications that rely on the microSD card, such as camera, gallery and music functions. To disconnect your phone from

the computer, carefully follow your computer’s instructions for correctly disconnecting USB devices, to avoid losing information on the card.

1Open the notification drawer and touch Turn off USB storage.

2Touch Turn off in the dialog that opens.

3Safely disconnect the USB device on your computer.

9. Unlock screen when using data connection

Your display will go dark if untouched for a period of time when using data connection. To turn on your LCD screen, just press the power key.

10.Do not connect your phone when you power on/off your PC

Make sure you disconnect your phone and PC via data cable as it might cause errors on your PC.

12

11.Hold your phone upright

Please hold your phone straight and upright, as with a normal phone The LG-P970 has an internal antenna. Be careful not to scratch or damage the back of the phone, as this will cause loss of performance. While making/ receiving calls or sending/receiving data, try to avoid holding the lower part of the phone where the antenna is located. This may affect call quality.

12. If the screen freezes

If the phone does not respond to user input or the screen freezes:

Remove the battery, insert it again and switch on the phone. If it still does not work, please contact the service centre.

13

Getting to know your phone

To turn on the phone, press and hold the Power key for 3 seconds.

To turn off the phone, press and hold the Power key for 3 seconds, touch Power off

and touch OK.


Earpiece

Power/Lock key


- Switch your phone

Proximity Sensor

on/off by pressing and

holding this key.


- Turn off and lock the

Home key

screen.

- Return to home from

Back key

any screen.

- Return to the previous


Menu key

screen.


- Check what options

Search key

are available.

- Search the web and


contents in your phone.


Microphone

WARNING: Placing a heavy object on the phone or sitting on it can damage its LCD and touch screen functions.

Do not cover the protective film on the LCD’s proximity sensor. This may cause the sensor to malfunction.

TIP! Touch the Menu key whenever you tap an application to check what options are available.

TIP! If the LG-P970 displays error messages when you use it, or if you cannot turn it on, remove the battery, put it back in, then turn it on after 5 seconds.

14

Microphone

Charger, micro USB


cable connector

Stereo earphone

Power/Lock key

connector


Volume keys

- On the home screen: control ringer volume. - During a call: control your earpiece volume.

- When playing a track: control volume continuously.

3D Motion Gesture key (G-key)

-Easy to activate features instantly by tilting, shaking or tapping the phone.

microSD memory

Back cover


card slot


Camera lens

Battery


SIM card slot


Speaker

15


Getting to know your phone

Installing the SIM card and battery

Before you can start exploring your new phone, you’ll need to set it up. To insert the SIM card and battery:

1To remove the back cover, hold the phone firmly in your hand. With the other hand, firmly press down the centre of the battery cover, while pulling the top away with your forefinger. Then lift off the battery cover.

2Slide the SIM card into the SIM card holder. Make sure the gold contact area on the card is facing downwards.

3Insert the battery into place by aligning the gold contacts on the phone and the battery.

16

4Replace the back cover of the phone.

NOTE: The battery must be fully charged initially to extend battery lifetime.

Charging your phone

The charger connector on the top of your LG-P970. Insert the charger and plug it into an electrical socket.

Your LG-P970 must be charged until you can see .

Installing the memory card

To store multimedia files, such as photographs created with the built-in camera, you must insert a memory card into your phone.

To insert a memory card:

1Turn off your phone before inserting or removing the memory card. Remove the back cover.

2Insert the memory card into the slot. Make sure the gold contact area is facing downwards.

17

Getting to know your phone

Formatting the memory card

Your memory card may already be formatted. If it isn’t, you must format it before you can use it.

NOTE: All files on your memory card are deleted when you format it.

1On the home screen, touch the

Applications tab to open the applications menu.

2 Scroll and touch Settings.

3Scroll and touch SD card & phone storage.

4 Touch Unmount SD Card.

5 Touch Format SD card, then

18confirm your choice.

6If you set the pattern lock, input the pattern lock and select Erase Everything. The card will then be formatted and ready to use.

NOTE: If there is content on your memory card, the folder structure may be different after formatting, as all the files will have been deleted.

TIP! If your memory card is already unmounted, you can use the following steps to format it. Touch Applications > Settings > SD card & phone storage > Format SD Card.

WARNING

Do not insert or remove the memory card when the phone is on. Otherwise, you may damage the memory card as well as your phone and the data stored on the memory card may be corrupted. To remove the memory card safely, please select Applications > Settings > SD card&phone storage > Unmount SD card.

Your Home screen

Touch-screen tips

Here are some tips on how to navigate around your phone.

Touch - To choose a menu/option or open an application, touch it.

Touch and hold - To open an options menu or grab an object you want to move, touch and hold it.

Drag - To scroll through a list or move slowly, drag across the touch screen.

Flick - To scroll through a list or move quickly, flick across the touch screen (drag quickly and release).

Tilting & Panning - Zoom in/out and navigate through lists.

Tapping - Control music and move the cursor on a text page by tapping one of the four sides of the phone.

NOTE:

To select an item, touch the centre of the icon.

Do not to press too hard; the touch screen is sensitive enough to pick up a light, firm touch.

Use the tip of your finger to touch the option you want. Be careful not to touch any other keys.

Lock your phone

When you are not using the LGP970, press the Power key to lock your phone. This helps to prevent accidental touching of the keys and saves battery power.

If you do not use the phone for a while, the home screen or other screen you are viewing is replaced by the lock screen to conserve the battery.

NOTE: If there are any programs running when you set the pattern, they may continue running in lock mode. It is recommended that you

19

Your Home screen

exit all programs before entering lock mode to avoid unnecessary charges (e.g. phone call, web access and data communications).

Unlock screen

TIP! Press the G-key on the left side of the phone, keep it pressed, then shake the phone twice. The camera preview will automatically be launched. If you want to use this feature,

you need to choose Settings > Gesture > turn on Use motion guestures > Go to camera.

To turn on your phone, press the Power key. The lock screen will appear. Touch and slide up the lock screen to unlock your home screen. The last screen you were working on will open.

Home

Simply swipe your finger to the left or right to view them.

You can also customise each panel with widgets, LG widgets, shortcuts to your favourite applications, folders and wallpapers.

TIP! Once the G-key is held down, tilting the phone left or right allows you to view the wallpaper quickly.

NOTE: Some screen images may be different depending on your phone provider.

In your home screen, you can view quick keys on the bottom of the screen. The quick keys provide easy, one-touch access to the functions you use the most.

Touch the Phone to bring up the touch-dialling pad to make a call.

Touch the Contacts to open your contacts.

Touch the Messaging icon to access the messaging menu.

Here, you can create a new message.

20

Touch the Applications tab at the bottom of the screen. You

can then view all your installed applications. Just touch to scroll through your applications.

To open the desired application, simply touch the icon in the applications list.

NOTE: Preloaded applications may be different depending on your phone’s software or your service provider.

Adding widgets to your home screen

You can customise your home screen by adding shortcuts, widgets, or folders to it. For more convenience when using your phone, add your favourite widgets to the home screen.

To add a desired icon to your home screen:

1On the home screen, touch the Menu key and select Add. Or

long touch the empty part of the home screen.

2On the Edit Mode menu, touch the type of item you want to add.

3For example, select Folders from the list and tap it. Select

Contacts with phone numbers from the list and tap it.

4You will see a new folder’s icon on the home screen. Drag it to the desired location on the desired panel and release your finger from the screen.

TIP! To add an application icon to the home screen on the Applications menu, touch and hold the application you want to add.

To remove an application icon from the home screen:

1Touch and hold the icon you want to remove.

2Drag and drop an application icon to the bin icon .

21

Ring Wi-Fi

Your Home screen

NOTE: You cannot delete the preloaded applications. (Only their icons can be deleted from the screen.)

Getting back to a recently used application

1Touch and hold the Home key. The screen will show you a pop up with icons of applications that you have used recently.

2Touch an icon to open its application. Or touch the Back key to return to the current application.

Notification drawer

The notification drawer runs across the top of your screen.

Bluetooth GPS Data

enabled

Touch and slide the notification drawer down with your finger.

Or on the home screen touch the

Menu key and select Notifications. Here you can check and manage sound, Wi-Fi, Bluetooth, GPS and Auto-rotate status as well as other notifications.

Viewing the status bar

The status bar uses different icons to display phone information, such as signal strength, new messages, battery life and active Bluetooth and data connections.

Below is a table explaining the meaning of icons you are likely to see in the status bar.

[Status bar]

22

Icon

Description


Icon

Description


No SIM card


Ringer is silenced


No signal


Vibrate mode


Airplane mode


Battery fully


charged


Connected to a


Battery is charging


Wi-Fi network


Wired headset


Data in and out


Call in progress


Phone is


connected to PC


Call hold


via USB cable


Speakerphone


Downloading


Phone


data


microphone is


Uploading data


muted


GPS is acquiring


Missed call


Receiving


Bluetooth is on


location data


Connected to a


from GPS


Bluetooth device


On-Screen Phone


System warning


connected


3 more


Alarm is set


notifications not


New voicemail


displayed

Icon Description

Data is syncing

Download finished

New email

New Gmail

New Google Talk message

New message

Song is playing

Upcoming event

FM radio turned on in the background

Portable Wi-Fi hotspot is active

SmartShare On

SmartShare sharing request

23

Your Home screen

Onscreen keyboard

You can enter text using the onscreen keyboard. The onscreen keyboard appears automatically on the screen when you need to enter text. To manually display the keyboard, simply touch a text field where you want to enter text.

Using the keypad & entering text

Tap once to capitalise the next letter you type. Double-tap for all caps.

Tap to switch to the numeric and symbol keyboard. You can also touch and hold this tab to view the settings menu.

Tap to view or long press to change the writing language.

Tap to enter a space.

Tap to create a new line in the message field.

Tap to delete the previous character.

Tap to hide the onscreen keyboard.

Entering accented letters

When you select French or Spanish as the text entry language, you can enter special French or Spanish characters (e.g. á).

For example, to input "á", touch and hold the "a" key until the special characters are shown. And select the special character you want.

24

Google Account Set-up

The first time you open the Google application on your phone, you will be required to sign in with your existing Google account. If you do not have a Google account, you will be prompted to create one.

Creating your Google account

1 On the home screen, touch

Applications tab to open the applications menu.

2Tap Gmail and tap Next > Create to start the Gmail set up wizard.

3Touch a text field to open the touch keyboard and enter your name and username for your Google account. When entering text, you can move to the next text field by touching Next on the keyboard.

4When you have finished inputting your name and username,

tap Next. Your phone is

communicating with Google servers and checking username availability.

5Enter and re-enter your password. Then follow the instructions and enter the required and optional information about the account. Wait while the server creates your account.

Signing in to your

Google account

1Enter your email address and password, then tap Sign in. Wait for signing in.

2After sign in, you can use Gmail and take advantages of Google services on your phone.

3Once you have set up your Google account on your phone, your phone will be automatically synchronised with your Google account on the web. (This depends on your synchronisation settings.)

25

Google Account Set-up

After sign in, you can use Gmail, Google Calendar and Android Market; download applications from Android Market; and take advantage of other Google services on your phone.

IMPORTANT!

Some applications, such as Calendar, only work with the first Google Account you add. If you plan to use more than one Google Account with your phone, be sure to sign into the one you want to use with these applications first. When you sign in, your contacts, Gmail messages, calendar events and other information from these applications and services on the web are synchronised with your phone. If you don’t sign into a Google account during setup, you will be prompted to sign in or to create a Google account the first time you start an application that requires one, such as Gmail or Android Market.

If you have an enterprise account through your company or other organisation, your IT department may have special instructions on how to sign into that account.

26

Calls/Contacts

Making a voice call

1 Touch

to open the keypad.

2Enter the number on the keypad. To delete a digit, touch Clear

icon

.


3 Touch Call icon

to make

a call.


4 To end a call, touch End icon

.

TIP! To enter “+” to make international calls, touch and hold down .

TIP! To bring up the keypad during a call, touch Dialpad.

Making a video call

1 Touch

to open the keypad.

2Enter the phone number as before.

3Touch the Video call icon to make a video call.

4If you do not want to use the speaker phone, touch Speaker and ensure you have the headset plugged in.

5While the video call is connecting, you will see your own image; after the other party has answered, their image will be displayed on the screen. Adjust the inner camera position if necessary.

6 To end a video call, touch End. Private: You can change the image instead of showing the current private image.

Dialpad: Type in a number.

Hold: Mute the sound and pause the video.

Mute: Mute the sound. Speaker: Speaker on or off.

27

Calls/Contacts

In Video call Menu

Capture - You can capture an image of the other.

Use secondary camera - Switch the camera.

Calling your contacts

1 Touch

to open your contacts.

2Scroll through the contact list or enter the first letter(s) of the contact you want to call by touching Search.

3In the list, touch the contact you want to call.

Answering and rejecting a call

TIP! Flip your phone or press the volume (side) key to mute the incoming call.

Press the volume (side) key to mute the incoming call also.

TIP! Press the G-key and shake your phone to answer a call. On a call press the G-key and shake to quit the call.

When screen locked:

When your phone rings, Drag decline icon to the left to decline/reject an incoming call.

When screen is unlocked:

When your phone rings, touch the Accept icon . Touch decline icon

to Decline/Reject an incoming

call.

TIP! Excuse messages

When you want to decline/reject a call, you can send a message quickly by dragging Excuse msg on the screen. This is useful if you need to reply the message during a meeting.

28

Loading...
+ 132 hidden pages