

LG LGP769BK User Manual

User Guide
E N G L I S H
MFL67649601 (1.1)
www.lg.com


English
LG Optimus L9 User Guide
This guide helps you get started using your phone.
If you need more information, please visit www.lg.com.
• Some of the contents of this manual may not
apply to your phone. This depends on your
phone’s software and your service provider.
• This handset is not recommended for the
visually impaired because of its touch screen
keyboard.
• Copyright ©2012 LG Electronics, Inc. All rights
reserved. LG and the LG logo are registered
trademarks of LG Group and its related entities.
All other trademarks are the property of their
respective owners.
• Google™, Maps™, Gmail™, YouTube™, Google
Talk™ and Play Store™ are trademarks of
Google, Inc.

SERVICE ACTIVATION
If you are a new T-Mobile® customer
and your service has not been
activated, simply call Customer
Care at 1-800-937-8997 from
your landline phone and a T-Mobile
Activations representative will assist
you. You will need the following
information when activating service:
• Service Agreement and agent code
on your Agreement.
• Your name, home address, home
phone, and billing address.
NOTE
For business and government
accounts, please provide the
name of your company or
government agency, address, and
tax ID.
• Your Social Security number,
current driver’s license number,
and date of birth for credit check
purposes.
• Your choice of T-Mobile rate plan
and services (see www.t-mobile.com
for the latest plan information).
• SIM serial number and IMEI
2
number (located on the box bar
code label).
By activating service, you acknowledge
that you have read, understand,
and agree to be bound by each of
T-Mobile’s Terms and Conditions and
your Service Agreement.
About this user guide
Please read this user guide carefully
before you use your phone and keep
it handy for future reference.
Should your phone fails to operate
correctly, refer to the FAQ section.
• Some features and service may
vary by area, phone, carrier, plan
and version of phone software.
• Screen displays and illustrations on
this user manual may differ from
those you see on the actual phone.
• Designs and specifications of the
phone and other accessories are
subject to change without any
notice.

Table of Contents
Getting to know your phone .........7
Your Phone .................................... 13
Getting Started ............................ 17
Installing the Micro SIM card and
battery .....................................................17
Charging your phone ..........................18
Inserting a microSD card .................20
Removing the microSD card ............ 21
Formatting the microSD card .......... 22
Switching between and exiting
applications .......................................... 22
Your Home screen ....................... 24
Touch screen tips ............................... 24
Proximity sensors ............................... 25
Lock your phone ................................. 26
Setting Swipe, Face Unlock, Pattern,
PIN, Password to unlock
your phone ........................................... 26
Quick Switch to Silent Mode ........... 27
QuickMemo.......................................... 27
Home screen ...................................... 29
Customizing your Home screen .....29
Getting back to a recently used
application ............................................ 30
Notifications Panel .............................. 31
Quick Setttings .................................... 31
Viewing the Status Bar ......................32
On-screen Keyboard ......................... 34
123 Mode.............................................. 36
Entering special characters ..............36
Applications ..........................................37
Google Account Setup ............... 49
Creating your Google account ........ 49
Signing into your Google account . 49
Connecting to Networks and
Devices .......................................... 51
Wi-Fi ....................................................... 51
Bluetooth® .............................................52
Tethering ............................................... 54
Smartphone Mobile Hotspots .........55
Wi-Fi Direct .........................................56
FileShare ............................................... 56
Calls .............................................. 57
Making a call ........................................ 57
Calling your contacts ......................... 57
Answering and rejecting a call ........ 57
Adjusting the in-call volume ...........58
Making a second call .........................58
Ending a Call ....................................... 58
Ending a Call from the Status Bar
Viewing your call logs ........................ 59
.. 59
3

Table of Contents
Call settings ......................................... 59
Contacts ....................................... 60
Searching for a contact ....................60
Adding a new contact ....................... 60
Favorite Contacts ................................60
Messaging/Email ......................... 62
Messaging ............................................ 62
Social Networking ....................... 68
Adding an account to your phone
Adding a social networking widget on
the home screen ................................ 68
Viewing and updating your status 69
Syncing accounts on your phone ...70
Removing accounts on your phone
Camera .......................................... 71
Getting to know the viewfinder .........71
Taking a photo ................................... 72
Once you’ve taken the photo .......... 72
Using the advanced settings............73
Viewing your saved photos .............. 75
Setting a photo as wallpaper ........... 75
Video Camera ...............................76
Getting to know the viewfinder ........76
Recording a video ...............................77
4
After recording a video ......................77
Using the advanced settings........... 78
Watching your saved videos ............ 79
Adjusting the volume when viewing a
video....................................................... 79
Multimedia ...................................80
Gallery ....................................................80
Sending a video ..................................80
Using an image as Wallpaper or
Caller ID ................................................. 81
..68
Viewing a slideshow ............................ 81
View photo details ............................... 81
Transferring files using USB Media
sync (MTP) ............................................ 81
Music Player .........................................82
.. 70
How to save music/video files to the
phone.....................................................82
How to play video files on the
phone.....................................................83
Playing a song ..................................... 83
Working with Playlists ........................ 83
To remove a song from a playlist ... 84
To rename or delete a playlist ......... 84
Using SmartShare ..............................84
Google Applications ....................88
About Google applications .............. 88

Google Maps™ .................................... 88
Searching For Locations and
Places ....................................................88
Getting Directions .............................. 89
Clear Map ............................................. 90
Latitude ................................................. 90
Local ....................................................... 91
Play Store™ .......................................... 92
Gmail™ .................................................. 93
Talk™ ...................................................... 93
Utilities ......................................... 96
411 & More ............................................96
Setting the alarm ................................ 96
Using the calculator ........................... 96
Adding an event to your calendar..96
Downloads .............................................97
File Manager ........................................ 98
Lookout Security .................................98
More for Me ......................................... 99
Initial Setup ...................................... 99
The More for Me Application .......99
Polaris Office ....................................... 99
Slacker Radio ..................................... 102
T-Mobile Name ID ............................ 102
T-Mobile TV........................................ 102
Application Manager ....................... 103
TeleNav® GPS Navigator ................. 103
Video Player ....................................... 103
Visual Voicemail ................................104
Voice Recorder .................................. 104
YouTube ...............................................105
The Web ..................................... 106
Browser ................................................ 106
Using options .................................... 106
Settings ...................................... 108
Wireless & networks ........................ 108
Wi-Fi ................................................. 108
Bluetooth ......................................... 109
Data usage.........................................111
Call .......................................................111
More... .................................................111
Device ....................................................115
Sound.................................................115
Display................................................116
Home screen ....................................116
Lock screen ...................................... 117
Storage ..............................................118
Power saver .......................................118
Apps ...................................................119
PERSONAL ..........................................119
Accounts & sync .............................119
Location services ............................119
Security ............................................ 120
Language & input ...........................121
Backup & reset ................................121
5

Table of Contents
SYSTEM ...............................................122
Date & Time ....................................122
Accessibility .....................................122
Connectivity .....................................122
Developer options ..........................122
About phone ...................................123
Software Update ........................124
Phone Software Update ..................124
LG Mobile Phone Software update
via Over-the-Air (OTA) .....................124
Copyrights and trademarks ......126
DivX Mobile ...................126
Accessories .................................127
Technical data .............................128
Troubleshooting ..........................129
For Your Safety ...........................133
6

Getting to know your phone
Before you start using
the phone, please read
this!
Please check to see if any
problems you have encountered
with your phone are described
in this section before taking the
phone in for service or calling a
service representative.
1. Phone Memory
In order to make more memory
available, you will have to manage
your applications and delete some
data, such as applications or
messages.
Managing Applications
1 From the Home screen, tap
the Menu Key and tap App
settings.
2 When the list of applications
appears, scroll and tap the
application you want to disable.
3 Tap Uninstall and then tap OK to
confirm that you want to uninstall
the desired application.
To stop applications:
1 From the Home screen, tap Apps
> Settings > Apps and select
the Running tab.
2 Scroll to the desired application
and tap
Stop
to stop it.
2. Optimizing Battery
Life
You can extend your battery’s life
between charges by turning off
features that you don’t need to
run constantly in the background.
You can also monitor how
applications and system resources
consume battery power.
To extend the life of your battery
- Turn off radio communications
that you aren’t using, such as
Wi-Fi, Bluetooth, or GPS.
- Lower screen brightness and set
a shorter screen timeout.
- Turn off automatic syncing for
Gmail™, Calendar, Contacts, and
other applications.
- Some applications you have
downloaded may cause your
7

Getting to know your phone
battery power to be reduced.
- While using downloaded
applications, check the battery
charged level.
To view the battery charge level
1 From the Home screen, tap the
Menu Key and tap System
settings > About phone >
Battery.
2 The battery status (charging
or not charging) and level are
displayed on the top menu of
the screen.
To monitor and control what uses
the battery
1 From the Home screen, tap the
Menu Key and tap System
settings > About phone > Battery
> Battery use.
2 The bottom of the screen
displays battery usage time.
Either how long since last
connected to a power source,
or if connected to a power
source, how long you were last
running on battery power. The
screen also lists applications or
services using battery power from
greatest amount to least.
8
3. Installing an Open
Source Operating
System
Installing an open source
operating system on your phone
and not using the operating
system provided by the
manufacturer can cause your
phone to malfunction.
Warning
• If you install and use an OS
other than the one provided by
the manufacturer, your phone
is no longer covered by the
warranty.
• To protect your phone and
personal data, download
applications only from trusted
sources, such as Play Store.
If some applications are not
properly installed on your phone,
your phone may not work
properly- or serious errors may
occur. You will need to uninstall
those applications and all of its
data and settings from the phone.

4. Using Swipe, Face
Unlock, Pattern,
PIN, or Password
Screen Lock
Set Swipe, Face unlock, Pattern,
PIN, or Password to secure your
phone. To set the screen lock,
follow the process below.
From the Home screen, tap the
Menu Key
settings
select among
Pattern, PIN or Password
NOTE
In case that you have trouble
with Face Unlock, you can
unlock the screen with a
pattern and/or PIN as a
backup.
, tap
>
Lock screen
Select screen lock
Swipe, Face Unlock
and
.
Warning
Take precautions when using
an Unlock Pattern, PIN, or
Password. It is very important
that you remember the screen
unlock information you set.
You are allowed 5 attempts
to enter your screen unlock
information. If you used up all
5 opportunities, you will have
to wait 30 seconds to attempt
unlocking the phone again.
,
When you can’t recall your Unlock
Pattern, PIN, or Password:
If you logged into a Google
account on the phone and failed
to use the correct pattern 5
times, tap
be required to sign in with your
Google account and prompted to
create a new unlock pattern.
If you have set a backup PIN, you
can unlock the screen by entering
the backup PIN.
Forgot pattern?
You will
9

Getting to know your phone
If you haven’t created a Google
account on the phone or you
forgot your PIN or Password, you
need to perform a hard reset.
5. Using Hard Reset
(Factory Reset)
If your phone needs to be
restored to its original condition,
use a Hard Reset to initialize your
phone.
Warning
If you perform a Hard Reset,
all user applications and
user data will be deleted.
Please remember to back up
any important data before
performing a
1 Turn the power off.
2 Press and hold the following keys
at the same time for 8 seconds:
Volume Down Key + Home Key
3 Your device will perform a factory
reset and reboot.
10
Hard Reset
+ Power/Lock Key .
.
6. Using Safe Mode
To recover your phone when
malfunctioning.
1 Turn off your phone and reboot.
When you see the Android robot
animation press and hold the
Down Volume Key . Your main
screen will then be displayed with
the words “Safe mode” in the
lower left corner.
2 From the Home screen, tap
the Menu Key and tap App
settings.
3 Tap one of the available tabs
at the top of the screen and
select the application you wish to
uninstall.
4 Tap Uninstall and OK to confirm.
5 After uninstalling the application,
turn off and reboot your phone.
7. Using a microSD
Card
Pictures, Music and Video files,
can be saved to external memory.
Before saving these files to
external memory, you need to
insert a microSD card. If you have
not inserted a microSD card, your
items will be saved to internal
memory.
Warning
Do not remove the microSD
card without unmounting
it first. Otherwise, it may
damage the microSD card as
well as your phone, and the
data stored on the microSD
card may be corrupted. To
unmount the microSD card,
from the Home screen, tap the
Menu Key
settings > Storage > Unmount
SD card > OK
and tap
.
System
8. Connecting
Your Phone to a
Computer via USB
1 Use the USB cable that was
provided with your phone to
connect the phone to a USB port
on your computer. You’ll receive
a notification that the USB is
connected and can see USB
connection type pop-up.
2 Tap Media sync (MTP) to confirm
that you want to transfer files
between your phone’s microSD
card and the computer.
When the phone is connected
as USB storage, you receive a
notification. Your phone’s microSD
card is installed as a drive on your
computer. You can now copy files
to and from the microSD card.
9. Opening and
Switching
Applications
Multitasking is easy with Android
because you can keep more than
one application running at the
same time. There’s no need to
quit an application before opening
another. Use and switch between
several open applications. Android
manages each application,
stopping and starting them
as needed to ensure that idle
applications don’t consume
resources unnecessarily.
11
Getting to know your phone
TIP
To return to a recent
application, press and hold
the Home Key
screen then displays a list of
applications you have recently
used.
. The
10. Unlock Screen
When Using Data
Connection
Your screen will go dark if
untouched for a period of time
when using a data connection. To
turn on your LCD screen, press
the
Power/Lock Key
.
11. Hold the Phone
Straight Up
Please hold the mobile phone
straight up as a regular phone.
While making/receiving calls or
sending/receiving data, try to
avoid holding the lower part of
the phone where the antenna is
located. It may affect call quality.
12
12. When the Screen
Freezes
If the phone does not respond to
user input or the screen freezes:
Remove the battery, reinsert it, then
turn the phone on.
OR
Press and hold the Power/Lock Key
for 10 seconds to turn it off. If it
still does not work, please contact
the service center.
13. Do Not Connect
Your Phone When
You Power On/Off
Your PC
Make sure to disconnect your
phone from the PC when
powering your PC on or off as it
might result in PC errors.
Your Phone
To turn on the phone, press and hold the
seconds.
To turn off the phone, press and hold the
seconds and tap
Power off
and OK to confirm.
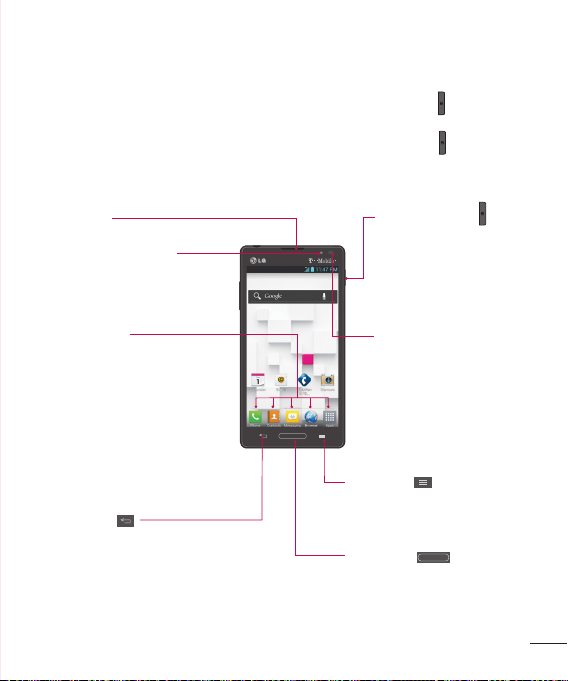
Front view
Earpiece
Front Camera Lens
- Use to take a picture of
yourself or to video chat
on supported applications.
Quick Keys
- Allow you to quickly access
your most used apps.
- To add an icon, drag and
drop the desired icon on
the Quick Keys bar.
- To remove an icon, touch
and hold the desired icon,
then remove it from the
Quick Keys bar.
Back Key
- Returns to the previous screen.
- Closes pop-up menus and dialog
boxes.
Power/Lock Key
Power/Lock Key
Menu Key
- Displays available options
for the current screen or
app.
Home Key
- Returns to the Home screen
from any screen.
- Press and hold to view a list of
the most recently used apps.
for 3
for 3
Power/Lock Key
- Powers your phone on/
off by pressing and
holding the key.
- Turns your screen on
and off and locks it.
Proximity Sensors
- Senses proximity
toward other objects,
such as your head
during a call, so that
you do not accidentally
activate unwanted
features.
13

Your Phone
NOTE:
Proximity sensor
When receiving and making calls, the proximity sensor
automatically turns the backlight off and locks the touch screen by
sensing when the phone is near your ear. This extends battery life
and prevents you from unintentionally activating the touch screen
during calls.
Warning
Placing a heavy object on the phone or sitting on it can damage
its LCD and touch screen functionalities. Do not cover the LCD’s
proximity sensor with a protective film. This can cause the sensor to
malfunction.
TIPS
- Tap the
- If your phone has errors when you use it or you cannot turn it on,
Menu Key
what options are available.
remove the battery, install it again and turn it on after 5 seconds.
whenever you open an application to check
14

Side view
3.5mm Headset Jack
Volume Keys
- Allows you to adjust the
ringer and media volumes, or
to adjust the in-call volume
during a call.
- Press and hold the Volume
Down Key to switch to the
silent mode.
TIP
Press and hold the Volume
Up and Volume Down
Keys for one second to
access QuickMemo. (See
on page 27).
Microphone(Sub)
Power/Lock Key
Microphone(Main)
Charger/Accessory Port
15
Your Phone
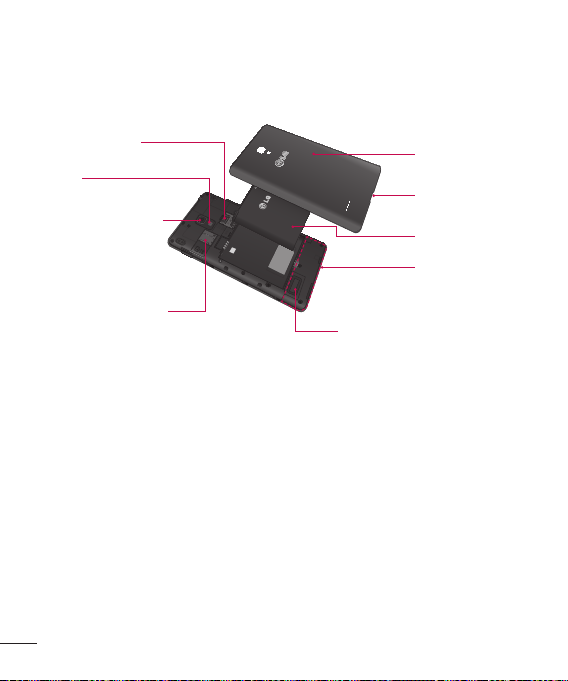
Rear view
SIM Card Slot
Flash
Back Camera Lens
microSD Card Slot
16
Back Cover
Fingertip
cutout
Battery
Internal
Antenna
External Speaker
- Allows you to listen to
sounds on your phone
such as ringtones and
music.

Getting Started
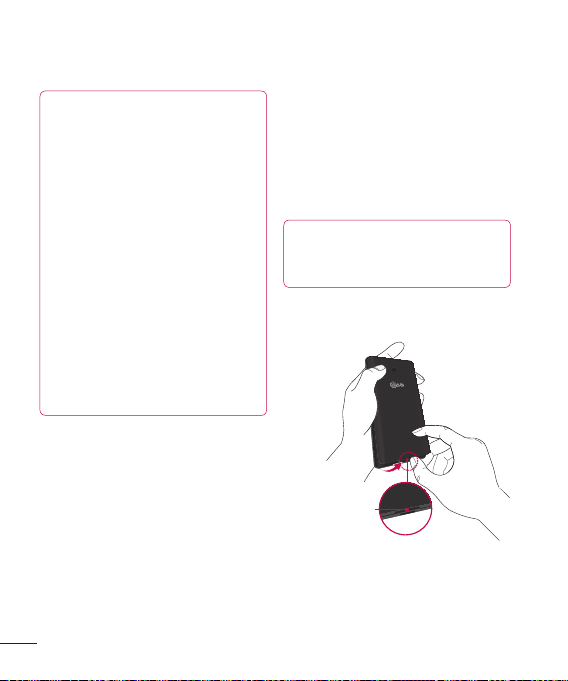
Installing the Micro SIM card and battery
Before you can start exploring
your new phone, you’ll need to
set it up. To insert the Micro SIM
card and battery:
1 Hold the phone on your hand
firmly. With the other hand, lift
the back cover using the fingertip
cutout located on the bottom of
the cover and remove it.
Fingertip Cutout
2 Slide the Micro SIM card into the
Micro SIM card slot. Make sure
the gold contact area on the
card is facing downwards and the
notched side is inserted first (see
image below).
3 Insert the battery into place by
aligning the gold contacts on the
phone and the battery and
press the battery down until it
clicks into place .
17

Getting Started
4 Align the back cover over the
battery compartment and
press it down until it clicks into
place .
18
Charging your phone
A rechargeable Li-ion battery
is used to power your phone. A
wall charger, which is included
with your phone, is be used to
charge the battery. Ask your
T-Mobile sales representative for
further details regarding approved
batteries and chargers.
Before first time use of your
phone, make sure the battery is
fully charged.
An uncharged battery will fully
recharge after 4 hours.
USB Adapter
USB Cable

NOTE
Make sure the battery is
installed before connecting
the wall charger. If the battery
is not installed and the wall
charger is connected, the
phone will not operate properly
due to prolonged power
cycling. Also, removing the
battery with the wall charger
connected may damage the
device. Please unplug wall
charger before removing
battery.
Warning!
If the touch screen does not
function while the phone’s in
the process of charging, this
may be due to an unstable
power supply. As a result,
disconnect the USB cable
from the device or unplug the
USB power adapter from the
power outlet.
1 Connect the USB adapter and
USB cable (as shown on the
previous page).
2 Plug the USB cable (as shown
below) into the phone’s Charger/
Accessory Port. Make sure the
USB symbol on the charging
cable is facing upwards.
NOTE
The battery must be fully
charged initially to improve
battery lifetime.
19
Getting Started
NOTE
Your phone has an internal
antenna(See on page 16).
Be careful not to scratch or
damage this rear area, as that
will cause loss of performance.
When charging your phone
with a fully discharged battery,
the keypad LED will briefly
flash indicating charging
is occurring in a mode
designed to prevent battery
damage. The blinking will
stop and normal charging will
commence once a sufficient
minimum charge has been
established.
20
Inserting a microSD card
Insert a microSD™ card to use
the camera and other multimedia
features. Multimedia contents can
be saved in the microSD card.
NOTE
This device supports up to a
32GB microSD card.
1 Remove the back cover as
previously described.
Fingertip
Cutout

2 Then insert the microSD card
into the slot. Make sure the gold
contact area is facing downwards.
Removing the microSD card
To safely remove the microSD
card from your phone, first you
need to unmount it.
1 From the Home screen, tap the
Menu Key and tap System
settings > Storage > Unmount
SD card > OK.
2 Remove the back cover and
battery, then gently pull the
microSD card from the slot.
Warning
Do not remove the microSD
card without unmounting it
first. Otherwise, it may damage
the microSD card as well as
your phone, and the data
stored on the microSD card
may be corrupted.
21
Getting Started
Formatting the microSD card
Warning
All files stored on your
microSD card are deleted
when you format the card.
1 From the Home screen, tap the
Menu Key and tap System
settings > Storage.
2 Tap Erase SD card twice.
3 If you set an unlock pattern, enter
it and tap Erase everything. The
card will then be formatted and
ready to use.
NOTE
If there is content on your
microSD card, the folder
structure may be different after
formatting since all the files will
have been deleted.
22
Switching between and exiting applications
Multi-tasking is easy with Android
because open applications keep
running even when you open
another application. There is no
need to quit an application before
opening another. Use and switch
among several open applications.
Android manages each
application, stopping and starting
them as needed, to ensure that
idle applications don’t consume
battery power unnecessarily.

Switching between
applications
- Press and hold the
. A list of recently used
applications will be displayed.
Then tap the application you
want to access.
To stop/exit an application
1 From the Home screen, tap
the Menu Key and tap App
settings and select the Running
tab.
2 Tap the desired application and
tap Stop to stop it.
Home Key
23

Your Home screen
Touch screen tips
With the touch of your finger, you
can access available applications,
make menu selections, and
access data saved to your phone.
The following terms are used for
describing the different available
actions using the touchscreen:
Tap -
A single finger tap selects
items, links, shortcuts and letters
on the on-screen keyboard.
Touch and hold -
an item on the screen by touching
it and not lifting your finger until
an action occurs. For example, to
open a contact’s available options,
touch and hold the contact in
the Contacts list until the context
menu opens.
Drag -
Touch and hold an item
for a moment and then, without
lifting your finger, move your finger
on the screen until you reach
the target position. You can drag
items on the Home screen to
reposition them.
24
Touch and hold
Swipe or slide -
quickly move your finger across
the surface of the screen, without
pausing when you first touch it (so
you don’t drag an item instead).
For example, you can slide the
screen up or down to scroll
through a list, or browse through
the different Home screens by
swiping from left to right (and vice
versa).
Double-tap -
on a Web page or a map. For
example, quickly double-tap a
section of a Web page to adjust
that section to fit the width of the
screen. You can also double-tap
to zoom in and out when taking
a picture (using the Camera), and
when using Maps.
Pinch-to-Zoom -
finger and thumb in a pinch or
spread motion to zoom in or out
when using the browser, Maps, or
browsing pictures. You can also
double-tap to zoom in and out
when taking a picture (using the
Camera).
To swipe or slide,
Double-tap to zoom
Use your index
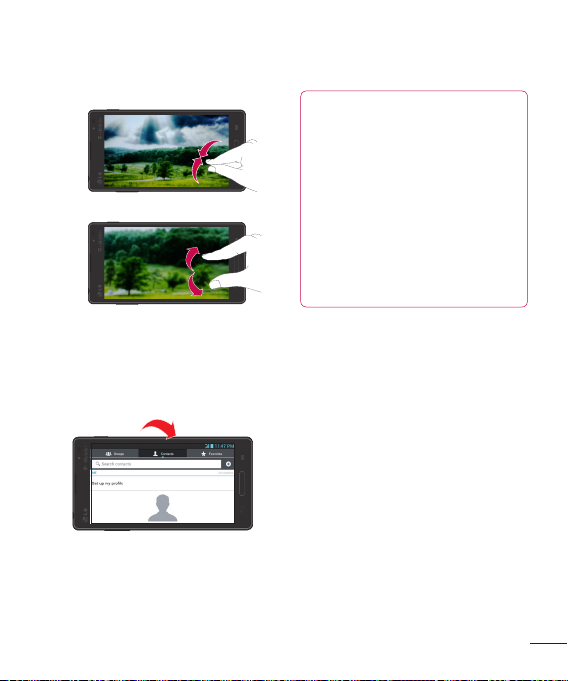
Pinch in (Zoom Out)
Pinch out (Zoom In)
NOTE
• To select an item, tap the
center of the icon.
• Do not to press too hard;
the touch screen is sensitive
enough to pick up a light,
firm touch.
• Use the tip of your finger to
tap the option you want. Be
careful not to tap any other
keys or icons.
Rotate the screen -
many applications and menus,
the orientation of the screen
adjusts to the device’s physical
orientation.
Rotate
From
Proximity sensors
When receiving and making calls,
this sensor automatically turns
the backlight off and locks the
touch keypad by sensing when
the phone is near your ear. This
extends battery life and prevents
the touch keypad from activating
unintentionally during calls.
25
Your Home screen
Lock your phone
When you are not using the LG
Optimus L9 press the
Key
to lock your phone. This
helps prevent accidental presses
and saves battery power.
Also, if you do not use the phone
for a while, the Home screen or
other screen you are viewing,
is automatically replaced with
the lock screen to conserve
the battery and prevent pocket
dialling.
To wake up your phone, press the
Power/Lock Key
will appear. Slide the lock screen
in any direction to unlock it. The
last screen you were working on
opens.
26
Power/Lock
. The lock screen
NOTE
• The automatic screen
timeout can be configured
manually in Settings.
• If there are any programs
running when you lock the
phone, they may still be
running in lock mode. It is
recommended that you exit
all programs before entering
the lock mode to avoid
unnecessary charges (e.g.,
phone call, web access and
data communications).
Setting Swipe, Face Unlock, Pattern, PIN, Password to unlock your phone
You can slide the screen without
entering any information, utilize
facial recognition, draw your own
unlock Pattern or enter a PIN or
Password to add more security
to your device. To set Swipe, Face
Unlock, Pattern, PIN, or Password,

from the Home screen tap the
Menu Key > Lock screen
settings > Select screen lock
choose from
or
Password
information.
Caution
You are allowed 5 attempts
to enter your screen unlock
information. If you used up all
5 opportunities, you will have
to wait 30 seconds to attempt
unlocking the phone again.
Swipe, Pattern, PIN
and enter the desired
. Then
,
Quick Switch to Silent Mode
To quickly set your phone to silent
mode, press and hold the
Down Key
screen.
until you see on the
Volume
QuickMemo
QuickMemo allows you to create
memos and capture screen
shots. You can use QuickMemo
to practically and efficiently create
memos during a call, with a saved
picture or on the current phone
screen.
1 While viewing the screen you want
to capture and create a memo on,
press and hold both Volume Keys
for one second.
27

Your Home screen
2 Select the desired menu option
from Pen type, Color, Eraser, and
create a memo.
3 Touch to save the memo.
The image is saved into the
QuickMemo album in the Gallery
application.
NOTE
Please use a fingertip while
using QuickMemo. Do not use
your fingernail.
Using the QuickMemo
options
While using QuickMemo, the
following options are available:
– Select if you want to use the
background screen.
– Tap to undo or redo
the most recent action.
– Select the pen type and
color.
– Erase the memo that you
created.
– Share the memo with
others.
– Save the memo.
28
 Loading...