

LG LGL55C User Manual [en, es]

Printed in Korea
LG L55C
GUÍA DEL USUARIO
USER GUIDE
LG L55C
USER GUIDE
LG L55C
P/NO : MFL67343401 (1.0)
G

Copyright ©2011 LG Electronics, Inc. All rights reserved.
LG and the LG logo are registered trademarks of LG
Group and its related entities. All other trademarks
are the property of their respective owners.
L55C User Guide
Some of the contents in this manual may differ from your phone depending on
the software of the phone or your service provider.
- English

Table of Contents
Table of Contents 2
Device Basics 4
Your Device Overview 4
Viewing the Display Screen 9
Turning Your Device On and Off 13
Battery and Charger 14
Device Function Keys 20
Touchscreen Navigation 28
Your Home Screen 30
Displaying Your Phone Number 45
Entering Text 45
Creating a Google Account 56
Phone 58
Making Calls 58
Call Log 68
Prepending a Number From
the Call Log 71
Saving a Phone Number 71
Finding a Phone Number 72
Device Settings 73
Wireless & networks settings 73
Roaming settings 76
2
Display Settings 84
Location & security settings 87
Accounts Settings 95
Removing an Account 97
Configuring Account Sync and
Display Options 98
Contacts 101
Creating a New Contacts Entry 101
Adding a Contact to Your
Favorites 102
Editing a Contacts Entry 103
Adding a Number to a Contacts
Entry 106
Editing a Contacts Entry’s
Numbers 107
Assigning Direct Dialing
Numbers 107
Assigning a Picture to an Entry 108
Selecting which Contacts are
Displayed 110
Communicating with Your
Contacts 110
Importing, Exporting, and
Sharing Contacts 113

Table of Contents
Accounts and Messaging 115
Text Messaging and MMS 124
Text Messaging and MMS 133
Synchronizing Accounts 153
Synchronizing Your Google
Account 154
Applications and
Entertainment 159
Android Market
Music 161
GPS Navigation 165
Google Maps
Navigation 169
Connecting to Wi-Fi Networks 171
™
™
Web and Data 171
Data Services 174
Virtual Private Networks (VPN) 175
Voice Dialer 190
Opening Menus With Voice
Dialer 192
Text-to-Speech 193
Tools and Calendar 204
Calendar 204
Folders 213
Clock 214
Alarms 216
Calculator 218
LG Mobile Phone Software
update via Over-the-Air (OTA) 219
Updating Your Profile 219
159
Updating Your PRL 220
Bluetooth 220
Turning Bluetooth On and Off 220
16 6
The Bluetooth Settings Menu 221
Pairing Bluetooth Devices 223
Sending Items via Bluetooth 226
Disconnecting Bluetooth
Connection During an Active Call227
Your Device's microSD Card and
Adapter 228
microSD Card Settings 231
Connecting Your Device to Your
Computer 232
Index 235
Camera and Video 195
Taking Pictures195
Recording Videos 200
3

Device Basics
Tip
Phone Software Upgrades – Updates to your device’s software may become available from time
to time. Press
Your Device Overview
Front View
and tap >
Settings > About phone > Software update.
Proximity Sensors
Status Bar
Phone Key
Home K
Menu Key
y
e
Microphone
Earpiece
Touchscreen
Appplications
Ta b
Browser Key
Search Key
Back Key
4
Device Basics
1. Proximity Sensors sense proximity towards other objects (such as your head)
so that touch commands are not accidentally activated during a call.
Note
Please be careful not to cover the sensors with a protective film, pouch, or a protective
case not authorized by LG.
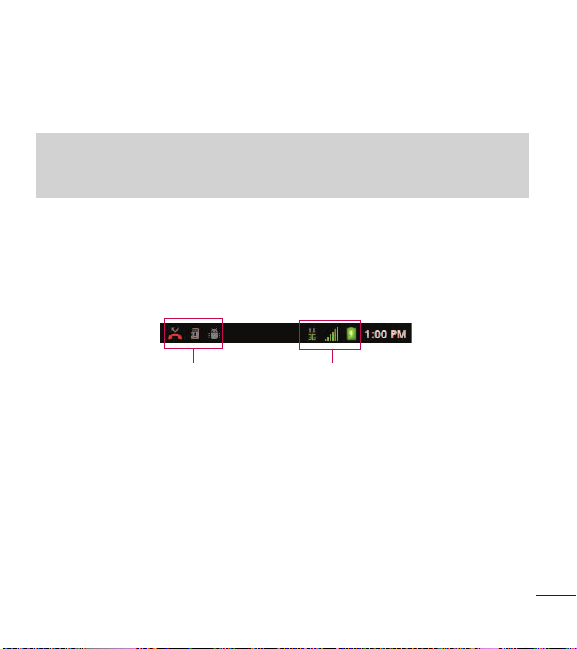
2. Status Bar provides information about your device’s status and options, such
as signal strength, roaming, ringer setting, messaging, and battery charge. The
Status Bar displays icons indicating that you’ve received notifications (on the
left) and icons indicating the device's status (on the right), along with the
current time.
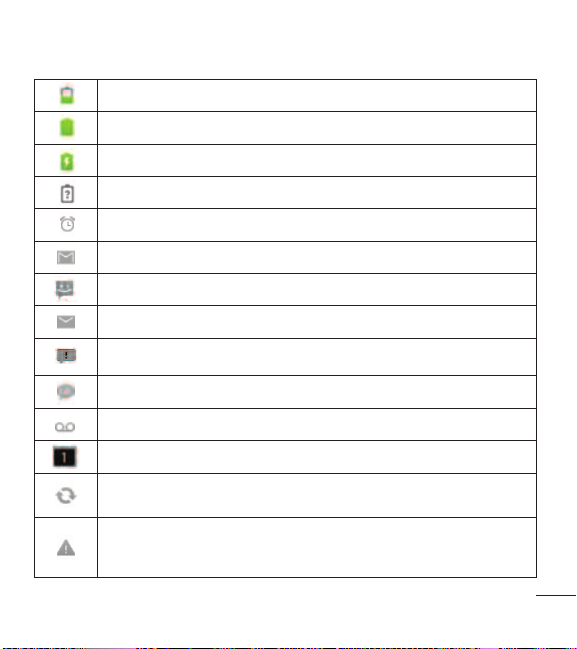
Notification icons
Status icons
3. Phone Key displays the dialpad so you can dial a number. Also provides
additional tabs to access
Call log,Contacts
, and your
Favorites
.
4. Home Key returns to the Home screen. If you're already viewing one of
extension panes, it opens the central Home screen. Press and hold to display
recently used applications.
5. Menu Key allows you to access your device's main functions menu from the
Home screen:
Notifications
Add,Wallpaper,Settings,Search,Manage apps
. While in an application, press to open a list of options available.
and
5

Device Basics
6. Microphone allows other callers to hear you clearly when you are speaking to
them.
7. Back Key returns to the previous screen. Also closes pop-up display items such
as menus and dialog boxes.
8. Search Key displays the Quick Search box that can be used to search for a key
term both on the device and onlin. See Using the Search Key on page 25.
●
For example, entering the word “Pa” will display any matching entries from
your device’s Contacts list, installed applications, or will suggest search terms.
●
Press and hold to launch Voice Search where you can initiate a Google™
search by verbally entering search terms. The device recognizes your spoken
words and initiates a Web search.
9. Browser Key launches the Web Browser.
10. Applications Tab opens the Applications screen to view installed applications.
11. Touchscreen displays all the information needed to operate your device, such
as the applications, call status, the Contacts list, the date and time, and the
signal and battery strength.
12. Earpiece lets you hear the caller and automated prompts.
6
Device Basics
Rear View
3.5 mm
Headset Jack
Camera
Lens
Camera
Key
Fingertip Cutout
1. 3.5mm Headset Jack allows you to plug in a headset for convenient, hands-
free conversations. CAUTION! Inserting an accessory into the incorrect jack
may damage the device.
2. Camera Lens as part of the built-in camera, lets you take pictures and videos.
3. Camera Key lets you activate the camera and camcorder. Once the Camera
function is open, you can access the Video recorder function as well.
4. Fingertip Cutout allows you to lift and remove the device's back cover.
Power/Lock
Key
Speaker
Volume
Keys
Charger/
Accessory Port
MicroSD
Slot
™
7

Device Basics
5. Charger/Accessory Port allows you to connect the device charger or an
optional USB cable (included). CAUTION! Inserting an accessory into the
incorrect port may damage the device.
6. Volume Keys allow you to adjust the ringer and media volumes, or to adjust
the in-call volume during a call. When you press and hold the Volume Key, the
phone switches to the Sound-off mode.
7. Speaker lets you hear the different ringers and sounds. The speaker also lets you
hear the caller’s voice in speakerphone mode.
8. Power/Lock Key locks the screen. Press and hold to open the Phone options
menu (for the following options):
9. microSD Slot accommodates the pre-installed microSD™ card (expandable
up to 32GB).
Note
Insert a microSD card to use the camera and other multimedia features. Multimedia
contents will be saved in the microSD card. LG L55C has a microSD™card pre-installed.
8
Silent mode,Airplane mode
, and
Power off.
Device Basics
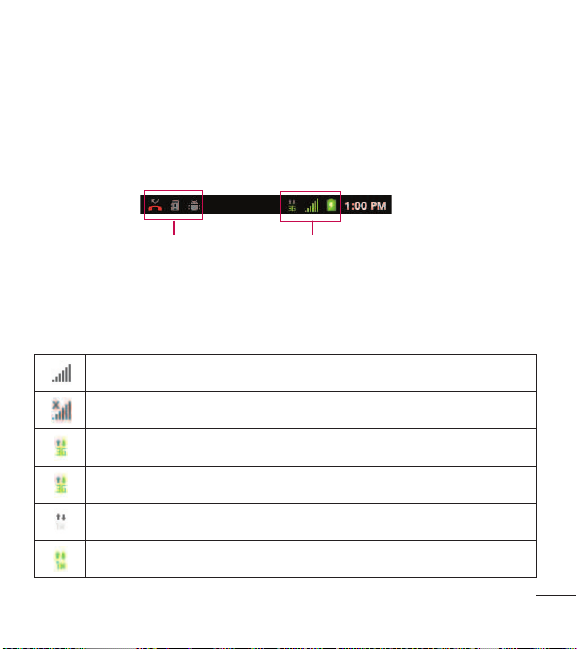
Viewing the Display Screen
The Status Bar appears at the top of the screen. It displays icons indicating that
you’ve received notifications (on the left) and icons indicating the device’s status
(on the right), along with the current time.
Notification icons
Status icons
If you have more notifications than can fit in the Status Bar, a plus icon prompts
you to open the Status Bar to view them all. (See Using the Notifications Panel
on page 22.) The following list identifies the symbols you’ll see on your device's
display screen:
Signal Strength – Shows your current signal strength. (More bars = stronger signal.)
No Service – Your phone cannot find a usable signal.
3G Connected – Indicates that 3G data service is available.
3G In Use – Indicates that 3G data service is in use.
1x Data Connected – Indicates that 1x data service is available.
1x Data Service In Use – Indicates that 1x data service is in use.
9

Device Basics
Bluetooth On – Indicates that Bluetooth is on.
Bluetooth Connected – Indicates that the phone is connected to a Bluetooth device.
GPSOn– Indicates that GPS is on.
GPS Communicating – Indicates that the device is receiving location data from GPS.
Roaming – Your phone is roaming.
Airplane Mode – Indicates that the device is in Airplane Mode.
Speakerphone On – Indicates that Speakerphone is on.
No microSD – Indicates that no microSD card is installed.
Vibrate Mode – Indicates that the ringer volume is set to vibrate and any sounds are silenced.
Ringer Silenced – Indicates that all sounds are turned off.
Muted – Indicates that phone microphone is muted.
Very Low Battery – Indicates that battery is very low.
Low Battery – Indicates that battery is low.
10
Device Basics
Battery Drained (40%) – Indicates that battery is partially drained.
Battery Full – Shows your current battery charge level. (Icon shown is fully charged.)
Battery Charging – Indicates that battery is charging.
Unknown Battery – Indicates that an unknown battery is inserted.
Alarm Clock – Indicates that an alarm is set up.
New Gmail Message – Indicates a new Gmail message.
New Text or Multimedia Message – Indicates you have received a new text or multimedia message.
New Email – Indicates a new Email message.
Problem With Text Or Multimedia Message Delivery – Indicates a text or multimedia message is
undeliverable.
New Google Talk Message – Indicates you have received a new Google Talk message.
New Voicemail – Indicates you have received a new voicemail message.
Upcoming Event – Alerts you to an upcoming event.
Data Is Syncing – Application sync is active and synchronization is in progress for Gmail, Calendar,
and Contacts.
Problem With Sign-In Or Sync – There has been an issue with your connection to the Google
server, or you were not properly signed into your account. In order to use Google application or
sync features, y
ou must set up and sign into an active Google account.
11
Device Basics
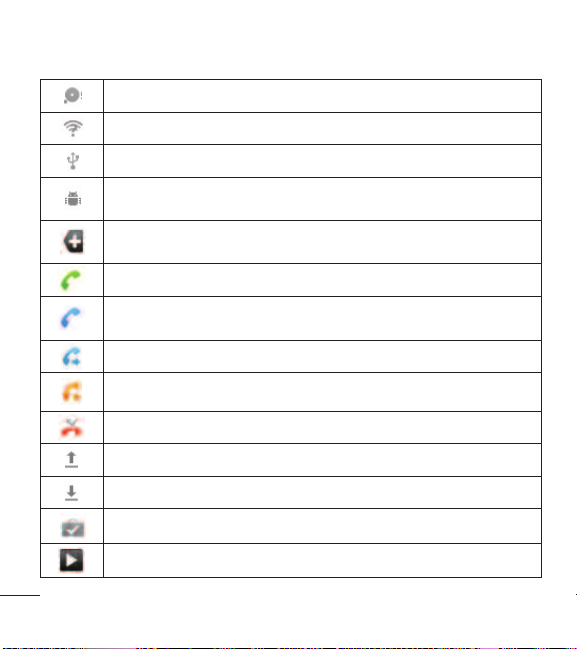
Full microSD Card – Indicates that microSD card is full.
An Open Wi-Fi Network Available – Indicates that an open Wi-Fi network is available.
USB Connected – The device has detected an active USB connection.
USB Debugging Connected – The device has detected an active USB connection and is in a USB
Debugging mode.
More Notifications Not Displayed – Indicates that there are more notifications which are not
displayed in the Status Bar.
Call In Progress – Indicates that a call is in progress.
Call In Progress Using Bluetooth Headset – Indicates that a call is in progress using the Bluetooth
headset.
Call Being Forwarded – Indicates that a call is being forwarded.
Call On Hold – Indicates that a call is on hold.
Missed Call – Indicates that you have missed calls.
Uploading Data – Indicates that your device is uploading data.
Downloading Data – Indicates that your device is downloading data.
inished
wnload F
Do
Song Is Playing – Indicates that a song is playing.
– Indicates that a download is complete.
12

Device Basics
Turning Your Device On and Off
Turn your device on and off and wake-up the screen by using the Power/Lock
Key.
Turning Your Device On
●
Press and hold .
Turning Your Device Off
1. Press and hold for two seconds until you see the Phone Options
menu.
2. Press
Power off
Your screen remains blank while your phone is off (unless the battery is
charging).
Wake Up the Screen
If you don’t use the device for a while, the screen and backlight will shut off to
conserve battery power. To wake up the device's screen:
1. Press . Your lock screen will appear. See Your Device's Lock Feature
on page 89.
2. Touch and drag the green Unlock icon to the right. The last screen you
were working on opens. (This is the default lock screen.)
and then tap OKto power off the device.
13

Device Basics
Battery and Charger
Warning! Use only LG-approved batteries and chargers with your device. The failure
to use a LG-approved battery and charger may increase the risk that your phone will
overheat, catch fire, or explode, resulting in serious bodily injury, death, or property.
Battery Capacity
Your device is equipped with a Lithium Ion (Li-Ion) battery. It allows you to
recharge your battery before it is fully drained. The battery provides up to 5
hours of continuous digital talk time.
When the battery reaches 5% of its capacity, the battery icon blinks. When there
are approximately two minutes of talk time left, the device can sound an audible
alert and then turn off.
Note
Long backlight settings, searching for service, using vibrate mode, browser use, and other
variables may reduce the battery’s talk and standby times.
Tip
Watch your device's battery level indicator and charge the battery before it runs out of
power.
14
Device Basics
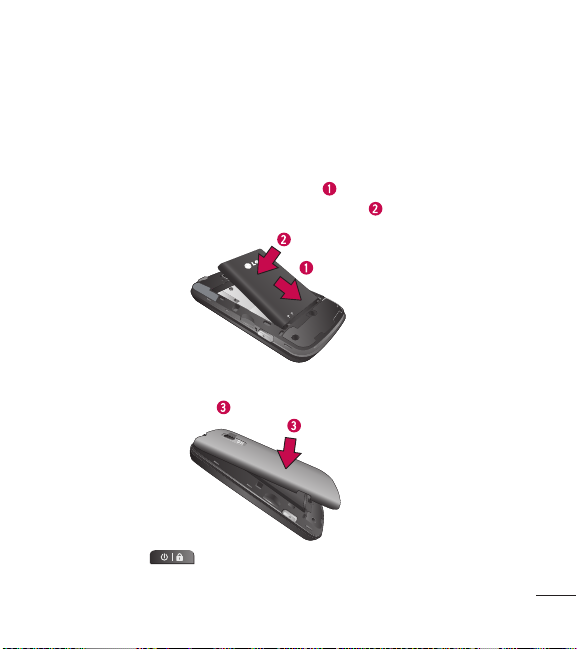
Installing the Battery
1. Install the battery.
●
Remove the battery from its packaging.
●
Insert the battery into the battery compartment in the back of the device,
making sure the connectors align (see step in the following illustration).
Gently press down to secure the battery (see step in the following
illustration).
●
Position the back cover over the battery compartment and press down until
you hear a click (see step in the following illustration).
2. Press and hold located on the top left of the phone to turn the
device on.
15
Device Basics
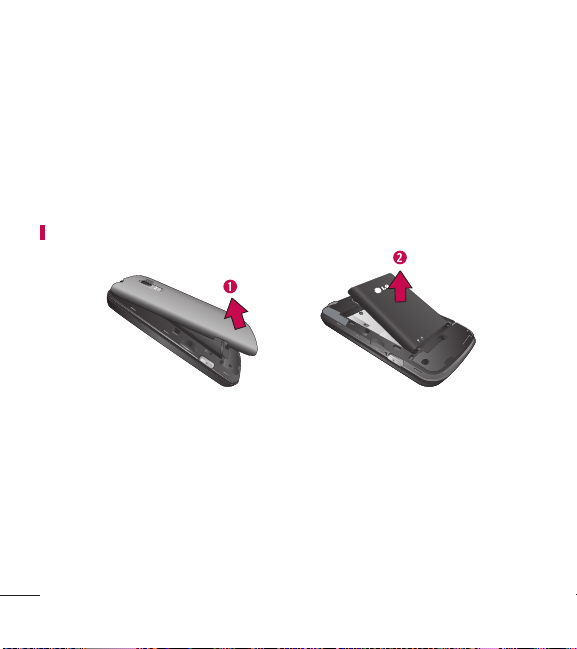
Removing the Battery
1. Make sure the power is turned off so that you don’t lose any unsaved items.
2. Lift the back cover using the fingertip cutout located on bottom of the cover
and remove it.
3. Lift the battery using the fingertip cutout and remove it from the device.
Warning! Do not handle a damaged or leaking Li-Ion battery as you can be burned.
Charging the Battery
Keeping track of your battery’s charge is important. If your battery level becomes
too low, your device automatically turns off, and you will lose any information
you were just working on.
Always use a LG-approved desktop charger, travel charger, or vehicle power
adapter to charge your battery.
16
Device Basics
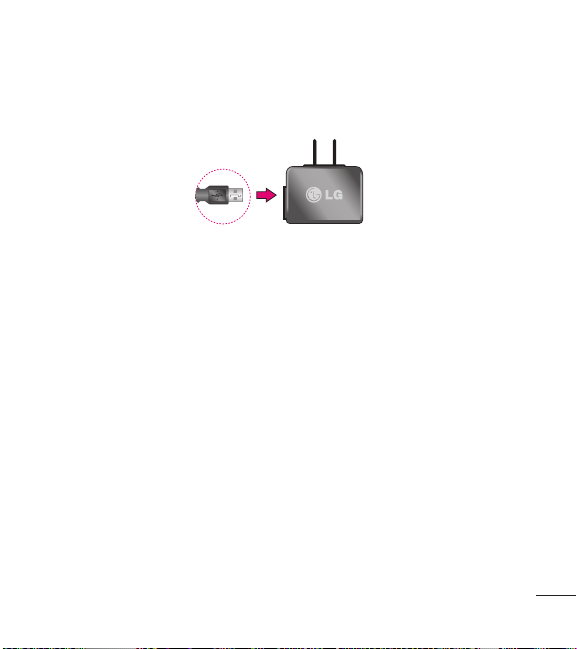
1. Connect the wall adapter and USB cable as shown; the LG logo on the USB
cable should face toward you.
2. Plug one end of the USB cable into the device's Charger/Accessory Port and
the other end into an electrical outlet. The charge time varies depending upon
the battery level.
With the LG-approved Li-Ion battery, you can recharge the battery before it
becomes completely discharged.
Battery Temperature Protection
Though extremely rare, if the battery becomes overheated, the phone will
automatically turn off.
Charging with USB
You can use your computer to charge your device. To be able to charge with the
USB cable, you need to install the necessary USB drivers on your computer first.
Connect one end of the USB cable to the Charger/Accessory Port on your
device and connect the other end to a USB port on your computer. It is best to
17

Device Basics
use the rear USB port when connecting to a desktop computer. The USB hub
should be powered by an external power source.
Note
Low-power USB ports are not supported, such as the USB port on your keyboard or buspowered USB hub.
LG USB Driver is downloadable from the following site: http://www.lg.com/us/mobilephones/index.jsp > Click
Model L55C > Click
Always unplug the charger from the wall socket after the phone is fully charged to save
unnecessary power consumption of the charger.
Extending Your Battery Life
You can extend your battery's life between charges by turning off features that
run in the background. You can also monitor how applications and system
resources consume battery power.
●
Reduce your Backlight On time.
●
Turn Bluetooth off when not in use.
●
Turn Wi-Fi off when not in use.
●
Deactivate the GPS when not needed. Most applications using this function
will periodically query the GPS satellites for your current location; each query
drains your battery.
18
Mobile Support > Select the Carrier(TracFone) > Select the
USB Cable Driver to download.

Device Basics
●
Do not wait until your battery is completely depleted before charging your
device. Repeating this process of a complete discharge and recharge can over
time reduce the storage capacity of any battery.
●
Turn off Automatic application sync.
●
Use the Power Control Widget to deactivate hardware functions such as Wi-Fi,
Bluetooth, GPS, Synchronization, or the LCD brightness setting.
●
Check the Running Services and close any unnecessary applications.
●
Turn down screen brightness and set a shorter screen timeout.
To check the battery's charge level:
Press > >
The battery status (charging or discharging) and level (as a percentage of fully
charged) are displayed at the top of the screen.
To monitor and control what uses the battery:
The Battery use screen shows which applications consume the most battery
power. You can also use it to turn off applications that you’ve downloaded, if
they are consuming too much power.
1. Press > >
2. Tap any of the listed items for more options.
Settings>About phone>Status
.
Settings>About phone>Battery use
.
19
Device Basics
●
Cell standby
●
Phone idle
●
Display
to view battery used by cell radio.
to view battery used when phone is idle.
to adjust the display settings.
Device Function Keys
The LG L55C comes equipped with four main function keys that can be used on
any screen to access added functions.
Menu Key
The
Menu Key
screen or application. When on the Home screen, the following menu options are
available:
●
Add
Shortcuts, Widgets, Folders, and Wallpapers.
●
Manage apps
how applications use memory, stop a misbehaving application, or uninstall an
application.
●
Wallpaper
wallpaper image. This image can be obtained from either your pre-installed
Wallpapers or from any of the available images within the device’s Gallery.
20
( ) activates an available menu function for the current
( ) adds one of the following functions to a selected screen:
( ) displays the Manage applications screen. You can manage
( ) provides the ability to customize the current screen’s

Device Basics
●
Search
( ) displays the Quick Search box that can be used to search for a
key term both on the device and on the Web.
●
Notifications
information about the current on-screen notification icons.
●
Settings
Working with Menus
There are two Android menu types: Options menus and Context menus.
Options menus
Options menus contain tools that apply to the activities of the current screen or
application, not to any specific item on the screen. To open the available options
menu, press .
●
Not all applications have Options menus; if you press on a screen that
has no Options menu, nothing will happen.
Some applications have more Options menu items than can fit in the options
menu; tap
( ) allows you to expand the Status Bar to provide more detailed
( ) provides quick access to the device’s settings menu.
More
to open the additional items.
Tap to open more menu items.
21
Device Basics
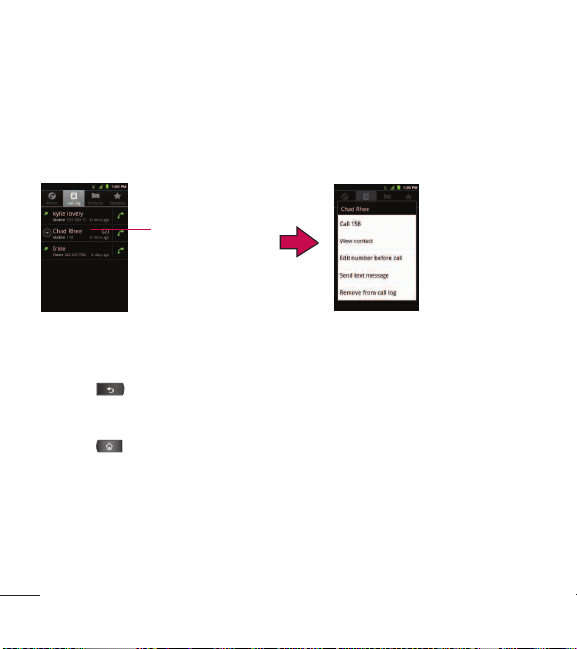
Using Context menus
Context menus contain options that apply to a specific item on the screen. To
open a Context menu, touch and hold an item on the screen. Not all items have
Context menus. If you touch and hold an item that has no Context menu,
nothing will happen.
When you touch and hold
certain items on a screen,
a Context menu opens.
Backing Up Within a Menu
To go to the previous menu:
●
Press .
To return to the Home screen:
●
Press .
Using the Notifications Panel
Notification icons report the arrival of new messages, calendar events, alarms, as
well as ongoing events, such as when you are on a call.
When you receive a notification, text appears briefly and the notification icon will
22

Device Basics
be displayed in the Status Bar. For descriptions of the various notification icons,
see Viewing the Display Screen on page 9.
You can open the Notifications Panel to view a list of all recent notifications.
Depending on your settings, you may hear a notification sound, and the device
may vibrate.
™
Applications whose activities produce notifications, such as Gmail
Talk, have their own settings, which you can use to configure whether, and how,
they send notifications. See the sections on those applications for details.
To open the Notifications Panel:
●
Touch and drag the Status Bar to the bottom of the screen.
– or –
●
Press > >
Notifications
.
The Notifications Panel displays a list of your current notifications, organized into
ongoing and event-based notifications.
To respond to a notification:
1. Open the Notifications Panel. Your current notifications are listed in the panel,
each with a brief description.
2. Tap a notification to view it. The Notifications Panel will close and the
application that corresponds to your response will open.
and Google
23

Device Basics
For example, new voicemail notifications dial your voicemail box, and new email
notifications open the Email application.
To clear all notifications:
1. Open the Notifications Panel.
Clear
2. Tap
All event-based notifications will be cleared; ongoing notifications will remain in
the list.
To close the Notifications Panel:
Touch and drag the tab at the bottom of the Notifications Panel to the top of
the screen.
- or Press .
- or Tap a notification and the Notifications Panel will close.
Home Key
The
available screens.)
Back Key
The
keyboard is currently open, this key closes the keyboard.
24
at the top right corner of the panel.
Home Key
Back Key
takes you back to your main Home screen. (of the 5 total
returns you to the previously active screen. If the on-screen
Device Basics
Search Key
The
Search Key
for a key term both on the device and on the Web. Some applications, such as
Contacts, Gmail
within those specific applications. Along with being able to search by typing in
search terms, you are also able to search by voice.
●
Press to launch the Quick Search Box.
●
Press and hold to launch the Voice Search function.
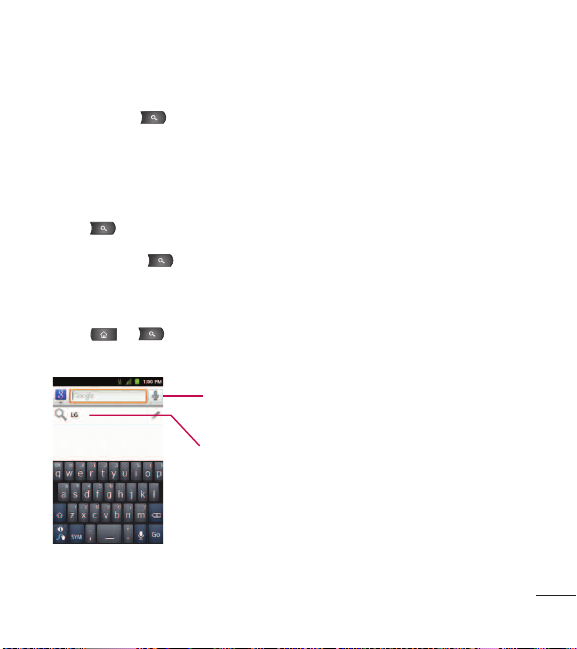
Device and Web Search Using Text Entry
1. Press > . When you press on the Home screen or in the other
applications that support this, the Quick Search Box will open automatically.
displays the Quick Search Box that can be used to search
™
, and Google Maps™, have the ability to search contents
Voice Search
Touch to search by voice.
Recent search results
Provides one touch shortcut
to previously searched terms.
25

Device Basics
●
In some applications, such as Gmail, Contacts, Browser, and Android MarketTM,
the application’s own search box opens when you press . This is
indicated by the application's icon on the left side of the search box.
2. Enter the text you're searching for in the Quick Search Box.
Tap to conduct the search.
As you type, search results from
your device, previous search
terms, and Web search
suggestions appear. Tap an item
to search for that term.
●
You can use the Search preferences to configure some aspects of Google Web
search (for example, whether it makes suggestions below the Quick Search
Box as you type), and what device features you want to include in searches.
3. Tap to search for the entered text.
– or –
If what you want to search for appears in the suggestions list, tap that item to
conduct the search.
26

Device Basics
To search different by type:
●
Tap >
To search using voice command:
●
press and hold .
– or –
Tap from the Quick Search Box.
When you stop speaking, Google Search by Voice analyzes your speech and
displays the results of your search.
All,Web,Apps
, or
Contacts
.
27

Device Basics
Touchscreen Navigation
The L55C is a touch-sensitive device which allows you to not only select an onscreen option with a single touch, but to easily scroll through long lists. Simply
slide up and down through the display with your fingertip. Your touchscreen
provides an excellent way to interact with and use your Android phone. With the
touch of your finger, you can access available applications, make menu selections,
and access data saved to your device. The following terms are used for describing
the different available actions using the touchscreen:
●
Tap
: A single finger tap selects items, links, shortcuts and letters on the on-
screen keyboard.
●
Touch and hold
lifting your finger until an action occurs. For example, to open a contact’s
available options, touch and hold the contact in the Contacts list until the
context menu opens.
●
Drag
: Touch and hold an item for a moment and then, without lifting your
finger, move your finger on the screen until you reach the target position. You
can drag items on the Home screen to reposition them, as described in
Changing the Device’s Wallpaper on page 43, or drag the Notifications Panel
open, as described in Using the Notifications Panel on page 22.
●
Swipe or slide
of the screen, without pausing when you first touch it (so you don’t drag an
item instead). For example, you can slide the screen up or down to scroll
28
: Touch and hold an item on the screen by touching it and not
: To swipe or slide, quickly move your finger across the surface
 Loading...