

Page 1

ESPAÑOL
Printed in China
ENGLISH
Guía del usuario
User Guide
MFL67566401 (1.1)
www.lg.com
Page 2

Page 3

LG Optimus Extreme™ User Guide
This guide helps you to get started using your phone.
Some of the contents of this manual
•
may not apply to your phone, depending
on the software and your service
provider.
This handset is not suitable for people
•
who have a visual impairment due to the
touch screen keyboard.
Copyright ©2012 LG Electronics, Inc. All
•
rights reserved. LG and the LG logo are
registered trademarks of LG Group and
its related entities. All other trademarks
are the property of their respective
owners.
Google™, Google Maps™, Gmail™,
•
YouTube™, Google Talk™ and Google
Play™ Store are trademarks of Google,
Inc.
ENGLISH
Page 4

Contents
Getting to know your phone ...............4
Device components ...............................9
Installing the SIM card and battery .......11
Charging your phone ...........................12
Using the memory card .......................12
Locking and unlocking the screen ........14
Secure your lock screen ......................14
Google account set up.........................15
Your Home screen ............................16
Touch screen tips ................................16
Home screen ......................................16
Customizing the application icon from
Home screen ......................................17
Customizing the Home screen .............17
Returning to recently-used applications 18
Status Bar ..........................................18
Viewing the Status Bar ........................18
On-screen keyboard ............................20
Entering special characters ..................20
QuickMemo .......................................21
Connecting to Networks and
Devices ............................................. 22
Wi-Fi ..................................................22
Connecting to Wi-Fi networks ..............22
Bluetooth ............................................22
Calls .................................................. 25
Making a call ......................................25
Calling your contacts ...........................25
Answering and rejecting a call .............25
Adjusting call volume ..........................25
Making a second call ..........................25
Viewing your call logs ..........................26
Call settings .......................................26
Contacts ............................................28
Searching for a contact .......................28
Adding a new contact..........................28
Favorite contacts ................................28
Import or export contacts .....................29
Messaging ........................................ 30
Sending a message ............................30
Threaded box ....................................30
Using Smilies ......................................30
Changing your message settings .........31
Email ................................................. 32
Managing an email account .................32
Email account screen ..........................32
Working with account folders ...............32
Composing and sending email .............33
2
Page 5

Camera ............................................. 34
Getting to know the viewfi nder .............34
Taking a quick photo ..........................35
Using the advanced settings ................35
View a photo ......................................36
Video camera ....................................38
Getting to know the viewfi nder .............38
Recording a video ...............................39
Using the advanced settings ................39
Play a video ........................................39
Multimedia ........................................41
Gallery ...............................................41
Music Player .......................................41
Transferring music fi les using Media sync
(MTP) devices .....................................41
Playing a song ....................................41
Utilities ..............................................43
Setting your alarm...............................43
Using your calculator ...........................43
Adding an event to your calendar .........43
Polaris Offi ce ......................................43
Using SmartShare ...............................44
The web ............................................ 46
Browser .............................................46
Using the web toolbar .........................46
Using options ......................................46
Settings ............................................47
WIRELESS & NETWORKS.....................47
DEVICE ...............................................48
PERSONAL .........................................49
SYSTEM .............................................51
DivX Mobile ........................................51
Phone Software update ....................52
Accessories ......................................54
Troubleshooting ................................55
FAQ ...................................................58
For Your Safety .................................69
3
Page 6

Getting to know your phone
Before you start using the phone, please read this!
Please check to see whether any problems
you encountered with your phone are
described in this section before taking the
phone in for service or calling a service
representative.
1. Phone memory
When there is less than 10% of space
available in your phone memory, your
phone cannot receive new messages. You
need to check your phone memory and
delete some data, such as applications
or messages, to make more memory
available.
To uninstall applications:
From the Home screen, touch
1
Apps tab > Settings
the DEVICE category.
Once all applications appear, scroll to
2
and select the application you want to
uninstall.
Touch Uninstall and OK to confirm.
3
> Apps from
2. Optimizing battery life
Extend your battery's life between
charges by turning off features that you
don't need to having running constantly
in the background. You can monitor
how applications and system resources
consume battery power.
Extending your phone's battery life:
Turn off radio communications you are
•
not using. If you are not using Wi-Fi,
Bluetooth or GPS, turn them off.
Reduce screen brightness and set a
•
shorter screen timeout.
Turn off automatic syncing for
•
>
Gmail™, Calendar, Contacts and other
applications.
Some applications you have downloaded
•
may reduce battery power.
To check the battery power level:
From the Home screen, touch
•
Apps tab > Settings
phone from the SYSTEM category >
Status
The battery status (charging or not
charging) and level (percentage charged) is
>
> About
4
Page 7

displayed at the top of the screen.
To monitor and control how battery
power is being used:
From the Home screen, touch
•
Apps tab > Settings
saver from the DEVICE category
> Battery use from the BATTERY
INFORMATION category.
Battery usage time is displayed on the
screen. It tells you how long it has been
since you last connected your phone to a
power source or, if currently connected,
how long the phone was last running
on battery power. The screen shows the
applications or services using battery
power, listed in order from the greatest to
smallest amount used.
>
> Power
3. Using folders
You can combine several app icons in a
folder. Drop one app icon over another on
a Home screen panel or the Applications
screen to create a folder with both icons
inside.
NOTE: You can customize contents
and properties of each folder. To
change the folder name and color,
touch the folder, then touch
add more apps to the folder, simply
drag and drop the icons into the
desired folder.
. To
4. Before installing an open
source application and
operating system (OS)
WARNING
If you install and use an OS other than
the one provided by the manufacturer it
may cause your phone to malfunction.
In addition, your phone will no longer
be covered by the warranty.
5
Page 8

Getting to know your phone
WARNING
To protect your phone and personal
data, only download applications
from trusted sources, such as Google
Play™ Store. If there are improperly
installed applications on your phone,
it may not work normally or a serious
error may occur. You must uninstall
those applications and all associated
data and settings from the phone.
5. Using the hard reset
(Factory reset)
If your phone needs to be restored to its
original condition, perform a hard reset to
reboot your phone.
Turn the phone off.
1
Press and hold the Volume Down Key
2
+ Home Key
Key
3
The touchkey lights will blink once. Then
the LG logo will be displayed. Release all
of the keys when the LG logo appears.
The phone will display an Android robot
4
animation and perform the factory reset.
.
+ Power/Lock
Leave your phone for at least a minute
while the hard reset is carried out. Your
phone will then reboot automatically and
will be ready for use.
Caution: If you perform a hard reset,
all user applications and user data will
be deleted. This cannot be reversed.
Remember to back up any important data
before performing a hard reset.
6. Opening and switching
applications
Multitasking is easy with Android because
you can keep more than one application
running at the same time. There's no
need to quit an application before opening
another. Use and switch between several
open applications. Android manages each
application, stopping and starting them
as needed to ensure that idle applications
don't consume resources unnecessarily.
To view a list of recently used
applications:
Simply press and hold the
.
Home Key
6
Page 9
To stop applications:
1
From the Home screen, touch
Apps tab > Settings
the DEVICE category > RUNNING tab.
Scroll and touch the desired application
2
and touch Stop to stop it.
>
> Apps from
7. Connecting Your Device to
Your Computer
Before using your device’s mass storage
capabilities, you need to prepare your
device’s data services to synchronize with
your desktop or laptop computer. Once
you have connected the device to the
computer, you can transfer your data to or
from the device memory.
To connect your device to a computer
via USB:
Use the USB cable that came with your
1
phone to connect the phone to a USB
port on your computer.
Open the Notifications panel and then
2
touch the USB icon.
Touch the connection mode you want
3
to use to connect to the PC. Choose
from the following options: Charge only,
Media sync (MTP), LG software.
Using Media sync (MTP) mode
When you connect the phone and PC
using a USB cable and set your device’s
USB connection mode to Media sync
(MTP), you will see one Portable Devices
on the PC. You can copy files to/from the
removable SD card.
NOTE: If you using Microsoft Windows
XP and synchronize your phone with
your PC using the USB cable, you need
to install Microsoft Windows Media
Player 11. Please refer to Microsoft's
Windows Media Player download site.
8. Hold your phone upright
Hold your mobile phone vertically, as
you would a regular phone. The Optimus
Extreme™ has an internal antenna. Be
careful not to scratch or damage the
back of the phone, as this may affect
performance.
While making/receiving calls or sending/
receiving data, avoid holding the lower part
of the phone where the antenna is located.
Doing so may affect call quality.
7
Page 10

Getting to know your phone
9. When the screen freezes
If the screen freezes or the phone does
not respond when you try to operate it:
Remove the battery, reinsert it, then turn
the phone on.
OR
Press and hold the
for 10 seconds to reboot it.
If it still does not work, please contact the
service center.
10. About the Google account
setup screen
When setting up the Google account, some
texts or tabs on the screen may appear
overlapped with each other depending on
the software version.
Power/Lock Key
Notice: With the Android ecosystem,
some available Play Store applications
only operate correctly with phones
that have a specific screen resolution.
Please be advised that some of the
applications on Play Store may not be
available for your phone due an LCD
resolution requirement that does not
match your phone. In addition, please
be aware that 3rd party applications
with programming defects may cause
abnormal behavior of your phone.
8
Page 11
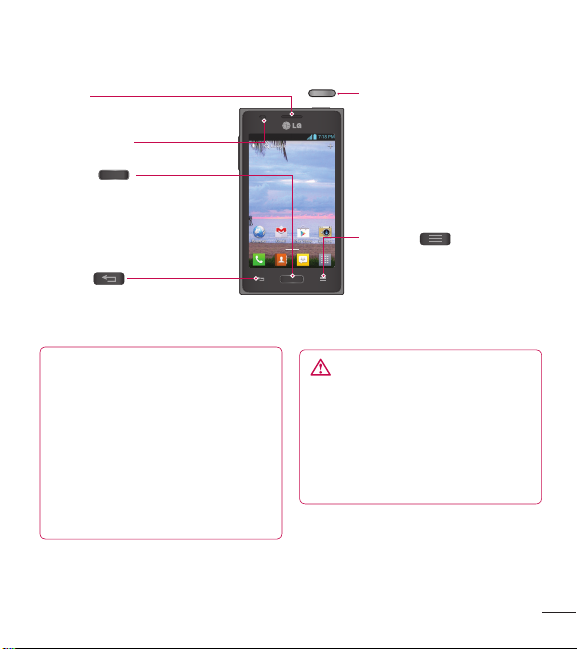
Device components
Earpiece
Proximity sensor
Home Key
• Return to the Home screen from
any screen.
• Press and hold to view a list of the
most recently used apps
Back Key
Return to the previous screen.
Power/Lock Key
• Switch your phone on/off by
pressing and holding this key.
• Short press to lock/unlock the
screen.
Menu Key
Displays available options.
NOTE: Proximity sensor
When receiving and making calls, the
proximity sensor automatically turns
the backlight off and locks the touch
screen by sensing when the phone is
near your ear. This extends battery life
and prevents you from unintentionally
activating the touch screen during
calls.
WARNING
Placing a heavy object on the phone
or sitting on it can damage the LCD
and touch screen functions. Do not
cover the LCD proximity sensor with
protective film. This could cause the
sensor to malfunction.
9
Page 12

Getting to know your phone
Power/Lock Key
Earphone Jack
Charger/USB Port
Microphone
Volume Keys
• In the Home screen: Control ringer
volume.
• During a call: Control your earpiece
volume.
• When playing a track: Control
volume continuously.
TIP! Press and hold both Volume
Keys for one second to access the
QuickMemo function.
Flash
microSD Card
Slot
Camera Lens
SIM Card Slot
Speaker
Back Cover
Battery
10
Page 13

Installing the SIM card and
battery
Before you can start exploring your new
phone, you'll need to set it up. To insert the
SIM card and battery:
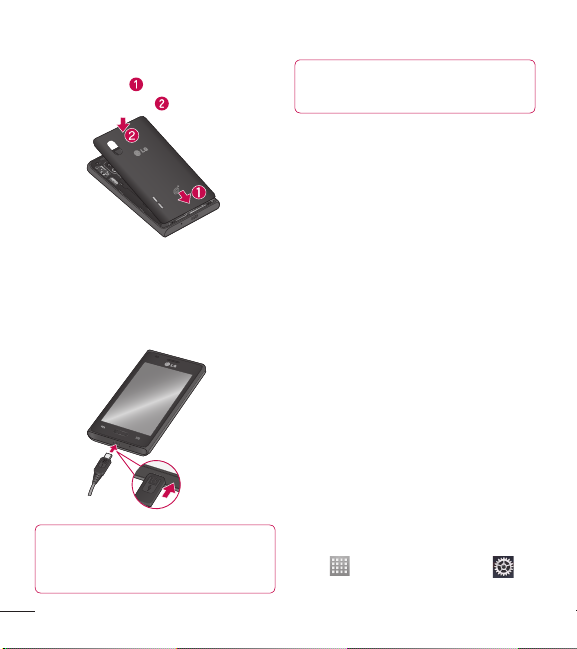
To remove the back cover, hold the
1
phone firmly in one hand. With your
other hand, lift off the back cover with
your fingernail as shown in the figure
below.
Slide the SIM card into the SIM card
2
slot. Make sure the gold contact area
on the card is facing downwards. Refer
to the image below.
NOTE: Put your thumbnail into the
ledge at the top of the phone and lift
off the back cover.
Insert the battery into place by aligning
3
the gold contacts on the phone and the
battery
and pressing it down until it
clicks into place
.
11
Page 14
Getting to know your phone
Align the back cover over the battery
4
compartment
it clicks into place
Charging your phone
The Charger/USB Port is at the bottom of
the phone. Insert the charger and plug it
into an electrical outlet.
NOTE: The battery must be fully
charged initially to improve battery
lifetime.
and press it down until
.
NOTE: Do not open the back cover
while charging your phone.
Battery Information and Care
Always unplug the charger from the wall
socket after the phone is fully charged to
save unnecessary power consumption of
the charger.
Using the memory card
Your phone supports the use of microSDTM
or microSDHC
32GB capacity. These memory cards are
specifically designed for mobile phones
and other ultra-small devices, and are ideal
for storing media-rich files such as music,
programs, videos, and photographs for use
with your phone.
To insert a memory card:
Remove the back cover and insert the
memory card into the slot. Make sure the
gold contact area is facing downwards.
To remove the memory card safely:
First, you must unmount the memory
card to remove it. From the Home screen,
touch
> Storage from the DEVICE category >
TM
memory cards of up to
> Apps tab > Settings
12
Page 15

Unmount SD card > OK. Then gently slide
the memory card out
NOTE:
•
Use only compatible memory cards
with your phone. Using incompatible
memory cards may damage the card
and data stored on the card, as well
as the phone.
As the device uses FAT32 the
•
maximum size for any given file is
4 GB.
WARNING
Do not remove the memory card
when the phone is on. Doing so may
damage the memory card as well as
your phone, and the data stored on the
memory card may get corrupted.
To format the memory card:
Your memory card may already be
formatted. If it isn't, you must format it
before you can use it.
NOTE: All files on your memory card
are deleted when it is formatted.
From the Home screen, touch >
1
Apps tab > Settings
from the DEVICE.
Touch Unmount SD card and touch OK
2
to confirm it.
Touch Erase SD card > Erase SD
3
card to confirm your choice.
If you have set a pattern lock, enter
4
the pattern lock and touch Erase
everything.
NOTE: If there is content on your
memory card, the folder structure may
be different after formatting as all the
files will be deleted.
> Storage
13
Page 16

Getting to know your phone
Locking and unlocking the
screen
If you do not use the phone for a while,
the screen is turned off and locked
automatically. This helps to prevent
accidental touches and saves battery
power.
When you are not using the phone, press
the Power/Lock Key
If there are any programs running when
you set lock screen, they may be still
running in Lock mode. It is recommended
that you exit all programs before entering
Lock mode to avoid unnecessary charges
(e.g. phone calls, web access and data
communications).
To wake up your phone, press the Power/
Lock Key
appear. Touch and slide the lock screen in
any direction to unlock your Home screen.
The last screen you viewed will open.
. The lock screen will
to lock it.
Secure your lock screen
You can lock your screen so that only you
can unlock it to access your phone.
To set Swipe, Pattern, PIN or Password
for the first time:
From the Home screen, touch
•
> Apps tab > Settings
screen > Select screen lock > Swipe,
Pattern, PIN or Password.
NOTE:
Precautions to take when using
pattern lock.
It is very important to remember the
unlock pattern you set. You will not be
able to access your phone if you use
an incorrect pattern 5 times. You have
5 opportunities to enter your unlock
pattern, PIN or password. If you have
used all 5 opportunities, you can try
again after 30 seconds.
> Lock
14
Page 17

When you cannot recall your unlock
pattern:
If you logged in to your Google account on
the phone but failed to enter the correct
pattern 5 times, touch Forgot pattern?.
You are then required to log in with your
Google account to unlock your phone or
enter your Backup PIN.
If you have not created a Google account
on the phone or you forgot it, you have to
perform a hard reset.
If you have forgotten PIN or Password:
If you forgot your PIN or Password, you
need to do Hard reset.
For more information, refer to "Using the
hard reset(Factory reset)" on page 6.
Google account set up
When you first turn on your phone, you
have the opportunity to activate the
network, to sign into your Google Account
and how you want to use some Google
services.
To set up your Google account:
Sign into a Google Account from the
•
prompted setup screen.
OR
From the Home screen, touch >
•
Apps tab > select a Google application,
such as Gmail
create a new account.
If you have a Google account, touch
Existing, enter your email address and
password, then touch Sign in.
Once you have set up your Google account
on your phone, your phone automatically
synchronizes with your Google account on
the web.
Your contacts, Gmail messages, Calendar
events and other information from these
applications and services on the web are
synchronized with your phone. (Depending
on your synchronization settings.)
After signing in, you can use Gmail™ and
take advantage of Google services on your
phone.
> select New to
15
Page 18
Your Home screen
Touch screen tips
Here are some tips on how to navigate
around your phone.
Touch – To choose a menu/option or open
an application, touch it.
Touch and hold – To open an options
menu or grab an object you want to move,
touch and hold it.
Drag – To scroll through a list or move
slowly, drag across the touch screen.
Flick – To scroll through a list or move
quickly, flick across the touch screen (drag
quickly and release).
NOTE:
• To select an item, touch the center
of the icon.
• Do not press too hard; the touch
screen is sensitive enough to pick
up a light, firm touch.
• Use the tip of your finger to touch
the option you want. Be careful not
to touch any other keys.
Home screen
Simply swipe your finger to the left or right
to view the panels. You can customize
each panel with apps, downloads, widgets
and wallpapers.
NOTE: Some screen images may be
different depending on your phone
provider.
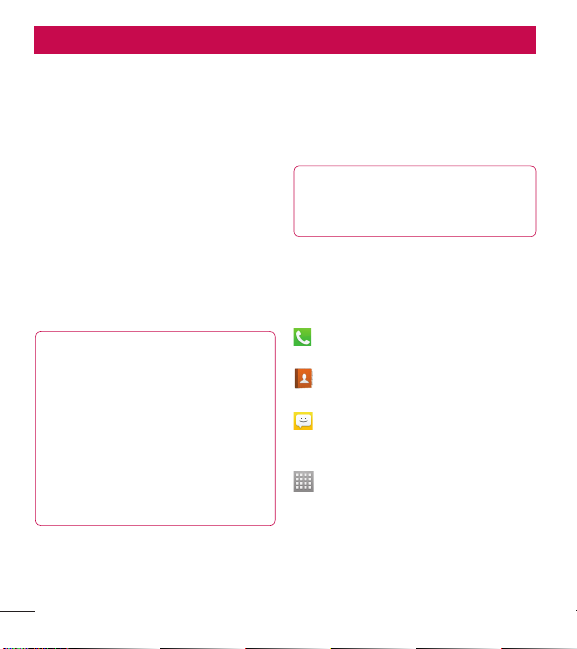
On your Home screen, you can view quick
keys at the bottom of the screen. Quick
keys provide easy, one-touch access to the
functions you use the most.
Touch the Phone icon to bring up the
touch screen dialpad to make a call.
Touch the Contacts icon to open your
contacts.
Touch the Messaging icon to access
the messaging menu, where you can
create a new message.
Touch the Apps icon to view all
your installed applications. To open any
application, simply touch the icon in the
applications list.
16
Page 19

Customizing the application
icon from Home screen
NOTE: This feature allows you to make
and use an icon with the pictures in
your Gallery.
You can further edit application icons on
the Home screen.
Touch and hold an icon until the canvas
1
grid is displayed, then release the icon.
An editing icon appears at the upper
right side of the application icon.
Touch the icon and select the desired
2
icon design.
Touch Create photo icon and select
3
Take photo to open the Camera
application and take a picture or Select
from Gallery to choose one of the
available pictures in your Gallery.
Customizing the Home screen
You can personalize your Home screen
by adding application icons, and widgets
to any Home screen canvas. You can also
change the wallpaper.
To add items on your Home screen:
Go to the Home screen canvas where
1
you want to add the item. Then touch
and hold the empty part of the Home
screen or touch
2
Touch the desired tab at the bottom of
the screen and select the item you want
to add. You will then see added items
on the Home screen.
Drag it to the location you want and lift
3
your finger.
To remove an item from the Home
screen:
From the Home screen, touch and hold
•
the icon you want to remove, then drag
it to
.
.
17
Page 20
TIP! To add an application icon to the
Home screen from the Applications
screen, touch and hold the application
you want to add. The Applications
screen closes and the Home screen
will be displayed.
Returning to recently-used
applications
Press and hold the Home Key .
1
The screen displays a pop-up with
previews of applications you have used
recently.
Touch an icon to open the application.
2
Or touch the Back Key
to your current application.
to return
Status Bar
The Status Bar runs across the top of your
screen.
18
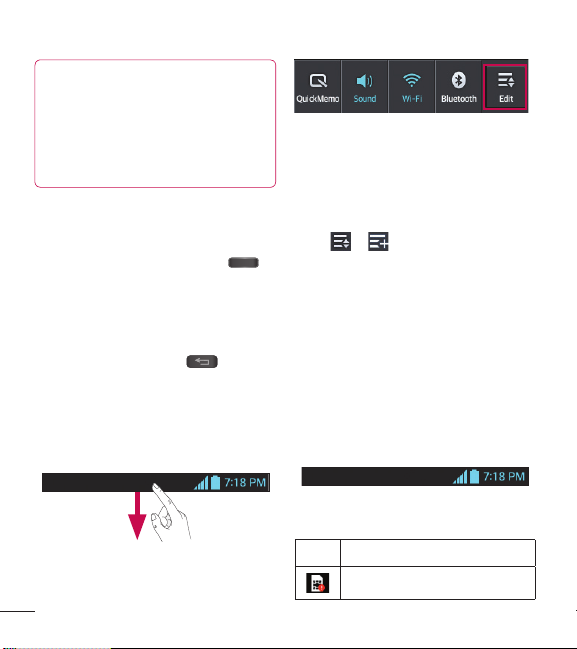
Touch and slide the Status Bar down with
your finger to display the Notifications
Panel. The Notifications Panel displays all
of your notifications along with the Quick
Settings at the top.
Touch
> to manage your Quick
Settings. Here you can check and manage
QuickMemo, Sound profile, Wi-Fi,
Bluetooth, Accounts & sync, Airplane
mode, Auto-rotate screen, Brightness, Data
enabled, and GPS.
Viewing the Status Bar
The Status Bar uses different icons to
display phone information such as signal
strength, new messages, battery life, and
Bluetooth and data connections.
Below is a table explaining the meaning of
icons you're likely to see in the Status Bar.
Icon Description
No SIM card
Page 21
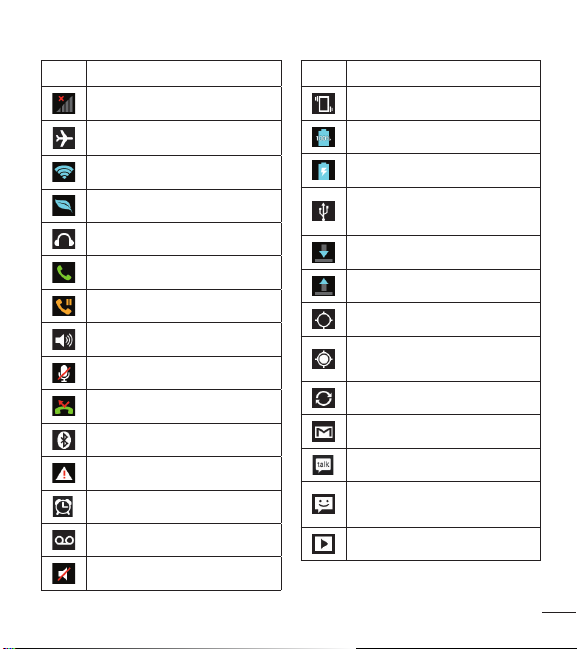
Icon Description
No signal
Airplane mode
Connected to a Wi-Fi network
Power saver is on
Wired headset
Call in progress
Call hold
Speakerphone is on
Phone microphone is muted
Missed call
Bluetooth is on
System warning
Alarm is set
New voicemail
Ringer is silenced
Icon Description
Vibrate mode
Battery fully charged
Battery is charging
Phone is connected to PC via
USB cable
Downloading data
Uploading data
GPS is acquiring
Receiving location data from
GPS
Data is syncing
New Gmail message
New Google Talk message
New text or multimedia
message
Song is playing
19
Page 22

Your Home screen
On-screen keyboard
You can enter text using the on-screen
keyboard. The on-screen keyboard appears
automatically on the screen when you
need to enter text. To manually display the
keyboard, simply touch a text field where
you want to enter text.
Using the keypad & entering text
Tap once to capitalize the next letter
you type. Double-tap for all caps.
Tap to switch to the numbers and
symbols keyboard. You can also touch and
hold this tab to view the Settings menu.
Tap to enter a space.
Tap to create a new line in the
message field.
Tap to delete the previous character.
Entering special characters
The on-screen keyboard allows you to
enter special characters (e.g. "á").
For example, to input "á", touch and hold
the "a" key until the zoom-in key grows
bigger and displays special characters.
Then select the special character you want.
20
Page 23

QuickMemo
The QuickMemo feature allows you to create memos and capture screen shots. You
can use QuickMemo to easily and efficiently create memos during a call, with a saved
picture or on the current phone screen.
Access the QuickMemo feature
1
by pressing both Volume Keys
for one second while viewing the
screen you want to capture.
NOTE: Please use a fingertip while using the QuickMemo function. Do not use your
fingernail.
Using the QuickMemo options
While using the QuickMemo feature, the following options are available:
- Select if you want to use the background screen or not use it.
- Select the pen type and the color.
- Erase the memo that you created.
- Crop the screen capture to the desired size.
- Save the memo to your Gallery.
- Share the memo with others.
Viewing the saved QuickMemo
Open the Gallery
and touch the QuickMemo album.
Or touch and
slide the Status
Bar downwards
and touch
2
Select the desired
menu option from
Pen type, Color and
Eraser. Then create
.
a memo.
Touch from
3
the Edit menu and
select
the memo.
to save
21
Page 24
Connecting to Networks and Devices
Wi-Fi
With Wi-Fi, you can use high-speed
Internet access within the coverage of the
wireless access point (AP). Enjoy wireless
Internet using Wi-Fi, without extra charges.
Connecting to Wi-Fi networks
To use Wi-Fi on your phone, you need
to access a wireless access point or
"hotspot". Some access points are open
and you can simply connect to them.
Others are hidden or use security features;
you must configure your phone to be able
to connect to them.
Turn off Wi-Fi when you're not using it to
extend the life of your battery.
NOTE: If you are out of the Wi-Fi zone
or set Wi-Fi to OFF, additional charges
may be applied by your mobile
operator for mobile data use.
Turning Wi-Fi on and connecting to a
Wi-Fi network
From the Home screen, touch >
1
Apps tab > Settings
the WIRELESS & NETWORKS category.
> Wi-Fi from
2
3
4
Bluetooth
You can use Bluetooth to send data by
running a corresponding application, not
from the Bluetooth menu as on most other
mobile phones.
Slide to the right to turn Wi-Fi
on and start scanning for available Wi-Fi
networks.
Secured networks are indicated by a
•
lock icon.
Touch a network to connect to it.
If the network is open, you are asked
•
to confirm that you want to connect to
that network by touching Connect.
If the network is secured, you are
•
prompted to enter a password or
other credentials. (Ask your network
administrator for details)
The Status Bar displays an icon that
indicates Wi-Fi status.
22
Page 25

TIP! Your phone allows you to enjoy
Bluetooth at high speed.
If the device you want to share
files with also supports high speed
Bluetooth, the files will automatically be
transferred via the high-speed network.
To use Bluetooth high speed data
transfer, please make sure the Wi-Fi is
OFF on your devices before use. The
settings for Bluetooth high speed may
be different depending on the device.
Please check the device's settings with
their service provider.
NOTE:
•
LG is not responsible for the loss,
interception, or misuse of data sent
or received via the Bluetooth wireless
feature.
Always ensure that you share and
•
receive data with devices that are
trusted and properly secured. If
there are obstacles between the
devices, the operating distance may
be reduced.
Some devices, especially those
•
that are not tested or approved by
Bluetooth SIG, may be incompatible
with your device.
Turning on Bluetooth and pairing up
your phone with a Bluetooth device
You must pair your device with another
device before you connect to it.
From the Home screen, touch
1
Apps tab > Settings
from the WIRELESS & NETWORKS
category.
Slide
2
on. Your phone will scan for and display
the IDs of all available Bluetooth inrange devices. If the device you want to
pair with isn’t on the list, make sure the
target device is set to be discoverable,
then tap Search for devices.
Choose the device you want to pair
3
up with from the list. Depending on
the type of device, you will have to
confirm codes, enter a code, or it will
automatically pair.
to the right to turn Bluetooth
>
> Bluetooth
23
Page 26

Connecting to Networks and Devices
Once the pairing is successful, your phone
will connect to the device.
Send data using the Bluetooth wireless
feature
Select a file or item, such as a contact,
1
calendar event, or media file, from an
appropriate application or Downloads.
Select the sharing option and choose
2
Bluetooth.
NOTE: The method for selecting an
option may vary by data type.
Search for and pair with a Bluetooth-
3
enabled device.
Your data will then be transmitted via
4
Bluetooth.
24
Page 27
Calls
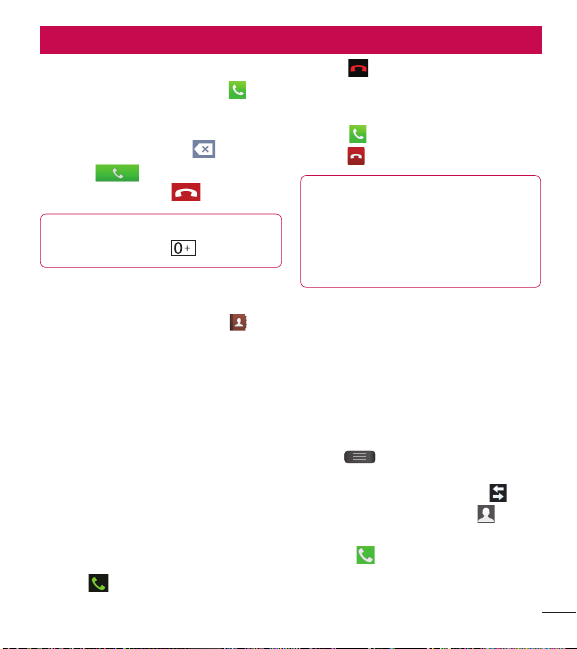
Making a call
From the Home screen, touch to
1
open the keypad.
Enter the number using the keypad. To
2
delete a digit, touch the
Touch
3
To end a call, touch
4
TIP! To enter "+" to make international
calls, touch and hold
to make a call.
Calling your contacts
From the Home screen, touch to
1
open your contacts.
Scroll through the contact list or enter
2
the first few letters of the contact you
want to call by touching the Search
contacts field.
In the list, touch the contact you want
3
to call.
Touch the phone number you want
4
to dial.
Answering and rejecting a call
Locked screen
•
in any direction to answer an
Swipe
incoming call.
.
.
.
Swipe in any direction to decline an
•
incoming call.
Unlocked screen
Touch
•
•
to answer an incoming call.
Touch
to decline an incoming call.
TIP! Quick msg
You can send a message quickly
using this function. This is useful if
you need to reply the message during
a meeting.
Adjusting call volume
To adjust the in-call volume during a call,
use the Volume Keys on the left-hand side
of the phone.
Making a second call
1
During your first call, touch the Menu
Key
number. You can also go to your
recently dialed list by touching
search contacts by touching
select the number you want to call.
2
Touch to make the call.
3
Both calls are displayed on the call
screen. Your initial call is locked and
> Add call and dial the
or
and
25
Page 28

Calls
put on hold.
To merge the calls, touch
4
active calls, touch
NOTE: You are charged for each call
you make.
Viewing your call logs
From the Home screen, touch and
choose the Call logs tab
View a complete list of all dialed, received
and missed voice calls.
TIP! Touch any call log entry to view
the date, time and duration of the call.
TIP! Touch the Menu Key , then
touch Delete all > OK to delete all the
recorded items.
. To end
.
.
Call settings
You can configure phone call settings
such as call forwarding and other special
features offered by your carrier.
From the Home screen, touch
1
Touch the Menu Key
2
3
Touch Call settings and choose the
options that you want to adjust.
Fixed dialing numbers – To turn on and
compile a list of numbers that can be
called from your phone. You’ll need your
PIN2, which is available from your operator.
Only numbers within the fixed dial list can
be called from your phone.
< VOICEMAIL >
Voicemail service – Allows you to select
your carrier’s voicemail service.
Voicemail settings – If you are using
your carrier’s voicemail service, this option
allows you to enter the phone number to
use for listening to and managing your
voicemail.
< OTHER CALL SETTINGS >
Quick messages – Add or edit quick
messages.
TTY mode – Set the TTY mode.
.
.
26
Page 29

Hearing aids – Checkmark to turn on
hearing aid compatibility.
Call duration – Check call duration.
Caller ID – Choose whether to display your
number on an outgoing call.
Sound settings – Allows you to change
the sound settings.
Additional settings – Allows you to
change additional settings.
Call forwarding - Allows you to set
•
call forwarding options.
Call waiting - Allows you to receive
•
a notification when you have call
waiting.
27
Page 30

Contacts
Add contacts to your phone and
synchronize them with the contacts in your
Google account or other accounts that
support contact syncing.
Searching for a contact
From the Home screen, touch to
1
open your contacts.
Touch the Search contacts field and
2
enter the contact name using the
keyboard or touch the letters along the
right side of the screen and scroll to
the contact.
Adding a new contact
From the Home screen, touch ,
1
enter the new contact's number, then
touch the Menu Key
Contacts > Create new contact.
If you want to add a picture to the new
2
contact, touch
Take photo or Select from Gallery.
Select the contact type by touching
3
Touch a category of contact information
4
and enter the details about your
contact.
Touch Save to save the contact.
5
> Add to
and choose from
Favorite contacts
You can classify frequently called contacts
as favorites.
Adding a contact to your favorites
From the Home screen, touch
1
open your contacts.
Touch a contact to view their details.
2
Touch the star to the right of the
3
contact's name. The star turns yellow.
Removing a contact from your favorites
list
From the Home screen, touch
1
open your contacts.
Touch the Favorites tab
2
a contact to view its details.
Touch the yellow star to the right of the
3
contact's name. The star turns grey
and the contact is removed from your
favorites.
.
and choose
to
to
28
Page 31

Import or export contacts
To import/export contact files (in vcf
format) from a storage memory(Internal
storage/memory card) or SIM or USIM card
to your device or vice versa.
From the Home screen, touch
1
open your contacts.
Touch the Menu Key
2
Export.
Select an desired option for importing/
3
exporting. If you have more than one
account, select an account to which you
want to add the contact.
Select contact files to import/export and
4
select OK to confirm.
to
> Import/
29
Page 32
Messaging
Your phone combines combines text (SMS)
and multimedia (MMS) messages into one
intuitive, easy-to-use menu.
Sending a message
Touch on the Home screen, and
1
touch
to create a new message.
Enter a contact name or contact
2
number in the To field. As you enter
the contact name, matching contacts
appear. You can touch a suggested
recipient. You can add multiple contacts.
NOTE: You will be charged for a text
message for every person you send
the message to.
Touch the text field and start to
3
compose your message.
Touch the Menu Key
4
the Options menu. Choose from
Discard, Add Cc/Bcc, Insert smiley,
All messages, and Keyboard settings.
Touch Send to send your message.
5
to open
WARNING: The 160-character
limit may vary from country to country
depending on the language and how
the SMS is coded.
WARNING: If an image, video
or audio file is added to an SMS
message, it is automatically converted
into an MMS message and you are
charged accordingly.
Threaded box
Messages (SMS, MMS) exchanged
with another party are displayed in
chronological order so that you can
conveniently see an overview of your
conversation.
Using Smilies
Liven up your messages using Smilies.
When writing a new message, touch the
Menu Key
smiley.
, then choose Insert
30
Page 33

Changing your message
settings
Your phone's message settings are
predefined, so you can send messages
immediately. You can change the settings
based on your preferences.
Touch
on the Home screen, and touch
the Menu Key
preferences as desired.
> Settings. Set your
31
Page 34

Email
You can use the Email application to read
emails from services other than Gmail. The
Email application supports the following
account types: POP3, IMAP and Exchange.
Your service provider or system
administrator can provide the account
settings you need.
Managing an email account
The first time you open the Email
application, a setup wizard opens to help
you to set up an email account.
To add another email account:
From the Home screen, touch
•
Apps tab > Email
> Settings > ADD ACCOUNT
After the initial setup, Email displays the
contents of your inbox. If you have added
more than one account, you can switch
among accounts.
To change an email account's setting:
From the Home screen, touch
•
Apps tab > Email
> Settings
> Menu Key
> Menu Key
>
>
To delete an email account:
From the Home screen, touch >
•
Apps tab > Email
> Settings. Then select an
account you want to delete and touch
Remove account > OK.
> Menu Key
Email account screen
You can touch an account to view its Inbox.
– Touch the folder icon to open the
account folders.
Only the most recent emails in your
account are downloaded to your phone.
Working with account folders
Each account has an Inbox, Outbox,
Sent and Drafts folder. Depending on the
features supported by your account's
service provider, you may have additional
folders.
32
Page 35

Composing and sending email
To compose and send a message
Open the Email application and touch
1
.
Enter an address for the message's
2
intended recipient. As you enter text,
matching addresses are offered from
your Contacts. Separate multiple
addresses with semicolon.
Touch the Menu Key
3
Cc/Bcc and add attachment files if
required.
Enter the text of the message.
4
Touch
5
to send the message.
If you aren't connected to a network, for
example, if you're working in airplane
mode, the messages that you send
are stored in your Outbox folder until
you're connected to a network again. If
it contains any pending messages, the
Outbox is displayed on the Accounts
screen.
to add
TIP! When a new email arrives in the
inbox, you will receive a notification
by sound or vibration (depending on
your settings). You will also receive a
notification in the Status Bar.
33
Page 36

Camera
Getting to know the viewfinder
Cheese shutter – Take photo with voice command (saying "Cheese").
Brightness – This defines and controls the amount of sunlight entering the
image.
Shot mode – Choose from Normal, Panorama or Continuous shot.
Flash – Allows you to turn on the flash when taking a photo in a dark place.
Settings – Access the Settings menu.
Mode switch – Allows you to switch between camera mode and video mode.
Capture – Takes a photo.
Gallery – Allows you to view the last photo you captured. This enables you to
access your Gallery and view saved photos within camera mode.
NOTE: The memory capacity may differ depending on the shooting scene or
shooting conditions.
34
Page 37

Taking a quick photo
Open the Camera application.
1
Hold the phone and point the lens
2
towards the subject you want to
photograph.
Touch the screen and a focus box will
3
appear in the center of the viewfinder
screen.
When the focus box turns green, the
4
camera has focused on your subject.
Touch
5
to capture the image.
Using the advanced settings
In the viewfinder, touch to open all
advanced options.
•
- Sets the focus mode.
•
-Select the image resolution. If you
choose the high resolution, the file size
will increase, which means you will
be able to store fewer photos in the
memory.
•
- Finds the color and light settings
appropriate for the current environment.
Choose from Normal, Portrait,
Landscape, Sports, Sunset and Night.
- The ISO rating determines the
•
sensitivity of the camera's light sensor.
The higher the ISO, the more sensitive
the camera is. This is useful in darker
conditions when you cannot use the
flash.
- Improves color qualities in different
•
lighting conditions.
- Applies color effects to the pictures.
•
- Set a delay after the Capture button
•
is pressed. This is ideal if you want to be
in the photo.
- Activate to use your phone's
•
location-based services. Take pictures
wherever you are and tag them with the
location. If you upload tagged pictures to
a blog that supports geotagging, you can
see the pictures displayed on a map.
NOTE: This function is only available
when GPS is active.
- Select one of the three shutter
•
sounds or turn it off.
- Automatically displays the picture
•
after taking it.
35
Page 38

Camera
- Select the storage location to save
•
images.
- Restore all camera default settings.
•
•
- Provides help information on some
of the camera features.
TIP! When you exit the camera, some
settings return to their defaults, such
as white balance, timer and scene
mode. Check these before you take
your next photo.
TIP! The Settings menu is
superimposed over the viewfinder
so, when you change elements of
the image color or quality, you see a
preview of the image change behind
the Settings menu.
View a photo
Learn to view photos saved in your
phone's storage.
From Home screen, touch
1
Gallery
2
Select a photo to view.
.
>
While viewing a photo, use the
following options:
To view more photos, scroll left or right.
•
To zoom in or out, tap the screen with
•
two fingers and spread them apart (move
your fingers closer together to zoom out).
To send a photo to others, touch
•
then select the method you want to use
to share the image.
TIP! If you have a social networking
account and set it up on your phone,
you can share your photo with the
social networking community.
•
To delete a photo, touch Delete .
Touch the Menu Key
following options:
Set image as – Allows you to set the
image as a Contact photo, Lockscreen
Wallpaper or Wallpaper.
Move – Allows you to move the image to
other albums.
Rename – Allows you to edit the name of
the selected picture.
Rotate left/right – Allows you to rotate the
image left or right.
,
to open the
36
Page 39

Crop – Crop your photo. Move your finger
across the screen to select the area.
Edit - View and edit the picture.
- Select the image resolution. If
you choose the high resolution, the file
size will increase, which means you will
be able to store fewer photos in the
memory.
- Improves color qualities in different
lighting conditions.
- Applies artistic effects to the
pictures.
- Applies the additional options for
pictures.
Slideshow – Automatically shows you the
picture you just took.
Details – Displays the picture information.
NOTE: Some file formats are not
supported depending on the software
of the device.
NOTE: If the file size exceeds the
available memory, an error can occur
when you open files.
37
Page 40

Video camera
Getting to know the viewfinder
Zoom – Zoom in or zoom out. Alternatively you can use the Volume Keys.
Brightness – This defines and controls the amount of sunlight entering the video.
Video size– Allows you to set the size (in pixels) of the video you are recording.
Flash – Allows you to turn on the flash when recording a video in dark conditions.
Settings – Access the Settings menu.
Camera mode – Allows you to switch to camera mode.
Record – Starts recording.
Gallery – Touch to view the last video you recorded. This enables you to access
your gallery and view your saved videos from within video mode.
38
Page 41

Recording a video
Touch the Camera mode button to
1
switch to video mode. The Capture icon
changes to
The video camera viewfinder appears
2
on the screen.
Holding the phone, point the lens
3
towards the subject you want to capture
in your video.
Touch
4
A red light appears at the top corner of
5
the viewfinder with a timer showing the
length of the video.
Touch
6
.
once to start recording.
to stop recording.
Using the advanced settings
Using the viewfinder, touch to open all
the advanced options.
- Improves color qualities in different
lighting conditions.
- Apply a special effect, such as Sepia
or Mono.
- Activate to use your phone's
location-based services. Records
videos wherever you are and tag
them with the location. If you upload
tagged videos to a blog that supports
geotagging, you can see the videos
displayed on a map.
- Allows you record videos with or
without sound.
- Auto review automatically shows you
the video you just recorded.
- Select the storage location to save
videos.
- Restore all video camera default
settings.
Play a video
Learn to use the video player to play
various kinds of videos.
From Home screen,touch
1
.
2
Select a video and touch
3
Rotate the device to landscape view.
4
Control playback with the virtual keys
on the screen.
> Gallery
to play it.
39
Page 42

Video camera
NOTE:
Some file formats are not supported
•
depending on the software of the
device.
If the file size exceeds the available
•
memory, an error can occur when
you open files.
Touch the Menu Key to open the
following options:
Move – Allows you to move the video to
other albums.
Rename – Allows you to edit the name of
the selected video.
Details – Allows you to see detailed
information, such as the name, date, time,
size and type.
Adjusting the volume when
viewing a video
To adjust the volume of a video while it is
playing, use the Volume Keys on the left
side of the phone.
40
Page 43

Multimedia
You can store multimedia files on a
memory card for easy access to all your
image and video files.
Gallery
Learn to view photos and play videos
saved in your device’s memory and
memory card.
From the Home screen, touch
tab > Gallery
. Open an album to view
the pictures.
Music Player
Your phone has a music player that lets
you play all your favorite tracks. To access
the music player, from the Home screen,
touch
> Apps tab > Music Player
.
Transferring music files using
Media sync (MTP) devices
Connect the LG Optimus Extreme™ to
1
a PC using a USB cable.
The connection type list will appear, and
2
select the Media sync (MTP) option.
You can view the portable device on
3
your PC and transfer the files.
> Apps
NOTE: If you are using Microsoft
Windows XP and synchronize your
phone with your PC using the USB
cable, you need to install Microsoft
Windows Media Player 11. Please
refer to Microsoft's Windows Media
Player download site.
Playing a song
From the Home screen, touch >
1
Apps tab > Music Player
2
Touch the Songs tab.
3
Select the song you want to play.
Touch to pause playback.
Touch to resume playback.
Touch to skip to the next track in the
album, playlist or shuffle. Touch and
hold to fast-forward.
Touch to go back to the beginning
of the song. Touch twice to return to
the previous song. Touch and hold to
rewind.
Touch to manage the music volume.
Touch to set repeat mode.
Touch to play the current playlist in
shuffle mode.
.
41
Page 44

Multimedia
Touch to see the current playlist.
Touch to see lyrics. This option is on
only if the song includes the lyrics.
Touch to go to Library.
To change the volume while listening to
music, press the Volume Keys on the left
side of the phone.
Touch and hold any song in the list for the
following options: Play, Add to playlist,
Set as ringtone, Delete, Share, Search
and Details.
NOTE: Music file copyrights may be
protected by international treaties and
national copyright laws.
Therefore, it may be necessary to
obtain permission or a licence to
reproduce or copy music.
In some countries, national laws
prohibit private copying of copyrighted
material. Before downloading or
copying the file, check the national
laws of the relevant country
concerning the use of such material.
42
Page 45

Utilities
Setting your alarm
From the Home screen, touch >
1
Apps tab > Alarm/Clock
Set the desired time.
2
Set Repeat, Snooze duration,
3
Vibration, Alarm sound, Puzzle lock
and Memo.
Touch Save to save the alarm.
4
Using your calculator
From the Home screen, touch >
1
Apps tab > Calculator
Touch the number keys to enter
2
numbers.
For simple calculations, touch the
3
function you want (+, –, x or ÷)
followed by =.
For more complex calculations, touch
4
the Menu Key
panel, then choose the desired
function.
Adding an event to your
calendar
From the Home screen, touch >
1
Apps tab > Calendar
to change to Day, Week,
Touch
2
> .
.
, select Advanced
.
Month or Agenda view.
Tap on the date you want to add an
3
event on.
Tap the time slot you want to add event
4
in. Then touch
account if necessary.
Touch the Event name field and enter
5
the event name.
Touch the Location field and enter the
6
location. Check the date and enter the
time you want your event to start and
finish.
If you want to add a note to your event,
7
touch the Description field and enter
the details.
If you want to repeat the alarm, set
8
REPEAT and REMINDERS, if necessary.
Touch Save to save the event in the
9
calendar.
. Select the calendar
Polaris Office
Polaris Office is a professional mobile
office solution that lets users conveniently
view various types of office documents,
including Word, Excel and PowerPoint files,
anywhere, anytime, using their mobile
devices.
43
Page 46

Utilities
From the Home screen, touch > Apps
tab > Polaris Office
Managing files
Polaris Office provides mobile users with
convenient file management features,
including copying, moving and pasting,
and deleting files and folders right on the
device.
Viewing files
Mobile users can now easily view a wide
variety of file types, including Microsoft
Office documents and Adobe PDF, right
on their mobile devices. When viewing
documents using Polaris Office, the objects
and layout remain the same as in their
original documents.
Using SmartShare
Using your phone, you can allow media
content files on the network to be shared
with other players.
From the Home screen, touch
1
SmartShare
Your device should be connected to
•
a Wi-Fi network. If not, you will be
prompted to connect to one.
.
>
.
Touch and select a device to view
2
its library content.
If there is a previously connected
•
device, the device's content list of is
displayed.
Touch
3
4
5
and select a renderer device.
•
You can only play the files on the
supported devices, such as DLNAenabled TVs and PCs.
•
Select a content file you want to play
from the content list.
•
•
Upload/download content files to/from
the content list.
•
•
•
to search for available
Touch
devices again.
Touch and hold a content file to play it
or to view its details.
Touch the Menu Key
upload/download, set it or view Help.
You can upload the content files
saved on your phone to other devices.
You can download the content files
saved in an external library to your
phone.
Download/upload progress can be
viewed on the Status Bar.
to play,
44
Page 47

The uploaded or downloaded content
•
files are saved in the SmartShare
folder.
The following settings are available in
6
the Settings menu.
Discoverable: Allows your phone to
•
be detected by other DLNA-enabled
devices.
Device name: Allows you to set
•
the name that is displayed on other
devices.
Always accept request:
•
Automatically accepts requests from
other devices to share content files.
Receive files: Allows other devices to
•
upload files to your phone.
MY SHARE CONTENTS: Allows you
•
to set the media file type you want
to share.
NOTE:
DMS (Digital Media Server) allows
•
you to share content files on your
phone with other devices connected
to the same network. With the DMC
(Digital Media Controller) function you
can view and control (playback/stop)
content files on other digital devices.
You can also play content files saved
on other devices on your phone
using the DMP (Digital Media Player).
You can only play content files in
•
the formats supported by the DMR.
It may not be possible to play some
content files, depending on the DMR.
The upload or download function
•
may not be supported, depending on
the DMS.
45
Page 48

The web
Browser
Browser gives you a fast, full-color world of
games, music, news, sport, entertainment
and much more, right on your mobile
phone. Wherever you are and whatever
you enjoy.
NOTE: Additional charges apply when
connecting to these services and
downloading content. Check data
charges with your network provider.
Using the web toolbar
Touch to go back a page.
Touch to go forwards a page, to the
page you connected to after the
current one. This is the opposite of
what happens when you press the
Back Key
previous page.
Touch and hold, then tilt the device up
and down to zoom in or out of browser.
Touch to add a new window.
Touch to open a list of saved
bookmarks
, which goes to the
Using options
Touch the Menu Key to view the
following options.
Refresh – Update the current web page.
Save to bookmarks – Add the current
web page as bookmark.
Go to Homepage – Allows you to go to
the homepage.
Share page – Allows you to share the web
page with others.
Find on page – Allows you to find letters
or words on the current web page.
Request desktop site – Allows you to
view the web page as desktop.
Save for offline reading – Allows you to
save current web page and read it offline
later.
Brightness – Allows you to adjust the
brightness of the screen.
Settings – Access Browser settings.
Exit – Allows you to exit from the browser.
46
Page 49

Settings
From the Home screen, touch the Menu
Key
OR
From the Home screen, touch
Settings
WIRELESS & NETWORKS
Here, you can manage Wi-Fi and
Bluetooth. You can also set up mobile
networks and switch to airplane mode.
< Wi-Fi >
Wi-Fi – Turns on Wi-Fi to connect to
available Wi-Fi networks and allows you
to set up and manage wireless access
points. Set network notification or add a
Wi-Fi network. The advanced Wi-Fi settings
screen is accessed from the Wi-Fi settings
screen. Touch the Menu Key
touch Advanced.
> System settings.
>
.
and
TIP! How to obtain the MAC address
To set up a connection in some
wireless networks with MAC filters, you
may need to enter the MAC address
of your LG Optimus Extreme™ into
the router.
You can find the MAC address in the
following user interface: From the
Home screen, touch
> Wi-Fi > Menu Key >
Advanced > MAC Address.
< Bluetooth >
Turns on Bluetooth to connect to Bluetooth
devices. Refer to page 22 for more
information about Bluetooth.
< Data usage >
Displays the data usage and set mobile
data limit.
< Call >
You can configure phone call settings
such as call forwarding and other special
features offered by your carrier.
> Settings
47
Page 50

Settings
< More >
Airplane mode – All wireless connections
are disabled if Airplane mode is activated.
This is ideal if you are in a place that does
not allow wireless networks.
Wi-Fi Direct – Allows you to connect
to other devices without the need of a
wireless access point. This menu allows
you to turn the function on, change the
name of your device, and scan for other
devices.
VPN – Displays the list of Virtual Private
Networks (VPNs) that you've previously
configured. Allows you to add different
types of VPN.
NOTE: You must set a lock screen
PIN or password before you can use
credential storage.
Mobile networks – Set options for data
roaming and access point names (APNs).
DEVICE
< Sound >
Sound profile – Allows you to set the
sound mode. Choose from Sound, Vibrate
only or Silent.
48
Volumes – Allows you to manage volume
levels for various settings.
Phone ringtone – Allows you to set your
default incoming call ringtone.
Notification sound – Allows you to set
your default notification sound.
Ringtone with vibration – Vibration
feedback for calls and notifications.
Dial pad touch tones – Allows you to set
the phone to play tones when using the
dialpad to dial numbers.
Touch sounds – Allows you to set your
phone to play a sound when you touch
buttons, icons and other onscreen items
that react to your touch.
Screen lock sound – Allows you to set
your phone to play a sound when locking
and unlocking the screen.
< Display >
Brightness – Adjust the screen brightness.
Auto-rotate screen – Set to switch
orientation automatically when you rotate
the phone.
Screen timeout – Set the time for screen
timeout.
Font type – Change the display font.
Font size – Allows you to set the font size.
Page 51

Front key light – Set the front key LED
light duration time.
< Home screen >
Animation – Allows you to set if you want
animations or no animations for window
transitions.
Screen effect – You can set the screen
effect when scrolling.
Wallpaper – You can set the wallpaper.
Scroll wallpaper – Enable/disable
wallpaper scrolls with the screen.
Scroll screens circularly – Show first
screen after last screen when scrolling.
< Lock screen >
Select screen lock – Allows you to set
Swipe, Pattern, PIN , Password or leave
it as None.
When you turn on your phone or wake
up the screen, you're asked to enter your
unlock sequence.
Wallpaper – Allows you to set the lock
screen wallpaper.
Widgets & shortcuts - Customize widgets
and shortcuts on the lock screen.
Owner info – Displays owner information
on the lock screen.
< Storage >
INTERNAL STORAGE – View the internal
storage usage.
SD CARD – Check total available SD card
space. Touch Unmount SD card for safe
removal. Touch Erase SD card if you want
to delete all data from the SD card.
< Power saver >
Allows you to manage the battery and
check the power saving items. You can
also check the battery use.
< Apps >
You can view and manage the applications.
PERSONAL
< Accounts & sync >
Permits applications to synchronize data
in the background, whether or not you are
actively working in them. Deselecting this
setting can save battery power and lowers
(but does not eliminate) data usage.
< Location services >
Google's location service – If you select
Google's location service, your phone
determines your approximate location
using Wi-Fi and mobile networks. When
you select this option, you're asked
49
Page 52

Settings
whether you consent to allowing Google
to use your location when providing these
services.
GPS satellites – If you select GPS
satellites, your phone determines your
location to street level accuracy.
Location & Google search – If you select
google use your location to improve search
results and other services.
< Security >
Set up SIM card lock – Set up SIM card
lock or change the SIM PIN.
Make passwords visible – Show
password as you type.
Device administrators – View or
deactivate device administrators.
Unknown sources – Allows you to install
non-Market applications.
Trusted credentials – Display trusted CA
certificates.
Install from storage – Choose to install
encrypted certificates from your SD card.
Clear credentials – Remove all
certificates.
< Language & input >
Use the Language & input settings to
select the language for the text on your
phone and for configuring the on-screen
keyboard, including words you've added to
its dictionary.
< Backup & reset >
Change the settings for managing your
settings and data.
Back up my data – Set to back up your
settings and application data to the Google
server.
Backup account – Set the account you
want to back up information to.
Automatic restore – Set to restore your
settings and application data when the
applications are reinstalled on your device.
Factory data reset – Reset your settings
to the factory default values and delete
all your data. If you reset the phone in
this way, you are prompted to reenter the
same information as when you first started
Android.
50
Page 53

SYSTEM
< Date & time >
Use Date & time settings to set how dates
are displayed. You can also use these
settings to set your own time and time
zone rather than obtaining the current time
from the mobile network.
< Accessibility >
Use the Accessibility settings to configure
accessibility plug-ins you have installed on
your phone.
NOTE: Requires additional plug-ins.
< Connectivity >
USB connection type – You can set the
desired mode (Charge only, Media sync
(MTP), LG software).
Ask on connection – Ask USB connection
mode when connecting to a computer.
Help – Displays information about the USB
connection types.
< About phone >
View legal information and check phone
status and software version.
DivX Mobile
ABOUT DIVX VIDEO: DivX® is a digital
video format created by DivX, LLC, a
subsidiary of Rovi Corporation. This is
an official DivX Certified
plays DivX video. Visit divx.com for more
information and software tools to convert
your files into DivX videos.
ABOUT DIVX VIDEO-ON-DEMAND: This
DivX Certified
in order to play purchased DivX Videoon-Demand (VOD) movies. To obtain your
registration code, locate the DivX VOD
section in your device setup menu. Go to
vod.divx.com for more information on how
to complete your registration.
DivX Certified
to 320x240.
DivX®, DivX Certified® and associated
logos are trademarks of Rovi
Corporation or its subsidiaries and are
used under license.
®
device that
®
device must be registered
®
to play DivX® video up
51
Page 54

Phone Software update
Update your smart phone without a
PC(FOTA)
This feature allows you to conveniently
update your phone’s software to a newer
version via Firmware Over-the-Air (FOTA),
without connecting with to a USB data
cable.
From the Home screen, touch the
1
Menu Key
> About phone > Software update.
Select the task.
2
Device service
•
Check now for update: You can check
the new software update and conduct
the update (Wi-Fi mode is enabled for a
download of more than 50MB).
Check automatically: When checked,
•
you will be notified of the new update
when it becomes available.
Update history
Last update: Displays the date of the
•
last software update.
Next check for updates: Displays the
•
date when the next check for software
update will occur.
> System settings
NOTE:
If no connection to the data network
•
has previously been made since
purchase, the timeline for the next
update cannot be identified since
the interval for the automated
update will not be created.
You will not be charged for data for
•
software updates.
Available software will be checked
•
automatically.
Make sure to check if the battery is
•
charged before update.
After download, you can install the
•
software immediately or select a
later time for the installation.
Each software version is updated
•
sequentially. Even after the update
is complete, check if there is any
newer version available.
Some features and service may vary
•
by area, phone, carrier, plan and
software version.
52
Page 55

LG reserves the right to make
•
firmware updates available only
for selected models at its own
discretion and does not guarantee
the availability of the newer version
of the firmware for all handset
models.
Update your smart phone by
connecting it to your PC
This feature allows you to update the fi
rmware on your phone to a newer version
conveniently from the Internet without you
needing to visit a service center.
Go to www.lg.com > Support > Search
1
for the model.
Scroll down and click on the
2
SOFTWARE UPDATE tab.
Install and execute the USB DRIVER
3
and LG MOBILE SUPPORT TOOL by
clicking the Download button.
Connect your phone to the PC by using
4
the bundled USB Cable.
Click Start Updating within the LG
5
Mobile Support Tool to begin.
NOTE:
If your phone needs to update,
•
the Start Updating button will be
enabled.
Please note that removing the
•
USB data cable or battery during
the update may seriously damage
your mobile phone and make it
inoperable.
•
This feature is only available if or
when LG makes a newer firmware
version available for your device.
53
Page 56

Accessories
These accessories are available for use with the LG Optimus Extreme™. (Items
described below may be optional and sold separately).
Travel
adapter
Battery SD card
(4GB)
Data cable
Connect your
LG Optimus
Extreme™
and PC.
NOTE:
• Always use genuine LG accessories. Failure to do this may void your warranty.
• Accessories may vary in different regions.
54
User Guide
Learn more
about your
LG Optimus
Extreme™.
Page 57

Troubleshooting
This chapter lists some problems you might encounter while using your phone. Some
problems require you to call your service provider, but most are easy to fix yourself.
Message Possible causes Possible corrective measures
SIM error
No network
connection/
Losing network
Codes do not
match
Any application
cannot be set
Calls not
available
Phone cannot
be switched on
There is no SIM card in the phone
or it is inserted incorrectly.
Signal is weak or you're outside
the carrier network.
Operator applied new services.
To change a security code, you
will need to confirm the new code
by re-entering it.
The two codes you have entered
do not match.
Not supported by service provider
or registration required.
Dialling error
New SIM card inserted.
Pre-paid charge limit reached.
Power/Lock Key pressed too
briefly.
Battery is not charged.
Battery contacts are dirty.
Make sure that the SIM card is correctly
inserted.
Move towards a window or into an open
area. Check the network operator coverage
map.
Check whether the SIM card is more than
6~12 months old. If so, change your SIM
at your network provider's nearest branch.
Contact your service provider.
If you forget the code, contact your service
provider.
Contact your service provider.
New network not authorised.
Check for new restrictions.
Contact service provider or reset limit with
PIN2.
Press the Power/Lock Key down for at least
two seconds.
Charge battery. Check charging indicator
on the display.
Clean the battery contacts.
55
Page 58

Troubleshooting
Message Possible causes Possible corrective measures
Battery is not charged. Charge battery.
Charging error
Number not
permitted
Impossible to
receive / send
SMS and MMS
Files not
opening
SD card not
working
Outside temperature is too hot
or cold.
Contact problem
No voltage Plug the charger into a different socket.
Charger defective Replace charger.
Wrong charger Only use original LG accessories.
Battery defective Replace battery.
The Fixed dialing number function
is on.
Memory full Delete some messages from the phone.
Unsupported file format
FAT16, FAT32 file system
supported
Make sure phone is charging at a normal
temperature.
Check the charger and connection to the
phone. Check the battery contacts and
clean them if necessary.
Check the Settings menu and turn the
function off.
Check the file formats that can be
supported.
Check SD card file system via card reader,
or format SD card using the phone.
56
Page 59

Message Possible causes Possible corrective measures
The screen
does not turn
on when I
receive a call.
No sound Vibration mode
Proximity sensor problem
If you use any protection tape or case,
check to see if it has covered the area
around the proximity sensor. Make sure
that the area around the proximity sensor
is clean.
Check the settings status of the sound
menu to make sure you are not in vibrate
or silent mode.
Hang up or
freeze
Intermittent software problem
Remove the battery, insert it again and
switch on the phone.
57
Page 60

FAQ
Please check to see if any problems you have encountered with your phone are
described in this section before taking the phone in for service or calling a service
representative.
Category
Sub-Category
BT
Bluetooth
Devices
BT
Bluetooth
Headset
Question Answer
You can connect Bluetooth audio device
such as Stereo/Mono headset, Car Kit
and share pictures, videos, contacts, etc
What are the functions
available via Bluetooth?
If my Bluetooth headset
is connected, can I
listen to my music
through my 3.5mm
wired headphones?
via Gallery/Contacts menu. Also when
FTP server is connected to a compatible
device, you can share contents stored in
the storage media (internal memory or SD
card).
When a Bluetooth headset is connected, all
system sounds are played over the headset.
As a result, you will not be able to listen to
music through your wired headphones.
58
Page 61
Category
Sub-Category
Question Answer
Data
Contacts
Backup
Data
Synchronization
Data
Synchronization
Google™
Service
Gmail Log-In
Google
Service
Google
Account
How can I back up
Contacts?
Is it possible to set
up one-way sync with
Gmail?
Is it possible to
synchronize all the
Email folders?
Do I have to log into
Gmail whenever I want
to access Gmail?
Is it possible to filter
emails?
The Contacts data can be synchronized
between your phone and Gmail™.
Only two-way synchronization is available.
The Inbox is automatically synchronized.
You can view other folders by touching the
Menu Key
choose a folder.
Once you log into Gmail, you don’t need to
log in Gmail again.
No, email filtering is not supported via the
phone.
and touch Folders to
59
Page 62

FAQ
Category
Sub-Category
Phone
Function
YouTube™
Phone
Function
Phone
Function
Ringtone
Phone
Function
Message Time
Phone
Function
microSD Card
Phone
Function
Navigation
60
Email
Question Answer
Is it possible to play
YouTube videos?
What happens when
I execute another
application while writing
an email?
Is there a file size
limitation for when I
want to use a .MP3 file
as a ringtone?
My phone does not
display the time of
receipt for messages
older than 24 hrs. How
can I change this?
What is the maximum
supported size for a
memory card?
Is it possible to install
another navigation
application on my
phone?
Yes, YouTube videos are supported but may
have to be viewed through the YouTube
application (and not the browser).
Your email will automatically be saved as
a draft.
There is no file size limitation.
You will only be able to see the times for
messages received the same day.
32 GB memory cards are compatible.
Any application that is available on Google
Play™ Store and is compatible with the
hardware can be installed and used.
Page 63
Category
Sub-Category
Phone
Function
Synchronization
Phone
Function
Wait and
Pause
Phone
Function
Security
Question Answer
Is it possible to
synchronize my
contacts from all my
email accounts?
Is it possible to save a
contact with Wait and
Pause in the numbers?
What are the phone’s
security functions?
Only Gmail and MS Exchange
server(Company Email Server) contacts can
be synchronized.
If you transferred a contact with the W & P
functions saved into the number, you will
not be able to use those features. You will
need to re-save each number.
How to save with Wait and Pause:
1. From the Home screen, touch the Phone
icon
2. Dial the number, then touch the Menu
Key
3. Touch Add 2-sec pause or Add wait.
You are able to set the phone to require
the entry of an unlock sequence before the
phone can be accessed or used.
.
.
61
Page 64

FAQ
Category
Sub-Category
Phone
Function
Unlock
Pattern
62
Question Answer
1. From the Home screen, touch the Menu
Key
2. Touch System settings > Lock screen.
3. Touch Select screen lock > Pattern.
The first time you do this, a short
tutorial about creating an Unlock Pattern
appears.
4. Set up by drawing your pattern once,
How do I create the
Unlock Pattern?
then again for confirmation.
5. Set a Backup PIN to unlock the phone in
case you forget the pattern.
Precautions to take when using pattern
lock.
It is very important to remember the unlock
pattern you set. You will not be able to
access your phone if you use an incorrect
pattern 5 times. You have 5 opportunities to
enter your unlock pattern, PIN or password.
If you have used all 5 opportunities, you can
try again after 30 seconds.
.
Page 65

Category
Sub-Category
Phone
Function
Unlock
Pattern
Question Answer
If you have forgotten Pattern :
If you logged in to your Google account on
the phone but failed to enter the correct
pattern 5 times, tab the Forgot pattern
button. You are then required to log in with
your Google account to unlock your phone.
You can also enter the Backup PIN. If you
What should I do if
I forgot the Unlock
Pattern and I didn’t
create the Google
account on the phone?
have not created a Google account on the
phone or you forgot it, you have to perform
a hard reset.
Caution: If you perform a factory reset,
all user applications and user data will
be deleted. Please remember to back up
any important data before performing a
factory reset.
How to perform a factory reset:
1. Turn the phone off.
2. Press and hold the
+ Home Key
.
Volume Down Key
+
Power/Lock Key
63
Page 66

FAQ
Category
Sub-Category
Phone
Function
Memory
Phone
Function
Language
Support
Phone
Function
64
VPN
Question Answer
3. The touchkey lights will blink once. Then
the LG logo will be displayed. Release all
of the keys when the LG logo appears.
4. The phone will display an Android robot
animation and perform the factory reset.
Will I know when my
memory is full?
Is it possible to change
the language?
How do I set up a VPN?
Yes, you will receive a notification.
The phone has multilingual capabilities.
To change the language:
1. From the Home screen, touch the Menu
Key
2. Touch Language & input > Language.
3. Touch the desired language.
VPN access configuration is different
according to each company. To configure
VPN access from your phone, you must
obtain the details from your company’s
network administrator.
and touch System settings.
Page 67

Category
Sub-Category
Phone
Function
Screen time
out
Phone
Function
Wi-Fi & 3G
Phone
Function
Home screen
Phone
Function
Application
Question Answer
1. From the Home screen, touch the Menu
My screen turns off
after only 15 seconds.
How can I change the
amount of time for the
backlight to turn off?
When Wi-Fi and 3G are
both available, which
service will my phone
use?
Is it possible to remove
an application from the
Home screen?
I downloaded an
application and it
causes a lot of errors.
How do I remove it?
Key
2. Touch System settings > Display.
3. Under Display settings, touch Screen
timeout.
4. Touch the preferred screen backlight
timeout time.
When using data, your phone may default
to the Wi-Fi connection (if Wi-Fi connectivity
on your phone is set to On). However, there
will be no notification when your phone
switches from one to the other.
To know which data connection is being
used, view the 3G or Wi-Fi icon at the top
of your screen.
Yes. Just touch and hold the icon until the
Remove icon appears at the top of the
screen. Then, without lifting your finger,
drag the icon to the Remove icon.
1. From the Home screen, touch the Menu
Key
2. Touch App settings > Downloaded tab.
3. Touch the application, then touch
Uninstall > OK.
.
.
65
Page 68

FAQ
Category
Sub-Category
Phone
Function
Charger
Phone
Function
Ringtones
Phone
Function
Alarm
Phone
Function
Alarm
66
Question Answer
Is it possible to charge
my phone by USB data
cable without installing
the necessary USB
driver?
Can I use music files as
my ringtone?
Will my alarm be
audible or will it go off if
the phone is turned off?
If my Ringer Volume is
set to Off or Vibrate, will
I hear my Alarm?
Yes, the phone will get charged by the USB
cable irrespective of whether the necessary
drivers are installed or not.
Yes. After saving a music file as a ringtone,
you can use it for your ringtone.
1. Touch and hold a song in a library list.
In the menu that opens, touch Set as
ringtone.
No, this is not supported.
Your alarm is programmed to be audible
even in these scenarios.
Page 69

Category
Sub-Category
Recovery
Solution
Factory data
reset
Question Answer
Reset your settings to the factory default
values and delete all your data. If you reset
the phone in this way, you are prompted to
reenter the same information as when you
first started Android.
1. From the Home screen, touch the Menu
Key
2. Touch System settings > Backup &
reset > Factory data reset.
How do I perform a
Factory data reset?
3. Read the warning and touch Reset
phone.
4. Touch Erase everything.
Attention:
If you select Factory data reset, it will
•
erase all of your personal data from
your phone’s system memory, including
information about your Google account,
any other accounts, your system/
application data and settings as well as
any downloaded applications and DRM
license.
.
67
Page 70

FAQ
Category
Sub-Category
Recovery
Solution
Factory data
68
reset
Question Answer
Resetting the phone does not erase
•
any system software updates you have
How do I perform a
Factory data reset?
downloaded or any files on your microSD
card such as music or photos. And so, if
you want to erase all the data on the SD
card while resetting the phone, select the
check box of Erase SD card.
Page 71

For Your Safety
The highest SAR value for this model
phone when tested for use at the ear is
0.69 W/kg and when worn on the body, as
described in this user guide, is 0.74 W/kg
(body-worn measurements differ among
phone models, depending upon available
accessories and FCC requirements).
While there may be differences between
SAR levels of various phones and at
various positions, they all meet the
government requirement for safe exposure.
The FCC has granted an Equipment
Authorization for this model phone with
all reported SAR levels evaluated as in
compliance with the FCC RF emission
guidelines. SAR information on this model
phone is on file with the FCC and can be
found under the Display Grant section
of http://www.fcc.gov/oet/ea/fccid/ after
searching on FCC ID ZNFL40G.
69
Page 72

Page 73

ESPAÑOL
Guía del usuario de LG Optimus Extreme™
Esta guía lo ayudará a comenzar a usar su teléfono.
•
Es posible que parte del contenido de
este manual no se aplique al teléfono,
en función del software o del proveedor
de servicios.
Este teléfono no es adecuado para
•
personas con alguna discapacidad
visual ya que cuenta con un teclado en
pantalla táctil.
Copyright ©2012 LG Electronics,
•
Inc. Todos los derechos reservados.
LG y el logotipo de LG son marcas
registradas de LG Group y sus entidades
relacionadas. Todas las demás marcas
son propiedad de sus respectivos
titulares.
Google™, Google Maps™, Gmail™,
•
YouTube™, Google Talk™ y Google
Play™ Store son marcas registradas de
Google, Inc.
Page 74

Contenido
Características del teléfono ................ 4
Componentes del dispositivo .................9
Instalación de la tarjeta SIM y la batería 11
Cargue el teléfono ...............................12
Uso de la tarjeta de memoria ...............12
Bloqueo y desbloqueo de pantalla ........14
Asegurar la pantalla de bloqueo ...........14
Confi guración de la cuenta de Google ..15
La pantalla principal .........................17
Sugerencias sobre la pantalla táctil ......17
Pantalla principal ................................17
Personalizar el icono de aplicaciones
desde la pantalla principal ...................18
Personalizar la pantalla principal ..........18
Volver a las aplicaciones usadas
recientemente ....................................19
Barra de estado ..................................19
Ver la Barra de estado .........................20
Teclado en pantalla .............................21
Introducir caracteres especiales ...........21
QuickMemo .......................................22
Conectarse a redes y dispositivos ....23
Wi-Fi ..................................................23
Conectarse a redes de Wi-Fi ................23
Bluetooth ............................................24
Llamadas .......................................... 26
Realizar una llamada ...........................26
Llamar a los contactos ........................26
Responder y rechazar una llamada ......26
Ajustar el volumen de la llamada .........26
Hacer una segunda llamada ................27
Ver los registros de llamadas ...............27
Ajustes de llamada..............................27
Contactos ..........................................29
Buscar un contacto .............................29
Agregar un nuevo contacto ..................29
Contactos favoritos .............................29
Importar o exportar contactos ..............30
Mensajería ........................................ 31
Enviar un mensaje ..............................31
Lista por remitente .............................31
Usar emoticones .................................32
Cambiar los ajustes de su mensaje ......32
Correo electrónico ............................33
Administración de una cuenta de email 33
Pantalla de la cuenta de email .............33
Usar las carpetas de las cuentas ..........33
Redactar y enviar correos electrónicos .34
2
Page 75

Cámara ............................................. 35
Uso del visor .......................................35
Tomar una foto rápida ........................36
Opciones de ajustes avanzados ...........36
Ver una foto ........................................37
Videocámara ..................................... 39
Uso del visor .......................................39
Grabar un video ..................................40
Opciones de ajustes avanzados ...........40
Reproducir un video ............................40
Multimedia ........................................42
Galería ...............................................42
Reproductor de música .......................42
Transferencia de archivos mediante
dispositivos de almacenamiento masivo
USB ...................................................42
Reproducir una canción .......................42
Utilidades .......................................... 44
Confi gurar una alarma.........................44
Usar la calculadora .............................44
Agregar un evento al calendario ...........44
Polaris Offi ce ......................................45
Usar SmartShare ................................45
Internet ............................................. 48
Navegador ..........................................48
Usar la barra de herramientas Web ......48
Usar opciones .....................................48
Confi guración ...................................49
REDES INALÁMBRICAS .......................49
DISPOSITIVO.......................................50
PERSONAL .........................................52
SISTEMA ............................................53
DivX Mobile ........................................54
Actualización del software del
teléfono .............................................55
Accesorios ........................................ 57
Solución de problemas .....................58
Preguntas frecuentes .......................61
Por su seguridad ...............................72
3
Page 76

Características del teléfono
Antes de comenzar a usar el teléfono, lea esto.
Antes de llevar el teléfono a reparación
o llamar a un representante del servicio
técnico, compruebe si alguno de los
problemas que presenta el teléfono se
describe en esta sección.
1. Memoria del teléfono
Cuando hay menos de un 10% de espacio
disponible en la memoria del teléfono, el
teléfono no puede recibir nuevos mensajes.
Deberá comprobar la memoria del teléfono
y borrar algunos datos, como aplicaciones
o mensajes, para contar con más espacio
en la memoria.
Para desinstalar aplicaciones:
En la pantalla principal, toque
1
> ficha Aplicaciones > Ajustes
> Aplicaciones en la categoría
DISPOSITIVO.
Cuando aparezcan todas las
2
aplicaciones, desplácese y seleccione la
aplicación que desee desinstalar.
Toque Desinstalar y OK para confirmar.
3
2. Optimizar la vida útil de la
batería
Prolongue la vida útil de la batería entre
cargas apagando las funciones que no
necesite ejecutar constantemente en
segundo plano. Puede controlar la forma
en que las aplicaciones y los recursos
consumen la energía de la batería.
Extensión de la vida útil de la batería:
Desactive las comunicaciones de radio
•
que no use. Si no usa Wi-Fi, Bluetooth o
GPS, desactívelos.
Disminuya el brillo de la pantalla y fije un
•
límite de tiempo de pantalla más corto.
Desactive la sincronización automática
•
de Gmail™, Calendar, Contactos y otras
aplicaciones.
Algunas de las aplicaciones descargadas
•
pueden reducir la energía de la batería.
Para comprobar el nivel de energía de
la batería:
En la pantalla principal, toque
•
ficha Aplicaciones > Ajustes
Acerca del teléfono en la categoría
SISTEMA > Estado
>
>
4
Page 77
El estado (cargando, no se está cargando)
y el nivel (porcentaje cargado) de la
batería aparecen en la parte superior de
la pantalla.
Para supervisar y controlar cómo se
está usando la energía de la batería:
En la pantalla principal, toque
•
ficha Aplicaciones > Ajustes
Economía de energía en la categoría
DISPOSITIVO > Uso de la batería en
la categoría INFORMACIÓN SOBRE LA
BATERÍA.
El tiempo de uso de la batería aparece en
la pantalla. Le indica cuánto tiempo ha
pasado desde la última vez que conectó el
teléfono a una fuente de alimentación o, si
está conectado, cuánto tiempo el teléfono
estuvo por última vez utilizando la batería.
La pantalla muestra las aplicaciones o los
servicios que usan la energía de la batería,
ordenados desde los que usan más a los
que usan menos.
>
>
3. Uso de las carpetas
Puede combinar varios iconos de
aplicaciones en una carpeta. Deje caer
un icono de aplicaciones sobre otro en
un panel de la pantalla principal o en la
pantalla de aplicaciones para crear una
carpeta con ambos iconos adentro.
NOTA: Puede personalizar el contenido
y propiedades de cada carpeta. Para
cambiar el nombre y color de las
carpetas, toque la carpeta deseada y
luego toque
iconos a la carpeta, simplemente
arrastre y suelte los iconos en la
carpeta deseada.
. Para agregar más
4. Antes de instalar una
aplicación y un sistema
operativo de código abierto
ADVERTENCIA
Si instala y usa un sistema operativo
(SO) distinto al proporcionado por
el fabricante podría provocar que el
teléfono no funcione correctamente.
Además, el teléfono ya no estará
cubierto por la garantía.
5
Page 78

Características del teléfono
ADVERTENCIA
Para proteger el teléfono y los
datos personales, sólo descargue
aplicaciones provenientes de fuentes
seguras, como Play Store. Si existen
aplicaciones mal instaladas en el
teléfono, es posible que no funcione
normalmente o que se produzca un
error grave. Debe desinstalar esas
aplicaciones y todos los datos y ajustes
asociados del teléfono.
5. Uso de la función de reinicio
completo (restablecimiento
de valores de fábrica)
Si es necesario restablecer el teléfono
a sus ajustes originales, debe utilizar el
reinicio completo.
Apague el teléfono.
1
Presione y mantenga presionadas la
2
Tecla de Volumen Inferior
Inicio
Bloquear
3
Las luces de las teclas táctiles parpadean
una vez. Después se muestra el logotipo
de LG. Suelte todas las teclas cuando
+ Tecla Encender/
.
+
Tecla
aparezca el logotipo de LG.
El teléfono mostrará una animación
4
del robot de Android y realizará el
restablecimiento de la configuración de
fábrica.
No use el teléfono durante al menos
un minuto mientras se efectúa el
restablecimiento completo. A continuación,
el teléfono se reinicia automáticamente y
podrá usarlo.
Precaución: Si realiza un reinicio
completo, se eliminarán todas las
aplicaciones y los datos de usuario.
Esta acción no se podrá revertir. Antes
de realizar ese tipo de restablecimiento
recuerde que debe hacer una copia de
seguridad de todos los datos que sean
importantes.
6. Abrir y alternar aplicaciones
Es fácil realizar varias tareas con Android
porque puede mantener más de una
aplicación en ejecución al mismo tiempo.
No necesita salir de una aplicación
antes de abrir otra. Use y alterne entre
varias aplicaciones abiertas. Android
administra cada aplicación, deteniéndolas
e iniciándolas según sea necesario, para
6
Page 79

garantizar que las aplicaciones inactivas no
consuman recursos innecesariamente.
Para ver la lista de aplicaciones usadas
recientemente:
Simplemente mantenga presionada la
Tecla Inicio
Para detener las aplicaciones:
En la pantalla principal, toque
1
> ficha Aplicaciones > Ajustes
> Aplicaciones en la categoría
DISPOSITIVO > ficha En ejecución.
Desplácese y toque la aplicación que
2
desee y toque Parar para detenerla.
.
7. Cómo conectar el teléfono a
la computadora
Antes de usar los recursos de
almacenamiento masivo del teléfono, debe
preparar los servicios de datos del teléfono
para sincronizarlos con la computadora
portátil o de escritorio.
Una vez que haya conectado el teléfono
a la computadora, podrá transferir datos
desde o hacia la memoria del teléfono.
Para conectar el teléfono a una
computadora mediante USB:
Use el cable USB que viene con el
1
teléfono para conectarlo a un puerto
USB de la computadora.
Abra el Panel de notificaciones y toque
2
Inicio.
Toque el modo de conexión que desea
3
usar para conectarse a la computadora.
Elija entre las siguientes opciones:
Solo cargar, Sincronización multimedia
(MTP), Software de LG.
Uso del modo Sincronización
multimedia (MTP)
Una vez que conecte el teléfono y la PC
mediante un cable USB y establezca el
modo de conexión USB del teléfono a
Sincronización multimedia (MTP), verá un
Dispositivo portátil en la PC.
Puede copiar archivos desde y hacia la
tarjeta SD extraíble.
NOTA:
Si usa Microsoft Windows XP y
sincroniza el teléfono y la PC mediante
el cable USB, deberá instalar Microsoft
Windows Media Player 11.
Visite el sitio de descarga de Microsoft
Windows Media Player.
7
Page 80

Características del teléfono
8. Sostenga el teléfono en
posición vertical
Sostenga el teléfono en posición vertical
como lo haría con un teléfono normal. El
teléfono LG Optimus Extreme™ cuenta
con una antena interna. Tenga cuidado
de no rayar o dañar la parte posterior del
teléfono, ya que eso podría afectar su
rendimiento.
Mientras haga o reciba llamadas o
mientras envíe o reciba datos, evite colocar
la mano sobre la parte inferior del teléfono,
donde se encuentra la antena. Esto podría
afectar la calidad de la llamada.
9. Cuando la pantalla se
congela
Si la pantalla se congela o el teléfono
no responde al intentar utilizarlo:
Extraiga la batería, vuelva a insertarla y
luego encienda el teléfono.
O
Mantenga presionada la Tecla Encender/
Bloquear
para apagarlo.
Si no funciona, comuníquese con el centro
de servicio.
durante 10 segundos
10. Acerca de la pantalla de
configuración de la cuenta
Google
Al configurar la cuenta de Google, es
posible que algunos textos o fichas en la
pantalla se superpongan, dependiendo de
la versión de software.
Nota: Con el sistema Android, algunas
aplicaciones disponibles de Play
Store sólo funcionan correctamente
con los teléfonos que tienen una
resolución de pantalla específica. Por
favor, tenga en cuenta que algunos
de las aplicaciones en Play Store
no pueden estar disponibles para
su teléfono debido a un requisito
de resolución LCD que no se
coincide con su teléfono. Además,
por favor tenga en cuenta que las
aplicaciones de terceros con defectos
de programación pueden provocar
comportamiento anormal de su
teléfono.
8
Page 81
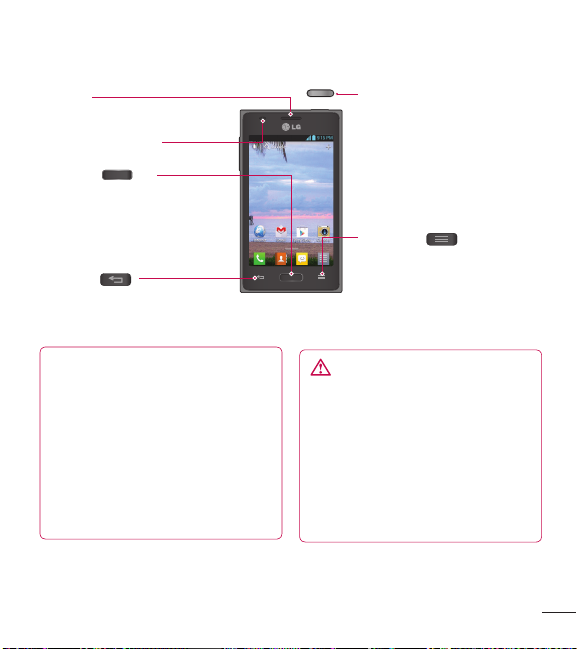
Componentes del dispositivo
Auricular
Sensor de proximidad
Tecla Inicio
• Vuelve a la pantalla principal
desde cualquier otra pantalla.
• Mantenga presionada para ver
una lista de las aplicaciones más
recientemente utilizadas.
Tecla Atrás
Vuelve a la pantalla anterior.
Tecla Encender/Bloquear
• Enciende o apaga el teléfono al
mantenerla presionada.
• Presión brevemente para
bloquear/desbloquear la pantalla.
Tecla Menú
• Muestra las opciones disponibles.
NOTA: Sensor de proximidad
Cuando reciba o realice llamadas,
el sensor de proximidad apagará
automáticamente la luz de fondo y
bloqueará la pantalla táctil al detectar
cuando el teléfono está cerca del oído.
Esto aumenta la vida útil de la batería
y evita que active accidentalmente la
pantalla táctil durante las llamadas.
ADVERTENCIA
Si coloca un objeto pesado sobre
el teléfono o se sienta sobre él, se
pueden dañar la pantalla LCD y las
funciones de la pantalla táctil. No
cubra el sensor de proximidad de
la pantalla LCD con una película
protectora. Eso puede hacer que el
sensor funcione mal.
9
Page 82

Características del teléfono
Tecla Encender/Bloquear
Conector del auricular
Puerto para Cargador/USB
Micrófono
Teclas de Volumen
• En la pantalla principal: Controlan
el volumen del timbre.
• Durante una llamada: Controlan el
volumen del auricular.
• Durante la reproducción de una
canción: Controlan el volumen
continuamente.
SUGERENCIA Mantenga presionadas
ambas Teclas de Volumen por un
segundo para acceder a la función
QuickMemo.
Flash
Ranura para la
tarjeta microSD
10
Lente de la cámara
Ranura para la tarjeta SIM
Tapa posterior
Batería
Altavoz
Page 83

Instalación de la tarjeta SIM y
la batería
Antes de comenzar a explorar su nuevo
teléfono, deberá configurarlo. Para insertar
la tarjeta SIM y la batería:
Para retirar la tapa posterior, sostenga
1
el teléfono firmemente en una mano.
Con la otra mano, retire la tapa
posterior con el pulgar como se
muestra en la imagen a continuación.
NOTA: Coloque su dedo en el borde en
la parte superior del teléfono y levante
la tapa posterior.
Deslice la tarjeta SIM hasta colocarla en
2
la ranura correspondiente. Asegúrese
de que el área de contacto dorada de
la tarjeta quede hacia abajo. Consulte la
imagen a continuación.
Inserte la batería en su lugar alineando
3
los contactos dorados del teléfono y la
batería
y presione la batería hacia
abajo hasta escuchar un clic
.
11
Page 84

Características del teléfono
Alinee la tapa posterior sobre el
4
compartimiento de la batería
presione hacia abajo hasta escuchar
un clic
.
Cargue el teléfono
El Puerto para Cargador/USB se encuentra
en la parte inferior del teléfono. Inserte el
cargador y conéctelo a un tomacorriente.
12
y
NOTA: La batería debe cargarse por
completo antes de usar el teléfono por
primera vez para mejorar su vida útil.
NOTA: No abra la tapa posterior
mientras se carga el teléfono.
Informacion y cuidado de la batería
Siempre desenchufe el cargador de la
toma de pared después de que el teléfono
está completamente cargado para evitar
el consumo de energía innecesario del
cargador.
Uso de la tarjeta de memoria
El teléfono permite el uso de tarjetas
de memoria microSD
con capacidad de hasta 32GB. Estas
tarjetas de memoria están especialmente
diseñadas para teléfonos móviles y otros
dispositivos muy pequeños, y son ideales
para almacenar archivos multimedia como
música, programas, videos y fotografías
para usarlos en el teléfono.
Para insertar una tarjeta de memoria:
Retire la tapa posterior e inserte la tarjeta
de memoria en la ranura. Asegúrese de
que el área de contacto dorada quede
TM
o microSDHCTM
Page 85

hacia abajo.
Para retirar la tarjeta de memoria de
manera segura:
Primero debe desactivar la tarjeta para
retirarla. En la pantalla principal, toque
> ficha Aplicaciones > Ajustes
> Almacenamiento en la categoría
DISPOSITIVO > Desactivar la microSD
> OK.
NOTA:
•
Use únicamente tarjetas de memoria
compatibles con el teléfono. Es
posible que el uso de tarjetas de
memoria incompatibles dañe la
tarjeta y los datos que almacena,
además de dañar el teléfono.
Dado que el dispositivo utiliza el
•
sistema de archivos FAT32, el
tamaño máximo para cualquier
archivo es de 4 GB.
ADVERTENCIA
No quite la tarjeta de memoria con el
teléfono encendido. De lo contrario,
podría dañar la tarjeta de memoria y
el teléfono, y los datos almacenados
en la tarjeta de memoria podrían
alterarse.
Para formatear la tarjeta de memoria:
Es posible que la tarjeta de memoria
ya esté formateada. Si no lo está, debe
formatearla antes de usarla.
NOTA: Se borrarán todos los archivos
de la tarjeta de memoria cuando la
formatee.
En la pantalla principal, toque >
1
ficha Aplicaciones > Ajustes
> Almacenamiento en la categoría
DISPOSITIVO.
Toque Desactivar la microSD y toque
2
OK para confirmar.
13
Page 86

Características del teléfono
Toque Formatear la microSD >
3
Formatear la microSD para confirmar
su elección.
Si configuró un patrón de bloqueo,
4
introdúzcalo y luego seleccione Borrar
todo.
NOTA: Si la tarjeta de memoria
contiene archivos, es posible que la
estructura de la carpeta sea diferente
después de formatearla, ya que se
eliminarán todos los archivos.
Bloqueo y desbloqueo de
pantalla
Si no usa el teléfono durante un
tiempo, la pantalla se apaga y bloquea
automáticamente. De esta forma, se evita
que las teclas se toquen por accidente y
se ahorra batería.
Cuando no esté usando el teléfono phone,
presione la Tecla Encender/Bloquear
para bloquear el teléfono.
Si hay programas ejecutándose cuando
bloquea la pantalla, es posible que sigan
ejecutándose en el modo de bloqueo.
Se recomienda que salga de todos los
programas antes de ingresar en el modo
de bloqueo para evitar cargos innecesarios
(como llamadas, acceso a la Web y
comunicaciones de datos).
Para reactivar el teléfono, presione la Tecla
Encender/Bloquear
la pantalla de bloqueo. Toque y deslice la
pantalla de bloqueo en cualquier dirección
para desbloquear la pantalla principal. Se
abrirá la última pantalla que vio.
. Aparecerá
Asegurar la pantalla de bloqueo
Puede bloquear la pantalla con el objetivo
de que sólo usted pueda desbloquearla
para acceder al teléfono.
Para establecer Deslizar, Patrón, PIN o
Contraseña por primera vez:
En la pantalla principal, toque
•
ficha Aplicaciones > Ajustes
Bloqueo de pantalla > Seleccione
bloqueo de pantalla > Deslizar,
Patrón, PIN o Contraseña.
>
>
14
Page 87

NOTA:
Precauciones que debe seguir al
usar el patrón de bloqueo.
Es muy importante recordar el patrón
de desbloqueo que configure. Si usa
un patrón incorrecto 5 veces, no
podrá acceder al teléfono. Tiene 5
oportunidades para introducir el patrón
de desbloqueo, el PIN o la contraseña.
Si usa las 5 oportunidades, puede
volver a intentarlo después de 30
segundos.
Si no puede recordar el patrón de
desbloqueo:
Si inició sesión en la cuenta de Google
en el teléfono pero introdujo un patrón
incorrecto 5 veces, toque ¿Has olvidado
el patrón?
Se le solicitará que inicie sesión con su
cuenta de Google para desbloquear el
teléfono o que ingrese su PIN de respaldo.
Si no creó una cuenta de Google en el
teléfono o si la olvidó, deberá realizar un
reinicio completo.
Si olvidó el PIN o la Contraseña: Si
olvidó el PIN o la Contraseña, debe realizar
un reinicio completo.
Para obtener más información, consulte
“Uso de la función de reinicio completo
(restablecimiento de valores de fábrica)” en
la página 6.
Configuración de la cuenta de
Google
La primera vez que enciende el teléfono,
tiene la oportunidad de activar la red,
acceder a su Cuenta de Google y
configurar cómo desea usar algunos de lo
servicios de Google.
Para configurar la cuenta de Google:
Acceda a una Cuenta de Google desde
•
la pantalla de configuración.
O
En la pantalla principal, toque
•
ficha Aplicaciones > seleccione una
aplicación de Google, como Gmail
> seleccione Crear cuenta para crear
una nueva cuenta.
Si tiene una cuenta Google, toque Usar
cuenta, ingrese su dirección de correo
electrónico y contraseña, y luego toque
Acceder.
>
15
Page 88

Características del teléfono
Una vez que haya configurado la cuenta
de Google en su teléfono, el teléfono se
sincronizará automáticamente con su
cuenta web de Google.
Los contactos, mensajes de Gmail, eventos
del calendario y otra información obtenida
de estas aplicaciones y estos servicios
en la web se sincronizan con el teléfono.
(Según sus ajustes de sincronización).
Después de iniciar sesión, puede usar
Gmail™ y aprovechar los servicios de
Google en el teléfono.
16
Page 89

La pantalla principal
Sugerencias sobre la pantalla
táctil
A continuación, se incluyen algunos
consejos sobre cómo navegar por el
teléfono.
Tocar: Para elegir un menú o una opción,
o abrir una aplicación, toque la opción
correspondiente.
Tocar y mantener presionado: Para abrir
un menú de opciones o tomar un objeto
que desee mover, tóquelo y manténgalo
presionado.
Arrastrar: Para desplazarse por una lista o
moverse lentamente, arrastre el dedo por
la pantalla táctil.
Dar un toquecito: Para desplazarse por
una lista o moverse rápidamente, dé
toquecitos en la pantalla táctil (arrastre el
dedo rápidamente y suelte).
NOTA:
• Para seleccionar un elemento, toque
el centro del icono.
• No ejerza demasiada presión; la
pantalla táctil es lo suficientemente
sensible para detectar un toque
suave, pero firme.
• Utilice la punta del dedo para tocar
la opción que desee. Tenga cuidado
de no tocar otras teclas.
Pantalla principal
Simplemente pase el dedo hacia la
izquierda o hacia la derecha para ver los
paneles. Puede personalizar cada panel
con aplicaciones, descargas, widgets y
fondos de pantalla.
NOTA: Algunas imágenes de pantalla
pueden ser diferentes según el
proveedor de su teléfono.
En la pantalla principal, podrá ver teclas
rápidas en la parte inferior de la pantalla.
Las teclas rápidas brindan acceso con un
solo toque a las funciones que más utiliza.
17
Page 90

La pantalla principal
Toque el icono Teléfono para mostrar
el teclado de marcación y realizar una
llamada.
Toque el icono Contactos para abrir
los contactos.
Toque el icono Mensajes para
acceder al menú de mensajería. Aquí
puede crear un nuevo mensaje.
Toque el icono Aplicaciones para ver
todas las aplicaciones instaladas. Para
abrir cualquier aplicación, simplemente
toque el icono en la lista de aplicaciones.
Personalizar el icono de
aplicaciones desde la pantalla
principal
18
NOTA: Esta función permite crear y
usar iconos con las imágenes de la
Galería.
Puede continuar editando los iconos de
aplicaciones en la pantalla principal.
Toque y mantenga presionado el icono
1
hasta que se muestre la cuadrícula del
panel y luego suelte el icono. Un icono
de edición aparece en la parte superior
derecha del icono de la aplicación.
2
Toque el icono y seleccione el diseño de
icono que prefiera.
3
Toque el Crear ícono de foto y
seleccione Tomar una foto para
abrir la aplicación Cámara y tomar
fotografías o Seleccionar del galería
para seleccionar una de las imágenes
disponibles de la galería.
Personalizar la pantalla
principal
Puede personalizar la pantalla principal
agregando iconos de aplicaciones y
widgets a cualquier panel de la pantalla
principal. Además, puede cambiar el fondo
de pantalla.
Page 91

Para agregar elementos a la pantalla
principal:
Vaya al panel de la pantalla principal
1
donde desea agregar el elemento.Luego
toque y mantenga presionada la parte
vacía de la pantalla o toque
Toque la ficha que desee en la parte
2
inferior de la pantalla y seleccione el
elemento que desee agregar. Verá los
elementos agregados en la pantalla
principal.
3
Arrástrelo a la ubicación que desee y
levante el dedo.
Para eliminar un elemento de la
pantalla principal:
•
En la pantalla principal, toque y
mantenga presionado el icono que desee
eliminar y luego arrástrelo a
SUGERENCIA Para agregar el icono
de una aplicación a la pantalla
principal desde la pantalla de
aplicaciones, toque y mantenga
presionada la aplicación que desea
agregar.
La pantalla de aplicaciones se cierra y
se mostrará la pantalla principal.
.
.
Volver a las aplicaciones
usadas recientemente
Mantenga presionada la Tecla Inicio
1
. La pantalla mostrará una
ventana emergente con vistas previas
de las aplicaciones que ha utilizado
recientemente.
Toque un icono para abrir la aplicación.
2
O toque la Tec la Atrás
volver a la aplicación actual.
para
Barra de estado
La Barra de estado se encuentra en la
parte superior de la pantalla.
Toque y deslice la Barra de estado hacia
abajo con el dedo para mostrar el Panel de
notificaciones.
El Panel de notificaciones muestra todas
sus notificaciones junto con los ajustes
rápidos en la parte superior.
19
Page 92

La pantalla principal
Toque > para administrar los
ajustes rápidos.
Aquí puede controlar y administrar las
funciones QuickMemo, Perfil de sonido,
Wi-Fi, Bluetooth, Brillo, Cuentas y
sincronización, Datos habilitados, GPS,
Modo avión y Pantalla giratoria.
Ver la Barra de estado
La Barra de estado usa diferentes
iconos para mostrar la información del
teléfono, como intensidad de la señal,
nuevos mensajes, vida útil de la batería, y
conexiones de Bluetooth y datos.
A continuación se muestra una tabla en la
que se explica el significado de los iconos
que se pueden ver en la Barra de estado.
Icono Descripción
Sin tarjeta SIM
Sin señal
Modo de vuelo
Conectado a la red Wi-Fi
La economía de energía está
activa
20
Icono Descripción
Auricular conectado
Llamada en curso
Llamada en espera
Altavoz encendido
Micrófono silenciado
Llamada perdida
Bluetooth activado
Advertencia del sistema
Alarma establecida
Nuevo correo de voz
Timbre silenciado
Modo de vibración
Batería completamente cargada
Se está cargando la batería
El teléfono está conectado a la
PC mediante el cable USB
Page 93

Icono Descripción
Descargando datos
Cargando datos
El GPS se está conectando
Recibiendo datos de ubicación
de GPS
Se están sincronizando los datos
Nuevo correo de Gmail
Nuevo mensaje de Google Talk
Nuevo mensaje de texto o
multimedia
Se está reproduciendo una
canción
Teclado en pantalla
Puede introducir texto mediante el teclado
en pantalla. El teclado en pantalla aparece
de forma automática cuando necesita
escribir algo. Para mostrarlo en forma
manual, toque el campo de texto en donde
desea introducir texto.
Usar el teclado e introducir texto
Toque una vez para poner en
mayúscula la próxima letra que escriba.
Tóquela dos veces para que todas las
letras se pongan en mayúscula.
Toque para cambiar al teclado
de números y símbolos. Puede también
mantener esta tecla presionada para ver el
menú de Ajustes.
Toque para introducir un espacio.
Toque para crear una nueva línea en el
campo del mensaje.
Toque para borrar el carácter anterior.
Introducir caracteres especiales
El teclado en pantalla permite introducir
caracteres especiales (por ejemplo, “á”).
Por ejemplo, para introducir “á”, toque y
mantenga presionada la tecla “a” hasta
que el tamaño de la tecla aumente y
muestre los caracteres especiales.
A continuación, seleccione el carácter
especial que desee.
21
Page 94

QuickMemo
La función QuickMemo permite crear notas y capturar las pantallas. Puede utilizar
QuickMemo para crear notas de manera sencilla y eficiente durante una llamada,
con una imagen guardada o en la pantalla de llamada actual.
Para acceder a la función
1
QuickMemo, presione
ambas Teclas de Volumen
durante un segundo
mientras ve la pantalla que
desee capturar.
NOTA: Al usar la función QuickMemo, use la punta de su dedo. No utilice las uñas.
Uso de las opciones de QuickMemo
Mientras utiliza la función QuickMemo, están disponibles las siguientes opciones:
- Seleccione si desea usar la pantalla de fondo o no usarla.
- Seleccione el tipo de bolígrafo y el color.
- Borra la nota que usted creó.
- Recorta la captura de pantalla al tamaño que desee.
- Guarda la nota en su Galería.
- Comparte la nota con otras personas.
Cómo ver la nota guardada
Abra la Galería y toque el álbum QuickMemo.
O toque y
2
deslice hacia
abajo la Barra
de estado y
toque
3
.
Seleccione la opción
de menú que desee
entre Tipo de
bolígrafo, Color y
Borrador. Luego
crea una nota.
Toque en el
4
menú Editar y
seleccione
para guardar la
nota.
22
Page 95

Conectarse a redes y dispositivos
Wi-Fi
Con Wi-Fi, puede utilizar el acceso a
Internet de alta velocidad dentro de
la cobertura del punto de acceso (AP)
inalámbrico. Disfrute de la conexión
inalámbrica a Internet por Wi-Fi sin cargos
extras.
Conectarse a redes de Wi-Fi
Para usar Wi-Fi en el teléfono, necesita
acceder al punto de acceso inalámbrico
o "hotspot". Algunos puntos de acceso
están abiertos y simplemente debe
conectarse a ellos. Otros están ocultos o
usan otras funciones de seguridad; por lo
que debe configurar el teléfono para poder
conectarse a ellos.
Desactive Wi-Fi cuando no la use para
prolongar la vida útil de la batería.
NOTA: Si no está dentro de una zona
Wi-Fi o desactivó Wi-Fi, es posible
que el operador móvil aplique cargos
adicionales para el uso de datos
móviles.
Activar Wi-Fi y conectarse a una red
Wi-Fi
En la pantalla principal, toque
1
ficha Aplicaciones > Ajustes
> Wi-Fi desde la categoría REDES
INALÁMBRICAS.
Deslice
2
encender Wi-Fi y comenzar a buscar las
redes Wi-Fi disponibles.
•
Las redes seguras se indican con un
icono de bloqueo.
Toque una red para conectarse a ella
3
Si la red está abierta, se le solicitará
•
que confirme que desea conectarse a
esa red; toque Conectar.
Si la red está protegida, se le pedirá
•
que introduzca una contraseña u
otras credenciales. (Consulte con su
administrador de red para obtener
más detalles).
La Barra de estado muestra iconos que
4
indican el estado de Wi-Fi.
a la derecha para
>
.
23
Page 96

Conectarse a redes y dispositivos
Bluetooth
Puede usar Bluetooth para enviar datos
ejecutando la aplicación correspondiente,
no desde el menú de Bluetooth como en la
mayoría de los teléfonos móviles.
SUGERENCIA Su teléfono le permite
disfriutar de una
alta velocidad.
Si el dispositivo con el que desea
compartir archivos es compatible
también con Bluetooth de alta
velocidad, los archivos se transferirán
automáticamente a través de la red de
alta velocidad.
Para usar la transferencia de datos a
través de Bluetooth de alta velocidad,
asegúrese de que Wi-Fi esté
DESACTIVADO en los dispositivos antes
de usarlos. Los ajustes para Bluetooth
de alta velocidad pueden ser distintos
en el dispositivo. Verifique los ajustes
del dispositivo con su proveedor de
servicios.
conexión Bluetooth de
NOTA:
LG no se responsabiliza por la
•
pérdida, la intercepción o el uso
incorrecto de los datos enviados
o recibidos a través de la función
inalámbrica de Bluetooth.
Siempre asegúrese de recibir y
•
compartir datos con dispositivos que
sean confiables y estén protegidos
en forma adecuada. Si existen
obstáculos entre los dispositivos, la
distancia operativa puede reducirse.
Algunos dispositivos, especialmente
•
los que no han sido probados ni
aprobados por Bluetooth SIG, pueden
ser incompatibles con su dispositivo.
Activar Bluetooth y vincular el teléfono
con un dispositivo Bluetooth
Debe vincular el teléfono con otro
dispositivo antes de conectarlos.
En la pantalla principal, toque
1
ficha Aplicaciones > Ajustes
> Bluetooth en la categoría REDES
INALÁMBRICAS.
>
24
Page 97

Deslice
2
para activar el Bluetooth. El teléfono
buscará y mostrará los ID de todos
los dispositivos Bluetooth dentro del
alcance que estén disponibles. Si el
dispositivo con el cual desea vincularse
no está en la lista, asegúrese de que
el dispositivo objetivo esté establecido
como visible y, a continuación, toque
Buscar dispositivos.
Elija en la lista el dispositivo con el
3
que desee vincularse. Según el tipo
de dispositivo, puede ser necesario
confirmar los códigos, ingresar un
código o se realizará la vinculación
automáticamente.
Una vez que se complete la vinculación,
su teléfono se conectará con el otro
dispositivo.
Envíe datos mediante la función
inalámbrica Bluetooth
Seleccione un archivo o elemento, como
1
un contacto, evento de calendario, o
archivo multimedia, de una aplicación
adecuada o de Descargas.
Seleccione la opción de compartir y elija
2
Bluetooth.
hacia la derecha
NOTA: El método para seleccionar
una opción puede variar según el tipo
de datos.
Busque un dispositivo habilitado con
3
Bluetooth y cuando lo encuentre,
vincule su teléfono con él.
Sus datos se compartarán vía Bluetooth.
4
25
Page 98

Llamadas
Realizar una llamada
En la pantalla principal, toque para
1
abrir el teclado.
Introduzca el número en el teclado.
2
Para borrar un dígito, toque
Toque
3
llamada.
Para finalizar una llamada, toque
4
SUGERENCIA Para introducir "+"
para realizar llamadas internacionales,
mantenga presionada la tecla
Llamar a los contactos
1
En la pantalla principal, toque para
abrir sus contactos.
2
Desplácese por la lista de contactos
o toque el campo Buscar contactos
para introducir las primeras letras del
contacto al que desea llamar.
En la lista, toque el contacto que desea
3
llamar.
Toque el número de teléfono al que
4
desea llamar.
para realizar una
.
Responder y rechazar una
llamada
Pantalla bloqueada
•
.
.
Deslice
responder a una llamada entrante.
Deslice
•
rechazar una llamada entrante.
Pantalla desbloqueada
Toque
•
entrante.
•
Toque
entrante.
SUGERENCIA Mensaje rápido
Puede enviar un mensaje rápidamente
utilizando esta función. Es útil si
necesita responder el mensaje
mientras está en una reunión.
en cualquier dirección para
en cualquier dirección para
para responder a una llamada
para rechazar una llamada
Ajustar el volumen de la
llamada
Para ajustar el volumen durante una
llamada entrante, utilice las Teclas de
Volumen en el lado izquierdo del teléfono.
26
Page 99

Hacer una segunda llamada
Durante la primera llamada, toque la
1
Tecla Menú
y marque el número. También puede
tocar
marcados recientemente o tocar
para buscar contactos y seleccionar el
número al que desea llamar.
Toque para realizar la llamada.
2
Ambas llamadas se verán en la pantalla
3
de llamada. La primera llamada se
bloqueará y quedará en espera.
Para combinar las llamadas,
4
toque
activas, toque
NOTA: Se le cobrará cada llamada
que realice.
> Agregar llamada
para ir a la lista de números
. Para finalizar las llamadas
.
Ver los registros de llamadas
En la pantalla principal, toque y elija la
ficha Registro
Podrá ver una lista completa de todas las
llamadas de voz realizadas, recibidas y
perdidas.
.
SUGERENCIA Toque cualquier entrada
de registro de llamadas para ver la
fecha, hora y duración de la llamada.
SUGERENCIA Toque la Tecla Menú
y luego toque Borrar todo >
OK para borrar todos los elementos
registrados.
Ajustes de llamada
Puede configurar las opciones de llamada
del teléfono, como desvío de llamadas, y
otras funciones especiales que ofrece su
proveedor.
En la pantalla principal, toque
1
Toque la Tecla Menú
2
Toque Ajustes de llamada y elija las
3
opciones que desee ajustar.
Números de marcación fija: Para activar
y compilar una lista de números a los que
puede llamar desde el teléfono. Necesitará
el código PIN2, que podrá obtener a través
de su operador. Sólo puede llamar desde
su teléfono a los números que estén
incluidos en la lista de marcado fijo.
.
.
27
Page 100

Llamadas
<BUZÓN DE VOZ>
Servicio de buzón de voz: Le permite
seleccionar el servicio de correo de voz de
su proveedor.
Ajustes de correo de voz: Si está
usando el servicio de correo de voz de su
proveedor, esta opción le permite introducir
el número de teléfono que desea usar para
escuchar y administrar el correo de voz.
<OTRAS OPCIONES DE LLAMADA>
Mensaje rápido: Para agregar o editar
mensajes rápidos.
Modo TTY - Para establecer el modo TTY.
Audífonos - Marque para encender la
compatibilidad de audífono.
Duración de llamadas: Para controlar la
duración de la llamada.
ID del emisor: Le permite elegir si desea
mostrar su número en las llamadas
salientes.
Configuraciones de sonido - Le permite
cambiar los ajustes de sonido.
Ajustes adicionales: Le permite cambiar
las siguientes opciones de configuración.
Desvío de llamada: Le permite
•
establecer las opciones de desvío de
llamadas.
Llam. en espera: Permite que reciba
•
una notificación cuando tenga una
llamada en espera.
28
 Loading...