

Page 1
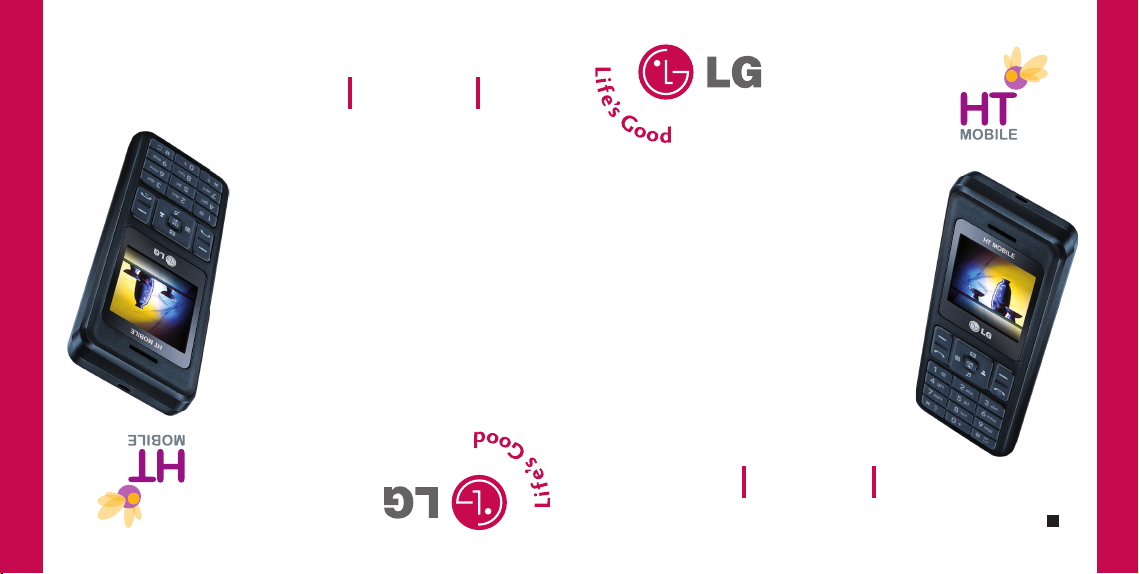
HD3000 Hướng dẫn sử dụng
HD3000 User Guide
P/N : MMBB0249001(1.0)
W
Page 2

CONTENTS
PHONE COMPONENTS 2
ONSCREEN ICONS 4
USING THE BATTERY AND
CHARGER 5
Installing and Removing the Battery 5
Charging the Battery 6
Battery Charge Level 6
BASIC FUNCTIONS 7
Turning the Phone On and Off 7
Changing the display language 7
Airplane Mode 7
Making a Call 8
Receiving Calls 8
MENU TREE 9
ENTERING AND EDITING
INFORMATION 10
Entering Information Using T9 Text
Input 10
To Edit in Viet Mode 11
MESSAGES 12
Write 12
INTRODUCTION 14
MENU FEATURES 15
SAFETY INFORMATION 25
Charger and Adapter Safety 25
Battery Information and Care 25
General Notice 25
1
Page 3

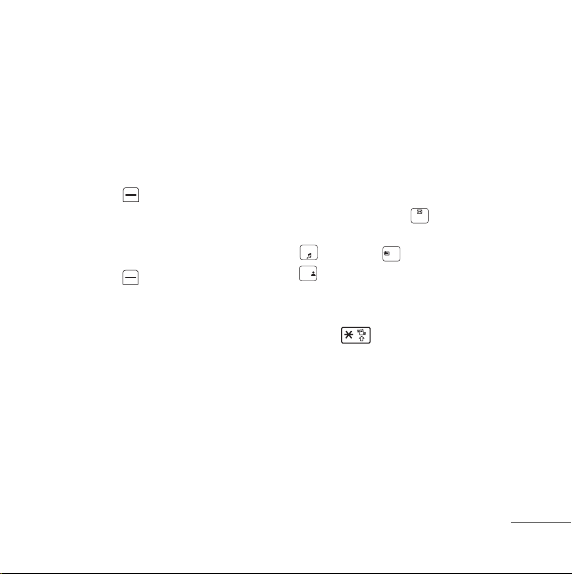
PHONE COMPONENTS
The following shows key components of your mobile phone.
1. Earpiece
2. Headset Jack
3. OK Key / Speaker Mode
4. Soft Key 1
5. CALL Key
6. Vibrate Mode Key
7. Microphone
8. Data Port
9. LCD Screen
10. 4 Way Navigation Key
11. Soft Key 2
12. END/PWR Key
13. Alphanumeric Keypad
14. Key Guard Key
15. Charger Port
2
Page 4
LCD Screen
indicator icons.
Soft Keys
these keys appear at the bottom of the
screen.
G
G
CALL Key
calls. See and redial from call history.
END/PWR Key
and to end a call. Using this key, you can
return to the main menu display screen.
When you press once, when a call is
received, the phone stops ringing or
Displays messages &
The names of the functions of
Soft Key 1
Used to display the function setting
menu. Accepts the highlighted choice
when navigating through a menu.
Soft Key 2
Used to search phonebook, change text
input mode, edit profiles and clear a
single space or character. Go to
previous menu.
Allows user to place or answer
Used to turn power On/Off
vibrating depending on the mode it is in.
Press twice to reject the call.
Alphanumeric Keypad
enable you to enter numbers and
characters and choose menu items.
Navigation Key
allows quick access Messages and
Voice Mail notification messages.
Ring Tone, Scheduler,
Profiles.
Vibrate Mode Key
the vibrate mode by pressing and holding
the key about 2 seconds.
OK Key / Speaker Mode
highlighted choice when navigating
through a menu. When pressed long,
access to Speaker Mode. When pressed
shortly, access to My Menu.
These keys
This Navigation key
In standby mode, set
Accepts the
3
Page 5
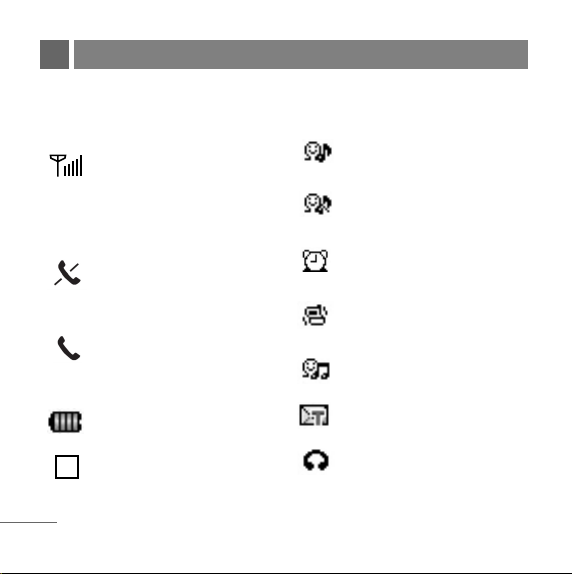
ONSCREEN ICONS
The phone screen displays several onscreen icons which appear when the phone
is powered on.
Displays the strength of the
signal received by the phone and
current signal strength is
indicated by the number of bars
displayed on the screen.
No service
The phone is not receiving a
system signal.
In use. A call is in progress.
* No icon indicates the phone is
in standby mode.
Charge level. Indicates battery
charge level.
Roaming mode.
R
4
In General mode
In Silent mode
In Alarm mode
In Vibrate Only mode
In Outdoor mode
Indicates that a Text Message
has been received.
In Headset mode.
Page 6
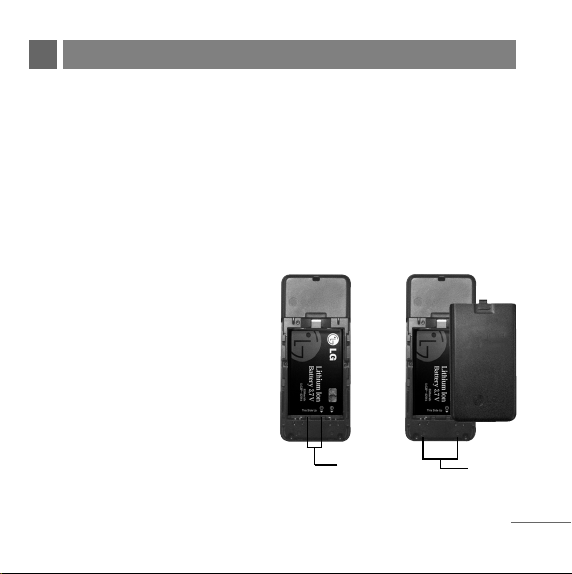
USING THE BATTERY AND CHARGER
Charge the battery fully before the initial use of the phone.
The phone comes with a rechargeable battery. Keep the battery charged while not
in use in order to maximize talk and standby time when using the phone.
Installing and Removing the Battery
G
To install, insert the battery into the opening on the back of the phone, and insert
the bottom of battery into groove
at the bottom of the handset.
Gently press down the cover until
the latch snaps into place.
G
To remove, push the back cover
down. Push the tab with one hand
and lift the top of the battery to
separate.
groove
slot
5
Page 7
Charging the Battery
To use the AC adapter charger provided with your phone:
1. Plug the AC adapter into the electrical outlet.
2. Insert the round end of the adapter into the AC adapter jack on the bottom of the
phone. (Make sure the battery is installed.)
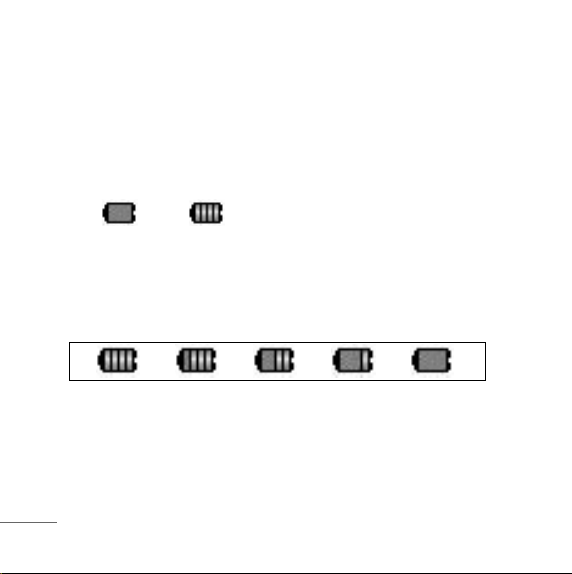
G
As the phone charges, the battery icon continually displays a progression from
empty ( ) to full ( ).
It takes about three hours to fully recharge a completely rundown battery. When
fully charged, battery icon indicates charging by twinkling.
Battery Charge Level
The battery charge level is shown at the top right of the LCD screen.
When the battery charge level becomes low, the low battery sensor will alert you in
three ways: sounding an audible tone, blinking the battery icon outline, and
displaying Recharge the battery If the battery charge level becomes exceedingly
low, the phone will automatically switch off and any function in progress will not be
saved.
6
Page 8

BASIC FUNCTIONS
Turning the Phone On and Off
1. Install a charged battery pack or connect the phone to an external power source
such as the cigarette lighter charger, car kit or AC adaptor.
2. Hold down the Key for 2 seconds until the LCD screen flashes.
NNoott ee
As any other communication device, avoid any unnecessary contact with the
antenna while your phone is turned on.
Changing the display language
1. In standby mode, press Soft Key 1 Menu.
2. Press , .
TTiiªªnngg VVii®®tt//EEnngglliisshh
3. Set
with and then press Soft Key 1.
Airplane Mode
When your phone is in Airplane Mode, it cannot send or receive any calls or access
online information. You may use the phone’s other features, such as Game,
Scheduler, Memo, etc. When Airplane Mode is enabled, a message “Airplane Mode
On” is displayed on the screen.
1. In standby mode, press Soft Key 1 Menu, , , .
7
Page 9
2. Select On or Off and press Soft Key 1.
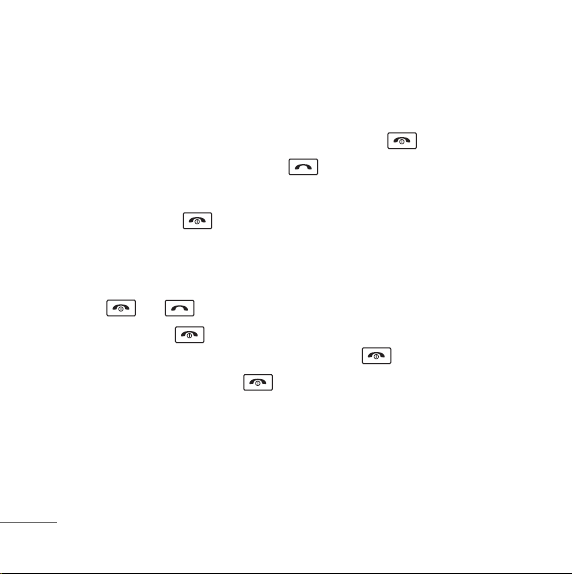
Making a Call
Every time you make a call, follow these steps:
1. Make sure that the phone is turned on. If not, hold down for 2 seconds.
2. Type the phone number and then press .
G
If the phone is locked, press Soft Key 2 Unlock and type the 4 digits lock code.
3. To end the call press .
Receiving Calls
1. When the phone rings or vibrate (if the Vibrate Mode is enabled), press any key
(except ) or depending on the Call setting.
G
When you press once, when a call is received, the phone stops ringing
or vibrating depending on the mode it is in. Press twice to disconnect.
2. To end an answered call, press .
3. If you are not in the condition to receive call, pressing Soft key 2 will send a
Preset SMS to Caller. The SMS can be editted using "Edit SMS on Call Reject"
function given under Settings' Call.
8
Page 10
MENU TREE
1. Names
1. Add Name
2. Find
3. Groups
4. Speed Dial
5. Copy & Move
6. Erase Names
7. My Profile
8. Memory Info
2. Messages
1. Write
2. Inbox
3. Outbox
4. Voice Mail
5. Archive in UIM
6. Drafts
7. Templates
8. SMS Groups
9. Erase Msgs
0. Msg Settings
3. Call History
1. Missed
2. Received
3. Dialled
4. In Call Memo
5. Call Duration
6. Erase History
4. Display
1.
Ngoân ngöõ
2. Clock
3. Time & Date
4. Wallpaper
5. Menu Style
6. Rhythmic Lighting
7. LCD Backlight
8. Keypad Backlight
9. Contrast
5. Games
1. Snake2
2. Game Settings
6. Profiles
1. Vibrate Only
2. Silent
3. General
4. Outdoor
5. Headset
7. Organiser
1. Scheduler
2. Memo
3. Alarm
8. Tools
1. Stopwatch
2. Calculator
3. World Clock
4. Unit Converter
9. Settings
1. My Menu
2. Call
3. Phone
4. Security
9
Page 11
ENTERING AND EDITING INFORMATION
Entering Information Using
T9 Text Input
In the text input field, press Soft Key 1
and select entry mode by pressing
Up/Down navigation key. There are 6
entry mode - T9En, T9Viet, Viet, 123,
Symbols and Smileys.
- Shift Key : Used to change the
letter case.
Typing In T9 Mode
For example, to write “Call the office”,
follow these steps:
1. Press: Soft Key 1 to change letter
case to T9En mode.
2. Press: .
3. Press: to complete the word
and add a space.
10
4. Press:
.
5. Display: Call the office.
Typing In VIET (Multi-tap) Mode
For example, to type “LG”, follow these
steps:
1. Press: Soft Key 1 to change letter
case to Viet mode.
2. Press: to change to VIET Caps
Lock mode.
3. Press: .
4. Display: LG.
Page 12

123 (Numbers) Mode
Type numbers using one keystroke per
number.
To change to 123 mode in a text entry
field, press Soft Key 1 and select 123
mode.
Symbols/Smileys Mode
To change to Symbols/Smileys mode in
a text entry field, press Soft Key 1 and
select Symbols or Smileys mode.
Press to cycle through the
desired items. To select item, Press the
assigned number key.
To Edit in Viet Mode
To write the desired word in T9Viet
mode, press each key once for one
letter or one diacritical mark.
For example, to write “
these steps:
1. Press once for "V".
2. Press once for "i".
3. Press once for "ê".
4. Press once for ".".
5. Press once for "t".
VVii®®tt
”, follow
11
Page 13
MESSAGES
Write
Text messages and page messages are all available.
1. Press Soft Key 1 Menu, or .
2. Select Write.
3. Type your desire message and press Soft Key 1 Options.
G Text Mode Use to select text type (entry mode).
G Send Use to send the message.
G Templates Select a sample message.
G Save Save to Draft message.
G Add Signature Insert signature (pre edited in Msg Setting).
G Insert Number Insert the desired number saved in Phone and UIM.
4. After selecting Send, enter the contact number where the message is to be sent,
enter the next recipients address by pressing . You can add up to 10
recipients. Press Soft Key 1 Options.
G Send Use to send the message.
G The Last Select a recent sent number.
G SMS Groups Select SMS Group.
G Find Names Select a phonebook entry.
12
Page 14

5. After entering the phone number, press Soft key 1 Options and select utility for
your message. Select send to send your message.
G Send Use to send the message.
G Priority Allows you to give the priority to message.
Normal or Urgent
G Delivery Ack This function allows you to know whether the message is
successfully transmitted to other party or not when the
transmitted message is received in other party’s phone. If you
want to activate this function, set to On.
G Save Sent Msg You can save this message in Outbox.
13
Page 15

INTRODUCTION
Congratulations on your purchase of the HD3000 Cellular phone that has been designed to
operate with the latest digital mobile communication technology, Code Division Multiple
Access (CDMA). The CDMA system has greatly enhanced voice clarity and can provide
various types of advanced features.
This is an advanced and compact phone which has diverse features as follows:
G
Large, easy-to-read, 5 lines display + 1 Icon Line + 1 Menu Line.
G
Paging, Messaging, Voice Mail and Caller ID.
G
21-key keypad (10 number keys / 2 function keys / 2 Soft keys / 4 way navigation 1 key /
1 Call key / 1 End key / 1 OK Key).
G
Long battery stand-by and talk time.
G
Choice of 17 Ring sounds.
G
Choice of 4 Wallpapers.
G
Menu-driven interface with prompt for easy operation and configuration.
G
Any Key Answer, Auto Redial, Speed Dial up to 99 memory locations.
G
Optional accessories with greater convenience and enhanced functionality.
G
In Call Memo, Game.
G
Airplane Mode, Rhythmic Lighting.
G
SMS, SMS to Group SMS.
G
SMS on call reject.
14
Page 16

MENU FEATURES
Names
Add Name Menu 1.1
Store up to 300 contacts, adding 4 phone
numbers + E-mail + Memo with each
entry and assign Group + Ring Tone +
Message Alert Tone to each entry. User
has an option to store Names in Phone
Memory or UIM Memory. Number of
contacts that can be stored in UIM
depends on the UIM memory size. Each
UIM contact entry can have name and
number only.
Find Menu 1.2
User can view the list of phone
numbers stored in the Phone and UIM
memories.
Groups Menu 1.3
This is a function for changing Group
Name and setting Ring/Msg tones by
Group.
Speed Dial Menu 1.4
Speed Dial allows you to make a call
faster by just dialing one or two digit
corresponding number.
Note: Speed dial numbers can not be
assigned to UIM entries.
Copy & Move Menu 1.5
Select Storage Type between Phone
to UIM and UIM to Phone.
Erase Names Menu 1.6
Erase names and numbers saved in
phone.
15
Page 17

may be viewed. Up to 30 can be stored.
My Profile Menu 1.7
Store my profile such as name, phone
numbers, e-mail and memo.
Memory Info Menu 1.8
This feature allows user to view the
number of records occupied in phone
and UIM memories and Memory status
is indicated by progress bar.
Messages
Write Menu 2.1
(Refer to 12~13 page)
Write and send Message.
Inbox Menu 2.2
Received Text messages, Page, lists
may be searched, and the contents
16
Outbox Menu 2.3
Up to 10 sent messages and 10 unsent
messages can be stored in the Outbox.
Voice Mail Menu 2.4
Allows you to view the new voice
messages recorded in the voice mail
box.
Archive in UIM Menu 2.5
Archives in UIM feature allows the user
to Store (move/copy) selected
messages from Inbox or Outbox to a
Folder "Archive in UIM",which will be
specifically stored in RUIM card,(so
that user can access those selcted
messages even if he chooses to use
another Handset with the same RUIM.)
Drafts Menu 2.6
Page 18

When a user is interrupted by a call
while composing a message, messages
automatically get saved. Up to 10 can
be stored.
Templates Menu 2.7
There are 21 predefined phrases
included in the Templates. You can add
up to 9 templates more.
SMS Groups Menu 2.8
Msg Groups consists of 5 SMS Groups
with each group consisting of maximum
10 members.
Call History
Missed Menu 3.1
Allows you to view list of all Missed
Calls. (Maximum 60 numbers are
possible including Missed, Received
and Dialled)
Received Menu 3.2
Allows you to view list of all Received
Calls. (Maximum 60 numbers are
possible including Missed, Received
and Dialled)
Erase Msgs Menu 2.9
Allows you to erase messages in each
message box.
Msg Settings Menu 2.0
Message Settings can be configured
for receiving new messages.
Dialled Menu 3.3
Allows you to view list of all Dialled
Calls. (Maximum 60 numbers are
possible including Missed, Received
and Dialled)
17
Page 19

In Call Memo Menu 3.4
Save the phone numbers taken while
talking and can view the list of numbers
present in In Call Memo. (Maximum 20
numbers are possible)
Call Duration Menu 3.5
View the duration and number of recent
calls you have dialled and received.
Also reset the time counter.
Erase History Menu 3.6
Erase the contents of each of the three
call histories.
Display
Language Menu 4.1
Set the Bilingual feature according to
your preference, choose between
English and
18
Tiªng Vi®t
.
Clock Menu 4.2
Allows you to select a clock on your
mobile phone display.
Time & Date Menu 4.3
Allows you to select time & date type.
Wallpaper Menu 4.4
You can set up the Theme to be
displayed on the LCD screen in the
standby mode (Up to 4 images) and also
set the Profile name on the Wallpaper.
Menu Style Menu 4.5
Allows you to select the menu style.
Rhythmic Lighting Menu 4.6
You can set rhythmic lighting as On or
Off. Used for an incoming call or alarms
(scheduler, reserved call or alarm).
Page 20

LCD/ Keypad Backlight
Menu 4.7/4.8
Choose the settings of the LCD and
keypad backlight.
NNoott ee
When press for over half
second in idle mode, backlight
turns off.
Contrast Menu 4.9
Using the Navigation Key, select the
contrast setting using the scale of
lightest to darkest.
Games
Game Settings Menu 5.2
Allows you to set the game volume and
backlight.
Profiles Menu 6
1. Vibrate Only / 2. Silent / 3. General /
4. Outdoor / 5. Headset
Profiles let you set your phone’s sound
settings to your environment. Each
profile contains settings for your phone’s
Ring Type, Ring Tone, Ringer Volume,
Speaker Volume, Earpiece Volume, Key
Volume and Message Alert.
Snake2 Menu 5.1
You must eat given food at stage by
managing snake that increase its body
little by little. Use Navigation keys or
2(up), 4(left), 6(right), 8(down) to move
snake. While entering your name, use
OK or Key 5 to submit.
Organiser
Scheduler Menu 7.1
Simply store your appointments and
your phone alerts you with a reminder
of your appointment. Up to 60, can be
saved.
19
Page 21

Memo Menu 7.2
Write memos. Up to 20, can be saved.
Alarm Menu 7.3
To change an event alarm time. Up to 4,
can be saved. (Alarm1~3 and Quick
Alarm)
about the time difference.
Unit Converter Menu 8.4
Unit Converter provides various
conversion unit like Currency, Length,
Surface, Mass, Volume, Temperature
and Velocity.
Tools
Stopwatch Menu 8.1
Allows you to take an accurate
measurement of time.
Calculator Menu 8.2
Calculate simple mathematical
computations.
World Clock Menu 8.3
Is useful if you need to make a call to
another country, and you are not sure
20
Settings
My Menu Menu 9.1
Lets you access to favorite menu
quickly by customising my menu.
Call Forward Menu 9.2.1
In phone, call forward lets you forward
all your incomming call to another
number.
Page 22

Call Waiting Menu 9.2.2
While a call is in progress, you may
hear two beeps indicating another
incoming call. When call waiting is
enabled, you may put the active call on
hold while you answer the other
incoming call.
Screen Call Menu 9.2.3
Allows you to screen calls from the
predefined numbers. Other parties of
screened numbers can not make a call
to you.
Any Key Answer Menu 9.2.4
When your phone rings, press any key to
answer except .
Auto Redial Menu 9.2.5
Set the length of time the phone waits
before automatically redialing a number
when the attempted call fails.
Call Timer Menu 9.2.6
You can set your phone to display the
running elapsed time while a call is
active.
Call Connect Alert Menu 9.2.7
This is a function to alert you that the
call connection has been established.
Edit SMS on Call Reject
Menu 9.2.8
Edit the message, which you want to
send during the call reject by pressing
right soft key.
Int’l Call Prefix Menu 9.2.9
User can make a international call by
using '+' code as international prefix
during Idle number editing. If user input
21
Page 23

'+' code during Idle number editing and
press send key, '+' code is changed to
user-defined international prefix.
Hold '0' key, '0' is changed '+'.
Key Guard Menu 9.3.1
Allows you to protect the keypad of
your phone from accidental dialing. Key
Guard feature locks the keypad
automatically after some specified
seconds as selected by the user. The
auto key guard can be set from the
phone settings menu item. When set as
Enable, you can set time from 10 sec to
9 min:59 secs.
Airplane Mode Menu 9.3.2
When your phone is in Airplane mode,
it cannot send or receive any calls or
access online information.
22
Service Alert Menu 9.3.3
Alerts you when service changes.
My Phone Number Menu 9.3.4
Allows you to check your phone
number.
Version Menu 9.3.5
View the S/W and PRL version.
PIN Code Request Menu 9.4.1
When activated On, phone requests
you to enter PIN Code for card-holder
verification. When booting phone, enter
the pin code (personal identification
number) of R-UIM Card. Without PIN
Code, cannot access to contact info,
SMS or making a call/answering a call.
For further assistance please contact
customer care.
Page 24

Lock Mode Menu 9.4.2
Keeps your phone from unauthorized
use. (Default Lock Code is 0000)
Emergency Numbers Menu 9.4.3
You can call these numbers 113, 114,
115 even when the phone is locked or
restricted. Up to 2, user defined number
can be added.
Change Code Menu 9.4.4
New Lock Code allows you to enter a
new four-digit Lock Code or PIN Code
number.
Reset Menu 9.4.5
Deletes all information saved in Phone
Book or all data saved in phone and go
back to default value or reset some of
the menu settings to their original
values.
Functions Used During a
Call
In Call Memo
During a Call : Menu 1
It allows you to note a phone number
that the other person provides you
during a call. Maximun 20 numbers are
possible.
Find
During a Call : Menu 2
It allows you to find contact lists from
your phonebook.
Mute/Unmute
During a Call : Menu 3
This function locks the microphone of
your telephone and prevent sounds
from your end being heard by the
person at the other end.
23
Page 25

Adjusting Speaker Mode On
During a Call : Press
During a call, to activate or cancel
speaker quickly, press .
Messages
Press up navigation key to go
messages.
24
Page 26

SAFETY INFORMATION
Please read and observe the following
information for safe and proper use of your
phone and to prevent damage. Also, keep
the user guide in an accessible place at all
the times after reading it.
Charger and Adapter Safety
G
The charger and adapter are intended
for indoor use only.
Battery Information and Care
G
Please dispose of your battery properly.
G
Use only LG-approved chargers
specific to your phone model since they
are designed to maximize battery life.
G
Do not disassemble or short-circuit the
battery.
G
Keep the battery’s metal contacts
clean.
G
Recharge the battery after long periods
of non-use to maximize battery life.
G
Battery life will vary due to usage
patterns and environmental conditions.
G
The self-protection function of the
battery cuts the power of the phone
when its operation is in an abnormal
state. In this case, remove the battery
from the phone, reinstall it, and turn the
phone on.
General Notice
G
Using a damaged battery or placing a
battery in your mouth may cause
serious injury.
G
Do not place items containing magnetic
components such as a credit card,
phone card, bank book or subway
ticket near your phone. The magnetism
of the phone may damage the data
stored in the magnetic strip.
25
Page 27

G
Talking on your phone for a long period
of time may reduce call quality due to
heat generated during use.
G
When the phone is not used for a long
period time, store it in a safe place with
the power cord unplugged.
G
Using the phone in proximity to
receiving equipment (i.e., TV or radio)
may cause interference to the phone.
G
Do not use the phone if the antenna is
damaged. If a damaged antenna
contacts skin, it may cause a slight
burn. Please contact an LG Authorized
Service Center to replace the damaged
antenna.
G
Do not immerse your phone in water. If
this happens, turn it off immediately and
remove the battery. If the phone does
not work, take it to an LG Authorized
Service Center.
26
G
The power cord on this product will
expose you to lead, a chemical known
to the State of California to cause
(cancer) birth defects or other
reproductive harm. Wash hands after
handling.
G
Do not paint your phone.
G
The data saved in your phone might be
deleted due to careless use, repair of
the phone, or upgrade of the software.
Please backup your important phone
numbers. (Ring tones, text messages,
and voice messages could also be
deleted.) The manufacturer is not liable
for damage due to the loss of data.
G
Do not turn your phone on or off when
putting it in your ear.
Page 28

MEMO
Page 29

NỘI DUNG
CÁC BỘ PHẬN CỦA ĐIỆN
THOẠI 2
CÁC BIỂU TƯỢNG TRÊN
MÀN HÌNH 4
SỬ DỤNG PIN VÀ BỘ SẠC 5
Lắp và Tháo pin 5
Sạc pin 6
Mức báo pin 6
CÁC TÍNH NĂNG CƠ BẢN 7
Tắt và bật điện thoại 7
Thay đổi ngôn ngữ hiển thị 7
Chế độ trên máy bay 7
Thực hiện cuộc gọi 8
Nhận cuộc gọi 8
SƠ ĐỒ MENU 9
NHẬP VÀ SỬA ĐỔI THÔNG
TIN 10
Nhập thông tin sử dụng chế độ
nhập văn bản T9 10
Để soạn thảo ở chế độ tiếng
Việt 11
TIN NHẮN 12
Soạn tin 12
GIỚI THIỆU 14
CÁC TÍNH NĂNG MENU 15
THÔNG TIN VỀ AN TOÀN 25
An toàn cho Bộ sạc và Bộ
đổi điện 25
Thông tin và chăm sóc pin 25
Lưu ý chung 26
1
Page 30

CÁC BỘ PHẬN CỦA ĐIỆN THOẠI
Sau đây là các bộ phận chính của điện thoại di động của bạn.
1. Tai nghe
2. Lỗ Cắm Tai Nghe
3. Phím OK / Chế Độ Loa
4. Phím Mềm 1
5. Phím Gọi
6. Phím Chế độ rung
7. Micro
8. Cổng dữ liệu
9. Màn hình LCD
10. Phím điều hướng 4 chiều
11. Phím Mềm 2
12. Phím Kết thúc/Nguồn
13. Bàn phím số
14. Phím khoá bàn phím
15. Cổng sạc pin
2
Page 31

Màn hình LCD
biểu tượng chỉ thị.
Các phím mềm
các phím này hiển thị ở phía dưới cùng
của màn hình.
●
Phím mềm 1
Được sử dụng để hiển thị menu cài
đặt tính năng. Chấp nhận Tuy chon đã
được đánh dấu khi di chuyển qua một
menu.
●
Phím mềm 2
Được sử dụng để tìm kiếm trong sổ
điện thoại, thay đổi chế độ nhập văn
bản, sửa đổi cấu hình và xóa một
khoảng trống hoặc ký tự. Trở về menu
trước.
Phím GỌI
thực hiện hoặc trả lời cuộc gọi. Xem và
quay lại số từ nhật ký cuộc gọi.
Phím Kết thúc/Nguồn
Bật/Tắt máy điện thoại và để kết thúc một
cuộc gọi. Sử dụng phím này, bạn có thể
trở về màn hình hiển thị menu chính. Khi
Hiển thị tin nhắn và
Tên chức năng của
Cho phép người sử dụng
Sử dụng để
bạn nhấn một lần, lúc nhận một cuộc gọi,
điện thoại sẽ dừng chuông hoặc rung tùy
thuộc vào chế độ điện thoại. Nhấn hai lần
để từ chối cuộc gọ
Bàn phím số
bạn nhập số và các ký tự và chọn các
danh mục con.
Phím điều hướng
này cho phép truy cập nhanh vào
Tin Nhắn và Tin nhắn thoại.
chuông,
Phím chế độ rung
chế độ rung bằng cách bấm và giữ phím
này
Phím OK / Chế độ loa
y chon đã được đánh dấu khi di chuyển
qua một menu. Bấm và giữ để truy cập
vào Chế độ loa. Bấm nhanh để truy cập
vào Menu riêng.
i.
Các phím này cho phép
Phím Điều Hướng
Nhạc
Lập lịch, Cấu hình.
Ở chế độ chờ, đặt
trong khoảng 2 giây.
Chấp nhận Tu
3
Page 32

CÁC BIỂU TƯỢNG TRÊN MÀN HÌNH
Màn hình điện thoại hiển thị một vài biểu tượng trên màn hình, các biểu
tượng này xuất hiện khi điện thoại được bật.
Hiển thị mức tín hiệu nhận được
bởi điện thoại và mức tín hiệu
hiện thời được chỉ thị bởi số
vạch được hiển thị trên màn
hình.
Không có dịch vụ
Điện thoại không nhận được tín
hiệu của hệ thống.
Đang sử dụng. Đang có cuộc
gọi.
* Không có biểu tượng chỉ thị
điện thoạ
i đang ở chế độ chờ.
Mức sạc. Chỉ báo mức sạc pin.
Chế độ chuyển vùng.
4
Ở chế độ Bình thường
Ở chế độ Im lặng
Ở chế độ Báo thức
Ở chế độ Chỉ rung.
Ở chế độ Ngoài trời
Cho biết đã nhận được một Tin
nhắn chữ.
Ở chế độ Tai nghe.
Page 33

SỬ DỤNG PIN VÀ BỘ SẠC
Sạc đầy pin trước khi sử dụng điện thoại lần đầu.
Điện thoại đi kèm với một pin có thể sạc lại. Giữ pin cẩn thận khi không sử
dụng để có thời gian gọi và chờ tối đa khi dùng lại.
Lắp và Tháo pin
●
Để lắp pin, đưa pin vào rãnh
chứa pin ở mặt sau của điện
thoại, và chèn đầu dưới pin
vào rãnh ở đầu dưới của
điện thoại.
Nhẹ nhàng ấn vỏ xuống cho
tới khi lẫy vào đúng vị trí.
●
Để tháo pin, đẩy vỏ sau ra.
Ấn đầu pin bằng một tay và
nhấc phần trên cùng của pin
lên.
rãnh khe
5
Page 34

Sạc Pin
Để sử dụng bộ sạc sử dụng nguồn xoay chiều đi kèm với điện thoại của bạn:
Cắm bộ sạc vào nguồn điện xoay chiều.
1.
Cắm đầu cuối có hình tròn của bộ sạc vào lỗ sạc ở dưới cùng của điện
2.
thoại.(Đảm bảo rằng pin đã được lắp.)
●
Khi điện thoại sạc, biểu tượng pin liên tục được hiển thị quá trình sạc từ
mức hết pin (
Mất khoảng ba tiếng để sạc đầy một pin đã hết điện hoàn toàn. Khi sạc đầy,
biểu tượng pin chỉ báo sạc bằng nhấp nháy.
) tới đầy ( ).
Mức báo pin
Mức sạc pin được hiển thị ở bên phải phía trên cùng của màn hình LCD.
Khi mức báo sạc pin tiến tới mức thấp, cảm biến pin yếu sẽ báo cho bạn
theo ba cách: phát âm báo, nháy đường bao bên ngoài của biểu tượng, và
hiển thị chữ Sạc lại pin Nếu mức pin là quá thấp, điện thoại sẽ tự động tắt
và bất kỳ tính năng nào đang sử dụng sẽ không được lưu.
6
Page 35

CÁC TÍNH NĂNG CƠ BẢN
Tắt và bật điện thoại
Lắp bộ pin đã được sạc hoặc kết nối điện thoại với nguồn điện bên ngoài
1.
như là bộ sạc cắm trên ôtô, bộ sử dụng trên ôtô hoặc bộ sạc xoay chiều.
Giữ Phím
2.
Cũng như bất ký thiết bị truyền thông nào khác, tránh bất kỳ tiếp xúc không cần
Lưu ý
thiết với anten trong khi điện thoại của bạn đang được bật.
trong khoảng 2 giây cho tới khi màn hình LCD nháy.
Thay đổi ngôn ngữ hiển thị
Ở chế độ chờ, nhấn Phím Mềm 1 Menu.
1.
Nhấn
2.
Đặt Tiếng Việt/English bằng
3.
, .
và sau đó nhấn Phím Mềm 1.
Chế độ trên máy bay
Khi điện thoại ở in chế độ Trên máy bay, sẽ không thể thực hiện hay nhận
bất kỳ cuộc gọi nào hoặc truy cập vào thông tin trực tuyến.
Bạn có thể sử dụng các tính năng khác của điện thoại như là Trò chơi, Lập
biểu, Ghi Nhớ, v.v... Khi bật Chế Độ Trên Máy Bay, thông báo “Chế độ máy
bay Bật” sẽ hiển thị trên màn hình.
Ở chế độ chờ, nhấn Phím Mềm 1 Menu, , , .
1.
7
Page 36

Chọn Bật hoặc Tắt và nhấn Phím Mềm 1.
2.
Thực hiện cuộc gọi
Mỗi khi bạn thực hiện một cuộc gọi, làm theo các bước sau:
Đảm bảo rằng điện thoại được bật. Nếu không, giữ
1.
giây.
Nhập số điện thoại và sau đó nhấn .
2.
●
Nếu điện thoại bị khóa, nhấn Phím Mềm 2 Mở khoá và nhập mã khóa
gồm 4 chữ số.
3.
Để kết thúc cuộc gọi nhấn
.
trong khoảng 2
Nhận cuộc gọi
Khi điện thoại đổ chuông hoặc rung (nếu Chế độ Rung được đặt), nhấn
1.
phím bất kỳ (trừ phím
●
Khi bạn nhấn một lần, lúc nhận một cuộc gọi, điện thoại sẽ dừng
chuông hoặc rung tùy thuộc vào chế độ điện thoại. Nhấn hai lần
để ngắt kết nối.
2.
Để kết thúc một cuộc gọi đã trả lời, nhấn
Nếu bạn không thể trả lời cuộc gọi, việc nhấn Phím mềm 2 sẽ gửi một tin
3.
nhắn mẫu cho Người gọi. Tin nhắn SMS này có thể được sửa đổi khi vào
chức năng “Sửa đổi SMS khi Từ chối cuộc gọi” dưới mục Cài đặt cuộc
gọi.
8
) hoặc tùy thuộc vào Cài đặt cuộc gọi.
.
Page 37

SƠ ĐỒ MENU
Danh bạ
1.
Thêm tên
1.
Tìm kiếm
2.
Nhóm
3.
Q.số nhanh
4.
Sao & Chuyển
5.
Xoá d.bạ
6.
Cấu hình riêng
7.
T.trạng bộ nhớ
8.
Tin nhắn
2.
Soạn tin
1.
Hộp thư đến
2.
Hộp thư đi
3.
Hộp thư thoại
4.
Lưu trong UIM
5.
Hộp thư nháp
6.
Tin nhắn mẫu
7.
Nhóm SMS
8.
.
Xóa tin nhắn
9
0. Cài đặt tin nhắn
Nhật ký c.gọi
3.
Bị nhỡ
1.
Đã nhận
2.
Đã gọi
3.
Ghi nhớ
4.
Thời lượng
5.
Xóa nhật ký
6.
Hiển thị
4.
Language
1.
Đồng hồ
2.
Giờ & Ngày
3.
Hình nền
4.
Kiểu Menu
5.
Sáng lấp lánh
6.
Đèn nền LCD
7.
Đèn bàn phím
8.
Độ tương phản
9.
5. Trò chơi
Rắn 2
1.
.
Cài đặt trò chơi
2
6. Cấu hình
Chỉ Rung
1.
Im lặng
2.
Thông thường
3.
Ngoài trời
4.
Tai nghe
5.
7. Sổ tay
Lịch làm việc
1.
Ghi nhớ
2.
Báo thức
3.
8. Hộp công cụ
Bấm giờ
1.
Máy tính
2.
Giờ quốc tế
3.
Đổi đơn vị đo
4.
9. Cài đặt
Mục riêng
1.
Cuộc gọi
2.
Điện thoại
3.
Bảo mật
4.
9
Page 38

NHẬP VÀ SỬA ĐỔI THÔNG TIN
Nhấn: để kết thúc từ và
Nhập thông tin sử
dụng chế độ nhập
văn bản T9
Trong trường nhập văn bản, nhấn
Phím Mềm 1 và chọn chế độ nhập
bằng cách nhấn phím điều hướng
Lên/Xuống. Có 6 chế độ nhập T9En, T9Viet, Viet, 123,
B.tượng và Nụ cười.
- Phím Chuyển : Được sử
dụng để đổi kiểu chữ thường/in hoa.
Nhập văn bản ở chế độ T9
Ví dụ, để nhập “Call the offi ce”,
thực hiện theo các bước sau:
1.
Nhấn: Phím Mềm 1 để chuyển
kiểu chữ thành chế độ T9En.
2.
10
Nhấn:
.
3.
chèn một dấu cách.
Nhấn:
4.
Hiển thị: Call the offi ce.
5.
Nhập văn bản ở chế độ VIET
(Nhiều lần nhấn)
Ví dụ, để nhập “LG”, theo các bước
này:
Nhấn: Phím Mềm 1 để chuyển
1.
kiểu chữ thành chế độ Viet.
Nhấn:
2.
VIET Chữ In Hoa.
Nhấn:
3.
Hiển thị: LG.
4.
.
để đổi sang chế độ
.
Page 39

Chế độ 123 (Nhập chữ số)
Nhập các số sử dụng một lần bấm
cho mỗi chữ số.
Để chuyển sang chế độ 123 trong
trường nhập văn bản, nhấn Phím
Mềm 1 và chọn chế độ 123.
Chế độ B.tượng/Nụ cười
Để chuyển sang chế độ B.tượng/Nụ
cười trong trường nhập văn bản,
nhấn Phím Mềm 1 và chọ
B.tượng/Nụ cười.
Nhấn quay vòng tới những mục
bạn muốn.
Để chọn mục, nhấn phím số được
gán.
n chế độ
Để soạn thảo ở chế
độ tiếng Việt
Để nhập từ mong muốn trong chế
độ T9Ve, nhấn mỗi phím một lần
cho mỗi chữ hoặc dấu.
Ví dụ, để nhập “Việt”, hãy thực hiện
theo các bước sau:
Nhấn
1.
V”.
2.
Nhấn
i”.
3.
Nhấn
ê”.
4.
Nhấn
nặng “.”.
5.
Nhấn
t”.
một lần để nhập chữ “
một lần để nhập chữ “
một lần để nhập chữ “
một để nhập dấu
một lần để nhập chữ “
11
Page 40

TIN NHẮN
Soạn tin
Có cả tin nhắn chữ và tin nhắn từ máy nhắn tin.
Nhấn Phím Mềm 1 Menu,
1.
Chọn
2.
3.
Nhập tin nhắn bạn muốn và nhấn Phím Mềm 1 T.chọn.
G
Kiểu chữ Sử dụng để chọn kiểu nhập văn bản (chế độ nhập).
G
Gửi Sử dụng để gửi tin nhắn.
G
Tin nhắn mẫu Chọn một tin nhắn mẫu.
G
Lưu Lưu vào tin nhắn Hộp thư nháp.
G
Thêm chữ ký Chèn chữ ký (được soạn sẵ
Soạn tin.
Nhắn).
G
Chèn số Chèn số bạn muốn, được lưu trong Điện thoại và
UIM.
4. Sau khi chọn Gửi, hãy nhập số đối tác cần gửi tin nhắn, nhập những
người nhận tiếp theo bằng cách nhấn
10 người nhận. Nhấn Phím Mềm 1 T. ch ọn.
G
Gửi Sử dụng để gửi tin nhắn.
G
Cuối cùng Chọn một số đa gửi gần đây.
G
Nhóm SMS Chọn Nhóm SMS.
12
hoặc .
n trong Cài Đặt Tin
. Bạn có thể thêm nhiều
nhất là
Page 41

G
Tìm tên Chọn một số trong danh bạ.
5. Sau khi nhập số điện thoại, nhấn Phím mềm 1 T.chọn và chọn tiện ích
cho tin nhắn của bạn. Chọn Gửi để gửi tin nhắn.
G
Gửi Sử dụng để gửi tin nhắn.
G
Ưu tiên Cho phép bạn đặt ưu tiên cho tin nhắn.
Bình thường hoặc Khẩn.
G
Xác nhận gửi Chức năng này cho phép bạn biết tin nhắn
đã được
chuyển đến người nhận hay chưa khi nào tin nhắn
được chuyển đi được nhận trong điện thoại của
người nhận. Nếu bạn muốn kích hoạt chức năng này,
đặt chức năng này là Bật.
G
Lưu tin đã gửi Bạn có thể lưu tin nhắn này trong Hộp thư đi.
13
Page 42

GIỚI THIỆU
Chúc mừng bạn đã mua được điện thoại di động HD3000, điện thoại này được thiết kế
để hoạt động với công nghệ truyền thông mới nhất, công nghệ CDMA (Đa người dùng
phân chia theo mã). Hệ thống CDMA có sự lọc âm đặc biệt nâng cao và có thể cung
cấp nhiều loại tính năng hiện đại khác nhau.
Đây là một điện thoại nhỏ gọn và hiện đại với rất nhi
●
Màn hình lớn, dễ đọc, 5 dòng hiển thị + 1 Dòng Biểu Tượng + 1 Dòng Menu.
●
Nhắn tin, Thư thoại, và Hiển thị số gọi đến.
●
Bàn phím 21 phím (10 phím số / 2 phím chức năng / 2 phím Mềm / 1 phím di chuyển
4 hướng / 1 phím Đàm thoại / 1 phím Kết thúc / 1 phím OK).
●
Pin chờ và gọi lâu.
●
Có thể chọn 17 kiểu chuông.
●
Có thể chọn 4 hình nền.
●
Giao diện kiểu Menu với lời nhắc dễ dàng sử dụng và đặt cấu hình.
●
ằng phím b.kỳ, Tự gọi lại, Q.số nhanh có thể lưu được tối đa 99 số.
T.l ời b
●
Các phụ kiện tùy chọn rất tiện lợi với các tính năng nâng cao.
●
Ghi nhớ trong khi gọi, Trò chơi.
●
Chế độ trên máy bay, Sáng lấp lánh.
●
SMS, SMS đến Nhóm SMS.
●
SMS khi từ chối cuộc gọi.
14
ều tính năng sau:
Page 43

CÁC TÍNH NĂNG MENU
Danh bạ
Thêm tên
Lưu tối đa 300 liên lạc, thêm được
4 số điện thoại + Email + Ghi nhớ
với mỗi mục nhập và gán Nhóm +
Nhạc Chuông + Âm Báo Tin Nhắn
cho mỗi mục nhập. Người sử dụng
có tùy chọn để lưu các Tên trong Bộ
Nhớ Điện Thoại hoặc Bộ Nhớ UIM.
Số liên lạc có thể lưu trong thẻ UIM
phụ thuộc vào dung lượng bộ nhớ
UIM. Mỗi liên lạc đượ
chỉ có thể bao gồm tên và số điện
thoại.
Tìm kiếm
Người sử dụng có thể xem danh
sách số điện thoại được lưu trong
bộ nhớ Điện Thoại và bộ nhớ UIM.
Menu 1.1
c lưu trên UIM
Menu 1.2
Nhóm
Đây là một tính năng để đổi Tên
nhóm và cài đặt kiểu Nhạc chuông
theo Nhóm.
Q.số nhanh
Quay Số Nhanh cho phép bạn thực
hiện một cuộc gọi nhanh hơn bằng
cách chỉ cần quay một hoặc hai chữ
số tương ứng.
Lưu ý: Không thể gán các số quay
số nhanh cho các số lưu trên thẻ
UIM.
Sao & Chuyển
Chọn kiểu lưu là Điện Thoại đến
UIM hoặc UIM đến Điện Thoại.
Xoá d.bạ
Xoá d.bạ và số điện thoại được lưu
trong điện thoại.
Menu 1.3
Menu 1.4
Menu 1.5
Menu 1.6
15
Page 44

Cấu hình riêng
Lưu thông tin cá nhân như là tên,
các số điện thoại, Email và ghi nhớ.
T.trạng bộ nhớ
Tính năng này cho phép người sử
dụng xem số bản ghi đã chiếm chỗ
trong bộ nhớ điện thoại và bộ nhớ
UIM và Tình trạng bộ nhớ được thể
hiện bằng thanh trạng thái.
Menu 1.7
Menu 1.8
Tin nhắn
Soạn tin
(Tham khảo trang 12~13)
Viết và gửi tin nhắn.
Hộp thư đến
Có thể tìm kiếm danh sách các Tin
nhắn chữ, Tin nhắn từ máy nhắn tin
đã nhận, và có thể xem nội dung.
Có thể lưu đến 30 tin.
16
Menu 2.1
Menu 2.2
Hộp thư đi
Có thể lưu tới 10 tin nhắn đã gửi và
10 tin nhắn chưa gửi trong Hộp thư
đi.
Hộp thư thoại
Cho phép bạn xem tin nhắn thoại
mới được lưu trong hộp thư thoại.
Lưu trong UIM
Tính năng Lưu trong UIM cho phép
người dùng Lưu (chuyển/sao chép)
các tin nhắn được chọn từ Hộp Thư
Đến hoặc Hộp Thư Đi vào Thư Mục
“Lưu trong UIM”, thư mục này sẽ
được lưu riêng trong thẻ RUIM, (để
người sử dụng có thể truy cập vào
các tin nhắn đã chọn này ngay cả
khi họ chọn sử dụng một Điện Thoại
khác với cùng thẻ RUIM.)
Hộp thư nháp
Khi một người sử dụng bị gián đoạn
bởi một cuộc gọi khi đang soạn tin
Menu 2.3
Menu 2.4
Menu 2.5
Menu 2.6
Page 45

nhắn, các tin nhắn được tự động
lưu. Có thể lưu nhiều nhất là 10
mục.
Tin nhắn mẫu
Có 21 cụm tin mẫu được lưu trong
thư mục Tin nhắn mẫu.
Bạn có thể bổ sung nhiều nhất là 9
mẫu nữa.
Nhóm SMS
Các Nhóm Tin Nhắn gồm 5 Nhóm
SMS, mỗi nhóm này gồm tối đa 10
thành viên.
Xóa tin nhắn
Cho phép bạn xóa các tin nhắn
trong mỗi hộp tin nhắn.
Cài đặt tin nhắn
Cài Đặt Tin Nhắn có thể được cấu
hình để nhận tin nhắn mới.
Menu 2.7
Menu 2.8
Menu 2.9
Menu 2.0
Nhật ký c.gọi
Bị nhỡ
Cho phép bạn xem danh sách tất cả
các Cuộc Gọi Nhỡ. (Có thể lưu tối
đa 60 số điện thoại bao gồm Bị nhỡ,
Đã nhận và Đã gọi)
Đã nhận
Cho phép bạn xem danh sách tất cả
các những Cuộc gọi đã nhận.
(Có thể lưu tối đa 60 số điện thoại
bao gồm Bị nhỡ, Đã gọi và Đã
nhận)
Đã gọi
Cho phép bạn xem danh sách
những cuộc gọi đi. (Có thể lưu tối
đa 60 số điện thoại bao gồm Bị nhỡ,
Đã gọi và Đã nhận)
Menu 3.1
Menu 3.2
Menu 3.3
17
Page 46

Ghi nhớ
Lưu nhưng sô điên thoai nhân đươc
trong khi goi va co thê xem danh sa
ch nhưng sô co trong Ghi nhớ cuộc
gọi. (Có thể lưu tối đa là 20 số)
Menu 3.4
Thời lượng
Xem thời lượng và số của các cuộc
gọi bạn đã gọi và nhận gần đây.
Đồng thời đặt lại bộ đếm thời gian.
Xóa nhật ký
Xóa nội dung của mỗi một trong ba
mục của nhật ký cuộc gọi.
Menu 3.5
Menu 3.6
Hiển thị
Language
Đặt tính năng Song Ngữ theo sở
thích của bạn, chọn giữa Tiếng Việt
và English.
18
Menu 4.1
Đồng hồ
Cho phép bạn chọn đồng hồ hiển
thị trên màn hình điện thoại di động
của bạn.
Giờ & Ngày
Cho phép bạn chọn kiểu ngày giờ.
Hình nền
Bạn có thể cài đặt Chủ đề sẽ được
hiển thị trên màn hình LCD ở chế
độ chờ (tối đa 4 hình) và đồng thời
đặt tên Cấu hình trên Hình nền.
Kiểu Menu
Cho phép bạn chọn kiểu menu.
Sáng lấp lánh
Bạn có thể bật hoặc tắt đèn theo
nhạc điệu. Được sử dụng cho một
cuộc gọi đến hoặc báo thức (lịch
biểu, cuộc gọi dành riêng hoặc báo
thức).
Menu 4.2
Menu 4.3
Menu 4.4
Menu 4.5
Menu 4.6
Page 47
Đèn nền LCD/ Đèn bàn
phím
Chọn cài đặt của LCD và đèn nền
của bàn phím.
Khi nhấn qua nửa giây ở
Lưu ý
chế độ chờ, đèn nền sẽ tắt..
Độ tương phản
Sử dụng Phím điều hướng, chọn
cài đặt tương phản sử dụng mức từ
sáng nhất tới tối nhất.
Menu 4.7/4.8
Menu 4.9
Trò chơi
Rắn 2
Bạn phải ăn số thức ăn được cung
cấp trong màn bằng cách điều khiển
rắn, con rắn này sẽ tăng kích thước
cơ thể từng chút một. Sử dụng các
phím Điều Hướng hoặc 2(lên), 4(trái),
6(phải), 8(xuống) để di chuyển rắn.
Trong khi nhập tên, hãy sử dụng
Menu 5.1
phím OK hoặc phím 5 để xác nhận.
Cài đặt trò chơi
Cho phép bạn đặt âm lượng lượng
và đèn nền cho trò chơi.
Cấu hình
1. Chỉ Rung / 2. Im lặng / 3. Thông
thường / 4. Ngoài trời / 5. Tai nghe
Cấu hình cho phép bạn cài đặt nhạc
cho điện thoại của bạn tuỳ theo
môi trường xung quanh. Mỗi cấu
hình bao gồm các cài đặt cho Kiểu
chuông, Nhạc chuông, Âm lượng
chuông, Âm lượng loa, Âm lượng tai
nghe, Âm lượng phím, và Chuông
tin nhắn.
Menu 5.2
Menu 6
Sổ tay
Lịch làm việc
Đơn giản chỉ cần lưu các cuộc hẹn
Menu 7.1
19
Page 48

và điện thoại sẽ báo cho bạn bằng
một nhắc nhở về cuộc hẹn. Có thể
lưu tới 60 cuộc hẹn.
Ghi nhớ
Ghi lại các sự kiện đáng nhớ.
Có thể lưu tới 20 sự kiện.
Báo thức
Để đặt thời gian báo thức một sự
kiện. Có thể lưu tới 4 thời điểm báo
thức. (Báo thức 1~3 và Báo thức
nhanh)
Menu 7.2
Menu 7.3
Hộp công cụ
Bấm giờ
Cho phép bạn đo thời gian chính
xác.
Máy tính
Tính các phép tính toán học đơn
giản.
20
Menu 8.1
Menu 8.2
Giờ quốc tế
Sẽ hữu ích nếu bạn cần thực hiện một
cuộc gọi tới một nước khác, và bạn
không rõ sự sai khác về thời gian.
Đổi đơn vị đo
Công cụ Đổi đơn vị đo cung cấp các
đơn vị chuyển đổi khác nhau như
là Tiền tệ, Độ dài, Diện tích, Khối
lượng, Thể tích, Nhiệt độ, và Vận
tốc.
Menu 8.3
Menu 8.4
Cài đặt
Mục riêng
Cho phép bạn truy cập vào menu
ưu thích nhanh chóng bằng cách
tùy chỉnh menu riêng.
Chuyển cuộc gọi
Trong điện thoại, tính năng chuyển
cuộc gọi cho phép bạn chuyển tiếp
tất cả các cuộc gọi đến tới một số
điện thoại khác.
Menu 9.1
Menu 9.2.1
Page 49

Cuộc gọi chờ
Khi đang có một cuộc gọi, bạn có
thể nghe thấy 2 tiếng bíp báo cho
bạn biết đang có một cuộc gọi đến
khác.
Khi tính năng Cuộc gọi chờ được
bật, bạn có thể giữ cuộc gọi hiện
hành trong khi trả lời cuộc gọi đến
khác.
Menu 9.2.2
Chấp nhận cuộc gọi
Cho phép bạn lọc cuộc gọi từ những
số điện thoại được xác định trước.
Người gọi ở đầu dây đằng kia của
các số điện thoại bị lọc sẽ không thể
gọi cho bạn.
Menu 9.2.3
T. lời bằng phím b.kỳ
Khi điện thoại của bạn đổ chuông,
nhấn phím bất kỳ để trả lời ngoại trừ
phím
.
Menu 9.2.4
Tự gọi lại
Đặt khoảng thời gian điện thoại chờ
trước khi tự động quay số lại khi
cuộc gọi không thành công.
Đếm thời gian gọi
Bạn có thể đặt điện thoại của bạn
để hiển thị thời gian gọi đã trôi qua
khi cuộc gọi được kết nối.
Menu 9.2.5
Menu 9.2.6
Báo kết nối cuộc gọi
Đây là một tính năng để báo cho
bạn biết rằng kết nối cuộc gọi đã
được thiết lập.
Menu 9.2.7
Gửi tin khi từ chối cuộc gọi
Sửa đổi tin nhắn bạn muốn gửi
trong khi từ chối cuộc gọi bằng cách
nhấn Phím mềm phải.
Menu 9.2.8
21
Page 50

Mã gọi quốc tế
Người sử dụng có thể thực hiện một
cuộc gọi quốc tế bằng cách sử dụng
dấu ‘+’ làm mã quốc tế khi nhập số.
Nếu người sử dụng nhập dấu ‘+’ khi
nhập số và nhấn phím gửi, dấu ‘+’
sẽ được đổi thành mã quốc tế được
xác định trước bởi người sử dụng.
Nhấn và giữ phím ‘0’, ‘0’ sẽ được
i thành ‘+’.
đổ
Khóa phím
Cho phép bạn bảo vệ bàn phím
điện thoại tránh khỏi việc bấm phím
tình cờ. Tính năng Khoá bàn phím
sẽ tự động khóa bàn phím sau một
khoảng thời gian do người sử dụng
chọn trước. Chức năng tự động
khóa bàn phím có thể được đặt từ
menu cài đặt điện thoại. Khi được
đặt là Bật, bạn có thể đặt thời gian
từ 10 giây đến 9 phút 59 giây.
22
Menu 9.2.9
Menu 9.3.1
Chế độ máy bay
Khi điện thoại ở in chế độ Trên Máy
Bay, sẽ không thể thực hiện hay
nhận bất kỳ cuộc gọi nào hoặc truy
cập vào bất kỳ một thông tin trực
tuyến nào.
Báo Dịch vụ
Báo cho bạn biết khi dịch vụ thay
đổi.
Số ĐT chủ
Cho phép bạn kiểm tra số điện thoại
của chính bạn.
Phiên bản
Xem phiên bản S/W và PRL.
Hỏi mã PIN
Khi được Bật, điện thoại sẽ yêu cầu
bạn nhập Mã PIN cho việc xác minh
người sở hữu thẻ. Khi bật điện thoại
lên, hãy nhập mã PIN (mã nhận
dạng cá nhân) của thẻ R-UIM.
Menu 9.3.2
Menu 9.3.3
Menu 9.3.4
Menu 9.3.5
Menu 9.4.1
Page 51

Nếu không có Mã PIN, bạn không
thể truy cập vào danh bạ, Tin nhắn
SMS hay thực hiện/trả lời cuộc gọi.
Để được trợ giúp thêm, vui lòng liên
hệ với trung tâm chăm sóc khách
hàng.
Mã khóa
Giữ không cho điện thoại của bạn bị
sử dụng trái phép.
(Mã Khóa Mặc Định là 0000)
Số khẩn cấp
Bạn có thể gọi các số 113, 114, 115
ngay cả khi điện thoại bị khóa hoặc
bị hạn chế.
Bạn có thể thêm tối đa 2 số khẩn
cấp do người sử dụng tự đặt.
Đổi mã
Mã khoá mới cho phép bạn nhập
một mật mã khoá gồm 4 chữ số mới
hoặc Mã PIN mới.
Menu 9.4.2
Menu 9.4.3
Menu 9.4.4
Cài đặt lại
Xóa tất cả thông tin được lưu trong
Danh bạ hoặc tất cả dữ liệu được
lưu trong điện thoại và trở về giá trị
mặc định hoặc xác lập lại một số
cài đặt menu về giá trị ban đầu của
chúng.
Menu 9.4.5
Các chức năng sử
dụng khi đàm thoại
Ghi nhớ
Trong khi Gọi : Menu 1
Nó cho phép bạn Ghi lại số điện
thoại mà người khác cung cấp cho
bạn trong khi gọi.
Có thể lưu tối đa là 20 số.
Tìm kiếm
Trong khi Gọi : Menu 2
Nó cho phép bạn tìm các liên lạc từ
danh bạ của bạn.
23
Page 52

Không Chuông/Bật tiếng
Trong khi Gọi : Menu 3
Tính năng này khóa micrô điện thoại
của bạn và không cho người khác
nghe thấy tiếng từ phía bạn.
Điều chỉnh bật chế độ loa
ngoài
Trong khi Gọi: Nhấn
Trong khi gọi, để nhanh chóng kích
hoạt hay huỷ loa ngoài, nhấn
.
Tin nhắn
Nhấn phím điều hướng lên để vào
mục Tin nhắn.
24
Page 53

THÔNG TIN VỀ AN TOÀN
Vui loìng âoüc vaì tuán theo thäng
tin âãø sæí duûng âiãûn thoaûi an toaìn
vaì thêch håüp vaì traïnh gáy hæ haûi.
Baûn cuîng luän âãø hæåïng dáùn sæí
duûng åí nåi dãù tçm sau khi âoüc.
An toàn cho Bộ sạc và Bộ
đổi điện
● Bäü naûp pin vaì bäü âäøi âiãûn chè
âæåüc thiãút kãú âãø sæí duûng trong
nhaì.
Thông tin và chăm sóc pin
● Xin hãy huỷ pin của bạn đúng
cách.
● Chè sæí duûng nhæîng bäü naûp
âæåüc LG phê chuẩn daình riãng
cho mẫu âiãûn thoaûi cuía baûn
kéo dài tối đa tuổi thọ của pin.
● Khäng thaïo råìi hoàûc làm ngắn
maûch pin.
●
Giæî saûch caïc tiếp điểm kim loại
cuía pin.
● Naûp laûi pin nếu không sử dụng
trong một thời gian dài âãø täúi
âa tuäøi thoü cuía pin.
● Tuäøi thoü cuía pin tuìy thuäüc vaìo
caïch sæí duûng vaì âiãöu kiãûn mäi
træåìng.
● Chæïc nàng tæû baío vãû cuía pin
ngàõt nguäön âiãûn pin khi pin hoaût
âäüng åí traûng thaïi khäng bçnh
thæåìng. Trong træåìng håüp naìy,
thaïo pin ra khoíi âiãûn thoaûi, làõp
tråí laûi, vaì báût âiãûn thoaûi.
25
Page 54

Lưu ý chung
● Sæí duûng pin bë hoíng hoàûc âãø
pin vaìo trong miãûng coï thãø gáy
cháún thæång nghiãm troüng.
● Khäng âàût nhæîng váût coï chæïa
caïc thaình pháön tæì tênh nhæ laì
theí tên duûng, säø ngán haìng
hoàûc veï taìu âiãûn ngáöm gáön
âiãûn thoaûi cuía baûn. Tæì trường
cuía âiãûn thoaûi coï thãø laìm hoíng
dæî liãûu læu trãn theí tæï.
● Noïi chuyãûn âiãûn thoaûi trong mäüt
thåìi gian daìi coï thãø laìm giaím
cháút læåüng cuäüc goüi do nhiãût
sinh ra khi đàm thoại.
● Khi khäng sæí duûng âiãûn thoaûi
trong thåìi gian daìi, âãø noï åí nåi
an toaìn vaìo thaïo dáy nguäön.
26
● Sæí duûng âiãûn thoaûi gáön thiãút bë
thu (nhæ laì TV hoàûc maïy thu
thanh) coï thãø gáy nhiãùu cho
âiãûn thoaûi.
● Khäng sæí duûng âiãûn thoaûi nãúu
anten bë hoíng. Nãúu anten bë
hoíng tiãúp xuïc våïi da, noï coï thãø
laìm boíng nheû. Vui loìng liãn
hãû våïi Trung Tám Dëch Vuû UÍy
Quyãön cuía LG âãø thay anten bë
hoíng.
● Khäng âãø næåïc vaìo âiãûn thoaûi
cuía baûn. Nãúu âiãöu naìy xaíy ra,
tàõt âiãûn thoaûi ngay láûp tæïc vaì
thaïo råìi pin. Nãúu âiãûn thoaûi
khäng laìm viãûc, hãy mang
máyï tåïi Trung Tám Dëch Vuû UÍy
Quyãön cuía LG .
Page 55

● Dáy âiãûn cuía saín pháøm naìy có
thể làm bạn bị nhiễm chì, mäüt
hoïa cháút, theo Bang California,
coï thãø gáy (ung thæ) khuyãút táût
sinh nåí hoàûc nguy haûi cho sinh
saín khaïc. Ræía tay sau khi sæí
duûng âiãûn thoaûi.
● Khäng sån âiãûn thoaûi cuía baûn.
● Dæî liãûu âæåüc læu trong âiãûn
thoaûi cuía baûn coï thãø bë xoïa do
sæí duûng thiãúu cáøn tháûn, do viãûc
sæía chæîa, hoàûc do náng cáúp
pháön mãöm. Vui loìng sao læu
nhæîng säú âiãûn thoaûi quan troüng
cuía baûn. (Nhaûc chuäng, tin
nhàõn chæî, tin nhắn thoại, hình
ảnh, vaì video cuîng coï thãø bë
xoïa.) Nhaì saín xuáút khäng chëu
traïch nhiãûm vãö nhæîng thiãût haûi
do máút dæî liãûu.
● Khäng báût hoàûc tàõt âiãûn thoaûi
khi âàût åí caûnh tai.
27
 Loading...