

Page 1

ENGLISH
Quick Start Guide
For online help and support, visit
support.google.com/nexus
MBM63821901 (1.2) G
Printed in Korea
Page 2

Page 3

Googl e, Android , Gmail, Google Maps, Nexus, Google Pl ay,
YouTube, Googl e+, and other trademarks are pro per ty of Go ogle
Inc. A list of Goo gle tradema rks is available at
google.com/per missions/guidelines. html. LG and the LG logo
are trademarks of LG El ectronics Inc. All othe r trademarks are
properti es of the ir respective owne rs.
The content of this guide may differ in some details from the
produ ct or its software. A ll info rmation in this document is
subje ct to change wi thout notice.
For online help and support, visit su ppor t.google.c om/ne xus
NE XU S 4 QUICK START GU IDE 1
http://www.
Page 4
2 NEXUS 4 QUICK START GU IDE
NE XU S 4 QUICK START GU IDE 3
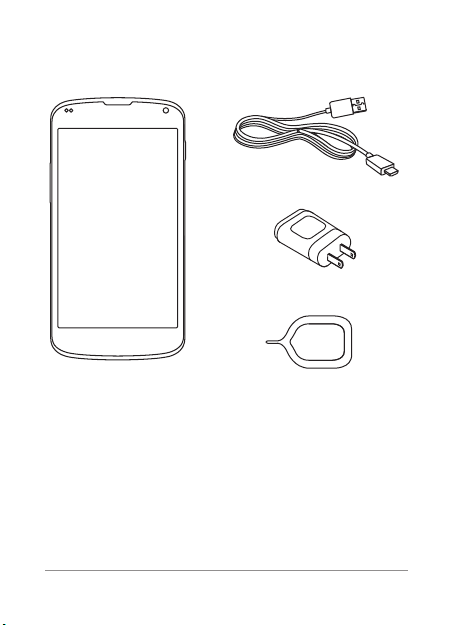
What’s in the box
Micro USB cable
Travel adapter
Nexus 4
SIM ejection tool
This Quick Start Guide and a Safety & Warranty booklet
are also included.
•
If any item is damaged or missing , contact your point
of purchase for assistance.
•
Use only approved accessories.
•
Accessories may var y by country or region.
Page 5
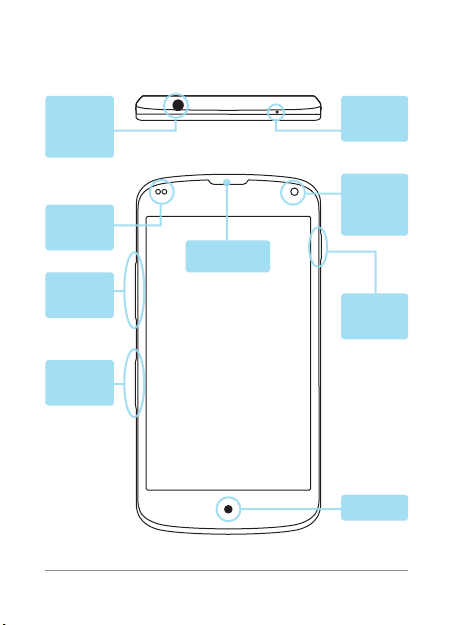
Your Nexus 4
3.5mm
headset
jack
Proximity
sensor
Volume
key
SIM card
tray
NE XU S 4 QUICK START GU IDE 3
TOP
Earpiece
FRONT
Micro phone
Frontfacing
camera
Power/
Lock key
LED
Page 6

4 NEXUS 4 QUICK START GU IDE
NE XU S 4 QUICK START GU IDE 5
Camera
lens
3.5mm
headset
Power/
jack
Lock key
Volume
Flash
Induc tion
coil
key
Speaker
BACK
Charger/USB/
SlimPort
Micro phone
BOTTOM
Page 7

Charge the battery
Your battery will not be fully charged when you rst
unpack your Nexus 4. It’s a good idea to fully charge the
battery as soon as you get a chance.
If you’re using the travel adapter that comes with the
phone, connect one end of the data cable to the charger
port at the bottom of the phone, and the other end to
the travel adapter. Then connect the travel adapter to a
power outlet.
NE XU S 4 QUICK START GU IDE 5
Page 8

6 NEXUS 4 QUICK START GU IDE
NE XU S 4 QUICK START GU IDE 7
The travel adapter varies by country or region.
•
•
Use only the travel adapter and Micro USB
cable that come with your Nexus 4. Using a
different travel adapter or cable may damage
your phone.
•
The input voltage range between the wall
outlet and this travel adapter is AC 100V–
240V, and the travel adapter’s output voltage
is DC 5V, 1.2A.
•
Charging your phone through a USB cable
attached to another device, such as a laptop
computer, takes longer than charging with a
travel adapter.
•
Nexus 4’s batter y can’t be removed. Don’t
attempt to open the phone.
If you’re using a wireless charger, see the instructions
that come with the charger.
IMPORTANT: If you use a wireless charger, you
must use an approved model and only as directed. The Nexus 4 travel adapter may not generate
enough current to power a wireless charger.
Page 9

Insert Micro SIM card & turn on phone
Before you star t using your phone, you may need to
inser t your Micro SIM card. If no card is installed, the
message “No SIM card” appears on the phone’s lock
screen.
Eject
button
aper ture
The SIM card tray is located on the left side of the
phone below the volume button. The eject button is a
small round aperture just above the tray door. To install
a new Micro SIM card:
1.
Inser t the SIM ejection tool that comes with the
phone (or a thin pin) into the eject button aper ture,
and push rmly but gently until the tray pops out.
NE XU S 4 QUICK START GU IDE 7
Page 10

8 NEXUS 4 QUICK START GU IDE
NE XU S 4 QUICK START GU IDE 9
2.
Remove the tray and place the micro SIM card inside
it, with the contacts out and the angled corner to the
right. There is only one possible way to t the card
snugly into the tray.
3.
Carefully reposition the tray in the slot and push it
gently back into the phone.
TIP: Your phone’s IMEI identication number is
on the SIM card tray. You may need this number
later to identif y your phone for ser vice purposes.
Write the IMEI number down in your QSG or take a
photo of the label on the product box.
To turn on your Nexus 4
, press and hold the Power
button on the right edge near the top for a few seconds.
Power/
Lock key
Page 11

When Nexus 4 is on, press the Power button again to
put it into sleep mode or wake it up.
To turn off your Nexus 4,
press and hold the Power
button until a conrmation dialog appears. Then touch
to complete the shut down.
OK
To restart your Nexus 4 if it becomes unresponsive,
press and hold the Power/Lock key for at least 10
seconds.
TIP: To quickly silence your phone or toggle
airplane mode, press and hold the power
button for one or two seconds to see a quick
conrmation dialog – even from the lock screen.
NE XU S 4 QUICK START GU IDE 9
Page 12

10 NE XU S 4 QUICK START GU IDE
NE XU S 4 QUICK START GU IDE 11
Set up your Nexus 4
The rst time you turn on your phone, you’ll see a
Welcome screen. To choose a different language, touch
the menu. Then touch
instructions.
A series of screens takes you through the setup
process. If you already have Gmail, use your Gmail
address and password when asked. If you don’t have
Gmail or any other Google Account, go ahead and
create one.
A Google Account lets you access your personal
information from any computer or mobile device:
•
Access from any where.
text messages, or social stream no matter where
you are or what computer or mobile device you’re
using – as long as you have a Wi-Fi or mobile data
connection. The same goes for Play music , movies,
or books in your Google Play libraries.
Never lose your contacts again. When you sign into
•
your phone with a Google Account, all the contacts
you associate with that account in the People
Star t and follow the on-screen
View your email messages,
Page 13

app are automatically backed up. They’re always
accessible through your Google Account from any
computer or mobile device.
Keep your stuff secure and available. Google works
•
around the clock to protect your personal data from
unauthorized access and to ensure that you get it
when you need it, wherever you need it.
Synchronize and back up all your data. Whether you
•
draft an email, add a contact, add an event to your
calendar, or take a photo, your work gets backed up
continuously by Google and synchronized with any
computer where you use the same Google Account.
Use other Google services. Your Google Account
•
also lets you take full advantage of any other Google
apps and services that you may want to use, such
as Gmail, Google Maps Navigation, Google Play,
YouTube, Google+, and many more.
If you skipped some of the steps in the Setup Wizard,
you can congure new accounts (including Gmail) and
adjust many other settings at any time. Touch the
All Apps icon from any Home screen, then
Settings.
For additional help and support, visit support.google.
com/nexus.
NE XU S 4 QUICK START GU IDE 11
Page 14

Airplane precautions
Check with airline personnel if you want to use your
Nexus 4 on board an aircraft. Most airlines have
restrictions for using electronic devices. Most airlines
allow electronic use only between and not during
takeoffs and landings.
There are three main types of airport security devices:
X-ray machines (used on items placed on conveyor
belts), magnetic detectors (used on people walking
through security checks), and magnetic wands (handheld devices used on people or individual items). You
can send your Nexus 4 through airport X-ray machines.
But do not send your Nexus 4 through airpor t magnetic
detectors or expose it to magnetic wands.
12 NE XU S 4 QUICK START GU IDE
Page 15

Page 16

Page 17

Page 18

 Loading...