

LG E720b, LG-E720b User Manual
P/N :
MFL66992701(1.0) H
www.lg.com/ca
LG-E720b
User Guide
Printed in Korea
E N G L I S H
FRANÇAIS

Bluetooth QD ID B017002
• Some of the contents of this
manual may not apply to your
phone depending on your phone’s
software or your service provider.
• This handset is not recommended
for the visually impaired because
of its touch-screen keypad.
• Copyright ©2010 LG Electronics,
Inc. All rights reserved. LG
and the LG logo are registered
trademarks of LG Group and
its related entities. All other
trademarks are the property of
their respective owners.
• Google™, Google Maps™,
Google Mail™, YouTube™,
Google Talk™ and Android
Market™ are trademarks of
Google, Inc.
LG-E720b User Guide
- English
Congratulations on your purchase of the advanced and compact
LG-E720b phone by LG, designed to operate with the latest digital
mobile communication technology.

2
Contents
Important notice .....................5
1. Phone memory ..................5
2. Optimising battery's life ......5
3.
Installing an open source OS
..6
4. Using unlock pattern...........7
5. Using safe mode and
hard reset ..........................7
6.
Connecting to Wi-Fi networks
..8
7. Using a microSD card .........9
8. Opening and switching
applications .......................9
9. Installing the LG PC suite
on your PC .......................10
10.
Connecting your phone
to a computer via USB...... 12
11. Unlock screen when
using data connection ...... 13
12. Do not connect your
phone when you power
on/off your PC ...............13
13.
Hold your phone straight up
13
14. When screen freezes ......13
Getting to know your phone...14
Installing the SIM card and
battery ................................16
Charging your phone ............17
Installing the memory card ...17
Formatting the memory card ...19
Your Home screen ................20
Touch-screen tips ................20
Proximity sensor ..................20
Lock your phone ..................20
Unlock screen ......................21
Home .................................21
Adding widgets to your
home screen .......................22
Getting back to a recently
used applications .................23
Onscreen keyboard ..............25
XT9 predictive mode ............26
Abc mode ............................26
123 Mode ...........................26
Entering accented letters ......26
Example ..............................26
Google Account Set-up .........27
Creating your Google account
..27
Signing in your Google account
..27
Calls/Contacts .......................29
Making a call .......................29
Calling your contacts ............29
Answering and rejecting a call
..29
Adjusting call volume ...........30
Making a second call ...........30
Viewing your call logs ...........30
Call settings .........................30
Contacts ..............................32
Searching for a contact ........32
Adding a new contact ...........32
Favourite contacts ................33
Messaging/E-mail .................34

3
Messaging ...........................34
Sending a message ..............34
Changing your message settings
35
Opening your email and
email accounts screen..........37
Reading your messages .......38
Responding to a message ....38
Starring messages ...............38
Composing and sending email
..39
Working with account folders ..40
Adding and editing email accounts
40
Social networking .................41
Adding your account to your phone
41
Viewing and updating your status
41
Removing accounts on your phone
42
Camera .................................43
Getting to know the viewfinder
..43
Using the focus mode ...........44
Taking a quick photo ...........44
Once you’ve taken the photo ...44
Using the advanced settings ...45
Viewing your saved photos ...47
Video camera ........................48
Getting to know the viewfinder 48
Shooting a quick video .........49
After shooting a video ...........49
Using the advanced settings ...49
Watching your saved videos ...50
Adjusting the volume when
viewing a video ....................50
Your photos and videos ........51
Editing your photos ..............51
Multimedia ............................52
To change how the contents
of an album are displayed .....52
Sending a photo ...................52
Sending a video ...................53
Music ..................................53
Playing a song .....................53
Using the radio ....................54
Searching for stations ..........54
Resetting channels ...............54
Listening to the radio ............54
Transferring files using
USB mass storage devices ....55
How to save music/video
files to the phone .................56
How to move the contacts from
the old phone to the current phone
56
How to send data from
your phone via Bluetooth ......57
Google applications ..............59
Google Maps™ ...................59
Market™ ............................59
Google Mail™ .....................60
Google Talk™ ......................60
Utilities ..................................62
Setting your alarm ................62
Using your calculator ............62

4
Adding an event to your calendar
62
Changing your calendar view 63
ThinkFree Office...................63
Voice recorder .....................64
Recording a sound or voice ...64
Sending the voice recording ..64
The Web ................................65
Browser ...............................65
Using options .......................65
Adding and accessing bookmarks
66
Changing web browser settings
66
Settings ................................67
Wireless & networks.............67
Sound .................................68
Display ...............................69
Location & security ..............69
Applications .........................72
Accounts & sync .................72
Privacy ................................72
SD card & phone storage ......73
Search ................................73
Language & keyboard ..........74
Voice input & output .............74
Accessibility .........................75
Date & time .........................76
About phone ........................76
Wi-Fi ...................................76
Sharing your phone’s
mobile data connection ........77
USB tethering & portable
Wi-Fi hotspot settings...........77
To share your phone’s
data connection via USB .......78
USB tethering and data sharing
78
To share your phone’s data
connection as a portable
Wi-Fi hotspot ........................79
To rename or secure your
portable hotspot ...................79
How to use On-Screen Phone
..80
On-Screen Phone icons ........80
On-Screen Phone features ....80
How to install On-Screen
Phone on your PC ................81
How to connect your
mobile phone to PC ..............81
To check the phone to PC
connection ..........................82
To disconnect your phone
from your PC .......................82
Phone Software update ........83
DivX Mobile ........................84
Accessories ..........................85
Technical data.......................85
Troubleshooting ....................86
For Your Safety .....................89
Safety Guidelines ..................96
Contents
5
Important notice
Please check to see if any
problems you have encountered
with your phone are described
in this section, before taking the
phone in for service or calling a
service representative.
1. Phone memory
When available space on your
phone memory is less than 10%,
your phone can not receive a new
message. You need to check your
phone memory and delete some
data such as applications or
messages to make more memory
available.
To manage the application:
1
On the home screen, touch
Applications
tab and
select
Settings > Applications
>
Manage applications
.
2
When all applications appear,
scroll and select the application
you want to uninstall.
3
Tap
Uninstall
and touch OK
to uninstall application you
desired.
2. Optimising battery's
life
You can extend your battery's
life between charges by turning
off features that you don't
need to run constantly in the
background. You can also
monitor how applications and
system resources consume
battery power.
To extend the life of your
battery:
• Turn off radio communications
that you aren't using. If you
aren't using Wi-Fi, Bluetooth,
or GPS, turn them off.
• Turn down screen brightness
and set a shorter screen
timeout.
• Turn off automatic syncing
for Google Mail, Calendar,
Contacts, and other
applications.
• Some applications you’ve
downloaded may cause your
battery’s life to be reduced.
6
To check the battery charge
level:
1
On the home screen, touch
Applications
tab and
select
Settings > About
phone > Status
.
2
The battery status (charging,
discharging) and level (as a
percentage of fully charged)
are displayed at the top of the
screen.
To monitor and control what
uses the battery:
1
On the home screen, touch
Applications
tab and
select
Settings > About
phone > Battery use.
2
The top of the screen displays
battery usage time. Either how
long since last connected to a
power source or, if connected
to a power source, how long
you were last running on
battery power. The body of the
screen lists applications or
services using battery power
from greatest amount to least.
3. Installing an open
source OS
If you install an open source
OS on your phone, and do not
use the OS provided by the
manufacturer, this may cause
your phone to malfunction.
WARNING
If you install and use an OS other
than the one provided by the
manufacturer, your phone is no
longer covered by the warranty.
WARNING
To protect your phone and
personal data, download
applications only from trusted
sources, such as Android
Market. If some applications
are not properly installed on
your phone, your phone may
not work normally or a serious
error can be occurred. You
will need to uninstall those
applications and all of its data
and settings from the phone.
Important notice

7
4. Using unlock pattern
Set unlock pattern to secure your
phone. Opens a set of screens
that guide you through drawing a
screen unlock pattern.
WARNING
Precautions to take when
using the Pattern Lock
It is very important that you
remember the unlock pattern
you set. You will not be able to
access your phone if you use
an incorrect pattern 5 times.
You have 5 opportunities to
enter your unlock pattern, PIN
or password. If you used all
the 5 opportunities, you can
attempt it after 30 seconds.
When you can’t recall your
unlock pattern, PIN, or password:
If you logged in Google account on
the phone and failed to use correct
pattern 5 times, tab the Forgot
pattern button. Then, you are
required to sign in with your Google
account to unlock your phone.
If you haven’t created a Google
account on the phone or you
forgot it, you need to perform a
factory reset.
5. Using safe mode and
hard reset
*Using safe mode
To recover from malfunction
state of your phone:
1
Turn off your phone and
reboot. When your phone
is powering back on, touch
and hold the Menu key while
Android Logo is displayed.
Your phone will boot all the
way to the main screen and
display "safe mode" in lower
left corner.
2
Select
Settings >
Applications > Manage
applications
, and choose the
application then select an
Uninstall
icon.
3
After uninstalling the
application, turn off and
reboot your phone.
8
* Using Hard Reset (Factory Reset)
If it does not restore to the
original condition, use
Hard
Reset
to initialise your phone.
If you press and hold the
Power
+ Volume up + Volume down
keys at the same time (for over
10 seconds), the phone will turn
on and perform factory reset
immediately.
Please note, after you perform
Hard Reset, all your data and
applications on your phone will be
erased and cannot be reversed.
WARNING
If you perform
Hard Reset
,
all user applications and
user data will be deleted.
Please remember to back up
any important data before
performing a
Hard Reset
.
6. Connecting to Wi-Fi
networks
To use Wi-Fi on your phone,
you access a wireless access
point, or “hotspot.” Some access
points are open and you can
simply connect to them. Others
are hidden or implement other
security features, so you must
configure your phone so it can
connect to them.
Turn off Wi-Fi when you're not
using it, to extend the life of your
battery.
To turn Wi-Fi on and connect to
a Wi-Fi network:
1
On the home screen, touch
Applications
tab and
select
Settings > Wireless &
networks > Wi-Fi settings
.
2
Touch
Wi-Fi
to turn it on and
begin scan for available Wi-Fi
networks.
• List of available Wi-Fi networks
is displayed. Secured networks
are indicated by a lock icon.
3
Touch a network to connect
to it.
• If the network is open, you
are prompted to confirm that
you want to connect to that
network by touching
Connect
.
Important notice
9
• If the network is secured,
you're prompted to enter
a password or other
credentials. (Ask your network
administrator for details.)
4
The status bar displays icons
that indicate Wi-Fi status.
7. Using a microSD card
Pictures, along with music and
video files, can only be saved to
external memory.
Before using the built-in camera,
you need to insert a micro SD
memory card to your phone first.
Without inserting a memory
card, you will not be able to
save pictures and video you had
taken.
WARNING
Do not insert or remove the
memory card when the phone
is on. Otherwise, it may damage
the memory card as well as
your phone, and the data
stored on the memory card
may be corrupted. To remove
the memory card safely, please
select
Applications
tab
> Settings > SD card&phone
storage > Unmount SD card.
8. Opening and switching
applications
Multi-tasking is easy with Android
because open applications keep
running even when you open
another application. There’s no
need to quit an application before
opening another. Use and switch
among several open applications.
Android manages each
application, stopping and starting
them as needed, to ensure that
idle applications don’t consume
resources unnecessarily.
10
To stop the application you use
1
On the home screen, touch
Applications tab and select
Settings> Applications>
Manage applications.
2
Scroll to the desire application
and touch
Force stop
to stop
using it.
TIP!
Getting back to recent Application
Touch and hold the Home key,
then a screen will display a listing
the applications you used recently.
9. Installing the LG PC
suite on your PC
To synchronise your phone via
USB cable with your PC, you
need to install the LG PC suite
program on your PC.
You can download this program
from the LG website (http://www.
lg.com/ca). Go to http://www.
lg.com/ca and select your
region, country & language.
Visit the LG website for more
information on installing and
using the program.
As PC suite is embedded at inboxed SD card. you can simply
copy it to your PC.
LG PC SUITE
The LG PC Suite IV is a
program that helps you
connect your mobile phone
to a PC using a USB data
communication cable, so that
you can use the functions of
the mobile phone on your PC.
Major functions of the LG PC
Suite IV
• Create, edit and delete
phone data conveniently
• Synchronise data from
a PC & phone (contacts,
calendar, message (SMS),
bookmark, call log)
• Transfer multimedia files
(photo, video, music)
conveniently with a simple
drag & drop between a PC
and phone
Important notice

11
• Transfer the messages from
a phone to a PC
• Use your phone as a
Modem
• S/W update without loosing
your data
LG-E720b does not support:
- PC Connection via
Bluetooth
- To-do in Calendar
- Memo
- Java Application
For more information, please
refer to the user's guide for
LG PC Suite IV is in Help
menu after installing LG PC
Suite IV.
Installing LG PC Suite from your
microSD memory card
1
Insert your microSD memory
card on your phone. (It may
already be inserted on your
phone.)
2
Before connecting the USB
data cable, make sure that
the
Mass storage only
mode
is enabled on your phone.
(On the
Applications
tab
, choose
Settings > SD card
& phone storage
, then select
Mass storage only
check
box.)
3
Connect your phone through
USB data cable to your PC.
(1) In the status bar, drag the
USB icon.
(2) Choose
USB Connected
and
Turn on USB storage
.
(3) You can view the mass
storage content on your PC
and transfer the files.
(4) Copy the ‘LGPCSuiteIV’ folder
on your mass storage to
your PC.
(5) Run ‘LGInstaller.exe’ file
on your PC and follow the
instructions.
* When LG PCSuite IV installation
completed, disable
Mass storage
only
mode to run LG PCSuite IV.
12
NOTE:
Please do not remove or
delete other program file installed
on your memory card this may
cause to damage your preinstalled application on the phone.
10.
Connecting your phone
to a computer via USB
To transfer files using USB
devices:
1
Install your microSD card on
your phone. ( It may already
be inserted on your phone.)
2
Before connecting the USB
data cable, make sure that
the
Mass storage only
mode
is enabled on your phone.
(On the
Applications
tab
choose
Settings > SD card
& phone storage
, then select
Mass storage only
check box.)
3
Use the USB cable with your
phone to connect the phone to
a USB port on your computer.
You receive a notification that
the USB is connected.
4
Open the notification drawer
and touch
USB connected
.
5
Touch
Turn on USB storage
to confirm that you want to
transfer files between your
phone’s microSD card and the
computer.
When the phone is connected
as USB storage, you receive
a notification. You phone’s
microSD card is mounted as a
drive on your computer. You can
now copy files to and from the
microSD card.
NOTE:
When uninstalling PC
Suite IV, USB and Bluetooth
Drivers are not automatically
removed. Therefore, they must
be uninstalled manually.
TIP!
To use a microSD card on
you phone again, you need to
open the notification drawer and
touch
Turn off USB storage.
During this time, you can’t
access the microSD card from
your phone, so you can’t use
applications that rely on the
microSD card, such as camera,
gallery and music functions.
Important notice

13
To disconnect your phone from
the computer, carefully follow
your computer’s instructions
to disconnect USB devices
correctly, to avoid losing
information on the card.
1
Safely disconnect the USB
device on your computer.
2
Open the notification drawer
and touch
Turn off USB
storage
.
3
Touch
Turn off USB storage
in
the dialog that opens.
11.
Unlock screen when
using data connection
Your display will go dark if
untouched for a period of time when
using data connection. To turn on
your LCD screen, just touch it.
12. Do not connect your
phone when you
power on/off your PC
Make sure to disconnect your
phone and PC via data cable as
it might have errors on your PC.
13. Hold your phone
straight up
Please hold your phone straight
up as a regular phone.The LGE720b has an internal antenna.
Be careful not to scratch or
damage this rear area, as that
will cause loss of performance.
While making/receiving calls or
sending/receiving data, try to
avoid holding the lower part of
the phone where the antenna is
located. It may affect call quality.
14. When screen freezes
If the phone does not respond to
user input or the screen freezes:
Remove the battery, insert it
again and power on the phone.
If it still does not work, please
contact to the service centre.
14
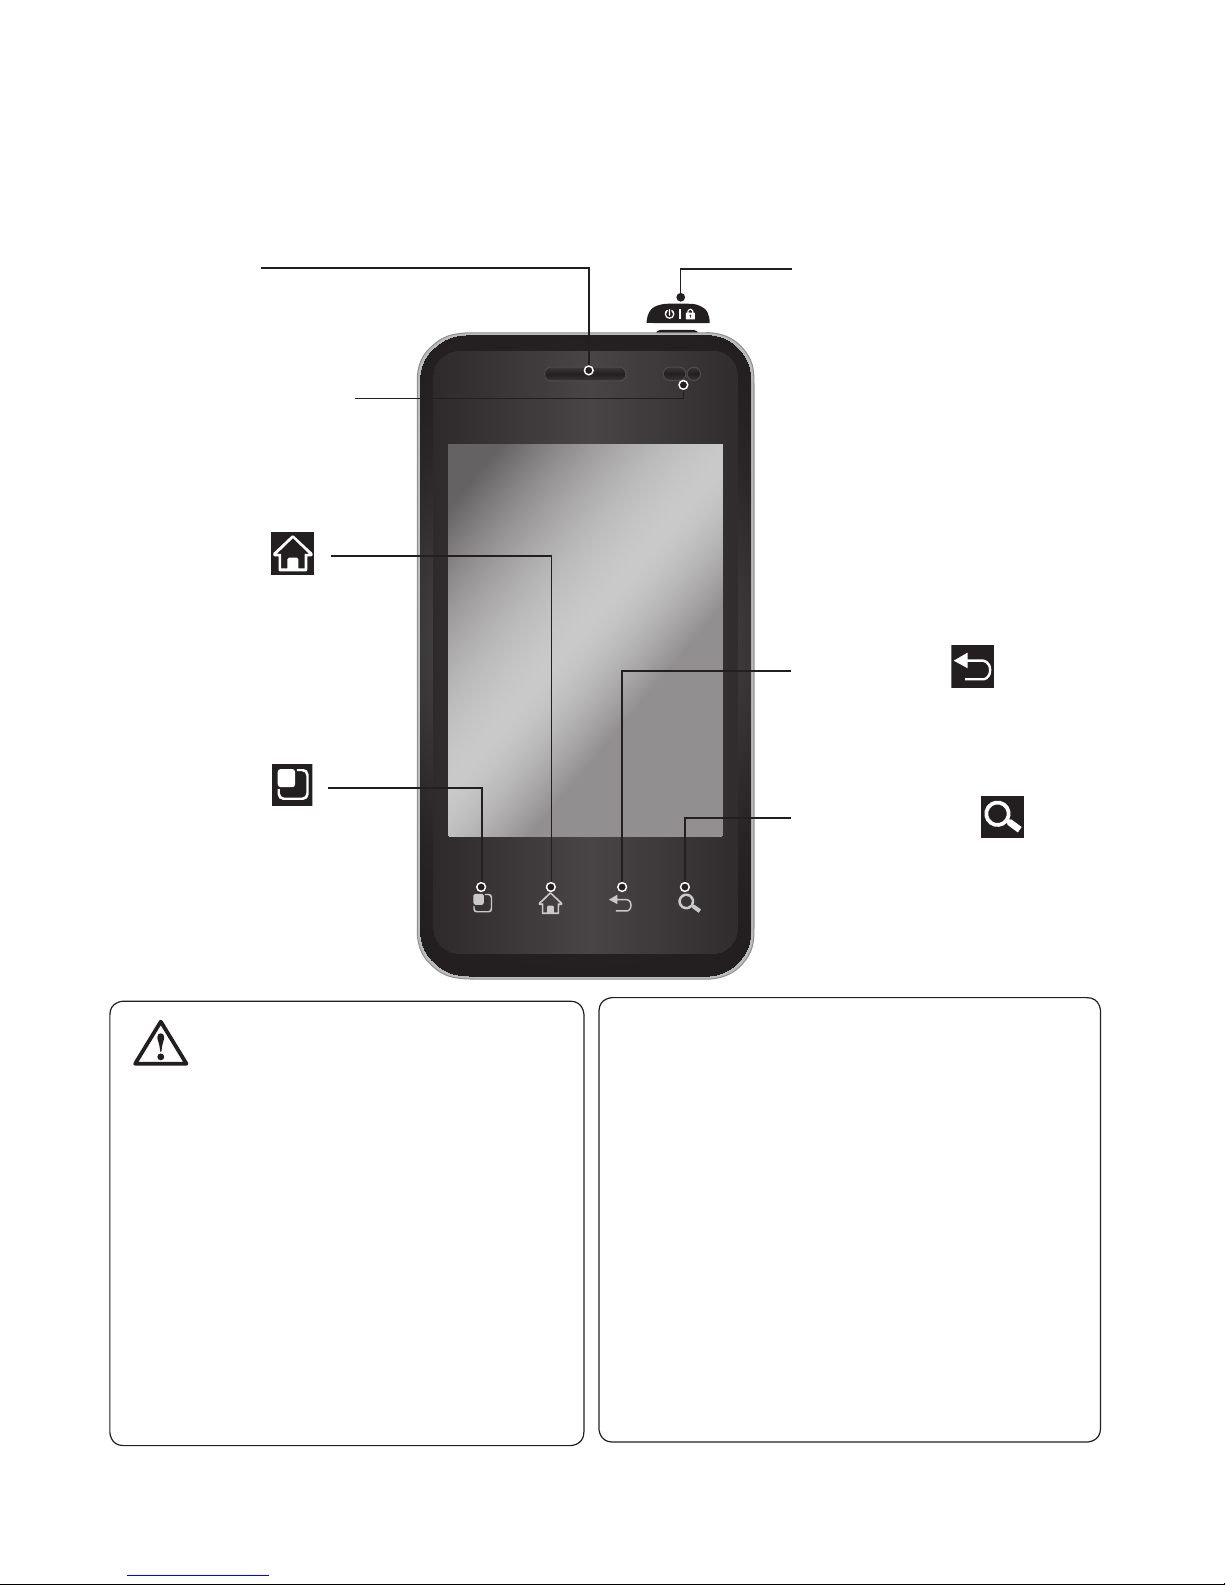
Getting to know your phone
To turn on the phone, press and hold the
Power
key for 3 seconds.
To Turn off the phone, press the Power key for 3 seconds and touch power off.
Home key
Returns to home
screen from any
screen.
Menu key
Check what options
are available.
Earpiece
Proximity sensor
Back key
Returns to the
previous screen.
Search key
Search the web and
contents in your
phone.
Power/Lock key
Powers your phone
on/off by pressing
and holding the key.
Turns off the screen
and locks.
WARNING
Placing a heavy object on
the phone or sitting on, it can
damage its LCD and touch
screen functionalities.
Do not cover the protective
film on the LCD’s proximity
sensor. This can cause the
sensor to malfunction.
TIP!
Touch the
Menu
key
whenever you tap an
application to check what
options are available.
TIP! If LG-E720b has errors when
you use it or you can not turn it on,
remove battery, install it again and
turn it on after 5 seconds.
NOTE:
LG-E720b does not
support Video call.
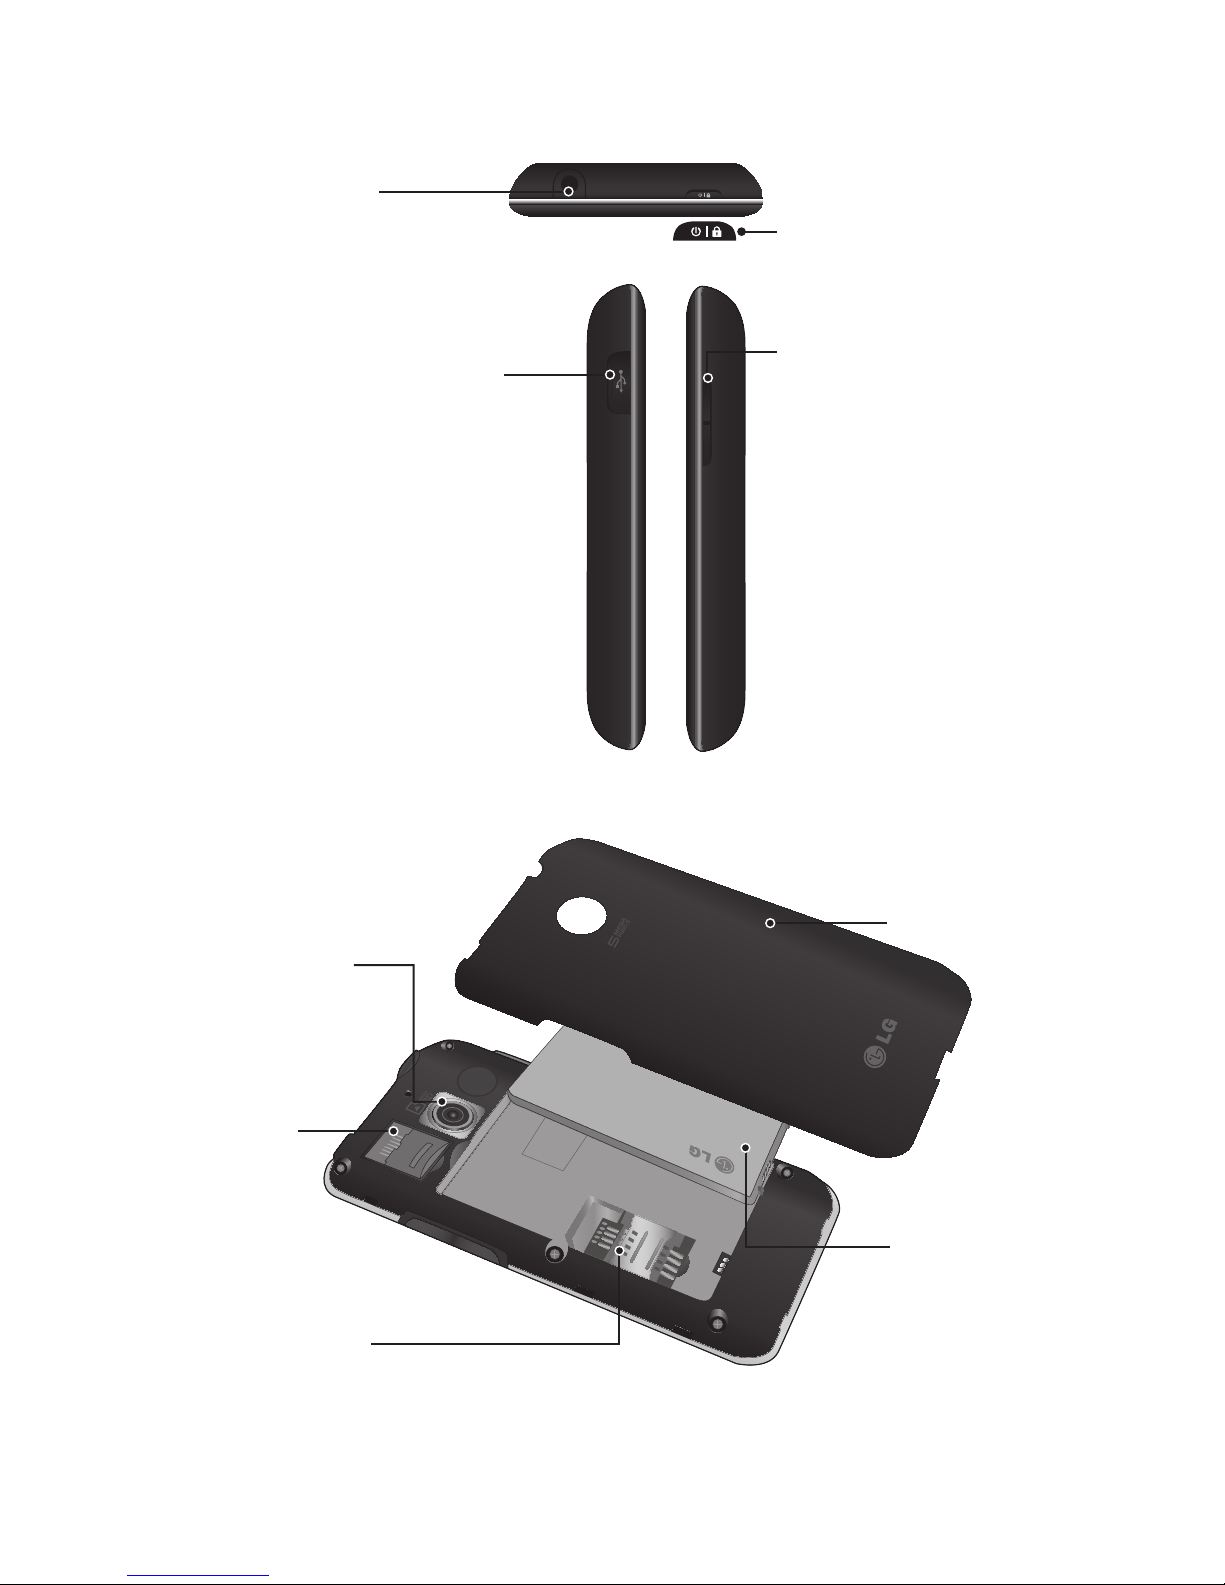
15
Back cover
Battery
SIM card slot
microSD
memory
card slot
Camera lens
Charger, micro USB cable
connector
Volume keys
On the home screen:
controls ringer volume.
• During a call: controls
your earpiece volume.
• When playing a track:
controls volume
continuously.
Stereo earphone
connector
Power/Lock key
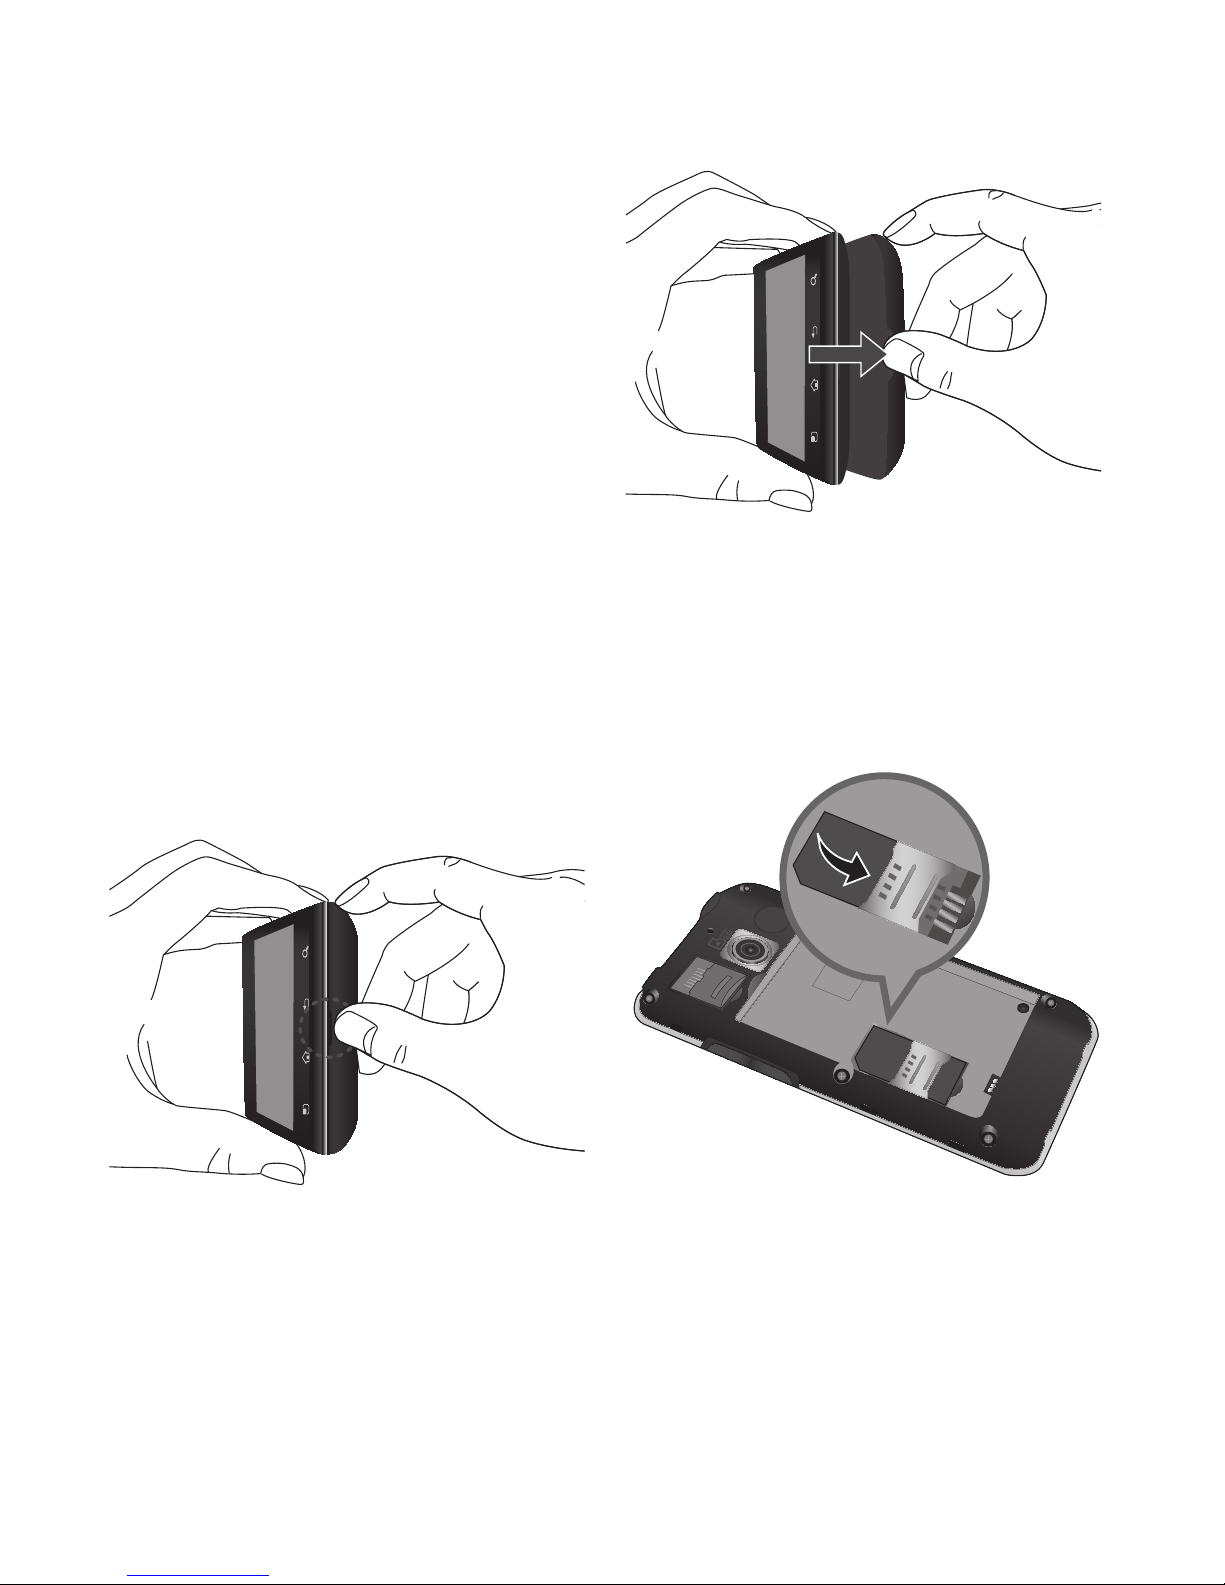
16
Installing the SIM card
and battery
Before you can start exploring
your new phone, you’ll need to
set It up. To insert the SIM card
and battery:
1
To remove the back cover,
hold the phone on your hand
firmly. With the other hand,
firmly press your thumb on
the back cover. And lift off
the battery cover with your
forefinger.
2
Slide the SIM card into the
SIM card holder. Make sure
the gold contact area on the
card is facing downwards.
Getting to know your phone

17
3
Insert the battery into place by
aligning the gold contacts on
the phone and the battery.
4
Replace the back cover of the
phone.
Charging your phone
Slide back the cover of the
charger connector on the side
of your LG-E720b. Insert the
charger, and plug it into an
electrical outlet. Your LG-E720b
must be charged until you can
see .
NOTE:
The battery must be fully
charged initially to improve battery
lifetime.
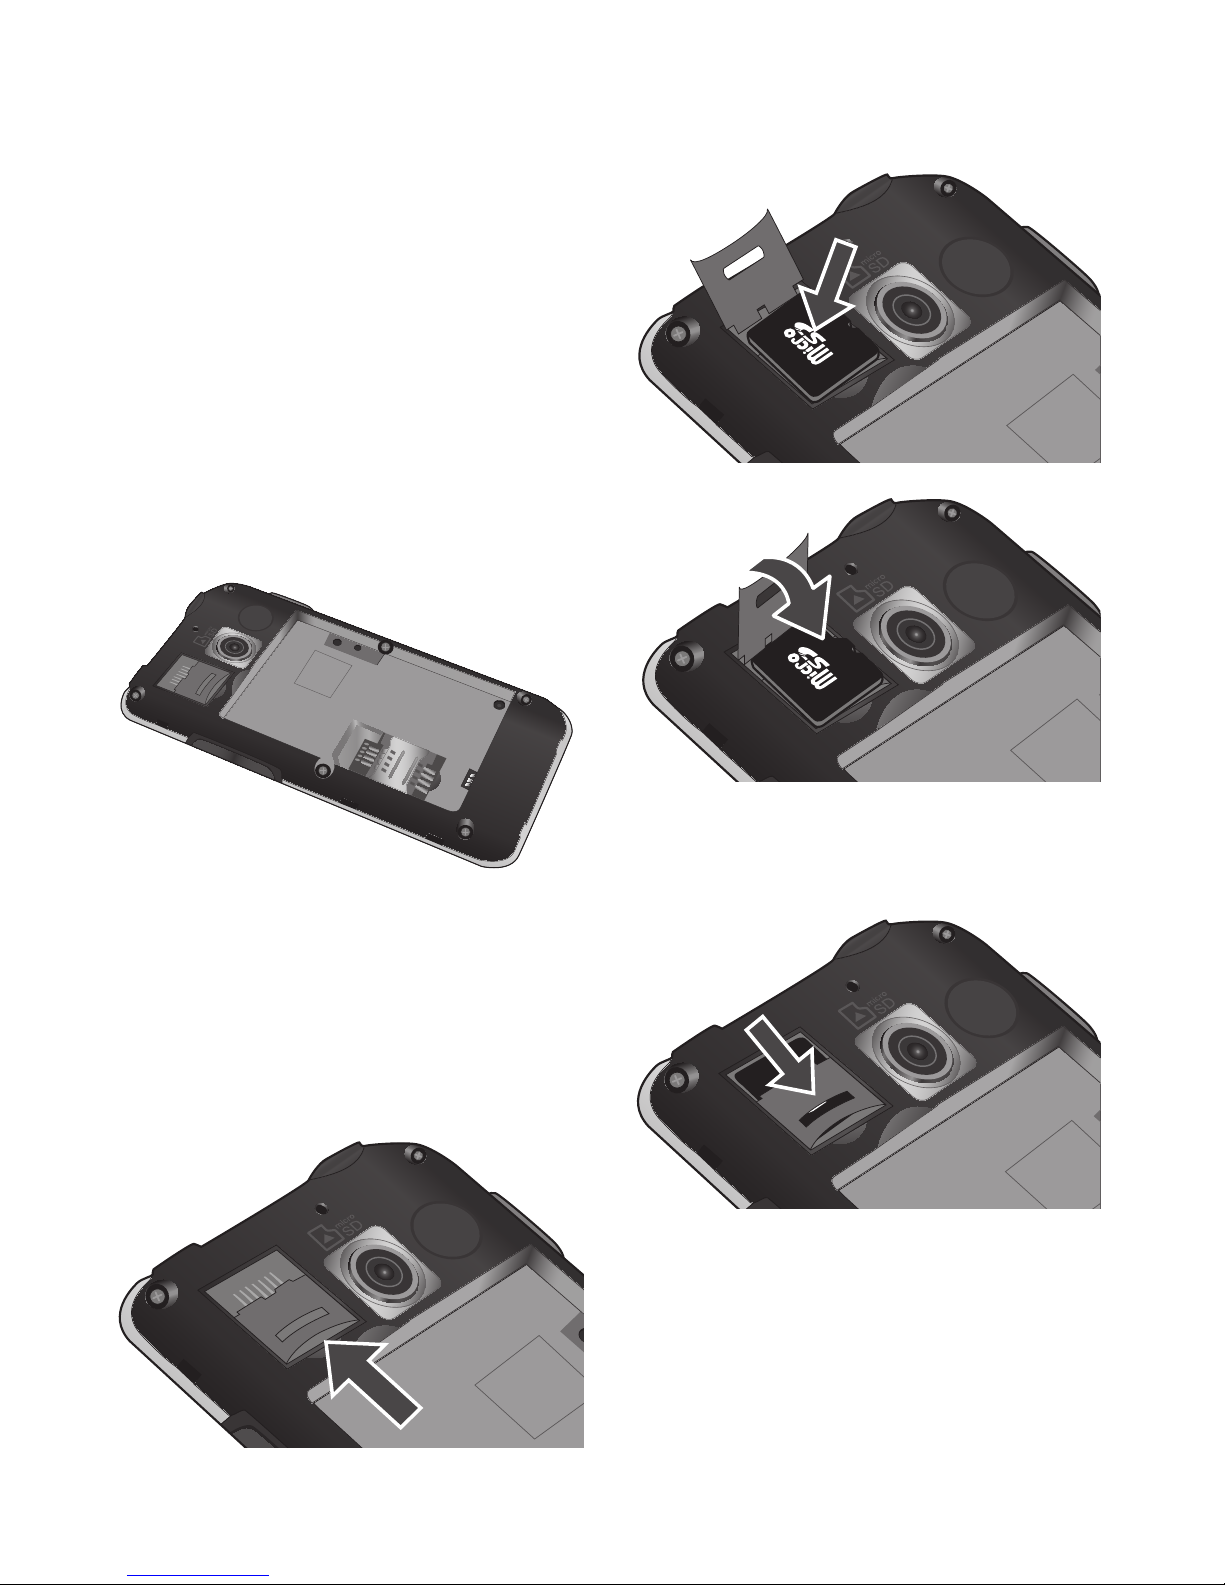
Installing the memory
card
To store multimedia files such
as captured images by using a
built-in camera, you must insert
a memory card to your phone.
18
NOTE:
The LG-E720b comes
preloaded with a memory card.
NOTE:
The LG-E720b supports
upto a 32 GB memory card.
To insert a memory card:
1
Turn the phone off before
inserting or removing the memory
card. Remove the back cover.
2
Open the slot protection and
insert the memory card into the
slot. Make sure the gold contact
area is facing downwards.
3
Close the slot protection.
Getting to know your phone
19
WARNING
Do not insert or remove the
memory card when the phone
is on. Otherwise, it may
damage the memory card as
well as your phone, and the
data stored on the memory
card may be corrupted.
Formatting the memory
card
Your memory card may already
be formatted. If it isn’t, you must
format it before you can use it.
NOTE:
All files on the card are
deleted when you format the
card.
1
On the home screen, touch
Applications
tab to open
the applications menu.
2
Scroll and touch
Settings
.
3
Scroll and touch
SD card &
phone storage
.
4
Touch
Unmount SD Card
.
5
Touch
Format SD card
, then
confirm your choice.
6
If you set the pattern lock,
input the pattern lock and
select
Erase Everything.
The
card will then be formatted
and ready to use.
NOTE:
If there is content on your
memory card, the folder structure
may be different after formatting
since all the files will have been
deleted.
TIP!
If your memory card is already
unmount, you can use the
following step to format it.
Touch
Applications
tab
> Settings > SD card & phone
storage > Format SD Card.

20
Your Home screen
Touch-screen tips
Here are some tips on how to
navigate around your phone.
Touch -
To choose a menu/
option or open an application,
touch it.
Touch and hold -
To open an
options menu or grab an object
you want to move, touch and
hold it.
Drag -
To scroll through a list or
move slowly, drag across the
touch screen.
Flick -
To scroll through a list or
move quickly, flick across the
touch screen (drag quickly and
release).
NOTE:
• To select an item, touch the
centre of the icon.
•
Do not to press too hard; the
touch screen is sensitive enough
to pick up a light, firm touch.
•
Use the tip of your finger to touch
the option you want. Be careful
not to touch any other keys.
Proximity sensor
When receiving and making calls,
this sensor automatically turns
the backlight off and locks the
touch keypad by sensing when
the phone is near your ear. This
extends battery life and prevents
the touch keypad from activating
unintentionally during calls.
Lock your phone
When you are not using LGE720b, press the
Power
key
to lock your phone. This helps
prevent accidental presses and
saves battery power.
If you do not use the phone for
a while, the home screen or
other screen you are viewing, is
replaced with the lock screen to
conserve the battery.
NOTE:
If there are any programs
running when you set the
pattern, they may be still running
in lock mode. It is recommended
to exit all programs before
entering the lock mode to avoid
21
unnecessary charges. (e.g.,
phone call, web access and data
communications)
TIP! Setting unlock pattern
You can draw your own
unlock pattern by connecting
four or more dots.
If you set a pattern, the
phone's screen is locked.
To unlock the phone, draw
the pattern you set on the
screen.
Caution:
When you set an
unlock pattern, you need
to create your Google Mail
account first.
Caution:
If there are more
than 5 pattern drawing
errors in a row, you cannot
unlock the phone. In
this case, your personal
information and downloaded
data will be deleted.
Unlock screen
To wake up your phone, press
the
Power
key. The lock screen
will appear. Touch the unlock
icon and drag your finger to
the right to unlock your home
screen. The last screen you were
working on opens.
Silent Mode
From the notification drawer,
touch to be . Or, if you
don't use unlock pattern, simply
drag to the left.
Home
Simply swipe your finger to the
left or right to view them.
You can also customise each
panel with widgets, shortcuts
which are shortcuts to your
favourite applications, folders
and wallpapers.
NOTE:
Some screen images may
be different depending on your
phone provider.

22
In your home screen, you can
view quick keys on the bottom
of the screen. The quick keys
provide easy, one-touch access to
the functions you use the most.
Touch the
Phone
icon to
bring up the touch-dialling pad
to make a call.
Touch to open your contacts.
Touch the
Applications
tab
at the bottom of the screen. You
can then view all your installed
applications. Just touch to scroll
through your applications.
To open the desire application,
simply touch its icon from the
applications list.
NOTE:
Preloaded applications
may be different depending on
your phone’s software or your
service provider.
Touch the
Message
icon to
access the messaging menu.
Here, you can create a new
message.
Touch to access the mobile
internet service.
Adding widgets to your
home screen
You can customise your home
screen by adding shortcuts,
widgets, or folders to it. For more
convenience using your phone,
add your favourite widgets on
the home screen.
To add an application icon from
the home screen:
1
On the home screen, touch
Menu
key and select
Add
. Or
long touch the empty part of
the home screen.
2
On the
Add to Home screen
menu, touch the type of item
you want to add.
3
For example, select
Folders
from the list and tap it.
Select
Contacts with phone
numbers
from the list and
tap it.
4
You will see a new folder’s icon
on the home screen. Drag it
to the desired location on the
desired panel and release your
finger from the screen.
Your Home screen
23
TIP!
To add an application
icon to home screen, on the
Applications
menu, touch
and hold an application you
want to add to home screen.
To remove an desired icon to
your home screen:
1
Touch and hold that icon you
want to remove. Applications
icon will be change as the
trash icon .
2
Drag and drop an application
icon to the trash icon .
NOTE:
You cannot delete the
preloaded applications. (Only
their icons can be deleted from
the screen.)
Getting back to a recently
used applications
1 Touch and hold the Home key.
The screen will show you a pop
up with icons of applications that
you've used recently.
2
Touch an icon to open its
application. Or, touch Back key to
return to the current application.
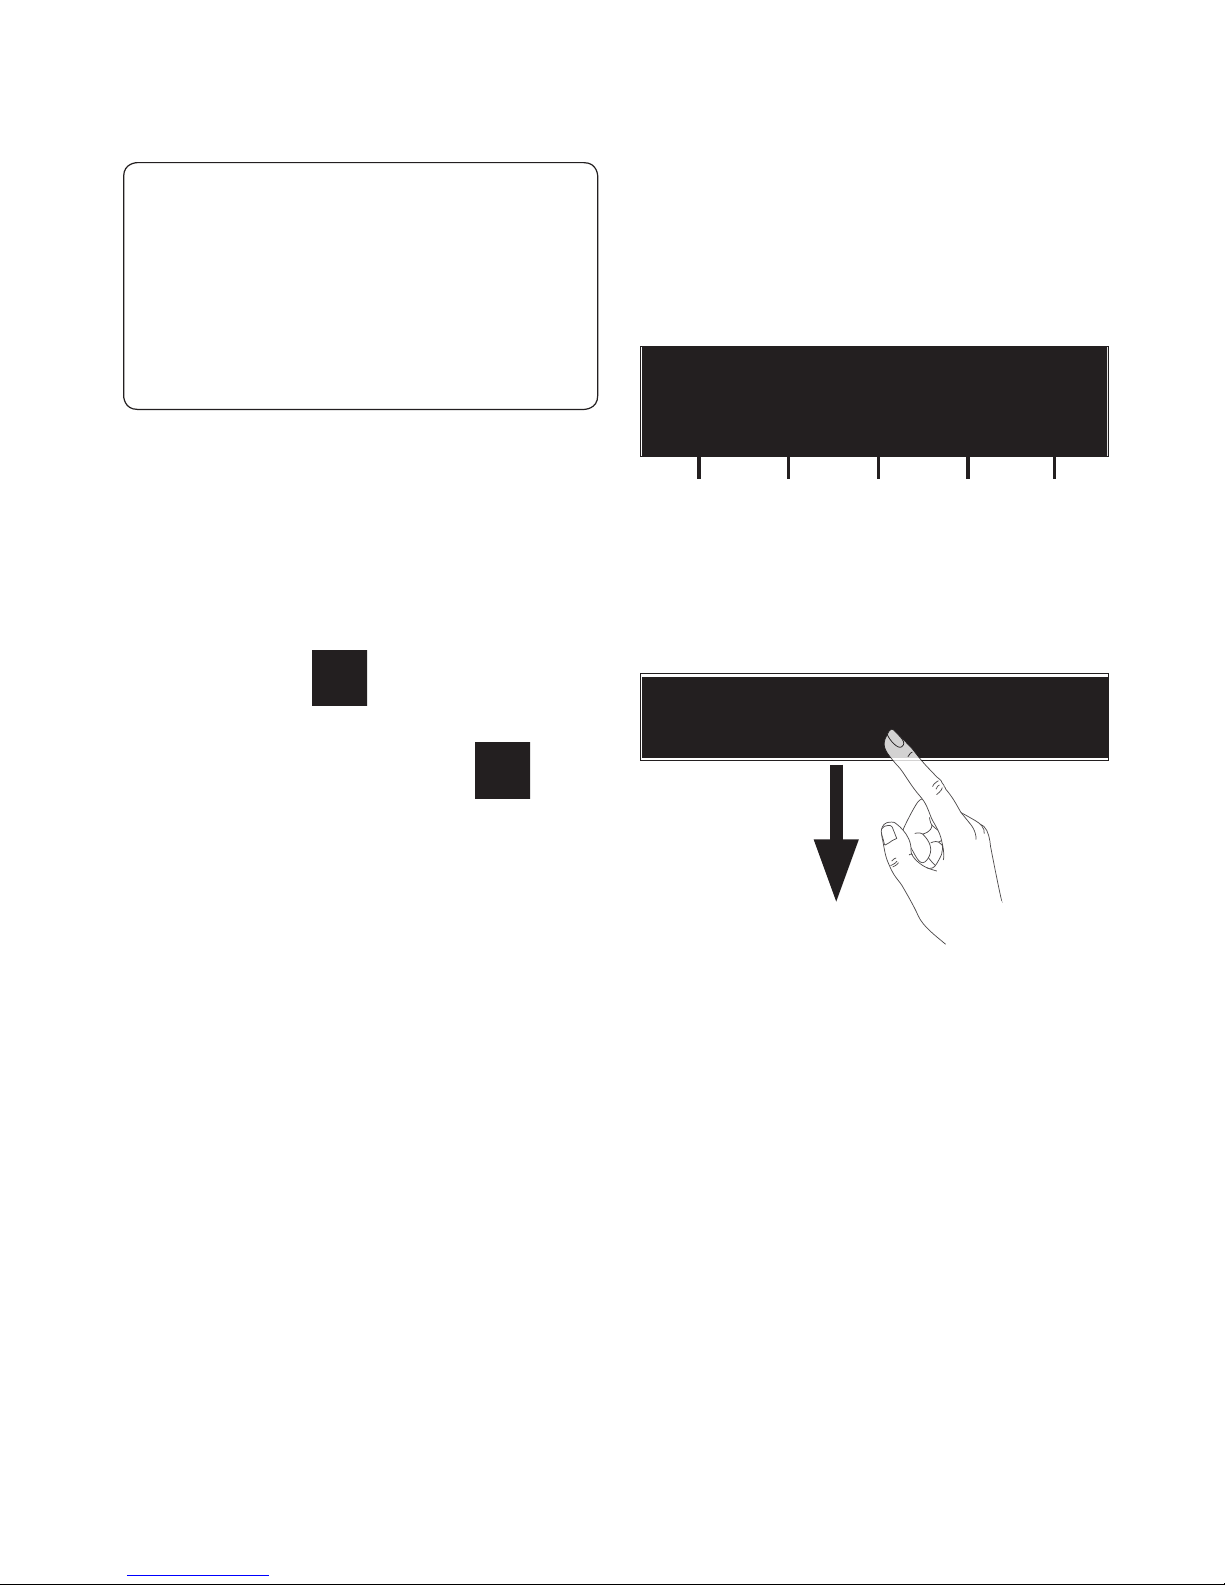
Notification drawer
The notification drawer runs
across the top of your screen.
3G
connection
GPSBluetooth
Wi-Fi
Ring
Touch and slide the notification
drawer down with your finger.
Or, on the home screen,
touch
Menu
key and select
Notifications
. Here, you can
check and manage Wi-Fi,
Bluetooth, GPS status as well as
other notifications.
24
Viewing the status bar
The status bar uses different
icons to display phone
information, such as signal
strength, new messages, battery
life, and active Bluetooth and
data connections.
Below is a table explaining the
meaning of icons you’re likely to
see in the status bar.
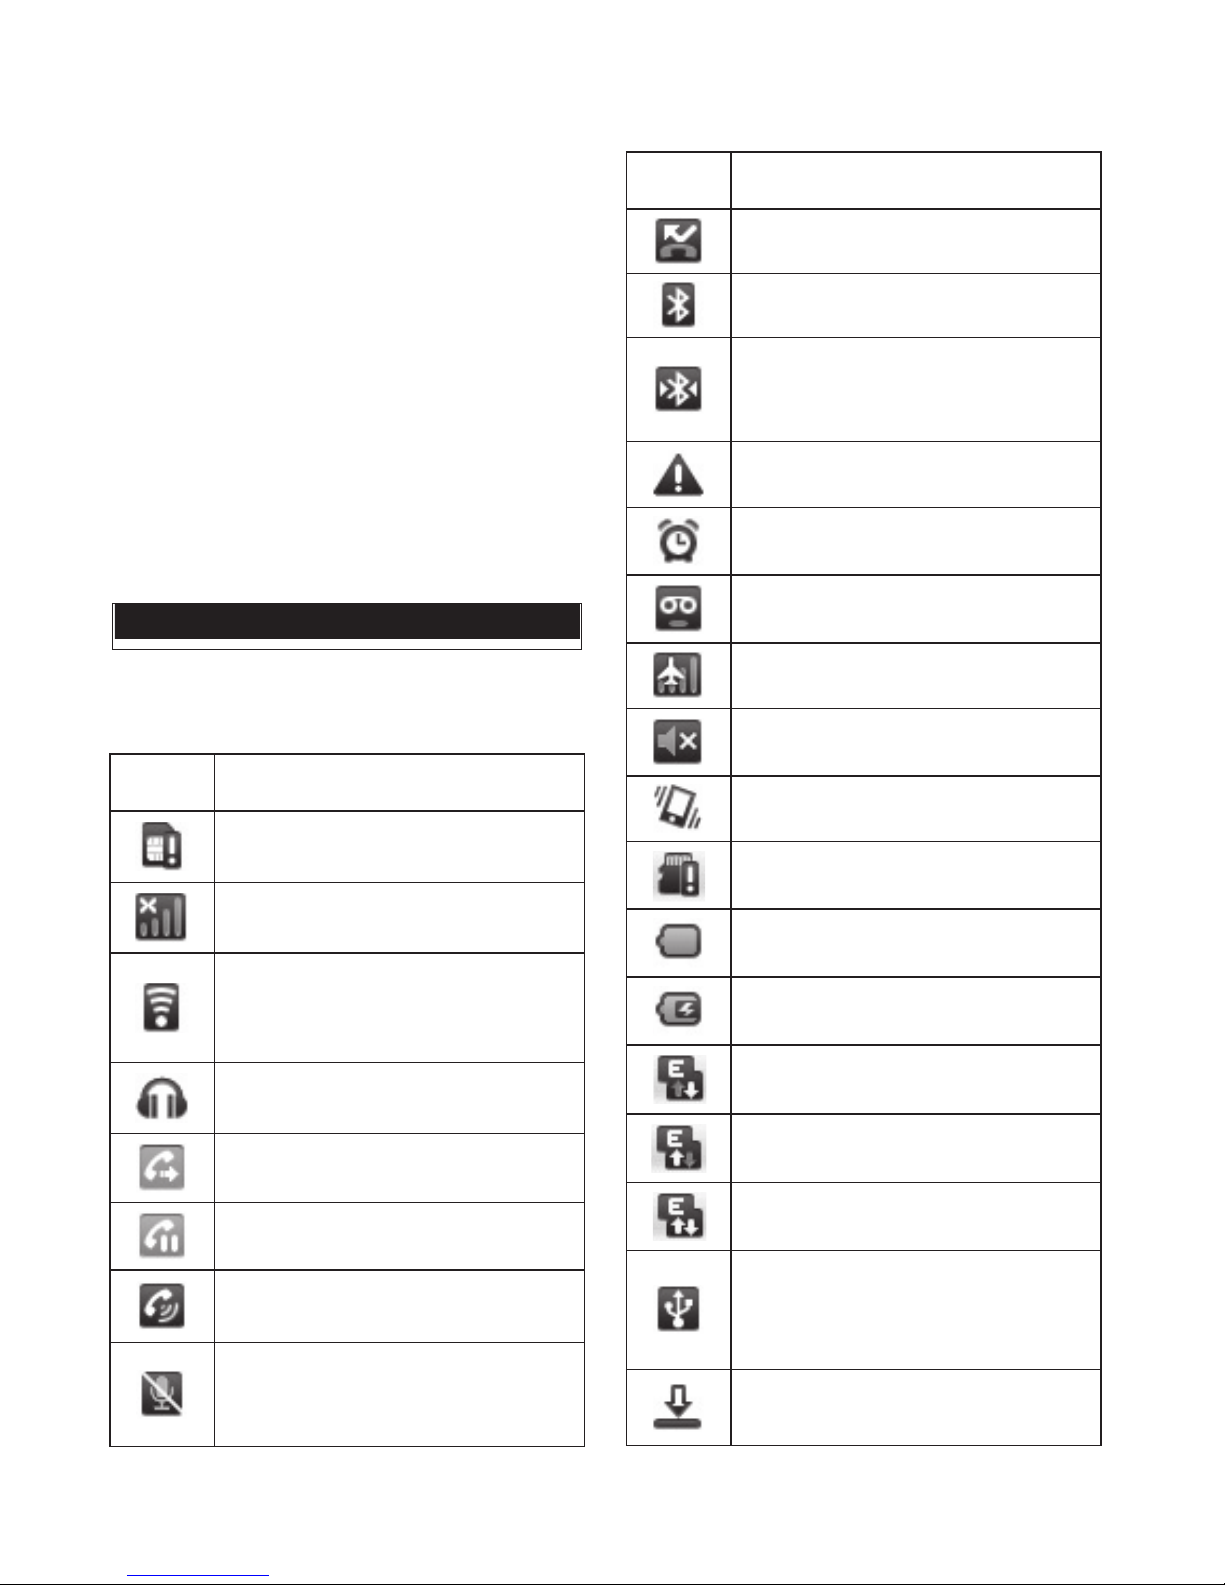
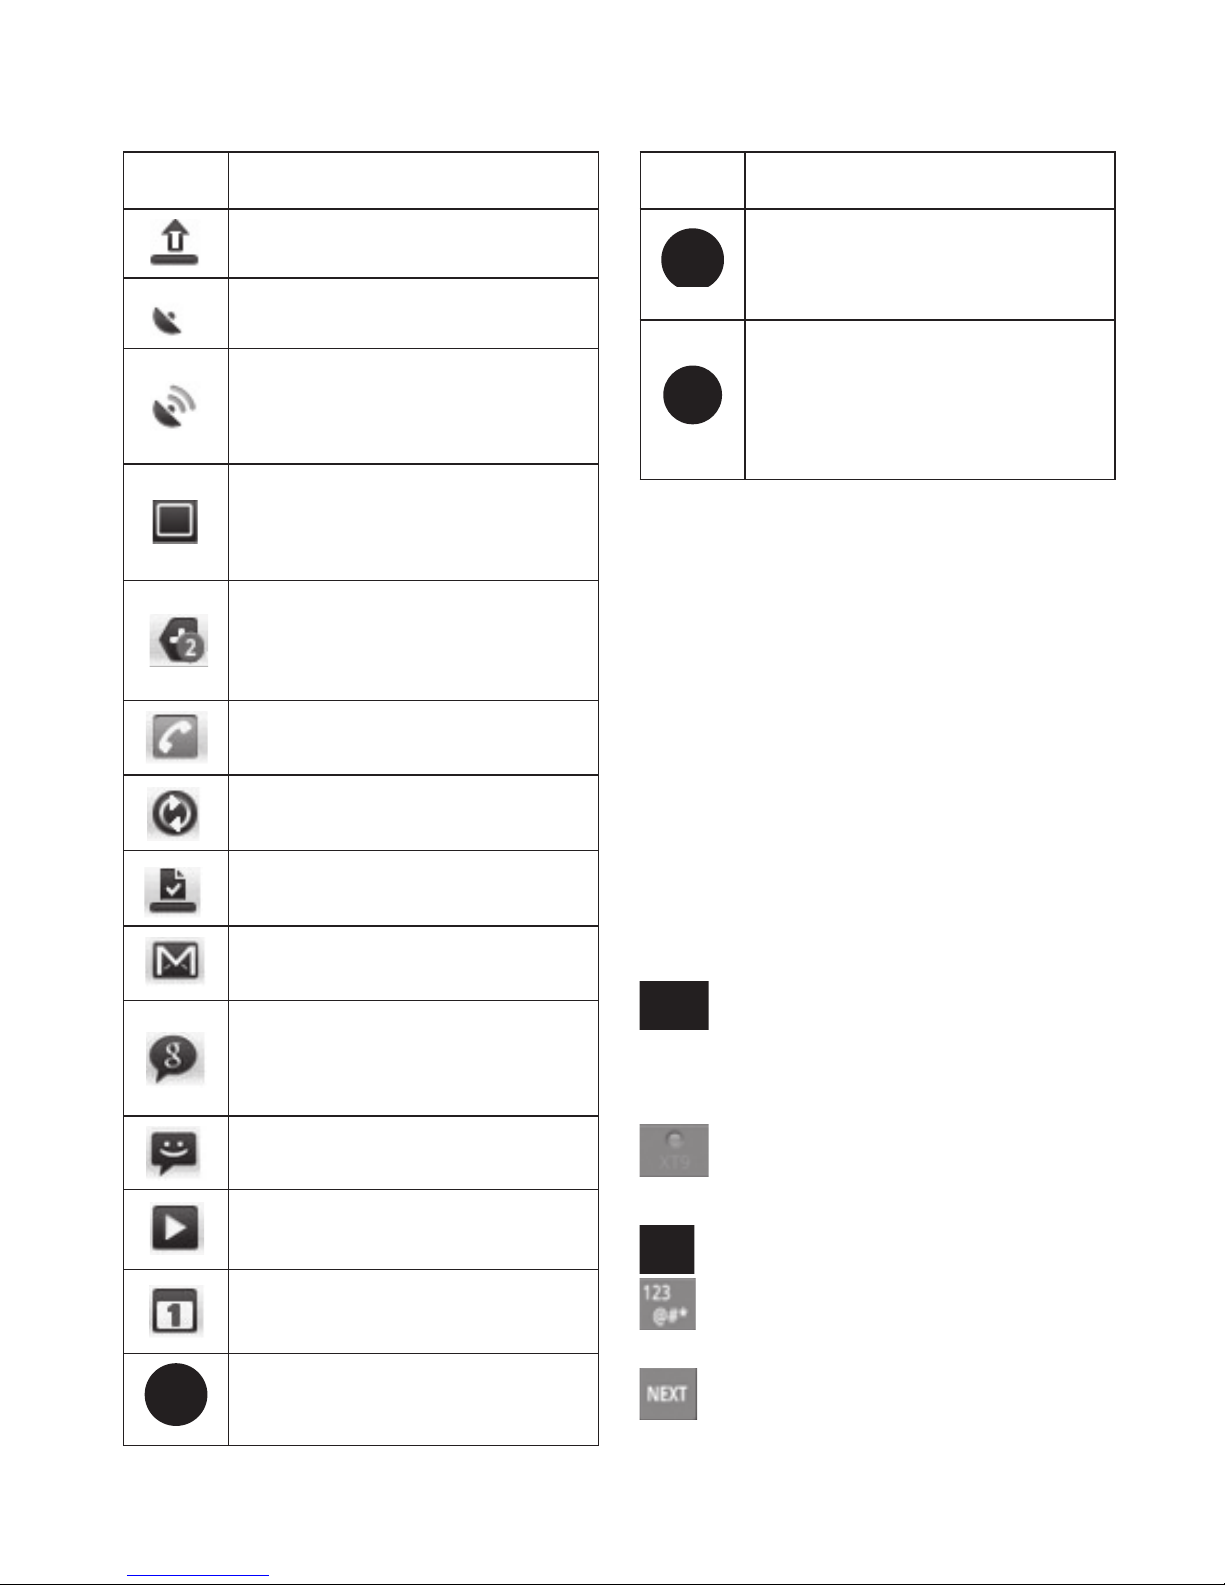
[Status bar]
Icon Description
No SIM card
No signal
Connected to a Wi-Fi
network
Wired headset
Call forward
Call hold
Speakerphone
Phone microphone is
muted
Icon Description
Missed call
Bluetooth is on
Connected to a
Bluetooth device
System warning
Alarm is set
New voicemail
Airplane mode
Ringer is silenced
Vibrate mode
No microSD card
Battery fully charged
Battery is charging
Data in
Data out
Data in and out
Phone is connected with
PC via USB cable
Downloading data
Your Home screen
25
Icon Description
Uploading data
GPS is acquiring
Receiving location data
from GPS
On-Screen Phone
connected
2 more notifications not
displayed
Call in progress
Data is syncing
Download finished
New Google Mail
New Google talk
message
New message
Song is playing
Upcoming event
USB tethering is active
Icon Description
Portable Wi-Fi hotspot
is active
Both USB tethering
and portable hotspot
are active
Onscreen keyboard
You can also enter text using
the onscreen keyboard. The
onscreen keyboard displays
automatically on the screen
when you need to enter text. To
manually display the keyboard,
simply touch a text field where
you want to enter text.
Using the keypad & Entering text
Touch once to capitalise
the next letter you type. Doubletap for all caps.
Tap to turn on or off XT9
predictive mode.
Tap to view the settings menu.
Tap to switch to the numeric
and symbol keyboard.
Tap to create a new line in
the message field.

26
Tap to hide or show the
onscreen keyboard.
Tap to delete the previous
character.
"Go forward" or "Go
backward" button only appears
in "LG Phone keypad". They do
not appear in Android Qwerty
keypad, Android Phone keypad,
or LG Qwerty keypad.
Tap to enter a space.
XT9 predictive mode
The onscreen keyboard has
predictive text to help you type
quickly and accurately. XT9
predictive mode uses a built-in
dictionary to recognise words based
on the key number sequences you
touch. Simply touch the number
key associated with the letter you
want to enter, and the dictionary will
predict the word you want to use.
Abc mode
This mode allows you to enter
letters by touching the key
labelled with the required letter
once, twice, three or four times
until the letter is displayed.
123 Mode
This mode allows you to enter
numbers in a text message (a
telephone number, for example)
more quickly. Touch the keys
corresponding to the required digits
before manually switching back to
the appropriate text entry mode.
Entering accented letters
When you select French or
Spanish as the text entry language,
you can enter special French or
Spanish characters (e.g., “a”).
After the corresponding letter
character disappears, touch the
same key repeatedly until you see
the special character you want.
Example
To input, touch and hold the
“a” key.
After the letter “a...” disappears,
keep your finger touched on the
screen and slide left or right to
select the desired character.
Your Home screen

27
The first time you open the
Google application on your
phone, you will be required to
sign in with your existing Google
account. If you do not have a
Google account, you’re prompted
to create one.
Creating your Google
account
1
On the home screen, touch
Applications
tab to open
the applications menu.
2
Tap
Gmail
and tap
Next >
Create
to start the Google
Mail set up wizard.
3
Touch a text field to open the
touch keyboard, and enter
your name and username for
your Google account. When
you entering the text, you
can move to the next text
field by touching
Next
on the
keyboard.
4
When you’re finished to
input name and username,
tap
Next
. Your phone is
communicating with Google
servers and checking
username availability.
5
Enter and re-enter your
password. Then follow
the instructions and enter
the required and optional
information about the
account. Wait while the server
creates your account.
Signing in your Google
account
1
Enter your e-mail address and
password, then tap
Sign in
.
Wait for signing in.
2
After sign in, you can
use Google Mail and take
advantages of Google services
on your phone.
3
Once you have set up your
Google account on your
phone, your phone will be
automatically synchronised
with your Google account on
the web. (It depends on your
synchronisation settings.)
Google Account Set-up

28
After sign in, you can use
Google Mail, Google Calendar,
Android Market and Google Map;
download applications from
Android Market; back up your
settings to Google servers; and
take advantage of other Google
services on your phone.
IMPORTANT!
• Some applications, such as
Calendar, work only with the
first Google Account you add.
If you plan to use more than
one Google Account with your
phone, be sure to sign into the
one you want to use with such
applications first. When you
sign in, your contacts, Google
Mail messages, calendar
events, and other information
from these applications and
services on the web are
synchronised with your phone.
If you don’t sign into a Google
account during setup, you
will be prompted to sign in or
to create a Google account
the first time you start an
application that requires one,
such as Google Mail or Android
Market.
• If you want to use the backup
feature to restore your settings
to this phone from another
phone that was running
Android OS or later, you must
sign into your Google account
now, during setup. If you wait
until after setup is complete,
your settings will not be
restored.
• If you have an enterprise
account through your company
or other organisation, your IT
department may have special
instructions on how to sign into
that account.
Google Account Set-up
 Loading...