

LG LGE455G Owner's manual

User Guide
LG-E455g
ENGLISH
MFL67841609 (1.0)
www.lg.com

User Guide
•
Screen displays and illustrations may
differ from those you see on actual
phone.
•
Some of the contents of this guide may
not apply to your phone, depending on
the software and your service provider.
All information in this document is
subject to change without notice.
•
This handset is not suitable for people
who have a visual impairment due to
the touch screen keyboard.
•
Copyright ©2013 LG Electronics, Inc. All
rights reserved. LG and the LG logo are
registered trademarks of LG Group and
its related entities. All other trademarks
are the property of their respective
owners.
•
Google™, Google Maps™, Gmail™,
YouTube™, Google Talk™ and Play Store™
are trademarks of Google, Inc.
ENGLISH

Table of contents
Important notice ....................................5
Getting to know your phone
Phone overview.......................................10
Installing the SIM card and battery
Charging the phone
Using the memory card
Locking and unlocking the screen
Your Home screen................................ 16
Touch screen tips
Home screen.............................................17
Customizing the Home screen
Returning to recently-used
applications
Using Dual SIM
Notications
Swipe down for notications &
settings
Quick Settings
Indicator icons on the Status Bar
On-screen keyboard
Entering accented letters
Google account setup
Connecting to Networks and Devices
............................................................. 24
.............................................................24
Wi-Fi
Connecting to Wi-Fi networks
Turning Wi-Fi on and connecting to
a Wi-Fi network
....................................16
..............................................18
.........................................18
.............................................19
...................................................19
......................................20
....................................24
2
............. 10
..............................14
........................14
.......17
..............................22
.................22
......................... 23
........ 24
Bluetooth
Sharing your phone's data connection
26
PC connections with a USB cable
..12
Calls
Making a call
Calling your contacts
...15
Answering and rejecting a call
Adjusting the in-call volume
Making a second call
Viewing your call logs
Call settings
Contacts
Searching for a contact
Adding a new contact
Favorite contacts
Creating a group
Messaging
...20
Sending a message
Threaded box
Changing your message settings
Email
..
Managing an email account
Working with account folders
Composing and sending email
Camera................................................... 39
Getting to know the viewnder
...................................................25
........................................................ 30
.............................................30
.............................30
.............................31
...............................................32
................................................ 33
.....................................33
.....................................34
............................................. 35
................................35
..........................................36
...................................................... 37
.....28
...........30
..............31
...........................31
.........................33
...........................33
.....36
...............37
............37
..........38
........39

Using the advanced settings ..............40
Taking a quick photo
Once you've taken a photo
Viewing your saved photos
Video camera
Getting to know the viewnder
Using the advanced settings
Recording a quick video
After recording a video
Watching your saved videos
Adjusting the volume when viewing a
video
............................................................46
LG Unique Function
QuickMemo function
Using the QuickMemo options
Viewing the saved QuickMemo
LG SmartWorld
How to Get to LG SmartWorld from
YourPhone
How to use LG SmartWorld
Multimedia............................................ 51
.........................................................51
Gallery
Viewing pictures
Playing videos
Editing photos/videos
Deleting images
Setting as wallpaper...........................52
Videos
.........................................................52
............................41
.................42
.................43
........................................ 44
........44
..............45
.......................45
.........................46
...............46
............................ 47
............................47
......48
....48
.........................................49
............................................49
.............49
..................................51
......................................51
.......................52
..................................52
Playing a video
Music
...........................................................53
Playing a song
FM radio
Searching for stations
Tuning in automatically
Utilities
.................................................. 56
Setting your alarm
Using your calculator.............................56
Adding an event to your calendar
Voice Recorder
Recording a sound or voice
Tasks
............................................................57
Polaris Viewer 4
Google+
Voice Search..............................................58
Downloads
The Web
................................................. 59
Internet
Using the Web toolbar
Viewing webpages
Opening a page
Searching the web by voice
Bookmarks
History
Chrome
Viewing webpages
Opening a page
Searching the web by voice
.....................................52
......................................53
.....................................................55
...........................55
....................55
..................................56
.........................................57
.............57
........................................58
.....................................................58
................................................58
.......................................................59
......................59
.............................59
...................................60
............60
.............................................60
.....................................................60
.......................................................61
.............................61
...................................61
............61
....56
3

Table of contents
Syncing with other devices .............61
Settings
................................................. 62
Access the Settings menu....................62
WIRELESS & NETWORKS
DEVICE
........................................................65
PERSONAL
SYSTEM
PC software (LG PC Suite)
Phone software update
About this user guide
About this user guide
Trademarks
Accessories............................................ 76
Troubleshooting
For your safety
Safety instructions
.................................................67
.......................................................68
................................................75
..................................... 81
.......................62
................... 70
...................... 73
......................... 75
............................75
..................................77
.............................. 88
4

Important notice
Please read this before you start using your phone
Please check if any problems you encountered with your phone are
described in this section before taking the phone in for service or calling a
service representative.
1. Phone memory
When there is less than 10% of space available in your phone memory,
your phone cannot receive new messages. You need to check your phone
memory and delete some data, such as applications or messages, to make
more memory available.
To uninstall applications:
1 Touch > Apps tab > Settings > Apps from DEVICE.
2 Once all applications appear, scroll to and select the application you
want to uninstall.
3 Touch Uninstall.
2. Optimizing battery life
Extend your battery's life between charges by turning off features that
you don't need to have running constantly in the background. You can
monitor how applications and system resources consume battery power.
Extending your phone's battery life:
•
Turn off radio communications when you're not using. If you are not
using Wi-Fi, Bluetooth or GPS, turn them off.
•
Reduce screen brightness and set a shorter screen timeout.
•
Turn off automatic syncing for Gmail, Calendar, Contacts and other
applications.
•
Some applications you have downloaded may reduce battery power.
5

Important notice
To check the battery power level:
•
Touch > Apps tab > Settings > About phone from SYSTEM >
Common tab > Battery.
The battery status (charging or discharging) and battery level (percentage
charged) is displayed at the top of the screen.
To monitor and control how battery power is being used:
•
Touch > Apps tab > Settings > About phone from SYSTEM >
Common tab > Battery > Battery use.
Battery usage time is displayed on the screen. It tells you how long it
has been since you last connected your phone to a power source or, if
currently connected, how long the phone was last running on battery
power. The screen shows the applications or services using battery power,
listed in order from the greatest to smallest amount used.
3. Installing an open source application and OS
If you install and use an OS other than the one provided by the manufacturer it may
cause your phone to malfunction. In addition, your phone will no longer be covered
by the warranty.
WARNING
To protect your phone and personal data, only download applications from
trusted sources, such as Play Store™. If there are improperly installed applications
on your phone, the phone may not work normally or a serious error may occur.
You must uninstall those applications and all associated data and settings from
the phone.
6
4. Using an unlock pattern
Set an unlock pattern to secure your phone. Touch > Apps tab >
Settings > Lock screen from DEVICE > Select screen lock > Pattern. This
opens a screen that will guide you through how to draw a screen unlock
pattern. You have to create a Backup PIN as a safety measure in case you
forget your unlock pattern.
NOTE: Create a Google account before setting an unlock pattern and remember the
Backup PIN you created when creating your pattern lock.
WARNING
Precautions to take when using pattern lock.
It is very important to remember the unlock pattern you set. You will not be
able to access your phone if you use an incorrect pattern 5 times. You have 5
opportunities to enter your unlock pattern, PIN or password. If you have used all
5 opportunities, you can try again after 30 seconds.
When you can't recall your unlock Pattern, PIN or Password:
< If you have forgotten your pattern >
If you logged in to your Google account on the phone but failed to enter
the correct pattern 5 times, press the Forgot pattern? button at the
bottom of the screen. You are then required to log in with your Google
Account or you have to enter the Backup PIN which you entered when
creating your Pattern Lock.
If you have not created a Google account on the phone or you forgot
Backup PIN, you have to perform a hard reset.
WARNING
If you perform a hard reset, all user applications, user data and DRM licenses will be
deleted. Please remember to back up any important data before performing a hard
reset.
7

Important notice
NOTE: If you have not logged into your Google Account and have forgotten
your Unlock Pattern, you will need to enter your Backup PIN.
5. Using the Hard Reset (Factory reset)
If your phone does not restore to the original condition, use a hard reset
(factory reset) to initialize it.
• Touch > Apps tab > Settings > Backup & reset > Select Factory data
reset.
6. Opening and switching applications
Multi-tasking is easy with Android because you can keep more than
one application running at the same time. There is no need to quit an
application before opening another one. Use and switch between several
open applications. Android manages each application, stopping and
starting them as needed to ensure that idle applications don't consume
resources unnecessarily.
To stop applications:
1 Touch > Apps tab > Settings > Apps from DEVICE > RUNNING.
2 Scroll and touch the desired application and touch Stop to stop it.
NOTE: For multitasking, press and hold Home key to move to another
app while using an app. This does not stop the previous app running in the
background on the device. Make sure to touch the Back key to exit an app
after using it.
8

7. Transferring music, photos and videos using Media sync
(MTP)
1 Touch > Apps tab > Settings > Storage from DEVICE to check out
the storage media.
2 Connect the phone to your PC using the USB cable.
3 A USB connection type list will appear on your phone screen, Select the
Media sync (MTP) option.
4 Open the memory folder on your PC. You can view the mass storage
content on your PC and transfer the files.
5 Copy the files from your PC to the drive folder or vice versa.
8. Hold your phone upright
Hold your cell phone vertically, as you would a regular phone. Your phone
has an internal antenna. Be careful not to scratch or damage the back of
the phone, as this may affect performance.
When making/receiving calls or sending/receiving data, avoid holding the
lower part of the phone where the antenna is located. Doing so may affect
call quality.
9. When the screen freezes
If the screen freezes or the phone does not respond when you try to
operate it:
Press and hold the Power/Lock
If it still does not work, please contact the service center.
key for 10 seconds to turn your phone off.
9

Getting to know your phone
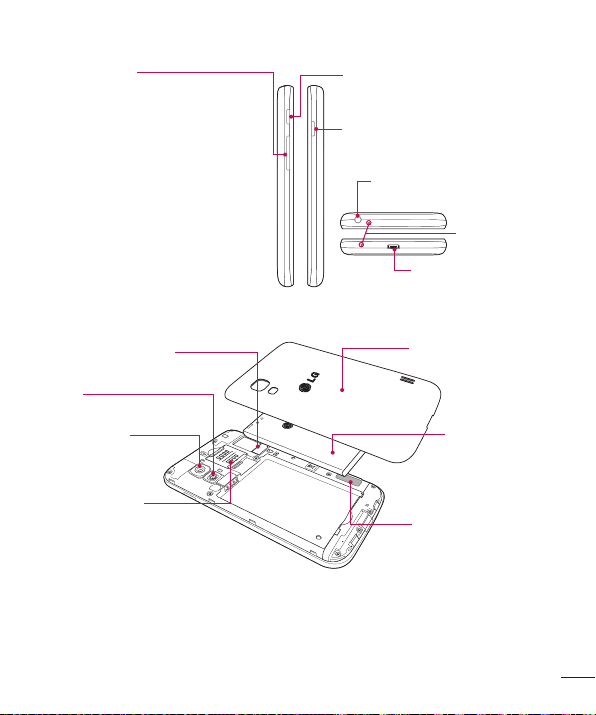
Phone overview
Earpiece
Proximity Sensor
Home Key
Return to the Home
screen from any screen.
Power/Lock Key
•
Switch your phone on/
off by pressing and
holding this key.
•
Short press to lock/
unlock the screen.
Back Key
Return to the previous
screen.
Menu Key
Display the available
options.
NOTE: Proximity sensor
When receiving and making calls, the proximity sensor automatically turns the
backlight off and locks the touch screen by sensing when the phone is near your
ear. This extends battery life and prevents you from unintentionally activating
the touch screen during calls.
WARNING
Placing a heavy object on the phone or sitting on it can damage the LCD and
touch screen functions. Do not cover the LCD proximity sensor with protective
film. This could cause the sensor to malfunction.
10
SIM Switch Key
Touch the key for SIM1/
SIM2 selection (Selected
SIM is marked by
Rectangle box on RSSI
icon). Touch and Hold
the key to go to Dual SIM
settings.
•
In the Home screen: Control
ringer volume.
•
During a call: Control your incall volume.
•
When playing a song: Control
volume continuously.
QuickMemo function KeyVolume keys
Power/Lock Key
Earphone Jack
Microphone
Charger/USB Port
microSD Card slot
Flash
Camera lens
SIM cards slot
(Upper slot for SIM1 and
Lower slot for SIM2)
Battery cover
Battery
Speaker
11
Getting to know your phone
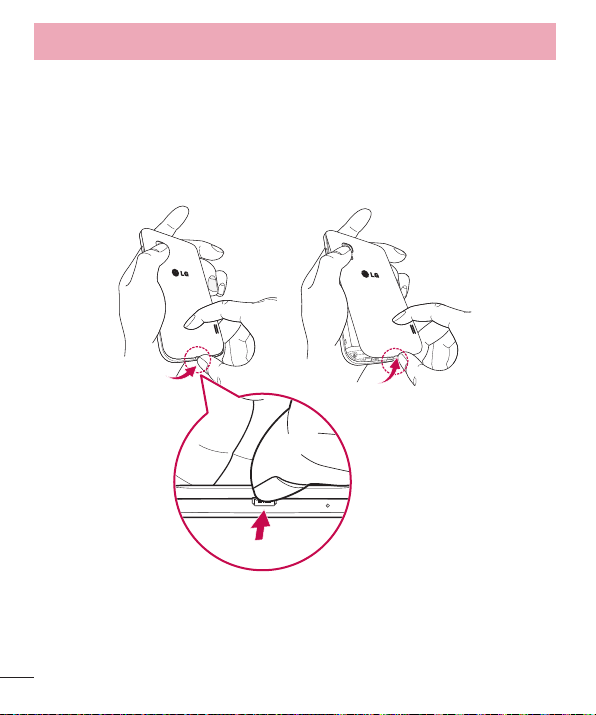
Installing the SIM card and battery
Before you can start exploring your new phone, you'll need to set it up. To
insert the SIM card and battery.
1 To remove the battery cover, hold the phone firmly in one hand. With
your other hand, lift off the battery cover with your index finger as
shown in figure.
12
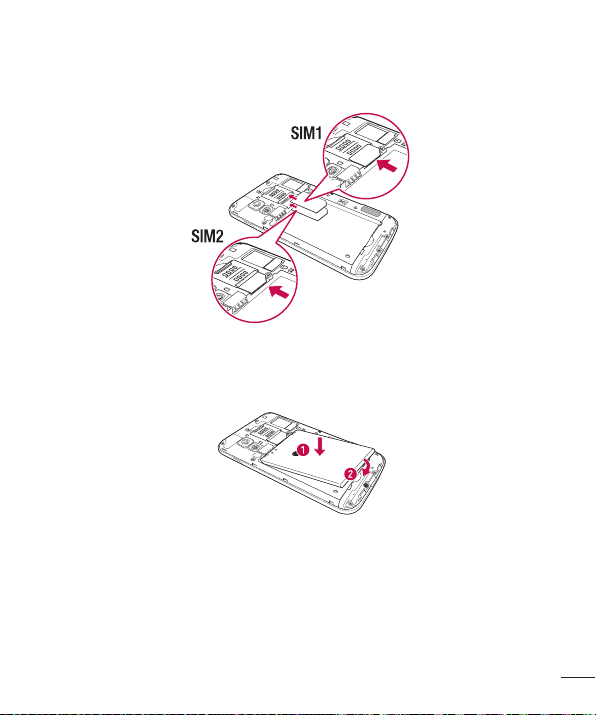
2 Slide the SIM card into its slots as shown in the figure. Make sure the
golden contact area on the card is facing downwards.
3 Insert the battery into place by aligning the golden contacts on the
phone and the battery (1) and pressing it down until it clicks into place
(2).
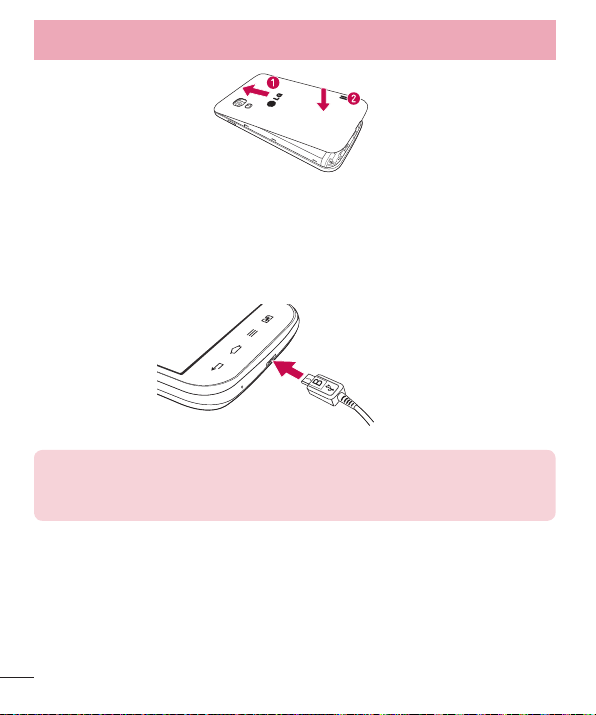
4 Align the battery cover over the battery compartment (1) and press it
down until it clicks into place (2).
13
Getting to know your phone
Charging the phone
The charger connector is at the bottom of the phone. Insert one end of the
charging cable into the phone and plug the other end into an electrical
outlet.
NOTES:
•
The battery must be fully charged initially to improve battery lifetime.
•
Do not open the battery cover while your phone is charging.
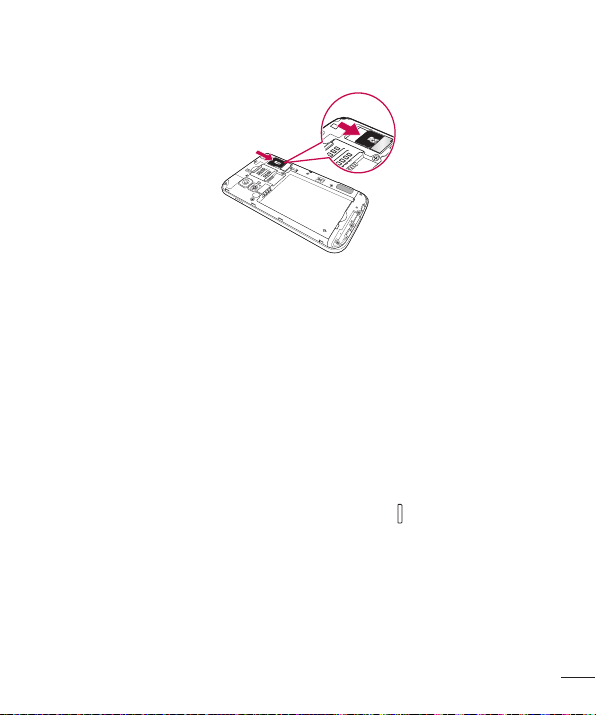
Using the memory card
Turn the phone off before inserting or removing the memory card.
Remove the battery cover. Insert the memory card into the slot. Make sure
the golden contact area is facing downwards.
14
z
Locking and unlocking the screen
If you do not use the phone for a while, the screen will be automatically
turned off and locked. This helps to prevent accidental touches and saves
battery power.
When you are not using your phone, press the Power/Lock key to lock
your phone.
If there are any programs running when you lock your screen, they may be
still running in Lock mode. It is recommended that you exit all programs
before entering Lock mode to avoid unnecessary charges (e.g. phone calls,
web access and data communications).
To wake up your phone, press the Power/Lock key
appear. Touch and slide the Lock screen in any direction to unlock your
Home screen. The last screen you viewed will open.
. The Lock screen will
15

Your Home screen
Touch screen tips
Here are some tips on how to navigate on your phone.
Tap or touch – A single finger tap selects items, links, shortcuts and letters
on the on-screen keyboard.
Touch and hold – Touch and hold an item on the screen by touching it
and not lifting your finger until an action occurs. For example, to open a
contact's available options, touch and hold the contact in the Contacts list
until the context menu opens.
Drag – Touch and hold an item for a moment and then, without lifting
your finger, move your finger on the screen until you reach the target
position. You can drag items on the Home screen to reposition them.
Swipe or slide – To swipe or slide, quickly move your finger across the
surface of the screen, without pausing when you first touch it (so you
don't drag an item instead). For example, you can slide the screen up
or down to scroll through a list or browse through the different Home
screens by swiping from left to right (and vice versa).
Double-tap – Double-tap to zoom on a webpage or a map. For example,
quickly double-tap a section of a webpage to adjust that section to fit the
width of the screen. You can also double-tap to zoom in and out when
taking a picture (using the Camera), and when using Maps.
Pinch-to-Zoom – Use your index finger and thumb in a pinching or
spreading motion to zoom in or out when using the browser, Maps or
when browsing pictures.
Rotate the screen – From many applications and menus, the orientation
of the screen adjusts to the device's physical orientation.
16

NOTES:
•
To select an item, touch the center of the icon.
•
Do not press too hard; the touch screen is sensitive enough to pick up a light,
yet firm touch.
•
Use the tip of your finger to touch the option you want. Be careful not to touch
any other keys.
Home screen
Simply swipe your finger to the left or right to view the panels. You
can customize each panel with applications, downloads, widgets and
wallpapers.
NOTE: Some screen images may be different depending on your phone provider.
On your home screen, you can view menu icons at the bottom of the
screen. Menu icons provide easy, one-touch access to the functions you
use the most like making calls, list of contacts and messaging.
Touch the Apps icon
installed applications. To open any application, simply touch the icon in
the applications list.
Customizing the Home screen
You can customize your Home screen by adding apps, downloads, widgets
or wallpapers. For more convenience using your phone, add your favorite
apps and widgets to the Home screen.
To add items on your Home screen:
1 Touch and hold the empty part of the Home screen.
Or touch
at the top of the right side.
at the bottom of the screen to view all the
17
Your Home screen
2 In the Add Mode menu, select the item you wish to add. You will then
see this added item on the Home screen.
3 Drag it to the desired location and lift your finger.
To remove an item from the Home screen:
Home screen > touch and hold the icon you want to remove > drag it to
.
TIP! To add an application icon to the Home screen from the Apps menu, touch
and hold the application you want to add.
TIP! Using folders
You can combine several app icons in a folder. Drop one app icon over another
one on a Home screen, and the two icons will be combined.
Returning to recently-used applications
1 Touch and hold the Home key. The screen displays a pop-up containing
the icons of applications you used recently.
2 Touch an icon to open the application. Or touch the Back key to return
to your previous screen.
Using Dual SIM
When two SIM cards are inserted on your phone, the SIM cards
information are displayed on your notification drawer. When you touch the
SIM switch key, currently active SIM is switched.
NOTE: If only one SIM card is inserted or one SIM is off, SIM switching is not
available, and the SIM switch key has no action. During a call, sending a message
or using a data service, the other SIM's RSSI might be displayed as 'No service'
due to the network service status.
18
WARNING: If you are outside of the service area, it may cause your device to
consume more battery power.
Notifications
Notifications alert you to the arrival of new messages, calendar events, and
alarms, as well as to ongoing events, such as video downloads.
From the notifications panel, you can view your phone's current status and
pending notifications.
When a notification arrives, its icon appears at the top of the screen. Icons
for pending notifications appear on the left, and system icons showing
things like Wi-Fi or bat tery strength on the right.
NOTE: The available options may vary depending on the region or service
provider.
Pending
notifications
Bluetooth, Wi-Fi &
battery status
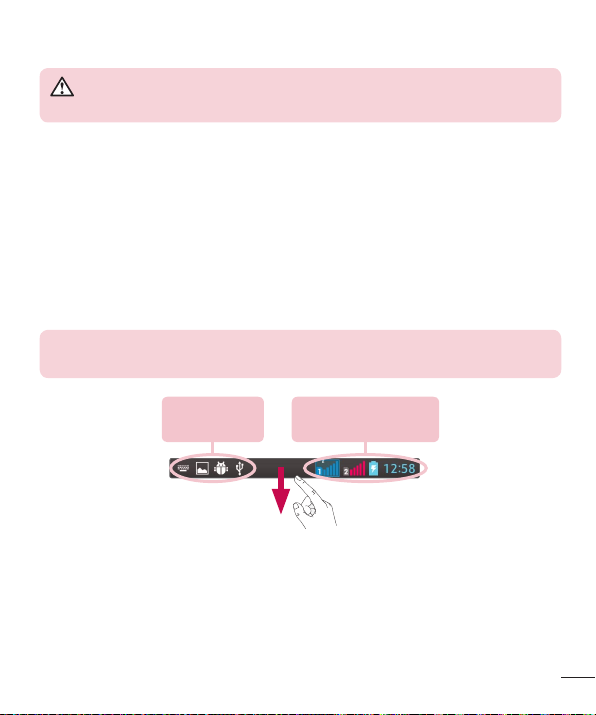
Swipe down for notifications & settings
Swipe down from the status bar to open the notifications panel. To close
the notifications panel, swipe up the bar that is at the bottom of the
screen.
19
Your Home screen
NOTE: When long pressing icon at the top of the screen, will go to Settings
directly.
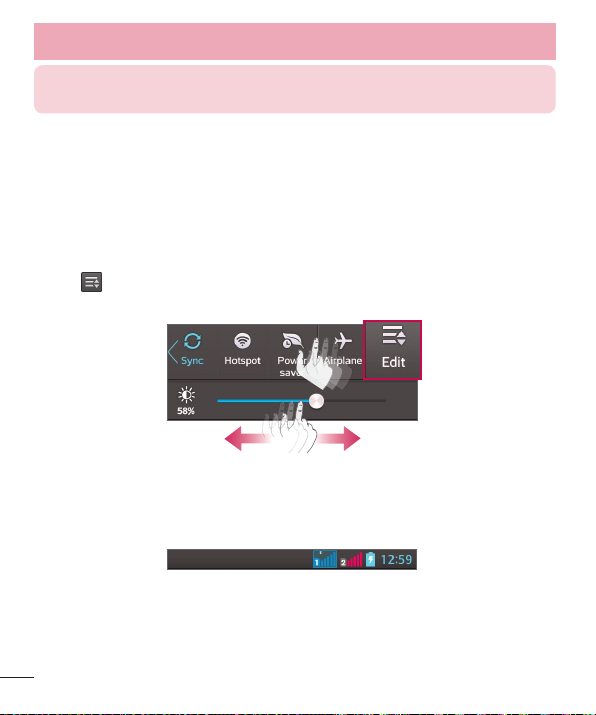
Quick Settings
Use Quick Settings to easily toggle function settings like Wi-Fi, manage
display brightness and more. For Quick Set tings, swipe down from the
status bar to open the notifications panel and swipe or touch for you
desired setting.
To rearrange Quick Setting items on the notification panel
Touch
panel.
Indicator icons on the Status Bar
Indicator icons appear on the status bar at the top of the screen to report
missed calls, new messages, calendar events, device status and more.
The icons displayed at the top of the screen provide information about
the status of the device. The icons listed in the table below are some of the
most common ones.
. You can then check and rearrange items on the notification
20
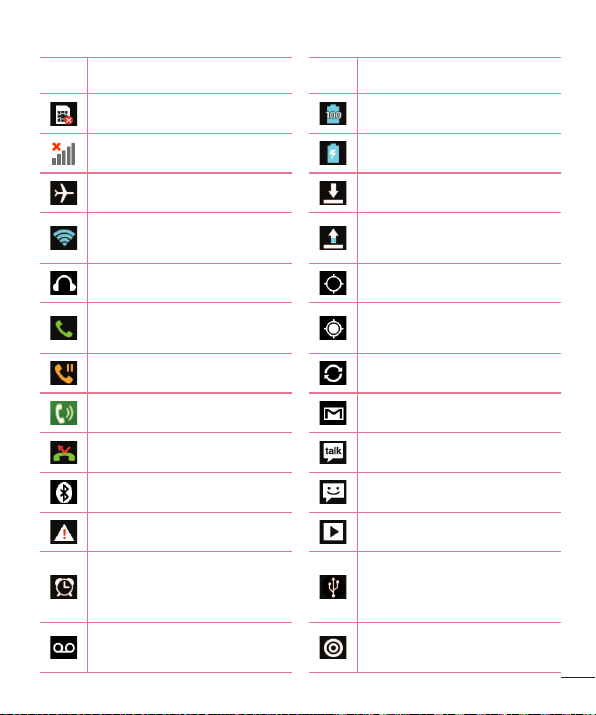
Icon Description Icon Description
No SIM card Battery fully charged
No signal Battery is charging
Airplane mode Downloading data
Connected to a Wi-Fi
network
Uploading data
Wired headset GPS is acquiring
Call in progress
Receiving location data from
GPS
Call hold Data is syncing
Speakerphone New Gmail
Missed call New Google Talk message
Bluetooth is on New message
System warning Song is playing
Phone is connected to PC via
Alarm is set
USB cable or USB tethering
is active
New voicemail
Both USB tethering and
portable hotspot are active
21
Your Home screen
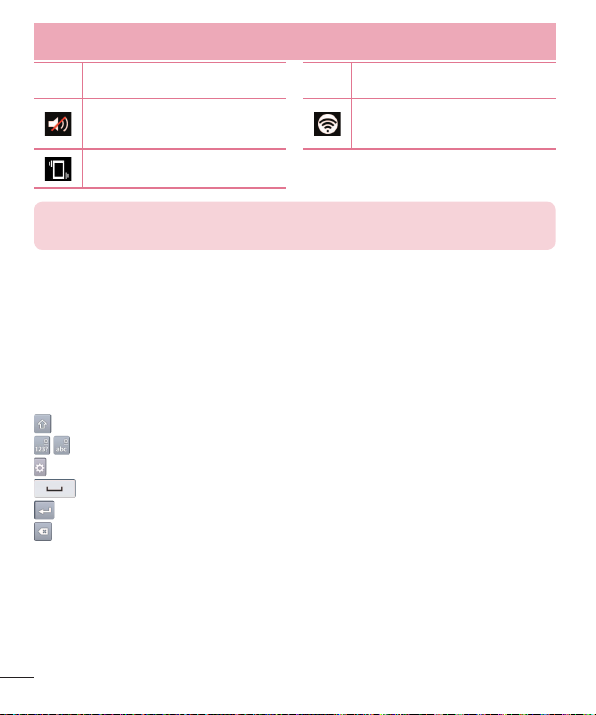
Icon Description Icon Description
Ringer is silenced
Vibrate mode
NOTE: The icons location in the status bar may differ according to the function
or service.
On-screen keyboard
You can enter text using the on-screen keyboard. The on-screen keyboard
appears automatically on the screen when you need to enter text. To
manually display the keyboard, simply touch a text field where you want
to enter text.
Using the keypad & entering text
Tap once to capitalize the next letter you type. Double-tap for all caps.
Tap to switch to the numbers and symbols keyboard.
You can touch and hold this tab to view the Settings menu.
Tap to enter a space.
Tap to create a new line in the message field.
Tap to delete the previous character.
Entering accented letters
When you select Spanish or French as the text entry language, you can
enter special Spanish or French characters (e.g. "á"). For example, to input
"á", touch and hold the "a" key until the zoom-in key grows bigger and
displays characters from different languages. Then select the special
character you want.
22
Portable Wi-Fi hotspot is
active

Google account setup
When you first turn on your phone, you have the opportunity to activate
the network, to sign into your Google Account and select how you want to
use certain Google services.
To set up your Google account:
•
Sign into a Google Account from the prompted set-up screen.
OR
•
Touch > Apps tab > select a Google application, such as Gmail >
select New to create a new account.
If you have a Google account, touch Existing, enter your email address
and password, then touch
Once you have set up your Google account on your phone, your phone
automatically synchronizes with your Google account on the web.
Your contacts, Gmail messages, Calendar events and other information
from these applications and services on the Web are synchronized with
your phone. (This will depend on your synchronization settings.)
After signing in, you can use Gmail™ and take advantage of Google
services on your phone.
.
23

Connecting to Networks and Devices
Wi-Fi
With Wi-Fi, you can use high-speed Internet access within the coverage of
the wireless access point (AP). Enjoy wireless Internet using Wi-Fi, without
extra charges.
Connecting to Wi-Fi networks
To use Wi-Fi on your phone, you need to access a wireless access point
or 'hotspot'. Some access points are open and you can simply connect to
them. Others are hidden or use security features, you must configure your
phone to be able to connect to them.
Turn off Wi-Fi when you're not using it to extend the life of your battery.
NOTE: If you are out of the Wi-Fi zone or have set Wi-Fi to OFF, additional
charges may be applied by your mobile operator for mobile data use.
Turning Wi-Fi on and connecting to a Wi-Fi network
1 Touch > Apps tab > Settings > Wi-Fi from the WIRELESS &
NETWORKS tab.
2 Set Wi-Fi to ON and start scanning for available Wi-Fi networks.
3 Tap the Wi-Fi menu again to see a list of active and in-range Wi-Fi
networks.
•
Secured networks are indicated by a lock icon.
4 Touch a network to connect to it.
•
If the network is secured, you are prompted to enter a password or
other credentials. (Ask your network administrator for details)
5 The status bar displays icons that indicate Wi-Fi status.
24

Bluetooth
You can use Bluetooth to send data by running a corresponding
application, but not from the Bluetooth menu as on most other mobile
phones.
NOTES:
•
LG is not responsible for the loss, interception or misuse of data sent or
received via the Bluetooth wireless feature.
•
Always ensure that you share and receive data with devices that are trusted
and properly secured. If there are obstacles between the devices, the
operating distance may be reduced.
•
Some devices, especially those that are not tested or approved by Bluetooth
SIG, may be incompatible with your device.
Turning on Bluetooth and pairing up your phone with a Bluetooth
device
You must pair your device with another device before you connect to it.
1 Touch > Apps tab > Settings > set Bluetooth to ON from the
WIRELESS & NETWORKS tab.
2 Tap the Bluetooth menu again. You will see the option to make your
phone visible and option to search devices. Now tap Search for devices
to view the devices in the Bluetooth Range.
3 Choose the device you want to pair with from the list.
Once the paring is successful, your device will connect to the other device.
NOTE: Some devices, especially headsets or hands-free car kits, may have a fixed
Bluetooth PIN, such as 0000. If the other device has a PIN, you will be asked to
enter it.
25
Connecting to Networks and Devices
Send data using the Bluetooth wireless feature
1 Select a file or item, such as a contact, calendar event or media file, from
an appropriate application or from Downloads
2 Select the option for sending data via Bluetooth.
NOTE: The method for selecting an option may vary by data type.
3 Search for and pair with a Bluetooth-enabled device.
Receive data using the Bluetooth wireless feature
1 Touch > Apps tab > Settings > set Bluetooth to ON and touch
Make phone visible to be visible on other devices.
NOTE: To select the length of time that your device will be visible, touch >
Visibility timeout.
2 Select Pair to confirm that you are willing to receive data from the
device.
Sharing your phone's data connection
USB tethering and portable Wi-Fi hotspot are great features when there
are no wireless connections available. You can share your phone's mobile
data connection with a single computer via a USB cable (USB tethering).
You can also share your phone's data connection with more than one
device at a time by turning your phone into a portable Wi-Fi hotspot.
When your phone is sharing its data connection, an icon appears in the
status bar and as an ongoing notification in the notifications drawer.
For the latest information about tethering and portable hotspots,
including supported operating systems and other details, visit http://www.
android.com/tether.
26

To change Portable Wi-Fi hotspot settings:
Touch
> Apps tab > Settings > More... from the WIRELESS &
NETWORKS tab > Portable Wi-Fi hotspot > choose options that you want
to adjust.
TIP! If your computer is running Windows 7 or a recent distribution of some
flavours of Linux (such as Ubuntu), you will not usually need to prepare your
computer for tethering. But, if you are running an earlier version of Windows or
another operating system, you may need to prepare your computer to establish
a network connection via USB. For the most current information about which
operating systems support USB tethering and how to configure them, visit
http://www.android.com/tether.
To rename or secure your portable hotspot
You can change the name of your phone's Wi-Fi network name (SSID) and
secure its Wi-Fi network.
1 On the Home screen, touch > Apps tab > Settings.
2 Touch More... from the WIRELESS & NETWORKS tab and select Portable
Wi-Fi hotspot.
3 Ensure that Portable Wi-Fi hotspot is checked.
4 Touch Set up Wi-Fi hotspot.
•
The Set up Wi-Fi hotspot dialogue box will open.
•
You can change the Network SSID (name) that other computers see
when scanning for Wi-Fi networks.
•
You can also touch the Security menu to configure the network with
Wi-Fi Protected Access 2 (WPA2) security using a pre-shared key (PSK).
•
If you touch the WPA2 PSK security option, a password field is added
to the Set up Wi-Fi hotspot dialogue box. If you enter a password, you
will need to enter that password when you connect to the phone's
hotspot with a computer or other device. You can set Open in the
27

Connecting to Networks and Devices
Security menu to remove security from your Wi-Fi network.
5 Touch Save.
ATTENTION! If you set the security option as Open, you cannot prevent
unauthorised usage of online services by other people and additional charges
may be incurred. To avoid unauthorized usage, you are advised to keep the
security option active.
PC connections with a USB cable
Learn to connect your device to a PC with a USB cable in USB connection
modes.
Transferring music, photos and videos using Media sync (MTP)
1 Connect your phone to a PC using a USB cable.
2 If you haven't installed the LG Android Platform Driver on your PC, you
will need to manually change the settings. Press Menu key on Home
screen > System settings > PC connection > USB connection type,
then select Media sync (MTP).
3 You can now view the mass storage content on your PC and transfer the
files.
Synchronize with Windows Media Player
Ensure that Windows Media Player is installed on your PC.
1 Use the USB cable to connect the phone to a PC on which Windows
Media Player has been installed.
2 Select the Media sync (MTP) option. When connected, a pop-up
window will appear on the PC.
3 Open Windows Media Player to synchronize music files.
4 Edit or enter your device's name in the pop-up window (if necessary).
5 Select and drag the music files you want to the sync list.
28
 Loading...