

LG LGD851TN User Manual

User Guide
MFL68583001 (1.0)
ENGLISH
www.lg.com

LG G3
LG G3 User Guide
• Screen displays and illustrations may differ
from those you see on actual phone.
• Some of the contents of this guide may
not apply to your phone, depending on
the software and your service provider. All
information in this document is subject to
change without notice.
• This handset is not suitable for people who
have a visual impairment due to the touch
screen keyboard.
• Copyright ©2014 LG Electronics, Inc. All rights
reserved. LG and the LG logo are registered
trademarks of LG Group and its related
entities. All other trademarks are the property
of their respective owners.
• Google™, Maps™, Gmail™, YouTube™ and
Google Play™ are trademarks of Google, Inc.
English

SERVICE ACTIVATION
If you are a new T-Mobile® customer and your service has not been activated, simply
call Customer Care at 1-800-937-8997 from your landline phone and a T-Mobile
Activations representative will assist you. You will need the following information when
activating service:
• Service Agreement and agent code on your Agreement.
• Your name, home address, home phone, and billing address.
NOTE: For business and government accounts, please provide the name of
your company or government agency, address, and tax ID.
• Your Social Security number, current driver’s license number, and date of birth for
credit check purposes.
• Your choice of T-Mobile rate plan and services (see http://www.t-mobile.com/ for the
latest plan information).
• SIM serial number and IMEI number (located on the box bar code label).
By activating service, you acknowledge that you have read, understand, and agree to be
bound by each of T-Mobile’s Terms and Conditions and your Service Agreement.
About this user guide
Please read this user guide carefully before you use your phone and keep it handy for
future reference.
Should your phone fails to operate correctly, refer to the FAQ section.
• Some features and service may vary by area, phone, carrier, plan and version
of phone software.
• Screen displays and illustrations on this user manual may differ from those you see on
the actual phone.
• Designs and specifications of the phone and other accessories are subject to change
without any notice.
2

Table of contents
SERVICE ACTIVATION ......................2
Important notice ................................6
Getting to know your phone ........... 12
Installing the SIM card and battery ..15
Charging your phone ........................... 17
Inserting a microSD card ....................18
Removing the microSD card..............19
Formatting the microSD card ...........20
Switching between and exiting
applications............................................20
Your Home screen ........................... 22
Touch screen tips .................................22
Proximity sensor ...................................23
Lock your phone ...................................23
KnockON ................................................ 24
Quick Switch to Silent/Vibrate Mode
Home Screen Overview ...................24
Navigating Through the Home Screen
Canvases ................................................25
Submenu Options ...............................25
Customizing your Home screen ...... 25
Customizing apps icons on the Home
screen ......................................................26
Creating Application Folders on the
Home screen .........................................28
Customizing the Apps screen ..........28
Home screen clean view ....................29
Quick access .........................................30
Notifi cations ...........................................30
Accessing notifi cations ......................... 31
Quick Settings......................................... 31
Notifi cation icons on the Status Bar 32
On-screen Keyboard ...........................33
123 Mode ............................................... 36
Entering Special Characters ..............36
.24
Using Clip Tray ...................................... 36
Text Link ................................................. 37
Google account setup ..................... 38
Creating your Google account..........38
Signing into your Google account ...38
Calls .................................................. 40
HD™ Voice .............................................40
Making a call .........................................40
Calling your contacts ...........................40
Answering and rejecting a call .......... 41
When the screen is locked .................. 41
Adjusting the in-call volume ..............41
Making a second call ...........................41
Viewing your call logs ..........................42
Call settings ...........................................42
Contacts ........................................... 43
Searching for a contact ......................43
Adding a new contact .........................43
Favorite Contacts..................................44
Creating a group ..................................44
Messaging ........................................ 45
Messaging ..............................................45
Conversation view ................................ 45
Sending a message ..............................45
Using smilies .......................................... 46
Changing the conversation theme ... 46
Changing your message settings ..... 46
Email ................................................. 47
Email ........................................................ 47
To open the Email application ............47
Microsoft Exchange Email Account .47
Other (POP3 & IMAP4) Email
Account ...................................................47
Incoming server settings .....................48
Outgoing server settings .....................48
3

Table of contents
To open your Combined inbox .......... 48
Composing and Sending Email .......48
Working with Account Folders .......... 49
Adding and Editing Email Accounts
Social Networking ............................ 51
Adding an account to your phone ... 51
Adding a social networking widget on
the Home screen ..................................51
Syncing accounts on your phone ....52
Removing accounts on your phone 52
Camera and Video ...........................53
Getting to know the viewfi nder .........53
Take Pictures ........................................54
Record Videos .......................................54
Camera and Video Settings ..............55
Multi-point Auto Focus .......................56
Gesture shot ..........................................56
Super Zooming .................................... 57
View Your Pictures ................................ 57
Gallery Options ..................................... 57
Assign Pictures .....................................58
Dual Camera .........................................59
Video Options ....................................... 59
Play a Video ...........................................60
Live Zoom ............................................... 61
Dual Play .................................................62
Multimedia ....................................... 63
Gallery ..................................................... 63
Music .......................................................63
How to save music/video fi les to the
phone ......................................................63
Connect your phone to the PC using
the USB cable. ....................................... 63
Save music or video fi les from the PC
to the phone. .......................................... 63
Playing a song.......................................64
4
.. 49
Working with Playlists ..........................64
To create a playlist ................................. 64
To add a song to a playlist .................65
To remove a song from a playlist .....65
To rename a playlist .............................65
To delete a playlist ............................... 65
Google Applications ........................ 66
About Google applications................66
Launch Google Maps..........................66
Play Store ...............................................68
Gmail ....................................................... 69
Hangouts ................................................ 69
Utilities .............................................. 71
QSlide ...................................................... 71
QuickMemo+ ......................................... 72
Quick Remote ....................................... 73
Universal remote .................................. 75
Using the Magic Remote feature .......75
SmartShare ............................................ 76
Setting the alarm ................................. 76
Using the calculator ............................ 76
Adding an event to your calendar ... 77
Tasks ........................................................ 78
The Web ........................................... 79
Browser ................................................... 79
Using options ........................................ 79
Adding bookmarks ..............................80
Changing the Browser settings ........80
Settings ............................................. 81
Networks tab .......................................... 81
Airplane mode ....................................... 81
Wi-Fi .......................................................... 81
Bluetooth ................................................. 83
Mobile data ............................................ 85
Call ............................................................ 86

Share & connect ....................................87
Tethering & networks ........................... 89
Sound tab ...............................................91
Sound profi le ........................................... 91
Volumes ................................................... 91
Vibrate strength ..................................... 92
Quiet mode ............................................. 92
Ringtone ................................................. 92
Notifi cation sound ................................. 92
Ringtone with vibration ........................ 92
Vibration Type ......................................... 92
Vibrate on tap......................................... 92
Sound effects ......................................... 92
Message/call voice notifi cations ........ 92
Display tab .............................................93
Home screen .......................................... 93
Lock screen............................................. 93
Home touch buttons ........................... 94
Font type ................................................ 94
Font size ................................................. 94
Brightness .............................................. 95
Notifi cation LED..................................... 95
Auto-rotate screen .............................. 95
Screen timeout ..................................... 95
Smart screen ......................................... 95
Screen-off effect ................................... 95
Daydream ............................................... 95
General tab ............................................ 95
Language & input ................................ 95
Location .................................................. 96
Accounts & sync ................................... 96
Cloud ........................................................ 96
Accessibility .............................................97
One-handed operation ........................ 98
Shortcut key ............................................ 99
Security .................................................... 99
Guest mode .......................................... 100
Gestures.................................................100
QuickCircle case ....................................101
Dual window ............................................101
Date & time ...........................................101
Storage ....................................................101
Battery ......................................................101
Smart cleaning .................................... 102
Apps ....................................................... 102
Default message app ......................... 102
Backup & reset .................................... 102
Printing ....................................................103
About phone .........................................103
LG PC Suite ................................... 104
For Windows OS ................................. 104
For Mac OS .......................................... 105
Phone software update .................107
Trademarks .....................................109
Accessories .......................................111
Troubleshooting ...............................112
For Your Safety ................................116
5

Important notice
Please check to see if any problems you have encountered with your phone
are described in this section before taking the phone in for service or calling a
service representative.
1. Phone Memory
In order to make more memory available, you will have to manage your
applications and delete some data, such as applications or messages.
Managing Applications
1 From the Home screen, tap > > Settings > General tab > Apps.
2 Tap one of the available options at the top of the screen and select the
application you want to uninstall.
3 Tap Uninstall and then tap OK to confi rm that you want to uninstall the
desired application.
2. Optimizing Battery Life
You can extend your battery's life between charges by turning off features that
you don't need to run constantly in the background. You can also monitor how
applications and system resources consume battery power.
To extend the life of your battery
• Turn off radio communications that you aren't using, such as Wi-Fi, Bluetooth,
or GPS.
• Wi-Fi will be set to On the first time you use your newly purchased phone.
• Lower screen brightness and set a shorter screen timeout.
• Turn off automatic syncing for Gmail, Calendar, Contacts, and other
applications.
• Some applications you have downloaded may cause your battery power to be
reduced.
• While using downloaded applications, check the battery charge level.
6

NOTE: If you accidently press the Power/Lock Key while the device is in your
pocket, the screen will turn off automatically in order to save battery power.
To view the battery charge level
1 From the Home screen, tap > > Settings > General tab > Battery.
2 The battery status (charging or discharging) and level are displayed on the
screen.
To monitor and control what uses the battery
1 From the Home screen, tap > > Settings > General tab > Battery.
2 Tap the battery icon.
3 A list all of the applications or services using battery power from the
greatest amount of energy used to the least amount. You can also use it
to turn off applications or services if they are consuming too much power.
Tap any of the listed items for more options.
3. Installing an Open Source Operating System
Installing an open source operating system on your phone and not using the
operating system provided by the manufacturer can cause your phone to
malfunction.
Warning!
• If you install and use an operating system other than the one provided by
the manufacturer, your phone is no longer covered by the warranty.
• To protect your phone and personal data, download applications only from
trusted sources, such as Play Store. If some applications are not properly
installed on your phone, your phone may not work properly- or serious
errors may occur. You will need to uninstall those applications and all of its
data and settings from the phone.
7

Important notice
4. Using a Screen Lock
Set a screen lock to secure your phone. To set the screen lock, follow the
process below.
From the Home screen, tap
> Select screen lock and select a desired screen lock from None, Swipe, Face
Unlock, Knock Code, Pattern, PIN and Password.
NOTE: In case that you have trouble with Face Unlock, you can unlock the
screen a Backup Pattern or PIN.
Warning! Take precautions when using an unlock Pattern, PIN, or Password.
It is very important that you remember the screen unlock information you
set. You are allowed 5 attempts to enter your screen unlock information. If
you used up all 5 opportunities, you will have to wait 30 seconds to attempt
unlocking the phone again.
When you can’t recall your Unlock Pattern, PIN, or Password:
If you logged into a Google account on the phone and failed to use the correct
pattern 5 times, tap Forgot pattern? You will be required to sign in with your
Google account and prompted to create a new unlock pattern.
If you have set a backup PIN, you can unlock the screen with keying in the
backup PIN.
If you haven’t created a Google account on the phone and you forgot your PIN,
Password, and the backup PIN, you need to perform a hard reset.
Caution If you perform a hard reset, all user applications and user data
will be deleted. Please remember to back up any important data before
performing a hard reset.
> > Settings > Display tab > Lock screen
8

Read ALL steps before attempting.
1 Turn the phone off.
2 Press and hold the following keys at the same time: Volume Down Key +
Power/Lock Key
3 Release the Power/Lock Key only when the LG logo is displayed, then
immediately press and hold the Power/Lock Key
4 Release all keys when the Factory hard reset screen is displayed.
5 Press the Volume Keys to highlight Ye s, then press the Power/Lock
Key
to continue.
6 Press the Volume Keys to highlight Ye s, then press the Power/Lock
Key
once more to confi rm.
7 Your device will perform a factory reset.
on the back of the phone.
again.
5. Using Safe Mode
Using Safe mode
To recover your phone when malfunctioning.
1 Turn off your phone and reboot. When you see the T-Mobile booting
animation press and hold the Volume Down Key
screen.
OR
While the phone is on, press and hold the Power/Lock Key
Phone options menu is displayed. Then touch and hold Power off and tap
OK. Your Home screen will then be displayed with the words "Safe mode"
in lower left corner.
2 From the Home screen, tap > > Settings > General tab > Apps.
3 Tap one of the available options at the top of the screen and select the
application you wish to uninstall.
4 Tap Uninstall and OK to confi rm.
5 After uninstalling the application, turn off and reboot your phone.
until you see the Home
until the
9

Important notice
6. Connecting your phone to a computer via USB
1 Use the USB cable that was provided with your phone to connect the
phone to a USB port on your computer. You'll receive a notifi cation that the
USB is connected and can see USB connection mode screen.
2 Tap Media device (MTP) or Send images (PTP) to confi rm that you want to
transfer fi les between your phone and the computer.
When the phone is connected as USB storage, you receive a notification. Your
phone is recognized as a device on your computer. You can now copy files to
and from the phone.
7. Unlock screen when using data connection
Your screen will go dark if untouched for a period of time when using a data
connection. To turn on your LCD screen, press the Power/Lock Key . To
change the length of time the screen takes to turn off, tap > > Settings
> Display tab > Screen timeout and select the desired amount.
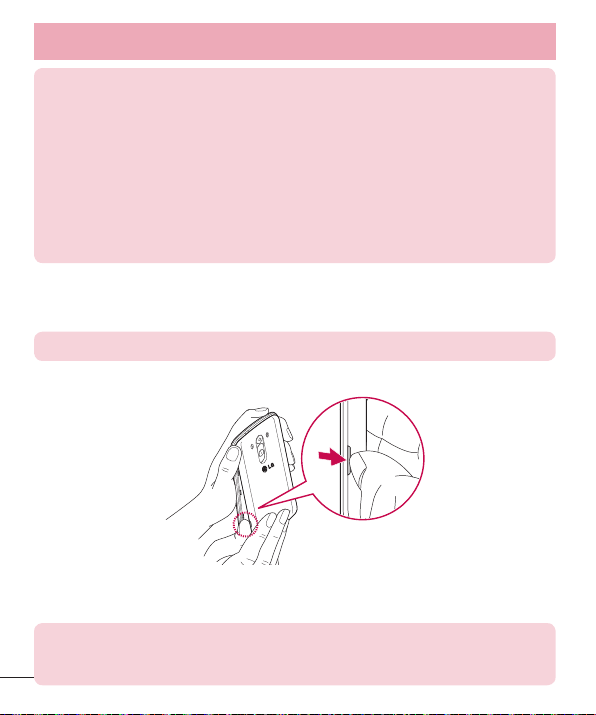
8. Internal antenna
Please hold the mobile phone straight up as a regular phone.
While making/receiving calls or sending/receiving data, try to avoid holding the
lower part of the phone where the antenna is located. It may affect call quality.
10

9. When the screen freezes
If the phone does not respond to user input or the screen freezes:
Press and hold the Power/Lock Key
for 10 seconds to reboot it.
10. Do not connect your phone when you power on/off
your PC
Make sure to disconnect your phone from the PC when powering your PC on
or off as it might result in PC errors.
11. Hardware key control mode
If your phone display is damaged or broken, you can answer an incoming call,
end a call, or turn off an alarm using the hardware keys.
1 Turn your phone off.
2 Press and hold the Power/Lock Key and the Volume Keys at the
same time for more than 6 seconds to enter the Hardware key control
mode.
3 Press the Volume Keys to scroll to the desired option, then press the
Power/Lock Key
• Answer a call: Press the Volume Keys at the same time.
• End a call: Press the Power/Lock Key during a call.
• Stop an alarm: When an alarm rings, press and hold the Volume Up Key
or Volume Down Key to stop the alarm.
NOTE: If you use your phone with a broken display glass, your phone can
break even more or you can be injured. Make sure to visit the LG authorized
service center to get your phone repaired.
to confi rm.
11
Getting to know your phone
To turn on the phone, press and hold the Power/Lock Key on the back side
of the phone for 3 seconds.
To turn off the phone, press the Power/Lock Key
phone for 3 seconds and tap Power off and OK to confirm.
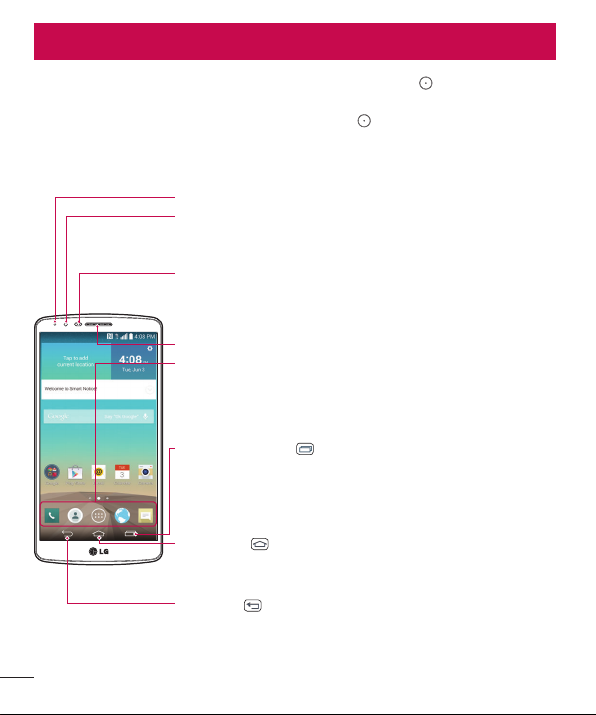
Front view
Notification LED
Front Camera Lens
- Use to take a picture of yourself or to video chat on
supported applications.
Proximity Sensor
- Senses proximity toward other objects, such as your head
during a call, so that you do not accidentally activate
unwanted features.
Earpiece
Quick Keys
- Gives you quick access to your most used applications.
- To add an icon, drag and drop it in the bar.
- To remove an icon, touch and hold it and remove it from the
bar.
Recent Apps Key
-
Displays available options for the current screen or
application.
- Touch and hold to display the available options for the current
app or screen.
Home Key
-
Returns to the Home screen from any screen.
-
Touch and hold to access Google Now
Back Key
-
Returns to the previous screen.
-
Closes pop-up menus and dialog boxes.
- Touch and hold to access the Dual window feature.
12
on the back side of the
Warning! Placing a heavy object on the phone or sitting on it can damage
its LCD and touch screen functionalities. Do not cover the LCD’s proximity
sensor with a protective film. This can cause the sensor to malfunction.
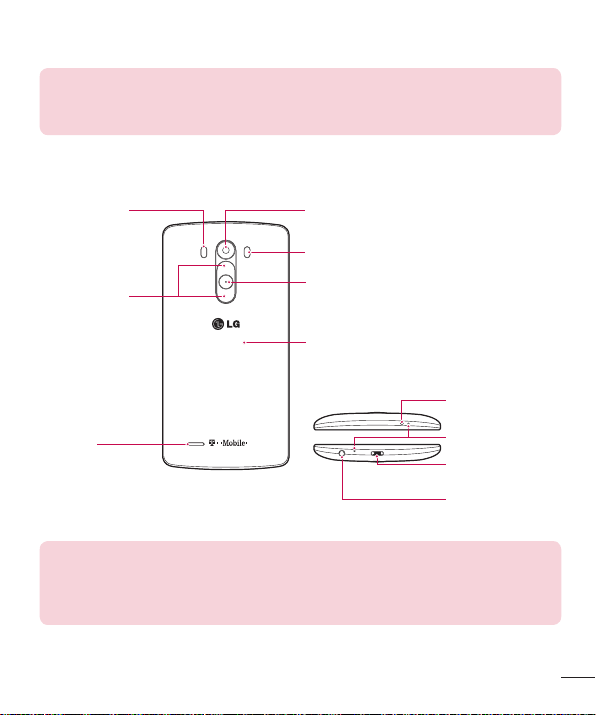
Side view
LDAF Sensor
(Laser Detection
Auto-Focus
Sensor)
Volume Keys
Speaker
NOTE: LDAF Sensor (Laser Detection Auto-focus Sensor) :
This sensor measures the distance to the subject using laser technology
and allows for improved focusing speed and object detection in low-light
situations.
Back Camera Lens
Flash
Power/Lock Key
NFC Touch Point
IR (Infrared)
LED
Microphone
Charger/
USB Port
3.5mm
Headset Jack
13
Getting to know your phone
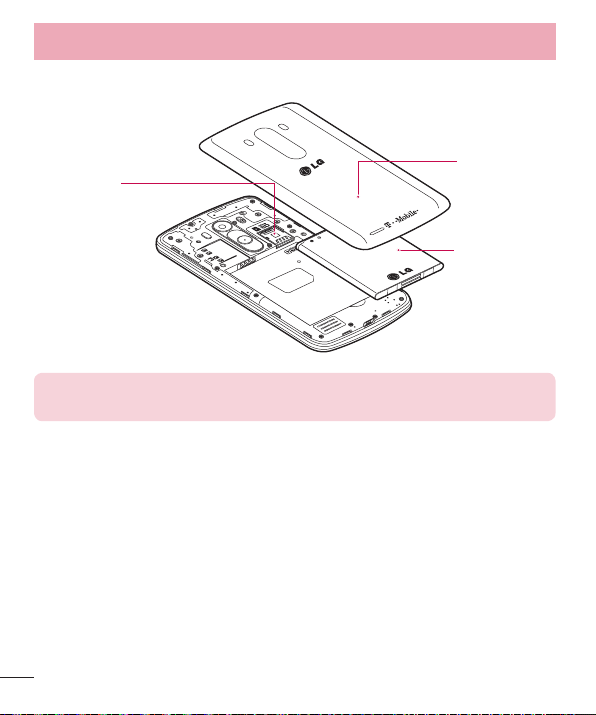
Rear view
Micro SIM/
microSD Card
slot
Notice
The NFC antenna for this model is on the back cover.
Back cover
Battery
14
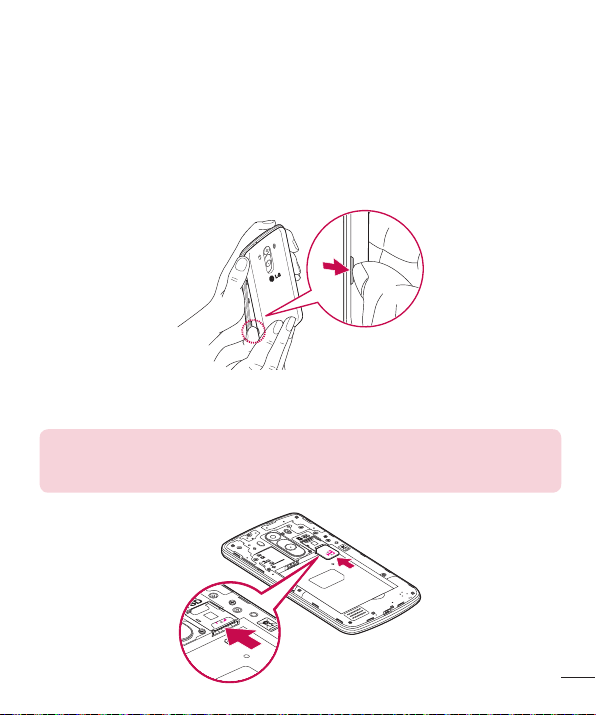
Installing the SIM card and battery
Before you can start exploring your new phone, you’ll need to set it up. To insert
the SIM card and battery:
1 Hold the phone on your hand fi rmly. With the other hand, lift the back
cover using the fi ngertip cutout located on the left side of the cover and
remove it.
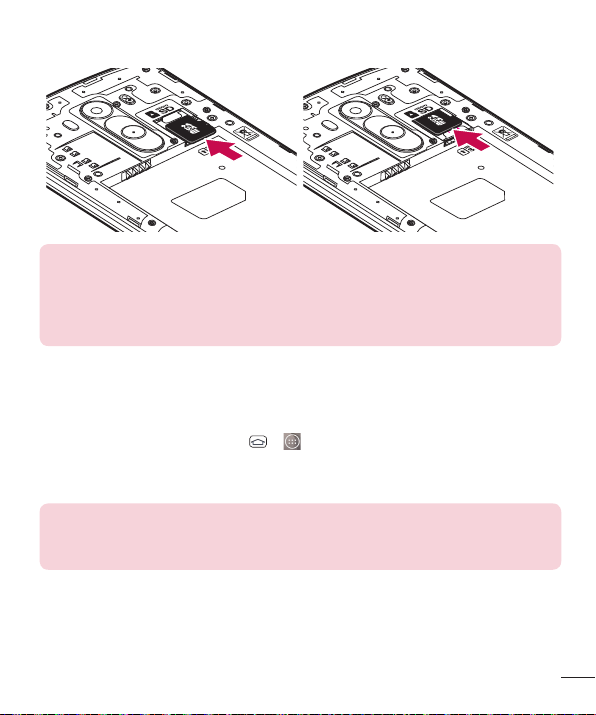
2 Slide the SIM card into the SIM card slot. Make sure the gold contact area
on the card is facing downwards.
NOTE: Please insert the notched side of the SIM card first. Refer to the
image inscribed below the SIM card slot. The SIM card slot is located at the
bottom of the dual card slot.
15
Getting to know your phone
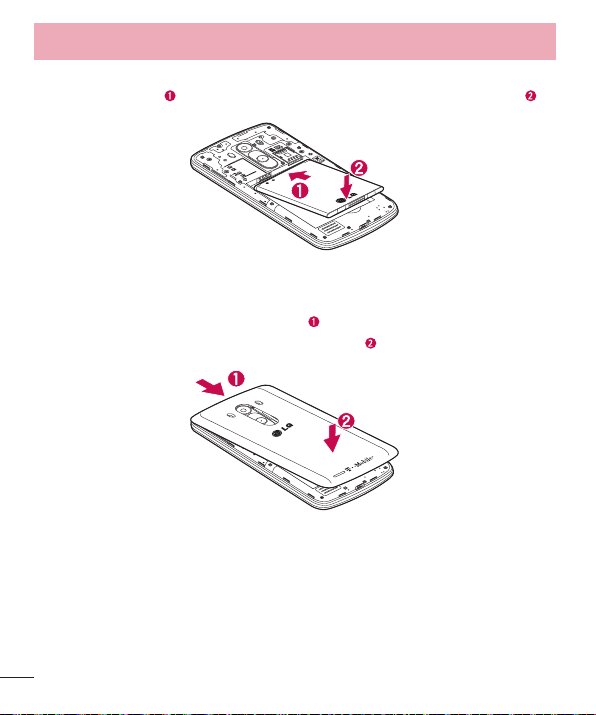
3 Insert the battery into place by aligning the gold contacts on the phone
and the battery
4 Replace the back cover of the phone . Apply a steady downward
pressure until the back cover clicks into place
and press the battery down until it clicks into place .
.
16
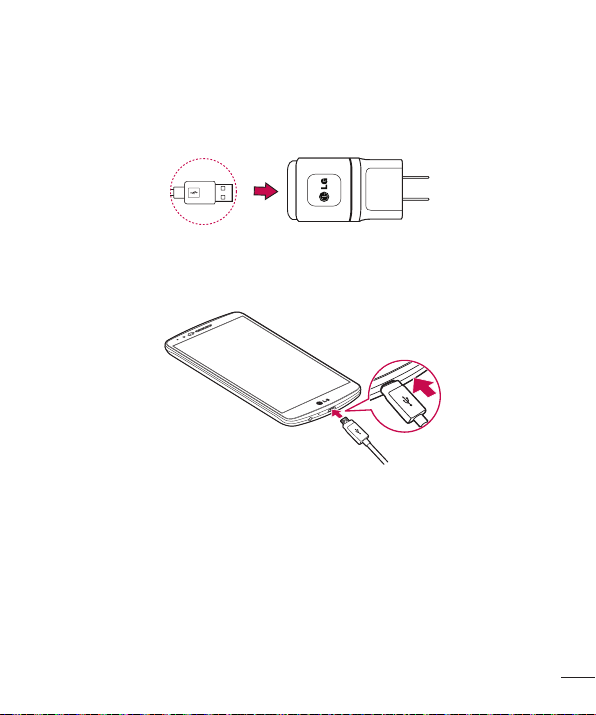
Charging your phone
1 Connect the wall adapter and USB cable as shown below. The USB symbol
on the USB cable should face toward you.
2 Plug the USB cable (as shown below) into the phone's Charger/Accessory
Port. Make sure the USB symbol is facing upwards.
Always unplug the charger from the wall socket after the phone is fully charged
to save unnecessary power consumption of the charger.
17
Getting to know your phone
NOTE:
• The battery must be fully charged initially to improve battery lifetime.
• Your phone has an internal antenna. Be careful not to scratch or damage this
rear area, as that will cause loss of performance.
When the battery becomes fully discharged and you connect the phone to a
charger, the LED lights for the keys at the bottom of the phone will blink. This
is normal operation for a completely discharged battery to prevent overflowing
current because the phone is designed to provide reasonable protection
against damage to the battery. Once the battery has enough charge, the
screen will turn on and display a battery image.
Inserting a microSD card
NOTE: This device supports up to a 2TB microSD card.
1 Remove the back cover.
2 Gently insert the microSD card into the slot. Make sure the gold contact
area is facing downwards.
NOTE: Please insert the notched side of the microSD card first. Refer to the
image next to the microSD card slot. The microSD card slot is located at
the top of the dual card slot.
18
NOTE: Some downloaded applications store data on the microSD card
as well as on the phone. Due to this feature, if you skip the unmount
procedure, it can cause an error because information between the microSD
card and the phone is not accorded properly. In the worst case, the microSD
card can be corrupted or damaged.
Removing the microSD card
To safely remove the microSD card from your phone, you must first unmount it.
1 From the Home screen, tap > > Settings > General tab > Storage >
Unmount SD card.
2 Remove the back cover and gently pull the microSD card from the slot.
Warning! Do not remove the microSD card without unmounting it first.
Otherwise, it may damage the microSD card as well as your phone, and the
data stored on the microSD card may be corrupted.
19

Getting to know your phone
Formatting the microSD card
Your microSD card may already be formatted. If it isn’t, you must format it
before you can use it.
NOTE: All files on the card are deleted when you format the microSD card.
1 From the Home screen, tap > > Settings > General tab > Storage >
Unmount SD card.
2 Tap Erase SD card twice.
3 If you set an unlock pattern, enter it and tap Erase everything. The card will
then be formatted and ready to use.
NOTE: If there is content on your microSD card, the folder structure may be
different after formatting since all the files will have been deleted.
Switching between and exiting applications
Multi-tasking is easy with Android because open applications keep running
even when you open another application. There is no need to quit an
application before opening another. Use and switch among several open
applications. Android manages each application, stopping and starting
them as needed, to ensure that idle applications don’t consume resources
unnecessarily.
Switching between applications
- Tap the Recent Apps Key
displayed. Then tap the application you want to access.
- To remove an application from the list, swipe the app preview to the left or
right.
. A list of recently used applications will be
20

To stop/exit an application
1 From the Home screen, tap > > Settings > General tab > Apps.
2 Tap one of the tabs at the top of the screen, choose the desired
application and tap Force stop (or Stop) to stop the application.
21

Your Home screen
Touch screen tips
With the touch of your finger, you can access available applications, make
menu selections, and access data saved to your phone. The following terms are
used for describing the different available actions using the touchscreen:
Tap - A single finger tap selects items, links, shortcuts and letters on the
on-screen keyboard.
Touch and hold - Touch and hold an item on the screen by touching it and
not lifting your finger until an action occurs. For example, to open a contact's
available options, touch and hold the contact in the Contacts list until the
context menu opens.
Drag - Touch and hold an item for a moment and then, without lifting your
finger, move your finger on the screen until you reach the target position. You
can drag items on the Home screen to reposition them.
Swipe or slide - To swipe or slide, quickly move your finger across the surface
of the screen, without pausing when you first touch it (so you don’t drag an
item instead). For example, you can slide the screen up or down to scroll
through a list, or browse through the different Home screens by swiping from
left to right (and vice versa).
Double-tap - Double-tap to zoom on a Web page or a map. For example,
quickly double-tap a section of a Web page to adjust that section to fit the
width of the screen. You can also double-tap to zoom in and out when using
Maps.
Pinch-to-Zoom - Use your index finger and thumb in a pinch or spread motion
to zoom in or out when using the browser, Maps, Camera, or browsing pictures.
Rotate the screen - From many applications and menus, the orientation of the
screen adjusts to the device's physical orientation.
NOTE:
• To select an item, tap the center of the icon.
• Do not to press too hard; the touch screen is sensitive enough to pick up a
light, firm touch.
• Use the tip of your finger to tap the option you want. Be careful not to tap
any other keys or icons.
22

Proximity sensor
When receiving and making calls, this sensor automatically turns the backlight
off and locks the touch keypad by sensing when the phone is near your
ear. This extends battery life and prevents the touch keypad from activating
unintentionally during calls.
NOTE: When turning the screen on while holding the phone in a horizontal
position, make sure you do not cover the proximity sensor. Doing so will turn
the screen off immediately after turning it on.
Lock your phone
When you are not using the phone, press the Power/Lock Key to lock your
phone. This helps prevent accidental presses and saves battery power.
Also, if you do not use the phone for a while, the Home screen, or other screen
you are viewing, is automatically replaced with the lock screen after 30 seconds
(depending on the screen timeout settings) of inactivity to conserve the battery
and prevent pocket dialing.
To wake up your phone, press the Power/Lock Key . The lock screen will
appear. Swipe the screen in any direction to unlock. The last screen you were
working on opens.
NOTE:
• The automatic screen timeout can be configured manually in Settings. To
change it, tap > > Settings > Display tab > Screen timeout.
• If there are any programs running when you lock the phone, they may still be
running in lock mode. It is recommended that you exit all programs before
entering the lock mode to avoid unnecessary charges (e.g., phone call, web
access and data communications).
23
Your Home screen
KnockON
The KnockON feature allows you to double-tap the screen to easily turn it on
or off.
To turn the screen on
1 Double-tap the center of the Lock screen to turn the screen on.
2 Unlock the screen or access any of the available shortcuts or widgets.
To turn the screen off
1 Double-tap an empty area of the Home screen or the Status Bar.
2 The screen will turn off.
NOTE:
• Tap on the center area of the screen. If you tap on the bottom or the top
area, the recognition rate may decrease.
Quick Switch to Silent/Vibrate Mode
To quickly set your phone to silent or vibrate mode, slide the Status Bar down
and tap until or appears.
Home Screen Overview
The main Home screen is the starting point for many applications and
functions, and it allows you to add items like application icons, shortcuts,
folders or widgets to give you instant access to information and applications.
This is the default page and accessible from any menu by tapping the Home
Key .
On your Home screen, you can view menu icons at the bottom of the screen. Menu
icons provide easy and one-touch access to the functions you use the most.
24

Navigating Through the Home Screen Canvases
Your phone has several Home screen canvases. If you like, you can place
different applications on each of the Home screen canvases.
From the main Home screen canvas, swipe the screen with your finger in either
direction. The main Home screen canvas is located in the middle. To add more
canvases, pinch in on the Home screen and tap
You can also customize each canvas with shortcuts, folders, and widgets.
.
Submenu Options
Submenus are available when you are at any Home screen or have selected a
feature or application such as Phone, Contacts, Messaging or Browser.
1 Touch the Menu icon on the screen. A submenu will be displayed on
the phone screen.
2 Tap an option.
Customizing your Home screen
You can customize your Home screen by adding quick access items, such as
shortcuts to an application, widgets, or changing the wallpaper.
• Apps: Add shortcuts to applications on the Home screen.
• Widgets: Add dynamically updating widgets to your Home screen to allow
quick access to applications without opening the full application.
• Wallpapers: Change the Home screen wallpaper.
To add shortcuts to apps or widgets on the Home screen:
1 Select a location (Home screen canvas) to add an item by swiping the
Home screen from left to right or vice versa.
2 Touch and hold an empty part of the Home screen.
3 Tap the type of item you want to add on the screen: Apps or Widgets.
4 Tap the desired app or widget.
25
Your Home screen
5 You will see a new icon on the Home screen. To place it on a different
canvas, touch and hold it to drag it to the desired location and release your
fi nger from the screen.
TIP!
To add a preloaded application or an application you have downloaded from
Play Store to the Home screen, simply touch and hold the icon you want in
the Apps screen and drag it to the desired Home screen canvas.
NOTE: If there is no available space on a particular Home screen panel, you
must delete or remove an item before you can add another item. In this
case, you have the option of switching to another Home screen panel.
To delete an application icon from the Home screen, touch and hold the
shortcut icon or widget you want to delete and drag to Remove
of the screen. When changes to , lift your finger.
You cannot delete the preloaded applications. (Only their icons can be
deleted from the screen).
Customizing apps icons on the Home screen
You can create your own custom application icon(s) using the images in your
Gallery.
1 Touch and hold an application icon until it’s unlocked from its current
position. Then drop it on the screen. The editing icon
upper right corner of the application.
NOTE: If an icon you placed can be resized, you will see a blue box around
the icon after you touch, hold and release it. Drag the edges of the box to
resize it.
at the top
will appear in the
26

2 Tap the application icon.
3 Tap the icon design you want from the available Icon Gallery. Or you can
tap Add new, select a size, and select an image from your Galllery.
27
Your Home screen
NOTE:
• Your customized application icon(s) are only applied to icons on your
Home screen. The Applications screen is not affected.
• Your custom photo icons are saved so you can easily select them for any of
your icon images.
Creating Application Folders on the Home screen
You can create application folders to hold similar applications if you wish.
On the Home screen
1 Touch and hold an icon to unlock it from its positions. Then drag it over
another icon and release it.
2 A folder will be created.
On the Apps screen
1 From the Home screen, tap the Apps Key to open the Apps screen,
then tap the Menu icon
2 Tap the desired icon, then touch and hold the desired icon to release it
from its position.
3 Drag the icon over another icon and release it to create a folder.
Customizing the Apps screen
1 From the Home screen, tap the Apps Key .
2 Tap the Apps tab at the top of the screen to go to the Apps screen, if it is
not already selected.
3 Tap Menu icon to access the following Applications screen options:
• View apps by: Tap to sort your applications either in alphabetical order, by
downloaded date, or user customized.
• Show small/large icons: Tap to change the application icons to either
small or large, then tap Yes to set your choice.
28
at the top right of the screen.
• Hide/Show apps: Tap to set which application icons will be displayed in
your Applications screen. Checkmark the icons you want to hide, then tap
.
• Edit/Uninstall apps: Tap to view app information or uninstall apps.
• Home screen settings: Tap to directly access to the phone's Home screen
settings menu.
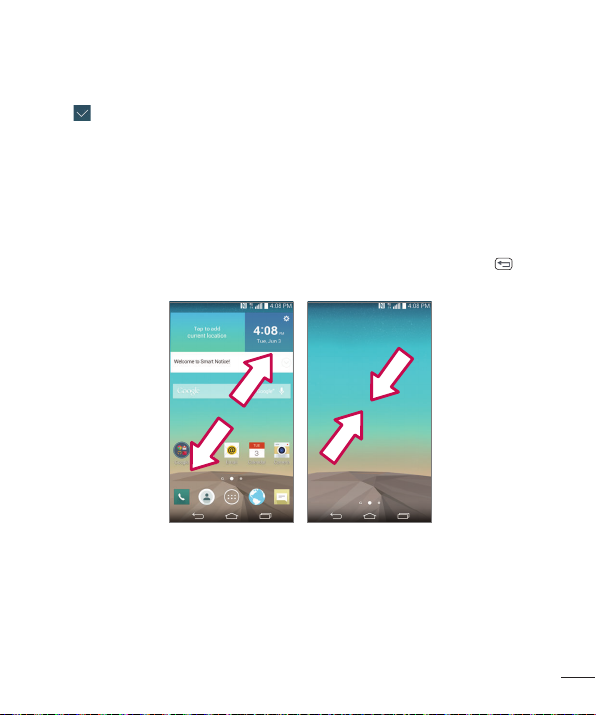
Home screen clean view
You can see the wallpaper without items on the Home screen by placing two
fingers on the screen and pinching out. Pinch in or tap the Back Key to see
applications and widgets again.
29
 Loading...