

Page 1
ENGLISH
Guárdelo para consultarlo en el futuro.
Lea este manual cuidadosamente antes de utilizar su teléfono.
MANUAL DEL USUARIO
USER GUIDE
USER GUIDE
Please read this manual carefully before operating your mobile
phone. Retain it for future reference.
ESPAÑOL
P/N : MMBB0339701(1.2) LG-AX840A
G
Printed in Korea
Page 2

Copyright ©2010 LG Electronics, Inc. All rights reserved.
LG and the LG logo are registered trademarks of LG
Group and its related entities. All other trademarks are the
property of their respective owners.
Tel. 1-800-793-8896 or Fax. 1-800-448-4026
HOW TO GET WARRANTY SERVICE:
Page 3
Important Safety Precautions
Read these instructions. Breaking the rules may be dangerous or
illegal. Further detailed information is given in this user guide.
WARNING! Violation of the instructions may cause serious injury or
death.
1. Never use an unapproved battery since this could
damage the phone and/or battery and could cause
the battery to explode.
2. Never place your phone in a microwave oven as it will
cause the battery to explode.
3. Never store your phone in temperatures less than
-4°F or greater than 122°F.
4. Do not dispose of your battery by fire or with
hazardous or flammable materials.
5. When riding in a car, do not leave your phone or set
up the hands-free kit near to the air bag. If wireless
equipment is improperly installed and the air bag is
deployed, you may be seriously injured.
6. Do not use a hand-held phone while driving.
7. Do not use the phone in areas where its use is
prohibited. (For example: aircraft)
Important Safety Precautions
1
Page 4
Important Safety Precautions
1. Do not expose the battery charger or adapter to direct
sunlight or use it in places with high humidity, such as
a bathroom.
2. Do not use harsh chemicals (such as alcohol, benzene,
thinners, etc.) or detergents to clean your phone. This
Important Safety Precautions
2
could cause a fire.
3. Do not drop, strike, or shake your phone severely. It
may harm the internal circuit boards of the phone.
4. Do not use your phone in high explosive areas as the
phone may generate sparks.
5. Do not damage the power cord by bending, twisting,
pulling, or heating. Do not use the plug if it is loose as
it may cause a fire or electric shock.
6. Do not place any heavy items on the power cord. Do
not allow the power cord to be crimped as it may
cause electric shock or fire.
7. Do not handle the phone with wet hands while it is
being charged. It may cause an electric shock or
seriously damage your phone.
8. Do not disassemble the phone.
Page 5
1. Do not place or answer calls while charging the phone as it may
short-circuit the phone and/or cause electric shock or fire.
2. Do not hold or let the antenna come in contact with your body
during a call.
3. Make sure that no sharp-edged items such as animal’s teeth or
nails, come into contact with the battery. This could cause a fire.
4. Store the battery out of reach of children.
5. Be careful that children do not swallow any parts (such as
rubber plugs, earphone, connection parts of the phone, etc.)
This could cause asphyxiation or suffocation resulting in serious
injury or death.
6. Unplug the power cord and charger during lightning storms to
avoid electric shock or fire.
7. Only use the batteries and chargers provided by LG. The
warranty will not be applied to products provided by other
suppliers.
8. Only authorized personnel should service the phone and its
accessories. Faulty installation or service may result in accidents
and consequently invalidate the warranty.
9. Your service provider programs one or more emergency phone
numbers, such as 911, that you can call under any
circumstances, even when your phone is locked. Your phone’s
preprogrammed emergency number(s) may not work in all
locations, and sometimes an emergency call cannot be placed
due to network, environmental, or interference issues.
Important Safety Precautions
3
Page 6

Table of Contents
Important Safety
Precautions 1
Table of Contents 4
Welcome 9
Technical Details 10
FCC RF Exposure Information 12
Bodily Contact During Operation 12
Vehicle-Mounted the External
Table of Contents
Antenna 13
FCC Notice and Cautions 13
Caution 14
Part 15.21 statement 14
Part 15.19 statement 14
Part 15.105 statement 14
Phone Overview 16
Menus Overview 21
Getting Started with
Your Phone 25
The Battery 25
Charging the Battery 25
Battery Charge Level 26
Turning the Phone On and Off 26
Signal Strength 27
4
Screen Icons 27
Making Calls 27
Correcting Dialing Mistakes 28
Redialing Calls 28
Receiving Calls 28
Quick Access to
Convenient Features 29
Lock Mode 29
Speaker Phone Function 29
Volume Quick Adjustment 29
Call Waiting 29
Caller ID 30
Speed Dialing 30
Text Input 31
Entering and Editing
Information 31
Contacts in Your Phone’s
Memory 32
The Basics of Storing Contacts
Entries 32
Phone Numbers With Pauses 32
Searching Your Phone’s Memory 34
Accessing Options 34
Making a Call From Your Phone’s
Memory 35
Page 7

Using Phone Menus 36
Contacts 36
1. New Contact 36
2. Contact List 36
3. Speed Dials 37
4. Groups 38
5. My Name Card 38
Recent Calls 39
1. Missed Calls 39
2. Received Calls 40
3. Dialed Calls 40
4. All Calls 40
5. Call Timer 40
6. Data 41
7. Data Counter 41
Messaging 41
1. New Text Message 41
2. New Picture Message 44
3. New E-mail 45
4. Inbox 45
5. Outbox 46
6. Drafts 48
7. Voicemail 48
8. Templates 49
9. Delete All 49
Instant Messaging 49
Alltel Web 50
Email 58
Alltel Shop 58
1. Alltel Shop 59
2. Settings 60
3. Help 61
Alltel Navigation 61
Take Photo 62
Record Video 63
Record Voice 65
Music 65
1. Now Playing/ Recently
Played 65
2. All Songs 66
3. Artists 66
Table of Contents
5
Page 8

Table of Contents
4. Albums 67
5. Genres 67
6. My Playlists 67
7. Settings 67
7.1 Repeat 67
7.2 Shuffle 68
7.3 Background Music 68
Radio Connect 68
My Stuff 69
Table of Contents
TV on Demand 69
Nutsie 69
Voice Command 70
1. Start Command 70
1.1 Call <Name> or <Number> 70
1.2 Voicemail 70
1.3 Missed Calls 70
1.4 Messages 71
1.5 Time & Date 71
1.6 Help 71
2. Command Mode 72
3. Announce Alert 72
6
4. Train Word 72
5. Best Match 73
Alarm Clock 73
Organizer 74
1. Calendar 74
2. Date Finder 74
Notepad 74
Tools 75
1. Calculator 75
2. Ez Tip Calculator 76
3. Unit Converter 77
4. Drawing Panel 77
5. World Clock 78
Stopwatch 79
Games 79
MyCastWeather 79
Sound 80
1. Ringers 80
Page 9

2. Volume 80
3. Message Alerts 80
4. Alert Type 81
5. Service Alerts 81
6. Power On/Off Tones 82
7. Slide Tone 82
Display 83
1. Wallpaper 83
1.1 Screen 83
1.2 Shuffle 83
1.3 Buy Wallpaper 84
2. Banner 84
3. Backlight 84
4. Brightness 85
5. Menu Style 85
6. Languages 85
7. Clock & Calendar 85
8. Font Settings 86
9. Name Match for Dialing 86
Touch 87
1. Touchscreen Calibration 87
2. Touchscreen Effect 87
3. Thumbpad Effect 88
Bluetooth
®
88
1. Power 89
2. Add New 89
3. Paired Devices 90
4. Settings 90
4.1 My Visibility 90
4.2 Device Name 91
4.3 My Bluetooth Info 91
System 91
1. Network 91
1.1 System Select 91
1.2 Set NAM 92
1.3 Auto NAM 92
1.4 Serving System 92
2. Location 93
Phone Settings 93
1. Power Save 93
2. Auto Lock 93
3. Security 94
3.1 Lock Phone 94
3.2 Restrictions 94
3.3 Emergency Numbers 95
3.4 Change Lock Code 95
Table of Contents
7
Page 10

Table of Contents
4. Memory 96
5. USB Connection Mode 96
6. Phone Info 97
6.1 My Number 97
6.2 ESN/MEID 97
6.3 Icon Glossary 97
6.4 Version 98
7. Alltel Web Setting 98
7.1 Message Notification 98
8. Software Update 98
9. Reset Settings 98
Table of Contents
Call Settings 99
1. Answer Options 99
2. Auto Retry 99
3. One-Touch Dial 100
4. Voice Privacy 100
5. Auto Volume 100
6. Airplane Mode 101
7. TTY Mode 101
Message Settings 102
1. All Messages 102
2. Text Messages 103
3. Picture Messages 103
4. Voicemail Number 103
8
Safety 104
TIA Safety Information 104
Safety Information 108
Warning! Important safety
information 112
FDA Consumer Update 114
10 Driver Safety Tips 124
Consumer Information
on SAR 128
FCC Hearing-Aid Compatibility
(HAC) Regulations for
Wireless Devices 131
Accessories 134
Limited Warranty
Statement 135
Index 139
Page 11
Thank you for choosing the
cellular phone designed
to operate with the latest digital
mobile communication technology,
Code Division Multiple Access
(CDMA). Along with the many
advanced features of the CDMA
system, such as greatly enhanced
voice clarity, this compact phone
offers:
Music capability and microSD
™
card slot.
Significantly enhanced voice
.
clarity
Slim and sleek design with
internal antenna (Internal
antenna described as antenna
throughout this user guide).
Large, easy-to-read, 9-line
backlit LCD with status icons.
Paging, messaging, voice mail,
and caller ID.
8 physical keys, a Touch Screen
and a full QWERTY keypad.
Welcome
Speakerphone feature.
3.0 Megapixel camera.
Menu-driven interface with
prompts for easy operation and
configuration.
Any key answer, auto answer,
auto retry, one-touch and speed
dialing with 99 memory
locations.
Bilingual (English and Spanish)
capabilities.
Bluetooth®wireless technology.
Note
The Bluetooth®word mark and
logos are owned by the Bluetooth
SIG, Inc. and any use of such marks
by LG Electronics is under license.
Other trademarks and trade names
are those of their respective owners.
Welcome
9
Page 12
Technical Details
Important Information
This user’s guide provides
important information on the use
and operation of your phone.
Please read all the information
carefully prior to using the
phone for the best performance
and to prevent any damage to or
misuse of the phone. Any
unapproved changes or
modifications will void your
warranty.
Technical Details
FCC Part 15 Class B
Compliance
This device and its accessories
comply with part 15 of FCC rules.
Operation is subject to the
following two conditions: (1) This
device and its accessories may not
cause harmful interference, and
(2) this device and its accessories
must accept any interference
received, including interference
that causes undesired operation.
10
Technical Details
The is an all digital
phone that operates on both Code
Division Multiple Access (CDMA)
frequencies: Cellular services at
800 MHz and Personal
Communication Services (PCS) at
1.9 GHz.
CDMA technology uses a feature
called DSSS (Direct Sequence
Spread Spectrum) that enables the
phone to keep communication from
being crossed and to use one
frequency channel by multiple users
in the same specific area. This results
in a 10-fold capacity increase when
compared with analog mode. In
addition, features such as soft /
softer handoff, hard handoff, and
dynamic RF power control
technologies combine to reduce call
interruptions.
The Cellular and PCS CDMA
networks consist of MSO (Mobile
Switching Office), BSC (Base
Station Controller), BTS (Base
Station Transmission System), and
MS (Mobile Station).
Page 13
* TSB-74: Protocol between an IS-
95A system and ANSI J-STD008
Its battery life is twice as long as
IS-95. High-speed data
transmission is also possible.
The following tab lists some
major CDMA standards.
CDMA Standard
Basic Air
Interface
Network
Service
1x EV-DO
Related
interface
Designator
TIA/EIA-95A
TSB-74
ANSI J-STD-008
TIA/EIA-IS2000
TIA/EIA/IS-634
TIA/EIA/IS/651
TIA/EIA/IS-41-C
TIA/EIA/IS-124
TIA/EIA/IS-96-B
TIA/EIA/IS-637
TIA/EIA/IS-657
IS-801
TIA/EIA/IS-707-A
TIA/EIA/IS-856
TIA/EIA/IS-878
TIA/EIA/IS-866
TIA/EIA/IS-890
Description
CDMA Dual-Mode Air Interface
14.4kbps radio link protocol and interband operations
IS-95 adapted for PCS frequency band
CDMA2000 1xRTT Air Interface
MAS-BS
PCSC-RS
Intersystem operations
Non-signaling data comm.
Speech CODEC
Short Message Service
Packet Data
Position Determination Service (gpsOne)
High Speed Packet Data
CDMA2000 High Rate Packet Data Air
Interface
1xEV-DO Inter-Operability Specification for
CDMA2000 Access Network Interfaces
Recommended Minimum Performance
Standards for CDMA2000 High Rate
Packet Data Access Terminal Test
Application Specification (TAS) for High
Rate Packet Data Air Interface
Technical Details
11
Page 14

Technical Details
FCC RF Exposure Information
WARNING! Read this
information before operating
the phone.
In August 1996, the Federal
Communications Commission
(FCC) of the United States, with
its action in Report and Order
FCC 96-326, adopted an
updated safety standard for
Technical Details
human exposure to Radio
Frequency (RF) electromagnetic
energy emitted by FCC regulated
transmitters. Those guidelines are
consistent with the safety
standard previously set by both
U.S. and international standards
bodies. The design of this phone
complies with the FCC guidelines
and these international
standards.
12
Bodily Contact During
Operation
This device was tested for typical
use with the back of the phone
kept 0.79 inches (2.0 cm) from
the body. To comply with FCC
RF exposure requirements, a
minimum separation distance of
0.79 inches (2.0 cm) must be
maintained between the user’s
body and the back of the phone,
including the antenna, whether
extended or retracted. Thirdparty belt-clips, holsters, and
similar accessories containing
metallic components should not
be used. Avoid the use of
accessories that cannot maintain
0.79 inches (2.0 cm) distance
between the user’s body and the
back of the phone and have not
been tested for compliance with
FCC RF exposure limits.
Page 15

Vehicle-Mounted the External
Antenna
(Optional, if available.)
To satisfy FCC RF exposure
requirements, keep 8 inches (20
cm) between the user /
bystander and vehicle-mounted
the external antenna. For more
information about RF exposure,
visit the FCC website at
www.fcc.gov.
FCC Notice and Cautions
This device and its accessories
comply with part 15 of FCC
rules. Operation is subject to the
following two conditions: (1)
This device and its accessories
may not cause harmful
interference, and (2) this device
and its accessories must accept
any interference received,
including interference that
causes undesired operation.
Any changes or modifications
not expressly approved in this
user guide could void your
warranty for this equipment. Use
only the supplied antenna. Use
of unauthorized antennas (or
modifications to the antenna)
could impair call quality, damage
the phone, void your warranty
and/or violate FCC regulations.
Don't use the phone with a
damaged antenna. A damaged
antenna could cause a minor skin
burn. Contact your local dealer
for a replacement antenna.
Technical Details
13
Page 16

Welcome
Caution
Use only the supplied and
approved antenna. Use of
unauthorized antennas or
modifications could impair call
quality, damage the phone, void
your warranty and/or result in
violation of FCC regulations. Do
not use the phone with a
damaged antenna. If a damaged
antenna comes into contact with
the skin a minor burn may result.
Contact your local dealer for a
replacement antenna.
Welcome
Part 15.21 statement
Change or Modifications that are
not expressly approved by the
manufacturer could void the
user's authority to operate the
equipment.
14
Part 15.19 statement
This device and its accessories
comply with part15 of FCC rules.
Operation is subject to the
following two conditions:
(1) This device & its accessories
may not cause harmful
interference.
(2) This device & its accessories
must accept any interference
received, including
interference that may cause
undesired operation.
Part 15.105 statement
This equipment has been tested
and found to comply with the
limits for a class B digital device,
pursuant to Part 15 of the FCC
Rules. These limits are designed
to provide reasonable protection
against harmful interference in a
residential installation. This
Page 17

equipment generates, uses, and
can radiate radio frequency
energy and, if not installed and
used in accordance with the
instructions, may cause harmful
interference to radio
communications. However, there
is no guarantee that interference
will not occur in a particular
installation. if this equipment
does cause harmful interference
or television reception, which can
be determined by turning the
equipment off and on, the user is
encouraged to try to correct the
interference by one or more of
the following measures:
- Reorient or relocate the
receiving antenna.
- Increase the separation between
the equipment and receiver.
- Connect the equipment into an
outlet on a circuit different from
that to which the receiver is
connected.
- Consult the dealer or an
experienced radio/TV
technician for help.
Welcome
15
Page 18
Phone Overview
Phone Overview
16
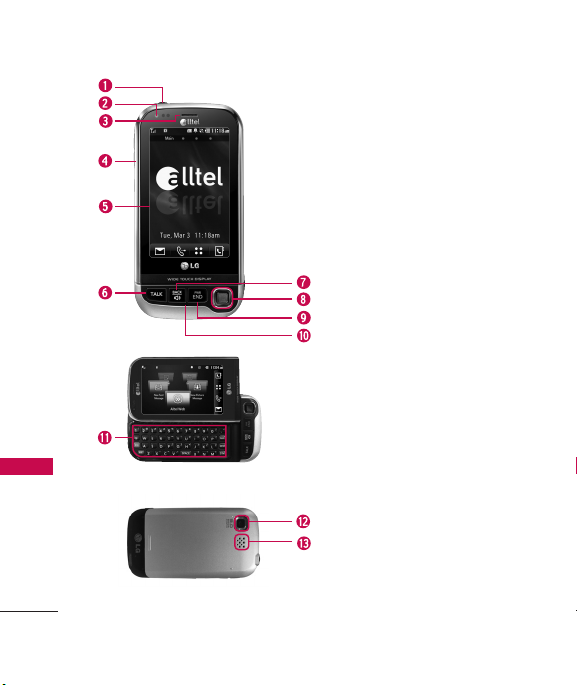
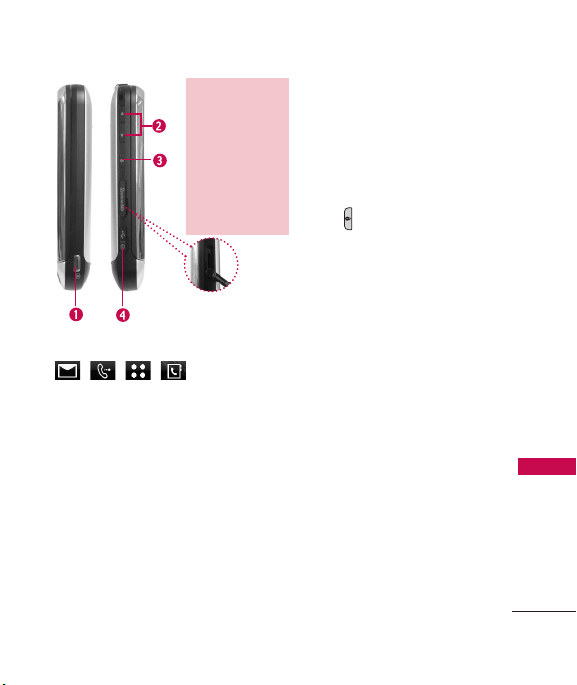
1.Earphone Jack Allows the use of a
headset to hear caller's voice.
2.Proximity Sensor
cm) to this sensor during a call, LCD turns
off allowing you to only adjust volume or
end the call so that you don't inadvertently
activate a feature.
3 Earpiece Lets you hear the caller.
4. Slide Slide open to access the QWERTY
keyboard.
5.LCD Screen Displays incoming calls,
messages and indicator icons as well as
viewing a wide variety of content you
select to view.
6.TALK Key Use to place or answer calls.
You can also press to access your most
Recent Calls.
7. BACK Key
characters with a quick press, but press and
hold to delete entire words. Will also back
you out of menus, one level at a time.
8.Thumbpad Use as a mouse when
browsing the internet, or use to scroll
through menu options.
9.PWR/END Key Use to turn the power
on/off and to end a call. Also returns to
standby mode.
Microphone
10.
11. Alphanumeric Keypad Use to enter
numbers and characters and select menu
items.
Camera Lens
12.
record video. Keep it clean for optimal
photo quality.
Speaker
13.
music and video in speakerphone mode.
When close (within 2-3
Deletes single spaces or
Lets callers hear you.
Used to take photos and
Lets you hear the caller's voice,
Page 19
microSD™card slot
(accommodates optional
™
card up to
microSD
16GB.) Insert microSD
card for external memory.
Use LG-approved
microSD
the microSD
you must remove the side
cover located on the side
of your phone.
™
card. To access
™
card slot
™
1.Side Camera Key Use for quick
access to Camera functions.
2.Side Volume Keys Use to adjust the
ringer volume in standby mode and
the earpiece volume during a call.
3.HOLD Key Use to lock your phone
when the slide is closed. To unlock,
press
()or open the slide.
4.Charger Port Connects the phone
to the battery charger or other
available accessories.
Touch Sensitive Soft Keys
( , , , )
1. Make sure your hands are
clean and dry. Remove
moisture from the surface of
your hands. Don't use the
touch keys in a humid
environment.
2. Touch key sensors are
sensitive to your light touch.
You don't need to press them
forcefully to use them. Protect
your phone from severe
impact because touch key
sensors may become damaged
from harsh use.
3. Use the tip of your finger to
touch the center of a touch
key. If you touch off-center it
may activate the nearby
function instead.
4. The touch feedback level can
be adjusted to your
preference.
Phone Overview
17
Page 20

Phone Overview
5. When the LCD screen is off,
touch keys are deactivated.
Press the Unlock Key ( ) to
turn on the Touch Screen and
touch keys.
6. The Screen Lock feature
protects against accidental key
presses during phone calls with
the flip closed.
7. Keep metal and other
Phone Overview
conductive material away from
the surface of touch keys
because contact may cause
electronic interference.
18
WARNING
Do not put heavy objects on the
Touch Screen.
Do not sit on your phone because
it may damage the Touch Screen.
Do not drag or scratch your
phone with any sharp materials.
Do not keep your phone in
extreme conditions (places that
are too humid, hot, or cold).
Keep chemicals away from your
phone because they may change
the cosmetic or functional
features of your phone.
Page 21

The Touch Screen is a great way to interact with the ’s
software. Take a little time to become accustomed to using it.
If it doesn’t react as you expect, you can adjust the Touch Screen
calibration.
TIP
Keep in mind that the smaller the text appears on the screen, the smaller the
area of touch activation. Try zooming the screen in, if available, to increase the
touch area.
Standby Mode Home Screens
Customize your Touch Screen to have instant access to features you
want to keep as close as a single finger touch.
The has four Standby Mode Home Screens for quick, direct
access to several frequently used device features.
Main:
Displays your Clock and/or Calendar. Customize your
preferences through the Display Settings menu.
Widget:
Customize for quick access to Widgets, My Menu items,
Bookmarks and Alltel Apps.
Contacts:
Displays favorite Contacts. Touch the contact and make call,
send message, view contact or to delete it.
Multimedia:
Displays favorite images, music and videos so you can
show them off at a moment’s notice without having to search.
Phone Overview
19
Page 22

Phone Overview
Set the features and items you want on each home screen and even
display different backgrounds for each one.
Main MultimediaWidget
Phone Overview
1.Message Displays the Messaging Menu.
2.Call Displays the Dialing Touchpad.
3.Menu Displays the Main Menu.
4.Contacts Displays your Contact List.
20
Contacts
Page 23
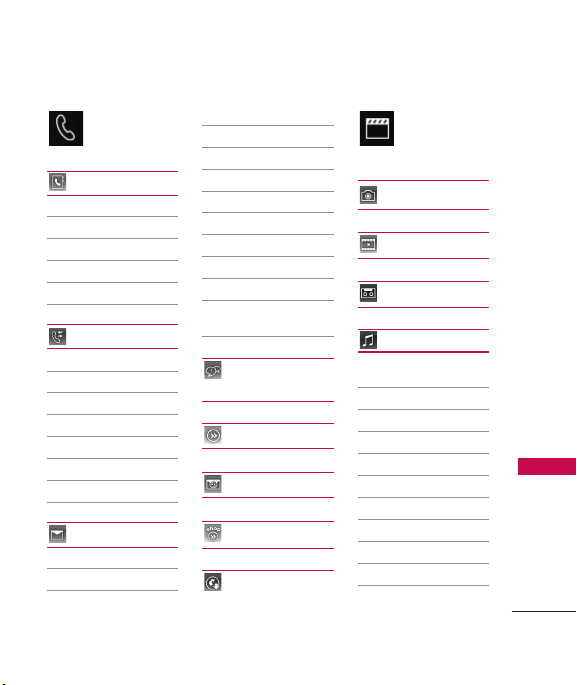
Communicate
Contacts
New Contact
Contact List
Speed Dials
Groups
My Name Card
Recent Calls
Missed Calls
Received Calls
Dialed Calls
All Calls
Call Timer
Data
Data Counter
Messaging
New Text Message
New Picture Message
New E-mail
Inbox
Outbox
Drafts
Voicemail
Templates
Delete All
Delete Inbox
Delete Outbox
Delete Drafts
Delete All
Messages
Instant
Messaging
Alltel Web
Email
Alltel Shop
Alltel
Navigation
Menus Overview
Entertainment
Take Photo
Record Video
Record Voice
Music
Now Playing/
Recently Played
All Songs
Artists
Albums
Genres
My Playlists
Settings
Repeat
Shuffle
Background Music
Menus Overview
21
Page 24

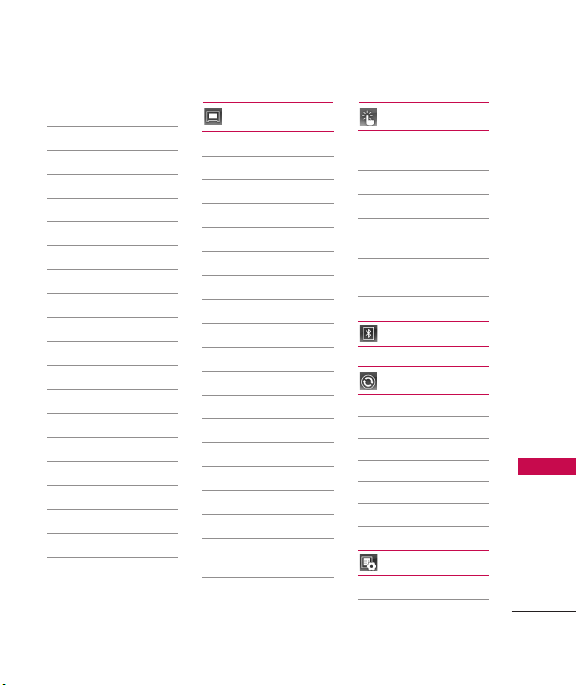
Menus Overview
Menus Overview
22
Radio Connect
My Stuff
Images
My Images
Default
Videos
Audios
Documents
TV on Demand
Nutsie
Utilities
Voice
Command
Start Command
Command Mode
Announce Alert
Train Word
Best Match
Alarm Clock
Organizer
Calendar
Date Finder
Notepad
Tools
Calculator
EZ Tip Calculator
Unit Converter
Drawing Panel
World Clock
Stopwatch
Games
Dart
Homerun Derby
Need for Speed
Monopoly
Collapse
PAC-MAN
MyCast
Weather
Settings
Sound
Ringers
All Calls
Caller ID
No Caller ID
Restricted Calls
Shuffle
Buy Ringtones
Volume
Master Volume
Page 25
Keypad
Earpiece
Speaker
Message Alerts
Text Message
Picture Message
Voicemail
All Messages
Message Reminder
Alert Type
Call Alert
Message Alert
Schedule Alert
Alarm Alert
Service Alerts
Minute Beep
Call Connect
Low Battery
Power On/Off Tones
Slide Tone
Display
Wallpaper
Screen
Shuffle
Buy Wallpaper
Banner
Backlight
Display
Keypad
Brightness
Auto Brightness
Brightness Level
Menu Style
Languages
Clock & Calendar
Font Settings
Font Type
Dial Font Size
Name Match for
Dialing
Touch
Touchscreen
Calibration
Touchscreen Effect
Thumbpad Effect
Thumbpad
Calibration
Thumbpad
Sensitivity
Bluetooth
System
Network
System Select
Set NAM
Auto NAM
Serving System
Location
Phone Settings
Power Save
Auto Lock
Menus Overview
23
Page 26

Menus Overview
Message
Notification
Software Update
Reset Settings
Call Settings
Answer Options
Auto Retry
One-Touch Dial
Voice Privacy
Auto Volume
Airplane Mode
TTY Mode
Menus Overview
Security
Lock Phone
Restrictions
Emergency
Numbers
Change Lock Code
Memory
USB Connection
Mode
Phone Info
My Number
ESN/MEID
Icon Glossary
Version
Alltel Web Setting
Menu Access
Touch the MENU Touch Key to have access to phone menus.
To access the MENU, unlock first by pressing down the unlock key
on the left side of your phone. To go back to standby mode, touch
or press at the bottom center of your phone.
24
Message
Settings
All Messages
Text Messages
Picture Messages
Voicemail Number
Page 27
Getting Started with Your Phone
The Battery
Note
It is important to fully charge the
battery before initial use of the
phone.
The phone comes with a
rechargeable battery. Keep the
battery charged while not in use
in order to maximize talk and
standby time. The battery charge
level is shown at the top of the
LCD screen.
Installing the Battery
Insert the bottom of the battery
into the opening on the back of
the phone, then push the battery
down until it snaps into place.
Removing the Battery
Turn power off. Slide the battery
cover up, then pull the bottom
side of the battery up to remove
it.
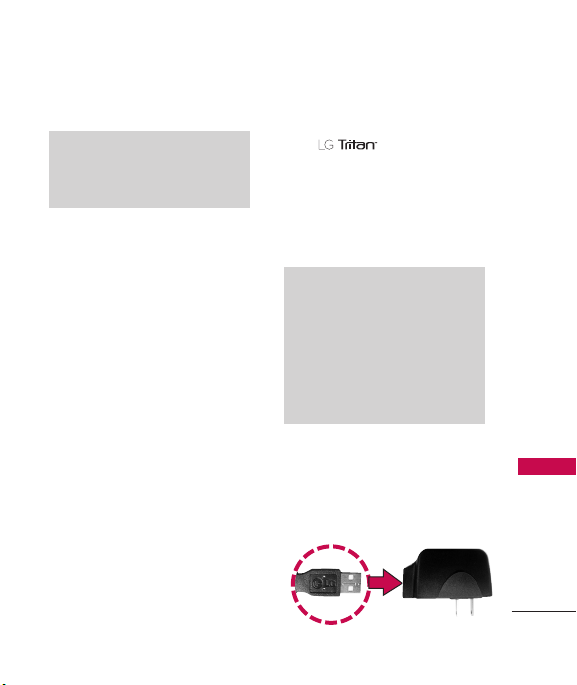
Charging the Battery
Your device comes
with a cableless travel adapter
and a USB data cable which are
connected together to charge
your phone. To charge your
phone:
Note
Please use only an approved
charging accessory to charge your
LG phone. Improper handling of
the charging port, as well as the
use of an incompatible charger,
may cause damage to your phone
and void the warranty.
Connect the cableless wall
1.
adapter and USB data cable.
When connecting as shown
below, the LG logo on the USB
cable should face toward you.
Getting Started with Your Phone
25
Page 28
Getting Started with Your Phone
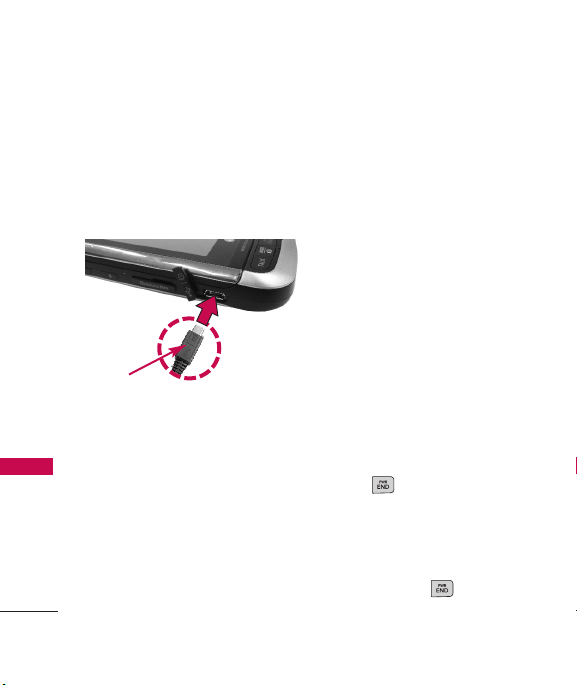
2. Gently uncover the accessory
charging port, then plug the
end of the AC adapter into
the phone’s charger port and
Getting Started with Your Phone
the other end into an
electrical outlet.
Notice
Please make sure that the 'B'
Side faces up before inserting a
charger or data cable into the
charger port of your phone.
3. The charge time varies
depending upon the battery
level.
Battery Charge Level
The battery charge level is shown
at the top right of the LCD
screen. When the battery charge
26
level becomes low, the low
battery sensor alerts you in three
ways: sounding an audible tone,
blinking the battery icon, and
displaying a warning message. If
the battery charge level becomes
exceedingly low, the phone
automatically switches off and
any function in progress is not
saved.
Turning the Phone On and
Off
Turning the Phone On
1. Install a charged battery or
connect the phone to an
external power source.
2. Press for about 3
seconds until the LCD screen
lights up.
Turning the Phone Off
1. Press and hold until the
display turns off.
Page 29

Signal Strength
Call quality depends on the
signal strength in your area. The
signal strength is indicated on
the screen as the number of bars
next to the signal strength icon
. The more bars, the better
the signal strength. If the signal
quality is poor, move to an open
area. If you are in a building, the
reception may be better near a
window.
Screen Icons
To see the icon glossary, touch
Menu
->
Settings
->
Phone Settings
Icon Glossary
->
Phone Info ->
on your phone.
Making Calls
lf the phone is locked, press the
Unlock Key on the left side
of your phone.
1. Touch and touch the
phone number (include the
area code if needed).
2. Press or touch .
Note
If the phone is restricted, you can
only dial phone numbers saved in
the Emergency Numbers or your
Contact List. To turn off this
function:
Menu -> Settings ->
Phone Settings -> Security ->
Restrictions -> Outgoing Calls ->
Allow All.
3. Press to end the call.
Getting Started with Your Phone
27
Page 30
Getting Started with Your Phone
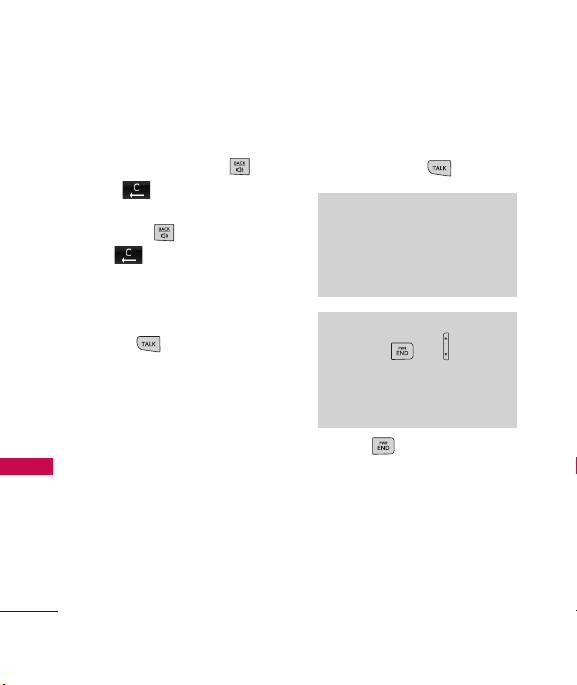
Correcting Dialing Mistakes
If you make a mistake while
dialing a number, press or
touch once to
erase the last digit entered, or
Getting Started with Your Phone
hold down or touch and
hold for at least 2 seconds
to go to standby mode.
Redialing Calls
1. Press twice to redial the
last number you dialed. The
last 150 numbers (received,
dialed and missed) are stored
in the call history list and you
can also select any of these to
redial.
28
Receiving Calls
1. When the phone rings or
vibrates, press to answer.
Tip
Call Settings Menu allows you to
choose answer options:
Slide Open/ Any Key/ TALK Key
Only/ Auto Answer
Note
If you press or (the side
keys), while the phone is ringing,
the ringing or vibration is muted for
that call.
2. Press to end the call.
Page 31

Quick Access to Convenient Features
Lock Mode
Sets your phone to require a 4digit password in order to use
the phone.
To set lock mode on, touch
Menu
->
Settings
->
Phone Settings
Lock Phone
Switch On
->
-> Touch
or
Immediately
Security
When
->
.
Note
Until you change it, the default
lock code/password is the last 4
digits of your phone number.
Speaker Phone Function
This Function can be used during
a phone call.
Touch / to transfer call
sounds between the Speakerphone
and the Earpiece.
Volume Quick Adjustment
Use the side keys to adjust the
ringer volume in standby mode,
and the earpiece volume during a
call. The upper key increases the
volume and the lower key
decreases the volume.
Note
Keypad Volume is adjusted
through the Sounds Volume Menu.
(
Menu
-
Settings
Sound
-
>
Volume ->Keypad).
>
-
>
Call Waiting
Your cellular service may offer
call waiting. While a call is in
progress, a beep indicates
another incoming call. When call
waiting is enabled, you may put
the active call on hold while you
answer the other incoming call.
Check with your cellular service
provider for information about
this function.
Quick Access to Convenient Features
29
Page 32

Quick Access to Convenient Features
1. Press to receive a
waiting call.
2. Press again to switch
Quick Access to Convenient Features
between calls.
Caller ID
Caller ID displays the phone
number or name of the incoming
call. If the caller’s identity is stored
in Contacts, the name will appear
along with the phone number.
Check with your service provider to
ensure they offer this feature.
Speed Dialing
Speed dialing is a convenient
feature that allows you to make
phone calls quickly. A number
key can be assigned to a specific
phone number. By pressing and
holding down a number key, your
phone will recall the phone
number associated from the
Contact List and display it briefly
30
while simultaneously dialing that
phone number for you. Speed
Dial Number 1 is set to Voice
Mailbox by default and is
unchangeable.
Dialing Single Digit Speed
Dials (from 2 to 9)
Press and hold the Speed Dial
number.
OR
Enter the Speed Dial number
and press .
Dialing Double Digit Speed
Dials (from 10 to 99)
Press the first digit and then
press and hold the key of the
second digit.
OR
Enter the first and second
digits and press .
Page 33

Entering and Editing Information
Text Input
Each time you touch a data entry field, the Touch Screen automatically
displays Touch Keys allowing you to change the input. For example, in a
name field, alphabet Touch Keys appear, but you can touch to select and
enter numbers instead.
ENTER TEXT Options.
Insert/ Text Format/ Save To/ Priority Level/
Callback Number/ Copy Text/ Paste
Touch to clear text.
Touch to change the text
input modes.
XT9 Mode
Entering and Editing Information
31
Page 34

Contacts in Your Phone’s Memory
The Basics of Storing
Contacts Entries
1. Open the slide to reveal the
Contacts in Your Phone’s Memory
keypad and enter the phone
number you want to save (up
to 48 digits).
2. Touch .
3.
Touch Save and select either
Add New Contact or Update
on the pop-up screen.
Existing
4. Touch a Phone Label.
Mobile1/ Home/ Office
Mobile2/ Fax
Note
Use
Existing Entry
phone number to a contact already
stored in memory.
5. Touch the Name field and
enter a name for the phone
number (up to 32 characters).
Then touch
32
to add another
Done
and
/
Save
A confirmation message is
displayed briefly.
Phone Numbers With
Pauses
When you call automated
systems such as voice mail or
credit billing numbers, you often
have to enter a series of numbers
to navigate through the system.
Instead of entering these
numbers by hand, you can store
the numbers in your Contacts
separated by special pause
characters (W, P). There are two
different types of pauses you can
use when storing a number:
Wait (W)
The phone stops dialing until
you select
the next number.
.
Release
to advance to
Page 35

2-Sec Pause (P)
The phone waits 2 seconds
before sending the next string of
digits.
Storing a Number with Pauses
1. Touch .
2. Touch
3. Touch
4. Enter a name (up to 32
characters) and touch the
number field to enter a
number.
5. Touch and select
2-Sec Pause
6. Enter additional number(s)
then touch and then
Save
Contacts
New Contact
.
Done
.
.
.
Wa it
or
Adding a 2-Sec Pause to an
Existing Number
1. Touch .
2. Touch
3. Touch
4. Scroll through the list and
touch the Contact entry you
wish to edit. Touch .
5. Touch
6. Touch the number.
7. Touch .
8. Touch
9. Touch and then
Save
Contacts
Contact List
Edit
.
Wa it
or
2-Sec Pause
Done
.
.
.
Contacts in Your Phone’s Memory
.
33
Page 36

Contacts in Your Phone’s Memory
Searching Your Phone’s
Memory
The phone is able to
perform a dynamic search of the
Contacts in your phone’s
Contacts in Your Phone’s Memory
memory. A dynamic search
compares entered letters or
numbers against the entry names
in your Contacts. A matching list
is displayed in descending order.
You can then select a number
from the list to call or edit.
Scrolling Through Your Contacts
1. Touch to display your
Contacts alphabetically.
2. Scroll through the list.
Searching by Letter
1. Touch to display your
contacts alphabetically.
34
2. Press (or press repeatedly)
the key on the keypad that
corresponds with the search
letter.
Accessing Options
1. Touch .
2. Touch .
3. Touch one of the available
options:
Send Message
message or picture message to
the selected contact.
Delete
from your Contacts.
Sort By:
Ascending or Descending order.
Send via Bluetooth:
contact(vCard) via Bluetooth®. In
case Bluetooth®power is not on,
a notice pops up to turn
Bluetooth®on.
: Send a text
: Delete the selected entry
Sort contact list in
Send a
Page 37

Delete All
Delete all Contacts in
the list.
Making a Call From Your
Phone’s Memory
Once you have stored phone
numbers in your Contacts, you
can place calls to those numbers
quickly and easily.
By highlighting a phone
number in Contacts or Recent
Calls, and pressing or
touching .
By using Speed Dialing.
From Contacts
1. Touch to display your
Contacts.
2. Touch the Contact entry.
3. Touch the phone number to
place the call.
From Recent Calls
1. Touch .
2. Touch
Recent Calls
.
3. Touch the type of recent call.
Missed Calls/ Received
Calls/ Dialed Calls/ All Calls
4. Touch the phone number.
5. Touch or press
to place the call.
Speed Dialing
For a single-digit Speed Dial,
press and hold the digit or press
the digit, then press . For a
double-digit Speed Dial, press
the first digit and hold the
second digit or press the first
and second digit, then press
.
Contacts in Your Phone’s Memory
35
Page 38

Using Phone Menus
Communicate
Contacts
The Contacts Menu allows you
to store names, phone numbers
and other information in your
phone’s memory.
1. New Contact
Allows you to add a new contact
to your Contact List.
Note
Communicate
Using this submenu, the number is
saved as a new Contact. To save
the number into an existing
Contact, edit the Contact entry.
1. Touch .
2. Touch .
New Contact.
3. Touch
4. Enter the name.
36
5. Continue entering Contact
information by touching the
corresponding field and
entering the desired
information.
6. Touch to save your
Save
new Contact.
2. Contact List
Allows you to view your Contact
List or contact Alltel Services.
1. Touch .
2. Touch .
3. Touch
Contact List
4. Choose from the following
options:
Scroll through your
Contacts alphabetically.
.
Page 39

Touch to select one of
the following:
Send Message/ Delete/
Sort By/ Send via
Bluetooth/ Delete All
Touch
New Contact
to
store new contact
information.
Alltel Services
Alltel Customer Service:
Dial *611 or touch .
Alltel Payment:
Dial #729 or touch .
Alltel Minutes of Use:
Dial #668 or touch .
Alltel Road Side Help:
Dial #869 or touch .
Voicemail Instructions:
Dial #865 or touch .
Alltel Device Insurance:
Dial 1-888-723-3360 or touch .
3. Speed Dials
Allows you to view your Speed
Dials list, designate new Speed
Dials, or remove Speed Dial
designations entered in your
Contacts.
1. Touch .
2. Touch .
Speed Dials
3. Touch
4. Touch the desired Unassigned
Speed Dial.
5. Touch the contact to assign, a
confirmation message is
displayed.
.
Communicate
37
Page 40

Communicate
4. Groups
Allows you to view your grouped
Contacts, add a new group,
change the name of a group, or
delete a whole group.
1. Touch .
2. Touch .
Groups
3. Touch
4. Choose from the following
Communicate
38
options:
Touch a group to view.
Touch a group, then touch
to choose from the
following options:
Send Message/ Rename
Group/ Remove from
Group/ Group Ringtone/
Send via Bluetooth/ Delete/
Delete All
5. My Name Card
Allows you to view all of your
personal Contact information
including name and phone
numbers.
1. Touch .
2. Touch .
.
My Name Card
3. Touch
4. Touch
Edit
.
5. Touch the field you want to
edit.
6. Edit the information as
necessary and touch
Note
You cannot edit your mobile phone
number, but you can add an
additional phone number.
.
Save
.
Page 41

Recent Calls
The Recent Calls Menu is a list
of phone numbers or Contact
entries for calls you placed,
accepted, or missed. It is
continually updated as new
numbers are added to the
beginning of the list and the
oldest entries are removed from
the bottom of the list.
Shortcut
To view a quick list of all your
recent calls, press
from standby mode.
TALK Key
1. Missed Calls
Allows you to view the list of
missed calls; up to 50 entries.
1. Touch .
2. Touch .
3. Touch
Missed Calls
4. Touch the entry. Or Touch
for the following options:
Go To Contact/ Go To
Dialing/ Delete/ Delete All/
Call Timer
5. Press to return to
standby mode.
.
Communicate
39
Page 42
Communicate
2. Received Calls
Allows you to view the list of
incoming calls; up to 50 entries.
1. Touch .
2. Touch .
3. Touch
Received Calls
4. Touch the entry.
3. Dialed Calls
Communicate
Allows you to view the list of
outgoing calls; up to 50 entries.
1. Touch .
2. Touch .
3. Touch
Dialed Calls
4. Touch the entry.
40
4. All Calls
Allows you to view a list of the
most recent Missed, Received
and Dialed calls.
1. Touch .
.
2. Touch .
All Calls
3. Touch
4. The list with the most recent
calls is displayed.
.
5. Call Timer
Allows you to view the duration
of selected calls.
1. Touch .
.
2. Touch .
3. Touch
Call Timer
4. Call times are displayed for
the following types of calls:
Last Call/ Home Calls
Roam Calls/ All Calls
.
/
Page 43

6. Data
Allows you to view the list of
data calls; up to 50 entries.
1. Touch .
2. Touch .
3. Touch
Data
.
4. Touch the entry.
7. Data Counter
Allows you to view the list of
received and transmitted data
calls.
1. Touch .
2. Touch .
Data Counter
3. Touch
4. Transmitted data are displayed
for the following types:
Received Data/Sent Data
All Data
.
/
Messaging
The can store up to
535 messages and notifications
(including a maximum of 200
SMS and 100 MMS in the
Inbox). The information stored in
the message is determined by
phone model and service
capability. Other limits such as
available characters per message
may exist, please check with your
service provider for system
features and capabilities.
Shortcut
From standby mode, touch .
1. New Text Message
Allows you to send text
messages, pages, and e-mail
transmissions.
Communicate
41
Page 44

Communicate
The Basics of Sending a Text
Message
1. Touch
Messaging
New Text Message
2. Touch to
3. Touch the Text field to access
4.
Communicate
5. Touch , then touch
Enter Number
enter the recipient's address
or to add contact.
Contacts
the message screen.
Type your message (text or
e-mail).
Done
Send
.
A confirmation message is
displayed.
Customizing the Text Message
Using Options
1. Touch
Messaging
New Text Message
2. Touch .
42
3. Touch the option(s) to
customize.
and
.
Save to Draft
Save the current message draft.
Priority Level
Normal
of your message.
Callback Number
On/Off
number to
4. Complete and send the
message.
Choose
High/
to set the priority level
Choose
to set your callback
On
or
Off.
Text Options
While you are composing the
text of a message, you have
various options to customize the
text.
1. Touch
and
.
Messaging
New Text Message
2. Touch the Text field to access
the Enter Text screen.
and
.
Page 45

3. Touch .
4. Touch the option(s) to
customize.
Insert Graphic/ Animation/
Sound/ Templates/ Signature/
Name & Number
Text Format Alignment/ Font
Size/ Font Style/ Text Color/
Background
Save To Draft
/
Template
Priority Level High/ Normal
Callback Number On/ Off
Copy Text/ Paste
5. Complete your message and
send or save it.
Message Icon Reference
Text Message Picture Message
Description Normal High Normal High
Sent
Fail
Pending
Unread
Delivery Acknowledgement
Read
Incomplete
WAP Push Msg
Voicemail Msg (With unread Msg)
Draft
Single Address Multi-Address
Single Address Multi-Address
Normal High Normal High
Communicate
43
Page 46

Communicate
2. New Picture Message
Allows you to send messages with
Text, Image/ Video, and Audio.
Messaging
1. Touch
New Picture Message
2. Touch to
3. Touch the corresponding field
Communicate
4. Touch the file you want to
44
Enter Number
enter the recipient's address
or to add contact.
Contacts
to add Text, Image/ Video,
and Audio to your message.
Options with Image/Video:
Image/ Video/ Take Photo/
Record Video
add.
and
.
5. When you touch the
field, your have the option of
attaching a saved Audio file, or
Recording a new one.
6. Options with the Menu:
Insert Slide
more picture message.
Preview
before sending.
Save to Draft
message as a Draft.
Priority Level High/ Normal
Delivery Notice Enhanced/
Normal
Remove Image/Video
Slide/ Subject
7. Touch to send.
Inserts slide to add
Shows your message
Send
Audio
Saves the current
/
Audio
/
Page 47

3. New E-mail
Allows you to send new text
message.
Messaging
1. Touch
New E-Mail
2. Touch to
.
Enter Number
and
enter the recipient's address
or to add contact.
Contacts
3. Touch the text field to enter
text.
4. After entering text, touch
and to
Done
Send
send message.
4. Inbox
The phone alerts you in 3 ways
when you receive a new message by:
Displaying a notification
message on the screen.
Displaying the message icon
(It blinks when the
message is urgent).
Playing an audio tone or
vibrating, depending on your
personal sound settings.
Received messages are displayed
from newest to oldest.
Viewing Your Inbox
Up to 400 messages (200 SMS +
100 MMS + 100 MMS Notification
Messages) can be stored in the
Inbox.
1. Touch
Inbox
Messaging
.
and
2. Touch an Inbox message.
Reply
Touch to reply to
the message.
Delete
Touch to delete the
message.
Communicate
45
Page 48

Communicate
Forward
message to other destination
address(es).
Save Contact
number, e-mail address, and
numbers in the received message
Communicate
into your Contacts.
Go to website
website by starting Browser.
(Only for messages containing a
URL.)
Lock/Unlock
the selected message.
Callback
received message.
Chat
Touch to view the
conversation in Chat view
mode.
Touch to choose from
the following options:
Forwards a received
Stores the callback
Locks or unlocks
Calls the number in the
46
Accesses the
Extract Address
address included in the message
to be extracted for viewing.
Message Info
info, such as Type, Priority level,
size and time.
Save To Templates
save the message as a template.
Allows the
Shows message
Allows you to
5. Outbox
Up to 100 messages (50 sent
SMS messages + 50 sent MMS
messages) can be stored in the
Outbox folder. View the contents
of sent messages and verify
whether the transmission was
successful or not.
Page 49

1. Touch
Messaging
Outbox
.
2. Touch an Outbox message.
While viewing the selected
Outbox message, touch
, , or to
view the following options:
Play Again
the sound or the picture.
Delete
message.
Forward
message to other destination
address(es).
Save Contact
Allows you to play
Deletes the selected
Forwards a received
Choose
Contact / Update Existing
save the phone number in your
Contacts.
and
EditResend
Add New
to
Save Media
Audio
media to your phone. (Only for
messages with Images or Audio
attached.)
Lock/Unlock
the selected message.
Go to website
website by starting Axcess Web.
(Only for messages containing a
URL.)
Extract Address
extract address from the sent
message.
Message Info
message's Type, Priority, Status
Subject, Size and Attachment.
Choose
Image/
to save the attached
Locks or unlocks
Accesses the
Allows you to
Shows the
Communicate
47
Page 50

Communicate
6. Drafts
Displays saved messages and
draft messages.
1. Touch
Messaging
Drafts
.
2. Touch to choose from the
following options:
Delete
Deletes the selected
message from the Drafts.
Lock/Unlock
Communicate
so that it is not erased if the
Erase Saved or Erase All feature is
used.
New Message
Sort by
Delete All
messages at one time.
4. Touch a saved Draft message
to Edit it.
48
Locks a message
Deletes multiple
and
When you are finished editing
the message, press Send to
send it.
7. Voicemail
Allows you to view new voice
messages recorded in your voice
mail box. Your phone will alert
you when you receive a new
voice message.
Checking Your Voicemail Box
1. Touch
Messaging
Voicemail
2. Choose from the following
options:
Touch to clear the
voice mail count.
Touch to listen to the
message(s).
.
Clear
Call
and
Page 51

8. Templates
Allows you to display, edit, and
add text phrases. These text
strings allow you to reduce
manual text input into messages.
Messaging
1. Touch
Templates
2. Touch
template.
3. After adding new template,
touch to
New
Save
.
to add new
save
and
it.
9. Delete All
Allows you to erase all the
messages stored in your Inbox,
Outbox, or Drafts messages
folders. You can also erase all
messages at the same time.
1. Touch
Messaging
Delete All
2. Touch Delete Inbox/ Delete
Outbox/ Delete Drafts/
Delete All Messages.
.
and
Instant Messaging
Allows you to use instant
messaging. Instant Messaging is
an application downloadable
from the Instant Messaging
Menu.
1. Touch .
2. Touch .
Communicate
49
Page 52

Communicate
Alltel Web
The Alltel Web feature allows you
to view Internet content.
Accessibility and selections
within this feature are dependent
upon your service provider. For
specific information on Alltel
Web contact your service
provider.
Start Browser
Starting an Alltel Web session.
Communicate
1. Touch .
Alltel Web
2. Touch
3. After a few seconds, you will
see the home page.
Ending an Alltel Web Session
End an Alltel Web session by
pressing .
50
Browser Navigation
Links embedded in content
Select items or links by touching
it on the screen.
Scrolling / Fast Scrolling
Use your fingertip to scroll the
screen contents in the direction
you move your finger.
How quickly you move your
finger determines the quickness
of the scroll.
Thumbpad
.
Use as a mouse when browsing
the internet, or use to scroll
through menu options.
CAUTION
Do not use a sharp item for your
pen-like stylus because it could
scratch your screen.
Page 53

Command Bar icons:
The Command Bar provides the
following toolbar buttons.
Back
to go back to the
previous page.
Forward
(if available)
takes you back to the next
page.
Refresh
Allows you to
reload the current Web page.
Home
Returns to Home
Page.
Zoom
Allows you to
zoom the screen in or out.
Bookmarks
Takes you to
the Bookmarks menu.
Allows you to enter a
Web address to go to.
Allows access to Browser
Menu.
Using the Browser Menu
Touch (in the Browser
Command Bar) to view Browser
menu items.
Browser Menu Items
NOTE
You may have to scroll down to see
some of the menu items listed
below.
Full Screen View
Use the
whole screen including the
annunciator and command bar
area to view pages.
Display Rendering
Allows
mode selection that changes
the layout of contents.
Communicate
51
Page 54

Communicate
Communicate
52
Standard
Displays a standard
Browser screen with vertical
and horizontal page
navigation.
Screen Optimized
Displays
vertically aligned contents of
the Web page which fit the
size of the screen. Allows
vertical navigation only.
Text Only
Displays only text
and excludes images used in
the Web page.
Send URL
Allows you to send
the link of the current page
via a text message.
Search Text
Allows you to
search for text you want to
find in the web page. (Search
Text is not case-sensitive.)
History
Displays list of visited
web pages.
Settings
Homepage
Allows you to set
your Home Page.
Display
Allows you to define
the Thumbnail, Scroll and Fit
to width settings.
JavaScript On/ Off
Timer
Set the duration of the
Key Press or Connection Time
Out.
Encryption
Displays the
Security settings menu and
certificates in device.
RSS Reader
Show image/
Update interval
Flash On / Off
Manage Memory
Manages
memory used by browser.
Page 55

Information
Show URL
Redisplays current
Web page.
About
Displays the current
browser information.
Thumbnail Option in Browser
Menu
This option displays the entire
outline of the Web page in the
screen corner, which is helpful to
find out where you are on the
page and move to where you
want to go on the Web page.
1. Touch Menu to access the
menu.
2. Touch the Browser icon .
3. Touch .
4. Touch ->
-> then choose
Thumbnail
DisplaySettings
one of the following options:
On
: thumbnail screen image is
always displayed in one corner
of the screen.
Off
: thumbnail screen image is
never displayed on the screen
(by default).
Auto
: thumbnail screen image
is displayed whenever you are
quickly scrolling through a
page.
Communicate
53
Page 56

Communicate
Entering/Deleting Text,
Numbers or Symbols
When text, numbers or symbols
need to be entered on the
screen, a Touch Keypad will pop
up when you touch the text field,
on the screen. Simply touch the
characters you want and touch
to delete.
NOTE
Sometimes it is necessary to touch
Communicate
the text field more than once in
order to bring up the Touch Keypad.
Flash Contents
has FlashLite engine
that supports Flash content with
the following Codecs:
- Video codec: sorenson, on2
- audio codec: mp3
54
How to play Flash contents:
Touch or image box.
Unsupported Flash media:
Flash media that requires a
higher version of Flash
available on the .
Error messages may result in
the following circumstances:
- Server times out. If the
server does not respond
within 60 seconds, the Flash
content will not load and
result in an error.
- Out of memory. If the Flash
content requires more
memory than what is
available on the ,
an Out of Memory error will
occur.
Page 57

Using Tabbed Browsing
Pages
management /
Count icon
[Multi-Windows Screen]
[Pages management Screen]
Using RSS reader
RSS (Really Simple Syndication)
is a family of web feed formats
used to publish frequently
updated content such as blog
entries, news headlines or
podcasts. An RSS document,
which is called a feed, web feed,
or channel, contains either a
Window Tab
with title
Touch this to
close the
window.
summary of content from an
associated web site or the full
text. RSS makes it possible for
people to keep up with their
favorite web sites in an
automated manner that is easier
than checking them manually.
Communicate
55
Page 58

Communicate
To add an RSS feed
You must first be on a website
that supports RSS. The RSS
registration indicator will show
the RSS icon if the site has RSS.
Opening a saved RSS Feed
[Step 1: Touch Bookmarks]
RSS registration indicator
Communicate
NOTE
This example uses a demo web site.
56
Touch the RSS registration
indicator next to the URL field
(as shown in the first screenshot
below) to add the RSS Feed to
your Feeds.
[Step 2: Touch Feeds]
[Step 3: Touch a saved Feed]
After adding an RSS
feed, registered FEEDS
are displayed.
Page 59

Fit To Width
A browser function that resizes the current webpage to fit better with
the width of the screen.
[Before Fit To Width] [After Fit To Width]
Fit To Width icon: Allows you to adjust zoom level
of Browser screen. To configure the Fit To Width
settings, follow the steps below:
Browser Menu > Settings > Display > Fit to
width (Manual/ Automatic)
Communicate
57
Page 60

Communicate
Email
Allows you to mobile email.
Select an email service. Mobile
Email is an application
downloadable from the
Messaging Menu. Don't miss an
important email. Thanks to
Mobile Email, you can get your
emails on your phone, while
you're on the go. Mobile Email
works with many providers,
including Yahoo! and AOL. Get
Communicate
alerts from your when
new email has arrived.
1. Touch .
Email
2. Touch
58
Alltel Shop
Alltel Shop allows you to do
more than just talk on your
phone. Alltel Shop is a
technology and service that
allows you to download and use
applications on your phone. With
Alltel Shop, it is quick and easy
to personalize your phone to suit
your lifestyle and tastes. Just
download the applications that
appeal to you. With a wide range
of software available, from
ringtones and wallpapers to
games and productivity tools,
you can be assured that you will
find something useful, practical,
or downright entertaining.
Page 61

Downloading Applications
You can download applications
and use Alltel Shop anywhere on
the network, as long as your
handset has a digital signal
available. Most applications do
not use a network connection
while in use.
Incoming Calls
While downloading an
application, incoming calls will
automatically be sent to your
voice mail, if available. If you do
not have voice mail, downloading
will not be interrupted by an
incoming call, and the caller will
receive a busy signal.
When using applications, an
incoming call will automatically
pause the application and allow
you to answer the call. When you
complete your call, you can
resume using the application.
1. Alltel Shop
Allows you to download selected
applications while displaying the
Alltel Apps application list relayed
from the server connection.
1. Touch .
Alltel Shop
2. Touch
3. Touch
Alltel Shop
Catalog
4. Touch
through the available
applications, or press Search
to search for a specific
application.
.
to browse
Communicate
59
Page 62

Communicate
2. Settings
Allows you to Manage, Move and
Remove the Alltel Apps in your
phone.
1. Touch .
Alltel Shop
2. Touch
3. Touch
Settings
following options:
Move Apps/ Manage Apps/
Communicate
60
View Log
Removing Applications
Only removing an application
deletes it completely from the
memory of the phone. To restore
an application once it has been
removed, you will be charged to
download it again.
for the
1. Access your Alltel Shop
applications.
2. Touch Settings.
3. Touch Manage Apps.
4. Touch the application to be
deleted.
Remove
5. Touch
.
Note
Please note that sometimes the
Remove option is not available. To
remove the application, you must
select Cancel Subscription.
Page 63

3. Help
Gives information about several
applications.
1. Touch .
Alltel Shop
2. Touch
3. Touch
Help
.
Alltel Navigation
Alltel Navigation is an application
downloadable from the Alltel
Navigation menu. Now you can
find the address of a great
restaurant or the nearest ATM.
Check movie times. Discover the
latest hot spots. And know
exactly how to get where you're
going. Alltel Navigation puts all
the advanced features of the
latest GPS devices and systems
on your wireless device at a
fraction of the price.
1. Touch .
Alltel Navigation
2. Touch
Communicate
.
61
Page 64

Entertainment
Entertainment
62
Take Photo
1. Touch .
2. Touch .
Take Photo
3. Touch
the one of the following options
to customize your settings:
Back
Record Video Changes from
Camera mode to
Video mode.
Zoom (not available at
highest resolution).
Brightness
Shot Mode Multishot/
Templates
Back
Record Video
Zoom
or use
Self Timer Off/ 3 Seconds/
5 Seconds/ 10 Seconds
My Images
Photo Tab Settings
Resolution 2048 X1536/
1600X1200/ 1280X960/
640X480/ 320X240
Night Mode On/ Off
Color Effects Normal/
Negative/ Aqua/ Sepia/
Mono/ Solarize
White Balance Auto/
Sunny/ Cloudy/
Fluorescent/ Glow
Macro On/ Off
Quality Normal/ Fine/
Super Fine
Settings
My Images
Self Timer
Shot Mode
Brightness
Take Photo
Page 65

Others Tab Settings
Memory Storage Internal/
External
Auto Focus On/ Off
View Option Actual View/
Full Screen
Shutter Sound Shutter/ No
Sound/ Say “Cheese”/
Ready! 1 2 3
Auto Save On/ Off
AlltelMyPics Reminder
On/ Off
Reset On/ Off
4. Take a picture by pressing the
Camera button or
Photo
.
5. Touch to save the
picture.
6. A prompt will ask you where
you wish to have the picture
saved. A second prompt will
ask if you wish to send the
picture to AlltelPics.net
Ta k e
Record Video
1. Touch .
2. Touch .
Record Video
3. Touch
use the one of the following
options to customize your
settings:
Back
Take Photo Changes from
Video mode to Camera
mode.
Zoom
Brightness
Resolution
320X240/176X144
My Videos
Video Tab Settings
Color Effects Normal/
Negative/ Aqua/ Sepia/
Mono/ Solarize
and
Entertainment
63
Page 66

Entertainment
Entertainment
64
White Balance Auto/
Sunny/ Cloudy/
Fluorescent/ Glow
Quality Fine/ Normal/
Super Fine
Record Time For Send/ For
Save
Others Tab Settings
Memory Storage Internal/
External
Mute On/ Off
Auto Save On/ Off
AlltelMyPics Reminder
On/ Off
Reset On/ Off
Back
Take Photo
Zoom
4. Press the Camera button or
to begin recording.
5. Press the Camera button or
to stop recording.
6. Touch to save the video.
The video is stored in
Videos
.
My
A Send to AlltelMyPics.net
prompt will also pop up,
giving you the option to
upload your video.
Settings
My Videos
Resolution
Brightness
Stop recording
Begin recording
Page 67

Record Voice
Allows you to record short verbal
reminders.
1. Touch .
2. Touch .
3. Touch Record Voice .
4. Start recording by pressing
.
Touch to stop.
Touch to pause.
5. After recording, voice memo is
automatically saved in your
phone.
Music
Allows you to listen to songs
stored in your memory card.
To access this feature, there
should be music already in your
memory card.
Notes
Be sure to use only recommended
microSDTMcards. Using nonrecommended microSDTMcards
could cause data loss and damage
your phone.
The microSD
can be easily damaged by improper
operation. Please be careful when
inserting, removing, or handling it.
Do not remove a microSD
while files are being accessed or
transferred. It may result in loss or
damage of data.
TM
card and its adapter
TM
card
1. Now Playing/
Recently Played
Allows you to view the most
recently played songs (if
applicable).
1. Touch .
2. Touch .
Entertainment
65
Page 68

Entertainment
3. Touch
Music
Now Playing
4. Touch
Recently Played
5. Select the music file and
touch to play.
2. All Songs
Allows you to play All Songs.
1. Touch .
Entertainment
2. Touch .
Music
3. Touch
All Songs
4. Touch
5. Select the music file and
touch to
Options
:
Now Playing/ Add to
Playlist/ Use Bluetooth
Headset/ Send Via
Bluetooth/ Delete/ Copy/
Move/ Delete All
66
play
.
or
.
.
.
or touch
Options available while playing
music:
/ / / /
, or touch for the
following options:
Minimize/ Go to my music/
Song Info
3. Artists
Allows you to view and listen to
your music by Artists.
1. Touch .
2. Touch .
Music
3. Touch
Artists
4. Touch
Artist you want to listen to.
.
and touch the
Page 69

4. Albums
Allows you to view and listen to
your music by Album.
1. Touch .
2. Touch .
Music
3. Touch
Albums
4. Touch
Album you want to listen to.
.
and touch the
5. Genres
Allows you to view and listen to
your music by Genre.
1. Touch .
2. Touch .
Music
3. Touch
Genres
4. Touch
Genre you want to listen to.
.
and touch the
6. My Playlists
Allows you to view, listen to and
create Playlists.
1. Touch .
2. Touch .
Music
3. Touch
My Playlists
4. Touch
5. Create a new Playlist by
touching . Then name
and Add Songs to the playlist.
.
.
Create
7. Settings
Allows you to customize music
playback settings.
7.1 Repeat
Allows you to set repeat settings.
1. Touch .
2. Touch .
Entertainment
67
Page 70

Entertainment
3. Touch
Music
Settings
4. Touch
Repeat
5. Touch
Repeat One/ Repeat All/ Off
7.2 Shuffle
Allows you to set shuffle settings.
1. Touch .
2. Touch .
Entertainment
Music
3. Touch
Settings
4. Touch
Shuffle
5. Touch
ON/ OFF
.
.
.
.
.
.
7.3 Background Music
Allows you to configure
background music preferences.
1. Touch .
2. Touch .
Music
3. Touch
Settings
4. Touch
Background Music
5. Touch
Prompt/ Always On/
Always Off
.
.
.
Radio Connect
Download now for free access to
this application to use this menu.
1. Touch .
2. Touch .
3. Touch
Radio Connect
.
68
Page 71

My Stuff
Allows you to view images,
videos, audios and documents
saved in phone.
1. Touch .
2. Touch .
My Stuff
3. Touch
Images/ Videos/
4. Touch
Audios/ Documents.
.
TV on Demand
This menu allows you to watch
different TV channels. You can
access news, entertainment,
sports, and much more.
You can access on-screen
instructions for Alltel TV by
touching the
the bottom-left of the LCD, then
selecting the
option.
Options
button on
Help/Settings
1. Touch .
2. Touch .
TV on Demand
3. Touch
Nutsie
Lets you play your own iTunes
playlists right on your phone.
1. Touch .
2. Touch .
3. Touch
Nutsie
.
.
Entertainment
69
Page 72

Utilities
Voice Command
Allows you to make phone calls
quickly and easily by voice. Your
phone recalls the number from
your Contacts, displays it briefly,
and then dials it. This menu also
includes a feature for those who
are driving or blind. It delivers
time and date information by
voice and allows you to check
missed calls, messages and
voicemails.
Utilities
1. Start Command
1.1 Call <Name> or <Number>
1. Touch .
2. Touch .
Voice Command
3. Touch
Start Command
4. Touch
5. Say
Call <Name> or
<Number>
6. Say the name as it is saved in
your Contact List or say the
number.
.
1.2 Voicemail
1. Touch .
2. Touch .
Voice Command
3. Touch
Start Command
4. Touch
Voicemail
5. Say
6. The phone will announce any
new Voicemail(s).
.
.
.
1.3 Missed Calls
.
You can hear details about
.
missed calls.
70
Page 73

1. Touch .
2. Touch .
Voice Command
3. Touch
4. Touch
Missed Calls
5. Say
Start Command
.
.
1.4 Messages
This voice command feature will
read out information from
messages received.
1. Touch .
2. Touch .
Voice Command
3. Touch
4. Touch
Messages
5. Say
Start Command
.
.
1.5 Time & Date
This voice command feature will
read out the current time &
date.
.
1. Touch .
2. Touch .
3. Touch
Voice Command
4. Touch
Start Command
5. Say
Time & Date
1.6 Help
Allows you to view more
information about the features in
Voice Command.
.
1. Touch .
2. Touch .
Voice Command
3. Touch
4. Touch
Start Command.
5. Say
Help
.
.
.
.
Utilities
.
71
Page 74

Utilities
2. Command Mode
Allows you to choose between
Normal or Speed settings. The
Speed setting allows you to
access the Voice Command
functions more quickly with a
non-verbal prompt.
1. Touch .
2. Touch .
Voice Command
3. Touch
Command Mode
4. Touch
Utilities
5. Select options.
Normal/ Speed
3. Announce Alert
Allows you to customize the
Announce Alert function. Alert
Announce allows you to hear
more information about an
incoming call in addition to, or
instead of, the Ring/Ringtone.
72
1. Touch .
2. Touch .
Voice Command
3. Touch
Announce Alert
4. Touch
5. between the options:
Announce/ Announce + Ring
.
.
Disable/
4. Train Word
.
Allows you to train the voice
.
recognition for improved results.
1. Touch .
2. Touch .
Voice Command
3. Touch
Train Word.
4. Touch
5. Select options.
Voice Command/ Answer/
Digit Dial
.
Page 75

5. Best Match
Allows you to customize Best
Match settings.
1. Touch .
2. Touch .
Voice Command
3. Touch
Best match
4. Touch
5. Select options.
.
.
1 Match/ 4 Matches
Alarm Clock
Allows you to set up to Five
alarms. At the alarm time, any set
alarm will sound and/or vibrate
(according to your sound
settings) the tone of your choice,
and a notification message will
be displayed on your screen.
1. Touch .
2. Touch .
Alarm Clock
3. Touch
.
Add
4. Touch the
set the alarm time.
5. Touch the
the Recurrence for the alarm.
Options are:
Set Time
Repeat
field to
field to set
Once/ Daily/ Mon - Fri
Weekends
7. Touch the
set the ringtone for the alarm.
8. Touch to save.
Ringtone
Save
field to
, and
/
Utilities
73
Page 76

Utilities
Organizer
1. Calendar
Allows you to store and access
your agenda(s). Simply store
your appointments in your
Calendar and your phone will
alert you with a reminder.
1. Touch .
2. Touch .
Organizer
3. Touch
Utilities
74
Calendar.
4. Touch the calendar day
(twice).
5. Touch .
6. Enter your schedule
Add
information including:
SubjectStart Time
End TimeRepeat
Until
TonesVibrate
On Time
, and
7. Touch to save.
Save
2. Date Finder
Allows you to find a date after, or
before, the Start date you enter.
1. Touch .
2. Touch .
3. Touch
Organizer
, and
Date Finder.
Notepad
Allows you to add, read, edit,
and erase notes to yourself.
1. Touch .
2. Touch .
Notepad
3. Touch
4. Touch to write a new
Add
note.
.
Page 77

5. Type the note, then touch
Save
.
A confirmation message displays
briefly, then displays your list of
notes.
Viewing a Notepad Entry
1. Access Notepad and select
the entry.
2. To erase, touch select list
then, touch .
To edit, touch ,
touch to delete.
Erase
Edit
Erase
Tools
1. Calculator
Allows you to perform simple
mathematical calculations. You
can enter numbers up to the
sixth decimal place.
1. Touch .
2. Touch .
3. Touch .
Calculator
4. Touch
5. Enter data.
Touch the keypad that
pops up to enter numbers.
Touch to enter
decimals.
Touch to delete the
last digit entered.
.
.
C
Utilities
75
Page 78

Utilities
Touch the corresponding
Touch Keys to enter
functions ( +, -, x, / ).
=
Touch to complete
equation.
2. Ez Tip Calculator
Allows you to quickly and easily
estimate the tip and total
amount of a bill by inputting the
bill amount before tip, the tip
percentage, and divide it by the
number of people paying.
Utilities
1. Touch .
2. Touch .
3. Touch .
Ez Tip Calculator
4. Touch
5. Enter the variable fields (Total
bill, Tip %, Split).
76
Touch the Total bill field to
display a keypad to enter
the amount.
Touch the left and right
arrow keys to increase or
decrease the Tip % and
Split amount(s).
Corresponding calculation
fields (tip and total for each
person) appear
automatically.
6. Touch when the
Reset
keypad is displayed for another
calculation.
.
Page 79

3. Unit Converter
Allows you to convert units of
measurement.
1. Touch .
2. Touch .
3. Touch .
Unit Converter
4. Touch
5. Touch the unit of measurement
you want to convert:
Currency/ Area/ Length/
Mass/ Temperature/
Volume/ Velocity
.
4. Drawing Panel
This function allows you to draw
freely so that you can save the
image, send it in a message or
set it as a Wallpaper.
1. Touch .
2. Touch .
3. Touch .
Drawing Panel
4. Touch
5. Touch to write a new
6. Create a drawing, then touch
Add
note.
to save it.
A confirmation message displays
briefly, then displays your list of
Drawings.
.
Utilities
77
Page 80

Utilities
Options for a Drawing Pad
Entry
1. Access Drawing Pad and select
the entry.
2. To erase, touch .
To edit, touch .
To send as a Picture Message,
Send
touch .
5. World Clock
Allows you to determine the
Utilities
current time in another time
zone or country.
1. Touch .
2. Touch .
3. Touch .
World Clock
4. Touch
78
Erase
Edit
5. Scroll through the continents
by touching the arrows under
the globe.
6. Touch to view the cities.
7. Touch a city to view the
Or
6. Touch to choose from
7. Touch a city from the list.
8. Touch to turn
.
OK
current date and time in that
city.
Cities
a list of available cities.
OK
Touch to view the
current date and time.
Set DST
Daylight Savings Time on or
off.
Page 81

Stopwatch
Allows you to use your phone as
a Stopwatch.
1. Touch .
2. Touch .
Stopwatch
3. Touch
4. Touch to start, and
5. Touch to reset.
Start
touch to stop.
Stop
You can use the Lap
function by pressing touch
to record up to 20
Lap
laps and lap times.
Reset
.
Games
Allows you to enjoy various
games.
1. Touch .
2. Touch .
Games
3. Touch
Select from the following
games and options:
Dart/ Homerun Derby/ Need
for Speed/ Monopoly/
Collapse/ PAC-MAN
.
MyCastWeather
Allows you easy access to
Weather information and
forecasts.
1. Touch .
2. Touch .
MyCastWeather
3. Touch
Utilities
.
79
Page 82

Settings
Sound
Options to customize the
phone’s sounds.
1. Ringers
Allows you to assign ringtones
for incoming calls.
1. Touch .
2. Touch .
Sound
3. Touch
Ringers
Settings
4. Touch
5. Touch a ringer to Set.
80
.
All Calls/Caller ID
No Caller ID/ Restricted
/
Shuffle/ Buy Ringtones
Calls
and
2. Volume
Allows you to set various volume
settings.
1. Touch .
2. Touch .
Sound
3. Touch
Volume
.
Master Volume
4. Touch
Keypad/ Earpiece/ Speaker
5. Adjust the volume by dragging
the volume levels up and
/
down, then touch to save
the setting.
.
and
/
.
Set
3. Message Alerts
Allows you to select the alert
tones for new messages.
1. Touch .
2. Touch .
Page 83

3. Touch
Sound
Message Alerts
Text Message/Picture
4. Touch
/
Message
Messages
Reminder.
5. Touch a ringtone.
Message Reminder
For the
option, choose from the
following settings:
Once/ Every 2 Minutes/
Every 15 Minutes/ Off
and
.
Voicemail/All
/
Message
4. Alert Type
Allows you to select the alert
types.
1. Touch .
2. Touch .
3. Touch
Alert Type
Sound
and
.
4. Touch the option you want to
customize:
Call Alert/Message Alert
Schedule Alert/Alarm Alert
5. Choose from the following
settings:
Ring Only/ Vibrate Only/
Ring & Vibrate
/
5. Service Alerts
Allows you to configure the
following 3 Service Alert options.
1. Touch .
2. Touch .
Sound
3. Touch
Service Alerts
4. Touch an alert option.
and
.
Settings
81
Page 84

Settings
Minute Beep
Alerts you 10 seconds before the
end of every minute during a call.
Call Connect
Alerts you when the call is
connected.
Low Battery
Alerts you when the battery
charge level is low.
Announce/ Tone
Settings
6. Power On/Off Tones
Allows you to set the phone to
sound a tone when the phone is
powered on and off.
1. Touch .
2. Touch .
3. Touch
Sound
Power On/Off
down to
.
Tones
82
and scroll
4. Toggle the setting between
the two options:
On/ Off
7. Slide Tone
Allows you to set a slide tone
that will play when you slide your
phone open or closed.
1. Touch .
2. Touch .
Sound
3. Touch
Slide Tone
down to
4. Toggle the setting between
the two options:
On/ Off
and scroll
.
Page 85

Display
Options to customize your
phone's display screen.
1. Wallpaper
Allows you to choose the kind of
background to be displayed on
the phone.
1.1 Screen
1. Touch .
2. Touch .
Display
3. Touch
Wallpaper
4. Touch a submenu.
Main/ Widget/ Contacts/
Multimedia/ Lock Screen
5. Touch your choice, then touch
Wallpaper
then
.
,
Screen.
1.2 Shuffle
1. Touch .
2. Touch .
Display
3. Touch
Wallpaper
4. Touch the Screen options
slider:
On/ Off
You will be prompted to add
items to the Shuffle folder,
select
Ye s
5. Mark the items you wish to
add to the Shuffle folder, then
Done
touch. .
6. Toggle the Screen setting
between On/Off.
7. Select the desired amount of
time between Screen changes
for the Shuffle function:
.
then
,
Shuffle.
Settings
83
Page 86

Settings
Every 5 Sec/ Every 1 Min/
Every 1 hour/ Every 1 Day
1.3 Buy Wallpaper
1. Touch .
2. Touch .
Display
3. Touch
Wallpaper
Wallpaper.
and
2. Banner
Allows you to enter a string of
Settings
characters which display on the
Main Home Screen and Lock
screen.
1. Touch .
2. Touch .
Display
3. Touch
Banner
.
4. Touch the Status field and
On/ Off
touch
84
Buy
.
and
and
5. Touch the Text field and type
your Banner text.
6. When you are finished, touch
Save
.
3. Backlight
Allows you to set the duration of
the Display and Keypad
backlight.
1. Touch .
2. Touch .
Display
3. Touch
Backlight
.
4. Touch a submenu.
Display/ Keypad
5. Touch a duration time:
7 seconds/ 10 seconds/
15 seconds/ 30 seconds/
Always On
and
Page 87

4. Brightness
1. Touch .
2. Touch .
Display
3. Touch
Bightness
4. Touch a setting for Auto
Brightness.
On/ Off
(If Auto Brightness is off, you
.
can set the brightness level
Dimmer/ Middle/
to:
)
Brighter
and
5. Menu Style
Allows you to choose the style in
which the Main Menu displays.
1. Touch .
2. Touch .
3. Touch
Menu Style
Display
and
.
4. Touch a setting.
Claro Style/ 3D Icon Style
6. Languages
Allows you to use the bilingual
feature according to your
preference. Choose between
English and Spanish.
1. Touch .
2. Touch .
3. Touch
Languages
4. Touch
Display
English
and
.
or
Spanish
.
7. Clock & Calendar
Allows you to select the type of
clocks displayed on the Main
Home Screen.
1. Touch .
2. Touch .
Settings
85
Page 88

Settings
3. Touch
Display
Clock & Calendar
4. Use your finger to slide from
left to right (and vice versa)
through the available options:
Off/ Normal/ Analog/ Large
Analog/ Digital 12/ Large
Digital 12/ Digital 24/ Large
Digital 24/ Dual/ Calendar
5. Touch .
8. Font Settings
Settings
Allows you to select the type of
font displayed on LCD.
1. Touch .
2. Touch .
3. Touch
4. Touch a sub-menu.
Set
Display
Font Settings
Font Type/ Dial Font Size
86
and
.
Options for Font Type
LG Gothic/ LG Serif/
LG Joy/ LG Script
Options for Dial Font Size
Normal/ Large
9. Name Match for
Dialing
Matches a saved Contact entry
with the corresponding letters
entered on the Dialpad.
1. Touch .
2. Touch .
Display
3. Touch
Name Match for Dialing
4. Touch the Status field and
touch
and
.
On/ Off
and
.
.
Page 89

Touch
1. Touchscreen
Calibration
Allows you to calibrate the Touch
Screen to ensure it is working
properly.
1. Touch .
2. Touch .
Touch
3. Touch
Touchscreen Calibration
4. Touch the screen to start
calibration, then touch the
target each time it appears.
and
.
2.
Touchscreen Effect
Allows you to customize your
Touch Screen effects sound and
vibration settings.
1. Touch .
2. Touch .
Touch
3. Touch
Touchscreen Effect
4. Touch the option you want to
customize:
Tone Type
and
.
Vibraphone/ High Pitch/
Glass/ Water Drop
Tone Level
Off/ Level 1/ Level 2/
Level 3/ Level 4/ Level 5
Vibrate Type
Short/ Double/ Long
Vibrate Level
Off/ Low/ Medium/ High
Settings
87
Page 90

Settings
3. Thumbpad Effect
Allows you to customize the
Thumbpad Calibration and
Thumbpad Sensitivity.
1. Touch .
2. Touch .
Touch
3. Touch
Thumbpad Effect
4. Touch a sub-menu.
Thumbpad Calibration/
Settings
88
Thumbpad Sensitivity
Note
Do not touch the Thumbpad
during Thumbpad Calibration.
and
.
Bluetooth
®
The is compatible
with devices that support the
®
Bluetooth
headset, stereo
headset and hands-free
profile(s)*. You may create and
store 20 pairings within the
and connect to one
device at a time. The approximate
communication range for
®
Bluetooth
wireless technology is
up to 30 feet (10 meters).
Bluetooth QD ID B014799
Note
Read user guide of each
accessory that you are trying to
pair with your phone because the
instructions may be different.
The
handset may not be compatible
with all
Your service provider or handset
manufacturer cannot be held
responsible for compatibility issues
with devices not sold by the service
provider or handset manufacturer.
Bluetooth
Bluetooth
®
features of this
®
enabled devices.
Bluetooth
®
Page 91

1. Power
Allows you to set the power
On/Off.
1. Touch .
2. Touch .
3. Touch
Bluetooth
.
4. Touch a setting.
On/ Off
Note
By default, your device’s
functionality is turned off.
Bluetooth
®
2. Add New
Pairing is the process that allows
the handset to locate, establish
and register a 1-to-1 connection
with the target device.
Pairing a new Bluetooth
®
device
1. Touch .
2. Touch .
Bluetooth
3. Touch
Search
.
4. Follow the Bluetooth
and
®
accessory instructions to set
the device to pairing mode.
®
5. If Bluetooth
power is set to
off, you will be prompted to
turn power on. Touch Ye s .
The device will appear in the
6.
Devices Found menu once it has
been located. Touch the device.
7. The handset may prompt you
for the passkey. Consult the
®
Bluetooth
accessory
instructions for the appropriate
passkey (typically “0000” - 4
zeroes). Enter the passkey and
Pair
touch .
Settings
89
Page 92
Settings
8. Once pairing is successful, you
will be asked to choose
Always Ask
Connect
with the Paired Device.
9.
Once connected, you will see
the device listed in the Paired
Devices menu.
or
before connecting
3. Paired Devices
Allows you to view the list of
paired devices with your phone.
Settings
1. Touch .
2. Touch .
Bluetooth
3. Touch
will be your
90
Paired Devices
Always
, listed
4. Settings
4.1 My Visibility
Allows you to set the visibility of
Bluetooth®feature.
your
1. Touch .
2. Touch .
Bluetooth
3. Touch
My Visibility.
and
4. Touch a setting.
On/ Off
Note
If you turn on My Visibility, your
device is able to be searched by
other in-range
.
Bluetooth
,
®
devices.
Page 93

4.2 Device Name
Allows you to edit the name of
the Bluetooth
1. Touch .
2. Touch .
3. Touch
and
4. Touch
5. Hold down to clear the
existing name.
6. Enter a new alias.
7. Touch to save and exit.
®
device.
Bluetooth
,
My Bluetooth Info.
Rename Device
Save
.
4.3 My Bluetooth Info
Allows you to view your phone's
®
Bluetooth
1. Touch .
2. Touch .
3. Touch
information.
Bluetooth
My Bluetooth Info.
and
,
System
The System menu allows you to
designate specific system
network settings.
1. Network
1.1 System Select
Allows you to set up the phone
producer’s management
environment. Leave this setting
as the default unless you want to
alter system selection as
instructed by your service
provider.
1. Touch .
2. Touch .
System
3. Touch
Network
4. Touch a setting.
Home Only/ Automatic A/
Automatic B
and
System Select
,
Settings
.
91
Page 94

Settings
1.2 Set NAM
Allows you to select the phone’s
NAM (Number Assignment
Module) if the phone is
registered with multiple service
providers.
1. Touch .
2. Touch .
System
3. Touch
Network
and
4. Touch a setting.
Settings
NAM1/ NAM2
1.3 Auto NAM
Allows the phone to
automatically switch between
programmed telephone numbers
corresponding to the service
provider area.
1. Touch .
2. Touch .
92
,
Set NAM
System
3. Touch
Network
4. Touch a setting.
On/ Off
and
Auto NAM
,
.
1.4 Serving System
Identifies the channel number of
a system that is served as a SID
Number. This information should
only be used for technical
.
support.
1. Touch .
2. Touch .
System
3. Touch
Network
and
,
Serving System
.
Page 95

2. Location
Menu for GPS (Global
Positioning System: Satellite
assisted location information
system) mode.
1. Touch .
2. Touch .
System
3. Touch
Location
.
a setting
4. Touch
Location On/ E911 Only
Note
GPS satellite signals are not always
transmitted, especially under bad
atmospheric and environmental
conditions, indoors etc.
and
.
Phone Settings
1. Power Save
Allows you to set power save
mode.
1. Touch .
2. Touch .
Phone Settings
3. Touch
and
Power Save
4. Touch a setting.
ON/ OFF
2. Auto Lock
Allows you to set the automatic
screen lock.
1. Touch .
2. Touch .
3. Touch
and
Auto Lock.
.
Phone Settings
Settings
93
Page 96

Settings
4. Touch a setting.
ON/ OFF
3. Security
The Security menu allows you to
secure the phone electronically.
3.1 Lock Phone
Keeps your phone from
unauthorized use. Once the
phone is locked, it is in restricted
mode until the lock code is
entered. You can still receive
Settings
phone calls and make emergency
calls. You can modify the lock
code by navigating to
Lock Code
menu.
1. Touch .
2. Touch .
3. Touch
94
Phone Settings
Security
within the Security
.
Change
4. Touch
Lock Phone
5. Touch one of the following
options:
None
The phone is not
locked (though, Lock mode
can still be used).
When Switch On
is locked when it is turned on.
Immediately
always locked. When locked,
you can receive incoming calls
and make only emergency
calls.
6. Enter the four-digit lock code
to confirm. The default lock
code is commonly the last 4
digits of your phone number.
3.2 Restrictions
Allows you to restrict incoming
and/or outgoing calls.
,
1. Touch .
.
The phone
The phone is
Page 97

2. Touch .
Phone Settings
3. Touch
Security
.
4. Touch a Restrictions submenu,
then the setting.
Incoming Calls
Contacts Only/ Block All)
Outgoing Calls
Contacts Only/ Block All)
(Allow All/
(Allow All/
,
Incoming Messages
(Allow All/ Block All)
Outgoing Messages
(Allow All/ Block All)
Camera
(Unlock/ Lock)
Data
(Unlock/ Lock)
5. Enter the four-digit lock code
to confirm. The default lock
code is commonly the last 4
digits of your phone number.
3.3 Emergency Numbers
Allows you to enter 3 emergency
numbers. You can call these
emergency numbers and 911,
even when the phone is locked
or restricted.
1. Touch .
2. Touch .
Phone Settings
3. Touch
Security
.
Emergency Numbers
4. Touch
5. Touch the emergency number
you want to edit.
,
3.4 Change Lock Code
Allows you to enter a new fourdigit lock code.
1. Touch .
2. Touch .
.
Settings
95
Page 98

Settings
3. Touch
Phone Settings
Security
.
Change Lock Code
4. Touch
5. Touch
Phone Only
Call & Applications
6. Enter the current lock code.
7. Enter a new 4-digit lock code.
8. For confirmation, it will ask
you to enter the new lock
code again.
Settings
4. Memory
Allows you to check out the
memory status of your phone.
1. Touch .
2. Touch .
Phone Settings
3. Touch
Memory
.
96
or
.
4. Touch an option:
,
Handset Common Memory/
.
Handset Reserved Memory/
External Memory/
Primary Storage Setting
Note
When Clear All is set on Handset
Common Memory or External
Memory, all contents including
locked contents are removed.
5.
USB Connection Mode
Allows you to select the PC
connection mode for your
device.
1. Touch .
2. Touch .
3. Touch
,
USB Connection Mode
4. Touch a setting.
USB Modem/ USB Mass
Storage
Phone Settings
,
.
Page 99

6. Phone Info
The Phone Information menu
provides you with specific
information pertaining to your
phone model.
1. Touch .
2. Touch .
Phone Settings
3. Touch
Phone Info
6.1 My Number
Allows you to view your phone
number.
1. Touch .
2. Touch .
3. Touch
Phone Info
.
Phone Settings
and
My Number
6.2 ESN/MEID
Allows you to view the ESN
and/or MEID information of your
phone.
1. Touch .
2. Touch .
Phone Settings
3. Touch
,
Phone Info
6.3 Icon Glossary
Allows you to view all the icons
and their meanings.
1. Touch .
2. Touch .
Phone Settings
3. Touch
.
Phone Info
.
Glossary
,
and
ESN/ MEID
and
Icon
,
.
Settings
,
97
Page 100

Settings
6.4 Version
Allows you to view the versions
of various applications.
1. Touch .
2. Touch .
Phone Settings
3. Touch
Phone Info
7. Alltel Web Setting
7.1 Message Notification
Settings
1. Touch .
2. Touch .
Phone Settings
3. Touch
Alltel Web Setting
Message Notification
4. Touch
Options for Message
notification
Automatic/ Prompt
98
and
Version
.
8. Software Update
Allows you to update your
phone's software, if updates are
available.
1. Touch .
2. Touch .
,
.
3. Touch
and
Software Update
4. Touch
Phone Settings
.
Check for Update
.
9. Reset Settings
Allows you to reset your phone
to the factory default settings.
,
1. Touch .
2. Touch .
.
Phone Settings
3. Touch
Reset Settings
4. Touch .
Ok
,
.
 Loading...