

LG LGA390 Owner’s Manual [en,fr]

User Guide
Guide de l’utilisateur
Manual do utilizador
LG-A390
ENGLISH
FRANÇAIS
PORTUGUÊS
MFL67787702 (1.2)
www.lg.com

0800-9811-5454(LGLG) 100% Toll Free
4 Adepele street, Computer Village, Lagos, Nigeria

LG-A390 User Guide - ENGLISH
This guide will help you understand your new mobile phone. It will provide you
with useful explanations of features on your phone.
Some of the contents in this manual may differ from your phone depending on
the software of the phone or your service provider.

Contents
Getting to know your phone ....................5
Installing the SIM Card and Charging the
Battery.........................................................7
Installing the SIM Card .......................... 7
Turning Your Phone On and Off .......10
Lock/Unlock Your Keypad ...................10
Calls ...........................................................10
Making a call ........................................... 10
Making a call from your contacts .....10
Answering and rejecting a call ........... 11
Using the speakerphone ...................... 11
Speed dialling ......................................... 12
Viewing your call logs ........................... 12
Changing the call settings ..................12
2
Contacts .................................................... 13
Searching for a contact........................13
Adding a new contact ..........................13
Adding a contact to a group ............. 14
Messaging ................................................. 14
Sending a message ..............................14
Entering text ............................................ 15
T9 mode ...................................................16
Using the T9 Mode ............................... 16
Abc mode .................................................17
123 mode .................................................17
Inserting symbols ....................................17
Changing the language ........................17
Message folders .....................................18

E-mail ........................................................19
Setting up your e-mail ......................... 19
Sending an e-mail using your new
account...................................................... 19
Camera ..................................................... 20
Taking a quick photo ...........................20
Video camera .......................................... 20
Shooting a quick video .......................20
Media Player ............................................20
Playing a song .......................................20
FM radio .................................................... 21
Searching for stations ...........................21
Listening to the radio ..........................22
Recording your radio............................22
Voice recorder .........................................22
Recording your voice memo ............. 23
Applications ............................................. 23
Organizer ................................................. 23
Setting your alarm ...............................23
Using the calendar .............................. 24
Adding an item to your To-do list ... 24
Adding a note .......................................24
Adding a city to your world time ......24
Using your calculator ..........................24
Converting a unit ................................. 24
Using the stopwatch ............................ 25
Shortcuts ................................................ 25
Internet .................................................... 25
Accessing the internet browser ........25
3

Settings .................................................... 25
Switching your SIM cards .................25
Activating SIM cards ............................26
Setting Phone Profile ...........................26
Changing your display settings ........ 26
Changing your connectivity settings
Changing your Bluetooth settings ...26
Pairing with another Bluetooth
device ........................................................ 27
Changing your phone settings ......... 28
Changing your security settings .......29
Resetting your phone ..........................30
Installing LG PC Suite on your
computer .................................................30
4
Phone Software update ..........................31
Guidelines for Safe and Efficient Use 32
Accessories .............................................. 42
Technical Data ......................................... 43
Troubleshooting ...................................... 44
.26
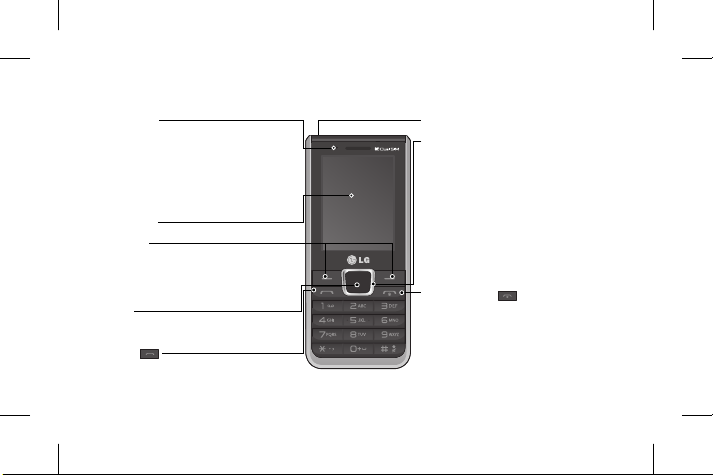
Getting to know your phone
LED Blinker
LED indicator blink with respective
color on pressing of SIM Switching
Key(SSK) in the idle screen, notification
popup(Message and missed call) and
glow continuously while charging.
Main screen
Soft keys
Each of these keys performs the functions
indicated by the text on the display
immediately above them.
OK key
Selects menu options and confirms actions.
Call key
Dials a phone number and answers
incoming calls.
Headset jack
Navigation keys
Use for quick access to phone functions
• In standby mode:
Press Up Navigation Key: Media Player
Press Down Navigation Key: Messaging
Press Right Navigation Key: FM Radio
Press Left Navigation Key: Camera
• In menu: Scroll up, down, right & left.
End/Power key
• Ends or rejects a call.
• Returns to the home screen when you
use the menu.
• Long press to turn On/Off your phone.
5
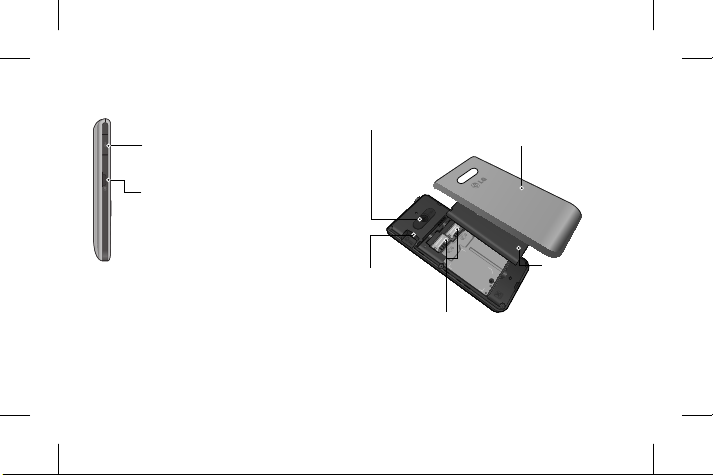
Charger / USB Cable connector
SIM Switch Key
SIM Switch Key is used to switch
between 2 SIM cards. You can
switch to another SIM card by
pressing the SIM Switch Key
more than 0.5 seconds.
6
Camera lens
MicroSD Card
slot
SIM card slots
1
Back cover
2
Battery
Installing the SIM Card and Charging the Battery
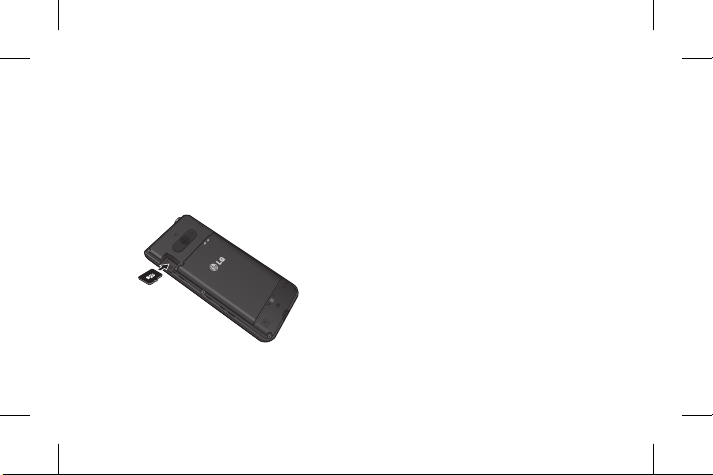
Installing a Memory card
Remove the Back cover and insert a micro
SD card with the golden contact area facing
downwards as shown in the diagram. To
remove the Memory card, gently pull it.
2
1
Note: Memory card is an optional accessory.
Formatting the Memory card
From your home screen, Press Menu and
select Gallery, Select External memory and
From Options choose Format and enter
Phone Password to format the Memory card.
WARNING: When you format your Memory
card, all the content will be Erased. If you do
not want to lose the data on your Memory card,
take a backup first.
Installing the SIM Card
When you subscribe to a cellular network,
you are provided with a SIM card loaded
with your subscription details, such as your
PIN, any optional services available and
many others.
7
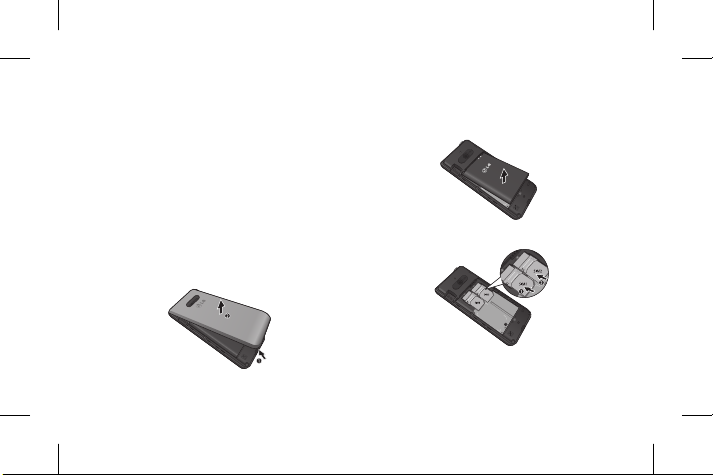
Important!
1
2
2. Remove the battery.
› The SIM card can be easily damaged by
scratches or bending, so be careful when
handling, inserting or removing the card.
Keep all SIM cards out of the reach of
2
1
small children.
› Only 2G/2.5G SIM cards are supported.
3. Insert your SIM Cards.
Illustrations
1. Open back cover.
2
2
1
8
1
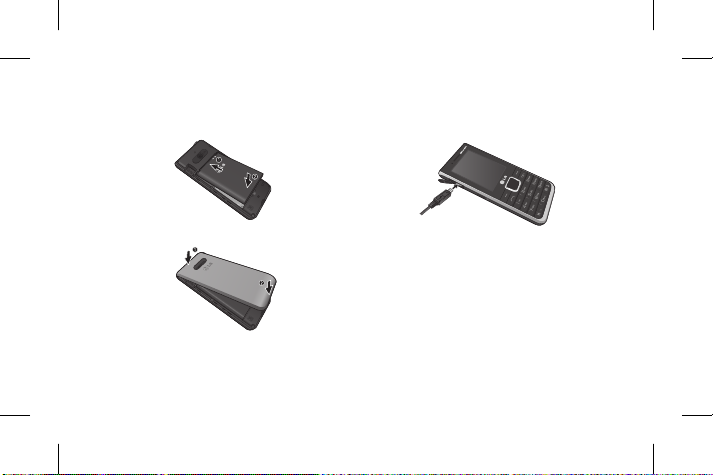
4. Insert your battery.
6. Charge your battery.
2
1
5. Close the back cover.
1
WARNING: Do not remove the battery when
the phone is switched on, as this may damage
2
the phone.
9

Turning Your Phone On and Off
You can power the phone on and off by
pressing and holding the Power key.
Lock/Unlock Your Keypad
To lock, press Menu (LSK) in main screen
and then press Keylock (RSK).
To Unlock, press Unlock(LSK) and then
press Ye s(RSK).
Calls
Making a call
1. Enter the number using the keypad. To
delete a digit press Clear.
10
2. Press
3. To end the call, press
TIP! To enter + when making an international
call, press and hold 0.
TIP! To control the volume during a call, press
the up and down navigation keys.
TIP! You can record your conversation during a
call. Press Options and select Voice recorder.
to initiate the call.
.
Making a call from your contacts
1. Select Contacts from the home screen.
2. Using the keypad, enter the first letter
of the contact you want to call and scroll
through the Contacts.
3. Press
to begin the call.

TIP! To scroll through your contacts, use the
up and down navigation keys.
TIP! You can make a call from any of the two
SIM cards, by selecting SIM Switching Key.
Answering and rejecting a call
When your phone rings, press to
answer the call.
While your phone is ringing, select Silent to
mute the ringing.
This is useful if you have forgotten to
change your profile to Silent while in a
meeting.
or select Silent then Reject to
Press
reject the incoming call.
TIP! You can change the settings on your
phone to answer your calls in different ways.
Press Menu, select Settings and choose Call.
Select Advanced settings then select Answer
mode and choose from Any key, Auto answer
when headset mode.
Using the speakerphone
During a call, you can activate speakerphone
by pressing RSK (H-Free) and you can use
the handset in hands-free mode.
If the speakerphone is active, press RSK
(H-Held) again to resume normal handset
conversation mode.
11

Speed dialling
Press Menu and select Contacts > Options
> Phonebook settings, then choose
Speed dial. Set the Status and choose
Set numbers. Assign contacts to any keys
between 4 and 8.
Speed dial 1 is set to your voice mail, 9 key
is set to SOS mode and 2 & 3 keys are
assigned to Speed SIM Budget. so you can
not change these keys.
TIP! Speed SIM budget is the function that
is easy way for checking SIM budget. If you
register Speed SIM budget, you can get the
information of SIM budget by long press of ‘2’
/ ‘3’ in idle screen.
12
Note : To activate Speed dial , status should be
On (Speed dial > Status)
Viewing your call logs
Press to view your missed, received and
dialled call logs.
Changing the call settings
You can set the menu relevant to a call.
Press Menu, select Settings and choose
Call.
Cost save mode
Every contact is added along with assigned
SIM when adding in phone book. During
Calling, matching operator SIM is identified
and the operation is completed using the

matching operator SIM. This makes possible
to use benefit from using same operator.
To use Cost save mode feature,make sure
the feature is On [Settings -> Call -> Cost
save mode]
Note: Cost save mode doesn’t work during
in-call.
Advanced settings
Blacklist - This menu shows you the phone
numbers of person you have chosen to
reject. You can add the new number in
Blacklist numbers. The incoming calls
received from the Blacklist numbers will be
automatically rejected.
Contacts
Searching for a contact
1. Select Contacts from the home screen.
2. Using the keypad enter the first letter of
the contact you want to call.
3. Press Up/Down navigation key to scroll
through the contacts.
Adding a new contact
1. Select Contacts from the home screen.
Select Add new contact.
2. Choose the contact storage location.
13

3. Then enter the Name, Number & details
of your new contact, select Options then
choose Save.
TIP! Assign SIM field is used to assign the
Contact to Default SIM/SIM1/SIM2. Call will
be originated via assigned SIM for the Contact
when Cost Save mode is ON.
Adding a contact to a group
You can save your contacts into groups,
for example, keeping your work colleagues
and family separate. To make a group press
Option from the Contacts menu. And select
Caller groups. You can set the Group name,
Group picture, Group ringtone in Add new
group.
14
Messaging
Sending a message
1. Press Menu, select Messaging, and choose
Write message to send an SMS or MMS.
2. A new message editor will open. The
message editor combines text message
and multimedia messages into one
intuitive and easy to switch between
editor. The default setting of the
message editor is text message.
3. Enter your message using either the T9
predictive mode or Abc manual mode
or 123 mode. You can switch text input
modes by pressing the
key.

4. If you want to add some images or
videos etc, select Options and choose
Add Picture, Add sound, Add video, Add
subject.
5. From Options choose Send to then
Select Enter recipient, Add from
Phonebook or Recent input. You can
even add multiple contacts by marking
the contacts.
Note: Message can be sent to a group also.
Edit the message then press OK Key to send
and select Add from phonebook. Navigate to
the right to select Caller groups and select the
group you want.
6. Press Send icon to send the
message.
TIP! You can select your message type as
SMS or MMS when you enter text by pressing
Options > Switch to MMS/SMS.
WARNING: Image, Video clip, Sound clip or
Subject is added to the message editor, it will
be automatically converted to MMS mode and
you will be charged accordingly.
Entering text
You can enter alphanumeric characters
using the phone’s keypad. The following text
input methods are available in the phone:
T9 mode, Abc mode and 123 mode.
To change modes, press the
key.
15

Note: Some fields may allow only one text
input mode (e.g. telephone number in address
book fields).
T9 mode
T9 mode uses a built-in dictionary to
recognise words you’re writing based on
the key sequences you press. Simply press
the number key associated with the letter
you want to enter, and the dictionary will
recognise the word once all the letters are
entered.
Using the T9 Mode
1. When you are in the T9 predictive text
input mode, start entering a word by
16
pressing keys to . Press one
key per letter.
- If the word is still incorrect after typing
completely, press the Up & Down
navigation keys to scroll through the
other word options.
- If the desired word is missing from the
word choices list, add it by using the
Abc mode.
2. Enter the whole word.
- To delete letters, press Clear.
- Complete each word with a space by
pressing the
key.

Abc mode
This mode allows you to enter letters by
pressing the key labeled with the required
letter once, twice, three or four times until
the letter is displayed.
123 mode
Type numbers using one keystroke per
number. You can also add numbers while
remaining in letter modes by pressing and
holding the desired key.
Inserting symbols
If you want to insert symbols, press the
key, then you can choose a symbol. Or you
can press Options and then choose Insert
symbol.
Changing the language
LG-A390 supports various languages.
There are two ways to change the writing
language from the writing screen. You can
press Options, go to Writing language and
then set the language you want or long
press
key in editor.
17

Message folders
Press Menu, select Messaging. And select
the folder you want.
Inbox - You will be alerted when you have
received messages. They will be stored in
Inbox.
TIP! Messages can be sorted with the given
sorting options for an easy access of messages
(Inbox > Options > Sort by : Sender, Subject,
Unread/read, Message size and Message type).
Drafts - If you don’t have time to finish
writing a message, you can save what you
have written so far in here.
Outbox - This is a temporary storage folder
used while messages are being sent.
18
Sent messages - After sending out the
message, the text message or multimedia
message is saved in the Sent folder.
Archive - You can access your saved
messages.
Broadcast messages - Choose whether
to receive, block, view or edit channels
to receive information service messages
(broadcast messages). Also choose the
languages of information service messages.
Message settings - Your message settings
are pre-defined so that you can send
messages immediately. If you would like to
change the settings, you can do this using
the settings options.

E-mail
Setting up your e-mail
You can stay in touch on the move using
e-mail on your LG-A390. It’s quick and
simple to set up a POP3 or IMAP4 e-mail
account.
1. Press Menu Select Messaging and
choose E-mail.
2. The first time you open the E-mail, you
need to setup an email account. A setup
wizard opens to help you add an e-mail
account.
3. Follow the pop up instruction and enter
the information required.
Sending an e-mail using your new
account
To send/receive an e-mail, you should set
up an e-mail account.
1. From Menu Select Messaging and
choose E-mail.
2. From Options Choose Write e-mail and a
new e-mail editor screen will open.
3. Enter the recipient’s address and write
a subject.
4. Enter your message.
5. Press Options, select Add attachments
to add a file.
6. From Options Choose Send to sent your
e-mail.
19
Camera
Taking a quick photo
1. Press Menu and select Multimedia.
Select Camera to open the viewfinder.
2. Hold the phone and, point the lens
towards the subject of the photo.
3. Press
key to take a photo.
Video camera
Shooting a quick video
1. Press Menu and select Multimedia, then
choose Camera, Press Down Navigation Key
to change camera mode to Video Camera.
20
2. Point the camera lens towards the
subject of the video.
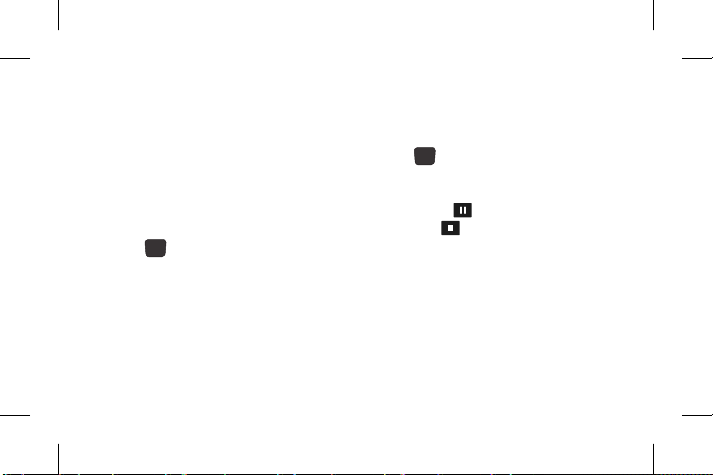
3. Press
4. Recording will start in the viewfinder and
5. Select LSK [ ] to Pause recording
key to start recording.
a timer will show the length of your video.
and RSK [
recorded Video.
] to Stop and save the
Media Player
Your LG-A390 has a built-in Media player
so you can play all your favourite music.
Playing a song
1. Press Menu and select Multimedia, then
choose Media Player.

2. Choose My playlists then select the song
you want to play.
3. Select
4. Select
5. Select
6. Select Back to minimise the music and
Note: Music is copyright protected in
international treaties and national copyright
laws. It may be necessary to obtain permission
or license to reproduce or copy music. In some
countries national law prohibits private copying
of copyrighted material.
Please check the national legislation of the
applicable country concerning the use of such
materials.
to pause the song.
to skip to the next song.
to skip to the previous song.
return to the Media player menu.
FM radio
Your LG-A390 has an FM radio feature so
you can tune into your favourite stations and
listen on the move.
During listening to the FM radio, you can
also record a short clip and save it.
Note: You will need to insert your headset in
order to listen to the radio. Insert the plug into
the headset connector in order to listen to the
radio and keep the good radio reception.
Searching for stations
1. Press Menu and select Multimedia, then
choose FM radio.
21

2. Select Options and choose Auto search.
You can also use the left and right
navigation keys to search for stations.
Listening to the radio
1. Press Menu and select Multimedia, then
choose FM radio.
2. Select the channel number of the station
you would like to listen to.
TIP! You can listen to the radio via built-in
speaker. Press Options, select Settings then
choose Loud speaker status as On.
Recording your radio
1. Press key during listening to the
radio.
22
2. The recording time is displayed on your
phone. If you want to stop the recording,
press Stop.
The recorded contents will be saved in
Gallery as .amr/.wav file.
Note: After recording your radio, you can listen
to all of the radio recordings by selecting
Options and Choose File list.
TIP! To configure your settings such as the
Background play, Loud speaker, Audio quality
or Record storage, press Options and select
Settings.
Voice recorder
Use your Voice recorder to record voice
memos or other sounds.

Recording your voice memo
1. Press Menu and select Multimedia, then
choose Voice recorder.
2. Press
3. Choose Stop to end the recording and
4. Press Options and select Play to listen to
key to begin recording.
Press Ye s to Save audio.
the last recorded audio.
• Steps to be followed to set the required
language in Facebook Application:
After login:
Menu > Settings > Language, user can
select the language.
Before Login:
In login screen , the last option “Language” ,
user can select the language.
Applications
Your LG-A390 comes with preloaded games
to keep you amused when you have time
to spare. If you choose to download any
additional games or applications they will be
saved into this folder. Press Menu and select
Applications. Choose My games & apps.
Organizer
Setting your alarm
(Menu > Organizer > Alarm clock)
You can set up to 5 alarms to invoke on a
specified time.
23

Using the calendar
(Menu > Organizer > Calendar)
When you enter this menu, a calendar
appears. A square cursor is located on the
current date. You can move the cursor to
another date using the navigation keys.
Adding an item to your To-do list
(Menu > Organizer > To-do list)
You can view, edit and add tasks to do.
Adding a note
(Menu > Organizer > Notes)
You can register your own notes here.
24
Adding a city to your world time
(Menu > Organizer > World time)
You can also check the current time of
major cities around the world.
Using your calculator
(Menu > Organizer > Calculator)
The calculator provides the basic
arithmetic functions: addition, subtraction,
multiplication and division.
Converting a unit
(Menu > Organizer > Converter)
This converts any measurements into a unit
you want.

Using the stopwatch
(Menu > Organizer > Stopwatch)
This option allows you to use the function of
a stopwatch.
Shortcuts
(Menu > Organizer > Shortcuts)
It helps you to go to the menu you search
for. You can set the item as Shortcuts.
Internet
Accessing the internet browser
You can launch the wap browser and access
the homepage of the activated profile on
Internet Profiles. You can also manually enter
an URL address and access the associated
wap page. Press Menu and select Internet.
Note: An additional cost is incurred when
connecting to this service and downloading
content. Check your data charges with your
network provider.
Settings
Switching your SIM cards
(Menu > Settings > Dual SIM > Dual
SIM switch)
You can choose which SIM card you’re going
to use between manually or automatically.
25

Activating SIM cards
(Menu > Settings > Dual SIM > Dual
SIM Settings)
You can choose one or all of SIM cards you
would like to activate.
Setting Phone Profile
(Menu > Settings > Profiles)
You can adjust and customize the phone
profile for different events or environments.
Changing your display settings
(Menu > Settings > Display)
You can change the settings for the phone
display.
26
Changing your connectivity settings
(Menu > Settings > Connectivity > Data
account)
Your connectivit y settings have already been
set up by your network operator, so you can
enjoy your new phone from switch on. If you
want to change any settings, use this menu.
You can configure the Data account in this
menu.
Changing your Bluetooth settings
(Menu > Settings > Connectivity >
Bluetooth)
• Power - Select Power as On/Off.

• Visibility - Choose whether to Permanent
visible, Temporary visible or Off your
device to others.
• My name - Enter a name for your
LG-A 390.
• Advanced - Set your Bluetooth settings
for Audio path, Storage, Sharing
permission and View your Bluetooth
address by choosing My address.
Pairing with another Bluetooth device
1. Check your Bluetooth is On and Visible.
You can change your visibility in the
Bluetooth menu, by selecting Visibility,
then Permanent Visible or Temporary
visible.
2. Select My device and choose Search new
device from the Bluetooth menu.
3. Your LG-A390 will search for devices.
When the search is completed Pair and
Back will appear on screen.
4. Choose the device you want to pair with,
then handset create passcode by default
everytime you connect.
5. Your phone will then connect to the other
device.
6. Your passcode protected Bluetooth
connection is now ready.
27

TIP!
1. When you use a Bluetooth headset,
A2DP and AVRCP profiles are not
supported while you play video. It
means you will not listen video sound
if you use Bluetooth headset.
2. Bluetooth file transferring function will
be blocked under some applications
running. (Camera/ Camcorder/UMS)
28
Changing your phone settings
(Menu > Settings > Phone)
Enjoy the freedom of adapting how your
LG-A390 works for your own style.
• Date & Time - You can set functions
relating to the date and time.
• Language/Preferred writing language -
You can change the language for the
display texts in your phone. This change
will also affect the Language Input mode.
• Greeting text - This menu allows you to
customize the greeting text upon the
phone’s power on. You can also set the
Greeting text On or Off.
 Loading...